Owner’s Manuals -...
134
Owner’s Manuals CLOSE PRINT Home Safety First Safe Operating Rules: XB Models Top of page Motorcycles are different from other vehicles. They operate, steer, handle and brake differently. Unskilled or improper use could result in loss of control, death or serious injury. (00556c) Take a rider training course. Read Owner's Manual before riding, adding accessories or servicing. Wear a helmet, eye protection and protective clothing. Never tow a trailer. Before operating your new Buell, it is your responsibility to read and follow operating and maintenance instructions in this manual. Follow these basic rules for your personal safety. Know and respect the rules of the road. See Rules of the Road: Buell Models . Read and observe the RIDING TIPS booklet that comes with this Owner's Manual. You should also read and know the contents of the MOTORCYCLE HANDBOOK for your state. Before starting engine, check for proper operation of brake, clutch, shifter and throttle controls. Inspect fuel and oil supply.
Transcript of Owner’s Manuals -...

Owner’s Manuals
CLOSE PRINT
Home
Safety First
Safe Operating Rules: XB Models
Top of page
Motorcycles are different from other vehicles. They operate, steer, handle and brake
differently. Unskilled or improper use could result in loss of control, death or serious
injury. (00556c)
Take a rider training course.
Read Owner's Manual before riding, adding accessories or servicing.
Wear a helmet, eye protection and protective clothing.
Never tow a trailer.
Before operating your new Buell, it is your responsibility to read and follow operating
and maintenance instructions in this manual. Follow these basic rules for your personal
safety.
Know and respect the rules of the road. See Rules of the Road: Buell Models. Read and
observe the RIDING TIPS booklet that comes with this Owner's Manual. You should
also read and know the contents of the MOTORCYCLE HANDBOOK for your state.
Before starting engine, check for proper operation of brake, clutch, shifter and throttle
controls. Inspect fuel and oil supply.

Do not use aftermarket parts and custom made front forks which can adversely affect
performance and handling. Removing or altering factory installed parts can adversely
affect performance and could result in death or serious injury. (00001a)
Use only Buell approved parts and accessories. Use of certain "race only" or other
manufacturer's performance parts will void your new motorcycle warranty. See a Buell
dealer for details.
Avoid spills. Slowly remove filler cap. Do not fill above bottom of filler neck insert,
leaving air space for fuel expansion. Secure filler cap after refueling. Gasoline is
extremely flammable and highly explosive, which could result in death or serious
injury. (00028a)
Use care when refueling. Pressurized air in fuel tank can force gasoline to escape
through filler tube. Gasoline is extremely flammable and highly explosive, which
could result in death or serious injury. (00029a)
Cooling fans operate automatically, even when the ignition switch is off. Keep hands
away from fan blades. Contact with a rotating fan blade can result in minor or
moderate injury. (00093a)
Engine exhaust from this product contains chemicals known to the State of California
to cause cancer and birth defects or other reproductive harm. (00004e)
Wheel weights on wheels without spokes contain lead and lead compounds, chemicals
known to the State of California to cause cancer and birth defects or other
reproductive harm. (00356c)

Do not run motorcycle in a closed garage or confined area. Inhaling motorcycle
exhaust, which contains poisonous carbon monoxide gas, could result in death or
serious injury. (00005a)
See Break-in Riding Rules. A new motorcycle must be operated according to the break-
in procedure.
Operate motorcycle only at moderate speed and out of traffic until you have become
thoroughly familiar with its operation and handling characteristics under all conditions.
NOTE:
We recommend that you obtain information and formal training in the correct motorcycle riding technique. In the United States, the Motorcycle Safety Foundation
® offers beginning and experienced rider safety courses. Call (949)727-3227 for information.
Travel at speeds appropriate for road and conditions and never travel faster than
posted speed limit. Excessive speed can cause loss of vehicle control, which could
result in death or serious injury. (00008a)
Know your limits as a rider. Do not exceed the legal speed limit or drive too fast for
existing conditions. Always reduce speed when poor driving conditions exist and/or you
feel the driving situation is uncomfortable. High speed increases the influence of any
other condition affecting stability and increases the possibility of loss of control.
If you are a novice rider, do not carry a passenger until you have experienced at least
two riding seasons, your motorcycle will handle different when carrying a passenger.
Pay strict attention to road surfaces and wind conditions. Your motorcycle may be
subject to the following upsetting forces:
1. Wind blasts from passing trucks.
2. Holes in the pavement.
3. Strips of tar used to seal cracked pavement.
4. Rough road surfaces.
5. Rider control error, etc.
These forces may influence the handling characteristics of your motorcycle. If this
happens, reduce speed and guide the motorcycle with a relaxed grip to a controlled
condition. Do not brake abruptly or force the handlebar; this may aggravate an unstable
condition.

NOTE:
New riders should gain experience under various conditions while riding at moderate speeds.
Operate your motorcycle defensively. Remember, a motorcycle does not afford the same
protection as an automobile in an accident. One of the most common accident situations
occurs when the driver of the other vehicle fails to see or recognize a motorcycle and
turns left into the oncoming motorcyclist. Riding with headlamp high beam switch on
during daylight hours will increase your chances of visibility.
Wear an approved helmet, clothing, and foot gear suited for motorcycle riding. Bright or
light colors are best for greater visibility in traffic, especially at night. Avoid loose,
flowing garments and scarves.
Avoid contact with exhaust system and wear protective clothing that completely
covers legs while riding. Exhaust pipes and mufflers get very hot when engine is
running and remain too hot to touch, even after engine is turned off. Failure to wear
protective clothing could result in burns or other serious injury. (00009a)
When carrying passengers, it is your responsibility to instruct them on proper riding
procedures.
Do not allow others under any circumstances to operate your motorcycle unless you
know they are experienced, licensed riders and are familiar with the operation of your
particular motorcycle.
Protect your motorcycle against theft. After parking your motorcycle, lock the steering
head and remove ignition key from switch.
Safe motorcycle operation requires alert mental judgment combined with a defensive
driving attitude. Do not allow fatigue, alcohol or drugs to endanger your safety or that of
others.
See MAINTENANCE AND LUBRICATION section. Maintain your motorcycle in
proper operating condition in accordance with the Maintenance Intervals chart in this
Owner's Manual. Particularly important to motorcycle stability is proper tire inflation
pressure, tread condition and proper inspection of wheel bearings and steering head
bearings.

Perform the service and maintenance operations as indicated in the regular service
interval table. Lack of regular maintenance at the recommended intervals can affect
the safe operation of your motorcycle, which could result in death or serious injury.
(00010a)
Do not operate motorcycle with loose, worn or damaged steering or suspension
systems. Contact a Buell dealer for repairs. Loose, worn or damaged steering or
suspension components can adversely affect stability and handling, which could result
in death or serious injury. (00113a)
Be sure all equipment required by federal, state or local law is installed and in good
operating condition.
Use Buell replacement fasteners. Aftermarket fasteners can adversely affect
performance, which could result in death or serious injury. (00116a)
See a Buell service manual for proper torque values.
Aftermarket fasteners may not have the specific property requirements to perform
properly.
Do not tow a disabled motorcycle. Towing can adversely affect stability and handling,
which could result in death or serious injury. (00017a)
Match tires, tubes, air valves and caps to the correct wheel rim. Contact a Buell
dealer. Mismatching can result in damage to the tire bead, allow tire slippage on the
rim or cause tire failure, which could result in death or serious injury. (00162a)
Be sure tires are properly inflated, balanced and have adequate tread. Inspect your
tires regularly and see a Buell dealer for replacements. Riding with excessively worn,

unbalanced or under-inflated tires can adversely affect stability and handling, which
could result in death or serious injury. (00114a)
Do not exceed the motorcycle's Gross Vehicle Weight Rating (GVWR) or Gross Axle
Weight Rating (GAWR). Exceeding these weight ratings can affect stability and
handling, which could result in death or serious injury. (00016e)
GVWR is the sum of the weight of the motorcycle, accessories, and the maximum
weight of the rider, passenger and cargo that can be safely carried.
GAWR is the maximum amount of weight that can be safely carried on each axle.
The GVWR and GAWR are shown on the information plate, located on the frame
steering head.
Do not pull a trailer with a motorcycle. Pulling a trailer can cause tire overload,
reduced braking efficiency and adversely affect stability and handling, which could
result in death or serious injury. (00018b)
Regularly inspect shock absorbers and front forks. Replace leaking, damaged or worn
parts that can adversely affect stability and handling, which could result in death or
serious injury. (00012a)
Batteries contain sulfuric acid, which could cause severe burns to eyes and skin. Wear
a protective face shield, rubberized gloves and protective clothing when working with
batteries. KEEP BATTERIES AWAY FROM CHILDREN. (00063a)
Batteries, battery posts, terminals and related accessories contain lead and lead
compounds, and other chemicals known to the State of California to cause cancer and
birth defects or other reproductive harm. Wash hands after handling. (00019d)

Observe warnings on labels of brake and battery fluids and cleaning compounds.
Failure to follow warnings could result in death or serious injury. (00131a)
Consult a Buell dealer regarding any questions or problems that occur in the operation
of your motorcycle. Failure to do so can aggravate an initial problem, cause costly
repairs, cause an accident and could result in death or serious injury. (00115a)
Rules of the Road: Buell Models
Top of page
As recommended previously, inexperienced riders are recommended to complete the
beginner's Motorcycle RiderCourse® sponsored by the Motorcycle Safety Foundation
®.
Important tips about riding safety are listed below.
Always sound your horn but do not rely on it to be your only defense against
other riders or drivers of automobiles and trucks.
Never try to pass another vehicle going in the same direction at street
intersections, on curves, or when going up and/or down a hill.
When you are at street intersections, give the right-of-way to vehicles according
to local regulations. Do not assume you have the right-of-way; the other driver
may not know that it is your turn.
Always use your signals when preparing to pass a vehicle, change lanes, turn or
stop.
All traffic signs, including those used for the control of traffic at intersections,
should be obeyed promptly. SLOW DOWN signs near schools and caution signs
at railroad crossings should always be observed and your actions governed
accordingly.
When intending to turn, signal at least 100 feet 30 meters before reaching the
turning point. When turning across an intersection, move over to the centerline of
the street (unless local rules require otherwise). Slow down, enter the intersection
of the street and turn carefully.
Never run through a yellow or red traffic light. When a change is indicated from
GO to STOP (or vice versa), slow down and wait for the light to change.
While turning either right or left, watch for pedestrians and animals; as well as
vehicles.
Do not leave the curb or parking area without signaling and being sure that your

way is clear to enter moving traffic. Moving lines of traffic have the right-of-
way.
Be sure that your license plate is installed in the position specified by law and
that it is clearly visible at all times. Keeping the plate clean will improve
visibility of the motorcycle to other motorists (especially at night).
Ride at a safe speed that is consistent with the type of highway you are on. Pay
strict attention to whether the road is dry, oily, icy, wet or under construction.
Watch for debris such as leaves or loose gravel.
Weather and traffic conditions on the highway dictate adjusting your speed and
driving habits accordingly.
Travel at speeds appropriate for road and conditions and never travel faster than
posted speed limit. Excessive speed can cause loss of vehicle control, which could
result in death or serious injury. (00008a)
Operating this motorcycle in a reckless manner, including performing wheelies,
stoppies or burnouts, can lead to parts failure or loss of control, which could result in
death or serious injury. (00120a)
Accessories and Cargo: XB Models
Top of page
Improper loading of cargo or installation of accessories can affect motorcycle stability
and handling, which could result in death or serious injury. (00121a)
Buell Motorcycle Company cannot test and make specific recommendations regarding
every accessory or combination of accessories sold, the rider must assume responsibility
for safe operation of the motorcycle when installing accessories or carrying additional
weight. Use the following guidelines when equipping a motorcycle or carrying
passengers and cargo.
Do not cover or restrict the air intake screen. Certain accessories, like tank bags,

may cover or restrict the air intake screen on the airbox cover. This will reduce
power and performance. See the Air Filter: XB Models section for more
information.
Do not exceed the Gross Vehicle Weight Rating (GVWR) on the information
plate located on the frame steering head. GVWR is the sum of the weight of the
motorcycle and accessories and the maximum weight of the rider and cargo that
may be carried safely.
Do not pull a trailer with this motorcycle.
Keep cargo weight concentrated close to the motorcycle as low as possible to
minimize the change in the motorcycle's center of gravity. Distribute weight
evenly on both sides of the vehicle and do not load bulky items too far behind the
rider or add weight to the handlebars or front forks.
Be sure cargo is secure and will not shift while riding. Periodically recheck load.
Accessories that change the operator's riding position can increase reaction time
and adversely affect handling. Only use such items if they are designed and
approved by Buell Motorcycle Company, built specifically for your motorcycle
and installed properly.
Additional electrical equipment can overload the motorcycle's electrical system
and cause an unsafe operating condition.
Large surfaces, such as fairings, windshields, backrests and luggage racks, can
affect handling. These items should be designed and approved by Buell
Motorcycle Company specifically for the motorcycle model and properly
installed.
Travel at speeds appropriate for road and conditions and never travel faster than
posted speed limit. Excessive speed can cause loss of vehicle control, which could
result in death or serious injury. (00008a)
Buell motorcycles are not designed for sidecar use. Sidecar use with a Buell can
adversely affect handling and reduce braking efficiency, which could result in death
or serious injury. (00132a)
Do not use aftermarket parts and custom made front forks which can adversely affect
performance and handling. Removing or altering factory installed parts can adversely
affect performance and could result in death or serious injury. (00001a)

Keep tail lamp visible at all times. Do not place objects on license plate bracket
blocking tail lamp visibility. Low visibility of rider can result in death or serious
injury. (00123a)
©2001-2009 Buell. All rights reserved.
Owner’s Manuals
CLOSE PRINT
Home
Identification
Vehicle Identification Number: XB Models
Top of page
See Typical Buell V.I.N.: 2008 Ulysses Models and Buell V.I.N. Breakdown:
2008 Models. The full serial number or Vehicle Identification Number (V.I.N.)
is stamped on the right front of the frame near the steering head. A Motor
Identification Number is stamped on the left side crankcase near the front of the
engine.
NOTE:

Always give the full Vehicle Identification Number when ordering parts or making any inquiry about your motorcycle.
Typical Buell V.I.N.: 2008 Ulysses Models
Buell V.I.N. Breakdown: 2008 Models
POSITION DESCRIPTION POSSIBLE VALUES
1 Market designation
(WMI code)
4MZ = Buell vehicles originally
manufactured for sale within the United
States
5MZ = Buell vehicles originally
manufactured for sale outside the
United States
2 Motorcycle type code AX=Firebolt®
DX=Ulysses™
JX=Lightning® Long
KP=Blast®
KX=Lightning® CityX
SX=Lightning®
WX=Lightning® Scg
XX=Lightning® Super TT
3 Engine type 01=492cc
02=984cc
03=1203cc
4 Market configuration A=Australia

B=Brazil
L=California
N=Canada
D=Domestic
E=England
R=Europe
F=France
J=Japan
5 V.I.N. check digit Can be 0-9 or X
6 Model year 8=2008
7 Assembly plant 3=East Troy, WI U.S.A.
8 Model 0=Blast (08)
2=XB9SX (08)
3=XB12R (08)
4=XB12S (08)
5=XB12Scg (08)
6=XB12Ss (08)
7=XB12X (08)
8=XB12STT (08)
9 Sequential number (last
five digits)
Varies
Labels: XB Models
Top of page

See Labels: Ulysses Models for safety and maintenance labels which were on
the vehicle when new. If removed, replacement labels may be purchased for
your motorcycle. Refer to Labels: Ulysses Models for label descriptions.
NOTE:
Some labels are available in different languages for destinations outside the U.S.
Labels: Ulysses Models
LABEL PART
NUMBER
DESCRIPTION LOCATION
1 C0178.5AA
(label set)*
General warning label Right side of swingarm.
2 Battery warning label Top of fuse block cover.
3 Frame modification
warning label
Right side of frame above
V.I.N. label.
4 Fuse block label Side of fuse block cover.
*C0178.5AA is a sheet that includes all the labels above.
Labels: Ulysses Models
©2001-2009 Buell. All rights reserved.

Owner’s Manuals
CLOSE PRINT
Home
Specifications
Specifications: 2008 Ulysses Models
Top of page
Engine: 2008 Ulysses Models
ITEM DATA
Cylinders 2

Type Four-stroke, 45 degree V-Twin
Cooling Air, oil and fan cooled
Bore 3.500 in. 88.90 mm
Stroke 3.812 in. 96.82 mm
Engine
displacement
73.4 cu. in. 1203 cc
Compression
ratio
10.0:1
Valve train OHV, two valves per cylinder
Valve
adjustment
Hydraulic, self-adjusting valve
tappets
Fuel delivery Dynamic Digital Fuel Injection
III
Ignition System: 2008 XB Models
ITEM DATA
Battery 12 volt, 12 amp./hr, 200 CCA
Spark plugs Harley-Davidson No. 10R12X
Size 12 mm
Gap 0.035 in. 0.89 mm
Torque 12-18 ft-lbs 16-24 Nm
NOTE:
Specifications in this publication may not match those of official certification in some markets due to timing of publication printing, variance in testing methods, and/or vehicle differences. Customers seeking officially recognized regulatory specifications for their vehicle should refer
to certification documents and/or contact their respective dealer or distributor.
Sprocket Teeth: 2008 Ulysses Models
DRIVE ITEM NUMBER OF TEETH
Primary Engine 38
Clutch 57
Final Transmission 27
Rear wheel 65
Belt 135

Capacities: 2008 Ulysses Models
ITEM U.S. LITERS
Fuel tank total
(including reserve)
4.40 gallons 16.7
Reserve/low fuel lamp
illuminates at
0.83 gallons 3.1
Oil tank 2.5 U.S. quarts 2.4
Transmission 1.0 U.S. quart 0.9
Transmission Gear Ratios: 2008 Ulysses Models
GEAR
FINAL OVERALL
First gear 2.648 9.563
Second gear 1.892 6.831
Third gear 1.407 5.080
Fourth gear 1.166 4.211
Fifth gear 1.000 3.611
NOTES:
Overall gear ratios indicate the number of engine revolutions required to drive the rear wheel one revolution.
Final gear ratios indicate the number of mainshaft revolutions required to drive the output sprocket one revolution.
Dimensions: 2008 Ulysses Models
ITEM IN. MM
Wheel base
(without rider)
54.1 1374
Seat height
(with rider)
31.8 808

Ground clearance
(without rider)
6.75 171
Trail 4.8 122
Rake
(steering angle)
23.5 degrees
Rake
(fork angle)
22 degrees
Weights: 2008 Ulysses Models
ITEM LB. KG
Weight 495 225
GVWR 950 431
GAWR front 345 156
GAWR rear 685 311
Load capacity 455 206
All measurements include a full tank of gasoline.
NOTES:
Gross Vehicle Weight Rating (GVWR) and corresponding Gross Axle Weight Ratings (GAWR) are given on a label located on the
frame steering head.
Weight is the total weight of the motorcycle including fuel, oil and primary fluid. GVWR is the Gross Vehicle Weight Rating (maximum allowable loaded vehicle weight). GAWR is the Gross Axle Weight Rating (maximum allowable loaded weight per
axle). Load capacity is the amount of weight (including the rider) that can be carried on the motorcycle without exceeding the
GVWR.
Bulb Chart: 2008 Ulysses Models
BULB BULBS
REQUIRED
WATTS AMPS PART
NUMBER
Headlamps Bulb (H7) 2 55 4.58 Y0148.1AD
Position lamp
(European models
only)
1 5 0.37 53436-97
Marker Tail/stop lamp Replace tail lamp assembly if lamp Y0401.1AKC

lamps fails.
Front and rear turn
signal lamps
(1 bulb each)
4 10 0.74 Y0042.K
License plate
illumination lamp
1 5 0.37 53436-97
Instruments Turn signal indicator 1 1.12 0.08 Y0163.02A8
Check engine 1 1.12 0.08 Y0163.02A8
High beam 1 0.7 0.05 Y0162.02A8
Oil indicator 1 1.12 0.08 Y0163.02A8
Neutral 1 1.12 0.08 Y0163.02A8
Backlight 2 1.12 0.08 Y0163.02A8
1 0.7 0.05 Y0162.02A8
Low fuel Replace instrument cluster if low fuel warning
lamp fails.
Tire Data: Ulysses XB12X
Top of page
Match tires, tubes, air valves and caps to the correct wheel rim. Contact a Buell
dealer. Mismatching can result in damage to the tire bead, allow tire slippage on the
rim or cause tire failure, which could result in death or serious injury. (00162a)
Use only Buell approved tires. See a Buell dealer. Using non-approved tires can
adversely affect stability, which could result in death or serious injury. (00133a)
Do not inflate tire beyond maximum pressure as specified on sidewall. Over inflated
tires can blow out, which could result in death or serious injury. (00027a)

Tubeless tires are used on all Buell cast wheels. Tire sizes are molded on the tire
sidewall.
Use only recommended tires (the same as original equipment). Other tires may
not fit correctly, could adversely affect handling, and may be hazardous to use.
NOTE:
Always check tire pressure before riding. Tire pressures listed are with tires cold.
Tires/Air Pressures: 2008 Ulysses Models
TIRE TYPE SIZE SOLO RIDER AT GVWR
PSI kPa PSI kPa
Front Pirelli Scorpion Sync 120/70ZR17 34 234 Same as solo Same as solo
Rear Pirelli Scorpion Sync 180/55ZR17 36 248 Same as solo Same as solo
Gasoline Blends: Buell Models
Top of page
Your motorcycle was designed to get the best performance and efficiency using
unleaded gasoline. Most gasoline sold is blended with alcohol and/or ether, to create
"oxygenated" blends. The type and amount of alcohol or ether added to the fuel is
important.
Do not use gasoline that contains methanol. Doing so can result in fuel system
component failure, engine damage and/or equipment malfunction. (00148a)
Gasoline containing METHYL TERTIARY BUTYL ETHER (MTBE):
Gasoline/MTBE blends are a mixture of gasoline and as much as 15% MTBE.
Gasoline/MTBE blends can be used in your motorcycle.
ETHANOL is a mixture of 10% ethanol (Grain alcohol) and 90% unleaded
gasoline. Gasoline/ethanol blends can be used in your motorcycle if the ethanol
content does not exceed 10%.
REFORMULATED OR OXYGENATED GASOLINES (RFG): "Reformulated
gasoline" is a term used to describe gasoline blends that are specifically designed
to burn cleaner than other types of gasoline, leaving fewer "tailpipe" emissions.

They are also formulated to evaporate less when you are filling your tank.
Reformulated gasolines use additives to "oxygenate" the gas. Your motorcycle
will run normally using this type of gas and Buell recommends you use it when
possible, as an aid to cleaner air in our environment.
Do not use race gas or octane boosters. Use of these fuels will damage the fuel
system.
You may find that some gasoline blends adversely affect the starting, drivability or fuel
efficiency of your bike. If you experience one or more of these problems, we
recommend you try a different brand of gasoline or higher octane rating.
Fuel
Top of page
Refer to Octane Ratings. Always use a good quality unleaded gasoline. Octane ratings
are usually found on the pump.
Avoid spills. Slowly remove filler cap. Do not fill above bottom of filler neck insert,
leaving air space for fuel expansion. Secure filler cap after refueling. Gasoline is
extremely flammable and highly explosive, which could result in death or serious
injury. (00028a)
Use care when refueling. Pressurized air in fuel tank can force gasoline to escape
through filler tube. Gasoline is extremely flammable and highly explosive, which
could result in death or serious injury. (00029a)
Modern service station pumps dispense a high flow of gasoline into a motorcycle fuel
tank making air entrapment and pressurization a possibility.
Octane Ratings
SPECIFICATION RATING
Pump Octane (R+M)/2 91 (95 RON)
©2001-2009 Buell. All rights reserved.

Owner’s Manuals
CLOSE PRINT
Home
Controls and Indicators
General: Controls and Indicators
Top of page

Read the CONTROLS AND INDICATORS section before riding your motorcycle.
Failure to understand the operation of the motorcycle could result in death or serious
injury. (00043a)
Some features explained in this section are standard equipment on this model. Other
features may be available as accessories for your Buell motorcycle. See a Buell dealer
for a complete list of accessories that will fit your specific motorcycle.
Ignition/Headlamp Key Switch: XB Models
Top of page
General
The automatic-on headlamp feature provides increased visibility of the rider to other
motorists. Be sure headlamp is on at all times. Poor visibility of rider to other
motorists can result in death or serious injury. (00030b)
NOTE:
Record your key number in the space provided at the front of this book. The key number is impressed on a plastic tab that comes with the keys.
The ignition/headlamp key switch controls the distribution of power to the ignition and
lamps.
1. See Ignition Key Switch: Ulysses Models. Turn the key clockwise to the ON (5)
position to start the bike.
NOTES:
o If you leave the key in this position for an extended period while parked the lamps will eventually discharge the
battery.
o The key cannot be removed from the ON position.
2. See Dash Panel: Ulysses Models. Observe instrument panel perform self-tests. If
self-tests fail, see a Buell dealer.
a. The needles will sweep the tachometer and speedometer.
b. The neutral lamp and the oil pressure signal lamp will illuminate.

c. If the OFF/RUN switch is in the RUN position, the check engine lamp
will illuminate for approximately 4 seconds. See Fuel Injection: Ulysses
Models for more information about the check engine lamp.
2. See Ignition Key Switch: Ulysses Models. Turn the key counterclockwise to the
OFF position (4) to shut the motorcycle off.
NOTES:
The tail lamp will illuminate when the ignition/headlamp key switch is in the ON or PARK position.
The headlamp will illuminate when the ignition/headlamp key switch is ON and the electric start switch is in the RUN position.
The key can be removed from the OFF position.
Locking Steering Head
See Steering Head Lock: XB Models for complete details.
1. PARKING LAMP position
2. LOCK position
3. PUSH DETENT
4. OFF position
5. ON position
Ignition Key Switch: Ulysses Models
Hand Controls: Ulysses Models
Top of page
Electric Starter Switch
See Hand Controls: Ulysses Models. The electric starter switch (11) is located on the

right handlebar control. Pushing in the electric starter switch engages the electric starter
and starts the engine if ignition power is ON. See Starting the Engine: XB Models for
operation procedures.
Engine OFF/RUN Switch
See Hand Controls: Ulysses Models. The engine OFF/RUN switch turns the ignition
power on or off. The engine OFF/RUN switch is located on the right handlebar control.
Push the top portion (9) of the engine OFF/RUN switch to turn off ignition power and
shut the engine off. Push the bottom portion (8) of the engine OFF/RUN switch to turn
on ignition power.
NOTES:
The engine OFF/RUN switch must be in the RUN position (8) to start or operate the engine.
The engine OFF/RUN switch should be used to shut the engine off.
1. To shut the engine off, push the top of the OFF/RUN switch to the ignition OFF
position (9).
2. See Ignition Key Switch: Ulysses Models. Turn the ignition/headlamp key
switch counterclockwise to the OFF (4) position to turn the ignition power
completely OFF.
Throttle Control Grip
See Hand Controls: Ulysses Models. The throttle control grip (10) is located on the right
handlebar control and is operated with the right hand.
1. Turn throttle control grip clockwise (toward the front of the bike) to close the
throttle (decelerate).
2. Turn throttle control grip counterclockwise (toward rear of bike) to open the
throttle (accelerate).
Clutch Hand Lever
Do not position fingers between hand control lever and handlebar grip. Improper hand
positioning can impair control lever operation and cause loss of vehicle control, which
could result in death or serious injury. (00032a)
See Hand Controls: Ulysses Models. The clutch hand lever (1) is located on the left

handlebar and is operated with the fingers of the left hand.
1. Slowly pull clutch hand lever in against handlebar grip to fully disengage clutch.
2. Shift to first gear using the gear shifter lever. See Gear Shift Lever.
3. Slowly release the clutch hand lever to engage clutch.
Horn Switch
See Hand Controls: Ulysses Models. The horn is operated by pushing on the horn switch
(7) located on the left handlebar control group.
Headlamp High/Low Beam Switch
The headlamp high/low beam switch is located on the left handlebar. The switch has two
positions to activate the headlamps high or low beams.
See Hand Controls: Ulysses Models. Press the top of the headlamp high/low
beam switch (3) to activate the high beam.
Press the bottom of the headlamp high/low beam switch (4) to return to the low
beam.
See Dash Panel: Ulysses Models. The (blue) high beam indicator lamp (3) will
illuminate when the high beam is on.
Passing Lamp Switch
See Hand Controls: Ulysses Models. The passing lamp switch (2) is located on the front
of the left handlebar control group. Pressing the switch when the headlamp dimmer
switch is set to low beam will momentarily flash the high beam headlamp.
Turn Signal Switch
See Hand Controls: Ulysses Models. The left/right turn signal switch (5) is located on
the left handlebar control and activates the front and rear turn signal flashers.
Push the turn signal switch to the right to activate the right front and right rear
turn signal flashers.
Push the turn signal switch to the left to activate the left front and left rear turn
signal flashers
Press the yellow button in the middle of the left/right handlebar turn signal
switch (6) to manually cancel the turn signal.

NOTE:
If signaling to turn in one direction and switch is depressed towards the opposite direction, the first signal is cancelled and the opposite side begins flashing.
See Dash Panel: Ulysses Models. The (green) turn signal indicator (1) will illuminate
and flash to indicate the turn signals are in use.
Heated Grips Switch
See Hand Controls: Ulysses Models. The heated grips switch (12) is located on the right
handlebar control group.
See Heated Grips Switch: Ulysses Models. Push the heated grips switch to the
right to turn heating off.
Push the heated grips switch to the middle to turn heating low.
Push the heated grips switch to the left to turn heating high.
1. Clutch hand lever
2. Passing lamp switch
3. Headlamp high beam
4. Headlamp low beam
5. Turn signal switch
6. Turn signal canceller button
7. Horn switch
8. Engine RUN
9. Engine OFF
10. Throttle control grip
11. Electric starter switch
12. Heated grip switch
Hand Controls: Ulysses Models

1. Heated grips switch
2. Heat OFF
3. Heat LOW
4. Heat HIGH
Heated Grips Switch: Ulysses
Models
Position Markers: XB Models
Top of page
See Ignition Key Switch: Ulysses Models. When the ignition/headlamp key switch is set
to the P (Parking Lamp) position, several indicator markers are or can be activated.
Refer to Position Lamps and Indicators: Ulysses Models. The position markers increase
the motorcycle's visibility to other motorists.
Position Lamps and Indicators: Ulysses Models
INDICATOR OPERATION
Headlamp position marker
(European models only)
On
Tail lamp position marker On
License plate illumination lamp On
Speedometer illumination lamp Off
Stop lamp Can be activated
Front and rear turn signals Can be activated
Horn Can be activated
Auxiliary power outlets On

Indicator Lamps: XB Models
Top of page
General
See Dash Panel: Ulysses Models. The dash panel has six indicator lamps.
The green turn signal indicator lamp (1) flashes when the turn signals are
activated.
The green neutral indicator lamp (2) illuminates when the transmission is in
neutral gear.
The blue high beam indicator lamp (3) illuminates when the headlamp high beam
is on.
The red oil pressure indicator lamp (5) illuminates when oil is not circulating
through the engine.
NOTE:
The oil pressure indicator indicator lamp will illuminate when the ignition is turned on prior to starting engine. With engine running, the oil
pressure indicator lamp should be off when engine speed is above idle.
See Fuel Injection: Ulysses Models for a description of the remaining lamps.
Oil Pressure Lamp Operation
Conditions that could cause the red oil pressure indicator lamp to illuminate during
operation include:
Empty oil tank, incorrect oil level or diluted oil (at speeds above idle).
Oil feed line clogged with ice and sludge, preventing oil circulation (in freezing
weather).
Grounded oil signal switch wire.
Faulty oil pressure switch.
Damaged or improperly operating bypass valve.
Improper oil pump operation.

If the oil pressure indicator lamp remains lit, always check the oil supply first.
If the oil supply is normal and the lamp is still lit, stop the engine at once and
do not ride further until the trouble is located and the necessary repairs are
made. Failure to do so may result in engine damage. (00157a)
If the oil pressure indicator lamp illuminates during operation:
Stop the engine immediately and check the oil level.
Add recommended oil as required until proper level is achieved.
If the oil pressure indicator lamp illuminates during operation despite proper oil level:
Stop the engine immediately and do not ride further until the necessary repairs
are made. See a Buell dealer.
Instruments: Ulysses XB12X
Top of page
Speedometer
Travel at speeds appropriate for road and conditions and never travel faster than
posted speed limit. Excessive speed can cause loss of vehicle control, which could
result in death or serious injury. (00008a)
See Dash Panel: Ulysses Models. The speedometer (11) registers miles per hour (mph)
and kilometers per hour (kph) of forward speed.
Odometer, Trip Odometer and Reserve Fuel Odometer (F-trip)
Never attempt to tamper with or alter the vehicle odometer. This is illegal. Tampering
with or altering a vehicle odometer may cause equipment damage. (00160a)
See Dash Panel: Ulysses Models. The odometer window (9) within the speedometer has

five displays. The default display is the odometer. It measures the cumulative number of
miles (kilometers) traveled.
Two separate trip odometers record mileage until reset. Use the trip odometers for
tracking distances between two points or for determining gasoline consumption between
fuel stops. The reserve fuel odometer (F-trip) is activated automatically when fuel level
drops below about 0.83 gallons (3.1 liters) and counts mileage traveled after low fuel
indicator illumination. The F-trip resets, after a 3-minute delay, when enough fuel is
added to bring fuel level above about 0.83 gallons (3.1 liters).
1. Turn ignition key to ON.
2. See Dash Panel: Ulysses Models. Press mode (M) button (8) to toggle between
odometer, trip odometers and clock. Display window will read TRIP in trip
odometer modes. The first digit in the window indicates TRIP 1 or 2.
3. Zero the trip odometers as follows. Activate trip odometer mode. Press and hold
reset (R) button (7) for 2-3 seconds to reset trip odometer.
1. Right and left turn signal indicator lamp
2. Neutral indicator lamp
3. Headlamp high beam indicator lamp
4. Check engine lamp
5. Oil pressure lamp
6. Low fuel warning lamp
7. Reset push button (R)
8. Mode push button (M)
9. Clock and odometer display
10. Tachometer
11. Speedometer
Dash Panel: Ulysses Models
Setting Clock
1. Turn ignition key to ON.

2. See Dash Panel: Ulysses Models. Press mode (M) button (8) to toggle to clock
display.
3. Simultaneously press (M) and (R) buttons for 2-seconds or until clock display
flashes.
4. Press (M) button to set hours and (R) button to set minutes.
5. After time has been set, simultaneously press (M) and (R) buttons to exit setting
mode and start clock operation.
Tachometer
See OPERATING RECOMMENDATIONS section. Do not operate the engine above
maximum safe RPM as shown under OPERATION (red zone on tachometer). Lower
the RPM by upshifting to a higher gear or reducing the amount of throttle. Failure to
lower RPM may cause equipment damage. (00159a)
See Dash Panel: Ulysses Models. The tachometer (10) registers the engine speed in
revolutions per minute (RPM).
Fuel Injection: Ulysses Models
Top of page
Dynamic Digital Fuel Injection III (DDFI III)
Your motorcycle features Buell's Dynamic Digital Fuel Injection (DDFI III). This
system allows for precise fuel and engine management under different operating
conditions.
Fuel injected vehicles have no fuel valve or enrichener system. These functions are
controlled by an electronic control module.
Check Engine Lamp
See Dash Panel: Ulysses Models. The red check engine lamp (4) is located in the
indicator panel to the right of the tachometer. Its purpose is to indicate whether or not
the engine management system is operating normally.

The check engine lamp normally illuminates when the motorcycle's ignition is first
turned on. The lamp remains on for approximately four seconds at this time. During
these four seconds, the engine management system runs a series of self diagnostics.
If the lamp remains continuously lit after the initial four seconds or if it begins blinking,
see a Buell dealer. This indicates an event has occurred relating to the proper operation
of the engine management system. If the engine lamp comes on at any other time, see a
Buell dealer.
See Operating Recommendations: Ulysses Models for more information on the check
engine lamp function.
Low Fuel Lamp
See Dash Panel: Ulysses Models. An amber lamp in the indicator panel to the right of
the tachometer serves as a low fuel warning lamp (6). This lamp illuminates
automatically when there is approximately 0.83 gallons 3.1 liters of gasoline left in the
tank. When the low fuel warning lamp illuminates, the reserve fuel odometer (F-trip) is
activated and counts mileage traveled after low fuel indicator illumination.
Gear Shift Lever
Top of page
The clutch must be fully disengaged before attempting a gear shift. Failure to fully
disengage the clutch can result in equipment damage. (00182a)
See Shifting Sequence (shown from left side of motorcycle). The gear shift lever is
located on the left side of the motorcycle and is operated with the left foot. The
transmission is a five speed sequential gear box.
1. Push the gear shift lever all the way down (full stroke) to shift the transmission
to the next lower gear.
2. Lift the gear shift lever all the way up (full stroke) to shift the transmission to the
next higher gear.
NOTES:
o Release the gear shift lever after each gear change.

o The lever must return to its central position before another gear change can be made.
First gear is the last gear position that can be found by pushing the gear shift lever full
stroke downward.
Neutral is located between first and second gear. The green neutral indicator lamp on the
dash will illuminate when the transmission is in neutral.
To shift from first gear to neutral, lift the gear shift lever 1/2 of its full stroke.
When the motorcycle is standing still and the engine is not running, shifting gears
requires a different technique. Before shifting in this condition, move the motorcycle
backward and forward with the clutch fully disengaged (clutch lever pulled in). While
maintaining slight pressure on the shift lever, shift from one gear to another.
Even with the engine running and the motorcycle standing still, difficulty may be
experienced in shifting gears. This difficulty occurs because transmission gears are not
turning and shifting parts are not lined up to permit engagement.
When difficulty of shifting gears is experienced, do not under any circumstances,
attempt to force the shift. The results of such abuse will be a damaged or broken
shifter mechanism. (00161a)
See Shifting Gears for more information.
Shifting Sequence (shown from left
side of motorcycle)
Adjusting Gear Shift Lever
Top of page
The shift linkage attached to the gear shift lever can be adjusted for rider preference. See
a Buell dealer to have this service performed.
Brake System
Top of page
Do not apply brake strongly enough to lock the wheel. A locked wheel will skid and
can cause loss of vehicle control, which could result in death or serious injury.
(00053a)
The rear brake pedal controls the rear wheel brake and is located on the motorcycle's
right side. Operate the rear brake pedal with the right foot.
The front brake hand lever controls the front wheel brake and is located on the right
handlebar. Operate the hand lever with the fingers of the right hand.
Do not position fingers between hand control lever and handlebar grip. Improper hand
positioning can impair control lever operation and cause loss of vehicle control, which
could result in death or serious injury. (00032a)
Brakes should be applied uniformly and evenly to prevent wheels from locking up. A
balance between rear and front braking is generally best.
Adjusting Front Brake Lever
Top of page
The distance of the front brake lever from the throttle control grip may be adjusted to the

rider's preference.
1. See Front Brake Hand Lever Dial. Push brake lever forward.
2. Turn knob to desired position.
a. Position "1" locates brake lever farthest from the throttle control grip.
b. Position "5" locates brake lever closest to the throttle control grip.
Front Brake Hand Lever Dial
Do not position fingers between hand control lever and handlebar grip. Improper hand
positioning can impair control lever operation and cause loss of vehicle control,
which could result in death or serious injury. (00032a)
Fuel Filler Cap: XB Models
Top of page
Avoid spills. Slowly remove filler cap. Do not fill above bottom of filler neck insert,
leaving air space for fuel expansion. Secure filler cap after refueling. Gasoline is
extremely flammable and highly explosive, which could result in death or serious
injury. (00028a)
Use care when refueling. Pressurized air in fuel tank can force gasoline to escape
through filler tube. Gasoline is extremely flammable and highly explosive, which
could result in death or serious injury. (00029a)

Do not spill fuel onto the motorcycle while refueling. Immediately wipe up fuel spills
on your motorcycle. Fuel can cause damage to cosmetic surfaces. (00147b)
Removal
1. See Fuel Cap: XB Models. Lift tab up.
2. Insert ignition key into filler cap lock.
3. Turn key 1/4 turn counterclockwise.
4. Lift cap off.
Installation
1. Replace cap.
2. Turn ignition key 1/4 turn clockwise.
3. Remove key.
4. Push tab down.
Fuel Cap: XB Models
Fuel Filler Opening: XB Models
Steering Head Lock: XB Models

Top of page
Protect your vehicle against theft. After parking your motorcycle, lock the steering
head and remove ignition key from switch. Failure to lock your motorcycle may result
in theft and/or equipment damage. (00151a)
The steering head lock is located on the ignition/headlamp key switch and is operated by
the ignition key.
1. Verify sidestand is down. Turn handlebars full left.
2. See Ignition Key Switch: Ulysses Models. Verify that key is in the OFF position.
3. Push in on the ignition key and turn it counterclockwise to the steering head
LOCK position. Move handlebars slightly until locked.
4. Attempt to turn the handlebars to the right to verify that the steering head is
locked. Handlebars should not turn.
5. Remove key from the ignition/headlamp key switch.
Do not operate vehicle with forks locked. Locking the forks restricts the vehicle's
turning ability, which could result in death or serious injury. (00035a)
Sidestand
Top of page
This motorcycle does NOT have a locking sidestand. Park the motorcycle on a level,
firm surface. An unbalanced motorcycle can fall, which could result in death or
serious injury. (00122a)
The sidestand is located on the left side of the motorcycle and swings down to support
the motorcycle for parking.

Be sure side stand is fully retracted before riding. If side stand is not fully retracted, it
can contact the road surface causing a loss of vehicle control, which could result in
death or serious injury. (00130a)
Rear View Mirrors
Top of page
Objects in mirrors are closer than they appear. Use caution when judging distance of
objects in mirrors. Failure to judge correct distances could result in death or serious
injury. (00033a)
Your vehicle is equipped with two convex rear view mirrors.
This type of mirror is designed to give a much wider view to the rear than a flat mirror.
However, cars and other objects seen in this type of mirror will look smaller and farther
away than they actually are.
Use caution when judging the size or relative distance of objects seen in rear
view mirrors.
Always adjust the rear view mirrors to clearly reflect the area behind the
motorcycle before riding.
NOTE:
Adjust mirrors so you can see a small portion of your shoulders in each mirror. This will help you establish the relative distance of vehicles to
the rear of your motorcycle.
©2001-2009 Buell. All rights reserved.

Owner’s Manuals
CLOSE PRINT
Home
Operation
Operating Recommendations: Ulysses Models
Top of page
General
Motorcycles are different from other vehicles. They operate, steer, handle and brake
differently. Unskilled or improper use could result in loss of control, death or serious
injury. (00556c)
Take a rider training course.
Read Owner's Manual before riding, adding accessories or servicing.
Wear a helmet, eye protection and protective clothing.
Never tow a trailer.
This manual contains information specific to 2008 Ulysses Models. Riders may wish to
purchase the 2008 Buell XB Models Service Manual (Part No. 99490-08Y). See a Buell
dealer for price and availability.

Do not run the engine at extremely high RPM with clutch disengaged or transmission
in neutral. Running an engine at high RPM can result in engine damage. (00177a)
The maximum recommended safe engine speed is 7100 RPM.
Sustainable engine speed is 6800 RPM.
Extended idling or continued operation above 6800 RPM can result in engine
damage.
Air-cooled engines require air movement over the cylinders and heads to maintain
proper operating temperature. Extended periods of idling or parade duty can overheat
the engine, resulting in serious engine damage. (00178a)
Cooling fans operate automatically, even when the ignition switch is off. Keep hands
away from fan blades. Contact with a rotating fan blade can result in minor or
moderate injury. (00093a)
Indicator Lamps and Cooling
An engine run long distances at high speed or run at idle for extended periods must be
given closer than ordinary attention to avoid overheating and possible consequent
damage. Have the engine checked regularly and keep it well tuned.
Your motorcycle has a system designed to warn of potential engine overheating and
reduce the likelihood of an overheat condition. If a fuel-injected engine exceeds normal
operating temperature, the engine will operate in a "skip spark" mode until the
temperature is back in the normal operating range. Reduced power will be experienced
until operating temperature returns to the normal range. The check engine lamp will
blink warning the rider of this condition. The check engine lamp will only blink as long
as the operating temperature remains above normal. If the check engine lamp blinks
excessively or potential overheating is not suspected, see a Buell dealer.
When riding on wet roads, brake efficiency and traction are greatly reduced. Failure to
use care when braking, accelerating or turning on wet roads can cause loss of control,
which could result in death or serious injury. (00041a)

Continuous use of brake causes overheating and reduced efficiency, which could
result in death or serious injury. (00042a)
Do not coast for long distances with the engine off. The transmission is properly
lubricated only when the engine is running. Coasting long distances can result in
transmission damage. (00180a)
Do not tow a disabled motorcycle. Towing can adversely affect stability and handling,
which could result in death or serious injury. (00017a)
Break-in Riding Rules
Top of page
The First 500 Miles (800 Kilometers)
The sound design, quality materials, and workmanship that are built into your new Buell
motorcycle will give you optimum performance right from the start.
To allow your engine to wear in its critical parts, we recommend that you observe the
riding rules provided below for the first 500 miles 800 kilometers . Adhering to these
suggestions will help to assure good future durability and performance.
1. During the first 50 miles 80 kilometers of riding, keep the engine speed below
4000 RPM in any gear. Do not lug the engine by running or accelerating at very
low RPM, or by running at high RPM longer than needed for shifting or passing.
2. Up to 500 miles 800 kilometers , vary the engine speed and avoid operating at
any steady engine speed for long periods. Engine speed up to 5000 RPM in any
gear is permissible.
3. Drive slowly and avoid fast starts at wide open throttle until the engine has
warmed up.
4. Avoid lugging the engine by not running the engine at very low speeds in higher
gears.

5. Avoid hard braking. New brakes need to be broken-in by moderate use for the
first 200 miles 300 kilometers .
Pre-Riding Checklist: Buell Models
Top of page
Read the CONTROLS AND INDICATORS section before riding your motorcycle.
Failure to understand the operation of the motorcycle could result in death or serious
injury. (00043a)
Before riding your motorcycle at any time, make a general inspection to be sure it is in
safe riding condition.
Stop the engine when refueling or servicing the fuel system. Do not smoke or allow
open flame or sparks near gasoline. Gasoline is extremely flammable and highly
explosive, which could result in death or serious injury. (00002a)
Avoid spills. Slowly remove filler cap. Do not fill above bottom of filler neck insert,
leaving air space for fuel expansion. Secure filler cap after refueling. Gasoline is
extremely flammable and highly explosive, which could result in death or serious
injury. (00028a)
Use care when refueling. Pressurized air in fuel tank can force gasoline to escape
through filler tube. Gasoline is extremely flammable and highly explosive, which
could result in death or serious injury. (00029a)
Do not spill fuel onto the motorcycle while refueling. Immediately wipe up fuel spills

on your motorcycle. Fuel can cause damage to cosmetic surfaces. (00147b)
1. Verify fuel is present in tank and add fuel if required.
2. Adjust mirrors to proper riding positions.
3. Verify oil is present in oil tank. Check oil level only after warming up the
motorcycle.
4. Check controls to make sure they operate properly. Operate the front and rear
brakes, throttle, clutch and shifter. All controls should operate freely without
binding.
5. Check steering for proper operation by turning the handlebars through the full
operating range. Handlebars should turn smoothly without binding.
Be sure tires are properly inflated, balanced and have adequate tread. Inspect your
tires regularly and see a Buell dealer for replacements. Riding with excessively worn,
unbalanced or under-inflated tires can adversely affect stability and handling, which
could result in death or serious injury. (00114a)
6. Check tire condition and pressure. Incorrect pressure will result in poor riding
characteristics and can affect handling and stability.
7. Check all electrical equipment and switches including the headlamp, stop lamp,
turn signals and horn, for proper operation.
NOTE:
Check horn operation with engine running.
Be sure headlamp, tail and stop lamp and turn signals are operating properly
before riding. Poor visibility of rider to other motorists can result in death or
serious injury. (00478b)
8. Check for any fuel, oil or hydraulic fluid leaks.
9. Check secondary belt for wear or damage. Service as necessary.
Starting the Engine: XB Models
Top of page

Shift transmission to neutral before starting engine to prevent accidental movement,
which could result in death or serious injury. (00044a)
The engine should be allowed to run slowly for 15-30 seconds. This will allow the
engine to warm up and let oil reach all surfaces needing lubrication. Failure to comply
can result in engine damage. (00181a)
NOTE:
Buell motorcycles feature a starter interlock. Before starting the engine, all the following conditions must be met.
Engine OFF/RUN switch on right handlebar control group must be in the ON position.
Clutch lever must be applied (pulled-in) before starting motorcycle in gear. Note that it is not necessary to apply clutch lever
before starting the vehicle in neutral.
NOTE:
The DDFI III fuel injection system compensates for all outside and engine temperatures to assure positive starts.
1. Engine Off/Run Switch: Ulysses Models. Turn engine OFF/RUN switch to RUN
(2).
2. Be sure throttle is closed.
3. Turn ignition/headlamp key switch to ON.
4. Verify transmission is in NEUTRAL position by observing lit green neutral
indicator lamp on dash panel and verify neutral position by rolling bike forward
and rearward.
5. Press electric starter switch (3) to operate starter.
6. Release electric starter switch when engine starts.
If you read this section and still have questions about the correct operation of your
motorcycle, talk to an authorized Buell dealer.
1. Engine off

2. Engine run
3. Electric starter switch
Engine Off/Run Switch: Ulysses
Models
Stopping The Engine: XB Models
Top of page
1. See Engine Off/Run Switch: Ulysses Models. Push the upper part of the engine
OFF/RUN switch to shut the engine OFF.
2. See Engine Off/Run Switch: Ulysses Models. Turn the ignition/headlamp key
switch to the OFF position.
Shifting Gears
Top of page
Getting Started
The clutch must be fully disengaged before attempting a gear shift. Failure to fully
disengage the clutch can result in equipment damage. (00182a)
Gear shift pattern is first gear down, next four gears up.
NOTE:
Always start engine with transmission in neutral. Always start motorcycle forward motion from first gear.
1. With motorcycle engine running and sidestand retracted, pull the clutch hand
lever in against handlebar grip to fully disengage clutch.
2. Push the foot shift lever down to end of its travel and release. The transmission is
now in first gear.
3. To start forward motion, release the clutch lever slowly to engage the clutch and
at the same time, open throttle gradually.

Upshift (Acceleration)
Refer to Upshift (Acceleration) Gear Speeds: XB Models. Engage second gear after the
motorcycle has reached the appropriate shifting speed.
Upshift (Acceleration) Gear Speeds: XB Models
GEAR CHANGE MPH KPH
First to second 15 25
Second to third 25 40
Third to fourth 40 65
Fourth to fifth 50 80
1. Close the throttle.
2. Disengage the clutch (pull clutch lever in).
3. See Upshift Shifting Sequence. Lift the gear shift lever up to the end of its travel
and release.
4. Engage the clutch (release clutch lever) and gradually open the throttle.
5. Repeat the previous steps to engage third, fourth, and fifth gears.
NOTES:
Disengage the clutch completely before each gear change.
Partially close the throttle so the engine will not drag when clutch is again engaged (clutch lever released).
Upshift Shifting Sequence
Downshift (Deceleration)

Do not downshift at speeds higher than those listed in the Changing Gear Speeds
table. Shifting to lower gears when speed is too high can cause the rear wheel to lose
traction and lead to loss of vehicle control, which could result in death or serious
injury. (00045a)
Gear shift pattern is fourth gear down; next three gears down. Refer to Downshift
(Deceleration) Gear Speeds: XB Models for shifting speeds.
Downshift (Deceleration) Gear Speeds: XB Models
GEAR CHANGE MPH KPH
Fifth to fourth 40 65
Fourth to third 30 50
Third to second 20 30
Second to first 10 15
NOTE:
The shifting points shown in the tables constitute a recommendation. Vehicle owners may determine that their own individual shifting patterns may differ than those stated and are additionally appropriate for individual riding styles.
See Downshift Shifting Sequence. When engine speed decreases, as in climbing a hill or
running at a reduced speed, shift to the next lower gear while partially closing the
throttle so the engine accelerates as soon as the clutch lever is released.
NOTES:
Disengage the clutch completely before each gear change.
Partially open the throttle so the engine will not drag when clutch is again engaged (clutch lever released).
Shift to neutral before stopping engine. Shifting mechanism can be damaged by
shifting gears while engine is stopped. (00183a)
The gear shifter mechanism permits shifting the transmission to neutral from either first
or second gear.

Downshift Shifting Sequence
Windshield: Ulysses XB12X
Top of page
Removal
See Windshield: Ulysses XB12X. Grasp the windshield firmly and pull the four
windshield mounting pins out of the four grommets in the windscreen.
Installation
1. Align the four windshield mounting pins with the four grommets in the
windscreen.
2. Press each windshield mounting pin into the grommet on the windscreen.
Windshield: Ulysses XB12X
Seat: Ulysses XB12X

Top of page
Removal
Rotate Triple Tail™ to upright or rearward position. Refer to Triple Tail™.
See Seat Lock: Ulysses XB12X. Insert ignition key into seat lock and rotate a 1/4 turn
clockwise. Grip the rear of seat and pull toward the rear of the motorcycle.
Installation
See Seat Tab/Hooks: Ulysses XB12X. Position seat and slide forward to engage the
front tab (3) with the slot in the frame and the four seat hooks (1) with the posts on the
tail section. Check that the front tab engages the frame slot and that all four hooks
engage the tail section.
After installing seat, pull upward on seat to be sure it is locked in position. While
riding, a loose seat can shift causing loss of control, which could result in death or
serious injury. (00070b)
Press down firmly on rear of seat to engage seat latch (2). Pull up on rear of seat to make
sure latch is engaged.
Seat Lock: Ulysses XB12X

1. Seat hook
2. Seat lock latch
3. Front tab
Seat Tab/Hooks: Ulysses XB12X
Seat Installation: Ulysses XB12X
Triple Tail™
Top of page
See Triple Tail™. Depending on its position, the Triple Tail™ can serve one of three
functions, forward luggage rack, passenger backrest, or rearward luggage rack.
Operation
1. See Triple Tail™ Locking Detent and Locking Collar. Use the thumb tab on the
locking collar to snap the locking collar out of the locked position and rotate it to
the fully open position.
2. Press key into Triple Tail locking detent to release lock while pulling the Triple

Tail toward the left hand grabrail out of the locking splines in the right hand
grabrail.
3. Rotate the Triple Tail to one of three positions.
4. Push the Triple Tail toward the right hand grabrail until it engages the locking
splines
5. Verify that the Triple Tail is locked into position and rotate the locking collar to
snap it back into its locked position.
NOTES:
The Triple Tail locking collar must be locked in position before operating the motorcycle.
Do not use the Triple Tail as a passenger seat in either the forward or rearward positions.
Maximum load capacity of the Triple Tail is 11 lbs (5 Kg).
See Tie Down Locations: Ulysses XB12X for tie down locations in the forward luggage rack or the rearward luggage rack positions.
Do not exceed luggage rack weight capacity. Too much weight can cause loss of
control, which could result in death or serious injury. (00373a)
1. Locking detent
2. Locking collar
3. Triple tail
Triple Tail™ Locking Detent and
Locking Collar

1. Forward luggage rack
2. Passenger backrest
3. Rearward luggage rack
4. Integrated tie down locations
Triple Tail™
Tie Down Locations: Ulysses XB12X
Top of page
Rearward Luggage Rack
See Triple Tail™. When the Triple Tail™ is in the the rearward luggage rack position,
the integrated tie down locations are suitable for attaching tie downs.
Forward Luggage Rack
See Tie Down Locations: Ulysses XB12X. When the Triple Tail™ is in the forward
luggage rack position, there are four locations under the tail piece suitable for attaching
tie downs.
NOTE:
See Accessories and Cargo: XB Models

Tie Down Locations: Ulysses
XB12X
Helmet Lock: Ulysses XB12X
Top of page
See Helmet Lock: Ulysses XB12X. Insert ignition key into seat lock and turn the key 1/4
turn clockwise.
Insert D-ring from helmet into open clasp and turn the key 1/4 counterclockwise to close
clasp and secure helmet.
NOTE:
Do not operate the motorcycle with a helmet in the helmet lock.
Helmet Lock: Ulysses XB12X
Auxiliary Power Outlets: Ulysses XB12X

Top of page
See Auxiliary Power Outlet: Ulysses XB12X (on dash) and Auxiliary Power Outlet:
Ulysses Models (under seat). Two auxiliary power outlets provide power for a several
accessories. One auxiliary power outlet is located on the dash and the other is located
under the seat.
NOTE:
The auxiliary power outlets deliver 12 volts at 120 watts with a maximum combined accessory draw of 10 amps.
Install the auxiliary power outlet covers whenever the motorcycle is being operated
without the accessories installed.
Auxiliary Power Outlet: Ulysses
XB12X (on dash)
Auxiliary Power Outlet: Ulysses
Models (under seat)
Tool Kit: Buell Models

Top of page
Buell motorcycles come with a standard tool set in a pouch which is under the seat. The
tool set consists of the following components:
Tool kit pouch.
4-in-1 screwdriver.
8 mm nut driver.
Combination wrench.
Spanner with 19 mm wrench.
Axle hex wrench.
5 mm L-style hex key.
T27 TORX wrench.
Security cable.
Store tool kit with the zipper facing down to prevent the zipper from contacting the
battery post.
Suspension Adjustments: Buell Models
Top of page
Each Buell motorcycle uses suspension components tailored to the vehicle's weight and
function. On all models, the front and rear preload setting will need to be adjusted for
the rider's weight and cargo. This adjustment should be made before the motorcycle is
ridden any distance and after changing the overall vehicle weight (adding saddlebags,
etc.). Your Buell dealer can assist you in setting the preload when you take delivery of
your motorcycle.
If the preload adjustment is correct, and you have the rebound and compression damping
set at the factory recommended points, the motorcycle should handle and ride properly.
Damping is set at the factory for the average solo rider under normal riding conditions.
The rider may make adjustments to compensate for individual riding styles and varying
road conditions. Evaluating and changing the rebound and compression damping is a
very subjective process with many variables and should be approached carefully.
Suspension Definitions: Buell Models
Top of page

Damping: Resistance to movement. Damping affects how easily the suspension can
move and limits oscillations of the system once movement has begun.
Compression: The suspension is compressed when the wheel moves upward.
Rebound: The suspension is rebounding when it is moving back from being
compressed.
Vehicle Sag: The amount the rear shock and fork springs are compressed by the weight
of the motorcycle.
Rider Sag: The amount the rear shock and fork springs are compressed by the weight of
the rider on the motorcycle.
Preload: An adjustment made to the rear shock and front fork springs to limit vehicle
and rider sag to a standard percentage of total suspension travel.
Compression and rebound adjusting valves may be damaged if too much force is used
at either end of the adjustment range. (00237a)
Before evaluating and adjusting suspension settings, check the motorcycle's tires. Refer
to Tires/Air Pressures: 2008 Ulysses Models. They must be in good condition and
properly inflated.
Fine Tuning Suspension: Ulysses Models
Top of page
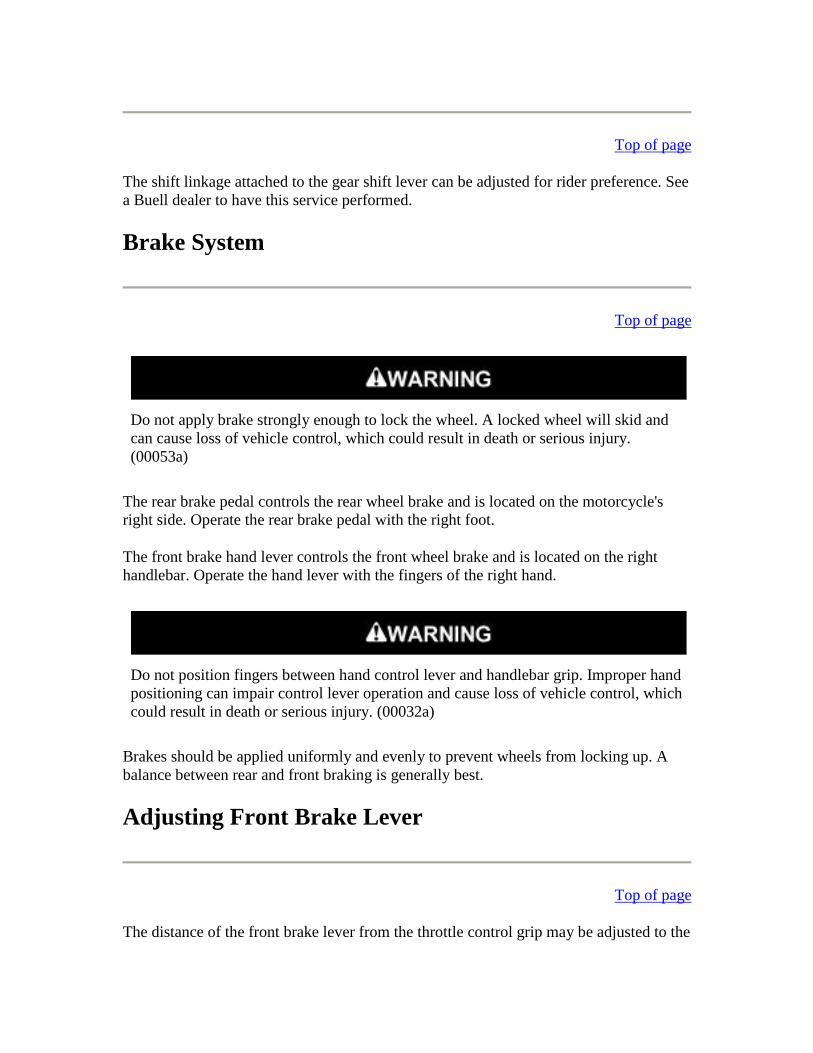
See Factory Suspension Settings: Ulysses XB12X. The settings are the best balance of
handling, ride, and stability. Suspension can be changed to accommodate rider
preferences for ride quality and handling for road conditions and load changes.
NOTES:
Do not continue to repeat the steps involved with the following settings beyond those which are listed.
Adjust suspension to the recommendation if possible, but never force adjusters beyond the mechanical stops.

Do not operate motorcycle with loose, worn or damaged steering or suspension
systems. Contact a Buell dealer for repairs. Loose, worn or damaged steering or
suspension components can adversely affect stability and handling, which could result
in death or serious injury. (00113a)
Changes in Load
Changes in the load carried requires changes in the preload setting(s). Carrying less
weight than was used for setting up the suspension requires decreasing the amount of
preload. Increasing the load carried requires adding more preload.
Do not exceed the motorcycle's Gross Vehicle Weight Rating (GVWR) or Gross Axle
Weight Rating (GAWR). Exceeding these weight ratings can affect stability and
handling, which could result in death or serious injury. (00016e)
GVWR is the sum of the weight of the motorcycle, accessories, and the
maximum weight of the rider, passenger and cargo that can be safely carried.
GAWR is the maximum amount of weight that can be safely carried on each
axle.
The GVWR and GAWR are shown on the information plate, located on the
frame steering head.
Ride Quality Enhancement
The stock settings are designed to offer sufficient chassis control, but some may choose
to enhance ride comfort over rougher road conditions or for long rides. Adjusting the
compression setting will reduce both high and low speed damping.
1. Adjust suspension for rider weight. See Factory Suspension Settings: Ulysses
XB12X.
2. Increase ride quality by reducing front and rear compression damping by turning
adjuster counterclockwise 1/4-1 turn.
3. If additional ride quality is desired, reduce front preload by turning adjuster
counterclockwise one turn.
4. If maximum ride quality is desired, decrease front and rear rebound damping by
turning adjusters counterclockwise by 1/4-1/2 turn.
Enhanced Steering Quickness

The response to steering input (quickness) may be enhanced by adjusting the vehicles
front/rear ride height. This adjustment effectively decreases the vehicles rake angle. This
is achieved by adjusting the preload to increase front sag and reduce rear sag.
1. Adjust suspension for rider weight. See Factory Suspension Settings: Ulysses
XB12X.
2. Reduce steering effort by increasing the rear preload 4 turns (8 clicks).
3. If more enhanced steering and cornering control is desired, reduce front preload
by turning adjuster counterclockwise one turn.
4. If additional enhanced steering and cornering control is desired, increase rear
compression damping by turning adjuster clockwise by 1/4-1/2 turn.
5. If maximum enhanced steering and cornering control is desired, increase front
rebound damping by turning adjuster clockwise 1/4 turn.
Chassis Control/Handling Enhancement
To provide more road surface feedback on smoother road conditions, increase
compression and rebound settings.
1. Adjust suspension for rider weight. See Factory Suspension Settings: Ulysses
XB12X.
2. Increase chassis/handling control by increasing front and rear compression
damping by turning adjuster clockwise by 1/2-1 1/2 turns.
3. If maximum chassis control/handling control is desired, increase front and rear
rebound damping by turning adjuster clockwise by 1/4-1/2 turn.
Cold Weather Riding Less Than 65° F (18° C)
The viscosity of the suspension fluid increases as the temperature decreases. As the fluid
viscosity increases so does the damping. It is recommended to compensate for the
varying fluid viscosity by readjusting the damping adjuster positions when operating
outside the normal ambient temperature range of 65-95° F (18-35° C).
1. Adjust suspension for rider weight. See Factory Suspension Settings: Ulysses
XB12X.
2. Reduce front and rear compression damping and rebound damping by turning
adjuster counterclockwise 1/4-1/2 turn.
Suspension Tuning: Buell Models

Top of page
Do not operate motorcycle with loose, worn or damaged steering or suspension
systems. Contact a Buell dealer for repairs. Loose, worn or damaged steering or
suspension components can adversely affect stability and handling, which could result
in death or serious injury. (00113a)
Make all suspension adjustments in small increments. Radical setting changes may
cause you to skip the best adjustment, but always remember that any setting chosen is a
compromise.
Refer to Suspension Tuning: XB Models. Possible suspension and operating
characteristics and their probable causes are listed. This table is helpful in keeping your
motorcycle in good operating condition.
To achieve the proper settings you will need the preload properly adjusted, the tires
properly inflated and a familiar bumpy road. It is useful if the road contains a variety of
different kinds of bumps from small sharp bumps such as potholes or frost heaves to
large cracks.
See Factory Suspension Settings: Ulysses XB12X. Begin the process by putting all the
damping settings as recommended. Ride the motorcycle over a variety of surfaces and
bumps at different speeds. If the suspension is set properly, the vehicle will feel stable
and comfortable.
Suspension Tuning: XB Models
SUSPENSION CHARACTERISTICS SOLUTION
Bike wallows through turns. Increase rebound
damping. Bike feels loose or vague after bumps.
Wheel tends to "pogo" or suffer continuous bouncing after passing
a bump. This is often noticable by watching the bike as it travels
over bumps.
Wheel responds to bump but doesn't return to ground quickly after
bumps. This is more pronounced over a series of bumps and is
often referred to as "packing down."
Reduce rebound
damping.
Bike bottoms in dips or while cornering. Increase
compression
damping. Bike has excessive brake dive.

Harsh ride, particularly over washboard surfaces. Reduce
compression
damping. Bumps transfer through handlebars or seat.
Suspension seems not to respond to bumps. Tires chatter through
corners or rider is jolted over rough roads.
Changes in Load
Top of page
Changes in the load carried requires changes in the preload setting(s). Carrying less
weight than was used for setting up the suspension requires decreasing the amount of
preload. Increasing the load carried requires adding more preload.
Do not exceed the motorcycle's Gross Vehicle Weight Rating (GVWR) or Gross Axle
Weight Rating (GAWR). Exceeding these weight ratings can affect stability and
handling, which could result in death or serious injury. (00016e)
GVWR is the sum of the weight of the motorcycle, accessories, and the
maximum weight of the rider, passenger and cargo that can be safely carried.
GAWR is the maximum amount of weight that can be safely carried on each
axle.
The GVWR and GAWR are shown on the information plate located on the frame
steering head.
Do not pull a trailer with a motorcycle. Pulling a trailer can cause tire overload,
reduced braking efficiency and adversely affect stability and handling, which could
result in death or serious injury. (00018b)
Adjusting Preload: Ulysses Models
Top of page

See Factory Suspension Settings: Ulysses XB12X for more information about
suspension tuning.
Setting Rear Shock Preload
See Rear Shock Preload Adjuster: Ulysses XB12X. Change the preload by turning the
preload adjuster. See Suspension Adjustments: Buell Models for factory settings.
The rear shock preload adjuster is located on the left side of the motorcycle.
Rotate adjuster clockwise to increase preload.
Rotate adjuster counterclockwise to decrease preload.
Setting Front Fork Preload
1. See Front Fork Preload and Rebound Adjuster: Ulysses Models. Turn preload
adjuster nut (2) counterclockwise until it stops. This is the minimum preload
setting.
Both forks should be adjusted equally. Forks that are not properly adjusted can
lead to loss of control, which could result in death or serious injury. (00124b)
2. Turn the adjuster nut clockwise the recommended amount specified in
Suspension Adjustments: Buell Models.
Rear Shock Preload Adjuster:
Ulysses XB12X

1. Rebound adjuster screw
2. Preload adjuster nut
Front Fork Preload and Rebound
Adjuster: Ulysses Models
Adjusting Suspension Damping: Ulysses Models
Top of page
For the recommended rebound and compression damping settings for various road and
riding conditions, see Factory Suspension Settings: Ulysses XB12X.
NOTE:
Adjust suspension to the recommendation if possible, but never force adjusters beyond the mechanical stops.
Setting Front Fork Rebound Damping
1. See Front Fork Preload and Rebound Adjuster: Ulysses Models. Using a
screwdriver, turn the rebound adjuster screw (1) clockwise until it stops. This is
the maximum rebound damping setting.
2. Turn the adjuster screw counterclockwise the recommended amount specified in
Recommended Suspension Settings: Ulysses Models.
Setting Front Fork Compression Damping
1. See Front Fork Compression Damping Adjuster: Ulysses Models. Using a
screwdriver, turn the compression damping adjuster clockwise until it stops. This
is the maximum compression damping setting.
2. Turn the adjuster counterclockwise the recommended amount specified in

Recommended Suspension Settings: Ulysses Models.
Front Fork Compression Damping
Adjuster: Ulysses Models
Setting Rear Shock Rebound Damping
1. See Rear Shock Rebound Damping Adjuster: Ulysses XB12X. Using a
screwdriver, turn the rebound adjuster clockwise until it stops. This is the
maximum rebound damping setting.
2. Turn the rebound adjuster counterclockwise the recommended amount specified
in Recommended Suspension Settings: Ulysses Models.
Setting Rear Shock Compression Damping
1. Remove seat. See Seat: Ulysses XB12X.
2. See Removing/Installing Air Flow Guide (Right Side): Ulysses Models. Squeeze
and pull the right side air flow guide from vehicle.
3. See Rear Shock Compression Damping Adjuster: Ulysses Models. Using a
screwdriver, turn the compression adjuster clockwise until it stops. This is the
maximum compression damping setting.
4. Turn the compression adjuster counterclockwise the recommended amount
specified in Recommended Suspension Settings: Ulysses Models.
5. Snap air flow guide into place.
After installing seat, pull upward on seat to be sure it is locked in position.
While riding, a loose seat can shift causing loss of control, which could result
in death or serious injury. (00070b)

6. Install seat.
Rear Shock Rebound Damping
Adjuster: Ulysses XB12X
Removing/Installing Air Flow Guide
(Right Side): Ulysses Models
Rear Shock Compression Damping
Adjuster: Ulysses Models
Factory Suspension Settings: Ulysses XB12X
Top of page
Refer to Recommended Suspension Settings: Ulysses Models for factory recommended
suspension settings.
Recommended Suspension Settings: Ulysses Models
LOAD*** FRONT FORKS REAR SHOCK
LB KG *PREL
OAD:
TURNS
IN
FROM
MINIM
UM
**COMPRE
SSION:
TURNS OUT
FROM
MAXIMUM
**REBO
UND:
TURNS
OUT
FROM
MAXIM
UM
*PRELO
AD:
TURNS
IN
FROM
MINIM
UM**
**COMPRE
SSION:
TURNS OUT
FROM
MAXIMUM
**REBO
UND:
TURNS
OUT
FROM
MAXIM
UM
Und
er
170
Less
than
77
1.5 2.5 1.5 3 2.5 2
170-
200
77-
91
2 2.25 1.25 6 2 1.875
200-
230
91-
104
3 2 1.25 9 1.75 1.5
230-
260
104-
118
3.5 2 1.125 13 1.5 1.25
260-
290
118-
132
3.5 1.875 1 16 1.125 1
290-
320
132-
145
4 1.875 1 18 0.875 0.75
320-
GV
WR
145-
GV
WR
4 1.75 0.875 max 0.5 0.625
*Both Front and Rear Spring Preload is set by loosening adjuster counterclockwise
until it stops at minimum and then counting the number of turns in to get to the desired
setting. The rear preload knob clicks every 1/2 turn.
**All damping adjuster settings are done by tightening adjuster clockwise until it stops
at maximum setting and then counting the turns counterclockwise to get to the desired
setting.
***Load includes rider, passenger, cargo, accessories and riding gear.
©2001-2009 Buell. All rights reserved.

Owner’s Manuals
CLOSE PRINT
Home
Maintenance and Lubrication
Safe Operating Maintenance
Top of page
Perform the service and maintenance operations as indicated in the regular service
interval table. Lack of regular maintenance at the recommended intervals can affect
the safe operation of your motorcycle, which could result in death or serious injury.
(00010a)
If you operate your motorcycle under adverse conditions (severe cold, extreme heat,
very dusty environment, very bad roads, through standing water, etc.), you should

perform the regular maintenance intervals more frequently to ensure the safe
operation of your motorcycle. Failure to maintain your motorcycle could result in
death or serious injury. (00094a)
Good maintenance creates a safe motorcycle. A careful check of certain equipment must
be made after periods of storage. Also, frequently inspect the motorcycle between the
regular service intervals to determine if additional maintenance is necessary.
Check the following items:
1. Tires for correct pressure, abrasions or cuts.
2. Belt and primary chain for proper tension, wear or damage.
3. Brakes, steering and throttle for responsiveness and freedom from binding.
4. Brake fluid level and condition. Hydraulic lines and fittings for leaks. Also,
check brake pads and discs for wear.
5. Cables for fraying or crimping and free operation.
6. Engine oil and primary chaincase/transmission fluid levels.
7. Headlamp, tail lamp, brake lamp and turn signals for proper operation.
Break-in Maintenance: Buell Models
Top of page
NOTE:
New motorcycle initial service is required to keep your new motorcycle warranty in force and to assure proper emissions system operation.
After a new motorcycle has been ridden its first 1000 miles 1600 kilometers , take it to
an authorized Buell dealer to have an initial service performed.
If it is impossible to take it to a dealer at the mileage intervals noted, the owner should:
1. Give the following outlined items attention or arrange to have the motorcycle
serviced.
2. Take the motorcycle to a dealer for more complete servicing as soon as possible.
We recommend a Buell dealer perform the initial service.
When supporting motorcycle, do not place supports under rear brake pedal. Damage
to the brake system can occur, which could result in death or serious injury. (00100a)

Initial Service Check: XB Models
Top of page
First 1000 Miles (1600 Kilometers)
The first scheduled maintenance is at 1000 miles 1600 kilometers . See Regular Service
Intervals: Buell Models for complete list of required services.
1. Change engine oil.
2. Replace oil filter.
3. Change transmission fluid and clean magnetic drain plug.
4. Check and adjust primary chain.
5. Inspect brake fluid level and condition. Check hydraulic brake lines and fittings
for leaks.
6. Check brake pads and rotors for wear.
7. Adjust clutch adjustment.
8. Check oil lines for leaks.
9. Check tire pressure and inspect tread.
10. Inspect air cleaner filter.
11. Check throttle cable adjustments.
12. Check operation of all electrical equipment and switches.
13. Road test.
Service Intervals and Performance: Buell Models
Top of page
Regular lubrication and maintenance will help keep your new Buell operating at peak
performance. Your Buell dealer knows best how to service your motorcycle with factory
approved methods and equipment assuring you of thorough and competent
workmanship.
See Regular Service Intervals: Buell Models for more information.
NOTE:
Refer to Regular Service Intervals: 2008 XB Models. Regular maintenance interval operations are required to keep your new motorcycle warranty in force. The use of other than Buell approved parts and service procedures may void the warranty. Any alterations to the emission
system components, such as the DDFI and exhaust system, may be in violation of Federal and State laws.

Perform the service and maintenance operations as indicated in the regular service
interval table. Lack of regular maintenance at the recommended intervals can affect
the safe operation of your motorcycle, which could result in death or serious injury.
(00010a)
If you operate your motorcycle under adverse conditions (severe cold, extreme heat,
very dusty environment, very bad roads, through standing water, etc.), you should
perform the regular maintenance intervals more frequently to ensure the safe
operation of your motorcycle. Failure to maintain your motorcycle could result in
death or serious injury. (00094a)
Engine Lubrication
Top of page
Do not switch lubricant brands indiscriminately because some lubricants interact
chemically when mixed. Use of inferior lubricants can damage the engine. (00184a)
Engine oil is a major factor in the performance and service life of the engine. Always
use the proper grade of oil for the lowest temperature expected before the next scheduled
oil change. Refer to Recommended Engine Oils. Your authorized dealer has the proper
oil to suit your requirements.
If it is necessary to add oil and Harley-Davidson oil is not available, use an oil certified
for diesel engines. Acceptable diesel engine oil designations include: CF-4, CG-4, CH-4
and CI-4.
The preferred viscosities for the diesel engine oils in descending order are: 20W50,
15W40 and 10W40.
At the first opportunity, see an authorized dealer to change back to 100 percent Harley-
Davidson oil.

Recommended Engine Oils
H-D
TYPE
VISCOSITY H-D
RATING
LOWEST AMBIENT
TEMPERATURE
COLD WEATHER
STARTS BELOW
50° F 10° C
H-D
Multi-
grade
SAE 10W40 HD 360 Below 40° F 4° C Excellent
H-D
Multi-
grade
SAE 20W50 HD 360 Above 40° F 4° C Good
H-D
Regular
Heavy
SAE 50 HD 360 Above 60° F 16° C Poor
H-D Extra
Heavy
SAE 60 HD 360 Above 80° F 27° C Poor
Checking Oil Level: XB Models
Top of page
An accurate engine oil level reading can only be obtained with the engine at normal
operating temperature (hot check). The engine will require a longer warm up period in
colder temperatures.
For preride inspection, simply verify that there are no oil leaks from the oil filter and oil
lines prior to operating the motorcycle.
NOTE:
Perform a hot check of the engine oil level at each fuel stop.
Do not allow hot oil level to fall below Add/Fill mark on dipstick. Doing so can result
in equipment damage and/or equipment malfunction. (00189a)

Do not overfill oil tank. Doing so can result in oil carryover to the air cleaner leading
to equipment damage and/or equipment malfunction. (00190a)
Do not switch lubricant brands indiscriminately because some lubricants interact
chemically when mixed. Use of inferior lubricants can damage the engine. (00184a)
Ride motorcycle for approximately 10 minutes to ensure the oil is hot and the engine is
at normal operating temperature.
1. The motorcycle must be on level ground, on the sidestand, with the engine off.
2. See Filler Plug/Dipstick Location: Ulysses XB12X. Unscrew and remove
dipstick from oil tank/swingarm filler hole. Wipe dipstick clean.
3. Insert dipstick into oil tank filler hole, screwing dipstick in completely.
NOTE:
See Oil Dipstick Proper Operating Range: XB Models . The area between the upper and lower registration marks is the operating range.
4. Unscrew and remove dipstick and note oil level.
a. Oil level should be within the operating range (between upper and lower
registration marks) on dipstick.
b. If oil level is below lower registration mark, add only enough oil to bring
oil level between lower and upper registration marks.
Filler Plug/Dipstick Location:
Ulysses XB12X

Oil Dipstick Proper Operating Range:
XB Models
Engine Oil Change: XB Models
Top of page
Do not switch lubricant brands indiscriminately because some lubricants interact
chemically when mixed. Use of inferior lubricants can damage the engine. (00184a)
Be sure that no lubricants or fluids get on tires, wheels or brakes when changing fluid.
Traction can be adversely affected, which could result in loss of control of the
motorcycle and death or serious injury. (00047d)
Ride motorcycle for approximately 10 minutes to ensure the oil is hot and the engine is
at normal operating temperature. Turn engine off.
1. Place a suitable container under the motorcycle.
2. See Oil Tank/Swingarm Drain Plug: Ulysses Models. Using a 5/8 in. wrench,
remove drain plug from under oil tank/swingarm. Wipe any accumulated debris
from magnetic tip on drain plug. Replace o-ring if torn or damaged.
3. Unscrew and remove dipstick from oil fill hole on top of oil tank/swingarm.
4. See Chin Fairing. Remove chin fairing by removing fasteners.

Oil Tank/Swingarm Drain Plug:
Ulysses Models
1. Fasteners with washers (7)
2. Chin fairing
Chin Fairing
5. Remove oil filter using pliers (Snap-on YA0450B) or belt type OIL FILTER
WRENCH.
6. Clean filter gasket contact surface on crankcase. Surface should be smooth and
free of any debris or old gasket material.
7. Replace drain plug in oil tank/swingarm after oil is thoroughly drained. Use
LOCTITE 565 PST THREAD SEALANT on fastener and tighten plug to 35-39
Nm (26-29 ft-lbs).
8. See Prepare Oil Filter. Apply a thin film of clean engine oil to filter gasket.

1. Apply thin film of clean engine oil to gasket
Prepare Oil Filter
9. Pour 4.0 fluid ounces 0.12 liter of clean engine oil into new filter when changing
oil (until filter is approximately 1/2 full).
10. Screw filter onto adapter until filter gasket touches crankcase surface. Rotate
filter another 1/2-3/4 turn by hand.
Be sure that no lubricants or fluids get on tires, wheels or brakes when
changing fluid. Traction can be adversely affected, which could result in loss
of control of the motorcycle and death or serious injury. (00047d)
11. Fill oil tank through filler (dipstick) hole with recommended oil from
Recommended Engine Oils. Oil tank capacity with filter change is approximately
2.5 U.S. quarts 2.4 liters and includes the 4.0 fluid ounces 0.12 liter poured into
the filter. Always verify proper hot oil level on dipstick. Do not overfill.
12. Install (screw in) dipstick into oil tank/swingarm fill hole. Make sure dipstick is
screwed in completely.
Compressed air can pierce the skin and flying debris from compressed air
could cause serious eye injury. Wear safety glasses when working with
compressed air. Never use your hand to check for air leaks or to determine air
flow rates. (00061a)
13. Inspect oil cooler fins for debris or damage. Blow out any debris from fins with
compressed air from the inside of the cooler.
14. Wipe up any spilled oil on muffler.
15. Start engine. Verify that oil pressure signal lamp on instrument panel turns off
after a few seconds when engine speed is 1000 RPM or above.
16. Check for oil leaks at oil filter, drain plug, hoses and oil cooler.
17. Install chin fairing. Use LOCTITE 271 (red) on fasteners and tighten to 4-5 Nm
(36-48 in-lbs ).
18. Check (hot) oil level. See Checking Oil Level: XB Models.
NOTE:
For ease of installation, apply a light film of clean engine oil to the dipstick o-ring.

Winter Lubrication
Top of page
In colder climates, the engine oil should be changed often. If motorcycle is used
frequently for short trips, less than 15 miles 24 kilometers , in ambient temperatures
below 60° F 16° C , oil change intervals should be reduced to 1500 miles 2400
kilometers . Motorcycles used only for short runs must have a thorough tank flush-out
before new oil is put in. The tank flush-out should be performed by an authorized dealer
or qualified technician.
NOTE:
The further below freezing the temperature drops, the shorter the oil change interval should be.
Water vapor is a normal by-product of combustion in any engine. During cold weather
operation, some of the water vapor condenses to liquid form on the cool metal surfaces
inside the engine. In freezing weather this water will become slush or ice and, if allowed
to accumulate too long, may block the oil lines and cause damage to the engine.
If the engine is run frequently and allowed to thoroughly warm up, most of this water
will become vapor again and will be blown out through the crankcase breather.
If the engine is not run frequently and allowed to thoroughly warm up, this water will
accumulate, mix with the engine oil and form a sludge that is harmful to the engine.
Fuel Filter: XB Models
Top of page
The fuel pump assembly located in the frame fuel cell includes a fuel filter. The fuel
filter does not require any maintenance.
Transmission Lubrication: XB Models
Top of page
Refer to Regular Service Intervals: 2008 XB Models. The transmission should be
drained and refilled with fresh lubricant at proper intervals. For best results, drain
lubricant while hot.
NOTE:
When checking the transmission lubricant level, motorcycle should be standing STRAIGHT UP, not leaning on the side stand. Keep
motorcycle upright for a short period of time to equalize lubricant level in the transmission compartments.
Check Lubricant Level
1. Ride motorcycle until engine is warmed up to normal operating temperature.
2. Position motorcycle straight up.
3. See Primary Drain Plug: XB Models. Remove screws with washers from clutch
inspection cover (1). Remove clutch inspection cover from primary cover.
NOTE:
The filler access is the clutch inspection cover.
When draining or adding lubricant, do not allow dirt, debris or other
contaminants to enter the engine. (00198a)
Be sure that no lubricants or fluids get on tires, wheels or brakes when
changing fluid. Traction can be adversely affected, which could result in loss
of control of the motorcycle and death or serious injury. (00047d)
Do not overfill the primary chaincase with lubricant. Overfilling can cause
rough clutch engagement, incomplete disengagement, clutch drag and/or
difficulty in finding neutral at engine idle. (00199b)
4. See Primary Lubricant Level: XB Models. Verify that lubricant level is even
with bottom of clutch diaphragm spring.
NOTE:
Add only enough of GENUINE Harley-Davidson FORMULA+ TRANSMISSION AND PRIMARY CHAINCASE LUBRICANT
(Part No. 98851-05, U.S. quart) through clutch inspection cover opening until the lubricant reaches the bottom of clutch diaphragm spring.
5. Install clutch inspection cover and new gasket on primary cover using screws

with washers removed in step 3. Tighten screws in a crosswise pattern to 9.5-
12.2 Nm (84-108 in-lbs ).
6. Start engine. Check for any lubricant leaks.
7. Turn engine off.
1. Inspection cover
2. Primary drain plug
Primary Drain Plug: XB Models
Changing Lubricant
1. Ride motorcycle until engine is warmed up to normal operating temperature.
2. When the engine reaches normal operating temperature, turn the engine off and
position motorcycle on side stand. This will allow the chaincase lubricant to
drain out of transmission.
3. See Primary Drain Plug: XB Models. Position a suitable container under primary
drain plug (2).
NOTE:
The drain plug is located under the clutch, on the underside of the chaincase.
4. Remove drain plug and drain lubricant.
5. Position the motorcycle STRAIGHT UP and LEVEL. This allows additional
fluid to be drained from clutch compartment.
NOTE:
Dispose of transmission lubricant in accordance with local regulations.
6. Remove foreign material from magnetic drain plug. Apply LOCTITE 565 PST
THREAD SEALANT (Part No. 99818-97) and install drain plug and tighten to
19-41 Nm (14-30 ft-lbs).

Do not over-tighten filler or drain plug. Doing so could result in a lubricant
leak. (00200b)
When draining or adding lubricant, do not allow dirt, debris or other
contaminants to enter the engine. (00198a)
Be sure that no lubricants or fluids get on tires, wheels or brakes when
changing fluid. Traction can be adversely affected, which could result in loss
of control of the motorcycle and death or serious injury. (00047d)
Do not overfill the primary chaincase with lubricant. Overfilling can cause
rough clutch engagement, incomplete disengagement, clutch drag and/or
difficulty in finding neutral at engine idle. (00199b)
7. See Primary Drain Plug: XB Models. Remove screws with washers from clutch
inspection cover (1). Remove clutch inspection cover from primary cover.
NOTE:
The filler access is the clutch inspection cover.
8. See Primary Lubricant Level: XB Models. Add 32 fluid ounces 0.95 liters of
GENUINE Harley-Davidson FORMULA+ TRANSMISSION AND PRIMARY
CHAINCASE LUBRICANT (Part No. 98851-05, U.S. quart) through the clutch
inspection cover opening or until the lubricant reaches the bottom of clutch
diaphragm spring (1).
9. Install a new clutch inspection cover gasket.
10. Install clutch inspection cover on primary cover using screws with washers
removed. Tighten screws in a crosswise pattern to 9.5-12.2 Nm (84-108 in-lbs ).
11. Start engine. Check for any lubricant leaks.
12. Turn engine off.

Primary Lubricant Level: XB Models
Primary Chain: XB Models
Top of page
Check the primary (front) chain adjustment at proper mileage intervals. Refer to Regular
Service Intervals: 2008 XB Models.
Chains allowed to run loose will cause the motorcycle to jerk when running at low
speed. This will result in excessive chain and sprocket wear.
Primary Chain Inspection
Top of page
See Primary Chain Inspection Cover. Measure primary chain tension through the
inspection cover opening. Adjust primary chains not meeting vertical free play
specifications.
1. See Primary Chain Inspection Cover. Remove two fasteners with captive
washers and primary chain inspection cover with gasket from primary cover.
2. See Measuring Primary Chain Free Play. Check primary chain tension by
measuring vertical free play.
a. Measure vertical free play through chain inspection cover opening.
b. Rotate engine to move primary chain to a different position on sprockets.
c. Measure vertical free play several times, each time with primary chain
moved so that the measurement is taken with sprockets rotated to the

tightest chain position.
3. The tightest measurement taken in Step 2 must be within the specifications listed
in Primary Chain Free Play: XB Models. If necessary, adjust as described under
Primary Chain Adjustment.
4. See Primary Chain Inspection Cover. Install primary chain inspection cover and
new gasket to primary cover using two fasteners with captive washers. Tighten
fasteners to 10-12 Nm (84-108 in-lbs ).
Primary Chain Inspection Cover
Measuring Primary Chain Free Play
Primary Chain Free Play: XB Models
ENGINE
TEMPERATURE
FREE PLAY
Cold 3/8-1/2
in.
9.5-12.7
mm
Operating temperature 1/4-3/8
in.
6.4-9.5 mm
Primary Chain Adjustment
Top of page

NOTE:
If vertical free play cannot be set within the limits specified, then primary chain and/or chain adjuster are worn beyond adjustment limits. See a Buell dealer or service manual to replace worn parts.
1. See Chain Tension Adjusting Fastener (Typical). Loosen locknut (1).
2. Turn adjusting fastener (2):
a. Clockwise (inward) to increase tension (reduce free play).
b. Counterclockwise (outward) to reduce tension (increase free play).
3. Tighten locknut (1) to 27-34 Nm (20-25 ft-lbs).
1. Locknut
2. Adjusting fastener
Chain Tension Adjusting Fastener
(Typical)
Rear Drive Belt: XB Models
Top of page
The rear drive belt inner tooth surface has a thin coating of UHMW plastic. During
initial operation, this coating will wear as it is burnished into the belt fabric. This is a
normal condition and not an indication of excessive belt wear.
No belt adjustment is required. Refer to Regular Service Intervals: 2008 XB Models for
inspection intervals.
Chassis Lubrication: XB Models
Top of page

If you operate your motorcycle under adverse conditions (severe cold, extreme heat,
very dusty environment, very bad roads, through standing water, etc.), you should
perform the regular maintenance intervals more frequently to ensure the safe
operation of your motorcycle. Failure to maintain your motorcycle could result in
death or serious injury. (00094a)
Do not switch lubricant brands indiscriminately because some lubricants interact
chemically when mixed. Use of inferior lubricants can damage the engine. (00184a)
1. The steering head bearings are sealed, angular contact bearings and do not
require additional lubrication.
2. See a dealer or service manual and check steering head bearing resistance:
a. At every 5000 mile (8000 kilometer) service interval.
b. When storing or removing the motorcycle for the season.
3. Front and rear wheel bearings are sealed and do not require additional
lubrication. Check every 5000 miles (8000 kilometers) (more often in adverse
conditions) or yearly if operated under winter conditions. Replace bearing
spacers if they show any wear or distortion.
4. Remove and lubricate handlebar throttle control grip sleeve with graphite every
5000 miles (8000 kilometers), once each year or when operation indicates
lubrication is necessary.
5. Every 5000 miles (8000 kilometers) lubricate throttle control cables and clutch
control cable. Lubricate front brake hand lever, clutch control hand lever, filler
cap, and ignition switch only if necessary. Lubricate sidestand pivot. Lubricate
interactive exhaust system cable and active intake cable (if equipped).
6. Rear swingarm pivot bearings are sealed and do not require additional
lubrication. Inspect rear swingarm pivot bearings at 10,000 mile (16,000
kilometer) intervals.
NOTE:
Lubricate all control connections and parts regularly. Pay particular attention to lubrication needs after washing motorcycle or driving in wet weather.
Front Fork Oil: Buell Models
Top of page

Incorrect amount of fork oil can adversely affect handling and lead to loss of vehicle
control, which could result in death or serious injury. (00298a)
Drain front fork oil and refill with TYPE E FORK OIL (Part No. 99884-80) at proper
mileage intervals. Refer to Regular Service Intervals: 2008 XB Models.
Incorrect amount of fork oil can adversely affect handling and lead to loss of vehicle
control, which could result in death or serious injury. (00298a)
If either fork leaks oil or does not seem to be working properly, see a Buell dealer. Forks
must contain equal amounts of fork oil for proper damping.
Incorrect recoil action will result if there is insufficient oil in either side of fork.
Air Filter: XB Models
Top of page
Install air filter before running engine. Failure to do so can draw debris into the engine
and could result in engine damage. (00207a)
See Air Intake Screen: XB Models. Clean the air intake screen as needed.
NOTE:
Do not cover or restrict the air intake screen. Certain tank bags or accessories may cover or restrict the air intake screen. This may reduce
power and performance.
See Air Filter: Ulysses XB12X. Remove air box cover and air filter cover and inspect
filter element at proper mileage intervals. Refer to Regular Service Intervals: 2008 XB
Models. Inspect more often under dusty conditions. See a Buell dealer or Service
Manual for more information.

Air Intake Screen: XB Models
Air Filter: Ulysses XB12X
Clutch: Ulysses XB12X
Top of page
Clutch control cable adjustment is required to compensate for normal clutch lining wear.
Oil and adjust the clutch control cable with LUBIT-8 TUFOIL CHAIN AND CABLE
LUBE (Part No. 94968-85TV).
See Clutch Cable Free Play. If the clutch cable free play at the clutch lever bracket is out
of specification, if the clutch slips under load, or if the clutch drags when released,
adjust the clutch control cable. See a Buell dealer or a service manual for more
information.

1. 1/16 to 1/8 in. (1.6 - 3.2 mm)
Clutch Cable Free Play
Brakes: XB Models
Top of page
Inspect brake pads for wear at service maintenance intervals. If you ride under
adverse conditions (steep hills, heavy traffic, etc.), inspect more frequently.
Excessively worn brake pads can lead to brake failure, which could result in death or
serious injury. (00052a)
The brake system needs routine inspections and maintenance at certain intervals. Refer
to Regular Service Intervals: 2008 XB Models for more information.
Brakes are a critical safety component. Contact a Buell dealer for brake repair or
replacement. Improperly serviced brakes can adversely affect brake performance,
which could result in death or serious injury. (00117a)
These tasks may include:
Inspecting front and rear brake pads and brake discs for wear.
Checking the fluid level in the front and rear master cylinder reservoirs.
Replacing the front and rear brake pads and pin.

Changing the brake fluid and having the brakes serviced. Use only D.O.T. 4
HYDRAULIC BRAKE FLUID.
Always take your motorcycle to a Buell dealer for brake system maintenance.
D.O.T. 4 brake fluid will damage painted and body panel surfaces it comes in contact
with. Always use caution and protect surfaces from spills whenever brake work is
performed. Failure to comply can result in cosmetic damage. (00239b)
Direct contact of D.O.T. 4 brake fluid with eyes can cause irritation. Avoid eye
contact. In case of eye contact flush with large amounts of water and get medical
attention. Swallowing large amounts of D.O.T. 4 brake fluid can cause digestive
discomfort. If swallowed, obtain medical attention. Use in well ventilated area. KEEP
OUT OF REACH OF CHILDREN. (00240a)
Tires: Buell Models
Top of page
Do not inflate tire beyond maximum pressure as specified on sidewall. Over inflated
tires can blow out, which could result in death or serious injury. (00027a)
Keep the tires properly inflated. Check tire pressure before riding when tires are cold.
Be sure tires are properly inflated, balanced and have adequate tread. Inspect your
tires regularly and see a Buell dealer for replacements. Riding with excessively worn,
unbalanced or under-inflated tires can adversely affect stability and handling, which
could result in death or serious injury. (00114a)

Check inflation pressure and inspect tread for punctures, cuts, breaks, etc. Inspect at
least weekly if in daily use or before each trip if used occasionally.
Refer to Tires/Air Pressures: 2008 Ulysses Models for tire pressures and sizes.
Match tires, tubes, air valves and caps to the correct wheel rim. Contact a Buell
dealer. Mismatching can result in damage to the tire bead, allow tire slippage on the
rim or cause tire failure, which could result in death or serious injury. (00162a)
Use only Buell approved tires. See a Buell dealer. Using non-approved tires can
adversely affect stability, which could result in death or serious injury. (00133a)
Replace worn tires with new tires identical to those that came on the motorcycle as
original equipment. Other tires may not fit correctly or may be hazardous to use.
Tires are a critical safety component. Contact a Buell dealer for tire repair or
replacement. Improper tire service can adversely affect stability and handling, which
could result in death or serious injury. (00134a)
Replace punctured or damaged tires. In some cases, small punctures in the tread area
may be repaired from within the demounted tire by a Buell dealer. Speed should NOT
exceed 50 mph (80 km/h) for the first 24 hours after repair, and the repaired tire
should NEVER be used over 80 mph (130 km/h). Failure to follow this warning could
result in death or serious injury. (00118a)
Striking an object, such as a curb, can cause internal tire damage. If an object is
struck, remove and inspect both the inside and outside of the tire. A damaged tire can
adversely affect stability and handling, which could result in death or serious injury.
(00058a)

Tire Replacement: Buell Pirelli Tires
Top of page
Inspection
Tread wear indicator bars will appear on Pirelli Scorpion Sync tire tread surfaces when
1/32 in. (0.8 mm) or less of tire tread remains. Always replace tires before the tread wear
indicator bars appear on the surface of the tire.
See Tread Wear Indicator: Pirelli Scorpion Sync and Tread Wear Bars: Pirelli Scorpion
Sync. The location of tread wear indicator bars are identified by 'TWI' markings on the
sidewalls of the tire.
When To Replace Tires
New tires are needed if any of the following conditions exist:
1. Tread wear indicator bars become visible on the tread surfaces.
2. Tire cords or fabric become visible through cracked sidewalls, snags, or deep
cuts.
3. A bump, bulge, or split in the tire.
4. Puncture, cut or other damage to the tire that cannot be repaired.
1. Tread wear indicator bar
2. Sidewall 'TWI' marking
Tread Wear Indicator: Pirelli
Scorpion Sync

Tread Wear Bars: Pirelli Scorpion
Sync
Shock Absorber: Buell Models
Top of page
The rear shock absorber requires inspections and maintenance at proper mileage
intervals. Refer to Regular Service Intervals: 2008 XB Models.
Inspect shock absorber for oil leaks.
Inspect rubber shock eye bushings for deterioration.
Check for loose mounting hardware.
See a Buell dealer for all shock absorber repairs.
Spark Plugs: XB Models
Top of page
Spark plugs require inspection and replacement at specific mileage intervals. Refer to
Regular Service Intervals: 2008 XB Models.
See a Buell dealer or service manual for details. Refer to Ignition System: 2008 XB
Models for ignition specifications.
Ignition Timing: XB Models
Top of page
Spark timing is advanced electronically as engine speed increases to suit starting, low
speed and high speed requirements.
Valve Tappets
Top of page
Valve tappets are the self-adjusting, hydraulic type. They automatically adjust length to
compensate for engine expansion and valve mechanism wear. Self-adjusting tappets
keep the valve mechanism free of lash when the engine is running. No adjustment is
required.
Wheel Bearings
Top of page
The wheel bearings are sealed units. No greasing or maintenance is required.
Inspect wheel bearings each time the wheel is removed. Replace when worn.
NOTE:
Excessive play or roughness indicates worn bearings that require replacement.
Voltage Regulator: Buell Models
Top of page
The alternator output is controlled and changed to direct current by the voltage regulator.
The voltage regulator increases charging rate when battery voltage is low.
The voltage regulator decreases charging rate when battery charge is up.

It is possible to overload your motorcycle's charging system by adding too many
electrical accessories. If your combined electrical accessories operating at any one
time consume more electrical current than your vehicle's charging system can
produce, the electrical consumption can discharge the battery and cause vehicle
electrical system damage. See a Buell dealer for advice about the amount of current
consumed by additional electrical accessories, or for necessary wiring changes.
(00249b)
NOTE:
The voltage regulator does not require any scheduled maintenance. If any electrical system trouble is experienced that might be traceable to
the alternator or voltage regulator, take the motorcycle to a Buell dealer. Dealers have the necessary parts and testing equipment to perform electrical service.
Idle Speed
Top of page
Idle speed is monitored and controlled by the Electronic Control Module (ECM) and
Idle Air Control (IAC).
Engine Idle Speed
MODEL REGULAR IDLE
Ulysses XB12X 1050-1150 RPM
Interactive Exhaust System
Top of page
The interactive exhaust system utilizes an actuator valve in the muffler which is
connected to a servo motor via a cable. The valve position automatically adjusts to
enhance engine performance. See a Buell dealer or service manual for details.
Battery: General

Top of page
Type
Your motorcycle uses a permanently sealed, maintenance-free, lead/calcium and sulfuric
acid battery. All batteries are shipped precharged and ready to be put into service. Do
not attempt to open the battery for any reason.
Antidotes for Battery Acid
CONTACT TREATMENT
External Flush with water.
Internal Drink large quantities of milk or
water, followed by milk of magnesia,
vegetable oil or beaten eggs. Get
immediate medical attention.
Eyes Flush with water. Get immediate
medical attention.
Batteries contain sulfuric acid, which could cause severe burns to eyes and skin. Wear
a protective face shield, rubberized gloves and protective clothing when working with
batteries. KEEP BATTERIES AWAY FROM CHILDREN. (00063a)
Explosive hydrogen gas, which escapes during charging, could cause death or serious
injury. Charge battery in a well-ventilated area. Keep open flames, electrical sparks
and smoking materials away from battery at all times. KEEP BATTERIES AWAY
FROM CHILDREN. (00065a)
Batteries, battery posts, terminals and related accessories contain lead and lead
compounds, and other chemicals known to the State of California to cause cancer and
birth defects or other reproductive harm. Wash hands after handling. (00019d)

Never remove warning label attached to top of battery. Failure to read and understand
all precautions contained in warning, could result in death or serious injury. (00064a)
1. Contents are corrosive
2. Wear safety glasses
3. Contents are explosive
4. Keep flames away
5. Read instructions
6. Keep away from children
Battery Warning Label
Battery Warning Label
Voltmeter Test
Refer to Voltmeter Test. The voltmeter test provides a general indicator of battery
condition. Check the voltage of the battery to verify that it is in a 100 percent fully
charged condition. If the open circuit (disconnected) voltage reading is below 12.6V,

charge the battery and then re-check the voltage after the battery has set for one to two
hours.
Voltmeter Test
READING IN
VOLTS
PERCENT OF
CHARGE
12.7 100
12.6 75
12.3 50
12.0 25
11.8 0
Cleaning and Inspection
Battery top must be clean and dry. Dirt and electrolyte on top of the battery can cause
battery to self-discharge.
1. Clean battery top.
2. Clean cable connectors and battery terminals using a wire brush or fine grit
sandpaper to remove any oxidation.
3. Inspect and clean the battery screws, clamps and cables. Check for breakage,
loose connections and corrosion.
4. Check the battery posts for melting or damage caused by overtightening.
5. Inspect the battery for discoloration, a raised top or a warped or distorted case.
This might indicate that the battery has been frozen, overheated or overcharged.
6. Inspect the battery case for cracks or leaks.
Charging
Never charge a battery without first reviewing the instructions for the charger being
used. In addition to the manufacturer's instructions, follow these general safety
precautions.
Charge the battery if any of the following conditions exist:
Vehicle lamps appear dim.
Electric starter sounds weak.
Battery has not been used for an extended period of time.

Explosive hydrogen gas, which escapes during charging, could cause death or serious
injury. Charge battery in a well-ventilated area. Keep open flames, electrical sparks
and smoking materials away from battery at all times. KEEP BATTERIES AWAY
FROM CHILDREN. (00065a)
Batteries contain sulfuric acid, which could cause severe burns to eyes and skin. Wear
a protective face shield, rubberized gloves and protective clothing when working with
batteries. KEEP BATTERIES AWAY FROM CHILDREN. (00063a)
1. Perform a voltmeter test to determine the state of charge. If battery needs to be
charged, proceed to the next step.
Remove battery from motorcycle before charging. Electrolyte leakage will
damage motorcycle parts. (00213a)
2. Remove the battery from the motorcycle. See Battery: XB Models.
3. Place the battery on a level surface.
Unplug or turn OFF battery charger before connecting charger cables to
battery. Connecting cables with charger ON can cause a spark and battery
explosion, which could result in death or serious injury. (00066a)
Connect positive (+) battery cable first. If positive (+) cable should contact
ground with negative (-) cable connected, the resulting sparks can cause a
battery explosion, which could result in death or serious injury. (00068a)
Disconnect negative (-) battery cable first. If positive (+) cable should contact

ground with negative (-) cable connected, the resulting sparks can cause a
battery explosion, which could result in death or serious injury. (00049a)
Do not reverse the charger connections described in the following steps or the
charging system of the motorcycle could be damaged. (00214a)
NOTES:
o The figures listed in the Amp-hour table assume that the battery is charging at room temperature. If warmer than
room temperature, use a slightly shorter charging time. If colder, use a slightly longer charging time.
o The use of constant current chargers to charge sealed maintenance free batteries is not recommended. Any
overcharge will cause dry-out and premature battery failure. If a constant current charger is the only type available,
do not exceed the charge times listed in 12 Amp-Hour Battery Charging Rates and Times and do not continue
charging the battery if it gets hot. When charging, never exceed 15 volts.
4. Connect the red battery charger lead to positive (+) terminal of the battery.
5. Connect the black battery charger lead to negative (-) terminal of the battery.
NOTE:
If the battery is still in the vehicle, connect the negative lead to the chassis ground. Make sure that the ignition and all electrical
accessories are turned off.
6. Step away from the battery and turn on the charger.
Unplug or turn OFF battery charger before disconnecting charger cables from
battery. Disconnecting clamps with charger ON can cause a spark and battery
explosion, which could result in death or serious injury. (00067a)
7. After the battery is fully charged, turn OFF the charger and disconnect the black
battery charger lead to the negative (-) terminal of the battery.
8. Disconnect the red battery charger lead to the positive (+) terminal of the battery.
9. Mark the charging date on the battery.
12 Amp-Hour Battery Charging Rates and Times
READING
(VOLTS)
PERCENT
CHARGE
3 AMP
CHARGER
6 AMP
CHARGER
10 AMP
CHARGER
20 AMP
CHARGER
12.7 100 N/A N/A N/A N/A
12.6 75 1 hour 10
minutes
34 minutes 20 minutes 10 minutes
12.3 50 2 hours 20 70 minutes 40 minutes 20 minutes

minutes
12.0 25 3 hours 20
minutes
1 hour 40
minutes
1 hour 30 minutes
11.8 0 4 hours 30
minutes
2 hours 14
minutes
1 hour 20
minutes
40 minutes
Storage
Turn engine over a few times to be sure there is no oil in the crankcase and that all oil
has been pumped back into the oil tank. Stop engine and re-check oil level. Failure to
do so can result in engine damage. (00071a)
Do not allow battery to completely discharge. The electrolyte in a discharged battery
will freeze. The more discharged a battery is, the more easily it can freeze and crack
the battery case. (00218a)
If the motorcycle will not be operated for several months, such as during the winter
season, remove the battery from the motorcycle and fully charge.
If the motorcycle is to be stored with the battery installed, it will be necessary to connect
a battery tender to maintain charge. See an authorized dealer for more information.
Self-discharge is a normal condition and occurs continuously. The rate of self-discharge
depends on the ambient temperature and the battery's state of charge.
Batteries discharge at a faster rate at higher ambient temperatures.
To reduce the self-discharge rate, store battery in a cool (not freezing), dry place.
Charge the battery every month if stored at temperatures below 60° F 16° C .
Charge the battery more frequently if stored in a warm area above 60° F 16° C .

1. Capacity
2. Months of stand
3. Measured at 105° F (40° C)
4. Measured at 77° F (25° C)
Effective Rate of Temperature on
Battery Self-discharging Rate
Battery: XB Models
Top of page
The battery is below the seat in the center of the vehicle. If it is necessary to remove the
battery from your motorcycle, consult your service manual for detailed instructions.
Owners should clean connections and check tightness every 5000 miles 8000 kilometers
or once monthly. Battery terminals should be tightened to 8-11 Nm (72-96 in-lbs ).
Jump-Starting Buell Motorcycles
Top of page
Buell does not recommend jump-starting a motorcycle. However, there may be
circumstances when it is necessary to do so. Therefore, we suggest jump-starting be
performed as follows:

Be sure jumper cables touch only appropriate battery terminals or ground. Allowing
jumper cables to touch each other can result in sparks and a battery explosion, which
could result in death or serious injury. (00072a)
Explosive hydrogen gas, which escapes during charging, could cause death or serious
injury. Charge battery in a well-ventilated area. Keep open flames, electrical sparks
and smoking materials away from battery at all times. KEEP BATTERIES AWAY
FROM CHILDREN. (00065a)
Buell motorcycles have a 12 Volt battery. Be sure the booster vehicle has a 12 Volt
system. Failure to do so could result in vehicle damage. (00242a)
NOTE:
This procedure presumes the BOOSTER battery is in another vehicle.
1. Turn off all unnecessary lamps and accessories.
Positive Cable
2. See Jump Start Cable Connections. Connect one end of a jumper cable to the
DISCHARGED battery positive (+) terminal (1).
3. Connect the other end of the same cable to the BOOSTER battery positive (+)
terminal (2).
Negative Cable
Do not connect negative (-) cable to or near the discharged battery negative (-)
terminal. Doing so could cause a spark and explosion, which could result in death or
serious injury. (00073a)
4. Connect one end of a jumper cable to the BOOSTER battery negative (-)
terminal (3).

Do not connect the negative (-) cable to painted or chrome parts. Doing so
could result in discoloration at the attachment point. (00221a)
5. Connect other end of the same cable to a safe ground (4), (away from the
DISCHARGED battery).
6. Start motorcycle.
7. Disconnect cables in reverse order of steps 2, 3, 4, 5. That is: steps 5, 4, 3, 2.
1. Discharged battery positive (+) terminal
2. Booster battery positive (+) terminal
3. Booster battery negative (-) terminal
4. Ground
Jump Start Cable Connections
Headlamp: Ulysses XB12X
Top of page
The Ulysses XB12X has two headlamps. Only one headlamp is illuminated during either
low or high beam operation. See a Buell dealer for replacement headlamp bulbs. See a
service manual for the headlamp aiming procedure.
The automatic-on headlamp feature provides increased visibility of the rider to other

motorists. Be sure headlamp is on at all times. Poor visibility of rider to other
motorists can result in death or serious injury. (00030b)
See Headlamp Grill: Ulysses XB12X . The XB12X has a headlamp grill to provide
additional protection for the headlamp assembly. When spreading the headlamp grill
during removal/installation be careful not to spread the grill too far. If this happens
simply compress the grill until it fits snugly on the headlamp assembly.
1. Headlamps
2. Headlamp grill
Headlamp Grill: Ulysses XB12X
Electrical Protection: Ulysses Models
Top of page
Fuses and Relays
See Fuses and Relays: Ulysses Models. To protect the motorcycle's electrical
components from overload, your vehicle has circuit fuses and a main fuse. The fuse
block and relays are located under the seat. The fuse block contains replaceable fuses.
The automatic-on headlamp feature provides increased visibility of the rider to other
motorists. Be sure headlamp is on at all times. Poor visibility of rider to other
motorists can result in death or serious injury. (00030b)

For diagnosis and repair of electrical problems, see a Buell dealer. They have the
necessary parts and equipment to perform electrical service.
1. Fuel pump (10 amp)
2. AUX (10 Amp)
3. Battery (30 Amp)
4. ECM (10 Amp)
5. Lamps (15 Amp)
6. Key switch (15 Amp)
7. Ignition (15 Amp)
8. Accessory (10 Amp)
9. Brake/horn/interactive exhaust (10 Amp)
10. Fan (10 Amp)
11. Spare (15 Amp)
12. Spare (10 Amp)
13. Key switch relay
14. Ignition relay
15. AUX relay
16. Start relay
Fuses and Relays: Ulysses Models
Storage: XB Models
Top of page
Proper storage is important for the trouble-free operation of your motorcycle. See
your Owner's Manual for storage recommendations or see a Buell dealer. Improper

storage procedures can lead to equipment damage. (00128a)
If the motorcycle will not be operated for several months, such as during the winter
season, follow the procedure below. Proper storage preparation will protect parts against
corrosion, preserve the battery and to prevent the build-up of gum and varnish in the fuel
system. Improper storage may adversely effect the warranty. See Warranty and Service
Information: Buell Models for more information.
List everything you do and fasten it to a handlebar. When you take the motorcycle out of
storage, this list will be your reference/checklist to get your motorcycle in operating
condition.
Do not store motorcycle with gasoline in tank within the home or garage where open
flames, pilot lights, sparks or electric motors are present. Gasoline is extremely
flammable and highly explosive, which could result in death or serious injury.
(00003a)
Placing Motorcycle In Storage
If motorcycle is to be covered, use a material such as light canvas that will breathe.
Plastic materials that do not breathe promote the formation of condensation which can
damage the finish of the motorcycle. (00247a)
1. Warm motorcycle to operating temperature. Change oil and turn engine over to
circulate the new oil.
2. Fill fuel tank and add a gasoline stabilizer. Use one of the commercially
available gasoline stabilizers and follow the manufacturer's instructions.
3. Run engine until gasoline stabilizer has had a chance to reach fuel injectors.
4. Check rear drive belt wear.
5. Check tire inflation. Adjust to proper inflation pressure.
6. Wash and polish molded-in-color, painted and chrome surfaces.
7. See Battery: General for proper battery care. Remove battery from the
motorcycle and charge. Store the battery above freezing temperatures and trickle
charge once a month.
Removal From Storage

Explosive hydrogen gas, which escapes during charging, could cause death or serious
injury. Charge battery in a well-ventilated area. Keep open flames, electrical sparks
and smoking materials away from battery at all times. KEEP BATTERIES AWAY
FROM CHILDREN. (00065a)
The clutch failing to disengage can cause loss of control, which could result in death
or serious injury. Prior to starting after extended periods of storage, place transmission
in gear and push vehicle back and forth several times to assure proper clutch
disengagement. (00075a)
1. Install charged battery if removed.
2. Remove and inspect the spark plugs. See service manual.
3. Clean the air cleaner filter element.
4. Start the engine and run until it reaches normal operating temperature. Turn
engine and ignition/headlamp key switch off.
5. Check oil tank level. Check transmission lubricant level.
6. Check controls to be sure they are operating properly. Operate the front and rear
brakes, throttle control, clutch lever and gear shift lever.
7. Check steering for smoothness by turning the handlebars through the full
operating range.
Be sure tires are properly inflated, balanced and have adequate tread. Inspect your
tires regularly and see a Buell dealer for replacements. Riding with excessively worn,
unbalanced or under-inflated tires can adversely affect stability and handling, which
could result in death or serious injury. (00114a)
8. Check for correct tire pressure. Incorrect tire pressure will result in poor riding
characteristics and can effect handling and stability.
9. Check all electrical equipment, switches, headlamp, stop lamp, turn signals and
horn for proper operation.
10. Check for any fuel, oil or brake fluid leaks.
©2001-2009 Buell. All rights reserved.

Owner’s Manuals
CLOSE PRINT
Home
Cosmetic Maintenance
Cleaning Your Buell
Top of page
Aluminum parts must be maintained regularly to retain their original shine and luster.
Frequently clean and wax your new Buell motorcycle to inhibit rust and corrosion.
To aid you in keeping your motorcycle clean, see a Buell dealer for cleaning, touch-up,
polishing and waxing products.
Do not use pressure washers to clean wheel bearings, sprocket bearings, steering head
bearings and swingarm pivot bearings. Doing so can result in equipment damage.
(00489b)

Observe warnings on labels of cleaning compounds. Failure to follow warnings could
result in death or serious injury. (00076a)
Do not wash brake discs with cleaners containing chlorine or silicone. Cleaners
containing chlorine and silicone can impair brake function, which could result in
death or serious injury. (00077a)
Do not use abrasive cleaners on frame, side stand, swingarm and wheels. The finish
on these parts could be damaged if abrasive cleaners are used. (00244a)
Windshield Maintenance: Buell Models
Top of page
Buell windscreens/windshields are made of Lexan. Lexan is a more durable and
distortion-resistant material than other types of motorcycle windshield material but
still requires attention and care to maintain. Failure to maintain Lexan properly can
result in damage to the windscreen/windshield. (00483c)
Windshields require special care. Buell recommends using Harley Softcloths with the
following products to clean your windshield. To minimize swirl marks, cleaning should
be done when motorcycle is cool and parked in the shade.
HARLEY-DAVIDSON BUG REMOVER (Part No. 94657-98).
HARLEY-DAVIDSON SUNWASH (Part No. 94659-98).
NOVUS 1 CLEANER/PROTECTANT (Part No. 99837-94T).
NOVUS 2 SCRATCH REMOVER (Part No. 99836-94T).
HARLEY GLAZE (Part No. 99701-84) to polish and seal after cleaning.
NOTE:

Faint swirl marks are normal and may be more visible on tinted than on clear windshields.
Molded-In-Color Body Panel Care
Top of page
Molded-In-Color Surfaces
Use of abrasive products or powered buffing equipment will cause permanent
cosmetic damage to body panels. Use only recommended products and techniques
outlined in this manual to avoid damaging body panels. (00245b)
Do not use touch-up paint on molded-in-color body panels. Use of touch-up paint can
damage finish. (00246a)
The body panels feature molded-in-color technology. The color pigment is mixed in
with the material when the part is made, not applied over the surface. Molded-in-color
panels require different maintenance than painted surfaces to maintain their original
shine. Using methods that work on painted surfaces may ruin the finish of molded-in-
color parts.
Recommended Products
Products recommended for the proper care and maintenance of molded-in-color body
panels are listed below:
HARLEY WASH (Part No. 99715-90) or HARLEY SUN WASH (Part No.
94659-98).
HARLEY GLOSS (Part No. 94627-98).
HARLEY GLAZE POLISH AND SEALANT (Part No. 99701-84).
HARLEY SWIRL AND SCRATCH TREATMENT (Part No. 94655-98).
Washing

To wash molded-in-color panels follow the instructions below:
1. Rinse surface with water.
2. Wash with Harley Wash or Harley Sun Wash.
3. Rinse surface thoroughly with water.
4. Dry with a clean chamois or soft dry natural fiber cloth.
Cleaning Between Washings
Untreated molded-in-color body panels sometimes have a static charge that attracts dust.
Applying Harley Gloss or Harley Glaze Polish and Sealant to molded-in-color surfaces
will eliminate this condition.
To keep a high gloss finish on molded-in-color panels follow the instructions below:
1. Spray Harley Gloss onto surface and wipe with a clean soft natural fiber cloth or
Harley Softcloth.
NOTE:
Rain or water will remove Harley Gloss from body panels.
2. Reapply Harley Gloss as required to keep surfaces looking their best.
Polishing
Polishing molded-in-color body panels results in greater surface gloss and a protective
coating.
Apply Harley Glaze Polish and Sealant every six months or as required to keep molded-
in-color panels protected and looking their best.
1. Clean and dry surfaces to be polished. See Washing.
2. Apply Harley Glaze Polish and Sealant to clean, slightly dampened cloth or
sponge and apply to surface with a light overlapping motion. Make sure to cover
all areas.
3. Let Harley Glaze Polish and Sealant dry to a haze and buff off residue with a
clean soft cloth or Harley Softcloth.
Minor Scratch Removal

Use of abrasive products or powered buffing equipment will cause permanent
cosmetic damage to body panels. Use only recommended products and techniques
outlined in this manual to avoid damaging body panels. (00245b)
To remove minor scratches from body panels follow the instructions below:
1. To remove light surface scratches and rubs, use Harley Swirl and Scratch
Treatment as recommended.
2. Make sure Swirl and Scratch Treatment is applied with a moist cloth and by hand
(not by machine).
3. After scratch or rub has been repaired, polish surface lightly with Harley Glaze.
NOTE:
Black body panels are more prone to suffer permanent cosmetic damage if attempts to remove scratches are overdone.
Major Scratch Removal
There is no repair procedure for severely scratched surfaces. Severely scratched body
panels must be replaced.
Cloth Care
Top of page
1. Vacuum or blow dust off.
2. Use mild soap and warm water for more difficult stains on the cloth. Rinse
thoroughly. Always allow cloth to dry completely before using.
Vinyl Care
Top of page
Wash with a good quality detergent or S100®.
Wheel Care: Ulysses Models

Top of page
To maintain the original luster and appearance of the wheels on your Buell motorcycle,
clean and polish wheels as often as possible to inhibit rust and corrosion. Damage from
harsh chemicals, acid based wheel cleaners, brake dust and lack of maintenance can
occur. Regular washing and the use of a corrosion protectant will help to maintain their
original appearance.
Harley-Davidson WHEEL AND TIRE CLEANER (Part No. 94658-98) is recommended
for cleaning wheels and tires. Then use HARLEY GLOSS™ (Part No. 94627-98) to
protect the wheel surfaces.
NOTES:
It is imperative that the wheels are cared for weekly to guard against pitting and corrosion.
Corrosion of these components is not considered to be a defect in materials or workmanship.
Buell recommends the following products:
WHEEL AND TIRE CLEANER (Part No. 94658-98): cleaner/degreaser for
wheels, tires and engine.
HARLEY GLOSS™ (Part No. 94627-98): all purpose surface protection the
provides UV protection and a gloss finish.
See a Buell dealer for cleaning, polishing and waxing products.
Frame and Swingarm Care: XB Models
Top of page
The aluminum frame of this motorcycle is the fuel tank. Drilling, welding, cutting,
grinding, sanding, polishing or other modifications to this frame can weaken it or
cause a fire, which could result in death or serious injury. (00126b)
The aluminum swingarm of this motorcycle is the oil tank. Drilling, welding, cutting,
grinding, sanding, polishing or other modifications to this swingarm can weaken it,
cause a fire or an oil leak, which could result in death or serious injury. (00127b)

To aid you in cleaning of the frame and swingarm, see a Buell dealer for cleaning
supplies and touch-up paint.
©2001-2009 Buell. All rights reserved.
Owner’s Manuals
CLOSE PRINT
Home
Troubleshooting
Troubleshooting: General
Top of page
The troubleshooting section of the Owner's Manual is a guide to diagnose
problems. Read the service manual before performing any work. Improper

repair and/or maintenance could result in death or serious injury. (00080a)
The following checklist of possible operating troubles and their probable causes
will be helpful in keeping your motorcycle in good operating condition. More
than one of these conditions may be causing trouble and should be carefully
checked.
Engine: XB Models
Top of page
Starter Does Not Operate or Does Not Turn Engine Over
1. Engine run switch in OFF position.
2. Ignition switch not ON.
3. Discharged battery or loose or corroded connections (solenoid chatters).
Engine Turns Over But Does Not Start
1. Fuel tank empty.
2. Discharged battery or loose or broken battery terminal connections.
3. Fouled spark plugs.
4. Spark plug cable connections loose or in bad condition and shorting.
5. Loose or corroded wire or cable connection(s) at coil or battery.
6. Engine oil too heavy (winter operation).
7. No output from ECM. See dealer.
8. Inadequate fuel pressure in fuel lines (possible leak). See dealer.
9. Clogged fuel filter. See dealer.
10. Clogged fuel injectors. See dealer.
11. Tripped bank angle sensor. Turn key to OFF and then back to ON again
to start bike.
12. No output from CKP sensor. See dealer.
13. Inoperative fuel pump. See dealer.
Starts Hard
1. Spark plugs in bad condition, have improper gap, or are partially fouled.
2. Spark plug cables in bad condition and leaking.
3. Battery nearly discharged.

4. Loose wire or cable connection(s) at one of the battery terminals or at
coil.
5. Engine oil too heavy (winter operation).
6. Water or dirt in fuel system.
7. IAT or ET sensors damaged or malfunctioning. See dealer.
8. Intake manifold leak. See dealer.
Starts But Runs Irregularly or Misses
1. Spark plugs in bad condition or partially fouled.
2. Spark plug cables in bad condition and leaking.
3. Spark plug gap too close or too wide.
4. Battery nearly discharged.
5. Damaged wire or loose connection at battery terminals or coils.
6. Intermittent short circuit due to damaged wire insulation.
7. Water or dirt in fuel system.
8. O2, IAT or ET sensors damaged or malfunctioning. See dealer.
9. Fuel level too low. Add gasoline.
10. Inoperative fuel injector. See dealer.
11. Obstructed fuel tank vent valve or pinched vent tube. See dealer.
12. Intake manifold leak. See dealer.
13. Interactive exhaust system not functioning correctly. See dealer.
14. Air intake screen covered or restricted.
A Spark Plug Fouls Repeatedly
1. Fuel mixture too rich.
2. Incorrect spark plug.
3. Air intake screen covered or restricted.
Pre-ignition or Detonation (Knocks or Pings)
1. Incorrect fuel.
Overheats
1. Insufficient oil supply or oil not circulating.
2. Heavy carbon deposit from lugging engine. See dealer.
3. Oil cooler obstructed.
4. Cooling fan inoperative. See dealer.

Excessive Vibration
1. Tie bar (engine isolation) mounts loose. See dealer.
2. Swingarm pivot shaft loose. See dealer.
3. Broken frame. See dealer.
4. Front chain or links tight as a result of insufficient lubrication or belt
badly worn.
5. Wheels and/or tires damaged. See dealer.
Poor Fuel Economy
1. O2 sensor damaged or malfunctioning (bike running rich). See dealer.
2. Air intake screen covered or restricted.
Lubrication System
Top of page
Oil Does Not Return to Oil Tank
1. Oil tank empty.
2. Restricted oil lines or fittings. See dealer.
3. Restricted oil filter. See dealer.
Engine Leaks Oil From Cases, Push Rods, Hoses
1. Loose parts. See dealer.
2. Imperfect seal at gaskets, push rod cover, washers, etc. See dealer.
3. Restricted oil return line to tank. See dealer.
Electrical System
Top of page
Alternator Does Not Charge

1. Module not grounded. See dealer.
2. Engine ground wire loose or broken. See dealer.
3. Loose or broken wires in charging circuit. See dealer.
Alternator Charge Rate is Below Normal
1. Weak battery.
2. Excessive use of add-on accessories.
3. Loose or corroded connections.
4. Extensive periods of idling or low speed riding.
Transmission: XB Models
Top of page
Transmission Shifts Hard
1. Transmission shifting mechanism worn. See dealer.
Transmission Jumps Out of Gear
1. Worn shifter dogs in transmission. See dealer.
Clutch Slips
1. Clutch controls improperly adjusted. See dealer.
2. Worn friction discs. See dealer.
3. Insufficient clutch spring tension. See dealer.
Clutch Drags or Does Not Release
1. Clutch controls improperly adjusted. See dealer.
2. Insufficient clutch spring tension. See dealer.
3. Clutch discs warped. See dealer.

Clutch Chatters
1. Friction discs or steel discs worn or warped. See dealer.
Brakes
Top of page
Brakes Do Not Hold Normally
1. Master cylinder low on fluid. See dealer.
2. Brake line contains air bubbles. See dealer.
3. Master or wheel cylinder piston worn. See dealer.
4. Brake pads contaminated with grease or oil. See dealer.
5. Brake pads badly worn. See dealer.
6. Brake disc badly worn or warped. See dealer.
7. Brake fades because of heat build up. Excessive braking or brake pads
dragging. See dealer.
8. Brake drags. Insufficient hand lever free play. See dealer.
©2001-2009 Buell. All rights reserved.

Owner’s Manuals
CLOSE PRINT
Home
Warranties and Responsibilities
Warranty and Maintenance: Buell Models
Top of page
See Regular Service Intervals: Buell Models. This Owner's Manual contains your new
motorcycle warranty and a maintenance record.
The maintenance record is a scheduled mileage interval that contains a specific
maintenance checklist for upkeep of your motorcycle. It is the owner's responsibility to
follow the scheduled mileage intervals as specified. All of the specified maintenance
services must be performed to keep your warranty valid.

1. Make an appointment with a Buell dealer for inspection and service prior to first
1000 miles 1600 kilometers .
2. Bring this Owner's Manual with you when you visit the dealer to have your
motorcycle inspected and serviced.
3. Have the owner record stubs dated and signed for required proof of service
during the warranty period.
4. Keep receipts covering any parts, service or maintenance performed.
These records should be transferred to each subsequent owner.
Do not use aftermarket parts and custom made front forks which can adversely affect
performance and handling. Removing or altering factory installed parts can adversely
affect performance and could result in death or serious injury. (00001a)
Use only Buell approved parts and accessories. Use of certain other manufactures
performance parts may void your warranty. See a Buell dealer.
Buell dealerships are independently owned and operated and may sell parts and
accessories that are not manufactured or approved by Buell. Therefore, you should
understand that we are not and cannot be responsible for the quality, suitability, or safety
of any non-Buell part, accessory or design modification, including labor, which may be
sold and/or installed by our dealers.
NOTE:
If you move from your present address or sell your motorcycle, please fill out and mail the post card at the back of this manual. This is
necessary in the event that the Buell Motorcycle Company needs to contact the owner concerning information that could affect the safe
operation of this motorcycle.
Keeping It All Buell
Top of page
Insist that your dealer uses only Genuine® Buell replacement parts to keep your Buell
motorcycle and its warranty intact.
NOTE:
Installing off-road or competition parts to enhance performance may void your new motorcycle warranty. See a Buell dealer for details.

It is possible to overload your motorcycle's charging system by adding too many
electrical accessories. If your combined electrical accessories operating at any one
time consume more electrical current than your vehicle's charging system can
produce, the electrical consumption can discharge the battery and cause vehicle
electrical system damage. See a Buell dealer for advice about the amount of current
consumed by additional electrical accessories, or for necessary wiring changes.
(00249b)
California Evaporative Emission Control: Buell Models
Top of page
All new 2008 Buell motorcycles sold in the state of California are equipped with an
evaporative emission control system. This system is designed to meet the CARB
regulations in effect at the time of manufacture.
The system requires a small amount of maintenance. Periodic inspection is required to
make sure hoses are properly routed, not kinked or blocked, and that all fittings are
secure. Mounting hardware should also be checked periodically for tightness.
EPA Noise Regulations in the United States: Buell
Models
Top of page
EPA noise regulations require that the following statements be included in the Owner's
Manual.
TAMPERING WITH NOISE CONTROL SYSTEM PROHIBITED: Federal law
prohibits the following acts or the causing thereof: (1) The removal or rendering
inoperative by any person other than for purposes of maintenance, repair, or replacement
of any device or element of design incorporated into any new vehicle for the purpose of
noise control prior to its sale or delivery to the ultimate purchaser or while it is in use, or
(2) the use of the vehicle after such device or element of design has been removed or
rendered inoperative by any person.
AMONG THOSE ACTS PRESUMED TO CONSTITUTE TAMPERING ARE THE

ACTS LISTED BELOW.
1. Replacing the muffler(s) and/or the entire exhaust system with parts not certified
to be noise legal for street use.
2. Removing or modifying the muffler internal baffles in any way.
3. Replacing the air intake/cleaner assembly with one not certified to be noise legal
for street use.
4. Modifying the air intake/cleaner assembly in such a way as to make the vehicle
no longer noise legal for street use.
Buell recommends that any and all noise related maintenance be done by an authorized
Buell dealer using Genuine® Buell parts.
Warranty and Service Information: Buell Models
Top of page
Any authorized Buell dealer is responsible for providing the warranty repair work on
your motorcycle. If you have any questions regarding warranty obligations contact your
selling dealer.
For normal service work or warranty work under the above conditions, you may obtain
the name and location of your nearest U.S. Buell dealer by calling 1-800-490-9635 (toll
free), in any state except Alaska and Hawaii. To find dealers worldwide, see
www.buell.com.
NOTE:
The number shown above is accessible only with a touch-tone phone.
Reporting Safety Defects in the United States: Buell
Models
Top of page
U.S. Only
Safety defects must be reported to the National Highway Traffic Safety Administration
(NHTSA) and Buell.

NHTSA Statement
If you believe that your vehicle has a defect which could cause a crash or could cause
injury or death, you should immediately inform the National Highway Traffic Safety
Administration (NHTSA) in addition to notifying Buell.
If NHTSA receives similar complaints, it may open an investigation, and if it finds that a
safety defect exists in a group of vehicles, it may order a recall and remedy campaign.
However, NHTSA cannot become involved in individual problems between you, your
dealer or Buell.
Refer to NHTSA Contacts to contact NHTSA.
NHTSA Contacts
ITEM DATA
Phone Call the Auto Safety Hot Line toll-free at 1-
888-DASH-2DOT
Mail U.S. Department of Transportation,
National Highway Traffic Safety
Administration, Office of Defects
Investigation, NVS-210, 400 7th Street
S.W., Washington, D.C. 20590
Web
site
www.nhtsa.dot.gov
You can also obtain other information about motor vehicle safety from the hot line.
NOTE:
If you move from your present address, or sell your motorcycle, please fill out and mail the post card at the back of this manual. This is necessary in the event that the Company needs to contact the owner concerning information that could affect the safe operation of this
motorcycle.
Owner Transfer Identification Form
Top of page
When purchasing a pre-owned Harley-Davidson or Buell, we encourage you to submit
an Owner Transfer Notification Form. It is critical that new owner information is
communicated to Harley-Davidson. New owner information is required to be on file

with Harley-Davidson to transfer an Extended Service Plan Contract. Harley-Davidson
is also required by the National Traffic and Motor Vehicle Safety Act to notify all
owners in the event of a recall. The form may be obtained at any Harley-Davidson
dealer.
Required Documentation For Imported Buell
Motorcycles
Top of page
If a Buell is imported into the United States, additional documentation is required to be
eligible for the United States Manufacturer's Limited Warranty. A Buell dealer can
provide a form explaining the requirements.
©2001-2009 Buell. All rights reserved.
Owner’s Manuals
CLOSE PRINT
Home
Limited Motorcycle Warranty

2008 BUELL MOTORCYCLE LIMITED
WARRANTY
Top of page
24 Months/Unlimited Miles
Buell warrants for any new 2008 Buell motorcycle that an authorized Buell
dealer will repair or replace without charge any parts found under normal use to
be defective in factory materials or workmanship. Such repair and replacement
will be Buell's sole obligation and the customer's sole remedy under this
warranty.
THERE IS NO OTHER EXPRESS WARRANTY (OTHER THAN THE
SEPARATE EMISSIONS AND NOISE WARRANTIES) ON THE
MOTORCYCLE. ANY IMPLIED WARRANTY OF MERCHANTABILITY
OR FITNESS FOR PARTICULAR PURPOSE IS LIMITED TO THE
DURATION OF THIS WARRANTY.
Some states do not allow limitations on how long an implied warranty lasts, so
the above limitation may not apply to you.
TO THE FULLEST EXTENT ALLOWED BY LAW, BUELL AND ITS
DEALERS SHALL NOT BE LIABLE FOR LOSS OF USE,
INCONVENIENCE, LOST TIME, COMMERCIAL LOSS OR OTHER
INCIDENTAL OR CONSEQUENTIAL DAMAGES. Some states do not allow
the exclusion or limitation of incidental or consequential damages, so the above
limitation or exclusion may not apply to you. This warranty gives you specific
legal rights, and you may have other rights which vary from state to state.
The following terms and conditions apply to this warranty:
Duration
1. The duration of this limited warranty is twenty four months, starting
from the earlier of (a) the date of initial retail purchase and delivery
from an authorized Buell dealer, or (b) the third anniversary of the last
day of the model year of the motorcycle. Your dealer will submit an
electronic Sales and Warranty Registration form to initiate your

warranty.
2. Any unexpired portion of this limited warranty will be transferred to
subsequent owners, upon the resale of the motorcycle during the
warranty period.
Owner's Obligations
To obtain warranty service, return your motorcycle at your expense within the
warranty period to an authorized dealer. Our dealer should be able to provide
warranty service during normal business hours and as soon as possible,
depending upon the workload of the dealer's service department and the
availability of necessary parts.
Buell Motor Company, P.O. Box 653, Milwaukee, Wisconsin 53201, U.S.A.
Exclusions
This warranty will not apply to any motorcycle/sidecar as follows:
1. Which has not been operated or maintained as specified in the Owner's
Manual.
2. Which has been abused, misused, improperly stored, used "off the
highway," or used for racing or competition of any kind.
3. Which is not manufactured to comply with the laws of the market in
which it is registered.
4. Installing off-road or competition parts to enhance performance may
void all or part of your new motorcycle warranty. See a Buell dealer for
details.
Other Limitations
This warranty does not cover:
1. Parts and labor for normal maintenance as recommended in the Owner's
Manual, or the replacement of parts due to normal wear and tear
including such items as the following: tires, lubrication, oil and filter
change, fuel system cleaning, battery maintenance, engine tune-up,
spark plugs, brake, clutch and chain/belt adjustment (including chain
replacement).
2. Cosmetic concerns that arise as a result of owner abuse, lack of proper
maintenance or environmental conditions (except concerns that result
from defects in material or workmanship, which are covered by this

warranty for the duration of the warranty period).
3. Any cosmetic condition existing at the time of retail delivery that has
not been documented by the selling dealer prior to retail delivery.
4. Defects or damage to the motorcycle caused by alterations outside of
Buell factory specifications.
Important: Read Carefully
1. Our dealers are independently owned and operated and may sell other
products. Because of this, BUELL IS NOT RESPONSIBLE FOR THE
SAFETY, QUALITY, OR SUITABILITY OF ANY NON-BUELL
PART, ACCESSORY OR DESIGN MODIFICATION INCLUDING
LABOR WHICH MAY BE SOLD AND/OR INSTALLED BY OUR
DEALERS.
2. This warranty is a contract between you and the manufacturer. It is
separate and apart from any warranty you may receive or purchase from
the dealer. The dealer is not authorized to alter, modify, or in any way
change the terms and conditions of this warranty.
3. Any warranty work or parts replacement authorized by the manufacturer
will not preclude the manufacturer from later relying on any exclusion
where applicable.
©2001-2009 Buell. All rights reserved.
Owner’s Manuals
CLOSE PRINT
Home

Limited Noise Warranty
2008 Buell Noise Control System Limited
Warranty
Top of page
The following warranty applies to the noise control system, is in addition to the
MOTORCYCLE LIMITED WARRANTY and EMISSION CONTROL
SYSTEM LIMITED WARRANTY, and applies only to motorcycles sold in the
U.S.
Buell Motor Company warrants that this vehicle is designed and built so as to
conform at the time of sale with applicable regulations of the U.S.
Environmental Protection Agency (as tested following F-76 Drive-By test
procedure) and that it is free from defects in materials and workmanship which
would cause this motorcycle not to meet such U.S. Environmental Protection
Agency Standards within 1 year one (1) year from initial retail purchase and
delivery from an authorized Buell dealer, or one (1) year from the [second]
anniversary of the last day of the model year of the motorcycle, or 3,730 miles
6,000 kilometers whichever expires first. Any unexpired portion of this limited
warranty will be transferred to subsequent owners, upon the resale of the
motorcycle during the warranty period. If the motorcycle was used as a
demonstrator, then the warranty period may have started and/or expired prior to
the initial retail sale. See a Buell Dealer for details.
THERE IS NO OTHER EXPRESS WARRANTY (OTHER THAN THE
SEPARATE MOTORCYCLE AND EMISSIONS WARRANTIES) ON THE
MOTORCYCLE. ANY IMPLIED WARRANTY OF MERCHANTABILITY
OR FITNESS FOR PARTICULAR PURPOSE IS LIMITED TO THE
DURATION OF THIS WARRANTY.
Some states do not allow limitations on how long an implied warranty lasts, so
the above limitation may not apply to you.
The warranty period shall begin on the date the motorcycle is delivered to the
first retail purchaser or, if the motorcycle is placed in service as a demonstrator
or company vehicle prior to sale at retail, on the date it is first placed in service.
THE FOLLOWING ITEMS ARE NOT COVERED BY THE NOISE
CONTROL SYSTEM WARRANTY

1. Failures which arise as a result of misuse, alterations, or accident as
specified in the Owner's Manual.
2. Replacing, removing, or modifying any portion of the NOISE
CONTROL SYSTEM (consisting of the exhaust system and air
intake/cleaner assembly) with parts not certified to be legal for street
use.
3. Any motorcycle on which the odometer mileage has been changed so
that the mileage cannot be determined.
4. TO THE FULLEST EXTENT ALLOWED BY LAW, BUELL AND
ITS DEALERS SHALL NOT BE LIABLE FOR LOSS OF USE,
INCONVENIENCE, LOST TIME, COMMERCIAL LOSS OR
OTHER INCIDENTAL OR CONSEQUENTIAL DAMAGES.
Some states do not allow the exclusion or limitation of incidental or
consequential damages, so the above limitation or exclusion may not apply to
you.
Other Rights
This warranty gives you specific legal rights, and you may have other rights
which vary from state to state.
Recommendations for Required Maintenance
It is recommended that any noise system maintenance be performed by an
authorized Buell dealer using genuine Buell replacement parts. The
maintenance, replacement or repair of the noise control system may be
performed by any other qualified service outlet or individual. Non-genuine
parts may be used only if such parts are certified to comply with U.S.
Environmental Protection Agency Standards.
Buell Motor Company, P.O. Box 653, Milwaukee, Wisconsin 53201, U.S.A.
©2001-2009 Buell. All rights reserved.

Limited Emission Warranty
2008 Buell Emission Control System Limited
Warranty
Top of page
The following warranty applies to the emission control system, is in addition to
the LIMITED MOTORCYCLE WARRANTY and NOISE CONTROL
SYSTEM LIMITED WARRANTY, and applies only to motorcycles sold in the
U.S.
Buell Motor Company warrants that this vehicle is designed and built so as to
conform at the time of sale with applicable regulations of the U.S. Federal
Environmental Protection Agency, and that it is free from defects in materials
and workmanship which would cause this motorcycle not to meet such U.S.
Environmental Protection Agency Standards within five (5) years from initial
retail purchase and delivery from an authorized Buell dealer, or five (5) years
from the [second] anniversary of the last day of the model year of the
motorcycle, or 18,641 miles (30,000 kilometers) whichever expires first. Any
unexpired portion of this limited warranty will be transferred to subsequent
owners, upon the resale of the motorcycle during the warranty period. If the
motorcycle was used as a demonstrator, then the warranty period may have
started and/or expired prior to the initial retail sale. See a Buell Dealer for
details.
THERE IS NO OTHER EXPRESS WARRANTY (OTHER THAN THE
SEPARATE MOTORCYCLE AND NOISE WARRANTIES) ON THE
MOTORCYCLE. ANY IMPLIED WARRANTY OF MERCHANTABILITY
OR FITNESS FOR PARTICULAR PURPOSE IS LIMITED TO THE
DURATION OF THIS WARRANTY.
Some states do not allow limitations on how long an implied warranty lasts, so
the above limitation may not apply to you.
The warranty period shall begin on the date the motorcycle is delivered to the
first retail purchaser or, if the motorcycle is placed in service as a demonstrator
or company vehicle prior to sale at retail, on the date it is first placed in service.
THE FOLLOWING ITEMS ARE NOT COVERED BY THE EMISSION
CONTROL SYSTEM WARRANTY

1. Failures which arise as a result of misuse, alterations, accident or non-
performance of maintenance as specified in the Owner's Manual.
2. The replacement of parts (such as spark plugs, fuel and oil filters, etc.)
used in required maintenance.
3. Any motorcycle on which the odometer mileage has been changed so
that the mileage cannot be determined.
4. TO THE FULLEST EXTENT ALLOWED BY LAW, BUELL AND
ITS DEALERS SHALL NOT BE LIABLE FOR LOSS OF USE,
INCONVENIENCE, LOST TIME, COMMERCIAL LOSS OR
OTHER INCIDENTAL OR CONSEQUENTIAL DAMAGES.
Some states do not allow the exclusion or limitation of incidental or
consequential damages, so the above limitation or exclusion may not apply to
you.
Other Rights
This warranty gives you specific legal rights, and you may have other rights
which vary from state to state.
Recommendations for Required Maintenance
It is recommended that any emission system maintenance be performed by an
authorized Buell dealer using genuine Buell replacement parts. The
maintenance, replacement or repair of the emissions control system may be
performed by any other qualified service outlet or individual. Non-genuine
parts may be used only if such parts are certified to comply with U.S.
Environmental Protection Agency Standards.
Buell Motor Company, P.O. Box 653, Milwaukee, Wisconsin 53201, U.S.A.
©2001-2009 Buell. All rights reserved.
Owner’s Manuals
CLOSE PRINT
Home
Maintenance Scheduling
Regular Service Intervals: Buell Models

Top of page
Regular lubrication and maintenance will help keep your new Buell operating at peak
performance. Your Buell dealer knows best how to service your motorcycle with factory
approved methods and equipment assuring you of thorough and competent
workmanship.
NOTES:
Refer to Regular Service Intervals: 2008 XB Models. Regular maintenance interval operations are required to keep your new
motorcycle warranty in force. The use of other than Buell approved parts and service procedures may void the warranty. Any alterations to the emission system components, such as the fuel and exhaust system, may be in violation of Federal and State laws.
Refer to Owner's Maintenance Records. When servicing your motorcycle, bring this owner's manual to the dealership and
complete the information needed in the blank columns listed.
Perform the service and maintenance operations as indicated in the regular service
interval table. Lack of regular maintenance at the recommended intervals can affect
the safe operation of your motorcycle, which could result in death or serious injury.
(00010a)
If you operate your motorcycle under adverse conditions (severe cold, extreme heat,
very dusty environment, very bad roads, through standing water, etc.), you should
perform the regular maintenance intervals more frequently to ensure the safe
operation of your motorcycle. Failure to maintain your motorcycle could result in
death or serious injury. (00094a)
Regular Service Intervals: 2008 XB Models
ITEM
SERVICED
PROCEDURE 1000
MI.
1600
KM
5000
MI.
8000
KM
10,000
MI.
16,000
KM
15,000
MI.
24,000
KM
20,000
MI.
32,000
KM
25,000
MI.
40,000
KM
NOTES
Engine oil and
filter
Replace X X X X X X
Air cleaner Inspect, service
as required
X X X X X
Replace filter
element
X
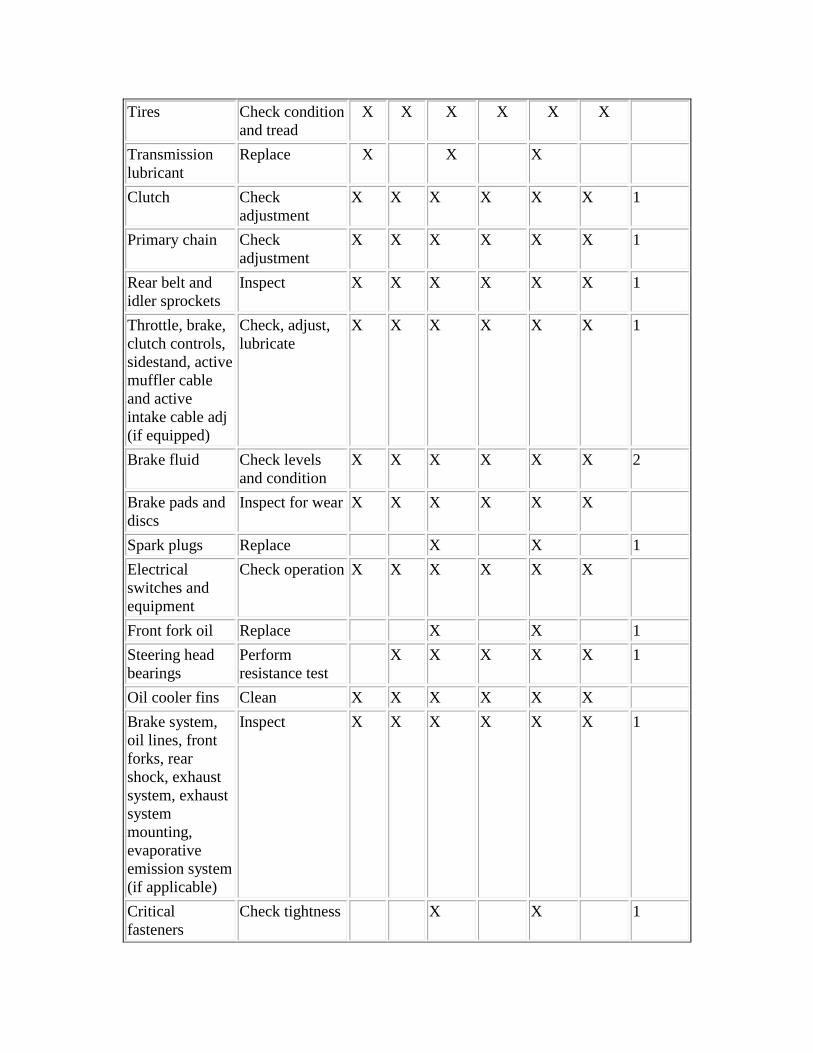
Tires Check condition
and tread
X X X X X X
Transmission
lubricant
Replace X X X
Clutch Check
adjustment
X X X X X X 1
Primary chain Check
adjustment
X X X X X X 1
Rear belt and
idler sprockets
Inspect X X X X X X 1
Throttle, brake,
clutch controls,
sidestand, active
muffler cable
and active
intake cable adj
(if equipped)
Check, adjust,
lubricate
X X X X X X 1
Brake fluid Check levels
and condition
X X X X X X 2
Brake pads and
discs
Inspect for wear X X X X X X
Spark plugs Replace X X 1
Electrical
switches and
equipment
Check operation X X X X X X
Front fork oil Replace X X 1
Steering head
bearings
Perform
resistance test
X X X X X 1
Oil cooler fins Clean X X X X X X
Brake system,
oil lines, front
forks, rear
shock, exhaust
system, exhaust
system
mounting,
evaporative
emission system
(if applicable)
Inspect X X X X X X 1
Critical
fasteners
Check tightness X X 1

Engine mounts,
stablizer, and
links
Inspect X X 1
Road test Verify
component and
system
functions
X X X X X X
NOTES: 1. Should be performed by an authorized Buell dealer, unless you
have the proper tools, service data and are mechanically qualified.
2. Change brake fluid every two (2) years.
Owner's Maintenance Records
SERVICE MILE INTERVAL DATE DEALER
NUMBER
TECHNICIAN
NAME
TECHNICIAN
SIGNATURE
1000 MI (1600 KM)
5000 MI (8000 KM)
10,000 MI (16,000 KM)
15,000 MI (24,000 KM)
20,000 MI (32,000 KM)
25,000 MI (40,000 KM)
30,000 MI (48,000 KM)
35,000 MI (56,000 KM)
40,000 MI (64,000 KM)
45,000 MI (72,000 KM)
50,000 MI (80,000 KM)
Service Literature: Buell Models
Top of page
Refer to Service Literature: 2008 Ulysses Models. Visit any Buell dealer or go to
www.buell.com to purchase a service or parts manual for your motorcycle. Factory
authorized manuals are the most complete and detailed source of information outside of

your Buell dealer.
Service Literature: 2008 Ulysses Models
DOCUMENT LANGUAGE PART
NUMBER
2008 Buell XB Models Service Manual English 99490-08Y
2008 Buell XB Models Electronic Diagnostics
Manual
English 99493-08Y
2008 Buell Ulysses Models Parts Catalog English 99575-08Y
H-D Michigan, Inc. Trademark Information
Top of page
Blast, Firebolt, Glaze, Gloss, Harley, Harley-Davidson, Lightning, Sunwash, Triple Tail,
Thunderstorm, Ulysses, Uniplanar and ZTL are among the trademarks of H-D Michigan,
Inc.
©2001-2009 Buell. All rights reserved.