Owner's Manual - my.cadillac.com · body designs appearing in this manual including, but not...
391
Transcript of Owner's Manual - my.cadillac.com · body designs appearing in this manual including, but not...

23396040 B
C
M
Y
CM
MY
CY
CMY
K
18_CAD_ATS_ATS-V_COV_en_US_23396040B_2017OCT03.ai 1 9/28/2017 10:03:22 AM18_CAD_ATS_ATS-V_COV_en_US_23396040B_2017OCT03.ai 1 9/28/2017 10:03:22 AM

Cadillac ATS/ATS-V Owner Manual (GMNA-Localizing-U.S./Canada/Mexico-11349135) - 2018 - crc - 9/25/17
Contents Introduction . . . . . . . . . . . . . . . . . . . . . . . . . . 2
In Brief . . . . . . . . . . . . . . . . . . . . . . . . . . . . . . . 5
Keys, Doors, and Windows . . . . . . . . . 30
Seats and Restraints . . . . . . . . . . . . . . . 54
Storage . . . . . . . . . . . . . . . . . . . . . . . . . . . . . 107
Instruments and Controls . . . . . . . . 110
Lighting . . . . . . . . . . . . . . . . . . . . . . . . . . . . 149
Infotainment System . . . . . . . . . . . . . 157
Climate Controls . . . . . . . . . . . . . . . . . . 163
Driving and Operating . . . . . . . . . . . . 174
Vehicle Care . . . . . . . . . . . . . . . . . . . . . . . 250
Service and Maintenance . . . . . . . . . 334
Technical Data . . . . . . . . . . . . . . . . . . . . 349
Customer Information . . . . . . . . . . . . 354
Reporting Safety Defects . . . . . . . . . 364
OnStar . . . . . . . . . . . . . . . . . . . . . . . . . . . . . . 368
Index . . . . . . . . . . . . . . . . . . . . . . . . 379

Cadillac ATS/ATS-V Owner Manual (GMNA-Localizing-U.S./Canada/Mexico-11349135) - 2018 - crc - 9/25/17
2 INTRODUCTION
Introduction
The names, logos, emblems, slogans,vehicle model names, and vehiclebody designs appearing in this manualincluding, but not limited to, GM, theGM logo, the CADILLAC Emblem, andCADILLAC ATS are trademarks and/orservice marks of General Motors LLC,its subsidiaries, affiliates, or licensors.
For vehicles first sold in Canada,substitute the name “General Motorsof Canada Company” for CadillacMotor Car Division wherever itappears in this manual.
This manual describes features thatmay or may not be on the vehiclebecause of optional equipment thatwas not purchased on the vehicle,model variants, country specifications,features/applications that may not beavailable in your region, or changessubsequent to the printing of thisowner’s manual.
Refer to the purchase documentationrelating to your specific vehicle toconfirm the features.
Keep this manual in the vehicle forquick reference.
Canadian Vehicle OwnersA French language manual can beobtained from your dealer, atwww.helminc.com, or from:
Propriétaires Canadiens
On peut obtenir un exemplaire de ceguide en français auprès duconcessionnaire ou à l'adressesuivante:
Helm, IncorporatedAttention: Customer Service47911 Halyard DrivePlymouth, MI 48170USA
Using this ManualTo quickly locate information aboutthe vehicle, use the Index in the backof the manual. It is an alphabeticallist of what is in the manual and thepage number where it can be found.
Litho in U.S.A.Part No. 23396040 B Second Printing ©2017 General Motors LLC. All Rights Reserved.

Cadillac ATS/ATS-V Owner Manual (GMNA-Localizing-U.S./Canada/Mexico-11349135) - 2018 - crc - 9/25/17
INTRODUCTION 3
Danger, Warning, andCautionWarning messages found on vehiclelabels and in this manual describehazards and what to do to avoid orreduce them.
{ Danger
Danger indicates a hazard with ahigh level of risk which will resultin serious injury or death.
{ Warning
Warning indicates a hazard thatcould result in injury or death.
Caution
Caution indicates a hazard thatcould result in property or vehicledamage.
A circle with a slash through it is asafety symbol which means “Do Not,”“Do not do this,” or “Do not let thishappen.”
SymbolsThe vehicle has components andlabels that use symbols instead oftext. Symbols are shown along withthe text describing the operation orinformation relating to a specificcomponent, control, message, gauge,or indicator.
M : Shown when the owner’s manualhas additional instructions orinformation.
* : Shown when the service manualhas additional instructions orinformation.
0 : Shown when there is moreinformation on another page —“see page.”
Vehicle Symbol Chart
Here are some additional symbols thatmay be found on the vehicle and whatthey mean. See the features in thismanual for information.
9 : Airbag Readiness Light
# : Air Conditioning
! : Antilock Brake System (ABS)
$ : Brake System Warning Light
" : Charging System
I : Cruise Control
` : Do Not Puncture
^ : Do Not Service
B : Engine Coolant Temperature
O : Exterior Lamps
_ : Flame/Fire Prohibited
. : Fuel Gauge
+ : Fuses
3 : Headlamp High/Low-BeamChanger
j : ISOFIX/LATCH System ChildRestraints
* : Malfunction Indicator Lamp

Cadillac ATS/ATS-V Owner Manual (GMNA-Localizing-U.S./Canada/Mexico-11349135) - 2018 - crc - 9/25/17
4 INTRODUCTION
: : Oil Pressure
O : Power
/ : Remote Vehicle Start
> : Seat Belt Reminders
7 : Tire Pressure Monitor
d : Traction Control/StabiliTrak
a : Under Pressure
M : Windshield Washer Fluid
Cadillac ATS/ATS-V Owner Manual (GMNA-Localizing-U.S./Canada/Mexico-11349135) - 2018 - crc - 9/25/17
IN BRIEF 5
In Brief
Instrument PanelInstrument Panel Overview . . . . . . . . . 6
Initial Drive InformationInitial Drive Information . . . . . . . . . . . 8Stop/Start System . . . . . . . . . . . . . . . . . . . 8Remote Keyless Entry (RKE)System . . . . . . . . . . . . . . . . . . . . . . . . . . . . . 8
Remote Vehicle Start . . . . . . . . . . . . . . . 9Door Locks . . . . . . . . . . . . . . . . . . . . . . . . . . 9Trunk . . . . . . . . . . . . . . . . . . . . . . . . . . . . . . . 10Windows . . . . . . . . . . . . . . . . . . . . . . . . . . . 10Seat Adjustment . . . . . . . . . . . . . . . . . . . 11Memory Features . . . . . . . . . . . . . . . . . . 14Second Row Seats . . . . . . . . . . . . . . . . . 14Heated Seats . . . . . . . . . . . . . . . . . . . . . . . 14Head Restraint Adjustment . . . . . . . 15Seat Belts . . . . . . . . . . . . . . . . . . . . . . . . . . . 15Passenger Sensing System . . . . . . . . 16Mirror Adjustment . . . . . . . . . . . . . . . . 16Steering Wheel Adjustment . . . . . . . 17Interior Lighting . . . . . . . . . . . . . . . . . . . 17Exterior Lighting . . . . . . . . . . . . . . . . . . . 18Windshield Wiper/Washer . . . . . . . . 19Climate Controls . . . . . . . . . . . . . . . . . . . 19Transmission . . . . . . . . . . . . . . . . . . . . . . . 21
Vehicle FeaturesInfotainment System . . . . . . . . . . . . . . 22Steering Wheel Controls . . . . . . . . . . 22Cruise Control . . . . . . . . . . . . . . . . . . . . . 22Driver InformationCenter (DIC) . . . . . . . . . . . . . . . . . . . . . . 22
Forward Collision Alert (FCA)System . . . . . . . . . . . . . . . . . . . . . . . . . . . . 23
Forward AutomaticBraking (FAB) . . . . . . . . . . . . . . . . . . . . 23
Lane Keep Assist (LKA) . . . . . . . . . . . 23Lane Change Alert (LCA) . . . . . . . . . . 24Rear Vision Camera (RVC) . . . . . . . . 24Rear Cross Traffic Alert (RCTA)System . . . . . . . . . . . . . . . . . . . . . . . . . . . . 24
Parking Assist . . . . . . . . . . . . . . . . . . . . . . 24Reverse AutomaticBraking (RAB) . . . . . . . . . . . . . . . . . . . . 24
Power Outlets . . . . . . . . . . . . . . . . . . . . . . 24Universal Remote System . . . . . . . . . 25Sunroof . . . . . . . . . . . . . . . . . . . . . . . . . . . . . 25
Performance and MaintenanceTraction Control/ElectronicStability Control . . . . . . . . . . . . . . . . . . 26
Tire Pressure Monitor . . . . . . . . . . . . . 26Fuel (LTG 2.0L L4 TurboEngine) . . . . . . . . . . . . . . . . . . . . . . . . . . . 27
Fuel (LGX 3.6L V6 Engines) . . . . . . . 27
Fuel (LF4 3.6L Twin TurboV6 Engine) . . . . . . . . . . . . . . . . . . . . . . . . 27
E85 or FlexFuel . . . . . . . . . . . . . . . . . . . . 28Engine Oil Life System . . . . . . . . . . . . 28Driving for Better FuelEconomy . . . . . . . . . . . . . . . . . . . . . . . . . . 28
Roadside Service . . . . . . . . . . . . . . . . . . . 29

Cadillac ATS/ATS-V Owner Manual (GMNA-Localizing-U.S./Canada/Mexico-11349135) - 2018 - crc - 9/25/17
6 IN BRIEF
Instrument Panel
Instrument Panel Overview

Cadillac ATS/ATS-V Owner Manual (GMNA-Localizing-U.S./Canada/Mexico-11349135) - 2018 - crc - 9/25/17
IN BRIEF 7
1. Air Vents 0 171.
2. Exterior Lamp Controls 0 149.
Turn Signal Lever. See Turn andLane-Change Signals 0 153.
3. Tap Shift Controls (If Equipped).See Manual Mode 0 201.
4. Cruise Control 0 218.
Adaptive Cruise Control 0 220 (IfEquipped).
Forward Collision Alert (FCA)System 0 232 (If Equipped).
Heated Steering Wheel 0 111 (IfEquipped).
Traction Control/ElectronicStability Control 0 209 (ATS-V).
Steering Wheel Controls 0 111.
5. Instrument Cluster 0 118.
Driver Information Center (DIC)Display. See Driver InformationCenter (DIC) 0 134.
6. Steering Wheel Controls 0 111 (IfEquipped).
7. Windshield Wiper/Washer 0 112.
8. Infotainment 0 157.
9. Light Sensor. See AutomaticHeadlamp System 0 152.
10. Dual Automatic Climate ControlSystem (Uplevel) 0 167 or DualAutomatic Climate Control System(Base) 0 163.
11. Hazard Warning Flashers 0 153.
12. Heated Front Seats 0 64 (IfEquipped).
13. Instrument Panel Storage 0 107 (IfEquipped).
Wireless Charging Pad (IfEquipped) (Out of View). SeeWireless Charging 0 115.
14. Traction Control/ElectronicStability Control 0 209 (ATS).
Stop/Start Disable Switch (IfEquipped). See Starting theEngine 0 192.
Electric Parking Brake (IfEquipped, Manual Transmission).See Parking Brake (Electric) 0 206or Parking Brake (Manual) 0 208.
MODE Button (ATS Only) or« /ª Button (ATS-V Only).See Driver Mode Control 0 210.
15. Shift Lever.See Automatic Transmission 0 199or Manual Transmission 0 203 (IfEquipped).
16. Storage Bin. See Instrument PanelStorage 0 107.
17. ENGINE START/STOP Button.See Ignition Positions 0 190.
18. Horn 0 112.
19. Steering Wheel Adjustment 0 111.
20. Head-Up Display (HUD) 0 136 (IfEquipped).
21. Parking Assist Button. See DriverAssistance Systems 0 228.
Lane Keep Assist (LKA) 0 239 (IfEquipped).
22. Electric Parking Brake (IfEquipped, AutomaticTransmission).See Parking Brake (Electric) 0 206or Parking Brake (Manual) 0 208.
23. Data Link Connector (DLC) (Outof View). See MalfunctionIndicator Lamp (Check EngineLight) 0 125.

Cadillac ATS/ATS-V Owner Manual (GMNA-Localizing-U.S./Canada/Mexico-11349135) - 2018 - crc - 9/25/17
8 IN BRIEF
24. Hood Release (Out of View). SeeHood 0 253.
25. Instrument Panel IlluminationControl 0 154.
Initial Drive InformationThis section provides a brief overviewabout some of the important featuresthat may or may not be on yourspecific vehicle.
For more detailed information, refer toeach of the features which can befound later in this owner’s manual.
Stop/Start SystemThe vehicle may have a fuel savingStop/Start system to shut off theengine and help conserve fuel.
When the brakes are applied and thevehicle is at a complete stop, theengine may turn off. When the brakepedal is released or the acceleratorpedal is pushed, the engine willrestart. The engine may restart evenwhile the brake is applied. See Startingthe Engine 0 192.
Remote Keyless Entry(RKE) SystemThe Remote Keyless Entry (RKE)transmitter may be used to lock andunlock the doors from up to 60 m(197 ft) away from the vehicle.
With Remote Start Shown, WithoutSimilar
Q : Press to lock all doors.
K : Press to unlock the driver door orall doors, depending on the vehiclepersonalization settings. See VehiclePersonalization 0 141.
7 : Press and release to initiatevehicle locator.

Cadillac ATS/ATS-V Owner Manual (GMNA-Localizing-U.S./Canada/Mexico-11349135) - 2018 - crc - 9/25/17
IN BRIEF 9
Press and hold 7 for three seconds tosound the panic alarm.
Press 7 again or start the vehicle tocancel the panic alarm.
X : Press twice quickly to release thetrunk.
Press the key release button near thebottom of the transmitter to removethe key. The key can be used for thedriver door and the glove box.
See Keys 0 30 and Remote KeylessEntry (RKE) System Operation 0 31.
Remote Vehicle StartIf equipped, the engine can be startedfrom outside of the vehicle.
Starting the Vehicle
1. Press and release Q on the RKEtransmitter.
2. Immediately press and hold /for at least four seconds or untilthe turn signal lamps flash.
Start the vehicle normally afterentering.
When the vehicle starts, the parkinglamps will turn on.
Remote start can be extended.
Canceling a Remote Start
To cancel a remote start, do one ofthe following:
. Press and hold/ until theparking lamps turn off.
. Turn on the hazard warningflashers.
. Turn the vehicle on and then off.
See Remote Vehicle Start 0 37.
Door LocksTo lock or unlock a door manually:
. From the outside, if the vehicle isequipped with Keyless Access,press the button on the doorhandle when the Remote KeylessEntry (RKE) transmitter is withinrange. See Remote Keyless Entry(RKE) System Operation 0 31.
. Use the key in the driver door,or if equipped, in the frontpassenger door key cylinder. Thekey cylinder is covered by a cap.See Door Locks 0 39.
. From the inside, to lock a reardoor, if equipped, push down onthe door lock knob on top of thedoor. To unlock a door, pull onceon the door handle to unlock it,and again to open it.
Power Door Locks
From the outside, press Q or K onthe RKE transmitter. See RemoteKeyless Entry (RKE) System Operation0 31.

Cadillac ATS/ATS-V Owner Manual (GMNA-Localizing-U.S./Canada/Mexico-11349135) - 2018 - crc - 9/25/17
10 IN BRIEF
From the inside, press Q or K. Theindicator light in the switch willilluminate when locked. See PowerDoor Locks 0 41.
Trunk
Sedan Shown, Coupe Similar
To open the trunk, the vehicle mustbe off or the shift lever must be inP (Park). Press| from inside the
vehicle, pressX twice quickly on theRemote Keyless Entry (RKE)transmitter, or press the touch pad onthe rear of the trunk above the licenseplate after unlocking all doors.See Remote Keyless Entry (RKE) SystemOperation 0 31 and Trunk 0 43.
Windows
Sedan Shown, Coupe Similar
The power windows work when theignition is on, in ACC/ACCESSORY,or when Retained Accessory Power(RAP) is active. See Retained AccessoryPower (RAP) 0 195.
Using the window switch, press toopen or pull to close the window.
The windows may be temporarilydisabled if they are used repeatedlywithin a short time.
See Power Windows 0 50.

Cadillac ATS/ATS-V Owner Manual (GMNA-Localizing-U.S./Canada/Mexico-11349135) - 2018 - crc - 9/25/17
IN BRIEF 11
Seat Adjustment
Power Seats
High Performance Seat Shown,Others Similar
To adjust the seat:
. Move the seat forward or rearwardby sliding the control forward orrearward.
. Raise or lower the seat by movingthe rear of the control up or down.
. If equipped, raise or lower thefront part of the seat cushion bymoving the front of the control upor down.
High Performance Seat Adjustment
1. Feature Select2. Up3. Rearward4. Down5. Forward
. Move Feature Select (1) to displayseat adjustments on the centerstack. Press and release or hold toscroll through features.
. Press Up (2) to make upwardadjustments of the selectedfeature.
. Press Rearward (3) to makerearward adjustments of theselected feature.
. Press Down (4) to make downwardadjustments of the selectedfeature.
. Press Forward (5) to make forwardadjustments of the selectedfeature.
See Power Seat Adjustment 0 57.
Reclining Seatbacks
Base Seat

Cadillac ATS/ATS-V Owner Manual (GMNA-Localizing-U.S./Canada/Mexico-11349135) - 2018 - crc - 9/25/17
12 IN BRIEF
To adjust the seatback:
. Tilt the top of the controlrearward to recline.
. Tilt the top of the control forwardto raise.
High Performance Seat
To adjust the seatback:
. Tilt the top of the controlrearward to recline.
. Tilt the top of the control forwardto raise.
See Reclining Seatbacks 0 60.
Lumbar Adjustment
Base Seat
To adjust the lumbar support:
. Press and hold the control forwardor rearward to adjust lumbarsupport forward or rearward.
Back Bolster Adjustment
If equipped, to increase or decreasethe back bolster support, press andhold the lumbar control up and down.
See Lumbar Adjustment 0 59.
Cadillac ATS/ATS-V Owner Manual (GMNA-Localizing-U.S./Canada/Mexico-11349135) - 2018 - crc - 9/25/17
IN BRIEF 13
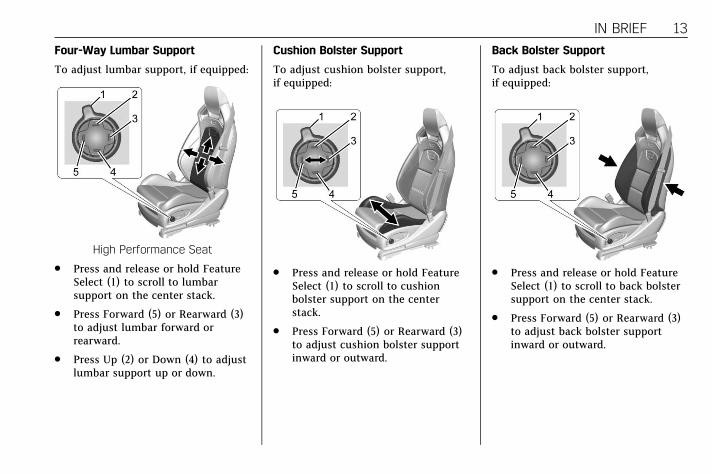
Four-Way Lumbar Support
To adjust lumbar support, if equipped:
High Performance Seat
. Press and release or hold FeatureSelect (1) to scroll to lumbarsupport on the center stack.
. Press Forward (5) or Rearward (3)to adjust lumbar forward orrearward.
. Press Up (2) or Down (4) to adjustlumbar support up or down.
Cushion Bolster Support
To adjust cushion bolster support,if equipped:
. Press and release or hold FeatureSelect (1) to scroll to cushionbolster support on the centerstack.
. Press Forward (5) or Rearward (3)to adjust cushion bolster supportinward or outward.
Back Bolster Support
To adjust back bolster support,if equipped:
. Press and release or hold FeatureSelect (1) to scroll to back bolstersupport on the center stack.
. Press Forward (5) or Rearward (3)to adjust back bolster supportinward or outward.

Cadillac ATS/ATS-V Owner Manual (GMNA-Localizing-U.S./Canada/Mexico-11349135) - 2018 - crc - 9/25/17
14 IN BRIEF
Memory Features
If equipped, memory seats allow twodrivers to store and recall their uniqueseat positions for driving the vehicle,and a shared exit position for gettingout of the vehicle. Other featurepositions may also be set, such aspower mirrors and power steeringwheel, if equipped. Memory positionsare linked to RKE transmitter 1 or 2for automatic memory recalls.
Before storing, adjust all availablememory feature positions. Turn theignition on and then press and releaseSET; a beep will sound. Thenimmediately press and hold 1, 2,
orB (Exit) on the driver door untiltwo beeps sound. To manually recallthese positions, press and hold 1, 2,orB until the saved position isreached.
When Auto Memory Recall is enabledin vehicle personalization, positionspreviously stored to memory buttons1 and 2 are recalled when the ignitionis changed from off to on or ACC/ACCESSORY.
When Easy Exit Options is enabled invehicle personalization, the featureautomatically recalls the previouslystored exit position when exiting thevehicle. See Memory Seats 0 61.
Second Row SeatsThe rear seatbacks can be foldeddown to increase cargo space.
See Rear Seats (Sedan Only) 0 66 orRear Seats (Coupe Only) 0 68.
Heated Seats
Uplevel Buttons Shown, Base ButtonsSimilar
If equipped, the buttons are near theclimate controls on the center stack.To operate, the vehicle must berunning.
Press J /M or z /L to heat thedriver or passenger seat cushion andseatback.
Press the button once for the highestsetting. With each press of the button,the seat will change to the next lowersetting, and then to the off setting.The indicator lights next to the

Cadillac ATS/ATS-V Owner Manual (GMNA-Localizing-U.S./Canada/Mexico-11349135) - 2018 - crc - 9/25/17
IN BRIEF 15
buttons indicate three for the highestsetting and one for the lowest. If theheated seats are on high, the levelmay automatically be lowered afterapproximately 30 minutes.
See Heated Front Seats 0 64.
Auto Heated Seats
When the vehicle is on, this featurewill automatically activate the heatedseats at the level required by thevehicle’s interior temperature.
The active high, medium, low, or offheated seat level will be indicated bythe manual heated seat buttons onthe center stack. Use the manualheated seat buttons on the centerstack to turn auto heated seats off.
If the passenger seat is unoccupied,the auto heated seats feature will notactivate that seat. The auto heatedseats feature can be programmed toalways be enabled when the vehicleis on.
The heated seats will not turn onduring a remote start unless they areenabled in the vehiclepersonalization menu.
See Vehicle Personalization 0 141.
Head Restraint AdjustmentIf equipped with base seats, thevehicle’s front seats have adjustablehead restraints in the outboardseating positions.
If equipped with high performanceseats, the vehicle’s front seats havehead restraints in the outboardseating positions that cannot beadjusted.
Do not drive until the head restraintsfor all occupants are installed andadjusted properly.
To achieve a comfortable seatingposition, change the seatback reclineangle as little as necessary whilekeeping the seat and the headrestraint height in the proper position.
See Head Restraints 0 55 and PowerSeat Adjustment 0 57.
Seat Belts
Refer to the following sections forimportant information on how to useseat belts properly:
. Seat Belts 0 70.
. How to Wear Seat Belts Properly0 71.
. Lap-Shoulder Belt 0 72.
. Lower Anchors and Tethers forChildren (LATCH System) 0 95.

Cadillac ATS/ATS-V Owner Manual (GMNA-Localizing-U.S./Canada/Mexico-11349135) - 2018 - crc - 9/25/17
16 IN BRIEF
Passenger Sensing System
United States
Canada and Mexico
The passenger sensing system willturn off the front outboard passengerfrontal airbag and knee airbag undercertain conditions. No other airbag isaffected by the passenger sensingsystem. See Passenger Sensing System0 82.
The passenger airbag status indicatorlights on the overhead console arevisible when the vehicle is started. SeePassenger Airbag Status Indicator0 124.
Mirror Adjustment
Exterior Mirrors
1. Move the selector switch to L(Left) or R (Right) to choose thedriver or passenger mirror.
2. Press one of the four arrows tomove the mirror.
3. Move the selector switch to ) todeselect the mirror.
The vehicle has manual foldingmirrors. See Folding Mirrors 0 48.
Interior Mirrors
Adjustment
Adjust the rearview mirror for a clearview behind the vehicle.
Manual Rearview Mirror
For vehicles with a manual rearviewmirror, push the tab forward fordaytime use and pull it for nighttimeuse to avoid glare from the headlampsfrom behind. See Manual RearviewMirror 0 49.
Automatic Dimming Rearview Mirror
For vehicles with an automaticdimming rearview mirror, the mirrorwill automatically reduce the glarefrom the headlamps from behind. Thedimming feature comes on when thevehicle is started. See AutomaticDimming Rearview Mirror 0 49.

Cadillac ATS/ATS-V Owner Manual (GMNA-Localizing-U.S./Canada/Mexico-11349135) - 2018 - crc - 9/25/17
IN BRIEF 17
Steering Wheel Adjustment
To adjust the steering wheel:
1. Pull the lever down.
2. Move the steering wheel upor down.
3. Pull or push the steering wheelcloser or away from you.
4. Pull the lever up to lock thesteering wheel in place.
Power Tilt and Telescoping Wheel
If equipped, the control is on the leftside of the steering column.
. Push the control up or down to tiltthe steering wheel up or down.
. Push the control forward orrearward to move the steeringwheel toward the front or rear ofthe vehicle.
Do not adjust the steering wheel whiledriving.
To set the power tilt wheel memoryposition, see Memory Seats 0 61.
Interior LightingDome Lamp
The dome lamp is in the overheadconsole.
To change the dome lamp settings,press the following:
OFF : Turns the lamp off, even when adoor is open.
DOOR : The lamp comes on when adoor is opened.
ON : Turns the lamp on.

Cadillac ATS/ATS-V Owner Manual (GMNA-Localizing-U.S./Canada/Mexico-11349135) - 2018 - crc - 9/25/17
18 IN BRIEF
Reading Lamps
There are front and rear readinglamps. These lamps come on whenany door is opened.
The front reading lamps are in theoverhead console.
Pressm orn to turn the lamps onor off.
Sedan
The rear reading lamps are over therear passenger doors.
Press the lamp lens to turn the rearpassenger reading lamps on or off.
Coupe
The rear reading lamps are in theheadliner.
Pressm orn to turn the lamps onor off.
For more information on interiorlighting, see Instrument PanelIllumination Control 0 154.
Exterior Lighting
There are four positions:
O : Turns the exterior lamps off anddeactivates the AUTO mode. Turn toO again to reactivate the AUTO mode.
In Canada, the headlamps willautomatically reactivate when thevehicle is shifted out of P (Park) onautomatic transmission vehicles, andwhen the parking brake is released onmanual transmission vehicles.

Cadillac ATS/ATS-V Owner Manual (GMNA-Localizing-U.S./Canada/Mexico-11349135) - 2018 - crc - 9/25/17
IN BRIEF 19
AUTO : Automatically turns theexterior lamps on and off, dependingon outside lighting.
; : Turns on the parking lampsincluding all lamps, except theheadlamps.
5 : Turns on the headlamps togetherwith the parking lamps andinstrument panel lights.
See Exterior Lamp Controls 0 149 andDaytime Running Lamps (DRL) 0 151.
Windshield Wiper/Washer
With the ignition on or in ACC/ACCESSORY, move the lever to selectthe wiper speed.
HI : Use for fast wipes.
LO : Use for slow wipes.
INT : Use this setting for intermittentwipes or Rainsense, if equipped. Forintermittent wipes, move thewindshield wiper lever to INT. Turnthex INT band up for morefrequent wipes or down for lessfrequent wipes.
If equipped with Rainsense and thefeature is enabled in vehiclepersonalization, move the windshieldwiper lever to INT and turn thexINT band to adjust the sensitivity tomoisture.
. Turn the band up for moresensitivity to moisture.
. Turn the band down for lesssensitivity to moisture.
. Move the windshield wiper leverout of the INT position todeactivate Rainsense.
To turn the Rainsense feature on oroff, see “Rain Sense Wipers” underVehicle Personalization 0 141.
OFF : Use to turn the wipers off.
1X : For a single wipe, briefly movethe lever down. For several wipes, holdthe lever down.
nL : Pull the lever toward you tospray windshield washer fluid andactivate the wipers.
See Windshield Wiper/Washer 0 112.
Climate ControlsIf equipped with one of these systems,it controls the heating, cooling, andventilation.

Cadillac ATS/ATS-V Owner Manual (GMNA-Localizing-U.S./Canada/Mexico-11349135) - 2018 - crc - 9/25/17
20 IN BRIEF
Base
1. Driver and PassengerTemperature Controls
2. Fan Control
3. AUTO (Automatic Operation)
4. Air Delivery Mode Control
5. OFF (Fan)
6. SYNC (Synchronize Driver andPassenger Temperature)
7. Driver and Passenger HeatedSeats (If Equipped)
8. Recirculation
9. Rear Window Defogger
10. Defrost
11. AC (Air Conditioning)

Cadillac ATS/ATS-V Owner Manual (GMNA-Localizing-U.S./Canada/Mexico-11349135) - 2018 - crc - 9/25/17
IN BRIEF 21
Uplevel
1. Driver and PassengerTemperature Controls
2. Fan Control
3. OFF (Fan)
4. Driver and Passenger HeatedSeats (If Equipped)
5. Recirculation
6. Rear Window Defogger
7. Defrost
8. AUTO (Automatic Operation)
See Dual Automatic Climate ControlSystem (Uplevel) 0 167 or DualAutomatic Climate Control System(Base) 0 163.
TransmissionDriver Shift Control (DSC) or TapShift
Vehicles equipped with DSC allowshifting an automatic transmissionsimilar to a manual transmission. DSCcan be enabled through the shift leveror the tap shift controls on the backof the steering wheel, if equipped. SeeManual Mode 0 201.

Cadillac ATS/ATS-V Owner Manual (GMNA-Localizing-U.S./Canada/Mexico-11349135) - 2018 - crc - 9/25/17
22 IN BRIEF
Vehicle Features
Infotainment SystemSee the infotainment manual forinformation on the radio, audioplayers, phone, navigation system, andvoice or speech recognition. It alsoincludes information on settings.
Steering Wheel ControlsThe infotainment system can beoperated by using the steering wheelcontrols. See "Steering WheelControls" in the infotainment manual.
Cruise Control
J : Press to turn the system on andoff. A white cruise control indicatorappears in the instrument clusterwhen cruise is turned on.
+RES : If there is a set speed inmemory, press the control up brieflyto resume to that speed or hold toaccelerate. If cruise control is alreadyactive, use to increase vehicle speed.To increase speed by 1 km/h (1 mph),press +RES up to the first detent. Toincrease speed to the next 5 km/h(5 mph) mark on the speedometer,press +RES up to the second detent.
SET− : Press the control down brieflyto set the speed and activate cruisecontrol. If cruise control is alreadyactive, use to decrease vehicle speed.To decrease speed by 1 km/h (1 mph),press SET− down to the first detent.To decrease speed to the next 5 km/h(5 mph) mark on the speedometer,press SET− down to the second detent.
* : Press to disengage cruise controlwithout erasing the set speed frommemory.
See Cruise Control 0 218 or AdaptiveCruise Control 0 220 (if equipped).
Driver InformationCenter (DIC)The DIC display is in the instrumentcluster. It shows the status of manyvehicle systems.

Cadillac ATS/ATS-V Owner Manual (GMNA-Localizing-U.S./Canada/Mexico-11349135) - 2018 - crc - 9/25/17
IN BRIEF 23
y orz : Press to move up or downin a list.
S or T : Press to move between theinteractive display zones in thecluster. Press S to go back to theprevious menu.
SEL : Press to open a menu or select amenu item. Press and hold to resetvalues on certain screens.
See Driver Information Center (DIC)0 134.
Forward Collision Alert(FCA) SystemIf equipped, FCA may help avoid orreduce the harm caused by front-endcrashes. FCA provides a greenindicator,V, when a vehicle isdetected ahead. This indicatordisplays amber if you follow a vehicletoo closely. When approaching avehicle ahead too quickly, FCAprovides a flashing red alert on thewindshield and rapidly beeps or pulsesthe driver seat.
See Forward Collision Alert (FCA)System 0 232.
Forward AutomaticBraking (FAB)If the vehicle has Adaptive CruiseControl (ACC), it also has FAB, whichincludes Intelligent Brake Assist (IBA).When the system detects a vehicleahead in your path that is traveling inthe same direction that you may beabout to crash into, it can provide aboost to braking or automatically
brake the vehicle. This can help avoidor lessen the severity of crashes whendriving in a forward gear.
See Forward Automatic Braking (FAB)0 235.
Lane Keep Assist (LKA)If equipped, LKA may help avoidcrashes due to unintentional lanedepartures. It may assist by gentlyturning the steering wheel if thevehicle approaches a detected lanemarking without using a turn signal inthat direction. It may also provide aLane Departure Warning (LDW) alertas the lane marking is crossed. Thesystem will not assist or alert if itdetects that you are actively steering.Override LKA by turning the steeringwheel. LKA uses a camera to detectlane markings between 60 km/h (37mph) and 180 km/h (112 mph).
See Lane Departure Warning (LDW)0 238 and Lane Keep Assist (LKA)0 239.
Cadillac ATS/ATS-V Owner Manual (GMNA-Localizing-U.S./Canada/Mexico-11349135) - 2018 - crc - 9/25/17
24 IN BRIEF
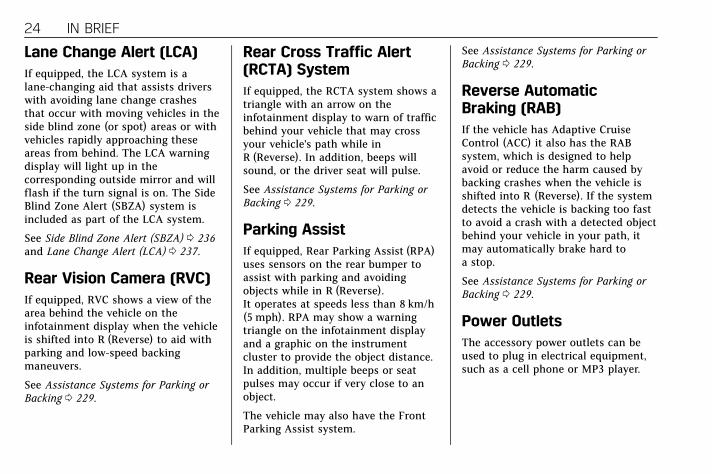
Lane Change Alert (LCA)If equipped, the LCA system is alane-changing aid that assists driverswith avoiding lane change crashesthat occur with moving vehicles in theside blind zone (or spot) areas or withvehicles rapidly approaching theseareas from behind. The LCA warningdisplay will light up in thecorresponding outside mirror and willflash if the turn signal is on. The SideBlind Zone Alert (SBZA) system isincluded as part of the LCA system.
See Side Blind Zone Alert (SBZA) 0 236and Lane Change Alert (LCA) 0 237.
Rear Vision Camera (RVC)If equipped, RVC shows a view of thearea behind the vehicle on theinfotainment display when the vehicleis shifted into R (Reverse) to aid withparking and low-speed backingmaneuvers.
See Assistance Systems for Parking orBacking 0 229.
Rear Cross Traffic Alert(RCTA) SystemIf equipped, the RCTA system shows atriangle with an arrow on theinfotainment display to warn of trafficbehind your vehicle that may crossyour vehicle's path while inR (Reverse). In addition, beeps willsound, or the driver seat will pulse.
See Assistance Systems for Parking orBacking 0 229.
Parking AssistIf equipped, Rear Parking Assist (RPA)uses sensors on the rear bumper toassist with parking and avoidingobjects while in R (Reverse).It operates at speeds less than 8 km/h(5 mph). RPA may show a warningtriangle on the infotainment displayand a graphic on the instrumentcluster to provide the object distance.In addition, multiple beeps or seatpulses may occur if very close to anobject.
The vehicle may also have the FrontParking Assist system.
See Assistance Systems for Parking orBacking 0 229.
Reverse AutomaticBraking (RAB)If the vehicle has Adaptive CruiseControl (ACC) it also has the RABsystem, which is designed to helpavoid or reduce the harm caused bybacking crashes when the vehicle isshifted into R (Reverse). If the systemdetects the vehicle is backing too fastto avoid a crash with a detected objectbehind your vehicle in your path, itmay automatically brake hard toa stop.
See Assistance Systems for Parking orBacking 0 229.
Power OutletsThe accessory power outlets can beused to plug in electrical equipment,such as a cell phone or MP3 player.

Cadillac ATS/ATS-V Owner Manual (GMNA-Localizing-U.S./Canada/Mexico-11349135) - 2018 - crc - 9/25/17
IN BRIEF 25
The vehicle has two accessory poweroutlets:
. Inside the instrument panelstorage area below the climatecontrol system.
. On the rear of the center floorconsole.
Lift the cover to access the accessorypower outlet.
See Power Outlets 0 114.
Universal Remote System
If equipped, this system provides away to replace up to three remotecontrol transmitters used to activatedevices such as garage door openers,security systems, and homeautomation devices.
Read the instructions completelybefore attempting to program theUniversal Remote system. Because ofthe steps involved, it may be helpfulto have another person available toassist you with programming theUniversal Remote system.
See Universal Remote System 0 146.
SunroofIf equipped with a sunroof, theignition must be on or in ACC/ACCESSORY, or Retained AccessoryPower (RAP) must be active, tooperate the sunroof.See Ignition Positions 0 190 andRetained Accessory Power (RAP) 0 195.
1. SLIDE Switch2. TILT Switch
Slide Switch
Express-Open/Express-Close :PressD (1) to the second detent andrelease to express-open the sunroof.Pressg (1) to the second detentand release to express-close thesunroof. Press again to stop themovement.

Cadillac ATS/ATS-V Owner Manual (GMNA-Localizing-U.S./Canada/Mexico-11349135) - 2018 - crc - 9/25/17
26 IN BRIEF
Open/Close (Manual Mode) :PressD (1) to the first detent and
hold to open the sunroof. Pressg(1) to the first detent and hold toclose the sunroof. Release to stop themovement.
Tilt Switch
Vent Feature : Press and holdE (2)to vent the sunroof. The sunshademust be manually opened. Press andholdg (2) to close thesunroof vent.
The sunroof is equipped with anautomatic reversal system. See Sunroof0 52.
Performance andMaintenance
Traction Control/ElectronicStability ControlThe Traction Control System (TCS)limits wheel spin. The system is onwhen the vehicle is started.
The StabiliTrak system assists withdirectional control of the vehicle indifficult driving conditions. Thesystem is on when the vehicle isstarted.
. To turn off TCS, press and releaseg on the center console (ATS) orthe steering wheel (ATS-V). iilluminates in the instrumentcluster and a DIC message maydisplay.
. Press and release g again to turntraction control back on.
. To turn off both TCS andStabiliTrak, press and hold g onthe center console (ATS) or thesteering wheel (ATS-V) until g
and i illuminate in theinstrument cluster. A DIC messagemay display.
. Press and release g again to turnon both systems.
See Traction Control/Electronic StabilityControl 0 209.
The vehicle has Driver Mode Controland may have Competitive DrivingMode.See Driver Mode Control 0 210 andCompetitive Driving Mode (FE3 Only)0 214.
Tire Pressure MonitorThis vehicle may have a Tire PressureMonitor System (TPMS).
The low tire pressure warning lightalerts to a significant loss in pressureof one of the vehicle's tires. If the

Cadillac ATS/ATS-V Owner Manual (GMNA-Localizing-U.S./Canada/Mexico-11349135) - 2018 - crc - 9/25/17
IN BRIEF 27
warning light comes on, stop as soonas possible and inflate the tires to therecommended pressure shown on theTire and Loading Information label.See Vehicle Load Limits 0 186. Thewarning light will remain on until thetire pressure is corrected.
The low tire pressure warning lightmay come on in cool weather whenthe vehicle is first started, and thenturn off as the vehicle is driven. Thismay be an early indicator that the tirepressures are getting low and the tiresneed to be inflated to the properpressure.
The TPMS does not replace normalmonthly tire maintenance. Maintainthe correct tire pressures.
See Tire Pressure Monitor System0 299.
Fuel (LTG 2.0L L4 TurboEngine)
Premium Recommended Fuel
Use premium 93 octane unleadedgasoline in your vehicle. Unleadedgasoline with an octane rating as lowas 87 may be used, but it will reduceperformance and fuel economy. SeeFuel 0 240.
Fuel (LGX 3.6L V6 Engines)
Regular Fuel
Use only unleaded gasoline rated87 octane or higher in your vehicle.Do not use gasoline with an octanerating lower as it may result in vehicledamage and lower fuel economy. SeeFuel 0 240.
Fuel (LF4 3.6L Twin TurboV6 Engine)
Premium Required Fuel
Use premium 93 octane unleadedgasoline in your vehicle. Unleadedgasoline with a 91 octane rating maybe used, but it will reduceperformance and fuel economy. SeeFuel 0 240.

Cadillac ATS/ATS-V Owner Manual (GMNA-Localizing-U.S./Canada/Mexico-11349135) - 2018 - crc - 9/25/17
28 IN BRIEF
E85 or FlexFuel
No E85 or FlexFuel
Gasoline-ethanol fuel blends greaterthan E15 (15% ethanol by volume),such as E85, cannot be used in thisvehicle.
Engine Oil Life SystemThe engine oil life system calculatesengine oil life based on vehicle useand displays the CHANGE ENGINEOIL SOON message when it is time tochange the engine oil and filter. Theoil life system should be reset to 100%only following an oil change.
Resetting the Oil Life System
1. Using the DIC controls on theright side of the steering wheel,display REMAINING OIL LIFE onthe DIC. See Driver Information
Center (DIC) 0 134. Whenremaining oil life is low, theCHANGE ENGINE OIL SOONmessage will appear on thedisplay.
2. Press and hold SEL to clear theCHANGE ENGINE OIL SOONmessage and reset the oil lifeat 100%.
Be careful not to reset the oil lifedisplay accidentally at any timeother than after the oil ischanged. It cannot be resetaccurately until the next oilchange.
The oil life system can also be reset asfollows:
1. Display REMAINING OIL LIFE onthe DIC. See Driver InformationCenter (DIC) 0 134.
2. Fully press and release theaccelerator pedal three timeswithin five seconds.
If the CHANGE ENGINE OILSOON message is not on, thesystem is reset.
See Engine Oil Life System 0 261.
Driving for Better FuelEconomyDriving habits can affect fuel mileage.Here are some driving tips to get thebest fuel economy possible.
. Avoid fast starts and acceleratesmoothly.
. Brake gradually and avoid abruptstops.
. Avoid idling the engine for longperiods of time.
. When road and weatherconditions are appropriate, usecruise control.
. Always follow posted speed limitsor drive more slowly whenconditions require.
. Keep vehicle tires properlyinflated.
. Combine several trips into asingle trip.
. Replace the vehicle's tires with thesame TPC Spec number moldedinto the tire's sidewall nearthe size.

Cadillac ATS/ATS-V Owner Manual (GMNA-Localizing-U.S./Canada/Mexico-11349135) - 2018 - crc - 9/25/17
IN BRIEF 29. Follow recommended scheduled
maintenance.
Roadside ServiceU.S.: 1-800-224-1400
Canada: 1-800-882-1112
TTY Users (U.S. Only): 1-888-889-2438
New Cadillac owners are automaticallyenrolled in the Roadside ServiceProgram.
See Roadside Service 0 358.

Cadillac ATS/ATS-V Owner Manual (GMNA-Localizing-U.S./Canada/Mexico-11349135) - 2018 - crc - 9/25/17
30 KEYS, DOORS, AND WINDOWS
Keys, Doors, andWindows
Keys and LocksKeys . . . . . . . . . . . . . . . . . . . . . . . . . . . . . . . . 30Remote Keyless Entry (RKE)System . . . . . . . . . . . . . . . . . . . . . . . . . . . . 31
Remote Keyless Entry (RKE)System Operation . . . . . . . . . . . . . . . . 31
Remote Vehicle Start . . . . . . . . . . . . . . 37Door Locks . . . . . . . . . . . . . . . . . . . . . . . . . 39Power Door Locks . . . . . . . . . . . . . . . . . 41Delayed Locking . . . . . . . . . . . . . . . . . . . 41Automatic Door Locks . . . . . . . . . . . . 42Lockout Protection . . . . . . . . . . . . . . . . 42Safety Locks (Sedan Only) . . . . . . . . 43
DoorsTrunk . . . . . . . . . . . . . . . . . . . . . . . . . . . . . . . 43
Vehicle SecurityVehicle Security . . . . . . . . . . . . . . . . . . . . 45Vehicle Alarm System . . . . . . . . . . . . . 45Immobilizer . . . . . . . . . . . . . . . . . . . . . . . . 47Immobilizer Operation . . . . . . . . . . . . 47
Exterior MirrorsConvex Mirrors . . . . . . . . . . . . . . . . . . . . 48Power Mirrors . . . . . . . . . . . . . . . . . . . . . . 48Folding Mirrors . . . . . . . . . . . . . . . . . . . . 48Heated Mirrors . . . . . . . . . . . . . . . . . . . . . 49Reverse Tilt Mirrors . . . . . . . . . . . . . . . 49
Interior MirrorsInterior Rearview Mirrors . . . . . . . . . 49Manual Rearview Mirror . . . . . . . . . . 49Automatic Dimming RearviewMirror . . . . . . . . . . . . . . . . . . . . . . . . . . . . . 49
WindowsWindows . . . . . . . . . . . . . . . . . . . . . . . . . . . 49Power Windows . . . . . . . . . . . . . . . . . . . . 50Sun Visors . . . . . . . . . . . . . . . . . . . . . . . . . . 52
RoofSunroof . . . . . . . . . . . . . . . . . . . . . . . . . . . . . 52
Keys and Locks
Keys
{ Warning
Leaving children in a vehicle with aRemote Keyless Entry (RKE)transmitter is dangerous andchildren or others could beseriously injured or killed. Theycould operate the power windowsor other controls or make thevehicle move. The windows willfunction with the RKE transmitterin the vehicle, and children orothers could be caught in the pathof a closing window. Do not leavechildren in a vehicle with an RKEtransmitter.

Cadillac ATS/ATS-V Owner Manual (GMNA-Localizing-U.S./Canada/Mexico-11349135) - 2018 - crc - 9/25/17
KEYS, DOORS, AND WINDOWS 31
This key, inside the Remote KeylessEntry (RKE) transmitter, is used forthe driver door and glove box.
To remove the key, press the buttonnear the bottom of the transmitter,and pull the key out. Never pull thekey out without pressing the button.
See your dealer if a new key is needed.
Contact Roadside Service if locked outof the vehicle. See Roadside Service0 358.
With an active OnStar service plan, anOnStar Advisor may remotely unlockthe vehicle. See OnStar Overview 0 368.
Remote Keyless Entry(RKE) SystemSee Radio Frequency Statement 0 364.
If there is a decrease in the RemoteKeyless Entry (RKE) operating range:
. Check the distance. Thetransmitter may be too far fromthe vehicle.
. Check the location. Other vehiclesor objects may be blocking thesignal.
. Check the transmitter's battery.See “Battery Replacement” later inthis section.
. If the transmitter is still notworking correctly, see your dealeror a qualified technician forservice.
Remote Keyless Entry(RKE) System OperationThe Keyless Access system allows forvehicle entry when the RemoteKeyless Entry (RKE) transmitter iswithin 1 m (3 ft). See “Keyless AccessOperation” following.
The RKE transmitter functions maywork up to 60 m (197 ft) away fromthe vehicle.
Keep in mind that other conditions,such as those previously stated, canimpact the performance of thetransmitter.

Cadillac ATS/ATS-V Owner Manual (GMNA-Localizing-U.S./Canada/Mexico-11349135) - 2018 - crc - 9/25/17
32 KEYS, DOORS, AND WINDOWS
With Remote Start Shown, WithoutSimilar
Q : Press to lock all doors and ifequipped, the fuel door. The turnsignal indicators may flash and/or thehorn may sound on the second pressto indicate locking. See VehiclePersonalization 0 141.
If the driver door is open when Q ispressed and enabled through vehiclepersonalization, all doors will lock andthen the driver door will immediatelyunlock. See Vehicle Personalization0 141. If a passenger door is openwhen Q is pressed, all doors lock.
Pressing Q may also arm the alarmsystem. See Vehicle Alarm System 0 45.
If equipped with auto mirror folding,pressing and holding Q forone second will fold the mirrors. Theauto mirror folding feature will notoperate unless it is enabled. SeeVehicle Personalization 0 141.
K : Press to unlock the driver door.Press unlock again within five secondsto unlock all doors. The RKEtransmitter can be programmed tounlock all doors on the first buttonpress. See Vehicle Personalization0 141.
When remotely unlocking the vehicleat night, the headlamps and back-uplamps will come on for about30 seconds to light your approach tothe vehicle. The turn signal indicatorsmay flash to indicate unlocking.
See Vehicle Personalization 0 141.
Pressing K will disarm the alarmsystem. See Vehicle Alarm System 0 45.
Press and hold K until the windowsfully open. Windows will not operateunless remote window operation isenabled. See Vehicle Personalization0 141.
If equipped, pressing K will alsounlock the fuel door.
/ : If equipped, press and release Qand then immediately press and hold/ for at least four seconds to startthe engine from outside the vehicleusing the RKE transmitter. See RemoteVehicle Start 0 37.
7 : Press and release to initiatevehicle locator. The exterior lampsflash and the horn chirps three times.Press and hold 7 for three seconds tosound the panic alarm. The hornsounds and the turn signal lampsflash for 30 seconds, or until 7 ispressed again or the vehicle is started.
X : Press twice quickly to release thetrunk.

Cadillac ATS/ATS-V Owner Manual (GMNA-Localizing-U.S./Canada/Mexico-11349135) - 2018 - crc - 9/25/17
KEYS, DOORS, AND WINDOWS 33
Keyless Access Operation
Some vehicles have the Keyless Accesssystem that lets you lock and unlockthe doors and access the trunkwithout removing the RKE transmitterfrom your pocket, purse, briefcase, etc.The RKE transmitter must be within1 m (3 ft) of the trunk or door beingopened. If the vehicle has this feature,there will be a button on the outsidedoor handles.
The Keyless Access system can beprogrammed to unlock all doors onthe first lock/unlock press from thedriver door. See Vehicle Personalization0 141.
If equipped with memory seats, RKEtransmitters 1 and 2 are linked toseating positions of memory 1 or 2.See Memory Seats 0 61.
Keyless Unlocking/Locking from theDriver Door
When the doors are locked and theRKE transmitter is within 1 m (3 ft) ofthe door handle, pressing the lock/unlock button on the driver doorhandle will unlock the driver door.
If the lock/unlock button is pressedagain within five seconds, allpassenger doors will unlock.
Driver Door Shown, Passenger Similar
Pressing the lock/unlock button willcause all doors to lock if any of thefollowing occur:
. It has been more than five secondssince the first lock/unlock buttonpress.
. Two lock/unlock button presseswere used to unlock all doors.
. Any vehicle door has opened andall doors are now closed.
Keyless Unlocking/Locking from thePassenger Doors
When the doors are locked and theRKE transmitter is within 1 m (3 ft) ofthe door handle, pressing the lock/unlock button on a passenger doorhandle will unlock all doors. Pressingthe lock/unlock button will cause alldoors to lock if any of the followingoccur:
. The lock/unlock button was usedto unlock all doors.
. Any vehicle door has opened andall doors are now closed.
Passive Locking
If equipped with Keyless Access, thevehicle will lock several seconds afterall doors are closed if the vehicle is offand at least one RKE transmitter hasbeen removed or none remain in thevehicle.
If equipped with a locking fuel door,the locking fuel door will also lock atthis time.
If other electronic devices interferewith the RKE transmitter signal, thevehicle may not detect the RKE
Cadillac ATS/ATS-V Owner Manual (GMNA-Localizing-U.S./Canada/Mexico-11349135) - 2018 - crc - 9/25/17
34 KEYS, DOORS, AND WINDOWS
transmitter inside the vehicle.If passive locking is enabled, the doorsmay lock with the RKE transmitterinside the vehicle. Do not leave theRKE transmitter in an unattendedvehicle.
Temporary Disable of PassiveLocking Feature
Temporarily disable the passivelocking by pressing and holding K onthe interior door switch with a dooropen for at least four seconds, or untilthree chimes are heard. Passivelocking will then remain disabled untilQ on the interior door is pressed,or until the vehicle is turned on.
To customize the doors toautomatically lock when exiting thevehicle, see Vehicle Personalization0 141.
Keyless Trunk Opening
Press the touch pad on the trunk toopen the trunk if the RKE transmitteris within 1 m (3 ft).
Key Access
To access a vehicle with a weaktransmitter battery, see Door Locks0 39.
Remote Left In Vehicle Alert
When the vehicle is turned off and anRKE transmitter is left in the vehicle,the horn will chirp three times afterall doors are closed. To turn on or offsee Vehicle Personalization 0 141.
Remote No Longer in Vehicle Alert
If the vehicle is on, with a door open,and then all doors are closed, thevehicle will check for RKEtransmitters inside. If an RKEtransmitter is not detected, the DICwill display NO REMOTE DETECTEDand the horn will chirp three times.
This occurs only once each time thevehicle is driven.
See Vehicle Personalization 0 141.
Programming Transmitters tothe Vehicle
Only RKE transmitters programmed tothe vehicle will work. If a transmitteris lost or stolen, a replacement can be
purchased and programmed throughyour dealer. The vehicle can bereprogrammed so that lost or stolentransmitters no longer work. Eachvehicle can have up to eighttransmitters matched to it.
Programming with RecognizedTransmitters
A new transmitter can be programmedto the vehicle when there are tworecognized transmitters.
To program, the vehicle must be offand all transmitters, both currentlyrecognized and new, must bewith you.
1. Remove the vehicle key from therecognized transmitter.
2. Place the two recognizedtransmitters in the cupholder.
3. Remove the key lock cylindercap. See Door Locks 0 39. Insertthe vehicle key into the key lockcylinder on the driver doorhandle, then turn the keycounterclockwise to the unlockposition five times within10 seconds.

Cadillac ATS/ATS-V Owner Manual (GMNA-Localizing-U.S./Canada/Mexico-11349135) - 2018 - crc - 9/25/17
KEYS, DOORS, AND WINDOWS 35
The Driver Information Center(DIC) displays READY TO LEARNELECTRONIC KEY #2, 3, 4, ETC.
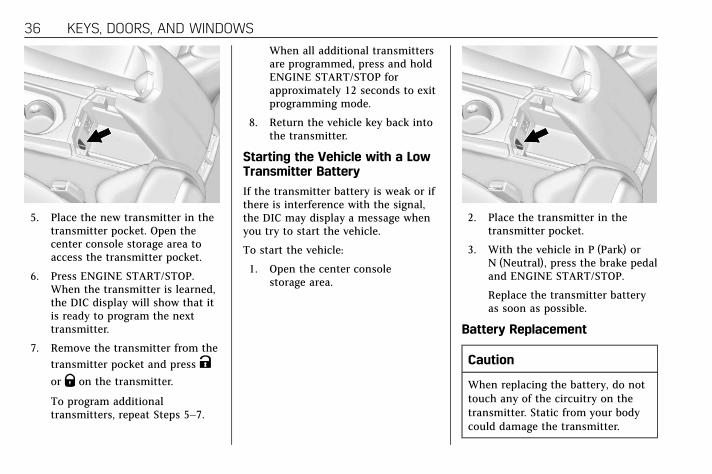
4. Place the new transmitter intothe transmitter pocket. Open thecenter console storage area toaccess the transmitter pocket.
5. Press ENGINE START/STOP.When the transmitter is learned,the DIC display will show that itis ready to program the nexttransmitter.
6. Remove the transmitter from thetransmitter pocket and press Kor Q on the transmitter.
To program additionaltransmitters, repeat Steps 4–6.
When all additional transmittersare programmed, press and holdENGINE START/STOP forapproximately 12 seconds to exitprogramming mode.
7. Return the vehicle key back intothe transmitter.
Programming without RecognizedTransmitters
If two currently recognizedtransmitters are not available, followthis procedure to program up to eighttransmitters. This feature is notavailable in Canada. This procedurewill take approximately 30 minutes tocomplete. The vehicle must be off andall transmitters to be programmedmust be with you.
1. Remove the vehicle key from thetransmitter.
2. Remove the key lock cylindercap. See Door Locks 0 39. Insertthe vehicle key into the key lockcylinder on the driver doorhandle, then turn the key
counterclockwise to the unlockposition five times within10 seconds.
The Driver Information Center(DIC) displays REMOTE LEARNPENDING, PLEASE WAIT.
3. Wait for 10 minutes until theDIC displays PRESS ENGINESTART BUTTON TO LEARN andthen press ENGINESTART/STOP.
The DIC display will again showREMOTE LEARN PENDING,PLEASE WAIT.
4. Repeat Step 3 two additionaltimes. After the third time allpreviously known transmitterswill no longer work with thevehicle. Remaining transmitterscan be relearned during the nextsteps.
The DIC display should nowshow READY FOR REMOTE # 1.
Cadillac ATS/ATS-V Owner Manual (GMNA-Localizing-U.S./Canada/Mexico-11349135) - 2018 - crc - 9/25/17
36 KEYS, DOORS, AND WINDOWS
5. Place the new transmitter in thetransmitter pocket. Open thecenter console storage area toaccess the transmitter pocket.
6. Press ENGINE START/STOP.When the transmitter is learned,the DIC display will show that itis ready to program the nexttransmitter.
7. Remove the transmitter from thetransmitter pocket and press Kor Q on the transmitter.
To program additionaltransmitters, repeat Steps 5–7.
When all additional transmittersare programmed, press and holdENGINE START/STOP forapproximately 12 seconds to exitprogramming mode.
8. Return the vehicle key back intothe transmitter.
Starting the Vehicle with a LowTransmitter Battery
If the transmitter battery is weak or ifthere is interference with the signal,the DIC may display a message whenyou try to start the vehicle.
To start the vehicle:
1. Open the center consolestorage area.
2. Place the transmitter in thetransmitter pocket.
3. With the vehicle in P (Park) orN (Neutral), press the brake pedaland ENGINE START/STOP.
Replace the transmitter batteryas soon as possible.
Battery Replacement
Caution
When replacing the battery, do nottouch any of the circuitry on thetransmitter. Static from your bodycould damage the transmitter.

Cadillac ATS/ATS-V Owner Manual (GMNA-Localizing-U.S./Canada/Mexico-11349135) - 2018 - crc - 9/25/17
KEYS, DOORS, AND WINDOWS 37
Replace the battery if the REPLACEBATTERY IN REMOTE KEY messagedisplays in the DIC.
1. Press the button on the side ofthe transmitter near the bottomand pull the key out.
2. Separate the two halves of thetransmitter using a flat toolinserted into the bottom centerof the transmitter. Do not usethe key slot.
3. Remove the old battery. Do notuse a metal object.
4. Insert the new battery on theback housing, positive side facingdown. Replace with a CR2032 orequivalent battery.
5. Align the front and back housingthen snap the transmittertogether.
Remote Vehicle StartIf equipped, this feature allows theengine to be started from outside thevehicle.

Cadillac ATS/ATS-V Owner Manual (GMNA-Localizing-U.S./Canada/Mexico-11349135) - 2018 - crc - 9/25/17
38 KEYS, DOORS, AND WINDOWS
/ : This button will be on the RKEtransmitter if the vehicle has remotestart.
The climate control system will usethe previous settings during a remotestart. The rear window defogger maycome on during remote start based oncold ambient conditions. The reardefog indicator light does not come onduring remote start.
If equipped heated seats, they maycome on during a remote start. SeeHeated Front Seats 0 64.
If equipped with a remote start heatedsteering wheel, it may come on duringa remote start. See Heated SteeringWheel 0 111.
Laws in some local communities mayrestrict the use of remote starters. Forexample, some laws may require aperson using remote start to have thevehicle in view. Check localregulations for any requirements.
If your vehicle is low on fuel, do notuse the remote start feature. Thevehicle may run out of fuel.
The RKE transmitter range may beless while the vehicle is running.
Other conditions can affect theperformance of the transmitter. SeeRemote Keyless Entry (RKE) System0 31.
Starting the Engine Using RemoteStart
1. Press and release Q on the RKEtransmitter.
2. Immediately press and hold /for at least four seconds or untilthe turn signal lamps flash. Theflashing confirms the request toremote start the vehicle has beenreceived.
During the remote start, thedoors will be locked and theparking lamps will remain on aslong as the engine is running.
The engine will shut off after10 minutes unless a timeextension is done or the vehicleis started.
3. Press the brake pedal and startthe vehicle to drive.
Extending Engine Run Time
The engine run time can also beextended by another 10 minutes,if during the first 10 minutesSteps 1 and 2 are repeated while theengine is still running. An extensioncan be requested, 30 seconds afterstarting. This provides a total of20 minutes.
The remote start can only beextended once.
A maximum of two remote starts, or aremote start with an extension, areallowed between ignition cycles.
The vehicle's ignition must be turnedon and then off before the remotestart procedure can be used again.
Canceling a Remote Start
To cancel a remote start, do any ofthe following:
. Press and hold/ until theparking lamps turn off.
. Turn on the hazard warningflashers.
. Turn the vehicle on and thenback off.

Cadillac ATS/ATS-V Owner Manual (GMNA-Localizing-U.S./Canada/Mexico-11349135) - 2018 - crc - 9/25/17
KEYS, DOORS, AND WINDOWS 39
Conditions in Which Remote StartWill Not Work
The remote start will not operate ifany of the following occur:
. The ignition is in any mode otherthan off.
. A transmitter is in the vehicle.
. The hood is not closed.
. The hazard warning flashersare on.
. There is an emission controlsystem malfunction.
. The engine coolant temperature istoo high.
. The oil pressure is low.
. Two remote vehicle starts or astart with an extension havealready been used.
. The vehicle is not in P (Park).
Door Locks
{ Warning
Unlocked doors can be dangerous.
. Passengers, especiallychildren, can easily open thedoors and fall out of a movingvehicle. The doors can beunlocked and opened whilethe vehicle is moving. Thechance of being thrown out ofthe vehicle in a crash isincreased if the doors are notlocked. So, all passengersshould wear seat beltsproperly and the doors shouldbe locked whenever thevehicle is driven.
. Young children who get intounlocked vehicles may beunable to get out. A child canbe overcome by extreme heatand can suffer permanentinjuries or even death fromheat stroke. Always lock thevehicle whenever leaving it.
(Continued)
Warning (Continued)
. Outsiders can easily enterthrough an unlocked doorwhen you slow down or stopthe vehicle. Locking the doorscan help prevent this fromhappening.
To lock/unlock the doors from outsidethe vehicle:
. Press Q or K on the RemoteKeyless Entry (RKE) transmitter.See Remote Keyless Entry (RKE)System Operation 0 31.
. Use the key in the key lockcylinder in the driver door or,if equipped, the passenger door.The key lock cylinder is coveredwith a cap.
To lock/unlock the doors from insidethe vehicle:
. Press Q or K on the power doorlock switch. See Power Door Locks0 41.

Cadillac ATS/ATS-V Owner Manual (GMNA-Localizing-U.S./Canada/Mexico-11349135) - 2018 - crc - 9/25/17
40 KEYS, DOORS, AND WINDOWS. Pull once on the door handle to
unlock the door and again to openthe door.
. On the rear doors, push down onthe door lock knob to lock thedoor manually.
Keyless Access
If equipped, use the Keyless Accesssystem to lock and unlock the door.When the doors are locked and theRKE transmitter is within 1 m (3 ft) ofthe driver door handle, press the lock/unlock button. When unlocking fromthe driver door, the first press unlocksthat door; press again withinfive seconds to unlock all passenger
doors and the trunk. See RemoteKeyless Entry (RKE) System Operation0 31.
Driver Door Key Lock CylinderAccess (In Case of Dead Battery)
To access the driver door key lockcylinder:
1. Pull the door handle (1) to theopen position and hold it openuntil the cap removal iscomplete.
2. Insert the key into the slot (3) onthe bottom of the cap (2) and liftthe key upward.
3. Move the cap (2) rearward andremove.
4. Use the key in the cylinder.
To replace the cap:
1. Pull the door handle (1) to theopen position and hold it openuntil the cap installation iscomplete.
2. Insert the two tabs (6) at theback of the cap between theseal (5) and the metal base (4).

Cadillac ATS/ATS-V Owner Manual (GMNA-Localizing-U.S./Canada/Mexico-11349135) - 2018 - crc - 9/25/17
KEYS, DOORS, AND WINDOWS 41
3. Slide the cap forward and pressthe forward edge to install thecap in place.
4. Release the door handle.
5. Check that the cap is secure.
Free-Turning Locks
The door key lock cylinder turns freelywhen either the wrong key is used,or the correct key is not fully inserted.The free-turning door lock featureprevents the lock from being forcedopen. To reset the lock, turn it to thevertical position with the correct keyfully inserted. Remove the key andinsert it again. If this does not resetthe lock, turn the key halfway aroundin the cylinder and repeat the resetprocedure.
Power Door Locks
Q : Press to lock the doors. Theindicator light in the switch willilluminate when activated.
K : Press to unlock the doors.
Delayed LockingThis feature delays the actual lockingof the doors until five seconds after alldoors are closed.
Delayed locking can only be turned onwhen the Open Door Anti-Lockoutfeature has been turned off.

Cadillac ATS/ATS-V Owner Manual (GMNA-Localizing-U.S./Canada/Mexico-11349135) - 2018 - crc - 9/25/17
42 KEYS, DOORS, AND WINDOWS
When Q is pressed on the power doorlock switch with the door open, achime will sound three timesindicating that delayed locking isactive.
The doors will then lock automaticallyfive seconds after all doors are closed.If a door is reopened beforefive seconds have elapsed, thefive-second timer will reset once allthe doors are closed again.
Press Q on the door lock switch again,
or press Q on the RKE transmitter, tooverride this feature and lock thedoors immediately.
Delayed locking can be programmedthrough the Driver Information Center(DIC). See Vehicle Personalization0 141.
Automatic Door LocksThe vehicle is programmed so thatwhen the doors are closed, theignition is on, and the shift lever ismoved out of P (Park) for automatic
transmissions, or the vehicle speed isabove 13 km/h (8 mph) for manualtransmissions, the doors will lock.
If a vehicle door is unlocked and thenopened and closed, the doors will lockeither when your foot is removed fromthe brake or the vehicle speedbecomes faster than 13 km/h (8 mph).
To unlock the doors:
. Press an unlock switch on a door.
. For vehicles with an automatictransmission, shift thetransmission into P (Park).
. For vehicles with a manualtransmission, turn the vehicle offwhen parked.
Automatic door locking cannot bedisabled. Automatic door unlockingcan be programmed. See VehiclePersonalization 0 141.
Lockout ProtectionIf the vehicle is on or in ACC/ACCESSORY and the power door lockswitch is pressed with the driver dooropen, all the doors will lock and onlythe driver door will unlock.
If the vehicle is off and is locked whilea door is open, when all doors areclosed the vehicle will check for RKEtransmitter(s) inside. If RKEtransmitter(s) are detected and nonewere removed, the driver door willunlock and the horn will chirp threetimes.
This feature can be manuallyoverridden with the driver door openby pressing and holding Q on thepower door lock switch.
Open Door Anti-Lockout
If Open Door Anti-Lockout has beenturned on and the vehicle is off, thedriver door is open, and locking isrequested, all the doors will lock andthe driver door will remain unlocked.Push the lock button on the door orthe RKE transmitter a second time tolock the driver door.
The Open Door Anti-Lockout featurecan be turned on or off. See VehiclePersonalization 0 141.
When this feature is off, the DelayedDoor Lock menu will be available.

Cadillac ATS/ATS-V Owner Manual (GMNA-Localizing-U.S./Canada/Mexico-11349135) - 2018 - crc - 9/25/17
KEYS, DOORS, AND WINDOWS 43
Safety Locks (Sedan Only)
The rear door safety locks preventpassengers from opening the reardoors from inside the vehicle.
Pressv { to activate the safety lockson the rear doors. The indicator lightin the switch will illuminate whenactivated.
The rear door power windows are alsodisabled. See Power Windows 0 50.
Pressv { again to deactivate thesafety locks.
If an inside rear door handle is beingpulled at the same time the safetylock is deactivated, only that door willremain locked and the indicator lightmay flash. Release the handle, thenpress the safety lock twice todeactivate the safety locks.
Doors
Trunk
{ Warning
Exhaust gases can enter the vehicleif it is driven with the liftgate ortrunk/hatch open, or with anyobjects that pass through the sealbetween the body and the trunk/hatch or liftgate. Engine exhaustcontains carbon monoxide (CO)which cannot be seen or smelled.It can cause unconsciousness andeven death.
If the vehicle must be driven withthe liftgate or trunk/hatch open:
. Close all of the windows.
. Fully open the air outlets onor under the instrumentpanel.
. Adjust the climate controlsystem to a setting thatbrings in only outside air and
(Continued)

Cadillac ATS/ATS-V Owner Manual (GMNA-Localizing-U.S./Canada/Mexico-11349135) - 2018 - crc - 9/25/17
44 KEYS, DOORS, AND WINDOWS
Warning (Continued)
set the fan speed to thehighest setting. See “ClimateControl Systems” in the Index.
. If the vehicle is equipped witha power liftgate, disable thepower liftgate function.
See Engine Exhaust 0 198.
Trunk Lock Release
Sedan Shown, Coupe Similar
To open the trunk, the vehicle mustbe off or the shift lever must be inP (Park).
. Press| on the driver door.
. PressX twice quickly on the RKEtransmitter.
. Press the touch pad on the rear ofthe trunk above the license platewhen all doors are unlocked.
The trunk may also be opened whilethe vehicle is locked by pressing thetouch pad on the rear of the trunkabove the license plate while the RKEtransmitter is within 1 m (3 ft) of therear of the vehicle.
If the vehicle is ever without power,the trunk area can still be accessed.
To access by the rear seatpass-through door, if equipped:
1. Fold the rear armrest down andopen the pass-through door. SeeRear Seat Pass-Through Door0 69.
2. Reach inward through theopening to locate the emergencytrunk release handle. See“Emergency Trunk ReleaseHandle” following.
3. Pull the release handle towardthe front of the vehicle to openthe trunk.
To access by folding the rear seat,if equipped:
1. Fold down the rear seatback.See Rear Seats (Sedan Only) 0 66or Rear Seats (Coupe Only) 0 68.
2. Reach inward through theopening to locate the emergencytrunk release handle.
3. Pull the release handle towardthe front of the vehicle to openthe trunk.
Cadillac ATS/ATS-V Owner Manual (GMNA-Localizing-U.S./Canada/Mexico-11349135) - 2018 - crc - 9/25/17
KEYS, DOORS, AND WINDOWS 45
Emergency Trunk ReleaseHandle
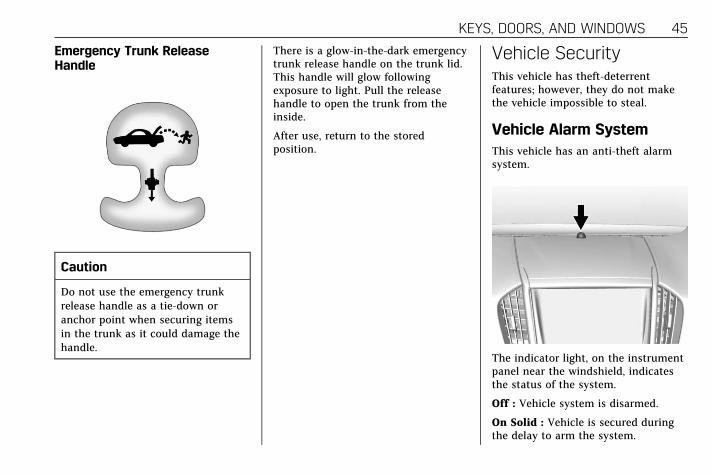
Caution
Do not use the emergency trunkrelease handle as a tie-down oranchor point when securing itemsin the trunk as it could damage thehandle.
There is a glow-in-the-dark emergencytrunk release handle on the trunk lid.This handle will glow followingexposure to light. Pull the releasehandle to open the trunk from theinside.
After use, return to the storedposition.
Vehicle SecurityThis vehicle has theft-deterrentfeatures; however, they do not makethe vehicle impossible to steal.
Vehicle Alarm SystemThis vehicle has an anti-theft alarmsystem.
The indicator light, on the instrumentpanel near the windshield, indicatesthe status of the system.
Off : Vehicle system is disarmed.
On Solid : Vehicle is secured duringthe delay to arm the system.

Cadillac ATS/ATS-V Owner Manual (GMNA-Localizing-U.S./Canada/Mexico-11349135) - 2018 - crc - 9/25/17
46 KEYS, DOORS, AND WINDOWS
Fast Flash : Vehicle is unsecured.A door, the hood, or the trunk is open.
Slow Flash : Alarm system is armed.
Arming the Alarm System
1. Turn off the vehicle.
2. Lock the vehicle in one ofthree ways:
. Use the RKE transmitter.
. Use the Keyless Accesssystem.
. With a door open, press theinterior Q.
3. After 30 seconds the alarmsystem will arm, and theindicator light will begin toslowly flash indicating the alarmsystem is operating. Pressing Qon the RKE transmitter a secondtime will bypass the 30-seconddelay and immediately arm thealarm system.
The vehicle alarm system will not armif the doors are locked with the key.
If the driver door is opened withoutfirst unlocking with the RKEtransmitter, the horn will chirp andthe lights will flash to indicatepre-alarm. If the vehicle is not started,or the door is not unlocked bypressing K on the RKE transmitterduring the 10-second pre-alarm, thealarm will be activated.
The alarm will also be activated if apassenger door, the trunk, or the hoodis opened without first disarming thesystem. When the alarm is activated,the turn signals flash and the hornsounds for about 30 seconds. thealarm system will then re-arm tomonitor for the next unauthorizedevent.
Disarming the Alarm System
To disarm the alarm system or turnoff the alarm if it has been activated,do one of the following:
. Press K on the RKE transmitter.
. Unlock the vehicle using theKeyless Access system.
. Start the vehicle.
To avoid setting off the alarm byaccident:
. Lock the vehicle after alloccupants have left the vehicleand all doors are closed.
. Always unlock a door with theRKE transmitter or use the KeylessAccess system.
Unlocking the driver door with the keywill not disarm the system or turn offthe alarm.
How to Detect a TamperCondition
If K is pressed on the RKEtransmitter and the horn chirps andthe lights flash three times, a previousalarm occurred while the system wasarmed.
If the alarm has been activated, amessage will appear on the DIC.
Power Sounder and InclinationSensor
In addition to the standardtheft-deterrent system features, thissystem may also have a powersounder and inclination sensor.

Cadillac ATS/ATS-V Owner Manual (GMNA-Localizing-U.S./Canada/Mexico-11349135) - 2018 - crc - 9/25/17
KEYS, DOORS, AND WINDOWS 47
The power sounder provides anaudible alarm which is distinct fromthe vehicle’s horn. It has its ownpower source, and can sound an alarmif the vehicle’s battery iscompromised.
The inclination sensor can set off thealarm if it senses movement of thevehicle, such as a change in vehicleorientation.
ImmobilizerSee Radio Frequency Statement 0 364.
Immobilizer OperationThis vehicle has a passivetheft-deterrent system.
The system does not have to bemanually armed or disarmed.
The vehicle is automaticallyimmobilized when the vehicle isturned off.
The immobilization system isdisarmed when the ignition is in ACC/ACCESSORY mode or the vehicle isstarted and a valid transmitter ispresent in the vehicle.
The security light, in the instrumentcluster, comes on if there is a problemwith arming or disarming thetheft-deterrent system.
The system has one or more RKEtransmitters matched to animmobilizer control unit in thevehicle. Only a correctly matched RKEtransmitter will start the vehicle.If the transmitter is ever damaged,you may not be able to start yourvehicle.
When trying to start the vehicle, thesecurity light comes on briefly whenthe ignition is turned on.
If the engine does not start and thesecurity light stays on, there is aproblem with the system. Turn thevehicle off and try again.
If the vehicle will not change ignitionmodes (ACC/ACCESSORY, on, off), andthe RKE transmitter appears to be
undamaged, try another transmitter.Or, you may try placing thetransmitter in the transmitter pocketlocated in the center console.
If the ignition modes will not changewith the other transmitter or in thetransmitter pocket, your vehicle needsservice. If the ignition does changemodes, the first transmitter may befaulty. See your dealer.
It is possible for the immobilizersystem to learn new or replacementRKE transmitters. Up to eighttransmitters can be programmed forthe vehicle. To program additionaltransmitters, see “ProgrammingTransmitters to the Vehicle” underRemote Keyless Entry (RKE) SystemOperation 0 31.
Do not leave the key or device thatdisarms or deactivates thetheft-deterrent system in the vehicle.

Cadillac ATS/ATS-V Owner Manual (GMNA-Localizing-U.S./Canada/Mexico-11349135) - 2018 - crc - 9/25/17
48 KEYS, DOORS, AND WINDOWS
Exterior Mirrors
Convex Mirrors
{ Warning
A convex mirror can make things,like other vehicles, look fartheraway than they really are. If you cuttoo sharply into the right lane, youcould hit a vehicle on the right.Check the inside mirror or glanceover your shoulder before changinglanes.
The passenger side mirror is convexshaped. A convex mirror's surface iscurved so more can be seen from thedriver seat.
Power Mirrors
1. Move the selector switch to L(Left) or R (Right) to choose thedriver or passenger mirror.
2. Press one of the four arrows tomove the mirror.
3. Move the selector switch to ) todeselect the mirror.
Exterior Automatic Dimming Mirror
If equipped, the driver side exteriorautomatic dimming mirror willautomatically adjust for the glare ofheadlamps behind.
Memory Mirrors
The vehicle may have exteriormemory mirrors. See Memory Seats0 61.
Side Blind Zone Alert (SBZA)
The vehicle may have Side Blind ZoneAlert. See Side Blind Zone Alert (SBZA)0 236.
Turn Signal Indicator
If equipped with turn signal indicatorson the mirror housings, the indicatorwill flash when a turn signal or thehazard warning flashers are used.
Folding Mirrors
Manual Folding Mirrors
The mirrors can be folded inwardtoward the vehicle to prevent damagewhen going through an automatic carwash. Push the mirror outward toreturn it to the original position.

Cadillac ATS/ATS-V Owner Manual (GMNA-Localizing-U.S./Canada/Mexico-11349135) - 2018 - crc - 9/25/17
KEYS, DOORS, AND WINDOWS 49
Heated MirrorsK : Press to heat the mirrors.
See “Rear Window Defogger” underDual Automatic Climate Control System(Uplevel) 0 167 or Dual AutomaticClimate Control System (Base) 0 163.
Reverse Tilt MirrorsIf equipped with memory seats, thepassenger and/or driver mirror tilts toa preselected position when thevehicle is in R (Reverse). This allowsthe curb to be seen when parallelparking.
The mirror(s) return to the originalposition when:
. The vehicle is shifted out ofR (Reverse), or remains inR (Reverse) for about 30 seconds.
. The ignition is turned off.
. The vehicle is driven inR (Reverse) above a set speed.
To turn this feature on or off, seeVehicle Personalization 0 141.
Interior Mirrors
Interior Rearview MirrorsAdjust the rearview mirror for a clearview of the area behind the vehicle.
Do not spray glass cleaner directly onthe mirror. Use a soft towel dampenedwith water.
Manual Rearview MirrorIf equipped with a manual rearviewmirror, push the tab forward fordaytime use and pull it for nighttimeuse to avoid glare from the headlampsfrom behind.
Automatic DimmingRearview MirrorIf equipped, automatic dimmingreduces the glare of headlamps frombehind. The dimming feature comeson when the vehicle is started.
Windows
{ Warning
Never leave a child, a helpless adult,or a pet alone in a vehicle,especially with the windows closedin warm or hot weather. They canbe overcome by the extreme heatand suffer permanent injuries oreven death from heat stroke.

Cadillac ATS/ATS-V Owner Manual (GMNA-Localizing-U.S./Canada/Mexico-11349135) - 2018 - crc - 9/25/17
50 KEYS, DOORS, AND WINDOWS
The vehicle aerodynamics aredesigned to improve fuel economyperformance. This may result in apulsing sound when either rearwindow is down and the frontwindows are up. To reduce the sound,open either a front window or thesunroof, if equipped.
Power Windows
{ Warning
Children could be seriously injuredor killed if caught in the path of aclosing window. Never leave theRemote Keyless Entry (RKE)transmitter in a vehicle withchildren. When there are children inthe rear seat, use the windowlockout switch to prevent operationof the windows. See Keys 0 30.
Sedan Shown, Coupe Similar
Power windows work when theignition is on, in ACC/ACCESSORY,or when Retained Accessory Power(RAP) is active. See Retained AccessoryPower (RAP) 0 195.
Using the window switch, press toopen or pull to close the window.
The windows may be temporarilydisabled if they are used repeatedlywithin a short time.
Window Lockout (Sedan Only)
This feature stops the rear doorpassenger window switches fromworking.
. PressZ to engage the rearwindow lockout feature. Theindicator light is on when engaged.
. PressZ again to disengage.
Window Express Movement
All windows can be opened withoutholding the window switch. Press theswitch down fully and quickly releaseto express open the window.
Cadillac ATS/ATS-V Owner Manual (GMNA-Localizing-U.S./Canada/Mexico-11349135) - 2018 - crc - 9/25/17
KEYS, DOORS, AND WINDOWS 51
If equipped, pull the window switchup fully and quickly release to expressclose the window.
Briefly press or pull the windowswitch in the same direction to stopthat window’s express movement.
Window Automatic ReversalSystem
The express-close feature will reversewindow movement if it comes incontact with an object. Extreme coldor ice could cause the window toauto-reverse. The window will operatenormally after the object or conditionis removed.
Automatic Reversal SystemOverride
{ Warning
If automatic reversal systemoverride is active, the window willnot reverse automatically. You orothers could be injured and thewindow could be damaged. Beforeusing automatic reversal system
(Continued)
Warning (Continued)
override, make sure that all peopleand obstructions are clear of thewindow path.
When the engine is on, override theautomatic reversal system by pullingand holding the window switch ifconditions prevent it from closing.
Programming the PowerWindows
Programming may be necessary if thevehicle battery has been disconnectedor discharged. If the window is unableto express-up, program eachexpress-close window:
1. Close all doors.
2. Turn the ignition on or to ACC/ACCESSORY.
3. Partially open the window to beprogrammed. Then close it andcontinue to pull the switchbriefly after the window has fullyclosed.
4. Open the window and continueto press the switch briefly afterthe window has fully opened.
Remote Window Operation
If equipped, this feature allows all thewindows to be opened remotely.If enabled in vehicle personalization,press and hold " on the RKEtransmitter. See Vehicle Personalization0 141.
Window Indexing (Coupe Only)
If the window freezes to the door,push the top of the window inwardwhile opening the door. Clear all snowand ice from the door and glass.
Then open the window completelyand then close it.
The door can now be closed.
When fully closed, indexingautomatically lowers the window asmall amount when the door isopened.

Cadillac ATS/ATS-V Owner Manual (GMNA-Localizing-U.S./Canada/Mexico-11349135) - 2018 - crc - 9/25/17
52 KEYS, DOORS, AND WINDOWS
When the door is closed, the windowwill raise to its previous position.If either window does not indexproperly, it could be due to loss ofpower. Before seeing your dealer forservice, program the power windows.
Sun VisorsPull the visor toward you, or move itto the side to help reduce glare.
To use the lighted mirror, lift thecover.
Roof
SunroofIf equipped, the ignition must be onor in ACC/ACCESSORY, or RetainedAccessory Power (RAP) must be activeto operate the sunroof.See Ignition Positions 0 190 andRetained Accessory Power (RAP) 0 195.
1. SLIDE Switch2. TILT Switch
Slide Switch
Express-Open/Express-Close :PressD (1) to the second detent andrelease to express-open the sunroof.Pressg (1) to the second detentand release to express-close thesunroof. Press again to stop themovement.
Open/Close (Manual Mode) :PressD (1) to the first detent and
hold to open the sunroof. Pressg(1) to the first detent and hold toclose the sunroof. Release to stop themovement.
Tilt Switch
Vent Feature : Press and holdE (2)to vent the sunroof. The sunshademust be manually opened. Press andholdg (2) to close thesunroof vent.
Automatic Reversal System
The sunroof has an automatic reversalsystem that is only active when thesunroof is operated inexpress-close mode.

Cadillac ATS/ATS-V Owner Manual (GMNA-Localizing-U.S./Canada/Mexico-11349135) - 2018 - crc - 9/25/17
KEYS, DOORS, AND WINDOWS 53
If an object is in the path whileexpress closing, the reversal systemwill detect an object, stop, and openthe sunroof again.
If frost or other conditions preventclosing, override the feature by closingthe sunroof in manual mode. To stopmovement, release the switch.
Dirt and debris may collect on thesunroof seal or in the track. Thiscould cause an issue with sunroofoperation or noise. It could also plugthe water drainage system.Periodically open the sunroof andremove any obstacles or loose debris.Wipe the sunroof seal and roof sealingarea using a clean cloth, mild soap,and water. Do not remove grease fromthe sunroof.

Cadillac ATS/ATS-V Owner Manual (GMNA-Localizing-U.S./Canada/Mexico-11349135) - 2018 - crc - 9/25/17
54 SEATS AND RESTRAINTS
Seats and Restraints
Head RestraintsHead Restraints . . . . . . . . . . . . . . . . . . . . 55
Front SeatsEasy Entry Seat (Coupe Only) . . . . 56Power Seat Adjustment . . . . . . . . . . . 57Lumbar Adjustment . . . . . . . . . . . . . . . 59Thigh Support Adjustment . . . . . . . . 60Reclining Seatbacks . . . . . . . . . . . . . . . 60Memory Seats . . . . . . . . . . . . . . . . . . . . . . 61Heated Front Seats . . . . . . . . . . . . . . . . 64
Rear SeatsRear Seats (Sedan Only) . . . . . . . . . . . 66Rear Seats (Coupe Only) . . . . . . . . . . 68Rear Seat Pass-Through Door . . . . . 69
Seat BeltsSeat Belts . . . . . . . . . . . . . . . . . . . . . . . . . . . 70How to Wear Seat BeltsProperly . . . . . . . . . . . . . . . . . . . . . . . . . . . 71
Lap-Shoulder Belt . . . . . . . . . . . . . . . . . . 72Seat Belt Use DuringPregnancy . . . . . . . . . . . . . . . . . . . . . . . . . 74
Seat Belt Extender . . . . . . . . . . . . . . . . . 75Safety System Check . . . . . . . . . . . . . . 75Seat Belt Care . . . . . . . . . . . . . . . . . . . . . . 75
Replacing Seat Belt System Partsafter a Crash . . . . . . . . . . . . . . . . . . . . . . 76
Airbag SystemAirbag System . . . . . . . . . . . . . . . . . . . . . 76Where Are the Airbags? . . . . . . . . . . . 78When Should an AirbagInflate? . . . . . . . . . . . . . . . . . . . . . . . . . . . 79
What Makes an Airbag Inflate? . . . 80How Does an Airbag Restrain? . . . 81What Will You See after an AirbagInflates? . . . . . . . . . . . . . . . . . . . . . . . . . . 81
Passenger Sensing System . . . . . . . . 82Servicing the Airbag-EquippedVehicle . . . . . . . . . . . . . . . . . . . . . . . . . . . . 86
Adding Equipment to theAirbag-Equipped Vehicle . . . . . . . . 87
Airbag System Check . . . . . . . . . . . . . . 88Replacing Airbag System Partsafter a Crash . . . . . . . . . . . . . . . . . . . . . . 88
Child RestraintsOlder Children . . . . . . . . . . . . . . . . . . . . . 88Infants and Young Children . . . . . . 90Child Restraint Systems . . . . . . . . . . . 92Where to Put the Restraint . . . . . . . 94Lower Anchors and Tethers forChildren (LATCH System) . . . . . . . 95
Replacing LATCH System PartsAfter a Crash . . . . . . . . . . . . . . . . . . . . 101
Securing Child Restraints (Withthe Seat Belt in theRear Seat) . . . . . . . . . . . . . . . . . . . . . . . 101
Securing Child Restraints (Withthe Seat Belt in theFront Seat) . . . . . . . . . . . . . . . . . . . . . . 103
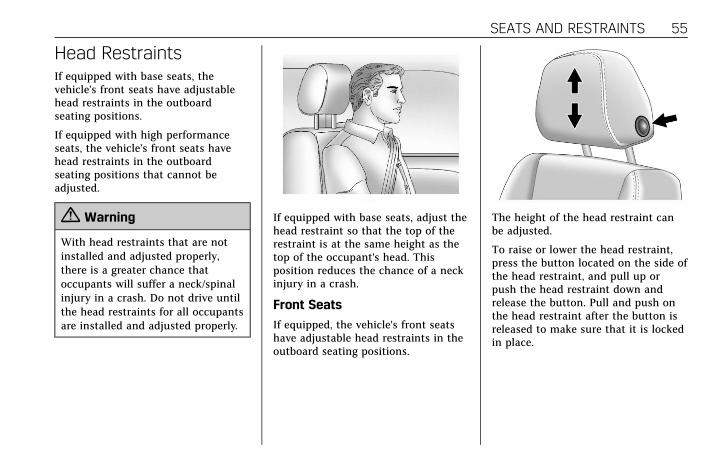
Cadillac ATS/ATS-V Owner Manual (GMNA-Localizing-U.S./Canada/Mexico-11349135) - 2018 - crc - 9/25/17
SEATS AND RESTRAINTS 55
Head RestraintsIf equipped with base seats, thevehicle’s front seats have adjustablehead restraints in the outboardseating positions.
If equipped with high performanceseats, the vehicle’s front seats havehead restraints in the outboardseating positions that cannot beadjusted.
{ Warning
With head restraints that are notinstalled and adjusted properly,there is a greater chance thatoccupants will suffer a neck/spinalinjury in a crash. Do not drive untilthe head restraints for all occupantsare installed and adjusted properly.
If equipped with base seats, adjust thehead restraint so that the top of therestraint is at the same height as thetop of the occupant's head. Thisposition reduces the chance of a neckinjury in a crash.
Front Seats
If equipped, the vehicle's front seatshave adjustable head restraints in theoutboard seating positions.
The height of the head restraint canbe adjusted.
To raise or lower the head restraint,press the button located on the side ofthe head restraint, and pull up orpush the head restraint down andrelease the button. Pull and push onthe head restraint after the button isreleased to make sure that it is lockedin place.

Cadillac ATS/ATS-V Owner Manual (GMNA-Localizing-U.S./Canada/Mexico-11349135) - 2018 - crc - 9/25/17
56 SEATS AND RESTRAINTS
To adjust the head restraint forwardand rearward, press the button locatedon the side facing of the headrestraint and move it forward orrearward until the desired lockingposition is reached. Try to move thehead restraint after the button isreleased to make sure that it is lockedin place.
The front seat outboard headrestraints are not removable.
Rear Seats
The vehicle's rear seats haveadjustable head restraints in theoutboard seating positions.
The height of the head restraint canbe adjusted. Pull the head restraint upto raise it. Try to move the headrestraint to make sure that it is lockedin place.
To lower the head restraint, press thebutton, located on the top of theseatback, and push the head restraintdown. Try to move the head restraintafter the button is released to makesure that it is locked in place.
Rear outboard head restraints are notremovable.
Front Seats
Easy Entry Seat(Coupe Only)
High Performance Seat
1. Seat Adjustment Switch2. Folding Seatback Handle
If equipped, the front seats can bemoved out of the way to make iteasier to get in and out of therear seat.
To fold the seatback, lift thehandle (2) on top of the seatback. Theseatback will fold forward.

Cadillac ATS/ATS-V Owner Manual (GMNA-Localizing-U.S./Canada/Mexico-11349135) - 2018 - crc - 9/25/17
SEATS AND RESTRAINTS 57
To move the seat forward, press andhold the front of the switch (1) on theoutboard side of the upper seatback.To move the seat rearward, press andhold the rear of the switch (1). Releasethe switch (1) when the seat reachesthe desired position.
After entering or exiting the rear seat,return the seatback to the uprightposition. Lift the seatback and push itrearward until it locks into place. Pushand pull on the seatback to make sureit is locked.
{ Warning
If either seatback is not locked, itcould move forward in a suddenstop or crash. That could causeinjury to the person sitting there.Always push and pull on theseatbacks to be sure they arelocked.
Power Seat Adjustment
High Performance Seat Shown,Others Similar
To adjust the seat:
. Move the seat forward or rearwardby sliding the control forward orrearward.
. Raise or lower the seat by movingthe rear of the control up or down.
. If equipped, raise or lower thefront part of the seat cushion bymoving the front of the control upor down.
To adjust the seatback, see RecliningSeatbacks 0 60.
To adjust the lumbar support, seeLumbar Adjustment 0 59.
Some vehicles are equipped with aSafety Alert Seat. This featureactivates a vibrating pulse alert in thedriver seat to help the driver avoidcrashes.
High Performance SeatAdjustment
{ Warning
You can lose control of the vehicleif you try to adjust a driver seatwhile the vehicle is moving. Adjustthe driver seat only when thevehicle is not moving.

Cadillac ATS/ATS-V Owner Manual (GMNA-Localizing-U.S./Canada/Mexico-11349135) - 2018 - crc - 9/25/17
58 SEATS AND RESTRAINTS
High Performance Seat
1. Feature Select2. Up3. Rearward4. Down5. Forward
. Move Feature Select (1) to displayseat adjustments on the centerstack. Press and release or hold toscroll through features.
. Press Up (2) to make upwardadjustments of the selectedfeature.
. Press Rearward (3) to makerearward adjustments of theselected feature.
. Press Down (4) to make downwardadjustments of the selectedfeature.
. Press Forward (5) to make forwardadjustments of the selectedfeature.
Four-Way Lumbar Support
To adjust lumbar support for a baseseat, see Lumbar Adjustment 0 59.
To adjust lumbar support for highperformance seats, if equipped:
High Performance Seat
. Press and release or hold FeatureSelect (1) to scroll to lumbarsupport on the center stack.
. Press Forward (5) or Rearward (3)to adjust lumbar forward orrearward.
. Press Up (2) or Down (4) to adjustlumbar support up or down.

Cadillac ATS/ATS-V Owner Manual (GMNA-Localizing-U.S./Canada/Mexico-11349135) - 2018 - crc - 9/25/17
SEATS AND RESTRAINTS 59
Cushion Bolster Support
To adjust cushion bolster support,if equipped:
. Press and release or hold FeatureSelect (1) to scroll to cushionbolster support on the centerstack.
. Press Forward (5) or Rearward (3)to adjust cushion bolster supportinward or outward.
Back Bolster
To adjust back bolster, if equipped:
. Press and release or hold FeatureSelect (1) to scroll to back bolsteron the center stack.
. Press Forward (5) or Rearward (3)to adjust back bolster inward oroutward.
Lumbar Adjustment
Base Seat
To adjust the lumbar and bolstersupport:
. Press and hold the control forwardor rearward to adjust lumbarsupport forward or rearward.

Cadillac ATS/ATS-V Owner Manual (GMNA-Localizing-U.S./Canada/Mexico-11349135) - 2018 - crc - 9/25/17
60 SEATS AND RESTRAINTS
Back Bolster Adjustment
If equipped, to increase or decreasethe back bolster support, press andhold the lumbar control up and down.
Thigh Support Adjustment
Base Seat
If equipped, pull up on the lever. Thenpull or push on the support tolengthen or shorten. Release the leverto lock in place.
Reclining Seatbacks
High Performance Seat
To adjust the seatback:
. Tilt the top of the controlrearward to recline.
. Tilt the top of the control forwardto raise.

Cadillac ATS/ATS-V Owner Manual (GMNA-Localizing-U.S./Canada/Mexico-11349135) - 2018 - crc - 9/25/17
SEATS AND RESTRAINTS 61
Base Seat
To adjust the seatback:
. Tilt the top of the controlrearward to recline.
. Tilt the top of the control forwardto raise.
{ Warning
Sitting in a reclined position whenthe vehicle is in motion can bedangerous. Even when buckled up,the seat belts cannot do their job.
The shoulder belt will not beagainst your body. Instead, it will bein front of you. In a crash, youcould go into it, receiving neck orother injuries.
The lap belt could go up over yourabdomen. The belt forces would bethere, not at your pelvic bones. Thiscould cause serious internalinjuries.
For proper protection when thevehicle is in motion, have theseatback upright. Then sit well backin the seat and wear the seat beltproperly.
Do not have a seatback reclined if thevehicle is moving.
Memory Seats

Cadillac ATS/ATS-V Owner Manual (GMNA-Localizing-U.S./Canada/Mexico-11349135) - 2018 - crc - 9/25/17
62 SEATS AND RESTRAINTS
If equipped, memory seats allow twodrivers to store and recall their uniqueseat positions for driving the vehicle,and a shared exit position for gettingout of the vehicle. Other featurepositions may also be set, such aspower mirrors and power steeringwheel, if equipped. Memory positionsare linked to RKE transmitter 1 or 2for automatic memory recalls.
Before storing, adjust all availablememory feature positions. Turn theignition on and then press and releaseSET; a beep will sound. Thenimmediately press and hold 1, 2,orB (Exit) on the driver door untiltwo beeps sound. To manually recallthese positions, press and hold 1, 2,orB until the saved position isreached.
The vehicle identifies the currentdriver’s RKE transmitter number(1–8). See Remote Keyless Entry (RKE)System Operation 0 31. Only RKEtransmitters 1 and 2 can be used forautomatic memory recalls. A DriverInformation Center (DIC) welcomemessage indicating the transmitternumber may display for the first few
ignition cycles following a transmitterchange. For Auto Memory Recall towork properly, save the positions tothe memory button (1 or 2) matchingthe RKE transmitter number displayedin the DIC welcome message. Carrythe linked RKE transmitter whenentering the vehicle.
Vehicle Personalization Settings
. To have the Auto Memory Recallmovement begin when the vehicleis started, select the Settingsmenu, then Vehicle, then Comfortand Convenience, and then AutoMemory Recall. Select On or Off.See “Auto Memory Recall” later inthis section.
. To begin Easy Exit Recallmovement when the ignition isturned off and the driver door isopened, or when the ignition isturned off with the driver dooralready opened, select the Settingsmenu, then Vehicle, then Comfortand Convenience, and then EasyExit Options. Select On or Off. See“Easy Exit Recall” later in thissection.
. See Vehicle Personalization 0 141for additional setting information.
Identifying Driver Number
To identify the driver number:
1. Start the vehicle with the otherkey or RKE transmitter. The DICshould display the drivernumber; 1 or 2. Turn the ignitionoff and remove the key or RKEtransmitter from the vehicle.
2. Start the vehicle with the initialkey or RKE transmitter. The DICshould display the other drivernumber not shown in step 1.
Saving Memory Positions
Read these instructions completelybefore saving memory positions.
To save preferred driving positions1 and 2:
1. Turn the ignition on or to ACC/ACCESSORY.
A DIC welcome message may bedisplayed indicating number 1 or2 for memory recalls.
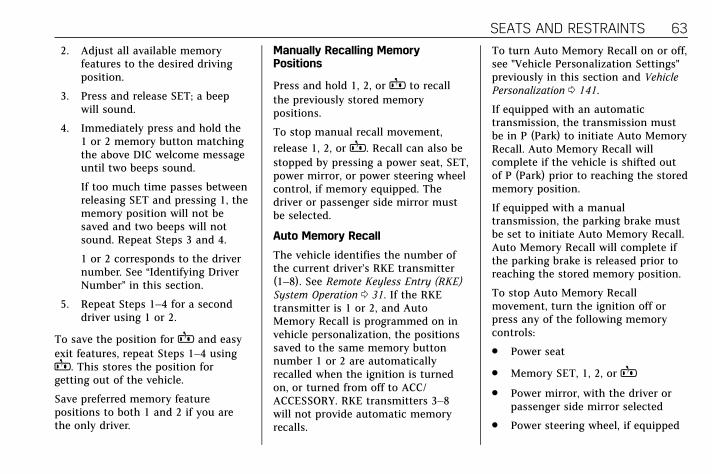
Cadillac ATS/ATS-V Owner Manual (GMNA-Localizing-U.S./Canada/Mexico-11349135) - 2018 - crc - 9/25/17
SEATS AND RESTRAINTS 63
2. Adjust all available memoryfeatures to the desired drivingposition.
3. Press and release SET; a beepwill sound.
4. Immediately press and hold the1 or 2 memory button matchingthe above DIC welcome messageuntil two beeps sound.
If too much time passes betweenreleasing SET and pressing 1, thememory position will not besaved and two beeps will notsound. Repeat Steps 3 and 4.
1 or 2 corresponds to the drivernumber. See “Identifying DriverNumber” in this section.
5. Repeat Steps 1–4 for a seconddriver using 1 or 2.
To save the position forB and easyexit features, repeat Steps 1–4 usingB. This stores the position forgetting out of the vehicle.
Save preferred memory featurepositions to both 1 and 2 if you arethe only driver.
Manually Recalling MemoryPositions
Press and hold 1, 2, orB to recallthe previously stored memorypositions.
To stop manual recall movement,release 1, 2, orB. Recall can also bestopped by pressing a power seat, SET,power mirror, or power steering wheelcontrol, if memory equipped. Thedriver or passenger side mirror mustbe selected.
Auto Memory Recall
The vehicle identifies the number ofthe current driver’s RKE transmitter(1–8). See Remote Keyless Entry (RKE)System Operation 0 31. If the RKEtransmitter is 1 or 2, and AutoMemory Recall is programmed on invehicle personalization, the positionssaved to the same memory buttonnumber 1 or 2 are automaticallyrecalled when the ignition is turnedon, or turned from off to ACC/ACCESSORY. RKE transmitters 3–8will not provide automatic memoryrecalls.
To turn Auto Memory Recall on or off,see "Vehicle Personalization Settings"previously in this section and VehiclePersonalization 0 141.
If equipped with an automatictransmission, the transmission mustbe in P (Park) to initiate Auto MemoryRecall. Auto Memory Recall willcomplete if the vehicle is shifted outof P (Park) prior to reaching the storedmemory position.
If equipped with a manualtransmission, the parking brake mustbe set to initiate Auto Memory Recall.Auto Memory Recall will complete ifthe parking brake is released prior toreaching the stored memory position.
To stop Auto Memory Recallmovement, turn the ignition off orpress any of the following memorycontrols:
. Power seat
. Memory SET, 1, 2, orB
. Power mirror, with the driver orpassenger side mirror selected
. Power steering wheel, if equipped
Cadillac ATS/ATS-V Owner Manual (GMNA-Localizing-U.S./Canada/Mexico-11349135) - 2018 - crc - 9/25/17
64 SEATS AND RESTRAINTS
If the stored memory seat positiondoes not automatically recall or recallsto the wrong positions, the driver’sRKE transmitter number (1 or 2) maynot match the memory buttonnumber that positions were saved to.Try storing the position to the othermemory button or try the other RKEtransmitter.
Easy Exit Recall
Easy Exit Recall is not linked to anRKE transmitter. The position storedtoB is used for all drivers. To turnEasy Exit Recall on or off, see "VehiclePersonalization Settings" previously inthis section and Vehicle Personalization0 141.
If turned on, the position saved toBis automatically recalled when one ofthe following occurs:
. The vehicle is turned off and thedriver door is opened within ashort time.
. The vehicle is turned off with thedriver door open.
To stop Easy Exit Recall movement,press any of the following memorycontrols:
. Power seat
. Memory SET, 1, 2, orB
. Power mirror, with the driver orpassenger side mirror selected
. Power steering wheel, if equipped
Obstructions
If something has blocked the driverseat and/or power steering wheelwhile recalling a memory position, therecall may stop. Remove theobstruction and try the recall again.If the memory position still does notrecall, see your dealer for service.
Heated Front Seats
{ Warning
If temperature change or pain tothe skin cannot be felt, the seatheater may cause burns. To reducethe risk of burns, use care whenusing the seat heater, especially forlong periods of time. Do not placeanything on the seat that insulatesagainst heat, such as a blanket,cushion, cover, or similar item. Thismay cause the seat heater tooverheat. An overheated seat heatermay cause a burn or may damagethe seat.

Cadillac ATS/ATS-V Owner Manual (GMNA-Localizing-U.S./Canada/Mexico-11349135) - 2018 - crc - 9/25/17
SEATS AND RESTRAINTS 65
Uplevel Buttons Shown, Base ButtonsSimilar
If equipped, the buttons are near theclimate controls on the center stack.To operate, the ignition must be on.
Press J /M or z /L to heat thedriver or passenger seat cushion andseatback.
Press the button once for the highestsetting. With each press of the button,the seat will change to the next lowersetting, and then to the off setting.
The indicator lights next to thebuttons indicate three for the highestsetting and one for the lowest. If theheated seats are on high, the levelmay automatically be lowered afterapproximately 30 minutes.
When this feature is off, the heatedseat symbol on the button is white.When the heated seat is turned on,the symbol turns red.
The passenger seat may take longer toheat up.
Auto Heated Seats
If the vehicle is equipped with autoheated seats, and the ignition is on,this feature will automatically activatethe heated seats at the level requiredby the vehicle's interior temperature.
The active high, medium, low, or offheated seat level will be indicated bythe manual heated seat buttons onthe center stack. Use the manualheated seat buttons on the centerstack to turn the auto heated seats off.
If the passenger seat is unoccupied,the auto heated seats feature will notactivate that seat. The auto heatedseats feature can be programmed toalways be enabled when the vehicle ison. If equipped with a heated steeringwheel, the auto heated steering wheelactivation will follow the heated seatauto activation and the heated wheelindicator will follow the state of thesteering wheel heat.
See Vehicle Personalization 0 141.
Remote Start Heated Seats
If equipped, the heated seats will turnon automatically during a remotestart if it is cold outside. If equipped,the heated steering wheel will turn onautomatically during a remote start ifit is cold outside. The heated seatindicators and heated steering wheelindicator may not come on during thisoperation.
The heated seats and heated steeringwheel may cancel when the vehicle isstarted. These features can bemanually selected after the ignition isturned on.

Cadillac ATS/ATS-V Owner Manual (GMNA-Localizing-U.S./Canada/Mexico-11349135) - 2018 - crc - 9/25/17
66 SEATS AND RESTRAINTS
The temperature performance of anunoccupied seat may be reduced. Thisis normal.
The heated seats will not turn onduring a remote start unless they areenabled in the vehicle personalizationmenu.See Remote Vehicle Start 0 37 andVehicle Personalization 0 141.
Rear Seats
Rear Seats (Sedan Only)
Rear Seat Reminder
If equipped, the message REAR SEATREMINDER LOOK IN REAR SEATdisplays under certain conditionsindicating there may be an item orpassenger in the rear seat. Checkbefore exiting the vehicle.
This feature will activate when asecond row door is opened while thevehicle is on or up to 10 minutesbefore the vehicle is turned on. Therewill be an alert when the vehicle isturned off. The alert does not directlydetect objects in the rear seat; instead,under certain conditions, it detectswhen a rear door is opened andclosed, indicating that there may besomething in the rear seat.
The feature is active only once eachtime the vehicle is turned on and off,and will require reactivation byopening and closing the second rowdoors. There may be an alert evenwhen there is nothing in the rear seat;
for example, if a child entered thevehicle through the rear door and leftthe vehicle without the vehicle beingshut off.
The feature can be turned on or off.See Vehicle Personalization 0 141.
Folding the Seatback
Either side of the seatback can befolded for more cargo space. Fold aseatback only when the vehicle is notmoving.
Caution
Folding a rear seat with the seatbelts still fastened may causedamage to the seat or the seatbelts. Always unbuckle the seatbelts and return them to theirnormal stowed position beforefolding a rear seat.
To fold the seatback:

Cadillac ATS/ATS-V Owner Manual (GMNA-Localizing-U.S./Canada/Mexico-11349135) - 2018 - crc - 9/25/17
SEATS AND RESTRAINTS 67
1. Disconnect the rear seat beltmini-latch using a key in the sloton the mini-buckle, and let thebelt retract.
2. Pull the lever on top of theseatback toward you to unlockthe seatback.
A red tab near the seatback leverraises when the seatback isunlocked.
3. Fold the seatback forward.
Repeat Steps 2 and 3 to fold theother seatback, if desired.
Raising the Seatback
{ Warning
If either seatback is not locked, itcould move forward in a suddenstop or crash. That could causeinjury to the person sitting there.Always push and pull on theseatbacks to be sure they arelocked.
{ Warning
A seat belt that is improperlyrouted, not properly attached,or twisted will not provide theprotection needed in a crash. Theperson wearing the belt could beseriously injured. After raising therear seatback, always check to besure that the seat belts are properlyrouted and attached, and are nottwisted.
To raise a seatback:
1. Lift the seatback up. Make surethe center seat belt and latch donot get trapped behind the seat.Push the seatback rearward tolock it in place.
A red tab near the seatback leverretracts when the seatback islocked in place.
2. Push and pull the top of theseatback to be sure it is lockedinto position.

Cadillac ATS/ATS-V Owner Manual (GMNA-Localizing-U.S./Canada/Mexico-11349135) - 2018 - crc - 9/25/17
68 SEATS AND RESTRAINTS
3. Reconnect the center seat beltmini-latch to the mini-buckle. Donot let the belt twist.
4. Pull on the center seat belt tomake sure the mini-latch issecure.
5. Repeat the steps to raise theother seatback, if necessary.
When the seat is not in use, it shouldbe kept in the upright, locked position.
Rear Seats (Coupe Only)
Folding the Seatback
Either side of the seatback can befolded for more cargo space. Fold aseatback only when the vehicle is notmoving.
Caution
Folding a rear seat with the seatbelts still fastened may causedamage to the seat or the seatbelts. Always unbuckle the seat
(Continued)
Caution (Continued)
belts and return them to theirnormal stowed position beforefolding a rear seat.
To fold the seatback:
1. Disconnect the rear seat beltmini-latch using a key in the sloton the mini-buckle, and let thebelt retract.
2. Pull the lever on top of theseatback toward you to unlockthe seatback.
A red tab near the seatback leverraises when the seatback isunlocked.
3. Fold the seatback forward.
Repeat Steps 2 and 3 to fold theother seatback, if desired.

Cadillac ATS/ATS-V Owner Manual (GMNA-Localizing-U.S./Canada/Mexico-11349135) - 2018 - crc - 9/25/17
SEATS AND RESTRAINTS 69
Raising the Seatback
{ Warning
If either seatback is not locked, itcould move forward in a suddenstop or crash. That could causeinjury to the person sitting there.Always push and pull on theseatbacks to be sure they arelocked.
{ Warning
A seat belt that is improperlyrouted, not properly attached,or twisted will not provide theprotection needed in a crash. Theperson wearing the belt could beseriously injured. After raising therear seatback, always check to besure that the seat belts are properlyrouted and attached, and are nottwisted.
To raise a seatback:
1. Lift the seatback up. Make surethe center seat belt and latch donot get trapped behind the seat.Push the seatback rearward tolock it in place.
A red tab near the seatback leverretracts when the seatback islocked in place.
2. Push and pull the top of theseatback to be sure it is lockedinto position.
3. Reconnect the center seat beltmini-latch to the mini-buckle. Donot let the belt twist.
4. Pull on the center seat belt tomake sure the mini-latch issecure.
5. Repeat the steps to raise theother seatback, if necessary.
When the seat is not in use, it shouldbe kept in the upright, locked position.
Rear SeatPass-Through Door
This vehicle may have a rear seatpass-through door in the center of therear seatback. Fold down the centerarmrest and pull the latch to openthe door.

Cadillac ATS/ATS-V Owner Manual (GMNA-Localizing-U.S./Canada/Mexico-11349135) - 2018 - crc - 9/25/17
70 SEATS AND RESTRAINTS
Seat BeltsThis section describes how to use seatbelts properly, and some things notto do.
{ Warning
Do not let anyone ride where a seatbelt cannot be worn properly. In acrash, if you or your passenger(s)are not wearing seat belts, injuriescan be much worse than if you arewearing seat belts. You can beseriously injured or killed by hittingthings inside the vehicle harder orby being ejected from the vehicle.In addition, anyone who is notbuckled up can strike otherpassengers in the vehicle.
It is extremely dangerous to ride ina cargo area, inside or outside of avehicle. In a collision, passengersriding in these areas are more likelyto be seriously injured or killed. Do
(Continued)
Warning (Continued)
not allow passengers to ride in anyarea of the vehicle that is notequipped with seats and seat belts.
Always wear a seat belt, and checkthat all passenger(s) are restrainedproperly too.
This vehicle has indicators as areminder to buckle the seat belts. SeeSeat Belt Reminders 0 123.
Why Seat Belts Work
When riding in a vehicle, you travel asfast as the vehicle does. If the vehiclestops suddenly, you keep going untilsomething stops you. It could be thewindshield, the instrument panel,or the seat belts!
When you wear a seat belt, you andthe vehicle slow down together. Thereis more time to stop because you stopover a longer distance and, when wornproperly, your strongest bones takethe forces from the seat belts. That iswhy wearing seat belts makes suchgood sense.
Questions and Answers AboutSeat Belts
Q: Will I be trapped in the vehicleafter a crash if I am wearing aseat belt?
A: You could be— whether you arewearing a seat belt or not. Yourchance of being conscious duringand after a crash, so you canunbuckle and get out, is muchgreater if you are belted.

Cadillac ATS/ATS-V Owner Manual (GMNA-Localizing-U.S./Canada/Mexico-11349135) - 2018 - crc - 9/25/17
SEATS AND RESTRAINTS 71
Q: If my vehicle has airbags, whyshould I have to wear seat belts?
A: Airbags are supplemental systemsonly. They work with seat belts—not instead of them. Whether ornot an airbag is provided, alloccupants still have to buckle upto get the most protection.
Also, in nearly all states and in allCanadian provinces, the lawrequires wearing seat belts.
How to Wear Seat BeltsProperlyThis section is only for people ofadult size.
There are special things to knowabout seat belts and children, andthere are different rules for smallerchildren and infants. If a child will beriding in the vehicle, see Older Children0 88 or Infants and Young Children0 90. Follow those rules for everyone'sprotection.
It is very important for all occupantsto buckle up. Statistics show thatunbelted people are hurt more oftenin crashes than those who are wearingseat belts.
There are important things to knowabout wearing a seat belt properly.
. Sit up straight and always keepyour feet on the floor in frontof you.
. Always use the correct buckle foryour seating position.
. Wear the lap part of the belt lowand snug on the hips, justtouching the thighs. In a crash,
this applies force to the strongpelvic bones and you would beless likely to slide under the lapbelt. If you slid under it, the beltwould apply force on yourabdomen. This could cause seriousor even fatal injuries.
. Wear the shoulder belt over theshoulder and across the chest.These parts of the body are bestable to take belt restraining forces.The shoulder belt locks if there isa sudden stop or crash.
{ Warning
You can be seriously injured,or even killed, by not wearing yourseat belt properly.
. Never allow the lap orshoulder belt to become looseor twisted.
. Never wear the shoulder beltunder both arms or behindyour back.
. Never route the lap orshoulder belt over an armrest.

Cadillac ATS/ATS-V Owner Manual (GMNA-Localizing-U.S./Canada/Mexico-11349135) - 2018 - crc - 9/25/17
72 SEATS AND RESTRAINTS
Lap-Shoulder BeltAll seating positions in the vehiclehave a lap-shoulder belt.
On sedan models, if you are using arear center seating position with adetachable seat belt and the seat beltis not attached, see “Folding theSeatback” under Rear Seats (SedanOnly) 0 66 or Rear Seats (Coupe Only)0 68 for instructions on reconnectingthe seat belt to the mini-buckle.
The following instructions explainhow to wear a lap-shoulder beltproperly.
1. Adjust the seat, if the seat isadjustable, so you can sit upstraight. To see how, see “Seats”in the Index.
2. Pick up the latch plate and pullthe belt across you. Do not let itget twisted.
The lap-shoulder belt may lock ifyou pull the belt across you veryquickly. If this happens, let thebelt go back slightly to unlock it.Then pull the belt across youmore slowly.
If the shoulder portion of apassenger belt is pulled out allthe way, the child restraintlocking feature may be engaged.If this happens, let the belt goback all the way and start again.
If the webbing locks in the latchplate before it reaches thebuckle, tilt the latch plate flat tounlock.

Cadillac ATS/ATS-V Owner Manual (GMNA-Localizing-U.S./Canada/Mexico-11349135) - 2018 - crc - 9/25/17
SEATS AND RESTRAINTS 73
3. Push the latch plate into thebuckle until it clicks.
Pull up on the latch plate tomake sure it is secure. If the beltis not long enough, see Seat BeltExtender 0 75.
Position the release button onthe buckle so that the seat beltcould be quickly unbuckled ifnecessary.
4. To make the lap part tight, pullup on the shoulder belt.
On sedan models, it may benecessary to pull stitching on theseat belt through the latch plateto fully tighten the lap belt onsmaller occupants.
To unlatch the belt, push the buttonon the buckle. The belt should returnto its stowed position.
Always stow the seat belt slowly. If theseat belt webbing returns quickly tothe stowed position, the retractor maylock and cannot be pulled out. If thishappens, pull the seat belt straight outfirmly to unlock the webbing, and
then release it. If the webbing is stilllocked in the retractor, see yourdealer.
Before a door is closed, be sure theseat belt is out of the way. If a door isslammed against a seat belt, damagecan occur to both the seat belt andthe vehicle.
Automatic Seat Belt TighteningSystem
The vehicle may have the AutomaticSeat Belt Tightening System.
Each time the vehicle is started withthe front seat belts buckled, thesystem activates once to tighten theseat belts when the forward vehiclespeed exceeds the threshold foractivation.
The system also activates duringemergency braking and/or suddendriving maneuvers and releases whendriving conditions return to normal.
The system turns off wheneverCompetitive Driving Mode is activated,and will turn back on when

Cadillac ATS/ATS-V Owner Manual (GMNA-Localizing-U.S./Canada/Mexico-11349135) - 2018 - crc - 9/25/17
74 SEATS AND RESTRAINTS
Competitive Driving Mode isdeactivated. See Competitive DrivingMode (FE3 Only) 0 214.
The system will not activate if theTraction Control/Electronic StabilityControl system is not functioningproperly. See Traction Control/Electronic Stability Control 0 209.If there is a problem with theAutomatic Seat Belt TighteningSystem, a message displays on theDriver Information Center (DIC). If asystem unavailable message displaysrepeatedly or a service messagedisplays, see your dealer. Other seatbelt functions are not affected by theAutomatic Seat Belt TighteningSystem.
Seat Belt Pretensioners
This vehicle has seat beltpretensioners for front outboardoccupants. Although the seat beltpretensioners cannot be seen, they arepart of the seat belt assembly. Theycan help tighten the seat belts duringthe early stages of a moderate tosevere frontal, near frontal, or rearcrash if the threshold conditions for
pretensioner activation are met. Seatbelt pretensioners can also helptighten the seat belts in a side crashor a rollover event.
Pretensioners work only once. If thepretensioners activate in a crash, thepretensioners and probably otherparts of the vehicle’s seat belt systemwill need to be replaced. See ReplacingSeat Belt System Parts after a Crash0 76.
Do not sit on the outboard seat beltwhile entering or exiting the vehicle orat any time while sitting in the seat.Sitting on the seat belt can damagethe webbing and hardware.
Rear Seat Belt Comfort Guides
Rear seat belt comfort guides mayprovide added seat belt comfort forolder children who have outgrownbooster seats and for some adults.When installed on a shoulder belt, thecomfort guide positions the shoulderbelt away from the neck and head.
Comfort guides are available throughyour dealer for the rear outboardseating positions. Instructions areincluded with the guide.
Seat Belt Use DuringPregnancySeat belts work for everyone,including pregnant women. Like alloccupants, they are more likely to beseriously injured if they do not wearseat belts.
A pregnant woman should wear alap-shoulder belt, and the lap portionshould be worn as low as possible,below the rounding, throughout thepregnancy.
The best way to protect the fetus is toprotect the mother. When a seat beltis worn properly, it is more likely that

Cadillac ATS/ATS-V Owner Manual (GMNA-Localizing-U.S./Canada/Mexico-11349135) - 2018 - crc - 9/25/17
SEATS AND RESTRAINTS 75
the fetus will not be hurt in a crash.For pregnant women, as for anyone,the key to making seat belts effectiveis wearing them properly.
Seat Belt ExtenderIf the vehicle's seat belt will fastenaround you, you should use it.
But if a seat belt is not long enough,your dealer will order you an extender.When you go in to order it, take theheaviest coat you will wear, so theextender will be long enough for you.To help avoid personal injury, do notlet someone else use it, and use itonly for the seat it is made to fit. Theextender has been designed for adults.Never use it for securing childrestraints. For more information onthe proper use and fit of seat beltextenders see the instruction sheetthat comes with the extender.
Safety System CheckPeriodically check the seat beltreminder, seat belts, buckles, latchplates, retractors, shoulder belt heightadjusters (if equipped), and seat belt
anchorages to make sure they are allin working order. Look for any otherloose or damaged seat belt systemparts that might keep a seat beltsystem from performing properly. Seeyour dealer to have it repaired. Tornor frayed seat belts may not protectyou in a crash. They can rip apartunder impact forces. If a belt is tornor frayed, have it replacedimmediately.
Make sure the seat belt reminder lightis working. See Seat Belt Reminders0 123.
Keep seat belts clean and dry. See SeatBelt Care 0 75.
Seat Belt CareKeep belts clean and dry.
{ Warning
Do not bleach or dye seat beltwebbing. It may severely weakenthe webbing. In a crash, they mightnot be able to provide adequateprotection. Clean and rinse seat belt
(Continued)
Warning (Continued)
webbing only with mild soap andlukewarm water. Allow the webbingto dry.
Seat belts should be properly cared forand maintained.
Seat belt hardware should be kept dryand free of dust or debris. Asnecessary exterior hard surfaces andseat belt webbing may be lightlycleaned with mild soap and water.Ensure there is not excessive dust ordebris in the mechanism. If dust ordebris exists in the system please seethe dealer. Parts may need to bereplaced to ensure properfunctionality of the system.

Cadillac ATS/ATS-V Owner Manual (GMNA-Localizing-U.S./Canada/Mexico-11349135) - 2018 - crc - 9/25/17
76 SEATS AND RESTRAINTS
Replacing Seat BeltSystem Parts after a Crash
{ Warning
A crash can damage the seat beltsystem in the vehicle. A damagedseat belt system may not properlyprotect the person using it,resulting in serious injury or evendeath in a crash. To help make surethe seat belt systems are workingproperly after a crash, have theminspected and any necessaryreplacements made as soon aspossible.
After a minor crash, replacement ofseat belts may not be necessary. Butthe seat belt assemblies that wereused during any crash may have beenstressed or damaged. See your dealerto have the seat belt assembliesinspected or replaced.
New parts and repairs may benecessary even if the seat belt systemwas not being used at the time of thecrash.
Have the seat belt pretensionerschecked if the vehicle has been in acrash, or if the airbag readiness lightstays on after you start the vehicle orwhile you are driving. See AirbagReadiness Light 0 124.
Airbag SystemThe vehicle has the following airbags:
. A frontal airbag for the driver
. A frontal airbag for the frontoutboard passenger
. A knee airbag for the driver
. A knee airbag for the frontoutboard passenger
. A seat-mounted side impact airbagfor the driver
. A seat-mounted side impact airbagfor the front outboard passenger
. A roof-rail airbag for the driverand the passenger seated directlybehind the driver
. A roof-rail airbag for the frontoutboard passenger and thepassenger seated directly behindthe front outboard passenger
Sedan models may have the followingairbags:
. Seat-mounted side impact airbagsfor the second row outboardpassengers
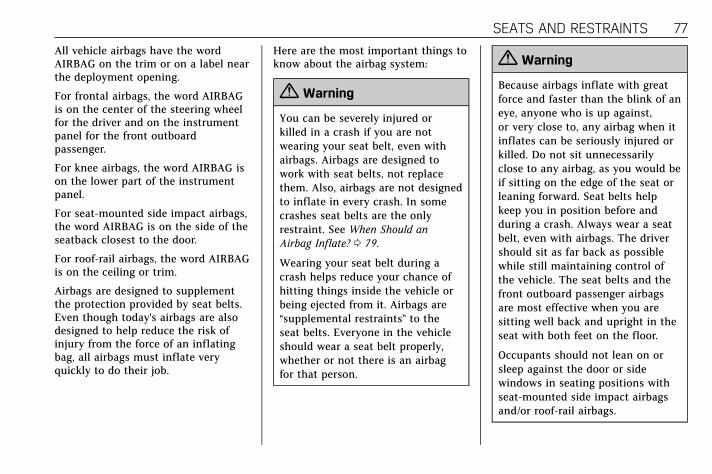
Cadillac ATS/ATS-V Owner Manual (GMNA-Localizing-U.S./Canada/Mexico-11349135) - 2018 - crc - 9/25/17
SEATS AND RESTRAINTS 77
All vehicle airbags have the wordAIRBAG on the trim or on a label nearthe deployment opening.
For frontal airbags, the word AIRBAGis on the center of the steering wheelfor the driver and on the instrumentpanel for the front outboardpassenger.
For knee airbags, the word AIRBAG ison the lower part of the instrumentpanel.
For seat-mounted side impact airbags,the word AIRBAG is on the side of theseatback closest to the door.
For roof-rail airbags, the word AIRBAGis on the ceiling or trim.
Airbags are designed to supplementthe protection provided by seat belts.Even though today's airbags are alsodesigned to help reduce the risk ofinjury from the force of an inflatingbag, all airbags must inflate veryquickly to do their job.
Here are the most important things toknow about the airbag system:
{ Warning
You can be severely injured orkilled in a crash if you are notwearing your seat belt, even withairbags. Airbags are designed towork with seat belts, not replacethem. Also, airbags are not designedto inflate in every crash. In somecrashes seat belts are the onlyrestraint. See When Should anAirbag Inflate? 0 79.
Wearing your seat belt during acrash helps reduce your chance ofhitting things inside the vehicle orbeing ejected from it. Airbags are“supplemental restraints” to theseat belts. Everyone in the vehicleshould wear a seat belt properly,whether or not there is an airbagfor that person.
{ Warning
Because airbags inflate with greatforce and faster than the blink of aneye, anyone who is up against,or very close to, any airbag when itinflates can be seriously injured orkilled. Do not sit unnecessarilyclose to any airbag, as you would beif sitting on the edge of the seat orleaning forward. Seat belts helpkeep you in position before andduring a crash. Always wear a seatbelt, even with airbags. The drivershould sit as far back as possiblewhile still maintaining control ofthe vehicle. The seat belts and thefront outboard passenger airbagsare most effective when you aresitting well back and upright in theseat with both feet on the floor.
Occupants should not lean on orsleep against the door or sidewindows in seating positions withseat-mounted side impact airbagsand/or roof-rail airbags.

Cadillac ATS/ATS-V Owner Manual (GMNA-Localizing-U.S./Canada/Mexico-11349135) - 2018 - crc - 9/25/17
78 SEATS AND RESTRAINTS
{ Warning
Children who are up against,or very close to, any airbag when itinflates can be seriously injured orkilled. Always secure childrenproperly in the vehicle. To readhow, see Older Children 0 88 orInfants and Young Children 0 90.
There is an airbag readiness light onthe instrument cluster, which showsthe airbag symbol. The system checksthe airbag electrical system formalfunctions. The light tells you ifthere is an electrical problem. SeeAirbag Readiness Light 0 124.
Where Are the Airbags?
The driver frontal airbag is in thecenter of the steering wheel.
The front outboard passenger frontalairbag is in the passenger sideinstrument panel.
The driver knee airbag is below thesteering column. The front outboardpassenger knee airbag is below theglove box.
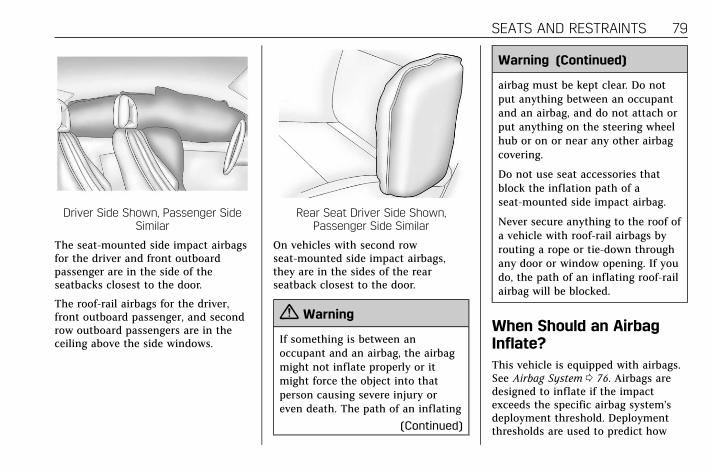
Cadillac ATS/ATS-V Owner Manual (GMNA-Localizing-U.S./Canada/Mexico-11349135) - 2018 - crc - 9/25/17
SEATS AND RESTRAINTS 79
Driver Side Shown, Passenger SideSimilar
The seat-mounted side impact airbagsfor the driver and front outboardpassenger are in the side of theseatbacks closest to the door.
The roof-rail airbags for the driver,front outboard passenger, and secondrow outboard passengers are in theceiling above the side windows.
Rear Seat Driver Side Shown,Passenger Side Similar
On vehicles with second rowseat-mounted side impact airbags,they are in the sides of the rearseatback closest to the door.
{ Warning
If something is between anoccupant and an airbag, the airbagmight not inflate properly or itmight force the object into thatperson causing severe injury oreven death. The path of an inflating
(Continued)
Warning (Continued)
airbag must be kept clear. Do notput anything between an occupantand an airbag, and do not attach orput anything on the steering wheelhub or on or near any other airbagcovering.
Do not use seat accessories thatblock the inflation path of aseat-mounted side impact airbag.
Never secure anything to the roof ofa vehicle with roof-rail airbags byrouting a rope or tie‐down throughany door or window opening. If youdo, the path of an inflating roof-railairbag will be blocked.
When Should an AirbagInflate?This vehicle is equipped with airbags.See Airbag System 0 76. Airbags aredesigned to inflate if the impactexceeds the specific airbag system’sdeployment threshold. Deploymentthresholds are used to predict how

Cadillac ATS/ATS-V Owner Manual (GMNA-Localizing-U.S./Canada/Mexico-11349135) - 2018 - crc - 9/25/17
80 SEATS AND RESTRAINTS
severe a crash is likely to be in timefor the airbags to inflate and helprestrain the occupants. The vehiclehas electronic frontal sensors thathelp the airbag system determine theseverity of the impact. Deploymentthresholds can vary with specificvehicle design.
Frontal airbags are designed to inflatein moderate to severe frontal ornear-frontal crashes to help reducethe potential for severe injuries,mainly to the driver's or frontoutboard passenger's head and chest.
Whether the frontal airbags will orshould inflate is not based primarilyon how fast the vehicle is traveling.It depends on what is hit, thedirection of the impact, and howquickly the vehicle slows down.
Frontal airbags may inflate atdifferent crash speeds depending onwhether the vehicle hits an objectstraight on or at an angle, andwhether the object is fixed or moving,rigid or deformable, narrow or wide.
Frontal airbags are not intended toinflate during vehicle rollovers, in rearimpacts, or in many side impacts.
In addition, the vehicle has advancedtechnology frontal airbags. Advancedtechnology frontal airbags adjust therestraint according to crash severity.
Knee airbags are designed to inflate inmoderate to severe frontal impacts.Knee airbags are not designed toinflate during vehicle rollovers, in rearimpacts, or in many side impacts.
The vehicle also has a seat positionsensor that enables the sensingsystem to monitor the position of thefront outboard passenger seat. Thepassenger seat position sensor and thepassenger seat belt buckle provideinformation that is used to determineif the passenger knee airbag shouldinflate.
Seat-mounted side impact airbags aredesigned to inflate in moderate tosevere side crashes, depending on thelocation of the impact. Seat-mountedside impact airbags are not designedto inflate in frontal impacts,near-frontal impacts, rollovers, or rear
impacts. A seat-mounted side impactairbag is designed to inflate on theside of the vehicle that is struck.
Roof-rail airbags are designed toinflate in moderate to severe sidecrashes, depending on the location ofthe impact. In addition, these roof-railairbags are designed to inflate duringa rollover or in a severe frontalimpact. Roof-rail airbags are notdesigned to inflate in rear impacts.Both roof-rail airbags will inflate wheneither side of the vehicle is struck or ifthe sensing system predicts that thevehicle is about to roll over on itsside, or in a severe frontal impact.
In any particular crash, no one cansay whether an airbag should haveinflated simply because of the vehicledamage or repair costs.
What Makes an AirbagInflate?In a deployment event, the sensingsystem sends an electrical signaltriggering a release of gas from theinflator. Gas from the inflator fills theairbag causing the bag to break out of

Cadillac ATS/ATS-V Owner Manual (GMNA-Localizing-U.S./Canada/Mexico-11349135) - 2018 - crc - 9/25/17
SEATS AND RESTRAINTS 81
the cover. The inflator, the airbag, andrelated hardware are all part of theairbag module.
For airbag locations, see Where Are theAirbags? 0 78.
How Does an AirbagRestrain?In moderate to severe frontal or nearfrontal collisions, even beltedoccupants can contact the steeringwheel or the instrument panel. Inmoderate to severe side collisions,even belted occupants can contact theinside of the vehicle.
Airbags supplement the protectionprovided by seat belts by distributingthe force of the impact more evenlyover the occupant's body.
Rollover capable roof-rail airbags aredesigned to help contain the head andchest of occupants in the outboardseating positions in the first andsecond rows. The rollover capableroof-rail airbags are designed to helpreduce the risk of full or partial
ejection in rollover events, althoughno system can prevent all suchejections.
But airbags would not help in manytypes of collisions, primarily becausethe occupant's motion is not towardthose airbags. See When Should anAirbag Inflate? 0 79.
Airbags should never be regarded asanything more than a supplement toseat belts.
What Will You See after anAirbag Inflates?After frontal, knee, and seat-mountedside impact airbags inflate, theyquickly deflate, so quickly that somepeople may not even realize theairbags inflated. Roof-rail airbags maystill be at least partially inflated forsome time after they inflate. Somecomponents of the airbag module maybe hot for several minutes. Forlocation of the airbags, see Where Arethe Airbags? 0 78.
The parts of the airbag that come intocontact with you may be warm, butnot too hot to touch. There may besome smoke and dust coming fromthe vents in the deflated airbags.Airbag inflation does not prevent thedriver from seeing out of thewindshield or being able to steer thevehicle, nor does it prevent peoplefrom leaving the vehicle.
{ Warning
When an airbag inflates, there maybe dust in the air. This dust couldcause breathing problems forpeople with a history of asthma orother breathing trouble. To avoidthis, everyone in the vehicle shouldget out as soon as it is safe to doso. If you have breathing problemsbut cannot get out of the vehicleafter an airbag inflates, then getfresh air by opening a window or adoor. If you experience breathingproblems following an airbagdeployment, you should seekmedical attention.

Cadillac ATS/ATS-V Owner Manual (GMNA-Localizing-U.S./Canada/Mexico-11349135) - 2018 - crc - 9/25/17
82 SEATS AND RESTRAINTS
The vehicle has a feature that mayautomatically unlock the doors, turnon the interior lamps and hazardwarning flashers, and shut off the fuelsystem after the airbags inflate. Thefeature may also activate, withoutairbag inflation, after an event thatexceeds a predetermined threshold.After turning the ignition off and thenon again, the fuel system will returnto normal operation; the doors can belocked, the interior lamps can beturned off, and the hazard warningflashers can be turned off using thecontrols for those features. If any ofthese systems are damaged in thecrash they may not operate as normal.
{ Warning
A crash severe enough to inflate theairbags may have also damagedimportant functions in the vehicle,such as the fuel system, brake andsteering systems, etc. Even if thevehicle appears to be drivable aftera moderate crash, there may be
(Continued)
Warning (Continued)
concealed damage that could makeit difficult to safely operate thevehicle.
Use caution if you should attemptto restart the engine after a crashhas occurred.
In many crashes severe enough toinflate the airbag, windshields arebroken by vehicle deformation.Additional windshield breakage mayalso occur from the front outboardpassenger airbag.
. Airbags are designed to inflateonly once. After an airbag inflates,you will need some new parts forthe airbag system. If you do notget them, the airbag system willnot be there to help protect you inanother crash. A new system willinclude airbag modules andpossibly other parts. The servicemanual for the vehicle covers theneed to replace other parts.
. The vehicle has a crash sensingand diagnostic module whichrecords information after a crash.See Vehicle Data Recording andPrivacy 0 365 and Event DataRecorders 0 366.
. Let only qualified technicianswork on the airbag systems.Improper service can mean thatan airbag system will not workproperly. See your dealer forservice.
Passenger Sensing SystemThe vehicle has a passenger sensingsystem for the front outboardpassenger position. The passengerairbag status indicator will light onthe overhead console when the vehicleis started.
United States

Cadillac ATS/ATS-V Owner Manual (GMNA-Localizing-U.S./Canada/Mexico-11349135) - 2018 - crc - 9/25/17
SEATS AND RESTRAINTS 83
Canada and Mexico
The words ON and OFF, or the symbolfor on and off, will be visible duringthe system check. When the systemcheck is complete, either the word ONor OFF, or the symbol for on or off,will be visible. See Passenger AirbagStatus Indicator 0 124.
The passenger sensing system turnsoff the front outboard passengerfrontal airbag and knee airbag, undercertain conditions. No other airbag isaffected by the passenger sensingsystem.
The passenger sensing system workswith sensors that are part of the frontoutboard passenger seat. The sensorsare designed to detect the presence ofa properly seated occupant anddetermine if the front outboard
passenger frontal airbag and kneeairbag should be allowed to inflateor not.
According to accident statistics,children are safer when properlysecured in a rear seat in the correctchild restraint for their weightand size.
Whenever possible, children aged12 and under should be secured in arear seating position.
Never put a rear-facing child seat inthe front. This is because the risk tothe rear-facing child is so great, if theairbag inflates.
{ Warning
A child in a rear-facing childrestraint can be seriously injured orkilled if the passenger frontal airbaginflates. This is because the back ofthe rear-facing child restraint wouldbe very close to the inflating airbag.A child in a forward-facing childrestraint can be seriously injured or
(Continued)
Warning (Continued)
killed if the passenger frontal airbaginflates and the passenger seat is ina forward position.
Even if the passenger sensingsystem has turned off the frontoutboard passenger airbag(s), nosystem is fail-safe. No one canguarantee that an airbag will notdeploy under some unusualcircumstance, even though theairbag(s) are off.
Never put a rear-facing childrestraint in the front seat, even ifthe airbag is off. If securing aforward-facing child restraint in thefront outboard passenger seat,always move the seat as far back asit will go. It is better to secure childrestraints in the rear seat. Considerusing another vehicle to transportthe child when a rear seat is notavailable.

Cadillac ATS/ATS-V Owner Manual (GMNA-Localizing-U.S./Canada/Mexico-11349135) - 2018 - crc - 9/25/17
84 SEATS AND RESTRAINTS
The passenger sensing system isdesigned to turn off the frontoutboard passenger frontal airbag andknee airbag if:
. The front outboard passenger seatis unoccupied.
. The system determines an infantis present in a child restraint.
. A front outboard passenger takeshis/her weight off of the seat for aperiod of time.
. There is a critical problem withthe airbag system or the passengersensing system.
When the passenger sensing systemhas turned off the front outboardpassenger frontal airbag and kneeairbag, the off indicator will light andstay lit as a reminder that the airbagsare off. See Passenger Airbag StatusIndicator 0 124.
The passenger sensing system isdesigned to turn on the frontoutboard passenger frontal airbag andknee airbag anytime the system
senses that a person of adult size issitting properly in the front outboardpassenger seat.
When the passenger sensing systemhas allowed the airbags to be enabled,the on indicator will light and stay litas a reminder that the airbags areactive.
For some children, including childrenin child restraints, and for very smalladults, the passenger sensing systemmay or may not turn off the frontoutboard passenger frontal airbag andknee airbag, depending upon theperson’s seating posture and bodybuild. Everyone in the vehicle who hasoutgrown child restraints should weara seat belt properly — whether or notthere is an airbag for that person.
{ Warning
If the airbag readiness light evercomes on and stays on, it meansthat something may be wrong withthe airbag system. To help avoidinjury to yourself or others, have
(Continued)
Warning (Continued)
the vehicle serviced right away. SeeAirbag Readiness Light 0 124 formore information, includingimportant safety information.
If the On Indicator Is Lit for aChild Restraint
The passenger sensing system isdesigned to turn off the frontoutboard passenger frontal airbag andknee airbag if the system determinesthat an infant is present in a childrestraint. If a child restraint has beeninstalled and the on indicator is lit:
1. Turn the vehicle off.
2. Remove the child restraint fromthe vehicle.
3. Remove any additional itemsfrom the seat such as blankets,cushions, seat covers, seatheaters, or seat massagers.
4. Reinstall the child restraintfollowing the directions providedby the child restraint
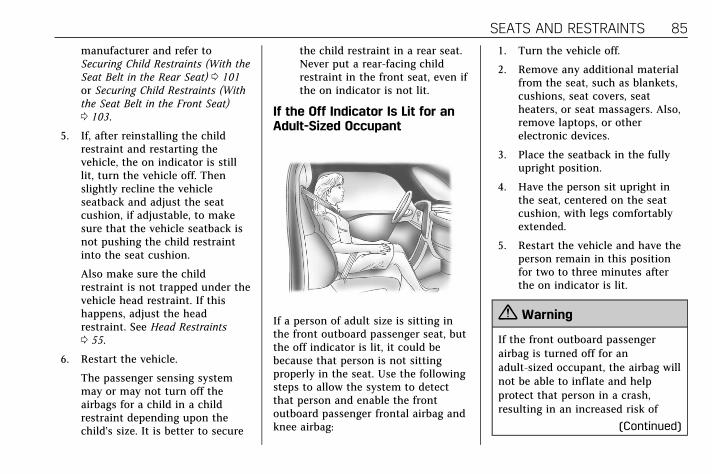
Cadillac ATS/ATS-V Owner Manual (GMNA-Localizing-U.S./Canada/Mexico-11349135) - 2018 - crc - 9/25/17
SEATS AND RESTRAINTS 85
manufacturer and refer toSecuring Child Restraints (With theSeat Belt in the Rear Seat) 0 101or Securing Child Restraints (Withthe Seat Belt in the Front Seat)0 103.
5. If, after reinstalling the childrestraint and restarting thevehicle, the on indicator is stilllit, turn the vehicle off. Thenslightly recline the vehicleseatback and adjust the seatcushion, if adjustable, to makesure that the vehicle seatback isnot pushing the child restraintinto the seat cushion.
Also make sure the childrestraint is not trapped under thevehicle head restraint. If thishappens, adjust the headrestraint. See Head Restraints0 55.
6. Restart the vehicle.
The passenger sensing systemmay or may not turn off theairbags for a child in a childrestraint depending upon thechild’s size. It is better to secure
the child restraint in a rear seat.Never put a rear-facing childrestraint in the front seat, even ifthe on indicator is not lit.
If the Off Indicator Is Lit for anAdult-Sized Occupant
If a person of adult size is sitting inthe front outboard passenger seat, butthe off indicator is lit, it could bebecause that person is not sittingproperly in the seat. Use the followingsteps to allow the system to detectthat person and enable the frontoutboard passenger frontal airbag andknee airbag:
1. Turn the vehicle off.
2. Remove any additional materialfrom the seat, such as blankets,cushions, seat covers, seatheaters, or seat massagers. Also,remove laptops, or otherelectronic devices.
3. Place the seatback in the fullyupright position.
4. Have the person sit upright inthe seat, centered on the seatcushion, with legs comfortablyextended.
5. Restart the vehicle and have theperson remain in this positionfor two to three minutes afterthe on indicator is lit.
{ Warning
If the front outboard passengerairbag is turned off for anadult-sized occupant, the airbag willnot be able to inflate and helpprotect that person in a crash,resulting in an increased risk of
(Continued)

Cadillac ATS/ATS-V Owner Manual (GMNA-Localizing-U.S./Canada/Mexico-11349135) - 2018 - crc - 9/25/17
86 SEATS AND RESTRAINTS
Warning (Continued)
serious injury or even death. Anadult-sized occupant should notride in the front outboard passengerseat, if the passenger airbag offindicator is lit.
Additional Factors AffectingSystem Operation
Seat belts help keep the passenger inposition on the seat during vehiclemaneuvers and braking, which helpsthe passenger sensing systemmaintain the passenger airbag status.See “Seat Belts” and “Child Restraints”in the Index for additionalinformation about the importance ofproper restraint use.
A thick layer of additional material,such as a blanket or cushion,or aftermarket equipment such as seatcovers, seat heaters, and seatmassagers can affect how well thepassenger sensing system operates.We recommend that you not use seatcovers or other aftermarket equipmentexcept when approved by GM for your
specific vehicle. See Adding Equipmentto the Airbag-Equipped Vehicle 0 87 formore information about modificationsthat can affect how the systemoperates.
A wet seat can affect the performanceof the passenger sensing system. Hereis how:
. The passenger sensing system mayturn off the passenger frontalairbag and passenger knee airbagwhen liquid is soaked into theseat. If this happens, the offindicator will be lit, and the airbagreadiness light on the instrumentpanel will also be lit.
. Liquid pooled on the seat that hasnot soaked in may make it morelikely that the passenger sensingsystem will turn on the passengerfrontal airbag and passenger kneeairbag while a child restraint orchild occupant is on the seat.If the passenger frontal airbag andpassenger knee airbag are turnedon, the on indicator will be lit.
If the passenger seat gets wet, dry theseat immediately. If the airbagreadiness light is lit, do not install achild restraint or allow anyone tooccupy the seat. See Airbag ReadinessLight 0 124 for important safetyinformation.
The on indicator may be lit if anobject, such as a briefcase, handbag,grocery bag, laptop, or other electronicdevice, is put on an unoccupied seat.If this is not desired, remove theobject from the seat.
{ Warning
Stowing articles under thepassenger seat or between thepassenger seat cushion andseatback may interfere with theproper operation of the passengersensing system.
Servicing theAirbag-Equipped VehicleAirbags affect how the vehicle shouldbe serviced. There are parts of theairbag system in several places around
Cadillac ATS/ATS-V Owner Manual (GMNA-Localizing-U.S./Canada/Mexico-11349135) - 2018 - crc - 9/25/17
SEATS AND RESTRAINTS 87
the vehicle. Your dealer and theservice manual have informationabout servicing the vehicle and theairbag system. To purchase a servicemanual, see Service PublicationsOrdering Information 0 363.
{ Warning
For up to 10 seconds after thevehicle is turned off and the batteryis disconnected, an airbag can stillinflate during improper service. Youcan be injured if you are close to anairbag when it inflates. Avoidyellow connectors. They areprobably part of the airbag system.Be sure to follow proper serviceprocedures, and make sure theperson performing work for you isqualified to do so.
Adding Equipment to theAirbag-Equipped VehicleAdding accessories that change thevehicle's frame, bumper system,height, front end, or side sheet metalmay keep the airbag system from
working properly. The operation of theairbag system can also be affected bychanging any parts of the front seats,seat belts, airbag sensing anddiagnostic module, steering wheel,instrument panel, inner door sealsincluding the speakers, any of theairbag modules, ceiling or pillargarnish trim, overhead console, frontsensors, side impact sensors, or airbagwiring.
Your dealer and the service manualhave information about the location ofthe airbag sensors, sensing anddiagnostic module, and airbag wiring.
In addition, the vehicle has apassenger sensing system for the frontoutboard passenger position, whichincludes sensors that are part of thepassenger seat. The passenger sensingsystem may not operate properly ifthe original seat trim is replaced withnon-GM covers, upholstery, or trim; orwith GM covers, upholstery, or trimdesigned for a different vehicle. Anyobject, such as an aftermarket seatheater or a comfort-enhancing pad ordevice, installed under or on top ofthe seat fabric, could also interfere
with the operation of the passengersensing system. This could eitherprevent proper deployment of thepassenger airbag(s) or prevent thepassenger sensing system fromproperly turning off the passengerairbag(s). See Passenger SensingSystem 0 82.
If the vehicle has rollover roof-railairbags, see Different Size Tires andWheels 0 307 for additional importantinformation.
If you have to modify your vehiclebecause you have a disability and havequestions about whether themodifications will affect the vehicle'sairbag system, or if you havequestions about whether the airbagsystem will be affected if the vehicle ismodified for any other reason, callCustomer Assistance. See CustomerAssistance Offices 0 356.

Cadillac ATS/ATS-V Owner Manual (GMNA-Localizing-U.S./Canada/Mexico-11349135) - 2018 - crc - 9/25/17
88 SEATS AND RESTRAINTS
Airbag System CheckThe airbag system does not needregularly scheduled maintenance orreplacement. Make sure the airbagreadiness light is working. See AirbagReadiness Light 0 124.
Caution
If an airbag covering is damaged,opened, or broken, the airbag maynot work properly. Do not open orbreak the airbag coverings. If thereare any opened or broken airbagcoverings, have the airbag coveringand/or airbag module replaced. Forthe location of the airbags, seeWhere Are the Airbags? 0 78. Seeyour dealer for service.
Replacing Airbag SystemParts after a Crash
{ Warning
A crash can damage the airbagsystems in the vehicle. A damagedairbag system may not properlyprotect you and your passenger(s)in a crash, resulting in seriousinjury or even death. To help makesure the airbag systems are workingproperly after a crash, have theminspected and any necessaryreplacements made as soon aspossible.
If an airbag inflates, you will need toreplace airbag system parts. See yourdealer for service.
If the airbag readiness light stays onafter the vehicle is started or comeson when you are driving, the airbagsystem may not work properly. Havethe vehicle serviced right away. SeeAirbag Readiness Light 0 124.
Child Restraints
Older Children
Older children who have outgrownbooster seats should wear the vehicle’sseat belts.
The manufacturer instructions thatcome with the booster seat state theweight and height limitations for thatbooster. Use a booster seat with alap-shoulder belt until the childpasses the fit test below:

Cadillac ATS/ATS-V Owner Manual (GMNA-Localizing-U.S./Canada/Mexico-11349135) - 2018 - crc - 9/25/17
SEATS AND RESTRAINTS 89. Sit all the way back on the seat.
Do the knees bend at the seatedge? If yes, continue. If no, returnto the booster seat.
. Buckle the lap-shoulder belt. Doesthe shoulder belt rest on theshoulder? If yes, continue. If no,try using the rear seat beltcomfort guide, if available. See“Rear Seat Belt Comfort Guides”under Lap-Shoulder Belt 0 72. If acomfort guide is not available, or ifthe shoulder belt still does not reston the shoulder, then return to thebooster seat.
. Does the lap belt fit low and snugon the hips, touching the thighs?If yes, continue. If no, return tothe booster seat.
. Can proper seat belt fit bemaintained for the length of thetrip? If yes, continue. If no, returnto the booster seat.
Q: What is the proper way to wearseat belts?
A: An older child should wear alap-shoulder belt and get theadditional restraint a shoulder beltcan provide. The shoulder beltshould not cross the face or neck.The lap belt should fit snuglybelow the hips, just touching thetop of the thighs. This applies beltforce to the child's pelvic bones ina crash. It should never be wornover the abdomen, which couldcause severe or even fatal internalinjuries in a crash.
Also see “Rear Seat Belt ComfortGuides” under Lap-Shoulder Belt 0 72.
According to accident statistics,children are safer when properlyrestrained in a rear seating position.
In a crash, children who are notbuckled up can strike other peoplewho are buckled up, or can be thrownout of the vehicle. Older children needto use seat belts properly.
{ Warning
Never allow more than one child towear the same seat belt. The seatbelt cannot properly spread theimpact forces. In a crash, they canbe crushed together and seriouslyinjured. A seat belt must be used byonly one person at a time.

Cadillac ATS/ATS-V Owner Manual (GMNA-Localizing-U.S./Canada/Mexico-11349135) - 2018 - crc - 9/25/17
90 SEATS AND RESTRAINTS
{ Warning
Never allow a child to wear the seatbelt with the shoulder belt behindtheir back. A child can be seriouslyinjured by not wearing thelap-shoulder belt properly. In acrash, the child would not berestrained by the shoulder belt. Thechild could move too far forwardincreasing the chance of head andneck injury. The child might alsoslide under the lap belt. The beltforce would then be applied righton the abdomen. That could causeserious or fatal injuries. Theshoulder belt should go over theshoulder and across the chest.
Infants and Young ChildrenEveryone in a vehicle needsprotection! This includes infants andall other children. Neither the distancetraveled nor the age and size of thetraveler changes the need, foreveryone, to use safety restraints. Infact, the law in every state in theUnited States and in every Canadianprovince says children up to some agemust be restrained while in a vehicle.
{ Warning
Children can be seriously injured orstrangled if a shoulder belt iswrapped around their neck. Theshoulder belt can tighten butcannot be loosened if it is locked.The shoulder belt locks when it ispulled all the way out of theretractor. It unlocks when theshoulder belt is allowed to go allthe way back into the retractor, butit cannot do this if it is wrappedaround a child’s neck. If theshoulder belt is locked andtightened around a child’s neck, theonly way to loosen the belt is tocut it.
Never leave children unattended ina vehicle and never allow childrento play with the seat belts.
Every time infants and young childrenride in vehicles, they should have theprotection provided by appropriatechild restraints. Neither the vehicle'sseat belt system nor its airbag systemis designed for them.

Cadillac ATS/ATS-V Owner Manual (GMNA-Localizing-U.S./Canada/Mexico-11349135) - 2018 - crc - 9/25/17
SEATS AND RESTRAINTS 91
Children who are not restrainedproperly can strike other people,or can be thrown out of the vehicle.
{ Warning
Never hold an infant or a childwhile riding in a vehicle. Due tocrash forces, an infant or a childwill become so heavy it is notpossible to hold it during a crash.For example, in a crash at only40 km/h (25 mph), a 5.5 kg (12 lb)infant will suddenly become a110 kg (240 lb) force on a person'sarms. An infant or child should besecured in an appropriate restraint.
{ Warning
Children who are up against,or very close to, any airbag when itinflates can be seriously injured orkilled. Never put a rear-facing childrestraint in the front outboard seat.Secure a rear-facing child restraintin a rear seat. It is also better tosecure a forward-facing childrestraint in a rear seat. If you mustsecure a forward-facing childrestraint in the front outboard seat,always move the front passengerseat as far back as it will go.
Child restraints are devices used torestrain, seat, or position children inthe vehicle and are sometimes calledchild seats or car seats.
There are three basic types of childrestraints:
. Forward-facing child restraints
. Rearward-facing child restraints
. Belt-positioning booster seats
The proper child restraint for yourchild depends on their size, weight,and age, and also on whether thechild restraint is compatible with thevehicle in which it will be used.

Cadillac ATS/ATS-V Owner Manual (GMNA-Localizing-U.S./Canada/Mexico-11349135) - 2018 - crc - 9/25/17
92 SEATS AND RESTRAINTS
For each type of child restraint, thereare many different models available.When purchasing a child restraint, besure it is designed to be used in amotor vehicle. If it is, the restraint willhave a label saying that it meetsfederal motor vehicle safety standards.The restraint manufacturer'sinstructions that come with therestraint state the weight and heightlimitations for a particular childrestraint. In addition, there are manykinds of restraints available forchildren with special needs.
{ Warning
To reduce the risk of neck and headinjury in a crash, infants andtoddlers should be secured in arear-facing child restraint until agetwo, or until they reach themaximum height and weight limitsof their child restraint.
{ Warning
A young child's hip bones are stillso small that the vehicle's regularseat belt may not remain low onthe hip bones, as it should. Instead,it may settle up around the child'sabdomen. In a crash, the belt wouldapply force on a body area that isunprotected by any bony structure.This alone could cause serious orfatal injuries. To reduce the risk ofserious or fatal injuries during acrash, young children should alwaysbe secured in appropriate childrestraints.
Child Restraint Systems
Rear-Facing Infant Restraint
A rear-facing child restraint providesrestraint with the seating surfaceagainst the back of the infant.
The harness system holds the infantin place and, in a crash, acts to keepthe infant positioned in the restraint.

Cadillac ATS/ATS-V Owner Manual (GMNA-Localizing-U.S./Canada/Mexico-11349135) - 2018 - crc - 9/25/17
SEATS AND RESTRAINTS 93
Forward-Facing Child Restraint
A forward-facing child restraintprovides restraint for the child's bodywith the harness.
Booster Seats
A belt-positioning booster seat is usedfor children who have outgrown theirforward-facing child restraint.Boosters are designed to improve thefit of the vehicle's seat belt systemuntil the child is large enough for thevehicle seat belts to fit properlywithout a booster seat. See the seatbelt fit test in Older Children 0 88.
Securing an Add-On ChildRestraint in the Vehicle
{ Warning
A child can be seriously injured orkilled in a crash if the childrestraint is not properly secured inthe vehicle. Secure the childrestraint properly in the vehicleusing the vehicle’s seat belt orLATCH system, following theinstructions that came with thatchild restraint and the instructionsin this manual.
To help reduce the chance of injury,the child restraint must be secured inthe vehicle. Child restraints must besecured in vehicle seats by lap belts orthe lap belt portion of a lap-shoulderbelt, or by the LATCH system. SeeLower Anchors and Tethers for Children(LATCH System) 0 95 for moreinformation. Children can beendangered in a crash if the childrestraint is not properly secured in thevehicle.

Cadillac ATS/ATS-V Owner Manual (GMNA-Localizing-U.S./Canada/Mexico-11349135) - 2018 - crc - 9/25/17
94 SEATS AND RESTRAINTS
When securing an add-on childrestraint, refer to the instructions thatcome with the restraint which may beon the restraint itself or in a booklet,or both, and to this manual. The childrestraint instructions are important,so if they are not available, obtain areplacement copy from themanufacturer.
Keep in mind that an unsecured childrestraint can move around in acollision or sudden stop and injurepeople in the vehicle. Be sure toproperly secure any child restraint inthe vehicle— even when no child isin it.
In some areas of the United Statesand Canada, Certified Child PassengerSafety Technicians (CPSTs) areavailable to inspect and demonstratehow to correctly use and install childrestraints. In the U.S., refer to theNational Highway Traffic SafetyAdministration (NHTSA) website tolocate the nearest child safety seatinspection station. For CPSTavailability in Canada, check withTransport Canada or the ProvincialMinistry of Transportation office.
Securing the Child Within theChild Restraint
{ Warning
A child can be seriously injured orkilled in a crash if the child is notproperly secured in the childrestraint. Secure the child properlyfollowing the instructions thatcame with that child restraint.
Where to Put the RestraintAccording to accident statistics,children and infants are safer whenproperly restrained in an appropriatechild restraint secured in a rearseating position.
Whenever possible, children aged12 and under should be secured in arear seating position.
Never put a rear-facing child restraintin the front. This is because the riskto the rear-facing child is so great ifthe airbag deploys.
{ Warning
A child in a rear-facing childrestraint can be seriously injured orkilled if the front passenger airbaginflates. This is because the back ofthe rear-facing child restraint wouldbe very close to the inflating airbag.A child in a forward-facing childrestraint can be seriously injured orkilled if the front passenger airbaginflates and the passenger seat is ina forward position.
Even if the passenger sensingsystem has turned off the frontpassenger frontal airbag, no systemis fail-safe. No one can guaranteethat an airbag will not deploy undersome unusual circumstance, eventhough it is turned off.
Secure rear-facing child restraintsin a rear seat, even if the airbag isoff. If you secure a forward-facingchild restraint in the front seat,always move the front passenger
(Continued)

Cadillac ATS/ATS-V Owner Manual (GMNA-Localizing-U.S./Canada/Mexico-11349135) - 2018 - crc - 9/25/17
SEATS AND RESTRAINTS 95
Warning (Continued)
seat as far back as it will go. It isbetter to secure the child restraintin a rear seat.
See Passenger Sensing System 0 82for additional information.
When securing a child restraint withthe seat belts in a rear seat position,study the instructions that came withthe child restraint to make sure it iscompatible with this vehicle.
Child restraints and booster seats varyconsiderably in size, and some may fitin certain seating positions betterthan others.
Depending on where you place thechild restraint and the size of thechild restraint, you may not be able toaccess adjacent seat belts or LATCHanchors for additional passengers orchild restraints. Adjacent seatingpositions should not be used if thechild restraint prevents access to orinterferes with the routing of theseat belt.
Wherever a child restraint is installed,be sure to follow the instructions thatcame with the child restraint systemand secure the child restraint systemproperly.
Keep in mind that an unsecured childrestraint can move around in acollision or sudden stop and injurepeople in the vehicle. Be sure toproperly secure any child restraint inthe vehicle — even when no child isin it.
Lower Anchors andTethers for Children(LATCH System)The LATCH system secures a childrestraint during driving or in a crash.LATCH attachments on the childrestraint are used to attach the childrestraint to the anchors in the vehicle.The LATCH system is designed tomake installation of a child restrainteasier.
In order to use the LATCH system inyour vehicle, you need a childrestraint that has LATCHattachments. LATCH-compatible
rear-facing and forward-facing childseats can be properly installed usingeither the LATCH anchors or thevehicle’s seat belts. Do not use boththe seat belts and the LATCHanchorage system to secure arear-facing or forward-facingchild seat.
Booster seats use the vehicle’s seatbelts to secure the child and thebooster seat. If the manufacturerrecommends that the booster seat besecured with the LATCH system, thiscan be done as long as the boosterseat can be positioned properly andthere is no interference with theproper positioning of the lap-shoulderbelt on the child.
Make sure to follow the instructionsthat came with the child restraint, andalso the instructions in this manual.
When installing a child restraint witha top tether, you must also use eitherthe lower anchors or the seat belts toproperly secure the child restraint.A child restraint must never beinstalled using only the top tether andanchor.
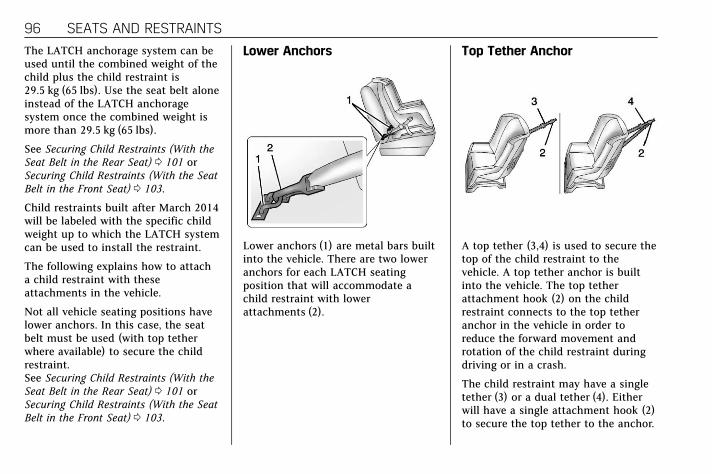
Cadillac ATS/ATS-V Owner Manual (GMNA-Localizing-U.S./Canada/Mexico-11349135) - 2018 - crc - 9/25/17
96 SEATS AND RESTRAINTS
The LATCH anchorage system can beused until the combined weight of thechild plus the child restraint is29.5 kg (65 lbs). Use the seat belt aloneinstead of the LATCH anchoragesystem once the combined weight ismore than 29.5 kg (65 lbs).
See Securing Child Restraints (With theSeat Belt in the Rear Seat) 0 101 orSecuring Child Restraints (With the SeatBelt in the Front Seat) 0 103.
Child restraints built after March 2014will be labeled with the specific childweight up to which the LATCH systemcan be used to install the restraint.
The following explains how to attacha child restraint with theseattachments in the vehicle.
Not all vehicle seating positions havelower anchors. In this case, the seatbelt must be used (with top tetherwhere available) to secure the childrestraint.See Securing Child Restraints (With theSeat Belt in the Rear Seat) 0 101 orSecuring Child Restraints (With the SeatBelt in the Front Seat) 0 103.
Lower Anchors
Lower anchors (1) are metal bars builtinto the vehicle. There are two loweranchors for each LATCH seatingposition that will accommodate achild restraint with lowerattachments (2).
Top Tether Anchor
A top tether (3,4) is used to secure thetop of the child restraint to thevehicle. A top tether anchor is builtinto the vehicle. The top tetherattachment hook (2) on the childrestraint connects to the top tetheranchor in the vehicle in order toreduce the forward movement androtation of the child restraint duringdriving or in a crash.
The child restraint may have a singletether (3) or a dual tether (4). Eitherwill have a single attachment hook (2)to secure the top tether to the anchor.

Cadillac ATS/ATS-V Owner Manual (GMNA-Localizing-U.S./Canada/Mexico-11349135) - 2018 - crc - 9/25/17
SEATS AND RESTRAINTS 97
Some child restraints with top tethersare designed for use with or withoutthe top tether being attached. Othersrequire the top tether always to beattached. In Canada, the law requiresthat forward-facing child restraintshave a top tether, and that the tetherbe attached. Be sure to read andfollow the instructions for your childrestraint.
Lower Anchor and Top TetherAnchor Locations
Rear Seat (Sedan)
I : Seating positions with top tetheranchors.
H : Seating positions with two loweranchors.
Rear Seat (Coupe)
I : Seating positions with top tetheranchors.
H : Seating positions with two loweranchors.
To assist in locating the loweranchors, each seating position withlower anchors has two labels, near thecrease between the seatback and theseat cushion.
To assist in locating the top tetheranchors, the top tether anchor symbolis on the cover.

Cadillac ATS/ATS-V Owner Manual (GMNA-Localizing-U.S./Canada/Mexico-11349135) - 2018 - crc - 9/25/17
98 SEATS AND RESTRAINTS
The outboard lower anchors arebehind the vertical openings in theseat trim.
Sedan Shown, Coupe Similar
The top tether anchors are behind therear seat, on the filler panel. Open thecovers to access the anchors. Be sureto use an anchor on the same side ofthe vehicle as the seating positionwhere the child restraint will beplaced.
Do not secure a child restraint in aposition without a top tether anchor ifa national or local law requires thatthe top tether be attached, or if the
instructions that come with the childrestraint say that the top tether mustbe attached.
According to accident statistics,children and infants are safer whenproperly restrained in a child restraintsystem or infant restraint systemsecured in a rear seating position. SeeWhere to Put the Restraint 0 94 foradditional information.
Securing a Child RestraintDesigned for the LATCH System
{ Warning
A child could be seriously injured orkilled in a crash if the childrestraint is not properly attached tothe vehicle using either the LATCHanchors or the vehicle seat belt.Follow the instructions that camewith the child restraint and theinstructions in this manual.
{ Warning
To reduce the risk of serious orfatal injuries during a crash, do notattach more than one childrestraint to a single anchor.Attaching more than one childrestraint to a single anchor couldcause the anchor or attachment tocome loose or even break during acrash. A child or others could beinjured.
{ Warning
Children can be seriously injured orstrangled if a shoulder belt iswrapped around their neck. Theshoulder belt can tighten butcannot be loosened if it is locked.The shoulder belt locks when it ispulled all the way out of theretractor. It unlocks when theshoulder belt is allowed to go allthe way back into the retractor, but
(Continued)

Cadillac ATS/ATS-V Owner Manual (GMNA-Localizing-U.S./Canada/Mexico-11349135) - 2018 - crc - 9/25/17
SEATS AND RESTRAINTS 99
Warning (Continued)
it cannot do this if it is wrappedaround a child’s neck. If theshoulder belt is locked andtightened around a child’s neck, theonly way to loosen the belt is tocut it.
Buckle any unused seat beltsbehind the child restraint sochildren cannot reach them. Pullthe shoulder belt all the way out ofthe retractor to set the lock, andtighten the belt behind the childrestraint after the child restrainthas been installed.
Caution
Do not let the LATCH attachmentsrub against the vehicle’s seat belts.This may damage these parts.If necessary, move buckled seatbelts to avoid rubbing the LATCHattachments.
(Continued)
Caution (Continued)
Do not fold the rear seatback whenthe seat is occupied. Do not fold theempty rear seat with a seat beltbuckled. This could damage theseat belt or the seat. Unbuckle andreturn the seat belt to its stowedposition, before folding the seat.
If you need to secure more than onechild restraint in the rear seat, seeWhere to Put the Restraint 0 94.
1. Attach and tighten the lowerattachments to the loweranchors. If the child restraintdoes not have lower attachmentsor the desired seating positiondoes not have lower anchors,secure the child restraint withthe top tether and the seat belts.Refer to the child restraintmanufacturer instructions andthe instructions in this manual.
1.1. Find the lower anchors forthe desired seatingposition.
1.2. Put the child restraint onthe seat.
1.3. Attach and tighten thelower attachments on thechild restraint to the loweranchors.
2. If the child restraintmanufacturer recommends thatthe top tether be attached, attachand tighten the top tether to thetop tether anchor, if equipped.Refer to the child restraintinstructions and the followingsteps:
2.1. Find the top tether anchor.
2.2. Open the top tether anchorcover to expose the anchor.
2.3. Route, attach, and tightenthe top tether according toyour child restraintinstructions and thefollowing instructions:

Cadillac ATS/ATS-V Owner Manual (GMNA-Localizing-U.S./Canada/Mexico-11349135) - 2018 - crc - 9/25/17
100 SEATS AND RESTRAINTS
If the position you areusing does not have aheadrest or head restraintand you are using a singletether, route the tetherover the seatback.
If the position you areusing does not have aheadrest or head restraint
and you are using a dualtether, route the tetherover the seatback.
If the position you areusing has an adjustableheadrest or head restraintand you are using a singletether, raise the headrestor head restraint and routethe tether under theheadrest or head restraintand in between theheadrest or head restraintposts.
If the position you areusing has an adjustableheadrest or head restraintand you are using a dualtether, raise the headrestor head restraint and routethe tether under theheadrest or head restraintand around the headrest orhead restraint posts.
3. Before placing a child in thechild restraint, make sure it issecurely held in place. To check,grasp the child restraint at theLATCH path and attempt tomove it side to side and backand forth. There should be nomore than 2.5 cm (1 in) ofmovement for properinstallation.

Cadillac ATS/ATS-V Owner Manual (GMNA-Localizing-U.S./Canada/Mexico-11349135) - 2018 - crc - 9/25/17
SEATS AND RESTRAINTS 101
Replacing LATCH SystemParts After a Crash
{ Warning
A crash can damage the LATCHsystem in the vehicle. A damagedLATCH system may not properlysecure the child restraint, resultingin serious injury or even death in acrash. To help make sure theLATCH system is working properlyafter a crash, see your dealer tohave the system inspected and anynecessary replacements made assoon as possible.
If the vehicle has the LATCH systemand it was being used during a crash,new LATCH system parts may beneeded.
New parts and repairs may benecessary even if the LATCH systemwas not being used at the time of thecrash.
Securing Child Restraints(With the Seat Belt in theRear Seat)When securing a child restraint withthe seat belts in a rear seat position,study the instructions that came withthe child restraint to make sure it iscompatible with this vehicle.
If the child restraint has the LATCHsystem, see Lower Anchors and Tethersfor Children (LATCH System) 0 95 forhow and where to install the childrestraint using LATCH. If a childrestraint is secured in the vehicleusing a seat belt and it uses a toptether, see Lower Anchors and Tethersfor Children (LATCH System) 0 95 fortop tether anchor locations.
Do not secure a child seat in aposition without a top tether anchor ifa national or local law requires thatthe top tether be anchored, or if theinstructions that come with the childrestraint say that the top strap mustbe anchored.
If the child restraint or vehicle seatposition does not have the LATCHsystem, you will be using the seat beltto secure the child restraint. Be sure tofollow the instructions that came withthe child restraint.
If more than one child restraint needsto be installed in the rear seat, be sureto read Where to Put the Restraint 0 94.
1. Put the child restraint onthe seat.
2. Pick up the latch plate, and runthe lap and shoulder portions ofthe vehicle seat belt through oraround the restraint. The childrestraint instructions will showyou how.

Cadillac ATS/ATS-V Owner Manual (GMNA-Localizing-U.S./Canada/Mexico-11349135) - 2018 - crc - 9/25/17
102 SEATS AND RESTRAINTS
Tilt the latch plate to adjust thebelt, if needed.
3. Push the latch plate into thebuckle until it clicks. If the latchplate will not go fully into thebuckle, check if the correctbuckle is being used.
Position the release button onthe buckle, away from the childrestraint system, so that the seatbelt could be quickly unbuckledif necessary.
4. Pull the shoulder belt all the wayout of the retractor to set thelock. When the retractor lock isset, the belt can be tightened butnot pulled out of the retractor.
5. To tighten the belt, push downon the child restraint, pull theshoulder portion of the belt totighten the lap portion of thebelt, and feed the shoulder beltback into the retractor. Wheninstalling a forward-facing childrestraint, it may be helpful to useyour knee to push down on thechild restraint as you tightenthe belt.
Try to pull the belt out of theretractor to make sure theretractor is locked. If theretractor is not locked, repeatSteps 4 and 5.
Cadillac ATS/ATS-V Owner Manual (GMNA-Localizing-U.S./Canada/Mexico-11349135) - 2018 - crc - 9/25/17
SEATS AND RESTRAINTS 103
6. If the child restraint has a toptether, follow the child restraintmanufacturer's instructionsregarding the use of the toptether. See Lower Anchors andTethers for Children (LATCHSystem) 0 95.
7. Before placing a child in thechild restraint, make sure it issecurely held in place. To check,grasp the child restraint at theseat belt path and attempt tomove it side to side and backand forth. When the childrestraint is properly installed,there should be no more than2.5 cm (1 in) of movement.
To remove the child restraint,unbuckle the vehicle seat belt and letit return to the stowed position. If thetop tether is attached to a top tetheranchor, disconnect it.
Securing Child Restraints(With the Seat Belt in theFront Seat)This vehicle has airbags. A rear seat isa safer place to secure aforward-facing child restraint. SeeWhere to Put the Restraint 0 94.
In addition, the vehicle has apassenger sensing system which isdesigned to turn off the frontoutboard passenger frontal airbag andknee airbag under certain conditions.See Passenger Sensing System 0 82 andPassenger Airbag Status Indicator 0 124for more information, includingimportant safety information.
Never put a rear-facing child seat inthe front. This is because the risk tothe rear-facing child is so great, if theairbag deploys.
{ Warning
A child in a rear-facing childrestraint can be seriously injured orkilled if the front outboard
(Continued)
Warning (Continued)
passenger frontal airbag inflates.This is because the back of therear-facing child restraint would bevery close to the inflating airbag.A child in a forward-facing childrestraint can be seriously injured orkilled if the front outboardpassenger frontal airbag inflatesand the passenger seat is in aforward position.
Even if the passenger sensingsystem has turned off the frontoutboard passenger airbag(s), nosystem is fail-safe. No one canguarantee that an airbag will notdeploy under some unusualcircumstance, even though theairbag(s) are off.
Secure rear-facing child restraintsin a rear seat, even if the airbag(s)are off. If you secure aforward-facing child restraint in thefront outboard passenger seat,
(Continued)

Cadillac ATS/ATS-V Owner Manual (GMNA-Localizing-U.S./Canada/Mexico-11349135) - 2018 - crc - 9/25/17
104 SEATS AND RESTRAINTS
Warning (Continued)
always move the seat as far back asit will go. It is better to secure thechild restraint in a rear seat.
See Passenger Sensing System 0 82for additional information.
If the child restraint uses a top tether,see Lower Anchors and Tethers forChildren (LATCH System) 0 95 for toptether anchor locations.
Do not secure a child seat in aposition without a top tether anchor ifa national or local law requires thatthe top tether be anchored, or if theinstructions that come with the childrestraint say that the top strap mustbe anchored.
In Canada, the law requires thatforward-facing child restraints have atop tether, and that the tether beattached.
When using the lap-shoulder belt tosecure the child restraint in thisposition, follow the instructions thatcame with the child restraint and thefollowing instructions:
1. Move the seat as far back as itwill go before securing theforward-facing child restraint.Move the seat upward or theseatback to an upright position,if needed, to get a tightinstallation of the child restraint.
When the passenger sensingsystem has turned off the frontoutboard passenger frontalairbag and knee airbag, the offindicator on the passenger airbagstatus indicator should light andstay lit when you start thevehicle. See Passenger AirbagStatus Indicator 0 124.
2. Put the child restraint onthe seat.
3. Pick up the latch plate, and runthe lap and shoulder portions ofthe vehicle's seat belt through or
around the restraint. The childrestraint instructions will showyou how.
Tilt the latch plate to adjust thebelt if needed.

Cadillac ATS/ATS-V Owner Manual (GMNA-Localizing-U.S./Canada/Mexico-11349135) - 2018 - crc - 9/25/17
SEATS AND RESTRAINTS 105
4. Push the latch plate into thebuckle until it clicks.
Position the release button onthe buckle, away from the childrestraint system, so that the seatbelt could be quickly unbuckledif necessary.
5. Pull the shoulder belt all the wayout of the retractor to set thelock. When the retractor lock isset, the belt can be tightened butnot pulled out of the retractor.
6. To tighten the belt, push downon the child restraint, pull theshoulder portion of the belt totighten the lap portion of thebelt, and feed the shoulder beltback into the retractor. Wheninstalling a forward-facing childrestraint, it may be helpful to useyour knee to push down on thechild restraint as you tightenthe belt.
Try to pull the belt out of theretractor to make sure theretractor is locked. If theretractor is not locked, repeatSteps 5 and 6.

Cadillac ATS/ATS-V Owner Manual (GMNA-Localizing-U.S./Canada/Mexico-11349135) - 2018 - crc - 9/25/17
106 SEATS AND RESTRAINTS
7. Before placing a child in thechild restraint, make sure it issecurely held in place. To check,grasp the child restraint at theseat belt path and attempt tomove it side to side and backand forth. When the childrestraint is properly installed,there should be no more than2.5 cm (1 in) of movement.
If the airbags are off, the off indicatorin the passenger airbag statusindicator will come on and stay onwhen the vehicle is started.
If a child restraint has been installedand the on indicator is lit, see “If theOn Indicator Is Lit for a ChildRestraint” under Passenger SensingSystem 0 82.
To remove the child restraint,unbuckle the vehicle seat belt and letit return to the stowed position.

Cadillac ATS/ATS-V Owner Manual (GMNA-Localizing-U.S./Canada/Mexico-11349135) - 2018 - crc - 9/25/17
STORAGE 107
Storage
Storage CompartmentsStorage Compartments . . . . . . . . . . 107Instrument Panel Storage . . . . . . . . 107Glove Box . . . . . . . . . . . . . . . . . . . . . . . . . 107Cupholders . . . . . . . . . . . . . . . . . . . . . . . . 108Armrest Storage . . . . . . . . . . . . . . . . . . 108Center Console Storage . . . . . . . . . . 108
Additional Storage FeaturesCargo Tie-Downs . . . . . . . . . . . . . . . . . 109
Storage Compartments
{ Warning
Do not store heavy or sharp objectsin storage compartments. In acrash, these objects may cause thecover to open and could result ininjury.
Instrument Panel Storage
To access, press on the cover andrelease. There is an accessory poweroutlet inside. See Power Outlets 0 114.
If equipped with storage behind theclimate control system, touch thebottom of the climate control paneluntil the door starts to open. Touchthe bottom of the climate controlpanel again until the doorautomatically starts to close.
Keep the storage bin closed whiledriving.
Glove BoxTo open the glove box, lift up on thelever. Use the key to lock and unlockit. The glove box may have a compactdisc player inside.
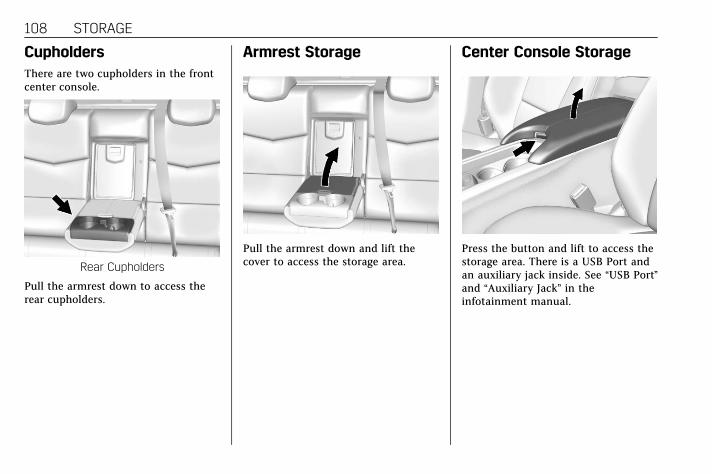
Cadillac ATS/ATS-V Owner Manual (GMNA-Localizing-U.S./Canada/Mexico-11349135) - 2018 - crc - 9/25/17
108 STORAGE
CupholdersThere are two cupholders in the frontcenter console.
Rear Cupholders
Pull the armrest down to access therear cupholders.
Armrest Storage
Pull the armrest down and lift thecover to access the storage area.
Center Console Storage
Press the button and lift to access thestorage area. There is a USB Port andan auxiliary jack inside. See “USB Port”and “Auxiliary Jack” in theinfotainment manual.

Cadillac ATS/ATS-V Owner Manual (GMNA-Localizing-U.S./Canada/Mexico-11349135) - 2018 - crc - 9/25/17
STORAGE 109
Additional StorageFeatures
Cargo Tie-Downs
The cargo tie-downs can be used tosecure small loads inside the trunk.

Cadillac ATS/ATS-V Owner Manual (GMNA-Localizing-U.S./Canada/Mexico-11349135) - 2018 - crc - 9/25/17
110 INSTRUMENTS AND CONTROLS
Instruments andControls
ControlsSteering Wheel Adjustment . . . . . 111Steering Wheel Controls . . . . . . . . . 111Heated Steering Wheel . . . . . . . . . . 111Horn . . . . . . . . . . . . . . . . . . . . . . . . . . . . . . . 112Windshield Wiper/Washer . . . . . . . 112Headlamp Washer . . . . . . . . . . . . . . . . 113Compass . . . . . . . . . . . . . . . . . . . . . . . . . . 114Clock . . . . . . . . . . . . . . . . . . . . . . . . . . . . . . 114Power Outlets . . . . . . . . . . . . . . . . . . . . . 114Wireless Charging . . . . . . . . . . . . . . . . 115
Warning Lights, Gauges, andIndicatorsWarning Lights, Gauges, andIndicators . . . . . . . . . . . . . . . . . . . . . . . 117
Instrument Cluster . . . . . . . . . . . . . . . 118Speedometer . . . . . . . . . . . . . . . . . . . . . . 121Odometer . . . . . . . . . . . . . . . . . . . . . . . . . 121Trip Odometer . . . . . . . . . . . . . . . . . . . . 121Tachometer . . . . . . . . . . . . . . . . . . . . . . . 121Fuel Gauge . . . . . . . . . . . . . . . . . . . . . . . . 122Engine Coolant TemperatureGauge . . . . . . . . . . . . . . . . . . . . . . . . . . . . 122
Seat Belt Reminders . . . . . . . . . . . . . . 123
Airbag Readiness Light . . . . . . . . . . 124Passenger Airbag StatusIndicator . . . . . . . . . . . . . . . . . . . . . . . . . 124
Charging System Light . . . . . . . . . . . 125Malfunction Indicator Lamp(Check Engine Light) . . . . . . . . . . . 125
Brake System Warning Light . . . . 127Parking Brake Light . . . . . . . . . . . . . . 128Service Electric Parking BrakeLight . . . . . . . . . . . . . . . . . . . . . . . . . . . . . 128
Antilock Brake System (ABS)Warning Light . . . . . . . . . . . . . . . . . . 128
Lane Keep Assist (LKA) Light . . . 129Vehicle Ahead Indicator . . . . . . . . . 129Traction Off Light . . . . . . . . . . . . . . . . 129StabiliTrak OFF Light . . . . . . . . . . . . 129Traction Control System (TCS)/StabiliTrak Light . . . . . . . . . . . . . . . . 130
Engine Coolant TemperatureWarning Light . . . . . . . . . . . . . . . . . . 130
Tire Pressure Light . . . . . . . . . . . . . . . 131Engine Oil Pressure Light . . . . . . . . 131Low Fuel Warning Light . . . . . . . . . 132Security Light . . . . . . . . . . . . . . . . . . . . . 132High-Beam On Light . . . . . . . . . . . . . 132Adaptive Forward Lighting (AFL)Light . . . . . . . . . . . . . . . . . . . . . . . . . . . . . 133
Lamps On Reminder . . . . . . . . . . . . . 133Cruise Control Light . . . . . . . . . . . . . . 133Door Ajar Light . . . . . . . . . . . . . . . . . . . 133
Information DisplaysDriver InformationCenter (DIC) . . . . . . . . . . . . . . . . . . . . . 134
Head-Up Display (HUD) . . . . . . . . . 136
Vehicle MessagesVehicle Messages . . . . . . . . . . . . . . . . . 140Engine Power Messages . . . . . . . . . . 140Vehicle Speed Messages . . . . . . . . . 141
Vehicle PersonalizationVehicle Personalization . . . . . . . . . . 141
Universal Remote SystemUniversal Remote System . . . . . . . . 146Universal Remote SystemProgramming . . . . . . . . . . . . . . . . . . . 146
Universal Remote SystemOperation . . . . . . . . . . . . . . . . . . . . . . . . 148

Cadillac ATS/ATS-V Owner Manual (GMNA-Localizing-U.S./Canada/Mexico-11349135) - 2018 - crc - 9/25/17
INSTRUMENTS AND CONTROLS 111
Controls
Steering Wheel Adjustment
To adjust the steering wheel:
1. Pull the lever down.
2. Move the steering wheel upor down.
3. Pull or push the steering wheelcloser or away from you.
4. Pull the lever up to lock thesteering wheel in place.
Power Tilt and Telescoping Wheel
If equipped, the control is on the leftside of the steering column.
. Push the control up or down to tiltthe steering wheel up or down.
. Push the control forward orrearward to move the steeringwheel toward the front or rear ofthe vehicle.
Do not adjust the steering wheel whiledriving.
To set the power tilt wheel memoryposition, see Memory Seats 0 61.
Steering Wheel ControlsThe infotainment system can beoperated by using the steering wheelcontrols. See "Steering WheelControls" in the infotainment manual.
Heated Steering Wheel
( : If equipped, press to turn theheated steering wheel on or off. Anindicator light next to the buttondisplays when the feature isturned on.
The steering wheel takes aboutthree minutes to be fully heated.
If equipped with a remote start heatedsteering wheel, the heated steeringwheel will turn on automatically in

Cadillac ATS/ATS-V Owner Manual (GMNA-Localizing-U.S./Canada/Mexico-11349135) - 2018 - crc - 9/25/17
112 INSTRUMENTS AND CONTROLS
remote start along with the heatedseats when it is cold outside. Theheated steering wheel indicator lightmay not come on. See Heated FrontSeats 0 64.
Horn
Pressa on the steering wheel pad tosound the horn.
Windshield Wiper/Washer
With the ignition on or in ACC/ACCESSORY, move the windshieldwiper lever to select the wiper speed.
HI : Use for fast wipes.
LO : Use for slow wipes.
INT : Use this setting for intermittentwipes or for Rainsense wipes, whenRainsense is enabled. For intermittentwipes, move the lever up to INT, thenturn thex INT band up for morefrequent wipes or down for lessfrequent wipes. If Rainsense isenabled, see “Rainsense” later in thissection.
If the windshield wipers are in usewhile driving, the exterior lamps comeon automatically if the exterior lampcontrol is in AUTO. The transitiontime for the lamps coming on variesbased on wiper speed. See “Lights Onwith Wipers” under AutomaticHeadlamp System 0 152.
OFF : Use to turn the wipers off.
1X : For a single wipe, briefly movethe wiper lever down. For severalwipes, hold the wiper lever down.
Clear snow and ice from the wiperblades and windshield before usingthem. If frozen to the windshield,carefully loosen or thaw them.Damaged blades should be replaced.See Wiper Blade Replacement 0 276.
Heavy snow or ice can overload thewiper motor.
Wiper Parking
If the ignition is turned off while thewipers are on LO, HI, or INT withRainsense disabled, they willimmediately stop.
If the windshield wiper lever is thenmoved to OFF before the driver door isopened or within 10 minutes, thewipers will restart and move to thebase of the windshield.
If the ignition is turned off while thewipers are performing wipes due towindshield washing or Rainsense, thewipers continue to run until theyreach the base of the windshield.
Rainsense
If equipped with Rainsense, a sensornear the top center of the windshielddetects the amount of water on the

Cadillac ATS/ATS-V Owner Manual (GMNA-Localizing-U.S./Canada/Mexico-11349135) - 2018 - crc - 9/25/17
INSTRUMENTS AND CONTROLS 113
windshield and controls the frequencyof the windshield wiper. To turn thisfeature on or off, see “Rain SenseWipers” under Vehicle Personalization0 141.
Keep this area of the windshield clearof debris to allow for best systemperformance.
INT : When enabled, move thewindshield wiper lever to INT. Turnthex INT band on the wiper leverto adjust the sensitivity.
. Turn the band up for moresensitivity to moisture.
. Turn the band down for lesssensitivity to moisture.
. Move the windshield wiper leverout of the INT position todeactivate Rainsense.
Wiper Arm Assembly Protection
When using an automatic car wash,move the windshield wiper lever toOFF. This disables the automaticRainsense windshield wipers.
With Rainsense, if the transmission isin N (Neutral) and the vehicle speed isvery slow, the wipers willautomatically stop at the base of thewindshield.
The wiper operations return to normalwhen the transmission is no longer inN (Neutral) or the vehicle speed hasincreased.
nL : Pull the windshield wiper levertoward you to spray windshieldwasher fluid and activate the wipers.The wipers will continue until thelever is released or the maximumwash time is reached. When thewindshield wiper lever is released,additional wipes may occur dependingon how long the windshield washerhad been activated. See Washer Fluid0 271 for information on filling thewindshield washer fluid reservoir.
{ Warning
In freezing weather, do not use thewasher until the windshield iswarmed. Otherwise the washer fluidcan form ice on the windshield,blocking your vision.
Headlamp WasherIf equipped with headlamp washers,they are located to the side of theheadlamps.
The headlamps must be on in order touse the headlamp washers. If theheadlamps are not on, only thewindshield will be washed.
Pull the wiper lever toward you andhold briefly to activate. The headlampwashers will spray once, pause, andspray again. The headlamp washerswill spray again after five windshieldwash cycles.
To refill the windshield washer fluid,see Washer Fluid 0 271.
Cadillac ATS/ATS-V Owner Manual (GMNA-Localizing-U.S./Canada/Mexico-11349135) - 2018 - crc - 9/25/17
114 INSTRUMENTS AND CONTROLS
CompassThe vehicle may have a compassdisplay on the Driver InformationCenter (DIC). The compass receives itsheading and other information fromthe Global Positioning System (GPS)antenna, StabiliTrak, and vehiclespeed information.
The compass system is designed tooperate for a certain number of milesor degrees of turn before needing asignal from the GPS satellites. Whenthe compass display shows CAL, drivethe vehicle for a short distance in anopen area where it can receive a GPSsignal. The compass system willautomatically determine when a GPSsignal is restored and provide aheading again.
ClockThe time and date for the clock can beset using the infotainment system. See“Time/Date” in “System“under“Settings” in the infotainment manual.
Power OutletsThe accessory power outlets can beused to plug in electrical equipment,such as a cell phone or MP3 player.
The vehicle has two accessory poweroutlets:
. Inside the instrument panelstorage area below the climatecontrol system.
. On the rear of the center floorconsole.
Lift the cover to access the accessorypower outlet.
Certain electrical accessories may notbe compatible with the accessorypower outlet and could overload avehicle circuit breaker or adapter fuse.If overloaded, the circuit breaker willreset after all devices are disconnectedor if Retained Accessory Power (RAP)is turned off and then back on. SeeRetained Accessory Power (RAP) 0 195.Wait one minute to allow the circuitbreaker to reset before reconnectingdevices or turning RAP back on. If theproblem continues, the issue could bewithin your device. Try another
known good device to make sure thecircuit breaker is operating properly.If this does not resolve your problem,see your dealer.
It is possible to replace the factorypower outlet with a cigar lighterreceptacle, if desired. This requires thefactory installed circuit breaker to bereplaced with a standard minifuse bythe dealer. A minifuse will not resetand will have to be replace if blown.
Caution
Failure to replace the circuitbreaker with the minifuse couldoverheat the cigar lighter anddamage the vehicle.
When adding electrical equipment, besure to follow the proper installationinstructions included with theequipment. See Add-On ElectricalEquipment 0 249.

Cadillac ATS/ATS-V Owner Manual (GMNA-Localizing-U.S./Canada/Mexico-11349135) - 2018 - crc - 9/25/17
INSTRUMENTS AND CONTROLS 115
Caution
Hanging heavy equipment from thepower outlet can cause damage notcovered by the vehicle warranty.The power outlets are designed foraccessory power plugs only, such ascell phone charge cords.
Always unplug electrical equipmentwhen not in use and do not plug inequipment that exceeds the maximum15 amps rating.
Power Outlet 110/120 VoltAlternating Current
If equipped, this power outlet is onthe rear of the center floor console.It can be used to plug in electricalequipment that uses a maximum limitof 150 watts.
An indicator light on the outlet turnson to show it is in use. The lightcomes on when the vehicle is started.equipment requiring less than 150watts is plugged into the outlet, andno system fault is detected.
The indicator light does not come onwhen the ignition is off or if theequipment is not fully seated into theoutlet.
If equipment is connected using morethan 150 watts or a system fault isdetected, a protection circuit shuts offthe power supply and the indicatorlight turns off. To reset the circuit,unplug the item and plug it back in orturn the Retained Accessory Power(RAP) off and then back on. SeeRetained Accessory Power (RAP) 0 195.The power restarts when equipmentusing 150 watts or less is plugged intothe outlet and a system fault is notdetected.
The power outlet is not designed forthe following and may not workproperly, if this equipment isplugged in:
. Equipment with high initial peakwattage, such ascompressor-driven refrigeratorsand electric power tools
. Other equipment requiring anextremely stable power supplysuch as: microcomputer-controlledelectric blankets, touch sensorlamps, etc.
. Medical equipment
Wireless ChargingThe system operates at 145 kHz andwirelessly charges one PMA or Qicompatible mobile device. The poweroutput of the system is capable ofcharging at a rate up to 1 amp (5W),as requested by the compatible mobiledevice. See Radio Frequency Statement0 364.
To check for phone or other devicecompatibility:
. In the U.S., see my.cadillac.com/learn.
. In Canada, see gmtotalconnect.ca.
. Or, see your dealer for details.
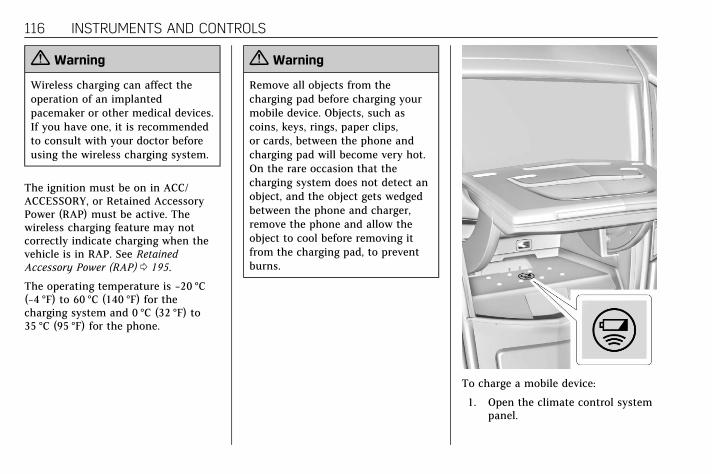
Cadillac ATS/ATS-V Owner Manual (GMNA-Localizing-U.S./Canada/Mexico-11349135) - 2018 - crc - 9/25/17
116 INSTRUMENTS AND CONTROLS
{ Warning
Wireless charging can affect theoperation of an implantedpacemaker or other medical devices.If you have one, it is recommendedto consult with your doctor beforeusing the wireless charging system.
The ignition must be on in ACC/ACCESSORY, or Retained AccessoryPower (RAP) must be active. Thewireless charging feature may notcorrectly indicate charging when thevehicle is in RAP. See RetainedAccessory Power (RAP) 0 195.
The operating temperature is −20 °C(−4 °F) to 60 °C (140 °F) for thecharging system and 0 °C (32 °F) to35 °C (95 °F) for the phone.
{ Warning
Remove all objects from thecharging pad before charging yourmobile device. Objects, such ascoins, keys, rings, paper clips,or cards, between the phone andcharging pad will become very hot.On the rare occasion that thecharging system does not detect anobject, and the object gets wedgedbetween the phone and charger,remove the phone and allow theobject to cool before removing itfrom the charging pad, to preventburns.
To charge a mobile device:
1. Open the climate control systempanel.
Cadillac ATS/ATS-V Owner Manual (GMNA-Localizing-U.S./Canada/Mexico-11349135) - 2018 - crc - 9/25/17
INSTRUMENTS AND CONTROLS 117
2. Remove all objects from thecharging pad. The system maynot charge if there are anyobjects between the phone andcharging pad.
3. Place the mobile device face upon the@ symbol on thecharging pad.
4. The} will show above the Von the infotainment display. Thisindicates that the mobile deviceis properly positioned andcharging. If a phone is placed onthe charging pad and} doesnot display, remove the phonefrom the pad, turn it180 degrees, and waitthree seconds before placing/aligning the phone on the padagain.
Keep the storage door closed whiledriving.
Warning Lights, Gauges,and IndicatorsWarning lights and gauges can signalthat something is wrong before itbecomes serious enough to cause anexpensive repair or replacement.Paying attention to the warning lightsand gauges could prevent injury.
Some warning lights come on brieflywhen the engine is started to indicatethey are working. When one of thewarning lights comes on and stays onwhile driving, or when one of thegauges shows there may be a problem,check the section that explains whatto do. Waiting to do repairs can becostly and even dangerous.

Cadillac ATS/ATS-V Owner Manual (GMNA-Localizing-U.S./Canada/Mexico-11349135) - 2018 - crc - 9/25/17
118 INSTRUMENTS AND CONTROLS
Instrument Cluster
English with Auto Stop Shown, Metric Similar

Cadillac ATS/ATS-V Owner Manual (GMNA-Localizing-U.S./Canada/Mexico-11349135) - 2018 - crc - 9/25/17
INSTRUMENTS AND CONTROLS 119
English V-Series Shown, Metric Similar

Cadillac ATS/ATS-V Owner Manual (GMNA-Localizing-U.S./Canada/Mexico-11349135) - 2018 - crc - 9/25/17
120 INSTRUMENTS AND CONTROLS
Cluster Application Displays
The cluster has three interactivedisplay zones.
Use the five-way control on the rightsteering wheel control to movebetween the different display zonesand scroll through the differentdisplays.
The left and right zones display DriverInformation Center (DIC) information.See Driver Information Center (DIC)0 134.
The center zone displays applicationinformation for the digitalspeedometer, navigation, audio,phone, efficiency gauge, best fueleconomy, or options.
Digital Speedometer
While the digital speedometer isdisplayed, press SEL to select speedlimit information.
Navigation
If there is no active route, a compasswill be displayed. If there is an activeroute, press SEL to end route guidanceor turn the voice prompts on or off.
Audio
While the Audio application page isdisplayed, press SEL to enter theAudio menu. In the Audio menusearch for music, select from favorites,or change the audio source.
Phone
While the Phone application page isdisplayed, press SEL to enter thePhone menu. In the Phone menu,if there is no active phone call, viewrecent calls, select from favorites,or scroll through contacts. If there isan active call, mute the phone orswitch to handset operation.
Best Fuel Economy
This page displays average fueleconomy, the best fuel economy overthe selected distance, and a bar graphshowing instantaneous fuel economy.
Options
Press SEL while the Optionsapplication page is displayed to enterthe Options menu.
Units : Press SEL while Units ishighlighted to enter the Units menu.Choose English or metric units bypressing SEL while the desired item ishighlighted. A checkmark will bedisplayed next to the selected item.
Info Pages : Press SEL while InfoPages is highlighted to select theitems to be displayed in the DICinformation displays. See DriverInformation Center (DIC) 0 134.
Head-up Display (HUD) Rotation :This feature allows for adjusting theangle of the HUD image. Press SEL onthe steering wheel controls whileHead-up Display Rotation ishighlighted to enter Adjust Mode.Press y or z to adjust the angle of
the HUD display. Press S or T tohighlight OK, then press SEL to savethe setting. Cancel can also beselected to cancel the setting. Thevehicle must be in P (Park).
Fav Button Options : Press SEL whileFav Button Options is highlighted toselect between FAV Primary and SEEKPrimary. This selection allows forconfiguration of the C andB

Cadillac ATS/ATS-V Owner Manual (GMNA-Localizing-U.S./Canada/Mexico-11349135) - 2018 - crc - 9/25/17
INSTRUMENTS AND CONTROLS 121
steering wheel controls. When FAVPrimary is selected, pressing C andB will go to the next or previousfavorite and pressing and holding CandB will seek. When SEEK Primary
is selected, pressing C andB will
seek and pressing and holding C andB will go to the next or previousfavorite.
Open Source Software : Press SELwhile Open Source Software ishighlighted to display open sourcesoftware information.
SpeedometerThe speedometer shows the vehicle'sspeed in either kilometers per hour(km/h) or miles per hour (mph).
OdometerThe odometer shows how far thevehicle has been driven, in eitherkilometers or miles.
Trip OdometerThe trip odometer shows how far thevehicle has been driven since the tripodometer was last reset.
The trip odometer is accessed andreset through the Driver InformationCenter (DIC). See Driver InformationCenter (DIC) 0 134.
TachometerThe tachometer displays the enginespeed in revolutions per minute (rpm).
For vehicles with the Stop/Startsystem, when the ignition is on, thetachometer indicates the vehiclestatus. When pointing to AUTO STOP,the engine is off but the vehicle is onand can move. The engine could autostart at any time. When the indicatorpoints to OFF, the vehicle is off.
When the engine is on, thetachometer will indicate the engine’srevolutions per minute (rpm). Thetachometer may vary by severalhundred rpm’s, during Auto Stopmode, when the engine is shutting offand restarting.
A slight bump may be felt when thetransmission is determining the mostfuel efficient operating range.
Caution
If the engine is operated with therpm’s in the warning area at thehigh end of the tachometer, thevehicle could be damaged, and thedamage would not be covered bythe vehicle warranty. Do not operatethe engine with the rpm’s in thewarning area.

Cadillac ATS/ATS-V Owner Manual (GMNA-Localizing-U.S./Canada/Mexico-11349135) - 2018 - crc - 9/25/17
122 INSTRUMENTS AND CONTROLS
Fuel Gauge
When the ignition is on, the fuelgauge indicates about how much fuelis left in the tank.
There is an arrow near the fuel gaugepointing to the side of the vehicle thefuel door is on.
When the indicator nears empty, thelow fuel light comes on. There still isa little fuel left, but the vehicle shouldbe refueled soon.
Here are four things that some ownersask about. None of these show aproblem with the fuel gauge:
. At the service station, the fuelpump shuts off before the gaugereads full.
. It takes a little more or less fuel tofill up than the gauge indicated.For example, the gauge may haveindicated the tank was half full,but it actually took a little more orless than half the tank's capacityto fill the tank.
. The gauge moves a little whileturning a corner or speeding up.
. The gauge takes a few seconds tostabilize after the ignition isturned on, and goes back to emptywhen the ignition is turned off.
Engine CoolantTemperature Gauge
Metric

Cadillac ATS/ATS-V Owner Manual (GMNA-Localizing-U.S./Canada/Mexico-11349135) - 2018 - crc - 9/25/17
INSTRUMENTS AND CONTROLS 123
English
This gauge measures the temperatureof the vehicle's engine.
While driving under normal operatingconditions, if the needle moves intothe shaded area, the engine is too hot.Pull off the road, stop the vehicle, andturn off the engine as soon aspossible.
Seat Belt Reminders
Driver Seat Belt Reminder Light
There is a driver seat belt reminderlight on the instrument cluster.
When the vehicle is started, this lightflashes and a chime may come on toremind the driver to fasten their seatbelt. Then the light stays on soliduntil the belt is buckled. This cyclemay continue several times if thedriver remains or becomes unbuckledwhile the vehicle is moving.
If the driver seat belt is buckled,neither the light nor the chimecomes on.
Passenger Seat Belt ReminderLight
There is a passenger seat beltreminder light near the passengerairbag status indicator. See PassengerSensing System 0 82.
When the vehicle is started, this lightflashes and a chime may come on toremind passengers to fasten their seatbelt. Then the light stays on soliduntil the belt is buckled. This cyclecontinues several times if thepassenger remains or becomesunbuckled while the vehicle is moving.
If the passenger seat belt is buckled,neither the chime nor the lightcomes on.
The front passenger seat belt reminderlight and chime may turn on if anobject is put on the seat such as abriefcase, handbag, grocery bag,laptop, or other electronic device. Toturn off the reminder light and/orchime, remove the object from theseat or buckle the seat belt.
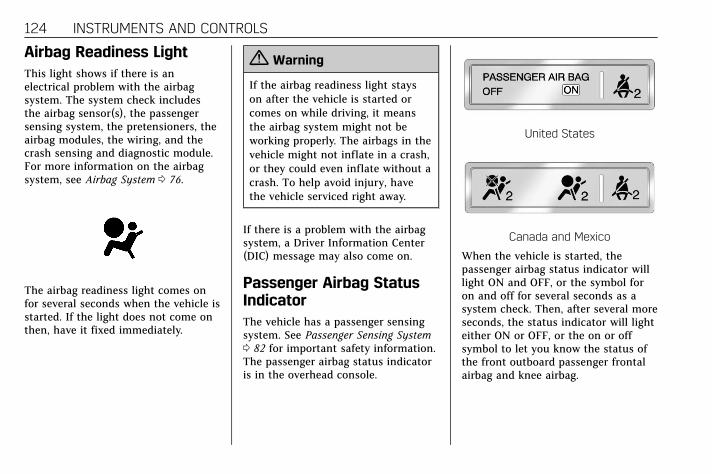
Cadillac ATS/ATS-V Owner Manual (GMNA-Localizing-U.S./Canada/Mexico-11349135) - 2018 - crc - 9/25/17
124 INSTRUMENTS AND CONTROLS
Airbag Readiness LightThis light shows if there is anelectrical problem with the airbagsystem. The system check includesthe airbag sensor(s), the passengersensing system, the pretensioners, theairbag modules, the wiring, and thecrash sensing and diagnostic module.For more information on the airbagsystem, see Airbag System 0 76.
The airbag readiness light comes onfor several seconds when the vehicle isstarted. If the light does not come onthen, have it fixed immediately.
{ Warning
If the airbag readiness light stayson after the vehicle is started orcomes on while driving, it meansthe airbag system might not beworking properly. The airbags in thevehicle might not inflate in a crash,or they could even inflate without acrash. To help avoid injury, havethe vehicle serviced right away.
If there is a problem with the airbagsystem, a Driver Information Center(DIC) message may also come on.
Passenger Airbag StatusIndicatorThe vehicle has a passenger sensingsystem. See Passenger Sensing System0 82 for important safety information.The passenger airbag status indicatoris in the overhead console.
United States
Canada and Mexico
When the vehicle is started, thepassenger airbag status indicator willlight ON and OFF, or the symbol foron and off for several seconds as asystem check. Then, after several moreseconds, the status indicator will lighteither ON or OFF, or the on or offsymbol to let you know the status ofthe front outboard passenger frontalairbag and knee airbag.
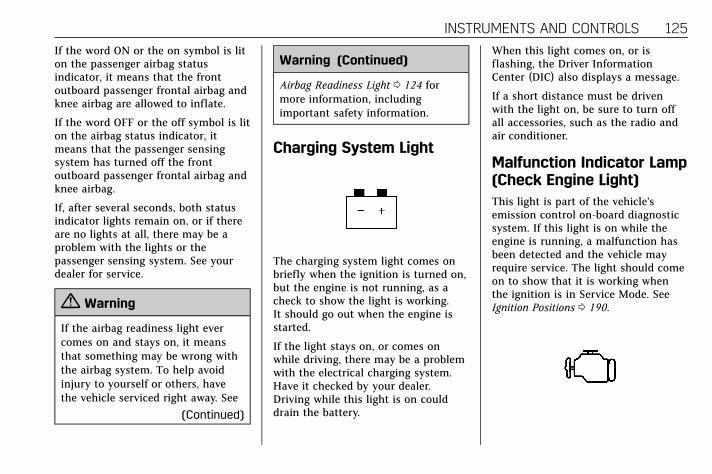
Cadillac ATS/ATS-V Owner Manual (GMNA-Localizing-U.S./Canada/Mexico-11349135) - 2018 - crc - 9/25/17
INSTRUMENTS AND CONTROLS 125
If the word ON or the on symbol is liton the passenger airbag statusindicator, it means that the frontoutboard passenger frontal airbag andknee airbag are allowed to inflate.
If the word OFF or the off symbol is liton the airbag status indicator, itmeans that the passenger sensingsystem has turned off the frontoutboard passenger frontal airbag andknee airbag.
If, after several seconds, both statusindicator lights remain on, or if thereare no lights at all, there may be aproblem with the lights or thepassenger sensing system. See yourdealer for service.
{ Warning
If the airbag readiness light evercomes on and stays on, it meansthat something may be wrong withthe airbag system. To help avoidinjury to yourself or others, havethe vehicle serviced right away. See
(Continued)
Warning (Continued)
Airbag Readiness Light 0 124 formore information, includingimportant safety information.
Charging System Light
The charging system light comes onbriefly when the ignition is turned on,but the engine is not running, as acheck to show the light is working.It should go out when the engine isstarted.
If the light stays on, or comes onwhile driving, there may be a problemwith the electrical charging system.Have it checked by your dealer.Driving while this light is on coulddrain the battery.
When this light comes on, or isflashing, the Driver InformationCenter (DIC) also displays a message.
If a short distance must be drivenwith the light on, be sure to turn offall accessories, such as the radio andair conditioner.
Malfunction Indicator Lamp(Check Engine Light)This light is part of the vehicle’semission control on-board diagnosticsystem. If this light is on while theengine is running, a malfunction hasbeen detected and the vehicle mayrequire service. The light should comeon to show that it is working whenthe ignition is in Service Mode. SeeIgnition Positions 0 190.

Cadillac ATS/ATS-V Owner Manual (GMNA-Localizing-U.S./Canada/Mexico-11349135) - 2018 - crc - 9/25/17
126 INSTRUMENTS AND CONTROLS
Malfunctions are often indicated bythe system before any problem isnoticeable. Being aware of the lightand seeking service promptly when itcomes on may prevent damage.
Caution
If the vehicle is driven continuallywith this light on, the emissioncontrol system may not work aswell, the fuel economy may belower, and the vehicle may not runsmoothly. This could lead to costlyrepairs that might not be coveredby the vehicle warranty.
Caution
Modifications to the engine,transmission, exhaust, intake,or fuel system, or the use ofreplacement tires that do not meetthe original tire specifications, cancause this light to come on. Thiscould lead to costly repairs not
(Continued)
Caution (Continued)
covered by the vehicle warranty.This could also affect the vehicle’sability to pass an EmissionsInspection/Maintenance test. SeeAccessories and Modifications 0 252.
If the light is flashing : Amalfunction has been detected thatcould damage the emission controlsystem and increase vehicleemissions. Diagnosis and service maybe required.
To help prevent damage, reducevehicle speed and avoid hardaccelerations and uphill grades.If towing a trailer, reduce the amountof cargo being hauled as soon aspossible.
If the light continues to flash, find asafe place to park. Turn the vehicle offand wait at least 10 seconds beforerestarting the engine. If the light isstill flashing, follow the previousguidelines and see your dealer forservice as soon as possible.
If the light is on steady : Amalfunction has been detected.Diagnosis and service may berequired.
Check the following:
. If fuel has been added to thevehicle using the capless fuelfunnel adapter, make sure that ithas been removed. See “Filling theTank with a Portable Gas Can”under Filling the Tank 0 242. Thediagnostic system can detect if theadapter has been left installed inthe vehicle, allowing fuel toevaporate into the atmosphere.A few driving trips with theadapter removed may turn off thelight.
. Poor fuel quality can causeinefficient engine operation andpoor driveability, which may goaway once the engine is warmedup. If this occurs, change the fuelbrand. It may require at least onefull tank of the proper fuel to turnthe light off. See Fuel 0 240.
If the light remains on, see yourdealer.

Cadillac ATS/ATS-V Owner Manual (GMNA-Localizing-U.S./Canada/Mexico-11349135) - 2018 - crc - 9/25/17
INSTRUMENTS AND CONTROLS 127
Emissions Inspection andMaintenance Programs
If the vehicle requires an EmissionsInspection/Maintenance test, the testequipment will likely connect to thevehicle's Data Link Connector (DLC).
The DLC is under the instrumentpanel to the left of the steering wheel.Connecting devices that are not usedto perform an Emissions Inspection/Maintenance test or to service thevehicle may affect vehicle operation.See Add-On Electrical Equipment 0 249.See your dealer if assistance is needed.
The vehicle may not passinspection if:
. The light is on when the engine isrunning.
. The light does not come on whenthe ignition is in Service Mode.
. Critical emission control systemshave not been completelydiagnosed. If this happens, thevehicle would not be ready forinspection and might requireseveral days of routine drivingbefore the system is ready forinspection. This can happen if the12-volt battery has recently beenreplaced or run down, or if thevehicle has been recently serviced.
See your dealer if the vehicle will notpass or cannot be made ready forthe test.
Brake System WarningLightThe vehicle brake system consists oftwo hydraulic circuits. If one circuit isnot working, the remaining circuit canstill work to stop the vehicle. Fornormal braking performance, bothcircuits need to be working.
If the warning light comes on, there isa brake problem. Have the brakesystem inspected right away.
Metric English
This light should come on brieflywhen the engine is started. If it doesnot come on then, have it fixed so itwill be ready to warn you if there is aproblem.
If the light comes on and stays on,there is a brake problem.
{ Warning
The brake system might not beworking properly if the brakesystem warning light is on. Drivingwith the brake system warning lighton can lead to a crash. If the light isstill on after the vehicle has beenpulled off the road and carefullystopped, have the vehicle towed forservice.

Cadillac ATS/ATS-V Owner Manual (GMNA-Localizing-U.S./Canada/Mexico-11349135) - 2018 - crc - 9/25/17
128 INSTRUMENTS AND CONTROLS
Parking Brake Light
Metric English
This light comes on when the parkingbrake is applied. If the light continuesflashing after the parking brake isreleased, or while driving, there is aproblem with the Electric ParkingBrake system. A message may alsodisplay in the Driver InformationCenter (DIC).
If the light does not come on,or remains flashing, see your dealer.
Service Electric ParkingBrake Light
This light should come on brieflywhen starting the vehicle. If it doesnot come on, have it fixed so it will beready to warn if there is a problem.
If this light stays on, there is aproblem with the Electric ParkingBrake system or another system onthe vehicle that is causing the parkingbrake system to work at a reducedlevel. The vehicle can still be driven,but should be taken to a dealer assoon as possible. See the informationfor the Electric Parking Brake underParking Brake (Electric) 0 206 orParking Brake (Manual) 0 208.A message may also display in theDriver Information Center (DIC).
Antilock Brake System(ABS) Warning Light
This light comes on briefly when theengine is started.
If the light does not come on, have itfixed so it will be ready to warn ifthere is a problem.
If the light comes on while driving,stop as soon as it is safely possibleand turn off the vehicle. Then startthe engine again to reset the system.If the ABS light stays on, or comes onagain while driving, the vehicle needsservice. A chime may also sound whenthe light comes on steady.
If the ABS light is the only light on,the vehicle has regular brakes, but theantilock brakes are not functioning.
If both the ABS and the brake systemwarning light are on, the vehicle'santilock brakes are not functioningand there is a problem with theregular brakes. See your dealer forservice.
See Brake System Warning Light 0 127.

Cadillac ATS/ATS-V Owner Manual (GMNA-Localizing-U.S./Canada/Mexico-11349135) - 2018 - crc - 9/25/17
INSTRUMENTS AND CONTROLS 129
Lane Keep Assist (LKA)Light
If available, this light comes on brieflywhile starting the vehicle.
If it does not come on, have thevehicle serviced.
This light is green if LKA is availableto assist.
LKA may assist by gently turning thesteering wheel if the vehicleapproaches a detected lane markingwithout using the turn signal in thatdirection. The LKA light will turnamber.
This light is amber and flashes as aLane Departure Warning (LDW) alert,to indicate that the lane marking hasbeen crossed.
See Lane Keep Assist (LKA) 0 239.
Vehicle Ahead Indicator
If equipped, this indicator will displaygreen when a vehicle is detectedahead and amber when you arefollowing a vehicle ahead much tooclosely.
See Forward Collision Alert (FCA)System 0 232.
Traction Off Light
This light comes on briefly whilestarting the engine. If it does not,have the vehicle serviced by your
dealer. If the system is workingnormally, the indicator light thenturns off.
The traction off light comes on whenthe Traction Control System (TCS) hasbeen turned off by pressing andreleasing the TCS/StabiliTrak button.
This light and the StabiliTrak OFFlight come on when StabiliTrak isturned off.
If the TCS is off, wheel spin is notlimited. Adjust driving accordingly.
See Traction Control/Electronic StabilityControl 0 209.
StabiliTrak OFF Light
This light comes on briefly whilestarting the engine. If it does not,have the vehicle serviced by yourdealer.

Cadillac ATS/ATS-V Owner Manual (GMNA-Localizing-U.S./Canada/Mexico-11349135) - 2018 - crc - 9/25/17
130 INSTRUMENTS AND CONTROLS
This light comes on when theStabiliTrak system is turned off.If StabiliTrak is off, the TractionControl System (TCS) is also off.
This light may also come on when aPerformance Traction Management(PTM) mode is selected. See“Performance Traction Management(V-Series Only)” under CompetitiveDriving Mode (FE3 Only) 0 214.
If the StabiliTrak and TCS are off, thesystem does not assist in controllingthe vehicle. Turn on the TCS and theStabiliTrak systems and the warninglight turns off.
See Traction Control/Electronic StabilityControl 0 209.
Traction Control System(TCS)/StabiliTrak Light
This light comes on briefly when theengine is started.
If the light does not come on, havethe vehicle serviced by your dealer.If the system is working normally, theindicator light turns off.
If the light is on and not flashing, theTCS and potentially the StabiliTraksystem have been disabled. A DriverInformation Center (DIC) messagemay display. Check the DIC messagesto determine which feature(s) is nolonger functioning and whether thevehicle requires service.
If the light is on and flashing, the TCSand/or the StabiliTrak system isactively working.
See Traction Control/Electronic StabilityControl 0 209.
Engine CoolantTemperature Warning Light
This light comes on briefly whilestarting the vehicle.
If it does not, have the vehicleserviced by your dealer. If the systemis working normally the indicator lightgoes off.
Caution
The engine coolant temperaturewarning light indicates that thevehicle has overheated. Driving withthis light on can damage the engineand it may not be covered by thevehicle warranty. See EngineOverheating 0 269.

Cadillac ATS/ATS-V Owner Manual (GMNA-Localizing-U.S./Canada/Mexico-11349135) - 2018 - crc - 9/25/17
INSTRUMENTS AND CONTROLS 131
The engine coolant temperaturewarning light comes on when theengine has overheated.
If this happens, pull over and turn offthe engine as soon as possible. SeeEngine Overheating 0 269.
Tire Pressure Light
For vehicles with the Tire PressureMonitor System (TPMS), this lightcomes on briefly when the engine isstarted. It provides information abouttire pressures and the TPMS.
When the Light Is On Steady
This indicates that one or more of thetires are significantly underinflated.
A Driver Information Center (DIC) tirepressure message may also display.Stop as soon as possible, and inflate
the tires to the pressure value shownon the Tire and Loading Informationlabel. See Tire Pressure 0 298.
When the Light Flashes First andThen Is On Steady
If the light flashes for about a minuteand then stays on, there may be aproblem with the TPMS. If theproblem is not corrected, the light willcome on at every ignition cycle. SeeTire Pressure Monitor Operation 0 300.
Engine Oil Pressure Light
Caution
Lack of proper engine oilmaintenance can damage theengine. Driving with the engine oillow can also damage the engine.The repairs would not be coveredby the vehicle warranty. Check theoil level as soon as possible. Add oilif required, but if the oil level iswithin the operating range and theoil pressure is still low, have the
(Continued)
Caution (Continued)
vehicle serviced. Always follow themaintenance schedule for changingengine oil.
This light should come on briefly asthe engine is started. If it does notcome on, have the vehicle serviced byyour dealer.
If the light comes on and stays on, itmeans that oil is not flowing throughthe engine properly. The vehicle couldbe low on oil and might have someother system problem. See your dealer.

Cadillac ATS/ATS-V Owner Manual (GMNA-Localizing-U.S./Canada/Mexico-11349135) - 2018 - crc - 9/25/17
132 INSTRUMENTS AND CONTROLS
Low Fuel Warning Light
This light is near the fuel gauge andcomes on briefly when the ignition isturned on as a check to show it isworking.
It also comes on when the fuel tank islow on fuel. The light turns off whenfuel is added. If it does not, have thevehicle serviced.
Security Light
The security light should come onbriefly as the engine is started. If itdoes not come on, have the vehicle
serviced by your dealer. If the systemis working normally, the indicatorlight turns off.
If the light stays on and the enginedoes not start, there could be aproblem with the theft-deterrentsystem. See Immobilizer Operation0 47.
High-Beam On Light
This light comes on when thehigh-beam headlamps are in use.
See Headlamp High/Low-Beam Changer0 151.
IntelliBeam Light
This light comes on when theIntelliBeam system, if equipped, isenabled.
See Exterior Lamp Controls 0 149.

Cadillac ATS/ATS-V Owner Manual (GMNA-Localizing-U.S./Canada/Mexico-11349135) - 2018 - crc - 9/25/17
INSTRUMENTS AND CONTROLS 133
Adaptive Forward Lighting(AFL) Light
This light should come on briefly asthe vehicle is started. If it does notcome on, have the vehicle serviced byyour dealer.
This light comes on solid when thereis a problem with the AFL system.It flashes when the system isswitching between lighting modes. SeeAdaptive Forward Lighting (AFL) 0 153.
Lamps On Reminder
This light comes on when the exteriorlamps are in use. See Exterior LampControls 0 149.
Cruise Control Light
The cruise control light is white whenthe cruise control is on and ready, andturns green when the cruise control isset and active. See Cruise Control0 218.
Adaptive Cruise Control Light
This light comes on when AdaptiveCruise Control (if equipped) is active.See Adaptive Cruise Control 0 220.
Door Ajar Light
For vehicles equipped with this light,it comes on when a door is open ornot securely latched. Before driving,check that all doors are properlyclosed.

Cadillac ATS/ATS-V Owner Manual (GMNA-Localizing-U.S./Canada/Mexico-11349135) - 2018 - crc - 9/25/17
134 INSTRUMENTS AND CONTROLS
Information Displays
Driver InformationCenter (DIC)The DIC displays are shown in the leftand right interactive display zones onthe instrument cluster. The displaysshow the status of many vehiclesystems. The controls for the DIC areon the right steering wheel control.
y or z : Press to move up or downin a list.
S or T : Press to move between theinteractive display zones in thecluster. Press S to go back to theprevious menu.
SEL : Press to open a menu or select amenu item. Press and hold to resetvalues on certain screens.
DIC Information Display Options
The information displays on the DICcan be turned on or off through theOptions menu.
1. Press SEL while viewing theOptions page in the centerdisplay zone on the cluster.
2. Scroll to Info Pages andpress SEL.
3. Press y or z to move throughthe list of possible informationdisplays.
4. Press SEL while an item ishighlighted to select or deselectthat item. When an item isselected, a checkmark will appearnext to it.
DIC Information Displays
The following is the list of all possibleDIC information displays. Some of theinformation displays may not beavailable for your particular vehicle.
Speed : Shows the vehicle speed ineither kilometers per hour (km/h) ormiles per hour (mph).
Trip 1 and Trip 2 : Shows the currentdistance traveled, in eitherkilometers (km) or miles (mi), sincethe trip odometer was last reset. Thetrip odometer can be reset by pressingand holding SEL while this display isactive.
Fuel Range : Shows the approximatedistance the vehicle can be drivenwithout refueling. LOW will bedisplayed when the vehicle is low onfuel. The fuel range estimate is basedon an average of the vehicle's fueleconomy over recent driving historyand the amount of fuel remaining inthe fuel tank.
Average Fuel Economy : Shows theapproximate average liters per100 kilometers (L/100 km) or miles pergallon (mpg). This number is

Cadillac ATS/ATS-V Owner Manual (GMNA-Localizing-U.S./Canada/Mexico-11349135) - 2018 - crc - 9/25/17
INSTRUMENTS AND CONTROLS 135
calculated based on the number ofL/100 km (mpg) recorded since thelast time this menu item was reset.This number reflects only theapproximate average fuel economythat the vehicle has right now, andwill change as driving conditionschange. The Average Fuel Economycan be reset by pressing and holdingSEL while this display is active.
Instantaneous Fuel Economy : Showsthe current fuel economy in eitherliters per 100 kilometers (L/100 km) ormiles per gallon (mpg). This numberreflects only the approximate fueleconomy that the vehicle has rightnow and changes frequently as drivingconditions change.
Average Speed : Shows the averagespeed of the vehicle in kilometers perhour (km/h) or miles per hour (mph).This average is calculated based onthe various vehicle speeds recordedsince the last reset of this value. Theaverage speed can be reset by pressingand holding SEL while this display isactive.
Timer : This display can be used as atimer. To start the timer, press SELwhile this display is active. Thedisplay will show the amount of timethat has passed since the timer waslast reset. To stop the timer, press SELbriefly while this display is active andthe timer is running. To reset thetimer to zero, press and hold SELwhile this display is active.
Compass : Shows the direction thevehicle is driving.
Turn Arrow : Shows the nextmaneuver when using route guidance.
Travel Time : Shows the estimatedtime duration remaining for thecurrent route.
Estimated Time to Arrival : Showsthe approximate time of arrival toyour destination when using routeguidance.
Speed Limit : Shows the currentspeed limit on vehicles with thenavigation system. The informationfor this page comes from a roadwaydatabase.
Speed Warning : Allows the driver toset a speed that they do not want toexceed. To set the Speed Warning,press SEL when Speed Warning isdisplayed. Press y or z to adjust thevalue. This feature can be turned offby pressing and holding SEL whileviewing this page. If the selectedspeed limit is exceeded, a pop-upwarning is displayed and a chime maysound.
Cruise Set Speed : Shows the speedthe cruise control or Adaptive CruiseControl (ACC, if equipped) is set to.
Follow Distance/Gap Setting : WhenAdaptive Cruise Control (ACC) is notengaged, the current follow time tothe vehicle ahead is displayed as atime value on this page. When ACChas been engaged, the displayswitches to the gap setting page. Thispage shows the current gap settingalong with the vehicle ahead telltale.
Battery Voltage : Shows the currentbattery voltage.

Cadillac ATS/ATS-V Owner Manual (GMNA-Localizing-U.S./Canada/Mexico-11349135) - 2018 - crc - 9/25/17
136 INSTRUMENTS AND CONTROLS
Oil Life : Shows an estimate of theoil's remaining useful life.If REMAINING OIL LIFE 99% isdisplayed, that means 99% of thecurrent oil life remains.
When the remaining oil life is low, theCHANGE ENGINE OIL SOON messagewill appear on the display. The oilshould be changed as soon aspossible. See Engine Oil 0 259. Inaddition to the engine oil life systemmonitoring the oil life, additionalmaintenance is recommended. SeeMaintenance Schedule 0 336.
The Oil Life display must be resetafter each oil change. It will not resetitself. Do not to reset the Oil Lifedisplay accidentally at any time otherthan when the oil has just beenchanged. It cannot be reset accuratelyuntil the next oil change. To reset theengine oil life system, press and holdSEL for several seconds while the OilLife display is active. See Engine OilLife System 0 261.
Tire Pressure : Shows theapproximate pressures of all four tires.Tire pressure is displayed in eitherkilopascal (kPa) or in pounds persquare inch (psi). If the pressure islow, the value for that tire is shown inamber.See Tire Pressure Monitor System 0 299and Tire Pressure Monitor Operation0 300.
Tire Temperature : Displays adescription of the tire air temperaturebased on the readings form the TPMSsensors. The temperature rangedisplayed will change based onambient conditions and driving style.
Engine Boost (LTG and LF4Engines) : Displays engine manifoldpressure relative to ambient airpressure. It will display boost pressuregenerated by the turbochargingsystem.
Vehicle Odometer : Shows theodometer.
Blank Page : The Blank Page displayallows for no information to bedisplayed in the DIC display zone(s).
Head-Up Display (HUD)
{ Warning
If the HUD image is too bright ortoo high in your field of view, itmay take you more time to seethings you need to see when it isdark outside. Be sure to keep theHUD image dim and placed low inyour field of view.
If equipped with HUD, someinformation concerning the operationof the vehicle is projected onto thewindshield. The information isprojected through the HUD lens onthe driver side of the instrumentpanel and focused out toward thefront of the vehicle.
Caution
If you try to use the HUD image asa parking aid, you may misjudgethe distance and damage yourvehicle. Do not use the HUD imageas a parking aid.
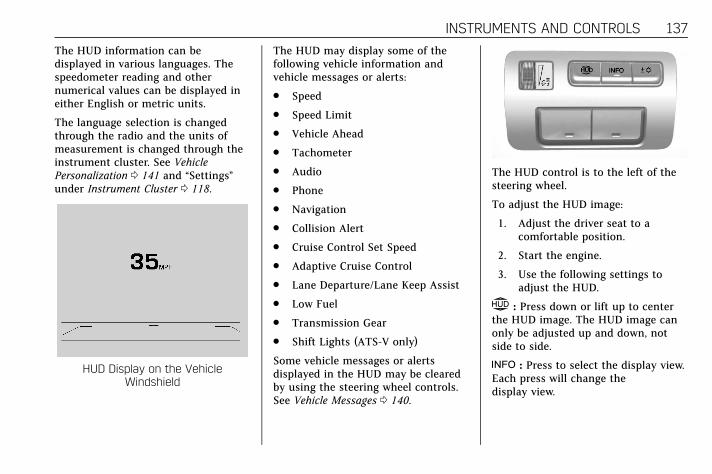
Cadillac ATS/ATS-V Owner Manual (GMNA-Localizing-U.S./Canada/Mexico-11349135) - 2018 - crc - 9/25/17
INSTRUMENTS AND CONTROLS 137
The HUD information can bedisplayed in various languages. Thespeedometer reading and othernumerical values can be displayed ineither English or metric units.
The language selection is changedthrough the radio and the units ofmeasurement is changed through theinstrument cluster. See VehiclePersonalization 0 141 and “Settings”under Instrument Cluster 0 118.
HUD Display on the VehicleWindshield
The HUD may display some of thefollowing vehicle information andvehicle messages or alerts:
. Speed
. Speed Limit
. Vehicle Ahead
. Tachometer
. Audio
. Phone
. Navigation
. Collision Alert
. Cruise Control Set Speed
. Adaptive Cruise Control
. Lane Departure/Lane Keep Assist
. Low Fuel
. Transmission Gear
. Shift Lights (ATS-V only)
Some vehicle messages or alertsdisplayed in the HUD may be clearedby using the steering wheel controls.See Vehicle Messages 0 140.
The HUD control is to the left of thesteering wheel.
To adjust the HUD image:
1. Adjust the driver seat to acomfortable position.
2. Start the engine.
3. Use the following settings toadjust the HUD.
$ : Press down or lift up to centerthe HUD image. The HUD image canonly be adjusted up and down, notside to side.
! : Press to select the display view.Each press will change thedisplay view.

Cadillac ATS/ATS-V Owner Manual (GMNA-Localizing-U.S./Canada/Mexico-11349135) - 2018 - crc - 9/25/17
138 INSTRUMENTS AND CONTROLS
D : Lift up and hold to brighten thedisplay. Press down and hold to dimthe display. Hold down to turn thedisplay off.
The HUD image will automaticallydim and brighten to compensate foroutside lighting. The HUD brightnesscontrol can also be adjusted asneeded.
The HUD image can temporarily lightup depending on the angle andposition of sunlight on the HUDdisplay. This is normal.
Polarized sunglasses could make theHUD image harder to see.
Head-Up Display (HUD) RotationOption
This feature allows for adjusting theangle of the HUD image.
Press SEL on the steering wheelcontrols while Head-up DisplayRotation is highlighted to enter MainView. From Main View, press SEL toenter the Adjust Menu. Press y or zto adjust the angle of the HUDdisplay. Press S or T to highlight OK,
then press SEL to save the setting.CANCEL can also be selected to cancelthe setting. The vehicle must be inP (Park). See Instrument Cluster 0 118.
HUD Views
There are four views in the HUD.Some vehicle information and vehiclemessages or alerts may be displayedin any view.
Metric
English
Speed View : This display gives thespeedometer reading (in English ormetric units), Adaptive Cruise Control,Set Speed, Speed Limit, Forward
Collision Alert, Lane DepartureWarning/ Lane Keep Assist, andVehicle Ahead indicator. Someinformation only appears on vehiclesthat have these features, and whenthey are active.
Metric
English
Audio/Phone View : This displayincludes the information in speedview along with audio/phoneinformation. The current radio station,media type, and incoming calls will bedisplayed.

Cadillac ATS/ATS-V Owner Manual (GMNA-Localizing-U.S./Canada/Mexico-11349135) - 2018 - crc - 9/25/17
INSTRUMENTS AND CONTROLS 139
All HUD views may briefly displayaudio information when the driveruses the steering wheel controls toadjust the audio settings appearing inthe instrument cluster.
Incoming phone calls appearing in theinstrument cluster may also display inany HUD view.
Metric
English
Navigation View : This displayincludes the information in speedview along with Turn-by-TurnNavigation information. Whennavigation routing is not active,“Compass Information Is Displayed”.
Navigation Turn-by-Turn Alertsshown in the instrument cluster mayalso be displayed in any HUD view.
Metric
English
Performance View : This displaygives the speedometer reading, rpmreading, transmission positions, ShiftTiming Light Position (ATS-V only),and gear shift indicator (if equipped).The radio, CD, navigation, and phoneinformation do not appear inPerformance view.
The shift timing lights at the top ofthe display will appear with increasesin engine rpm. The rows of lights getcloser together as the shift point getscloser. Shift the transmission beforethe lights come together in thedisplay. Shift immediately if the lightsare flashing.See Manual Mode 0 201 or ManualTransmission 0 203.
Care of the HUD
Clean the inside of the windshield toremove any dirt or film that couldreduce the sharpness or clarity of theHUD image.
Clean the HUD lens with a soft clothsprayed with glass cleaner. Wipe thelens gently, then dry it.
HUD Troubleshooting
Check that:
. Nothing is covering the HUD lens.
. HUD brightness setting is not toodim or too bright.
. HUD is adjusted to the properheight.
Cadillac ATS/ATS-V Owner Manual (GMNA-Localizing-U.S./Canada/Mexico-11349135) - 2018 - crc - 9/25/17
140 INSTRUMENTS AND CONTROLS. Polarized sunglasses are not worn.
. Windshield and HUD lens areclean.
If the HUD image is not correct,contact your dealer.
The windshield is part of the HUDsystem. If windshield replacement isrequired, see Windshield Replacement0 277.
Vehicle MessagesMessages displayed on the DICindicate the status of the vehicle orsome action that may be needed tocorrect a condition. Multiple messagesmay appear one after another.
The messages that do not requireimmediate action can beacknowledged and cleared by pressingV. The messages that requireimmediate action cannot be cleareduntil that action is performed.
All messages should be takenseriously; clearing the message doesnot correct the problem.
If a SERVICE message appears, seeyour dealer.
Follow the instructions given in themessages. The system displaysmessages regarding the followingtopics:
. Service Messages
. Fluid Levels
. Vehicle Security
. Brakes
. Ride Control Systems
. Driver Assistance Systems
. Cruise Control
. Lighting and Bulb Replacement
. Wiper/Washer Systems
. Doors and Windows
. Seat Belts
. Airbag Systems
. Engine and Transmission
. Tire Pressure
. Battery
Engine Power Messages
ENGINE POWER IS REDUCED
This message displays when thevehicle's propulsion power is reduced.Reduced propulsion power can affectthe vehicle's ability to accelerate.If this message is on, but there is noobserved reduction in performance,proceed to your destination. Theperformance may be reduced the nexttime the vehicle is driven. The vehiclemay be driven while this message is

Cadillac ATS/ATS-V Owner Manual (GMNA-Localizing-U.S./Canada/Mexico-11349135) - 2018 - crc - 9/25/17
INSTRUMENTS AND CONTROLS 141
on, but maximum acceleration andspeed may be reduced. Anytime thismessage stays on, or displaysrepeatedly, the vehicle should betaken to your dealer for service assoon as possible.
Vehicle Speed Messages
SPEED LIMITED TO XXXKM/H (MPH)
This message shows that the vehiclespeed has been limited to the speeddisplayed. The limited speed is aprotection for various propulsion andvehicle systems, such as lubrication,thermal, suspension, or tires.
Vehicle PersonalizationThe following are all possible vehiclepersonalization features. Dependingon the vehicle, some may not beavailable.
For System, Apps, and Personalfeatures and functions, see “Settings”in the infotainment manual.
To access the vehiclepersonalization menu:
1. Touch the Settings icon on theHome Page of the infotainmentdisplay.
2. Touch Vehicle to display a list ofavailable options.
3. Touch to select the desiredfeature setting.
4. Touch9 or R to turn a featureoff or on.
5. Touch z to go to the top level ofthe Settings menu.
The menu may contain the following:
Rear Seat Reminder
This allows for a chime and a messagewhen the rear door has been openedbefore or during operation of thevehicle.
Touch Off or On.
Driving Mode
These settings will overwrite the mainVehicle Mode selections made withthe MODE switch on the console.
Touch and the following may display:
. Engine Sound Management
. Steering
. Suspension
Engine Sound Management
This setting adjusts the sound of theengine exhaust from a quiet to a loudexhaust volume.
Touch Auto (Follows the MODEswitch), Tour, Sport, or Track.
Steering
This setting adjusts how the steeringfeels from a lighter to a reduced assistfor more steering feel.
Cadillac ATS/ATS-V Owner Manual (GMNA-Localizing-U.S./Canada/Mexico-11349135) - 2018 - crc - 9/25/17
142 INSTRUMENTS AND CONTROLS
Touch Auto (Follows the MODEswitch), Tour, Sport, or Track.
Suspension
This setting adjusts the suspensionfrom a comfortable to a moreresponsive tune.
Touch Auto (Follows the MODEswitch), Tour, Sport, or Track.
Climate and Air Quality
Touch and the following may display:
. Auto Fan Speed
. Air Quality Sensor
. Auto Heated Seats
. Auto Defog
. Auto Rear Defog
Auto Fan Speed
This setting specifies the amount ofairflow when the climate control fansetting is Auto Fan.
Touch Low, Medium, or High.
Air Quality Sensor
This setting switches the system intoRecirculation Mode based on thequality of the outside air.
Touch Off, Low Sensitivity, or HighSensitivity.
Auto Heated Seats
This setting automatically turns onand regulates the heated seats whenthe cabin temperature is cool. Theauto heated seats can be turned off byusing the heated seat buttons on thecenter stack. See Heated Front Seats0 64.
If equipped with Auto Heated SteeringWheel, this feature will turn on whenthe Auto Heated Seats turn on.
Touch Off or On.
Auto Defog
This setting automatically turns thefront defogger on when the engine isstarted.
Touch Off or On.
Auto Rear Defog
This setting automatically turns therear defogger on when the engine isstarted.
Touch Off or On.
Collision / Detection Systems
Touch the Collision/Detection Systemsmenu and the following may display:
. Alert Type
. Forward Collision System
. Adaptive Cruise Go Notifier
. Lane Change Alert
. Rear Camera Park Assist Symbols
. Rear Cross Traffic Alert
Alert Type
This setting specifies the type ofvehicle feedback provided, either abeep or seat vibration, when you arein danger of colliding with an object.
Touch Beeps or Safety Alert Seat.

Cadillac ATS/ATS-V Owner Manual (GMNA-Localizing-U.S./Canada/Mexico-11349135) - 2018 - crc - 9/25/17
INSTRUMENTS AND CONTROLS 143
Forward Collision System
This setting controls the vehicleresponse when detecting a vehicleahead of you. The Off setting disablesall FCA and FAB functions. With theAlert and Brake setting, both FCA andFAB are available. The Alert settingdisables FAB. See Forward AutomaticBraking (FAB) 0 235.
Touch Off, Alert, or Alert and Brake.
Adaptive Cruise Go Notifier
This setting determines if an alert willappear when Adaptive Cruise Controlbrings the vehicle to a complete stopand the vehicle ahead of you startsmoving again. See Adaptive CruiseControl 0 220.
Touch Off or On.
Lane Change Alert
This setting specifies if an alert willdisplay on the outside mirror to helpyou avoid crashing into a vehicle inyour blind spot, or rapidlyapproaching your blind spot, during alane change maneuver. See LaneChange Alert (LCA) 0 237.
Touch Off or On.
Rear Camera Park Assist Symbols
This setting enables the Rear CameraPark Assist Symbols. See AssistanceSystems for Parking or Backing 0 229.
Touch Off or On.
Rear Cross Traffic Alert
This setting specifies if an alert willdisplay when the vehicle detectsapproaching rear cross traffic when inR (Reverse). See Assistance Systems forParking or Backing 0 229.
Touch Off or On.
Comfort and Convenience
Touch and the following may display:
. Auto Memory Recall
. Easy Exit Options
. Chime Volume
. Reverse Tilt Mirror
. Rain Sense Wipers
Auto Memory Recall
This feature automatically recalls thecurrent driver’s previously stored 1 or2 button positions when the ignitionis changed from off to on or ACC/ACCESSORY. See Memory Seats 0 61.
Touch Off or On.
Easy Exit Options
This feature automatically recalls thepreviously stored exit button positionwhen exiting the vehicle. See MemorySeats 0 61.
Touch Off or On.
Chime Volume
This setting determines the chimevolume level.
Touch the controls on theinfotainment system to adjust thevolume.
Reverse Tilt Mirror
When on, both the driver andpassenger, driver, or passenger outsidemirrors will tilt downward when thevehicle is shifted to R (Reverse) toimprove visibility of the ground near

Cadillac ATS/ATS-V Owner Manual (GMNA-Localizing-U.S./Canada/Mexico-11349135) - 2018 - crc - 9/25/17
144 INSTRUMENTS AND CONTROLS
the rear wheels. They will return totheir previous driving position whenthe vehicle is shifted out ofR (Reverse) or the engine is turned off.
Touch Off, On - Driver and Passenger,On - Driver, or On - Passenger.
Rain Sense Wipers
This setting automatically turns onthe wipers when moisture is detectedand the wiper switch is inintermittent mode.
Touch Disabled or Enabled.
Lighting
Touch and the following may display:
. Vehicle Locator Lights
. Exit Lighting
. Adaptive Forward Lighting
Vehicle Locator Lights
This setting flashes the vehicle’sheadlamps when K is pressed on theRemote Keyless Entry (RKE)transmitter.
Touch Off or On.
Exit Lighting
This setting specifies how long theheadlamps stay on after the vehicle isturned off and exited.
Touch Off, 30 Seconds, 60 Seconds,or 120 Seconds.
Adaptive Forward Lighting
This setting automatically adjusts theheadlamps to provide greater roadillumination based on drivingconditions.
Touch Off or Corner and CurveLighting.
Power Door Locks
Touch and the following may display:
. Open Door Anti Lock Out
. Auto Door Unlock
. Delayed Door Lock
Open Door Anti Lock Out
This setting prevents the driver doorfrom locking when the door is open.If this setting is on, the Delayed DoorLock menu will not be available.
Touch Off or On.
Auto Door Unlock
This setting allows selection of whichdoors will automatically unlock whenthe vehicle is shifted into P (Park).
Touch Off, All Doors, or Driver Door.
Delayed Door Lock
This setting delays the locking of thevehicle’s doors.
Touch Off or On.
Remote Lock, Unlock, Start
Touch and the following may display:
. Remote Unlock Light Feedback
. Remote Lock Feedback
. Remote Door Unlock
. Remote Start Auto Heat Seats
. Remote Window Operation
. Passive Door Unlock
. Passive Door Lock
. Remote Left in Vehicle Alert

Cadillac ATS/ATS-V Owner Manual (GMNA-Localizing-U.S./Canada/Mexico-11349135) - 2018 - crc - 9/25/17
INSTRUMENTS AND CONTROLS 145
Remote Unlock Light Feedback
This setting flashes the exterior lampswhen the vehicle is unlocked with theRKE transmitter.
Touch Off or Flash Lights.
Remote Lock Feedback
This setting specifies how the vehicleresponds when the vehicle is lockedwith the RKE transmitter.
Touch Off, Lights and Horn, LightsOnly, or Horn Only.
Remote Door Unlock
This setting specifies whether alldoors, or just the driver door, unlockwhen pressing K on the RKEtransmitter.
Touch All Doors or Driver Door.
Remote Start Auto Heat Seats
This setting automatically turns onthe heated seats when using theremote start function on cold days.See Heated Front Seats 0 64 andRemote Vehicle Start 0 37.
If equipped with Auto Heated SteeringWheel, this feature will turn on whenthe Remote Start Auto Heated Seatsturn on.
Touch Off or On.
Remote Window Operation
If equipped, this feature enablesremote operation of the windows withthe RKE transmitter. See RemoteKeyless Entry (RKE) System Operation0 31.
Touch Off or On.
Passive Door Unlock
This setting specifies which doorsunlock when using the button on thedriver door handle to unlock thevehicle.
Touch All Doors or Driver Door Only.
Passive Door Lock
This setting specifies if the vehicle willautomatically lock, or lock andprovide an alert after all the doors areclosed, and you walk away from thevehicle with the RKE transmitter. SeeRemote Keyless Entry (RKE) SystemOperation 0 31.
Touch Off, On with Horn Chirp, or On.
Remote Left in Vehicle Alert
This feature sounds an alert when theRKE transmitter is left in the vehicle.This menu also enables Remote NoLonger in Vehicle Alert.
Touch Off or On.
Teen Driver
See “Teen Driver” under “Settings” inthe infotainment manual.
Valet Mode
This will lock the infotainment systemand steering wheel controls. It mayalso limit access to vehicle storagelocations, if equipped.
To enable valet mode:
1. Enter a four-digit code on thekeypad.
2. Touch Enter to go to theconfirmation screen.
3. Re-enter the four-digit code.
Touch Lock or Unlock to lock orunlock the system. Touch Back to goback to the previous menu.

Cadillac ATS/ATS-V Owner Manual (GMNA-Localizing-U.S./Canada/Mexico-11349135) - 2018 - crc - 9/25/17
146 INSTRUMENTS AND CONTROLS
Universal RemoteSystemSee Radio Frequency Statement 0 364.
Universal Remote SystemProgramming
If equipped, these buttons are in theoverhead console.
This system can replace up to threeremote control transmitters used toactivate devices such as garage dooropeners, security systems, and homeautomation devices. These
instructions refer to a garage dooropener, but can be used for otherdevices.
Do not use the Universal Remotesystem with any garage door openerthat does not have the stop andreverse feature. This includes anygarage door opener modelmanufactured before April 1, 1982.
Read these instructions completelybefore programming the UniversalRemote system. It may help to haveanother person assist with theprogramming process.
Keep the original hand-heldtransmitter for use in other vehiclesas well as for future programming.Erase the programming when vehicleownership is terminated. See “ErasingUniversal Remote System Buttons”later in this section.
To program a garage door opener,park outside directly in line with andfacing the garage door opener receiver.Clear all people and objects near thegarage door.
Make sure the hand-held transmitterhas a new battery for quick andaccurate transmission of theradio-frequency signal.
Programming the UniversalRemote System
For questions or programming help,see www.homelink.com/gm or call1-800-355-3515.
Programming involves time-sensitiveactions, and may time out causing theprocedure to be repeated.
To program up to three devices:
1. Hold the end of the hand-heldtransmitter about 3 to 8 cm (1 to3 in) away from the UniversalRemote system buttons with theindicator light in view. Thehand-held transmitter wassupplied by the manufacturer ofthe garage door opener receiver.
2. At the same time, press and holdboth the hand-held transmitterbutton and one of the threeUniversal Remote systembuttons to be used to operate thegarage door. Do not release either

Cadillac ATS/ATS-V Owner Manual (GMNA-Localizing-U.S./Canada/Mexico-11349135) - 2018 - crc - 9/25/17
INSTRUMENTS AND CONTROLS 147
button until the indicator lightchanges from a slow to a rapidflash. Then release both buttons.
Some garage door openers mayrequire substitution of Step 2with the procedure under “RadioSignals for Canada and SomeGate Operators” later in thissection.
3. Press and hold the newlyprogrammed Universal Remotesystem button for five secondswhile watching the indicatorlight and garage door activation.
. If the indicator light stays oncontinuously or the garagedoor moves when the buttonis pressed, then programmingis complete. There is no needto complete Steps 4–6.
. If the indicator light does notcome on or the garage doordoes not move, a secondbutton press may berequired. For a second time,press and hold the newlyprogrammed button for
five seconds. If the light stayson or the garage door moves,programming is complete.
. If the indicator light blinksrapidly for two seconds, thenchanges to a solid light andthe garage door does notmove, continue withprogramming Steps 4–6.
Learn or Smart Button
4. After completing Steps 1–3,locate the Learn or Smart buttoninside the garage on the garagedoor opener receiver. The nameand color of the button may varyby manufacturer.
5. Press and release the Learn orSmart button. Step 6 must becompleted within 30 seconds ofpressing this button.
6. Inside the vehicle, press and holdthe newly programmed UniversalRemote system button fortwo seconds and then release it.If the garage door does not moveor the lamp on the garage dooropener receiver does not flash,press and hold the same buttona second time for two seconds,then release it. Again, if the doordoes not move or the garagedoor lamp does not flash, pressand hold the same button a thirdtime for two seconds, thenrelease it.
The Universal Remote system shouldnow activate the garage door.
Repeat the process for programmingthe two remaining buttons.
Radio Signals for Canada andSome Gate Operators
For questions or programming help,see www.homelink.com/gm or call1-800-355-3515.
Canadian radio-frequency laws andsome U.S. gate operators requiretransmitter signals to time out or quitafter several seconds of transmission.

Cadillac ATS/ATS-V Owner Manual (GMNA-Localizing-U.S./Canada/Mexico-11349135) - 2018 - crc - 9/25/17
148 INSTRUMENTS AND CONTROLS
This may not be long enough for theUniversal Remote system to pick upthe signal during programming.
If the programming did not work,replace Step 2 under “Programmingthe Universal Remote System” withthe following:
Press and hold the Universal Remotesystem button while pressing andreleasing the hand-held transmitterbutton every two seconds until thesignal has been successfully acceptedby the Universal Remote system. TheUniversal Remote system indicatorlight will flash slowly at first and thenrapidly. Proceed with Step 3 under“Programming the Universal RemoteSystem” to complete.
Universal Remote SystemOperation
Using the Universal RemoteSystem
Press and hold the appropriateUniversal Remote system button for atleast one-half second. The indicatorlight will come on while the signal isbeing transmitted.
Erasing Universal RemoteSystem Buttons
Erase all programmed buttons whenvehicle ownership is terminated.
To erase:
1. Press and hold the two outsidebuttons until the indicator lightbegins to flash. This should takeabout 10 seconds.
2. Release both buttons.
Reprogramming a SingleUniversal Remote SystemButton
To reprogram any of the systembuttons:
1. Press and hold any one of thebuttons. Do not release thebutton.
2. The indicator light will begin toflash after 20 seconds. Withoutreleasing the button, proceedwith Step 1 under “Programmingthe Universal Remote System.”
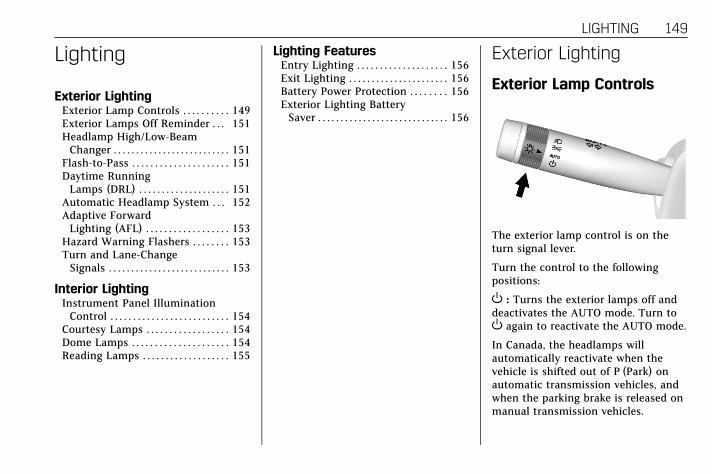
Cadillac ATS/ATS-V Owner Manual (GMNA-Localizing-U.S./Canada/Mexico-11349135) - 2018 - crc - 9/25/17
LIGHTING 149
Lighting
Exterior LightingExterior Lamp Controls . . . . . . . . . . 149Exterior Lamps Off Reminder . . . 151Headlamp High/Low-BeamChanger . . . . . . . . . . . . . . . . . . . . . . . . . . 151
Flash-to-Pass . . . . . . . . . . . . . . . . . . . . . 151Daytime RunningLamps (DRL) . . . . . . . . . . . . . . . . . . . . 151
Automatic Headlamp System . . . 152Adaptive ForwardLighting (AFL) . . . . . . . . . . . . . . . . . . 153
Hazard Warning Flashers . . . . . . . . 153Turn and Lane-ChangeSignals . . . . . . . . . . . . . . . . . . . . . . . . . . . 153
Interior LightingInstrument Panel IlluminationControl . . . . . . . . . . . . . . . . . . . . . . . . . . 154
Courtesy Lamps . . . . . . . . . . . . . . . . . . 154Dome Lamps . . . . . . . . . . . . . . . . . . . . . 154Reading Lamps . . . . . . . . . . . . . . . . . . . 155
Lighting FeaturesEntry Lighting . . . . . . . . . . . . . . . . . . . . 156Exit Lighting . . . . . . . . . . . . . . . . . . . . . . 156Battery Power Protection . . . . . . . . 156Exterior Lighting BatterySaver . . . . . . . . . . . . . . . . . . . . . . . . . . . . . 156
Exterior Lighting
Exterior Lamp Controls
The exterior lamp control is on theturn signal lever.
Turn the control to the followingpositions:
O : Turns the exterior lamps off anddeactivates the AUTO mode. Turn toO again to reactivate the AUTO mode.
In Canada, the headlamps willautomatically reactivate when thevehicle is shifted out of P (Park) onautomatic transmission vehicles, andwhen the parking brake is released onmanual transmission vehicles.
Cadillac ATS/ATS-V Owner Manual (GMNA-Localizing-U.S./Canada/Mexico-11349135) - 2018 - crc - 9/25/17
150 LIGHTING
AUTO : Automatically turns theexterior lamps on and off, dependingon outside lighting.
; : Turns on the parking lampsincluding all lamps, except theheadlamps.
2 : Turns on the headlamps togetherwith the parking lamps andinstrument panel lights.
IntelliBeam System
If equipped, this system turns thevehicle's high-beam headlamps on andoff according to surrounding trafficconditions.
The system turns the high-beamheadlamps on when it is dark enoughand there is no other traffic present.
An indicator lightb (Cluster with
Auto Stop) or2 (V-Series Cluster)comes on in the instrument clusterwhen the IntelliBeam system isenabled.
Turning On and Enabling IntelliBeam
To enable the automatic high-beamsystem, with the turn signal lever inthe neutral position, turn the exterior
lamp control to AUTO. The bluehigh-beam on light appears on theinstrument cluster when the highbeams are on.
Driving with IntelliBeam
The system only activates the highbeams when driving over 40 km/h(25 mph).
There is a sensor near the top centerof the windshield, which automaticallycontrols the system. Keep this area ofthe windshield clear of debris to allowfor best system performance.
The high-beam headlamps remain on,under the automatic control, until oneof the following situations occurs:
. The system detects anapproaching vehicle's headlamps.
. The system detects a precedingvehicle's taillamps.
. The outside light is bright enoughthat high-beam headlamps are notrequired.
. The vehicle's speed drops below20 km/h (12 mph).
. The turn signal lever is movedforward to the high-beam positionor the Flash-to-Pass feature isused.See Headlamp High/Low-BeamChanger 0 151 and Flash-to-Pass0 151.
. The Intellibeam system is disabledby the high/low-beam changer orthe flash-to-pass feature. If thishappens, the high/low-beamchanger must be activated twotimes within two seconds toreactivate the Intellibeam system.The instrument cluster light willcome on to indicate theIntellibeam system is reactivated.See Headlamp High/Low-BeamChanger 0 151 and Flash-to-Pass0 151.
The high beams may not turn offautomatically if the system cannotdetect other vehicle's lamps becauseof any of the following:
. The other vehicle's lamp(s) aremissing, damaged, obstructed fromview, or otherwise undetected.

Cadillac ATS/ATS-V Owner Manual (GMNA-Localizing-U.S./Canada/Mexico-11349135) - 2018 - crc - 9/25/17
LIGHTING 151. The other vehicle's lamp(s) are
covered with dirt, snow, and/orroad spray.
. The other vehicle's lamp(s) cannotbe detected due to dense exhaust,smoke, fog, snow, road spray, mist,or other airborne obstructions.
. Your vehicle's windshield is dirty,cracked, or obstructed bysomething that blocks the view ofthe light sensor.
. Your vehicle is loaded such thatthe front end points upward,causing the light sensor to aimhigh and not detect headlampsand taillamps.
. You are driving on winding or hillyroads.
You may need to manually disable orcancel the high-beam headlamps byturning the low-beam headlamps on,if any of the above conditions exist.
Exterior Lamps OffReminderA warning chime will sound if theexterior lamp control is left on ineither the headlamp or parking lampposition and the driver door is openedwith the ignition off.
Headlamp High/Low-BeamChangerPush the turn signal lever away fromyou and release, to turn the highbeams on. To return to low beams,push the lever again or pull it towardyou and release.
This indicator light turns on in theinstrument cluster when thehigh-beam headlamps are on.
Flash-to-PassThis feature allows the high-beamheadlamps to be used to signal thedriver in front of you that you wantto pass.
Pull and hold the turn signal levertoward you to use this feature. Whenthis is done the following will occur:
. If the headlamps are off or inlow-beam mode, the high-beamheadlamps will turn on. They willstay on as long as the lever is heldthere. Release the lever to turnthem off.
. If the headlamps are in high-beammode, they will go to low beam.
Daytime RunningLamps (DRL)DRL can make it easier for others tosee the front of your vehicle duringthe day. Fully functional DRL arerequired on all vehicles first sold inCanada.
The DRL system turns on thelow-beam headlamps at a reducedbrightness. For vehicles with High

Cadillac ATS/ATS-V Owner Manual (GMNA-Localizing-U.S./Canada/Mexico-11349135) - 2018 - crc - 9/25/17
152 LIGHTING
Intensity Discharge (HID) headlamps,there is a dedicated DRL. The DRL willcome on when all of the followingconditions are met:
. The ignition is on.
. The exterior lamp control isin AUTO.
. The light sensor determines it isdaytime.
. The parking brake is released orthe vehicle is not in P (Park).
The taillamps, sidemarker lamps,instrument panel lights, and otherlamps will not be on.
The DRL turn off when the headlampsare turned to O or the ignition is off.For vehicles first sold in Canada, theDRL can only be turned off when thetransmission is in P (Park).
Automatic HeadlampSystemWhen the exterior lamp control is setto AUTO and it is dark enoughoutside, the headlamps come onautomatically.
There is a light sensor on top of theinstrument panel. Do not cover thesensor, otherwise the headlamps willcome on when they are not needed.
The system may also turn on theheadlamps when driving through aparking garage or tunnel.
If the vehicle is started in a darkgarage, the automatic headlampsystem comes on immediately. If it islight outside when the vehicle leavesthe garage, there is a slight delaybefore the automatic headlampsystem changes to the DRL. Duringthat delay, the instrument cluster maynot be as bright as usual. Make surethe instrument panel brightness
control is in the full bright position.See Instrument Panel IlluminationControl 0 154.
When it is bright enough outside, theheadlamps will turn off or may changeto Daytime Running Lamps (DRL).
The automatic headlamp system turnsoff when the exterior lamp control isturned to O or the ignition is off.
Lights On with Wipers
If the windshield wipers are activatedin daylight with the engine on, andthe exterior lamp control is in AUTO,the headlamps, parking lamps, andother exterior lamps come on. Thetransition time for the lamps comingon varies based on wiper speed. Whenthe wipers are not operating, theselamps turn off. Move the exteriorlamp control to O or; to disablethis feature.

Cadillac ATS/ATS-V Owner Manual (GMNA-Localizing-U.S./Canada/Mexico-11349135) - 2018 - crc - 9/25/17
LIGHTING 153
Adaptive ForwardLighting (AFL)On vehicles with the AFL system, theheadlamps pivot horizontally toprovide greater road illuminationwhile turning. To enable AFL, set theexterior lamp control on the turnsignal lever to the AUTO position.Moving the control out of the AUTOposition will deactivate the system.AFL will operate when the vehiclespeed is greater than 3 km/h (2 mph).AFL will not operate when thetransmission is in R (Reverse). AFL isnot immediately operable afterstarting the vehicle; driving a shortdistance is required to calibrate theAFL. See Exterior Lamp Controls 0 149.
Hazard Warning Flashers
| : Press to make the front and rearturn signal lamps flash on and off.Press again to turn the flashers off.
The hazard warning flashers turn onautomatically if the airbags deploy.
Turn and Lane-ChangeSignals
Move the lever all the way up or downto signal a turn.
An arrow on the instrument clusterflashes in the direction of the turn orlane change.
Raise or lower the lever until thearrow starts to flash to signal a lanechange. Hold it there until the lanechange is completed. If the lever isbriefly pressed and released, the turnsignal flashes three times.
The turn and lane-change signal canbe turned off manually by moving thelever back to its original position.

Cadillac ATS/ATS-V Owner Manual (GMNA-Localizing-U.S./Canada/Mexico-11349135) - 2018 - crc - 9/25/17
154 LIGHTING
If after signaling a turn or lanechange, the arrow flashes rapidly ordoes not come on, a signal bulb mightbe burned out.
Replace any burned out bulbs. If abulb is not burned out, check the fuse.See Fuses and Circuit Breakers 0 281.
Interior Lighting
Instrument PanelIllumination Control
The brightness of the instrumentpanel lighting and steering wheelcontrols can be adjusted.
D : Move the thumbwheel up ordown to brighten or dim the lights.
The brightness of the displaysautomatically adjusts based onoutdoor lighting. The instrumentpanel illumination control will set thelowest level to which the displays willautomatically be adjusted.
Courtesy LampsThe courtesy lamps come on whenany door is opened and the domelamp is in the DOOR position.
Dome LampsThe dome lamp is in the overheadconsole.
To change the dome lamp settings,press:
OFF : Turns the lamp off, even when adoor is open.
DOOR : The lamp comes on when adoor is opened.

Cadillac ATS/ATS-V Owner Manual (GMNA-Localizing-U.S./Canada/Mexico-11349135) - 2018 - crc - 9/25/17
LIGHTING 155
ON : Turns the lamp on.
Reading LampsThere are front and rear readinglamps. These lamps come on whenany door is opened.
The front reading lamps are in theoverhead console.
Pressm orn to turn the lamps onor off.
Sedan
The rear reading lamps are over therear passenger doors.
Press the lamp lens to turn the rearpassenger reading lamps on or off.
Coupe
The rear reading lamps are in theheadliner.
Pressm orn to turn the lamps onor off.

Cadillac ATS/ATS-V Owner Manual (GMNA-Localizing-U.S./Canada/Mexico-11349135) - 2018 - crc - 9/25/17
156 LIGHTING
Lighting Features
Entry LightingSome exterior lamps and most of theinterior lights turn on briefly at night,or in areas of limited lighting when Kis pressed on the Remote KeylessEntry (RKE) transmitter. See RemoteKeyless Entry (RKE) System Operation0 31. When the driver door is opened,all control lights, Driver InformationCenter (DIC) lights, and door pocketlights turn on. After about 30 secondsthe exterior lamps turn off, then theremaining interior lights dim to off.Entry lighting can be disabledmanually by turning the ignition on orto ACC/ACCESSORY, or by pressing Qon the RKE transmitter.
This feature can be changed. See“Vehicle Locator Lights” under VehiclePersonalization 0 141.
Exit LightingSome exterior lamps and interiorlights come on at night, or in areaswith limited lighting, when the driverdoor is opened after the ignition isturned off. The dome lamp comes onafter the ignition is turned off. Theexterior lamps and dome lamp remainon for a set amount of time, thenautomatically turn off.
The exterior lamps turn offimmediately by turning the exteriorlamp control off.
This feature can be changed. SeeVehicle Personalization 0 141.
Battery Power ProtectionThe battery saver feature is designedto protect the vehicle's battery.
If some interior lamps are left on andthe ignition is turned off, the batteryrundown protection systemautomatically turns the lamp off aftersome time.
Exterior Lighting BatterySaverThe exterior lamps turn off about10 minutes after the ignition is turnedoff, if the parking lamps or headlampshave been manually left on. Thisprotects against draining the battery.To restart the 10-minute timer, turnthe exterior lamp control to the Oposition and then back to the; or2 position.
To keep the lamps on for more than10 minutes, the ignition must be on orin ACC/ACCESSORY.

Cadillac ATS/ATS-V Owner Manual (GMNA-Localizing-U.S./Canada/Mexico-11349135) - 2018 - crc - 9/25/17
INFOTAINMENT SYSTEM 157
Infotainment System
IntroductionInfotainment . . . . . . . . . . . . . . . . . . . . . 157
Performance DataRecorder (PDR)Performance DataRecorder (PDR) . . . . . . . . . . . . . . . . . 157
Introduction
InfotainmentSee the infotainment manual forinformation on the radio, audioplayers, phone, navigation system, andvoice or speech recognition. It alsoincludes information on settings.
Performance DataRecorder (PDR)If equipped, the PDR icon displays onthe Home Page.
Important Information
Use of the PDR may be prohibited orlegally restricted in certain countriesand situations. Ensure compliancewith applicable laws and regulations,including, but not limited to: privacylaws, laws related to camerasurveillance and recordings, roadtraffic and security laws, and laws onthe protection of publicity andpersonality rights.
. Do not use the PDR if it causesdistraction.
. Do not rely on camera footage tosteer the vehicle.
. Comply with any notice andconsent requirements beforecapturing and/or recording thevoices or images of other personsor before collecting otherpersonal data.

Cadillac ATS/ATS-V Owner Manual (GMNA-Localizing-U.S./Canada/Mexico-11349135) - 2018 - crc - 9/25/17
158 INFOTAINMENT SYSTEM. Notify other drivers of your
vehicle of the above rules andrequire them to comply.
. General Motors does not acceptany responsibility or liability inconnection with use that is notpermitted.
. Law enforcement authorities mayhave the right to seize videorecordings and use them asevidence of criminal/drivingoffenses against you or thirdparties.
The PDR records video, audio, andvehicle data. This data is stored on aremovable SD card in the glove box.
The recorded data is not storedanywhere else and is only accessiblefrom the SD card.
To begin, insert a FAT32 formatted SDcard, Class 10 required, 8, 16, or 32 GBrecommended, into the glove box SDcard reader.
Touch the PDR icon to access the PDRmenu. The options displayed are:
Start Recording
If the system is unable to beginrecording, the Start Recording buttonis grayed out.
Touch Start Recording to beginrecording. After recording begins, thisbutton changes to Stop Recording.Touch to stop the recording session.
The recording must be stopped andthe file closed before removing the SDcard, or the recording cannot bereviewed.
The elapsed time will show whenrecording. To define a finish line, see“Define Finish Line” later in thissection.
If there is no available space on theSD card, a message displays. Delete ortransfer recordings on the SD card oruse another SD card with free space.

Cadillac ATS/ATS-V Owner Manual (GMNA-Localizing-U.S./Canada/Mexico-11349135) - 2018 - crc - 9/25/17
INFOTAINMENT SYSTEM 159
To delete a recording, go to theRecorded Sessions menu and touch znext to the item. See “RecordedSessions” later in this section.
If no SD card is inserted, a messagedisplays.
Define Finish Line
To track and record the vehicle’s laptimes, the starting point of a lap mustbe set. Crossing this point activatesthe lap timer when recording.
To set the finish line, position thevehicle with the front bumper at thestart/finish point. From the PDRmenu, touch Define Finish Line andthen touch Mark Finish Line. This canbe done with the vehicle moving.
Recorded Sessions
To view recorded videos, touchRecorded Sessions.
A list of recordings displays.
Select the recording to start playback.
Touch z next to an item to deletethat recording. Touch Yes to delete orNo to cancel on the confirmationscreen. Touch Dismiss to exit.
Video playback is not allowed whilethe vehicle is in motion.
Tap on the screen while the video isplaying to display the video controls:
Video Scrubber : Changes theposition and playback. The length ofthe bar corresponds to the time of thevideo. Advance or rewind the video bydragging along the bar.

Cadillac ATS/ATS-V Owner Manual (GMNA-Localizing-U.S./Canada/Mexico-11349135) - 2018 - crc - 9/25/17
160 INFOTAINMENT SYSTEM
Delete Recording : Touch to deletethe video. A confirmation screendisplays. Touch Yes to delete or No tocancel.
Pause/Play : Touch to play or pausethe video. The button will changewhen pressed.
/ : Touch to display the previousscreen.
Exit : Touch to exit the currentdisplay.
Choose Video Overlay
Touch the Choose Video Overlayscreen button to display the menuscreen.
Select one:
. No Overlay
. Sport
. Track
. Performance Timing
No Overlay:
No vehicle data displays on top of therecorded video. Vehicle data is stillavailable with the video whenaccessed in the toolbox software.
Sport:
Displays these vehicle metrics:
. Vehicle Speed: Up to three digitsare displayed in km/h or MPHdepending on vehicle settings.
. Engine Rotations Per Minute(RPMs): The curved line showscurrent RPMs. As the RPMsincrease, the backfill follows.
. Transmission State (Current Gear):Automatic and manualtransmissions display 1, 2, etc.
. Lateral G-Force Graphic: Left andRight G-Forces are displayed. Thegraphic fills to the left or the rightdepending on the measure value.The measured G-Force displays asa number at the top of thegraphic.
. Event Odometer: This displays themileage driven since the recordingbegan.
Track:
Displays these vehicle metrics:
. Vehicle Speed: Same as Sport.

Cadillac ATS/ATS-V Owner Manual (GMNA-Localizing-U.S./Canada/Mexico-11349135) - 2018 - crc - 9/25/17
INFOTAINMENT SYSTEM 161. GPS Tracking Map: Shows the
vehicle’s current position relativeto a known route.
. Engine Rotations Per Minute(RPMs): Same as Sport.
. Transmission State (Current Gear):Same as Sport.
. Friction Bubble Graphic: Lateraland longitudinal G-Forces aredisplayed as a dot within a bubble.A red dot displays when thevehicle starts braking and turnsgreen when the vehicleaccelerates. The dot is white whenthe vehicle is not moving. A whitedot is the default.
. Brake and Throttle Graphic:Displays the percentage value ofbrake and throttle pedal positionfrom 0–100%.
. Steering Angle: The graphic fillsfrom the center to the left or rightdepending on the direction ofsteering. The numerical steeringangle displays below the graphic.
. StabiliTrak Active Indicator: Thegraphic only displays if the activehandling systems are activated.
. Performance TractionManagement (PTM) Mode:Displays the current PTM mode.The options are Wet, Dry, Sport 1,Sport 2, or Race.
. Current Lap Time: Displays theelapsed lap time if the finish lineis defined and the vehicle hascrossed the defined finish line atleast once.
. Event Odometer: Displays themileage driven since the recordingbegan.
. Drive Mode: Displays the vehicle’scurrent drive mode.
Performance Timing:
Displays these vehicle metrics:
. Vehicle Speed: Same as Sport.
. Engine Rotations Per Minute(RPMs): Same as Sport.
. Transmission State (Current Gear):Same as Sport.
. 0–100 km/h (0–60 mph), 0–200 km/h (0–100 mph), 400 m (1/4 mi), and 0–200–0 km/h (0–100–0 mph): The timer starts recordingas soon as the vehicle accelerates.As the vehicle passes each speedand distance milestone, it isdisplayed on the overlay.
. Throttle Position: Displaysthe percentage of throttle appliedfrom 0–100%.

Cadillac ATS/ATS-V Owner Manual (GMNA-Localizing-U.S./Canada/Mexico-11349135) - 2018 - crc - 9/25/17
162 INFOTAINMENT SYSTEM. StabiliTrak Active Indicator: The
graphic only displays if the activehandling systems are activated.
Naming Convention
The recorded video file name is storedas the recorded date and the length ofthe recording.
If the recorded session was recordedwhile the system was in Valet Mode,the file name will display the mode,date, and length of time.
Settings
Touch the Settings button from thePDR menu to display settings.
Valet Mode Recording : Allowsrecording preferences to be selected.It is recommended that a blank SDcard be used. Available choices are:
. Automatically record when inValet Mode: Enables the PDR tobegin recording as soon as thevehicle is in Valet Mode.
. Overwrite existing data whenmemory full: Allows manualoverwriting of previous recordings,one at a time starting with theoldest, when the current recordingrequires additional storage tocontinue.
Audio will not record duringValet Mode.
Record Audio : Allows audio to berecorded along with video.
Audio will not record duringValet Mode.
Software Information : Displays PDRsoftware information and versionnumbers.
Toolbox Software : Allows for theevaluation of the driver and thevehicle performance on a personalcomputer after a recorded event. Seewww.cadillac.com to download thesoftware.
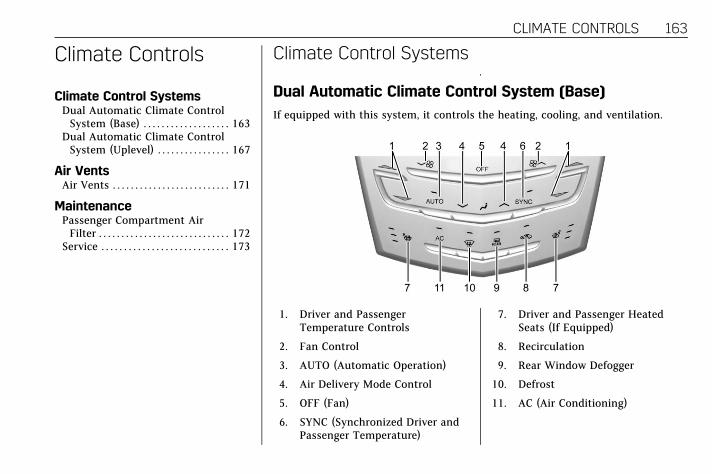
Cadillac ATS/ATS-V Owner Manual (GMNA-Localizing-U.S./Canada/Mexico-11349135) - 2018 - crc - 9/25/17
CLIMATE CONTROLS 163
Climate Controls
Climate Control SystemsDual Automatic Climate ControlSystem (Base) . . . . . . . . . . . . . . . . . . . 163
Dual Automatic Climate ControlSystem (Uplevel) . . . . . . . . . . . . . . . . 167
Air VentsAir Vents . . . . . . . . . . . . . . . . . . . . . . . . . . 171
MaintenancePassenger Compartment AirFilter . . . . . . . . . . . . . . . . . . . . . . . . . . . . . 172
Service . . . . . . . . . . . . . . . . . . . . . . . . . . . . 173
Climate Control Systems
Dual Automatic Climate Control System (Base)If equipped with this system, it controls the heating, cooling, and ventilation.
1. Driver and PassengerTemperature Controls
2. Fan Control
3. AUTO (Automatic Operation)
4. Air Delivery Mode Control
5. OFF (Fan)
6. SYNC (Synchronized Driver andPassenger Temperature)
7. Driver and Passenger HeatedSeats (If Equipped)
8. Recirculation
9. Rear Window Defogger
10. Defrost
11. AC (Air Conditioning)

Cadillac ATS/ATS-V Owner Manual (GMNA-Localizing-U.S./Canada/Mexico-11349135) - 2018 - crc - 9/25/17
164 CLIMATE CONTROLS
Climate Control Function with Stop/Start (If Equipped)
The climate control system dependson other vehicle systems for heat andpower input. The climate controlsystem will balance stop/startefficiency with air conditioningcomfort and defog operation.
The following climate control settingsresult in fewer auto stops:
. The defrost mode
. High fan speed settings
. Extreme temperature settings
Automatic Operation
The system automatically controls thefan speed, air delivery, airconditioning, and recirculation inorder to heat or cool the vehicle to thedesired temperature.
When AUTO is lit, all four functionsoperate automatically. Each functioncan also be manually set and theselected setting is displayed.Functions not manually set will
continue to be automaticallycontrolled, even if the AUTO indicatoris not lit.
For automatic operation:
1. Press AUTO.
2. Set the temperature. Allow thesystem time to stabilize. Thenadjust the temperature as neededfor best comfort.
To improve fuel efficiency and to coolthe vehicle faster, recirculation may beautomatically selected in warmweather. The recirculation light willnot come on. Press@ to selectrecirculation; press it again to selectoutside air.
English units can be changed tometric units through the instrumentcluster. See “Settings” underInstrument Cluster 0 118.
OFF : Press to turn the fan on or off.When off is selected, the system willstop air from flowing into the cabin.If on is selected, or any other buttonpress occurs, the climate controlsystem will turn on and operate to the
current setting. The temperaturecontrol and air delivery mode can stillbe adjusted.
w orx : The temperature can beadjusted separately for the driver andthe passenger. Press to increase ordecrease the temperature. Press andhold to rapidly increase or decreasethe temperature.
SYNC : Press SYNC to link all climatezone settings to the driver settings.The SYNC indicator will be lit. Adjustthe driver side temperature control tochange the linked temperature. Whenthe passenger settings are adjusted,the temperatures are unlinked and theSYNC indicator turns off.
Manual Operation
z9 or9y : Press the fan controlbuttons to increase or decrease thefan speed. Press and hold the buttonsto adjust speed more quickly. The fanspeed setting displays. Pressing eitherbutton cancels automatic fan controland the fan can be controlledmanually. Press AUTO to return toautomatic operation. To turn off thefan, press OFF.

Cadillac ATS/ATS-V Owner Manual (GMNA-Localizing-U.S./Canada/Mexico-11349135) - 2018 - crc - 9/25/17
CLIMATE CONTROLS 165
zNy : Press the air delivery modebuttons to change the direction of theairflow. Selecting any of the airdelivery modes cancels automatic airdelivery control and the direction ofthe airflow can be controlledmanually. Press AUTO to return toautomatic operation.
To change the current mode, selectone of the following:
Y : Air is directed to the instrumentpanel outlets.
\ : Air is divided between theinstrument panel outlets and the flooroutlets.
[ : Air is directed to the flooroutlets, with some air to thewindshield and side windows.
- : Clears the windows of fog ormoisture. Air is directed to thewindshield, side windows, and flooroutlets. Some air may go to the rearfloor outlets.
0 : Press to turn defrost on or off.This clears the windshield of fog orfrost more quickly. Air is directed tothe windshield and side windows.
A/C : Press to turn the airconditioning on or off. If the fan isturned off, the air conditioner will notrun. Outside temperatures belowfreezing may also prevent the airconditioner from running.
Press AUTO to return to automaticoperation and the air conditioner runsas needed. When the indicator light ison, the air conditioner runsautomatically to cool the air insidethe vehicle or to dry the air needed todefog the windshield faster.
Automatic Air Recirculation : Whenthe AUTO indicator light is on, the airis automatically recirculated asneeded to help quickly cool the insideof the vehicle.
@ : Press to alternate betweenrecirculating air inside the vehicle orpulling in outside air. The indicatorlight on the button is lit whenrecirculation mode is active. Thishelps to quickly cool the air inside thevehicle or reduce the outside air andodors that may enter.
Pressing this button cancels automaticrecirculation. Press AUTO to return toautomatic operation; recirculationruns automatically as needed.
Manual recirculation mode is notavailable when in Defrost or Defogmodes.
Auto Defog : The climate controlsystem may have a sensor toautomatically detect high humidityinside the vehicle. When highhumidity is detected, the climatecontrol system may adjust to outsideair supply and turn on the airconditioner. If the climate controlsystem does not detect possiblewindow fogging, it returns to normaloperation. To turn Auto Defog off oron, see “Climate and Air Quality”under Vehicle Personalization 0 141.
Rear Window Defogger
K : Press to turn the rear windowdefogger on or off. An indicator lighton the button comes on to show thatthe rear window defogger is on. Therear window defogger only workswhen the engine is running.
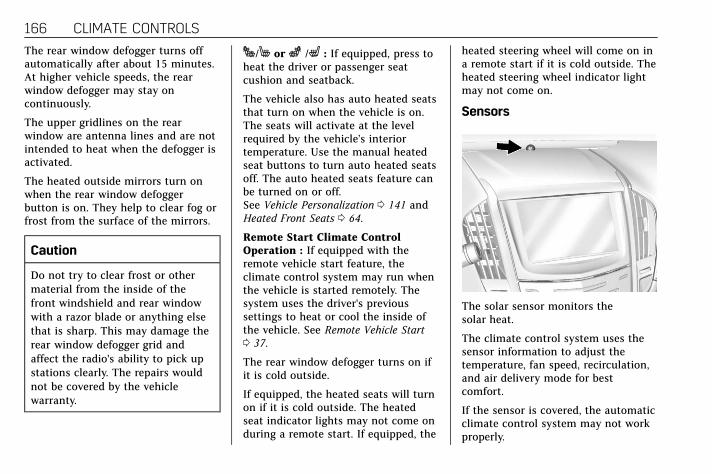
Cadillac ATS/ATS-V Owner Manual (GMNA-Localizing-U.S./Canada/Mexico-11349135) - 2018 - crc - 9/25/17
166 CLIMATE CONTROLS
The rear window defogger turns offautomatically after about 15 minutes.At higher vehicle speeds, the rearwindow defogger may stay oncontinuously.
The upper gridlines on the rearwindow are antenna lines and are notintended to heat when the defogger isactivated.
The heated outside mirrors turn onwhen the rear window defoggerbutton is on. They help to clear fog orfrost from the surface of the mirrors.
Caution
Do not try to clear frost or othermaterial from the inside of thefront windshield and rear windowwith a razor blade or anything elsethat is sharp. This may damage therear window defogger grid andaffect the radio's ability to pick upstations clearly. The repairs wouldnot be covered by the vehiclewarranty.
J/M or z /L : If equipped, press toheat the driver or passenger seatcushion and seatback.
The vehicle also has auto heated seatsthat turn on when the vehicle is on.The seats will activate at the levelrequired by the vehicle’s interiortemperature. Use the manual heatedseat buttons to turn auto heated seatsoff. The auto heated seats feature canbe turned on or off.See Vehicle Personalization 0 141 andHeated Front Seats 0 64.
Remote Start Climate ControlOperation : If equipped with theremote vehicle start feature, theclimate control system may run whenthe vehicle is started remotely. Thesystem uses the driver's previoussettings to heat or cool the inside ofthe vehicle. See Remote Vehicle Start0 37.
The rear window defogger turns on ifit is cold outside.
If equipped, the heated seats will turnon if it is cold outside. The heatedseat indicator lights may not come onduring a remote start. If equipped, the
heated steering wheel will come on ina remote start if it is cold outside. Theheated steering wheel indicator lightmay not come on.
Sensors
The solar sensor monitors thesolar heat.
The climate control system uses thesensor information to adjust thetemperature, fan speed, recirculation,and air delivery mode for bestcomfort.
If the sensor is covered, the automaticclimate control system may not workproperly.

Cadillac ATS/ATS-V Owner Manual (GMNA-Localizing-U.S./Canada/Mexico-11349135) - 2018 - crc - 9/25/17
CLIMATE CONTROLS 167
Dual Automatic Climate Control System (Uplevel)The climate control buttons on the center stack and on the climate controldisplay are used to adjust the heating, cooling, and ventilation.
Center Stack Climate Controls
1. Driver and PassengerTemperature Controls
2. Fan Control
3. OFF (Fan)
4. Driver and Passenger HeatedSeats (If Equipped)
5. Recirculation
6. Rear Window Defogger
7. Defrost
8. AUTO (Automatic Operation)
Climate Control Display
1. Driver and PassengerTemperature Controls
2. Fan Controls
3. REAR (Rear Climate ControlDisplay, If Equipped)
4. Sync (Synchronized Driver andPassenger Temperature)
5. Recirculation
6. Air Delivery Mode Control
7. Auto (Automatic Operation)
8. A/C (Air Conditioning)
9. On/Off

Cadillac ATS/ATS-V Owner Manual (GMNA-Localizing-U.S./Canada/Mexico-11349135) - 2018 - crc - 9/25/17
168 CLIMATE CONTROLS
Climate Control Display
The fan, air delivery mode, A/C mode,driver and passenger temperatures,and SYNC settings can be controlledby touching CLIMATE on theinfotainment Home Page or theclimate button in the displayapplication tray. A selection can thenbe made on the front climate controlpage displayed. See the infotainmentmanual.
Climate Control Status Display
The climate control status displayappears briefly when the climatecontrol buttons on the center stack
are adjusted. Touching the quickstatus pane opens the climateapplication.
Climate Control Function with Stop/Start (If Equipped)
The climate control system dependson other vehicle systems for heat andpower input. The climate controlsystem will balance stop/startefficiency with air conditioningcomfort and defog operation.
The following climate control settingsresult in fewer auto stops:
. The defrost mode
. High fan speed settings
. Extreme temperature settings
For maximum air conditioningcomfort, use the stop/start disableswitch. See “Auto Engine Stop/Start”under Starting the Engine 0 192.
Automatic Operation
The system automatically controls thefan speed, air delivery, airconditioning, and recirculation inorder to heat or cool the vehicle to thedesired temperature.
When AUTO is lit, all four functionsoperate automatically. Each functioncan also be manually set and theselected setting is displayed.Functions not manually set willcontinue to be automaticallycontrolled, even if the AUTO indicatoris not lit.
For automatic operation:
1. Press AUTO.
2. Set the temperature. Allow thesystem time to stabilize. Thenadjust the temperature as neededfor best comfort.
To improve fuel efficiency and to coolthe vehicle faster, recirculation may beautomatically selected in warmweather. The recirculation light willnot come on. Press@ to selectrecirculation; press it again to selectoutside air.
English units can be changed tometric units through the instrumentcluster. See “Settings” underInstrument Cluster 0 118.

Cadillac ATS/ATS-V Owner Manual (GMNA-Localizing-U.S./Canada/Mexico-11349135) - 2018 - crc - 9/25/17
CLIMATE CONTROLS 169
OFF : Press to turn the fan on or off.When off is selected, the system willstop air from flowing into the cabin.If on is selected, or any other buttonpress occurs, the climate controlsystem will turn on and operate to thecurrent setting. The temperaturecontrol and air delivery mode can stillbe adjusted.
w orx : The temperature can beadjusted separately for the driver andthe passenger. Press to increase ordecrease the temperature. Press andhold to rapidly increase or decreasethe temperature. The driver andpassenger temperatures can also beadjusted by touching the controls onthe climate control display.
SYNC : Touch SYNC on the climatecontrol display to link all climate zonesettings to the driver settings. Adjustthe driver side temperature control tochange the linked temperature. Whenthe passenger settings are adjusted,the SYNC button is displayed whenthe temperatures are unlinked.
Manual Operation
z9 or9y : Press or touch thefan controls on the center stack or theclimate control display to increase ordecrease the fan speed. Press and holdthe controls to adjust speed morequickly. The fan speed settingdisplays. Pressing either buttoncancels automatic fan control and thefan can be controlled manually. PressAUTO to return to automaticoperation. To turn off the fan andclimate control system, press and holdthe fan down button on the centerstack or the climate control displayuntil it is off.
Air Delivery Mode Control : Touchthe air delivery mode on the climatecontrol display to change the directionof the airflow. The selected airdelivery mode control is lit. Pressingany of the air delivery controls cancelsautomatic air delivery control and thedirection of the airflow can becontrolled manually. Press AUTO toreturn to automatic operation.
To change the current mode, selectone of the following:
Y : Air is directed to the instrumentpanel outlets.
\ : Air is divided between theinstrument panel outlets and the flooroutlets.
[ : Air is directed to the flooroutlets, with some air to thewindshield and side windows.
- : Clears the windows of fog ormoisture. Air is directed to thewindshield, side windows, and flooroutlets. Some air may go to the rearfloor outlets.
0 : Press0 to turn defrost on oroff. This clears the windshield of fogor frost more quickly. Air is directed tothe windshield and side windows.
A/C Mode : Touch A/C Mode on theclimate control display to turn theautomatic air conditioning on or off.If the fan is turned off, the airconditioner will not run. Outsidetemperatures below freezing may alsoprevent the air conditioner fromrunning.

Cadillac ATS/ATS-V Owner Manual (GMNA-Localizing-U.S./Canada/Mexico-11349135) - 2018 - crc - 9/25/17
170 CLIMATE CONTROLS
Press AUTO to return to automaticoperation and the air conditioner runsas needed.
Automatic Air Recirculation : Whenthe AUTO indicator light is on, the airis automatically recirculated asneeded to help quickly cool the insideof the vehicle.
@ : Press to alternate betweenrecirculating air inside the vehicle orpulling in outside air. The indicatorlight on the button is lit whenrecirculation mode is active. Thishelps to quickly cool the air inside thevehicle or reduce the outside air andodors that may enter.
Pressing this button cancels automaticrecirculation. Press AUTO to return toautomatic operation; recirculationruns automatically as needed.
Manual recirculation mode is notavailable when in Defrost or Defogmodes.
Auto Defog : The climate controlsystem may have a sensor toautomatically detect high humidityinside the vehicle. When highhumidity is detected, the climate
control system may adjust to outsideair supply and turn on the airconditioner. If the climate controlsystem does not detect possiblewindow fogging, it returns to normaloperation. To turn Auto Defog off oron, see “Climate and Air Quality”under Vehicle Personalization 0 141.
Rear Window Defogger
K : Press to turn the rear windowdefogger on or off. An indicator lighton the button comes on to show thatthe rear window defogger is on. Therear window defogger only workswhen the engine is running.
The rear window defogger turns offautomatically after about 15 minutes.At higher vehicle speeds, the rearwindow defogger may stay oncontinuously.
The upper gridlines on the rearwindow are antenna lines and are notintended to heat when the defogger isactivated.
The heated outside mirrors turn onwhen the rear window defoggerbutton is on. They help to clear fog orfrost from the surface of the mirrors.
The rear window defogger can be setto automatic operation. See “Climateand Air Quality” under VehiclePersonalization 0 141. When auto reardefog is selected, the rear windowdefogger turns on automatically whenthe interior temperature is cold andthe outside temperature is about 4 °C(40 °F) and below. The auto reardefogger turns off automatically.
Caution
Do not try to clear frost or othermaterial from the inside of thefront windshield and rear windowwith a razor blade or anything elsethat is sharp. This may damage therear window defogger grid andaffect the radio's ability to pick upstations clearly. The repairs wouldnot be covered by the vehiclewarranty.
J or z : If equipped, press J or zto heat the driver or passenger seatcushion and seatback.

Cadillac ATS/ATS-V Owner Manual (GMNA-Localizing-U.S./Canada/Mexico-11349135) - 2018 - crc - 9/25/17
CLIMATE CONTROLS 171
The vehicle also has auto heated seatsthat turn on when the vehicle is on.The seats will activate at the levelrequired by the vehicle’s interiortemperature. Use the manual heatedseat buttons to turn auto heated seatsoff. The auto heated seats feature canbe turned on or off.See Vehicle Personalization 0 141 andHeated Front Seats 0 64.
Remote Start Climate ControlOperation : If equipped with theremote vehicle start feature, theclimate control system may run whenthe vehicle is started remotely. Thesystem uses the driver's previoussettings to heat or cool the inside ofthe vehicle. See Remote Vehicle Start0 37.
The rear window defogger turns on ifit is cold outside.
If equipped, the heated seats will turnon if it is cold outside. The heatedseat indicator lights may not come onduring a remote start. If equipped, theheated steering wheel will come on ina remote start if it is cold outside. Theheated steering wheel indicator lightmay not come on.
Sensor
The solar sensor monitors thesolar heat.
The climate control system uses thesensor information to adjust thetemperature, fan speed, recirculation,and air delivery mode for bestcomfort.
If the sensor is covered, the automaticclimate control system may not workproperly.
Air VentsAdjustable air vents are in the centerand on the side of the instrumentpanel.
Use the thumbwheels (1) near the airvents to open or close off the airflow.

Cadillac ATS/ATS-V Owner Manual (GMNA-Localizing-U.S./Canada/Mexico-11349135) - 2018 - crc - 9/25/17
172 CLIMATE CONTROLS
Move the slats (2) to change thedirection of the airflow.
Additional air vents are beneath thewindshield and the driver andpassenger door windows. These arefixed and cannot be adjusted.
Operation Tips
. Clear away any ice, snow, or leavesfrom air inlets at the base of thewindshield that could block theflow of air into the vehicle.
. Clear snow off the hood toimprove visibilty and helpdecrease moisture drawn into thevehicle.
. Keep the path under the frontseats clear of objects to helpcirculate the air inside the vehiclemore effectively.
. Use of non-GM approved hooddeflectors can adversely affect theperformance of the system. Checkwith your dealer before addingequipment to the outside of thevehicle.
. Do not attach any devices to theair vent slats. This restricts airflowand may cause damage to the airvents.
Maintenance
Passenger CompartmentAir FilterThe filter reduces dust, pollen, andother airborne irritants from outsideair that is pulled into the vehicle. Thefilter should be replaced as part ofroutine scheduled maintenance. SeeMaintenance Schedule 0 336.
See your dealer regarding replacementof the filter.

Cadillac ATS/ATS-V Owner Manual (GMNA-Localizing-U.S./Canada/Mexico-11349135) - 2018 - crc - 9/25/17
CLIMATE CONTROLS 173
ServiceAll vehicles have a label underhoodthat identifies the refrigerant used inthe vehicle. The refrigerant systemshould only be serviced by trained andcertified technicians. The airconditioning evaporator should neverbe repaired or replaced by one from asalvage vehicle. It should only bereplaced by a new evaporator toensure proper and safe operation.
During service, all refrigerants shouldbe reclaimed with proper equipment.Venting refrigerants directly to theatmosphere is harmful to theenvironment and may also createunsafe conditions based on inhalation,combustion, frostbite, or otherhealth-based concerns.

Cadillac ATS/ATS-V Owner Manual (GMNA-Localizing-U.S./Canada/Mexico-11349135) - 2018 - crc - 9/25/17
174 DRIVING AND OPERATING
Driving andOperating
Driving InformationDistracted Driving . . . . . . . . . . . . . . . . 175Defensive Driving . . . . . . . . . . . . . . . . 176Drunk Driving . . . . . . . . . . . . . . . . . . . . 176Control of a Vehicle . . . . . . . . . . . . . . 176Braking . . . . . . . . . . . . . . . . . . . . . . . . . . . . 176Steering . . . . . . . . . . . . . . . . . . . . . . . . . . . 177Off-Road Recovery . . . . . . . . . . . . . . . . 177Loss of Control . . . . . . . . . . . . . . . . . . . 178Track Events and CompetitiveDriving . . . . . . . . . . . . . . . . . . . . . . . . . . 178
Driving on Wet Roads . . . . . . . . . . . 183Hill and Mountain Roads . . . . . . . . 184Winter Driving . . . . . . . . . . . . . . . . . . . . 184If the Vehicle Is Stuck . . . . . . . . . . . 186Vehicle Load Limits . . . . . . . . . . . . . . 186
Starting and OperatingNew Vehicle Break-In . . . . . . . . . . . . 189Composite Materials . . . . . . . . . . . . . 190Ignition Positions . . . . . . . . . . . . . . . . 190Starting the Engine . . . . . . . . . . . . . . 192Engine Heater . . . . . . . . . . . . . . . . . . . . 194Retained AccessoryPower (RAP) . . . . . . . . . . . . . . . . . . . . 195
Shifting Into Park (AutomaticTransmission) . . . . . . . . . . . . . . . . . . . 195
Shifting out of Park . . . . . . . . . . . . . . 196Parking (ManualTransmission) . . . . . . . . . . . . . . . . . . . 197
Parking over ThingsThat Burn . . . . . . . . . . . . . . . . . . . . . . . 197
Extended Parking . . . . . . . . . . . . . . . . . 197
Engine ExhaustEngine Exhaust . . . . . . . . . . . . . . . . . . . 198Running the Vehicle WhileParked . . . . . . . . . . . . . . . . . . . . . . . . . . . 199
Automatic TransmissionAutomatic Transmission . . . . . . . . . 199Manual Mode . . . . . . . . . . . . . . . . . . . . . 201
Manual TransmissionManual Transmission . . . . . . . . . . . . 203Active Rev Match . . . . . . . . . . . . . . . . 204
Drive SystemsAll-Wheel Drive . . . . . . . . . . . . . . . . . . 205
BrakesAntilock Brake System (ABS) . . . . 205Parking Brake (Electric) . . . . . . . . . . 206Parking Brake (Manual) . . . . . . . . . . 208Brake Assist . . . . . . . . . . . . . . . . . . . . . . . 208Hill Start Assist (HSA) . . . . . . . . . . . 209
Ride Control SystemsTraction Control/ElectronicStability Control . . . . . . . . . . . . . . . . 209
Driver Mode Control . . . . . . . . . . . . . 210Competitive Driving Mode(FE3 Only) . . . . . . . . . . . . . . . . . . . . . . . 214
Limited-Slip Rear Axle (ExceptV-Series) . . . . . . . . . . . . . . . . . . . . . . . . . 217
Limited-Slip Rear Axle(V-Series Only) . . . . . . . . . . . . . . . . . . 217
Cruise ControlCruise Control . . . . . . . . . . . . . . . . . . . . 218Adaptive Cruise Control . . . . . . . . . 220
Driver Assistance SystemsDriver Assistance Systems . . . . . . . 228Assistance Systems for Parkingor Backing . . . . . . . . . . . . . . . . . . . . . . . 229
Assistance Systems forDriving . . . . . . . . . . . . . . . . . . . . . . . . . . 232
Forward Collision Alert (FCA)System . . . . . . . . . . . . . . . . . . . . . . . . . . 232
Forward AutomaticBraking (FAB) . . . . . . . . . . . . . . . . . . . 235
Side Blind Zone Alert (SBZA) . . . . 236Lane Change Alert (LCA) . . . . . . . . 237Lane DepartureWarning (LDW) . . . . . . . . . . . . . . . . . 238
Lane Keep Assist (LKA) . . . . . . . . . . 239
Cadillac ATS/ATS-V Owner Manual (GMNA-Localizing-U.S./Canada/Mexico-11349135) - 2018 - crc - 9/25/17
DRIVING AND OPERATING 175
FuelFuel . . . . . . . . . . . . . . . . . . . . . . . . . . . . . . . 240California Fuel Requirements . . . . 241Fuels in Foreign Countries . . . . . . . 242Fuel Additives . . . . . . . . . . . . . . . . . . . . 242Filling the Tank . . . . . . . . . . . . . . . . . . 242Filling a Portable FuelContainer . . . . . . . . . . . . . . . . . . . . . . . . 244
Trailer TowingGeneral Towing Information . . . . 244Driving Characteristics andTowing Tips . . . . . . . . . . . . . . . . . . . . . 244
Trailer Towing (Sedan WithV6 Engine Except V-Series) . . . . 247
Trailer Towing (Sedan With L4Engine, Coupe, andV-Series) . . . . . . . . . . . . . . . . . . . . . . . . . 248
Towing Equipment (Sedan WithV6 Engine Except V-Series) . . . . 248
Towing Equipment (Sedan WithL4 Engine, Coupe, andV-Series) . . . . . . . . . . . . . . . . . . . . . . . . . 249
Conversions and Add-OnsAdd-On Electrical Equipment . . . 249
Driving Information
Distracted DrivingDistraction comes in many forms andcan take your focus from the task ofdriving. Exercise good judgment anddo not let other activities divert yourattention away from the road. Manylocal governments have enacted lawsregarding driver distraction. Becomefamiliar with the local laws inyour area.
To avoid distracted driving, keep youreyes on the road, keep your hands onthe steering wheel, and focus yourattention on driving.
. Do not use a phone in demandingdriving situations. Use ahands-free method to place orreceive necessary phone calls.
. Watch the road. Do not read, takenotes, or look up information onphones or other electronic devices.
. Designate a front seat passengerto handle potential distractions.
. Become familiar with vehiclefeatures before driving, such asprogramming favorite radiostations and adjusting climatecontrol and seat settings. Programall trip information into anynavigation device prior to driving.
. Wait until the vehicle is parked toretrieve items that have fallen tothe floor.
. Stop or park the vehicle to tend tochildren.
. Keep pets in an appropriate carrieror restraint.
. Avoid stressful conversationswhile driving, whether with apassenger or on a cell phone.
{ Warning
Taking your eyes off the road toolong or too often could cause acrash resulting in injury or death.Focus your attention on driving.

Cadillac ATS/ATS-V Owner Manual (GMNA-Localizing-U.S./Canada/Mexico-11349135) - 2018 - crc - 9/25/17
176 DRIVING AND OPERATING
Refer to the infotainment manual formore information on using thatsystem and the navigation system,if equipped, including pairing andusing a cell phone.
Defensive DrivingDefensive driving means “alwaysexpect the unexpected.” The first stepin driving defensively is to wear theseat belt. See Seat Belts 0 70.
. Assume that other road users(pedestrians, bicyclists, and otherdrivers) are going to be carelessand make mistakes. Anticipatewhat they might do and be ready.
. Allow enough following distancebetween you and the driver infront of you.
. Focus on the task of driving.
Drunk DrivingDeath and injury associated withdrinking and driving is a globaltragedy.
{ Warning
Drinking and then driving is verydangerous. Your reflexes,perceptions, attentiveness, andjudgment can be affected by even asmall amount of alcohol. You canhave a serious — or even fatal —collision if you drive after drinking.
Do not drink and drive or ride witha driver who has been drinking.Ride home in a cab; or if you arewith a group, designate a driverwho will not drink.
Control of a VehicleBraking, steering, and accelerating areimportant factors in helping to controla vehicle while driving.
BrakingBraking action involves perceptiontime and reaction time. Deciding topush the brake pedal is perceptiontime. Actually doing it isreaction time.
Average driver reaction time is aboutthree-quarters of a second. In thattime, a vehicle moving at 100 km/h(60 mph) travels 20 m (66 ft), whichcould be a lot of distance in anemergency.
Helpful braking tips to keep in mindinclude:
. Keep enough distance betweenyou and the vehicle in frontof you.
. Avoid needless heavy braking.
. Keep pace with traffic.
If the engine ever stops while thevehicle is being driven, brake normallybut do not pump the brakes. Doing socould make the pedal harder to pushdown. If the engine stops, there willbe some power brake assist but it willbe used when the brake is applied.Once the power assist is used up, itcan take longer to stop and the brakepedal will be harder to push.

Cadillac ATS/ATS-V Owner Manual (GMNA-Localizing-U.S./Canada/Mexico-11349135) - 2018 - crc - 9/25/17
DRIVING AND OPERATING 177
Steering
Variable Effort Steering
The vehicle has a steering system thatvaries the amount of effort required tosteer the vehicle in relation to thespeed of the vehicle.
The amount of steering effort requiredis less at slower speeds to make thevehicle more maneuverable and easierto park. At faster speeds, the steeringeffort increases to provide a sport-likefeel to the steering. This providesmaximum control and stability.
Electric Power Steering
The vehicle has electric powersteering. It does not have powersteering fluid. Regular maintenance isnot required.
If power steering assist is lost due to asystem malfunction, the vehicle canbe steered, but may require increasedeffort. See your dealer if there is aproblem.
If the steering wheel is turned until itreaches the end of its travel and isheld against that position for anextended period of time, powersteering assist may be reduced.
If the steering assist is used for anextended period of time while thevehicle is not moving, power assistmay be reduced.
Normal use of the power steeringassist should return when the systemcools down.
See your dealer if there is a problem.
Curve Tips. Take curves at a reasonable speed.
. Reduce speed before entering acurve.
. Maintain a reasonable steadyspeed through the curve.
. Wait until the vehicle is out of thecurve before accelerating gentlyinto the straightaway.
Steering in Emergencies. There are some situations when
steering around a problem may bemore effective than braking.
. Holding both sides of the steeringwheel allows you to turn180 degrees without removinga hand.
. Antilock Brake System (ABS)allows steering while braking.
Off-Road Recovery

Cadillac ATS/ATS-V Owner Manual (GMNA-Localizing-U.S./Canada/Mexico-11349135) - 2018 - crc - 9/25/17
178 DRIVING AND OPERATING
The vehicle's right wheels can drop offthe edge of a road onto the shoulderwhile driving. Follow these tips:
1. Ease off the accelerator and then,if there is nothing in the way,steer the vehicle so that itstraddles the edge of thepavement.
2. Turn the steering wheel aboutone-eighth of a turn, until theright front tire contacts thepavement edge.
3. Turn the steering wheel to gostraight down the roadway.
Loss of Control
Skidding
There are three types of skids thatcorrespond to the vehicle's threecontrol systems:
. Braking Skid — wheels are notrolling.
. Steering or Cornering Skid — toomuch speed or steering in a curvecauses tires to slip and losecornering force.
. Acceleration Skid — too muchthrottle causes the driving wheelsto spin.
Defensive drivers avoid most skids bytaking reasonable care suited toexisting conditions, and by notoverdriving those conditions. Butskids are always possible.
If the vehicle starts to slide, followthese suggestions:
. Ease your foot off the acceleratorpedal and steer the way you wantthe vehicle to go. The vehicle maystraighten out. Be ready for asecond skid if it occurs.
. Slow down and adjust your drivingaccording to weather conditions.Stopping distance can be longerand vehicle control can be affectedwhen traction is reduced by water,snow, ice, gravel, or other materialon the road. Learn to recognizewarning clues — such as enoughwater, ice, or packed snow on theroad to make a mirrored surface— and slow down when you haveany doubt.
. Try to avoid sudden steering,acceleration, or braking, includingreducing vehicle speed by shiftingto a lower gear. Any suddenchanges could cause the tires toslide.
Remember: Antilock brakes help avoidonly the braking skid.
Track Events andCompetitive Driving
{ Danger
High-performance features areintended for use only on closedtracks by experienced and qualifieddrivers and should not be used onpublic roads. High-speed driving,aggressive cornering, hard braking,and other high-performance drivingcan be dangerous. Improper driverinputs for the conditions may resultin loss of control of the vehicle,which could injure or kill you orothers. Always drive safely.

Cadillac ATS/ATS-V Owner Manual (GMNA-Localizing-U.S./Canada/Mexico-11349135) - 2018 - crc - 9/25/17
DRIVING AND OPERATING 179
Competitive driving may affect thevehicle warranty. See the warrantymanual before using the vehicle forcompetitive driving.
Caution
Low oil levels can damage theengine. If using the vehicle forcompetitive driving, the engine mayuse more oil than it would withnormal use. Check the oil leveloften during competitive driving.
Competitive Driving Mode can beselected. See Driver Mode Control0 210.
Engine Oil
2.0L L4 Turbo Engine (LTG) Only:
. Use a 600 W fan in addition to theproduction option V03.
. Premium fuel must be used forcompetitive driving to protectagainst engine damage. Colderspark plug ratings should also beused. Consult your dealer.
3.6L V6 Non-Turbo (LGX)Engine Only:
. 3.6L V6 Non-Turbo Engine (LGX)with Oil Cooler: Confirm the oillevel is at the upper mark thatshows the proper operating rangeon the engine oil dipstick.
. 3.6L V6 Non-Turbo Engine (LGX)without Oil Cooler: Do not use fortrack events and competitivedriving.
3.6L V6 Twin Turbo Engine(LF4) Only:
. The 3.6L V6 twin turbo engine(LF4) requires premium fuel, andcomes standard with a 7 qt sump,integrated oil cooler, and otherpowertrain and powertrain coolingcomponents in preparation fortrack use.
Automatic Transmission Fluid
Have the transmission fluid set to thetrack specific oil level prior to trackusage. Transmission fluid should bechanged after every 15 hours of track
usage. Any transmission level set orchange should be performed at yourdealer.
Manual Transmission Fluid
Manual transmission fluid should bechanged after every 15 hours of trackusage.
Brake Fluid. Before racing, replace existing
brake fluid with a qualified racingbrake fluid from a sealedcontainer. Brake fluid with a dryboiling point >279 °C (534 °F) isqualified. If racing brake fluid isused, replace it with GM approvedbrake fluid before driving onpublic roads. See RecommendedFluids and Lubricants 0 345.
. Do not use silicone-based fluids.
If racing brake fluid is in the vehicleand the age of the brake fluid is over amonth old or unknown, replace thebrake fluid between racing/closedtrack driving.
Cadillac ATS/ATS-V Owner Manual (GMNA-Localizing-U.S./Canada/Mexico-11349135) - 2018 - crc - 9/25/17
180 DRIVING AND OPERATING
Caution
Failure to change the brake fluidand transfer case fluid after anyperformance or race track drivingcould result in damage not coveredby the vehicle warranty. Have thebrake fluid and transfer case fluidchanged by your dealer after anyperformance or race track driving.See Recommended Fluids andLubricants 0 345.
Brake Burnishing
For vehicles equipped with frontBrembo brake systems:
Base Vehicles Only: Performance/racing brake pads are required prior toracing or closed track driving. Vehicleswith option code Y4Q haveperformance brake pads.
New brake pads must be burnishedbefore racing or other competitivedriving.
Caution
Performing the brake burnishprocedure on a base brake systemcan result in brake damage.
Caution
The new vehicle break-in periodshould be completed beforeperforming the brake burnishprocedure, otherwise damage mayoccur to the powertrain/engine. SeeNew Vehicle Break-In 0 189.
Caution
Brake pedal fade will occur duringany track burnish procedure andcan cause brake pedal travel andforce to increase. This could extendstopping distance until the brakesare fully burnished.
When this procedure is performed asinstructed, it will not damage thebrakes. The brake pads will smoke andproduce an odor. The braking forceand pedal travel may increase. Afterthe procedure, the brake pads mayappear white at the rotor contact.
Perform this procedure only on drypavement, in a safe manner, and incompliance with all local and stateordinances/laws regarding motorvehicle operation.
Brake Burnish Procedure (V-Seriesand Y4Q Only)
1. Apply the brakes 25 timesstarting at 100 km/h (60 mph) to50 km/h (30 mph) whiledecelerating at 0.4 g. This is amedium brake application. Drivefor at least 1 km (0.6 mi)between applying the brakes.This first step may be skipped ifthere are more than 320 km(200 mi) on the brake pads.
2. Repeatedly apply the brakes from100 km/h (60 mph) to 25 km/h(15 mph) while decelerating at0.8 g. This is a hard brake

Cadillac ATS/ATS-V Owner Manual (GMNA-Localizing-U.S./Canada/Mexico-11349135) - 2018 - crc - 9/25/17
DRIVING AND OPERATING 181
application, without activatingthe Antilock Brake System (ABS).Drive for at least 1 km (0.6 mi)between stops. Repeat until thebrake pedal travel starts toincrease. Depending onconditions, this should take nolonger than 25 brakeapplications.
3. Cool down: Drive at 100 km/h(60 mph) for approximately15 km (10 mi) without using thebrakes.
4. Apply the brakes 25 times from100 km/h (60 mph) to 50 km/h(30 mph) while decelerating at0.4 g. This is a medium brakeapplication. Drive for at least1 km (0.6 mi) betweenapplications.
Axle Fluid
Axles must have 805 km (500 mi)before being used in track driving.
The front, if equipped with AWD, andrear axle fluid temperatures may behigher than when driving in severeconditions. Drain and refill with newfluid after the first racing or
competitive driving event, and thenafter every 24 hours of racing orcompetitive driving. See RecommendedFluids and Lubricants 0 345.
Caution
During a first time track or racingevent, high axle temperatures canoccur. Damage could be caused tothe axle and would not be coveredby the vehicle warranty. Do notdrive as long or as fast the firsttime the vehicle is driven on thetrack or raced.
. The axle lubricant should bereplaced with new lubricant.
. Additional cooling capacity is alsorequired for continuouscompetitive driving.
Track Battery
If equipped, this is a lightweight, lowpower battery for track use only.Remove after each event.
Only use this battery whentemperatures are above freezing.
Store in a cool, dry location. Chargeperiodically to keep the state of chargefrom getting too low. A battery tendercan be used.
When installing or removing the trackbattery, steps must be followed tocalibrate the electronic throttlecontrol. See Battery - North America0 273.
Wheel Alignment (V-Series Only)
Wheel alignment suggested specs fortrack use:
. Front: -2.0 deg camber, 0.2 degtotal toe
. Rear: -1.7 deg camber, 0.2 degtotal toe
V-Series Vehicles Equipped withthe Original Equipment Tires
Follow the requirements andrecommendations for tire inflationpressures while driving on varioustypes of tracks/courses. This helps toachieve a well-balanced vehicle andenhance tire traction performance.

Cadillac ATS/ATS-V Owner Manual (GMNA-Localizing-U.S./Canada/Mexico-11349135) - 2018 - crc - 9/25/17
182 DRIVING AND OPERATING
Use good judgment to determine theappropriate tire inflation pressure andspeeds for the track/courseconfiguration and environmentalconditions. Contact the tiremanufacturer if further assistance isneeded.
To maximize tire life, drive 800 km(500 mi) prior to racetrack driving orcomplete the minimum track runningthat will increase the tire pressures by35 kPa (5 psi). After this, immediatelylet the tires cool to cold pressures.
Tire Inflation PressureGuidelines
Tire inflation pressures affect vehiclehandling and tire life, and should beadjusted for various types of tracks/courses.
Inspect the tires prior to every track/course session. Track/course drivingwill reduce the tire tread life.
Driving and Operating
{ Warning
Operating the vehicle at high speedscan be dangerous. Improper tireinflation pressure can putadditional strain on the tires andcan cause a sudden failure. Makesure the tires are in excellentcondition, and use the correct coldtire inflation pressure for thevehicle load and track/course.
{ Warning
Tracks/courses put high loads ontires operating at high speed, whichcan lead to tire failure if notinflated properly. Always limitvehicle cargo to the driver plus onepassenger with no additional cargo.
{ Warning
Track/course loads wear tires bothon the tread and internal to thetire. When driven in track/courseconditions, even if tread is not worndown to the treadwear indicator,tires must be replaced after theequivalent of two tanks of fuel orapproximately 160 km (100 mi).
Tire Inflation Pressure for Trackswith Sustained High-SpeedOperation on Banked Turns
(e.g., Daytona International Speedway,Indianapolis Motor Speedway,or similar)
Inflate tires to a minimum of 300 kPa(44 psi) when cold.
Do not reduce tire inflation pressurewhen hot.

Cadillac ATS/ATS-V Owner Manual (GMNA-Localizing-U.S./Canada/Mexico-11349135) - 2018 - crc - 9/25/17
DRIVING AND OPERATING 183
Tire Inflation Pressure for Trackswith Combined High-Speed andHigh-Load Corners
(e.g., Nurburgring Nordschliefe, SpaFrancorchamps, or similar)
Inflate tires to a minimum of 260 kPa(38 psi) when cold.
Limit vehicle speed to below 230 km/h(143 mph) until 290 kPa (42 psi) isreached.
For continuous track use, hot tireinflation pressure may be adjusted toa minimum of 290 kPa (42 psi).
Tire Inflation Pressure for Road/Street Courses
(e.g., Virginia International Raceway,Road Atlanta, or similar)
Inflate tires to a minimum of 240 kPa(35 psi) cold.
For continuous road/street course use,hot tire inflation pressure may beadjusted to a minimum of 270 kPa(39 psi).
Return the tires to the recommendedcold tire inflation pressure whenhigh-speed driving has ended.See Vehicle Load Limits 0 186 and TirePressure 0 298.
Driving on Wet RoadsRain and wet roads can reduce vehicletraction and affect your ability to stopand accelerate. Always drive slower inthese types of driving conditions andavoid driving through large puddlesand deep-standing or flowing water.
{ Warning
Wet brakes can cause crashes. Theymight not work as well in a quickstop and could cause pulling to oneside. You could lose control of thevehicle.
After driving through a large puddleof water or a car/vehicle wash,lightly apply the brake pedal untilthe brakes work normally.
(Continued)
Warning (Continued)
Flowing or rushing water createsstrong forces. Driving throughflowing water could cause thevehicle to be carried away. If thishappens, you and other vehicleoccupants could drown. Do notignore police warnings and be verycautious about trying to drivethrough flowing water.
Hydroplaning
Hydroplaning is dangerous. Water canbuild up under the vehicle's tires sothey actually ride on the water. Thiscan happen if the road is wet enoughand you are going fast enough. Whenthe vehicle is hydroplaning, it haslittle or no contact with the road.
There is no hard and fast rule abouthydroplaning. The best advice is toslow down when the road is wet.

Cadillac ATS/ATS-V Owner Manual (GMNA-Localizing-U.S./Canada/Mexico-11349135) - 2018 - crc - 9/25/17
184 DRIVING AND OPERATING
Other Rainy Weather Tips
Besides slowing down, other wetweather driving tips include:
. Allow extra following distance.
. Pass with caution.
. Keep windshield wiping equipmentin good shape.
. Keep the windshield washer fluidreservoir filled.
. Have good tires with proper treaddepth. See Tires 0 290.
. Turn off cruise control.
Hill and Mountain RoadsDriving on steep hills or throughmountains is different than driving onflat or rolling terrain. Tips include:
. Keep the vehicle serviced and ingood shape.
. Check all fluid levels and brakes,tires, cooling system, andtransmission.
. Shift to a lower gear when goingdown steep or long hills.
{ Warning
Using the brakes to slow the vehicleon a long downhill slope can causebrake overheating, can reduce brakeperformance, and could result in aloss of braking. Shift thetransmission to a lower gear to letthe engine assist the brakes on asteep downhill slope.
{ Warning
Coasting downhill in N (Neutral) orwith the ignition off is dangerous.This can cause overheating of thebrakes and loss of steering assist.Always have the engine runningand the vehicle in gear.
. Drive at speeds that keep thevehicle in its own lane. Do notswing wide or cross thecenter line.
. Be alert on top of hills; somethingcould be in your lane (e.g., stalledcar, accident).
. Pay attention to special road signs(e.g., falling rocks area, windingroads, long grades, passing orno-passing zones) and takeappropriate action.
Winter Driving
Driving on Snow or Ice
Snow or ice between the tires and theroad creates less traction or grip, sodrive carefully. Wet ice can occur atabout 0 °C (32 °F) when freezing rainbegins to fall. Avoid driving on wet iceor in freezing rain until roads can betreated.
For Slippery Road Driving:
. Accelerate gently. Accelerating tooquickly causes the wheels to spinand makes the surface under thetires slick.
. Turn on Traction Control. SeeTraction Control/Electronic StabilityControl 0 209.

Cadillac ATS/ATS-V Owner Manual (GMNA-Localizing-U.S./Canada/Mexico-11349135) - 2018 - crc - 9/25/17
DRIVING AND OPERATING 185. Antilock Brake System (ABS)
improves vehicle stability duringhard stops, but the brakes shouldbe applied sooner than when ondry pavement. See Antilock BrakeSystem (ABS) 0 205.
. Allow greater following distanceand watch for slippery spots. Icypatches can occur on otherwiseclear roads in shaded areas. Thesurface of a curve or an overpasscan remain icy when thesurrounding roads are clear. Avoidsudden steering maneuvers andbraking while on ice.
. Turn off cruise control.
Blizzard Conditions
Stay with the vehicle unless there ishelp nearby. If possible, use RoadsideAssistance. See Roadside Service 0 358.To get help and keep everyone in thevehicle safe:
. Turn on the hazard warningflashers.
. Tie a red cloth to an outsidemirror.
{ Warning
Snow can trap engine exhaustunder the vehicle. This may causeexhaust gases to get inside. Engineexhaust contains carbon monoxide(CO), which cannot be seen orsmelled. It can causeunconsciousness and even death.
If the vehicle is stuck in snow:
. Clear snow from the base ofthe vehicle, especially anyblocking the exhaust pipe.
. Open a window about 5 cm(2 in) on the vehicle side thatis away from the wind, tobring in fresh air.
. Fully open the air outlets onor under the instrumentpanel.
. Adjust the climate controlsystem to circulate the airinside the vehicle and set the
(Continued)
Warning (Continued)
fan speed to the highestsetting. See “Climate ControlSystems.”
For more information about CO, seeEngine Exhaust 0 198.
To save fuel, run the engine for shortperiods to warm the vehicle and thenshut the engine off and partially closethe window. Moving about to keepwarm also helps.
If it takes time for help to arrive,when running the engine, push theaccelerator pedal slightly so theengine runs faster than the idle speed.This keeps the battery charged torestart the vehicle and to signal forhelp with the headlamps. Do this aslittle as possible, to save fuel.
Cadillac ATS/ATS-V Owner Manual (GMNA-Localizing-U.S./Canada/Mexico-11349135) - 2018 - crc - 9/25/17
186 DRIVING AND OPERATING
If the Vehicle Is StuckSlowly and cautiously spin the wheelsto free the vehicle when stuck in sand,mud, ice, or snow.
If stuck too severely for the tractionsystem to free the vehicle, turn thetraction system off and use therocking method. See Traction Control/Electronic Stability Control 0 209.
{ Warning
If the vehicle's tires spin at highspeed, they can explode, and you orothers could be injured. The vehiclecan overheat, causing an enginecompartment fire or other damage.Spin the wheels as little as possibleand avoid going above 56 km/h(35 mph).
Rocking the Vehicle to Get it Out
Turn the steering wheel left and rightto clear the area around the frontwheels. Turn off any traction system.Shift back and forth betweenR (Reverse) and a low forward gear,
spinning the wheels as little aspossible. To prevent transmissionwear, wait until the wheels stopspinning before shifting gears. Releasethe accelerator pedal while shifting,and press lightly on the acceleratorpedal when the transmission is ingear. Slowly spinning the wheels inthe forward and reverse directionscauses a rocking motion that couldfree the vehicle. If that does not getthe vehicle out after a few tries, itmight need to be towed out. If thevehicle does need to be towed out, seeTowing the Vehicle 0 322.
Vehicle Load LimitsIt is very important to know howmuch weight the vehicle can carry.This weight is called the vehiclecapacity weight and includes theweight of all occupants, cargo, andall nonfactory-installed options.Two labels on the vehicle mayshow how much weight it mayproperly carry: the Tire andLoading Information label and theCertification label.
{ Warning
Do not load the vehicle anyheavier than the Gross VehicleWeight Rating (GVWR),or either the maximum front orrear Gross Axle Weight Rating(GAWR). This can causesystems to break and changethe way the vehicle handles.This could cause loss of controland a crash. Overloading canalso reduce stopping distance,damage the tires, and shortenthe life of the vehicle.

Cadillac ATS/ATS-V Owner Manual (GMNA-Localizing-U.S./Canada/Mexico-11349135) - 2018 - crc - 9/25/17
DRIVING AND OPERATING 187
Tire and Loading InformationLabel
Label Example
A vehicle-specific Tire andLoading Information label isattached to the vehicle's centerpillar (B-pillar). The Tire andLoading Information label showsthe number of occupant seatingpositions (1), and the maximumvehicle capacity weight (2) inkilograms and pounds.
The Tire and Loading Informationlabel also shows the tire size ofthe original equipment tires (3)
and the recommended cold tireinflation pressures (4). For moreinformation on tires and inflationsee Tires 0 290 and Tire Pressure0 298.
There is also important loadinginformation on the Certificationlabel. It may show the GrossVehicle Weight Rating (GVWR)and the Gross Axle Weight Rating(GAWR) for the front and rearaxle. See “Certification Label” laterin this section.
“Steps for Determining CorrectLoad Limit–
1. Locate the statement "Thecombined weight ofoccupants and cargo shouldnever exceed XXX kg orXXX lbs." on your vehicle’splacard.
2. Determine the combinedweight of the driver andpassengers that will be ridingin your vehicle.
3. Subtract the combined weightof the driver and passengersfrom XXX kg or XXX lbs.
4. The resulting figure equalsthe available amount of cargoand luggage load capacity. Forexample, if the "XXX" amountequals 1400 lbs. and therewill be five 150 lb passengersin your vehicle, the amountof available cargo and luggageload capacity is 650 lbs.(1400-750 (5 x 150) =650 lbs.)
5. Determine the combinedweight of luggage and cargobeing loaded on the vehicle.That weight may not safelyexceed the available cargoand luggage load capacitycalculated in Step 4.
6. If your vehicle will be towinga trailer, load from yourtrailer will be transferred toyour vehicle. Consult thismanual to determine how

Cadillac ATS/ATS-V Owner Manual (GMNA-Localizing-U.S./Canada/Mexico-11349135) - 2018 - crc - 9/25/17
188 DRIVING AND OPERATING
this reduces the availablecargo and luggage loadcapacity of your vehicle.”
See Trailer Towing (Sedan WithV6 Engine Except V-Series) 0 247 orTrailer Towing (Sedan With L4Engine, Coupe, and V-Series) 0 248for important information ontowing a trailer, towing safetyrules, and trailering tips.
Example 1
1. Vehicle Capacity Weightfor Example 1 = 453 kg(1,000 lbs).
2. Subtract Occupant Weight@ 68 kg (150 lbs) × 2 =136 kg (300 lbs).
3. Available Occupant andCargo Weight = 317 kg(700 lbs).
Example 2
1. Vehicle Capacity Weightfor Example 2 = 453 kg(1,000 lbs).
2. Subtract Occupant Weight@ 68 kg (150 lbs) × 5 =340 kg (750 lbs).
3. Available Cargo Weight =113 kg (250 lbs).
Example 3
1. Vehicle Capacity Weightfor Example 3 = 453 kg(1,000 lbs).
2. Subtract Occupant Weight@ 91 kg (200 lbs) × 5 =453 kg (1,000 lbs).
3. Available Cargo Weight =0 kg (0 lbs).
Refer to the vehicle's Tire andLoading Information label forspecific information about thevehicle's capacity weight andseating positions. The combined

Cadillac ATS/ATS-V Owner Manual (GMNA-Localizing-U.S./Canada/Mexico-11349135) - 2018 - crc - 9/25/17
DRIVING AND OPERATING 189
weight of the driver, passengers,and cargo should never exceed thevehicle's capacity weight.
Certification Label
Label Example
A vehicle-specific Certificationlabel is attached to the vehicle'scenter pillar (B-pillar). The labelmay show the gross weightcapacity of the vehicle, called theGross Vehicle Weight Rating(GVWR). The GVWR includes theweight of the vehicle, alloccupants, fuel, and cargo.
{ Warning
Things inside the vehicle canstrike and injure people in asudden stop or turn, or in acrash.
. Put things in the cargoarea of the vehicle. In thecargo area, put them as farforward as possible. Try tospread the weight evenly.
. Never stack heavier things,like suitcases, inside thevehicle so that some ofthem are above the tops ofthe seats.
. Do not leave an unsecuredchild restraint in thevehicle.
. Secure loose items in thevehicle.
. Do not leave a seat foldeddown unless needed.
Starting and Operating
New Vehicle Break-InFollow these recommended guidelinesduring the first 2 414 km (1,500 mi) ofdriving this vehicle. Parts have abreak-in period and performance willbe better in the long run.
For the first 2 414 km (1,500 mi):
. Avoid full throttle starts andabrupt stops.
. Do not exceed 4000 engine rpm.
. Avoid driving at any one constantspeed, fast or slow.
. Avoid downshifting to brake orslow the vehicle when the enginespeed will exceed 4000 rpm.
. Do not let the engine labor. Neverlug the engine in high gear at lowspeeds. With a manualtransmission, shift to the nextlower gear. This rule applies at alltimes, not just during the break-inperiod.

Cadillac ATS/ATS-V Owner Manual (GMNA-Localizing-U.S./Canada/Mexico-11349135) - 2018 - crc - 9/25/17
190 DRIVING AND OPERATING. Check engine oil with every
refueling and add if necessary. Oiland fuel consumption may behigher than normal during thefirst 2 414 km (1,500 mi).
. New brake linings also need abreak-in period. Avoid makinghard stops during the first322 km (200 mi). This isrecommended every time brakelinings are replaced.
Composite MaterialsThis vehicle may be equipped withparts containing carbon fiber,sheet-molding compound, or othercomposite materials. Dealer-installedaccessories may also containcomposite materials. These parts andaccessories may include the splitter orrocker extensions.
{ Warning
Exposed edges of parts containingcarbon fiber and other compositematerials can be sharp. Contactwith these parts could result ininjury. Use caution to avoidcontacting these parts, includingwhen washing the vehicle. If theparts are damaged, replace theparts promptly with replacementsfrom your dealer.
{ Warning
Rocker extensions may break underpressure, resulting in propertydamage or injury. Do not stand onthe rocker extension or use it asa step.
Ignition Positions
The vehicle has an electronic keylessignition with pushbutton start.
The Remote Keyless Entry (RKE)transmitter must be in the vehicle forthe system to operate. If thepushbutton start is not working, thevehicle may be near a strong radioantenna signal causing interference tothe Keyless Access system. See RemoteKeyless Entry (RKE) System Operation0 31.
To shift out of P (Park), the vehiclemust be in on and the brake pedalmust be applied.

Cadillac ATS/ATS-V Owner Manual (GMNA-Localizing-U.S./Canada/Mexico-11349135) - 2018 - crc - 9/25/17
DRIVING AND OPERATING 191
Stopping the Engine/OFF (NoIndicator Lights) : When the vehicleis stopped, press ENGINE START/STOP once to turn the engine off.
If the vehicle is in P (Park), theignition will turn off, and RetainedAccessory Power (RAP) will remainactive. See Retained Accessory Power(RAP) 0 195.
Automatic Transmission
If the vehicle is not in P (Park), theignition will return to ACC/ACCESSORY and display a message inthe Driver Information Center (DIC).When the vehicle is shifted intoP (Park), the ignition will turn off.
Manual Transmission
If the vehicle is stationary, theignition will turn off, and RetainedAccessory Power (RAP) will remainactive. See Retained Accessory Power(RAP) 0 195.
The vehicle may have an electricsteering column lock. The lock isactivated when the ignition is turnedoff and either front door is opened.A sound may be heard as the lock
actuates or releases. The steeringcolumn lock may not release with thewheels turned off center. If thishappens, the vehicle may not start.Move the steering wheel from left toright while attempting to start thevehicle. If this does not work, thevehicle needs service.
Do not turn the engine off when thevehicle is moving. This will cause aloss of power assist in the brake andsteering systems and disable theairbags.
If the vehicle must be shut off in anemergency:
1. Brake using a firm and steadypressure. Do not pump thebrakes repeatedly. This maydeplete power assist, requiringincreased brake pedal force.
2. Shift the vehicle to N (Neutral).This can be done while thevehicle is moving. After shiftingto N (Neutral), firmly apply thebrakes and steer the vehicle to asafe location.
3. Come to a complete stop. Shift toP (Park) with an automatictransmission, or Neutral with amanual transmission. Turn theignition off.
4. Set the parking brake.See Parking Brake (Electric) 0 206or Parking Brake (Manual) 0 208.
{ Warning
Turning off the vehicle whilemoving may cause loss of powerassist in the brake and steeringsystems and disable the airbags.While driving, only shut the vehicleoff in an emergency.
If the vehicle cannot be pulled over,and must be shut off while driving,press and hold ENGINE START/STOPfor longer than two seconds, or presstwice within five seconds.
ACC/ACCESSORY (Amber IndicatorLight) : This mode allows you to usesome electrical accessories when theengine is off.

Cadillac ATS/ATS-V Owner Manual (GMNA-Localizing-U.S./Canada/Mexico-11349135) - 2018 - crc - 9/25/17
192 DRIVING AND OPERATING
With the ignition off, pressing thebutton one time without the brakepedal applied will place the ignitionsystem in ACC/ACCESSORY.
The ignition will switch from ACC/ACCESSORY to OFF after five minutesto prevent battery rundown.
ON/RUN/START (Green IndicatorLight) : This mode is for driving andstarting. With the ignition off, and thebrake pedal applied, pressing thebutton once will turn the ignition on.Once engine cranking begins, releasethe button. Engine cranking willcontinue until the engine starts. SeeStarting the Engine 0 192. The ignitionwill then remain on.
Service Mode
This power mode is available forservice and diagnostics, and to verifythe proper operation of themalfunction indicator lamp as may berequired for emission inspectionpurposes. With the vehicle off, and thebrake pedal not applied, pressing andholding the button for more thanfive seconds will place the vehicle inService Mode. The instruments and
audio systems will operate as they doin ON/RUN/START, but the vehiclewill not be able to be driven. Theengine will not start in Service Mode.Push the button again to turn thevehicle off.
Starting the EnginePlace the transmission in theproper gear.
Caution
If you add electrical parts oraccessories, you could change theway the engine operates. Anyresulting damage would not becovered by the vehicle warranty. SeeAdd-On Electrical Equipment 0 249.
Automatic Transmission
Move the shift lever to P (Park) orN (Neutral). To restart the vehiclewhen it is already moving, useN (Neutral) only.
Caution
Do not try to shift to P (Park) if thevehicle is moving. If you do, youcould damage the transmission.Shift to P (Park) only when thevehicle is stopped.
Manual Transmission
The shift lever should be in Neutraland the parking brake engaged. Holdthe clutch pedal down to the floor andstart the engine.
Starting Procedure
1. With the Keyless Access system,the RKE transmitter must be inthe vehicle. Press ENGINESTART/STOP with the brakepedal applied. When the enginebegins cranking, let go of thebutton.
The idle speed will go down asthe engine gets warm. Do notrace the engine immediatelyafter starting it.
Cadillac ATS/ATS-V Owner Manual (GMNA-Localizing-U.S./Canada/Mexico-11349135) - 2018 - crc - 9/25/17
DRIVING AND OPERATING 193
If the RKE transmitter is not inthe vehicle, if there isinterference, or if the RKEbattery is low, the DriverInformation Center (DIC) willdisplay a message. See RemoteKeyless Entry (RKE) SystemOperation 0 31.
Caution
Cranking the engine for longperiods of time, by pressingENGINE START/STOP immediatelyafter cranking has ended, canoverheat and damage the crankingmotor, and drain the battery. Waitat least 15 seconds between eachtry, to let the cranking motorcool down.
2. If the engine does not start afterfive to 10 seconds, especially invery cold weather (below −18 °Cor 0 °F), it could be flooded withtoo much gasoline. Try pushingthe accelerator pedal all the wayto the floor and holding it thereas you press ENGINE START/
STOP, for up to a maximum of15 seconds. Wait at least15 seconds between each try, toallow the cranking motor to cooldown. When the engine starts,let go of the button and theaccelerator. If the vehicle startsbriefly but then stops again, dothe same thing. This clears theextra gasoline from the engine.Do not race the engineimmediately after starting it.Operate the engine andtransmission gently until the oilwarms up and lubricates allmoving parts.
Stop/Start System
{ Warning
The automatic engine Stop/Startfeature causes the engine to shutoff while the vehicle is still on. Donot exit the vehicle before shiftingto P (Park) for an automatictransmission or N (Neutral) for amanual transmission. The vehicle
(Continued)
Warning (Continued)
may restart and move unexpectedly.Always shift to P (Park), or shift toN (Neutral) and set the parkingbrake, and then turn the ignition offbefore exiting the vehicle.
The vehicle may have a fuel savingstop/start system to shut off theengine and help conserve fuel.
Auto Engine Stop/Start
When the brakes are applied and thevehicle is at a complete stop, theengine may turn off. When stopped,the tachometer may point to AUTOSTOP. See Tachometer 0 121. Whenthe brake pedal is released or theaccelerator pedal is pressed, theengine may restart.
Auto Stop may be deactivated if:
. A minimum vehicle speed is notreached.
. The engine or transmission is notat the required operatingtemperature.

Cadillac ATS/ATS-V Owner Manual (GMNA-Localizing-U.S./Canada/Mexico-11349135) - 2018 - crc - 9/25/17
194 DRIVING AND OPERATING. The outside temperature is not in
the required operating range,typically below −10 °C (14 °F) orabove 50 °C (122 °F).
. The shift lever is in any gear otherthan D (Drive).
. The battery has been recentlydisconnected.
. The battery charge is low.
. The interior comfort level has notreached the required level for theclimate control system or defogsettings.See Dual Automatic Climate ControlSystem (Uplevel) 0 167 or DualAutomatic Climate Control System(Base) 0 163.
. The Auto Stop time is greater thantwo minutes.
The automatic engine stop/startfunction can be disabled using theswitch. The indicator on the switchwill illuminate when the system isoperational.
Engine HeaterVehicles with the engine heater canuse this option in cold weatherconditions at or below −18 °C (0 °F) foreasier starting and better fueleconomy during engine warm-up. Plugin the engine heater at least fourhours before starting your vehicle. Aninternal thermostat in the plug-end of
the cord may exist which will preventengine heater operation attemperatures above −18 °C (0 °F).
To Use the Engine Heater
1. Turn off the engine.
2. Open the hood and unwrap theelectrical cord. The cord isclipped to the diagonal brace onthe passenger side of the enginecompartment.
Check the heater cord fordamage. If it is damaged, do notuse it. See your dealer for areplacement. Inspect the cord fordamage yearly.
3. Plug it into a normal, grounded110-volt AC outlet.

Cadillac ATS/ATS-V Owner Manual (GMNA-Localizing-U.S./Canada/Mexico-11349135) - 2018 - crc - 9/25/17
DRIVING AND OPERATING 195
{ Warning
Improper use of the heater cord oran extension cord can damage thecord and may result in overheatingand fire.
. Plug the cord into athree-prong electrical utilityreceptacle that is protected bya ground fault detectionfunction. An ungroundedoutlet could cause an electricshock.
. Use a weatherproof,heavy-duty, 15 amp-ratedextension cord if needed.Failure to use therecommended extension cordin good operating condition,or using a damaged heater orextension cord, could make it
(Continued)
Warning (Continued)
overheat and cause a fire,property damage, electricshock, and injury.
. Do not operate the vehiclewith the heater cordpermanently attached to thevehicle. Possible heater cordand thermostat damage couldoccur.
. While in use, do not let theheater cord touch vehicleparts or sharp edges. Neverclose the hood on theheater cord.
. Before starting the vehicle,unplug the cord, reattach thecover to the plug, andsecurely fasten the cord. Keepthe cord away from anymoving parts.
4. Before starting the engine, besure to unplug and store the cordas it was before to keep it awayfrom moving engine parts. If youdo not, it could be damaged.
Contact your dealer for informationon how long to use the heater in yourparticular area.
Retained AccessoryPower (RAP)Some vehicle accessories may be usedafter the ignition is turned off.
The power windows and sunroof,if equipped, will continue to work forup to 10 minutes or until any door isopened.
The infotainment system will continueto work for 10 minutes, until thedriver door is opened, or until theignition is turned on or placed inACC/ACCESSORY.
Shifting Into Park(Automatic Transmission)To shift into P (Park):
1. Hold the brake pedal down andset the parking brake.
See Parking Brake (Electric) 0 206or Parking Brake (Manual) 0 208.
Cadillac ATS/ATS-V Owner Manual (GMNA-Localizing-U.S./Canada/Mexico-11349135) - 2018 - crc - 9/25/17
196 DRIVING AND OPERATING
2. Move the shift lever into P (Park)by holding in the button on theshift lever and pushing the leverall the way toward the front ofthe vehicle.
3. Turn the ignition off.
4. Take the Remote KeylessAccess (RKE) transmitterwith you.
Leaving the Vehicle with theEngine Running (AutomaticTransmission)
{ Warning
It can be dangerous to leave thevehicle with the engine running.It could overheat and catch fire.
It is dangerous to get out of thevehicle if the shift lever is not fullyin P (Park) with the parking brakefirmly set. The vehicle can roll.
Do not leave the vehicle when theengine is running. If you have leftthe engine running, the vehicle can
(Continued)
Warning (Continued)
move suddenly. You or others couldbe injured. To be sure the vehiclewill not move, even when you areon fairly level ground, always setthe parking brake and move theshift lever to P (Park). See ShiftingInto Park (Automatic Transmission)0 195. If you are towing a trailer,see Driving Characteristics andTowing Tips 0 244.
If you have to leave the vehicle withthe engine running, the vehicle mustbe in P (Park) with the parking brakeset. After shifting into P (Park), try tomove the shift lever without firstpressing the button on the shift lever.
If you can, the shift lever was notfully locked into P (Park).
Torque Lock (AutomaticTransmission)
Torque lock is when the weight of thevehicle puts too much force on theparking pawl in the transmission. Thishappens when parking on a hill and
shifting the transmission into P (Park)is not done properly and then it isdifficult to shift out of P (Park). Toprevent torque lock, set the parkingbrake and then shift into P (Park). Tofind out how, see "Shifting Into Park"listed previously.
If torque lock does occur, the vehiclemay need to be pushed uphill byanother vehicle to relieve the parkingpawl pressure, so you can shift out ofP (Park).
Shifting out of ParkThis vehicle is equipped with anelectronic shift lock release system.The shift lock release is designed toprevent movement of the shift leverout of P (Park), unless the ignition ison and the brake pedal is applied.
The shift lock release is alwaysfunctional except in the case of anuncharged or low voltage (less than9 volt) battery.

Cadillac ATS/ATS-V Owner Manual (GMNA-Localizing-U.S./Canada/Mexico-11349135) - 2018 - crc - 9/25/17
DRIVING AND OPERATING 197
If the vehicle has an unchargedbattery or a battery with low voltage,try charging or jump starting thebattery. See Jump Starting - NorthAmerica 0 320.
To shift out of P (Park):
1. Apply the brake pedal.
2. Turn the ignition on.
3. Release the parking brake.See Parking Brake (Electric) 0 206or Parking Brake (Manual) 0 208.
4. Press the shift lever button.
5. Move the shift lever.
If unable to shift out of P (Park):
1. Fully release the shift leverbutton.
2. While holding down the brakepedal, press the shift leverbutton again.
3. Move the shift lever.
If the shift lever will not move fromP (Park), consult your dealer or aprofessional towing service.
Parking (ManualTransmission)If the vehicle has a manualtransmission, before getting out of thevehicle, move the shift lever intoR (Reverse) if parking on a downhillslope. On a level surface or an uphillslope, use 1 (First) gear. Apply theparking brake. Turn the wheels towardthe curb for a downhill slope, or awayfrom the curb for an uphill slope.Once the shift lever has been placedinto gear with the clutch pedalpressed in, turn the ignition to off,and release the clutch.
Parking over ThingsThat Burn
{ Warning
Things that can burn could touchhot exhaust parts under the vehicleand ignite. Do not park over papers,leaves, dry grass, or other thingsthat can burn.
Extended ParkingIt is best not to park with the vehiclerunning. If the vehicle is left running,be sure it will not move and there isadequate ventilation.See Shifting Into Park (AutomaticTransmission) 0 195 and EngineExhaust 0 198.
If the vehicle is left parked andrunning with the RKE transmitteroutside the vehicle, it will turn offafter one hour.
If the vehicle is left parked andrunning with the RKE transmitterinside the vehicle, it will turn off aftertwo hours.
The vehicle could turn off sooner if itis parked on a hill, due to lack ofavailable fuel.
Cadillac ATS/ATS-V Owner Manual (GMNA-Localizing-U.S./Canada/Mexico-11349135) - 2018 - crc - 9/25/17
198 DRIVING AND OPERATING
Automatic Transmission
The timer will reset if the vehicle isshifted out of P (Park) while it isrunning.
Manual Transmission
The timer will reset if the vehiclespeed is greater than 4 km/h(2.5 mph).
Engine Exhaust
{ Warning
Engine exhaust contains carbonmonoxide (CO), which cannot beseen or smelled. Exposure to COcan cause unconsciousness andeven death.
Exhaust may enter the vehicle if:
. The vehicle idles in areas withpoor ventilation (parkinggarages, tunnels, deep snowthat may block underbodyairflow or tail pipes).
. The exhaust smells or soundsstrange or different.
. The exhaust system leaks dueto corrosion or damage.
. The vehicle exhaust systemhas been modified, damaged,or improperly repaired.
(Continued)
Warning (Continued)
. There are holes or openingsin the vehicle body fromdamage or aftermarketmodifications that are notcompletely sealed.
If unusual fumes are detected or ifit is suspected that exhaust iscoming into the vehicle:
. Drive it only with thewindows completely down.
. Have the vehicle repairedimmediately.
Never park the vehicle with theengine running in an enclosed areasuch as a garage or a building thathas no fresh air ventilation.
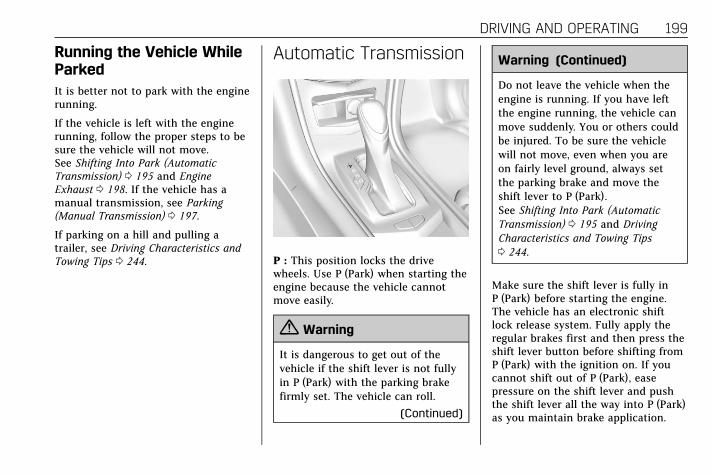
Cadillac ATS/ATS-V Owner Manual (GMNA-Localizing-U.S./Canada/Mexico-11349135) - 2018 - crc - 9/25/17
DRIVING AND OPERATING 199
Running the Vehicle WhileParkedIt is better not to park with the enginerunning.
If the vehicle is left with the enginerunning, follow the proper steps to besure the vehicle will not move.See Shifting Into Park (AutomaticTransmission) 0 195 and EngineExhaust 0 198. If the vehicle has amanual transmission, see Parking(Manual Transmission) 0 197.
If parking on a hill and pulling atrailer, see Driving Characteristics andTowing Tips 0 244.
Automatic Transmission
P : This position locks the drivewheels. Use P (Park) when starting theengine because the vehicle cannotmove easily.
{ Warning
It is dangerous to get out of thevehicle if the shift lever is not fullyin P (Park) with the parking brakefirmly set. The vehicle can roll.
(Continued)
Warning (Continued)
Do not leave the vehicle when theengine is running. If you have leftthe engine running, the vehicle canmove suddenly. You or others couldbe injured. To be sure the vehiclewill not move, even when you areon fairly level ground, always setthe parking brake and move theshift lever to P (Park).See Shifting Into Park (AutomaticTransmission) 0 195 and DrivingCharacteristics and Towing Tips0 244.
Make sure the shift lever is fully inP (Park) before starting the engine.The vehicle has an electronic shiftlock release system. Fully apply theregular brakes first and then press theshift lever button before shifting fromP (Park) with the ignition on. If youcannot shift out of P (Park), easepressure on the shift lever and pushthe shift lever all the way into P (Park)as you maintain brake application.

Cadillac ATS/ATS-V Owner Manual (GMNA-Localizing-U.S./Canada/Mexico-11349135) - 2018 - crc - 9/25/17
200 DRIVING AND OPERATING
Then press the shift lever button andmove the shift lever into another gear.See Shifting out of Park 0 196.
Caution
Shifting to R (Reverse) while thevehicle is moving forward coulddamage the transmission. Therepairs would not be covered by thevehicle warranty. Shift toR (Reverse) only after the vehicle isstopped.
R : Use this gear to back up.
At low vehicle speeds, R (Reverse) canbe used to rock the vehicle back andforth to get out of snow, ice, or sandwithout damaging the transmission.See If the Vehicle Is Stuck 0 186.
N : In this position, the engine doesnot connect with the wheels. Torestart the engine when the vehicle isalready moving, use N (Neutral) only.
{ Warning
Shifting into a drive gear while theengine is running at high speed isdangerous. Unless your foot isfirmly on the brake pedal, thevehicle could move very rapidly.You could lose control and hitpeople or objects. Do not shift intoa drive gear while the engine isrunning at high speed.
Caution
Shifting out of P (Park) orN (Neutral) with the engine runningat high speed may damage thetransmission. The repairs would notbe covered by the vehicle warranty.Be sure the engine is not running athigh speed when shifting thevehicle.
Caution
A transmission hot message maydisplay if the automatictransmission fluid is too hot.Driving under this condition candamage the vehicle. Stop and idlethe engine to cool the automatictransmission fluid. This messageclears when the transmission fluidhas cooled sufficiently.
D : This position is for normal driving.If more power is needed for passing,press the accelerator pedal down.
Downshifting the transmission inslippery road conditions could resultin skidding; see “Skidding” under Lossof Control 0 178.

Cadillac ATS/ATS-V Owner Manual (GMNA-Localizing-U.S./Canada/Mexico-11349135) - 2018 - crc - 9/25/17
DRIVING AND OPERATING 201
Caution
Spinning the tires or holding thevehicle in one place on a hill usingonly the accelerator pedal maydamage the transmission. Therepair will not be covered by thevehicle warranty. If the vehicle isstuck, do not spin the tires. Whenstopping on a hill, use the brakes tohold the vehicle in place.
While in Sport or Track Mode, thevehicle monitors driving behavior, andautomatically enables PerformanceShift Features when spirited driving isdetected. These features maintainlower transmission gears to increaseavailable engine braking and improveacceleration response. The vehicle willexit these features and return tonormal operation after a short periodwhen no spirited driving is detected.See Driver Mode Control 0 210.
The transmission will shift down agear to help hold vehicle speed andreduce brake wear when:
. Driving on a steep descent.
. The shift lever is in D (Drive).
. Frequent braking is required.
If the brake remains applied, thetransmission will downshift until3 (Third) gear is reached. If the brakeis released for some time, thetransmission will upshift a gear. If theroad levels out and the acceleratorpedal is pressed, the transmission willupshift until the appropriate gear isreached.
Manual Mode
Driver Shift Control (DSC)
Caution
Driving with the engine at a highrpm without upshifting while usingDriver Shift Control (DSC), coulddamage the vehicle. Always upshiftwhen necessary while using DSC.
Vehicles with DSC may either use theshift lever or the tap shift controls onthe back of the steering wheel (ifequipped) to manually shift theautomatic transmission.
To use DSC using the shift lever:
1. Move the shift lever to the leftfrom D (Drive) to M (ManualMode). The transmission will bein Manual Mode and will holdthe current gear.
2. Move the shift lever forward toupshift or rearward to downshift.
3. To cancel DSC, move the shiftlever back to D (Drive).

Cadillac ATS/ATS-V Owner Manual (GMNA-Localizing-U.S./Canada/Mexico-11349135) - 2018 - crc - 9/25/17
202 DRIVING AND OPERATING
Tap Shift
If equipped, the tap shift controls areon the back of the steering wheel.
To use DSC using the tap shiftcontrols:
1. Move the shift lever to the leftfrom D (Drive) to M (ManualMode). The transmission will bein Manual Mode and will holdthe current gear.
2. Pull the control toward you toshift. Pull the left control to(−) downshift, and the rightcontrol to (+) upshift. To shift tothe lowest available gear, pressand hold the left control (−).
3. To cancel DSC, move the shiftlever back to D (Drive).
Tap Shift Mode can also be usedtemporarily while driving in D (Drive).Pull either the (+) upshift or(−) downshift control.
To cancel Tap Shift Mode, holdthe (+) upshift control for two seconds.If no action is taken, the vehiclereturns to automatic shifting after abrief period of driving at a steadyspeed, or when the vehicle comes toa stop.
While using the DSC feature, thevehicle will have firmer, quickershifting. This can be used for sportdriving, climbing or descending hills,staying in gear longer, downshiftingfor more power, or engine braking.
The transmission will only allowshifting into gears appropriate for thevehicle speed and engine revolutionsper minute (rpm). The transmissionwill not automatically shift to the nexthigher gear if the engine rpm istoo high.
If shifting is prevented for any reason,a DIC message will appear.
When accelerating the vehicle from astop in snowy and icy conditions, it issuggested to shift into second gear,or third gear as available. A highergear allows the vehicle to gain moretraction on slippery surfaces. SeeDriver Mode Control 0 210.

Cadillac ATS/ATS-V Owner Manual (GMNA-Localizing-U.S./Canada/Mexico-11349135) - 2018 - crc - 9/25/17
DRIVING AND OPERATING 203
Manual TransmissionIf equipped, this is the shift patternfor the manual transmission.
ATS
ATS-V
Caution
A transmission hot message maydisplay if the manual transmissionfluid is too hot. Driving at highspeed under this condition candamage the vehicle. Drive at aslower speed, or stop and idle theengine to cool the manualtransmission fluid. The messageclears when the vehicle has slowedand the transmission fluid hascooled sufficiently.
1 (First) : Press the clutch pedal andshift into 1 (First). Slowly let up onthe clutch pedal while pressing on theaccelerator pedal.
After a complete stop, if it is hard toshift into 1 (First), let up on the clutchpedal, then press it back down andshift into 1 (First).
2 (Second) : Press the clutch pedaland let up on the accelerator pedal,then shift into 2 (Second). Then,slowly let up on the clutch pedal whileaccelerating.
3 (Third), 4 (Fourth), 5 (Fifth), and6 (Sixth) : Shift into 3 (Third),4 (Fourth), 5 (Fifth), and 6 (Sixth) thesame as 2 (Second).
To stop, let up on the acceleratorpedal and press the brake pedal. Justbefore the vehicle stops, press theclutch pedal and the brake pedal, andshift to Neutral.
Neutral : Use this position when youstart or idle the engine. The shift leveris in Neutral when it is centered in theshift pattern, not in any gear.

Cadillac ATS/ATS-V Owner Manual (GMNA-Localizing-U.S./Canada/Mexico-11349135) - 2018 - crc - 9/25/17
204 DRIVING AND OPERATING
R (Reverse) : To back up, press downthe clutch pedal, completely stop thevehicle, and shift into R (Reverse). OnATS models, apply additional pressureto get the lever past 1 (First) and2 (Second) into R (Reverse). Let up onthe clutch pedal slowly while pressingthe accelerator pedal.
{ Warning
If you skip a gear whendownshifting, you could losecontrol of the vehicle. You couldinjure yourself or others. Do notshift down more than one gear at atime when downshifting.
Caution
When downshifting, if more thanone gear is skipped, or the engine isracing when the clutch pedal isreleased, the engine, clutch,driveshaft or transmission could bedamaged.
No Lift-Shift
On ATS-V vehicles equipped with amanual transmission, the vehicle canbe shifted up a gear when theaccelerator pedal is pressed to thefloor without being released. Thisallows for less power interruption andwill improve acceleration times. Thisfeature is available in all vehiclemodes and is only active when theengine speed is greater than 2500 rpm.
Active Rev MatchATS-V vehicles equipped with amanual transmission have Active RevMatch (ARM). ARM aids in smoothershifting by matching the engine speedto the next selected gear. Bymonitoring shift lever and clutchoperation, ARM adjusts engine speedto match a calibrated value based ongear selection. On upshifts anddownshifts, engine speed will beincreased and decreased to matchvehicle road speed and transmissiongear position. ARM is maintainedwhile the clutch pedal is pressed, butwill deactivate if the shift lever is leftin the Neutral position.
The system is activated anddeactivated by pressing either of thepaddles on the steering wheel. Thesystem must be activated with eachnew ignition cycle.
A gear indicator in the instrumentcluster displays the current gearselected. ARM is also shown in thePerformance View of the HUD:
. When ARM is activated, the gearnumber is amber.
. When ARM is deactivated, thegear number is white.

Cadillac ATS/ATS-V Owner Manual (GMNA-Localizing-U.S./Canada/Mexico-11349135) - 2018 - crc - 9/25/17
DRIVING AND OPERATING 205. If no gear number is displayed
while the shift lever is in gear,service is required. ARM will bedisabled, and the malfunctionindicator lamp will be on. SeeMalfunction Indicator Lamp (CheckEngine Light) 0 125. The clutch andmanual transmission will continueto operate normally.
ARM will also:
. Be active above 14 km/h (9 mph).
. Match engine speed up to6100 rpm.
. Not operate when the acceleratorpedal is applied.
. Be disabled when the coolanttemperature is below 0 °C (32 °F).
Drive Systems
All-Wheel DriveVehicles with this feature always sendengine power to all four wheels. It isfully automatic, and adjusts itself asneeded for road conditions.
Brakes
Antilock BrakeSystem (ABS)This vehicle has an Antilock BrakeSystem (ABS), an advanced electronicbraking system that helps prevent abraking skid.
When the vehicle begins to driveaway, ABS checks itself. A momentarymotor or clicking noise may be heardwhile this test is going on, and it mayeven be noticed that the brake pedalmoves a little. This is normal.
If there is a problem with ABS, thiswarning light stays on. See AntilockBrake System (ABS) Warning Light0 128.

Cadillac ATS/ATS-V Owner Manual (GMNA-Localizing-U.S./Canada/Mexico-11349135) - 2018 - crc - 9/25/17
206 DRIVING AND OPERATING
If driving safely on a wet road and itbecomes necessary to slam on thebrakes and continue braking to avoida sudden obstacle, a computer sensesthe wheels are slowing down. If one ofthe wheels is about to stop rolling, thecomputer will separately work thebrakes at each wheel.
ABS can change the brake pressure toeach wheel, as required, faster thanany driver could. This can help yousteer around the obstacle whilebraking hard.
As the brakes are applied, thecomputer keeps receiving updates onwheel speed and controls brakingpressure accordingly.
Remember: ABS does not change thetime needed to get a foot up to thebrake pedal or always decreasestopping distance. If you get too closeto the vehicle in front of you, therewill not be enough time to apply thebrakes if that vehicle suddenly slowsor stops. Always leave enough roomup ahead to stop, even with ABS.
Using ABS
Do not pump the brakes. Just hold thebrake pedal down firmly and let ABSwork. You may hear the ABS pump ormotor operating and feel the brakepedal pulsate. This is normal.
Braking in Emergencies
ABS allows you to steer and brake atthe same time. In many emergencies,steering can help more than even thevery best braking.
Parking Brake (Electric)
Automatic Transmission
Manual Transmission
If equipped with an Electric ParkingBrake (EPB), the switch is on thecenter console for manualtransmission vehicles, or on the leftside of the instrument panel forautomatic transmission vehicles. TheEPB can always be activated, even ifthe ignition is off. To prevent drainingthe battery, avoid repeated cycles ofthe EPB when the engine is notrunning.
The system has aY or PARK
Electric Parking Brake light, and a 8Service Parking Brake light.
Cadillac ATS/ATS-V Owner Manual (GMNA-Localizing-U.S./Canada/Mexico-11349135) - 2018 - crc - 9/25/17
DRIVING AND OPERATING 207
See Parking Brake Light 0 128 andService Electric Parking Brake Light0 128. There are also parkingbrake-related Driver InformationCenter (DIC) messages.
Before leaving the vehicle, check fortheY or PARK light to ensure thatthe parking brake is applied.
EPB Apply
To apply the EPB:
1. Be sure the vehicle is at acomplete stop.
2. Lift up the EPB switchmomentarily.
TheY or PARK light will flash andthen stay on once the EPB is fullyapplied. If theY or PARK lightflashes continuously, then the EPB isonly partially applied or there is aproblem with the EPB. A DIC messagewill display. Release the EPB and tryto apply it again. If the light does notcome on, or keeps flashing, have thevehicle serviced. Do not drive the
vehicle if theY or PARK light isflashing. See your dealer. See ParkingBrake Light 0 128.
If the 8 light is on, press the EPBswitch and hold it. Continue to holdthe switch until theY or PARK light
remains on. If the 8 light remains on,see your dealer.
If the EPB is applied while the vehicleis moving, the vehicle will decelerateas long as the switch is pressed. If theswitch is pressed until the vehiclecomes to a stop, the EPB will remainapplied.
The vehicle may automatically applythe EPB in some situations when thevehicle is not moving. This is normal,and is done to periodically check thecorrect operation of the EPB system.
If the EPB fails to apply, block the rearwheels to prevent vehicle movement.
EPB Release
To release the EPB:
1. Turn the ignition on or to ACC/ACCESSORY.
2. Apply and hold the brake pedal.
3. Press the EPB switchmomentarily.
The EPB is released when theY orPARK light is off.
If the 8 light is on, release the EPB bypressing and holding the EPB switch.Continue to hold the switch until theY or PARK light is off. If either lightstays on after release is attempted, seeyour dealer.
Caution
Driving with the parking brake oncan overheat the brake system andcause premature wear or damage tobrake system parts. Make sure thatthe parking brake is fully releasedand the brake warning light is offbefore driving.
Automatic EPB Release
The EPB will automatically release ifthe vehicle is running, placed intogear, and an attempt is made to drive

Cadillac ATS/ATS-V Owner Manual (GMNA-Localizing-U.S./Canada/Mexico-11349135) - 2018 - crc - 9/25/17
208 DRIVING AND OPERATING
away. Avoid rapid acceleration whenthe EPB is applied, to preserve parkingbrake lining life.
The EPB can also be used to preventroll back for vehicles with a manualtransmission taking off on a hill.When no roll back is desired, anapplied EPB will allow both feet to beused for the clutch and acceleratorpedals in preparation for starting thevehicle moving in the intendeddirection. In this case, there is noneed to press the switch to releasethe EPB.
Parking Brake (Manual)
To set the parking brake, hold theregular brake pedal down, then pushthe parking brake pedal down.
If the ignition is on, the brake systemwarning light will come on. See BrakeSystem Warning Light 0 127.
Caution
Driving with the parking brake oncan overheat the brake system andcause premature wear or damage tobrake system parts. Make sure thatthe parking brake is fully releasedand the brake warning light is offbefore driving.
To release the parking brake, hold theregular brake pedal down, then pushdown momentarily on the parkingbrake pedal until you feel the pedalrelease. Slowly pull your foot up offthe parking brake pedal. If the parkingbrake is not released when you beginto drive, the brake system warninglight will be on and a chime willsound warning you that the parkingbrake is still on.
If you are towing a trailer and areparking on a hill, see DrivingCharacteristics and Towing Tips 0 244.
Brake AssistThis vehicle has a brake assist featuredesigned to assist the driver instopping or decreasing vehicle speedin emergency driving conditions. Thisfeature uses the stability systemhydraulic brake control module tosupplement the power brake systemunder conditions where the driver hasquickly and forcefully applied thebrake pedal in an attempt to quicklystop or slow down the vehicle. Thestability system hydraulic brakecontrol module increases brakepressure at each corner of the vehicleuntil the ABS activates. Minor brakepedal pulsation or pedal movementduring this time is normal and thedriver should continue to apply thebrake pedal as the driving situationdictates. The brake assist feature willautomatically disengage when thebrake pedal is released or brake pedalpressure is quickly decreased.

Cadillac ATS/ATS-V Owner Manual (GMNA-Localizing-U.S./Canada/Mexico-11349135) - 2018 - crc - 9/25/17
DRIVING AND OPERATING 209
Hill Start Assist (HSA)This vehicle has a Hill Start Assist(HSA) feature, which may be usefulwhen the vehicle is stopped on agrade sufficient enough to activateHSA. This feature is designed toprevent the vehicle from rolling, eitherforward or rearward, during vehicledrive off. After the driver completelystops and holds the vehicle in acomplete standstill on a grade, HSAwill be automatically activated. Duringthe transition period between whenthe driver releases the brake pedal andstarts to accelerate to drive off on agrade, HSA holds the braking pressurefor a maximum of two seconds toensure that there is no rolling. Thebrakes will automatically release whenthe accelerator pedal is applied withinthe two-second window. It will notactivate if the vehicle is in a drive gearand facing downhill, or if the vehicleis facing uphill and in R (Reverse).
Ride Control Systems
Traction Control/ElectronicStability Control
System Operation
The vehicle has a Traction ControlSystem (TCS) and StabiliTrak, anelectronic stability control system.These systems help limit wheel spinand assist the driver in maintainingcontrol, especially on slippery roadconditions.
TCS activates if it senses that any ofthe drive wheels are spinning orbeginning to lose traction. When thishappens, TCS applies the brakes to thespinning wheels and reduces enginepower to limit wheel spin.
StabiliTrak activates when the vehiclesenses a difference between theintended path and the direction thevehicle is actually traveling.StabiliTrak selectively applies brakingpressure to any one of the vehiclewheel brakes to assist the driver inkeeping the vehicle on theintended path.
If cruise control is being used and TCSor StabiliTrak begins to limit wheelspin, cruise control will disengage.Cruise control may be turned back onwhen road conditions allow.
Both systems come on automaticallywhen the vehicle is started and beginsto move. The systems may be heard orfelt while they are operating or whileperforming diagnostic checks. This isnormal and does not mean there is aproblem with the vehicle.
It is recommended to leave bothsystems on for normal drivingconditions, but it may be necessary toturn TCS off if the vehicle gets stuckin sand, mud, ice, or snow. See If theVehicle Is Stuck 0 186 and “Turningthe Systems Off and On” later in thissection.

Cadillac ATS/ATS-V Owner Manual (GMNA-Localizing-U.S./Canada/Mexico-11349135) - 2018 - crc - 9/25/17
210 DRIVING AND OPERATING
The indicator light for both systems isin the instrument cluster. Thislight will:
. Flash when TCS is limitingwheel spin.
. Flash when StabiliTrak isactivated.
. Turn on and stay on when eithersystem is not working.
If either system fails to turn on or toactivate, a message may display in theDriver Information Center (DIC), andd comes on and stays on to indicatethat the system is inactive and is notassisting the driver in maintainingcontrol. The vehicle is safe to drive,but driving should be adjustedaccordingly.
If d comes on and stays on:
1. Stop the vehicle.
2. Turn the engine off and wait15 seconds.
3. Start the engine.
4. Drive the vehicle.
If d comes on and stays on, thevehicle may need more time todiagnose the problem. If the conditionpersists, see your dealer.
Turning the Systems Off and On
The g button for TCS and StabiliTrakis on the center console (ATS) or thesteering wheel (ATS-V).
Caution
Do not repeatedly brake oraccelerate heavily when TCS is off.The vehicle driveline could bedamaged.
To turn off only TCS, press andrelease g. The Traction Off light idisplays in the instrument cluster anda DIC message may display.
To turn TCS on again, press andrelease g. The Traction Off light idisplayed in the instrument clusterwill turn off.
If TCS is limiting wheel spin when gis pressed, the system will not turn offuntil the wheels stop spinning.
To turn off both TCS and StabiliTrak,press and hold g until the Traction
Off light i and StabiliTrak OFF lightg come on and stay on in theinstrument cluster. A DIC messagemay display.
To turn TCS and StabiliTrak on again,press and release g. The Traction Off
light i and StabiliTrak OFF light gin the instrument cluster turn off.
Adding accessories can affect thevehicle performance. See Accessoriesand Modifications 0 252.
Driver Mode ControlDriver Mode Control attempts to adda sportier feel, provide a morecomfortable ride, or assist in differentweather conditions or terrain. Thissystem simultaneously changes thesoftware settings of varioussub-systems. Depending on the optionpackage, available features, and modeselected, the suspension, steering, and

Cadillac ATS/ATS-V Owner Manual (GMNA-Localizing-U.S./Canada/Mexico-11349135) - 2018 - crc - 9/25/17
DRIVING AND OPERATING 211
powertrain will change settings toachieve the desired modecharacteristics. If the vehicle isequipped with Magnetic Ride Control,selecting the various Driver Modesadjusts the ride of the vehicle toenhance the ride performance for theroad conditions and theselected mode.
The Driver Mode Control has three orfour modes: Tour, Sport, Snow/Ice,and Track (V-Series Only). Snow/Icemode is only available on automatictransmission vehicles. Press andrelease the MODE button (ATS) orpress they orz button (ATS-V) onthe center console to activate themode menu in the cluster. The firstpress of the button will show thecurrent mode. Subsequent presses willscroll though the available modes. TheTour and Sport modes will feel similaron a smooth road. Select a newsetting whenever driving conditionschange.
Tour Mode
Use for normal city and highwaydriving to provide a smooth, soft ride.
Sport Mode
Use where road conditions or personalpreference demand a more controlledresponse.
When selected, the Sport modeindicator will display in the DriverInformation Center (DIC).
When in Sport or Track mode, thevehicle will shift automatically butmay hold a lower gear longer than itwould in the normal driving modebased on braking, throttle input, andvehicle lateral acceleration. SeeAutomatic Transmission 0 199. Thesteering will change to provide moreprecise control. If the vehicle hasMagnetic Ride Control, the suspensionwill change to provide bettercornering performance.
Competitive Driving Mode can beaccessed through this mode.
Snow/Ice Mode
Use when more traction is neededduring slippery conditions.
Snow/Ice mode will use a differentaccelerator pedal map to optimizetraction on a slippery surface. Theaccelerator pedal will reduce enginetorque at small pedal inputs. Thetransmission will also shift differentlyto assist in maintaining traction.
When selected, the Snow/Ice modeindicator will display in the DIC.
This feature is not intended for usewhen the vehicle is stuck in sand,mud, ice, snow, or gravel. If thevehicle becomes stuck, see If theVehicle Is Stuck 0 186.
Track Mode (V-Series Only)
Use when maximum vehicle handlingis desired. When selected, the Trackmode indicator will display in the DIC.
The accelerator pedal is adjusted togive maximum control during thehighest level of spirited driving.
Cadillac ATS/ATS-V Owner Manual (GMNA-Localizing-U.S./Canada/Mexico-11349135) - 2018 - crc - 9/25/17
212 DRIVING AND OPERATING
The automatic transmission andsteering will function similar toSport Mode.
The Magnetic Ride Control will be setto the optimum level for vehicleresponsiveness.
Competitive Driving Mode can beaccessed through this mode.
Use when driving on a closed racecourse or drag strip.
Vehicle systems are optimized formaximum track performance.
This mode allows entry toPerformance Traction Management(PTM) in the CompetitiveDriving Mode.

Cadillac ATS/ATS-V Owner Manual (GMNA-Localizing-U.S./Canada/Mexico-11349135) - 2018 - crc - 9/25/17
DRIVING AND OPERATING 213
Modes: TOURDefault
SPORT SNOW/ICE TRACK
Throttle Progression Tour Tour Snow/Ice Track
Transmission Shift Mode Tour Sport Tour Track
Steering (Assist Effort) Tour Sport Tour Track
Magnetic Ride Control (if equipped) Tour Sport Tour Track
Launch Control (V-Series Only) NA NA NA Available
Stability Control Tour Tour Tour Track
Performance Traction Management (ifequipped) (V-Series Only)
NA NA NA Available
Engine Sound Management NA NA NA Available
Driver Mode Selector AttributesAffected
The Gauge Cluster Display isconfigured for each mode when linked(default):
Throttle Progression
Adjusts throttle sensitivity byselecting how quick or slow thethrottle reacts to input.
. Snow/Ice - The accelerator pedalwill reduce engine torque at smallpedal inputs. This allows betterwheel control on slippery surfaces.
. Track - The accelerator pedal isadjusted to give maximum controlduring the highest level of spiriteddriving.
Transmission Shift Mode
Sport or Track – Performance ModeLift Foot (PMLF) allows thetransmission to hold the current gearafter a quick release of a heavilyapplied accelerator pedal. Thisprovides greater engine braking andenhanced vehicle control withoutusing the paddles. PerformanceAlgorithm Shift (PAS) recognizesaggressive cornering, heavy braking,and high acceleration to select and

Cadillac ATS/ATS-V Owner Manual (GMNA-Localizing-U.S./Canada/Mexico-11349135) - 2018 - crc - 9/25/17
214 DRIVING AND OPERATING
hold lower gears when not usingpaddles. The shifts are also firmer toincrease the quickness of shifting.
Steering (Assist Effort)
Adjusts from a lighter steering feel inTour mode to reduced assist in Sportand Track mode for moresteering feel.
Magnetic Ride Control (If equipped)
Adjusts the shock dampeningfirmness from a comfort tune in Tourmode to an optimized responsivenesstune in Sport and Track.
Launch Control (V-Series Only)
Available only in Track mode formaximum “off–the–line” accelerationwhen in Competitive Driving Modeor PTM.
Stability Control
. Competitive Driving Mode allowsless computer control to permitsome slide and drift and isselected with the button – onlyavailable in Track mode.
. StabiliTrak can be turned off bypressing and holding the buttonfor five seconds.
PTM (Performance TractionManagement) (If equipped)(V-Series Only)
. Available in Track mode.
. There are five selectable settings.
Driver Mode Customization
The Engine Sound Management,steering, and suspension drive modescan be set to the driver’s preference.See “Driving Mode” under VehiclePersonalization 0 141.
When in the Track main vehicle mode,you cannot overwrite the Steering orSuspension settings. These settingsare designed to interact with theadvanced functions in the Track Modeand cannot be overwritten.
The selections made in the DrivingMode menu overwrite the mainvehicle mode selection via the buttonsor switch on the center console. Inorder to customize and overwrite,select one of the three settings bytouching the infotainment display.
When in the customization screen foreach system, select one of fouroptions:
. Auto (Follows the mode switch)
. Tour
. Sport
. Track
The default will be to follow thevehicle mode switch settings, but themain vehicle mode selection for thecurrently selected system can beoverwritten using this menu. Thesettings selected in this menu will setthe vehicle behavior in all selectedvehicle modes, and will be retainedover each ignition cycle. They do nothave to be reset each time the vehicleis started.
Competitive Driving Mode(FE3 Only)To select this optional handling mode,pressY quickly two times and theDIC will display the appropriatemessage. While in the CompetitiveDriving Mode, the traction off light i

Cadillac ATS/ATS-V Owner Manual (GMNA-Localizing-U.S./Canada/Mexico-11349135) - 2018 - crc - 9/25/17
DRIVING AND OPERATING 215
and StabiliTrak OFF light g will comeon in the instrument cluster. TCS doesnot limit wheel spin, the ElectronicLimited-Slip Differential (eLSD) allowsincreased vehicle agility, and moreeffort is required to turn the steeringwheel. See “Limited-Slip Axle (V-SeriesOnly)” later in this section. Adjustyour driving accordingly.
PressY again, or turn the ignition toACC/ACCESSORY and restart thevehicle, to turn TCS back on. Thetraction off light i and StabiliTrak
OFF light g will go out in theinstrument cluster.
Caution
When traction control is turned off,or Competitive Driving Mode isactive, it is possible to lose traction.
Performance TractionManagement (V-Series Only)
Performance Traction Management(PTM) integrates the Traction Control,StabiliTrak, and Magnetic Ride
Control systems to provide improvedand consistent performance whencornering. The amount of availableengine power is based on the modeselected, track conditions, driver skill,and the radius of each corner.
This light is on when the vehicle is inthe PTM mode.
To select this optional handling mode,the vehicle mode must be Track. Thenquickly press theY on the steeringwheel two times. PERF TRAC 1 - WETACTIVE HANDLING ON displays inthe DIC.
When PTM is active, the up and downbuttons will no longer change DriveModes, but instead change PTMmodes.
To select a mode while in PTM, pressthe Driver Mode Control/PTM buttonson the center console.
To experience the performance benefitof this system, after entering a curveand at the point where normalacceleration occurs, fully push theaccelerator pedal. The PTM systemwill modify the level of engine powerfor a smooth and consistentcorner exit.
The PTM system contains five modes.These modes are selected by pressingthe Driver Mode Control/PTM buttonson the center console. Scroll up ordown through modes 1-5 by pressingthe MODE up and down button. Thefollowing is a DIC display descriptionand the recommended usage ofeach mode:
PERF TRAC 1 – WET ACTIVEHANDLING ON. Intended for all driver skill levels.
. Wet or damp conditions only —not intended for use in heavy rainor standing water.
. StabiliTrak is on.

Cadillac ATS/ATS-V Owner Manual (GMNA-Localizing-U.S./Canada/Mexico-11349135) - 2018 - crc - 9/25/17
216 DRIVING AND OPERATING
PERF TRAC 2 – DRY ACTIVEHANDLING ON. For use by less experienced drivers
or while learning a new track.
. Dry conditions only.
. StabiliTrak is on.
PERF TRAC 3 – SPORT ACTIVEHANDLING ON. For use by drivers who are familiar
with the track.
. Dry conditions only.
. Requires more driving skill thanmode 2.
. StabiliTrak is on.
PERF TRAC 4 – SPORT ACTIVEHANDLING OFF. For use by drivers who are familiar
with the track.
. Dry conditions only.
. Requires more driving skill thanmodes 2 or 3.
. StabiliTrak is off.
PERF TRAC 5 – RACE ACTIVEHANDLING OFF. For use by experienced drivers
who are familiar with the track.
. Dry conditions only.
. Requires more driving skill than inother modes.
. StabiliTrak is off.
Press and releaseY to turn off PTMand return to the traction control andStabiliTrak systems. The traction offlight i and StabiliTrak OFF light gwill go out.
Launch Control (V-Series Only)
A Launch Control feature is available,within Competitive Driving Mode(V-Series) or Performance TractionManagement (V-Series), to allow thedriver to achieve high levels of vehicleacceleration in a straight line. LaunchControl is a form of traction controlthat manages tire spin whilelaunching the vehicle. This feature isintended for use during closed course
race events where consistent zero to60 and quarter mile times aredesirable.
Launch Control is only available whenthe following criteria are met:
. Competitive Driving Mode isselected (V-Series) or any of thePerformance TractionManagement modes are selected(V-Series). The TCS light comes onin the instrument cluster and theappropriate DIC message displays.
. The vehicle is not moving.
. The steering wheel is pointingstraight.
Manual Transmissions
. The clutch is pressed and thevehicle is in 1 (First) gear.
. The accelerator pedal is rapidlyapplied to wide open throttle.
The Launch Control feature willinitially limit engine speed as thedriver rapidly applies the acceleratorpedal to wide open throttle. Allow theengine rpm to stabilize. A smooth,quick release of the clutch, while

Cadillac ATS/ATS-V Owner Manual (GMNA-Localizing-U.S./Canada/Mexico-11349135) - 2018 - crc - 9/25/17
DRIVING AND OPERATING 217
maintaining the fully pressedaccelerator pedal, will manage wheelslip. Complete shifts as described inManual Transmission 0 203.
Automatic Transmissions
. The brake pedal must be firmlypressed to the floor, equivalent toa panic brake event.
. The accelerator pedal is rapidlyapplied to wide open throttle. (Ifthe vehicle rolls due to wide openthrottle, release the throttle, pressthe brake pedal more firmly, andre-apply the accelerator to wideopen throttle.)
The Launch Control feature willinitially limit engine speed as thedriver rapidly applies the acceleratorpedal to wide open throttle. Allow theengine rpm to stabilize. A smooth,quick release of the brake pedal, whilemaintaining the fully pressedaccelerator pedal, will managewheel slip.
After the vehicle is launched, thesystem continues in PerformanceTraction Management (V-Series).
Competitive Driving Mode, PTM, andLaunch Control are systems designedfor a closed course race track and notintended for use on public roads. Thesystems are not intended tocompensate for lack of driverexperience or familiarity with the racetrack.
Limited-Slip Rear Axle(Except V-Series)If equipped, the mechanicallimited-slip differential can give moretraction on snow, mud, ice, sand,or gravel. It works like a standard axlemost of the time, but when traction islow, this feature allows the drivewheel with the most traction to movethe vehicle. For vehicles withlimited-slip differential, driven undersevere conditions, the rear axle fluidshould be changed.See Competitive Driving Mode (FE3Only) 0 214 and Maintenance Schedule0 336.
Limited-Slip Rear Axle(V-Series Only)If equipped, the ElectronicLimited-Slip Differential (eLSD) isautomatically activated. eLSD activelymonitors vehicle sensors and driverinputs to determine the amount ofchange for the conditions. With eLSD,the vehicle has:
. Enhanced high-speed control.
. Improved traction throughcorners, allowing moreacceleration.
. More precise steering.
. Increased vehicle agility.
. Integration with StabiliTrak.
For vehicles with eLSD, driven undersevere conditions, the rear axle fluidshould be changed.See Competitive Driving Mode (FE3Only) 0 214 and Maintenance Schedule0 336.

Cadillac ATS/ATS-V Owner Manual (GMNA-Localizing-U.S./Canada/Mexico-11349135) - 2018 - crc - 9/25/17
218 DRIVING AND OPERATING
Cruise ControlWith cruise control, a speed of about40 km/h (25 mph) or more can bemaintained without keeping your footon the accelerator. Cruise control doesnot work at speeds below about40 km/h (25 mph).
{ Warning
Cruise control can be dangerouswhere you cannot drive safely at asteady speed. Do not use cruisecontrol on winding roads or inheavy traffic.
Cruise control can be dangerous onslippery roads. On such roads, fastchanges in tire traction can causeexcessive wheel slip, and you couldlose control. Do not use cruisecontrol on slippery roads.
If equipped with a manualtransmission and 2.0L L4 engine(LTG), the cruise control will remainactive when the gears are shifted. Thecruise is deactivated if the clutch ispressed for several seconds. In an
ATS-V Series vehicle, cruise control iscanceled immediately with theactivation of the clutch pedal.
If the StabiliTrak system begins tolimit wheel spin while using cruisecontrol, the cruise controlautomatically disengages. See TractionControl/Electronic Stability Control0 209. If a collision alert occurs whencruise control is activated, cruisecontrol is disengaged. See ForwardCollision Alert (FCA) System 0 232.When road conditions allow you tosafely use it again, cruise control canbe turned back on.
Turning off the TCS or StabiliTraksystem will disengage the cruisecontrol.
If the brakes are applied, cruisecontrol disengages.
J : Press to turn the system on andoff. A white cruise control indicatorappears in the instrument clusterwhen cruise is turned on.
+RES : If there is a set speed inmemory, press the control up brieflyto resume that speed or hold toaccelerate. If cruise control is alreadyactive, use to increase vehicle speed.To increase speed by 1 km/h (1 mph),press +RES up to the first detent. Toincrease speed to the next 5 km/h(5 mph) mark on the speedometer,press +RES up to the second detent.

Cadillac ATS/ATS-V Owner Manual (GMNA-Localizing-U.S./Canada/Mexico-11349135) - 2018 - crc - 9/25/17
DRIVING AND OPERATING 219
SET− : Press the control down brieflyto set the speed and activate cruisecontrol. If cruise control is alreadyactive, use to decrease vehicle speed.To decrease speed by 1 km/h (1 mph),press SET− down to the first detent.To decrease speed to the next 5 km/h(5 mph) mark on the speedometer,press SET− down to the second detent.
* : Press to disengage cruise controlwithout erasing the set speed frommemory.
Setting Cruise Control
IfJ is on when not in use, SET− or+RES could get bumped and go intocruise when not desired. KeepJ offwhen cruise is not being used.
1. PressJ.
2. Get up to the desired speed.
3. Press and release SET−.
4. Remove your foot from theaccelerator.
When the cruise control has been setto the desired speed, the cruisecontrol indicator appears green on the
instrument cluster and a cruise setspeed message appears on theHead-Up Display (HUD), if equipped.
Resuming a Set Speed
If the cruise control is set at a desiredspeed and then the brakes are appliedor* is pressed, the cruise control isdisengaged without erasing the setspeed from memory.
Once the vehicle speed reaches about40 km/h (25 mph) or more, brieflypress +RES up to the first detent. Thevehicle returns to the previous setspeed.
Increasing Speed While CruiseControl is at a Set Speed
If the cruise control system is alreadyactivated:
. Press and hold +RES up until thedesired speed is reached, thenrelease it.
. To increase vehicle speed in smallincrements, briefly press +RES upto the first detent. For each press,the vehicle goes about 1 km/h(1 mph) faster.
. To increase vehicle speed in largerincrements, briefly press +RES upto the second detent. For eachpress, the vehicle speed increasesto the next 5 km/h (5 mph) markon the speedometer.
The speedometer reading can bedisplayed in either English or metricunits. See Instrument Cluster 0 118.The increment value used depends onthe units displayed.
Reducing Speed While CruiseControl is at a Set Speed
If the cruise control system is alreadyactivated:
. Press and hold SET− down untilthe desired lower speed is reached,then release it.
. To decrease the vehicle speed insmall increments, briefly pressSET− down to the first detent. Foreach press, the vehicle goes about1 km/h (1 mph) slower.
. To decrease the vehicle speed inlarger increments, briefly pressSET− down to the second detent.

Cadillac ATS/ATS-V Owner Manual (GMNA-Localizing-U.S./Canada/Mexico-11349135) - 2018 - crc - 9/25/17
220 DRIVING AND OPERATING
For each press, the vehicle speeddecreases to the next 5 km/h(5 mph) mark on the speedometer.
The cruise control system mayautomatically brake to slow thevehicle down (ATS model only).
The speedometer reading can bedisplayed in either English or metricunits. See Instrument Cluster 0 118.The increment value used depends onthe units displayed.
Passing Another Vehicle WhileUsing Cruise Control
Use the accelerator pedal to increasethe vehicle speed. When you take yourfoot off the pedal, the vehicle will slowdown to the previously set cruisespeed. While pressing the acceleratorpedal or shortly following the releaseto override cruise control, brieflyapplying the SET– control will resultin cruise control set to the currentvehicle speed.
Using Cruise Control on Hills
How well cruise control will work onhills depends upon the vehicle speed,load, and the steepness of the hills.
When going up steep hills, you mighthave to step on the accelerator pedalto maintain the vehicle speed. Whengoing downhill, the cruise controlsystem may automatically brake (ATSonly), and the transmission maydownshift to a lower gear, to slow thevehicle down. Also, you may have tobrake or shift to a lower gear to keepthe vehicle speed down. If the brakepedal is applied, cruise control willdisengage.
Ending Cruise Control
There are five ways to end cruisecontrol:
. Step lightly on the brake pedal(manual and automatictransmissions).
. Press the clutch pedal for severalseconds or shift to Neutral(manual transmissions).
. Shift the transmission toN (Neutral).
. Press*.
. PressJ.
Erasing Speed Memory
The cruise control set speed is erasedfrom memory ifJ is pressed or ifthe ignition is turned off.
Adaptive Cruise ControlIf equipped with Adaptive CruiseControl (ACC), it allows for selectingthe cruise control set speed andfollowing gap. Read this entire sectionbefore using this system. ACC uses acamera and radar sensors to detectother vehicles. See Radio FrequencyStatement 0 364. The following gap isthe following time (or distance)between your vehicle and a vehicledetected directly ahead in your path,moving in the same direction. If novehicle is detected in your path, ACCworks like regular cruise control.
If a vehicle is detected in your path,ACC can speed up the vehicle or applylimited, moderate braking to maintainthe selected following gap. Todisengage ACC, apply the brake. If theTraction Control System (TCS) orStabiliTrak® electronic stabilitycontrol system activates while ACC is

Cadillac ATS/ATS-V Owner Manual (GMNA-Localizing-U.S./Canada/Mexico-11349135) - 2018 - crc - 9/25/17
DRIVING AND OPERATING 221
engaged, ACC may automaticallydisengage. See Traction Control/Electronic Stability Control 0 209. Whenroad conditions allow ACC to be safelyused, ACC can be turned back on. ACCwill not engage if the TCS orStabiliTrak electronic stability controlsystem is disabled.
{ Warning
ACC has limited braking ability andmay not have time to slow thevehicle down enough to avoid acollision with another vehicle youare following. This can occur whenvehicles suddenly slow or stopahead, or enter your lane. Also see“Alerting the Driver” in this section.Complete attention is alwaysrequired while driving and youshould be ready to take action andapply the brakes. See DefensiveDriving 0 176.
{ Warning
ACC will not detect or brake forchildren, pedestrians, animals,or other objects.
Do not use ACC when:
. On winding and hilly roads orwhen the sensors are blockedby snow, ice, or dirt. Thesystem may not detect avehicle ahead. Keep the entirefront of the vehicle clean.
. Visibility is low, such as infog, rain, or snow conditions.ACC performance is limitedunder these conditions.
. On slippery roads where fastchanges in tire traction cancause excessive wheel slip.
J : Press to turn the system on oroff. The indicator turns white on theinstrument cluster when ACC isturned on.
+RES : Press the control up briefly toresume the previous set speed or toincrease vehicle speed if ACC isalready engaged. To increase speed by1 km/h (1 mph), press +RES up to thefirst detent. To increase speed to thenext 5 km/h (5 mph) mark on thespeedometer, press +RES up to thesecond detent.

Cadillac ATS/ATS-V Owner Manual (GMNA-Localizing-U.S./Canada/Mexico-11349135) - 2018 - crc - 9/25/17
222 DRIVING AND OPERATING
SET– : Press the control down brieflyto set the speed and activate ACC orto decrease vehicle speed if ACC isalready engaged. To decrease speed by1 km/h (1 mph), press SET− down tothe first detent. To decrease speed tothe next 5 km/h (5 mph) mark on thespeedometer, press SET− down to thesecond detent.
* : Press to disengage ACC withouterasing the set speed from memory.
[ : Press to select a following gaptime (or distance) setting for ACC ofFar, Medium, or Near.
The speedometer reading can bedisplayed in either English or metricunits. See Instrument Cluster 0 118.The increment value used depends onthe units displayed.
Switching Between ACC andRegular Cruise Control
To switch between ACC and regularcruise control, press and hold*.A Driver Information Display (DIC)message displays. See Vehicle Messages0 140.
ACC Indicator Regular CruiseControl Indicator
When ACC is engaged, a green\indicator will be lit on the instrumentcluster. When the regular cruisecontrol is engaged, a greenJindicator will be lit on the instrumentcluster.
When the vehicle is turned on, thecruise control mode will be set to thelast mode used before the vehicle wasturned off.
{ Warning
Always check the cruise controlindicator on the instrument clusterto determine which mode cruisecontrol is in before using thefeature. If ACC is not active, the
(Continued)
Warning (Continued)
vehicle will not automatically brakefor other vehicles, which couldcause an accident if the brakes arenot applied manually. You andothers could be seriously injured orkilled.
Setting Adaptive Cruise Control
IfJ is on when not in use, it couldget pressed and go into ACC when notdesired. KeepJ off when cruise isnot being used.
Select the set speed desired for ACC.This is the vehicle speed when novehicle is detected in its path.
ACC will not set at a speed less than25 km/h (16 mph), although it can beresumed when driving at lowerspeeds.
To set ACC:
1. PressJ.
2. Get up to the desired speed.
3. Press and release SET–.

Cadillac ATS/ATS-V Owner Manual (GMNA-Localizing-U.S./Canada/Mexico-11349135) - 2018 - crc - 9/25/17
DRIVING AND OPERATING 223
4. Remove your foot from theaccelerator.
After ACC is set, it may immediatelyapply the brakes if a vehicle ahead isdetected closer than the selectedfollowing gap.
The ACC indicator displays in theinstrument cluster and Head-UpDisplay (HUD). When the ACC isactive, the indicator will be lit green.
Be mindful of speed limits,surrounding traffic speeds, andweather conditions when selecting theset speed.
Resuming a Set Speed
If the ACC is set at a desired speedand then the brakes are applied, theACC is disengaged without erasing theset speed from memory.
To begin using ACC again, press +RESup briefly. The vehicle returns to theprevious set speed.
Increasing Speed While ACC is at aSet Speed
Do one of the following:
. Use the accelerator to get to thehigher speed. Press SET– down.Release the control and theaccelerator pedal. The vehicle willnow cruise at the higher speed.
When the accelerator pedal ispressed, ACC will not brakebecause it is overridden. The ACCindicator will turn blue on theinstrument cluster and theHead-Up Display (HUD). SeeVehicle Messages 0 140.
. Press and hold +RES up until thedesired set speed appears on thedisplay, then release it.
. To increase vehicle speed in smallincrements, press +RES up to thefirst detent. For each press, thevehicle goes 1 km/h (1 mph)faster.
. To increase vehicle speed in largerincrements, press +RES up to thesecond detent. For each press, thevehicle speed increases to the next5 km/h (5 mph) mark on thespeedometer.
When it is determined that there is novehicle ahead inside the selectedfollowing gap, then the vehicle speedwill increase to the set speed.
Reducing Speed While ACC is at aSet Speed
Do one of the following:
. Use the brake to get to the desiredlower speed. Press SET– down andrelease the accelerator pedal. Thevehicle will now cruise at thelower speed.
. Press and hold SET– down untilthe desired lower speed is reached,then release it.
. To decrease the vehicle speed insmall increments, press SET−down to the first detent. For eachpress, the vehicle goes about1 km/h (1 mph) slower.
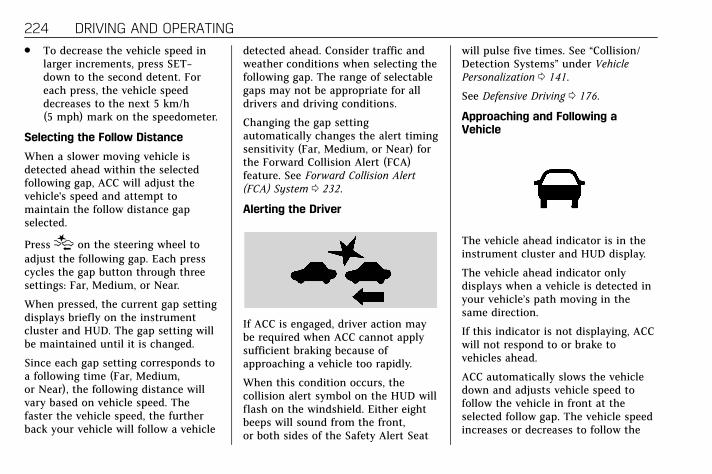
Cadillac ATS/ATS-V Owner Manual (GMNA-Localizing-U.S./Canada/Mexico-11349135) - 2018 - crc - 9/25/17
224 DRIVING AND OPERATING. To decrease the vehicle speed in
larger increments, press SET−down to the second detent. Foreach press, the vehicle speeddecreases to the next 5 km/h(5 mph) mark on the speedometer.
Selecting the Follow Distance
When a slower moving vehicle isdetected ahead within the selectedfollowing gap, ACC will adjust thevehicle's speed and attempt tomaintain the follow distance gapselected.
Press[ on the steering wheel toadjust the following gap. Each presscycles the gap button through threesettings: Far, Medium, or Near.
When pressed, the current gap settingdisplays briefly on the instrumentcluster and HUD. The gap setting willbe maintained until it is changed.
Since each gap setting corresponds toa following time (Far, Medium,or Near), the following distance willvary based on vehicle speed. Thefaster the vehicle speed, the furtherback your vehicle will follow a vehicle
detected ahead. Consider traffic andweather conditions when selecting thefollowing gap. The range of selectablegaps may not be appropriate for alldrivers and driving conditions.
Changing the gap settingautomatically changes the alert timingsensitivity (Far, Medium, or Near) forthe Forward Collision Alert (FCA)feature. See Forward Collision Alert(FCA) System 0 232.
Alerting the Driver
If ACC is engaged, driver action maybe required when ACC cannot applysufficient braking because ofapproaching a vehicle too rapidly.
When this condition occurs, thecollision alert symbol on the HUD willflash on the windshield. Either eightbeeps will sound from the front,or both sides of the Safety Alert Seat
will pulse five times. See “Collision/Detection Systems” under VehiclePersonalization 0 141.
See Defensive Driving 0 176.
Approaching and Following aVehicle
The vehicle ahead indicator is in theinstrument cluster and HUD display.
The vehicle ahead indicator onlydisplays when a vehicle is detected inyour vehicle’s path moving in thesame direction.
If this indicator is not displaying, ACCwill not respond to or brake tovehicles ahead.
ACC automatically slows the vehicledown and adjusts vehicle speed tofollow the vehicle in front at theselected follow gap. The vehicle speedincreases or decreases to follow the
Cadillac ATS/ATS-V Owner Manual (GMNA-Localizing-U.S./Canada/Mexico-11349135) - 2018 - crc - 9/25/17
DRIVING AND OPERATING 225
vehicle in front of you, but will notexceed the set speed. It may applylimited braking, if necessary. Whenbraking is active, the brake lamps willcome on. The automatic braking mayfeel or sound different than if thebrakes were applied manually. This isnormal.
Stationary or Very Slow-MovingObjects
{ Warning
ACC may not detect and react tostopped or slow-moving vehiclesahead of you. For example, thesystem may not brake for a vehicleit has never detected moving. Thiscan occur in stop-and-go traffic orwhen a vehicle suddenly appearsdue to a vehicle ahead changinglanes. Your vehicle may not stopand could cause a crash. Usecaution when using ACC. Yourcomplete attention is alwaysrequired while driving and youshould be ready to take action andapply the brakes.
ACC Automatically Disengages
ACC may automatically disengage andthe driver will need to manually applythe brakes to slow the vehicle if:
. The sensors are blocked.
. The Traction Control System (TCS)or StabiliTrak system has activatedor been disabled.
. There is a fault in the system.
. The radar falsely reports ablockage when driving in a desertor remote area with no othervehicles or roadside objects. A DICmessage may display to indicatethat ACC is temporarilyunavailable.
The ACC active symbol will turn whitewhen ACC is no longer active.
Notification to Resume ACC
ACC will maintain a follow gap behinda detected vehicle and slow yourvehicle to a stop behind that vehicle.
If the stopped vehicle ahead hasdriven away and ACC has notresumed, the vehicle ahead indicatorwill flash as a reminder to check
traffic before proceeding. In addition,the left and right sides of the SafetyAlert Seat will pulse three times,or three beeps will sound. See“Switching Between ACC and RegularCruise Control” previously in thissection. See “Alert Type” and “GoNotifier” in “Collision/DetectionSystems” under Vehicle Personalization0 141.
When the vehicle ahead drives away,press +RES or the accelerator pedal toresume ACC. If stopped for more thantwo minutes or if the driver door isopened and the driver seat belt isunbuckled, the ACC automaticallyapplies the Electric Parking Brake(EPB) to hold the vehicle. The EPBstatus light will turn on.See Parking Brake (Electric) 0 206 orParking Brake (Manual) 0 208. Toresume ACC and release the EPB,press the accelerator pedal. ACC canbe resumed when the vehicle istraveling greater than 5 km/h (3 mph).
A DIC warning message may displayindicating to shift to P (Park) beforeexiting the vehicle. See VehicleMessages 0 140.

Cadillac ATS/ATS-V Owner Manual (GMNA-Localizing-U.S./Canada/Mexico-11349135) - 2018 - crc - 9/25/17
226 DRIVING AND OPERATING
{ Warning
If ACC has stopped the vehicle, andif ACC is disengaged, turned off,or canceled, the vehicle will nolonger be held at a stop. The vehiclecan move. When ACC is holding thevehicle at a stop, always beprepared to manually apply thebrakes.
{ Warning
Leaving the vehicle without placingit in P (Park) can be dangerous. Donot leave the vehicle while it isbeing held at a stop by ACC. Alwaysplace the vehicle in P (Park) andturn off the ignition before leavingthe vehicle.
ACC Override
If using the accelerator pedal whileACC is active, the ACC indicator turnsblue on the instrument cluster and inthe HUD (if equipped) to indicate that
automatic braking will not occur. SeeVehicle Messages 0 140. ACC willresume operation when theaccelerator pedal is not being pressed.
{ Warning
The ACC will not automaticallyapply the brakes if your foot isresting on the accelerator pedal.You could crash into a vehicleahead of you.
Curves in the Road
{ Warning
On curves, ACC may not detect avehicle ahead in your lane. Youcould be startled if the vehicleaccelerates up to the set speed,especially when following a vehicleexiting or entering exit ramps. Youcould lose control of the vehicle orcrash. Do not use ACC while drivingon an entrance or exit ramp. Alwaysbe ready to use the brakes ifnecessary.
{ Warning
On curves, ACC may respond to avehicle in another lane, or may nothave time to react to a vehicle inyour lane. You could crash into avehicle ahead of you, or lose controlof your vehicle. Give extra attentionin curves and be ready to use thebrakes if necessary. Select anappropriate speed while driving incurves.
ACC may operate differently in asharp curve. It may reduce the vehiclespeed if the curve is too sharp.

Cadillac ATS/ATS-V Owner Manual (GMNA-Localizing-U.S./Canada/Mexico-11349135) - 2018 - crc - 9/25/17
DRIVING AND OPERATING 227
When following a vehicle and enteringa curve, ACC may not detect thevehicle ahead and accelerate to the setspeed. When this happens the vehicleahead indicator will not appear.
ACC may detect a vehicle that is notin your lane and apply the brakes.
ACC may occasionally provide an alertand/or braking that is consideredunnecessary. It could respond tovehicles in different lanes, signs,guardrails, and other stationaryobjects when entering or exiting acurve. This is normal operation. Thevehicle does not need service.
Other Vehicle Lane Changes
ACC will not detect a vehicle aheaduntil it is completely in the lane. Thebrake may need to be manuallyapplied.
Do Not Use ACC on Hills and WhenTowing a Trailer
Do not use ACC when driving on steephills or when towing a trailer. ACC willnot detect a vehicle in the lane whiledriving on steep hills. The driver willoften need to take over accelerationand braking on steep hills, especiallywhen towing a trailer. If the brakes areapplied, the ACC disengages.
Ending ACC
There are three ways todisengage ACC:
. Step lightly on the brake pedal.
. Press*.
. PressJ.
Erasing Speed Memory
The cruise control set speed is erasedfrom memory ifJ is pressed or ifthe ignition is turned off.

Cadillac ATS/ATS-V Owner Manual (GMNA-Localizing-U.S./Canada/Mexico-11349135) - 2018 - crc - 9/25/17
228 DRIVING AND OPERATING
Cleaning the Sensing System
The camera sensor on the windshieldbehind the rearview mirror and theradar sensors on the front of thevehicle can become blocked by snow,ice, dirt, or mud. These areas need tobe cleaned for ACC to operateproperly.
For cleaning instructions, see“Washing the Vehicle” under ExteriorCare 0 326.
System operation may also be limitedunder snow, heavy rain, or road sprayconditions.
Driver AssistanceSystemsThis vehicle may have features thatwork together to help avoid crashes orreduce crash damage while driving,backing, and parking. Read this entiresection before using these systems.
{ Warning
Do not rely on the DriverAssistance Systems. These systemsdo not replace the need for payingattention and driving safely. Youmay not hear or feel alerts orwarnings provided by thesesystems. Failure to use proper carewhen driving may result in injury,death, or vehicle damage. SeeDefensive Driving 0 176.
Under many conditions, thesesystems will not:
. Detect children, pedestrians,bicyclists, or animals.
(Continued)
Warning (Continued)
. Detect vehicles or objectsoutside the area monitored bythe system.
. Work at all driving speeds.
. Warn you or provide you withenough time to avoid a crash.
. Work under poor visibility orbad weather conditions.
. Work if the detection sensoris not cleaned or is coveredby ice, snow, mud, or dirt.
. Work if the detection sensoris covered up, such as with asticker, magnet, or metalplate.
. Work if the area surroundingthe detection sensor isdamaged or not properlyrepaired.
Complete attention is alwaysrequired while driving, and youshould be ready to take action andapply the brakes and/or steer thevehicle to avoid crashes.
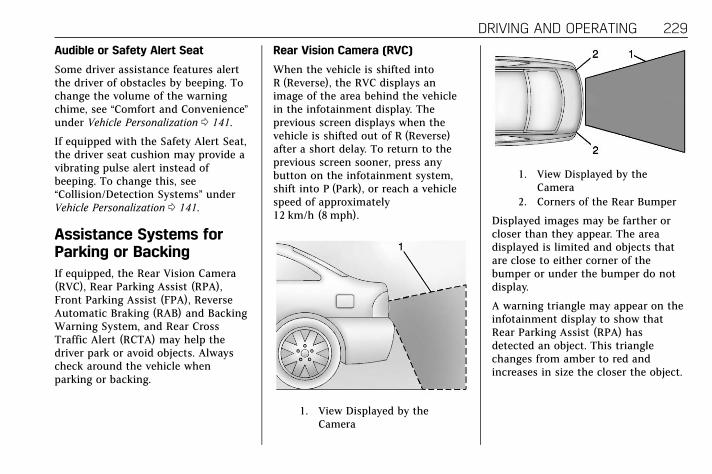
Cadillac ATS/ATS-V Owner Manual (GMNA-Localizing-U.S./Canada/Mexico-11349135) - 2018 - crc - 9/25/17
DRIVING AND OPERATING 229
Audible or Safety Alert Seat
Some driver assistance features alertthe driver of obstacles by beeping. Tochange the volume of the warningchime, see “Comfort and Convenience”under Vehicle Personalization 0 141.
If equipped with the Safety Alert Seat,the driver seat cushion may provide avibrating pulse alert instead ofbeeping. To change this, see“Collision/Detection Systems” underVehicle Personalization 0 141.
Assistance Systems forParking or BackingIf equipped, the Rear Vision Camera(RVC), Rear Parking Assist (RPA),Front Parking Assist (FPA), ReverseAutomatic Braking (RAB) and BackingWarning System, and Rear CrossTraffic Alert (RCTA) may help thedriver park or avoid objects. Alwayscheck around the vehicle whenparking or backing.
Rear Vision Camera (RVC)
When the vehicle is shifted intoR (Reverse), the RVC displays animage of the area behind the vehiclein the infotainment display. Theprevious screen displays when thevehicle is shifted out of R (Reverse)after a short delay. To return to theprevious screen sooner, press anybutton on the infotainment system,shift into P (Park), or reach a vehiclespeed of approximately12 km/h (8 mph).
1. View Displayed by theCamera
1. View Displayed by theCamera
2. Corners of the Rear Bumper
Displayed images may be farther orcloser than they appear. The areadisplayed is limited and objects thatare close to either corner of thebumper or under the bumper do notdisplay.
A warning triangle may appear on theinfotainment display to show thatRear Parking Assist (RPA) hasdetected an object. This trianglechanges from amber to red andincreases in size the closer the object.
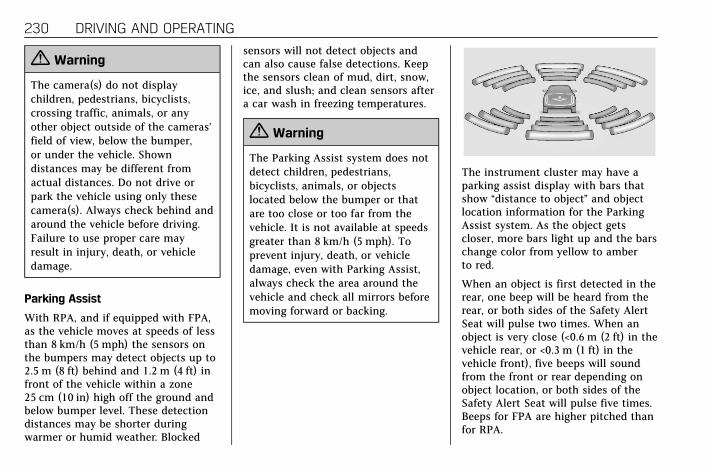
Cadillac ATS/ATS-V Owner Manual (GMNA-Localizing-U.S./Canada/Mexico-11349135) - 2018 - crc - 9/25/17
230 DRIVING AND OPERATING
{ Warning
The camera(s) do not displaychildren, pedestrians, bicyclists,crossing traffic, animals, or anyother object outside of the cameras’field of view, below the bumper,or under the vehicle. Showndistances may be different fromactual distances. Do not drive orpark the vehicle using only thesecamera(s). Always check behind andaround the vehicle before driving.Failure to use proper care mayresult in injury, death, or vehicledamage.
Parking Assist
With RPA, and if equipped with FPA,as the vehicle moves at speeds of lessthan 8 km/h (5 mph) the sensors onthe bumpers may detect objects up to2.5 m (8 ft) behind and 1.2 m (4 ft) infront of the vehicle within a zone25 cm (10 in) high off the ground andbelow bumper level. These detectiondistances may be shorter duringwarmer or humid weather. Blocked
sensors will not detect objects andcan also cause false detections. Keepthe sensors clean of mud, dirt, snow,ice, and slush; and clean sensors aftera car wash in freezing temperatures.
{ Warning
The Parking Assist system does notdetect children, pedestrians,bicyclists, animals, or objectslocated below the bumper or thatare too close or too far from thevehicle. It is not available at speedsgreater than 8 km/h (5 mph). Toprevent injury, death, or vehicledamage, even with Parking Assist,always check the area around thevehicle and check all mirrors beforemoving forward or backing.
The instrument cluster may have aparking assist display with bars thatshow “distance to object” and objectlocation information for the ParkingAssist system. As the object getscloser, more bars light up and the barschange color from yellow to amberto red.
When an object is first detected in therear, one beep will be heard from therear, or both sides of the Safety AlertSeat will pulse two times. When anobject is very close (<0.6 m (2 ft) in thevehicle rear, or <0.3 m (1 ft) in thevehicle front), five beeps will soundfrom the front or rear depending onobject location, or both sides of theSafety Alert Seat will pulse five times.Beeps for FPA are higher pitched thanfor RPA.

Cadillac ATS/ATS-V Owner Manual (GMNA-Localizing-U.S./Canada/Mexico-11349135) - 2018 - crc - 9/25/17
DRIVING AND OPERATING 231
Backing Warning and ReverseAutomatic Braking
Vehicles with Adaptive Cruise Control(ACC) have the Backing Warning andReverse Automatic Braking (RAB)system. The Backing Warning part ofthis system can warn of rear objectswhen backing up at speeds greaterthan 8 km/h (5 mph).
The Backing Warning System willbeep once from the rear when apotential object threat is firstdetected, or pulse twice on both sidesof the Safety Alert Seat. When thesystem detects a potential crash,beeps will be heard from the rear,or five pulses will be felt on both sidesof the Safety Alert Seat. There mayalso be a brief, sharp application ofthe brakes.
{ Warning
The Backing Warning System onlyoperates at speeds greater than8 km/h (5 mph). It does not detectchildren, pedestrians, bicyclists,
(Continued)
Warning (Continued)
animals, or objects below thebumper or that are too close or toofar from the vehicle. In somesituations, such as at higherbacking speeds, there may not beenough time for the short, sharpapplication of the vehicle brakesystem to occur. To prevent injury,death, or vehicle damage, even withthe Backing Warning System,always check the area around thevehicle and check all mirrors beforebacking.
When the vehicle is in R (Reverse),if the system detects the vehicle isbacking too fast to avoid a crash witha detected object behind your vehiclein your path, it may automaticallybrake hard to a stop to help avoid orreduce the harm caused by a backingcrash.
{ Warning
RAB may not avoid many types ofbacking crashes. Do not wait for theautomatic braking to apply. Thissystem is not designed to replacedriver braking and only works inR (Reverse) when an object isdetected directly behind the vehicle.It may not brake or stop in time toavoid a crash. It will not brake forobjects when the vehicle is movingat very low speeds. It does notdetect children, pedestrians,bicyclists, animals, or objects belowthe bumper or that are too close ortoo far from the vehicle. To preventinjury, death, or vehicle damage,even with RAB, always check thearea around the vehicle before andwhile backing.
Pressing the brake pedal after thevehicle comes to a stop will releasethe Reverse Automatic Braking. If thebrake pedal is not pressed soon afterthe stop, the Electric Parking Brake(EPB) may be set. When it is safe,

Cadillac ATS/ATS-V Owner Manual (GMNA-Localizing-U.S./Canada/Mexico-11349135) - 2018 - crc - 9/25/17
232 DRIVING AND OPERATING
press the accelerator pedal firmly atany time to override the ReverseAutomatic Braking.
{ Warning
There may be instances whereunexpected or undesired automaticbraking occurs. If this happens,either press the brake pedal orfirmly press the accelerator pedal torelease the brakes from the RABsystem. Before releasing the brakes,check the RVC and check the areaaround the vehicle to make sure itis safe to proceed.
Rear Cross Traffic Alert (RCTA)
If equipped, RCTA displays a redwarning triangle with a left or rightpointing arrow on the infotainmentdisplay to warn of traffic coming fromthe left or right. This system detectsobjects coming from up to 20 m (65 ft)from the left or right side of thevehicle. When an object is detected,either three beeps sound from the leftor right or three Safety Alert Seat
pulses occur on the left or right side,depending on the direction of thedetected vehicle.
Use caution while backing up whentowing a trailer, as the RCTAdetection zones that extend out fromthe back of the vehicle do not movefurther back when a trailer is towed.
Turning the Features On or Off
TheX button to the left of thesteering wheel is used to turn on oroff the Front and Rear Parking Assist,Rear Cross Traffic Alert (RCTA),Reverse Automatic Braking, andBacking Warning System at the sametime. The indicator light next to thebutton comes on when the featuresare on and turns off when the featureshave been disabled.
Turn off parking assist and ReverseAutomatic Braking when towing atrailer.
To turn the RPA symbols and rearguidance lines on or off, see VehiclePersonalization 0 141.
RCTA can be turned on or off. See“Collision/Detection Systems” underVehicle Personalization 0 141.
Assistance Systems forDrivingIf equipped, when driving the vehiclein a forward gear, Forward CollisionAlert (FCA), Lane Departure Warning(LDW), Lane Keep Assist (LKA), SideBlind Zone Alert (SBZA), Lane ChangeAlert (LCA), and/or ForwardAutomatic Braking (FAB) can help toavoid a crash or reduce crash damage.
Forward Collision Alert(FCA) SystemIf equipped, the FCA system may helpto avoid or reduce the harm caused byfront-end crashes. When approachinga vehicle ahead too quickly, FCAprovides a flashing red alert on thewindshield and rapidly beeps or pulsesthe Safety Alert Seat. FCA also lightsan amber visual alert if followinganother vehicle much too closely.

Cadillac ATS/ATS-V Owner Manual (GMNA-Localizing-U.S./Canada/Mexico-11349135) - 2018 - crc - 9/25/17
DRIVING AND OPERATING 233
FCA detects vehicles within a distanceof approximately 60 m (197 ft) andoperates at speeds above 40 km/h(25 mph). If the vehicle has AdaptiveCruise Control (ACC), it can detectvehicles to distances of approximately110 m (360 ft) and operates at allspeeds. See Adaptive Cruise Control0 220.
{ Warning
FCA is a warning system and doesnot apply the brakes. Whenapproaching a slower-moving orstopped vehicle ahead too rapidly,or when following a vehicle tooclosely, FCA may not provide awarning with enough time to helpavoid a crash. It also may notprovide any warning at all. FCAdoes not warn of pedestrians,animals, signs, guardrails, bridges,construction barrels, or otherobjects. Be ready to take action andapply the brakes. See DefensiveDriving 0 176.
FCA can be disabled with either theFCA steering wheel control or,if equipped, through vehiclepersonalization. See “Collision/Detection Systems” under VehiclePersonalization 0 141.
Detecting the Vehicle Ahead
FCA warnings will not occur unlessthe FCA system detects a vehicleahead. When a vehicle is detected, thevehicle ahead indicator will displaygreen. Vehicles may not be detectedon curves, highway exit ramps,or hills, due to poor visibility; or if avehicle ahead is partially blocked bypedestrians or other objects. FCA willnot detect another vehicle ahead untilit is completely in the driving lane.
{ Warning
FCA does not provide a warning tohelp avoid a crash, unless it detectsa vehicle. FCA may not detect avehicle ahead if the FCA sensor isblocked by dirt, snow, or ice, or ifthe windshield is damaged. It mayalso not detect a vehicle on windingor hilly roads, or in conditions thatcan limit visibility such as fog, rain,or snow, or if the headlamps orwindshield are not cleaned or inproper condition. Keep thewindshield, headlamps, and FCAsensors clean and in good repair.
Collision Alert
With Head-Up Display

Cadillac ATS/ATS-V Owner Manual (GMNA-Localizing-U.S./Canada/Mexico-11349135) - 2018 - crc - 9/25/17
234 DRIVING AND OPERATING
Without Head-Up Display
When your vehicle approachesanother detected vehicle too rapidly,the red FCA display will flash on thewindshield. Also, eight high-pitchedbeeps will sound from the front,or both sides of the Safety Alert Seatwill pulse five times. When thisCollision Alert occurs, the brakesystem may prepare for driver brakingto occur more rapidly which can causea brief, mild deceleration. Continue toapply the brake pedal as needed.Cruise control may be disengagedwhen the Collision Alert occurs.
Tailgating Alert
The vehicle ahead indicator willdisplay amber when you are followinga detected vehicle ahead much tooclosely.
Selecting the Alert Timing
The Collision Alert control is on thesteering wheel. Press[ to set theFCA timing to Far, Medium, Near,or on some vehicles, Off. The firstbutton press shows the current settingon the DIC. Additional button presseswill change this setting. The chosensetting will remain until it is changedand will affect the timing of both theCollision Alert and the TailgatingAlert features. The timing of bothalerts will vary based on vehicle speed.The faster the vehicle speed, thefarther away the alert will occur.Consider traffic and weatherconditions when selecting the alerttiming. The range of selectable alerttiming may not be appropriate for alldrivers and driving conditions.
If equipped with Adaptive CruiseControl (ACC), changing the FCAtiming setting automatically changesthe ACC following gap setting (Far,Medium, or Near).
Following Distance Indicator
The following distance to a movingvehicle ahead in your path is indicatedin following time in seconds on the

Cadillac ATS/ATS-V Owner Manual (GMNA-Localizing-U.S./Canada/Mexico-11349135) - 2018 - crc - 9/25/17
DRIVING AND OPERATING 235
Driver Information Center (DIC). SeeDriver Information Center (DIC) 0 134.The minimum following time is0.5 seconds away. If there is no vehicledetected ahead, or the vehicle ahead isout of sensor range, dashes will bedisplayed.
Unnecessary Alerts
FCA may provide unnecessary alertsfor turning vehicles, vehicles in otherlanes, objects that are not vehicles,or shadows. These alerts are normaloperation and the vehicle does notneed service.
Cleaning the System
If the FCA system does not seem tooperate properly, this may correct theissue:
. Clean the outside of thewindshield in front of the rearviewmirror.
. Clean the entire front of thevehicle.
. Clean the headlamps.
Forward AutomaticBraking (FAB)If the vehicle has Adaptive CruiseControl (ACC), it also has FAB, whichincludes Intelligent Brake Assist (IBA).When the system detects a vehicleahead in your path that is traveling inthe same direction that you may beabout to crash into, it can provide aboost to braking or automaticallybrake the vehicle. This can help avoidor lessen the severity of crashes whendriving in a forward gear. Dependingon the situation, the vehicle mayautomatically brake moderately orhard. This forward automatic brakingcan only occur if a vehicle is detected.This is shown by the FCA vehicleahead indicator being lit. See ForwardCollision Alert (FCA) System 0 232.
The system works when driving in aforward gear above 4 km/h (2 mph).It can detect vehicles up toapproximately 60 m (197 ft).
{ Warning
FAB is an emergency crashpreparation feature and is notdesigned to avoid crashes. Do notrely on FAB to brake the vehicle.FAB will not brake outside of itsoperating speed range and onlyresponds to detected vehicles.
FAB may not:
. Detect a vehicle ahead onwinding or hilly roads.
. Detect all vehicles, especiallyvehicles with a trailer,tractors, muddy vehicles, etc.
. Detect a vehicle whenweather limits visibility, suchas in fog, rain, or snow.
. Detect a vehicle ahead if it ispartially blocked bypedestrians or other objects.
Complete attention is alwaysrequired while driving, and youshould be ready to take action andapply the brakes and/or steer thevehicle to avoid crashes.

Cadillac ATS/ATS-V Owner Manual (GMNA-Localizing-U.S./Canada/Mexico-11349135) - 2018 - crc - 9/25/17
236 DRIVING AND OPERATING
FAB may slow the vehicle to acomplete stop to try to avoid apotential crash. If this happens, FABmay engage the Electric Parking Brake(EPB) to hold the vehicle at a stop. Torelease automatic braking, release theEPB or firmly press the acceleratorpedal.
{ Warning
FAB may automatically brake thevehicle suddenly in situationswhere it is unexpected andundesired. It could respond to aturning vehicle ahead, guardrails,signs, and other non-movingobjects. To override FAB, firmlypress the accelerator pedal, if it issafe to do so.
Intelligent Brake Assist (IBA)
IBA may activate when the brakepedal is applied quickly by providing aboost to braking based on the speedof approach and distance to a vehicleahead.
Minor brake pedal pulsations or pedalmovement during this time is normaland the brake pedal should continueto be applied as needed. IBA willautomatically disengage only whenthe brake pedal is released.
{ Warning
IBA may increase vehicle braking insituations when it may not benecessary. You could block the flowof traffic. If this occurs, take yourfoot off the brake pedal and thenapply the brakes as needed.
FAB and IBA can be disabled throughvehicle personalization. See “Collision/Detection Systems” under VehiclePersonalization 0 141.
{ Warning
Using FAB or IBA while towing atrailer could cause you to losecontrol of the vehicle and crash.Turn the system to Off whentowing a trailer.
Side Blind ZoneAlert (SBZA)If equipped, the SBZA system is alane-changing aid that assists driverswith avoiding crashes that occur withmoving vehicles in the side blind zone(or spot) areas. When the vehicle is ina forward gear, the left or right sidemirror display will light up if a movingvehicle is detected in that blind zone.If the turn signal is activated and avehicle is also detected on the sameside, the display will flash as an extrawarning not to change lanes. Sincethis system is part of the Lane ChangeAlert (LCA) system, read the entireLCA section before using this feature.

Cadillac ATS/ATS-V Owner Manual (GMNA-Localizing-U.S./Canada/Mexico-11349135) - 2018 - crc - 9/25/17
DRIVING AND OPERATING 237
Lane Change Alert (LCA)If equipped, the LCA system is alane-changing aid that assists driverswith avoiding lane change crashesthat occur with moving vehicles in theside blind zone (or spot) areas or withvehicles rapidly approaching theseareas from behind. The LCA warningdisplay will light up in thecorresponding outside side mirror andwill flash if the turn signal is on.
{ Warning
LCA does not alert the driver tovehicles outside of the systemdetection zones, pedestrians,bicyclists, or animals. It may notprovide alerts when changing lanesunder all driving conditions. Failureto use proper care when changinglanes may result in injury, death,or vehicle damage. Before making alane change, always check mirrors,glance over your shoulder, and usethe turn signals.
LCA Detection Zones
1. SBZA Detection Zone2. LCA Detection Zone
The LCA sensor covers a zone ofapproximately one lane over fromboth sides of the vehicle, or 3.5 m(11 ft). The height of the zone isapproximately between 0.5 m (1.5 ft)and 2 m (6 ft) off the ground. The SideBlind Zone Alert (SBZA) warning areastarts at approximately the middle ofthe vehicle and goes back 5 m (16 ft).Drivers are also warned of vehiclesrapidly approaching from up to 25 m(82 ft) behind the vehicle.
How the System Works
The LCA symbol lights up in the sidemirrors when the system detects amoving vehicle in the next lane overthat is in the side blind zone orrapidly approaching that zone frombehind. A lit LCA symbol indicates itmay be unsafe to change lanes. Beforemaking a lane change, check the LCAdisplay, check mirrors, glance overyour shoulder, and use the turnsignals.
Left Side MirrorDisplay
Right Side MirrorDisplay
When the vehicle is started, bothoutside mirror LCA displays willbriefly come on to indicate the systemis operating. When the vehicle is in aforward gear, the left or right sidemirror display will light up if a movingvehicle is detected in the next laneover in that blind zone or rapidlyapproaching that zone. If the turn

Cadillac ATS/ATS-V Owner Manual (GMNA-Localizing-U.S./Canada/Mexico-11349135) - 2018 - crc - 9/25/17
238 DRIVING AND OPERATING
signal is activated in the samedirection as a detected vehicle, thisdisplay will flash as an extra warningnot to change lanes.
LCA can be disabled through vehiclepersonalization. See “Collision/Detection Systems” under VehiclePersonalization 0 141. If LCA isdisabled by the driver, the LCA mirrordisplays will not light up.
When the System Does NotSeem to Work Properly
The LCA system requires some drivingfor the system to calibrate tomaximum performance. Thiscalibration may occur more quickly ifthe vehicle is driven on a straighthighway road with traffic and roadsideobjects (e.g., guardrails, barriers).During a trip, the LCA system is notoperational until the vehicle firstreaches a speed of 24 km/h (15 mph).
LCA displays may not come on whenpassing a vehicle quickly, for astopped vehicle, or when towing atrailer. The LCA detection zones thatextend back from the side of thevehicle do not move further back
when a trailer is towed. Use cautionwhile changing lanes when towing atrailer. LCA may alert to objectsattached to the vehicle, such as atrailer, bicycle, or object extending outto either side of the vehicle. Attachedobjects may also interfere with thedetection of vehicles. This is normalsystem operation; the vehicle does notneed service.
LCA may not always alert the driver tovehicles in the next lane over,especially in wet conditions or whendriving on sharp curves. The systemdoes not need to be serviced. Thesystem may light up due to guardrails,signs, trees, shrubs, and othernon-moving objects. This is normalsystem operation; the vehicle does notneed service.
LCA may not operate when the LCAsensors in the left or right corners ofthe rear bumper are covered withmud, dirt, snow, ice, or slush, or inheavy rainstorms. For cleaninginstructions, see "Washing theVehicle" under Exterior Care 0 326.If the DIC still displays the systemunavailable message after cleaning
both sides of the vehicle toward therear corners of the vehicle, see yourdealer.
If the LCA displays do not light upwhen moving vehicles are in the sideblind zone or rapidly approaching thiszone and the system is clean, thesystem may need service. Take thevehicle to your dealer.
When LCA is disabled for any reasonother than the driver turning it off,the Lane Change Alert On option willnot be available on thepersonalization menu.
Radio Frequency Information
See Radio Frequency Statement 0 364.
Lane DepartureWarning (LDW)If equipped, LDW may help avoidcrashes due to unintentional lanedepartures. It may provide a warningif the vehicle is crossing a detectedlane marking without using a turnsignal in the lane departure direction.Since this system is part of the Lane
Cadillac ATS/ATS-V Owner Manual (GMNA-Localizing-U.S./Canada/Mexico-11349135) - 2018 - crc - 9/25/17
DRIVING AND OPERATING 239
Keep Assist (LKA) system, read theentire LKA section before using thisfeature.
Lane Keep Assist (LKA)If equipped, LKA may help avoidcrashes due to unintentional lanedepartures. It may assist by gentlyturning the steering wheel if thevehicle approaches a detected lanemarking without using a turn signal inthat direction. It may also provide aLane Departure Warning (LDW)system alert as the lane marking iscrossed. The LKA system will notassist or provide an LDW alert if itdetects that you are actively steering.Override LKA by turning the steeringwheel. LKA uses a camera to detectlane markings between 60 km/h (37mph) and 180 km/h (112 mph).
{ Warning
The LKA system does notcontinuously steer the vehicle.It may not keep the vehicle in the
(Continued)
Warning (Continued)
lane or give a Lane DepartureWarning (LDW) alert, even if a lanemarking is detected.
The LKA and LDW systemsmay not:
. Provide an alert or enoughsteering assist to avoid a lanedeparture or crash.
. Detect lane markings underpoor weather or visibilityconditions. This can occur ifthe windshield or headlampsare blocked by dirt, snow,or ice, if they are not inproper condition, or if the sunshines directly into thecamera.
. Detect road edges.
. Detect lanes on winding orhilly roads.
If LKA only detects lane markingson one side of the road, it will onlyassist or provide an LDW alert
(Continued)
Warning (Continued)
when approaching the lane on theside where it has detected a lanemarking. Even with LKA and LDW,you must steer the vehicle. Alwayskeep your attention on the road andmaintain proper vehicle positionwithin the lane, or vehicle damage,injury, or death could occur. Alwayskeep the windshield, headlamps,and camera sensors clean and ingood repair. Do not use LKA in badweather conditions.
{ Warning
Using LKA while towing a trailer oron slippery roads could cause lossof control of the vehicle and acrash. Turn the system off.

Cadillac ATS/ATS-V Owner Manual (GMNA-Localizing-U.S./Canada/Mexico-11349135) - 2018 - crc - 9/25/17
240 DRIVING AND OPERATING
How the System Works
The LKA camera sensor is on thewindshield ahead of the rearviewmirror.
To turn LKA on and off, pressA tothe left of the steering wheel.
When on,A is green if LKA isavailable to assist and provide LDWalerts. It may assist by gently turningthe steering wheel and displayAas amber if the vehicle approaches adetected lane marking without using aturn signal in that direction. It mayalso provide an LDW alert by flashingA amber as the lane marking iscrossed. Additionally, there may bethree beeps, or the driver seat maypulse three times, on the right or left,depending on the lane departuredirection.
Take Steering
The LKA system does notcontinuously steer the vehicle. If LKAdoes not detect active driver steering,an alert, chime, or DIC message maybe provided. Steer the vehicle todismiss.
When the System Does NotSeem to Work Properly
The system performance may beaffected by:
. Close vehicles ahead.
. Sudden lighting changes, such aswhen driving through tunnels.
. Banked roads.
. Roads with poor lane markings,such as two-lane roads.
If the LKA system is not functioningproperly when lane markings areclearly visible, cleaning the windshieldmay help.
LKA assistance and/or LDW alertsmay occur due to tar marks, shadows,cracks in the road, temporary orconstruction lane markings, or otherroad imperfections. This is normalsystem operation; the vehicle does notneed service. Turn LKA off if theseconditions continue.
FuelGM recommends the use of TOP TIERDetergent Gasoline to keep the enginecleaner and reduce engine deposits.See www.toptiergas.com for a list ofTOP TIER Detergent Gasolinemarketers and applicable countries.
Do not use any fuel labeled E85 orFlexFuel. Do not use gasoline withethanol levels greater than 15% byvolume.
For the 2.0L L4 turbo engine (LTG),premium unleaded gasoline meetingASTM specification D4814 with aposted octane rating of 93 is highly

Cadillac ATS/ATS-V Owner Manual (GMNA-Localizing-U.S./Canada/Mexico-11349135) - 2018 - crc - 9/25/17
DRIVING AND OPERATING 241
recommended for best performanceand fuel economy. Unleaded gasolinewith an octane rated as low as 87 canbe used. Using unleaded gasolinerated below 93 octane, however, willlead to reduced acceleration and fueleconomy. If knocking occurs, use agasoline rated at 93 octane as soon aspossible, otherwise, the engine couldbe damaged. If heavy knocking isheard when using gasoline with a93 octane rating, the engine needsservice.
For the 3.6L V6 engine (LGX), useregular unleaded gasoline meetingASTM specification D4814 with aposted octane rating of 87 or higher.Do not use gasoline with a postedoctane rating of less than 87, as thismay cause engine knock and willlower fuel economy.
For the 3.6L twin turbo V6 engine(LF4), use premium unleaded gasolinemeeting ASTM specification D4814with a posted octane rating of 93.If unavailable, unleaded gasoline witha posted octane rating of 91 may beused, but with reduced performanceand fuel economy. If the octane is less
than 91, the engine could be damagedand the repairs would not be coveredby the vehicle warranty. If heavyknocking is heard when using gasolinerated at 93 octane, the engine needsservice.
Prohibited Fuels
Caution
Do not use fuels with any of thefollowing conditions; doing so maydamage the vehicle and void itswarranty:
. For vehicles which are notFlexFuel, fuel labeled greaterthan 15% ethanol by volume,such as mid-level ethanolblends (16 – 50% ethanol),E85, or FlexFuel.
. Fuel with any amount ofmethanol, methylal, andaniline. These fuels cancorrode metal fuel systemparts or damage plastic andrubber parts.
(Continued)
Caution (Continued)
. Fuel containing metals suchas methylcyclopentadienylmanganese tricarbonyl(MMT), which can damagethe emissions control systemand spark plugs.
. Fuel with a posted octanerating of less than therecommended fuel. Using thisfuel will lower fuel economyand performance, and maydecrease the life of theemissions catalyst.
California FuelRequirementsIf the vehicle is certified to meetCalifornia Emissions Standards, it isdesigned to operate on fuels that meetCalifornia specifications. See theunderhood emission control label.If this fuel is not available in statesadopting California EmissionsStandards, the vehicle will operatesatisfactorily on fuels meeting federal

Cadillac ATS/ATS-V Owner Manual (GMNA-Localizing-U.S./Canada/Mexico-11349135) - 2018 - crc - 9/25/17
242 DRIVING AND OPERATING
specifications, but emission controlsystem performance may be affected.The malfunction indicator lamp couldturn on and the vehicle may not passa smog-check test. See MalfunctionIndicator Lamp (Check Engine Light)0 125. If this occurs, return to yourauthorized dealer for diagnosis. If it isdetermined that the condition iscaused by the type of fuel used,repairs may not be covered by thevehicle warranty.
Fuels in Foreign CountriesThe U.S., Canada, and Mexico postfuel octane ratings in anti-knock index(AKI). For fuel not to use in a foreigncountry, see “Prohibited Fuels” in Fuel0 240.
Fuel AdditivesTo keep fuel systems clean, TOP TIERdetergent gasoline is recommended.See Fuel 0 240.
If TOP TIER detergent gasoline is notavailable, one bottle of GM FuelSystem Treatment Cleaner added tothe fuel tank at every engine oil
change, can help. GM Fuel SystemTreatment Cleaner is the only gasolineadditive recommended by GeneralMotors. It is available at your dealer.
Filling the Tank
{ Warning
Fuel vapors and fuel fires burnviolently and can cause injury ordeath.
. To help avoid injuries to youand others, read and followall the instructions on thefuel pump island.
. Turn off the engine whenrefueling.
. Keep sparks, flames, andsmoking materials awayfrom fuel.
. Do not leave the fuel pumpunattended.
. Do not use a cell phone whilerefueling.
(Continued)
Warning (Continued)
. Do not reenter the vehiclewhile pumping fuel.
. Keep children away from thefuel pump and never letchildren pump fuel.
. Fuel can spray out if therefueling nozzle is insertedtoo quickly. This spray canhappen if the tank is nearlyfull, and is more likely in hotweather. Insert the refuelingnozzle slowly and wait for anyhiss noise to stop prior tobeginning to flow fuel.

Cadillac ATS/ATS-V Owner Manual (GMNA-Localizing-U.S./Canada/Mexico-11349135) - 2018 - crc - 9/25/17
DRIVING AND OPERATING 243
If equipped, the fuel door is lockedwhen the vehicle doors are locked.Press K on the RKE transmitter tounlock.
To open the fuel door, push andrelease the rearward center edge ofthe door.
The vehicle has a capless refuelingsystem and does not have a fuel cap.The filling nozzle must be fullyinserted and latched prior to startingfuel flow.
{ Warning
Overfilling the fuel tank by morethan three clicks of a standard fillnozzle may cause:
. Vehicle performance issues,including engine stalling anddamage to the fuel system.
. Fuel spills.
. Potential fuel fires.
Be careful not to spill fuel. Wait a fewseconds after you have finishedpumping before removing the nozzle.Clean fuel from painted surfaces assoon as possible. See Exterior Care0 326.
{ Warning
If a fire starts while you arerefueling, do not remove the nozzle.Shut off the flow of fuel by shuttingoff the pump or by notifying thestation attendant. Leave the areaimmediately.
Filling the Tank with a PortableGas Can
If the vehicle runs out of fuel andmust be filled from a portable gas can:
1. Locate the capless funneladapter from under the carpet inthe trunk.
2. Insert and latch the funnel intothe capless fuel system.
{ Warning
Attempting to refuel without usingthe funnel adapter may cause fuelspillage and damage the caplessfuel system. This could cause a fireand you or others could be badlyburned and the vehicle could bedamaged.

Cadillac ATS/ATS-V Owner Manual (GMNA-Localizing-U.S./Canada/Mexico-11349135) - 2018 - crc - 9/25/17
244 DRIVING AND OPERATING
3. Remove and clean the funneladapter and return it to thestorage location.
Filling a Portable FuelContainer
{ Warning
Filling a portable fuel containerwhile it is in the vehicle can causefuel vapors that can ignite either bystatic electricity or other means.You or others could be badlyburned and the vehicle could bedamaged. Always:
. Use approved fuel containers.
. Remove the container fromthe vehicle, trunk, or pickupbed before filling.
. Place the container on theground.
. Place the nozzle inside the fillopening of the containerbefore dispensing fuel, and
(Continued)
Warning (Continued)
keep it in contact with the fillopening until filling iscomplete.
. Fill the container no morethan 95% full to allow forexpansion.
. Do not smoke, light matches,or use lighters whilepumping fuel.
. Avoid using cell phones orother electronic devices.
Trailer Towing
General TowingInformationOnly use towing equipment that hasbeen designed for the vehicle. Contactyour dealer or trailering dealer forassistance with preparing the vehiclefor towing a trailer. Read the entiresection before towing a trailer.
For towing a disabled vehicle, seeTowing the Vehicle 0 322. For towingthe vehicle behind another vehiclesuch as a motor home, seeRecreational Vehicle Towing 0 323.
Driving Characteristics andTowing Tips
Driving with a Trailer
When towing a trailer:
. Become familiar with the stateand local laws that apply to trailertowing.

Cadillac ATS/ATS-V Owner Manual (GMNA-Localizing-U.S./Canada/Mexico-11349135) - 2018 - crc - 9/25/17
DRIVING AND OPERATING 245. Do not tow a trailer during the
first 2 414 km (1,500 mi) toprevent damage to the engine,axle, or other parts.
. Then during the first 800 km(500 mi) of trailer towing, do notdrive over 80 km/h (50 mph) anddo not make starts at full throttle.
. Vehicles can tow in D (Drive). Shiftthe transmission to a lower gear ifthe transmission shifts too oftenunder heavy loads and/or hillyconditions.
. Do not use Adaptive CruiseControl when towing.
. The Forward Automatic BrakingSystem should be set to Off whentowing. See Forward AutomaticBraking (FAB) 0 235.
. Turn off Parking Assist whentowing.
{ Warning
When towing a trailer, exhaustgases may collect at the rear of thevehicle and enter if the liftgate,trunk/hatch, or rear-most windowis open.
When towing a trailer:
. Do not drive with the liftgate,trunk/hatch, or rear-mostwindow open.
. Fully open the air outlets onor under the instrumentpanel.
. Also adjust the climatecontrol system to a settingthat brings in only outside air.See “Climate Control Systems”in the Index.
For more information about carbonmonoxide, see Engine Exhaust0 198.
Towing a trailer requires a certainamount of experience. Thecombination you are driving is longer
and not as responsive as the vehicleitself. Get acquainted with thehandling and braking of the rig beforesetting out for the open road.
Before starting, check all trailer hitchparts and attachments, safety chains,electrical connectors, lamps, tires, andmirrors. If the trailer has electricbrakes, start the combination movingand then apply the trailer brakecontroller by hand to be sure thebrakes work.
During the trip, check occasionally tobe sure that the load is secure and thelamps and any trailer brakesstill work.
Following Distance
Stay at least twice as far behind thevehicle ahead as you would whendriving the vehicle without a trailer.This can help to avoid heavy brakingand sudden turns.
Passing
More passing distance is needed whentowing a trailer. The combination willnot accelerate as quickly and is longer
Cadillac ATS/ATS-V Owner Manual (GMNA-Localizing-U.S./Canada/Mexico-11349135) - 2018 - crc - 9/25/17
246 DRIVING AND OPERATING
so it is necessary to go much fartherbeyond the passed vehicle beforereturning to the lane.
Backing Up
Hold the bottom of the steering wheelwith one hand. To move the trailer tothe left, move that hand to the left. Tomove the trailer to the right, moveyour hand to the right. Always backup slowly and, if possible, havesomeone guide you.
Making Turns
Caution
Making very sharp turns whiletrailering could cause the trailer tocome in contact with the vehicle.The vehicle could be damaged.Avoid making very sharp turnswhile trailering.
When turning with a trailer, makewider turns than normal. Do this sothe trailer will not strike soft
shoulders, curbs, road signs, trees,or other objects. Avoid jerky or suddenmaneuvers. Signal well in advance.
If the trailer turn signal bulbs burnout, the arrows on the instrumentcluster will still flash for turns. It isimportant to check occasionally to besure the trailer bulbs are still working.
Driving on Grades
Reduce speed and shift to a lower gearbefore starting down a long or steepdowngrade. If the transmission is notshifted down, the brakes might get hotand no longer work well.
Vehicles can tow in D (Drive). Shiftthe transmission to a lower gear if thetransmission shifts too often underheavy loads and/or hilly conditions.
When towing at high altitude on steepuphill grades, consider the following:Engine coolant will boil at a lowertemperature than at normal altitudes.If the engine is turned off immediatelyafter towing at high altitude on steepuphill grades, the vehicle may showsigns similar to engine overheating. Toavoid this, let the engine run whileparked, preferably on level ground,
with the automatic transmission inP (Park) for a few minutes beforeturning the engine off. If the overheatwarning comes on, see EngineOverheating 0 269.
Parking on Hills
{ Warning
Parking the vehicle on a hill withthe trailer attached can bedangerous. If something goeswrong, the rig could start to move.People can be injured, and both thevehicle and the trailer can bedamaged. When possible, alwayspark the rig on a flat surface.
If parking the rig on a hill:
1. Press the brake pedal, but do notshift into P (Park) yet. Turn thewheels into the curb if facingdownhill or into traffic if facinguphill.
2. Have someone place chocksunder the trailer wheels.

Cadillac ATS/ATS-V Owner Manual (GMNA-Localizing-U.S./Canada/Mexico-11349135) - 2018 - crc - 9/25/17
DRIVING AND OPERATING 247
3. When the wheel chocks are inplace, release the regular brakesuntil the chocks absorb the load.
4. Reapply the brake pedal. Thenapply the parking brake and shiftinto P (Park).
5. Release the brake pedal.
Leaving After Parking on a Hill
1. Apply and hold the brake pedal.
2. Start the engine.
3. Shift into a gear.
4. Release the parking brake.
5. Let up on the brake pedal.
6. Drive slowly until the trailer isclear of the chocks.
7. Stop and have someone pick upand store the chocks.
Maintenance when TrailerTowing
The vehicle needs service more oftenwhen pulling a trailer. SeeMaintenance Schedule 0 336. Thingsthat are especially important in traileroperation are automatic transmission
fluid, engine oil, axle lubricant, belts,cooling system, and brake system. It isa good idea to inspect these beforeand during the trip.
Check periodically to see that all hitchnuts and bolts are tight.
Trailer Towing (Sedan WithV6 Engine Except V-Series)Before pulling a trailer, threeimportant considerations have to dowith weight:
. Weight of the trailer
. Weight of the trailer tongue
. Total weight on your vehicle's tires
Weight of the Trailer
How heavy can a trailer safely be?
It should never weigh more than454 kg (1,000 lb). But even that can betoo heavy.
It depends on how the rig is used. Forexample, speed, altitude, road grades,outside temperature, and how muchthe vehicle is used to pull a trailer areall important. It can depend on any
special equipment on the vehicle, andthe amount of tongue weight thevehicle can carry. See “Weight of theTrailer Tongue” following.
Maximum trailer weight is calculatedassuming the tow vehicle has thedriver, a front seat passenger, all therequired tow equipment, and it has allthe required trailering equipment. Theweight of additional optionalequipment, passengers, and cargo inthe tow vehicle must be subtractedfrom the maximum trailer weight.
Ask your dealer for traileringinformation or advice, or write us atour Customer Assistance Offices. SeeCustomer Assistance Offices 0 356.
Weight of the Trailer Tongue
The tongue load (1) of any trailer is animportant weight to measure becauseit affects the total gross weight of thevehicle. The Gross Vehicle Weight(GVW) includes the curb weight of thevehicle, any cargo carried in it, andthe people who will be riding in thevehicle. If there are a lot of options,equipment, passengers, or cargo in thevehicle, it will reduce the tongue

Cadillac ATS/ATS-V Owner Manual (GMNA-Localizing-U.S./Canada/Mexico-11349135) - 2018 - crc - 9/25/17
248 DRIVING AND OPERATING
weight the vehicle can carry, whichwill also reduce the trailer weight thevehicle can tow. If towing a trailer, thetongue load must be added to theGVW because the vehicle will becarrying that weight, too. See VehicleLoad Limits 0 186.
The trailer tongue (1) should weigh10 % of the total loaded trailerweight (2).
After loading the trailer, weigh thetrailer and then the tongue,separately, to see if the weights areproper. If they are not, adjustmentsmight be made by moving some itemsaround in the trailer.
Total Weight on Your Vehicle'sTires
Be sure the vehicle's tires are inflatedto the upper limit for cold tires. Thesenumbers can be found on the Tire andLoading Information label. See VehicleLoad Limits 0 186. Make sure not to goover the GVW limit for the vehicle,including the weight of the trailertongue.
Trailer Towing (Sedan WithL4 Engine, Coupe, andV-Series)The vehicle is neither designed norintended to tow a trailer.
Towing Equipment (SedanWith V6 Engine ExceptV-Series)
Hitches
Use the correct hitch equipment. Seeyour dealer or a hitch dealer forassistance.
. The rear bumper on the vehicle isnot intended for hitches. Do notattach rental hitches or otherbumper-type hitches to it. Useonly a frame-mounted hitch thatdoes not attach to the bumper.
. Will any holes be made in thebody of the vehicle when thetrailer hitch is installed? If so, sealthe holes when the hitch isremoved. If the holes are notsealed, dirt, water, and deadlycarbon monoxide (CO) from theexhaust can get into the vehicle.See Engine Exhaust 0 198.
Safety Chains
Always attach chains between thevehicle and the trailer. Cross the safetychains under the tongue of the trailerto help prevent the tongue fromcontacting the road if it becomesseparated from the hitch. Leaveenough slack so the rig can turn.Never allow safety chains to drag onthe ground.

Cadillac ATS/ATS-V Owner Manual (GMNA-Localizing-U.S./Canada/Mexico-11349135) - 2018 - crc - 9/25/17
DRIVING AND OPERATING 249
Trailer Brakes
Does the trailer have its own brakes?State and local regulations mayrequire the trailer to have its ownbraking system if loaded above acertain threshold. Trailer brakerequirements vary from state to state.Be sure to read and follow theinstructions for the trailer brakes sothey are installed, adjusted, andmaintained properly.
Because the vehicle has antilockbrakes, do not tap into the vehicle'sbrake system. If this is done, bothbrake systems will not work well orat all
Towing Equipment (SedanWith L4 Engine, Coupe, andV-Series)The vehicle is neither designed norintended to tow a trailer.
Conversions andAdd-Ons
Add-On ElectricalEquipment
{ Warning
The Data Link Connector (DLC) isused for vehicle service andEmission Inspection/Maintenancetesting. See Malfunction IndicatorLamp (Check Engine Light) 0 125.A device connected to the DLC —such as an aftermarket fleet ordriver-behavior tracking device —may interfere with vehicle systems.This could affect vehicle operationand cause a crash. Such devicesmay also access information storedin the vehicle’s systems.
Caution
Some electrical equipment candamage the vehicle or causecomponents to not work and wouldnot be covered by the vehiclewarranty. Always check with yourdealer before adding electricalequipment.
Add-on equipment can drain thevehicle's 12-volt battery, even if thevehicle is not operating.
The vehicle has an airbag system.Before attempting to add anythingelectrical to the vehicle, see Servicingthe Airbag-Equipped Vehicle 0 86 andAdding Equipment to theAirbag-Equipped Vehicle 0 87.
Cadillac ATS/ATS-V Owner Manual (GMNA-Localizing-U.S./Canada/Mexico-11349135) - 2018 - crc - 9/25/17
250 VEHICLE CARE
Vehicle Care
General InformationGeneral Information . . . . . . . . . . . . . 251California Proposition65 Warning . . . . . . . . . . . . . . . . . . . . . 251
California Perchlorate MaterialsRequirements . . . . . . . . . . . . . . . . . . . 252
Accessories andModifications . . . . . . . . . . . . . . . . . . . 252
Vehicle ChecksDoing Your OwnService Work . . . . . . . . . . . . . . . . . . . . 252
Hood . . . . . . . . . . . . . . . . . . . . . . . . . . . . . . 253Engine CompartmentOverview . . . . . . . . . . . . . . . . . . . . . . . . . 254
Engine Oil . . . . . . . . . . . . . . . . . . . . . . . . . 259Engine Oil Life System . . . . . . . . . . . 261Automatic TransmissionFluid . . . . . . . . . . . . . . . . . . . . . . . . . . . . . 263
Manual Transmission Fluid . . . . . 263Hydraulic Clutch . . . . . . . . . . . . . . . . . 263Engine Air Cleaner/Filter . . . . . . . . . 264Cooling System (Engine) . . . . . . . . . 265Cooling System (Intercooler) . . . . 269Engine Overheating . . . . . . . . . . . . . . 269Washer Fluid . . . . . . . . . . . . . . . . . . . . . 271Brakes . . . . . . . . . . . . . . . . . . . . . . . . . . . . . 271
Brake Fluid . . . . . . . . . . . . . . . . . . . . . . . 272Battery - North America . . . . . . . . . 273All-Wheel Drive . . . . . . . . . . . . . . . . . . 274Starter Switch Check . . . . . . . . . . . . . 275Automatic Transmission ShiftLock Control FunctionCheck . . . . . . . . . . . . . . . . . . . . . . . . . . . . 276
Park Brake and P (Park)Mechanism Check . . . . . . . . . . . . . . 276
Wiper Blade Replacement . . . . . . . 276Windshield Replacement . . . . . . . . 277Gas Strut(s) . . . . . . . . . . . . . . . . . . . . . . . 277
Headlamp AimingHeadlamp Aiming . . . . . . . . . . . . . . . . 278
Bulb ReplacementBulb Replacement . . . . . . . . . . . . . . . . 279Halogen Bulbs . . . . . . . . . . . . . . . . . . . . 279High Intensity Discharge (HID)Lighting . . . . . . . . . . . . . . . . . . . . . . . . . 279
LED Lighting . . . . . . . . . . . . . . . . . . . . . 279Back-Up Lamps . . . . . . . . . . . . . . . . . . . 279License Plate Lamp . . . . . . . . . . . . . . 280
Electrical SystemElectrical System Overload . . . . . . 281Fuses and Circuit Breakers . . . . . . 281Engine Compartment FuseBlock . . . . . . . . . . . . . . . . . . . . . . . . . . . . 282
Instrument Panel Fuse Block . . . . 285
Rear Compartment FuseBlock . . . . . . . . . . . . . . . . . . . . . . . . . . . . 287
Wheels and TiresTires . . . . . . . . . . . . . . . . . . . . . . . . . . . . . . . 290All-Season Tires . . . . . . . . . . . . . . . . . . 291Winter Tires . . . . . . . . . . . . . . . . . . . . . . 291Run-Flat Tires . . . . . . . . . . . . . . . . . . . . 292Self-Sealing Tires . . . . . . . . . . . . . . . . . 292Summer Tires . . . . . . . . . . . . . . . . . . . . 293Tire Sidewall Labeling . . . . . . . . . . . 293Tire Designations . . . . . . . . . . . . . . . . . 295Tire Terminology andDefinitions . . . . . . . . . . . . . . . . . . . . . . 295
Tire Pressure . . . . . . . . . . . . . . . . . . . . . . 298Tire Pressure for High-SpeedOperation . . . . . . . . . . . . . . . . . . . . . . . . 299
Tire Pressure Monitor System . . . 299Tire Pressure MonitorOperation . . . . . . . . . . . . . . . . . . . . . . . . 300
Tire Inspection . . . . . . . . . . . . . . . . . . . 303Tire Rotation . . . . . . . . . . . . . . . . . . . . . 303When It Is Time for NewTires . . . . . . . . . . . . . . . . . . . . . . . . . . . . . 305
Buying New Tires . . . . . . . . . . . . . . . . 306Different Size Tires andWheels . . . . . . . . . . . . . . . . . . . . . . . . . . 307
Uniform Tire Quality Grading . . . 307Wheel Alignment and TireBalance . . . . . . . . . . . . . . . . . . . . . . . . . . 309
Wheel Replacement . . . . . . . . . . . . . . 309

Cadillac ATS/ATS-V Owner Manual (GMNA-Localizing-U.S./Canada/Mexico-11349135) - 2018 - crc - 9/25/17
VEHICLE CARE 251
Tire Chains . . . . . . . . . . . . . . . . . . . . . . . 310If a Tire Goes Flat . . . . . . . . . . . . . . . . 311Tire Sealant andCompressor Kit . . . . . . . . . . . . . . . . . 312
Storing the Tire Sealant andCompressor Kit . . . . . . . . . . . . . . . . . 319
Jump StartingJump Starting - NorthAmerica . . . . . . . . . . . . . . . . . . . . . . . . . 320
Towing the VehicleTowing the Vehicle . . . . . . . . . . . . . . . 322Recreational Vehicle Towing . . . . 323
Appearance CareExterior Care . . . . . . . . . . . . . . . . . . . . . . 326Interior Care . . . . . . . . . . . . . . . . . . . . . . 330Floor Mats . . . . . . . . . . . . . . . . . . . . . . . . 333
General InformationFor service and parts needs, visit yourdealer. You will receive genuine GMparts and GM-trained and supportedservice people.
Genuine GM parts have one of thesemarks:
California Proposition65 Warning
{ Warning
Most motor vehicles, including thisone, as well as many of its serviceparts and fluids, contain and/oremit chemicals known to the Stateof California to cause cancer andbirth defects or other reproductiveharm. Engine exhaust, many partsand systems, many fluids, andsome component wear by-productscontain and/or emit thesechemicals. For more information goto www.P65Warnings.ca.gov/passenger-vehicle.
See Battery - North America 0 273 andJump Starting - North America 0 320and the back cover.

Cadillac ATS/ATS-V Owner Manual (GMNA-Localizing-U.S./Canada/Mexico-11349135) - 2018 - crc - 9/25/17
252 VEHICLE CARE
California PerchlorateMaterials RequirementsCertain types of automotiveapplications, such as airbag initiators,seat belt pretensioners, and lithiumbatteries contained in Remote KeylessEntry transmitters, may containperchlorate materials. Specialhandling may be necessary. Foradditional information, seewww.dtsc.ca.gov/hazardouswaste/perchlorate.
Accessories andModificationsAdding non-dealer accessories ormaking modifications to the vehiclecan affect vehicle performance andsafety, including such things asairbags, braking, stability, ride andhandling, emissions systems,aerodynamics, durability, andelectronic systems like antilockbrakes, traction control, and stabilitycontrol. These accessories ormodifications could even causemalfunction or damage not covered bythe vehicle warranty.
Damage to suspension componentscaused by modifying vehicle heightoutside of factory settings will not becovered by the vehicle warranty.
Damage to vehicle componentsresulting from modifications or theinstallation or use of non-GM certifiedparts, including control module orsoftware modifications, is not coveredunder the terms of the vehiclewarranty and may affect remainingwarranty coverage for affected parts.
GM Accessories are designed tocomplement and function with othersystems on the vehicle. See yourdealer to accessorize the vehicle usinggenuine GM Accessories installed by adealer technician.
Also, see Adding Equipment to theAirbag-Equipped Vehicle 0 87.
Vehicle Checks
Doing Your OwnService Work
{ Warning
It can be dangerous to work onyour vehicle if you do not have theproper knowledge, service manual,tools, or parts. Always followowner’s manual procedures andconsult the service manual for yourvehicle before doing anyservice work.
If doing some of your own servicework, use the proper service manual.It tells you much more about how toservice the vehicle than this manualcan. To order the proper servicemanual, see Service PublicationsOrdering Information 0 363.
This vehicle has an airbag system.Before attempting to do your ownservice work, see Servicing theAirbag-Equipped Vehicle 0 86.
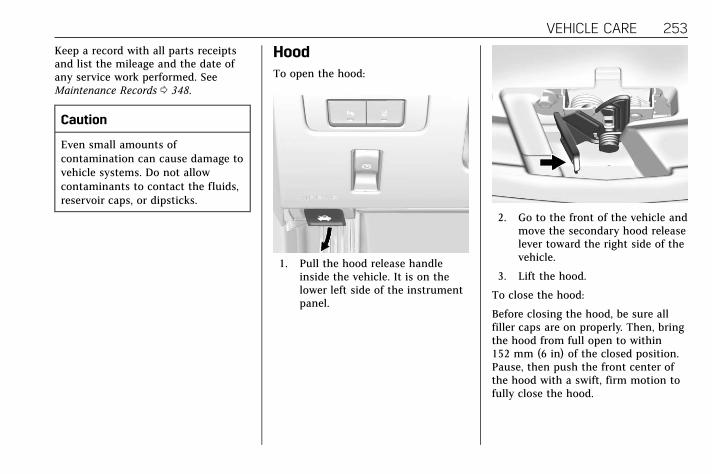
Cadillac ATS/ATS-V Owner Manual (GMNA-Localizing-U.S./Canada/Mexico-11349135) - 2018 - crc - 9/25/17
VEHICLE CARE 253
Keep a record with all parts receiptsand list the mileage and the date ofany service work performed. SeeMaintenance Records 0 348.
Caution
Even small amounts ofcontamination can cause damage tovehicle systems. Do not allowcontaminants to contact the fluids,reservoir caps, or dipsticks.
HoodTo open the hood:
1. Pull the hood release handleinside the vehicle. It is on thelower left side of the instrumentpanel.
2. Go to the front of the vehicle andmove the secondary hood releaselever toward the right side of thevehicle.
3. Lift the hood.
To close the hood:
Before closing the hood, be sure allfiller caps are on properly. Then, bringthe hood from full open to within152 mm (6 in) of the closed position.Pause, then push the front center ofthe hood with a swift, firm motion tofully close the hood.

Cadillac ATS/ATS-V Owner Manual (GMNA-Localizing-U.S./Canada/Mexico-11349135) - 2018 - crc - 9/25/17
254 VEHICLE CARE
Engine Compartment Overview
2.0L L4 Engine (LTG)

Cadillac ATS/ATS-V Owner Manual (GMNA-Localizing-U.S./Canada/Mexico-11349135) - 2018 - crc - 9/25/17
VEHICLE CARE 255
1. Windshield Washer FluidReservoir. See Washer Fluid0 271.
2. Remote Positive (+) BatteryTerminal. See Jump Starting -North America 0 320.
3. Remote Negative (-) BatteryTerminal. See Jump Starting -North America 0 320.
4. Engine Coolant Surge Tank andPressure Cap.See Cooling System (Engine) 0 265or Cooling System (Intercooler)0 269.
5. Engine Compartment Fuse Block0 282.
6. Engine Oil Fill Cap. See Engine Oil0 259.
7. Engine Cooling Fan (Out ofView).See Cooling System (Engine) 0 265or Cooling System (Intercooler)0 269.
8. Engine Oil Dipstick. See EngineOil 0 259.
9. Brake/Clutch Fluid Reservoir.See Brake Fluid 0 272 andHydraulic Clutch 0 263.
10. Engine Air Cleaner/Filter 0 264.
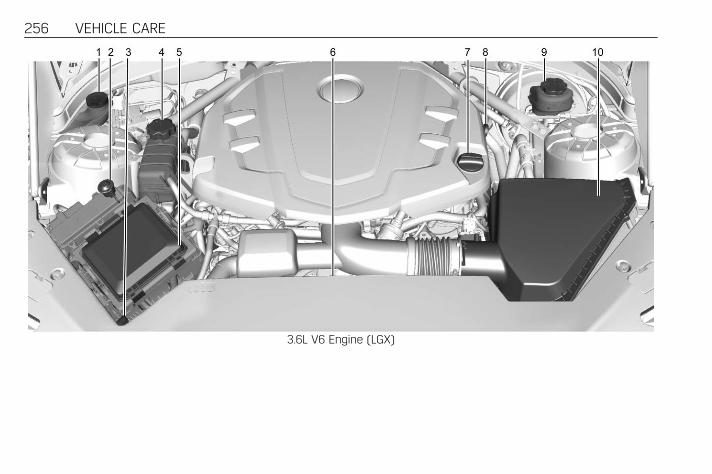
Cadillac ATS/ATS-V Owner Manual (GMNA-Localizing-U.S./Canada/Mexico-11349135) - 2018 - crc - 9/25/17
256 VEHICLE CARE
3.6L V6 Engine (LGX)
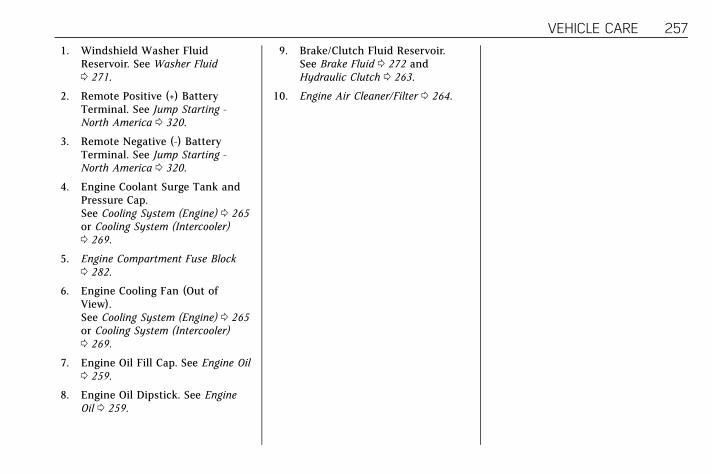
Cadillac ATS/ATS-V Owner Manual (GMNA-Localizing-U.S./Canada/Mexico-11349135) - 2018 - crc - 9/25/17
VEHICLE CARE 257
1. Windshield Washer FluidReservoir. See Washer Fluid0 271.
2. Remote Positive (+) BatteryTerminal. See Jump Starting -North America 0 320.
3. Remote Negative (-) BatteryTerminal. See Jump Starting -North America 0 320.
4. Engine Coolant Surge Tank andPressure Cap.See Cooling System (Engine) 0 265or Cooling System (Intercooler)0 269.
5. Engine Compartment Fuse Block0 282.
6. Engine Cooling Fan (Out ofView).See Cooling System (Engine) 0 265or Cooling System (Intercooler)0 269.
7. Engine Oil Fill Cap. See Engine Oil0 259.
8. Engine Oil Dipstick. See EngineOil 0 259.
9. Brake/Clutch Fluid Reservoir.See Brake Fluid 0 272 andHydraulic Clutch 0 263.
10. Engine Air Cleaner/Filter 0 264.
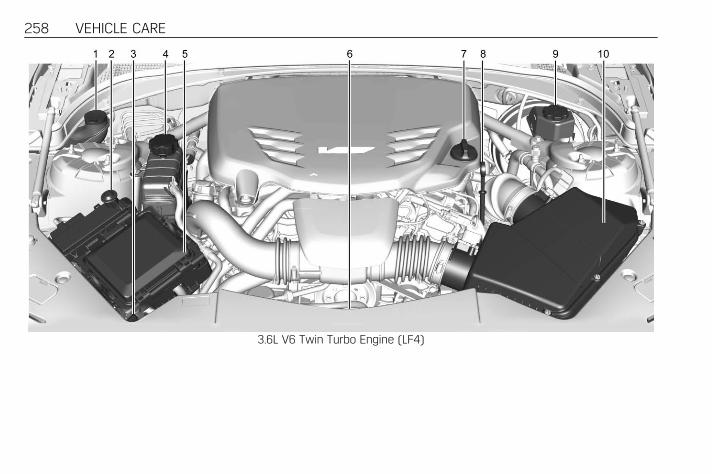
Cadillac ATS/ATS-V Owner Manual (GMNA-Localizing-U.S./Canada/Mexico-11349135) - 2018 - crc - 9/25/17
258 VEHICLE CARE
3.6L V6 Twin Turbo Engine (LF4)
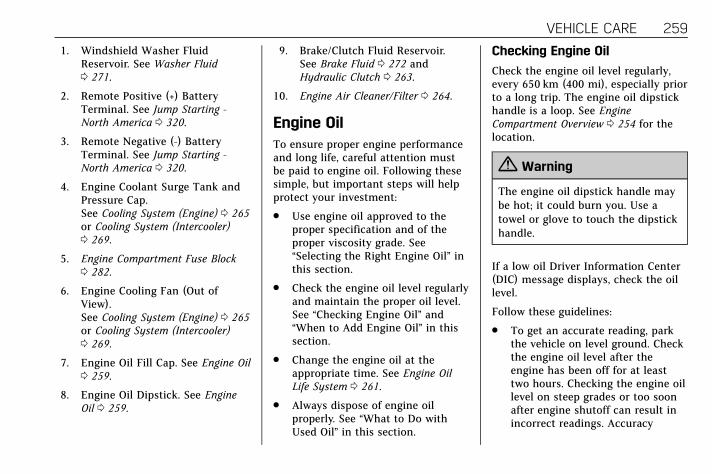
Cadillac ATS/ATS-V Owner Manual (GMNA-Localizing-U.S./Canada/Mexico-11349135) - 2018 - crc - 9/25/17
VEHICLE CARE 259
1. Windshield Washer FluidReservoir. See Washer Fluid0 271.
2. Remote Positive (+) BatteryTerminal. See Jump Starting -North America 0 320.
3. Remote Negative (-) BatteryTerminal. See Jump Starting -North America 0 320.
4. Engine Coolant Surge Tank andPressure Cap.See Cooling System (Engine) 0 265or Cooling System (Intercooler)0 269.
5. Engine Compartment Fuse Block0 282.
6. Engine Cooling Fan (Out ofView).See Cooling System (Engine) 0 265or Cooling System (Intercooler)0 269.
7. Engine Oil Fill Cap. See Engine Oil0 259.
8. Engine Oil Dipstick. See EngineOil 0 259.
9. Brake/Clutch Fluid Reservoir.See Brake Fluid 0 272 andHydraulic Clutch 0 263.
10. Engine Air Cleaner/Filter 0 264.
Engine OilTo ensure proper engine performanceand long life, careful attention mustbe paid to engine oil. Following thesesimple, but important steps will helpprotect your investment:
. Use engine oil approved to theproper specification and of theproper viscosity grade. See“Selecting the Right Engine Oil” inthis section.
. Check the engine oil level regularlyand maintain the proper oil level.See “Checking Engine Oil” and“When to Add Engine Oil” in thissection.
. Change the engine oil at theappropriate time. See Engine OilLife System 0 261.
. Always dispose of engine oilproperly. See “What to Do withUsed Oil” in this section.
Checking Engine Oil
Check the engine oil level regularly,every 650 km (400 mi), especially priorto a long trip. The engine oil dipstickhandle is a loop. See EngineCompartment Overview 0 254 for thelocation.
{ Warning
The engine oil dipstick handle maybe hot; it could burn you. Use atowel or glove to touch the dipstickhandle.
If a low oil Driver Information Center(DIC) message displays, check the oillevel.
Follow these guidelines:
. To get an accurate reading, parkthe vehicle on level ground. Checkthe engine oil level after theengine has been off for at leasttwo hours. Checking the engine oillevel on steep grades or too soonafter engine shutoff can result inincorrect readings. Accuracy

Cadillac ATS/ATS-V Owner Manual (GMNA-Localizing-U.S./Canada/Mexico-11349135) - 2018 - crc - 9/25/17
260 VEHICLE CARE
improves when checking a coldengine prior to starting. Removethe dipstick and check the level.
. If unable to wait two hours, theengine must be off for at least15 minutes if the engine is warm,or at least 30 minutes if theengine is not warm. Pull out thedipstick, wipe it with a clean papertowel or cloth, then push it backin all the way. Remove it again,keeping the tip down, and checkthe level.
When to Add Engine Oil
2.0L L4 Engine (LTG)
3.6L V6 Engine (LGX)
3.6L V6 Twin Turbo Engine (LF4)
If the oil is below the cross-hatchedarea at the tip of the dipstick and theengine has been off for at least15 minutes, add 1 L (1 qt) of therecommended oil and then recheckthe level. See “Selecting the RightEngine Oil” later in this section for anexplanation of what kind of oil to use.For engine oil crankcase capacity, seeCapacities and Specifications 0 350.
Caution
Do not add too much oil. Oil levelsabove or below the acceptableoperating range shown on thedipstick are harmful to the engine.If you find that you have an oillevel above the operating range, i.e.,the engine has so much oil that theoil level gets above thecross-hatched area that shows theproper operating range, the enginecould be damaged. You shoulddrain out the excess oil or limitdriving of the vehicle and seek aservice professional to remove theexcess amount of oil.
See Engine Compartment Overview0 254 for the location of the engine oilfill cap.
Add enough oil to put the levelsomewhere in the proper operatingrange. Push the dipstick all the wayback in when through.

Cadillac ATS/ATS-V Owner Manual (GMNA-Localizing-U.S./Canada/Mexico-11349135) - 2018 - crc - 9/25/17
VEHICLE CARE 261
Selecting the Right Engine Oil
Selecting the right engine oil dependson both the proper oil specificationand viscosity grade. See RecommendedFluids and Lubricants 0 345.
Specification
Ask for and use full synthetic engineoils that meet the dexos1specification. Engine oils that havebeen approved by GM as meeting thedexos1 specification are marked withthe dexos1 approved logo. Seewww.gmdexos.com.
Caution
Failure to use the recommendedengine oil or equivalent can resultin engine damage not covered bythe vehicle warranty.
Viscosity Grade
Use SAE 5W-30 viscosity grade engineoil for the 2.0L L4 turbo engine (LTG),3.6L V6 engine (LGX), and 3.6L V6twin turbo engine (LF4).
Cold Temperature Operation: In anarea of extreme cold, where thetemperature falls below −29 °C(−20 °F), an SAE 0W-30 oil may beused. An oil of this viscosity grade willprovide easier cold starting for theengine at extremely low temperatures.When selecting an oil of theappropriate viscosity grade, it isrecommended to select an oil of thecorrect specification. See“Specification” earlier in this section.
Engine Oil Additives/Engine OilFlushes
Do not add anything to the oil. Therecommended oils meeting the dexos1specification are all that is needed forgood performance and engineprotection.
Engine oil system flushes are notrecommended and could cause enginedamage not covered by the vehiclewarranty.
What to Do with Used Oil
Used engine oil contains certainelements that can be unhealthy foryour skin and could even causecancer. Do not let used oil stay onyour skin for very long. Clean yourskin and nails with soap and water,or a good hand cleaner. Wash orproperly dispose of clothing or ragscontaining used engine oil. See themanufacturer's warnings about theuse and disposal of oil products.
Used oil can be a threat to theenvironment. If you change your ownoil, be sure to drain all the oil fromthe filter before disposal. Neverdispose of oil by putting it in the trashor pouring it on the ground, intosewers, or into streams or bodies ofwater. Recycle it by taking it to a placethat collects used oil.
Engine Oil Life System
When to Change Engine Oil
This vehicle has a computer systemthat indicates when to change theengine oil and filter. This is based on acombination of factors which include

Cadillac ATS/ATS-V Owner Manual (GMNA-Localizing-U.S./Canada/Mexico-11349135) - 2018 - crc - 9/25/17
262 VEHICLE CARE
engine revolutions, enginetemperature, and miles driven. Basedon driving conditions, the mileage atwhich an oil change is indicated canvary considerably. For the oil lifesystem to work properly, the systemmust be reset every time the oil ischanged.
When the system has calculated thatoil life has been diminished, itindicates that an oil change isnecessary. A CHANGE ENGINE OILSOON message comes on. Change theoil as soon as possible within the next1 000 km (600 mi). It is possible that,if driving under the best conditions,the oil life system might indicate thatan oil change is not necessary for upto a year. The engine oil and filtermust be changed at least once a yearand at this time the system must bereset. Your dealer has trained servicepeople who will perform this work andreset the system. It is also importantto check the oil regularly over thecourse of an oil drain interval andkeep it at the proper level.
If the system is ever reset accidentally,the oil must be changed at 5 000 km(3,000 mi) since the last oil change.Remember to reset the oil life systemwhenever the oil is changed.
How to Reset the Engine Oil LifeSystem
Reset the system whenever the engineoil is changed so that the system cancalculate the next engine oil change.To reset the system:
1. Using the DIC controls on theright side of the steering wheel,display REMAINING OIL LIFE onthe DIC. See Driver InformationCenter (DIC) 0 134. Whenremaining oil life is low, theCHANGE ENGINE OIL SOONmessage will appear on thedisplay.
2. Press SEL on the DIC controlsand hold SEL down for a fewseconds to clear the CHANGEENGINE OIL SOON message andreset the oil life at 100%.
Be careful not to reset the oil lifedisplay accidentally at any timeother than after the oil ischanged. It cannot be resetaccurately until the next oilchange.
The oil life system can also be reset asfollows:
1. Display REMAINING OIL LIFE onthe DIC. See Driver InformationCenter (DIC) 0 134.
2. Fully press and release theaccelerator pedal three timeswithin five seconds.
If the CHANGE ENGINE OILSOON message is not on, thesystem is reset.
The system is reset when theCHANGE ENGINE OIL SOON messageis off.
If the CHANGE ENGINE OIL SOONmessage comes back on when thevehicle is started, the engine oil lifesystem has not been reset. Repeat theprocedure.

Cadillac ATS/ATS-V Owner Manual (GMNA-Localizing-U.S./Canada/Mexico-11349135) - 2018 - crc - 9/25/17
VEHICLE CARE 263
Automatic TransmissionFluid
How to Check AutomaticTransmission Fluid
It is not necessary to check thetransmission fluid level.A transmission fluid leak is the onlyreason for fluid loss. If a leak occurs,take the vehicle to your dealer andhave it repaired as soon as possible.
The vehicle is not equipped with atransmission fluid level dipstick.There is a special procedure forchecking and changing thetransmission fluid. Because thisprocedure is difficult, this should bedone at the dealer. Contact your dealerfor additional information.
Change the fluid and filter at theintervals listed in MaintenanceSchedule 0 336, and be sure to use thefluid listed in Recommended Fluids andLubricants 0 345.
Manual Transmission Fluid
How to Check ManualTransmission Fluid
It is not necessary to check themanual transmission fluid level.A transmission fluid leak is the onlyreason for fluid loss. If a leak occurs,take the vehicle to your dealer andhave it repaired as soon as possible.See Recommended Fluids andLubricants 0 345 for the proper fluidto use.
Hydraulic ClutchFor vehicles with a manualtransmission, it is not necessary toregularly check brake/clutch fluidunless there is a leak suspected.Adding fluid will not correct a leak.A fluid loss in this system couldindicate a problem. Have the systeminspected and repaired.
When to Check and What to Use
The brake/hydraulic clutch fluidreservoir cap has either a symbol ortext specifying the type of brake fluid.The common brake/clutch fluidreservoir is filled with GM approvedDOT 3 brake fluid as indicated on thereservoir cap. See Engine CompartmentOverview 0 254 for reservoir location.
How to Check and Add Fluid
Visually check the brake/clutch fluidreservoir to make sure the fluid levelis at the MIN (minimum) line on theside of the reservoir. The brake/hydraulic clutch fluid system shouldbe closed and sealed.
Do not remove the cap to check thefluid level or to top off the fluid level.Remove the cap only when necessaryto add the proper fluid until the levelreaches the MIN line.

Cadillac ATS/ATS-V Owner Manual (GMNA-Localizing-U.S./Canada/Mexico-11349135) - 2018 - crc - 9/25/17
264 VEHICLE CARE
Engine Air Cleaner/FilterThe engine air cleaner/filter is in theengine compartment on the driverside of the vehicle. See EngineCompartment Overview 0 254 forlocation.
When to Inspect the Engine AirCleaner/Filter
For intervals on changing andinspecting the engine air cleaner/filter,see Maintenance Schedule 0 336.
How to Inspect the Engine AirCleaner/Filter
Do not start the engine or have theengine running with the engine aircleaner/filter housing open. Beforeremoving the engine air cleaner/filter,make sure that the engine air cleaner/filter housing and nearby componentsare free of dirt and debris. Remove theengine air cleaner/filter. Lightly tapand shake the engine air cleaner/filter(away from the vehicle), to releaseloose dust and dirt. Inspect the engineair cleaner/filter for damage, andreplace if damaged. Do not clean the
engine air cleaner/filter orcomponents with water orcompressed air.
To inspect or replace the air cleaner/filter:
2.0L L4 Engine (LTG) Shown, 3.6LV6 Engine (LGX) Similar
1. Remove the four screws and liftthe cover out of the assembly.
2. Inspect or replace the engine aircleaner/filter.
3. Lower the cover and secure withthe four screws.
3.6L V6 Twin Turbo Engine (LF4)
1. Remove the six screws and liftthe cover out of the assembly.
2. Inspect or replace the engine aircleaner/filters. The filters can beremoved from the top cover bypressing the buttons.
3. Lower the cover and secure withthe six screws.
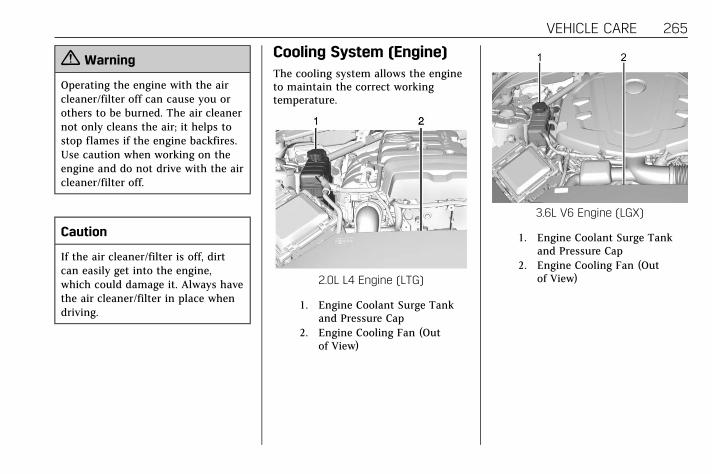
Cadillac ATS/ATS-V Owner Manual (GMNA-Localizing-U.S./Canada/Mexico-11349135) - 2018 - crc - 9/25/17
VEHICLE CARE 265
{ Warning
Operating the engine with the aircleaner/filter off can cause you orothers to be burned. The air cleanernot only cleans the air; it helps tostop flames if the engine backfires.Use caution when working on theengine and do not drive with the aircleaner/filter off.
Caution
If the air cleaner/filter is off, dirtcan easily get into the engine,which could damage it. Always havethe air cleaner/filter in place whendriving.
Cooling System (Engine)The cooling system allows the engineto maintain the correct workingtemperature.
2.0L L4 Engine (LTG)
1. Engine Coolant Surge Tankand Pressure Cap
2. Engine Cooling Fan (Outof View)
3.6L V6 Engine (LGX)
1. Engine Coolant Surge Tankand Pressure Cap
2. Engine Cooling Fan (Outof View)

Cadillac ATS/ATS-V Owner Manual (GMNA-Localizing-U.S./Canada/Mexico-11349135) - 2018 - crc - 9/25/17
266 VEHICLE CARE
3.6L V6 Engine (LF4)
1. Engine Coolant Surge Tankand Pressure Cap
2. Engine Cooling Fan (Outof View)
{ Warning
An underhood electric fan can startup even when the engine is notrunning and can cause injury. Keephands, clothing, and tools awayfrom any underhood electric fan.
{ Warning
Do not touch heater or radiatorhoses, or other engine parts. Theycan be very hot and can burn you.Do not run the engine if there is aleak; all coolant could leak out.That could cause an engine fire andcan burn you. Fix any leak beforedriving the vehicle.
Engine Coolant
The cooling system in the vehicle isfilled with DEX-COOL engine coolant.See Maintenance Schedule 0 336 andRecommended Fluids and Lubricants0 345.
The following explains the coolingsystem and how to check and addcoolant when it is low. If there is aproblem with engine overheating, seeEngine Overheating 0 269.
What to Use
{ Warning
Do not touch heater or radiatorhoses, or other engine parts. Theycan be very hot and can burn you.Do not run the engine if there is aleak; all coolant could leak out.That could cause an engine fire andcan burn you. Fix any leak beforedriving the vehicle.
Use a 50/50 mixture of cleandrinkable water and DEX-COOLcoolant. This mixture:
. Gives freezing protection down to−37 °C (−34 °F), outsidetemperature.
. Gives boiling protection up to129 °C (265 °F), enginetemperature.
. Protects against rust andcorrosion.
. Will not damage aluminum parts.
. Helps keep the proper enginetemperature.

Cadillac ATS/ATS-V Owner Manual (GMNA-Localizing-U.S./Canada/Mexico-11349135) - 2018 - crc - 9/25/17
VEHICLE CARE 267
Caution
Do not use anything other than amix of DEX-COOL coolant thatmeets GM Standard GMW3420 andclean, drinkable water. Anythingelse can cause damage to theengine cooling system and thevehicle, which would not be coveredby the vehicle warranty.
Never dispose of engine coolant byputting it in the trash, pouring it onthe ground, or into sewers, streams,or bodies of water. Have the coolantchanged by an authorized servicecenter, familiar with legalrequirements regarding used coolantdisposal. This will help protect theenvironment and your health.
Checking Coolant
The vehicle must be on a level surfacewhen checking the coolant level.
It is normal to see coolant moving inthe upper coolant hose return linewhen the engine is running. It is alsonormal to see bubbles entering thesurge tank through the small hose.
Check to see if coolant is visible in thecoolant surge tank. If the coolantinside the coolant surge tank isboiling, do not do anything else untilit cools down.
If coolant is visible but the coolantlevel is not at or above the cold fillline, add a 50/50 mixture of cleandrinkable water and DEX-COOLcoolant.
Be sure the cooling system is coolbefore this is done.
It is normal for the coolant level inthe bottom chamber to rise and fallwith operating temperature andambient conditions. Coolant willevaporate from the bottom chamberin normal operation. This will happenfaster when the vehicle is driven forlong periods in hot, dry conditions.
If no coolant is visible in the coolantsurge tank, add coolant as follows:
How to Add Coolant to theCoolant Surge Tank
{ Warning
Spilling coolant on hot engine partscan burn you. Coolant containsethylene glycol and it will burn ifthe engine parts are hot enough.
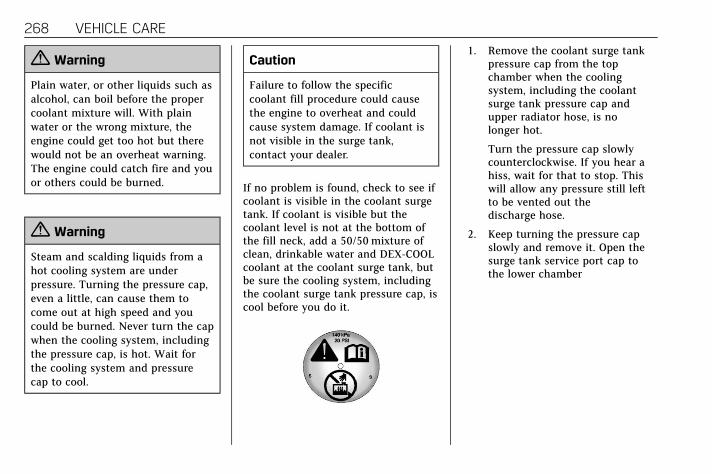
Cadillac ATS/ATS-V Owner Manual (GMNA-Localizing-U.S./Canada/Mexico-11349135) - 2018 - crc - 9/25/17
268 VEHICLE CARE
{ Warning
Plain water, or other liquids such asalcohol, can boil before the propercoolant mixture will. With plainwater or the wrong mixture, theengine could get too hot but therewould not be an overheat warning.The engine could catch fire and youor others could be burned.
{ Warning
Steam and scalding liquids from ahot cooling system are underpressure. Turning the pressure cap,even a little, can cause them tocome out at high speed and youcould be burned. Never turn the capwhen the cooling system, includingthe pressure cap, is hot. Wait forthe cooling system and pressurecap to cool.
Caution
Failure to follow the specificcoolant fill procedure could causethe engine to overheat and couldcause system damage. If coolant isnot visible in the surge tank,contact your dealer.
If no problem is found, check to see ifcoolant is visible in the coolant surgetank. If coolant is visible but thecoolant level is not at the bottom ofthe fill neck, add a 50/50 mixture ofclean, drinkable water and DEX-COOLcoolant at the coolant surge tank, butbe sure the cooling system, includingthe coolant surge tank pressure cap, iscool before you do it.
1. Remove the coolant surge tankpressure cap from the topchamber when the coolingsystem, including the coolantsurge tank pressure cap andupper radiator hose, is nolonger hot.
Turn the pressure cap slowlycounterclockwise. If you hear ahiss, wait for that to stop. Thiswill allow any pressure still leftto be vented out thedischarge hose.
2. Keep turning the pressure capslowly and remove it. Open thesurge tank service port cap tothe lower chamber

Cadillac ATS/ATS-V Owner Manual (GMNA-Localizing-U.S./Canada/Mexico-11349135) - 2018 - crc - 9/25/17
VEHICLE CARE 269
3. Fill the surge tank top chamberwith the proper mixture to thebottom of the fill neck. The topchamber needs to be completelyfull. Fill the surge tank bottomchamber through the service portto approximately half.
4. With the coolant surge tankpressure cap off and the surgetank service port cap open, startthe engine and let it run untilyou can feel the upper radiatorhose getting hot. Watch out forthe engine cooling fan.
By this time, the coolant levelinside the coolant surge tank topchamber may be lower. If the
level is lower, add more of theproper mixture to the surge tanktop chamber until the levelreaches the bottom of thefill neck.
5. Replace the surge tank pressurecap tightly and close the surgetank service port cap.
6. Check the level in the surge tanktop and bottom chambers whenthe cooling system has cooleddown. If the coolant is notat the proper levels, repeatSteps 1–6 and reinstall thepressure cap and close theservice port. If the coolant still isnot at the proper levels when thesystem cools down again, seeyour dealer.
Caution
If the pressure cap is not tightlyinstalled, coolant loss and enginedamage may occur. Be sure the capis properly and tightly secured.
Cooling System(Intercooler)
Intercooler ATS-V Only
The 3.6L V6 twin turbo engine (LF4)has an intercooler cooling system.
The intercooler cooling system has aspecial procedure for draining andadding coolant. Because thisprocedure is difficult, see the dealerfor service if the intercooler is low oncoolant or a leak is suspected.
Engine OverheatingThe vehicle has several indicators towarn of the engine overheating.
There is an engine coolanttemperature gauge and an enginecoolant temperature warning light onthe instrument cluster.See Engine Coolant Temperature Gauge0 122 and Engine Coolant TemperatureWarning Light 0 130. The vehicle mayalso display a message on the DriverInformation Center (DIC).

Cadillac ATS/ATS-V Owner Manual (GMNA-Localizing-U.S./Canada/Mexico-11349135) - 2018 - crc - 9/25/17
270 VEHICLE CARE
If the decision is made not to lift thehood when this warning appears, getservice help right away. See RoadsideService 0 358.
If the decision is made to lift thehood, make sure the vehicle is parkedon a level surface.
Then check to see if the enginecooling fan is running. If the engine isoverheating, the fan should berunning. If it is not, do not continueto run the engine. Have the vehicleserviced.
Caution
Do not run the engine if there is aleak in the engine cooling system.This can cause a loss of all coolantand can damage the system andvehicle. Have any leaks fixedright away.
If Steam Is Coming from theEngine Compartment
{ Warning
Steam and scalding liquids from ahot cooling system are underpressure. Turning the pressure cap,even a little, can cause them tocome out at high speed and youcould be burned. Never turn the capwhen the cooling system, includingthe pressure cap, is hot. Wait forthe cooling system and pressurecap to cool.
If Steam Is Coming from theEngine Compartment with NoOverheat Warning(V-Series Only)
The V-Series hood vent is functional,and will allow water from rain and carwashes to enter the enginecompartment and contact hotsurfaces. If steam is seen coming fromthe hood vent with no accompanyingoverheat warning, no action isrequired.
If No Steam Is Coming from theEngine Compartment
If an engine overheat warning isdisplayed but no steam can be seen orheard, the problem may not be tooserious. Sometimes the engine can geta little too hot when the vehicle:
. Climbs a long hill on a hot day.
. Stops after high-speed driving.
. Idles for long periods in traffic.
If the overheat warning is displayedwith no sign of steam:
1. Turn the air conditioning off.
2. Turn the heater on to the highesttemperature and to the highestfan speed. Open the windows asnecessary.
3. When it is safe to do so, pull offthe road, shift to P (Park) orN (Neutral) for an automatictransmission or Neutral for amanual transmission, and let theengine idle.
If the engine coolant temperaturegauge is no longer in the overheatedarea or the engine coolant

Cadillac ATS/ATS-V Owner Manual (GMNA-Localizing-U.S./Canada/Mexico-11349135) - 2018 - crc - 9/25/17
VEHICLE CARE 271
temperature warning light no longerdisplays, the vehicle can be driven.Continue to drive the vehicle slowlyfor about 10 minutes. Keep a safedistance from the vehicle in front.If the warning does not come back on,continue to drive normally and havethe cooling system checked for properfill and function.
If the warning continues, pull over,stop, and park the vehicle right away.
If there is no sign of steam, idle theengine for three minutes while parked.If the warning is still displayed, turnoff the engine until it cools down.
Washer Fluid
What to Use
When windshield washer fluid isneeded, be sure to read themanufacturer's instructions beforeuse. If operating the vehicle in an areawhere the temperature may fall belowfreezing, use a fluid that has sufficientprotection against freezing.
Adding Washer Fluid
Open the cap with the washer symbolon it. Add washer fluid until the tankis full. See Engine CompartmentOverview 0 254 for reservoir location.
Caution
. Do not use washer fluid thatcontains any type of waterrepellent coating. This cancause the wiper blades tochatter or skip.
. Do not use engine coolant(antifreeze) in the windshieldwasher. It can damage thewindshield washer systemand paint.
(Continued)
Caution (Continued)
. Do not mix water withready-to-use washer fluid.Water can cause the solutionto freeze and damage thewasher fluid tank and otherparts of the washer system.
. When using concentratedwasher fluid, follow themanufacturer instructions foradding water.
. Fill the washer fluid tank onlythree-quarters full when it isvery cold. This allows forfluid expansion if freezingoccurs, which could damagethe tank if it iscompletely full.
BrakesDisc brake pads have built-in wearindicators that make a high-pitchedwarning sound when the brake padsare worn and new pads are needed.The sound can come and go or be

Cadillac ATS/ATS-V Owner Manual (GMNA-Localizing-U.S./Canada/Mexico-11349135) - 2018 - crc - 9/25/17
272 VEHICLE CARE
heard all the time when the vehicle ismoving, except when applying thebrake pedal firmly.
{ Warning
The brake wear warning soundmeans that soon the brakes will notwork well. That could lead to acrash. When the brake wearwarning sound is heard, have thevehicle serviced.
Caution
Continuing to drive with worn-outbrake pads could result in costlybrake repair.
Some driving conditions or climatescan cause a brake squeal when thebrakes are first applied or lightlyapplied. This does not meansomething is wrong with the brakes.
If equipped with high performancebrake linings, there could be anincreased build-up of brake dust aswell as minor noises as compared tostandard brake linings.
Properly torqued wheel nuts arenecessary to help prevent brakepulsation. When tires are rotated,inspect brake pads for wear andevenly tighten wheel nuts in theproper sequence to torquespecifications. See Capacities andSpecifications 0 350.
Brake pads should be replaced ascomplete sets.
Brake Pedal Travel
See your dealer if the brake pedal doesnot return to normal height, or ifthere is a rapid increase in pedaltravel. This could be a sign that brakeservice may be required.
Replacing Brake System Parts
Always replace brake system partswith new, approved replacement parts.If this is not done, the brakes may notwork properly. The brakingperformance expected can change in
many other ways if the wrongreplacement brake parts are installedor parts are improperly installed.
Brake Fluid
The brake/clutch master cylinderreservoir is filled with GM approvedDOT 3 brake fluid as indicated on thereservoir cap. See Engine CompartmentOverview 0 254 for the location of thereservoir.
Checking Brake Fluid
Place the vehicle in P (Park) orNeutral with the parking brake appliedif equipped with a manualtransmission. On a level surface, thebrake fluid level should be betweenthe minimum and maximum markson the brake fluid reservoir.
Cadillac ATS/ATS-V Owner Manual (GMNA-Localizing-U.S./Canada/Mexico-11349135) - 2018 - crc - 9/25/17
VEHICLE CARE 273
There are only two reasons why thebrake fluid level in the reservoir maygo down:
. Normal brake lining wear. Whennew linings are installed, the fluidlevel goes back up.
. A fluid leak in the brake/clutchhydraulic system. Have the brake/clutch hydraulic system fixed.With a leak, the brakes will notwork well.
Always clean the brake fluid reservoircap and the area around the capbefore removing it.
Do not top off the brake/clutch fluid.Adding fluid does not correct a leak.If fluid is added when the linings areworn, there will be too much fluidwhen new brake linings are installed.Add or remove fluid, as necessary,only when work is done on the brake/clutch hydraulic system.
{ Warning
If too much brake fluid is added, itcan spill on the engine and burn,if the engine is hot enough. You orothers could be burned, and thevehicle could be damaged. Addbrake fluid only when work is doneon the brake/clutch hydraulicsystem.
When the brake/clutch fluid falls to alow level, the brake warning lightcomes on. See Brake System WarningLight 0 127.
Brake fluid absorbs water over timewhich degrades the effectiveness ofthe brake fluid. Replace brake fluid atthe specified intervals to preventincreased stopping distance. SeeMaintenance Schedule 0 336.
What to Add
Use only GM approved DOT 3 brakefluid from a clean, sealed container.See Recommended Fluids andLubricants 0 345.
{ Warning
The wrong or contaminated brakefluid could result in damage to thebrake system. This could result inthe loss of braking leading to apossible injury. Always use theproper GM approved brake fluid.
Caution
If brake fluid is spilled on thevehicle's painted surfaces, the paintfinish can be damaged. Immediatelywash off any painted surface.
Battery - North AmericaThe original equipment battery ismaintenance free. Do not remove thecap and do not add fluid.
The battery is in the trunk, beneaththe trim panel, on the driver side ofthe vehicle. Refer to the replacementnumber shown on the original batterylabel when a new battery is needed.

Cadillac ATS/ATS-V Owner Manual (GMNA-Localizing-U.S./Canada/Mexico-11349135) - 2018 - crc - 9/25/17
274 VEHICLE CARE
{ Warning
WARNING: Battery posts,terminals, and related accessoriescontain lead and lead compounds,chemicals known to the State ofCalifornia to cause cancer and birthdefects or other reproductive harm.Batteries also contain otherchemicals known to the State ofCalifornia to cause cancer. WASHHANDS AFTER HANDLING. Formore information go towww.P65Warnings.ca.gov/passenger-vehicle.
See California Proposition 65 Warning0 251 and the back cover.
After a power loss, such asdisconnecting the battery or removingthe maxi fuses in the powerdistribution fuse block, the followingsteps must be performed to calibratethe electronic throttle control. If thisis not done, the engine will not runproperly.
1. Turn the ignition on but do notstart the engine.
2. Leave the ignition on for at leastthree minutes so that theelectronic throttle control willcycle and relearn its homeposition.
3. Turn the ignition off.
4. Start and run the engine for atleast 30 seconds.
If equipped with the Stop/Startsystem, the engine will not engageauto stop after the battery isdisconnected. After reconnecting thebattery, the vehicle must situntouched for four hours. See “AutoEngine Stop/Start” in Starting theEngine 0 192.
Vehicle Storage
{ Warning
Batteries have acid that can burnyou and gas that can explode. Youcan be badly hurt if you are notcareful. See Jump Starting - North
(Continued)
Warning (Continued)
America 0 320 for tips on workingaround a battery withoutgetting hurt.
Infrequent Usage: Remove the black,negative (−) cable from the battery tokeep the battery from running down.
Extended Storage: Remove the black,negative (−) cable from the battery oruse a battery trickle charger.
All-Wheel DriveIf the vehicle is equipped withAll-Wheel-Drive (AWD), this is anadditional system that needslubrication.
Transfer Case
When to Check Lubricant
It is not necessary to regularly checkthe transfer case fluid unless a leak issuspected or an unusual noise isheard. A fluid loss could indicate aproblem. Have it inspected andrepaired.

Cadillac ATS/ATS-V Owner Manual (GMNA-Localizing-U.S./Canada/Mexico-11349135) - 2018 - crc - 9/25/17
VEHICLE CARE 275
How to Check Lubricant
1. Fill Plug2. Drain Plug
To get an accurate reading, the vehicleshould be on a level surface.
If the level is below the bottom of thefill plug hole, on the transfer case,some lubricant will need to be added.Add enough lubricant to raise thelevel to the bottom of the fill plughole. Use care not to overtighten thefill plug.
What to Use
Refer to the Maintenance Schedule todetermine what kind of lubricant touse. See Recommended Fluids andLubricants 0 345.
Starter Switch Check
{ Warning
When you are doing this inspection,the vehicle could move suddenly.If the vehicle moves, you or otherscould be injured.
1. Before starting this check, besure there is enough roomaround the vehicle.
2. Apply both the parking brakeand the regular brake.
Do not use the accelerator pedal,and be ready to turn off theengine immediately if it starts.
3. For automatic transmissionvehicles, try to start the enginein each gear. The vehicle shouldstart only in P (Park) orN (Neutral). If the vehicle startsin any other position, contactyour dealer for service.
For manual transmissionvehicles, put the shift lever inNeutral, push the clutch pedaldown halfway, and try to startthe engine. The vehicle shouldstart only when the clutch pedalis pushed down all the way tothe floor. If the vehicle startswhen the clutch pedal is notpushed all the way down, contactyour dealer for service.

Cadillac ATS/ATS-V Owner Manual (GMNA-Localizing-U.S./Canada/Mexico-11349135) - 2018 - crc - 9/25/17
276 VEHICLE CARE
Automatic TransmissionShift Lock Control FunctionCheck
{ Warning
When you are doing this inspection,the vehicle could move suddenly.If the vehicle moves, you or otherscould be injured.
1. Before starting this check, besure there is enough roomaround the vehicle. It should beparked on a level surface.
2. Apply the parking brake. Beready to apply the regular brakeimmediately if the vehicle beginsto move.
3. With the engine off, turn theignition on, but do not start theengine. Without applying theregular brake, try to move theshift lever out of P (Park) withnormal effort. If the shift levermoves out of P (Park), contactyour dealer for service.
Park Brake and P (Park)Mechanism Check
{ Warning
When you are doing this check, thevehicle could begin to move. You orothers could be injured andproperty could be damaged. Makesure there is room in front of thevehicle in case it begins to roll. Beready to apply the regular brake atonce should the vehicle beginto move.
Park on a fairly steep hill, with thevehicle facing downhill. Keeping yourfoot on the regular brake, set theparking brake.
. To check the parking brake'sholding ability: With the enginerunning and the transmission inN (Neutral), slowly remove footpressure from the regular brakepedal. Do this until the vehicle isheld by the parking brake only.
. To check the P (Park) mechanism'sholding ability: With the enginerunning, shift to P (Park). Thenrelease the parking brake followedby the regular brake.
Contact your dealer if service isrequired.
Wiper Blade ReplacementWindshield wiper blades should beinspected for wear and cracking. SeeMaintenance Schedule 0 336.
Replacement blades come in differenttypes and are removed in differentways. For proper type and length, seeMaintenance Replacement Parts 0 346.
To replace the windshield wiper blade:
1. Pull the windshield wiperassembly away from thewindshield.

Cadillac ATS/ATS-V Owner Manual (GMNA-Localizing-U.S./Canada/Mexico-11349135) - 2018 - crc - 9/25/17
VEHICLE CARE 277
2. Lift up on the latch in the middleof the wiper blade where thewiper arm attaches.
3. With the latch open, pull thewiper blade down toward thewindshield far enough to releaseit from the J-hooked end of thewiper arm.
4. Remove the wiper blade.
Allowing the wiper blade arm totouch the windshield when nowiper blade is installed coulddamage the windshield. Anydamage that occurs would not be
covered by the vehicle warranty.Do not allow the wiper blade armto touch the windshield.
5. Reverse Steps 1–3 for wiperblade replacement.
Windshield Replacement
HUD System
The windshield is part of the HUDsystem. If the windshield must bereplaced, get one that is designed forHUD or the HUD image may look outof focus.
Driver Assistance Systems
If the windshield needs to be replacedand the vehicle is equipped with afront camera sensor for the DriverAssistance Systems, a GMreplacement windshield isrecommended. The replacementwindshield must be installedaccording to GM specifications forproper alignment. If it is not, thesesystems may not work properly, theymay display messages, or they maynot work at all. See your dealer forproper windshield replacement.
Gas Strut(s)This vehicle is equipped with gasstrut(s) to provide assistance in liftingand holding open the hood/trunk/liftgate system in full open position.
{ Warning
If the gas struts that hold open thehood, trunk, and/or liftgate fail, youor others could be seriously injured.Take the vehicle to your dealer forservice immediately. Visuallyinspect the gas struts for signs ofwear, cracks, or other damageperiodically. Check to make sure thehood/trunk/liftgate is held openwith enough force. If struts arefailing to hold the hood/trunk/liftgate, do not operate. Have thevehicle serviced.

Cadillac ATS/ATS-V Owner Manual (GMNA-Localizing-U.S./Canada/Mexico-11349135) - 2018 - crc - 9/25/17
278 VEHICLE CARE
Caution
Do not apply tape or hang anyobjects from gas struts. Also do notpush down or pull on gas struts.This may cause damage to thevehicle.
See Maintenance Schedule 0 336.
Hood
Trunk
Liftgate
Headlamp AimingHeadlamp aim has been preset andshould need no further adjustment.
If the vehicle is damaged in a crash,the headlamp aim may be affected.If adjustment to the headlamps isnecessary, see your dealer.

Cadillac ATS/ATS-V Owner Manual (GMNA-Localizing-U.S./Canada/Mexico-11349135) - 2018 - crc - 9/25/17
VEHICLE CARE 279
Bulb ReplacementFor the proper type of replacementbulbs, or any bulb changing procedurenot listed in this section, contact yourdealer.
Halogen Bulbs
{ Warning
Halogen bulbs have pressurized gasinside and can burst if you drop orscratch the bulb. You or otherscould be injured. Be sure to readand follow the instructions on thebulb package.
High Intensity Discharge(HID) Lighting
{ Warning
The High Intensity Discharge (HID)lighting system operates at a veryhigh voltage. If you try to serviceany of the system components, youcould be seriously injured. Haveyour dealer or a qualified technicianservice them.
After an HID headlamp bulb has beenreplaced, the beam might be a slightlydifferent shade than it was originally.This is normal.
LED LightingThis vehicle has several LED lamps.For replacement of any LED lightingassembly, contact your dealer.
Back-Up Lamps
1. Back-Up Bulb Socket2. Back-Up Lamp Assembly

Cadillac ATS/ATS-V Owner Manual (GMNA-Localizing-U.S./Canada/Mexico-11349135) - 2018 - crc - 9/25/17
280 VEHICLE CARE
To replace one of these bulbs:
1. Reach under the rear fascia andlocate the back-up lampassembly.
2. Remove the bulb socket (1) byturning counterclockwise andpulling straight out of the lampassembly (2).
3. Pull the bulb out of the socket.
4. Install the new bulb in the bulbsocket.
5. Install the bulb socket by turningclockwise.
License Plate Lamp
Lamp Assembly
Bulb Assembly
1. Bulb Socket2. Bulb3. Lamp Assembly
To replace one of these bulbs:
1. Push the lamp assembly (3)toward the center of the vehicle.
2. Pull the lamp assembly down toremove.
3. Turn the bulb socket (1)counterclockwise to remove itfrom the lamp assembly (3).
4. Pull the bulb (2) straight out ofthe bulb socket (1).
5. Push the replacement bulbstraight into the bulb socket andturn the bulb socket clockwise toinstall it into the lamp assembly.
6. Push the lamp assembly backinto position until the release tablocks into place.

Cadillac ATS/ATS-V Owner Manual (GMNA-Localizing-U.S./Canada/Mexico-11349135) - 2018 - crc - 9/25/17
VEHICLE CARE 281
Electrical System
Electrical System OverloadThe vehicle has fuses and circuitbreakers to protect against anelectrical system overload.
When the current electrical load is tooheavy, the circuit breaker opens andcloses, protecting the circuit until thecurrent load returns to normal or theproblem is fixed. This greatly reducesthe chance of circuit overload and firecaused by electrical problems.
Fuses and circuit breakers protectpower devices in the vehicle.
Replace a bad fuse with a new one ofthe identical size and rating.
If there is a problem on the road anda fuse needs to be replaced, thesame amperage fuse can be borrowed.Choose some feature of the vehiclethat is not needed to use and replaceit as soon as possible.
Headlamp Wiring
An electrical overload may cause thelamps to go on and off, or in somecases to remain off. Have theheadlamp wiring checked right away ifthe lamps go on and off or remain off.
Windshield Wipers
If the wiper motor overheats due toheavy snow or ice, the windshieldwipers will stop until the motor coolsand will then restart.
Although the circuit is protected fromelectrical overload, overload due toheavy snow or ice may cause wiperlinkage damage. Always clear ice andheavy snow from the windshieldbefore using the windshield wipers.
If the overload is caused by anelectrical problem and not snow orice, be sure to get it fixed.
Fuses and Circuit BreakersThe wiring circuits in the vehicle areprotected from short circuits by acombination of fuses and circuit
breakers. This greatly reduces thechance of damage caused by electricalproblems.
{ Danger
Fuses and circuit breakers aremarked with their ampere rating.Do not exceed thespecified amperage rating whenreplacing fuses and circuit breakers.Use of an oversized fuse or circuitbreaker can result in a vehicle fire.You and others could be seriouslyinjured or killed.
To check a fuse, look at thesilver-colored band inside the fuse.If the band is broken or melted,replace the fuse. Be sure to replace abad fuse with a new one of theidentical size and rating.
Fuses of the same amperage can betemporarily borrowed from anotherfuse location, if a fuse goes out.Replace the fuse as soon as possible.

Cadillac ATS/ATS-V Owner Manual (GMNA-Localizing-U.S./Canada/Mexico-11349135) - 2018 - crc - 9/25/17
282 VEHICLE CARE
Engine Compartment FuseBlockThe underhood fuse block is on thepassenger side of the enginecompartment.
Lift the fuse block cover to access thefuses.
The vehicle may not be equipped withall of the fuses and relays shown.
Caution
Spilling liquid on any electricalcomponent on the vehicle maydamage it. Always keep the coverson any electrical component.

Cadillac ATS/ATS-V Owner Manual (GMNA-Localizing-U.S./Canada/Mexico-11349135) - 2018 - crc - 9/25/17
VEHICLE CARE 283
Fuses Usage
1 –
2 –
3 Passenger motorizedseat belt
4 –
5 –
6 Driver power seat
7 –
9 –
10 –
11 –
12 –
13 Passenger power seat
14 –
15 Passive entry/Passivestart
16 –
17 Headlamp washer
18 –
19 Antilock brakesystem pump

Cadillac ATS/ATS-V Owner Manual (GMNA-Localizing-U.S./Canada/Mexico-11349135) - 2018 - crc - 9/25/17
284 VEHICLE CARE
Fuses Usage
20 Antilock brakesystem valve
21 –
22 Driver motorizedseat belt
26 –
27 –/Heated seat 2
28 –/Reverse lock out
29 Adaptive forwardlighting, Automaticheadlamp leveling/Pedestrian protection
30 –
31 Passenger windowswitch
32 –
33 Sunroof
34 Front wiper
35 Steering column lock
36 Rear bussed electricalcenter/Ignition
Fuses Usage
37 –/MalfunctionIndicator Lamp/Ignition
38 Aeroshutter
39 O2 sensor/Emissions
40 Ignition coil even/O2sensor
41 Ignition coil odd
42 Engine controlmodule
43 –
44 –
45 Washer
48 Instrument panel/Body/Ignition
49 Fuel system controlmodule/Ignition
50 Heated steeringwheel
51 Engine controlmodule/Ignition
Fuses Usage
52 Transmission controlmodule/Ignition
53 Coolant pump
55 –
56 Transmission controlmodule
64 Adaptive headlampleveling
65 Left HID headlamp
66 Right HID headlamp
67 Left/Right high-beamheadlamp
68 Headlamp levelingmotor
69 Horn
71 Cooling fan
72 Starter 2
73 Brake vacuum pump
74 Starter 1
75 Air conditioningclutch
76 –

Cadillac ATS/ATS-V Owner Manual (GMNA-Localizing-U.S./Canada/Mexico-11349135) - 2018 - crc - 9/25/17
VEHICLE CARE 285
Relays Usage
8 Headlamp washer
23 Wiper control
24 Wiper speed
25 Engine controlmodule
46 Rear washer
47 Front washer
54 Coolant pump
57 Low-beam headlamprelay
58 High-beam headlamp
59 Run/Crank
60 Starter 2
61 Vacuum pump
62 Starter 1
63 Air conditioningcontrol
70 Horn
Instrument Panel FuseBlockThe instrument panel fuse block is inthe end of the driver side of theinstrument panel.
To access the fuses, remove the endpanel by gently prying with a plastictool near each clip, beginning at thepoint shown.
To install the end cover, insert thetabs on the back of the cover into theslots in the instrument panel at thepoints shown. Align the clips with theslots in the instrument panel, andpress the cover into place.
The vehicle may not be equipped withall of the fuses and relays shown.

Cadillac ATS/ATS-V Owner Manual (GMNA-Localizing-U.S./Canada/Mexico-11349135) - 2018 - crc - 9/25/17
286 VEHICLE CARE
Fuses Usage
2 Cupholder motor
Fuses Usage
3 Electric steeringcolumn lock
Fuses Usage
4 –
5 –
6 Tilt and telescopicsteering column
8 Data link connector
9 Glovebox release
10 Shunt
11 Body controlmodule 1
12 Body controlmodule 5
13 Body controlmodule 6
14 –
15 Body controlmodule 7
16 Transmission controlmodule
17 –
18 –
19 Auxiliary power outlet
20 Lighter

Cadillac ATS/ATS-V Owner Manual (GMNA-Localizing-U.S./Canada/Mexico-11349135) - 2018 - crc - 9/25/17
VEHICLE CARE 287
Fuses Usage
21 Wireless charger
22 Sensing diagnosticmodule/Automaticoccupant sensing
23 Radio/DVD/Heating,ventilation/Airconditioning control
24 Display
25 Heated steering wheel
26 Wireless charger
27 Steering wheelcontrols
28 –
29 Visor vanity lamp
30 –
31 Retained accessorypower/Accessory
32 –
33 Front heating,ventilation/Airconditioning controlblower
CircuitBreakers
Usage
CB1 Auxiliary power outlet
CB7 –
Relays Usage
K10 Retained accessorypower/Accessory
K605 Logistics
K644 Retained accessorypower/Accessory /Glovebox release
Rear Compartment FuseBlock
The rear compartment fuse block isbehind a cover on the driver side ofthe rear compartment.
The vehicle may not be equipped withall of the fuses, relays, and featuresshown.

Cadillac ATS/ATS-V Owner Manual (GMNA-Localizing-U.S./Canada/Mexico-11349135) - 2018 - crc - 9/25/17
288 VEHICLE CARE
Fuses Usage
1 Rear driver controlmodule/DC DCtransformer
2 Left window
3 Body controlmodule 8
4 Alternate currentinverter
5 Passive entry/Passivestart/Battery 1
6 Body controlmodule 4
7 Heated mirrors
8 Amplifier
9 Rear windowdefogger
10 Glass break
11 Trailer connector
12 OnStar (if equipped)
13 Right window
14 Electric parkingbrake

Cadillac ATS/ATS-V Owner Manual (GMNA-Localizing-U.S./Canada/Mexico-11349135) - 2018 - crc - 9/25/17
VEHICLE CARE 289
Fuses Usage
15 –
16 Trunk release
19 Logistics
21 Mirror windowmodule
22 –
23 Canister vent
24 Body controlmodule 2
25 Rear vision camera
26 Front ventilated seats
27 Side blind zone alert/Lane departurewarning/Externalobject calculatingmodule
28 Trailer/Sunshade
29 Rear heated seats
30 Semi-active dampingsystem
Fuses Usage
31 Transfer case controlmodule/Rear controldrive module
32 Theft module/Universal garage dooropener/Rain sensor
33 Ultrasonic parkingassist
34 Radio/DVD
35 – /Exhaustvalve (V-series)
36 Trailer
37 Fuel system controlmodule
38 Fuel pump prime/Exhaustvalve (V-series)
39 –
42 Memory seat module
43 Body controlmodule 3
Fuses Usage
44 –
45 Battery regulatedvoltage control
46 Engine controlmodule/Battery
47 –
48 –
49 Trailer module
53 –
55 –
Relays Usage
17 Trailer
18 Logistics
20 Rear windowdefogger
40 Run crank2 (V-series)
41 Fuel pump prime/Run crank 2

Cadillac ATS/ATS-V Owner Manual (GMNA-Localizing-U.S./Canada/Mexico-11349135) - 2018 - crc - 9/25/17
290 VEHICLE CARE
Relays Usage
50 Child door locksecurity
51 Rear closure
52 Rear closure 2
54 Door lock security
56 Fuel door
Wheels and Tires
TiresEvery new GM vehicle hashigh-quality tires made by aleading tire manufacturer. See thewarranty manual for informationregarding the tire warranty andwhere to get service. Foradditional information refer to thetire manufacturer.
{ Warning
. Poorly maintained andimproperly used tires aredangerous.
. Overloading the tires cancause overheating as aresult of too much flexing.There could be a blowoutand a serious crash. SeeVehicle Load Limits 0 186.
(Continued)
Warning (Continued)
. Underinflated tires posethe same danger asoverloaded tires. Theresulting crash could causeserious injury. Check alltires frequently tomaintain therecommended pressure.Tire pressure should bechecked when the tiresare cold.
. Overinflated tires are morelikely to be cut, punctured,or broken by a suddenimpact — such as whenhitting a pothole. Keeptires at the recommendedpressure.
. Worn or old tires cancause a crash. If the treadis badly worn,replace them.
(Continued)

Cadillac ATS/ATS-V Owner Manual (GMNA-Localizing-U.S./Canada/Mexico-11349135) - 2018 - crc - 9/25/17
VEHICLE CARE 291
Warning (Continued)
. Replace any tires that havebeen damaged by impactswith potholes, curbs, etc.
. Improperly repaired tirescan cause a crash. Onlythe dealer or an authorizedtire service center shouldrepair, replace, dismount,and mount the tires.
. Do not spin the tires inexcess of 56 km/h(35 mph) on slipperysurfaces such as snow,mud, ice, etc. Excessivespinning may cause thetires to explode.
See Tire Pressure for High-SpeedOperation 0 299 for inflationpressure adjustment forhigh-speed driving.
All-Season TiresThis vehicle may come with all-seasontires. These tires are designed toprovide good overall performance onmost road surfaces and weatherconditions. Original equipment tiresdesigned to GM's specific tireperformance criteria have a TPCspecification code molded onto thesidewall. Original equipmentall-season tires can be identified bythe last two characters of this TPCcode, which will be “MS.”
Consider installing winter tires on thevehicle if frequent driving on snow orice-covered roads is expected.All-season tires provide adequateperformance for most winter drivingconditions, but they may not offer thesame level of traction or performanceas winter tires on snow or ice-coveredroads. See Winter Tires 0 291.
Winter TiresThis vehicle was not originallyequipped with winter tires. Wintertires are designed for increasedtraction on snow and ice-covered
roads. Consider installing winter tireson the vehicle if frequent driving onice or snow covered roads is expected.See your dealer for details regardingwinter tire availability and proper tireselection. Also, see Buying New Tires0 306.
With winter tires, there may bedecreased dry road traction, increasedroad noise, and shorter tread life.After changing to winter tires, be alertfor changes in vehicle handling andbraking.
If using winter tires:
. Use tires of the same brand andtread type on all four wheelpositions.
. Use only radial ply tires of thesame size, load range, and speedrating as the original equipmenttires.
Winter tires with the same speedrating as the original equipment tiresmay not be available for H, V, W, Y,and ZR speed rated tires. If wintertires with a lower speed rating arechosen, never exceed the tire'smaximum speed capability.

Cadillac ATS/ATS-V Owner Manual (GMNA-Localizing-U.S./Canada/Mexico-11349135) - 2018 - crc - 9/25/17
292 VEHICLE CARE
Run-Flat TiresThis vehicle, when new, may have hadrun-flat tires. There is no spare tire,no tire changing equipment, and noplace to store a tire in the vehicle.
The vehicle also has a Tire PressureMonitor System (TPMS) that indicatesa loss of tire pressure in any of thetires.
{ Warning
If the low tire warning light displayson the instrument cluster, thehandling capabilities will bereduced during severe maneuvers.Driving too fast could cause loss ofcontrol and you or others could beinjured. Do not drive over 90 km/h(55 mph) when the low tire warninglight is displayed. Drive cautiouslyand check the tire pressures assoon as possible.
Run-flat tires can be driven on withno air pressure. There is no need tostop on the side of the road to changethe tire. Continue driving; however, do
not drive too far or too fast. Drivingon the tire may not be possible ifthere is permanent damage. Toprevent permanent damage, keepspeed below 80 km/h (50 mph). Witha light load the vehicle can be drivenup to 100 km (60 mi); with amoderate load 80 km (50 mi); and aheavy load 45 km (25 mi). As soon aspossible, contact the nearestauthorized GM or run-flat servicingfacility for inspection and repair orreplacement.
When driving on a deflated run-flattire, avoid potholes and other roadhazards that could damage the tireand/or wheel beyond repair. When atire has been damaged, or driven anydistance while deflated, check with anauthorized run-flat tire service centerto determine whether the tire can berepaired or should be replaced. Tomaintain the run-flat feature, allreplacement tires must be run-flattires.
To locate the nearest GM or run-flatservicing facility, call CustomerAssistance.
The valve stems on run-flat tires havesensors that are part of the TPMS. SeeTire Pressure Monitor System 0 299.These sensors contain batteries thatare designed to last for 10 years undernormal driving conditions. See yourdealer for wheel or sensorreplacement.
Caution
Using liquid sealants can damagethe tire valves and tire pressuremonitor sensors in the run-flattires. This damage is not covered bythe vehicle warranty. Do not useliquid sealants in run-flat tires.
Self-Sealing TiresThis vehicle may have self-sealingtires. These tires have a materialinside that can seal punctures up to6 mm (0.25 in) in the tread area. Thetire may lose air pressure if thesidewall is damaged or the treadpuncture is too large. If the TirePressure Monitor System indicates thetire pressure is low, inspect the tire for

Cadillac ATS/ATS-V Owner Manual (GMNA-Localizing-U.S./Canada/Mexico-11349135) - 2018 - crc - 9/25/17
VEHICLE CARE 293
damage and inflate it to therecommended pressure. If the tire isunable to maintain the recommendedpressure, contact the nearestauthorized GM servicing facilityimmediately for inspection and repairor replacement. To locate the nearestGM servicing facility, call GMCustomer Assistance.
Caution
Do not drive on a deflatedself-sealing tire as this coulddamage the tire. Make sure the tireis inflated to the recommendedpressure or have it immediatelyrepaired or replaced.
When tire replacement is neededreplace with a self-sealing tire,because the vehicle does not comewith a spare tire or tire changingequipment.
Summer TiresThis vehicle may come with highperformance summer tires. These tireshave a special tread and compoundthat are optimized for maximum dryand wet road performance. Thisspecial tread and compound will havedecreased performance in coldclimates, and on ice and snow. It isrecommended that winter tires beinstalled on the vehicle if frequentdriving at temperatures belowapproximately 5 °C (40 °F) or on ice orsnow covered roads is expected. SeeWinter Tires 0 291.
Caution
High performance summer tireshave rubber compounds that loseflexibility and may develop surfacecracks in the tread area attemperatures below −7 °C (20 °F).Always store high performancesummer tires indoors and attemperatures above −7 °C (20 °F)when not in use. If the tires have
(Continued)
Caution (Continued)
been subjected to −7 °C (20 °F) orless, let them warm up in a heatedspace to at least 5 °C (40 °F) for24 hours or more before beinginstalled or driving a vehicle onwhich they are installed. Do notapply heat or blow heated airdirectly on the tires. Always inspecttires before use. See Tire Inspection0 303.
Tire Sidewall LabelingUseful information about a tire ismolded into its sidewall. Theexamples show a typical passengertire sidewall.

Cadillac ATS/ATS-V Owner Manual (GMNA-Localizing-U.S./Canada/Mexico-11349135) - 2018 - crc - 9/25/17
294 VEHICLE CARE
Passenger (P-Metric) Tire Example
(1) Tire Size : The tire size is acombination of letters andnumbers used to define aparticular tire's width, height,aspect ratio, construction type,and service description. See the“Tire Size” illustration later in thissection for more detail.
(2) TPC Spec (Tire PerformanceCriteria Specification) : Originalequipment tires designed to GM'sspecific tire performance criteriahave a TPC specification code
molded onto the sidewall. GM'sTPC specifications meet or exceedall federal safety guidelines.
(3) DOT (Department ofTransportation) : TheDepartment of Transportation(DOT) code indicates that the tireis in compliance with the U.S.Department of TransportationMotor Vehicle Safety Standards.
DOT Tire Date of Manufacture :The last four digits of the TINindicate the tire manufactureddate. The first two digits representthe week (01-52) and the last twodigits, the year. For example, thethird week of the year 2010 wouldhave a four-digit DOT dateof 0310.
(4) Tire Identification Number(TIN) : The letters and numbersfollowing the DOT code are theTire Identification Number (TIN).The TIN shows the manufacturerand plant code, tire size, and datethe tire was manufactured. The
TIN is molded onto both sides ofthe tire, although only one sidemay have the date ofmanufacture.
(5) Tire Ply Material : The typeof cord and number of plies in thesidewall and under the tread.
(6) Uniform Tire QualityGrading (UTQG) : Tiremanufacturers are required tograde tires based on threeperformance factors: treadwear,traction, and temperatureresistance. For more informationsee Uniform Tire Quality Grading0 307.
(7) Maximum Cold InflationLoad Limit : Maximum load thatcan be carried and the maximumpressure needed to supportthat load.

Cadillac ATS/ATS-V Owner Manual (GMNA-Localizing-U.S./Canada/Mexico-11349135) - 2018 - crc - 9/25/17
VEHICLE CARE 295
Tire Designations
Tire Size
The following is an example of atypical passenger vehicle tire size.
(1) Passenger (P-Metric) Tire :The United States version of ametric tire sizing system. Theletter P as the first character inthe tire size means a passengervehicle tire engineered tostandards set by the U.S. Tire andRim Association.
(2) Tire Width : The three-digitnumber indicates the tire sectionwidth in millimeters from sidewallto sidewall.
(3) Aspect Ratio : A two-digitnumber that indicates the tireheight-to-width measurements.
For example, if the tire size aspectratio is 60, as shown in item 3 ofthe illustration, it would meanthat the tire's sidewall is60 percent as high as it is wide.
(4) Construction Code : A lettercode is used to indicate the typeof ply construction in the tire. Theletter R means radial plyconstruction; the letter D meansdiagonal or bias ply construction;and the letter B means belted-biasply construction.
(5) Rim Diameter : Diameter ofthe wheel in inches.
(6) Service Description : Thesecharacters represent the loadindex and speed rating of the tire.The load index represents the loadcarrying capacity a tire is certifiedto carry. The speed rating is themaximum speed a tire is certifiedto carry a load.
Tire Terminology andDefinitionsAir Pressure : The amount of airinside the tire pressing outwardon each square inch of the tire.Air pressure is expressed in kPa(kilopascal) or psi (pounds persquare inch).
Accessory Weight : The combinedweight of optional accessories.Some examples of optionalaccessories are automatictransmission, power windows,power seats, and air conditioning.
Aspect Ratio : The relationship ofa tire's height to its width.
Belt : A rubber coated layer ofcords between the plies and thetread. Cords may be made fromsteel or other reinforcingmaterials.
Bead : The tire bead contains steelwires wrapped by steel cords thathold the tire onto the rim.
Cadillac ATS/ATS-V Owner Manual (GMNA-Localizing-U.S./Canada/Mexico-11349135) - 2018 - crc - 9/25/17
296 VEHICLE CARE
Bias Ply Tire : A pneumatic tire inwhich the plies are laid atalternate angles less than90 degrees to the centerline of thetread.
Cold Tire Pressure : The amountof air pressure in a tire, measuredin kPa (kilopascal) or psi (poundsper square inch) before a tire hasbuilt up heat from driving. SeeTire Pressure 0 298.
Curb Weight : The weight of amotor vehicle with standard andoptional equipment including themaximum capacity of fuel, oil, andcoolant, but without passengersand cargo.
DOT Markings : A code moldedinto the sidewall of a tiresignifying that the tire is incompliance with the U.S.Department of Transportation(DOT) Motor Vehicle SafetyStandards. The DOT code includesthe Tire Identification Number(TIN), an alphanumeric designator
which can also identify the tiremanufacturer, production plant,brand, and date of production.
GVWR : Gross Vehicle WeightRating. See Vehicle Load Limits0 186.
GAWR FRT : Gross Axle WeightRating for the front axle. SeeVehicle Load Limits 0 186.
GAWR RR : Gross Axle WeightRating for the rear axle. SeeVehicle Load Limits 0 186.
Intended Outboard Sidewall :The side of an asymmetrical tirethat must always face outwardwhen mounted on a vehicle.
Kilopascal (kPa) : The metric unitfor air pressure.
Light Truck (LT-Metric) Tire : Atire used on light duty trucks andsome multipurpose passengervehicles.
Load Index : An assigned numberranging from 1 to 279 thatcorresponds to the load carryingcapacity of a tire.
Maximum Inflation Pressure :The maximum air pressure towhich a cold tire can be inflated.The maximum air pressure ismolded onto the sidewall.
Maximum Load Rating : The loadrating for a tire at the maximumpermissible inflation pressure forthat tire.
Maximum Loaded VehicleWeight : The sum of curb weight,accessory weight, vehicle capacityweight, and production optionsweight.
Normal Occupant Weight : Thenumber of occupants a vehicle isdesigned to seat multiplied by68 kg (150 lb). See Vehicle LoadLimits 0 186.
Occupant Distribution :Designated seating positions.

Cadillac ATS/ATS-V Owner Manual (GMNA-Localizing-U.S./Canada/Mexico-11349135) - 2018 - crc - 9/25/17
VEHICLE CARE 297
Outward Facing Sidewall : Theside of an asymmetrical tire thathas a particular side that facesoutward when mounted on avehicle. The side of the tire thatcontains a whitewall, bears whitelettering, or bears manufacturer,brand, and/or model namemolding that is higher or deeperthan the same moldings on theother sidewall of the tire.
Passenger (P-Metric) Tire : A tireused on passenger cars and somelight duty trucks andmultipurpose vehicles.
Recommended InflationPressure : Vehicle manufacturer'srecommended tire inflationpressure as shown on the tireplacard.See Tire Pressure 0 298 and VehicleLoad Limits 0 186.
Radial Ply Tire : A pneumatic tirein which the ply cords that extendto the beads are laid at 90 degreesto the centerline of the tread.
Rim : A metal support for a tireand upon which the tire beads areseated.
Sidewall : The portion of a tirebetween the tread and the bead.
Speed Rating : An alphanumericcode assigned to a tire indicatingthe maximum speed at which atire can operate.
Traction : The friction betweenthe tire and the road surface. Theamount of grip provided.
Tread : The portion of a tire thatcomes into contact with the road.
Treadwear Indicators : Narrowbands, sometimes called wearbars, that show across the tread ofa tire when only 1.6 mm (1/16 in)of tread remains. See When It IsTime for New Tires 0 305.
UTQGS (Uniform Tire QualityGrading Standards) : A tireinformation system that providesconsumers with ratings for a tire'straction, temperature, and
treadwear. Ratings are determinedby tire manufacturers usinggovernment testing procedures.The ratings are molded into thesidewall of the tire. See UniformTire Quality Grading 0 307.
Vehicle Capacity Weight : Thenumber of designated seatingpositions multiplied by68 kg (150 lb) plus the rated cargoload. See Vehicle Load Limits 0 186.
Vehicle Maximum Load on theTire : Load on an individual tiredue to curb weight, accessoryweight, occupant weight, andcargo weight.
Vehicle Placard : A labelpermanently attached to a vehicleshowing the vehicle capacityweight and the original equipmenttire size and recommendedinflation pressure. See “Tire andLoading Information Label” underVehicle Load Limits 0 186.

Cadillac ATS/ATS-V Owner Manual (GMNA-Localizing-U.S./Canada/Mexico-11349135) - 2018 - crc - 9/25/17
298 VEHICLE CARE
Tire PressureTires need the correct amount ofair pressure to operate effectively.
Caution
Neither tire underinflation noroverinflation is good.Underinflated tires, or tires thatdo not have enough air, canresult in:
. Tire overloading andoverheating which couldlead to a blowout.
. Premature orirregular wear.
. Poor handling.
. Reduced fuel economy.
Overinflated tires, or tires thathave too much air, can result in:
. Unusual wear.
. Poor handling.(Continued)
Caution (Continued)
. Rough ride.
. Needless damage fromroad hazards.
The Tire and Loading Informationlabel on the vehicle indicates theoriginal equipment tires and thecorrect cold tire inflationpressures. The recommendedpressure is the minimum airpressure needed to support thevehicle's maximum load carryingcapacity. See Vehicle Load Limits0 186.
How the vehicle is loaded affectsvehicle handling and ride comfort.Never load the vehicle with moreweight than it was designed tocarry.
When to Check
Check the tires once a monthor more.
How to Check
Use a good quality pocket-typegauge to check the tire pressure.Proper tire inflation cannot bedetermined by looking at the tire.Check the tire inflation pressurewhen the tires are cold, meaningthe vehicle has not been driven forat least three hours or no morethan 1.6 km (1 mi).
Remove the valve cap from thetire valve stem. Press the tiregauge firmly onto the valve to getthe pressure measurement. If thecold tire inflation pressurematches the recommendedpressure on the Tire and LoadingInformation label, no furtheradjustment is necessary.
If the inflation pressure is low,add air until the recommendedpressure is reached. If theinflation pressure in high, presson the metal stem in the center of

Cadillac ATS/ATS-V Owner Manual (GMNA-Localizing-U.S./Canada/Mexico-11349135) - 2018 - crc - 9/25/17
VEHICLE CARE 299
the tire valve to release air.Re-check the tire pressure withthe tire gauge.
Put the valve caps back on thevalve stems to keep out dirt andmoisture and prevent leaks. Useonly valve caps designed for thevehicle by GM. TPMS sensorscould be damaged and would notbe covered by the vehiclewarranty.
Tire Pressure forHigh-Speed Operation
{ Warning
Driving at high speeds, 160 km/h(100 mph) or higher, puts additionalstrain on tires. Sustainedhigh-speed driving causes excessiveheat buildup and can cause suddentire failure. This could cause acrash, and you or others could bekilled. Some high-speed rated tiresrequire inflation pressure
(Continued)
Warning (Continued)
adjustment for high-speedoperation. When speed limits androad conditions allow the vehicle tobe driven at high speeds, make surethe tires are rated for high-speedoperation, are in excellentcondition, and are set to the correctcold tire inflation pressure for thevehicle load.
Vehicles with P225/45R17 90V and225/40R18 92V size tires requireinflation pressure adjustment whendriving the vehicle at speeds of160 km/h (100 mph) or higher. Set thecold tire inflation pressure to280 kPa (41 psi).
Vehicles with 225/40RF18 88W and255/35RF18 90W or 255/35ZR18 (94Y)and 275/35ZR18 (99Y) size tiresrequire inflation pressure adjustmentwhen driving the vehicle at speeds of160 km/h (100 mph) or higher. Set thecold tire inflation pressure to300 kPa (44 psi).
Sustained operation at speeds over160 km/h (100 mph) requires a loadlimit of the driver and one passenger,with no additional cargo. When loadedabove this level, up to the GVW, donot operate the vehicle above160 km/h (100 mph).
Return the tires to the recommendedcold tire inflation pressure whenhigh-speed driving has ended.See Vehicle Load Limits 0 186 and TirePressure 0 298.
Tire Pressure MonitorSystemThe Tire Pressure Monitor System(TPMS) uses radio and sensortechnology to check tire pressurelevels. The TPMS sensors monitor theair pressure in your tires and transmittire pressure readings to a receiverlocated in the vehicle.
Each tire, including the spare (ifprovided), should be checked monthlywhen cold and inflated to theinflation pressure recommended bythe vehicle manufacturer on thevehicle placard or tire inflation

Cadillac ATS/ATS-V Owner Manual (GMNA-Localizing-U.S./Canada/Mexico-11349135) - 2018 - crc - 9/25/17
300 VEHICLE CARE
pressure label. (If your vehicle hastires of a different size than the sizeindicated on the vehicle placard or tireinflation pressure label, you shoulddetermine the proper tire inflationpressure for those tires.)
As an added safety feature, yourvehicle has been equipped with a tirepressure monitoring system (TPMS)that illuminates a low tire pressuretelltale when one or more of your tiresis significantly under-inflated.
Accordingly, when the low tirepressure telltale illuminates, youshould stop and check your tires assoon as possible, and inflate them tothe proper pressure. Driving on asignificantly under-inflated tire causesthe tire to overheat and can lead totire failure. Under-inflation alsoreduces fuel efficiency and tire treadlife, and may affect the vehicle'shandling and stopping ability.
Please note that the TPMS is not asubstitute for proper tire maintenance,and it is the driver's responsibility tomaintain correct tire pressure, even if
under-inflation has not reached thelevel to trigger illumination of theTPMS low tire pressure telltale.
Your vehicle has also been equippedwith a TPMS malfunction indicator toindicate when the system is notoperating properly. The TPMSmalfunction indicator is combinedwith the low tire pressure telltale.When the system detects amalfunction, the telltale will flash forapproximately one minute and thenremain continuously illuminated. Thissequence will continue uponsubsequent vehicle start-ups as longas the malfunction exists.
When the malfunction indicator isilluminated, the system may not beable to detect or signal low tirepressure as intended. TPMSmalfunctions may occur for a varietyof reasons, including the installationof replacement or alternate tires orwheels on the vehicle that prevent theTPMS from functioning properly.Always check the TPMS malfunctiontelltale after replacing one or moretires or wheels on your vehicle toensure that the replacement or
alternate tires and wheels allow theTPMS to continue to functionproperly.
See Tire Pressure Monitor Operation0 300.
See Radio Frequency Statement 0 364.
Tire Pressure MonitorOperationThis vehicle may have a Tire PressureMonitor System (TPMS). The TPMS isdesigned to warn the driver when alow tire pressure condition exists.TPMS sensors are mounted onto eachtire and wheel assembly, excluding thespare tire and wheel assembly. TheTPMS sensors monitor the airpressure in the tires and transmit thetire pressure readings to a receiverlocated in the vehicle.

Cadillac ATS/ATS-V Owner Manual (GMNA-Localizing-U.S./Canada/Mexico-11349135) - 2018 - crc - 9/25/17
VEHICLE CARE 301
When a low tire pressure condition isdetected, the TPMS illuminates thelow tire pressure warning light on theinstrument cluster. If the warninglight comes on, stop as soon aspossible and inflate the tires to therecommended pressure shown on theTire and Loading Information label.See Vehicle Load Limits 0 186.
A message to check the pressure in aspecific tire displays in the DriverInformation Center (DIC). The low tirepressure warning light and the DICwarning message come on at eachignition cycle until the tires areinflated to the correct inflationpressure. Using the DIC, tire pressurelevels can be viewed. For additionalinformation and details about the DICoperation and displays see DriverInformation Center (DIC) 0 134.
The low tire pressure warning lightmay come on in cool weather whenthe vehicle is first started, and thenturn off as the vehicle is driven. Thiscould be an early indicator that the airpressure is getting low and needs tobe inflated to the proper pressure.
A Tire and Loading Information label,attached to your vehicle, shows thesize of the original equipment tiresand the correct inflation pressure forthe tires when they are cold. SeeVehicle Load Limits 0 186, for anexample of the Tire and LoadingInformation label and its location.Also see Tire Pressure 0 298.
The TPMS can warn about a low tirepressure condition but it does notreplace normal tire maintenance. SeeTire Inspection 0 303, Tire Rotation0 303 and Tires 0 290.
Caution
Tire sealant materials are not allthe same. A non-approved tiresealant could damage the TPMSsensors. TPMS sensor damagecaused by using an incorrect tiresealant is not covered by thevehicle warranty. Always use onlythe GM approved tire sealantavailable through your dealer orincluded in the vehicle.
Factory-installed Tire Inflator Kits usea GM approved liquid tire sealant.Using non-approved tire sealantscould damage the TPMS sensors. SeeTire Sealant and Compressor Kit 0 312for information regarding the inflatorkit materials and instructions.
TPMS Malfunction Light andMessage
The TPMS will not function properly ifone or more of the TPMS sensors aremissing or inoperable. When thesystem detects a malfunction, the lowtire pressure warning light flashes forabout one minute and then stays onfor the remainder of the ignition cycle.A DIC warning message also displays.The malfunction light and DICwarning message come on at eachignition cycle until the problem iscorrected. Some of the conditions thatcan cause these to come on are:
. One of the road tires has beenreplaced with the spare tire. Thespare tire does not have a TPMSsensor. The malfunction light andDIC message should go off afterthe road tire is replaced and the

Cadillac ATS/ATS-V Owner Manual (GMNA-Localizing-U.S./Canada/Mexico-11349135) - 2018 - crc - 9/25/17
302 VEHICLE CARE
sensor matching process isperformed successfully. See “TPMSSensor Matching Process” later inthis section.
. The TPMS sensor matchingprocess was not done or notcompleted successfully afterrotating the tires. The malfunctionlight and the DIC message shouldgo off after successfullycompleting the sensor matchingprocess. See "TPMS SensorMatching Process" later in thissection.
. One or more TPMS sensors aremissing or damaged. Themalfunction light and the DICmessage should go off when theTPMS sensors are installed andthe sensor matching process isperformed successfully. See yourdealer for service.
. Replacement tires or wheels donot match the original equipmenttires or wheels. Tires and wheelsother than those recommendedcould prevent the TPMS fromfunctioning properly. See BuyingNew Tires 0 306.
. Operating electronic devices orbeing near facilities using radiowave frequencies similar to theTPMS could cause the TPMSsensors to malfunction.
If the TPMS is not functioningproperly it cannot detect or signal alow tire pressure condition. See yourdealer for service if the TPMSmalfunction light and DIC messagecomes on and stays on.
TPMS Sensor Matching Process
Each TPMS sensor has a uniqueidentification code. The identificationcode needs to be matched to a newtire/wheel position after rotating thevehicle’s tires or replacing one or moreof the TPMS sensors. The TPMSsensor matching process should alsobe performed after replacing a sparetire with a road tire containing theTPMS sensor. The malfunction lightand the DIC message should go off atthe next ignition cycle. The sensorsare matched to the tire/wheelpositions, using a TPMS relearn tool,in the following order: driver sidefront tire, passenger side front tire,
passenger side rear tire, and driverside rear. See your dealer for service orto purchase a relearn tool. A TPMSrelearn tool can also be purchased.See Tire Pressure Monitor SensorActivation Tool atwww.gmtoolsandequipment.com orcall 1-800-GM TOOLS(1-800-468-6657).
There are two minutes to match thefirst tire/wheel position, andfive minutes overall to match all fourtire/wheel positions. If it takes longer,the matching process stops and mustbe restarted.
The TPMS sensor matching process is:
1. Set the parking brake.
2. Place the vehicle in ServiceMode. See Ignition Positions0 190.
3. Make sure the Tire Pressure infodisplay option is turned on. Theinfo displays on the DIC can beturned on and off through theOptions menu. See DriverInformation Center (DIC) 0 134.
Cadillac ATS/ATS-V Owner Manual (GMNA-Localizing-U.S./Canada/Mexico-11349135) - 2018 - crc - 9/25/17
VEHICLE CARE 303
4. Use the five-way DIC control onthe right side of the steeringwheel to scroll to the TirePressure screen under the DICinfo page. See Driver InformationCenter (DIC) 0 134.
5. Press and hold SEL in the centerof the five-way DIC control.
The horn sounds twice to signalthe receiver is in relearn modeand the TIRE LEARNING ACTIVEmessage displays on the DICscreen.
6. Start with the driver sidefront tire.
7. Place the relearn tool against thetire sidewall, near the valve stem.Then press the button to activatethe TPMS sensor. A horn chirpconfirms that the sensoridentification code has beenmatched to this tire and wheelposition.
8. Proceed to the passenger sidefront tire, and repeat Step 7.
9. Proceed to the passenger siderear tire, and repeat Step 7.
10. Proceed to the driver side reartire, and repeat Step 7. The hornsounds two times to indicate thesensor identification code hasbeen matched to the driver siderear tire, and the TPMS sensormatching process is no longeractive. The TIRE LEARNINGACTIVE message on the DICdisplay screen goes off.
11. Turn the vehicle off.
12. Set all four tires to therecommended air pressure levelas indicated on the Tire andLoading Information label.
Tire InspectionWe recommend that the tires,including the spare tire, if thevehicle has one, be inspected forsigns of wear or damage at leastonce a month.
Replace the tire if:
. The indicators at three or moreplaces around the tire canbe seen.
. There is cord or fabric showingthrough the tire's rubber.
. The tread or sidewall iscracked, cut, or snagged deepenough to show cord or fabric.
. The tire has a bump, bulge,or split.
. The tire has a puncture, cut,or other damage that cannotbe repaired well because of thesize or location of the damage.
Tire RotationIf the vehicle has non-directionaltires, they should be rotated every12 000 km/7,500 mi. SeeMaintenance Schedule 0 336.
Tires are rotated to achieve auniform wear for all tires. The firstrotation is the most important.
Anytime unusual wear is noticed,rotate the tires as soon aspossible, check for proper tireinflation pressure, and check fordamaged tires or wheels. If the

Cadillac ATS/ATS-V Owner Manual (GMNA-Localizing-U.S./Canada/Mexico-11349135) - 2018 - crc - 9/25/17
304 VEHICLE CARE
unusual wear continues after therotation, check the wheelalignment.See When It Is Time for New Tires0 305 and Wheel Replacement0 309.
Directional tires should not berotated. Each tire and wheelshould be used only in theposition it is in. Directional tireswill have an arrow on the tireindicating the proper direction ofrotation or will have “left” or“right” molded on the sidewall.
Use this rotation pattern if thevehicle has different size tires onthe front and rear and they arenon-directional.
Different tire sizes should not berotated front to rear.
Use this rotation pattern whenrotating tires of the same sizeinstalled on all four wheelpositions.
If the vehicle has a compact sparetire, do not include it in the tirerotation.
Adjust the front and rear tires tothe recommended inflationpressure on the Tire and LoadingInformation label after the tireshave been rotated.See Tire Pressure 0 298 and VehicleLoad Limits 0 186.
Reset the Tire Pressure MonitorSystem. See Tire Pressure MonitorOperation 0 300.
Check that all wheel nuts areproperly tightened. See “WheelNut Torque” under Capacities andSpecifications 0 350.
{ Warning
Rust or dirt on a wheel, or on theparts to which it is fastened, canmake wheel nuts become looseafter time. The wheel could comeoff and cause an accident. Whenchanging a wheel, remove any rustor dirt from places where the wheelattaches to the vehicle. In anemergency, a cloth or a paper towel
(Continued)
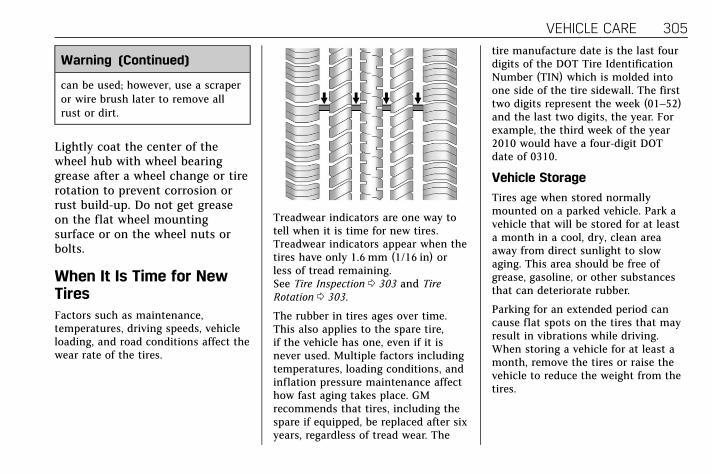
Cadillac ATS/ATS-V Owner Manual (GMNA-Localizing-U.S./Canada/Mexico-11349135) - 2018 - crc - 9/25/17
VEHICLE CARE 305
Warning (Continued)
can be used; however, use a scraperor wire brush later to remove allrust or dirt.
Lightly coat the center of thewheel hub with wheel bearinggrease after a wheel change or tirerotation to prevent corrosion orrust build-up. Do not get greaseon the flat wheel mountingsurface or on the wheel nuts orbolts.
When It Is Time for NewTiresFactors such as maintenance,temperatures, driving speeds, vehicleloading, and road conditions affect thewear rate of the tires.
Treadwear indicators are one way totell when it is time for new tires.Treadwear indicators appear when thetires have only 1.6 mm (1/16 in) orless of tread remaining.See Tire Inspection 0 303 and TireRotation 0 303.
The rubber in tires ages over time.This also applies to the spare tire,if the vehicle has one, even if it isnever used. Multiple factors includingtemperatures, loading conditions, andinflation pressure maintenance affecthow fast aging takes place. GMrecommends that tires, including thespare if equipped, be replaced after sixyears, regardless of tread wear. The
tire manufacture date is the last fourdigits of the DOT Tire IdentificationNumber (TIN) which is molded intoone side of the tire sidewall. The firsttwo digits represent the week (01–52)and the last two digits, the year. Forexample, the third week of the year2010 would have a four-digit DOTdate of 0310.
Vehicle Storage
Tires age when stored normallymounted on a parked vehicle. Park avehicle that will be stored for at leasta month in a cool, dry, clean areaaway from direct sunlight to slowaging. This area should be free ofgrease, gasoline, or other substancesthat can deteriorate rubber.
Parking for an extended period cancause flat spots on the tires that mayresult in vibrations while driving.When storing a vehicle for at least amonth, remove the tires or raise thevehicle to reduce the weight from thetires.

Cadillac ATS/ATS-V Owner Manual (GMNA-Localizing-U.S./Canada/Mexico-11349135) - 2018 - crc - 9/25/17
306 VEHICLE CARE
Buying New TiresGM has developed and matchedspecific tires for the vehicle. Theoriginal equipment tires installedwere designed to meet GeneralMotors Tire Performance CriteriaSpecification (TPC Spec) systemrating. When replacement tires areneeded, GM strongly recommendsbuying tires with the same TPCSpec rating.
GM's exclusive TPC Spec systemconsiders over a dozen criticalspecifications that impact theoverall performance of the vehicle,including brake systemperformance, ride and handling,traction control, and tire pressuremonitoring performance. GM'sTPC Spec number is molded ontothe tire's sidewall near the tiresize. If the tires have an all-seasontread design, the TPC Specnumber will be followed by MS for
mud and snow. See Tire SidewallLabeling 0 293, for additionalinformation.
GM recommends replacing worntires in complete sets of four.Uniform tread depth on all tireswill help to maintain theperformance of the vehicle.Braking and handling performancemay be adversely affected if all thetires are not replaced at the sametime. If proper rotation andmaintenance have been done, allfour tires should wear out atabout the same time. See TireRotation 0 303 for information onproper tire rotation. However, if itis necessary to replace only oneaxle set of worn tires, place thenew tires on the rear axle.
Winter tires with the same speedrating as the original equipmenttires may not be available for H, V,W, and ZR speed rated tires. Neverexceed the winter tire's maximum
speed capability when usingwinter tires with a lower speedrating.
{ Warning
Tires could explode duringimproper service. Attempting tomount or dismount a tire couldcause injury or death. Only yourdealer or authorized tire servicecenter should mount ordismount the tires.
{ Warning
Mixing tires of different sizes (otherthan those originally installed onthe vehicle), brands, or types maycause loss of control of the vehicle,resulting in a crash or other vehicledamage. Use the correct size, brand,and type of tire on all four wheels.
Cadillac ATS/ATS-V Owner Manual (GMNA-Localizing-U.S./Canada/Mexico-11349135) - 2018 - crc - 9/25/17
VEHICLE CARE 307
{ Warning
Using bias-ply tires on thevehicle may cause the wheel rimflanges to develop cracks aftermany miles of driving. A tireand/or wheel could fail suddenlyand cause a crash. Use onlyradial-ply tires with the wheelson the vehicle.
If the vehicle tires must bereplaced with a tire that does nothave a TPC Spec number, makesure they are the same size, loadrange, speed rating, andconstruction (radial) as theoriginal tires.
Vehicles that have a tire pressuremonitoring system could give aninaccurate low-pressure warning ifnon-TPC Spec rated tires areinstalled. See Tire Pressure MonitorOperation 0 300.
The Tire and Loading Informationlabel indicates the originalequipment tires on the vehicle.See Vehicle Load Limits 0 186.
Different Size Tires andWheelsIf wheels or tires are installed that area different size than the originalequipment wheels and tires, vehicleperformance, including its braking,ride and handling characteristics,stability, and resistance to rollovermay be affected. If the vehicle haselectronic systems such as antilockbrakes, rollover airbags, tractioncontrol, electronic stability control,or All-Wheel Drive, the performanceof these systems can also be affected.
{ Warning
If different sized wheels are used,there may not be an acceptablelevel of performance and safety iftires not recommended for thosewheels are selected. This increases
(Continued)
Warning (Continued)
the chance of a crash and seriousinjury. Only use GM specific wheeland tire systems developed for thevehicle, and have them properlyinstalled by a GM certifiedtechnician.
See Buying New Tires 0 306 andAccessories and Modifications 0 252.
Uniform Tire QualityGradingThe following information relatesto the system developed by theUnited States National HighwayTraffic Safety Administration(NHTSA), which grades tires bytreadwear, traction, andtemperature performance. Thisapplies only to vehicles sold in theUnited States. The grades aremolded on the sidewalls of mostpassenger car tires. The UniformTire Quality Grading (UTQG)
Cadillac ATS/ATS-V Owner Manual (GMNA-Localizing-U.S./Canada/Mexico-11349135) - 2018 - crc - 9/25/17
308 VEHICLE CARE
system does not apply to deeptread, winter tires, compact sparetires, tires with nominal rimdiameters of 10 to 12 inches(25 to 30 cm), or to somelimited-production tires.
While the tires available onGeneral Motors passenger carsand light trucks may vary withrespect to these grades, they mustalso conform to federal safetyrequirements and additionalGeneral Motors Tire PerformanceCriteria (TPC) standards.
Quality grades can be found whereapplicable on the tire sidewallbetween tread shoulder andmaximum section width. Forexample:
Treadwear 200 Traction AATemperature A
All Passenger Car Tires MustConform to Federal SafetyRequirements In Addition ToThese Grades.
Treadwear
The treadwear grade is acomparative rating based on thewear rate of the tire when testedunder controlled conditions on aspecified government test course.For example, a tire graded150 would wear one and one-half(1½) times as well on thegovernment course as a tiregraded 100. The relativeperformance of tires dependsupon the actual conditions oftheir use, however, and maydepart significantly from the normdue to variations in driving habits,service practices and differencesin road characteristics andclimate.
Traction
The traction grades, from highestto lowest, are AA, A, B, and C.Those grades represent the tire'sability to stop on wet pavement asmeasured under controlledconditions on specified
government test surfaces ofasphalt and concrete. A tiremarked C may have poor tractionperformance. Warning: Thetraction grade assigned to this tireis based on straight-ahead brakingtraction tests, and does notinclude acceleration, cornering,hydroplaning, or peak tractioncharacteristics.
Temperature
The temperature grades are A (thehighest), B, and C, representingthe tire's resistance to thegeneration of heat and its abilityto dissipate heat when testedunder controlled conditions on aspecified indoor laboratory testwheel. Sustained high temperaturecan cause the material of the tireto degenerate and reduce tire life,and excessive temperature canlead to sudden tire failure. Thegrade C corresponds to a level ofperformance which all passengercar tires must meet under the

Cadillac ATS/ATS-V Owner Manual (GMNA-Localizing-U.S./Canada/Mexico-11349135) - 2018 - crc - 9/25/17
VEHICLE CARE 309
Federal Motor Safety StandardNo. 109. Grades B and A representhigher levels of performance onthe laboratory test wheel than theminimum required by law.Warning: The temperature gradefor this tire is established for a tirethat is properly inflated and notoverloaded. Excessive speed,underinflation, or excessiveloading, either separately or incombination, can cause heatbuildup and possible tire failure.
Wheel Alignment and TireBalanceThe tires and wheels were aligned andbalanced at the factory to provide thelongest tire life and best overallperformance. Adjustments to wheelalignment and tire balancing are notnecessary on a regular basis. Consideran alignment check if there is unusualtire wear or the vehicle is significantlypulling to one side or the other. Someslight pull to the left or right,depending on the crown of the roadand/or other road surface variations
such as troughs or ruts, is normal.If the vehicle is vibrating when drivingon a smooth road, the tires andwheels may need to be rebalanced.See your dealer for proper diagnosis.
Wheel ReplacementReplace any wheel that is bent,cracked, or badly rusted or corroded.If wheel nuts keep coming loose, thewheel, wheel bolts, and wheel nutsshould be replaced. If the wheel leaksair, replace it. Some aluminum wheelscan be repaired. See your dealer if anyof these conditions exist.
Your dealer will know the kind ofwheel that is needed.
Each new wheel should have the sameload-carrying capacity, diameter,width, and offset, and should bemounted the same way as the one itreplaces.
Replace wheels, wheel bolts, wheelnuts, or Tire Pressure Monitor System(TPMS) sensors with new GM originalequipment parts.
{ Warning
Using the wrong replacementwheels, wheel bolts, or wheel nutscan be dangerous. It could affectthe braking and handling of thevehicle. Tires can lose air, andcause loss of control, causing acrash. Always use the correct wheel,wheel bolts, and wheel nuts forreplacement.
Caution
The wrong wheel can also causeproblems with bearing life, brakecooling, speedometer or odometercalibration, headlamp aim, bumperheight, vehicle ground clearance,and tire clearance to the body andchassis.

Cadillac ATS/ATS-V Owner Manual (GMNA-Localizing-U.S./Canada/Mexico-11349135) - 2018 - crc - 9/25/17
310 VEHICLE CARE
{ Warning
Never use oil or grease on studs orthe threads of the wheel nuts. Thewheel nuts might come loose andthe wheel could fall off, causing acrash.
{ Warning
Incorrect wheel nuts or improperlytightened wheel nuts can cause thewheel to become loose and evencome off. This could lead to a crash.Be sure to use the correct wheelnuts. If you have to replace them,be sure to get new GM originalequipment wheel nuts.
Caution
Improperly tightened wheel nutscan lead to brake pulsation androtor damage. To avoid expensivebrake repairs, evenly tighten thewheel nuts in the proper sequenceand to the proper torquespecification.
Used Replacement Wheels
{ Warning
Replacing a wheel with a used oneis dangerous. How it has been usedor how far it has been driven maybe unknown. It could fail suddenlyand cause a crash. When replacingwheels, use a new GM originalequipment wheel.
Tire Chains
{ Warning
If the vehicle has 225/40R18, 225/40RF18, 255/35RF18, 225/35R19,or 255/30R19 size tires, do not usetire chains. There is not enoughclearance. Tire chains used on avehicle without the proper amountof clearance can cause damage tothe brakes, suspension, or othervehicle parts. The area damaged bythe tire chains could cause loss ofcontrol and a crash. Use anothertype of traction device only if itsmanufacturer recommends it forthe vehicle's tire size combinationand road conditions. Follow thatmanufacturer's instructions. Toavoid vehicle damage, drive slowand readjust or remove the tractiondevice if it contacts the vehicle. Donot spin the wheels. If tractiondevices are used, install them onthe rear tires.

Cadillac ATS/ATS-V Owner Manual (GMNA-Localizing-U.S./Canada/Mexico-11349135) - 2018 - crc - 9/25/17
VEHICLE CARE 311
Caution
If the vehicle is equipped with a tiresize other than 225/40R18, 225/40RF18, 255/35RF18, 225/35R19,or 255/30R19, use tire chains onlywhere legal and only whennecessary. Use low profile chainsthat add no more than 12 mmthickness to the tire tread and innersidewall. Use chains that are theproper size for the tires. Installthem on the tires of the rear axle.Don't use chains on the tires of thefront axle. Tighten them as tightlyas possible with the ends securelyfastened. Drive slowly and followthe chain manufacturer'sinstructions. If the chains contactthe vehicle, stop and retightenthem. If the contact continues, slowdown until it stops. Driving too fastor spinning the wheels with chainson will damage the vehicle.
If a Tire Goes FlatIf the vehicle has run-flat tires, thereis no need to stop on the side of theroad to change a flat tire. See Run-FlatTires 0 292.
{ Warning
Special tools and procedures arerequired to service a run-flat tire.If these special tools andprocedures are not used, injury orvehicle damage may occur. Alwaysbe sure the proper tools andprocedures, as described in theservice manual, are used.
It is unusual for a tire to blow outwhile driving, especially if the tires aremaintained properly. See Tires 0 290.If air goes out of a tire, it is muchmore likely to leak out slowly. But ifthere is ever a blowout, here are a fewtips about what to expect and whatto do:
If a front tire fails, the flat tire createsa drag that pulls the vehicle towardthat side. Take your foot off the
accelerator pedal and grip the steeringwheel firmly. Steer to maintain laneposition, and then gently brake to astop, well off the road, if possible.
A rear blowout, particularly on acurve, acts much like a skid and mayrequire the same correction as used ina skid. Stop pressing the acceleratorpedal and steer to straighten thevehicle. It may be very bumpy andnoisy. Gently brake to a stop, well offthe road, if possible.
{ Warning
Lifting a vehicle and getting underit to do maintenance or repairs isdangerous without the appropriatesafety equipment and training. If ajack is provided with the vehicle, itis designed only for changing a flattire. If it is used for anything else,you or others could be badly injuredor killed if the vehicle slips off thejack. If a jack is provided with thevehicle, only use it for changing aflat tire.

Cadillac ATS/ATS-V Owner Manual (GMNA-Localizing-U.S./Canada/Mexico-11349135) - 2018 - crc - 9/25/17
312 VEHICLE CARE
If this vehicle does not have run-flattires and a tire goes flat, avoid furthertire and wheel damage by drivingslowly to a level place, well off theroad, if possible.
1. Turn on the hazard warningflashers. See Hazard WarningFlashers 0 153.
2. Set the parking brake firmly.
3. Put an automatic transmission inP (Park) or a manualtransmission in 1 (First) orR (Reverse).
4. Turn off the ignition.
5. Inspect the flat tire.
{ Warning
Driving on a flat tire will causepermanent damage to the tire.Re-inflating a tire after it has beendriven on while severelyunderinflated or flat may cause ablowout and a serious crash. Neverattempt to re-inflate a tire that hasbeen driven on while severelyunderinflated or flat. Have yourdealer or an authorized tire servicecenter repair or replace the flat tireas soon as possible.
If this vehicle has a tire sealant kitand the tire has been separated fromthe wheel, has damaged sidewalls,or has a puncture larger than6 mm (0.25 in), the tire is too severelydamaged for the tire sealant andcompressor kit to be effective. If thetire has a puncture less than6 mm (0.25 in) in the tread area of thetire, see Tire Sealant and CompressorKit 0 312.
Tire Sealant andCompressor Kit
{ Warning
Idling a vehicle in an enclosed areawith poor ventilation is dangerous.Engine exhaust may enter thevehicle. Engine exhaust containscarbon monoxide (CO) whichcannot be seen or smelled. It cancause unconsciousness and evendeath. Never run the engine in anenclosed area that has no fresh airventilation. For more information,see Engine Exhaust 0 198.

Cadillac ATS/ATS-V Owner Manual (GMNA-Localizing-U.S./Canada/Mexico-11349135) - 2018 - crc - 9/25/17
VEHICLE CARE 313
{ Warning
Overinflating a tire could cause thetire to rupture and you or otherscould be injured. Be sure to readand follow the tire sealant andcompressor kit instructions andinflate the tire to its recommendedpressure. Do not exceed therecommended pressure.
{ Warning
Storing the tire sealant andcompressor kit or other equipmentin the passenger compartment ofthe vehicle could cause injury. In asudden stop or collision, looseequipment could strike someone.Store the tire sealant andcompressor kit in its originallocation.
If this vehicle has a tire sealant andcompressor kit, there may not be aspare tire or tire changing equipment,and on some vehicles there may notbe a place to store a tire.
The tire sealant and compressor canbe used to temporarily seal puncturesup to 6 mm (0.25 in) in the tread areaof the tire. It can also be used toinflate an underinflated tire.
If the tire has been separated from thewheel, has damaged sidewalls, or hasa large puncture, the tire is tooseverely damaged for the tire sealantand compressor kit to be effective. SeeRoadside Service 0 358.
Read and follow all of the tire sealantand compressor kit instructions.
The kit includes:
1. Selector Switch (Sealant/Airor Air Only)
2. On/Off Button3. Pressure Gauge

Cadillac ATS/ATS-V Owner Manual (GMNA-Localizing-U.S./Canada/Mexico-11349135) - 2018 - crc - 9/25/17
314 VEHICLE CARE
4. Pressure Deflation Button5. Tire Sealant Canister6. Sealant/Air Hose (Clear)7. Air Only Hose (Black)8. Power Plug9. Canister Release Button
(Under Sealant/Air Hose)
Tire Sealant
Read and follow the safe handlinginstructions on the label adhered tothe sealant canister.
Check the tire sealant expiration dateon the sealant canister. The sealantcanister should be replaced before itsexpiration date. Replacement sealantcanisters are available at your localdealer. See “Removal and Installationof the Sealant Canister” following.
There is only enough sealant to sealone tire. After usage, the sealantcanister and sealant/air hose assemblymust be replaced. See “Removal andInstallation of the Sealant Canister”following.
Using the Tire Sealant andCompressor Kit to TemporarilySeal and Inflate aPunctured Tire
Follow the directions closely forcorrect sealant usage.
1. Selector Switch (Sealant/Airor Air Only)
2. On/Off Button3. Pressure Gauge

Cadillac ATS/ATS-V Owner Manual (GMNA-Localizing-U.S./Canada/Mexico-11349135) - 2018 - crc - 9/25/17
VEHICLE CARE 315
4. Pressure Deflation Button5. Tire Sealant Canister6. Sealant/Air Hose (Clear)7. Air Only Hose (Black)8. Power Plug9. Canister Release Button
(Under Sealant/Air Hose)
When using the tire sealant andcompressor kit during coldtemperatures, warm the kit in aheated environment for five minutes.This will help to inflate the tire faster.
If a tire goes flat, avoid further tireand wheel damage by driving slowlyto a level place. Turn on the hazardwarning flashers. See Hazard WarningFlashers 0 153.
See If a Tire Goes Flat 0 311 for otherimportant safety warnings.
Do not remove any objects that havepenetrated the tire.
1. Remove the tire sealant andcompressor kit from its storagelocation. See Storing the TireSealant and Compressor Kit 0 319.
2. Unwrap the sealant/air hose (6)and the power plug (8).
3. Place the kit on the ground.
Make sure the tire valve stem ispositioned close to the ground sothe hose will reach it.
4. Remove the valve stem cap fromthe flat tire by turning itcounterclockwise.
5. Attach the sealant/air hose (6)onto the tire valve stem. Turn itclockwise until it is tight.
6. Plug the power plug (8) into theaccessory power outlet in thevehicle. Unplug all items fromother accessory power outlets.See Power Outlets 0 114.
If the vehicle has an accessorypower outlet, do not use thecigarette lighter.
If the vehicle only has a cigarettelighter, use the cigarette lighter.
Do not pinch the power plugcord in the door or window.
7. Start the vehicle. The vehiclemust be running while using theair compressor.
8. Press and turn the selectorswitch (1) counterclockwise tothe Sealant + Air position.
9. Press the on/off button (2) toturn the tire sealant andcompressor kit on.
The compressor will injectsealant and air into the tire.
The pressure gauge (3) willinitially show a high pressurewhile the compressor pushes thesealant into the tire. Once thesealant is completely dispersedinto the tire, the pressure willquickly drop and start to riseagain as the tire inflates withair only.
10. Inflate the tire to therecommended inflation pressureusing the pressure gauge (3). Therecommended inflation pressurecan be found on the Tire andLoading Information label. SeeTire Pressure 0 298.
The pressure gauge (3) may readhigher than the actual tirepressure while the compressor ison. Turn the compressor off to

Cadillac ATS/ATS-V Owner Manual (GMNA-Localizing-U.S./Canada/Mexico-11349135) - 2018 - crc - 9/25/17
316 VEHICLE CARE
get an accurate pressure reading.The compressor may be turnedon/off until the correct pressureis reached.
Caution
If the recommended pressurecannot be reached afterapproximately 25 minutes, thevehicle should not be driven farther.The tire is too severely damagedand the tire sealant and compressorkit cannot inflate the tire. Removethe power plug from the accessorypower outlet and unscrew theinflating hose from the tire valve.See Roadside Service 0 358.
11. Press the on/off button (2) toturn the tire sealant andcompressor kit off.
The tire is not sealed and willcontinue to leak air until thevehicle is driven and the sealantis distributed in the tire,therefore, Steps 12–18 must bedone immediately after Step 11.
Be careful while handling the tiresealant and compressor kit as itcould be warm after usage.
12. Unplug the power plug (8) fromthe accessory power outlet in thevehicle.
13. Turn the sealant/air hose (6)counterclockwise to remove itfrom the tire valve stem.
14. Replace the tire valve stem cap.
15. Replace the sealant/air hose (6),and the power plug (8) back intheir original location.
16. If the flat tire was able to inflateto the recommended inflationpressure, remove the maximumspeed label from the sealantcanister (5) and place it in ahighly visible location. Do not
exceed the speed on this labeluntil the damaged tire is repairedor replaced.
17. Return the equipment to itsoriginal storage location in thevehicle.
18. Immediately drive the vehicle8 km (5 mi) to distribute thesealant in the tire.
19. Stop at a safe location and checkthe tire pressure. Refer toSteps 1–11 under “Using the TireSealant and Compressor Kitwithout Sealant to Inflate a Tire(Not Punctured).”
If the tire pressure has fallenmore than 68 kPa (10 psi) belowthe recommended inflationpressure, stop driving the vehicle.The tire is too severely damagedand the tire sealant cannot sealthe tire. See Roadside Service0 358.
If the tire pressure has notdropped more than 68 kPa(10 psi) from the recommended

Cadillac ATS/ATS-V Owner Manual (GMNA-Localizing-U.S./Canada/Mexico-11349135) - 2018 - crc - 9/25/17
VEHICLE CARE 317
inflation pressure, inflate the tireto the recommended inflationpressure.
20. Wipe off any sealant from thewheel, tire, and vehicle.
21. Dispose of the used sealantcanister (5) and sealant/air hose(6) assembly at a local dealer orin accordance with local statecodes and practices.
22. Replace with a new canisterassembly available from yourdealer.
23. After temporarily sealing the tireusing the tire sealant andcompressor kit, take the vehicleto an authorized dealer within161 km (100 mi) of driving tohave the tire repaired orreplaced.
Using the Tire Sealant andCompressor Kit without Sealantto Inflate a Tire (Not Punctured)
To use the air compressor to inflate atire with air only and not sealant:
1. Selector Switch (Sealant/Airor Air Only)
2. On/Off Button3. Pressure Gauge
4. Pressure Deflation Button5. Tire Sealant Canister6. Sealant/Air Hose (Clear)7. Air Only Hose (Black)8. Power Plug9. Canister Release Button
(Under Sealant/Air Hose)
If a tire goes flat, avoid further tireand wheel damage by driving slowlyto a level place. Turn on the hazardwarning flashers. See Hazard WarningFlashers 0 153.
See If a Tire Goes Flat 0 311 for otherimportant safety warnings.
1. Remove the tire sealant andcompressor kit from its storagelocation. See Storing the TireSealant and Compressor Kit 0 319.
2. Unwrap the air only hose (7) andthe power plug (8).
3. Place the kit on the ground.
Make sure the tire valve stem ispositioned close to the ground sothe hose will reach it.
4. Remove the tire valve stem capfrom the flat tire by turning itcounterclockwise.

Cadillac ATS/ATS-V Owner Manual (GMNA-Localizing-U.S./Canada/Mexico-11349135) - 2018 - crc - 9/25/17
318 VEHICLE CARE
5. Attach the air only hose (7) ontothe tire valve stem by turning itclockwise until it is tight.
6. Plug the power plug (8) into theaccessory power outlet in thevehicle. Unplug all items fromother accessory power outlets.See Power Outlets 0 114.
If the vehicle has an accessorypower outlet, do not use thecigarette lighter.
If the vehicle only has a cigarettelighter, use the cigarette lighter.
Do not pinch the power plugcord in the door or window.
7. Start the vehicle. The vehiclemust be running while using theair compressor.
8. Press and turn the selectorswitch (1) clockwise to the AirOnly position.
9. Press the on/off button (2) toturn the compressor on.
The compressor will inflate thetire with air only.
10. Inflate the tire to therecommended inflation pressureusing the pressure gauge (3). Therecommended inflation pressurecan be found on the Tire andLoading Information label. SeeTire Pressure 0 298.
The pressure gauge (3) may readhigher than the actual tirepressure while the compressor ison. Turn the compressor off toget an accurate reading. Thecompressor may be turned on/offuntil the correct pressure isreached.
If you inflate the tire higher thanthe recommended pressure youcan adjust the excess pressure bypressing the pressure deflationbutton (4) until the properpressure reading is reached. Thisoption is only functional whenusing the air only hose (7).
11. Press the on/off button (2) toturn the tire sealant andcompressor kit off.
Be careful while handling the tiresealant and compressor kit as itcould be warm after usage.
12. Unplug the power plug (8) fromthe accessory power outlet in thevehicle.
13. Disconnect the air only hose (7)from the tire valve stem, byturning it counterclockwise, andreplace the tire valve stem cap.
14. Replace the air only hose (7) andthe power plug (8) and cord backin its original location.
15. Place the equipment in theoriginal storage location in thevehicle.

Cadillac ATS/ATS-V Owner Manual (GMNA-Localizing-U.S./Canada/Mexico-11349135) - 2018 - crc - 9/25/17
VEHICLE CARE 319
The tire sealant and compressor kithas an accessory adapter located in acompartment on the bottom of itshousing that may be used to inflateair mattresses, balls, etc.
Removal and Installation of theSealant Canister
To remove the sealant canister:
1. Unwrap the sealant hose.
2. Press the canister releasebutton (9).
3. Pull up and remove the canister.
4. Replace with a new canisterwhich is available from yourdealer.
5. Push the new canister into place.
Storing the Tire Sealantand Compressor KitTo access the tire sealant andcompressor kit:
1. Open the trunk. See Trunk 0 43.
2. Lift the cover.
3. Remove the strap.
4. Remove the tire sealant andcompressor kit.
To store the tire sealant andcompressor kit, reverse the steps.

Cadillac ATS/ATS-V Owner Manual (GMNA-Localizing-U.S./Canada/Mexico-11349135) - 2018 - crc - 9/25/17
320 VEHICLE CARE
Jump Starting
Jump Starting - NorthAmericaFor more information about thevehicle battery, see Battery - NorthAmerica 0 273.
If the battery has run down, try to useanother vehicle and some jumpercables to start your vehicle. Be sure touse the following steps to do it safely.
{ Warning
WARNING: Battery posts,terminals, and related accessoriescontain lead and lead compounds,chemicals known to the State ofCalifornia to cause cancer and birthdefects or other reproductive harm.Batteries also contain otherchemicals known to the State ofCalifornia to cause cancer. WASHHANDS AFTER HANDLING. Formore information go towww.P65Warnings.ca.gov/passenger-vehicle.
See California Proposition 65 Warning0 251 and the back cover.
{ Warning
Batteries can hurt you. They can bedangerous because:
. They contain acid that canburn you.
. They contain gas that canexplode or ignite.
. They contain enoughelectricity to burn you.
If you do not follow these stepsexactly, some or all of these thingscan hurt you.
Caution
Ignoring these steps could result incostly damage to the vehicle thatwould not be covered by the vehiclewarranty. Trying to start the vehicleby pushing or pulling it will notwork, and it could damage thevehicle.
1. Good Battery Positive Post2. Good Battery Negative Post3. Discharged Battery
Positive Post4. Discharged Battery Negative
Grounding Point
The jump start positive post (1) andnegative post (2) are on the battery ofthe vehicle providing the jump start.
The jump start positive post (3) andthe negative grounding point (4) forthe discharged battery are on thepassenger side of the vehicle.

Cadillac ATS/ATS-V Owner Manual (GMNA-Localizing-U.S./Canada/Mexico-11349135) - 2018 - crc - 9/25/17
VEHICLE CARE 321
The positive jump start connection forthe discharged battery is under a redcover. Remove the cover to expose theterminal.
1. Check the other vehicle. It musthave a 12-volt battery with anegative ground system.
Caution
If the other vehicle does not have a12-volt system with a negativeground, both vehicles can bedamaged. Only use a vehicle thathas a 12-volt system with anegative ground for jump starting.
2. Position the two vehicles so thatthey are not touching.
3. Set the parking brake firmly andput the shift lever in P (Park)with an automatic transmission,or Neutral with a manualtransmission. See Shifting IntoPark (Automatic Transmission)0 195 with an automatic
transmission, or Parking (ManualTransmission) 0 197 with amanual transmission.
Caution
If any accessories are left on orplugged in during the jump startingprocedure, they could be damaged.The repairs would not be coveredby the vehicle warranty. Wheneverpossible, turn off or unplug allaccessories on either vehicle whenjump starting.
4. Turn the ignition off. Turn off alllights and accessories in bothvehicles, except the hazardwarning flashers if needed.
{ Warning
An electric fan can start up evenwhen the engine is not running andcan injure you. Keep hands,clothing, and tools away from anyunderhood electric fan.
{ Warning
Using a match near a battery cancause battery gas to explode. Peoplehave been hurt doing this, andsome have been blinded. Use aflashlight if you need more light.
Battery fluid contains acid that canburn you. Do not get it on you.If you accidentally get it in youreyes or on your skin, flush the placewith water and get medical helpimmediately.
{ Warning
Fans or other moving engine partscan injure you badly. Keep yourhands away from moving partsonce the engine is running.
5. Connect one end of the redpositive (+) cable to thepositive (+) terminal on thedischarged battery.

Cadillac ATS/ATS-V Owner Manual (GMNA-Localizing-U.S./Canada/Mexico-11349135) - 2018 - crc - 9/25/17
322 VEHICLE CARE
6. Connect the other end of the redpositive (+) cable to thepositive (+) terminal of the goodbattery.
7. Connect one end of the blacknegative (–) cable to thenegative (–) terminal of the goodbattery.
8. Connect the other end of theblack negative (–) cable to thenegative (–) grounding point forthe discharged battery.
9. Start the engine in the vehiclewith the good battery and runthe engine at idle speed for atleast four minutes.
10. Try to start the vehicle that hadthe dead battery. If it will notstart after a few tries, it probablyneeds service.
Caution
If the jumper cables are connectedor removed in the wrong order,electrical shorting may occur anddamage the vehicle. The repairswould not be covered by the vehiclewarranty. Always connect andremove the jumper cables in thecorrect order, making sure that thecables do not touch each other orother metal.
Jumper Cable Removal
Reverse the sequence exactly whenremoving the jumper cables.
After starting the disabled vehicle andremoving the jumper cables, allow itto idle for several minutes.
Towing the Vehicle
Caution
Incorrectly towing a disabledvehicle may cause damage. Thedamage would not be covered bythe vehicle warranty.
Do not lash or hook to suspensioncomponents. Use the proper strapsaround the tires to secure thevehicle.
Use only a flatbed tow truck fortowing a disabled vehicle. Never use asling type lift or damage will occur.Use ramps to help reduce approachangles if necessary. A towed vehicleshould have its drive wheels off theground. Consult a professional towingservice if the disabled vehicle must betowed.

Cadillac ATS/ATS-V Owner Manual (GMNA-Localizing-U.S./Canada/Mexico-11349135) - 2018 - crc - 9/25/17
VEHICLE CARE 323
Due to low ramp angles on theV-Series only, use care when loadingthe vehicle onto a flatbed carrier.Front spring spacers were provided forlifting the front suspension if moreclearance is necessary when towing.
Consult your dealer or a professionaltowing service if the disabled vehiclemust be towed.
Front Tow Eye
Caution
Improper use of the tow eye cancause vehicle damage. Use cautionand low speeds to prevent damageto the vehicle.
If the vehicle is equipped with toweye, only use the tow eye to pull thevehicle onto a flatbed car carrier froma flat road surface. Do not use the toweye to pull the vehicle from snow,mud or sand. The tow eye is locatedunderneath the load floor, near thespare tire or the compressor kit,if equipped.
Carefully open the cover in the fasciaby using the small notch that concealsthe tow eye socket.
Install the tow eye into the socket andturn it until it is fully tightened. Whenthe tow eye is removed, reinstall thecover with the notch in the originalposition.
Recreational VehicleTowingRecreational vehicle towing meanstowing the vehicle behind anothervehicle, such as behind a motorhome.The two most common types ofrecreational vehicle towing are knownas dinghy towing and dolly towing.Dinghy towing is towing the vehiclewith all four wheels on the ground.Dolly towing is towing the vehiclewith two wheels on the ground andtwo wheels up on a device known as adolly.
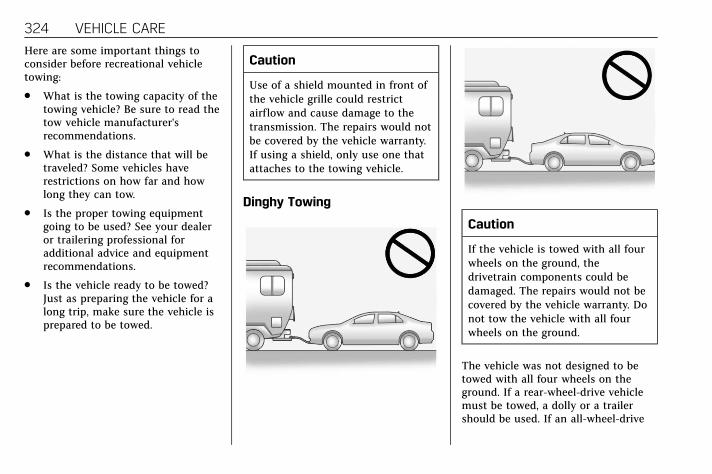
Cadillac ATS/ATS-V Owner Manual (GMNA-Localizing-U.S./Canada/Mexico-11349135) - 2018 - crc - 9/25/17
324 VEHICLE CARE
Here are some important things toconsider before recreational vehicletowing:
. What is the towing capacity of thetowing vehicle? Be sure to read thetow vehicle manufacturer'srecommendations.
. What is the distance that will betraveled? Some vehicles haverestrictions on how far and howlong they can tow.
. Is the proper towing equipmentgoing to be used? See your dealeror trailering professional foradditional advice and equipmentrecommendations.
. Is the vehicle ready to be towed?Just as preparing the vehicle for along trip, make sure the vehicle isprepared to be towed.
Caution
Use of a shield mounted in front ofthe vehicle grille could restrictairflow and cause damage to thetransmission. The repairs would notbe covered by the vehicle warranty.If using a shield, only use one thatattaches to the towing vehicle.
Dinghy Towing
Caution
If the vehicle is towed with all fourwheels on the ground, thedrivetrain components could bedamaged. The repairs would not becovered by the vehicle warranty. Donot tow the vehicle with all fourwheels on the ground.
The vehicle was not designed to betowed with all four wheels on theground. If a rear-wheel-drive vehiclemust be towed, a dolly or a trailershould be used. If an all-wheel-drive

Cadillac ATS/ATS-V Owner Manual (GMNA-Localizing-U.S./Canada/Mexico-11349135) - 2018 - crc - 9/25/17
VEHICLE CARE 325
vehicle must be towed, a trailer shouldbe used. See the information on dollytowing.
Dolly Towing (Rear-Wheel-DriveVehicles)
To dolly tow a rear-wheel-drive vehiclefrom the rear:
1. Attach the dolly to the towvehicle following the dollymanufacturer's instructions.
2. Put the rear wheels on the dolly.
3. Firmly set the parking brake.See Parking Brake (Electric) 0 206or Parking Brake (Manual) 0 208.
4. Put the vehicle in P (Park).
5. Securely attach the vehicle beingtowed to the dolly.
6. Clamp the steering wheel in astraight-ahead position with aclamping device designed fortowing.
7. Turn the ignition off.
Dolly Towing (All-Wheel-DriveVehicles)
Caution
Towing an all-wheel-drive vehiclewith all four wheels on the ground,or even with only two of its wheelson the ground, will damagedrivetrain components. Do not towan all-wheel-drive vehicle with anyof its wheels on the ground.
All-wheel-drive vehicles can only betowed with all four wheels on a trailer.

Cadillac ATS/ATS-V Owner Manual (GMNA-Localizing-U.S./Canada/Mexico-11349135) - 2018 - crc - 9/25/17
326 VEHICLE CARE
Appearance Care
Exterior Care
Locks
Locks are lubricated at the factory.Use a de-icing agent only whenabsolutely necessary, and have thelocks greased after using. SeeRecommended Fluids and Lubricants0 345.
Washing the Vehicle
To preserve the vehicle's finish, washit often and out of direct sunlight.
Caution
Do not use petroleum-based, acidic,or abrasive cleaning agents as theycan damage the vehicle's paint,metal, or plastic parts. If damageoccurs, it would not be covered bythe vehicle warranty. Approvedcleaning products can be obtainedfrom your dealer. Follow allmanufacturer directions regarding
(Continued)
Caution (Continued)
correct product usage, necessarysafety precautions, and appropriatedisposal of any vehicle careproduct.
Caution
Avoid using high-pressure washescloser than 30 cm (12 in) to thesurface of the vehicle. Use of powerwashers exceeding 8,274 kPa(1,200 psi) can result in damage orremoval of paint and decals.
Caution
Do not power wash any component
under the hood that has thisesymbol.
This could cause damage thatwould not be covered by the vehiclewarranty.
If using an automatic car wash, followthe car wash instructions. Thewindshield wiper and rear windowwiper, if equipped, must be off.Remove any accessories that may bedamaged or interfere with the carwash equipment.
Rinse the vehicle well, before washingand after, to remove all cleaningagents completely. If they are allowedto dry on the surface, they could stain.
Dry the finish with a soft, cleanchamois or an all-cotton towel toavoid surface scratches and waterspotting.
Finish Care
Application of aftermarket clearcoatsealant/wax materials is notrecommended. If painted surfaces aredamaged, see your dealer to have thedamage assessed and repaired. Foreignmaterials such as calcium chlorideand other salts, ice melting agents,road oil and tar, tree sap, birddroppings, chemicals from industrialchimneys, etc., can damage thevehicle's finish if they remain onpainted surfaces. Wash the vehicle as

Cadillac ATS/ATS-V Owner Manual (GMNA-Localizing-U.S./Canada/Mexico-11349135) - 2018 - crc - 9/25/17
VEHICLE CARE 327
soon as possible. If necessary, usenon-abrasive cleaners that are markedsafe for painted surfaces to removeforeign matter.
Occasional hand waxing or mildpolishing should be done to removeresidue from the paint finish. See yourdealer for approved cleaning products.
Do not apply waxes or polishes touncoated plastic, vinyl, rubber, decals,simulated wood, or flat paint asdamage can occur.
Caution
Machine compounding oraggressive polishing on a basecoat/clearcoat paint finish may damageit. Use only non-abrasive waxes andpolishes that are made for abasecoat/clearcoat paint finish onthe vehicle.
To keep the paint finish looking new,keep the vehicle garaged or coveredwhenever possible.
Carbon Fiber Care
Carbon fiber composite parts can bewashed and waxed like any otherparts. Use a clear or black pigmentedwax. See Composite Materials 0 190.
Protecting Exterior Bright MetalMoldings
Caution
Failure to clean and protect thebright metal moldings can result ina hazy white finish or pitting. Thisdamage would not be covered bythe vehicle warranty.
The bright metal moldings on thevehicle are aluminum, chrome orstainless steel. To prevent damagealways follow these cleaninginstructions:
. Be sure the molding is cool to thetouch before applying any cleaningsolution.
. Use only approved cleaningsolutions for aluminum, chrome orstainless steel. Some cleaners are
highly acidic or contain alkalinesubstances and can damage themoldings.
. Always dilute a concentratedcleaner according to themanufacturer’s instructions.
. Do not use cleaners that are notintended for automotive use.
. Use a nonabrasive wax on thevehicle after washing to protectand extend the molding finish.
Cleaning Exterior Lamps/Lenses,Emblems, Decals, and Stripes
Use only lukewarm or cold water, asoft cloth, and a car washing soap toclean exterior lamps, lenses, emblems,decals, and stripes. Follow instructionsunder "Washing the Vehicle"previously in this section.
Lamp covers are made of plastic, andsome have a UV protective coating. Donot clean or wipe them when dry.
Do not use any of the following onlamp covers:
. Abrasive or caustic agents.

Cadillac ATS/ATS-V Owner Manual (GMNA-Localizing-U.S./Canada/Mexico-11349135) - 2018 - crc - 9/25/17
328 VEHICLE CARE. Washer fluids and other cleaning
agents in higher concentrationsthan suggested by themanufacturer.
. Solvents, alcohols, fuels, or otherharsh cleaners.
. Ice scrapers or other hard items.
. Aftermarket appearance caps orcovers while the lamps areilluminated, due to excessive heatgenerated.
Caution
Failure to clean lamps properly cancause damage to the lamp coverthat would not be covered by thevehicle warranty.
Caution
Using wax on low gloss black finishstripes can increase the gloss leveland create a non-uniform finish.Clean low gloss stripes with soapand water only.
Air Intakes
Clear debris from the air intakes,between the hood and windshield,when washing the vehicle.
Windshield and Wiper Blades
Clean the outside of the windshieldwith glass cleaner.
Clean rubber blades using a lint-freecloth or paper towel soaked withwindshield washer fluid or a milddetergent. Wash the windshieldthoroughly when cleaning the blades.Bugs, road grime, sap, and a buildupof vehicle wash/wax treatments maycause wiper streaking.
Replace the wiper blades if they areworn or damaged. Damage can becaused by extreme dusty conditions,sand, salt, heat, sun, snow, and ice.
Weatherstrips
Apply weatherstrip lubricant onweatherstrips to make them lastlonger, seal better, and not stick orsqueak. Lubricate weatherstrips atleast once a year. Hot, dry climatesmay require more frequent
application. Black marks from rubbermaterial on painted surfaces can beremoved by rubbing with a cleancloth. See Recommended Fluids andLubricants 0 345.
Tires
Use a stiff brush with tire cleaner toclean the tires.
Caution
Using petroleum-based tire dressingproducts on the vehicle maydamage the paint finish and/ortires. When applying a tire dressing,always wipe off any overspray fromall painted surfaces on the vehicle.
Wheels and Trim— Aluminum orChrome
Use a soft, clean cloth with mild soapand water to clean the wheels. Afterrinsing thoroughly with clean water,dry with a soft, clean towel. A waxmay then be applied.
Cadillac ATS/ATS-V Owner Manual (GMNA-Localizing-U.S./Canada/Mexico-11349135) - 2018 - crc - 9/25/17
VEHICLE CARE 329
Caution
Chrome wheels and other chrometrim may be damaged if the vehicleis not washed after driving on roadsthat have been sprayed withmagnesium, calcium, or sodiumchloride. These chlorides are usedon roads for conditions such as iceand dust. Always wash the chromewith soap and water after exposure.
Caution
To avoid surface damage, do notuse strong soaps, chemicals,abrasive polishes, cleaners, brushes,or cleaners that contain acid onaluminum or chrome-plated wheels.Use only approved cleaners. Also,never drive a vehicle withaluminum or chrome-plated wheelsthrough an automatic car wash thatuses silicone carbide tire cleaning
(Continued)
Caution (Continued)
brushes. Damage could occur andthe repairs would not be covered bythe vehicle warranty.
Brake System
Visually inspect brake lines and hosesfor proper hook-up, binding, leaks,cracks, chafing, etc. Inspect disc brakepads for wear and rotors for surfacecondition. Inspect drum brake linings/shoes for wear or cracks. Inspect allother brake parts.
Steering, Suspension, andChassis Components
Visually inspect steering, suspension,and chassis components for damaged,loose, or missing parts or signs ofwear at least once a year.
Inspect power steering for properattachment, connections, binding,leaks, cracks, chafing, etc.
Visually check constant velocity jointboots and axle seals for leaks.
Body Component Lubrication
Lubricate all key lock cylinders, hoodhinges, liftgate hinges, and the steelfuel door hinge, unless thecomponents are plastic. Applyingsilicone grease on weatherstrips with aclean cloth will make them lastlonger, seal better, and not stick orsqueak.
Underbody Maintenance
At least twice a year, spring and fall,use plain water to flush any corrosivematerials from the underbody. Takecare to thoroughly clean any areaswhere mud and other debris cancollect.
Do not directly power wash thetransfer case and/or front/rear axleoutput seals. High pressure water canovercome the seals and contaminatethe fluid. Contaminated fluid willdecrease the life of the transfer caseand/or axles and should be replaced

Cadillac ATS/ATS-V Owner Manual (GMNA-Localizing-U.S./Canada/Mexico-11349135) - 2018 - crc - 9/25/17
330 VEHICLE CARE
Sheet Metal Damage
If the vehicle is damaged and requiressheet metal repair or replacement,make sure the body repair shopapplies anti-corrosion material toparts repaired or replaced to restorecorrosion protection.
Original manufacturer replacementparts will provide the corrosionprotection while maintaining thevehicle warranty.
Finish Damage
Quickly repair minor chips andscratches with touch-up materialsavailable from your dealer to avoidcorrosion. Larger areas of finishdamage can be corrected in yourdealer's body and paint shop.
Chemical Paint Spotting
Airborne pollutants can fall upon andattack painted vehicle surfacescausing blotchy, ring-shapeddiscolorations, and small, irregulardark spots etched into the paintsurface. See “Finish Care” previously inthis section.
Interior CareTo prevent dirt particle abrasions,regularly clean the vehicle's interior.Immediately remove any soils.Newspapers or dark garments cantransfer color to the vehicle’s interior.
Use a soft bristle brush to removedust from knobs and crevices on theinstrument cluster. Using a mild soapsolution, immediately remove handlotions, sunscreen, and insectrepellent from all interior surfaces orpermanent damage may result.
Use cleaners specifically designed forthe surfaces being cleaned to preventpermanent damage. Apply all cleanersdirectly to the cleaning cloth. Do notspray cleaners on any switches orcontrols. Remove cleaners quickly.
Before using cleaners, read and followall safety instructions on the label.While cleaning the interior, open thedoors and windows to get properventilation.
To prevent damage, do not clean theinterior using the following cleanersor techniques:
. Never use a razor or any othersharp object to remove soil fromany interior surface.
. Never use a brush with stiffbristles.
. Never rub any surface aggressivelyor with too much pressure.
. Do not use laundry detergents ordishwashing soaps withdegreasers. For liquid cleaners, useapproximately 20 drops per 3.8 L(1 gal) of water. A concentratedsoap solution will create streaksand attract dirt. Do not usesolutions that contain strong orcaustic soap.
. Do not heavily saturate theupholstery when cleaning.
. Do not use solvents or cleanerscontaining solvents.
Interior Glass
To clean, use a terry cloth fabricdampened with water. Wipe dropletsleft behind with a clean dry cloth.If necessary, use a commercial glasscleaner after cleaning with plain water.

Cadillac ATS/ATS-V Owner Manual (GMNA-Localizing-U.S./Canada/Mexico-11349135) - 2018 - crc - 9/25/17
VEHICLE CARE 331
Caution
To prevent scratching, never useabrasive cleaners on automotiveglass. Abrasive cleaners oraggressive cleaning may damagethe rear window defogger.
Cleaning the windshield with waterduring the first three to six months ofownership will reduce tendency to fog.
Speaker Covers
Vacuum around a speaker covergently, so that the speaker will not bedamaged. Clean spots with water andmild soap.
Coated Moldings
Coated moldings should be cleaned.
. When lightly soiled, wipe with asponge or soft, lint-free clothdampened with water.
. When heavily soiled, use warmsoapy water.
Fabric/Carpet/Suede
Start by vacuuming the surface usinga soft brush attachment. If a rotatingvacuum brush attachment is beingused, only use it on the floor carpet.Before cleaning, gently remove asmuch of the soil as possible:
. Gently blot liquids with a papertowel. Continue blotting until nomore soil can be removed.
. For solid soils, remove as much aspossible prior to vacuuming.
To clean:
1. Saturate a clean, lint-freecolorfast cloth with water.Microfiber cloth is recommendedto prevent lint transfer to thefabric or carpet.
2. Remove excess moisture bygently wringing until water doesnot drip from the cleaning cloth.
3. Start on the outside edge of thesoil and gently rub toward thecenter. Fold the cleaning cloth toa clean area frequently toprevent forcing the soil in to thefabric.
4. Continue gently rubbing thesoiled area until there is nolonger any color transfer fromthe soil to the cleaning cloth.
5. If the soil is not completelyremoved, use a mild soapsolution followed only by plainwater.
If the soil is not completely removed,it may be necessary to use acommercial upholstery cleaner or spotlifter. Test a small hidden area forcolorfastness before using acommercial upholstery cleaner or spotlifter. If ring formation occurs, cleanthe entire fabric or carpet.
After cleaning, use a paper towel toblot excess moisture.
Cleaning High Gloss Surfacesand Vehicle Information andRadio Displays
Use a microfiber cloth on high glosssurfaces or vehicle displays. First, usea soft bristle brush to remove dirt thatcan scratch the surface. Then gentlyclean by rubbing with a microfibercloth. Never use window cleaners or

Cadillac ATS/ATS-V Owner Manual (GMNA-Localizing-U.S./Canada/Mexico-11349135) - 2018 - crc - 9/25/17
332 VEHICLE CARE
solvents. Periodically hand wash themicrofiber cloth separately, using mildsoap. Do not use bleach or fabricsoftener. Rinse thoroughly and air drybefore next use.
Caution
Do not attach a device with asuction cup to the display. This maycause damage and would not becovered by the vehicle warranty.
Instrument Panel, Leather, Vinyl,Other Plastic Surfaces, LowGloss Paint Surfaces, andNatural Open Pore WoodSurfaces
Use a soft microfiber cloth dampenedwith water to remove dust and loosedirt. For a more thorough cleaning,use a soft microfiber cloth dampenedwith a mild soap solution.
Caution
Soaking or saturating leather,especially perforated leather, as wellas other interior surfaces, maycause permanent damage. Wipeexcess moisture from these surfacesafter cleaning and allow them todry naturally. Never use heat,steam, or spot removers. Do not usecleaners that contain silicone orwax-based products. Cleanerscontaining these solvents canpermanently change the appearanceand feel of leather or soft trim, andare not recommended.
Do not use cleaners that increasegloss, especially on the instrumentpanel. Reflected glare can decreasevisibility through the windshieldunder certain conditions.
Caution
Use of air fresheners may causepermanent damage to plastics andpainted surfaces. If an air freshenercomes in contact with any plasticor painted surface in the vehicle,blot immediately and clean with asoft cloth dampened with a mildsoap solution. Damage caused byair fresheners would not be coveredby the vehicle warranty.
Cargo Cover andConvenience Net
Wash with warm water and milddetergent. Do not use chlorine bleach.Rinse with cold water, and then drycompletely.
Care of Seat Belts
Keep belts clean and dry.

Cadillac ATS/ATS-V Owner Manual (GMNA-Localizing-U.S./Canada/Mexico-11349135) - 2018 - crc - 9/25/17
VEHICLE CARE 333
{ Warning
Do not bleach or dye seat beltwebbing. It may severely weakenthe webbing. In a crash, they mightnot be able to provide adequateprotection. Clean and rinse seat beltwebbing only with mild soap andlukewarm water. Allow the webbingto dry.
Floor Mats
{ Warning
If a floor mat is the wrong size or isnot properly installed, it caninterfere with the pedals.Interference with the pedals cancause unintended acceleration and/or increased stopping distancewhich can cause a crash and injury.Make sure the floor mat does notinterfere with the pedals.
Use the following guidelines forproper floor mat usage.
. The original equipment floor matswere designed for your vehicle.If the floor mats need replacing, itis recommended that GM certifiedfloor mats be purchased. Non-GMfloor mats may not fit properlyand may interfere with the pedals.Always check that the floor matsdo not interfere with the pedals.
. Do not use a floor mat if thevehicle is not equipped with afloor mat retainer on the driverside floor.
. Use the floor mat with the correctside up. Do not turn it over.
. Do not place anything on top ofthe driver side floor mat.
. Use only a single floor mat on thedriver side.
. Do not place one floor mat on topof another.
The floor mats are held in place bybutton-type retainers.
Removing and Replacing theFloor Mats
1. Pull up on the rear of the floormat to unlock the retainers andremove.
2. Reinstall by lining up the floormat retainer openings over thecarpet retainers and snap intoposition.
3. Make sure the floor mat isproperly secured in place. Verifythe floor mat does not interferewith the pedals.

Cadillac ATS/ATS-V Owner Manual (GMNA-Localizing-U.S./Canada/Mexico-11349135) - 2018 - crc - 9/25/17
334 SERVICE AND MAINTENANCE
Service andMaintenance
General InformationGeneral Information . . . . . . . . . . . . . 334
Cadillac Premium CareMaintenanceCadillac Premium CareMaintenance . . . . . . . . . . . . . . . . . . . . 336
Maintenance ScheduleMaintenance Schedule . . . . . . . . . . . 336
Special Application ServicesSpecial Application Services . . . . . 341
Additional Maintenanceand CareAdditional Maintenanceand Care . . . . . . . . . . . . . . . . . . . . . . . . . 342
Recommended Fluids,Lubricants, and PartsRecommended Fluids andLubricants . . . . . . . . . . . . . . . . . . . . . . . 345
Maintenance ReplacementParts . . . . . . . . . . . . . . . . . . . . . . . . . . . . . 346
Maintenance RecordsMaintenance Records . . . . . . . . . . . . 348
General InformationYour vehicle is an importantinvestment. This section describes therequired maintenance for the vehicle.Follow this schedule to help protectagainst major repair expensesresulting from neglect or inadequatemaintenance. It may also help tomaintain the value of the vehicle if itis sold. It is the responsibility of theowner to have all requiredmaintenance performed.
Your dealer has trained technicianswho can perform requiredmaintenance using genuinereplacement parts. They haveup-to-date tools and equipment forfast and accurate diagnostics. Manydealers have extended evening andSaturday hours, courtesytransportation, and online schedulingto assist with service needs.
Your dealer recognizes the importanceof providing competitively pricedmaintenance and repair services. Withtrained technicians, the dealer is theplace for routine maintenance such asoil changes and tire rotations and

Cadillac ATS/ATS-V Owner Manual (GMNA-Localizing-U.S./Canada/Mexico-11349135) - 2018 - crc - 9/25/17
SERVICE AND MAINTENANCE 335
additional maintenance items liketires, brakes, batteries, and wiperblades.
Caution
Damage caused by impropermaintenance can lead to costlyrepairs and may not be covered bythe vehicle warranty. Maintenanceintervals, checks, inspections,recommended fluids, and lubricantsare important to keep the vehicle ingood working condition.
Do not have chemical flushes thatare not approved by GM performedon the vehicle. The use of flushes,solvents, cleaners, or lubricants thatare not approved by GM coulddamage the vehicle, requiringexpensive repairs that are notcovered by the vehicle warranty.
The Tire Rotation and RequiredServices are the responsibility of thevehicle owner. It is recommended tohave your dealer perform theseservices every 12 000 km/7,500 mi.
Proper vehicle maintenance helps tokeep the vehicle in good workingcondition, improves fuel economy, andreduces vehicle emissions.
Because of the way people usevehicles, maintenance needs vary.There may need to be more frequentchecks and services. The AdditionalRequired Services - Normal are forvehicles that:
. Carry passengers and cargo withinrecommended limits on the Tireand Loading Information label. SeeVehicle Load Limits 0 186.
. Are driven on reasonable roadsurfaces within legal driving limits.
. Use the recommended fuel. SeeFuel 0 240.
Refer to the information in theMaintenance Schedule AdditionalRequired Services - Normal chart.
The Additional Required Services -Severe are for vehicles that are:
. Mainly driven in heavy city trafficin hot weather
. Mainly driven in hilly ormountainous terrain
. Frequently towing a trailer
. Used for high speed or competitivedriving
. Used for taxi, police, or deliveryservice
Refer to the information in theMaintenance Schedule AdditionalRequired Services - Severe chart.
{ Warning
Performing maintenance work canbe dangerous and can cause seriousinjury. Perform maintenance workonly if the required information,proper tools, and equipment areavailable. If they are not, see yourdealer to have a trained techniciando the work. See Doing Your OwnService Work 0 252.

Cadillac ATS/ATS-V Owner Manual (GMNA-Localizing-U.S./Canada/Mexico-11349135) - 2018 - crc - 9/25/17
336 SERVICE AND MAINTENANCE
Cadillac Premium CareMaintenanceThis vehicle comes with CadillacPremium Care Maintenance. It is amaintenance program that coversselect routine maintenance serviceswhen scheduled in accordance withthe owner’s manual, including:
. Oil changes based on the vehicle'soil life monitor system.
. Tire rotation every 12 000 km(7,500 mi).
. Engine air cleaner filterreplacement. (ATS-V Only)
. Passenger compartment air filterreplacement.
. Multi-point vehicle inspection(MPVI) performed by a qualifiedtechnician.
Cadillac requires that all CadillacPremium Care Maintenance servicesbe performed by a Cadillac authorizedservice dealer.
Maintenance ScheduleOwner Checks and Services
At Each Fuel Stop
. Check the engine oil level. SeeEngine Oil 0 259.
Once a Month
. Check the tire inflation pressures.See Tire Pressure 0 298.
. Inspect the tires for wear. See TireInspection 0 303.
. Check the windshield washer fluidlevel. See Washer Fluid 0 271.
Engine Oil Change
When the CHANGE ENGINE OILSOON message displays, have theengine oil and filter changed withinthe next 1 000 km/600 mi. If drivenunder the best conditions, the engineoil life system may not indicate theneed for vehicle service for up to ayear. The engine oil and filter must bechanged at least once a year and the
oil life system must be reset. Yourtrained dealer technician can performthis work. If the engine oil life systemis reset accidentally, service thevehicle within 5 000 km/3,000 mi sincethe last service. Reset the oil lifesystem when the oil is changed. SeeEngine Oil Life System 0 261.
Tire Rotation and RequiredServices Every 12 000 km/7,500 mi
Rotate the tires, if recommended forthe vehicle, and perform the followingservices. See Tire Rotation 0 303.
. Check engine oil level and oillife percentage. If needed, changeengine oil and filter, and reset oillife system.See Engine Oil 0 259 and Engine OilLife System 0 261.
. Check engine coolant level.See Cooling System (Engine) 0 265or Cooling System (Intercooler)0 269.
. Check windshield washer fluidlevel. See Washer Fluid 0 271.

Cadillac ATS/ATS-V Owner Manual (GMNA-Localizing-U.S./Canada/Mexico-11349135) - 2018 - crc - 9/25/17
SERVICE AND MAINTENANCE 337. Visually inspect windshield wiper
blades for wear, cracking,or contamination. See ExteriorCare 0 326. Replace worn ordamaged wiper blades. See WiperBlade Replacement 0 276.
. Check tire inflation pressures. SeeTire Pressure 0 298.
. Inspect tire wear. See TireInspection 0 303.
. Visually check for fluid leaks.
. Inspect engine air cleaner filter.See Engine Air Cleaner/Filter 0 264.
. Inspect brake system. See ExteriorCare 0 326.
. Visually inspect steering,suspension, and chassiscomponents for damaged, loose,or missing parts or signs of wear.See Exterior Care 0 326.
. Check restraint systemcomponents. See Safety SystemCheck 0 75.
. Visually inspect fuel system fordamage or leaks.
. Visually inspect exhaust systemand nearby heat shields for looseor damaged parts.
. Lubricate body components. SeeExterior Care 0 326.
. Check starter switch. See StarterSwitch Check 0 275.
. Check automatic transmissionshift lock control function. SeeAutomatic Transmission Shift LockControl Function Check 0 276.
. Check parking brake andautomatic transmission parkmechanism. See Park Brake andP (Park) Mechanism Check 0 276.
. Check accelerator pedal fordamage, high effort, or binding.Replace if needed.
. Visually inspect gas strut for signsof wear, cracks, or other damage.Check the hold open ability of thestrut. If the hold open ability islow, service the gas strut. See GasStrut(s) 0 277.
. Check tire sealant expiration date,if equipped. See Tire Sealant andCompressor Kit 0 312.
. Inspect sunroof track and seal,if equipped. See Sunroof 0 52.

Cadillac ATS/ATS-V Owner Manual (GMNA-Localizing-U.S./Canada/Mexico-11349135) - 2018 - crc - 9/25/17
338 SERVICE AND MAINTENANCE
Maintenance ScheduleAdditional Required Services -Normal
12000km/7
,500mi
24000km/1
5,000mi
36000km/2
2,500mi
48000km/3
0,000mi
60000km/3
7,500mi
72000km/4
5,000mi
84000km/5
2,500mi
96000km/6
0,000mi
108000km/6
7,500mi
120000km/7
5,000mi
132000km/8
2,500mi
144000km/9
0,000mi
156000km/9
7,500mi
168000km/1
05,000mi
180000km/1
12,500mi
192000km/1
20,000mi
204000km/1
27,500mi
216000km/1
35,000mi
228000km/1
42,500mi
240000km/1
50,000mi
Rotate tires and perform Required Services. Checkengine oil level and oil life percentage. Changeengine oil and filter, if needed.
@ @ @ @ @ @ @ @ @ @ @ @ @ @ @ @ @ @ @ @
Replace passenger compartment air filter. (1) @ @ @ @ @ @
Inspect evaporative control system. (2) @ @ @
ATS-V Only: Replace engine air cleaner filter. (3) @ @ @ @ @ @
Except ATS-V: Replace engine air cleaner filter. (3) @ @ @
Change transfer case fluid, if equipped withAWD. (4)
@
Change rear axle fluid, if equipped with limited slipdifferential. (4)
@ @ @
Change rear axle fluid, without limited slipdifferential. (4)
@
2.0L or 3.6L Twin Turbo Engine Only: Replace sparkplugs. Inspect spark plug wires.
@ @
3.6L V6 Engine Only: Replace spark plugs. Inspectspark plug wires.
@
Drain and fill engine cooling system. (5) @
Visually inspect accessory drive belts. (6) @
Replace brake fluid, if equipped with an automatictransmission. (7)
Replace brake/clutch fluid, if equipped with amanual transmission. (8)

Cadillac ATS/ATS-V Owner Manual (GMNA-Localizing-U.S./Canada/Mexico-11349135) - 2018 - crc - 9/25/17
SERVICE AND MAINTENANCE 339
Footnotes — Maintenance ScheduleAdditional Required Services -Normal
(1) Or every two years, whichevercomes first. More frequent passengercompartment air filter replacementmay be needed if driving in areas withheavy traffic, poor air quality, highdust levels, or environmentalallergens. Passenger compartment airfilter replacement may also be neededif there is reduced airflow, windowfogging, or odors. Your GM dealer canhelp determine when to replace thefilter.
(2) Visually check all fuel and vaporlines and hoses for proper attachment,connection, routing, and condition.
(3) Or every four years, whichevercomes first. If driving in dustyconditions, inspect the filter at eachoil change or more often as needed.
(4) Do not directly power wash thetransfer case and/or front/rear axleoutput seals. High pressure water canovercome the seals and contaminatethe transfer case fluid. Contaminated
fluid will decrease the life of thetransfer case and/or axles and shouldbe replaced.
(5) Or every five years, whichevercomes first.See Cooling System (Engine) 0 265 orCooling System (Intercooler) 0 269.
(6) Or every 10 years, whichevercomes first. Inspect for fraying,excessive cracking, or damage; replace,if needed.
(7) If equipped with an automatictransmission, replace brake fluid everyfive years. See Brake Fluid 0 272.
(8) If equipped with a manualtransmission, replace brake/clutchfluid every three years. See Brake Fluid0 272.

Cadillac ATS/ATS-V Owner Manual (GMNA-Localizing-U.S./Canada/Mexico-11349135) - 2018 - crc - 9/25/17
340 SERVICE AND MAINTENANCE
Maintenance ScheduleAdditional Required Services -Severe
12000km/7
,500mi
24000km/1
5,000mi
36000km/2
2,500mi
48000km/3
0,000mi
60000km/3
7,500mi
72000km/4
5,000mi
84000km/5
2,500mi
96000km/6
0,000mi
108000km/6
7,500mi
120000km/7
5,000mi
132000km/8
2,500mi
144000km/9
0,000mi
156000km/9
7,500mi
168000km/1
05,000mi
180000km/1
12,500mi
192000km/1
20,000mi
204000km/1
27,500mi
216000km/1
35,000mi
228000km/1
42,500mi
240000km/1
50,000mi
Rotate tires and perform Required Services. Checkengine oil level and oil life percentage. Changeengine oil and filter, if needed.
@ @ @ @ @ @ @ @ @ @ @ @ @ @ @ @ @ @ @ @
Replace passenger compartment air filter. (1) @ @ @ @ @ @
Inspect evaporative control system. (2) @ @ @
ATS-V Only: Replace engine air cleaner filter. (3) @ @ @ @ @ @
Except ATS-V: Replace engine air cleaner filter. (3) @ @ @
Change automatic transmission fluid and filter. @ @ @
Change manual transmission fluid. @ @ @
Change transfer case fluid, if equipped withAWD. (4)
@ @ @
Change rear axle fluid, if equipped with limited slipdifferential. (4)
@ @ @
Change rear axle fluid, without limited slipdifferential. (4)
@ @
2.0L or 3.6L Twin Turbo Engine Only: Replace sparkplugs. Inspect spark plug wires.
@ @
3.6L V6 Engine Only: Replace spark plugs. Inspectspark plug wires.
@
Drain and fill engine cooling system. (5) @
Visually inspect accessory drive belts. (6) @
Replace brake fluid, if equipped with an automatictransmission. (7)
Replace brake/clutch fluid, if equipped with amanual transmission. (8)

Cadillac ATS/ATS-V Owner Manual (GMNA-Localizing-U.S./Canada/Mexico-11349135) - 2018 - crc - 9/25/17
SERVICE AND MAINTENANCE 341
Footnotes — Maintenance ScheduleAdditional Required Services -Severe
(1) Or every two years, whichevercomes first. More frequent passengercompartment air filter replacementmay be needed if driving in areas withheavy traffic, poor air quality, highdust levels, or environmentalallergens. Passenger compartment airfilter replacement may also be neededif there is reduced airflow, windowfogging, or odors. Your GM dealer canhelp determine when to replace thefilter.
(2) Visually check all fuel and vaporlines and hoses for proper attachment,connection, routing, and condition.
(3) Or every four years, whichevercomes first. If driving in dustyconditions, inspect the filter at eachoil change or more often as needed.
(4) Do not directly power wash thetransfer case and/or front/rear axleoutput seals. High pressure water canovercome the seals and contaminatethe transfer case fluid. Contaminated
fluid will decrease the life of thetransfer case and/or axles and shouldbe replaced.
(5) Or every five years, whichevercomes first.See Cooling System (Engine) 0 265 orCooling System (Intercooler) 0 269.
(6) Or every 10 years, whichevercomes first. Inspect for fraying,excessive cracking, or damage; replace,if needed.
(7) If equipped with an automatictransmission, replace brake fluid everyfive years. See Brake Fluid 0 272.
(8) If equipped with a manualtransmission, replace brake/clutchfluid every three years. See Brake Fluid0 272.
Special ApplicationServices. Severe Commercial Use Vehicles
Only: Lubricate chassiscomponents every oil change.
. Have underbody flushing serviceperformed. See "UnderbodyMaintenance" in Exterior Care0 326.

Cadillac ATS/ATS-V Owner Manual (GMNA-Localizing-U.S./Canada/Mexico-11349135) - 2018 - crc - 9/25/17
342 SERVICE AND MAINTENANCE
Additional Maintenanceand CareYour vehicle is an importantinvestment and caring for it properlymay help to avoid future costlyrepairs. To maintain vehicleperformance, additional maintenanceservices may be required.
It is recommended that your dealerperform these services — their traineddealer technicians know your vehiclebest. Your dealer can also perform athorough assessment with amulti-point inspection to recommendwhen your vehicle may needattention.
The following list is intended toexplain the services and conditions tolook for that may indicate services arerequired.
Battery
The 12-volt battery supplies power tostart the engine and operate anyadditional electrical accessories.
. To avoid break-down or failure tostart the vehicle, maintain abattery with full cranking power.
. Trained dealer technicians havethe diagnostic equipment to testthe battery and ensure that theconnections and cables arecorrosion-free.
Belts
. Belts may need replacing if theysqueak or show signs of crackingor splitting.
. Trained dealer technicians haveaccess to tools and equipment toinspect the belts and recommendadjustment or replacement whennecessary.
Brakes
Brakes stop the vehicle and are crucialto safe driving.
. Signs of brake wear may includechirping, grinding, or squealingnoises, or difficulty stopping.
. Trained dealer technicians haveaccess to tools and equipment toinspect the brakes and recommendquality parts engineered for thevehicle.
Fluids
Proper fluid levels and approved fluidsprotect the vehicle’s systems andcomponents. See Recommended Fluidsand Lubricants 0 345 for GM approvedfluids.
. Engine oil and windshield washerfluid levels should be checked atevery fuel fill.
. Instrument cluster lights maycome on to indicate that fluidsmay be low and need to be filled.
Hoses
Hoses transport fluids and should beregularly inspected to ensure thatthere are no cracks or leaks. With amulti-point inspection, your dealercan inspect the hoses and advise ifreplacement is needed.

Cadillac ATS/ATS-V Owner Manual (GMNA-Localizing-U.S./Canada/Mexico-11349135) - 2018 - crc - 9/25/17
SERVICE AND MAINTENANCE 343
Lamps
Properly working headlamps,taillamps, and brake lamps areimportant to see and be seen onthe road.
. Signs that the headlamps needattention include dimming, failureto light, cracking, or damage. Thebrake lamps need to be checkedperiodically to ensure that theylight when braking.
. With a multi-point inspection,your dealer can check the lampsand note any concerns.
Shocks and Struts
Shocks and struts help aid in controlfor a smoother ride.
. Signs of wear may include steeringwheel vibration, bounce/swaywhile braking, longer stoppingdistance, or uneven tire wear.
. As part of the multi-pointinspection, trained dealertechnicians can visually inspectthe shocks and struts for signs of
leaking, blown seals, or damage,and can advise when service isneeded.
Tires
Tires need to be properly inflated,rotated, and balanced. Maintainingthe tires can save money and fuel, andcan reduce the risk of tire failure.
. Signs that the tires need to bereplaced include three or morevisible treadwear indicators; cordor fabric showing through therubber; cracks or cuts in the treador sidewall; or a bulge or split inthe tire.
. Trained dealer technicians caninspect and recommend the righttires. Your dealer can also providetire/wheel balancing services toensure smooth vehicle operationat all speeds. Your dealer sells andservices name brand tires.
Vehicle Care
To help keep the vehicle looking likenew, vehicle care products areavailable from your dealer. Forinformation on how to clean and
protect the vehicle’s interior andexterior, see Interior Care 0 330 andExterior Care 0 326.
Wheel Alignment
Wheel alignment is critical forensuring that the tires deliver optimalwear and performance.
. Signs that the alignment may needto be adjusted include pulling,improper vehicle handling,or unusual tire wear.
. Your dealer has the requiredequipment to ensure proper wheelalignment.
Windshield
For safety, appearance, and the bestviewing, keep the windshield cleanand clear.
. Signs of damage include scratches,cracks, and chips.
. Trained dealer technicians caninspect the windshield andrecommend proper replacement ifneeded.

Cadillac ATS/ATS-V Owner Manual (GMNA-Localizing-U.S./Canada/Mexico-11349135) - 2018 - crc - 9/25/17
344 SERVICE AND MAINTENANCE
Wiper Blades
Wiper blades need to be cleaned andkept in good condition to provide aclear view.
. Signs of wear include streaking,skipping across the windshield,and worn or split rubber.
. Trained dealer technicians cancheck the wiper blades and replacethem when needed.

Cadillac ATS/ATS-V Owner Manual (GMNA-Localizing-U.S./Canada/Mexico-11349135) - 2018 - crc - 9/25/17
SERVICE AND MAINTENANCE 345
Recommended Fluids, Lubricants, and Parts
Recommended Fluids and Lubricants
Usage Fluid/Lubricant
Automatic Transmission DEXRON-HP Automatic Transmission Fluid (GM Part No. 19353429, inCanada 19353430).
Chassis Lubrication Chassis Lubricant (GM Part No. 12377985, in Canada 88901242) or lubricantmeeting requirements of NLGI #2, Category LB or GC-LB.
Engine Coolant 50/50 mixture of clean, drinkable water and use only DEX-COOL Coolant.See Cooling System (Engine) 0 265 or Cooling System (Intercooler) 0 269.
Engine Oil Engine oil meeting the dexos1 specification of the proper SAE viscosity grade.ACDelco dexos1 full synthetic is recommended. See Engine Oil 0 259.
Electronic Limited-Slip Differential(eLSD) Hydraulic Apply Fluid
(V-Series Only)
DEXRON-VI Automatic Transmission Fluid.
Hood Latch Assembly, Secondary Latch,Pivots, Spring Anchor, and Release Pawl
Lubriplate Lubricant Aerosol (GM Part No. 89021668, in Canada 89021674) orlubricant meeting requirements of NLGI #2, Category LB or GC-LB.
Hydraulic Brake/Clutch System DOT 3 Hydraulic Brake Fluid (GM Part No. 19353126, in Canada 19299819).
Key Lock Cylinders, Hood and DoorHinges
Multi-Purpose Lubricant, Superlube (GM Part No. 12346241, inCanada 10953474).
Manual Transmission (Except ATS-V) DEXRON-VI Automatic Transmission Fluid.
Manual Transmission (ATS-V) Manual Transmission Fluid (GM Part No. 88861800, in Canada 88861801).

Cadillac ATS/ATS-V Owner Manual (GMNA-Localizing-U.S./Canada/Mexico-11349135) - 2018 - crc - 9/25/17
346 SERVICE AND MAINTENANCE
Usage Fluid/Lubricant
Rear Axle/Front Axle (All-Wheel Drive) Gear DEXRON MTF 75W-90 (GM Part No. 88863089, in Canada 88863090).
Rear Axle (Limited-Slip Differential) DEXRON LS Gear 75W-90 (GM Part No. 88862624, in Canada 88862625).
Rear Axle (Non-Limited-SlipDifferential)
Gear DEXRON MTF 75W-90 (GM Part No. 88863089, in Canada 88863090).
Transfer Case (All-Wheel Drive) Transfer Case Fluid (GM Part No. 88861950, in Canada 88861951).
Weatherstrip Conditioning Weatherstrip Lubricant (GM Part No. 3634770, in Canada 10953518) orequivalent.
Windshield Washer Automotive windshield washer fluid that meets regional freeze protectionrequirements.
Maintenance Replacement PartsReplacement parts identified below by name, part number, or specification can be obtained from your dealer.
Part GM Part Number ACDelco Part Number
Engine Air Cleaner/Filter
2.0L L4, 3.6L V6 (LFX) 20857930 A3178C
3.6L V6 Twin Turbo Engine (LF4) (2 Required) 13367308 A3202C
Engine Oil Filter
2.0L L4 Engine 12640445 PF64

Cadillac ATS/ATS-V Owner Manual (GMNA-Localizing-U.S./Canada/Mexico-11349135) - 2018 - crc - 9/25/17
SERVICE AND MAINTENANCE 347
Part GM Part Number ACDelco Part Number
3.6L V6 Engine (LGX) 19330000 PF63E
3.6L V6 Twin Turbo Engine (LF4) 19330000 PF63E
Passenger Compartment Air Filter 13508023 CF185
Spark Plugs
2.0L L4 Engine 12647827 41-125
3.6L V6 Engine (LGX) 12646780 41-130
3.6L V6 Twin Turbo Engine (LF4) 12662396 41-147
Wiper Blades
Driver Side – 55 cm (21.7 in) 23360288 —
Passenger Side – 45 cm (17.7 in) 23353587 —

Cadillac ATS/ATS-V Owner Manual (GMNA-Localizing-U.S./Canada/Mexico-11349135) - 2018 - crc - 9/25/17
348 SERVICE AND MAINTENANCE
Maintenance RecordsAfter the scheduled services are performed, record the date, odometer reading, who performed the service, and the type ofservices performed in the boxes provided. Retain all maintenance receipts.
Date OdometerReading Serviced By Maintenance Stamp Services Performed

Cadillac ATS/ATS-V Owner Manual (GMNA-Localizing-U.S./Canada/Mexico-11349135) - 2018 - crc - 9/25/17
TECHNICAL DATA 349
Technical Data
Vehicle IdentificationVehicle IdentificationNumber (VIN) . . . . . . . . . . . . . . . . . . . 349
Service Parts IdentificationLabel . . . . . . . . . . . . . . . . . . . . . . . . . . . . . 349
Vehicle DataCapacities and Specifications . . . . 350Engine Drive Belt Routing . . . . . . . 353
Vehicle Identification
Vehicle IdentificationNumber (VIN)
This legal identifier is in the frontcorner of the instrument panel, on thedriver side of the vehicle. It can beseen through the windshield fromoutside. The Vehicle IdentificationNumber (VIN) also appears on theVehicle Certification and Service Partslabels and certificates of title andregistration.
Engine Identification
The eighth character in the VIN is theengine code. This code identifies thevehicle's engine, specifications, andreplacement parts. See “EngineSpecifications” under Capacities andSpecifications 0 350 for the vehicle'sengine code.
Service Parts IdentificationLabelThere may be a label on the inside ofthe trunk that contains the followinginformation:
. Vehicle IdentificationNumber (VIN)
. Model designation
. Paint information
. Production options and specialequipment
If there is no label, there is a barcodeon the certification label on thecenter (B) pillar to scan for this sameinformation.

Cadillac ATS/ATS-V Owner Manual (GMNA-Localizing-U.S./Canada/Mexico-11349135) - 2018 - crc - 9/25/17
350 TECHNICAL DATA
Vehicle Data
Capacities and SpecificationsThe following approximate capacities are given in metric and English conversions. See Recommended Fluids and Lubricants0 345 for more information.
ApplicationCapacities
Metric English
Air Conditioning Refrigerant For the air conditioning system refrigerant type andcharge amount, see the refrigerant label under the
hood. See your dealer for more information.
Cooling System – Engine
2.0L L4 Engine 8.8 L 9.3 qt
3.6L V6 Engine without Additional Oil Cooler (RPO KC4) 10.0 L 10.6 qt
3.6L V6 Engine with Additional Oil Cooler (RPO KC4) 10.6 L 11.2 qt
3.6L V6 Twin Turbo Engine (V-Series Only) 11.6 L 12.3 qt
3.6L V6 Cooling System Intercooler (V-Series Only) 3.1 L 3.3 qt
Engine Oil with Filter
2.0L L4 Engine RWD 4.7 L 5.0 qt
2.0L L4 Engine AWD 5.7 L 6.0 qt
3.6L V6 Engine (LGX) RWD (without oil cooler) 5.2 L 5.5 qt

Cadillac ATS/ATS-V Owner Manual (GMNA-Localizing-U.S./Canada/Mexico-11349135) - 2018 - crc - 9/25/17
TECHNICAL DATA 351
ApplicationCapacities
Metric English
3.6L V6 Engine (LGX) RWD (with oil cooler) 5.7 L 6.0 qt
3.6L V6 Engine (LGX) AWD 6.15 L 6.5 qt
3.6L V6 Twin Turbo Engine 6.6 L 7.0 qt
Fuel Tank 62.5 L 16.5 gal
Transfer Case – AWD 0.80 L 0.84 qt
Rear Axle (with non-limited-slip) 0.85 L 0.9 qt
Rear Axle (with limited-slip) 1.0 L 1.1 qt
Rear Axle (226 mm Axle with Differential Oil Cooler) 1.50 L 1.60 qt
Electronic Limited-Slip Differential (eLSD) Hydraulic Apply Fluid(V-Series only)
0.141 L 0.149 qt
Wheel Nut Torque – ATS 140Y 100 lb ft
Wheel Nut Torque – ATS-V 190Y 140 lb ft
All capacities are approximate. When adding, be sure to fill to the approximate level, as recommended in this manual.Recheck fluid level after filling.

Cadillac ATS/ATS-V Owner Manual (GMNA-Localizing-U.S./Canada/Mexico-11349135) - 2018 - crc - 9/25/17
352 TECHNICAL DATA
Engine Specifications
Engine VIN Code Transmission Spark Plug Gap
2.0L L4 Engine (LTG) X AutomaticManual
0.9 mm (0.035 in)
3.6L V6 Engine (LGX) S Automatic 0.80–0.90 mm (0.031–0.035 in)
3.6L V6 Twin Turbo Engine (LF4) Y AutomaticManual
0.75–0.90 mm (0.030–0.035 in)

Cadillac ATS/ATS-V Owner Manual (GMNA-Localizing-U.S./Canada/Mexico-11349135) - 2018 - crc - 9/25/17
TECHNICAL DATA 353
Engine Drive Belt Routing
2.0L L4 Engines
3.6L V6 Engine (LGX)
3.6L V6 Twin Turbo Engine (LF4)
Cadillac ATS/ATS-V Owner Manual (GMNA-Localizing-U.S./Canada/Mexico-11349135) - 2018 - crc - 9/25/17
354 CUSTOMER INFORMATION
CustomerInformation
Customer InformationCustomer SatisfactionProcedure . . . . . . . . . . . . . . . . . . . . . . . 354
Customer Assistance Offices . . . . 356Customer Assistance for TextTelephone (TTY) Users . . . . . . . . . 356
Online Owner Center . . . . . . . . . . . . . 357GM Mobility ReimbursementProgram . . . . . . . . . . . . . . . . . . . . . . . . . 357
Roadside Service . . . . . . . . . . . . . . . . . 358Scheduling ServiceAppointments . . . . . . . . . . . . . . . . . . . 360
Courtesy TransportationProgram . . . . . . . . . . . . . . . . . . . . . . . . . 360
Collision Damage Repair . . . . . . . . . 361Service Publications OrderingInformation . . . . . . . . . . . . . . . . . . . . . 363
Radio Frequency Statement . . . . . 364
Reporting Safety DefectsReporting Safety Defects to theUnited States Government . . . . . 364
Reporting Safety Defects to theCanadian Government . . . . . . . . . 364
Reporting Safety Defects toGeneral Motors . . . . . . . . . . . . . . . . . 365
Vehicle Data Recording andPrivacyVehicle Data Recording andPrivacy . . . . . . . . . . . . . . . . . . . . . . . . . . . 365
Event Data Recorders . . . . . . . . . . . . 366OnStar . . . . . . . . . . . . . . . . . . . . . . . . . . . . . 366Infotainment System . . . . . . . . . . . . . 367
Customer Information
Customer SatisfactionProcedureYour satisfaction and goodwill areimportant to your dealer and toCadillac. Normally, any concerns withthe sales transaction or the operationof the vehicle will be resolved by yourdealer's sales or service departments.Sometimes, however, despite the bestintentions of all concerned,misunderstandings can occur. If yourconcern has not been resolved to yoursatisfaction, the following stepsshould be taken:
STEP ONE : Discuss your concernwith a member of dealershipmanagement. Normally, concerns canbe quickly resolved at that level. If thematter has already been reviewed withthe sales, service or parts manager,contact the owner of your dealershipor the general manager.
STEP TWO : If after contacting amember of dealership management, itappears your concern cannot beresolved by your dealership without

Cadillac ATS/ATS-V Owner Manual (GMNA-Localizing-U.S./Canada/Mexico-11349135) - 2018 - crc - 9/25/17
CUSTOMER INFORMATION 355
further help, in the U.S., call theCadillac Customer Assistance Centerat 1-800–458–8006. In Canada, callthe Canadian Cadillac Customer CareCentre at 1-888-446-2000.
We encourage you to call the toll-freenumber in order to give your inquiryprompt attention. Have the followinginformation available to give theCustomer Assistance representative:
. Vehicle IdentificationNumber (VIN). This is availablefrom the vehicle registration ortitle, or the plate at the top left ofthe instrument panel and visiblethrough the windshield.
. Dealership name and location.
. Vehicle delivery date and presentmileage.
When contacting Cadillac, rememberthat your concern will likely beresolved at a dealer's facility. That iswhy we suggest following Step Onefirst.
STEP THREE — U.S. Owners : BothGeneral Motors and your dealer arecommitted to making sure you are
completely satisfied with the newvehicle. However, if you continue toremain unsatisfied after following theprocedure outlined in Steps One andTwo, you can file with the BetterBusiness Bureau (BBB) Auto LineProgram to enforce your rights.
The BBB Auto Line Program is anout-of-court program administered bythe Council of Better Business Bureausto settle automotive disputesregarding vehicle repairs or theinterpretation of the New VehicleLimited Warranty. Although you maybe required to resort to this informaldispute resolution program prior tofiling a court action, use of theprogram is free of charge and yourcase will generally be heard within40 days. If you do not agree with thedecision given in your case, you mayreject it and proceed with any othervenue for relief available to you.
You may contact the BBB Auto LineProgram using the toll-free telephonenumber or write them at the followingaddress:
BBB Auto Line ProgramCouncil of Better Business Bureaus,Inc.3033 Wilson BoulevardSuite 600Arlington, VA 22201
Telephone: 1-800-955-5100http://www.bbb.org/council/programs-services/dispute-handling-and-resolution/bbb-auto-line
This program is available in all50 states and the District of Columbia.Eligibility is limited by vehicle age,mileage, and other factors. GeneralMotors reserves the right to changeeligibility limitations and/ordiscontinue its participation in thisprogram.
STEP THREE — Canadian Owners :In the event that you do not feel yourconcerns have been addressed afterfollowing the procedure outlined inSteps One and Two, General Motors ofCanada Company wants you to beaware of its participation in ano-charge mediation/arbitrationprogram. General Motors of CanadaCompany has committed to binding

Cadillac ATS/ATS-V Owner Manual (GMNA-Localizing-U.S./Canada/Mexico-11349135) - 2018 - crc - 9/25/17
356 CUSTOMER INFORMATION
arbitration of owner disputes involvingfactory-related vehicle service claims.The program provides for the reviewof the facts involved by an impartialthird party arbiter, and may includean informal hearing before the arbiter.The program is designed so that theentire dispute settlement process,from the time you file your complaintto the final decision, should becompleted in about 70 days. Webelieve our impartial program offersadvantages over courts in mostjurisdictions because it is informal,quick, and free of charge.
For further information concerningeligibility in the Canadian MotorVehicle Arbitration Plan (CAMVAP),call toll-free 1-800-207-0685, or callthe Cadillac Customer Care Centre,1-888-446-2000, or write to:
General Motors Cadillac CustomerCare CentreGeneral Motors of Canada CompanyMail Code: CA1-163-0051908 Colonel Sam DriveOshawa, Ontario L1H 8P7
The inquiry should be accompaniedby the Vehicle IdentificationNumber (VIN).
Customer AssistanceOfficesCadillac encourages customers to callthe toll-free number for assistance.However, if a customer wishes towrite or e-mail Cadillac, the lettershould be addressed to:
United States and Puerto Rico
Cadillac Customer Assistance CenterCadillac Motor Car DivisionP.O. Box 33169Detroit, MI 48232-5169www.Cadillac.com
1-800-458-80061-800-833-2622 (For Text Telephonedevices (TTYs))Roadside Service: 1-800-224-1400
From U.S. Virgin Islands:
1-800-496-9994
Canada
General Motors of Canada CompanyCadillac Customer Care Centre, MailCode: CA1-163-0051908 Colonel Sam DriveOshawa, Ontario L1H 8P7www.gm.ca
1-888-446-2000 (English/French)Cadillac Roadside Service:1-800-882-1112
Overseas
Contact the local General MotorsBusiness Unit.
Customer Assistance forText Telephone (TTY)UsersTo assist customers who are deaf,hard of hearing, or speech-impairedand who use Text Telephones (TTYs),Cadillac has TTY equipment availableat its Customer Assistance Center. AnyTTY user can communicate withCadillac by dialing: 1-800-833-2622.TTY users in Canada can dial1-800-263-3830.

Cadillac ATS/ATS-V Owner Manual (GMNA-Localizing-U.S./Canada/Mexico-11349135) - 2018 - crc - 9/25/17
CUSTOMER INFORMATION 357
Online Owner Center
Online Owner Experience (U.S.)my.cadillac.com
The Cadillac online owner experienceallows interaction with Cadillac andkeeps important vehicle-specificinformation in one place.
Membership Benefits
E : Download owner’s manuals andview vehicle-specific how-to videos.
G : View maintenance schedules,alerts, and OnStar onboard vehiclediagnostic information. Scheduleservice appointments.
I : View printable dealer-recordedservice records and self-recordedservice records.
D : Select a dealer and viewlocations, maps, phone numbers, andhours.
r : Track your vehicle’s warrantyinformation.
J : View active recalls or search byVehicle Identification Number (VIN).See Vehicle Identification Number (VIN)0 349.
H : View GM Card, SiriusXM Satelliteradio (if equipped), and OnStaraccount information.
F : Chat with online helprepresentatives.
See my.cadillac.com to register yourvehicle.
Cadillac Owner Centre (Canada)cadillacowner.ca
Visit the Cadillac Owner Centre:
. Chat live with online helprepresentatives.
. Locate owner resources such aslease-end, financing, and warrantyinformation.
. Retrieve favorite articles, quizzes,tips, and multimedia galleriesorganized into the FeaturedArticles and Auto Care Sections.
. Download owner’s manuals.
. Find Cadillac-recommendedmaintenance services.
GM MobilityReimbursement Program
This program is available to qualifiedapplicants for cost reimbursement, upto certain limits, of eligibleaftermarket adaptive equipmentrequired for the vehicle, such as handcontrols or a wheelchair/scooter liftfor the vehicle.
To learn about the GM Mobilityprogram, see www.gmmobility.com orcall the GM Mobility AssistanceCenter at 1-800-323-9935. TextTelephone (TTY) users, call1-800-833-9935.

Cadillac ATS/ATS-V Owner Manual (GMNA-Localizing-U.S./Canada/Mexico-11349135) - 2018 - crc - 9/25/17
358 CUSTOMER INFORMATION
General Motors of Canada also has aMobility program. See www.gm.ca orcall 1-800-GM-DRIVE (800-463-7483)for details. TTY users call1-800-263-3830.
Roadside ServiceU.S.: 1-800-224-1400.
Canada: 1-800-882-1112.
Text Telephone (TTY) Users (U.S.Only): 1-888-889-2438.
Service is available 24 hours a day,365 days a year.
Calling for Service
When calling Roadside Service, havethe following information ready:
. Your name, home address, andhome telephone number
. Telephone number of yourlocation
. Location of the vehicle
. Model, year, color, and licenseplate number of the vehicle
. Odometer reading, VehicleIdentification Number (VIN), anddelivery date of the vehicle
. Description of the problem
Coverage
Services are provided for the durationof the vehicle’s powertrain warranty.
In the U.S., anyone driving the vehicleis covered. In Canada, a person drivingthe vehicle without permission fromthe owner is not covered.
Roadside Service is not a part of theNew Vehicle Limited Warranty.General Motors North America andCadillac reserve the right to make anychanges or discontinue the RoadsideService program at any time withoutnotification.
General Motors North America andCadillac reserve the right to limitservices or payment to an owner ordriver if they decide the claims aremade too often, or the same type ofclaim is made many times.
Cadillac Owner Privileges™. Emergency Fuel Delivery:
Delivery of enough fuel for thevehicle to get to the nearestservice station.
. Lock-Out Service: Service tounlock the vehicle if you arelocked out. A remote unlock maybe available if you have OnStar.For security reasons, the drivermust present identification beforethis service is given.
. Emergency Tow from a PublicRoad or Highway: Tow to thenearest Cadillac dealer forwarranty service, or if the vehiclewas in a crash and cannot bedriven. Assistance is not givenwhen the vehicle is stuck in thesand, mud, or snow.
. Flat Tire Change: Service tochange a flat tire with a spare tire.The spare tire, if equipped, mustbe in good condition and properlyinflated. It is your responsibilityfor the repair or replacement ofthe tire if it is not covered by thewarranty.

Cadillac ATS/ATS-V Owner Manual (GMNA-Localizing-U.S./Canada/Mexico-11349135) - 2018 - crc - 9/25/17
CUSTOMER INFORMATION 359. Battery Jump Start: Service to
jump start a dead battery.
. Trip Interruption Benefits andService: If your trip is interrupteddue to a warranty failure,incidental expenses may bereimbursed during the Powertrainwarranty period. Items consideredare hotel, meals, and rental car ora vehicle being delivered back tothe customer, up to 500 miles.
Cadillac Technician RoadsideService (U.S. Only)
Cadillac's exceptional Roadside Serviceis more than an auto club or towingservice. It provides every Cadillacowner in the United States with theadvantage of contacting a Cadillacadvisor and, where available, aCadillac trained dealer technician whocan provide on-site service.
A dealer technician will travel to yourlocation within a 30-mile radius of aparticipating Cadillac dealership.If beyond this radius, we will arrangeto have your car towed to the nearestCadillac dealership. Each techniciantravels with a specially equipped
service vehicle complete with thenecessary Cadillac parts and toolsrequired to handle most roadsiderepairs.
Services Not Included inRoadside Service. Impound towing caused by
violation of any laws
. Legal fines
. Mounting, dismounting,or changing of snow tires, chains,or other traction devices
Service is not provided if a vehicle isin an area that is not accessible to theservice vehicle or is not a regularlytraveled or maintained public road,which includes ice and winter roads.Off-road use is not covered.
Services Specific toCanadian-Purchased Vehicles. Fuel delivery: Reimbursement is
up to 7 liters. Diesel fuel deliverymay be restricted. Propane andother fuels are not providedthrough this service.
. Lock-Out Service: Vehicleregistration is required.
. Trip Interruption Benefits andService: Pre-authorization, originaldetailed receipts, and a copy of therepair orders are required. Onceauthorization has been received,the Roadside Service advisor willhelp you make arrangements andexplain how to receive payment.Items considered are hotel, meals,and rental car or a vehicle beingdelivered back to the customer, upto 800 km.
. Alternative Service: If assistancecannot be provided right away, theRoadside Service advisor may giveyou permission to get localemergency road service. You willreceive payment, up to $100, aftersending the original receipt toRoadside Service. Mechanicalfailures may be covered, howeverany cost for parts and labor forrepairs not covered by thewarranty are the ownerresponsibility.

Cadillac ATS/ATS-V Owner Manual (GMNA-Localizing-U.S./Canada/Mexico-11349135) - 2018 - crc - 9/25/17
360 CUSTOMER INFORMATION
Scheduling ServiceAppointmentsWhen the vehicle requires warrantyservice, contact your dealer andrequest an appointment. Byscheduling a service appointment andadvising the service consultant ofyour transportation needs, your dealercan help minimize yourinconvenience.
If the vehicle cannot be scheduledinto the service departmentimmediately, keep driving it until itcan be scheduled for service, unless,of course, the problem is safetyrelated. If it is, please call yourdealership, let them know this, andask for instructions.
If your dealer requests you to bringthe vehicle for service, you are urgedto do so as early in the work day aspossible to allow for same-day repair.
Courtesy TransportationProgramTo enhance your ownershipexperience, we and our participatingdealers are proud to offer CourtesyTransportation, a customer supportprogram for vehicles with theBumper-to-Bumper (Base WarrantyCoverage period in Canada), extendedpowertrain, and/or hybrid-specificwarranties in both the U.S. andCanada.
Several Courtesy Transportationoptions are available to assist inreducing inconvenience whenwarranty repairs are required.
Courtesy Transportation is not a partof the New Vehicle Limited Warranty.A separate booklet entitled “LimitedWarranty and Owner AssistanceInformation” furnished with each newvehicle provides detailed warrantycoverage information.
Transportation Options
Warranty service can generally becompleted while you wait. However,if you are unable to do so, your dealermay offer the following transportationoptions:
Shuttle Service
This includes one-way or round-tripshuttle service within reasonable timeand distance parameters of yourdealer's area.
Public Transportation or FuelReimbursement
If overnight warranty repairs areneeded, and public transportation isused, the expense must be supportedby original receipts and within themaximum amount allowed by GM forshuttle service. If U.S. customersarrange their own transportation,limited reimbursement for reasonablefuel expenses may be available. Claimamounts should reflect actual costsand be supported by original receipts.See your dealer for information.

Cadillac ATS/ATS-V Owner Manual (GMNA-Localizing-U.S./Canada/Mexico-11349135) - 2018 - crc - 9/25/17
CUSTOMER INFORMATION 361
Courtesy Rental Vehicle
For an overnight warranty repair, thedealer may provide an availablecourtesy rental vehicle or provide forreimbursement of a rental vehicle.Reimbursement is limited and mustbe supported by original receipts aswell as a signed and completed rentalagreement and meet state/provincial,local, and rental vehicle providerrequirements. Requirements vary andmay include minimum agerequirements, insurance coverage,credit card, etc. Additional fees suchas fuel usage charges, taxes, levies,usage fees, excessive mileage, or rentalusage beyond the completion of therepair are also your responsibility.
It may not be possible to provide alike vehicle as a courtesy rental.
Additional Program Information
All program options, such as shuttleservice, may not be available at everydealer. Contact your dealer for specificavailability.
General Motors reserves the right tounilaterally modify, change,or discontinue Courtesy
Transportation at any time and toresolve all questions of claimeligibility pursuant to the terms andconditions described herein at its solediscretion.
Collision Damage RepairIf the vehicle is involved in a collisionand it is damaged, have the damagerepaired by a qualified technicianusing the proper equipment andquality replacement parts. Poorlyperformed collision repairs diminishthe vehicle resale value, and safetyperformance can be compromised insubsequent collisions.
Collision Parts
Genuine GM Collision parts are newparts made with the same materialsand construction methods as the partswith which the vehicle was originallybuilt. Genuine GM Collision parts arethe best choice to ensure that thevehicle's designed appearance,durability, and safety are preserved.The use of Genuine GM parts can helpmaintain the GM New Vehicle LimitedWarranty.
Recycled original equipment partsmay also be used for repair. Theseparts are typically removed fromvehicles that were total losses in priorcrashes. In most cases, the parts beingrecycled are from undamaged sectionsof the vehicle. A recycled originalequipment GM part may be anacceptable choice to maintain thevehicle's originally designedappearance and safety performance;however, the history of these parts isnot known. Such parts are not coveredby the GM New Vehicle LimitedWarranty, and any related failures arenot covered by that warranty.
Aftermarket collision parts are alsoavailable. These are made bycompanies other than GM and maynot have been tested for the vehicle.As a result, these parts may fit poorly,exhibit premature durability/corrosionproblems, and may not performproperly in subsequent collisions.Aftermarket parts are not covered bythe GM New Vehicle LimitedWarranty, and any vehicle failurerelated to such parts is not covered bythat warranty.

Cadillac ATS/ATS-V Owner Manual (GMNA-Localizing-U.S./Canada/Mexico-11349135) - 2018 - crc - 9/25/17
362 CUSTOMER INFORMATION
Repair Facility
GM also recommends that you choosea collision repair facility that meetsyour needs before you ever needcollision repairs. Your dealer may havea collision repair center withGM-trained technicians andstate-of-the-art equipment, or be ableto recommend a collision repair centerthat has GM-trained technicians andcomparable equipment.
Insuring the Vehicle
Protect your investment in the GMvehicle with comprehensive andcollision insurance coverage. There aresignificant differences in the quality ofcoverage afforded by variousinsurance policy terms. Manyinsurance policies provide reducedprotection to the GM vehicle bylimiting compensation for damagerepairs by using aftermarket collisionparts. Some insurance companies willnot specify aftermarket collision parts.When purchasing insurance, werecommend that you ensure that thevehicle will be repaired with GMoriginal equipment collision parts.
If such insurance coverage is notavailable from your current insurancecarrier, consider switching to anotherinsurance carrier.
If the vehicle is leased, the leasingcompany may require you to haveinsurance that ensures repairs withGenuine GM Original EquipmentManufacturer (OEM) parts or GenuineManufacturer replacement parts. Readthe lease carefully, as you may becharged at the end of the lease forpoor quality repairs.
If a Crash Occurs
If there has been an injury, callemergency services for help. Do notleave the scene of a crash until allmatters have been taken care of. Movethe vehicle only if its position putsyou in danger, or you are instructed tomove it by a police officer.
Give only the necessary informationto police and other parties involved inthe crash.
For emergency towing see RoadsideService 0 358.
Gather the following information:
. Driver name, address, andtelephone number
. Driver license number
. Owner name, address, andtelephone number
. Vehicle license plate number
. Vehicle make, model, andmodel year
. Vehicle IdentificationNumber (VIN)
. Insurance company and policynumber
. General description of the damageto the other vehicle
Choose a reputable repair facility thatuses quality replacement parts. See“Collision Parts” earlier in this section.
If the airbag has inflated, see WhatWill You See after an Airbag Inflates?0 81.
Managing the Vehicle DamageRepair Process
In the event that the vehicle requiresdamage repairs, GM recommends thatyou take an active role in its repair.

Cadillac ATS/ATS-V Owner Manual (GMNA-Localizing-U.S./Canada/Mexico-11349135) - 2018 - crc - 9/25/17
CUSTOMER INFORMATION 363
If you have a pre-determined repairfacility of choice, take the vehiclethere, or have it towed there. Specifyto the facility that any requiredreplacement collision parts be originalequipment parts, either new GenuineGM parts or recycled original GMparts. Remember, recycled parts willnot be covered by the GM vehiclewarranty.
Insurance pays the bill for the repair,but you must live with the repair.Depending on your policy limits, yourinsurance company may initially valuethe repair using aftermarket parts.Discuss this with the repairprofessional, and insist on GenuineGM parts. Remember, if the vehicle isleased, you may be obligated to havethe vehicle repaired with Genuine GMparts, even if your insurance coveragedoes not pay the full cost.
If another party's insurance companyis paying for the repairs, you are notobligated to accept a repair valuationbased on that insurance company'scollision policy repair limits, as youhave no contractual limits with thatcompany. In such cases, you can have
control of the repair and parts choicesas long as the cost stays withinreasonable limits.
Service PublicationsOrdering Information
Service Manuals
Service Manuals have the diagnosisand repair information on the engines,transmission, axle, suspension, brakes,electrical, steering, body, etc.
Owner Information
Owner publications are writtenspecifically for owners and intendedto provide basic operationalinformation about the vehicle. TheOwner’s Manual includes theMaintenance Schedule for all models.
In-Portfolio: Includes a Portfolio,Owner’s Manual, and WarrantyManual.
RETAIL SELL PRICE: $35.00 –$40.00 (U.S.) plus handling andshipping fees.
Without Pouch: Owner’s Manual only.
RETAIL SELL PRICE:$25.00 (U.S.) plus handling andshipping fees.
Current and Past Models
Service and Owner publications areavailable for many current and pastmodel year GM vehicles.
ORDER TOLL FREE: 1-800-551-4123Monday – Friday 8:00 AM – 6:00 PMEastern Time
For Credit Card Orders Only(VISA-MasterCard-Discover), see Helm,Inc. at: www.helminc.com.
Or write to:
Helm, IncorporatedAttention: Customer Service47911 Halyard DrivePlymouth, MI 48170
Prices are subject to change withoutnotice and without incurringobligation. Allow ample time fordelivery.
All listed prices are quoted in U.S.funds. Make checks payable in U.S.funds.

Cadillac ATS/ATS-V Owner Manual (GMNA-Localizing-U.S./Canada/Mexico-11349135) - 2018 - crc - 9/25/17
364 CUSTOMER INFORMATION
Radio FrequencyStatementThis vehicle has systems that operateon a radio frequency that complieswith Part 15/Part 18 of the FederalCommunications Commission (FCC)rules and with Innovation, Scienceand Economic Development (ISED)Canada's RSP-100 / license-exemptRSS's / ICES-001.
Operation is subject to the followingtwo conditions:
1. The device may not causeharmful interference.
2. The device must accept anyinterference received, includinginterference that may causeundesired operation of thedevice.
Changes or modifications to any ofthese systems by other than anauthorized service facility could voidauthorization to use this equipment.
Reporting SafetyDefects
Reporting Safety Defectsto the United StatesGovernmentIf you believe that your vehiclehas a defect which could cause acrash or could cause injury ordeath, you should immediatelyinform the National HighwayTraffic Safety Administration(NHTSA) in addition to notifyingGeneral Motors.
If NHTSA receives similarcomplaints, it may open aninvestigation, and if it finds that asafety defect exists in a group ofvehicles, it may order a recall andremedy campaign. However,NHTSA cannot become involvedin individual problems betweenyou, your dealer, or GeneralMotors.
To contact NHTSA, you may callthe Vehicle Safety Hotline toll-freeat 1-888-327-4236 (TTY:1-800-424-9153); go tohttp://www.safercar.gov; or write to:
Administrator, NHTSA1200 New Jersey Avenue, S.E.Washington, D.C. 20590
You can also obtain otherinformation about motor vehiclesafety from http://www.safercar.gov.
Reporting Safety Defectsto the CanadianGovernmentIf you live in Canada, and youbelieve that the vehicle has asafety defect, notify TransportCanada immediately, and notifyGeneral Motors of CanadaCompany. Call Transport Canadaat 1-800-333-0510; go to:
www.tc.gc.ca/recalls (English)
www.tc.gc.ca/rappels (French)
or write to:

Cadillac ATS/ATS-V Owner Manual (GMNA-Localizing-U.S./Canada/Mexico-11349135) - 2018 - crc - 9/25/17
CUSTOMER INFORMATION 365
Transport CanadaMotor Vehicle Safety DirectorateDefect Investigations and RecallsDivision80 Noel StreetGatineau, QC J8Z 0A1
Reporting Safety Defectsto General MotorsIn addition to notifying NHTSA (orTransport Canada) in a situation likethis, notify General Motors.
Call 1-800-458-8006, or write:
Cadillac Customer Assistance CenterCadillac Motor Car DivisionP.O. Box 33169Detroit, MI 48232-5169
In Canada, call 1-888-446-2000,or write:
Canadian Cadillac Customer CareCentre, Mail Code: CA1-163-005General Motors of Canada Company1908 Colonel Sam DriveOshawa, Ontario L1H 8P7
In Mexico, call 01-800-466-0805.
In other Central America andCaribbean Countries, call52-722-236-0680.
Vehicle Data Recordingand PrivacyThe vehicle has a number ofcomputers that record informationabout the vehicle’s performance andhow it is driven. For example, thevehicle uses computer modules tomonitor and control engine andtransmission performance, to monitorthe conditions for airbag deploymentand deploy them in a crash, and,if equipped, to provide antilockbraking to help the driver control thevehicle. These modules may store datato help the dealer technician servicethe vehicle. Some modules may alsostore data about how the vehicle isoperated, such as rate of fuelconsumption or average speed. Thesemodules may retain personalpreferences, such as radio presets, seatpositions, and temperature settings.

Cadillac ATS/ATS-V Owner Manual (GMNA-Localizing-U.S./Canada/Mexico-11349135) - 2018 - crc - 9/25/17
366 CUSTOMER INFORMATION
Event Data RecordersThis vehicle is equipped with an eventdata recorder (EDR). The mainpurpose of an EDR is to record, incertain crash or near crash-likesituations, such as an air bagdeployment or hitting a road obstacle,data that will assist in understandinghow a vehicle’s systems performed.The EDR is designed to record datarelated to vehicle dynamics and safetysystems for a short period of time,typically 30 seconds or less. The EDRin this vehicle is designed to recordsuch data as:
. How various systems in yourvehicle were operating;
. Whether or not the driver andpassenger safety belts werebuckled/fastened;
. How far (if at all) the driver wasdepressing the accelerator and/orbrake pedal; and,
. How fast the vehicle was traveling.
These data can help provide a betterunderstanding of the circumstances inwhich crashes and injuries occur.
NoteEDR data are recorded by your vehicleonly if a non-trivial crash situationoccurs; no data are recorded by theEDR under normal driving conditionsand no personal data (e.g., name,gender, age, and crash location) arerecorded. However, other parties, suchas law enforcement, could combinethe EDR data with the type ofpersonally identifying data routinelyacquired during a crash investigation.
To read data recorded by an EDR,special equipment is required, andaccess to the vehicle or the EDR isneeded. In addition to the vehiclemanufacturer, other parties, such aslaw enforcement, that have the specialequipment, can read the informationif they have access to the vehicle orthe EDR.
GM will not access these data or shareit with others except: with the consentof the vehicle owner or, if the vehicleis leased, with the consent of thelessee; in response to an officialrequest by police or similargovernment office; as part of GM'sdefense of litigation through the
discovery process; or, as required bylaw. Data that GM collects or receivesmay also be used for GM researchneeds or may be made available toothers for research purposes, where aneed is shown and the data is not tiedto a specific vehicle or vehicle owner.
OnStarIf the vehicle is equipped with OnStarand has an active service plan,additional data may be collectedthrough the OnStar system. Thisincludes information about thevehicle’s operation; collisions involvingthe vehicle; the use of the vehicle andits features; and, in certain situations,the location and approximate GPSspeed of the vehicle. Refer to theOnStar Terms and Conditions andPrivacy Statement on the OnStarwebsite.
See OnStar Additional Information0 374.

Cadillac ATS/ATS-V Owner Manual (GMNA-Localizing-U.S./Canada/Mexico-11349135) - 2018 - crc - 9/25/17
CUSTOMER INFORMATION 367
Infotainment SystemIf the vehicle is equipped with anavigation system as part of theinfotainment system, use of thesystem may result in the storage ofdestinations, addresses, telephonenumbers, and other trip information.See the infotainment manual forinformation on stored data and fordeletion instructions.

Cadillac ATS/ATS-V Owner Manual (GMNA-Localizing-U.S./Canada/Mexico-11349135) - 2018 - crc - 9/25/17
368 ONSTAR
OnStar
OnStar OverviewOnStar Overview . . . . . . . . . . . . . . . . . . 368
OnStar ServicesEmergency . . . . . . . . . . . . . . . . . . . . . . . . 369Security . . . . . . . . . . . . . . . . . . . . . . . . . . . 370Navigation . . . . . . . . . . . . . . . . . . . . . . . . 370Connections . . . . . . . . . . . . . . . . . . . . . . 371Diagnostics . . . . . . . . . . . . . . . . . . . . . . . 373
OnStar Additional InformationOnStar AdditionalInformation . . . . . . . . . . . . . . . . . . . . . 374
OnStar Overview
= Voice Command Button
Q Blue OnStar Button
> Red Emergency Button
This vehicle may be equipped with acomprehensive, in-vehicle system thatcan connect to an OnStar Advisor forEmergency, Security, Navigation,Connections, and Diagnostics Services.OnStar services may require a paidservice plan and data plan. OnStarrequires the vehicle battery andelectrical system, cellular service, andGPS satellite signals to be availableand operating. OnStar acts as a link toexisting emergency service providers.OnStar may collect information aboutyou and your vehicle, includinglocation information. See OnStar UserTerms, Privacy Statement, andSoftware Terms for more details
including system limitations atwww.onstar.com (U.S.) orwww.onstar.ca (Canada).
The OnStar system status light is nextto the OnStar buttons. If the statuslight is:
. Solid Green: System is ready.
. Flashing Green: On a call.
. Red: Indicates a problem.
. Off: System is active. Press Qtwice to speak with an OnStarAdvisor.
PressQ or call 1-888-4ONSTAR(1-888-466-7827) to speak to anAdvisor.
Functionality of the Voice Commandbutton may vary by vehicle andregion.
Press= to:
. Open the OnStar app on theinfotainment display. See theinfotainment manual forinformation on how to use theOnStar app.
Or

Cadillac ATS/ATS-V Owner Manual (GMNA-Localizing-U.S./Canada/Mexico-11349135) - 2018 - crc - 9/25/17
ONSTAR 369. Make a call, end a call, or answer
an incoming call.
. Give OnStar Hands-Free Callingvoice commands.
. Give OnStar Turn-by-TurnNavigation voice commands.
. Obtain and customize the Wi-Fihotspot name or SSID andpassword, if equipped.
PressQ to connect to an Advisor to:
. Verify account information orupdate contact information.
. Get driving directions.
. Receive a Diagnostic check of thevehicle's key operating systems.
. Receive Roadside Assistance.
. Manage Wi-Fi Settings,if equipped.
Press> to get a priority connectionto an OnStar Advisor available 24/7 to:
. Get help for an emergency.
. Be a Good Samaritan or respondto an AMBER Alert.
. Get assistance in severe weatheror other crisis situations and findevacuation routes.
OnStar Services
EmergencyEmergency Services require an active,OnStar service plan (excludes BasicPlan). With Automatic CrashResponse, built-in sensors canautomatically alert a specially trainedOnStar Advisor who is immediatelyconnected in to the vehicle to help.
Press> for a priority connection toan OnStar Advisor who can contactemergency service providers, directthem to your exact location, and relayimportant information.
With OnStar Crisis Assist, speciallytrained Advisors are available24 hours a day, 7 days a week, toprovide a central point of contact,assistance, and information during acrisis.
With Roadside Assistance, Advisorscan locate a nearby service provider tohelp with a flat tire, a battery jump,or an empty gas tank.

Cadillac ATS/ATS-V Owner Manual (GMNA-Localizing-U.S./Canada/Mexico-11349135) - 2018 - crc - 9/25/17
370 ONSTAR
SecurityIf equipped, OnStar provides theseservices:
. With Stolen Vehicle Assistance,OnStar Advisors can use GPS topinpoint the vehicle and helpauthorities quickly recover it.
. With Remote Ignition Block,if equipped, OnStar can block theengine from being restarted.
. With Stolen Vehicle Slowdown,if equipped, OnStar can work withlaw enforcement to gradually slowthe vehicle down.
Theft Alarm Notification
If equipped, if the doors are lockedand the vehicle alarm sounds, anotification by text, e-mail, or phonecall will be sent. If the vehicle isstolen, an OnStar Advisor can workwith authorities to recover the vehicle.
NavigationOnStar navigation requires a specificOnStar service plan.
PressQ to receive Turn-by-Turndirections or have them sent to thevehicle’s navigation screen,if equipped.
Turn-by-Turn Navigation
1. PressQ to connect to anAdvisor.
2. Request directions to bedownloaded to the vehicle.
3. Follow the voice-guidedcommands.
Using Voice Commands During aPlanned Route
Functionality of the Voice Commandbutton may vary by vehicle andregion. For some vehicles, press= toopen the OnStar app on theinfotainment display. For othervehicles press= as follows.
Cancel Route
1. Press=. System responds:“OnStar ready,” then a tone.
2. Say “Cancel route.” Systemresponds: “Do you want to canceldirections?”
3. Say “Yes.” System responds: “OK,request completed, thank you,goodbye.”
Route Preview
1. Press=. System responds:“OnStar ready,” then a tone.
2. Say “Route preview.” Systemresponds with the next threemaneuvers.
Repeat
1. Press=. System responds:“OnStar ready,” then a tone.
2. Say “Repeat.” System respondswith the last direction given,then responds with “OnStarready,” then a tone.
Get My Destination
1. Press=. System responds:“OnStar ready,” then a tone.

Cadillac ATS/ATS-V Owner Manual (GMNA-Localizing-U.S./Canada/Mexico-11349135) - 2018 - crc - 9/25/17
ONSTAR 371
2. Say “Get my destination.” Systemresponds with the address anddistance to the destination, thenresponds with “OnStar ready,”then a tone.
Send Destination to Vehicle
Directions can be sent to the vehicle’snavigation screen, if equipped.
PressQ, then ask the Advisor todownload directions to the vehicle’snavigation system, if equipped. Afterthe call ends, the navigation screenwill provide prompts to begin drivingdirections. Routes that are sent to thenavigation screen can only becanceled through the navigationsystem.
See www.onstar.com (U.S.) orwww.onstar.ca (Canada).
ConnectionsThe following OnStar services helpwith staying connected.
For coverage maps, seewww.onstar.com (U.S.) orwww.onstar.ca (Canada).
Ensuring Security
. Change the default passwords forthe Wi-Fi hotspot and myCadillacmobile app. Make these passwordsdifferent from each other and usea combination of letters, numbers,and symbols to increase thesecurity.
. Change the default name of theSSID (Service Set Identifier). Thisis your network’s name that isvisible to other wireless devices.Choose a unique name and avoidfamily names or vehicledescriptions.
OnStar Wi-Fi Hotspot (If Equipped)
The vehicle may have a built-in Wi-Fihotspot that provides access to theInternet and web content at 4G LTEspeed. Up to seven mobile devices canbe connected. A data plan is required.Use the in-vehicle controls only whenit is safe to do so.
1. To retrieve Wi-Fi hotspotinformation, press= to openthe OnStar app on theinfotainment display, then select
Wi-Fi Hotspot. On some vehicles,touch Wi-Fi or Wi-Fi Settings onthe screen.
2. The Wi-Fi settings will displaythe Wi-Fi hotspot name (SSID),password, and on some vehicles,the connection type (no Internetconnection, 3G, 4G, 4G LTE), andsignal quality (poor, good,excellent).
3. To change the SSID or password,pressQ or call 1-888-4ONSTARto connect with an Advisor. Onsome vehicles, the SSID andpassword can be changed in theWi-Fi Hotspot menu.
After initial set-up, your vehicle’sWi-Fi hotspot will connectautomatically to your mobile devices.Manage data usage by turning Wi-Fion or off on your mobile device, byusing the myCadillac mobile app,or by contacting an OnStar Advisor.On some vehicles, Wi-Fi can also bemanaged from the Wi-FiHotspot menu.
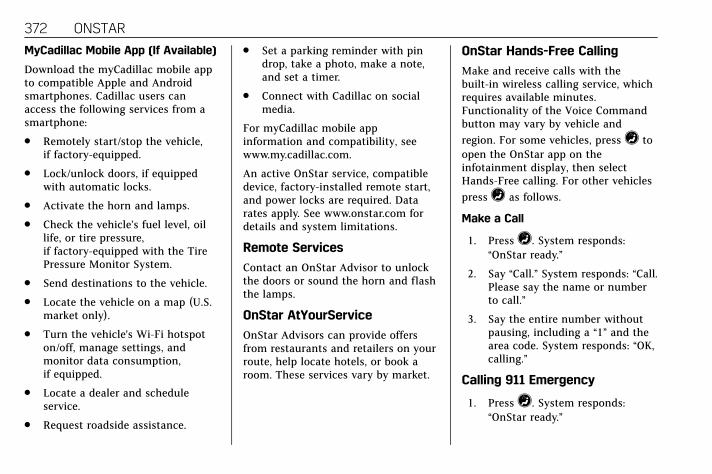
Cadillac ATS/ATS-V Owner Manual (GMNA-Localizing-U.S./Canada/Mexico-11349135) - 2018 - crc - 9/25/17
372 ONSTAR
MyCadillac Mobile App (If Available)
Download the myCadillac mobile appto compatible Apple and Androidsmartphones. Cadillac users canaccess the following services from asmartphone:
. Remotely start/stop the vehicle,if factory-equipped.
. Lock/unlock doors, if equippedwith automatic locks.
. Activate the horn and lamps.
. Check the vehicle’s fuel level, oillife, or tire pressure,if factory-equipped with the TirePressure Monitor System.
. Send destinations to the vehicle.
. Locate the vehicle on a map (U.S.market only).
. Turn the vehicle's Wi-Fi hotspoton/off, manage settings, andmonitor data consumption,if equipped.
. Locate a dealer and scheduleservice.
. Request roadside assistance.
. Set a parking reminder with pindrop, take a photo, make a note,and set a timer.
. Connect with Cadillac on socialmedia.
For myCadillac mobile appinformation and compatibility, seewww.my.cadillac.com.
An active OnStar service, compatibledevice, factory-installed remote start,and power locks are required. Datarates apply. See www.onstar.com fordetails and system limitations.
Remote Services
Contact an OnStar Advisor to unlockthe doors or sound the horn and flashthe lamps.
OnStar AtYourService
OnStar Advisors can provide offersfrom restaurants and retailers on yourroute, help locate hotels, or book aroom. These services vary by market.
OnStar Hands-Free Calling
Make and receive calls with thebuilt-in wireless calling service, whichrequires available minutes.Functionality of the Voice Commandbutton may vary by vehicle andregion. For some vehicles, press= toopen the OnStar app on theinfotainment display, then selectHands-Free calling. For other vehiclespress= as follows.
Make a Call
1. Press=. System responds:“OnStar ready.”
2. Say “Call.” System responds: “Call.Please say the name or numberto call.”
3. Say the entire number withoutpausing, including a “1” and thearea code. System responds: “OK,calling.”
Calling 911 Emergency
1. Press=. System responds:“OnStar ready.”

Cadillac ATS/ATS-V Owner Manual (GMNA-Localizing-U.S./Canada/Mexico-11349135) - 2018 - crc - 9/25/17
ONSTAR 373
2. Say “Call.” System responds: “Call.Please say the name or numberto call.”
3. Say “911” without pausing.System responds: “911.”
4. Say “Call.” System responds: “OK,dialing 911.”
Retrieve My Number
1. Press=. System responds:“OnStar ready.”
2. Say “My number.” Systemresponds: “Your OnStarHands-Free Calling number is,”then says the number.
End a Call
Press=. System responds: “Callended.”
Verify Minutes and Expiration
Press= and say “Minutes” then“Verify” to check how many minutesremain and their expiration date.
DiagnosticsBy monitoring and reporting on thevehicle’s key systems, OnStarAdvanced Diagnostics provides a wayto keep up on maintenance.Capabilities vary by model. Seewww.onstar.com for details andsystem limitations. Message and datarates may apply. Advanced Diagnosticsrequires an active OnStar paid serviceplan, e-mail address on file, andenrollment in Advanced Diagnostics.
Includes:
. Diagnostic Alerts: Set preferencesto receive real-time e-mails, texts,or monthly reports of the vehicle’shealth. Or pressQ to have anAdvisor initiate a remotediagnostic report.
. Proactive Alerts: Receive areal-time e-mail or text messageregarding potential issues with keyvehicle components, such as thebattery, fuel system, or startersystem. Alerts for potential issuesappear on the infotainmentdisplay. Proactive Alerts aredesigned to help predict specific
types of issues based oninformation collected from thevehicle. Other factors may affectvehicle performance. Not all issueswill deliver alerts. In some cases, adealer service check may berequired to confirm the accuracyof the alerts.
. Dealer Maintenance Notification:Have the vehicle notify yourpreferred dealer when it is time formaintenance. Your dealer will thencontact you to set up anappointment.
To begin, pressQ to speak to anAdvisor, or see www.onstar.com.
Cadillac ATS/ATS-V Owner Manual (GMNA-Localizing-U.S./Canada/Mexico-11349135) - 2018 - crc - 9/25/17
374 ONSTAR
OnStar AdditionalInformationIn-Vehicle Audio Messages
Audio messages may play importantinformation at the following times:
. Prior to vehicle purchase. PressQto set up an account.
. With the OnStar Basic Plan, every60 days.
. After change in ownership and at90 days.
Transferring Service
PressQ to request account transfereligibility information. The Advisorcan cancel or change accountinformation.
Selling/Transferring the Vehicle
Call 1-888-4ONSTAR (1-888-466-7827)immediately to terminate your OnStaror connected services if the vehicle isdisposed of, sold, transferred, or if thelease ends.
Reactivation for SubsequentOwners
PressQ and follow the prompts tospeak to an Advisor as soon aspossible. The Advisor will updatevehicle records and explain OnStar orconnected service options.
How OnStar Service Works
Automatic Crash Response,Emergency Services, Crisis Assist,Stolen Vehicle Assistance, RemoteServices, Roadside Assistance, andHands-Free Calling are available onmost vehicles. Not all OnStar servicesare available everywhere or on allvehicles. For more information, a fulldescription of OnStar services, systemlimitations, and OnStar User Terms,Privacy Statement, and SoftwareTerms:
. Call 1-888-4ONSTAR(1-888-466-7827).
. See www.onstar.com (U.S.).
. See www.onstar.ca (Canada).
. Call TTY 1-877-248-2080.
. PressQ to speak with an Advisor.
OnStar or connected services cannotwork unless the vehicle is in a placewhere OnStar has an agreement witha wireless service provider for servicein that area. The wireless serviceprovider must also have coverage,network capacity, reception, andtechnology compatible with OnStar orconnected services. Service involvinglocation information about the vehiclecannot work unless GPS signals areavailable, unobstructed, andcompatible with the OnStar hardware.OnStar or connected services may notwork if the OnStar equipment is notproperly installed or it has not beenproperly maintained. If equipment orsoftware is added, connected,or modified, OnStar or connectedservices may not work. Otherproblems beyond the control ofOnStar — such as hills, tall buildings,tunnels, weather, electrical systemdesign and architecture of the vehicle,damage to the vehicle in a crash,or wireless phone network congestionor jamming — may prevent service.
See Radio Frequency Statement 0 364.

Cadillac ATS/ATS-V Owner Manual (GMNA-Localizing-U.S./Canada/Mexico-11349135) - 2018 - crc - 9/25/17
ONSTAR 375
Services for People withDisabilities
Advisors provide services to help withphysical disabilities and medicalconditions.
PressQ to help:
. Locate a gas station with anattendant to pump gas.
. Find a hotel, restaurant, etc., thatmeets accessibility needs.
. Provide directions to the closesthospital or pharmacy in urgentsituations.
TTY Users
OnStar has the ability to communicateto deaf, hard-of-hearing,or speech-impaired customers while inthe vehicle. The availabledealer-installed TTY system canprovide in-vehicle access to all OnStarservices, except Virtual Advisor andOnStar Turn-by-Turn Navigation.
OnStar Personal IdentificationNumber (PIN)
A PIN is needed to access someOnStar services. The PIN will need tobe changed the first time whenspeaking with an Advisor. To changethe OnStar PIN, contact an OnStarAdvisor by pressingQ or calling1-888-4ONSTAR.
Warranty
OnStar equipment may be warrantedas part of the vehicle warranty.
Languages
The vehicle can be programmed torespond in multiple languages. PressQ and ask for an Advisor. Advisorsare available in English, Spanish, andFrench. Available languages may varyby country.
Potential Issues
OnStar cannot perform Remote DoorUnlock or Stolen Vehicle Assistanceafter the vehicle has been offcontinuously for 10 days without anignition cycle. If the vehicle has notbeen started for 10 days, OnStar can
contact Roadside Assistance or alocksmith to help gain access to thevehicle.
Global Positioning System (GPS). Obstruction of the GPS can occur
in a large city with tall buildings;in parking garages; aroundairports; in tunnels andunderpasses; or in an area withvery dense trees. If GPS signals arenot available, the OnStar systemshould still operate to call OnStar.However, OnStar could havedifficulty identifying the exactlocation.
. In emergency situations, OnStarcan use the last stored GPSlocation to send to emergencyresponders.
A temporary loss of GPS can causeloss of the ability to send aTurn-by-Turn Navigation route. TheAdvisor may give a verbal route ormay ask for a call back after thevehicle is driven into an open area.

Cadillac ATS/ATS-V Owner Manual (GMNA-Localizing-U.S./Canada/Mexico-11349135) - 2018 - crc - 9/25/17
376 ONSTAR
Cellular and GPS Antennas
Cellular reception is required forOnStar to send remote signals to thevehicle. Do not place items over ornear the antenna to prevent blockingcellular and GPS signal reception.
Unable to Connect to OnStarMessage
If there is limited cellular coverage orthe cellular network has reachedmaximum capacity, this message maycome on. PressQ to try the call againor try again after driving a few milesinto another cellular area.
Vehicle and Power Issues
OnStar services require a vehicleelectrical system, wireless service, andGPS satellite technologies to beavailable and operating for features tofunction properly. These systems maynot operate if the battery isdischarged or disconnected.
Add-on Electrical Equipment
The OnStar system is integrated intothe electrical architecture of thevehicle. Do not add any electrical
equipment. See Add-On ElectricalEquipment 0 249. Added electricalequipment may interfere with theoperation of the OnStar system andcause it to not operate.
Vehicle Software Updates
OnStar or GM may remotely deliversoftware updates or changes to thevehicle without further notice orconsent. These updates or changesmay enhance or maintain safety,security, or the operation of thevehicle or the vehicle systems.Software updates or changes mayaffect or erase data or settings thatare stored in the vehicle, such asOnStar Hands-Free Calling name tags,saved navigation destinations,or pre-set radio stations. NeitherOnStar nor GM is responsible for anyaffected or erased data or settings.These updates or changes may alsocollect personal information. Suchcollection is described in the OnStarprivacy statement or separatelydisclosed at the time of installation.These updates or changes may alsocause a system to automaticallycommunicate with GM servers to
collect information about vehiclesystem status, identify whetherupdates or changes are available,or deliver updates or changes. Anactive OnStar agreement constitutesconsent to these software updates orchanges and agreement that eitherOnStar or GM may remotely deliverthem to the vehicle.
Privacy
The complete OnStar PrivacyStatement may be found atwww.onstar.com (U.S.),or www.onstar.ca (Canada). Werecommend that you review it. If youhave any questions, call1-888-4ONSTAR (1-888-466-7827) orpressQ to speak with an Advisor.Users of wireless communications arecautioned that the privacy of anyinformation sent via wireless cellularcommunications cannot be assured.Third parties may unlawfully interceptor access transmissions and privatecommunications without consent.

Cadillac ATS/ATS-V Owner Manual (GMNA-Localizing-U.S./Canada/Mexico-11349135) - 2018 - crc - 9/25/17
ONSTAR 377
OnStar - SoftwareAcknowledgements
Certain OnStar components includelibcurl and unzip software and otherthird party software. Below are thenotices and licenses associated withlibcurl and unzip and for other thirdparty software please see http://opensource.lge.com/index
www.onstar.com/us/en/
libcurl:
COPYRIGHT AND PERMISSIONNOTICE
Copyright (c) 1996 - 2010, DanielStenberg, <[email protected]>.
All rights reserved.
Permission to use, copy, modify, anddistribute this software for anypurpose with or without fee is herebygranted, provided that the abovecopyright notice and this permissionnotice appear in all copies.
THE SOFTWARE IS PROVIDED “ASIS,” WITHOUT WARRANTY OF ANYKIND, EXPRESS OR IMPLIED,INCLUDING BUT NOT LIMITED TO
THE WARRANTIES OFMERCHANTABILITY, FITNESS FOR APARTICULAR PURPOSE ANDNONINFRINGEMENT OF THIRDPARTY RIGHTS. IN NO EVENT SHALLTHE AUTHORS OR COPYRIGHTHOLDERS BE LIABLE FOR ANYCLAIM, DAMAGES OR OTHERLIABILITY, WHETHER IN AN ACTIONOF CONTRACT, TORT OROTHERWISE, ARISING FROM, OUTOF OR IN CONNECTION WITH THESOFTWARE OR THE USE OR OTHERDEALINGS IN THE SOFTWARE.
Except as contained in this notice, thename of a copyright holder shall notbe used in advertising or otherwise topromote the sale, use or otherdealings in this Software without priorwritten authorization of the copyrightholder.
unzip:
This is version 2005-Feb-10 of theInfo-ZIP copyright and license. Thedefinitive version of this documentshould be available at ftp://ftp.info-zip.org/pub/infozip/license.html indefinitely.
Copyright (c) 1990-2005 Info-ZIP. Allrights reserved.
For the purposes of this copyright andlicense, “Info-ZIP” is defined as thefollowing set of individuals:
Mark Adler, John Bush, Karl Davis,Harald Denker, Jean-Michel Dubois,Jean-loup Gailly, Hunter Goatley, EdGordon, Ian Gorman, Chris Herborth,Dirk Haase, Greg Hartwig, RobertHeath, Jonathan Hudson, Paul Kienitz,David Kirschbaum, Johnny Lee, Onnovan der Linden, Igor Mandrichenko,Steve P. Miller, Sergio Monesi, KeithOwens, George Petrov, Greg Roelofs,Kai Uwe Rommel, Steve Salisbury,Dave Smith, Steven M. Schweda,Christian Spieler, Cosmin Truta,Antoine Verheijen, Paul von Behren,Rich Wales, Mike White.
This software is provided “as is,”without warranty of any kind, expressor implied. In no event shall Info-ZIPor its contributors be held liable forany direct, indirect, incidental, specialor consequential damages arising outof the use of or inability to use thissoftware.

Cadillac ATS/ATS-V Owner Manual (GMNA-Localizing-U.S./Canada/Mexico-11349135) - 2018 - crc - 9/25/17
378 ONSTAR
Permission is granted to anyone touse this software for any purpose,including commercial applications,and to alter it and redistribute itfreely, subject to the followingrestrictions:
1. Redistributions of source codemust retain the above copyrightnotice, definition, disclaimer, andthis list of conditions.
2. Redistributions in binary form(compiled executables) mustreproduce the above copyrightnotice, definition, disclaimer, andthis list of conditions indocumentation and/or othermaterials provided with thedistribution. The sole exceptionto this condition is redistributionof a standard UnZipSFX binary(including SFXWiz) as part of aself-extracting archive; that ispermitted without inclusion ofthis license, as long as thenormal SFX banner has not beenremoved from the binary ordisabled.
3. Altered versions–including, butnot limited to, ports to newoperating systems, existing portswith new graphical interfaces,and dynamic, shared, or staticlibrary versions–must be plainlymarked as such and must not bemisrepresented as being theoriginal source. Such alteredversions also must not bemisrepresented as being Info-ZIPreleases–including, but notlimited to, labeling of the alteredversions with the names“Info-ZIP” (or any variationthereof, including, but notlimited to, differentcapitalizations), “Pocket UnZip,”“WiZ” or “MacZip” without theexplicit permission of Info-ZIP.Such altered versions are furtherprohibited frommisrepresentative use of theZip-Bugs or Info-ZIP e-mailaddresses or of theInfo-ZIP URL(s).
4. Info-ZIP retains the right to usethe names “Info-ZIP,” “Zip,”“UnZip,” “UnZipSFX,” “WiZ,”“Pocket UnZip,” “Pocket Zip,” and“MacZip” for its own source andbinary releases.

Cadillac ATS/ATS-V Owner Manual (GMNA-Localizing-U.S./Canada/Mexico-11349135) - 2018 - crc - 9/25/17
INDEX 379
Index AAccessories and Modifications . . . . . 252Accessory Power . . . . . . . . . . . . . . . . . . . . 195Active Rev Match . . . . . . . . . . . . . . . . . . . 204Adaptive Cruise Control . . . . . . . . . . . . 220Adaptive ForwardLighting (AFL) . . . . . . . . . . . . . . . . . . . . . 153
Adaptive Forward Lighting(AFL) Light . . . . . . . . . . . . . . . . . . . . . . . . 133
Add-On Electrical Equipment . . . . . . 249Additional InformationOnStar . . . . . . . . . . . . . . . . . . . . . . . . . . . . . 374
Additional Maintenanceand Care . . . . . . . . . . . . . . . . . . . . . . . . . . . 342
AdjustmentsLumbar, Front Seats . . . . . . . . . . . . . . . .59Thigh Support . . . . . . . . . . . . . . . . . . . . . .60
Air Cleaner/Filter, Engine . . . . . . . . . . 264Air Conditioning . . . . . . . . . . . . . . .163, 167Air Filter, PassengerCompartment . . . . . . . . . . . . . . . . . . . . . 172
Air Vents . . . . . . . . . . . . . . . . . . . . . . . . . . . . 171Airbag SystemCheck . . . . . . . . . . . . . . . . . . . . . . . . . . . . . . . .88How Does an Airbag Restrain? . . . . .81Passenger Sensing System . . . . . . . . .82What Makes an Airbag Inflate? . . . .80
Airbag System (cont'd)What Will You See after anAirbag Inflates? . . . . . . . . . . . . . . . . . . .81
When Should an AirbagInflate? . . . . . . . . . . . . . . . . . . . . . . . . . . . . .79
Where Are the Airbags? . . . . . . . . . . . .78AirbagsAdding Equipment to theVehicle . . . . . . . . . . . . . . . . . . . . . . . . . . . . .87
Passenger Status Indicator . . . . . . . 124Readiness Light . . . . . . . . . . . . . . . . . . . 124Servicing Airbag-EquippedVehicles . . . . . . . . . . . . . . . . . . . . . . . . . . . .86
System Check . . . . . . . . . . . . . . . . . . . . . . .76AlarmVehicle Security . . . . . . . . . . . . . . . . . . . . .45
AlertLane Change . . . . . . . . . . . . . . . . . . . . . . 237Side Blind Zone (SBZA) . . . . . . . . . . 236
All-Season Tires . . . . . . . . . . . . . . . . . . . . . 291All-Wheel Drive . . . . . . . . . . . . . . . .205, 274Antilock Brake System (ABS) . . . . . . 205Warning Light . . . . . . . . . . . . . . . . . . . . 128
Appearance CareExterior . . . . . . . . . . . . . . . . . . . . . . . . . . . . 326Interior . . . . . . . . . . . . . . . . . . . . . . . . . . . . 330
Armrest Storage . . . . . . . . . . . . . . . . . . . . . 108Assistance Systems for Driving . . . . 232
Cadillac ATS/ATS-V Owner Manual (GMNA-Localizing-U.S./Canada/Mexico-11349135) - 2018 - crc - 9/25/17
380 INDEX
Assistance Systems for Parkingand Backing . . . . . . . . . . . . . . . . . . . . . . . 229
AutomaticDoor Locks . . . . . . . . . . . . . . . . . . . . . . . . . .42Forward Braking . . . . . . . . . . . . . . . . . . 235Headlamp System . . . . . . . . . . . . . . . . 152Transmission . . . . . . . . . . . . . . . . . . . . . . 199Transmission Fluid . . . . . . . . . . . . . . . 263
Automatic TransmissionManual Mode . . . . . . . . . . . . . . . . . . . . . 201Shift Lock Control FunctionCheck . . . . . . . . . . . . . . . . . . . . . . . . . . . . 276
BBatteryExterior Lighting BatterySaver . . . . . . . . . . . . . . . . . . . . . . . . . . . . . 156
Power Protection . . . . . . . . . . . . . . . . . . 156Battery - North America . . . . . .273, 320Blade Replacement, Wiper . . . . . . . . . 276BrakeSystem Warning Light . . . . . . . . . . . . 127
Brakes . . . . . . . . . . . . . . . . . . . . . . . . . . . . . . . 271Antilock . . . . . . . . . . . . . . . . . . . . . . . . . . . 205Assist . . . . . . . . . . . . . . . . . . . . . . . . . . . . . . 208Fluid . . . . . . . . . . . . . . . . . . . . . . . . . . . . . . . 272Parking . . . . . . . . . . . . . . . . . . . . . . . 206, 208
Braking . . . . . . . . . . . . . . . . . . . . . . . . . . . . . . 176
Braking (cont'd)Automatic Forward . . . . . . . . . . . . . . . 235
Break-In, New Vehicle . . . . . . . . . . . . . . 189Bulb ReplacementBack-up Lamps . . . . . . . . . . . . . . . . . . . 279Halogen Bulbs . . . . . . . . . . . . . . . . . . . . 279Headlamp Aiming . . . . . . . . . . . . . . . . 278Headlamps . . . . . . . . . . . . . . . . . . . . . . . . 279High Intensity Discharge(HID) Lighting . . . . . . . . . . . . . . . . . . . 279
License Plate Lamps . . . . . . . . . . . . . . 280Buying New Tires . . . . . . . . . . . . . . . . . . . 306
CCadillac Premium CareMaintenance . . . . . . . . . . . . . . . . . . . . . . 336
Calibration . . . . . . . . . . . . . . . . . . . . . . . . . . 114CaliforniaFuel Requirements . . . . . . . . . . . . . . . . 241Perchlorate MaterialsRequirements . . . . . . . . . . . . . . . . . . . 252
California Proposition65 Warning . . . . . . . . . . . . .251, 273, 320,
Back CoverCanadian Vehicle Owners . . . . . . . . . . . . .2Capacities and Specifications . . . . . . 350Carbon MonoxideEngine Exhaust . . . . . . . . . . . . . . . . . . . 198
Carbon Monoxide (cont'd)Trunk . . . . . . . . . . . . . . . . . . . . . . . . . . . . . . . .43Winter Driving . . . . . . . . . . . . . . . . . . . . 184
CargoTie-Downs . . . . . . . . . . . . . . . . . . . . . . . . . 109
Caution, Danger, and Warning . . . . . . . .3Center Console Storage . . . . . . . . . . . . . 108Chains, Tire . . . . . . . . . . . . . . . . . . . . . . . . . 310ChargingWireless . . . . . . . . . . . . . . . . . . . . . . . . . . . 115
Charging System Light . . . . . . . . . . . . . 125CheckEngine Light (MalfunctionIndicator) . . . . . . . . . . . . . . . . . . . . . . . . 125
Child RestraintsInfants and Young Children . . . . . . . .90Lower Anchors and Tethers forChildren . . . . . . . . . . . . . . . . . . . . . . . . . . .95
Older Children . . . . . . . . . . . . . . . . . . . . . .88Securing . . . . . . . . . . . . . . . . . . . . . . 101, 103Systems . . . . . . . . . . . . . . . . . . . . . . . . . . . . .92
Circuit Breakers . . . . . . . . . . . . . . . . . . . . . 281CleaningExterior Care . . . . . . . . . . . . . . . . . . . . . . 326Interior Care . . . . . . . . . . . . . . . . . . . . . . 330
Climate Control SystemsDual Automatic . . . . . . . . . . . . . . 163, 167
Clock . . . . . . . . . . . . . . . . . . . . . . . . . . . . . . . . . 114
Cadillac ATS/ATS-V Owner Manual (GMNA-Localizing-U.S./Canada/Mexico-11349135) - 2018 - crc - 9/25/17
INDEX 381
Cluster, Instrument . . . . . . . . . . . . . . . . . 118Clutch, Hydraulic . . . . . . . . . . . . . . . . . . . 263Collision Damage Repair . . . . . . . . . . . 361CompartmentsStorage . . . . . . . . . . . . . . . . . . . . . . . . . . . . 107
Compass . . . . . . . . . . . . . . . . . . . . . . . . . . . . . 114Competitive Driving Mode . . . . . . . . . 214Composite Materials . . . . . . . . . . . . . . . . 190Compressor Kit, Tire Sealant . . . . . . . 312ConnectionsOnStar . . . . . . . . . . . . . . . . . . . . . . . . . . . . . 371
ControlTraction and ElectronicStability . . . . . . . . . . . . . . . . . . . . . . . . . . 209
Control of a Vehicle . . . . . . . . . . . . . . . . 176Convex Mirrors . . . . . . . . . . . . . . . . . . . . . . 48CoolantEngine Temperature Gauge . . . . . . 122Engine Temperature WarningLight . . . . . . . . . . . . . . . . . . . . . . . . . . . . . 130
Cooling . . . . . . . . . . . . . . . . . . . . . . . . .163, 167Cooling System . . . . . . . . . . . . . . . .265, 269Courtesy Lamps . . . . . . . . . . . . . . . . . . . . . 154Courtesy TransportationProgram . . . . . . . . . . . . . . . . . . . . . . . . . . . . 360
Cruise Control . . . . . . . . . . . . . . . . . . . . . . . 218Light . . . . . . . . . . . . . . . . . . . . . . . . . . . . . . . 133
Cruise Control, Adaptive . . . . . . . . . . . 220
Cupholders . . . . . . . . . . . . . . . . . . . . . . . . . . 108Customer Assistance . . . . . . . . . . . . . . . 356Offices . . . . . . . . . . . . . . . . . . . . . . . . . . . . . 356Text Telephone (TTY) Users . . . . . 356
Customer InformationService Publications OrderingInformation . . . . . . . . . . . . . . . . . . . . . . 363
Customer SatisfactionProcedure . . . . . . . . . . . . . . . . . . . . . . . . . . 354
DDamage Repair, Collision . . . . . . . . . . . 361Danger, Warning, and Caution . . . . . . . .3Data CollectionInfotainment System . . . . . . . . . . . . . 367OnStar . . . . . . . . . . . . . . . . . . . . . . . . . . . . . 366
Data RecorderPerformance . . . . . . . . . . . . . . . . . . . . . . . 157
Data Recorders, Event . . . . . . . . . . . . . . 366Daytime Running Lamps (DRL) . . . 151Defensive Driving . . . . . . . . . . . . . . . . . . . 176Delayed Locking . . . . . . . . . . . . . . . . . . . . . 41DiagnosticsOnStar . . . . . . . . . . . . . . . . . . . . . . . . . . . . . 373
Distracted Driving . . . . . . . . . . . . . . . . . . 175Dome Lamps . . . . . . . . . . . . . . . . . . . . . . . . 154DoorAjar Light . . . . . . . . . . . . . . . . . . . . . . . . . 133
Door (cont'd)Delayed Locking . . . . . . . . . . . . . . . . . . . .41Locks . . . . . . . . . . . . . . . . . . . . . . . . . . . . . . . .39Power Locks . . . . . . . . . . . . . . . . . . . . . . . . .41Rear Seat Pass-Through . . . . . . . . . . . .69
Drive Belt Routing, Engine . . . . . . . . . 353Drive SystemsAll-Wheel Drive . . . . . . . . . . . . . . 205, 274
Driver Assistance Systems . . . . . . . . . 228Driver InformationCenter (DIC) . . . . . . . . . . . . . . . . . . . . . . . 134
Driver Mode Control . . . . . . . . . . . . . . . . 210DrivingAssistance Systems . . . . . . . . . . . . . . . 232Characteristics andTowing Tips . . . . . . . . . . . . . . . . . . . . . 244
Competitive . . . . . . . . . . . . . . . . . . . . . . . 214Defensive . . . . . . . . . . . . . . . . . . . . . . . . . . 176Drunk . . . . . . . . . . . . . . . . . . . . . . . . . . . . . . 176For Better Fuel Economy . . . . . . . . . . .28Hill and Mountain Roads . . . . . . . . 184If the Vehicle is Stuck . . . . . . . . . . . . 186Loss of Control . . . . . . . . . . . . . . . . . . . . 178Off-Road Recovery . . . . . . . . . . . . . . . . 177Track Events and Competitive . . . 178Vehicle Load Limits . . . . . . . . . . . . . . 186Wet Roads . . . . . . . . . . . . . . . . . . . . . . . . . 183Winter . . . . . . . . . . . . . . . . . . . . . . . . . . . . . 184

Cadillac ATS/ATS-V Owner Manual (GMNA-Localizing-U.S./Canada/Mexico-11349135) - 2018 - crc - 9/25/17
382 INDEX
Dual Automatic ClimateControl System . . . . . . . . . . . . . . .163, 167
EEasy Entry Seat . . . . . . . . . . . . . . . . . . . . . . 56Electrical Equipment, Add-On . . . . . 249Electrical SystemEngine Compartment FuseBlock . . . . . . . . . . . . . . . . . . . . . . . . . . . . . 282
Fuses and Circuit Breakers . . . . . . . 281Instrument Panel Fuse Block . . . . 285Overload . . . . . . . . . . . . . . . . . . . . . . . . . . . 281Rear Compartment FuseBlock . . . . . . . . . . . . . . . . . . . . . . . . . . . . . 287
EmergencyOnStar . . . . . . . . . . . . . . . . . . . . . . . . . . . . . 369
EngineAir Cleaner/Filter . . . . . . . . . . . . . . . . . 264Check Light (MalfunctionIndicator) . . . . . . . . . . . . . . . . . . . . . . . . 125
Compartment Overview . . . . . . . . . . 254Coolant Temperature Gauge . . . . . 122Coolant TemperatureWarning Light . . . . . . . . . . . . . . . . . . . 130
Cooling System . . . . . . . . . . . . . . 265, 269Drive Belt Routing . . . . . . . . . . . . . . . . 353Exhaust . . . . . . . . . . . . . . . . . . . . . . . . . . . . 198Heater . . . . . . . . . . . . . . . . . . . . . . . . . . . . . 194
Engine (cont'd)Oil Life System . . . . . . . . . . . . . . . . . . . . 261Oil Pressure Light . . . . . . . . . . . . . . . . . 131Overheating . . . . . . . . . . . . . . . . . . . . . . . 269Power Messages . . . . . . . . . . . . . . . . . . 140Running While Parked . . . . . . . . . . . 199Starting . . . . . . . . . . . . . . . . . . . . . . . . . . . . 192
Entry Lighting . . . . . . . . . . . . . . . . . . . . . . 156Equipment, Towing . . . . . . . . . . . .248, 249Event Data Recorders . . . . . . . . . . . . . . 366Exit Lighting . . . . . . . . . . . . . . . . . . . . . . . . 156Extended Parking . . . . . . . . . . . . . . . . . . . 197Extender, Seat Belt . . . . . . . . . . . . . . . . . . 75Exterior Lamp Controls . . . . . . . . . . . . 149Exterior Lamps Off Reminder . . . . . . 151Exterior Lighting Battery Saver . . . . 156
FFeaturesMemory . . . . . . . . . . . . . . . . . . . . . . . . . . . . .14
Filter,Engine Air Cleaner . . . . . . . . . . . . . . . . 264
Flash-to-Pass . . . . . . . . . . . . . . . . . . . . . . . . 151Flashers, Hazard Warning . . . . . . . . . . 153Flat Tire . . . . . . . . . . . . . . . . . . . . . . . . . . . . . 311Floor Mats . . . . . . . . . . . . . . . . . . . . . . . . . . . 333FluidAutomatic Transmission . . . . . . . . . 263
Fluid (cont'd)Brakes . . . . . . . . . . . . . . . . . . . . . . . . . . . . . 272Washer . . . . . . . . . . . . . . . . . . . . . . . . . . . . 271
Folding Mirrors . . . . . . . . . . . . . . . . . . . . . . 48Forward Automatic Braking . . . . . . . . 235Forward Collision Alert (FCA)System . . . . . . . . . . . . . . . . . . . . . . . . . . . . . 232
Frequency StatementRadio . . . . . . . . . . . . . . . . . . . . . . . . . . . . . . 364
Front SeatsHeated . . . . . . . . . . . . . . . . . . . . . . . . . . . . . . .64
Fuel . . . . . . . . . . . . . . . . . . . . . . . . . . . . . . . . . . 240Additives . . . . . . . . . . . . . . . . . . . . . . . . . . 242Economy Driving . . . . . . . . . . . . . . . . . . .28Filling a Portable FuelContainer . . . . . . . . . . . . . . . . . . . . . . . . 244
Filling the Tank . . . . . . . . . . . . . . . . . . . 242Foreign Countries . . . . . . . . . . . . . . . . . 242Gauge . . . . . . . . . . . . . . . . . . . . . . . . . . . . . . 122Low Fuel Warning Light . . . . . . . . . 132Requirements, California . . . . . . . . . 241
FusesEngine Compartment FuseBlock . . . . . . . . . . . . . . . . . . . . . . . . . . . . . 282
Fuses and Circuit Breakers . . . . . . . 281Instrument Panel Fuse Block . . . . 285Rear Compartment FuseBlock . . . . . . . . . . . . . . . . . . . . . . . . . . . . . 287
Cadillac ATS/ATS-V Owner Manual (GMNA-Localizing-U.S./Canada/Mexico-11349135) - 2018 - crc - 9/25/17
INDEX 383
GGarage Door Opener . . . . . . . . . . . . . . . . 146Programming . . . . . . . . . . . . . . . . . . . . . . 146
Gas Strut(s) . . . . . . . . . . . . . . . . . . . . . . . . . 277GaugesEngine Coolant Temperature . . . . 122Fuel . . . . . . . . . . . . . . . . . . . . . . . . . . . . . . . . 122Odometer . . . . . . . . . . . . . . . . . . . . . . . . . . 121Speedometer . . . . . . . . . . . . . . . . . . . . . . 121Tachometer . . . . . . . . . . . . . . . . . . . . . . . 121Trip Odometer . . . . . . . . . . . . . . . . . . . . 121Warning Lights andIndicators . . . . . . . . . . . . . . . . . . . . . . . . 117
General InformationService and Maintenance . . . . . . . . 334Towing . . . . . . . . . . . . . . . . . . . . . . . . . . . . 244Vehicle Care . . . . . . . . . . . . . . . . . . . . . . . 251
Glove Box . . . . . . . . . . . . . . . . . . . . . . . . . . . 107GM Mobility ReimbursementProgram . . . . . . . . . . . . . . . . . . . . . . . . . . . . 357
HHalogen Bulbs . . . . . . . . . . . . . . . . . . . . . . 279Hazard Warning Flashers . . . . . . . . . . 153Head Restraints . . . . . . . . . . . . . . . . . . . . . . 55Head-up Display . . . . . . . . . . . . . . . . . . . . 136
HeadlampsAdaptive ForwardLighting (AFL) . . . . . . . . . . . . . . . . . . . 153
Aiming . . . . . . . . . . . . . . . . . . . . . . . . . . . . . 278Automatic . . . . . . . . . . . . . . . . . . . . . . . . . 152Bulb Replacement . . . . . . . . . . . . . . . . 279Daytime RunningLamps (DRL) . . . . . . . . . . . . . . . . . . . . 151
Flash-to-Pass . . . . . . . . . . . . . . . . . . . . . . 151High Intensity Discharge(HID) Lighting . . . . . . . . . . . . . . . . . . . 279
High-Beam On Light . . . . . . . . . . . . . . 132High/Low Beam Changer . . . . . . . . . 151Lamps On Reminder . . . . . . . . . . . . . . 133Washer . . . . . . . . . . . . . . . . . . . . . . . . . . . . 113
HeatedSteering Wheel . . . . . . . . . . . . . . . . . . . . 111
Heated Front Seats . . . . . . . . . . . . . . . . . . 64Heated Mirrors . . . . . . . . . . . . . . . . . . . . . . . 49HeaterEngine . . . . . . . . . . . . . . . . . . . . . . . . . . . . . 194
Heating . . . . . . . . . . . . . . . . . . . . . . . . .163, 167High-Beam On Light . . . . . . . . . . . . . . . . 132High-Speed Operation . . . . . . . . . . . . . . 299Hill and Mountain Roads . . . . . . . . . . 184Hill Start Assist (HSA) . . . . . . . . . . . . . 209Hood . . . . . . . . . . . . . . . . . . . . . . . . . . . . . . . . . 253Horn . . . . . . . . . . . . . . . . . . . . . . . . . . . . . . . . . 112
How to Wear Seat Belts Properly . . . 71HVAC . . . . . . . . . . . . . . . . . . . . . . . . . . .163, 167Hydraulic Clutch . . . . . . . . . . . . . . . . . . . . 263
IIgnition Positions . . . . . . . . . . . . . . . . . . . 190Immobilizer . . . . . . . . . . . . . . . . . . . . . . . . . . 47IndicatorVehicle Ahead . . . . . . . . . . . . . . . . . . . . . 129
Infants and Young Children,Restraints . . . . . . . . . . . . . . . . . . . . . . . . . . . 90
Infotainment . . . . . . . . . . . . . . . . . . . . . . . . 157Infotainment System . . . . . . . . . . . . . . . 367Instrument Cluster . . . . . . . . . . . . . . . . . 118Instrument PanelStorage Area . . . . . . . . . . . . . . . . . . . . . . 107
Instrument Panel Overview . . . . . . . . . . .6Interior Rearview Mirrors . . . . . . . . . . . 49Introduction . . . . . . . . . . . . . . . . . . . . . . . . . . . .2
JJump Starting - North America . . . . 320
KKeyless EntryRemote (RKE) System . . . . . . . . . . . . . .31
Keys . . . . . . . . . . . . . . . . . . . . . . . . . . . . . . . . . . 30
LLabeling, Tire Sidewall . . . . . . . . . . . . . 293

Cadillac ATS/ATS-V Owner Manual (GMNA-Localizing-U.S./Canada/Mexico-11349135) - 2018 - crc - 9/25/17
384 INDEX
LampsCourtesy . . . . . . . . . . . . . . . . . . . . . . . . . . . 154Daytime Running (DRL) . . . . . . . . . . 151Dome . . . . . . . . . . . . . . . . . . . . . . . . . . . . . . 154Exterior Controls . . . . . . . . . . . . . . . . . . 149Exterior Lamps Off Reminder . . . . 151Exterior Lighting BatterySaver . . . . . . . . . . . . . . . . . . . . . . . . . . . . . 156
License Plate . . . . . . . . . . . . . . . . . . . . . . 280Malfunction Indicator (CheckEngine) . . . . . . . . . . . . . . . . . . . . . . . . . . 125
On Reminder . . . . . . . . . . . . . . . . . . . . . . 133Reading . . . . . . . . . . . . . . . . . . . . . . . . . . . . 155
Lane Change Alert (LCA) . . . . . . . . . . . 237Lane DepartureWarning (LDW) . . . . . . . . . . . . . . . . . . . 238
Lane Keep Assist (LKA) . . . . . . . . . . . . 239Lane Keep Assist Light . . . . . . . . . . . . . 129Lap-Shoulder Belt . . . . . . . . . . . . . . . . . . . . 72LATCH SystemReplacing Parts after a Crash . . . . 101
LATCH, Lower Anchors andTethers for Children . . . . . . . . . . . . . . . 95
LED Lighting . . . . . . . . . . . . . . . . . . . . . . . . 279LightingAdaptive Forward . . . . . . . . . . . . . . . . . 153Entry . . . . . . . . . . . . . . . . . . . . . . . . . . . . . . 156Exit . . . . . . . . . . . . . . . . . . . . . . . . . . . . . . . . 156
Lighting (cont'd)Illumination Control . . . . . . . . . . . . . . 154LED . . . . . . . . . . . . . . . . . . . . . . . . . . . . . . . . 279
LightsAdaptive Forward Lighting(AFL) Light . . . . . . . . . . . . . . . . . . . . . . 133
Airbag Readiness . . . . . . . . . . . . . . . . . 124Antilock Brake System (ABS)Warning . . . . . . . . . . . . . . . . . . . . . . . . . 128
Brake System Warning . . . . . . . . . . . 127Charging System . . . . . . . . . . . . . . . . . . 125Check Engine (MalfunctionIndicator) . . . . . . . . . . . . . . . . . . . . . . . . 125
Cruise Control . . . . . . . . . . . . . . . . . . . . . 133Door Ajar . . . . . . . . . . . . . . . . . . . . . . . . . . 133Engine Coolant TemperatureWarning . . . . . . . . . . . . . . . . . . . . . . . . . 130
Engine Oil Pressure . . . . . . . . . . . . . . . 131Flash-to-Pass . . . . . . . . . . . . . . . . . . . . . . 151High-Beam On . . . . . . . . . . . . . . . . . . . . 132High/Low Beam Changer . . . . . . . . . 151Lane Keep Assist . . . . . . . . . . . . . . . . . . 129Low Fuel Warning . . . . . . . . . . . . . . . . 132Parking Brake . . . . . . . . . . . . . . . . . . . . . 128Seat Belt Reminders . . . . . . . . . . . . . . 123Security . . . . . . . . . . . . . . . . . . . . . . . . . . . . 132Service Electric Parking Brake . . . 128StabiliTrak OFF . . . . . . . . . . . . . . . . . . . 129
Lights (cont'd)Tire Pressure . . . . . . . . . . . . . . . . . . . . . . 131Traction Control System(TCS)/StabiliTrak . . . . . . . . . . . . . . . . 130
Traction Off . . . . . . . . . . . . . . . . . . . . . . . 129Limited-Slip Rear Axle . . . . . . . . . . . . . 217LocksAutomatic Door . . . . . . . . . . . . . . . . . . . . .42Delayed Locking . . . . . . . . . . . . . . . . . . . .41Door . . . . . . . . . . . . . . . . . . . . . . . . . . . . . . . . .39Lockout Protection . . . . . . . . . . . . . . . . .42Power Door . . . . . . . . . . . . . . . . . . . . . . . . . .41Safety . . . . . . . . . . . . . . . . . . . . . . . . . . . . . . . .43
Loss of Control . . . . . . . . . . . . . . . . . . . . . . 178Low Fuel Warning Light . . . . . . . . . . . 132Lower Anchors and Tethers forChildren (LATCH System) . . . . . . . . . 95
Lumbar Adjustment . . . . . . . . . . . . . . . . . 59Front Seats . . . . . . . . . . . . . . . . . . . . . . . . . .59
MMaintenanceRecords . . . . . . . . . . . . . . . . . . . . . . . . . . . . 348
Maintenance and CareAdditional . . . . . . . . . . . . . . . . . . . . . . . . . 342
Maintenance Schedule . . . . . . . . . . . . . 336

Cadillac ATS/ATS-V Owner Manual (GMNA-Localizing-U.S./Canada/Mexico-11349135) - 2018 - crc - 9/25/17
INDEX 385
Maintenance Schedule (cont'd)Recommended Fluids andLubricants . . . . . . . . . . . . . . . . . . . . . . . 345
Malfunction Indicator Lamp . . . . . . . 125Manual Mode . . . . . . . . . . . . . . . . . . . . . . . 201Manual Transmission . . . . . . . . . . . . . . 203Fluid . . . . . . . . . . . . . . . . . . . . . . . . . . . . . . . 263
MatchingActive Rev . . . . . . . . . . . . . . . . . . . . . . . . . 204
Memory Features . . . . . . . . . . . . . . . . . . . . 14Memory Seats . . . . . . . . . . . . . . . . . . . . . . . . 61MessagesEngine Power . . . . . . . . . . . . . . . . . . . . . 140Vehicle . . . . . . . . . . . . . . . . . . . . . . . . . . . . . 140Vehicle Speed . . . . . . . . . . . . . . . . . . . . . 141
MirrorsAutomatic Dimming Rearview . . . . .49Convex . . . . . . . . . . . . . . . . . . . . . . . . . . . . . . .48Folding . . . . . . . . . . . . . . . . . . . . . . . . . . . . . .48Heated . . . . . . . . . . . . . . . . . . . . . . . . . . . . . . .49Manual Rearview . . . . . . . . . . . . . . . . . . .49Power . . . . . . . . . . . . . . . . . . . . . . . . . . . . . . . .48Tilt in Reverse . . . . . . . . . . . . . . . . . . . . . .49
Mirrors, Interior Rearview . . . . . . . . . . . 49Mode . . . . . . . . . . . . . . . . . . . . . . . . . . . . . . . . 210Driver Control . . . . . . . . . . . . . . . . . . . . . 210
Monitor System, Tire Pressure . . . . . 299
NNavigationOnStar . . . . . . . . . . . . . . . . . . . . . . . . . . . . . 370
New Vehicle Break-In . . . . . . . . . . . . . . . 189
OOdometer . . . . . . . . . . . . . . . . . . . . . . . . . . . . 121Trip . . . . . . . . . . . . . . . . . . . . . . . . . . . . . . . . 121
Off-RoadRecovery . . . . . . . . . . . . . . . . . . . . . . . . . . . 177
OilEngine . . . . . . . . . . . . . . . . . . . . . . . . . . . . . 259Engine Oil Life System . . . . . . . . . . . 261Pressure Light . . . . . . . . . . . . . . . . . . . . . 131
Older Children, Restraints . . . . . . . . . . . 88Online Owner Center . . . . . . . . . . . . . . . 357OnStar . . . . . . . . . . . . . . . . . . . . . . . . . . . . . . . 366OnStar Additional Information . . . . 374OnStar Connections . . . . . . . . . . . . . . . . 371OnStar Diagnostics . . . . . . . . . . . . . . . . . 373OnStar Emergency . . . . . . . . . . . . . . . . . . 369OnStar Navigation . . . . . . . . . . . . . . . . . . 370OnStar Overview . . . . . . . . . . . . . . . . . . . . 368OnStar Security . . . . . . . . . . . . . . . . . . . . . 370OrderingService Publications . . . . . . . . . . . . . . 363
OutletsPower . . . . . . . . . . . . . . . . . . . . . . . . . . . . . . 114
Overheating, Engine . . . . . . . . . . . . . . . . 269
PParkShifting Into . . . . . . . . . . . . . . . . . . . . . . 195Shifting Out of . . . . . . . . . . . . . . . . . . . . 196
Parking . . . . . . . . . . . . . . . . . . . . . . . . . . . . . . 197Brake . . . . . . . . . . . . . . . . . . . . . . . . . 206, 208Brake and P (Park)Mechanism Check . . . . . . . . . . . . . . . 276
Extended . . . . . . . . . . . . . . . . . . . . . . . . . . 197Over Things That Burn . . . . . . . . . . . 197
Parking Assist . . . . . . . . . . . . . . . . . . . . . . . 229Parking BrakeLight . . . . . . . . . . . . . . . . . . . . . . . . . . . . . . . 128
Parking or BackingAssistance Systems . . . . . . . . . . . . . . . 229
Passenger Airbag StatusIndicator . . . . . . . . . . . . . . . . . . . . . . . . . . . 124
Passenger Compartment AirFilter . . . . . . . . . . . . . . . . . . . . . . . . . . . . . . . 172
Passenger Sensing System . . . . . . . . . . 82Perchlorate MaterialsRequirements, California . . . . . . . . . 252
Performance DataRecorder (PDR) . . . . . . . . . . . . . . . . . . . . 157
PersonalizationVehicle . . . . . . . . . . . . . . . . . . . . . . . . . . . . . 141

Cadillac ATS/ATS-V Owner Manual (GMNA-Localizing-U.S./Canada/Mexico-11349135) - 2018 - crc - 9/25/17
386 INDEX
PowerDoor Locks . . . . . . . . . . . . . . . . . . . . . . . . . .41Mirrors . . . . . . . . . . . . . . . . . . . . . . . . . . . . . .48Outlets . . . . . . . . . . . . . . . . . . . . . . . . . . . . . 114Protection, Battery . . . . . . . . . . . . . . . . 156Retained Accessory (RAP) . . . . . . . . 195Seat Adjustment . . . . . . . . . . . . . . . . . . . .57Windows . . . . . . . . . . . . . . . . . . . . . . . . . . . .50
Pregnancy, Using Seat Belts . . . . . . . . . 74Premium Care MaintenanceCadillac . . . . . . . . . . . . . . . . . . . . . . . . . . . . 336
PrivacyVehicle Data Recording . . . . . . . . . . 365
ProgramCourtesy Transportation . . . . . . . . . 360
Proposition65 Warning,California . . . . . . . . . . . . . . .251, 273, 320,
Back Cover
RRadio Frequency Statement . . . . . . . . 364Reading Lamps . . . . . . . . . . . . . . . . . . . . . 155Rear AxleLimited-Slip . . . . . . . . . . . . . . . . . . . . . . . 217
Rear Seat Pass-Through Door . . . . . . . 69Rear Seats . . . . . . . . . . . . . . . . . . . . . . . . 66, 68Rear Vision Camera (RVC) . . . . . . . . . 229
Rearview Mirrors . . . . . . . . . . . . . . . . . . . . 49Automatic Dimming . . . . . . . . . . . . . . . .49
Reclining Seatbacks . . . . . . . . . . . . . . . . . 60Recommended Fluids andLubricants . . . . . . . . . . . . . . . . . . . . . . . . . 345
RecordsMaintenance . . . . . . . . . . . . . . . . . . . . . . 348
Recreational Vehicle Towing . . . . . . . 323Reimbursement Program, GMMobility . . . . . . . . . . . . . . . . . . . . . . . . . . . . 357
Remote Keyless Entry (RKE)System . . . . . . . . . . . . . . . . . . . . . . . . . . . . . . 31
Remote Vehicle Start . . . . . . . . . . . . . . . . 37Replacement PartsAirbags . . . . . . . . . . . . . . . . . . . . . . . . . . . . . .88Maintenance . . . . . . . . . . . . . . . . . . . . . . 346
Replacing Airbag System . . . . . . . . . . . . 88Replacing LATCH System Partsafter a Crash . . . . . . . . . . . . . . . . . . . . . . . 101
Replacing Seat Belt SystemParts after a Crash . . . . . . . . . . . . . . . . . 76
Reporting Safety DefectsCanadian Government . . . . . . . . . . . . 364General Motors . . . . . . . . . . . . . . . . . . . 365U.S. Government . . . . . . . . . . . . . . . . . . 364
RestraintsWhere to Put . . . . . . . . . . . . . . . . . . . . . . . .94
Retained AccessoryPower (RAP) . . . . . . . . . . . . . . . . . . . . . . . 195
Reverse Tilt Mirrors . . . . . . . . . . . . . . . . . 49Ride Control SystemsLimited Slip Rear Axle . . . . . . . . . . . 217
RoadsDriving, Wet . . . . . . . . . . . . . . . . . . . . . . . 183
Roadside Service . . . . . . . . . . . . . . . . . . . . 358RoofSunroof . . . . . . . . . . . . . . . . . . . . . . . . . . . . . .52
Rotation, Tires . . . . . . . . . . . . . . . . . . . . . . 303Routing, Engine Drive Belt . . . . . . . . . 353Run-Flat Tires . . . . . . . . . . . . . . . . . . . . . . . 292Running the Vehicle WhileParked . . . . . . . . . . . . . . . . . . . . . . . . . . . . . 199
SSafety Defects ReportingCanadian Government . . . . . . . . . . . . 364General Motors . . . . . . . . . . . . . . . . . . . 365U.S. Government . . . . . . . . . . . . . . . . . . 364
Safety Locks . . . . . . . . . . . . . . . . . . . . . . . . . . 43Safety System Check . . . . . . . . . . . . . . . . 75Scheduling Appointments . . . . . . . . . . 360Sealant Kit, Tire . . . . . . . . . . . . . . . . . . . . . 312Seat Belts . . . . . . . . . . . . . . . . . . . . . . . . . . . . . 70Care . . . . . . . . . . . . . . . . . . . . . . . . . . . . . . . . . .75Extender . . . . . . . . . . . . . . . . . . . . . . . . . . . . .75

Cadillac ATS/ATS-V Owner Manual (GMNA-Localizing-U.S./Canada/Mexico-11349135) - 2018 - crc - 9/25/17
INDEX 387
Seat Belts (cont'd)How to Wear Seat BeltsProperly . . . . . . . . . . . . . . . . . . . . . . . . . . . .71
Lap-Shoulder Belt . . . . . . . . . . . . . . . . . . .72Reminders . . . . . . . . . . . . . . . . . . . . . . . . . 123Replacing after a Crash . . . . . . . . . . . . .76Use During Pregnancy . . . . . . . . . . . . . .74
SeatsEasy Entry Seat . . . . . . . . . . . . . . . . . . . . .56Head Restraints . . . . . . . . . . . . . . . . . . . . .55Heated Front . . . . . . . . . . . . . . . . . . . . . . . .64Lumbar Adjustment, Front . . . . . . . . .59Memory . . . . . . . . . . . . . . . . . . . . . . . . . . . . .61Power Adjustment, Front . . . . . . . . . .57Rear . . . . . . . . . . . . . . . . . . . . . . . . . . . . . .66, 68Reclining Seatbacks . . . . . . . . . . . . . . . .60
Securing Child Restraints . . . . .101, 103SecurityLight . . . . . . . . . . . . . . . . . . . . . . . . . . . . . . . 132OnStar . . . . . . . . . . . . . . . . . . . . . . . . . . . . . 370Vehicle . . . . . . . . . . . . . . . . . . . . . . . . . . . . . . .45Vehicle Alarm . . . . . . . . . . . . . . . . . . . . . . .45
Self-Sealing Tires . . . . . . . . . . . . . . . . . . . 292Service . . . . . . . . . . . . . . . . . . . . . . . . . . . . . . . 173Accessories andModifications . . . . . . . . . . . . . . . . . . . . 252
Doing Your Own Work . . . . . . . . . . . 252Maintenance Records . . . . . . . . . . . . 348
Service (cont'd)Maintenance, GeneralInformation . . . . . . . . . . . . . . . . . . . . . . 334
Parts Identification Label . . . . . . . . 349Publications OrderingInformation . . . . . . . . . . . . . . . . . . . . . . 363
Scheduling Appointments . . . . . . . . 360Service Electric Parking BrakeLight . . . . . . . . . . . . . . . . . . . . . . . . . . . . . . . 128
ServicesSpecial Application . . . . . . . . . . . . . . . 341
Servicing the Airbag . . . . . . . . . . . . . . . . . 86Shift Lock Control FunctionCheck, AutomaticTransmission . . . . . . . . . . . . . . . . . . . . . . 276
ShiftingInto Park . . . . . . . . . . . . . . . . . . . . . . . . . . 195Out of Park . . . . . . . . . . . . . . . . . . . . . . . . 196
Side Blind Zone Alert (SBZA) . . . . . . 236Signals, Turn and Lane-Change . . . . 153Special Application Services . . . . . . . 341Specifications and Capacities . . . . . . 350Speedometer . . . . . . . . . . . . . . . . . . . . . . . . 121StabiliTrakOFF Light . . . . . . . . . . . . . . . . . . . . . . . . . . 129
Start Assist, Hill . . . . . . . . . . . . . . . . . . . . 209Start Vehicle, Remote . . . . . . . . . . . . . . . 37Starter Switch Check . . . . . . . . . . . . . . . 275
Starting the Engine . . . . . . . . . . . . . . . . . 192Steering . . . . . . . . . . . . . . . . . . . . . . . . . . . . . . 177Heated Wheel . . . . . . . . . . . . . . . . . . . . . 111Wheel Adjustment . . . . . . . . . . . . . . . . 111Wheel Controls . . . . . . . . . . . . . . . . . . . 111
Storage AreasArmrest . . . . . . . . . . . . . . . . . . . . . . . . . . . . 108Center Console . . . . . . . . . . . . . . . . . . . . 108Glove Box . . . . . . . . . . . . . . . . . . . . . . . . . 107Instrument Panel . . . . . . . . . . . . . . . . . 107
Storage Compartments . . . . . . . . . . . . . 107Storing the Tire Sealant andCompressor Kit . . . . . . . . . . . . . . . . . . . . 319
StrutsGas . . . . . . . . . . . . . . . . . . . . . . . . . . . . . . . . . 277
Stuck Vehicle . . . . . . . . . . . . . . . . . . . . . . . 186Summer Tires . . . . . . . . . . . . . . . . . . . . . . . 293Sun Visors . . . . . . . . . . . . . . . . . . . . . . . . . . . . 52Sunroof . . . . . . . . . . . . . . . . . . . . . . . . . . . . . . . 52Symbols . . . . . . . . . . . . . . . . . . . . . . . . . . . . . . . .3SystemForward Collision Alert (FCA) . . . . 232Infotainment . . . . . . . . . . . . . . . . . 157, 367
SystemsDriver Assistance . . . . . . . . . . . . . . . . . 228

Cadillac ATS/ATS-V Owner Manual (GMNA-Localizing-U.S./Canada/Mexico-11349135) - 2018 - crc - 9/25/17
388 INDEX
TTachometer . . . . . . . . . . . . . . . . . . . . . . . . . 121Text Telephone (TTY) Users . . . . . . . 356Theft-Deterrent Systems . . . . . . . . . . . . 47Immobilizer . . . . . . . . . . . . . . . . . . . . . . . . .47
Thigh Support Adjustment . . . . . . . . . . 60Time . . . . . . . . . . . . . . . . . . . . . . . . . . . . . . . . . 114Tires . . . . . . . . . . . . . . . . . . . . . . . . . . . . . . . . . 290All-Season . . . . . . . . . . . . . . . . . . . . . . . . . 291Buying New Tires . . . . . . . . . . . . . . . . . 306Chains . . . . . . . . . . . . . . . . . . . . . . . . . . . . . 310Designations . . . . . . . . . . . . . . . . . . . . . . 295Different Size . . . . . . . . . . . . . . . . . . . . . . 307If a Tire Goes Flat . . . . . . . . . . . . . . . . 311Inspection . . . . . . . . . . . . . . . . . . . . . . . . . 303Pressure . . . . . . . . . . . . . . . . . . . . . . 298, 299Pressure Light . . . . . . . . . . . . . . . . . . . . . 131Pressure Monitor Operation . . . . . . 300Pressure Monitor System . . . . . . . . 299Rotation . . . . . . . . . . . . . . . . . . . . . . . . . . . 303Run-Flat . . . . . . . . . . . . . . . . . . . . . . . . . . . 292Sealant and Compressor Kit . . . . . 312Sealant and Compressor Kit,Storing . . . . . . . . . . . . . . . . . . . . . . . . . . . 319
Self-Sealing . . . . . . . . . . . . . . . . . . . . . . . . 292Sidewall Labeling . . . . . . . . . . . . . . . . . 293Terminology and Definitions . . . . 295Uniform Tire Quality Grading . . . . 307
Tires (cont'd)Wheel Alignment and TireBalance . . . . . . . . . . . . . . . . . . . . . . . . . . 309
Wheel Replacement . . . . . . . . . . . . . . 309When It Is Time for NewTires . . . . . . . . . . . . . . . . . . . . . . . . . . . . . 305
Winter . . . . . . . . . . . . . . . . . . . . . . . . . . . . . 291TowingDriving Characteristics . . . . . . . . . . . 244Equipment . . . . . . . . . . . . . . . . . . . 248, 249General Information . . . . . . . . . . . . . . 244Recreational Vehicle . . . . . . . . . . . . . . 323Trailer . . . . . . . . . . . . . . . . . . . . . . . . 247–249Vehicle . . . . . . . . . . . . . . . . . . . . . . . . . . . . . 322
Track Events and CompetitiveDriving . . . . . . . . . . . . . . . . . . . . . . . . . . . . . 178
TractionControl System (TCS)/StabiliTrak Light . . . . . . . . . . . . . . . . 130
Limited-Slip Rear Axle . . . . . . . . . . . 217Off Light . . . . . . . . . . . . . . . . . . . . . . . . . . . 129
Traction Control/ElectronicStability Control . . . . . . . . . . . . . . . . . . . 209
TrailerTowing . . . . . . . . . . . . . . . . . . . . . . . 247–249
TransmissionAutomatic . . . . . . . . . . . . . . . . . . . . . . . . . 199Fluid, Automatic . . . . . . . . . . . . . . . . . . 263
Transmission (cont'd)Fluid, Manual . . . . . . . . . . . . . . . . . . . . . 263
Transportation Program,Courtesy . . . . . . . . . . . . . . . . . . . . . . . . . . . 360
Trip Odometer . . . . . . . . . . . . . . . . . . . . . . 121Trunk . . . . . . . . . . . . . . . . . . . . . . . . . . . . . . . . . 43Turn and Lane-Change Signals . . . . 153
UUniform Tire Quality Grading . . . . . . 307Universal Remote System . . . . . . . . . . 146Operation . . . . . . . . . . . . . . . . . . . . . . . . . . 148Programming . . . . . . . . . . . . . . . . . . . . . . 146
Using This Manual . . . . . . . . . . . . . . . . . . . .2
VVehicleAlarm System . . . . . . . . . . . . . . . . . . . . . . .45Canadian Owners . . . . . . . . . . . . . . . . . . . . 2Control . . . . . . . . . . . . . . . . . . . . . . . . . . . . 176Identification Number (VIN) . . . . . 349Load Limits . . . . . . . . . . . . . . . . . . . . . . . 186Messages . . . . . . . . . . . . . . . . . . . . . . . . . . 140Personalization . . . . . . . . . . . . . . . . . . . 141Remote Start . . . . . . . . . . . . . . . . . . . . . . . .37Security . . . . . . . . . . . . . . . . . . . . . . . . . . . . . .45Speed Messages . . . . . . . . . . . . . . . . . . . 141Towing . . . . . . . . . . . . . . . . . . . . . . . . . . . . 322
Vehicle Ahead Indicator . . . . . . . . . . . . 129
Cadillac ATS/ATS-V Owner Manual (GMNA-Localizing-U.S./Canada/Mexico-11349135) - 2018 - crc - 9/25/17
INDEX 389
Vehicle CareStoring the Tire Sealant andCompressor Kit . . . . . . . . . . . . . . . . . . 319
Tire Pressure . . . . . . . . . . . . . . . . . . . . . . 298Vehicle Data Recording andPrivacy . . . . . . . . . . . . . . . . . . . . . . . . . . . . . 365
Ventilation, Air . . . . . . . . . . . . . . . . . . . . . 171Visors . . . . . . . . . . . . . . . . . . . . . . . . . . . . . . . . . 52
WWarningBrake System Light . . . . . . . . . . . . . . . 127Caution and Danger . . . . . . . . . . . . . . . . . 3Lane Departure (LDW) . . . . . . . . . . . 238
Warning Lights, Gauges, andIndicators . . . . . . . . . . . . . . . . . . . . . . . . . . 117
WarningsHazard Flashers . . . . . . . . . . . . . . . . . . . 153
Washer Fluid . . . . . . . . . . . . . . . . . . . . . . . . 271Washer, Headlamps . . . . . . . . . . . . . . . . 113WheelsAlignment and Tire Balance . . . . . 309Different Size . . . . . . . . . . . . . . . . . . . . . . 307Replacement . . . . . . . . . . . . . . . . . . . . . . 309
When It Is Time for New Tires . . . . 305Where to Put the Restraint . . . . . . . . . 94Wi-Fi . . . . . . . . . . . . . . . . . . . . . . . . . . . . . . . . . 371Windows . . . . . . . . . . . . . . . . . . . . . . . . . . . . . 49
Windows (cont'd)Power . . . . . . . . . . . . . . . . . . . . . . . . . . . . . . . .50
WindshieldReplacement . . . . . . . . . . . . . . . . . . . . . . 277Wiper/Washer . . . . . . . . . . . . . . . . . . . . . 112
WinterDriving . . . . . . . . . . . . . . . . . . . . . . . . . . . . 184
Winter Tires . . . . . . . . . . . . . . . . . . . . . . . . . 291Wiper Blade Replacement . . . . . . . . . . 276Wireless Charging . . . . . . . . . . . . . . . . . . 115

23396040 B
C
M
Y
CM
MY
CY
CMY
K
18_CAD_ATS_ATS-V_COV_en_US_23396040B_2017OCT03.ai 1 9/28/2017 10:03:22 AM18_CAD_ATS_ATS-V_COV_en_US_23396040B_2017OCT03.ai 1 9/28/2017 10:03:22 AM