Owner’s Guide - Electroluxmanuals.electroluxappliances.com/prodinfo_pdf/Edison/87979en.pdf · v...
22
Owner’s Guide
-
Upload
nguyenkhanh -
Category
Documents
-
view
216 -
download
2
Transcript of Owner’s Guide - Electroluxmanuals.electroluxappliances.com/prodinfo_pdf/Edison/87979en.pdf · v...

Owner’s Guide

2
ENGLISH
IMPORTANT SAFEGUARDSWhen using an electrical appliance, basic precautions should always be followed, including the following:
READ ALL INSTRUCTIONS BEFORE USING THIS VACUUM CLEANER.
WARNINGTo reduce the risk of fire, electric shock, or injury:
SAVE THESE INSTRUCTIONSFOR HOUSEHOLD USE ONLY
To reduce the risk of electric shock,
Thermal Cut Off

FRANÇAIS
CONSIGNES DE SÉCURITÉ IMPORTANTESAVERTISSEMENT
Pour réduire le risque de feu, de choc électrique ou de blessure :
CONSERVER CES INSTRUCTIONSUTILISER L’ASPIRATEUR UNIQUEMENT DANS UN ENVIRONNEMENT DOMESTIQUE
Pour réduire le risque de choc électrique,
Coupure thermique

4
ESPAÑOL
IMPORTANTE MEDIDAS DE PROTECCIÓN
ADVERTENCIAPara reducir el riesgo de incendio, descarga eléctrica o lesiones:
GUARDE ESTAS INSTRUCCIONESSÓLO PARA USO DOMÉSTICO
Para reducir el riesgo de una descarga eléctrica,
Apagado térmico

you begin by reading through the instructions, and
reference.
UNPACK AND CHECK CARTON CONTENTS
Accessories” list.
CAUTION
FRANÇAIS
DÉBALLER L’APPAREIL ET VÉRIFIER LECONTENUSORTEZ TOUT DU CARTON.
ATTENTION:
ESPAÑOL
referencia futura.
DESEMPAQUE Y VERIFICACIóN DEL CONTENIDO DE LA CAJA
PRECAUCIÓN:
5
Servicing Part Numbers DUST BAG, S-BAG®
sure to always replace the dust bag with a
EXHAUST FILTER (EL012/EL020)
BELT (EL097)
Numéros de pièces de réparationSAC À POUSSIÈRE, S-BAG®
FILTRES DE SORTIE (EL012/EL020)
LA COURROIE (EL097)
Números de partes de servicio
BOLSA PARA POLVO, S-BAG®
FILTRO DE ESCAPE (EL012/EL020)
LA CORREA
DE ELECTROLUX.
1
12
11
2
4
56 478109
3
13
14
15
16
1817
1920

ENGLISH
BEFORE STARTING
included.*
Enjoy your Electrolux UltraOne!
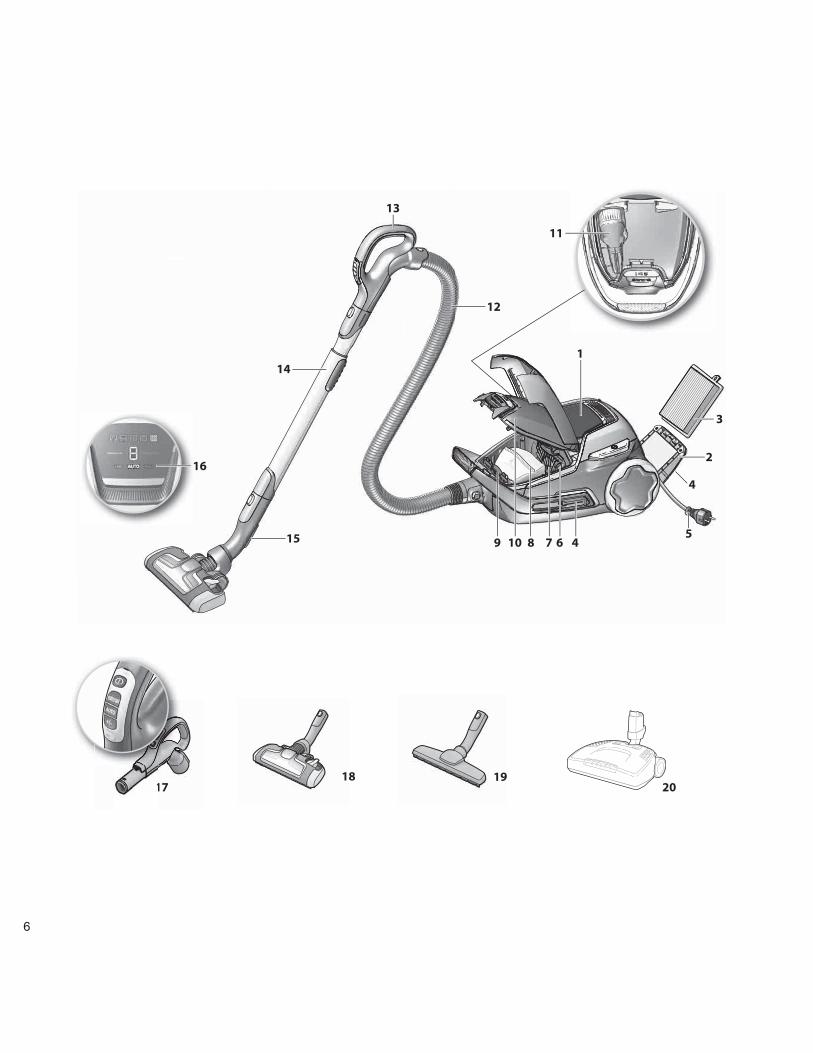
DESCRIPTION OF YOUR ULTRAONE
ESPAÑOL
ANTES DE COMENZAR
seguridad.
Disfrute de su Electrolux UltraOne!
DESCRIPCIÓN DE SU ULTRAONE
FRANÇAIS
AVANT DE COMMENCER
UltraOne
tous les accessoires sont bien inclus*.
Electrolux UltraOne pour un nettoyage plus
DESCRIPTION DE VOTRE ULTRAONE

8
1. 3.
4.
7.
2.
6.
Click!
Click
Click
8. 9.
10. 11.
5.

ENGLISH
HOW TO USE THE VACUUM CLEANER
1 Check that the s-bag® is in
place.
2 Insert the hose into the cleaner
4 Attach the telescopic tube to the hose handle
5 Adjust the telescopic tubewith one hand and pulling the handle with the other hand.
Pull out the power cord and plug it into the mains.
7 Switch on/off the vacuum cleaner by pushing
8 Models with remote control can also be
Adjust suction power. The cleaner starts in
BRUSH button on the handle.*
11 rewind the cable by pushing the REWIND button.
FRANÇAIS
MODE D’EMPLOI DE L’ASPIRATEUR
1
que le sac à poussière s-bag® est bien en place.
2
Fixer le tube télescopique au suceur pour sols.
4 Fixer le tube télescopique à la poignée du
5 Régler le tube télescopique en tenant le
Tirer sur le cordon d’alimentation et le brancher sur le secteur.
Démarrer/arrêter l’aspirateur en appuyant sur le
8 Les modèles avec télécommande*
Réglage de la puissance :
11 enrouler le cordon en appuyant sur le bouton de l’enrouleur.
ESPAÑOL
CÓMO UTILIZAR LA ASPIRADORA
Verifique que la s-bag® está debidamente colocada.
2. Inserte la manguera en la aspiradora
Conecte el tubo telescópico a la boquilla de piso
4. Conecte el tubo telescópico a la boquilla de piso
5. Ajuste el tubo telescópico
Extraiga el cable de alimentación y conéctelo a la toma de corriente.
Encienda o apague la aspiradora presionando
8. Los modelos con control remoto
Ajuste de la potencia de succión.
vuelva a enrollar el cable presionando el botón REWIND (rebobinar).
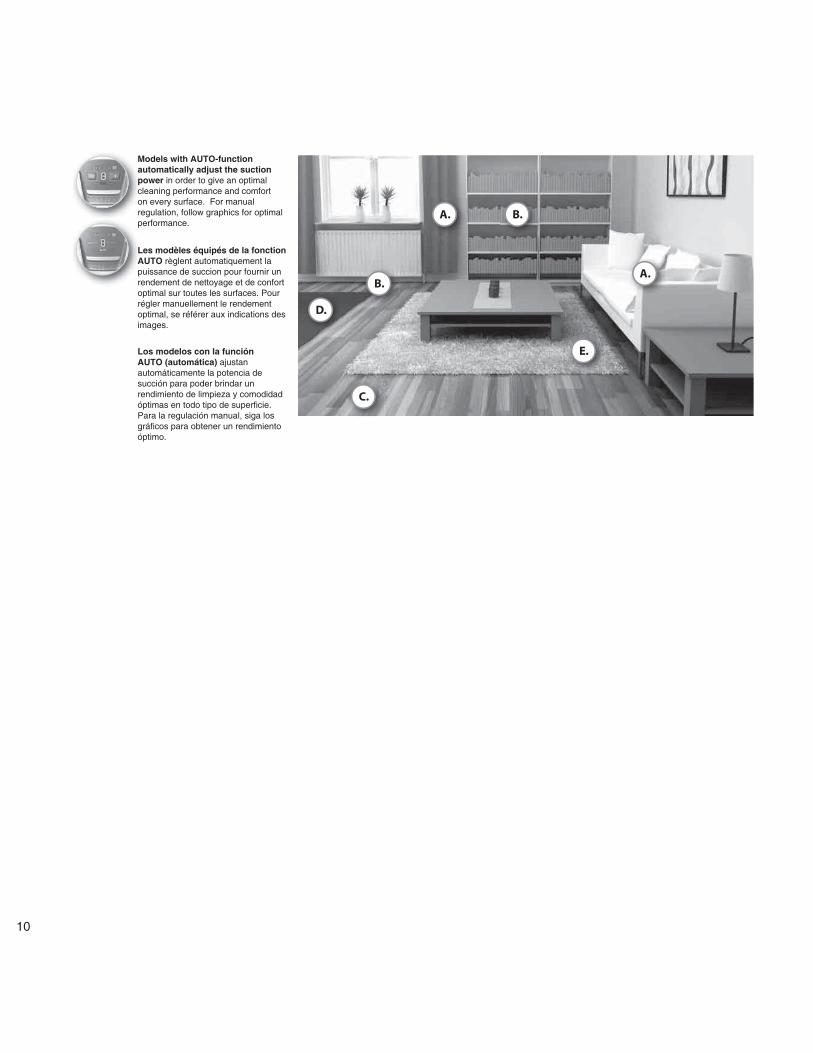
A.
B.
B.
A.
C.
D.
E.
Models with AUTO-function automatically adjust the suction power
Les modèles équipés de la fonction AUTOpuissance de succion pour fournir un
Los modelos con la función AUTO (automática)

11
A. B.
C. D. E.
1 2 1 2
3 4 5 3 4 5 3 4 5
*
!
>15mm
!
Power setting
de la puissancepuissance
puissancepuissance
puissance
Brushes down. Brushes up. Brushes up.
Brush roller on or off as preferred.deep cleaning of carpets through the rotating brush roller agitating the carpet. Do not leave the
Attention: on fur rugs, rugs with long fringes or deep
the brush roller off.
Brosses descendues. Brosses relevées. Brosses relevées.
Attention :

12
1.
3.
3.
2.
(B) (A)
(C)

ENGLISH
TIPS ON HOW TO GET BEST RESULTS
PARKING POSITIONS1.
cleaning.2
AEROPRO 3IN1 NOZZLE
3
USING THE POWER NOZZLE
carpeting because of the deep cleaning brushroll.
and hose, turn on the canister and the brushroll for carpet cleaning.
Release the handle by pressing down on the
Turn off the cleaner when it is not in use. Do not
FRANÇAIS
CONSEILS POUR OBTENIR LES MEILLEURS RÉSULTATS
POSITIONS DE RANGEMENT1.
nettoyage. 2
ACCESSOIRE AEROPRO 3 EN 1
3
UTILISATION DU SUCEUR MOTORISÉ
Ne pas utiliser le suceur sur des sols nus sans avoir d’abord éteindre la brosse rotative.
ESPAÑOL
CONSEJOS PARA OBTENER LOS MEJORES RESULTADOS
PARKING POSITIONS1.
2
BOQUILLA AEROPRO 3 EN 1
3
USO DE LA BOQUILLA DE POTENCIA
No utilice la boquilla de energía en los suelos sin sin apagar el cepillo giratorio.
cepillo giratorio.
pedal ubicado en la parte posterior de la cubierta
giratorio.
De potencia apoyada sobre un lugar funcionando

14
1.
4.
2. 3.

15
ENGLISH
REPLACING THE DUSTBAG, S-BAG®
1. Models with digital display: Change the dust bag
2. Open the dust compartment cover by pulling the S-BAG button.
3. Pull the cardboard handle to close and remove the s-bag®
4. Insert a new s-bag® by pushing the cardboard
lid will not close.
NB:
UltraOne!www.s-bag.com
FRANÇAIS
REMPLACER LE SAC À POUSSIÈRE, S-BAG®
1. Modèles avec témoins lumineux : Le sac à poussière doit être remplacé
2. Pour accéder au compartiment du sac à poussière, appuyer sur le bouton S-BAG.
3.
4. Mettre en place un nouveau sac à poussière s-bag®
Remarque :
www.s-bag.com
ESPAÑOL
REEMPLAZO DE LA BOLSA PARA POLVO,
S-BAG®
1. Modelos con pantalla digital: Cambie la bolsa para polvo
2. Abra la tapa del compartimiento para polvo jalando el botón de la S-BAG.
3. Jale el mango de cartón para cerrar y extraer la s-bag®
NB:
www.s-bag.com®
®
®

1.
4.
8. 9. 10.
5. 6. 7.
2. 3.
Click!

ENGLISH
REPLACING THE FILTERS
1. Models with FILTER indicator
2. button at the rear of the cleaner body. Use
3. Lift out the filter and check the colour of the frame to determine type. Green colour: Must be replaced by a new filter. Blue colour: Replace by
4. Cleaning the washable exhaust filter. Rinse
Note:touching the filter surface Let the filter dry completely (min.24 h In room temperature) before putting back! washable filter also at least once in a year or when it
5. When the filter has been replaced, the filter lid
6. If the filter lid comes loose, restore by
into place.
7. every 5th s-bag®.
lid.
CLEANING THE AEROPRO NOZZLES
8.
9. If the wheels are stuck,
10.
FRANÇAIS
REMPLACER LE SAC À POUSSIÈRE, S-BAG®
1. Modèles avec voyant FILTER
uniquement.
2. bouton FILTER à l’arrière de l’appareil.
.
3. couleur de son cadre.
4. Lavage du filtre de sortie d’air lorsqu’il est lavable.
Remarque :de toucher la surface du filtre. est complète-ment sec (minimum 24 h à température ambiante) avant de le replacer dans l’aspirateur ! En outre,
5.
un clic.
6.
7. tous les 5 sacs à poussière s-bag®.
NETTOYAGE DU SUCEUR AEROPRO
8.
9. Si les roues sont bloquées, les nettoyer en
10.
ESPAÑOL
REPLACING THE FILTERS
1. Los modelos con indicador de FILTRO
lavables.
trasero del cuerpo de la aspiradora. Utilice
para determinar el tipo.
Nota:
se seque por completo (mínimo 25 horas, a temperatura ambiente) antes de volverlo a instalar.
trabado en su lugar.
restaure colocando
en su lugar.
LIMPIEZA DE LAS BOQUILLAS AEROPRO
8.
9. Si se han atorado las ruedas,
10. las tapas de las ruedas con un destornillador

18
A CD
B
1.
3.
6.
2.
5.
7.
4.

ENGLISH
TIPS ON HOW TO GET BEST RESULTS
CAUTION:
restart.
CLEANING THE HOSE
cleaner.
NOTE: the hose caused by cleaning it.
HOW TO REPLACE BELT (BELT STYLE EL097) ON DEEP CLEAN POWER NOZZLECAUTION: Unplug the cleaner before replacing belt.
case, followed by the other end.
place and replacing the four screws.
FRANÇAIS
CONSEILS POUR OBTENIR LES MEILLEURS RÉSULTATS
ATTENTION:
NETTOYAGE DU TUYAU
REMARQUE :
nettoyage.
COMMENT REMPLACER LA COURROIE (TYPE DE BROSSE EL097) SUR LA TÊTE MOTORISÉE DE NETTOYAGE EN PROFONDEURATTENTION: Unplug the cleaner before replacing belt.
refroidir.
base.
Utiliser une courroie de rechange ELECTROLUX
ESPAÑOL
CONSEJOS PARA OBTENER LOS MEJORES RESULTADOS
PRECAUCIÓN:
arrancar de repente.
LIMPIEZA DE LA MANGUERA
NOTA:
CÓMO REEMPLAZAR LA CORREA (CORREATIPO EL097)ATENCIÓN: Desenchufe la aspiradora antes de
usada.
sitio e insertando los cuatro tornillos.

ENGLISH
THE ELECTROLUX LIMITED WARRANTY
1-800-896-9756You may also visit us online at
www.electroluxusa.com (USA) or www.electrolux.ca (Canada)
FUTHER LIMITATIONS AND EXCLUSIONS ARE AS FOLLOWS:
REGISTRATION
FRANÇAIS
LA GARANTIE LIMITFE ELECTROLUX
1-800-896-9756
D’AUTRES RESTRIC TIONS ET EXCLUSIONS:
ENREGISTRANT

ESPAÑOL
LA GARANTÍA LIMITADA DE ELECTROLUX
1-800-896-9756También puede visitar nuestro sitio web en www.electroluxusa.com
LAS SIG UIENTES SON OTRAS L IMITACION ES Y EXCLUSIO NES ADICIONALES:
anteriores pueden no aplicarse en su caso.
REGISTRANDO
or Canada, please telephone toll free:
1-800-896-9756
www.electroluxusa.com (USA) orwww.electrolux.ca (Canada)
1-800-896-9756
www.electroluxusa.com (USA) ouwww.electrolux.ca (Canada)
1-800-896-9756
www.electroluxusa.com (USA) owww.electrolux.ca (Canadá)
21
ENGLISH
TROUBLESHOOTINGThe vacuum cleaner does not start
Clearing the hose
case the obstruction has been caused by glass or needles caught inside the hose.Note: The warranty does not cover any damage to hoses caused by cleaning them.Water has entered the vacuum cleaner
FRANÇAIS
DÉPANNAGEL’aspirateur ne se met pas en marche :
Remarque : la garantie ne couvre pas les dommages
De l’eau a été aspirée
ESPAÑOL
SOLUCIÓN DE PROBLEMASLa aspiradora no se pone en funcionamiento
corriente.
Nota: la garantía no cubre ningún daño ocasionado en
Ha entrado agua en la aspiradora

©
The Electrolux Story
For more than 90 years, Electroluxhas been designing products with realpeople in mind. We call it “thoughtfuldesign” - which means that ourproducts are not only made to last,but are also made for ease-of-use andpeace-of-mind.
The “Thinking of you” promise fromElectrolux goes beyond meeting theneeds of today’s consumers. It alsomeans we’re committed to makingappliances safe for the environment -now and for future generations.
At Electrolux, we’re thinking of you.