OWNER S MANUAL - EV Rider, LLCevrider.com/manuals/MiniRider Lite manual-2019.06.5_Rev1.pdfOWNER’S...
32
EV Rider, LLC 6410 Arc Way, Suite A, Fort Myers, FL 33966 Intend Use: Moving of adult disabled persons by self driving. Maximum user weight: 130 kg; Classified in Class A (EN12184) Maximum safe slope: 3° (Not intended for use outdoors) The product is not intended for visually impaired people. The drivers need to mentally and physically suitable to drive the scooters. The fingers need to work functionally. The device can’t be used by children until age of 12. The driving distance will be reduced if the power scooter is used frequently on slopes, rough ground or to climb kerbs. The scooter is not for use as a seat in motor vehicle. All adjustments can be adjusted by both occupant and assistant Please refer to our official website for general product information at www.evrider.com MiniRider Lite OWNER’S MANUAL
Transcript of OWNER S MANUAL - EV Rider, LLCevrider.com/manuals/MiniRider Lite manual-2019.06.5_Rev1.pdfOWNER’S...

EV Rider, LLC
6410 Arc Way, Suite A, Fort Myers, FL 33966
Intend Use:
Moving of adult disabled persons by self driving. Maximum user weight: 130 kg;
Classified in Class A (EN12184) Maximum safe slope: 3° (Not intended for use outdoors)
The product is not intended for visually impaired people. The drivers need to mentally and physically suitable to drive the
scooters. The fingers need to work functionally. The device can’t be used by children until age of 12.
The driving distance will be reduced if the power scooter is used frequently on slopes, rough ground or to climb kerbs.
The scooter is not for use as a seat in motor vehicle.
All adjustments can be adjusted by both occupant and assistant
Please refer to our official website for general product information at www.evrider.com
MiniRider Lite
OWNER’S MANUAL

1
Don’t operate your power scooter without completely reading and understanding this user manual!
Do not operate the scooter with depleted batteries, since the occupant could be stranded.
The end user is NOT allowed to change the parameter.
The occupant can switch off the key to stop the scooter for any emergency stop
Please remove the battery package from the scooter unit before long term storage
MiniRider Lite should be turned off prior to entering or existing the seat. Make sure the scooter is
fully un-fold before driving.
Please refer to our official website for general product information at www.evrider.com
Environmental conditions may affect the safety and performance of your power scooter. Water and
extreme temperatures are the main elements that can cause damage and affect performance.
A) Rain, Sleet and Snow
If exposed to water, your power scooter is susceptible to damage to electronic or mechanical
components. Water can cause electronic malfunction or promote premature corrosion of electrical
components and frame.
B) Temperature
Some of the parts of the power scooter are susceptible to change in temperature. The controller can
only operate in temperature that range between -13 F and +122 F.
At extreme low temperatures, the batteries may freeze, and your power scooter may not be able to
operate. In extreme high temperatures, it may operate at slower speeds due to a safety feature of the
controller that prevents damage to the motors and other electrical components.

2
PREFACE AND INTRODUCTION
Please carefully read this owner’s manual before using the vehicle. Improper use of the vehicle could
result in harm, injury or traffic accidents. Therefore, for maximum pleasure while using the vehicle please
read this owner’s manual.
This owner’s manual includes operation instructions for every aspect of the vehicle, assembly
instructions, as well as instructions for how to deal with possible accidents.
The symbols used in this manual are explained below:
Read especially the notes marked with these symbols:
Warning
Improper usage could result in serious injury or death
Attention
Improper usage could lead to injury and/or damage to your scooter.
Suggestion
Follow these instructions to keep your vehicle in a good operating order.
This manual includes a copy of repair and maintenance record chart and warranty information. Please
keep it in a safe place or in the scooter.
If someone else uses the scooter, please make sure that you provide them with the instruction manual
for his or her consideration.
As designs change some illustrations and pictures in the manual may not correspond to the vehicle
that you purchased. We reserve the right to make design modifications.
Our scooters have been designed and manufactured to provide a comfortable and secure yet affordable
solution for some mobility requirements.
Suggestion
To maximize your batteries efficiency and service life, please fully recharge your new battery before its first time use.

3
Always use a seat belt, and
keep your feet on the scooter
all the time.
Never operate the scooter
while you are under the
influence of alcohol.
Do not ride your scooter
during snow in order to avoid
accident on slippery road.
Never use electronic radio
transmitters such as
walkie-talkies, or cellular
phones.
Make sure that there are no
obstacles behind you while
reversing your scooter.
Do not allow unsupervised
children to play near this
equipment while the batteries
are charging.
Do not make a sharp turn or a
sudden stop while riding your
scooter.
Do not ride your scooter in
traffic.
Do not leave your hands and
legs off the scooter when
driving.
Do not attempt to climb curbs
greater than limitation show
on Technical Specification
SAFETY NOTICE

4
Warning – Don’t operate your scooter for the first time without completely reading and
understanding this user manual.
1. Don’t operate scooter on public streets and roadways. Be aware that it may be difficult for traffic to
see you when you are seated on the scooter. Obey all local pedestrian traffic rules. Wait until your
path is clear of traffic, and then proceed with extreme cautions. To prevent injury to yourself or others,
always ensure that the power is switched off when getting on or off of the scooter.
2. Always check that the drive wheels are engaged (drive mode) before driving. Do not switch off the
power when the scooter is still moving forward. This will bring the scooter to an extremely abrupt
stop.
3. Do not use this product or any available optional equipment without first completely reading and
understanding these instructions. If you are unable to understand the warnings, cautions or
instructions, contact a healthcare professional, the dealers or technical supports before attempting to
use this equipment, otherwise, injury or damage may occur.
4. There are certain situations, including some medical conditions, where the scooter user will need to
practice operating the scooter in the presence of a trained attendant. A trained attendant can be
defined as a family member or care professional especially trained in assisting a scooter user in
various daily living activities. Consult with your physician if you are taking any medication that may
affect your ability to operate your scooter safely.
5. Do not attempt to lift or move a power scooter by any of its removable parts including the armrests,
seats or shrouds. Personal injury and damage to the power scooter may result.
6. Never try to use your scooter beyond its limitations as described in this manual.
7. Please do not sit on your scooter while it is in a moving vehicle.
8. Keep your hands away from the wheels (tires) while driving scooters. Be aware that loose fitting
clothing can become caught in the drive tires.
9. Consult your physician if you are taking prescribed medication or if you have any certain physical
limitations. Some medications and limitations may impair your ability to operate scooters in a safe
manner.
10. Be aware when the drive mode is unlocked or locked.
11. Don’t remove anti-tipper if there is any-tipper equipped with the scooter.
12. Contact with tools can cause electrical shock and do not connect an extension cord to the AC/DC
converter or the battery charger.
13. Do not attempt to lift or move your scooter by any of its removal parts, such as the armrests, seats, or
shroud.
14. When climbing an incline, don’t drive at an angle up the face of the incline. Drive your scooter
straight up the incline. This greatly reduces the possibility of a tip or a fall.
15. Don’t climb a slope steeper than the scooter’s limitation.
16. Don’t attempt to have your scooter proceed backward down any step, curb or other obstacle. This
may cause the scooter to fall or tip.
SAFETY NOTICE

5
17. Always reduce your speed and maintain a stable center of gravity when cornering sharply. Don’t
corner sharply when driving scooters at higher speeds.
18. Operating in rain, snow, salt, mist conditions and on icy or slippery surfaces may have an adverse
effect on the electrical system.
19. Never sit on your scooter when it is being used in connection with any type of lift or elevation product.
Your scooter is not designed with such use in mind and any damage or injury incurred from such use
is not the responsibility of EVRIDER.
20. Surfaces of the power scooter that can come into direct contact with the occupant’s skin and/or
assistant’s skin during normal use and that are within occupant reach shall not exceed 106 °F. The
motor surface can reach temperatures greater than 106°F after driving. Do not touch these parts when
disassembling the scooter or wait until the motor is cooled down.
21. The programming of the controller shall only be carried out by personnel, which is authorized by his
manufacturer. A wrong programming can result in safety hazards for the occupant!
22. If the power scooter is switched off while driving on the horizontal at maximum speed at 4 mph, it
will come to a stop with the maximum stopping distance of 4 ft. Please consider this distance when
driving.
23. Drive-wheel needs to be switched to engaged-mode while transporting the power scooter with a car
or airplane.
24. Surface temperatures can increase when exposed to external sources of heat.
25. Surfaces of the power scooter that can come into direct contact with the occupant’s skin and/or
assistant’s skin during normal use and that are within occupant reach shall not exceed 106 °F. The
motor surface can reach temperatures greater than 106 °F after driving. Do not touch these parts when
disassembling the scooter or wait until the motor is cooled down.
26. Please always turn off the power prior to entering or existing this scooter.
27. Do not operate this scoter if it is behaving abnormally or erratically.
28. Federal law restricts this device to sale by or on the order of a practitioner licensed by the law of the
State in which he/she practices.
SAFETY NOTICE

6
Modifications
EVRIDER Product has designed and engineered power scooter to provide maximum utility. However,
under no circumstances should you modify, add, remove, or disable any part or function of your power
scooter. Personal injury and damage to the power scooter may result.
1. Do not modify your power scooter in any way not authorized by EVRIDER. Do not use accessories if
they have not been tested or approved for EVRIDER products. Changing of controller parameter
shall be only performed by authorized technicians due to the safety concern.
2. Get to know the feel of your power scooter and its capabilities. EVRIDER recommends that you
perform a safety check before each use to make sure your power scooter operates safely.
Inspections prior to using your power scooter:
1. If equipped with pneumatic tires, please check for proper tire inflations.
2. Please check all electrical connections and make sure they are tight and not corroded.
3. Please check all harness connections and make sure they are secured properly.
4. Please check the brakes.
Weight limitation.
1. Please refer to the specifications table for weight capacity information. Power scooter is rated for a
maximum weight capacity.
2. Stay within the specified weight capacity for your scooter. Exceeding the weight capacity voids your
warranty. EVRIDER will not be held responsible for injuries or property damage resulting from
failure to observe weight limitations.
3. Don’t carry passengers on scooters.
4. Carrying passengers on scooter may affect the center of gravity, resulting in a tip or a fall.
Tire inflation
1. If your scooter is equipped with pneumatic tires, it is necessary to check the air pressure at least one
time a week.
2. Proper inflation pressures will prolong the life your tires and ensure the smooth operation while
riding.
3. Do not under-inflate or over-inflate your tires. It is critically important that 30-25 psi (2-2.4bar) tire
pressure be maintained in pneumatic tires at all times.
4. Inflating your tires from an unregulated air source could over-inflate them, resulting in a burs tire.
Temperature
1. Some of the parts of the power scooter are susceptible to change in temperature. The controller can
only operate in temperature that ranges between -13°F ~ 122°C.
2. At extreme low temperatures, the batteries may freeze, and your power scooter may not be able to
operate. In extreme high temperatures, it may operate at slower speeds due to a safety feature of the
controller that prevents damage to the motors and other electrical components.
SAFETY NOTICE

7
EMI
This portion of the content will provide the user with basic information that describes the problems with
EMI, known sources of EMI, protective measures either to lessen the possibility or exposure or to
minimize the degree of exposure, and suggested action should unexpected or erratic movement occur.
Warning:
The scooter itself can disturb the performance of the electromagnetic fields such as emitted by alarm
systems of shops.
The driving performance of the scooter can be influenced by electro magnetic fileds
■ ELECTROMAGNETIC INTERFERENCE (EMI) FROM RADIO WAVE SOURCES
Powered vehicle may be susceptible to electromagnetic interference (EMI), which is interfering
electromagnetic energy (EM) emitted from sources such as radio stations, TV stations, amateur radio
(HAM) transmitters, two-way radios, and cellular phones. The interference (from radio wave sources)
can cause the powered vehicle to release its brakes, move by itself, or move in unintended directions. It
can also permanently damage the powered vehicle’s control system. The intensity of the interfering EM
energy can be measured in volts per meter (V/m). Each powered vehicle can resist EMI up to a certain
intensity. This is called its “immunity level”. The higher the immunity level, the greater the protection.
At this time, current technology is capable of achieving at least a 20 V/m immunity level, which would
provide useful protection from the more common sources of radiated EMI. This powered vehicle model
as shipped, with no further modification, has an immunity level of 20 V/m without any accessories.
There are a number of sources of relatively intense electromagnetic fields in the everyday environment.
Some of these sources are obvious and easy to avoid. Others are not apparent and exposure is
unavoidable. However, we believe that by following the warning listed below, your risk to EMI will be
minimized.
The sources of radiated EMI can be broadly classified into three types:
1. Hand-held portable transceivers ( transmitter-receivers with the antenna mounted
directly on the transmitting unit. Examples include: citizens band (CB) radios, “ walkie talkie”,
security, fire, and police transceivers, cellular telephones and other personal communication
devices.
2. Medium-range mobile transceivers, such as those used in police cars, fire trucks, ambulances and
taxis. These usually have the antenna mounted on the outside of the
Vehicle,
3. Long-range transmitters and transceivers, such as commercial broadcast transmitter (radio and TV
broadcast antenna towers) and amateur (HAM) radios;
SAFETY NOTICE

8
PARTS INTRODUCTION
PARTS DESCRIPTION
1. Power switch 2. Charger Socket Cover 3. Basket Bracket
4. Tiller Adjust Lever 5. Wheel lock knob 6. Seat Rotate Lever
7. Armrest 8. Width Adjustable Armrests Knob
9. Circuit Breaker 10. Freewheel Lever
11. Anti-tip Wheel 12. Connecting device
.
1
2
3
4
5
6
8
7
9
10
11
12

9
OPERATION
CONTROL PANEL
1. Battery Level Indicator
2. Speed Dial
3. Horn
4. Wigwag Paddle
HOW TO OPERATE YOUR SCOOTER
■ Power switch
Turn the key to power ON or OFF
(ON) : Power is turned on
(OFF) : Power is turned off
■ Speed Dial
Press the slowest or fastest setting to
determine the maximum speed of the scooter.
■ Forward, Reverse, and Braking
Pull the speed control lever backwards with your right fingers and the vehicle will move forward.
Pull the speed control lever backwards with your left fingers and the vehicle will move backward.
The horn will beep when the vehicle is in reverse.
Release the speed control lever freely while either going forward or reverse, and the
electromagnetic brake in the motor will be activated, and the vehicle will stop.
Slowest setting Fastest setting

10
■ Horn Button
Press the horn button to sound the horn. Release the button to stop the horn.
▓ How To Set Freewheel Mode
The motor on the scooter can be disengaged to allow the scooter to be pushed.
Drive Mode
– To put the scooter in to “drive” mode, push the freewheel lever up completely
Freewheel Mode
– To put the scooter in to “freewheel mode”, push the freewheel lever down completely and the
scooter can be moved manually.
Please note that this will put the scooter in to freewheel mode, so scooter’s motor and brake will be
disengaged
■ Battery Indicator
The battery indicator on the tiller console uses
a color code to indicate the approximate power remaining in
your batteries. Green indicates (40~100%) capacity, yellow
a draining charge(10 ~ 30%),and red indicates that an
immediate recharge is necessary.
The remaining power suggested by the battery indicator will vary by the actual driving time incurred
and how you drive. Repeated starting, stopping, climbing will consume the power more quickly.
OPERATION
OPERATION
DRIVE
NEUTRAL
RED YELLOW GREEN

11
▓ Braking4 . OP E RAT I ON4 . OPE RAT I ON4 . OPE RAT I ON
Electro-magnetic brake:
Release the speed control lever completely, and the electromagnetic brake will be activated
automatically, and the scooter will stop.
Manual hand brake (if fitted with this option):
Emergency braking is possible using the manual hand brake. Squeeze the hand brake and use the
button to lock it (use it for parking).
Squeeze the hand brake again to release the button.
■ Parking
After stopping, turn the main key to OFF and remove the key. The lights will turn OFF. The
electromagnetic brake is engaged (locked).
The hand brake lever can be locked by pushing button while squeezing hand brake lever. To
release the hand brake – squeeze lever gently.
■ How to adjust the armrest width
Loosen the knobs at the back of the seat frame firstly, then adjust the armrest width by sliding the
armrest. Once satisfied with the width, tighten the knob.
■ Seat
The seat can be turned to 45 degrees or 90 degrees.
Pull the seat adjustment lever forward and swivel seat.
Release the lever, then continue swiveling the seat until it locks in position.
Attention
Return the seat to the forward position before driving.
Ensure the limit switch is set to the slowest setting when using the scooter on the pavement. It is an
offence to traveler when driving faster than 4mph on the pavement.
Warning
When on a gradient NEVER switch the vehicle to the freewheel mode. The electromagnetic brakes will
not be applied. This may result in injury.
OPERATION

12
■ How to re-position the seat
The seat can be slide backward and forward for a comfortable driving position. To slide the seat,
pull the lever at the front the seat and reposition as required.
■ Tiller Adjustment
The tiller can be adjusted in to many different positions to suit each driver.
1. Loosen the lever to adjust the tiller to positions you want.
2. Once decide the position, tighten the lever to secure the tiller.
■ Main Circuit Breaker (Reset Button)
When the voltage in your scooter’s batteries becomes low or the scooter is heavily strained because of
excessive loads or steep inclines, the main circuit breaker may tip to protect the motor and electronics
from damage.
OPERATION

13
ASSEMBLING AND DISASSEMBLING
■ Assembling The Scooter
No tools are required to disassemble or assemble your scooter.
1. Place the freewheel mode lever in the drive position.
2. Set the rear section in the up position and make sure the hook for the front section is
connected to the axle of the rear section.
3. Put down the front and rear sections until the scooter is lock.
4. Set down the battery pack on the scooter, and make sure it is in the correct position.
5. Set down the seat on the seat post until the swivel lock engages and you hear a click.
6. Turn key switch to “ON”. Make sure battery gauge indicates sufficient power.
■ Disassembling The Scooter
The T4D can be disassembled in to four pieces, the seat(7.21 kg / 15.9 lbs), the front section (15.74 kg
/ 34.7 lbs),the rear section (10.69 kg / 23.5 lbs) and battery pack (9.18 kg / 20.2 lbs).
Please follow the steps.
1. Make sure the tiller is raised before reassembling the scooter.
2. Turn key switch to “OFF”.
3. Place the free wheel mode lever in the drive position.
4. Take off the basket.
5. Push the Seat Rotate Lever whilst pulling up on the seat to remove.
6. Unlock the battery lock part and rotate the battery lock part.
7. Pick up the battery pack and remove it from the scooter.
8. Loosen the tiller adjustment knob and fold down the tiller and retighten knob.
9. Lock the front wheel and tiller by turn and pull the wheel lock catch down.
10. Pull the connecting device upward to the rear section and stand upright.
11. Take off the front section with both hands and lower the shaft.
Warning
To avoid personal injury, ask for assistance, if
necessary, while disassembling or
assembling your scooter.
OPERATION

14
5. Push the Seat Rotate Lever whilst pulling up on the seat to remove.
6. Unlock the battery lock part and rotate the battery lock part.
7. Pick up the battery pack and remove it from the scooter.
OPERATION

15
8. Loosen the tiller adjustment knob and fold down the tiller and retighten knob.
9. Lock the front wheel and tiller by turn and pull the wheel lock catch down.
10. Pull the connecting device upward to the rear section and stand upright.

16
CHANGING THE OPTIONAL COLOR PANEL
Your scooter features interchangeable panels which
allow you to change the color of your scooter.
These instructions will guide you through the process
of changing the panels. The panels that can be
changed are indicated in the illustration at the right.
■ To replace the tiller color panel
Use a screwdriver to unlock tiller colour panel.
■ Replacing the front and rear shroud color panel
Please disassemble the scooter before you replace the front and rear shroud color panel.
Remove the color panel by snapping off from underneath the shroud, screwdriver is required.
OPERATION

17
BATTERY CHARGING AND CARE
CHARGING THE BATTERY
Follow the procedure below step by step:
1. Turn the power switch to (OFF)
2. Connect the charger’s power cord into the power outlet.
3. Open the charging socket cap on the battery pack. Then connect the
charger’s round plug to the charging socket.
4. Turn on the switch on the charger.
5. Both the charger’s red and orange LEDs will be lit when beginning
charging. The charging duration is about 6 hours. To ensure
optimum performance a 10-hour charge is recommended. But we do
not recommend a charging more than 24 consecutive hours.
6. Both the charger’s LEDs will be lit during the charging process. The
orange LED will turn green when charging is complete.
7. Turn off the charger; disconnect the power cord and the round plug from charger socket on the
scooter.
Warning
The fan inside the charger will be activated accordingly when you turn on the charger. If the fan
does not work when connected to the charger or the green light is not showing, DO NOT use this
charger. It may lead to overheating of the charger and cause a fire as a result.
There is a red LED present on the charger to illustrate operation. If this LED does not illuminate the
charger is defective, please contact your dealer.
Attention
While gripping or folding the handle bar, beware of finger or hands caught in the handle area.
While returning the battery pack to the battery pack cavity of shroud, beware of finger or hands.
Warning
1. Keep away from flammable objects while charging as it may lead to fire or explosion of battery.
2. Do not smoke while charging as the battery may release hydrogen gas. Always charge your battery in
a well-ventilated space.
3. Never connect or disconnect the plug or cord with wet hands while charging. Do not connect or
disconnect the plug or cord when they are wet, it may lead to electric shock.
NOTE: The immovable function will be activated while your scooter is in charging status, which will
make your scooter not run.

18
BATTERY CHARGING AND CARE
Attention - Please follow the rules below to avoid accidents while charging.
1. Please use the WU’S charger only, and recharge the battery to its full capacity every time. You may
damage the battery and scooter if you use a charger, which is not to the correct specification.
2. Please charge in a well-ventilated space where it is not directly exposed to the sunlight. Do not charge
in surroundings where it is humid or under rainfall and morning dews.
3. Do not charge in temperatures less than -10°C or higher than +50°C as the charger may not work well
and the batteries may become damaged.
BATTERY
Do not expose the battery to temperatures below 14 °F or above 122°F when charging or storing
the vehicle. Under the above temperature range can cause the battery either to freeze or overheat.
This will damage the batteries and shorten their life.
These batteries are maintenance free and there is no need to refill with water.
You are required to recharge the batteries on a regular basis. Even if the scooter is stood idle, you
should charge the batteries at least once a week.
The batteries carry a six-month manufacturer's warranty. This warranty only covers issues relating to
manufacturing faults, and not faults relating to failure to recharge the batteries as instructed above.
Suggestion – How to maximize your batteries efficiency and service life
1. Fully recharge your new battery before it’s first time use.
2. Be sure to charge the battery fully every time. The battery life will be seriously shortened or
decayed if the battery is repeatedly used without being fully charged.
3. Always complete the charging until the orange LED light turns green. NEVER stop charging
before it is complete.
4. Keep your batteries fully charged whenever possible.
5. If you do not use your scooter for a long time, it should be charged at least every week to keep the
battery in a fully usable condition.
6. The ambient temperature will affect charging time. Charging time will be longer in the winter.
7. After charging, do not leave the charger socket plugged in to the scooter, as this will cause a power
drain on the scooter and temporarily reduce its range.
19
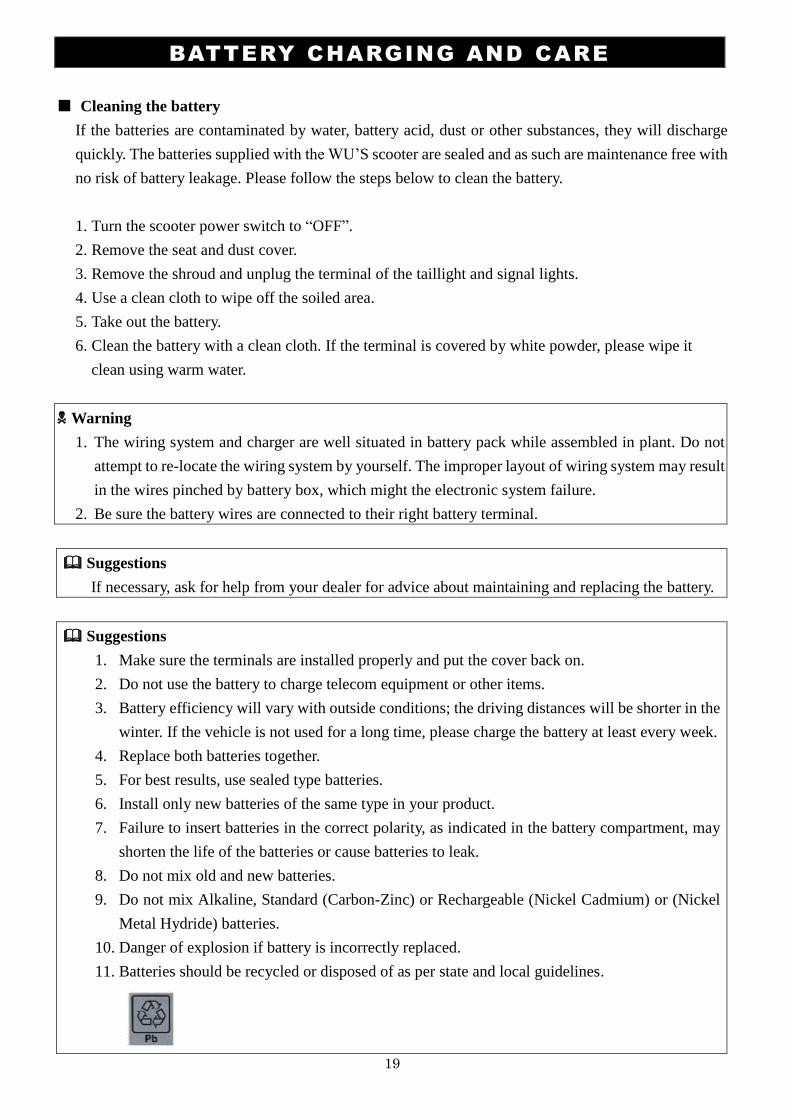
■ Cleaning the battery
If the batteries are contaminated by water, battery acid, dust or other substances, they will discharge
quickly. The batteries supplied with the WU’S scooter are sealed and as such are maintenance free with
no risk of battery leakage. Please follow the steps below to clean the battery.
1. Turn the scooter power switch to “OFF”.
2. Remove the seat and dust cover.
3. Remove the shroud and unplug the terminal of the taillight and signal lights.
4. Use a clean cloth to wipe off the soiled area.
5. Take out the battery.
6. Clean the battery with a clean cloth. If the terminal is covered by white powder, please wipe it
clean using warm water.
Warning
1. The wiring system and charger are well situated in battery pack while assembled in plant. Do not
attempt to re-locate the wiring system by yourself. The improper layout of wiring system may result
in the wires pinched by battery box, which might the electronic system failure.
2. Be sure the battery wires are connected to their right battery terminal.
Suggestions
If necessary, ask for help from your dealer for advice about maintaining and replacing the battery.
Suggestions
1. Make sure the terminals are installed properly and put the cover back on.
2. Do not use the battery to charge telecom equipment or other items.
3. Battery efficiency will vary with outside conditions; the driving distances will be shorter in the
winter. If the vehicle is not used for a long time, please charge the battery at least every week.
4. Replace both batteries together.
5. For best results, use sealed type batteries.
6. Install only new batteries of the same type in your product.
7. Failure to insert batteries in the correct polarity, as indicated in the battery compartment, may
shorten the life of the batteries or cause batteries to leak.
8. Do not mix old and new batteries.
9. Do not mix Alkaline, Standard (Carbon-Zinc) or Rechargeable (Nickel Cadmium) or (Nickel
Metal Hydride) batteries.
10. Danger of explosion if battery is incorrectly replaced.
11. Batteries should be recycled or disposed of as per state and local guidelines.
BATTERY CHARGING AND CARE

20
INSPECTION AND MAINTENANCE
INSPECTION
Clean the scooter with a damp cloth and dust down approximately once a week to preserve the
appearance of the scooter.
Adjust the tiller height and return to the original position and swivel the seat once a week to ensure
the parts adjust and remove smoothly and easily when required.
Check for signs of wear and tear on the tires and the upholstery on a regular basis.
For optimum performance and to increase the lifespan of your scooter, it is recommended that you
have your scooter serviced once a year.
REGULAR CHECKING RECORD
To make sure your scooter is correctly serviced, take it to your dealer for regular maintenance checks.
This should be at intervals of six months after the first inspection after one month. Your dealer may
charge a fee for this service.
BATTERY, FUSE AND TYRE
■ Battery
Refer to the section entitled “ 5.2 BATTERY” in “5. BATTERY CHARGING AND CARE ”.
■ Fuse
If the battery charger is turned on and no LEDs are lit, check the fuse.
YEAR 1 2 3 4 YEAR 1 2 3 4
Service Dates Service Dates
Controller Upholstery
On/off switch Seat
Controller Lever Back
Braking Armrests
Recharge point Electrics
Batteries Connections condition
Levels Lights
Connections Test run
Discharge test Forwards
Wheels and Tyres Reverse
Wear Emergency stop
Pressure Left turn
Bearings Right turn
Wheel nuts Slope test
Motors Over obstacles
Wiring List Items repaired
Noise
Connections
Brake
Brushes
Chassis
Condition
Steering

21
INSPECTION AND MAINTENANCE
Suggestion
Ask for help from your scooter dealer to inspect or replace the fuse, since the tiller shroud has to be
removed first before you can replace the fuse.
▓Tires
The condition of the tires depends on how you drive and use your scooter.
Inspecting tire tread
Please check the tread groove regularly. Replace the tires when the tread groove is less than 0.5 mm.
Attention
1. When tread groove is below 0.2 in it can easily lead to vehicle slippage, making braking
distances longer. Therefore, replace the tires as early as possible when they do not have
insufficient tread depth.
.
Attention
When conducting maintenance of your vehicle, please turn the power switch to OFF and remove the
charger cords.
Suggestions
Do not splash water directly to wash your scooter as this could lead to malfunction of the system
electrics.
Do not use petrol, solvents or vaporizing solution as these may deform or damage the shrouds.
Do not use wax.

22
INSPECTION AND MAINTENANCE
STORAGE
Make sure the vehicle is stored under the following circumstances:
Make sure the seat is set in the “Forward”position
Make sure the Power switch is turned to OFF
Your power scooter should be stored in a dry place, free from temperature extremes. When storing,
disconnect the batteries from the power scooter. If you fail to store the unit properly, the frame can
rust and the electronics can be damaged.
Please remove the battery package from the scooter unit before long term storage
If you plan on not using your power scooter for an extended period of time, it is best to:
Fully charge its batteries prior to storage.
Disconnect the batteries from the scooter.
Store your power scooter in a warm, dry environment.
Avoid storing your power scooter where it will be exposed to temperature extremes.
Operating conditions (-13 F ~ 122 F) and Storage conditions (-40. F~149 F)
Make sure the batteries are fully charged before use after long-term storage
Batteries that are regularly and deeply discharged, infrequently charged, stored in extreme temperatures,
or stored without a full charge may be permanently damaged, causing unreliable performance and limited
service life. It is recommended that you charge the power scooter batteries periodically throughout periods
of prolonged storage to ensure proper performance.
MOVING ABOUT
Turn the power switch “OFF” before moving.
Lift the scooter by the chassis, and not by the bumpers. Lifting the scooters by the bumper could
cause damage or injury.
For your safety, always ask for help if required. You will need 2 or 3 persons when moving or lifting
the vehicle.

23
■ TROUBLE SHOOTING
Symptom Remedy
The scooter will not switch on • Try recharging the battery
• Check the fuse and circuit breaker in the scooter
The scooter switches on, but the
scooter will not move. • Ensure there is enough power in the batteries. If not,
recharge the batteries.
• Ensure the freewheel lever is engaged in the ‘DRIVE’
position.
The scooter appears slow • Check the battery power level and recharge
• Check the speed dial is not set to slow.
The seat turns when in operation • Slowly rotate the seat until it drops in to place and is
secure
The handlebar appears loose • Tighten the height adjustment handle to secure the
handlebar
Involuntarily horn sounds • Ensure that the wigwag paddle is released.
• Switch the scooter off and on.
• Recharge the batteries.
• If the problem persists, contact your WU’S dealer.
TROUBLE SHOOTING AND SPECIFICATION

24
■ FLASH CODES
Your power wheelchair is fitted with DYNAMIC controller, which continuously monitors the
operating conditions of your power wheelchair. If it detects a problem, it will indicate with error
message by flashing light on the power ON/ OFF light. You must count the number of the flash, and
see the list to check what kind of error has happened according to the number)
If, when powered up, there is an error with the system, then the status indicator will flash red. The
number of flashes will indicate the type of error. These are described in the table below.
TROUBLE SHOOTING AND FLASH CODES

25
■ SPECIFICATION
MiniRider Lite seat is tested according to EN 1021 regarding resistance to ignition, but it is
recommended to avoid the use of flame near the power scooter and of smoking during sitting on the
power scooter.
The stability tests were performed in the least stable positions of the seat (height and front/rear
position).
The distance will be reduced if the wheelchair is used frequently on slopes, rough round or to climb
the curbs.
The stopping distance on the slope can be significantly greater than on the level ground.
SPECIFICATION
Model Reference T4D
Dimension
(L x W x H mm/in) 1080 x 480 x 910 mm / 42.5 x 19 x 36in
Weight w/i battery
without battery
42.8 kg / 92 lb.
33.6 kg / 72.2 lbs
Battery 12 Ah(option 20Ah)
Charger 2A Off-Board
Front Tire 200X50 PU TIRE
Rear Tire 200X50 PU TIRE
Driving System Direct drive the rear wheels (with differential gear)
Brake System Electromagnetic brakes
Control Method By speed control lever
Top Speed 4 mph / 6.4 Km/h
Climbing angle 8 degree
Cruising range 6 ~ 7.5 miles /10 ~ 12 km
Max. user weight 130 kg (280 lb.)

26
■ ISO 7176-5 TEST RESULTS
SPECIFICATION

27
BATTERY SPECIFICATIONS

28
Warranty by EV Rider, LLC
All Products – Except the Stand-N-Ride
THREE-YEAR LIMITED WARRANTY
Three (3) years from the date of purchase on all structural frame components; including platform, seat post, and
frame.
ONE-YEAR LIMITED WARRANTY
One (1) year from the date of purchase, if any part or electronic component of the Scooter is found upon examination
to be defective in material and/or workmanship, it will be repaired or replaced, at EV Rider, LLC’s option, without
charge. Labor charges are NOT included. The purchaser is responsible for the delivery to the authorized repair
facility. Satisfactory proof of purchase, serial number and the date of purchase are always required. For
warranty service, please contact the dealer/company from whom you purchased your EV Rider product.
SHIPPING - DOMESTIC: All warranty items will be shipped via Fedex Ground. Requested expedited shipping will
be at the expense of the purchaser.
SHIPPING - INTERNATIONAL: Parts will be provided under warranty at no charge, but shipping to any
offshore and/or international location will be the responsibility of the purchaser. International and offshore
end-users must contact the dealer/distributor directly to initiate the warranty process.
ONE-YEAR WARRANTY EXCEPTIONS
Motor: In cases where there is an increase in the operational noise level, the warranty does not apply. (An increase
in operational noise level usually occurs due to abusive and excessive strain on the scooter).
The batteries that are purchased separately or in addition to the batteries provided with the scooter are warranted by
EV Rider for one year after the purchase of the Unit with the exception of the Stand-N-Ride scooter.
Service: Warranty service can be performed by EV Rider, LLC or by an authorized EV Rider, LLC service facility. Do
not return faulty parts to EV Rider, LLC without prior consent. A request for a Return Authorization is
required prior to returning items. All transportation costs and shipping damage incurred while submitting units
and/or parts for repair or replacement are the responsibility of the original purchaser.
WARRANTY EXCLUSIONS: This warranty is only given to the original purchaser of the
Scooter. This Warranty excludes:
• Batteries that are provided free with the scooter. See the EV Rider invoice/packing slip for additional detail.
• Consumable items which may need replacing due to normal wear and tear (tires, tubes, belts, bulbs,
upholstery and seating, motor brushes, fuses, plastic shrouds and footrest covers, etc.)
• Damaged caused by: battery fluid spillage or leakage, abuse, misuse, accident, or negligence, improper
operation, excessive loading, maintenance, or storage, commercial use or use other than normal.
• Used other than for the purpose of the purchaser’s mobility.
• Repairs and/or modifications made to any part of the scooter without specific and prior consent from EV Rider,
LLC.
• Labor, service calls, shipping, and other charges incurred for repair of the product not approved by EV Rider,
LLC.

29
Batteries: Batteries carry a limited warranty which is subject to a stringent wear and tear clause. Any battery faults
due to a defect in the original manufacture will normally become obvious within the first two months of use. Any
gradual deterioration in performance after this period is normally associated with fair wear and tear, misuse or
accidental damage and as such is not covered by the manufacturer’s warranty. There is no other express warranty.
Implied warranties, including those of merchantability and fitness for a particular purpose, are limited to one (1) year
from the date of the original purchase and to the extent permitted by law. Any and all implied warranties are
excluded. This is the exclusive remedy. Liabilities for consequential damages under any and all warranties are
excluded.
Some states do not allow limitations on how long an implied warranty lasts or do not allow the exclusion of limitation
of incidental or consequential damages. So, the above limitation or exclusion may not apply to you.
EV Rider, LLC // www.evrider.com
800-944-1997
30
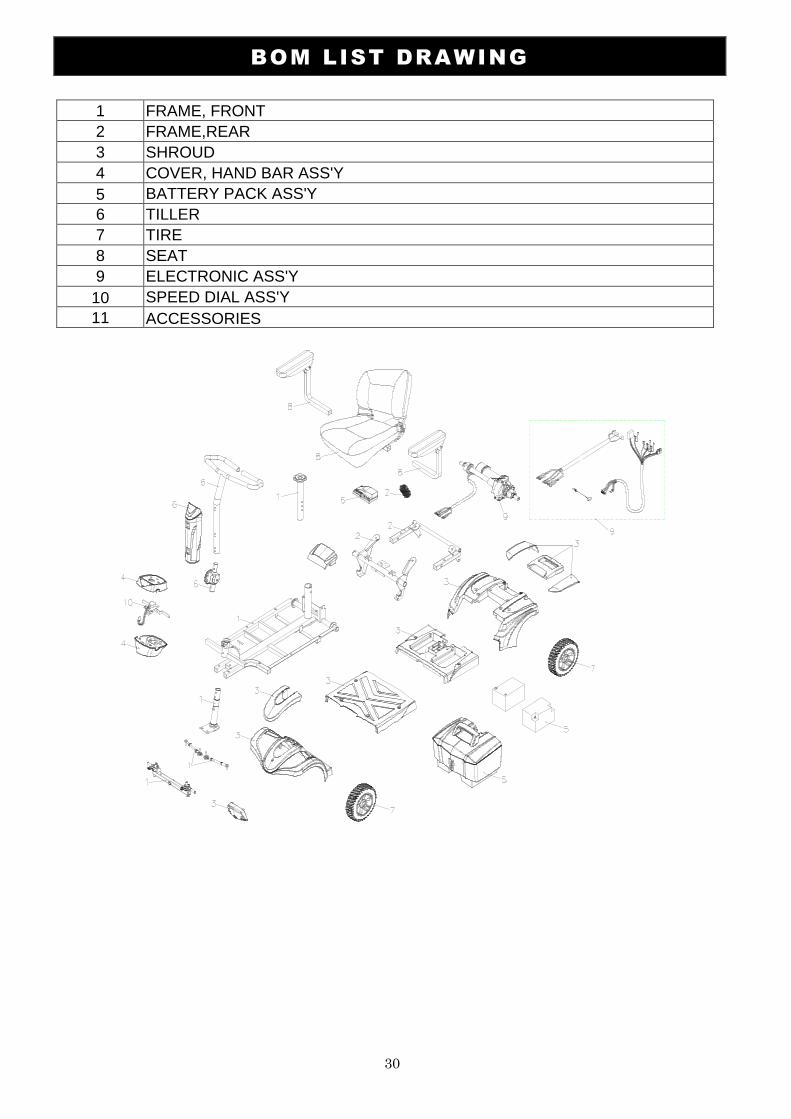
BOM LIST DRAWING
1 FRAME, FRONT
2 FRAME,REAR
3 SHROUD
4 COVER, HAND BAR ASS'Y
5 BATTERY PACK ASS'Y
6 TILLER
7 TIRE
8 SEAT
9 ELECTRONIC ASS'Y
10 SPEED DIAL ASS'Y
11 ACCESSORIES

31
Designed and manufactured by:
EV Rider, LLC 6410 Arc Way
Fort Myers, FL 33966
Tel: (239) 278-5054
Fax: (239) 278-1431
Wu’s Tech Co. Ltd. 3 Fl. No.112 Sec. 2, Chung-Shan N. Rd.,
Taipei, Taiwan, R.O.C.
Tel: +886 2 2541 3253
Fax:+886 2 2536 7575
Distributed by: