Overdrive Setup Guide - iPad Accessing e-Books with your ... · Overdrive Setup Guide - iPad ......
13
Overdrive Setup Guide - iPad JANUARY 2016 iPad 1 Accessing e-Books with your IPad What you need to know about library e-books is that each one is protected by Digital Rights Management (DRM). This means that access to e-books is restricted to one user per book and copying of the file is prohibited. DRM also means that you must have authorization to use e- books. This guide will help you set up your device to allow you to access DRM protected library e-books. Setting Up Using e-books is a straightforward process; however, to make this easier and trouble free, you will want to make sure you have setup your iPad properly. Before you do anything, you will want to make sure that you are connected to the internet. Once you have made sure you are connected, you are ready to setup. You will only have to complete these steps once. 1. On your iPad you will need to download the Overdrive Media Console App from your respective app store (i.e. iTunes’ App Store, Android Marketplace; Google Play). Simply open your app store and search “Overdrive Media Console” and select Download or Install. Each time you want to read or download a new e-book you will look for this icon on your iPad. 2. The first time you open Overdrive on your iPad you will be prompted to create an Overdrive Account. Select Sign up and fill in the required information. You must provide this information; it will authorize you to download e-books. Enter your name, email address, and a password. Finish off by tapping Sign Up at the bottom of the screen.
Transcript of Overdrive Setup Guide - iPad Accessing e-Books with your ... · Overdrive Setup Guide - iPad ......

Overdrive Setup Guide - iPad
JANUARY 2016 iPad 1
Accessing e-Books with your IPad
What you need to know about library e-books is that each one is protected by Digital Rights
Management (DRM). This means that access to e-books is restricted to one user per book and
copying of the file is prohibited. DRM also means that you must have authorization to use e-
books. This guide will help you set up your device to allow you to access DRM protected library
e-books.
Setting Up
Using e-books is a straightforward process; however, to make this easier and trouble free, you
will want to make sure you have setup your iPad properly.
Before you do anything, you will want to make sure that you are connected to the internet. Once
you have made sure you are connected, you are ready to setup. You will only have to complete
these steps once.
1. On your iPad you will need to download the Overdrive Media Console App from your
respective app store (i.e. iTunes’ App Store, Android Marketplace; Google Play). Simply
open your app store and search “Overdrive Media Console” and select Download or Install.
Each time you want to read or download a new e-book you will look for this icon on your
iPad.
2. The first time you open Overdrive on your iPad you will be prompted to create an Overdrive
Account. Select Sign up and fill in the required information. You must provide this
information; it will authorize you to download e-books.
Enter your name, email
address, and a
password. Finish off by
tapping Sign Up at the
bottom of the screen.

Overdrive Setup Guide - iPad
JANUARY 2016 iPad 2
3. Once you have filled in this information, click Sign Up to complete the process. This same
account can be used for multiple devices, so it’s a good idea to keep a record of your
username and password. You will receive an email from Overdrive Accounts asking you to
verify your account. Make sure you click the link that you receive in that email to activate
your account.
4. Now that you have installed the app and authorized, you will need to Add a Library.
5. Open the Overdrive App. Navigate to the home menu, located at the top-right of the screen.
Tap on Add a Library. This will open a search box.
6. In the search box, type in “Orillia Public Library” to find your library. Now you will want to
favourite this library by tapping on the star beside the library name, which will appear as
Ontario Library Service Consortium. It will turn yellow when you have done this. This will
create a permanent link to our library e-book website.
Click Cancel to exit this screen. This will not cancel your selection of a favourite library.
Make sure that this square is
yellow before tapping on Cancel.
Home Menu button.

Overdrive Setup Guide - iPad
JANUARY 2016 iPad 3
7. To get to the library’s e-book website, you will now click on Ontario Library Service
Consortium which will allow you to browse our Overdrive site without leaving the app.
8. Next, you will want to Sign In to view Orillia’s collection. We have purchased additional titles
of select books for exclusive access by Orillia patrons; you will not know which titles are
included unless you are signed in.
Click here to sign-in
to your account.

Overdrive Setup Guide - iPad
JANUARY 2016 iPad 4
9. After tapping Sign In, you will be asked for your library’s name. Type in “Orillia Public
Library” and then select this library from the list.
10. After you have selected Orillia Public Library a new text box will appear and you will need
to type in your library barcode number and then click Sign In. You do not need to type in the
spaces when you do this. To save time, you may want to click the check box that says
Remember my login information on this device.
Make sure that you have checked this
box. Your library card will be stored in
your tablets memory, saving you time.

Overdrive Setup Guide - iPad
JANUARY 2016 iPad 5
Logging In After the initial setup of Overdrive, you will simply need to login and check out e-books. These
are the steps you will go through each time you want to find a new e-book to read.
1. Open your Overdrive app.
2. Opening your Overdrive will bring you to the home page. If you’re not currently reading a
book, your app will open to your bookshelf, which will show you any e-books you have
downloaded. To get a new book, you will need to go to Orillia’s Overdrive website.
Remember to click the Home menu and then select Ontario Library Service Consortium
from your libraries.
3. Clicking Ontario Library Service Consortium will take you to our Overdrive webpage. It is
recommended that you sign in to your account before you do any browsing, this way you
can see any additional titles that we have purchased for Orillia Library Patrons.
4. To sign-in, simply click on Sign-In in the top right hand corner of the page.
5. If necessary, type in your library name. Then, fill in your library card number information
(without the spaces). If you have not already done so, it is recommended that you select
Home Menu
Overdrive Setup Guide - iPad
JANUARY 2016 iPad 6
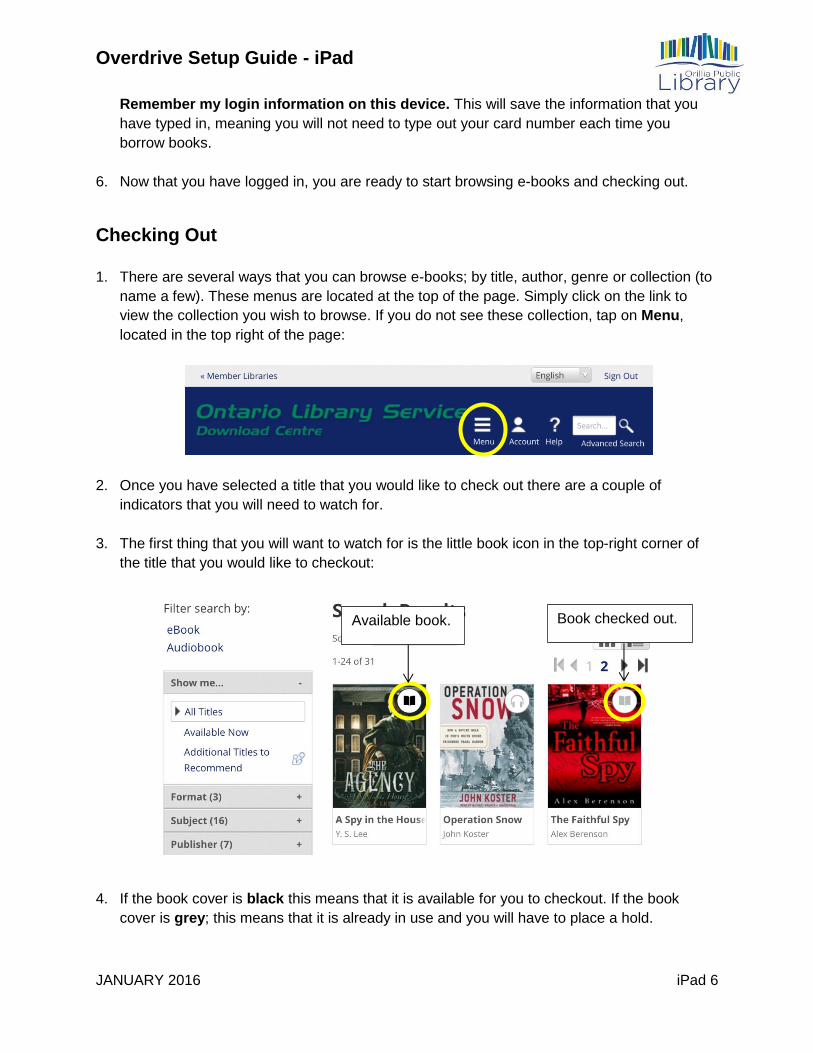
Remember my login information on this device. This will save the information that you
have typed in, meaning you will not need to type out your card number each time you
borrow books.
6. Now that you have logged in, you are ready to start browsing e-books and checking out.
Checking Out
1. There are several ways that you can browse e-books; by title, author, genre or collection (to
name a few). These menus are located at the top of the page. Simply click on the link to
view the collection you wish to browse. If you do not see these collection, tap on Menu,
located in the top right of the page:
2. Once you have selected a title that you would like to check out there are a couple of
indicators that you will need to watch for.
3. The first thing that you will want to watch for is the little book icon in the top-right corner of
the title that you would like to checkout:
4. If the book cover is black this means that it is available for you to checkout. If the book
cover is grey; this means that it is already in use and you will have to place a hold.
Available book. Book checked out.

Overdrive Setup Guide - iPad
JANUARY 2016 iPad 7
5. To view more information about the book like a description or the number of copies of a
book, you will need to tap on the book cover.
6. Once you have decided that you would like to borrow the book, you simply click Borrow and
follow the prompts. This will move the book you have checked out to your bookshelf.
Borrow will check the book
out to your account.
More will give you a
description of the book. Bookmark will add this
item to your wish list.

Overdrive Setup Guide - iPad
JANUARY 2016 iPad 8
7. Once your book has moved to your checkouts, you will now press the button that says Add
to app. This will download your e-book so that you can read it without being connected to
the internet. You will have two messages on your screen: loading title, title added.
8. To find the downloaded version of your book in your Overdrive app you will need to navigate
to your Bookshelf, which you can find by clicking the home menu:
9. To open the book, simply click on the book cover and the book will open. To turn the page,
simple swipe on the right side of the page to go forward, and the left to go back. Tap the
centre of the page to reveal the menu.
You are now in your Checkouts,
which will show you the items you
have checked out.
Tap Add to app to read your book
without an Internet connection.
Tap on Bookshelf to see and
read your downloaded titles.

Overdrive Setup Guide - iPad
JANUARY 2016 iPad 9
Advanced Features
Now that you know the basics of signing in and checking out your e-books, there are some
features you will want to be able to do, like place a hold or return a title early.
Placing a Hold
1. Our e-book collection is popular, so it is likely that you will have to wait for certain titles to
become available. Like physical books, the library only has so many copies of e-books and
they are only licensed for one user at a time. Placing a hold is easy; all you need is an email
address.
2. When you encounter a book you want to borrow and it is unavailable (identifiable by the
gray book in the top right corner of the book cover), you will see the option to Place a Hold
instead of Borrow. Simply tap on Place a Hold.
3. This will open a new window, where you will type in your email address. Always double
check for spelling errors as you will be notified via email when the item is available for you.
This can be updated at any time in the event that you change your email address.
Your e-book will be automatically
checked out to you if you have not
exceeded the maximum number of
check outs.

Overdrive Setup Guide - iPad
JANUARY 2016 iPad 10
4. By default, your hold will be automatically checked out to you when it is available. This way
you will not miss picking up your hold; all you’ll have to do is download the book and start
reading.
5. After receiving an email notifying you that your hold is available for pick up, you will login to
your Overdrive account.
6. Navigate to your Checkouts to find the items that you have checked out. Since the hold
was automatically checked out to you, you should find the item here. Tap Add to app to
start reading.
7. If your hold is not in your Checkouts this may mean that you have unchecked the automatic
checkout. In this case, navigate to your Holds shelf and check if the item is there. You will
see a button to Borrow, which will check it out to you, adding it to your Checkouts, and
then you can Add to app.
8. The Holds shelf is the place where you can find out your position in the holds queue.
Deleting/Returning Titles
With e-books you will never accumulate late fees as access simply expires; however, the books
will not automatically remove themselves from your iPad. You will continue to see the book
cover on your iPad, but you will not be able to open it after your title has expired.
This tells you what your
place is in the holds
queue and the number of
copies available.

Overdrive Setup Guide - iPad
JANUARY 2016 iPad 11
To remove the title from your device once it has expired, you simply tap and hold your finger on
the image of the book you want to remove.
This will open a menu and you will tap on Delete to remove the item from your iPad.
If your title has not expired and you tap on Delete this will not remove the book from your
account. It will still be checked out to you, it is only the file of the book that you have removed.
This means that you can login to your account and re-download the book to your iPad.
If you would like to return your e-book early (i.e. remove the book completely from your account)
you will tap and hold on the book cover in question. This time in the menu you will select
Return. This will remove the book from your iPad and return it to the Overdrive library. You will
not be able to access the book again unless you borrow it once again from the collection.
Overdrive Setup Guide - iPad
JANUARY 2016 iPad 12
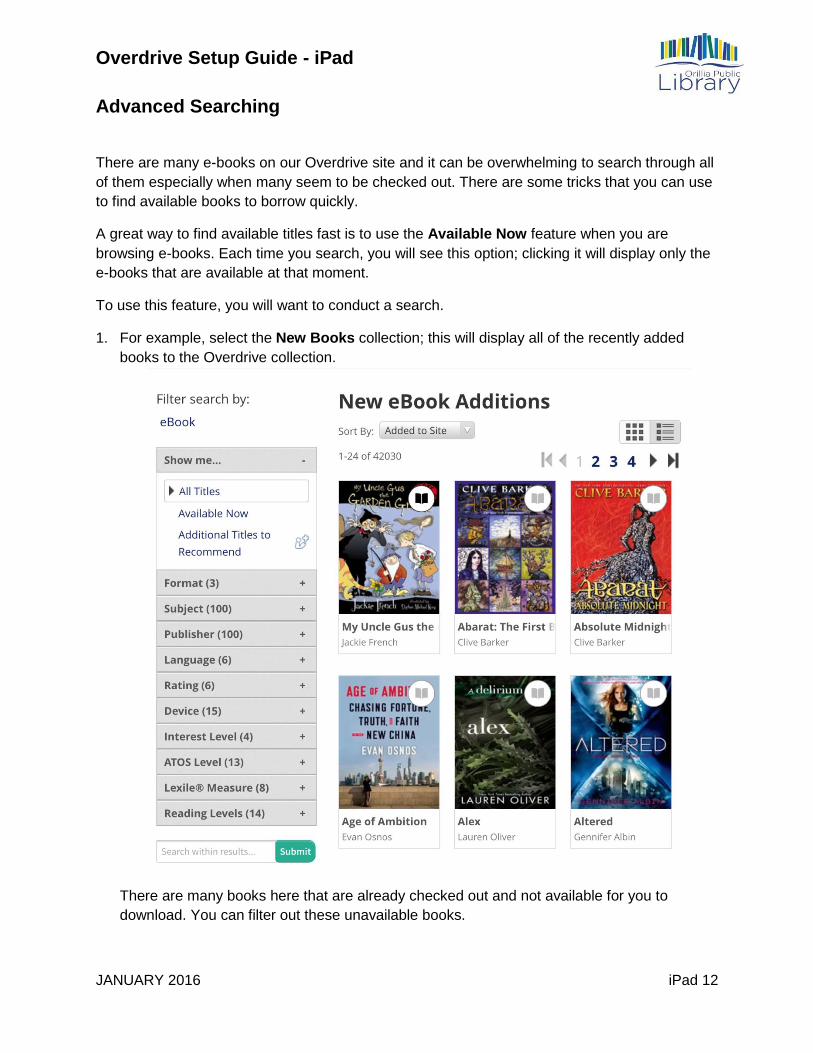
Advanced Searching
There are many e-books on our Overdrive site and it can be overwhelming to search through all
of them especially when many seem to be checked out. There are some tricks that you can use
to find available books to borrow quickly.
A great way to find available titles fast is to use the Available Now feature when you are
browsing e-books. Each time you search, you will see this option; clicking it will display only the
e-books that are available at that moment.
To use this feature, you will want to conduct a search.
1. For example, select the New Books collection; this will display all of the recently added
books to the Overdrive collection.
There are many books here that are already checked out and not available for you to
download. You can filter out these unavailable books.

Overdrive Setup Guide - iPad
JANUARY 2016 iPad 13
2. Look to the left hand side of the page. This section will allow you to filter your results. Tap on
Available Now to filter your results. Now all the books that will appear are those that can be
checked out immediately.
10.
Clicking Available Now will make sure
that you are only seeing books that can
be checked out right away.