
Outlook Live Basics
89
Outlook Live Basics for Students
Transcript of Outlook Live Basics

Outlook Live Basics
for Students

2 Outlook Live for Support Staff
Outlook Live for Support Staff 3
Getting Started ................................................................................................................................ 6
Signing into your Outlook Account ............................................................................................ 6
Migrating your Account .................................................................................................................. 8
Address Book .............................................................................................................................. 8
Exporting a Novell GroupWise Address Book ....................................................................... 8
Moving your Emails to CardMail ............................................................................................. 12
Migrating your Account ........................................................................................................ 12
Setting the Time Zone for your Account .................................................................................. 19
Working with Mail Messages ....................................................................................................... 21
Reading a Mail Message ........................................................................................................... 21
Opening a Mail Message ...................................................................................................... 21
Reading an Mail Message in Reading Pane .......................................................................... 22
Sending Messages ..................................................................................................................... 23
Sending New Mail Messages ................................................................................................ 23
Replying to Sender ................................................................................................................ 24
Replying to Sender and all Recipients .................................................................................. 25
Forwarding a Mail Message.................................................................................................. 25
Replying to a Mail Message from the Reading Pane ............................................................ 26
Forwarding a Mail Message from Reading Pane .................................................................. 27
Forwarding a Mail Message as an Attachment ..................................................................... 27
Attachments .............................................................................................................................. 28
Opening Attachments ............................................................................................................ 28
Sending One Attachment ...................................................................................................... 28
Sending Multiple Attachments ............................................................................................. 30
Managing Mail Items .................................................................................................................... 32
Folders....................................................................................................................................... 32
Creating a Personal Folder .................................................................................................... 32
Moving an Item to a Folder .................................................................................................. 34
Flagging a Mail Item for Follow up .......................................................................................... 35
Flagging an Item for Follow up ............................................................................................ 35
Set a Deadline Date for a Follow up Item ............................................................................. 35
Mark a Follow up as Completed ........................................................................................... 36
Remove a Follow up Flag ..................................................................................................... 36
Forwarding Mail to an Outside Email Account ........................................................................ 37
4 Outlook Live for Support Staff
Categories ................................................................................................................................. 40
Creating a Category .............................................................................................................. 40
Modifying a Category ........................................................................................................... 42
Applying a Category ............................................................................................................. 43
Removing a Category ........................................................................................................... 43
Filtering Mail ............................................................................................................................ 44
Filtering Based on Sender ..................................................................................................... 44
Filtering Based on Flag ......................................................................................................... 46
Filtered Based on Categories ................................................................................................ 46
Removing a Filter ................................................................................................................. 47
Deleting and Restoring Mail Messages .................................................................................... 48
Deleting a Mail Message ...................................................................................................... 48
Recovering a Deleted Mail Message .................................................................................... 49
Purging a Mail Message........................................................................................................ 49
Recovering a Purged Mail Message ..................................................................................... 50
Using the Address Book ........................................................................................................... 52
Using the Address Book to Address Mail Messages ............................................................ 52
Blind Copying a Recipient .................................................................................................... 54
Name Completion ..................................................................................................................... 55
Using Name Completion to Address a Mail Item ................................................................. 55
Removing an E-mail Address from Name Completion ........................................................ 56
Working with Contacts ................................................................................................................. 57
Searching for E-mail Addresses ................................................................................................ 57
Searching for Contacts from the Microsoft Outlook Live Main Window ............................ 57
Searching for Contacts from the Address Book ................................................................... 58
Sending a Contact a Mail Message Directly from the Address Book ...................................... 59
Adding Contacts to an Address Book ....................................................................................... 60
Adding a Contact .................................................................................................................. 60
Distribution Lists ...................................................................................................................... 62
Creating a Distribution List (Private Group) ........................................................................ 62
Removing Contacts from a Distribution List ........................................................................ 63
Deleting a Distribution List .................................................................................................. 64
Public Group ............................................................................................................................. 65
Creating a Public Group........................................................................................................ 65
Outlook Live for Support Staff 5
Joining Public Groups ........................................................................................................... 69
Sending a Mail Message to a Group ......................................................................................... 70
Contact Lists (Address Books) ................................................................................................. 72
Creating a Contact List ......................................................................................................... 72
Deleting a Contact List ......................................................................................................... 73
Microsoft Outlook Live Calendars ............................................................................................... 75
Appointments ............................................................................................................................ 75
Creating Posted Appointments ............................................................................................. 75
Creating a Group Appointment ............................................................................................. 77
Recurring Events ................................................................................................................... 79
Checking Others’ Schedules for an Appointment ................................................................ 81
Accepting or Declining an Appointment .................................................................................. 82
Accepting an Appointment ................................................................................................... 82
Declining an Appointment .................................................................................................... 83
Sharing a Calendar .................................................................................................................... 84
Creating a Shared Calendar .................................................................................................. 84
Accepting a Shared Calendar ................................................................................................ 85
Viewing a Shared Calendar .................................................................................................. 86
Closing a Shared Folder ........................................................................................................ 88

6 Outlook Live for Support Staff
Getting Started
You will find many of the functions that you are used to performing in Novell GroupWise work essentially the same in Microsoft Outlook
Signing into your Outlook Account
Step Action 1. Open Microsoft Internet Explorer. 2. Type outlook.com into the Address Bar and press [Enter].
3. Sign in with your university e-mail address (e.g. [email protected].) and your ulink password.
4. Click the Sign in button.
Outlook Live for Support Staff 7
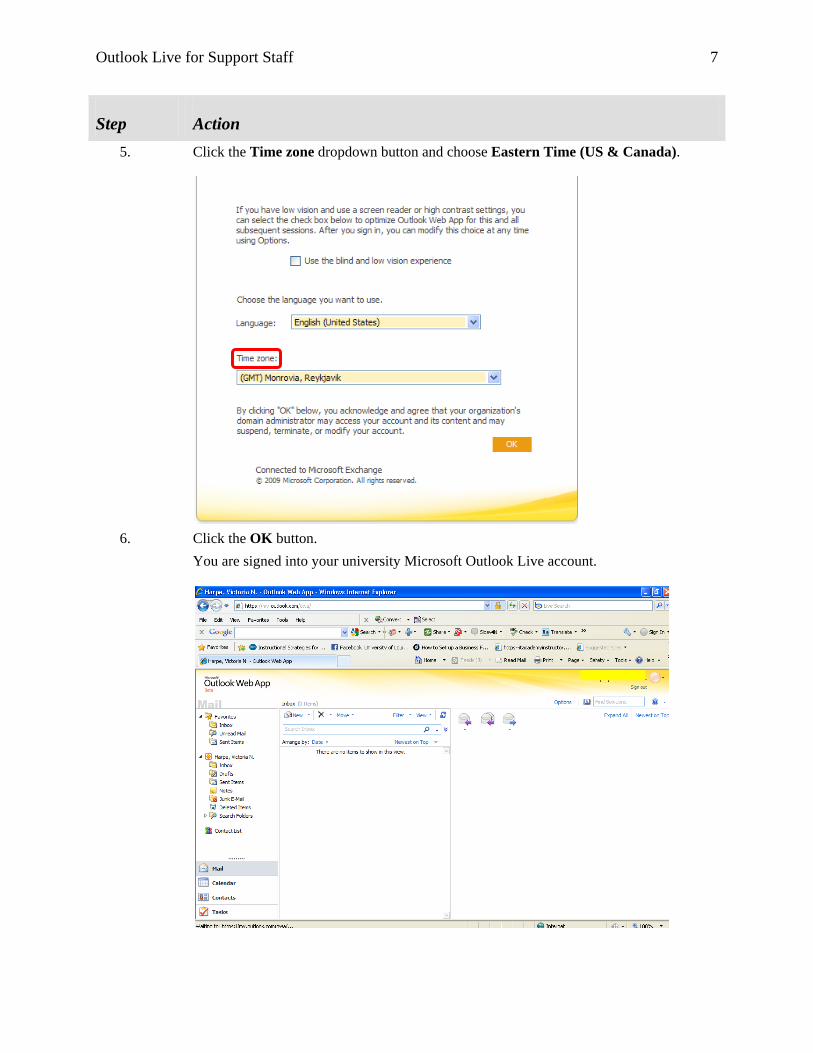
Step Action 5. Click the Time zone dropdown button and choose Eastern Time (US & Canada).
6. Click the OK button. You are signed into your university Microsoft Outlook Live account.

8 Outlook Live for Support Staff
Migrating your Account
Address Book
If you wish to keep your personal address books from Novell GroupWise, you must export the address books before disabling your Novell GroupWise account.
Exporting a Novell GroupWise Address Book
Step Action 1. Open the Novell GroupWise client, not the web browser.
2. Click the Address Book button.
3. Right-click on the address book you wish to export.
4. Choose Export Book.
Outlook Live for Support Staff 9
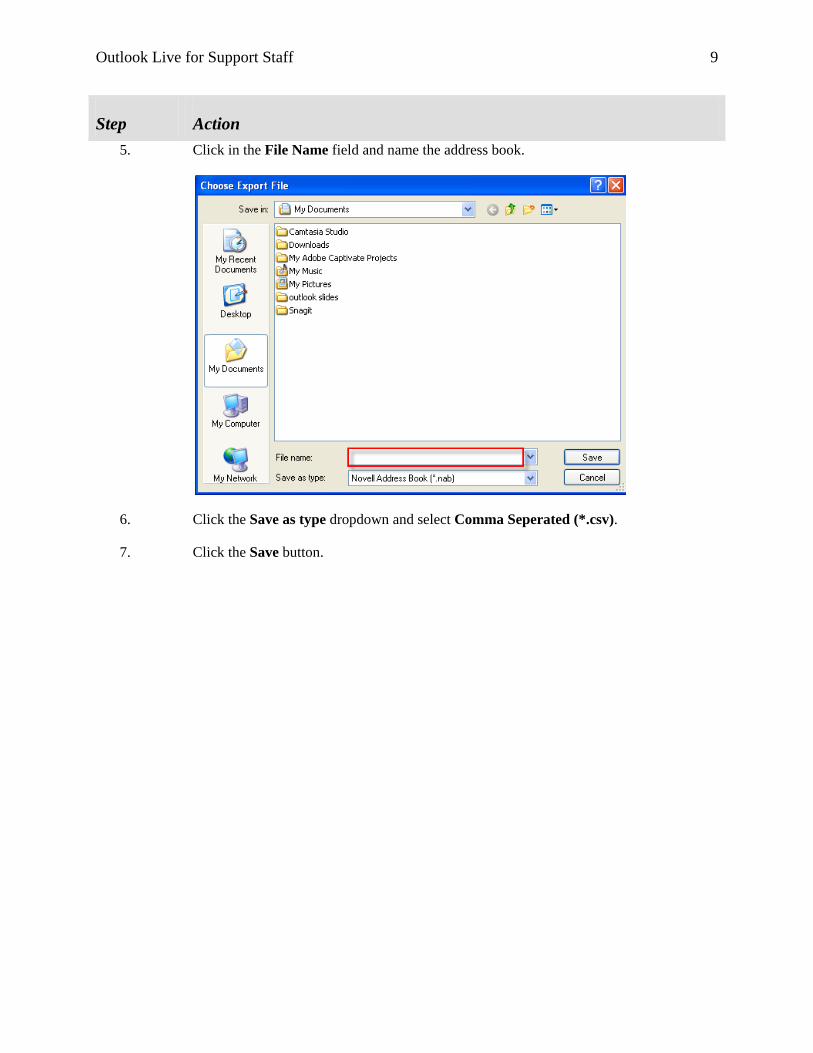
Step Action 5. Click in the File Name field and name the address book.
6. Click the Save as type dropdown and select Comma Seperated (*.csv).
7. Click the Save button.

10 Outlook Live for Support Staff
Importing an Address Book into your CardMail Account
Once you have exported all of your address books, you can not import them into your CardMail account.
Step Action 1. Open your CardMail account.
2. Click the Contacts button on the left.
3. Click the Import button.

Outlook Live for Support Staff 11
Step Action 4. Click the Browse button.
5. Navigate to the .csv file.
6. Select the file and click the Open button.
7. Click the Next button.

12 Outlook Live for Support Staff
Step Action 8. Click the Finish button.
Moving your Emails to CardMail
Migrating your Account
Migration of your account is not instantaneous. Please check the migration status until the migration is complete.
Step Action
1. Log into your university Microsoft Outlook Live account.
2. Click the Options link at the top right corner of the screen.
Outlook Live for Support Staff 13
Step Action
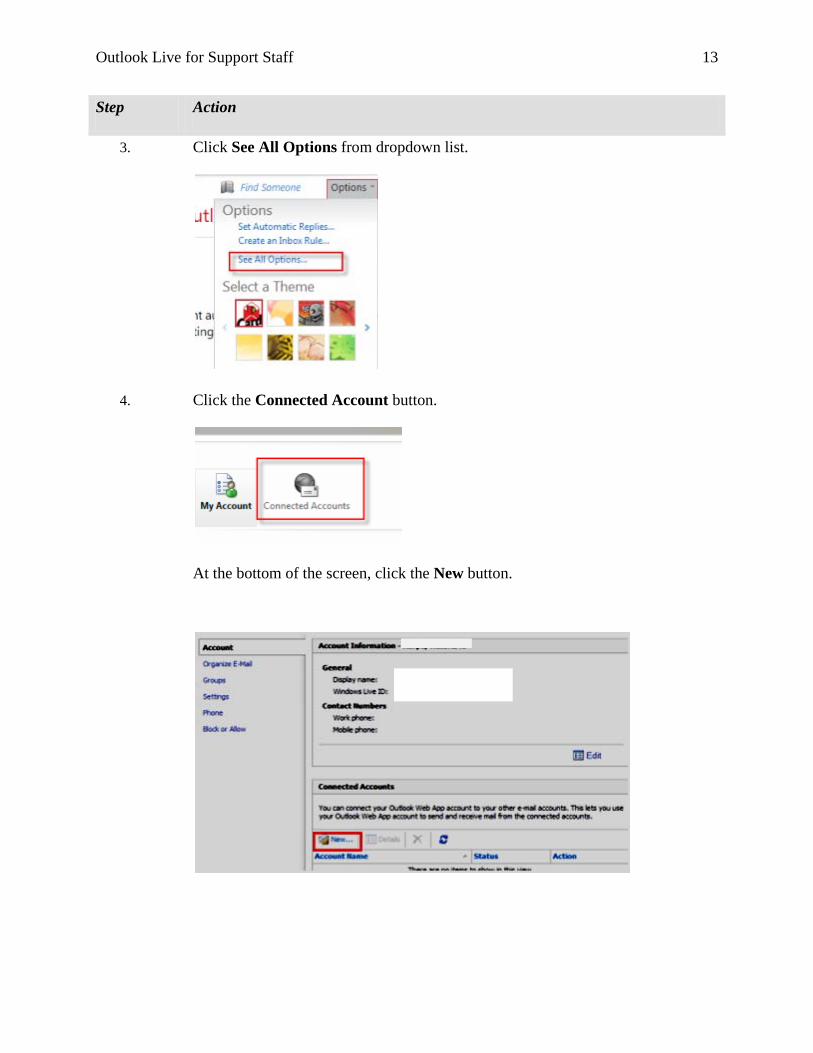
3. Click See All Options from dropdown list.
4. Click the Connected Account button.
At the bottom of the screen, click the New button.

14 Outlook Live for Support Staff
Step Action
5. Type your university e-mail address ([email protected].) into the *E-mail address field and Ulink password into the Password field.
6. Click the Next button.
Microsoft Outlook Live searches for your e-mail address.

Outlook Live for Support Staff 15
Step Action
7. The connection is made. Click the Finish button.
Your e-mail messages will start to migrate.
Close Novell GroupWise
After your GroupWise emails have fully migrated and you have imported your GroupWise address books to your CardMail account, you will need to close your GroupWise account. You will not be able to access your GroupWise account after you close it.
Step Action
1. Open an internet browser.
2. Type the address ulink.louisville.edu .
3. Click the Go button.
4. Click in the UserId field and type your ulink id.
5. Click in the Password field and type your ulink password.
16 Outlook Live for Support Staff
Step Action
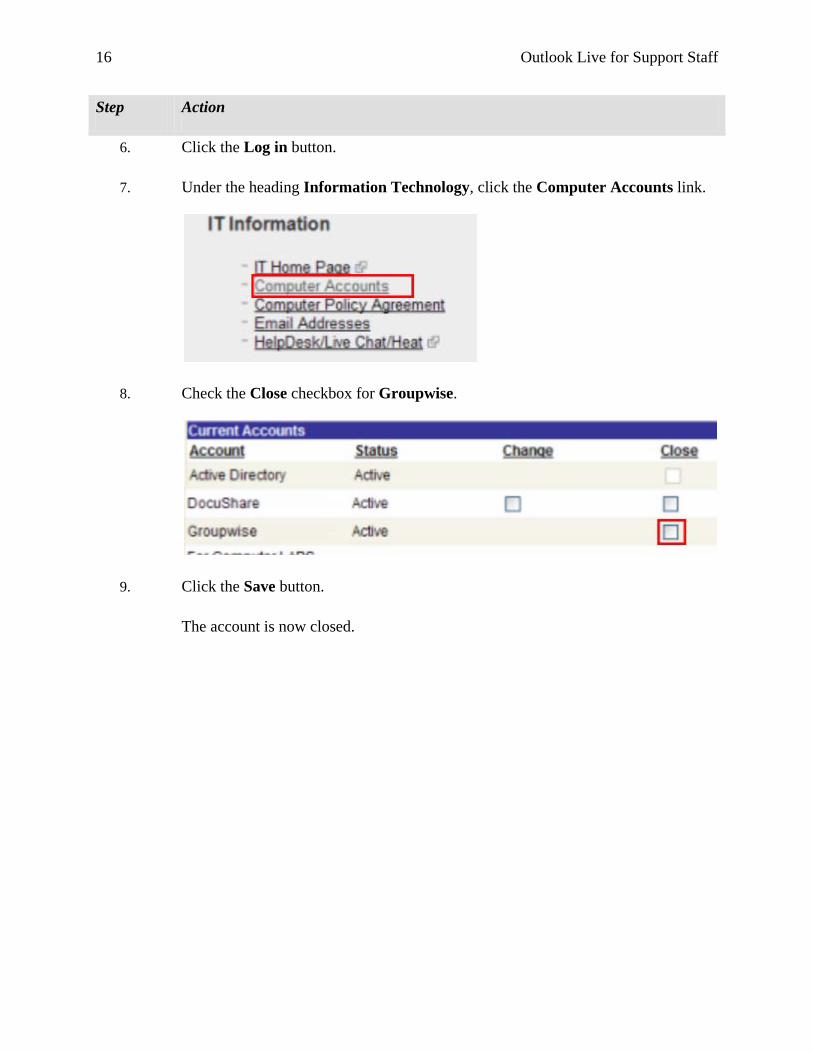
6. Click the Log in button.
7. Under the heading Information Technology, click the Computer Accounts link.
8. Check the Close checkbox for Groupwise.
9. Click the Save button.
The account is now closed.

Outlook Live for Support Staff 17
Breaking the Link between GroupWise and CardMail
After you close your GroupWise account, you will need to break the link between GroupWise and CardMail.
Step Action
1. Log into your university Microsoft Outlook Live account.
2. Click the Options link at the top right corner of the screen.
3. Click See All Options from dropdown list.
4. Click the Connected Account button.
5. Select the GroupWise mail account.
6. Click the Delete button.
18 Outlook Live for Support Staff
Step Action
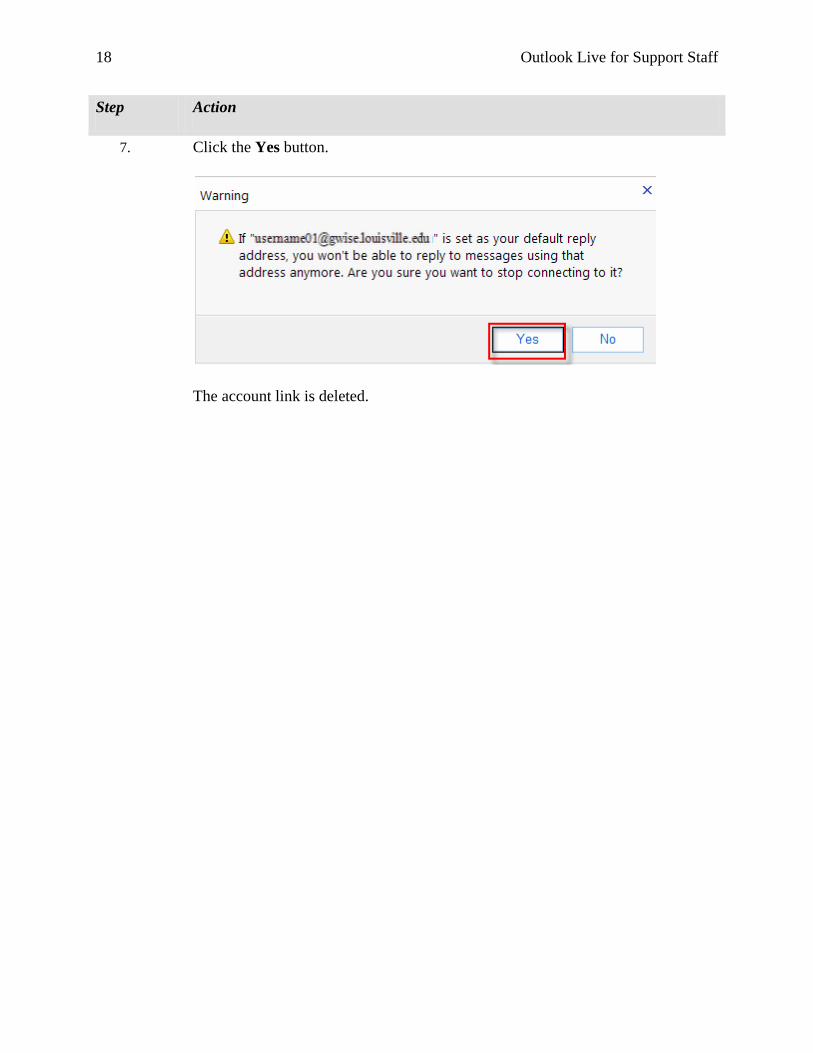
7. Click the Yes button.
The account link is deleted.

Outlook Live for Support Staff 19
Setting the Time Zone for your Account By default Microsoft Outlook’s time zone is GMT Monrovia, Reykjavik time. You will need to set it to Eastern Daylight Time.
Step Action 1. Log into your university Microsoft Outlook Live account.
2. Click the Options link. 3. Click on the Settings category.
4. Click the Regional button.
5. Click the Current time zone dropdown.
6. Choose Eastern Time (US & Canada).

20 Outlook Live for Support Staff
Step Action 7. Click the Save button.
8. Click on the My Mail link.

Outlook Live for Support Staff 21
Working with Mail Messages
Reading a Mail Message
The number of unread e-mail messages in each folder appears as a number (in blue font) next to the folder.
Opening a Mail Message
Step Action 1. Click the Inbox folder.
2. Double-click the envelope button of the mail item.

22 Outlook Live for Support Staff
Step Action The mail message opens in its own window.
Reading an Mail Message in Reading Pane
Step Action 1. Click the Inbox folder.
2. Click the mail message once. The text will appear in a Reading Pane window on the right.
Outlook Live for Support Staff 23
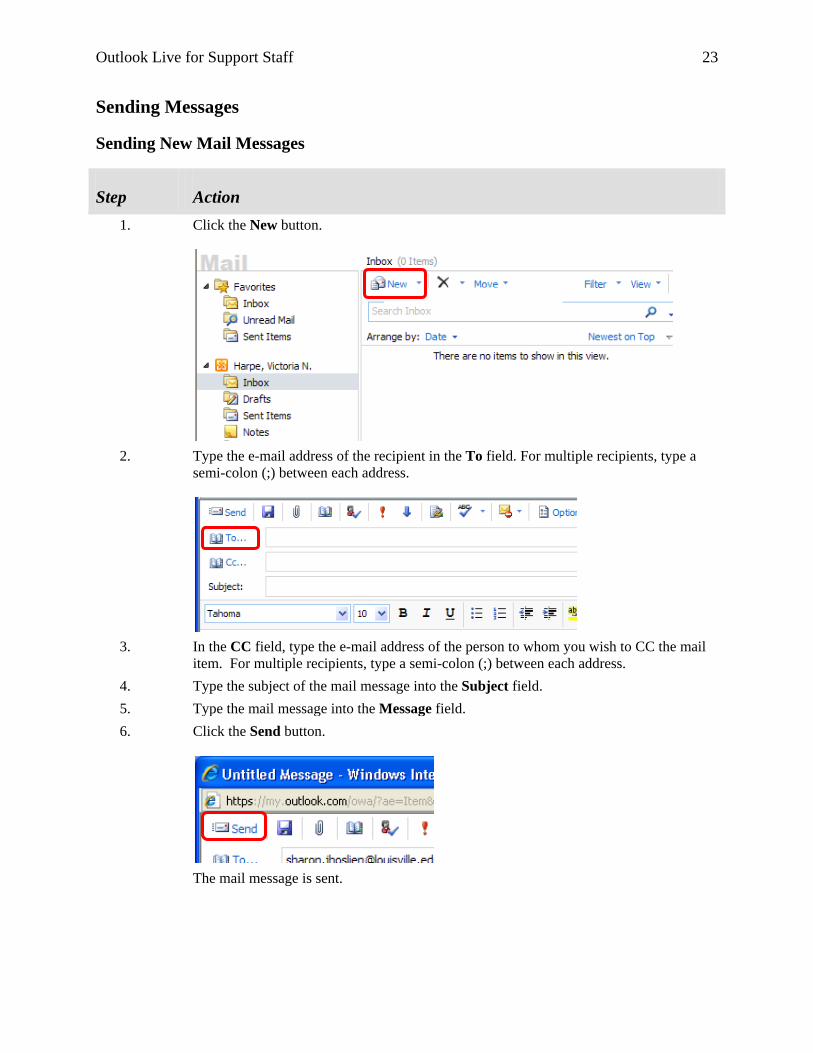
Sending Messages
Sending New Mail Messages
Step Action 1. Click the New button.
2. Type the e-mail address of the recipient in the To field. For multiple recipients, type a
semi-colon (;) between each address.
3. In the CC field, type the e-mail address of the person to whom you wish to CC the mail
item. For multiple recipients, type a semi-colon (;) between each address. 4. Type the subject of the mail message into the Subject field. 5. Type the mail message into the Message field. 6. Click the Send button.
The mail message is sent.

24 Outlook Live for Support Staff
Replying to Sender
Step Action 1. Click the Reply button in the Mail Message window.
2. Type the mail message and click the Send button.
Outlook Live for Support Staff 25
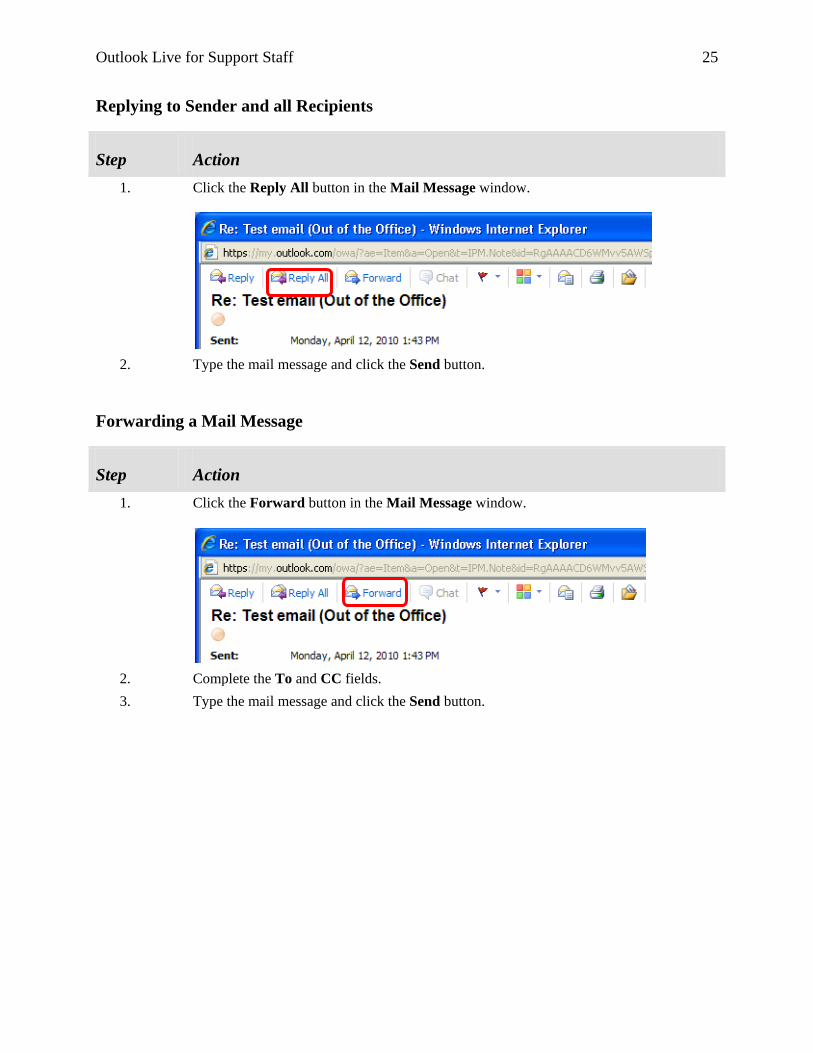
Replying to Sender and all Recipients
Step Action 1. Click the Reply All button in the Mail Message window.
2. Type the mail message and click the Send button.
Forwarding a Mail Message
Step Action 1. Click the Forward button in the Mail Message window.
2. Complete the To and CC fields. 3. Type the mail message and click the Send button.

26 Outlook Live for Support Staff
Replying to a Mail Message from the Reading Pane
Step Action 1. Click the Single Envelope Purple Arrow button to reply to just the sender.
Or the Multiple Envelope Purple Arrow button to reply to the sender and all recipients.
2. Type your message. 3. Click the Send button.
Outlook Live for Support Staff 27
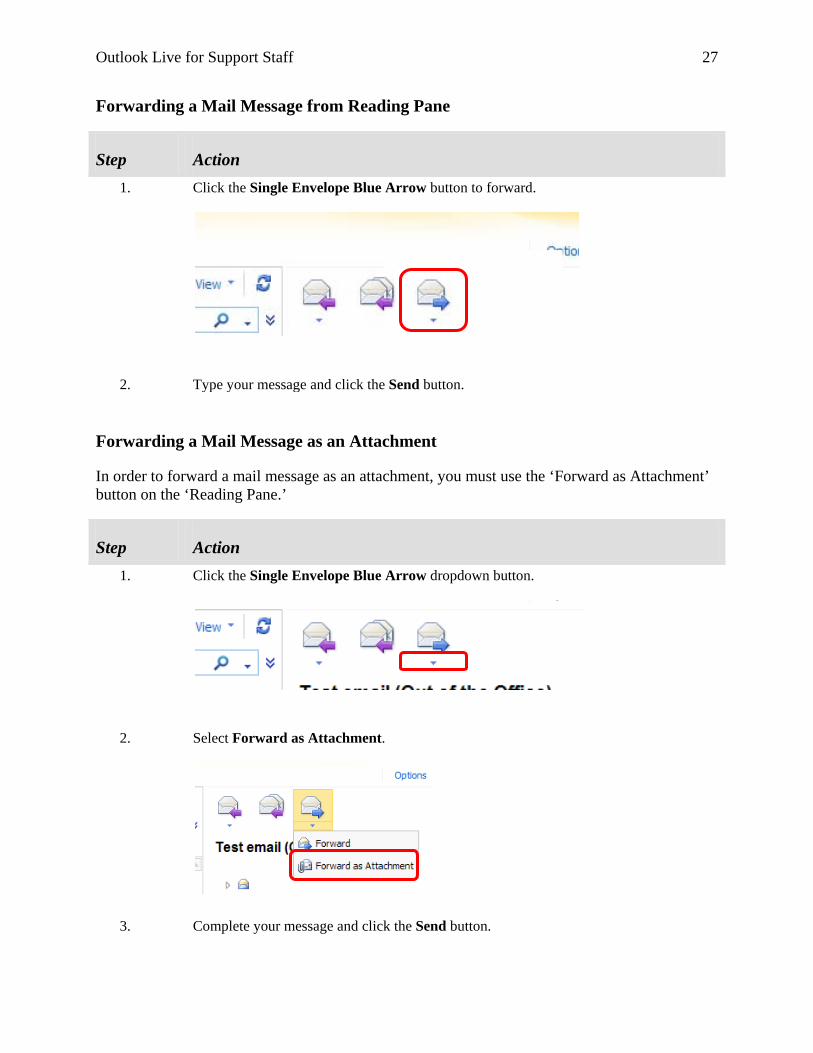
Forwarding a Mail Message from Reading Pane
Step Action 1. Click the Single Envelope Blue Arrow button to forward.
2. Type your message and click the Send button.
Forwarding a Mail Message as an Attachment
In order to forward a mail message as an attachment, you must use the ‘Forward as Attachment’ button on the ‘Reading Pane.’
Step Action 1. Click the Single Envelope Blue Arrow dropdown button.
2. Select Forward as Attachment.
3. Complete your message and click the Send button.

28 Outlook Live for Support Staff
Attachments
You can send and receive attachments inside e-mail messages in Microsoft Outlook Live.
Opening Attachments
Step Action
1. Click the mail item with the attachment. 2. Click the attachment link.
3. Click the Open or Save button in the File Download dialog box.
Sending One Attachment
Step Action
1. Create a new mail message. 2. Address the mail message as usual.

Outlook Live for Support Staff 29
Step Action
3. Click the Attachment button on the Mail Message toolbar.
4. Click the Browse button.
5. Navigate to the folder that contains the file you wish to send. 6. Select the file. 7. Click the Open button.

30 Outlook Live for Support Staff
Step Action
8. Click the Attach button.
9. The file is uploaded to the mail message.
10. Send the mail message as usual.
Sending Multiple Attachments
Step Action
1. Create a new mail message. 2. Address the mail message as usual. 3. Click the Attachment button on the Mail Message toolbar.
Outlook Live for Support Staff 31
Step Action
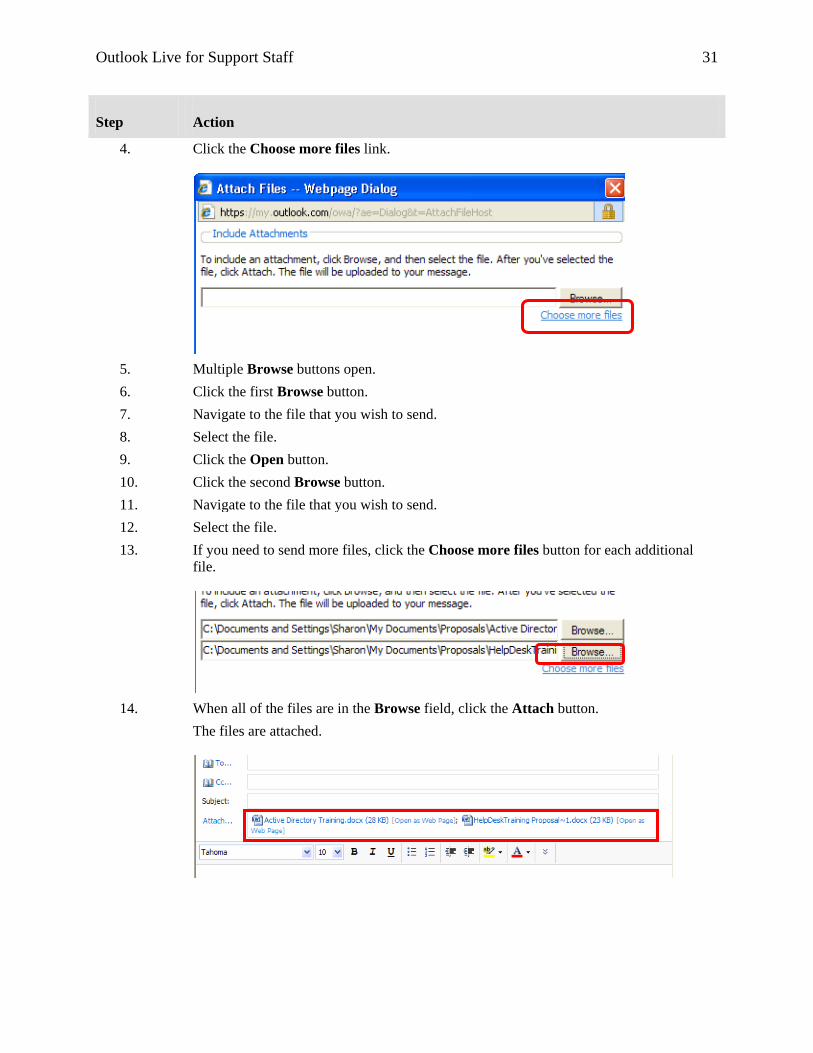
4. Click the Choose more files link.
5. Multiple Browse buttons open. 6. Click the first Browse button. 7. Navigate to the file that you wish to send. 8. Select the file. 9. Click the Open button. 10. Click the second Browse button. 11. Navigate to the file that you wish to send. 12. Select the file. 13. If you need to send more files, click the Choose more files button for each additional
file.
14. When all of the files are in the Browse field, click the Attach button. The files are attached.
32 Outlook Live for Support Staff
Managing Mail Items
Folders
Folders help organize your mail messages better. By default Microsoft Outlook includes the Inbox, Unread Mail, Sent, Calendar, Drafts, Junk Mail, Notes, and Tasks folders. You can also create your own personal folders to organize your Microsoft Outlook account.
Creating a Personal Folder
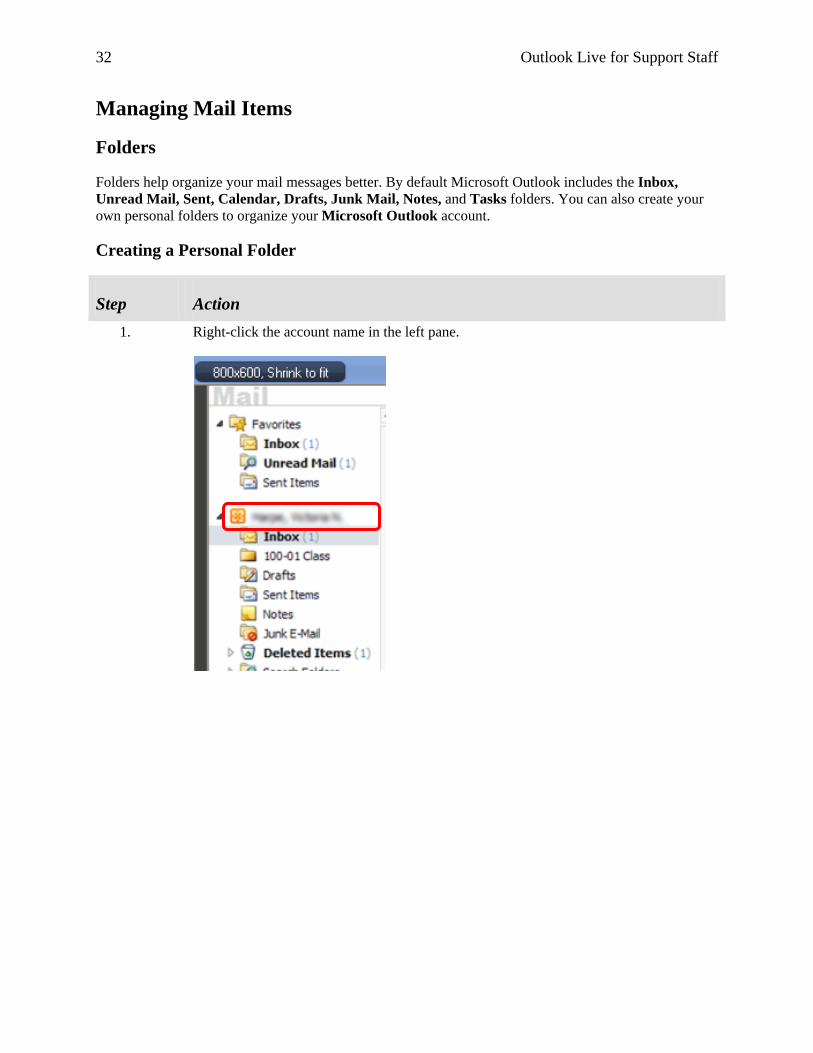
Step Action 1. Right-click the account name in the left pane.
Outlook Live for Support Staff 33
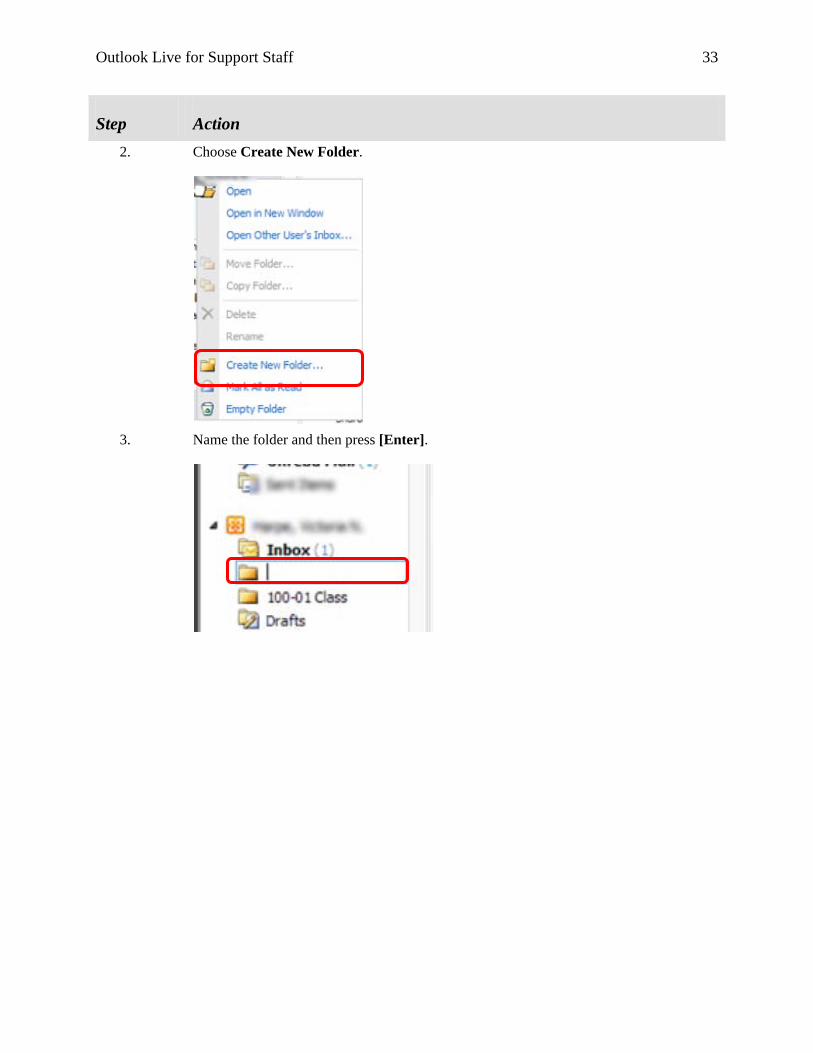
Step Action 2. Choose Create New Folder.
3. Name the folder and then press [Enter].

34 Outlook Live for Support Staff
Moving an Item to a Folder
Step Action 1. Right-click mail item.
To select multiple mail items, hold down the [CTRL] key while selecting.
2. Choose Move to Folder.
3. Select the folder to which you want to move the mail item.
4. Click the Move to Folder button.

Outlook Live for Support Staff 35
Flagging a Mail Item for Follow up
You can flag an item as urgent or for follow up. This will remind you to complete an action for that item.
Flagging an Item for Follow up
Step Action 1. Click the Flag button on the mail message.
Set a Deadline Date for a Follow up Item
Step Action 1. Right-click the Follow up flag. 2. Select the deadline date.

36 Outlook Live for Support Staff
Mark a Follow up as Completed
Step Action 1. Right-click the Follow up flag. 2. Select the Mark Complete.
Remove a Follow up Flag
Step Action 7. Right-click the Follow up flag. 8. Select the Clear Flag.

Outlook Live for Support Staff 37
Forwarding Mail to an Outside Email Account
If you wish, you can forward your mail to an outside account.
Step Action 1. Navigate to your mail account. 2. Click the Options link in the top right corner of the screen.
3. On the left side of the screen, click on the 'Organize E-Mail' option.
4. Click the New dropdown button.
5. Select the Create a new rule for arriving messages option. 6. Click the When the message arrives dropdown menu.
7. Choose Apply to all message option.
38 Outlook Live for Support Staff
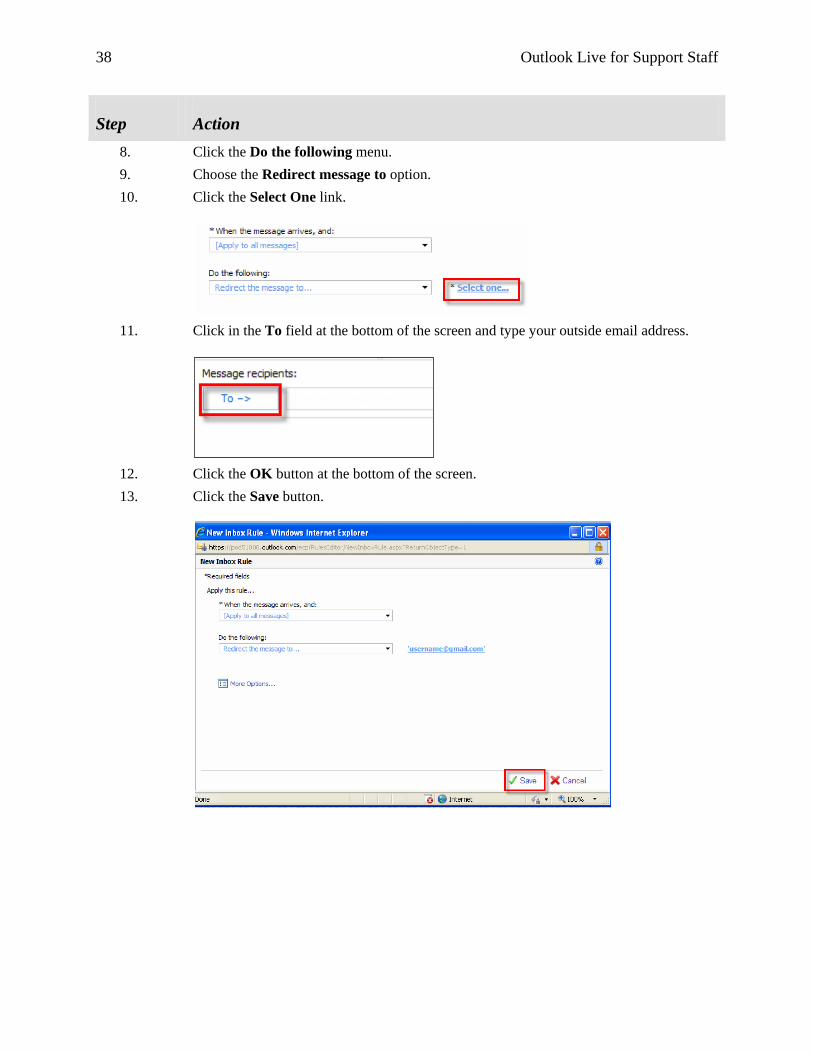
Step Action 8. Click the Do the following menu. 9. Choose the Redirect message to option. 10. Click the Select One link.
11. Click in the To field at the bottom of the screen and type your outside email address.
12. Click the OK button at the bottom of the screen. 13. Click the Save button.

Outlook Live for Support Staff 39
Step Action 14. Click the Yes button.
The rule is saved.

40 Outlook Live for Support Staff
Categories
You can create and use categories to label the messages, such as messages for a particular class.
Creating a Category
Step Action 15. Open a mail message. 16. Click the Categories button the message toolbar.
17. Select Manage Categories.
Outlook Live for Support Staff 41
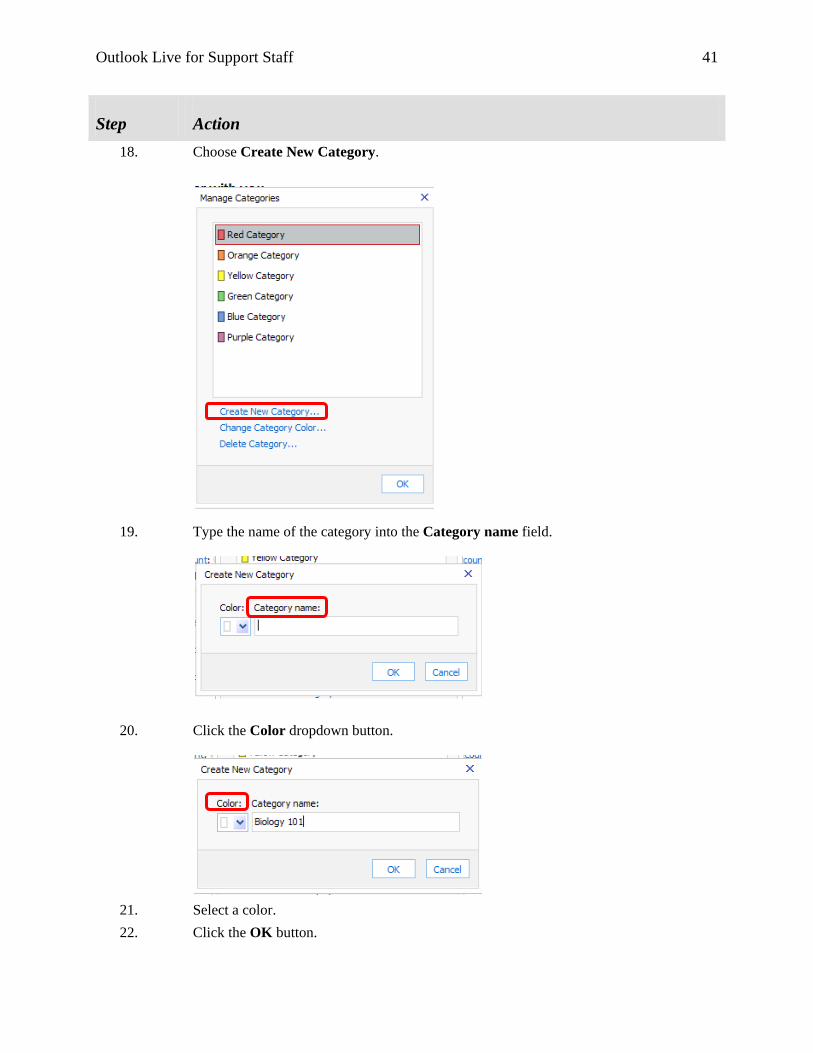
Step Action 18. Choose Create New Category.
19. Type the name of the category into the Category name field.
20. Click the Color dropdown button.
21. Select a color. 22. Click the OK button.
42 Outlook Live for Support Staff
Step Action 23. Click the OK button. 24. Close the mail message.
Modifying a Category
You cannot change the name of a category, but you can change its color.
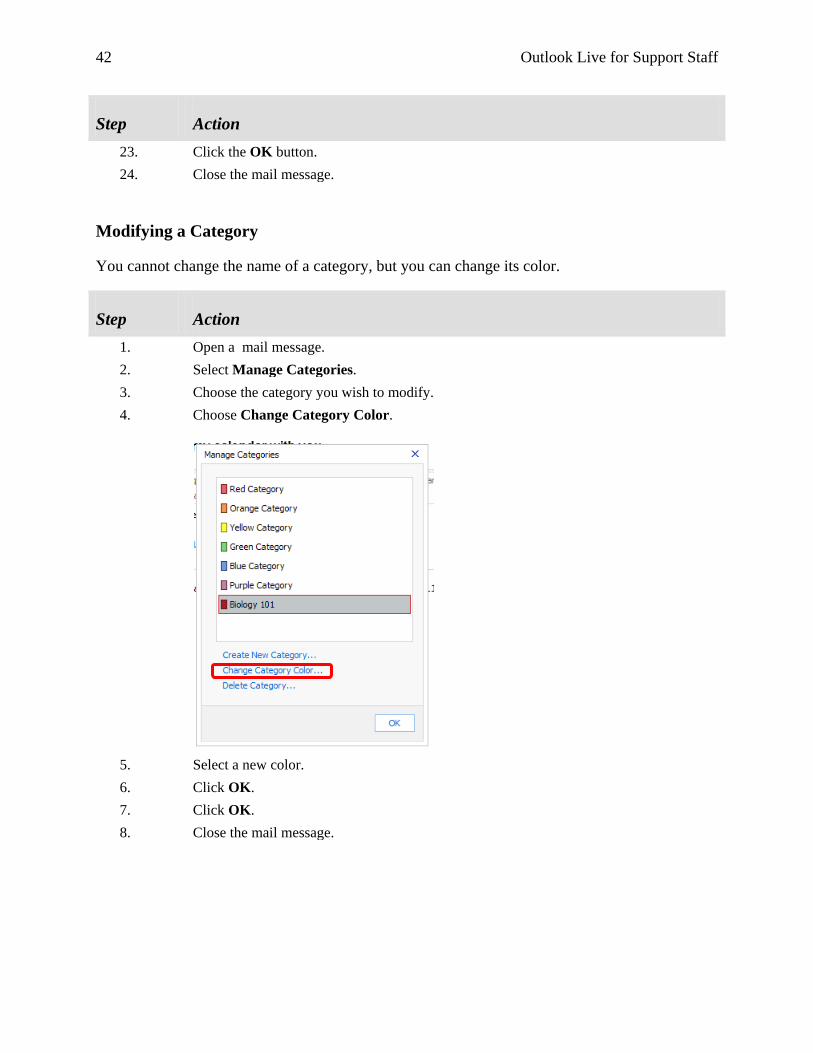
Step Action 1. Open a mail message. 2. Select Manage Categories. 3. Choose the category you wish to modify. 4. Choose Change Category Color.
5. Select a new color. 6. Click OK. 7. Click OK. 8. Close the mail message.

Outlook Live for Support Staff 43
Applying a Category
Step Action 1. Open the mail message you want to categorize. 2. Click the Categories button. 3. Check the category or categories. 4. Close the mail message.
Removing a Category
Step Action 1. Open the mail message you want to categorize. 2. Click the Categories button. 3. Check the category or categories you wish to remove. 4. Close the mail message.
The category or categories are removed.

44 Outlook Live for Support Staff
Filtering Mail
When you have a lot of messages in your mailbox, you can filter based on sender, flagging, and categories.
Filtering Based on Sender
Step Action 5. Navigate to the mail folder. 6. Click the Filter dropdown menu.
7. Select the From choice.
Outlook Live for Support Staff 45
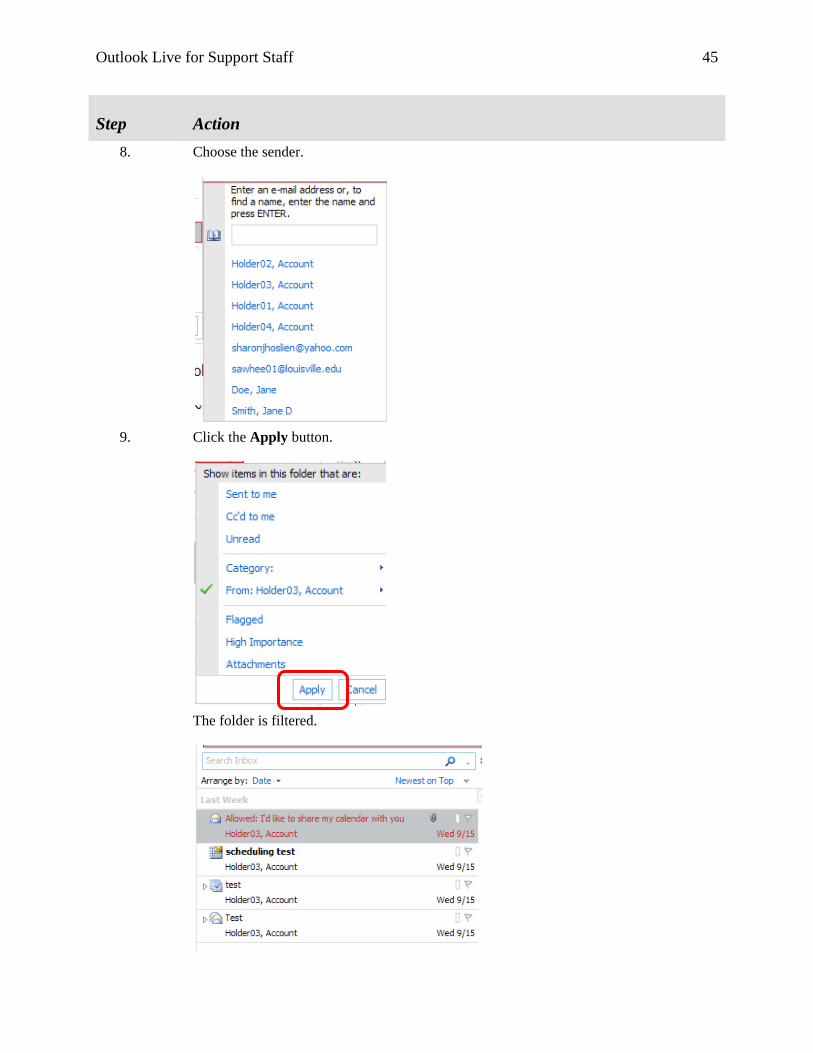
Step Action 8. Choose the sender.
9. Click the Apply button.
The folder is filtered.

46 Outlook Live for Support Staff
Filtering Based on Flag
Step Action 1. Navigate to the mail folder. 2. Click the Filter dropdown menu. 3. Select the Flagged choice.
4. Click Apply. 5. The folder only shows flagged messages.
Filtered Based on Categories
Step Action 1. Navigate to the mail folder. 2. Click the Filter dropdown menu.

Outlook Live for Support Staff 47
Step Action 3. Select the Flagged choice.
4. Select the category.
5. Click the Apply button. The folder is filtered
Removing a Filter
Step Action 1. Navigate to the mail folder. 2. Click the Filter button. 3. The filter is removed.

48 Outlook Live for Support Staff
Deleting and Restoring Mail Messages
Deleting a Mail Message
When you delete a mail message, it is sent to the ‘Deleted Items’ folder. Deleted items will stay in this folder for eight days.
Step Action 4. Right-click on the message you wish to delete. 5. Choose the Delete option.
6. The message is sent to your Deleted Items folder.
Outlook Live for Support Staff 49
Recovering a Deleted Mail Message
You have 8 days to recover a mail message from the ‘Deleted Folder.’
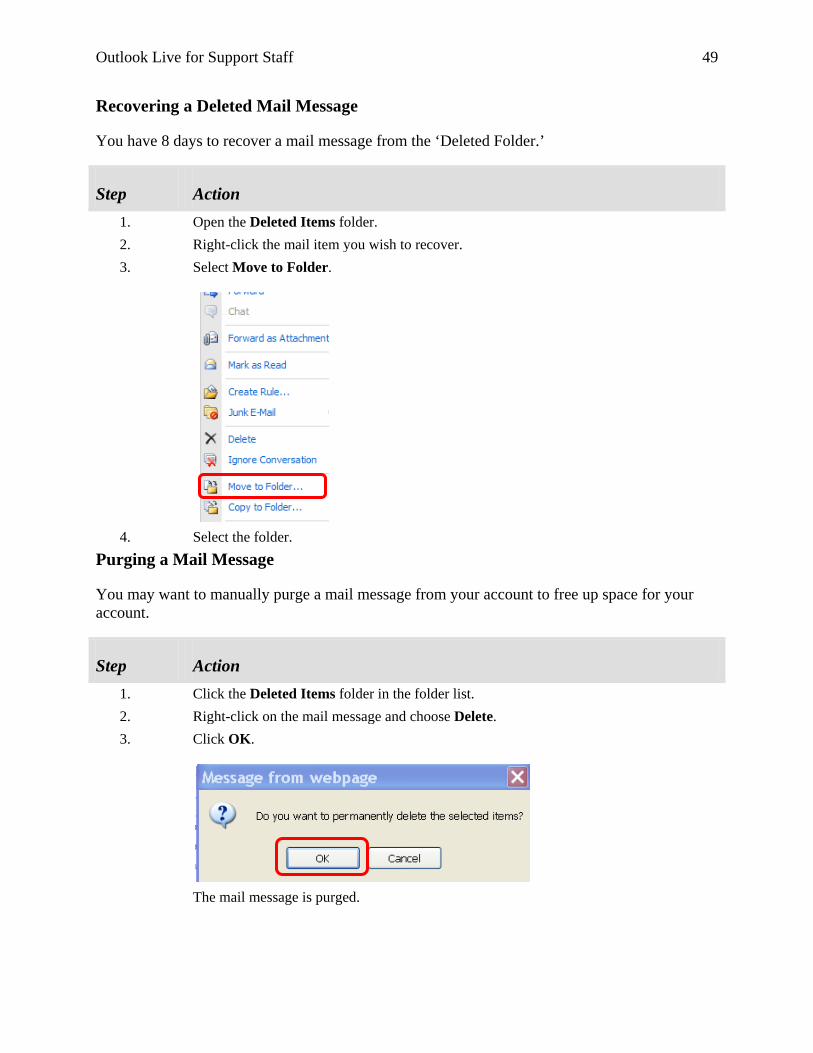
Step Action 1. Open the Deleted Items folder. 2. Right-click the mail item you wish to recover. 3. Select Move to Folder.
4. Select the folder.
Purging a Mail Message
You may want to manually purge a mail message from your account to free up space for your account.
Step Action 1. Click the Deleted Items folder in the folder list. 2. Right-click on the mail message and choose Delete. 3. Click OK.
The mail message is purged.

50 Outlook Live for Support Staff
Recovering a Purged Mail Message
You have 30 days to recover a mail message that you purged from your mailbox
Step Action 5. Right-click on the Deleted Folder in the folder list. 6. Select Recover Deleted Items.

Outlook Live for Support Staff 51
Step Action 7. Select the mail item you wish to recover.
8. Click the Recover Selected Items button.
52 Outlook Live for Support Staff
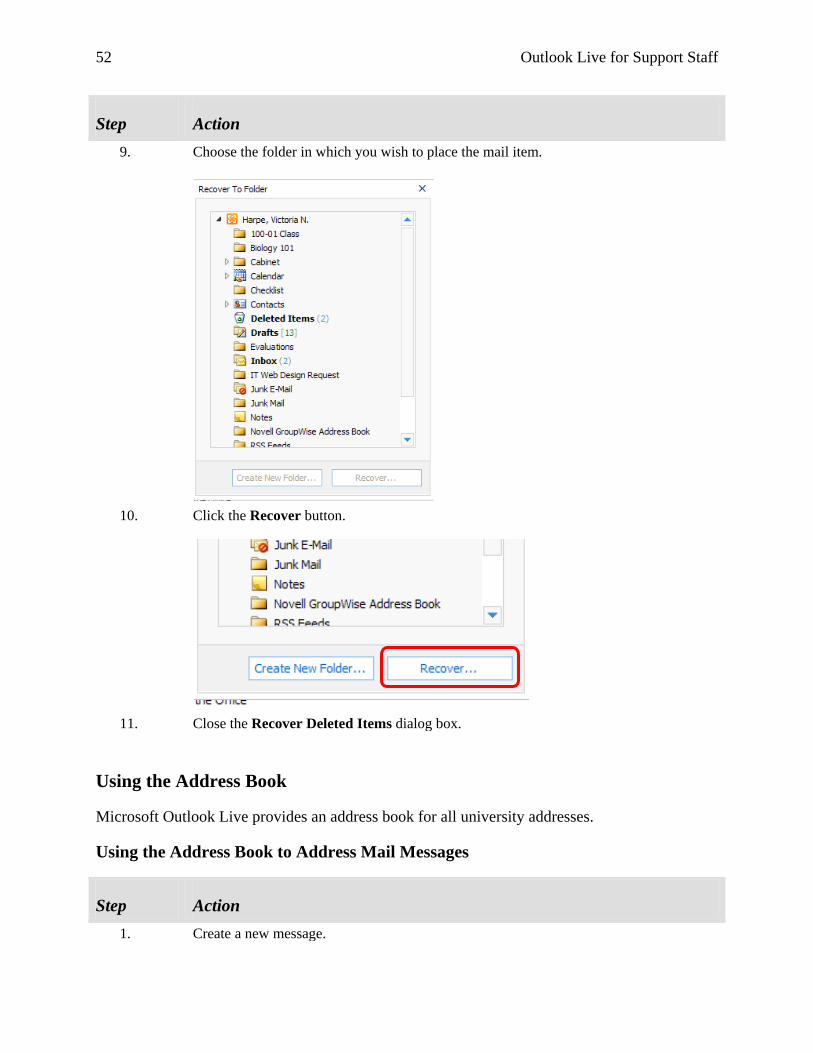
Step Action 9. Choose the folder in which you wish to place the mail item.
10. Click the Recover button.
11. Close the Recover Deleted Items dialog box.
Using the Address Book
Microsoft Outlook Live provides an address book for all university addresses.
Using the Address Book to Address Mail Messages
Step Action 1. Create a new message.

Outlook Live for Support Staff 53
Step Action 2. Click the To button.
3. Type the last name of the reciepient. Click the Search button.
4. Select an e-mail address.

54 Outlook Live for Support Staff
Step Action 5. Click the To button at the bottom of the window.
6. Click OK. 7. Complete the mail message as usual.
Blind Copying a Recipient
You must have a recipient in the ‘To’ field in order to blind copy a recipient.
Step Action 1. Click the New dropdown button. 2. Select Message. 3. Enter a recipient into the To field. 4. Click the To button in the mail message window. 5. Click in the search field. 6. Type the last of the recipient of the person you wish to blind copy. 7. Select the recipient and click the BCC button at the bottom of the screen.
8. Click OK.
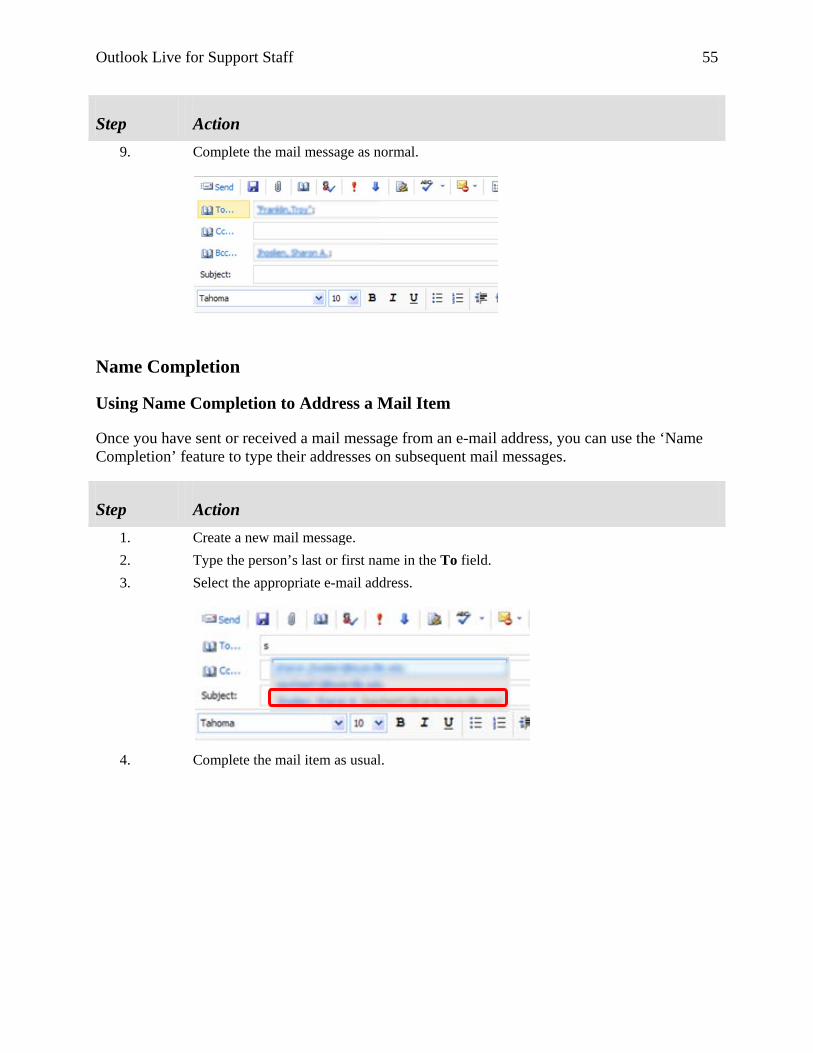
Outlook Live for Support Staff 55
Step Action 9. Complete the mail message as normal.
Name Completion
Using Name Completion to Address a Mail Item
Once you have sent or received a mail message from an e-mail address, you can use the ‘Name Completion’ feature to type their addresses on subsequent mail messages.
Step Action 1. Create a new mail message. 2. Type the person’s last or first name in the To field. 3. Select the appropriate e-mail address.
4. Complete the mail item as usual.

56 Outlook Live for Support Staff
Removing an E-mail Address from Name Completion
If you mistyped an address or no longer need to e-mail the person, you can remove an address from name completion.
Step Action 1. Create a new mail message. 2. Type the person’s last or first name in the To field. 3. Begin typing the name of the addressee.
4. Use the keyboard [Up] and [Down] arrows to navigate to the address. 5. Press the [Delete] key on your keyboard. The address is removed.

Outlook Live for Support Staff 57
Working with Contacts
Searching for E-mail Addresses
You can search for an e-mail address either from the main window of Microsoft Outlook Live or from the Microsoft Outlook Live address book.
Searching for Contacts from the Microsoft Outlook Live Main Window
Step Action 1. Click in the Find Someone field at the top right corner of the Microsoft Outlook Live
main window.
2. Type: Smith. Press [Enter]. A list of e-mail addresses with the name, Smith, appears. 3. Click the link: Smith, Elizabeth.
4. A pop-up window appears with information about Elizabeth Smith.
5. Close the pop-up window.
58 Outlook Live for Support Staff
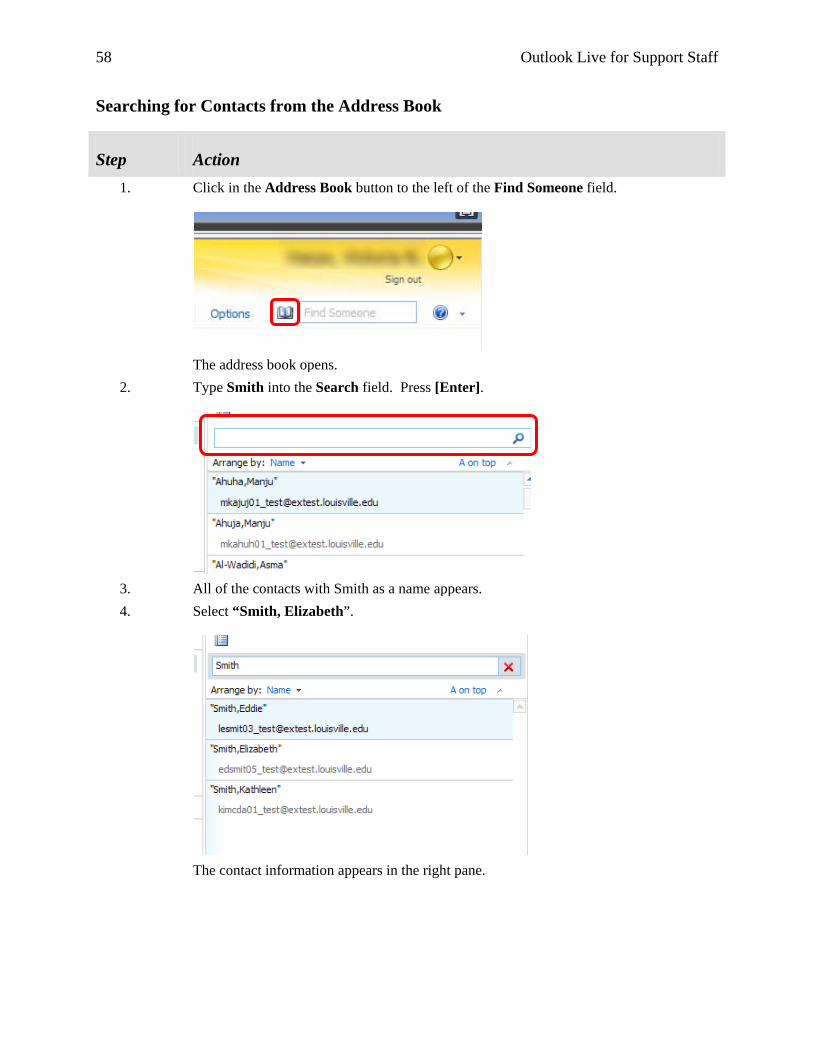
Searching for Contacts from the Address Book
Step Action 1. Click in the Address Book button to the left of the Find Someone field.
The address book opens. 2. Type Smith into the Search field. Press [Enter].
3. All of the contacts with Smith as a name appears. 4. Select “Smith, Elizabeth”.
The contact information appears in the right pane.

Outlook Live for Support Staff 59
Sending a Contact a Mail Message Directly from the Address Book
Once you find the correct contact, you can send an e-mail message to the contact from the information pop-up window.
Step Action 1. Find the entry: Elizabeth Smith and open the contact information window. 2. Click the e-mail address link for Elizabeth Smith.
The mail message dialog box appears. Complete the mail message and click the Send
button. 3. Close the address book window.
60 Outlook Live for Support Staff
Adding Contacts to an Address Book
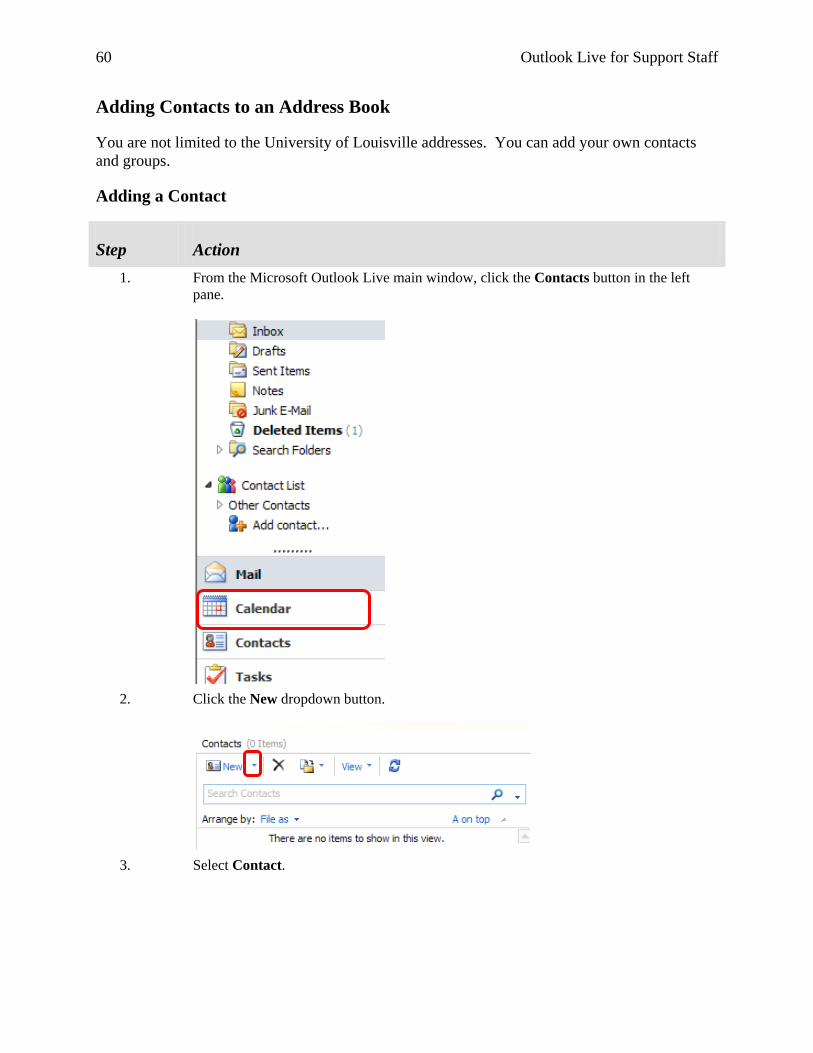
You are not limited to the University of Louisville addresses. You can add your own contacts and groups.
Adding a Contact
Step Action 1. From the Microsoft Outlook Live main window, click the Contacts button in the left
pane.
2. Click the New dropdown button.
3. Select Contact.

Outlook Live for Support Staff 61
Step Action 4. Complete the form.
(You must complete at least the First Name or Last Name in order for the contact to be saved).
5. In the Contact section, you can click the Additional Field dropdown and select a different field.

62 Outlook Live for Support Staff
Step Action 6. Click the Save and Close button.
Distribution Lists
A group is a list of contacts and/or groups to which you can send the same mail message or appointment. A distribution list is a group that you create for your exclusive use.
Creating a Distribution List (Private Group)
Step Action 1. From the main Microsoft Outlook Live window, click the Contacts button in the left
pane. 2. Click the New dropdown button.
3. Select Group.

Outlook Live for Support Staff 63
Step Action 4. Click in the Group Name field.
5. Type the group’s name. 6. Click in the Members text field.
7. Begin typing the name or e-mail address of the contact that you wish to add. Click the
Add button after you select each address. Or click the Members button and search for and add the names of the contacts from the address book.
8. Click in the Notes section. 9. Type a description about the group. 10. Click the Save and Close button.
Removing Contacts from a Distribution List
You can remove a contact from a group that you have created.
64 Outlook Live for Support Staff
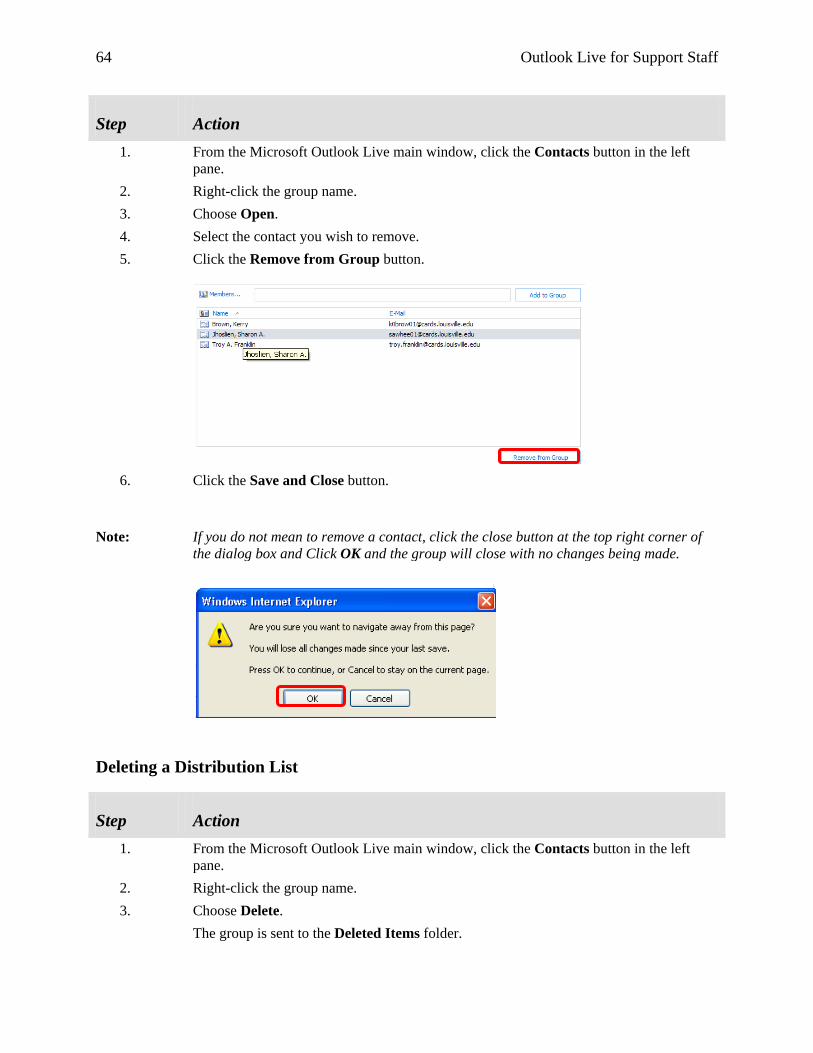
Step Action 1. From the Microsoft Outlook Live main window, click the Contacts button in the left
pane. 2. Right-click the group name. 3. Choose Open. 4. Select the contact you wish to remove. 5. Click the Remove from Group button.
6. Click the Save and Close button.
Note: If you do not mean to remove a contact, click the close button at the top right corner of the dialog box and Click OK and the group will close with no changes being made.
Deleting a Distribution List
Step Action 1. From the Microsoft Outlook Live main window, click the Contacts button in the left
pane. 2. Right-click the group name. 3. Choose Delete. The group is sent to the Deleted Items folder.
Outlook Live for Support Staff 65
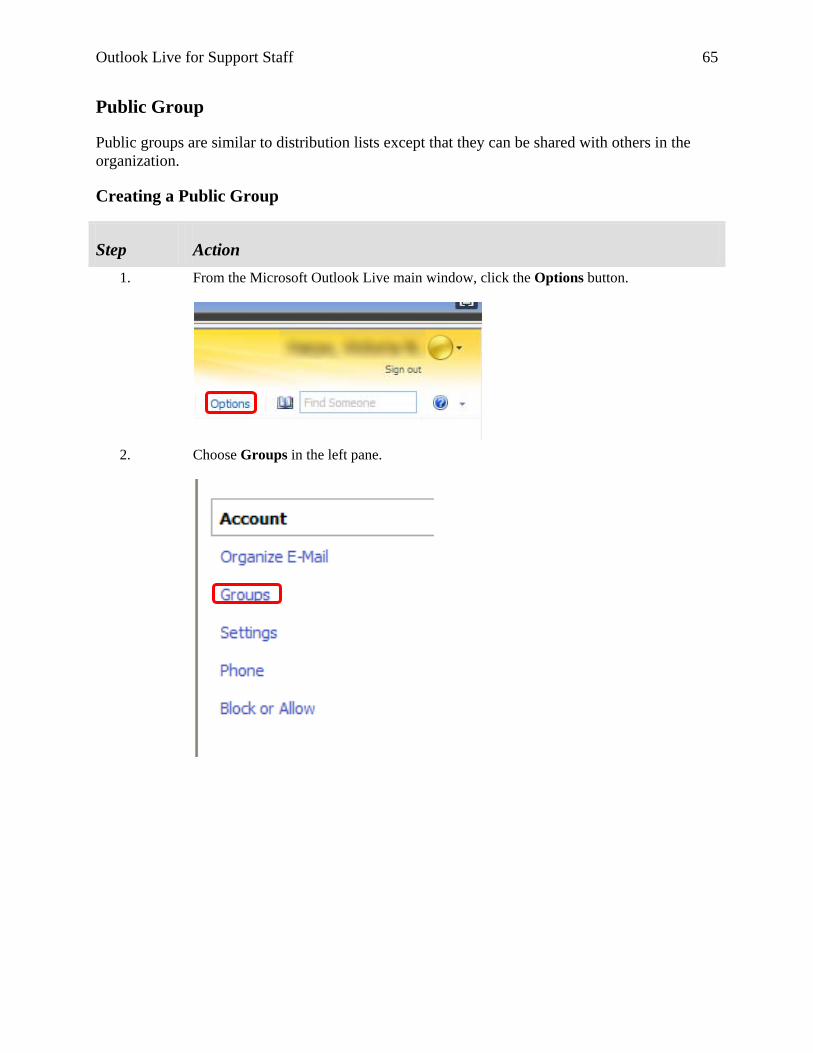
Public Group
Public groups are similar to distribution lists except that they can be shared with others in the organization.
Creating a Public Group
Step Action 1. From the Microsoft Outlook Live main window, click the Options button.
2. Choose Groups in the left pane.

66 Outlook Live for Support Staff
Step Action 3. Click the New button under the heading Public Groups I Own.
4. Complete the Display Name.
5. Type a short name for the group in the E-mail address field.
6. Type the description into the Description field.

Outlook Live for Support Staff 67
Step Action 7. Your e-mail address is listed as the group owner.
8. Click the Expand button on the Membership header.
9. You can add or not add the owners as members by checking or unchecking the Add
group owners as members field.
10. Click the Add button.
68 Outlook Live for Support Staff
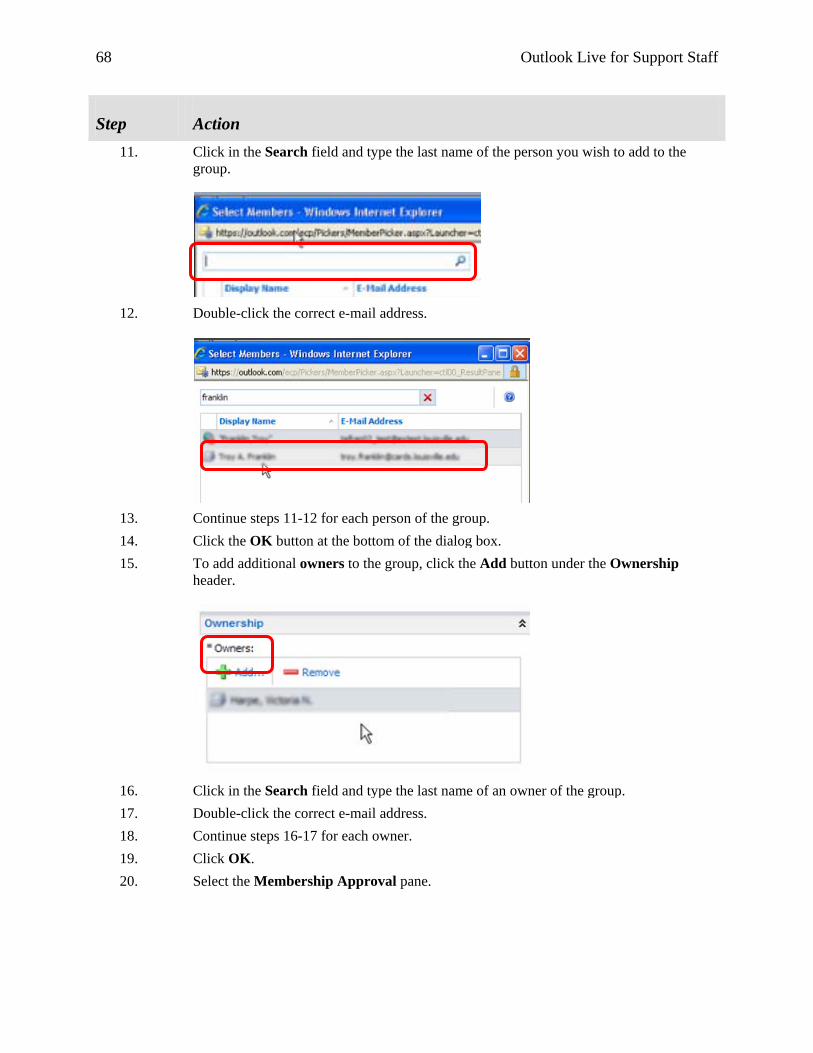
Step Action 11. Click in the Search field and type the last name of the person you wish to add to the
group.
12. Double-click the correct e-mail address.
13. Continue steps 11-12 for each person of the group. 14. Click the OK button at the bottom of the dialog box. 15. To add additional owners to the group, click the Add button under the Ownership
header.
16. Click in the Search field and type the last name of an owner of the group. 17. Double-click the correct e-mail address. 18. Continue steps 16-17 for each owner. 19. Click OK. 20. Select the Membership Approval pane.

Outlook Live for Support Staff 69
Step Action 21. Select the approval rights for this group.
22. Click the Save button. The public group is created.
Joining Public Groups
At times, you may wish to join a public group. (Note: The owner of the group must grant rights to others to request or join a group).
Step Action 1. Click the Options link. 2. Click the Groups category on the left. 3. Click in the Search field and type the keywords of the group you wish to join.
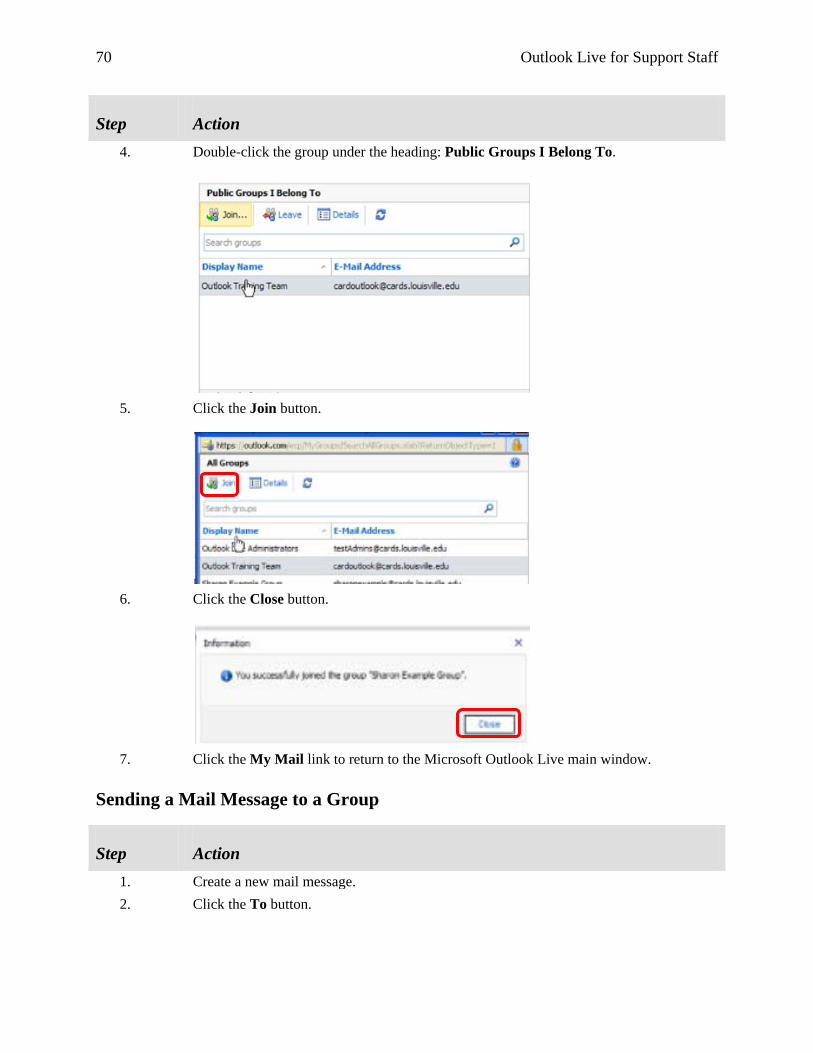
70 Outlook Live for Support Staff
Step Action 4. Double-click the group under the heading: Public Groups I Belong To.
5. Click the Join button.
6. Click the Close button.
7. Click the My Mail link to return to the Microsoft Outlook Live main window.
Sending a Mail Message to a Group
Step Action 1. Create a new mail message. 2. Click the To button.

Outlook Live for Support Staff 71
Step Action 3. Click the All Groups link.
4. Select the group to whom you want to send the mail message.
5. Click theTo button at the bottom of the dialog box. 6. Click OK. 7. Continue writing the mail message as normal.

72 Outlook Live for Support Staff
Contact Lists (Address Books)
You can create a list of contacts and/or groups.
Creating a Contact List
Step Action 1. Click the Contacts button in the left pane.
2. From the Microsoft Outlook Live main window, click the My Contacts button in the left
pane. 3. Right-click Contacts.
Outlook Live for Support Staff 73
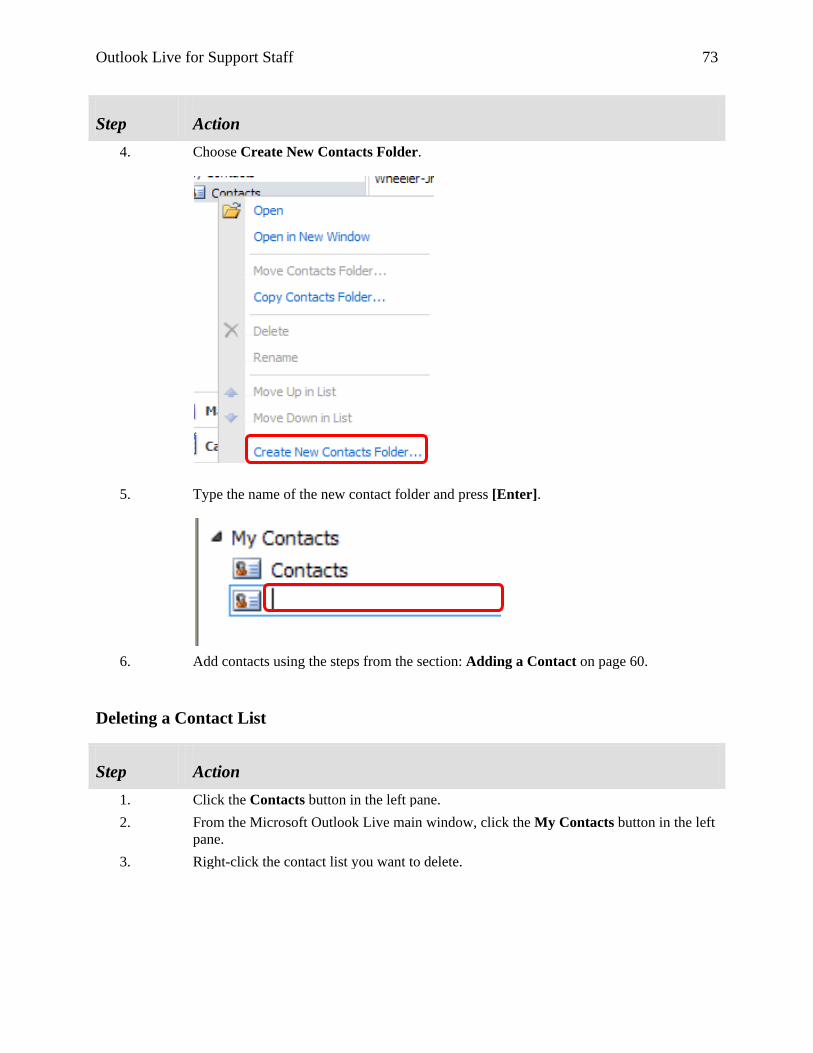
Step Action 4. Choose Create New Contacts Folder.
5. Type the name of the new contact folder and press [Enter].
6. Add contacts using the steps from the section: Adding a Contact on page 60.
Deleting a Contact List
Step Action 1. Click the Contacts button in the left pane. 2. From the Microsoft Outlook Live main window, click the My Contacts button in the left
pane. 3. Right-click the contact list you want to delete.

74 Outlook Live for Support Staff
Step Action 4. Select Delete.
5. Click Yes.
The contact folder is deleted.

Outlook Live for Support Staff 75
Microsoft Outlook Live Calendars
With Microsoft Outlook Live, you can manage your appointments and daily events.
Appointments
Creating Posted Appointments
You can create appointments just for yourself.
Step Action 1. Click the Calendar button.
2. Navigate to the day of the appointment.
76 Outlook Live for Support Staff
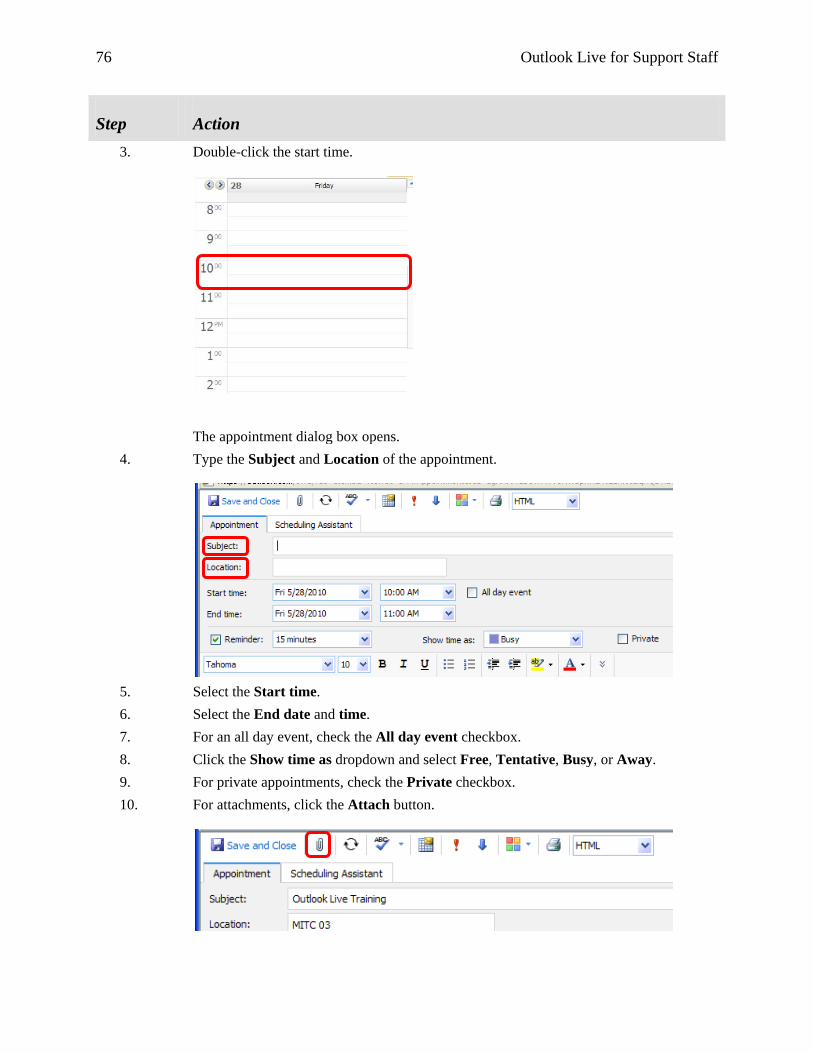
Step Action 3. Double-click the start time.
The appointment dialog box opens.
4. Type the Subject and Location of the appointment.
5. Select the Start time. 6. Select the End date and time. 7. For an all day event, check the All day event checkbox. 8. Click the Show time as dropdown and select Free, Tentative, Busy, or Away. 9. For private appointments, check the Private checkbox. 10. For attachments, click the Attach button.

Outlook Live for Support Staff 77
Step Action 11. Click the Save and Close. 12. The appointment is created.
Creating a Group Appointment
You can create appointments for others. If you wish to be included in the appointment, you will need to include yourself in the ‘To’ field.
Step Action 1. Click the New dropdown button.
2. Select Meeting Request.

78 Outlook Live for Support Staff
Step Action 3. Type the contacts that you need to invite into the To field.
4. Type the contacts that you want to invite into the Optional field. 5. If the meeting room is scheduled throughMicrosoft Outlook, type the meeting room into
the Resources field. 6. Type the subject into the Subject field. 7. If the location is not scheduled through Microsoft Outlook, type the location into the
Location field. 8. Select the Start date and time. 9. Select the End date and time. 10. For all day events, check All day event. 11. Type the message into the Message field. 12. Click the Attach button to attach a file. 13. When the appointment is completed, click the Send button.
Outlook Live for Support Staff 79
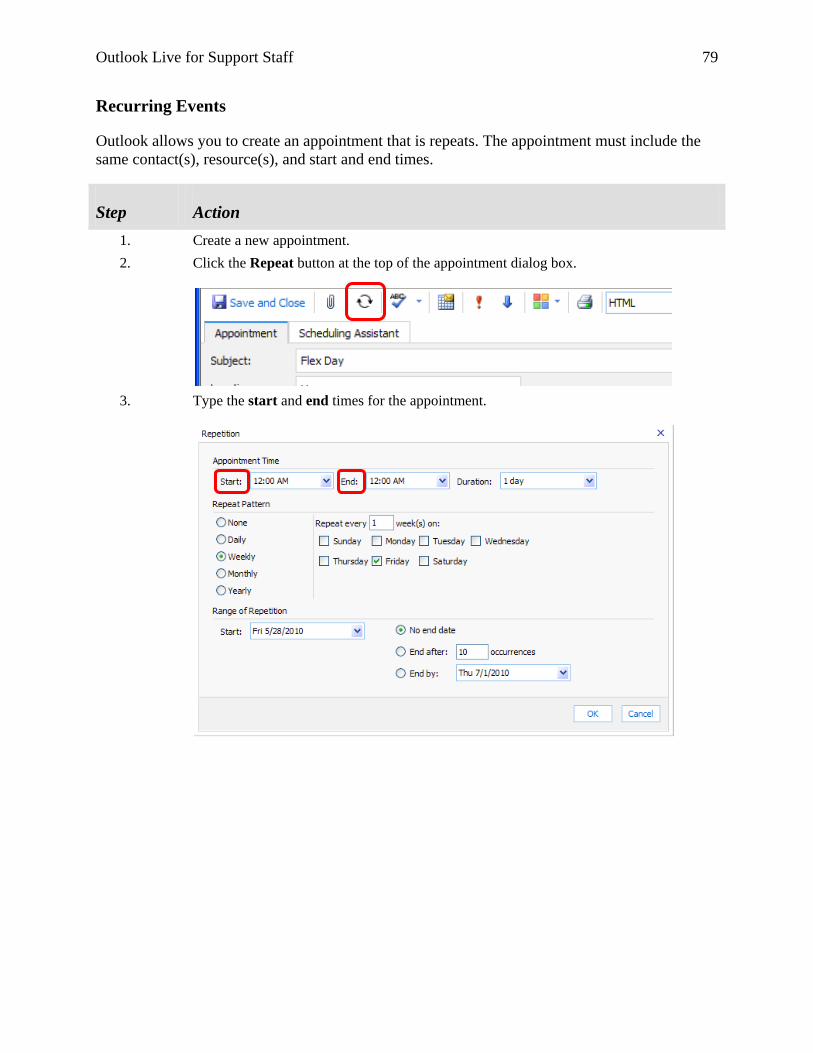
Recurring Events
Outlook allows you to create an appointment that is repeats. The appointment must include the same contact(s), resource(s), and start and end times.
Step Action 1. Create a new appointment. 2. Click the Repeat button at the top of the appointment dialog box.
3. Type the start and end times for the appointment.

80 Outlook Live for Support Staff
Step Action 4. Select whether the appointment will repeat by the day, week, month, or year.
5. Select how often the appointment will recur.
6. Select the Start date.
7. Select the End by date.
8. Click OK. 9. Complete the rest of the appointment fields. 10. Save and close or send the appointment.

Outlook Live for Support Staff 81
Checking Others’ Schedules for an Appointment
Step Action 1. Create a new meeting request. 2. Add all of the users who need to attend into the To field. 3. Add all of the users that you want to attend into the Optional field. 4. Add resources that are scheduled through Microsoft Outlook Live. 5. Choose the earliest date that you want the appointment to occur. 6. Choose the earliest time that you want the appointment to occur. 7. Choose the end time. 8. Click the Scheduling Assistant tab. 9. Check the Show only working hours checkbox.
10. Select one of the free times on the right of screen.
11. Click the Appointment tab and complete the rest of the fields. 12. Click Send.
82 Outlook Live for Support Staff
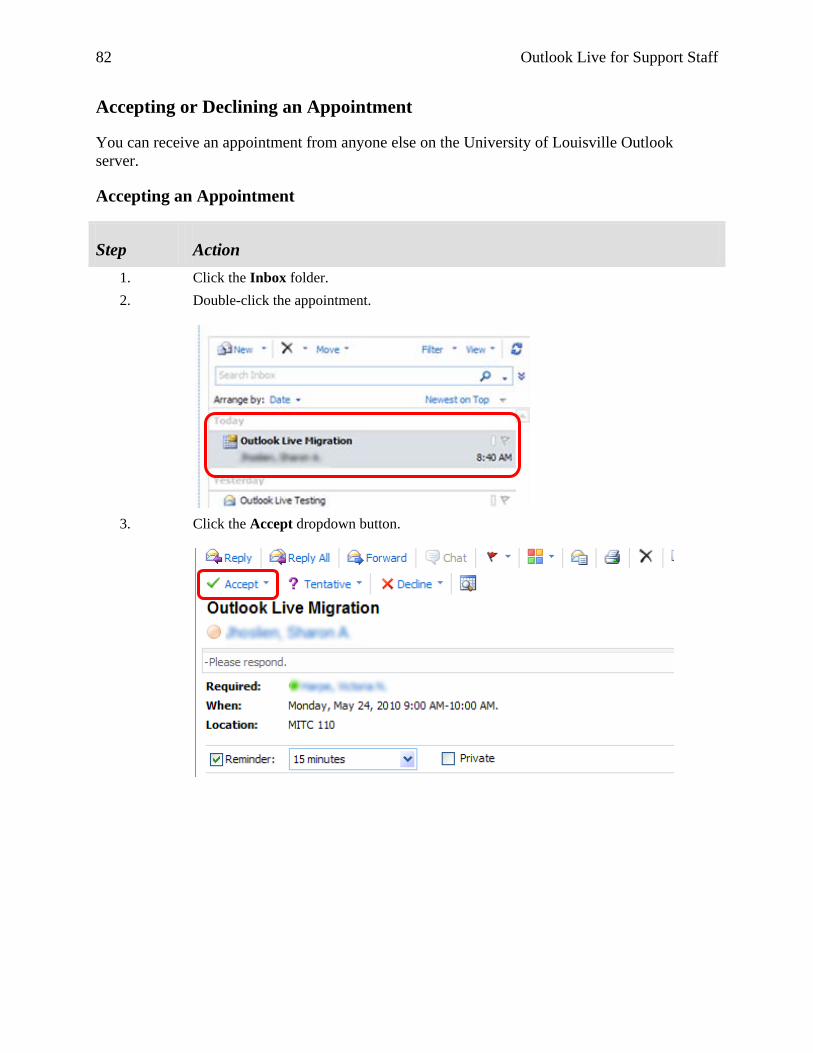
Accepting or Declining an Appointment
You can receive an appointment from anyone else on the University of Louisville Outlook server.
Accepting an Appointment
Step Action 1. Click the Inbox folder. 2. Double-click the appointment.
3. Click the Accept dropdown button.

Outlook Live for Support Staff 83
Step Action 4. Choose: Edit the response before sending, Send the response now, or Don’t send a
response.
Declining an Appointment
Step Action 1. Click the Inbox folder. 2. Double-click the appointment.
3. Click the Decline dropdown button.

84 Outlook Live for Support Staff
Step Action 4. Choose: Edit the response before sending, Send the response now, or Don’t send a
response.
Sharing a Calendar
You can share a calendar with anyone in your shared address book. You have the option of selecting what information to share with another user.
Creating a Shared Calendar
Step Action 1. Click the Calendar folder. 2. Click the Shared dropdown button.
3. Select Share a Calendar.
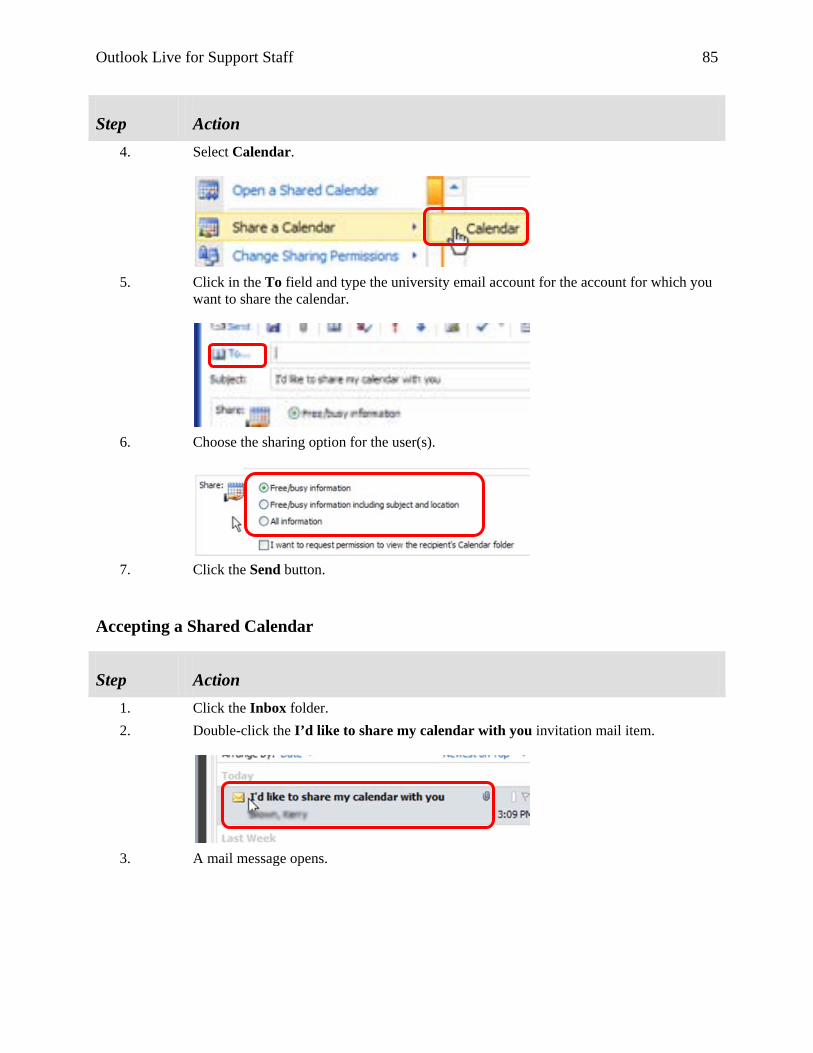
Outlook Live for Support Staff 85
Step Action 4. Select Calendar.
5. Click in the To field and type the university email account for the account for which you
want to share the calendar.
6. Choose the sharing option for the user(s).
7. Click the Send button.
Accepting a Shared Calendar
Step Action 1. Click the Inbox folder. 2. Double-click the I’d like to share my calendar with you invitation mail item.
3. A mail message opens.

86 Outlook Live for Support Staff
Step Action 4. Click the Add This Calendar button in the mail message dialog box.
5. Close the mail message.
Viewing a Shared Calendar
Step Action 1. Click the Calendar folder. 2. Click the Share dropdown button.
3. Select Open a Shared Calendar.

Outlook Live for Support Staff 87
Step Action 4. Type the e-mail account of the person whose calendar you wish to view into the Name
field.
5. Click OK. 6. Check the shared calendar in the left pane.

88 Outlook Live for Support Staff
Closing a Shared Folder
Step Action 1. Uncheck the shared folder you wish to hide in the left pane.

Outlook Live for Support Staff 89


![Safety Basics for the Non-Safety Professional [Live Session]](https://static.fdocuments.us/doc/165x107/558ebedb1a28abab518b469b/safety-basics-for-the-non-safety-professional-live-session.jpg)


