Outgoing Load Balancing
15
PFSENSE Load Balance with Fail Over From Version Beta3 Following are the Installation instructions of PFSense beginning at first Login to setup Load Balance and Fail over procedures for outbound Internet traffic. Outbound Terminology means LAN users Internet requests. It is advisable to check for any current updates and apply them prior to configuring PFSense. It is also advisable to configure PFSense manually for each installation; it is not recommended that you import a previous configuration file. This configuration manual also assumes that you understand how to install PFSense and that you PC Hardware is configured with 3 or more Network Adaptors. This tutorial covers a basic Load Balance and Fail over installation only and does NOT cover Hardened Firewall procedures. What hardware will I need? PFSense Hardware compatibility can be found at the following link. To load balance Internet connections you will need a minimum of PC with a 133MHz CPU but 400MHz CPU is recommended with Minimum of 128MB RAM and a 1GB Hard Drive 3 Network Interface Adaptors 2 ADSL Ethernet Routers 2 Static IP Addresses from your ISP Most Likely 2 ADSL Accounts 2 Telephone Lines with ADSL enabled http://www.pfsense.com/index.php?id=37 The PFSense Firewall PC specifications that this document was create on uses the following Intel P4 2GHz CPU 1GB pc2700 RAM (2 x 512MB Dual Channel) 40GB IDE ATA100 Harddrive 4 Netgear GA311 Gigabit Network Interface Adaptors with the Realtek 81695 chipset 2 DLInk DSL-502T ADSL Routers 2 Static IP Addresses from ISP 2 ADSL Accounts 2 Telephone lines ADSL enabled Alternative PFSense compatible Hardware configurations can be found at; http://www.pfsense.com/index.php?id=40 Plan your PFSense Network Configuration Addresses prior to setup, it makes it easier during the setup process. Ensure that you DO NOT use conflicting IP Address ranges and Subnets. LAN and WAN and OPT addresses can not begin with the same IP range. You will ADSL Routers to suit the Static IP Address Range that you have chosen for your Gatway’s for both WAN and OPT Interfaces. If you require instructions on configuring an additional LAN or DMZ interfaces, please visit the PFSense website for Tutorials and the Support Forum for additional assistance. 1
-
Upload
evy-yosita-silva -
Category
Documents
-
view
231 -
download
0
Transcript of Outgoing Load Balancing

8/6/2019 Outgoing Load Balancing
http://slidepdf.com/reader/full/outgoing-load-balancing 1/15
PFSENSE Load Balance with Fail Over
From Version Beta3
Following are the Installation instructions of PFSense beginning at first Login to setup Load Balance and Fail over procedures for outbound Internet traffic. Outbound Terminology means LAN users Internet requests. It is advisable to check for any current updates and apply them prior to configuring PFSense. It is also advisable to configure PFSense manually for each installation; it is not recommended that you import a previous configuration file. This configuration manual also assumes that you understand how to install PFSense and that you PC Hardware is configured with 3 or more Network Adaptors. This tutorial covers a basic Load Balance and Fail over installation only and does NOT cover Hardened Firewall procedures.
What hardware will I need? PFSense Hardware compatibility can be found at the following link. To load balance Internet connections you will
need a minimum of PC with a133MHz CPU but 400MHz CPU is recommended withMinimum of 128MB RAM and a1GB Hard Drive3 Network Interface Adaptors2 ADSL Ethernet Routers2 Static IP Addresses from your ISPMost Likely 2 ADSL Accounts2 Telephone Lines with ADSL enabled
http://www.pfsense.com/index.php?id=37 The PFSense Firewall PC specifications that this document was create on uses the following
Intel P4 2GHz CPU1GB pc2700 RAM (2 x 512MB Dual Channel)40GB IDE ATA100 Harddrive4 Netgear GA311 Gigabit Network Interface Adaptors with the Realtek 81695 chipset2 DLInk DSL-502T ADSL Routers2 Static IP Addresses from ISP2 ADSL Accounts2 Telephone lines ADSL enabled
Alternative PFSense compatible Hardware configurations can be found at;
http://www.pfsense.com/index.php?id=40
Plan your PFSense Network Configuration Addresses prior to setup, it makes it easier during thesetup process. Ensure that you DO NOT use conflicting IP Address ranges and Subnets. LAN andWAN and OPT addresses can not begin with the same IP range. You will ADSL Routers to suit theStatic IP Address Range that you have chosen for your Gatway’s for both WAN and OPT Interfaces.
If you require instructions on configuring an additional LAN or DMZ interfaces, please visit thePFSense website for Tutorials and the Support Forum for additional assistance.
1
8/6/2019 Outgoing Load Balancing
http://slidepdf.com/reader/full/outgoing-load-balancing 2/15
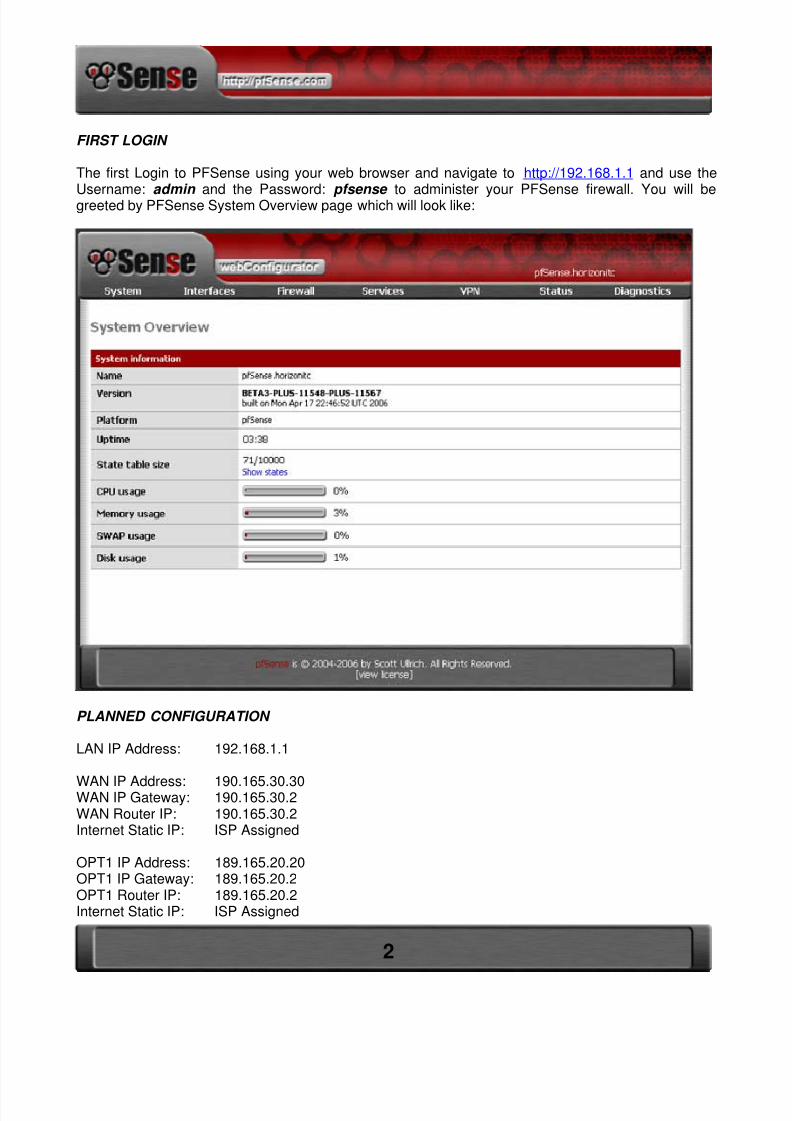
FIRST LOGIN
The first Login to PFSense using your web browser and navigate to http://192.168.1.1 and use the
Username: admin and the Password: pfsense to administer your PFSense firewall. You will begreeted by PFSense System Overview page which will look like:
PLANNED CONFIGURATION
LAN IP Address: 192.168.1.1
WAN IP Address: 190.165.30.30WAN IP Gateway: 190.165.30.2WAN Router IP: 190.165.30.2Internet Static IP: ISP Assigned
OPT1 IP Address: 189.165.20.20OPT1 IP Gateway: 189.165.20.2OPT1 Router IP: 189.165.20.2Internet Static IP: ISP Assigned
2
8/6/2019 Outgoing Load Balancing
http://slidepdf.com/reader/full/outgoing-load-balancing 3/15
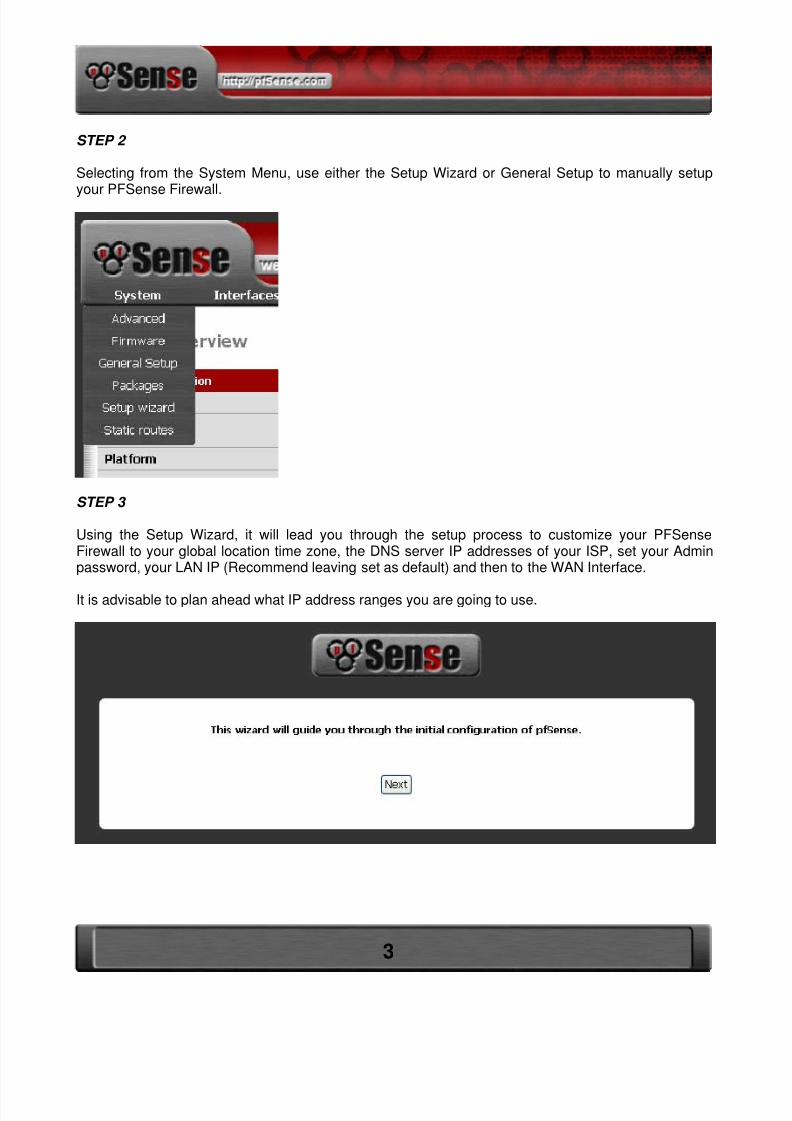
STEP 2
Selecting from the System Menu, use either the Setup Wizard or General Setup to manually setup
your PFSense Firewall.
STEP 3
Using the Setup Wizard, it will lead you through the setup process to customize your PFSenseFirewall to your global location time zone, the DNS server IP addresses of your ISP, set your Adminpassword, your LAN IP (Recommend leaving set as default) and then to the WAN Interface.
It is advisable to plan ahead what IP address ranges you are going to use.
3
8/6/2019 Outgoing Load Balancing
http://slidepdf.com/reader/full/outgoing-load-balancing 4/15
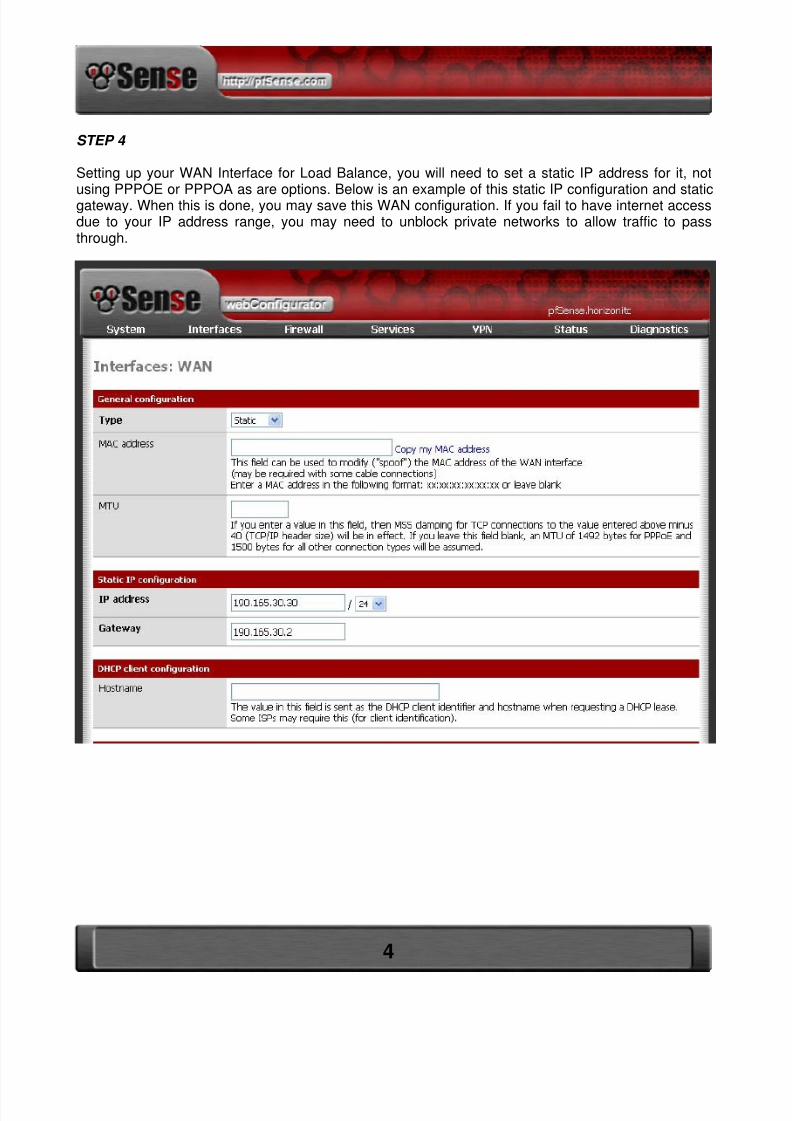
STEP 4
Setting up your WAN Interface for Load Balance, you will need to set a static IP address for it, not
using PPPOE or PPPOA as are options. Below is an example of this static IP configuration and staticgateway. When this is done, you may save this WAN configuration. If you fail to have internet accessdue to your IP address range, you may need to unblock private networks to allow traffic to passthrough.
4
8/6/2019 Outgoing Load Balancing
http://slidepdf.com/reader/full/outgoing-load-balancing 5/15
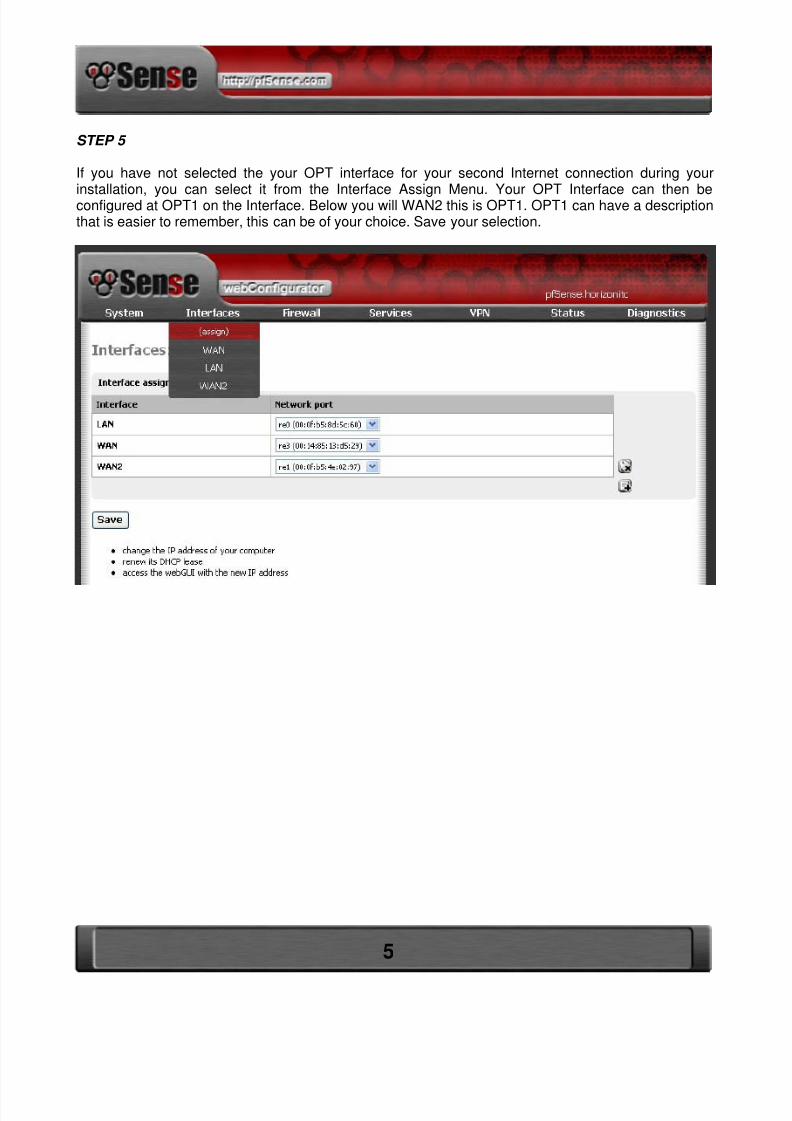
STEP 5
If you have not selected the your OPT interface for your second Internet connection during your
installation, you can select it from the Interface Assign Menu. Your OPT Interface can then beconfigured at OPT1 on the Interface. Below you will WAN2 this is OPT1. OPT1 can have a descriptionthat is easier to remember, this can be of your choice. Save your selection.
5
8/6/2019 Outgoing Load Balancing
http://slidepdf.com/reader/full/outgoing-load-balancing 6/15
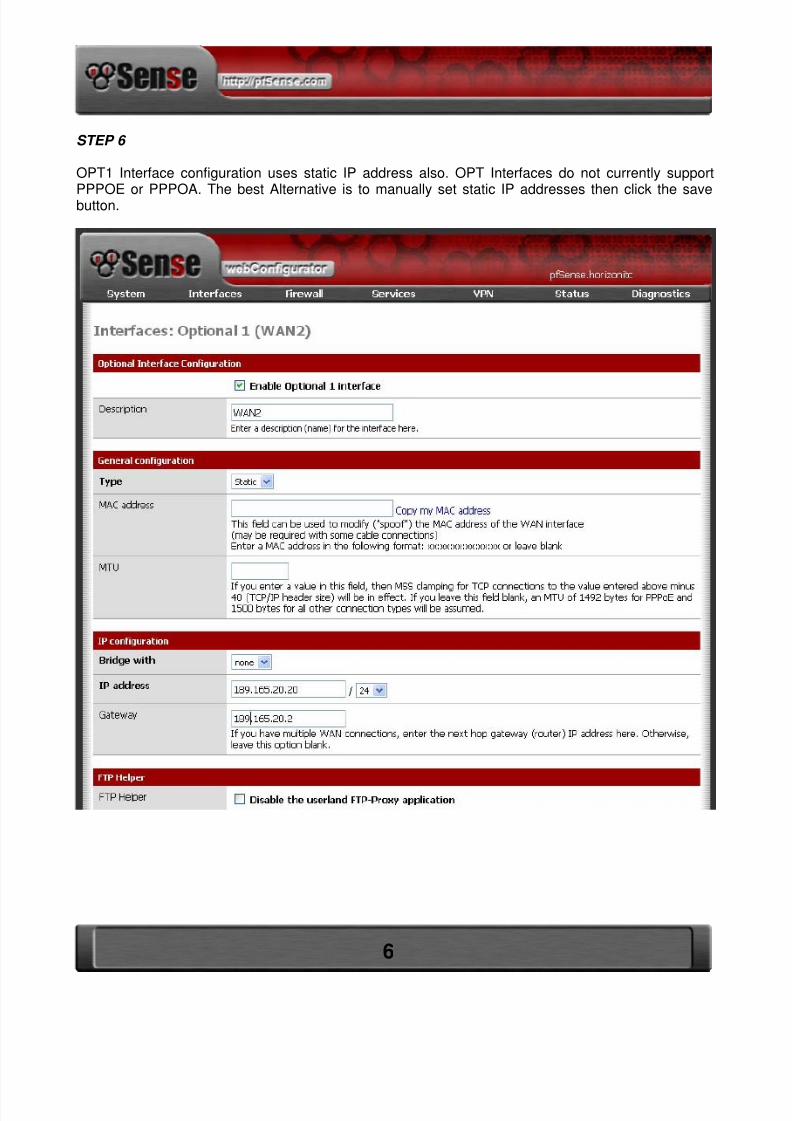
STEP 6
OPT1 Interface configuration uses static IP address also. OPT Interfaces do not currently support
PPPOE or PPPOA. The best Alternative is to manually set static IP addresses then click the savebutton.
6
8/6/2019 Outgoing Load Balancing
http://slidepdf.com/reader/full/outgoing-load-balancing 7/15
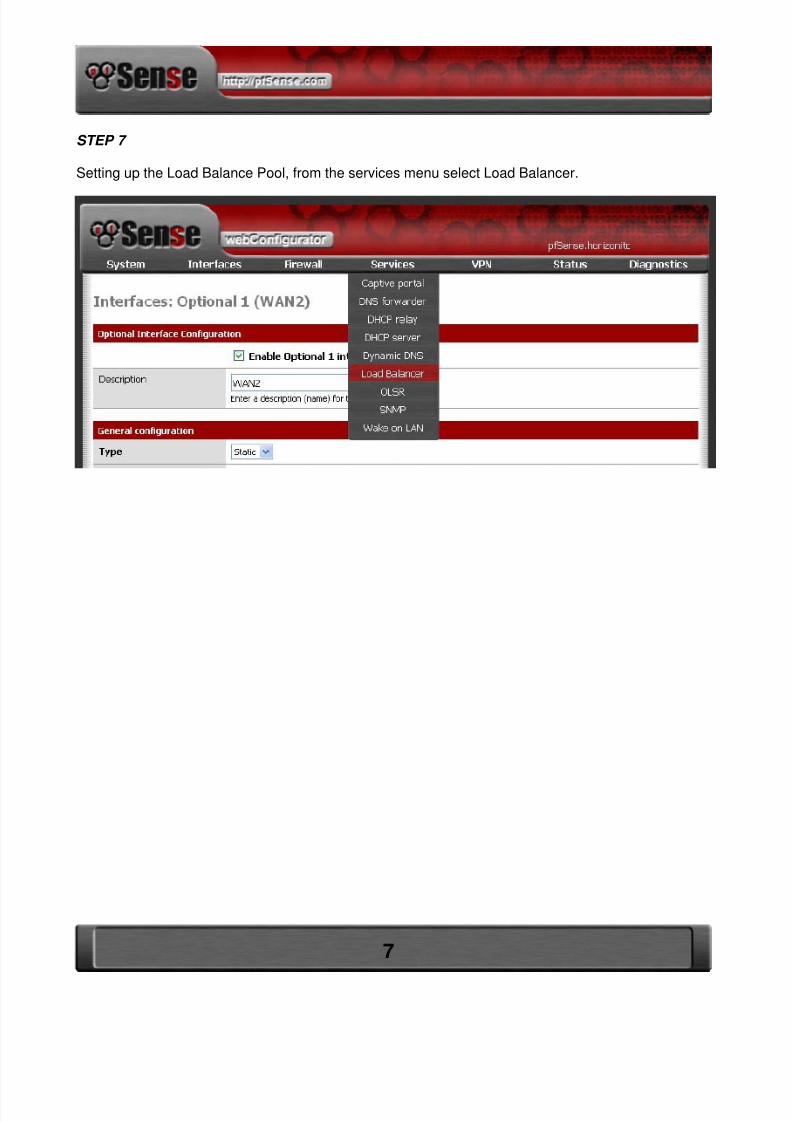
STEP 7
Setting up the Load Balance Pool, from the services menu select Load Balancer.
7

8/6/2019 Outgoing Load Balancing
http://slidepdf.com/reader/full/outgoing-load-balancing 8/15
STEP 8
Create your Load Balance Pool by selecting the symbol. It will bring up the window below. As an
example I have created one IP Address ready to add to the Pool. Select Add to Pool when your havechosen either your WAN gateway IP or your OPT Gateway.
*** IMPORTANT*** Ensure that your WAN and OPT Monitor IP Addresses are not the same IP. It isadvisable to use an IP address that is associated with your ISP for that Interface. EG: WAN ISP is ABC then use their Gateway for the monitor IP, OPT ISP is XYZ then use that gateway for that monitor IP.
EXAMPLE:
WAN 190.165.30.30 ====== [Router Static IP] ======{Internet Monitor IP 202.173.144.33}||
LAN192.168.1.1========[PFSense]LoadBalance||
OPT1 189.165.20.20 ====== [Router Static IP] ======{Internet Monitor IP 202.173.144.81}
When you have finished creating your balance pool click the save button.
8
8/6/2019 Outgoing Load Balancing
http://slidepdf.com/reader/full/outgoing-load-balancing 9/15
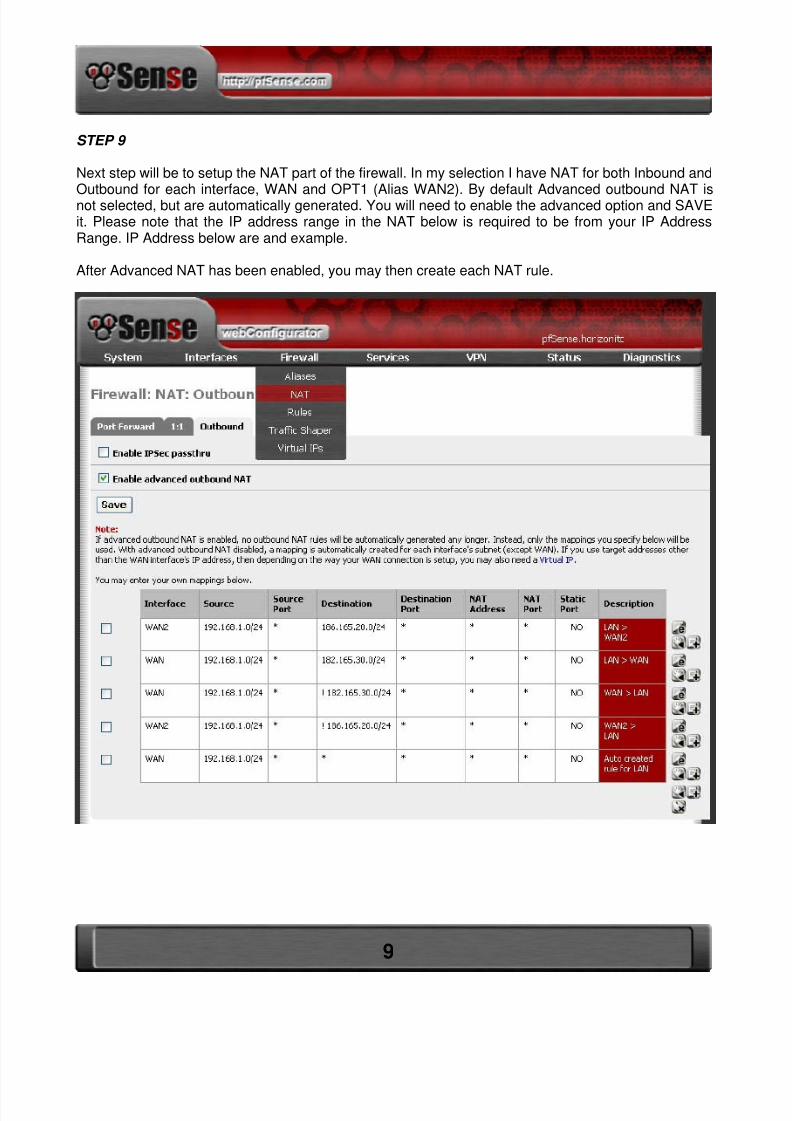
STEP 9
Next step will be to setup the NAT part of the firewall. In my selection I have NAT for both Inbound and
Outbound for each interface, WAN and OPT1 (Alias WAN2). By default Advanced outbound NAT isnot selected, but are automatically generated. You will need to enable the advanced option and SAVEit. Please note that the IP address range in the NAT below is required to be from your IP AddressRange. IP Address below are and example.
After Advanced NAT has been enabled, you may then create each NAT rule.
9
8/6/2019 Outgoing Load Balancing
http://slidepdf.com/reader/full/outgoing-load-balancing 10/15
STEP 10
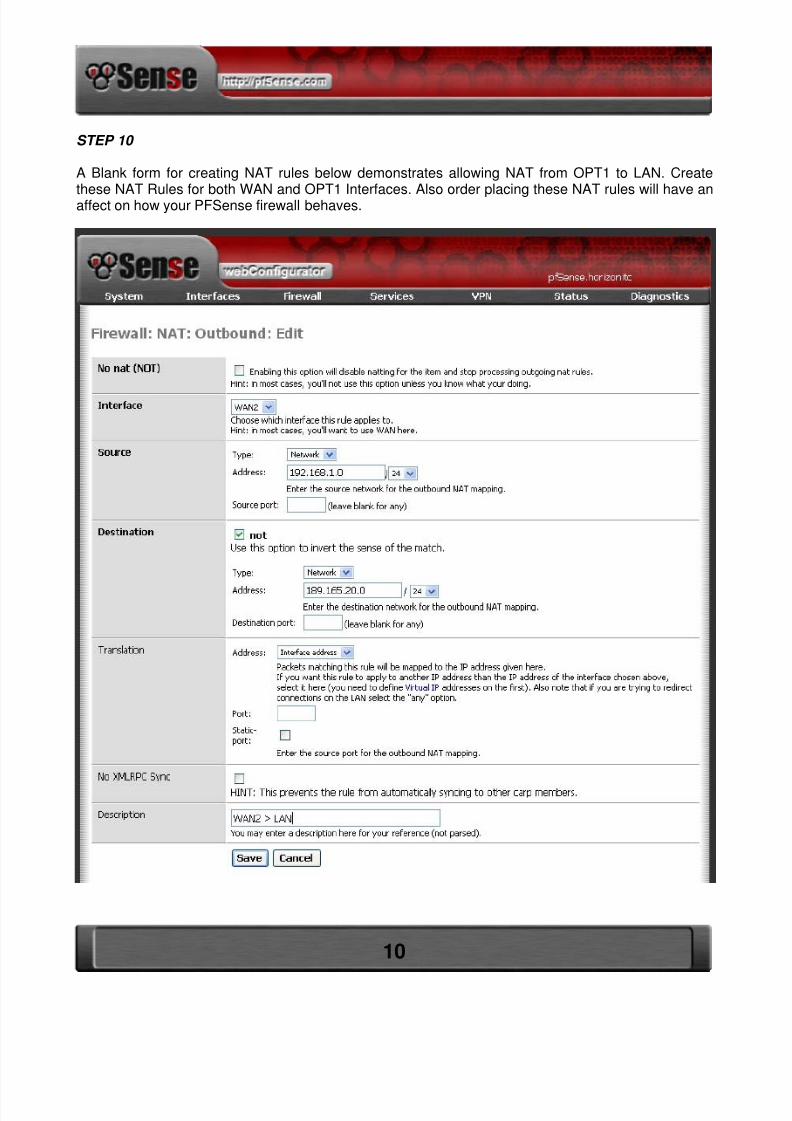
A Blank form for creating NAT rules below demonstrates allowing NAT from OPT1 to LAN. Create
these NAT Rules for both WAN and OPT1 Interfaces. Also order placing these NAT rules will have anaffect on how your PFSense firewall behaves.
10
8/6/2019 Outgoing Load Balancing
http://slidepdf.com/reader/full/outgoing-load-balancing 11/15
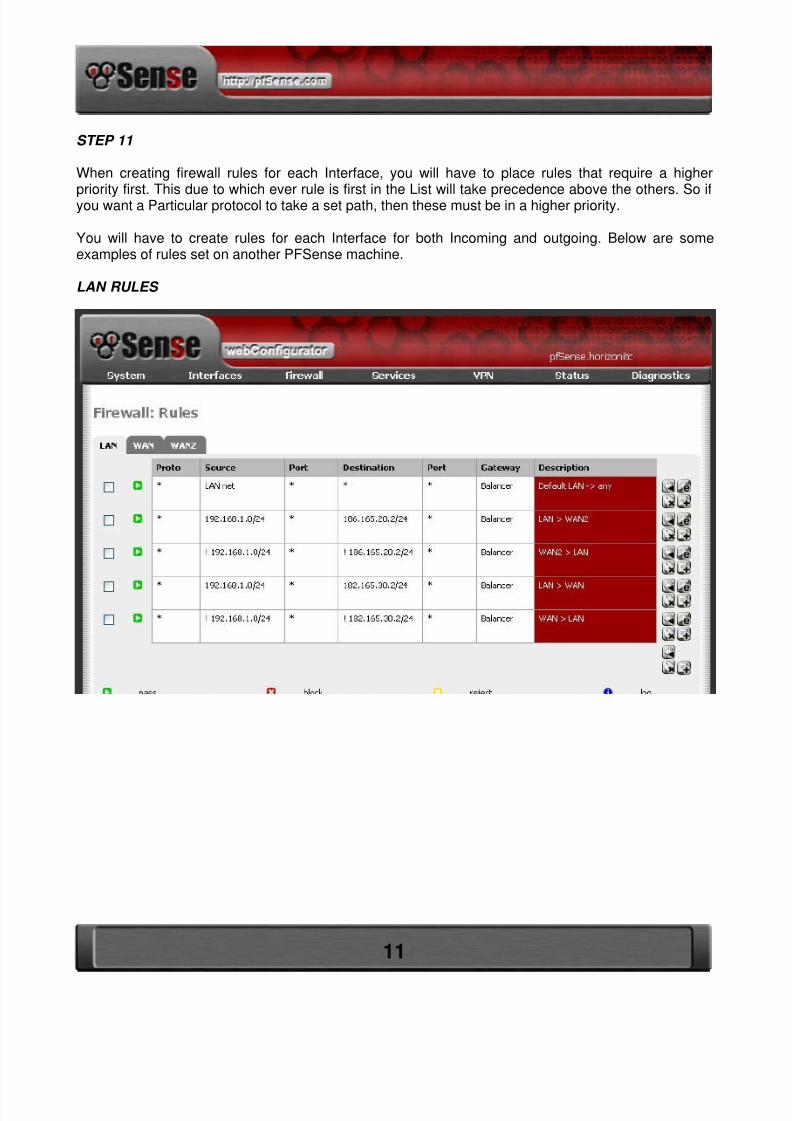
STEP 11
When creating firewall rules for each Interface, you will have to place rules that require a higher
priority first. This due to which ever rule is first in the List will take precedence above the others. So ifyou want a Particular protocol to take a set path, then these must be in a higher priority.
You will have to create rules for each Interface for both Incoming and outgoing. Below are someexamples of rules set on another PFSense machine.
LAN RULES
11
8/6/2019 Outgoing Load Balancing
http://slidepdf.com/reader/full/outgoing-load-balancing 12/15
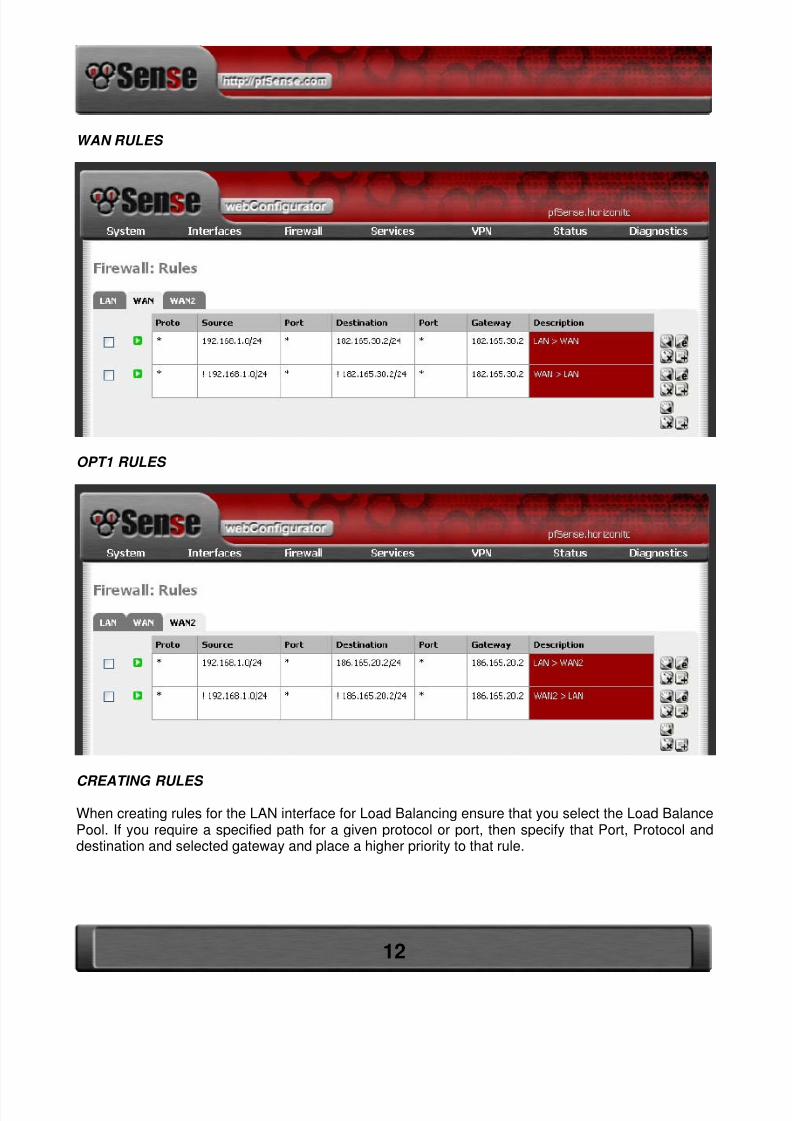
WAN RULES
OPT1 RULES
CREATING RULES
When creating rules for the LAN interface for Load Balancing ensure that you select the Load BalancePool. If you require a specified path for a given protocol or port, then specify that Port, Protocol anddestination and selected gateway and place a higher priority to that rule.
12

8/6/2019 Outgoing Load Balancing
http://slidepdf.com/reader/full/outgoing-load-balancing 13/15
When creating Rules for WAN and OPT Interfaces, ensure that when you select the Gateway, ensurethat it is the gateway for that Interface as specified on the WAN and OPT1 Interface pages.
You will also have to create a Rule to “Invert the sense of the match”, which means if the default is togo to the internet, then to invert means to bring back in to the LAN.
EG: WAN IP Address: 190.165.30.30WAN IP Gateway: 190.165.30.2
STEP 12
Router Setup When you setup the Ethernet port on the Router allocates the LAN side (not Internetside) the IP Address of either the WAN Gateway IP or the OPT1 Gateway IP. Ensure that you enableNAT, this will assist PFSense gain the DNS information that is required for Internet access.
If you are unable to gain access to your Router through PFSense itself, then it is probable that you willhave to connect it directly to a LAN client and configure it prior to connecting to PFSense Firewall.
Router Security To assist in securing your PFSense firewall, it may be a desired feature that eachRouter does not respond to “Denial of Service Attacks”, “Flood Pings”, External Pings” and otherundesired Internet Based attacks. If you’re Router have these Firewall features it may be advisable toutilize these security features. Please refer to your Router Manufacturer Users manual.
DMZ Access Enabling Router Security Firewall and blocking or dropping External Requests, mayprevent you from having DMZ or Remote Access to Servers or PFSense itself. If remote access isrequired and you desire to tighten up the Security on your PFSense Firewall, use the following. Thiswill take time by Closing all access and then slowly easing security until you have a secure Firewallbut have the desired access control.
Testing Firewall Security To test firewall security, Internet Based Security companies have Websitefeatures that will test Firewalls, Routers and Clients from a remote location. This is done by youinviting the company to test your security which also produces a report that may assist you in yourFirewall Security. There are a number of User Pay and Subscription options available. For a quicksecurity check that is FREE, try using the Gibson Research Centre Website “ShieldsUP Test” onhttp://www.grc.com Finally When you have configured all your Rules and NAT and Pools it may be a desired choice toreboot PFSense. On reboot you may want to test your Load Balance and Fail Over configurations.The fail over option can be simulated by either unplugging the Ethernet patch lead or turning off thepower from each ADSL Router independently one at a time and testing Internet access. To test LoadBalance you can use a website that replies to your IP Addresses.http://dynamic.zoneedit.com/checkip.html if you refresh the page it will give you your alternate IPAddress. Another way to test the Load Balance is to have two or more users on the LAN and searchfor a Web Page at the same time. They should take alternate paths.
13
8/6/2019 Outgoing Load Balancing
http://slidepdf.com/reader/full/outgoing-load-balancing 14/15
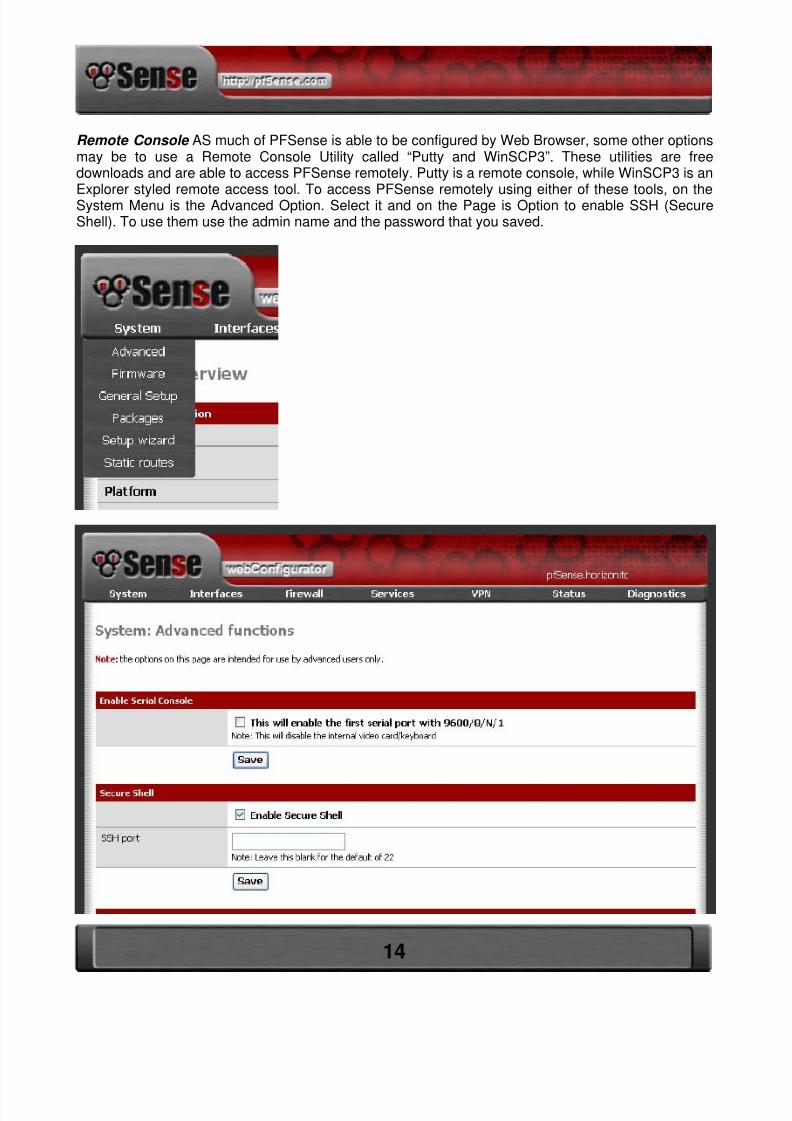
Remote Console AS much of PFSense is able to be configured by Web Browser, some other optionsmay be to use a Remote Console Utility called “Putty and WinSCP3”. These utilities are freedownloads and are able to access PFSense remotely. Putty is a remote console, while WinSCP3 is an
Explorer styled remote access tool. To access PFSense remotely using either of these tools, on theSystem Menu is the Advanced Option. Select it and on the Page is Option to enable SSH (SecureShell). To use them use the admin name and the password that you saved.
14
8/6/2019 Outgoing Load Balancing
http://slidepdf.com/reader/full/outgoing-load-balancing 15/15
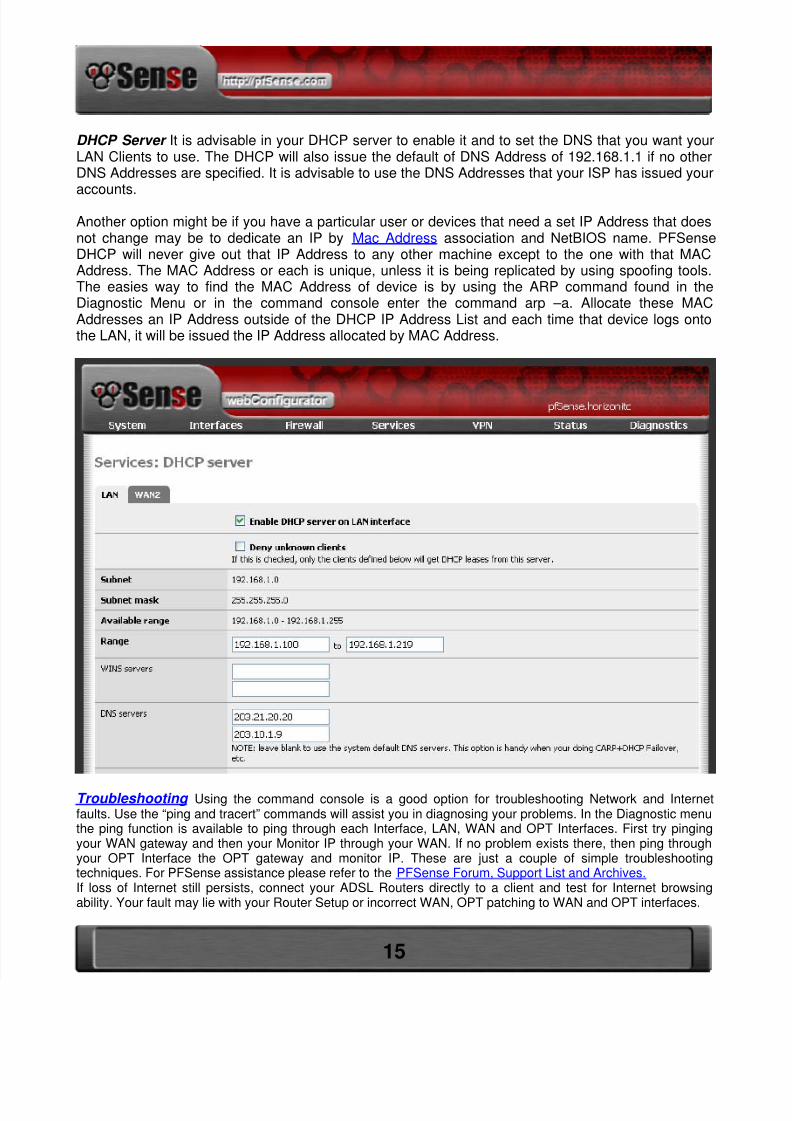
DHCP Server It is advisable in your DHCP server to enable it and to set the DNS that you want yourLAN Clients to use. The DHCP will also issue the default of DNS Address of 192.168.1.1 if no otherDNS Addresses are specified. It is advisable to use the DNS Addresses that your ISP has issued your
accounts.
Another option might be if you have a particular user or devices that need a set IP Address that doesnot change may be to dedicate an IP by Mac Address association and NetBIOS name. PFSenseDHCP will never give out that IP Address to any other machine except to the one with that MACAddress. The MAC Address or each is unique, unless it is being replicated by using spoofing tools.The easies way to find the MAC Address of device is by using the ARP command found in theDiagnostic Menu or in the command console enter the command arp –a. Allocate these MACAddresses an IP Address outside of the DHCP IP Address List and each time that device logs ontothe LAN, it will be issued the IP Address allocated by MAC Address.
Troubleshooting Using the command console is a good option for troubleshooting Network and Internetfaults. Use the “ping and tracert” commands will assist you in diagnosing your problems. In the Diagnostic menuthe ping function is available to ping through each Interface, LAN, WAN and OPT Interfaces. First try pingingyour WAN gateway and then your Monitor IP through your WAN. If no problem exists there, then ping throughyour OPT Interface the OPT gateway and monitor IP. These are just a couple of simple troubleshootingtechniques. For PFSense assistance please refer to the PFSense Forum, Support List and Archives.If loss of Internet still persists, connect your ADSL Routers directly to a client and test for Internet browsingability. Your fault may lie with your Router Setup or incorrect WAN, OPT patching to WAN and OPT interfaces.
15