Outdoor Progression Patch - Girl Scouts...The Camp Out segment teaches girls about knot tying,...
28
OUTDOOR PROGRESSION PATCH The Outdoor Progression Patch is an opportunity for an individual Girl Scout or a troop to learn new outdoor skills to combine with ones they already know so they can be respectful stewards of the outdoors. Each of the five components will have separate segments that create a larger patch. The Explore Out segment must be completed first, then girls may move on to the other segments. Adventure Out segment should be completed last. The segments are broken down by levels (Daisies and Brownies, Juniors, Cadettes, Seniors and Ambassadors). Girls can earn this patch multiple times based on their level. Explore Out The Explore Out segment teaches girls about the 7 Leave No Trace Principles which are important to know before you go out in to the wilderness. Camp Out The Camp Out segment teaches girls about knot tying, lashing, tent set-up, and whittling. Cook Out The Cook Out segment teaches girls the proper way to cookout outdoors whether that is over a campfire or a stove. Adventure Out The Adventure Out segment is where girls will take all the segment elements, put them together to plan and go on an outdoor trip for several days. This trip should be at least two nights for Daisies and Brownies and at least three nights for Juniors, Cadettes, Seniors and Ambassadors (if girls are ready). Corner Additions The corner additions are additional outdoor experiences that girls can earn to add to their progression patch segments. • Wilderness First Aid • GSSSC Camp • Orienteering • One Match
Transcript of Outdoor Progression Patch - Girl Scouts...The Camp Out segment teaches girls about knot tying,...

OUTDOOR PROGRESSION PATCH
The Outdoor Progression Patch is an opportunity for an individual Girl Scout or a troop to learn new
outdoor skills to combine with ones they already know so they can be respectful stewards of the
outdoors.
Each of the five components will have separate segments that
create a larger patch. The Explore Out segment must be completed
first, then girls may move on to the other segments. Adventure Out
segment should be completed last.
The segments are broken down by levels (Daisies and Brownies,
Juniors, Cadettes, Seniors and Ambassadors). Girls can earn this
patch multiple times based on their level.
Explore Out The Explore Out segment teaches girls about the 7 Leave No Trace Principles which are important to know before you go out in to the wilderness. Camp Out The Camp Out segment teaches girls about knot tying, lashing, tent set-up, and whittling. Cook Out The Cook Out segment teaches girls the proper way to cookout outdoors whether that is over a campfire or a stove. Adventure Out The Adventure Out segment is where girls will take all the segment elements, put them together to plan and go on an outdoor trip for several days. This trip should be at least two nights for Daisies and Brownies and at least three nights for Juniors, Cadettes, Seniors and Ambassadors (if girls are ready). Corner Additions The corner additions are additional outdoor experiences that girls can earn to add to their progression
patch segments.
• Wilderness First Aid
• GSSSC Camp
• Orienteering
• One Match

OUTDOOR PROGRESSION PATCH
Explore Out Patch The Explore Out segment teaches girls about the 7 Leave No Trace Principles which are important to know before you go into the wilderness. Find the correct level and follow instructions for learning about Leave No Trace by Discovering, Connecting, and Taking-Action. Tips on how and where to explore out are at the end of this segment.
Girls must complete ALL Discover, Connect and Take-Action categories for this segment.
Leave No Trace Principles- Daisies, Brownies and Juniors 10 Essentials
1. Map and compass 2. Knife 3. Flashlight 4. 1st aid kit 5. Extra clothing 6. Food 7. Water 8. Sun protection 9. Shelter 10. Heat source - matches
Discover! Leave No Trace - Plan and Prepare Ahead (Discuss)
• Know the regulations and special concerns for the area you’ll visit.
• Prepare for extreme weather, hazards, and emergencies.
• Schedule your trip to avoid times of high use.
• Repackage food to minimize waste. Connect! Activity Materials Needed: 10 Essentials Backpack Hide the 10 Essentials around the room. Have an empty backpack sitting on the table and ask the girls what they think essential means. Tell them that it means the most important things needed. Explain that there are 10 essential items hiding around the room that they should always take with them when going hiking or backpacking. Have them work as a team to find the 10 items. Once they find the items, talk about the importance of each one and put them in to the backpack.

OUTDOOR PROGRESSION PATCH
Discover! Travel and Camp on Durable Surfaces (Discuss)
• Durable surfaces include established trails and campsites, rock, gravel, dry grasses, or snow.
• Protect areas by camping at least 200 feet from lakes and streams.
• Good campsites are found, not made. Altering a site is not necessary. In popular areas: Concentrate use on existing trails and campsites. Walk single file in the middle of the trail, even when wet or muddy. Keep campsites small. Focus activity in areas where vegetation is absent. In pristine areas: Disperse use to prevent the creation of campsites and trails. Avoid places where impacts are just beginning. Connect! Activity Materials Needed:
• Tape measure
How far is 200 feet? Give the girls a starting point and ask them how far they think 200 feet is from that starting point. Use a tape measure and use girls as markers to see how far 200 feet really is. Connect! Activity Materials Needed
• Durable and non-durable location examples (pictures of rocks, water, grass, concrete, hard dirt, mud, flower fields, etc.)
What’s durable? Explain to girls that if something is durable, it means to can handle pressure or damage. It’s something that is tough. Show girls images of durable and non-durable locations. Ask the girls which they think are the most durable. After you chat about it, ask them if they were sleeping in a tent outside, which area would be best to put their tent, as far as the most durable spot. Connect! Activity Materials Needed:
• Tents Have girls practice putting up tents and ask them where they would set their tent up based on the information they just learned about. Discover! Dispose of Waste Properly (Discuss) Pack it in, Pack it out
• Pack it in, pack it out. Inspect your campsite and rest areas for trash or spilled foods. Pack out all trash, leftover food, and litter.
• Deposit solid human waste in catholes dug 6-8 inches deep, at least 200 feet from water, camp and trails. Cover and disguise the cathole when finished.
• Pack out toilet paper and hygiene products.

OUTDOOR PROGRESSION PATCH
Connect! Activity Materials Needed:
• trash
• gloves
• bags
Trash Pick Up Plant pieces of garbage in an open area outside and have a race to pick up the most trash. Alternative is to set teams to race. Connect! Activity Materials Needed: (safe area to dig)
• trowel or small garden shovels
• measuring tape Dig a Cathole - Give each girl a trowel and have them dig a cathole. Have them use a measuring tape to make sure it’s 6-8 inches deep. Optional: Give a prize to the girl who can disguise the cathole the best! Discover! Leave What You Find (Discuss) (take only pictures, leave only footprints)
• Preserve the past: examine, but do not touch cultural or historic structures and artifacts.
• Leave rocks, plants, and other natural objects as you find them.
• Avoid introducing or transporting non-native species.
• Do not build structures, furniture, or dig trenches. Connect! Activity Materials Needed:
• Bag of wrapped candy
Pass around a bag of candy and tell girls they can take as many as they want (make sure there is NOT enough for everyone in the bag). When all the candy is gone and there are still girls left who didn’t get a piece, explain to the girls that if we were to go out and pick all the wildflowers in an area on a trail, the people who go down the trail after us wouldn’t be able to see the flowers. Ask girls who didn’t get any candy how they feel about not getting any. Ask the other girls how they would feel if they didn’t get any candy. Then ask the girls to share the candy and pass out more if needed. Discover! Minimize Campfire Impacts (Discuss)
• Campfires can cause lasting impacts to the backcountry. Use a lightweight stove for cooking and enjoy a candle lantern for light.
• Where fires are permitted, use established fire rings, fire pans, or mound fires. Keep fires small.
• Only use sticks from the ground (dead, down, and on the ground) that can be broken by hand.
• Burn all wood and coals to ash, put out campfires completely, then scatter cool ashes.

OUTDOOR PROGRESSION PATCH
Connect! Activity Edible Campfires: have girls make edible campfires while learning about campfire safety. (directions can be found at http://scoutingweb.com/scoutingweb/subpages/ediblefire.htm). ***For Juniors and older do this too- Explain the three different campfires (A-Frame- cooking food, Tepee- s’mores and warmth and Log Cabin- cooking food. Have pictures available of the 3 different types). Have girls create each kind of fire with their edible campfire supplies. Connect! Activity Have a campfire in an established fire ring. Afterwards, have girls put out campfire completely. ***For Juniors and older – Girls need to be proficient in building all 3 types of fire. Discover! Respect Wildlife (Discuss)
• Observe wildlife from a distance. Do not follow or approach them.
• Never feed animals. Feeding wildlife damages their health, alters natural behaviors, and exposes them to predators and other dangers.
• Protect wildlife and your food by storing rations and trash securely.
• Avoid wildlife during sensitive times: mating, nesting, raising young, or winter. Connect! Activity Materials Needed:
• Paper
• Crayons
Provide girls paper and crayons and have them draw their favorite animal or favorite outdoor place. Invite them to share about their animal. Why do they like that animal? Ask questions such as “what would happen if you tried to catch a bird you saw?” “Do you think it’s a good idea to try to pet a deer or other wild animal?” “Why or Why not?” and so on. Talk about how mommy animals are protective of their kids, just like their mothers are. Discover! Be Considerate of Other Visitors (Discuss)
• Respect other visitors and protect the quality of their experience.
• Be courteous. Yield to other users on the trail.
• Step to the downhill side of the trail when encountering pack stock (horses, mules, etc.).
• Take breaks and/or camp away from trails and other visitors.
• Let nature’s sounds prevail. Avoid loud voices and noises. Connect! Activity Split group in to two. Have one group walk down a sidewalk (or tape off a “path”) one way and the other group down the same sidewalk going the other way. Tell the girls they cannot get off the sidewalk to pass.

OUTDOOR PROGRESSION PATCH
After the girls attempt to do so, explain that it’s important to stay on the trail instead of wandering from it because the trail is a way to travel through nature without hurting it. Have the girls in one group go single file and the other group go single file and ask girls if that is easier. If there still isn’t enough room on the sidewalk, explain to the girls that they can step off the side to let one of the groups pass first and then get back on the sidewalk to continue their journey. Explain that this is courteous trail etiquette. Take-Action! Now that you have learned about the seven principles of Leave No Trace, it’s time to Take-Action and get out there on the trails! Boise: The Greenbelt, Camel’s Back, the Military Reserve, Table Rock
Twin Falls: Shoshone Falls, Snake River Canyon Trail, South Hill Trails
Pocatello: Portneuf Greenway, Ami Kirkland Trail, or Red Hill Hike
Idaho Falls: Greenbelt loop, Twentymile Lava Trail, Black Canyon to Big Burns
Check out this website for even more trails! www.everytrail.com
Hiking Activities
Hug a tree Materials Needed:
• Blindfold This activity needs to be done in a location with many trees. Divide girls into pairs and give each pair a bandana. One girl will put the bandana on and the other girl and leader her to a tree. The girl wearing the bandana will then use her senses to learn as much as she can about the tree. She should touch the tree, smell it and so on. Once the blindfolded girl has had a couple of minutes to get to know her tree, have her partner lead her back to the starting point. Once they are there, they can take the blindfolds off. Girls who were blindfolded will then have the task to find “their” tree. Once they find the tree, have them switch and then lead their partner to a different tree blindfolded. This activity will help girls learn to use all their senses when outdoors.
OUTDOOR PROGRESSION PATCH
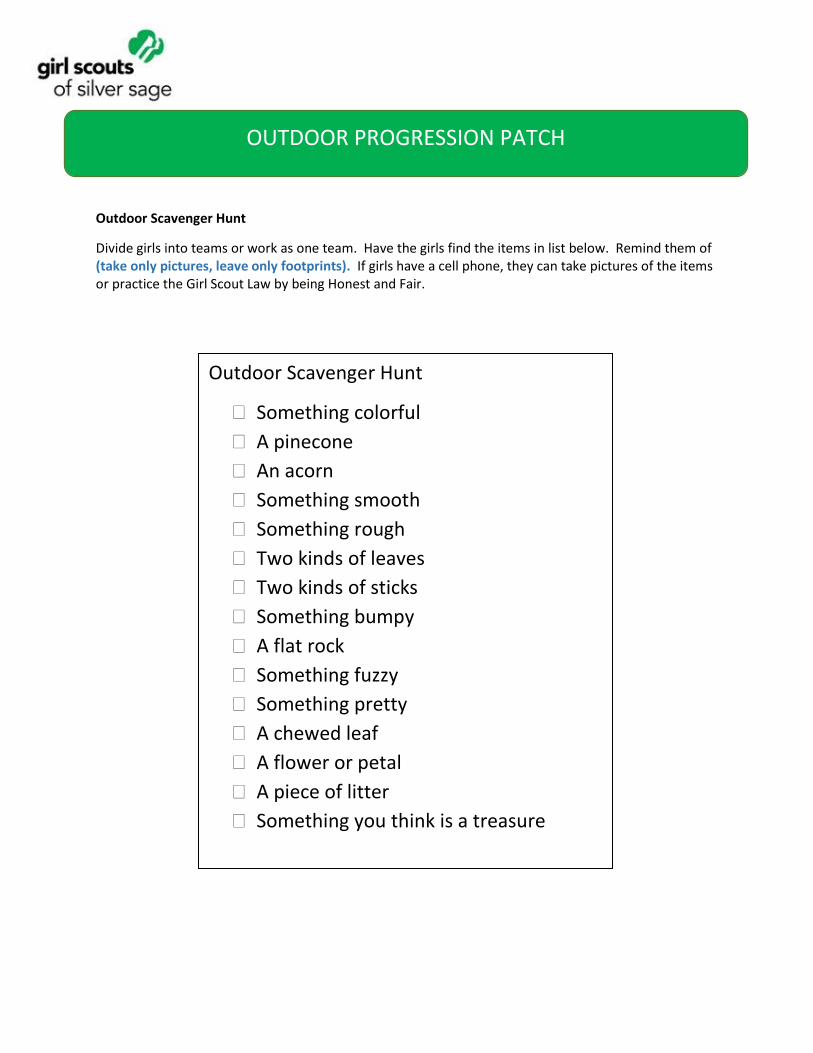
Outdoor Scavenger Hunt
Divide girls into teams or work as one team. Have the girls find the items in list below. Remind them of (take only pictures, leave only footprints). If girls have a cell phone, they can take pictures of the items or practice the Girl Scout Law by being Honest and Fair.
Outdoor Scavenger Hunt
Something colorful
A pinecone
An acorn
Something smooth
Something rough
Two kinds of leaves
Two kinds of sticks
Something bumpy
A flat rock
Something fuzzy
Something pretty
A chewed leaf
A flower or petal
A piece of litter
Something you think is a treasure

OUTDOOR PROGRESSION PATCH
Camp Out Patch
The Camp Out segment teaches girls about knot tying, lashing, tent set-up, and whittling. Find the correct level and follow instructions for learning about camping out by Discovering, Connecting, and Taking-Action. Girls must complete the Discover, Connect and Take-Action for their age group.
Tent Set-Up – All Ages
Discover! There are many kinds of tents that you can use while camping. These directions should give you a good
idea on where to start. Always feel free to check the directions that come with your specific tent.
Connect! 1. Practice makes perfect- You should always set up your tent before going out into the wilderness
to go camping. This will give you more confidence once you are out in the wilderness setting it
up for real. You will also be able to make sure all the pieces that are needed are there.
2. Durable surfaces -It’s important that you find an area to set the tent up that is flat and free of
sharp objects. Make sure the area is durable and that you aren’t putting your tent up on
wildflowers or other important pieces of nature.
3. Unpack the tent and all the pieces -Sort out the parts of the tent; tent stakes, poles, rain fly and
so on. This will make it easier to set up the tent and to make sure you don’t lose the pieces.
4. Open tent- Open the tent and place it in the area that you would like it to be located. You can
point it towards the east if you want to open your tent door to the sunrise.
5. Stake it down- After you lay it out, stake down one corner and move on to the opposite side,
making sure to pull the floor of the tent tight as you do so. Almost all tents will need to be
staked down, but there are some that do not need to be.
6. Connect the poles- Usually, tent poles come in sections that you put together. To make sure
that you don’t put the wrong sections together, the tent poles may be color-coded.
7. Assemble the frame- As stated earlier, tents come in many different shapes and sizes. Some
tents are free standing and down need to be tied to anything to stand. Others, have a simple
two-pole design and stand up only when the tent is staked and tied down. Make sure to use the
clips if you have them on your tent around your poles.
8. Rain fly- Most tents are not waterproof. The rain-fly is the top part that will keep you and your
gear dry. Rain-flies also work well at keeping the heat inside your tent. To put the rain-fly on
your tent, it usually involves fastening the corners of the rain-fly to cords that attach to the base
of the tent. Rain-flies may include extra poles and clips. Make sure to read your instructions if
more help is needed.

OUTDOOR PROGRESSION PATCH
Take Action! Set up your tent and sleep in it during your camp out. ***For Juniors and older – Girls need to be proficient in setting up their tents.
Knot Tying Knowing how to tie different knots is a skill that is important and can be used anywhere. Below is the progression chart for knot tying.
Daisies - Brownies Discover! For our younger girls or girls who have a hard time with small motor skills, we have two different knots for them to work on. The first is a basic knot, used for tying shoes. The second one is a bit harder and girls may need to use both hands, which is for the one-hand knot. Connect! Talk with others about what these knots could be used for? Could you tie your shoe with either of these knots? Why or why not? Take Action! You must successfully complete at least one of the knots.

OUTDOOR PROGRESSION PATCH
Juniors Discover! Make sure all girls can do the knots from the Daisy and Brownie section first. The Square Knot and the Clove Hitch are both used frequently while outdoors. The Square Knot is great for first aid and bundling wood together and the Clove Hitch is important for putting a shelter together. Connect! Practice makes perfect. You must successfully complete either the Square or the Clove Hitch knots. Take Action! Use the Square Knot and/or Clove Hitch for:
1. Tying bandages 2. Tying packages 3. Joining sections of survival cordage 4. Tying shorter ropes together 5. Tying a bundle of firewood 6. Securing a line to a tree or post quickly 7. Fasten a shelter together

OUTDOOR PROGRESSION PATCH
Cadettes Discover! Make sure all girls can do the knots from the Daisy, Brownie and Junior sections first. The Figure 8 Knot is a stopper knot and is fun to teach girls. It is also used commonly during climbing activities. The Bowline Knot is a great knot that can help create a loop at the end of the rope that won’t slip. Connect! Practice makes perfect. You must successfully complete one of these knots. Take Action! Use these knots for:
1. Stopper knots at the end of ropes 2. Tie several harder knots 3. Create a loop at the end of a rope 4. Securing a tarp

OUTDOOR PROGRESSION PATCH
Seniors - Ambassadors Discover! Make sure all girls can do the knots from the Daisy, Brownie, Junior and Cadette sections first. The Sheet Bend helps join two ropes with different diameters together and the Taut Line Hitch is important to anchor tents and will grip well when tight. Connect! Practice makes perfect. You must successfully complete the Sheet Bend or the Taut Line Hitch. Take Action! Use the Sheet Bend or Taut Line Hitch to:
1. Join two ropes with different diameters together
2. Grip 3. Anchor a tent
Check out these websites for more information on knot tying:

OUTDOOR PROGRESSION PATCH
Knot Tying Helps http://preparednessmama.com/basic-knot-tying-instructions/ http://www.animatedknots.com/indexscouting.php?crlt.pid=camp.GqK9QcNMHg80#ScrollPoint Knot Tying Practice Ideas http://30minutecrafts.com/2016/07/knot-tying-practice-sticks.html http://langlopress.net/cubscouts/resources/index.php?op=knottingboard Knot Tying Games http://peopleof.oureverydaylife.com/scouting-games-tying-knots-7093.html http://swaps-a-lot.ecrater.com/p/13583389/mini-practice-knots-quick-reference Lashing http://makezine.com/projects/The-Lost-Art-of-Lashing/ Video: https://www.youtube.com/watch?v=KDLPgu9MMKk Videos https://www.youtube.com/watch?v=zfQQWng889o https://www.youtube.com/watch?v=7yo5nSXND5o https://www.youtube.com/watch?v=VsklQlEPlsQ&t=117s

OUTDOOR PROGRESSION PATCH
Knife Safety Rules (All levels) Using a knife is a privilege and comes with the responsibility of using it properly to make sure all are safe- the users, other people, and the environment.
1. A knife is a tool, not a toy.
2. Always establish a safety circle when using a knife. Extend your arm directly out from you and move your arm around you. If another person is within reach, move to a new location and try again to establish a safety circle.
3. Hold the handle of your knife firmly. Do not put your thumb on the blade.
4. Cut away from the body.
5. Cut slowly so the knife won’t slip
6. Do not walk around with an open knife.
Give girls a paper plate, bar of soap (Ivory works the best) and a plastic knife. Challenge them to turn their soap bar into a fish! Walk around and correct the ways they hold their knives and check to see that they follow all rules.

OUTDOOR PROGRESSION PATCH
Whittling (All levels)
Discover! (Discuss)
Whittling is a fun activity to do while sitting around the campsite. It gives you something to do while
spending time outdoors and is a great opportunity to get creative. Every girl who participates in
whittling should have already participated in the knife safety portion of this segment. As every girl learns
at a different pace, it is up to the adults to make sure everyone is being held responsible for knife safety.
The Wood You can gather your wood from the woods, or you can go to a local craft store and find a variety of softwoods that are great for whittling. If you are gathering wood from the woods, these trees are softwood:
• Basswood - Basswood has been used for millennia for woodcarving. During the Middle Ages, it was the preferred wood of German sculptors who crafted elaborate altar pieces. It’s a good wood to whittle with because it’s soft and doesn’t have much grain. You can pick up Basswood blocks in various sizes at your local craft store for a reasonable price.
• Pine - Pine is another traditional whittling wood. It’s soft, cuts easily, and is readily available. But it has its drawbacks. Some whittlers think pine doesn’t hold detail very well. And if you’re using a fresh pine twig or branch, you’ll have to regularly clean the sticky sap off your knife while you’re whittling.
• Balsa - Balsa wood is a soft, inexpensive, lightweight wood that’s perfect for beginning whittlers. You can buy it in bulk at craft stores inexpensively.
• Random twigs and branches. You don’t need a pre-cut block of wood to whittle. Twigs and branches from most kinds of trees are for great whittling. There’s nothing more enjoyable than sitting around a campfire and whittling away at a twig while you talk to your friends. Wooden knives are a popular item to whittle from a tree branch.
Connect! Although we went over safety in the knife safety portion of this badge, it’s always a great reminder.
1. Take it slow 2. Cut away from you 3. Watch your fingers and hand positions 4. Keep your knife sharp 5. Wear gloves if needed
Take Action!
1. Get creative and create a piece of artwork 2. Make marshmallow skewers 3. Create a walking stick
For more information on whittling, check out this website: http://beginnerwoodcarving.com/

OUTDOOR PROGRESSION PATCH
Cook Out Patch The Cook Out segment teaches girls the proper way to cookout outdoors whether that is over a campfire or a stove. All age levels complete all steps (Discover, Connect and Take-Action. Specific age level Connect Activities will be marked and must be completed. Recipes, tips and handouts for some of the Connect Activities can be found at the end of this segment. After completing these three steps, you have accomplished the Cook Out segment of the Outdoor Progression Patch. Discover! (Discuss) Step 1: Campfire Safety Learn about the importance of fire safety before cooking out. These important safety rules include:
1. Always have your hair pulled back- Ask girls why it’s important to have your hair pulled back? We don’t want our beautiful hair to catch fire!
2. Fire safety circle- Create a circle around the fire. You need to stay out of the circle unless you have permission from an adult to be in it. When you are in the circle, you agree to be very careful and not to run. If you’re in the circle, this means that you are close enough to the fire to get hurt if not following the rules. One 1-3 girls should be in the circle at a time.
3. Have water near by- Have a bucket of water full before starting your fire. Why is it important to have water by your campfire?
4. Always have three points of contact when cooking over a campfire- You should kneel with one foot planted firmly on the ground. Your knee on the ground makes your second point of contact and the third should be a hand on the ground or your elbow on your knee. With three points of contact, you can make sure you won’t fall in to the fire.
5. Never leave a fire unattended- Why shouldn’t you leave a fire alone? What could happen if you did?
Discover! (Discuss) Step 2: Building your fire
1. Firewood - There are three sizes of firewood we need to start a fire. When looking for firewood you always want to use things that are “dead, down and on the ground”. You never want to pull leaves or branches off living trees.
• Tiny Tinder- This would be your very small pieces of wood that help start your fire. Tiny tinder shouldn’t be wider than your pinky. This would include twigs, pine needles and other fire starters.
• Kind Kindling- Kind kindling should be no wider than your wrist. Larger branches and split firewood would work perfectly for kind kindling.
• Fun Fuel- All great fires need fuel to continue to burn. Logs and large pieces of firewood work well for fun fuel.

OUTDOOR PROGRESSION PATCH
2. Log Cabin or Tipi? - What is the difference between the log cabin and the tipi? The log cabin is used primarily for when you are cooking food in pans or needing flames. It’s great for setting things on because it’s flat. Tipis are primarily used for s’mores or food that needs coals. Tipis tend to make coals faster which is great for foiled dinner.
3. Putting out your fire - After you cook over your fire, you need to make sure you know how to
put it out. You should have at least one bucket of water near you before making your fire. When putting out your fire, make sure that you “drown, stir, and feel” before you leave your fire unattended.
Connect! Activity Edible campfires- a great way to teach girls about fire safety. By creating a campfire, you can talk about each rule involved while keeping their attention.
Supplies Needed: Paper Plate or Napkin (Safety Circle) Potato Sticks or Shredded Coconut (Tinder) Small Cup w/ water or juice (water bucket) Pretzel Sticks or Chinese Noodles (Kindling) Fork (rake or shovel) Pretzel Logs or Bread Sticks (fuel logs) Toothpick (match) Red Hots or Red Licorice (sparks, small fire) Mini Marshmallows, Jelly Beans, M&M’s or Cheerios (fire ring)
Candy Corn (large fire
Collect supplies and pull back hair! Clear a safety circle 5 feet out from fire circle
Have your water bucket & tools nearby Make your fire circle ring

OUTDOOR PROGRESSION PATCH
Make an "A" or "V" frame of logs Make a teepee or lean to of tinder Open end facing the wind inside the logs in a corner of the A or V
Light the tinder with a match, add sparks When a small fire is started add kindling leaving room for air to flow
Now the fire is burning brightly Completed Edible Fire!
With a real fire, when done the fire bucket would be used to put out the fire and the rake or shovel would be used to stir it up until cold to the touch. However, in this case just eat the fire and drink from the fire bucket and leave a clean fire area!

OUTDOOR PROGRESSION PATCH
Connect! Activity Build your fire- Split in to small groups and build the log cabin or the tipi out of tiny tinder. Make sure this is done in a safe area where a small fire may be lit. Lean about the importance of match safety and how to light a match from an adult. Explain the importance of match safety. Practice lighting small tinder fires. (Use your discretion if Daisies or Brownies can use the matches. This is more suitable for Juniors and older) ***Cadettes, Seniors and Ambassadors should be proficient in building both types of fires before earning this patch.
Take Action! Step 3: Making your food
1. Kapers - Before you start making your food, be sure to create a kaper chart. A kaper is a chore or task that a girl or group will be responsible for doing. Girls can oversee helping with food prep, cooking, fire-starters and clean up. Assigning kapers gives everyone responsibility and the jobs get done quickly and without argument.
2. Food Prep – Use one of the recipes at the end of the Cook Out segment. Please use the ones that are most age appropriate.
***Daisies and Brownies, use foil pouch recipes. Juniors, with the help of adults, try your hand at Dutch Oven cooking. Cadettes and older, be proficient in all cooking methods in this segment.
When you are cooking outdoors, there are some important factors to consider. The weather, tools to be used, time and so on. You will want to make sure that you aren’t only being safe using tools, but also that you aren’t contaminating other food. Set up the food prep area beforehand. *We want to make sure we are having girls involved as much as possible as our programming is Girl Led.
***Cadette, Seniors and Ambassadors Challenge: Use a Camp Stove - Sometimes when out in the wilderness, campfires are not permitted. Camp stoves are durable, light weight and easy to use. Learn how to use a camp stove safely to make some hot cocoa. Supplies Needed:
• Camp stove and fuel
• Camp cooking pot/vessel
• Mug and spoon
• Hot cocoa
• Something to light the stove if not using a Jetboil For directions on how to use a camp stove, see camp stove handout! (Some camp stoves may have different directions. Be familiar with yours before you head out)
OUTDOOR PROGRESSION PATCH
3. Cooking food - Girls may place their foiled dinners into the fire once they have asked permission and have an adult present to watch and help if needed. Remember the fire circle and the three-point stance. It is at the volunteer’s discretion on how much they feel a girl can help with cooking after placing their food in to the fire. Sometimes it’s difficult to flip or move foiled dinners. Offer help when needed.
4. Clean up - If you used the kaper chart, make sure to have helpers start the clean-up process. This does not mean that the other girls do not help. Everyone can pitch in to make sure they leave the cooking area cleaner than when you found it! If cooking in an area where wildlife is present, be sure to clear all food and throw away where animals cannot get to it. This would be an excellent time to talk about respecting wildlife which is a part of the Leave No Trace patch!
Cook Out Recipes
Hobo Pies/Stew (Daisies and older) Supplies needed:
• Plates, silverware, tin foil, can openers, butter knives, pairing knives, Sharpie Food supplies needed:
• Canned veggies, salt, pepper, potatoes, ground meat, shredded cheese Have each food item set up in bowls or on plates with serving spoons so everyone can scoop their own amounts (remind girls to take only what they can really eat and that they need to leave food for others). Cut potatoes in to small pieces. Line food up in order of: butter, veggies, potatoes, cheese, meat and salt and pepper with a marker to write names on their foil at the end. (remember these prep tasks can be a kaper) Each girl should receive approximately 1.5-2 ft. long piece of tin foil. Start at the beginning of the line with plastic butter knives to be used to spread butter on their foil and work their way down the line.
Quesadillas (Daisies and older)
Supplies needed:
• Plates, silverware, tin foil, can opener, Sharpie Food supplies needed:
• Tortillas, chicken, salsa, shredded cheese, black beans, any other toppings for after the meal is cooked.
Put each food item in bowls or on plates with serving spoons so everyone can scoop their own amounts. Line food up in order of toppings and make sure to have a marker at the end for girls to write their names on their foil. (kapers can be used)
OUTDOOR PROGRESSION PATCH
Girls take turns building their quesadillas with a piece of tin foil move down the line adding toppings they would like. Have girls close their tin foil to make a packet coving their food. They now need to write their names on their packet.
Pizza Fondue (Daisies and Older)
Supplies needed:
• Plates, can opener, tin foil, Sharpie Food Supplies needed:
• Frozen garlic bread, canned tomato sauce, shredded mozzarella cheese
Prep bread by wrapping in foil and open tomato sauce. Each girl can wrap their own bread or you can wrap it all together and do a group portion. Place the foiled bread into the fire. Place the tomato sauce either on a grate or in the coals to cook. Make sure the spot is flat. Check on the bread and periodically move it so it doesn’t burn on one side. Stir the tomato sauce occasionally, stirring more as the sauce heats up so it doesn’t bubble and pop. Add cheese to the sauce and stir continuously until it has formed fondue texture. Make sure to remind everyone of the fire circle and the three-point stance.
Dutch Oven Pizza (Juniors and Older – practice how to use a Dutch Oven, including how to determine how many coals are needed to reach different temperature levels)
Supplies needed:
• Plates, can opener, tin foil, Dutch oven, charcoal (if using charcoal instead of wood for fire) Food Supplies needed:
• Vegetable oil
• Tube of pre-made pizza crust
• Small cans of tomato sauce
• Shredded mozzarella cheese, and grated cheddar cheese
• Garlic powder, salt, and pepper to taste
• Veggie/ pepperoni pizza toppings Open the tomato sauce cans, cut up any veggies if needed, and open pizza crust tubes. You will need to take pizza crust and shape it to fit the round Dutch Oven.
Pour vegetable oil in the cold Dutch Oven, spreading it around the bottom and sides of the Dutch Oven. Place the pizza dough out of the tube and split it in half. Spread half of the dough in the bottom of the Dutch Oven. Spread the tomato sauce over the pizza dough and sprinkle with garlic powder, salt, and pepper to taste. Add pizza toppings. After toppings are on, place Dutch Oven over fire or coals. (Have girls research how many coals they need and where to place coals)
Cook pizza dough for roughly 10 minutes, remove the lid, and sprinkle the mozzarella cheese and cheddar cheese over the top of the hot pizza. Place the lid back on the Dutch Oven and let the

OUTDOOR PROGRESSION PATCH
cheese melt. The more coals placed on the lid, the faster the cheese will melt. When the cheese has melted, remove the lid, and then take the Dutch Oven off the fire or coals. It’s now ready to eat!
Dutch Oven Temperature Guide This Dutch Oven temperature guide chart helps you decide the approximate number of charcoal briquettes needed to reach required temperature. The general rule of thumb to produce about a 350° F. heat (about 180° C.), is to take the diameter of the Dutch oven in inches, double the number, and use that many total briquettes. So, for a 12" oven you would use 24 briquettes, for a 14" oven you would use 28 briquettes, etc. Remember this is just a rule of thumb, and does not work for all ovens (some may have a larger volume) or under all circumstances (if it is a windy day, for instance, you will probably require more briquettes to achieve your desired cooking temperature. This means you'll have to play around a little to see what works best for you. But that's all part of the fun, right?
Temperature/# briquettes
325°F 350°F 375°F 400°F 425°F 450°F
Oven size 160°C 180°C 190°C 200°C 220°C 230°C
8" 15 16 17 18 19 20
TOP 10 11 11 12 13 14
BOTTOM 5 5 6 6 6 6
10" 19 21 23 25 27 29
TOP 13 14 16 17 18 19
BOTTOM 6 7 7 8 9 10
12" 23 25 27 29 31 33
TOP 16 17 18 19 21 22
BOTTOM 7 8 9 10 10 11
14" 30 32 34 36 38 40
TOP 20 21 22 24 25 26
BOTTOM 10 11 12 12 13 14

OUTDOOR PROGRESSION PATCH
Cleaning Dutch Ovens - For Most Dutch Oven enthusiasts there are a few "DO NOTS" when is comes to cleaning a Dutch Oven.
1. Do NOT use dish soap or detergent (it can leave a soapy taste in the oven that may transfer to the food.)
2. Do NOT use a metal scrapper or scouring pad (it can remove the "hard-earned" seasoning.) 3. Do NOT put cold water on a hot Dutch Oven (it can cause the oven to crack.) 4. Do NOT "burn out" your Dutch Oven over the fire. (It can warp or crack the oven.)
For best results, Dutch Ovens should be cleaned immediately after they are used. If needed, you can put some hot water in the oven to let it soak while you finish your meal.
Using a plastic scrapper, carefully scrap out the excess food.
With a little warm water and a dish cloth finish cleaning the inside of oven. Drain wash water and rinse with warm water.
Thoroughly dry the Dutch
oven with paper towel or
warm it on the gas stove or
over a fire just enough to
completely dry the oven
Using a paper towel or
soft cloth, wipe a "thin"
coating of oil over the
entire oven.
Make sure to wipe out
excess oil so that it doesn't
turn rancid when not in
use.
To store, place a paper towel under the lid and hanging slightly out the side to absorb any excess oil and moisture and to allow some air into the oven.

OUTDOOR PROGRESSION PATCH
Camp Stove Handout
Propane camp stoves are great for backpacking and overnight trips. They are light and durable. There
are some safety points that need to be talked about and taught before using these camp stoves with
campers.
Canister Care- Before using a canister, create a mixture using 1 tbsp. of dishwashing detergent to 1 cup of water and lightly pour on the outside of the canister to determine if there are any leaks. The mixture will lightly bubble if there is a hole in the canister with escaping gas. The propane canister should be used carefully when attaching and detaching from the camping stove. Making sure that the nozzle is tight and that there are no leaks or holes will assist in the stove working and functioning properly. The canister should be stored in a cool dry location away from heat and additional flame. The canister should not be shaken or dropped as this could cause the canister to ex2plode. Additionally, making sure the propane canister is the appropriate size for the stove will prevent a gas leak. Stove- Make sure that the stove is in a properly ventilated area outdoors. Never use a propane stove in a camper, tent, or a garage. Propane gives off carbon monoxide. Too much carbon monoxide will cause a person's oxygen level to be depleted and may lead to death. Make sure that the propane cylinder that attaches to the stove is not rusted or broken anyway. Also, make sure that the knobs that connect the stove to the cylinder are not stripped and have a secure and tight fit. Burner- One of the most important parts of the propane camping stove is the burner. The burner uses the gas flow from the canister to ignite the burner. The burner establishes a flame which is controlled by the temperature knob. If the burner has any breaks or rust in its shape, it will likely not perform up to proper temperature standards. Most burners can reach temperatures up to 400 degrees F, while some are higher depending on the size of the stove. Ignition- Making sure that the stove ignites properly and quickly is beneficial in it reaching the recommended temperatures. Ignition occurs when a switch is engaged and the friction from the switch meets the gas flow to establish a spark. The spark ignites the burner and the stove begins to heat up. For ignition problems, checking to see if a battery needs to be replaced is a safe troubleshooting method. It is not recommended to ignite a stove with a match or lighter if the igniter switch is broken. Doing so can cause a small fireball of gas to rise and possibly cause burns on the person igniting the stove. Lighting- Lighting the stove should always be done using the stove's igniter--a safe method because the spark is isolated inside of the stove. The metal stove resists fire and backlash from a small gas explosion, should one occur. Making sure that fingers, arms, face and other body parts are away from the stove during the ignition process will reduce the risks of burns and serious injury. See https://www.trails.com/list_1114_tips-using-propane-camping-stove.html for more info.

OUTDOOR PROGRESSION PATCH
Additional Outdoor Cooking Information Water Sources- It is important to make sure that your drinking water is clean. Although it may look clean, bacteria, viruses and parasites can still be found in it. Before going on your overnight or trip, make sure camp staff and campers will have drinkable water. There are a couple of ways to make sure your water is safe. Drinking water should be boiled, filtered, or chemically treated as appropriate. For our overnights and trips, groups should have access to clean, drinkable water from the faucets at Ponderosa State Park or will take a water filter with them when needed. Food on Trips and Overnights- To make sure all camp staff and campers are eating safe foods, food should be prepared and stored under safe and sanitary conditions with care given to maintaining potentially hazardous foods at proper temperatures. For overnights and trips, campers will be urged to choose menus items that do not need to be refrigerated. If there are food items that need to be kept cool, a cooler will be provided with ice and camp staff will oversee making sure food stays cold and at the correct temperature. It is also important to make sure all utensils used for cooking are correctly cleaned and sanitized after each use and protected from contamination between use. Each trip and overnight group shall have dish soap available to clean all cooking utensils and equipment. If there is a dish sink, make sure to use that to wash all pieces. If there are no dish sinks available, use follow these guidelines found on www.outdoorherbivore.com.
When you have access to extra water for cleaning, the traditional way of washing with biodegradable soap may be best. As you are aware, water is a precious resource. Keep it clean by not contaminating it with your dirty dishes. Don’t dip your dishes directly in a water source. Toss any dirty water at least 200 feet (about 70 steps) from water sources. To make cleaning easier, prepare ahead at home. Cut a smaller sponge for cleaning and take a micro cloth or bandanna for wiping dishes dry.
How to Wash Dishes when Backpacking: the traditional way 1. At home, make a one-third or smaller sized sponge by dividing and cutting a household scouring
sponge into equal squares. The dual scour and soft sponge (as shown above) works well. A sponge is optional, but it is handy and takes up little space. Store the sponge inside your cooking gear. It should fit nicely inside one of the nesting style bowl/cups cook sets sold by MSR or GSI.
2. Add water to the largest pot you have, or use your pot carrying bag – many of the modern backpacking cook sets are lined with a waterproof material to function as a sink. During the winter, you can use snow instead of water.
3. Add 1 drop of concentrated, biodegradable soap to the sponge. Use soap sparingly. And if you are thru-hiking, Bronner’s soap also works well for shaving and cleaning clothing.
4. Wet the sponge by dipping it into the pot of water. Clean each item with the dampened sponge. Add a splash of water from the pot to each dish to rinse. Wipe away any leftover food residue with a bandanna or towel.

OUTDOOR PROGRESSION PATCH
5. Scatter dish washing water and food particles left on your bandanna by dispersing it around the wash area rather than dumping it on a single spot on the ground. Dispersing the wash water helps it to evaporate quickly and reduces the attraction for animals. Remember to toss away all gray water from nearby rivers, lakes, or streams
6. Dry everything thoroughly with a cloth or air dry. Squeeze excess water from your sponge to speed up drying and prevent bacterial growth. Most bacteria require moisture to multiply. It is always good practice to dry all utensils and dishes thoroughly before packing them up.
How to Wash Dishes when Backpacking: without soap or water Sometimes washing dishes is unsafe when in areas that are known to attract wildlife. Sometimes water is scarce and washing up is not possible. In winter, when it is snowy and frigid, it might not be necessary. In these circumstances, the best thing to do is to remove food residue from all your dishes, utensils, and cooking pots before packing them up. The best way to do this is to consume all those bits of foods (you need the calories anyway). Wipe the sides of your dish with tortilla, bread, spoon, or finger. Some other possibilities –
• Olive oil added to cooking water makes clean-up a breeze. Add a single packet of olive oil or 1 TB when you boil your water. This provides extra fat calories to the meal and the oil makes it easier to clean up if you do not have a coated pan. We have tried this with a non-coated aluminum pan from an old Boy Scout mess kit and food sticking was minimal.
• Drink it or Sip it. Add some water to the pot, swish it around and drink. Soup! Seriously, this works fine if you are low on water or not near a source of water. Why waste food calories or water for cleaning when your body can use it?
• Dip it, but don’t Lick it. Have some spare bread or tortilla? Wipe the pot clean with a chunk of bread and you’ve got an instant dip. No bread? Some people may lick the pot clean (or let the dog), but we don’t recommend doing this since the mouth contains a lot of bacteria. Instead of licking the pot, wipe any excess food residue with a clean finger, spoon, or bandanna, and then air dry the pot or dish thoroughly.
• If you have a camp fire, use what is already available from nature – wood ash. Ash and water combine to make a mild alkali, and when combined with any leftover fat present from the food particles you want to eliminate, it becomes the basic composition of soap. Place the ash in the cooking pot and add enough water to make into a paste. Use the paste like you would soap to clean all your pots and utensils. Use a small sponge or cloth and rinse with clean water.
• If you do not have a sponge, use what is available on the ground. A handful of grass works well. Pine needles, leaves or pine cones can also work. If you are camping on a beach where sand is abundant, use the sand as an abrasive to clean dishes.
• Clean your cook pot with plain water and a small sponge. Dried meals are already pre-cooked and should not leave much residue since you are only reheating them. Pour ¼ C of water into the dish and swoosh with the small scouring sponge you made from home (as shown above). Make sure you boil the water for the next meal and dip any utensils into the boiling pot of water for a few seconds to kill any standing bacteria.

OUTDOOR PROGRESSION PATCH
• Wipe dishes dry without soap or water. Consume as much of the leftover food as possible by scraping your spoon/spork around every nook and cranny and inserting into the mouth. Now wipe everything clean. If you dry the cooking pot thoroughly by wiping it down with a bandana or camp towel, it will remain relatively hygienic since most bacteria require moisture to multiply. Be sure to wipe everything clean and allow to air dry before packing it up.
Cleaning up with soap and water The traditional way of cleaning is with soap and water. Soap is more than just a convenience, it also helps clean wounds, clothing, and yourself. Therefore, soap and water tend to be the number one choice for keeping everything clean in the backcountry. When water is available, you may opt for using a highly concentrated biodegradable liquid soap, such as Dr Bronner’s or Campsuds to clean dishes. Our personal preference is Bronner’s soap because it feels refreshing when used to clean teeth or skin. And if you are thru-hiking, this soap also works well for shaving and cleaning clothing – either on the trail or during zero days in your hotel sink. Plus, Bronner’s makes a nifty claim: a total of 18-in-1 magical uses, and the plastic bottle is always entertaining to read when you have time to spare. On the other hand, there is a non-commercial alternative cleaning agent that comes in handy when you are in the woods: wood ash. Wood ash as soap Wood ash is a good solution if you have a campfire going. It is freely available, safe for the environment, and works well for cleaning. In fact, early Americans used wood ash as the lye, together with animal fat, to make soap. The basic composition of modern soap is still lye and fat. The difference now is that the lye is chemically produced from sodium or potassium hydroxide, and the oil tends to be plant-based rather than animal. Wood ash works as a cleaner because it is both abrasive and alkaline. The primary chemical constituent of burned wood is calcium carbonate, which is soluble in water, and trace particles that are not water soluble that come from the soil in which the tree grew, such as silica, copper, iron and other elements from the earth. How do you use wood ash? Just collect the ash from a campfire. Add a few drops of water to make a paste and use it like you would soap. Don’t use it to clean yourself though – it is too harsh. Disinfecting dishes without soap What else can you do to sanitize? Boiling water is often sufficient for drinking water, cooking, and cleaning. If you are cleaning in the absence of soap or wood ash, boil water to disinfect any viruses, bacteria or other pathogens that may cause diarrhea if consuming from unsanitary dishes. The common microorganisms such as Giaradia and Cryptosporidium are sensitive to heat, so just bringing the water to a boil is often sufficient. Be sure to dip any utensils and dishes into the boiling water to sanitize.

OUTDOOR PROGRESSION PATCH
Adventure Out Patch (All levels)
Plan and take an outdoor trip for several days. This trip should be at least one to two nights for
Daisies, two nights for Brownies and at least three nights for Juniors, Cadettes, Seniors and
Ambassadors
Discover! Brainstorm some ideas on where you would like to go during your adventure out trip. What do you want to gain out of the trip? Here are some great ideas to get your brain going!
1. Learn and practice a new outdoor skill 2. Learn a new outdoor cooking skill 3. Develop first-aid skills and use safety check points
Connect! Plan your trip. Using the pieces from the other outdoor progression patches, plan your trip. Make sure to include the who, what, when and how much. Feel free to reach out to community partners if you need help in your planning or equipment rentals. Take Action! (complete all 4)
1. Develop first-aid skills and use Safety Activity Check Points 2. Teach and inspire others about the outdoors 3. Practice and share all Leave No Trace principles 4. Participate in an environmental service project
Corner Additions
The corner additions are additional outdoor experiences that girls may gain to add to their
progression patch.
Wilderness First Aid Take your first aid skills to the next level. Learn about how to help a person in need when out in the wilderness. GSSSC Camp Attend Camp Ta-Man-A-Wis or Camp Alice Pittenger. Orienteering Learn how to use a map and compass to help you in case you get lost in the wilderness. One Match Patch Start a campfire using one match, tinder, kindling and fuel. Fire starters are not allowed to be used while earning the one match patch.