Out of Browser with COM Interop Labaz12722.vo.msecnd.net/silverlight4trainingcourse1-3/labs... ·...
18
Hands-On Lab Silverlight 4 – Out-of-Browser with COM Interop
Transcript of Out of Browser with COM Interop Labaz12722.vo.msecnd.net/silverlight4trainingcourse1-3/labs... ·...
Hands-On Lab
Silverlight 4 – Out-of-Browser with COM Interop

Out-of-Browser with COM Interop
Contents
Introduction .................................................................................................................................................. 3
Exercise 1 - Creating an Out-of-Browser Application ..................................................................................... 4
Task 1 – Elevate Privileges and Handle Out-of-Browser Events .............................................................. 5
Task 2 – Integrating Silverlight with Excel and Outlook .......................................................................... 8
Exercise 2 - Signing a XAP Assembly and Performing Silent Installations ...................................................... 14
Task 1 – Signing a XAP File ................................................................................................................... 15
Task 2 – Performing a Silent Installation .............................................................................................. 16
Conclusion .................................................................................................................................................. 18
Out-of-Browser with COM Interop
Introduction
Silverlight 4 added many features for LOB (Line of Business) applications. While Silverlight 3 introduced the
ability to run a Silverlight application without a browser host (Out-of-Browser), Silverlight 4 adds features
including the ability to elevate the application's security permissions in order to gain access to local
resources such as the file system, the ability to use native integration and COM automation.
In this Lab we'll build an out-of-browser application, see how to elevate permissions and learn how to
manipulate COM objects to control applications such as Outlook and Excel. We'll add code to send records
in a DataGrid control into Excel and even sync changes made in Excel with the DataGrid. In addition, we'll
also learn how to load data from Silverlight into an Outlook email message, change the chrome of an out-of-
browser application, sign a XAP to make it trusted and perform a silent installation of a XAP file.
Estimated completion time for this lab is 60 minutes.

Out-of-Browser with COM Interop
Exercise 1 - Creating an Out-of-Browser
Application
In this exercise we'll see how to enable an application to run out-of-browser with elevated privileges. We'll
also handle checking for application updates and detecting if the application is closing. Once those tasks are
completed code will be added to automate Excel and Outlook.
1. Start Visual Studio 2010
2. On the File menu click Open Project/Solution…
a. Alternatively, from Visual Studio Start Page click “Open Project…”
3. At the “Open Project” dialog navigate to the Lab installation folder
4. Navigate to the “Source\Ex01\begin” folder
5. Click the “OOBWindows.sln” file followed by the “Open” button
6. Take some time to familiarize yourself with the application
a. Points of interest here are:
MainPage.xaml
MainPage.xaml.cs
WindowClosing.xaml
WindowClosing.xaml.cs
DataHelper.cs
7. Set the OOBWindows.Web project as the startup project by right clicking the project in the
Solution Explorer and selecting “Set as Startup Project”
Out-of-Browser with COM Interop
Task 1 – Elevate Privileges and Handle Out-of-Browser Events
In this task you will modify the Silverlight project's properties and add code to the application to handle
specific out-of-browser events. You'll also create a ChildWindow that will prompt the user to install the
application.
1. If you have not opened the project open it now (see previous section for instructions)
2. Right-click on the OOBWindows project in the Solution Explorer and select Properties from the
menu.
3. Go to the Silverlight tab and check the Enable running application out of the browser checkbox.
4. Click the Out-of-Browser Settings button and check the Require elevated trust when running
outside the browser checkbox. This will allow the application to access specific features such as
COM Interop once it's running out-of-browser.
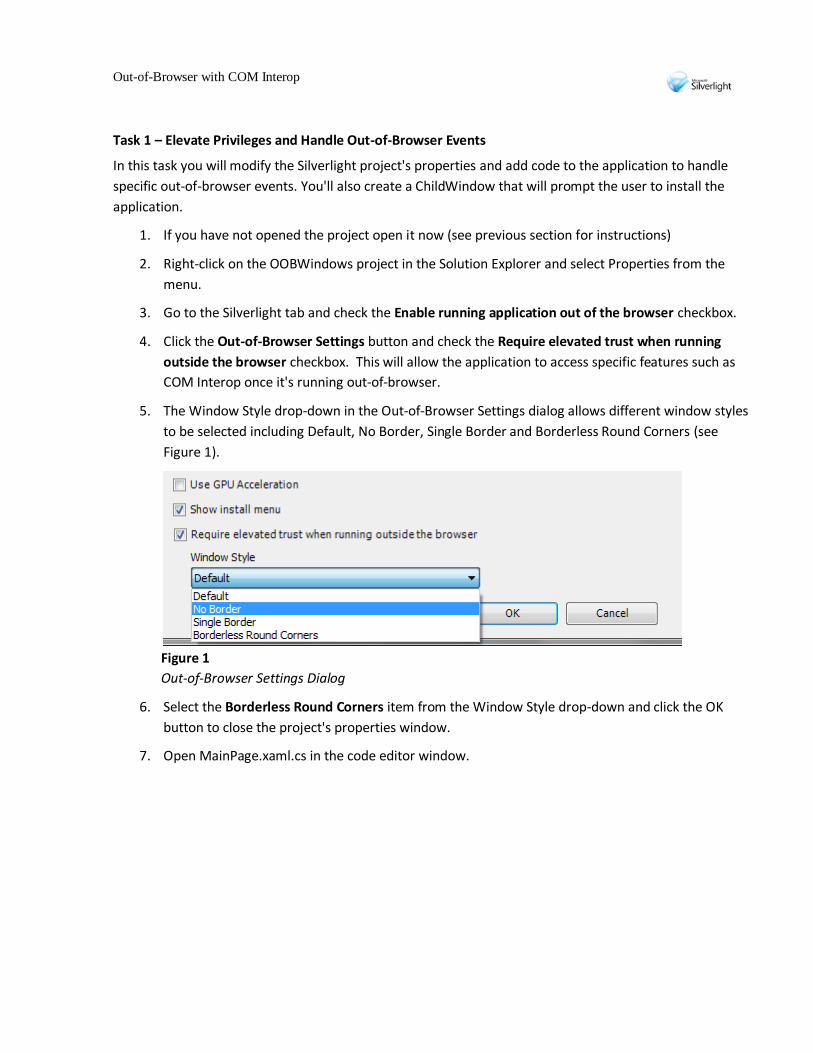
5. The Window Style drop-down in the Out-of-Browser Settings dialog allows different window styles
to be selected including Default, No Border, Single Border and Borderless Round Corners (see
Figure 1).
Figure 1
Out-of-Browser Settings Dialog
6. Select the Borderless Round Corners item from the Window Style drop-down and click the OK
button to close the project's properties window.
7. Open MainPage.xaml.cs in the code editor window.

Out-of-Browser with COM Interop
8. Add a field of type Window named mainWindow:
C#
Window mainWindow;
9. Within the MainPage_Loaded method add the following code to check if the application is running
out-of-browser:
C#
mainWindow = Application.Current.MainWindow; if (Application.Current.IsRunningOutOfBrowser)
{
}
else
{
}
10. Within the if statement add code to handle the MainWindow object's Closing event:
C#
mainWindow.Closing += (s, args) =>
{
WindowClosing win = new WindowClosing();
win.Closed += (sen, winArgs) =>
{
if (win.DialogResult.Value) args.Cancel = true;
};
win.Show();
};
11. Immediately under the code added in the previous step add code to check if a new update is
available on the server. If an update is found notify the user.
C#
Application.Current.CheckAndDownloadUpdateCompleted += (s, args) =>
{
if (args.UpdateAvailable) MessageBox.Show("Application has been updated." +
"Please close and re-launch the application to pick up the changes.");
};
Application.Current.CheckAndDownloadUpdateAsync();
12. Now that all of the out-of-browser events have been handled we'll add a ChildWindow that will
display when the application first loads. The ChildWindow will let the user know that they need to
install the application and provide an install button that they can click.
13. Right-click on the OOBWindows project and select Add New Item from the menu.
14. Select Silverlight Child Window and give it a name of InstallWindow.xaml.

Out-of-Browser with COM Interop
15. Remove the 2 buttons that are currently in the InstallWindow.xaml file.
16. Add the following code within the existing Grid control:
XAML
<StackPanel>
<TextBlock Text="This application must be installed out-of-browser to run.
Please click the Install Button and then exit the application."
TextWrapping="Wrap" Margin="10"/>
<Button Content="Install Application" HorizontalAlignment="Center"
FontSize="14" Click="Button_Click" Margin="50" />
</StackPanel>
17. Double-click on the Install Application button in the XAML designer to create a click event handler
for it.
18. Add the following code within the button's click event handler in InstallWindow.xaml.cs:
C#
if (App.Current.InstallState != InstallState.Installing)
{
App.Current.InstallStateChanged += (s, args) =>
{
if (App.Current.InstallState == InstallState.Installed)
{
MessageBox.Show("Application installed! Please close your " +
"browser and run the application from your desktop " +
"or Start menu.");
}
};
App.Current.Install();
}
19. Go back to MainPage.xaml.cs, locate MainPage_Loaded and add the following code into the else
block to show the InstallWindow to the user if the application is not running out-of-browser:
C#
InstallWindow win = new InstallWindow();
win.Closed += (s, args) =>
{
this.LayoutRoot.Visibility = Visibility.Collapsed;
};
win.Show();
20. Run the application by pressing F5 and the ChildWindow should display. Click the Install Application
button to take the application out-of-browser. Close the browser and the out-of-browser
application that is running.
21. Right-click on the OOBWindows project and select "Set as Startup Project" from the menu.

Out-of-Browser with COM Interop
22. Go to the OOBWindows properties window, select the Debug tab and ensure that the Installed out-
of-browser application radio button is selected. Close the properties window once you're done.
23. Press F5 again to run the application and note that the out-of-browser application starts instead of
the browser-based application. Looking at the application you'll see a DataGrid containing
customer data as well as buttons that allow users to export the data to Excel or email the data using
Outlook. Close the application before moving on to the next task.
Figure 2
Running the out-of-browser application
Task 2 – Integrating Silverlight with Excel and Outlook
Silverlight 4 allows out-of-browser applications with elevated privileges to interact with desktop
applications such as Excel and Outlook. In this task we'll add code to instantiate Excel through COM Interop
and add data from a DataGrid to a worksheet. We'll also see how to interact with Outlook and dynamically
add data from the Silverlight application into an email message.
1. Right-click on the OOBWindows project in the Solution Explorer and select Add Reference from the
menu.
2. Select the Microsoft.CSharp assembly and click OK. This assembly supports the new C# 4.0 dynamic
keyword which we'll use to create Excel and Outlook objects through COM Interop.

Out-of-Browser with COM Interop
3. Open MainPage.xaml.cs in the code editor and add a reference to the
System.Runtime.InteropServices.Automation namespace at the top of the MainPage.xaml.cs file.
This namespace contains the AutomationFactory class used to interact with COM-based
applications such as Excel.
C#
using System.Runtime.InteropServices.Automation;
4. Locate the LaunchExcel method and add the following code to check if Excel is running already by
calling AutomationFactory.GetObject. If it's not running a new Excel object will be created using
AutomationFactory.CreateObject.
C#
string excelName = "Excel.Application";
try
{
//See if Excel is already running
excel = AutomationFactory.GetObject(excelName);
}
catch
{
excel = AutomationFactory.CreateObject(excelName);
}
5. Once the object is created Excel needs to be made visible to the end user and a workbook needs to
be created. Add the following code into LaunchExcel below the code added in the previous step:
C#
if (excel == null) excel = AutomationFactory.CreateObject("Excel.Application");
excel.Visible = true;
dynamic workbook = excel.workbooks;
workbook.Add();
dynamic sheet = excel.ActiveSheet;
6. The data from the existing DataGrid needs to be exported to Excel. To accomplish that task we'll
iterate through the DataGrid's ItemSource and programmatically create cells that are added into
the Excel worksheet. Add the following code immediately below the code added in the previous
step:
C#
dynamic cell = null;
int i = 1;
foreach (Customer cust in dg.ItemsSource)
{
cell = sheet.Cells[i /*row*/, 1 /*col*/];

Out-of-Browser with COM Interop
cell.Value = cust.FirstName;
cell.ColumnWidth = 25;
cell = sheet.Cells[i, 2];
cell.Value = cust.LastName;
cell.ColumnWidth = 25;
cell = sheet.Cells[i, 3];
cell.Value = cust.Phone;
cell.ColumnWidth = 25;
cell = sheet.Cells[i, 4];
cell.Value = cust.State;
cell.ColumnWidth = 25;
i++;
}
7. If the end user changes data in the Excel spreadsheet we'd like to sync it automatically with the
Silverlight DataGrid. Add the following code (below the previous code) which handles Excel's
SheetChange event:
C#
if (firstTime)
{
excel.SheetChange += new SheetChangedDelegate(sheetChangedEventHandler);
string name = sheet.Name;
firstTime = false;
}
8. As data changes in the Excel spreadsheet we want to sync it with the application's DataGrid. Add a
sheetChangedEventHandler method to walk through the Excel cells and update the DataGrid's
ItemsSource with any changes. Once the DataGrid is updated we'll show a NotificationWindow to
the end user. Add the event handler method below into the MainPage.xaml.cs class.
C#
private void sheetChangedEventHandler(dynamic excelSheet, dynamic rangeArgs)
{
dynamic sheet = excelSheet;
string name = sheet.Name;
dynamic range = rangeArgs;
dynamic rowvalue = range.Row;
IEnumerable<Customer> custs = dg.ItemsSource as IEnumerable<Customer>;
int len = custs.Count();
Customer[] newEntities = new Customer[len];

Out-of-Browser with COM Interop
dynamic col1range = sheet.Range("A1:A" + len.ToString());
dynamic col2range = sheet.Range("B1:B" + len.ToString());
dynamic col3range = sheet.Range("C1:C" + len.ToString());
dynamic col4range = sheet.Range("D1:D" + len.ToString());
for (int i = 0; i < len; i++)
{
dynamic item1 = col1range.Item(i + 1);
dynamic item2 = col2range.Item(i + 1);
dynamic item3 = col3range.Item(i + 1);
dynamic item4 = col4range.Item(i + 1);
Customer newEntity = new Customer();
newEntity.CustomerID = i;
newEntity.FirstName = item1.Value;
newEntity.LastName = item2.Value;
newEntity.Phone = item3.Value;
newEntity.State = item4.Value;
newEntities[i] = newEntity;
}
dg.ItemsSource = newEntities;
dg.SelectedIndex = Convert.ToInt32(rowvalue) - 1;
//Show NotificationWindow
NotificationWindow win = new NotificationWindow();
Grid grid = new Grid { Background = new SolidColorBrush(Colors.Yellow) };
grid.Children.Add(new TextBlock { FontSize = 20, Text = "Customers Modified",
HorizontalAlignment = HorizontalAlignment.Center,
VerticalAlignment=VerticalAlignment.Center });
win.Content = grid;
win.Show(3000);
}
9. The user may want to email the data in the DataGrid to one or more people in their company. This
can be done by converting the data to HTML and then embedding it in an Outlook email message.
Open the DataHelper class in the code editor window and look through the method named
GetCustomersAsHtmlTable. Notice that the method simply iterates through a collection of
Customer objects and converts the data into HTML that can be embedded in an email message.
10. Close the DataHelper.cs class in the code editor.

Out-of-Browser with COM Interop
11. Go back to MainPage.xaml.cs and locate the CreateEmail method. This method will use the
AutomationFactory class's GetObject method to check if Outlook is already running or not. If it isn't
AutomationFactory.CreateObject will be called. Once Outlook is available the code will create an
email message and assign values to the To, Subject and Body properties. Add the following code
into the CreateEmail method to handle the creation an Outlook message object using COM Interop:
C#
string outlookName = "Outlook.Application";
try
{
//See if Outlook is already running
outlook = AutomationFactory.GetObject(outlookName);
}
catch
{
outlook = AutomationFactory.CreateObject(outlookName);
}
dynamic mailItem = outlook.CreateItem(0);
mailItem.Display();
string msgBody = "<P>Customer Records</P>";
msgBody += "<P>" + DataHelper.GetCustomersAsHtmlTable() + "</P>";
mailItem.To = "BigBoss;";
mailItem.Subject = "Updated Customer Records";
mailItem.HTMLBody = msgBody;
12. Build the project by going to Build Rebuild Solution on the Visual Studio menu.
13. Run the application by clicking the icon on the desktop (or in the Start menu if you didn't install it
with the desktop option). If you're notified that changes have been made close the application and
re-start it to pick up the changes.
14. Once the application opens click the Export to Excel button which will show the data in a new Excel
spreadsheet. Make a change in the spreadsheet and notice how the notification window appears in
the lower-right corner of the desktop and how any changes are updated in the application's
DataGrid.
15. Click the Send Email button and notice how the DataGrid data is converted into HTML and
embedded in the Outlook email message.

Out-of-Browser with COM Interop
Figure 3
Sending an Email from Silverlight using COM Interop
16. Right-click on the application and select Remove this application from the menu.

Out-of-Browser with COM Interop
Exercise 2 - Signing a XAP Assembly and
Performing Silent Installations
The introduction of elevated trust out-of-browser applications in Silverlight 4 will enable developers to push
the limits of what was previously capable in the plug-in and take advantage of platform privileges that are
in-accessible to sandboxed Silverlight apps. Along with this privilege comes more risk for an application to
do harm to an end user’s machine. XAP signing is introduced to offer protection from and educate end
user’s on applications that may be potentially harmful.
XAP signing reassures end users of the authenticity of an application’s publisher and that the code has not
been tampered with. It has an effect on the app install experience and restricts the scenarios for update of
elevated trust applications. Upon installation of an elevated trust application end user’s will be presented
with dialogs as shown in Figure 4 and Figure 5.
Figure 4
Unverified Publisher Install Dialog

Out-of-Browser with COM Interop
Figure 5
Verified Publisher Install Dialog
A XAP can be signed post-build using the SignTool.exe command line tool which is present in the Windows
SDK, as part of Visual Studio 2010 and a handful of other packages. XAPs must be signed using code signing
certificates.
In addition to XAP signing, Silverlight out-of-browser applications can also be installed silently using
sllauncher.exe. This allows applications to be installed using a .bat file or from a CD or DVD.
We'll create a silent installer .bat file in Task 2 of this exercise.
Task 1 – Signing a XAP File
In this task you'll go through the process of signing a XAP file using the SignTool.exe command line tool.
1. Locate the Visual Studio Command Prompt by going to Start All Programs Visual Studio 2010
Visual Studio Tools Visual Studio Command Prompt.
2. Right-click on Visual Studio Command Prompt and select Run as administrator.
3. Type the following into the command window and then press [Enter] to go back to the root of the c
drive:
cd \
4. Type the following into the command window and press [Enter] to create a self-signed root
certificate using makecert.exe. If you get any type of arguments error after hitting [Enter] double-
check what you typed against the text below.
makecert –n “CN=My Root Certificate Authority” –r –a sha1–sr LocalMachine –sky signature
–sv OOBRootCA.pvk OOBRootCA.cer

Out-of-Browser with COM Interop
5. When prompted for a password use P@ssw0rd. You'll be prompted to enter the password a few
times – enter the same password each time.
6. Type the following into the command window and press [Enter] to create a child certificate that can
be used for code signing. It will be signed by the root certificate created earlier.
makecert -sv OOBCodeSigningCA.pvk -iv OOBRootCA.pvk -n "CN=OOB Code Signing CA"
-ic OOBRootCA.cer OOBCodeSigningCA.cer
7. Enter P@ssw0rd for the password when prompted.
8. Generate a PFX file (contains the password and the private key in one file for convenience). Note
that the same password entered earlier is used. Enter the following into the command window and
press [Enter]:
pvk2pfx –pvk OOBCodeSigningCA.pvk –spc OOBCodeSigningCA.cer –pfx OOBCodeSigningCA.pfx
–po P@ssw0rd
9. Enter P@ssw0rd for the password when prompted.
10. Copy all of the certificate files that were generated from the root c:\ folder to the lab's
Ex02\begin\OOBWindows.Web\ClientBin folder.
11. Navigate to the Ex02\begin\OOBWindows.Web\ClientBin folder in the Visual Studio Command
Prompt window (example command syntax: cd [Lab Folder
Path]\Source\Ex02\begin\OOBWindows.Web\ClientBin).
12. Type the following into the command window and press [Enter] to sign the XAP file:
signtool sign /v /f OOBCodeSigningCA.pfx /p P@ssw0rd OOBWindows.xap
13. If the XAP was successfully signed you'll see verbiage similar to the following in the command
window.
Figure 6
Signing a XAP using signtool.exe
Task 2 – Performing a Silent Installation

Out-of-Browser with COM Interop
In this task you will create a .bat file that can be used to perform a silent installation using sllauncher.exe.
Silent installs are useful for installing a Silverlight application directly on a machine using a .bat file or from a
CD or DVD.
1. Open Windows Explorer and navigate to the lab's Source\Ex02\begin\OOBWindows.Web\ClientBin
folder.
2. Right-click in the ClientBin folder and select New Text Document from the menu. Name the
document SilentInstaller.bat.
3. Start Visual Studio 2010 (close the existing solution if one is already open).
4. On the File menu click Open Project/Solution…
a. Alternatively, from Visual Studio Start Page click “Open Project…”
5. At the “Open Project” dialog navigate to the Lab folder
6. Navigate to “Source\Ex02\begin” folder
7. Click the “OOBWindows.sln” file and then click the “Open” button
8. Right-click the OOBWindows.Web project and select "Start as Startup Project" from the menu.
9. Press F5 to run the project.
10. Once the browser loads, note the port number that is being used in the URL.
11. Go back to Windows Explorer, right-click on SilentInstaller.bat, and select Edit from the menu.
12. Enter the following into the SilentInstaller.bat file and save the file when done. Adjust the /install
switch path to point to the location of the OOBWindows.xap file and the URL defined using the
/origin switch to use the port where your XAP file is hosted when the application is run in the
browser.
"C:\Program Files\Microsoft Silverlight\sllauncher.exe" /install:"C:\[Path to Lab
Folder]\Source\Ex02\end\OOBWindows.Web\ClientBin\OOBWindows.xap"
/origin:"http://localhost:49786/ClientBin/OOBWindows.xap" /shortcut:desktop+startmenu
/overwrite
13. Click the SilentInstaller.bat file in Windows Explorer to execute it. The OOBWindows application
should be installed and an icon for it should show on the desktop.

Out-of-Browser with COM Interop
Conclusion
In this lab we learned about the new features Silverlight 4 offers for out of browser applications. We saw
how to create an out-of-browser application, configure it to use elevated permissions, and use COM
automation from Silverlight to manipulate Word and Excel. We've also seen how a XAP file can be signed
using SignTool.exe and how a XAP can be installed silently using sllauncher.exe