OSIsoft PI System to AWS Connector on the AWS Cloud · Amazon Web Services – OSIsoft PI System to...
33
Page 1 of 33 OSIsoft PI System to AWS Connector on the AWS Cloud Quick Start Reference Deployment March 2018 47Lining Team AWS Quick Start Reference Team Contents Overview................................................................................................................................. 2 Costs and Licenses.............................................................................................................. 3 Architecture............................................................................................................................ 4 Prerequisites ........................................................................................................................ 10 Specialized Knowledge ..................................................................................................... 10 Technical Requirements................................................................................................... 10 Planning the Deployment .................................................................................................... 10 Deployment Options ........................................................................................................ 10 Authentication Options .....................................................................................................11 Instance Selection............................................................................................................. 12 Kinesis Data Streams Shards ........................................................................................... 12 Deployment Steps ................................................................................................................ 13 Step 1. Download OSIsoft Software and Microsoft Tools ................................................ 13 Step 2. Prepare Your AWS Account ................................................................................. 15 Step 3. Launch the Quick Start ........................................................................................ 15
Transcript of OSIsoft PI System to AWS Connector on the AWS Cloud · Amazon Web Services – OSIsoft PI System to...
Page 1 of 33
OSIsoft PI System to AWS Connector
on the AWS Cloud
Quick Start Reference Deployment
March 2018
47Lining Team
AWS Quick Start Reference Team
Contents
Overview ................................................................................................................................. 2
Costs and Licenses .............................................................................................................. 3
Architecture ............................................................................................................................ 4
Prerequisites ........................................................................................................................ 10
Specialized Knowledge ..................................................................................................... 10
Technical Requirements ................................................................................................... 10
Planning the Deployment .................................................................................................... 10
Deployment Options ........................................................................................................ 10
Authentication Options ..................................................................................................... 11
Instance Selection............................................................................................................. 12
Kinesis Data Streams Shards ........................................................................................... 12
Deployment Steps ................................................................................................................ 13
Step 1. Download OSIsoft Software and Microsoft Tools ................................................ 13
Step 2. Prepare Your AWS Account ................................................................................. 15
Step 3. Launch the Quick Start ........................................................................................ 15
Amazon Web Services – OSIsoft PI System to AWS Connector on the AWS Cloud March 2018
Page 2 of 33
Step 4. Test the Deployment ........................................................................................... 28
Step 5. Use the Management Console to Explore Connector Features ........................... 29
Optional: Adding VPC Definitions .................................................................................. 30
FAQ....................................................................................................................................... 31
Additional Resources ........................................................................................................... 32
Git Repository ...................................................................................................................... 33
Document Revisions ............................................................................................................ 33
This Quick Start deployment guide was created by 47Lining, a REAN Cloud Company, in
partnership with Amazon Web Services (AWS). 47Lining is an AWS Premier Consulting
Partner specializing in big data.
Quick Starts are automated reference deployments that use AWS CloudFormation
templates to deploy a specific workload on AWS, following AWS best practices.
Overview
This Quick Start reference deployment guide provides step-by-step instructions for
deploying the OSIsoft PI System to AWS Connector on the AWS Cloud.
The OSIsoft PI System to AWS Connector synchronizes your OSIsoft PI System data to
AWS to enable advanced analytics on your industrial process time-series data. You can use
this connector to get your data to Amazon Simple Storage Service (Amazon S3), and explore
and analyze your data by using a wide variety of AWS services that support agile analytics.
Using the PI System to manage industrial process time-series data is common within
vertical industries such as oil and gas, mining, manufacturing, and energy and utilities.
Users who have invested in a PI System footprint that aggregates and manages industrial
process time-series data currently face two challenges:
Users would like to be able to use AWS analytics services to operate on their data, but
making the data and its associated structure available in AWS isn’t currently a
straightforward process.
Users would also like to be able to perform real-time analytics on their data, but
establishing and managing real-time feeds of industrial process time-series data from
the PI System to AWS can be a cumbersome process.

Amazon Web Services – OSIsoft PI System to AWS Connector on the AWS Cloud March 2018
Page 3 of 33
The OSIsoft PI System to AWS Connector solves both of these problems. You can deploy
and use the connector with just a few clicks from your own AWS account. After you deploy
this Quick Start, you can easily establish near real-time managed feeds for selected data, get
your data to Amazon S3, keep it current, and explore and analyze your data with AWS
analytics services.
The OSIsoft PI System to AWS Connector provides these features:
Security – You can connect to your PI Data Archive and PI Asset Framework (AF)
Server by using Windows Integrated Security (WIS), virtual private network (VPN), and
Active Directory. Or, you can connect to your PI Data Archive through your user
credentials.
Synchronization – You can synchronize your PI AF structure in AF Server and PI
Points, which are defined in PI Data Archive.
Near real-time subscription – You can subscribe to Snapshot and Archive updates
on selected PI Points to get your data to AWS through Amazon Kinesis.
Backfilling – You can backfill PI Points for periods in the past and move that data to
Amazon S3.
Interpolation – You can interpolate your PI Points at specified intervals and observe
the data flow to AWS.
Exploration – You can use Amazon Athena to explore your PI Points.
Publishing – You can publish your data in an S3 bucket for sandboxed analytics.
Management – A dedicated Management Console web application lets you explore
OSIsoft PI System to AWS Connector features and provides administrative functions.
Visualization – You can visualize your data by using Kibana dashboards and PI Points
data available in AWS Elasticsearch Service (Amazon ES).
When your PI Data is available in AWS, you can use a wide range of other AWS services to
operate on your data and apply descriptive, predictive, and real-time analytics to optimize
your business and its operations.
Costs and Licenses You are responsible for the cost of the AWS services used while running this Quick Start
reference deployment. There is no additional cost for using the Quick Start.
The AWS CloudFormation template for this Quick Start includes configuration parameters
that you can customize. Some of these settings, such as instance type, will affect the cost of

Amazon Web Services – OSIsoft PI System to AWS Connector on the AWS Cloud March 2018
Page 4 of 33
deployment. For cost estimates, see the pricing pages for each AWS service you will be
using. Prices are subject to change.
This Quick Start requires that you obtain your own PI AF Client software. You must already
own licenses for OSIsoft PI Server, and you must have access to the OSIsoft website to
download the software.
Architecture Deploying this Quick Start for a new virtual private cloud (VPC) with default parameters
builds the following OSIsoft PI System to AWS Connector environment in the AWS Cloud.

Amazon Web Services – OSIsoft PI System to AWS Connector on the AWS Cloud March 2018
Page 5 of 33
Figure 1: Quick Start architecture for OSIsoft PI System to AWS Connector on AWS

Amazon Web Services – OSIsoft PI System to AWS Connector on the AWS Cloud March 2018
Page 6 of 33
The Quick Start sets up the following:
A virtual private cloud (VPC) that spans two Availability Zones and includes two
public and two private subnets.*
An internet gateway to allow access to the internet.*
In the public subnets, managed NAT gateways to allow outbound internet access
for resources in the private subnets.*
In the public subnets, Linux bastion hosts in an Auto Scaling group to allow
inbound Secure Shell (SSH) access to EC2 instances in public and private subnets.*
In a public subnet, a Connector Agent .NET application with OSIsoft PI AF SDK
hosts in an Auto Scaling group. This application integrates with PI Data Archive and
optionally with AF Server.
In a private subnet, a web application instance that hosts Management Console
in an Auto Scaling group. The Management Console exposes the functionality of the
OSIsoft PI System to AWS Connector.
In a private subnet, a Communication Worker host in an Auto Scaling group to
allow asynchronous communication between Connector Agent and Management
Console.
AWS Lambda, to remove managed feed data from Amazon ES after a specified
period.
Identity and Access Management (IAM) roles to provide permissions to
access AWS resources; for example, to permit Amazon Kinesis Firehose and Amazon
Athena to read and write curated datasets.
Integration with other AWS services such as Amazon S3, Amazon Simple
Queue Service (Amazon SQS), Amazon Athena, Amazon DynamoDB, AWS Lambda,
Amazon ES with Kibana, Amazon Kinesis, and Amazon CloudWatch.
* The template that deploys the Quick Start into an existing VPC skips the tasks
marked by asterisks and prompts you for your existing VPC configuration.
Figures 2 and 3 show how these components work together to support asynchronous
communications and data streaming.
Figure 2 shows how Management Console and Connector Agent exchange messages
asynchronously through Amazon SQS queues.

Amazon Web Services – OSIsoft PI System to AWS Connector on the AWS Cloud March 2018
Page 7 of 33
Figure 2: Asynchronous communication between Connector Agent and Management Console

Amazon Web Services – OSIsoft PI System to AWS Connector on the AWS Cloud March 2018
Page 8 of 33
By using AWS native services and loose coupling through queue-based communication, you
can further extend this Quick Start to support a variety of enterprise-level deployment
scenarios, in which Connector Agent can be placed on premises and still communicate
through the AWS SDK for .NET and access AWS API endpoints.
Figure 3 shows how PI Points time-series data flows from PI Data Archive to Connector
Agent. Connector Agent then pushes data to a Kinesis stream that has two consumers:
Kinesis Data Firehose with an Amazon S3 destination, which persists managed feeds to
a curated datasets bucket in Amazon S3.
Kinesis Data Analytics application, which transforms data so that it can be indexed in
Amazon ES.
The managed feeds data is retained in Amazon ES for the number of days you specify when
you launch the Quick Start, after which the data is removed from Amazon ES.

Amazon Web Services – OSIsoft PI System to AWS Connector on the AWS Cloud March 2018
Page 9 of 33
Figure 3: Streaming architecture for managed feeds with Kinesis
Amazon Web Services – OSIsoft PI System to AWS Connector on the AWS Cloud March 2018
Page 10 of 33
Prerequisites
Specialized Knowledge
Before you deploy this Quick Start, we recommend that you become familiar with the
following AWS services. (If you are new to AWS, see Getting Started with AWS.)
Amazon Athena
Amazon CloudWatch
Amazon DynamoDB
Amazon EC2
Amazon ES
Amazon Kinesis
Amazon S3
Amazon SQS
Amazon VPC
AWS Lambda
Technical Requirements
To use this Quick Start, you must have OSIsoft PI Data Archive, and, optionally, OSIsoft PI
AF Server set up correctly in your data center. The Quick Start sets up an environment that
connects to these resources. For information about downloading and setting up these
products, see the OSIsoft website.
In addition, you will need to install PI Asset Framework (AF) Client, .NET Framework,
.NET Framework Targeting Pack, and MSBuild tools before you deploy the Quick Start.
This is covered in step 1 of the deployment steps.
Planning the Deployment Before you deploy OSIsoft PI System to AWS Connector on AWS, please review the
following sections for guidelines on OSIsoft authentication, instance types, and VPC
considerations for deployment.
Deployment Options
This Quick Start provides two deployment options:
Deploy OSIsoft PI System to AWS Connector into a new VPC (end-to-end
deployment). This option builds a new AWS environment consisting of the VPC,
subnets, NAT gateways, security groups, bastion hosts, and other infrastructure

Amazon Web Services – OSIsoft PI System to AWS Connector on the AWS Cloud March 2018
Page 11 of 33
components, and then deploys OSIsoft PI System to AWS Connector into this new
VPC.
Deploy OSIsoft PI System to AWS Connector into an existing VPC. This
option provisions OSIsoft PI System to AWS Connector in your existing AWS
infrastructure.
The Quick Start provides separate templates for these options. It also lets you configure
CIDR blocks, instance types, and OSIsoft PI System to AWS Connector settings, as
discussed later in this guide.
Authentication Options
Before you deploy OSIsoft PI System to AWS Connector, you’ll need to decide how to
authenticate Connector Agent with your PI Data Archive and AF Server. When you launch
the Quick Start, you use the Authentication Method parameter to indicate your choice.
Windows Integrated Security (WIS) is the most secure authentication method
supported by OSIsoft. If you already have a VPN connection between your on-premises
OSIsoft servers and the AWS Cloud, and if you are using Active Directory to manage
access to your PI Data Archive, this Quick Start can seamlessly integrate with your
current infrastructure.
The explicit user and password authentication method is less secure than WIS, but
makes it possible to deploy this Quick Start to any PI System setup, as long as a PI user
with those credentials has permissions to access PI Data Archive and AF Server. Make
sure that inbound and outbound ports are open; by default, they are 5450 for PI Data
Archive and 5457 for PI AF Server. The security settings of your PI System must permit
authentication with explicit login, as shown in Figure 4.
Figure 4: PI System security settings for explicit login

Amazon Web Services – OSIsoft PI System to AWS Connector on the AWS Cloud March 2018
Page 12 of 33
Instance Selection In most circumstances, the number of PI Points and frequency of updates will dictate the
type of instance type you use for Connector Agent, Management Console, and
Communication Worker. In the following tables, recommendations are based on workload
size.
Connector Agent
Instance type PI Point updates per minute
m5.large
m4.large
1 – 10,000
m5.xlarge
m4.xlarge
10,000 – 100,000
Communication Worker
Instance type PI Point updates per minute
m5.large
m4.large
1 – 10,000
m5.xlarge
m4.xlarge
10,000 – 100,000
Kinesis Data Streams Shards The Quick Start lets you choose the number of Kinesis Data Streams shards to provision for
the PI Data stream during deployment. (The default is 2.)
The number of shards has to be scaled linearly with the number of PI Point updates per
minute; for example:
Kinesis Data Streams
shards count
PI Point updates
per minute
2 < 1,250,000
4 < 2,500,000
10 < 5,000,000
Amazon Web Services – OSIsoft PI System to AWS Connector on the AWS Cloud March 2018
Page 13 of 33
Deployment Steps
Step 1. Download OSIsoft Software and Microsoft Tools
Before you deploy OSIsoft PI System to AWS Connector, you’ll need to download PI Asset
Framework (AF) Client and the following Microsoft tools: .NET Framework, .NET
Framework Targeting Pack, MSBuild Tools. This step is required due to licensing
restrictions related to redistributing binaries from these software vendors.
Licensed Software Location and Structure
The licensed software used by the Quick Start must be stored in an S3 bucket in your
account.
Create an S3 bucket
1. Sign in to the AWS Management Console, and open the Amazon S3 console at
https://console.aws.amazon.com/s3.
2. Create an S3 bucket for the licensed software. For instructions, see the Amazon S3
documentation.
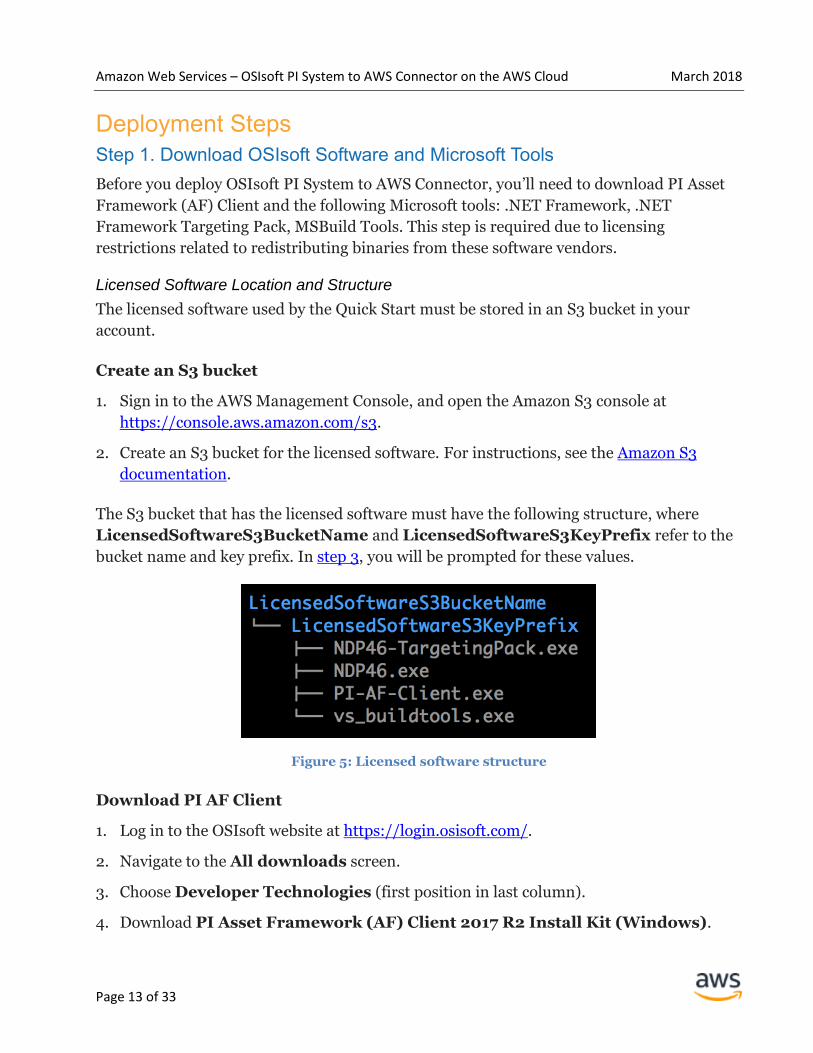
The S3 bucket that has the licensed software must have the following structure, where
LicensedSoftwareS3BucketName and LicensedSoftwareS3KeyPrefix refer to the
bucket name and key prefix. In step 3, you will be prompted for these values.
Figure 5: Licensed software structure
Download PI AF Client
1. Log in to the OSIsoft website at https://login.osisoft.com/.
2. Navigate to the All downloads screen.
3. Choose Developer Technologies (first position in last column).
4. Download PI Asset Framework (AF) Client 2017 R2 Install Kit (Windows).

Amazon Web Services – OSIsoft PI System to AWS Connector on the AWS Cloud March 2018
Page 14 of 33
5. Make sure that the file is named PI-AF-Client.exe; rename it if needed.
6. Upload PI-AF-Client.exe to your S3 bucket, following the structure shown in Figure 5.
Download .NET Framework
1. Download .NET Framework from the Microsoft website.
2. Save the file as NDP46.exe.
3. Upload NDP46.exe to your S3 bucket for licensed software, following the structure
shown in Figure 5.
Download .NET Framework Targeting Pack
1. Download .NET Framework Targeting Pack from the Microsoft website.
2. Save the file as NDP46-TargetingPack.exe.
3. Upload NDP46-TargetingPack.exe to your S3 bucket for licensed software, following
the structure shown in Figure 5.
Download MSBuild Tools
1. Download MSBuild Tools from the Microsoft website.
2. Save the file as vs_buildtools.exe.
3. Upload vs_buildtools.exe to your S3 bucket for licensed software, following the
structure shown in Figure 5.
Connector Agent Assets Location and Structure
Download the Connector Agent from https://s3.amazonaws.com/aws-quickstart-
datasets/osisoft/agent/v1/connector-agent.zip and store it in a separate S3 bucket in your
AWS account.
The S3 bucket must have the following structure, where
ConnectorAgentAssetsS3BucketName and ConnectorAgentAssetsS3KeyPrefix
refer to the bucket name and key prefix. In step 3, you will be prompted for these values.

Amazon Web Services – OSIsoft PI System to AWS Connector on the AWS Cloud March 2018
Page 15 of 33
Figure 6: Connector Agent assets structure
Step 2. Prepare Your AWS Account
1. If you don’t already have an AWS account, create one at https://aws.amazon.com by
following the on-screen instructions.
2. Use the region selector in the navigation bar to choose the AWS Region where you want
to deploy OSIsoft PI System to AWS Connector on AWS.
Important This Quick Start includes services that aren’t supported in all AWS
Regions. See the pages for Amazon Kinesis Data Firehose and Amazon Kinesis Data
Analytics on the AWS website for a list of supported regions.
3. Create a key pair in your preferred region.
4. If necessary, request a service limit increase for the Amazon EC2 t2.micro instance
type. You might need to do this if you already have an existing deployment that uses this
instance type, and you think you might exceed the default limit with this reference
deployment.
5. If necessary, request a service limit increase for AWS CloudFormation stacks. This
Quick Start creates up to fifteen (15) stacks. You may need to request a service limit
increase if you already have existing deployments that use AWS CloudFormation stacks.
Step 3. Launch the Quick Start
Note You are responsible for the cost of the AWS services used while running this
Quick Start reference deployment. There is no additional cost for using this Quick
Start. For full details, see the pricing pages for each AWS service you will be using in
this Quick Start. Prices are subject to change.

Amazon Web Services – OSIsoft PI System to AWS Connector on the AWS Cloud March 2018
Page 16 of 33
1. Choose one of the following options to launch the AWS CloudFormation template into
your AWS account. For help choosing an option, see deployment options earlier in this
guide.
Option 1
Deploy Quick Start into a
new VPC on AWS
Option 2
Deploy Quick Start into an
existing VPC on AWS
Important If you’re deploying OSIsoft PI System to AWS Connector into an
existing VPC, make sure that your VPC has two private subnets in different
Availability Zones. These subnets require NAT gateways or NAT instances in their
route tables, to allow the instances to download packages and software without
exposing them to the internet. You’ll also need the domain name option configured
in the DHCP options as explained in the Amazon VPC documentation. You will be
prompted for your VPC settings when you launch the Quick Start.
Each deployment takes about 50 minutes to complete.
2. Check the region that’s displayed in the upper-right corner of the navigation bar, and
change it if necessary. This is where the network infrastructure for OSIsoft PI System to
AWS Connector will be built. The template is launched in the US West (Oregon) Region
by default.
Important This Quick Start includes services that aren’t supported in all AWS
Regions. See the pages for Amazon Kinesis Data Firehose and Amazon Kinesis Data
Analytics on the AWS website for a list of supported regions.
3. On the Select Template page, keep the default setting for the template URL, and then
choose Next.
4. On the Specify Details page, change the stack name if needed. Review the parameters
for the template. Provide values for the parameters that require input. For all other
parameters, review the default settings and customize them as necessary. When you
finish reviewing and customizing the parameters, choose Next.
In the following tables, parameters are listed by category and described separately for
the two deployment options:
Launch Launch
Amazon Web Services – OSIsoft PI System to AWS Connector on the AWS Cloud March 2018
Page 17 of 33
– Parameters for deploying OSIsoft PI System to AWS Connector into a new VPC
– Parameters for deploying OSIsoft PI System to AWS Connector into an existing VPC
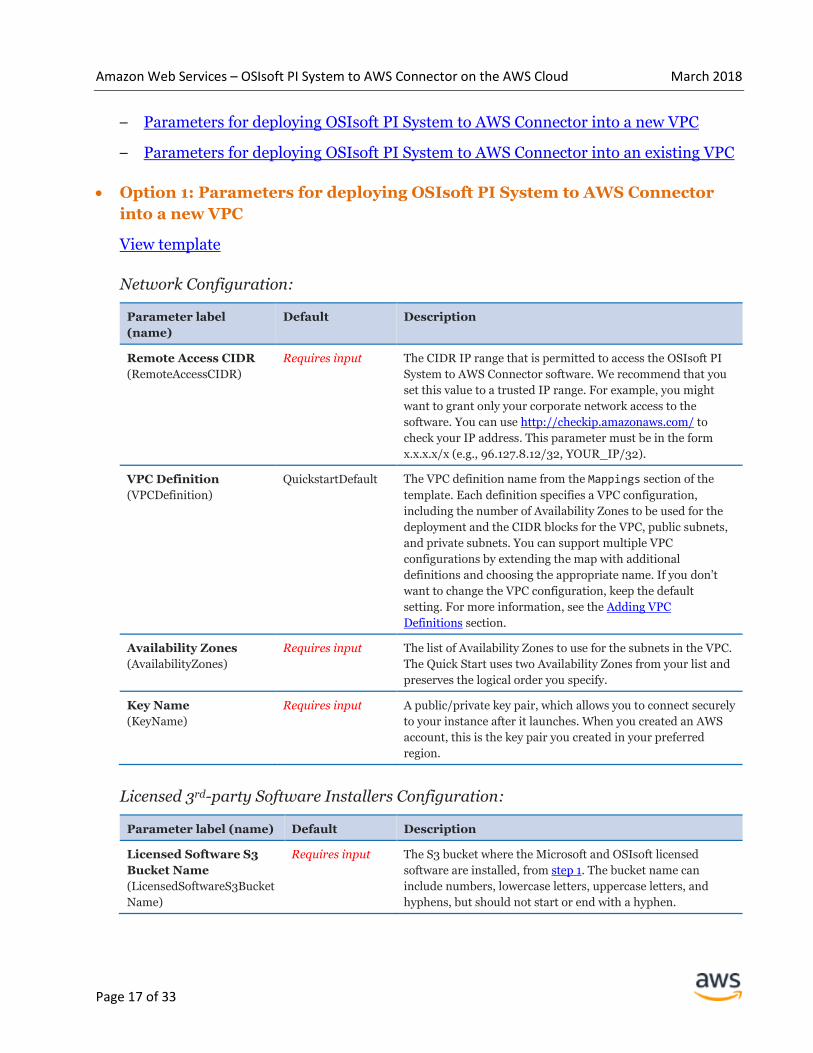
Option 1: Parameters for deploying OSIsoft PI System to AWS Connector
into a new VPC
View template
Network Configuration:
Parameter label
(name)
Default Description
Remote Access CIDR
(RemoteAccessCIDR)
Requires input The CIDR IP range that is permitted to access the OSIsoft PI
System to AWS Connector software. We recommend that you
set this value to a trusted IP range. For example, you might
want to grant only your corporate network access to the
software. You can use http://checkip.amazonaws.com/ to
check your IP address. This parameter must be in the form
x.x.x.x/x (e.g., 96.127.8.12/32, YOUR_IP/32).
VPC Definition
(VPCDefinition)
QuickstartDefault The VPC definition name from the Mappings section of the
template. Each definition specifies a VPC configuration,
including the number of Availability Zones to be used for the
deployment and the CIDR blocks for the VPC, public subnets,
and private subnets. You can support multiple VPC
configurations by extending the map with additional
definitions and choosing the appropriate name. If you don’t
want to change the VPC configuration, keep the default
setting. For more information, see the Adding VPC
Definitions section.
Availability Zones
(AvailabilityZones)
Requires input The list of Availability Zones to use for the subnets in the VPC.
The Quick Start uses two Availability Zones from your list and
preserves the logical order you specify.
Key Name
(KeyName)
Requires input A public/private key pair, which allows you to connect securely
to your instance after it launches. When you created an AWS
account, this is the key pair you created in your preferred
region.
Licensed 3rd-party Software Installers Configuration:
Parameter label (name) Default Description
Licensed Software S3
Bucket Name
(LicensedSoftwareS3Bucket
Name)
Requires input The S3 bucket where the Microsoft and OSIsoft licensed
software are installed, from step 1. The bucket name can
include numbers, lowercase letters, uppercase letters, and
hyphens, but should not start or end with a hyphen.
Amazon Web Services – OSIsoft PI System to AWS Connector on the AWS Cloud March 2018
Page 18 of 33
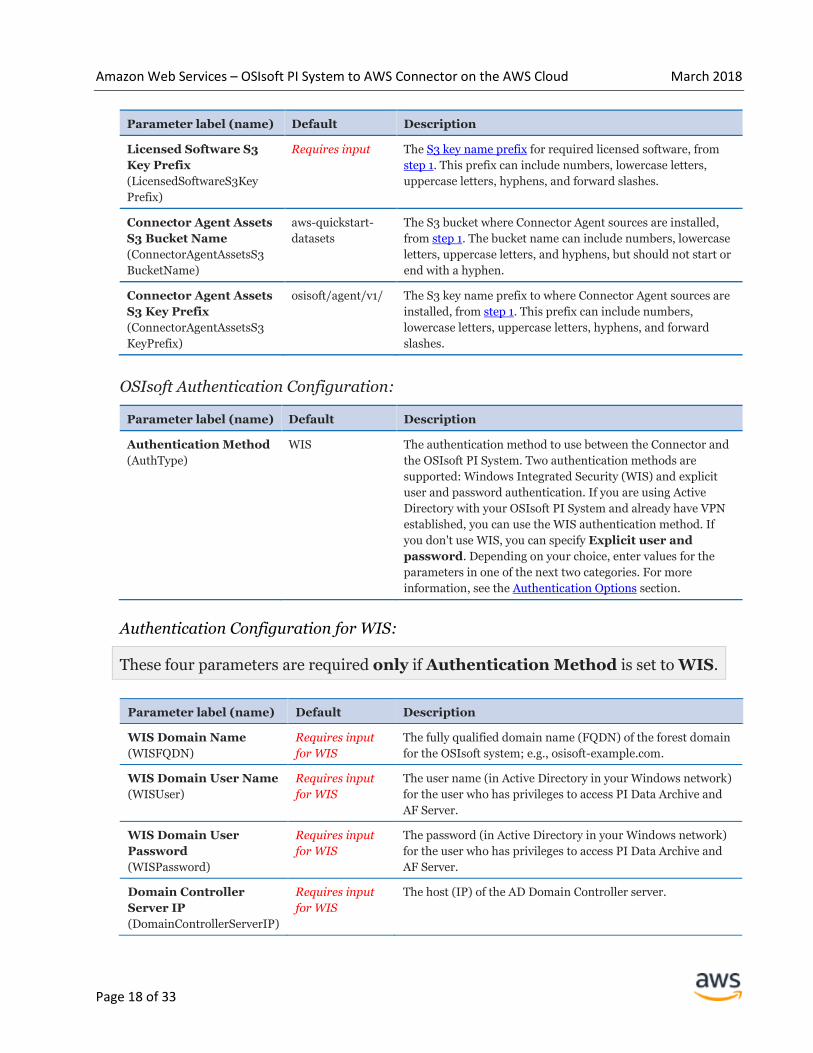
Parameter label (name) Default Description
Licensed Software S3
Key Prefix
(LicensedSoftwareS3Key
Prefix)
Requires input The S3 key name prefix for required licensed software, from
step 1. This prefix can include numbers, lowercase letters,
uppercase letters, hyphens, and forward slashes.
Connector Agent Assets
S3 Bucket Name
(ConnectorAgentAssetsS3
BucketName)
aws-quickstart-
datasets
The S3 bucket where Connector Agent sources are installed,
from step 1. The bucket name can include numbers, lowercase
letters, uppercase letters, and hyphens, but should not start or
end with a hyphen.
Connector Agent Assets
S3 Key Prefix
(ConnectorAgentAssetsS3
KeyPrefix)
osisoft/agent/v1/ The S3 key name prefix to where Connector Agent sources are
installed, from step 1. This prefix can include numbers,
lowercase letters, uppercase letters, hyphens, and forward
slashes.
OSIsoft Authentication Configuration:
Parameter label (name) Default Description
Authentication Method
(AuthType)
WIS The authentication method to use between the Connector and
the OSIsoft PI System. Two authentication methods are
supported: Windows Integrated Security (WIS) and explicit
user and password authentication. If you are using Active
Directory with your OSIsoft PI System and already have VPN
established, you can use the WIS authentication method. If
you don't use WIS, you can specify Explicit user and
password. Depending on your choice, enter values for the
parameters in one of the next two categories. For more
information, see the Authentication Options section.
Authentication Configuration for WIS:
These four parameters are required only if Authentication Method is set to WIS.
Parameter label (name) Default Description
WIS Domain Name
(WISFQDN)
Requires input
for WIS
The fully qualified domain name (FQDN) of the forest domain
for the OSIsoft system; e.g., osisoft-example.com.
WIS Domain User Name
(WISUser)
Requires input
for WIS
The user name (in Active Directory in your Windows network)
for the user who has privileges to access PI Data Archive and
AF Server.
WIS Domain User
Password
(WISPassword)
Requires input
for WIS
The password (in Active Directory in your Windows network)
for the user who has privileges to access PI Data Archive and
AF Server.
Domain Controller
Server IP
(DomainControllerServerIP)
Requires input
for WIS
The host (IP) of the AD Domain Controller server.

Amazon Web Services – OSIsoft PI System to AWS Connector on the AWS Cloud March 2018
Page 19 of 33
Authentication Configuration for Explicit User and Password:
These five parameters are required only if Authentication Method is set to
Explicit user and password.
Parameter label (name) Default Description
PI User
(PIUser)
Requires input
for explicit user
The name of the PI Data Archive user.
PI Password
(PIPassword)
Requires input
for explicit user
The password for the PI Data Archive user.
Asset Framework
Domain Name
(AFDomainName)
Requires input
for explicit user
The domain name of the user who runs AF Server. This
parameter is required only if you set Authentication
Method to Explicit user and password and you
adopted AF Server in your OSIsoft system. This Quick Start
can independently connect to PI Data Archive and AF
Server.
Asset Framework User
(AFUser)
Requires input
for explicit user
The name of the user who has privileges to access PI Asset
Framework Server. This parameter is required only if you
set Authentication Method to Explicit user and
password and you adopted AF Server in your OSIsoft
system. This Quick Start can independently connect to PI
Data Archive and AF Server.
Asset Framework
Password
(AFPassword)
Requires input
for explicit user
The password of the user who has privileges to access AF
Server. This parameter is required only if Authentication
Method is set to Explicit user and password and you
adopted AF Server in your OSIsoft system. This Quick Start
can independently connect to PI Data Archive and AF
Server.
PI Data Archive Server Configuration:
Parameter label (name) Default Description
PI Server IP
(PIServerIP)
Requires input The host (IP) of the PI Data Archive server.
PI Port
(PIPort)
5450 The port on which PI Data Archive runs.
Asset Framework Server Configuration:
These three parameters are required only if you adopted AF Server in your OSIsoft
system. This Quick Start can independently connect to PI Data Archive and AF
Server.

Amazon Web Services – OSIsoft PI System to AWS Connector on the AWS Cloud March 2018
Page 20 of 33
Parameter label
(name)
Default Description
Asset Framework
Server IP
(AFServerIP)
Requires input
for AF Server
The host (IP) of PI AF Server.
Asset Framework Port
(AFPort)
5457 The port on which PI AF Server runs.
Asset Framework
Structure Database
(AfStructureDatabase)
Requires input
for AF Server
The name of the AF database that Connector Agent will
connect to; for example, NuGreen.
Connector Agent Configuration:
Parameter label
(name)
Default Description
Connector Agent
Instance Type
(ConnectorInstanceType)
m4.xlarge The EC2 instance type for the Connector Agent instance.
Log Group Name Prefix
(LogGroupNamePrefix)
ConnectorLog
Group
The name of the Amazon CloudWatch log group for metric
filters.
Metric Namespace
Name Prefix
(MetricNamespaceName
Prefix)
ConnectorMetric
Namespace
The namespace name for the metric filters.
Management Console Configuration:
Parameter label
(name)
Default Description
Management Console
Instance Type
(InstanceType)
t2.micro The EC2 instance type for Management Console.
Management Console
User Name
(ApplicationUser)
ConsoleAdmin The user name for Management Console, consisting of 1-64
ASCII characters.
Management Console
Password
(ApplicationPassword)
Requires input The user password for Management Console. The password
must contain 8-64 printable ASCII characters, excluding /,
", ', \, and @, and must contain one uppercase letter, one
lowercase letter, and one number.
Amazon Web Services – OSIsoft PI System to AWS Connector on the AWS Cloud March 2018
Page 21 of 33
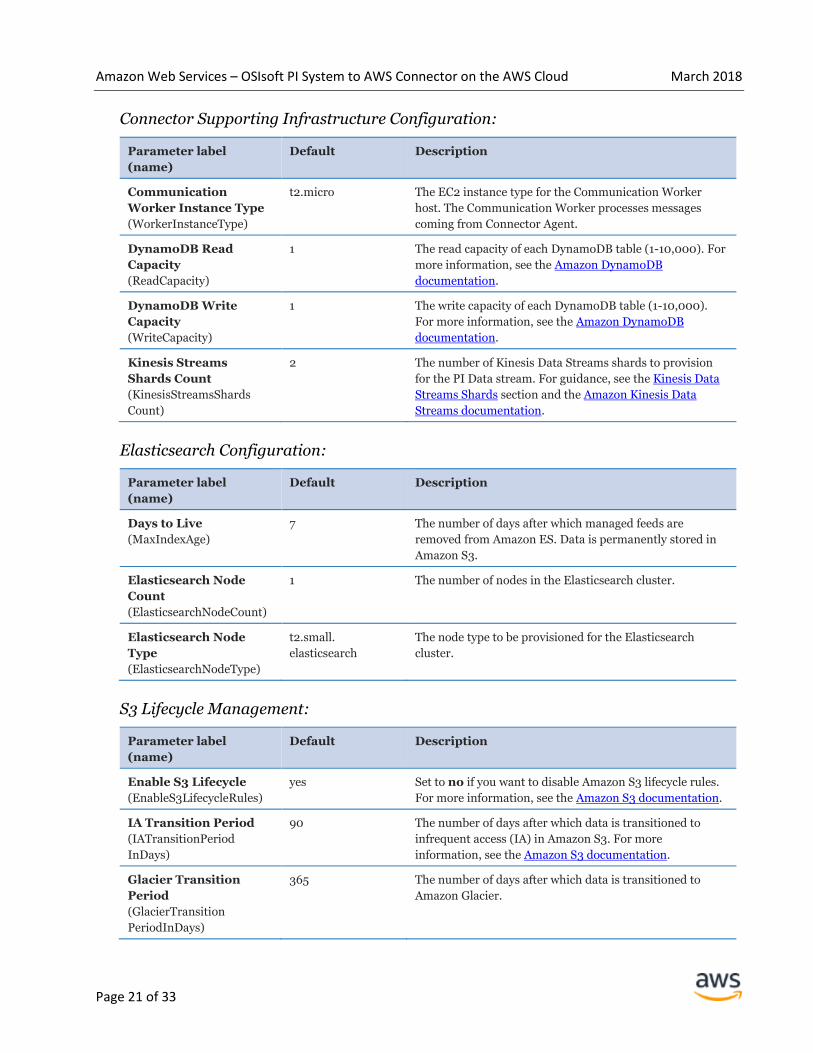
Connector Supporting Infrastructure Configuration:
Parameter label
(name)
Default Description
Communication
Worker Instance Type
(WorkerInstanceType)
t2.micro The EC2 instance type for the Communication Worker
host. The Communication Worker processes messages
coming from Connector Agent.
DynamoDB Read
Capacity
(ReadCapacity)
1 The read capacity of each DynamoDB table (1-10,000). For
more information, see the Amazon DynamoDB
documentation.
DynamoDB Write
Capacity
(WriteCapacity)
1 The write capacity of each DynamoDB table (1-10,000).
For more information, see the Amazon DynamoDB
documentation.
Kinesis Streams
Shards Count
(KinesisStreamsShards
Count)
2 The number of Kinesis Data Streams shards to provision
for the PI Data stream. For guidance, see the Kinesis Data
Streams Shards section and the Amazon Kinesis Data
Streams documentation.
Elasticsearch Configuration:
Parameter label
(name)
Default Description
Days to Live
(MaxIndexAge)
7 The number of days after which managed feeds are
removed from Amazon ES. Data is permanently stored in
Amazon S3.
Elasticsearch Node
Count
(ElasticsearchNodeCount)
1 The number of nodes in the Elasticsearch cluster.
Elasticsearch Node
Type
(ElasticsearchNodeType)
t2.small.
elasticsearch
The node type to be provisioned for the Elasticsearch
cluster.
S3 Lifecycle Management:
Parameter label
(name)
Default Description
Enable S3 Lifecycle
(EnableS3LifecycleRules)
yes Set to no if you want to disable Amazon S3 lifecycle rules.
For more information, see the Amazon S3 documentation.
IA Transition Period
(IATransitionPeriod
InDays)
90 The number of days after which data is transitioned to
infrequent access (IA) in Amazon S3. For more
information, see the Amazon S3 documentation.
Glacier Transition
Period
(GlacierTransition
PeriodInDays)
365 The number of days after which data is transitioned to
Amazon Glacier.
Amazon Web Services – OSIsoft PI System to AWS Connector on the AWS Cloud March 2018
Page 22 of 33
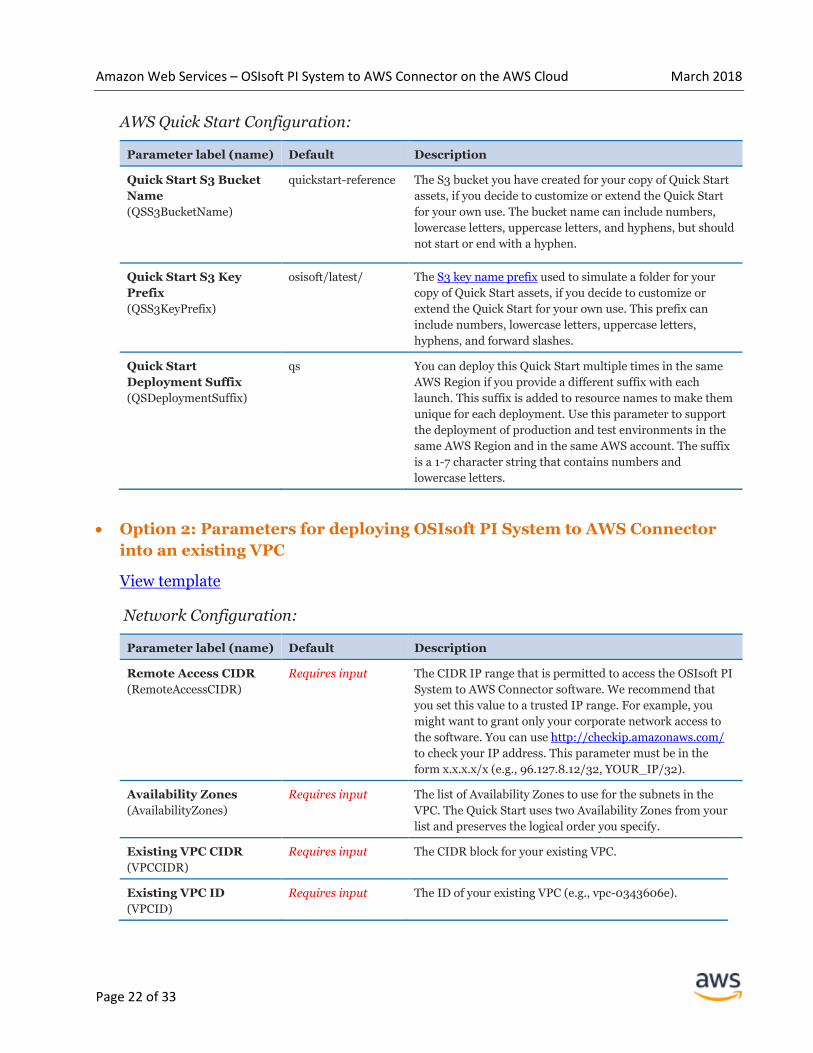
AWS Quick Start Configuration:
Parameter label (name) Default Description
Quick Start S3 Bucket
Name
(QSS3BucketName)
quickstart-reference The S3 bucket you have created for your copy of Quick Start
assets, if you decide to customize or extend the Quick Start
for your own use. The bucket name can include numbers,
lowercase letters, uppercase letters, and hyphens, but should
not start or end with a hyphen.
Quick Start S3 Key
Prefix
(QSS3KeyPrefix)
osisoft/latest/ The S3 key name prefix used to simulate a folder for your
copy of Quick Start assets, if you decide to customize or
extend the Quick Start for your own use. This prefix can
include numbers, lowercase letters, uppercase letters,
hyphens, and forward slashes.
Quick Start
Deployment Suffix
(QSDeploymentSuffix)
qs You can deploy this Quick Start multiple times in the same
AWS Region if you provide a different suffix with each
launch. This suffix is added to resource names to make them
unique for each deployment. Use this parameter to support
the deployment of production and test environments in the
same AWS Region and in the same AWS account. The suffix
is a 1-7 character string that contains numbers and
lowercase letters.
Option 2: Parameters for deploying OSIsoft PI System to AWS Connector
into an existing VPC
View template
Network Configuration:
Parameter label (name) Default Description
Remote Access CIDR
(RemoteAccessCIDR)
Requires input The CIDR IP range that is permitted to access the OSIsoft PI
System to AWS Connector software. We recommend that
you set this value to a trusted IP range. For example, you
might want to grant only your corporate network access to
the software. You can use http://checkip.amazonaws.com/
to check your IP address. This parameter must be in the
form x.x.x.x/x (e.g., 96.127.8.12/32, YOUR_IP/32).
Availability Zones
(AvailabilityZones)
Requires input The list of Availability Zones to use for the subnets in the
VPC. The Quick Start uses two Availability Zones from your
list and preserves the logical order you specify.
Existing VPC CIDR
(VPCCIDR)
Requires input The CIDR block for your existing VPC.
Existing VPC ID
(VPCID)
Requires input The ID of your existing VPC (e.g., vpc-0343606e).

Amazon Web Services – OSIsoft PI System to AWS Connector on the AWS Cloud March 2018
Page 23 of 33
Parameter label (name) Default Description
Existing VPC Private
Subnet 1 ID
(PrivateSubnet1ID)
Requires input The ID of the private subnet in Availability Zone 1 in your
existing VPC (e.g., subnet-a0246dcd).
Existing VPC Private
Subnet 2 ID
(PrivateSubnet2ID)
Requires input The ID of the private subnet in Availability Zone 2 in your
existing VPC (e.g., subnet-b58c3d67).
Existing VPC Public
Subnet 1 ID
(PublicSubnet1ID)
Requires input The ID of the public subnet in Availability Zone 1 in your
existing VPC.
Existing VPC Public
Subnet 2 ID
(PublicSubnet2ID)
Requires input The ID of the public subnet in Availability Zone 2 in your
existing VPC.
Key Name
(KeyName)
Requires input A public/private key pair, which allows you to connect
securely to your instance after it launches. When you created
an AWS account, this is the key pair you created in your
preferred region.
Licensed 3rd-party Software Installers Configuration:
Parameter label (name) Default Description
Licensed Software S3
Bucket Name
(LicensedSoftwareS3Bucke
tName)
Requires input The S3 bucket where the Microsoft and OSIsoft licensed
software are installed, from step 1. The bucket name can
include numbers, lowercase letters, uppercase letters, and
hyphens, but should not start or end with a hyphen.
Licensed Software S3
Key Prefix
(LicensedSoftwareS3Key
Prefix)
Requires input The S3 key name prefix for required licensed software, from
step 1. This prefix can include numbers, lowercase letters,
uppercase letters, hyphens, and forward slashes.
Connector Agent Assets
S3 Bucket Name
(ConnectorAgentAssetsS3
BucketName)
aws-quickstart-
datasets
The S3 bucket where Connector Agent sources are installed,
from step 1. The bucket name can include numbers,
lowercase letters, uppercase letters, and hyphens, but should
not start or end with a hyphen.
Connector Agent Assets
S3 Key Prefix
(ConnectorAgentAssetsS3
KeyPrefix)
osisoft/agent/v1/ The S3 key name prefix to where Connector Agent sources
are installed, from step 1. This prefix can include numbers,
lowercase letters, uppercase letters, hyphens, and forward
slashes.
OSIsoft Authentication Configuration:
Parameter label (name) Default Description
Authentication Method
(AuthType)
WIS The authentication method to use between the Connector
and the OSIsoft PI System. Two authentication methods are
supported: Windows Integrated Security (WIS) and explicit
user and password authentication. If you are using Active

Amazon Web Services – OSIsoft PI System to AWS Connector on the AWS Cloud March 2018
Page 24 of 33
Parameter label (name) Default Description
Directory with your OSIsoft PI System and already have
VPN established, you can use the WIS authentication
method. If you don't use WIS, you can specify Explicit user
and password. Depending on your choice, enter values for
the parameters in one of the next two categories. For more
information, see the Authentication Options section.
Authentication Configuration for WIS:
These four parameters are required only if Authentication Method is set to WIS.
Parameter label
(name)
Default Description
WIS Domain Name
(WISFQDN)
Requires input
for WIS
The fully qualified domain name (FQDN) of the forest
domain for the OSIsoft system; e.g., osisoft-example.com.
WIS Domain User
Name
(WISUser)
Requires input
for WIS
The user name (in Active Directory in your Windows
network) for the user who has privileges to access PI Data
Archive and AF Server.
WIS Domain User
Password
(WISPassword)
Requires input
for WIS
The password (in Active Directory in your Windows
network) for the user who has privileges to access PI Data
Archive and AF Server.
Domain Controller
Server IP
(DomainControllerServer
IP)
Requires input
for WIS
The host (IP) of the AD Domain Controller server.
Authentication Configuration for Explicit User and Password:
These five parameters are required only if Authentication Method is set to
Explicit user and password.
Parameter label
(name)
Default Description
PI User
(PIUser)
Requires input
for explicit user
The name of the PI Data Archive user.
PI Password
(PIPassword)
Requires input
for explicit user
The password for the PI Data Archive user.
Asset Framework
Domain Name
(AFDomainName)
Requires input
for explicit user
The domain name of the user who runs AF Server. This
parameter is required only if you set Authentication
Method to Explicit user and password and you
adopted AF Server in your OSIsoft system. This Quick Start
can independently connect to PI Data Archive and AF
Server.

Amazon Web Services – OSIsoft PI System to AWS Connector on the AWS Cloud March 2018
Page 25 of 33
Parameter label
(name)
Default Description
Asset Framework User
(AFUser)
Requires input
for explicit user
The name of the user who has privileges to access PI Asset
Framework Server. This parameter is required only if you
set Authentication Method to Explicit user and
password and you adopted AF Server in your OSIsoft
system. This Quick Start can independently connect to PI
Data Archive and AF Server.
Asset Framework
Password
(AFPassword)
Requires input
for explicit user
The password of the user who has privileges to access AF
Server. This parameter is required only if Authentication
Method is set to Explicit user and password and you
adopted AF Server in your OSIsoft system. This Quick Start
can independently connect to PI Data Archive and AF
Server.
PI Data Archive Server Configuration:
Parameter label
(name)
Default Description
PI Server IP
(PIServerIP)
Requires input The host (IP) of the PI Data Archive server.
PI Port
(PIPort)
5450 The port on which PI Data Archive runs.
Asset Framework Server Configuration:
These three parameters are required only if you adopted AF Server in your OSIsoft
system. This Quick Start can independently connect to PI Data Archive and AF
Server.
Parameter label
(name)
Default Description
Asset Framework
Server IP
(AFServerIP)
Requires input
for AF Server
The host (IP) of PI AF Server.
Asset Framework Port
(AFPort)
5457 The port on which PI AF Server runs.
Asset Framework
Structure Database
(AfStructureDatabase)
Requires input
for AF Server
The name of the AF database that Connector Agent will
connect to; for example, NuGreen.

Amazon Web Services – OSIsoft PI System to AWS Connector on the AWS Cloud March 2018
Page 26 of 33
Connector Agent Configuration:
Parameter label
(name)
Default Description
Connector Agent
Instance Type
(ConnectorInstanceType)
m4.xlarge The EC2 instance type for the Connector Agent instance.
Log Group Name Prefix
(LogGroupNamePrefix)
ConnectorLog
Group
The name of the Amazon CloudWatch log group for metric
filters.
Metric Namespace
Name Prefix
(MetricNamespaceName
Prefix)
ConnectorMetric
Namespace
The namespace name for the metric filters.
Management Console Configuration:
Parameter label
(name)
Default Description
Management Console
Instance Type
(InstanceType)
t2.micro The EC2 instance type for Management Console.
Management Console
User Name
(ApplicationUser)
ConsoleAdmin The user name for Management Console, consisting of 1-64
ASCII characters.
Management Console
Password
(ApplicationPassword)
Requires input The user password for Management Console. The password
must contain 8-64 printable ASCII characters, excluding /,
", ', \, and @, and must contain one uppercase letter, one
lowercase letter, and one number.
Connector Supporting Infrastructure Configuration:
Parameter label
(name)
Default Description
Communication
Worker Instance Type
(WorkerInstanceType)
t2.micro The EC2 instance type for the Communication Worker
host. The Communication Worker processes messages
coming from Connector Agent.
DynamoDB Read
Capacity
(ReadCapacity)
1 The read capacity of each DynamoDB table (1-10,000). For
more information, see the Amazon DynamoDB
documentation.
DynamoDB Write
Capacity
(WriteCapacity)
1 The write capacity of each DynamoDB table (1-10,000).
For more information, see the Amazon DynamoDB
documentation.
Kinesis Streams
Shards Count
(KinesisStreamsShards
Count)
2 The number of Kinesis Data Streams shards to provision
for the PI Data stream. For guidance, see the Kinesis Data
Streams Shards section and the Amazon Kinesis Data
Streams documentation.

Amazon Web Services – OSIsoft PI System to AWS Connector on the AWS Cloud March 2018
Page 27 of 33
Elasticsearch Configuration:
Parameter label
(name)
Default Description
Days to Live
(MaxIndexAge)
7 The number of days after which managed feeds are
removed from Amazon ES. Data is permanently stored in
Amazon S3.
Elasticsearch Node
Count
(ElasticsearchNodeCount)
1 The number of nodes in the Elasticsearch cluster.
Elasticsearch Node
Type
(ElasticsearchNodeType)
t2.small.
elasticsearch
The node type to be provisioned for the Elasticsearch
cluster.
S3 Lifecycle Management:
Parameter label
(name)
Default Description
Enable S3 Lifecycle
(EnableS3LifecycleRules)
yes Set to no if you want to disable Amazon S3 lifecycle rules.
For more information, see the Amazon S3 documentation.
IA Transition Period
(IATransitionPeriod
InDays)
90 The number of days after which data is transitioned to
infrequent access (IA) in Amazon S3. For more
information, see the Amazon S3 documentation.
Glacier Transition
Period
(GlacierTransition
PeriodInDays)
365 The number of days after which data is transitioned to
Amazon Glacier.
AWS Quick Start Configuration:
Parameter label (name) Default Description
Quick Start S3 Bucket
Name
(QSS3BucketName)
quickstart-reference The S3 bucket you have created for your copy of Quick Start
assets, if you decide to customize or extend the Quick Start
for your own use. The bucket name can include numbers,
lowercase letters, uppercase letters, and hyphens, but should
not start or end with a hyphen.
Quick Start S3 Key
Prefix
(QSS3KeyPrefix)
osisoft/latest/ The S3 key name prefix used to simulate a folder for your
copy of Quick Start assets, if you decide to customize or
extend the Quick Start for your own use. This prefix can
include numbers, lowercase letters, uppercase letters,
hyphens, and forward slashes.
Quick Start
Deployment Suffix
(QSDeploymentSuffix)
qs You can deploy this Quick Start multiple times in the same
AWS Region if you provide a different suffix with each
launch. This suffix is added to resource names to make them
unique for each deployment. Use this parameter to support
the deployment of production and test environments in the
Amazon Web Services – OSIsoft PI System to AWS Connector on the AWS Cloud March 2018
Page 28 of 33
Parameter label (name) Default Description
same AWS Region and in the same AWS account. The suffix
is a 1-7 character string that contains numbers and
lowercase letters.
5. On the Options page, you can specify tags (key-value pairs) for resources in your stack
and set advanced options. When you’re done, choose Next.
6. On the Review page, review and confirm the template settings. Under Capabilities,
select the check box to acknowledge that the template will create IAM resources.
7. Choose Create to deploy the stack.
8. Monitor the status of the stack. When the status is CREATE_COMPLETE, the OSIsoft
PI System to AWS Connector environment is ready.
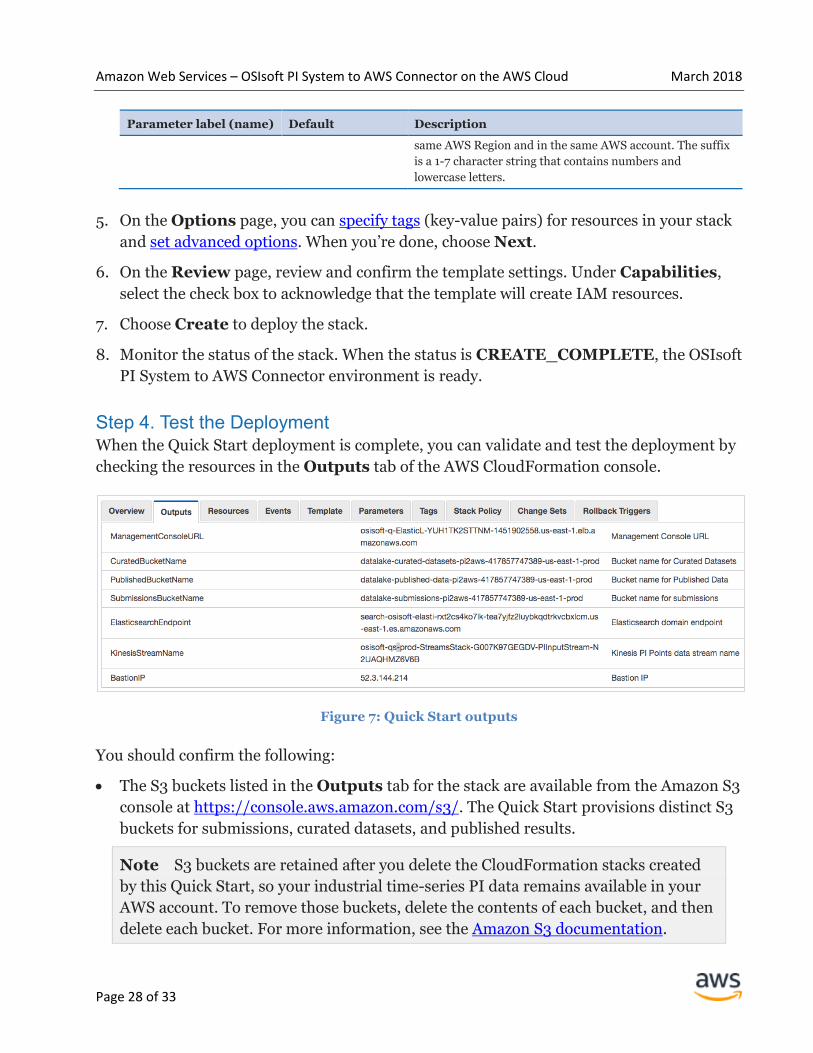
Step 4. Test the Deployment When the Quick Start deployment is complete, you can validate and test the deployment by
checking the resources in the Outputs tab of the AWS CloudFormation console.
Figure 7: Quick Start outputs
You should confirm the following:
The S3 buckets listed in the Outputs tab for the stack are available from the Amazon S3
console at https://console.aws.amazon.com/s3/. The Quick Start provisions distinct S3
buckets for submissions, curated datasets, and published results.
Note S3 buckets are retained after you delete the CloudFormation stacks created
by this Quick Start, so your industrial time-series PI data remains available in your
AWS account. To remove those buckets, delete the contents of each bucket, and then
delete each bucket. For more information, see the Amazon S3 documentation.
Amazon Web Services – OSIsoft PI System to AWS Connector on the AWS Cloud March 2018
Page 29 of 33
The Management Console URL listed in the Outputs tab for the stack points to a
running web application if you open it in a web browser.
The Kinesis data stream for streaming PI Points listed in the Outputs tab for the stack
is available in the Kinesis console at https://console.aws.amazon.com/kinesis/.
The ElasticSearch cluster listed in the Outputs tab for the stack is available in the
Amazon ES console at https://console.aws.amazon.com/es/, and the Kibana endpoint
listed on the Outputs tab is accessible from a web browser client within the Remote
Access CIDR that you specified when launching the Quick Start.
Step 5. Use the Management Console to Explore Connector Features
You’ll see a URL for Management Console in the Outputs tab. You can use Management
Console to synchronize your AF structure or PI Points. After successful synchronization,
you can establish a subscription to selected PI Points or use features such as interpolation
or backfilling to ingest your industrial time-series into the AWS Cloud.
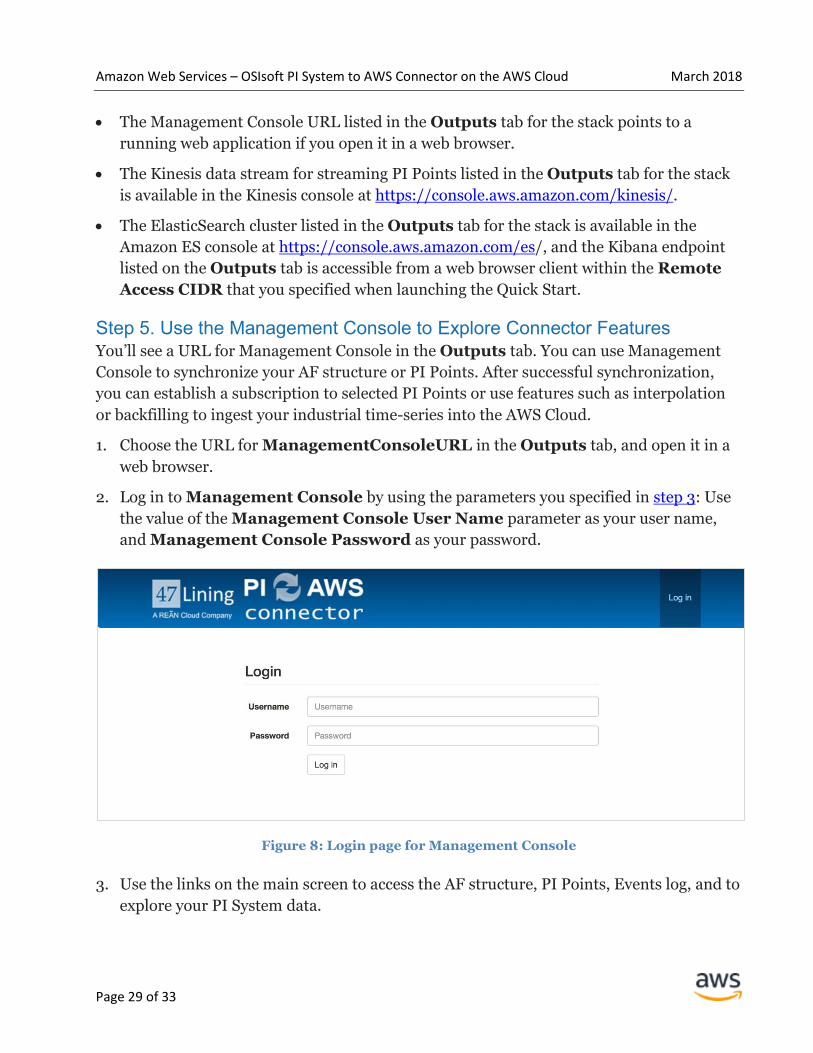
1. Choose the URL for ManagementConsoleURL in the Outputs tab, and open it in a
web browser.
2. Log in to Management Console by using the parameters you specified in step 3: Use
the value of the Management Console User Name parameter as your user name,
and Management Console Password as your password.
Figure 8: Login page for Management Console
3. Use the links on the main screen to access the AF structure, PI Points, Events log, and to
explore your PI System data.

Amazon Web Services – OSIsoft PI System to AWS Connector on the AWS Cloud March 2018
Page 30 of 33
Figure 9: Main screen of Management Console
Optional: Adding VPC Definitions
When you launch the Quick Start in the mode where a new VPC is created, the Quick Start
uses VPC parameters that are defined in a mapping within the Quick Start templates. If you
choose to download the templates from the GitHub repository, you can add new named
VPC definitions to the mapping, and choose one of these named VPC definitions when you
launch the Quick Start.
The following table shows the parameters within each VPC definition. You can create as
many VPC definitions as you need within your environments. When you deploy the Quick
Start, use the VPC Definition parameter to specify the configuration you want to use.
Parameter Default Description
VPCCIDR 10.0.0.0/16 The CIDR block for the VPC.
PublicSubnet1CIDR 10.0.128.0/20 The CIDR block for the public (DMZ) subnet 1 located in Availability
Zone 1.
PrivateSubnet1CIDR 10.0.0.0/19 The CIDR block for the private subnet 1 located in Availability Zone 1.
PublicSubnet2CIDR 10.0.144.0/20 The CIDR block for the public (DMZ) subnet 2 located in Availability
Zone 2.
PrivateSubnet2CIDR 10.0.32.0/19 The CIDR block for the private subnet 2 located in Availability Zone 2.
NumberOfAZs 2 The number of Availability Zones to use in the VPC.

Amazon Web Services – OSIsoft PI System to AWS Connector on the AWS Cloud March 2018
Page 31 of 33
FAQ
Q. I encountered a CREATE_FAILED error when I launched the Quick Start.
A. If AWS CloudFormation fails to create the stack, we recommend that you relaunch the
template with Rollback on failure set to No. (This setting is under Advanced in the
AWS CloudFormation console, Options page.) With this setting, the stack’s state will be
retained and the instance will be left running, so you can troubleshoot the issue. (Look at
the log files in %ProgramFiles%\Amazon\EC2ConfigService and C:\cfn\log.)
Important When you set Rollback on failure to No, you’ll continue to
incur AWS charges for this stack. Please make sure to delete the stack when
you’ve finished troubleshooting.
For additional information, see Troubleshooting AWS CloudFormation on the AWS
website.
Q. I encountered an “S3 bucket already exists” error during deployment.
A. S3 buckets created by this Quick Start are retained after you delete the CloudFormation
stacks, so your industrial time-series PI data remains available in your AWS account. To
remove those buckets, delete the contents of each bucket, and then delete each bucket.
Another option is to relaunch the Quick Start and change the Quick Start Deployment
Suffix parameter so that the names of the S3 buckets are differentiated from the previous
deployment.
Q. I don’t have OSIsoft AF Server installed in my data center. Can I benefit from this Quick
Start?
A. Yes, you can. Providing an endpoint for AF Server is optional. If you don’t have AF
Server installed, you will still be able to use the environment set up by this Quick Start to
connect to PI Data Archive.
Q. I launched this Quick Start with the explicit user and password authentication method,
and deployment was successful, but I can’t access the Management Console web
application.
A. If you’re using explicit user and password authentication, you need to open firewall ports
in your OSIsoft system and configure your PI System security settings to allow
authentication with explicit login. For more information, see the section about
authentication in this guide.

Amazon Web Services – OSIsoft PI System to AWS Connector on the AWS Cloud March 2018
Page 32 of 33
Q. I encountered a problem accessing the Kibana dashboard in Amazon ES.
A. Amazon ES is protected from public access. Make sure that your IP matches the input
parameter Remote Access CIDR, which is white-listed for Amazon ES.
Q. I deployed the Quick Start in the EU (London) Region, but it didn’t work.
A. This Quick Start includes services that aren’t supported in all regions. See the pages for
Amazon Kinesis Data Firehose and Amazon Kinesis Data Analytics on the AWS website for
a list of supported regions.
Q. I encountered a size limitation error when I deployed the AWS Cloudformation
templates.
A. We recommend that you launch the Quick Start templates from the location we’ve
provided or from another S3 bucket. If you deploy the templates from a local copy on your
computer or from a non-S3 location, you might encounter template size limitations when
you create the stack. For more information about AWS CloudFormation limits, see the AWS
documentation.
Additional Resources AWS services
Amazon EC2
https://docs.aws.amazon.com/AWSEC2/latest/WindowsGuide/
AWS CloudFormation
https://aws.amazon.com/documentation/cloudformation/
Amazon VPC
https://aws.amazon.com/documentation/vpc/
OSIsoft PI System
Overview and documentation
https://www.osisoft.com/corporate/connected-services/pisystem.html
Quick Start reference deployments
AWS Quick Start home page
https://aws.amazon.com/quickstart/
Amazon Web Services – OSIsoft PI System to AWS Connector on the AWS Cloud March 2018
Page 33 of 33
Git Repository You can visit our GitHub repository to download the templates and scripts for this Quick
Start, to post your comments, and to share your customizations with others.
Document Revisions Date Change In sections
March 2018 Initial publication —
© 2018, Amazon Web Services, Inc. or its affiliates, and 47Lining, a REAN Cloud
Company. All rights reserved.
Notices
This document is provided for informational purposes only. It represents AWS’s current product offerings
and practices as of the date of issue of this document, which are subject to change without notice. Customers
are responsible for making their own independent assessment of the information in this document and any
use of AWS’s products or services, each of which is provided “as is” without warranty of any kind, whether
express or implied. This document does not create any warranties, representations, contractual
commitments, conditions or assurances from AWS, its affiliates, suppliers or licensors. The responsibilities
and liabilities of AWS to its customers are controlled by AWS agreements, and this document is not part of,
nor does it modify, any agreement between AWS and its customers.
The software included with this paper is licensed under the Apache License, Version 2.0 (the "License"). You
may not use this file except in compliance with the License. A copy of the License is located at
http://aws.amazon.com/apache2.0/ or in the "license" file accompanying this file. This code is distributed on
an "AS IS" BASIS, WITHOUT WARRANTIES OR CONDITIONS OF ANY KIND, either express or implied.
See the License for the specific language governing permissions and limitations under the License.