Orchestra Enigmatica, User's Guide
32
www.fairlyconfusing.net SZCZ’s AUDIO ADVENTURES USER’S GUIDE
Transcript of Orchestra Enigmatica, User's Guide

www.fairlyconfusing.net
SZCZ’s AUDIO ADVENTURES
USER’S gUIDE

Licence and technical information
Orchestra Enigmatica is a virtual instrument for Native Instruments Kontakt sampler, you need full version of Kontakt 5.6.6 or newer to run it.
Instrument interface is fairly large, it takes 1000x750 pixels inside Kontakt. If you want to be able to access the whole interface without scrolling, be sure to use screen resolution of at least 1280x1024.
You are licensed to use this device and samples which come with it, in the creation of a recorded or live sound performance, free or commercial, without paying any additional licence fees or providing source attribution.
Please DO NOT: include provided scripts and samples in any music library or sample library; sell, re-package or re-distribute the samples or sampler programs.
USE AT YOUR OWN RISK! This device is provided ‘as is’ and there is no warranty of any kind.
�
Orchestra Enigmatica
Orchestra Enigmatica is vintage orchestral synthesizer instrument. Homage to early synthetic emulations of traditional acoustic instruments. Those sounds mostly required a vivid imagination and a kind of positive enthusiastic approach to hear the similarities to emulated instruments. However, as the time passed, they grew a charm of their own, becoming a different type of classical instrument.
While ‘Orchestra’ stands for a kind of historic exhibit, ‘Enigmatica’ hints a bit of experiment and innovation. The instrument features unique multi-arpeggiator function. It can populate several arpeggio patterns from the same chord, which can run at different rates, different rhythms and different algorithms. Arpeggios can run simultaneously and/or be mixed together creating complex note patterns from a simple chord.
Contents:
The Orchestra . . . . . . . . . . . . . . . . . . . . . . . . . . . . . . . . . . . . . . 3Interface panels . . . . . . . . . . . . . . . . . . . . . . . . . . . . . . . . . . . . 5Multi-arp . . . . . . . . . . . . . . . . . . . . . . . . . . . . . . . . . . . . . . . . . 5Keyboard split . . . . . . . . . . . . . . . . . . . . . . . . . . . . . . . . . . . . . 6Selecting sounds . . . . . . . . . . . . . . . . . . . . . . . . . . . . . . . . . . . 6Selecting arps . . . . . . . . . . . . . . . . . . . . . . . . . . . . . . . . . . . . . 7Arpeggiator modes . . . . . . . . . . . . . . . . . . . . . . . . . . . . . . . . . . 7Arpeggiator repeat sequence. . . . . . . . . . . . . . . . . . . . . . . . . . . . 9Arpeggiator chord trim . . . . . . . . . . . . . . . . . . . . . . . . . . . . . . . . 9Arpeggiator timing. . . . . . . . . . . . . . . . . . . . . . . . . . . . . . . . . . .10Arpeggiator dynamics and rhythm . . . . . . . . . . . . . . . . . . . . . . . . 11Overlapping notes . . . . . . . . . . . . . . . . . . . . . . . . . . . . . . . . . . .12Arpeggiator transpose . . . . . . . . . . . . . . . . . . . . . . . . . . . . . . . .13Random pitch . . . . . . . . . . . . . . . . . . . . . . . . . . . . . . . . . . . . . 14Out of range notes. . . . . . . . . . . . . . . . . . . . . . . . . . . . . . . . . . 14Tuning . . . . . . . . . . . . . . . . . . . . . . . . . . . . . . . . . . . . . . . . . 14Pitch bend . . . . . . . . . . . . . . . . . . . . . . . . . . . . . . . . . . . . . . . .15Combining arpeggiators / cycle mode . . . . . . . . . . . . . . . . . . . . . 16Latch . . . . . . . . . . . . . . . . . . . . . . . . . . . . . . . . . . . . . . . . . . . 17Sequence restart keyswitch . . . . . . . . . . . . . . . . . . . . . . . . . . . . 17Solo / mute arpeggiator . . . . . . . . . . . . . . . . . . . . . . . . . . . . . . 18Function menu . . . . . . . . . . . . . . . . . . . . . . . . . . . . . . . . . . . . 19Edit all switch . . . . . . . . . . . . . . . . . . . . . . . . . . . . . . . . . . . . . 22Diverge (round robin) . . . . . . . . . . . . . . . . . . . . . . . . . . . . . . . . 23Snapshots and multi-arp presets . . . . . . . . . . . . . . . . . . . . . . . . 23Keyswitch memory . . . . . . . . . . . . . . . . . . . . . . . . . . . . . . . . . 24Preset browser . . . . . . . . . . . . . . . . . . . . . . . . . . . . . . . . . . . . 25Loading preset from file . . . . . . . . . . . . . . . . . . . . . . . . . . . . . . 26Configuring voices . . . . . . . . . . . . . . . . . . . . . . . . . . . . . . . . . . 27Effect chains . . . . . . . . . . . . . . . . . . . . . . . . . . . . . . . . . . . . . 28Effects configuration . . . . . . . . . . . . . . . . . . . . . . . . . . . . . . . . 29MIDI output. . . . . . . . . . . . . . . . . . . . . . . . . . . . . . . . . . . . . . . 30Using custom samples . . . . . . . . . . . . . . . . . . . . . . . . . . . . . . . .31

�
The Orchestra
The instrument has 16 sounds and is mostly based on classic Italian synthesizer from 1979, Siel Orchestra. The original Orchestra had two versions, version 2 introduced in 1983 had more controllers, additional sounds and different filter. It is also known as ARP Quartet, as it had been bought by ARP and sold under it’s own label. Sample sets used in Orchestra Enigmatica come from the first version, produced by Siel.
The Orchestra has four sections: brass, strings, reed and piano. Each section has two sounds with different set of controllers, fun feature of the instrument is that the sounds can be combined freely. Brass section consists of trombone and trumpet, which sound like the same oscillator at different octave with different filter envelope. Strings have cello and violin and sound great, especially when layered. They also have a ‘perc’ variation, which is the same sound with a volume envelope and some attack noise (or maybe it’s a noisy envelope). Besides ‘perc’ there’s also a ‘solo’ mode, which is basically a plain saw oscillator. The solo variation has not been sampled for this instrument. The reed section has accordion, plain but charming, and musette, which is an odd flanged version of the accordion. Then there’s piano, which is very nice, with honky tonk variation, which seems parallel to musette, oddly flanged.
Different sections run separately and even have different noise floor. Generally the instrument is full of little quirks, maybe it’s the matter of age, but there are many little strange noises, volume drifts and small oddities going on, giving it almost organic nature.
To expand the Orchestra, I added few sounds designed with Sequential Circuits Six-Track, 1984 analog synthesizer from manufacturer famous of Prophet synthesizers. While Six-Track was a budget machine, it is quite capable, although very inconvenient to program, as the input interface is one knob plus little rubber numeric keyboard. However Six-Track was one of the first synthesizers to feature MIDI and all parameters can be controlled externally, allowing me to program it directly from Kontakt based front-end. Amazing how 34 years of technological gap is no barrier in connecting both machines. Compared to Siel, Six-Track seems quite tamed, there are no strange critters and noise floor is much better. However, unlike Siel, Six-track has a tendency to go out of tune rather quickly, which it is well known of.
Additional sounds are: brass, harp, harpsichord, opera singer, organ and recorder. They should be taken with a solid grain of salt too, as they are made to fit the vintage analog mood and the names are taken with a bit of creative imagination.
Siel Orchestra

�
Orchestra Enigmatica is really not a sample library, the sounds should be taken more like raw oscillators to be processed and combined inside Kontakt, than a ready-made library sounds. The sound are quite raw, there are no effects and minimal modulation to make them more fit for applying filters and effects of choice. Where there was a choice, a short attack and long release has been set to make it easier to apply volume envelope in Kontakt.
The sounds have been sampled with love and respect, trying to preserve the quirky nature of a vintage analog. There’s a sample for every key (both source instruments are velocity insensitive), continuous sounds have fairly long loop length, depending on sound complexity it can go up to 40 seconds, or even two minutes in one case. Sample loops have been set manually without any crossfading, I took time to find a good seamless loop in a raw recording.
In voice selector, sounds of Siel Orchestra are prefixed as “SL” (short of Siel) and sounds from Six-Track are prefixed as “ST”.
Six-Track

�
Interface panels
There are four interface panels in Orchestra Enigmatica:
MULTI-ARP – contains the core engine, it is where you configure arpeggiators, performance options and decide which sound to play.
VOICES – here you can tweak each sound, apply filter, envelopes, LFO, send levels, etc.
EFFECTS – contain controllers for insert and send effects.
RECORDER – internal MIDI recorder, you can record what is played to multichannel MIDI and then export it by drag’n’drop. Besides being handy, it allows you to get arpeggiators output to different MIDI channels (Kontakt’s MIDI out is one channel).
Multi-arp
Multi-arpeggiator is a unique feature of Orchestra Enigmatica, while it may look enigmatic at first sight, it’s not really complicated. It just offers a lot of options. The basic idea is to make it possible to run several different arpeggios originating from a single chord.
There are 8 arpeggiators which can be stacked (play simultaneously) or queued (play a number of steps one after another). The instrument has keyboard split functionality, part of keyboard can be used to trigger arpeggios and at the same time you can play a melody using the other region of the keyboard. Arpeggiator region is colored green on virtual keyboard and non-arpeggiated region is colored blue.
Each arp has “OFF” option as a mode of operation. When all arps are off, the whole key range can be played normally. You can also turn the whole arpeggiator engine on/off without disabling arps one by one, using arp on/off switch.
Normally when you press a key in arp region only the arpeggio can be heard. However you can play both, arpeggio and sustained notes in the arp region, when you turn on “thru” switch. You can use the switch to turn sustained sounds on/and off while holding a chord.
Observe the message line. Whenever you change a non-trivial controller, it will display a hint on what is happening, e.g. displaying the exact value of a knob.
interface panels
arp on/off switch
note thru switch
options panel switch
arp selector arp mode
message line
arpeggiator region
non-arpegiatted region

�
Keyboard split
Arp and sustained regions can be configured freely within the instrument range. Look for the KEYBOARD SPLIT section in multi-arp options panel. Use “split point” slider to set border key between regions and “arp side” switch to flip sides – arp region can be set to lower or upper part of the keyboard. Turning off “color keyboard” switch disables different colors on virtual keyboard – whole instrument range will be colored blue.
Selecting sounds
Use SELECT VOICE controllers to set which sounds to play. Sounds can be selected for each arp and for sustained sounds individually. Also, like in Siel Orchestra synthesizer, you can combine sounds by selecting multiple voices.
“Selected arp / through note” switches determine if you edit voice assignment for sustained notes or currently selected arp. Selecting an arp will automatically switch edit mode to arp. To edit assignment simply click on sound name. Switching on “multiple” button, enables selecting many sounds at once. Bright blue diode next to sound name indicates that it has been assigned to sustained notes, bright green diode indicates assignment to currently selected arp. You can pick sounds quicker, clicking directly on diodes, clicking on a blue diode sets sounds for sustained notes, clicking on green diode sets sounds for an arp.
Note that volume and pan knobs change color to blue when selecting “through note” switch. They can be used to tweak loudness and panning for each arp and sustained notes individually, independently from specific voice settings. Selecting many sounds at once makes an arp/sustained notes louder, so volume setting can be used to compensate on arpeggiator level.
volume and pan
controllers
select sound
sound assigned to through notes
allow selecting multiple sounds
edit selected arp or sustained notes setting
panel switch
keyboard split controllers
�
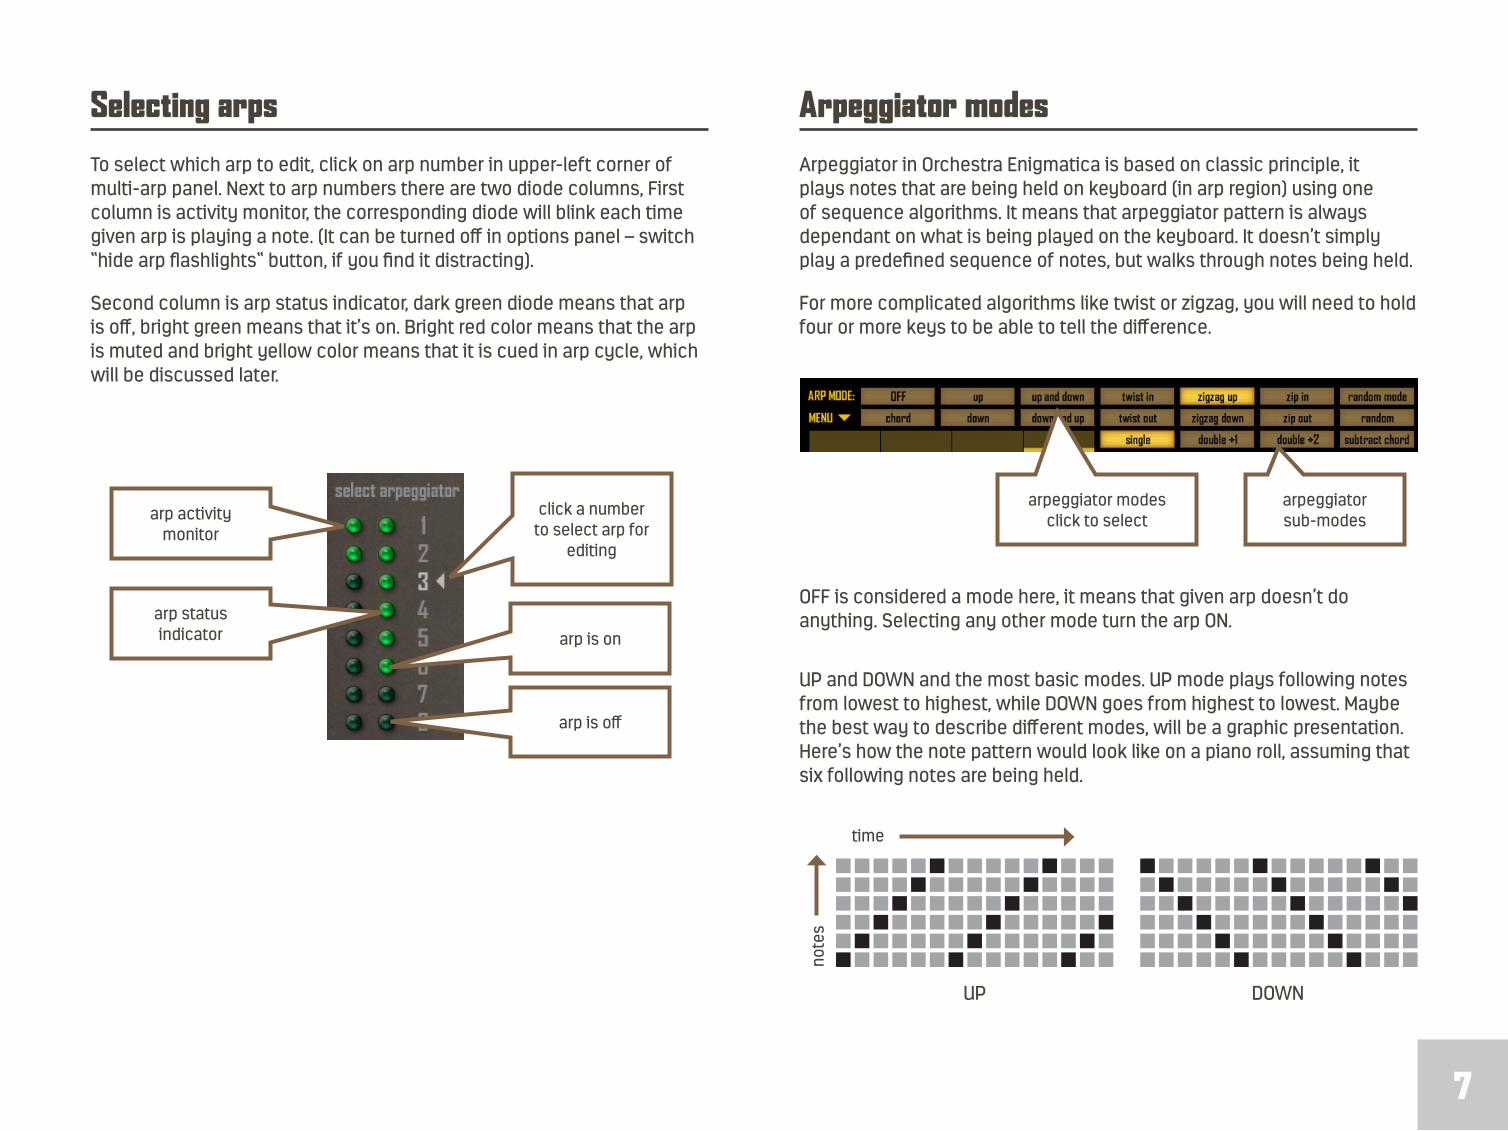
Selecting arps
To select which arp to edit, click on arp number in upper-left corner of multi-arp panel. Next to arp numbers there are two diode columns, First column is activity monitor, the corresponding diode will blink each time given arp is playing a note. (It can be turned off in options panel – switch “hide arp flashlights“ button, if you find it distracting).
Second column is arp status indicator, dark green diode means that arp is off, bright green means that it’s on. Bright red color means that the arp is muted and bright yellow color means that it is cued in arp cycle, which will be discussed later.
Arpeggiator modes
Arpeggiator in Orchestra Enigmatica is based on classic principle, it plays notes that are being held on keyboard (in arp region) using one of sequence algorithms. It means that arpeggiator pattern is always dependant on what is being played on the keyboard. It doesn’t simply play a predefined sequence of notes, but walks through notes being held.
For more complicated algorithms like twist or zigzag, you will need to hold four or more keys to be able to tell the difference.
OFF is considered a mode here, it means that given arp doesn’t do anything. Selecting any other mode turn the arp ON.
UP and DOWN and the most basic modes. UP mode plays following notes from lowest to highest, while DOWN goes from highest to lowest. Maybe the best way to describe different modes, will be a graphic presentation. Here’s how the note pattern would look like on a piano roll, assuming that six following notes are being held.
timeno
tes
UP DOWN
arpeggiator modes click to select
arpeggiator sub-modesarp activity
monitor
arp status indicator
click a number to select arp for
editing
arp is on
arp is off

�
Then there are UP and DOWN derivatives...
UP AND DOWN DOWN AND UP
...and more exotic patterns.
TWIST IN TWIST OUT
ZIGZAG UP ZIGZAG DOWN
ZIP IN ZIP OUT
CHORD plays all notes at once and RANDOM plays notes in random order.
CHORD RANDOM
Additionally you can select one of four sub-modes, which allows arp to play more than one note in one turn. Here’s how sub-modes work on the same example, coupled with UP mode.
UP / single UP / subtract chord
UP / double +1 UP / double +2
Finally there’s a special mode: CHORD / subtract chord, which logically should produce no notes. But as no notes are no fun, it produces something different:
CHORD / subtract chord
In arp mode controller block, there’s “random mode” button. It’s not an actual arp mode. Selecting this option will make the machine select a random mode each time it completes the velocity sequence.

�
Arpeggiator repeat sequence
In addition to arp modes and sub-modes, there’s repeat sequence. It’s a sequenced version of “stroke” option known from Kontakt’s factory arpeggiator script. It tells the sequencer how many times to repeat each step. Following columns stand for following steps and “x” indicates a loop point. Pressing “?” button will generate a random repeat sequence.
repeat sequence “1” (default)
repeat sequence “3-1-2-1-1”
UP / “1”
And here’s how it looks when applied to our example UP mode pattern.
UP / “2”
UP / “3-1” UP / “2-1-1-4”
Arpeggiator chord trim
Chord trim setting can restrict arp mode algorithm to only a portion of held chord. For example, following notes are being held: C-D-E-F-G and we only want given arp to go through E-F-G. To do that we set chord trim to 3R (three from the right), to restrict chord range to C-D-E, we set chord trim to 3L (three from the left). While it doesn’t make any sense with a single arp, it can be very useful when creating a multi-arp patch, being a way to combine different algorithms.
And here’s how it looks on 6-note UP pattern example.
UP / chord trim is OFF UP / chord trim = 3R
UP / chord trim = 4L UP / chord trim = 1R
chord trim controller

10
Arpeggiator timing
Arp rate defines interval between following notes in arp pattern. That is, how often following notes are played. Rate of sixteenth means that it takes sixteenth note for each pattern step. Available arp rates are: 32nd, sixteenth, eighth, quarter, half and whole note, plus modifiers: triplet and 3/4. A rate of 3/4 quarter, means that sequencer moves every three sixteenth notes. You can only select one modifier at a time, triplet or 3/4.
All arps are tempo synchronized and each can run at any rate.
There are also two random range modes: free random and quantum random, which are range based. You will notice that when random rate is selected you can select multiple rates. For example when sixteenth, eight and quarter are selected, it means that range for random step is from sixteenth to quarter note. In “free random” mode step duration will be picked freely from defined range, it can be any value quantized to midi tick (quarter note /960). On the other hand, “quantum rand” mode will pick one of the range, so step duration can be sixteenth, eight or quarter note. So free mode will play erratic rhythm and quantum mode will stay with the basic grid.
There are three arp controllers which will affect arp timing: note duration, step swing and sequence delay. Time related knobs are colored white.
“Note duration” controller is self explanatory, defines note duration for all motes generated by given arp.
“Step swing” changes timing of every other step to create a swing feel. Positive swing makes every odd note play too late, negative swing makes it play too early.
“Sequence delay”, as the name indicates, delays the entire arp pattern. It simply makes given arp start later than others, creating an offset. A simple, example application: set two arps to eighth note rate, set second arp delay to 50%. As result you get a sixteenth note rate pattern where every second note is played by the second arp. It’s one way to mix different arp modes.
Remember that sequence delay is applied at the beginning of the sequence, changing sequence delay setting while arps are playing does not produce any audible result. You need to restart the arp (release keys and press another chord) to notice the difference.
All three controllers are defined as a percentage of arp rate. So, for example, if arp rate is eight note and you set note duration to 50% it will play a sixteenth notes in eighth note interval.
arp rate selection
arp random rate range selection
arp timing parameters

11
Arpeggiator dynamics and rhythm
You can see two sequence tables in arp controller area. Upper table it pitch sequence and lower table is velocity sequence. You can bring focus to one or the other table for easier editing.
Velocity sequence has two functions. It defines arp pulse, which sequence steps are louder and which quieter. It also defines arp rhythm. Setting a velocity step to zero, creates and empty step, pattern sequencer doesn’t play a note on an empty step, so this way you can create a varied rhythm.
For example, a C-D-E chord in UP mode applied to above sequence will play like this:
C D E C D E
If you like, you can make the sequencer move through chord at zero velocity steps, making it skip steps. To do so switch “count zero” button.
With “count zero” enabled the same sequence will play like this:
C D E D E D
Velocity sequence size can be set to any value from 1 to 32 steps, using “velocity size” knob. You can also apply a random velocity to every note in arp pattern, using “random velocity” knob, which works bipolar. It means that with the setting 5, a random value from range -5 to 5 will be added to note velocity. You can also adjust entire selected arp loudness with volume knob. Just note if the volume knob is colored green, as the same knob is used to set volume of sustained notes, it is colored blue then.
press to set focus on pitch sequence
press to set focus on velocity sequence
count zero button
velocity sequence size
random velocity range
sequence volume

12
Velocity of following steps can also depend on velocity of the corresponding notes in chords which triggered the arp pattern. Look at velocity balance slider in options panel. It defines how much velocity value of given note in arp pattern depends on value of current step in velocity sequence and how much it depends on velocity value of the parent note. Setting the slider all the way to the right makes following notes velocity match the values from velocity sequence. When you set the slider all the way to the left, velocity sequence only defines the rhythm – no notes are played on zero velocity steps – and note velocity is copied from parent note.
Overlapping notes
Kontakt can play the same sample twice at the same time. In multi-arp environment it can happen easily that the same note of the same sound is being triggered simultaneously, two or more times. Simplest example: create a copy of an arp and have two exact arps running at the same time. It’s like loading the same patch to Kontakt twice, the result sounds just like playing a single sound, but louder.
By default, in such case arp sequencer script only plays one instance of the note (assuming it is mapped to the same voice). But, if you would like to use this effect creatively, this mechanism can be turned off. Flip “overlapping” switch in “select voice” section. When the diode is bright, it means that overlapping notes are allowed. This is a general switch, it always applies to all arps.
However, if you want to use Kontakt as MIDI generator or record performance to MIDI object in recorder panel, it may be a good idea to keep overlapping disallowed.
allow overlapping
notes switch
13
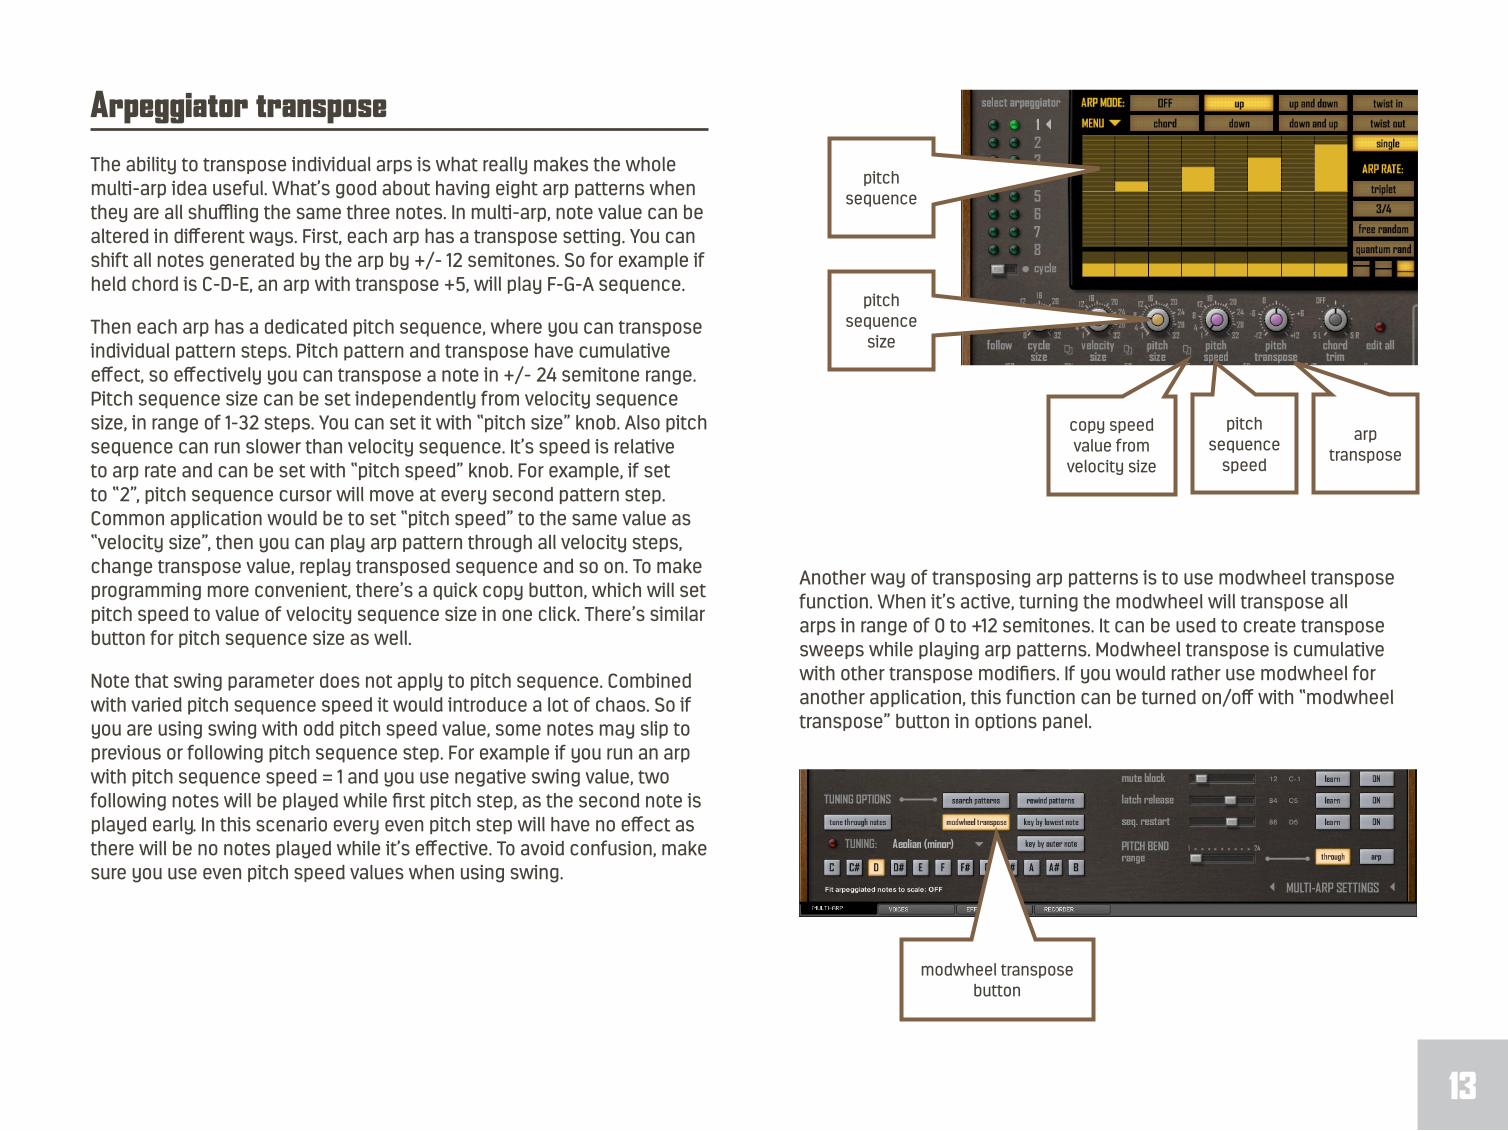
Arpeggiator transpose
The ability to transpose individual arps is what really makes the whole multi-arp idea useful. What’s good about having eight arp patterns when they are all shuffling the same three notes. In multi-arp, note value can be altered in different ways. First, each arp has a transpose setting. You can shift all notes generated by the arp by +/- 12 semitones. So for example if held chord is C-D-E, an arp with transpose +5, will play F-G-A sequence.
Then each arp has a dedicated pitch sequence, where you can transpose individual pattern steps. Pitch pattern and transpose have cumulative effect, so effectively you can transpose a note in +/- 24 semitone range. Pitch sequence size can be set independently from velocity sequence size, in range of 1-32 steps. You can set it with “pitch size” knob. Also pitch sequence can run slower than velocity sequence. It’s speed is relative to arp rate and can be set with “pitch speed” knob. For example, if set to “2”, pitch sequence cursor will move at every second pattern step. Common application would be to set “pitch speed” to the same value as “velocity size”, then you can play arp pattern through all velocity steps, change transpose value, replay transposed sequence and so on. To make programming more convenient, there’s a quick copy button, which will set pitch speed to value of velocity sequence size in one click. There’s similar button for pitch sequence size as well.
Note that swing parameter does not apply to pitch sequence. Combined with varied pitch sequence speed it would introduce a lot of chaos. So if you are using swing with odd pitch speed value, some notes may slip to previous or following pitch sequence step. For example if you run an arp with pitch sequence speed = 1 and you use negative swing value, two following notes will be played while first pitch step, as the second note is played early. In this scenario every even pitch step will have no effect as there will be no notes played while it’s effective. To avoid confusion, make sure you use even pitch speed values when using swing.
Another way of transposing arp patterns is to use modwheel transpose function. When it’s active, turning the modwheel will transpose all arps in range of 0 to +12 semitones. It can be used to create transpose sweeps while playing arp patterns. Modwheel transpose is cumulative with other transpose modifiers. If you would rather use modwheel for another application, this function can be turned on/off with “modwheel transpose” button in options panel.
pitch sequence
pitch sequence
size
pitch sequence
speed
arp transpose
copy speed value from
velocity size
modwheel transpose button
14
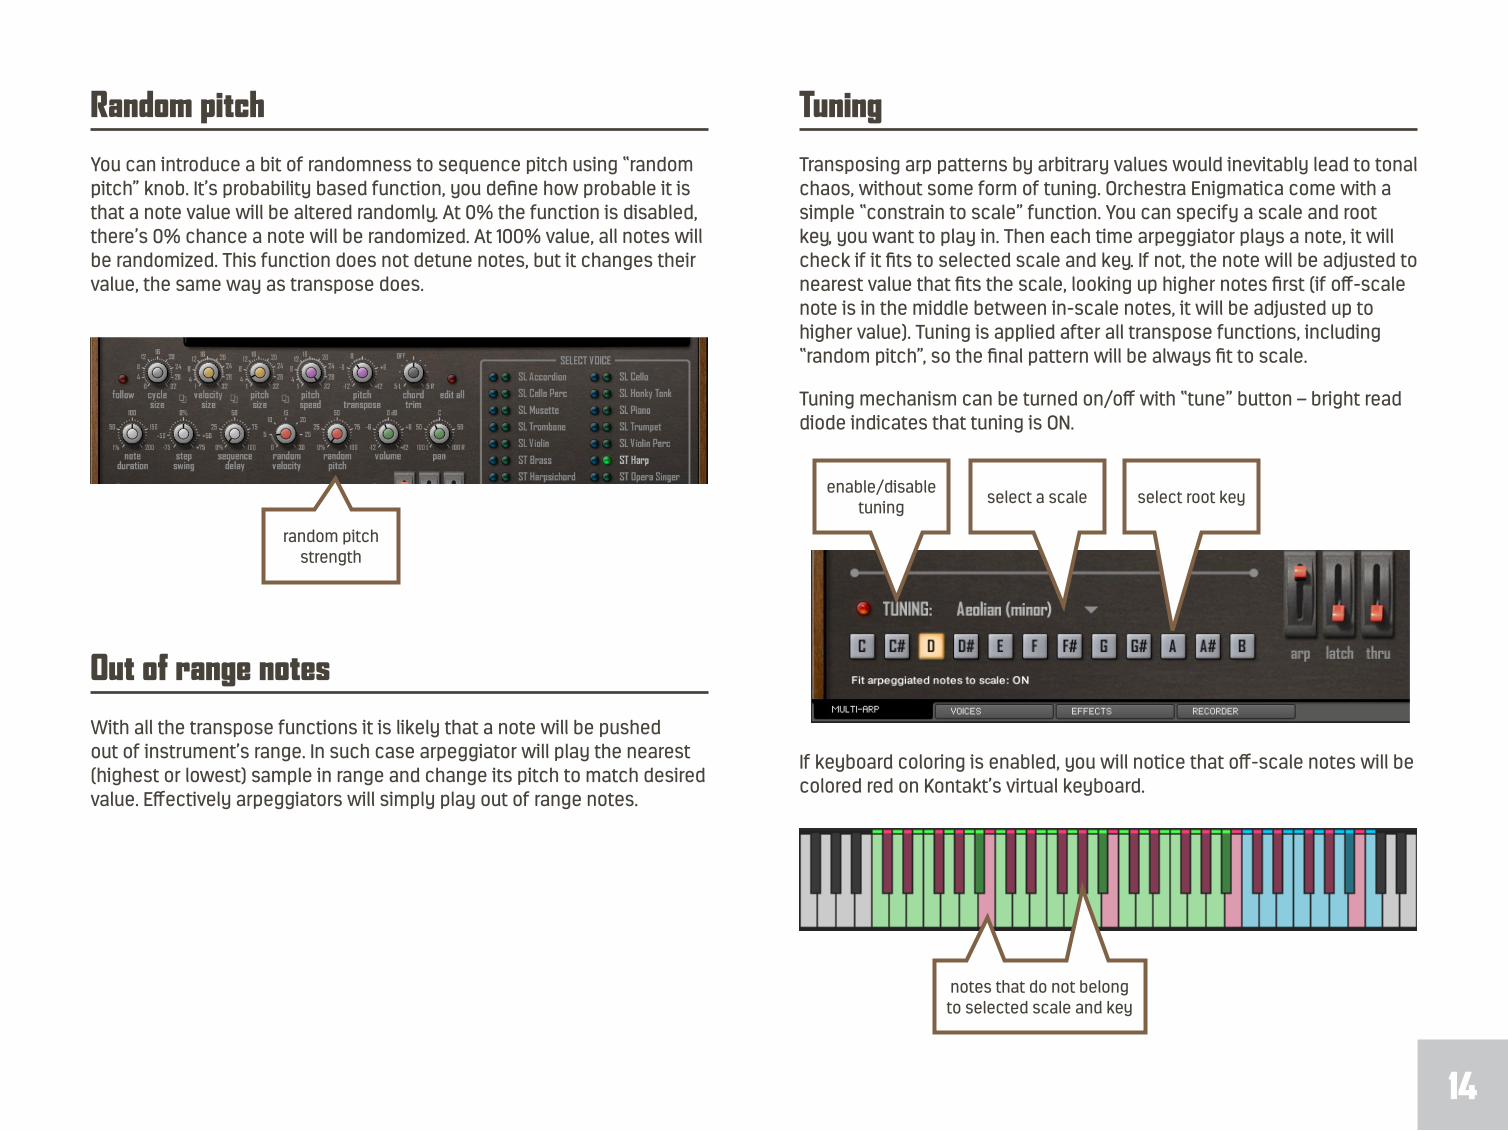
Random pitch
You can introduce a bit of randomness to sequence pitch using “random pitch” knob. It’s probability based function, you define how probable it is that a note value will be altered randomly. At 0% the function is disabled, there’s 0% chance a note will be randomized. At 100% value, all notes will be randomized. This function does not detune notes, but it changes their value, the same way as transpose does.
Tuning
Transposing arp patterns by arbitrary values would inevitably lead to tonal chaos, without some form of tuning. Orchestra Enigmatica come with a simple “constrain to scale” function. You can specify a scale and root key, you want to play in. Then each time arpeggiator plays a note, it will check if it fits to selected scale and key. If not, the note will be adjusted to nearest value that fits the scale, looking up higher notes first (if off-scale note is in the middle between in-scale notes, it will be adjusted up to higher value). Tuning is applied after all transpose functions, including “random pitch”, so the final pattern will be always fit to scale.
Tuning mechanism can be turned on/off with “tune” button – bright read diode indicates that tuning is ON.
Out of range notes
With all the transpose functions it is likely that a note will be pushed out of instrument’s range. In such case arpeggiator will play the nearest (highest or lowest) sample in range and change its pitch to match desired value. Effectively arpeggiators will simply play out of range notes.
If keyboard coloring is enabled, you will notice that off-scale notes will be colored red on Kontakt’s virtual keyboard.
random pitch strength
enable/disable tuning
select a scale select root key
notes that do not belong to selected scale and key

15
Pre-programmed scale pattern bank includes common scales/modes and numerous exotic ones. By default “constrain to scale” function only works on arpeggiator generated notes, not interfering with notes played by hand. If you’d like to experiment with scales you are not familiar to, you can enable adjusting “through notes”, look at extended tuning options in “presets and options” panel. Switch “tune through notes” button to enable tuning off all notes.
Changing root key within a song project or performance can done by automating root key buttons. However there are more convenient ways to do it. Changing root key can be automated using unassigned midi notes out of instrument’s range (keys without coloring on virtual keyboard). To enable this function, set “key by outer note” button.
Root key can be also automatically set to match the lowest note in chord held in arpeggiator range (it works only in arpeggiated keyboard range, so you can play a melody without changing the key). To enable this option set “key by lowest note” button.
Tuning mechanism has also a little bonus, a pattern search function. It’s not a performance function (there’s no use for it while playing), but it lets you to explore included pattern bank. It will tell you which scales and root keys given chord belongs to. To use it, press a chord first (latch option can be used). Now while there are some keys being held, press “search patterns” button, the program will automatically select next root key / scale that matches played chord. Pressing “search patterns” repeatedly lets you browse through scale/key combinations that fits given chord. Pressing “rewind patterns” button, automatically selects “Ionian C”, the first scale-key combination on the list. Use it if you don’t want to click through all of the exotic scales.
enable tuning of notes played by
hand
scale search function – see which scales match the
chord being played
root key selecting options
Pitch bend
Pitch wheel can be used for the pitch bend effect. It can be fine-tuned in options panel. You can set the pitch bend range from 1 to 24 semitones. Also you can specify if pitch bend should apply to arpeggiated (“arp” button) or/and non-arpeggiated notes (“through” button). Switching both buttons off disables pitch bend.
pitch bend range slider pitch bend target

16
Combining arpeggiators / cycle mode
The fun thing about multi-arp is that you can combine arpeggiator modes. For example, play two steps of up mode, then play two steps of down mode and so on. It can be done by preparing velocity sequences in such way that given arps do not play simultaneously. Here’s simple example:
arp 1 velocity sequence arp 2 velocity sequence
In this setup, if you set the same rate for both sequences, the machine will play one note of arp 1, then one note of arp 2 and so on, in a loop. You can set arp to different modes and/or transpose one of them to create a combined arpeggio.
However, this method is somewhat laborious, especially when you want to add another arp to previously set combination, or run arps at different rates. Instead, you can use the “cycle mode”. Cycle mode switch is located right below arp selector. When cycle mode is enabled, arpeggio patterns will be played one after another in a queue, instead of being played simultaneously.
In cycle mode each arp is using additional parameter, “cycle size” (cycle size knob is inactive, when cycle mode if off). It states how many steps of given arp should be played before switching to next arp. To replicate the above, velocity pattern based setup in cycle mode, you just need to configure two arps and set both cycle size parameters to “1”. To add another arp to the queue, you simply set it up and pick a cycle size.
Also, if you like, you can exclude some arps from the queue, by setting the cycle size to “zero”. Excluded arp will play simultaneously with queued arps, just like when cycle mode if off. Queued arps have yellow colored diode next to arp number, excluded arps have green diode. When sequencer is running, bright yellow diode will indicate queued arp which is playing at the moment.
The sequencer always starts from first queued arp, so the order of queued arps matters. When you release all keys and press arpeggiated chord again, the sequence will restart form the beginning. You can see that for queued arps there is additional sequence table below velocity sequence. It is purely informative, if arp is active it shows cycle cursor position, when cursor reaches the end of table, the arp is being paused and next arp in queue is activated. When the cycle turns around and given arp is activated again, it starts right where it stopped, continuing from previous position of pitch and velocity sequences.
If you’d like to observe what is happening in following arps in the cycle as the sequencer is running, turn “follow” switch on. Then sequencer will automatically select new arp when cycling through queue.
queued arps
arp excluded from queue
cycle mode switch
cycle size knob
cycle follow switch
arp which is playing now velocity sequence cursor
cycle cursor

17
Latch
Latch is a convenience function, it can keep the keys down for you. When latch is activated and you press a chord, the arpeggio pattern will keep running after you release the keys. You will notice that the keys will stay down on virtual keyboard. For as long as any key is being held in arpeggiated range, pressing another key will add it to latched chord. If you release all keys and play another chord, previous chord will be released and the machine will latch a new chord.
Note that latch only applies to arpeggiated notes, it has no effect on notes played in non-arpeggiated range, also it has no effect on through notes played in arp range (they will stop playing as you release the keys).
To activate/deactivate latch, turn the latch switch placed next to arp on/off switch. To stop the arpeggiator sequencer turn the latch switch off or use “latch release” keyswitch. Latch release key will be inverse colored on virtual keyboard (black on white keys or white on black keys). The keyswitch coloring will be only visible when latch switch is on, if latch switch is off, the key will resume normal functionality.
Latch release keyswitch can be assigned to any convenient note, you can set it up in options panel. It can be placed using a slider, you can type in a specific note number to value edit box or use MIDI learn function. The keyswitch can be turned on/off using “ON” button.
Sequence restart keyswitch
Multi-arp can produce complex sequences which may unroll differently, depending on how they are played. A sequence can be restarted anytime, using a keyswitch. “Sequence restart” keyswitch can be configured in similar way as “latch release” keyswitch in options panel. Pressing restart key has the same effect as releasing all keys and pressing the same chord back again, but without stopping the sequencer.
latch switch
change keyswitch
position with the slider
or type note value here
or use MIDI learn
enable/ disable
keyswitch
sequence restart keyswitch position
latch release keyswitch
sequence restart keyswitch

18
Solo / mute arpeggiator
With many arps playing simultaneously, it can sometimes be hard to figure out which arp is playing what. To make examining arp program easier, you can use “arp solo” switch. When it’s on, the sequence will continue playing normally, but only currently selected arp will be audible.
A reverse approach is possible, using arp mute switches. Press a diode button, which color indicates arp status, to mute/un-mute it. Muted arp will play silently, that is all sequences will be running normally, but it will produce no notes. The status diode of a muted arp will be colored bright red.
Mute buttons can be automated by keyswitch block and can be used as performance function – you can mute/un-mute parts of the sequence as it plays. You can define mute keyswitch block with controllers in options panel. Set the position of the first note in keyswitch block. Eight following notes will act as mute/un-mute switch, ninth note will act as mute all switch and tenth as un-mute all. Mute keyswitches will be colored according to following arps status.
Mute and solo functionality is independent, so it you solo a muted arp, the machine will be silent.
MUTE KEYSWITCH BLOCK
muted arp
active arp
unused arp
mute all
un-mute all
solo switch
active arp
muted arp
click to mute /
un-mute

19
Function menu
Multi-arp comes with numerous edit functions, which can be useful in creating a program. Functions are available from a drop-down menu and are organized in groups:
FUNCTIONS (general arp management)
Move selected arp down / move selected arp up – in cycle mode arp order has impact on final sequence, so a function to easily re-order arps can be handy. Example “move down” called when arp 2 is selected will swap arp 2 with arp 3.
Duplicate selected arp – creates a copy of selected arp, the copy will be placed into next unused arp slot (unused means that the arp is in OFF mode). If all arps are active, the function has no effect. It can be very handy in programming arp combinations.
Reset selected arp – sets all arp parameters to default values and turns it OFF.
Sort all arps – is a clean-up function. It resets all unused arps and puts active arp on top of the list. It is purely aesthetic function with no effect on how the program sounds.
RESET ALL arps – as reset selected arp, but it applies to all arps. It resets all parameters, so use it with caution, there is no undo for it.
Remaining functions only apply to arp sequences: pitch and velocity sequence. You can specify which sequence you would like to process, by setting a focus button. When focus is set on velocity sequence, a function will apply only to velocity sequence. You can also set focus to both sequences (they will appear equally large), in such case the function will apply to both sequences. Since pitch sequence is bipolar and velocity sequence is unipolar, some functions can have a different effect depending on sequence applied to.
function menu focus buttons

20
SEQUENCE MEMORY (copy/paste functions)
Copy sequence / paste sequence – you can copy a sequence to memory and then paste it to another arp. Sequence size is being copied along with sequence contents. There is separate clipboard memory for both sequence types – which means you can’t copy pitch sequence into velocity sequence.
Mix paste – instead of replacing the old sequence with sequence from clipboard, this function creates a mix of the two (calculates the average value). This function preserves size of target sequence and interpolates the memorized one.
example:
sequence in memory mix paste to result
Difference paste – similar to mix paste, but calculates the difference of both values.
example:
sequence in memory difference paste to result
Restore sequence – undo function. Each time sequence transform function is called, current sequence is saved in undo memory. If you’re not happy with result of called function, you can restore given sequence to previous state. Calling undo function again will cancel the undo restoring previous sequence state. This function only restores sequence program, it won’t help if you want to cancel resetting entire arp.
GENERATE SEQUENCE (replace current sequence with a predefined type)
Reset – sets all sequence steps to default value. Unlike other sequence transforms it also resets sequence rhythm.
Random – create a random sequence.
Linear fade-in – writes a fade in from smallest to largest value within defined sequence size. Like all following sequence transform functions it will skip zero value velocity sequence steps which define sequence rhythm.
examples:
initial sequence linear fade-in
initial sequence linear fade-in
Square / cubic / sine fade-in – different fade-in curves. You can notice there are no fade-out functions. It’s a design choice to make menu list shorter, fade-out can be generated by reversing a fade-in.
examples:
square fade-in cubic fade-in sine fade-in

21
Peak/dip – creates linear fade-in followed by fade-out, or the same in reversed order.
examples:
peak dip
TRANSFORM SEQUENCE (following functions will alter the initial sequence)
Randomize – change sequence step values a little
example:
initial sequence result
Push one step – slide whole sequence one step to the right.
example:initial sequence result
Pull one step – slide whole sequence one step to the left.
Push halfway – slide whole sequence half way the sequence size
example:initial sequence result
Clone – increase sequence size by 100% and duplicate initial sequence. Note that this function needs relatively small sequence size value, so it can be increased. Applying it to 32 step long sequence will have no affect as the sequence size is already at maximum.
example:initial sequence result
Mirror clone – same as clone, but reverse duplicated sequence.
example:initial sequence result
Reverse – order the sequence backwards
example:initial sequence result
Invert – invert sequence values. In some cases the result may be the same as reverse, but it’s different function.
example:
initial sequence result

22
Align to top – change sequence values, so the highest value is at maximum, while preserving the sequence relative values between steps.
example:initial sequence result
Align to bottom – change sequence values, so the lowest value is at minimum, while preserving the sequence relative values between steps.
example:initial sequence result
Maximize – expand sequence value range so the highest value reaches the maximum.
example:initial sequence result
Compress – reduce all values proportionally.
example:
initial sequence result
GENERATE PATTERN (these functions will set some steps to zero value to generate a rhythm)
I-I- / I--- / etc. – are predefined patterns which can be applied to sequence
example:initial sequence I-I- pattern applied
Edit all switch
“Edit all” switch lets you make mass edits, when it’s on any parameter change will apply to all active arps. Muted and disabled (OFF) arps will not be affected. “Edit all” is effective on all arp parameter knobs, arp mode (except when turning an arp off), rate and repeat pattern, voice selection. It is not effective on sequence pattern edits. This is powerful function and it’s easy to forget it’s on and overwrite whole program, so use it cautiously.
edit all switch
23
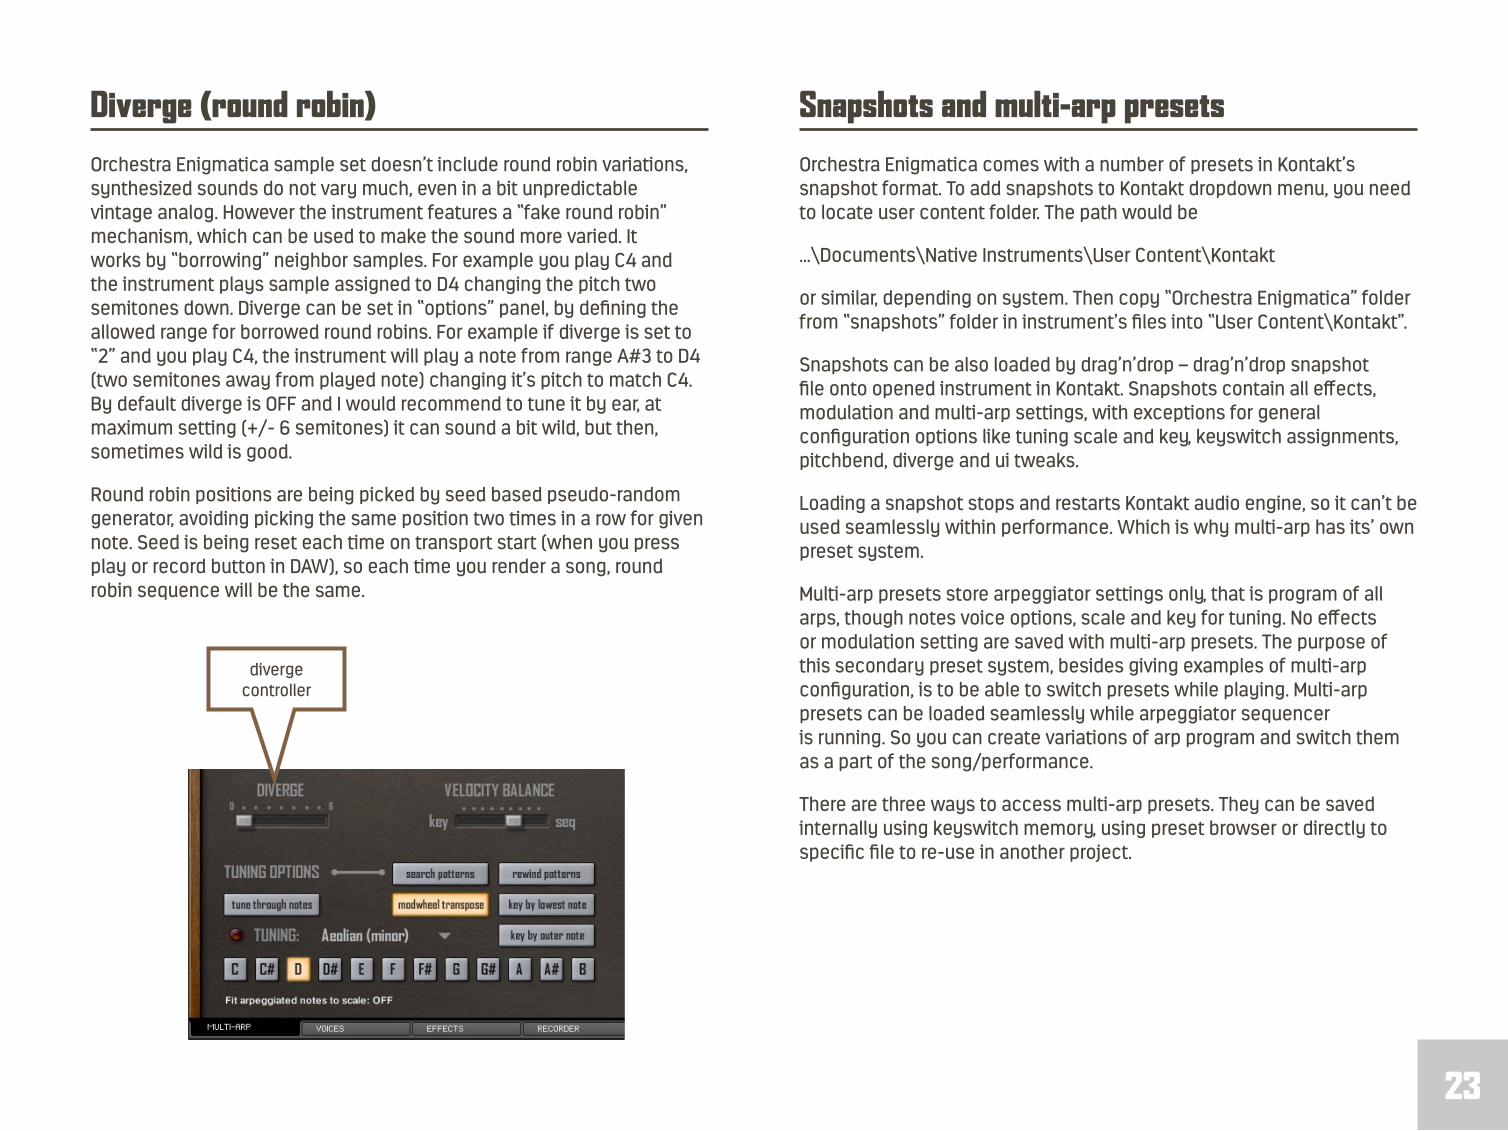
Diverge (round robin)
Orchestra Enigmatica sample set doesn’t include round robin variations, synthesized sounds do not vary much, even in a bit unpredictable vintage analog. However the instrument features a “fake round robin” mechanism, which can be used to make the sound more varied. It works by “borrowing” neighbor samples. For example you play C4 and the instrument plays sample assigned to D4 changing the pitch two semitones down. Diverge can be set in “options” panel, by defining the allowed range for borrowed round robins. For example if diverge is set to “2” and you play C4, the instrument will play a note from range A#3 to D4 (two semitones away from played note) changing it’s pitch to match C4. By default diverge is OFF and I would recommend to tune it by ear, at maximum setting (+/- 6 semitones) it can sound a bit wild, but then, sometimes wild is good.
Round robin positions are being picked by seed based pseudo-random generator, avoiding picking the same position two times in a row for given note. Seed is being reset each time on transport start (when you press play or record button in DAW), so each time you render a song, round robin sequence will be the same.
Snapshots and multi-arp presets
Orchestra Enigmatica comes with a number of presets in Kontakt’s snapshot format. To add snapshots to Kontakt dropdown menu, you need to locate user content folder. The path would be
...\Documents\Native Instruments\User Content\Kontakt
or similar, depending on system. Then copy “Orchestra Enigmatica” folder from “snapshots” folder in instrument’s files into “User Content\Kontakt”.
Snapshots can be also loaded by drag’n’drop – drag’n’drop snapshot file onto opened instrument in Kontakt. Snapshots contain all effects, modulation and multi-arp settings, with exceptions for general configuration options like tuning scale and key, keyswitch assignments, pitchbend, diverge and ui tweaks.
Loading a snapshot stops and restarts Kontakt audio engine, so it can’t be used seamlessly within performance. Which is why multi-arp has its’ own preset system.
Multi-arp presets store arpeggiator settings only, that is program of all arps, though notes voice options, scale and key for tuning. No effects or modulation setting are saved with multi-arp presets. The purpose of this secondary preset system, besides giving examples of multi-arp configuration, is to be able to switch presets while playing. Multi-arp presets can be loaded seamlessly while arpeggiator sequencer is running. So you can create variations of arp program and switch them as a part of the song/performance.
There are three ways to access multi-arp presets. They can be saved internally using keyswitch memory, using preset browser or directly to specific file to re-use in another project.
diverge controller

24
Keyswitch memory
Keyswitch memory purpose is to be able to load pre-programmed arpeggiator variations as the sequencer is playing. There are 12 memory slots stored within patch/DAW project. Stored preset can be loaded by pressing a key on MIDI keyboard. You can position memory keyswitch block anywhere in MIDI range. Keyswitch memory can be configured in “options” panel.
Setting up memory keyswitch block is similar to defining other keyswitches. You position the first key in the block, using a slider, value box or MIDI learn. Memory keyswitches can be disabled, if not needed, using “ON” button. Placing keyswitches within instrument range will overwrite keys functionality, that is given key will serve as preset load button and can’t be used to play a note. If you have a limited range MIDI controller and you don’t need 12 memory slots, you can limit memory block size and use fewer keyswitches.
Empty memory keyswitches will be colored yellow on virtual keyboard, written keyswitches will be colored orange. To save a preset to keyswitch, press “save to key” button on “presets and options” panel and then press keyswitch you want to save to. To load saved preset simply press the MIDI key assigned to it. You can also clear a memory slot, by pressing “clear key” button and then memory keyswitch you want to wipe.
Tuning scale and root key, as well as voice configuration for arps and through notes are stored in multi-arp presets, but you can choose to ignore these when loading a preset. If “read routing” button if off, voice assignments will not be read when loading presets. If “read tuning” button if off, scale and root key data will not be read. These options apply to all presets either loaded from keyswitch or with preset browser.
Note that each time you load a preset, the arpeggiator sequencer is being restarted. Loading the same preset repeatedly will have the same effect as using “sequence restart” keyswitch.
written memory slots
empty memory slots
set memory block position on MIDI
keyboard
preset loading options
keyswitch save/clear buttons
define memory keyswitch block size
turn memory keyswitches on/off
25
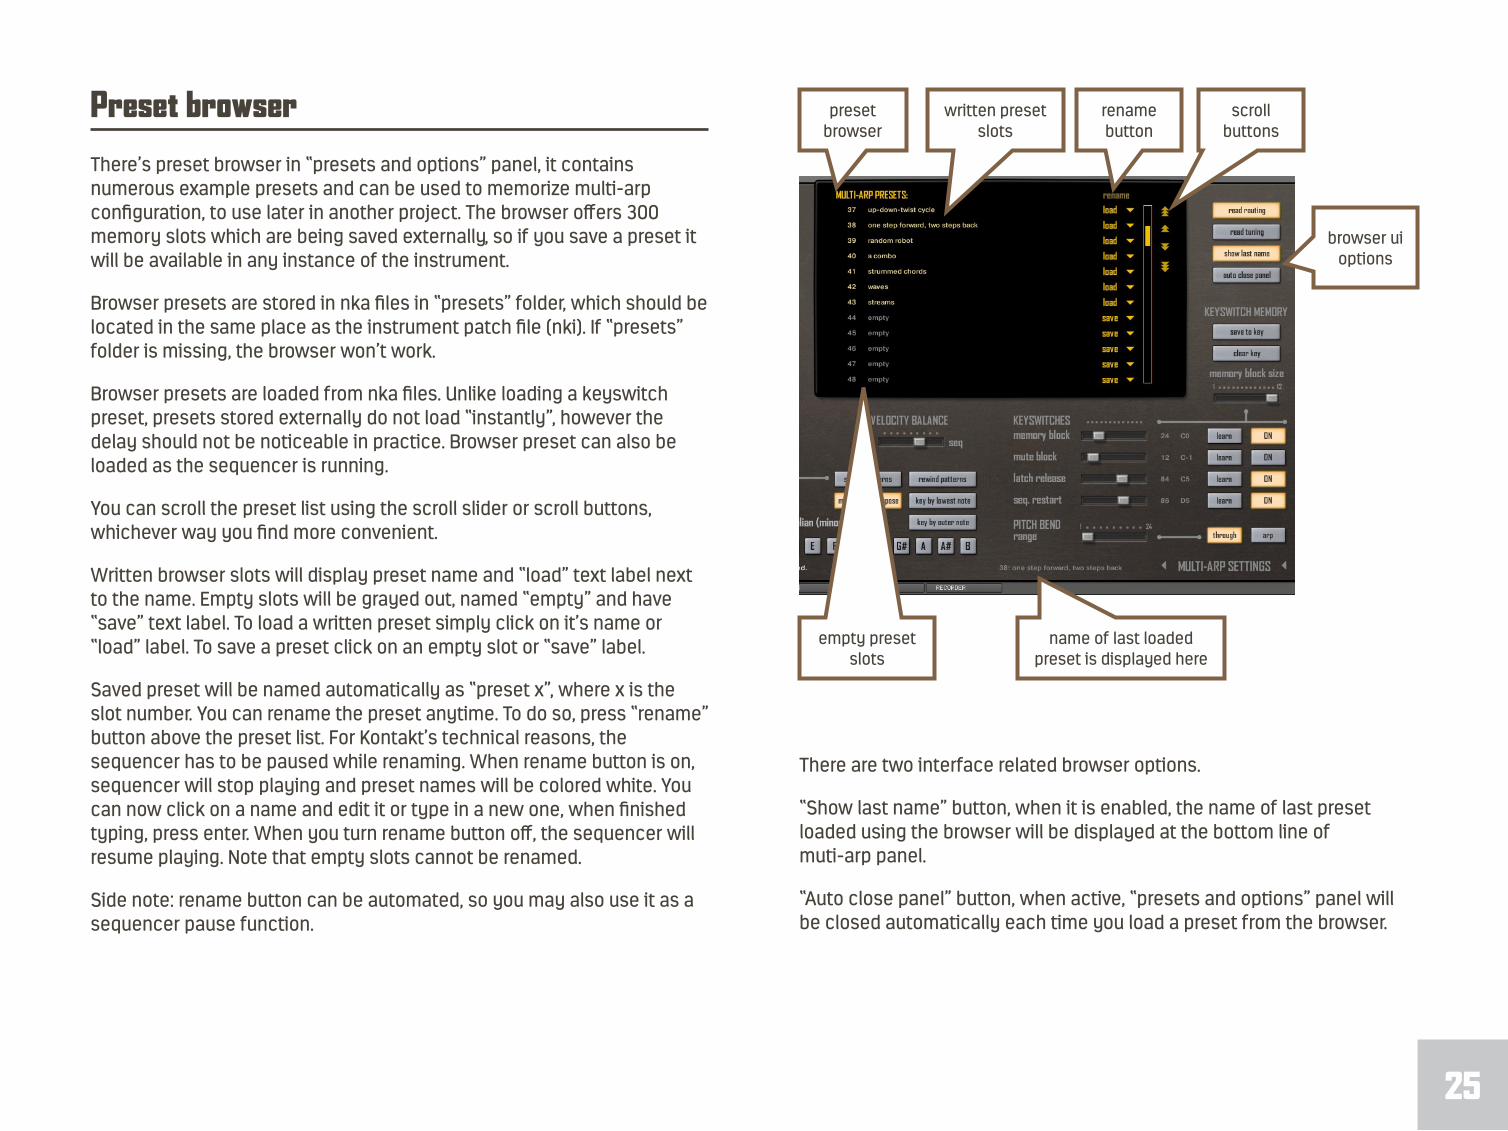
Preset browser
There’s preset browser in “presets and options” panel, it contains numerous example presets and can be used to memorize multi-arp configuration, to use later in another project. The browser offers 300 memory slots which are being saved externally, so if you save a preset it will be available in any instance of the instrument.
Browser presets are stored in nka files in “presets” folder, which should be located in the same place as the instrument patch file (nki). If “presets” folder is missing, the browser won’t work.
Browser presets are loaded from nka files. Unlike loading a keyswitch preset, presets stored externally do not load “instantly”, however the delay should not be noticeable in practice. Browser preset can also be loaded as the sequencer is running.
You can scroll the preset list using the scroll slider or scroll buttons, whichever way you find more convenient.
Written browser slots will display preset name and “load” text label next to the name. Empty slots will be grayed out, named “empty” and have “save” text label. To load a written preset simply click on it’s name or “load” label. To save a preset click on an empty slot or “save” label.
Saved preset will be named automatically as “preset x”, where x is the slot number. You can rename the preset anytime. To do so, press “rename” button above the preset list. For Kontakt’s technical reasons, the sequencer has to be paused while renaming. When rename button is on, sequencer will stop playing and preset names will be colored white. You can now click on a name and edit it or type in a new one, when finished typing, press enter. When you turn rename button off, the sequencer will resume playing. Note that empty slots cannot be renamed.
Side note: rename button can be automated, so you may also use it as a sequencer pause function.
There are two interface related browser options.
“Show last name” button, when it is enabled, the name of last preset loaded using the browser will be displayed at the bottom line of muti-arp panel.
“Auto close panel” button, when active, “presets and options” panel will be closed automatically each time you load a preset from the browser.
preset browser
written preset slots
empty preset slots
rename button
scroll buttons
browser ui options
name of last loaded preset is displayed here

26
There is a small “preset management” drop-down menu next to each preset slot.
Delete – deletes preset saved in given slot, so it is free to save a different preset. A note here: Kontakt script cannot actually delete a file (which is good), the preset system is organized by having separate nki files for each memory slot and a master index list, telling the browser which slots are available and how are they named. This way the instrument doesn’t have to scan 300 files to update preset list each time it loads. It just reads preset list and name table. File delete function just flags given slot as “empty”, leaving preset files as is. Which also makes it possible to undelete a preset...
Undelete – checks if there is preset file for given browser slot. If a file is found, it will be put back on the browser list.
Copy/cut/paste functions make it easier to organize presets, you can cut a preset and paste it into another slot, which having to load it first.
Loading preset from file
Finally you can save multi-arp preset directly to nka file. Press “save to file” button then save the file anywhere, however “data” folder in instrument path would be probably most convenient location, as Kontakt will point there each time you want to load a preset.
To load a file press ”load from file” button and pick a file. Saving to nka files can be possibly useful if you want to trade presets. The file format is the same as one used by preset browser.
preset management
menu
file load/save buttons

27
Configuring voices
You can fine-tune each voice individually using “VOICES” panel. There is pitch section, filter, volume envelope, amplifier with send levels and a multipurpose LFO.
First select a voice to edit, selecting a name from the list on the left side of the panel.
Voice can be de-tuned in range from -48 to +48 cents. Random de-tune modulator will change tune of each note by a value from defined range, it can put some life into static sampled voices. There’s also octave shift switch, a voice pitch can be changed by +/-1 octave. Pitch changes are applied by changing sample pitch, not by changing note numbers. If you want to preserve sound’s authenticity, you may want to avoid octave shift as it re-tunes samples by 12 semitones.
Pitch section has dedicated sine LFO to create subtle vibrato. There’s retrigger switch, when it’s on (pushed to the right) LFO will re-start at the beginning of each note. LFO amount knob is bipolar, a negative amount applies phase inverted modulation, which in practice would only matter, if retrigger option is active.
There’s one filter per voice, filter type can be selected from drop-down menu. There’s wide range of filter types available in Kontakt. Note that 1-pole state variable filters do not use resonance parameter, so resonance knob will have no effect when this type of filter is selected. Filter cutoff has dedicated AHD envelope. Again, envelope amount controller is bipolar, negative value applies inverted modulation. Note that with active cutoff envelope you may need to retrigger notes to hear effects of manipulating the cutoff controller.
Voice sounds are sampled using possibly short attack and long release for volume envelope. It can be adjusted at voice panel level using AHDSR envelope with attack curve shape controller.
Voice volume can be adjusted in amplifier section, it can be useful when using combined sounds for non-arpeggiated notes (in multi-arp you can adjust volume at note level for each arp individually).
Velocity knob controls how much impact note velocity has over voice playback volume. This is being set for each voice individually. Higher velocity sensitivity will make the voice quieter overall, which can be compensated with volume controller.
Saturation is Kontakt’s waveshaping effect, negative value will make sound softer, positive value will make it sound louder and clipped. At center setting the effect if off.
You can position voices in stereo panorama using pan controller. It will have cumulative effect with note level panning available in multi-arp.
There is general purpose LFO which can be assigned to one of four parameters: voice volume, pan, filter cutoff or resonance. LFO has retrigger option and can be run in free or tempo synchronized mode (selected from drop-down menu). LFO depth is bipolar, like with previous modulators, negative value applies phase inverted modulation. LFO attack is the depth fade-in time. It is only practical to use attack parameter when LFO retrigger is on.

28
Effect chains
Orchestra Enigmatica has three insert effect chains and two convolution reverbs as send effects. Each effect chain has chorus, phaser, rotator and delay. So you can have three different configurations of mentioned effects, for each voice you can select one chain as the output.
You assign effect chain to a voice using four button set labeled “voice output”. Select “no effects” button to connect voice output directly to instrument’s out, bypassing insert effects.
In “send levels” section you can set the amount of signal to send to convolution reverberators before it is processed with insert effects. There are separate send points placed at the end of each effect chain, giving you many creative options of shaping the reverberated sound. “Dry” parameter in voice “send levels” is volume level applied after send points. Main application for it, is to set a voice to be “reverb only”.
Here’s the scheme of the signal chain:
You can edit parameters for all voices at once. Switch “ALL” button, as long as it’s on, any parameter change will be applied to all voices.
Use “SOLO” button to hear only the selected voice, which can be quite useful when tuning multi-voice programs.
There’s also a small voice edit function set, click on “select voice” label to bring the drop down menu. You can copy voice configuration and paste it to another voice, handy when you like to try the modulation setup on a different sound. You can also reset selected voice, this function sets all parameters to default. Functions works with respect to “ALL” button, so when ALL is selected and you call reset function, all voices will be reset. Similarly you can paste settings to all voices.
sendsvoice out
dry level
reverb 1
reverb 2
chain 2
chain 3
instrument out
chain 1
functions drop-down menu
select voice
edit all voices
solo selected voice

29
Effects configuration
Insert and send effect controllers are available in EFFECTS panel. Click on effect name label to turn effect on/off, enabled effects have bright diode next to effect name, disabled effects are indicated by dim diode and grayed out effect name.
There are three sets of insert effects, named “effect chains”, select chain to edit using “effect chain” buttons. Under chain selection buttons there is a drop down menu, with “reset chain” function. Call it, to reset all effect in selected chain to default.
Use “amount” controllers to set how much of the effect output should be mixed with input signal. It’s equivalent of “wet” level controller.
I believe chorus, phaser and delay don’t need an introduction. Rotator is rotating speaker simulator, knows as Leslie speaker.
For delay you can choose between free (absolute) and tempo-synchronized time controller, using drop down menu.
At the end of each effect chain there are two sends to convolution reverbs. So you can choose to send signal to reverberators after applying effects, or combine it with sends at voice level. Example, send dry signal to one type of reverb and signal with effects to different reverb effect.
Convolution reverbs use Kontakt’s factory impulse-response set. Use drop down menus to select reverb category and then specific IR file. Click on “random” label to pick random reverb type from random category. Low cut controller can be used to apply high-pass filter to reverb output. Use it to tame excessive low end frequencies build-up, which can occur in some configurations. “Return” controller is reverb output volume.
chorus is on
chorus on/off button
phaser is off
delay time mode menu
effects panel
select reverb category
select impulse response file
select random impulse
select effect chain to edit
30
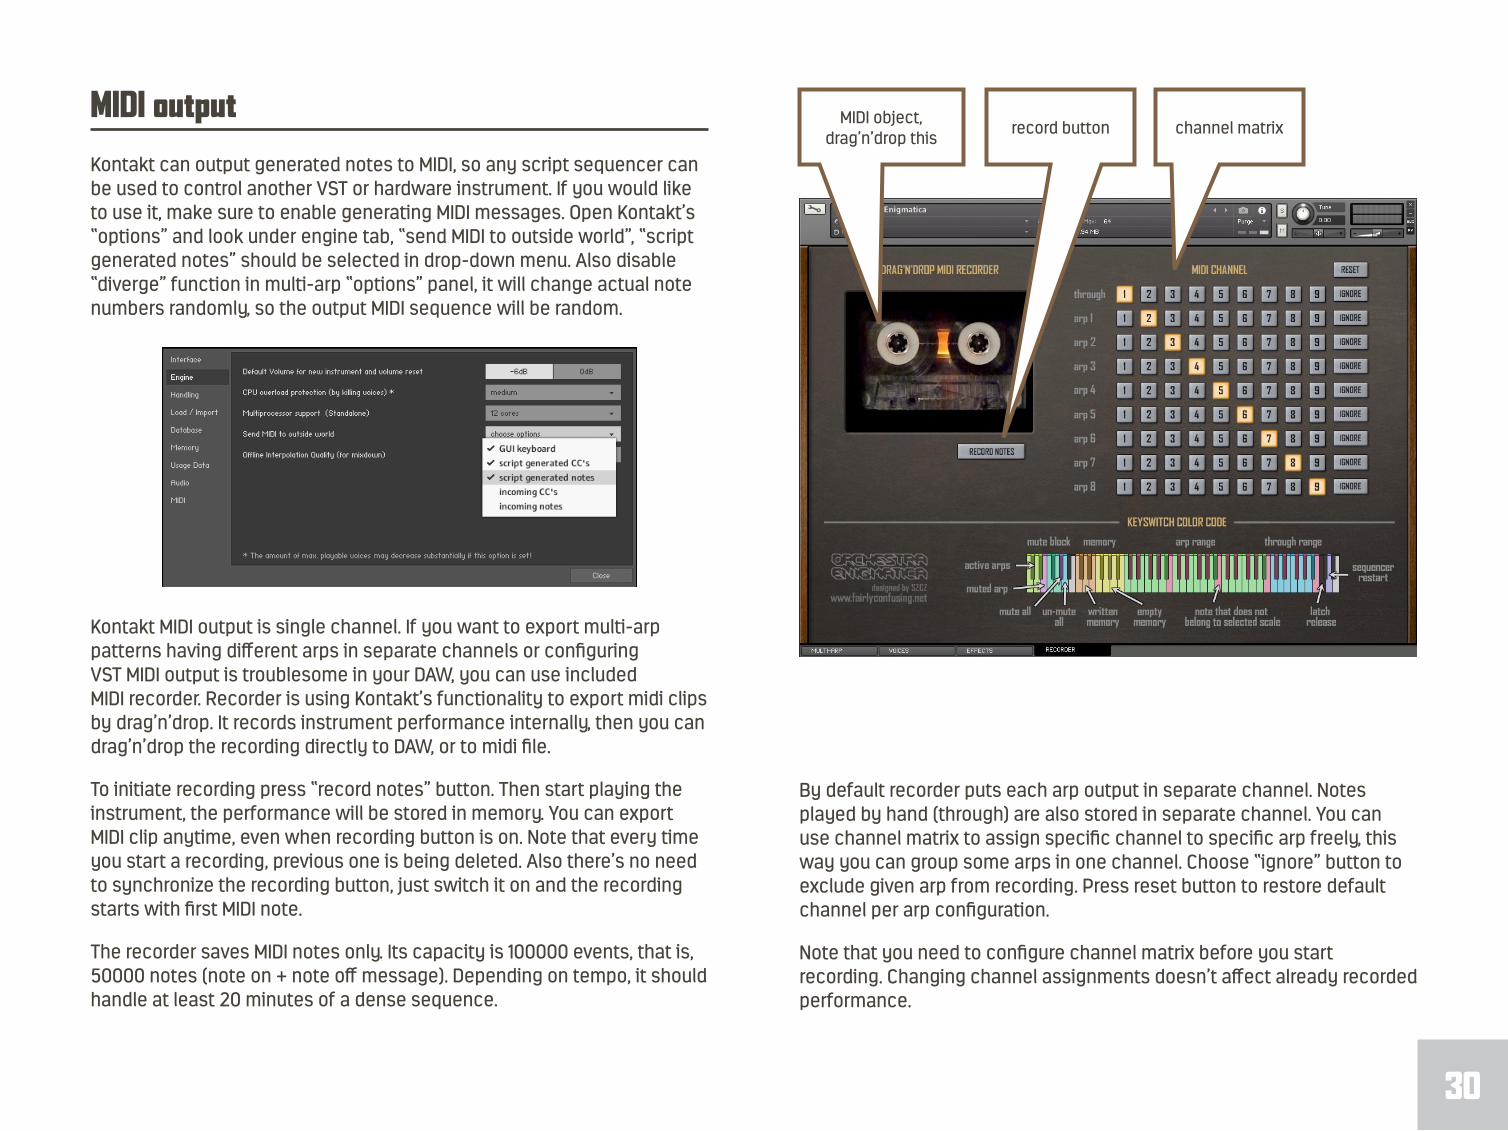
MIDI output
Kontakt can output generated notes to MIDI, so any script sequencer can be used to control another VST or hardware instrument. If you would like to use it, make sure to enable generating MIDI messages. Open Kontakt’s “options” and look under engine tab, “send MIDI to outside world”, “script generated notes” should be selected in drop-down menu. Also disable “diverge” function in multi-arp “options” panel, it will change actual note numbers randomly, so the output MIDI sequence will be random.
Kontakt MIDI output is single channel. If you want to export multi-arp patterns having different arps in separate channels or configuring VST MIDI output is troublesome in your DAW, you can use included MIDI recorder. Recorder is using Kontakt’s functionality to export midi clips by drag’n’drop. It records instrument performance internally, then you can drag’n’drop the recording directly to DAW, or to midi file.
To initiate recording press “record notes” button. Then start playing the instrument, the performance will be stored in memory. You can export MIDI clip anytime, even when recording button is on. Note that every time you start a recording, previous one is being deleted. Also there’s no need to synchronize the recording button, just switch it on and the recording starts with first MIDI note.
The recorder saves MIDI notes only. Its capacity is 100000 events, that is, 50000 notes (note on + note off message). Depending on tempo, it should handle at least 20 minutes of a dense sequence.
By default recorder puts each arp output in separate channel. Notes played by hand (through) are also stored in separate channel. You can use channel matrix to assign specific channel to specific arp freely, this way you can group some arps in one channel. Choose “ignore” button to exclude given arp from recording. Press reset button to restore default channel per arp configuration.
Note that you need to configure channel matrix before you start recording. Changing channel assignments doesn’t affect already recorded performance.
MIDI object, drag’n’drop this
record button channel matrix

31
Using custom samples
It is possible to use custom samples with Orchestra Enigmatica. However instrument range and number of voices are fixed.
To replace samples go to Kontakt’s edit mode (wrench button), now you can select a group, select and delete samples in mapping editor. Then you can paste/place new sample set. Do not delete groups, just delete and replace samples within existing groups. Note, that instrument range is C1 to C5, the instrument won’t play samples out of this range.
To have updated voice names within instrument’s interface, rename changed groups (each voice takes one group). Now, in edit mode, you will see script tab named “transmitter”, turn “use custom voice names” button. When you leave edit mode, you will notice that voice names in muti-arp panel and voice panels are copied from group names in group editor.
If you are saving a new patch with updated sample set, make sure you save it in the same folder as original patch. Otherwise the scripts won’t be able to locate resource files and presets folder.
* * *
You may have noticed “notes to cc transmitter” and “mute” buttons. At the moment they are unused. Notes to CC transmitter is experimental way of getting live multichannel MIDI output from Kontakt, which is still in development and not guaranteed to work successfully. At the moment leave it as is.
You can also notice that all five script slots are taken. If you need to add a custom script to the instrument, you will need to delete one of existing scripts. If you do not plan to use custom samples, you can safely remove “transmitter” script. It has no other function than switching custom names mode on/off. If you don’t need MIDI recorder, you can safely remove this script as well, it has no impact on other script slots. Do not move existing script to another script slot, especially multi-arp script, it will break snapshots.
access edit mode
select / rename groups
delete / replace samples
transmitter script tab
custom names switch
custom names in multi-arp panel
32
End of file
This document ends here.
Have fun with Orchestra Enigmatica.
This instrument has been created by Marcin Gruszczyński.
I would like to thank Pendle Poucher for multi-arp idea.
More thanks to David Donaldson, Kirke Godfrey and James Michael Wolk for beta testing and feature suggestions.
© 2018 SzcZ
www.fairlyconfusing.net
www.facebook.com/szcz.audio.adventures/