Oracle/PLSQL: Data Types - Zied Zaierziedzaier.com/wp-content/uploads/2015/09/oracle-9.pdf ·...
39
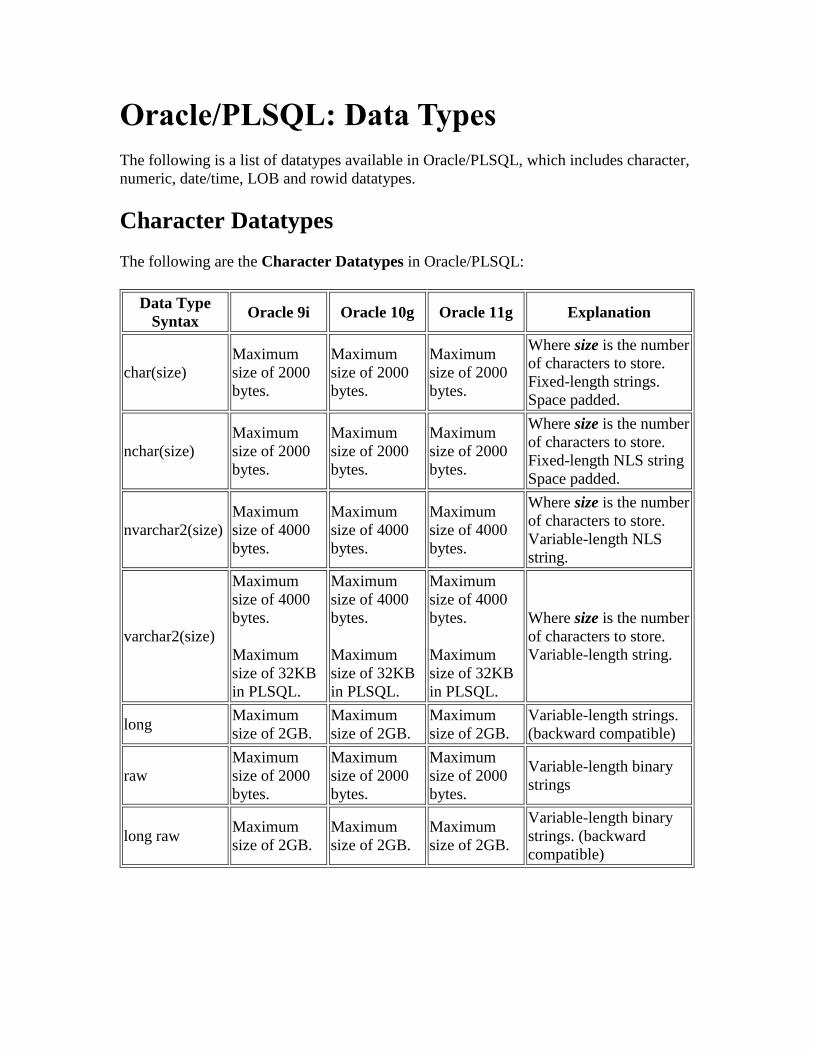
Oracle/PLSQL: Data Types The following is a list of datatypes available in Oracle/PLSQL, which includes character, numeric, date/time, LOB and rowid datatypes. Character Datatypes The following are the Character Datatypes in Oracle/PLSQL: Data Type Syntax Oracle 9i Oracle 10g Oracle 11g Explanation char(size) Maximum size of 2000 bytes. Maximum size of 2000 bytes. Maximum size of 2000 bytes. Where size is the number of characters to store. Fixed-length strings. Space padded. nchar(size) Maximum size of 2000 bytes. Maximum size of 2000 bytes. Maximum size of 2000 bytes. Where size is the number of characters to store. Fixed-length NLS string Space padded. nvarchar2(size) Maximum size of 4000 bytes. Maximum size of 4000 bytes. Maximum size of 4000 bytes. Where size is the number of characters to store. Variable-length NLS string. varchar2(size) Maximum size of 4000 bytes. Maximum size of 32KB in PLSQL. Maximum size of 4000 bytes. Maximum size of 32KB in PLSQL. Maximum size of 4000 bytes. Maximum size of 32KB in PLSQL. Where size is the number of characters to store. Variable-length string. long Maximum size of 2GB. Maximum size of 2GB. Maximum size of 2GB. Variable-length strings. (backward compatible) raw Maximum size of 2000 bytes. Maximum size of 2000 bytes. Maximum size of 2000 bytes. Variable-length binary strings long raw Maximum size of 2GB. Maximum size of 2GB. Maximum size of 2GB. Variable-length binary strings. (backward compatible)
Transcript of Oracle/PLSQL: Data Types - Zied Zaierziedzaier.com/wp-content/uploads/2015/09/oracle-9.pdf ·...
Oracle/PLSQL: Data Types
The following is a list of datatypes available in Oracle/PLSQL, which includes character,
numeric, date/time, LOB and rowid datatypes.
Character Datatypes
The following are the Character Datatypes in Oracle/PLSQL:
Data Type
Syntax Oracle 9i Oracle 10g Oracle 11g Explanation
char(size)
Maximum
size of 2000
bytes.
Maximum
size of 2000
bytes.
Maximum
size of 2000
bytes.
Where size is the number
of characters to store.
Fixed-length strings.
Space padded.
nchar(size)
Maximum
size of 2000
bytes.
Maximum
size of 2000
bytes.
Maximum
size of 2000
bytes.
Where size is the number
of characters to store.
Fixed-length NLS string
Space padded.
nvarchar2(size)
Maximum
size of 4000
bytes.
Maximum
size of 4000
bytes.
Maximum
size of 4000
bytes.
Where size is the number
of characters to store.
Variable-length NLS
string.
varchar2(size)
Maximum
size of 4000
bytes.
Maximum
size of 32KB
in PLSQL.
Maximum
size of 4000
bytes.
Maximum
size of 32KB
in PLSQL.
Maximum
size of 4000
bytes.
Maximum
size of 32KB
in PLSQL.
Where size is the number
of characters to store.
Variable-length string.
long Maximum
size of 2GB.
Maximum
size of 2GB.
Maximum
size of 2GB.
Variable-length strings.
(backward compatible)
raw
Maximum
size of 2000
bytes.
Maximum
size of 2000
bytes.
Maximum
size of 2000
bytes.
Variable-length binary
strings
long raw Maximum
size of 2GB.
Maximum
size of 2GB.
Maximum
size of 2GB.
Variable-length binary
strings. (backward
compatible)

Numeric Datatypes
The following are the Numeric Datatypes in Oracle/PLSQL:
Data Type
Syntax Oracle 9i Oracle 10g Oracle 11g Explanation
number(p,s)
Precision can
range from 1
to 38.
Scale can
range from -
84 to 127.
Precision can
range from 1
to 38.
Scale can
range from -
84 to 127.
Precision can
range from 1
to 38.
Scale can
range from -
84 to 127.
Where p is the precision and s
is the scale.
For example, number(7,2) is
a number that has 5 digits
before the decimal and 2
digits after the decimal.
numeric(p,s)
Precision can
range from 1
to 38.
Precision can
range from 1
to 38.
Precision can
range from 1
to 38.
Where p is the precision and s
is the scale.
For example, numeric(7,2) is
a number that has 5 digits
before the decimal and 2
digits after the decimal.
float
dec(p,s)
Precision can
range from 1
to 38.
Precision can
range from 1
to 38.
Precision can
range from 1
to 38.
Where p is the precision and s
is the scale.
For example, dec(3,1) is a
number that has 2 digits
before the decimal and 1 digit
after the decimal.
decimal(p,s)
Precision can
range from 1
to 38.
Precision can
range from 1
to 38.
Precision can
range from 1
to 38.
Where p is the precision and s
is the scale.
For example, decimal(3,1) is
a number that has 2 digits
before the decimal and 1 digit
after the decimal.
integer
int
smallint
real
double
precision

Date/Time Datatypes
The following are the Date/Time Datatypes in Oracle/PLSQL:
Data Type
Syntax Oracle 9i Oracle 10g Oracle 11g Explanation
date
A date between
Jan 1, 4712 BC
and Dec 31,
9999 AD.
A date between
Jan 1, 4712 BC
and Dec 31,
9999 AD.
A date between
Jan 1, 4712 BC
and Dec 31,
9999 AD.
timestamp
(fractional
seconds
precision)
fractional
seconds
precision must
be a number
between 0 and
9. (default is 6)
fractional
seconds
precision must
be a number
between 0 and
9. (default is 6)
fractional
seconds
precision must
be a number
between 0 and
9. (default is 6)
Includes year,
month, day, hour,
minute, and seconds.
For example:
timestamp(6)
timestamp
(fractional
seconds
precision) with
time zone
fractional
seconds
precision must
be a number
between 0 and
9. (default is 6)
fractional
seconds
precision must
be a number
between 0 and
9. (default is 6)
fractional
seconds
precision must
be a number
between 0 and
9. (default is 6)
Includes year,
month, day, hour,
minute, and seconds;
with a time zone
displacement value.
For example:
timestamp(5) with
time zone
timestamp
(fractional
seconds
precision) with
local time
zone
fractional
seconds
precision must
be a number
between 0 and
9. (default is 6)
fractional
seconds
precision must
be a number
between 0 and
9. (default is 6)
fractional
seconds
precision must
be a number
between 0 and
9. (default is 6)
Includes year,
month, day, hour,
minute, and seconds;
with a time zone
expressed as the
session time zone.
For example:
timestamp(4) with
local time zone
interval year
(year
precision)
to month
year precision is the number
of digits in the
year. (default is
2)
year precision is the number
of digits in the
year. (default is
2)
year precision is the number
of digits in the
year. (default is
2)
Time period stored in
years and months.
For example:
interval year(4) to
month

interval day
(day precision)
to second
(fractional
seconds
precision)
day precision must be a
number
between 0 and
9. (default is 2)
fractional
seconds
precision must
be a number
between 0 and
9. (default is 6)
day precision must be a
number
between 0 and
9. (default is 2)
fractional
seconds
precision must
be a number
between 0 and
9. (default is 6)
day precision must be a
number
between 0 and
9. (default is 2)
fractional
seconds
precision must
be a number
between 0 and
9. (default is 6)
Time period stored in
days, hours, minutes,
and seconds.
For example:
interval day(2) to
second(6)
Large Object (LOB) Datatypes
The following are the LOB Datatypes in Oracle/PLSQL:
Data
Type
Syntax
Oracle 9i Oracle 10g Oracle 11g Explanation
bfile
Maximum
file size of
4GB.
Maximum file size
of 232-1 bytes.
Maximum file size
of 264-1 bytes.
File locators that
point to a binary file
on the server file
system (outside the
database).
blob
Store up to
4GB of
binary data.
Store up to (4
gigabytes -1) * (the
value of the
CHUNK parameter
of LOB storage).
Store up to (4
gigabytes -1) * (the
value of the
CHUNK parameter
of LOB storage).
Stores unstructured
binary large objects.
clob
Store up to
4GB of
character
data.
Store up to (4
gigabytes -1) * (the
value of the
CHUNK parameter
of LOB storage) of
character data.
Store up to (4
gigabytes -1) * (the
value of the
CHUNK parameter
of LOB storage) of
character data.
Stores single-byte
and multi-byte
character data.
nclob
Store up to
4GB of
character text
data.
Store up to (4
gigabytes -1) * (the
value of the
CHUNK parameter
of LOB storage) of
character text data.
Store up to (4
gigabytes -1) * (the
value of the
CHUNK parameter
of LOB storage) of
character text data.
Stores unicode data.

Rowid Datatypes
The following are the Rowid Datatypes in Oracle/PLSQL:
Data
Type
Syntax
Oracle 9i Oracle 10g Oracle 11g Explanati
on
rowid
The format of the
rowid is:
BBBBBBB.RRRR.F
FFFF
Where BBBBBBB is
the block in the
database file;
RRRR is the row in
the block;
FFFFF is the
database file.
The format of the
rowid is:
BBBBBBB.RRRR.F
FFFF
Where BBBBBBB is
the block in the
database file;
RRRR is the row in
the block;
FFFFF is the
database file.
The format of the
rowid is:
BBBBBBB.RRRR.F
FFFF
Where BBBBBBB is
the block in the
database file;
RRRR is the row in
the block;
FFFFF is the
database file.
Fixed-
length
binary
data.
Every
record in
the
database
has a
physical
address or
rowid.
urowid(si
ze)
Universal
rowid.
Where
size is
optional.

Oracle/PLSQL: CREATE TABLE
Statement
This Oracle tutorial explains how to use the Oracle CREATE TABLE statement with
syntax, examples, and practice exercises.
Description
The Oracle CREATE TABLE statement allows you to create and define a table.
Syntax
The syntax for the CREATE TABLE statement in Oracle/PLSQL is:
CREATE TABLE table_name
(
column1 datatype [ NULL | NOT NULL ],
column2 datatype [ NULL | NOT NULL ],
...
column_n datatype [ NULL | NOT NULL ]
);
Parameters or Arguments
table_name
The name of the table that you wish to create.
column1, column2, ... column_n
The columns that you wish to create in the table. Each column must have a datatype.
The column should either be defined as "null" or "not null" and if this value is left blank,
the database assumes "null" as the default.
Example
Let's look at an Oracle CREATE TABLE example.
CREATE TABLE customers
( customer_id number(10) NOT NULL,
customer_name varchar2(50) NOT NULL,
city varchar2(50)
);
This Oracle CREATE TABLE example creates a table called customers which has 3
columns.

The first column is called customer_id which is created as a number datatype (maximum 10 digits in length) and can not contain null values.
The second column is called customer_name which is a varchar2 datatype (50 maximum characters in length) and also can not contain null values.
The third column is called city which is a varchar2 datatype but can contain null values.
Now the only problem with this Oracle CREATE TABLE statement is that you have not
defined a primary key for the table. We could modify this CREATE TABLE statement
and define the customer_id as the primary key as follows:
CREATE TABLE customers
( customer_id number(10) NOT NULL,
customer_name varchar2(50) NOT NULL,
city varchar2(50),
CONSTRAINT customers_pk PRIMARY KEY (customer_id)
);
Practice Exercise #1:
Create an Oracle table called suppliers that stores supplier ID, name, and address
information.
Solution for Practice Exercise #1:
The Oracle CREATE TABLE statement for the suppliers table is:
CREATE TABLE suppliers
( supplier_id number(10) NOT NULL,
supplier_name varchar2(50) NOT NULL,
address varchar2(50),
city varchar2(50),
state varchar2(25),
zip_code varchar2(10)
);
Practice Exercise #2:
Create an Oracle table called customers that stores customer ID, name, and address
information.
But this time, the customer ID should be the primary key for the table.
Solution for Practice Exercise #2:
The Oracle CREATE TABLE statement for the customers table is:
CREATE TABLE customers
( customer_id number(10) NOT NULL,

customer_name varchar2(50) NOT NULL,
address varchar2(50),
city varchar2(50),
state varchar2(25),
zip_code varchar2(10),
CONSTRAINT customers_pk PRIMARY KEY (customer_id)
);
Practice Exercise #3:
Based on the departments table below, create an Oracle table called employees that stores
employee number, employee name, department, and salary information. The primary key
for the employees table should be the employee number. Create a foreign key on the
employees table that references the departments table based on the department_id field.
CREATE TABLE departments
( department_id number(10) NOT NULL,
department_name varchar2(50) NOT NULL,
CONSTRAINT departments_pk PRIMARY KEY (department_id)
);
Solution for Practice Exercise #3:
The Oracle CREATE TABLE statement for the employees table is:
CREATE TABLE employees
( employee_number number(10) NOT NULL,
employee_name varchar2(50) NOT NULL,
department_id number(10),
salary number(6),
CONSTRAINT employees_pk PRIMARY KEY (employee_number),
CONSTRAINT fk_departments
FOREIGN KEY (department_id)
REFERENCES departments(department_id)
);

Oracle/PLSQL: CREATE TABLE AS
Statement
This Oracle tutorial explains how to use the Oracle CREATE TABLE AS statement
with syntax and examples.
Description
You can also use the Oracle CREATE TABLE AS statement to create a table from an
existing table by copying the existing table's columns.
It is important to note that when creating a table in this way, the new table will be
populated with the records from the existing table (based on the SELECT Statement).
Create TAble - By Copying all columns from another
table
Syntax
The syntax for the CREATE TABLE AS statement that copies all of the columns in
Oracle/PLSQL is:
CREATE TABLE new_table
AS (SELECT * FROM old_table);
Example
Let's look at a CREATE TABLE AS example that shows how to create a table by
copying all columns from another table.
CREATE TABLE suppliers
AS (SELECT *
FROM companies
WHERE company_id < 5000);
This example would create a new table called suppliers that included all columns from
the companies table.
If there were records in the companies table, then the new suppliers table would be
populated with the records returned by the SELECT statement.
Create TAble - By Copying selected columns from
another table

Syntax
The syntax for the CREATE TABLE AS statement that copies the selected columns in
Oracle/PLSQL is:
CREATE TABLE new_table
AS (SELECT column_1, column2, ... column_n
FROM old_table);
Example
Let's look at a CREATE TABLE AS example that shows how to create a table by
copying selected columns from another table.
For Example:
CREATE TABLE suppliers
AS (SELECT company_id, address, city, state, zip
FROM companies
WHERE company_id < 5000);
This example would create a new table called suppliers, but the new table would only
include the specified columns (ie: company_id, address, city, state, and zip) from the
companies table.
Again, if there were records in the companies table, then the new suppliers table would
be populated with the records returned by the SELECT statement.
Create table - By Copying selected columns from
multiple tables
Syntax
The syntax for the CREATE TABLE AS statement that copies columns from multiple
tables in Oracle/PLSQL is:
CREATE TABLE new_table
AS (SELECT column_1, column2, ... column_n
FROM old_table_1, old_table_2, ... old_table_n);
Example
Let's look at a CREATE TABLE AS example that shows how to create a table by
copying selected columns from multiple tables.
For example:

CREATE TABLE suppliers
AS (SELECT companies.company_id, companies.address,
categories.category_type
FROM companies, categories
WHERE companies.company_id = categories.category_id
AND companies.company_id < 5000);
This example would create a new table called suppliers based on columns definitions
from both the companies and categories tables (ie: company_id, address, and
category_type).
Frequently Asked Questions
Question: How can I create an Oracle table from another table without copying any
values from the old table?
Answer: To do this, the Oracle CREATE TABLE syntax is:
CREATE TABLE new_table
AS (SELECT *
FROM old_table WHERE 1=2);
For example:
CREATE TABLE suppliers
AS (SELECT *
FROM companies WHERE 1=2);
This would create a new table called suppliers that included all column definitions from
the companies table, but no data from the companies table.

Oracle/PLSQL: Primary Keys
This Oracle tutorial explains how to create, drop, disable, and enable a primary key in
Oracle with syntax and examples.
What is a primary key in Oracle?
In Oracle, a primary key is a single field or combination of fields that uniquely defines a
record. None of the fields that are part of the primary key can contain a null value. A
table can have only one primary key.
Note:
In Oracle, a primary key can not contain more than 32 columns.
A primary key can be defined in either a CREATE TABLE statement or an ALTER
TABLE statement.
Create Primary Key - Using CREATE TABLE
statement
You can create a primary key in Oracle with the CREATE TABLE statement.
Syntax
The syntax to create a primary key using the CREATE TABLE statement in
Oracle/PLSQL is:
CREATE TABLE table_name
(
column1 datatype null/not null,
column2 datatype null/not null,
...
CONSTRAINT constraint_name PRIMARY KEY (column1, column2, ...
column_n)
);
Example
Let's look at an example of how to create a primary key using the CREATE TABLE
statement in Oracle:
CREATE TABLE supplier
(
supplier_id numeric(10) not null,

supplier_name varchar2(50) not null,
contact_name varchar2(50),
CONSTRAINT supplier_pk PRIMARY KEY (supplier_id)
);
In this example, we've created a primary key on the supplier table called supplier_pk. It
consists of only one field - the supplier_id field.
We could also create a primary key with more than one field as in the example below:
CREATE TABLE supplier
(
supplier_id numeric(10) not null,
supplier_name varchar2(50) not null,
contact_name varchar2(50),
CONSTRAINT supplier_pk PRIMARY KEY (supplier_id, supplier_name)
);
Create Primary Key - Using ALTER TABLE statement
You can create a primary key in Oracle with the ALTER TABLE statement.
Syntax
The syntax to create a primary key using the ALTER TABLE statement in
Oracle/PLSQL is:
ALTER TABLE table_name
ADD CONSTRAINT constraint_name PRIMARY KEY (column1, column2, ...
column_n);
Example
Let's look at an example of how to create a primary key using the ALTER TABLE
statement in Oracle.
ALTER TABLE supplier
ADD CONSTRAINT supplier_pk PRIMARY KEY (supplier_id);
In this example, we've created a primary key on the existing supplier table called
supplier_pk. It consists of the field called supplier_id.
We could also create a primary key with more than one field as in the example below:
ALTER TABLE supplier
ADD CONSTRAINT supplier_pk PRIMARY KEY (supplier_id, supplier_name);

Drop Primary Key
You can drop a primary key in Oracle using the ALTER TABLE statement.
Syntax
The syntax to drop a primary key using the ALTER TABLE statement in Oracle/PLSQL
is:
ALTER TABLE table_name
DROP CONSTRAINT constraint_name;
Example
Let's look at an example of how to drop a primary key using the ALTER TABLE
statement in Oracle.
ALTER TABLE supplier
DROP CONSTRAINT supplier_pk;
In this example, we're dropping a primary key on the supplier table called supplier_pk.
Disable Primary Key
You can disable a primary key in Oracle using the ALTER TABLE statement.
Syntax
The syntax to disable a primary key using the ALTER TABLE statement in
Oracle/PLSQL is:
ALTER TABLE table_name
DISABLE CONSTRAINT constraint_name;
Example
Let's look at an example of how to disable a primary using the ALTER TABLE statement
in Oracle.
ALTER TABLE supplier
DISABLE CONSTRAINT supplier_pk;
In this example, we're disabling a primary key on the supplier table called supplier_pk.

Enable Primary Key
You can enable a primary key in Oracle using the ALTER TABLE statement.
Syntax
The syntax to enable a primary key using the ALTER TABLE statement in
Oracle/PLSQL is:
ALTER TABLE table_name
ENABLE CONSTRAINT constraint_name;
Example
Let's look at an example of how to enable a primary key using the ALTER TABLE
statement in Oracle.
ALTER TABLE supplier
ENABLE CONSTRAINT supplier_pk;
In this example, we're enabling a primary key on the supplier table called supplier_pk.

Oracle/PLSQL: Foreign Keys
This Oracle tutorial explains how to use Foreign Keys in Oracle with syntax and
examples.
What is a foreign key in Oracle?
A foreign key is a way to enforce referential integrity within your Oracle database. A
foreign key means that values in one table must also appear in another table.
The referenced table is called the parent table while the table with the foreign key is
called the child table. The foreign key in the child table will generally reference a
primary key in the parent table.
A foreign key can be defined in either a CREATE TABLE statement or an ALTER
TABLE statement.
Using a CREATE TABLE statement
Syntax
The syntax for creating a foreign key using a CREATE TABLE statement is:
CREATE TABLE table_name
(
column1 datatype null/not null,
column2 datatype null/not null,
...
CONSTRAINT fk_column
FOREIGN KEY (column1, column2, ... column_n)
REFERENCES parent_table (column1, column2, ... column_n)
);
Example
CREATE TABLE supplier
( supplier_id numeric(10) not null,
supplier_name varchar2(50) not null,
contact_name varchar2(50),
CONSTRAINT supplier_pk PRIMARY KEY (supplier_id)
);
CREATE TABLE products
( product_id numeric(10) not null,
supplier_id numeric(10) not null,
CONSTRAINT fk_supplier
FOREIGN KEY (supplier_id)

REFERENCES supplier(supplier_id)
);
In this example, we've created a primary key on the supplier table called supplier_pk. It
consists of only one field - the supplier_id field. Then we've created a foreign key called
fk_supplier on the products table that references the supplier table based on the
supplier_id field.
We could also create a foreign key with more than one field as in the example below:
CREATE TABLE supplier
( supplier_id numeric(10) not null,
supplier_name varchar2(50) not null,
contact_name varchar2(50),
CONSTRAINT supplier_pk PRIMARY KEY (supplier_id, supplier_name)
);
CREATE TABLE products
( product_id numeric(10) not null,
supplier_id numeric(10) not null,
supplier_name varchar2(50) not null,
CONSTRAINT fk_supplier_comp
FOREIGN KEY (supplier_id, supplier_name)
REFERENCES supplier(supplier_id, supplier_name)
);
In this example, our foreign key called fk_foreign_comp references the supplier table
based on two fields - the supplier_id and supplier_name fields.
Using an ALTER TABLE statement
Syntax
The syntax for creating a foreign key in an ALTER TABLE statement is:
ALTER TABLE table_name
ADD CONSTRAINT constraint_name
FOREIGN KEY (column1, column2, ... column_n)
REFERENCES parent_table (column1, column2, ... column_n);
Example
ALTER TABLE products
ADD CONSTRAINT fk_supplier
FOREIGN KEY (supplier_id)
REFERENCES supplier(supplier_id);
In this example, we've created a foreign key called fk_supplier that references the
supplier table based on the supplier_id field.

We could also create a foreign key with more than one field as in the example below:
ALTER TABLE products
ADD CONSTRAINT fk_supplier
FOREIGN KEY (supplier_id, supplier_name)
REFERENCES supplier(supplier_id, supplier_name);

Oracle/PLSQL: Unique Constraints
This Oracle tutorial explains how to create, drop, disable, and enable unique
constraints in Oracle with syntax and examples.
What is a unique constraint in Oracle?
A unique constraint is a single field or combination of fields that uniquely defines a
record. Some of the fields can contain null values as long as the combination of values is
unique.
Note:
In Oracle, a unique constraint can not contain more than 32 columns.
A unique constraint can be defined in either a CREATE TABLE statement or an ALTER
TABLE statement.
What is the difference between a unique constraint and
a primary key?
Primary Key Unique Constraint
None of the fields that are part of
the primary key can contain a null
value.
Some of the fields that are part of the unique constraint
can contain null values as long as the combination of
values is unique.
Oracle does not permit you to create both a primary key and unique constraint with the
same columns.
Create unique Contraint - Using a CREATE TABLE
statement
The syntax for creating a unique constraint using a CREATE TABLE statement in Oracle
is:
CREATE TABLE table_name
(
column1 datatype [ NULL | NOT NULL ],
column2 datatype [ NULL | NOT NULL ],
...
CONSTRAINT constraint_name UNIQUE (uc_col1, uc_col2, ... uc_col_n)

);
table_name
The name of the table that you wish to create.
column1, column2
The columns that you wish to create in the table.
constraint_name
The name of the unique constraint.
uc_col1, uc_col2, ... uc_col_n
The columns that make up the unique constraint.
Example
Let's look at an example of how to create a unique constraint in Oracle using the
CREATE TABLE statement.
CREATE TABLE supplier
( supplier_id numeric(10) NOT NULL,
supplier_name varchar2(50) NOT NULL,
contact_name varchar2(50),
CONSTRAINT supplier_unique UNIQUE (supplier_id)
);
In this example, we've created a unique constraint on the supplier table called
supplier_unique. It consists of only one field - the supplier_id field.
We could also create a unique constraint with more than one field as in the example
below:
CREATE TABLE supplier
( supplier_id numeric(10) NOT NULL,
supplier_name varchar2(50) NOT NULL,
contact_name varchar2(50),
CONSTRAINT supplier_unique UNIQUE (supplier_id, supplier_name)
);
Create unique contraint - Using an ALTER TABLE
statement
The syntax for creating a unique constraint using an ALTER TABLE statement in Oracle
is:
ALTER TABLE table_name
ADD CONSTRAINT constraint_name UNIQUE (column1, column2, ... column_n);

table_name
The name of the table to modify. This is the table that you wish to add a unique
constraint to.
constraint_name
The name of the unique constraint.
column1, column2, ... column_n
The columns that make up the unique constraint.
Example
Let's look at an example of how to add a unique constraint to an existing table in Oracle
using the ALTER TABLE statement.
ALTER TABLE supplier
ADD CONSTRAINT supplier_unique UNIQUE (supplier_id);
In this example, we've created a unique constraint on the existing supplier table called
supplier_unique. It consists of the field called supplier_id.
We could also create a unique constraint with more than one field as in the example
below:
ALTER TABLE supplier
ADD CONSTRAINT supplier_name_unique UNIQUE (supplier_id,
supplier_name);
Drop Unique Constraint
The syntax for dropping a unique constraint in Oracle is:
ALTER TABLE table_name
DROP CONSTRAINT constraint_name;
table_name
The name of the table to modify. This is the table that you wish to remove the unique
constraint from.
constraint_name
The name of the unique constraint to remove.
Example
Let's look at an example of how to remove a unique constraint from a table in Oracle.

ALTER TABLE supplier
DROP CONSTRAINT supplier_unique;
In this example, we're dropping a unique constraint on the supplier table called
supplier_unique.
Disable Unique Constraint
The syntax for disabling a unique constraint in Oracle is:
ALTER TABLE table_name
DISABLE CONSTRAINT constraint_name;
table_name
The name of the table to modify. This is the table whose unique constraint you wish to
disable.
constraint_name
The name of the unique constraint to disable.
Example
Let's look at an example of how to disable a unique constraint in Oracle.
ALTER TABLE supplier
DISABLE CONSTRAINT supplier_unique;
In this example, we're disabling a unique constraint on the supplier table called
supplier_unique.
Enable Unique Constraint
The syntax for enabling a unique constraint in Oracle is:
ALTER TABLE table_name
ENABLE CONSTRAINT constraint_name;
table_name
The name of the table to modify. This is the table whose unique constraint you wish to
enable.
constraint_name
The name of the unique constraint to enable.
Example

Let's look at an example of how to enable a unique constraint in Oracle.
ALTER TABLE supplier
ENABLE CONSTRAINT supplier_unique;
In this example, we're enabling a unique constraint on the supplier table called
supplier_unique.

Oracle/PLSQL: Check Constraints
This Oracle tutorial explains how to use the check constraints in Oracle with syntax and
examples.
What is a check constraint in Oracle?
A check constraint allows you to specify a condition on each row in a table.
Using a CREATE TABLE statement
The syntax for creating a check constraint using a CREATE TABLE statement in Oracle
is:
CREATE TABLE table_name
(
column1 datatype null/not null,
column2 datatype null/not null,
...
CONSTRAINT constraint_name CHECK (column_name condition) [DISABLE]
);
The DISABLE keyword is optional. If you create a check constraint using the DISABLE
keyword, the constraint will be created, but the condition will not be enforced.
Example
CREATE TABLE suppliers
(
supplier_id numeric(4),
supplier_name varchar2(50),
CONSTRAINT check_supplier_id
CHECK (supplier_id BETWEEN 100 and 9999)
);
In this first example, we've created a check constraint on the suppliers table called
check_supplier_id. This constraint ensures that the supplier_id field contains values
between 100 and 9999.
CREATE TABLE suppliers
(
supplier_id numeric(4),
supplier_name varchar2(50),
CONSTRAINT check_supplier_name
CHECK (supplier_name = upper(supplier_name))
);
In this second example, we've created a check constraint called check_supplier_name.
This constraint ensures that the supplier_name column always contains uppercase
characters.
Using an ALTER TABLE statement
The syntax for creating a check constraint in an ALTER TABLE statement in Oracle is:
ALTER TABLE table_name
ADD CONSTRAINT constraint_name CHECK (column_name condition) [DISABLE];
The DISABLE keyword is optional. If you create a check constraint using the DISABLE
keyword, the constraint will be created, but the condition will not be enforced.
Example
ALTER TABLE suppliers
ADD CONSTRAINT check_supplier_name
CHECK (supplier_name IN ('IBM', 'Microsoft', 'NVIDIA'));
In this example, we've created a check constraint on the existing suppliers table called
check_supplier_name. It ensures that the supplier_name field only contains the following
values: IBM, Microsoft, or NVIDIA.
Drop a Check Constraint
The syntax for dropping a check constraint is:
ALTER TABLE table_name
DROP CONSTRAINT constraint_name;
Example
ALTER TABLE suppliers
DROP CONSTRAINT check_supplier_id;
In this example, we're dropping a check constraint on the suppliers table called
check_supplier_id.
Enable a Check Constraint
The syntax for enabling a check constraint in Oracle is:
ALTER TABLE table_name
ENABLE CONSTRAINT constraint_name;

Example
ALTER TABLE suppliers
ENABLE CONSTRAINT check_supplier_id;
In this example, we're enabling a check constraint on the suppliers table called
check_supplier_id.
Disable a Check Constraint
The syntax for disabling a check constraint in Oracle is:
ALTER TABLE table_name
DISABLE CONSTRAINT constraint_name;
Example
ALTER TABLE suppliers
DISABLE CONSTRAINT check_supplier_id;
In this example, we're disabling a check constraint on the suppliers table called
check_supplier_id.

Oracle/PLSQL: Indexes
This Oracle tutorial explains how to create, rename and drop indexes in Oracle with
syntax and examples.
What is an Index in Oracle?
An index is a performance-tuning method of allowing faster retrieval of records. An
index creates an entry for each value that appears in the indexed columns. By default,
Oracle creates B-tree indexes.
Create an Index
Syntax
The syntax for creating an index in Oracle/PLSQL is:
CREATE [UNIQUE] INDEX index_name
ON table_name (column1, column2, ... column_n)
[ COMPUTE STATISTICS ];
UNIQUE
It indicates that the combination of values in the indexed columns must be unique.
index_name
The name to assign to the index.
table_name
The name of the table in which to create the index.
column1, column2, ... column_n
The columns to use in the index.
COMPUTE STATISTICS
It tells Oracle to collect statistics during the creation of the index. The statistics are then
used by the optimizer to choose a "plan of execution" when SQL statements are
executed.
Example
Let's look at an example of how to create an index in Oracle/PLSQL.
For example:

CREATE INDEX supplier_idx
ON supplier (supplier_name);
In this example, we've created an index on the supplier table called supplier_idx. It
consists of only one field - the supplier_name field.
We could also create an index with more than one field as in the example below:
CREATE INDEX supplier_idx
ON supplier (supplier_name, city);
We could also choose to collect statistics upon creation of the index as follows:
CREATE INDEX supplier_idx
ON supplier (supplier_name, city)
COMPUTE STATISTICS;
Create a Function-Based Index
In Oracle, you are not restricted to creating indexes on only columns. You can create
function-based indexes.
Syntax
The syntax for creating a function-based index in Oracle/PLSQL is:
CREATE [UNIQUE] INDEX index_name
ON table_name (function1, function2, ... function_n)
[ COMPUTE STATISTICS ];
UNIQUE
It indicates that the combination of values in the indexed columns must be unique.
index_name
The name to assign to the index.
table_name
The name of the table in which to create the index.
function1, function2, ... function_n
The functions to use in the index.
COMPUTE STATISTICS
It tells Oracle to collect statistics during the creation of the index. The statistics are then
used by the optimizer to choose a "plan of execution" when SQL statements are
executed.

Example
Let's look at an example of how to create a function-based index in Oracle/PLSQL.
For example:
CREATE INDEX supplier_idx
ON supplier (UPPER(supplier_name));
In this example, we've created an index based on the uppercase evaluation of the
supplier_name field.
However, to be sure that the Oracle optimizer uses this index when executing your SQL
statements, be sure that UPPER(supplier_name) does not evaluate to a NULL value. To
ensure this, add UPPER(supplier_name) IS NOT NULL to your WHERE clause as
follows:
SELECT supplier_id, supplier_name, UPPER(supplier_name)
FROM supplier
WHERE UPPER(supplier_name) IS NOT NULL
ORDER BY UPPER(supplier_name);
Rename an Index
Syntax
The syntax for renaming an index in Oracle/PLSQL is:
ALTER INDEX index_name
RENAME TO new_index_name;
index_name
The name of the index that you wish to rename.
new_index_name
The new name to assign to the index.
Example
Let's look at an example of how to rename an index in Oracle/PLSQL.
For example:
ALTER INDEX supplier_idx
RENAME TO supplier_index_name;
In this example, we're renaming the index called supplier_idx to supplier_index_name.

Collect Statistics on an Index If you forgot to collect statistics on the index when you first created it or you want to
update the statistics, you can always use the ALTER INDEX command to collect
statistics at a later date.
Syntax The syntax for collecting statistics on an index in Oracle/PLSQL is: ALTER INDEX index_name
REBUILD COMPUTE STATISTICS;
index_name
The index in which to collect statistics.
Example
Let's look at an example of how to collect statistics for an index in Oracle/PLSQL.
For example:
ALTER INDEX supplier_idx
REBUILD COMPUTE STATISTICS;
In this example, we're collecting statistics for the index called supplier_idx.
Drop an Index
Syntax
The syntax for dropping an index in Oracle/PLSQL is:
DROP INDEX index_name;
index_name
The name of the index to drop.
Example
Let's look at an example of how to drop an index in Oracle/PLSQL.
For example:
DROP INDEX supplier_idx;
In this example, we're dropping an index called supplier_idx.

Oracle/PLSQL: ALTER TABLE
Statement
This Oracle tutorial explains how to use the Oracle ALTER TABLE statement to add a
column, modify a column, drop a column, rename a column or rename a table (with
syntax, examples and practice exercises).
Description
The Oracle ALTER TABLE statement is used to add, modify, or drop/delete columns in
a table. The Oracle ALTER TABLE statement is also used to rename a table.
Add column in table
Syntax
To ADD A COLUMN in a table, the Oracle ALTER TABLE syntax is:
ALTER TABLE table_name
ADD column_name column-definition;
Example
Let's look at an example that shows how to add a column in an Oracle table using the
ALTER TABLE statement.
For example:
ALTER TABLE customers
ADD customer_name varchar2(45);
This Oracle ALTER TABLE example will add a column called customer_name to the
customers table.
Add multiple columns in table Syntax To ADD MULTIPLE COLUMNS to an existing table, the Oracle ALTER TABLE
syntax is: ALTER TABLE table_name
ADD (column_1 column-definition,
column_2 column-definition,
...
column_n column_definition);

Example
Let's look at an example that shows how to add multiple columns in an Oracle table using
the ALTER TABLE statement.
For example:
ALTER TABLE customers
ADD (customer_name varchar2(45),
city varchar2(40));
This Oracle ALTER TABLE example will add two columns, customer_name as a
varchar2(45) field and city as a varchar2(40) field to the customers table.
Modify column in table
Syntax
To MODIFY A COLUMN in an existing table, the Oracle ALTER TABLE syntax is:
ALTER TABLE table_name
MODIFY column_name column_type;
Example
Let's look at an example that shows how to modify a column in an Oracle table using the
ALTER TABLE statement.
For example:
ALTER TABLE customers
MODIFY customer_name varchar2(100) not null;
This Oracle ALTER TABLE example will modify the column called customer_name to
be a data type of varchar2(100) and force the column to not allow null values.
Modify Multiple columns in table
SyntaX
To MODIFY MULTIPLE COLUMNS in an existing table, the Oracle ALTER TABLE
syntax is:
ALTER TABLE table_name
MODIFY (column_1 column_type,
column_2 column_type,
...

column_n column_type);
Example
Let's look at an example that shows how to modify multiple columns in an Oracle table
using the ALTER TABLE statement.
For example:
ALTER TABLE customers
MODIFY (customer_name varchar2(100) not null,
city varchar2(75));
This Oracle ALTER TABLE example will modify both the customer_name and city
columns.
Drop column in table
Syntax
To DROP A COLUMN in an existing table, the Oracle ALTER TABLE syntax is:
ALTER TABLE table_name
DROP COLUMN column_name;
Example
Let's look at an example that shows how to drop a column in an Oracle table using the
ALTER TABLE statement.
For example:
ALTER TABLE customers
DROP COLUMN customer_name;
This Oracle ALTER TABLE example will drop the column called customer_name from
the table called customers.
Rename column in table
(NEW in Oracle 9i Release 2)
Syntax
Starting in Oracle 9i Release 2, you can now rename a column.
To RENAME A COLUMN in an existing table, the Oracle ALTER TABLE syntax is:

ALTER TABLE table_name
RENAME COLUMN old_name to new_name;
Example
Let's look at an example that shows how to rename a column in an Oracle table using the
ALTER TABLE statement.
For example:
ALTER TABLE customers
RENAME COLUMN customer_name to cname;
This Oracle ALTER TABLE example will rename the column called customer_name to
cname.
Rename table
Syntax
To RENAME A TABLE, the Oracle ALTER TABLE syntax is:
ALTER TABLE table_name
RENAME TO new_table_name;
Example
Let's look at an example that shows how to rename a table in Oracle using the ALTER
TABLE statement.
For example:
ALTER TABLE customers
RENAME TO contacts;
This Oracle ALTER TABLE example will rename the customers table to contacts.
Practice Exercise #1:
Based on the departments table below, rename the departments table to depts.
CREATE TABLE departments
( department_id number(10) not null,
department_name varchar2(50) not null,
CONSTRAINT departments_pk PRIMARY KEY (department_id)
);

Solution for Practice Exercise #1:
The following Oracle ALTER TABLE statement would rename the departments table to
depts:
ALTER TABLE departments
RENAME TO depts;
Practice Exercise #2:
Based on the employees table below, add a column called bonus that is a number(6)
datatype.
CREATE TABLE employees
( employee_number number(10) not null,
employee_name varchar2(50) not null,
department_id number(10),
CONSTRAINT employees_pk PRIMARY KEY (employee_number)
);
Solution for Practice Exercise #2:
The following Oracle ALTER TABLE statement would add a bonus column to the
employees table:
ALTER TABLE employees
ADD bonus number(6);
Practice Exercise #3:
Based on the customers table below, add two columns - one column called contact_name
that is a varchar2(50) datatype and one column called last_contacted that is a date
datatype.
CREATE TABLE customers
( customer_id number(10) not null,
customer_name varchar2(50) not null,
address varchar2(50),
city varchar2(50),
state varchar2(25),
zip_code varchar2(10),
CONSTRAINT customers_pk PRIMARY KEY (customer_id)
);
Solution for Practice Exercise #3:
The following Oracle ALTER TABLE statement would add the contact_name and
last_contacted columns to the customers table:

ALTER TABLE customers
ADD (contact_name varchar2(50),
last_contacted date);
Practice Exercise #4:
Based on the employees table below, change the employee_name column to a
varchar2(75) datatype.
CREATE TABLE employees
( employee_number number(10) not null,
employee_name >varchar2(50) not null,
department_id number(10),
CONSTRAINT employees_pk PRIMARY KEY (employee_number)
);
Solution for Practice Exercise #4:
The following Oracle ALTER TABLE statement would change the datatype for the
employee_name column to varchar2(75):
ALTER TABLE employees
MODIFY employee_name varchar2(75);
Practice Exercise #5:
Based on the customers table below, change the customer_name column to NOT allow
null values and change the state column to a varchar2(2) datatype.
CREATE TABLE customers
( customer_id number(10) not null,
customer_name varchar2(50),
address varchar2(50),
city varchar2(50),
state varchar2(25),
zip_code varchar2(10),
CONSTRAINT customers_pk PRIMARY KEY (customer_id)
);
Solution for Practice Exercise #5:
The following Oracle ALTER TABLE statement would modify the customer_name and
state columns accordingly in the customers table:
ALTER TABLE customers
MODIFY (customer_name varchar2(50) not null,
state varchar2(2));
Practice Exercise #6:

Based on the employees table below, drop the salary column.
CREATE TABLE employees
( employee_number number(10) not null,
employee_name varchar2(50) not null,
department_id number(10),
salary number(6),
CONSTRAINT employees_pk PRIMARY KEY (employee_number)
);
Solution for Practice Exercise #6:
The following Oracle ALTER TABLE statement would drop the salary column from the
employees table:
ALTER TABLE employees
DROP COLUMN salary;
Practice Exercise #7:
Based on the departments table below, rename the department_name column to
dept_name.
CREATE TABLE departments
( department_id number(10) not null,
department_name varchar2(50) not null,
CONSTRAINT departments_pk PRIMARY KEY (department_id)
);
Solution for Practice Exercise #7:
The following Oracle ALTER TABLE statement would rename the department_name
column to dept_name in the departments table:
ALTER TABLE departments
RENAME COLUMN department_name to dept_name;

Oracle/PLSQL: DROP TABLE Statement
This Oracle tutorial explains how to use the Oracle DROP TABLE statement with
syntax and examples.
Description
The Oracle DROP TABLE statement allows you to remove or delete a table from the
Oracle database.
Syntax
The syntax for the Oracle DROP TABLE statement is:
DROP [schema_name].TABLE table_name
[ CASCADE CONSTRAINTS ]
[ PURGE ];
Parameters or Arguments
schema_name
The name of the schema that owns the table.
table_name
The name of the table to remove from the Oracle database.
CASCADE CONSTRAINTS
Optional. If specified, all referential integrity constraints will be dropped as well.
PURGE
Optional. If specified, the table and its dependent objects will be purged from the
recycle bin and you will not be able to recover the table. If not specified, the table
and its dependent objects are placed in the recycle bin and can be recovered later,
if needed.
Note: If there are referential integrity constraints on table_name and you do not specify
the CASCADE CONSTRAINTS option, the DROP TABLE statement will return an error
and Oracle will not drop the table.
Example
Let's look at an example that shows how to drop a table in Oracle by using the DROP
TABLE statement.
For example:
DROP TABLE customers;

This Oracle DROP TABLE example would drop the table called customers.
Purge
Let's look at how to use the PURGE option with the DROP TABLE statement in Oracle.
When issuing a DROP TABLE statement in Oracle, you can specify the PURGE option.
The PURGE option will purge the table and its dependent objects so that they do not
appear in the recycle bin. The risk of specifying the PURGE option is that you will not be
able to recover the table. However, the benefit of using PURGE is that you can ensure
that sensitive data will not be left sitting in the recycle bin.
For example:
DROP TABLE customers PURGE;
This DROP TABLE statement would drop the table called customers and issue a PURGE
so that the space associated with the customers table is released. In other words, the
customers table is not placed into the recycle bin and, therefore, can not be recovered
later if required.