
Oracle White Paper - Oracle | Integrated Cloud … VM Manager 3.2 – Quick Start Guide for Managing...
18
An Oracle White Paper January 2013 Oracle VM Manager 3.2: Quick Start Guide for Managing Oracle VM Server for SPARC
Transcript of Oracle White Paper - Oracle | Integrated Cloud … VM Manager 3.2 – Quick Start Guide for Managing...

An Oracle White Paper
January 2013
Oracle VM Manager 3.2: Quick Start Guide for Managing Oracle VM Server for SPARC

Oracle VM Manager 3.2 – Quick Start Guide for Managing Oracle VM Server for SPARC
Introduction .............................................................................................. 2
Introduction to Oracle VM Manager for Oracle VM Server for SPARC Customers ............................................................................................ 2
Prepare for Implementation ...................................................................... 3
What You Need to Get Started ............................................................. 4
Prepare Hardware ................................................................................ 5
Prepare Network Infrastructure ............................................................. 5
Prepare Centralized External Storage .................................................. 5
Download Oracle VM Software ............................................................. 6
Download Oracle VM Templates .......................................................... 6
Next Steps ............................................................................................ 7
Build Oracle VM Platform ......................................................................... 7
Install Oracle Solaris 11 and Oracle VM Server on Physical Servers .... 7
Install Oracle Linux on Management Server ....................................... 10
Install Oracle VM Manager on Management Server ........................... 10
Log Into Oracle VM Manager .............................................................. 15
Using the environment ........................................................................ 15
Oracle VM Manager 3.2 – Quick Start Guide for Managing Oracle VM Server for SPARC
2
Introduction
This quick start guide shows how to use a new feature in the Oracle VM 3.2 release: support for Oracle
VM Server for SPARC (formerly called Logical Domains) from Oracle VM Manager. This new
capability makes it possible to provide unified management for Oracle VM virtual environments
whether they are running on x86 or SPARC. Customers will be able to use Oracle VM Manager to
discover SPARC servers running Oracle VM Server for SPARC, and manage virtual machines.
The guide is designed to give the reader an overview of the concepts and activities needed to get a
logical domain guest up and running with Oracle VM Manager. The goal is to help the reader become
familiar enough with the product to successfully design and implement an Oracle VM environment, in
particular for readers working with Oracle VM Server for SPARC getting started with Oracle VM
Manager. This document does not discuss general procedures on how to set up and configure Oracle
VM server pools or guests. Please refer to the Getting Started Guide embedded within the Oracle
VM Manager user interface or the Oracle VM User’s Guide available from Oracle Technology
Network documentation for more detailed information about working with Oracle VM.
Introduction to Oracle VM Manager for SPARC Customers
In this release, Oracle VM Server for SPARC gains the ability to interoperate with Oracle VM Manager
alongside Oracle VM Server for x86. This introduces several concepts that are briefly reviewed here.
Oracle VM Manager is a management tool for virtualization that provides a graphical interface for
administering and applying policies to virtual machines, the servers they run on, and the network and
storage services they depend on. Oracle VM Manager controls the virtualization environment, creating
and monitoring Oracle VM servers and the virtual machines. The administrator uses the graphical
interface to “discover” servers that will host virtual machines, and the resources they use.
Using Oracle VM Manager, multiple physical Oracle VM Server hosts are grouped into server pools. A
Manager instance can manage multiple server pools, each of which can have up to 32 physical servers.
This lets a single administrative console manage hundreds of physical servers and the virtual machines
on them. The Manager assigns a server from the pool as a “master server”, and uses a relocatable IP
address, called the virtual IP, to whichever server currently has that role. The Manager uses the master
server to execute long-running tasks, such as importing virtual machine templates, rather than adding
load to the Manager host. This improves scalability and user-interface responsiveness.
Oracle VM makes use of shared storage repositories to hold virtual machine disk images, files
containing ISO images, and pre-configured virtual machine templates and assemblies. The
administrator can import such pre-configured virtual machine images from network-accessible sources,
and then create virtual machines from them. Every server in a given pool has access to a shared storage
repository which can be a combination of NFS, Fibre Channel or iSCSI. For this release, the repository

Oracle VM Manager 3.2 – Quick Start Guide for Managing Oracle VM Server for SPARC
3
must reside on NFS for SPARC servers. This allows guest VMs associated with a pool to start and run
on any physical server within the pool.
Oracle VM Server for SPARC integrates with the Oracle VM Manager though an agent which is
installed on the Oracle VM Server for SPARC control domain. This support has the following pre-
requisites:
SPARC servers supported by Oracle VM Server for SPARC 3.0 or later. Please review the release
notes about the list of supported SPARC servers. The command “ldm –V” can be used from a
control domain to see what version is installed. The control domain must be running Oracle Solaris
11.1 or later. Guest domains can be either Solaris 10 or Solaris 11. Oracle VM Agent will be installed
in the control domain.
Oracle VM Manager runs on 64-bit Oracle Linux 5.5 OS or later, and requires a separate server
outside of the server pool. This can be either a physical server or a guest virtual machine of Oracle
VM Server on an x86 host.
Guest domain images will be stored on external shared NFS storage. The amount of NFS storage
allocated for the storage repository depends on the number and size of guest domains that you want
to deploy.
Oracle VM Manager and Oracle Enterprise Manager
Oracle Enterprise Manager is a comprehensive management product focused on infrastructure
management. Oracle Enterprise Manager Ops Center provisions, services, and monitors Oracle x86
and SPARC hardware, firmware, switches, hardware fault analysis, My Oracle Support integration,
BIOS configuration, the Oracle Solaris and Oracle Linux operating systems. It also provides
sophisticated support for Oracle’s virtualization technologies and, with Oracle Enterprise Manager
Cloud Control 12c, complete cloud capability for private and public clouds. By comparison, Oracle
VM Manager is a management backplane for the virtualization layer. Customers can choose between
the products based on the functionality they need, and since Oracle Enterprise Manager can connect to
and discover Oracle VM Manager instances, they can be combined to work together.
For this release, testing has not completed for SPARC systems on these integrations and thus it is
currently not recommended that you use Oracle VM Manager 3.2.1 build with Oracle Enterprise
Manager 12c or Oracle Enterprise Manager Ops Center 12c together. If you do try them together, do
not use a production instance of Oracle Enterprise Manager.
Prepare for Implementation
The first phase focuses on what you need to get started, including basic hardware, operating system
and application downloads, storage and networking.
To learn more about Oracle VM, please refer to the white papers at Oracle VM OTN page.
Oracle VM Manager 3.2 – Quick Start Guide for Managing Oracle VM Server for SPARC
4
Important note for All Readers
Please note that the object names, locations and configuration examples are used as illustrations to
convey concepts and should not be copied literally. The repository names, host names, IP addresses,
network configurations and assignment of network roles are examples, and should not be construed as
the way your particular environment should be configured.
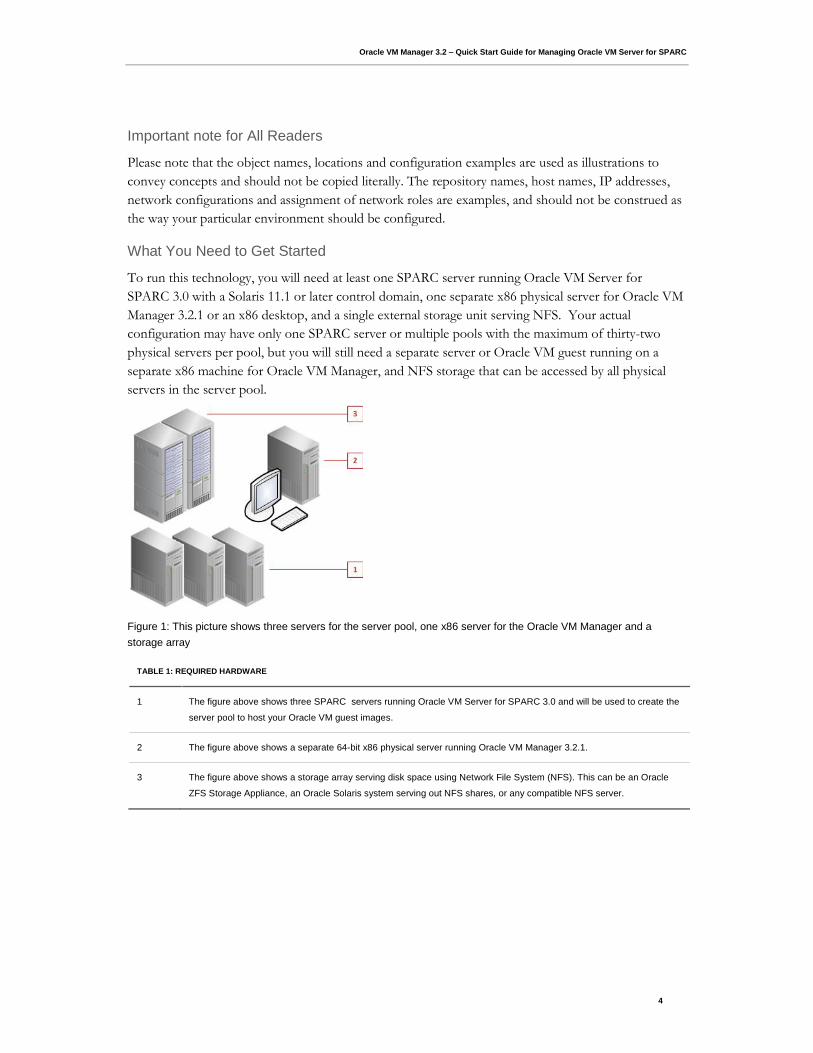
What You Need to Get Started
To run this technology, you will need at least one SPARC server running Oracle VM Server for
SPARC 3.0 with a Solaris 11.1 or later control domain, one separate x86 physical server for Oracle VM
Manager 3.2.1 or an x86 desktop, and a single external storage unit serving NFS. Your actual
configuration may have only one SPARC server or multiple pools with the maximum of thirty-two
physical servers per pool, but you will still need a separate server or Oracle VM guest running on a
separate x86 machine for Oracle VM Manager, and NFS storage that can be accessed by all physical
servers in the server pool.
Figure 1: This picture shows three servers for the server pool, one x86 server for the Oracle VM Manager and a
storage array
TABLE 1: REQUIRED HARDWARE
1 The figure above shows three SPARC servers running Oracle VM Server for SPARC 3.0 and will be used to create the
server pool to host your Oracle VM guest images.
2 The figure above shows a separate 64-bit x86 physical server running Oracle VM Manager 3.2.1.
3 The figure above shows a storage array serving disk space using Network File System (NFS). This can be an Oracle
ZFS Storage Appliance, an Oracle Solaris system serving out NFS shares, or any compatible NFS server.

Oracle VM Manager 3.2 – Quick Start Guide for Managing Oracle VM Server for SPARC
5
Prepare Hardware
The Oracle VM Server for SPARC hypervisor resides in the server’s firmware, so it is important to run
current versions of firmware. Please refer to the Release Notes to see the firmware version needed for
your servers, and update the server if necessary before installing the logical domains manager software.
It is recommended that servers are configured exactly the same. This means the same processor types
(such as SPARC T4 processors) and memory sizes, that PCI cards should occupy the same slots in all
servers, that network cables from each subnet should be connected to the same ports on the servers
and that firmware revisions should be the same on each physical server. This can reduce confusion
later when installing and using the systems. Also ensure that you have access to the console via the
ILOM (Integrated Lights Out Manager) service processor on each SPARC server.
Prepare Network Infrastructure
You will need to assign several IP addresses depending on your implementation. You can use a single
network but will need separate addresses for each server’s control domain, the guests, the Oracle VM
Manager, plus a relocatable IP address used for the server pool.
In a production implementation you may want to use multiple networks to separate traffic for virtual
machine I/O, access to network storage, and management. Oracle VM Manager supports multiple
subnets on different physical interfaces/VLANS. Typical implementations include separate networks
for “public”, “storage” and “private/management” subnet. In this getting started tutorial we will use a
single network to keep things simple.
Prepare Centralized External Storage
You will need to create and present (export) a directory via NFS for the storage repository. This file
system is used for Oracle VM guest images as well as all storage related resources for the server pool.
Shares should be set up to be root-writeable by the servers in the pool.

Oracle VM Manager 3.2 – Quick Start Guide for Managing Oracle VM Server for SPARC
6
Download Oracle VM Software
There are several parts to download:
Oracle Solaris 11.1 or later, which includes pre-installed Oracle VM Server for SPARC 3.0 Logical
Domains Manager. This software is installed on the SPARC server to create a control domain..
Complete instructions on how to configure Oracle VM Server for SPARC are outside the scope of
this document, which is focused on using it with Oracle VM Manager, but the minimal set of
commands needed will be shown below.
Oracle VM Agent 3.2.1 for SPARC. The Agent provides the interface between Oracle VM Server for
SPARC and the Oracle VM Manager. This can be downloaded from Oracle Technology Network as
described in the release announcement.
Oracle Solaris 11.1 and Oracle Solaris 10 install images in CD-ROM or DVD “.iso” format for guest
OS installation.
Oracle VM Manager 3.2.1 installer ISO image. Oracle VM Manager is an Oracle Fusion Middleware
application, based on the Oracle WebLogic Server application server and an Oracle or MySQL
database. The Oracle VM Manager runs on 64-bit Oracle Linux 5.5 OS or later. The management
repository resides in a MySQL or Oracle Database, which can be installed either on the same
management server or a separate server. MySQL Database is bundled with Oracle VM Manager
3.2.1.
Oracle Linux ISO image. This is needed for the physical server where Oracle VM Manager 3.2.1 will
be installed. Although the process is not covered in this document, Oracle VM Manager 3.2.1 can be
installed onto a VM guest running Oracle Linux somewhere on the network, but must be
independent of your Oracle VM Servers.
Download Oracle VM Templates
At the time this is being written there are no Oracle VM Server for SPARC templates or assemblies
published with pre-built Solaris images available for download. When they are made available,
instructions will be provided on how to download Oracle Solaris templates for installation under
Oracle VM.
In the meantime, Solaris guests can be installed from ISO images, or by using a network install based
on Jumpstart (for Solaris 10) or Automated Installer (for Solaris 11). For ISO images, assemblies and
templates, perform the following tasks once the download has completed:
Oracle VM Manager 3.2 – Quick Start Guide for Managing Oracle VM Server for SPARC
7
Copy or move the downloaded file to an internal web server that will be accessible from the Oracle
VM Manager that will eventually be installed as part of this tutorial. The web server will be used by
Oracle VM Manager to import the template in later steps.
Unzip the file, if it is in .zip format.
Next Steps
The preparation phase should be completed once all of the above tasks have been accomplished. We
will now move on to the next major phase of building the platform for our Oracle VM environment.
Build Oracle VM Server Platform
Oracle VM Server for SPARC software is pre-installed in Solaris 11.1 so it doesn’t need to be
separately downloaded. The amount of pre-configuration work on the Oracle VM Servers should be
minimal, since most configuration tasks are performed by the Oracle VM Server Agent or Manager
instead of the logical domains CLI.
If you have an existing system with Solaris 11.1 installed and already running Oracle VM Server for
SPARC 3.0, you can proceed directly to installing the ovs-agent as described below. Existing guest
domains should be migrated to a different server.
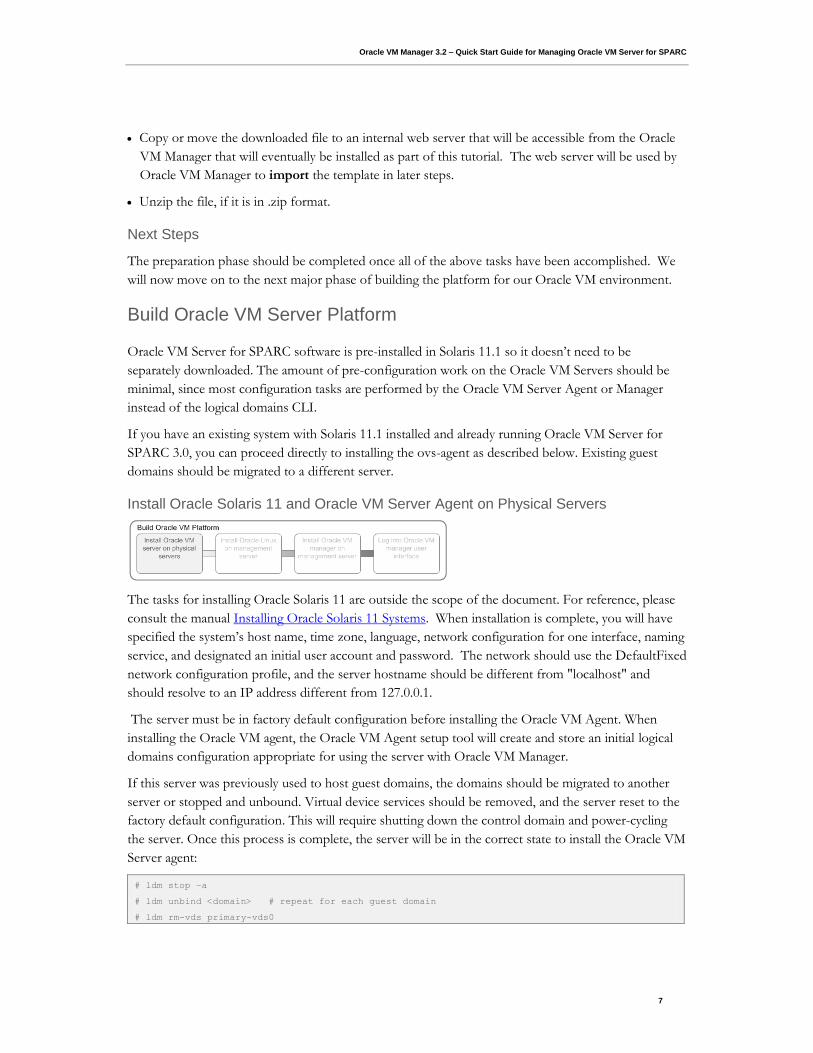
Install Oracle Solaris 11 and Oracle VM Server Agent on Physical Servers
The tasks for installing Oracle Solaris 11 are outside the scope of the document. For reference, please
consult the manual Installing Oracle Solaris 11 Systems. When installation is complete, you will have
specified the system’s host name, time zone, language, network configuration for one interface, naming
service, and designated an initial user account and password. The network should use the DefaultFixed
network configuration profile, and the server hostname should be different from "localhost" and
should resolve to an IP address different from 127.0.0.1.
The server must be in factory default configuration before installing the Oracle VM Agent. When
installing the Oracle VM agent, the Oracle VM Agent setup tool will create and store an initial logical
domains configuration appropriate for using the server with Oracle VM Manager.
If this server was previously used to host guest domains, the domains should be migrated to another
server or stopped and unbound. Virtual device services should be removed, and the server reset to the
factory default configuration. This will require shutting down the control domain and power-cycling
the server. Once this process is complete, the server will be in the correct state to install the Oracle VM
Server agent:
# ldm stop –a
# ldm unbind <domain> # repeat for each guest domain
# ldm rm-vds primary-vds0
Oracle VM Manager 3.2 – Quick Start Guide for Managing Oracle VM Server for SPARC
8
After Solaris has shutdown, login to the service processor, and perform a power cycle of the system to
load the factory default configuration.
At this time you have a single domain running on the SPARC server, owning all the server’s CPUs and
RAM. In a manual Oracle VM Server for SPARC configuration, the administrator would now issue
commands to reduce the control domain in size to free up CPUs and RAM for guest domains. The
administrator would also define virtual disk, virtual network, and virtual console concentrator services.
This effort is eliminated here because the Oracle VM Agent automatically reconfigures the control
domain, saves a new configuration, and defines necessary services
You can now install the Oracle VM Agent (“ovs-agent”) used to communicate with Oracle VM
Manager. Download the ovs-agent tar file as directed by the instructions, and then install the agent as
shown below. You will be prompted to enter a agent password, and then will be prompted to reboot
the server to complete installation. Actual file names will be different.
# svcadm disable vntsd
# ldm rm-vcc primary-vcc0
# ldm rm-vsw primary-vsw0
# ldm set-config factory-default
# shutdown -y -g0 –i5
-> stop /SYS
-> start /SYS
# tar zxf ovs-ldoms-3.2.1.tar.gz
# cd ovs-ldoms-3.2.1
# ./install
Oracle VM Agent Release 3.2.1 Installer
- Installing Packages
Packages to install: 6
Create boot environment: No
Create backup boot environment: No
Services to change: 1
DOWNLOAD PKGS FILES XFER (MB) SPEED
Completed 6/6 226/226 1.6/1.6 0B/s
PHASE ITEMS
Installing new actions 352/352
Updating package state database Done
Updating image state Done
Creating fast lookup database Done
- Configuring the OVS Agent
Oracle VM Manager 3.2 – Quick Start Guide for Managing Oracle VM Server for SPARC
9
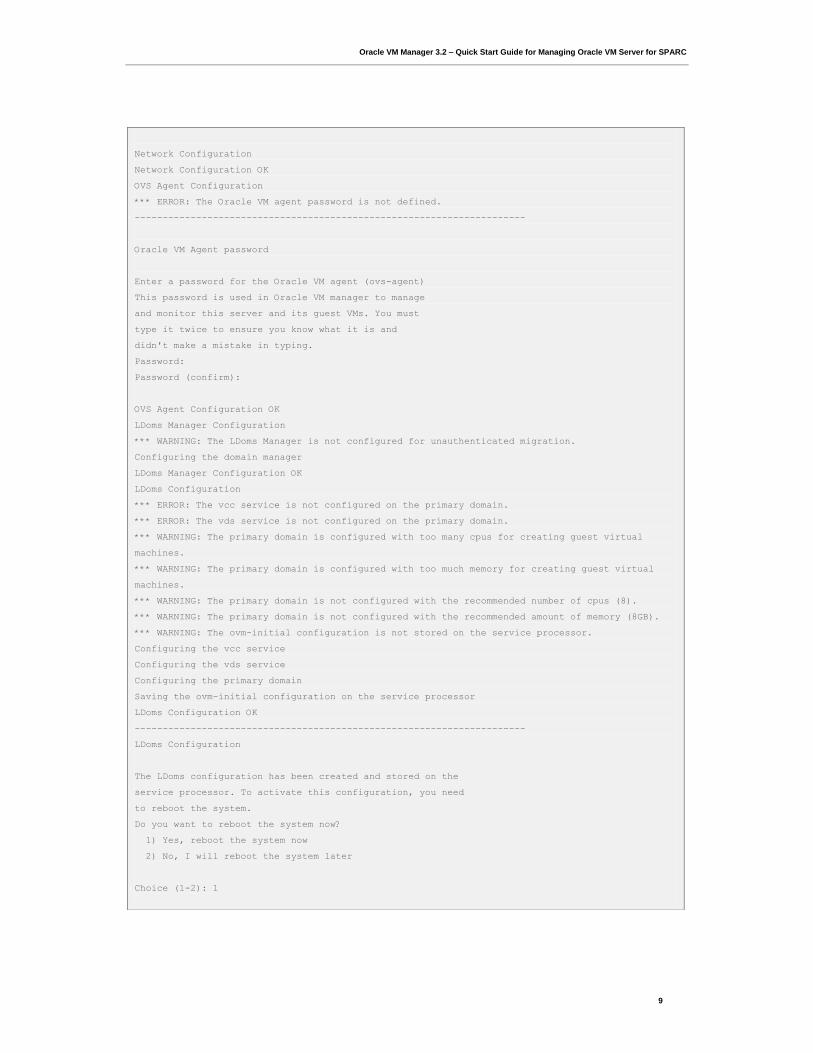
Network Configuration
Network Configuration OK
OVS Agent Configuration
*** ERROR: The Oracle VM agent password is not defined.
----------------------------------------------------------------------
Oracle VM Agent password
Enter a password for the Oracle VM agent (ovs-agent)
This password is used in Oracle VM manager to manage
and monitor this server and its guest VMs. You must
type it twice to ensure you know what it is and
didn't make a mistake in typing.
Password:
Password (confirm):
OVS Agent Configuration OK
LDoms Manager Configuration
*** WARNING: The LDoms Manager is not configured for unauthenticated migration.
Configuring the domain manager
LDoms Manager Configuration OK
LDoms Configuration
*** ERROR: The vcc service is not configured on the primary domain.
*** ERROR: The vds service is not configured on the primary domain.
*** WARNING: The primary domain is configured with too many cpus for creating guest virtual
machines.
*** WARNING: The primary domain is configured with too much memory for creating guest virtual
machines.
*** WARNING: The primary domain is not configured with the recommended number of cpus (8).
*** WARNING: The primary domain is not configured with the recommended amount of memory (8GB).
*** WARNING: The ovm-initial configuration is not stored on the service processor.
Configuring the vcc service
Configuring the vds service
Configuring the primary domain
Saving the ovm-initial configuration on the service processor
LDoms Configuration OK
----------------------------------------------------------------------
LDoms Configuration
The LDoms configuration has been created and stored on the
service processor. To activate this configuration, you need
to reboot the system.
Do you want to reboot the system now?
1) Yes, reboot the system now
2) No, I will reboot the system later
Choice (1-2): 1
Oracle VM Manager 3.2 – Quick Start Guide for Managing Oracle VM Server for SPARC
10
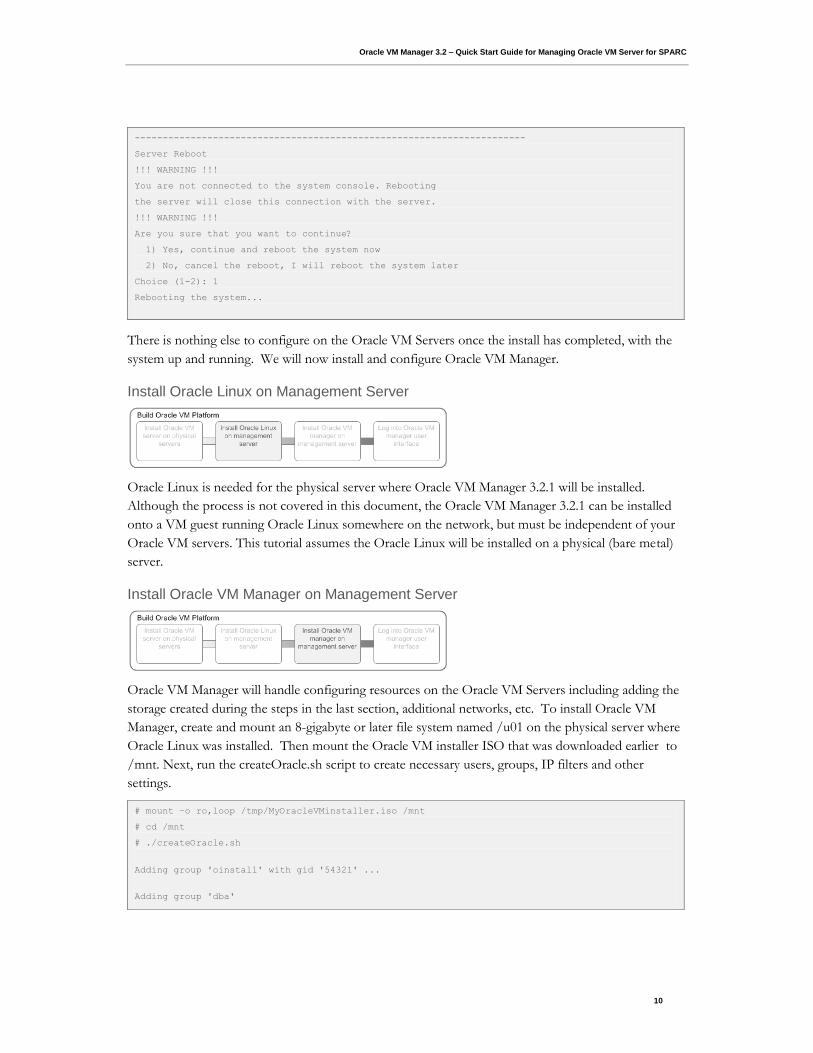
There is nothing else to configure on the Oracle VM Servers once the install has completed, with the
system up and running. We will now install and configure Oracle VM Manager.
Install Oracle Linux on Management Server
Oracle Linux is needed for the physical server where Oracle VM Manager 3.2.1 will be installed.
Although the process is not covered in this document, the Oracle VM Manager 3.2.1 can be installed
onto a VM guest running Oracle Linux somewhere on the network, but must be independent of your
Oracle VM servers. This tutorial assumes the Oracle Linux will be installed on a physical (bare metal)
server.
Install Oracle VM Manager on Management Server
Oracle VM Manager will handle configuring resources on the Oracle VM Servers including adding the
storage created during the steps in the last section, additional networks, etc. To install Oracle VM
Manager, create and mount an 8-gigabyte or later file system named /u01 on the physical server where
Oracle Linux was installed. Then mount the Oracle VM installer ISO that was downloaded earlier to
/mnt. Next, run the createOracle.sh script to create necessary users, groups, IP filters and other
settings.
----------------------------------------------------------------------
Server Reboot
!!! WARNING !!!
You are not connected to the system console. Rebooting
the server will close this connection with the server.
!!! WARNING !!!
Are you sure that you want to continue?
1) Yes, continue and reboot the system now
2) No, cancel the reboot, I will reboot the system later
Choice (1-2): 1
Rebooting the system...
# mount –o ro,loop /tmp/MyOracleVMinstaller.iso /mnt
# cd /mnt
# ./createOracle.sh
Adding group 'oinstall' with gid '54321' ...
Adding group 'dba'

Oracle VM Manager 3.2 – Quick Start Guide for Managing Oracle VM Server for SPARC
11
Start the installer as root from /mnt once createOracle.sh has completed. The example below shows a
simple installation which installs MySQL, Oracle WebLogic Server, Oracle Application Development
Framework (ADF), Java, and Oracle VM Manager on the local management server. Filenames and
messages may differ slightly.
Adding user 'oracle' with user id '54321', initial login group 'dba', supplementary group
'oinstall' and home directory '/home/oracle' ..
Creating user 'oracle' succeeded ...
Verifying user 'oracle' OS prerequisites for Oracle VM Manager ...
oracle soft nofile 8192
oracle hard nofile 8192
oracle soft nproc 4096
oracle hard nproc 4096
oracle soft core unlimited
oracle hard core unlimited
Setting user 'oracle' OS limits for Oracle VM Manager ...
Altered file /etc/security/limits.conf
Original file backed up at /etc/security/limits.conf.orabackup
Verifying & setting of user limits succeeded ...
Creating mountpoint '/u01' ...
Modifying iptables for OVM
Adding rules to enable access to:
7001 : Weblogic t3
7002 : Oracle VM Manager https
15901 : Oracle VM Manager VM console proxy
54321 : Oracle VM Manager core
54322 : Oracle VM Manager core via SSL
123 : NTP
10000 : Oracle VM Manager CLI Tool
iptables: Saving firewall rules to /etc/sysconfig/iptables:[ OK ]
Rules added.

Oracle VM Manager 3.2 – Quick Start Guide for Managing Oracle VM Server for SPARC
12
The installer will ensure prerequisites are met before continuing and then prompt for a password that
will be the default password used for all products being installed as well as the log in password for the
Oracle VM Manager user interface after the installer has completed.
The installer will prompt the user to continue after it has verified the passwords and space
requirements.
The actual install process will begin by displaying something like the following over the next few
minutes. The entire install process can take 20 minutes or more
# cd /mnt
# ./runInstaller.sh
Oracle VM Manager Release 3.2.1 Installer
Oracle VM Manager Installer log file:
/tmp/ovm-manager-3-install-2012-11-30-181411.log
Please select an installation type:
1: Simple (includes database if necessary)
2: Custom (using existing Oracle database)
3: Uninstall
4: Help
Select Number (1-4): 1
Starting production with local database installation ...
Verifying installation prerequisites ...
*** WARNING: Recommended memory for the Oracle VM Manager server installation is 3950 MB RAM
One password is used for all users created and used during the installation.
Enter a password for all logins used during the installation:
Enter a password for all logins used during the installation (confirm):
Verifying configuration ...
Start installing the configured components:
1: Continue
2: Abort
Select Number (1-2): 1
Step 1 of 9 : Database Software...
Installing Database Software...
Retrieving MySQL Database ...
Installing MySQL Database 5 ...
Unzipping MySQL File ...
Configuring MySQL Database 5 ...
Step 2 of 9 : Java ...

Oracle VM Manager 3.2 – Quick Start Guide for Managing Oracle VM Server for SPARC
13
Installing Java ...
Step 3 of 9 : Database schema ...
Creating database 'ovs' ...
Creating user 'ovs' for database 'ovs'...
Step 4 of 9 : WebLogic ...
Retrieving Oracle WebLogic Server 11g ...
Installing Oracle WebLogic Server 11g ...
Step 5 of 9 : ADF ...
Retrieving Oracle Application Development Framework (ADF) ...
Unzipping Oracle ADF ...
Installing Oracle ADF ...
Installing Oracle ADF Patch...
Step 6 of 9 : Oracle VM ...
Retrieving Oracle VM Manager Application ...
Extracting Oracle VM Manager Application ...
Installing Oracle VM Manager Core ...
Step 7 of 9 : Domain creation ...
Creating Oracle WebLogic Server domain ...
Starting Oracle WebLogic Server 11g ...
Configuring data source 'OVMDS' ...
Creating Oracle VM Manager user 'admin' ...
Step 8 of 9 : Deploy ...
Deploying Oracle VM Manager Core container ...
Deploying Oracle VM Manager UI Console ...
Deploying Oracle VM Manager Help ...
Granting ovm-admin role to user 'admin' ...
Set Log Rotation ...
Disabling HTTP and enabling HTTPS...
Step 9 of 9 : Oracle VM Manager Shell ...
Retrieving Oracle VM Manager Shell & API ...
Extracting Oracle VM Manager Shell & API ...
Installing Oracle VM Manager Shell & API ...
Retrieving Oracle VM Manager Upgrade tool ...
Extracting Oracle VM Manager Upgrade tool ...
Installing Oracle VM Manager Upgrade tool ...
Retrieving Oracle VM Manager CLI tool ...
Extracting Oracle VM Manager CLI tool...
Installing Oracle VM Manager CLI tool ...
Copying Oracle VM Manager shell to '/usr/bin/ovm_shell.sh' ...
Installing ovm_admin.sh in '/u01/app/oracle/ovm-manager-3/bin' ...
Installing ovm_upgrade.sh in '/u01/app/oracle/ovm-manager-3/bin' ...

Oracle VM Manager 3.2 – Quick Start Guide for Managing Oracle VM Server for SPARC
14
The following information will be displayed after the Oracle VM Manager installer has completed. The
post-install message contains important information about the Oracle VM Manager and should be
saved to a text file for future reference:
Figure 2: Important post-installation information displayed by the Oracle VM Manager installer. Keep a copy of the
information handy.
The final task is to install a Java serial console client, and if you will be installing x86 servers, install a
VNC client. The download instructions for these packages are available from Oracle VM Installation
and Upgrade Guide: Installing and Configuring Virtual Machine Console Utilities. This will allow you
Enabling Oracle VM Manager service ...
Restarting Oracle VM Manager instance ...
Waiting 15 seconds for the application to initialize ...
Oracle VM Manager is running ...
Oracle VM Manager installed.
Installation Summary
--------------------
Database configuration:
Database type : MySQL
Database host name : localhost
Database name : ovs
Database listener port : 49500
Database user : ovs
Weblogic Server configuration:
Administration username : weblogic
Oracle VM Manager configuration:
Username : admin
Core management port : 54321
UUID : 0004fb00650100002f72ae7c96ce1dc6
Passwords:
There are no default passwords for any users. The passwords to use for Oracle VM Manager,
Database, and Oracle WebLogic Server have been set by you during this installation. In the case
of a default install, all passwords are the same.
Oracle VM Manager UI:
https://MyManager:7002/ovm/console
Log in with the user 'admin', and the password you set during the installation.
Please note that you need to install tightvnc-java on this computer to access a virtual machine's
console.
For more information about Oracle Virtualization, please visit:
http://www.oracle.com/virtualization/
Oracle VM Manager installation complete.

Oracle VM Manager 3.2 – Quick Start Guide for Managing Oracle VM Server for SPARC
15
to use Oracle VM Manager to launch x86 graphical console sessions as well as serial console on
running Oracle VM guests.
Figure 3: Process for installing VNC client and Java serial console client.
This particular figure shows TightVNC being installed, but the free RealVNC can be substituted and in
some cases may have better mouse control. Also, Oracle Linux 6 comes with a variation of TightVNC
called TigerVNC and should be used instead of TightVNC if the Oracle VM Manager is installed on
Oracle Linux 6.
Log Into Oracle VM Manager
There is nothing else to configure at this point and you should be able to connect to the Oracle VM
Manager user interface (UI) with any supported browser as shown in the figure below. The browser
URL for the Oracle VM Manager UI is noted in the post-installation information you saved from
above and should look something like the following:
Unlike prior versions of Oracle VM Manager, there is no longer a clear text “http” login; “https” is
required. You will see messages about an untrusted site because this is an SSL connection to a web site
without a signed certificate. Log into the Oracle VM Manager UI using “admin” and the password you
set when you ran the installer for Oracle VM Manager.
Using the Manager environment
At this point you have an Oracle VM Manager environment and servers that can be configured to run
SPARC and x86 servers and virtual machines. Rather than duplicate information, please refer to the
Getting Started guide from Oracle VM Documentation. There are also differences in the
implementation services for SPARC. In particular, note that storage must be on NFS, not on Fibre
Channel or iSCSI. Note also that the virtual console is not accessed via vnc: instead there is a serial
console icon to click on when a virtual machine is launched. Most of the other product aspects are
similar, so the life-cycle of defining server pools, storage repositories, networks, and virtual machines
are done the same ways.
Customers familiar with Oracle VM Server for SPARC should be aware of operational differences.
Since the manager and agent software control the environment, avoid using “ldm” commands that alter
logical domain configurations, though it is safe to use “ldm list” commands like “ldm list”, “ldm list-
bindings”, “ldm list-services”. Inactive guest domains are not visible in an “ldm list” command,
because the Manager defines the logical domain to the control domain only when it is startedGuest
# rpm -ivh tightvnc-java-1.3.9-4.noarch.rpm
# rpm –ivh jta-2.6-1.noarch.rpm
https://MyManager:7002/ovm/console
Oracle VM Manager 3.2 – Quick Start Guide for Managing Oracle VM Server for SPARC
16
consoles can be accessed by local telnet from the control domain to the port bound to the guest, or by
clicking on the serial console icon (displayed below) provided by the Manager GUI.
Summary
With this technology release, Oracle VM Server for SPARC customers can start using logical domains
with the management capabilities and graphical user interface of Oracle VM Manager.
Oracle VM 3.2.1: Quick Start Guide for SPARC
Users
January 2013
Author: Jeff Savit
Contributing Authors: Honglin Su, Greg King
Oracle Corporation
World Headquarters
500 Oracle Parkway
Redwood Shores, CA 94065
U.S.A.
Worldwide Inquiries:
Phone: +1.650.506.7000
Fax: +1.650.506.7200
oracle.com
Copyright © 2013, Oracle and/or its affiliates. All rights reserved. This document is provided for information purposes only and the
contents hereof are subject to change without notice. This document is not warranted to be error-free, nor subject to any other
warranties or conditions, whether expressed orally or implied in law, including implied warranties and conditions of merchantability or
fitness for a particular purpose. We specifically disclaim any liability with respect to this document and no contractual obligations are
formed either directly or indirectly by this document. This document may not be reproduced or transmitted in any form or by any
means, electronic or mechanical, for any purpose, without our prior written permission.
Oracle and Java are registered trademarks of Oracle and/or its affiliates. Other names may be trademarks of their respective owners.
Intel and Intel Xeon are trademarks or registered trademarks of Intel Corporation. All SPARC trademarks are used under license and
are trademarks or registered trademarks of SPARC International, Inc. AMD, Opteron, the AMD logo, and the AMD Opteron logo are
trademarks or registered trademarks of Advanced Micro Devices. UNIX is a registered trademark of The Open Group. 0612


![SPARC Enterprise Oracle VM Server for SPARC …€¦ · • An optional element must be enclosed in [ ]. • A group of options for an optional keyword must be enclosed in [ ] and](https://static.fdocuments.us/doc/165x107/5b5edcca7f8b9a310a8d57d6/sparc-enterprise-oracle-vm-server-for-sparc-an-optional-element-must-be.jpg)


