Oracle Utilities Software Development Kit V2.2.0 ... · Oracle Utilities Software Development Kit...
77
Oracle Utilities Software Development Kit V2.2.0 Installation Guide Last Modified: December 10, 2013 4:20 PM Printed On: December 10, 2013
Transcript of Oracle Utilities Software Development Kit V2.2.0 ... · Oracle Utilities Software Development Kit...
Oracle Utilities Software Development Kit V2.2.0
Installation Guide
Last Modified: December 10, 2013 4:20 PM
Printed On: December 10, 2013

Installation Guide Oracle Utilities Software Development Kit
2 ©2013 Oracle Proprietary and Confidential
PROPRIETARY INFORMATION
THIS MATERIAL CONTAINS, AND IS PART OF, A COMPUTER SOFTWARE APPLICATION WHICH IS PROPRIETARY INFORMATION OWNED BY ORACLE CORPORATION. THE APPLICATION, INCLUDING THIS MATERIAL, MAY NOT BE DUPLICATED, DISCLOSED OR REPRODUCED IN WHOLE OR IN PART FOR ANY PURPOSE WITHOUT THE EXPRESS WRITTEN AUTHORIZATION OF ORACLE CORPORATION.
This Document is subject to change without notice, and Oracle Corporation does not warrant that the material contained in this Document is error-free. If you find any problems with this Document, please report them to Oracle Corporation in writing.
Oracle Corporation and Oracle are registered trademarks of Oracle Corporation or one of its subsidiaries. All other products or company names mentioned are used for identification purposes only, and may be trademarks of their respective owners.
SPL Oracle Utilities Software Development Kit Installation Guide
©2013 Oracle Proprietary and Confidential 3
Table of Contents
Table of Contents .......................................................................................................................... 3
Oracle Utilities Software Development Kit Installation ............................................................. 4 Known Issues ............................................................................................................................ 4 Components Of The Oracle Utilities Software Development Kit .............................................. 4
Project Development Database .......................................................................................... 6 Project Repository .............................................................................................................. 6 Development Workstation .................................................................................................. 6
Setting Up For Development ..................................................................................................... 6 Setting Up the Project Development Database .................................................................. 7 Setting Up the Project Repository ...................................................................................... 7 Setting Up Development Workstations ............................................................................. 10 Setting Up For CM Packaging .......................................................................................... 12 Setting Up A Build Server ................................................................................................. 13
Appendix ................................................................................................................................. 13 Installing the Oracle Utilities Software Development Kit Client ........................................ 13 Installing the Eclipse SDK for the Project Repository ...................................................... 19 Installing the Eclipse SDK for Developers ........................................................................ 68

Installation Guide Oracle Utilities Software Development Kit
4 ©2013 Oracle Proprietary and Confidential
Oracle Utilities Software Development Kit Installation This document describes the installation procedure of the Oracle Utilities Software Development Kit.
Contents Known Issues Components Of The Oracle Utilities Software Development Kit Setting Up For Development Appendix
Known Issues
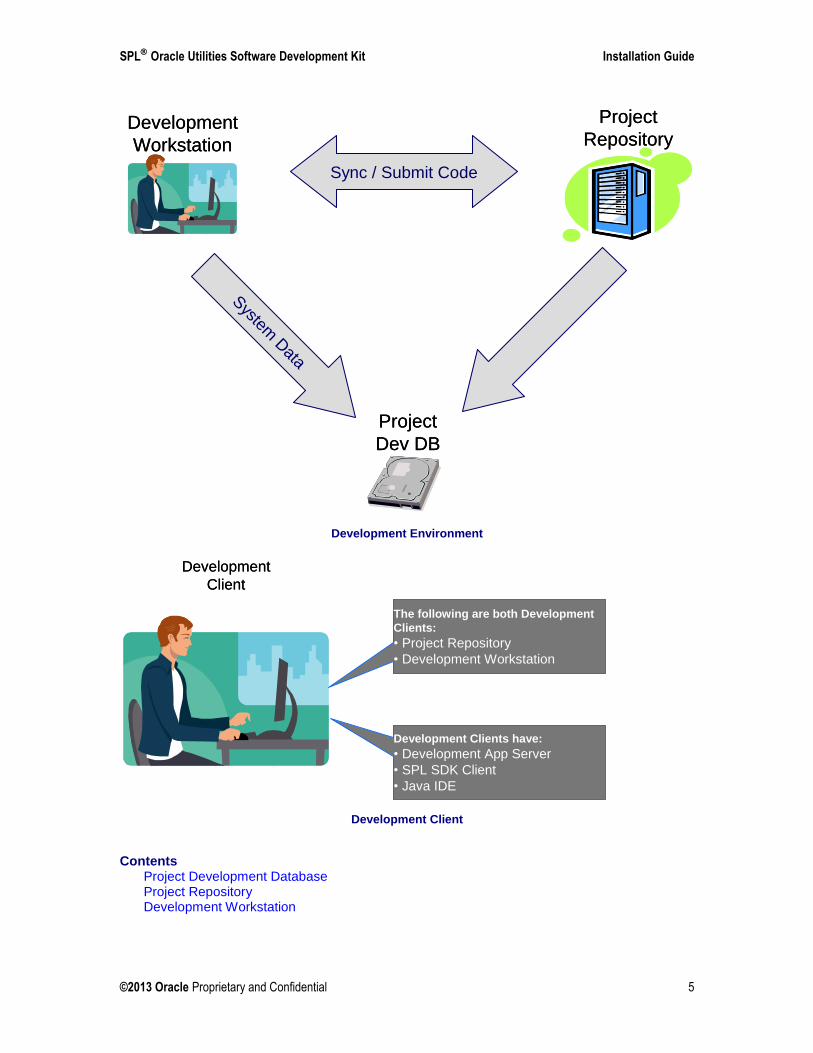
Components Of The Oracle Utilities Software Development Kit The following diagram illustrates the typical development environment.
SPL Oracle Utilities Software Development Kit Installation Guide
©2013 Oracle Proprietary and Confidential 5
Development
Workstation
Development
Workstation
Project
Repository
Project
Repository
System
Data
Sync / Submit Code
Project
Dev DB
Project
Dev DB
Development Environment
Development
Client
Development
Client
The following are both Development
Clients:
• Project Repository
• Development Workstation
Development Clients have:
• Development App Server
• SPL SDK Client
• Java IDE
Development Client
Contents Project Development Database Project Repository Development Workstation
Installation Guide Oracle Utilities Software Development Kit
6 ©2013 Oracle Proprietary and Confidential
Project Development Database Each project has a development database. This is a regular database install of the product that is being customized. System data for customizations are stored in this database. Development processes like code generation connect to this database. In addition, development app servers in development workstations connect to this database.
Project Repository The project repository serves the following purposes:
It is the central storage for all completed, unit-tested code.
It provides the environment from which to build the latest state of the project.
It provides the latest state of the project dev app server from which all developers can synchronize with.
It is the source for CM Packaging.
To support these purposes:
It has to be accessible to all developers.
It is set up as a development client, i.e., similar to a development workstation (see Development Workstation below).
Development Workstation Developers write, generate, compile, and test code on development workstations. A development client is installed for each project that the developer works on.
The main components of a development client are the following:
Project Dev App Server. Code is developed on and executables built into the project dev app server.
Oracle Utilities Software Development Kit Client. This is the primary development tool of the Oracle Utilities Software Development Kit and contains COBOL development tools.
Eclipse SDK. This is the Java development tool used in the Oracle Utilities Software Development Kit.
Setting Up For Development The following are the steps required to set up for developing customizations:
Create a project development database.
Create a project repository.
Each developer sets up a development client on his development workstation.
SPL Oracle Utilities Software Development Kit Installation Guide
©2013 Oracle Proprietary and Confidential 7
Contents Setting Up the Project Development Database Setting Up the Project Repository Setting Up Development Workstations Setting Up For CM Packaging Setting Up A Build Server
Setting Up the Project Development Database The project development database is a regular database install of the product. The procedure for creating one is the same as for the product database.
Setting Up the Project Repository
Contents Pre-Requisites Setup Install App Server Setting up the Oracle Utilities Software Development Kit Client Set Up tools Folder Install Eclipse for Project Repository
Pre-Requisites The project repository requires additional software because it is a development environment.
Contents Microsoft .NET Framework Version 3.5 Redistributable Package Install and Configure NetExpress
Microsoft .NET Framework Version 3.5 Redistributable Package
Please note: It is not required to upgrade .Net framework if you already have .NET Framework Version 1.1 redistributable package installed, this application is certified on .Net Framework 1.1 and 3.5
The version to download is located at the URL:
http://www.microsoft.com/downloads/details.aspx?FamilyID=333325fd-ae52-4e35-b531-508d977d32a6&displaylang=en
Follow the download instructions under the Instructions section.
Install and Configure NetExpress
Note. Micro Focus Net Express is required only if there will be code developed in COBOL.

Installation Guide Oracle Utilities Software Development Kit
8 ©2013 Oracle Proprietary and Confidential
Note. Micro Focus Application Server must first be uninstalled before installing Micro Focus Net
Express.
You must purchase and install the Micro Focus Net Express product and apply the appropriate
wrappack.
Please refer to the supported platforms document for the appropriate version of NetExpress.
Ensure that the system path for the development workstation includes the NetExpress\Base\bin
as part of the PATH.
Note. Development workstations must install this software in the same drive and directory in their
development workstations. It is important that the installation directory be chosen carefully so
that this be achieved.
Setup The following are the steps in creating a project repository:
Install an app server.
Install an Oracle Utilities Software Development Kit Client or configure the app server for development.
Note. Installing the Oracle Utilities Software Development Kit Client also configures the app
server it is set up with to be a development app server. If the Oracle Utilities Software
Development Kit Client was installed in the previous step, its installation already configured the
app server for development and there is no need to execute this step.
Install and configure an Eclipse SDK.
Note. Since the project repository is a development environment, developers just synchronize
the project repository's development app server into their development workstations using a
source code control system instead of installing and building one for themselves. However, this
means that the drive names and directories must be the same in the project repository and in the
development workstations.
Install App Server Install an app sever of the product to be customized and point it to the project development database. This is a regular install of the app server of the product to be customized.
Select the following options during the installation of the app server:
App server is used for development.
Web application is deployed in the exploded directory.
SPL Oracle Utilities Software Development Kit Installation Guide
©2013 Oracle Proprietary and Confidential 9
Setting up the Oracle Utilities Software Development Kit Client If the required version of the Oracle Utilities Software Development Kit is not yet installed, install it by following the section Install Oracle Utilities Software Development Kit Client. Otherwise, proceed by following the section Configure App Server for Development.
Contents Install Oracle Utilities Software Development Kit Client Configure App Server for Development
Install Oracle Utilities Software Development Kit Client Install an Oracle Utilities Software Development Kit Client of the appropriate version, if not already installed. The first three components of the Oracle Utilities Software Development Kit Client version number must match the same of the framework that the product to be customized is built on. See Oracle Utilities Software Development Kit Client later in this document.
See Installing the Oracle Utilities Software Development Kit Client in the Appendix.
Configure App Server for Development
Switch to a project that uses the required version of the Oracle Utilities Software Development Kit.
Note. It is important to first switch to a project with the required version of the Oracle Utilities
Software Development Kit because the process of configuring an app server for development
uses the current project's version of the Oracle Utilities Software Development Kit to configure it.
Open the Oracle Utilities Software Development Kit Client Scripts folder by going through Start Programs Oracle Utilities Software Development Kit 2.2.0.x Oracle Utilities Software Development Kit Client Scripts; x denotes the build number.
Double-click on createNewEnv.bat to initiate configuration of an app server for development.
Specify the directory of the app server to configure for development upon being prompted.
The script displays messages describing what was done to configure the app server for development and then asks the user to press any key when done.
Note. The user must execute switchEnvironments.bat and select the newly-configured project to
begin working that project.
Note. When the project needs to be deployed locally, the developer has to change the
environment variables in the “environ.ini” in the “etc” folder of the application server.
e.g. C:\spl\V220_CCB_SDK_WIN_ORA_TCAT\etc\ ENVIRON.INI
The variables BSN_WLHOST, WEB_WLHOST must be changed to point to the “localhost”.
Installation Guide Oracle Utilities Software Development Kit
10 ©2013 Oracle Proprietary and Confidential
Set Up tools Folder Copy the tools directory from <splsdkroot>\SDK\2.2.0.x\tools into the
SPLSDKCommon\tools directory of the app server; x denotes the build number.
Copy the following 3rd
party libraries into the SPLSDKCommon\tools directory of the app server
jta.jar. This jar file is available from the lib folder of the apache-tomcat folder.
Install Eclipse for Project Repository See Installing the Eclipse SDK for the Project Repository in the Appendix.
Setting Up Development Workstations The following items are prerequisites for each developer workstation.
Contents Pre-Requisites Setup Synchronize to Project Repository Dev App Server Setting up the Oracle Utilities Software Development Kit Client Install Eclipse SDK Online Help
Pre-Requisites
Contents Recommended Hardware Configuration Microsoft Windows XP Pre-Requisites of the Product to be Customized Microsoft .NET Framework Version 3.5 Redistributable Package
Recommended Hardware Configuration Please note the following recommended hardware configuration:
Processor: 3 GHz or faster Pentium 4 class or any Core 2 Duo or Athlon X2 class
Memory (RAM): 2 GB or larger
Display Resolution: 1280x1024 or greater
Hard Disk Space: 80 GB or larger
Microsoft Windows XP Please refer to the supported platforms document for the appropriate version of the windows client
SPL Oracle Utilities Software Development Kit Installation Guide
©2013 Oracle Proprietary and Confidential 11
Pre-Requisites of the Product to be Customized All the software specified as pre-requisites of the app server of the product to be customized must be installed on the dev workstation. Follow the section Web/Application Server Tier for Windows App Server with Oracle in the installation guide of the product to be customized.
Microsoft .NET Framework Version 3.5 Redistributable Package The procedure for installing Microsoft .NET for the development workstation is the same as that for the project repository. Refer to that section for the procedure.
Setup The following are the steps in creating a development client:
Synchronize to the development app server from the project repository.
Install an Oracle Utilities Software Development Kit Client or configure the app server for development.
Note. Installing the Oracle Utilities Software Development Kit Client also configures the app
server it is set up with to be a development app server. If the Oracle Utilities Software
Development Kit Client was installed in the previous step, its installation already configured the
app server for development and there is no need to execute this step.
Install and configure an Eclipse SDK
Note. Since the project repository is a development environment, developers just synchronize a
copy of the project repository's development app server into their development workstations
instead of installing and building one for themselves. However, this means that the drive names
and directories must be the same in the project repository and in the development workstations.
Note. The project repository can simply be a shadow/replica from a source code control system,
in which case, the developer just checks in the code and the project repository is automatically
updated.
Synchronize to Project Repository Dev App Server The project repository development app server contains the latest state of the project. To create a development app server for the project, simply synchronize the project development app server to the development workstation.
Note. The project repository development app server must be synchronized to the development
workstation to the exact same drive letter and directory.
Note. If Perforce is used to synchronize the project repository, then It checks-out the files in
read-only mode. Make sure that these synchronized folders are writeable.
Installation Guide Oracle Utilities Software Development Kit
12 ©2013 Oracle Proprietary and Confidential
Setting up the Oracle Utilities Software Development Kit Client The procedure for installing an Oracle Utilities Software Development Kit Client or configuring a project for development is the same as that for the project repository. Refer to that section for the procedure.
Note. The project repository and all dev workstations must use the same Oracle Utilities
Software Development Kit Client version.
Install Eclipse SDK See Installing the Eclipse SDK for Developers in the Appendix.
Online Help Online Help is available in the Help menu of the Oracle Utilities Application Workbench.
The online help can also be accessed through the MS Windows Start menu or by entering the path directly on the web browser.
Using the MS Windows Start menu, do the following menu selections:
Start All Programs Oracle Utilities Software Development Kit 2.2.0.x Oracle Utilities Software Development Kit Help, here x denotes the build number.
Using a web browser, enter the following path in the address bar of the web browser:
file:///<splsdkroot>/SDK/2.2.0.x/help/ENG/SPLHelp.html
Setting Up For CM Packaging The CM packaging tool provides the scripts and files necessary to package completed customizations so that they may be deployed for QA or production environments. A person, referred to as the project release manager in the Oracle Utilities Software Development Kit documents, is assigned to package the customizations for deployment and is the person who installs the Oracle Utilities Software Development Kit CM packaging tool.
The Oracle Utilities Software Development Kit CM packaging tool has two components: database and app server.
Contents Database CM Packaging Tool App Server CM Packaging Tool
Database CM Packaging Tool The database CM packaging tool is installed by simply unzipping the file DBPackaging-Oracle.zip (for Oracle Database) or DBPAckaging-MS-SQL.zip (for MS SQL database) into a development workstation or a MS Windows-accessible network folder.
SPL Oracle Utilities Software Development Kit Installation Guide
©2013 Oracle Proprietary and Confidential 13
App Server CM Packaging Tool The app server CM packaging tool has a version for each of MS Windows and Unix. The appropriate version is be installed based on the target environments, i.e., the project release manager installs either the MS Windows or Unix version, or both, to match the operating system of the target environments.
The MS Windows version is installed by simply unzipping the file AppServerPackagingWindows.zip into a development workstation or a MS Windows-accessible network folder.
The Unix version is installed by simply decompressing the file AppServerPackagingUnix.zip into a Unix server or a Unix-accessible network folder with the following command:
zcat CM_packaging.tar.Z | tar -xf –
Setting Up A Build Server This component is an environment where all necessary generates and compiles are done and JUnit tests are automatically executed whenever new code is submitted. It can also have the added responsibility of refreshing a shared development app server.
The build server is an optional component and is described in the User Guide.
Appendix
Contents Installing the Oracle Utilities Software Development Kit Client Installing the Eclipse SDK for the Project Repository Installing the Eclipse SDK for Developers
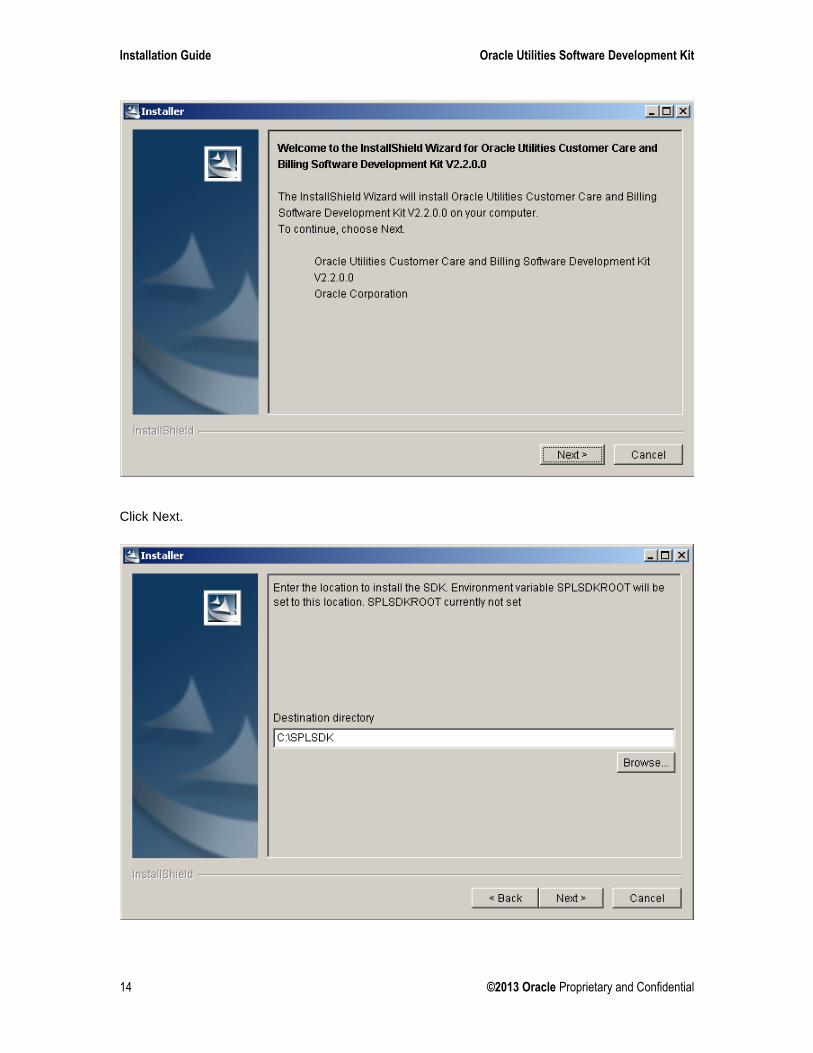
Installing the Oracle Utilities Software Development Kit Client Run ClientSetup.exe to install the Oracle Utilities Software Development Kit Client. Follow the screens and specify appropriate values when prompted.
Note. It is necessary to have the Windows regional settings changed to English (USA) before
installing the Oracle Utilities Software Development Kit
Installation Guide Oracle Utilities Software Development Kit
14 ©2013 Oracle Proprietary and Confidential
Click Next.
SPL Oracle Utilities Software Development Kit Installation Guide
©2013 Oracle Proprietary and Confidential 15
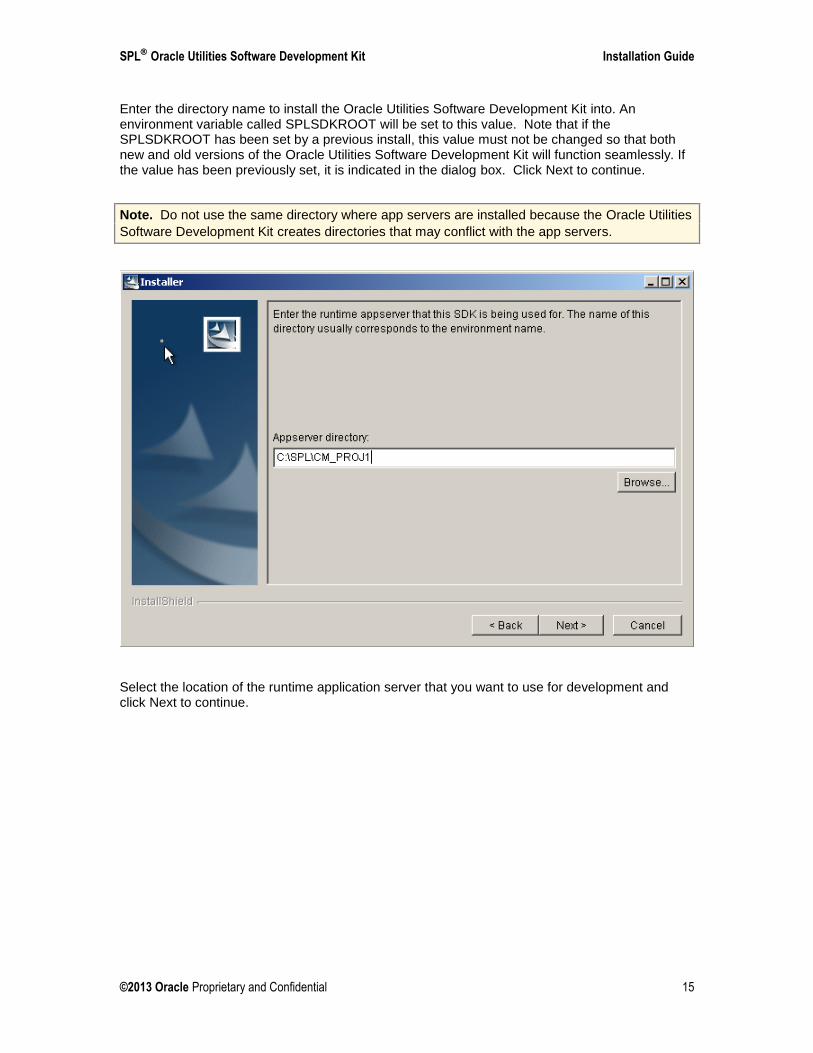
Enter the directory name to install the Oracle Utilities Software Development Kit into. An environment variable called SPLSDKROOT will be set to this value. Note that if the SPLSDKROOT has been set by a previous install, this value must not be changed so that both new and old versions of the Oracle Utilities Software Development Kit will function seamlessly. If the value has been previously set, it is indicated in the dialog box. Click Next to continue.
Note. Do not use the same directory where app servers are installed because the Oracle Utilities
Software Development Kit creates directories that may conflict with the app servers.
Select the location of the runtime application server that you want to use for development and click Next to continue.
Installation Guide Oracle Utilities Software Development Kit
16 ©2013 Oracle Proprietary and Confidential
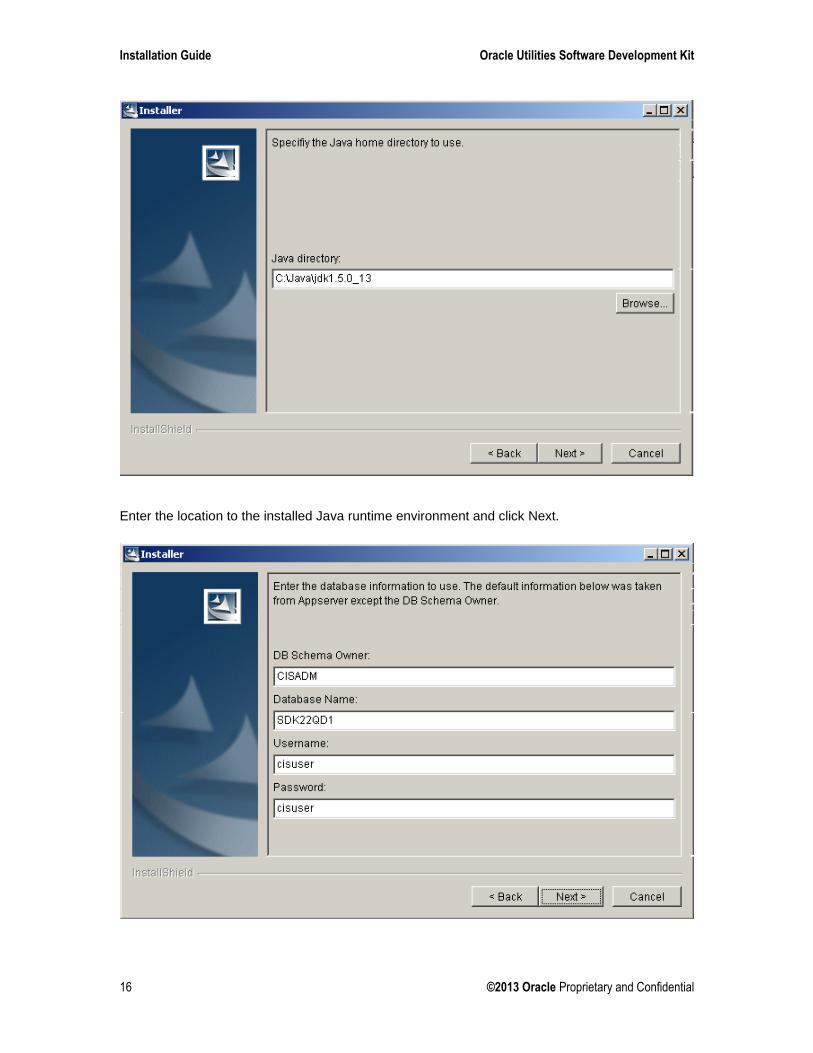
Enter the location to the installed Java runtime environment and click Next.
SPL Oracle Utilities Software Development Kit Installation Guide
©2013 Oracle Proprietary and Confidential 17
The database information is defaulted to information that the runtime application server is using. Only the DB schema is not obtained from server. Update the information as necessary and click Next to continue.
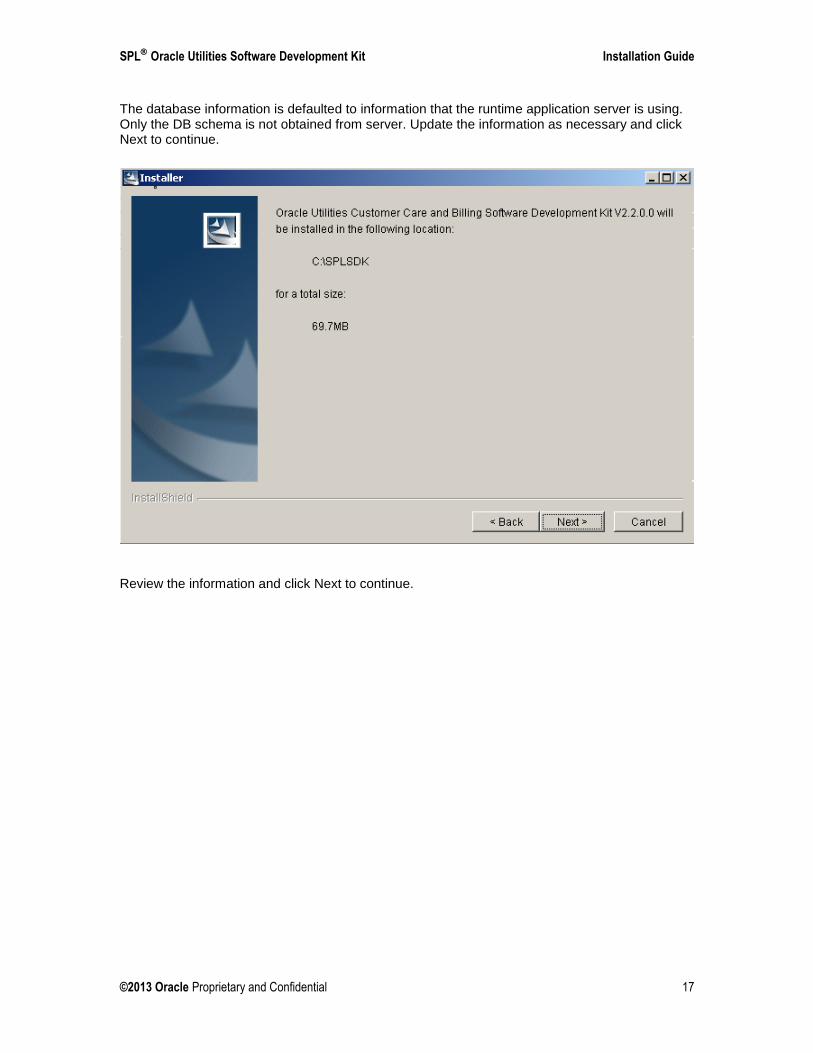
Review the information and click Next to continue.
Installation Guide Oracle Utilities Software Development Kit
18 ©2013 Oracle Proprietary and Confidential
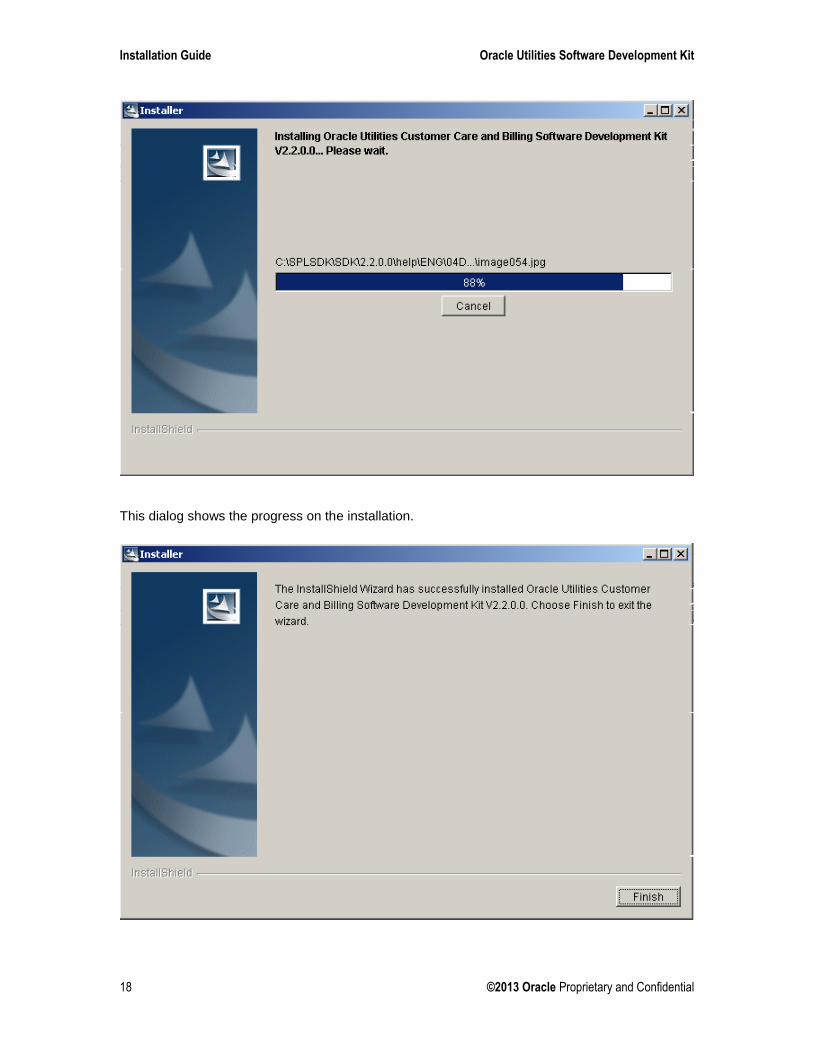
This dialog shows the progress on the installation.
SPL Oracle Utilities Software Development Kit Installation Guide
©2013 Oracle Proprietary and Confidential 19
Click Finish to complete the installation
Installing the Eclipse SDK for the Project Repository Below are the steps in setting up the Eclipse SDK for use in the Oracle Utilities Software Development Kit.
Contents Initial Eclipse Setup Configuring Eclipse Project via Oracle Utilities Eclipse Configuration Configuring Eclipse Project manually Set Up To Run Artifact Generator Set Up to Deploy cm.jar
Initial Eclipse Setup
Contents Get A Copy Of Eclipse SDK Copy Eclipse Plug-ins Into Eclipse Launch Eclipse Create Linked Resource asBase
Get A Copy Of Eclipse SDK
Download Eclipse SDK and unzip it to a local folder. The following is a link to the download page:
http://archive.eclipse.org/eclipse/downloads/drops/R-3.2.2-200702121330/index.php
Unzip the downloaded file into <splsdkroot>\SDK\2.2.0.x\Eclipse, where x is the build number.
Copy Eclipse Plug-ins Into Eclipse
Copy the folders and files under <splsdkroot>\SDK\2.2.0.x\tools\eclipse\plugins into the Eclipse SDK plugins directory at <splsdkroot>\SDK\2.2.0.x\Eclipse\plugins.
Copy the c3p0 jar file into <splsdkroot>\SDK\2.2.0.x\Eclipse\plugins\com.splwg.eclipseTools_1.0.0\shared\lib as c3p0-0.9.1.2.jar. The c3p0 jar file is in the directory referred to by the C3P0_JAR_DIR environment variable set up for the app server. This is typically set to <app server direcotory>\ \splapp\applications\root\WEB-INF\lib.
Copy the hibernate jar file into <splsdkroot>\SDK\2.2.0.x\Eclipse\plugins\com.splwg.eclipseTools_1.0.0\shared\lib as hibernate-3.2.5.ga.jar. The hibernate jar file is in the directory referred to by the HIBERNATE_JAR_DIR environment variable set up for the app server. This is typically set to <app server direcotory>\ \splapp\applications\root\WEB-INF\lib.
Note. This step only needs to be done once per version of the SDK.
Installation Guide Oracle Utilities Software Development Kit
20 ©2013 Oracle Proprietary and Confidential
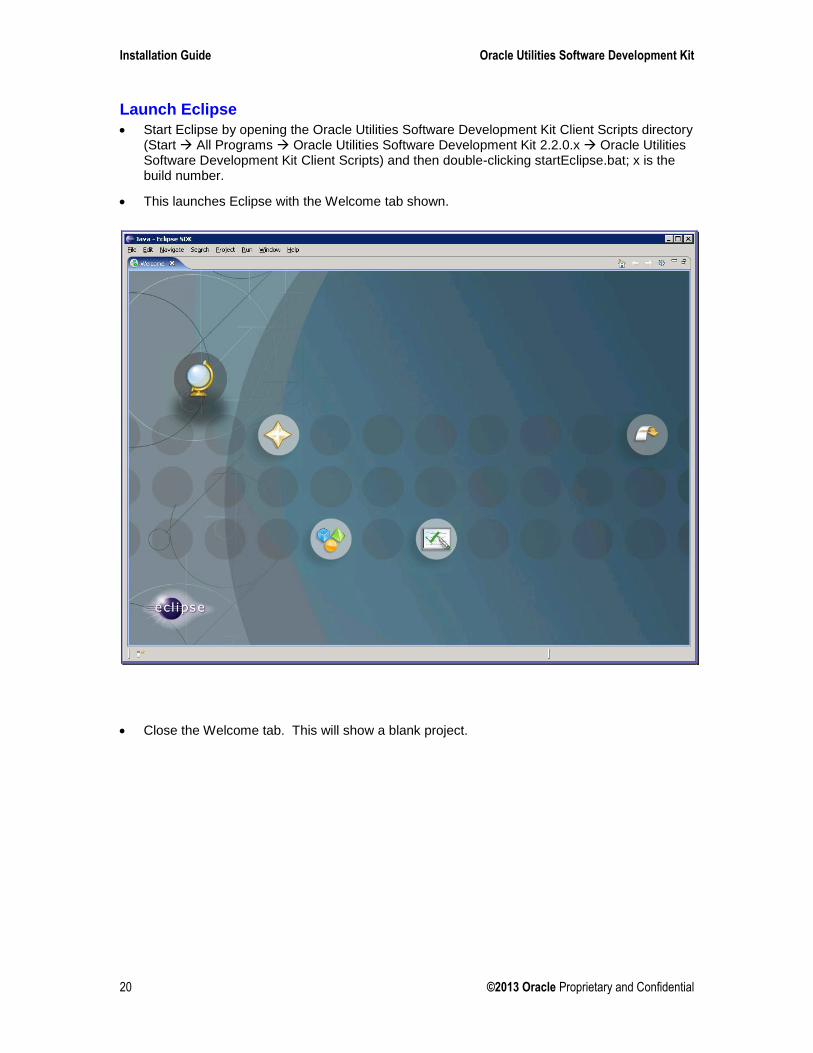
Launch Eclipse
Start Eclipse by opening the Oracle Utilities Software Development Kit Client Scripts directory (Start All Programs Oracle Utilities Software Development Kit 2.2.0.x Oracle Utilities Software Development Kit Client Scripts) and then double-clicking startEclipse.bat; x is the build number.
This launches Eclipse with the Welcome tab shown.
Close the Welcome tab. This will show a blank project.
SPL Oracle Utilities Software Development Kit Installation Guide
©2013 Oracle Proprietary and Confidential 21
Create Linked Resource asBase
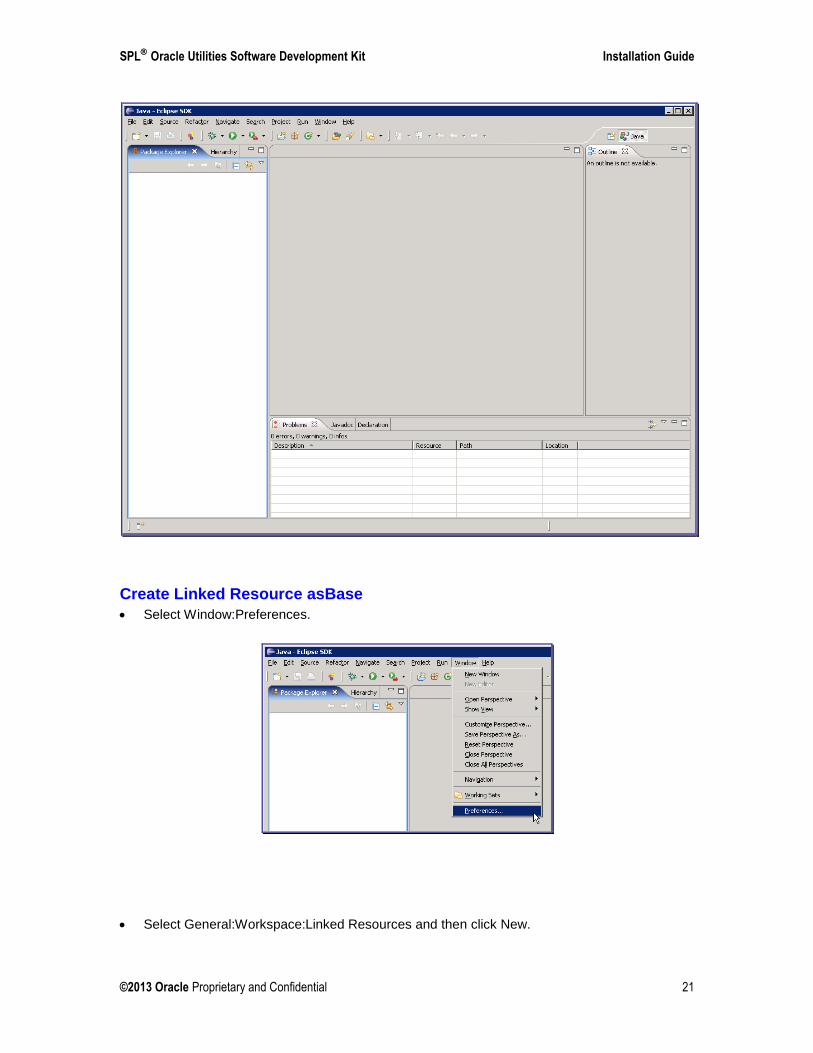
Select Window:Preferences.
Select General:Workspace:Linked Resources and then click New.
Installation Guide Oracle Utilities Software Development Kit
22 ©2013 Oracle Proprietary and Confidential
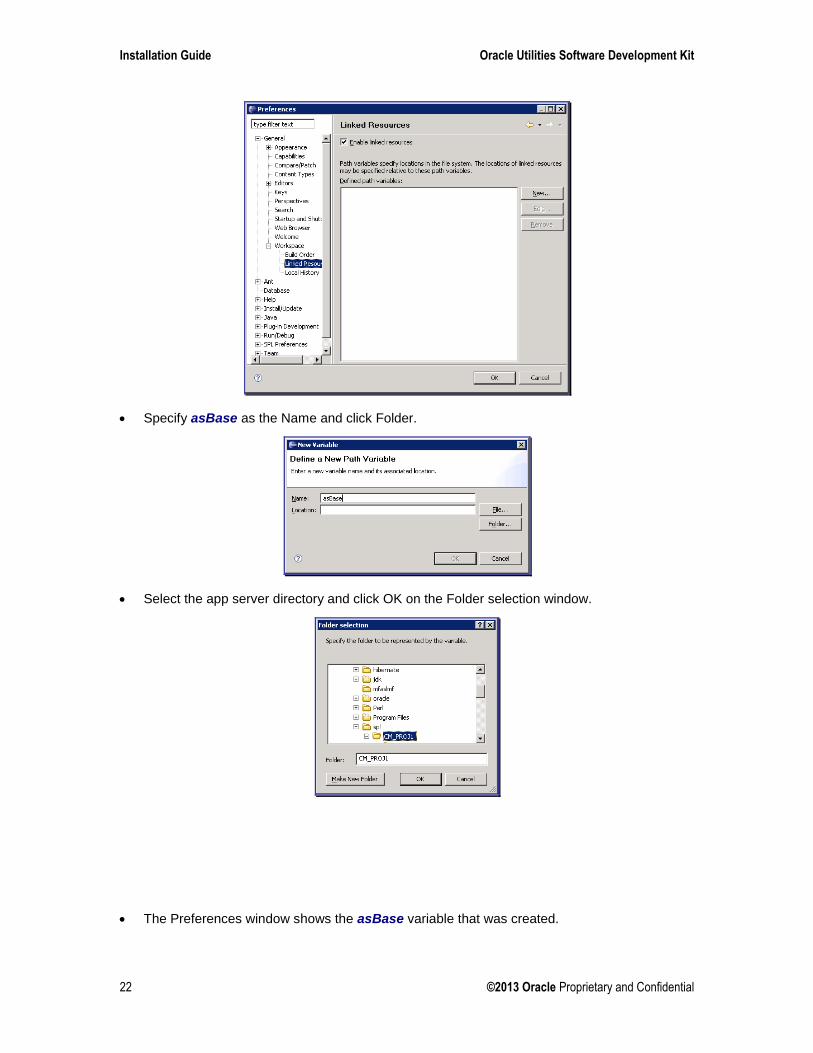
Specify asBase as the Name and click Folder.
Select the app server directory and click OK on the Folder selection window.
The Preferences window shows the asBase variable that was created.

SPL Oracle Utilities Software Development Kit Installation Guide
©2013 Oracle Proprietary and Confidential 23
Click OK to close the window.
Configuring Eclipse Project via Oracle Utilities Eclipse Configuration
Contents Overview Pre-requisites Install configuration Import Project into Eclipse
Overview Once the base Eclipse setup is done and the application server base is set as a linked resource, it is the time to setup a project and setup the classpath. The Oracle Utilities Eclipse Configuration setup is an easy way to configure classpath and other configurations.
Oracle Utilities Eclipse Configuration does the following tasks:
Creates a project with name as “EclipseProject220”
Connects different project folders to application server folders
Configures different libraries (jars) for classpath
Creates a launch configuration for the Artifact Generator and Deploy step for CM
Oracle Utilities Eclipse Configuration installation is found in SDK installation Directory <SDKROOT>/SDK e.g. If SDK is installed at C:\SPLSDK, the UtilitiesEclipseConfig would be at c:\SPLSDK\SDK\UtilitiesEclipseConfig.exe
Installation Guide Oracle Utilities Software Development Kit
24 ©2013 Oracle Proprietary and Confidential
Note. Oracle Utilities Eclipse Configuration configures a project with name “EclipseProject220”.
If one chooses not to use this, a manual setup and configuration of eclipse is also available.
Pre-requisites
This installation assumes that the environment already has the Application Server and Eclipse already installed.
Eclipse must be configured to have the link resource (asBase) for the Application Server.
Install configuration Following steps will install the eclipse configuration.
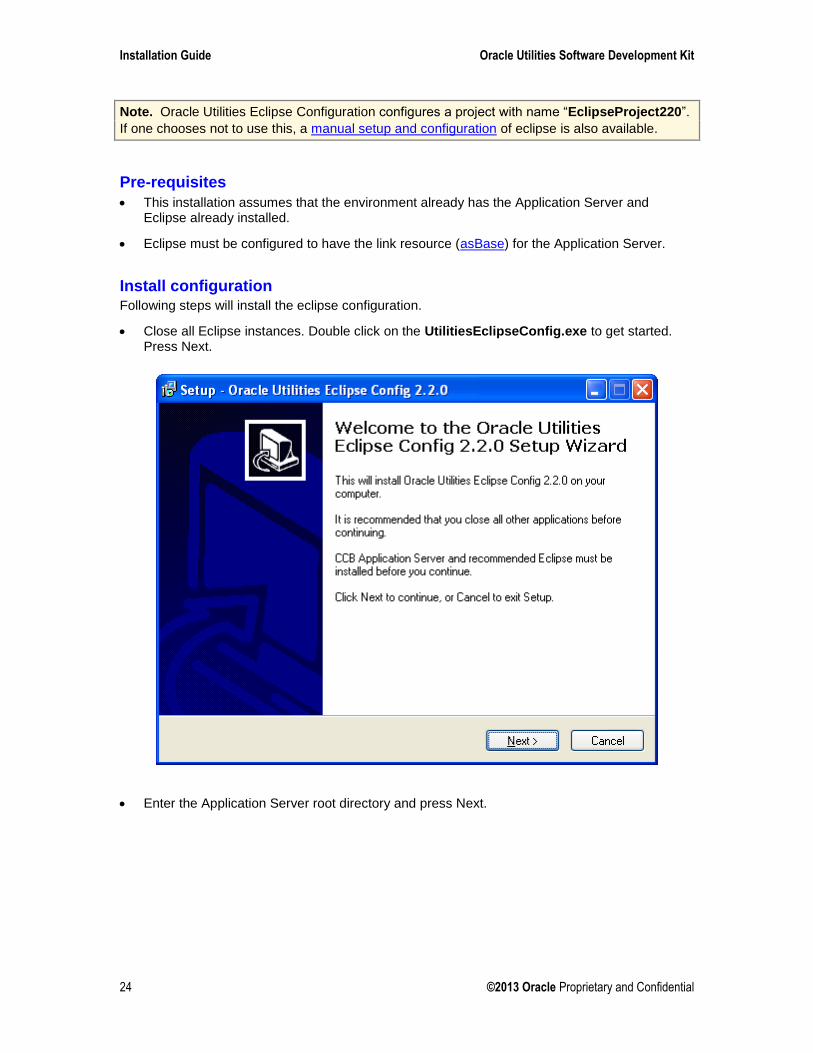
Close all Eclipse instances. Double click on the UtilitiesEclipseConfig.exe to get started. Press Next.
Enter the Application Server root directory and press Next.
SPL Oracle Utilities Software Development Kit Installation Guide
©2013 Oracle Proprietary and Confidential 25
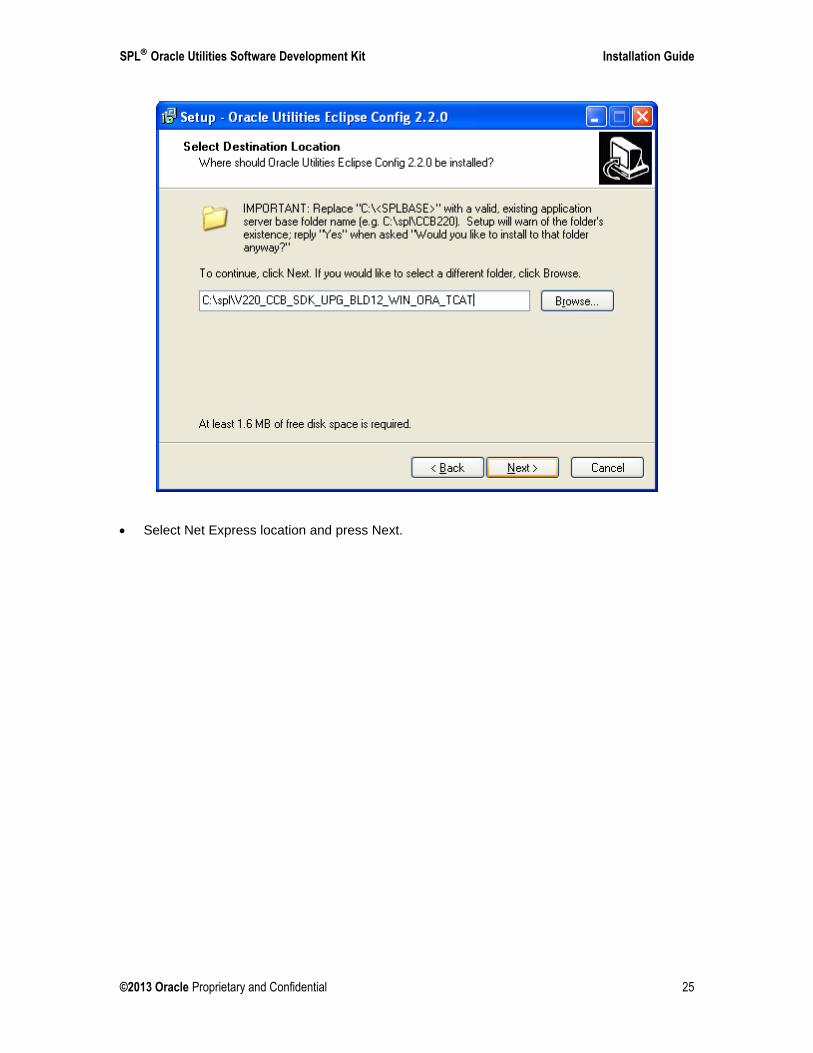
Select Net Express location and press Next.
Installation Guide Oracle Utilities Software Development Kit
26 ©2013 Oracle Proprietary and Confidential
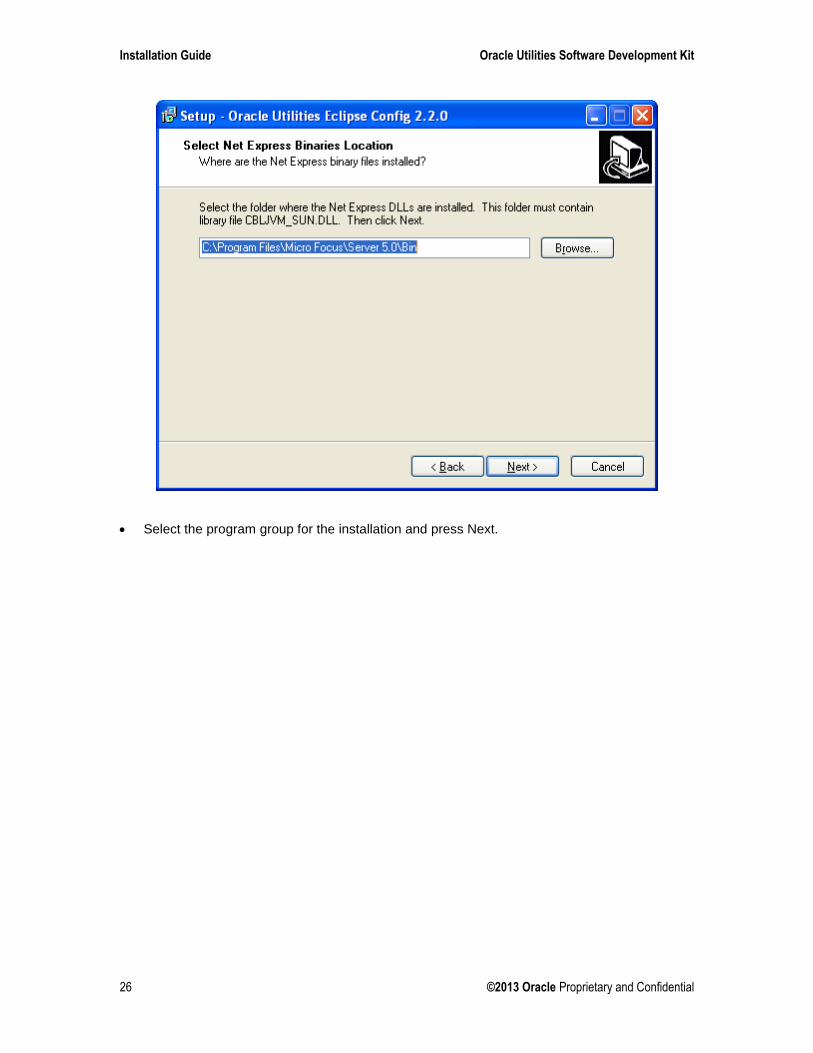
Select the program group for the installation and press Next.

SPL Oracle Utilities Software Development Kit Installation Guide
©2013 Oracle Proprietary and Confidential 27
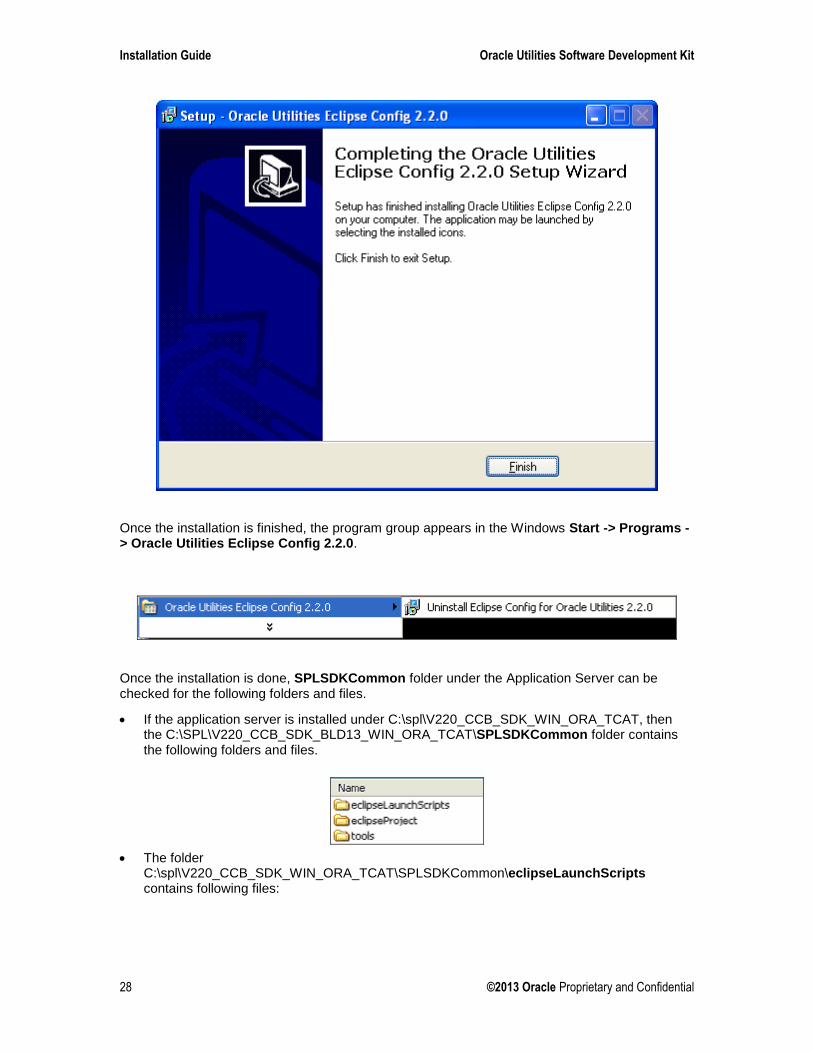
Finish Oracle Utilities Eclipse Configuration Installation.
Installation Guide Oracle Utilities Software Development Kit
28 ©2013 Oracle Proprietary and Confidential
Once the installation is finished, the program group appears in the Windows Start -> Programs -> Oracle Utilities Eclipse Config 2.2.0.
Once the installation is done, SPLSDKCommon folder under the Application Server can be checked for the following folders and files.
If the application server is installed under C:\spl\V220_CCB_SDK_WIN_ORA_TCAT, then the C:\SPL\V220_CCB_SDK_BLD13_WIN_ORA_TCAT\SPLSDKCommon folder contains the following folders and files.
The folder C:\spl\V220_CCB_SDK_WIN_ORA_TCAT\SPLSDKCommon\eclipseLaunchScripts contains following files:

SPL Oracle Utilities Software Development Kit Installation Guide
©2013 Oracle Proprietary and Confidential 29
The folder C:\spl\V220_CCB_SDK_WIN_ORA_TCAT\SPLSDKCommon\eclipseProject contains the following files:
Note. The Oracle Utilities Eclipse Configuration DOES NOT install another Eclipse. It sets
classpaths to reduce the manual configuration.
Import Project into Eclipse
Start the eclipse from the Oracle Utilities SDK shortcuts as shown below.
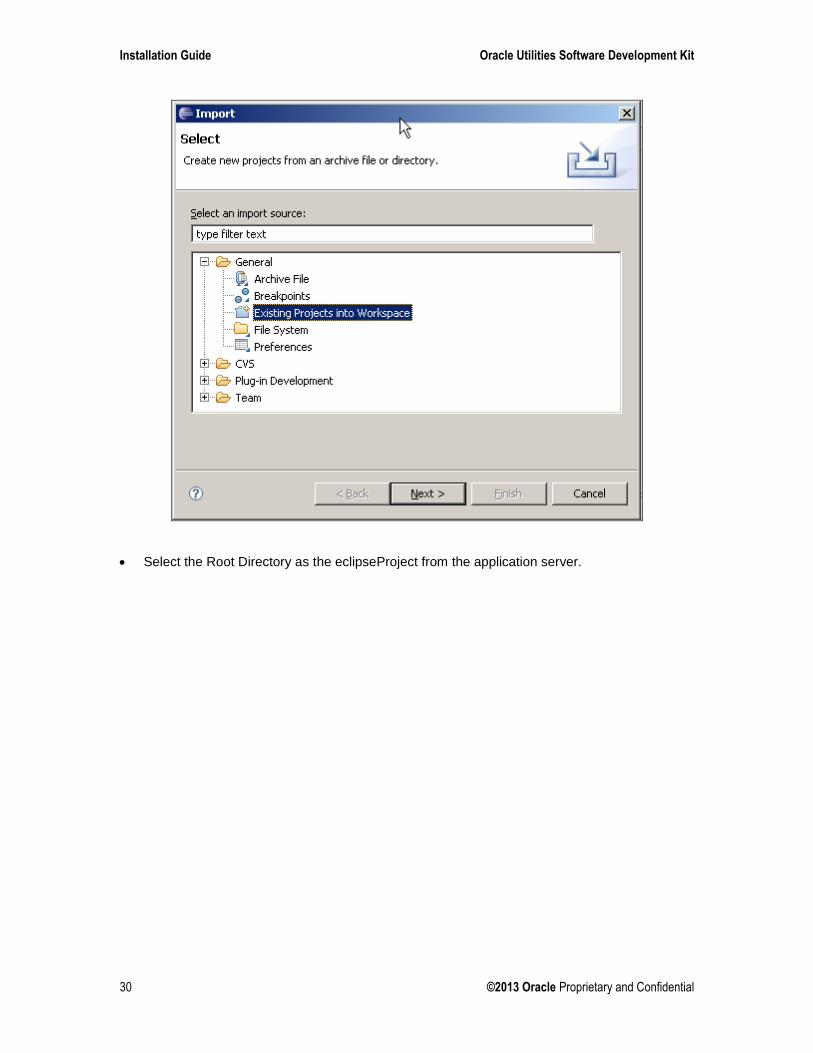
Once the eclipse is open, right click on the Package Explorer, Click on Import. Select General/Existing Projects into Workspace and press Next.
Installation Guide Oracle Utilities Software Development Kit
30 ©2013 Oracle Proprietary and Confidential
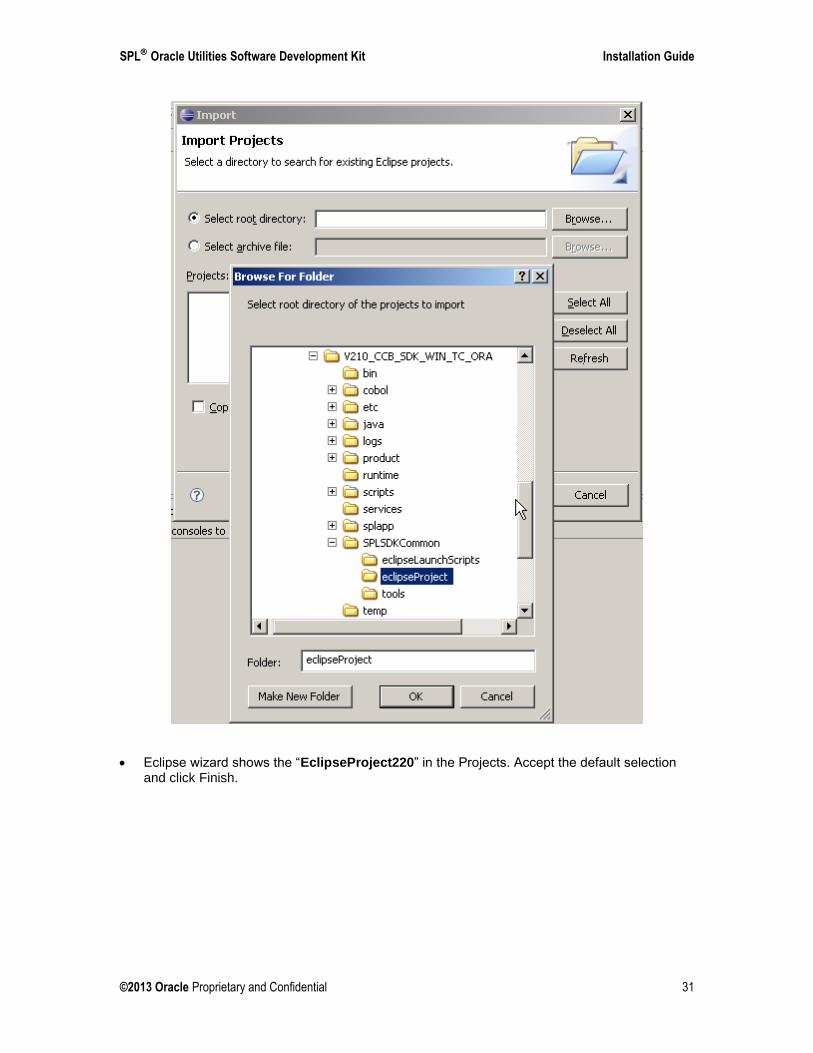
Select the Root Directory as the eclipseProject from the application server.
SPL Oracle Utilities Software Development Kit Installation Guide
©2013 Oracle Proprietary and Confidential 31
Eclipse wizard shows the “EclipseProject220” in the Projects. Accept the default selection and click Finish.
Installation Guide Oracle Utilities Software Development Kit
32 ©2013 Oracle Proprietary and Confidential
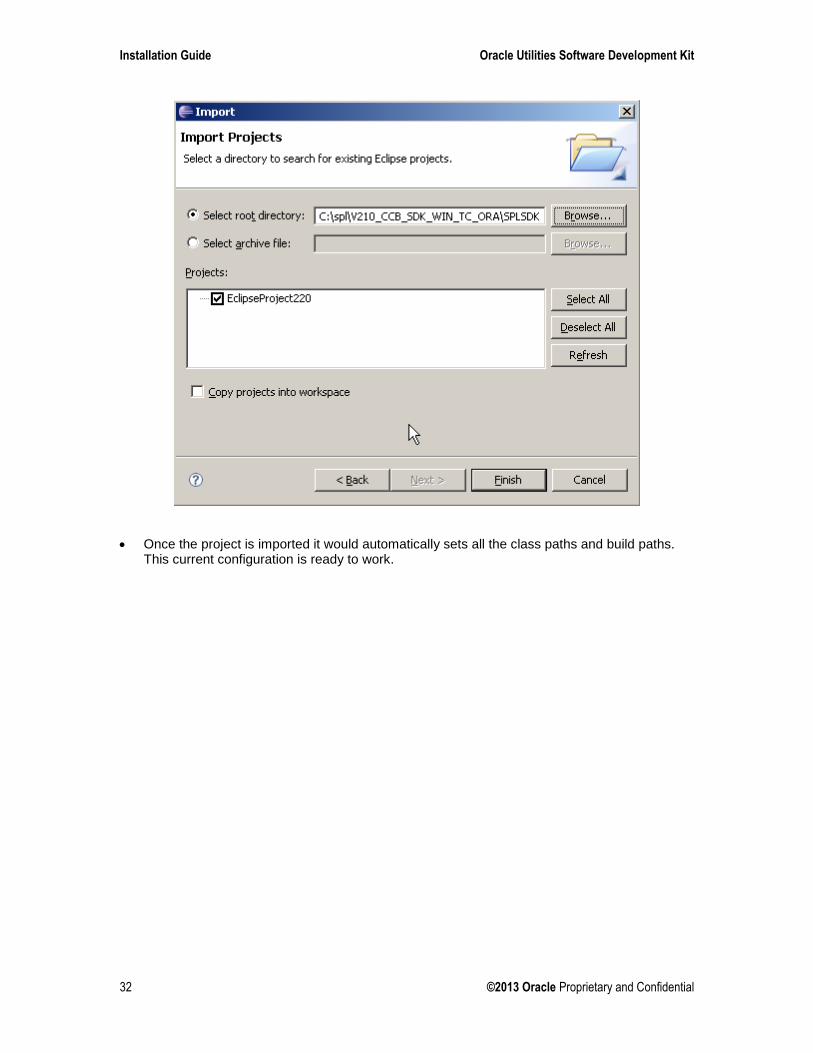
Once the project is imported it would automatically sets all the class paths and build paths. This current configuration is ready to work.
SPL Oracle Utilities Software Development Kit Installation Guide
©2013 Oracle Proprietary and Confidential 33
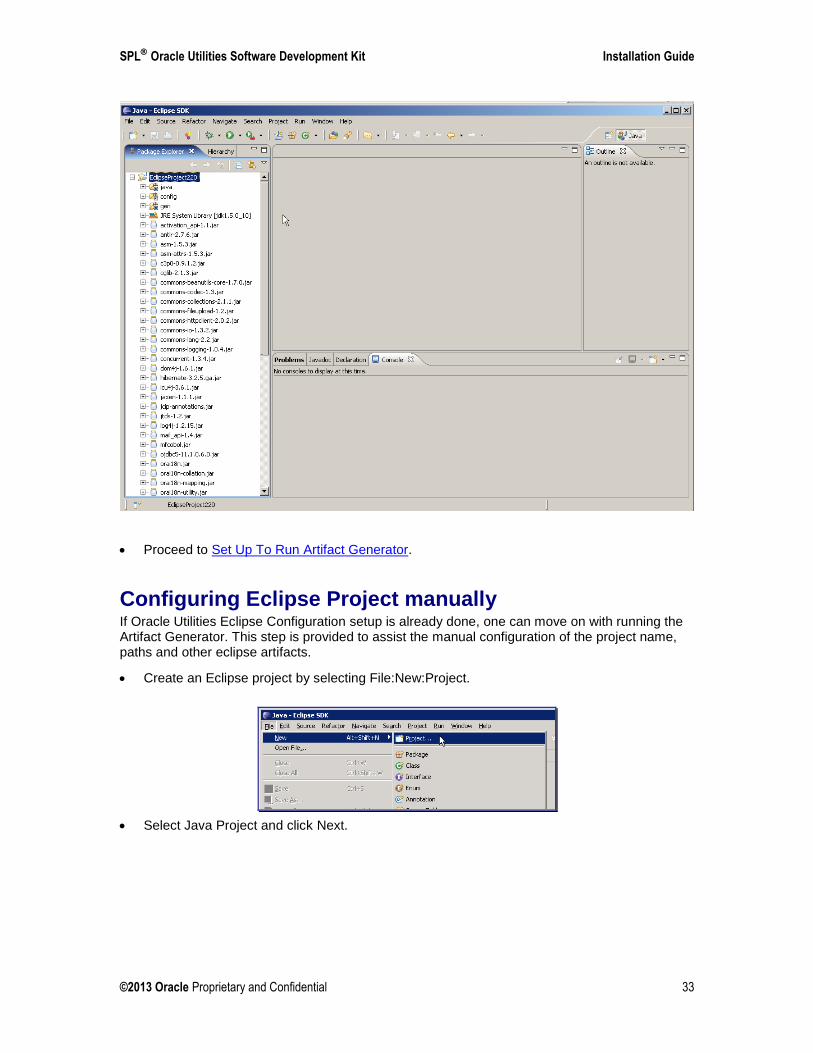
Proceed to Set Up To Run Artifact Generator.
Configuring Eclipse Project manually If Oracle Utilities Eclipse Configuration setup is already done, one can move on with running the Artifact Generator. This step is provided to assist the manual configuration of the project name, paths and other eclipse artifacts.
Create an Eclipse project by selecting File:New:Project.
Select Java Project and click Next.
Installation Guide Oracle Utilities Software Development Kit
34 ©2013 Oracle Proprietary and Confidential
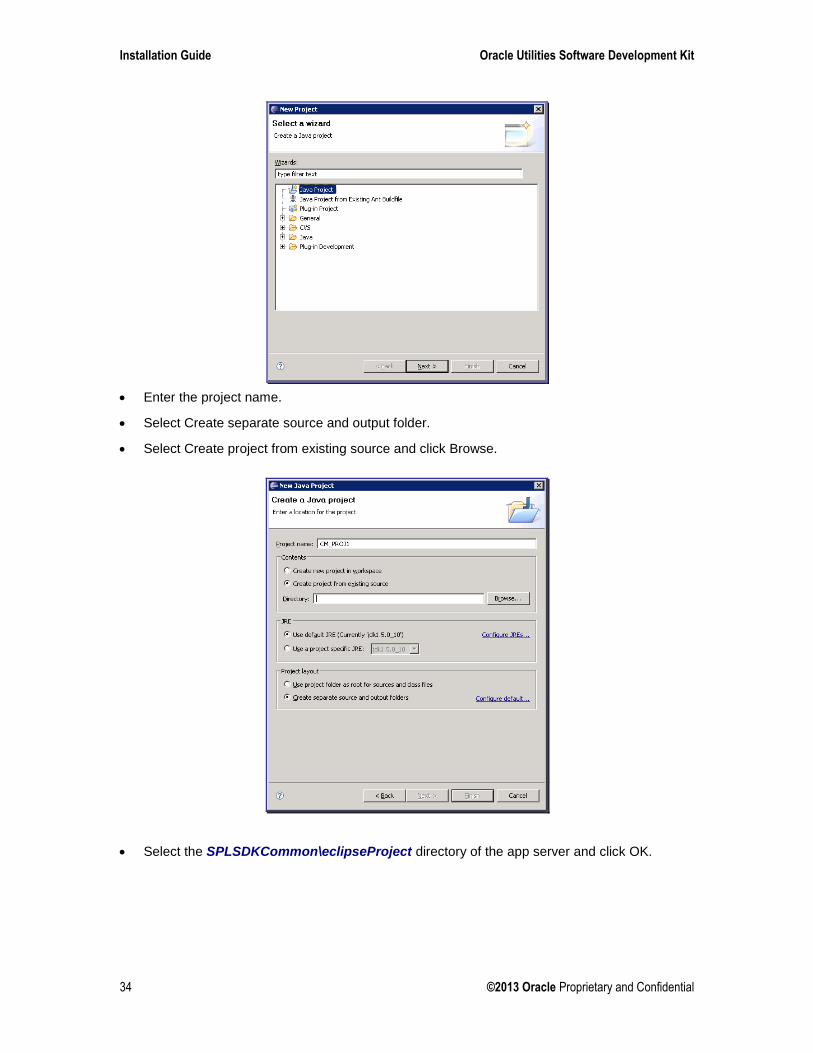
Enter the project name.
Select Create separate source and output folder.
Select Create project from existing source and click Browse.
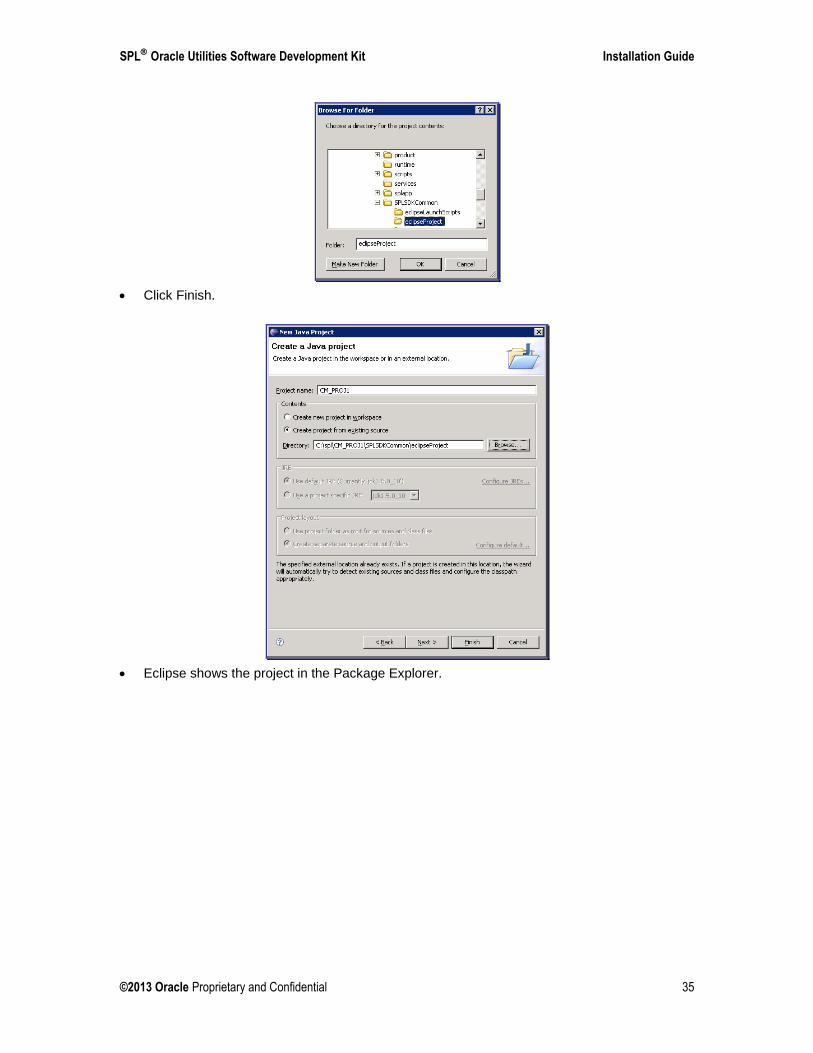
Select the SPLSDKCommon\eclipseProject directory of the app server and click OK.
SPL Oracle Utilities Software Development Kit Installation Guide
©2013 Oracle Proprietary and Confidential 35
Click Finish.
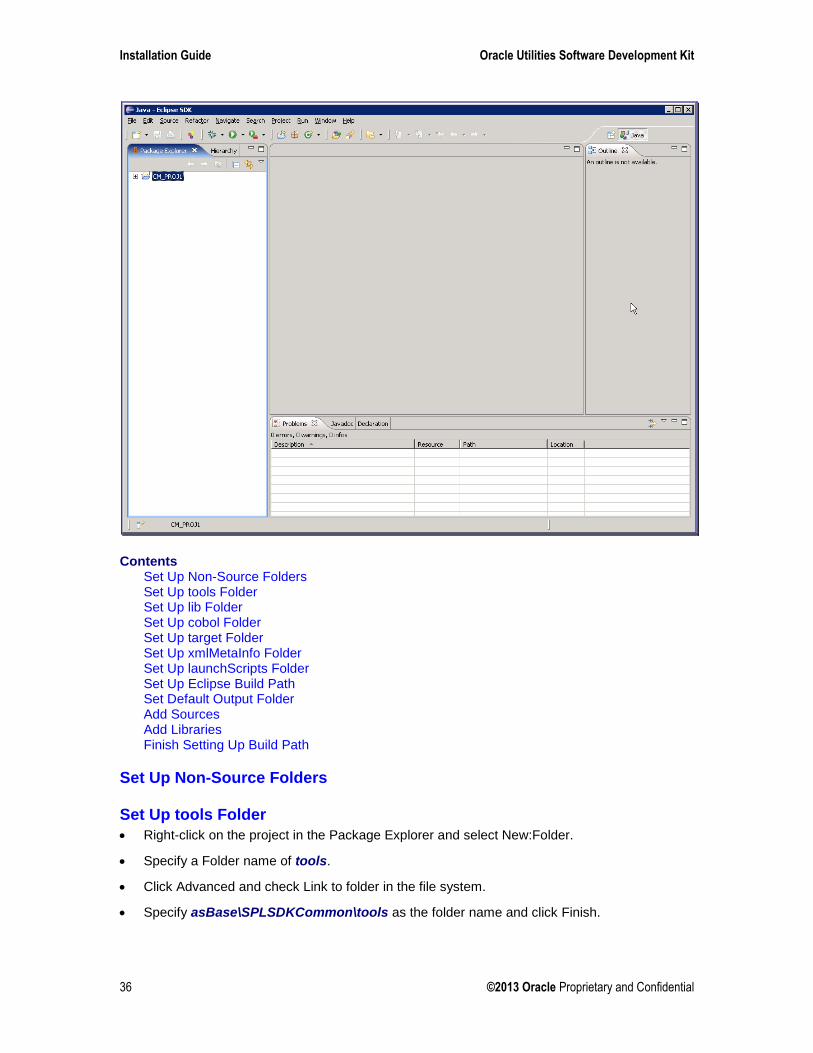
Eclipse shows the project in the Package Explorer.
Installation Guide Oracle Utilities Software Development Kit
36 ©2013 Oracle Proprietary and Confidential
Contents Set Up Non-Source Folders Set Up tools Folder Set Up lib Folder Set Up cobol Folder Set Up target Folder Set Up xmlMetaInfo Folder Set Up launchScripts Folder Set Up Eclipse Build Path Set Default Output Folder Add Sources Add Libraries Finish Setting Up Build Path
Set Up Non-Source Folders
Set Up tools Folder
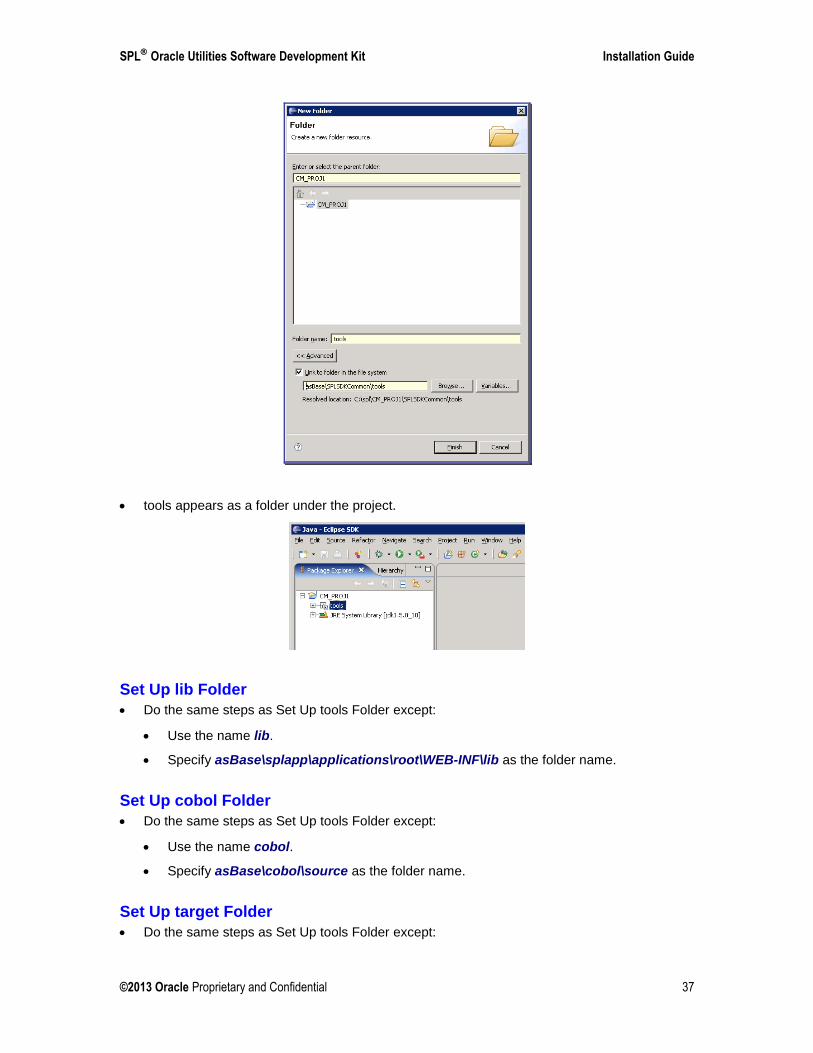
Right-click on the project in the Package Explorer and select New:Folder.
Specify a Folder name of tools.
Click Advanced and check Link to folder in the file system.
Specify asBase\SPLSDKCommon\tools as the folder name and click Finish.
SPL Oracle Utilities Software Development Kit Installation Guide
©2013 Oracle Proprietary and Confidential 37
tools appears as a folder under the project.
Set Up lib Folder
Do the same steps as Set Up tools Folder except:
Use the name lib.
Specify asBase\splapp\applications\root\WEB-INF\lib as the folder name.
Set Up cobol Folder
Do the same steps as Set Up tools Folder except:
Use the name cobol.
Specify asBase\cobol\source as the folder name.
Set Up target Folder
Do the same steps as Set Up tools Folder except:
Installation Guide Oracle Utilities Software Development Kit
38 ©2013 Oracle Proprietary and Confidential
Use the name target.
Specify asBase\java\target\cm as the folder name.
Set Up xmlMetaInfo Folder
Do the same steps as Set Up tools Folder except:
Use the name xmlMetaInfo.
Specify asBase\splapp\xmlMetaInfo as the folder name.
Set Up launchScripts Folder
Do the same steps as Set Up tools Folder except:
Use the name launchScripts.
Specify asBase\SPLSDKCommon\eclipseLaunchScripts as the folder name.
Set Up Eclipse Build Path The build path is used to specify all dependencies required to compile the project. The following must be set up as part of the build path:
Source files, which include handwritten and generated code and configuration files.
Libraries, which are in the lib and tools folders set up earlier.
To set it up:
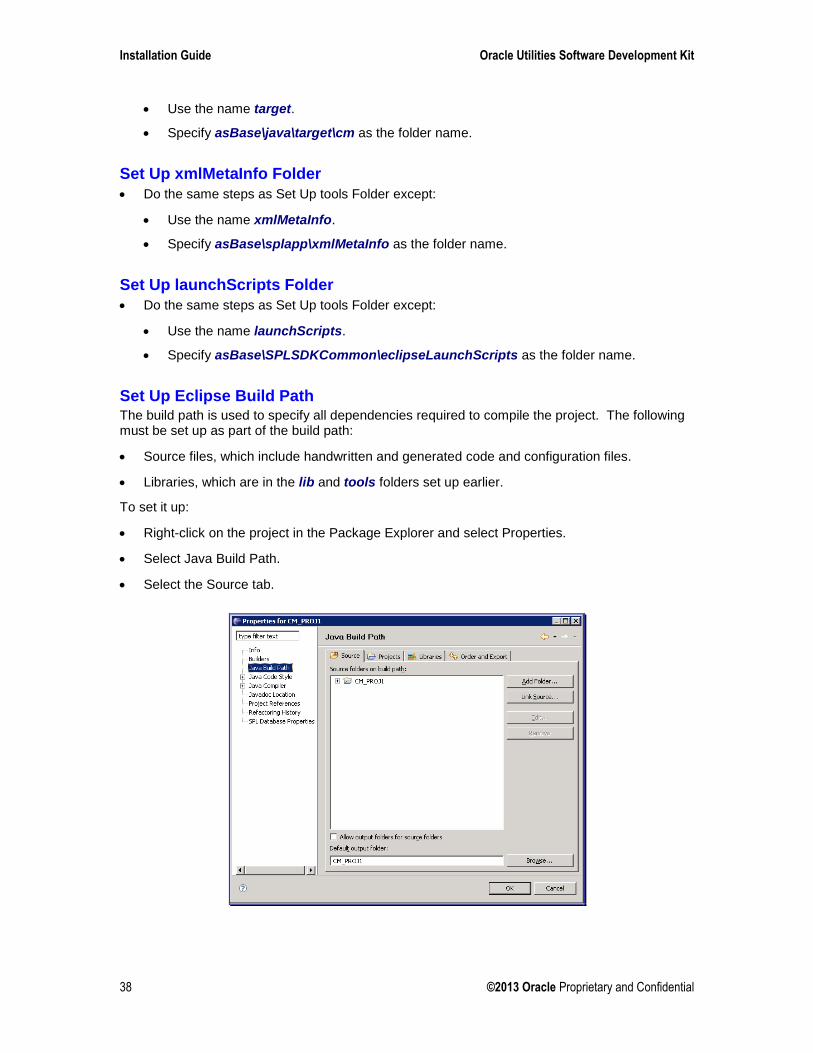
Right-click on the project in the Package Explorer and select Properties.
Select Java Build Path.
Select the Source tab.
SPL Oracle Utilities Software Development Kit Installation Guide
©2013 Oracle Proprietary and Confidential 39
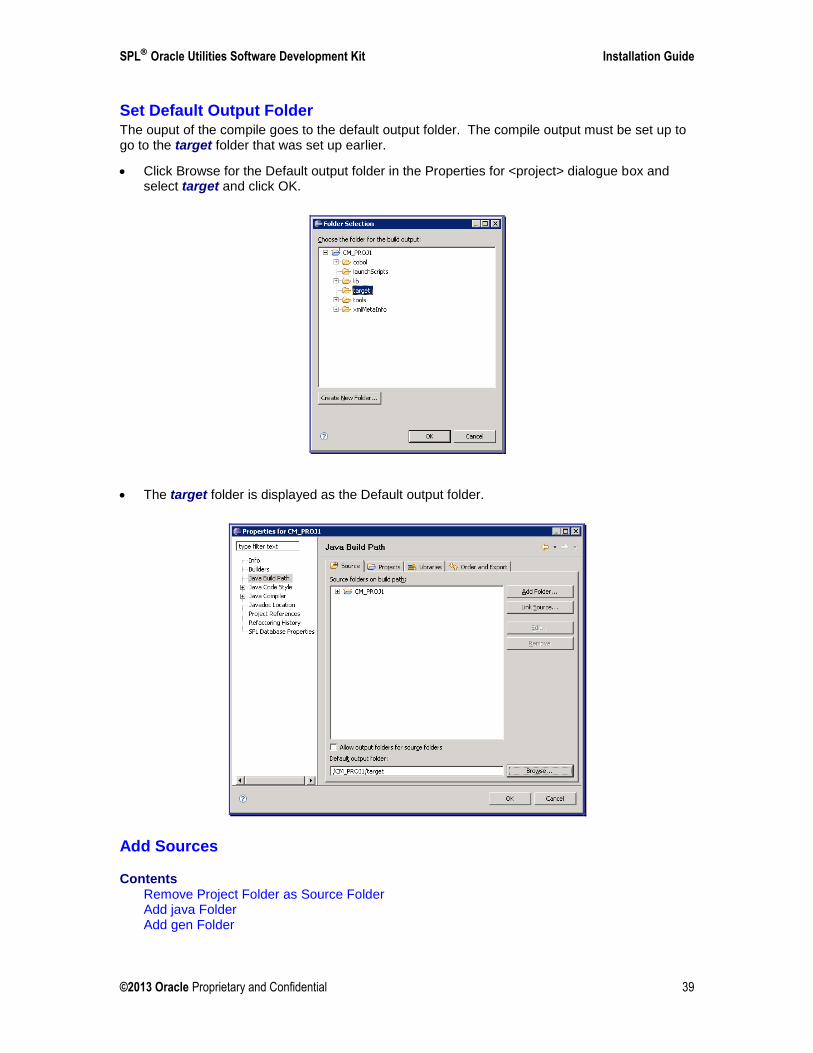
Set Default Output Folder The ouput of the compile goes to the default output folder. The compile output must be set up to go to the target folder that was set up earlier.
Click Browse for the Default output folder in the Properties for <project> dialogue box and select target and click OK.
The target folder is displayed as the Default output folder.
Add Sources
Contents Remove Project Folder as Source Folder Add java Folder Add gen Folder
Installation Guide Oracle Utilities Software Development Kit
40 ©2013 Oracle Proprietary and Confidential
Add config Folder
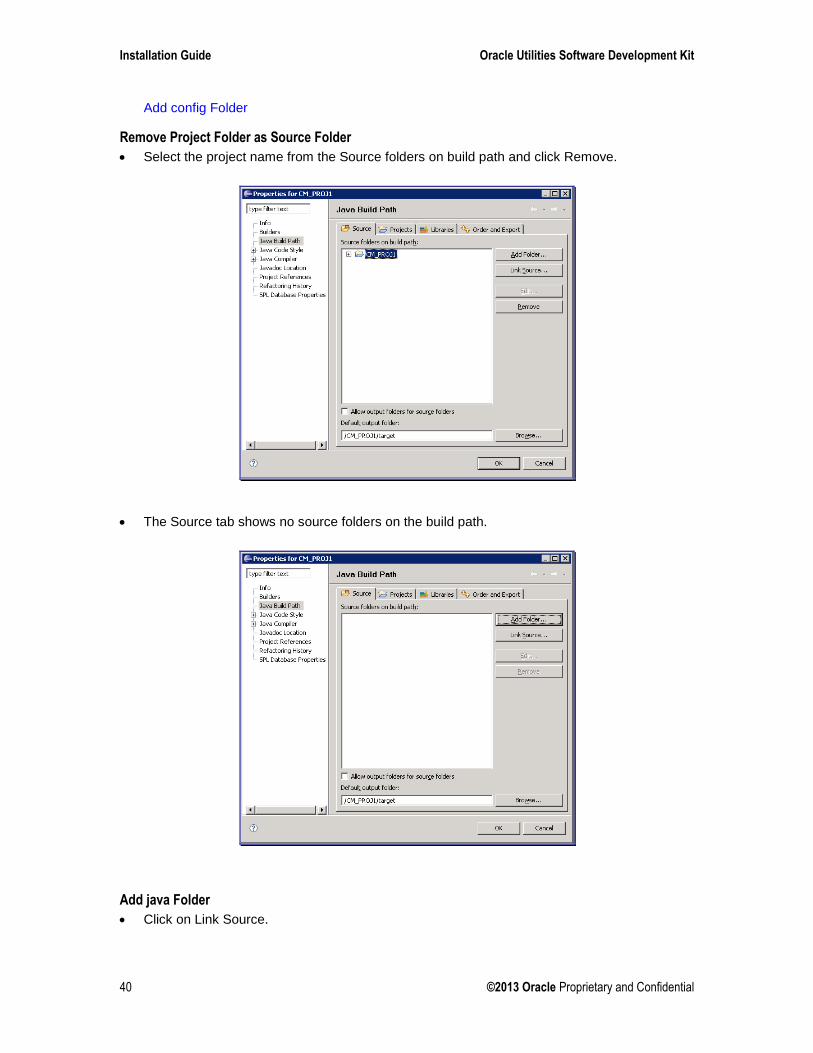
Remove Project Folder as Source Folder
Select the project name from the Source folders on build path and click Remove.
The Source tab shows no source folders on the build path.
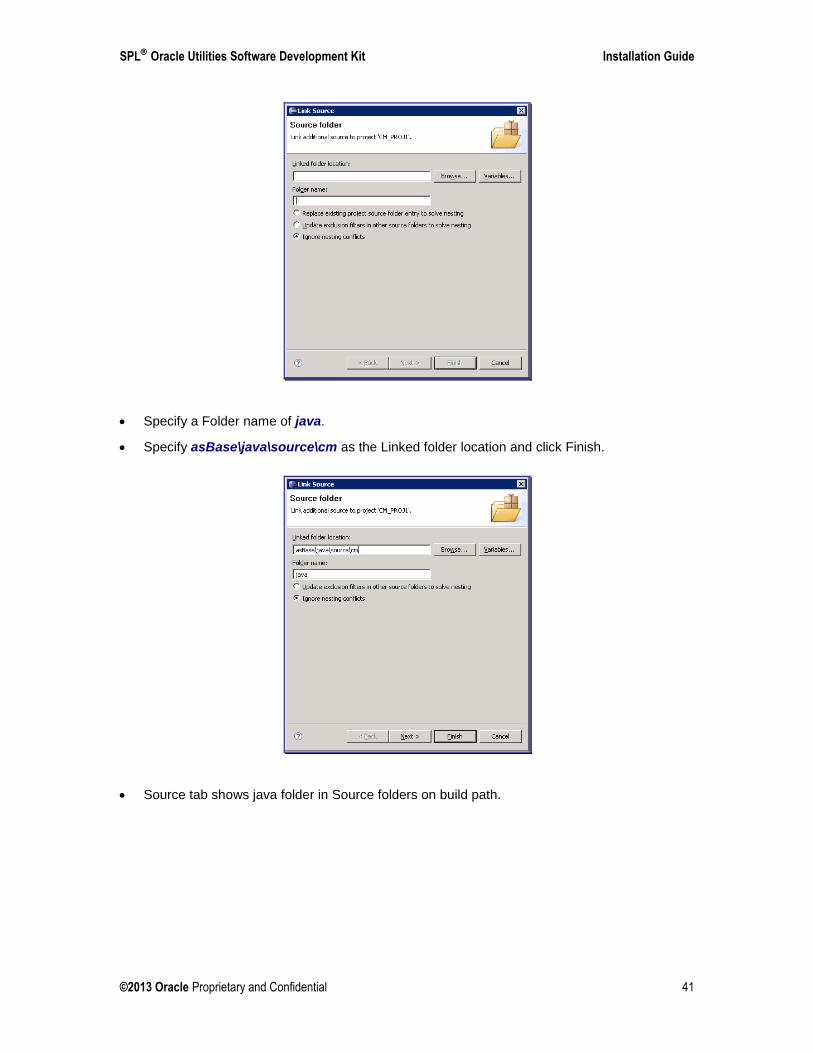
Add java Folder
Click on Link Source.
SPL Oracle Utilities Software Development Kit Installation Guide
©2013 Oracle Proprietary and Confidential 41
Specify a Folder name of java.
Specify asBase\java\source\cm as the Linked folder location and click Finish.
Source tab shows java folder in Source folders on build path.
Installation Guide Oracle Utilities Software Development Kit
42 ©2013 Oracle Proprietary and Confidential
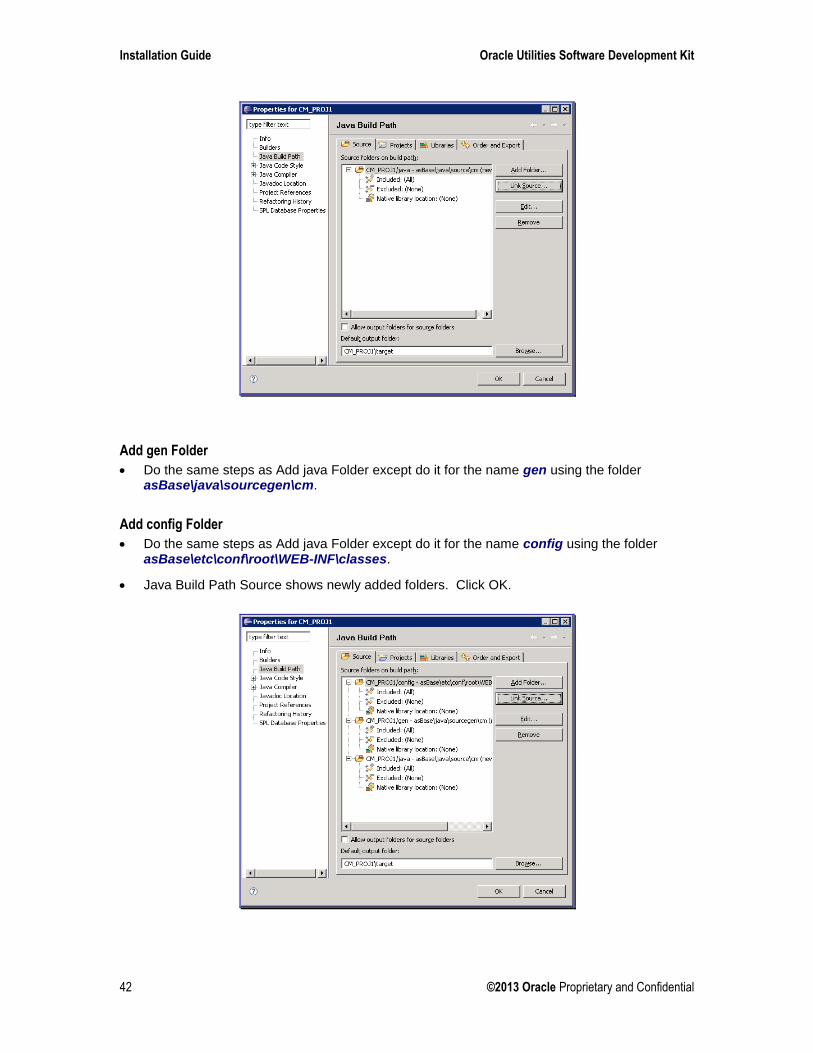
Add gen Folder
Do the same steps as Add java Folder except do it for the name gen using the folder asBase\java\sourcegen\cm.
Add config Folder
Do the same steps as Add java Folder except do it for the name config using the folder asBase\etc\conf\root\WEB-INF\classes.
Java Build Path Source shows newly added folders. Click OK.
SPL Oracle Utilities Software Development Kit Installation Guide
©2013 Oracle Proprietary and Confidential 43
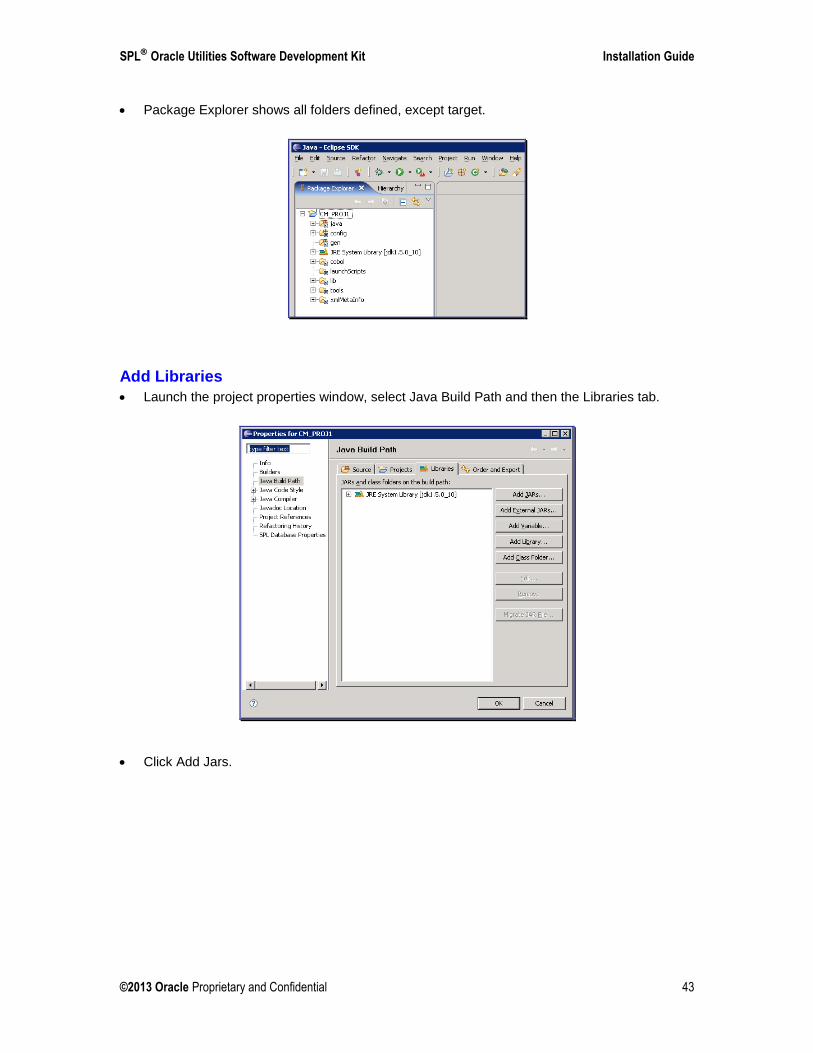
Package Explorer shows all folders defined, except target.
Add Libraries
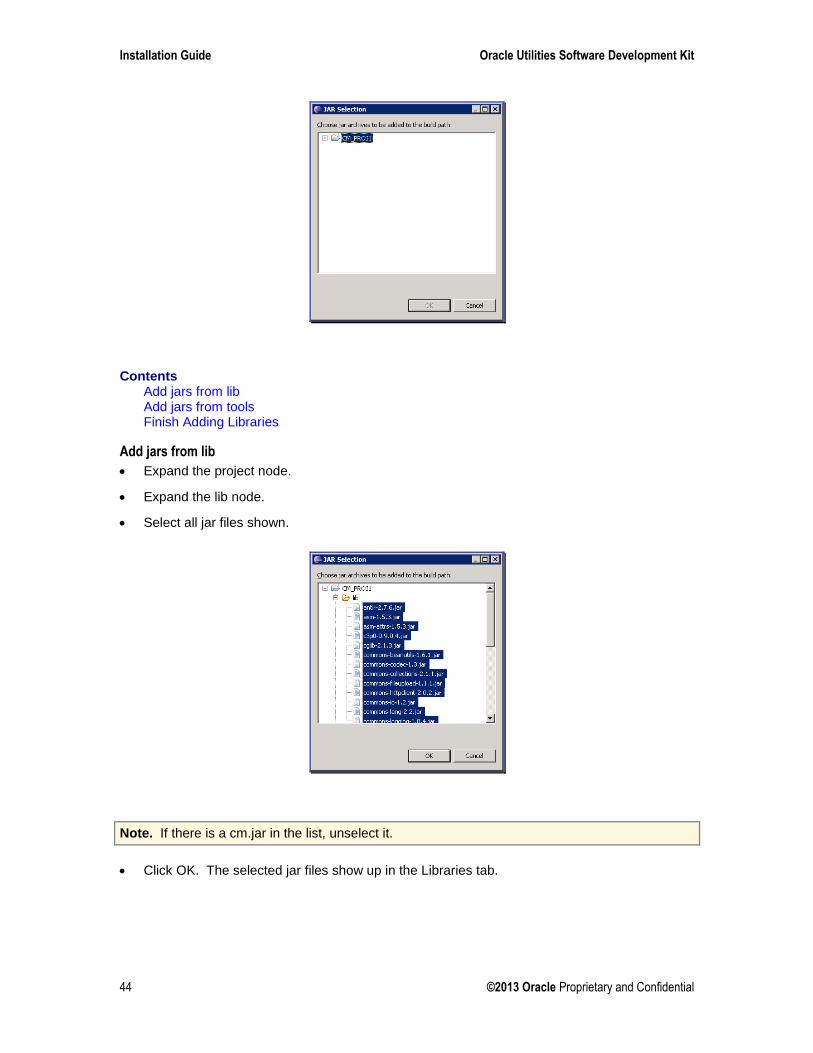
Launch the project properties window, select Java Build Path and then the Libraries tab.
Click Add Jars.
Installation Guide Oracle Utilities Software Development Kit
44 ©2013 Oracle Proprietary and Confidential
Contents Add jars from lib Add jars from tools Finish Adding Libraries
Add jars from lib
Expand the project node.
Expand the lib node.
Select all jar files shown.
Note. If there is a cm.jar in the list, unselect it.
Click OK. The selected jar files show up in the Libraries tab.

SPL Oracle Utilities Software Development Kit Installation Guide
©2013 Oracle Proprietary and Confidential 45
Add jars from tools
Do the same steps as Add jars from lib except to it for tools.
Finish Adding Libraries
Java Build Path Source shows newly added jars. Click OK.
Finish Setting Up Build Path
Project Explore shows added folders and jars.
Installation Guide Oracle Utilities Software Development Kit
46 ©2013 Oracle Proprietary and Confidential
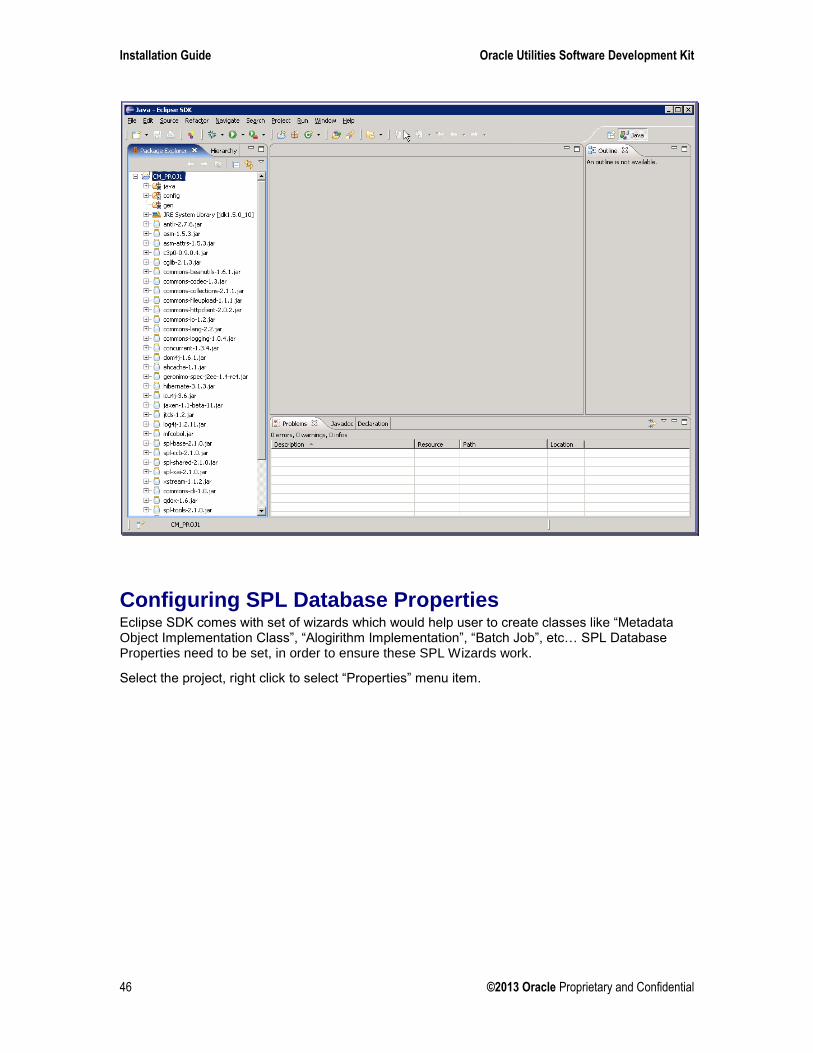
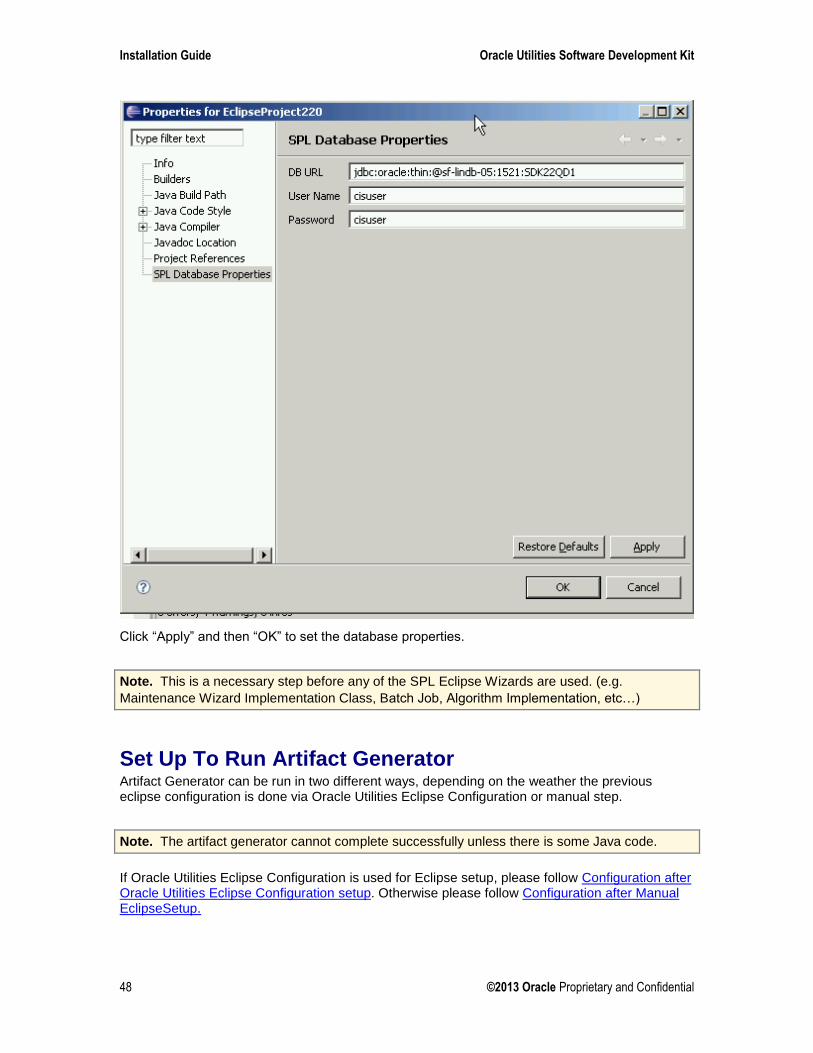
Configuring SPL Database Properties Eclipse SDK comes with set of wizards which would help user to create classes like “Metadata Object Implementation Class”, “Alogirithm Implementation”, “Batch Job”, etc… SPL Database Properties need to be set, in order to ensure these SPL Wizards work.
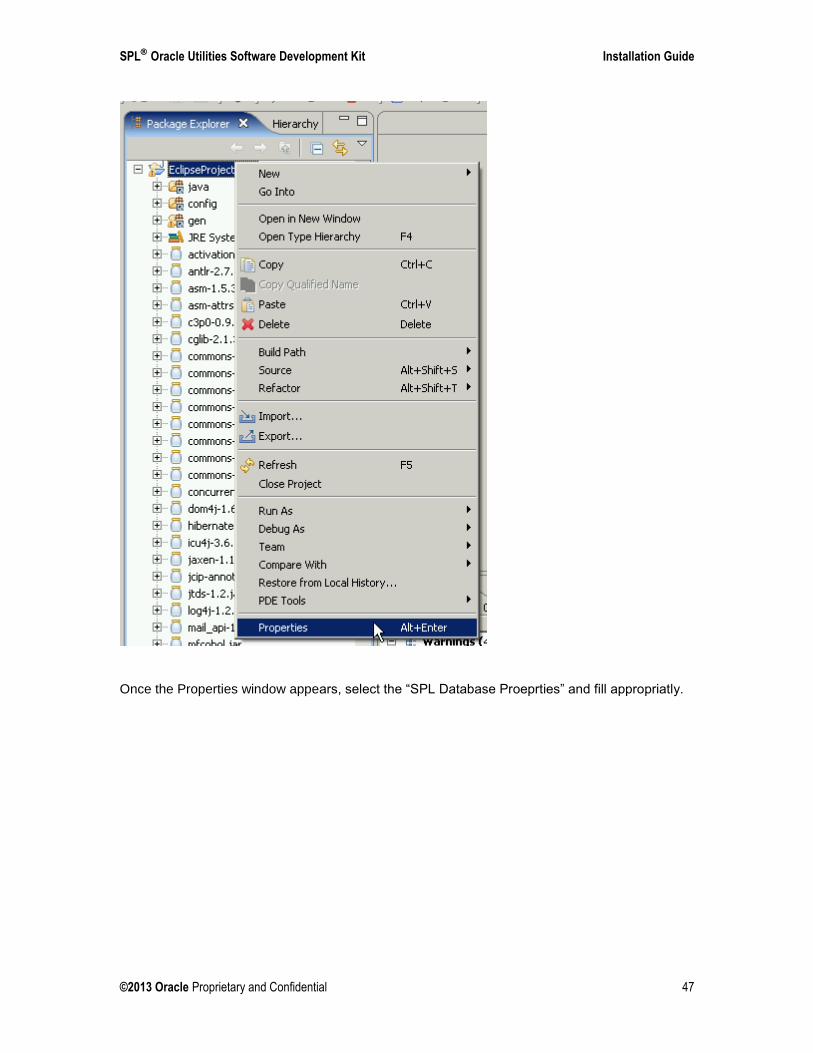
Select the project, right click to select “Properties” menu item.
SPL Oracle Utilities Software Development Kit Installation Guide
©2013 Oracle Proprietary and Confidential 47
Once the Properties window appears, select the “SPL Database Proeprties” and fill appropriatly.
Installation Guide Oracle Utilities Software Development Kit
48 ©2013 Oracle Proprietary and Confidential
Click “Apply” and then “OK” to set the database properties.
Note. This is a necessary step before any of the SPL Eclipse Wizards are used. (e.g.
Maintenance Wizard Implementation Class, Batch Job, Algorithm Implementation, etc…)
Set Up To Run Artifact Generator Artifact Generator can be run in two different ways, depending on the weather the previous eclipse configuration is done via Oracle Utilities Eclipse Configuration or manual step.
Note. The artifact generator cannot complete successfully unless there is some Java code.
If Oracle Utilities Eclipse Configuration is used for Eclipse setup, please follow Configuration after Oracle Utilities Eclipse Configuration setup. Otherwise please follow Configuration after Manual EclipseSetup.

SPL Oracle Utilities Software Development Kit Installation Guide
©2013 Oracle Proprietary and Confidential 49
Contents Configuration after Oracle Utilities Eclipse Configuration setup Configuration after Manual Eclipse Setup
Configuration after Oracle Utilities Eclipse Configuration setup
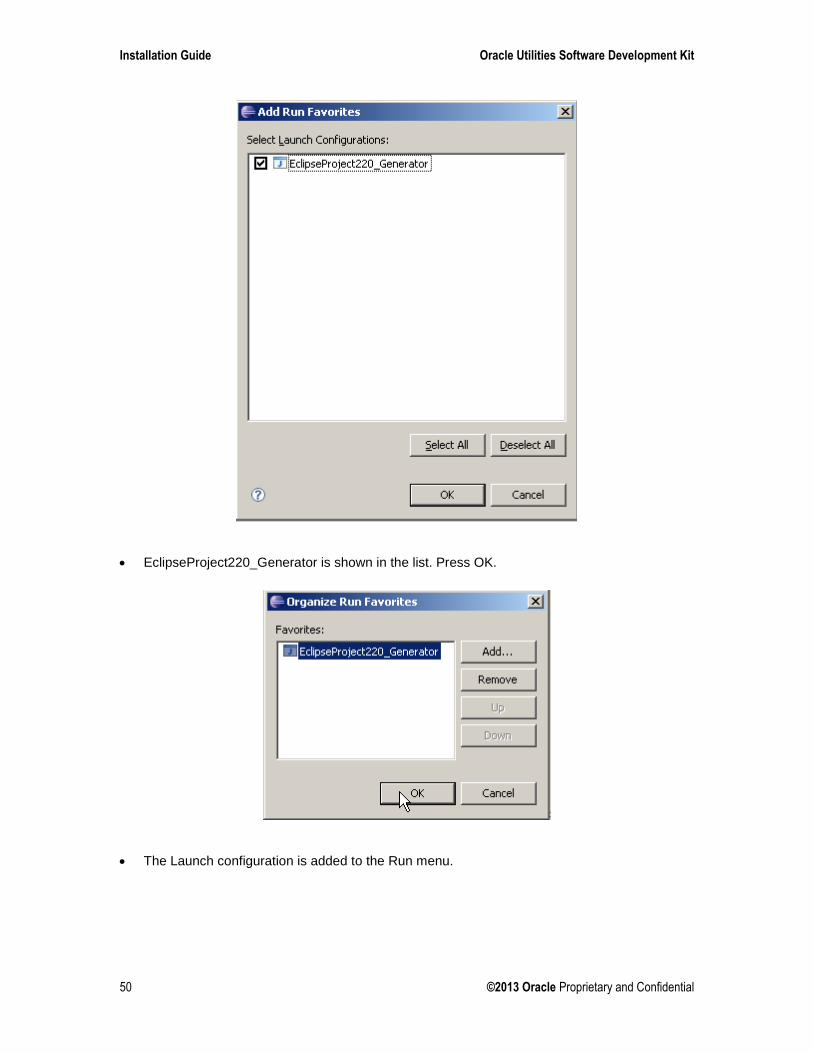
Select Run from the menu and select Organize Favorites.
Press Add.
Select “EclipseProject220_Generator” from the Favorites and click OK.
Installation Guide Oracle Utilities Software Development Kit
50 ©2013 Oracle Proprietary and Confidential
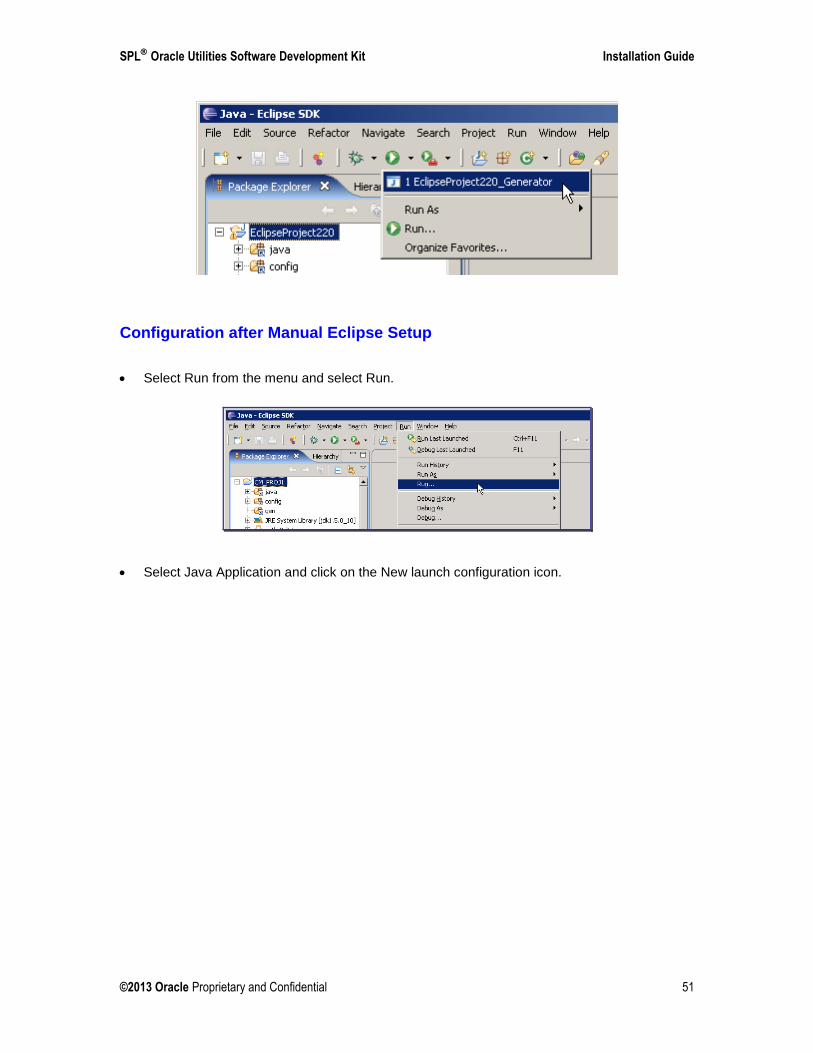
EclipseProject220_Generator is shown in the list. Press OK.
The Launch configuration is added to the Run menu.
SPL Oracle Utilities Software Development Kit Installation Guide
©2013 Oracle Proprietary and Confidential 51
Configuration after Manual Eclipse Setup
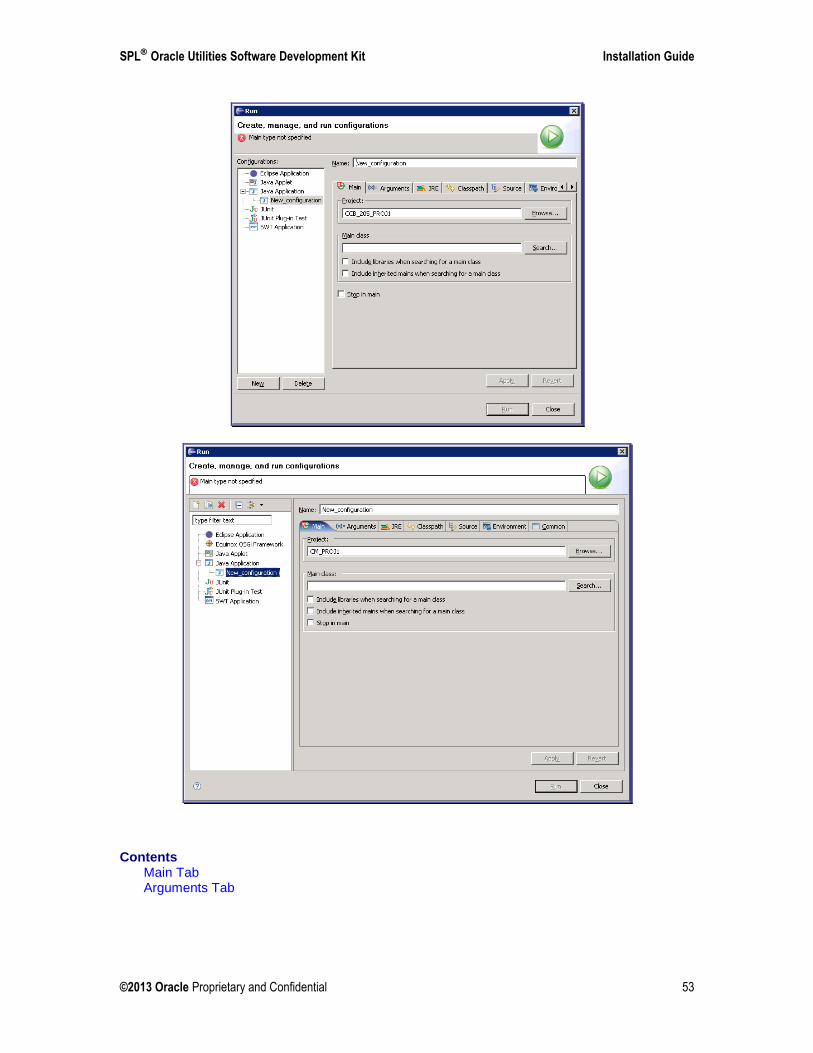
Select Run from the menu and select Run.
Select Java Application and click on the New launch configuration icon.
Installation Guide Oracle Utilities Software Development Kit
52 ©2013 Oracle Proprietary and Confidential
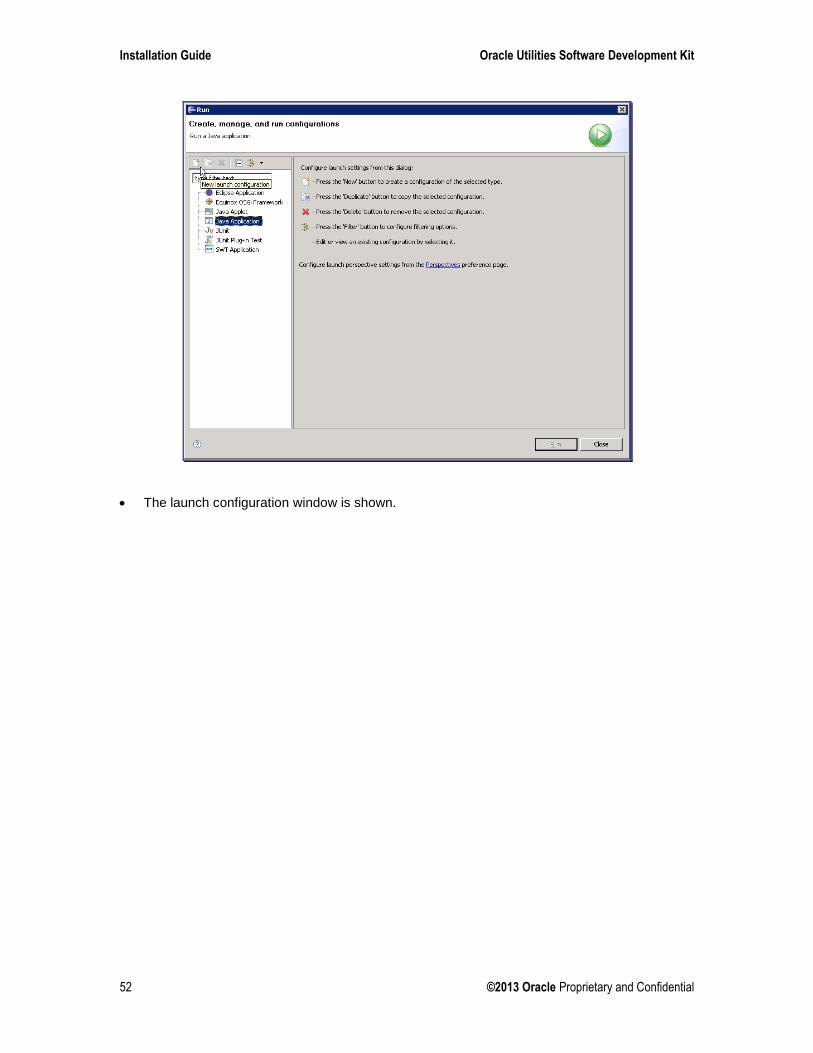
The launch configuration window is shown.
SPL Oracle Utilities Software Development Kit Installation Guide
©2013 Oracle Proprietary and Confidential 53
Contents Main Tab Arguments Tab
Installation Guide Oracle Utilities Software Development Kit
54 ©2013 Oracle Proprietary and Confidential
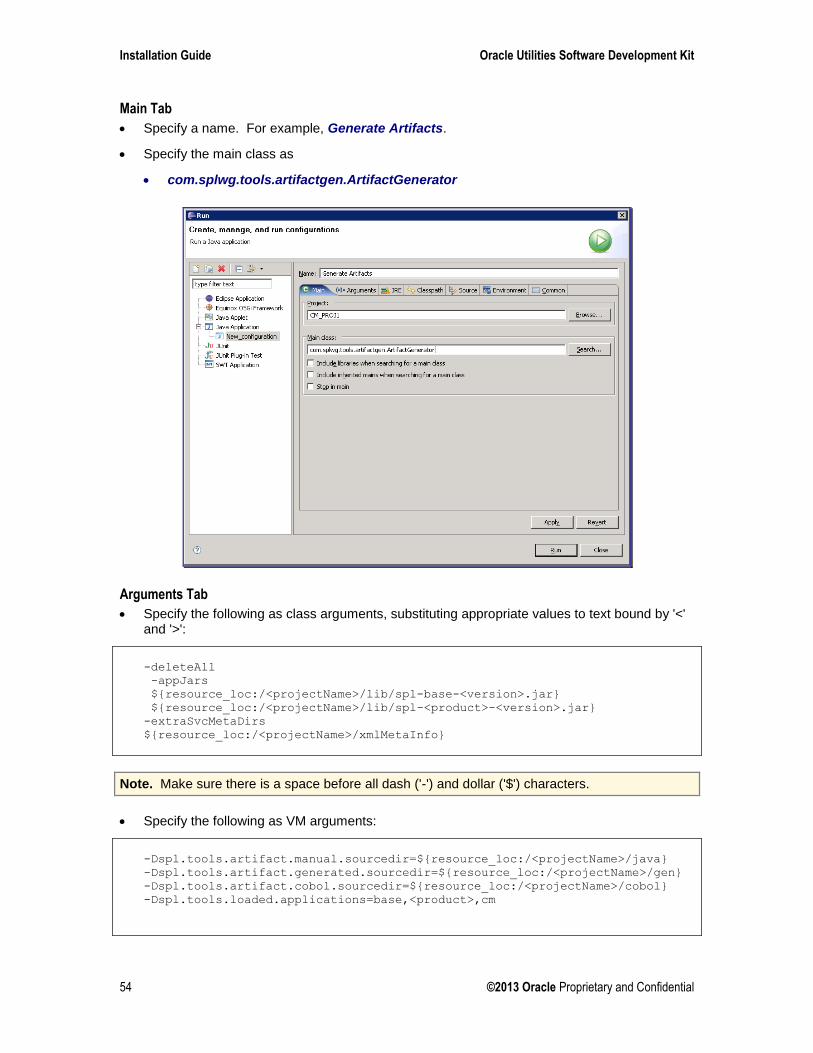
Main Tab
Specify a name. For example, Generate Artifacts.
Specify the main class as
com.splwg.tools.artifactgen.ArtifactGenerator
Arguments Tab
Specify the following as class arguments, substituting appropriate values to text bound by '<' and '>':
-deleteAll -appJars ${resource_loc:/<projectName>/lib/spl-base-<version>.jar} ${resource_loc:/<projectName>/lib/spl-<product>-<version>.jar}
-extraSvcMetaDirs
${resource_loc:/<projectName>/xmlMetaInfo}
Note. Make sure there is a space before all dash ('-') and dollar ('$') characters.
Specify the following as VM arguments:
-Dspl.tools.artifact.manual.sourcedir=${resource_loc:/<projectName>/java} -Dspl.tools.artifact.generated.sourcedir=${resource_loc:/<projectName>/gen}
-Dspl.tools.artifact.cobol.sourcedir=${resource_loc:/<projectName>/cobol}
-Dspl.tools.loaded.applications=base,<product>,cm
SPL Oracle Utilities Software Development Kit Installation Guide
©2013 Oracle Proprietary and Confidential 55
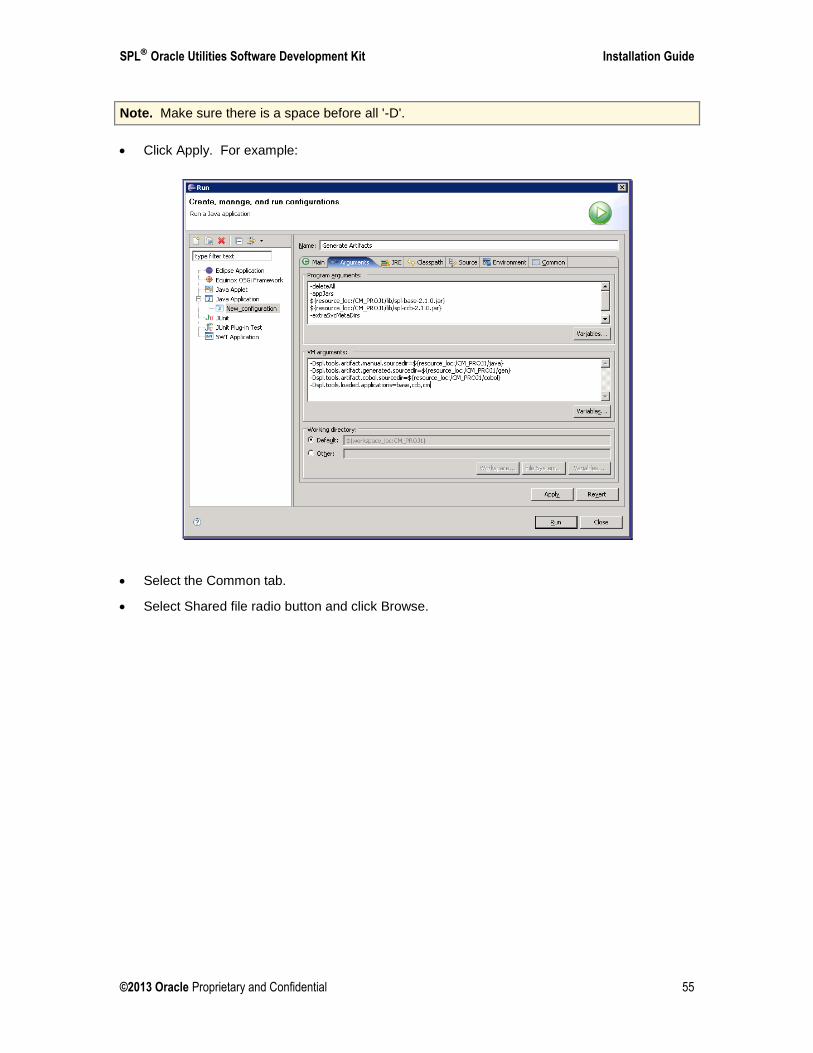
Note. Make sure there is a space before all '-D'.
Click Apply. For example:
Select the Common tab.
Select Shared file radio button and click Browse.
Installation Guide Oracle Utilities Software Development Kit
56 ©2013 Oracle Proprietary and Confidential
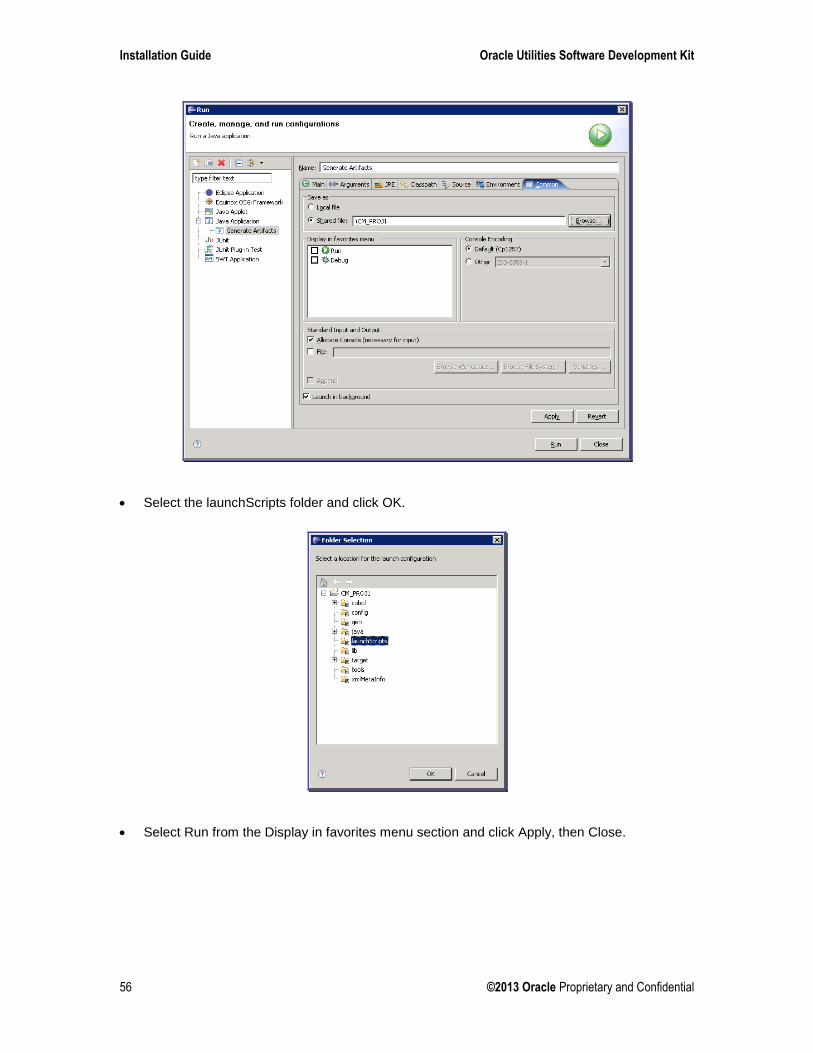
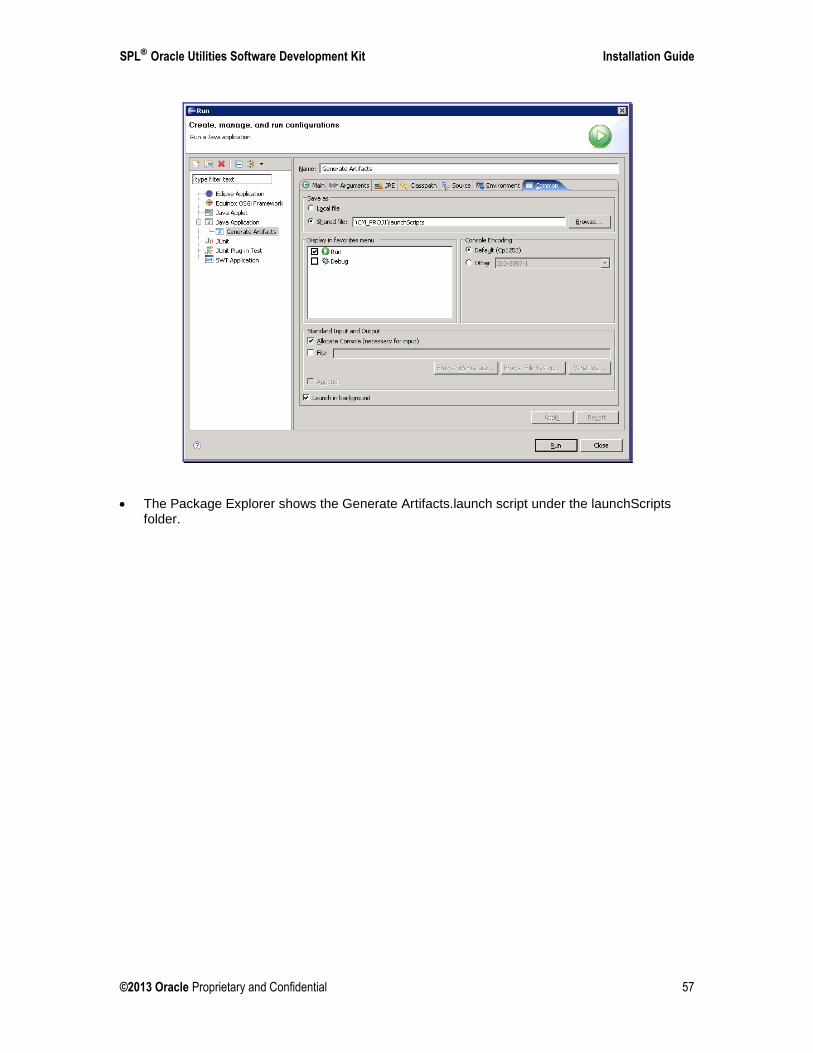
Select the launchScripts folder and click OK.
Select Run from the Display in favorites menu section and click Apply, then Close.
SPL Oracle Utilities Software Development Kit Installation Guide
©2013 Oracle Proprietary and Confidential 57
The Package Explorer shows the Generate Artifacts.launch script under the launchScripts folder.
Installation Guide Oracle Utilities Software Development Kit
58 ©2013 Oracle Proprietary and Confidential
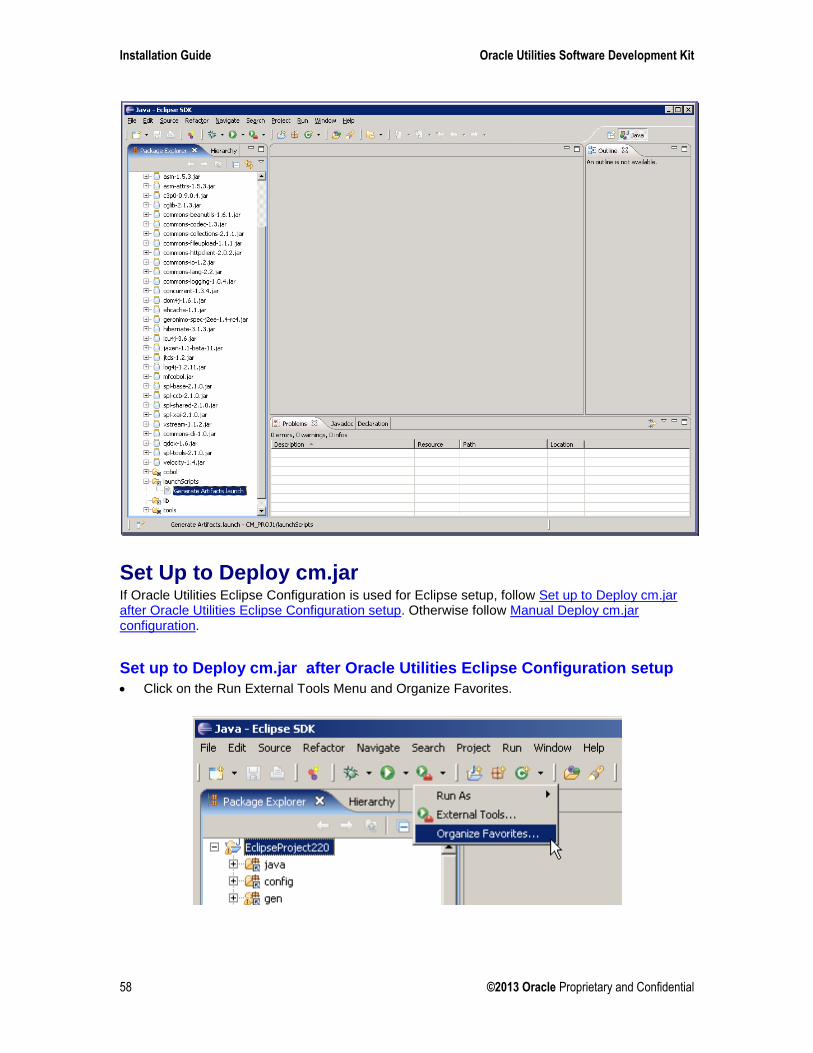
Set Up to Deploy cm.jar If Oracle Utilities Eclipse Configuration is used for Eclipse setup, follow Set up to Deploy cm.jar after Oracle Utilities Eclipse Configuration setup. Otherwise follow Manual Deploy cm.jar configuration.
Set up to Deploy cm.jar after Oracle Utilities Eclipse Configuration setup
Click on the Run External Tools Menu and Organize Favorites.
SPL Oracle Utilities Software Development Kit Installation Guide
©2013 Oracle Proprietary and Confidential 59
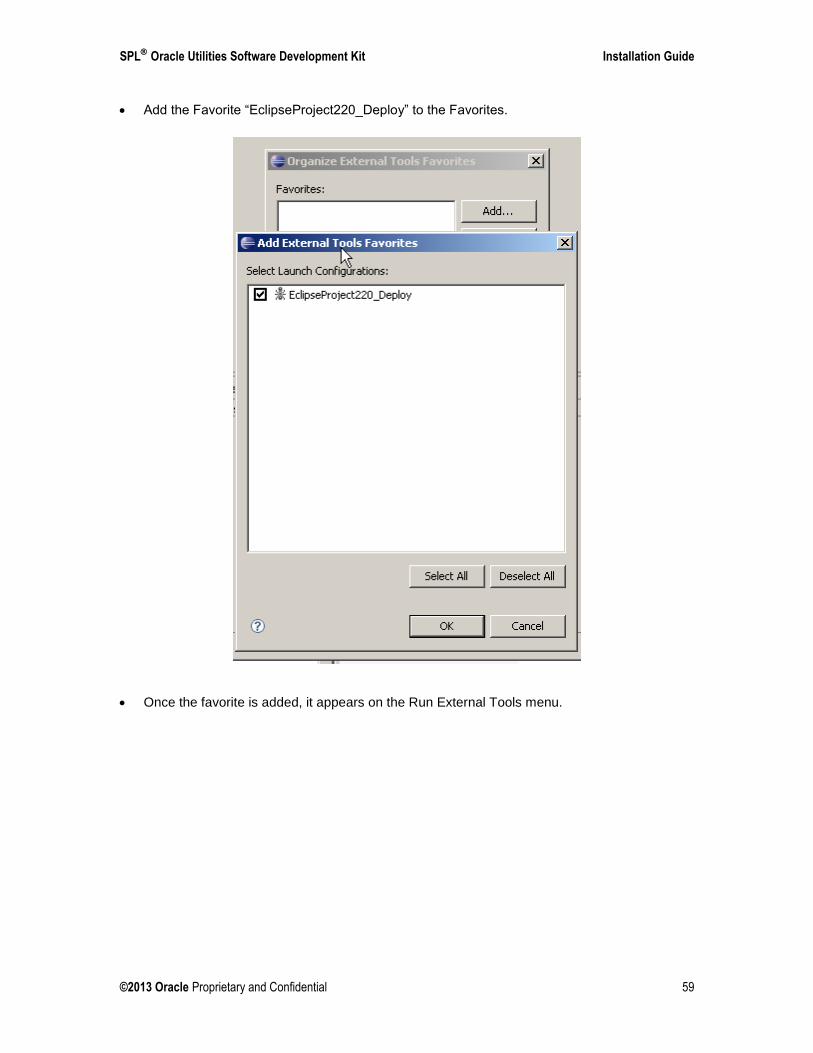
Add the Favorite “EclipseProject220_Deploy” to the Favorites.
Once the favorite is added, it appears on the Run External Tools menu.
Installation Guide Oracle Utilities Software Development Kit
60 ©2013 Oracle Proprietary and Confidential
\
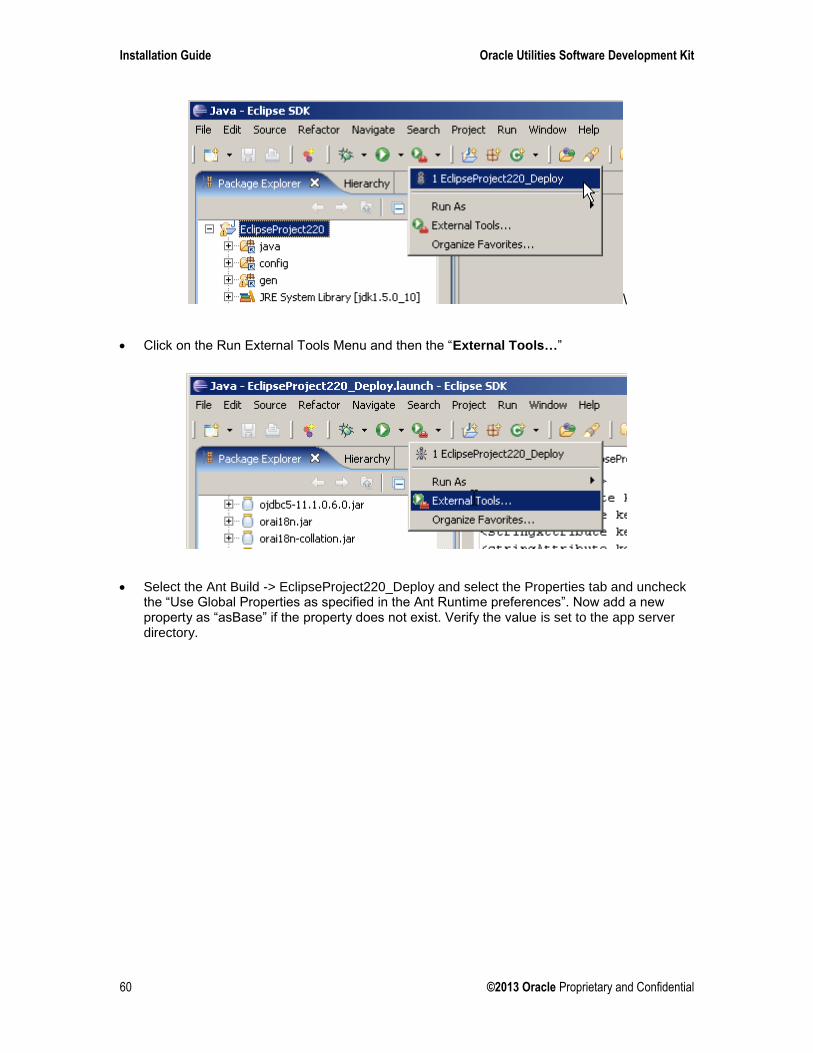
Click on the Run External Tools Menu and then the “External Tools…”
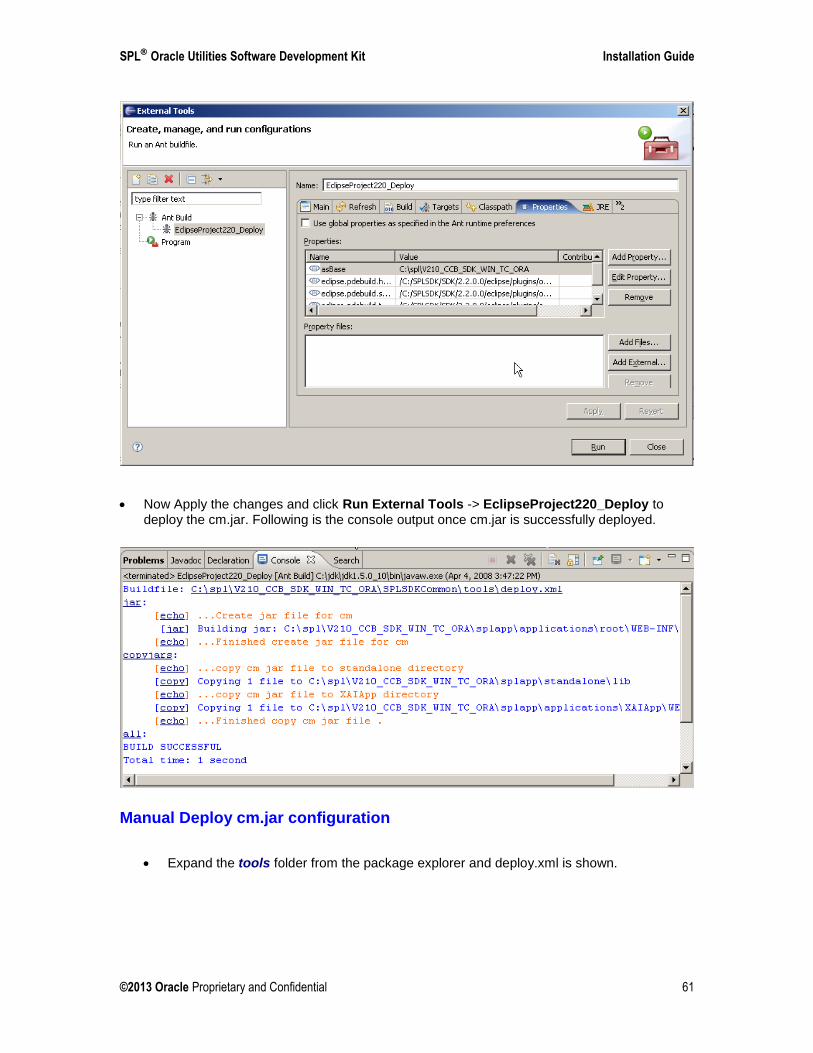
Select the Ant Build -> EclipseProject220_Deploy and select the Properties tab and uncheck the “Use Global Properties as specified in the Ant Runtime preferences”. Now add a new property as “asBase” if the property does not exist. Verify the value is set to the app server directory.
SPL Oracle Utilities Software Development Kit Installation Guide
©2013 Oracle Proprietary and Confidential 61
Now Apply the changes and click Run External Tools -> EclipseProject220_Deploy to deploy the cm.jar. Following is the console output once cm.jar is successfully deployed.
Manual Deploy cm.jar configuration
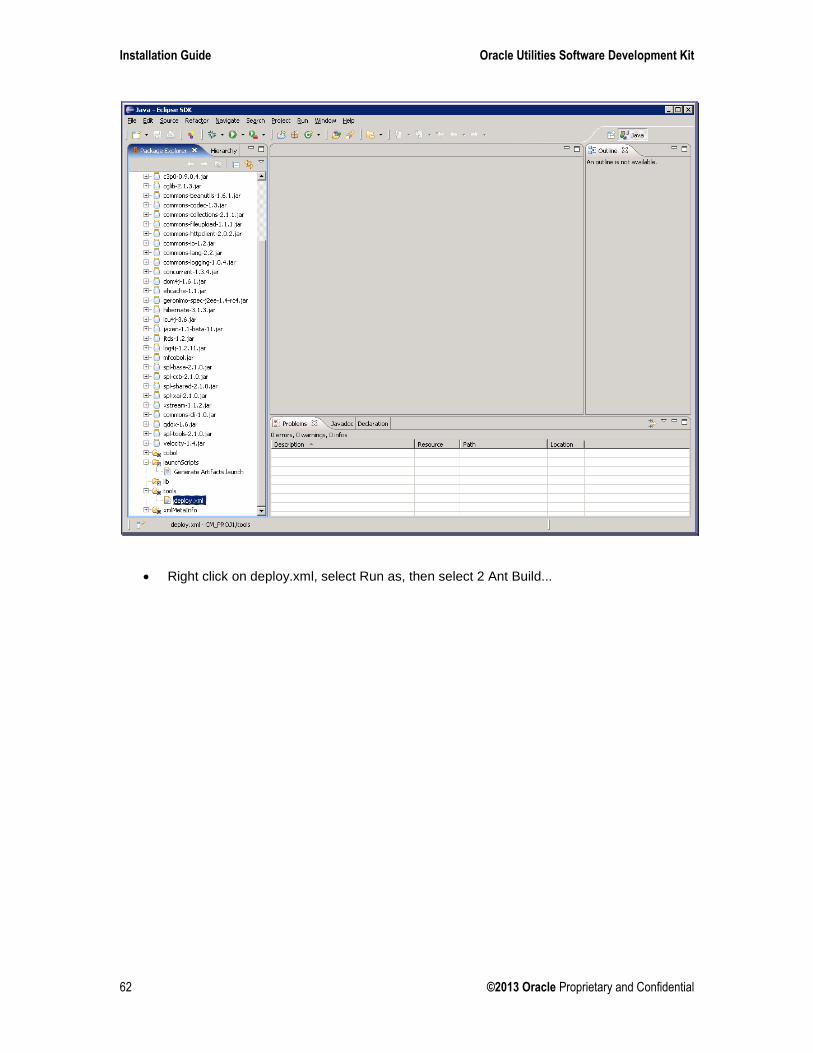
Expand the tools folder from the package explorer and deploy.xml is shown.
Installation Guide Oracle Utilities Software Development Kit
62 ©2013 Oracle Proprietary and Confidential
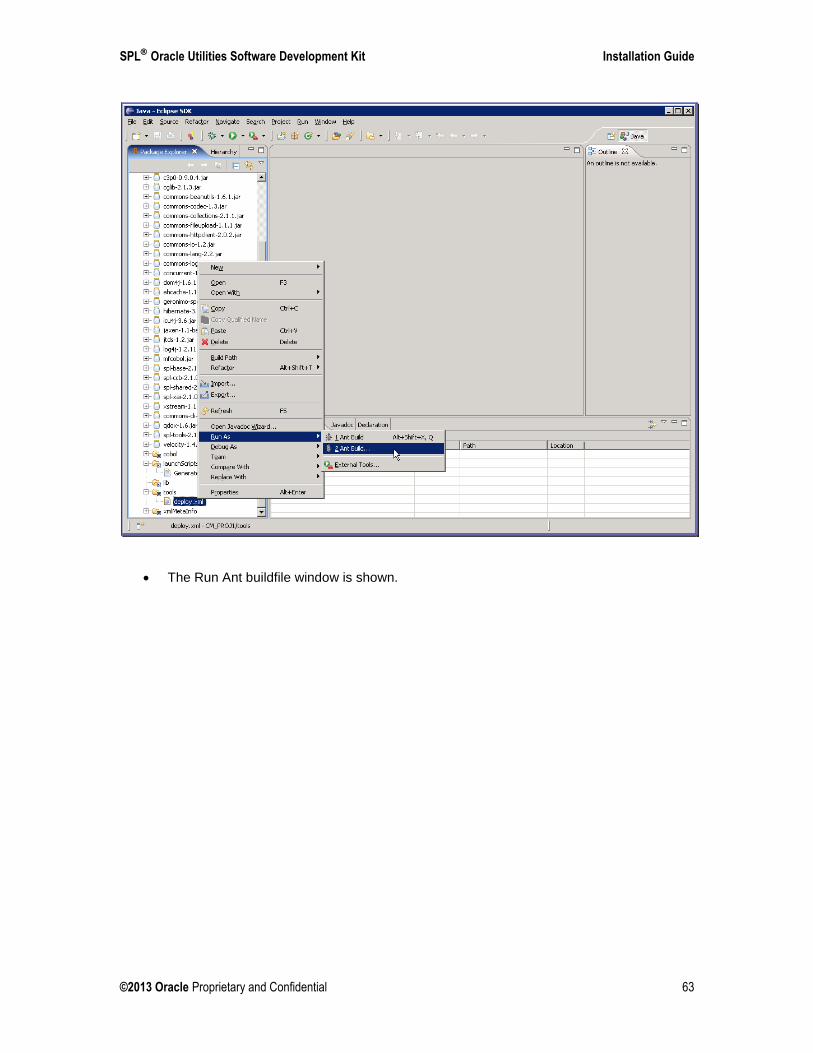
Right click on deploy.xml, select Run as, then select 2 Ant Build...
SPL Oracle Utilities Software Development Kit Installation Guide
©2013 Oracle Proprietary and Confidential 63
The Run Ant buildfile window is shown.

Installation Guide Oracle Utilities Software Development Kit
64 ©2013 Oracle Proprietary and Confidential
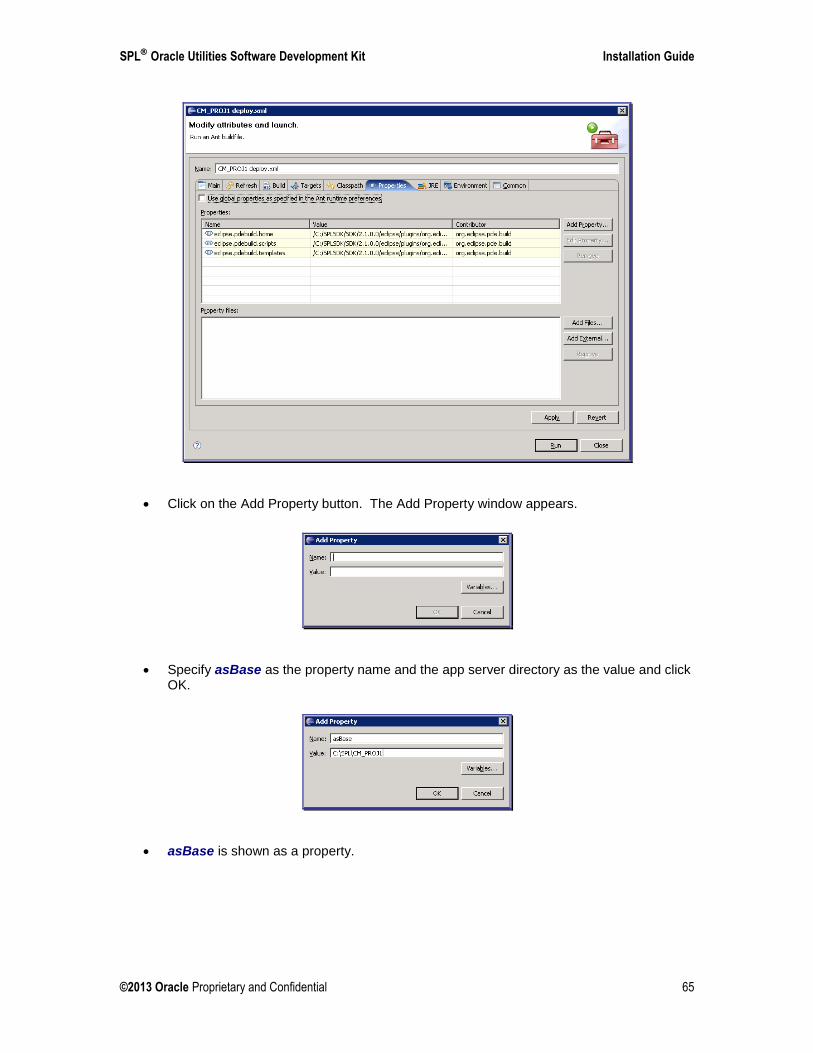
Select the Properties tab.
Uncheck Use global properties as specified in the Ant runtime preferences checkbox.
The Add Property button is enabled.
SPL Oracle Utilities Software Development Kit Installation Guide
©2013 Oracle Proprietary and Confidential 65
Click on the Add Property button. The Add Property window appears.
Specify asBase as the property name and the app server directory as the value and click OK.
asBase is shown as a property.
Installation Guide Oracle Utilities Software Development Kit
66 ©2013 Oracle Proprietary and Confidential
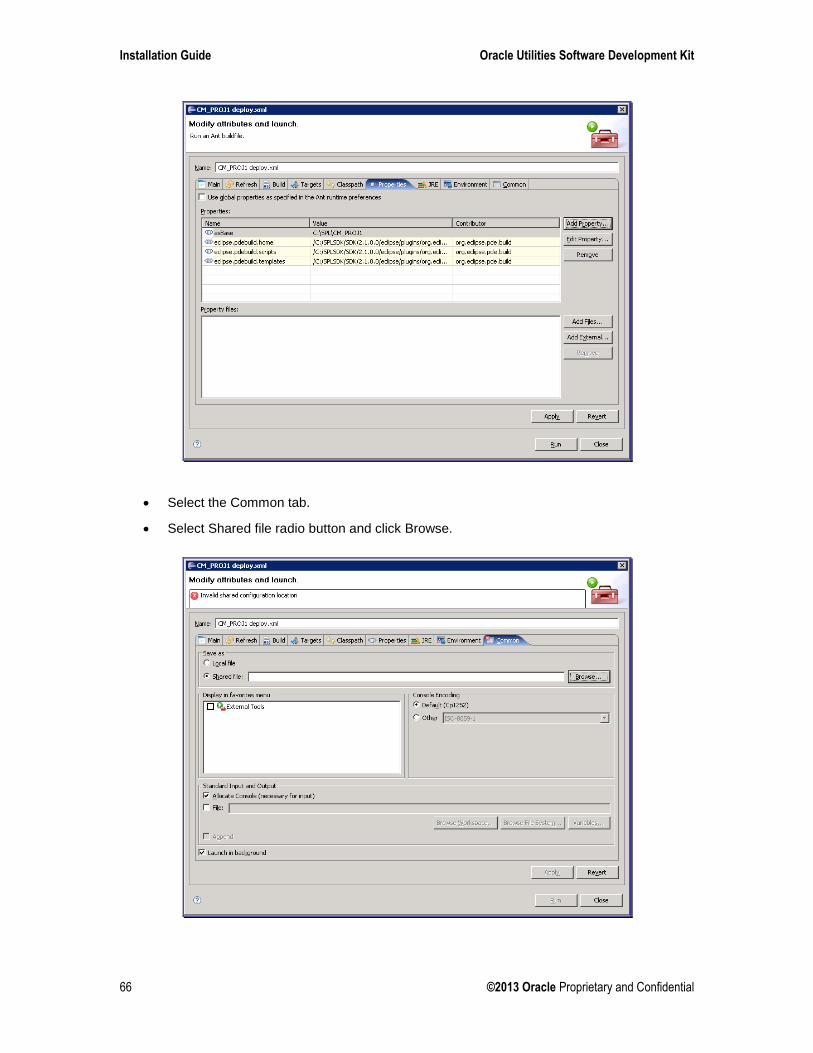
Select the Common tab.
Select Shared file radio button and click Browse.
SPL Oracle Utilities Software Development Kit Installation Guide
©2013 Oracle Proprietary and Confidential 67
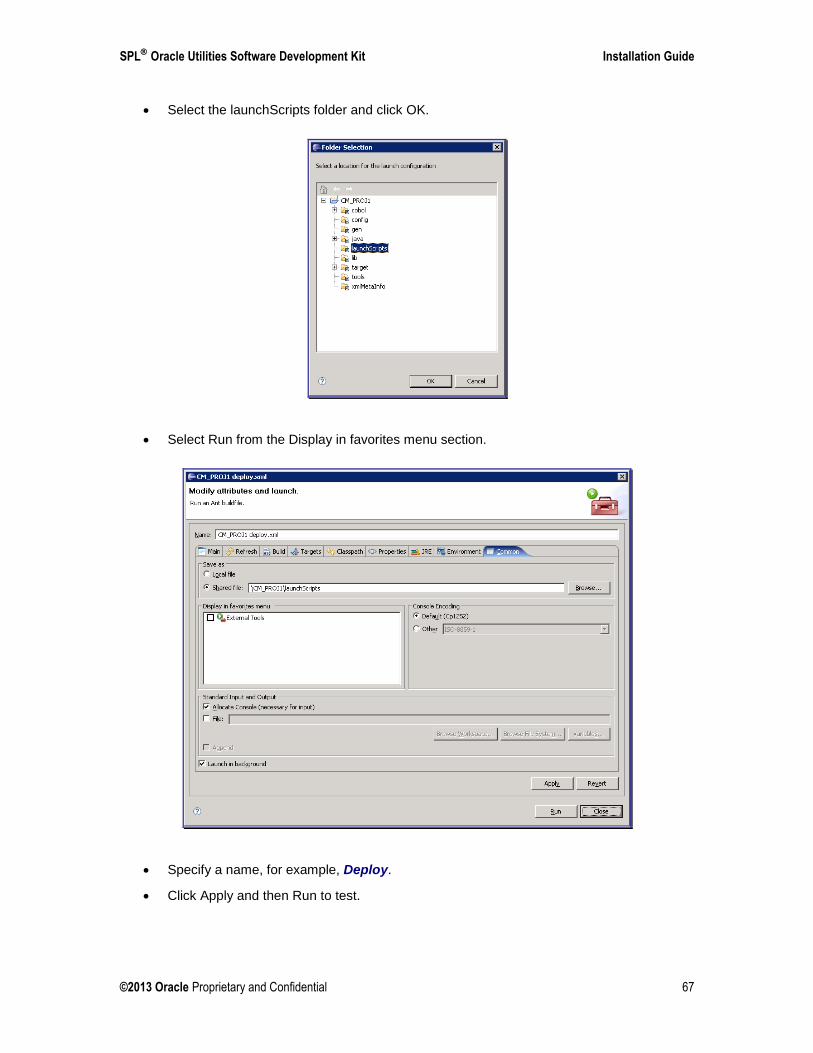
Select the launchScripts folder and click OK.
Select Run from the Display in favorites menu section.
Specify a name, for example, Deploy.
Click Apply and then Run to test.
Installation Guide Oracle Utilities Software Development Kit
68 ©2013 Oracle Proprietary and Confidential
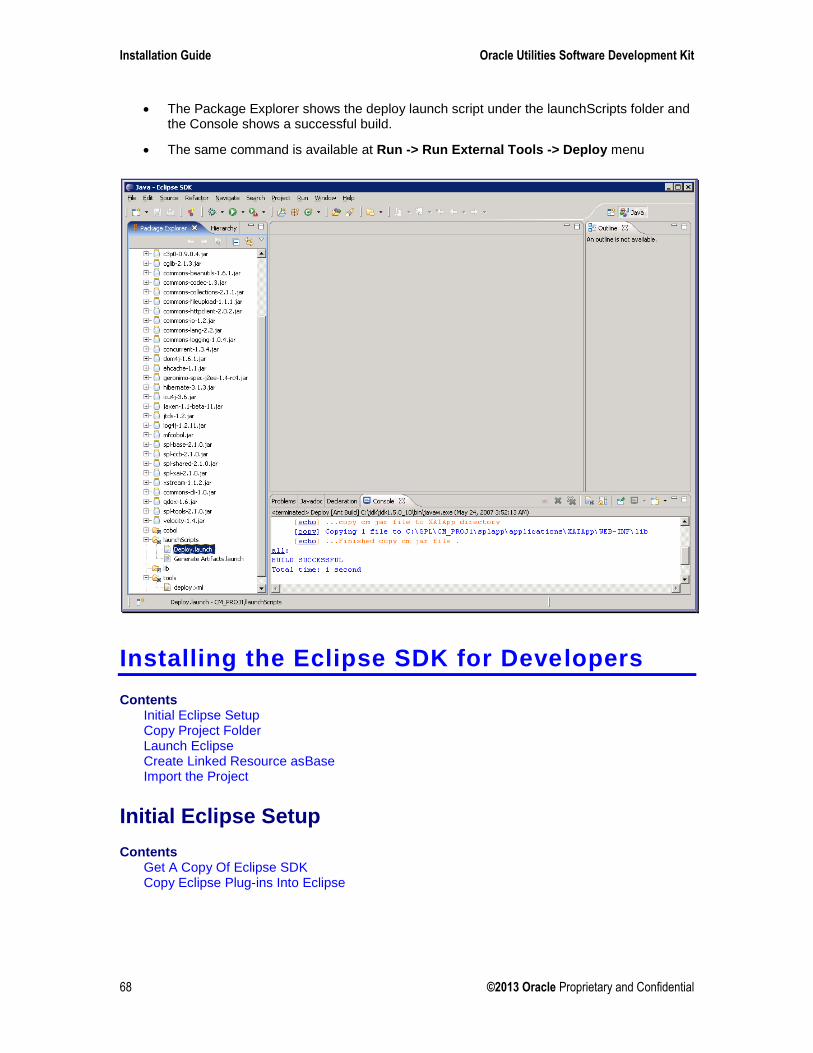
The Package Explorer shows the deploy launch script under the launchScripts folder and the Console shows a successful build.
The same command is available at Run -> Run External Tools -> Deploy menu
Installing the Eclipse SDK for Developers
Contents Initial Eclipse Setup Copy Project Folder Launch Eclipse Create Linked Resource asBase Import the Project
Initial Eclipse Setup
Contents Get A Copy Of Eclipse SDK Copy Eclipse Plug-ins Into Eclipse
SPL Oracle Utilities Software Development Kit Installation Guide
©2013 Oracle Proprietary and Confidential 69
Get A Copy Of Eclipse SDK
Download Eclipse SDK and unzip it to a local folder. The following is a link to the download page:
http://archive.eclipse.org/eclipse/downloads/drops/R-3.2.2-200702121330/index.php
Unzip the downloaded file into <splsdkroot>\SDK\2.2.0.x\Eclipse; x is the build number.
Copy Eclipse Plug-ins Into Eclipse
Copy the folders under <splsdkroot>\SDK\2.2.0.x\tools\eclipse\plugins into the Eclipse SDK plugins directory at <splsdkroot>\SDK\2.2.0.0\Eclipse\plugins.
Copy the c3p0 jar file into <splsdkroot>\SDK\2.2.0.x\Eclipse\plugins\com.splwg.eclipseTools_1.0.0\shared\lib as c3p0-0.9.0.4.jar. The c3p0 jar file is in the directory referred to by the C3P0_JAR_DIR environment variable set up for the app server.
Copy the hibernate jar file into <splsdkroot>\SDK\2.2.0.x\Eclipse\plugins\com.splwg.eclipseTools_1.0.0\shared\lib as hibernate-3.1.3.jar. The hibernate jar file is in the directory referred to by the HIBERNATE_JAR_DIR environment variable set up for the app server.
Note. This step only needs to be done once per version of the SDK.
Copy Project Folder Copy the eclipseProject folder SPLSDK Common folder of app server to the folder of the
Oracle Utilities Software Development Kit Client folder for the project.
Installation Guide Oracle Utilities Software Development Kit
70 ©2013 Oracle Proprietary and Confidential
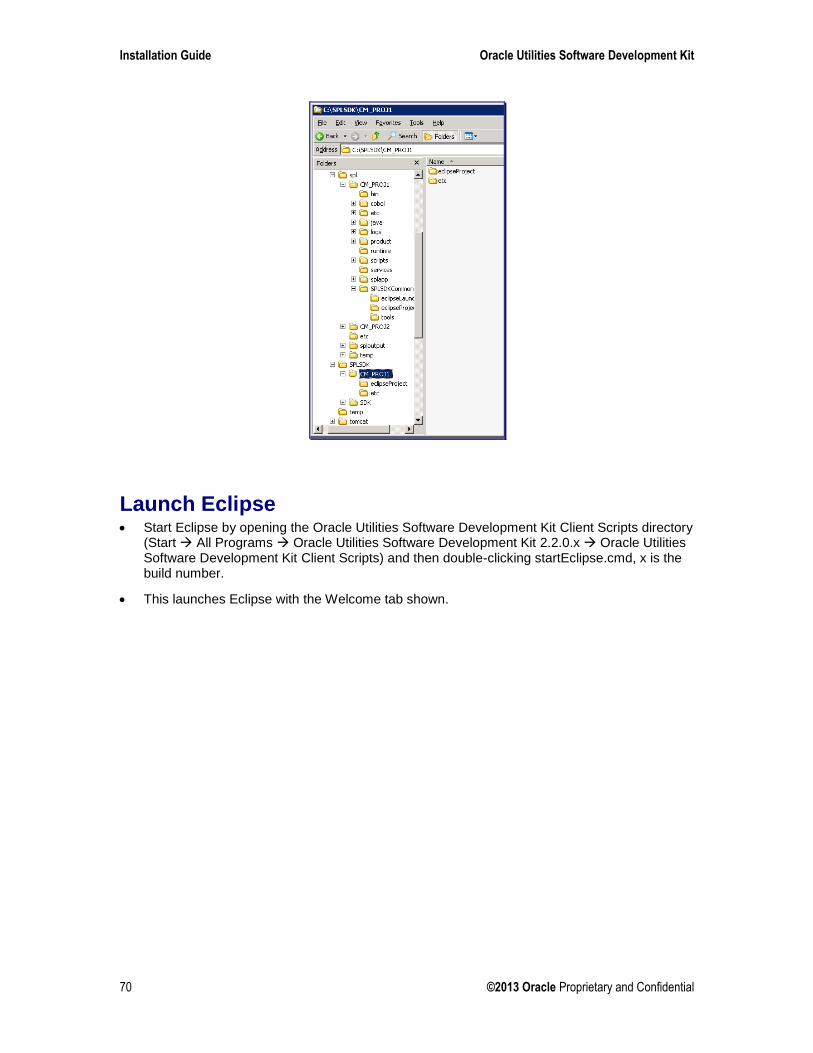
Launch Eclipse Start Eclipse by opening the Oracle Utilities Software Development Kit Client Scripts directory
(Start All Programs Oracle Utilities Software Development Kit 2.2.0.x Oracle Utilities Software Development Kit Client Scripts) and then double-clicking startEclipse.cmd, x is the build number.
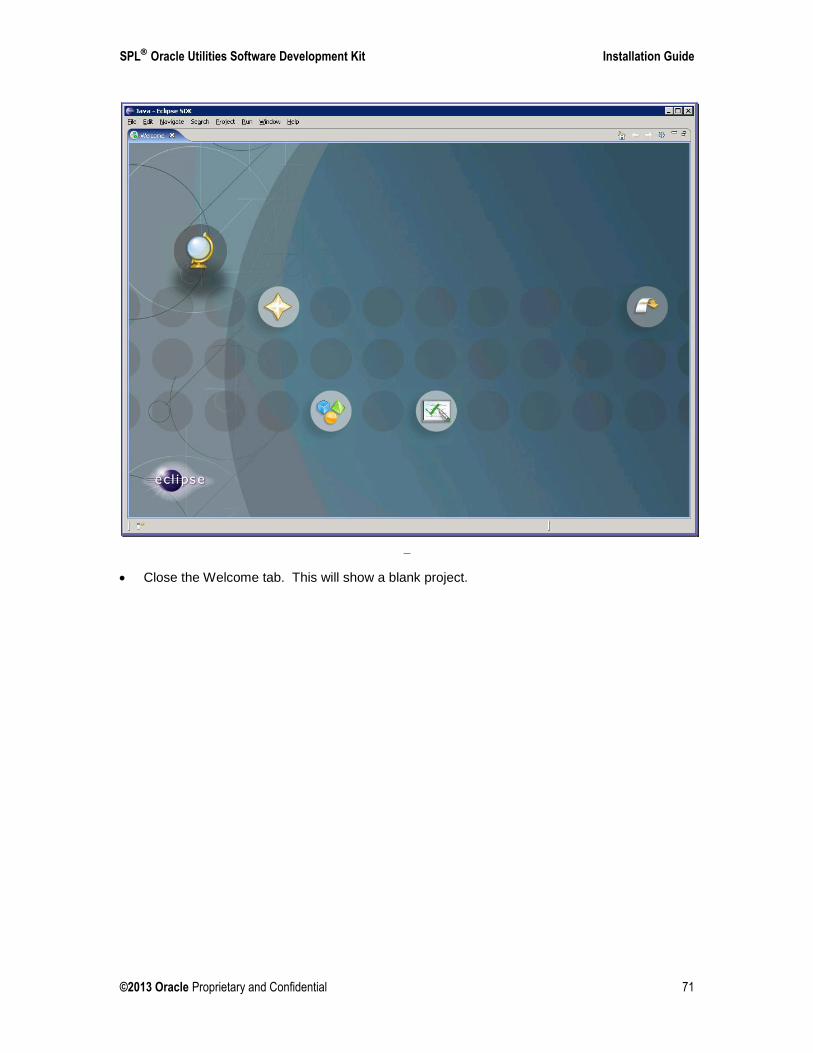
This launches Eclipse with the Welcome tab shown.
SPL Oracle Utilities Software Development Kit Installation Guide
©2013 Oracle Proprietary and Confidential 71
_
Close the Welcome tab. This will show a blank project.
Installation Guide Oracle Utilities Software Development Kit
72 ©2013 Oracle Proprietary and Confidential
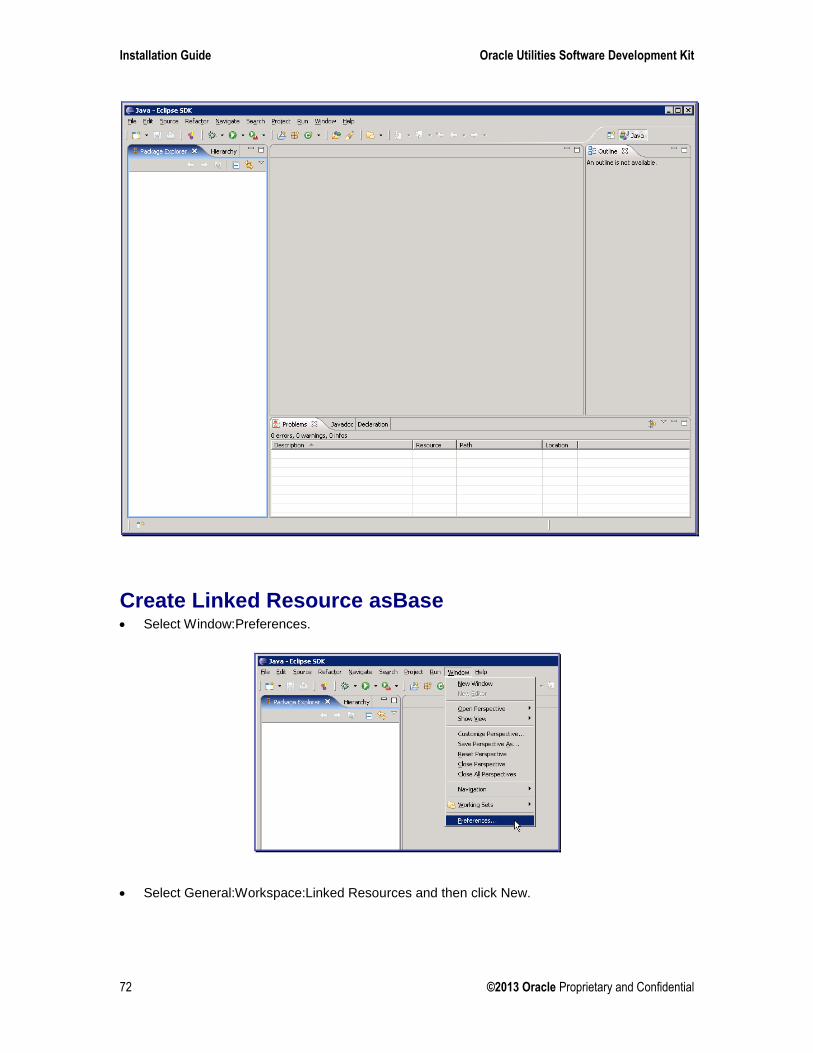
Create Linked Resource asBase Select Window:Preferences.
Select General:Workspace:Linked Resources and then click New.
SPL Oracle Utilities Software Development Kit Installation Guide
©2013 Oracle Proprietary and Confidential 73
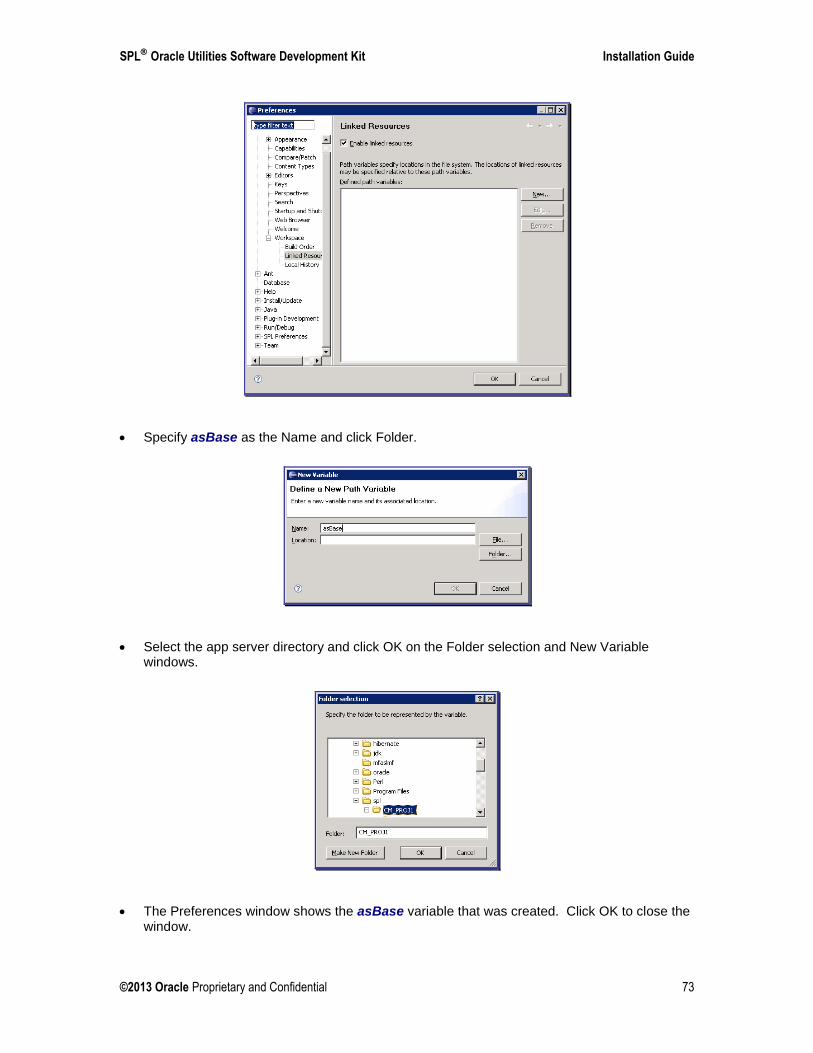
Specify asBase as the Name and click Folder.
Select the app server directory and click OK on the Folder selection and New Variable windows.
The Preferences window shows the asBase variable that was created. Click OK to close the window.
Installation Guide Oracle Utilities Software Development Kit
74 ©2013 Oracle Proprietary and Confidential
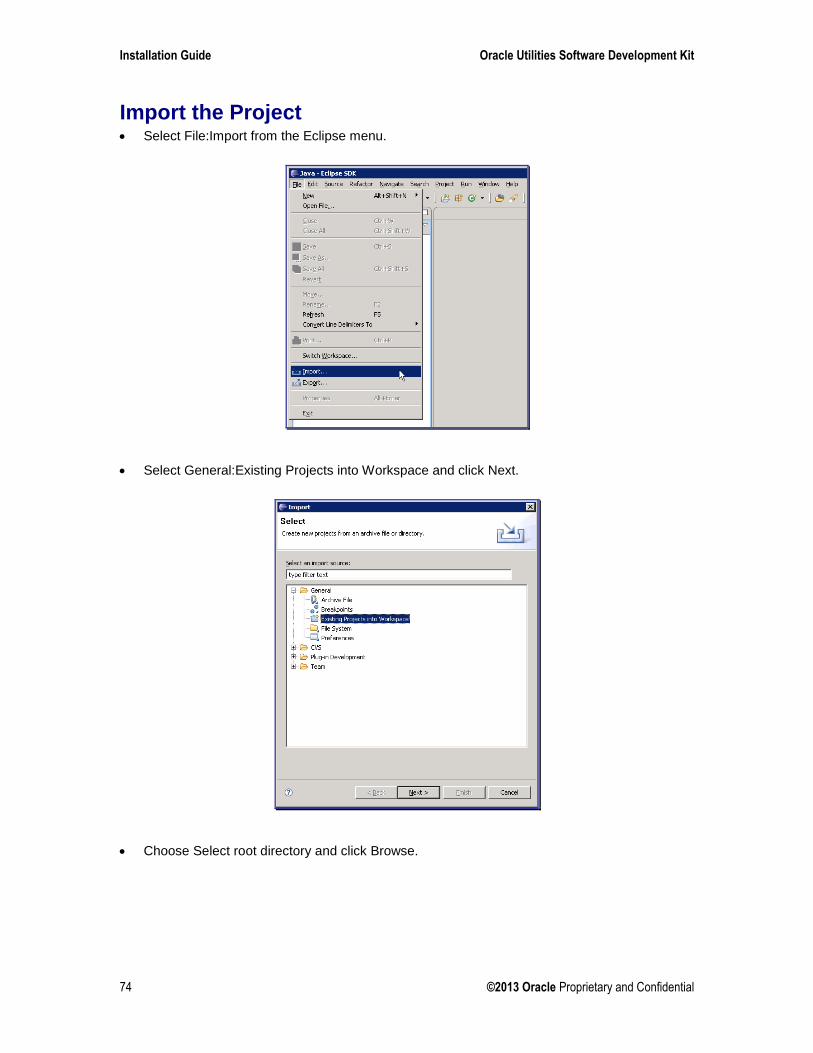
Import the Project Select File:Import from the Eclipse menu.
Select General:Existing Projects into Workspace and click Next.
Choose Select root directory and click Browse.
SPL Oracle Utilities Software Development Kit Installation Guide
©2013 Oracle Proprietary and Confidential 75
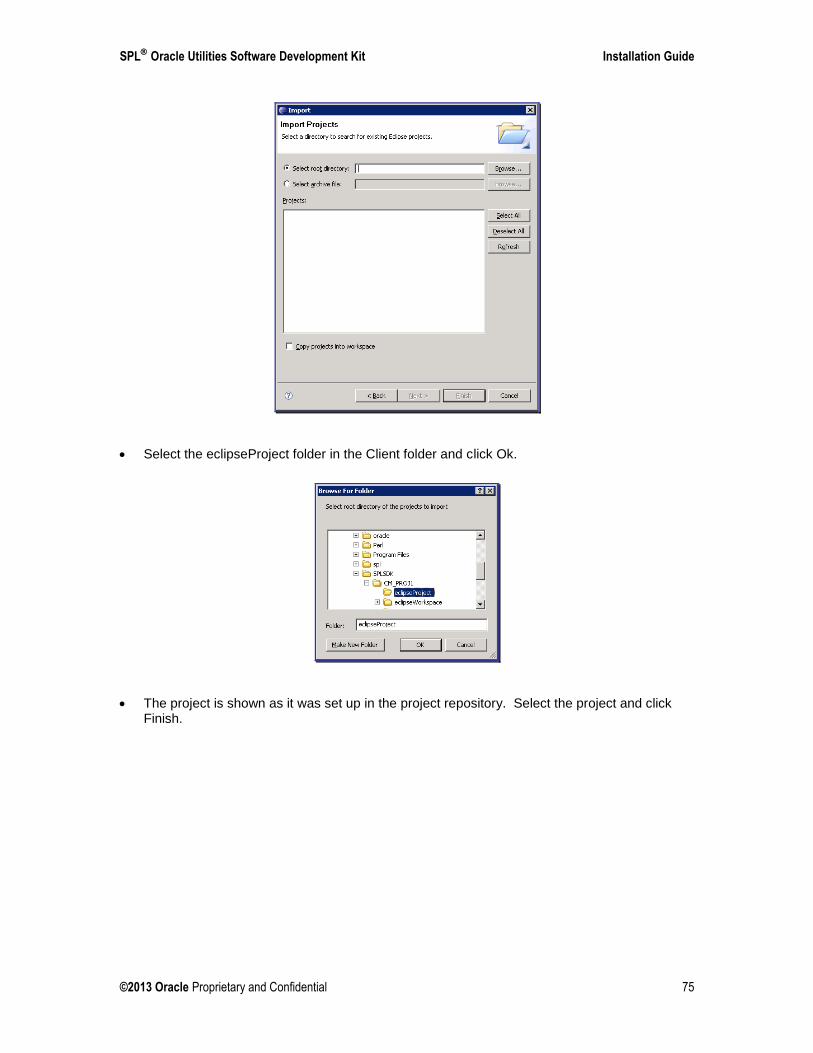
Select the eclipseProject folder in the Client folder and click Ok.
The project is shown as it was set up in the project repository. Select the project and click Finish.
Installation Guide Oracle Utilities Software Development Kit
76 ©2013 Oracle Proprietary and Confidential
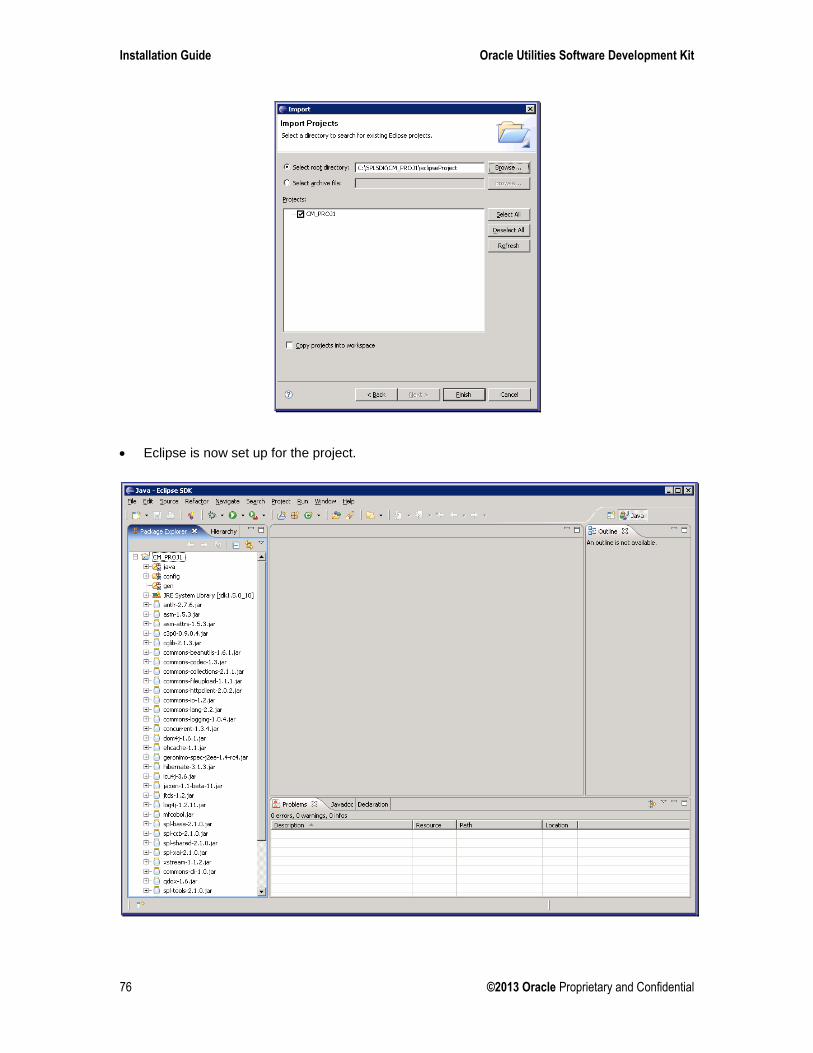
Eclipse is now set up for the project.

SPL Oracle Utilities Software Development Kit Installation Guide
©2013 Oracle Proprietary and Confidential 77