Oracle Utilities Advanced Spatial and Operational ...
116
Oracle Utilities Advanced Spatial and Operational Analytics Administration Guide Release 2.4.0.4 E37466-02 December 2012
Transcript of Oracle Utilities Advanced Spatial and Operational ...

Oracle Utilities Advanced Spatial and Operational AnalyticsAdministration GuideRelease 2.4.0.4E37466-02
December 2012

Oracle Utilities Advanced Spatial and Operational Analytics Administration Guide, Release 2.4.0.4
E37466-02
Copyright © 2000, 2012, Oracle and/or its affiliates. All rights reserved.
This software and related documentation are provided under a license agreement containing restrictions on use and disclosure and are protected by intellectual property laws. Except as expressly permitted in your license agreement or allowed by law, you may not use, copy, reproduce, translate, broadcast, modify, license, transmit, distribute, exhibit, perform, publish, or display any part, in any form, or by any means. Reverse engineering, disassembly, or decompilation of this software, unless required by law for interoperability, is prohibited.
The information contained herein is subject to change without notice and is not warranted to be error-free. If you find any errors, please report them to us in writing.
If this software or related documentation is delivered to the U.S. Government or anyone licensing it on behalf of the U.S. Government, the following notice is applicable:
U.S. GOVERNMENT RIGHTS Programs, software, databases, and related documentation and technical data delivered to U.S. Government customers are "commercial computer software" or "commercial technical data" pursuant to the applicable Federal Acquisition Regulation and agency-specific supplemental regulations. As such, the use, duplication, disclosure, modification, and adaptation shall be subject to the restrictions and license terms set forth in the applicable Government contract, and, to the extent applicable by the terms of the Government contract, the additional rights set forth in FAR 52.227-19, Commercial Computer Software License (December 2007). Oracle America, Inc., 500 Oracle Parkway, Redwood City, CA 94065.
This software or hardware is developed for general use in a variety of information management applications. It is not developed or intended for use in any inherently dangerous applications, including applications which may create a risk of personal injury. If you use this software or hardware in dangerous applications, then you shall be responsible to take all appropriate fail-safe, backup, redundancy and other measures to ensure its safe use. Oracle Corporation and its affiliates disclaim any liability for any damages caused by use of this software or hardware in dangerous applications.
Oracle and Java are registered trademarks of Oracle and/or its affiliates. Other names may be trademarks of their respective owners.
Intel and Intel Xeon are trademarks or registered trademarks of Intel Corporation. All SPARC trademarks are used under license and are trademarks or registered trademarks of SPARC International, Inc. AMD, Opteron, the AMD logo, and the AMD Opteron logo are trademarks or registered trademarks of Advanced Micro Devices. UNIX is a registered trademark of The Open Group.
This software or hardware and documentation may provide access to or information on content, products and services from third parties. Oracle Corporation and its affiliates are not responsible for and expressly disclaim all warranties of any kind with respect to third party content, products and services. Oracle Corporation and its affiliates will not be responsible for any loss, costs, or damages incurred due to your access to or use of third party content, products or services.

Contents
Preface................................................................................................................................................................ i-vAudience ........................................................................................................................................................................... i-vRelated Documents......................................................................................................................................................... i-vConventions ..................................................................................................................................................................... i-v
Chapter 1Overview............................................................................................................................................................. 1-1
Chapter 2Oracle Utilities Advanced Spatial and Operational Analytics Fundamentals ................................................. 2-1
The Data Warehouse ..................................................................................................................................................... 2-1Star Schemas.................................................................................................................................................................... 2-1Extraction, Transformation, and Loading (ETL)...................................................................................................... 2-2
Extract Programs ........................................................................................................................................... 2-3Transform Programs ..................................................................................................................................... 2-3Load Programs ............................................................................................................................................... 2-3
Materialized Views ......................................................................................................................................................... 2-3
Chapter 3Extract, Transform, and Load Processes (ETL).............................................................................................. 3-1
Data Extraction and Transformation.......................................................................................................................... 3-1Data Extraction in Oracle Utilities Customer Care and Billing and Oracle Utilities Work and Asset
Management..................................................................................................................................................................................... 3-1Data Extraction in Oracle Utilities Network Management System ....................................................... 3-5Data Extraction in Oracle Utilities Meter Data Management and Oracle Utilities Mobile Workforce
Management..................................................................................................................................................................................... 3-6Oracle Warehouse Builder ............................................................................................................................................ 3-8
Overview of Oracle Warehouse Builder .................................................................................................... 3-8Extract Programs and External Tables....................................................................................................... 3-9File Manager ................................................................................................................................................... 3-9Oracle Warehouse Builder Transformations ........................................................................................... 3-10
Running and Monitoring Extract Loads................................................................................................................... 3-13About the File Processors Daemon.......................................................................................................... 3-13Log File.......................................................................................................................................................... 3-16Monitoring Jobs ........................................................................................................................................... 3-16Resolving Errors During Loads................................................................................................................. 3-17Capturing Fact Load Errors ....................................................................................................................... 3-18Adding Custom Fact Load Validations .................................................................................................... 3-19Fixing Load Errors ...................................................................................................................................... 3-21Resubmitting a Failed Job........................................................................................................................... 3-22
Materialized Views ....................................................................................................................................................... 3-22Materialized View Refresh.......................................................................................................................... 3-23Query Rewrite............................................................................................................................................... 3-23
Parallelism and Partitioning ........................................................................................................................................ 3-24Parallelism in Oracle Warehouse Builder (OWB) Mappings ................................................................ 3-25Parallelism in Materialized Views .............................................................................................................. 3-25Partitioning in Materialized Views and Facts........................................................................................... 3-26
Purging Audit Records ................................................................................................................................................ 3-28Purging Extract, Transform, and Load (ETL) Job Control Tables ..................................................... 3-29
NMS/BI Recent Outage Data Purge Process ......................................................................................................... 3-30Purging the NMS data archive ................................................................................................................... 3-31Configuring Oracle Warehouse Builder to Enable Purging .................................................................. 3-32
i

ii
Chapter 4Configuring Dashboards................................................................................................................................... 4-1
Configuring User Security ............................................................................................................................................. 4-1Authentication ................................................................................................................................................ 4-2
OUASA: Configuring Drill Back ................................................................................................................................. 4-2OUASA: Answer Configuration .................................................................................................................................. 4-3OUASA: Spatial Data Configuration .......................................................................................................................... 4-3
Loading Geographic Data ............................................................................................................................ 4-4Integrating Mapping with the Network Management System Network Model................................... 4-4Configuring MapViewer for Dashboards................................................................................................... 4-6Map Profile Configuration............................................................................................................................ 4-7
OUASA: Label Configuration ...................................................................................................................................... 4-7Overview of Labels........................................................................................................................................ 4-8Overriding Base Labels ................................................................................................................................. 4-8Supporting Multiple Languages ................................................................................................................... 4-9
Chapter 5Customizations ................................................................................................................................................. 5-1
User-Defined Columns.................................................................................................................................................. 5-1User-Defined Field (UDF) ........................................................................................................................... 5-2User-Defined Measure (UDM).................................................................................................................... 5-3User-Defined Dimension (UDD) ............................................................................................................... 5-4User-Defined Degenerate Dimension (UDDGEN)................................................................................ 5-5User-Defined Foreign Key Dimensions (UDDFK)................................................................................. 5-6
Extending Extractors and Schema .............................................................................................................................. 5-6Extending Oracle Utilities Customer Care and Billing (CC&B) and Workforce and Asset Management
(WAM).............................................................................................................................................................................................. 5-6Extending Oracle Utilities Network Management Systems (NMS)....................................................... 5-7Extending Oracle Utilities Meter Data Management (MDM) and Mobile Workforce Management
(MWM) ............................................................................................................................................................................................. 5-7
Chapter 6 Adding New Requirements ............................................................................................................................. 6-1
Customizing Dashboards .............................................................................................................................................. 6-1Modifying the RPD File................................................................................................................................ 6-1Customizing Answers.................................................................................................................................... 6-2Creating New Answers.................................................................................................................................. 6-2Adding New Labels ....................................................................................................................................... 6-2
Creating a New Star Schema......................................................................................................................................... 6-4Oracle Warehouse Builder (OWB) Objects ............................................................................................................... 6-4Running the Oracle Warehouse Builder (OWB) Code Generator ......................................................................... 6-5Loading and Deploying TCL files in Oracle Warehouse Builder (OWB)............................................................. 6-7File Processor Daemon ................................................................................................................................................. 6-8Auto Cache Refresh ....................................................................................................................................................... 6-8 Extraction, Transformation, and Loading (ETL) Customization.......................................................................... 6-9
Oracle Utilities Network Management System (NMS) ............................................................................ 6-9Oracle Utilities Meter Data Management (MDM) and Mobile Workforce Management (MWM)... 6-9Oracle Utilities Customer Care and Billing (CC&B) and Work and Asset Management (WAM) .. 6-10
Chapter 7Oracle Warehouse Builder Licensing and Optional Features ......................................................................... 7-1
Disabling the Optional Features in Oracle Warehouse Builder (OWB)................................................................ 7-1
Chapter 8Maintaining Environments............................................................................................................................... 8-1
Overview of Environment Maintenance .................................................................................................................... 8-1

Moving Code................................................................................................................................................................... 8-1Database Cloning ........................................................................................................................................................... 8-3
Appendix APackage Process Flows ..................................................................................................................................... A-1
Appendix BOracle Utilities Customer Care and Billing Extractor Details ......................................................................... B-1
Appendix COracle Utilities Meter Data Management Extractor Details ........................................................................... C-1
Synchronization BO-based Extract Details: ............................................................................................. C-1Idiosyncratic Batch Extract Details: .......................................................................................................... C-3
Appendix DOracle Utilities Mobile Workforce Management Extractor Details ............................................................... D-1
Appendix EOracle Utilities Network Management System Extractor Details.................................................................. E-1
Appendix FOracle Utilities Work and Asset Management Extractor Details .................................................................... F-1
Appendix GOracle Utilities Validation Functions and Error Identification Procedure Names........................................ G-1
iii

iv

Preface
This guide provides instructions for configuring and administering Oracle Utilities Advanced Spatial and Operational Analytics.
This preface contains these topics:
• Audience
• Related Documents
• Conventions
AudienceThis Administration Guide is intended for anyone interested in the process of configuring and administering Oracle Utilities Advanced Spatial and Operational Analytics.
Related DocumentsFor more information, see these Oracle documents:
• Oracle Utilities Advanced Spatial and Operational Analytics Installation Guide
For installation and configuration tasks relating to Oracle Business Intelligence Enterprise Edition, refer to the Oracle Business Intelligence Suite Enterprise Edition documentation.
ConventionsThe following text conventions are used in this document:
Convention Meaning
boldface Boldface type indicates graphical user interface elements associated with an action, or terms defined in text or the glossary.
italic Italic type indicates book titles, emphasis, or placeholder variables for which you supply particular values.
v

monospace Monospace type indicates commands within a paragraph, URLs, code in examples, text that appears on the screen, or text that you enter.
Convention Meaning
vi

Chapter 1Overview
Oracle Utilities Advanced Spatial and Operational Analytics (OUASA) is a set of star schemas, graphic templates, and Extract, Transform, and Load (ETL) programs that allow you to build a Business Intelligence (BI) solution to meet your organization’s analytic requirements.
It is recommended that you form a basic understanding of the system’s design principles before starting to configure the application. After you have finished reviewing these principles, you should be able to compile the required metadata to configure the system. After adding metadata to a system, the data is extracted, and data warehouse is loaded with historical data. The historical data can be then viewed using the standard dashboards provided with the product.
The above statement seems vague and does not do full justice to what all complexities and procedures are involved in OUASA 2.4.0. A brief outline should suffice but it should exactly describe what the user understands with ease and will help him in understanding the core functionality of OUASA.
For details, refer to the following topics in this document:
• Oracle Utilities Advanced Spatial and Operational Analytics Fundamentals This chapter describes how data warehousing theory has been implemented in the Oracle Utilities Advanced Spatial Analytics (OUASA) application.
• Extract, Transform, and Load Processes (ETL) This chapter describes the extract, transform, and load (ETL) methodology used to populate the data warehouse.
Overview 1-1

1-2 Administration Guide

Chapter 2Oracle Utilities Advanced Spatial and Operational Analytics Fundamentals
This chapter describes the fundaments of Oracle Utilities Advanced Spatial and Operational Analytics (OUASA) concepts like data warehousing theory. It explains in detail as to how these concepts have been implemented in the Oracle Utilities Business Intelligence application.
Refer to the Oracle Utilities Advanced Spatial and Operational Analytics Installation Guide for details on designing and setting up the Oracle Utilities Advanced Spatial and Operational Analytics (OUASA) application.
This section includes the following topics:
• The Data Warehouse
• Star Schemas
• Extraction, Transformation, and Loading (ETL)
• Materialized Views
The Data WarehouseThe Oracle Utilities business intelligence data warehouse is a separate database from the operational database. The data warehouse is organized into a variety of that contain data extracted from applications. The data warehouse has the following features:
• Data structures are easily accessible by end users for their reporting needs.
• Large volumes of data can be retrieved quickly. This in turn allows for fast rendering of graphics that showcase the Key Performance Indicators (KPIs).
• Additional star schemas and graphics can also be added. Oracle Utiilities Business Intelligence contains star schemas and graphics suited for data retrieved from various Oracle Utilities Edge Applications. However, you can make use of the development tools to add additional star schemas and graphics as per your requirement.
Star SchemasAll data that is extracted from a production system and transferred to the data warehouse is held in star schemas. A star schema represents tables that hold a given type of factual data from a production system. A separate star schema is maintained for every fact held in a data warehouse. A fact is a record of an event that occurs in the operating system. For example, one fact might exist to record every bill and payment, whereas a different fact might exist to record every purchase order.
Oracle Utilities Advanced Spatial and Operational Analytics Fundamentals 2-1
Star schemas are sometimes called ‘data cubes’ owing to their multi-dimensional nature. The term ‘cubes’ here may imply that only three dimensions are supported; however, in reality most star schemas support more than three dimensions.
Every star schema has a single fact table at the center of the star and one or more dimension tables. The tables in a star schema are divided into two categories of facts and dimensions:
• Fact tables: These tables contain individual rows for every occurrence of a fact in the production system. Fact tables contain columns called measures. These columns are aggregated to calculate key performance indicators (KPIs).
• Dimension tables: These tables are used to “slice” the facts in different ways. For example, the star schema above allows users to slice the financial fact by the attributes on the six dimensions linked to it.
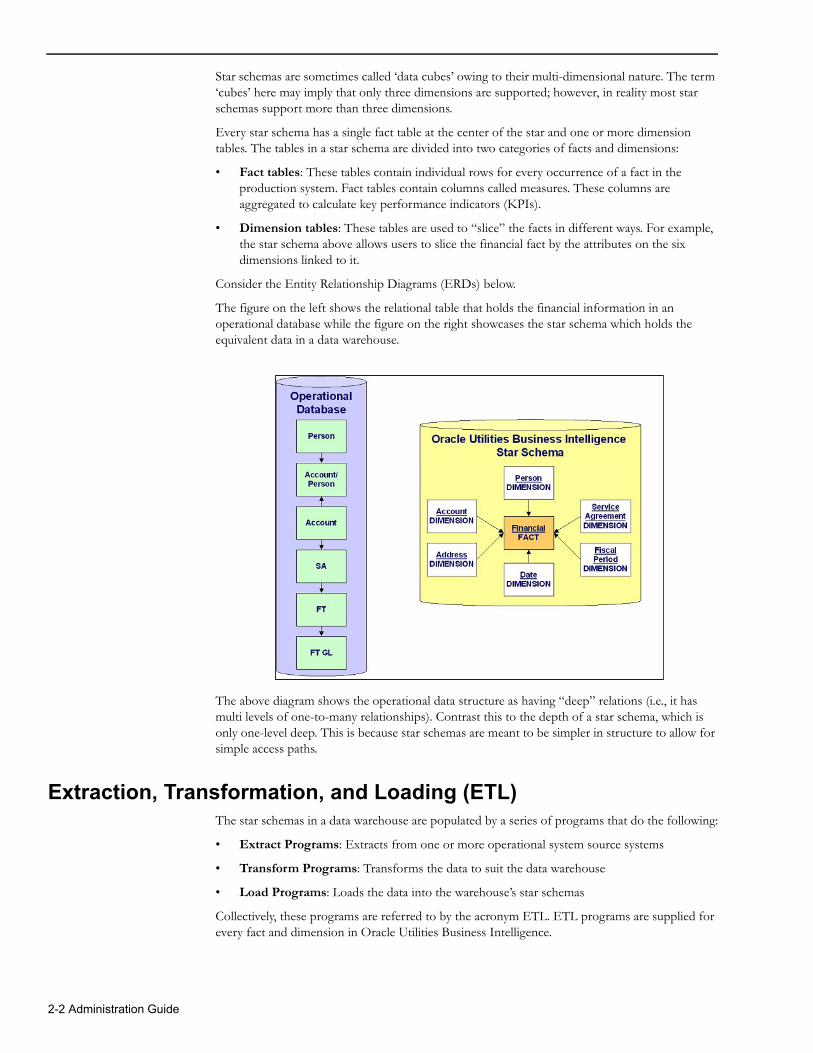
Consider the Entity Relationship Diagrams (ERDs) below.
The figure on the left shows the relational table that holds the financial information in an operational database while the figure on the right showcases the star schema which holds the equivalent data in a data warehouse.
The above diagram shows the operational data structure as having “deep” relations (i.e., it has multi levels of one-to-many relationships). Contrast this to the depth of a star schema, which is only one-level deep. This is because star schemas are meant to be simpler in structure to allow for simple access paths.
Extraction, Transformation, and Loading (ETL)The star schemas in a data warehouse are populated by a series of programs that do the following:
• Extract Programs: Extracts from one or more operational system source systems
• Transform Programs: Transforms the data to suit the data warehouse
• Load Programs: Loads the data into the warehouse’s star schemas
Collectively, these programs are referred to by the acronym ETL. ETL programs are supplied for every fact and dimension in Oracle Utilities Business Intelligence.
2-2 Administration Guide

The below diagram provides an overview of ETL programs and how they are executed:
Extract ProgramsThe extract programs execute in the operational database as they are extracting operational data. Oracle Utilities Business Intelligence uses flat files as the only source to load data into the data warehouse. The flat files are generated through an extraction process in the edge applications. Every fact and dimension in the data warehouse schema has a corresponding extract batch process. These batch processes extract data from the source system and transfer it to flat files. Along with each data flat file containing the extracted data, a single-record control file containing the batch information about the extractor program is also generated. The data and the control flat files, in turn, are loaded into the Oracle Utilities Business Intelligence data warehouse.
Transform ProgramsExtract programs perform some transformation activities while the load programs are used to perform others; however, there are no programs wholly dedicated to perform the transformation effort.
Load ProgramsThe flat files produced by the extract programs serve as input to the load programs. The load programs use this data to populate the star schemas in the data warehouse.
While any data warehouse product can be used to build the star schemas, Oracle Utilities Business Intelligence uses Oracle Warehouse Builder (OWB) to perform this task. Oracle Utilities Business Intelligence is supplied with the required metadata to transform the extracted data and load into the data warehouse.
Refer to the Oracle Warehouse Builder documentation for more information.
Materialized ViewsFact tables typically contain many rows. In order for the queries to perform efficiently, the facts must be summarized. While Online Analytic Processing (OLAP) servers are designed to perform this task, you can also use the materialized views to hold the summarized analytic data.
Materialized views are SQL statement that are saved on the database. Whenever the database receives an SQL statement that is same as or is similar to a materialized view, it retrieves the data from the materialized view rather than performing the joins against the base tables. If materialized views are not created to summarize the analytic data, the database must summarize the facts on the fly, and this has an adverse impact on performance. In other words, materialized views allow the end users to have a good response time.
Oracle Utilities Advanced Spatial and Operational Analytics Fundamentals 2-3

Standard materialized views are provided in the Oracle Warehouse Builder (OWB) metadata, and refresh process flows provided can be used to update materialized views after data is loaded into a fact table.
The amount of time it takes to create materialized views depends on the number of rows in your facts. However, the benefit can be large because whenever users need to access this data, the summarization of large volumes of data is unnecessary, so response times will be faster.
Note that the materialized views have to be generated only after the data in the warehouse has changed, for example, when a new operational data has been loaded through the Extract, Transform and Load (ETL) program. The existing process flows refresh the materialized view in incremental mode, so only new data is added to the materialized views after a load.
If the associated materialized views do not get rebuilt after loading the data warehouse with new facts data, the associated materialized views become stale. The database does not use stale views and has no choice but to summarize facts on the fly, if a query is received that requires this data. As a result, response time is slow.
2-4 Administration Guide

Chapter 3Extract, Transform, and Load Processes (ETL)
This section describes the Extract, Transform, and Load process used in the Oracle Utilities Business Intelligence including the following topics:
• Data Extraction and Transformation
• Oracle Warehouse Builder
• Running and Monitoring Extract Loads
• Materialized Views
• Parallelism and Partitioning
• Purging Audit Records
Data Extraction and TransformationData is extracted from the edge applications and transformed in the format required by Oracle Utilities Business Intelligence.
Data Extraction consists of the following two operations:
• Identifying the data that has to be extracted
• Extracting and transforming the identified data
There are different mechanisms used in Oracle Utilities Business Intelligence to identify the changed data and extract it into flat files. This section describes how the changed data is identified and extracted by different edge applications. It includes the following topics:
• Data Extraction in Oracle Utilities Customer Care and Billing and Oracle Utilities Work and Asset Management
• Data Extraction in Oracle Utilities Network Management System
• Data Extraction in Oracle Utilities Meter Data Management and Oracle Utilities Mobile Workforce Management
Data Extraction in Oracle Utilities Customer Care and Billing and Oracle Utilities Work and Asset Management
This section describes the data extraction methods used in Oracle Utilities Customer Care and Billing and Oracle Utilities Work and Asset Management Edge Applications. This section contains the following topics:
• Change Detect Mechanism
• Fields on the Change Log
Extract, Transform, and Load Processes (ETL) 3-1
• Typical Structure of Triggers
• Rows In the Change Log
• Extracting and Transforming Data
• Basic Parameters Supplied To Extract Processes
Change Detect MechanismEvery production database table used to populate the data warehouse must be monitored for changes so that these changes can be reflected in the data warehouse. Triggers insert a row into the Change Log when the source tables change. The topics in this section describe the Change Log and the triggers that populate it.
Note: This section applies to the Oracle Utilities Customer Care and Billing and Oracle Utilities Work and Asset Management.
Fields on the Change LogThe sole job of triggers is to populate the change log. Therefore, You must understand the fields of the change log table in order to understanding the triggers. The change log contains the following primary fields:
• Change Log ID: This is a random prime key of the change log and is generated by the trigger.
• Batch Code: This is the code for the extract process that will process this change.
• Batch Number: This is the current run number for the extract process.
• Change Date and Time: The date and time of the change.
• Change Type: This indicates if a row in the table was inserted, updated, or deleted.
• Table Name: The name of the table that was changed.
• Prime Key 1 – 5: The prime key of the object that was affected. The change log accommodates prime keys with up to five parts. The prime key stored on the change log is not the prime key of the record that was changed but the prime key of the object. For example, if the phone number of a person was changed, these prime key fields would contain the prime key of the person object, not the prime key of the phone number record. When any field on an object is changed, the entire object must be re-extracted.
Typical Structure of TriggersBecause all triggers populate the change log, they are similar in the following ways:
• They determine if a row needs to be inserted into the change log. Not all table changes need to be reflected in the data warehouse, so not all changes need to be noted in the change log. For example, if an unfrozen financial transaction is created, a change log record does not need to be inserted if the data warehouse only tracks frozen financial transactions.
• They generate a prime key for the change log.
• They know the codes for the appropriate extract processes that will handle the table change.
• They retrieve the current run numbers for the extract processes.
• They determine the prime key of the main object.
Rows In the Change LogA record in the change log is processed by only one extract process. If multiple extract processes are needed to handle a single change in a source table (for example, if a new object requires the addition of multiple facts or dimensions) then multiple rows must be inserted into the change log.
3-2 Administration Guide

This can be accomplished with one trigger inserting multiple rows into the change log or with multiple triggers on the same table, each trigger inserting one row.
Extracting and Transforming DataBoth Oracle Utilities Customer Care and Billing and Oracle Utilities Work and Asset Management use batch controls with an underlying extract program to generate the flat files based on the change log tables populated by the triggers.
Two Modes of ExecutionMost extract programs support two modes of execution (you control the mode by a parameter supplied to the extract process):
• Extract everything mode, or Initial Extract: This mode extracts every row on the operational table. You would use this mode to instantiate the data warehouse. For example, if you run the extract accounts program in “extract everything mode”, every account will be extracted.
• Extract recent changes mode, or Incremental Extract: This mode only extracts data that was added or changed since the last time the extract was executed. For example, if you run the extract accounts program in “extract recent changes mode”, every account that was added or changed since the last execution will be extracted.
Basic Parameters Supplied To Extract ProcessesAll extract processes are submitted in their source system (e.g., programs that extract data from Oracle Utilities Customer Care and Billing are submitted in Oracle Utilities Customer Care and Billing). The following points describe the hard parameters that are supplied to these processes for Oracle Utilities Customer Care and Billing.
• Batch code: Batch code is the unique identifier of the extract process. The batch code for each extract process is identified in the description of the various facts and dimensions. Refer to the appropriate fact and dimension chapter for the details in Oracle Utilities Data Mapping Guides.
• Batch thread number: Thread number is only used for extract processes that can be run in multiple parallel threads. It contains the relative thread number of the process. For example, if the arrears process has been set up to run in 20 parallel threads, each of the 20 instances receives its relative thread number (1 through 20). Refer to Optimal Thread Count for Parallel Background Processes in the background process chapter of the source system for more information.
• Batch thread count: Thread count is only used for extract processes that can be run in multiple parallel threads. It contains the total number of parallel threads that have been scheduled. For example, if the billing process has been set up to run in 20 parallel threads, each of the 20 instances receives a thread count of 20. Refer to Optimal Thread Count for Parallel Background Processes in the background process chapter of the source system for more information.
• Batch rerun number: Rerun number should only be supplied if you need to download an historical run (rather than the latest run).
• Batch business date: Business date is only used for extract processes that use the current date in their processing. For example, the Oracle Utilities Customer Care and Billing arrears extracts use the business date to extract arrears as of a given date. If this parameter is left blank, the system date is used. If supplied, this date must be in the format YYYY-MM-DD. This parameter is only used to test how processes behave over time.
• Override maximum minutes between cursor re-initiation: This parameter is optional and overrides each extract process's Standard Cursor Re-Initiation Minutes. Each extract process reinitiates cursors every 15 minutes. You would reduce these values, for example, if you were submitting a job during the day and you wanted more frequent commits to release held
Extract, Transform, and Load Processes (ETL) 3-3

resources (or more frequent cursor initiations). You might want to increase these values when an extract process is executed at night or on weekends, and you have sufficient bandwidth and memory available on the servers. The maximum minute between cursor re-initiation parameter is relevant for Oracle implementations only. Most of the system extract processes contain an outermost loop / cursor. The cursor is opened at the beginning of the process and closed at the end. If Oracle detects that the cursor is open for too long, it may incorrectly interpret this as a problem and will display an error that the snapshot is too old. The processing for the extract processes is designed to refresh the cursor based on the minutes between cursor re-initiation in order to prevent this error.
• User ID: Following must be ensured with respect to a User ID:
• The user ID is a user who should have access to all application services in the system. This is because some batch processes call application services to perform maintenance functions (e.g., when an account is updated, the batch process may call the account maintenance application service).
• The display profile of the user ID controls how dates and currency values are formatted in messages.
• Password: Password is not currently used.
• Language Code: All language-sensitive data is extracted in this language. In addition, all error messages are presented in this language.
• Trace program at start (Y/N), trace program exit (Y/N), trace SQL (Y/N) and output trace (Y/N): These switches are only used during QA and benchmarking. If trace program start is set to Y, a message is displayed whenever a program is started. If trace program at exist is set to Y, a message is displayed whenever a program is exited. If trace SQL is set to Y, a message is displayed whenever an SQL statement is executed. If output trace is set to Y, special messages formatted by the extract process are written.
The information displayed when the output trace switch is turned on depends on each extract process. It is possible that an extract process displays no special information for this switch.
• Initial Load Switch: This switch controls whether the extract program is run in extract everything mode or extract recent changes mode.
• File Path and File Name: These parameters define the file path and/or file name for the output file. When supplying a FILE-PATH variable, the directory specified in the FILE-PATH must already exist and must grant write access to the Oracle Utilities Business Intelligence administrator account. You may need to verify a proper location with your system administrator. The syntax of the FILE-PATH depends on the platform used for your Oracle Utilities Business Intelligence application server. Contact your system administrator for verification. For example, if the platform is UNIX, use forward slashes and be sure to put a trailing slash, for example /spltemp/filepath/. Note: The control file is created with the same name as the data file but with a fixed extension of CTL. For this reason, do not use CTL as the extension when defining value for FILE-NAME parameter.
In order to avoid overwriting the flat files generated during the previous execution, the extractor programs insert a string containing the concatenated values of data source indicator, batch number, and the batch thread number in the name of the generated data and the control file. The value is inserted just before the extension of the file name specified.
• Maximum Errors: This parameter is not currently used.
• UDF and UDMs: Refer to Extending extractors for the details on how to extend the various UDF and UDM fields.
3-4 Administration Guide

The list of the extract programs used to populate each fact and dimension can be found in the Appendix D and Appendix F list the Sync Business Object (BO) names and additional details for each fact and dimension table name.
Data Extraction in Oracle Utilities Network Management SystemThis section describes the data extraction methods used for Oracle Utilities Network Management System. It contains the following topics:
• Change Detect Mechanism
• Extracting and Transforming Data
Change Detect MechanismThe Oracle Utilities Network Management System (NMS) uses a view- based approach to identify the changed data. These views query the database tables and retrieve required data in the format required in the extract flat file for each Fact/Dimension. One or more database tables can be queried against to retrieve this information.
Oracle Utilities Network Management System (NMS) maintains change log tables for updated or deleted records. These log tables store the primary key of the changed data or the deleted record. The view retrieves all the data that have been inserted in the delete log, as well as joins the update log table to the source table to get the updated records. The view also retrieves the inserted data from the source table.
Oracle Network Management System (NMS) uses two types of Views for the Change Detect Mechanism:
• Modify View: This type of view is used to identify new/changed records from NMS log tables and the actual transactional tables are queried to retrieve the required information.
• Delete View: This type of view is used to identify the deleted record information. NMS uses delete_log tables to capture the deleted record information.
The mapping of these views to BI database tables is documented in comments column while creating these views.
For example, in the following image, the NRTSNL_MODIFY_V view is used to populate the CF_CUST_RECENT_OUTG BI Database table:
The list of 'modify views' and 'delete views' used to populate each fact and dimension is described in Appendix E.
Extracting and Transforming DataOracle Utilities Network Management System (NMS) uses extract programs to extract changes into a flat file with the help of extract-scripts or the procedures.
Extract, Transform, and Load Processes (ETL) 3-5

• Each of these scripts is based on direct queries from the NMS database views defined in the above section and are to be configured to run in scheduled cron jobs and are designed to run periodically.
• The data retrieved from these views is used to generate the data and control files in the configured bi_extract_dir directory (recommended as $HOME/extract).
• Each script generates a log file which should list any errors.
The list of the extract programs used to populate each fact and dimension can be found in the section Appendix E.
Data Extraction in Oracle Utilities Meter Data Management and Oracle Utilities Mobile Workforce Management
This section describes the data extraction methods used for Oracle Utilities Meter Data Management and Oracle Utilities Mobile Workforce Management. It contains the following topics:
• Change Detect Mechanism
• Extracting and Transforming Data
• Multiple Data Source Indicator Support for MDM and MWM Extractors
• Multiple Data Source Indicator Changes for MDM Application
• Multiple Data Source Indicator changes for MWM Application
Change Detect MechanismOracle Utilities Meter Data Management and Oracle Utilities Mobile Workforce Management use the master data synchronization mechanism that is provided by the Oracle Utility Application Framework. During the initial load, called Initial Sync, there are batch jobs that are executed for each fact and dimension being extracted. The Initial Load batch jobs picks up all the required data from the source tables and inserts pending records into the Sync Request table.
For the incremental load, called Ongoing Sync, whenever a record is created, updated or deleted in a table, a corresponding pending Sync Request record is created. This Sync Request record will reference the primary key of the record inserted, updated, or deleted. An audit algorithm is the one responsible for detecting the incremental change and creating the appropriate pending Sync Request record.
When the Sync Request Monitor batch is executed, all the pending sync request records in Sync Request table will be moved to Synchronized state, during which the final snapshot of the record that will be sent to the data warehouse is taken. Running the Extract Batch programs for each fact and dimension will retrieve the final snapshots and write them to the extract flat files.
In order to extract incremental data using Sync Request, user needs to define "Audit" algorithm on the MO, to trigger creation of pending Sync Request if there is a change on the entity. Depending on the algorithm, user may need to specify the "Sync Request BO" in MO-Options, so that the audit algorithm can create the appropriate Sync Request record.
For snapshot facts and certain dimensions with idiosyncratic extraction logic, Oracle Utilities Meter Data Management provided specialized Java batch processes to extract the data.
Extracting and Transforming DataOracle Utilities Meter Data Management and Oracle Utilities Mobile Workforce Management use Extract Batch programs to extract data into a flat file. These programs read data from the Sync Request table to retrieve the final snapshots taken.
3-6 Administration Guide

Note that it is advisable to always execute the Extract Batches immediately after executing the Sync Request Monitor batch. You can run the Sync Request Monitor batch for a single Sync Request BO or for all the Sync Request BOs.
A list of extract batch information for Oracle Utilities Meter Data Management and Oracle Utilities Mobile Workforce Management is available in Appendix C and Appendix D.
Multiple Data Source Indicator Support for MDM and MWM ExtractorsOracle utilities customers can implement multiple utilities application leveraging the integration supported by these systems.
For example Oracle Utilities Meter Data Management (MDM) & Oracle Utilities Customer Care and Billing (CC&B) joint implementations can leverage the MDM-CCB integration and customers can use CC&B as the master repository for customer related data (Account, Premise, Person etc). So the MDM instance does not store any customer related information but refers to the information in CCB. Similarly the Oracle MWM can be integrated with Oracle Utilities MDM and Oracle Utilities CC&B, use MDM as the master repository for all meter and measurements related data. In the OBIU data warehouse, the data for these objects is loaded from the master repository only. E.g. Account, Person, Premise dimensions are loaded only from CCB environment and the MDM fact may have a reference to dimensional data loaded from CCB.
In this case, while loading the MDM data, the load process needs to look-up correct records in the dimension table loaded from CC&B. Hence, the need to identify the data source indicator of C&CB environment. Data Source indicator is a unique value corresponding to each instance of an edge application feeding data into data warehouse. The edge applications default the data source indicator from environment ID.
To support this requirement the MDM and MWM extract programs have been enhanced to accept additional parameters for CCB DSI and MDM DSI. These additional DSI values are appended into the control file of extract files. During data load in the warehouse, the load process use CCB DSI to lookup and join to CCB specific dimensions and MDM DSI to lookup and join to MDM specific dimensions.
Refer to the Oracle Utilities Business Intelligence (OUBI) Readme document for the required MDM and MWM patches to support this feature.
Multiple Data Source Indicator Changes for MDM ApplicationThis section describes how to configure CCB DSI on MDM Applications. To configure CCB DSI on MDM Applications, follow the below procedural steps:
1. Add a new feature configuration for the feature type 'Business Intelligence Configuration'.
2. Select the Option Type 'External Data Source Indicator 1' and for the Value, enter the CCB DSI. The CCB DSI can be retrieved by running the below query in the CCB database:
select ENV_ID from F1_INSTALLATION;During the ETL process, if the CCB Data Source Indicator is set in the extract Staging Control File, it will be used to join with the matching Data Source Indicator in the dimension table to match the dimension key. If the Customer Data Source Indicator has not been extracted in the Staging Control File, then the default data source indicator will be used.
For the MDM source application, CCB DSI will join with CC&B related dimension keys such as Account Key, Person Key, Premise Key and SA Key for the following Facts:
• CF_CONSUMPTION
• CF_DEVICE_ACTIVITY
• CF_DEVICE_EVT
• CF_INSTALL_EVT
• CF_SP
Extract, Transform, and Load Processes (ETL) 3-7

• CF_SP_SNAP
• CF_SP_UT_AGE
• CF_VEE_EXCP
Multiple Data Source Indicator changes for MWM ApplicationThis section describes how to configure CCB DSI and MDM DSI on MWM Applications:
1. Add a new feature configuration for the feature type 'Business Intelligence Configuration'.
2. Select the Option Type 'External Data Source Indicator 1' and for the Value, enter the CCB DSI. The CCB DSI can be retrieved by running the below query in the CCB database
select ENV_ID from F1_INSTALLATION;3. Add one more entry with the Option Type as ‘External Data Source Indicator 2’ and for the
Value, enter the MDM DSI. The MDM DSI can be retrieved by running the below query in the MDM database
select ENV_ID from F1_INSTALLATION;
The MWM application can be integrated with CC&B and MDM and therefore two separate data source indicator columns have been added to the MWM Fact Staging Control tables.
CCB DSI will cause a join to CC&B related dimension keys such as Account Key, Person Key, Premise Key, SA Key and MDM DSI will join with MDM related dimension keys such as Contact Key, Meter Device Key, SP Key and US Key for the following Facts:
• CF_CREW_TASK
• CF_FLD_ACTIVITY
Note: The Multiple Data Source Indicator support is a new enhancement included in OBIU release 2.4 Service Pack 4 also known as the OIBU 2.4.0.4. This feature is not supported in earlier releases of OBIU. In previous releases, it was suggested to make MDM DSI same as CCB DSI, to achieve the same functionality. After this enhancement it is not required to match MDM DSI with CCB DSI. Therefore, the MDM and MWM DSI values are defaulted from environment ID and are no more configurable.
Oracle Warehouse BuilderThis section describes Oracle Warehouse Builder (OWB) including the following topics:
• Overview of Oracle Warehouse Builder
• Extract Programs and External Tables
• File Manager
• Oracle Warehouse Builder Transformations
Overview of Oracle Warehouse BuilderOracle Warehouse Builder is Oracle’s data warehousing tool. Oracle Utilities Business Intelligence uses Oracle Warehouse Builder to store the following items:
• Table designs of the star schemas
• Data mappings that are used to generate batch jobs that perform extract-transform-load operations
• Process flows that validate the extracted information, load the star schemas, and perform exception handling
3-8 Administration Guide

The following diagram illustrates the components involved in the Extraction, Transformation, Loading (ETL) process for Oracle Utilities Business Intelligence:
Extract Programs and External TablesThe extract programs execute in the source application. They produce flat files that contain the data extracted from the source system. Each process creates:
• A single-record control file that contains information about the entire batch job.
• Data files that contain the information to be loaded into the warehouse. These files are also referred to as the staging files.
Oracle external tables are defined in the warehouse for each type of control and data file. Specifically, two external tables are defined for each fact and dimension that is loaded from flat files. These external tables provide a SQL-based interface to the data in the flat files by the data mappings. A data mapping exists for each fact and dimension.
Within the Oracle database, the external tables have the following naming format:
• STG_table_name_EXT for the data files
• STG_table_name_CTL_EXT for the control files that are used to load a specific table.
For example, the External Tables used to load the CD_ACCT table are named STG_ACCT_EXT and STG_ACCT_CTL_EXT.
The flat file names are different from the name of the external tables. The standard format for the file names are table_name_EXT.DAT and table_name_EXT.CTL. So for the CD_ACCT table, the files will be named D_ACCT_EXT.DAT and D_ACCT_EXT.CTL.
Refer to the Oracle Utilities Advanced Spatial and Operational Analytics Data Mapping Guides for respective edge application for the list of file names for each fact and dimension.
File ManagerThe file manager is a Perl program that resides on the database server. The program is responsible for performing housekeeping activities against the files holding the extracted information. It also ensures that the files are supplied in the correct order.
The program accepts the following parameters:
Extract, Transform, and Load Processes (ETL) 3-9
• The name of the file that the external table reads the data from. This name should match the value of the flat file name without the file extension. So for the load of the CD_ACCT table, this would be D_ACCT_EXT.
• FILE-NAME parameter on the extract batch program.
• The location of the files.
• Mode of execution. The program can be executed in pre-mapping and post-mapping modes.
• Processing condition (success or failure).
In the pre-mapping mode, the file manager performs the following actions:
• Creates “error” and “processed” files inside the folder where the files are located.
• Sorts to get the name of the earliest control and data files that match the file name specified by the parameter passed.
• Copies the data file and the control file to the files that the external table reads. This is required because the external tables are defined to read data from one particular file and the extractor programs insert the data source indicator, batch number, and batch thread number in the data and control file names to avoid overwriting the generated files.
• Saves the name of the file being processed in a temporary file. This file is used later in the post-mapping stage to identify the name of the file that was processed. It is also used by the subsequent executions to know if a file is being processed.
In post-mapping mode, depending on the processing condition specified, the file manager moves the processed control and data file to either the error or the processed folder. It also removes the temporary file created in the pre-mapping mode.
Oracle Warehouse Builder TransformationsThis section describes the various Oracle Warehouse Builder (OWB) transformations used to load the extracted information into the data warehouse. It includes the following topics:
• Pre- and Post-Mapping Functions
• Setup Procedures
• Dimension Update Procedures
• Data Mappings
• Process Flows
Pre- and Post-Mapping FunctionsThe topics in this section describe how the pre- and post-mapping functions validate and load extracted information into the warehouse. The following functions are invoked by process flows before and after the data mappings are executed:
• SPL_PREMAP_PROCESS_FNC: This function is used to validate and load the contents of a control file into the ETL Job Control table before the mapping loads the data file. Once the validations have been made, the function inserts or updates an ETL job control record and marks it “In Progress”.
• OUBI_POST_MAPPING_PRC: This procedure is called before a mapping commits to validate that the number of records loaded into the fact or dimension table matches the number of records that should have been loaded based on the record in the control file. If the number loaded is less than the number that should have been loaded, the transaction is rolled back and the load marked will be marked as “In Error” by the SPL_POSTMAP_PROCESS_FNC function.
3-10 Administration Guide

• SPL_POSTMAP_PROCESS_FNC: This function updates the ETL job control record to either “Completed” or “In Error” depending on the status of the data mapping.
• OUBI_REFRESH_MV_FNC: This function refreshes a materialized view. It is called after a load of a fact table. It refreshes only the materialized views associated with the fact table being loaded.
• OUBI_UPDATE_OBIEE_PRC: This procedure creates a record in the B1_OBIEE_EVENT_POLLING table informing OBIEE that a fact table has new data, and that queries that are run against this fact table should be sent to Oracle instead of being updated from the OBIEE cache. This procedure is only called when data has been loaded into a fact table, and only after the materialized views have been refreshed.
Setup ProceduresSetup processes are database-stored procedures used to populate some of the dimensions in the warehouse. The following setup processes are included:
• SPL_LOADDATE: This process generates data in the DATE dimension table (CD_DATE) for a range of dates. This process should be executed only when setting up the data warehouse for the first time.
• SPL_LOADSNAPTYPE: The process generates data in the SNAPSHOT TYPE dimension table (CD_SNAPTYPE).
• SPL_LOAD_DEFAULT_VALUE: The process seeds the various dimension tables with '0' key value and '***' dimensional attribute codes. This value is referenced on fact rows that do not contain a reference to a given dimension (because they avoid optional foreign keys on the various fact tables).
Dimension Update ProceduresType II Slowly Changing Dimensions (SCDs) are dimensions that store history of all changes. These dimensions are used for time series analysis. The following points describe what happens when a change to a dimension is detected:
• The effective end date on the latest record is updated to the change date.
• A new dimension record is created with the effective start date.
Data mappings for such dimensions can be very complex to create, so an update procedure for each such dimension is provided. These procedures are called by the pre-mapping functions to update and insert the dimensional records when a change occurs.
Data MappingsThe data mappings load data from the external tables (produced by the extracts) into the facts and dimensions in the warehouse.
For a list of the facts and dimensions, their external tables, and the related data mappings, refer to the data mapping guide for your source application. This document describes the source application’s facts and dimensions and how they are populated.
Process FlowsA separate process flow exists to execute each mapping along with the pre- and post-mapping processes.
The following diagram shows a typical process flow:
Extract, Transform, and Load Processes (ETL) 3-11

Each data load process flow is designed to:
• Execute the file manager to perform housekeeping on the data and control files in pre- and post-mapping modes
• Execute the pre- and post-mapping functions to validate, load, and maintain batch information in the ETL job control transaction
• Execute the data mappings once the file is available and validated
• Send an email if an error occurs. Also, if an error occurs before the mapping executes, the process flow aborts the complete process. Otherwise, it sends an email and continues.
Process flow modules allow you to group process flow packages. Process flow packages, in turn, allow you to group process flows. Together, the process flow modules and packages provide two levels to manage and deploy process flows. You can validate, generate, and deploy process flows at either the module or the package level. All process flows are presently grouped under the following packages for easier administration:
• INIT_PKG: This package contains the process flows to load the default records into the dimensions. It also contains process flows to load the date & time dimensions and includes the purge workflow.
• DIM: This package contains process flows for dimensions delivered in Oracle Utilities Business Intelligence.
• DIM2: This package contains process flows for dimensions delivered in Oracle Utilities Business Intelligence.
• DIM_MDM: This package contains process flows for dimensions delivered in Oracle Utilities Business Intelligence for all Oracle Utilities Meter Data Management dimension tables.
• DIM_MWM: This package contains process flows for dimensions delivered in Oracle Utilities Business Intelligence for all Oracle Utilities Mobile Workforce Management dimension tables.
• DIM_UDD: This contains the process flows for all user defined dimensions delivered in Oracle Utilities Business Intelligence.
• FACT: This package contains process flows to load all of the fact tables in Oracle Utilities Business Intelligence.
• FACT_MDM: This package contains process flows for facts delivered in Oracle Utilities Business Intelligence for all Oracle Utilities Meter Data Management fact tables.
3-12 Administration Guide

• FACT_MWM: This package contains process flows for facts delivered in Oracle Utilities Business Intelligence for all Oracle Utilities Mobile Workforce Management fact tables.
• MV_RFSH: This package contains process flows to refresh the default materialized views created for each fact table. If custom materialized views are created, then a copy of the fact table process flow should be created and the new materialized view refresh added to the copied process flow. Note that the refresh of the materialized views are done in parallel.
• LOADRFSH: This package contains process flows to load a fact table and then refresh the materialized views for that fact table. A load refresh process flow initiates the load for facts and subsequently executes the related materialized view refresh using the process flows under the package 'MV_RFSH'.
Refer to Appendix A: Package Process Flows for details on process flows in each of the packages.
Note the following about the various process flows:
• Process flows can be scheduled for execution using the file processor daemon. See Running and Monitoring Extract Loads on page 3-13 for more information.
• Process flows for dimensions must be executed before the fact process flows.
• Each process flow executes its data mapping using parallel set-based processing with a commit frequency set to 0.
Running and Monitoring Extract LoadsThis section describes how to configure the file processor daemon to run extract file loads. It includes the following topics:
• About the File Processors Daemon
• Log File
• Monitoring Jobs
• Resolving Errors During Loads
• Capturing Fact Load Errors
• Resubmitting a Failed Job
About the File Processors DaemonThe File Processor Daemon is a simple java based utility that mimics the capabilities of a job scheduler. This persistent process runs continuously in the background and periodically monitors the extract folder. When new data files arrive, it processes them and triggers the appropriate OWB process flows for loading the data.
It has the intelligence to determine the fact dimension dependency. When a fact data file arrives in the extract file directory, it scans the extract directory to see if there are any data files present for any of the dimensions associated with this particular fact. If so, the loading of this particular fact file is skipped to let the dimension data load first into the data warehouse.
The File Processor Daemon also scans the error folder to verify whether any of the dimension load jobs have failed. If there are failures, all of the related fact data files all the related fact data files are skipped from processing until the related dimensions are loaded successfully. Fact dimension dependency is determined through the database constraints table present in the data warehouse.
Mappings in the parameter file control how the file processor daemon can determine which OWB process to trigger for which data file and which table name to check while querying the constraints
Extract, Transform, and Load Processes (ETL) 3-13
table for fact/dimension dependencies. For more details refer to the detailed description of the parameter extract.file.mappingN mentioned below.
The installation of the standard setup for the File Processor Daemon is documented in the Oracle Utilities Advanced Spatial and Operational Analytics Installation Guide. All of the standard process flows will be configured to run with the base installation. For information on how to install and run the File Processor Daemon, please refer to the Oracle Utilities Advanced Spatial and Operational Analytics Installation Guide.
The File Processor Daemon reads a parameter file, SchedulerParm.properties, that will need to exist in the directory that the File Processor Daemon is installed in. The released version of this properties file includes entries for all standard process flows, so that if any of the base extract files are present in the extract load directory, they will be processed automatically. No extract configuration needs to be done if only base extracts are being implemented.
The following required parameter entries are present in the delivered SchedulerParm.properties file and can be modified if needed for an implementation by using the (configureEnv.sh/cmd) command as documented in the Oracle Utilities Advanced Spatial and Operational Analytics Installation Guide:
Parameter Name Description
execution.switch Determines if the file processor daemon is active or inactive. As long as this parameter is set to 1, the file processor daemon will continue to run. To stop the file processor daemon without killing the process, modify this file and set the execution.switch parameter to 0.
scheduler.poll.duration This parameter determines whether the File Processor Daemon is active or not. As long as this parameter is set to 1, the File Processor Daemon will continue to run. To stop the File Processor Daemon, modify this file and set the execution.switch parameter to 0.
extract.dir.path This parameter tells the File Processor Daemon where to look for new extract files. This path must match the path that the OWB process flows have been configured to look for extract files.
extract.max.load This parameter tells the File Processor Daemon how many extract files to load at a single time. If there are more files in the extract directory than the number specified by this parameter, the first set of files found will be loaded with the current run of the File Processor Daemon. This parameter can be modified based on the size of the machine and how many files can be handled at once by the Oracle Warehouse Builder.
extract.file.mapping.count This parameter tells the File Processor Daemon how many process flows will be listed in the parameter file. This count will need to match the largest extract.file.mapping(N) present in the parameter file. If this count is set to a lower number then the number of mappings, then only this number of mappings will be processed by the File Processor Daemon.
3-14 Administration Guide

Note: The following optional parameter is not present in the delivered SchedulerParm.properties file but can be added if needed:
Parameter Name Description
extract.file.mapping.override.count
This parameter provides a way to override the mapping count specified in the extract.file.mapping.count parameter. The default parameter file does not include this parameter. If this parameter is specified, then the extract.file.mapping.count value is not used by the file processor daemon.
The important fields in the parameter file to look at when implementing new loads are the mapping.count and the mappingN parameters. New loads can be added to the parameter file if they have been implemented by a project. It is recommended that the new mappingN values be entered at the end of the list, so that in an upgrade it will be easy to identify those added records when updating the newly released SchedulerParm.properties file.
After updating any of these parameters using the configureEnv program, you must run the initialSetup.sh/cmd script to create the cm_schedulerParm.properties.exit_1.include parameter file. You must place this file in the <INSTALL_DIR>/templates directory, and then restart the file processor daemon. Refer to the Oracle Utilities Advanced Spatial and Operational Analytics Installation Guide for more information on this process.
extract.file.mappingN N is a number between 1 and the extract.file.mapping.count parameter, or extract.file.mapping.override.count parameter if this is specified.
These parameters tell the File Processor Daemon which extract files to look for, and what process flow to run when an extract file is found and the actual table name in the data warehouse. The format of this parameter is: Extract File Name, Process Flow Name, Table Name. The extract file name should be just the base name without the data source indicator, batch number, thread number values and without the .DAT or .CTL extensions. For example, this entry will look for the Account Extract Files and run the SPLWF_D_ACCT process flow when a new account extract file is found:
extract.file.mapping1 = D_ACCT_EXT,SPLWF_D_ACCT,CD_ACCT
The table name is used for determining the dependency between the facts and dimensions by query the database constraints table. This dependency check is required to avoid processing of any fact data files, if any of its dimension data files are required to be loaded first.
It is important when entering values that the N numbers increase sequentially and that no numbers are skipped. The largest N value should match the mapping.count or mapping.override.count parameter specified in the parameter file.
Parameter Name Description
Extract, Transform, and Load Processes (ETL) 3-15

Log FileThe instructions on how to start the File Processor Daemon are located in the Oracle Utilities Advanced Spatial and Operational Analytics Installation Guide. Once started, a log file called FileProcessorDaemon.log will be written to by the File Processor Daemon. Messages from the File Processor Daemon are written here for various normal activities. Error messages are also written to this file. If OWB process flows are not triggered properly, review this log file possibly identify the cause of the problem.
The log file is deleted once it reaches a size of 100 megabytes, and a new file is started, so if older errors are not seen, the file may have been recently purged by the File Processor Daemon.
Monitoring JobsNote: You must have the full license of the Oracle Utilities Advanced Spatial and Operational Analytics (OUASA) to use this feature.
The process flows that are run by the file processor daemon are set up in two different ways, depending on whether a fact or a dimension extract file is being loaded. For a dimension load, only the dimension file is loaded into the dimension table of the data warehouse. However, when a fact file is loaded, the fact table is updated, and then, any associated materialized views are refreshed.
The load jobs are visible in the ETL Job Control Administration Portal. The JOB COMPLETE (JC) status shown in the screenshot below indicates that the data file loaded successfully. If a fact is loaded, the JOB COMPLETE Status does not indicate that the materialized views were successfully updated. An e-mail is sent to the data warehouse administrator if the materialized view refresh fails.
The following attributes are available for ETL Job Control process as shown in the screenshot above:
• Job No. : Unique number identifying the load process. A link will be presented on the value if the job status is ‘ERROR’
• Batch Code: Unique code identifying the extraction routine used to generate the extract files on the source system.
• Description: A descriptive name for the extract process
• Batch No.: the batch no indicates the batch in which the extract was run
• Batch Thread: A batch can generate multiple files. Each file is identifiable by a thread number
• Start Date/Time: Indicates the start time of the load process
• End Date/Time: Indicates the End time of the load process
3-16 Administration Guide

• ETL Job Status: The current status of the job.
• Data Source Indicator: Unique identifier for each source system
• Load Audit ID: A reference to the OWB audit log tables
• ETL Map: The process name that contains the code to load the data into the target
• Extract Record Count: The number of records in the extract file
• Load Record Count: The number of records loaded into target
• Load Error Count: The number of records that failed
• Load Error Message: Summary error message identifying the cause of the job failure.
In addition, the load jobs and any associated errors can be viewed in the OWB Control Center. In general, if an e-mail message indicating a load failed is not received, then it indicates that the load of a data file (and any materialized view refresh) was successful.
Resolving Errors During LoadsThere are various reasons for why a load fails. The following list describes attributes to check when trying to find out why an extract does not load or why an error is generated during a load.
For details regarding resolving OWB load problems, refer to the Oracle Warehouse Builder User's Guide. You should turn off file processor daemon before debugging.
• Job Status: Make sure that jobs are not in an In Progress (IP) or Error (ER) state. The status of a job is stored in the JOB_STATUS_FLG field in the B1_ETL_JOB_CTRL table, and you can view the status on the ETL Job Control Administration Portal. If the data in error has been fixed and the file is ready to reload, then you can reset the Error job status on the ETL Job Control Portal as well.
• OWB Errors: There are two views that you can query to see errors from a process flow: ALL_RT_AUDIT_EXEC_MESSAGES and BIREPOWN.WB_RT_ERRORS. These errors should be present in the e-mail messages sent when a mapping fails. However, you can run the following SQL statements to view the errors stored from the last four hours, if the e-mail messages are lost or do not contain any error messages:
beginowbsys.wb_workspace_management.set_workspace('SPLBIREP','BIREPOWN');end;-- where workspace name is SPLBIREP and workspace owner is BIREPOWN;-- replace if necessary. To find the Workspace Name and Owner, run:select * from owbsys.WORKSPACE_ASSIGNMENT;select to_char( created_on, 'dd-mon-yyyy hh24:mi:ss - ' ) || message_textfrom all_rt_audit_exec_messageswhere created_on > sysdate - .2order by message_audit_id;
• Error RPE-02248: If you get this error, then change the Runtime.properties file in the $ORACLE_HOME/owb/bin/admin directory:
-- Change these settings from DISABLED to NATIVE_JAVAproperty.RuntimePlatform.0.NativeExecution.FTP.security_constraint = NATIVE_JAVAproperty.RuntimePlatform.0.NativeExecution.Shell.security_constraint = NATIVE_JAVAproperty.RuntimePlatform.0.NativeExecution.SQLPlus.security_constraint = NATIVE_JAVA
Extract, Transform, and Load Processes (ETL) 3-17

• Viewing data in Oracle: Sometimes it helps to view the data in an extract file from Oracle. This can be done by copying the Extract file to the Staging file used during the load. This file has the same name as the Extract file, without the numbers in the file name. For example, if the Account extract generates these two extract files, D_ACCT_EXT000004000000001001.CTL and D_ACCT_EXT000004000000001001.DAT, then the staging files are named D_ACCT_EXT.CTL and D_ACCT_EXT.DAT.
After copying the files, the data can be viewed in Oracle using the following two Staging Tables: STG_ACCT_CTL_EXT and STG_ACCT_EXT.
• Strange Characters in data files: If you view the data in Oracle and there are strange characters when you run a query, then the character set may be specified incorrectly for the external file. The character set can be changed by running the EditFFCS.TCL file in OWB. You can see the character set for a specific external file by running the following query:
select * from dba_external_tables where table_name = 'STG_ACCT_CTL_EXT';
Capturing Fact Load ErrorsDuring the Fact load, users might want to capture various exception scenarios for which data should not be loaded. Instead, the load routine should capture the exceptions and display those to the users. Users can then correct the exceptions and reload the correct data.
OUASA provides out of the box validation for checking the referential integrity between the facts and corresponding required dimensions. During a fact load, if a required dimension record is not found in the dimension table, the fact record will not be loaded, and an error notification will be sent to the user indicating this.
Apart from this out of the box validation, OUASA also allows users to add additional validations to capture their business requirements.
In general, this process of capturing Fact load errors is divided into two steps:
1. Validation:
• A validation function is invoked to execute the validation check. OUASA out of the box validation validates the number of records loaded into the target by comparing it with the number of records specified in the control file. Users can write their own validation check as required.
• In case if the validation fails, (as in the case of out of the box validation, if the number of records loaded into the target is less than the number of records specified in the control file), the load is marked as an invalid load and a process to identify such records is executed.
2. Error Identification: This process executes certain queries to identify the records that failed to load and also the reason for the failure (missing reference records in a required dimension). All such records are inserted into a table B1_ETL_DATA_ERR. If users want to write a custom check, they should write the logic to identify such records and make an entry into the B1_ETL_DATA_ERR table.
3-18 Administration Guide

The following screenshot displays user interface records that failed to load.
In the above screenshot, the jobs have been filtered by the status = ‘ERROR’. The report shows the number of rows in the data file and the number of rows loaded. Click on the Job No. field to navigate to that particular error details page. It shows the details of the errors recorded by Oracle Warehouse Builder (OWB) as shown in the screenshot below.
The figure above shows individual record lever details.
The report provides the following details
• Fact Natural Key: Indicates the unique key combination for the staging table.
• The Error type description: B1FK indicates a foreign key reference issue.
• Dimension Table: The dimension table for which a reference could not be resolved.
• Dimension Natural Key: Natural key columns of the dimension which are used in to fetch the reference key.
• Update Date/Time: The Update date time in the extract file.
• Data Source Indicator: The Data source indicator in the extract file.
• Validation Procedure Name: The procedure name that was used to identify these issues.
In the example, there are missing references to the following dimensions:
• CD_MSRMT_COND
• CD_CONS_TYPE
Adding Custom Fact Load ValidationsNote that the out of the box validation is always going to be executed during every Fact load. In addition to this out of the box validation, a user exit hook has been provided to allow customers to write their own CM validation functions and error identification procedures. The out-of-box fact
Extract, Transform, and Load Processes (ETL) 3-19

load procedure will automatically call these functions/procedures if these objects exist in the database.
The list of all the existing Validation functions and Error Identification Procedures is provided in Appendix G. It also lists the custom function and procedure names to be used while extending the data load validation.
Note: The user must use the exact name provided in the Appendix G for their custom validations to be called while loading the fact.
In general, it is advisable to follow closely the out of the box routine for the custom code. The following guidelines have to be followed when creating custom validation functions:
• The validation function name should be derived from the built in validation function by replacing ‘B1’ with ‘CM’ in the name. Refer to Appendix G for complete list of validation functions for all facts. For example for the fact CF_CC, the name of the out of the box validation function is B1_VAL_F_CC, then the custom validation function name should be CM_VAL_F_CC.
• The custom validation function should have same input parameters as those for the custom validation function. Follow the below template to create customer validation function:
CREATE OR REPLACEFUNCTION << Custom Validation Function Name >> ( p_num_inserts
IN NUMBER, p_num_merged IN NUMBER, p_num_updates IN NUMBER)RETURN NUMBER AS lv_ret_value NUMBER;BEGIN/* Your Logic Here */EXCEPTION WHEN OTHERS THEN lv_ret_value := 1 ; RETURN lv_ret_value; END B1_VAL_F_ARREARS;/*
The input parameters to the custom Validation function are explained as below:
p_num_inserts - the actual number of records inserted into target fact table by the mapping
p_num_merged - the actual number of records merged into target fact table by the mapping
p_num_updates - the actual number of records updated into target fact table by the mapping
*/• The function should return 1 in case the validation fails and the load needs to be
cancelled and 0 otherwise
The following guidelines have to be followed when creating custom error identification procedure. Always use the built in procedure as a starting point:
• The procedure name should be derived from the built in procedure by replacing ‘B1’ with ‘CM’ in the name. Refer to Appendix G for complete list of error identification procedures. For example for the fact CF_CC, the name of the out of the box Error Identification Procedure is B1_ERR_F_CC, then the custom Error Identification Procedure name should be CM_ERR_F_CC.
• The custom procedures should have the same input parameters as those of the out of the box procedures.
• Follow the below template to create the customer error identification procedure:
CREATE OR REPLACE
3-20 Administration Guide

PROCEDURE << Custom Error Handling Procedure Name >> ("IN_MAP_NAME" IN VARCHAR2, "IN_JOB_NBR" IN NUMBER)
ISPRAGMA AUTONOMOUS_TRANSACTION;BEGIN/* Your Logic Here */EXCEPTIONWHEN OTHERS THENROLLBACK;END << Custom Error Handling Procedure Name >>;_/*
The input parameters to the custom Error Identification Procedure are explained as below:
IN_MAP_NAME - the name of the mapping for which the procedure is getting executed for custom error record identification.
IN_JOB_NBR - the job number of the particular mapping ( as in B1_ETL_JOB_CTRL table.) for which the procedure is getting executed for custom error record identification.
*/• The procedure must be executed as an autonomous transaction.
• The insert statement should be appropriately modified as per the custom validation implemented.
Fixing Load ErrorsThis section describes how to determine why records fail to load. If a data file fails to load, it is moved to the error directory just below the load directory. The load directory can be accessed from the database server.
You can determine the directory path using the following query from the DWADM account, and with the Control Table Name that is included in the failed record:
SELECT directory_pathFROM user_external_tables a, all_directories bWHERE a.table_name = UPPER( '&Control_Table_Name' ) ANDb.directory_name = a.default_directory_name ANDExtract, Transform, and Load Processes (ETL) 3-21b.owner = a.default_directory_owner;
For example, if the load directory is /spl/BIDevelopment/bi221prf, the error file will be located in /spl/BIDevelopment/bi221prf/error.
The easiest way to examine the data file that has errors is to copy it into the Load directory, so that the Oracle queries can be run against it. The extract file replaces the .DAT file in that directory with the File name. For example, the /spl/BIDevelopment/bi221prf/error/D_ACCT_EXT017933000000001001.DAT file would replace the /spl/BIDevelopment/bi221prf/D_ACCT_EXT.DAT file. The .CTL file in the processed directory can also replace the .CTL file in the load directory.
Once you find the missing records, you can then determine if a required dimension key is missing from the dimension table. Note that it is possible that a later dimension load added the dimension records after the fact table was loaded, so if no records are returned by any of these queries, then reloading the fact records may solve the problem.
There are several different ways to fix the data so that it can be loaded. The method you use to successfully load the data depends on how the data is fixed:
• Make sure that the dimension files were loaded successfully. If there were errors during the dimension load or the number of records loaded did not match the number of records in the file, then you may have to figure out why the dimension records did not load. Fix these and reload the dimension files, before you can start working on the reloading fact records.
Extract, Transform, and Load Processes (ETL) 3-21

• Fix a fact data problem in the source system. This allows the data to be re-extracted the next time the fact data is extracted. However, some fact extracts only extract new records, not changed records; so, this may not always fix the data in the data warehouse.
• Modify the fact records to have valid dimension keys. If the fact records are modified, then they will need to be added to a new extract file to get reloaded. A manual extract can be done to create a new extract file, and then the modified records can be loaded to this file. The modified records will then be loaded when the next load process is run.
• Change effective start and end dates on the dimension records. If a fact record does not load if the update time on the fact record is not within the range of the effective start and end date on the dimension, the effective start or end date on the dimension record can be changed manually to allow the load to occur. If this is changed, then the fact records should be added to a new extract file as described in the preceding section.
Resubmitting a Failed JobNote: You must have the full license of the Oracle Utilities Advanced Spatial and Operational Analytics to use this feature.
Follow these steps to resubmit a failed job:
1. View the ETL Job Control screen under the Admin menu of Dashboards.
2. Select the Job that needs to be restarted. This will change the ETL Job Status on the screen to RE_INITIALIZE.
3. Move the data and control files that errored out from the error folder. This is very important because the file processor will not process the files that are in the error folder.
4. Place the corrected files in the data folder and switch on the File Processor Daemon
The corresponding process flow is triggered during the next polling of the file.
Materialized ViewsA materialized view is a database object that contains the results of a query. They are local copies of data located remotely, or are used to create summary tables based on aggregations of a table's data. Materialized views, which store data based on remote tables, are also known as snapshots.
Materialized views can be used to achieve different goals, mostly related to performance. The following topics are discussed:
• Materialized View Refresh
• Query Rewrite
3-22 Administration Guide

Materialized View RefreshA materialized view's data does not necessarily match the current data of its master table or master materialized view at all times. A materialized view is a transactionally (read) consistent reflection of its master as the data existed at a specific point in time (that is, at creation or when a refresh occurs). To keep a materialized view's data relatively current with the data of its master, the materialized view must be refreshed periodically. A materialized view refresh is an efficient batch operation that makes a materialized view reflect a more current state of its master table or master materialized view.
A refresh of an updatable materialized view first pushes the deferred transactions at the materialized view site to its master site or master materialized view site. Then, the data at the master site or master materialized view site is pulled down and applied to the materialized view.
A row in a master table can be updated many times between refreshes of a materialized view, but the refresh updates the row in the materialized view only once with the current data. For example, a row in a master table might be updated 10 times since the last refresh of a materialized view, but the result is still only one update of the corresponding row in the materialized view during the next refresh.
For more information on the Materialized views, refer to Chapter 3, “Materialized View Concepts and Architecture”, in the Oracle Database Advanced Replication 11g Release 2,
Query RewriteWhen base tables contain large amount of data, it is expensive and time-consuming to compute the required aggregates or to compute joins between these tables. In such cases, queries can take minutes or even hours to execute. Because materialized views contain already pre-computed aggregates and joins, Oracle Database employs an extremely powerful process called query rewrite to quickly answer the query using materialized views.
One of the major benefits of creating and maintaining materialized views is the ability to take advantage of query rewrite, which transforms a SQL statement expressed in terms of tables or views into a statement accessing one or more materialized views that are defined on the detail tables. The transformation is transparent to the end user or application, requiring no intervention and no reference to the materialized view in the SQL statement. Because query rewrite is transparent, materialized views can be added or dropped just like indexes without invalidating the SQL in the application code.
A query undergoes several checks to determine whether it is a candidate for query rewrite. If the query fails any of the checks, then the query is applied to the detail tables rather than the materialized view. This can be costly in terms of response time and processing power.
A query is rewritten only when a certain number of conditions are met:
• Query rewrite must be enabled for the session.
• A materialized view must be enabled for query rewrite.
• The rewrite integrity level should allow the use of the materialized view. For example, if a materialized view is not fresh and query rewrite integrity is set to ENFORCED, then the materialized view is not used.
• Either all or part of the results requested by the query must be obtainable from the precomputed result stored in the materialized view or views.
To test these conditions, the optimizer may depend on some of the data relationships declared by the user using constraints and dimensions, among others, hierarchies, referential integrity, and uniqueness of key data, and so on.
For more details on query rewrite support in oracle products, see Chapter 17, “Basic Query Rewrite” in the Oracle Database Data Warehousing Guide.
Extract, Transform, and Load Processes (ETL) 3-23

How are materialized views used in the Oracle Utilities Advance Spatial and Operational Analytics product?
• Oracle Utilities Business Intelligence (OUBI) utilizes materialized views to improve the performance of the dashboard & analytics utilizing the query rewrite feature.
• Materialized view refresh is set to force on demand, which means that the oracle optimizer selects whether to use a Complete Refresh or Fast Refresh based on the volume of the changes required.
• Materialized views are refreshed as part of the Load Refresh process for the corresponding fact.
• Oracle Business Intelligence Enterprise Edition (OBIEE) uses cache for recently used queries to improve the performance of dashboards. However when materialized views or facts are updated the cache associated with those entities becomes stale and can give results that are not up to date. Oracle Utilities Advanced Spatial and Operational Analytics (OUASA) provides an automatic cache refresh mechanism which is executed along with the materialized view refreshes. This is done by the OUBI_UPDATE_OBIEE_PRC procedure mentioned in the preceding sections under the topic Oracle Warehouse Builder Transformations.
Parallelism and PartitioningThis section discusses how to properly configure the database for partitioning and parallelism for better system performance.
Partitioning helps to scale a data warehouse by dividing database objects into smaller pieces, enabling access to smaller, more manageable objects. Having direct access to smaller objects addresses the scalability requirements of data warehouses.
It takes longer to scan a big table than it takes to scan a small table. Queries against partitioned tables may access one or more partitions that are small in contrast to the total size of the table. Similarly, queries may take advantage of partition elimination on indexes. It takes less time to read a smaller portion of an index from disk than to read the entire index. Index structures that share the partitioning strategy with the table, such as local partitioned indexes, can be accessed and maintained on a partition-by-partition basis.
The database can take advantage of the distinct data sets in separate partitions if you use parallel execution to speed up queries, DML, and DDL statements. Individual parallel execution servers can work on their own data sets, identified by the partition boundaries.
Parallel execution enables the application of multiple CPU and I/O resources to the execution of a single database operation. It dramatically reduces response time for data-intensive operations on large databases typically associated with a decision support system (DSS) and data warehouses. You can also implement parallel execution on an online transaction processing (OLTP) system for batch processing or schema maintenance operations such as index creation. Parallel execution is sometimes called parallelism. Parallelism is the idea of breaking down a task so that, instead of one process doing all of the work in a query, many processes do part of the work at the same time. An example of this is when four processes combine to calculate the total sales for a year, each process handles one quarter of the year instead of a single process handling all four quarters by itself. The improvement in performance can be quite significant. Parallel execution improves processing for:
• Queries requiring large table scans, joins, or partitioned index scans
• Creation of large indexes
• Creation of large tables (including materialized views)
• Bulk insertions, updates, merges, and deletions
For details on parallelism, partitioning, and other performance enhancement options, refer to the Oracle Database VLDB and Partitioning Guide 11g Release 2.
3-24 Administration Guide

The following topics are discussed in detail:
• Parallelism in Oracle Warehouse Builder (OWB) Mappings
• Parallelism in Materialized Views
• Partitioning in Materialized Views and Facts
Parallelism in Oracle Warehouse Builder (OWB) MappingsOracle Warehouse Builder (OWB) mappings generate PL/SQL packages which utilize bulk load to populate the target entities. These jobs can make use of the parallel DML feature available with the Oracle database. All mappings have been configured for parallelism; however, the degree of parallelism has been set to a default of 1. Customers can appropriately change the degree of parallelism based on their hardware setup, data volumes for individual entities, and the performance gain obtained by increasing the degree of parallelism.
Installing or upgrading the Oracle Utilities Advance Spatial and Operational Analytics (OUASA) prompts you to set the degree of parallelism. However, if you want to change the degree of parallelism, follow these steps outlined in the Oracle Warehouse Builder (OWB):
1. Open Oracle Warehouse builder designer.
2. Navigate to the mapping for which you would like to modify the degree of parallelism.
3. On the Context menu, click Configure.
4. Navigate to the target entity and change the loading hint (highlighted in the image below), by replacing the value 1 with an appropriate degree of parallelism.
5. Save the changes and redeploy the mapping
.
Parallelism in Materialized Views
Extract, Transform, and Load Processes (ETL) 3-25

The materialized views can also utilize parallelism to refresh the snapshot data quickly. All materialized views have been preconfigured to a default degree of parallelism of 1. However this can easily be changed during install or post install from the database or through the Oracle Warehouse Builder (OWB)
To change the degree of parallelism at the time of the installation, refer to the installation guide.
Use the following command to change the degree of parallelism through database:
ALTER MATERIALIZED VIEW <MVIEW_NAME> PARALLEL <DEGREE>.
Specify the materialized view for which you want to change the parallelism by replacing <MVIEW_NAME> with the actual materialized view name and < DEGREE> with an appropriate integer value greater than 1.
This does not require the materialized view to be recreated.
Follow these steps to change the degree of parallelism for a materialized view using OWB:
1. Open the Oracle Warehouse Builder (OWB) designer.
2. Navigate to the mapping for which you would like to modify the degree of parallelism.
3. On the Context menu, click on Configure.
4. Change the property for the Parallel Degree to an appropriate value.
5. Save changes and redeploy the materialized view.
Caution: Before changing the degree of parallelism for mappings or materialized views, understand and analyze the implications of the change and the capability of the hardware to support the changes.
Partitioning in Materialized Views and FactsThe materialized views and the facts which are components of the Oracle Utilities Business Intelligence (OUBI) product are not partitioned by default. Customers who have the partitioning license can opt to partition the materialized views and the facts as another way to increase the overall performance of the product.
The following topics are discussed in detail in this section:
• Partitioning Recommendations
• Tables to consider for Partitioning of Materialized Views
Partitioning RecommendationsIt is recommended that the materialized views be partitioned on the year and month columns. Most of the dashboards and analytics are month and year based; hence, partitioning on the month and year would improve the efficiency of the data fetches in the dashboards.
3-26 Administration Guide

In particular, we recommend to partitioning the following materialized views used in the TopX reports be partitioned on the month and year keys:
B1_VEE_EXCP_TOPX_MON_MV1
B1_DEV_ACT_TOPX_MON_MV1
B1_DEVICE_EVT_MON_TOPX_MV1
B1_SP_SNAP_MON_TOPX_MV1
B1_SP_UT_AGE_MON_TOPX_MV1
B1_CONSUMPTION_MON_TOPX_MV1
B1_CREW_TASKS_MON_MV1
B1_CMP_SHIFT_MON_MV1
B1_FLD_ACTIVITY_MON_MV1
The facts can become huge quite quickly and partitioning based on the date key of the fact may help in improving the performance.
Note: This is not the complete list of delivered with OUASA v2.4.0.
Tables to consider for Partitioning of Materialized ViewIf the partitioning of materialized view does not prove sufficient to achieve desired performance you can consider partitioning Fact tables as well.
As the primary keys for all tables are sequential, it is possible to partition any table based on the primary key field. However, you should partition Fact tables based on one of the Date Keys present in the table. Some of the date keys are optional, so it is important to pick a date key field that will always have a non-zero value. Also, because the RECENT fact tables should be purged daily, these tables do not need to be partitioned.
The following is a list of the tables and corresponding key columns that are candidates for partitioning. The partitioning key listed is the suggested date key field that should not have 0 values.
Note: The optimal partition key for a table may vary depending on the data. The list below is just a potential candidate keys for partitioning.
Table Name Partition Column Name
CF_ARREARS DATE_KEY
CF_BILLED_USAGE BILL_DATE_KEY
CF_CASE OPEN_DATE_KEY
CF_CASE_LOG LOG_DATE_KEY
CF_CC CC_DATE_KEY
CF_CITY_OUTG BEGIN_DATE_KEY
CF_COLL_EVT EVENT_DATE_KEY
CF_COLL_PROC START_DATE_KEY
CF_CTRL_ZONE_OUTG BEGIN_DATE_KEY
CF_CUST_RECENT_OUTG BEGIN_DATE_KEY
Extract, Transform, and Load Processes (ETL) 3-27

Caution: Before partitioning the facts or materialized views, understand and analyze the implications of the change and the capability of the hardware to support the changes.
Purging Audit RecordsOracle Utilities Advance Spatial and Operational Analytics (OUASA) utilizes Oracle Workflow when running Oracle Warehouse Builder (OWB) Process flows to load extract files into the data
CF_CUST_RST_OUTG BEGIN_DATE_KEY
CF_FEEDER_DLVRD_LOAD SNAPSHOT_DATE_KEY
CF_OP_ACTG TRANS_DATE_KEY
CF_ORDER CREATE_DATE_KEY
CF_OUTG SNAPSHOT_DATE_KEY
CF_PAY_TNDR PAYEVT_DATE_KEY
CF_RST_CALL CALL_DATE_KEY
CF_RST_CREW ASSIGN_DATE_KEY
CF_RST_JOB BEGIN_DATE_KEY
CF_SA START_DATE_KEY
CF_STRM_INV SNAPSHOT_DATE_KEY
CF_SW_PLAN BEGIN_DATE_KEY
CF_SW_PLAN_STATE BEGIN_DATE_KEY
CF_TD_ENTRY CREATE_DATE_KEY
CF_UCOL_EVT EVT_DATE_KEY
CF_UCOL_PROC START_DATE_KEY
CF_FLD_ACTIVITY SCHED_START_DATE_KEY, STATUS_DATE_KEY, CRE_DATE_KEY
CF_CMP_SHIFT SHIFT_PLANNED_START_DATE_KEY
CF_CREW_TASK FROM_DATE_KEY
CF_INSTALL_EVT INSTALL DATE_KEY
CF_SP_SNAP DATE_KEY
CF_VEE_EXCP DATE_KEY
CF_DEVICE_ACTIVITY START_DATE_KEY
CF_DEVICE_EVT START_DATE_KEY
CF_SP_UT_AGE DATE_KEY
Table Name Partition Column Name
3-28 Administration Guide

warehouse. Even if extract files are not present, records are created in Audit tables each time a process flow is run. Depending on the frequency with which process flows are scheduled, these audit tables can grow to become unmanageable and can cause upgrades or process flow changes to fail when deployed.
The following topics are discussed in this section:
• Purging Extract, Transform, and Load (ETL) Job Control Tables
• Configuring Oracle Warehouse Builder to Enable Purging
A few of these audit tables include the run-time Oracle workflow audit tables and can grow very large:
• WF_ITEM_ATTRIBUTE_VALUES: This table stores the run-time values of the Item Attributes for a particular Process flow.
• WF_ITEM_ACTIVITY_STATUSES: This table, along with the WF_ITEM_ACTIVITY_STATUSES_H contains all of the activities executed by a specific occurrence of a Process flow.
• WF_NOTIFICATION_ATTRIBUTES: This table contains the run-time values of all the Message Attributes for a specific Notification.
In addition, Oracle Warehouse Builder (OWB) also contains audit tables that can also grow very large if not purged periodically.
Oracle Utilities Advance Spatial and Operational Analytics (OUASA) includes a Purge process flow that calls the Oracle Warehouse Builder (OWB) and Oracle Workflow Application Programming Interfaces (APIs) to purge these audit tables as well. The OUBIWF_PURGE_RT_AUDIT process flow in the INIT_PKG Package is set up to purge audit data that is older than one month.
The OUBIWF_PURGE_RT_AUDIT process flow is not run from the file processor daemon, so you must schedule it using a scheduler tool that can run OWB Process Flows. You can also schedule the procedure that this process flow calls, OUBI_PURGE_RT_AUDIT_DATA_PRC, using a tool that can call a PL/SQL command. This procedure requires no parameters, and can be called directly from a PL/SQL block, like this:
BEGIN OUBI_PURGE_RT_AUDIT_DATA_PRC;END;
You should run either this purge routine, or the OWB and OWF purge routines at least monthly, so that the audit tables remain small. It is recommended to purge these tables at least once a month.
Purging Extract, Transform, and Load (ETL) Job Control TablesIt is recommended that the Extract, Transform, and Load Job Control tables be purged on a regular basis. For analysis purposes it is suggested to retain 30-90 days of data but depending on your need this value should be appropriately adjusted.
The ETL Job Control table resides in the dwadm schema on the BI instance. A sample script to purge the ETL Job Control table is shown below. Provide an appropriate value for the number of days for which data needs to be retained in the ETL Job Control table.
delete from b1_etl_job_ctrl where start_dttm < sysdate -&days_to_retain and end_dttm is not null and job_status_flag = 'JC'; commit;
Note: You should make a backup before proceeding.
Extract, Transform, and Load Processes (ETL) 3-29

NMS/BI Recent Outage Data Purge Process
NMS/BI Recent Outage Data Purge ProcessThe NMS RDBMS is generally not intended to be in the long term (longer than a year or two) repository for historical customer outage data. Rather Network Management System (NMS) is intended to track the current and relatively recent status of the utility load area infrastructure. The NMS RDBMS generally includes a record of relatively recent customer outages – for operational reference/review purposes. Beyond this project specific “reasonably recent” window it is expected that some type of Network Management System (NMS) outage data archive/purge process will be executed on a regular (daily or weekly) basis to keep the NMS RDBMS instance relatively lean and performing optimally.
The Oracle BI RDBMS is intended to be the long term home for historical customer outage data. However, the Oracle BI RDBMS tracks two different types of outages in two sets of BI RDBMS tables and only one of them is considered a long term repository. The Oracle BI RDBMS tracks both recent and restored outages.
• Recent outages – sometimes called Near Real Time (NRT) outages. The primary purpose of the NRT data store is to support tracking current (active) and relatively recent completed outages. The NRT data store can also be used to help gauge the ability of existing resources to deal with a current storm – to help determine if external/foreign (crew) resources will or will not be required. Just like the Oracle NMS RDBMS data store the Oracle BI RDBMS “recent outage” data store is not intended to be a long term repository.
• Restored outages – sometimes called historical outage data. The primary purpose of the restored outage tables is for long term reporting purposes. The restored outage data store should be the most accurate data store and is intended to support required regulatory customer impact reports. This data store has no periodic purge requirements. Historical outage data is intended to be held in this data store indefinitely.
BI Near Real Time data purge processBI Near Real Time (NRT) data can be purged two ways:
• Purging data manually using Oracle supplied SQL script
• Purging BI NRT data through extract files generated on the NMS side based on the contents of the oms_delete_log table
In both methods described above, the database function SPL_OMS_SNAPSHOT_PKG.SPL_PURGE_RECENT_FNC is being called to purge the data. The database function physically deletes the data from the following tables
• cf_recent_call
• cf_recent_crew
• cf_recent_job
• cf_cust_recent_outg
• cf_recent_td_entry
When data is purged manually using Oracle supplied SQL script, the function deletes data older than a customer defined retention period. When NRT data is being purged using method 2, i.e., through extract files generated on the NMS side based on the contents of the oms_delete_log table, the BI import job reads the NMS extract file and executes the workflow package - SPLWF_F_PURGE_RECENT. The workflow package calls the same database function (SPL_OMS_SNAPSHOT_PKG.SPL_PURGE_RECENT_FNC) to physically purge the no longer desired BI NRT data.
In both methods described above, the database function SPL_OMS_SNAPSHOT_PKG.SPL_PURGE_RECENT_FNC is being called to purge the data. The database function physically deletes the data from the following tables:
3-30 Administration Guide
NMS/BI Recent Outage Data Purge Process
• cf_recent_call
• cf_recent_crew
• cf_recent_job
• cf_cust_recent_outg
• cf_recent_td_entry
When data is purged manually through Oracle supplied script, the function deletes data older than a customer defined retention period. When NRT data is being purged using extract files generated on the NMS side, the BI import job reads the NMS extract file and executes the workflow package - SPLWF_F_PURGE_RECENT. The workflow package calls the same database function (SPL_OMS_SNAPSHOT_PKG.SPL_PURGE_RECENT_FNC) to physically purge the no longer desired BI NRT data.
Following things are to be noted while purging BI data:
• Purging BI data using either of the above method requires no down time. Purging jobs can be scheduled while other BI import jobs are running.
• If the data to be deleted does not exist in BI RDBMS, no SQL error will be generated since the DELETE statements will find nothing to delete.
• Purging BI NRT data can be done independent of NMS data purging process. That said, retention period of data for NMS and BI can be different. The retention period can be defined based on customer’s business needs.
• It is worth noting that having smaller data volume in BI NRT tables will generally improve performance for import jobs and building Materialized Views that are based on NRT tables.
• It is generally advised that periodic purge of BI NRT data should be done on a regular basis – at least weekly, possibly daily. This is can be achieved via an automated process (Cron or similar).
Purging the NMS data archiveTo purge the NMS data archive, perform the following steps in the given order:
1. Run the Oracle provided Network Management System (NMS) arch_outage_info.ces script to archive and/or purge completed outages older than the required retain window (for example, 13 months).
2. When NMS jobs, incidents (outage tables) are purged as a result of executing the project configured arch_outage_info.ces script records will be written to the oms_delete_log table. The oms_delete_log is populated via triggers set up to fire when records from relevant NMS outage tables are deleted.
3. The next scheduled NMS BI extract process will read the records from the oms_delete_log table and create an NMS extract file - capturing relevant NMS outage record deletions.
4. The NMS extract file is copied to the BI RDBMS instance machine.
5. The BI import process reads and processes the NMS oms_delete_log extract file – calling the SPL_OMS_SNAPSHOT_PKG.SPL_PURGE_RECENT_FNC data purge function to physically delete the BI NRT records. If the BI NRT purge process already purged these records then this process will simply find nothing to delete – which is perfectly acceptable and should not cause a problem.
Following general notes and concerns for purging the NMS data archive are as listed below:
• The above process is generally intended for routine (daily or weekly) incremental outage data purging. If a significant (say more than 50K) backlog of completed outage jobs have queued up in NMS and/or BI than modifications to the above process may be necessary to “get caught up”. Otherwise, we run the risk of overloading the infrastructure and impacting other
Extract, Transform, and Load Processes (ETL) 3-31

NMS/BI Recent Outage Data Purge Process
BI import processes. The primary process that we expect could take significant time/resources is the BI import process for deleted outage data – where it searches for and physically deletes each BI NRT record identified in the BI import data file.
• Assuming the above archive process can be fully automated it is expected that it could be run on either a daily or weekly basis. Each infrastructure must be validated to determine the maximum number of outages that you think could be reasonably deleted in the execution period. Ensure that the infrastructure can reasonably handle the volume of deletions without significant impact to other extract processes. For example, the purge process should not significantly delay normal NRT BI import data processing.
• To get a handle on what is reasonable on production hardware, it is recommended that at least three tests be run on a representative test environment. Use the arch_outage_info.ces script on test environment to:
• Delete 10K outages – time/monitor how long to process resulting BI import file
• Delete 25K outages – time/monitor results
• Delete 50K outages – time/monitor results
The tolerable limit is project specific; however, it is recommended that anything less than five minutes should be considered a reasonable limit and a success. Hence, if 50K outages can be deleted in five minutes then you can adjust the timing interval for the archive process to be weekly. This is based on a rough guess that (at least, under almost any reasonable scenario) that the NMS would not generate more than 50K jobs in any given week. Project can and is expected to adjust to reflect customer/project realities as necessary.
The scripted BI NRT and NMS data purge processes can be executed using different retain periods and in any order. They can be executed without disabling other extract import processing. Depending on the volume of outage data to purge, some planning and thinking should be applied as to when a major purge is executed. However, in general, it is expected that these purge processes can be run on a fully live system. If the required data retention period for BI NRT and NMS are the same (say for example, 13 months), then it should be possible to schedule an automated daily or weekly purge process from NMS that would automatically propagate to BI NRT. If BI NRT and NMS do not have a common retain period, then both purge scripts can be scheduled independently.
Configuring Oracle Warehouse Builder to Enable PurgingFollow these steps to configure the Oracle Warehouse Builder (OWB) to allow the DWADM schema to execute the OUBI_PURGE_RT_AUDIT_DATA_PRC procedure successfully:
3-32 Administration Guide

NMS/BI Recent Outage Data Purge Process
1. The DWADM user should be given Administration privileges on the workspace. The following image shows the Administrator role granted to a DWADM user.
2. The following objects should be granted roles to DWADM:
• OWFMGR.WF_PURGE
• OWBSYS.WB_RT_AUDIT_PURGE
• OWBSYS.WB_RT_AUDIT_EXECUTIONS
• OWBSYS.WB_RT_DEF_EXECUTION_OPERATORS
3. Create synonyms for the following objects in the DWADM schema:
• OWBSYS.WB_RT_AUDIT_EXECUTIONS
• OWBSYS.WB_RT_DEF_EXECUTION_OPERATORS
Extract, Transform, and Load Processes (ETL) 3-33

NMS/BI Recent Outage Data Purge Process
3-34 Administration Guide
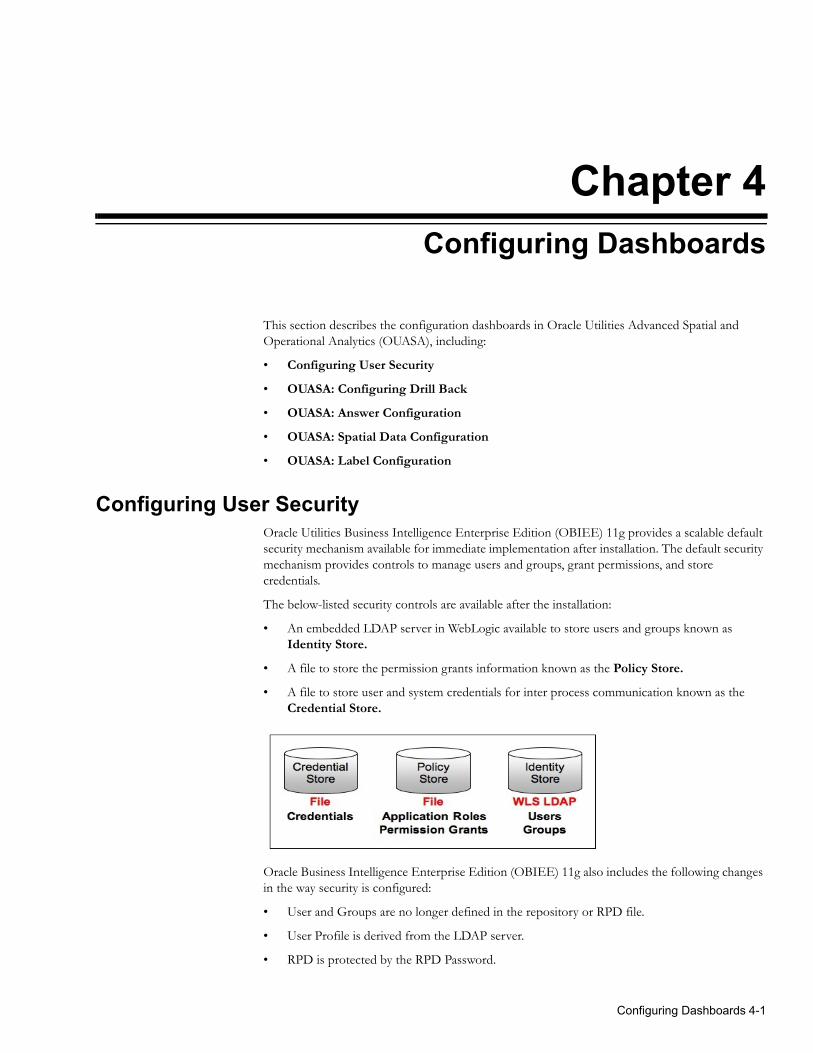
Chapter 4Configuring Dashboards
This section describes the configuration dashboards in Oracle Utilities Advanced Spatial and Operational Analytics (OUASA), including:
• Configuring User Security
• OUASA: Configuring Drill Back
• OUASA: Answer Configuration
• OUASA: Spatial Data Configuration
• OUASA: Label Configuration
Configuring User SecurityOracle Utilities Business Intelligence Enterprise Edition (OBIEE) 11g provides a scalable default security mechanism available for immediate implementation after installation. The default security mechanism provides controls to manage users and groups, grant permissions, and store credentials.
The below-listed security controls are available after the installation:
• An embedded LDAP server in WebLogic available to store users and groups known as Identity Store.
• A file to store the permission grants information known as the Policy Store.
• A file to store user and system credentials for inter process communication known as the Credential Store.
Oracle Business Intelligence Enterprise Edition (OBIEE) 11g also includes the following changes in the way security is configured:
• User and Groups are no longer defined in the repository or RPD file.
• User Profile is derived from the LDAP server.
• RPD is protected by the RPD Password.
Configuring Dashboards 4-1

• RPD is encrypted.
• Applications Roles are introduced.
• User Administrator and Group Administrators are not coded in the RPD.
• Administrator User not used for Inter-Process Communication (component to component).
• Credential Store storage mechanism.
AuthenticationIn Oracle Utilities Business Intelligence Enterprise Edition (OBIEE) 10g version, default authentication is RPD based. However, in Oracle Business Intelligence Enterprise Edition (OBIEE) 11g, the user and group definitions are moved to the Identity Store, which is an LDAP server embedded with the WebLogic server. WebLogic is the default authentication provider for OBIEE 11g; hence, creation of users and groups and the association of members to groups are managed in the WebLogic administration console. Users are authenticated by the WebLogic server based on the credentials in the embedded WebLogic LDAP server. The embedded LDAP server is default Authentication provider for WebLogic and for OBIEE.
Oracle Utilities Business Intelligence Enterprise Edition (OBIEE) 11g gets user, groups, and other user attributes from the WebLogic LDAP server. This eliminates the limitation with previous versions of OBIEE where only one group for a user can be read directly from an LDAP server.
An application role defines the set of permissions granted to a user or group. Default application roles have corresponding default system user groups used in assigning catalog permissions and system privileges.
The following default application roles are shipped with the default security configuration:
• BISystem: This role is designed for system tasks and is usually not assigned to users.
• BIConsumer: This role grants the permissions necessary to use or to consume content created by other users. By default, every Oracle Business Intelligence authenticated user is part of the BIConsumer group and does not need to be explicitly added to the group or role.
• BIAuthor: This role grants the permissions necessary to create and edit content for other users to use or to consume. Any member of the BIAuthor group is explicitly granted this role and implicitly granted the BIConsumer role.
• BIAdministrator: This role grants the administrative permissions necessary to configure and manage the Oracle Business Intelligence installation. Any member of the BIAdministrator group is explicitly granted this role and implicitly granted the BIAuthor and BIConsumer roles.
Additional roles can be created as required and users can be assigned to these roles to control the access provided to the users.
Refer to the Oracle Fusion Middleware Administrator's Guide for Oracle Business Intelligence Publisher for further details on user creation, access control, and administering Oracle Business Intelligence Enterprise Edition (OBIEE).
OUASA: Configuring Drill BackOracle Utilities Advanced Spatial and Analytics (OUASA) provides multiple drill back functionality from various reports in OUASA to the source applications (MDM, MWM, and CCB). You must configure the drill back by providing required information for this functionality to work.
4-2 Administration Guide

The Configuration dashboard under Administration group can used for configuring various options in Oracle Utilities Advanced Spatial and Analytics (OUASA). The first tab Configuration contains drill-back settings for the source applications.
You can update the host name, port, and the context root folder for the various edge applications involved in the Oracle Utilities Advanced Spatial and Analytics (OUASA) application through this page. After updating the value for the environment, the drill back links on the various dashboard pages use the new values when an item is selected.
Currently, the product supports drill back to the following edge applications:
• Oracle Utilities Customer Care and Billing (CC&B)
• Oracle Utilities Meter Data Management (MDM)
• Oracle Utilities Mobile Workforce Management (MWM)
Note: Customers are required to configure the applications for which they have implemented the Oracle Utilities Advanced and Spatial Analytics (OUASA). They can ignore configuration for applications for which they have not implemented OUASA.
OUASA: Answer ConfigurationYou must configure the following MDM answers before viewing the data:
• Tamper Events answer (Overview dashboard)
• Usage Unreported for > 30 Days (Overview dashboard)
• Percent of Normal Intervals (Overview dashboard)
• Percent of On-Time Intervals (Overview dashboard)
• Degree Days (Overview dashboard)
After customizing the answers, save the reports in a separate CM catalog.
Refer to the Oracle Utilities Meter Data Management Metric Reference Guide for details.
OUASA: Spatial Data ConfigurationThis section describes how to configure mapping for Oracle Utilities Advanced Spatial and Operational Analytics. It includes the following topics:
• Loading Geographic Data
• Integrating Mapping with the Network Management System Network Model
Configuring Dashboards 4-3

• Configuring MapViewer for Dashboards
• Map Profile Configuration
Loading Geographic DataIn order to place information on a geographic map, data in the data warehouse must match geographic data (themes) that are configured in Oracle MapViewer.
The standard map answers delivered with Oracle Utilities Advanced Spatial Analytics (OUASA) include maps that query state, city, county, postal codes, and network model summary data. As Oracle Utilities Advanced Spatial Analytics does not have access to this spatial data (and as each customer may require different spatial data), you must set up the geographic themes used in the maps.
For details regarding setting up these standard spatial themes, refer to the Oracle Utilities Advanced Spatial Analytics Installation Guide.
The installation instructions refer to shape files downloaded from the US Census bureau. However, shape files can also be used for the state, city, county, and zip code boundaries. The only requirement is that the names of the geographic entities in the shape file should match the corresponding name in the CD_ADDR table. This is not usually a problem for postal code data, but can be an issue for city and county names, as different sources may use different names to refer to geographic places. Make sure after loading the MapViewer shapefiles that the names in the geographic tables match the names that are in the CD_ADDR table. If they do not match, then the maps may not display correctly.
Integrating Mapping with the Network Management System Network ModelOracle Utilities Network Management System (NMS) provides a mechanism to create spatial themes in Oracle MapViewer for the entire electrical network model. The default implementation of Oracle Utilities Advanced Spatial Analytics (OUASA) does not provide links to these MapViewer themes; however, the maps can be modified in the Outage Analytics dashboards to show the various elements of the network model on the Outage Maps. This section provides an overview of the steps needed to provide the network model on the outage maps. For details regarding the steps required to set up the Network Management System (NMS) Model Build process, refer to the NMS Installation Guide.
To build the network model in Oracle Utilities Network Management System (NMS), the model build process must be set up to populate the geometry columns. Detailed instructions for this can be found in the NMS Installation Guide.
To ensure that the network model can be displayed without coordinate translations during runtime, one of the geometry columns should use the same projection coordinate system as the base map used by the Outage Analytics Outage maps. If Oracle eLocation is being used as the base map, then this would be srid 54004.
Once the model build is set up to populate the geometry columns, themes for the various network model components must be built. For example, there may be a theme for transformers, another theme for conductors, and other themes as required to build the network model. NMS provides templates that helps in setting up these themes, a base product installation may have ten or more themes. For details, refer to the NMS Installation Guide.
After the Network Management System (NMS) Network Model themes are set up, they can be either accessed directly from the outage Analytics Outage Maps or can be copied to the MapViewer instance used by the Oracle Business Intelligence Enterprise Edition (OBIEE) dashboards.
There following are the advantages of using either of the two options discussed above:
• If the Oracle Utilities Network Management System (NMS) themes are accessed directly, then near real-time device status information can be displayed in the Outage Analytics Outage
4-4 Administration Guide

Maps. Caching affects the lag time of the status information. This can be a good or bad, depending on how the refresh frequency of the NRT outage information in the data warehouse is set. There may remain some information in the device status that is yet to be extracted. This may result in a mismatch between the database data and the spatial data.
• Display of the Network Management System (NMS) themes require access to the NMS database; hence, if the database is down or network access to the database is not available from the data warehouse database, then the NMS themes would not display on the maps.
• There can be a performance impact on the NMS database, if a large number of users are displaying the outage maps in the Oracle Business Intelligence Enterprise Edition (OBIEE) dashboards.
• If the themes are accessed through the Business Intelligence (BI) database, then a mechanism to periodically copy any changes to the Network Model from the Network Management System (NMS) to Business Intelligence (BI) needs to be setup. The DIAGRAM_OBJECTS table along with the Theme Metadata should also be copied.
For each theme defined in the Network Management System (NMS) Network Model that should be displayed on an Outage Map, the static text for the answer should be updated to access that theme and provide a check box that will turn the theme on or off.
Note that if this change is done, the process described in the Oracle Business Intelligence Enterprise Edition (OBIEE) customization section above should be followed. First create a copy of the answer that needs to be modified, edit that copy of the answer, and then modify the dashboard to access the copy of the answer instead of the released copy of the answer.
Consider the following example. You want to add two Network Management System (NMS) themes named 'Transformers' and 'Conductors' to the Outage Map answer on the Overview tab of the Outage Dashboard. If you edit the dashboard page, you will see that this answer is called 'outage demo' and exists in the / Shared Folders/Outage Analytics/Spatial Requests folder.
To edit modify this answer, follow these steps:
Create a folder called ‘Project Customizations’ or some other unique name in the /Shared Folders folder, and copy the outage demo answer into it.
1. Open the outage demo answer and edit the static text box.
2. In the static text box, edit the JavaScript code to add the new Transformers and Conductors themes. The following code should be added just before the addLegendFilter code. Set the legendSelected parameter to ‘Y’ to display the network model themes when the map first opens up.
var parm11 = new Array(); parm11['nodeId'] = 'MapNode1'; parm11['legendLabel']='Show Transformers'; parm11['theme'] = 'Transformer'; parm11['legendSelected'] = 'N'; addStaticThemeParameter(parm11);
var parm12 = new Array(); parm12['nodeId'] = 'MapNode1'; parm12['legendLabel']='Show Conductors'; parm12['theme'] = 'Conductors'; parm12['legendSelected'] = 'N'; addStaticThemeParameter(parm12);
Note: Using the Firefox Browser to edit static text sometimes result in issues like not being able to view the complete static text. Hence, it is recommended to make use of the Internet Explorer (IE) browser when editing the static text for the Map answers in Oracle Utilities Advanced Spatial Analytics (OUASA).
Configuring Dashboards 4-5

Configuring MapViewer for DashboardsThis section describes the two different methods of implementing maps in Oracle Utilities Advanced Spatial Analytics (OUASA), including:
• Custom Implementation Method
• Standard Implementation Method
Custom Implementation MethodThe custom implementation method has been used for Outage Maps from the Oracle Utilities Network Management System (NMS) dashboards and is similar to the stand-alone MapViewer setup used in Oracle Business Intelligence Enterprise Edition (OBIEE) versions prior to OBIEE 11g. Sets of Map attribute and theme profiles are provided to support this method. Attribute profiles hold the data source information and the Application Programming Interface (API) keys. Theme profiles are used to map the Geographic column with the key column.
Using the above method you can:
• Create new answers using static text view with a call to the Standard APIs along with the theme profiles that should be applied.
• Update theme profiles from the Map Profile Page that is provided in the Configuration Dashboard. You can override the base values by using the Override Value column, as shown in the below image:
Note that no support is provided to create new theme profiles. Upgrade scripts are provided to load the custom themes into the new Configuration table.
Standard Implementation MethodThe standard implementation method is the default implementation method for Oracle Business Intelligence Enterprise Edition (OBIEE) 11g. This form of map can be seen in various dashboards like Meter Data Management (MDM), Mobile Workforce Management (MWM) and Customer Care and Billing (CC&B) Analytics. Using this method, you can create new answers using the Map View. This view uses the configuration defined under the Administration menu in Manage Map Data.
The layers, background maps, and the images being used in the map must be defined in this page. The Key column and geographical columns should be mapped for each Subject Area used in the analysis. This is a one-time setup unless new subject areas are added.
4-6 Administration Guide

Note that you should not customize the map metadata until after you import the Spatial Catalog file.
For customizations that involve map analysis, all customer modifications must be done in a separate folder in order for those modifications to be preserved when upgrading Oracle Utilities Advanced Spatial Analytics (OUASA).
Map Profile ConfigurationThe configuration dashboard contains three tabs that are used for configuring various items for Oracle Business Intelligence Enterprise Edition (OBIEE). The Map Profile configuration tab contains configuration options for the 10g version of the maps used in the NMS dashboards.
OUASA: Label ConfigurationThis section describes how to create and customize the labels that appear in answers and dashboards.
Note: You must have the full license of the Oracle Utilities Advanced Spatial and Operational Analytics to use this feature.
This section includes the following topics:
Configuring Dashboards 4-7

• Overview of Labels
• Overriding Base Labels
• Supporting Multiple Languages
Overview of LabelsOracle Utilities Advanced Spatial Analytics (OUASA) uses labels for columns and tables in the delivered Oracle Business Intelligence Enterprise Edition (OBIEE) repository file when displaying the columns in the presentation folders for users. These labels are displayed in the answers for the columns on the dashboards. In addition, the answers are also titled based on labels stored in metadata displayed in report titles, sub-titles, and other dashboard strings.
The main reason that the application uses labels instead of hard-coding the text values in the answers and RPD file is to support translation of dashboards into different languages and allow easy overriding of labels for customers that want to customize the field label.
For example, within an answer, labels can be referred to by biServer variables. For example, the Device Activity - Distributions report uses this variable in the title section of the answer: @{biServer.variables['NQ_SESSION.B1_RPT_DEV_ACTI_DISTRIBUTION']}. The B1_RPT_DEV_ACTI_DISTRIBUTION label is defined in the B1_MD_FLD table in DWADM schema.
For columns in the fact and dimension tables, labels exist for every field. For example, the UDF1_DESCR column in the CD_ACCT table has the Description of Customer Class, and the Customer Class label is displayed in the presentation folder for this field.
Overriding Base LabelsThere are several reasons that an implementation may want to update an existing label:
1. A field may contain data that does not match the default extracted data for that field. In the CD_ACCT example in the above section, you may elect to store information other than customer class in the UDF1_DESCR field. If an extract change is made to the default CD_ACCT extract, then an implementation change in the label for the UDF1_DESCR field of the CD_ACCT table at one place will change the label in all dashboards and answers that display that field. This reason would also apply if data is extracted to a UDF field that does not already have a default population.
2. Even if you use the default extract code, you may choose to use some other name for the extracted data other than the default name. In the CD_ACCT example, if you call the field extracted into the UDF1_DESCR field Account Class instead of Customer Class, you can make this change at one place and have it updated on all dashboards and answers.
3. You may want to provide multilingual labels for your users. The Oracle Utilities Advanced Spatial Analytics (OUASA) application provides the labels to a user based on the language they selected when logging into the Oracle Business Intelligence Enterprise Edition (OBIEE), assuming that the language is present in the B1_MD_FLD table. An implementation can add their own translated fields or can download supported language packs from the Oracle Software Delivery Cloud. Note that multilingual support is only provided for labels and not for the underlying data in the data warehouse. The data displayed in all database tables is not translatable from extract language. To update a label for a base field, use the Base Field Maintenance dashboard in the Administration portal.
4-8 Administration Guide

There are four types of labels that can be queried in this screen:
• Table Labels: For records that have the Table Name field populated but not the Field Name, this label is shown in the presentation folder for the fields that are available in this table. For example, the CD_ACCT table has the label ‘Account Dimension’ displayed in the Presentation folders wherever it is used.
• Field Labels: For records that have both the Table Name and Field Name fields populated, this label is shown in the presentation folder and on answers whenever that field is used. For example, the UDF1_DESCR field in the CD_ACCT table has the label ‘Customer Class’ displayed whenever it is used in an answer or when a user selects it from the presentation folder when creating a new answer.
• Report Labels: Records that have a field name like ‘B1_RPT%’ and no table name value are used for the titles of answers in the dashboards. For example, the B1_RPT_DEV_ACTI_DISTRIBUTION label is defined to be ‘Device Activity Distribution’, and this is displayed on the MDM dashboard when the answer is displayed.
• Other Labels: All other non-report labels that have a field name but no table name are used for calculations that are computed in the RPD Logical layer for display on answers. For example, the B1_APPT_IND_SUM label is defined to be ‘Number of Appointments’, and is used in MWM answers that compute the number of crew appointments based on the Appointment Indicator field in the CF_CREW_TASK fact table.
If a base field label should be changed, then the implementation team can query the required record on the Base Field Maintenance dashboard, populate a value in the Override Description field, and click Update. Once populated, the OBIEE Server must be restarted (as documented in the installation guide) for the changes to take effect.
Supporting Multiple LanguagesOracle Utilities Advanced Spatial Analytics (OUASA) is released with default support for English labels on all dashboards and answers. While Oracle Business Intelligence Enterprise Edition (OBIEE) and OUASA both provide multiple language support.
The default language on the login page is English. However, you can select any of the supported language on the login page or can change the preferred language under the Administration menu, to view Dashboards in a different language. If you have not purchased and applied the specific language pack and a you selects a language other than English, the default Oracle Business
Configuring Dashboards 4-9

Intelligence Enterprise Edition (OBIEE) labels will still be translated in the selected language but the Oracle Utilities Advanced Spatial Analytics (OUASA) product specific labels will appear in English.
Oracle Utilities Advanced Spatial Analytics (OUASA) may release various language packs depending on user demands. Hence, for the language that is already released, installing the language pack is sufficient for creating the labels needed by the dashboards.
To view the list of Oracle Utilities Advanced Spatial Analytics (OUASA) language pack applied on an environment, you can navigate to the About OUASA dashboard under the About heading.
Contact your Oracle support representative to purchase a OUASA Language Pack for additional language support.
4-10 Administration Guide

Chapter 5Customizations
Oracle Utilities Advanced Spatial and Operational Analytics (OUASA) comes with out of the box solution with Extractors & Schemas, Extraction, Transformation, and Loading (ETL) programs, Oracle Warehouse Builder (OWB) configurations, and Oracle Business Intelligence Enterprise Edition (OBIEE) Analytics. The data warehouse schema in OUASA covers a wide range of reporting requirements. Customers often have the need to add additional data elements to meet site specific requirements. OUASA allows such extensions to the schema through the use of user defined constructs such as User Defined Fields. User Defined Measures, User Defined De-generate Dimensions, and User Defined Foreign Keys. Using these constructs customers can customize the product to suite their extended requirements easily.
This section describes how to customize the Oracle Utilities Advanced Spatial and Operational Analytics (OUASA) application. It includes the following topics:
• User-Defined Columns
• Extending Extractors and Schema
User-Defined ColumnsThis section covers the general data warehousing concepts required to understand the various user-defined columns available as placeholders in the Oracle Utilities Business Intelligence (OUBI) product. For specific details on how to extend a particular dimension's User-Defined Field (UDF) or a fact table’s User-Defined Measure (UDM) refer to the individual sections of the various extraction approaches. These sections are explained in detail below.
This section includes the following topics:
• User-Defined Field (UDF)
• User-Defined Measure (UDM)
• User-Defined Dimension (UDD)
• User-Defined Degenerate Dimension (UDDGEN)
• User-Defined Foreign Key Dimensions (UDDFK)
• Extending Extractors and Schema
Customizations 5-1

User-Defined Field (UDF)Users look at the facts in a data warehouse by slicing and filtering the analytic data by different dimensions. For example, the following graph shows collectible sliced by customer class (the Collectibles fact is sliced by the customer class field on the account dimension):
Whereas the below report slices the same fact by a different field on a different dimension (the city on the address dimension). In addition, it limits the analysis to a specific customer class, i.e., Commercial. The below figure shows how a single report can be sliced and filtered by different dimensional attributes.
.
Users can “slice and filter” a fact using any field on any dimension linked to the analytic's fact. For example, users can slice reports related to the financial fact by any field on its dimensions. The following simplified data model of the financial fact's star schema helps clarify this concept.
5-2 Administration Guide

:
This data model shows that the financial fact has six dimensions. This means that graphs can be configured to allow end users to slice the financial fact by any of the attributes on the six dimensions. For example, you could set up a report to slice the financial fact by any combination of:
• The Account Dimension's Customer Class and Manager
• The Address Dimension's Jurisdiction
• The Service Agreement Dimension's Revenue Class
• The Rate Schedule Dimension's Rate
• ….
You can set up another report to slice and filter this fact by a different combination of fields. It should be noted that the above example is a simplified version. In reality, most facts have more than six dimensions and most dimensions have several fields.
While Oracle Utilities Business Intelligence (OUBI) allows you to slice and filter a fact by any field on its dimension, it also enables you to limit the number of fields on your report to a discreet group. This helps as the materialized views that are configured may make the system slow if these views contain too many fields.
You can change the User-Defined Field (UDF) on your dimensions at a later date. The following points summarize the major steps involved in doing this:
• Update the meta-data in the source system to populate the UDFs on the respective dimensions. For more detailed information refer to the “Extending extractors for User-Defined Field (UDF) and User-Defined Measure (UDM)” section under each of the different extraction sections.
• Update the dimensions extract program to extract the new fields.
• Run the respective extract in "extract everything" mode or the Initial Load batch control depending upon your particular approach.
Performing the above procedure allows all new facts to be sliced and filtered by the newly added User-Defined Fields. If you want to “slice and filter” historical facts by the new fields, you must update the historical dimensions to contain the current value of the new User-Defined Field.
User-Defined Measure (UDM)The acronym User-Defined Measure (UDM) is used to reference the measures on the facts that you populate with implementation-specific measures.
A measure is a column on a fact that holds a measurable value. For example, the financial fact has a measure that holds the amount of revenue produced by a bill. Most facts in the Oracle Utilities Business Intelligence data warehouse have several measures. For example, in addition to the
Customizations 5-3

revenue measure, the financial fact also has measures holding the total taxes and other charges on a bill.
For example, the following report shows several measures - Score, Revenue Amount for the current, last, and the last three periods.
The facts and their extract programs are delivered with all of the obvious measures populated. However, if your implementation requires additional measures, you can populate User-Defined Measure (UDM) on the facts. To do this, you can introduce logic to the fact's extract program (in a user exit) to populate one or more UDM accordingly. Note that no database or Oracle Warehouse Builder (OWB) changes are necessary as both the data warehouse and OWB are delivered in a ready state to support the newly populated UDMs.
User-Defined Dimension (UDD)The acronym User-Defined Dimension (UDD) is used to reference implementation-specific dimensions on the fact tables. All fact tables are delivered referencing several empty UDDs for you to use.
As described earlier, you can set up analytic reports to “slice and filter” a fact using any field on the dimensions linked to the fact. Oracle Utilities Business Intelligence (OUBI) delivers facts referencing the obvious dimensions. However, your implementation may need you to link additional dimensions to some facts. For example, the financial fact is delivered assuming that the revenue, tax, and expense amounts should be aggregated regardless of the General Ledger (GL) accounts impacted by a financial transaction (for example, if a given adjustment references six revenue GL accounts, all six revenue amounts are summarized onto a single financial fact). This means that you cannot “slice and filter” revenue by specific general ledger accounts. If you want to offer this option to your users, you must introduce an additional dimension to the financial fact (in addition, you must change the fact's extract program to extract at this new level of granularity).
The following points below summarize how to set up a new UDD:
• You must create database trigger(s)/view(s) or sync Business Objects (BO) to cause new and changed dimensions to be interfaced to the data warehouse. There are many examples of dimensional triggers in the operating system that can be used as samples for the new triggers.
• You must create a new program to extract the new dimension's values. This extract will be executed in the operational system and will produce a flat-file containing the dimension's values. There are many examples of dimensional extract programs in the operating system that can be used as a basis of your new program.
• The flat-file produced by the extract is the input to the Oracle Warehouse Builder (OWB). Oracle Warehouse Builder is delivered preconfigured to load the data warehouse from the flat-file.
5-4 Administration Guide

• Run the new extract program in “extract everything” mode and let the Oracle Warehouse Builder populate the dimension's rows.
• Return to Oracle Utilities Business Intelligence (OUBI) and display the User-Defined Dimension (UDD) table by updating the Oracle Business Intelligence Enterprise Edition (OBIEE) .rpd file. Enter the appropriate Override Label of each User-Defined Fields (UDFs) on the table. Note these are the dimensional attributes that is used to slice and filter the dimension's facts. For example, if the dimension is meant to hold General Ledger (GL) accounts, it makes sense to define at least two User-Defined Fields as shown below:
• The General Ledger (GL) account number
• The General Ledger (GL) account type (for example, revenue, expense, tax etc.)
• Transfer to the operating system (for example, Oracle Utilities Customer Care & Billing) and introduce user-exit code to the extract program to the appropriate User-Defined Dimension (UDD) values for the fact. Refer to the edge applications chapter for the various approaches for more information about the extract programs. When you extract the facts after this point, the flat-file supplied to Oracle Warehouse Builder (OWB) will be populated with the appropriate references to the User-Defined Dimension (UDD).
Increasing GranularityUser-Defined Dimension (UDD) may or may not increase the granularity of the fact. By increasing granularity, we mean that the number of rows or records extracted for the fact (i.e., the grains or level of details) increases. Adding a UDD that does not change the number of rows in a fact does not impact the granularity of the fact.
Granularity IncreasedAn example showing an increase in granularity would be adding a User-Defined Dimension (UDD) for distribution code. Before adding a UDD for distribution code, one bill results in one financial fact record. After adding the UDD, one bill results in many financial fact records (one per distribution code referenced on the bill segment). Increasing the number of records extracted means increasing the granularity.
When a UDD results in an increase in granularity, the implementation needs to include a change to the base code for the extract (i.e., develop a new extract by copying the base-package version).
Granularity Not IncreasedAn example showing no increase in granularity would be adding a User-Defined Dimension (UDD) for adjustment type. Since each financial transaction can only reference one adjustment type, adding this as a UDD would not increase the number of fact records produced by a financial transaction and would therefore, not increase granularity. In this case, you only need to develop a new extract to extract the adjustment types, and make a simple change to the financial extract to populate a UDD with the adjustment type for the financial transaction.
After you set up the User-Defined Dimension (UDD), User-Defined Measure (UDM), and User Defined Field (UDF), you can create new analytics reports to view this information.
User-Defined Degenerate Dimension (UDDGEN)User-Defined Degenerate dimension (UDDGEN) columns reside directly on the fact table and can be used to filter fact data in the same way as the User-Defined Field (UDF). For example, currency code columns are commonly used UDDGEN in the Oracle Utilities Business Intelligence application. These columns exist on most of the fact tables and can be used to limit fact data shown in reports to a given currency code. Most fact tables in Oracle Utilities Business Intelligence (OUBI) are delivered with multiple UDDGEN. These columns are populated by introducing user-exit code in the respective fact extract programs. The main benefit of using
Customizations 5-5

UDDGENs as opposed to using User Defined Dimension (UDDs) is that UDDGENs can be populated in the fact extract program and thereby, reduce implementation time.
User-Defined Foreign Key Dimensions (UDDFK)At times, there are requirements that can be easily satisfied by adding an existing dimension to a fact. For example, the case fact is not delivered referencing the service agreement dimension. If your users require analytics that “slice and filter” cases by service agreement dimensional attributes, you can configure the system to reference the existing service agreement dimension on the case fact. Facts that support this type of extension contain columns called User-Defined Foreign Key (UDDFK). If you do not see these columns on a fact, then it means that this functionality is not available in it.
Extending Extractors and SchemaUsing the User-Defined Field (UDF), User-Defined Measure (UDM), User-Defined Dimension (UDD), User-Defined Degenerate Dimension (UDDGEN), and User-Defined Foreign Key Dimension (UDDFK), you can extend the extractors and schema delivered with the base product. The process to extend the extractors and schema varies based on the type of change detect mechanism used for the base application.
These sections describe the process to extend the extractors and schema for each type:
• Extending Oracle Utilities Customer Care and Billing (CC&B) and Workforce and Asset Management (WAM)
• Extending Oracle Utilities Network Management Systems (NMS)
• Extending Oracle Utilities Meter Data Management (MDM) and Mobile Workforce Management (MWM)
Extending Oracle Utilities Customer Care and Billing (CC&B) and Workforce and Asset Management (WAM)
Oracle Utilities Customer Care & Billing (CC&B) and Oracle Utilities Work and Asset Management (WAM) use the trigger-based approach to detect the changes on the base table that needs to be populated in the data warehouse.
Most extract processes support populating User Defined Field (UDF) and User Defined Measure (UDM) fields on their flat file records with specific fields from the source system. For example, you can set up the premise extract program to populate the first User-Defined Field on its flat file with the premise's city, county, or any address-oriented field.
You should specify to the extract program which fields require to be populated on the flat file by populating the batch process parameters. The number and type of parameters differ depending on the extract and type of information being extracted. However, in general, there are two types of fields that can be transferred to the flat file:
• Columns: Many dimensional extracts allow predefined columns to be populated on the flat file. For example, you can set up the premise extract program to populate the first User-Defined Field (UDF) on its flat file with the premise's city, county, or any address-oriented column. An analogous concept is used to populate the User-Defined Measure (UDM) on the fact extracts.
• Characteristics: Many dimensional extracts allow characteristics to be populated on the flat file. For example, you can set up the premise extract program to populate the first User-Defined Field (UDF) on its flat file with the premise's tax characteristic, or/and premise-oriented characteristic.
5-6 Administration Guide

Note: Most dimensional extracts support the population of their User-Defined Fields with characteristic values. A limited number of fact extracts allow characteristics to be used to populate User-Defined Measures. This is because most of the transaction files that trigger the fact extracts do not contain characteristics.
You can identify how an extract populates its User-Defined Fields and User-Defined Measures by populating parameters. Each User-Defined Field/ User-Defined Measure supported by an extract has two parameters that must be populated:
• Type: This parameter is defined or populated if the field is a true column or a characteristic. Enter PROG if you want to populate a User-Defined Field (UDF) / User-Defined Measure (UDM) with a column. Enter CHAR if you want to populate the User-Defined Field (UDF) / User-Defined Measure (UDM) with a characteristic.
• Value: This parameter defines the respective column or characteristic.
To define a column, the value should be in the formation Table.Column (for example, CI_PREM.CITY_UPR - would be used on the address extract to populate a UDF with the upper-case format of an address's city).
To define a characteristic, enter the characteristic's type code. Note, as of now, in the current release only pre-defined value characteristics are supported.
Note: For details, refer to the relevant fact and dimension chapter in this guide for a description of each extract program and the various User-Defined Field (UDF) and User-Defined Measure (UDM) parameters that are supported in each.
Extracting Additional FieldsWhile the extract programs are delivered to populate their flat files with commonly used information, you may want to populate the User Defined Field (UDF) and User Defined Measure (UDM) with information not supported by the base-package. To do this, customers must introduce “user-exit” code to the respective extract programs.
For details on how to extend the warehouse schema “User exits in Oracle Utilities Customer Care and Billing” refer to Knowledge Article “ Extending the OBIU Data Warehouse (Using User Defined Constructs in CC&B)” on My Oracle Support (https://support.oracle.com/).
Extending Oracle Utilities Network Management Systems (NMS)Oracle Utilities Network Management System (NMS) uses the view-based approach to detect the change in the source table that needs to be populated in the data warehouse.
For any changes required in Extracts like populating the User-Defined Field and User-Defined Measure with new column values, follow the below approach:
• Create new views to extract data as required
• Create a new extract program/procedure to access the view from above step. Ensure that the existing views/scripts are not updated as it might lead to upgrade impacts.
• Run the new extract program to retrieve data into flat files.
Refer to Appendix E for source Extract scripts and View names when you are trying to duplicate the scripts.
Extending Oracle Utilities Meter Data Management (MDM) and Mobile Workforce Management (MWM)
Oracle Utilities Meter Data Management (MDM) and Oracle Utilities Mobile Workforce Management (MWM) generally use the Sync Business Object (BO)-based approach to detect the
Customizations 5-7

change in the source table that needs to be populated in the data warehouse. In some cases, where there are complex logic to perform the extract, there are idiosyncratic batch processes that will do the job.
Both of these approaches support the population of User-Defined Field (UDF) and User-Defined Measure (UDM) on their flat file records with specific fields from the source system. For example, you can set up the metadata in the source system to populate the first User-Defined Field on a Service Point Dimension's flat file with the time zone or any Service Point-oriented field.
A particular fact or dimension may fall into one of these two extraction styles, both of them have their own ways of being extended. In both the methods, once the metadata has been configured appropriately, the respective batch controls have to be run again to generate the new flat files with the User-Defined Field (UDF)/User-Defined Measure (UDM) columns populated.
Synchronization BO-based ExtractEach fact and dimension that uses the synchronization BO approach for extract has its own Sync Request BO. Each of these BOs has the following options:
• Snapshot DA: This is the data area that contains the elements that are sent to the data warehouse. The elements in this DA are listed in order in which the ETL expects them.
• BO to Read: This is the primary BO whose contents are sent to the data warehouse. Its elements should match those in the Snapshot DA as it will be read and then its contents “moved by name” to the Snapshot DA.
• Element Population Rule: These options are used to populate an element on the Snapshot DA that cannot be “moved by name” from the BO to Read. The option value contains the following mnemonic:
Option Type Sequence Option Value
Element Population Rule
<A unique sequence number>
sourceElement=XXX populateTargetWithInfoString=true/false targetElement=XXX
The sourceElement attribute refers to an element in the BO specified in the option type 'BO to Read'. The targetElement attribute refers to an element in the Snapshot DA that needs to be populated. The populateTargetWithInfoString accepts a ‘true’ or ‘false’ value (a value of ‘true’ means that the sourceElement’s FK reference in the BO to Read schema will be used to retrieve the element’s information string).
• Post Service Script: This is the script that will be executed after the Snapshot DA is populated with the BO to Read elements and the Element Population Rules (if any). It is responsible for populating elements on the Snapshot DA that cannot be derived directly from the BO to Read.
You can extend the facts and dimensions by adding new options:
• Element Population Rule: To extend the Element Population Rules, you will have to add new Element Population Rule options following the mnemonic specified above. You can set up as many Element Population Rules as you need, and the sequences do not matter.
• Post Service Script: To extend the Post Service Script, you will have to create a new service script.
Option Type Sequence Option Value
Post Service Script for Extract
<A unique sequence number>
Custom Service Script Name
The option value to be supplied is the name of the customer service script which has the logic
5-8 Administration Guide

to populate the User-Defined Field (UDF) / User-Defined Measure (UDM) columns with the desired values. There are few things to note here. First, the schema of the service script should match the schema of the Snapshot Data Area used in the Sync Request BO (this can be done by including the Snapshot DA specified on the sync request BO’s option in the Post Service Script’s schema). Second, the Post Service Script with the highest sequence number will be the one executed. Hence, make sure to provide the appropriate sequence number on your custom service script. And lastly, because the highest-sequenced Post Service Script will override any existing scripts, if MDM or MWM has delivered a Post Service Script, your new custom service script should either call the existing Post Service Script (and avoid duplicating the same steps in your custom script), or not, depending on what you want to populate.
Idiosyncratic Batch ExtractFor snapshot facts and certain dimensions, there are idiosyncratic batch jobs that were created to handle complex extraction logic.
• Batch Parameters: Certain batch jobs delivered as part of the source system allows additional batch parameters for the end users to supply custom service script. The service script must include the same Snapshot DA defined as batch parameter on the batch job.
• Algorithm Soft parameters: Certain algorithms delivered as part of the source system allows additional soft parameters for the end users to supply custom element population rules and service script. The usage of these parameter values is similar as explained for the 'Element Population Rule' and ‘Post Service Script’ above in the Synchronization BO-based style. The service script must include the same Snapshot DA defined as soft parameter on the algorithm.
• New Algorithm: In case where the user needs to drastically change the logic of populating the UDF/UDM columns or even the remaining set of fields in the flat files, users may wish to create a new algorithm and plug it in on the originating BO. This algorithm will have to be plugged in with a higher sequence than the base product algorithm. Additional care will have to be taken since this will completely override the existing algorithm logic and this new algorithm will have to supply the logic of populating the entire flat file.
Extracting Additional FieldsWhile the extract programs are delivered to populate their flat files with commonly used information, you may want to populate the User Defined Field (UDF) and User Defined Measure (UDM) with information not supported by the base-package. To do this, customers must use the "Sync BO Options" to the respective extract objects.
For details on how to extend the warehouse schema “User exits in Oracle Utilities Meter Data Management” refer to Knowledge Article “Extending the OBIU Data Warehouse (Using Sync BO in MDM)” on My Oracle Support (https://support.oracle.com/).
Customizations 5-9

5-10 Administration Guide

Chapter 6 Adding New Requirements
This section describes how Oracle Utilities Advanced Spatial and Operational Analytics (OUASA) can be extended by customers to add the functionality that is not built into the product.
This section includes the following topics for developing the new requirements:
• Customizing Dashboards
• Creating a New Star Schema
• Oracle Warehouse Builder (OWB) Objects
• Running the Oracle Warehouse Builder (OWB) Code Generator
• Loading and Deploying TCL files in Oracle Warehouse Builder (OWB)
• File Processor Daemon
• Auto Cache Refresh
• Extraction, Transformation, and Loading (ETL) Customization
Customizing DashboardsThis section describes how to use Oracle Business Intelligence Enterprise Edition (OBIEE) to customize Oracle Utilities Advanced Spatial and Operational Analytics. It includes the following topics:
• Modifying the RPD File
• Customizing Answers
• Creating New Answers
• Adding New Labels
Modifying the RPD FileAll customer modifications must be done in a separate repository file which is separate from the product’s out-of-the-box repository. Any customization done is merged into the upgraded repository file through the Merge utility of Oracle Business Intelligence Enterprise Edition (OBIEE) along with the product’s out-of-the-box repository file.
Oracle recommends that you use a staging environment for the repository upgrade. However, as long as customer modifications are done on top of a copy of the base repository file, the OBIEE upgrade process is able to handle most customizations that may be made to the repository file. The simpler the changes, the less complex upgrade procedure; hence, you should try to limit the changes made to the repository file.
Adding New Requirements 6-1

For information about managing, upgrading, and merging repository (.rpd) files, see the Oracle Business Intelligence Server Administration Guide.
Customizing AnswersAll customer modifications must be done in a separate folder in order to preserve these modifications for upgrading the Oracle Utilities Advanced Spatial Analytics (OUASA). If an existing answer needs to be changed to meet your requirements, a copy of the product report should be created, and changes should be made to the copy (not to the original report). The dashboard should be changed to point or refer to the new copy instead.
Note that dashboards are overwritten during the upgrade and any mappings between dashboards and customized answers are lost and must be re-mapped manually. Therefore, you should use a staging environment for upgrade and manually remap dashboards before moving the upgraded customized content into the production environment.
For more details about managing, upgrading, and merging presentation catalogs, refer to the Oracle Business Intelligence Presentation Services Administration Guide.
Creating New AnswersOracle Utilities Advanced Spatial Analytics (OUASA) provides out-of-the-box dashboards with rich and varied set of analytics for Credit & Collection Analytics, Customer Analytics, Distribution Analytics, Meter Data Analytics, Mobile Workforce Analytics, Outage Analytics, Revenue Analytics, Exception Analytics, and Work & Assets Analytics. However, if required, customers can create new answers or dashboards.
As noted in the above section regarding customization of existing answers, new answers should also be saved in a separate folder so that they are not overwritten while upgrading the Oracle Utilities Advance Spatial Analytics (OUASA).
A customer implementation can create field labels for use in their answers or the labels can just be created directly in the answer, if there is no multilingual/localization requirements. If product labels are used in an answer, they can be modified during an upgrade (unless you have entered an override label). At best, it is recommended to limit the changes to the existing labels; however, there can be certain situations, when they are updated.
Adding New LabelsIf an implementation wants to use the label mechanism for new answers, then the Custom Field Maintenance dashboard can be used to add, update, and delete custom labels. These custom labels can then be used in answers as well as in the logical and physical objects in the repository or RPD file.
Note: Only custom field labels, identified by a CM owner flag, can be updated or deleted. New labels are created with a CM owner flag. A label that already exists cannot be created, so if a base labels already exists, an implementation can update the override label as described in the preceding section Creating New Answers.
To create a new label, select the Insert tab. Populate the Table Name (if required), Field Name (if required), and the Description associated with the field. Click Insert. A new record is created, which can be used in the same way as labels are used in the base RPD file and base answers.
6-2 Administration Guide

To update an existing CM label, query the field to be updated on the Update Table, change the description associated with the field, and click Update.
A CM label can be deleted using the Delete tab by selecting the check box next to each record that needs to be deleted. Click Delete.
Adding New Requirements 6-3

Creating a New Star SchemaThe star schema is perhaps the simplest data warehouse schema. It is called a star schema as the entity-relationship diagram of this schema resembles a star with points radiating from a central table. The center of the star consists of a large fact table. The end points of the star are the dimension tables.
A star query is a join between a fact table and a number of dimension tables. Each dimension table is joined to the fact table using a primary key to foreign key join; however, the dimension tables are not joined to each other. The optimizer recognizes star queries and generates efficient execution plans. It is not mandatory to have any foreign keys on the fact table for star transformation to take effect.
A typical fact table contains keys and measures. A star join is a primary key to foreign key join of the dimension tables to a fact table. The main advantages of a star schema is as follows:
• It provides a direct and intuitive mapping between the business entities analyzed by end users and the schema design.
• It provides highly-optimized performance for typical star queries.
• It is widely supported by a large number of business intelligence tools, which may anticipate or even require that the data warehouse schema contain dimension tables.
Star schemas are used for both simple data marts as well as very large data warehouses. Once the model has been designed, the Oracle Warehouse Builder (OWB) code generator can be utilized to generate the mappings and process flows.
For details regarding data modeling, refer to Oracle® Database Data Warehousing Guide 11g Release 2 (Chapter 19 Schema Modeling Techniques).
Oracle Warehouse Builder (OWB) ObjectsOracle Warehouse Builder objects are described in the table below:
OWB Object Description
Facts The new fact table designed for storing the measures and attributes, and foreign keys to dimensions.
Dimensions Any new dimensions that are needed to support analytics.
Sequences Sequences used to generate the surrogate keys for new facts and dimensions.
Staging Tables External tables required to import data from files into the target table.
Mappings The job definition to extract, transform, and load the target facts/dimensions from external tables.
6-4 Administration Guide
Perform the below steps for creating the Oracle Warehouse Builder (OWB) code:
1. Create a fact or dimension.
2. Specify the column sizes.
3. Specify the external table name.
4. Map a column from external table to target.
5. Specify the join conditions.
6. Generate the Oracle Warehouse Builder (OWB) code.
Running the Oracle Warehouse Builder (OWB) Code GeneratorThe Oracle Warehouse Builder (OWB) Code Generator is used to create OMBPlus TCL scripts. OMBPlus is an OWB scripting language that can create, alter, delete, and deploy OWB objects. The GenOWB.exe program is located in the Database Package in the scripts folder.
GenOWB.exe must be run on a Windows machine that can connect to the data warehouse database. Use the following syntax to run the OWB Code Generator:
GenOWB.exe -d <DBInfo> -t <TableName> -m <Mapping/Workflow/StagingTables/Facts/Dimension/All> -a <Dimensions/Facts/All> -h -g
The parameters and related values in the GenOWB.exe are described below:
Workflows Process flows defined for the execution of the mappings. Typical process flow generated by the Oracle Warehouse Builder (OWB) code generator includes the mapping, which is followed by a process flow to refresh the associated materialized views and creating an entry into the event polling table to refresh the Oracle Business Intelligence Enterprise Edition (OBIEE) cache.
OWB Object Description
Parameter Value
-d Database information: Database User ID, password, database TNS name (for example, dwadm, dwadm, or bivmdv)
-t Name of dimension or fact tables
-m Generate:• Mapping (M)
• WorkFlow (W)
• Staging Tables (S)
• Sequences (Q)
• Facts (F)
• Dimensions (D)
• All (A)
Adding New Requirements 6-5

When the Oracle Warehouse Builder (OWB) Code Generator is run for a table, the following files are generated:
• seq_nam.TCL: A file that creates the sequence in Oracle Warehouse Builder (OWB) used for the primary key of the table to be loaded. For example, the SPL_ACCT_SEQ.TCL file creates the sequence used to populate the primary key of the CD_ACCT table. Note that the sequence should also be created manually in the database, as it is not recommended to deploy sequences from Oracle Warehouse Builder (OWB) to the database.
• tbl_name.TCL: A file that creates the table definition in the Oracle Warehouse Builder (OWB). For example, the CD_ACCT.TCL script creates the CD_ACCT table in the Oracle Warehouse Builder. Note that tables should also be created manually in the database, as it is not recommended to deploy tables from Oracle Warehouse Builder to the database.
• stg_file_name.TCL: A file that creates the data file definition in the Oracle Warehouse Builder (OWB). For example, the STG_ACCT_FF.TCL creates the definition of the CD_ACCT extract file.
• ctl_file_name.TCL: A file that creates the control file definition in the Oracle Warehouse Builder (OWB). For example, the STG_ACCT_CTL_FF.TCL creates the definition of the CD_ACCT control file.
• stg_tbl_name.TCL: A file that creates the data file external table definition in the Oracle Warehouse Builder (OWB). For example, the STG_ACCT_EXT.TCL creates the definition of the CD_ACCT external table STG_ACCT_EXT.
• ctl_tbl_name.TCL: A file that creates the control file external table definition in the Oracle Warehouse Builder (OWB). For example, the STG_ACCT_CTL_EXT.TCL creates the definition of the CD_ACCT control table STG_ACCT_CTL_EXT.
• owb_map_name.TCL: A file that creates the Oracle Warehouse Builder (OWB) mapping, which loads the data from the external table into the data warehouse table. For example, the SPLMAP_D_ACCT.TCL script creates the SPLMAP_D_ACCT mapping, which reads records from the STG_ACCT_EXT and STG_ACCT_CTL_EXT files and loads the extracted records into the CD_ACCT table.
• owb_wf_name.TCL: A file that creates the process flow which takes an extract file and loads it into the fact or dimension table. For example, the SPLWF_D_ACCT.TCL creates the SPLWF_D_ACCT process flow, which checks to see if an account extract file exists in the data load directory, and if it exists, then loads it into the CD_ACCT table.
• OUBI_LDRF_wf_name.TCL: A file that is created only for fact loads. It creates a process flow, which calls the data file loading process flow and the materialized view refresh process
-a Generate Mapping/Workflow/Staging Tables/Sequences/Cubes/Dimensions for all (D)imension Tables, all (F)act tables or (A)ll Dimension and Fact tables (D/F/A)
-x Generate DROP statement? (Y)es or (N)o. Default is No.
-h Help
-g generate debug info
Parameter Value
6-6 Administration Guide

flow sequentially. For example, the OUBI_LDRF_FT.TCL file creates the OUBI_LDRF_FT process flow that calls the SPLWF_F_FT and OUBI_RFSH_FT process flows.
Note: To create this process flow, the materialized view refresh process flow must exist.
Depending on which Oracle Warehouse Builder objects are changed, the parameters to the GenOWB.exe program is modified.
In the previous example for the CF_CASE table change, the following two commands should be run:
GenOWB.exe -d spluser,spluser_pw,BICONN -t CF_CASE -m M -x YGenOWB.exe -d spluser,spluser_pw,BICONN -t CF_CASE -m W -x Y
The first command shown above creates the SPLMAP_F_CASE.TCL file and the second command creates the SPLWF_F_CASE.TCL and OUBI_LDRF_CASE.TCL files, with drop commands in each file since the objects should already exist in the Oracle Warehouse Builder (OWB) repository.
Loading and Deploying TCL files in Oracle Warehouse Builder (OWB)
Once the TCL scripts are created, they need to be loaded into the Oracle Warehouse Builder (OWB) repository using OMBPlus. OMB Plus is a flexible, high-level command line metadata access tool for Oracle Warehouse Builder. Use OMB Plus to create, modify, delete, and retrieve object metadata in Warehouse Builder design and runtime repositories. For more information about OMBPlus refer to the Oracle Warehouse Builder API and Scripting Reference document.
To open an OMBPlus window, in the OWB Design Center select View->OMB*Plus.
From within the OMBPlus window, there are many OMBPlus commands available, but the following commands are the two that will usually be used:
• cd SOURCE_DIRECTORY
• source TCL_FILE
Note that OMBPlus is case sensitive, so that the commands must be specified in lowercase. Also, the ‘\’ is an escape character in OMBPlus, so within a directory name, two ‘\’s must be used if it is needed.
To load the files that would have been created by using the commands in the previous section, assume that the TCL files are in the c:\bi\tcl directory. The following OMBPlus commands can be used to load the files:
cd c:\\bi\\tclsource SPLMAP_F_CASE.TCLsource SPLWF_F_CASE.TCLsource OUBI_LDRF_CASE.TCL
The order that the TCL files are loaded is important, as the objects are dependant on other objects. If an Object is deleted from OWB by running a TCL file, then references to that object are dropped from already existing OWB objects. So in all cases, the order that the TCL files are listed in the preceding section should always be used. Also, if an earlier object is recreated, all of the other objects that are listed afterwards also need to be created.
For example, if a change needs to be made to an OWB mapping, the owb_map_name.TCL, owb_wf_name.TCL and OUBI_LDRF_wf_name.TCL (for facts) scripts will have to be regenerated and reloaded into OMBPlus.
Adding New Requirements 6-7

After loading some of these TCL scripts, the customizations that were done prior to earlier deployments will be lost, so the preconditions to deployment must be redone. The following is a list of the scripts that you must rerun after changes are made:
• EditFFCS.tcl – this will need to be run if Flat File TCL scripts (stg_file_name.TCL and ctl_file_name.TCL) are loaded.
• EditFFLL.tcl – This will need to be run if External Table TCL scripts (stg_tbl_name.TCL and ctl_tbl_name.TCL) are loaded.
• EDITFP.tcl and editmail.tcl – These scripts will need to be run is Process Flow TCL scripts (owb_wf_name.TCL) are loaded.
File Processor DaemonWhen new extracts are set up on the source application side and new OWB process flows have been setup to load the new flat files, the File Processor Daemon needs to be extended to allow the processing of the new flat files.
More specifically the parameters file needs to be extended to include the new mappings. In the new CM parameters file these following two types of mapping need to be present
• extract.file.mapping.override.count
• extract.file.mapping
The details of these two parameters have already been mentioned previously in Chapter 3 under the section "Running and Monitoring Extract Loads"
For more details on the file processor daemon, please refer to Oracle Utilities Advanced Spatial and Operational Analytics Installation Guide
Auto Cache RefreshOBIEE provides a mechanism called Event Polling, which allows OBIEE to query a Database Table to find out when data has been updated in fact or dimension tables. By modifying the OWB load process to populate an Event Polling table, we can let OBIEE know when data has been updated in the data warehouse, and enable OBIEE to know when to refresh the cache data that has been queried before.
A new event polling table has be made available as part of Oracle Utilities Advanced Spatial Analytics B1_OBIEE_EVENT_POLLING.
The use of an Oracle BI Server event polling table (event table) is a way to notify the Oracle BI Server that one or more physical tables have been updated and then that the query cache entries are stale.
Each row that is added to an event table describes a single update event, such as an update occurring to a Product table.
The Oracle BI Server cache system reads rows from, or polls, the event table, extracts the physical table information from the rows, and purges stale cache entries that reference those physical tables.
For new requirements, new extractors will be created along with new OWB load processes to load data into the new fact or dimension tables. Here in order to ensure that the OBIEE cache data is automatically refreshed, an additional step has to be included in the OWB process flow to ensure that an entry is made in the available event polling table B1_OBIEE_EVENT_POLLING.
This will ensure that whenever new data is loaded by the OWB process flow, the OBIEE cache is automatically refreshed and made available for the analytics reports.
Refer to an existing base product supplied OWB process flow for samples.
6-8 Administration Guide

Extraction, Transformation, and Loading (ETL) CustomizationThis section describes how to customize the Extraction, Transformation, and Loading (ETL) process for different Oracle Utilities products, including:
• Oracle Utilities Network Management System (NMS)
• Oracle Utilities Meter Data Management (MDM) and Mobile Workforce Management (MWM)
• Oracle Utilities Customer Care and Billing (CC&B) and Work and Asset Management (WAM)
Oracle Utilities Network Management System (NMS)As mentioned in the prior sections, Network Management System (NMS) uses the view-based approach to detect the change in the source table that needs to be populated in the data warehouse.
To populate the new facts / dimensions, the following approach is to be followed:
1. Create new modify and delete views that have the business logic to extract the required data.
2. Create a new extract program/procedure to access the view from above step.
3. Run the new extract program to retrieve data into flat files.
The detail given in Appendix C about the source Extract scripts and View names would be useful reference when trying to create new scripts.
Oracle Utilities Meter Data Management (MDM) and Mobile Workforce Management (MWM)
For all the facts and dimensions other than those of snapshot type and certain dimensions with complex extract logic, it is advisable to use the Synchronization BO mechanism provided by the Oracle Utilities Application Framework (OUAF). There are two options to extract new Dimension or Fact data
Perform the following steps to create the new sync request Business Object (BO):
1. Copy an existing Sync Request BO.
2. Modify the following BO Options in the newly created Sync Request BO:
a. BO to Read. This needs to be populated with the BO which has elements that need to be extracted.
b. Snapshot Data Area. This defines the schema which will be exactly extracted in the flat file, including the order of elements and the element types.
c. Post Service Script. If you want to extract data which is not available in the schema BO to Read BO, you will have to write a processing script to extract such elements.
d. Element Population Rule. If you want to move data from an element defined on BO to Read BO to another element defined in the Snapshot Data Area, you can add the Element Population Rule.
e. Batch for Extract. This is the name of the batch that needs to be executed to extract the flat files. It is recommended that you create a new extract batch control for your new fact or dimension so you can define and default the parameters specific to your fact or dimension, but you should be able to use the existing extract java batch program.
f. Star Schema Type. Mention whether this BO is for a Fact or Dimension.
Adding New Requirements 6-9

3. To handle initial sync, it is recommended that you create a new initial load batch control for your new fact or dimension if there is no existing one for the MO of your ETL source. If there is an existing initial load batch control for the MO, add the newly created Sync Request BO as additional Sync Request BO batch parameter.
4. To handle incremental sync, create an Audit algorithm to define the logic to control the creation of pending Sync Request record. This should be plugged in on the MO of your ETL source. Refer to an existing audit algorithm delivered in the edge application. Depending on the audit algorithm created above, add the newly created Sync Request BO as an option on the MO of your ETL source.
For snapshot type facts and certain dimensions with complex extraction logic, you can create an idiosyncratic java batch program to extract the data without using the Sync Request BO.
Perform the following steps to create such program:
1. Define Data Area that reflects the structure of the flat file, including the data type and order of elements.
2. Write the batch extract program that retrieves each record that needs to be extracted and performs the following:
• Populate the Data Area with the information to be extracted as appropriate.
• Invoke the BusinessService “F1-ConvertXMLToFileFormat” to transform Data Area into the fixed length string. This string would be written to the extract file when the program is executed.
• Write the record to the extract flat file.
3. Create new batch control for the new extract program
Oracle Utilities Customer Care and Billing (CC&B) and Work and Asset Management (WAM)
As mentioned previously in Chapter 3, CCB and WAM uses the trigger-based approach to detect the change in the source table that needs to be populated in the data warehouse.
To populate the new facts / dimensions, the following approach is to be followed:
1. Create new triggers that have the business logic to extract the required data from the new tables.
2. Create a new extract program/procedure to with the desired extraction logic from the change log tables.
3. Create new batch controls for the extract programs.
4. Run the new batch controls to extract data into flat files.
Refer to Appendix B regarding source Extract Programs and trigger names while trying to create the new extracts.
6-10 Administration Guide

Chapter 7Oracle Warehouse Builder Licensing and
Optional Features
Oracle Warehouse Builder (OWB) provides various optional features which are not included in the basic Extraction, Transformation, and Loading (ETL) feature group. The basic ETL feature group is included in the Oracle Database Enterprise Edition License, hence; there is no additional license cost required to use or install the basic features. The standard ETL processes included in Oracle Utilities Advanced Spatial and Operational Analytics (OUASA) uses only the features that are included in the basic ETL feature group.
In addition, the Oracle Warehouse Builder (OWB) Code Generator does not create any code that requires the use of optional OWB features; hence, any additional Extraction, Transformation, and Loading (ETL) code created by an implementation using the OWB Code Generator does not require any additional OWB License costs. However, if Oracle Warehouse Builder (OWB) is used to create other ETL code outside of the OWB Code Generator, then using some of these optional features may require additional OWB licenses.
Disabling the Optional Features in Oracle Warehouse Builder (OWB)
In order to ensure that optional features are not used, the Oracle Warehouse Builder (OWB) provides a means to disable the use of optional features. After starting the Warehouse Builder Repository Assistant, choose the “Manage optional features” operation, as shown in the following image.
Oracle Warehouse Builder Licensing and Optional Features 7-1

After entering the password for the OWBSYS user, deselect all of the licensed option names on the Enable Optional Features page.
Once the options are deselected, the new selections will take effect for any new connections to Oracle Warehouse Builder, and if options are used that are not available, an error dialog will be displayed.
7-2 Administration Guide

For further details regarding the feature groups and licensing of Oracle Warehouse Builder (OWB), visit the OWB page on OTN at this location:
http://www.oracle.com/technetwork/developer-tools/warehouse.
Oracle Warehouse Builder Licensing and Optional Features 7-3

7-4 Administration Guide

Chapter 8Maintaining Environments
This section describes how to maintain your Oracle Utilities Advanced Spatial and Operational Analytics OUASA) environments, including moving code changes from one environment to another.
This section includes the following topics:
• Overview of Environment Maintenance
• Moving Code
• Database Cloning
Overview of Environment MaintenanceYou should implement processes to maintain code control over various environments. The following components of the Oracle Utilities Advanced Spatial Analytics (OUASA) should be handled separately.
• OBIEE Web Catalog
• OBIEE Repository File
• Field Label Metadata
• OWB Repository
• OUAF Metadata (only required if there are OWB customizations)
• Mapviewer Spatial Data
Assuming that custom changes are made to any of these objects, then a mechanism must be put in place to develop, test, and move these customizations to the production environment.
Moving CodeDuring the development phase of coding, you usually do not need to move code from a development environment to any other environments. However, once a project moves to the Quality Analyst (QA) or production phases, code changes may be need to be migrated.
For example, in an internal development process, there may be two Development environments, one for Oracle Business Intelligence Enterprise Edition (OBIEE) Dashboard creation and one for the Oracle Warehouse Builder (OWB) Development. You can build a QA environment from scratch, that is, an empty database is created, the Oracle Warehouse Builder (OWB) objects are imported and deployed, and the OBIEE web catalog and repository file are created fresh.
To do this, use the installation process for creating an empty Oracle database, Oracle Warehouse Builder repository, and WebLogic environment. Then, use the OWB Export process to create two
Maintaining Environments 8-1

MDL files from the Development environment, one for the locations, and one for all of the other OWB objects. You should then copy the OBIEE Repository file, and use the OBIEE export process to create the OBIEE web catalog files.
Once you have these files, follow the install process to load the MDL files in the OWB repository, copy the OBIEE Repository file into the QA WebLogic environment, update the user name, password, and database connections for the QA databases, and import the web catalog export files into the same location as they were in the development environment.
This process works well for a development move to QA, but will not work once a system goes into production, because parts of this process require the creation of an empty database, which is not something that should be done in a production environment.
In situations, where bug fixes have been made in a development environment and they need to be moved to a production environment, you can to export the entire OWB repository and OBIEE web catalog and replace this in the production environment. Use this method to move the code if it is not known exactly which objects have changed.
For OWB though, if the modified objects are known, then it is possible to export only the changed objects, import them in the QA environment, and then, once QA is successful, do the same import process into the production environment. Another option is to save the TCL files that were created by the OWB Code Generator, and then load them into the QA and production environments.
To create an MDL file for a known set of OWB objects, follow these steps:
1. Log on to Workflow Development Database using Design Center as Repository Owner (BIREPOWN).
2. Review the modified the Oracle Warehouse Builder (OWB) objects and then, select the OWB objects:
3. Export them by navigating to Design > WareHouse Builder Metadata
4. Review the path for MDL and log file and select Export all dependencies.
5. Click Export.
6. Use the created MDL file to move objects from a Development environment to a QA or Production environment.
This process assumes that database changes are handled outside of the Oracle Warehouse Builder (OWB). Hence, new tables, modifications to existing tables, or materialized view log changes should be handled via SQL scripts created by the Development team.
For Oracle Business Intelligence Enterprise Edition (OBIEE), a full move is not recommended, there are ways of merging code in the web catalog and also in the repository file. These methods are documented in the Oracle Business Intelligence Enterprise Edition (OBIEE) Administration guide. See Chapter 24, “Moving Between Environments,” in the System Administrator's Guide for Oracle Business Intelligence Enterprise Edition 11g Release 1. This chapter shows how you can
8-2 Administration Guide

move Oracle Business Intelligence to a new environment or from a test to a production environment.
For moving modified override labels from development to QA to production, for MapViewer data, it should be added to QA or production environments the same way that it is added to development. If a shapefile is downloaded and added to the Development environment, the same shapefile should be added to the QA and production environments.
Finally, it is very important that the process of moving code from development to QA is exactly the same as the process that moves the code to production. It is only by following the same sequence of steps in both cases that the movement process is also tested. If one process is followed to move code to QA and another process is followed to move code to Production, then problems can arise in the move to production that were not seen in the move to QA.
Database CloningYou can use database cloning to move the entire development database to a QA environment or a new production environment. This cannot be used to move a development database to an existing production environment, as the existing production database tables will be overwritten. But for QA purposes, this can move the development database quicker than a fresh install. Note that this does not move the OBIEE objects, but does handle all of the Oracle Warehouse Builder (OWB) code, field label changes, MapViewer metadata, and any new database objects.
To clone a development database, follow these steps:
1. Clone the existing database.
2. Go to the ORACLE_HOME/owb/UnifiedRepos directory, and connect to database as sys.
3. Execute reset_owbcc_home.sql and remote_owb_install.sql scripts.
4. Go to ORACLE_HOME/owb/rtp/sql directory.
5. Connect with OWBSYS user and execute reset_repository.sql You may get the following error:
ERROR at line 1:ORA-29532: Java call terminated by uncaught Java exception:java.sql.SQLException: The file/orasw/app/oracle_test/product/11.2.0/dbhome_1/owb/bin/admin/rtrepos.propertiescannot be accessed or has not been properly created on the server tudevlv0335.If the file does not exist or if the database owner (normally user 'oracle')does not have the required file permissions or if the file has not beenproperly created then the file can be recreated by running the SQL*Plus script/orasw/app/oracle_test/product/11.2.0/dbhome_1/owb/rtp/sql/reset_repository.sql(in a RAC environment the file must be manually copied to each server which isused for OWB). Otherwise if using a 10.2 database instance, then please run theSQL*Plus script/orasw/app/oracle_test/product/11.2.0/dbhome_1/owb/UnifiedRepos/reset_owbcc_home.sql.The exception which caused this failure is'java.security.AccessControlException(the Permission (java.io.FilePermission
Maintaining Environments 8-3

/orasw/app/oracle_test/product/11.2.0/dbhome_1/owb/bin/admin/rtrepos.propertiesWrit If you do see this error, follow these steps:
a. Connect as sys to database and execute reset_owbcc_home.sql and remote_owb_install.sql again.
b. Connect with OWBSYS and execute reset_repository.sql.
6. Submit the SELECT * FROM OWBRTPS query. An updated oracle home is shown in the value column.
7. Connect with OWBSYS and submit select SERVER_SIDE_HOME from WB_RT_SERVICE_NODES query. The updated oracle home is shown.
8. Log in to the design repository and get the name of all the control centers with which locations are registered.
9. Go to the ORACLE_HOME/owb/rtp/sql directory, connect with OWBSYS and execute UpdateControlCenter.sql for all control centers with which locations are registered. Provide the following inputs:
Enter Workspace Name: SPLBIREP Enter Workspace User Name: BIREPOWN Enter Control Center Name: BI24TEST Host: tudevlv0335.us.oracle.com Port: 1521 Service Name: OWBTEST New Net Service Name: OWBTEST Select Workspace Id for workspace SPLBIREP and user BIREPOWN Workspace id = 2 Update location properties for BI24TEST Location Type = Control Center Control Center BI24TEST Found Connection Type = Default HOST:PORT:SERVICE Updating... Updating CMPLocation_Host = tudevlv0335.us.oracle.com CMPLocation_Host Not Found Inserting Updating CMPLocation_Port = 1521 CMPLocation_Port Not Found Inserting Updating CMPLocation_ServiceName = OWBTEST PL/SQL procedure successfully completed.
10. Go to ORACLE_HOME/owb/rtp/sql directory, connect with OWBSYS and execute UpdateLocation.sql for all locations. Make sure to provide correct version numbers. For example:
Enter Workspace Name: SPLBIREPEnter Workspace User Name: BIREPOWNEnter Location Name: SPL_BI_TGT_LOCNew Host: tudevlv0335.us.oracle.comNew Port: 1521New Service Name: OWBTESTNew Net Service Name: OWBTESTNew Version: 11.2Select Workspace Id for workspace SPLBIREP and user BIREPOWNWorkspace id = 2Update location properties for SPL_BI_TGT_LOCLocation Type = Oracle Database
8-4 Administration Guide

Location SPL_BI_TGT_LOC FoundConnection Type = Default HOST:PORT:SERVICE Updating...Updating CMPLocation_Host = tudevlv0335.us.oracle.comUpdating CMPLocation_Port = 1521Updating CMPLocation_ServiceName = OWBTESTUpdating CMPLocation_Version = 11.2
PL/SQL procedure successfully completed.
11. Connect to OWBSYS and select EXECUTE UPDATE WB_RT_SERVICE_NODES SET CONNECT_SPEC='localhost:1521:<dbname>'; commit;
12. Connect to the control center manager in the design repository.
13. Register all locations.
14. Unregister all locations.
15. Save all objects and exit from the Control Center Manager.
16. Double-click the control center and move all selected locations to available locations.
17. Click OK.
18. Rename the control center as required.
19. Set the other control centers with which locations are registered as default control center for default_configuration and connect to control center.
20. Register all locations.
21. Unregister all locations.
22. Select SAVE ALL OBJECTS and exit from the control center.
23. Double-click the control center and move all selected locations to available locations.
24. Click OK.
25. Rename the control center as required.
26. Repeat the above steps for setting the control centers for all registered centers.
This removes all control center information from the registration tab of all locations. If you do not remove control center dependencies, you are able to register locations with any control center but not able to update location information after you unregister the location.
Move the locations from the available section to the selected location in the required control center. Then set the required control center as default control center for default_configuration and log in to control center.
After this, locations are available for update and can be registered, then objects can be deployed.
Maintaining Environments 8-5

8-6 Administration Guide

Appendix APackage Process Flows
This section lists the process flows that are included with each package.
Package name Process Flow
DIM SPLWF_D_ACCT
SPLWF_D_ADDR
SPLWF_D_ADJ_TYPE
SPLWF_D_ASSET
SPLWF_D_CALL_INFO
SPLWF_D_CAMPAIGN
SPLWF_D_CASETYPE_STATUS
SPLWF_D_CASE_COND
SPLWF_D_CC_TYPE
SPLWF_D_COLLEVT_TYPE
SPLWF_D_COLLPROC_STATUS
SPLWF_D_COLLPROC_TMPL
SPLWF_D_CREW
SPLWF_D_CTRL_ZONE
SPLWF_D_DELETE
SPLWF_D_DEVICE
SPLWF_D_EVENT
SPLWF_D_EVENT_STATUS
SPLWF_D_FAILURE
SPLWF_D_FISCAL_CAL
SPLWF_D_FT_TYPE
Package Process Flows A-1

SPLWF_D_METER
SPLWF_D_OP_ACCT
SPLWF_D_OP_ACTG_TY
SPLWF_D_OP_EXP
SPLWF_D_OP_UOM
SPLWF_D_ORDER_CAN_RSN
SPLWF_D_ORDER_STATUS
SPLWF_D_PAY_CAN_RSN
SPLWF_D_PER
SPLWF_D_PKG
SPLWF_D_PLANNER
SPLWF_D_PREM
SPLWF_D_RATE
SPLWF_D_REPAIR
SPLWF_D_ROOT_CAUSE
SPLWF_D_SA
SPLWF_D_SA_STATUS
SPLWF_D_SEVEVT_TYPE
SPLWF_D_SNL
SPLWF_D_SQI
SPLWF_D_STOCK_ITMTY
SPLWF_D_STRM
SPLWF_D_STRM_TR_TY
SPLWF_D_TNDR_SRCE
SPLWF_D_TNDR_STATUS
SPLWF_D_TNDR_TYPE
SPLWF_D_TOU
SPLWF_D_UCOLEVT_TYPE
SPLWF_D_UCOLPROC_STATUS
SPLWF_D_UCOLPROC_TMPL
SPLWF_D_UOM
SPLWF_D_USER
SPLWF_D_WRKORD_TY
Package name Process Flow
A-2 Administration Guide

DIM2 OUBIWF_D_CUTET
OUBIWF_D_MSG
OUBIWF_D_ODET
OUBIWF_D_ODPT
OUBIWF_D_TD
OUBIWF_D_TD_PRIORITY
OUBIWF_D_TD_ROLE
OUBIWF_D_TD_SKILL
OUBIWF_D_TD_STATUS
OUBIWF_D_TD_TYPE
SPLWF_D_CC_UDD1
SPLWF_D_CC_UDD2
SPLWF_D_CREW_SHIFT
SPLWF_D_FEEDER
SPLWF_D_FT_UDD1
SPLWF_D_FT_UDD2
SPLWF_D_GL_ACCT
SPLWF_D_PHASE
SPLWF_D_SERVICE_AREA
SPLWF_D_STORM
SPLWF_D_STORM_OUTAGE_TYPE
SPLWF_D_SW_PLAN
SPLWF_D_SW_PLAN_STATE
DIM_MDM OUBIWF_D_CONS_TYPE
OUBIWF_D_CONTACT
OUBIWF_D_DAYS_LASTUT_TYPE
OUBIWF_D_DAYS_LAST_MSRMT
OUBIWF_D_DEVICE_ACTIVITY_TYPE
OUBIWF_D_DEVICE_EVT_STATUS
OUBIWF_D_DEVICE_EVT_TYPE
OUBIWF_D_DEV_ACT_STATUS
OUBIWF_D_EXCP_SEV
OUBIWF_D_EXCP_TYPE
Package name Process Flow
Package Process Flows A-3

OUBIWF_D_IE_STATUS
OUBIWF_D_IMD_TYPE
OUBIWF_D_MC
OUBIWF_D_MSRMT_COND
OUBIWF_D_MTR_DEVICE
OUBIWF_D_SP
OUBIWF_D_SPR
OUBIWF_D_SP_STATUS
OUBIWF_D_SP_UT_AGE_TYPE
OUBIWF_D_UOM_TOU
OUBIWF_D_UOM_TOU_SQI
OUBIWF_D_US
OUBIWF_D_USAGE_GROUP
OUBIWF_D_VEE_RULE
OUBIWF_D_APPT_TM
DIM_MWM OUBIWF_D_APPT_TM_OF_DAY
OUBIWF_D_CREW_TM_USG
OUBIWF_D_EARLY_LOGOFF_TM
OUBIWF_D_LATE_LOGON_TM
OUBIWF_D_RESP_TM_DEV
OUBIWF_D_SHIFT_BO_STATUS
OUBIWF_D_TASK_BO_STATUS
OUBIWF_D_TASK_TYPE
OUBIWF_D_TRAVEL_DIST_DEV
OUBIWF_D_TRAVEL_DUR_DEV
OUBIWF_D_WORK_DUR_DEV
DIM_UDD OUBIWF_D_CMP_SHIFT_UDD1
OUBIWF_D_CMP_SHIFT_UDD2
OUBIWF_D_CONSUMPTION_UDD1
OUBIWF_D_CONSUMPTION_UDD2
OUBIWF_D_CREW_TASK_UDD1
OUBIWF_D_CREW_TASK_UDD2
OUBIWF_D_DEVICE_ACTIVITY_UDD1
Package name Process Flow
A-4 Administration Guide

OUBIWF_D_DEVICE_ACTIVITY_UDD2
OUBIWF_D_DEVICE_EVT_UDD1
OUBIWF_D_DEVICE_EVT_UDD2
OUBIWF_D_FLD_ACTIVITY_UDD1
OUBIWF_D_FLD_ACTIVITY_UDD2
OUBIWF_D_INSTALL_EVT_UDD1
OUBIWF_D_INSTALL_EVT_UDD2
OUBIWF_D_SP_SNAP_UDD1
OUBIWF_D_SP_SNAP_UDD2
OUBIWF_D_SP_UDD1
OUBIWF_D_SP_UDD2
OUBIWF_D_SP_UT_AGE_UDD1
OUBIWF_D_SP_UT_AGE_UDD2
OUBIWF_D_TD_ENTRY_UDD1
OUBIWF_D_TD_ENTRY_UDD2
OUBIWF_D_TD_ENTRY_UDD3
OUBIWF_D_TD_ENTRY_UDD4
OUBIWF_D_TD_ENTRY_UDD5
OUBIWF_D_VEE_EXCP_UDD1
OUBIWF_D_VEE_EXCP_UDD2
SPLWF_D_ARREARS_UDD1
SPLWF_D_ARREARS_UDD2
SPLWF_D_FT_GL_UDD1
SPLWF_D_FT_GL_UDD2
FACT OUBIWF_F_CUTEV
OUBIWF_F_ODEV
OUBIWF_F_ODPR
OUBIWF_F_RECENT_TD_ENTRY
OUBIWF_F_TD_ENTRY
SPLWF_F_ARREARS
SPLWF_F_BILLED_USAGE
SPLWF_F_CASE
SPLWF_F_CASE_LOG
Package name Process Flow
Package Process Flows A-5

SPLWF_F_CC
SPLWF_F_CITY_OUTG
SPLWF_F_COLL_EVT
SPLWF_F_COLL_PROC
SPLWF_F_CTRL_ZONE_OUTG
SPLWF_F_CUST_RECENT_OUTG
SPLWF_F_CUST_RST_OUTG
SPLWF_F_FEEDER_DLVRD_LOAD
SPLWF_F_FT
SPLWF_F_FT_GL
SPLWF_F_OP_ACTG
SPLWF_F_ORDER
SPLWF_F_OUTG
SPLWF_F_PAY_TNDR
SPLWF_F_PURGE_RECENT
SPLWF_F_RECENT_CALL
SPLWF_F_RECENT_CREW
SPLWF_F_RECENT_JOB
SPLWF_F_RST_CALL
SPLWF_F_RST_CREW
SPLWF_F_RST_JOB
SPLWF_F_SA
SPLWF_F_SEV_EVT
SPLWF_F_STRM_INV
SPLWF_F_STRM_TR
SPLWF_F_SW_PLAN
SPLWF_F_SW_PLAN_STATE
SPLWF_F_UCOL_EVT
SPLWF_F_UCOL_PROC
SPLWF_F_WRKORD_TK
FACT_MDM OUBIWF_F_CONSUMPTION
OUBIWF_F_DEVICE_ACTIVITY
OUBIWF_F_DEVICE_EVT
Package name Process Flow
A-6 Administration Guide

OUBIWF_F_INSTALL_EVT
OUBIWF_F_SP
OUBIWF_F_SP_SNAP
OUBIWF_F_SP_UT_AGE
OUBIWF_F_VEE_EXCP
FACT_MWM OUBIWF_F_CMP_SHIFT
OUBIWF_F_CREW_TASK
OUBIWF_F_FLD_ACTIVITY
INIT_PKG LOAD_DATE
LOAD_DEFAULT_VALUE
LOAD_SNAPTYPE
LOAD_TIME
OUBIWF_PURGE_RT_AUDIT
MV_RFSH OUBI_RFSH_ARREARS
OUBI_RFSH_BILLED_USAGE
OUBI_RFSH_CASE
OUBI_RFSH_CASE_LOG
OUBI_RFSH_CC
OUBI_RFSH_CITY_OUTG
OUBI_RFSH_CMP_SHIFT
OUBI_RFSH_COLL_EVT
OUBI_RFSH_COLL_PROC
OUBI_RFSH_CONSUMPTION
OUBI_RFSH_CREW_TASK
OUBI_RFSH_CTRL_ZONE_OUTG
OUBI_RFSH_CUST_RECENT_OUTG
OUBI_RFSH_CUST_RST_OUTG
OUBI_RFSH_DEVICE_ACTIVITY
OUBI_RFSH_DEVICE_EVT
OUBI_RFSH_FEEDER_DLVRD_LOAD
OUBI_RFSH_FLD_ACTIVITY
OUBI_RFSH_FT
OUBI_RFSH_FT_GL
Package name Process Flow
Package Process Flows A-7

OUBI_RFSH_INSTALL_EVT
OUBI_RFSH_OP_ACTG
OUBI_RFSH_ORDER
OUBI_RFSH_OUTG
OUBI_RFSH_PAY_TNDR
OUBI_RFSH_RECENT_CALL
OUBI_RFSH_RECENT_CREW
OUBI_RFSH_RECENT_JOB
OUBI_RFSH_RECENT_TD_ENTRY
OUBI_RFSH_RST_CALL
OUBI_RFSH_RST_CREW
OUBI_RFSH_RST_JOB
OUBI_RFSH_SA
OUBI_RFSH_SP
OUBI_RFSH_SP_SNAP
OUBI_RFSH_SP_UT_AGE
OUBI_RFSH_STRM_INV
OUBI_RFSH_STRM_TR
OUBI_RFSH_SW_PLAN
OUBI_RFSH_SW_PLAN_STATE
OUBI_RFSH_TD_ENTRY
OUBI_RFSH_UCOL_EVT
OUBI_RFSH_UCOL_PROC
OUBI_RFSH_VEE_EXCP
OUBI_RFSH_WRKORD_TK
LOADRFSH OUBI_LDRF_ARREARS
OUBI_LDRF_BILLED_USAGE
OUBI_LDRF_CASE
OUBI_LDRF_CASE_LOG
OUBI_LDRF_CC
OUBI_LDRF_CITY_OUTG
OUBI_LDRF_CMP_SHIFT
OUBI_LDRF_COLL_EVT
Package name Process Flow
A-8 Administration Guide

OUBI_LDRF_COLL_PROC
OUBI_LDRF_CONSUMPTION
OUBI_LDRF_CREW_TASK
OUBI_LDRF_CTRL_ZONE_OUTG
OUBI_LDRF_CUST_RECENT_OUTG
OUBI_LDRF_CUST_RST_OUTG
OUBI_LDRF_CUTEV
OUBI_LDRF_DEVICE_ACTIVITY
OUBI_LDRF_DEVICE_EVT
OUBI_LDRF_FEEDER_DLVRD_LOAD
OUBI_LDRF_FLD_ACTIVITY
OUBI_LDRF_FT
OUBI_LDRF_FT_GL
OUBI_LDRF_INSTALL_EVT
OUBI_LDRF_ODEV
OUBI_LDRF_ODPR
OUBI_LDRF_OP_ACTG
OUBI_LDRF_ORDER
OUBI_LDRF_OUTG
OUBI_LDRF_PAY_TNDR
OUBI_LDRF_RECENT_CALL
OUBI_LDRF_RECENT_CREW
OUBI_LDRF_RECENT_JOB
OUBI_LDRF_RECENT_TD_ENTRY
OUBI_LDRF_RST_CALL
OUBI_LDRF_RST_CREW
OUBI_LDRF_RST_JOB
OUBI_LDRF_SA
OUBI_LDRF_SEV_EVT
OUBI_LDRF_SP
OUBI_LDRF_SP_SNAP
OUBI_LDRF_SP_UT_AGE
OUBI_LDRF_STRM_INV
Package name Process Flow
Package Process Flows A-9

OUBI_LDRF_STRM_TR
OUBI_LDRF_SW_PLAN
OUBI_LDRF_SW_PLAN_STATE
OUBI_LDRF_TD_ENTRY
OUBI_LDRF_UCOL_EVT
OUBI_LDRF_UCOL_PROC
OUBI_LDRF_VEE_EXCP
OUBI_LDRF_WRKORD_TK
Package name Process Flow
A-10 Administration Guide
Appendix BOracle Utilities Customer Care and Billing
Extractor Details
This section includes the details for the Oracle Utilities Customer Care and Billing (CC&B) extractors:
Fact / Dimension Table Name
Batch Control Name
Source Table Name Trigger Name UDFs/UDMs being used
CF_ARREARS EXTSAARS CI_SA C1_BI_F_SAAC
CF_BILLED_USAGE EXTBLUSG CI_FT C1_BI_F_FTFZ
CF_CASE EXTCASE CI_CASE C1_BI_F_CASE
CF_CASE_LOG EXTCLOG CI_CASE_LOG C1_BI_F_CLOG
CF_CC C1-CSCNT CI_CC C1_BI_F_CUSTCONT
CF_COLL_EVT C1-CUTEV CI_CUT_EVT C1_BI_F_CUTEV
C1-ODEV CI_OD_EVT C1_BI_F_ODEV
EXTCOLEV CI_COLL_EVT C1_BI_F_COLEV
EXTSEVEV CI_SEV_EVT C1_BI_F_SEVEV
CF_COLL_PROC C1-ODPR CI_OD_PROC C1_BI_F_ODPR
EXTCOLPR CI_COLL_PROC C1_BI_F_COLPR
CF_FT EXTFIN CI_FT C1_BI_F_BUFZ
CF_FT_GL C1-FTGL CI_FT_GL C1_BI_F_FTGL
CF_ORDER C1-ORDER CI_ENRL C1_BI_F_ORDER
CF_PAY_TNDR C1-PYTND CI_PAY_TNDR C1_BI_F_PAYTNDR
CF_RECENTTD_ENTRY
C1-RECTD CI_TD_ENTRY C1_BI_F_RECTD
CF_SA EXTSAACC CI_SA C1_BI_F_SAAC
CF_TD_ENTRY C1-TDENT CI_TD_ENTRY C1_BI_F_TDENT
Oracle Utilities Customer Care and Billing Extractor Details B-1

CF_UCOL_EVT EXTUNCEV CI_WO_EVT C1_BI_F_UNCEV
CF_UCOL_PROC EXTUNCPR CI_WO_PROC C1_BI_F_UNCPR
CD_ACCT EXTACCT CI_ACCT C1_BI_D_ACCT UDF1_CD - CUST_CL_CDUDF1_DESCR - CI_CUST_CL_L.DESCRUDF2_CD - ACCT_MGMT_GRP_CDUDF2_DESCR - CI_ACCT_MGMT_GR_L.DESCRUDF3_CD - CIS_DIVISIONUDF3_DESCR - CI_CIS_DIVISION_L.DESCRUDF4_CD - BILL_CYC_CDUDF4_DESCR - CI_BILL_CYC_L.DESCRUDF5_CD - COLL_CL_CDUDF5_DESCR - CI_COLL_CL_L.DESCR
CD_ADDR EXTADDR CI_PREM C1_BI_D_ADDR UDF1_CD - CITY_UPRUDF1_DESC - CITY_UPRUDF2_CD - COUNTYUDF2_DESC - COUNTYUDF3_CD - POSTALUDF3_DESC - POSTALUDF4_CD - STATEUDF4_DESC - CI_STATE_L.DESCRUDF5_CD - COUNTRYUDF5_DESC - CI_COUNTRY_L.DESCRUDF6_CD - GEO_CDUDF6_DESC - GEO_CD
Fact / Dimension Table Name
Batch Control Name
Source Table Name Trigger Name UDFs/UDMs being used
B-2 Administration Guide

CD_ADJ_TYPE EXTADJT CI_ADJ_TYPE C1_BI_D_ADJT, C1_BI_D_ADJTD
UDF1_CD -AP_REQ_TYPE_CDUDF1_DESCR - CI_APREQ_TYPE_L.DESCRUDF2_CD - DST_IDUDF2_DESCR -CI_DST_CODE_L.DESCR
CD_CAMPAIGN C1-CMPGN CI_CAMPAIGN C1_BI_D_CMPGN, C1_BI_D_CMPAIGND
UDF1_CD - CAMP_STATUS_FLGUDF1_DESCR - CI_LOOKUP_VAL_L.DESCR
CD_CASE_TYPE_STATUS
EXTCTS CI_CASE_STATUS C1_BI_D_CTS
CD_CASE_COND EXTLKUP CI_LOOKUP_VAL C1_BI_D_LKUPC1_BI_D_LKUPD
CD_CC_TYPE C1-CCTTY CI_CC_TYPE C1_BI_D_CCNCTYPD
CD_COLLEVT_TYPE
C1-CUTET CI_CUT_EVT_TYPE
C1_BI_D_CUTETD
C1-ODET CI_OD_EVT_TYPE
C1_BI_D_ODETD
EXTSET CI_SEV_EVT_TYPE
C1_BI_D_SET C1_BI_D_SETD
C1-EXTCET CI_COLL_EVT_TYP
C1_BI_D_CETC1_BI_D_CETD
CD_COLLPROC_STATUS
EXTLKUP CI_LOOKUP_VAL C1_BI_D_LKUP,C1_BI_D_LKUPD
CD_COLLPROC_TMPL
EXTCPT CI_COLL_PROC_TM
C1_BI_D_CPTD
C1-ODPT CI_OD_PROC_TMP
C1_BI_D_ODPTD
CD_FISCAL_CAL EXTFIPD CI_CAL_PERIOD C1_BI_D_FIPDC1_BI_D_FIPDD
CD_FT_TYPE EXTLKUP CI_LOOKUP_VAL C1_BI_D_LKUPC1_BI_D_LKUPD
CD_GL_ACCT C1-FTGL CI_FT_PROC
CD_MSG C1-MSG CI_MSG C1_BI_D_MSGC1_BI_D_MSGD, C1_BI_D_MSGCAT, C1_BI_D_MSGCATD
CD_ORDER_STATUS EXTLKUP CI_LOOKUP_VAL C1_BI_D_LKUpC1_BI_D_LKUPD
Fact / Dimension Table Name
Batch Control Name
Source Table Name Trigger Name UDFs/UDMs being used
Oracle Utilities Customer Care and Billing Extractor Details B-3

CD_ORDER_CAN_RSN
C1-OCNRS CI_ENRL_CAN_RSN
C1_BI_D_OCNRSND
CD_ORDER_STATUS EXTLKUP CI_LOOKUP_VAL C1_BI_D_LKUPC1_BI_D_LKUPD
CD_PAY_CAN_RSN C1-PCNRS CI_PAY_CAN_RSN C1_BI_D_PCNCRSND
CD_PER EXTPER CI_PER C1_BI_D_PERC1_BI_D_PERN, C1_BI_D_PERP
CD_PKG C1-PCKGE CI_PKG C1_BI_D_PKGD
CD_PREM EXTPREM CI_PREM C1_BI_D_PREM UDF1_CD - CIS_DIVISIONUDF1_DESCR - CI_CIS_DIVISION_L.DESCRUDF2_CD - PREM_TYPE_CDUDF2_DESCR - CI_PREM_TYPE_L.DESCRUDF3_CD - LS_SL_FLGUDF3_DESCR - CI_LOOKUP_VAL_L.DESCRUDF4_CD - TREND_AREA_CDUDF4_DESCR - CI_TREND_AREA_L.DESCRUDF5_CD - IN_CITY_LIMITUDF5_DESCR - IN_CITY_LIMIT
CD_RATE EXTRATE CI_RS C1_BI_D_RATEC1_BI_D_RATED
UDF1_CD - SVC_TYPE_CDUDF1_DESCR - CI_SVC_TYPE_L.DESCRUDF2_CD - FREQ_CDUDF2_DESCR - CI_FREQ_L.DESCR
Fact / Dimension Table Name
Batch Control Name
Source Table Name Trigger Name UDFs/UDMs being used
B-4 Administration Guide

CD_SA EXTSA CI_SA C1_BI_D_SA UDF1_CD - SVC_TYPE_CDUDF1_DESCR - CI_SVC_TYPE_L.DESCRUDF2_CD - CIS_DIVISIONUDF2_DESCR - CI_CIS_DIVISION_L.DESCRUDF3_CD - SA_TYPE_CDUDF3_DESCR - CI_SA_TYPE_LUDF4_CD - CI_SA_TYPE. REV_CL_CDUDF4_DESCR - CI_REV_CL.DESCRUDF5_CD - SIC_CDUDF5_DESCR - CI_SIC_L.DESCRUDF6_CD - CI_SA_TYPE. DEP_CL_CDUDF6_DESCR - CI_DEP_CL_L.DESCRUDF7_CD - CI_ENRL.CAMPAIGN_CDUDF7_DESCR - CI_CAMPAIGN_L.DESCRUDF8_CD - CI_SA_TYPE.DEBT_CL_CDUDF8_DESCR - CI_DEBT_CL_L.DESCR
CD_SA_STATUS EXTLKUP CI_LOOKUP_VAL C1_BI_D_LKUP,C1_BI_D_LKUPD
CD_SQI EXTSQI CI_SQI C1_BI_D_SQID
CD_TD C1-TD CI_TD_ENTRY C1_BI_D_TDENT
CD_TD_PRIORITY EXTLKUP CI_LOOKUP_VAL C1_BI_D_LKUP,C1_BI_D_LKUPD
CD_TD_ROLE C1-TDROL CI_ROLE C1_BI_D_TDROLE, C1_BI_D_TDROLED
CD_TD_SKILL C1-TDSKL Populated via extracts from Characteristic data
CD_TD_STATUS EXTLKUP CI_LOOKUP_VAL C1_BI_D_LKUP, C1_BI_D_LKUPD
CD_TD_TYPE C1-TDTYP CI_TD_TYPE C1_BI_D_TDTYP, C1_BI_D_TDTYPD
CD_TNDR_STATUS EXTLKUP CI_LOOKUP_VAL C1_BI_D_LKUP, C1_BI_D_LKUPD
CD_TNDR_SRCE C1-TNDCT CI_TNDR_SRCE C1_BI_D_TNDSRCE, C1_BI_D_TNDSRCED
Fact / Dimension Table Name
Batch Control Name
Source Table Name Trigger Name UDFs/UDMs being used
Oracle Utilities Customer Care and Billing Extractor Details B-5

CD_TNDR_TYPE C1-TNDTY CI_TENDER_TYPE
C1_BI_D_TNDTYPED
CD_TOU EXTTOU CI_TOU C1_BI_D_TOUD
CD_UCOLEVT_TYPE EXTUET CI_WO_EVT_TYP C1_BI_D_UET,C1_BI_D_UETD
CD_UCOLPROC_STATUS
EXTLKUP CI_LOOKUP_VAL C1_BI_D_LKUP, C1_BI_D_LKUPD
CD_UCOLPROC_TMPL EXTUCPT CI_WO_PROC_TMPL
C1_BI_D_WPTD
CD_UOM EXTUOM CI_UOM C1_BI_D_UOM, C1_BI_D_UOMD
CD_USER EXTUSER SC_USER C1_BI_D_USER
Fact / Dimension Table Name
Batch Control Name
Source Table Name Trigger Name UDFs/UDMs being used
B-6 Administration Guide

Appendix COracle Utilities Meter Data Management
Extractor Details
This section contains details regarding each fact and dimension from the Oracle Utilities Meter Data Management (MDM) Edge Application for Synchronization BO-based extract and idiosyncratic Batch Extract as shown below:
Synchronization BO-based Extract Details:
Fact / Dimension Table Name
Initial Load Batch Control
Extract Batch Control Sync BO Extension
CF_DEVICE_EVT D1-DEVIL D1-DEVFX D1- DeviceEventFact Via Element Population Rules and Post Service Script on the Sync BO
CF_INSTALL_EVT D1-INEIL D1-INEFX D1- InstallEventFact Via Element Population Rules and Post Service Script on the Sync BO
CF_SP D1-SPIL D1-SPAFX D1-SPAccumulationFact Via Element Population Rules and Post Service Script on the Sync BO
CF_DEVICE_ACTIVITY D1-ACTIL D1-ACTFX D1-ActivityAccumulationFact Via Element Population Rules and Post Service Script on the Sync BO
CD_CONS_TYPE D2-CSTIL D2-CSTDX D2-ConsumSnapshotTypeDimension
Via Element Population Rules and Post Service Script on the Sync BO
CD_MTR_DEVICE D1-DVCIL D1-DVCDX D1-DeviceDimension Via Element Population Rules and Post Service Script on the Sync BO
CD_MC D1-MCIL D1-MCDX D1-MeasuringComponentDimension
Via Element Population Rules and Post Service Script on the Sync BO
CD_SPR D1-SPRIL D1-SPRDX D1-ServiceProviderDimension Via Element Population Rules and Post Service Script on the Sync BO
Oracle Utilities Meter Data Management Extractor Details C-1

CD_SP D1-SPIL D1-SPDX D1-SPDimension Via Element Population Rules and Post Service Script on the Sync BO
CD_ADDR D1-SPIL D1-ADRDX D1-AddressDimension Via Element Population Rules and Post Service Script on the Sync BO
CD_US D2-USIL D2-USDX D2-USDimension Via Element Population Rules and Post Service Script on the Sync BO
CD_USAGE_GROUP D2-UGIL D2-UGDX D2-UsageGroupDimension Via Element Population Rules and Post Service Script on the Sync BO
CD_CONTACT D2-CONIL D2-CONDX D2-ContactDimension Via Element Population Rules and Post Service Script on the Sync BO
CD_MSRMT_COND D2-MRCIL D2-MRCDX D2-MsrmtConditionDimension
Via Element Population Rules and Post Service Script on the Sync BO
CD_IE_STATUS D1-IESIL D1-IESDX D1-IEBOStatusAndReasnDimension
Via Element Population Rules and Post Service Script on the Sync BO
CD_SP_STATUS D1-SPSIL D1-SPSDX D1-SPBOStatusAndReasnDimension
Via Element Population Rules and Post Service Script on the Sync BO
CD_DAYS_LAST_MSRMT D1-LNMIL D1-LNMDX D1-DaysSinceLastNormalMsrmtDim
Via Element Population Rules and Post Service Script on the Sync BO
CD_EXCP_TYPE D2-EXTIL D2-EXTDX D2-ExceptionTypeDimension Via Element Population Rules and Post Service Script on the Sync BO
CD_VEE_RULE D2-VERIL D2-VERDX D2-VEERuleDimension Via Element Population Rules and Post Service Script on the Sync BO
CD_DEVICE_ACTIVITY_STATUS
D1-ACSIL D1-ACSDX D1-ActivityBOStatusAndReasnDim
Via Element Population Rules and Post Service Script on the Sync BO
CD_DEVICE_ACTIVITY_TYPE
D1-ATYIL D1-ATYDX D1-ActivityTypeDimension Via Element Population Rules and Post Service Script on the Sync BO
CD_DEVICE_EVT_STATUS D1-DESIL D1-DESDX D1-DEBOStatusAndReasnDimension
Via Element Population Rules and Post Service Script on the Sync BO
CD_DEVICE_EVT_TYPE D1-DETIL D1-DETDX D1-DeviceEventTypeDimension
Via Element Population Rules and Post Service Script on the Sync BO
Fact / Dimension Table Name
Initial Load Batch Control
Extract Batch Control Sync BO Extension
C-2 Administration Guide

Idiosyncratic Batch Extract Details:
Fact / Dimension Table Name
Extract Batch Control System Event Snapshot Algorithm Extension
CF_CONSUMPTION D2-SPCFX Usage Snapshot D2-SP-CA Via new snapshot algorithm
CF_SP_SNAP D1-SPSFX Service Point Snapshot D1-SPSNAP-SE Via Post Service Script on the snapshot algorithm's parameter
CF_SP_UT_AGE D2-SUAFX Unreported Usage Analysis Snapshot
D2-SP-UT-AGE Via new snapshot algorithm
CF_VEE_EXCP D2-SVEFX SP VEE Exception Snapshot
D2-SPVEEEXC Via new snapshot algorithm
CD_UOM_TOU D2-UTIL n/a n/a Via Post Service Script on the batch control parameter
CD_UOM_TOU_SQI D2-UTSIL n/a n/a Via Post Service Script on the batch control parameter
CD_IMD_TYPE D2-ITLIL n/a n/a No extension
CD_EXCP_SEV D2-EXLIL n/a n/a No extension
CD_SP_UT_AGE_TYPE D2-UTAIL D2-UTADX D2-SPUTAgingTypeDimension
Via Element Population Rules and Post Service Script on the Sync BO
CD_DAYS_LASTUT_TYPE D2-LUTIL D2-LUTDX D2-DaysSinceLastUTDimension
Via Element Population Rules and Post Service Script on the Sync BO
Fact / Dimension Table Name
Initial Load Batch Control
Extract Batch Control Sync BO Extension
Oracle Utilities Meter Data Management Extractor Details C-3

C-4 Administration Guide
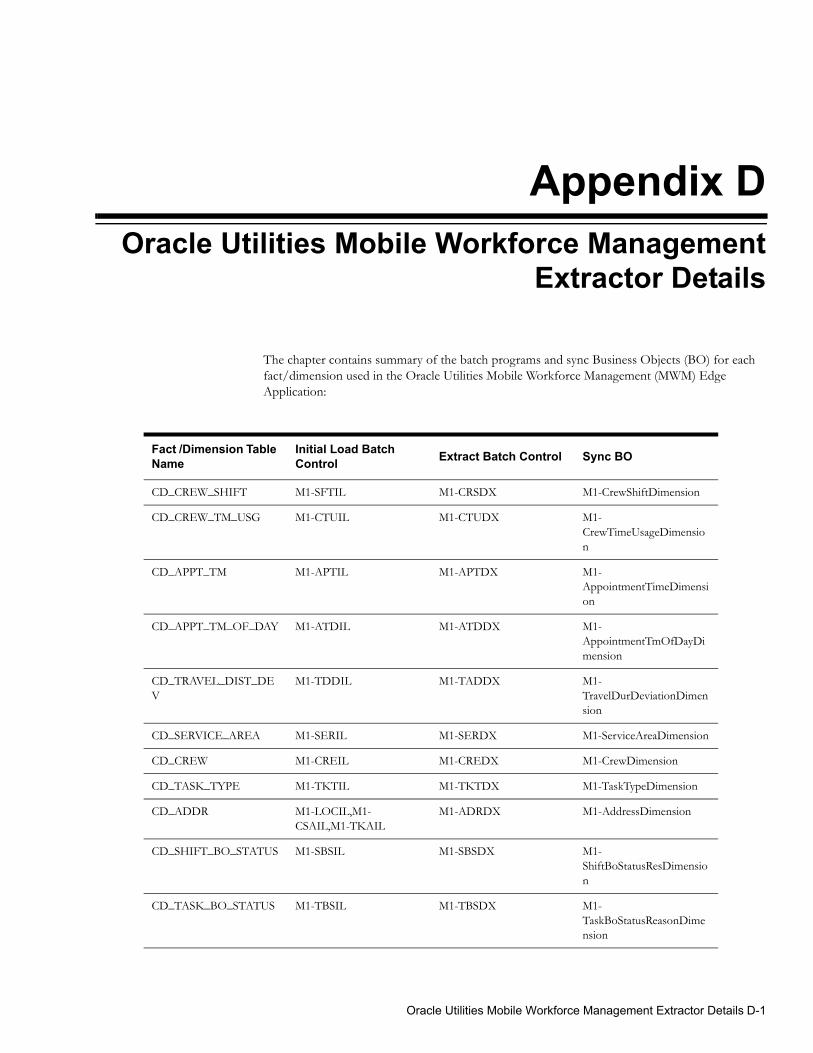
Appendix DOracle Utilities Mobile Workforce Management
Extractor Details
The chapter contains summary of the batch programs and sync Business Objects (BO) for each fact/dimension used in the Oracle Utilities Mobile Workforce Management (MWM) Edge Application:
Fact /Dimension Table Name
Initial Load Batch Control Extract Batch Control Sync BO
CD_CREW_SHIFT M1-SFTIL M1-CRSDX M1-CrewShiftDimension
CD_CREW_TM_USG M1-CTUIL M1-CTUDX M1-CrewTimeUsageDimension
CD_APPT_TM M1-APTIL M1-APTDX M1-AppointmentTimeDimension
CD_APPT_TM_OF_DAY M1-ATDIL M1-ATDDX M1-AppointmentTmOfDayDimension
CD_TRAVEL_DIST_DEV
M1-TDDIL M1-TADDX M1-TravelDurDeviationDimension
CD_SERVICE_AREA M1-SERIL M1-SERDX M1-ServiceAreaDimension
CD_CREW M1-CREIL M1-CREDX M1-CrewDimension
CD_TASK_TYPE M1-TKTIL M1-TKTDX M1-TaskTypeDimension
CD_ADDR M1-LOCIL,M1-CSAIL,M1-TKAIL
M1-ADRDX M1-AddressDimension
CD_SHIFT_BO_STATUS M1-SBSIL M1-SBSDX M1-ShiftBoStatusResDimension
CD_TASK_BO_STATUS M1-TBSIL M1-TBSDX M1-TaskBoStatusReasonDimension
Oracle Utilities Mobile Workforce Management Extractor Details D-1

CD_LATE_LOGON_TM M1-LLTIL M1-LLTDX M1-LateLogonTimeDimension
CD_EARLY_LOGOFF M1-ELTIL M1-ELTDX M1-EarlyLogoffTimeDimension
CD_TRAVEL_DUR_DEV
M1-TADIL M1-TDDDX M1-TravelDistDevDimension
CD_WORK_DUR_DEV M1-WDDIL M1-WDDDX M1-WorkDurationDevtnDimension
CD_RESP_TM_DEV M1-RTDIL M1-RTDDX M1-RespTimeDevDimension
CF_FLD_ACTIVITY M1-ACTIL M1-ACTFX M1-ActivityFact
CF_CMP_SHIFT M1-SFTIL M1-CCSFX M1-CompletedShiftFact
CF_CREW_TASK M1-SFTIL M1-CRTFX M1-CrewTaskFact
Fact /Dimension Table Name
Initial Load Batch Control Extract Batch Control Sync BO
D-2 Administration Guide

Appendix EOracle Utilities Network Management System
Extractor Details
This section contains a summary of the extract scripts and the corresponding view names for each fact and dimension used in the Oracle Utilities Network Management System (NMS) Edge Application:
Table Name Extract Program Extract Procedure Modify View Delete View
CD_ACCT bi_customer_extractor PR_BI_EXTOACCT EXTOACCT_MODIFY_V
EXTOACCT_DELETE_V
CD_ADDR bi_customer_extractor PR_BI_EXTOADDR EXTOADDR_MODIFY_V
EXTOADDR_DELETE_V
CD_CALL_INFO bi_event_extractor AND nrt_extractor
PR_BI_EXTCINFO EXTCINFO_MODIFY_V
EXTCINFO_DELETE_V
CD_CREW bi_common_extractor PR_BI_EXTOACCT EXTOCREW_MODIFY_V
EXTOCREW_DELETE_V
CD_CTRL_ZONE bi_common_extractor PR_BI_EXTZONE EXTZONE_MODIFY_V EXTZONE_DELETE_V
CD_DEVICE bi_common_extractor PR_BI_EXTDEV EXTDEV_MODIFY_V EXTDEV_DELETE_V
CD_EVENT bi_event_extractor AND nrt_extractor
PR_BI_EXTJOBD EXTJOBD_MODIFY_V EXTJOBD_DELETE_V
CD_EVENT_STATUS
bi_common_extractor PR_BI_EXTESTAT EXTESTAT_MODIFY_V EXTESTAT_DELETE_V
CD_FEEDER bi_feeder_extractor PR_BI_EXTFDR EXTFDR_MODIFY_V EXTFDR_DELETE_V
CD_METER bi_customer_extractor PR_BI_EXTOMTR EXTOMTR_MODIFY_V EXTOMTR_DELETE_V
CD_PER bi_customer_extractor PR_BI_EXTOPER EXTOPER_MODIFY_V EXTOPER_DELETE_V
CD_PHASE bi_feeder_extractor PR_BI_EXTPHASE EXTPHASE_MODIFY_V
CD_PREM bi_customer_extractor PR_BI_EXTOPREM EXTOPREM_MODIFY_V
EXTOPREM_DELETE_V
CD_SNL bi_customer_extractor PR_BI_EXTCSP EXTCSP_MODIFY_V EXTCSP_DELETE_V
CD_STORM bi_event_extractor and nrt_extractor
PR_BI_EXTSTORM EXTSTORM_MODIFY_V
EXTSTORM_DELETE_V
Oracle Utilities Network Management System Extractor Details E-1

CD_STORM_OUTAGE_TYPE
bi_common_extractor and bi_event_extractor
PR_BI_EXTSTORMOT
EXTSTORMOT_MODIFY_V
CD_SW_PLAN bi_switch_extractor PR_BI_EXTSWSD EXTSWSD_MODIFY_V EXTSWSD_DELETE_V
CD_SW_PLAN_STATE
bi_switch_extractor PR_BI_EXTVALST EXTVALID_STATES_MODIFY_V
CD_USER bi_common_extractor PR_BI_EXTOUSER EXTOUSER_MODIFY_V
EXTOUSER_DELETE_V
CF_CUST_RECENT_OUTG
nrt _extractor PR_BI_NRTCOF NRTSNL_MODIFY_V EXTSNL_DELETE_V
CF_CUST_RST_OUTG
bi_event _extractor PR_BI_EXTCOF EXTSNL_MODIFY_V EXTSNL_DELETE_V
CF_FEEDER_DLVRD_LOAD
bi_feeder_extractor PR_BI_ EXTFDRLD EXTFDRLD_MODIFY_V
CF_RECENT_CALL nrt _extractor PR_BI_NRTINC EXTINC_MODIFY_V EXTINC_DELETE_V
CF_RECENT_CREW nrt _extractor PR_BI_NRTCRWA EXTCRWA_MODIFY_V
CF_RST_CREW bi_event_extractor PR_BI_EXTCRWA EXTCRWA_MODIFY_V
CF_RST_JOB bi_event _extractor PR_BI_EXTJOBT EXTJOBT_MODIFY_V EXTJOBT_DELETE_V
CF_SW_PLAN bi_switch_extractor PR_BI_ EXTSWS EXTSWS_MODIFY_V EXTSWS_DELETE_V
CF_SW_PLAN_STATE
bi_switch_extractor PR_BI_ EXTSWSLOG
EXTSWSLOG_MODIFY_V
Table Name Extract Program Extract Procedure Modify View Delete View
E-2 Administration Guide

FN
C
C
C
C
C
C
C
Appendix FOracle Utilities Work and Asset Management
Extractor Details
This section includes the details for the Oracle Utilities Work and Asset Management extractors used in the Oracle Utilities Work and Asset Management (WAM) Edge Application:
act/Dimension Table ame Batch Control Name Source Table Name Trigger Name UDFs/UDMs being
used
D_ASSET EXTDASSET SA_ASSET SDBT_BI_ADIU_ASSET UDF1: Asset Class UDF2: Criticality UDF3: Building UDF4: Location UDF5: Process UDF6: Asset Record Type UDF7: Facility UDF8: Organization UDF9: Company
D_CREW EXTDWRKC SA_CREW SDBT_BI_ADIU_CREW
D_FAILURE EXTDFAIL SA_AUTHORITY SDBT_BI_ADIU_FAILURE
D_OP_ACCT EXTDOPAC SA_ACCOUNT_DATA SDBT_BI_ADIU_ACCT_DATA
UDF1: Area UDF2 : Facility UDF3 : Organization UDF4 : Company UDF5 : Level-1 Department UDF6 : Level-2 Department UDF7 : Level-3 Department
D_OP_ACTG_TY EXTDOATT SA_AUTHORITY SDBT_BI_ADIU_OP_ACTG_TR_TY
D_OP_EXP EXTDOPEX UDF1 : Expense Category UDF2 : Facility
D_OP_UOM EXTDOUOM SA_AUTHORITY SDBT_BI_ADIU_OUOM
Oracle Utilities Work and Asset Management Extractor Details F-1

C
C
C
C
C
C
C
C
C
C
C
FN
D_PLANNER EXTDWRKP SA_RULE_KEY SDBT_BI_ADIU_RULE_KEY_PLAN
D_REPAIR EXTDREPR SA_AUTHORITY SDBT_BI_ADIU_REPAIR
UDF1: Facility
D_ROOT_CAUSE EXTDROOT SA_AUTHORITY SDBT_BI_ADIU_ROOTCAUSE
D_STOCK_ITMTY EXTDSITE SA_STOREROOM_LOG SDBT_BI_AI_STRM_LOG
UDF1 : Stock Type UDF2 : Stock Class UDF3 : Commodity Category UDF4 : Commodity NameUDF5 : Commodity UDF6 : Facility
D_STRM EXTDSTRM SA_STOREROOM_SETUP
SDBT_BI_ADIU_STRM_SETUP
UDF1 :Storeroom Type UDF2 : Facility UDF3 : Organization UDF4 : Company
D_STRM_TR_TY EXTDSTTT SA_STOREROOM_LOG SDBT_BI_AI_STRM_LOG
D_WRKORD_TY EXTDWOTY SA_AUTHORITY SDBT_BI_ADIU_WRK_ORD_TYPE
F_OP_ACTG EXTFOPAT SA_AUTHORITY SDBT_BI_ADIU_OP_ACTG_TR_TY
F_STRM_INV EXTFSTOR SA_STOREROOM_SETUP
SDBT_BI_ADIU_STRM_SETUP
F_STRM_TR EXTFSTTR SA_STOREROOM_LOG SDBT_BI_AI_STRM_LOG
F_WRKORD_TK EXTFWRKT SA_WORK_ORDER_TASK
SDBT_BI_WORK_ORDER_TASK
UDM1: Days LateUDM2: Days to closeUDM3 : Scheduled Downtime Indicator
act/Dimension Table ame Batch Control Name Source Table Name Trigger Name UDFs/UDMs being
used
F-2 Administration Guide

Fa
CF
CF
CF
CF
CF
CF
CF
CF
CF
CF
CF
CF
CF
CF
CF O
CF G
CF T
CF
CF _
Appendix GOracle Utilities Validation Functions and Error
Identification Procedure Names
This section lists the names for the Validation functions and Error Identification Procedure names for all Facts, along with the CM Error Procedure Name and Validation Function Name for those facts if a user wants to add more validations :
ct Name Error Procedure Name Validation Function Name
Custom Error Procedure Name
UDFs/UDMs being used
_ARREARS B1_ERR_F_ARREARS B1_ERR_F_ARREARS CM_ERR_F_ARREARS CM_VAL_F_ARREARS
_BILLED_USAGE B1_ERR_F_BILLED_USAGE B1_VAL_F_BILLED_USAGE CM_ERR_F_BILLED_USAGE CM_VAL_F_BILLED_USAGE
_CASE B1_ERR_F_CASE B1_VAL_F_CASE CM_ERR_F_CASE CM_VAL_F_CASE
_CASE_LOG B1_ERR_F_CASE_LOG B1_VAL_F_CASE_LOG CM_ERR_F_CASE_LOG CM_VAL_F_CASE_LOG
_CC B1_ERR_F_CC B1_VAL_F_CC CM_ERR_F_CC CM_VAL_F_CC
_CMP_SHIFT B1_ERR_F_CMP_SHIFT B1_VAL_F_CMP_SHIFT CM_ERR_F_CMP_SHIFT CM_VAL_F_CMP_SHIFT
_COLL_EVT B1_ERR_F_CUTEV B1_VAL_F_CUTEV CM_ERR_F_CUTEV CM_VAL_F_CUTEV
_COLL_EVT B1_ERR_F_SEV_EVT B1_VAL_F_SEV_EVT CM_ERR_F_SEV_EVT CM_VAL_F_SEV_EVT
_COLL_EVT B1_ERR_F_ODEV B1_VAL_F_ODEV CM_ERR_F_ODEV CM_VAL_F_ODEV
_COLL_EVT B1_ERR_F_COLL_EVT B1_VAL_F_COLL_EVT CM_ERR_F_COLL_EVT CM_VAL_F_COLL_EVT
_COLL_PROC B1_ERR_F_COLL_PROC B1_VAL_F_COLL_PROC CM_ERR_F_COLL_PROC CM_VAL_F_COLL_PROC
_COLL_PROC B1_ERR_F_ODPR B1_VAL_F_ODPR CM_ERR_F_ODPR CM_VAL_F_ODPR
_CONSUMPTION B1_ERR_F_CONSUMPTION B1_VAL_F_CONSUMPTION CM_ERR_F_CONSUMPTION CM_VAL_F_CONSUMPTION
_CREW_TASK B1_ERR_F_CREW_TASK B1_VAL_F_CREW_TASK CM_ERR_F_CREW_TASK CM_VAL_F_CREW_TASK
_CUST_RECENT_OUTG B1_ERR_F_CUST_RECENT_OUTG
B1_VAL_F_CUST_RECENT_OUTG
CM_ERR_F_CUST_RECENT_OUTG
CM_VAL_F_CUST_RECENT_UTG
_CUST_RST_OUTG B1_ERR_F_CUST_RST_OUTG B1_VAL_F_CUST_RST_OUTG CM_ERR_F_CUST_RST_OUTG CM_VAL_F_CUST_RST_OUT
_DEVICE_ACTIVITY B1_ERR_F_DEVICE_ACTIVITY B1_VAL_F_DEVICE_ACTIVITY
CM_ERR_F_DEVICE_ACTIVITY CM_VAL_F_DEVICE_ACTIVIY
_DEVICE_EVT B1_ERR_F_DEVICE_EVT B1_VAL_F_DEVICE_EVT CM_ERR_F_DEVICE_EVT CM_VAL_F_DEVICE_EVT
_FEEDER_DLVRD_LOAD B1_ERR_F_FEEDER_DLVRD_LOAD
B1_VAL_F_FEEDER_DLVRD_LOAD
CM_ERR_F_FEEDER_DLVRD_LOAD
CM_VAL_F_FEEDER_DLVRDLOAD
Oracle Utilities Validation Functions and Error Identification Procedure Names G-1

CF
CF
CF
CF
CF
CF
CF
CF
CF
CF
CF
CF
CF
CF
CF
CF
CF
CF
CF
CF
CF
CF E
CF
CF
CF
CF
CF
Fa
_FLD_ACTIVITY B1_ERR_F_FLD_ACTIVITY B1_VAL_F_FLD_ACTIVITY CM_ERR_F_FLD_ACTIVITY CM_VAL_F_ARREARS
_FT B1_ERR_F_FT B1_VAL_F_FT CM_ERR_F_FT CM_VAL_F_FT
_FT_GL B1_ERR_F_FT_GL B1_VAL_F_FT_GL CM_ERR_F_FT CM_VAL_F_FT
_INSTALL_EVT B1_ERR_F_INSTALL_EVT B1_VAL_F_INSTALL_EVT CM_ERR_F_INSTALL_EVT CM_VAL_F_INSTALL_EVT
_OP_ACTG B1_ERR_F_OP_ACTG B1_VAL_F_OP_ACTG CM_ERR_F_OP_ACTG CM_VAL_F_OP_ACTG
_ORDER B1_ERR_F_ORDER B1_VAL_F_ORDER CM_ERR_F_ORDER CM_VAL_F_ORDER
_PAY_TNDR B1_ERR_F_PAY_TNDR B1_VAL_F_PAY_TNDR CM_ERR_F_PAY_TNDR CM_VAL_F_PAY_TNDR
_RECENT_CALL B1_ERR_F_RECENT_CALL B1_VAL_F_RECENT_CALL CM_ERR_F_RECENT_CALL CM_VAL_F_RECENT_CALL
_RECENT_CREW B1_ERR_F_RECENT_CREW B1_VAL_F_RECENT_CREW CM_ERR_F_RECENT_CREW CM_VAL_F_RECENT_CREW
_RECENT_JOB B1_ERR_F_RECENT_JOB B1_VAL_F_RECENT_JOB CM_ERR_F_RECENT_JOB CM_VAL_F_RECENT_JOB
_RECENT_TD_ENTRY B1_ERR_F_RECENT_TD_ENTRY
B1_VAL_F_RECENT_TD_ENTRY
CM_ERR_F_RECENT_TD_ENTRY
CM_VAL_F_RECENT_TD_ENTRY
_RST_CALL B1_ERR_F_RST_CALL B1_VAL_F_RST_CALL CM_ERR_F_RST_CALL CM_VAL_F_RST_CALL
_RST_CREW B1_ERR_F_RST_CREW B1_VAL_F_RST_CREW CM_ERR_F_RST_CREW CM_VAL_F_RST_CREW
_RST_JOB B1_ERR_F_RST_JOB B1_VAL_F_RST_JOB CM_ERR_F_RST_JOB CM_VAL_F_RST_JOB
_SA B1_ERR_F_SA B1_VAL_F_SA CM_ERR_F_SA CM_VAL_F_SA
_SP B1_ERR_F_SP B1_VAL_F_SP CM_ERR_F_SP CM_VAL_F_SP
_SP_SNAP B1_ERR_F_SP_SNAP B1_VAL_F_SP_SNAP CM_ERR_F_SP_SNAP CM_VAL_F_SP_SNAP
_SP_UT_AGE B1_ERR_F_SP_UT_AGE B1_VAL_F_SP_UT_AGE CM_ERR_F_SP_UT_AGE CM_VAL_F_SP_UT_AGE
_STRM_INV B1_ERR_F_STRM_INV B1_VAL_F_STRM_INV CM_ERR_F_STRM_INV CM_VAL_F_STRM_INV
_STRM_TR B1_ERR_F_STRM_TR B1_VAL_F_STRM_TR CM_ERR_F_STRM_TR CM_VAL_F_STRM_TR
_SW_PLAN B1_ERR_F_SW_PLAN B1_VAL_F_SW_PLAN CM_ERR_F_SW_PLAN CM_VAL_F_SW_PLAN
_SW_PLAN_STATE B1_ERR_F_SW_PLAN_STATE B1_VAL_F_SW_PLAN_STATE CM_ERR_F_SW_PLAN_STATE CM_VAL_F_SW_PLAN_STAT
_TD_ENTRY B1_ERR_F_TD_ENTRY B1_VAL_F_TD_ENTRY CM_ERR_F_TD_ENTRY CM_VAL_F_TD_ENTRY
_UCOL_EVT B1_ERR_F_UCOL_EVT B1_VAL_F_UCOL_EVT CM_ERR_F_UCOL_EVT CM_VAL_F_UCOL_EVT
_UCOL_PROC B1_ERR_F_UCOL_PROC B1_VAL_F_UCOL_PROC CM_ERR_F_UCOL_PROC CM_VAL_F_UCOL_PROC
_VEE_EXCP B1_ERR_F_VEE_EXCP B1_VAL_F_VEE_EXCP CM_ERR_F_VEE_EXCP CM_VAL_F_VEE_EXCP
_WRKORD_TK B1_ERR_F_WRKORD_TK B1_VAL_F_WRKORD_TK CM_ERR_F_WRKORD_TK CM_VAL_F_WRKORD_TK
ct Name Error Procedure Name Validation Function Name
Custom Error Procedure Name
UDFs/UDMs being used
G-2 Administration Guide