Oracle Planning and Budgeting Cloud - Dartmouth Collegebudget/docs/smart_view.pdf · Oracle...
22
1 | Page Updated 03/22/17 Oracle Planning and Budgeting Cloud (PBCS) Smart View for Office
Transcript of Oracle Planning and Budgeting Cloud - Dartmouth Collegebudget/docs/smart_view.pdf · Oracle...

1 | P a g e
Updated 03/22/17
Oracle
Planning and Budgeting Cloud (PBCS)
Smart View for Office

2 | P a g e
Table of Contents What is Smart View? ......................................................................................................................................................... 3
PBCS Web Forms........................................................................................................................................................... 3
Ad Hoc Analysis Queries ............................................................................................................................................... 3
Installing Smart View ........................................................................................................................................................ 3
Internet Explorer Settings ............................................................................................................................................. 3
Adding PBCS as a Trusted Site .................................................................................................................................. 3
Smart View Install ......................................................................................................................................................... 4
Using Smart View for the first time .............................................................................................................................. 6
Using Smart View .............................................................................................................................................................. 7
Connecting to Smart View ............................................................................................................................................ 7
Opening a Task List ....................................................................................................................................................... 8
Opening a Data Form .................................................................................................................................................. 10
Creating an Ad Hoc Analysis Query ............................................................................................................................ 13
Pivot ........................................................................................................................................................................ 15
Selecting Members ................................................................................................................................................. 17
Zoom In / Zoom Out / Keep Only / Remove Only ................................................................................................... 20
Change Alias ............................................................................................................................................................ 21
Additional Smart View Options .............................................................................................................................. 21

3 | P a g e
What is Smart View? Smart view is an add in used in Microsoft Office applications, especially Excel, allowing you to extract data from the
Planning and Budget Cloud Service (PBCS, formerly known as Hyperion Planning) and send it back. You can use
Smart View to open the PBCS Web Forms in Excel and to create your own Ad Hoc Analysis queries. Ad Hoc Analysis
queries can be used to create pivoted free form reports with formatting the way you want it.
PBCS Web Forms With Smart View you can open PBCS Web forms in Excel where you can:
View, enter, edit and send data back into the cubes.
Add formulas (with caveats) to calculate data.
Use other functionality to calculate, spread data etc. for budgets or projections.
Ad Hoc Analysis Queries With Smart View you can create Ad Hoc Analysis queries to define your own reports and to drill into the details of
numbers across dimensions.
Installing Smart View If you already have Smart View installed on your computer, skip to Using Smart View for the first time. If you are
using PBCS and installing Smart View for the first time, there are a few steps to go through. The recommended
browser for using PBCS is Mozilla’s Firefox, but the web application can be accessed from the browser of your
choice. If you are using Internet Explorer, the following steps should be taken.
Internet Explorer Settings
Adding PBCS as a Trusted Site 1. In Internet Explorer select Internet Options from the Tools menu.
2. Click on the Security tab, highlight Trusted Sights, and click the Sites button
3. Add the following URLs as Trusted sites, clicking the add button for each one:
a. https://planning-a420314.pbcs.us2.oraclecloud.com
b. https://apex.oracle.com

4 | P a g e
4. Then, with Trusted Sights still highlighted, click the Customer Level… button.
5. Scroll approximately halfway through the settings and Enable “Allow script-initiated windows…”
6. Click OK twice.
Smart View Install 1. If this is your first time accessing PBCS and installing Smart View, paste the following link into the address
bar of the browser you are using. Otherwise log into PBCS and continue to Step #.
a. https://planning-a420314.pbcs.us2.oraclecloud.com/workspace/index.jsp
2. You will need to enter the Identity Domain ID for Dartmouth College’s instance of PBCS.
a. Type in a420314, select the Remember my choice parameter, and click Go.
3. Click on the Company Sign In button. Do Not select the Remember my choice parameter for this step.
4. You will then enter your Dartmouth NetID and password as you would for other Dartmouth College
applications.

5 | P a g e
5. Install Smart View from the drop down list in the upper right hand corner with your user name, select
Downloads...
6. And then click on Download from Oracle Technology Network for Smart View.
7. And then click on the Download Latest Version button, accept the license agreement and click Download
Now.
a. From there, follow the prompts and accept the license agreement to download and install the
application.
i. You will be asked to create an Oracle Account. This is a free Oracle Account that will give
you access to Oracle online applications, support, communities, etc.
ii. And now that we are planning in the Cloud, both Smart View and the web application will be
updated regularly keeping us with the most current versions of the software.
8. Please note, that you can uninstall your current version of Smart View before installing the newest version,
but it is not necessary because the install process will take care of that for you.

6 | P a g e
Using Smart View for the first time The Smart View connection needs be defined, and there are a few setup options that should be made. These
options follow best practices.
1. Open Microsoft Excel.
2. From the Smart View ribbon, select Options.
3. Select Advanced and verify/paste the Shared Connections URL.
a. https://planning-a420314.pbcs.us2.oraclecloud.com/workspace/SmartViewProviders
4. Set the following Best Practice options:
a. Select Member Options and under the Member Retention section select the Include Selection
parameter.
i. When you Zoom In on a selected member in a query, this option will keep the selected
member along with the children of that member you zoomed into.
ii. If you do not select this option and zoom in on a member, only the children of the selected
member will remain.
b. Select Data Options and under the Replacement section, set #NoData/Missing label to be
#NumericZero, and select the Submit Zero parameter.
c. Select Data Options and under the Suppress Rows section, deselect any of the parameters in this
section, if selected.
d. Select Data Options and under the Mode section, deselect “Suppress Missing Blocks”, if selected.
7 | P a g e
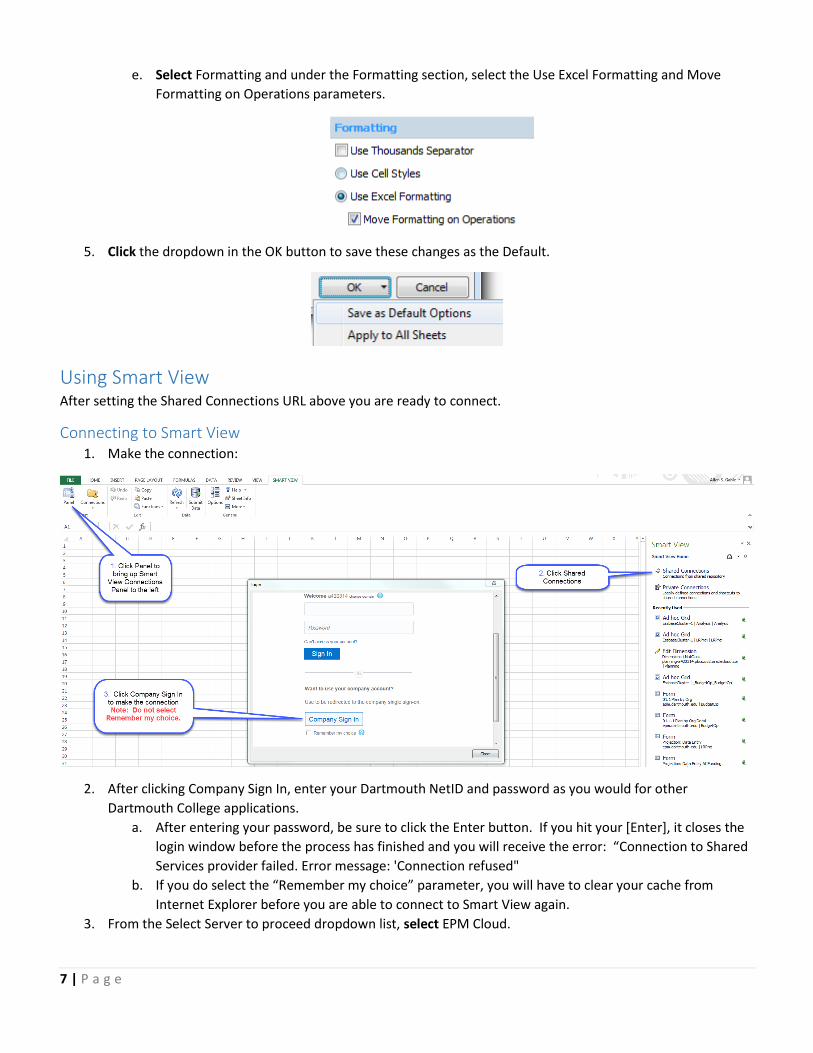
e. Select Formatting and under the Formatting section, select the Use Excel Formatting and Move
Formatting on Operations parameters.
5. Click the dropdown in the OK button to save these changes as the Default.
Using Smart View After setting the Shared Connections URL above you are ready to connect.
Connecting to Smart View 1. Make the connection:
2. After clicking Company Sign In, enter your Dartmouth NetID and password as you would for other
Dartmouth College applications.
a. After entering your password, be sure to click the Enter button. If you hit your [Enter], it closes the
login window before the process has finished and you will receive the error: “Connection to Shared
Services provider failed. Error message: 'Connection refused"
b. If you do select the “Remember my choice” parameter, you will have to clear your cache from
Internet Explorer before you are able to connect to Smart View again.
3. From the Select Server to proceed dropdown list, select EPM Cloud.

8 | P a g e
4. You are now connected PBCS and from here you can:
a. Open a Data Form
b. Open a Task List
c. Make an Ad Hoc Analysis connection to any of the available cubes.
Opening a Task List You can open and manage task lists from the Smart View panel in Excel. Tasks lists are created in PBCS to guide you
through the planning process. The Budget Tasks include instructions to guide you through the process and links to
the different Data Forms used to create your budget.
1. After making your connection to PBCS, expand the connection options tree as follows:
a. Planning-a420314.pbcs.us2.oraclecloud.com>Planning>Task Lists
2. Highlight the task list and either:
a. Double-click the selected task list,
b. Right-click and select Open Task List or

9 | P a g e
c. Click Open Task List at the bottom of the panel.
3. Once the Task List has been opened, it will display in the Smart View panel.
4. For each task, you can View the Instructions and Mark it as complete.
10 | P a g e
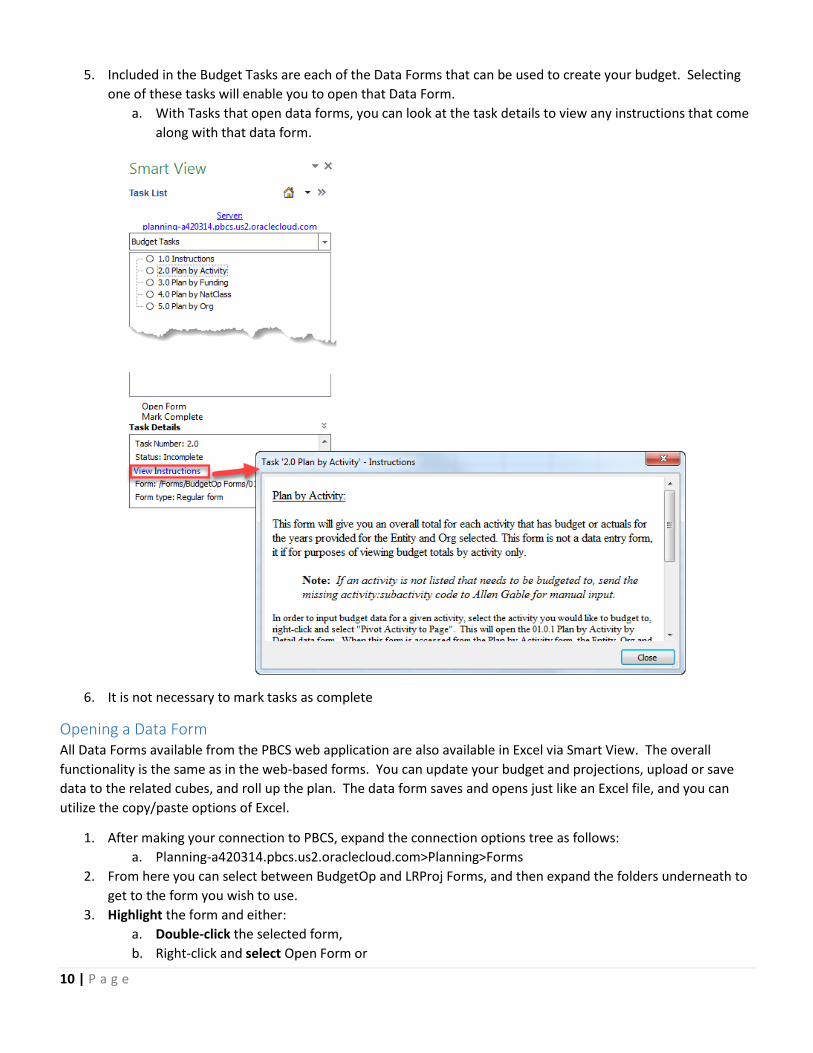
5. Included in the Budget Tasks are each of the Data Forms that can be used to create your budget. Selecting
one of these tasks will enable you to open that Data Form.
a. With Tasks that open data forms, you can look at the task details to view any instructions that come
along with that data form.
6. It is not necessary to mark tasks as complete
Opening a Data Form All Data Forms available from the PBCS web application are also available in Excel via Smart View. The overall
functionality is the same as in the web-based forms. You can update your budget and projections, upload or save
data to the related cubes, and roll up the plan. The data form saves and opens just like an Excel file, and you can
utilize the copy/paste options of Excel.
1. After making your connection to PBCS, expand the connection options tree as follows:
a. Planning-a420314.pbcs.us2.oraclecloud.com>Planning>Forms
2. From here you can select between BudgetOp and LRProj Forms, and then expand the folders underneath to
get to the form you wish to use.
3. Highlight the form and either:
a. Double-click the selected form,
b. Right-click and select Open Form or

11 | P a g e
c. Click Open Form at the bottom of the panel.
4. Once the Data Form has been opened, a new Planning ribbon has been added and you can perform the
following actions:

12 | P a g e
When available for a data form, you can right-click and pivot a related detail data form to the page. In the above
example, you can select an Activity, right-click and select Pivot the selection to Page.
When you pivot the detail data form to the page, it will open as a second tab in the Excel workbook where you can
make changes to data in the yellow cells.
You can enter data in yellow cells using the following methods:
Overwrite the data by typing over it with a new value.
Copy/Paste from another cell into a cell
Enter an Excel formula to calculate the value.
o Excel formulas will remain in the spreadsheet even after submitting the data back to a cube.
o If you open the same data form in PBCS at the same intersection of dimensions, you will only see the
cell value, you will not see the formula used in Excel to calculate the value.
o Formulas will only remain in the saved spreadsheet. If you reopen the form again in a new
spreadsheet, you will only see the value.

13 | P a g e
Once you’ve opened a Data Form in Excel, you can save it locally to be used again later. The next time you open this
saved data form, just click the Refresh button in the Smart View ribbon and the connection will be made after just
having to enter your NetID and Password.
Please note that saving Excel spreadsheet does not submit data back to the cube.
Creating an Ad Hoc Analysis Query Smart View provides ad hoc querying capability with the power, formatting and functionality of Excel. Users
dynamically access data and develop their own queries. Each query can be saved as Excel documents to use again
and share with others.
1. After making your connection to PBCS, expand the connection options tree as follows:
a. Planning-a420314.pbcs.us2.oraclecloud.com>Planning
2. Highlight the applicable cube and either:
a. Double-click the selected cube,
b. Right-click and select Connect or
c. Click Connect at the bottom of the panel.

14 | P a g e
3. After making the connection, either:
a. Double-click the selected cube again,
b. Right-click and select Ad Hoc Analysis or
c. Click Ad Hoc Analysis at the bottom of the panel.
4. Once the Ad Hoc Analysis query has been opened, a new Planning Ad Hoc ribbon has been added and you
can perform the following actions:
15 | P a g e
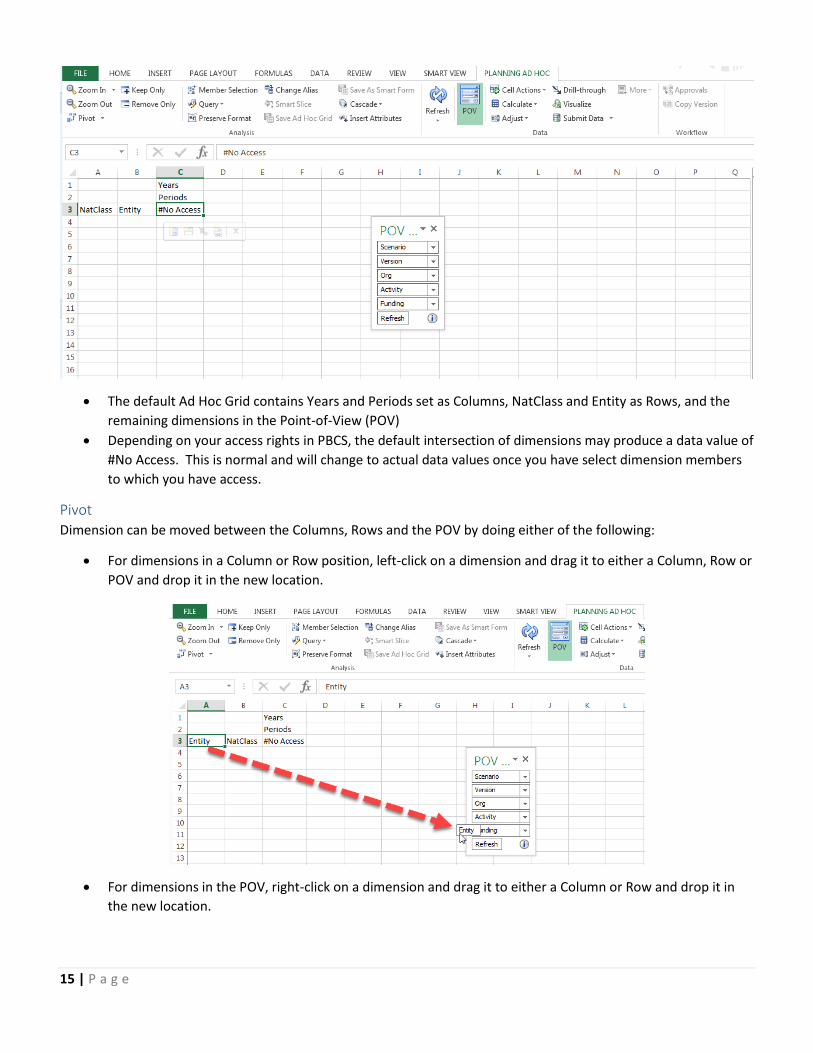
The default Ad Hoc Grid contains Years and Periods set as Columns, NatClass and Entity as Rows, and the
remaining dimensions in the Point-of-View (POV)
Depending on your access rights in PBCS, the default intersection of dimensions may produce a data value of
#No Access. This is normal and will change to actual data values once you have select dimension members
to which you have access.
Pivot Dimension can be moved between the Columns, Rows and the POV by doing either of the following:
For dimensions in a Column or Row position, left-click on a dimension and drag it to either a Column, Row or
POV and drop it in the new location.
For dimensions in the POV, right-click on a dimension and drag it to either a Column or Row and drop it in
the new location.

16 | P a g e
You can also select a dimension and use the Pivot button in the Planning Ad Hoc ribbon to pivot the
dimension to another location.
o If the dimension is in a Row, then Pivot will send it to the Column.
o If the dimension is in a Column, then Pivot will send it to the Row.
o Otherwise select Pivot to POV.
o You cannot use this option to Pivot dimensions out of the POV.
You can also select a dimension, right-click and select Pivot or Pivot to POV from the Smart View Member.

17 | P a g e
o You cannot use this option to Pivot dimensions out of the POV.
Selecting Members Selecting Dimensions can be done in one of three ways. In all cases, select the cell that you wish to make the
member selection in first.
1. From the Planning Ad Hoc ribbon, click on .
o This should detect which dimension you are selecting a member from. If it doesn’t, the first thing to
do is change the dimension from the dropdown list in the upper right-hand corner of the Member
Selection dialogue box.

18 | P a g e
o From the Member Selection dialogue box you can:
Manually select each member that you want included.
Highlight a Parent Member and use the selection options button to select that parent
member’s
Children - immediate descendants to the parent member
Decedents - all descendants of the parent member
Base Members - Level 0 members of the parent member
Manually select a member and then open the dropdown list on the Add button to add the:
Checked Items
Descendants
Descendants Inclusive - includes the selected parent member in the members to
add
Siblings - members that are on the same level as the selected member
Siblings Inclusive
Etc.

19 | P a g e
You can also use the filter options to limit what is in the list of members to select from.
When you select multiple members for the Row section, a new row will be added for each.
When you select multiple members for the Column section, a new column will be added for
each.
2. Right-click in the cell and from the menu select Smart View>Member Selection. This will open the same
Member Selection dialogue box as described above.
3. To make Member Selections from dimensions in the POV box, select the ellipsis to open the Member
Selection dialogue box.

20 | P a g e
o When you make multiple selections for a dimension in the POV, each of these selections will now be
available in the POV dropdown list for that dimension.
4. After making your selections, click to update the displayed data.
Zoom In / Zoom Out / Keep Only / Remove Only Using the Zoom In, Zoom Out, and Keep Only functionality is another way to make member selections directly from
your Ad Hoc Analysis query. You can only use these three buttons from members selected in the Rows or Columns.
From the Smart View ribbon Options button, you can define how the Zoom-In button works. In the Member
Options section you can make these settings:
General > Zoom In Level - set the default behavior to either zoom into the:
o Next Level
o All Levels
o Bottom Level
Member Retention - select the “Include Selection” parameter to keep the member in addition to the
members zoomed into. If not selected, only the members zoomed into will be displayed.

21 | P a g e
Zoom In
To Zoom In on a selected member, either double-click the member and you will zoom in based on the defaults
defined above, or highlight the member and click the button from the Planning Ad Hoc ribbon to zoom in
to the next level, all levels or the bottom level.
Zoom Out
Use the button to zoom back up a level in the dimension hierarchy.
Keep Only
Use the button to remove all members from the rows or columns except for the highlighted Member.
Remove Only
Use the button to remove only the selected member from the rows or columns.
Change Alias You can define how members display in your Ad Hoc Analysis query from the Planning Ad Hoc ribbon by clicking the
button.
None - will display a members name. For example, in the NatClass dimension, a member’s name will be its
NatClass number, or in the Org dimension, a member’s name will be its Org number.
o NatClass = N:600:6011
o Org = O:786
Default - will display a member default alias which will be the members description
o NatClass = 600:6011:SAL FACULTY REG Beneft Excl Pension
o Org = 786:Administration
Presentation - not currently in use
Additional Smart View Options In the Options dialogue box, you can make the following settings in how your Ad Hoc Analysis query will display
data.
22 | P a g e
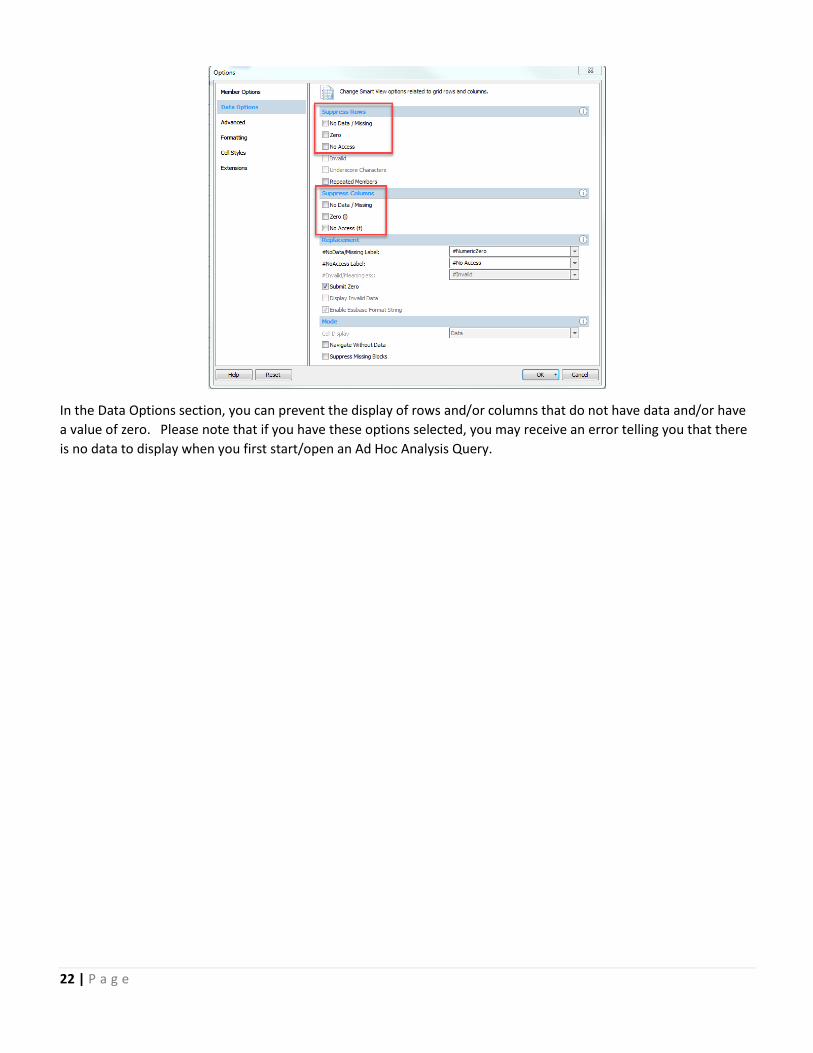
In the Data Options section, you can prevent the display of rows and/or columns that do not have data and/or have
a value of zero. Please note that if you have these options selected, you may receive an error telling you that there
is no data to display when you first start/open an Ad Hoc Analysis Query.