
Oracle Insurance Documents .....viii Conventions ..... ix System Requirements..... ix Manual History...
167
Oracle Insurance Data Capture Palette User Guide Release 5.2 October 2014
Transcript of Oracle Insurance Documents .....viii Conventions ..... ix System Requirements..... ix Manual History...

Oracle Insurance
Data Capture Palette User Guide Release 5.2
October 2014

Copyright © 2014, Oracle and/or its affiliates. All rights reserved. Oracle Insurance Data Capture Palette User Guide Release 5.2 Part # E56149-01 Library #E56152-01 October 2014 Primary Author: Mary Elizabeth Wiger Contributing Authors: Laura Childers This software and related documentation are provided under a license agreement containing restrictions on use and disclosure and are protected by intellectual property laws. Except as expressly permitted in your license agreement or allowed by law, you may not use, copy, reproduce, translate, broadcast, modify, license, transmit, distribute, exhibit, perform, publish, or display any part, in any form, or by any means. Reverse engineering, disassembly, or decompilation of this software, unless required by law for interoperability, is prohibited. The information contained herein is subject to change without notice and is not warranted to be error-free. If you find any errors, please report them to us in writing. If this is software or related documentation that is delivered to the U.S. Government or anyone licensing it on behalf of the U.S. Government, the following notice is applicable: U.S. GOVERNMENT END USERS: Oracle programs, including any operating system, integrated software, any programs installed on the hardware, and/or documentation, delivered to U.S. Government end users are "commercial computer software" pursuant to the applicable Federal Acquisition Regulation and agency-specific supplemental regulations. As such, use, duplication, disclosure, modification, and adaptation of the programs, including any operating system, integrated software, any programs installed on the hardware, and/or documentation, shall be subject to license terms and license restrictions applicable to the programs. No other rights are granted to the U.S. Government. This software or hardware is developed for general use in a variety of information management applications. It is not developed or intended for use in any inherently dangerous applications, including applications that may create a risk of personal injury. If you use this software or hardware in dangerous applications, then you shall be responsible to take all appropriate fail-safe, backup, redundancy, and other measures to ensure its safe use. Oracle Corporation and its affiliates disclaim any liability for any damages caused by use of this software or hardware in dangerous applications. Oracle and Java are registered trademarks of Oracle and/or its affiliates. Other names may be trademarks of their respective owners. Intel and Intel Xeon are trademarks or registered trademarks of Intel Corporation. All SPARC trademarks are used under license and are trademarks or registered trademarks of SPARC International, Inc. AMD, Opteron, the AMD logo, and the AMD Opteron logo are trademarks or registered trademarks of Advanced Micro Devices. UNIX is a registered trademark of The Open Group. This software or hardware and documentation may provide access to or information on content, products, and services from third parties. Oracle Corporation and its affiliates are not responsible for and expressly disclaim all warranties of any kind with respect to third-party content, products, and services. Oracle Corporation and its affiliates will not be responsible for any loss, costs, or damages incurred due to your access to or use of third-party content, products, or services.
Contents
ii
CONTENTS
Preface ................................................................................................................. viii Audience .............................................................................................................. viii Related Documents ............................................................................................. viii Conventions .......................................................................................................... ix System Requirements ........................................................................................... ix Manual History ...................................................................................................... ix
CHAPTER 1 Overview of Data Capture Palette ....................................................................... 10 Creation Process.................................................................................................. 11 Product Configuration and Palette Relationships ................................................ 12
CHAPTER 2 Products Page...................................................................................................... 13 Product Page Fields ............................................................................................. 14 Functionality ......................................................................................................... 14 Editing Products ................................................................................................... 15
CHAPTER 3 System Wide Functionality ................................................................................... 16 Navigation ............................................................................................................ 16 Records per Page Settings .................................................................................. 16 Column Sorting .................................................................................................... 17 Searching ............................................................................................................. 18 Help ...................................................................................................................... 19 Copying Content .................................................................................................. 19
CHAPTER 4 Questionnaire ....................................................................................................... 21 Fields .................................................................................................................... 22 Functionality ......................................................................................................... 22 New Questionnaires ............................................................................................. 22 Opening a Questionnaire ..................................................................................... 24 Manage Questionnaire Tabs ................................................................................ 24 Column Layout Options ....................................................................................... 25 Default Submit Navigation ................................................................................... 26 Locale ................................................................................................................... 28 Customizing a Locale ........................................................................................... 29 Locale Settings..................................................................................................... 30
Contents
iii
Editing Questionnaires ......................................................................................... 33 Deleting Questionnaires ....................................................................................... 34
CHAPTER 5 Risk Objects ......................................................................................................... 35 Risk Object Listing ............................................................................................... 36 Functionality ......................................................................................................... 36 Risk Object Details ............................................................................................... 37 Properties ............................................................................................................. 37 Editing .................................................................................................................. 39 Name Formats ..................................................................................................... 40 Deleting ................................................................................................................ 42
CHAPTER 6 Tabs ..................................................................................................................... 43 Fields .................................................................................................................... 44 Functionality ......................................................................................................... 44 New ...................................................................................................................... 44 Searching ............................................................................................................. 52 Editing .................................................................................................................. 54 Deleting ................................................................................................................ 55 Working with a Tab in a Questionnaire ................................................................ 56
CHAPTER 7 Question Groups .................................................................................................. 57 Fields .................................................................................................................... 58 Functionality ......................................................................................................... 58 New ...................................................................................................................... 59 Searching ............................................................................................................. 66 Editing .................................................................................................................. 67 Deleting ................................................................................................................ 69
CHAPTER 8 Questions ............................................................................................................. 71 Fields .................................................................................................................... 71 Functionality ......................................................................................................... 73 Searching ............................................................................................................. 73 Question Preparation ........................................................................................... 73 Forming Questions ............................................................................................... 74 Question Types .................................................................................................... 74 Panel .................................................................................................................... 75 Parent/Trigger ...................................................................................................... 75 Postback .............................................................................................................. 75 Simple .................................................................................................................. 76 Table .................................................................................................................... 76

Contents
iv
New ...................................................................................................................... 76 General Tab Fields .............................................................................................. 78 Functionality ......................................................................................................... 79 Answer Display Format ........................................................................................ 81 Fields .................................................................................................................... 81 Control Properties ................................................................................................ 82 Behaviors ............................................................................................................. 83 Function ............................................................................................................... 84 Actions ................................................................................................................. 86 Integration Activity ................................................................................................ 88 Answer Maps ....................................................................................................... 92 Make Conditional ................................................................................................. 94 Display Condition ................................................................................................. 98 Help Text .............................................................................................................. 99 Question Conditions ........................................................................................... 100 Question Visibility ............................................................................................... 100 Mapping IDs ....................................................................................................... 101 Control Types ..................................................................................................... 101 Editing ................................................................................................................ 106 Copying Questions ............................................................................................. 107 Deleting .............................................................................................................. 107 Questions in Worksite ........................................................................................ 109
CHAPTER 9 Releases ............................................................................................................ 110 Fields .................................................................................................................. 110 Functionality ....................................................................................................... 111 Generate ............................................................................................................ 112 Delete ................................................................................................................. 113 Publish ............................................................................................................... 114 View Risk Object Schema XML ......................................................................... 116 View UI Config XML ........................................................................................... 117 View SSIX XML .................................................................................................. 118
CHAPTER 10 Workbench ......................................................................................................... 119 Fields .................................................................................................................. 120 Functionality ....................................................................................................... 120 Add New Column ............................................................................................... 121
CHAPTER 11 Worksite ............................................................................................................. 124
SUPPORT Contacting Support ............................................................................................ 126

Contents
v
GLOSSARY Glossary Terms .................................................................................................. 127
APPENDIX A Question Condition Language ........................................................................... 130 Question Condition Language Usage ................................................................ 130 Value Lookup ..................................................................................................... 132 <Object Reference> ........................................................................................... 132 Object Reference Property Definitions .............................................................. 137 <Property> ......................................................................................................... 138 <Property Values> ............................................................................................. 139 <Operators> ....................................................................................................... 139 <Operator Values> ............................................................................................. 140
APPENDIX B Question Behavior – Functions .......................................................................... 142
APPENDIX C Question Behavior – Action ............................................................................... 151
APPENDIX D Question Behavior – Activities ........................................................................... 156
APPENDIX E Question Behavior – Answer Maps.................................................................... 159
INDEX Index .................................................................................................................. 162

vi
LIST OF FIGURES FIGURE 1 OIDC PROCESS FLOW ........................................................................................................... 11 FIGURE 2 PROJECT PAGE/HOME PAGE ................................................................................................ 13 FIGURE 3 PRODUCT RIGHT CLICK MENU ............................................................................................. 14 FIGURE 4 PRODUCT DESCRIPTION ....................................................................................................... 15 FIGURE 5 EDITING A PRODUCT .............................................................................................................. 15 FIGURE 6 PAGE SETTINGS FOR TABS .................................................................................................. 16 FIGURE 7 SORTING BY COLUMNS ......................................................................................................... 17 FIGURE 8 SEARCHING FOR TABS .......................................................................................................... 18 FIGURE 9 HELP ......................................................................................................................................... 19 FIGURE 10 MANAGE QUESTIONNAIRE .................................................................................................. 21 FIGURE 11 CREATING A NEW QUESTIONNAIRE .................................................................................. 23 FIGURE 12 SELECTING A QUESTIONNAIRE .......................................................................................... 24 FIGURE 13 TWO COLUMN LAYOUT ........................................................................................................ 25 FIGURE 14 WORKSITE DEFAULT POLICY SUBMIT NAVIGATION ....................................................... 26 FIGURE 15 WORKSITE STANDARD NAVIGATION ................................................................................. 27 FIGURE 16 LOCALE TAB .......................................................................................................................... 28 FIGURE 17 CUSTOMIZING LOCALE ........................................................................................................ 29 FIGURE 18 RISK OBJECTS....................................................................................................................... 35 FIGURE 19 RISK OBJECT LISTING .......................................................................................................... 36 FIGURE 20 RISK CATEGORIES RIGHT CLICK MENU ............................................................................ 36 FIGURE 21 RISK OBJECT DETAILS ......................................................................................................... 37 FIGURE 22 RISK OBJECT PROPERTIES ................................................................................................. 38 FIGURE 23 RISK OBJECT PROPERTIES - NAME FORMAT ................................................................... 40 FIGURE 24 NAME FORMAT IN WORKSITE ............................................................................................. 40 FIGURE 25 RISK OBJECT FIELD (MID) OF A QUESTION ...................................................................... 41 FIGURE 26 TABS ....................................................................................................................................... 43 FIGURE 27 NEWTAB ................................................................................................................................. 45 FIGURE 28 QUESTIONNAIRE IN WORKSITE .......................................................................................... 46 FIGURE 29 ASSIGNING RISK OBJECTS ................................................................................................. 48 FIGURE 30 ASSIGNING QUESTION GROUPS ........................................................................................ 49 FIGURE 31 QUESTION GROUP ASSIGNMENT TAB - RISK SELECTION ............................................. 50 FIGURE 32 QUESTION GROUP ASSIGNMENT TAB - QUESTION GROUP ASSIGNMENT ................. 51 FIGURE 33 QUESTION GROUP ASSIGNMENT TAB - ASSIGNED QUESTION GROUPS .................... 52 FIGURE 34 SEARCH UNASSIGNED QUESTION GROUPS .................................................................... 53 FIGURE 35 EDITING A TAB....................................................................................................................... 54 FIGURE 36 DELETE CONFIRMATION MESSAGE ................................................................................... 55 FIGURE 37 TABS IN WORKSITE .............................................................................................................. 56 FIGURE 38 QUESTION GROUPS MAIN ................................................................................................... 57 FIGURE 39 QUESTIONNAIRE IN WORKSITE .......................................................................................... 59 FIGURE 40 CREATING A NEW QUESTION GROUP ............................................................................... 60 FIGURE 41 CREATING NEW QUESTION GROUP SUCCESS MESSAGE ............................................. 61 FIGURE 42 ASSIGNING QUESTIONS ...................................................................................................... 62 FIGURE 43 ASSIGNING QUESTIONS TO THE QUESTION GROUP ...................................................... 63 FIGURE 44 ASSIGNING QUESTIONS TO A QUESTION GROUP........................................................... 65 FIGURE 45 EDITING A QUESTION GROUP ............................................................................................ 67 FIGURE 46 UPDATING A QUESTION GROUP ........................................................................................ 68 FIGURE 47 DELETING A QUESTION GROUP ......................................................................................... 69 FIGURE 48 DELETE CONFIRMATION ...................................................................................................... 70 FIGURE 49 MANAGE QUESTIONS ........................................................................................................... 72 FIGURE 50 CREATING A NEW QUESTION ............................................................................................. 77 FIGURE 51 ANSWER DISPLAY FORMAT OF A QUESTION ................................................................... 81 FIGURE 52 CONTROL PROPERTIES OF A QUESTION ......................................................................... 82

vii
FIGURE 53 BEHAVIORS OF A QUESTION .............................................................................................. 83 FIGURE 54 QUESTION BEHAVIOR FUNCTION ...................................................................................... 84 FIGURE 55 QUESTION BEHAVIOR ACTION ........................................................................................... 86 FIGURE 56 QUESTION BEHAVIOR INTEGRATION ACTIVITY ............................................................... 90 FIGURE 57 QUESTION BEHAVIOR ANSWER MAP ................................................................................ 92 FIGURE 58 SELECTING THE OPTIONS FOR MAKE CONDITIONAL ..................................................... 94 FIGURE 59 ENTERING A CUSTOM VALUE ............................................................................................. 95 FIGURE 60 MAKE CONDITIONAL FUNCTION ON A QUESTION ........................................................... 96 FIGURE 61 COMPLETED BEHAVIORS TAB ............................................................................................ 97 FIGURE 62 DISPLAY CONDITION COMPLETED..................................................................................... 98 FIGURE 63 HELP TEXT ON A QUESTION ............................................................................................... 99 FIGURE 64 UPDATING A QUESTION ..................................................................................................... 106 FIGURE 65 DELETING A QUESTION ..................................................................................................... 108 FIGURE 66 DELETE CONFIRMATION .................................................................................................... 108 FIGURE 67 QUESTIONS IN WORKSITE ................................................................................................ 109 FIGURE 68 RELEASES ............................................................................................................................ 110 FIGURE 69 GENERATING A RELEASE .................................................................................................. 112 FIGURE 70 SUCCESSFULLY GENERATED RELEASE ......................................................................... 113 FIGURE 71 DELETING A RELEASE ....................................................................................................... 113 FIGURE 72 PUBLISHING A RELEASE .................................................................................................... 114 FIGURE 73 SUCCESSFUL PUBLISHED RELEASE ............................................................................... 115 FIGURE 74 RISK OBJECT SCHEMA ...................................................................................................... 116 FIGURE 75 UI CONFIG XML.................................................................................................................... 117 FIGURE 76 SSIX SAMPLE XML .............................................................................................................. 118 FIGURE 77 WORKBENCH, PROJECT LIST ........................................................................................... 119 FIGURE 78 ADDING NEW COLUMN TO PROJECT LIST ...................................................................... 121 FIGURE 79 SELECTING RISK OBJECT FIELD ...................................................................................... 122 FIGURE 80 EDITING A RISK OBJECT IN PROJECT LIST ..................................................................... 123 FIGURE 81 RE-ORDERING COLUMNS IN PROJECT LIST ................................................................... 123 FIGURE 82 DATA CAPTURE WORKSITE HOME .................................................................................. 124 FIGURE 83 DATA CAPTURE WORKSITE HOME, PRODUCT & QUESTIONNAIRE SELECTED ........ 125

Preface
viii
PREFACE Welcome to the Oracle Insurance Data Capture Palette User Guide. Oracle Insurance Data Capture (OIDC) is a web-based data capture application system built specifically for the insurance industry that streamlines data capture by allowing insurers to create and configure questions and rules through an intelligent front-end data capture web application. OIDC can be used by producers, CSRs, underwriters or applicants to enter information using an intelligent, rules-based interview approach. OIDC can integrate with many systems, provide straight-through-processing and eliminate redundant entry. OIDC checks for accuracy and completeness and then accepts or knocks out depending on the answers. OIDC consists of the following components:
• Data Capture Worksite - (Worksite) The front end application where users can work with projects, and create new applications, forms, requests or submissions.
• Data Capture Palette - (Palette) The back end workspace where questionnaires are created. A
questionnaire can be an insurance application, a claims form, or any other input method that requires data to be captured and then used by other systems.
This guide explains the features and functionality of Palette.
AUDIENCE This guide is intended for business users and others who create data capture questionnaires.
RELATED DOCUMENTS For more information, refer to the following Oracle resources:
● The Oracle Insurance Data Capture series. You can view these guides at this address:
http://www.oracle.com/technetwork/documentation/insurance-097481.html
● The Oracle Insurance web site:
http://www.oracle.com/industries/insurance/index.html
Preface
ix
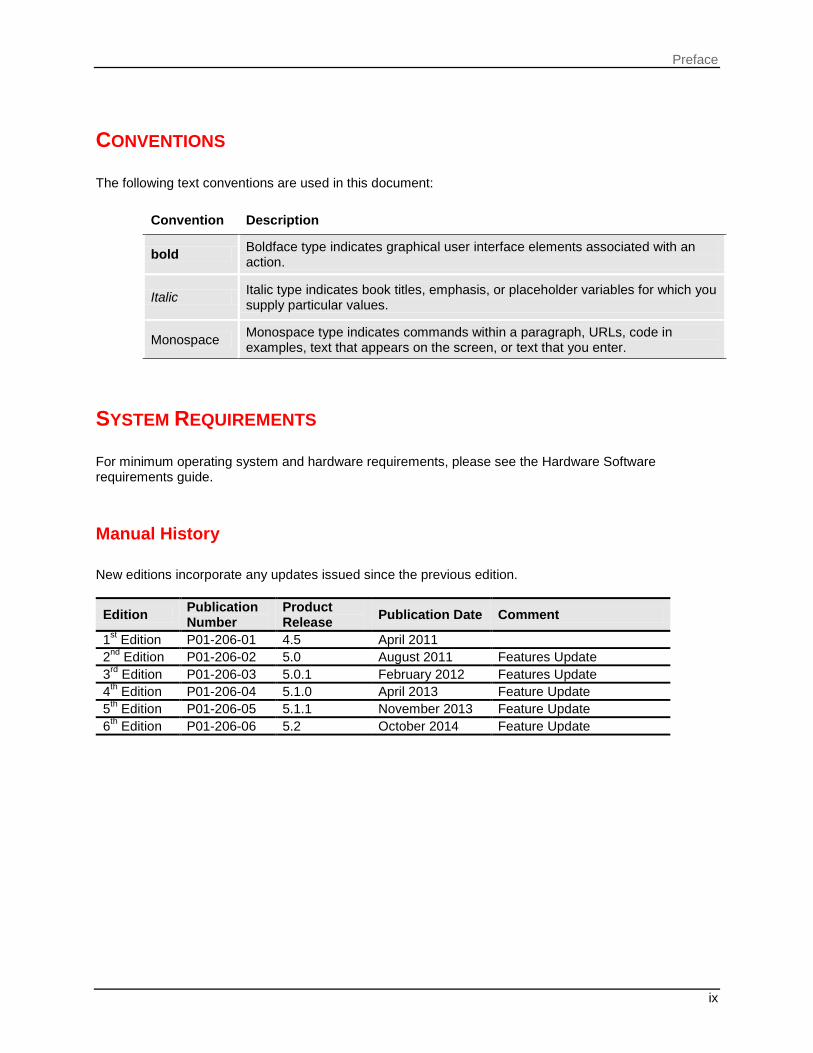
CONVENTIONS The following text conventions are used in this document:
Convention Description
bold Boldface type indicates graphical user interface elements associated with an action.
Italic Italic type indicates book titles, emphasis, or placeholder variables for which you supply particular values.
Monospace Monospace type indicates commands within a paragraph, URLs, code in examples, text that appears on the screen, or text that you enter.
SYSTEM REQUIREMENTS For minimum operating system and hardware requirements, please see the Hardware Software requirements guide.
Manual History New editions incorporate any updates issued since the previous edition.
Edition Publication Number
Product Release Publication Date Comment
1st Edition P01-206-01 4.5 April 2011 2nd Edition P01-206-02 5.0 August 2011 Features Update 3rd Edition P01-206-03 5.0.1 February 2012 Features Update 4th Edition P01-206-04 5.1.0 April 2013 Feature Update 5th Edition P01-206-05 5.1.1 November 2013 Feature Update 6th Edition P01-206-06 5.2 October 2014 Feature Update

Chapter 1
OVERVIEW OF DATA CAPTURE PALETTE Data Capture Palette (Palette) is the back end design time workspace where questionnaires are created. A questionnaire can be an insurance application, a claims form, or any other input method that requires data to be captured and then be used by other systems. Palette Contents: Palette is composed of multiple areas where you create the various questionnaire components. You begin by selecting the product where you want to work. Next you can create a new questionnaire or select an existing questionnaire to work in. Each product can have one or more questionnaires. Opening the questionnaire will allow you to design and edit the components that are unique to that questionnaire. These areas work in combination to create a questionnaire of your design. The main components of Palette are:
● Product - Holds a list of current products that have been implemented from product configuration basic system information for each product.
● Questionnaire - Holds a list of current questionnaires per product and the basic system information for each questionnaire.
● Risk Objects - This area contains the risk objects for the product. A Risk Object is the insured or property that data is being collected on. Risk Objects are set up in product configuration.
● Tabs - This is where you create the tabs that will be displayed on the questionnaire. Tabs will contain the questions groups that you have created along with the basic navigation buttons.
● Question Groups - This is where you categorize questions together into like minded groups. Question groups contain the questions that you have created.
● Questions - Questions that are asked on the questionnaire are created and edited here. The Questions tab also is where the answer fields used by the questions are created and edited. Questions and answers are created from the fields defined in the product object model. Additional questions that are specific to data capture only can be created in Palette.
● Releases - The final stage when creating a questionnaire is creating a release. A release is the packaging of the XML representation of the questionnaire.
● Workbench - Workbench is where you manage the columns that will be displayed on the workbench.
● Help - Displays the most recent version information, the database being used and context information.

Chapter 1 – Data Capture Palette Overview
11
CREATION PROCESS
1. Begin in Product Configuration (PC) by creating the product you want to use. This would include all of the objects and fields that were defined in the business object model that was used to generate the product object model version. Product Configuration Product Implementation publishes the product definition to Palette, and creates the appropriate objects and field-based questions.
2. Next move to Palette to define the components of the questionnaire. This is where you create or select the questionnaire, tabs, question groups, questions you want to use.
3. Create a questionnaire release and the published questionnaire is populated to Workbench.
Figure 1 OIDC Process Flow

Chapter 1 – Data Capture Palette Overview
12
There are many possible ways to create a questionnaire. The recommended creation process allows you to create a base element and then fine tune the other elements involved. This way, as you move back and forth between tabs, questions, question groups and answer maps, you will create the questionnaire that meets your needs.
Product Configuration and Palette Relationships Product Configuration and Palette objects have relationships and dependencies throughout the system.
• Products - Products created in PC are also created in Palette when the product object model version is published to data capture using Product Implementation.
• Objects - Objects created in PC are also created in Palette when the product object model version is published to data capture using Product Implementation.
• Fields - Fields created in PC are created as Questions in Palette when the product object model version is published to data capture using Product Implementation.
Palette Requirements: Palette is populated with content from Oracle Insurance Product Configuration (PC). Product Configuration is the business modeling tool that allows you to create a re-usable schema that defines your insurance product. Creation of the business model must be done prior to any work being performed in Palette. You must have content published to Palette before any work can be started.
13
Chapter 2
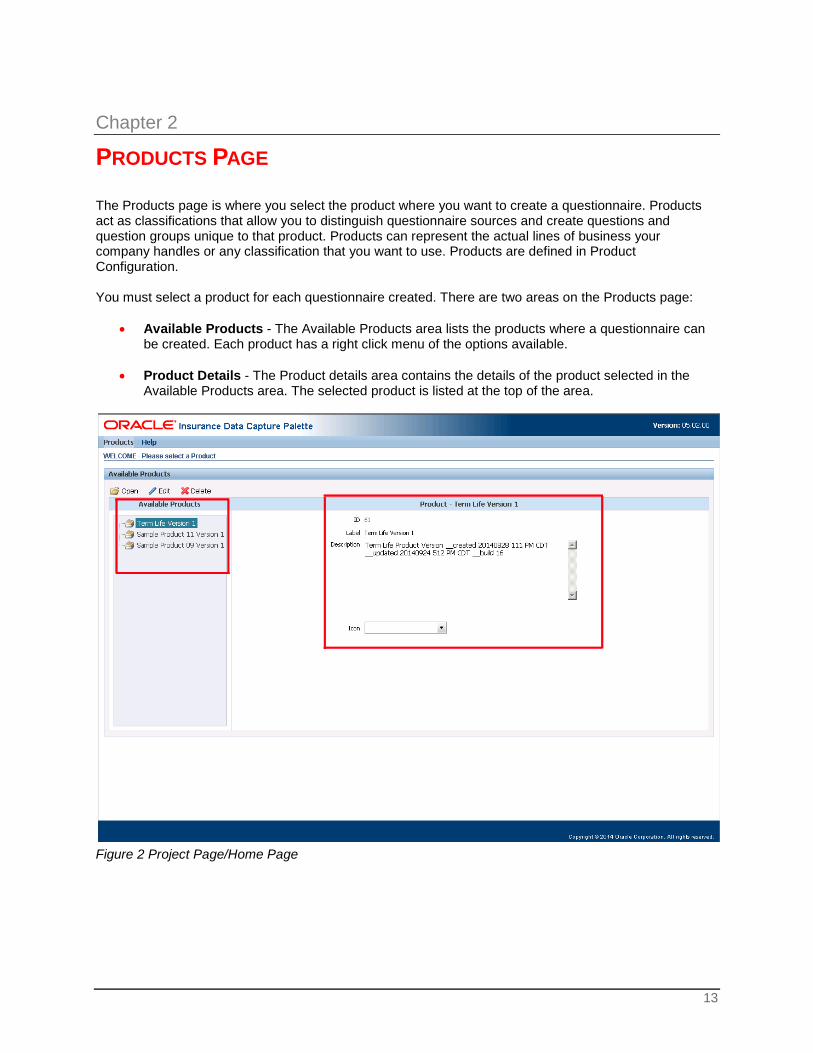
PRODUCTS PAGE The Products page is where you select the product where you want to create a questionnaire. Products act as classifications that allow you to distinguish questionnaire sources and create questions and question groups unique to that product. Products can represent the actual lines of business your company handles or any classification that you want to use. Products are defined in Product Configuration. You must select a product for each questionnaire created. There are two areas on the Products page:
• Available Products - The Available Products area lists the products where a questionnaire can be created. Each product has a right click menu of the options available.
• Product Details - The Product details area contains the details of the product selected in the
Available Products area. The selected product is listed at the top of the area.
Figure 2 Project Page/Home Page

Chapter 2 – Products Page
14
PRODUCT PAGE FIELDS The properties for the selected project are displayed in the Project Details area on the right side of the screen. In Palette, only the icon field can be updated. There are four fields for each project:
● ID - This is a system generated ID number. This is an information only field and cannot be changed in either Palette or Product Configuration.
● Label - The descriptive text that is displayed for this project. This field can be edited in Product
Configuration only.
● Description - The description of the product. This field can be edited in Product Configuration.
● Icon - You can choose a display icon from the system-defined list. Icons cannot be added to this list. If no icon is selected, the default icons are used.
FUNCTIONALITY The Product page has menu options located at the top of the screen and right click menus on each project listed in the Available Projects area. Menu Options:
Opens the project.
Edits the selected project.
Deletes the selected project.
Right Click Options: Products listed in the Available Products area have a right click menu with the same options as the menu bar; Open, Edit, and Delete. To view the right click menu options, select the product where you want to work and right click.
Figure 3 Product Right Click Menu

Chapter 2 – Products Page
15
Viewing the Description: To view the product description, hover your cursor over the product. An information field is displayed.
Figure 4 Product Description
EDITING PRODUCTS In Palette, only product icons can be edited. Any other changes to the Product must be made in PCP.
Figure 5 Editing a Product To Edit:
1. Select product you want to edit.
2. Right click and select Edit or click Edit in the menu bar.
3. Select the icon you want to use.
4. Click Update to save changes. Items that are grayed out, such as the ID, Label and Description must be edited in Product Configuration.

16
Chapter 3
SYSTEM WIDE FUNCTIONALITY OIDC has functionality that applies throughout the system regardless of what product or questionnaire you are in. Functionality includes setting the records displayed per page, column sorting, and searching.
NAVIGATION System wide there is common navigation. Page settings and column sorting work the same on any screen where these functions are available.
Records per Page Settings Records per Page settings can be set on Tab, Questions Groups, Questions, and Releases screens. Page settings allow you to set the number of records you want displayed per page. The records selector on most screens allows for 10, 25, 50, 75 or 100 records per page. A smaller number will eliminate scrolling on the page. A larger number will require scrolling but allow you to view a greater selection. Selections do not apply to all screens. If more than one page of tabs, question groups, questions, or answer maps is present, pages numbers will be displayed in the lower left corner of the screen. To go to another page, click the underlined page number. You can select any page at any time.
Figure 6 Page Settings for Tabs

Chapter 3 – System Wide Functionality
17
Column Sorting Columns can be sorted on Tabs, Questions Groups, Questions, and Releases screens. You can sort fields by individual column headers.
● Alphabetically (A to Z) ● Alphabetically (Z to A) ● Numerically (lowest to highest) ● Numerically (highest to lowest) ● Date (Newest first) for Releases
Figure 7 Sorting by Columns To sort by a different column header, click the column header you want to sort by and the current results will be resorted. Information will be sorted either alphabetically or numerically, depending on the column header. You can sort results as many times as you want. The first click will sort A-Z or lowest to highest. The second click will reverse the order, Z-A or highest to lowest. Sorting does not filter results. It only rearranges the order in which they are displayed.

Chapter 3 – System Wide Functionality
18
Searching Manage Questionnaire, Tabs, Question Groups, Questions, and Releases all contain a Search function. Search allows you to search for a specific element within the screen selected. Searches are done against the columns listed or descriptions and IDs. The results returned will be the elements that meet the search criteria. Searches are done against the entire tab and will return every element that meets the search criteria. Searching can be done at any time and does effect the elements you have already selected.
Figure 8 Searching for Tabs To Search:
1. Enter your search criteria in the search window.
2. Click the search icon at the end of the field. Results will be displayed in the body of the screen. To clear the field, clear the search field and search against a blank field. This will return all available elements.
Chapter 3 – System Wide Functionality
19
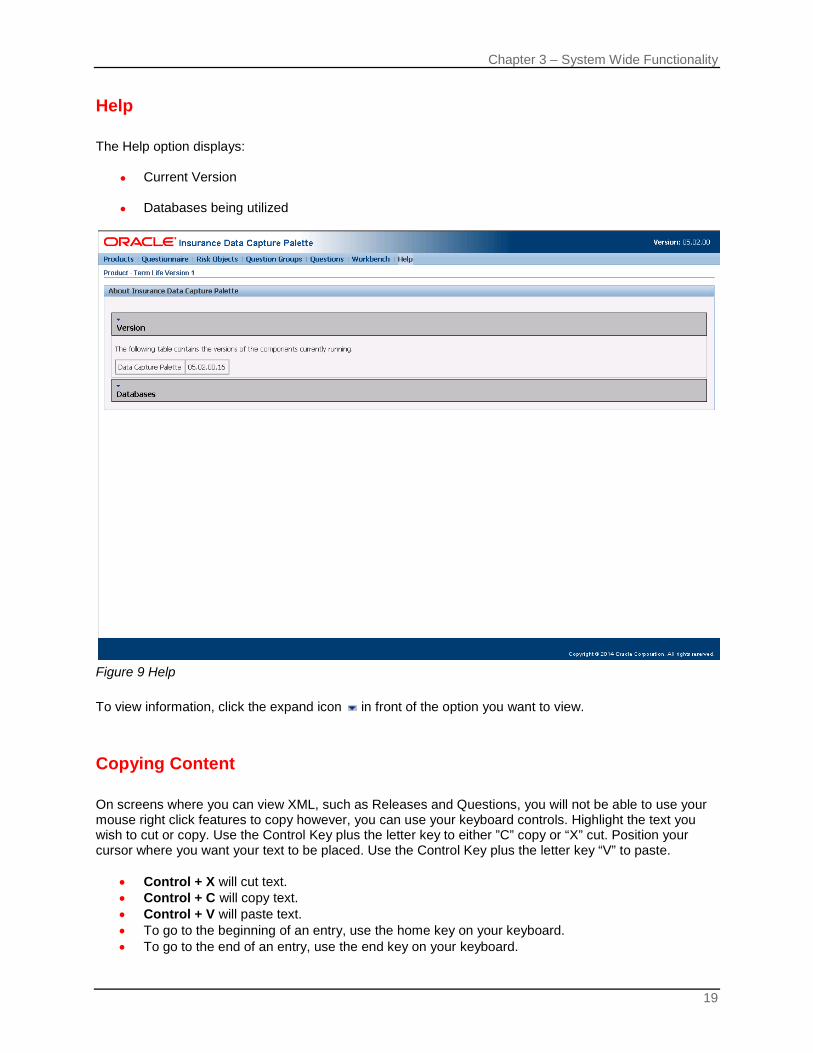
Help The Help option displays:
● Current Version ● Databases being utilized
Figure 9 Help To view information, click the expand icon in front of the option you want to view.
Copying Content On screens where you can view XML, such as Releases and Questions, you will not be able to use your mouse right click features to copy however, you can use your keyboard controls. Highlight the text you wish to cut or copy. Use the Control Key plus the letter key to either ”C” copy or “X” cut. Position your cursor where you want your text to be placed. Use the Control Key plus the letter key “V” to paste.
• Control + X will cut text. • Control + C will copy text. • Control + V will paste text. • To go to the beginning of an entry, use the home key on your keyboard. • To go to the end of an entry, use the end key on your keyboard.
Chapter 3 – System Wide Functionality
20
On some screens, you will be able to paste text back in to the screen. In Releases, you will be able to copy content only from:
● View Risk Object Schema XML
● View UI Config XML
● View SSIX XML You will be able to paste the copied text into another program for easier viewing. You will not be able to paste any content back into these screens.
21
Chapter 4
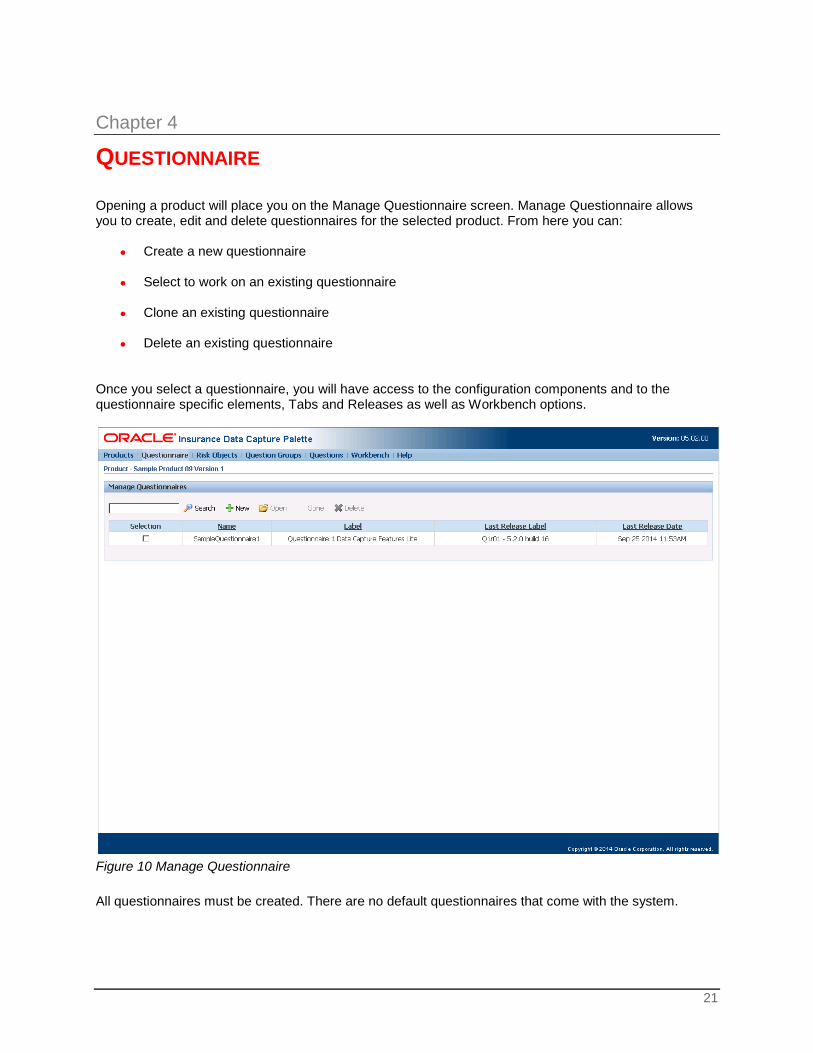
QUESTIONNAIRE Opening a product will place you on the Manage Questionnaire screen. Manage Questionnaire allows you to create, edit and delete questionnaires for the selected product. From here you can:
● Create a new questionnaire ● Select to work on an existing questionnaire ● Clone an existing questionnaire ● Delete an existing questionnaire
Once you select a questionnaire, you will have access to the configuration components and to the questionnaire specific elements, Tabs and Releases as well as Workbench options.
Figure 10 Manage Questionnaire All questionnaires must be created. There are no default questionnaires that come with the system.

Chapter 4 – Questionnaire
22
FIELDS The Manage Questionnaire screen has a tool bar at the top of the screen and a listing of all current questionnaires for the product. Questionnaires are listed from newest to oldest with the newest at the top of the list. There are five fields for each questionnaire:
● Selection - Check this box to select the questionnaire.
● Name - The name of the questionnaire.
● Description - The description of the questionnaire.
● Last Release Label - The descriptive label of the last release for this questionnaire.
● Last Release Date - The date of the last release for this questionnaire.
FUNCTIONALITY The Manage Questionnaire screen has menu options located at the top of the screen. There are no right click menus. Menu Options: There are four menu items in the top bar menu.
Searches the screen for the criteria that have been entered.
Creates a new Questionnaire.
Opens the Questionnaire.
Clones the Questionnaire
Deletes the selected Questionnaire.
NEW QUESTIONNAIRES New Questionnaires can be created at any time. To Create a New Questionnaire:
1. Open the product where you want to create a new questionnaire. This places you on the Manage Questionnaire screen for the product.

Chapter 4 – Questionnaire
23
2. Click New. The screen refreshes with the Properties tab for the new questionnaire. The Properties tab is part of the configuration file components for the questionnaire. The Properties tab has a Name field that is required to create a new questionnaire. Fields with a red asterisk ( ) are required.
Figure 11 Creating a New Questionnaire
3. Enter the Name information. . The field is limited to 30 alpha numeric characters. Spaces can be used as well as the special characters underscore ( _ ) and period ( . ). You can edit the Name field prior to publishing the first release. This field is required.
4. Enter a Label. The label that will be displayed in Questionnaire. A brief description of the
questionnaire. This field is limited to 50 characters. Alpha numeric, special characters, and spaces are allowed.
5. Select the column layout for the questionnaire.
6. Check if you want to enable default submit navigation.
7. Click Create. The screen displays a success or failure message. Click OK. You must correct any errors to continue.
You can now work on the elements of this questionnaire, such as risk objects and tabs. The Locale tab can be updated now or at a later time. The default locale from the server is used. NOTE: It is strongly recommended that you do not change the Name Information after the release has
been published.
Chapter 4 – Questionnaire
24
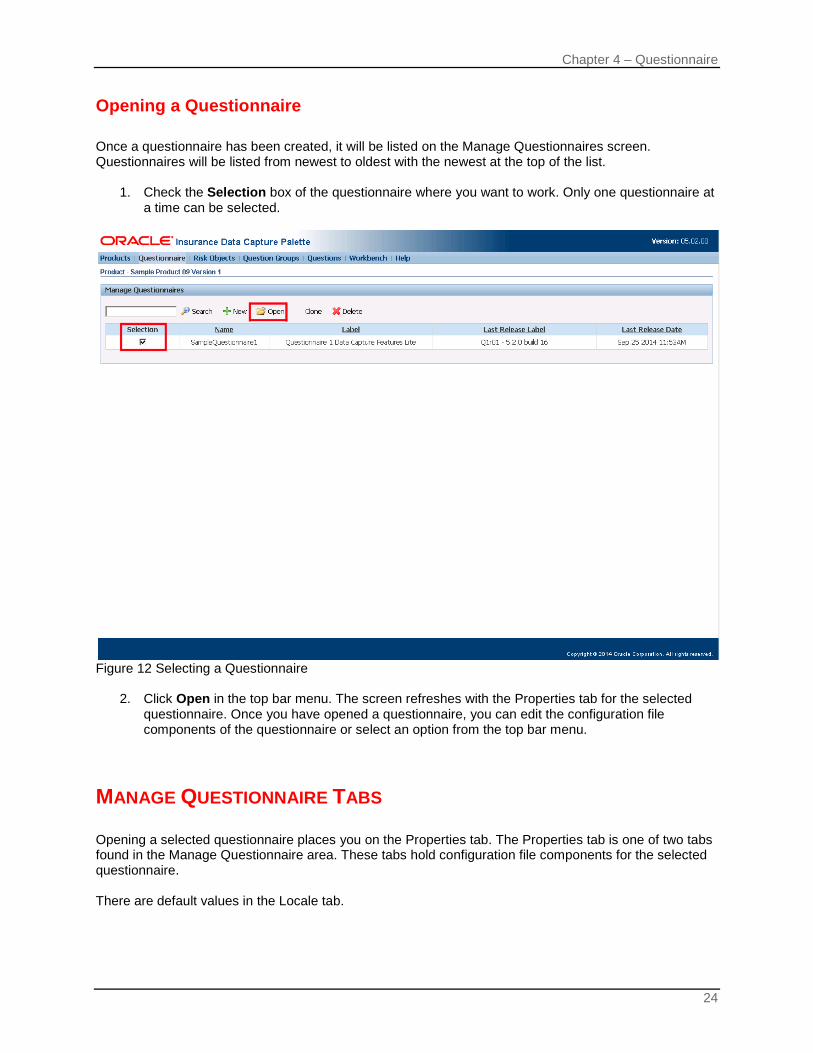
Opening a Questionnaire Once a questionnaire has been created, it will be listed on the Manage Questionnaires screen. Questionnaires will be listed from newest to oldest with the newest at the top of the list.
1. Check the Selection box of the questionnaire where you want to work. Only one questionnaire at a time can be selected.
Figure 12 Selecting a Questionnaire
2. Click Open in the top bar menu. The screen refreshes with the Properties tab for the selected
questionnaire. Once you have opened a questionnaire, you can edit the configuration file components of the questionnaire or select an option from the top bar menu.
MANAGE QUESTIONNAIRE TABS Opening a selected questionnaire places you on the Properties tab. The Properties tab is one of two tabs found in the Manage Questionnaire area. These tabs hold configuration file components for the selected questionnaire. There are default values in the Locale tab.

Chapter 4 – Questionnaire
25
Column Layout Options Question Layout Type allows you to display multiple columns on a questionnaire in Worksite. This can be helpful when you have a questionnaire where you want to see more than one column and reduce scrolling. When using multi column layout, there are a few things you should keep in mind.
1. The length of your question. The longer the question, the more likely it is that it will wrap. Wrapping does not affect the way the question behaves. Wrapping will affect the way the question is displayed on the page. It may wrap but be visually unattractive.
2. The order in which you want the questions to appear. You should have some idea of what order you want to place your questions and in what column you want them to be displayed. Strategically placing questions may require inserting blank questions. The use of blank questions can force a question in to the order you want.
Figure 13 Two Column Layout

Chapter 4 – Questionnaire
26
Default Submit Navigation Every questionnaire has some default navigation. Tabs may contain one or more navigation buttons:
● Next - Takes you to the next tab.
● Back - Returns you to the previous tab.
● Submit Policy - Submits the data gathered in the questionnaire to the target system.
Using Policy Submit Navigation: When default policy submit navigation is used (EnableDefaultPolicySubmitNavigation = true), the expectation is that the last tab will trigger the submit activity. The Submit Policy button will be active on the last object instance on the next to last tab.
Figure 14 Worksite Default Policy Submit Navigation

Chapter 4 – Questionnaire
27
Using Standard Navigation: When default policy submit is not used (EnableDefaultPolicySubmitNavigation = false), there will be no Submit Policy button.
Figure 15 Worksite Standard Navigation

Chapter 4 – Questionnaire
28
Locale Locale is defined as the unique attributes of a location including the formatting of numbers, currency, time, date, phone numbers and tax identification numbers. The default locale will be US English. The default can be changed on the questionnaire. Administrators can change the default by editing the locale file on the server where Palette is installed. Every new questionnaire will assume the default locale. Locale settings will be used if a field is identified as a number, currency, time, date, phone number or tax identification number in an Answer Map. The fields will automatically follow the settings defined by the locale of the questionnaire. Questionnaires must have a locale.
Figure 16 Locale Tab The Locale tab has two sections:
● The Locale selector located at the top of the tab. The current locale used by the questionnaire will be shown. You can select another locale from the list. After you have made your selection, click Update to save your choice.
● The Sample Formatting located in the middle. The default settings of the current locale will be
displayed in the sample area. This area is for display only. You cannot make updates here.
Chapter 4 – Questionnaire
29
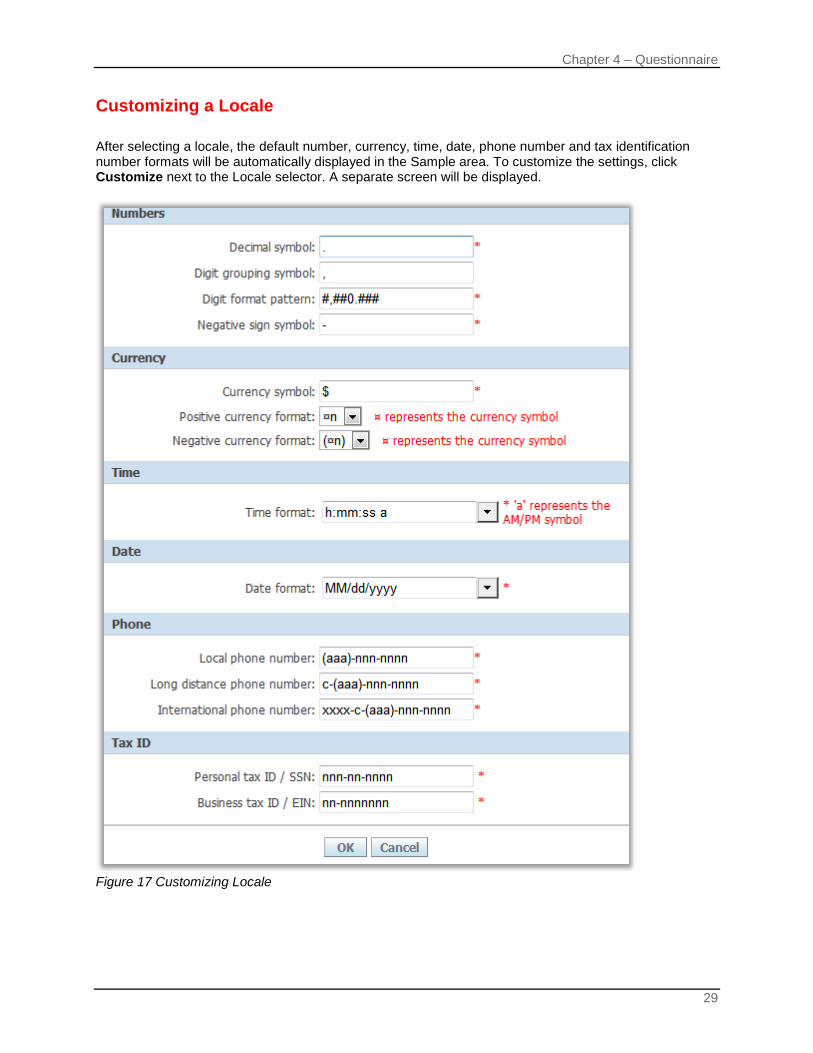
Customizing a Locale After selecting a locale, the default number, currency, time, date, phone number and tax identification number formats will be automatically displayed in the Sample area. To customize the settings, click Customize next to the Locale selector. A separate screen will be displayed.
Figure 17 Customizing Locale

Chapter 4 – Questionnaire
30
Locale Settings The current locale settings will be displayed. These values can be updated and you will be allowed to type in an alternate value on select fields if you choose. You must have a value in each field. Formats are for display purposes. Data is not stored in any designated format. Numbers Number formats will be used for any field identified as a number. If you want to create a number that does not use the locale number format, such as a ZIP code or house number, use the text field answer map and define the values as numeric.
● Decimal symbol - The decimal symbol indicates the integral part of a number from the fractional part. For example, 10.25 (using a period as the decimal symbol) or 8,50 (using a comma as the decimal symbol).
● Digit grouping symbol - The digit grouping symbol indicates the symbol that will be used to
show the thousands separator. For example, 1,000 (using a comma as the digit grouping symbol) or 1.000 (using a period as the digit grouping symbol). Digit grouping is by the thousandths only.
● Digit format pattern - The digit format pattern is used for decimal precision and the location of
the zero position.
Decimal precision is the number of places you want displayed for any decimal value. The zero position is the last position of the zero value. You can set the placement of the zero value to be prior to the decimal symbol, for example a digit format #,##0.## would display the entry 5.001 as 5. Or you can set the placement of the zero value to be after the decimal symbol. For example, a digit format of #,###.#0 would display the entry 120 as 120.00.
To enter the digit format, enter a 0 in the last place where you want to display a zero value. Enter a pound sign (#) for every numeric value you want displayed after the decimal symbol.
Where:
- First line # equals the preceding numbers - , represents the digit grouping symbol - 0 equals the zero position of the number - . represents the decimal symbol - End line # equals the decimal precision
NOTE: Do not change the decimal or digit grouping symbols in the digit format pattern. The decimal
symbol is for visual confirmation only. The digit grouping symbol can be removed if you do not want to display a digit grouping. Unless deleted, the digit grouping symbol and the decimal symbol entered in the respective fields are the elements that will be used in the questionnaire.
- Most separators, i.e. comma ( , ), period ( . ), or space ( ) will be allowed. - Do not use the same separator for the decimal and digital. The separators should be
different. - Only one separator per entry. You will not be able to enter a space ( ) for the millions
separator and then a comma ( , ) for the thousands separator. You will have to select either the space or the comma.

Chapter 4 – Questionnaire
31
● Negative sign symbol - This is the sign used to denote negative numbers. Currency Currency format will be used for any field identified as a currency.
● Currency symbol - the symbol to designate the currency being used. Symbols can be any value up to 10 digits.
● Positive currency format - the format of positive currency values. You can select a format from
the list. There are four options:
- ¤n - The currency symbol immediately before the value - n¤ - The currency symbol immediately after the value - ¤ n - The currency symbol one space in front of the value - n ¤ - The currency symbol one space after the value
● Negative currency format - the format of negative currency values. You can select a format
from the list. There are 16 options:
Where:
- ¤ - Represents the currency symbol - n - Represents the numeric value - ( ) - The numeric value will be placed in parenthesis - - - Will place a dash (-) in the numeric value - - A single space may be in front or after the numeric value
Time Time format will be used for any field designated as a time.
● Time format - the format of the time being displayed. You can select a time value from the list or
enter your own format.
Where:
- H or h - The hour - m - The minute - s - The second - a - AM/PM indicator
- The lower case h represents a 12 hour clock. - The capital H represents a 24 hour clock.
NOTE: Any custom time value will be added to the list of available selections. Date Date format will be used for any field designated as a date.

Chapter 4 – Questionnaire
32
● Date format - the format of the date being displayed. You can select a format from the list or enter your own format.
Where:
- M - The month - d - The date - y - The Year. You can use a 4 digit entry YYYY or a 2 digit Year entry YY
- A separator does not have to be used - Static values are allowed
Phone Number Phone number format will be used for any field designated as a phone number. Phone fields will have specific phone formats that need to be entered. Phone numbers can be up to 22 digits including separators.
● Local phone number - the format of the local phone number being displayed. You can enter your own format.
● Long Distance phone number - the format of the long distance phone number being displayed.
You can enter your own format.
● International phone number - the format of the international phone number being displayed. You can enter your own format.
Where:
- x - The country code - c - The long distance - a - The area code indicator - n - The local number
- The only separator allowed is the dash (-) - A separator does not have to be used
Tax Identification Number Tax identification format will be used for any field designated as a SSN. Tax identification fields will have specific SSN formats that need to be entered. Tax identification numbers can be up to 22 digits including separators.
● Personal tax ID/SSN - the format of the personal tax ID/SSN being displayed. You can enter your own format.
● Business tax ID/EIN - the format of the international phone number being displayed. You can
enter your own format.
Where:
- n equals the number - The only separator allowed is the dash (-) - A separator does not have to be used.

Chapter 4 – Questionnaire
33
Customizing the Locale
1. Enter the questionnaire where you want to customize the locale.
2. Select the Locale Settings tab.
3. Select the Locale you want to use from the locale selector.
4. To customize the settings, click Customize. A separate screen will be displayed.
5. Make your entries. Fields are validated when you exit the field. If there are any errors, please correct before continuing.
6. Click OK to close the screen. You will be back on the Locale Settings tab.
7. Click Update to save your changes. Your changes are not applied until you click Update.
Editing the Locale While it is possible to change the locale at any time, it is recommended that the locale be selected prior to the questionnaire being published and not be changed once the questionnaire has been published. CAUTION: Changing locale after the questionnaire has been published may result in programs not
running properly.
EDITING QUESTIONNAIRES You can edit any Manage Questionnaire tab at any time. Each tab can be edited in the same way.
1. Check the Selection box of the questionnaire where you want to work. Only one questionnaire at a time can be selected.
2. Click Open in the top bar menu. The screen will refresh with the Properties tab for the selected questionnaire.
3. Select the tab where you want to make changes.
4. Type in the entry that you want and click Update. You must click Update to save your entry.
5. A successful update will display a message box. Click OK to close the message and return to the screen. An unsuccessful update will display an error message. Please make any necessary changes and try again.
Changes will not be effective until a release has been generated and published.
Chapter 4 – Questionnaire
34
DELETING QUESTIONNAIRES You can delete any questionnaire at any time.
1. Check the Selection box of the questionnaire where you want to work. Only one questionnaire at a time can be selected.
2. Click Delete in the top bar menu. A Confirmation message will be displayed.
3. Click OK to delete the questionnaire. Click Cancel to return to the previous screen without deleting.
4. The screen will refresh and with the selected questionnaire removed. Make sure this is the action you want to take. This action cannot be undone.
35
Chapter 5
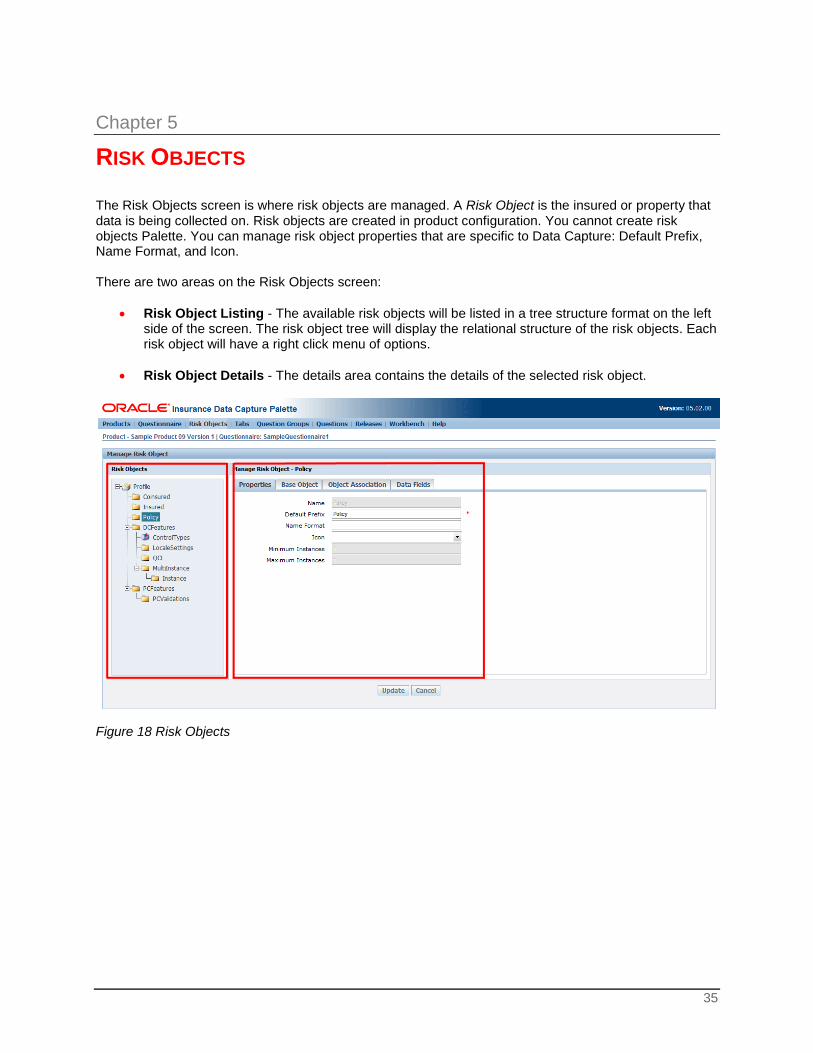
RISK OBJECTS The Risk Objects screen is where risk objects are managed. A Risk Object is the insured or property that data is being collected on. Risk objects are created in product configuration. You cannot create risk objects Palette. You can manage risk object properties that are specific to Data Capture: Default Prefix, Name Format, and Icon. There are two areas on the Risk Objects screen:
• Risk Object Listing - The available risk objects will be listed in a tree structure format on the left side of the screen. The risk object tree will display the relational structure of the risk objects. Each risk object will have a right click menu of options.
• Risk Object Details - The details area contains the details of the selected risk object.
Figure 18 Risk Objects
Chapter 5 – Risk Categories
36
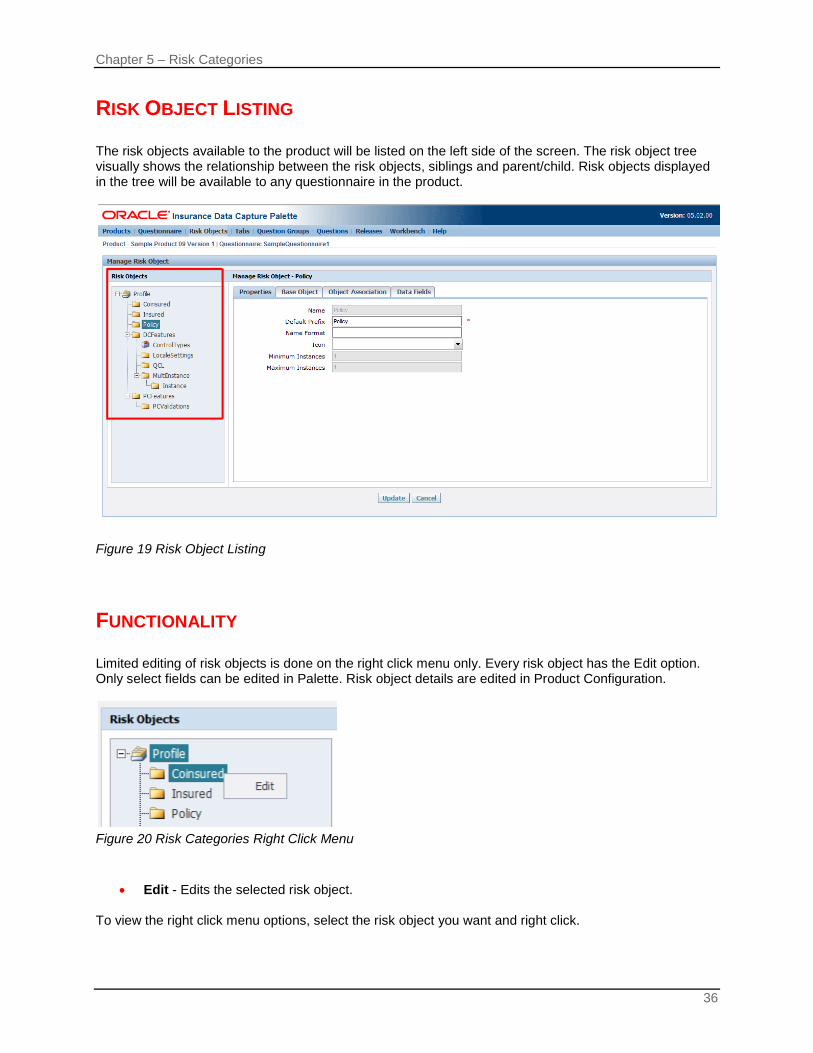
RISK OBJECT LISTING The risk objects available to the product will be listed on the left side of the screen. The risk object tree visually shows the relationship between the risk objects, siblings and parent/child. Risk objects displayed in the tree will be available to any questionnaire in the product.
Figure 19 Risk Object Listing
FUNCTIONALITY Limited editing of risk objects is done on the right click menu only. Every risk object has the Edit option. Only select fields can be edited in Palette. Risk object details are edited in Product Configuration.
Figure 20 Risk Categories Right Click Menu
• Edit - Edits the selected risk object. To view the right click menu options, select the risk object you want and right click.

Chapter 5 – Risk Categories
37
RISK OBJECT DETAILS The details area contains the details of the selected risk object.
Figure 21 Risk Object Details Risk object tabs:
• Properties - Lists the details of the risk object. • Data Fields Displays a list of Fields that were created in this object in product configuration.
Properties Every object will have a properties tab.

Chapter 5 – Risk Categories
38
Figure 22 Risk Object Properties
● Name - Is the identifying element. The risk object name displays the object Custom ID created in product configuration. You cannot edit this value.
● Default Prefix - The identifying name used in risk object trees and question group headings in
questionnaire. The field is limited to 30 alpha numeric characters. Spaces can be used as well as the special characters underscore ( _ ) and period ( . ). The field is required. The default value is the object Custom ID created in product configuration
● Name Format - Allows for a custom defined name to be used as a label on the questionnaire. This field requires the question property Risk Object Field or Mapping ID (mId) and may be completed at a later time. If no format is entered, the default prefix will be displayed.
● Icon - The representative icon for the risk object. A folder is the default icon.
● Minimum Instances - The minimum number of instances required for this risk object is defined in product configuration (Min Occurrences) and cannot be edited in Palette.
● Maximum Instances - The maximum number of instances allowed for this risk object is defined in product configuration (Max Occurrences) and cannot be edited in Palette.
To Enter Properties:
1. Fields with a red asterisk ( ) are required. Default Prefix is required.
2. The Default Prefix and Icon can be entered at any.
3. Click Update to save your entry. Risk object options will be in effect when a release is generated and published.

Chapter 5 – Risk Categories
39
EDITING Risk objects can be edited at any time. Changes to risk objects that are unique to a product will be visible in that product only. Please be aware that changes to risk objects may affect other questionnaires in that product. To Edit Risk Objects:
1. Select the risk object you want to edit and right click. Select Edit. The screen will refresh and the editable field will be open.
2. Make your changes. Options will depend upon the type of risk object selected.
3. Click Update to save changes. TIP: Items that are grayed out are not available for editing. TIP: If you are unsure or this is not the action you want to take, click Cancel.

Chapter 5 – Risk Categories
40
Name Formats Name formats are used to format how risk object information is to be displayed on the questionnaire. If there is a name format entered, when a questionnaire is in process or completed, the risk object will be displayed as formatted. The name format can be entered on the Properties tab. If you do not enter a Name Format, the risk object name will be displayed. For example, instead of the Insured’s first and last name, “Insured” would be displayed. For Example: For example, if you want to format how an Insured name is displayed, you would enter a name format like: [mId:FIRST_NAME] [mId:LAST_NAME]
Figure 23 Risk Object Properties - Name Format This would take the values entered in the Insured’s First Name and Last Name questions and place it on every instance where this risk object was being displayed in the questionnaire.
Figure 24 Name Format in Worksite

Chapter 5 – Risk Categories
41
Entering a Name Format: Name formats are created using the question property Risk Object Field. This information may not be available at the time of risk object creation. The risk object can be edited at a later time and the name format can be entered then.
Figure 25 Risk Object Field (mId) of a Question Prior to entering a Name Format, you will need the question risk object field for the information that you want to use. The risk object field can be found on the question.
1. Open the questionnaire where you want to format names.
2. Proceed to the Questions tab.

Chapter 5 – Risk Categories
42
3. Locate the question(s) that contains the information you want to format. For example, if you want to format the Insured and the Insured contains the first name, last name and middle initial, you would need to locate all three questions.
4. Select Edit on the question(s) to access the Risk Object Fields/Mapping IDs. Name format must follow the pattern: [mId:xxx]
Element Description
[ – Left bracket mId – lower case m, capital I, lower case d
: – Semi-colon xxx – where xxx is the question risk object field name (PCP Custom ID) mapping ID
] – Right bracket The name format must be in the exact order you want. For example: [mId:FirstName] [mId:LastName] With a single space between the brackets. Punctuation can be added between the entries. Comma ( , ) period ( .) –dash ( ) and underscore ( _ ) are allowed. Name formats will override the values in the Default Prefix. Name formats are not required and can be added or removed at any time.
DELETING Objects are managed in product configuration. You cannot delete risk objects in Palette.

43
Chapter 6
TABS The Tabs screen is where you manage tabs. Tabs are the pages that will be displayed for the questionnaire. Each tab contains question groups and the associated risk objects. Tabs are unique to the questionnaire where they were created The Tabs menu option will not be visible until you select the questionnaire where you want to work. All tabs must be created. There are no default tabs.
Figure 26 Tabs On the Manage Tabs screen you can:
• Create new tabs • View and edit existing tabs • Delete un-used tabs • Search for tab elements
Chapter 6 – Tabs
44
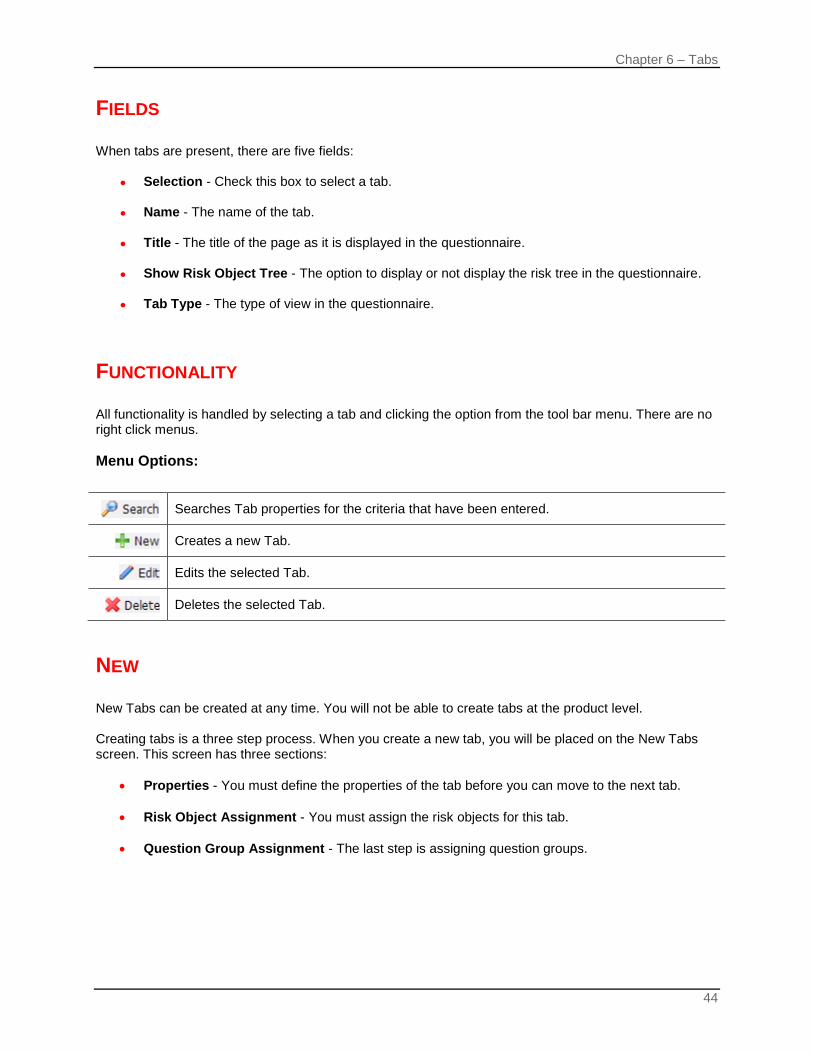
FIELDS When tabs are present, there are five fields:
● Selection - Check this box to select a tab.
● Name - The name of the tab.
● Title - The title of the page as it is displayed in the questionnaire.
● Show Risk Object Tree - The option to display or not display the risk tree in the questionnaire.
● Tab Type - The type of view in the questionnaire.
FUNCTIONALITY All functionality is handled by selecting a tab and clicking the option from the tool bar menu. There are no right click menus. Menu Options:
Searches Tab properties for the criteria that have been entered.
Creates a new Tab.
Edits the selected Tab.
Deletes the selected Tab.
NEW New Tabs can be created at any time. You will not be able to create tabs at the product level. Creating tabs is a three step process. When you create a new tab, you will be placed on the New Tabs screen. This screen has three sections:
• Properties - You must define the properties of the tab before you can move to the next tab.
• Risk Object Assignment - You must assign the risk objects for this tab.
• Question Group Assignment - The last step is assigning question groups.

Chapter 6 – Tabs
45
Figure 27 NewTab The assignment sections will be visible as you complete the Properties section. You have to create properties before the risk object assignment and the question group assignment section will be accessible. Tab Creation Preparation: Prior to creating any tabs in Palette, you may find it helpful to have a plan on how you want the tabs to be displayed on the questionnaire in Worksite. Knowing which tab you want displayed first, second and so on will assist you when you create your tabs. You may also find it helpful to have a plan for the elements that you want on your tabs. What questions you want to use or what information you want to gather on each tab.

Chapter 6 – Tabs
46
Figure 28 Questionnaire in Worksite Some items to consider:
1. The order you want to tabs to be displayed. The order that you create the tabs in will be the order the tabs are displayed in the questionnaire. Tabs cannot be re-ordered.
For example, if you know you want the Insured Information tab to be displayed first in the questionnaire, you would need to create that tab first.
2. The risk objects that you want to use on each tab. You can use single or multiple risk objects on
tabs. You also can use the same risk object on multiple tabs. If you are using child risk objects, make sure that the parent risk object is also used.
3. The order you want the risk objects to be displayed on that tabs. Risk objects will be displayed in the order in which they were selected. If you select the Insured first and the Co-Insured second, then the Insured will be listed first on the tab and the Co-Insured will be next and so on. Risk objects cannot be re-ordered.
4. The question groups that you want to be displayed on each tab. Or the information you need to
gather on the tab. Step 1 - Creating a New Tab, Properties: This is where you assign the basic properties to the tab.

Chapter 6 – Tabs
47
1. Open the Product where you want to create a tab.
2. Select the Questionnaire where you want to create a tab. Click Open.
3. Select Tabs on the top bar menu. This will open the New Tabs screen.
4. Click New to open the New Tab screen.
5. Enter the Properties for the tab.
6. Click Create to go to the next screen.
Clicking Create will save your entries. If you want to stop at this point and continue later, you can. TIP: In order to continue, Risk Objects must be in place. If you have not created any custom risk objects
that you need, you can stop here and finish at a later time. Properties Fields: Tab Properties contains 5 fields. Two fields are required, Name and Title. The other fields can remain with the default values or can be completed a later time.
• Name - A unique identifier for the tab. This will be used for page navigation and not displayed on the questionnaire. The field is limited to 30 alpha numeric characters. The Name field cannot contain spaces and the only special characters allowed are underscore ( _ ) and period ( . ). Names cannot be duplicated. The field is required.
• Title - The name of the tab as it appears in the questionnaire. This tab will be displayed as a
navigation tab at the top of the questionnaire. The field is limited to 30 alpha numeric characters. Spaces can be used as well as the special characters underscore ( _ ) and period ( . ). Titles can be duplicated. The field is required.
• Show Risk Object Tree - Select Yes to display the risk object tree on the tab. Select No to hide
the risk object tree.
• Risk Object Tree Title - Enter the name of the risk object tree if displayed. This name will be displayed in the title bar over the risk object tree. The default is Risk Items. The field is limited to 30 alpha numeric characters. Spaces can be used as well as the special characters underscore ( _ ) and period ( .).
• Work Area Title Bar - Enter the title that will be displayed in the title bar at the top of the tab. The
default is Questionnaire. If a risk object tree is not displayed, this will be the only element displayed. The field is limited to 30 alpha numeric characters. Spaces can be used as well as the special characters underscore ( _ ) and period ( . ).
Step 2 - Creating a New Tab, Risk Object Assignment: Next you will need to assign risk objects to the tab. The risk objects assigned will define the type of data that will be gathered on the tab. Placing a risk object on the tab makes the object available to be used on the tab. If you need more than one instance of a object on a tab, make sure you include a question that

Chapter 6 – Tabs
48
will allow for multiple instances or return to product configuration and adjust the minimum number of instances. You can select as many risk objects as you need. Each object assigned to a tab creates a form. Keep in mind the relationship between risk objects. For example, in Figure 28, if you are going to use, the ControlTypes risk object under DCFeatures, you need to make sure you use the DCFeatures risk object also. It does not have to be on this tab but it must be somewhere within the questionnaire. ControlTypes is related to DCFeatures and must be used in that context.
Figure 29 Assigning Risk Objects Risk Object Order: To specify an order, select the risk object that you want to be first and click Update. This will assure that the risk object you have selected will be first. Repeat the select and Update process for the remaining risk objects. To Select a Risk Object:
1. Check the box in front of the risk object that you want to make available to the tab.
2. Click Update to go to the next screen. Clicking Update will save your entries. If you want to stop at this point and continue later, you can.

Chapter 6 – Tabs
49
TIP: In order to continue, Question Groups must be in place. If you have not created any questions groups, you will not be able to assign questions.
Step 3 - Creating a New Tab, Question Group Assignment: The last step is to assign question groups. Assigning Question Groups to Tabs defines the specific data that will be gathered on that Tab. There are three areas where you can view information or perform an action:
• Risk Objects (Forms) • Question Group Assignment - Unassigned • Question Group Assignment - Assigned
You also can search the question groups.
Figure 30 Assigning Question Groups There are three icons in the Question Group Assignment area:
Select - moves the selected question group to the assigned question group area.
Remove - removes the selected question group from the assigned question group area.
Searches the available question groups for the criteria that have been entered.
Chapter 6 – Tabs
50
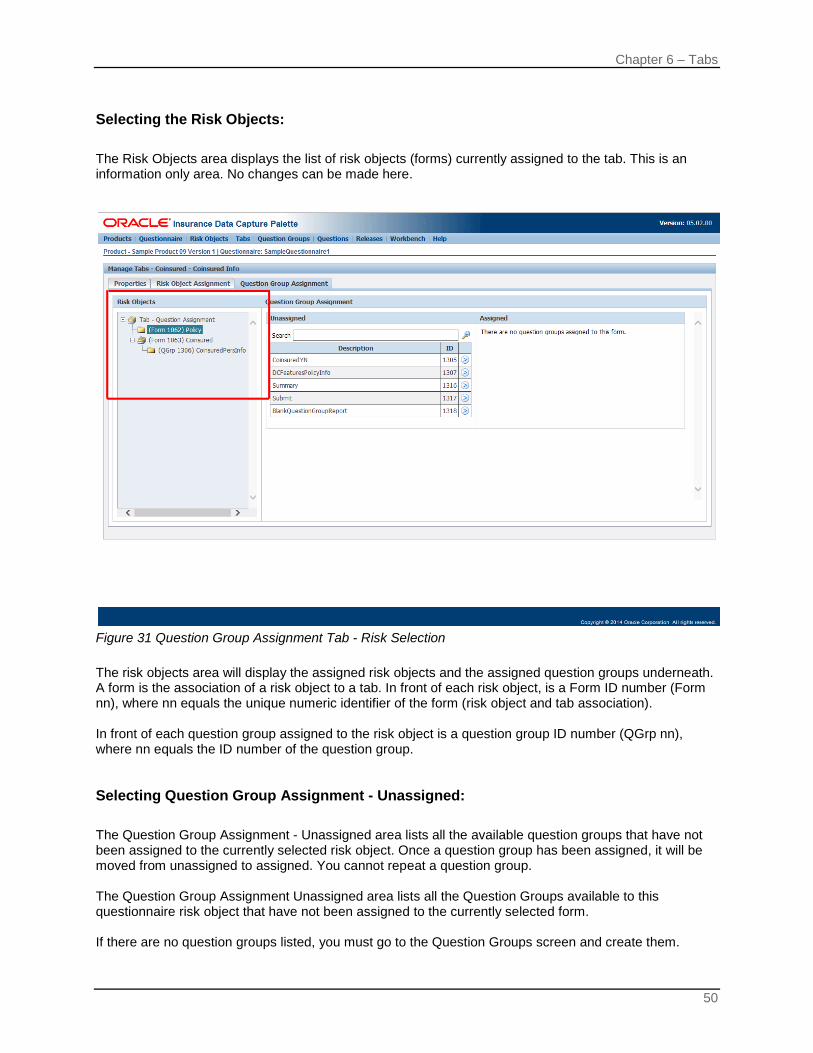
Selecting the Risk Objects: The Risk Objects area displays the list of risk objects (forms) currently assigned to the tab. This is an information only area. No changes can be made here.
Figure 31 Question Group Assignment Tab - Risk Selection The risk objects area will display the assigned risk objects and the assigned question groups underneath. A form is the association of a risk object to a tab. In front of each risk object, is a Form ID number (Form nn), where nn equals the unique numeric identifier of the form (risk object and tab association). In front of each question group assigned to the risk object is a question group ID number (QGrp nn), where nn equals the ID number of the question group. Selecting Question Group Assignment - Unassigned: The Question Group Assignment - Unassigned area lists all the available question groups that have not been assigned to the currently selected risk object. Once a question group has been assigned, it will be moved from unassigned to assigned. You cannot repeat a question group. The Question Group Assignment Unassigned area lists all the Question Groups available to this questionnaire risk object that have not been assigned to the currently selected form. If there are no question groups listed, you must go to the Question Groups screen and create them.

Chapter 6 – Tabs
51
Figure 32 Question Group Assignment Tab - Question Group Assignment To Assign a Question Group:
1. Select the form you want to use. You must select the form (risk object) where you want the question groups to be placed.
2. Select the question groups you want for the risk. Click the Select icon at the end of the row. The
question group will move over into the assigned question group area. Question groups are saved when you select.
Question Group Assignment - Assigned: The Assigned question group area contains the question groups that have been selected for the risk object. In this area you can - Unassign Question Group(s).

Chapter 6 – Tabs
52
Figure 33 Question Group Assignment Tab - Assigned Question Groups To Unassign a Question Group:
1. Select the question groups you want to unassign.
2. Click the Remove icon at the end of the row. The question group will move over into the unassigned question group area. Question groups are saved when you select.
Searching At the top of the unassigned area is a search option. This allows you to Search for question groups by description or ID. Searching can be done at any time and does effect the question groups you have already selected. Searches are done against question group descriptions and IDs. The results returned will be the question groups that meet the search criteria that are not assigned to the risk. You will be able to assign a question group to the risk object from a search. You can search against the entire tab. This will return every question group that meets the search criteria; however you will not be able to assign a question group to a risk object. Question groups can only be assigned if a risk object has been selected. To clear the field, clear the search field and search against a blank field. This will return all available question groups.

Chapter 6 – Tabs
53
Figure 34 Search Unassigned Question Groups

Chapter 6 – Tabs
54
EDITING You can edit any tab at any time. Risk Objects and Question Groups can be added or removed. Tabs will not reflect any changes in Worksite until the release has been published. If you want to remove a risk object you will need to unassign the question groups from the risk objects. Risk objects cannot be removed until all associated question groups have been unassigned.
Figure 35 Editing a Tab To Edit:
1. Open the Product where you want to edit a tab.
2. Select the Questionnaire where you want to edit a tab. Click Open.
3. Select Tabs on the top bar menu. This will open the Manage Tabs screen.
4. Check the selection box in front of the tab you want to edit.
5. Click Edit. This will open the Properties tab where you can make any edits to the tab.

Chapter 6 – Tabs
55
DELETING You can delete any tab at any time. Tabs that are in use can be deleted. You do not have to clear risk objects or questions groups. The tab will not be removed from Worksite until the release has been published. Please make sure this is the action you want to take. Deletes are permanent. To Delete:
1. Open the Product where you want to delete a tab.
2. Select the Questionnaire where you want to delete a tab. Click Open.
3. Select Tabs on the top bar menu. This will open the Manage Tabs screen.
4. Check the selection box in front of the tab you want to edit.
5. Click Delete. A Confirmation message will be displayed.
Figure 36 Delete Confirmation Message
6. Click OK to delete the tab. The screen will refresh and your tab will no longer be listed.
TIP: If you are unsure or this is not the action you want to take, click Cancel.

Chapter 6 – Tabs
56
WORKING WITH A TAB IN A QUESTIONNAIRE Once a tab is created, it will be available on a questionnaire after a release has been created and published. Tabs will be listed on the questionnaire in creation order. The first tab created will be first, the second tab will be next and so on.
Figure 37 Tabs in Worksite The tabs you have created will be listed across the top of the page. On each tab will be the risk objects and the associated question groups that have been selected for the risk object.

57
Chapter 7
QUESTION GROUPS The Manage Question Groups screen is where you manage question groups. A Question Group is a collection of one or more related questions. You can group questions in any way that you choose with as many or as few questions as you want. For example, you could create a single question group for Insured that held Name, Date of Birth, and Occupation. Or you could create two question groups for Insured, one for Name and Date of Birth and one for Employment Information. Question Groups are tied to a specific product and risk object. The Question Group menu option will be visible when a selected product is open. Question groups can be created in the product or questionnaire. You can create question groups while working in a specific questionnaire however; question groups are not unique to the questionnaire. There are no default question groups. All question groups must be created.
Figure 38 Question Groups Main On the Manage Question Groups screen you can:
• Create new question groups • View and edit existing question groups
Chapter 7 – Question Groups
58
• Assign questions to a question group • Search for question group elements
Fields When question groups are present, there will be six fields for each question group:
● Edit - Select the edit icon when you want to edit the question group. Editing a question group includes deleting question groups.
● Assign - Select the assign icon when you want to assign questions to the question group.
● ID - This is a system generated ID number. This is an information only field and cannot be
changed.
● Risk Object - The product and object where this question group was created. Question groups will be displayed for the selected product.
● Name - The name of the question group. The name does not have to be unique.
● Display Text - The text that is displayed in a questionnaire for this question group.
FUNCTIONALITY All functionality is handled by selecting an icon for the question group or clicking the Add New Group option at the top of the screen. There are no right click menus. Menu Options:
Searches question group properties for the criteria that have been entered.
Creates a new question group.
Opens the question group for editing.
Opens the question group to where you can assign questions.

Chapter 7 – Question Groups
59
NEW New question groups can be created at any time in either the product or questionnaire. For example, if you create a question group called Drivers in the Auto product, then only questionnaires created in the Auto product will be able to use this question group. A questionnaire created in the Home product will not have this question group available. Question Group Preparation: Prior to creating questions groups, you should have an idea of the types of questions you want to group together and at what level. Question Groups allow multiple questions to be grouped by a common element, such as a risk object. What common element would you like to group your questions by?
Figure 39 Questionnaire in Worksite When considering your question groups, keep in mind the risk objects that you have created or may need to create. For example, if you know that you want Driver, Vehicle and Claims question groups then you must create these objects in product configuration prior to creating the Question Group.
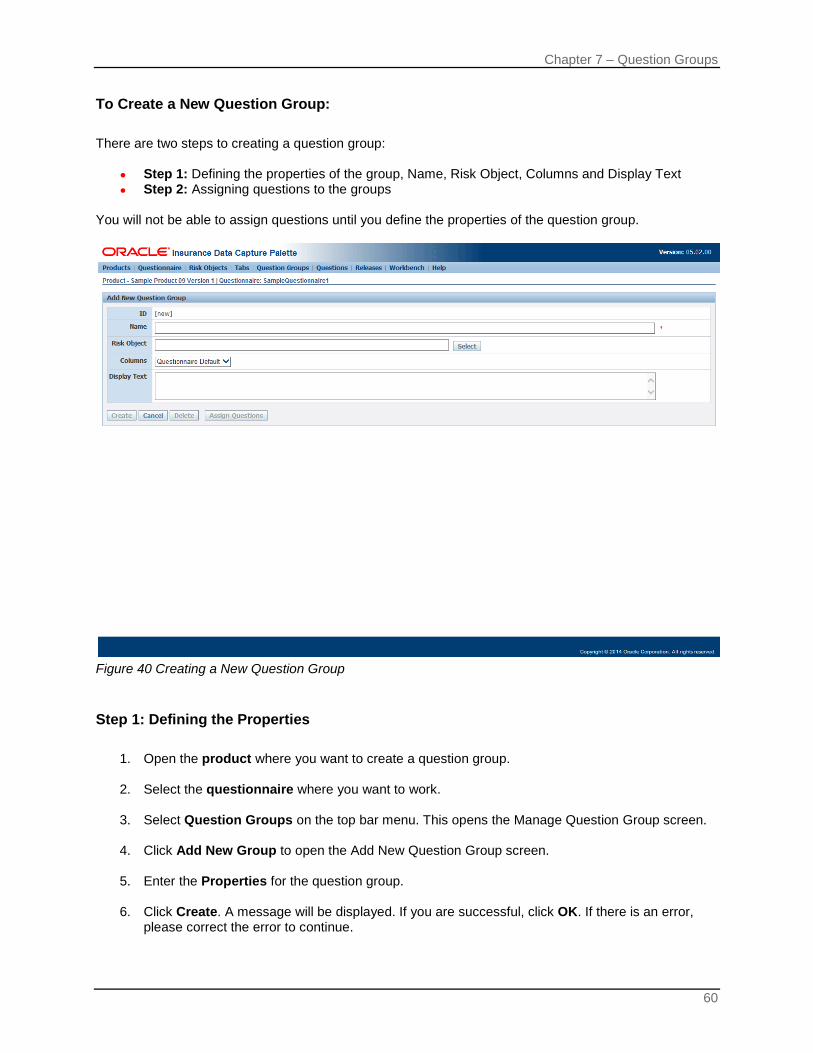
Chapter 7 – Question Groups
60
To Create a New Question Group: There are two steps to creating a question group:
● Step 1: Defining the properties of the group, Name, Risk Object, Columns and Display Text ● Step 2: Assigning questions to the groups
You will not be able to assign questions until you define the properties of the question group.
Figure 40 Creating a New Question Group Step 1: Defining the Properties
1. Open the product where you want to create a question group.
2. Select the questionnaire where you want to work.
3. Select Question Groups on the top bar menu. This opens the Manage Question Group screen.
4. Click Add New Group to open the Add New Question Group screen.
5. Enter the Properties for the question group.
6. Click Create. A message will be displayed. If you are successful, click OK. If there is an error, please correct the error to continue.

Chapter 7 – Question Groups
61
Figure 41 Creating New Question Group Success Message Clicking Create will save your entries and allow you to continue. If you want to stop at this point and continue later, you can by clicking Cancel to leave the screen. Fields: The Add New Question Group screen has 3 fields. Two fields are required, Name and Display Text. The ID field is a default system identification number and cannot be edited.
• ID – A system identification number that cannot be edited.
• Name – A unique identifier for the question group. This will be used for page navigation and not displayed on the questionnaire. The field is limited to 30 alpha numeric characters. The Name field cannot contain spaces and the only special characters allowed are underscore ( _ ) and period ( . ). Names cannot be duplicated. The field is required.
• Risk Object – The risk object associated with this question group. The field is required.
• Columns – The number of columns to be used by the question group. The default is to use the column setting of the questionnaire. An entry in this field overrides the questionnaire setting for this question group only.
• Display Text – The name of the question group as it appears in the questionnaire. The Display Text is the title of the question group in the questionnaire. The field is limited to 30 alpha numeric characters. Spaces can be used as can the special characters underscore ( _ ) and period ( . ). Display Text can be duplicated. The field is required.

Chapter 7 – Question Groups
62
Step 2: Assigning Questions to the Question Group Questions can be assigned at the time you create the question group or at a later date. Assign Questions to Question Group: When you create a new question group, the screen will refresh and the Assign Questions option will now be available.
1. Click Assign Questions. The Assign Questions to Question Group screen will be displayed.
The Assign Questions to Question Group screen lists. Unassigned questions will be located on the left hand side and the questions that have been assigned to the question group will be on the right.
Figure 42 Assigning Questions
2. Select the questions you want for the question group and click the Select icon at the end of the row. The question will move over into the assigned area.
3. When you have selected all the questions you want in the question group, click Done. Your
selections will be saved and you will be returned to the Assign Questions to Question Group screen.

Chapter 7 – Question Groups
63
4. If necessary, you can make updates to the Name of Display Text. If you are finished with the question group, click Cancel to return to the Manage Question Group screen.
Figure 43 Assigning Questions to the Question Group There are four icons in the Assign Questions to Question Group area:
Select - moves the selected question to the assigned question area.
Remove - removes the selected question from the assigned question area.
Order - allows you to drop and drag the question to the position you want.
Searches the available questions for the criteria that have been entered.
You can change the number of questions displayed on the screen using the options displayed element found in the search area. You can page through the questions using the page links at the bottom of the screen. To reduce the number of questions displayed, Enter search criteria. To Reorder Questions: Reordering questions will allow you to place the question you want to ask first at the top of the questionnaire. Do you want to present some knock-out questions up front to make sure that the risk is something that your company covers? For example, if you are creating an insurance application and your

Chapter 7 – Question Groups
64
company covers personal auto, you will want to make sure that the risk is clearly a personal auto risk and not a commercial auto risk. If your company defines a personal auto risk as 9 vehicles or less, you may want to ask if the coverage is for less than 10 vehicles as one of the first things. This way you can be sure that you are completely the correct questionnaire.
1. Select the question you want to move up or down.
2. Click the Reorder icon at the end of the row. A box will be placed around the question.
3. Drag the question to the position you want and drop it there. The order is saved when you drop the question.
To Unassign a Question: .
1. Select the question you want to unassign.
2. Click the Remove icon at the end of the row. The question will move over into the unassigned question area. Questions are saved when you select.
You also can assign questions from the Manage Question Group screen.

Chapter 7 – Question Groups
65
Assign Questions to an Existing Question Group: Questions can be assigned at any time after the Question Group has been created. Click the Assign icon on the Question Group where you want to assign questions. This opens the question group to the Assign Questions to Question Group screen.
Figure 44 Assigning Questions to a Question Group Any question in the same product and risk object can be used in any question group. This does not prevent the same question from being used by another question group. The same question can be used in other Question Groups on multiple tabs in multiple questionnaires. TIP: Do not assign the same question to the same object on a tab. This may cause errors For example,
if you had a Name question assigned to the Insured in group1, then you should not assign the Name question to the Insured in group2 on the same tab.

Chapter 7 – Question Groups
66
Searching Searching can be done on Manage Question Groups main screen or on the Assign Questions to Question Group screen. Searches on the Assign Questions to Question Group screen are done against question descriptions and IDs. The results returned will be the questions that meet the search criteria that are not assigned to the question group. You will be able to assign a question to a question group from a search. The search field is at the top of the unassigned area. Searching can be done at any time and does effect the questions you have already selected. Searches on the Manage Question Groups main screen are done on any element listed on the screen. The results returned will be every question group that meets the search criteria. You will be able to edit or assign questions from the results returned. The search field is located at the top of the screen. Searching can be done at any time and does not affect the question groups already created. To Search: In the Assign Questions to Question Group screen, Enter your search criteria. Click the search icon at the end of the field. Results will be displayed in the unassigned field. In the Manage Question Group screen, enter your search criteria and click the search icon at the end of the field. Results will be displayed in the main body of the screen. To clear the field, clear the search field and search against a blank field. This will return all available question groups.

Chapter 7 – Question Groups
67
EDITING Any question group can be edited at any time. Edits will not be reflected in Worksite until the release has been published. System generated ID number is not available for editing.
Figure 45 Editing a Question Group To Edit:
1. Open the product where you want to edit a question group.
2. Select the questionnaire where you want to work. Click Open.
3. Select Question Groups on the top bar menu. This opens the Manage Question Groups screen.
4. Click the edit icon in front of the question group you want to edit. This opens the Question Group screen where you can make any edits to the question group.

Chapter 7 – Question Groups
68
Figure 46 Updating a Question Group
5. Make any necessary changes.
6. Click Update to save your changes.
7. If you are finished, click Cancel to return to the Manage Question Groups screen. You also can
click Assign Questions to go to the Assign Questions to Question Group screen.

Chapter 7 – Question Groups
69
DELETING You can delete any question group at any time. Question groups that are in use can be deleted. The question group will not be removed from Worksite until the release has been published. Deletes are permanent. Please make sure this is the action you want to take. You cannot undo a delete. To Delete:
1. Open the product where you want to delete a question group.
2. Select the questionnaire where you want to work. Click Open.
3. Select Question Group on the top bar menu. This opens the Manage Question Groups screen.
4. Click the edit icon in front of the question group you want to edit. This opens the Question Group screen where you can delete the question group.
Figure 47 Deleting a Question Group
5. Click Delete. A Confirmation message will be displayed.

Chapter 7 – Question Groups
70
Figure 48 Delete Confirmation
6. Click OK to delete the question group. The screen will refresh and you will be placed on the
Manage Question Groups screen. Your question group will no longer be listed. TIP: If you are unsure or this is not the action you want to take, click Cancel.
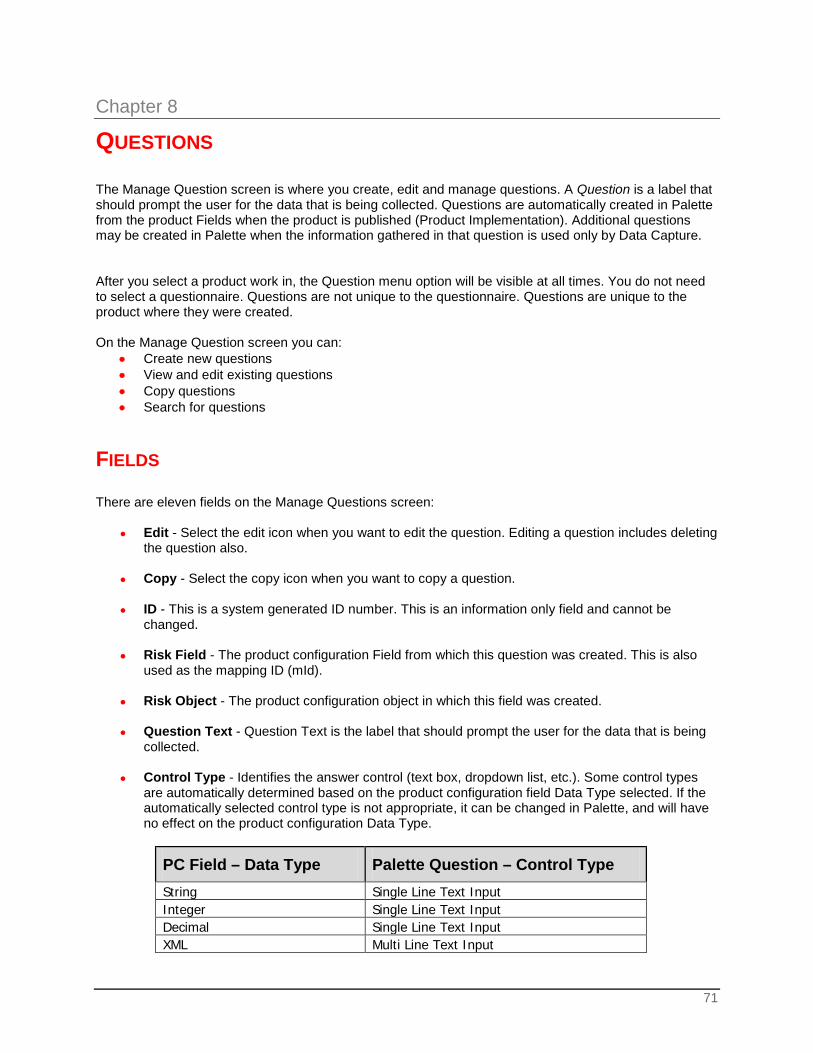
71
Chapter 8
QUESTIONS The Manage Question screen is where you create, edit and manage questions. A Question is a label that should prompt the user for the data that is being collected. Questions are automatically created in Palette from the product Fields when the product is published (Product Implementation). Additional questions may be created in Palette when the information gathered in that question is used only by Data Capture. After you select a product work in, the Question menu option will be visible at all times. You do not need to select a questionnaire. Questions are not unique to the questionnaire. Questions are unique to the product where they were created. On the Manage Question screen you can:
• Create new questions • View and edit existing questions • Copy questions • Search for questions
FIELDS There are eleven fields on the Manage Questions screen:
● Edit - Select the edit icon when you want to edit the question. Editing a question includes deleting the question also.
● Copy - Select the copy icon when you want to copy a question. ● ID - This is a system generated ID number. This is an information only field and cannot be
changed.
● Risk Field - The product configuration Field from which this question was created. This is also used as the mapping ID (mId).
● Risk Object - The product configuration object in which this field was created.
● Question Text - Question Text is the label that should prompt the user for the data that is being collected.
● Control Type - Identifies the answer control (text box, dropdown list, etc.). Some control types are automatically determined based on the product configuration field Data Type selected. If the automatically selected control type is not appropriate, it can be changed in Palette, and will have no effect on the product configuration Data Type.
PC Field – Data Type Palette Question – Control Type String Single Line Text Input Integer Single Line Text Input Decimal Single Line Text Input XML Multi Line Text Input

Chapter 8 – Questions
72
PC Field – Data Type Palette Question – Control Type Date Calendar Time Single Line Text Input Date-Time Single Line Text Input Currency Single Line Text Input Boolean (true/false) Select Boolean Checkbox Phone Single Line Text Input Tax ID Single Line Text Input Percent Single Line Text Input String Enumeration Single Select Drop Down Integer Enumeration Single Select Drop Down Decimal Enumeration Single Select Drop Down
● Required - (True/False) whether an answer is required for the question required.
● Question Type - The question type controls the behavior of the question.
● Parent ID - Displays the numeric identifier of the parent question, if applicable.
Figure 49 Manage Questions

Chapter 8 – Questions
73
FUNCTIONALITY All functionality is handled by selecting an icon for the question or clicking the Add New Question option at the top of the screen. There are no right click menus. Menu Options:
Searches question properties for the criteria that have been entered.
Creates a new question.
Opens the question group for editing.
Copies the question.
Searching Searching can be done on Manage Question screen. Searches on the Manage Question screen are done on any element listed on the screen except Risk Object. The results returned will be every question that meets the search criteria. You will be able to edit or copy questions from the results returned. The search field is located at the top of the screen. Searching can be done at any time and does not affect the questions already created. To Search: In the Manage Question screen, enter your search criteria and click the search icon at the end of the field. Results will be displayed in the main body of the screen. To clear the field, clear the search field and search against a blank field. This will return all available questions.
QUESTION PREPARATION Doing prep work will allow for better utilization of the application. The majority of this shold be addressed in the creation of product configuration fields. Knowing the questions you need to ask and types of answers you are likely to get will assist you in creating Questions and Answer Maps. There are two main things to keep in mind while planning your questions:
● The Input: Where your data comes from.
● The Output: Where your data will go.
Chapter 8 – Questions
74
The input and the output must work together to define the behavior of your question. Input: The Input can come from a wide variety of resources that you may use to collect data. Does this data come from a customer or another system? Will the information be entered by an applicant or obtained from a database? Will you have a paper application you can use as a base? Are there rules and requirements guides for you to follow? How you are getting the data and what form the data will be in can help determine whether you need a simple question or a more complex question that may lead to additional questions. Output: The Output is more than just the output you expect. Output also defines what can be done with the data once OIDC has finished processing it. Where is the data going? Does this data need to go into a policy administration system, claims system, business intelligence report, form or a rating engine? For example, if you are collecting data from an insurance application, you will most likely have various Name fields. First name, last name, and middle initial are usually required. But you also may require co-insured names, maiden names or suffix. Each of these fields may need to be passed through to one system or more systems. Name fields may be required to create policy or print a form but name fields are usually not required to obtain a rating. Likewise, you may be collecting information that goes only into a rating system, like number of years driving or parking garage ZIP code. These are just a few of the things to keep in mind when creating questions, and answer maps. By reconciling the two factors; the input and the output, you can create a questionnaire that will help you to get the information you want and place it where it needs to go.
FORMING QUESTIONS There are many ways to form and create questions in Data Capture. You can create questions with as much or as little complexity as you need. You can create questions that trigger more questions or questions that can be answered with a simple yes or no. There are no limits to how you can create your questions. Prior to creating questions, you should know the behavior of the question you want to create. You may want to plan the question type you want to use and the question condition you want to use ahead of time.
Question Types The type of question you are asking can determine the question type you may want to use. There are multiple question types:
● Panel ● Parent/Trigger ● Postback
Chapter 8 – Questions
75
● Simple ● Table
Panel The panel type questions are used to create reports or sub-forms.
Parent/Trigger The parent/trigger questions are reflexive questions that will always trigger a change event that forces associated questions to reevaluate themselves. Parent Questions:
● A parent/trigger question can be a parent question and contain child questions. ● When the parent question is selected for a question group, all of the associated child questions
will go with it. ● A child question may or may not have display conditions. ● A child question will automatically evaluate when the parent is answered.
Trigger Questions:
● A trigger question can have associated dependent questions. ● Dependent questions must be included in the question group. ● Dependent questions are identified in the trigger questions answer map. ● Dependent questions will only reevaluate when included in the triggers answer map.
Usage: Use this question type when you have a question that may require further information to complete and you want the additional information on the same tab. For example, “Is your mailing address the same as your resident address?” If the answer is No, then the mailing address questions can be made visible.
Postback A postback question also can require additional information and like a parent/trigger question, can be a parent and contain child questions. The main difference is that postback questions post information to the server and refresh the entire tab. On this question type, any event related to the postback question occurs when the value is changed. There are cases where you have to use a postback question type; however, you should use postback questions carefully. A postback question type causes the entire page to refresh, which takes time. Usage: Use a postback question type when you know the process you want to follow when the answer is returned. For example, “Is there a Coinsured?” You know the answer will be Yes or No. You may want to see that information on the same page as the question. You also will need to create an instance for the
Chapter 8 – Questions
76
Coinsured. In that case you would use a postback question type to refresh the entire page and create a new instance. Postback Questions in Worksite: When a postback parent question has a child question, a plus sign (+) can be displayed in the question label. This will let you know that when a parent/trigger question needs to display the children, the Worksite frame will change to allow the children to be displayed. The application frame around it will remain static. TIP: The parent/trigger question indicator * or + can be made non-visible or visible by setting the Display
Dependent Question Indicator option to true in Worksite configuration. The default is that the icons will be displayed.
Simple A simple question moves data forward and does not have dependent or child questions associated with it. Use a simple type of question when you have a question where a response can be made that fully answers the question. All child questions are a simple question type. For example, “What is your name?” This question usually does not require another question to complete the response. Also, this question generally can be moved to the output without any further information to complete the question.
Table The table type questions create tables which allow users to create multiple instances of a particular object.
NEW Question used to share information outside of Data Capture should be created in Product Configuration. When information applies only to Data Capture, new questions can be created. The options you will have available when creating a new question will depend upon the type of question you choose to create. There are 6 tabs in the New/Edit question screen. Not every tab will be available for every question.
● General Info – General information regarding the question.
● Answer Display Format – display dimensions for the answer field.
● Control Properties – For Panel and Table question types. Allows for managing properties that are specific to these question types
● Behaviors – set behaviors for the question
● Display Condition – Sets the conditions for the display of the question.

Chapter 8 – Questions
77
● Help text – Enter the help text to be displayed when a cursor is held on the worksite question help icon.
Creating a New Question:
1. Open the product where you want to create a question.
2. Select the questionnaire where you want to work. Click Open.
3. Select Questions on the top bar menu. This opens the Manage Questions screen.
4. Click Add New Question to open the Add New Question screen.
Figure 50 Creating a New Question
5. The first tab is the only tab that is accessible until the question is created. Complete any field you may need for the question. Every question will require a Question Type and Control Type. While not required, it is strongly recommended that you also include a Mapping ID and text.
TIP: If you do not have all the information you need, you can create your question to this point and finish
at a later time.
6. Click Create. A message will be displayed. If you are successful, click OK. If there is an error,
please correct the error to continue.

Chapter 8 – Questions
78
Clicking Create will save your entries and allow you to continue. If you want to stop at this point and continue later, you can by clicking Cancel to leave the screen. If this is not the action you want to take, click Cancel to return to the Manage Questions screen. If you have not clicked Create, your work will not be saved.
GENERAL TAB FIELDS Question fields are the fields you will be presented with when you create or edit a question. Fields can be simple requiring only a numeric value or a text value, such as Child Sequence # and Help Text. Other question fields will require you to make a selection from a list, such as Question Type or Answer Map. A more complex field is Display Condition. This field can either be blank or contain a simple format or a more complex format, depending on what you require from the question.
ID – A system generated ID number. This is an information only field and cannot be changed.
Question Types – The type of question. Question Types is a multiple choice field where you can select the value you want. This is a required field. There are five question types:
● Panel ● Parent/Trigger ● Postback ● Simple ● Table
Please see Question Types for more information.
Risk Object – The Risk Object.
Risk Object Field – The Risk Object Field ID (mId) is a product configuration field Custom ID. This mId can also be used in Question Condition Language and answer maps. Risk Object Field cannot be selected when a Mapping ID is entered. Either a Mapping ID or Risk Object Field is required.
Data Type - Data types depend on the type of question selected.
Control Types –
The type of answer field to be displayed. Control Types is a multiple choice field where you can select the value you want. Only one control type can be selected. A control type is required. Control types vary according to the question type selected. Some examples of control types are:
● LabeledCheckBox

Chapter 8 – Questions
79
● SingleSelectDropDown ● SingleLineTextInput ● MultiLineTextInput ● RadioBox ● Label ● HiddenConstant ● MultiLevelRadioBox ● SingleSelectList ● Calendar ● SecureTextInput ● SubQuesListMgr ● RiskItemTable ● ReportPanel
Please see Control Types for more information
Mapping ID – The Mapping ID (mId) is a user created identification field. Limited to 50 characters, including spaces, this field is used in Risk Objects Name Format and data transportation. This mId can also be used in Question Condition Language and answer maps. Mapping ID cannot be entered when a Risk Object Field is selected. Either a Mapping ID or Risk Object Field is required.
Parent Question ID – The parent question ID field is where you enter the system generated ID of the question designated to be the parent question. An entry is required only if you are creating a child question.
Child Question Sequence # –
The order child questions should be displayed. You can create up to 99 child questions in a sequence If no sequence is chosen, child questions will be listed in the order entered. This is not a required field.
Text – This field will hold the question, a label that should prompt the user for the data that is being collected. This field is limited to 750 characters including spaces. This is a required field.
Required – (True/False) Check this box if an answer is required. A red asterisk ( * ) will be displayed on the questionnaire to indicate that this field is required. In Worksite, if the user does not complete the required question, they will not be able to continue in the questionnaire. Any question can be required. Questions are only validated if visible. If the conditions are not met, then it is not answered. The default is no question is required.
Default Value – Sets a default value for the question. This is not a required element.
FUNCTIONALITY There are three Menu Functions on the Create/Edit Questions screen:
● Create - Creates the Question. This option is available for New Questions only. OR
● Update - Update the Question with your changes. This option is available on Edit Questions only.

Chapter 8 – Questions
80
● Cancel - Returns you to the Manage Questions screen. If you have not clicked Update, you will be returned to the Manage Questions screen without saving any of your changes.
● Delete - Deletes the selected question. This option is available on Edit Questions only.

Chapter 8 – Questions
81
Answer Display Format Answer Display Format is where you can set the display parameters for the answer. This is not a required tab. Not available to Panel or Table question types.
Figure 51 Answer Display Format of a Question
Fields Height – Enter the height of the answer control. Width – Enter the width of the answer control. Rows – The number of rows where a response may be entered. Rows can only be displayed for multiline text and single select list control types. Three rows is the default. The field is limited to 25 rows. This is not a required element. Alignment – Select the alignment, left, right or center. Orientation – Select the orientation, horizontal or vertical. CSS Class – Enter the custom CSS Class Name.

Chapter 8 – Questions
82
Control Properties Control Properties are used for Panel Sub-Form and Table question types. Allows for assigning the Risk Object Type to sub-forms and tables, and assigning table columns, defining their display title and width, and enabling the table manual merge option.
Figure 52 Control Properties of a Question

Chapter 8 – Questions
83
Behaviors Enter the behavior of the question.
Figure 53 Behaviors of a Question There are four behaviors that can be defined:
● Function – A function is dependent on another answer where you compute and return an answer.
● Actions – An action triggers a callout or an action to happen. For example, you can trigger a flag.
When using as a callout, the actual callout is a function.
● Integration Activity – Activities are well known, pre-defined business processes between Data Capture and an external system.
● Answer Maps – Answer maps can be used to allow for a specific process to be performed when
specific conditions are in place. The question behaviors can be made Conditional by setting parameters with the Make Conditional option.

Chapter 8 – Questions
84
Function A function is dependent on another answer where you compute and return an answer. Functions return a single value to the question hosting the <Func> command. It is assumed that the control that will display this value is a Text Box or a Label since only a single value will be returned. When functions occur will depend upon the function. The function can be edited or deleted. Deletion clears the fields, the function Edit will still be listed on the tab.
Figure 54 Question Behavior Function
1. Select the Function Type from the drop down. The description is updated with your selection.
2. The fields displayed depend upon the function selected.
3. Starting at the top, select the first available field. The options for the field are displayed to the right.
4. Select the option you want and move to the next field.

Chapter 8 – Questions
85
5. Click OK to save your entry.
6. Click Update to save your entry.
Delete clears the field. Cancel closes the screen without making any changes. If you want to view the XML for the function, click View XML. A separate screen is displayed with the XML. Available Functions Types: The available function types vary according to the question data type. For example, if the question data type is numeric, the mathematical functions are displayed.
● Date Difference - Performs subtraction of date values and returns their difference as an integer. The expected date values must be in valid yyyy-MM-dd format.
● Date Calculation - Calculates and returns a date value from a start date the 'span' integer value.
● Lookup - Returns the the result of the lookup expression as the value as the answer value.
● Current Object Instance - eturns the specified property of the current object instance as the answer value.
● Current System Datetime - Returns the current system (server) date-time stamp as the answer value.
● Object Instances - Checks to see if any object exists for the specified query. Returns the
specified property of the object instance as the answer value or list of valid answer values.
● Add Values - Performs addition of values and returns their sum.
● Divide Values - Performs division of values and returns their quotient.
● Multiply Values - Performs multiplication of values and returns their product.
● Subtract Values - Performs subtraction of values and returns their difference.
● Percentage Of - Calculates and returns the percentage value of a specified number value.
● Add Child Values - Sums values across all instances of the specified child object and field. For more details on functions, please see Appendix B Question Behavior – Functions.

Chapter 8 – Questions
86
Actions An action triggers a callout or an action to happen. For example, you can trigger a flag. When using as a callout, the actual callout is a function. Actions can be used to set the value of another question or to perform tasks that do not affect the value of the current question hosting the <Action> command. Actions provide the ability to utilize the currently defined actions to set values of other questions or to perform tasks that do not affect the value of the current question hosting the <Action> command. Actions occur when the question is submitted, when you leave the page or during a post back. A question behavior may contain multiple actions.
Figure 55 Question Behavior Action
1. Select the Action Type you want from the drop down. The description will be updated with your latest selection.
2. The action template XML is displayed in the body of the screen. Edit the values as needed.

Chapter 8 – Questions
87
3. Click OK to save your entry.
4. Click Update to save your entry. Delete clears the field. Cancel closes the screen without making any changes. Available Action Types:
● Add Item - Manages the creation of a single object insrtance depending on create condition specified.
● Delete Risk Items - Allows an answer to a question to delete risk items of a specific object.
● Manage Risk Item - Manages the creation and deletion of a single risk item depending on create
and delete conditions specified.
● Override - Overrides the values of one or more question items with the value of the current question or that of an optional explicit override value.
● Refresh Answer - Forces one or more questions to refresh their current values by executing any
defaults, lookup commands, functions, or actions assigned.
● Set If Empty - Set any of the specified questions whose values are empty to the value of the question whose response map defines this action.
● Calculate Answer - Looks up the values of one or more questions and/or constant values and
sets the calcluated result as the value of the specified target question. For more details on Actions, please see Appendix C Question Behavior – Action.

Chapter 8 – Questions
88
Integration Activity Callouts are integrations between Data Capture in external systems. Generic Callouts are custom, user-defined integrations with no specific data expected in the response (other than transaction status), and no specific behavior expected in Data Capture based on the callout and/or response. Activities are well known, pre-defined business processes between Data Capture and an external system. OIDC will expect specific data in responses and have established behavior based on each activity type. Sample business processes include:
● Rating ● Underwriting ● List of Values ● Policy Submission (i.e., Issuance, Policy Bind) ● Supplemental Data (e.g., underwriting reports like CLUE, MVR, Credit Score, Replacement Cost
Estimate) All callouts from Data Capture must go through a supported Enterprise Service Bus (ESB). No callout can be made directly from a page to the end service. The following ESBs are supported:
● IBSS (Java) An activity <Activity /> map triggers a specific callout type to happen. A question behavior map may contain one activity. All activity question behaviors have the same attribute, argument, and filter options, although the values of these options may differ based on the “type” of activity ALL ACTIVITIES ATTRIBUTES: ● type - (required) the name of the activity type
Document ListOfValues ProjectSubmit Rating Rule (Underwriting) SupplementalData
● serviceAdaptorName - (required) the name of the service adaptor as registered with IBSS ● executionContext - defines when the callout will execute. Valid values are
onLoad (default) meaning when the page loads onSubmit meaning when the page is submitted onLoadAndSubmit meaning when the page loads and when the page is submitted
● showStatusMessage - (optional) determines whether a callout status and transaction message(s) will display, based on the transaction status always - (default if none selected) status message is always displayed never - status message is never displayed pass - status message is displayed only when status is PASS fail - status message is displayed only when status is FAIL
● includeProjectData - (optional) determines whether the full project data payload will be included with the activity request
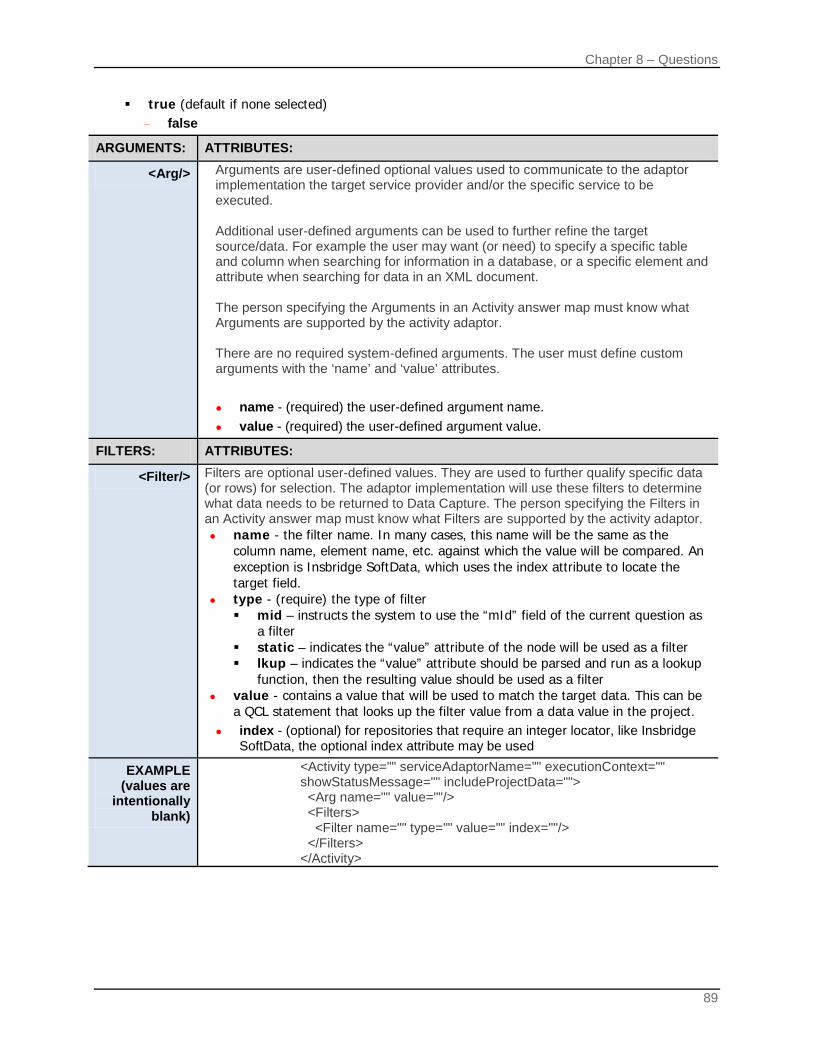
Chapter 8 – Questions
89
true (default if none selected) - false
ARGUMENTS: ATTRIBUTES:
<Arg/> Arguments are user-defined optional values used to communicate to the adaptor implementation the target service provider and/or the specific service to be executed. Additional user-defined arguments can be used to further refine the target source/data. For example the user may want (or need) to specify a specific table and column when searching for information in a database, or a specific element and attribute when searching for data in an XML document. The person specifying the Arguments in an Activity answer map must know what Arguments are supported by the activity adaptor. There are no required system-defined arguments. The user must define custom arguments with the ‘name’ and ‘value’ attributes. ● name - (required) the user-defined argument name. ● value - (required) the user-defined argument value.
FILTERS: ATTRIBUTES:
<Filter/> Filters are optional user-defined values. They are used to further qualify specific data (or rows) for selection. The adaptor implementation will use these filters to determine what data needs to be returned to Data Capture. The person specifying the Filters in an Activity answer map must know what Filters are supported by the activity adaptor. ● name - the filter name. In many cases, this name will be the same as the
column name, element name, etc. against which the value will be compared. An exception is Insbridge SoftData, which uses the index attribute to locate the target field.
● type - (require) the type of filter mid – instructs the system to use the “mId” field of the current question as
a filter static – indicates the “value” attribute of the node will be used as a filter lkup – indicates the “value” attribute should be parsed and run as a lookup
function, then the resulting value should be used as a filter ● value - contains a value that will be used to match the target data. This can be
a QCL statement that looks up the filter value from a data value in the project. ● index - (optional) for repositories that require an integer locator, like Insbridge
SoftData, the optional index attribute may be used
EXAMPLE (values are
intentionally blank)
<Activity type="" serviceAdaptorName="" executionContext="" showStatusMessage="" includeProjectData=""> <Arg name="" value=""/> <Filters> <Filter name="" type="" value="" index=""/> </Filters> </Activity>
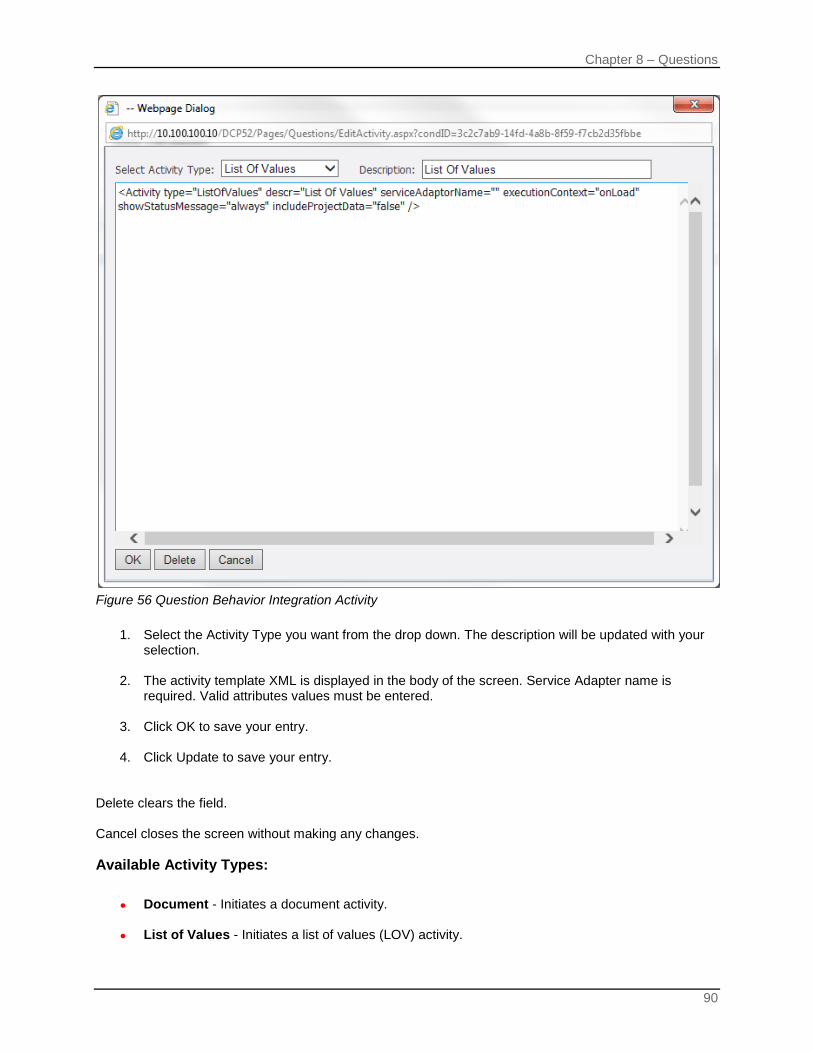
Chapter 8 – Questions
90
Figure 56 Question Behavior Integration Activity
1. Select the Activity Type you want from the drop down. The description will be updated with your selection.
2. The activity template XML is displayed in the body of the screen. Service Adapter name is
required. Valid attributes values must be entered.
3. Click OK to save your entry.
4. Click Update to save your entry. Delete clears the field. Cancel closes the screen without making any changes. Available Activity Types:
● Document - Initiates a document activity.
● List of Values - Initiates a list of values (LOV) activity.
Chapter 8 – Questions
91
● Project Submit - Initiates a policy submit activity.
● Rating - Initiates a rating activity.
● Rule (Underwriting) - Initiates a rule activity.
● Supplemental Data - Initiates a supplemental data activity.
For more on Activities, please see Appendix D.

Chapter 8 – Questions
92
Answer Maps Answer maps can be used to allow for a specific process to be performed when specific conditions are in place.
Figure 57 Question Behavior Answer Map
5. Select the Answer Map you want from the drop down.
6. Edit as needed.
7. Click OK to save your entry.
8. Click Update to save your entry. Delete clears the field. Cancel closes the screen without making any changes. Available Answer Maps:
Chapter 8 – Questions
93
● Answer Control Format
● Dependent Question List
● Valid Answer List - The XML A answer map is used when you want to present a list of available answers. For example, when you want to use a dropdown list. You can list as many selections as you need.
● Validation Conditions - Allows the user to specify a condition, which – if true – will display an error
message.
● Report Display (Answer Map HTML)
● Report Display (Default Project Report)
● Report Display (Default Soft Service Report)
● Report Display (Soft Service Returned HTML)

Chapter 8 – Questions
94
Make Conditional If more than one question behavior is present, then question behaviors can be made conditional. Adding a Make Conditional statement creates a </choose> answer map. Not available on Panel type questions. If there is only one condition, do not add a make conditional statement. Conditional question behaviors contain:
● when - One or more when tags with a test attribute The when tag requires a test attribute whose value is the QCL statement describing the condition for the availability of the set of values. A choose answer map must always have a when.
● Map - The Map is a test attribute that contains the answer map data applicable to the condition.
● otherwise - The otherwise an optional test attribute that contains the Map applicable to all other conditions that are not identified by when tags. Otherwise must be used with a when.
Adding a Make Conditional Option
1. On the Behaviors tab, select Make Conditional. A separate screen is displayed.
2. Select the –Insert Object Reference – field and the options are populated to the side. The other fields depend upon the selection made here.
3. Select the option you want.
Figure 58 Selecting the Options for Make Conditional
4. If available, select the –Insert Object Property – field and the options are populated to the side.
5. Select the option you want.
6. If available, select the –Insert Property Value – field and the options are populated to the side.
7. Select the option you want.
8. Select the –Insert Operator – field and the options are populated to the side.
9. Select the option you want.
10. Select the –Insert Operator Value – field and the options are populated to the side.

Chapter 8 – Questions
95
11. Select the option you want.
12. If another condition needs to be added, click WHEN and select to insert either an And condition
or an OR condition.
13. If parentheses are needed, click the field in front of the –Insert Object Reference – to add the Open parentheses [ ( ].
14. The close parentheses [ ) ] is added in the field at the end of the –Insert Operator Value – field.
15. When complete, click OK to save your entry. The –Insert Operator Value – field allows for a Custom (or Literal) value to be entered. If you select this option, a field for a custom value is displayed. Enter the value you want to use and click Set.
Figure 59 Entering a Custom Value
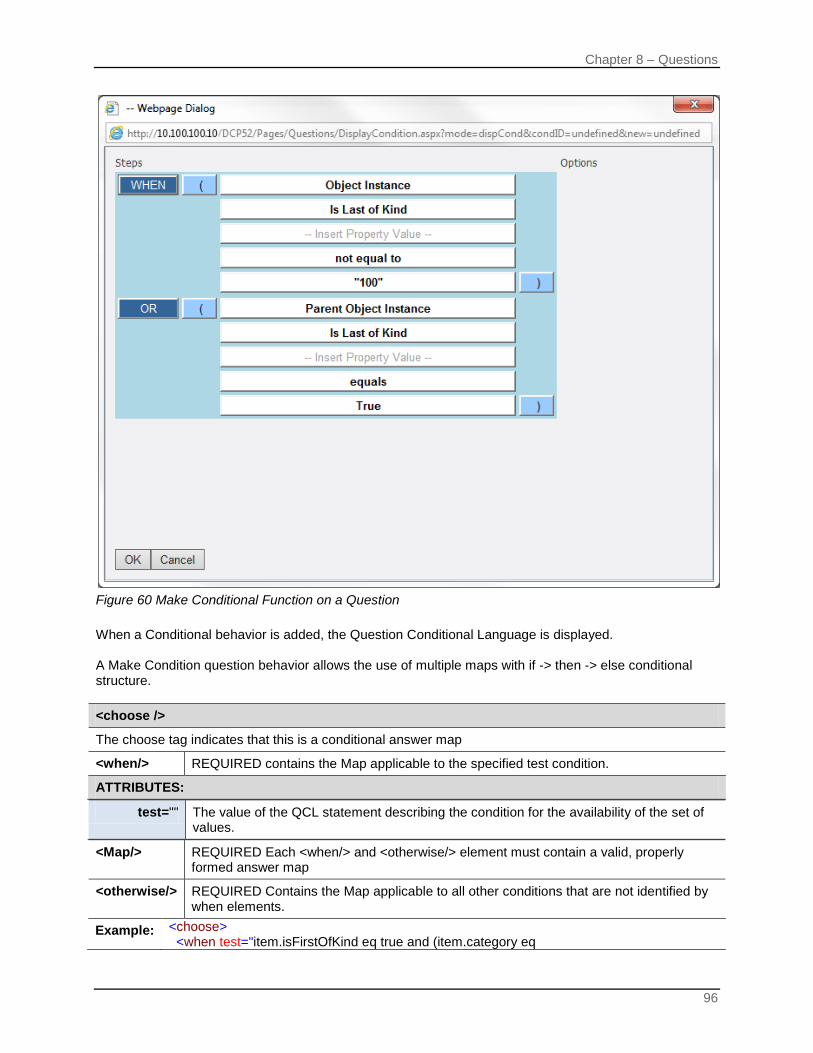
Chapter 8 – Questions
96
Figure 60 Make Conditional Function on a Question When a Conditional behavior is added, the Question Conditional Language is displayed. A Make Condition question behavior allows the use of multiple maps with if -> then -> else conditional structure. <choose />
The choose tag indicates that this is a conditional answer map
<when/> REQUIRED contains the Map applicable to the specified test condition.
ATTRIBUTES:
test="" The value of the QCL statement describing the condition for the availability of the set of values.
<Map/> REQUIRED Each <when/> and <otherwise/> element must contain a valid, properly formed answer map
<otherwise/> REQUIRED Contains the Map applicable to all other conditions that are not identified by when elements.
Example: <choose> <when test="item.isFirstOfKind eq true and (item.category eq

Chapter 8 – Questions
97
SubFormInstance or item.category eq Instance)"> <Map> <A value="FirstOfKind" name="First Of Kind"/> </Map> </when> <when test="item.isFirstOfKind neq true and (item.category eq SubFormInstance or item.category eq Instance)"> <Map> <A value="" name="-- Select --"/> <A value="NotFirstOfKind" name="Not First Of Kind"/> </Map> </when> <otherwise> <Map> <A value="" name="-- Select --"/> <A value="AllOther" name="All Other"/> <A value="OnlyOfKind" name="Only Of Kind"/> </Map> </otherwise> </choose>
Figure 61 Completed Behaviors Tab

Chapter 8 – Questions
98
Display Condition Every question in OIDC can use a display condition if needed. The Display Condition tab describes the condition under which this question will display. The Display Condition field can be as simple or as complex as you need, depending on what you require from the question. Before completing the display condition, you need to ask under what circumstances do you want this question displayed and how do you want the question displayed? Display Conditions may rely on other values. This field is limited to 510 characters including spaces. This is not a required field. Please see Question Condition Language for more information.
Figure 62 Display Condition Completed To add a display condition, click Add/Edit and a separate screen is displayed. The entry of a display condition is the same as Make Conditional. Click Update to save your entry. When a Display Condition is added, the Question Conditional Language (QCL) is displayed. You can hide the QCL by clicking Hide Report. For more on QCL, please see Chapter 11 Question Condition Language. Delete clears the field. Cancel closes the screen without making any changes. Display conditions are defined by the use of QCL statements. There are no restrictions by question type. Hidden Constant: When using with a hidden constant, different functionality may apply. The answer can be captured without being displayed. If you do not want a hidden constant to be answered, you must enter a value into the display condition. The actions or function related to a hidden constant always occurs unless its display condition is not met.
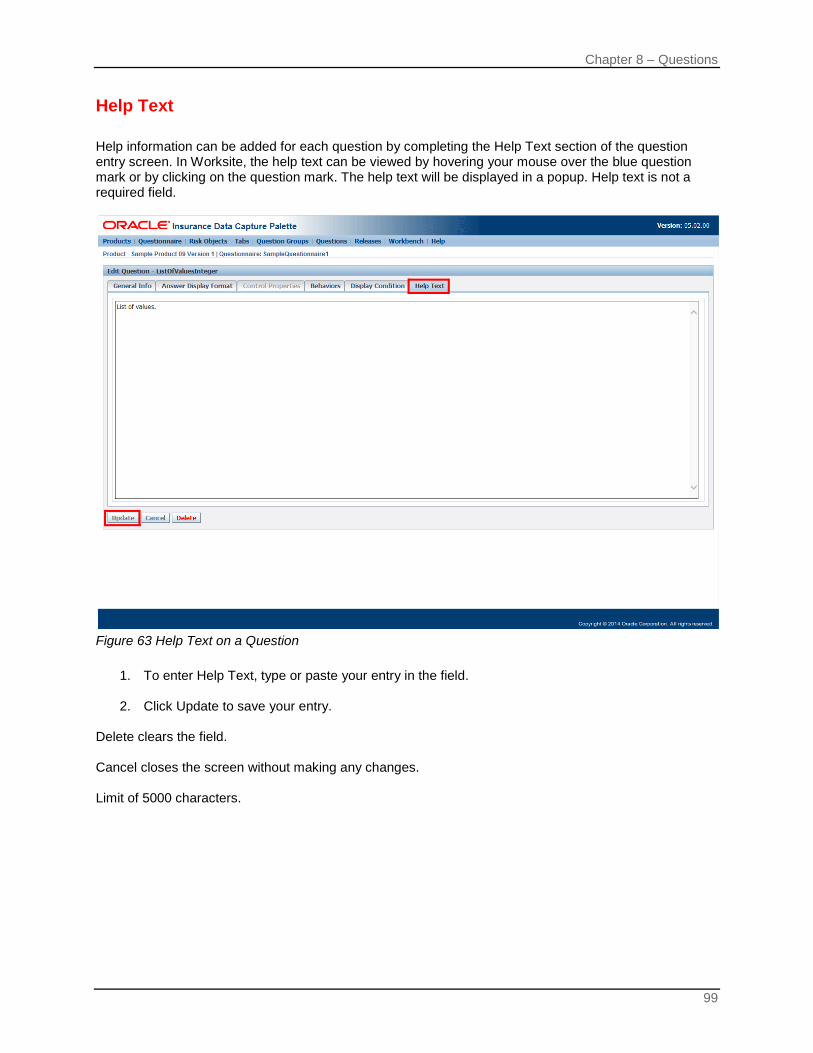
Chapter 8 – Questions
99
Help Text Help information can be added for each question by completing the Help Text section of the question entry screen. In Worksite, the help text can be viewed by hovering your mouse over the blue question mark or by clicking on the question mark. The help text will be displayed in a popup. Help text is not a required field.
Figure 63 Help Text on a Question
1. To enter Help Text, type or paste your entry in the field.
2. Click Update to save your entry. Delete clears the field. Cancel closes the screen without making any changes. Limit of 5000 characters.
Chapter 8 – Questions
100
Question Conditions The question type defines the behavior of the question. Question conditions can help you to define the kind of the questions you want to ask and how you may want to construct them. You can create questions that depend upon another question and are only displayed when that question is selected. Or you can create questions that are conditional on other questions. Child Questions: Parent and child questions are a fairly common question classification. You may want to create a question structure that asks broad questions and then asks for details depending upon the answer.
● Every child question must have a Question Type of Simple. ● Child questions are not in any question group. They are tied to the parent. When selecting a
parent question for inclusion in a question group, the child questions will not be listed with it. ● Child questions can be displayed in an exact order if necessary. The default order is the order
entered. ● Child question will have only one parent. The parent question must be identified in the child
question definition. ● Multiple child questions can share the same parent. ● Child question are shaded and indented when displayed in Worksite.
Dependent Questions: A Dependent Question is a question that is triggered by another question.
● A dependent question must be added to a Question Group. ● A dependent question is identified in the trigger questions Answer Map. ● A dependent question is visible if it does not have a display condition or the display condition is
met.
Question Visibility
● Child questions will be visible according to the childs display condition. If there are no conditions, they will be displayed.
● The visibility of the child question depends upon the parent question. If the parent is not visible then the child question will not be visible.
● A dependent questions visibility is dependent upon the trigger question on the same tab. Questions do not hold answers when values are updated. For example, a trigger question is answered and a required dependent question is now visible. The dependent question is answered. Then the trigger question is updated and the dependent question is no longer required. Then the trigger question is updated again and the dependent question is once again required. The previous answer will be lost. You must enter it again.

Chapter 8 – Questions
101
Mapping IDs Mapping IDs are created as the Risk Object Field from the product configuration field Custom ID when the product is published to Palette. Mapping IDs are also created when a new question is defined in Palette. Both types result in the creation of the ‘mId’ that will be used for reference throughout Palette. All Data Capture data transportation - import, export, and internal - utilizes mapping IDs. Mapping IDs represent an objects attributes or properties. Risk Object Field or Mapping ID=mId.
Where: mId – lower case m, capital I, lower case d Mapping IDs do not have to be unique. You can duplicate ID’s and have multiple questions using the same Risk Object Field or Mapping ID. For example, on your questionnaire you may have two questions regarding age. One question calculates the age and one question asks for it directly. In some cases, the calculated question is displayed in other cases the direct input question is displayed. Both questions will get the answer you need. You could use the same Risk Object Field or Mapping ID on both questions to assure that whichever question is answered, the age gets carried through to the output. If there is more than one question with the same mId in a risk object, only one question will store a value. If the questions with the same mId are all visible and stored, only the last question value will be included in the output. It is highly recommended that only one question using a shared mId is made visible at any given time.
Control Types You must select one of the available control types for your question. Some control types are automatically determined based on the product configuration field Data Type selected. If the automatically selected control type is not appropriate, it can be changed in Palette, and will have no effect on the product configuration Data Type.
PC Field – Data Type Palette Question – Control Type String Single Line Text Input Integer Single Line Text Input Decimal Single Line Text Input XML Multi Line Text Input Date Calendar Time Single Line Text Input Date-Time Single Line Text Input Currency Single Line Text Input Boolean (true/false) Select Boolean Checkbox Phone Single Line Text Input Tax ID Single Line Text Input Percent Single Line Text Input String Enumeration Single Select Drop Down

Chapter 8 – Questions
102
PC Field – Data Type Palette Question – Control Type Integer Enumeration Single Select Drop Down Decimal Enumeration Single Select Drop Down
Labeled Check Box – A labeled checkbox allows you to enter a question and a label for the response field. Users can select the check box if needed. You also can create a multi labeled checkbox that allows you to enter labels for as many response fields as you need. Multiple choices can be selected with the multi label check box option. Every field would be open for selection unless limited by conditional display or answer map. Multiline checkboxes require an <A/> answer map. A name and a value are required. Check box selections can be changed and removed. If an item has been selected, it also can be unselected.
For Example
Single Select Drop Down – A single select drop down allows the user to select one option from a drop down list. The default number of visible response rows is 3. If you require more than three rows, you must enter the value in Response Rows field. The maximum number of visible rows is 25. Single select drop down requires an <A/> answer map.
For Example
Single Line Text Input – A single line text input field allows the user to Enter a single line of text. It is recommended that you limit the number of characters in the answer field by using an appropriate answer map. Other properties of the text field can be further defined in the answer map.
For Example
Multi Line Text Input – A multiple line text input field allows the user to Enter multiple lines of text. The default number of visible response rows is 3. If you require more than three rows, you must enter the value in Response Rows field. The maximum number of visible rows is 25. It is recommended that you limit the number of characters in the answer field by using an appropriate

Chapter 8 – Questions
103
answer map. The properties of the text field can be further defined in the Answer Map.
For Example
Radio Box – A radio box control type allows users to select the option they want. Further action could be determined by the condition display field or by an answer map. Once an answer has been selected, it can be changed but not de-selected. Only one selection is allowed on a radio control. Requires an <A/> answer map. The answer options will be presented horizontally. Once an answer has been selected, it can be changed but not de-selected. Only one selection is allowed on a radio control.
For Example
Label – A label field allows you to place a function on to the response field such as a default value or a value lookup. A label cannot be edited. It is populated through various means.
For Example
Hidden Constant – A hidden constant is a field that will not be seen on the questionnaire and triggers other questions or holds answers to be sent to other systems. When using with a hidden constant, different functionality may apply. The answer can be captured without being displayed. If you do not want a hidden constant to be answered, you must enter a value into the display condition. The actions or function related to a hidden constant always occur unless its display condition is not met. It is recommended that you do not set a hidden constant question to be required.
Multi Level Radio Box – A multi level radio box allows users to select the option they want from a list of options. Further action could be determined by the condition display field or by an answer map. Requires an <A/> answer map. Once an answer has been selected, it can be changed but not de-selected. Only one selection is allowed on a radio control. Multi level radio box will be displayed in vertically.
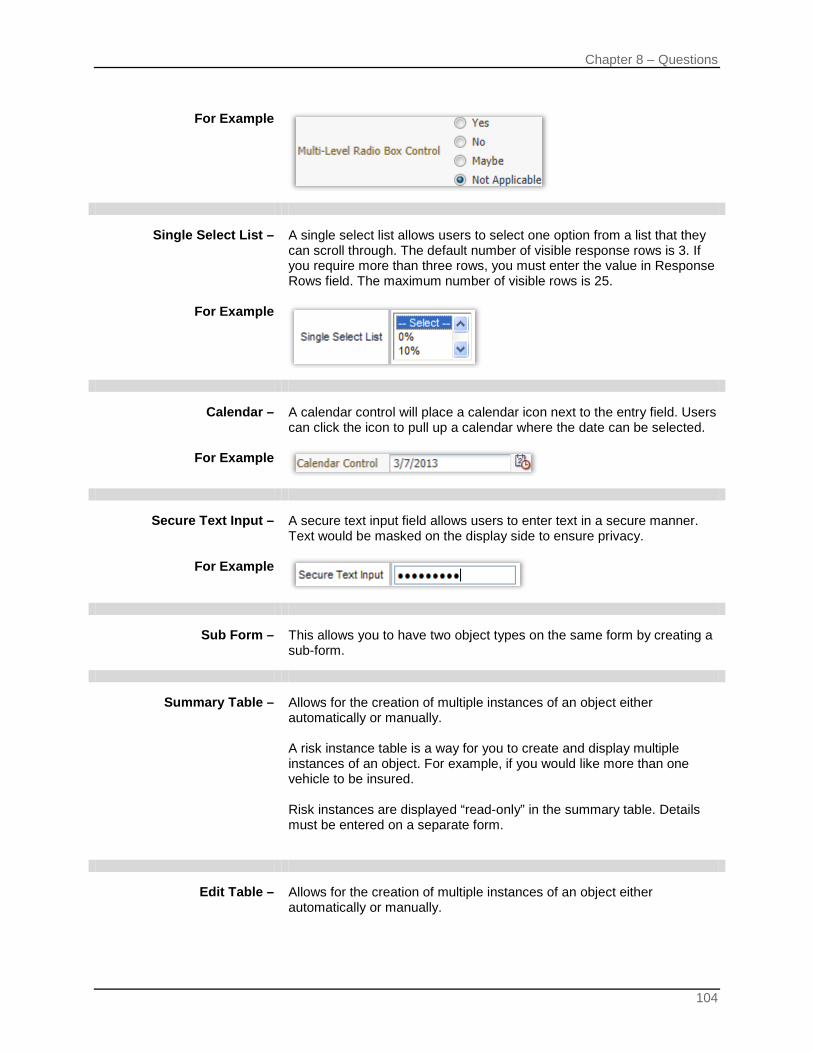
Chapter 8 – Questions
104
For Example
Single Select List – A single select list allows users to select one option from a list that they can scroll through. The default number of visible response rows is 3. If you require more than three rows, you must enter the value in Response Rows field. The maximum number of visible rows is 25.
For Example
Calendar – A calendar control will place a calendar icon next to the entry field. Users can click the icon to pull up a calendar where the date can be selected.
For Example
Secure Text Input – A secure text input field allows users to enter text in a secure manner. Text would be masked on the display side to ensure privacy.
For Example
Sub Form – This allows you to have two object types on the same form by creating a sub-form.
Summary Table – Allows for the creation of multiple instances of an object either automatically or manually. A risk instance table is a way for you to create and display multiple instances of an object. For example, if you would like more than one vehicle to be insured.
Risk instances are displayed “read-only” in the summary table. Details must be entered on a separate form.
Edit Table – Allows for the creation of multiple instances of an object either automatically or manually.

Chapter 8 – Questions
105
Edit table allows you to edit the details in the table.
Sub Form Table – Allows for the creation of multiple instances of an object either automatically or manually.
Allows you to create multiple instances of a different object type that is editable.
Report Panel – Displays results from a callout or HTML formatted answer map data. Required to create a report display answer map question behavior. Requires a ‘Report Display’ Answer Map question behavior.

Chapter 8 – Questions
106
EDITING Any question can be edited at any time. To Edit:
1. Open the product where you want to edit a question.
2. Select the questionnaire where you want to work. Click Open.
3. Select Questions on the top bar menu. This will open the Manage Questions screen.
4. Click the edit icon in front of the question you want to edit. This will open the Edit Question screen where you can make any edits to the question.
Figure 64 Updating a Question
5. Make any necessary changes.
6. Click Update to save your changes.
7. If you are finished, click Cancel to return to the Manage Questions screen.

Chapter 8 – Questions
107
COPYING QUESTIONS Any question can be copied at any time. When you copy a question, everything except the system issued ID number will be copied. No confirmation or error dialogue will be displayed when you copy a question. To Copy a Question:
1. Open the product where you want to copy a question.
2. Select the questionnaire where you want to work. Click Open.
3. Select Questions on the top bar menu. This will open the Manage Questions screen.
4. Click the copy icon in front of the question you want to copy.
5. On the page listing at the bottom of the screen, click the last page.
6. The newly copied question will be the last question on the list. It will be identical to the original question except for the ID. This question is open for editing and use.
DELETING You can delete any question at any time. Questions that are in use can be deleted. The question will not be removed from Worksite until the release has been published. Deletes will not affect the product configuration field from which the question was created, and if the product is re-published to Palette, the question will be re-created. Please make sure this is the action you want to take. You cannot undo a delete. To Delete:
1. Open the product where you want to delete a question.
2. Select the questionnaire where you want to work. Click Open.
3. Select Questions on the top bar menu. This will open the Manage Questions screen.
4. Click the edit icon in front of the question you want to edit. This will open the Edit Question screen where you can delete the question.

Chapter 8 – Questions
108
Figure 65 Deleting a Question
5. Click Delete. A Confirmation message will be displayed.
Figure 66 Delete Confirmation
6. Click OK to delete the question. The screen will refresh and you will be placed on the Manage
Questions screen. Your question will no longer be listed. TIP: If you are unsure or this is not the action you want to take, click Cancel.

Chapter 8 – Questions
109
Questions in Worksite Questions will behave as you have directed in your questions and answer maps. When to display, the type of answer that is expected, help text, etc. Question will be in the assigned question group on the assigned tab with the assigned risk item.
Figure 67 Questions in Worksite

110
Chapter 9
RELEASES The Releases screen is where you manage releases. Releases are the compilation of your entries for the Product, Questionnaire, Tabs, Question Groups, and Questions that you created. When you are ready to distribute to the questionnaire, you will create a Release. Creating a release is the final step in Palette. After the release has been created, you must enter Worksite and apply the release. The Releases menu option will not be visible until you select the questionnaire where you want to work. Releases are unique to the questionnaire where they were created All releases must be created. There are no default releases.
Figure 68 Releases
FIELDS There are five fields on the main Releases tab.
● Selection - Check this box to select a Release.

Chapter 10 – Releases
111
● ID - A system generated ID number. This is an information only field and cannot be changed.
● Date Packaged - The date and time stamp for when this release was generated.
● Release Name - The name of the release. This is a user defined field limited to 200 characters, including spaces. Special characters are allowed.
● Date Published - the date of the last publication. TIP: Multiple releases can be created per questionnaire. You may want to use a naming strategy that
can help you to identify the release easily.
FUNCTIONALITY All functionality is handled by selecting a release and clicking the option from the tool bar menu. There are no right click menus. Menu Options:
Searches release properties for the criteria that have been entered.
Generates a new Release.
Deletes the selected Release.
Displays the risk object schema for the selected Release.
Displays the UI configuration XML for the selected Release.
Displays the SSIX XML for the selected Release
Publishes a release to Worksite database.

Chapter 10 – Releases
112
GENERATE A new release can be generated at any time. Releases should be generated any time changes have been made to a questionnaire that apply to Worksite.
Figure 69 Generating a Release
1. On the Manage Releases screen, click Generate. This brings up the Release Generation screen.
2. Enter the Release Label.
3. Click Generate. If your release was generated, it will be listed on the Manage Releases screen and you will receive a success message.

Chapter 10 – Releases
113
Figure 70 Successfully Generated Release If there was an error in your release, an error message will be displayed. Please correct and try again.
DELETE Releases can be deleted at any time. Please make sure this is the action you want to take. This is a permanent action.
1. On the Manage Releases screen, click Delete. A Confirmation screen will be displayed.
2. Click OK to delete the release. Click Cancel if this is not the action you want to take.
Figure 71 Deleting a Release
3. You will be returned to the Manage Releases screen. Deleted releases are removed immediately.

Chapter 10 – Releases
114
PUBLISH The publish option will be available for any generated release. Publish will push the release to the Worksite environment. Releases are published one at a time and can be published more than once. Published releases can be deleted if they are no longer needed.
Figure 72 Publishing a Release To Publish a Release:
1. On the main Releases tab, select the release you want to publish.
2. Click the Publish icon.
3. The screen will refresh with a success or fail message. If there are any failures, please correct and try again.
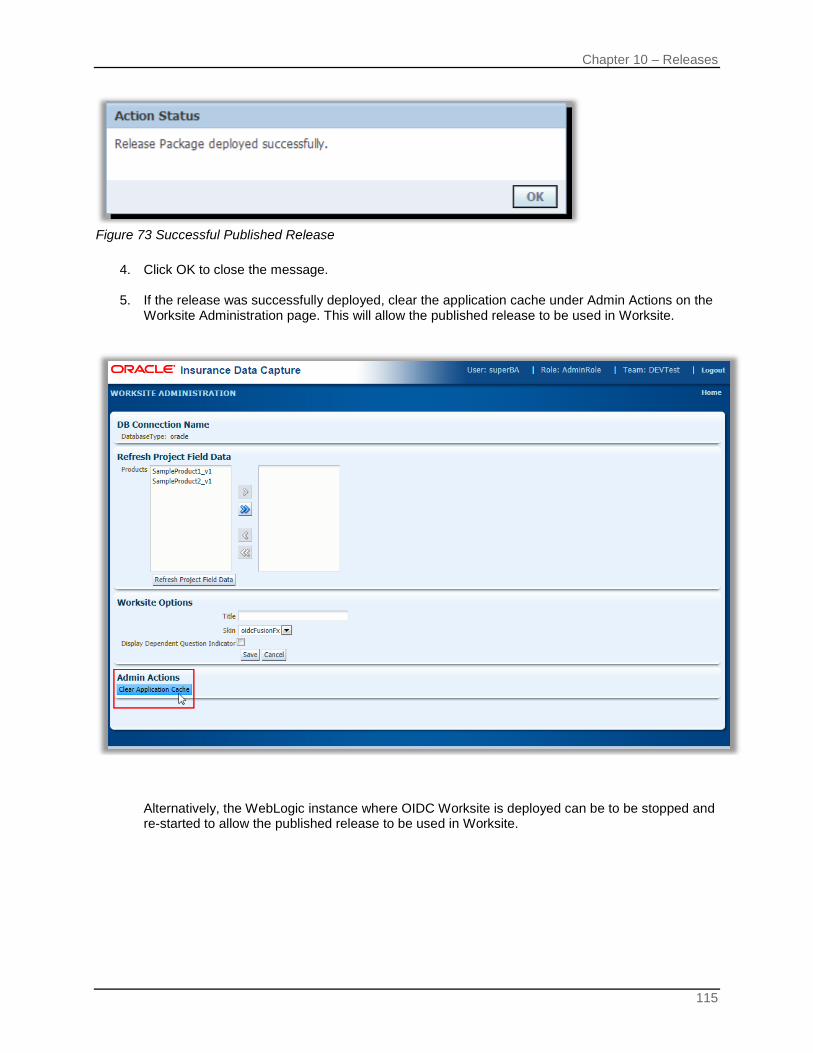
Chapter 10 – Releases
115
Figure 73 Successful Published Release
4. Click OK to close the message. 5. If the release was successfully deployed, clear the application cache under Admin Actions on the
Worksite Administration page. This will allow the published release to be used in Worksite.
Alternatively, the WebLogic instance where OIDC Worksite is deployed can be to be stopped and re-started to allow the published release to be used in Worksite.

Chapter 10 – Releases
116
VIEW RISK OBJECT SCHEMA XML The View Risk Object Schema XML is the risk object information for each risk object used in the questionnaire in XML format. The risk object schema information presented here is the same information you will find on each individual risk on the Risk Object tab. The advantage to the View Risk Object Schema XML is that the information is presented as a detailed list of only the risk objects used in the questionnaire. If you wanted this same information on the Risk Objects tab, you would need to view each risk object separately. Also, the Risk Objects tab presents every risk object available to the questionnaire, not just the ones being used. You can view the risk object schema at any time. Viewing the risk object schema is helpful when you want to make adjustments to your questionnaire and you want to view a summary of the risk object schema information used in the questionnaire.
1. Select a single release where you want to view the risk object schema.
2. Click View Risk Object Schema XML. A separate window will be displayed.
Figure 74 Risk Object Schema This is an information only screen. You cannot edit on this screen but you can copy content and paste in to another program to view. Click Close to close the screen and return to the Manage Release screen.

Chapter 10 – Releases
117
VIEW UI CONFIG XML The View UI Config XML contains the definition of the questionnaire in XML format. The information presented here is the same information you will find for each individual element; Product, Risk Objects, Tabs, Question Groups, Questions and Answer Maps, that define the questionnaire. The advantage to the View UI Config XML is that the information is presented as a detailed listing of only the elements used in the questionnaire. If you wanted this same information from all the other tabs, you would need to view each element on each tab. Also, the tabs will present every element available to the questionnaire, not just the ones being used. The View UI Config XML is faster and more efficient way to view the element details of the questionnaire. You can view the UI configuration information at any time. Viewing the UI Config XML is helpful when you want to make adjustments to your questionnaire and you want to view all the questionnaire information at one time.
1. Select a single release where you want to view the UI Configuration.
2. Click View UI Config XML. A separate window will be displayed.
Figure 75 UI Config XML This is an information only screen. You cannot edit on this screen but you can copy content and paste in to another program to view. Click Close to close the screen and return to the Manage Release screen.
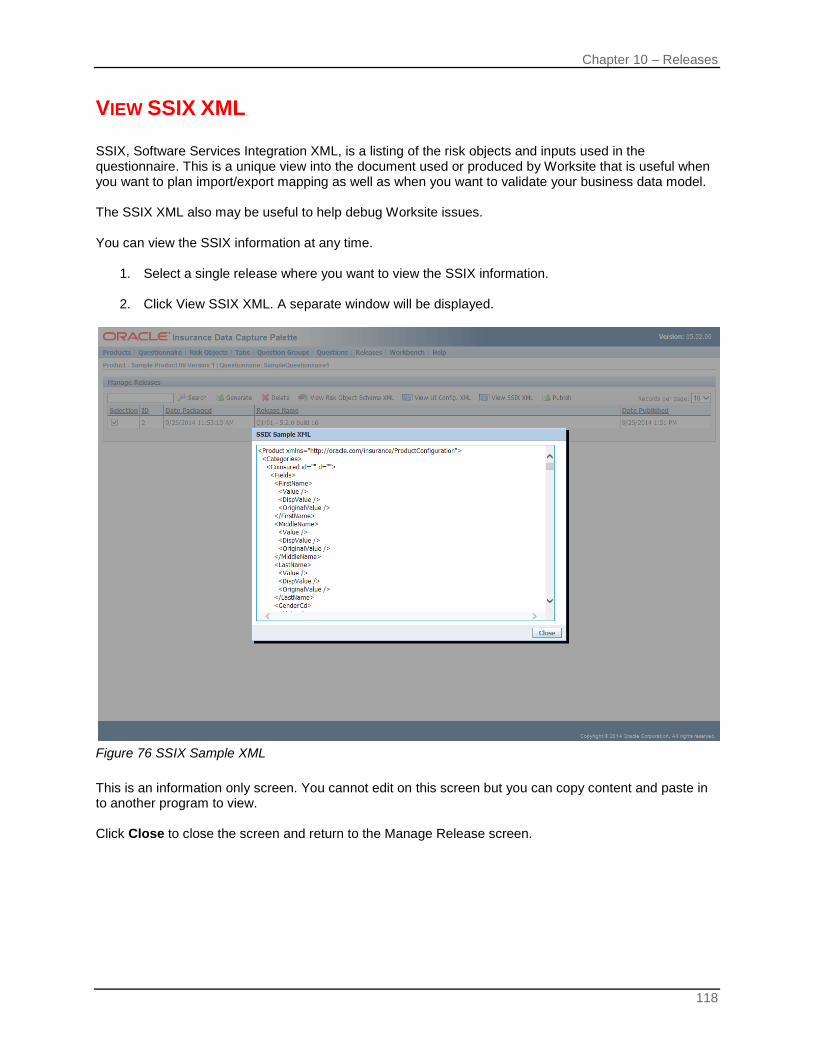
Chapter 10 – Releases
118
VIEW SSIX XML SSIX, Software Services Integration XML, is a listing of the risk objects and inputs used in the questionnaire. This is a unique view into the document used or produced by Worksite that is useful when you want to plan import/export mapping as well as when you want to validate your business data model. The SSIX XML also may be useful to help debug Worksite issues. You can view the SSIX information at any time.
1. Select a single release where you want to view the SSIX information.
2. Click View SSIX XML. A separate window will be displayed.
Figure 76 SSIX Sample XML This is an information only screen. You cannot edit on this screen but you can copy content and paste in to another program to view. Click Close to close the screen and return to the Manage Release screen.

119
Chapter 10
WORKBENCH The Workbench tab is where you can manage the columns that you want displayed and made available for searching on the Worksite Home page Project List. A single worksite may contain multiple products and questionnaires. The initial view of the workbench project list displays the default columns that are available to all products. The default columns are:
● Project ID - a system-generated project ID ● Modified Date - the date the project was last updated ● Status - the current status of the project ● Group Name - the group under which the project was created
Palette allows you to define additional columns to be included in the Project List for each product. A Release must be generated and published to include the Project List definition in the worksite.
Figure 77 Workbench, Project List
Chapter 11 – Workbench
120
FIELDS There are seven fields on the main Releases tab.
● Edit - Check this box to select a Release
● Column Name - The label that is displayed in the worksite column heading
● Field Name - The Risk Object Field or Mapping ID of the question that is used in this project list column
● Display - The type of display that applies to this column.
● Risk Object - The Risk Object of the question that is used in this project list column.
● System - Indicates whether this is a system-defined default project list column.
● Re-order - an icon that allows you to drag and drop an item to re-order its place in the Project List.
FUNCTIONALITY All functionality is handled by selecting the option from the tool bar menu. There are no right click menus. Menu Options:
Adds a new column to the Project List definition.
There are two icons in the Manage Project List Column Assignment area:
Edit - Allows you to edit the selected Column.
Order - Allows you to drop and drag the Column to the position you want.

Chapter 11 – Workbench
121
ADD NEW COLUMN A new column can be added at any time.
1. On the Manage Project Lists page, click the Add New Column icon.
Figure 78 Adding New Column to Project List

Chapter 11 – Workbench
122
2. Select a Field Name. The available options are listed in a separate screen. Select the filed you want and click OK.
Figure 79 Selecting Risk Object Field
3. Enter a Column Name.
4. Select a Display Condition.
5. Click Save.
6. The screen will refresh and the new column will be added to the bottom of the list.

Chapter 11 – Workbench
123
To Edit Risk Objects:
1. Click the Edit. icon for the column you want to edit The screen will refresh and the column definition dialog will open.
2. Make your changes. Options will depend upon the type of risk object selected.
3. Click Update to save changes.
Figure 80 Editing a Risk Object in Project List To Reorder Columns: Reordering columns will allow you to place the columns in the order you want them to appear in Worksite. To reorder a column
1. Click on the Order icon for the column you want to move.
2. Drag the mouse cursor to the position you want.
3. Click the mouse button to drop the column in its new position.
Figure 81 Re-ordering Columns in Project List

124
Chapter 11
WORKSITE To access Worksite: Open an Internet Explorer web browser either remotely on the local OIDC web server and browse to the following location, replacing SERVERNAME with the actual server name: http://SERVERNAME:7001/DCW52/faces/LoginPage.jspx The port number may be updated by the installer/system administrator.
Figure 82 Data Capture Worksite Home

Chapter 12 – Worksite
125
Figure 83 Data Capture Worksite Home, Product & Questionnaire Selected

126
Support
CONTACTING SUPPORT If you need assistance with an Oracle Insurance Data Capture System product, please log a Service Request using My Oracle Support at https://support.oracle.com/. Oracle customers have access to electronic support through My Oracle Support. For information, visit http://www.oracle.com/pls/topic/lookup?ctx=acc&id=info or visit http://www.oracle.com/pls/topic/lookup?ctx=acc&id=trs if you are hearing impaired. Address any additional inquiries to: Oracle Corporation World Headquarters 500 Oracle Parkway Redwood Shores, CA 94065 U.S.A. Worldwide Inquiries: Phone: +1.650.506.7000 Fax: +1.650.506.7200 oracle.com

127
Glossary
GLOSSARY TERMS KEY: Term [Previous Term, if any] | Definition
A Activity A well known, pre-defined business process between Data Capture and an external system.
Answer Map A set of instructions in XML format that controls the behavior of a question
response such as providing a list of valid options, restricting values and/or formats.
C Callout The ability to generically connect to an external data source through one or more ESBs (Enterprise Service Busses).
Configuration XML Created in OIDC Palette when a Release is generated, the Configuration
XML defines the questionnaire Properties, Globals, Options, Page Navigation, Locale Settings, Risk Object Schema Overrides, Quote Project Tabs, and Forms.
Control Type Determines the expected response to a question (such as an editable text box, a dropdown list, a non-editable label, etc.).
D Dependent Question
A question that relies on another (Trigger) questions value.
Designer A person using Data Capture Palette to define a Work Site.
E Engine Data Capture installed components and back-end processes that are transparent to use.
ESB Enterprise Service Bus.
F Form The association of a risk object to a tab.
G Globalization When applied to software engineering is an all encompassing word that
describes the act of making your product marketable in all regions of the world. It is often applied to a product that can work in many languages simultaneously and is sensitive to the end users cultural requirements.
Globals Questionnaire definition global variable that configure the location of application files.
I
Internationalization The act of designing software so that it is generic enough allow specific language support to be almost plugged in. An internationalized product makes no assumptions about the language that it will operate in and is not usable without the addition of a language add-on; often abbreviated as I18N for the 18 letters between I and N.
L Line of Business A specific type of insurance, such as home, auto, life, commercial property, etc.

Glossary
128
Localization The act of taking an internationalized product and making it usable by
creating language add-ons. Translating the interface can be considered one important step in localizing a product; often abbreviated as L10N for the 10 letters between L and N.
O OIDC Oracle Insurance Data Capture.
Options Define the application settings, such as session timeout length and page validation.
P Page Navigation Questionnaire page navigation.
Palette Tool used to build content for the OIDC Work Site.
Panel Question Where we are currently using an Answer Map to define the look and feel of a question, such as tables and Sub-Forms.
Project XML An XML document that contains the data collected for a particular customer Profile and Project.
Q Question A description of the data being collected.
Question Condition Language (QCL)
Statements used in a question’s definition (Conditional Parent Value | Display Condition) that control the behavior of the question.
Question Group A collection of one or more Questions that relate to a particular Risk Object.
Question Type Defines some question behavior.
Questionnaire The presentation of a Data Capture question set (Tabs, Question Groups, and Questions) to a user.
R Release Creates the schema and configuration files that define a Questionnaire.
Risk Object A Risk Object is a group of information that is specific to an item. For
example, an auto policy would have objects of Policy, Driver and Vehicle. A home policy would have a Policy and Dwelling object.
Risk Object Schema
Created in OIDC Palette when a Release is generated, the Risk Object Schema XML provides instructions to the Questionnaire about the objects available or required.
Risk Object Instance
A specific instance of a Risk Object.
S SSIX Software Services Integration XML.
Soft Data Defines references an external sources (Insbridge SRP) for question answer values.
Soft Service A generic API that facilitates the transport of an XML doc to a target adaptor.
Sub-Form A panel question that allows users to deviate from the object currently in use

Glossary
129
in a specific form.
T Target A soft service end-point.
Transformation Converting a document from one format to another.
Trigger Question A question whose value affects another (Dependent) question (a.k.a., Initiating Question)
U User A Data Capture Work Site end-user.
W Worksite The presentation of a Data Capture interface - Questionnaire + Workbench - to a user (runtime user interface).
Workbench The presentation of a Data Capture Customer List and/or Quote List to a user.

130
Appendix A
QUESTION CONDITION LANGUAGE Question Condition Language (QCL) is a statement that controls the behavior of a question or other questionnaire elements. QCL statements begin with the ^rx literal, then an object reference and any defining properties, property values, operators and operator values. QCL statements consist of:
^rx <ValueLookup> <operator> <operatorValue> Where:
● ^rx is a literal value that indicates a special process. ^rx is followed by a space.
● ValueLookup
- Format: <object reference>.<property>.<propertyValue> Where:
- <Object Reference> is the object or instance that you are looking up, followed by a period ( . ).
- <Property> are the type of information you want to search for, followed by a period ( . ).
- <Property Values> the specific values you want from the property, followed by a space.
● <Operators> the differentiation function you want to perform, followed by a space.
● <Operator Value> the values you want to compare. For Example:
● ^rx item.mId.VehicleMake eq XYZ
Question Condition Language Usage QCL is native to OIDC and used in Display Condition, Question Text and Answer Maps. Using QCL allows OIDC to be reflexive in its presentation; if this happens, then do this. QCL has a defined structure but allows for wide variety of elements to be included.
● QCL statements are Case Sensitive.
● The parenthesis works mathematically, process what is in the parenthesis first then process outside.
● Most QCL statements will start with ^rx. unless otherwise noted. ^rx will be required when used
in a Question as a Display Condition or Default Value.

Appendix A – QCL
131
● There are no mandatory elements. The structure and inclusion of elements depend upon the event or action that needs to take place.
Question Condition Language (QCL) statements are used in a question's definition to control the behavior of the question.
● Simple Parent Question value condition
o When defining a 'child' question, the 'Display Condition' can be a simple value (example - the parent question's valid answer values are 'Yes' or 'No'; if the 'child' question should display when the parent question answer is 'Yes' , the 'Display Condition' would simply be 'Yes')
● Complex conditions o Complex conditions can be defined by combining logical statements with comparison
statements in nested bounded groupings. This provides a very wide range of condition checking flexibility to the use
● Case Sensitive Display Condition QCL Statements QCL statements consist of an object reference accompanied by the following (as applicable to the specific object) ^rx (literal, followed by a space) Object Property
● Defines what type information to search for, such as an answer to a question or information about a specific risk instance (e.g., Insured)
Property Value
● The specific value(s) to search for ● Followed by a space
Operator
● Equal, not equal, greater than, etc ● Followed by a space
Operator Value
● The literal expected value (A,B,C,1,2,3) -- or -- ● A condition (true, false) ● Followed by a space ● Special Character "/" cannot be used in value.
QCL Statement Examples ^rx object.property.propertyValue operator operatorValue ^rx item.mId.VehicleMake eq XYZ Complex QCL Statement Examples ^rx pol.state.abbr in {CA,PA,TX} and pol.mId.EffectiveDt gt 01/01/2010 ^rx (pol.state.abbr in {CA,PA,TX} and pol.mId.EffectiveDt gt 01/01/2010) or pol.mId.EffectiveDt gt 06/01/2013

Appendix A – QCL
132
VALUE LOOKUP In a QCL statement, the ValueLookup follows the ^rx.
^rx <ValueLookup> <operator> <operatorValue> The Value Lookup section of a QCL statement can consist of up to three parts, separated by a period ( . ):
<object reference>.<property>.<propertyValue> You may use one, two or all three parts of the Value Lookup or not use the Value Lookup at all. It will depend upon the event or action that needs to take place. Value Lookup may be used in other areas of the system where you need to lookup a system value.
<Object Reference> Instances of various interface objects can be referenced in the QCL to lookup data. Objects are system defined such as screen data, project data, risk object instance data, and can be accessed. Object References can be used to access interface objects and their properties. For example:
● pol = policy ● item = the current instance of a risk object ● insured = insured risk object ● screen = the tab you are on
Object references are not interchangeable and each has a specific meaning. For example, pol.mId.Address1 and item.mId.Address1 may result in the same answer but there are differences. Pol is looking for one specific object (the policy object instance) while item is looking for a different object (the current instance of any object, based on the form tab/object association). Object Reference in QCL Structure: In the QCL structure, object reference is the element that follows ^rx (space).
^rx object.property.propertyValue operator operatorValue In the Value Lookup structure, object reference is the first element.
<object reference>.<property>.<propertyValue>
Object Reference Details: There are 10 Object References available:
Appendix A – QCL
133
Object Reference Object Definition baseItem Base Object Instance cat.<objectName>** Object Name** coinsured Coinsured firstInstance First Instance of Risk Object insured Insured item Risk Object Instance parentItem Parent Object Instance parentVal*** Parent question value*** pol Policy prj Project Session Session
NOTES: **Object Name object reference (cat) creates an atypical QCL statement. That is, the object reference requires not only the literal reference value – “cat” (i.e., Object), it also requires the Object Name. When the ‘Object Name’ is selected, the QCL statement should include both the object reference and the <objectName> separated by a period (.). A firstInstance is not allowed when the object is a singleton. ^rx object.<objectName>.property.propertyValue operator operatorValue ^rx cat.Person.mId.PersonInfo eq XYZ *** Also, the Parent Question Value (parentVal) does not require/allow a property or property value, and can only be used in a child question. ^rx object operator operatorValue ^rx parentVal in {A,B,C} Ctrl+Click the Object Reference to view details. Object reference properties are defined in Object Reference Property Definitions.
Object Details
baseItem
Description: Represents any base risk object of the currently selected risk object instance. Can be any risk object type defined in the risk object schema. When a risk object extends another, the core object is its base. For example, a Driver may be an extension of Insured, or HouseholdMember and they are its base.
Properties: ● mId.<mId> ● object ● baseCategory

Appendix A – QCL
134
● isFirstOfKind ● is LastOfKind ● numberOfKind ● maxNumberOfKind ● numberOf<objectID> ● isInsured ● isCoInsured
Examples: baseItem.mId.QUOTE_STATE eq TX baseItem.isCoinsured neq true
cat.<objectName>
Description: Provides access to singleton and first instance risk objects. It could be any risk object type defined in the risk object schema.
Properties: ● mId.<mId>
Examples: cat.Policy.mId.AGE lt 16
coinsured
Description: Provides access to the coinsured risk object instance.
Properties: ● mId.<mId> ● object
Examples: coinsured.mId.FIRST_NAME eq John coninsured.NumberOf.Person eq true
firstInstance
Description: Provides access to the first risk object instance that is of the same type as the currently selected risk object. It could be any risk object type defined in the risk object schema.
Properties: ● mId.<mId>
Examples: firstInstance.mId.VEHICLE_YEAR neq !Empty
insured
Description: Provides access to the insured risk object instance.
Properties: ● mId.<mId> ● object
Examples: insured.mId.LAST_NAME eq Smith insured.isFirstOfKind eq true
item
Description: Represents the current risk object instance. It could be any risk object type defined in the risk object schema.
Properties: ● mId.<mId> ● object ● baseCategory ● isFirstOfKind ● isLastOfKind ● numberOfKind

Appendix A – QCL
135
● maxNumberOfKind ● numberOf.<objectID> ● isInsured ● isCoInsured
Examples: item.mId.NUMBER_OF_ACCIDENTS gte 3 item.isInsured eq true
parentItem
Description: Represents the parent risk object of the current risk object instance. It could be any risk object type defined in the risk object schema.
Properties: ● mId.<mId>
Example: parentItem.mId.PersonInfo eq !Empty
parentVal
Description: Value of the parent question. Used for child questions where you want a value other than a single literal “equals” to be the value for child conditions.
Examples: parentVal neq 16 parentVal lt
pol
Description: Provides access to the policy risk object instance.
Properties: ● mId.<mId> ● numberOf.<objectID> ● hasANY.<objectID>
Example: pol.numberOf.Vehicle gte 7 pol.hasAny.Vehicle eq true
prj
Description: Provides access to the project details. Project is the top most level and contains information regarding the project that will not be located elsewhere such as Project Name and Line of Business.
Properties: ● mId.<mId> ● questionnaireName ● status ● numberOf.<objectID> ● hasANY.<objectID> ● tabGroupLayout ● UserGroupID ● UserName
Examples: prj.state.abbr eq 12 prj.questionnaireName eq MyQuestionnaire prj.leadId in {A,B,C} prj.status gt 7 prj.numberOf.Driver eq 5 prj.hasANY.Driver eq true

Appendix A – QCL
136
session
Description: Provides session information.
Properties: ●
Example:
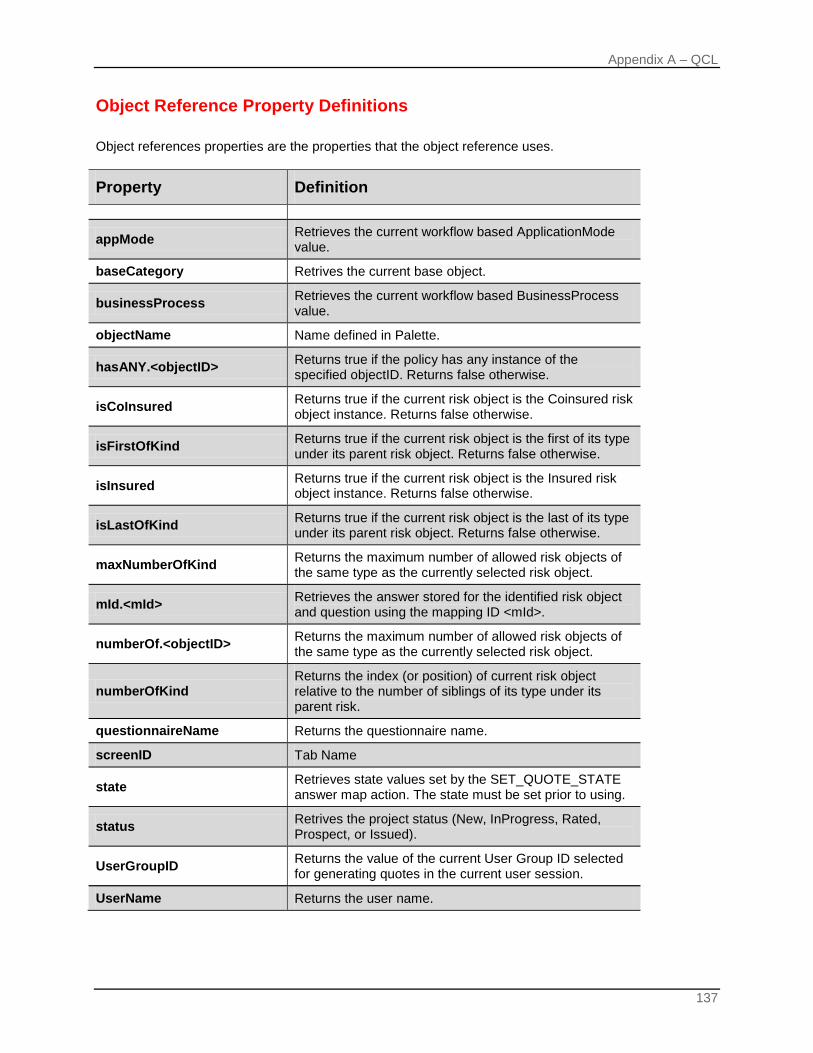
Appendix A – QCL
137
Object Reference Property Definitions Object references properties are the properties that the object reference uses.
Property Definition
appMode Retrieves the current workflow based ApplicationMode value.
baseCategory Retrives the current base object.
businessProcess Retrieves the current workflow based BusinessProcess value.
objectName Name defined in Palette.
hasANY.<objectID> Returns true if the policy has any instance of the specified objectID. Returns false otherwise.
isCoInsured Returns true if the current risk object is the Coinsured risk object instance. Returns false otherwise.
isFirstOfKind Returns true if the current risk object is the first of its type under its parent risk object. Returns false otherwise.
isInsured Returns true if the current risk object is the Insured risk object instance. Returns false otherwise.
isLastOfKind Returns true if the current risk object is the last of its type under its parent risk object. Returns false otherwise.
maxNumberOfKind Returns the maximum number of allowed risk objects of the same type as the currently selected risk object.
mId.<mId> Retrieves the answer stored for the identified risk object and question using the mapping ID <mId>.
numberOf.<objectID> Returns the maximum number of allowed risk objects of the same type as the currently selected risk object.
numberOfKind Returns the index (or position) of current risk object relative to the number of siblings of its type under its parent risk.
questionnaireName Returns the questionnaire name.
screenID Tab Name
state Retrieves state values set by the SET_QUOTE_STATE answer map action. The state must be set prior to using.
status Retrives the project status (New, InProgress, Rated, Prospect, or Issued).
UserGroupID Returns the value of the current User Group ID selected for generating quotes in the current user session.
UserName Returns the user name.
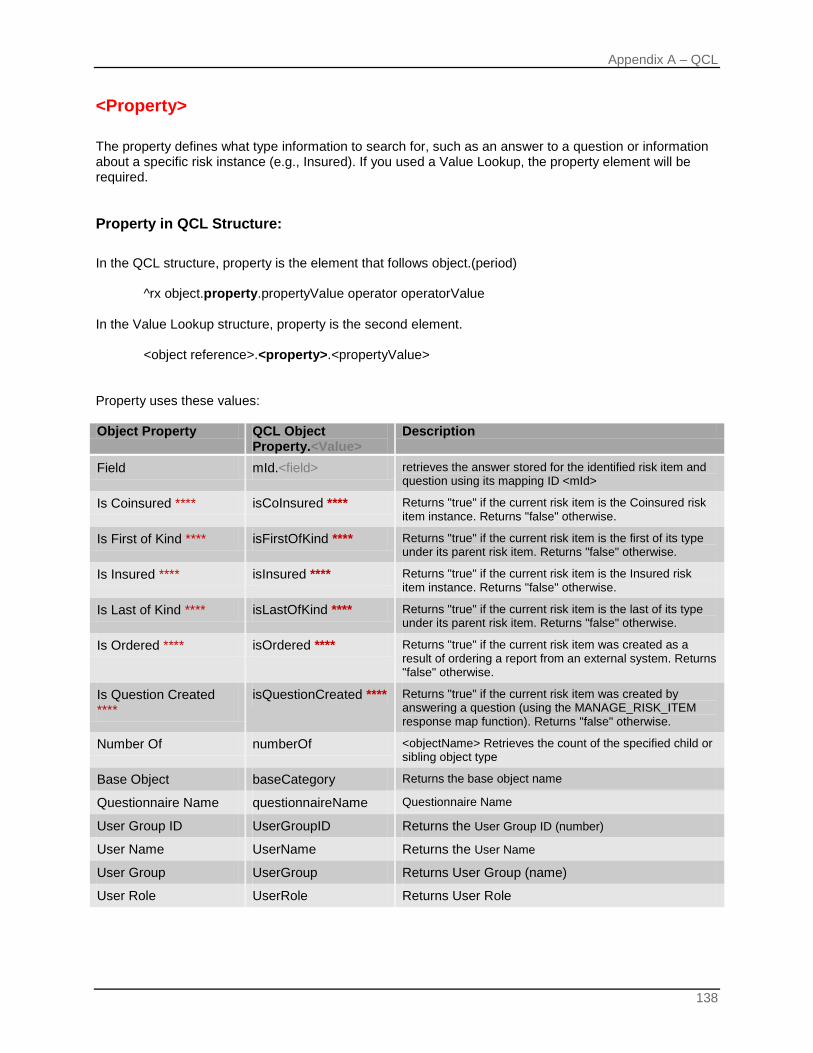
Appendix A – QCL
138
<Property> The property defines what type information to search for, such as an answer to a question or information about a specific risk instance (e.g., Insured). If you used a Value Lookup, the property element will be required. Property in QCL Structure: In the QCL structure, property is the element that follows object.(period)
^rx object.property.propertyValue operator operatorValue In the Value Lookup structure, property is the second element.
<object reference>.<property>.<propertyValue> Property uses these values: Object Property QCL Object
Property.<Value> Description
Field mId.<field> retrieves the answer stored for the identified risk item and question using its mapping ID <mId>
Is Coinsured **** isCoInsured **** Returns "true" if the current risk item is the Coinsured risk item instance. Returns "false" otherwise.
Is First of Kind **** isFirstOfKind **** Returns "true" if the current risk item is the first of its type under its parent risk item. Returns "false" otherwise.
Is Insured **** isInsured **** Returns "true" if the current risk item is the Insured risk item instance. Returns "false" otherwise.
Is Last of Kind **** isLastOfKind **** Returns "true" if the current risk item is the last of its type under its parent risk item. Returns "false" otherwise.
Is Ordered **** isOrdered **** Returns "true" if the current risk item was created as a result of ordering a report from an external system. Returns "false" otherwise.
Is Question Created ****
isQuestionCreated **** Returns "true" if the current risk item was created by answering a question (using the MANAGE_RISK_ITEM response map function). Returns "false" otherwise.
Number Of numberOf <objectName> Retrieves the count of the specified child or sibling object type
Base Object baseCategory Returns the base object name
Questionnaire Name questionnaireName Questionnaire Name
User Group ID UserGroupID Returns the User Group ID (number)
User Name UserName Returns the User Name
User Group UserGroup Returns User Group (name)
User Role UserRole Returns User Role

Appendix A – QCL
139
NOTES **** The ‘true/false’ Object Properties (isCoInsured, isFirstOfKind, isInsured, isLastOfKind, isOrdered, isQuestionCreated) do not require/allow a property value. isFirstOfKind is not allowed when the object reference is firstInstance. isLastOfKind is not allowed when the object reference is firstInstance. baseCategory is only available when the current object type is an extension. ^rx object.property operator operatorValue ^rx coinsured.isQuestionCreated eq true ^rx item.isLastOfKind eq true ^rx item.isInsured eq true
<PROPERTY VALUES> Property values are the specific value(s) to search for. If the property is ans then its value is a question ID. If the property is an mId then its value is mapping ID. Properties valid values depend on the property itself. Property values are case sensitive. The value must match exactly. Property Value in QCL Structure: In the QCL structure, property value is the element that follows property.(period)
^rx object.property.propertyValue operator operatorValue In the Value Lookup structure, propertyValue is the third element.
<object reference>.<property>.<propertyValue>
<OPERATORS> QCL supports comparison and logical operators. Operators are lower case. Operator in QCL Structure: In the QCL structure, operator follows propertyValue (space). ^rx object.property.propertyValue operator operatorValue
● Comparison Operators

Appendix A – QCL
140
Operator Description QCL Operator
equals eq not equal to neq
in a set of values ***** in *****
not in a set of values ***** nin ***** less than lt less than or equal to lte greater than gt greater than or equal to gte
● Value Operators
Operator Value QCL Operator Value
True true False false
Empty _EMPTY replaces deprecated !Empty
Non Empty _NON_EMPTY replaces deprecated !NonEmpty
Any Value _ANY_VALUE replaces deprecated !AnyVal Custom (or Literal) <User-Defined>
<OPERATOR VALUES> Operator values are followed by a space and the special character forward slash ( / ) cannot be used. Operator Values in QCL Structure: In the QCL structure, operator value follows operator (space).
^rx object.property.propertyValue operator operatorValue Operator Values Can Be:
● A Literal Value ABC.
● A Set of Values with the set members enclosed in braces { } and separated by a comma. For example {a,b,c,d}.
● A Condition such as true or false.
● %_x_% means to process only when the exact content is matched, where _x_ is the value you
want matched.
● !EMPTY means empty.
● !NonEmpty means that this must have a value.

Appendix A – QCL
141
● !AnyVal means empty or not empty.
QCL Rules:
● eq YES - Must match exactly including case and spacing.
● gte %0.50% - If you want to search for special characters you must use percent signs. Anything within the percent sign (%) will be treated exactly as entered, %value%.
Restricted Special Characters: There is a short list of special characters that will not be allowed in any part of the system. If you attempt to use a restricted special character, you will receive an error message instructing you to change your entry.
Name Symbol
Greater Than >
Less Than <
Apostrophe ‘
Quotation Marks “
Ampersand &
Any other special character will be allowed.
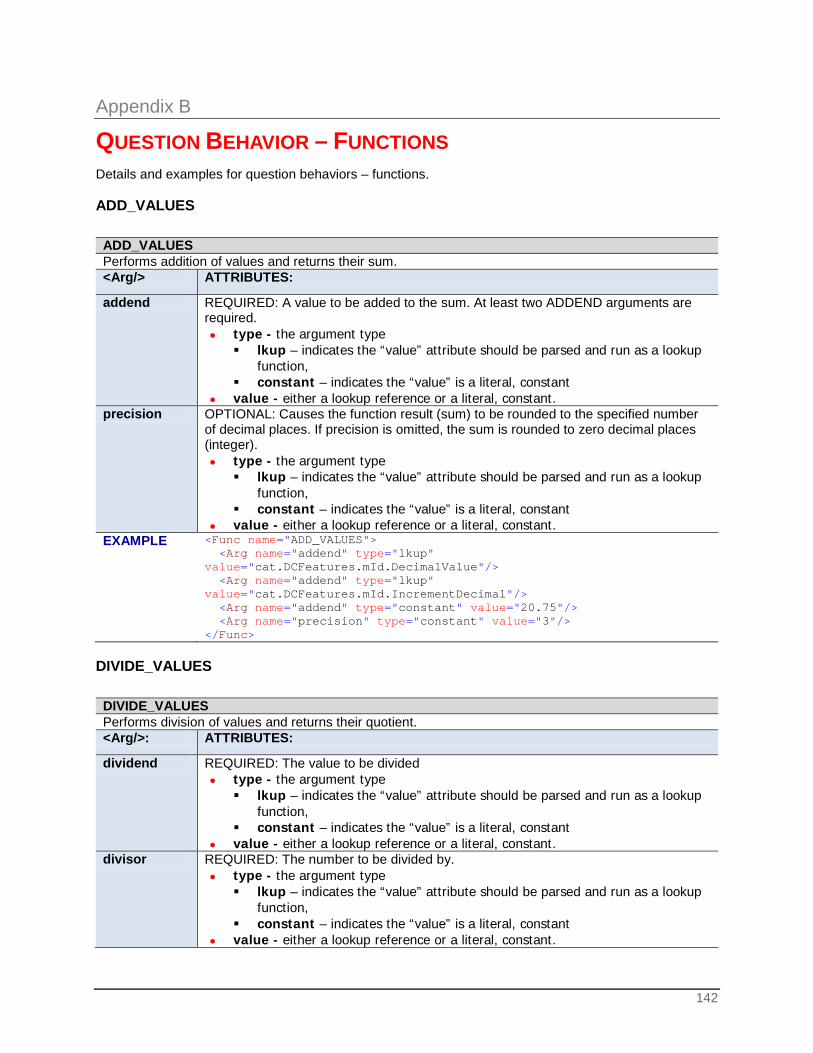
142
Appendix B
QUESTION BEHAVIOR – FUNCTIONS Details and examples for question behaviors – functions. ADD_VALUES ADD_VALUES Performs addition of values and returns their sum. <Arg/> ATTRIBUTES:
addend REQUIRED: A value to be added to the sum. At least two ADDEND arguments are required. ● type - the argument type
lkup – indicates the “value” attribute should be parsed and run as a lookup function,
constant – indicates the “value” is a literal, constant ● value - either a lookup reference or a literal, constant.
precision OPTIONAL: Causes the function result (sum) to be rounded to the specified number of decimal places. If precision is omitted, the sum is rounded to zero decimal places (integer). ● type - the argument type
lkup – indicates the “value” attribute should be parsed and run as a lookup function,
constant – indicates the “value” is a literal, constant ● value - either a lookup reference or a literal, constant.
EXAMPLE <Func name="ADD_VALUES"> <Arg name="addend" type="lkup" value="cat.DCFeatures.mId.DecimalValue"/> <Arg name="addend" type="lkup" value="cat.DCFeatures.mId.IncrementDecimal"/> <Arg name="addend" type="constant" value="20.75"/> <Arg name="precision" type="constant" value="3"/> </Func>
DIVIDE_VALUES DIVIDE_VALUES Performs division of values and returns their quotient. <Arg/>: ATTRIBUTES:
dividend REQUIRED: The value to be divided ● type - the argument type
lkup – indicates the “value” attribute should be parsed and run as a lookup function,
constant – indicates the “value” is a literal, constant ● value - either a lookup reference or a literal, constant.
divisor REQUIRED: The number to be divided by. ● type - the argument type
lkup – indicates the “value” attribute should be parsed and run as a lookup function,
constant – indicates the “value” is a literal, constant ● value - either a lookup reference or a literal, constant.

Appendix – B
143
precision OPTIONAL: Causes the function result to be rounded to the specified number of decimal places. If precision is omitted, the quotient is rounded to zero decimal places (integer). ● type - the argument type
lkup – indicates the “value” attribute should be parsed and run as a lookup function,
constant – indicates the “value” is a literal, constant ● value - either a lookup reference or a literal, constant.
EXAMPLE <Func name="DIVIDE_VALUES"> <Arg name="dividend" type="lkup" value="cat.DCFeatures.mId.DecimalValue"/> <Arg name="divisor" type="lkup" value="cat.DCFeatures.mId.IncrementDecimal"/> <Arg name="precision" type="constant" value="4"/> </Func>
MULTIPLY_VALUES MULTIPLY_VALUES Performs multiplication of values and returns their product. <Arg/>: ATTRIBUTES:
factor REQUIRED: The number that is multiplied by the multiplier ● type - the argument type
lkup – indicates the “value” attribute should be parsed and run as a lookup function,
constant – indicates the “value” is a literal, constant ● value - either a lookup reference or a literal, constant.
precision OPTIONAL: Causes the function result to be rounded to the specified number of decimal places. If precision is omitted, the product is is rounded to zero decimal places (integer). ● type - the argument type
lkup – indicates the “value” attribute should be parsed and run as a lookup function,
constant – indicates the “value” is a literal, constant ● value - either a lookup reference or a literal, constant.
EXAMPLE <Func name="MULTIPLY_VALUES"> <Arg name="factor" type="lkup" value="cat.DCFeatures.mId.DecimalValue"/> <Arg name="factor" type="lkup" value="cat.DCFeatures.mId.IncrementDecimal"/> <Arg name="factor" type="constant" value="20.75"/> <Arg name="precision" type="constant" value="4"/> </Func>
SUBTRACT_VALUES SUBTRACT_VALUES Performs subtraction of values and returns their difference <Arg/>: ATTRIBUTES:

Appendix – B
144
minuend REQUIRED: The number from which the subtrahend is deducted ● type - the argument type
lkup – indicates the “value” attribute should be parsed and run as a lookup function,
constant – indicates the “value” is a literal, constant ● value - either a lookup reference or a literal, constant.
subtrahend REQUIRED: The number that is deducted from the minuend ● type - the argument type
lkup – indicates the “value” attribute should be parsed and run as a lookup function,
constant – indicates the “value” is a literal, constant ● value - either a lookup reference or a literal, constant.
precision OPTIONAL: Causes the function result to be rounded to the specified number of decimal places. If precision is omitted, the difference is is rounded to zero decimal places (integer) ● type - the argument type
lkup – indicates the “value” attribute should be parsed and run as a lookup function,
constant – indicates the “value” is a literal, constant ● value - either a lookup reference or a literal, constant
EXAMPLE <Func name="SUBTRACT_VALUES"> <Arg name="minuend" type="lkup" value="cat.DCFeatures.mId.DecimalValue"/> <Arg name="subtrahend" type="lkup" value="cat.DCFeatures.mId.IncrementDecimal"/> <Arg name="precision" type="constant" value="1"/> </Func>
ADD_CHILDVALUES ADD_CHILDVALUES Sums values across all instances of the specified child object and field <Arg/>: ATTRIBUTES:
category REQUIRED: Identifies the risk object to search for. These items must be children of the current item ● value - required, object ID
mId REQUIRED: Identifies the field to search for ● value - required, Field name / Mapping ID
precision OPTIONAL: Causes the function result to be rounded to the specified number of decimal places. If precision is omitted, the difference is is rounded to zero decimal places (integer) ● type - the argument type
lkup – indicates the “value” attribute should be parsed and run as a lookup function,
constant – indicates the “value” is a literal, constant ● value - either a lookup reference or a literal, constant
EXAMPLE <Func name="ADD_CHILDVALUES"> <Arg name="category" value="Instance"/> <Arg name="mId" value="InstanceNumber"/> <Arg name="precision" type="constant" value="1"/> </Func>

Appendix – B
145
DATE_DIFFERENCE DATE_DIFFERENCE Performs subtraction of date values and returns their difference as an integer. The expected date values must be in valid yyyy-MM-dd format <Arg/>: ATTRIBUTES:
enddate REQUIRED: The date from which the startdate is deducted ● type - the argument type
lkup – indicates the “value” attribute should be parsed and run as a lookup function. The lookup result must be a valid date in yyyy-MM-dd format
variable – indicates that the system will perform an internal function or calculation to obtain the date value. Valid values are: o _NOW_ – returns the current system date
constant – indicates the “value” is a literal, constant date in yyyy-MM-dd format
● value - either a lookup reference or a literal, constant, or a valid systen function
startdate REQUIRED: The date that is deducted from the enddate ● type - the argument type
lkup – indicates the “value” attribute should be parsed and run as a lookup function. The lookup result must be a valid date in yyyy-MM-dd format
variable – indicates that the system will perform an internal function or calculation to obtain the date value. Valid values are: o _NOW_ – returns the current system date
constant – indicates the “value” is a literal, constant date in yyyy-MM-dd format
● value - either a lookup reference or a literal, constant, or a valid systen function
precision REQUIRED: Causes the function result to be calculated as a specified integer value (number of days, weeks, months or years) ● type - the argument type
lkup – indicates the “value” attribute should be parsed and run as a lookup function. The lookup result must be either o DAYS (365) o WEEKS (52) o MONTHS (12) o YEARS (1)
constant – indicates the “value” attribute is a literal, constant. Valid values are: o DAYS (365) o WEEKS (52) o MONTHS (12) o YEARS (1)
● value - either a lookup reference or a literal, constant EXAMPLE <Func name="DATE_DIFFERENCE">
<Arg name="enddate" type="lkup" value="item.mId.BirthDate"/> <Arg name="startdate" type="lkup" value="pol.mId.EffectiveDate"/> <Arg name="precision" type="constant" value="YEARS"/> </Func>

Appendix – B
146
DATE_CALCULATION DATE_CALCULATION Calculates and returns a date value from a start date the 'span' integer value <Arg/> ATTRIBUTES:
function_type REQUIRED: Identifies the type of math function to build/use to set the caluclated date value. ● value - the argument type
add_values – performs addition of the values and returns the result as a date
subtract_values - performs subtraction of the values and returns the result as a date
startdate REQUIRED: The date that is added to or deducted from the span ● type - the argument type
lkup – indicates the “value” attribute should be parsed and run as a lookup function. The lookup result must be a valid date in yyyy-MM-dd format
variable – indicates that the system will perform an internal function or calculation to obtain the date value. Valid values are: o _NOW_ – returns the current system date
constant – indicates the “value” is a literal, constant date in yyyy-MM-dd format
● value - either a lookup reference or a literal, constant, or a valid systen function
span REQUIRED: The integer value that added to or deducted from startdate ● type - the argument type
lkup – indicates the “value” attribute should be parsed and run as a lookup function. The lookup result must be a valid integer
constant – indicates the “value” is a literal, constant integer ● value - either a lookup reference or a literal, constant, or a valid
systen function precision REQUIRED: Causes the function result to be calculated as a specified
integer value (number of days, weeks, months or years) ● type - the argument type
lkup – indicates the “value” attribute should be parsed and run as a lookup function. The lookup result must be either o DAYS (365) o WEEKS (52) o MONTHS (12) o YEARS (1)
constant – indicates the “value” attribute is a literal, constant. Valid values are: o DAYS (365) o WEEKS (52) o MONTHS (12) o YEARS (1)
● value - either a lookup reference or a literal, constant EXAMPLE(s) <Func name="DATE_CALCULATION">
<Arg name="startdate" type="lkup" value="item.mId.EffectiveDate"/> <Arg name="span" type="lkup" value="item.mId.ContractTerm"/> <Arg name="function_type" value="add_values"/>
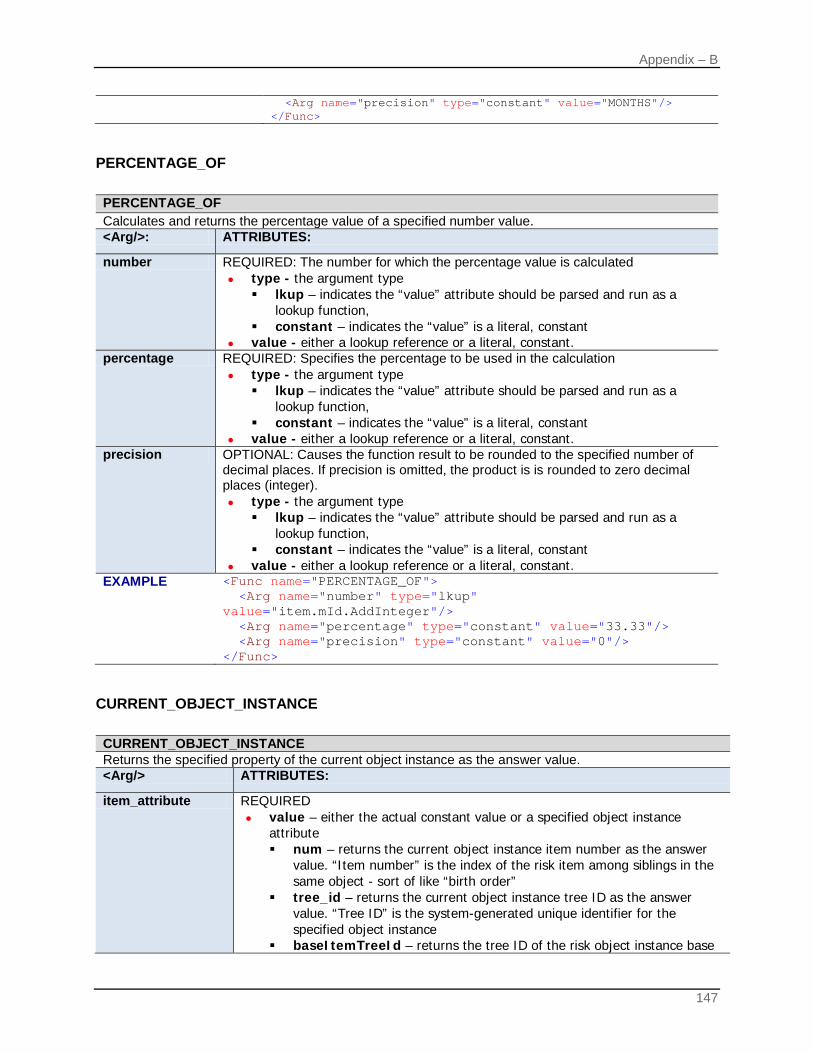
Appendix – B
147
<Arg name="precision" type="constant" value="MONTHS"/> </Func>
PERCENTAGE_OF PERCENTAGE_OF Calculates and returns the percentage value of a specified number value. <Arg/>: ATTRIBUTES:
number REQUIRED: The number for which the percentage value is calculated ● type - the argument type
lkup – indicates the “value” attribute should be parsed and run as a lookup function,
constant – indicates the “value” is a literal, constant ● value - either a lookup reference or a literal, constant.
percentage REQUIRED: Specifies the percentage to be used in the calculation ● type - the argument type
lkup – indicates the “value” attribute should be parsed and run as a lookup function,
constant – indicates the “value” is a literal, constant ● value - either a lookup reference or a literal, constant.
precision OPTIONAL: Causes the function result to be rounded to the specified number of decimal places. If precision is omitted, the product is is rounded to zero decimal places (integer). ● type - the argument type
lkup – indicates the “value” attribute should be parsed and run as a lookup function,
constant – indicates the “value” is a literal, constant ● value - either a lookup reference or a literal, constant.
EXAMPLE <Func name="PERCENTAGE_OF"> <Arg name="number" type="lkup" value="item.mId.AddInteger"/> <Arg name="percentage" type="constant" value="33.33"/> <Arg name="precision" type="constant" value="0"/> </Func>
CURRENT_OBJECT_INSTANCE CURRENT_OBJECT_INSTANCE Returns the specified property of the current object instance as the answer value. <Arg/> ATTRIBUTES:
item_attribute REQUIRED ● value – either the actual constant value or a specified object instance
attribute num – returns the current object instance item number as the answer
value. “Item number” is the index of the risk item among siblings in the same object - sort of like “birth order”
tree_id – returns the current object instance tree ID as the answer value. “Tree ID” is the system-generated unique identifier for the specified object instance
baseItemTreeId – returns the tree ID of the risk object instance base
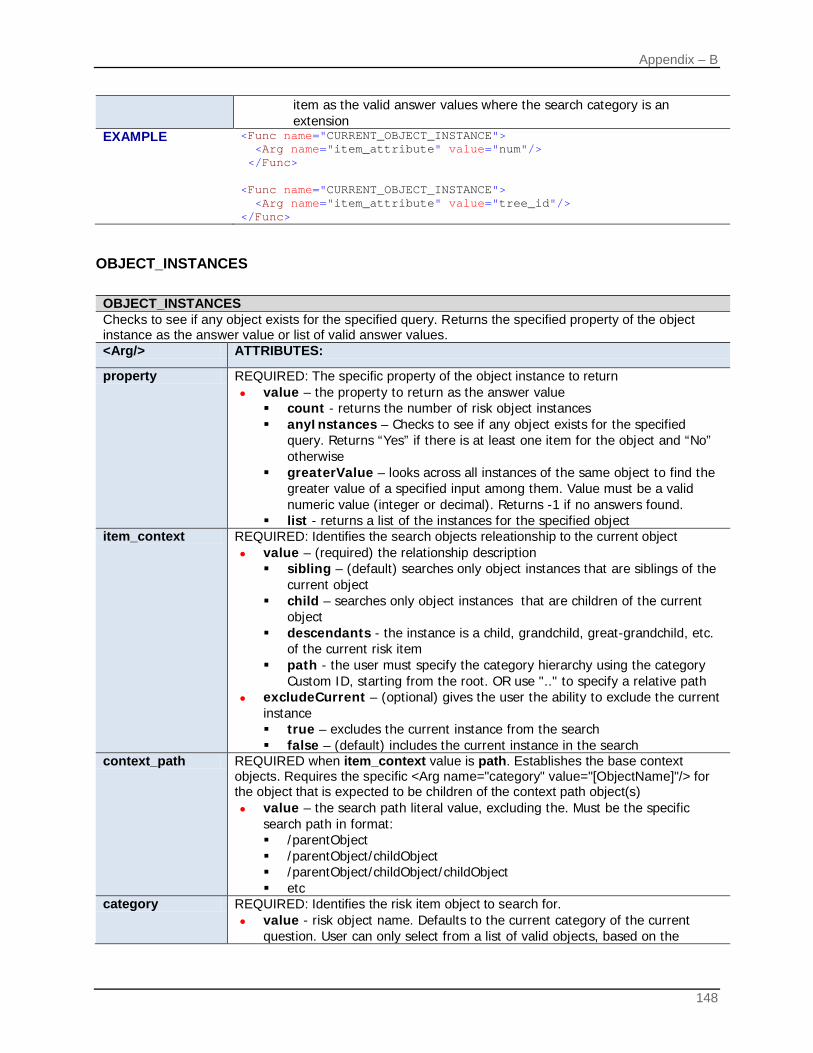
Appendix – B
148
item as the valid answer values where the search category is an extension
EXAMPLE <Func name="CURRENT_OBJECT_INSTANCE"> <Arg name="item_attribute" value="num"/> </Func> <Func name="CURRENT_OBJECT_INSTANCE"> <Arg name="item_attribute" value="tree_id"/> </Func>
OBJECT_INSTANCES OBJECT_INSTANCES Checks to see if any object exists for the specified query. Returns the specified property of the object instance as the answer value or list of valid answer values. <Arg/> ATTRIBUTES:
property REQUIRED: The specific property of the object instance to return ● value – the property to return as the answer value
count - returns the number of risk object instances anyInstances – Checks to see if any object exists for the specified
query. Returns “Yes” if there is at least one item for the object and “No” otherwise
greaterValue – looks across all instances of the same object to find the greater value of a specified input among them. Value must be a valid numeric value (integer or decimal). Returns -1 if no answers found.
list - returns a list of the instances for the specified object item_context REQUIRED: Identifies the search objects releationship to the current object
● value – (required) the relationship description sibling – (default) searches only object instances that are siblings of the
current object child – searches only object instances that are children of the current
object descendants - the instance is a child, grandchild, great-grandchild, etc.
of the current risk item path - the user must specify the category hierarchy using the category
Custom ID, starting from the root. OR use ".." to specify a relative path ● excludeCurrent – (optional) gives the user the ability to exclude the current
instance true – excludes the current instance from the search false – (default) includes the current instance in the search
context_path REQUIRED when item_context value is path. Establishes the base context objects. Requires the specific <Arg name="category" value="[ObjectName]"/> for the object that is expected to be children of the context path object(s) ● value – the search path literal value, excluding the. Must be the specific
search path in format: /parentObject /parentObject/childObject /parentObject/childObject/childObject etc
category REQUIRED: Identifies the risk item object to search for. ● value - risk object name. Defaults to the current category of the current
question. User can only select from a list of valid objects, based on the

Appendix – B
149
previously defined item_context
mId REQUIRED for greaterValue, OPTIONAL for anyInstances: the field or mapping ID (mId) that contains the value to search for ● value – Field name / Mapping ID. User can only select from a list of valid
objects, based on the previously defined category item_value REQUIRED for anyInstances + mId only: describes the value to search for
● value – the actual value to search for item_attribute REQUIRED for list property only:
● value – either the actual constant value or a specified object instance attribute num – returns the current object instance item number as the answer
value. “Item number” is the index of the risk item among siblings in the same object - sort of like “birth order”
tree_id – returns the current object instance tree ID as the answer value. “Tree ID” is the system-generated unique identifier for the specified object instance
name – (valid with attribute type only) returns the name (display) value of the risk object instances as the valid answer values.
baseItemTreeId – returns the tree ID of the risk object instance base item as the valid answer values where the search category is an extension
default_text OPTIONAL for list property only: ● value - a user-defined constant value that will display as the first item
(default value) in the dropdown list. The stored answer value is “” (empty).
EXAMPLE <Func name="OBJECT_INSTANCES"> <Arg name="property" value="count"/> <Arg name="item_context" value="child"/> <Arg name="category" value="Instance"/> </Func> <Func name="OBJECT_INSTANCES"> <Arg name="property" value="anyInstances"/> <Arg name="item_context" value="child"/> <Arg name="category" value="Instance"/> </Func> <Func name="OBJECT_INSTANCES"> <Arg name="property" value="anyInstances"/> <Arg name="item_context" value="sibling"/> <Arg name="category" value="Instance"/> <Arg name="mId" value="InstanceTreeID"/> <Arg name="item_value" value="0_DCFeatures_1_MultiInstance_1_Instance_4"/> </Func> <Func name="OBJECT_INSTANCES"> <Arg name="property" value="greaterValue"/> <Arg name="item_context" value="child"/> <Arg name="category" value="Instance"/> <Arg name="mId" value="InstanceNumber"/> </Func> <Func name="OBJECT_INSTANCES"> <Arg name="property" value="list"/> <Arg name="item_context" value="path"/> <Arg name="context_path" value="/DCFeatures/MultiInstance"/> <Arg name="category" value="Instance"/>

Appendix – B
150
<Arg name="item_attribute" value="num"/> <Arg name="default_text" value="-- Select --"/> </Func>
CURRENT_SYSTEM_DATETIME CURRENT_SYSTEM_DATETIME Returns the current system (server) date-time stamp as the answer value. EXAMPLE <Func name="CURRENT_SYSTEM_DATETIME"/>
Display Format
The question definition dialog should allow the user to apply a specified display format to the returned value. Include the questionnaire locale format, a list of pre-defined formats (similar to MS Excel examples below), and allow the user to specify a custom format.
Formatting Examples (Excel-like):
12/5/2013
Short Date Thursday, December 05, 2013
Long Date
12:17:19 PM
Time 12/5/2013 12:17
Custom - m/d/yyyy h:mm
17:19.5
Custom - mm:ss.0 5-Dec-13
Custom - d-mmm-yy
Thursday, December 05, 2013 12:17:19.5 PM
Custom - dddd, mmmm dd, yyyy hh:mm:ss.0 AM/PM LOOKUP LOOKUP Returns the the result of the lookup expression as the value as the answer value <Arg/> ATTRIBUTES:
expression REQUIRED: indicates that the “value” attribute should be parsed and run as a lookup function ● value - a lookup reference
override OPTIONAL triggers the questions answer value to be refreshed on each page load ● true – the value will by the lookup expression each time the page loads,
regardless of whether the current value is empty ● false – (default) the value will only be populated by the lookup expression
when the current value is empty EXAMPLE(s) <Func name="LOOKUP">
<Arg name="expression" value="cat.Policy.mId.VersionInfo"/> <Arg name="override" value="true"/> </Func>

151
Appendix C
QUESTION BEHAVIOR – ACTION ADD_OBJECT_INSTANCE ADD_OBJECT_INSTANCE Manages the creation of a single object insrtance depending on create condition specified <Arg/> ATTRIBUTES:
category REQUIRED: Identifies the object to create. These items must be siblings of the current item. ● value - risk object name
create_condition REQUIRED: Identifies create conditions. Requires an ^rx style logic statement to specify create conditions. When true, appropriate risk items will be created. ● when – the ^rx style logic statement (QCL)
EXAMPLE <Action name="ADD_OBJECT_INSTANCE"> <Arg name="category" value="OtherPersons"/> <Arg name="create_condition" when="item.mId.AddAnotherPerson eq Yes"/> </Action>
DELETE_RISK_ITEMS DELETE_RISK_ITEMS Allows an answer to a question to delete all instances of a specific object. <Arg/> ATTRIBUTES:
category REQUIRED: Identifies the object instances to delete. These items must be related to the current object instance as indicated by the item_context argument. ● value - risk object name
delete_condition REQUIRED: Identifies delete condition(s). Takes an ^rx style logic statement to specify delete conditions. When true, appropriate object instances will be deleted. ● when - the ^rx style logic statement (QCL)
item_context REQUIRED: Identifies the search objects relationship to the current object ● value – (required) the relationship description
sibling – (default) searches only object instances that are siblings of the current object
child – searches only object instances that are children of the current object
descendants - the instance is a child, grandchild, great-grandchild, etc. of the current risk item
path - the user must specify the category hierarchy using the category Custom ID, starting from the root. OR use ".." to specify a relative path
● excludeCurrent – (optional) gives the user the ability to exclude the current instance true – excludes the current instance from the search false – (default) includes the current instance in the search
context_path REQUIRED when item_context value is path. Establishes the base context objects. Requires the specific <Arg name="category" value="[ObjectName]"/> for

Appendix C
152
the object that is expected to be children of the context path object(s) ● value – the search path literal value, excluding the. Must be the specific
search path in format: /parentObject /parentObject/childObject /parentObject/childObject/childObject etc
EXAMPLE <Action name="DELETE_RISK_ITEMS"> <Arg name="category" value="Instance"/> <Arg name="delete_condition" when="item.mId.DeleteRiskItem eq Yes and cat.MultiInstance.mId.CountOfInstance gt 0"/> <Arg name="item_context" value="sibling" excludeCurrent="true"/> </Action>
MANAGE_RISK_ITEM MANAGE_RISK_ITEM Manages the creation and/or deletion of a single object instance depending on create and delete conditions specified <Arg/> ATTRIBUTES:
category REQUIRED: Identifies the object to create or delete. These items must be siblings or descendents of the current item as indicated by ITEM_CONTEXT. ● value - risk object name
create_condition REQUIRED: Identifies create conditions. Requires an ^rx style logic statement to specify create conditions. When true, appropriate risk items will be created. ● when – the ^rx style logic statement (QCL)
delete_condition REQUIRED: Identifies delete conditions. Takes an ^rx style logic statement to specify delete conditions. When true, appropriate risk items will be deleted. ● when - the ^rx style logic statement (QCL)
item_context REQUIRED: Identifies the search objects relationship to the current object ● value – (required) the relationship description
sibling – (default) searches only object instances that are siblings of the current object
child – searches only object instances that are children of the current object
● excludeCurrent – (optional) gives the user the ability to exclude the current instance true – excludes the current instance from the search false – (default) includes the current instance in the search
property OPTIONAL: Identifies properties to set on newly created risk item. These can be literal values or look ups from other questions. ● mId - REQUIRED, specify a field name/mapping ID to identify the property
to be set ● type - the argument type
lkup – indicates the “value” attribute should be parsed and run as a lookup function
constant – indicates the “value” is a literal, constant ● value - either a lookup reference or a literal, constant
EXAMPLE <Action name="MANAGE_RISK_ITEM"> <Arg name="category" value="Coinsured"/> <Arg name="create_condition" when="pol.mId.CoinsuredYN eq Yes"/>

Appendix C
153
<Arg name="delete_condition" when="pol.mId.CoinsuredYN eq No"/> <Arg name="item_context" value="sibling"/> <Arg name="property" mId="LastName" type="lkup" value="insured.mId.LastName"/> </Action>
● CREATE WHEN context menu – allows the user to Insert ‘OR’ and/or ‘AND’ logical operators to
create complex QCL statements.
● DELETE WHEN context menu – allows the user to Insert ‘OR’ and/or ‘AND’ logical operators to create complex QCL statements.
● ITEM CONTEXT right-click context menu – allows the user to Insert an optional ‘PROPERTY’
argument and allow the user to Exclude Current object instance.
● PROPERTY context menu – allows the user to Insert an additional ‘PROPERTY’ argument, or Delete itself.
OVERRIDE OVERRIDE Overrides the values of one or more question items with the value of the current question or that of an optional explicit override value <Arg/> ATTRIBUTES:
target REQUIRED: Overrides the specified object field/mapping ID with the current answer’s value or the optional override value. ● value - REQUIRED a lookup expression that specifies the object field/mapping ID
to override ● overrideValue - OPTIONAL a literal value to set for the target item
EXAMPLE <Action name="OVERRIDE"> <Arg name="target" value="cat.DCFeatures.mId.OverriddenValue"/> </Action> <Action name="OVERRIDE"> <Arg name="target" value="cat.DCFeatures.mId.OverriddenValue" overrideValue="OverrideAction"/> </Action>
● TARGET right-click context menu – allow the user to Insert additional TARGET arguments or, if
there is more than one TARGET, delete itself. REFRESH_ANSWER REFRESH_ANSWER Forces one or more questions to refresh their current values by executing any defaults, lookup commands, functions, or actions assigned. <Arg/> ATTRIBUTES:
target REQUIRED: Holds parameters used to find the object field/mId to be refreshed. ● value - is always a lookup command, identifies the object field/mId to

Appendix C
154
refresh. EXAMPLE <Action name="REFRESH_ANSWER">
<Arg name="target" value="pol.mId.VersionInfo"/> </Action> <Action name="REFRESH_ANSWER"> <Arg name="target" value="cat.AnswerMaps.mId.MultiplyDecimal"/> <Arg name="target" value="cat.AnswerMaps.mId.DivideDecimal"/> <Arg name="target" value="cat.AnswerMaps.mId.AddDecimal"/> </Action>
● TARGET right-click context menu – allow the user to Insert additional TARGET arguments or, if
there is more than one TARGETs, delete itself. SET_IF_EMPTY SET_IF_EMPTY Set any of the specified questions whose values are empty to the value of the question whose response map defines this action. ATTRIBUTES: onChangeOnly - OPTIONAL ● true - the action will only be taken if the value of the answer has changed ● false - (default) the action will always be taken
<Arg/> ATTRIBUTES:
target REQUIRED: the parameters used to identify the object field/mId to set. ● value - a lookup reference identifying object field name / mapping ID to be
set EXAMPLE <Action name="SET_IF_EMPTY" onChangeOnly="false">
<Arg name="target" value="cat.DCFeatures.mId.ValueEmpty"/> </Action>
CALCULATE_ANSWER CALCULATE_ANSWER Looks up the values of one or more questions and/or constant values and sets the calcluated result as the value of the specified target question ATTRIBUTES: onChangeOnly - OPTIONAL ● true - the action will only be taken if the value of the answer has changed ● false - (default) the action will always be taken
<Arg/> ATTRIBUTES:
function_type REQUIRED: Identifies the type of math function to build/use to set the target answer value. ● value - the argument type
add_values – performs addition of the values and returns their sum addend REQUIRED for function type “add_values”: A value to be added to the sum. At
least two ADDEND arguments are required. ● type - the argument type
lkup – indicates the “value” attribute should be parsed and run as a lookup function,
constant – indicates the “value” is a literal, constant
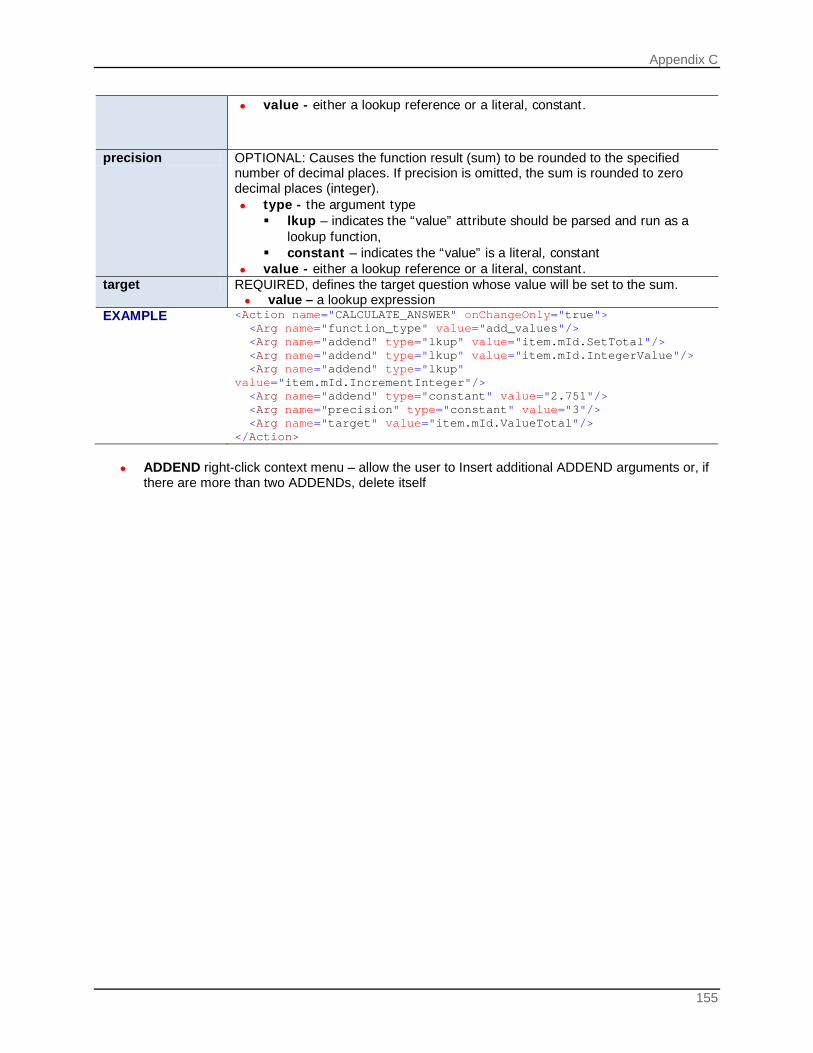
Appendix C
155
● value - either a lookup reference or a literal, constant.
precision OPTIONAL: Causes the function result (sum) to be rounded to the specified number of decimal places. If precision is omitted, the sum is rounded to zero decimal places (integer). ● type - the argument type
lkup – indicates the “value” attribute should be parsed and run as a lookup function,
constant – indicates the “value” is a literal, constant ● value - either a lookup reference or a literal, constant.
target REQUIRED, defines the target question whose value will be set to the sum. ● value – a lookup expression
EXAMPLE <Action name="CALCULATE_ANSWER" onChangeOnly="true"> <Arg name="function_type" value="add_values"/> <Arg name="addend" type="lkup" value="item.mId.SetTotal"/> <Arg name="addend" type="lkup" value="item.mId.IntegerValue"/> <Arg name="addend" type="lkup" value="item.mId.IncrementInteger"/> <Arg name="addend" type="constant" value="2.751"/> <Arg name="precision" type="constant" value="3"/> <Arg name="target" value="item.mId.ValueTotal"/> </Action>
● ADDEND right-click context menu – allow the user to Insert additional ADDEND arguments or, if
there are more than two ADDENDs, delete itself

156
Appendix D
QUESTION BEHAVIOR – ACTIVITIES
● Supplemental Data - Initiates a supplemental data activity. Documents Documents answer maps will ‘have knowledge’ of the possible related service if “Documaker” is the service provider. DataCapture/Documaker integration requirements will be addressed in a separate document. Provider argument is required for the documents activity type. Documents Initiates a document activity. ATTRIBUTES:
type REQUIRED: The specific activity type ● Documents
<Arg/> ATTRIBUTES:
Provider REQUIRED: The name of the documents service provider. ● value - either a lookup reference or a literal, constant
Documaker (Default) the literal value “Documaker” Custom – a user-defined custom value
EXAMPLE <Activity type="Documents" serviceAdaptorName="DocumentsService" executionContext="onLoad" showStatusMessage="always" includeProjectData="true"> <Arg name="Provider" value="Documaker"/> <Arg name="Service" value="Application"/> </Activity>
ListOfValues ListOfValues Initiates a list of values (LOV) activity. ATTRIBUTES:
type REQUIRED: The specific activity type ● ListOfValues
EXAMPLE <Activity type="ListOfValues" serviceAdaptorName="LOVTestSoftData" executionContext="onLoad" showStatusMessage="fail" includeProjectData="false"> <Arg name="TargetID" value="2"/> <Arg name="ValueResultID" value="2"/> <Arg name="DisplayTextResultID" value="3"/> <Filters> <Filter name="CoverageCd" type="static" value="PD" index="1"/> <Filter name="StateProvCd" type="lkup" value="pol.mId.ControllingStateProvCd" index="2"/> </Filters> </Activity>

Appendix D
157
ProjectSubmit ProjectSubmit Initiates a policy submit activity. ATTRIBUTES:
type REQUIRED: The specific activity type ● ProjectSubmit
EXAMPLE <Activity type="ProjectSubmit" serviceAdaptorName="PolicySubmitMockImpl" executionContext="onLoad" showStatusMessage="always" includeProjectData="true"/>
Rating Rating (and Rules) answer maps will ‘have knowledge’ of the possible related programs if “Insbridge” is the service provider. The user will be required to select the release and controller program that is the rating entry point for this questionnaire. DataCapture/Insbridge integration requirements will be addressed in a separate document. Provider argument is required for the rating activity type. Rating Initiates a rating activity. ATTRIBUTES:
type REQUIRED: The specific activity type ● Rating
<Arg/> ATTRIBUTES:
Provider REQUIRED: The name of the rating service provider. ● value - either a lookup reference or a literal, constant
Insbridge (Default) the literal value “Insbridge” Custom – a user-defined custom value
EXAMPLE <Activity type="Rating" serviceAdaptorName="RatingService" executionContext="onLoad" showStatusMessage="always" includeProjectData="true"> <Arg name="Provider" value="Insbridge"/> </Activity>
Rules Rules (and Rating) answer maps will ‘have knowledge’ of the possible related programs if “Insbridge” is the service provider. The user will be required to select the release and controller program that is the rules entry point for this questionnaire. DataCapture/Insbridge integration requirements will be addressed in a separate document. Provider argument is required for the rules activity type. Rules Initiates a rule activity. ATTRIBUTES:

Appendix D
158
type REQUIRED: The specific activity type ● Rules
<Arg/> ATTRIBUTES:
Provider REQUIRED: The name of the rules service provider. ● value - either a lookup reference or a literal, constant
Insbridge (Default) the literal value “Insbridge” Custom – a user-defined custom value
EXAMPLE <Activity type="Rules" serviceAdaptorName="RulesService" executionContext="onLoad" showStatusMessage="always" includeProjectData="true"> <Arg name="Provider" value="Insbridge"/> </Activity>
SupplementalData SupplementalData Initiates a supplemental data activity. ATTRIBUTES:
type REQUIRED: The specific activity type ● SupplementalData
EXAMPLE <Activity type="SupplementalData" serviceAdaptorName="SupplementalDataMockService" executionContext="onLoad" showStatusMessage="always" includeProjectData="true"> <Arg name="Provider" value="SampleContent"/> <Arg name="Service" value="SupplementalDataCalloutRecordsXML"/> <Arg name="ObjectType" value="Insured"/> <Filters> <Filter name="FirstName" type="lkup" value="insured.mId.FirstName"/> <Filter name="LastName" type="lkup" value="insured.mId.LastName"/> <Filter name="BirthDt" type="lkup" value="insured.mId.BirthDt"/> </Filters> </Activity>

159
Appendix E
QUESTION BEHAVIOR – ANSWER MAPS Valid Answer List <A /> - The XML A answer map is used a when you want to present a list of available answers. For example, when you want to use a dropdown list. A
The XML A answer map is used when you want to present a list of available answers. For example, when you want to use a dropdown list. You can list as many selections as you need.
ATTRIBUTES:
value=“” REQUIRED: The XML "value" attribute defines the data that will be stored as the answer value. This could be a literal value or a code that represents the value. The first value in the list will be the default value of the question using the answer map. Using empty double quotes for the value ("") means the value is a null.
name=“” The XML "name" attribute defines the data that will be displayed on the Questionnaire screen.
Example: <A value="" name="-- Select --"/> <A value="Y" name="Yes"/> <A value="N" name="No"/> <A value="M" name="Maybe"/> <A value="NA" name="Not Applicable"/>
Validation Validation Allows the user to specify a condition, which – if true – will display an error message ATTRIBUTES:
name REQUIRED: ● CONDITIONS
<Arg/> ATTRIBUTES:
test REQUIRED: describes the condition(s) to search for. If the result is "true", the message will display ● value – an ^rx style expression (QCL)
ErrorMessage REQUIRED: contains the message that will display is the conditions are met. ● value – a literal string value
EXAMPLE(s) <Validation name="CONDITIONS"> <Arg name="when" value="item.mId.DecimalValue lte 0 or item.mId.IncrementDecimal lte 0"/> <Arg name="ErrorMessage" value="Decimal Value and Increment Decimal Value answer values must be greater than zero in order to calculate the Divide by Decimal, Multiply by Decimal, and Add Decimal values on the Answer Maps form, Answer Map Functions question group."/>
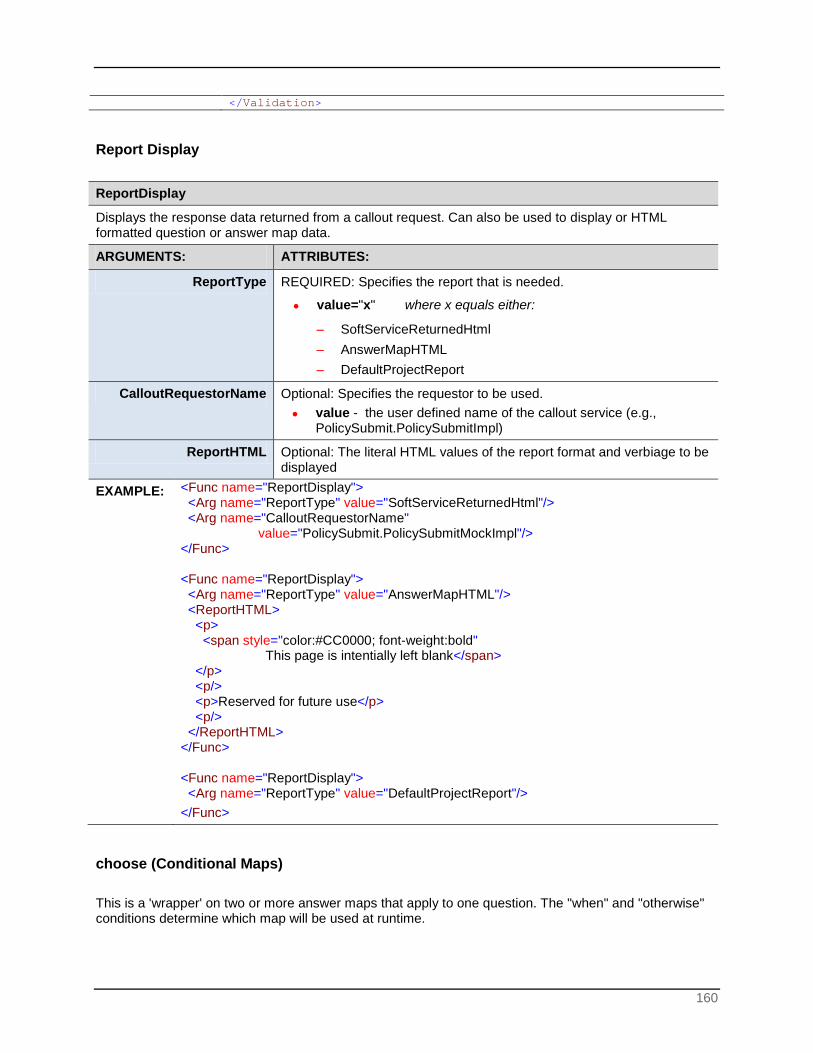
160
</Validation>
Report Display ReportDisplay
Displays the response data returned from a callout request. Can also be used to display or HTML formatted question or answer map data.
ARGUMENTS: ATTRIBUTES:
ReportType REQUIRED: Specifies the report that is needed.
● value="x" where x equals either:
− SoftServiceReturnedHtml − AnswerMapHTML − DefaultProjectReport
CalloutRequestorName Optional: Specifies the requestor to be used. ● value - the user defined name of the callout service (e.g.,
PolicySubmit.PolicySubmitImpl)
ReportHTML Optional: The literal HTML values of the report format and verbiage to be displayed
EXAMPLE: <Func name="ReportDisplay"> <Arg name="ReportType" value="SoftServiceReturnedHtml"/> <Arg name="CalloutRequestorName" value="PolicySubmit.PolicySubmitMockImpl"/> </Func> <Func name="ReportDisplay"> <Arg name="ReportType" value="AnswerMapHTML"/> <ReportHTML> <p> <span style="color:#CC0000; font-weight:bold" This page is intentially left blank</span> </p> <p/> <p>Reserved for future use</p> <p/> </ReportHTML> </Func> <Func name="ReportDisplay"> <Arg name="ReportType" value="DefaultProjectReport"/> </Func>
choose (Conditional Maps) This is a 'wrapper' on two or more answer maps that apply to one question. The "when" and "otherwise" conditions determine which map will be used at runtime.

161
choose Allows users to create conditional question behaviors. Additional Elements:
<when/> REQUIRED contains the Map applicable to the specified test condition. ATTRIBUTES: test REQUIRED An ^rx style expression (QCL) that describes the condition for the
availability of the set of values in the related Map <otherwise/> REQUIRED Contains the Map applicable to all other conditions that are not
identified by when elements. <Map/> REQUIRED Each <when/> and <otherwise/> element must contain a valid,
properly formed answer map EXAMPLE(s) <choose>
<when test="item.isFirstOfKind eq true and (item.category eq SubFormInstance or item.category eq Instance)"> <Map> <A value="FirstOfKind" name="First Of Kind"/> </Map> </when> <when test="item.isFirstOfKind neq true and (item.category eq SubFormInstance or item.category eq Instance)"> <Map> <A value="" name="-- Select --"/> <A value="NotFirstOfKind" name="Not First Of Kind"/> </Map> </when> <otherwise> <Map> <A value="" name="-- Select --"/> <A value="AllOther" name="All Other"/> <A value="OnlyOfKind" name="Only Of Kind"/> </Map> </otherwise> </choose>
Index
162
Index
INDEX
^ ^rx, 132
< <A />
Question Behavior, 159 <Action>
Question Behaviors, 86 <choose />
Conditional Question Behavior, 96 <Func />, 83, 84 <object reference>, 132 <Operator Values>, 140 <Operators>, 139 <Property Values>, 139 <Property>, 138
A Action Question Behaviors, 86 Alignment
Answer Display Format, 81 appMode
Object References Properties, 137 Arg
Action Question Behavior, 86 Arguments
Action Question Behavior, 86 Assign
Question Groups, 58 Assigning Question
Question Group, 62, 65 Asterisk
Required Field, 23, 38, 79 Available Products
Products Page, 13
B Back
Questionnaire, 26 baseCategory
Object References Properties, 137 baseItem
Object References, 133 businessProcess
Object References Properties, 137
C Calendar
Question Control Type, 104 cat.<RiskCategory>, 134
Category Association Risk Category Details Tab, 37
Child Definition Questions, 76
Child Dependent Question Visibility, 100
Child Question Sequence # Add New Question, 79
Child Questions, 76, 100 Column Sorting, 17 Columns
Question Group Properties, 61 Comparison Operators, 139 Conditional Answer Map
Format, 94 Conditional Question Behavior, 96 Configuring
OIDC, 124 coninsured
Object References, 134 Control Type
Manage Questions, 71 Control Types
Add New Question, 78 Question, 101
Copy Manage Questions, 71
Copying Questions, 107
Copying Text, 19 Creating
Question Group, 59 Questions, 76 Tabs, 44
Cutting Text, 19
D Date Packaged
Manage Releases, 111 Date Published
Manage Releases, 111 Decimal Symbol, 30 Default Prefix
Risk Category Properties, 38 Default Value
Add New Question, 79 Deleting
Question Group, 69 Questionnaire, 34 Questions, 107 Release, 113
Delting Tabs, 55
Dependent Questions, 100 Description
Manage Questionnaire, 22

Index
163
Project Page, 14 Digit Grouping Symbol, 30 Display Condition, 98
Add New Question, 98 Display Text
Question Group Properties, 61 Question Groups, 58
E Edit
Manage Questions, 71 Question Groups, 58 Risk Category Listing, 36
Editing Product Page, 15 Question Group, 67 Questionnaire, 33 Tabs, 54
Edition Notice, 2 Entering
Name Formats, 41 Risk Category Properties, 38
F Fields
Add New Question, 78 Manage Question Groups, 58 Manage Releases, 110 Manage Tabs, 44 Questionnaire, 22
firstInstance Object References, 134
Format QCL Statements, 130
Function Question Behavior, 83, 84 Functionality
Add New Question, 79 Edit New Question, 79 Manage Questionnaire, 22 Manage Questions, 73 Manage Releases, 111 Manage Tabs, 44 Project Page, 14 Question Groups, 58 Risk Category Listing, 36
G Generating a Release, 112
H hasANY<objectID>
Object References Properties, 137 Height
Answer Display Format, 81 Help Text
Add New Question, 99 Hidden Constant
Question Control Type, 103 Using, 98
Home Key Usage, 19
I Icon
Project Page, 14 Risk Category Properties, 38
ID Add New Question, 78 Manage Questions, 71 Manage Releases, 111 Project Page, 14 Question Group Properties, 61 Question Groups, 58
Input Question Preparation, 74
insured Object References, 134
isCoInsured Object References Properties, 137
isFirstOfKind Object References Properties, 137
isInsured Object References Properties, 137
isLastOfKind Object References Properties, 137
item Object References, 134
L Label
Project Page, 14 Question Control Type, 103
Labeled Check Box Question Control Type, 102
Last Release Label Manage Questionnaire, 22
Late Release Date Manage Questionnaire, 22
Locale Manage Questionnaire Tabs, 28
Lookups Lkup Question Behavior, 86
M Manage Question Groups, 57 Manage Questionnaire, 21 Manage Questions, 71 Manage Releases, 110 Manage Risk Categories, 35 Manage Tabs, 43 Map
Conditional Question Behaviors, 94 Mapping ID
Add New Question, 79 Maximum Instance
Risk Category Properties, 38
Index
164
maxNumberOfKind Object References Properties, 137
mId.<mId> Object References Properties, 137
Minimum Instance Risk Category Properties, 38
Multi Column Layout Question Layout, 25
Multi Level Radio Box Question Control Type, 103
Multi Line Text Input Question Control Type, 102
N Name
Manage Questionnaire, 22 Manage Tabs, 44 Question Group Properties, 61 Question Groups, 58 Tab Properties, 47
Name Format Risk Category Properties, 38
Name Formats Format, 42 Risk Categories, 40
Next Questionnaire, 26
numberOf.<objectID> Object References Properties, 137
numberOfKind Object References Properties, 137
O Object Definition, 132 Object Reference, 132 Object References Properties, 137 objectName
Object References Properties, 137 OIDC
Configuring, 124 Opening
Questionnaire, 24 Operator Values, 140
Rules, 140 Operators, 139 Oracle Resources, viii Orientation
Answer Display Format, 81 otherwise
Conditional Question Behaviors, 94 Output
Question Preparation, 74
P Page Navigation
Default, 26 Page Settings, 16 Paging, 16 Palette Contents, 10
Palette Definition, viii Palette Relationships, 12 Panel
Question Types, 74 Parent ID
Manage Questions, 72 Parent Question ID
Add New Question, 79 Parent Questions, 75 Parent/Trigger
Question Types, 74 parentItem
Object References, 135 parentVal
Object References, 135 Pasting Text, 19 PC Definition, 12 pol
Object References, 135, 136 Postback
Question Types, 74 Postback Questions, 75 Preparation
Questions, 73 Preparation for Creating Tabs, 45 Preparation for Question Groups, 59 prj
Object References, 135 Product Details
Products Page, 13 Properties
Manage Questionnaire Tabs, 23 Question Group, 60 Risk Category Details Tab, 37
Properties for a New Tab, 46 Property
QCL, 138 Property Values, 139 Publishing a Release, 114
Q QCL, 130
Structure, 130 QCL Statements
Format, 130 QCL Structure
Object Reference, 132 Operator Values, 140 Operators, 139 Property, 138 Property Values, 139
Question Condition Language, 130 Question Conditions, 100 Question Group Assignment
Assigning Question Groups, 51 Searching Tab, 52
Question Group Assignment Assigned Tab, 51
Question Group Assignment for a New Tab, 49 Question Group Assignment Unassigned
Tab, 50

Index
165
Question Group Assignment Unssigning Tab, 52
Question Text Manage Questions, 71
Question Type Manage Questions, 72
Question Types Add New Question, 78
Questionnaire View UI Config XML, 117 Viewing in XML Format, 116
Questionnaire Overrides Name Formats, 40
questionnaireName Object References Properties, 137
Questions New, 76 Relationships, 12 Reordering on Question Group, 64 Worksite, 109
R Radio Box
Question Control Type, 103 Records Per Page
Setting, 16 Release Name
Manage Releases, 111 Releases, 114 Reordering
Questions in Question Group, 64 Report Panel
Question Control Type, 105 ReportDisplay
Function Answer Map, 160 Required
Add New Question, 79 Manage Questions, 72
Required Field Asterisk, 23, 38, 79
Restricted Special Characters, 141 Right Click Menus
Products Page, 14 Risk Categories
Grayed Out Entries, 39 Risk Category Assignment for a New Tab, 48 Risk Category Details, 37
Risk Categories, 35 Risk Category Listing
Risk Categories, 35 Risk Category Order on Tabs, 48 Risk Category Tree Title
Tab Properties, 47 Risk Item Table
Question Control Type, 104, 105 Risk Object
Question Groups, 58 Risk Objects
Question Group Properties, 61 Rows
Answer Display Format, 81
S screenID
Object References Properties, 137 Searching, 18
Manage Questions, 73 Question Group, 66 Question Group Assignment, 52
Secure Text Input Question Control Type, 104
Selection Manage Questionnaire, 22 Manage Releases, 110 Manage Tabs, 44
SERVERNAME Replacing, 124
Show Risk Category Tree Manage Tabs, 44 Tab Properties, 47
Simple Question Types, 74
Simple Questions, 76 Single Line Text Input
Question Control Type, 102 Single Select List
Question Control Type, 104 Sorting, 17 state
Object References Properties, 137 status
Object References Properties, 137 Sub Ques List Mgr
Question Control Type, 104
T Tab Type
Manage Tabs, 44 Table
Question Types, 74 Tabs
In Questionnaire, 56 Manage Questionnaire, 24
Text Add New Question, 79 Cutting and Pasting, 19
Title Manage Tabs, 44 Tab Properties, 47
Title Bar Tab Properties, 47
Trigger Questions, 75
U Unassigning Question
Question Group, 64 Usage
Home Key, 19 UserGroupID
Object References Properties, 137 UserName
Index
166
Object References Properties, 137
V Value Operators, 140 ValueLookup, 132 View Risk Category Schema XML, 116 View SSIX XML, 118 View UI Config XML, 117 Visibility
Child Dependent Question, 100
W when
Conditional Question Behaviors, 94 Width
Answer Display Format, 81 Worksite Definition, viii
X XML A Question Behavior, 159


![Chapter IX Measures on Fractalsjswlamb/M345PA46/[B] chap IX...332 Chapter IX Measures on Fractals Figure IX.247. The Random Iteration Algo-rithm, Program 1 in Chap-ter III, is applied](https://static.fdocuments.us/doc/165x107/5e523483009e794eb04a4a25/chapter-ix-measures-on-fractals-jswlambm345pa46b-chap-ix-332-chapter-ix-measures.jpg)