
Oracle Identity Manager Best Practices Guide - Oracle Documentation
80
Oracle® Identity Manager Best Practices Guide Release 9.1.0.2 E14761-02 June 2009
Transcript of Oracle Identity Manager Best Practices Guide - Oracle Documentation

Oracle® Identity ManagerBest Practices Guide
Release 9.1.0.2
E14761-02
June 2009

Oracle Identity Manager Best Practices Guide, Release 9.1.0.2
E14761-02
Copyright © 2009, Oracle and/or its affiliates. All rights reserved.
Primary Author: Lyju Vadassery
Contributing Author: Debapriya Datta
This software and related documentation are provided under a license agreement containing restrictions on use and disclosure and are protected by intellectual property laws. Except as expressly permitted in your license agreement or allowed by law, you may not use, copy, reproduce, translate, broadcast, modify, license, transmit, distribute, exhibit, perform, publish, or display any part, in any form, or by any means. Reverse engineering, disassembly, or decompilation of this software, unless required by law for interoperability, is prohibited.
The information contained herein is subject to change without notice and is not warranted to be error-free. If you find any errors, please report them to us in writing.
If this software or related documentation is delivered to the U.S. Government or anyone licensing it on behalf of the U.S. Government, the following notice is applicable:
U.S. GOVERNMENT RIGHTS Programs, software, databases, and related documentation and technical data delivered to U.S. Government customers are "commercial computer software" or "commercial technical data" pursuant to the applicable Federal Acquisition Regulation and agency-specific supplemental regulations. As such, the use, duplication, disclosure, modification, and adaptation shall be subject to the restrictions and license terms set forth in the applicable Government contract, and, to the extent applicable by the terms of the Government contract, the additional rights set forth in FAR 52.227-19, Commercial Computer Software License (December 2007). Oracle USA, Inc., 500 Oracle Parkway, Redwood City, CA 94065.
This software is developed for general use in a variety of information management applications. It is not developed or intended for use in any inherently dangerous applications, including applications which may create a risk of personal injury. If you use this software in dangerous applications, then you shall be responsible to take all appropriate fail-safe, backup, redundancy, and other measures to ensure the safe use of this software. Oracle Corporation and its affiliates disclaim any liability for any damages caused by use of this software in dangerous applications.
Oracle is a registered trademark of Oracle Corporation and/or its affiliates. Other names may be trademarks of their respective owners.
This software and documentation may provide access to or information on content, products, and services from third parties. Oracle Corporation and its affiliates are not responsible for and expressly disclaim all warranties of any kind with respect to third-party content, products, and services. Oracle Corporation and its affiliates will not be responsible for any loss, costs, or damages incurred due to your access to or use of third-party content, products, or services.

iii
Contents
Preface ................................................................................................................................................................. ix
Audience....................................................................................................................................................... ixDocumentation Accessibility ..................................................................................................................... ixRelated Documents ..................................................................................................................................... xDocumentation Updates ............................................................................................................................ xConventions ................................................................................................................................................. x
1 Using the Deployment Manager
1.1 Features of the Deployment Manager ..................................................................................... 1-21.2 Export System Objects Only When Necessary ....................................................................... 1-31.3 Export Related Groups of Objects ............................................................................................ 1-31.4 Group Definition Data and Operational Data Separately .................................................... 1-31.5 Use Logical Naming Conventions for Versions of a Form ................................................... 1-31.6 Export Root to Preserve a Complete Organizational Hierarchy.......................................... 1-41.7 Provide Clear Export Descriptions........................................................................................... 1-41.8 Check All Warnings Before Importing .................................................................................... 1-41.9 Check Dependencies Before Exporting Data .......................................................................... 1-41.10 Match Scheduled Task Parameters .......................................................................................... 1-41.11 Compile Adapters and Enable Scheduled Tasks ................................................................... 1-51.12 Export Entity Adapters Separately........................................................................................... 1-51.13 Check Group Permissions ......................................................................................................... 1-51.14 Back Up the Database................................................................................................................. 1-51.15 Import Data When the System Is Quiet................................................................................... 1-61.16 Update the SDK Table................................................................................................................ 1-61.17 Remove Data Object Fields Before Importing Event Handlers as Dependencies ............. 1-6
2 Tuning Oracle Database for Oracle Identity Manager
2.1 Sample Instance Configuration Parameters............................................................................ 2-12.2 Physical Data Placement ............................................................................................................ 2-22.3 Pinning Sequences and Stored Procedures in the System Global Area (SGA).................. 2-32.4 Database Performance Monitoring .......................................................................................... 2-4
iv
3 Tuning Connector Performance
4 Tuning Application Server Performance
4.1 Oracle WebLogic Server Version 10.x...................................................................................... 4-14.1.1 JVM Memory Settings ......................................................................................................... 4-14.1.1.1 Deployed on WebLogic Admin Server ..................................................................... 4-14.1.1.2 Deployed on WebLogic Managed Servers................................................................ 4-24.1.1.2.1 Starting the Managed Server By Using the xlStartManagedServer script ... 4-24.1.1.2.2 Starting the Managed Server By Using Admin Console ................................. 4-24.1.2 JDBC Connection Pool ........................................................................................................ 4-34.1.3 Number of Message Driven Beans.................................................................................... 4-34.1.4 Changing the Number of Open File Descriptors for UNIX (Optional) ....................... 4-34.2 IBM WebSphere Application Server Version 6.1 ................................................................... 4-34.2.1 JVM Memory Settings ......................................................................................................... 4-44.2.2 JDBC Connection Pool ........................................................................................................ 4-44.2.3 Number of Message Driven Beans.................................................................................... 4-54.2.4 Thread Pool........................................................................................................................... 4-54.3 JBoss Application Server Version 4.2.3 .................................................................................... 4-64.3.1 JVM Memory Settings ......................................................................................................... 4-64.3.2 JDBC Connection Pool ........................................................................................................ 4-64.3.3 Thread Pool........................................................................................................................... 4-74.3.4 JMS Pool Size........................................................................................................................ 4-74.3.5 Number of Message Driven Beans and DQL Retry........................................................ 4-84.3.6 Deployment Scanning......................................................................................................... 4-84.4 Oracle Application Server Version 10.1.3.x............................................................................. 4-94.4.1 JVM Memory Settings ......................................................................................................... 4-94.4.2 JDBC Connection Pool ..................................................................................................... 4-104.4.3 Number of Message Driven Beans................................................................................. 4-10
5 Managing the Cache
5.1 Sample Cache Configuration .................................................................................................... 5-15.2 General Cache Configuration Properties ................................................................................ 5-25.3 Category-Based Cache Configuration Properties .................................................................. 5-35.4 Class Reloading ........................................................................................................................... 5-45.5 Purging the Cache....................................................................................................................... 5-55.6 Optimal Cache Configuration for a Production Environment............................................. 5-5
6 Securing a Deployment
6.1 Securing the Administrative and User Console ..................................................................... 6-16.2 Securing Oracle Identity Manager While Leaving the Self-Registration and Forgot
Password Pages Unprotected 6-1
7 Enabling Offline Provisioning
7.1 Features of Offline Processing................................................................................................... 7-17.2 Enabling and Disabling Offline Provisioning......................................................................... 7-37.3 Reports Related to Offline Provisioning.................................................................................. 7-3
v
7.4 Configuring the Remove Failed Off-line Messages Scheduled Task .................................. 7-4
8 Integrating with Oracle Access Manager
8.1 About the Integration with Oracle Identity Manager ........................................................... 8-18.2 Integration Architecture............................................................................................................. 8-28.3 Preparing the Environment ....................................................................................................... 8-48.4 Configuring Single Sign-On for Oracle Access Manager...................................................... 8-48.5 Setting Up Oracle Identity Manager for Single Sign-On with Oracle Access Manager ... 8-58.6 Setting Up Oracle Application Server OC4J Plugin to Communicate with Oracle Access
Manager 8-6
9 Integrating with Oracle Application Server Single Sign-On
9.1 Setting Up Oracle Application Server OC4J Plugin to Communicate with OracleAS Single Sign-On 9-1
9.2 Setting Up Oracle Identity Manager for Single Sign-On with OracleAS Single Sign-On 9-49.3 Creating Single Sign-On User Accounts for Oracle Identity Manager Users .................... 9-5
10 Using the Reconciliation Archival Utility
10.1 Understanding the Reconciliation Archival Utility ............................................................ 10-110.2 Preparing Oracle Database for the Reconciliation Archival Utility ................................. 10-310.3 Preparing Microsoft SQL Server for the Reconciliation Archival Utility ........................ 10-410.4 Running the Reconciliation Archival Utility........................................................................ 10-410.5 Output Files Generated by the Reconciliation Archival Utility ........................................ 10-6
11 Using the Task Archival Utility
11.1 Understanding the Task Archival Utility............................................................................. 11-111.2 Preparing Oracle Database for the Task Archival Utility .................................................. 11-211.3 Preparing Microsoft SQL Server for the Task Archival Utility ......................................... 11-311.4 Running the Task Archival Utility ........................................................................................ 11-411.5 Reviewing the Output Files Generated by the Task Archival Utility .............................. 11-6
Index

vi

vii
List of Tables
1–1 Parameter Import Rules ............................................................................................................ 1-42–1 Sample Configuration Parameters .......................................................................................... 2-25–1 Cache Configuration Properties .............................................................................................. 5-25–2 Category-Based Cache Configuration Parameters................................................................ 5-310–1 Output Files Generated by the Reconciliation Archival Utility ....................................... 10-611–1 Output Files Generated by the Task Archival Utility........................................................ 11-6

viii

ix
Preface
This guide discusses best practices related to using Oracle Identity Manager.
AudienceThis guide is intended for database administrators, system administrators, and developers who use Oracle Identity Manager extensively in production environments.
Documentation AccessibilityOur goal is to make Oracle products, services, and supporting documentation accessible to all users, including users that are disabled. To that end, our documentation includes features that make information available to users of assistive technology. This documentation is available in HTML format, and contains markup to facilitate access by the disabled community. Accessibility standards will continue to evolve over time, and Oracle is actively engaged with other market-leading technology vendors to address technical obstacles so that our documentation can be accessible to all of our customers. For more information, visit the Oracle Accessibility Program Web site at http://www.oracle.com/accessibility/.
Accessibility of Code Examples in DocumentationScreen readers may not always correctly read the code examples in this document. The conventions for writing code require that closing braces should appear on an otherwise empty line; however, some screen readers may not always read a line of text that consists solely of a bracket or brace.
Accessibility of Links to External Web Sites in DocumentationThis documentation may contain links to Web sites of other companies or organizations that Oracle does not own or control. Oracle neither evaluates nor makes any representations regarding the accessibility of these Web sites.
Deaf/Hard of Hearing Access to Oracle Support ServicesTo reach Oracle Support Services, use a telecommunications relay service (TRS) to call Oracle Support at 1.800.223.1711. An Oracle Support Services engineer will handle technical issues and provide customer support according to the Oracle service request process. Information about TRS is available at http://www.fcc.gov/cgb/consumerfacts/trs.html, and a list of phone numbers is available at http://www.fcc.gov/cgb/dro/trsphonebk.html.

x
Related DocumentsFor more information, see the following documents in the Oracle Identity Manager documentation set:
Documentation UpdatesOracle is committed to delivering the best and most recent information available. For information about updates to the Oracle Identity Manager documentation set, visit Oracle Technology Network at
http://www.oracle.com/technology/documentation/index.html
ConventionsThe following text conventions are used in this document:
Convention Meaning
boldface Boldface type indicates graphical user interface elements associated with an action, or terms defined in text or the glossary.
italic Italic type indicates book titles, emphasis, or placeholder variables for which you supply particular values.
monospace Monospace type indicates commands within a paragraph, URLs, code in examples, text that appears on the screen (or text that you enter), and names of files, directories, attributes, and parameters.

1
Using the Deployment Manager 1-1
1 Using the Deployment Manager
The Deployment Manager enables developers to move an Oracle Identity Manager deployment from one server to another while minimizing the problems that often occur during a migration. The Deployment Manager allows multiple developers to work on different parts of a deployment and upload only the part of the deployment that they have changed, rather than waiting for the entire deployment to be rebuilt.
This chapter discusses the following topics:
■ Features of the Deployment Manager
■ Export System Objects Only When Necessary
■ Export Related Groups of Objects
■ Group Definition Data and Operational Data Separately
■ Use Logical Naming Conventions for Versions of a Form
■ Export Root to Preserve a Complete Organizational Hierarchy
■ Provide Clear Export Descriptions
■ Check All Warnings Before Importing
■ Check Dependencies Before Exporting Data
■ Match Scheduled Task Parameters
■ Compile Adapters and Enable Scheduled Tasks
■ Export Entity Adapters Separately
■ Check Group Permissions
■ Back Up the Database
■ Import Data When the System Is Quiet
■ Update the SDK Table
■ Remove Data Object Fields Before Importing Event Handlers as Dependencies
Caution: The most recently imported data overwrites the previous data. Developers should not export data that can overwrite the work of another developer.
Features of the Deployment Manager
1-2 Oracle Identity Manager Best Practices Guide
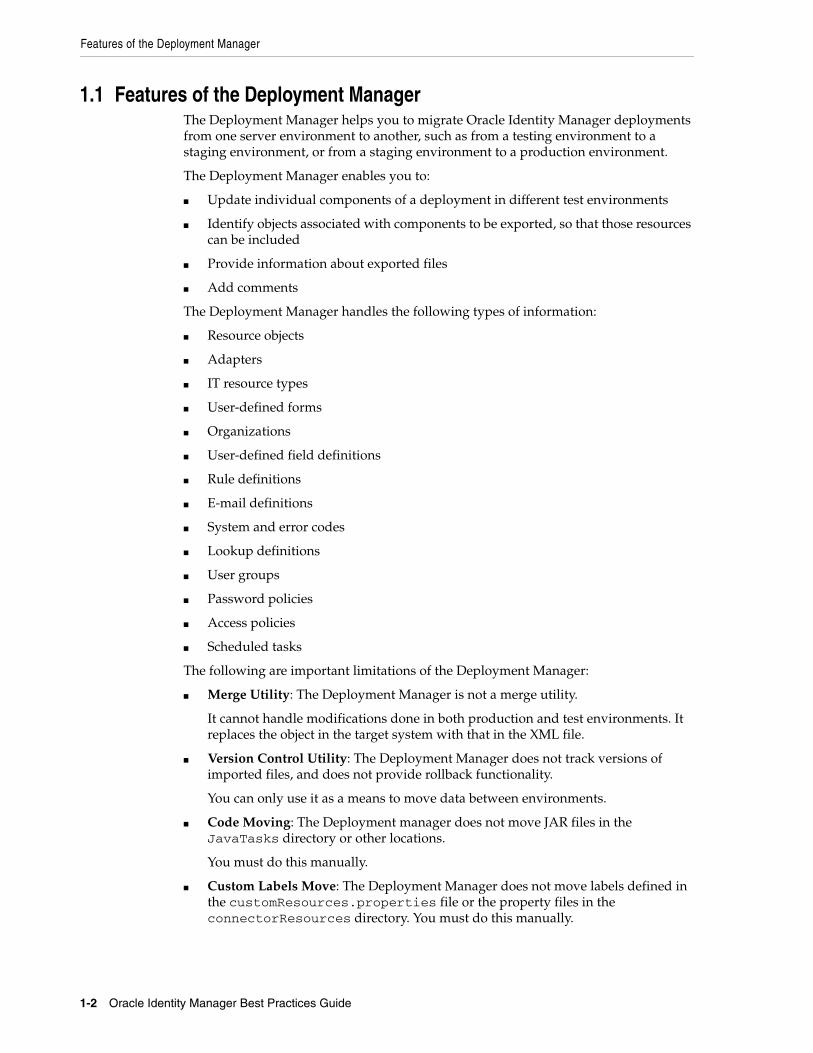
1.1 Features of the Deployment ManagerThe Deployment Manager helps you to migrate Oracle Identity Manager deployments from one server environment to another, such as from a testing environment to a staging environment, or from a staging environment to a production environment.
The Deployment Manager enables you to:
■ Update individual components of a deployment in different test environments
■ Identify objects associated with components to be exported, so that those resources can be included
■ Provide information about exported files
■ Add comments
The Deployment Manager handles the following types of information:
■ Resource objects
■ Adapters
■ IT resource types
■ User-defined forms
■ Organizations
■ User-defined field definitions
■ Rule definitions
■ E-mail definitions
■ System and error codes
■ Lookup definitions
■ User groups
■ Password policies
■ Access policies
■ Scheduled tasks
The following are important limitations of the Deployment Manager:
■ Merge Utility: The Deployment Manager is not a merge utility.
It cannot handle modifications done in both production and test environments. It replaces the object in the target system with that in the XML file.
■ Version Control Utility: The Deployment Manager does not track versions of imported files, and does not provide rollback functionality.
You can only use it as a means to move data between environments.
■ Code Moving: The Deployment manager does not move JAR files in the JavaTasks directory or other locations.
You must do this manually.
■ Custom Labels Move: The Deployment Manager does not move labels defined in the customResources.properties file or the property files in the connectorResources directory. You must do this manually.
Use Logical Naming Conventions for Versions of a Form
Using the Deployment Manager 1-3
1.2 Export System Objects Only When NecessaryYou should export or import system objects, for example, Request, Xellerate User, and System Administrator, only when it is absolutely necessary. Exporting system objects from the testing and staging environments into production can cause problems. If possible, exclude system objects when exporting or importing data.
You may want to export or import system objects when, for example, you define trusted source reconciliation on Xellerate User resource objects.
1.3 Export Related Groups of ObjectsOracle recommends that you use the Deployment Manager to export sets of related objects. A unit of export should be a collection of logical items that you want to group together.
Avoid exporting everything in the database in one operation, or exporting items one at a time. For example, suppose that you manage an integration between Oracle Identity Manager and a target system that includes processes, resource objects, adapters, IT resource type definitions, IT resource definitions, scheduled tasks, and so on. For this environment, you should create groups of related objects before exporting.
For example, if you use the same e-mail definitions in multiple integrations, you should export the e-mail definitions as one unit, and the integrations as a different unit. This enables you to import changes to e-mail definitions independently of target system integration changes. Or, if multiple resources use the same IT resource type definition, you can export and import the type definition separately from other data.
You can import one or more sets of exported data at a time. For example, you can import a resource object definition, an e-mail definition, and an IT resource type definition in a single operation.
1.4 Group Definition Data and Operational Data SeparatelyYou must group and export definition data and operational data separately.
You configure definition data in the testing and staging environment. Definition data includes resource objects, processes, and rules.
You typically configure operational data in the production environment. Operational data includes groups and group permissions. The testing and staging servers usually do not include this data.
By grouping data according to where it is changed, you know what data goes to testing and staging, and what goes to production. For example, if approval processes are changed in production, you should group approval processes and export them with other operational data.
1.5 Use Logical Naming Conventions for Versions of a FormYou often revise forms multiple times before exporting them. Avoid generic names, for example, "v23," to differentiate among versions of a form. Create meaningful names,
Caution: The Deployment Manager keeps track of imported components and structures, but not of completed imports. After an import is completed, you cannot roll it back to a previous version. A new import is required.
Export Root to Preserve a Complete Organizational Hierarchy
1-4 Oracle Identity Manager Best Practices Guide
for example, "Before Production" or "After Production Verification." Do not use special characters, including double quotation marks, in version names.
1.6 Export Root to Preserve a Complete Organizational HierarchyWhen you export a leaf or an organization in an organizational hierarchy, only one dependency level is exported. To export a complete organizational hierarchy, you must export the root of the hierarchy.
1.7 Provide Clear Export DescriptionsThe Deployment Manager records some information automatically, for example, the date of the export, who performed the export, and the source database. You must also provide a meaningful description of the content of the export, for example, "resource definition after xxx attributes added in reconciliation." This informs the importer of the file of the contents of the data being imported.
1.8 Check All Warnings Before ImportingWhen importing information to the production environment, check all the warnings before completing the import operation. Treat each warning seriously.
1.9 Check Dependencies Before Exporting DataThe wizard in the top right pane shows resources that must be available in the target system.
Consider the following types of dependencies:
■ If the resources are already available in the target system, they do not need to be exported.
■ If the resources are new (not in the target system), they must be exported.
■ If the target system does not include the resources, such as lookups, IT resource definitions, or others that are reused, then record the data and export it in a separate file so it can be imported if necessary.
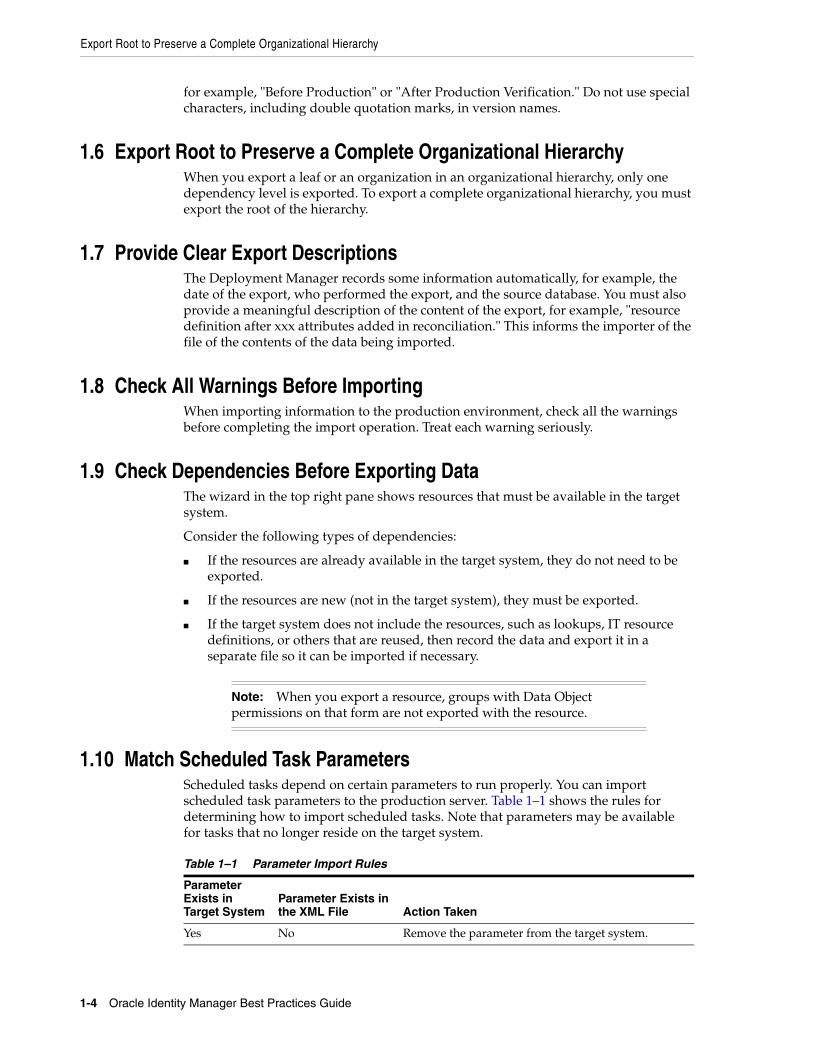
1.10 Match Scheduled Task ParametersScheduled tasks depend on certain parameters to run properly. You can import scheduled task parameters to the production server. Table 1–1 shows the rules for determining how to import scheduled tasks. Note that parameters may be available for tasks that no longer reside on the target system.
Note: When you export a resource, groups with Data Object permissions on that form are not exported with the resource.
Table 1–1 Parameter Import Rules
Parameter Exists in Target System
Parameter Exists in the XML File Action Taken
Yes No Remove the parameter from the target system.

Back Up the Database
Using the Deployment Manager 1-5
1.11 Compile Adapters and Enable Scheduled TasksAfter an import operation, the adapters are set to recompile and the scheduled tasks are disabled. This prevents these items from running before their associated resources and settings are configured.
After importing the classes and adjusting the task attributes, manually recompile the adapters and enable the scheduled tasks.
1.12 Export Entity Adapters SeparatelyEntity adapters are modified to bring just the entity adapter, not its usage. If you want to export the usage of an entity adapter, you must separately export each use with a data object by exporting the data object. If you export a data object, all the adapters and event handlers attached to the object along with the permissions on the object are exported. You must pay special attention when exporting data objects. For example, to export a form, you should also add the data object corresponding to the form. This ensures that the associated entity adapters can use the form.
1.13 Check Group PermissionsWhen you export groups, group permissions on different data objects are also exported. However, when you import data, any permissions for missing data objects are ignored. If the group is exported as a way of exporting group permission setup, check the warnings carefully to ensure that permission requirements are met. For example, if a group has permissions for objects A, B, and C, but the target system only has objects A and B, the permissions for object C are ignored. If object C is added later, the group permissions for C must be added manually, or the group must be imported again.
When you export groups that have permissions for viewing certain reports, ensure that the reports exist in the target environment. If the reports are missing, consider removing the permissions before exporting the group.
1.14 Back Up the DatabaseBefore you import data into a production environment, back up the database. This enables you to restore the data if anything goes wrong with the import. Backing up the database is always a good precaution before making significant changes.
No Yes Add the parameter and current value from the XML file.
Yes Yes Use the more recent value of the parameter.
Note: When you import forms and user-defined fields, you add entries to the database. These database entries cannot be rolled back or deleted. Before each import operation, ensure that the correct form version is active.
Table 1–1 (Cont.) Parameter Import Rules
Parameter Exists in Target System
Parameter Exists in the XML File Action Taken

Import Data When the System Is Quiet
1-6 Oracle Identity Manager Best Practices Guide
1.15 Import Data When the System Is QuietYou cannot complete an import operation in a single transaction because it includes schema changes. These changes affect currently running transactions on the system. To limit the effect of an import operation, temporarily disable the Web application for general use and perform the operation when the system has the least activity, for example, overnight.
1.16 Update the SDK TableThe SDK table contains metadata definitions for user-defined data objects. When you import data from an XML file into the SDK table, the values in the SDK_SCHEMA column might be modified with the schema name of the source system where the XML file was created. For this reason, after you import data from an XML file into the SDK table, you must check the schema name in the SDK_SCHEMA column, and if necessary, manually change it to the schema name on the target system where the Oracle Identity Manager database is running. To update the schema name in the SDK_SCHEMA column, run a SQL query similar to the following with SQL*Plus on Oracle Database installations or with SQL Query Analyzer on Microsoft SQL Server installations:
UPDATE SDK SET SDK_SCHEMA='target system schema name'
If you do not update the schema name in the SDK_SCHEMA column, an error similar to the following might be generated when you import other XML files that modify user-defined field (UDF) definitions:
CREATE SEQUENCE UGP_SEQjava.sql.SQLException: ORA-00955: name is already used by an existing object
1.17 Remove Data Object Fields Before Importing Event Handlers as Dependencies
The Deployment Manager does not import event handlers that include data object fields if the event handlers are imported as dependencies. For this reason, you must remove the data object fields from any event handlers that you want to import as dependencies with the Deployment Manager.

2
Tuning Oracle Database for Oracle Identity Manager 2-1
2 Tuning Oracle Database for Oracle IdentityManager
As with any enterprise class business application, there is no simple procedure for tuning that works for all systems. This section describes one sample configuration and outlines the principles for tuning Oracle Database.
Oracle Identity Manager has many configuration options. The best way to identify bottlenecks and optimize performance is to monitor key database performance indicators in your production environment and adjust the configuration accordingly. This chapter serves as a guideline to help you choose the initial baseline database configuration.
This chapter discusses the following topics:
■ Sample Instance Configuration Parameters
■ Physical Data Placement
■ Pinning Sequences and Stored Procedures in the System Global Area (SGA)
■ Database Performance Monitoring
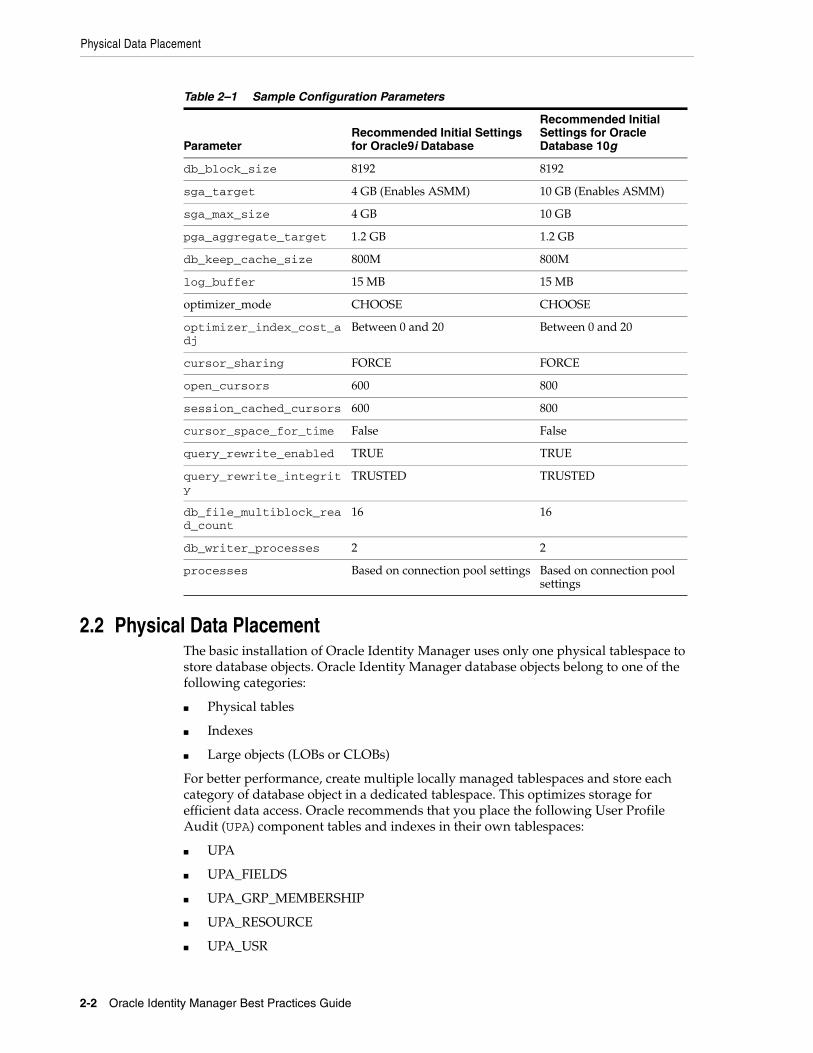
2.1 Sample Instance Configuration ParametersThe following sample configuration parameter settings are based on a server with four CPUs (64 bit) and 8 or 16 gigabytes (GB) RAM.
Note: In the following table:
ASMM denotes the Automatic Shared Memory Management feature of Oracle Database 10g. It automatically distributes the memory among various subcomponents to ensure the most effective memory utilization.
You should set the processes parameter to accommodate the following connection pool requirements and few extra connections for external programs:
■ Connection pool size of XA data-source configured in Application Server
■ Connection pool size for non-XA data-source configured in Application Server
■ Direct database connection pool size configured in xlconfig.xml
Physical Data Placement
2-2 Oracle Identity Manager Best Practices Guide
2.2 Physical Data PlacementThe basic installation of Oracle Identity Manager uses only one physical tablespace to store database objects. Oracle Identity Manager database objects belong to one of the following categories:
■ Physical tables
■ Indexes
■ Large objects (LOBs or CLOBs)
For better performance, create multiple locally managed tablespaces and store each category of database object in a dedicated tablespace. This optimizes storage for efficient data access. Oracle recommends that you place the following User Profile Audit (UPA) component tables and indexes in their own tablespaces:
■ UPA
■ UPA_FIELDS
■ UPA_GRP_MEMBERSHIP
■ UPA_RESOURCE
■ UPA_USR
Table 2–1 Sample Configuration Parameters
ParameterRecommended Initial Settings for Oracle9i Database
Recommended Initial Settings for Oracle Database 10g
db_block_size 8192 8192
sga_target 4 GB (Enables ASMM) 10 GB (Enables ASMM)
sga_max_size 4 GB 10 GB
pga_aggregate_target 1.2 GB 1.2 GB
db_keep_cache_size 800M 800M
log_buffer 15 MB 15 MB
optimizer_mode CHOOSE CHOOSE
optimizer_index_cost_adj
Between 0 and 20 Between 0 and 20
cursor_sharing FORCE FORCE
open_cursors 600 800
session_cached_cursors 600 800
cursor_space_for_time False False
query_rewrite_enabled TRUE TRUE
query_rewrite_integrity
TRUSTED TRUSTED
db_file_multiblock_read_count
16 16
db_writer_processes 2 2
processes Based on connection pool settings Based on connection pool settings
Pinning Sequences and Stored Procedures in the System Global Area (SGA)
Tuning Oracle Database for Oracle Identity Manager 2-3
These tables can store significant amounts of historical data and can be used by historical reports.
The database schema includes the following tables for reconciliation data:
■ RCA
■ RCB
■ RCD
■ RCE
■ RCH
■ RCM
■ RCP
■ RCU
■ RPC
If your environment generates a large amount of reconciliation data, move these tables to a new tablespace. Use the locally managed tablespaces with automatic extent allocation.
You can use performance metrics to identify tables that are accessed frequently (hot tables). To reduce I/O contention, move hot tables to dedicated tablespaces. See "Database Performance Monitoring" on page 2-4 for more information about performance metrics.
Redo-Log FilesDepending on the reconciliation processes configured in Oracle Identity Manager, the volume of database transactions and commits during a reconciliation run can be high. Oracle recommends that you use multiple redo-log files. The total allocated redo-log space should be 1 GB to 2 GB.
Keep Pool ChangesBy default, Oracle Identity Manager assigns USR and PCQ tables to be cached in the database by using a keep pool buffer (see db_keep_cache_size in Table 2–1). If your installation contains more than 50,000 users, then Oracle recommends that you use the default database buffer for USR and PCQ tables instead of the keep pool buffer. You can use the following commands.
ALTER TABLE USR STORAGE(buffer_pool default);
ALTER TABLE PCQ STORAGE(buffer_pool default);
2.3 Pinning Sequences and Stored Procedures in the System Global Area (SGA)
Oracle Identity Manager uses sequence objects to generate unique record identifiers. Oracle Identity Manager also uses stored procedures to perform specific database operations. To optimize performance during production, pin the sequence objects and stored procedures in the SGA. A script named create_db_trigger.sql is shipped with the Oracle Identity Manager installation for this purpose. The create_db_trigger.sql script is written for the Oracle Identity Manager database account SYSADM. It is a sample Oracle login account.
This script is located in the following installation directory:

Database Performance Monitoring
2-4 Oracle Identity Manager Best Practices Guide
/installServer/Xellerate/db/oracle
To pin the sequence objects and stored procedures:
1. Log in as SYS.
2. Start SQL*Plus (the Oracle client tool) at a command prompt, by entering the following command:
sqlplus /nolog
3. Connect to the Oracle instance as SYS user with SYSDBA role.
For example, enter the following command:
CONNECT SYS/sys_password@db_instance AS SYSDBA
In this command, sys_password is the password for the SYS user account, and db_instance is the Net 8 service name for connecting to the database instance.
For example:
CONNECT SYS/sys@xeltest AS SYSDBAConnected.
4. Edit the create_db_trigger.sql script in a text editor, and specify your Oracle Identity Manager database account name.
5. In create_db_trigger.sql, substitute all references to sysadm with the account name that you used.
For example, if your Oracle Identity Manager database account name is myschema, edit your script as follows:
create or replace trigger cache_seq after startup on database beginmyschema.pin_obj;-- pin all sysadm's sequences in shared_poolmyschema.pin_sp;-- pin all commonly executed XELL stored procedures or functionsend;/
6. Run the create_db_trigger.sql script.
This script creates a database trigger that is fired every time the database starts. Any subsequent database bounces automatically pin the sequences and stored procedures in the SGA.
7. While connected to the Oracle instance as the SYS user, enter the following commands:
EXEC database_user.PIN_OBJ;EXEC database_user.PIN_SP;
In these commands, database_user is the database account.
Run these commands only once during initial schema creation. Bouncing the Oracle server is not required.
2.4 Database Performance MonitoringTo identify performance bottlenecks, you can monitor real-time performance metrics for the Oracle Identity Manager database.

Database Performance Monitoring
Tuning Oracle Database for Oracle Identity Manager 2-5
Perform the following at regular intervals:
■ Monitor real-time performance by using a performance-monitoring tool such as Oracle Enterprise Manager console or Automatic Workload Repository (AWR) in Oracle Database 10g.
■ Collect complete schema statistics upon implementation of Oracle Identity Manager.
Update schema statistics regularly, so that the Cost-Based Optimizer (CBO) can access the latest statistics. You must consider complete schema or table statistics on mass data change events like a huge reconciliation run from a new target, reconciliation archival, or a task archival.
This helps the CBO determine an efficient query execution plan that is based on the current state of data. The following is a sample SQL command to collect database statistics on a regular basis:
DBMS_STATS.GATHER_SCHEMA_STATS(OWNNAME=> schema_owner, ESTIMATE_PERCENT=>DBMS_STATS.AUTO_SAMPLE_SIZE, DEGREE=>8, OPTIONS=>'GATHER AUTO', NO_INVALIDATE=>FALSE);
■ Look for relevant recommendations provided in advisory sections in the Automatic Database Diagnostic Monitor (ADDM) or Automatic Workload Repository (AWR) report, and adjust the instance configuration parameters according to the recommended settings.

Database Performance Monitoring
2-6 Oracle Identity Manager Best Practices Guide
3
Tuning Connector Performance 3-1
3Tuning Connector Performance
This chapter describes how to improve connector performance by identifying indexes that are required for connector tables.
When a connector is imported in Oracle Identity Manager, it creates certain database tables (UD_*) and updates metadata in the Oracle Identity Manager schema. The connector may be further customized to suit processes required in a particular installation with reconciliation rules, data flow, and lookup definitions. After a connector is imported and customized, indexes must be created. The following procedure describes how to identify tables and index key fields. Additional requirements can be gathered by running a reconciliation and examining database AWR reports.
To identify connector tables and index requirements:
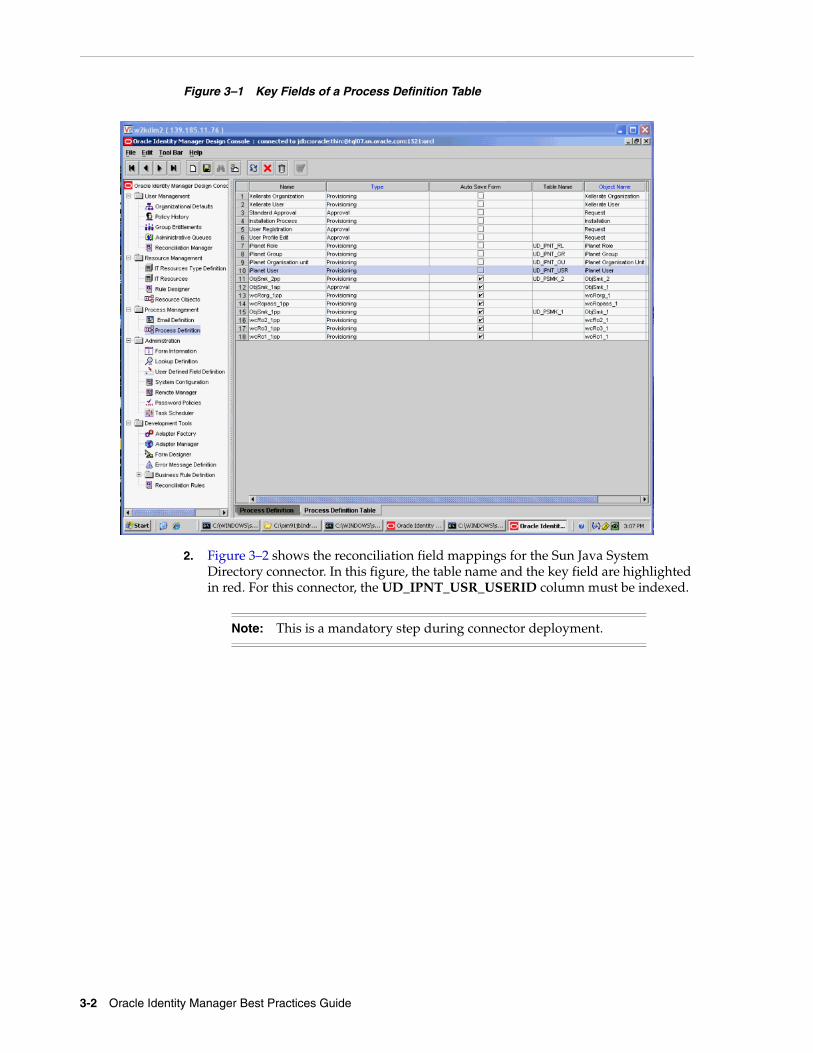
1. Figure 3–1 shows the process definition table for the Sun Java System Directory connector in the Design Console. For this connector, double-click the iPlanet User provisioning process, and then click the Reconciliation Field Mappings tab to view the field mappings
Note: In the following procedure, the Sun Java System Directory connector has been used as an example.
All the key fields used for field mappings must be indexed from the UD_* table or the process definition table.
3-2 Oracle Identity Manager Best Practices Guide
Figure 3–1 Key Fields of a Process Definition Table
2. Figure 3–2 shows the reconciliation field mappings for the Sun Java System Directory connector. In this figure, the table name and the key field are highlighted in red. For this connector, the UD_IPNT_USR_USERID column must be indexed.
Note: This is a mandatory step during connector deployment.

Tuning Connector Performance 3-3
Figure 3–2 Reconciliation Field Mappings
The following are the guidelines for indexing key fields:
■ The key fields from the child tables must also be indexed. In Figure 3–2, the key fields for child tables are highlighted in blue. For the Sun Java System Directory connector, the UD_IPNT_ROL_ROLE_NAME and UD_IPNT_GRP_GROUP_NAME columns should be indexed.
■ If the connector contains any user-defined field and the attribute value is used for searching users in the Oracle Identity Manager database, then the corresponding database field should be indexed.
■ If any key field is defined in Oracle Identity Manager as case insensitive, then a function-based index on that key field should be created. For example, if the connector code internally performs a search for the first name (assuming that FIRST_NAME is a key), then the indexing should be performed as follows:
CREATE INDEX FDX_USR_FIRST_NAME ON USR(UPPER(FIRST_NAME)
■ While creating indexes, consider using the COMPUTE STATISTICS clause, so that statistics are generated for the index.
■ After configuring a connector and creating indexes with above process, you should generate a database table and index statistics (or schema statistics).
Note: if multiple (composite) keys are used for looking up a user, then composite indexes should be created.

3-4 Oracle Identity Manager Best Practices Guide

4
Tuning Application Server Performance 4-1
4Tuning Application Server Performance
This chapter describes how to upgrade application servers for Oracle Identity Manager to improve performance. This chapter contains the following sections:
4.1 Oracle WebLogic Server Version 10.xThe following recommendations are specific to Oracle Identity Manager deployed on Oracle WebLogic Server version 10.x:
■ JVM Memory Settings
■ JDBC Connection Pool
■ Number of Message Driven Beans
■ Changing the Number of Open File Descriptors for UNIX (Optional)
4.1.1 JVM Memory SettingsThis section describes how to increase the JVM memory settings when Oracle Identity Manager is:
■ Deployed on WebLogic Admin Server
■ Deployed on WebLogic Managed Servers
4.1.1.1 Deployed on WebLogic Admin ServerWhen Oracle Identity Manager is deployed on WebLogic admin server, to increase the JVM memory settings:
1. Use the WebLogic Server Administration Console to shut down the application server gracefully.
Note: All tuning parameter suggestions and values in this section are for reference purposes only. Values should be modified based on your needs, application usage patterns, loads, and hardware specifications.
Note: Changing any of the settings may require you to restart the server.
See Also: Oracle® WebLogic Server Performance and Tuning documentation for more information about tuning Oracle Application Server

Oracle WebLogic Server Version 10.x
4-2 Oracle Identity Manager Best Practices Guide
2. Navigate to Weblogic DOMAIN_HOME/bin. For example, C:\bea103\user_projects\domains\base_domain\bin or /opt/bea103/user_projects/domains/base_domain/bin.
3. Open xlStartWLS.cmd for Microsoft Windows. For UNIX, open xlStartWLS.sh.
For Microsoft Windows:
Before "SET JAVA_OPTIONS=....", add any one of the following lines depending on the type of JVM:
■ For Sun and HP JVMs, add: set USER_MEM_ARGS=-Xms1280m -Xmx1280m -XX:PermSize=128m -XX:MaxPermSize=256m
■ For JRockit JVMs, add: set USER_MEM_ARGS=-Xms1280m -Xmx1280m -XnoOpt
■ For IBM JVMs, add: set USER_MEM_ARGS=-Xms1280m -Xmx1280
For UNIX:
a. Before "JAVA_OPTIONS=...", add any one of the following lines depending on the type of JVM:
For Sun and HP JVMs, add: USER_MEM_ARGS=-Xms1280m -Xmx1280m -XX:PermSize=128m -XX:MaxPermSize=256m
For JRockit JVMs, add: USER_MEM_ARGS=-Xms1280m -Xmx1280 -XnoOpt
For IBM JVMs, add: USER_MEM_ARGS=-Xms1280m -Xmx1280
b. Add the following line:
export USER_MEM_ARGS
4.1.1.2 Deployed on WebLogic Managed ServersYou can deploy Oracle Identity Manager on WebLogic managed servers. This is the only option for clustered installation. Depending on how you start the managed server, such as by using WebLogic admin console or Node Manager, or by running the scripts, changes must be made in different locations.
4.1.1.2.1 Starting the Managed Server By Using the xlStartManagedServer script When managed servers are started by running the xlStartManagedServer script, repeat the steps for increasing the JVM memory settings when Oracle Identity Manager is deployed on Weblogic admin server for script DOMAIN_HOME/bin/xlStartManagedServer.sh or DOMAIN_HOME/bin/xlStartManagedServer.cmd. For more information, see "Deployed on WebLogic Admin Server" on page 4-1.
4.1.1.2.2 Starting the Managed Server By Using Admin Console When Managed Servers are started by using the Admin console, perform the following steps to increase the JVM memory settings:
1. Open the WebLogic Server Administration Console.
2. Click Environment, Servers, SERVER_NAME, for example OIM_SERVER1.
3. Click the Server Start tab.
4. Change the JVM Memory values as shown in the procedure when Oracle Identity Manager is deployed on WebLogic admin server.
IBM WebSphere Application Server Version 6.1
Tuning Application Server Performance 4-3
4.1.2 JDBC Connection PoolJDBC Datasource xlDS is used by the WebLogic JMS for JMS operations. JDBC Datasource XlXADS is used by Oracle Identity Manager for all other purposes. To increase the capacity of the JDBC connection pools:
1. Open the WebLogic Server Administration Console.
2. For JDBC Datasource xlXADS:
a. Click Services, JDBC, Data Sources, xlXADS, and then click the Connection Pool tab.
b. Set the same value for Initial Capacity and Maximum Capacity. For example, you can set Initial Capacity and Maximum Capacity as 50.
For JDBC Datasource xlDS:
a. Click Services, JDBC, Data Sources, xlDS, and then click the Connection Pool tab.
b. Set the same value for Initial Capacity and Maximum Capacity. For example, you can set Initial Capacity and Maximum Capacity as 50.
3. Save and activate the changes.
4.1.3 Number of Message Driven BeansOracle Identity Manager uses Message Driven Beans (MDBs) for processing all offline activities, such as reconciliation, auditing, requests, and attestation. By default 16 MDB instances concurrently serve request for each module. However based on the requirement this can be increased by modifying the Weblogic Work Manager configuration. For more information refer to Weblogic documentation.
4.1.4 Changing the Number of Open File Descriptors for UNIX (Optional)WebLogic limits the number of open file descriptors in the <WL_HOME>/common/bin/commEnv.sh script to 1024. In some cases, if there is a huge number of concurrent users, WebLogic may throw the "TOO MANY OPEN FILES" exception. If you face this error, then increase the limit beyond 1024. Ensure that the operating system is able to handle the increase in the number of open files.
4.2 IBM WebSphere Application Server Version 6.1The following recommendations are specific to Oracle Identity Manager deployed on IBM WebSphere Application Server version 6.1:
■ JVM Memory Settings
■ JDBC Connection Pool
Note: Ensure that any increase in number of connections on the application server connection pools are compensated by database configuration changes.
Note: Changing any of the settings may require you to restart the server.
IBM WebSphere Application Server Version 6.1
4-4 Oracle Identity Manager Best Practices Guide
■ Number of Message Driven Beans
■ Thread Pool
4.2.1 JVM Memory SettingsTo increase the JVM memory settings for a nonclustered environment:
1. Log in to the WebSphere Administrative Console by using the following URL:
http://WEBSPHERE_HOSTNAME:WEBSPHERE_ADMIN_PORT /admin
2. Select Servers, and then select Application Servers.
3. Select the server name.
4. Go to Server Infrastructure, and then click Java and Process Management.
5. Select Process Definition.
6. Go to Additional Properties, and then click Java Virtual Machine and enter the following values:
Minimum Heap Size = 1280
Maximum Heap Size = 1280
Generic JVM Arguments = -Xjit:disableLocalVP,disableGlobalVP
7. Click OK.
8. Click Save to commit the setting.
4.2.2 JDBC Connection PoolThe xlConnectionPool is used by the WebLogic JMS for JMS operations. XlXAConnectionPool is used by Oracle Identity Manager for all other purposes. To increase the capacity of the JDBC connection pool
1. Log in to the WebSphere Administrative Console.
2. Select Resources, JDBC, Data Sources, and then select Non XA DataSource. Select Connection pool properties under Additional properties. Enter the following values.
Minimum connections = 10
Maximum connections = 50
3. Click OK and then click Save.
4. Select Resources, JDBC, Data Sources, and then select XA DataSource. Select Connection pool properties under Additional properties. Enter the following values.
Minimum connections = 30
Maximum connections = 50
5. Click OK and then click Save.
Note: For a clustered environment, the changes in the aforementioned procedure must be done on each server in the cluster.
IBM WebSphere Application Server Version 6.1
Tuning Application Server Performance 4-5
4.2.3 Number of Message Driven BeansOracle Identity Manager uses MDBs for processing all offline activities, such as reconciliation, auditing, requests, and attestation. The default number of MDBs may not be enough for a heavy load.
To increase the number of MDBs for default JMS messaging:
1. Click Resources, Resource Adapters, and J2C activation specifications.
2. For each queue specification:
a. Click J2C activation specification custom properties from Additional Properties.
b. On Page 1, select the maxConcurrency link and set Value to 20.
c. Click OK and then click Save.
d. Click on the arrow to go to Page 2.
e. On Page 2, select the maxConcurrency link and set Value to 20.
f. Click OK and then click Save.
To increase the number of MDBs for nondefault JMS messaging, increase the value of Maximum Sessions for the corresponding listener port. For example, if you are using the MDBs for reconciliation, select the listener port that you use for reconciliation and increase the value of Maximum Sessions.
4.2.4 Thread PoolTo increase the server thread pool:
1. Log in to the WebSphere Administrative Console.
2. Click Application Servers, click the server on which Oracle Identity Manager is deployed, and then click Thread Pools.
3. Click Default and set the values of Minimum Size and Maximum Size. For example, enter 20 for Minimum Size and 75 for Maximum Size.
4. Click Save.
Note: Depending on the JMS being used in the installation, choose the specific instructions accordingly.
Note: When you increase the number of MDBs, the JDBC connection pool may also need to be increased accordingly.
Note: For a clustered environment, the changes in the aforementioned procedure must be implemented on each server in the cluster.
Also ensure that the CPU capacity supports the increase in threads.

JBoss Application Server Version 4.2.3
4-6 Oracle Identity Manager Best Practices Guide
4.3 JBoss Application Server Version 4.2.3The following recommendations are specific to Oracle Identity Manager deployed on JBoss Application Server version 4.2.3:
■ JVM Memory Settings
■ JDBC Connection Pool
■ Thread Pool
■ JMS Pool Size
■ Number of Message Driven Beans and DQL Retry
■ Deployment Scanning
4.3.1 JVM Memory SettingsDepending on the operating system of your environment, perform the following:
For Microsoft Windows:
1. Open the JBOSS_HOME\bin\run.bat file in a text editor.
2. Locate the following line:
set JAVA_OPTS=%JAVA_OPTS% -Xms128m -Xmx512m
3. Change the memory settings to the following recommended values:
set JAVA_OPTS=%JAVA_OPTS% -Xms1280m -Xmx1280m -XX:PermSize=128m -XX:MaxPermSize=256m
4. Save and close the run.bat file.
For UNIX:
1. Open the JBOSS_HOME/bin/run.conf file in a text editor.
2. Locate the following line:
JAVA_OPTS="-Xms128m -Xmx512m"
3. Change the memory settings to the following recommended values:
JAVA_OPTS="-server -Xms1280m -Xmx1280m -XX:PermSize=128m -XX:MaxPermSize=256m"
4. Save and close the run.conf file.
4.3.2 JDBC Connection PoolTo modify the JDBC connection pools, open the JBOSS_HOME/server/default/deploy/xell-ds.xml file and make the following changes:
Note: Changing any of the settings may require you to restart the server.

JBoss Application Server Version 4.2.3
Tuning Application Server Performance 4-7
1. For the jdbc/xlDS pool, insert the following before the line </local-tx-datasource>:
<min-pool-size>10</min-pool-size><max-pool-size>50</max-pool-size><blocking-timeout-millis>15000</blocking-timeout-millis><idle-timeout-minutes>15</idle-timeout-minutes>
2. For the jdbc/xlXADS pool, insert the following before the line </xa-datasource>:
<min-pool-size>30</min-pool-size><max-pool-size>50</max-pool-size><blocking-timeout-millis>15000</blocking-timeout-millis><idle-timeout-minutes>15</idle-timeout-minutes>
4.3.3 Thread PoolTo increase the number of threads:
1. Open JBOSS_HOME/server/default/conf/jboss-service.xml.
2. Set the maximum pool size as follows and save the file:
<mbean code="org.jboss.util.threadpool.BasicThreadPool" name="jboss.system:service=ThreadPool">...<attribute name="MaximumPoolSize">50</attribute>...</mbean>
4.3.4 JMS Pool SizeTo increase the JMS pool size:
1. Open the JBOSS_HOME/server/default/deploy/jms/jms-ds.xml file in a text editor.
Note: For a clustered installation of Oracle Identity Manager on JBoss Application Server, the xell-ds.xml file can be located at JBOSS._HOME/server/all/farm.
Note: For a clustered installation of Oracle Identity Manager on JBoss Application Server, the jboss-service.xml file can be located at JBOSS._HOME/server/all/conf.
Note: When you increase the number of threads, the JDBC connection pool may also need to be increased accordingly.
Also ensure that the CPU capacity supports the increase in threads.
Note: For a clustered installation of Oracle Identity Manager on JBoss Application Server, open the JBOSS_HOME/server/all/deploy/jms/hajndi-jms-ds.xml file in a text editor.

JBoss Application Server Version 4.2.3
4-8 Oracle Identity Manager Best Practices Guide
2. Set the maximum pool size as follows and save the file:
<tx-connection-factory>...<max-pool-size>20</max-pool-size>...</tx-connection-factory>
4.3.5 Number of Message Driven Beans and DQL RetryTo increase the size of MDBs:
1. Open the JBOSS_HOME/server/default/conf/standardjboss.xml file in a text editor.
2. Locate the following xml fragment:
<invoker-proxy-binding><name> message-driven-bean</name>...<MinimumSize>4</MinimumSize><MaximumSize>20</MaximumSize>...
3. Add the following to this fragment:
<DLQConfig>...<MaxTimesRedelivered>5</MaxTimesRedelivered>...</invoker-proxy-binding>
When you add the aforementioned attribute, the JMS messages are redelivered as many times as defined by this attribute in case of failure.
4.3.6 Deployment ScanningTo disable deployment scanning:
1. Open the JBOSS_HOME/server/default/conf/jboss-service.xml file in a text editor.
Note: When you increase the JMS pool size, the JDBC connection pool may also need to be increased accordingly.
Note: For a clustered installation of Oracle Identity Manager on JBoss Application Server, open the JBOSS_HOME/server/all/conf/standardjboss.xml file in a text editor.
Note: When you make these changes, the JDBC connection pool may also need to be increased accordingly.
Oracle Application Server Version 10.1.3.x
Tuning Application Server Performance 4-9
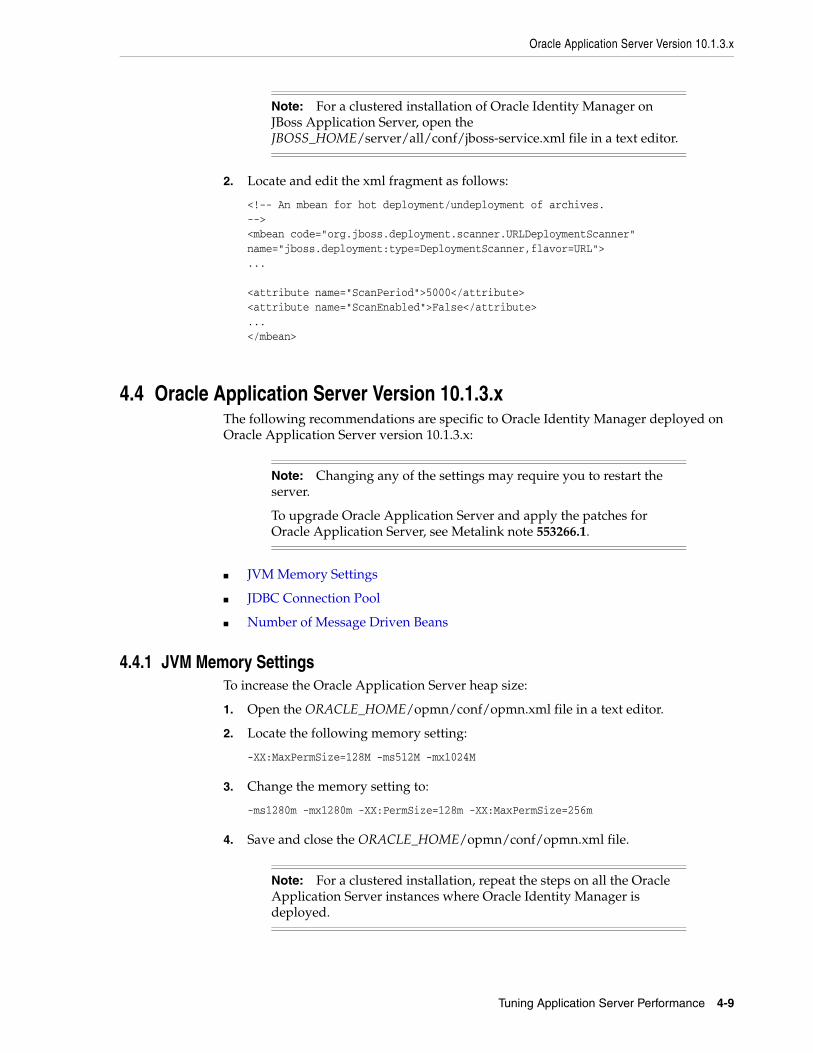
2. Locate and edit the xml fragment as follows:
<!-- An mbean for hot deployment/undeployment of archives. --> <mbean code="org.jboss.deployment.scanner.URLDeploymentScanner" name="jboss.deployment:type=DeploymentScanner,flavor=URL"> ... <attribute name="ScanPeriod">5000</attribute> <attribute name="ScanEnabled">False</attribute> ... </mbean>
4.4 Oracle Application Server Version 10.1.3.xThe following recommendations are specific to Oracle Identity Manager deployed on Oracle Application Server version 10.1.3.x:
■ JVM Memory Settings
■ JDBC Connection Pool
■ Number of Message Driven Beans
4.4.1 JVM Memory SettingsTo increase the Oracle Application Server heap size:
1. Open the ORACLE_HOME/opmn/conf/opmn.xml file in a text editor.
2. Locate the following memory setting:
-XX:MaxPermSize=128M -ms512M -mx1024M
3. Change the memory setting to:
-ms1280m -mx1280m -XX:PermSize=128m -XX:MaxPermSize=256m
4. Save and close the ORACLE_HOME/opmn/conf/opmn.xml file.
Note: For a clustered installation of Oracle Identity Manager on JBoss Application Server, open the JBOSS_HOME/server/all/conf/jboss-service.xml file in a text editor.
Note: Changing any of the settings may require you to restart the server.
To upgrade Oracle Application Server and apply the patches for Oracle Application Server, see Metalink note 553266.1.
Note: For a clustered installation, repeat the steps on all the Oracle Application Server instances where Oracle Identity Manager is deployed.

Oracle Application Server Version 10.1.3.x
4-10 Oracle Identity Manager Best Practices Guide
4.4.2 JDBC Connection PoolDo not change any parameter of the connection pool by using Oracle Application Server control. This may cause a user to be locked on the database side. It is recommended to make connection pool changes in the configuration file as follows:
1. Stop the Oracle Application Server instance where Oracle Identity Manager is deployed.
2. Open the ORACLE_HOME/j2ee/INSTANCE_NAME/config/data-sources.xml file and implement the following changes:
a. For xlConnectionPool the minimum and maximum connection pool values should be set as follows:
min-connections="10"
max-connections="50"
b. For xlXAConnectionPool, the minimum and maximum connection pool values should be set as follows:
min-connections="30"
max-connections="100"
4.4.3 Number of Message Driven BeansOracle Identity Manager uses MDBs for processing all offline activities, such as reconciliation, auditing, requests, and attestation. The default number of MDBs may not be enough for a heavy load. To increase the number of MDBs, perform the following:
1. Change the number of MDBs as follows:
For File-based JMS Persistence (Default OIM Installation):
a. Open OIM_HOME/DDTemplates/BO/orion-ejb-jar.xml.
b. Change value of listener-threads for all the MDBs to 20. This represents the numbers of MDBs for each queue.
For database/AQ based JMS Persistence:
a. Open OIM_HOME/DDTemplates/BO/orion-ejb-jar.xml.
b. Change value of Receiver-Threads for all the MDBs to 20. This represents the numbers of MDBs for each queue.
2. After changing the values, change the directory to OIM_HOME/setup and run the following script:
For Microsoft Windows:
patch_oc4j.cmd oc4j_admin_password oim_schema_password
For UNIX:
patch_oc4j.sh oc4j_admin_password oim_schema_password
Note: For a clustered installation, repeat the steps on all the Oracle Application Server instances where Oracle Identity Manager is deployed.

Oracle Application Server Version 10.1.3.x
Tuning Application Server Performance 4-11
3. After the patch completes, restart the application server. This will rebuild the application with the latest modified values for MDBs.
Note: For a clustered installation, repeat the steps on all the Oracle Application Server instances where Oracle Identity Manager is deployed.
When you increase the number of MDBs, the JDBC connection pool may also need to be increased accordingly

Oracle Application Server Version 10.1.3.x
4-12 Oracle Identity Manager Best Practices Guide

5
Managing the Cache 5-1
5 Managing the Cache
Oracle Identity Manager uses two types of caching: global and ThreadLocal.
The global cache stores information globally. Any part of the system can access information that is stored in this cache. The global cache uses OSCache from OpenSymphony. One advantage of using OSCache is its support for cluster environments. Database queries are usually stored in the global cache so that repeated queries are not run against the database again.
The ThreadLocal cache stores information that is used multiple times in a single transaction. For example, a query that is issued many times during a transaction uses data from the ThreadLocal cache. The data used for this query does not change for the transaction.
Oracle Identity Manager allows caching by category. You can enable and disable caching for specific entities and configure separate expiration times.
This chapter discusses the following topics:
■ Sample Cache Configuration
■ General Cache Configuration Properties
■ Category-Based Cache Configuration Properties
■ Class Reloading
■ Purging the Cache
■ Optimal Cache Configuration for a Production Environment
5.1 Sample Cache ConfigurationThis section contains a sample code block from the Cache section in the xlconfig.xml file, as shown in Example 5–1. The code contains the general configuration properties available in the xlconfig.xml file.
Example 5–1 Cache Section in the xlconfig.xml File
<Cache> <Enable>false</Enable> <ThreadLocalCacheEnabled>false</ThreadLocalCacheEnabled> <ExpireTime>14400</ExpireTime>
<CacheProvider>com.thortech.xl.cache.OSCacheProvider</CacheProvider> <XLCacheProvider> <Size>5000</Size> <MultiCastAddress>231.121.212.133</MultiCastAddress> </XLCacheProvider>
General Cache Configuration Properties
5-2 Oracle Identity Manager Best Practices Guide
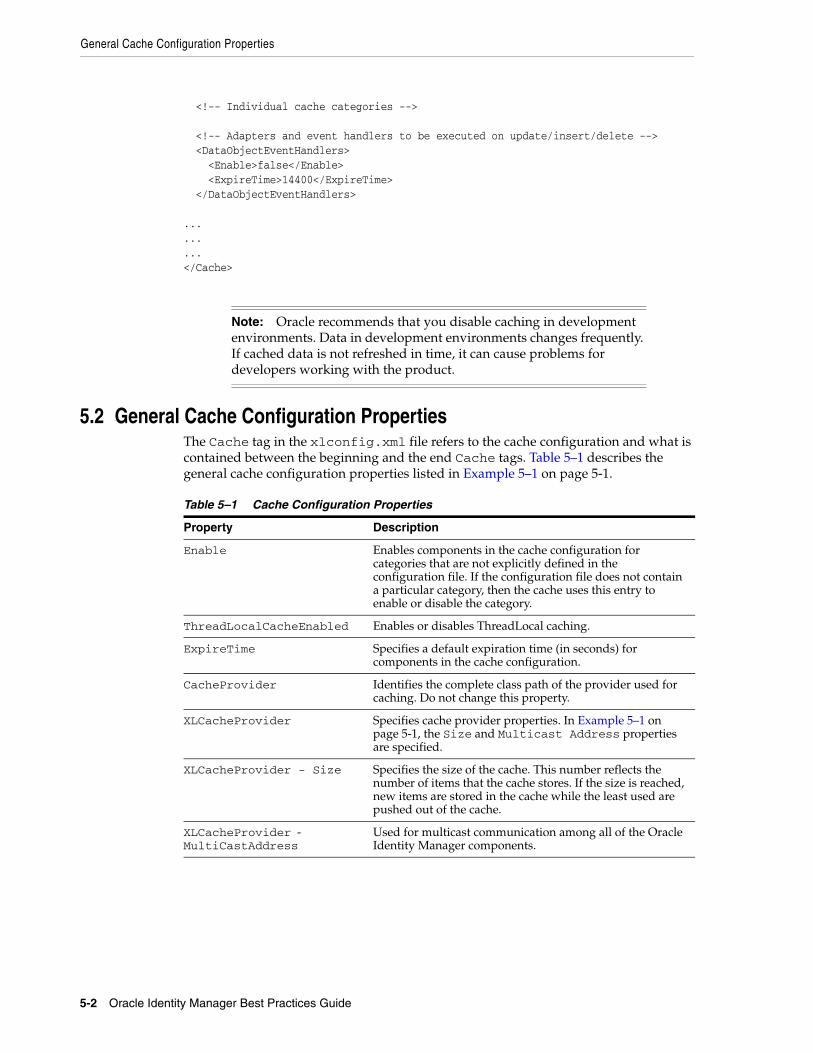
<!-- Individual cache categories -->
<!-- Adapters and event handlers to be executed on update/insert/delete --> <DataObjectEventHandlers> <Enable>false</Enable> <ExpireTime>14400</ExpireTime> </DataObjectEventHandlers> .........</Cache>
5.2 General Cache Configuration PropertiesThe Cache tag in the xlconfig.xml file refers to the cache configuration and what is contained between the beginning and the end Cache tags. Table 5–1 describes the general cache configuration properties listed in Example 5–1 on page 5-1.
Note: Oracle recommends that you disable caching in development environments. Data in development environments changes frequently. If cached data is not refreshed in time, it can cause problems for developers working with the product.
Table 5–1 Cache Configuration Properties
Property Description
Enable Enables components in the cache configuration for categories that are not explicitly defined in the configuration file. If the configuration file does not contain a particular category, then the cache uses this entry to enable or disable the category.
ThreadLocalCacheEnabled Enables or disables ThreadLocal caching.
ExpireTime Specifies a default expiration time (in seconds) for components in the cache configuration.
CacheProvider Identifies the complete class path of the provider used for caching. Do not change this property.
XLCacheProvider Specifies cache provider properties. In Example 5–1 on page 5-1, the Size and Multicast Address properties are specified.
XLCacheProvider - Size Specifies the size of the cache. This number reflects the number of items that the cache stores. If the size is reached, new items are stored in the cache while the least used are pushed out of the cache.
XLCacheProvider - MultiCastAddress
Used for multicast communication among all of the Oracle Identity Manager components.
Category-Based Cache Configuration Properties
Managing the Cache 5-3
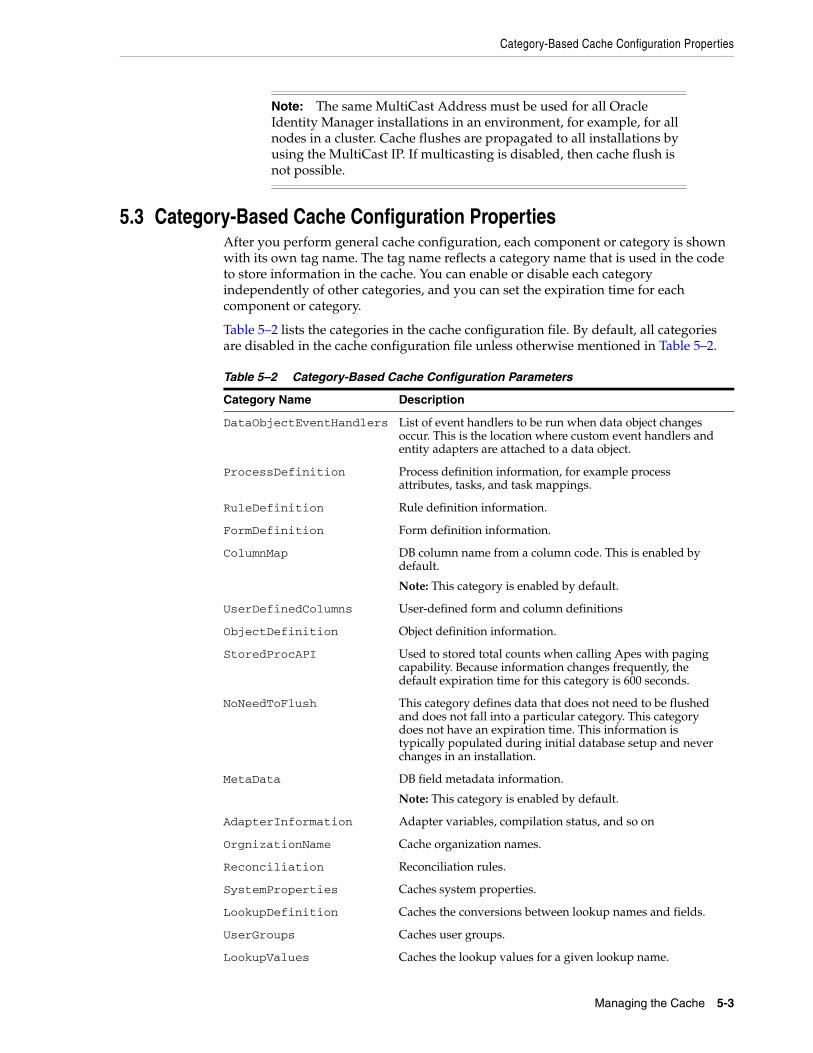
5.3 Category-Based Cache Configuration PropertiesAfter you perform general cache configuration, each component or category is shown with its own tag name. The tag name reflects a category name that is used in the code to store information in the cache. You can enable or disable each category independently of other categories, and you can set the expiration time for each component or category.
Table 5–2 lists the categories in the cache configuration file. By default, all categories are disabled in the cache configuration file unless otherwise mentioned in Table 5–2.
Note: The same MultiCast Address must be used for all Oracle Identity Manager installations in an environment, for example, for all nodes in a cluster. Cache flushes are propagated to all installations by using the MultiCast IP. If multicasting is disabled, then cache flush is not possible.
Table 5–2 Category-Based Cache Configuration Parameters
Category Name Description
DataObjectEventHandlers List of event handlers to be run when data object changes occur. This is the location where custom event handlers and entity adapters are attached to a data object.
ProcessDefinition Process definition information, for example process attributes, tasks, and task mappings.
RuleDefinition Rule definition information.
FormDefinition Form definition information.
ColumnMap DB column name from a column code. This is enabled by default.
Note: This category is enabled by default.
UserDefinedColumns User-defined form and column definitions
ObjectDefinition Object definition information.
StoredProcAPI Used to stored total counts when calling Apes with paging capability. Because information changes frequently, the default expiration time for this category is 600 seconds.
NoNeedToFlush This category defines data that does not need to be flushed and does not fall into a particular category. This category does not have an expiration time. This information is typically populated during initial database setup and never changes in an installation.
MetaData DB field metadata information.
Note: This category is enabled by default.
AdapterInformation Adapter variables, compilation status, and so on
OrgnizationName Cache organization names.
Reconciliation Reconciliation rules.
SystemProperties Caches system properties.
LookupDefinition Caches the conversions between lookup names and fields.
UserGroups Caches user groups.
LookupValues Caches the lookup values for a given lookup name.

Class Reloading
5-4 Oracle Identity Manager Best Practices Guide
5.4 Class ReloadingClass reloading refers to automatically reloading classes without restarting the server.Class. Reloading settings are useful for scheduled tasks and adapter-related files. Oracle recommends that you disable class reloading in production environments for better performance. You must restart the Oracle Identity Manager server if cache reloading is disabled and any new adapters are imported, existing adapters are changed, or any JAR files are modified.
The class reloading configuration information is included in the xlconfig.xml file as follows:
<ClassLoading> <ReloadEnabled>true</ReloadEnabled> <ReloadInterval>15</ReloadInterval> <LoadingStyle>ParentFirst</LoadingStyle></ClassLoading>
■ ReloadEnabled, when set to true, enables class reloading on regular basis.
■ ReloadInterval specifies the time to reload (in seconds).
■ LoadingStyle specifies the type of loading used.
The following are the different types of loading:
– With parentFirst mode , first preference is given to classes placed in System Classpath, Oracle Identity Manager Application Classpath, and then the ADP Classpath. This is the Oracle recommended option.
– With ParentLast mode, first preference is given to classes placed in ADP Classpath, System classpath, and then Oracle Identity Manager Application Classpath. This is deprecated option and must not be used because it might cause ClassCastExceptions.
ITResourceKey IT Resources DB key cache.
ServerProperties Caches what data is to be encrypted along with System Properties
ColumnMetaData Database metadata information for common queries.
CustomResourceBundle Caches the custom resource bundle.
CustomDefaultBundle Caches the custom default bundle.
ConnectorResourceBundle Caches connector resource bundles
EmailDefinition Caches e-mail definition information
LinguisticSort Caches database sort parameters
RecordExists Caches user keys
GenericConnector Caches pertinent data about a particular Generic Technology Connector instance
GenericConnectorProviders
Caches the provider parameter values associated with a particular Generic Technology Connector instance
Table 5–2 (Cont.) Category-Based Cache Configuration Parameters
Category Name Description
Optimal Cache Configuration for a Production Environment
Managing the Cache 5-5
5.5 Purging the CacheIf you want to purge the cache before the allocated amount of time, use the PurgeCache utility in the OIM_HOME/bin directory. This utility purges all elements in the cache.
To use the PurgeCache utility, run PurgeCache.bat category name on Microsoft Windows systems or PurgeCache.sh category name on Linux and UNIX systems. The category name argument represents the name of the category that must be purged. For example, the following commands purge all FormDefinition entries from a system and its clusters:
PurgeCache.bat FormDefinitionPurgeCache.sh FormDefinition
To purge all Oracle Identity Manager categories, pass a value of "All" to the PurgeCache utility.
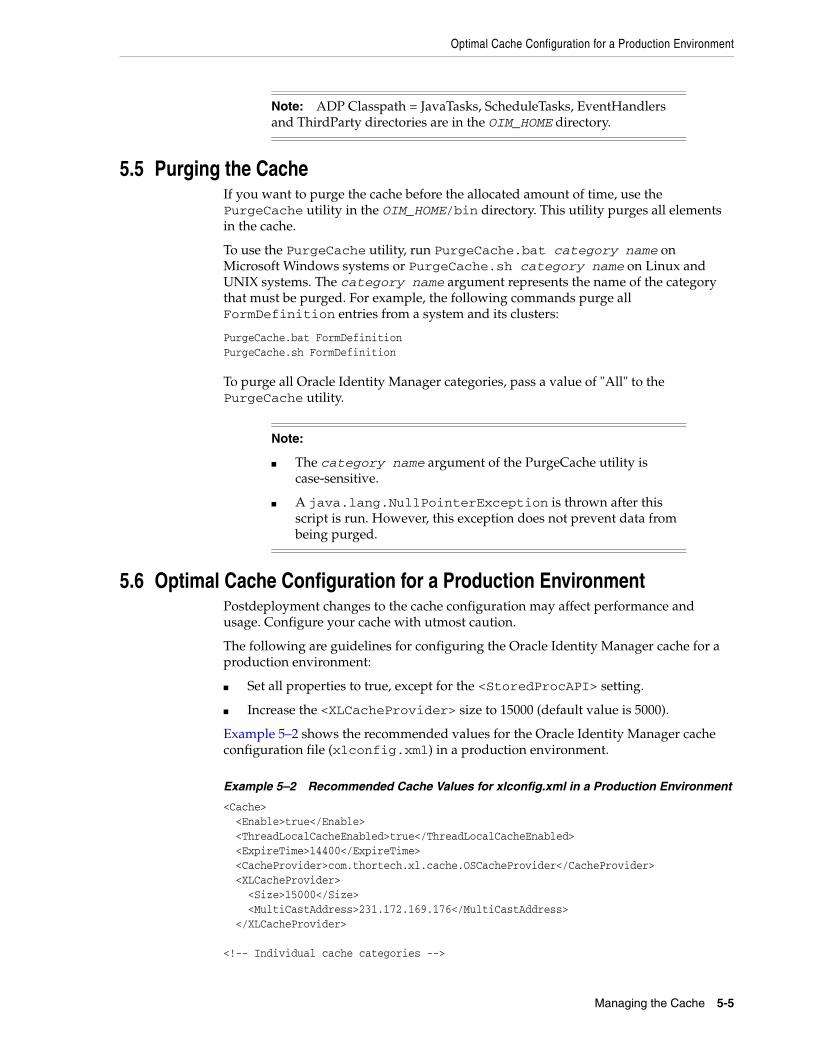
5.6 Optimal Cache Configuration for a Production EnvironmentPostdeployment changes to the cache configuration may affect performance and usage. Configure your cache with utmost caution.
The following are guidelines for configuring the Oracle Identity Manager cache for a production environment:
■ Set all properties to true, except for the <StoredProcAPI> setting.
■ Increase the <XLCacheProvider> size to 15000 (default value is 5000).
Example 5–2 shows the recommended values for the Oracle Identity Manager cache configuration file (xlconfig.xml) in a production environment.
Example 5–2 Recommended Cache Values for xlconfig.xml in a Production Environment
<Cache> <Enable>true</Enable> <ThreadLocalCacheEnabled>true</ThreadLocalCacheEnabled> <ExpireTime>14400</ExpireTime> <CacheProvider>com.thortech.xl.cache.OSCacheProvider</CacheProvider> <XLCacheProvider> <Size>15000</Size> <MultiCastAddress>231.172.169.176</MultiCastAddress> </XLCacheProvider> <!-- Individual cache categories -->
Note: ADP Classpath = JavaTasks, ScheduleTasks, EventHandlers and ThirdParty directories are in the OIM_HOME directory.
Note:
■ The category name argument of the PurgeCache utility is case-sensitive.
■ A java.lang.NullPointerException is thrown after this script is run. However, this exception does not prevent data from being purged.

Optimal Cache Configuration for a Production Environment
5-6 Oracle Identity Manager Best Practices Guide
<!-- Adapters and event handlers to be executed on update/insert/delete --> <DataObjectEventHandlers> <Enable>true</Enable> <ExpireTime>14400</ExpireTime> </DataObjectEventHandlers> <ProcessDefinition> <Enable>true</Enable> <ExpireTime>14400</ExpireTime> </ProcessDefinition> <RuleDefinition> <Enable>true</Enable> <ExpireTime>14400</ExpireTime> </RuleDefinition> <FormDefinition> <Enable>true</Enable> <ExpireTime>14400</ExpireTime> </FormDefinition> <ColumnMap> <Enable>true</Enable> <ExpireTime>14400</ExpireTime> </ColumnMap> <UserDefinedColumns> <Enable>true</Enable> <ExpireTime>14400</ExpireTime> </UserDefinedColumns> <ObjectDefinition> <Enable>true</Enable> <ExpireTime>14400</ExpireTime> </ObjectDefinition> <StoredProcAPI> <Enable>false</Enable> <ExpireTime>600</ExpireTime> </StoredProcAPI> <!-- This information must not be flushed out. For example, key for requests organization. --> <NoNeedToFlush> <Enable>true</Enable> <ExpireTime>-1</ExpireTime> </NoNeedToFlush> <!-- Metadata Information --> <MetaData> <Enable>true</Enable> <ExpireTime>14400</ExpireTime> </MetaData> <!-- Adapter Mapping Information --> <AdapterInformation> <Enable>true</Enable> <ExpireTime>14400</ExpireTime> </AdapterInformation> <!-- Name of the organization for a given key and vice versa --> <OrgnizationName> <Enable>true</Enable> <ExpireTime>14400</ExpireTime> </OrgnizationName>

Optimal Cache Configuration for a Production Environment
Managing the Cache 5-7
<!-- Reconciliation rules --> <Reconciliation> <Enable>true</Enable> <ExpireTime>14400</ExpireTime> </Reconciliation> <!-- System Properties --> <SystemProperties> <Enable>true</Enable> <ExpireTime>14400</ExpireTime> </SystemProperties> <LookupDefinition> <Enable>true</Enable> <ExpireTime>14400</ExpireTime> </LookupDefinition> <UserGroups> <Enable>true</Enable> <ExpireTime>14400</ExpireTime> </UserGroups> <LookupValues> <Enable>true</Enable> <ExpireTime>14400</ExpireTime> </LookupValues> <ITResourceKey> <Enable>true</Enable> <ExpireTime>14400</ExpireTime> </ITResourceKey> <RecordExists> <Enable>true</Enable> <ExpireTime>14400</ExpireTime> </RecordExists> <ServerProperties> <Enable>true</Enable> <ExpireTime>14400</ExpireTime> </ServerProperties> <!-- Column Meta Data --> <ColumnMetaData> <Enable>true</Enable> <ExpireTime>14400</ExpireTime> </ColumnMetaData> <CustomResourceBundle> <Enable>true</Enable> <ExpireTime>-1</ExpireTime> </CustomResourceBundle> <CustomDefaultBundle> <Enable>true</Enable> <ExpireTime>-1</ExpireTime> </CustomDefaultBundle> <ConnectorResourceBundle> <Enable>true</Enable> <ExpireTime>-1</ExpireTime> </ConnectorResourceBundle> <LinguisticSort> <Enable>true</Enable> <ExpireTime>-1</ExpireTime> </LinguisticSort> <GenericConnector> <Enable>true</Enable> <ExpireTime>-1</ExpireTime>

Optimal Cache Configuration for a Production Environment
5-8 Oracle Identity Manager Best Practices Guide
</GenericConnector> <GenericConnectorProviders> <Enable>true</Enable> <ExpireTime>-1</ExpireTime> </GenericConnectorProviders></Cache>
6
Securing a Deployment 6-1
6 Securing a Deployment
This chapter describes how to use Oracle Application Server Single Sign-On to secure an Oracle Identity Manager deployment.
This chapter discusses the following topics:
■ Securing the Administrative and User Console
■ Securing Oracle Identity Manager While Leaving the Self-Registration and Forgot Password Pages Unprotected
6.1 Securing the Administrative and User ConsoleTo secure the Administrative and User Console, use Oracle Application Server Single Sign-On to protect the following URLs:
http://hostname:port/xlWebApphttp://hostname:port/Nexaweb
6.2 Securing Oracle Identity Manager While Leaving the Self-Registration and Forgot Password Pages Unprotected
To secure Oracle Identity Manager while leaving the Self Registration and Forgot Password pages unprotected, use Oracle Application Server Single Sign-On to protect the following URL:
http://hostname:port/xlWebApp/Logon.do
After using Oracle Application Server Single Sign-On to protect the Self Registration and Forgot Password pages, you can use the following URLs to directly access the pages:
http://hostname:port/xlWebApp/selfRegister.do?method=New%20Registrationhttp://hostname:port/xlWebApp/forgetPassword.do?method=displayVerifyUserId
See Also: Oracle Application Server Single Sign-On Administrator's Guide for information about how to protect URLs

Securing Oracle Identity Manager While Leaving the Self-Registration and Forgot Password Pages Unprotected
6-2 Oracle Identity Manager Best Practices Guide
7
Enabling Offline Provisioning 7-1
7Enabling Offline Provisioning
In online provisioning, multiple provisioning operations that constitute a provisioning request are performed in sequence. For example, if you create a request to allocate (provision) five resources to an OIM User, then the system:
■ Treats the provisioning of one resource to one user as a provisioning operation
■ Processes provisioning operations in sequence, one after the other
The provisioning request is treated as a single transaction. This approach could cause performance issues under certain conditions. In addition, there is a higher probability of transaction timeout and, therefore, the entire transaction being rolled back.
In offline provisioning, provisioning operations within a request are converted into JMS messages. One JMS message is submitted for each resource provisioned to each user. For example, if you create a request to provision 5 resources to 5 OIM Users, then 25 JMS messages are generated. Processing of each JMS message is treated as a single transaction, and it is asynchronous and independent of other JMS messages. Processing of the other messages continues even if one transaction times out. This approach offers better performance and a lower probability of transaction timeout.
This section discusses the following topics:
■ Features of Offline Processing
■ Enabling and Disabling Offline Provisioning
■ Configuring the Remove Failed Off-line Messages Scheduled Task
7.1 Features of Offline ProcessingThe following are features of offline provisioning:
■ The offline provisioning approach is applied only during Provision (Create Target System Account) Resource, Enable Resource, Disable Resource, and Revoke Resource operations. The offline provisioning approach is not applied in a provisioning operation that involves modification of an allocated (provisioned) resource.
■ Offline provisioning is not applied during organization provisioning.
■ You enable offline provisioning at the resource object level. The procedure is described later in this chapter.
■ JMS messages generated during offline provisioning are processed in parallel. Each message is processed independently and asynchronously of other messages. This approach provides better performance over the online provisioning approach

Features of Offline Processing
7-2 Oracle Identity Manager Best Practices Guide
in which provisioning operations generated during a particular provisioning request are processed in sequence.
■ The response to a provisioning operation is displayed almost immediately after the provisioning data is submitted. This response is not dependent on the processing of each request in the operation.
When you view resource details of an OIM User, the "Provisioning in Queue" status is displayed if the request for a particular resource has not yet been processed.
■ The final status of the resource instance is the same as the status for online provisioning. For example, if a message for a resource is accepted, then the Provisioned status is displayed. The same status is displayed for online provisioning.
■ Within an offline provisioning request, processing of each message is treated as an independent transaction. Rejection or failure of a single message does not affect processing of the remaining messages in the provisioning request.
■ During offline provisioning, details of a failed message (along with an explanation) are not displayed on the console. This behavior is different from that of online provisioning in which details of a failed operation are displayed on the console. In offline provisioning, details of failed messages are stored in the OPS table. You can view these details by running the Off-line Resource Provisioning Messages report. See "Reports Related to Offline Provisioning" for information about this report.
■ When you disable or delete an OIM User, all the resources provisioned to the user must be disabled or revoked, respectively. This is the expected outcome in both online and offline provisioning. The outcome is the same if the request succeeds, regardless of the type of provisioning. However, the outcome is different if an exception is encountered during the operation.
Online provisioning treats a Disable or Delete OIM User operation as one transaction. If even a single resource cannot be successfully disabled or revoked on the target system, then the entire transaction is rolled back.
In offline provisioning, the following JMS messages are generated in response to a Disable or Delete OIM User operation:
■ JMS message to disable or delete the OIM User
■ JMS messages to disable or revoke each resource assigned to the OIM User
If the OIM User is successfully disabled or deleted, then a message (statement) to this effect is displayed on the console. The display of this message (statement) is
Note: A rollback in Oracle Identity Manager does not affect the status of the resource on the target systems. For example, suppose an OIM User is assigned Resource A, Resource B, and Resource C. If this OIM User is deleted, then the system first tries to delete the resources from the respective target systems. Suppose Resources A and B are deleted but problems are encountered on attempting to delete Resource C. In this case, the entire transaction is rolled back and the status of Resources A, B, and C on Oracle Identity Manager is set to whatever it was at the start of the transaction. However, the actual status of Resources A and B on their target systems is that they have been deleted.

Reports Related to Offline Provisioning
Enabling Offline Provisioning 7-3
independent of the success or failure of the JMS messages generated to disable or revoke each resource. If the JMS message for a particular resource fails, then that resource becomes a rogue account in Oracle Identity Manager. You can identify these rogue accounts by running the Off-line Resource Provisioning Messages report. For each of the remaining resources, the status of the resource (Disabled or Revoked) in Oracle Identity Manager is the same as the status of the resource (Disabled or Deleted) on the target system.
7.2 Enabling and Disabling Offline ProvisioningAs mentioned earlier, you enable offline provisioning at the resource object level.
To enable offline provisioning:
1. Log in to the Design Console.
2. Expand Resource Management, and double-click Resource Objects.
3. Search for and open the resource object for which you want to enable offline provisioning.
4. On the Resource Object form, select Off-line Provisioning.
5. Click the Save icon.
6. Expand Process Management, and double-click Process Definitions.
7. Search for and open the process definition corresponding to the resource object that you modified earlier.
8. Select the Auto Save Form check box.
9. Click the Save icon.
To disable offline provisioning:
1. Log in to the Design Console.
2. Expand Resource Management, and double-click Resource Objects.
3. Search for and open the resource object for which you want to enable offline provisioning.
4. On the Resource Object form, deselect the Off-line Provisioning check box.
5. Click the Save icon.
7.3 Reports Related to Offline ProvisioningThe Off-line Resource Provisioning Messages report returns the list of messages that are generated during offline provisioning and rejected by the target system.
Note: For Enable, Disable, and Revoke Resource operations, offline provisioning is enabled when you select the Off-line Provisioning check box. Perform the remaining steps of this procedure if you also want to enable offline provisioning for Provision Resource operations.

Configuring the Remove Failed Off-line Messages Scheduled Task
7-4 Oracle Identity Manager Best Practices Guide
7.4 Configuring the Remove Failed Off-line Messages Scheduled TaskConfigure the Remove Failed Off-line Messages scheduled task to schedule deletion of failed requests from the OPS table. While configuring this scheduled task, set a value for the Remove Failed Messages Older Than (days) attribute.
See Oracle Identity Manager Design Console Guide for information about working with scheduled tasks.

8
Integrating with Oracle Access Manager 8-1
8 Integrating with Oracle Access Manager
This chapter describes how to use Oracle Access Manager to manage user authentication and authorization when a user logs in to Oracle Identity Manager.
This chapter discusses the following topics:
■ About the Integration with Oracle Identity Manager
■ Integration Architecture
■ Preparing the Environment
■ Configuring Single Sign-On for Oracle Access Manager
■ Setting Up Oracle Identity Manager for Single Sign-On with Oracle Access Manager
■ Setting Up Oracle Application Server OC4J Plugin to Communicate with Oracle Access Manager
8.1 About the Integration with Oracle Identity ManagerThe integration of Oracle Access Manager with Oracle Identity Manager provides a secure Web-based infrastructure for identity management for all customer applications and processes. Oracle Access Manager integrates identity and access management across Oracle Identity Manager, enterprise resources, and other domains deployed on e-business networks. Oracle Access Manager provides the foundation for managing the identities of customers, partners, and employees across Internet applications. These user identities are combined with security policies for protected Web interaction.
This integration adds the following features to Oracle Identity Manager implementations:
■ Oracle Access Manager authentication, authorization, and auditing services for Oracle Identity Manager.
■ Oracle Access Manager single sign-on for Oracle Identity Manager and other Oracle Access Manager-protected resources within a single domain or across multiple domains.
Note: This chapter focuses on using JBoss Application Server as the application server in the integration. The same configuration steps apply to instances where Oracle Identity Manager is deployed on IBM WebSphere Application Server, Oracle WebLogic Server, or any other J2EE application server that is supported by Oracle Identity Manager.
Integration Architecture
8-2 Oracle Identity Manager Best Practices Guide
■ Oracle Access Manager authentication schemes: The following schemes provide single sign-on authentication for Oracle Identity Manager:
– Basic: Users must enter a user name and password in a window supplied by the Web server.
This method can be redirected to the Secure Sockets Layer (SSL).
– Form: This method is similar to the basic challenge method, but users enter information in the custom HTML form.
You can choose the information that users must provide in the form that you create.
– X509 Certificates: X.509 digital certificates over SSL must be available.
A user's browser must supply a certificate.
– Integrated Windows Authentication (IWA): Users will not notice a difference between an Oracle Access Manager authentication and IWA when they log on to the desktop, open an Internet Explorer (IE) browser, request an Oracle Access Manager-protected Web resource, and complete single sign-on.
– Custom: Additional forms of authentication can be incorporated through use of the Oracle Access Manager Authentication Plug-in API.
■ Session timeout: Oracle Access Manager enables you to set the length of time that a user session is valid.
■ Ability to use the Oracle Access Manager Identity System: This system provides identity management features such as user self-service for registration and updating user profiles, portal inserts, delegated administration, and workflows. You can send Identity System data to back-end applications by using a custom data template and a workflow.
8.2 Integration ArchitectureOracle Identity Manager has two authentication mechanisms:
■ Default mode, where Oracle Identity Manager manages the credential validation and session maintenance.
■ Single sign-on mode, where Oracle Identity Manager looks for an HTTP header variable that is passed to it.
The header variable should contain the user ID of the Oracle Identity Manager user.
Oracle Access Manager single sign-on with Oracle Identity Manager is achieved as follows:
■ Deploy the HTTP Server in front of the J2EE Application server.
■ Deploy the HTTP Server as a reverse proxy.
■ Deploy a Oracle Access Manager WebGate on the HTTP Server.
■ Populate a header variable with an attribute value that is stored in the LDAP directory used by Oracle Access Manager.
■ Configure Oracle Identity Manager to use the single sign-on mode of authentication.
Figure 8–1 shows the architecture for single sign-on between Oracle Identity Manager and Oracle Access Manager.

Integration Architecture
Integrating with Oracle Access Manager 8-3
The user accesses the Oracle Identity Manager Administrative and User Console with a Web browser. The Oracle Access Manager WebGate intercepts the user's HTTP request and checks for the presence of an obSSOCookie. If the cookie does not exist or it has expired, the user is challenged for credentials. Oracle Access Manager verifies the credentials, and if the user is authenticated, the WebGate redirects the user to the requested resource and passes the required header variable to Oracle Identity Manager. Oracle Identity Manager, which has been configured to read an HTTP header variable instead of its authentication, reads the HTTP header and uses the value stored in the variable as the logged-in user.
Figure 8–1 Integration with Oracle Identity Manager
Process overview: Single sign-on with Oracle Identity Manager1. A user attempts to access the Administrative and User Console.
2. An Oracle Access Manager WebGate that is deployed on the HTTP server intercepts the request.
3. The WebGate checks the Access Server to determine if the resource (the Oracle Identity Manager URL) is protected.
The security policy in the Access System contains an authentication scheme, authorization rules, and allowed operations based on authentication and authorization success or failure.
4. If a valid session does not exist, and the resource is protected, the WebGate prompts the user for credentials.
Oracle Identity ManagerWeb Client
WebBrowser
Oracle IdentityManagerDatabase
Server
Oracle IdentityManagerServer
Application Server
Web Server
OracleAccess
ManagerWebGate
Oracle AccessManager
Access Server
obSSOCookie
LDAP

Preparing the Environment
8-4 Oracle Identity Manager Best Practices Guide
5. If the credentials are validated, Oracle Access Manager performs the actions that are defined in the security policy for the resource and sets an HTTP header variable that maps to the Oracle Identity Manager user ID.
6. If a valid session cookie exists, and if the user is authorized to access the resource, the WebGate redirects the user to the requested Oracle Identity Manager resource.
7. The Administrative and User Console reads the HTTP header variable and sets the value as the logged-in user.
8. The Administrative and User Console generates the application pages, pending any further authorization checks performed in Oracle Identity Manager.
8.3 Preparing the EnvironmentComplete the following tasks to prepare your environment for the integration of Oracle Access Manager with Oracle Identity Manager.
Task overview: Preparing your environment for the integration1. Install a supported directory server according to vendor instructions.
2. Install and configure Oracle Access Manager by using the directory server as the Lightweight Direct Access Protocol (LDAP) repository.
3. Install a WebGate on the Oracle Identity Manager HTTP server.
Do not install the WebGate against an application server that supports HTTP services, for example, Oracle WebLogic Server. If your application server is Oracle Application Server, JBoss Application Server, IBM WebSphere Application Server, or Oracle WebLogic Server, install an HTTP server such as IIS, Apache, iPlanet, or Oracle HTTP Server.
4. Configure the HTTP server to forward user requests to the J2EE application server and send responses from the Oracle Identity Manager back to the user.
5. Configure the Web browser to allow cookies, according to vendor instructions.
6. Set up Oracle Access Manager for Oracle Identity Manager.
8.4 Configuring Single Sign-On for Oracle Access ManagerThe following procedure describes how to configure single sign-on for Oracle Access Manager.
To configure single sign-on for Oracle Access Manager1. On the welcome page of the Access System, click Policy Manager, and then click
Create Policy Domain.
2. Create a policy domain and policies to restrict access to the Oracle Identity Manager URLs.
3. In the Access System console, define host identifiers for Oracle Identity Manager.
4. Click Policy Manager, and then click the link for the Oracle Identity Manager policy domain.
See Also: Oracle Access Manager Installation Guide
See Also: Oracle Access Manager Installation Guide
Setting Up Oracle Identity Manager for Single Sign-On with Oracle Access Manager
Integrating with Oracle Access Manager 8-5
5. Click the Resources tab and define resources for Oracle Access Manager to protect.
6. Click the Authorization Rules tab and define an authorization rule to determine authenticated users who can access the Oracle Identity Manager URLs.
7. Click the Default Rules tab. The Authentication Rule subtab is selected.
8. Define an authentication rule, for example, Basic Over LDAP.
9. Click the Actions subtab and define an authorization action that sets a custom HTTP header variable on successful authorization. The header variable should contain a value that maps to the Oracle Identity Manager user ID.
10. Click the Policies tab.
11. Click Add and define an access policy in the Oracle Identity Manager policy domain, and add the Oracle Identity Manager URL resources to this policy.
8.5 Setting Up Oracle Identity Manager for Single Sign-On with Oracle Access Manager
The following procedure describes how to set up Oracle Identity Manager for integration with Oracle Access Manager.
To configure single sign-on for Oracle Identity Manager1. Stop the application server gracefully.
2. Start a plain-text editor and open the following file:
OIM_HOME/xellerate/config/xlconfig.xml
3. Locate the following single sign-on configuration (the following are the default settings without single sign-on):
<web-client><Authentication>Default</Authentication><AuthHeader>REMOTE_USER</AuthHeader></web-client>
4. Edit the single sign-on configuration as follows.
Replace SSO_HEADER_NAME with the appropriate header configured in your single sign-on system:
<web-client><Authentication>SSO</Authentication><AuthHeader>SSO_HEADER_NAME</AuthHeader></web-client>
To enable single sign-on with non-ASCII character logins, you must include a decoding class name to decode the non-ASCII header value. Add the decoding class name and edit the single sign-on configuration as follows:
<web-client><Authentication>SSO</Authentication><AuthHeader>SSO_HEADER_NAME</AuthHeader><AuthHeaderDecoder>com.thortech.xl.security.auth.CoreIDSSOAuthHeaderDecoder</AuthHeaderDecoder></web-client>
Setting Up Oracle Application Server OC4J Plugin to Communicate with Oracle Access Manager
8-6 Oracle Identity Manager Best Practices Guide
Replace SSO_HEADER_NAME with the appropriate header configured in your single sign-on system.
5. Change your application server and Web server configuration to enable single sign-on.
If you are using Oracle Application Server, then see "Setting Up Oracle Application Server OC4J Plugin to Communicate with Oracle Access Manager" on page 8-6 for information about performing this step. If you are using any other application server, then see your application server and Web server vendor documentation for details.
6. Restart the application server.
8.6 Setting Up Oracle Application Server OC4J Plugin to Communicate with Oracle Access Manager
Several different configurations, including application and Web servers, are possible in an Oracle Identity Manager and Oracle Access Manager environment. This section demonstrates one possible configuration to integrate Oracle Identity Manager with Oracle Access Manager by using Oracle Application Server and the Internet Information Services (IIS) plug-in of the application server (Oracle Application Server OC4J Plugin).
You must install and configure the plug-in so that Oracle Application Server can communicate with the Oracle Access Manager server. The Oracle Application Server OC4J Plugin plug-in is a file named opii.dll.
To install and configure the Oracle Application Server OC4J Plugin
1. Download the Oracle Application Server OC4J Plugin from Oracle Technology Network (OTN) by using the following steps.
a. Go to the OTN Web site at the following URL:
http://www.oracle.com/technology/index.html
b. Click Downloads on the horizontal navigation menu at the top of the page.
c. Scroll to the Middleware section of the page and click SOA Suite in the Developer Tools section.
d. Click See All in the Oracle SOA Suite 10g Release 3 (10.1.3.x) section.
e. In the page that is displayed, accept the License Terms and Export Restrictions and also the Oracle Technology Network Development License Agreement.
f. Expand the Oracle SOA Suite 10g Companion (10.1.3.x) CD entry. In the list that is displayed, the Oracle Application Server OC4J Plugin is listed as a component.
g. Click CD1 for the appropriate operating system to download CD1 for the Oracle SOA Suite 10g Companion (10.1.3.x) CD.
2. Open the Registry Editor and perform the following steps:
Note: The information in this section is based on IIS version 6.0. See your application and Web server vendor's documentation for more information about configuring single sign-on.

Setting Up Oracle Application Server OC4J Plugin to Communicate with Oracle Access Manager
Integrating with Oracle Access Manager 8-7
a. Click HKEY_LOCAL_MACHINE, and then click SOFTWARE.
b. Right-click Oracle and select New. Then select Key and name it opii.
c. Right-click the opii entry, select New. Then select String Value and name the String Value log_file.
d. Right-click the log_file entry and select Modify. The Edit String dialog box is displayed.
e. In the Value data field, enter the path where you want to keep the opii log file and click OK.
f. Right-click the opii entry, and then select New.
g. Select String Value and name the String Value log_level. This log_level string value specifies the desired log level for opii, for which debug, inform, error, and emerg are valid values.
h. Right-click the opii entry, and then select New. Then select String Value and name the String Value server_defs.
i. Right-click the server_def String Value and select Modify. The Edit String dialog box is displayed.
j. Enter the path where the opii.conf file will reside. You will create the opii.conf file in Step 10.
3. Start the IIS Management Console, then expand the entry for the node hosting the IIS server that will communicate with the Oracle Access Manager server.
4. Expand the Web Sites entry, then right-click the Default Web Sites entry and then select New. After this, select Virtual Directory. The Virtual Directory Creation Wizard is displayed.
5. Click Next and perform the following steps:
a. Enter opii in the Alias Name field and click Next.
b. Enter the location of the opii.dll file in the Path field and click Next.
c. Select the Read, Run scripts, and Execute options on the Virtual Directory Access Permissions screen and click Next.
d. Click Finish to close the Virtual Directory Creation Wizard.
6. Add the opii.dll Oracle Application Server OC4J Plugin as a filter to your IIS Web sites by using the following steps:
a. In the IIS Management Console, right-click the Default Web Sites entry and select Properties. The Default Web Site Properties dialog box is displayed.
b. Click the ISAPI Filters tab, and then click Add.
c. Enter opii in the Filter Name field.
d. Enter the path of the opii.dll Oracle Application Server OC4J Plugin in the Executable field.
e. Click OK on the Add/Edit Filter Properties dialog box.
f. Click OK on the Default Web Site Properties dialog box.
Note: This procedure uses sample steps by using regedit.
Setting Up Oracle Application Server OC4J Plugin to Communicate with Oracle Access Manager
8-8 Oracle Identity Manager Best Practices Guide
7. Restart the IIS server by using the following steps in the IIS Management Console:
a. Right-click the node hosting the IIS server that will communicate with the Oracle Access Manager server. Select All Tasks, and then select Restart IIS. The Stop/Start/Restart dialog box is displayed.
b. Select Restart Name_of_IIS_server and click OK.
c. After the IIS server restarts, verify that the opii.dll Oracle Application Server OC4J Plugin is running by right-clicking Default Web Sites, selecting Properties, selecting the ISAPI Filters tab, and confirming that there is a green arrow pointing up for the opii filter.
8. On the IIS Management Console, click Web Services Extensions, select opii, and then click the Allow button.
9. Identify the port for the ajp13 protocol by using the following steps:
a. On the computer hosting the Oracle Application Server, open the OAS_HOME/j2ee/OAS_INSTANCE/config/default-web-site-.xml file in a text editor.
b. Search for the string ajp13.
c. Identify the port number for ajp13, for example 8889.
10. Create a file named opii.conf in the opii directory that contains the following entries. The entries list the Oracle Identity Manager applications protected by OracleAS Single Sign-On, the name of the computer hosting Oracle Identity Manager (for example, host_name), and the port number for ajp13 (for example, ajp13 port number).
Oc4jMount/xlWebApp ajp13://host_name:ajp13 port numberOc4jMount/xlWebApp/* ajp13://host_name:ajp13 port numberOc4jMount/xlScheduler ajp13://host_name:ajp13 port numberOc4jMount/xlScheduler/* ajp13://host_name:ajp13 port numberOc4jMount/Nexaweb ajp13://host_name:ajp13 port numberOc4jMount/Nexaweb/* ajp13://host_name:ajp13 port number
Note: Ensure that the opii filter has a lower priority than the WebGate filter.
Note: OAS_HOME represents the location in which Oracle Application Server is installed.
OAS_INSTANCE represents the name of the Oracle Application Server instance.

9
Integrating with Oracle Application Server Single Sign-On 9-1
9 Integrating with Oracle Application ServerSingle Sign-On
This chapter describes how to use Oracle Application Server (OracleAS) Single Sign-On, a component of Oracle Application Server, to manage user authentication and authorization when a user logs in to Oracle Identity Manager.
This chapter assumes you are familiar with OracleAS Single Sign-On and Oracle Identity Management infrastructure, and that you have already installed the required components, including your application server, Web server, Oracle Identity Manager, OracleAS Single Sign-On, and Oracle Internet Directory.
This chapter contains the following topics:
■ Setting Up Oracle Application Server OC4J Plugin to Communicate with OracleAS Single Sign-On
■ Setting Up Oracle Identity Manager for Single Sign-On with OracleAS Single Sign-On
■ Creating Single Sign-On User Accounts for Oracle Identity Manager Users
9.1 Setting Up Oracle Application Server OC4J Plugin to Communicate with OracleAS Single Sign-On
You must install and configure the Oracle Application Server OC4J Plugin, which is an IIS plug-in for OC4J, so that Oracle Application Server can communicate with the
See Also: Oracle Application Server Single Sign-On Administrator's Guide for more information about deploying OracleAS Single Sign-On
Important: Several different configurations, including application and Web servers, are possible in an Oracle Identity Manager and OracleAS Single Sign-On environment.
To demonstrate one possible configuration, this chapter describes how to integrate with OracleAS Single Sign-On by using Oracle Application Server and the Oracle Application Server OC4J Plugin. The information in this chapter is based on IIS version 6.0.
See your application and Web server vendor's documentation for more information about configuring single sign-on.

Setting Up Oracle Application Server OC4J Plugin to Communicate with OracleAS Single Sign-On
9-2 Oracle Identity Manager Best Practices Guide
OracleAS Single Sign-On server. The Oracle Application Server OC4J Plugin is a file named opii.dll.
To install and configure the Oracle Application Server OC4J Plugin
1. Download the Oracle Application Server OC4J Plugin from Oracle Technology Network (OTN) by using the following steps:
a. Go to the OTN Web site at the following URL:
http://www.oracle.com/technology/index.html
b. Click Downloads on the horizontal navigation menu at the top of the page.
c. Scroll to the Middleware section of the page and click SOA Suite in the Developer Tools section.
d. Click See All in the Oracle SOA Suite 10g Release 3 (10.1.3.x) section.
e. In the page that is displayed, accept the License Terms and Export Restrictions and also the Oracle Technology Network Development License Agreement.
f. Expand the Oracle SOA Suite 10g Companion (10.1.3.x) CD entry. In the list that is displayed, the Oracle Application Server OC4J Plugin is listed as a component.
g. Click CD1 for the appropriate operating system to download CD1 for the Oracle SOA Suite 10g Companion (10.1.3.x) CD.
2. Open the Registry Editor and perform the following steps:
a. Click HKEY_LOCAL_MACHINE, and then click SOFTWARE.
b. Right-click Oracle and select New. Then select Key and name it opii.
c. Right-click the opii entry, select New. Then select String Value and name the String Value log_file.
d. Right-click the log_file entry and select Modify. The Edit String dialog box is displayed.
e. In the Value data field, enter the path where you want to keep the opii log file and click OK.
f. Right-click the opii entry, and then select New.
g. Select String Value and name the String Value log_level. This log_level string value specifies the desired log level for opii, for which debug, inform, error, and emerg are valid values.
h. Right-click the opii entry, and then select New. Then select String Value and name the String Value server_defs.
i. Right-click the server_def String Value and select Modify. The Edit String dialog box is displayed.
j. Enter the path where the opii.conf file will reside. You will create the opii.conf file in Step 11.
3. Start the IIS Management Console, then expand the entry for the node hosting the IIS server that will communicate with the OracleAS Single Sign-On server.
Note: This procedure uses sample steps by using regedit.

Setting Up Oracle Application Server OC4J Plugin to Communicate with OracleAS Single Sign-On
Integrating with Oracle Application Server Single Sign-On 9-3
4. Expand the Web Sites entry, then right-click the Default Web Sites entry and select New, then select Virtual Directory. The Virtual Directory Creation Wizard is displayed.
5. Click Next and perform the following steps:
a. Enter opii in the Alias Name field and click Next.
b. Enter the location where the opii.dll file is located in the Path field and click Next.
c. Select the Read, Run scripts, and Execute options on the Virtual Directory Access Permissions screen and click Next. Click Finish to close the Virtual Directory Creation Wizard.
6. Add the opii.dll Oracle Application Server OC4J Plugin as a filter to your IIS Web sites by using the following steps:
a. In the IIS Management Console, right-click the Default Web Sites entry and select Properties. The Default Web Site Properties dialog box is displayed.
b. Click the ISAPI Filters tab and click Add.
c. Enter opii in the Filter Name field.
d. Enter the path to the location of the opii.dll Oracle Application Server OC4J Plugin in the Executable field.
e. Click OK on the Add/Edit Filter Properties dialog box.
f. Click OK on the Default Web Site Properties dialog box.
7. Give permission to the IIS group on the OSSO_HOME/bin folder by using the following steps:
a. Right-click the OSSO_HOME/bin folder and select Properties.
b. Click the Security tab.
c. Add the IIS_WPG group with Read and Execute permissions.
8. Restart the IIS server by using the following steps from the IIS Management Console:
a. Right-click the node hosting the IIS server that will communicate with the OracleAS Single Sign-On server, select All Tasks, and then select Restart IIS. The Stop/Start/Restart dialog box is displayed.
b. Select Restart Name_of_IIS_server and click OK.
c. After the IIS server restarts, verify that the opii.dll Oracle Application Server OC4J Plugin is running by right-clicking Default Web Sites, selecting Properties, selecting the ISAPI Filters tab, and confirming that there is a green arrow pointing up for the opii filter.
9. On the IIS Management Console, click Web Services Extensions, select opii, and then click the Allow button.
10. Identify the port for the ajp13 protocol by using the following steps:
a. On the computer hosting Oracle Application Server, open the OAS_HOME/j2ee/OAS_INSTANCE/config/default-web-site-.xml file in a text editor.

Setting Up Oracle Identity Manager for Single Sign-On with OracleAS Single Sign-On
9-4 Oracle Identity Manager Best Practices Guide
b. Search for the string ajp13.
c. Identify the port number for ajp13, for example 8889.
11. Create a file named opii.conf in the opii directory that contains the following entries. The entries list the Oracle Identity Manager applications protected by OracleAS Single Sign-On, the name of the computer hosting Oracle Identity Manager (for example, host_name), and the port number for ajp13 (for example, ajp13 port number):
Oc4jMount /xlWebApp ajp13://host_name:ajp13 port numberOc4jMount /xlWebApp/* ajp13://host_name:ajp13 port numberOc4jMount /xlScheduler ajp13://host_name:ajp13 port numberOc4jMount /xlScheduler/* ajp13://host_name:ajp13 port numberOc4jMount /Nexaweb ajp13://host_name:ajp13 port numberOc4jMount /Nexaweb/* ajp13://host_name:ajp13 port number
9.2 Setting Up Oracle Identity Manager for Single Sign-On with OracleAS Single Sign-On
Perform the following steps to set up Oracle Identity Manager for integration with OracleAS Single Sign-On:
1. Stop the application server.
2. Start a plain-text editor and open the following file:
OIM_HOME/xellerate/config/xlconfig.xml
3. Locate the following single sign-on configuration (the following are the default settings without single sign-on):
<web-client><Authentication>Default</Authentication><AuthHeader>REMOTE_USER</AuthHeader></web-client>
4. Edit the single sign-on configuration as follows.
<web-client><Authentication>SSO</Authentication><AuthHeader>osso-username</AuthHeader></web-client>
To enable single sign-on with non-ASCII character logins, you must include a decoding class name to decode the non-ASCII header value. Add the decoding class name and edit the single sign-on configuration as follows:
<web-client><Authentication>SSO</Authentication><AuthHeader>osso-username</AuthHeader><AuthHeaderDecoder>com.thortech.xl.security.auth.CoreIDSSOAuthHeaderDecoder</AuthHeaderDecoder></web-client>
5. Restart the application server.
Note: OAS_HOME represents the location where Oracle Application Server is installed. OAS_INSTANCE represents the name of the Oracle Application Server instance.

Creating Single Sign-On User Accounts for Oracle Identity Manager Users
Integrating with Oracle Application Server Single Sign-On 9-5
9.3 Creating Single Sign-On User Accounts for Oracle Identity Manager Users
You must create an entry in Oracle Internet Directory for each Oracle Identity Manager user that will use OracleAS Single Sign-On for authentication. Oracle Internet Directory is the repository for all OracleAS Single Sign-On user accounts and passwords. The OracleAS Single Sign-On server authenticates users against their entries in Oracle Internet Directory.
Perform the following steps to create an entry in Oracle Internet Directory for each Oracle Identity Manager user that will use OracleAS Single Sign-On for authentication:
1. Log in to the Oracle Delegated Administration Services home page at the following URL:
http://host:port/oiddas/
In this example, host represents the name of the computer on which Oracle Delegated Administration Services is located, and port is the port number of this server. Oracle Delegated Administration Services and OracleAS Single Sign-On generally have the same host name.
2. Click the Directory tab.
3. Click Create on the Users tab.
4. Create the information about the Oracle Identity Manager user by entering information in the following fields:
■ First Name
■ Last Name
■ User ID
■ Password for OracleAS Single Sign-On (and confirm by entering it twice)
5. Create the user by clicking the Submit button.
Note: The User ID must be the same as User ID for Oracle Identity Manager.

Creating Single Sign-On User Accounts for Oracle Identity Manager Users
9-6 Oracle Identity Manager Best Practices Guide

10
Using the Reconciliation Archival Utility 10-1
10 Using the Reconciliation Archival Utility
This chapter describes how to use the Reconciliation Archival utility. It contains the following topics:
■ Understanding the Reconciliation Archival Utility
■ Preparing Oracle Database for the Reconciliation Archival Utility
■ Preparing Microsoft SQL Server for the Reconciliation Archival Utility
■ Running the Reconciliation Archival Utility
■ Output Files Generated by the Reconciliation Archival Utility
10.1 Understanding the Reconciliation Archival Utility
Oracle Identity Manager stores reconciliation data from target systems in the following tables, which are called active reconciliation tables:
■ RCA
■ RCB
■ RCD
■ RCE
■ RCH
■ RCM
■ RCP
■ RCU
■ RPC
During the reconciliation process, Reconciliation Manager reconciles data in the active reconciliation tables with the Oracle Identity Manager core tables. Because Reconciliation Manager does not remove reconciled data from the active reconciliation tables, they might eventually grow very large, resulting in decreased performance during the reconciliation process. You can use the Reconciliation Archival utility to archive data that has been reconciled with Oracle Identity Manager. The Reconciliation Archival utility stores archived data in the following tables, called archive reconciliation tables, which have the same structure as the active reconciliation tables:
Note: The Reconciliation Archival utility is backward-compatible from Oracle Identity Manager release 8.5.3.x onward.
Understanding the Reconciliation Archival Utility
10-2 Oracle Identity Manager Best Practices Guide
■ ARCH_RCA
■ ARCH_RCB
■ ARCH_RCD
■ ARCH_RCE
■ ARCH_RCH
■ ARCH_RCM
■ ARCH_RCP
■ ARCH_RCU
■ ARCH_RPC
You can use the Reconciliation Archival utility to perform the following tasks:
■ Archive all or specific data from the active reconciliation tables to the archive reconciliation tables
■ Delete all data from the archive reconciliation tables
■ Delete all data from the active reconciliation tables
When you archive selective data from the active reconciliation tables to the archive reconciliation tables, you must specify start date, end date, and reconciliation event status parameters. Start and end dates must be in the format YYYYMMDD. For the reconciliation event parameter, you can choose Event Linked, Event Closed, or both. The Event Linked status represents events that are successfully reconciled into Oracle Identity Manager, whereas the Event Closed status represents events that are manually closed with Reconciliation Manager.
To reduce the time that the archiving process takes, the utility drops the indexes on all active reconciliation tables when the number of records to be archived is greater than 200000. The indexes are re-created after the archived data is deleted from the active tables. If required, you can change the value 200000 to any other value by editing the following line:
■ In the OIM_ReconArch.bat file, change the following line:
set INDXRESP=200000
■ In the OIM_ReconArch.sh file, change the following line:
INDXOPT=200000
If you choose to archive selective data, then the utility archives data that falls in the specified date range and event status.
When you archive all data from the active reconciliation tables to the archive reconciliation tables, the Reconciliation Archival utility archives all reconciliation data with event status of Event Linked or Event Closed.
The files that constitute the Oracle Database version of the Reconciliation Archival utility are located in the following directory:
installServer/xellerate/db/oracle/Utilities/ReconArchival
The files that constitute the Microsoft SQL Server version of the Reconciliation Archival utility are located in the following directory:
installServer/xellerate/db/sqlserver/Utilities/ReconArchival
Preparing Oracle Database for the Reconciliation Archival Utility
Using the Reconciliation Archival Utility 10-3
10.2 Preparing Oracle Database for the Reconciliation Archival UtilityBefore you can use the Reconciliation Archival utility with Oracle Database, you must perform the following steps:
1. Start SQL*Plus and connect to Oracle Database as SYS user.
2. Create a separate tablespace for the archival reconciliation tables by entering the following command. Replace DATA_DIR with the directory where you want to store the data file and adjust the size and other parameters as necessary for your environment.
CREATE TABLESPACE OIM_RECON_ARCH DATAFILE 'DATA_DIR\reconarch_01.dbf' SIZE 1000M REUSE EXTENT MANAGEMENT LOCAL SEGMENT SPACE MANAGEMENT AUTO;
3. To be able to use the utility, the Oracle Identity Manager database user must be explicitly granted the CREATE TABLE privilege. To grant this privilege to the database user, replace OIM_DB_USER with the Oracle Identity Manager database user ID in the following command, and then run the command:
GRANT CREATE TABLE TO OIM_DB_USER
4. Connect to Oracle Database as the Oracle Identity Manager database user.
5. Enter the following command to run the Create_recon_arch_tables.sql script, which creates the archive reconciliation tables:
@ path/Create_recon_arch_tables.sql
6. Enter the following command to run the cr_recon_ddl_table.sql script, which creates a table named oim_recon_ddl. The oim_recon_ddl table is used by the Reconciliation Archival utility.
@ path/cr_recon_ddl_table.sql
7. Enter the following command to run the OIM_SP_ReconArchival.sql script, which creates a stored procedure that the Reconciliation Archival utility uses to archive and delete reconciliation data:
@ path/OIM_SP_ReconArchival.sql
Note: Data that has been archived from the active reconciliation tables to the archive reconciliation tables will no longer be available through Oracle Identity Manager. To access this data, you must query the archive reconciliation tables in your Oracle Identity Manager database.
Note:
Oracle recommends that you allocate a large UNDO tablespace when archiving large amounts of data.
If your Oracle Database instance is running in ARCHIVELOG mode, you must switch to NOARCHIVELOG mode before running the Recon Archival utility. See Oracle Database Administrator's Guide for information about changing the database archiving mode.

Preparing Microsoft SQL Server for the Reconciliation Archival Utility
10-4 Oracle Identity Manager Best Practices Guide
10.3 Preparing Microsoft SQL Server for the Reconciliation Archival Utility
Before you can use the Reconciliation Archival utility with Microsoft SQL Server, you must perform the following steps:
1. Start SQL Query Analyzer and connect to Microsoft SQL Server as a user that is a member of sysadmin, or who has a dbcreator server role or db_owner database role.
2. Enter the following commands. Replace DATA_DIR with the directory in which you want to store the data file, and adjust the SIZE, MAXSIZE, and FILEGROWTH parameters as necessary for your environment. These commands create the OIM_RECON_ARCH file group, which the Reconciliation Archival utility uses to store date from archival reconciliation tables.
USE masterGOALTER DATABASE oim_database_nameADD FILEGROUP OIM_RECON_ARCHGOALTER DATABASE oim_database_name ADD FILE (NAME = OIM_RECON_ARCH_01, FILENAME = 'DATA_DIR\RECON_ARCH_01.NDF', SIZE = 1000MB, MAXSIZE = 5000MB, FILEGROWTH = 25MB)TO FILEGROUP OIM_RECON_ARCHGO
3. Disconnect from Microsoft SQL Server and reconnect again as the Oracle Identity Manager database user.
4. Load and execute the path/Create_recon_arch_tables.sql script, which creates the archive reconciliation tables.
5. Load and execute the path/OIM_SP_ReconArchival.sql script, which creates a stored procedure that the Reconciliation Archival utility uses to archive and delete reconciliation data.
10.4 Running the Reconciliation Archival UtilityPerform the following steps to run the Reconciliation Archival utility:
1. Ensure that the Oracle Identity Manager database is available and that no reconciliation processes are running. In addition, ensure that the Oracle Identity Manager database is not open to transactions for other sessions.
2. Stop the Oracle Identity Manager by following the instructions in the Oracle Identity Manager installation guide for your application server.
3. On Microsoft Windows platforms, you must specify the short date format as dddd M/d/yyyy. In addition, you must specify the time format as H:mm:ss. To
Note: Oracle recommends that you run the Reconciliation Archival utility during off-peak hours.

Running the Reconciliation Archival Utility
Using the Reconciliation Archival Utility 10-5
customize the date and time formats, use the Regional and Language Options command in Control Panel.
4. On Linux and UNIX platforms, run the following commands to set execution permission for the OIM_ReconArch.sh file and to ensure that the file is a valid Linux and UNIX text file:
chmod 755 path/OIM_ReconArch.shdos2unix path/OIM_ReconArch.sh
5. On Linux and UNIX platforms, run the path/OIM_ReconArch.sh file. On Microsoft Windows platforms, run the path\OIM_ReconArch.bat file.
6. For Oracle Database installations, enter values for the following parameters when prompted:
■ Oracle home directory
■ Oracle Identity Manager database name or TNS string if the Oracle Identity Manager database is running on a remote computer
■ Oracle Identity Manager database user name and password
For Microsoft SQL Server installations, enter values for the following parameters when prompted:
■ Server name on which the Microsoft SQL Server database is running
■ Oracle Identity Manager database name
■ Oracle Identity Manager database user name and password
7. When prompted, select one of the following options:
■ 1) Archive data from active reconciliation tables
■ 2) Delete all data from archival reconciliation tables
■ 3) Delete all data from active reconciliation tables
■ 4) Exit
8. If you selected to archive data, perform the following procedures:
a. Select one of the following archival options:
– Archive selective data
– Archive all data
– Exit
b. If you chose to archive selective data, enter start and end dates in the format YYYYMMDD when prompted.
c. Select a reconciliation event status for the data that you want to archive:
Note: When you change the date and time format, the change will be applied to all the applications running on the Microsoft Windows platform.
Caution: You must enter an end date that is later than or equal to the start date. Otherwise, data will not be archived.
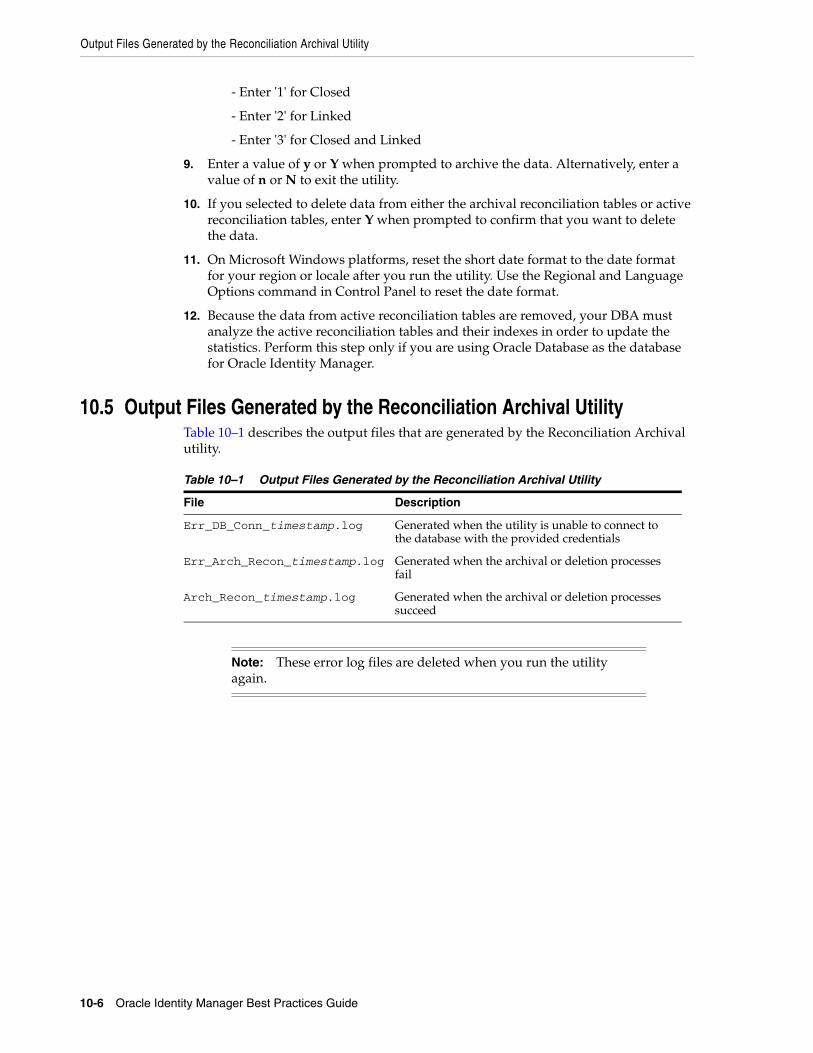
Output Files Generated by the Reconciliation Archival Utility
10-6 Oracle Identity Manager Best Practices Guide
- Enter '1' for Closed
- Enter '2' for Linked
- Enter '3' for Closed and Linked
9. Enter a value of y or Y when prompted to archive the data. Alternatively, enter a value of n or N to exit the utility.
10. If you selected to delete data from either the archival reconciliation tables or active reconciliation tables, enter Y when prompted to confirm that you want to delete the data.
11. On Microsoft Windows platforms, reset the short date format to the date format for your region or locale after you run the utility. Use the Regional and Language Options command in Control Panel to reset the date format.
12. Because the data from active reconciliation tables are removed, your DBA must analyze the active reconciliation tables and their indexes in order to update the statistics. Perform this step only if you are using Oracle Database as the database for Oracle Identity Manager.
10.5 Output Files Generated by the Reconciliation Archival UtilityTable 10–1 describes the output files that are generated by the Reconciliation Archival utility.
Table 10–1 Output Files Generated by the Reconciliation Archival Utility
File Description
Err_DB_Conn_timestamp.log Generated when the utility is unable to connect to the database with the provided credentials
Err_Arch_Recon_timestamp.log Generated when the archival or deletion processes fail
Arch_Recon_timestamp.log Generated when the archival or deletion processes succeed
Note: These error log files are deleted when you run the utility again.

11
Using the Task Archival Utility 11-1
11
Using the Task Archival Utility
This chapter describes how to use the Task Archival utility. It contains the following topics:
■ Understanding the Task Archival Utility
■ Preparing Oracle Database for the Task Archival Utility
■ Preparing Microsoft SQL Server for the Task Archival Utility
■ Running the Task Archival Utility
■ Reviewing the Output Files Generated by the Task Archival Utility
11.1 Understanding the Task Archival UtilityIn Oracle Identity Manager, a task refers to one or more activities that comprise a process, which handles the provisioning of a resource. For example, a process for requesting access to a resource may include multiple approval and provisioning tasks. Oracle Identity Manager stores task data in the following tables, which are called active task tables:
■ OSI
■ OSH
■ SCH
By default, Oracle Identity Manager does not remove completed tasks from the active task tables. As the size of the active task tables increases, you might experience a reduction in performance, especially when managing open tasks and pending approvals. After a task executes successfully, you can use the Task Archival utility to archive the task data and remove it from the active task tables. Archiving task data with the Task Archival utility improves performance and ensures that the data is safely stored.
The Task Archival utility stores archived task data in the following archive task tables, which have the same structure as the active task tables:
■ ARCH_OSI
■ ARCH_OSH
■ ARCH_SCH
You can use the Task Archival utility to archive the following types of tasks:
■ Provisioning tasks for resource instances that have been revoked for disabled or deleted users

Preparing Oracle Database for the Task Archival Utility
11-2 Oracle Identity Manager Best Practices Guide
■ Provisioning tasks for resource instances that have been revoked
■ Approval tasks with a request status of Request Complete, Request Cancelled, or Object Approval Complete
When you archive tasks with the Task Archival utility, you can specify the type of archive operation, the user status, the task execution date, and the number of records on which to drop the indexes before archiving. The archive operation represents the type of task data to archive and the user status determines whether to archive data for users who have been deleted, disabled, or both. The task execution date represents the date on which a task is executed and must be in the format YYYYMMDD.
All executed tasks, up to the task execution date you specify, will be archived. To reduce the time that the archiving process takes, the utility drops the indexes on all active task tables when the number of records to be archived is greater than 200000. The indexes are re-created after the archived data is deleted from the active task tables. You can change the value 200000 to your preferred value. You can change the value in the following lines of code in the OIM_TasksArch.bat file or in the OIM_TasksArch.sh file:
In the .bat file, set INDXRESP=200000
In the .sh file, indxopt=200000
The files that constitute the Oracle Database version of the Task Archival utility are located in the following directory:
OIM_HOME/xellerate/Database/Oracle/Utilities/TaskArchival
The files that constitute the Microsoft SQL Server version of the Task Archival utility are located in the following directory:
OIM_HOME/xellerate/Database/SQLServer/Utilities/TaskArchival
11.2 Preparing Oracle Database for the Task Archival UtilityBefore you can use the Task Archival utility with Oracle Database, you must perform the following steps:
1. Start SQL*Plus and connect to Oracle Database as a SYS user.
2. Create a separate tablespace for the archival task tables by entering the following command. Replace DATA_DIR with the directory in which you want to store the data file and adjust the size and other parameters as necessary for your environment.
CREATE TABLESPACE TasksArch DATAFILE 'DATA_DIR\tasksarch_01.dbf' SIZE 1000M REUSE EXTENT MANAGEMENT LOCAL SEGMENT SPACE MANAGEMENT AUTO;
Note: Data that has been archived from the active task tables to the archive task tables will no longer be available through Oracle Identity Manager. To access this data, you must query the archive task tables in your Oracle Identity Manager database.
Preparing Microsoft SQL Server for the Task Archival Utility
Using the Task Archival Utility 11-3
3. Connect to Oracle Database as the Oracle Identity Manager database user.
4. If you plan to run the Task Archival utility on an Oracle Identity Manager release that is earlier than 9.1.0, then execute the following command. This command adds the ORC_TASKS_ARCHIVED column to the ORC table. The Task Archival utility updates this column to value of 1, which indicates that the tasks for that particular process instance have been archived.
ALTER TABLE ORC ADD(ORC_TASKS_ARCHIVED VARCHAR2(1))
5. Enter the following command to run the cr_taskarchival_ddl_table.sql script, which creates a table named OIM_TASK_ARCH_DDL. This table is used by the Task Archival utility.
@ path/cr_taskarchival_ddl_table.sql
6. Enter the following command to run the Create_TasksArch_Tables.sql script, which creates the archive task tables:
@ path/Create_TasksArch_Tables.sql
7. Enter the following command to run the OIM_SP_TASKS_ARCHIVAL.sql script, which creates a stored procedure that the Task Archival utility uses to archive and delete task data:
@ path/OIM_SP_TASKS_ARCHIVAL.sql
8. If your Oracle Database instance is running in ARCHIVELOG mode, you must switch to NOARCHIVELOG mode before running the Task Archival utility. See Oracle Database Administrator's Guide for information about changing the database archiving mode.
11.3 Preparing Microsoft SQL Server for the Task Archival UtilityBefore you can use the Task Archival utility with Microsoft SQL Server, you must perform the following steps:
1. If you have added any custom indexes to the OSI, SCH, or OSH tables, then you must also add them to the path/Create_TasksArch_Indexes.sql file.
2. Start SQL Query Analyzer and connect to SQL Server as a user that is a member of sysadmin, or who has a dbcreator server role or db_owner database role.
3. Enter the following commands. Replace DATA_DIR with the directory in which you want to store the data file and adjust the SIZE, MAXSIZE, and FILEGROWTH parameters as necessary for your environment. These commands create the OIM_ARCH_TASKS file group, which the Task Archival utility uses to store data from archive task tables.
USE masterGOALTER DATABASE oim_database_nameADD FILEGROUP OIM_ARCH_TASKS
Note: Oracle recommends that you allocate a large UNDO tablespace when archiving large amounts of data. In addition, turn on parallel execution by configuring the parallel_max_servers and parallel_min_servers initialization parameters. Parallel execution helps improve the performance of the archival process.

Running the Task Archival Utility
11-4 Oracle Identity Manager Best Practices Guide
GOALTER DATABASE oim_database_name ADD FILE (NAME = OIM_ARCH_TASKS, FILENAME = 'DATA_DIR\OIM_ARCH_TASKS.NDF', SIZE = 1000MB, MAXSIZE = 5000MB, FILEGROWTH = 25MB)TO FILEGROUP OIM_ARCH_TASKSGO
4. Disconnect from SQL Server and reconnect again as the Oracle Identity Manager database user.
5. If you plan to run the Task Archival utility on an Oracle Identity Manager release that is earlier than 9.1.0, then execute the following command. This command adds the ORC_TASKS_ARCHIVED column to the ORC table. The Task Archival utility updates this column to value of 1, which indicates that the tasks for that particular process instance have been archived.
ALTER TABLE ORC ADD ORC_TASKS_ARCHIVED VARCHAR(1)
6. Load and execute the path/Create_TasksArch_Tables.sql script, which creates the archive task tables.
7. Load and execute the path/OIM_SP_TASKS_ARCHIVAL.sql script, which creates a stored procedure that the Task Archival utility uses to archive and delete task data.
11.4 Running the Task Archival UtilityPerform the following steps to run the Task Archival utility:
1. Ensure that the Oracle Identity Manager database is available and that no reconciliation processes are running. Also, ensure that the Oracle Identity Manager database is not open to transactions for other sessions.
2. Back up the OSI, SCH, and OSH tables.
3. Stop Oracle Identity Manager by following the instructions in the Oracle Identity Manager installation guide for your application server.
4. On Microsoft Windows platforms, you must specify the short date format as dddd M/d/yyyy. In addition, you must specify the time format as H:mm:ss. To customize the date and time formats, select the Regional and Language Options command in the Control Panel.
5. On Linux and UNIX platforms, run the path/OIM_TasksArch.sh file. On Microsoft Windows platforms, run the path\OIM_TasksArch.bat file.
Note: Oracle recommends that you run the Task Archival utility during off-peak hours.
Note: When you change the date and time format, all applications running on the Microsoft Windows platform will be affected.

Running the Task Archival Utility
Using the Task Archival Utility 11-5
6. For Oracle Database installations, enter values for the following parameters when prompted:
■ Oracle home directory
■ Oracle Identity Manager database name or TNS string if the Oracle Identity Manager database is running on a remote computer
■ Oracle Identity Manager database user name and password
For Microsoft SQL Server installations, enter values for the following parameters when prompted:
■ Server name where the SQL Server database is running
■ Oracle Identity Manager database name
■ Oracle Identity Manager database user name and password
7. When prompted, select one of the following options:
■ Archive all provisioning tasks on resource instances that have been revoked for disabled or deleted users.
■ Archive all provisioning tasks on resource instances that have been revoked.
■ Archive all approval tasks in which the request status is Request Complete, Request Cancelled, or Object Approval Complete.
■ Exit.
8. If you chose to archive all provisioning tasks for resource instances that have been revoked for disabled or deleted users, select one of the following options:
■ Users at Deleted status
■ Users at Disabled status
■ Users at Deleted and Disabled status
■ Go back to Main Menu
9. Enter a task execution date in the format YYYYMMDD when prompted. All executed tasks, up to the task execution date you specify, will be archived. To archive all tasks that were executed on or before the current date, press Enter without entering a date.
10. Enter a value of y or Y when prompted to archive the tasks. Otherwise, enter a value of n or N to exit the utility.
11. On Microsoft Windows platforms, reset the short date format to the date format for your region or locale after the Task Archival utility finishes running. Use the Regional and Language Options command in the Control Panel to reset the date format.
Note: You must enter the value of Y or N when prompted. If you press Enter without selecting a value, then the utility again counts the number of tasks to be archived and prompts you without beginning the archive.

Reviewing the Output Files Generated by the Task Archival Utility
11-6 Oracle Identity Manager Best Practices Guide
11.5 Reviewing the Output Files Generated by the Task Archival UtilityTable 11–1 describes the output files that are generated by the Task Archival utility.
Note: Because the data from active task tables is removed, you must analyze the active task tables and their indexes for updated statistics. Perform this step only if you are using Oracle Database as the database for Oracle Identity Manager.
Table 11–1 Output Files Generated by the Task Archival Utility
File Description
Err_DB_Conn_timestamp.log Generated when the utility is unable to connect to the database with the specified credentials
Err_Arch_Tasks_timestamp.log Generated when the archival or deletion processes fail
Arch_TaskData_timestamp.log Generated when the archival or deletion processes succeed
Note: These error log files are deleted when you run the utility again.

Index-1
Index
Aadapters
compilation, 1-5administrative and user console
securing, 6-1
Ccache configuration
category-based properties, 5-3class reloading, 5-4general properties, 5-2optimal, 5-5production environment, for, 5-5purging, 5-5sample, 5-1
cache managementbest practices, 5-1
class reloading, 5-4
Ddatabase back up, 1-5definition data, 1-3Deployment Manager
best practices, 1-1exporting system objects, 1-3features, 1-2limitations, 1-2
deployment manager, 1-1
Eentity adapters, 1-5export descriptions, 1-4exporting data
dependencies, 1-4
Gglobal cache, 5-1group permissions, 1-5
Iimporting data, 1-6
Nnaming conventions, 1-3
Ooperational data, 1-3Oracle Application Server
OC4J plugin, 9-1setting up Oracle Identity Manager, 9-4
Oracle Application Server Single Sign-Onintegration, 9-1
Oracle Databaseperformance monitoring, 2-4physical data placement, 2-2pinning sequences, 2-3sample instance configuration, 2-1stored procedures, 2-3System Global Area, 2-3
Oracle Identity Managerabout, 8-1integration
about, 8-1tuning Oracle Database, 2-1
oracle identity managersecuring, 6-1
organizational hierarchyexporting, 1-4
Pphysical data placement
indexes, 2-2tablespace, 2-2
purging, 5-5
Rreconciliation archival utility, 10-1
output files generated, 10-6preparing oracle database, 10-3running, 10-4
related groups of objectsexporting, 1-3
report permissions, 1-5

Index-2
Sscheduled tasks, 1-5
parameter matching, 1-4SDK table
updates, 1-6Single Sign-On user accounts
creation, 9-5system objects
exporting, 1-3
Ttask archival utility, 11-1
running, 11-4ThreadLocal cache, 5-1
Wwarnings, 1-4