
Lecture 3 Towards a Verifying Compiler: Verifying Object Invariants

Oracle Financial Services Data Foundation Applications Pack – Java 7 and Java 8
Installation Guide
Release 8.0.5.0.0

OFSDF 8.0.5.0.0 Installation Guide
Oracle Financial Services Software 2
TTAABBLLEE OOFF CCOONNTTEENNTTSS
PPRREEFFAACCEE ....................................................................................................................................................... 7
Summary ............................................................................................................................................................. 7
Audience ............................................................................................................................................................. 7
Prerequisites for the Audience ............................................................................................................................ 7
Documentation Accessibility ................................................................................................................................ 7
Access to Oracle Support .......................................................................................................................................7
Related Documents ............................................................................................................................................. 7
Conventions and Acronyms ................................................................................................................................ 8
1 ABOUT OFSAA AND OFSAA APPLICATION PACKS .............................................................................. 10
1.1 About Oracle Financial Services Analytical Applications (OFSAA) ........................................................... 10
1.2 About OFSAA Applications Pack .............................................................................................................. 10
1.3 About OFSDF Applications Pack .............................................................................................................. 11
1.4 About Oracle Financial Services Analytical Applications Infrastructure (OFS AAI) ................................... 12
1.4.1 Components of OFSAAI ........................................................................................................................... 12
1.5 OFSAA Infrastructure High Availability ..................................................................................................... 12
2 UNDERSTANDING OFSDF APPLICATIONS PACK INSTALLATION .............................................................. 13
2.1 Installation Overview................................................................................................................................. 13
2.2 Deployment Topology ............................................................................................................................... 14
2.3 Hardware and Software Requirements ..................................................................................................... 15
2.3.1 Configurations Supported for Java 7 ........................................................................................................ 15
2.3.2 Configurations Supported for Java 8 ........................................................................................................ 18
2.4 Verifying the System Environment ............................................................................................................ 22
2.5 Understanding Installation Modes ............................................................................................................ 22
3 PREPARING FOR INSTALLATION ............................................................................................................. 23
3.1 Installer and Installation Prerequisites ...................................................................................................... 23
3.2 Obtaining the Software ............................................................................................................................. 25
3.3 Common Installation Tasks ...................................................................................................................... 26
3.3.1 Identifying the Installation, Download and Metadata Directories ............................................................... 26
3.3.2 Configuration for GUI Mode Installation .................................................................................................... 26
3.3.3 Downloading and Copying the Software ................................................................................................... 27
3.3.4 Extracting the Software ............................................................................................................................ 27
3.3.5 Setting up the Web Application Server ..................................................................................................... 28

OFSDF 8.0.5.0.0 Installation Guide
Oracle Financial Services Software 3
4 INSTALLING ORACLE FINANCIAL SERVICES DATA FOUNDATION APPLICATIONS PACK ............................. 29
4.1 Schema Creator Utility .............................................................................................................................. 29
4.1.1 Execution Modes in Schema Creator Utility .............................................................................................. 29
4.1.2 Execution Options in Schema Creator Utility ............................................................................................ 30
4.2 Configuring and Executing the Schema Creator Utility ............................................................................. 30
4.2.1 Prerequisites ............................................................................................................................................ 30
4.2.2 Configuring the Schema Creator Utility ..................................................................................................... 31
4.2.3 Executing the Schema Creator Utility ....................................................................................................... 31
4.3 Installing the OFSDF Applications Pack ................................................................................................... 38
4.3.1 Installing in GUI Mode .............................................................................................................................. 38
4.3.2 Installing in SILENT Mode ........................................................................................................................ 66
4.3.3 Verifying the Log File ................................................................................................................................ 73
4.4 Verifying the Installation ............................................................................................................................ 74
5 UPGRADING THE OFSDF APPLICATION PACK ....................................................................................... 75
5.1 Performing Model Upload Outside Installer .............................................................................................. 79
6 POST INSTALLATION CONFIGURATION ................................................................................................... 81
6.1 Configuring Resource Reference ............................................................................................................. 81
6.2 Starting OFSAA Infrastructure Services ................................................................................................... 81
6.3 Adding TNS Entries in TNSNAMES.ORA File .......................................................................................... 81
6.4 Creating and Deploying the Application Pack Web Archive ...................................................................... 82
6.5 Accessing the OFSAA Application ............................................................................................................ 82
6.6 Performing Post Deployment Configurations ............................................................................................ 82
7 APPENDIX A: CONFIGURING WEB SERVER ............................................................................................ 83
7.1 Configuring Web Server ........................................................................................................................... 83
7.2 Configuring Web Application Server ......................................................................................................... 83
7.2.1 Configuring WebSphere Application Server for Application Deployment ................................................... 84
7.2.2 Configuring WebLogic for Application Deployment ................................................................................... 87
7.2.3 Configuring Apache Tomcat Server for Application Deployment ............................................................... 94
8 APPENDIX B: CONFIGURING RESOURCE REFERENCE IN WEB APPLICATION SERVERS ............................. 98
8.1 Configuring Resource Reference in WebSphere Application Server ........................................................ 98
8.1.1 Creating JDBC Provider ........................................................................................................................... 98
8.1.2 Creating Data Source ............................................................................................................................. 102
8.1.3 Creating J2C Authentication ................................................................................................................... 106
8.1.4 Creating JDBC Connection Pooling ........................................................................................................ 107
8.2 Configuring Resource Reference in WebLogic Application Server ......................................................... 109

OFSDF 8.0.5.0.0 Installation Guide
Oracle Financial Services Software 4
8.2.1 Creating Data Source ............................................................................................................................. 109
8.2.2 Creating GridLink Data Source ............................................................................................................... 114
8.2.3 Configuring Multi Data Sources .............................................................................................................. 115
8.2.4 Advanced Settings for Data Source ........................................................................................................ 118
8.2.5 Creating JDBC Connection Pooling ........................................................................................................ 119
8.3.1 Creating Data Source ............................................................................................................................. 119
8.3.2 Creating JDBC Connection Pooling ........................................................................................................ 120
8.3.3 Configuring Class Loader for Apache Tomcat ........................................................................................ 121
9 APPENDIX C: CREATING AND DEPLOYING EAR/ WAR FILE ................................................................. 122
9.1 Creating EAR/WAR File .......................................................................................................................... 122
9.2 Deploying EAR/WAR File ....................................................................................................................... 123
9.2.1 Deploying EAR/WAR Files on WebSphere ............................................................................................. 123
9.2.2 Deploying EAR / WAR File on WebLogic ................................................................................................ 128
10 APPENDIX D: STARTING / STOPPING SERVICES.................................................................................... 136
10.1 Start/Stop OFSAA Infrastructure Services .............................................................................................. 136
10.1.1 Starting Infrastructure Services .............................................................................................................. 136
10.1.2 Starting Web Application Servers ........................................................................................................... 137
10.1.3 Stopping Infrastructure Services ............................................................................................................. 137
11 APPENDIX E: ACCESSING OFSAA APPLICATION ................................................................................. 139
11.1 Access the OFSAA Application .............................................................................................................. 139
11.2 OFSAAI Login ......................................................................................................................................... 140
12 APPENDIX F: POST DEPLOYMENT CONFIGURATIONS ............................................................................ 142
12.1 Deploying the Application ....................................................................................................................... 142
12.2 Logging as System Administrator ........................................................................................................... 142
12.3 Creating Users ........................................................................................................................................ 142
12.4 Mapping the Application User(s) to User Group ..................................................................................... 144
12.5 Changing ICC Batch Ownership ............................................................................................................. 145
12.6 Mapping ICC Batch Execution Rights to Users ...................................................................................... 146
12.7 Saving Post-Load Change Transformations ........................................................................................... 146
13 APPENDIX G: CLONING OFSAA INSTANCE.......................................................................................... 148
14 APPENDIX H: OFSAA LANDING PAGE ................................................................................................ 149
14.1 Installation Checklist ............................................................................................................................... 149
14.2 OFSAA Landing Page for OFSDF Administrator .................................................................................... 150
14.2.1 Applications Tab ..................................................................................................................................... 150
14.2.2 Object Administration Tab ...................................................................................................................... 150

OFSDF 8.0.5.0.0 Installation Guide
Oracle Financial Services Software 5
14.2.3 System Configuration and Identity Management Tab ............................................................................. 151
14.3 Enabling a Product within an Application Pack ....................................................................................... 151
15 APPENDIX I: ADDITIONAL INFORMATION ............................................................................................... 154
15.1 FTP/ SFTP Configuration for File Transfer ............................................................................................. 154
15.2 Configuring Infrastructure Server Memory .............................................................................................. 155
15.2.1 Setting Infrastructure Server Memory ..................................................................................................... 155
15.3 Setting Internet Explorer ......................................................................................................................... 156
15.4 Retrieving Patch Information .................................................................................................................. 158
15.5 Configuring OLAP Data Server ............................................................................................................... 159
15.6 Configuring Infrastructure Ports .............................................................................................................. 159
15.7 Executing OFSAAI Setup Information Fetching Tool .............................................................................. 160
15.8 Encryption Changer ................................................................................................................................ 160
15.9 Configuring Infrastructure LDAP ............................................................................................................. 160
15.9.1 Configuring Infrastructure ‘Configuration Schema’ .................................................................................. 160
15.9.2 Configuring OpenLDAP Files.................................................................................................................. 161
15.9.3 Migrating Data from CSSMS tables to LDAP server ............................................................................... 163
15.10 Configuring OFSAAI Web Services ........................................................................................................ 164
15.10.1 Configuring DynamicWSConfig.xml File ................................................................................................. 164
15.10.2 Attributes for WEBSERVICE tag ............................................................................................................ 165
15.10.3 Attributes for OPERATION tag ............................................................................................................... 166
15.10.4 Attributes for INPUT tag ......................................................................................................................... 166
15.10.5 Attributes for OUTPUT tag ..................................................................................................................... 167
15.10.6 web.xml Entries ...................................................................................................................................... 167
15.11 Deploying OFSAAI Web Services .......................................................................................................... 175
15.12 Configuring Enable Parallel Execution of DML statements ..................................................................... 175
15.13 Configuring Message Details in Forms Designer .................................................................................... 176
15.14 Clearing Application Cache .................................................................................................................... 177
15.15 Configuring Password Changes ............................................................................................................. 177
15.15.1 Changing OFSAA Infrastructure Config Schema Password .................................................................... 177
15.15.2 Changing OFSAA Infrastructure Atomic Schema Password ................................................................... 178
15.16 Configuring Internal Service (Document Upload/ Download) .................................................................. 178
16 APPENDIX J: PATCHING FSDF PACK INSTALLATION ............................................................................ 180
17 APPENDIX K: GRANTS FOR ATOMIC/ CONFIG SCHEMA ......................................................................... 181
17.1 Grants for Atomic Schema ...................................................................................................................... 181
17.2 Grants for Config Schema ...................................................................................................................... 181

OFSDF 8.0.5.0.0 Installation Guide
Oracle Financial Services Software 6
17.3 Grants on Config Schema Entities for Atomic Users .............................................................................. 182
18 APPENDIX L: CONFIGURING FSDF PACK XML FILES ........................................................................... 186
18.1 Configuring OFS_BFND_PACK.XML file ................................................................................................ 186
18.2 Configuring OFS_BFND_SCHEMA_IN.XML File ................................................................................... 188
19 APPENDIX M: CONFIGURING OFSAAI_INSTALLCONFIG.XML FILE ........................................................ 194
20 APPENDIX N: MIGRATION FOR EXCEL UPLOAD ..................................................................................... 198
20.1 Prerequisites ........................................................................................................................................... 198
20.2 Migration for Excel Upload ...................................................................................................................... 198
21 APPENDIX O: JDBC JAR FILES .......................................................................................................... 200
22 APPENDIX P: UPGRADING AN EXISTING OFSAA 8.0.X JAVA 7 INSTANCE TO JAVA 8............................. 201
22.1 Prerequisites ........................................................................................................................................... 201
22.2 Steps for Upgrading OFSAA 8.0.x Java 7 Instance to Java 8 ................................................................. 201
22.3 Configuring Web Application Server ....................................................................................................... 201
22.3.1 Oracle WebLogic Server Updates .......................................................................................................... 202
22.3.2 Apache Tomcat Server Updates ............................................................................................................. 203
22.4 OFSAA Generic Configurations .............................................................................................................. 203
22.4.1 User .profile Settings .............................................................................................................................. 203
22.4.2 Configurations for Java 8 ........................................................................................................................ 203
22.5 OFSAA Configurations for New Web Application Server Installation ...................................................... 204
23 APPENDIX Q: REMOVING OFSAA ....................................................................................................... 205
23.1 Uninstalling OFSAA Infrastructure .......................................................................................................... 205
23.2 Uninstalling EAR Files in WebSphere ..................................................................................................... 206
23.3 Uninstalling EAR Files in WebLogic ........................................................................................................ 207
23.4 Uninstalling WAR Files in Tomcat........................................................................................................... 208
24 APPENDIX R: FAQS AND ERROR DICTIONARY ..................................................................................... 210
24.1 Frequently Asked Questions ................................................................................................................... 210
24.1.1 OFSAAI FAQs ........................................................................................................................................ 210
24.1.2 Application Pack 8.0.5.0.0 FAQs ............................................................................................................ 228
24.2 Error Dictionary ....................................................................................................................................... 233
24.2.1 Accessing Error Dictionary ..................................................................................................................... 233
24.2.2 Error Code Dictionary ............................................................................................................................. 234

OFSDF 8.0.5.0.0 Installation Guide
Oracle Financial Services Software 7
PPrreeffaaccee
This Preface provides supporting information for the Oracle Financial Services Data Foundation
Applications Pack Installation Guide and includes the following topics:
Summary
Audience
Documentation Accessibility
Related Documents
Conventions
Summary
You can find the latest copy of this document in OHC Document Library which includes all the recent
additions/revisions (if any) done till date.
Before you begin the installation, ensure that you have an access to the Oracle Support Portal with the
required login credentials to quickly notify us of any issues at any stage. You can obtain the login
credentials by contacting Oracle Support.
Audience
The Oracle Financial Services Data Foundation (OFSDF) Application Pack Installation and Configuration
Guide is intended for Administrators, Business User, Strategists, and Data Analyst, who are responsible
for installing and maintaining the application pack components.
Prerequisites for the Audience
These are the expected preparations for administrators before starting the installation:
The document assumes you have experience in installing Enterprise components. Basic knowledge about
the Oracle Financial Services Advanced Analytical Applications Infrastructure Applications Pack
components, OFSAA Architecture, UNIX commands, Database concepts and Web Server/ Web
Application Server is recommended.
Documentation Accessibility
For information about Oracle's commitment to accessibility, visit the Oracle Accessibility Program website
at http://www.oracle.com/pls/topic/lookup?ctx=acc&id=docacc.
Access to Oracle Support Oracle customers have access to electronic support through My Oracle Support. For information, visit
http://www.oracle.com/pls/topic/lookup?ctx=acc&id=info or visit
http://www.oracle.com/pls/topic/lookup?ctx=acc&id=trs if you are hearing impaired.
Related Documents
This section identifies additional documents related to OFSDF. You can access Oracle documentation
online from Documentation Library for OFSDF (OHC).
Oracle Financial Services Data Foundation User Guide

OFSDF 8.0.5.0.0 Installation Guide
Oracle Financial Services Software 8
Oracle Financial Services Analytical Applications Infrastructure User Guide (OHC)
Oracle Financial Services Analytical Applications Infrastructure Environment Check Utility Guide
(OHC)
Conventions and Acronyms
Conventions Description
AIX Advanced Interactive executive
DEFQ Data Entry Forms and Queries
DML Data Manipulation Language
EAR Enterprise Archive
EJB Enterprise JavaBean
ERM Enterprise Resource Management
FTP File Transfer Protocol
GUI Graphical User Interface
HTTPS Hypertext Transfer Protocol Secure
J2C J2EE Connector
J2EE Java 2 Enterprise Edition
JDBC Java Database Connectivity
JDK Java Development Kit
JNDI Java Naming and Directory Interface
JRE Java Runtime Environment
JVM Java Virtual Machine
LDAP Lightweight Directory Access Protocol
LHS Left Hand Side
MOS My Oracle Support
OFSAAI Oracle Financial Services Analytical Application Infrastructure
OHC Oracle Help Center
OLAP On-Line Analytical Processing
OS Operating System
RAM Random Access Memory
RDMS Relational Database Management System

OFSDF 8.0.5.0.0 Installation Guide
Oracle Financial Services Software 9
Conventions Description
SFTP Secure File Transfer Protocol
SID System Identifier
SSL Secure Sockets Layer
TNS Transparent Network Substrate
URL Uniform Resource Locator
VM Virtual Machine
Web Archive WAR
XML Extensible Markup Language

OFSDF 8.0.5.0.0 Installation Guide
Oracle Financial Services Software 10
1 About OFSAA and OFSAA Application Packs
This chapter includes the following topics:
About OFSAA
About OFSAA Application Packs 8.0.5.0.0
About OFSDF Applications Pack
About Oracle Financial Services Analytical Applications Infrastructure (OFS AAI)
1.1 About Oracle Financial Services Analytical Applications (OFSAA)
In today's turbulent markets, financial institutions require a better understanding of their risk- return, while
strengthening competitive advantage and enhancing long-term customer value. Oracle Financial Services
Analytical Applications enable financial institutions to measure and meet risk adjusted performance
objectives, cultivate a risk management culture through transparency, lower the costs of compliance and
regulation, and improve insight into customer behavior.
OFSAA uses industry-leading analytical methods, shared data model and applications architecture to
enable integrated risk management, performance management, customer insight, and compliance
management. OFSAA actively incorporates risk into decision making, enables to achieve a consistent view
of performance, promote a transparent risk management culture, and provide pervasive intelligence.
Oracle Financial Services Analytical Applications delivers a comprehensive, integrated suite of financial
services analytical applications for both banking and insurance domain.
1.2 About OFSAA Applications Pack
The following figure depicts the various application packs that are available across the OFSAA Banking
and Insurance domains.

OFSDF 8.0.5.0.0 Installation Guide
Oracle Financial Services Software 11
1.3 About OFSDF Applications Pack
Oracle Financial Services Data Foundation (OFSDF) Application Pack provides integrated stress testing
and modeling capabilities that you can readily apply across multiple risk areas enabling institutions to
devise appropriate enterprise-wide and holistic risk and economic capital strategies.
OFSDF enables you to comply with regulatory requirements on stress testing, enables advanced customer
and portfolio analytics, utilize multiple industry standard techniques, test and model with complete data
integrity.
The application pack includes a logical data model, physical data model and supporting scripts.
NOTE: The schema/ domain for FSDF are referred to as BFND.

OFSDF 8.0.5.0.0 Installation Guide
Oracle Financial Services Software 12
T2T Data Process Framework
SCD and Controls
Data Aggregations
Data Movement
FINANCIAL SERVICES ANALYTICAL APPLICATIONS DATA MODEL
FINANCIAL SERVICES ANALYTICAL APPLICATIONS FRAMEWORK
FINANCIAL SERVICES ANALYTICAL APPLICATIONS FRAMEWORK
1.4 About Oracle Financial Services Analytical Applications Infrastructure (OFS AAI)
Oracle Financial Services Analytical Applications Infrastructure (OFS AAI) powers the Oracle Financial
Services Analytical Applications family of products to perform the processing, categorizing, selection and
manipulation of data and information needed to analyze, understand and report on specific performance,
risk, compliance and customer insight issues by providing a strong foundation for the entire family of
Oracle Financial Services Analytical Applications across the domains of Risk, Performance, Compliance
and Customer Insight.
1.4.1 Components of OFSAAI
The OFSAA Infrastructure is comprised of a set of frameworks that operates on and with the Oracle
Financial Services Analytical Applications Data Model and form the array of components within the
Infrastructure.
The OFSAA Infrastructure components/ frameworks are installed in two layers; primarily the metadata
server and Infrastructure services run on one layer, and the UI and presentation logic runs on the other.
The UI and presentation layer is deployed on any of the supported J2EE Servers.
The following figure depicts the various frameworks and capabilities that make up the OFSAA
Infrastructure:
1.5 OFSAA Infrastructure High Availability
The current release of the OFSAA Infrastructure supports only "Single Instance" installation for the
Infrastructure components. However, the High Availability (HA) for the Database Server and/ or the Web
Application Server clustering and deployment are supported in this release.
This release supports Active-Passive model of implementation for OFSAAI components. For more
information, refer Configuration for High Availability- Best Practices Guide.
Forms & Workflow Framework
BPEL Workflows
Forms Manager
Business Mapper
Modeling & Stress Testing
Framework
Business Dimension Maps
Workflow Manager
Forms Manager
Computations & Rule Framework
Business Processors
Multi-hierarchy Conditional -
Rules
Rules Executed in DB
Simulation Run
Baseline Run
Conditional Execution
Run Framework
Mart Management Framework
Aggregated & OLAP Computed
Measures
Relational Mart Builder
Cube Builder
Data Quality
Data Quality
Business Integrity
Data Quality Reporting
Batch & Real-Time Management
Multi-Node Dispatch
Scheduler
Data Access Services
Metadata Management
Framework
Data Model Management
Metadata Trace
Metadata Browser
UN
IFIE
D A
NA
LYTI
CA
L M
ETA
DA
TA

OFSDF 8.0.5.0.0 Installation Guide
Oracle Financial Services Software 13
2 Understanding OFSDF Applications Pack Installation
This chapter includes the following topics:
Installation Overview
Logical Deployment Architecture
Hardware and Software Requirements
Verifying the System Environment
Understanding Installation Modes
2.1 Installation Overview
This release (8.0.5.0.0) of the OFSDF Application Pack bundles the upgrade patch set along with the
base installer. Users/Administrators who wish to install a new OFSDF Application Pack
8.0.5.0.0 instance or upgrade an existing OFSDF Application Pack 8.0.x instance to 8.0.5.0.0 should
download this installer. The following figure depicts the order of procedures required to follow to install a
new OFSDF Pack 8.0.5.0.0 instance. To upgrade an existing OFSDF Application Pack 8.0.x.x.x instance
to 8.0.5.0.0 release, refer to Upgrading the OFSDF Application Pack chapter. The following figure shows
the order of procedures to install.

OFSDF 8.0.5.0.0 Installation Guide
Oracle Financial Services Software 14
The below table provides additional information and links to specific documentation for each task in the
flowchart
Tasks Details and Documentation
Verify Systems
Environment
To verify that your system meets the minimum necessary requirements
for installing and hosting the OFSDF Applications Pack, see "Hardware
and Software Requirements Specifications" and "Verifying the System
Environment"
Obtain the software See "Obtaining the software".
Configure and Execute the
Schema Creator Utility See “Configuring and Executing the Schema Creator Utility".
Install OFSDF Pack See “Installing the OFSDF Pack Installer".
Configure OFSDF Pack See “Post Installation Configuration".
Verify Installation See "Verifying the Installation".
Upgrade Installation See “Upgrading the OFSDF Application Pack”
2.2 Deployment Topology
The deployment architecture depicts the mapping of a logical architecture to a physical environment. The
physical environment includes the computing nodes in an intranet or Internet environment, CPUs, memory,
storage devices, and other hardware and network devices.

OFSDF 8.0.5.0.0 Installation Guide
Oracle Financial Services Software 15
2.3 Hardware and Software Requirements
This section describes the various Operating Systems, Database, Web Server, and Web Application
Server versions, and other variant details on which this release of the OFSDF Pack has been qualified.
NOTE: OFSDF Applications Pack installation can be performed on both Virtual and Physical servers.
2.3.1 Configurations Supported for Java 7
The following table shows the minimum hardware and software requirements for installing Oracle Financial
Services Data Foundation Application Pack (Java 7) on each machine.
Requirement
Sub-Category
Value
Operating
System
Oracle Linux / Red
Hat Enterprise Linux
(x86-64 bit)
Red Hat Enterprise Linux or Oracle Linux Server release 6 Update 6
and above
Red Hat Enterprise Linux or Oracle Linux Server release 7 Update 1
and above
Oracle Solaris
(SPARC) / Solaris
x86-64 bit
Solaris 10 – Install the required OS patches. For more information,
see Installing the Required Oracle Solaris 10 Patches. Additionally,
install the required runtime libraries. For more information, see
Installing Only the Runtime Libraries on Oracle Solaris 10.
Solaris 11 – Upgrade to Oracle Solaris 11.3 with SRU09 or higher.
See
https://docs.oracle.com/cd/E60778_01/html/E60743/gouaw.html#scr
olltoc to upgrade to SRU09 if you have a lower SRU version.
Additionally, install the required runtime libraries. For more
information, see Installing Only the Runtime Libraries on Oracle
Solaris 11.
IBM AIX (PowerPC)
AIX 6.1 (TL 09 and above) - 64 bit
AIX 7.1 (TL 03 and above) - 64 bit
Shell
KORN Shell (KSH)
Note:
If the OS is IBM AIX 6.1 and the file size limit for the AIX user on the target server is too small, configure the size
parameter setting for "Large File Support". Follow these steps:

OFSDF 8.0.5.0.0 Installation Guide
Oracle Financial Services Software 16
Requirement
Sub-Category
Value
Change the file size limit for the user that initiates the transfer on the AIX system. To change the file size
limit for a particular user, add or edit the fsize attribute for the user in the /etc/security/limits file on the AIX
system.
Change the file size limit to unlimited (fsize = -1) or to a size equal to the size of the file being transferred.
This may require a restart of the AIX server to pick up the new configuration. For more information refer IBM
Support.
If the operating system is RHEL, install the package lsb_release using one of the following commands
by logging in as root user:
o yum install redhat-lsb-core
o yum install redhat-lsb
Java Runtime
Environment
Oracle Linux / Red
Hat Enterprise Linux
Oracle Solaris
Oracle Java Runtime Environment (JRE) 1.7.x - 64 bit
Oracle Java Runtime Environment (JRE) 1.8.x - 64 bit
IBM AIX
IBM AIX Runtime, Java Technology JRE 1.7.x - 64 bit
IBM AIX Runtime, Java Technology JRE 1.8.x - 64 bit
Oracle
Database
Server and
Client
Oracle Database Server Enterprise Edition 11g Release 2 (11.2.0.3.0 +) - 64 bit RAC/ Non-
RAC with/ without partitioning option
Oracle Database Server Enterprise Edition 12c Release 1 (12.1.0.1.0 +)- 64 bit RAC/ Non-
RAC with/ without partitioning option
Oracle Database Server 12c Release 2 (12.2.0.1+) Enterprise Edition
Oracle Client 12c Release 1 (12.1.0.1.0+) - 64 bit
Oracle 11g Release 2 (11.2.0.3+) JDBC driver (Oracle thin driver)
Oracle 12C Release 1 (12.1.0.1+) JDBC driver (Oracle thin driver)
Oracle Distribution of R version 3.1.1 (Optional)
Oracle R Enterprise (Server) version 1.4.1 (Optional)
Oracle R Enterprise 1.4.1 requires Oracle Database Enterprise Edition
11.2.0.3/1.2.0.4/12.1.0.1
Note:
Ensure that the following patches are applied:
Oracle Server 12c, v12.1.0.1 – 17082699
Oracle Server 12c, v12.1.0.2 – 20698050
Also for latest information, refer http://support.oracle.com/, 12.1.0.2 Bundle Patches for
Engineered Systems and DB In-Memory - List of Fixes in each Bundle (Doc ID 1937782.1)

OFSDF 8.0.5.0.0 Installation Guide
Oracle Financial Services Software 17
Requirement
Sub-Category
Value
OLAP
Oracle Hyperion
Essbase
V 11.1.2.1+ (Server and Client) with Oracle 11g Database
V 11.1.2.3+ (Server and Client) with Oracle 12c Database
Oracle OLAP
V 11.2.0.3+ with Oracle 11g Database
V 12.1.0.1+ with Oracle 12c Database
Note:
Oracle Hyperion Essbase & Oracle OLAP is required only if you are using the OLAP feature of
OFSAAI. For Oracle OLAP, ensure that you have configured the Oracle Database server with
OLAP option.
Web Server/
Web
Application
Server
Oracle Linux / Red
Hat Enterprise Linux/
IBM AIX
Oracle Solaris
Oracle HTTP Server 11.1.1.7.1 or 11.1.1.9+ / Apache HTTP Server 2.2.x/ IBM HTTP Server 8.5.5
IBM WebSphere Application Server WebSphere 8.5.5.9+ (64 bit)
Oracle WebLogic Server 12.1.3+ with jersey 1.18 (64 bit) /
Oracle WebLogic Server 12.2.x with jersey 2.25 (64 bit)
Apache Tomcat 8.0.25+ (64 bit)
Note:
IBM WebSphere 8.5.x (Full Profile) on Java 8 is not available.
Note:
OFSAA Infrastructure web component deployment on Oracle WebLogic Server with Oracle
JRockit is not supported.
Desktop
Requirements
Operating System
MS Windows 7 / Windows 10
Browser
MS Internet Explorer 11.x (Compatibility Mode)
Oracle Java plug-in 1.7.0+* (64-bit) / Oracle Java plug-in 1.8.0+ (64-
bit)
Turn off Pop-up blocker settings. For more information, refer
Internet Explorer Settings.
Google Chrome 57.x
Mozilla Firefox 52.x
For Chrome and Firefox, Turn off Pop-up blocker settings by
choosing "Always allow pop-ups for <URL>"
Office Tools
MS Office 2007/ 2010/ 2013/ 2016
Adobe Acrobat Reader 10 or above

OFSDF 8.0.5.0.0 Installation Guide
Oracle Financial Services Software 18
Requirement
Sub-Category
Value
Screen Resolution
1024*768 or 1280*1024
Other
Software
Directory Services
OFSAAI is qualified on both OPEN LDAP 2.2.29+ and Oracle Internet
Directory v 11.1.1.3.0. However, it can be integrated with other directory
services software like MS Active Directory.
Note:
Configuration of Directory services software for OFSAAI installation is optional. For more
information on configuration, see Infrastructure LDAP Configuration.
Open LDAP needs to be installed on MS Windows Server machine.
* This indicates the latest version available at the time of the release. Any latest updates may be applied.
2.3.2 Configurations Supported for Java 8
The following table shows the minimum hardware and software requirements for installing Oracle Financial
Services Data Foundation Application Pack (Java 8) on each machine.
Requirement
Sub-Category
Value
Operating
Oracle Linux / Red
Red Hat Enterprise Linux or Oracle Linux Server release 6 Update 6
System Hat Enterprise Linux and above
(x86-64 bit) Red Hat Enterprise Linux or Oracle Linux Server release 7 Update 1
and above
Oracle Solaris
Solaris 10 – Install the required OS patches. For more information,
(SPARC) / Solaris see Installing the Required Oracle Solaris 10 Patches. Additionally,
x86-64 bit install the required runtime libraries. For more information, see
Installing Only the Runtime Libraries on Oracle Solaris 10.
Solaris 11 – Upgrade to Oracle Solaris 11.3 with SRU09 or higher.
See
https://docs.oracle.com/cd/E60778_01/html/E60743/gouaw.html#scr
olltoc to upgrade to SRU09 if you have a lower SRU version.
Additionally, install the required runtime libraries. For more
information, see Installing Only the Runtime Libraries on Oracle
Solaris 11.

OFSDF 8.0.5.0.0 Installation Guide
Oracle Financial Services Software 19
Requirement
Sub-Category
Value
IBM AIX
(POWERPC)
AIX 6.1 (TL 09 and above) - 64 bit
AIX 7.1 (TL 03 and above) - 64 bit
Shell
KORN Shell (KSH)
Note:
If the OS is IBM AIX 6.1 and the file size limit for the AIX user on the target server is too small, configure the size
parameter setting for "Large File Support". Follow these steps:
Change the file size limit for the user that initiates the transfer on the AIX system. To change the file size
limit for a particular user, add or edit the fsize attribute for the user in the /etc/security/limits file on the AIX
system.
Change the file size limit to unlimited (fsize = -1) or to a size equal to the size of the file being transferred.
This may require a restart of the AIX server to pick up the new configuration. For more information refer IBM
Support.
If the operating system is RHEL, install the package lsb_release using one of the following commands
by logging in as root user:
o yum install redhat-lsb-core
o yum install redhat-lsb
Java Runtime
Environment
Oracle Linux / Red
Hat Enterprise Linux
Oracle Solaris
Oracle Java Runtime Environment (JRE) 1.8.x - 64 bit
IBM AIX
IBM AIX Runtime, Java Technology JRE 1.8.x - 64 bit
Oracle
Database
Server and
Client
Oracle Database Server Enterprise Edition 11g Release 2 (11.2.0.3.0 +) - 64 bit RAC/ Non-
RAC with/ without partitioning option
Oracle Database Server Enterprise Edition 12c Release 1 (12.1.0.1.0 +)- 64 bit RAC/ Non-
RAC with/ without partitioning option
Oracle Database Server 12c Release 2 (12.2.0.1+) Enterprise Edition
Oracle Client 12c Release 1 (12.1.0.1.0+) - 64 bit
Oracle 11g Release 2 (11.2.0.3+) JDBC driver (Oracle thin driver)
Oracle 12C Release 1 (12.1.0.1+) JDBC driver (Oracle thin driver)
Oracle Distribution of R version 3.1.1 (Optional)
Oracle R Enterprise (Server) version 1.4.1 (Optional)
Oracle R Enterprise 1.4.1 requires Oracle Database Enterprise Edition
11.2.0.3/1.2.0.4/12.1.0.1

OFSDF 8.0.5.0.0 Installation Guide
Oracle Financial Services Software 20
Requirement
Sub-Category
Value
Note:
Ensure that the following patches are applied:
Oracle Server 12c, v12.1.0.1 – 17082699
Oracle Server 12c, v12.1.0.2 – 20698050
Also for latest information, refer http://support.oracle.com/, 12.1.0.2 Bundle Patches for
Engineered Systems and DB In-Memory - List of Fixes in each Bundle (Doc ID 1937782.1)
OLAP
Oracle Hyperion
Essbase
V 11.1.2.1+ (Server and Client) with Oracle 11g Database
V 11.1.2.3+ (Server and Client) with Oracle 12c Database
Oracle OLAP
V 11.2.0.3+ with Oracle 11g Database
V 12.1.0.1+ with Oracle 12c Database
Note:
Oracle Hyperion Essbase & Oracle OLAP is required only if you are using the OLAP feature of
OFSAAI. For Oracle OLAP, ensure that you have configured the Oracle Database server with
OLAP option.
Web Server/
Web
Application
Server
Oracle Linux / Red
Hat Enterprise Linux/
IBM AIX
Oracle Solaris
Oracle HTTP Server 11.1.1.7.1 or 11.1.1.9+ / Apache HTTP Server 2.2.x/ IBM HTTP Server 8.5.5
IBM WebSphere Application Server WebSphere 8.5.5.9+
Oracle Weblogic Server 12.1.3+ with jersey 1.18 (64 bit)/Oracle
Weblogic Server 12.2.x with jersey 2.25 (64 bit)
Apache Tomcat 8.0.25+ (64 bit)
Note:
IBM WebSphere 8.5.x (Full Profile) on Java 8 is not available.
Note:
OFSAA Infrastructure web component deployment on Oracle WebLogic Server with Oracle
JRockit is not supported.
For deployment on Oracle WebLogic Server 12.1.3+ (64 bit) with Java 8, download and install
patch 18729264 from http://support.oracle.com/
Desktop
Requirements
Operating System
MS Windows 7/ Windows 10
Browser
MS Internet Explorer 11.x (Compatibility Mode)
Oracle Java plug-in 1.7.0+* (64-bit) / Oracle Java plug-in 1.8.0+ (64-
bit)

OFSDF 8.0.5.0.0 Installation Guide
Oracle Financial Services Software 21
Requirement
Sub-Category
Value
Turn off Pop-up blocker settings. For more information, refer
Internet Explorer Settings.
Google Chrome 57.x
Mozilla Firefox 52.x
For Chrome and Firefox, Turn off Pop-up blocker settings by choosing
"Always allow pop-ups for <URL>"
Office Tools
MS Office 2007/ 2010/ 2013/ 2016
Adobe Acrobat Reader 10 or above
Screen Resolution
1024*768 or 1280*1024
Other
Software
Directory Services
OFSAAI is qualified on both OPEN LDAP 2.2.29+ and Oracle Internet
Directory v 11.1.1.3.0. However, it can be integrated with other directory
services software like MS Active Directory.
Note:
Configuration of Directory services software for OFSAAI installation is optional. For more
information on configuration, see Infrastructure LDAP Configuration.
Open LDAP needs to be installed on MS Windows Server machine only.
NOTE: To upgrade an existing OFSAA 8.0.x Java 7 instance to Java 8, see Appendix P.
The following table shows the minimum software requirements for running OFSDF Applications Pack on
each machine.
Table 1: Recommended software Combinations
Operating System
Database
Web Application Server
Web Server
Oracle Linux 6.6 / 7.1
Oracle Database
Oracle WebLogic Server
/Apache Tomcat Server
Oracle HTTP Server/
Apache HTTP Server
Oracle Solaris 5.10 / 5.11
Oracle Database
Oracle WebLogic Server
/Apache Tomcat Server
Oracle HTTP Server/
Apache HTTP Server
IBM AIX 6.1 / 7.1
Oracle Database
IBM WebSphere Application
Server /Apache Tomcat
Server
IBM HTTP Server/
Apache HTTP Server

OFSDF 8.0.5.0.0 Installation Guide
Oracle Financial Services Software 22
2.4 Verifying the System Environment
To verify your system environment meets the minimum requirements for the installation, a Pre- Install
Check utility is available within the Install Kit archive file. This utility can also be obtained separately by
contacting Oracle Support.
Though the system environment verification is an integral and automated part of the installation of this
software product, Oracle strongly recommends running this utility prior to beginning the installation as part
of your organization’s "Installation Readiness Verification Process".
NOTE: For more details on download and usage of this utility, see Oracle Financial Services Analytical
Applications Infrastructure Environment Check Utility Guide given in the Related Documents
section.
2.5 Understanding Installation Modes
You can install OFSDF Applications Pack in Graphical User Interface (GUI) Mode. This mode launches the
product installation in a GUI mode. Users need to enter the required information on various panels within
the UI. For more information on configuration required for GUI mode installation, see Configuration for GUI
Mode Installation.
This mode mandates updating the installation configuration files with required details and performs
installation in a "Silent" non-user interactive format.

OFSDF 8.0.5.0.0 Installation Guide
Oracle Financial Services Software 23
3 Preparing for Installation
This chapter provides necessary information to review before installing the OFSDF Applications Pack
v8.0.5.0.0. This chapter includes the following topics:
Installer and Installation Prerequisites
Obtaining the Software
Common Installation Activities
NOTE: If you are installing an application pack on an environment, where another application pack is
already installed, you may sometimes get a warning message such as "Object Already Exists".
This message can be ignored.
3.1 Installer and Installation Prerequisites
Following table mentions the list of prerequisites required before beginning the installation for OFSDF
application. The Installer/ Environment Check utility notifies you if any requirements are not met.
Table 2: Installer and Installation Prerequisites
Requirement Sub-Category Expected Value
Environment
Settings
Java Settings PATH variable in .profile file must be set to include the Java
Runtime Environment absolute path. The path should include java
version (Java 7, or Java 8) based on the configuration.
Note:
Ensure that the absolute path to JRE/bin is set at the
beginning of PATH variable.
For example,
PATH=/usr/java/jre1.7/bin:$ORACLE_HOME/bin:$P
ATH
JAVA_HOME variable must be set in .profile file, pointing to
the appropriate Java Runtime Environment Path.
For example, export
JAVA_HOME=/usr/jdk/instances/jdk1.6.0
Ensure that SYMBOLIC links to JAVA installation are not set
in the PATH variable.
Ensure that you set the Heap Size in .profile file, using
following command:
export _JAVA_OPTIONS="-Xms512m -Xmx1024m"
Heap size is a validation to get the memory size for Model
Upload. If the Heap size is less than the ten times as of the
Model, then it returns an error.

OFSDF 8.0.5.0.0 Installation Guide
Oracle Financial Services Software 24
Requirement Sub-Category Expected Value
Oracle Database
Settings
TNS_ADMIN variable must be set in .profile file pointing to
appropriate tnsnames.ora file.
ORACLE_HOME variable must be set in .profile file
pointing to appropriate Oracle Client installation.
PATH variable in .profile file must be set to include
appropriate $ORACLE_HOME/bin path
Ensure that an entry (with SID/ SERVICE NAME) is added in
the tnsnames.ora file on the OFSAA server.
Oracle Essbase
Settings
ARBORPATH, ESSBASEPATH, HYPERION_HOME to be set in
the .profile file pointing to an appropriate Oracle Essbase Client
installation.
Note: These settings are required only if you want to use Oracle
Hyperion Essbase OLAP features.
OS/ File System
Settings
File Descriptor
Settings
Greater than 15000
Note: The value specified here is the minimum value to be set for
the Installation process to go forward. For other modules, this value
may depend on the available resources and the number of
processes executed in parallel.
Total Number of
Process Settings
Greater than 4096
Note: The value specified here is the minimum value to be set for
the Installation process to go forward. For other modules, this value
may depend on the available resources and the number of
processes executed in parallel.
Port Settings Default port numbers to be enabled on the system are 6500, 6501,
6505, 6507, 6509, 6510, 6666, 9999, and 10101.
.profile
permissions
User to have 755 permission on the .profile file.
Installation
Directory
A directory where the installation files will be installed.
Assign 755 permission on this directory.
This directory needs to be set as FIC_HOME.
Staging Area/
Metadata
Repository
Directory
A directory to hold the application metadata artifacts and
additionally act as staging area for flat files.
The directory should exist on the same system as the OFSAA
Installation. This directory can be configured on different
mount or under a different user profile.
Assign 777 permission on this directory.
Download
Directory
A directory where the product installer files will be
downloaded/ copied.
Assign 755 permission on this directory.

OFSDF 8.0.5.0.0 Installation Guide
Oracle Financial Services Software 25
Requirement Sub-Category Expected Value
OS Locale Linux: en_US.utf8
AIX: EN_US.UTF-8
Solaris: en_US.UTF-8
To check the locale installed, execute the following
command:
locale -a | grep -i 'en_US.utf'
Database Settings Database Instance
Settings
NLS_CHARACTERSET to be AL32UTF8
NLS_LENGTH_SEMANTICS to be BYTE
OPEN CURSORS limit to be greater than 1000
Web Application
Server
WebSphere/
WebLogic/
Tomcat
Web Application Server should be installed and profile /
domain created.
You will be prompted to enter the WebSphere Profile path or
WebLogic Domain path or Tomcat Deployment path during
OFSAAI installation.
Note:
Refer Appendix A for WebSphere Profile Creation and
WebLogic Domain Creation.
For deployment on Oracle WebLogic Server 12.1.3+ (64 bit)
with Java 8, download and install patch 18729264 from
http://support.oracle.com/
Web Server Apache HTTP
Server/
Oracle HTTP
Server/
IBM HTTP Server
This is an optional requirement.
HTTP Server Installation to be present.
You will be required to enter the Web Server IP/ Hostname and
Port details during installation.
Note: See Appendix A for Web Server installation.
Others Oracle R/ Oracle R
Enterprise
This is an optional requirement.
See section Installing Oracle R distribution and Oracle R Enterprise
(ORE) for more details.
OFSAA Download the one-off patch 22755805 from
https://support.oracle.com/ if the setup has OFSAA Application
Pack version below 8.0.5.0.0.
Download the one-off patch 26589735 from
https://support.oracle.com/ if the setup has OFSAA Application
Pack version 8.0.5.0.0.
NOTE: Ensure that the tablespace(s) used for the database user(s) is set to AUTOEXTEND ON.
3.2 Obtaining the Software
This release of OFSDF Applications Pack 8.0.5.0.0 can be downloaded My Oracle Support.
See the following instructions to download this release of OFS BFND Application Pack. You need to have

OFSDF 8.0.5.0.0 Installation Guide
Oracle Financial Services Software 26
a valid Oracle account in order to download the software:
Login to https://support.oracle.com/ and search for 26583731 under the Patches & Updates tab.
Download the OFSDF Application Pack v8.0.5.0.0 archive file and copy it to your OFSAA server in
Binary mode.
NOTE: The archive files are different for every operating system like AIX, Solaris, and
RHEL/Oracle Linux.
3.3 Common Installation Tasks
The following are the common pre-installation activities that you need to carry out before installing the
OFSDF application.
This section includes the following topics:
Identifying the Installation, Download and Metadata Repository Directories
Configuration for GUI Mode Installation
Downloading and Copying the Software
Extracting the Software
Setting up the Web Application Server
3.3.1 Identifying the Installation, Download and Metadata Directories
To install OFSDF Application Pack, create the following directories:
OFSDF Download Directory (Optional): Create a download directory and copy the OFSDF
Application Pack Installer File (Archive). This is the directory where the downloaded installer/
patches can be copied.
OFSAA Installation Directory (Mandatory): Create an installation directory. This is the directory
where the installer would install/ copy the product files. FIC_HOME variable to be set in the
pointing to this OFSAA Installation Directory.
OFSAA Staging/ Metadata Repository Directory (Mandatory): Create a Staging/ Metadata
Repository Directory. This is the directory where you would be required to copy data loading files,
save data extracts etc. Additionally, this folder also maintains the OFSAA metadata artifacts. This is
commonly referred as “FTPSHARE”.
NOTE: Ensure the user permission is set to 755 on the Installation directory.
Ensure the user permission is set to 777 on the Staging directory.
Ensure the OFSAA Staging directory is not set to the same path as the OFSAA
Installation directory and is not a sub-folder inside the OFSAA Installation directory.
3.3.2 Configuration for GUI Mode Installation
To install this product in GUI mode, you need to ensure the below software and configurations are
available:

OFSDF 8.0.5.0.0 Installation Guide
Oracle Financial Services Software 27
Install and configure any PC X Server software such as Open Text Exceed (formerly Hummingbird
Exceed) on the user desktop system from which the installation is triggered.
Configure DISPLAY variable.
Ensure to set the DISPLAY variable (in user .profile) on the system on which the OFSAA
Infrastructure will be installed, to point to the user desktop system where the PC X Server software
has been installed.
Syntax:
export DISPLAY = hostname:n
where hostname is the IP Address/ Host Name of the user desktop system and n is the sequence
number (usually 0).
For example, 10.11.12.13:0 or myhostname:0
3.3.3 Downloading and Copying the Software
To download can copy the OFSDF Application Pack Installer, follow these steps:
To download the OFSDF Application Pack, login to https://support.oracle.com/ and search for
26583731 under the Patches & Updates tab.
Download or copy the installer archive into the Download directory (in Binary mode) in the setup
identified for OFSDF installation.
3.3.4 Extracting the Software
After obtaining the installer, copy the installer (in BINARY mode) to the system on which the OFSAA
Infrastructure components will be installed.
NOTE: You must be logged in to the UNIX operating system as a non-root user.
1. Download the unzip utility (OS specific) , and copy it in Binary mode to any directory
and include the directory in your PATH variable. If you already have the unzip utility to extract the
contents of the downloaded archive, skip to the next step.
2. Uncompress the unzip installer file using the command:
uncompress unzip_<os>.Z
NOTE: In case you notice an error message "uncompress: not found [No such file or directory]"
when the package is not installed, contact your UNIX administrator.
3. Assign 751 permission to the file using the command:
chmod 751 unzip_<os>
For example, chmod 751 unzip_sparc
4. Extract the contents of the OFSDF Application Pack 8.0.5.0.0 to Download Directory with the
following command:
unzip OFS_BFND_PACK.zip

OFSDF 8.0.5.0.0 Installation Guide
Oracle Financial Services Software 28
NOTE: Do not rename the Application Pack installer folder name on extraction from the
archive.
5. Navigate to the Download Directory and Assign 755 permission to the installer folder with the
following command:
chmod –R 755 OFS_BFND_PACK
3.3.5 Setting up the Web Application Server
For setting up the environment based on your selected Web Application Server, refer to Appendix A for
more information.

OFSDF 8.0.5.0.0 Installation Guide
Oracle Financial Services Software 29
4 Installing Oracle Financial Services Data Foundation Applications Pack
Follow the instructions in this chapter to install the OFSDF Applications Pack depending on the mode of
installation.
This chapter includes the following topics:
Schema Creator Utility
Configuring and Executing the Schema Creator Utility
Running the OFSDF Applications Pack Installer
Verifying the Installation
4.1 Schema Creator Utility
Creating database users/ schemas is one of the primary steps in the complete OFSAA installation. This
release of OFSAA provides a utility to quickly get started with the OFSAA 8.0 installation by allowing easier
and faster creation of database User(s)/ Schema(s), assign the necessary GRANT(s) etc. Additionally, it
also creates the required database objects in these schemas.
The schema creator utility needs to be configured and executed mandatorily every time prior to installation
of any OFSAA Application Pack.
The following are the types of schemas that can be configured in the OFSAA:
CONFIG – Denotes the unique OFSAA setup configuration schema. It contains entities and other
objects required for OFSAA setup information.
NOTE: There can be only one CONFIG schema per OFSAA instance.
ATOMIC – Denotes the schema that contains the data model entities. One ATOMIC schema is
attached to one Information Domain.
NOTE: There can be multiple ATOMIC schemas per OFSAA Instance, and an Information Domain
can have only one ATOMIC schema.
SANDBOX – Denotes the schema that contains the data for all Sandbox executions. One
SANDBOX schema is attached to one Sandbox Information Domain.
NOTE: There can be multiple SANDBOX schemas per OFSAA Instance and a Sandbox
Information Domain can have only one SANDBOX schema.
4.1.1 Execution Modes in Schema Creator Utility
The Schema Configuration Utility supports the following modes of execution:
Online Mode: In the Online mode, the utility connects to the database and executes the DDLs for
Users, Objects and Grants. If you have the SYSDBA privileges you can execute the Schema Creator
Utility in Online mode and thereby create the Users, Objects, and Grants during the execution

OFSDF 8.0.5.0.0 Installation Guide
Oracle Financial Services Software 30
process.
NOTE: To execute the utility in Online mode, you must connect as “<User> AS SYSDBA”.
Offline Mode: In the Offline mode, the utility generates SQL script with all the required DDLs for
User, Objects and Grants. This script needs to be executed by the DBA on the appropriate database
identified for OFSAA usage. If you do not have the SYSDBA privileges, you can execute the
Schema Creator Utility in Offline mode and generate the script file that contains the Schemas,
Objects, and Grants information. Subsequently, a SYSDBA user can execute the script file manually.
NOTE:
1. To execute the utility in Offline mode, you need to connect as any user with below grants:
(alternatively, you can also connect as a user with SYSDBA privileges):
For more details refer, Executing the Schema Creator Utility in Offline Mode.
2. If there are any errors during the script execution, reconfigure the
<PACK>_SCHEMA_IN.XML file and execute the utility. This regenerates the scripts with
corrected information. For more information, refer Configuring
OFS_BFND_SCHEMA_IN.XML file
3. Do not modify the <PACK>_SCHEMA_OUT.XML file generated after the execution of this utility.
4.1.2 Execution Options in Schema Creator Utility
Depending on the option selected to run the OFSDF Applications Pack Installer, you need to select the
schema creator utility execution option. If you try to run the OFSDF Applications Pack installer in SILENT
mode, it is mandatory to execute the schema creator utility with –s option.
NOTE: If the schema creator utility is executed without the option –s, it is mandatory to run the OFSDF
Applications Pack Installer in GUI mode.
4.2 Configuring and Executing the Schema Creator Utility
Schema Creator Utility is used to create the schema in the database. This section includes the following topics:
Prerequisites
Configuring the Schema Creator Utility
Executing the Schema Creator Utility
Verifying the Log File
4.2.1 Prerequisites
The following prerequisites must be satisfied before configuring the Schema Creator Utility:

OFSDF 8.0.5.0.0 Installation Guide
Oracle Financial Services Software 31
Oracle User ID/ Password with SYSDBA privileges.
JDBC Connection URL for RAC/ Non RAC database.
HOSTNAME/IP of the server on which OFSAA is getting installed.
4.2.2 Configuring the Schema Creator Utility
This section explains the steps to configure and run the Schema Creator Utility. To configure the Schema
Creator Utility, follow these steps:
1. Log in to the system as non-root user.
2. Navigate to the following path: OFS_BFND_PACK/schema_creator/conf
3. Edit the OFS_BFND_SCHEMA_IN.xml file in a text editor.
4. Configure the elements as described in the table Configuring OFS_BFND_SCHEMA_IN.XML file in
Appendix K.
5. Save the OFS_BFND_SCHEMA_IN.xml file.
6. Navigate to BIN folder, provide execute permissions to file osc.sh and run the schema creator
utility.
NOTE: On successful execution of the utility, the entered passwords in the
OFS_BFND_SCHEMA_IN.xml file are nullified.
4.2.3 Executing the Schema Creator Utility
This section includes the following topics:
Executing the Schema Creator Utility in Online Mode
Executing the Schema Creator Utility in Offline Mode
Executing the Schema Creator Utility with –s option
Executing the Schema Creator Utility while Installing Subsequent Application Pack
Verifying the Log File
NOTE: If you intend to use Oracle OLAP feature, execute the below grant on all ATOMIC
schema(s) @ grant olap_user to &database_username
4.2.3.1 Executing the Schema Creator Utility in Online Mode
In Online Mode, the Schema Creator Utility will create all the Schemas, Schema Objects, Tablespaces,
Grants, and Roles in the database during the execution process.
To execute the schema creator utility in Online Mode, follow these steps:
1. Log in to the system as non-root user.
2. Navigate to the following folder path: OFS_BFND_PACK/schema_creator/bin/
3. Execute the following command.

OFSDF 8.0.5.0.0 Installation Guide
Oracle Financial Services Software 32
./osc.sh
The following message is displayed: You have chosen ONLINE mode. Triggering the utility in
ONLINE mode will execute the DDLs directly on the Database. Do you wish to proceed? (Y/y or
N/n).
4. Enter Y/y to proceed.
5. Enter the DB User Name with SYSDBA Privileges. For example: SYS as SYSDBA.
6. Enter the User Password.
7. The console runs the initial validation checks and then displays the following message:
You have chosen to install this Application Pack on <Name of the Atomic Schema>ATOMIC
schema. Do you want to proceed? (Y/N). You have chosen to install this Application Pack on <Name
of the Infodom>. Do you want to proceed? (Y/N).
8. Enter Y/y to start the schema creation or enter N/n if you want to quit executing the schema creation.

OFSDF 8.0.5.0.0 Installation Guide
Oracle Financial Services Software 33
On successful execution of schema creator utility, the console displays the following status
message:
Schema Creator executed successfully. Please proceed with the installation.
NOTE: If schema creation is successful, the console displays the following status message:
Schema Creator executed successfully. Please proceed with the installation.
Subsequently, an OFS_BFND_SCHEMA_OUTPUT.xml is generated under
FS_BFND_Pack>/schema_creator/
Refer log file in OFS_BFND_PACK/schema_creator/logs directory for execution status.
In case of any errors, contact Oracle Support.
4.2.3.2 Executing the Schema Creator Utility in Offline Mode
In Offline Mode, the Schema Creator Utility will create an output in SQL file format. This script has to be
executed manually by logging into the database as any user with SYSDBA privileges. The SQL file will
contain the scripts for creation of Schemas, Schema Objects, Tablespaces, Grants, and Roles.
Prerequisites
To execute the utility in Offline mode, you need to connect as any user with below grants (alternatively,
you can also connect as a user with SYSDBA privileges):
SELECT ON DBA_ROLES
SELECT ON DBA_USERS
SELECT ON DBA_DIRECTORIES
SELECT ON DBA_TABLESPACES
CREATE SESSION

OFSDF 8.0.5.0.0 Installation Guide
Oracle Financial Services Software 34
NOTE: Explicit Grants to the user are required. Grants assigned through Roles are not supported.
To execute the schema creator utility in the Offline mode, follow these steps:
1. Log in to the system as non-root user.
2. Navigate to the following path: OFS_BFND_PACK/schema_creator/bin directory.
3. Execute the osc.sh file using the following command:
./osc.sh –o
4. The following message is displayed:
You have chosen OFFLINE mode. Triggering the utility in OFFLINE mode will generate the script.
Do you wish to proceed? (Y/y or N/n).
5. Enter Y/y to proceed.
6. Enter the DB Username with SELECT privileges.
7. Enter the User Password.
8. The console runs the initial validation checks and displays the following message: You have chosen
to install this Application Pack on <Name of the Atomic Schema>ATOMIC schema. Do you want to
proceed? (Y/N).
You have chosen to install this Application Pack on <Name of the Infodom>. Do you want to
proceed? (Y/N).
9. Enter Y/y to start the script generation.
Or
Enter N/n if you want to quit the script generation.

OFSDF 8.0.5.0.0 Installation Guide
Oracle Financial Services Software 35
NOTE: On successful execution of schema creator utility, the console displays the following status
message:

OFSDF 8.0.5.0.0 Installation Guide
Oracle Financial Services Software 36
Schema Creator executed successfully. Please execute
OFS_BFND_Pack/schema_creator/sysdba_output_scripts.sql file before
proceeding with the installation.
10. Navigate to the directory: OFS_BFND_Pack/schema_creator
11. Login to SQLPLUS with a user having SYSDBA Privileges.
12. Execute the sysdba_output_scripts.sql file under
OFS_BFND_Pack/schema_creator using the following command:
SQL>@sysdba_output_scripts.sql
Alternatively, you can copy the sysdba_output_scripts.sql file and SQLScripts folder to
a remote server and execute sysdba_output_scripts.sql file, after providing appropriate
execute permissions.
The schema creator utility is executed successfully.
NOTE: Refer log sysdba_output_scripts.log file for execution status. In case of any errors,
contact Oracle Support. This log would be empty if there are no errors in the execution.
4.2.3.3 Executing the Schema Creator Utility with –s Option
If you want to run the OFSDF Applications Pack Installer in SILENT mode, it is mandatory to execute the
schema creator utility with –s option.
To execute the utility with –s option, follow these steps:
1. Edit the file OFS_BFND_PACK/schema_creator/conf/OFS_BFND_SCHEMA_IN.xml
file in text editor.
2. Set the value for attribute “INFODOM” of <SCHEMA> tag(s) to specify a specific Information
Domain name. By default, the value is empty and the utility will derive the Information Domain name,
if not set. If the attribute value is set, the utility/ installer will configure the Information Domain against
this <SCHEMA>.
3. Execute the utility with –s option. For example: ./osc.sh –s
NOTE: If the utility is executed without the –s option, it is mandatory to launch the OFSDF
Applications Pack Installer in GUI mode.
To execute the utility in OFFLINE mode with SILENT option, type /osc.sh –o –s
4. Make a TNS entry for the new users created. For details, see Adding TNS Entries in the
TNSNAMES.ORA File section.
4.2.3.4 Executing the Schema Creator Utility for Subsequent Application Pack
While executing the schema creator utility for subsequent Application Pack, you can choose to install the
pack either on the same Information Domain/Atomic Schema or on a new Information Domain/Atomic

OFSDF 8.0.5.0.0 Installation Guide
Oracle Financial Services Software 37
Schema. You can execute the Schema Creator Utility either in Online or Offline Mode.
To execute the schema creator utility while creating the schemas for subsequent application pack, follow
these steps:
NOTE: Ensure to use the same config schema user name as the previous Application Pack.
1. Navigate to the following folder path: OFS_BFND_Pack>/schema_creator/bin/
2. Execute the ./osc.sh file.
3. Enter the DB Username with SYSDBA Privileges.
4. Enter the User Password.
5. The console identifies the Application Packs that are already installed on the current OFSAA setup
and then displays the following: You have selected to install this Application Pack on <> ATOMIC
schema. To proceed enter (Y/y). To change the selection, enter (N/n). Do you want to proceed?
(Y/N)
6. Enter Y/y to start the schema creation.
7. If you enter N/n, the list of Atomic Users is displayed.
8. You can select the Atomic User, on which you want to install the Application Pack.
9. Make a TNS entry for the new users created. For details, see Adding TNS Entries in the
TNSNAMES.ORA File section.
10. If schema creation is successful, the console displays the following status message: Success.
Please proceed with the installation.
NOTE: Refer log file in OFS_BFND_PACK/schema_creator/logs folder for execution status.

OFSDF 8.0.5.0.0 Installation Guide
Oracle Financial Services Software 38
Refer log sysdba_output_scripts.log file for execution status, if executed in offline
mode. This log would be empty if there are no errors in the execution. In case of any
errors, contact Oracle Support.
4.2.3.5 Verifying the Log File
If schema creation is successful, the console would display an appropriate message. If the schema
creation runs into errors, do refer the log file:
<<OFSBFND Installer folder>>/<<OFS_BFND_PACK>>/schema_creator/logs/
<<OFS_BFND>>_OSC_<timestamp>.log for further details. You may contact Oracle Support anytime
for assistance.
4.3 Installing the OFSDF Applications Pack
OFSDF Applications Pack installation supports two modes of installation:
Installing in GUI Mode
Installing in SILENT Mode
4.3.1 Installing in GUI Mode
NOTE: Ensure you have followed the steps as mentioned in the Configuration for GUI Mode
Installation section prior to proceeding with the next steps.

OFSDF 8.0.5.0.0 Installation Guide
Oracle Financial Services Software 39
1. Log in to the system as non-root user.
2. Identify a directory for installation and set the same in the user .profile file as follows:
FIC_HOME=< OFSAA Installation Directory > export FIC_HOME
3. Execute the user .profile file.
4. Navigate to OFS_BFND_PACK directory.
5. Edit the OFS_BFND_PACK/schema_creator/conf/OFS_BFND_SCHEMA_IN.xml file to set the
appropriate attribute values.
NOTE: See Configuring OFS_BFND_SCHEMA_IN.XML File for details on configuring this XML
file.
6. Execute the schema creator utility.
NOTE: This step is mandatory and should be executed before every OFSAA Application Pack
installation. See Executing the Schema Creator Utility for more details.
7. Navigate to the: OFS_BFND_PACK/bin directory.
8. Execute the following command in the console:
./setup.sh GUI
NOTE: Refer the console for any errors during Pre-install checks.
Validating the Installation

OFSDF 8.0.5.0.0 Installation Guide
Oracle Financial Services Software 40
Initialization Window
9. The General License Agreement is displayed.
10. Select I accept the terms if the License Agreement option.
11. Click Next. The Application Pack details are displayed:
12. Select the product to enable for which you have already obtained license. Refer to Appendix for
enabling additional products post the OFSDF App pack installation at a later time.
13. Click Next. The Application Pack License Agreement is displayed.

OFSDF 8.0.5.0.0 Installation Guide
Oracle Financial Services Software 41
14. Select I accept the terms if the License Agreement option.
15. Click Next. The Pre-Installation Summary window is displayed.
16. Click Next. The Manage Information Domains window is displayed.
NOTE: If you are installing OFSDF on top of any existing application pack, and if you want to use
the same Information Domain, click Next.

OFSDF 8.0.5.0.0 Installation Guide
Oracle Financial Services Software 42
If you want to install OFSDF on a new Information Domain, edit the Information Domain
field with new name, and click Next.
Domain Name
17. The default Information Domain Name for this Application Pack is OFSBFNDINFO. Double-click the
Information Domain Name to edit if it is a new Information domain and you wish to change the
name of the information domain name.
NOTE: For subsequent Application Pack installation on the same Information Domain, the
Information Domain Name is not editable.
Permissible length is 16 characters and only alphanumeric characters are allowed. No
special characters are allowed.
18. Change the INFODOM name to FSDFINFO and click Next. The User Installation Directory window
is displayed.
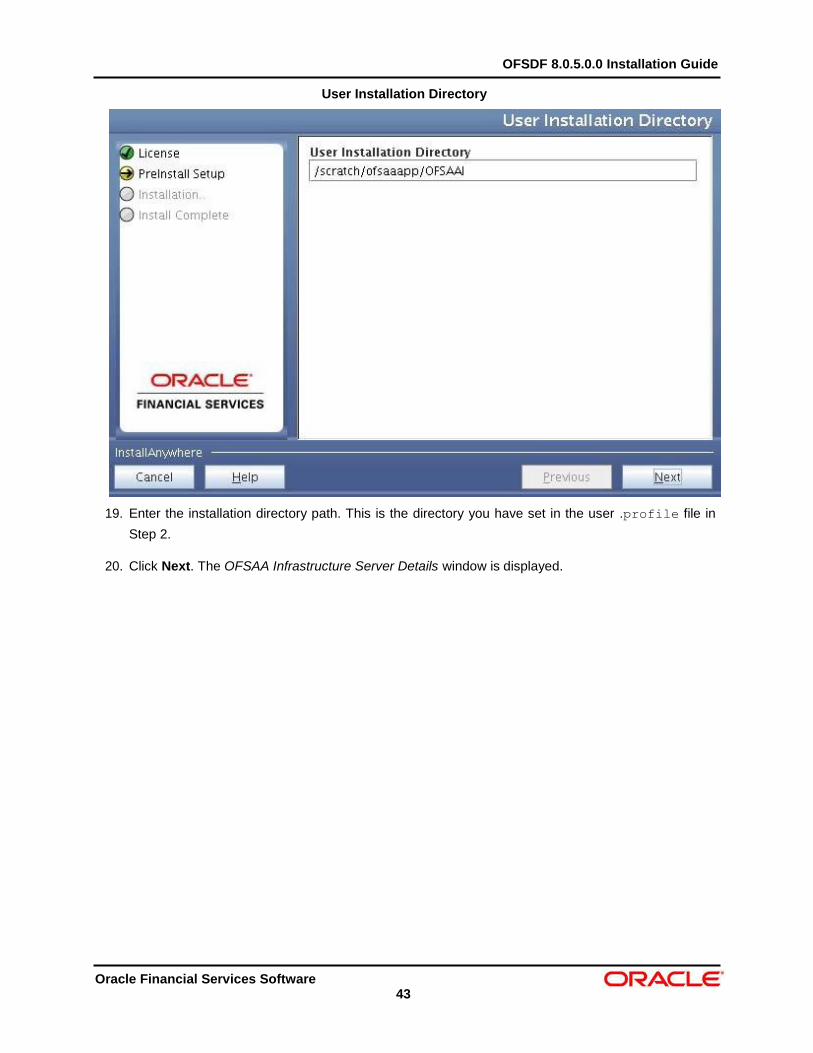
OFSDF 8.0.5.0.0 Installation Guide
Oracle Financial Services Software 43
User Installation Directory
19. Enter the installation directory path. This is the directory you have set in the user .profile file in
Step 2.
20. Click Next. The OFSAA Infrastructure Server Details window is displayed.

OFSDF 8.0.5.0.0 Installation Guide
Oracle Financial Services Software 44
OFSAA Infrastructure Server Details
21. Enter the IP address or hostname of the Database Server.
NOTE: The OFSAAI Server IP/Hostname is auto-populated by default.
22. Click Next. The Web Application Server window is displayed.
Web Application Server
23. Select the appropriate Web Application server type. The options are Tomcat, WebSphere
and WebLogic.

OFSDF 8.0.5.0.0 Installation Guide
Oracle Financial Services Software 45
24. Click Next. Based on the selection, corresponding screens are displayed.
For Tomcat: The Absolute Tomcat Path window is displayed.
Absolute Tomcat Path
25. Enter the Tomcat installation path (till /webapps) where OFSAAI will be deployed.
For WebSphere: The WebSphere Setup Details window is displayed.
WebSphere Setup Details
26. Enter the installation path (up to the Node Cell Name directory) of the WebSphere. The
format is WebSphere path <WebSphere profile directory>/installedApps/
<NodeCellName>.
For WebLogic: The Weblogic Home window is displayed.

OFSDF 8.0.5.0.0 Installation Guide
Oracle Financial Services Software 46
WebLogic Home
27. Enter the WebLogic home directory path.
WebLogic Setup Details
28. Enter the path of the WebLogic domain home directory and click Next.
The OLAP Details window is displayed.

OFSDF 8.0.5.0.0 Installation Guide
Oracle Financial Services Software 47
OLAP Details
29. Enter 1 if you want to configure OFSAAI OLAP feature. By default, 0 is displayed.
30. Click Next. The Web Server Details window is displayed.
Web Server Details
31. Select the Enable HTTPS checkbox to configure HTTPS, if required and enter the WEB
SERVER (HTTP Server) PORT, WEB APP SERVER (HTTP Server) IP address, Context
name for deployment and the Web Local path to any folder on the Web Application
Server (Tomcat/ WebSphere/ WebLogic).
32. Click Next. The Database Details window is displayed.

OFSDF 8.0.5.0.0 Installation Guide
Oracle Financial Services Software 48
Database Details
33. Enter Oracle SID/Service Name.
NOTE: The JDBC URL, CONFIGURATION SCHEMA USER ID and Oracle Configuration
Schema Password, and ABSOLUTE DRIVER PATH fields are auto-populated.
ABSOLUTE DRIVER PATH can be the path where Oracle DB client is installed or
JDBC driver is installed. For example:
/scratch/oracle/app/oracle/product/11.2.0/client_1/jdbc/lib
34. Click Next. The Ports Configuration window is displayed.
Ports Configuration
NOTE: The Java Port, Native Port, Agent Port, ICC Server Port, and ICC Native Port fields are

OFSDF 8.0.5.0.0 Installation Guide
Oracle Financial Services Software 49
auto-populated. You can proceed with the default port values configured or modify.
35. Click Next. The Ports Configuration window is displayed.
Ports Configuration
NOTE: The OLAP Port, Message Server Port, Router Port, and AM Port fields are auto-
populated. You can also configure the Ports settings.
36. Click Next. The SFTP Details window is displayed.
SFTP Details
37. Enter 1 to enable SFTP or 0 to enable FTP.
NOTE: ENABLE SFTP and FILE TRANSFER PORT fields are auto-populated.
Ensure the system on which the OFSAA Infrastructure is being installed, has either
FTP/ SFTP enabled.
You can also modify the SFTP settings.

OFSDF 8.0.5.0.0 Installation Guide
Oracle Financial Services Software 50
38. Enter the port to be used for file transfer.
39. Click Next. The OFSAAI FTP / SFTP Details window is displayed.
OFSAAI FTP / SFTP Details
40. Enter the FTPSHARE path. This is same as the OFSAA Staging/ Metadata directory.
41. Enter the FTP/SFTP User ID and Password for FTPSHARE directory access.
NOTE: The transfer of data (files) between the OFSAAI Server and the Web Application Server
happens over FTP/ SFTP. Ensure the necessary host configurations are made for a
successful handshake.
For more details, see FTP/SFTP Configuration for File Transfer.
42. Click Next. The Pre Installation Summary window is displayed.
Pre Installation Summary
43. Click Install. The Installing OFSAAInfrastructure window is displayed.

OFSDF 8.0.5.0.0 Installation Guide
Oracle Financial Services Software 51
Installing OFSAA Infrastructure
NOTE: Anytime during the installation, you can click Cancel to stop the installation. Once
completed, the INSTALLATION SUMMARY window is displayed.
Installation Summary
The INSTALLATION SUMMARY window displays the number of Fatal Errors, Errors,
Debug Statements, Information, and Warnings along with the location of log files.
44. Click Next. The Installation Complete window is displayed.

OFSDF 8.0.5.0.0 Installation Guide
Oracle Financial Services Software 52
Installation Complete
NOTE: If the installation is successful with some warnings, you can navigate to the installation
log for more details and address them.
45. Click Done. The following message is displayed: Please wait, pack install is being
configured for your system. This may take a moment.
Checking OFSAAI Services
NOTE: This step verifies the OFSAA services startup. In case of errors during services check, an
appropriate error message is displayed.
After checking the OFSAA services, installation proceeds with the OFS BFND Application
Pack Installation.
46. The Installer will prepare to install Oracle Financial Services Data Foundation
Applications Pack.

OFSDF 8.0.5.0.0 Installation Guide
Oracle Financial Services Software 53
Installing Oracle Financial Services Data Foundation Applications Pack
47. The Solution Setup – Introduction window is displayed.
Solution Setup Introduction
48. Click Next. Log mode window is displayed. Select the Log Mode.
NOTE: If Debug is selected, the Passwords will get printed in the log file.
If General is selected then the general information will get printed in the log file.

OFSDF 8.0.5.0.0 Installation Guide
Oracle Financial Services Software 54
Log Mode
49. Click on Next. Segment creation window is displayed. Enter the Data Management
Segment, Application Server ftpshare log path, and Database server ftpshare log path in
the Information Domain window, and click Next.
Segment Creation
NOTE: If you are installing FSDF on top of any other pack, you must provide segment name and
click Next.
50. Click Next. The Pre-Information Creation Summary window is displayed.

OFSDF 8.0.5.0.0 Installation Guide
Oracle Financial Services Software 55
Pre-Information Domain Creation Summary
51. Click Next. The Information Domain Creation window is displayed.
Information Domain Creation
52. Click Next. The Model Upload window is displayed.

OFSDF 8.0.5.0.0 Installation Guide
Oracle Financial Services Software 56
Model Upload
53. Select Yes and click Next. The Model Type window is displayed.
Model Type
54. Select Released Data Model and click Next. The Model will get copied to ftpshare.

OFSDF 8.0.5.0.0 Installation Guide
Oracle Financial Services Software 57
Model Copy
55. The Pre-Model Upload Summary window is displayed.
Model Review
56. Click Next, It will check for the Heap Memory Warning.

OFSDF 8.0.5.0.0 Installation Guide
Oracle Financial Services Software 58
Model Heap Memory Warning
57. Click Back, Update your .profile entry with required heap memory size.
a. Open a new session in Putty
b. Shutdown OFSAAI server using
$FIC_HOME/ficapp/common/FICServer/bin/ stopofsaai.sh
c. Update the X_ARGS_APP entry in .profile following example:
X_ARGS_APP="-Xms2g -Xmx18g -XX:+UseAdaptiveSizePolicy -
XX:MaxPermSize=1024M -XX:+UseParallelOldGC -
XX:+DisableExplicitGC"
NOTE: Ensure that, in an integrated environment for pack on pack installation the memory size
is 10 times the value of all the data model sizes taken together.
d. Run .profile file.
e. Start OFSAA services using $FIC_HOME/ficapp/common/FICServer/bin/
startofsaai.sh
f. Proceed for Model Upload.
58. Click Next again. The Data Model Upload will get start. This will take 3 Hours approx.

OFSDF 8.0.5.0.0 Installation Guide
Oracle Financial Services Software 59
Model Upload
59. After Data Model Upload completion, the Pre-Setup Information window is displayed.
ETL Application/ Source Pair
60. Select New Application/Source pair and click Next.
NOTE: If the option New application/source pair is chosen, then the Staging Details window
is displayed seeking the application and source name for creation of the same.
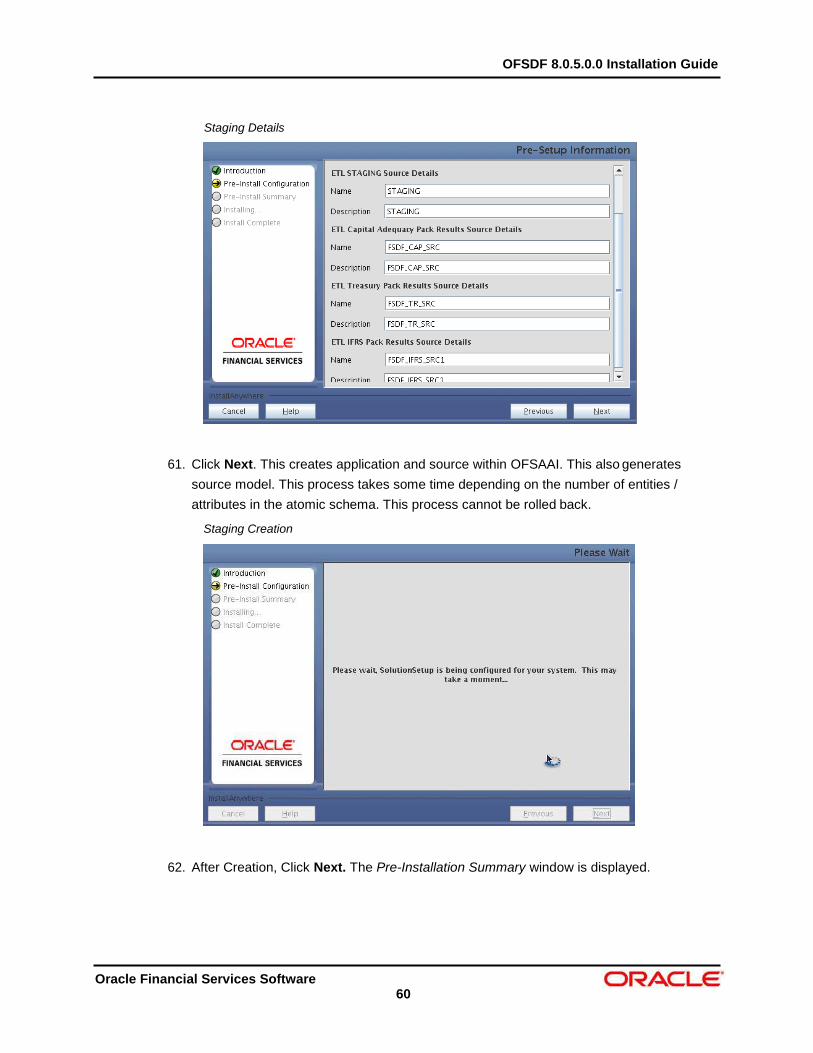
OFSDF 8.0.5.0.0 Installation Guide
Oracle Financial Services Software 60
Staging Details
61. Click Next. This creates application and source within OFSAAI. This also generates
source model. This process takes some time depending on the number of entities /
attributes in the atomic schema. This process cannot be rolled back.
Staging Creation
62. After Creation, Click Next. The Pre-Installation Summary window is displayed.

OFSDF 8.0.5.0.0 Installation Guide
Oracle Financial Services Software 61
Installation Details Review
NOTE: This window displays the pre-installation summary. Verify all details and proceed.
63. Click Install. A pop-up window asks for the confirmation.
Confirmation
64. Click Yes. The Installation is initiated and progress is displayed in the Installing
SolutionSetup window.

OFSDF 8.0.5.0.0 Installation Guide
Oracle Financial Services Software 62
Installing SolutionSetup
NOTE: Anytime during the installation you can click Cancel to stop the installation.
65. After the installation is complete, the Install Complete window is displayed.
Install Complete
66. Click Done. The panel will go back to App Pack Installation Window.

OFSDF 8.0.5.0.0 Installation Guide
Oracle Financial Services Software 63
App Pack Installation
67. After processing the Installation Summary window is displayed.
Installation Summary
68. Click Done. The Installation Complete window is displayed.

OFSDF 8.0.5.0.0 Installation Guide
Oracle Financial Services Software 64
Installation Complete
69. Click Done.
NOTE: The installation process continues on the console. Do not close the console until the
installation process is complete.
The Post Install Health checks are displayed: You have successfully installed the OFS
BFND Application Pack.

OFSDF 8.0.5.0.0 Installation Guide
Oracle Financial Services Software 65
Installation Complete on Console
70. Perform the steps mentioned in Post Installation Configuration section.

OFSDF 8.0.5.0.0 Installation Guide
Oracle Financial Services Software 66
4.3.2 Installing in SILENT Mode
In the SILENT Mode Installation, you must configure the product XML files and follow instructions
in the command prompt.
To install OFS BFND Pack in SILENT mode, follow these steps:
NOTE: For Schema Creator Utility steps, see Executing the Schema Creator Utility.
1. Log in to the system as non-root user.
2. Identify a directory for installation and set the same in the user .profile file as below:
FIC_HOME=< OFSAA Installation Directory >
export FIC_HOME
3. Execute the user .profile file.
4. Navigate to OFS_BFND_PACK directory.
5. Edit the OFS_BFND_PACK/conf/OFS_BFND_PACK.xml file to enable the product
licenses.
NOTE: Ensure to enter Yes in ENABLE tag for OFS_AAI/APP_ID to install OFS
BFND applications.
See Configuring OFS_BFND_PACK.XML File for details on configuring this
XML file.
6. Edit the OFS_BFND_PACK/schema_creator/conf/OFS_BFND_SCHEMA_IN.xml file
to set the appropriate attribute values.
Include INFODOM = "<Infodom Name>" in OFS_BFND_SCHEMA_IN.xml file
NOTE: See Configuring OFS_BFND_SCHEMA_IN.XML File for details on configuring
this XML file.
Ensure to make a TNS entry for the new users created. For details, see Adding
TNS Entries in TNSNAMES.ORA File section.
7. Edit the OFS_BFND_PACK/OFS_AAI/conf/OFSAAI_InstallConfig.xml file to set
the appropriate infrastructure installation attribute values.
NOTE: See Configuring OFSAAI_InstallConfig.xml File for details on configuring this
XML file.
8. Execute the schema creator utility.
NOTE: This step is mandatory and should be executed before every OFSAA
Application Pack installation.
Ensure to execute with -s option in Online/ Offline Mode.
For more information, see Executing the Schema Creator Utility.

OFSDF 8.0.5.0.0 Installation Guide
Oracle Financial Services Software 67
9. Create a copy of the Silent.template file present in the installer folder
OFS_BFND_PACK/OFS_BFND/conf and rename it as Silent.props.
10. Edit the file Silent.props and specify the parameters as per the requirements.
SILENT installation is achieved via a properties file (Silent.props) that must be
updated with proper values, before attempting to install using the silent mode. The
following table lists all the properties that need to be specified.
Elements in Silent.props file
Property Name Description of Property Permissible values Comments
LOG_MODE Mode for logging 0 = Debug
1= General
# Optional;
Default: 0
SEGMENT_CODE Segment Code Example: BFNDSEG # Mandatory
Segment Code should not
exceed 10 characters and
there should not be
special characters or extra
spaces
APPFTP_LOG_PATH Information Domain
Maintenance log path(to be
created) for the new Information
Domain for App Layer
Not Applicable # Mandatory if this an App
Layer Installation and
want to create a new
Information Domain
DBFTP_LOG_PATH Information Domain
Maintenance log path(to be
created) for the new Information
Domain for DB Layer
Not Applicable # Mandatory if this an App
Layer Installation and
want to create a new
Information Domain
UPLOAD_MODEL Whether you want to perform
Model Upload
0 = No
1 = yes
# Mandatory
MODEL_TYPE Released data model or
Customized data model
0 = released
1 = customized
# Mandatory only in the
case of uploading the
data model
DATAMODEL The file name for the
customized data model
Not Applicable # Mandatory only in the
case of uploading the
customized data model
# Option selected for
MODEL_TYPE=1

OFSDF 8.0.5.0.0 Installation Guide
Oracle Financial Services Software 68
DM_DIRECTORY The path for the customized
data model
Not Applicable # Mandatory only in the
case of uploading the
customized data model
# Option selected for
MODEL_TYPE=1
ETL_APPSRC_TYPE The ETL application name 0=New Pair
1=Existing
# Mandatory
ETL_APP_1_DESC Give description for the ETL
FSAPPS Application
Not Applicable
Example:
FSDFAPPDESC
# Mandatory if you want to
create new ETL app/src
pair
# Option selected for
ETL_APPSRC_TYPE=0
ETL_SRC_1_1_DESC Give description for the ETL
FSDF Staging Source
Not Applicable
Example:
FSDFSRCDESC
# Mandatory if you want to
create new ETL app/src
pair
# Option selected for
ETL_APPSRC_TYPE=0
ETL_SRC_1_2_DESC Give description for the ETL
FSDF CAP ADQ Pack
Integration Source
Not Applicable
Example:
FSDF_CAP_SRC
# Mandatory if you want to
create new ETL app/src
pair
# Option selected for
ETL_APPSRC_TYPE=0
ETL_SRC_1_3_DESC Give description for the ETL
FSDF TR Pack Integration
Source
Not Applicable
Example:
FSDF_TR_SRC
# Mandatory if you want to
create new ETL app/src
pair
# Option selected for
ETL_APPSRC_TYPE=0
ETL_SRC_1_4_DESC Give description for the ETL
FSDF IFRS Pack Integration
Source
Not Applicable
Example:
FSDF_IFRS_SRC
# Mandatory if you want to
create new ETL app/src
pair
# Option selected for
ETL_APPSRC_TYPE=0
ETL_APP_1_NAME Give name for the ETL
FSAPPS Application
Not Applicable
Example:
FSDFAPPS
# Mandatory if you want to
create new ETL app/src
pair
# Option selected for
ETL_APPSRC_TYPE=0

OFSDF 8.0.5.0.0 Installation Guide
Oracle Financial Services Software 69
ETL_SRC_1_1_NAME Give name for the ETL FSDF
Staging Source
Not Applicable
Example: FSDFSRC
# Mandatory if you want to
create new ETL app/src
pair
# Option selected for
ETL_APPSRC_TYPE=0
ETL_SRC_1_2_NAME Give name for the ETL FSDF
CAP ADQ Pack Integration
Source
Not Applicable
Example:
FSDF_CAP_SRC
# Mandatory if you want to
create new ETL app/src
pair
# Option selected for
ETL_APPSRC_TYPE=0
ETL_SRC_1_3_NAME Give name for the ETL FSDF
TR Pack Integration Source
Not Applicable
Example:
FSDF_TR_SRC
# Mandatory if you want to
create new ETL app/src
pair
# Option selected for
ETL_APPSRC_TYPE=0
ETL_SRC_1_4_NAME Give name for the ETL FSDF
IFRS Pack Integration Source
Not Applicable
Example:
FSDF_IFRS_SRC
# Mandatory if you want to
create new ETL app/src
pair
# Option selected for
ETL_APPSRC_TYPE=0
Installation:
11. Give a path for installation log file in log4j.xml in OFS_BFND_PACK/OFS_BFND/conf
directory.
12. Navigate to the following directory:
OFS_BFND_Pack/bin/
13. Execute the following command in the console to execute the application pack installer
with Silent option:
./setup.sh SILENT
The installer proceeds with Pre-Installation Checks.

OFSDF 8.0.5.0.0 Installation Guide
Oracle Financial Services Software 70
14. On successful completion of Pre-Installation checks, when prompted enter the
Infrastructure FTP/SFTP password.
Console Prompts User Inputs
Enter Infrastructure FTP/SFTP password
Enter the password to access Product Staging/Metadata repository directory in the application server.
Note: In case the prompt reads as below, enter the user name/
password for accessing the product Staging/ Metadata Repository FTPSHARE
Kerberos username [user]
Kerberos password for user:
15. Enter Always when prompted to add host key fingerprint.
The OFSAAI License Agreement is displayed.

OFSDF 8.0.5.0.0 Installation Guide
Oracle Financial Services Software 71
16. Enter Y/y to accept the License Agreement and proceed.
NOTE: The installation process continues on the console. Do not close the console
until the installation process is complete.
17. The OFS AAI platform is installed.
NOTE: After the platform is installed, it proceeds for the OFS BFND PACK installation.
After successful OFS BFND Pack installation, WAR file is generated and all the
servers are verified.
18. The OFS BFND Pack installation starts.

OFSDF 8.0.5.0.0 Installation Guide
Oracle Financial Services Software 72
NOTE: Data Model Upload may take several hours to get complete. You can check the
Logs in /OFS_BFND_PACK/OFS_BFND/logs.
NOTE: Do not close the console until the installation is complete.

OFSDF 8.0.5.0.0 Installation Guide
Oracle Financial Services Software 73
19. The following message is displayed in the console:
Installation completed…
20. Perform the steps mentioned in Post Installation Configuration section.
4.3.3 Verifying the Log File
The log files OFS_BFND_installation.log can be found in the installation path
<OFSBFND Installer Folder>OFS_BFND_PACK/OFS_BFND/logs and
OFSAAInfrastructure_Install.log can be found in the installation path $FIC_HOME. The
log files contain detailed summary of installation processes. It also shows the number of Fatal
Errors, Errors, Debug Statements, Information, and Warnings.
NOTE: Applications Pack installer performs all the pre-requisite validation checks during
installation. Any errors encountered during the process are displayed in
InfrastructurePreValidations.log generated in
<OFS_BFND_PACK Installer Folder>/bin directory.
Three log files:
Application Pack specific log file (overall status of the app pack installation) can be found
in:
<OFSBFND Installer Folder>/OFS_BFND_PACK/logs/Pack_install.log.
AAI Installation log file can be found in:

OFSDF 8.0.5.0.0 Installation Guide
Oracle Financial Services Software 74
<OFSBFND Installer folder>/OFS_BFND_PACK/OFS_AAI/logs/
OFSAAI<timestamp>.log
Application installation log file. The following log file can be found in:
<OFSBFND Installer Folder> /OFS_BFND_PACK/OFS_BFND/logs :
o OFS_BFND_Installation_debug.log
o OFS_BFND_installation.log
4.4 Verifying the Installation
This section explains the steps to verify the installation of OFSDF Application Pack.
To verify that you have successfully installed the OFSDF pack, follow the below steps:
1. Login in to the Atomic Schema. Verify that all the database objects like view, procedure,
and functions are compiled without any compilation error.
2. Verify the application log (must not have any error).
3. Deploy the EAR/WAR files and check whether the application screen is up. For
deployment of the application, see Appendix C.

OFSDF 8.0.5.0.0 Installation Guide
Oracle Financial Services Software 75
5 Upgrading the OFSDF Application Pack
Refer to the following instructions to download, extract, install, and configure this release.
1. To download and copy the OFSDF Application Pack v8.0.5.0.0 archive file, see
Downloading and Copying the Software Installer section.
NOTE: The archive files are different for every operating system like AIX, Solaris, and
RHEL/Oracle Linux.
2. Log in to the OFSAA Server.
3. Shut down all the OFSAAI Services. For more information, refer to the Start/Stop
Infrastructure Services section in Appendix D.
4. Execute the following command:
chmod -R 755 $FIC_HOME
5. If you have Unzip utility, skip to the next step. Download the Unzip utility (OS specific)
and copy it in Binary mode to the directory that is included in your PATH variable,
typically $HOME path or directory in which you have copied the 8.0.5.0.0 installer.
Uncompress the unzip installer file using the command:
uncompress unzip_<os>.Z
NOTE: In case you notice an error message uncompress: not found [No such file or
directory]” when the package is not installed, contact your UNIX administrator.
Give EXECUTE permission to the file using the command:
chmod 755 OFS_BFND_80500_<OperatingSystem>.zip
6. Extract the contents of the Oracle Financial Services Data Foundation Application Pack
8.0.5.0.0 installer archive file using the following command:
unzip_<os> <name of the file to be unzipped>
7. Give EXECUTE permission to the archive file. Navigate to the path OFS_BFND_
80500_<OperatingSystem>.zip and execute the command:
chmod -R 755 OFS_BFND_80500
8. Create a copy of the Silent.template file present in the installer folder
OFS_BFND_PACK/OFS_BFND/conf and rename it as Silent.props.
9. Edit the file Silent.props and specify the parameters as per the requirements.
SILENT installation is achieved via a properties file (Silent.props) that must be
updated with proper values. The following table lists all the properties that must be
specified.

OFSDF 8.0.5.0.0 Installation Guide
Oracle Financial Services Software 76
Table 3: Elements in the Silent.props file
Property Name Description of Property Permissible values Comments
LOG_MODE Mode for logging 0 = Debug
1= General
# Optional;
Default: 0
SEGMENT_CODE Segment Code Example: BFNDSEG # Mandatory
Segment Code must be
same as the code that is
used during the first FSDF
installation (Base Pack)
APPFTP_LOG_PATH Information Domain
Maintenance log path (to be
created) for the new Information
Domain for App Layer
Not Applicable # Mandatory
Information Domain
Maintenance log path
must be same as the log
path that is used during
the first FSDF installation
(Base Pack)
DBFTP_LOG_PATH Information Domain
Maintenance log path (to be
created) for the new Information
Domain for DB Layer
Not Applicable # Mandatory
Information Domain
Maintenance log path
must be same as the log
path that is used during
the first FSDF installation
(Base Pack)
UPLOAD_MODEL Whether you want to perform
Model Upload
0 = No
1 = yes
# Mandatory
MODEL_TYPE Released data model or
Customized data model
0 = released
1 = customized
# Mandatory only in the
case of uploading the
data model
DATAMODEL The file name for the
customized data model
Not Applicable # Mandatory only in the
case of uploading the
customized data model
# Option selected for
MODEL_TYPE=1

OFSDF 8.0.5.0.0 Installation Guide
Oracle Financial Services Software 77
DM_DIRECTORY The path for the customized
data model
Not Applicable # Mandatory only in the
case of uploading the
customized data model
# Option selected for
MODEL_TYPE=1
ETL_APPSRC_TYPE The ETL application name 0=New Pair
1=Existing
# Mandatory
ETL_APP_1_DESC Give description for the ETL
FSAPPS Application
Not Applicable
Example:
FSDFAPPDESC
# Mandatory if you want to
create new ETL app/src
pair
# Option selected for
ETL_APPSRC_TYPE=0
ETL_SRC_1_1_DESC Give description for the ETL
FSDF Staging Source
Not Applicable
Example:
FSDFSRCDESC
# Mandatory if you want to
create new ETL app/src
pair
# Option selected for
ETL_APPSRC_TYPE=0
ETL_SRC_1_2_DESC Give description for the ETL
FSDF CAP ADQ Pack
Integration Source
Not Applicable
Example:
FSDF_CAP_SRC
# Mandatory irrespective
of CAP Pack application is
installed or not. The
source gets used only
when the CAP Pack
application is installed.
ETL_SRC_1_3_DESC Give description for the ETL
FSDF TR Pack Integration
Source
Not Applicable
Example:
FSDF_TR_SRC
# Mandatory irrespective
of TR Pack application is
installed or not. The
source gets used only
when the TR Pack
application is installed.
ETL_SRC_1_4_DESC Give description for the ETL
FSDF IFRS Pack Integration
Source
Not Applicable
Example:
FSDF_IFRS_SRC
# Mandatory irrespective of
IFRS Pack application is
installed or not. The source
gets used only when the
IFRS Pack application is
installed.
ETL_APP_1_NAME Give name for the ETL
FSAPPS Application
Not Applicable
Example:
FSDFAPPS
# Mandatory if you want to
create new ETL app/src
pair
# Option selected for
ETL_APPSRC_TYPE=0

OFSDF 8.0.5.0.0 Installation Guide
Oracle Financial Services Software 78
ETL_SRC_1_1_NAME Give name for the ETL FSDF
Staging Source
Not Applicable
Example: FSDFSRC
# Mandatory if you want to
create new ETL app/src
pair
# Option selected for
ETL_APPSRC_TYPE=0
ETL_SRC_1_2_NAME Give name for the ETL FSDF
CAP ADQ Pack Integration
Source
Not Applicable
CAP Example:
FSDF_ _SRC
# Mandatory irrespective of
CAP Pack application is
installed or not. The source
gets used only when the
CAP Pack application is
installed.
ETL_SRC_1_3_NAME Give name for the ETL FSDF
TR Pack Integration Source
Not Applicable
Example:
FSDF_TR_SRC
# Mandatory irrespective of
TR Pack application is
installed or not. The source
gets used only when the
TR Pack application is
installed.
ETL_SRC_1_4_NAME Give name for the ETL FSDF
IFRS Pack Integration Source
Not Applicable
Example:
FSDF_IFRS_SRC
# Mandatory irrespective of
IFRS Pack application is
installed or not. The source
gets used only when the
IFRS Pack application is
installed.
10. Execute setup.sh file using the following command:
./setup.sh SILENT
Verify if the release is applied successfully by checking the log file generated in the
installation folder. You can ignore ORA-00001, ORA-00955, ORA-02260, and ORA-01430
errors in the log file. In case of any other errors, contact Oracle Support.
NOTE: OFS_BFND_80500 upgrade does not support GUI mode installation.
11. For more information on securing your OFSAA Infrastructure, refer to the Security Guide
in OHC Documentation Library.
12. After successful installation, follow these steps:
Clear the application cache. Navigate to the following path depending on the configured
web application server and delete the files.
Tomcat
<Tomcat installation folder>/work/Catalina/localhost/<Application
name>/org/apache/jsp
WebLogic

OFSDF 8.0.5.0.0 Installation Guide
Oracle Financial Services Software 79
<Weblogic installation location>/domains/<Domain
name>/servers/<Server name>/tmp/_WL_user/<Application name>/<auto
generated folder>/jsp_servlet
WebSphere
<Websphere installation folder>/AppServer/profiles/<Profile
name>/temp/<Node name>/server1/<Application name>/<.war file
name>
13. Add umask 0027 in the .profile of the UNIX account which manages the WEB server to
ensure restricted access permissions.
14. Restart all the OFSAAI services. For more information, refer to the Start/Stop
Infrastructure Services section in Appendix D.
15. Generate the application EAR/WAR file and redeploy the application onto your configured
web application server. For more information on generating and deploying EAR / WAR
file, refer Appendix C section.
5.1 Performing Model Upload Outside Installer
NOTE: This section is applicable if you are performing Model Upload outside the installer.
The following tables should not have any data before Model Upload is triggered. Based on your
current FSDF version, the tables must be selected.
You can take the backup of these tables and reload the data after Model Upload is performed.
In FSDF 8.0.0.0.0
DIM_PRODUCT_FEATURE
FCT_ACCOUNT_FEATURE_MAP
STG_MGMT_FORECAST
FCT_MGMT_FORECAST
FSDF 8.0.1.0.0
STG_TIME_SPECIFIC_OBLIGATIONS
DIM_TERMINAL
FCT_REG_CAP_ACCOUNT_SUMMARY
FSDF 8.0.2.0.0
FCT_REG_CAP_ACCOUNT_SUMMARY
FCT_IFRS_ACCOUNT_SUMMARY
FCT_IFRS_STAGE_DETERMINATION
FCT_REG_OR_CAPITAL_SUMMARY
FCT_REG_LE_CAPITAL_SUMMARY
FCT_REG_CP_CAPITAL_SUMMARY
FCT_REG_CAP_POOL_SUMMARY

OFSDF 8.0.5.0.0 Installation Guide
Oracle Financial Services Software 80
FCT_REG_CAP_PLCD_COLL_SUMMARY
FCT_REG_COUNTERPARTY_CVA
FCT_REG_RUN_LEGAL_ENTITY_MAP
FSDF 8.0.3.0.0
FCT_REG_AGG_CASH_FLOWS
FCT_CREDIT_LINE
FCT_LOAN_ACCOUNT_SUMMARY
FCT_ACCOUNT_FAIR_VALUE
DIM_UOM_ATTR
DIM_UOM_HIER
FCT_INSTRUMENT_MARKET_PRICES
STG_ACCOUNT_INCEPTION_RATES
FSDF 8.0.3.1.0
FCT_LOAN_ACCOUNT_SUMMARY
FCT_ACCOUNT_FAIR_VALUE
DIM_UOM_ATTR
DIM_UOM_HIER
FCT_INSTRUMENT_MARKET_PRICES
STG_ACCOUNT_INCEPTION_RATES
In FSDF 8.0.4.0.0
FCT_LLFP_ECL_RECONCILIATION
STG_PROFESSION_RANK_MASTER
FCT_INSTRUMENT_MARKET_PRICES
In FSDF 8.0.4.1.0
FCT_LLFP_ECL_RECONCILIATION
STG_PROFESSION_RANK_MASTER
FCT_INSTRUMENT_MARKET_PRICES

OFSDF 8.0.5.0.0 Installation Guide
Oracle Financial Services Software 81
6 Post Installation Configuration
Once the OFSDF Applications Pack installation is completed successfully, certain post-
installation steps are required to set configuration parameters. These configuration parameters
are distributed across the machines on which Infrastructure Web, Application, and Database
components have been installed.
This chapter includes the following sections:
Configuring Resource Reference
Starting OFSAA Infrastructure Services
Adding TNS Entries in TNSNAMES.ORA File
Creating and Deploying the Application Pack Web Archive
Accessing the OFSAA Application
Performing Post Deployment Configurations
NOTE: Ensure to clear the application cache prior to the deployment of Infrastructure or
Application Service Packs / One-off patches. This is applicable to all Web Servers
(WebSphere, WebLogic, and Tomcat) and OS combinations.
6.1 Configuring Resource Reference
Configure the resource reference in the Web Application Server configured for OFSAA
Applications. Refer Appendix B for details on configuring the resource reference in WebSphere,
WebLogic, and Tomcat Application Servers.
6.2 Starting OFSAA Infrastructure Services
Start the OFSAA Infrastructure Services prior to deployment or accessing the OFSAA
Applications.
Refer to the Appendix D for details on Start/ Stop OFSAA Services.
6.3 Adding TNS Entries in TNSNAMES.ORA File
Add TNS entries in the tnsnames.ora file, for every schema created for the Application Pack
To find the tnsname for the entries, follow these steps:
1. Login to the application using System Administrator privileges.
2. Navigate to System Configuration & Identity Management tab.
3. Click Administration and Configuration > System Configuration > Database Details.
4. Expand the dropdown list for Name to get the list of TNS entry names.

OFSDF 8.0.5.0.0 Installation Guide
Oracle Financial Services Software 82
5. Alternatively, you can connect to the CONFIG schema and execute the below query:
select dbname from db_master where dbname !='CONFIG'
6.4 Creating and Deploying the Application Pack Web Archive
On successful installation of the OFSAA Application Pack, the Web Archive file is automatically
generated. However, you need to deploy the generated Web Archive file on the Web Application
Server.
For identifying the location of the generated Web Archive file and for generating and deploying
the web archive file at any time later, refer Appendix C.
NOTE: Refer the Oracle Financial Services Forms Manager User Guide for instructions on
Creating and Deploying the Forms Manager Web Archive.
6.5 Accessing the OFSAA Application
Prior to accessing the OFSAA application ensure the Internet Explorer Settings are configured.
Refer to Appendix E for details on accessing the OFSAA Application on successful deployment of
the application Web Archive.
6.6 Performing Post Deployment Configurations
Prior to using the OFSAA Application, perform the Post Deployment Configuration steps detailed
in Appendix F.

OFSDF 8.0.5.0.0 Installation Guide
Oracle Financial Services Software 83
7 Appendix A: Configuring Web Server
This appendix includes the following sections:
Configuring Web Server
Configuring Web Application Server
7.1 Configuring Web Server
This step assumes an installation of a Web Server exists as per the prerequisites.
Refer the product specific Installation Guide/ Configuration Guide to install/ configure the Web
Server. If an installation already exists, skip and proceed to the next step.
NOTE: Make a note of the IP Address/ Hostname and Port of the web server. This information
is required during the installation process.
Refer Oracle Financial Services Analytical Applications Infrastructure Security Guide
mentioned in the Documentation Library for OFSAAI 8.0.5.0.0 (OTN), for additional
information on securely configuring your Web Server.
Ensure to enable sticky session/affinity session configuration on the web server. Refer
the respective product specific Configuration Guide for more details. Additionally, you
also need to enable the sticky session/affinity session configuration at Load Balancer
level if you have configured a Load Balancer in front of the web server(s).
7.2 Configuring Web Application Server
This step assumes an installation of a web application server exists as per the prerequisites. To
configure the Web Application Server for OFSAA Deployment refer the sections below.
This section includes the following topics:
Configuring WebSphere for Application Deployment
Configuring WebLogic for Application Deployment
Configuring Apache Tomcat Server for Application Deployment
NOTE: Make a note of the IP Address/ Hostname and Port of the web application server. This
information is required during the installation process (required if Web Server is not
configured).
Make a note of the IP Address/ Hostname and Port of the web application server. This
information is required during the installation process (required if web server is not
configured).
Refer OFSAA Secure Configuration Guide/ Security Guide for additional information on
securely configuring your Web Server.

OFSDF 8.0.5.0.0 Installation Guide
Oracle Financial Services Software 84
7.2.1 Configuring WebSphere Application Server for Application Deployment
You can deploy multiple OFSAA applications on different profiles of a WebSphere application
server. To create multiple WebSphere "Profiles", in a stand-alone server use the command line
option as explained below. A profile is the set of files that define the runtime environment. At least
one profile must exist to run WebSphere Application Server.
This section includes the following topics:
Creating New Profile in WebSphere
Managing Applications in WebSphere
Deleting WebSphere Profiles
Configuring WebSphere HTTPS
Setting WebSphere Memory
7.2.1.1 Creating New Profile in WebSphere
The Profile is created in WebSphere through command line using the manageprofiles.sh which
resides in <WebSphere Install directory>/AppServer/bin.
The command to create a profile without admin security through command line is as follows:
"manageprofiles.sh -create -profileName <profile> -profilePath
<profile_path> -templatePath <template_path> -nodeName <node_name> -
cellName <cell_name> -hostName <host_name>"
Example:
$usr/home>./manageprofiles.sh -create -profileName mockaix -
profilePath/websphere/webs64/Appserver/profiles/mockaix -
templatePath/websphere/webs64/Appserver/profileTemplates/default -
nodeName ipa020dorNode04 - cellName ipa020dorNode04Cell -hostName
ipa020dor
The command to create a profile with admin security through command line is as follows:
"manageprofiles.sh -create -profileName <profile> -profilePath
<profile_path> -templatePath <template_path> -nodeName <node_name> -
cellName <cell_name> -hostName <host_name> -enableAdminSecurity true
-adminUserName <Admin User Name> -adminPassword < Admin User
Password> -samplespassword <sample User Password>"
Example:
$usr/home>./manageprofiles.sh -create -profileName mockaix -
profilePath/websphere/webs64/Appserver/profiles/mockaix -
templatePath/websphere/webs64/Appserver/profileTemplates/default -
nodeName ipa020dorNode04 -cellName ipa020dorNode04Cell -hostName

OFSDF 8.0.5.0.0 Installation Guide
Oracle Financial Services Software 85
ipa020dor -enableAdminSecurity true -adminUserName ofsaai -
adminPassword ofsaai -samplespassword ofsaai"
NOTE: While using the manageprofiles.sh command to create a New Profile in WebSphere,
you can also use "-validatePorts" to validate if the specified ports are not reserved or in
use. Additionally, you can specify new ports with "-startingPort <base port>" which
specifies the starting port number to generate and assign all ports for the profile. For
more information on using these ports, refer WebSphere manageprofiles command.
7.2.1.2 Managing Applications in WebSphere
To manage the installed applications in WebSphere, do the following:
1. Open the administrator console using the following URL:
Example: (https, if SSL is enabled)
NOTE: Administrative Console Port value is available in serverindex.xml file within <WebSphere Profile
Directory>/config/cells/<Node Cell>/nodes/<Node Name> directory.
The Integrated Solutions Console Login window is displayed.
Integrated Solutions Console Login
2. Log on with the User ID provided with the admin rights.
3. From the LHS menu, expand the Applications Application Type WebSphere
Enterprise Applications.

OFSDF 8.0.5.0.0 Installation Guide
Oracle Financial Services Software 86
4. The Enterprise Applications screen is displayed.
Enterprise Applications
5. This Enterprise Applications screen helps you to:
Install new application
Uninstall existing applications
Start or Stop the installed applications
7.2.1.3 Deleting WebSphere Profiles
To delete a WebSphere profile, do the following:
1. Select the checkbox adjacent to the required application and click Stop.
2. Stop the WebSphere profile to be deleted.
3. Navigate to WebSphere directory:
<WebSphere_Installation_Directory>/AppServer/bin/
4. Execute the command:
manageprofiles.sh -delete -profileName <profile_name>
5. Delete profile folder.
6. Example:
7. Execute the command:
manageprofiles.sh –validateAndUpdateRegistry

OFSDF 8.0.5.0.0 Installation Guide
Oracle Financial Services Software 87
7.2.1.4 Configuring WebSphere HTTPS
Following are the steps for configuring an HTTPS Transport on WebSphere:
1. Create a profile using the Profile Creation Wizard in WebSphere.
Note down the HTTPS port specified during this process and use the same as servlet
port or web server port during OFSAAI installation.
To enable https configuration on Infrastructure, assign value 1 to " " in
OFSAAI_InstallConfig.xml for SILENT mode OFSAAI installation.
7.2.1.5 Setting WebSphere Memory
To configure the WebSphere Memory Settings:
1. Navigate to
.
2. Change the memory setting for Java Heap:
Initial heap size = 512
Maximum heap size =3072
7.2.2 Configuring WebLogic for Application Deployment
Applicable only if the web container is WebLogic.
You can deploy multiple OFSAA applications on different domains of a stand-alone WebLogic
application Server. To create a WebLogic "Domain" you can use the Domain Creation wizard. A
domain is the set of files that define the runtime environment. At least one domain must exist to
run WebLogic Application Server.
NOTE: For deployment on Oracle WebLogic Server 12.1.2+ (64 bit) with Java 8, download and install
patch 18729264.
This section includes the following topics:
Creating Domain in WebLogic Server
Deleting Domain in WebLogic
Setting WebLogic Memory
7.2.2.1 Creating Domain in WebLogic Server
To create a new domain using Configuration Wizard in WebLogic, do the following:
1. Navigate to <WLS_HOME>/wlserver/common/bin directory and execute the command:
./config.sh

OFSDF 8.0.5.0.0 Installation Guide
Oracle Financial Services Software 88
The Welcome window of the Configuration Wizard is displayed.
Welcome
2. Select Create a new WebLogic domain option and click Next.
The Select Domain Source window is displayed.
Select Domain Source

OFSDF 8.0.5.0.0 Installation Guide
Oracle Financial Services Software 89
3. Select the Generate a domain configured automatically to support the following
products option and click Next.
4. The Specify Domain Name and Location window is displayed.
Specify Domain Name and Location
5. Enter the Domain Name and Location. Click Browse to navigate and specify the
location. Click Next.
The Configure Administrator Username and Password window is displayed.
Configure Administrator Username and Password
6. Enter the User name and User password to be assigned to the Administrator. Ensure
that the password is of minimum 8 characters in length.
7. Re-enter the password for confirmation and add a brief Description. Click Next.
The Configure Server Start Mode and JDK window is displayed.

OFSDF 8.0.5.0.0 Installation Guide
Oracle Financial Services Software 90
Configure Server Start Mode and JDK
8. Select the following options:
In the WebLogic Domain Startup Mode section, select the required mode
(Development Mode or Production Mode).
In the JDK Selection section, select Other JDK. Click Browse and navigate to the JDK
location. Click Next.
The Select Optional Configuration window is displayed.
Select Optional Configuration

OFSDF 8.0.5.0.0 Installation Guide
Oracle Financial Services Software 91
9. Select Administration Server. A WebLogic Server domain must have an
Administration Server. You can also select Manages Servers, Clusters and Machines
and RDBMS Security Store if required. Click Next.
The Configure the Administration Server window is displayed.
Configure the Administration Server
10. Enter Administration Server details such as the Name, Listen address, Listen Port, SSL
listen port, and SSL enabled (for secure login using https) check box. Click Next.
The Configuration Summary window is displayed.
NOTE: Make a note of the Listen Port or SSL Listen Port value (ex: 7007), since the same has to be
entered in the Servlet port field during installation.

OFSDF 8.0.5.0.0 Installation Guide
Oracle Financial Services Software 92
Configure Server Start Mode and JDK
11. Verify the configuration details of the WebLogic domain and click Create.
12. The Creating Domain window is displayed with the status indication of the domain
creation process.
Configure Server Start Mode and JDK

OFSDF 8.0.5.0.0 Installation Guide
Oracle Financial Services Software 93
13. Click Done when complete. The domain server is created enabling the deployment of
multiple Infrastructure applications on a single WebLogic.
NOTE: Note down the HTTPS port specified during this process and use the same as servlet
port or web server port during OFSAAI Installation.
To enable https configuration on Infrastructure, assign value 1 to "HTTPS_ENABLE" in
OFSAAI_InstallConfig.xml for silent mode OFSAAI installation
14. Add a java option entry -DUseSunHttpHandler=true in WLS_HOME/bin/
"setDomainEnv.sh" file (Required only if self-signed certificate is used).
7.2.2.2 Deleting Domain in WebLogic
15. Navigate to the following directory:
16. Execute ./stopWebLogic.sh to stop the WebLogic domain.
17. Delete the WebLogic domain.
7.2.2.3 Setting WebLogic Memory
To configure the WebLogic Memory Settings:
18. Change the memory setting for Java Heap to in
file, which resides in the folder and in file which
resides in the folder .
19. Edit this file for customizing memory settings and garbage collector settings depending
on the available hardware configuration.
Example 1:
if [ "${JAVA_VENDOR}" = "Sun" ] ; then
WLS_MEM_ARGS_64BIT="-Xms512m -Xmx1024m"
export WLS_MEM_ARGS_64BIT
WLS_MEM_ARGS_32BIT="-Xms512m -Xmx1024m"
export WLS_MEM_ARGS_32BIT
else
WLS_MEM_ARGS_64BIT="-Xms512m -Xmx1024m"
export WLS_MEM_ARGS_64BIT
WLS_MEM_ARGS_32BIT="-Xms512m -Xmx1024m"

OFSDF 8.0.5.0.0 Installation Guide
Oracle Financial Services Software 94
export WLS_MEM_ARGS_32BIT
Example 2:
JAVA_VM=
MEM_ARGS="-Xms256m -Xmx1024m"
7.2.3 Configuring Apache Tomcat Server for Application Deployment
This section is applicable only when the Web Application Server type is Tomcat.
Administering Tomcat User
Configuring Tomcat to use JAVA 64 bit Executables
Configuring Servlet Port
Configuring SL Port
Setting Apache Tomcat Memory
Uninstalling WAR Files in Tomcat
Configuring Axis API
7.2.3.1 Administering Tomcat User
The Tomcat administration and manager application does not provide a default login. You are
required to edit "$CATALINA_HOME/conf/tomcat-users.xml" as instructed below.
This file contains an XML tag <user> for each individual user, which will display the username
and password used by admin to log on to Tomcat, and the role names to which the admin user is
associated with. For example, <user name="admin" password="admin"
roles="standard,manager"/>
1. Add the manager role to any one of the existing username/password combination as
shown in the example above.
2. Use the same username/password to which the manager-gui role has been assigned
to access the Tomcat Application Manager.
3. If the Tomcat server is already running, it requires a re-start after the above
configuration is done.

OFSDF 8.0.5.0.0 Installation Guide
Oracle Financial Services Software 95
7.2.3.2 Configuring Tomcat to use JAVA 64 bit Executables
1. Navigate to the "$CATALINA_HOME/bin" folder.
2. Edit the setclasspath.sh as explained below.
3. Replace the following block of text:
# Set standard commands for invoking Java.
RUNJAVA="$JRE_HOME"/bin/java
if [ "$os400" != "true" ]; then
RUNJDB="$JAVA_HOME"/bin/jdb
With:
# Set standard commands for invoking Java.
RUNJAVA="$JAVA_BIN"/java
if [ "$os400" != "true" ]; then
RUNJDB="$JAVA_BIN"/jdb
4. If the Tomcat server is already running, it requires a re-start after the above
configuration is done.
NOTE: In case tomcat is installed under different UNIX profile, set JAVA_BIN environment
variable in .profile to include the Java Runtime Environment absolute path.
For example:
export JAVA_BIN /usr/java/jdk1.7.0_65/jre/bin
export JAVA_BIN = /usr/jdk1.7.0_75/bin/sparcv9 for Solaris Sparc
7.2.3.3 Configuring Servlet Port
The default servlet port configured for the Tomcat installation is 8080. Ignore this section if you
need to use the default port.
If you need to use a different port number, you must first configure the port in the " in
the " directory of Tomcat Installation directory. The following steps guide you through the
configuration process:
1. Navigate to $CATALINA_HOME/conf. Open server.xml and locate the tag:
" "
2. Against this tag, a parameter is specified ' '. Edit this value
to the new port number that will be used during the installation process.
3. Save your changes in server.xml .
NOTE: Make a note of the servlet port configured. This information is required during the
installation of OFSAA Application Pack.

OFSDF 8.0.5.0.0 Installation Guide
Oracle Financial Services Software 96
7.2.3.4 Configuring SSL Port
If you need to configure and access your OFSAA setup for HTTPS access, ensure that the
following connect tag under in
<Tomcat_installation_folder>/conf/server.xml file is uncommented for SSL Configuration.
(By default, it is commented).
<Connector port="8443" protocol="HTTP/1.1" SSLEnabled="true"
maxThreads="150" scheme="https" secure="true"
clientAuth="false" sslProtocol="TLS"
NOTE: Make a note of the servlet port configured. This information would be required during
the installation of OFSAA Application Pack.
To enable https configuration on Infrastructure, assign value 1 to "HTTPS_ENABLE" in
OFSAAI_InstallConfig.xml for SILENT mode OFSAAI installation.
For more information related to SSL Configuration on Tomcat, refer to
/.
7.2.3.5 Setting Apache Tomcat Memory
To configure the Apache Tomcat Memory Settings:
1. Locate the file which resides in the folder .
2. Edit this file for customizing the memory settings and garbage collector settings
depending on the available hardware configuration.
3. Add the memory setting for Java Heap to .
4. Example:
if [ -z "$LOGGING_MANAGER" ]; then
JAVA_OPTS="$JAVA_OPTS -Xms512m -Xmx1024m
-Djava.util.logging.manager=org.apache.juli.ClassLoaderLogManager"
else
JAVA_OPTS="$JAVA_OPTS -Xms512m -Xmx1024m $LOGGING_MANAGER"
fi
7.2.3.6 Uninstalling WAR Files in Tomcat
To uninstall WAR files in Tomcat refer Uninstalling WAR Files in Tomcat.

OFSDF 8.0.5.0.0 Installation Guide
Oracle Financial Services Software 97
7.2.3.7 Configuring Axis API
This step is optional and required only if the web application server used in Apache Tomcat. If you use any other web application server, skip and proceed to next step.
Copy the jaxrpc.jar from the <OFSAA Installation Directory>/axis-
1_4/webapps/axis/WEB-INF/lib and place it in under <Tomcat Installation
Directory>/lib and restart the Tomcat Server.

OFSDF 8.0.5.0.0 Installation Guide
Oracle Financial Services Software 98
8 Appendix B: Configuring Resource Reference in Web Application Servers
This appendix includes the following topics:
Configuring Resource Reference in WebSphere Application Server
Configuring Resource Reference in WebLogic Application Server
Configuring Resource Reference in Tomcat Application Server
8.1 Configuring Resource Reference in WebSphere Application Server
This section is applicable only when the Web Application Server is WebSphere.
This section includes the following topics:
Creating JDBC Provider
Creating Data Source
Creating J2C Authentication
Creating JDBC Connection Pooling
8.1.1 Creating JDBC Provider
1. Open the WebSphere admin console in the browser window:
enabled). The Login window is displayed.
2. Login with the user ID that has admin rights.
(https, if SSL is
3. Expand the Resources option in the LHS menu and click JDBC JDBC Providers.
The JDBC Providers window is displayed.

OFSDF 8.0.5.0.0 Installation Guide
Oracle Financial Services Software 99
JDBC Providers
4. Select the Scope from the drop-down list. Scope specifies the level at which the
resource definition is visible.
5. Click New to add new JDBC Provider under the Preferences section. The Create new
JDBC provider window is displayed.

OFSDF 8.0.5.0.0 Installation Guide
Oracle Financial Services Software 100
Create a new JDBC Provider
6. Enter the following details:
Database Type - Oracle
Provider Type- Oracle JDBC Driver
Implementation Type- Connection pool data source
Name- The required display name for the resource
Description - The optional description for the resource
7. Click Next.

OFSDF 8.0.5.0.0 Installation Guide
Oracle Financial Services Software 101
Enter database class path information
8. Specify the directory location for "ojdbc<version>.jar" file. Ensure that you do not use
the trailing slash file separators.
The Oracle JDBC driver can be downloaded from the following Oracle Download site:
■ Oracle Database 11g Release 2 (11.2.0.4) JDBC Drivers
■ Oracle Database 12c Release 1 (12.1.0.1) JDBC Drivers
Once downloaded, you need to copy the file in the required folder on the server.
NOTE: Refer Appendix O for identifying the correct ojdbc<version>.jar version to be
copied.
9. Click Next. The Summary window is displayed.
Summary

OFSDF 8.0.5.0.0 Installation Guide
Oracle Financial Services Software 102
10. Verify the details and click Finish to create the JDBC Provider.
11. The options to Save and Review are displayed. Click Save.
8.1.2 Creating Data Source
The steps given below are applicable for both CONFIG and ATOMIC data source creation.
1. Open this URL in the browser window: http://<ipaddress>:<administrative
console port>/ibm/console. (https, if SSL is enabled). The Login window is
displayed.
2. Login with the user ID that has admin rights.
3. Expand the Resources option in the LHS menu and click JDBC Data sources
option. The Data sources page is displayed.
Data Sources
4. Select the Scope from the drop down list. Scope specifies the level at which the
resource definition is visible.
5. Click New. The Create a Data Source window is displayed.

OFSDF 8.0.5.0.0 Installation Guide
Oracle Financial Services Software 103
Create a Data Source
6. Specify the Data Source name and JNDI name for the new "Data Source".
The JNDI and Data Source name are case sensitive. Ensure that JNDI name is same
as the "Information Domain" name.
7. Click Next. The Select JDBC provider window is displayed.
Select JDBC Provider
8. Select the option Select an Existing JDBC Provider and select the required JDBC
provider from the drop-down list. Click Next.

OFSDF 8.0.5.0.0 Installation Guide
Oracle Financial Services Software 104
Enter Database Properties
9. Specify the database connection URL.
For Example: jdbc:oracle:thin:@<DB_SEREVER_IP>:<DB_SERVER_PORT>:<SID>
10. Select Data Store Helper Class Name from the drop-down list and ensure that the
checkbox Use this data source in container managed persistence (CMP) is
selected.
NOTE: For RAC configuration, provide the RAC URL specified during installation.
For Example:
jdbc:oracle:thin:@(DESCRIPTION=(ADDRESS_LIST=(ADDRESS=(PROTOCOL=TCP)(HOST=1
0.11.12.13)(port=1521))(ADDRESS=(PROTOCOL=TCP)(HOST=10.11.12.14)(PORT=1521)
)(LOAD_BALANCE=no)(FAILOVER=yes))(CONNECT_DATA=(SERVICE_NAME=pqadb)))
11. Click Next.

OFSDF 8.0.5.0.0 Installation Guide
Oracle Financial Services Software 105
Setup Security Aliases
12. Map the J2C authentication alias, if already created. If not, you can create a new J2C
authentication alias by accessing the link given (Global J2C authentication alias) or
you can continue with the data source creation by clicking Next and then Finish.
Summary
You can also create and map J2C authentication alias after creating the data source.

OFSDF 8.0.5.0.0 Installation Guide
Oracle Financial Services Software 106
13. You must create another Data source by following the above procedure with
jdbc/FICMASTER as JNDI name pointing to the "configuration schema" of
Infrastructure.
8.1.3 Creating J2C Authentication
The steps given below are applicable for creating both config and atomic J2C Authentication.
To create J2C Authentication details:
1. Select the newly created Data Source and click JAAS - J2C authentication data link
under Related Items.
JAAS - J2C Authentication Data
2. Click New under the Preferences section.

OFSDF 8.0.5.0.0 Installation Guide
Oracle Financial Services Software 107
JAAS - J2C Authentication Data - New
3. Enter the Alias, User ID, Password, and Description. Ensure the following:
User ID is the Oracle user ID created for the respective CONFIG and ATOMIC
Schema for the “Information Domain”.
Specify the CONFIG database user ID and password information for the
jdbc/FICMASTER data source, and specify the ATOMIC database user ID and
password information for the ATOMIC schema data source that you created earlier.
4. Click Apply and save the details.
8.1.4 Creating JDBC Connection Pooling
To define the JDBC connection pooling ensure that you have created JDBC Provider and Data
source to access the data from the database.
1. Expand the Resources option in the LHS menu and click JDBC Data sources
option. The Data sources page is displayed.
2. Click the newly created Data Source and navigate to the path
.

OFSDF 8.0.5.0.0 Installation Guide
Oracle Financial Services Software 108
Connection Pools
3. Set the values for Connection timeout to 0 seconds, Maximum connections to 100
connections, and Minimum connections to 10 connections as shown in the above
figure. You can also define Reap Time, Unused Timeout, and Aged Timeout as
required.

OFSDF 8.0.5.0.0 Installation Guide
Oracle Financial Services Software 109
8.2 Configuring Resource Reference in WebLogic Application Server
This section is applicable only when the Web Application Server is WebLogic.
Creating Data Source
Creating GridLink Data Source
Configuring Multi Data Sources
Advanced Settings for Data Source
Creating JDBC Connection Pooling
In WebLogic, you can create "Data Source" in the following ways:
For a Non RAC Database instance, Generic Data Source has to be created. See
Creating Data Source.
For a RAC Database instance, GridLink Data Source has to be created. See Creating
GridLink Data Source.
When Load Balancing/Fail over is required, Multi Data Source has to be created. See
Configuring Multi Data Sources.
8.2.1 Creating Data Source
The steps given below are applicable for both config and atomic data source creation.
1. Open WebLogic Admin Console in the browser window:
(https, if SSL is
enabled). The Welcome window is displayed.
2. Login with the Administrator Username and Password.

OFSDF 8.0.5.0.0 Installation Guide
Oracle Financial Services Software 110
Welcome
3. From the LHS menu (Domain Structure), click Services Data Sources. The
Summary of JDBC Data Sources window is displayed.
Summary of JDBC Data Sources
4. Click New and select Generic Data Source option. The Create a New JDBC Data
Source window is displayed.
You can also select GridLink Data Source or Multi Data Source while creating a Data
Source. For more information, see Creating Data Source or Configuring Multi Data
Sources.

OFSDF 8.0.5.0.0 Installation Guide
Oracle Financial Services Software 111
Create a New JDBC Data Source
5. Enter JDBC data source Name, JNDI Name, and select the Database Type from the
drop-down list. Click Next.
Ensure the following:
The JNDI Name field should be in the format "jdbc/informationdomain"
Same steps needs to be followed to create a mandatory data source pointing to
the "configuration schema" of infrastructure with as JNDI
name.
JNDI Name is the same as mentioned in file of OFSAAI Application.
Required "Database Type" and "Database Driver" should be selected.
JDBC Data Source Properties
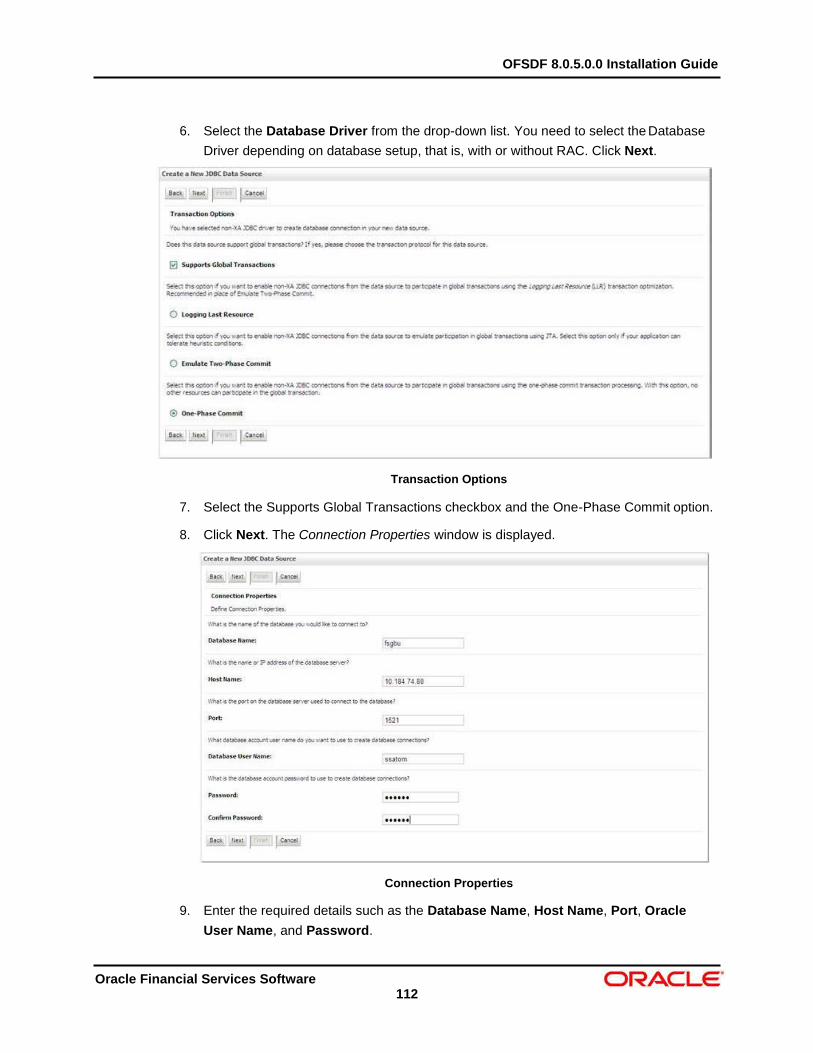
OFSDF 8.0.5.0.0 Installation Guide
Oracle Financial Services Software 112
6. Select the Database Driver from the drop-down list. You need to select the Database
Driver depending on database setup, that is, with or without RAC. Click Next.
Transaction Options
7. Select the Supports Global Transactions checkbox and the One-Phase Commit option.
8. Click Next. The Connection Properties window is displayed.
Connection Properties
9. Enter the required details such as the Database Name, Host Name, Port, Oracle
User Name, and Password.

OFSDF 8.0.5.0.0 Installation Guide
Oracle Financial Services Software 113
10. Click Next. The Test Database Connection window is displayed.
Test Database Connection
11. Verify the details and click Test Configuration and test the configuration settings.
A confirmation message is displayed stating "Connection test succeeded."
12. Click Finish. The created "Data Source" is displayed in the list of Data Sources.
NOTE: "User ID" is the Oracle user ID that is created for the respective CONFIG and ATOMIC
schema of the respective "Information Domain".
"User ID" to be specified for data source with "FICMASTER" as "JNDI" name should be
the Oracle user ID created for the CONFIG schema.

OFSDF 8.0.5.0.0 Installation Guide
Oracle Financial Services Software 114
13. Select the new Data Source and click the Targets tab.
Select Targets
14. Select the AdminServer option and click Finish.
8.2.2 Creating GridLink Data Source
If you have selected the option, New GridLink Data Source while creating the "Data Source",
you can directly specify the JDBC URL as indicated.
Create a New JDBC GridLinkData Source
1. Enter Data Source Name, and JNDI Name.
Ensure that the "JNDI Name" field is specified in the format "jdbc/infodomname" and
the XA Driver checkbox is not selected. Click Next.

OFSDF 8.0.5.0.0 Installation Guide
Oracle Financial Services Software 115
JDBC GridLinkData Source- Connection Properties
2. Specify Complete JDBC URL, Database User Name, and Password. Click Finish. The created "Data Source" is displayed in the list of Data Sources.
8.2.3 Configuring Multi Data Sources
A JDBC multi data source is an abstraction around a group of data sources that provides load
balancing and failover between data sources. As with data sources, multi data sources are also
bound to the JNDI tree. Applications can look up a multi data source on the JNDI tree and then
reserve a database connection from a data source. The multi data source determines from which
data source to provide the connection.
When the database used is Oracle RAC (Real Application Clusters) which allows Oracle
Database to run across a set of clustered servers, then group of data sources can be created for
instances running on a set of clustered servers and a JDBC multi data source can be created so
that applications can look up a multi data source on the JNDI tree to reserve database
connection. If a clustered server fails, Oracle continues running on the remaining servers.
1. Open WebLogic Admin Console in the browser window:
http://<ipaddress>:<administrative console port>/console. (https,
if SSL is enabled). The Login window is displayed.
2. Login with the "User ID" that has admin rights.
3. In the LHS menu (Domain Structure), select Services JDBC Multi Data
Sources. The Summary of JDBC Multi Data Sources window is displayed.

OFSDF 8.0.5.0.0 Installation Guide
Oracle Financial Services Software 116
Summary of JDBC Multi Data Sources
4. Click New. The New JDBC Multi Data Source screen is displayed.
NOTE: Ensure that the Data Sources which needs to be added to new JDBC Multi Data
Source has been created.
Configure the Multi Data Source
5. Enter the JDBC Source Name, JNDI name, and select the Algorithm Type from the
drop-down list. Click Next.
NOTE: The JNDI Name has to be specified in the format jdbc/infodomname.
JNDI Name of the Data Sources that will be added to new JDBC Multi data source
should be different from the JNDI name specified during Multi Data Source.
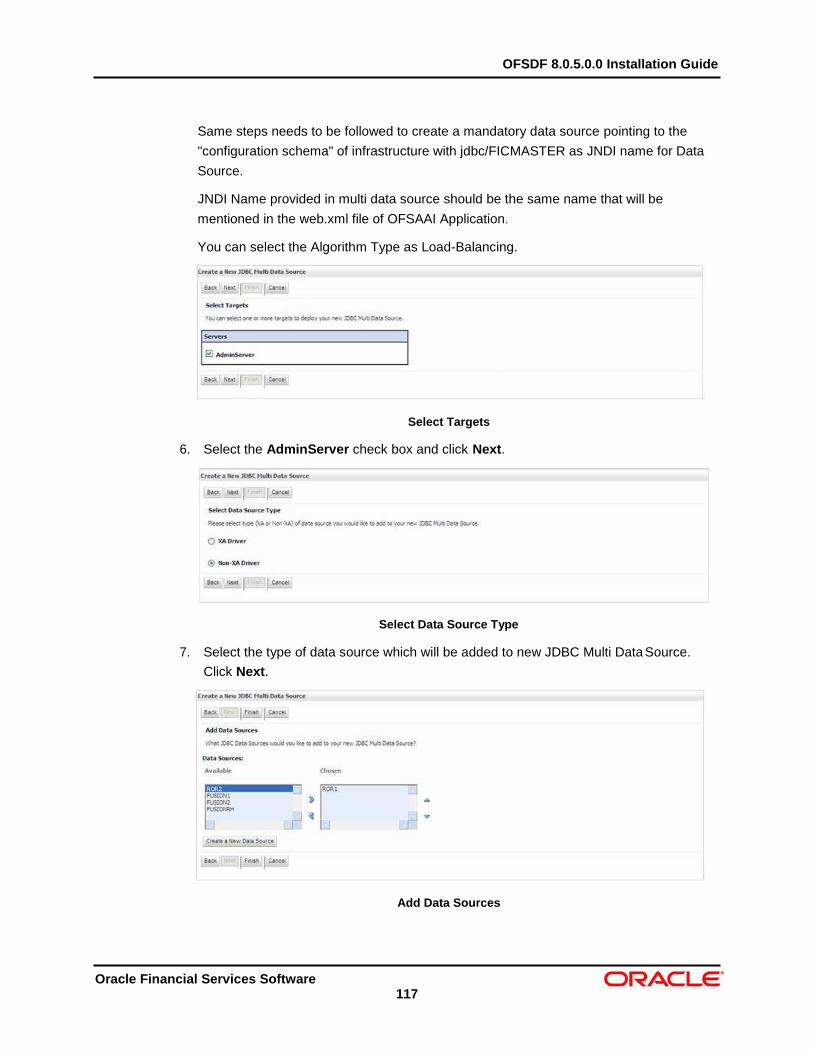
OFSDF 8.0.5.0.0 Installation Guide
Oracle Financial Services Software 117
Same steps needs to be followed to create a mandatory data source pointing to the
"configuration schema" of infrastructure with jdbc/FICMASTER as JNDI name for Data
Source.
JNDI Name provided in multi data source should be the same name that will be
mentioned in the web.xml file of OFSAAI Application.
You can select the Algorithm Type as Load-Balancing.
Select Targets
6. Select the AdminServer check box and click Next.
Select Data Source Type
7. Select the type of data source which will be added to new JDBC Multi Data Source.
Click Next.
Add Data Sources

OFSDF 8.0.5.0.0 Installation Guide
Oracle Financial Services Software 118
8. Map the required Data Source from the Available Data Sources. Click Finish.
The New JDBC Multi Data Source is created with added data sources.
8.2.4 Advanced Settings for Data Source
1. Click the new Data Source from the Summary of JDBC Data Sources window. The
Settings for <Data Source Name> window is displayed.
2. Select the Connection Pooling tab given under Configuration.
3. Go to the Advanced option at the bottom of the page, and check the Test Connection
of Reserve checkbox (enables WebLogic Server to test a connection before giving it to
a client).
4. To verify if the data source is valid, select "Data Source name". For example,
FICMASTER.
Settings for <Data Source Name>
5. Select the server and click Test Data Source.
6. A message is displayed indicating that the test was successful.
7. Once the "Data Source" is created successfully, the following messages are displayed:
All changes have been activated. No restart is necessary.
Settings updated successfully.
If not, follow the steps given above to recreate the data source.

OFSDF 8.0.5.0.0 Installation Guide
Oracle Financial Services Software 119
8.2.5 Creating JDBC Connection Pooling
To define the JDBC connection pooling, ensure that you have created JDBC Provider and Data
source to access the data from the database.
1. Click the newly created Data Source $DATA_SOURCE$ and navigate to the path
Oracle Home Summary of Services: JDBC Summary of JDBC Data
Sources JDBC Data Source-<INFODDOM_NAME>
2. Set the values for Initial Capacity to 10, Maximum Capacity to 100, Capacity Increment
by 1, Statement Cache Type to LRU, and Statement Cache Size to 10.
3. Click Save.
8.3 Configuring Resource Reference in Tomcat Application Server
This section is applicable only when the Web Application Server is Tomcat.
This section includes the following topics:
Creating Data Source
Creating JDBC Connection Pooling
Configuring Class Loader for Apache Tomcat
Copy the Oracle JDBC driver file, ojdbc<version>.jar from <Oracle Home>/jdbc/lib
and place it in <Tomcat Home>/lib.
NOTE: Refer Appendix O for identifying the correct ojdbc<version>.jar version to be
copied.
8.3.1 Creating Data Source
To create "data source" for OFSAA application, navigate to and edit the
following block of text by replacing the actual values in server.xml.
NOTE: The User-IDs for configuration/ atomic schemas have the prefix of setupinfo depending
on the value set for PREFIX_SCHEMA_NAME in <<APP Pack>>_SCHEMA_IN.XML file
of Schema Creator Utility.
For example: if the value set for PREFIX_SCHEMA_NAME is DEV and the schema
name was mentioned as ofsaaconf, then the actual schema created in the database
would be DEV_ofsaaconf.
<Context path ="/<context name>" docBase="<Tomcat Installation
Directory>/webapps/<context name>" debug="0" reloadable="true"
crossContext="true">
<Resource auth="Container"
name="jdbc/FICMASTER"

OFSDF 8.0.5.0.0 Installation Guide
Oracle Financial Services Software 120
type="javax.sql.DataSource"
driverClassName="oracle.jdbc.driver.OracleDriver"
username="<user id for the configuration schema>"
password="<password for the above user id>"
url="jdbc:oracle:thin:@<DB engine IP address>:<DB Port>:<SID>"
maxActive="100"
maxIdle="30"
maxWait="10000"/>
<Resource auth="Container"
name="jdbc/< INFORMATION DOMAIN NAME >"
type="javax.sql.DataSource"
driverClassName="oracle.jdbc.driver.OracleDriver"
username="<user id for the atomic schema>"
password="<password for the above user id>"
url="jdbc:oracle:thin:@<DB engine IP address>:<DB Port>:<SID>"
maxActive="100"
maxIdle="30"
maxWait="10000"/>
</Context>
NOTE: The Resource tag must be repeated for each Information Domain created.
After the above configuration, the "WAR" file has to be created and deployed in
Tomcat.
8.3.2 Creating JDBC Connection Pooling
To define the JDBC connection pooling, do the following:
1. Copy $ORACLE_HOME/jdbc/lib/ojdbc<version>.jar to the path
$TOMCAT_DIRECTORY/lib/
NOTE: Refer Appendix O for identifying the correct ojdbc<version>.jar version to be
copied.
2. Edit the present under the path with the below
changes, which is required for connection pooling.
Context path="/ $CONTEXTNAME$" docBase=" $APP_DEPLOYED_PATH$ "
debug="0" reloadable="true" crossContext="true">
<Resource auth="Container"
name="jdbc/ $INFODOM_NAME$"

OFSDF 8.0.5.0.0 Installation Guide
Oracle Financial Services Software 121
type="javax.sql.DataSource"
driverClassName="oracle.jdbc.driver.OracleDriver"
username=" $ATOMICSCHEMA_USERNAME$"
password="$ATOMICSCHEMA_PASSWORD$"
url="$JDBC_CONNECTION_URL"
maxActive="100"
maxIdle="30"
maxWait="10000"
removeAbandoned="true" removeAbandonedTimeout="60"
logAbandoned="true"/>
</Context>
Note the following:
$APP_DEPLOYED_PATH$ should be replaced by OFSAAI application deployed
path.$INFODOM_NAME$ should be replaced by Information Domain Name.
$ATOMICSCHEMA_USERNAME$ should be replaced by Atomic schema database user name.
$ATOMICSCHEMA_PASSWORD$ should be replaced by Atomic schema database password.
$JDBC_CONNECTION_URL should be replaced by JDBC connection string
jdbc:Oracle:thin:<IP>:<PORT>:<SID>.
For example: jdbc:oracle:thin 10.80.50.53:1521:soluint
The User-IDs for configuration/ atomic schemas have the prefix of setupinfo depending on
the value set for PREFIX_SCHEMA_NAME in <<APP Pack>>_SCHEMA_IN.XML file of
Schema Creator Utility.
For example: if the value set for PREFIX_SCHEMA_NAME is DEV and the schema name
was mentioned as ofsaaconf, then the actual schema created in the database would be
DEV_ofsaaconf.
8.3.3 Configuring Class Loader for Apache Tomcat
1. Edit the server.xml available in $TOMCAT_HOME/conf/ folder.
2. Add tag <Loader delegate="true" /> within the <Context> tag, above the
<Resource> tag. This is applicable only when the web application server is Apache
Tomcat 8.
NOTE: This configuration is required if Apache Tomcat version is 8.

OFSDF 8.0.5.0.0 Installation Guide
Oracle Financial Services Software 122
9 Appendix C: Creating and Deploying EAR/ WAR File
This appendix includes the following topics:
Creating EAR/WAR File
Deploying EAR/WAR File
9.1 Creating EAR/WAR File
To create EAR/WAR File, follow these steps:
1. Navigate to the $FIC_WEB_HOME directory on the OFSAA Installed server.
2. Execute . /ant.sh command to trigger the creation of EAR/ WAR file.
3. On completion of the EAR files creation, the "BUILD SUCCESSFUL" and "Time taken"
message is displayed and you will be returned to the prompt.
4. The EAR/ WAR file - <contextname>.ear/.war - is created.
NOTE: The <contextname> is the name given during installation.
This process overwrites any existing version of EAR file that exists in the path.
In case of OFSAA configured on Tomcat installation, <contextname>.war will be
created.

OFSDF 8.0.5.0.0 Installation Guide
Oracle Financial Services Software 123
9.2 Deploying EAR/WAR File
This section includes the following topics:
Deploying WebSphere EAR/WAR Files
Deploying WebLogic EAR/WAR Files
Deploying Tomcat WAR Files
NOTE: Ensure to clear the application cache prior to the deployment of Application Pack Web
Archive. This is applicable to all Web Servers (WebSphere, WebLogic, and Tomcat).
For more information, refer Clearing Application Cache section.
9.2.1 Deploying EAR/WAR Files on WebSphere
To deploy WebSphere EAR/WAR File, follow these steps:
1. Start WebSphere Profile by navigating to the path
/<Websphere_Installation_Directory>/IBM/WebSphere/AppServer/prof
iles/<Profile_Name>/bin/ and execute the command:
./startServer.sh server1
2. Open the following URL in the browser:
console. (https, if SSL is enabled). The login screen is displayed.
Login Window

OFSDF 8.0.5.0.0 Installation Guide
Oracle Financial Services Software 124
3. Enter the user credentials with admin privileges and click Log In.
4. From the LHS menu, select Applications and click New Application. The New
Application window is displayed.
New Application
5. Click New Enterprise Application. The Preparing for the application installation
window is displayed.
Preparing for the Application Installation
6. Select Remote File System and click Browse. Select the EAR file generated for
OFSAA to upload and install. Click Next.
Installation Options
7. Select the Fast Path option and click Next. The Install New Application window is
displayed.

OFSDF 8.0.5.0.0 Installation Guide
Oracle Financial Services Software 125
Install New Application
8. Enter the required information and click Next. The Map Modules to Servers window is
displayed.
Map Modules to Servers
9. Select the Web Application and click Next. The Map Resource References to

OFSDF 8.0.5.0.0 Installation Guide
Oracle Financial Services Software 126
Resources window is displayed.
Map Resource References to Resources
10. Map each resource defined in the application to a resource JNDI name defined earlier.
11. Click Modify Resource Authentication Method and specify the authentication
method created earlier.
You can specify "config" for FICMASTER resource or "atomic" for atomic resource as
the authentication method.
12. Select the OFSAAI Web Application check box and click Next. The Map Virtual hosts
for Web Modules window is displayed.
Map Virtual Host for Web Modules
13. Select the Web Application check box and click Next. The Summary page is
displayed.

OFSDF 8.0.5.0.0 Installation Guide
Oracle Financial Services Software 127
Summary
14. Click Finish and deploy the Infrastructure Application on WebSphere.
15. On successful installation, a message is displayed. Click Save and save the master file
configuration. The details are displayed in the Master File Configuration window.
9.2.1.1 To start the application
1. Expand Applications Application Type WebSphere Enterprise Applications.
The Enterprise Applications window is displayed.
Enterprise Applications

OFSDF 8.0.5.0.0 Installation Guide
Oracle Financial Services Software 128
2. Select the installed application and click Start.
NOTE: <profile name> is the profile name given while creating the WebSphere profile.
<cell name> is the cell name given during profile creation
<contextname> is the context name given during installation.
9.2.2 Deploying EAR / WAR File on WebLogic
Following are the steps for deploying Infrastructure application that would be created during
installation:
1. Navigate to the path <WebLogic Installation
directory>/user_projects/domains/<domain name>/bin in the machine in
which WebLogic is installed.
2. Start WebLogic by executing the command:
./startWebLogic.sh -d64 file
3. Open the URL in the browser window: http://<ipaddress>:<admin server
port>/console. (https, if SSL is enabled). The Sign in window of the WebLogic
Server Administration Console is displayed.
NOTE: Ensure that you have started Infrastructure Server by executing
“./reveleusstartup.sh" as mentioned in Start Infrastructure section
4. Log on to the WebLogic Server by entering the user credentials having privileges to
deploy the EAR file.
5. From the Domain Structure LHS menu, click Deployments. The Summary of
Deployments window is displayed.
Summary of Deployments

OFSDF 8.0.5.0.0 Installation Guide
Oracle Financial Services Software 129
6. Click Install. The Install Application Assistant window is displayed.
7. Select the Exploded EAR directory after browsing to the directory where it is saved and
click Next.
9.2.2.1 Exploding EAR
To explode EAR, follow the below steps:
1. Create the "applications" folder under domain name. For example,
/Bea/user_projects/domains/ <Domain _name>/applications.
2. Create <context_name>.ear folder under "applications" folder.
3. Copy the <$FIC_WEB_HOME/<context_name>.ear file to
<WEBLOGIC_INSTALL_DIR>/Bea/user_projects/domains/<DOMAIN_NAME>/a
pplications/<context_ name>.ear.
4. Explode the <context_name>.ear file by executing the command:
jar -xvf <context_name>.ear
5. Delete the <context>.ear and < context >.war files (recently created)
<WEBLOGIC_INSTALL_DIR>/Bea/user_projects/domains/<DOMAIN_
NAME>/applications/<context_name>.ear.
6. Create a directory <context_name>.war under <WEBLOGIC_INSTALL_
DIR>/Bea/user_projects/domains/<DOMAIN_NAME>/applications/<conte
xt_ name>.ear
7. Copy <$FIC_WEB_HOME/<context_name>.war file to <WEBLOGIC_INSTALL_
DIR>/Bea/user_projects/domains/<DOMAIN_NAME>/applications/<conte
xt_ name>.ear/<context_name>.war.
8. Explode the <context_name>.war file by executing the following command to get
the directory structure:
jar -xvf <context_name>.war
9.2.2.2 Installing Application
To install Application:
1. Open the Install Application Assistant.

OFSDF 8.0.5.0.0 Installation Guide
Oracle Financial Services Software 130
2. Click Next.
Install Application Assistant
3. From the Choose targeting style section, select the Install this deployment as an
application option and click Next. The Optional Settings window is displayed.
Optional Settings
4. Enter a Name for the deployment if required.
5. Under the Security section, select the DD only option to specify that only roles and
policies that are defined in the deployment descriptors should be used.

OFSDF 8.0.5.0.0 Installation Guide
Oracle Financial Services Software 131
6. Select the “I will make the deployment available from the following location“ option
under the Source accessibility section.
7. Click Next to continue. The Deployment Summary window is displayed.
Deployment Summary
8. Select the Yes, take me to the deployment's configuration screen option and click Finish. The Settings for <Deployment Name> window is displayed.

OFSDF 8.0.5.0.0 Installation Guide
Oracle Financial Services Software 132
Settings for <Deployment Name>
9. Review the general configuration details of the deployment. You can also update the
configuration of the deployment in this window. In the Overview tab you can view the
complete deployment configuration.
10. Click Save to update the changes, if any.
11. From the LHS menu, click Deployments. The Summary of Deployments window is displayed.
Summary of Deployments

OFSDF 8.0.5.0.0 Installation Guide
Oracle Financial Services Software 133
12. Select the newly deployed Infrastructure application and click Start Servicing all
requests. Ensure that the Infrastructure server is up and running.
Summary of Deployments
13. The State of the deployed application is displayed as Active if started successfully.
9.2.2.3 Deploying WAR Files on Tomcat
Before deploying the WAR files, ensure that the previously deployed applications of Infrastructure
are uninstalled. See Uninstalling Previously Deployed WAR Files in Tomcat for the procedure to
uninstall the previously deployed Infrastructure war files.
On the machine that hosts Tomcat, follow the below steps outlined to deploy Infrastructure
application:
1. Copy the <context-name>.war from $FIC_WEB_HOME/ <context-name.war> to
<Tomcat Installation Directory>/webapps/ directory. Copy the <context-
name>.war from $FIC_WEB_HOME/<context-name.war> to <Tomcat
Installation Directory>/webapps/ directory.

OFSDF 8.0.5.0.0 Installation Guide
Oracle Financial Services Software 134
Tomcat Home Page
2. Click Manager App. The Connect to dialog box is displayed.
3. Enter the User Id and Password that has admin rights and click OK. (For user creation
in Tomcat, see Tomcat User Administration. The Tomcat Web Application Manager
window is displayed with the list of all the applications deployed.
Tomcat Web Application Manager

OFSDF 8.0.5.0.0 Installation Guide
Oracle Financial Services Software 135
4. In the Deploy section, enter the Context Path provided during the installation as
"/<context-name>".
5. Enter the path where the <context-name>.war file resides (by default "$FIC_WEB_
HOME/<context-name>.war") in the WAR or Directory URL field and click Deploy.
6. On successful application deployment, a confirmation message is displayed. Start the
Tomcat server. Refer Starting Web Application Servers for more details.

OFSDF 8.0.5.0.0 Installation Guide
Oracle Financial Services Software 136
10 Appendix D: Starting / Stopping Services
10.1 Start/Stop OFSAA Infrastructure Services
This chapter details on how to start and stop OFSAA Infrastructure services. This chapter
includes the following sections:
Starting Infrastructure services
Starting Web Application Servers
Stopping Infrastructure Services
10.1.1 Starting Infrastructure Services
Once the installation of Infrastructure has been completed successfully and the post-installation
steps are completed, the servers must be started. Log on to each machine and run the
file. All servers mentioned must be started from the same shell encoding. The servers mentioned
below are dependent on each other. It is mandatory to maintain the order in which the servers are
started. Allow each of the servers to initialize completely before starting the next server.
1. On the machine in which Infrastructure Application components have been installed,
navigate to and execute the following
command to start the Infrastructure Server.
NOTE: You can also start the Infrastructure Server by executing the command "nohup ./
startofsaai.sh &". Starting the process using "nohup" and "&" will return the command
prompt without having to wait till the process completes. However, this command
cannot be used when you are starting the server for the first time or starting after
changing user password in the configuration database schema. You can also start the
Infrastructure Server by executing the command ".
Starting the process using "nohup" and "&" will return the command prompt without
having to wait till the process completes. However, this command cannot be used when
you are starting the server after changing the CONFIGURATION schema user
password in the configuration database schema.
2. Start ICC server:
On the machine in which Infrastructure default Application components have
been installed, navigate to $FIC_HOME/ficapp/icc/bin and execute the
command.
./iccserver.sh
NOTE: Only Infrastructure Default Application Server would hold ICC component.

OFSDF 8.0.5.0.0 Installation Guide
Oracle Financial Services Software 137
3. To start Back-end Services:
On the machine on which Infrastructure Database components have been
installed, navigate to $FIC_DB_HOME/bin and execute the command to start
"Agent server":
./agentstartup.sh
Or
Start Back-end services using the command:
nohup ./agentstartup.sh &
NOTE: This agent internally starts the Router, Message Server, OLAP data server and AM
services.
10.1.2 Starting Web Application Servers
Start the Web Application Server depending on the type from the following table.
Startup Option Description
Starting WebSphere profile On the machine in which Web sphere is installed, navigate to
[Webshpere_Install_Directory]
/AppServer/<profiles>/<profile name>/bin and execute the
command:
./startServer.sh server1
Starting WebLogic Domain On the machine in which WebLogic is installed navigate to
<WebLogic Installation
directory>/user_projects/domains/<domain name>/bin and
execute the command:
startWebLogic.sh -d64
Note: If WebLogic is already running, access the WebLogic Admin
Console. Stop and start the application <context name>.ear.
Starting Tomcat Application On the machine in which Tomcat is installed, navigate
<Tomcat_Instal
l_ Directory>/bin and execute the command
./catalina.sh run
10.1.3 Stopping Infrastructure Services
To stop Infrastructure services:
1. On the machine in which Infrastructure Application components have been installed,
navigate to $FIC_APP_HOME/common/FICServer/bin and execute the command:

OFSDF 8.0.5.0.0 Installation Guide
Oracle Financial Services Software 138
./stopofsaai.sh
2. To stop ICC server, on the machine in which Infrastructure default Application
components have been installed, navigate to $FIC_HOME/ficapp/icc/bin and
execute the command:
./iccservershutdown.sh
NOTE: Only Infrastructure Default Application Server would hold ICC component.
3. To stop Back-end server, on the machine in which Infrastructure database components
have been installed, navigate to $FIC_DB_HOME/bin and execute the command:
./agentshutdown.sh

OFSDF 8.0.5.0.0 Installation Guide
Oracle Financial Services Software 139
11 Appendix E: Accessing OFSAA Application
This appendix gives details about the steps to be performed to access OFSAA Application.
11.1 Access the OFSAA Application
Perform the following steps to access the OFSAA application:
1. From a your desktop, open the browser and enter the URL in below format:
<scheme>://<IP address/ hostname>:<port>/<context-name>/login.jsp
For example, https://192.0.2.2:8080/ofsaa/login.jsp
The OFSAA login window is displayed as below:
OFSAA Login window
2. With installation of every OFSAA Application Pack, there are two seeded user profiles
configured in the system:
SYSADMN – System Administrator
SYSAUTH – System Authorizer
NOTE: For SYSADMN and SYSAUTH, the default password is password0.
3. Login to the application using the "SYSADMN" User ID. (Note that, there is no "I" in the
SYSADMN login USER ID). Enter the password that was provided during installation. On
the first login, you will be prompted to change the password.
Once you have logged into the Infrastructure system, you need to perform the following

OFSDF 8.0.5.0.0 Installation Guide
Oracle Financial Services Software 140
additional configurations to setup the OFSAAI environment:
Define Server Details for Database, Application and Web servers.
Add Database Details.
Create an Information Domain.
Create a Segment.
Create / Add User with access to all permissions.
NOTE: Each new file that is created in the ftpshare folder of any installation layer should be
granted specific / explicit permission. If you encounter any problems during setup, please
contact Infrastructure Support.
11.2 OFSAAI Login
While accessing Oracle Financial Services Analytical Applications Infrastructure, the Splash
screen is as displayed:
You can select the required language from the Language drop-down list. The language options
displayed in the drop down are based on the license. Based on the selection of Language, the
appropriate language login screen is displayed.
Enter the User ID and Password provided by the System Administrator and click Login. You will
be prompted to change your password on your first login. Alternatively, you can also choose to
change your password any time.

OFSDF 8.0.5.0.0 Installation Guide
Oracle Financial Services Software 141
In the Change Password screen, enter a new password, confirm it and click OK to view the
Splash screen. Refer to the following guidelines for Password Creation:
Passwords are displayed as asterisks (stars) while you enter. This is to ensure that the
password is not revealed to other users.
Ensure that the entered password is at least six characters long.
The password must be alphanumeric with a combination of numbers and characters.
The password should not contain spaces.
Passwords are case sensitive and ensure that the Caps Lock is not turned ON.
By default the currently used password is checked for validity if password history is not
set.
New password should be different from previously used passwords based on the
password history which can be configured.
If you encounter any of the following problems, contact the System Administrator:
o Your user ID and password are not recognized.
o Your user ID is locked after three consecutive unsuccessful attempts.
o Your user ID has been disabled.
o Guest user cannot change the password.

OFSDF 8.0.5.0.0 Installation Guide
Oracle Financial Services Software 142
12 Appendix F: Post Deployment Configurations
This chapter includes the following sections:
Deploying the Application
Logging as System Administrator
Creating Users
Mapping the User to User Group
Change ICC Batch Ownership
Mapping ICC Batch Execution Rights to Users
Saving Post-Load Change Transformations
12.1 Deploying the Application
This section explains steps to deploy the application. Web Layer deployment is required and for
more information, see Appendix A.
12.2 Logging as System Administrator
Post installation, the first login into Infrastructure is possible only for a System Administrator
through user id “sysadmn”. This ID is created at the time of installation with the password
provided during installation. Enter login id “sysadmn” and password that was provided during
installation. Click Login. For more information, refer OFSAAI Login.
12.3 Creating Users
User Maintenance facilitates you to create user definitions, view, manage, modify, and delete
user information. You can access User Maintenance by expanding User Administrator section
within the tree structure of LHS menu.
The User Maintenance screen displays user details such as User ID, Name, Profile Name, Start
and End dates. You can also identify the user status if enabled to access the Infrastructure
system.
To add a user in the User Maintenance screen:
1. Select add button from the User Maintenance tool bar. Add button is disabled if you
have selected any User ID in the grid. The New User screen is displayed.

OFSDF 8.0.5.0.0 Installation Guide
Oracle Financial Services Software 143
2. Enter the user details as tabulated.
Field Description
Fields marked in red asterisk (*) are mandatory.
User ID Enter a unique user id. Ensure that there are no special characters and extra spaces in the id entered.
User Name Enter the user name. The user name specified here is displayed on the Infrastructure splash screen. Ensure that the User Name does not contain any special characters or spaces except ”–“, “’”. and “.”.
Contact Address Enter the contact address of the user. It can be the physical location from where the user is accessing the system. Ensure that Contact Address does not contain any special characters except ".", "#", "-", ",".
Date Of Birth Specify the date of birth. You can use the popup calendar to enter the date.
Designation Enter the user designation. Ensure that Designation does not contain any special characters except “_, “:” and "-".
Profile Name Select the profile name by clicking on the drop down list.
User Start Date Specify the user start date based on the day slot the user is enabled to access the system. Ensure that User Start Date is greater than today’s date. You can use the popup calendar to enter the date.
User End Date Specify the user end date based on month and year when the user Id expires. Ensure that user End Date is greater than User Start Date. You can use the popup calendar to enter the date.

OFSDF 8.0.5.0.0 Installation Guide
Oracle Financial Services Software 144
Password Enter the default password for the user for the initial login. User needs to change the default password during the first login.
A user is denied access in case the user has forgotten the password or enters the wrong password for the specified number of attempts (as defined in the Configuration screen). To enable access, enter a new password here.
Notification Time (Optional) Specify the notification start and end time within which the user can be notified with alerts.
E-mail ID Enter the e-mail address of the user.
Mobile No (Optional) Enter the mobile number of the user.
Pager No (Optional) Enter the pager number of the user.
Enable User Select the checkbox to allow user to access the system.
A deselected checkbox denies access to the user.
3. Click Save to upload the user details.
The new User details are populated in the User Authorization screen which has to be
authorized by System Authorizers. Once authorized, the User details are displayed in
User Maintenance screen and can then be mapped to the required user group in the
User UserGroup Map screen.
12.4 Mapping the Application User(s) to User Group
User UserGroup Map facilitates you to map user(s) to specific user group which in turn is mapped
to a specific Information Domain and role. Every UserGroup mapped to the Information Domain
needs to be authorized. Else, it cannot be mapped to users.
User UserGroup Map screen displays details such as User ID, Name, and the corresponding
Mapped Groups. You can view and modify the existing mappings within the User UserGroup
Maintenance screen.
Starting the OFSAA 8.0 release, with installation of FSDF Application Pack, preconfigured
Application user groups are seeded. These user groups are unique to every OFSAA Application
Pack and have application roles pre-configured.
You can access User UserGroup Map by expanding Identity Management section within the tree
structure of LHS menu.
Table 4: Seeded User Groups
Name Description
FSDF Admin
User mapped to this group will have access to all the menu items for entire
FSDF Application. The exclusive menu’s which are available only to this
group users are Application Preference and Global Preference under
Settings Menu.

OFSDF 8.0.5.0.0 Installation Guide
Oracle Financial Services Software 145
Name Description
FSDF Data Modeler
User mapped to this group will have access only for Data Model
Management and Metadata Browser Menus.
FSDF Analyst
User mapped to this group will have access for Data Management
Framework, Dimension Management and Metadata Browser Menus.
FSDF Operator
User mapped to this group will have access for Rule Run Framework and
Operations Menus.
12.5 Changing ICC Batch Ownership
All the seeded Batches in OFSDF Applications Pack will be automatically assigned to SYSADMN
user during Installation. If one user who wants to see the Batches in Batch Maintenance Menu,
He needs to execute the following Queries in Config Schema of the Database.
Syntax:
begin
AAI_OBJECT_ADMIN.TRANSFER_BATCH_OWNERSHIP
('fromUser','toUser','infodom');
end;
OR
begin
AAI_OBJECT_ADMIN.TRANSFER_BATCH_OWNERSHIP ('fromuser','touser');
end;
Where from User indicates the user who currently owns the batch, to User indicated the user to
which the ownership has to be transferred. Infodom is optional parameter, if specified the
ownership of batches pertaining to that Infodom will be changed.
Example:
begin
AAI_OBJECT_ADMIN.TRANSFER_BATCH_OWNERSHIP
('SYSADMN','FSDFOP','OFSBFNDINFO’);
end;

OFSDF 8.0.5.0.0 Installation Guide
Oracle Financial Services Software 146
12.6 Mapping ICC Batch Execution Rights to Users
By default all users who are mapped to FSDF Admin and FSDF Operator will have the
permission to execute the seeded Batches in FSDF Application Pack. However if any other user-
defined batches or any other application pack batches created during the respective installation of
application packs, the user need to map the Batch execution rights for each user/batch in the
Batch Execution Rights menu under Object Administration >> Object Security.
NOTE: Any user who is mapped under FSDF Admin User Group will have the access to map
the Batch execution rights menu.
12.7 Saving Post-Load Change Transformations
After creating users, Login to Infrastructure as any user who is mapped to FSDF Admin or FSDF
Analyst group. Navigate to Data Management Framework >> Post Load Changes.

OFSDF 8.0.5.0.0 Installation Guide
Oracle Financial Services Software 147
A New window is displayed. Click on Each Transformation from Transformations List and Click
on Stored Procedure in the Right Panel, Click on Edit in the Top Right Menu and Click on
Finish Button in Bottom
NOTE: All the Transformation Stored Procedures are required to be edited and saved (Finish
Button) once for getting it is available.

OFSDF 8.0.5.0.0 Installation Guide
Oracle Financial Services Software 148
13 Appendix G: Cloning OFSAA Instance
There is a consistent need for a faster and effective approach of replicating an existing OFSAA
instance for further project developments, that is, setting up OFSAA instances that are exact
copies of the current OFSAA instance. For more information on cloning, refer OFSAA Cloning
Reference Guide

OFSDF 8.0.5.0.0 Installation Guide
Oracle Financial Services Software 149
14 Appendix H: OFSAA Landing Page
This appendix includes the following topics:
Installation Checklist
OFSAA Landing Page for OFSDF Administrator
Enabling a Product within an Application Pack
14.1 Installation Checklist
This section provides you a list of topics that you must check while installing the application.
It is recommended to take a print out of the checklist and follow the checklist step by step.
Table with (General, Pre-Install, Install, and Post Install) Checklist
Step No.
Task
Done
General
1 Check the OFSDF Release Notes and Read Me document for any additional steps to be performed on OFSDF Pack or OFSAAI.
Note: For more details, contact Oracle support.
OFSDF Pack Pre Installation + During Installation
2 Prior to installation, ensure that sufficient free temp space (minimum 1 GB free) is available in /tmp directory of Unix server hosting OFSAAI.
OFSDF Pack Post Installation
3 Perform post-installation steps. For more information, refer to Chapter Post Installation.

OFSDF 8.0.5.0.0 Installation Guide
Oracle Financial Services Software 150
14.2 OFSAA Landing Page for OFSDF Administrator
The landing page includes multiple tabs and each tab has specific links to OFSAA Infrastructure
and/or Application modules. The tabs and links are displayed based on the OFSAA Application
accessed and the access roles mapped to the logged in user.
Each tab contains LHS Menu and RHS Menu. The LHS Menu holds link(s) to modules in a tree
structure. The RHS Menu holds link(s) to modules in a navigational panel format.
The following tabs are available in the Landing Page:
Applications Tab
Object Administration Tab
System Configuration and Identity Management Tab
14.2.1 Applications Tab
This tab lists the various OFSDF Applications that are installed in the OFSDF setup. The Select
Application drop-down list displays the OFSDF Applications, based on the logged in user and
mapped OFSDF Application User Group(s). Links to related modules within Applications and
Infrastructure are grouped appropriately to maintain a unified experience.
14.2.2 Object Administration Tab
This tab lists the various OFSDF Information Domains created in the OFSDF setup. The Select
Information Domain drop-down list displays the OFSDF Information Domains based on the
logged in user and mapped OFSDF Application User Group(s). Links to modules that enable
object traceability and migration of objects are grouped in this tab.

OFSDF 8.0.5.0.0 Installation Guide
Oracle Financial Services Software 151
14.2.3 System Configuration and Identity Management Tab
This tab lists the OFSDF Infrastructure System Configuration and Identity Management modules.
These modules work across Applications/ Information Domains and hence there are no
Application and Information Domain drop-down lists in this tab. Links to modules that allow the
maintenance of setup installation and identity management tasks are grouped together in this tab.
NOTE: Refer the User Manual for more details on how to operate on each tab.
14.3 Enabling a Product within an Application Pack
You can also enable a product/ application within an application pack post installation at any point
of time.
To enable a product through the application UI, follow these steps:
1. Login to the application as SYSADMN user or any user with System Administrator
privileges.
2. Navigate to System Configurations & Identity Management tab, expand Administration and Configuration and select System Configuration.
3. Click Manage OFSAA Product License(s). The Manage OFSAA Product License(s)
window is displayed as below.
4. Select an Application pack to view the products in it. The products are displayed in the
Products in the Application Pack section. The following fields are displayed in the
INSTALLED APPLICATION PACKS section:

OFSDF 8.0.5.0.0 Installation Guide
Oracle Financial Services Software 152
Field Description
Application Pack ID
Displays a unique Application Pack ID related to the application pack.
Select the appropriate Pack id using the radio button. The Products in
the application pack is displayed below in the PRODUCTS IN THE
APPLICATION PACKS section.
Application Pack
Name
Displays the name of the Application Pack.
Description Displays the description of the Application Pack.
Install Date Displays the date when the Application Pack was installed.
5. The following fields are displayed in the PRODUCTS IN THE APPLICATION PACK
section:
Field Description
Enable Select the checkbox to enable a product within an Application Pack.
Product ID Displays a unique product id for the product.
Product Name Displays the name of the Product
Description Displays the description of the product.
Enable Date Displays the date when the product was enabled.
6. Select the checkbox to enable a product within the selected Application Pack which is not
enabled during installation.
7. Click VIEW LICENSE AGREEMENT button. The License Agreement section is
displayed.
8. Select the option I ACCEPT THE LICENSE AGREEMENT and click ENABLE. An
appropriate pop-up message confirmation is displayed showing that the product is
enabled for the pack.
NNOOTTEE:: To use the newly enabled product, you need to map your application users to the appropriate
product specific User_Group(s) and subsequently, authorize the actions by logging in as
System Authorizer.

OFSDF 8.0.5.0.0 Installation Guide
Oracle Financial Services Software 153
NNOOTTEE:: For more information refer to Mapping/Unmapping Users section in the Oracle
Financial Services Analytical Applications Infrastructure User Guide 8.0 (OTN).
To identify the newly enabled product specific UserGroups/ Application Pack specific
User_Groups, refer to the respective Application Pack specific Installation and
Configuration Guide/ User Manual.

OFSDF 8.0.5.0.0 Installation Guide
Oracle Financial Services Software 154
15 Appendix I: Additional Information
This section includes the following topics:
FTP/ SFTP Configuration for File Transfer
Configure Infrastructure Server Memory
Internet Explorer Settings
Retrieving Patch Information
OLAP Data Server Configuration
OFSAAI Setup Information Fetching Tool
Encryption Changer
Infrastructure LDAP Configuration
Configuring OFSAAI Web Services
Deploying OFSAAI Web Services
Configuration to Enable Parallel Execution of DML statements
Configure Message Details in Forms Designer
Clearing Application Cache
Configuring Password changes
Configure Internal Service (Document Upload/ Download)
15.1 FTP/ SFTP Configuration for File Transfer
In OFSAA, certain modules require transfer of files from the web application server to the OFSAA
server over SSH.
Follow these steps to ensure the OFSAA server recognizes the web application server during file
transfers.
1. Login to the web application server.
2. Type sftp <user>@<OFSAA Server>
3. Specify Yes when prompted for permission.
Are you sure you want to continue connecting (Yes/No)?
4. This will add an entry into the "known_hosts" file.
5. A confirmation message is displayed:
Permanently added <OFSAA Server> RSA) to the list of known hosts.

OFSDF 8.0.5.0.0 Installation Guide
Oracle Financial Services Software 155
15.2 Configuring Infrastructure Server Memory
The memory settings for Infrastructure Application Server, Tomcat, WebSphere, and WebLogic
can be edited for customizing memory settings and garbage collector settings depending on the
available hardware configuration as explained below. These settings are base minimum and have
to be incremented considering the deployment metrics into account. The increments are usually
handled in multiples of 128mb for heap and 64mb for stack.
15.2.1 Setting Infrastructure Server Memory
You can configure the Infrastructure Application Memory settings as follows:
1. Locate the .profile file.
2. Edit X_ARGS field in this file for customizing memory settings and garbage collector
settings depends on the hardware configuration.
This has a default value X_ARGS_APP ="-Xms200m"
X_ARGS_APP =" "$X_ARGS" $DELIM -Xmx2048m"
NOTE: You need to modify X_ARGS_APP variable in the .profile file to customize Java
Memory Settings for Model Upload based on the Data Model size.
For Run and Rule executions, the following value is recommended:
X_ARGS_RNEXE="-Xms1g -Xmx1g -XX:+UseAdaptiveSizePolicy -
XX:MaxPermSize=512M -XX:+UseParallelOldGC -XX:+DisableExplicitGC"
X_ARGS_RLEXE="-Xms1g -Xmx1g -XX:+UseAdaptiveSizePolicy -
XX:MaxPermSize=512M -XX:+UseParallelOl3dGC -XX:+DisableExplicitGC"

OFSDF 8.0.5.0.0 Installation Guide
Oracle Financial Services Software 156
15.3 Setting Internet Explorer
NOTE: OFSAAI supports only default zoom setting in Internet Explorer, that is, 100%.
Cookies should be enabled.
The following browser settings have to be specified at every client machine prior to accessing the
Infrastructure application.
1. Open Internet Explorer. Select Tools Internet Options. The Internet Options
window is displayed.
2. Click the Settings button. The Settings window is displayed.
3. Select the option Every time I visit the webpage and click OK.
4. In the Internet Options window, select the Security tab and select the Internet option
under Select a zone to view or change the security settings.
5. Click Default Level under Security level for this zone.

OFSDF 8.0.5.0.0 Installation Guide
Oracle Financial Services Software 157
6. Click OK to save.
7. Click Internet Explorer >> Tools >> Compatibility View Settings.
8. Enter the OFSAA setup URL in the Add this website field.
9. Click Add.
10. Ensure the URL is listed under Websites you've added to Compatibility View.
11. In the Internet Options window, select the Privacy tab and select the Turn on Pop-up
Blocker option under Pop-up Blocker settings.

OFSDF 8.0.5.0.0 Installation Guide
Oracle Financial Services Software 158
12. Click Settings. The Pop-up Blocker Settings window is displayed.
13. Enter the URL of the OFSAA Application in the Address of Website to Allow: field.
14. Click Add. The OFSAA URL is displayed in the Allowed Sites section.
15. Click Close.
16. Click OK in the Internet Options window.
15.4 Retrieving Patch Information
To identify the list of patches installed on your OFSAA setup, follow these steps:
1. Login to the OFSAA application as a user with Object AdminAdvanced Role.
2. Navigate to Object Administration tab.
3. Click System Utilities.
4. Click Patch Information.
5. The page displays the list of patches installed on the OFSAA setup across Applications/
Platform.

OFSDF 8.0.5.0.0 Installation Guide
Oracle Financial Services Software 159
15.5 Configuring OLAP Data Server
This section is applicable if you are using the OLAP feature of OFSAAI.
The following parameters must be set to ensure that the system limitations are not exceeded at
any stage. The values for these OS parameters should be specified based on the expected load
at each implementation site.
Example:
Process Memory Limit
Max Thread Stack Size
Max Number of Threads per Process
Sort Buffer settings: This must be set at the Essbase application level appropriate to the
anticipated load.
Shutdown and Restart: During shutdown of OFSAAI Server that has an instance of Data
Services that is communicating with an OLAP Data Server, it is imperative to ensure that the
cleanup of the old instance is completed on the OLAP Data Server before restarting the OFSAAI
Server. Pause for a period of time based on the load the system was subjected to, before
restarting the Data Services subsystem.
15.6 Configuring Infrastructure Ports
The Port Changer utility can be used to change IP/ Hostname, Ports, and Deployed paths of the
OFSAA instance.
Prerequisite
You should have minimum version as OFSAAI 8.0.
How to run Port Changer utility
1. Navigate to $FIC_HOME folder on Target.
2. Execute java -jar PortC.jar DMP.
A file with the name DefaultPorts.properties will be created under $FIC_HOME directory
which contains the ports, IPs and paths currently being used.
Make the necessary changes to those ports, IPs, and paths in the DefaultPorts.properties
file as per the Target environment. Save the changes.
3. Run the PortC.jar utility using the command:
java -jar PortC.jar UPD
This will change the ports, IPs and paths in .profile (under home directory), all files under
$FIC_HOME directory, and tables in the database according to the values mentioned in
DefaultPorts.properties file.

OFSDF 8.0.5.0.0 Installation Guide
Oracle Financial Services Software 160
15.7 Executing OFSAAI Setup Information Fetching Tool
Executing the file available in the path will help you retrieve the related
information about the OFSAAI Set up such as Operating System Name and version, Database
Type and Version, OFSAAI architecture, Log file locations and so on.
To execute " in console:
1. Navigate to the path $FIC_HOME.
2. Enter the command:
java -jar SetupInfo.jar
After execution, the output file location is displayed in the console.
15.8 Encryption Changer
This utility helps you to regenerate the new AESCryptKey.ext file and encrypt all the encrypted
values of the OFSAAI setup according to the new key.
To execute in console:
1. Navigate to the path $FIC_HOME.
2. Enter the command:
java -jar EncryptC.jar
A confirmation message is displayed after execution.
Once executed, you need to create and deploy the EAR / WAR file depending on the configured
Web Application Server. For more information, see Create and Deploy EAR/ WAR files.
15.9 Configuring Infrastructure LDAP
For more information on LDAP configuration, refer OFSAAI Administration Guide.
15.9.1 Configuring Infrastructure ‘Configuration Schema’
In the Infrastructure "configuration schema", ensure the following entries in Configuration Table.
Table 5: Configuration Schema
PARAMNAME Description PARAM Value Example
AUTHENTICATIONTYPE Authentication type 3 - AUTHENTICATIONTYPE value must be 3 for LDAP
ROOTCONTEXT The Root Context for the LDAP Directory
dc=<OFSAA>, dc=<com>
ROOTDN The Root dn for LDAP directory cn=<Manager>, dc=<Reveleus>, dc=<com>

OFSDF 8.0.5.0.0 Installation Guide
Oracle Financial Services Software 161
PARAMNAME Description PARAM Value Example
ROOTPASS Password for the Root <secret>
LDAPURL LDAP URL <ldap://10.11.12.13.1234/>
LDAP_SSL_MODE LDAP in SSL Mode N for non - SSL and Y for SSL
HASHPASS Should the user password be Hashed
FALSE or TRUE. When HASSPASS is set as FALSE, we need to have the ROOTDN value as "uid=ORCLADMIN, ou =Users, dc=OFSAAI, dc=com". ORCLADMIN is a dummy user, it will be replaced dynamically with the logged in user. When HASSPASS is set as TRUE, we need to have the ROOTDN value as "cn=orcladmin, cn=Users, dc=i-flex, dc=com" and proper oracladmin LDAP password as ROOTPASS. First OFSAAI connects to LDAP directory using orcladmin user and fetches the login user details and verifies the entered password.
RETRIEVE_DN To retrieve Distinguished Name TRUE
NOTE: ROOTCONTEXT, ROOTDN, and ROOTPASS entries should be same as in the
slapd.conf file.
15.9.2 Configuring OpenLDAP Files
1. Copy the reveleusSchema.schema from <Infrastructure Installation
Directory> /ficapp/common/FICServer/conf/LDAP_LDIF
LDAPServer folder.
Copy the Domains.ldif and Reveleus.ldif files from <Infrastructure
Installation Directory>/ficapp/common/FICServer/conf/LDAP_LDIF
OpenLDAPServer
NOTE: Make sure that the ROOTCONTEXT in the Domains.ldif and Reveleus.ldif files
are the same as slapd.conf file.
NOTE: Provide the appropriate entries for ROOTDN, ROOTPASS, and ROOTCONTEXT in
slapd.conf file in the OpenLDAPServer folder.
3. Add the text "include schema/reveleusSchema.schema" as the first line of the
slapd.conf file.
NOTE: The above steps of the configuration are for OpenLDAP Server only. If you need to
configure Infrastructure for any other LDAP Server, you will have to make the changes
appropriately.

OFSDF 8.0.5.0.0 Installation Guide
Oracle Financial Services Software 162
4. In the command prompt, navigate to the LDAP installation directory and execute the
command "ldapadd -D"ROOTDN" -w ROOTPASS -f/data/Reveleus.ldif"
5. This is for creating the entries for Users, User Groups, Functions, Profiles, Segments,
Domains, Roles, and HolidayMaster in the Data information Tree of LDAP.
6. Make an entry in the Domains.ldif file for each Information Domain that is created
through the Infrastructure UI.
To add an entry corresponding to the new Information Domain to the Domains.ldif file, add
the following block of text with the appropriate values:
NOTE: DSNID refers to Information Domain name.
dn: DSNID=<DSN ID>,ou=Domains,@LDAP_DIRECTORY_ROOTCONTEXT@
changetype: add
mappedsegments: <Mapped segments/~>
dsnid: <DSN ID>
infodomname: < Information Domain Name>
objectClass: Infodom
objectClass: top
infodomdescription: < Information Domain Description>
Example:
dn: DSNID=FUSIONMOCK, ou=Domains, dc=FTP1,dc=com
mappedsegments: ~
dsnid: FUSIONMOCK
infodomname: FUSIONMOCK
objectClass: Infodom
objectClass: top
infodomdescription: FUSIONMOCK
Then, navigate to LDAP installation directory and execute the command D"ROOTDN" -w
ROOTPASS -f/data/Domains.ldif"
NOTE: You can add entries for multiple Information Domains at the same time.

OFSDF 8.0.5.0.0 Installation Guide
Oracle Financial Services Software 163
15.9.3 Migrating Data from CSSMS tables to LDAP server
If you are using LDAP authentication, it is required to migrate all the details from the CSSMS
table, which contains the information entered using the Infrastructure Administration module
under Security Management to the LDAP Server.
To migrate data from CSSMS tables to LDAP server:
1. Invoke the file in
$FIC_HOME/MigrationUtilities/Migration_LDAP/ bin folder. The Select
Source & Destination for Migration window is displayed with the option to migrate the
data from SMS to LDAP or vice versa.
Select Source & Destination for Migration
2. Select the SMS to LDAP option and click OK. The Select Entities to Migrate window is
displayed.
Select Entities to Migrate

OFSDF 8.0.5.0.0 Installation Guide
Oracle Financial Services Software 164
You can select the data that you wish to migrate such as Users, User Groups,
Functions, Roles, Segment, Profiles, Holiday Master, Function Role Maps, User - User
Group Maps, User Group Role Map, and User Group- Domain Map.
3. Select the entities that you wish to migrate and click Migrate. The data is migrated and
a confirmation dialog is displayed.
4. You can verify the data migrated to LDAP server through the LDAP Browser.
NOTE: You should also enter the passwords for all the users as passwords are not migrated in
migration process.
15.10 Configuring OFSAAI Web Services
Web Services in OFSAAI is meant for exposing a web service to "asynchronously" or
"synchronously" execute requested tasks offered by OFSAAI. The configuration steps given
below are to be done only if you are using the Web Services feature of OFSAAI.
15.10.1 Configuring DynamicWSConfig.xml File
For each third party web service that needs to be accessed using the OFSAAI Web services
framework and the operations to be invoked, corresponding entries are to be made in the
DynamicWSConfig.xml template file.
The variable <WebServer> denotes any one of the application server, i.e. WebSphere,
WebLogic, or Tomcat.
The DynamicWSConfig.xml file will be available in the <OFSAAI Installation
Directory>/EXEWebService/ <WebServer>/ROOT/conf directory. This file can be
placed in any directory that is accessible by the application and this location must be specified in
the web.xml file, as WSCONFIGFILE parameter.
The DynamicWSConfig.xml template file will be in <WebServer Deployment Path>/
EXEWebService.ear/EXEWebService.war/conf directory.
This template is given below:
<XML>
<WEBSERVICES>
<WEBSERVICE CODE="$CODE"
ENDPOINT="$ENDPOINT" TARGETNAMESPACE="$TARGETNAMESPACE"
XMLNS_XSD="$XMLNS_XSD" ENCODINGSTYLE="$ENCODINGSTYLE"
SERVICENAME="$SERVICENAME" PORTTYPENAME="$PORTTYPENAME"
SESSION_MAINTAIN_PROPERTY="$SESSION_MAINTAIN_PROPERTY"
USERNAME="$USERNAME"

OFSDF 8.0.5.0.0 Installation Guide
Oracle Financial Services Software 165
PASSWORD="$PASSWORD" STYLE="$WEBSERVICESTYLE"
STUBIMPLEMENTATION="$STUBIMPLEMENTATION">
<OPERATION CODE="$CODE"
NAME="$NAME"
SOAPACTION="$SOAPACTION"
STYLE="$STYLE"
PACKAGENAME="$PACKAGENAME">
<INPUT ORDER="$ORDER"
PARAMNAME="$PARAMNAME"
ARGTYPE="$ARGTYPE"
CLASSNAME="$CLASSNAME"/>
<OUTPUT PARAMNAME="$PARAMNAME"
RETURNTYPE="$RETURNTYPE"
CLASSNAME="$CLASSNAME"/>
</OPERATION>
</WEBSERVICE>
</WEBSERVICES>
</XML>
The DynamicWSConfig.xml has the placeholders as tabulated below. These have to be updated
depending on the web service chosen and the mode of accessing it. For each Web service to be
accessed, the entire webservice tag in the DynamicWSConfig.xml file must be repeated. The
placeholders tabulated below should be set in accordance to the parameters published in the
third party wsdl files (webservices) to be accessed. The stub class specified must implement the
"com.iflex.Oracle Reveleus.execution.webservice.EXEWebIF" interface.
15.10.2 Attributes for WEBSERVICE tag
WEBSERVICE tag
Placeholder
Description
$CODE
Unique number within the xml file and cannot be 999 or 0.
$ENDPOINT
soap: address location in the wsdl: service name tag of the wsdl file.
$TARGETNAMESPACE
The attribute value for the targetNamespace of the wsdl: definitions tag.
$XMLNS_XSD The attribute value for the xmlns:s of the wsdl:definitions tag
$ENCODINGSTYLE The attribute value for the xmlns:soapenc of the wsdl:definitions tag.

OFSDF 8.0.5.0.0 Installation Guide
Oracle Financial Services Software 166
Placeholder
Description
$SERVICENAME
Name of the service found under the wsdl:service name tag of the wsdl file.
$PORTTYPENAME
wsdl port type name as mentioned in the wsdl file.
$SESSION_MAINTAIN_PROPERTY
This could be given as "" also.
$USERNAME
User name to access the web services. Enter "" if no user name is required.
$PASSWORD
Password to access the web services. Enter "" if no password is required.
$WEBSERVICESTYLE This can take either "rpc" in case of DII mode of invoking web services or
"stub" in case of static mode. This is a mandatory parameter.
$STUBIMPLEMENTATION
Fully qualified class name (package name.classname).
15.10.3 Attributes for OPERATION tag
Ensure that the ‘operation tag attributes’ are repeated for each of the operation tags.
OPERATION tag
Placeholder Description
$CODE Should be unique within the Webservice tag.
$NAME The name of the Function that is to be called by the wsdl file.
$SOAPACTION The URL for the Operation to access. This is associated with the
Operation tag of the wsdl file.
$STYLE This can take "rpc" if the web services invoking is in DII mode or "stub" if it
is in static mode. This is a mandatory parameter.
$PACKAGENAME Represents the JAXB package of input object.
15.10.4 Attributes for INPUT tag
INPUT tag
Placeholder Description
$ORDER The sequential number of the INPUT tag. Should start from 0. This is in
line with the input order of the arguments that the API accepts which is
called by this operation.
$PARAMNAME Input parameter name to be called by the wsdl file.

OFSDF 8.0.5.0.0 Installation Guide
Oracle Financial Services Software 167
Placeholder Description
$ARGTYPE Input Parameter Data Type. If the input argument type is complex object,
specify $ARGTYPE as "xmlstring".
$CLASSNAME Represents class name of input object parameter.
15.10.5 Attributes for OUTPUT tag
OUTPUT tag
Placeholder Description
$PARAMNAME Output parameter name to be returned by the web service.
$RETURNTYPE Output parameter Data Type. If the web service response is a complex
object, then specify $RETURNTYPE as "object".
$CLASSNAME Represents class name of output object parameter.
15.10.6 web.xml Entries
This step is optional and required only if the web application server used is Tomcat. In case of any
other application server, skip and proceed with next step.
1. Navigate to $FIC_HOME/webroot/WEB-INF/ and edit the web.xml file. Set parameter value
DOCSERVICEAPP to EXEWebServiceAXIS.
2. Navigate to <OFSAAI Installation
Directory>/EXEWebService/<WebServer>/ROOT/WEB-INF/ and edit the web.xml file as
explained below.
NOTE: In case of Java 7 when WebLogic is used as web application server replace following
line of <OFSAAI Installation
Directory>/EXEWebService/Weblogic/ROOT/WEB-INF/web.xml file that is
<?xml version='1.0' encoding='UTF-8'?>
<web-app id="WebApp_ID" version="3.0"
xmlns="http://java.sun.com/xml/ns/javaee"
xmlns:xsi="http://www.w3.org/2001/XMLSchema-instance"
xsi:schemaLocation="http://java.sun.com/xml/ns/javaee
http://java.sun.com/xml/ns/javaee/web-app_3_0.xsd" metadata-
complete="true">
with

OFSDF 8.0.5.0.0 Installation Guide
Oracle Financial Services Software
173
<?xml version='1.0' encoding='UTF-8'?>
<web-app xmlns="http://java.sun.com/xml/ns/j2ee"
xmlns:xsi="http://www.w3.org/2001/XMLSchema-instance">
15.10.6.1 Entry for WSConfig File
The WSCONFIG file (DynamicWSConfig.xml) is available in the <WebServer Deployment
Path>/ EXEWebService.ear/EXEWebService.war/conf directory. This file can be placed
in any directory that is accessible by the application.
The path where the WSCONFIG file is placed must be specified in place of
$WSCONFIGFILELOCATION$ in the following block of text in web.xml.
<context-param>
<description>WebServices Configuration File</description>
<param-name>WSCONFIGFILE</param-name>
<param-value>$WSCONFIGFILELOCATION$</param-value>
<!--Specify the Location of DynamicWSConFig.xml-->
</context-param>
15.10.6.2 Proxy Settings
Replace the following <param-value> given in bold in the following block of text in web.xml
file, with appropriate values.
If no values are required, leave the <param-value> blank.
<context-param>
<description>http Proxy Host</description>
<param-name>http.proxyHost</param-name>
<param-value>$PROXYHOST$</param-value>
<!-- Specify the IP address or hostname of the http proxy server-->
</context-param>
<context-param>
<description>http Proxy Port</description>
<param-name>http.proxyPort</param-name>
<param-value>$PROXYPORT$</param-value>
<!--Port Number for the Proxy Server-->

OFSDF 8.0.5.0.0 Installation Guide
Oracle Financial Services Software
174
</context-param>
<context-param>
<description>http proxy UserName</description>
<param-name>http.proxyUserName</param-name>
<param-value>$PROXYUSERNAME$</param-value>
<!-- User ID To get authenticated by proxy server-->
</context-param>
<context-param>
<description>http proxy Password</description>
<param-name>http.proxyPassword</param-name>
<param-value>$PROXYPASSWORD$</param-value>
<!-- User Password To get authenticated by proxy server-->
</context-param>
<context-param>
<description>http non-ProxyHosts</description>
<param-name>http.nonProxyHosts</param-name>
<param-value>$NONPROXYHOST$</param-value>
<!--Hosts for which the proxy settings should get by-passed (Note:
Separate them by "|" symbol) -->
</context-param>
15.10.6.3 OFSAAI Home Entry
This entry should point to the Application layer / Web layer of the OFSAAI installation and should
be accessible.
Replace $FIC_HOME$ in the following block of text in web.xml with <WebServer
Deployment Path>/EXEWebService.ear/EXEWebService.war.
<context-param>
<description>OFSAAI Web Home</description>
<param-name>FIC_HOME</param-name>
<param-value>$FIC_HOME$</param-value>
<!--OFSAAI Installation Folder-->

OFSDF 8.0.5.0.0 Installation Guide
Oracle Financial Services Software
175
</context-param>
<context-param>
<description>OFSAAI Web Home</description>
<param-name>FIC_PHYSICAL_HOME</param-name>
<param-value>$FIC_HOME$</param-value>
<!--OFSAAI Installation Folder-->
</context-param>
15.10.6.4 DynamicWSConfig.xml
For each third party web service that needs to be accessed using the OFSAAI Web services
framework, and the operation to be invoked, make corresponding entries into this file. This file is
to be placed in the location that is specified in the , as parameter.
15.11 Deploying OFSAAI Web Services
You can deploy OFSAAI Web Services separately if you had not configured OFSAAI Web
Services as part of the installation.
1. Complete the manual configuration of OFSAAI Web Services.
2. Navigate to <OFSAAI Installation Directory>/EXEWebService/<WebServer> and
execute the command:
./ant.sh
3. This will trigger the EAR/WAR file creation, which is required for the deployment.
4. Deploy the generated EXEWebService.EAR/EXEWebService.WAR file into the
WebServer.
If you have already configured OFSAAI Web Services as part of the installation, deploy the
generated file into the OFSAAI Deployment area in
WebServer profile.
15.12 Configuring Enable Parallel Execution of DML statements
A configuration file, OracleDB.conf has been introduced to accommodate any configurable
parameter related to operations on oracle database. If you do not want to set a parameter to a
specific value, then the respective parameter entry can be removed/commented off form the
OracleDB.conf file which resides in the path $FIC_DB_HOME/conf.
As of now, the OracleDB.conf file has only one parameter namely
CNF_DEGREE_OF_PARALLELISM. This parameter indicates the degree of parallelism to be used
for a DML operation if parallel DML is explicitly enabled in the session with the ENABLE

OFSDF 8.0.5.0.0 Installation Guide
Oracle Financial Services Software
176
PARALLEL DML clause of the ALTER SESSION statement. The default mode of a session is
DISABLE PARALLEL DML. If CNF_DEGREE_OF_PARALLELISM is not set, then the default
degree, as decided by Oracle will be used.
15.13 Configuring Message Details in Forms Designer
You can configure the Message Details in Forms Designer under Data Entry Forms and Queries
module by updating the details of mail server in the "NotificationConfig.cfg" file which
resides in the path $FIC_APP_HOME/common/FICServer/conf.
Ensure that the "authorized User details" for whom you need to configure the Message details are
included in Administration Security Management User Administrator User
Maintenance window.
Update the following parameters in the "NotificationConfig.cfg" file:
NotificationConfig.cfg File
Parameter
Description
SMTP_SERVER_IP
Specify the hostname or IP address of SMTP
Server.
SMTP_DEBUG_MODE
To run SMTP service in Debug mode, set value to
'true', otherwise set value to 'false'.
SMTP_AUTHORIZATION
Set to 'true' if SMTP server requires the client to be
authenticated, otherwise set to 'false'.
SMTP_USERNAME
Username required for logging into SMTP server, if
authentication is not required use a dummy value.
SMTP_PASSWORD
Password required for logging into SMTP server, if
authentication is not required use a dummy value.
SMTP_MAILID
If the Messages has to go from a Particular ID that
ID need to be added. Exchange server forces you
set a valid ID that is there in the exchange server.
(Based on Security settings)
Ensure that the authorized User details are included in Administration Security
Management User Administrator User Maintenance window.

OFSDF 8.0.5.0.0 Installation Guide
Oracle Financial Services Software
177
15.14 Clearing Application Cache
This is applicable to all Web Servers (i.e. WebSphere, WebLogic, and Tomcat).
Prior to the deployment of Infrastructure or Application Service Packs / One-off patches, navigate
to the following path depending on the WebServer configured and clear the cache:
Tomcat: <Tomcat installation
folder>/work/Catalina/localhost/<Application name>/org/apache/jsp
WebLogic: <Weblogic installation location>/domains/<Domain
name>/servers/<Server name>/tmp/_WL_user/<Application
name>/qaelce/jsp_servlet
WebSphere: <Websphere installation
directory>/AppServer/profiles/<Profile name>/temp/<Node
name>/server1/<Application name>/<.war file name>
15.15 Configuring Password Changes
This section explains about how to modify the OFSAA Infrastructure Config Schema and Atomic
Schema passwords.
15.15.1 Changing OFSAA Infrastructure Config Schema Password
To change the Config Schema password, perform the following steps:
1. Change the Config schema User Password in the database.
2. Delete the $FIC_HOME/conf/Reveleus.SEC file.
3. Shutdown the OFSAAI App service:
cd $FIC_APP_HOME/common/FICServer/bin
./ reveleusshutdown.sh
2. Start the Infrastructure Server in foreground directly on the server or through X-
Windows software using the command:
./ reveleusstartup.sh
At the prompt, enter System Password. Enter the "new Config schema" password. The
service will start and initialize itself if it is able to successfully connect to the DB.
4. Post successful startup of the service, if required, the Infrastructure server may be shut
down and restarted in the background using nohup mode.

OFSDF 8.0.5.0.0 Installation Guide
Oracle Financial Services Software
178
15.15.2 Changing OFSAA Infrastructure Atomic Schema Password
To change the Atomic Schema password, perform the following steps:
1. Change the Atomic schema User Password in the database.
2. Login to the application from the browser using SYSADMN account or any user id,
which has System Administrator role mapped.
3. Navigate to System Configuration Database Details window. Select the appropriate
connection and edit the password.
4. Navigate to Unified Metadata Manager Technical Metadata Data Integrator
Define Sources window. Update the appropriate Source details.
5. If you are using Apache Tomcat as Web server, update the <Context> ->
Resource tag details in Server.xml file from the $CATALINA_HOME/conf folder. (In
case of Tomcat only Atomic <Resource> will exist).
6. If you are using WebSphere as Web server:
a. Login to the WebSphere Administration Console, from the left side menu.
b. Navigate to Resources >JDBC >Data Sources. A list of data sources will be
populated on the right side.
c. Select the appropriate Data Source and edit the connection details. (In this
case, both Config and Atomic data sources will need to be modified).
If you are using WebLogic as Web server:
d. Login to the WebLogic Administration Console, from the left side menu
e. Under Domain Structure list box, expand the appropriate Domain and navigate
to Services JDBC >Data Sources. A list of data sources will be populated
on the right side.
f. Select the appropriate Data Source and edit the connection details. (In this
case, both Config and Atomic data sources need to be modified).
7. Restart the OFSAAI services.
15.16 Configuring Internal Service (Document Upload/ Download)
This step can be ignored if it has already been configured as part of any previous IR /ML
installation.
The Document Upload /Download feature has undergone a change and can now be configured to
use Internal service for document upload / download instead of the earlier ExeWebService.
OFSDF 8.0.5.0.0 Installation Guide
Oracle Financial Services Software
179
To facilitate Internal service for document upload/ download, perform the following configurations:
1. Create the folders download, upload, TempDocument and Temp in the local path of
Web application server and provide Read/Write permission.
To find the exact location, execute the following query in CONFIG schema:
select localpath from web_server_info
To create folders with Read/Write permission, execute the command:
mkdir -m 777 download upload TempDocument Temp
3. Create DocStorage folder in the FTPSHARE location of APP tier and provide
Read/Write permission.
To find the exact location, execute the query in CONFIG schema:
select ftpdrive from app_server_info
To create folder with Read/Write permission, execute the command:
mkdir -m 777 DocStorage
By default, the parameter DOCUMENT_SERVICE_TYPE_EXTERNAL value is set to FALSE in
the Configuration table in CONFIG schema and hence the application “ExeWebService” will not
be used. It is recommended that the value to be set to FALSE and use the Internal service for
document upload/ downloads. If you intend to continue using the External ExeWebService, set
the value to TRUE.
Navigate to $FIC_HOME/EXEWebService/<WEBSERVER_TYPE> directory of WEB tier and type
./ant.sh. This triggers the creation of EAR/WAR file EXEWebService.ear/.war. The EAR/WAR file
EXEWebService.ear/.war will be created in
$FIC_HOME/EXEWebService/<WEBSERVER_TYPE> directory of WEB tier. Redeploy the
generated EAR/WAR file onto your configured web application server.

OFSDF 8.0.5.0.0 Installation Guide
Oracle Financial Services Software
180
16 Appendix J: Patching FSDF Pack Installation
Oracle strongly recommends installing the latest available patch set so as to be up to date with
the various releases of the OFSAA products.
Refer http://support.oracle.com for more information on latest releases.

OFSDF 8.0.5.0.0 Installation Guide
Oracle Financial Services Software
181
17 Appendix K: Grants for Atomic/ Config Schema
This appendix includes the following sections:
Grants for Atomic Schema
Grants for Config Schema
Grants for Config Schema Entities for Atomic Users
17.1 Grants for Atomic Schema
Atomic Schema creation requires certain grants for object creation. This can be located in
$FIC_HOME/privileges_atomic_user.sql file
The following are the Grants for Atomic Schema:
grant create SESSION to &database_username
/
grant create PROCEDURE to &database_username
/
grant create SEQUENCE to &database_username
/
grant create TABLE to &database_username
/
grant create TRIGGER to &database_username
/
grant create VIEW to &database_username
/
grant create MATERIALIZED VIEW to &database_username
/
grant olap_user to &database_username
/
grant select on SYS.V_$PARAMETER to &database_username
/
grant create SYNONYM to &database_username
/
NOTE: If you intend to use Oracle OLAP feature, execute the below grant on all ATOMIC
schema(s): grant olap_user to &database_username
17.2 Grants for Config Schema
Config Schema creation requires certain grants for object creation. This can be located in
$FIC_HOME/privileges_config_user.sql file
The following are the Grants for Config Schema:
grant create SESSION to &database_username
/
grant create PROCEDURE to &database_username
/
grant create SEQUENCE to &database_username
/

OFSDF 8.0.5.0.0 Installation Guide
Oracle Financial Services Software
182
grant create TABLE to &database_username
/
grant create TRIGGER to &database_username
/
grant create VIEW to &database_username
/
grant create MATERIALIZED VIEW to &database_username
/
grant olap_user to &database_username
/
grant select on SYS.V_$PARAMETER to &database_username
/
grant create SYNONYM to &database_username
/
17.3 Grants on Config Schema Entities for Atomic Users
Atomic Schema creation requires certain grants for config schema object access. This can be
located in $FIC_HOME/config_table_privileges_for_atomic_user.sql file.
The following are the Grants for Config Schema entities for Atomic Users:
grant select on CSSMS_USR_PROFILE to &database_username
/
grant select on CSSMS_ROLE_MAST to &database_username
/
grant select on CSSMS_GROUP_MAST to &database_username
/
grant select on CSSMS_FUNCTION_MAST to &database_username
/
grant select on CSSMS_USR_GROUP_MAP to &database_username
/
grant select on CSSMS_USR_GROUP_DSN_SEG_MAP to &database_username
/
grant select on CSSMS_ROLE_FUNCTION_MAP to &database_username
/
grant select on CSSMS_GROUP_ROLE_MAP to &database_username
/
grant select on CSSMS_SEGMENT_MAST to &database_username
/
grant select on BATCH_TASK to &database_username
/
grant select on CSSMS_USR_DSN_SEG_MAP to &database_username
/
grant select on CSSMS_USR_ROLE_MAP to &database_username
/
grant select on CSSMS_METADATA_SEGMENT_MAP to &database_username
/
grant select on BATCH_RUN to &database_username
/
grant select on PR2_FILTERS to &database_username
/
grant select on PR2_TASK_FILTER to &database_username
/

OFSDF 8.0.5.0.0 Installation Guide
Oracle Financial Services Software
183
grant select on PR2_TASK_FILTER_DETAIL to &database_username
/
grant select on ST_STRESS_MASTER to &database_username
/
grant select on ST_SCENARIO_MASTER to &database_username
/
grant select on ST_SHOCK_MASTER to &database_username
/
grant select on BATCH_MASTER to &database_username
/
grant select on ICC_MESSAGELOG to &database_username
/
grant select on PR2_MASTER to &database_username
/
grant select on PR2_RUN_REQUEST to &database_username
/
grant select on MF_MODEL_SCRIPT_MASTER to &database_username
/
grant select on MF_INPUT_VALUES to &database_username
/
grant select on MF_MODEL_OUTPUT_VALUES to &database_username
/
grant select on DB_MASTER to &database_username
/
grant select on DSNMASTER to &database_username
/
grant select on pr2_rule_map to &database_username
/
grant delete on pr2_rule_map_pr to &database_username
/
grant insert on pr2_rule_map_pr to &database_username
/
grant update on pr2_rule_map_pr to &database_username
/
grant select on pr2_rule_map_pr to &database_username
/
grant delete on pr2_rule_map_pr_tmp to &database_username
/
grant insert on pr2_rule_map_pr_tmp to &database_username
/
grant update on pr2_rule_map_pr_tmp to &database_username
/
grant select on pr2_rule_map_pr_tmp to &database_username
/
grant select on pr2_rule_map_exclude to &database_username
/
grant delete on pr2_rule_map_exclude_pr to &database_username
/
grant insert on pr2_rule_map_exclude_pr to &database_username
/
grant update on pr2_rule_map_exclude_pr to &database_username
/
grant select on pr2_rule_map_exclude_pr to &database_username
/
grant delete on pr2_rule_map_exclude_pr_tmp to &database_username

OFSDF 8.0.5.0.0 Installation Guide
Oracle Financial Services Software
184
/
grant insert on pr2_rule_map_exclude_pr_tmp to &database_username
/
grant update on pr2_rule_map_exclude_pr_tmp to &database_username
/
grant select on pr2_rule_map_exclude_pr_tmp to &database_username
/
grant select on pr2_run_object to &database_username
/
grant select on pr2_run_object_member to &database_username
/
grant select on pr2_run_map to &database_username
/
grant select on pr2_run_execution_b to &database_username
/
grant select on pr2_run_execution_filter to &database_username
/
grant select on pr2_firerun_filter to &database_username
/
grant select on pr2_filters to &database_username
/
grant select on configuration to &database_username
/
grant select on batch_parameter to &database_username
/
grant select on component_master to &database_username
/
grant select on MDB_OBJECT_TYPE_ATT_LAYOUT to &database_username
/
grant select on REV_OBJECT_ATTRIBUTE_DTL to &database_username
/
grant select on FORMS_LOCALE_MASTER to &database_username
/
grant select on mdb_object_dependencies to &database_username
/
grant select on mdb_execution_details to &database_username
/
grant select on REV_STAT_DATA to &database_username
/
grant select on REV_OBJECT_REPOSITORY_B to &database_username
/
grant select on REV_OBJECT_REPOSITORY_TL to &database_username
/
grant select on REV_OBJECT_ATTRIBUTE_DTL_MLS to &database_username
/
grant select on REV_OBJECT_APPLICATION_MAP to &database_username
/
grant select on MDB_OBJ_EXPR_DETAILS to &database_username
/
grant select on MDB_EXECUTION_DETAILS to &database_username
/
grant select on REV_OBJECT_TYPES_CD to &database_username
/
grant select on REV_OBJECT_TYPES_MLS to &database_username
/
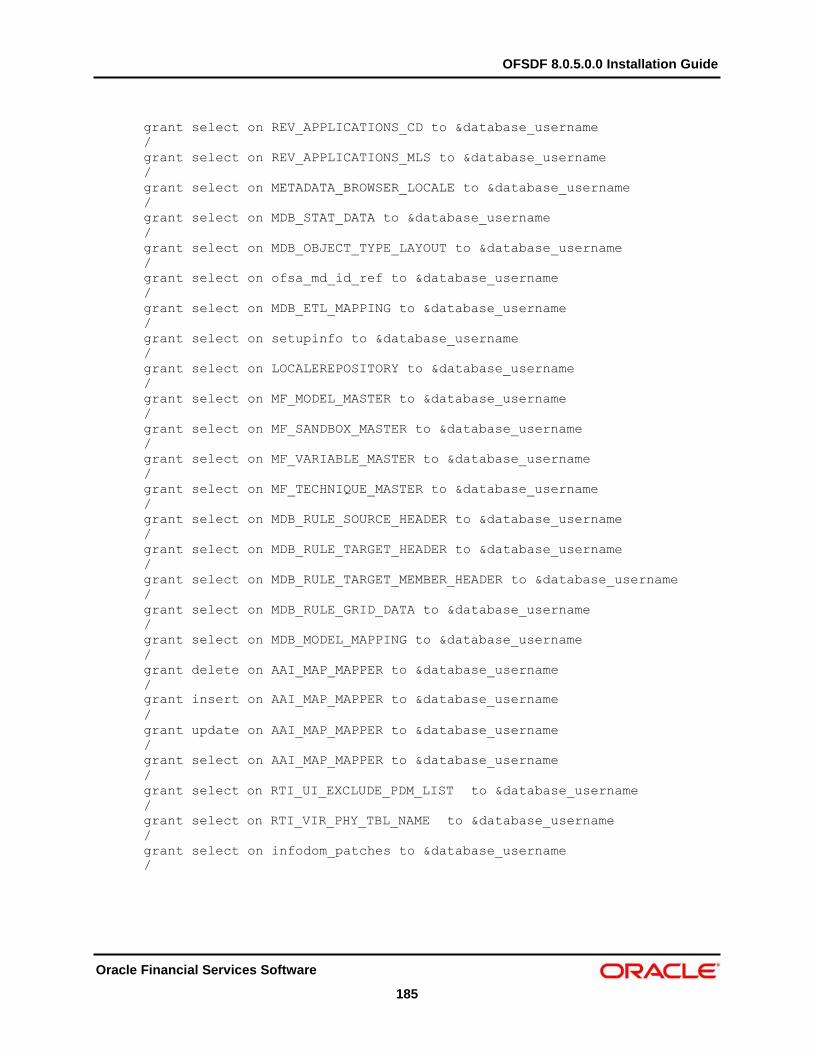
OFSDF 8.0.5.0.0 Installation Guide
Oracle Financial Services Software
185
grant select on REV_APPLICATIONS_CD to &database_username
/
grant select on REV_APPLICATIONS_MLS to &database_username
/
grant select on METADATA_BROWSER_LOCALE to &database_username
/
grant select on MDB_STAT_DATA to &database_username
/
grant select on MDB_OBJECT_TYPE_LAYOUT to &database_username
/
grant select on ofsa_md_id_ref to &database_username
/
grant select on MDB_ETL_MAPPING to &database_username
/
grant select on setupinfo to &database_username
/
grant select on LOCALEREPOSITORY to &database_username
/
grant select on MF_MODEL_MASTER to &database_username
/
grant select on MF_SANDBOX_MASTER to &database_username
/
grant select on MF_VARIABLE_MASTER to &database_username
/
grant select on MF_TECHNIQUE_MASTER to &database_username
/
grant select on MDB_RULE_SOURCE_HEADER to &database_username
/
grant select on MDB_RULE_TARGET_HEADER to &database_username
/
grant select on MDB_RULE_TARGET_MEMBER_HEADER to &database_username
/
grant select on MDB_RULE_GRID_DATA to &database_username
/
grant select on MDB_MODEL_MAPPING to &database_username
/
grant delete on AAI_MAP_MAPPER to &database_username
/
grant insert on AAI_MAP_MAPPER to &database_username
/
grant update on AAI_MAP_MAPPER to &database_username
/
grant select on AAI_MAP_MAPPER to &database_username
/
grant select on RTI_UI_EXCLUDE_PDM_LIST to &database_username
/
grant select on RTI_VIR_PHY_TBL_NAME to &database_username
/
grant select on infodom_patches to &database_username
/

OFSDF 8.0.5.0.0 Installation Guide
Oracle Financial Services Software
186
18 Appendix L: Configuring FSDF Pack XML Files
18.1 Configuring OFS_BFND_PACK.XML file
The OFS_BFND_PACK.xml file holds details on the various OFSAA products that are packaged
in a particular Application Pack.
The following table gives details about the various tags/ parameters available in the file and the
values that need to be updated. Prior to installing the OFSAA Application Pack in SILENT mode,
it is mandatory to update this file.
NOTE: If you are installing in the GUI mode, then this file need not be updated.
OFS_BFND_PACK.XML Parameters
Tag Name/ Attribute Name Description Mandatory
(Y/ N)
Default Value/
Permissible Value
Comments
APP_PACK_ID Unique Application
Pack Identifier
Y Unique Seeded Value DO NOT modify this
value.
APP_PACK_NAME Unique Application
Pack Name
Y Unique Seeded Value DO NOT modify this
value.
APP_PACK_DESCRIPTION Unique Application
Pack Description
Y Unique Seeded Value DO NOT modify this
value.
VERSION Unique release
version
Y Unique Seeded Value DO NOT modify this
value.
APP Unique Application
Entries
Y Unique Seeded Value DO NOT remove
these tags.
APP_ID Unique Application
Identifier
Y Unique Seeded Value DO NOT modify this
value.
APP_ID/ PREREQ Prerequisite
Application/ Product
Y Unique Seeded Value For most
applications
Infrastructure would
be the prerequisite
set. For certain
other applications,
an appropriate
Application ID
would be set.
DO NOT modify this
value.

OFSDF 8.0.5.0.0 Installation Guide
Oracle Financial Services Software
187
Tag Name/ Attribute Name Description Mandatory
(Y/ N)
Default Value/
Permissible Value
Comments
APP_ID/ DEF_SEL_FLAG Default Selected
Flag
Y Default - YES In all Application
Packs,
Infrastructure would
have this value set
to “YES”. DO NOT
modify this value.
APP_ID/ ENABLE Enable Application/
Product
YES if
installing in
SILENT
mode.
Default –
YES for Infrastructure
NO for Others
Permissible - YES or
NO
Set this attribute-
value to YES
against every
APP_ID which is
licensed and should
be enabled for use.
Note: Application/
Product once
enabled cannot be
disabled. However,
Application/ Product
not enabled during
installation can be
enabled later
through the
Administration UI.
APP_NAME Unique Application/
Product Name
Y Unique Seeded Value DO NOT modify this
value.
APP_DESCRIPTION Unique Application/
Product Name
Y Unique Seeded Value DO NOT modify this
value.
VERSION Unique release
version
Y Unique Seeded Value DO NOT modify this
value.

OFSDF 8.0.5.0.0 Installation Guide
Oracle Financial Services Software
188
18.2 Configuring OFS_BFND_SCHEMA_IN.XML File
Creating database schemas, object within schemas and assigning appropriate grants are the
primary steps in the installation process of OFSAA Applications. The OFS_BFND
_SCHEMA_IN.xml file contains details on the various application schemas that should be
created prior to the Application Pack installation.
The following table gives details about the various tags/ parameters available in the file and the
values that need to be updated. Prior to executing the schema creator utility, it is mandatory to
update this file.
OFS_BFND_SCHEMA_IN.XML Parameters
Tag Name/
Attribute Name
Description Mandatory
/ Optional
Default Value/
Permissible Value
Comments
<APP_PACK_ID> Unique Application
Pack Identifier
Y Unique Seeded Value DO NOT modify
this value.
<JDBC_URL> Enter the JDBC URL. Y Example,
Note: You can enter
RAC and NON-RAC
enabled database
connectivity URL.
jdbc:oracle:thin:@<HOST/IP
>:<PORT>:<SID>
or
jdbc:oracle:thin:@//[HOST][:
PORT]/SERVICE
or
jdbc:oracle:thin:@(DESCRIP
TION=(ADDRESS_LIST=(A
DDRESS=(PROTOCOL=TC
P)(HOST=[HOST])(port=[PO
RT]))(ADDRESS=(PROTOC
OL=TCP)(HOST=[HOST])(P
ORT=[PORT]))(LOAD_BAL
ANCE=yes)(FAILOVER=yes
))(CONNECT_DATA=(SER
VICE_NAME=[SERVICE])))
For example,
jdbc:oracle:thin:@//dbhost.s
erver.com:1521/service1
or
jdbc:oracle:thin:@//dbshost.
server.com:1521/scan-1
OFSDF 8.0.5.0.0 Installation Guide
Oracle Financial Services Software
189
Tag Name/
Attribute Name
Description Mandatory
/ Optional
Default Value/
Permissible Value
Comments
or
jdbc:oracle:thin:@(DESCRIP
TION=(ADDRESS_LIST=(A
DDRESS=(PROTOCOL=TC
P)(HOST=dbhost1.server.co
m)(port=1521))(ADDRESS=(
PROTOCOL=TCP)(HOST=d
bhost2.server.com)(PORT=
1521))(LOAD_BALANCE=y
es)(FAILOVER=yes))(CONN
ECT_DATA=(SERVICE_NA
ME=service1)))
<JDBC_DRIVER> By default this driver
name is seeded.
Note: Do not edit this
attribute value.
Y Example,
oracle.jdbc.driver.OracleDriv
er
Only JDBC Thin
Driver is supported.
DO NOT modify
this value.
<HOST> Enter the Hostname/ IP
Address of the system
on which you are
installing the OFSAA
components.
Y Host Name/ IP Address
<SETUPINFO>/
NAME
Enter the acronym for
the type of
implementation. This
information is displayed
in the OFSAA Home
Page.
Note: On executing the
schema creator utility,
this value will be
prefixed with each
schema name. For
example:
dev_ofsaaconf,
uat_ofsaaatm.
Y Accepts strings with a
minimum length of two and
maximum of four.
Example,
DEV, SIT, PROD
This name would
appear in the
OFSAA Landing
Page as
“Connected To:
xxxx”
The schemas being
created would get
this prefix. For E.g.
dev_ofsaaconf,
uat_ofsaaconf etc.

OFSDF 8.0.5.0.0 Installation Guide
Oracle Financial Services Software
190
Tag Name/
Attribute Name
Description Mandatory
/ Optional
Default Value/
Permissible Value
Comments
<SETUPINFO>/ Identifies if the value N YES or NO Default value is
PREFIX_SCHEM specified in YES.
A_NAME <SETUPINFO>/
NAME attribute
should be prefixed to
the schema name.
<PASSWORD>/
APPLYSAMEFOR
ALL
Enter as Y if you want
to apply the password
specified in DEFAULT
attribute for all the
schemas.
Y Default – N
Permissible – Y or N
Note: Setting this
attribute value is
mandatory, If
DEFAULT attribute
is set.
If you enter as N, you
need to provide
individual passwords for
all schemas.
Note: In case you have
entered Y in
APPLYSAMEFORALL
attribute and also have
specified individual
passwords for all the
schemas, then the
specified individual
passwords will take
precedence.
<PASSWORD>/
DEFAULT*
Enter the password if
you want to set a
default password for all
schemas.
N The maximum length
allowed is 30 characters.
Special characters are not
allowed.
Note: You also need to
set
APPLYSAMEFORALL
attribute as Y to apply
the default password for
all the schemas.

OFSDF 8.0.5.0.0 Installation Guide
Oracle Financial Services Software
191
Tag Name/
Attribute Name
Description Mandatory
/ Optional
Default Value/
Permissible Value
Comments
<SCHEMA>/
TYPE
The different types of
schemas that are
supported in this
release are ATOMIC,
CONFIG, SANDBOX,
and ADDON.
By default, the schemas
types are seeded based
on the Application Pack.
Note: Do not edit this
attribute value.
Y ATOMIC/CONFIG/SANDBO
X/ADDON
Note:
SANDBOX AND ADDON
schemas are not applicable
for OFS AAAI Application
Pack.
Only One CONFIG
schema can exist in
the file.
This schema
identifies as the
CONFIGURATION
schema that holds
the OFSAA setup
details and other
metadata
information.
Multiple ATOMIC/
SANDBOX/
ADDON schemas
can exist in the file.
ATOMIC schema
refers to the
Information Domain
schema.
SANDBOX schema
refers to the
SANDBOX
schema. ADDON
schema refers to
other miscellaneous
schema (not
applicable for this
Application Pack).
<SCHEMA.>/
NAME
By default, the schemas
names are seeded
based on the
Application Pack.
You can edit the
schema names if
required.
Note:
The Schema Name will
Y The permissible length is 15
characters and only
alphanumeric characters
allowed. No special
characters allowed except
underscore ‘_’.
SETUPINFO/
NAME attribute
value would be
prefixed to the
schema name
being created.
For E.g. if name is
set as ‘ofsaaatm’
and setupinfo as
‘uat’ then schema

OFSDF 8.0.5.0.0 Installation Guide
Oracle Financial Services Software
192
Tag Name/
Attribute Name
Description Mandatory
/ Optional
Default Value/
Permissible Value
Comments
have a prefix of the
SETUPINFO/ NAME
attribute.
being created
would be
‘uat_ofsaaatm’.
SCHEMA NAME must
be same for all the
ATOMIC Schemas of
applications within an
Application Pack.
NAME should be
same where
APP_GRP=1 for all
SCHEMA tags (Not
applicable for this
Application Pack).
<SCHEMA>/
PASSWORD*
Enter the password of
the schema to be
created.
Note:
If this attribute is left
blank, then the
password specified in
the
<PASSWORD>/DEFAU
LT attribute is applied
as the Schema
Password.
N The maximum length
allowed is 30 characters.
Special characters are not
allowed.
Note: You need to
mandatorily enter
the password if you
have set the
<PASSWORD>/
APPLYSAMEFORA
LL attribute as N.
<SCHEMA>/
APP_ID
By default, the
Application ID is seeded
based on the
Application Pack.
Note: Do not edit this
Y Unique Seeded Value Identifies the
Application/ Product
for which the
schema is being
created.
attribute value. DO NOT modify
this value.
<SCHEMA>/
DEFAULTTABLE
SPACE
Enter the available
default tablespace for
DB User.
Note:
N Default – USERS
Permissible – Any existing
valid tablespace name.
Modify this value to
associate any valid
tablespace with the
schema.
If this attribute is left
blank, then USERS is
set as the default
tablespace.

OFSDF 8.0.5.0.0 Installation Guide
Oracle Financial Services Software
193
Tag Name/
Attribute Name
Description Mandatory
/ Optional
Default Value/
Permissible Value
Comments
<SCHEMA>/
TEMPTABLESPA
CE
Enter the available
temporary tablespace
for the DB User.
Note:
N Default – TEMP
Permissible – Any existing
valid temporary tablespace
name.
Modify this value to
associate any valid
tablespace with the
schema.
If this attribute is left
blank, then TEMP is set
as the default
tablespace.
<SCHEMA>/
QUOTA
Enter the quota to be
set on
DEFAULTTABLESPAC
E attribute for the
schema/ user. By
default, the quota size is
set to 500M. Minimum:
500M or Unlimited on
default Tablespace
N Example,
600M/m
20G/g
UNLIMITED/unlimited
Modify this value to
grant the specified
quota on the
mentioned
tablespace to the
user.
<SCHEMA>/
INFODOM
Enter the name of the
Information Domain to
associate this schema.
The schema creator
utility automatically
derives an Information
Domain Name based on
the Application Pack if
no value is specified for
this attribute.
N
(Optional
for Atomic
and
mandatory
for sandbox
)
Permissible length is 16
characters and only
alphanumeric characters
allowed. No special
characters allowed.
Enter this field in
UPPERCASE.
*On successful execution of the utility, the entered passwords in the file are nullified.

OFSDF 8.0.5.0.0 Installation Guide
Oracle Financial Services Software
194
19 Appendix M: Configuring OFSAAI_InstallConfig.xml File
1. Navigate to OFS_BFND_PACK/OFS_AAI/conf directory.
2. Open the OFSAAI_InstallConfig.xml file in text editor
3. Configure the OFSAAI_InstallConfig.xml file as mentioned in the below table:
4. You need to manually set the InteractionVariable parameter values as mentioned in the
table. If a value is not applicable, enter NA and ensure that the value is not entered as
NULL.
InstallConfig.xml Parameters
InteractionVariable Name Significance and Expected Value Mandatory Y/N
<Layer name="GENERAL">
WEBAPPSERVERTYPE Identifies the web application server on which the OFSAA Infrastructure web components would be deployed.
The below numeric value should be set depending on the type:
Apache Tomcat = 1
IBM WebSphere Application Server = 2
Oracle WebLogic Server = 3
For example, <InteractionVariable name="WEBAPPSERVERTYPE">3</InteractionVariable>
Yes
DBSERVER_IP Identifies the hostname or IP address of the system on which the Database Engine is hosted.
Note: For RAC Database, the value should be NA.
For example, <InteractionVariable name="DBSERVER_ IP">14.15.16.17</InteractionVariable> or
<InteractionVariable name="DBSERVER_IP">dbhost.server.com </InteractionVariable>
Yes
ORACLE_SID/SERVICE_ NAME
Identifies the Oracle DB Instance SID or SERVICE_NAME
Note: The Oracle_SID value should be exactly the same as it is mentioned in JDBC_URL.
For example, <InteractionVariable name="ORACLE_SID/SERVICE_NAME">ofsaser </InteractionVariable>
Yes
ABS_DRIVER_PATH Identifies the directory where the JDBC driver (ojdbc<version>.jar) exists. This would typically be the
$ORACLE_HOME/jdbc/lib
For example, <InteractionVariable name="ABS_DRIVER_ PATH">">/oradata6/revwb7/oracle
</InteractionVariable>
Note: Refer Appendix O for identifying the correct
ojdbc<version>.jar version to be copied.
Yes

OFSDF 8.0.5.0.0 Installation Guide
Oracle Financial Services Software
195
InteractionVariable Name Significance and Expected Value Mandatory Y/N
OLAP_SERVER_ IMPLEMENTATION
Identifies if the OFSAA Infrastructure OLAP component needs to be configured depending on whether you intend to use the OLAP feature. The below numeric value should be set depending on the choice:
YES - 1
NO - 0
No
Note: If value for OLAP_SERVER_IMPLEMENTATION is set to 1, it checks for following environment variables are set
in .profile:
ARBORPATH, HYPERION_HOME and ESSBASEPATH.
SFTP_ENABLE Identifies if the SFTP (Secure File Transfer Protocol) feature is to be enabled. The below numeric value should be set depending on the choice:
SFTP - 1
FTP - 0
Yes
Note: The default value set is 1 as this release of the OFSAA Infrastructure mandates the SFTP service be up
and running on the system where OFSAA Infrastructure would be installed.
For example, <InteractionVariablename="SFTP_ENABLE">0</InteractionVariable>
FILE_TRANSFER_PORT Identifies the port used for the file transfer service. The default value specified is 22 (SFTP). Specify value as 21 or any other PORT value if value for SFTP_ENABLE is 0.
For example, <InteractionVariable name="FILE_TRANSFER_ PORT">21</InteractionVariable>
Yes
LOCALE Identifies the locale information to be used during the installation. This release of the OFSAA Infrastructure supports only US English.
For example, <InteractionVariable name="LOCALE">en_US</InteractionVariable>
Yes
Note: The below ports are used internally by the various OFSAA Infrastructure services. The default values
mentioned below are set in the installation. If you intend to specify a different value, update the parameter value accordingly and ensure this port value is in the range of 1025 to 65535 and the respective port is enabled.
JAVAPORT 9999 Yes
NATIVEPORT 6666 Yes
AGENTPORT 6510 Yes
ICCPORT 6507 Yes
ICCNATIVEPORT 6509 Yes
OLAPPORT 10101 Yes
MSGPORT 6501 Yes
ROUTERPORT 6500 Yes
AMPORT 6505 Yes
Note: If value for HTTPS_ENABLE is set to 1, ensure you have a valid certificate available from a trusted CA and
the same is configured on your web application server.
OFSDF 8.0.5.0.0 Installation Guide
Oracle Financial Services Software
196
InteractionVariable Name Significance and Expected Value Mandatory Y/N
HTTPS_ENABLE Identifies if the UI should be accessed using HTTP or HTTPS scheme. The default value set is 0. The below numeric value should be set depending on the choice:
YES - 1
NO - 0
For example, <InteractionVariable name="HTTPS_ENABLE">0 </InteractionVariable>
Yes
WEB_SERVER_IP Identifies the HTTP Server IP/ Hostname or Web Application Server IP/ Hostname, to be used for accessing the UI. This IP would typically be the HTTP Server IP.
If no separate HTTP Server is available, the value should be Web Application Server IP/Hostname.
For example, <InteractionVariable name="WEB_SERVER_ IP">10.11.12.13</InteractionVariable>
or
<InteractionVariable name="WEB_SERVER_IP"> myweb.server.com</InteractionVariable>
No
WEB_SERVER_PORT Identifies the Web Server Port. This would typically be 80 for non SSL and 443 for SSL. If no separate HTTP Server exists, the value should be the port configured for Web Application Server.
Note: The port value will not be accepted as 80 if HTTPS_ENABLE
is 1 and as 443, if HTTPS_ENABLE is 0.
For example, <InteractionVariable name="WEB_ SERVER_PORT">80</InteractionVariable>
Yes
CONTEXT_NAME Identifies the web application context name which will be used to build the URL to access the OFSAA applications. The context name can be identified from a URL as below:
<scheme>://<host>:<port>/<context-name>/lo
gin.jsp
Sample URL:
https://myweb:443/ofsaadev/login.jsp
For example, <InteractionVariable name="CONTEXT_ NAME">ofsaadev</InteractionVariable>
Yes
WEBAPP_CONTEXT_PATH Identifies the absolute path of the exploded .ear file on the web application server.
For Tomcat, specify the Tomcat directory path till
/webapps, such as
/oradata6/revwb7/tomcat/webapps/.
For WebSphere, enter the WebSphere path as
<WebSphere profile directory>/installedApps/
<NodeCellName>. For example,
/data2/test//WebSphere/AppServer/profiles/
<Profile_
Name>/installedApps/aix-imfNode01Cell. Where aix-imf is Host name.
For WebLogic, provide the WebLogic home directory path as /<WebLogic home directory path>/bea/wlserver_10.3
Yes

OFSDF 8.0.5.0.0 Installation Guide
Oracle Financial Services Software
197
InteractionVariable Name Significance and Expected Value Mandatory Y/N
WEB_LOCAL_PATH Identifies the absolute path to any directory on the web application server that can hold temporary files being uploaded as part of the applications usage.
Note: In case of a clustered deployment, ensure this path and
directory is same on all the nodes.
Yes
WEBLOGIC_DOMAIN_HOM E
Identifies the WebLogic Domain Home.
For example, <InteractionVariable name="WEBLOGIC_DOMAIN_
HOME">/home/weblogic/bea/user_ projects/domains/mydomain
</InteractionVariable>
Yes Specify the value only if WEBSERV
OFSAAI_FTPSHARE_PATH Identifies the absolute path to the directory identified as file system stage area.
Note:
1. The directory should exist on the same system on which the OFSAA Infrastructure is being installed (can be on a separate mount).
2. The user mentioned in APP_SFTP_USER_ID parameter below should have RWX permission on the directory.
For example, <InteractionVariable name="APP_FTPSHARE_PATH">">/oradata6/revwb7/ftpshare</In teractionVariable>
Yes
OFSAAI_SFTP_USER_ID Identifies the user who has RWX permissions on the directory identified under parameter APP_FTPSHARE_PATH above.
Yes

OFSDF 8.0.5.0.0 Installation Guide
Oracle Financial Services Software
198
20 Appendix N: Migration for Excel Upload
This appendix provides detailed instructions to migrate for excel upload.
20.1 Prerequisites
The prerequisites for migration are as follows:
Data model in ATOMIC schemas should be same on the source and target setups.
OFS AAI (platform) patch level version should be same on the source and target setups.
PL/SQL Developer to connect and query the database.
WinSCP to connect and access server file system.
20.2 Migration for Excel Upload
To migrate, follow these steps:
1. Open PL/SQL Developer and logon to the source setup’s configuration (CONFIG)
schema by entering the appropriate username and password.
2. In a new SQL window query the data of table EXCEL_MAPPING_MASTER.
3. Open a new session in PL/SQL developer and logon to the target setup’s configuration
(CONFIG) schema by entering the appropriate username and password.
4. Insert the records from Step 1 above in to this table.
5. In V_INFODOM column of EXCEL_MAPPING_MASTER table update the Information
Domain name with the target Information Domain name.
NOTE: If all the mappings can work out of the single target Information Domain, update same
Information Domain value across all rows. If only few mappings will work out of the
target Information Domain, update the Information Domain value for selective records.
Excel upload mappings will work only if the target Information Domain has same data
model entities as used in the mappings defined on source setup.
6. Update V_CREATED_BY column with the name of any user present in the target setup
that has appropriate roles to perform Excel Upload tasks.
NOTE: It is mandatory to update values for V_INFODOM and V_CREATED_BY columns.
7. Open WinSCP and login a new session by entering the host name, port number, user
name and password to access the source setup.
8. Navigate to the folder referred as FTPSHARE.

OFSDF 8.0.5.0.0 Installation Guide
Oracle Financial Services Software
199
9. Copy the excel-entity mapping xml file(s) which are located in this folder according to
their folder structure on to your desktop. For example: /ftpshare
/STAGE/ExcelUpload/$SOURCE_INFODOM_NAME/$EXCEL_FILE_NAME.xml
NOTE: Actual file name of Excel Sheet is mentioned in the V_EXCEL_NAME column of
EXCEL_MAPPING_MASTER table.
10. Copy the excel templates (.xls/ .xlsx) file(s) which are located in this folder according to
their folder structure on to your desktop. For example:
/ftpshare/STAGE/ExcelUpload/TEMPLATE/*.xls or *.xlsx
NOTE: Ignore this step if files are not present at the location.
11. Login a new session in WinSCP by entering the host name, port number, user name
and password to access the target setup.
12. Copy the xml file(s) from Step 3 to the below location in the target setup. For example:
/ftpshare/STAGE/ExcelUpload/$TARGET_INFODOM_NAME/$EXCEL_FILE_NAME
.xml
NOTE: $TARGET_INFODOM_NAME should be target setup Information Domain in which you
have uploaded the appropriate data model and the name should be same as the
V_INFODOM column value updated in EXCEL_MAPPING_MASTER table.
13. Copy the xls/ xlsx file(s) from Step 3 to the below location in target setup. For example:
/ftpshare/STAGE/ExcelUpload/TEMPLATE/*.xls or *.xlsx
NOTE: Ignore this step if files are not present at the location.

OFSDF 8.0.5.0.0 Installation Guide
Oracle Financial Services Software
200
21 Appendix O: JDBC Jar Files
The ojdbc<version>.jar file should be copied based on Database and Java version. Refer to
the following table for details.
Oracle Database
Version
JDK Version Supported JDBC Jar Files Specific to the
Release
12.1 or 12cR1 JDK 7 and JDK 8 ojdbc7.jar for JDK 7/JDK 8
11.2 or 11gR2 JDK 7 and JDK 8 supported in 11.2.0.3 and
11.2.0.4
ojdbc6.jar for JDK 7 / JDK 8

OFSDF 8.0.5.0.0 Installation Guide
Oracle Financial Services Software
201
22 Appendix P: Upgrading an Existing OFSAA 8.0.x Java 7 Instance to Java 8
This section explains the configurations required to upgrade an existing OFSAA 8.0.x Java 7
instance to Java 8. It consists of the following topics:
Prerequisites
Steps for upgrading OFSAA 8.0.x Java 7 instance to Java 8
Web Application Server Configurations
OFSAA Generic Configurations
OFSAA Configurations for New Web Application Server Installation
22.1 Prerequisites
The following are the prerequisites for upgrading OFSAA 8.0.x Java 7 instance to Java 8:
Java 8 should be installed on the OFSAA server and Web Application Server.
Oracle WebLogic Server should be 12.1.3.0 or above. Download and install patch
18729264 from http://support.oracle.com/ for the same.
NOTE: IBM WebSphere 8.5.x (Full Profile) on Java 8 is not available.
22.2 Steps for Upgrading OFSAA 8.0.x Java 7 Instance to Java 8
To upgrade OFSAA 8.0.x Java 7 instance to Java 8, follow these steps:
1. Configure Web Application Server to Java 8. For more information, refer Web Application
Server Configurations.
2. Configure the OFSAA instance to Java 8. For more information, refer OFSAA Generic
Configurations. For a newly installed Web Application Server, refer OFSAA
Configurations for New Web Application Server Installation
3. Restart the OFSAA services. For more information, refer the Start/Stop Infrastructure
Services section in Appendix D
4. Generate the application EAR/WAR file and redeploy the application onto your configured
web application server. For more information on generating and deploying EAR / W AR
file, refer Appendix C.
22.3 Configuring Web Application Server
This section describes the changes to be made in the Web Application Server. Following are the
two options to perform Web Application Server Configurations which are listed as follows:
Upgrade the existing Web Application Server Installation to Java 8
Install a new instance of the Web Application Server with Java 8

OFSDF 8.0.5.0.0 Installation Guide
Oracle Financial Services Software
202
This section consists of the following topics:
Oracle WebLogic Server Updates
Apache Tomcat Server Updates
22.3.1 Oracle WebLogic Server Updates
Perform the following configurations to upgrade the existing WebLogic server instance to Java 8:
1. Navigate to <WLS_HOME>/Middleware/Oracle_Home/wlserver.
2. Edit the product.properties file. Set JAVA_HOME, WLS_JAVA_HOME, JAVAHOME
properties to the new Java path and java.vm.version to the new Java version. For
example,
JAVA_HOME=/usr/java/jdk1.8.0_45
WLS_JAVA_HOME=/usr/java/jdk1.8.0_45
JAVAHOME=/usr/java/jdk1.8.0_45
java.vm.version=1.8.0_45
3. Navigate to
<WLS_HOME>/Middleware/Oracle_Home/user_projects/domains/<domain>/
bin. Update SUN_JAVA_HOME, DEFAULT_JAVA_HOME, JAVA_HOME in the
setDomainEnv.sh file to point to the new Java path. For example,
SUN_JAVA_HOME="/usr/java/jdk1.8.0_45"
DEFAULT_SUN_JAVA_HOME="/usr/java/jdk1.8.0_45"
JAVA_HOME="/usr/java/jdk1.8.0_45"
4. Clear the Application cache. Navigate to the following path and delete the files:
<Weblogic installation location>/domains/<Domain
name>/servers/<Server name>/tmp/_WL_user/<Application
name>/qaelce/jsp_servlet
If you wish to install a new instance of the Oracle WebLogic Server, follow these steps:
1. Install Oracle WebLogic Server 12.1.3.x on Java 8.
2. Perform the configurations for the newly installed WebLogic server. For more information
refer Configuring Resource Reference in Weblogic Application Server.
NOTE: While creating WebLogic Domain, the Listen Port should be set same as that of the
existing Domain.
Note down the new Domain path to perform OFSAA Configurations.

OFSDF 8.0.5.0.0 Installation Guide
Oracle Financial Services Software
203
22.3.2 Apache Tomcat Server Updates
Perform the following configurations to upgrade the existing Apache Tomcat Server from Java 7
to Java 8:
1. Login to the Apache Tomcat Server as a non-root user.
2. Edit the user .profile. Update the value for JAVA_HOME from JRE 1.7 to JRE 1.8. For
Example:
JAVA_HOME=/usr/java/jre1.8.0_45
3. Clear the Application cache. Navigate to the following path and delete the files:
<Tomcat installation folder>/work/Catalina/localhost/<Application
name>/org/apache/jsp
If you wish to install a new instance of the Apache Tomcat Server, follow these steps:
1. Install Apache Tomcat Server 8 with Java 8.
2. Perform the configurations for the newly installed Tomcat server. For more information
refer Configuring Resource Reference in Tomcat Application Server.
NOTE: Update the Connector Port in /apache-tomcat-8.0.21/conf/server.xml file to
that of the existing Tomcat instance.
Note down the new deployment path to perform OFSAA Configurations.
22.4 OFSAA Generic Configurations
This section consists of the following topics:
User .profile Settings
Configurations for Java 8
22.4.1 User .profile Settings
Perform the following configurations:
1. Login to the OFSAA Server as a non-root user.
2. Edit the user .profile. Update the value for PATH variable from JRE 1.7 to JRE 1.8.
For Example,
PATH=/usr/java/jdk1.8.0_45/jre
JAVA_BIN=/usr/java/jdk1.8.0_45/jre/bin
LD_LIBRARY_PATH=$LD_LIBRARY_PATH:/usr/java/jdk1.8.0_45/jre/lib/am
d64/server
22.4.2 Configurations for Java 8
Perform the configurations explained in the section Configurations for Java 8.

OFSDF 8.0.5.0.0 Installation Guide
Oracle Financial Services Software
204
22.5 OFSAA Configurations for New Web Application Server Installation
This configuration is required only if you have freshly installed Oracle WebLogic 12.1.3 or Apache
Tomcat Server 8.0. Follow these steps:
1. Modify the following parameters in the Configuration table present in the Config Schema
with the new Domain Path in case of WebLogic or with the new deployment path in case
of Tomcat:
DeFiHome
REV_IMG_PATH
EMBEDDED_JSP_JS_PATH
2. Login to the OFSAA Server as a non-root user.
3. Navigate to $FIC_HOME/ficweb/webroot/WEB_INF and update the following
parameters in the web.xml file with the new Domain path in case of WebLogic or with
the new deployment path in case of Tomcat:
FIC_PHYSICAL_HOME_LOC
FIC_HOME
ICC_SERVLET_LOG_FILE
4. Navigate to $FIC_HOME/ficweb/webroot/conf and update the Domain path in case
of WebLogic or with the new deployment path in case of Tomcat:
OFSAALogger.xml
MDBLogger.xml
RevLog4jConfig.xml
RFDLogger.xml
ExportLog4jConfig.xml
RFDLogger.xml
PR2Logger.xml

OFSDF 8.0.5.0.0 Installation Guide
Oracle Financial Services Software
205
23 Appendix Q: Removing OFSAA
This chapter includes the following sections:
Uninstalling OFSAA Infrastructure
Uninstalling EAR Files in WebSphere
Uninstalling EAR Files in WebLogic
Uninstalling WAR Files in Tomcat
23.1 Uninstalling OFSAA Infrastructure
This section will guide you through the necessary steps to uninstall the OFSAA Infrastructure
product.
Before you start the uninstallation process, ensure that no open connections exist to the OFSAA
Infrastructure Config and Atomic Schemas and Infrastructure services are brought down.
To uninstall OFSAA Infrastructure:
1. Log in to the system as non-root user.
2. Navigate to the $FIC_HOME directory and execute the command:
./Uninstall.sh
3. Enter the password for OFSAAI Configuration Schema when prompted as shown in the
following figure.
NOTE: Uninstallation does not remove the Infrastructure application from the Web Application
Server. This has to be done manually.
The entries in the .profile file will have to be removed manually.
The files/ folders under the file system staging area (ftpshare) have to be deleted
manually.
All the Database objects from Atomic Schemas have to be dropped manually.

OFSDF 8.0.5.0.0 Installation Guide
Oracle Financial Services Software
206
23.2 Uninstalling EAR Files in WebSphere
Following are the steps to uninstall any previously deployed application:
1. Open the URL in the browser window: http://<ipaddress>:<Administrative
Console Port>/ibm/console (https, if SSL is enabled). The Login window is
displayed.
2. Login with the user ID that has admin rights.
3. Expand Applications Application Types WebSphere enterprise applications from
the LHS. The Enterprise Applications window is displayed with all the deployed
applications.
4. Select the checkbox adjacent to the application to be uninstalled and click Stop.
5. Click Uninstall. The Uninstall Application window is displayed.
6. Click OK to confirm.
7. Click Save to save the master file configuration.

OFSDF 8.0.5.0.0 Installation Guide
Oracle Financial Services Software
207
23.3 Uninstalling EAR Files in WebLogic
On the machine that hosts WebLogic, perform the following steps to uninstall any previously
deployed application:
1. Open the URL in the browser window: http://<ipaddress>:<admin server
port>/console (https, if SSL is enabled). The Login window of the WebLogic Server
Administration Console is displayed.
2. Login with the WebLogic user credentials having administrator privileges.
3. From the Domain Structure LHS menu, click Deployments. The Summary of
Deployments screen is displayed
4. Select the checkbox adjacent to the application to be uninstalled and click Stop> Force
Stop Now.
5. Click Yes in the confirmation dialog to stop the selected deployment.

OFSDF 8.0.5.0.0 Installation Guide
Oracle Financial Services Software
208
6. Select the checkbox adjacent to the application and click Delete to delete the selected
deployment.
7. Click Yes in the confirmation dialog to remove the selected deployment from the domain
configuration.
23.4 Uninstalling WAR Files in Tomcat
On the machine that hosts Tomcat, perform the following steps to uninstall any previously
deployed application:
1. Comment out Context path section from server.xml file in $CATALINA_HOME/conf
directory to avoid conflict during undeploy and re-deploy of the WAR file.
Place comment <!-- --> in between the context path section. For
example:
<!--
<Context path ="/pr2test" docBase="/home/perfuser/tomcat-
7.0.19/webapps/pr2test" debug="0" reloadable="true"
crossContext="true">
<Resource auth="Container"
name="jdbc/PR2ATM"
type="javax.sql.DataSource"
driverClassName="oracle.jdbc.driver.OracleDriver"
username="pr2atm"
password="pr2atm"
url="jdbc:oracle:thin:@10.184.74.99:1521:PERFTEST"
maxActive="100"
maxIdle="30"
maxWait="10000"/>
</Context>
-->
Restart the Tomcat service by doing the following:
a. Login to the "Unix server" through a terminal emulator.
b. Navigate to $catalina_home/bin directory.
c. Stop the tomcat services using the command ./shutdown.sh

OFSDF 8.0.5.0.0 Installation Guide
Oracle Financial Services Software
209
d. Start the tomcat services using the command ./startup.sh
2. Open the URL in a browser window: http://<IP address>:<Tomcat server
port>. (https, if SSL is enabled). The Tomcat home window is displayed.
3. Click the Manager App. The Connect to window is displayed.
4. Login with the user credentials having admin rights. The Tomcat Web Application
Manager window is displayed with the list of all applications deployed in Tomcat.
Tomcat Web Application Manager
5. Click the Undeploy link against the deployed Infrastructure application. A confirmation
message is displayed on the application /Infrastructure being uninstalled.

OFSDF 8.0.5.0.0 Installation Guide
Oracle Financial Services Software
210
24 Appendix R: FAQs and Error Dictionary
This section of the document consists of resolution to the frequently asked questions and error
codes noticed during OFSAAI installation.
Frequently Asked Questions
Error Dictionary
OFSAAI installer performs all the pre-requisite validation check during installation. Any errors
encountered in the process are displayed with an appropriate Error Code. You can refer to the
Error Dictionary to find the exact cause and resolution to rectify the error.
24.1 Frequently Asked Questions
You can refer to the Frequently Asked Questions which has been developed with the interest to
help you resolve some of the OFSAAI Installation and configuration issues. This intends to share
the knowledge of problem resolution to a few of the known issues. This is not an official support
document and just attempts to share the knowledge of problem resolution to a few of the known
issues.
This section includes the following topics:
OFSAAI FAQs
Application Pack 8.0.5.0.0 FAQs
24.1.1 OFSAAI FAQs
What are the different components that get installed during OFSAAI?
The different components of OFSAAI are illustrated in Figure 1–1, "OFSAA Infrastructure
Framework".
Can the OFSAA Infrastructure components be installed on multi-tier?
No. OFSAA Infrastructure components (ficapp, ficweb, ficdb) cannot be installed on multi-tier. By
default, they will be installed on single-tier. However, OFSAA Infrastructure can be deployed
within the n-Tier architecture where the Database, Web Server and Web Application Server is
installed on separate tiers.
What are the different modes of OFSAAI installation?
OFSAAI can be installed in two modes, Silent Mode, and GUI mode.
What deployment options does OFSAAI recommend?
OFSAAI recommends you to install all OFSAAI components namely FICAPP, FICWEB, and
FICDB on a single machine (Single Tier).

OFSDF 8.0.5.0.0 Installation Guide
Oracle Financial Services Software
211
Is JDK (Java Development Kit) required during installation of OFSAA? Can it be
uninstalled after OFSAA installation?
JDK is not required during installation of OFSAA and only a run time is needed for details. Refer
Hardware and Software Requirements, Java Runtime Environment section.
Is JRE required during installation of OFSAA? Can it be uninstalled after OFSAAI
installation?
Only JRE (Java Runtime Environment) is required during installation of OFSAA and cannot be
uninstalled as the JRE is used by the OFSAA system to work.
How do I know what is the Operating system, webservers and other software versions that
OFSAA supports?
Refer to OFSAA Technology Stack Matrices.
What are the different files required to install OFSAAI?
The following files are required:
setup.sh.
envCheck.sh
preinstallcheck.sh
VerInfo.txt
OFSAAInfrastructure.bin
validatedXMLinputs.jar
MyResources_en_US.properties
log4j.xml
OFSAAI_PostInstallConfig.xml
OFSAAI_InstallConfig.xml
privileges_config_user.sql
privileges_atomic_user.sql
XML_Utility.jar
During installation, when one gets an error message, "Execute Permission denied", what
is to be done?
Please check whether all the files provided for OFSAAI installation has execute permissions.
To give execute permissions, navigate to the path OFSAAI_80000 and execute the command:
chmod 755

OFSDF 8.0.5.0.0 Installation Guide
Oracle Financial Services Software
212
"Graphical installers are not..." message is displayed.
If error resembles "Graphical installers are not supported by the VM. The console mode will be
used instead..." then check whether any of the X-windows software has been installed.
Example: Hummingbird Exceed is started and configured to Graphical mode installation.
NOTE: Type 'xclock' from prompt and this should display clock in graphical mode.
"No Java virtual machine could be…" message is displayed.
If the error message reads "No Java virtual machine could be found from your PATH environment
variable. You must install a VM prior to running this program", then:
Check whether "java path" is set in PATH variable. See the Table 3–1, "Prerequisite
Information" in this document.
Check whether sufficient temporary space is available.
Ensure that the movement of OFSAAI Installer text files to the target system is done in
the Text mode so that setup.sh file does not contain control line feed characters (^M).
During the installation, what should one do if the error message shows "OracleDriver Files
Not Found, Please Choose the Right Path To Continue"?
Check whether the provided path for Oracle Driver files is correct and whether the user has
permissions to access the files.
During installation, what is to be done if the error always reads "User must have CREATE
TABLE, CREATE VIEW, CREATE TRIGGER, CREATE INDEX, CREATE SEQUENCE,
CREATE PROCEDURE" even though the oracle schema user created has the mentioned
privileges?
OFSAAI installer validates the database details provided during installation, so ensure:
Whether the oracle schema user has the required set of privileges for successful
installation.
Whether the oracle schema user has been created with quota privileges on tablespace to
create database objects.
See the "Prerequisite Information" section for more information.
Installation of OFSAAI was completed successfully! What next?
Post the successful completion of OFSAAI installation, one has to perform the Post Installation
steps. See "Post Installation Configuration", for more information.

OFSDF 8.0.5.0.0 Installation Guide
Oracle Financial Services Software
213
What should I do when OFSAAI Installation is unsuccessful?
OFSAAI installer generates log file OFSAAInfrastructure_Install.log in the Infrastructure
Installation Directory. There is also another log file created in the path configured in Log4j.xml.
The logs of any of these reported, Warnings/Non Fatal Errors/Fatal Errors/Exceptions should be
brought to the notice of the OFSAAI Customer Support. It is recommended not to proceed, until
the reported problems are adequately addressed.
Can OFSAAI config and atomic schemas be on different databases?
OFSAAI requires both config and atomic schemas to be present on the same database instance.
How to grant privileges if a new information domain is created?
If you are creating a new information domain, provide a set of privileges (database permissions)
to the new Atomic schema.
Log into the database as sys and connect as sysdba user.
Execute the file privileges_config_user.sql available under $FIC_HOME directory
Enter the database schema for which you want to grant privileges.
When should I run the MLS utility?
See the Multiple Language Support (MLS) Utility section in OFSAAI Administration Guide in the
Documentation Library for OFSAAI 8.0.5.0.0 on OTN.
Does OFSAAI support Oracle Linux versions other than 5.5?
OFSAAI supports the Oracle Linux versions from 5.5 up to 5.10 and also from 6.0 and above.
On the UNIX System terminal, error message shows "Insert New Media. Please insert
Disk1 or type its location” while executing ./setup.sh, what should be done?
1. Login as root user on the UNIX machine where OFSAAI is getting installed.
2. Navigate to the path /etc/security/.
3. Edit the file limits.conf to add/edit a row for the Unix user installing OFSAA:
<Unix User> soft nofile 9216
4. After saving the changes, log in as Unix user with which OFSAAI is getting installed and
execute the command:
ulimit -n
The command should return the value 9216.

OFSDF 8.0.5.0.0 Installation Guide
Oracle Financial Services Software
214
How do I verify if the system environment is ready for OFSAAI installation?
To verify the system environment meets the minimum requirements for the installation, a Pre-
Install Check utility is available within the Install Kit archive file. This utility can also be obtained
separately by contacting Oracle Support.
See Verifying the System Environment section for additional information.
How do I know if the installation is completed successfully?
The OFSAA Infrastructure installation performs a post install health check automatically on
successful installation of the product. To rerun the post install verification at a later time, perform
the following steps:
1. Navigate to the path $FIC_HOME (Product Installation Directory).
2. Execute the command:
./piverify.sh
What should I do if the installation in GUI mode is not invoked?
There are set of configuration steps required to be performed during the installation in GUI mode.
Verify whether the steps mentioned under Configuration for GUI Mode Installation section are
done correctly.
What should I do if there are any exceptions or errors in installation and how to proceed?
1. Please backup the installation logs.
2. Share the backup logs with Oracle support.
On Solaris 11 system, if I get the following error message during OFSAAI installation, what
should I do?
"Error: OFSAAI-1108
ORA-00604: error occurred at recursive SQL level 1
ORA-01882: timezone region not found"
Or
"Time zone cannot be set as null or 'localtime' "
This happens if the time zone is not set, that is NULL or it is set as ’localtime’. Set the
environment variable TZ to a valid time zone region in the .profile file. For example,
TZ=Asia/Calcutta
export TZ

OFSDF 8.0.5.0.0 Installation Guide
Oracle Financial Services Software
215
What happens if the installation process is abruptly terminated or aborted? What should I
do?
If the installation is abruptly terminated, then the installation process will be incomplete. To
recover from this, follow the below steps:
1. Drop the DB objects in the config schema created by OFSAAI installation.
2. Open the .profile and remove the entries made by the OFSAAI installation which are
made between the comment statements, #Beginning of entries by OFSAA Infrastructure
installation and #End of entries by OFSAA Infrastructure installation.
3. Delete the OFSAA install directory created by the OFSAAI installer.
4. Perform the OFSAAI installation again.
Would OFSAA support any other web server types, other than the ones stated in tech
matrix and installation guide?
No, all the supported software and versions are stated in the OFSAA Technology Stack Matrices.
What should I do if the database connection from connection pool throws an error
"java.sql.SQLRecoverableException: IO Error: Connection reset"?
This happens while running several database intensive tasks in parallel. To correct this error, add
the line securerandom.source=file:/dev/./urandom in the java.security configuration file
available in $JAVA_HOME/jre/lib/security/ path.
NOTE: This needs to be configured on all the machines or VMs where the OFSAAI
components are installed.
If the issue is not resolved even with the above settings, check the Maximum Transmission Unit
(MTU) settings on the Linux box. For details on MTU settings and updating them, contact your
system Administrator.
When I invoke setup.sh file from my install archive, it throws syntax errors/file not found
error messages, what should I do?
This could mostly happen:
When installer was not unzipped rightly or corrupted during unzip.
setup.sh file which resides within the install archive was not transferred in ASCII or text
mode, which could have corrupted the file.
To correct this, follow the steps:
1. Copy the installer (in BINARY mode) to the system on which the OFSAA Infrastructure
components will be installed.
2. Unzip the installer using the command:
unzip <OFSAAI_Installer>.zip

OFSDF 8.0.5.0.0 Installation Guide
Oracle Financial Services Software
216
3. The corrupted setup.sh file would have introduced certain ^M characters into the file. You
can remove ^M characters from setup.sh file by following the below steps:
a. Login to the server where the installer is copied.
b. Navigate to the directory OFSAAI_80000.
c. Open the setup.sh file in the vi editor using the command: vi setup.sh.
d. Inside vi editor in Esc mode, type: %s/^M//g
NOTE: To enter ^M, hold the CTRL key then press V and M in succession.
e. Save the setup.sh file by typing: wq!
Does OFSAA support Oracle DB 11g Standard edition?
The OCI client and the JDBC driver does not change depending on whether it is a standard or
enterprise edition. So, OFSAAI will work with standard edition too.
We do not recommend standard edition because it will not scale and does not support partition
pack, database security vault, or advanced analytics.
On the UNIX System terminal, Error message shows "./startofsaai.sh: /java: Execute
permission denied" while executing ./startofsaai.sh file. What is to be done?
Ensure JAVA_BIN environment variable path is set on the "Unix user" terminal from
where the reveleusstartup.sh file is invoked.
Ensure the .profile where the environment/ path settings are made has been executed
successfully.
OFSAAI Login page does not come up, error message "Could not retrieve list of locales" is
displayed. What should I do?
This could be due to 2 reasons:
1. System is unable to resolve the hostname configured.
2. Conflict with the ports configured.
To correct them, follow the below steps:
A. Steps to replace the hostnames with IP address:
1. Stop all the OFSAA services. See Stopping Infrastructure section on how to stop the
services.
2. Replace all the hostnames with the IP address in all the places mentioned in the
document (Where to find port, IP address, HTTPS Configuration for OFSAAI 7.2
Installation (DOC ID 1500479.1)).
3. Restart all the OFSAAI services. See Starting Infrastructure section.

OFSDF 8.0.5.0.0 Installation Guide
Oracle Financial Services Software
217
B. Steps to correct the port number conflicts
1. Stop all the OFSAA services.
2. Refer to the port numbers stated in the document (Where to find port, IP address, HTTPS
Configuration for OFSAAI 7.2 Installation (DOC ID 1500479.1)) and check on the
discrepancy in the port numbers and correct them.
3. Restart all the OFSAAI services.
What happens when the OFSAAI Application Server does not proceed even after providing
the system password?
Ensure that, the System Password provided when prompted should match with the "Oracle
Configuration password" provided during installation. Also check whether the connection to the
"configuration schema" can be established through SQL Plus.
Although the OFSAAI installation has completed successfully, when OFSAAI servers are
started, and the application URL is accessed, it gives an error message "the page cannot
be found or displayed" or "Could not retrieve list of languages from Server. Please contact
the system administrator". What should I do?
Ensure OFSAAI servers have been started and are running successfully. On the server start up
parameters options, see Starting Infrastructure section.
For more details on the issue, refer on to the Revappserver log in $FIC_APP_
HOME/common/FICServer/logs directory or the Web Server log files.
Is it necessary to provide the specified grants to the Oracle schema user before
installation? If yes, can it be revoked after completion of installation?
The "Oracle schema" user requires the necessary grants specified before, during, and after the
installation process. Grants provided should never be revoked as the application makes use of
these grants all the time.
Can we have distributed OFSAAI Application Server for load balancing?
OFSAAI Application server can be scaled out/distributed across different JVM's (machines)
based on the various services and Information Domains, in other words, Load balancing could be
achieved with distribution of services.
Why do we need Ftpshare? Why is it needed on all the layers? Can we have ftpshare on
another machine other than the machines where OFSAAI is installed?
Ftpshare is a Metadata Repository directory. All the metadata related files used in Infrastructure
are stored in the ftpshare directory. The ftpshare contains folders for each Information Domain,
with each Information Domain folders holding Erwin, log, and scripts folder. The transfer of data
among the Web, Application, and Database servers in Infrastructure takes place through
FTP/SFTP.

OFSDF 8.0.5.0.0 Installation Guide
Oracle Financial Services Software
218
You need to configure FTP/SFTP and enable communication between the servers by providing
App server's FTP/SFTP credentials to the Web server and DB server users.
Yes, we can have ftpshare on another machine other than the machines where OFSAAI is
installed.
Is it mandatory to provide the ftp/sftp password?
Yes, OFSAAI needs credentials of the user which has complete permissions on ftpshare
directory, and should be able to independently login to the UNIX server.
What are the permissions required for ftpshare and when should I give them?
It is recommended to provide 777 permissions on ftpshare in case of installations done across
different machines or VMs (multitier installation).
In case of single tier installation, 770 permissions can be provided if the UNIX users of OFSAAI
and web server belong to the same UNIX group.
And on any new file that is created in the 'ftpshare' folder of any installation layer should be
granted specific/explicit permission.
Port Change utility could be used to have the Port number modified, which are currently being
used by the Infrastructure application. For more information, refer Configure Infrastructure Ports
section.
Are there any in-built system administration users within OFSAAI Application?
The three in-built system administration users are provided to configure and setup OFSAAI.
1. SYSADMN
2. SYSAUTH
3. GUEST
Does OFSAAI Application support both FTP and SFTP?
OFSAAI supports both FTP and SFTP configuration.
Is it necessary to enable the FTP/SFTP services to use the OFSAAI?
Yes, enabling of FTP/SFTP services and its ports is a pre-requisite step towards using the
OFSAAI.
OFSAAI Configuration: Unable to save the server details?
1. Ensure the input User ID, Password, and Share Name are correct.
2. Ensure FTP/SFTP services are enabled.
3. Have a test FTP/SFTP connection made and confirm if they are successful.

OFSDF 8.0.5.0.0 Installation Guide
Oracle Financial Services Software
219
During Information Domain creation, the message "Please create a database and then
create the information domain" appears. What should be done?
Information Domain is mapped to only one Database; and thus before the creation of Information
Domain, at least one database details would need to exist.
The message "ConnectToDatabase: FatalError, could not connect to the DB server"
appears during startup of backend engine message server. What do I need to do?
Verify whether connection to the "configuration schema" can be established through SQL
Plus.
Verify "configuration schema" password is modified post installation.
Ensure oracle database alias name created for oracle instance and oracle service name
are same.
On a multitier Installation mode, ensure TNSNAME and SID are the same in both the
Application and Database Layers.
The message "Fatal Error, failed to get user ID from LibSmsConnect" appears during the
startup of backend engine message server. What should I do?
Ensure Reveleus.sec file exist under the $FIC_HOME/conf directory where the Database
components are installed.
Does OFSAAI Application support LDAP authentication?
OFSAAI supports LDAP configuration and authentication.
Does OFSAAI support multiple languages?
Yes, OFSAAI supports multiple languages.
Does OFSAAI provide any data back-up features?
OFSAAI does not have built-in back up facility. External Storage Infrastructure is recommended
for back-up.
What kind of security features does the OFSAAI provides?
OFSAAI provides security at:
Segment Level: Users can access only the segment they are mapped to.
Application Level: Users can perform an operation only if mapped to appropriate role and
functions.
Does OFSAAI have the ability to enforce periodic password change?
OFSAAI provides configurable parameters to define number of days after which the user
password would expire and then the user is forced to change the password after expiration
period.

OFSDF 8.0.5.0.0 Installation Guide
Oracle Financial Services Software
220
What is the password policy followed in OFSAAI?
OFSAAI enforces a minimum password length with a combination of Upper and Lower case
characters and alpha-numeric strings.
Which version of Erwin Data Modeler does OFSAAI support?
OFSAAI now supports ERwin version 9.2 and 9.5 generated .xml files in addition to ERwin 4.1,
ERwin 7.1, ERwin 7.3 and ERwin 9.0 formats.
Note: OFS AAI supports data model upload for data models generated using ERwin 7.1.x, 7.2.x,
7.3.x, 9.0.x, 9.2.x, and 9.5.x versions
Does OFSAAI provide the mechanism to upload Business Data model?
OFSAAI provides two mechanisms for business data model upload:
Easy to use GUI based Model upload mechanism to upload the Business Data Model
through Unified Metadata Manager --> Import Model.
OFSAAI also provides a model upload utility "upload.sh" for uploading the business data
model through the command line parameter by executing this shell script file under the
path <FIC_HOME>/ficapp/common/FICServer/bin.
Refer the section Run the Model Upload Utility of the Oracle Financial Services Analytical
Application Infrastructure User Guide on OTN for details.
The Business Data model undergoes changes; how does this incremental change get
applied to the existing model?
Modified data model can be uploaded into the system and OFSAAI has the ability to compare the
changes within the data model with respect to the one already present in the system and enables
propagation of incremental changes in a consistent manner.
What are the different types of uploading a business data Model?
OFSAAI supports uploading of business data model from client desktop and also by picking up
the data model from the server location.
Can the OFSAAI "Configuration Schema" password be modified post installation?
The OFSAAI "configuration schema" password can be modified post installation. OFSAAI
application stores the password in the database and few configuration files, thus any changes to
the "configuration schema" password would necessitate updating in these. Contact OFSAAI
support for more details.
Can the OFSAAI "Atomic Schema" password be modified?
The OFSAAI "Atomic Schema" password can be modified. OFSAAI application stores the atomic
schema password in the database and few configuration files, thus any change to the atomic
schema password would necessitate updating the password.

OFSDF 8.0.5.0.0 Installation Guide
Oracle Financial Services Software
221
To change the Atomic Schema password, follow the steps:
1. Login to OFSAA.
2. Navigate to System Configuration Database Details window. Select the appropriate
connection, provide the modified password and save.
3. Navigate to Unified Metadata Manager Technical Metadata Data Integrator
Define Sources window. Update the appropriate Source details.
a. If you are using Apache Tomcat as Web server:
Update the <Context> -> Resource tag details in server.xml file from
the $CATALINA_HOME/conf folder. (In case of Tomcat only Atomic
<Resource> will exist).
b. If you are using WebSphere as Web server:
Login to the WebSphere Administration Console from the left side
menu.
Navigate to Resources >JDBC >Data Sources. A list of data sources
will be populated on the right side.
Select the appropriate Data Source and edit the connection details.
(In this case, both Config and Atomic data sources need to be
modified).
c. If you are using WebLogic as Web server:
Login to the WebLogic Administration Console from the left side
menu.
Under Domain Structure list box, expand the appropriate Domain
and navigate to Services JDBC >Data Sources. A list of data
sources will be populated on the right side.
Select the appropriate Data Source and edit the connection details.
(In this case, both Config and Atomic data sources need to be
modified).
4. Restart the OFSAAI services.
NOTE: If the modified passwords are not updated, OFSAAI logs displays the message ORA-
28000: the account is locked.
Does the upload of Business Data model depend on Java Memory?
Business data model upload through OFSAAI depends on the Java memory settings on the client
and server machines. Java memory setting varies with the data model size and the available
RAM. Contact OFSAAI support for more details.

OFSDF 8.0.5.0.0 Installation Guide
Oracle Financial Services Software
222
Why do the Business Metadata Management screens (Business Processors screen) in
User Interface, takes longer time to load?
The Log file in DynamicServices.xml which resides in $FIC_HOME/conf is continuously being
updated/refreshed to cache metadata. This can be observed when you are starting
reveleusstartup.sh and if any of the log file (Ex: SMSService.log) in DynamicServices.xml is being
continuously refreshed for longer time.
By default, the Metadata Log file cache size is set to 1000. If in case the log is being updated
beyond this limit, retrospectively the preceding entries are overwritten. For example, the 1001th
entry is overwritten by deleting the first entry. This results in the application screen taking a longer
time to load.
Increase the cache size limit in Dynamicservices.xml located at <FIC_HOME>/conf, depending
on the currently logged count for the specific metadata.
1. Generate the Log report by executing the below query in config schema.
select count(1), t.metadata_name, m.dsn_id
from metadata_master m, metadata_type_master t
where m.metadata_type = t.metadata_type
group by t.metadata_name, m.dsn_id
2. The above query returns a list of codes with their respective metadata count. You can
refer to "metadata_type_master" table to identify the metadata name.
3. View the log report to identify the metadata which is being updated/refreshed beyond the
specified cache size limit. Accordingly increase the cache size limit in
Dynamicservices.xml depending on the currently logged count for the specific metadata.
For example, if the "MEASURE_CACHE_SIZE" is set to 1000 and total measure reported
in log is 1022, increase the limit to 2000 (approximately).
4. Restart Reveleus/OFSAAI servers (Web and APP) and check the issue.
What should I do if I get OutOfMemoryError while deploying EAR file in WebSphere
application server?
The Java memory needs to be increased in ejbdeploy.sh file which is present under <WebSphere
Install directory>/AppServer/deploytool/itp. For example,
$JAVA_CMD \
-Xbootclasspath/a:$ejbd_bootpath \
Xms256m -Xmx1024m \

OFSDF 8.0.5.0.0 Installation Guide
Oracle Financial Services Software
223
What configurations should I ensure if my data model size is greater than 2GB?
In order to upload data model of size greater than 2GB in OFSAAI Unified Metadata Manager-
Import Model, you need to configure the required model size in struts.xml file available in the path
$FIC_WEB_HOME/webroot/WEB-INF/classes.
NOTE: The size requirements have to be always specified in bytes.
For example, if you need to configure for model size of 2.5GB, then you can approximately set
the max size to 3GB (3221225472 bytes) as indicated below, in order to avoid size constraints
during model upload.
<constant name="struts.multipart.maxSize" value="3221225472"/>
After configuring struts.xml file, generate the application EAR/WAR file and redeploy the
application onto your configured web application server. For more information on generating and
deploying EAR / WAR file, see Appendix C.
What should I do if my Hierarchy filter is not reflecting correctly after I make changes to
the underlying Hierarchy?
In some cases, the Hierarchy Filters do not save the edits correctly if the underlying Hierarchy
has been changed. This can occur in hierarchy maintenance, where you have moved a member
to another hierarchy branch, and that member was explicitly selected in the Filter and is now a
child of a node which is already selected in the Filter.
Please refer to Support Note for the workaround.
How do I turn off unused information domains (infodoms) from cache?
Follow the below steps to turn off unused Information Domains from cache:
Navigate to $FIC_HOME/conf in the APP layer of your OFSAAI installation.
1. In the DynamicServices.xml file, identify the section for <Service code="20">.
2. Modify the value of parameter CACHE_ON_STARTUP to 0 (default is 1).
3. Repeat the same in the WEB layer too. Generate the application EAR/WAR file and
redeploy the application onto your configured web application server. For more
information on generating and deploying EAR / WAR file, see Appendix C.
4. Restart the OFSAAI Services (APP and WEB). For more information, see Start / Stop
Infrastructure Services chapter.
NOTE: This setting will cache the Information Domain metadata only for the Information
Domains that get accessed upon user login. Information Domains which do not get
accessed, will not be cached.
Sample code is pasted below:

OFSDF 8.0.5.0.0 Installation Guide
Oracle Financial Services Software
224
<SERVICE CODE="20"
CLASS="com.iflex.fic.metadata.services.MetadataServiceProvider"
NAME="BMD"
SERVERID="DEFAULT" PATH=" " LOGGERNAME="UMMLOGGER" LOGGERLEVEL="10">
<PARAMETERS>
<PARAMETER NAME="CACHE_ON_STARTUP" VALUE="0" />
<PARAMETER NAME="BACKUP_XML" VALUE="1" />
<PARAMETER NAME="MAX_BACKUP_XML" VALUE="2" />
<PARAMETER NAME="PC_NONBI_BI_SWITCH" VALUE="2048" />
<PARAMETER NAME="HIERARCHY_NODE_LIMIT" VALUE="2000" />
<PARAMETER NAME="ALIAS_CACHE_SIZE" VALUE="1000" />
<PARAMETER NAME="DATASET_CACHE_SIZE" VALUE="2000" />
<PARAMETER NAME="MEASURE_CACHE_SIZE" VALUE="2000" />
<PARAMETER NAME="HIERARCHY_CACHE_SIZE" VALUE="2000" />
<PARAMETER NAME="DIMENSION_CACHE_SIZE" VALUE="2000" />
<PARAMETER NAME="HIERARCHYATTRIBUTE_CACHE_SIZE" VALUE="1000" />
<PARAMETER NAME="CUBE_CACHE_SIZE" VALUE="1000" />
<PARAMETER NAME="RDM_CACHE_SIZE" VALUE="1000" />
<PARAMETER NAME="BUSINESSPROCESSOR_CACHE_SIZE" VALUE="2000" />
<PARAMETER NAME="DERIVEDENTITY_CACHE_SIZE" VALUE="1000" />
<PARAMETER NAME="LOG_GET_METADATA" VALUE="false" />
<PARAMETER NAME="METADATA_PARALLEL_CACHING" VALUE="0" />
</PARAMETERS>
</SERVICE>
Can I install an Application Pack on an existing Atomic schema/ Information Domain
created manually?
No, you cannot install an Application Pack on existing Atomic schema/Information Domain
created manually. Application Packs can be installed only on Atomic Schemas/Information
Domain created using schema creator utility and/ or the Application Pack installer.

OFSDF 8.0.5.0.0 Installation Guide
Oracle Financial Services Software
225
When trying to view the model outputs in Model Outputs screen, I get "Exception ->Local
Path/STAGE/Output file name (No such file or directory)".
Ensure you have created a folder "STAGE" under the path mentioned as "Local Path" in the web
server details screen. This folder needs to be created under the local path on every node for web
application server clustering.
During OFSAA services startup, I get Exception in thread “main”
java.lang.UnsatisfiedLinkError: net (Not a directory)?
Ensure the JRE referred in .profile is not a symbolic link. Correct the path reference to point to a
physical JRE installed.
What is the optimized memory settings required for "New" model upload?
The following table lists the optimized memory settings required for "New" model upload.
Table 6: optimized memory settings required for "New" model upload
Model Upload Options Size of Data Model XML
File
X_ARGS_APP ENV Variable in
OFSAAI APP Layer
Pick from Server 106 MB -Xms1024m -Xmx1024m
36 MB -Xms2048m -Xmx2048m
815 MB -Xms4096m -Xmx4096m
1243 MB -Xms6144m -Xmx6144m
Model Upload Utility 106 MB -Xms1024m -Xmx1024m
336 MB -Xms2048m -Xmx2048m
815 MB -Xms4096m -Xmx4096m
1243 MB -Xms6144m -Xmx6144m
Save New Erwin File In
Server
106 MB -Xms1024m -Xmx1024m
336 MB -Xms2048m -Xmx2048m
815 MB -Xms4096m -Xmx4096m
1243 MB -Xms6144m -Xmx6144m
What is the resolution if I get the error - ORA 01792 maximum number of columns in a
table or view is 1000 during T2T execution?
You should apply the below patch set from Oracle. Applicable only for 12c.
https://support.oracle.com/epmos/faces/DocumentDisplay?id=1937782.1
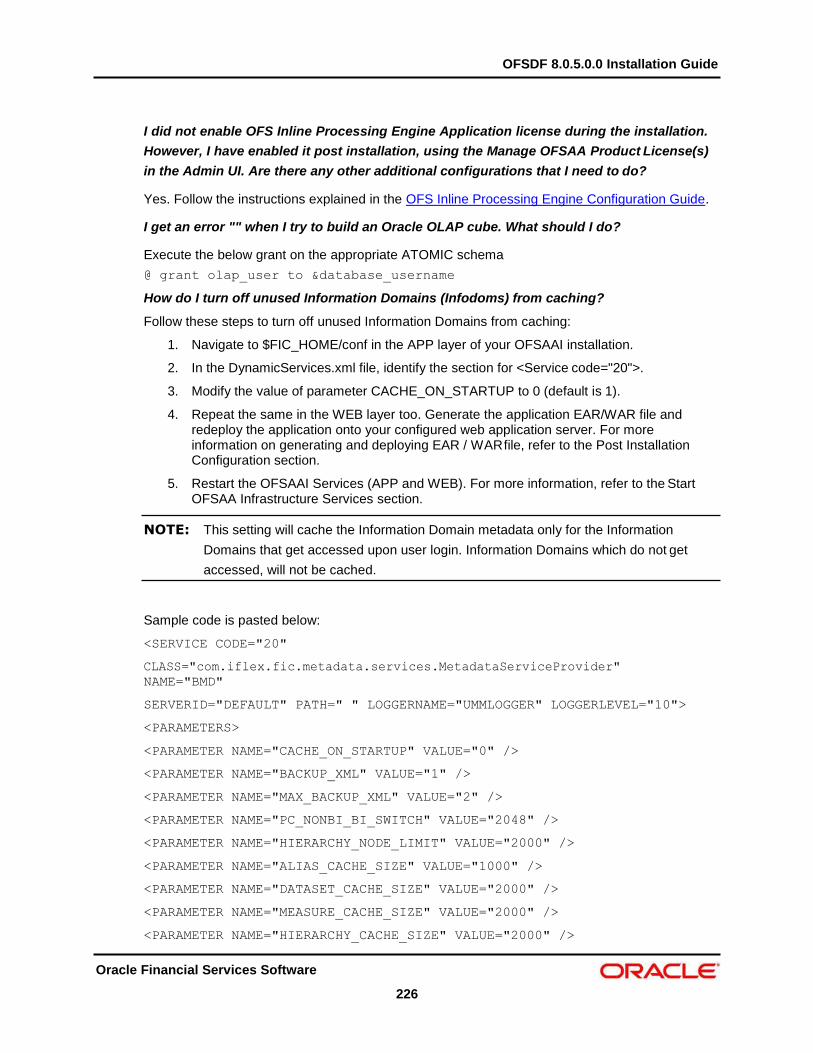
OFSDF 8.0.5.0.0 Installation Guide
Oracle Financial Services Software
226
I did not enable OFS Inline Processing Engine Application license during the installation.
However, I have enabled it post installation, using the Manage OFSAA Product License(s)
in the Admin UI. Are there any other additional configurations that I need to do?
Yes. Follow the instructions explained in the OFS Inline Processing Engine Configuration Guide.
I get an error "" when I try to build an Oracle OLAP cube. What should I do?
Execute the below grant on the appropriate ATOMIC schema
@ grant olap_user to &database_username
How do I turn off unused Information Domains (Infodoms) from caching?
Follow these steps to turn off unused Information Domains from caching:
1. Navigate to $FIC_HOME/conf in the APP layer of your OFSAAI installation.
2. In the DynamicServices.xml file, identify the section for <Service code="20">.
3. Modify the value of parameter CACHE_ON_STARTUP to 0 (default is 1).
4. Repeat the same in the WEB layer too. Generate the application EAR/WAR file and redeploy the application onto your configured web application server. For more information on generating and deploying EAR / WAR file, refer to the Post Installation Configuration section.
5. Restart the OFSAAI Services (APP and WEB). For more information, refer to the Start OFSAA Infrastructure Services section.
NOTE: This setting will cache the Information Domain metadata only for the Information
Domains that get accessed upon user login. Information Domains which do not get
accessed, will not be cached.
Sample code is pasted below:
<SERVICE CODE="20"
CLASS="com.iflex.fic.metadata.services.MetadataServiceProvider"
NAME="BMD"
SERVERID="DEFAULT" PATH=" " LOGGERNAME="UMMLOGGER" LOGGERLEVEL="10">
<PARAMETERS>
<PARAMETER NAME="CACHE_ON_STARTUP" VALUE="0" />
<PARAMETER NAME="BACKUP_XML" VALUE="1" />
<PARAMETER NAME="MAX_BACKUP_XML" VALUE="2" />
<PARAMETER NAME="PC_NONBI_BI_SWITCH" VALUE="2048" />
<PARAMETER NAME="HIERARCHY_NODE_LIMIT" VALUE="2000" />
<PARAMETER NAME="ALIAS_CACHE_SIZE" VALUE="1000" />
<PARAMETER NAME="DATASET_CACHE_SIZE" VALUE="2000" />
<PARAMETER NAME="MEASURE_CACHE_SIZE" VALUE="2000" />
<PARAMETER NAME="HIERARCHY_CACHE_SIZE" VALUE="2000" />

OFSDF 8.0.5.0.0 Installation Guide
Oracle Financial Services Software
227
<PARAMETER NAME="DIMENSION_CACHE_SIZE" VALUE="2000" />
<PARAMETER NAME="HIERARCHYATTRIBUTE_CACHE_SIZE" VALUE="1000" />
<PARAMETER NAME="CUBE_CACHE_SIZE" VALUE="1000" />
<PARAMETER NAME="RDM_CACHE_SIZE" VALUE="1000" />
<PARAMETER NAME="BUSINESSPROCESSOR_CACHE_SIZE" VALUE="2000" />
<PARAMETER NAME="DERIVEDENTITY_CACHE_SIZE" VALUE="1000" />
<PARAMETER NAME="LOG_GET_METADATA" VALUE="false" />
<PARAMETER NAME="METADATA_PARALLEL_CACHING" VALUE="0" />
</PARAMETERS>
</SERVICE>
"While creating an Excel Mapping, after specifying the excel worksheet, the target table,
and mapping each column in the worksheet to a target table, I click SAVE and nothing
happens. But when I click CANCEL, a message pops up informing me that all changes will
be discarded", what is to be done.
Check if the excel mapping creation is done using I.E 8 with JRE 1.4 plug in enabled on machine.
If so, upgrade the JRE plug in to 1.7+
How can I configure the OFSAA application for High Availability?
OFSAA can have active-passive high availability. For more details, refer Configuration for High
Availability- Best Practices Guide.
What should I do if I get the following error message, "Error while fetching open cursor
value Status: FAIL"?
This error occurs while executing envCheck.sh because the user does not have access to
V$parameter. This error does not occur due to sysdba or non sysdba privileges provided they
have access/grants to V$parameter.
What should I do when an entity containing many attributes (>100 columns) is selected as
Source entity and the Data Mapping (T2T definition) save operation takes longer than
expected with the hourglass in the UI continuously rotating?
In such cases, the user might falsely assume that T2T definition save has failed. The reason for
this occurrence is that the FilerServlet has taken considerable amount of time to validate the xml
data that was passed. If we skip validation in excludeURLList.cfg, there will be no latency in
Data Mapping save operation. To rectify this, follow these steps:
1. Locate the webserver deployed area webroot/conf/excludeURLList.cfg file.
2. Modify the following entries:
[SQLIA]./dataIntegrator/ to [ALL]./dataIntegrator/
[SQLIA]./ETLExtractionServlet to [ALL]./ETLExtractionServlet

OFSDF 8.0.5.0.0 Installation Guide
Oracle Financial Services Software
228
3. Save the changes and restart the webserver.
4. Resave the definition.
I get an error while executing grant olap_user to the schema. What should I do?
During OLAP user creation (Error while executing- grant olap_user to dev_ofsaafsd37), this error
occurs “java.sql.SQLSyntaxErrorException: ORA-01919: role 'OLAP_USER' does not exist”.
Follow this workaround:
1. Create this role as mentioned below and proceed further.
2. The OLAP_USER role is defined in the sql script file in this path,
$ORACLE_HOME/olap/admin/apsroles.sql.
24.1.2 Application Pack 8.0.5.0.0 FAQs
What is an Application pack?
An Application Pack is suite of products. For more information, refer Application Packs.
Can I get a standalone installer for OFSAAI 8.0?
No. AAI is part of every application pack and installs automatically.
How does OFSAA 8.0 Application pack relate to OFSAA 7.x series?
8.0 is a new major release consolidating all products from OFSAA product suite.
Can existing OFSAA 7.x customers upgrade to OFSAA 8.0 Application Pack?
There is no upgrade path available. However, we will have migration kit / path for every product to
8.0 application pack. Further details will be available with Oracle Support.
Does OFSAA 8.0 Application pack UPGRADE’s automatically existing environments?
No. Refer Point 5. OFSAA 8.0 application pack has to be installed in a new environment and
subsequently migration path / migration kit needs to be run to migrate from 7.x to 8.0. Please
note we will have migration path only from the previously released version of OFSAA products.
Where can I download OFSAA 8.0 Application Pack?
You can download the OFSAAI 8.0 Application Pack from Oracle Software Delivery
Cloud (OSDC).
What are the minimum system and software requirements for OFSAA 8.0 Application
Pack?
Refer installation guide section Hardware and Software Requirements section.
Is my environment compatible with OFSAA 8.0 Application Pack?

OFSDF 8.0.5.0.0 Installation Guide
Oracle Financial Services Software
229
Environment Check utility performs the task. It is part of install and can also be run separately.
Has OFSAA 8.0 Application Pack is supports all Operating systems?
LINUX, AIX, SOLARIS 10, 11. Refer to Technology Matrix for the technology matrix that OFSAA
suite products are/ will be qualified on.
How can I install OFSAA 8.0 Application Pack?
Refer to Oracle Financial Services Advanced Analytical Infrastructure Installation And
Configuration Guide published in OHC Documentation Library for the application pack installers.

OFSDF 8.0.5.0.0 Installation Guide
Oracle Financial Services Software
230
Does this installation require any Third party Software’s?
Oracle Financial Services Advanced Analytical Infrastructure Installation And Configuration Guide
published in OHC Documentation Library lists the third party software that needs to be installed.
What languages are supported during OFSAA 8.0 Application Pack installation?
US English is the language supported.
What mode of installations OFSAA Application Pack supports? [Silent, GUI]
OFSAA Application Packs supports both, GUI and Silent Mode.
Does OFSAA 8.0 Application Pack support Multi-tier Installations?
OFSAA 8.0 does single tier installation. For more information refer to OFSAAI FAQ section.
Does this Application Pack validate all Pre-requisites required for this installation i.e.,
Memory, Disk Space etc.?
Yes. The pre-requisite checks are done by the respective application pack installer.
What happens if it aborts during installation of any application with in Application pack?
Customer needs to restore the system and retrigger the installation
Does this Application pack ‘Rolls Back’ if any of application installation fails due to
errors?
Rollback of installation is not supported.
Does the Application pack installs all applications bundled?
All application pack system files are installed but there is an option to enable the licensed
products.
How can I re-install any of the Application Pack?
You can retrigger in case of failure.
Does Application pack allow enabling / disabling any of the applications installed?
Yes. You cannot disable once the product is enabled in an environment.
I have installed one application in an Application pack and can I install any of new
applications within the Application pack later point of time?
No, installation is not required. Enabling the application is an option to use it later.
How many OFSAA Infrastructures can be installed in a single server?
There is no issue in installing separate OFSAAI installations, each with their own PFT/FTP
installations and separate associated database instances and separate Web Server installations
on the same server as long as adequate memory is allocated for each instance and as long as
each OFSAAI installation is installed using a separate UNIX user and profile. Care should be
taken if running multiple OFSAAI installations on a single server.

OFSDF 8.0.5.0.0 Installation Guide
Oracle Financial Services Software
231
Adequate memory will be required for each installation as several OFSAAI processes (model
upload, DEFQ services, and so on) take significant amounts of memory. So it depends on your
server memory.
Is it possible to Install OFSAA 8.0 Application pack on any one of the existing ‘Infodom’
where another OFSAA 8.0 application is installed?
Yes. However, the Behavioral Detection Application Pack, Compliance Regulatory Reporting
Application pack Asset Liability Management Application Pack and Profitability Application Pack
are the exceptions. They need to be installed in a different INFODOM.
Is there any option in Application pack for the user to select Infodom during installations?
Yes. You can select or change the required Information Domain.
Can I install all Application Packs in a ‘Single Infodom’?
Yes. But Behavioral Detection Application Pack, Compliance Regulatory Reporting Application
Pack, Asset Liability Management Application Pack and Profitability Application Pack are the
exceptions. They need to be installed in a different INFODOM.
Is it possible to install applications on different Infodom within the Application pack? (That
is if you want to install LRM & MR in two infodoms)
Applications within application pack have to be installed in the same information domain in the
same environment.
How many Infodoms can be created over a single OFSAA Infrastructure of 8.0.5.0.0?
You can install only one infodom during installation. But after installation, you can create multiple
infodoms.
Is the 'Data Model' bundled?
Does ‘Data Model’ bundled is Application pack Specific or Specific to individual
application?
A merged data model for all applications within the application pack is bundled and uploaded.
Is it possible to install OFS Enterprise Modeling in later point of time?
OFS Enterprise Modeling is a separate product and can be enabled as an option later from any
application pack that bundles Enterprise Modeling.
Will Application pack creates sandbox automatically for the required applications?
Yes, Sandbox creation is part of application install process.
Are Upgrade Kits available for individual applications or the complete Application Pack?
Maintenance Level (ML) Release / Minor Release upgrades are available across all applications.
Can I upgrade AAI only?
Yes, you can upgrade AAI alone.

OFSDF 8.0.5.0.0 Installation Guide
Oracle Financial Services Software
232
Can I upgrade one application within the Application Pack? i.e., LRM will be upgraded in
Treasury Application pack, but MR won’t be upgraded.
No. Not possible Upgrade is applied across packs.
Is it possible to uninstall any Application from the Application pack?
No, it is not possible to uninstall any Application from the Application Pack.
Can I uninstall entire Application Pack?
No, you cannot uninstall the Application Pack.
Is it possible to uninstall only application and retain AAI in the installed environment?
No, you cannot uninstall only the application and retain AAI in the installed environment.
Does Application Pack contain all Language Packs supported?
Language Packs need to be installed on 8.0 application packs.
Can I install an Application Pack over another Application Pack (that is same infodom or
different infodom?)
Yes, you can install an Application Pack over another Application Pack in the same information
domain or different information domain. But Behavioral Detection Application Pack and
Compliance Regulatory Reporting Application Pack, Asset Liability Management Application Pack
and Profitability Application Pack are the exceptions. They need to be installed in a different
INFODOM.
Can I use an existing manually created schema as information domain for application pack
installation?
No. Schemas required by OFSAA applications have to be created using Schema Creator Utility.
Does OFSAA 8.0 support on WebLogic 10.3.6 with Oracle 12c?
Yes, OFSAA 8.0 will support on WebLogic 10.3.6 with Oracle 12c. WebLogic 10.3.6 supports
oracle 12c with some additional configurations. Refer the link
http://docs.oracle.com/cd/E28280_01/web.1111/e13737/ds_12cdriver.htm#JDBCA655 for
additional configurations.
While running the schema creator utility, I get an error “HostName in input xml is not
matching with the local hostname”?
One possible reason could be the machine is configured for zonal partitioning. Ensure all the
known IP Addresses of the machine are present in the /etc/hosts file.
What are the Java versions supported in OFS AAAI Application Pack version 8.0.5.0.0?
OFS AAAI Application Pack supports Java 1.7.x and 1.8.x.

OFSDF 8.0.5.0.0 Installation Guide
Oracle Financial Services Software
233
Is this release of the OFS AAAI Application Pack version 8.0.5.0.0 supported on Java 8?
Yes. To install this release of the OFS AAAI Application Pack version 8.0.5.0.0 on Java 8. For
more information, refer to specific notes mentioned in the sections Installer and Installation
Prerequisites, Configurations supported for Java 8, Configuring the Schema Creator Utility, GUI
Mode Installation, SILENT Mode Installation.
24.2 Error Dictionary
The content of this section has been created with the interest to help you resolve the installation
issues if any. There is a compilation of all the possible errors that might arise during the
installation process with the possible cause and the resolution to quickly fix the issue and proceed
further with the installation.
24.2.1 Accessing Error Dictionary
Instead of scrolling through the document to find the error code, you can use the pdf search
functionality. In the "Find" dialog available in any of the Adobe Acrobat version that you are using
to view the pdf document, follow the below instructions to quickly find the error resolution.
1. With the Installation pdf open, press Ctrl+F or select Edit Find.
2. The Find dialog is displayed as indicated.
3. Enter the error code that is displayed on screen during Infrastructure installation.
4. Press Enter. The search results are displayed and highlighted as indicated below.
Error Dictionary
View the details of the issues, its cause, and resolution specific to the error code. Repeat the step
to find an answer to any other errors that you notice during installation. If you are not able to
resolve the issue even after following the steps provided in resolution, you can contact
support.oracle.com along with log files and appropriate screen shots.

OFSDF 8.0.5.0.0 Installation Guide
Oracle Financial Services Software
234
24.2.2 Error Code Dictionary
24.2.2.1 Error code - OFSAAI-1001
Cause Unix shell is not "korn" shell.
Resolution Change the shell type to "korn". Use chsh Unix command to change SHELL
type.
Shell type can also be changed by specifying shell path for the Unix user in
/etc/passwd file.
Note: chsh command is not available in Solaris OS.
24.2.2.2 Error code - OFSAAI-1002
Cause No proper arguments are available.
Resolution Provide proper arguments. Invoke Setup.sh using either SILENT or GUI mode.
Example: ./Setup.sh SILENT or ./Setup.sh GUI
24.2.2.3 Error code - OFSAAI-1004
Cause File .profile is not present in $HOME.
Resolution Create .profile in $HOME, i.e. in the home directory of user.
24.2.2.4 Error code - OFSAAI-1005
Cause File OFSAAInfrastructure.bin is not present in current folder.
Resolution Copy OFSAAInfrastructure.bin into installation kit directory.
24.2.2.5 Error code - OFSAAI-1006
Cause File CustReg.DAT is not present in current folder.
Resolution Copy CustReg.DAT into installation kit directory.

OFSDF 8.0.5.0.0 Installation Guide
Oracle Financial Services Software
235
24.2.2.6 Error code - OFSAAI-1007
Cause File OFSAAI_InstallConfig.xml is not present in current folder.
Resolution Copy OFSAAI_InstallConfig.xml into installation kit directory.
24.2.2.7 Error code - OFSAAI-1008
Cause File validateXMLInputs.jar is not present in current folder.
Resolution Copy validateXMLInputs.jar into installation kit directory.
24.2.2.8 Error code - OFSAAI-1009
Cause File log4j.xml is not present in current folder.
Resolution Copy log4j.xml into installation kit directory.
24.2.2.9 Error code - OFSAAI-1010
Cause Unknown error occurred.
Resolution Make sure to provide proper argument (SILENT or GUI) to the Setup.sh file.
24.2.2.10 Error code - OFSAAI-1011
Cause XML validation failed.
Resolution Check InfrastructurePreValidations.Log for more details.
24.2.2.11 Error code - OFSAAI-1012
Cause Property file with locale name does not exist.
Resolution Copy MyResources_en_US.properties to the setup kit directory and keep
en_US in LOCALE tag of OFSAAI_InstallConfig.xml

OFSDF 8.0.5.0.0 Installation Guide
Oracle Financial Services Software
236
24.2.2.12 Error code - OFSAAI-1013
Cause File OFSAAI_InstallConfig.xml/OFSAAI_PostInstallConfig.xml not
found.
Resolution Copy OFSAAI_InstallConfig.xml/OFSAAI_PostInstallConfig.xml
to the setup kit directory.
24.2.2.13 Error code - OFSAAI-1014
Cause XML node value is blank.
Resolution Make sure all node values except SMTPSERVER, PROXYHOST,
PROXYPORT, PROXYUSERNAME, PROXYPASSWORD, NONPROXYHOST,
or RAC_URL are not blank.
24.2.2.14 Error code - OFSAAI-1015
Cause XML is not well formed.
Resolution Execute the command dos2unix OFSAAI_InstallConfig.xml to convert
plain text file from DOS/MAC format to UNIX format.
OR
Make sure that OFSAAI_InstallConfig.xml is valid. Try to open the file
through Internet Explorer for a quick way to check validity. If it is not getting
opened, create new OFSAAI_InstallConfig.xml using the
XML_Utility.jar.
24.2.2.15 Error code - OFSAAI-1016
Cause User installation directory contain blank spaces.
Resolution Provide an installation path that does not contain spaces. Check the tag
USER_INSTALL_DIR in OFSAAI_InstallConfig.xml file. This path should
not contain any spaces.

OFSDF 8.0.5.0.0 Installation Guide
Oracle Financial Services Software
237
24.2.2.16 Error code - OFSAAI-1017
Cause User installation directory is invalid.
Resolution Provide a valid installation path. Check if you are able to create the directory
mentioned in USER_INSTALL_DIR tag value of
OFSAAI_InstallConfig.xml file.

Oracle Financial Services Data Foundation Applications Pack
8.0.5.0.0 Installation Guide
Oracle Corporation
World Headquarters
500 Oracle Parkway
Redwood Shores, CA 94065
U.S.A.
Worldwide Inquiries:
Phone: +1.650.506.7000
Fax: +1.650.506.7200
www.oracle.com/us/industries/financial-services/
Copyright © 2018 Oracle Financial Services Software Limited. All rights reserved.
No part of this work may be reproduced, stored in a retrieval system, adopted or transmitted in any form or by any means, electronic, mechanical, photographic, graphic, optic
recording or otherwise, translated in any language or computer language, without the prior written permission of Oracle Financial Services Software Limited.
Due care has been taken to make this OFSDF 8.0.5.0.0 Installation Guide and accompanying software package as accurate as possible. However, Oracle Financial Services
Software Limited makes no representation or warranties with respect to the contents hereof and shall not be responsible for any loss or damage caused to the user by the direct
or indirect use of this OFSDF 8.0.5.0.0 Installation Guide and the accompanying Software System. Furthermore, Oracle Financial Services Software Limited reserves the right
to alter, modify or otherwise change in any manner the content hereof, without obligation of Oracle Financial Services Software Limited to notify any person of such revision or
changes.
All company and product names are trademarks of the respective companies with which they are associated.