Oracle ® Enterprise Communications Broker · Preface About this guide The Oracle® Enterprise...
54
Oracle® Enterprise Communications Broker Administrator's Essentials Guide Release P-CZ1.0.0 November 2014
-
Upload
doankhuong -
Category
Documents
-
view
240 -
download
0
Transcript of Oracle ® Enterprise Communications Broker · Preface About this guide The Oracle® Enterprise...

Oracle® Enterprise CommunicationsBrokerAdministrator's Essentials GuideRelease P-CZ1.0.0
November 2014

Notices
Copyright ©2013, 2013, Oracle and/or its affiliates. All rights reserved.
This software and related documentation are provided under a license agreement containing restrictions on useand disclosure and are protected by intellectual property laws. Except as expressly permitted in your licenseagreement or allowed by law, you may not use, copy, reproduce, translate, broadcast, modify, license, transmit,distribute, exhibit, perform, publish, or display any part, in any form, or by any means. Reverse engineering,disassembly, or decompilation of this software, unless required by law for interoperability, is prohibited.
The information contained herein is subject to change without notice and is not warranted to be error-free. If youfind any errors, please report them to us in writing.
If this is software or related documentation that is delivered to the U.S. Government or anyone licensing it onbehalf of the U.S. Government, the following notice is applicable:
U.S. GOVERNMENT END USERS: Oracle programs, including any operating system, integrated software, anyprograms installed on the hardware, and/or documentation, delivered to U.S. Government end users are"commercial computer software" pursuant to the applicable Federal Acquisition Regulation and agency-specificsupplemental regulations. As such, use, duplication, disclosure, modification, and adaptation of the programs,including any operating system, integrated software, any programs installed on the hardware, and/ordocumentation, shall be subject to license terms and license restrictions applicable to the programs. No otherrights are granted to the U.S. Government.
This software or hardware is developed for general use in a variety of information management applications. It isnot developed or intended for use in any inherently dangerous applications, including applications that maycreate a risk of personal injury. If you use this software or hardware in dangerous applications, then you shall beresponsible to take all appropriate fail-safe, backup, redundancy, and other measures to ensure its safe use.Oracle Corporation and its affiliates disclaim any liability for any damages caused by use of this software orhardware in dangerous applications.
Oracle and Java are registered trademarks of Oracle and/or its affiliates. Other names may be trademarks of theirrespective owners.
Intel and Intel Xeon are trademarks or registered trademarks of Intel Corporation. All SPARC trademarks areused under license and are trademarks or registered trademarks of SPARC International, Inc. AMD, Opteron, theAMD logo, and the AMD Opteron logo are trademarks or registered trademarks of Advanced Micro Devices.UNIX is a registered trademark of The Open Group.
This software or hardware and documentation may provide access to or information on content, products, andservices from third parties. Oracle Corporation and its affiliates are not responsible for and expressly disclaim allwarranties of any kind with respect to third-party content, products, and services. Oracle Corporation and itsaffiliates will not be responsible for any loss, costs, or damages incurred due to your access to or use of third-party content, products, or services.

Contents
1 Applicable Platforms........................................................................9Software Packaging...............................................................................................................................................9Cabling the Netra Server X3-2 for Acme Packet................................................................................................ 10
Available Connections............................................................................................................................ 11Local Console Cabling Procedure...........................................................................................................12ILOM Cabling Procedure........................................................................................................................13Network Management Ports Cabling Procedure..................................................................................... 13Media and Signaling Network Interfaces................................................................................................14
Cabling for HA Deployments..............................................................................................................................15HA Cabling..............................................................................................................................................15
BIOS Setting Configuration................................................................................................................................ 16Virtual Systems................................................................................................................................................... 18
2 Getting the System Operational.....................................................19Appliance Installation and Start-Up.................................................................................................................... 19
Hardware Installation Summary..............................................................................................................19Connecting to Your Oracle ECB.............................................................................................................19System Boot............................................................................................................................................ 23Format Hard Drive.................................................................................................................................. 25System Image Filename.......................................................................................................................... 26
Running Setup..................................................................................................................................................... 26Adding a License with the Setup Wizard............................................................................................................29Setting Up System Basics....................................................................................................................................30
New User and Superuser Passwords....................................................................................................... 30New System Prompt................................................................................................................................30
3 Initial Configuration...................................................................... 31Overview............................................................................................................................................................. 31System Administration........................................................................................................................................31
Configuration Icons.................................................................................................................................32Save and Activate....................................................................................................................................34
General Settings.................................................................................................................................................. 35System Settings....................................................................................................................................... 35NTP Servers............................................................................................................................................ 35Logging (Syslog).....................................................................................................................................36SNMP...................................................................................................................................................... 36Communications Monitoring Probe settings...........................................................................................37Denial of Service Settings....................................................................................................................... 38High Availability Settings.......................................................................................................................38
Network Interface................................................................................................................................................40Network Interface Configuration............................................................................................................ 40Enable ICMP........................................................................................................................................... 40Network Interface High Availability Configuration............................................................................... 40
SIP Interface Settings.......................................................................................................................................... 41SIP Interface Configuration.....................................................................................................................41
Accounting Settings............................................................................................................................................ 42Configuring Accounting..........................................................................................................................42FTP Push................................................................................................................................................. 43
Oracle® Enterprise Communications Broker 3
FTP Push Configuration..........................................................................................................................43Configuring a RADIUS Account Server.................................................................................................44
Security Settings..................................................................................................................................................45Certificate Record Configuration............................................................................................................ 45TLS Profile Configuration.......................................................................................................................46Generating a Certificate Request from the GUI......................................................................................47Importing Certificates..............................................................................................................................47
SNMP.................................................................................................................................................................. 48Overview................................................................................................................................................. 48Basic SNMP Parameters......................................................................................................................... 48SNMP Community..................................................................................................................................48Trap Receivers.........................................................................................................................................49SNMP Community Settings.................................................................................................................... 49Trap Receiver Settings............................................................................................................................ 49
Web Server Settings............................................................................................................................................ 49
4 Oracle ECB Maintenance and Debugging........................................51Your Oracle ECB Image..................................................................................................................................... 51
Obtaining a New Image...........................................................................................................................52Upgrade Software with the GUI..........................................................................................................................52
4 Oracle® Enterprise Communications Broker

PrefaceAbout this guide
The Oracle® Enterprise Communications Broker (ECB) is a purpose-built core communications controller designedto meet session management and other communications core requirements of enterprises.
Your Documentation Supplement
The Oracle® Enterprise Communications Broker Administrator's Essentials Guide Release Version P-CZ1.0.0 isaugmented by documentation published for the Oracle Communications SBC and Oracle Enterprise SBC. Thisdocument covers the features and functions available with the Oracle ECB itself. As such, this document is dependentupon the larger body of documentation for those features and functions that are not specific to the Oracle ECB.
Product Name Notice
Although the product is named the Oracle Enterprise Communications Broker, there are multiple references to theproduct as an Acme Packet product within the software. Acme Packet is the name of a company recently acquired byOracle. Please note that the naming within the software will change.
Related Documentation
The following table lists the members that comprise the documentation set for this release. There are multipleversions of these documents, based on software release. Please refer to documentation for enterprise software versionE-C[xz]6.4.0 and service provider software version S-Cx6.3:
Document Name Document Description
Acme Packet 4500 System HardwareInstallation Guide
Contains information about the components and installation of the Net-Net 4500 system.
Acme Packet 3800 Hardware InstallationGuide
Contains information about the components and installation of the Net-Net 3800 system.
Acme Packet 3000 & 4000 Release Notes Contains information about the current documentation set release,including new features and management changes.
Acme Packet 4000 ACLI ConfigurationGuide
Contains information about the administration and softwareconfiguration of the Oracle SBC.

Document Name Document Description
Oracle Communications Session BorderController ACLI Reference Guide
Contains explanations of how to use the ACLI, as an alphabeticallistings and descriptions of all ACLI commands and configurationparameters.
Oracle Communications Session BorderController Maintenance andTroubleshooting Guide
Contains information about Oracle SBC logs, performanceannouncements, system management, inventory management, upgrades,working with configurations, and managing backups and archives.
Oracle Communications Session BorderController MIB Reference Guide
Contains information about Management Information Base (MIBs),enterprise MIBs, general trap information, including specific detailsabout standard traps and enterprise traps, Simple Network ManagementProtocol (SNMP) GET query information (including standard andenterprise SNMP GET query names, object identifier names andnumbers, and descriptions), examples of scalar and table objects.
Oracle Communications Session BorderController Accounting Guide
Contains information about the Oracle SBC’s accounting support,including details about RADIUS accounting.
Oracle Communications Session BorderController HDR Resource Guide
Contains information about the Oracle SBC’s Historical DataRecording (HDR) feature. This guide includes HDR configuration andsystem-wide statistical information.
Oracle Communications Session BorderController Administrative SecurityEssentials
Contains information about the Oracle SBC’s support for itsAdministrative Security license.
In addition to the above, refer to the following document as a supplement to this document.
Oracle® Communications Enterprise Session BorderController-SE/VME Web GUI User Guide E-C[xz]6.4
Contains generic information about the Web GUIinterface, including Monitoring and Tracing and SystemFile management.
Oracle® Communications Enterprise Session BorderController Configuration Guide Release Version E-C[xz]6.4
Contains a wide range on information on Oracle E-SBCproduct, including platform information.
Release Caveats
For high availability Oracle ECB deployments, session counts on the standby device are not accurate.
• The Oracle ECB runs in "session" mode, as opposed to "dialog" mode. In session mode, a standby can take overthe active role and continue to process existing calls (as well as process new calls) without having existing calldata synchronized by the high availability checkpointing process.
Known Issues
The table below lists known issues in the PCZ1.0.0 release of which the user should be aware. The informationincludes explanations of the impact of the issue and, if applicable, a workaround to the issue.
Issue Workaround/Impact
The system can loose its tree view afterimporting dial plans via a CSV file.
Log in and out of the device to re-establish the desired tree view.
Importing dial plans occurs infrequently. The scenario produces nonegative impact on system operation and the impact on the user islow.

Issue Workaround/Impact
The system exhibits various GUI functionproblems if it logs a user out of the "admin"account due to inactivity, and a usersubsequently logs back in to the "user"account.
Ensure that users deliberately log out of the "admin" account withoutallowing the system to time out.
Users infrequently change privilege levels. The impact on systemoperation and the user is low.
The system enables the dial pattern table'sdelete button even when no pattern isselected.
Be aware of the scenario.
The impact is considered very low because the system does notperform any action if the user clicks the delete button.
The system does not perform accountingserver configuration save proceduresproperly if the user does not click the OKbutton.
Be sure click the OK button to retain accounting server changesbefore moving to other dialogs.
The impact is considered low because users to not often performaccounting configuration procedures.
The system does not perform enum serverconfiguration save procedures properly if theuser does not click the OK button.
Be sure to click the OK button to retain enum server changes beforemoving to other dialogs.
The impact is considered low because users to not often performaccounting configuration procedures.
Changing case in GUI "name" fields doesnot enable the "OK" button.
If you find you need to change a field name to a different case, firstchange it to a temporary name and click OK. Then change the nameback to the original name with the correct case.
System configuration element names are case sensitive.Configurations for element names with incorrect case do not work.
The system allows the user to set route entryin the routing table to the wildcard character(*).
Do not set route entries to the wildcard character (*). These routes donot route the applicable traffic.
The "show support-info" ACLI commanddoes not include software version.
When the user submits a defect, please include the output of the"show version" and "show running-config" commands, in addition tothe output of the "show support-info" command.
The Geographical dial plan data provided bydefault is currently incomplete.
The Geographical dial plan data provided bydefault includes complete dial plan data forthe following:
• Argentina• Brazil• Colombia• Mexico• Peru• France• Germany• Italy• Poland• Spain• United Kingdom
Manually complete dial plan configuration for those countries withincomplete dial plan data.

Issue Workaround/Impact
In addition, country codes for the largest 50countries in the world is provided in thedefault dial plan, allowing outbound dialingto those countries.
The system does not grey out "Network"High Availability (HA) settings even thoughHA is disabled globally within the system's"General" settings.
Be aware of the issue.
There is no impact on system operation and the impact on the user islow because network HA settings have no effect when HA isdisabled globally.
The system allows the user to set theNumber Translation's "n-digit-dialing"setting to 0.
Do not set "n-digit-dialing" to 0. The valid range is 1-25 with adefault of 1.
Number translations with "n-digit-dialing" set to 0 do not work.
The file management function, under theSystem tab fails on backup configurationswith names that include quotes, slashes,greater-than and less-then signs.
Do not configure backup configuration filenames with the characterslisted.
The impact includes error messages displayed by the GUI duringapplicable file management functions.
The system times out requests to download0-length files from the System tab.
Click the Download button again. The system proceeds to downloadthe file.
There is no impact on the system and the impact on the user isconsidered low.
The system's Current Memory Usage piegraph does not display the usable memoryfor SUN Netra hardware. Instead, it displaysthe physical size of RAM.
Be aware of the issue.
There is no impact on the system and the impact on the user isconsidered very low.
Revision History
Date Revision Number Description
October 30, 2013 Revision 1.00 Initial Release
November 11, 2013 Revision 1.10 Adds the Known Issues section to About this Guide
December 11, 2013 Revision 1.20 Adds minimum VM resource list
Sept 26, 2014 Revision 1.30 Removes references to wancom2 as being supported in HAconfigurations.
Nov 26, 2014 Revision 1.40 Corrects Communications monitoring probe default port as4739.

1Applicable Platforms
The Oracle ECB is available either as an appliance or as a application for operation on virtual machines. Whenrunning as an appliance, the Oracle ECB software is packaged with the Netra Server X3-2 for Acme Packet anddelivered to the end customers. When running as a virtual application, the Oracle ECB software can be deployed onany third-party COTS hardware that meets the specified guidelines.
When delivered as an appliance, the application comes pre-installed on Oracle's Netra Server X3-2 for Acme Packet.Server cabling instructions, which also identifies key hardware elements, such as interfaces, are presented below.Instructions on installation and maintenance of the Netra Server X3-2 for Acme Packet are generic to SBC, SessionRouter and other appliance applications.
The generic Netra Server X3-2 for Acme Packet documentation herein identifies all hardware interfaces. With respectto cabling the Oracle ECB, the applicable interfaces, as named in the hardware documentation, include:
• s0p0—Service access• wancom0—Management access• wancom1—High Availability (HA) access• SER MGT(COM1)—Serial management access
You run the application as a virtual machine over a VM system, such as Oracle VM Server. You use VMmanagement software, such as Oracle VM Manager, to create and maintain your virtual machines.
Virtual machine installation instructions are available in the Platforms chapter of the Oracle Enterprise SessionBorder Controller Configuration Guide. Generic hardware information is provided in the applicable documentationprovided by your hardware vendor.
Software PackagingThe Release P-Cz version 2 build image is labeled nnPCz200.bz. The image is compressed by the zlib softwarelibrary and includes all software components needed to install and operate the Oracle ECB.
Note: Note that you must obtain a license if you want to operate with TLS. The procedure to obtain thislicense is documented herein.
Oracle ECB software delivered for virtual machines includes the following packages:
Image Name Description
nnPCz200.bz Standalone compressed image - This .bz image package is primarily used to load and operatethe Oracle ECB software as an appliance.
Oracle® Enterprise Communications Broker 9
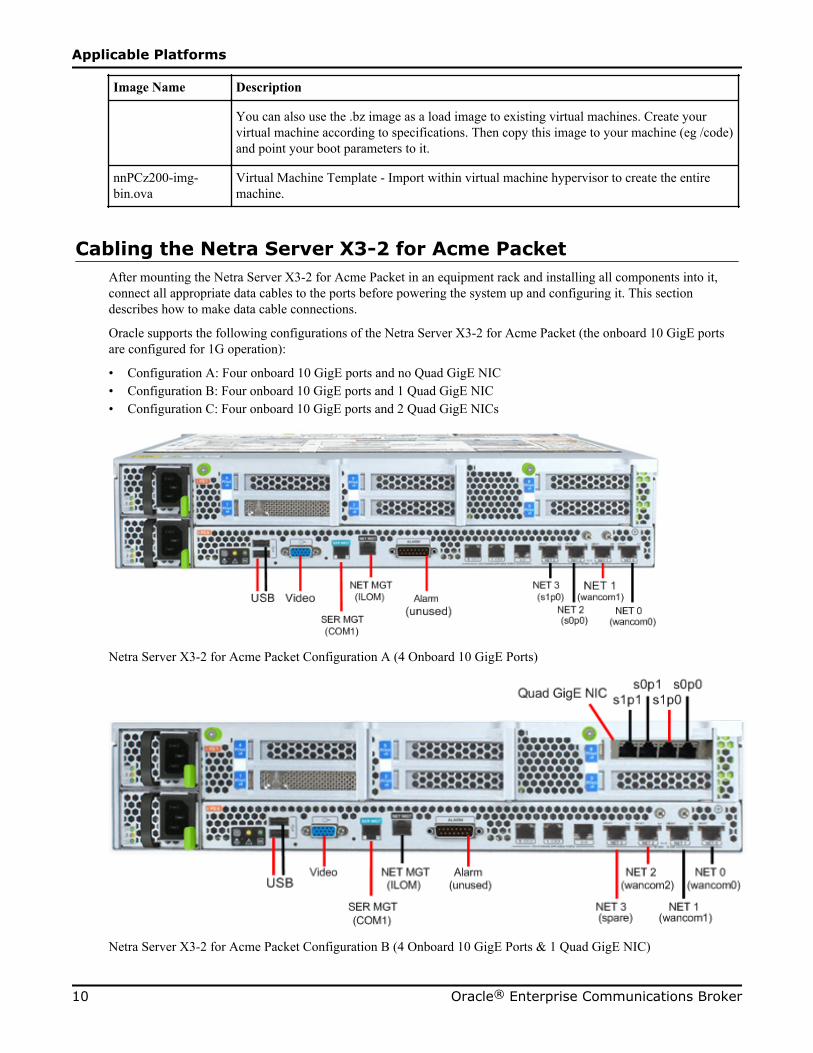
Image Name Description
You can also use the .bz image as a load image to existing virtual machines. Create yourvirtual machine according to specifications. Then copy this image to your machine (eg /code)and point your boot parameters to it.
nnPCz200-img-bin.ova
Virtual Machine Template - Import within virtual machine hypervisor to create the entiremachine.
Cabling the Netra Server X3-2 for Acme PacketAfter mounting the Netra Server X3-2 for Acme Packet in an equipment rack and installing all components into it,connect all appropriate data cables to the ports before powering the system up and configuring it. This sectiondescribes how to make data cable connections.
Oracle supports the following configurations of the Netra Server X3-2 for Acme Packet (the onboard 10 GigE portsare configured for 1G operation):
• Configuration A: Four onboard 10 GigE ports and no Quad GigE NIC• Configuration B: Four onboard 10 GigE ports and 1 Quad GigE NIC• Configuration C: Four onboard 10 GigE ports and 2 Quad GigE NICs
Netra Server X3-2 for Acme Packet Configuration A (4 Onboard 10 GigE Ports)
Netra Server X3-2 for Acme Packet Configuration B (4 Onboard 10 GigE Ports & 1 Quad GigE NIC)
Applicable Platforms
10 Oracle® Enterprise Communications Broker
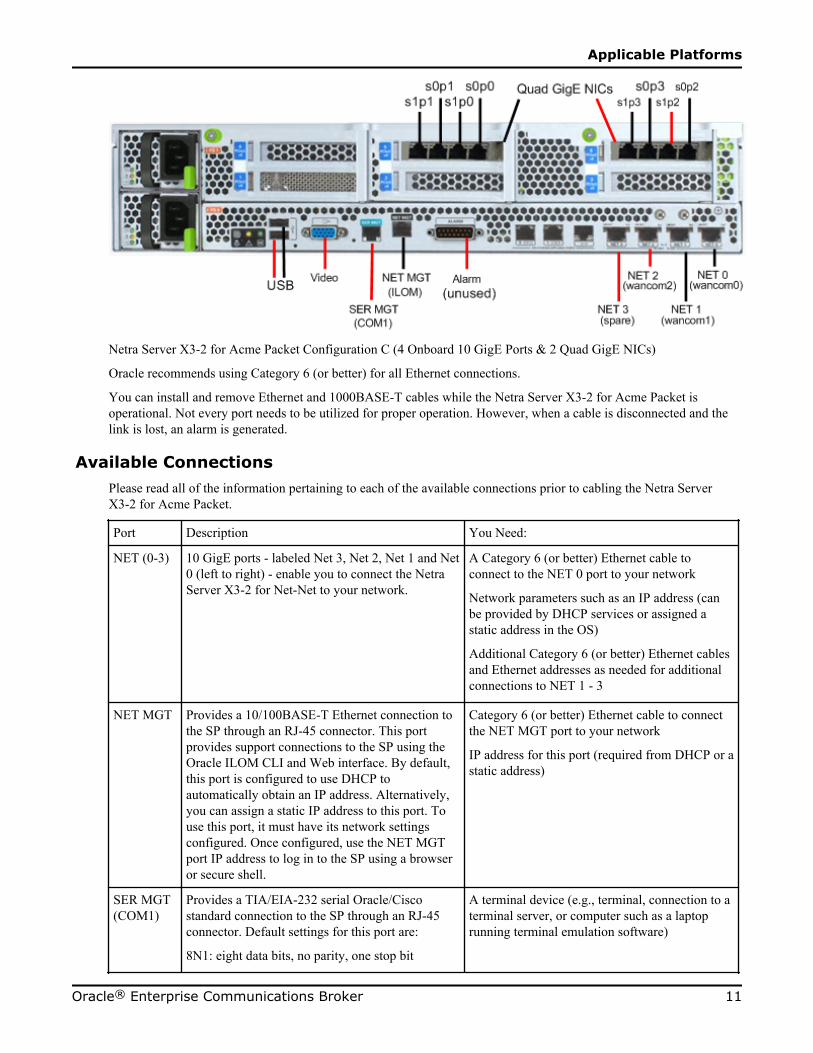
Netra Server X3-2 for Acme Packet Configuration C (4 Onboard 10 GigE Ports & 2 Quad GigE NICs)
Oracle recommends using Category 6 (or better) for all Ethernet connections.
You can install and remove Ethernet and 1000BASE-T cables while the Netra Server X3-2 for Acme Packet isoperational. Not every port needs to be utilized for proper operation. However, when a cable is disconnected and thelink is lost, an alarm is generated.
Available ConnectionsPlease read all of the information pertaining to each of the available connections prior to cabling the Netra ServerX3-2 for Acme Packet.
Port Description You Need:
NET (0-3) 10 GigE ports - labeled Net 3, Net 2, Net 1 and Net0 (left to right) - enable you to connect the NetraServer X3-2 for Net-Net to your network.
A Category 6 (or better) Ethernet cable toconnect to the NET 0 port to your network
Network parameters such as an IP address (canbe provided by DHCP services or assigned astatic address in the OS)
Additional Category 6 (or better) Ethernet cablesand Ethernet addresses as needed for additionalconnections to NET 1 - 3
NET MGT Provides a 10/100BASE-T Ethernet connection tothe SP through an RJ-45 connector. This portprovides support connections to the SP using theOracle ILOM CLI and Web interface. By default,this port is configured to use DHCP toautomatically obtain an IP address. Alternatively,you can assign a static IP address to this port. Touse this port, it must have its network settingsconfigured. Once configured, use the NET MGTport IP address to log in to the SP using a browseror secure shell.
Category 6 (or better) Ethernet cable to connectthe NET MGT port to your network
IP address for this port (required from DHCP or astatic address)
SER MGT(COM1)
Provides a TIA/EIA-232 serial Oracle/Ciscostandard connection to the SP through an RJ-45connector. Default settings for this port are:
8N1: eight data bits, no parity, one stop bit
A terminal device (e.g., terminal, connection to aterminal server, or computer such as a laptoprunning terminal emulation software)
Applicable Platforms
Oracle® Enterprise Communications Broker 11
115200 baud
Disable hardware flow control (CTS/RTS)
Disable software flow control (XON/XOFF)
A cable to connect the terminal device to theSER MGT (COM1) port
USB Provides USB connections to the service processor(SP). The USB ports are hot pluggable, so you canconnect/disconnect USB cables from these portsand peripheral devices without affecting serveroperations.
USB keyboard
USB mouse
Note: Maximum USB cable length: 5 meters
Video Provides a temporary video connection to the SP. VGA monitor
HDB-15 video cable with a maximum cablelength of 6 meters (19.7 feet)
Local Console Cabling ProcedureThis section explains how to physically make a console connection to the Netra Server X3-2 for Acme Packet.Administration console may be connected to either the ILOM (NET MGT), the local VGA+USB console ports, or thelocal SER MGT (COM1) serial console port. When configuring bootloader parameters, set the console to VGA ifILOM or VGA+USB are used, or COM1 if SER MGT is used. The bootloader is accessible on all console ports, butonly input from the active console port can be recognized by the Netra Server X3-2 for Acme Packet.
Note: DO NOT configure COM2 in the bootparams menu! Configuring COM2 can cause the system to boothang!
• To cable a serial console connection:
• Serial console cable with an RJ-45 connector• To cable a USB and Video Connection:
• DB-15 video cable with a maximum cable length of 6 meters (19.7 feet)• USB cable with a maximum cable length of 6 meters (19.7 feet)• USB keyboard
In the following procedure, you have the option to either cable a serial connection or to cable a USB/Video connection.
To cable a local console connection:
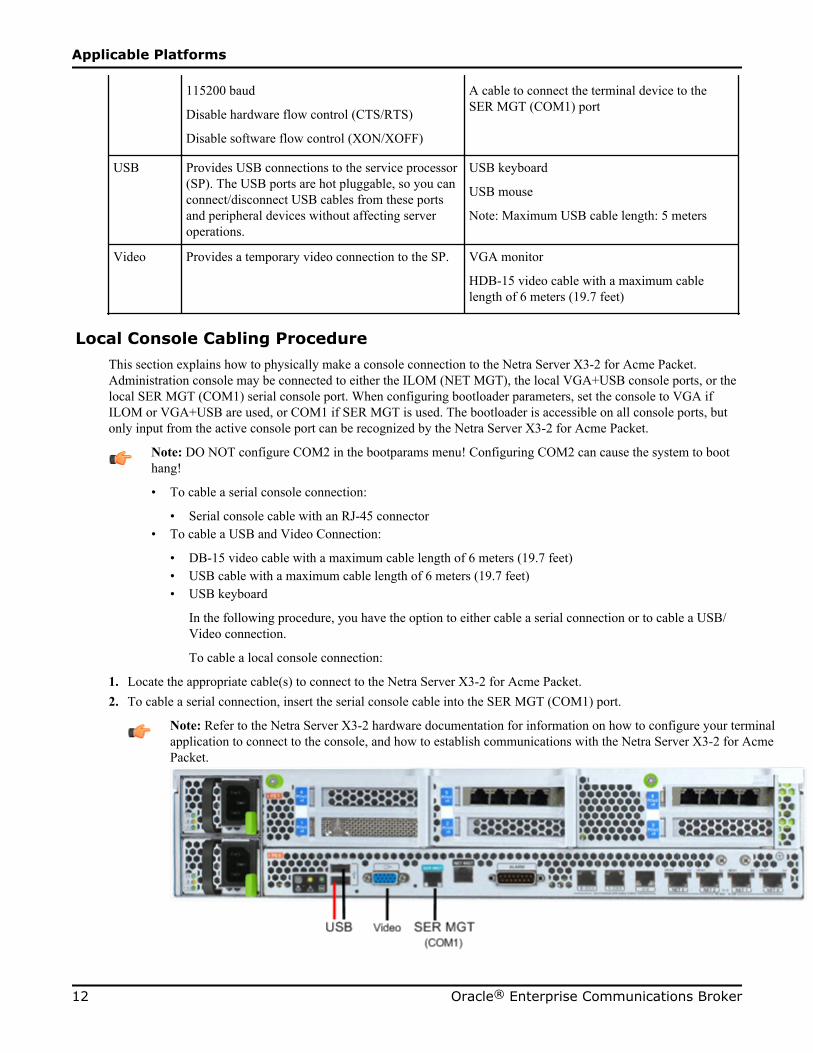
1. Locate the appropriate cable(s) to connect to the Netra Server X3-2 for Acme Packet.2. To cable a serial connection, insert the serial console cable into the SER MGT (COM1) port.
Note: Refer to the Netra Server X3-2 hardware documentation for information on how to configure your terminalapplication to connect to the console, and how to establish communications with the Netra Server X3-2 for AcmePacket.
Applicable Platforms
12 Oracle® Enterprise Communications Broker

Connecting to USB, VGA and SER MGT (COM1) Ports3. To cable a USB/Video connection, insert the 15-pin connector on the end of the video cable into the Video port.
Then insert the USB cable from the mouse and keyboard into the USB ports.4. Lead the cables neatly away from the rear panel.5. Plug in the cables to their respective destination components.
ILOM Cabling ProcedureThis section explains how to make a connection to the Netra Server X3-2 for Acme Packet ILOM port. For a remotepermanent connection to the SP over the ILOM connection, use the rear panel NET MGT port.
Refer to the Netra Server X3-2 for Acme Packet hardware documentation for information on how to configure yourWeb browser application to connect to the console, and how to establish communications with the Netra Server X3-2for Acme Packet.
Note: Keep Ethernet cables separated from power cables by at least 60mm where possible and never run themin the same channel of the rack without segregation.
Prerequisites:
• Category 6 (or better) Ethernet cable with RJ-45 jacks
To cable an ILOM connection:
1. Locate the cable to connect to the Netra Server X3-2 for Acme Packet.2. Insert the male end of the RJ-45 connector on the end of the Ethernet cable into the female RJ-45 receptacle. The
release tab on the RJ-45 jack clicks into place when you insert it properly.
NET MGT (ILOM) Port3. Lead the cable neatly away from the rear panel.4. Connect the other end of the cable to the LAN.
Network Management Ports Cabling ProcedureThis section describes how to connect cables to the network management ports. These ports support 10/100/1G/10GMbps speeds.
Note: Keep Ethernet cables separated from power cables by at least 60mm where possible and never run themin the same channel of the rack without segregation.
Prerequisites:
• Category 6 (or better) Ethernet cable with RJ-45 jacks
To connect to the network management ports:
1. Locate the Ethernet cables you plan to connect to the Netra Server X3-2 for Acme Packet.2. Insert the RJ-45 connector on the end of the Ethernet cable into one the NET0 Ethernet port (wancom0).
Note: The wancom0 and wancom1 ports are common to all supported Netra Server X3-2 for Acme Packetconfigurations. The wancom2 port is not used on the Oracle ECB.
The release tab on the RJ-45 jack will click into place when you insert it properly.
Applicable Platforms
Oracle® Enterprise Communications Broker 13
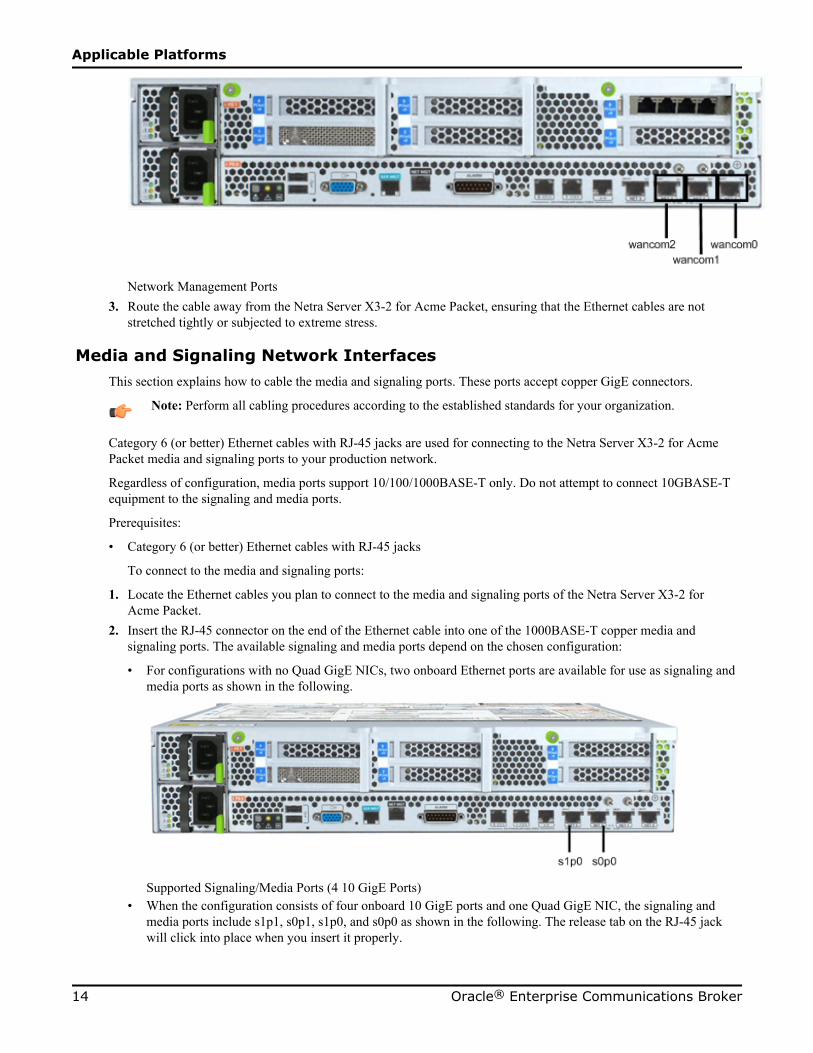
Network Management Ports3. Route the cable away from the Netra Server X3-2 for Acme Packet, ensuring that the Ethernet cables are not
stretched tightly or subjected to extreme stress.
Media and Signaling Network InterfacesThis section explains how to cable the media and signaling ports. These ports accept copper GigE connectors.
Note: Perform all cabling procedures according to the established standards for your organization.
Category 6 (or better) Ethernet cables with RJ-45 jacks are used for connecting to the Netra Server X3-2 for AcmePacket media and signaling ports to your production network.
Regardless of configuration, media ports support 10/100/1000BASE-T only. Do not attempt to connect 10GBASE-Tequipment to the signaling and media ports.
Prerequisites:
• Category 6 (or better) Ethernet cables with RJ-45 jacks
To connect to the media and signaling ports:
1. Locate the Ethernet cables you plan to connect to the media and signaling ports of the Netra Server X3-2 forAcme Packet.
2. Insert the RJ-45 connector on the end of the Ethernet cable into one of the 1000BASE-T copper media andsignaling ports. The available signaling and media ports depend on the chosen configuration:
• For configurations with no Quad GigE NICs, two onboard Ethernet ports are available for use as signaling andmedia ports as shown in the following.
Supported Signaling/Media Ports (4 10 GigE Ports)• When the configuration consists of four onboard 10 GigE ports and one Quad GigE NIC, the signaling and
media ports include s1p1, s0p1, s1p0, and s0p0 as shown in the following. The release tab on the RJ-45 jackwill click into place when you insert it properly.
Applicable Platforms
14 Oracle® Enterprise Communications Broker

Supported Signaling/Media Ports (4 OB 10 GigE Ports & 1 Quad GigE NIC)• When the configuration consists of four onboard 10 GigE ports and two Quad GigE NICs, the signaling and
media ports include s1p1, s0p1, s1p0, s0p0, s1p3, s0p3, s1p2 and s0p2 as shown in the following. The releasetab on the RJ-45 jack will click into place when you insert it properly.
Supported Signaling/Media Ports (4 OB 10 GigE Ports & 2 Quad GigE NICs)3. Route the cable away from the Netra Server X3-2 for Acme Packet. Make sure that the Ethernet cables are not
stretched tightly or subjected to extreme stress.4. Repeat Steps 1 through 2 for each additional Ethernet cable you connect to your Netra Server X3-2 for Acme
Packet.
Cabling for HA DeploymentsThe information and instructions in this section explain how to cable a high availability (HA) node.
HA CablingCategory 6 Ethernet cables are required for cabling two HA nodes together.
Rear Panel Cabling
You can use one connection for HA redundancy support between the two members of an HA node. As a rule,wancom0 should be reserved as the boot/maintenance interface. This leaves wancom1 available for sharing HAinformation.
Applicable Platforms
Oracle® Enterprise Communications Broker 15

4 Onboard 10 GigE Ports & 1 Quad GigE NIC
Prerequisites:
• Category 6 (or better) Ethernet cables with RJ-45 jacks
Single Rear Interface Support
To cable a Netra Server X3-2 for Acme Packet HA node using single rear interface support:
1. Insert one end of an Ethernet cable into wancom1 on the rear panel of Netra Server X3-2 for Acme Packet #1. Therelease tab on the RJ-45 jack clicks into place when you insert it properly.
2. Insert the other end of the Ethernet cable into the corresponding management interface on the rear panel of theNetra Server X3-2 for Acme Packet #2 as presented here. For example, If you use wancom1 on Netra Server X3-2for Acme Packet #1, then you will connect it to wancom1 on Netra Server X3-2 for Acme Packet #2.
HA Node Using Single Rear Interface Support (No Quad GigE NIC)3. Refer to the configuration procedures located in the HA Nodes information in this Configuration Guide.
BIOS Setting ConfigurationThe following changes on the Netra Server X3-2 are required to run Oracle ECB. This procedure shows where tomake changes in the BIOS setup utility.
1. Set the USB slot to be the first boot device. The disk controller should be the second boot device.
Applicable Platforms
16 Oracle® Enterprise Communications Broker

2. Set Hyper-Threading to Disabled
3. Change Energy Performance to Performance
Applicable Platforms
Oracle® Enterprise Communications Broker 17

4. After setting Performance, press Escape to return to the main menu, then select Save & Exit to apply the changes.The system will reboot using the newly configured settings.
Virtual SystemsThe Oracle ECB can operate on virtual machines running on generic, off-the-shelf servers. Specifications for virtualmachines is available in the Platforms chapter of the Oracle Enterprise Session Border Controller ConfigurationGuide. This document also includes information about hardware components, including hard drive partitions createdduring install, interface mapping and high availability.
As its name indicates, the VM Edition software is designed for use within virtual environments. It provides supportfor a variety of hypervisors, including the Oracle hypervisor. Oracle recommends the use of Oracle Virtual Machine(OVM) hypervisor for running Oracle ECB virtual application.
The end-user installs the virtual machine software in hardware of the customer’s choice. The number of VMssupported by a server is constrained only by the resources on your system.
Minimum VM Resources
Each VM instance requires the following minimum allocation or network resources.
• CPU cores: 2• Memory: 2GB• Hard drive storage: 40GB• 32-bit application• Interfaces: 8 recommended (less can be used)
Applicable Platforms
18 Oracle® Enterprise Communications Broker

2Getting the System Operational
Appliance Installation and Start-UpThis section outlines hardware installation at a very high level and describes system power-on. It bridges hardwareinstallation and application start-up, presenting information about what to expect from Oracle ECB software as thehardware powers up. Administrators need to know how to access the software while it boots, and what successfulsoftware startup looks like.
If running the Oracle ECB as a virtual application, refer to the hardware vendor's installation instructions forhardware to learn how to access the software while it boots. From a console connection, there is little difference to theway successful startup appears as an appliance versus a virtual machine.
Hardware Installation SummaryInstalling your Oracle ECB in your rack requires the steps summarized here. This checklist is only an overview. It isnot designed to substitute for following the detailed procedures in the hardware installation guides.
1. Unpacking the Oracle ECB2. Installing the Oracle ECB into your rack3. Installing power supplies4. Installing fan modules5. Installing physical interface cards6. Cabling the Oracle ECB
Make sure you complete installation procedures fully and note the safety warnings to prevent physical harm toyourself and/or damage to your Oracle ECB.
After you have completed the hardware installation procedures, you are ready to establish a connection to yourOracle ECB. Then you can load the Oracle ECB software image you want to use and establish basic operatingparameters.
Connecting to Your Oracle ECBBy default, the Oracle ECB is delivered with no management IP address. You must set this address the first time youstart your system. Find instructions on configuring this address in the System Boot section below.
You can connect to your Oracle ECB either through a direct console connection, or by creating a remote Telnet orSSH session. Both of these access methods provide you with a wide range of configuration, monitoring, and
Oracle® Enterprise Communications Broker 19

management options. IP-based management access, including Telnet SSH and GUI, requires an IP address for yourmanagement port. This address is specified in boot parameter named "ip address".
Note: The ip address parameter is displayed using different names, depending on the context:
• The boot parameters wizard field name is also "ip address".• The initial configuration wizard field name is "Management interface ip address".• The ACLI show interfaces command field name is "wancom0".
By default, Telnet, sftp and web GUI connections to your Oracle ECB are enabled, but are only accessible via the "ipaddress" address. You cannot use telnet, sftp or the web GUI until you set this address.
Depending on platform, software installation may be required upon first startup. You perform/monitor softwareinstallation via the console connection. The Oracle ECB requires most configuration via the GUI. Proceduresrequiring the ACLI include:
• Change default management interface IP address• Format hard drive• Set/Change password• Set/Change SIP Monitor and Trace filters• Disable telnet
Local Connections and Time-outs
The ACLI is available via serial, telnet and SSH connections. Prior to software installation, you reach the ACLI via alocal, serial connection.
If deploying the Oracle ECB on a virtual machine, the virtual machine manager provides console access via a virtualserial connection. See documentation on your virtual machine to learn how to access the console. Once you haveaccessed a virtual machine console, working within that console is the same as on dedicated hardware.
If deploying on dedicated hardware, you can connect your laptop or PC directly to the Oracle ECB using a serialconnection. If you use a laptop, you must take appropriate steps to ensure grounding.
One end of the cable plugs into your terminal, and the other end plugs into the RJ-45 port, normally on the back ofyour server.
To set up a console connection to your Oracle ECB:
1. Set the connection parameters for your terminal to the default boot settings:
• Baud rate: 115,200 bits/second• Data bits: 8• Parity: No• Stop bit: 1• Flow control: None
2. Use a serial cable to connect your PC to the Oracle ECB. Refer to your hardware documentation for the locationof your server's serial port.
3. Power on your Oracle ECB.The system boots. Upon successful boot, the system prompts you to log in.
Password:4. Enter the appropriate password information when prompted to log into User mode of the ACLI. The default user
mode password is acme.
The system displays the ACLI's user mode prompt :
ORACLE>5. If necessary enter Superuser mode, by entering enable at the ACLI and pressing Enter.
The system ACLI prompts you for the superuser password:
Getting the System Operational
20 Oracle® Enterprise Communications Broker

ORACLE>enablePassword:
6. Enter the appropriate password information to log into Superuser mode of the ACLI. The default Superuser modepassword is packet.The system changes the ACLI prompt to:
ORACLE#7. Proceed with system configuration or setup.
You can control the amount of time it takes for your console connection to time out by setting the console-timeoutparameter in the system configuration. If your connection times out, the login sequence appears again and promptsyou for your passwords. The default for this field is 0, which means that no time-out is being enforced.
Telnet Remote Connections and Time-outs
You can also Telnet to your Oracle ECB. Using remote Telnet access, you can provision the Oracle ECB remotelythrough the management interface over IP. You configure management interface IP during system setup, describedbelow, or via the Oracle ECB boot parameters.
The Oracle ECB can support up to five concurrent Telnet sessions. However, only one user can carry outconfiguration tasks at one time.
Note: Telnet does not offer a secure method of sending passwords. Using Telnet, passwords are sent in cleartext across the network.
To Telnet to your Oracle ECB, you need to know the IPv4 address of its administrative interface (wancom0).The wancom0 IPv4 address of your Oracle ECB can be found using the ACLI to display the boot parametervalue named IP Address .
You can manage the Telnet connections to your Oracle ECB by setting certain ACLI parameters and by usingcertain commands:
• To set a time-out due to inactivity, use the telnet-timeout parameter in the system configuration. You canset the number of seconds that elapse before the Telnet connection or SSH connection is terminated. Thedefault for this field is 0, which means that no time-out is being enforced.
• To view the users who are currently logged into the system, use the command, show users. You can seethe ID, timestamp, connection source, and privilege level for active connections.
• From Superuser mode in the ACLI, you can terminate the connections of other users in order to free upconnections. Use the command, kill user, with the corresponding connection ID.
• From Superuser mode in the ACLI, you can globally enable and disable Telnet connections to the OracleECB.
• Telnet service is enabled by default on your Oracle ECB.• To disable Telnet, type the command, management disable telnet, at the ACLI Superuser prompt and
reboot your system. The Oracle ECB then refuses any attempts at Telnet connections. If you want torestart Telnet service, type management enable telnet.
• If you reboot your Oracle ECB from a Telnet session, you lose IP access and therefore your connection.
SSH Remote Connections
For increased security, you can connect to your Oracle ECB using SSH. An SSH client is required for this type ofconnection.
The Oracle ECB supports five concurrent SSH and/or SFTP sessions.
There are two ways to use SSH to connect to your Oracle ECB. The first works the way a Telnet connection works,except that authentication takes place before the connection to the Oracle ECB is made. The second requires that youset an additional password
Getting the System Operational
Oracle® Enterprise Communications Broker 21

SSH without Username and Password
Many SSH clients allow you to initiate an SSH connection without specifying a username. To initiate an SSHconnection to the Oracle ECB without specifying users and SSH user passwords:
1. Open your SSH client.2. At the prompt in the SSH client, type the ssh command, a Space, the IPv4 address of your Oracle ECB, and then
press Enter.
The SSH client prompts you for a password before connecting to the Oracle ECB. Enter the Oracle ECB’s Usermode password. After it is authenticated, an SSH session is initiated and you can continue with tasks in Usermode or enable Superuser mode.
Bear in mind that some clients interpret SSH session initiation without a username as a means of logging in withyour system login name. The procedure above does not work for these clients.
Note: You can also create connections to the Oracle ECB using additional username and passwordoptions.
SSH with Username and Password
To initiate an SSH connection to the Oracle ECB with an SSH username and password:
1. In the ACLI at the Superuser prompt, type the ssh-password and press Enter. Enter the name of the user you wantto establish. Then enter a password for that user when prompted. Passwords do not appear on your screen.
SYSTEM# ssh-passwordSSH username [saved]: MJonesEnter new password: 95X-SDEnter new password again: 95X-SD
Note: After you configure ssh-password, the SSH login accepts the username and password you set, aswell as the default SSH/SFTP usernames: User and admin.
2. Configure your SSH client to connect to your Oracle ECB’s management IPv4 address using the username youjust created. The standard version of this command would be:
ssh -l MJones 10.0.1.573. Enter the SSH password you set in the ACLI.
[email protected] password: 95X-SD4. Enter your User password to work in User mode on the Oracle ECB. Enable Superuser mode and enter your
password to work in Superuser mode.5. An SSH session window opens and you can enter your password to use the ACLI.
GUI Access
Oracle requires the use of GUI for ongoing configuration and management of the Oracle ECB. Most user/provisioning procedures cannot be conducted via the ACLI. Important exceptions to this include setting the initialmanagement IP address and changing GUI access passwords.
GUI access is available via HTTP at the configured management address. You must set this address beforeproceeding. You can configure HTTPS access, if desired. Disabling the GUI is not supported.
When you access the GUI via browser, you see the login screen, from which you login and then access SystemAdministration and Service Provisioning controls.
Getting the System Operational
22 Oracle® Enterprise Communications Broker

System BootWhenever your Oracle ECB boots, the following information about the tasks and settings for the system appear inyour terminal window.
• System boot parameters• From what location the software image is being loaded: an external device or internal flash memory• Requisite tasks that the system is starting• Log information: established levels and where logs are being sent• Any errors that might occur during the loading process
After the loading process is complete, the ACLI login prompt appears.
Note: You can set boot parameters using the ACLI or the GUI. Boot parameter definitions, which help youunderstand what you should set them to, are provided below.
Oracle ECB Boot Parameters
Boot parameters specify the information that your Oracle ECB uses at boot time when it prepares to run applications.The Oracle ECB’s boot parameters:
• Allow you to set the IP address for the management interface (wancom0).• Allow you to set a system prompt. The target name parameter also specifies the title name displayed in your web
browser and SNMP device name parameters.• Determine the software image to boot and from where the system boots that image.• Sets up the username and password for network booting from an external FTP server.
In addition to providing details about the Oracle ECB’s boot parameters, this section explains how to view, edit, andimplement them.
When displaying the boot parameters, your screen shows a help menu and the first boot parameter (boot device).Press Enter to continue down the list of boot parameters.
Boot Parameter Changes
You can access and edit boot parameters by using either the ACLI or by interrupting the system boot process.
Note: Changes to boot parameters do not go into effect until you reboot the Oracle ECB.
Oracle recommends that you use management port 0 (wancom0) as the boot interface, and that your managementnetwork is either:
• directly a part of your LAN for management port 0• accessible through management port 0
Otherwise, your management messages may use an incorrect source address.Change Boot Parameters from the ACLI
To access and change boot parameters from the ACLI:
Getting the System Operational
Oracle® Enterprise Communications Broker 23

1. In Superuser mode, type configure terminal, and press Enter.
ORACLE# configure terminal2. Type bootparam, and press Enter. The boot device parameters display.
ORACLE(configure)# bootparam'.' = clear field; '-' = go to previous field; ^D = quitboot device : eth0To navigate through the boot parameters, press Enter and the next parameter appears on the following line.
You can navigate through the entire list this way. To go back to a previous line, type a hyphen (-) and press Enter.Any value that you enter entirely overwrites the existing value and does not append to it.
3. To change a boot parameter, type the new value that you want to use next to the old value. For example, if youwant to change the image you are using, type the new filename next to the old one. You can clear the contents of aparameter by typing a period and then pressing Enter.
ORACLE(configure)# bootparam'.' = clear field; '-' = go to previous field; ^D = quitboot device : eth0processor number : 0host name : goosefile name : /boot/nnPCz100.gz /boot/nnPCz200.gzWhen you have scrolled through all of the boot parameters, the system prompt for the configure terminal branchdisplays.
ORACLE(configure)#4. Exit the configure terminal branch.5. Reboot the Oracle ECB for the changes to take effect.
The ACLI reboot and reboot force commands initiate a reboot. With the reboot command, you must confirm thatyou want to reboot. With the reboot force command, you do not have make this confirmation.
ORACLE# reboot forceThe Oracle ECB completes the full booting sequence. If necessary, you can stop the auto-boot at countdown to fixany boot parameters.
If you configured boot parameters correctly, the system prompt displays and you can go ahead with configuration,management, or monitoring tasks.
Note: If you configured the boot parameters incorrectly, the Oracle ECB goes into a booting loop anddisplays an error message.
Error loading file: errno = 0x226.Can't load boot file!!Press the space bar to stop the loop. Correct the error in the boot parameter, and reboot the system.
Change Boot Parameters by Interrupting a Boot in Progress
To access and change boot parameters by interrupting a boot in progress:
1. When the Oracle ECB is in the process of booting, you can press the space bar on your keyboard to interrupt whenyou see the following message appear:
Press the space bar to stop auto-boot...2. After you stop the booting process, you can enter the letter p to display the current parameters, the letter c to
change the boot parameters or the @ (at-sign) to continue booting.
[Acme Packet Boot]: c'.' = clear field; '-' = go to previous field; ^D = quitboot device : wancom0To navigate through the boot parameters, press Enter and the next parameter appears on the following line.
Getting the System Operational
24 Oracle® Enterprise Communications Broker

You can navigate through the entire list this way. To go back to a previous line, type a hyphen (-) and press Enter.Any value that you enter entirely overwrites the existing value and does not append to it.
3. To change a boot parameter, type the new value that you want to use next to the old value. For example, if youwant to change the image you are using, type the new filename next to the old one.
ORACLE(configure)# bootparam'.' = clear field; '-' = go to previous field; ^D = quitboot device : wancom0processor number : 0host name : goosefile name : /code/nnPCz100.bz /code/nnPCz200.bz
4. After you have scrolled through the complete list of boot parameters, you return to the boot prompt. To rebootwith your changes taking effect, type @ (the at-sign), and press Enter.
[Acme Packet Boot]: @The Oracle ECB completes the full booting sequence, unless there is an error in the boot parameters.
If you have configured boot parameters correctly, the system prompt displays and you can go ahead withconfiguration, management, or monitoring tasks.
Note: If you have configured the boot parameters incorrectly, the Oracle ECB goes into a booting loopand displays an error message.
Error loading file: errno = 0x226.Can't load boot file!!Press the space bar to stop the loop. Correct the error, and reboot your system.
Set Management IP AddressYou must manually set your management IP address within the Oracle ECB's boot parameters.
To set your management interface IP, access the boot parameters using a serial console connection within the contextof one of the methods described above.
1. Type the letter c (change) to start boot parameter editing.2. Press Enter until you reach the parameter named IP Address.3. Type in the desired IP address.4. Press Enter until you reach the end of the boot parameter list.5. Reboot your Oracle ECB.
After being set, the management interface IP address provides access to your system via telnet, ssh and web GUI.You can verify the status of this interface using the following command to display the address and status of wancom0.
Oracle ECB# show interfaces briefSlt Prt Vlan Interface IP Gateway Adm OperNum Num ID Name Address Address Stat Stat--- --- ---- ---------- ---------------------- ------------------- ---- ----- - - lo 127.0.0.1 - up up - - - wancom0 122.30.204.127/16 - up up0 0 0 M00 122.170.1.200/16 0.0.0.0 up up ----------------------------------------------------------------------------Oracle ECB#
Format Hard DriveManual software installation, performed on virtual and COTs machines, does not include formatting the hard driveautomatically. After manual software installation and boot parameter configuration, the user must format the harddrive from the ACLI.
Generic installation documentation may not include the requirement to format the hard-disk. Run the commandformat hard-disk from the Oracle ECB ACLI to create a persistent partition for your /opt directory, within whichyou can store data needed after a reboot. Perform this procedure the FIRST time you start your Oracle ECB.
Getting the System Operational
Oracle® Enterprise Communications Broker 25
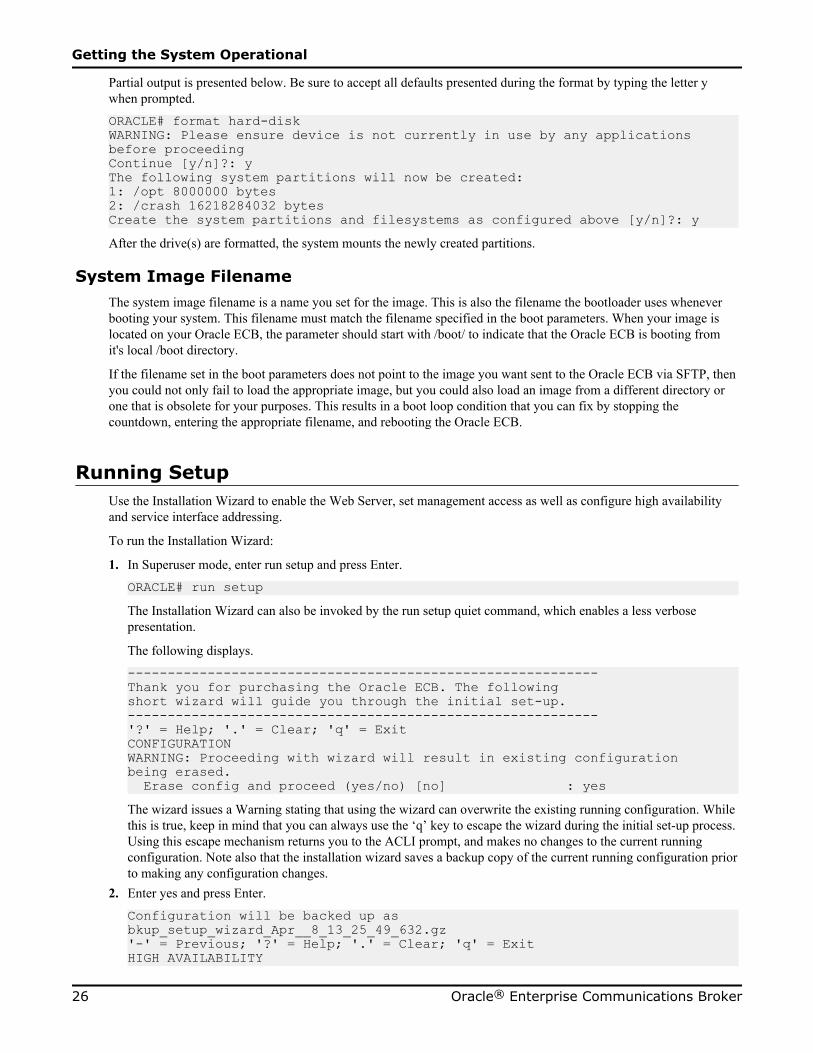
Partial output is presented below. Be sure to accept all defaults presented during the format by typing the letter ywhen prompted.
ORACLE# format hard-diskWARNING: Please ensure device is not currently in use by any applicationsbefore proceedingContinue [y/n]?: yThe following system partitions will now be created:1: /opt 8000000 bytes2: /crash 16218284032 bytesCreate the system partitions and filesystems as configured above [y/n]?: yAfter the drive(s) are formatted, the system mounts the newly created partitions.
System Image FilenameThe system image filename is a name you set for the image. This is also the filename the bootloader uses wheneverbooting your system. This filename must match the filename specified in the boot parameters. When your image islocated on your Oracle ECB, the parameter should start with /boot/ to indicate that the Oracle ECB is booting fromit's local /boot directory.
If the filename set in the boot parameters does not point to the image you want sent to the Oracle ECB via SFTP, thenyou could not only fail to load the appropriate image, but you could also load an image from a different directory orone that is obsolete for your purposes. This results in a boot loop condition that you can fix by stopping thecountdown, entering the appropriate filename, and rebooting the Oracle ECB.
Running SetupUse the Installation Wizard to enable the Web Server, set management access as well as configure high availabilityand service interface addressing.
To run the Installation Wizard:
1. In Superuser mode, enter run setup and press Enter.
ORACLE# run setupThe Installation Wizard can also be invoked by the run setup quiet command, which enables a less verbosepresentation.
The following displays.
-----------------------------------------------------------Thank you for purchasing the Oracle ECB. The followingshort wizard will guide you through the initial set-up.-----------------------------------------------------------'?' = Help; '.' = Clear; 'q' = ExitCONFIGURATIONWARNING: Proceeding with wizard will result in existing configuration being erased. Erase config and proceed (yes/no) [no] : yesThe wizard issues a Warning stating that using the wizard can overwrite the existing running configuration. Whilethis is true, keep in mind that you can always use the ‘q’ key to escape the wizard during the initial set-up process.Using this escape mechanism returns you to the ACLI prompt, and makes no changes to the current runningconfiguration. Note also that the installation wizard saves a backup copy of the current running configuration priorto making any configuration changes.
2. Enter yes and press Enter.
Configuration will be backed up as bkup_setup_wizard_Apr__8_13_25_49_632.gz'-' = Previous; '?' = Help; '.' = Clear; 'q' = ExitHIGH AVAILABILITY
Getting the System Operational
26 Oracle® Enterprise Communications Broker

This ECB may be a standalone or part of a highly available redundant pair.Oracle ECB mode 1 - standalone 2 - high availabilityEnter choice [1 - standalone] : 1
3. Enter 1 for a standalone server or Enter 2 to configure an HA device, press Enter and go to Step 4 in Setting UpHA Mode - Primary Oracle ECB to complete the installation.
It is highly recommended that you configure high availability (HA) using this Installation Wizard.
Enter choice [1 - standalone] :1The following displays.
ECB SETTINGSUnique target name of this ECB [primary] :
4. Enter a unique target name for the NN-ECB (or keep the default in [ ]), and press Enter.
Unique target name of this ECB [primary] :ecb01The following displays.
IP address on management interface [172.30.200.111] :5. Enter the IP address to be used for accessing the Web GUI (or keep the default in [ ]), and press Enter.
IP address on management interface : 164.30.85.51The following displays.
Subnet mask on management interface [255.255.0.0] :6. Enter subnet mask to be used for accessing the Web GUI (or keep the default in [ ]), and press Enter.
subnet mask on management interface [255.255.0.0] :The following displays.
Gateway IP address on management interface [164.30.0.1] :7. Enter the SIP interface IP address (or keep the default in [ ]), and press Enter.
Gateway IP address on management interface [164.30.0.1] :The following displays.
IP address on SIP interface [] :8. Enter the IP address to be used for accessing the SIP interface, and press Enter. This step is required; the system
does not allow you to proceed without making a setting.
IP address on SIP interface : 172.16.12.12The following displays.
Subnet mask on SIP interface [255.255.0.0] :9. Enter subnet mask to be used for accessing the SIP interface (or keep the default in [ ]), and press Enter.
Subnet mask on SIP interface [255.255.0.0] :The following displays.
Gateway IP address on SIP interface :10. Enter the gateway IP address and press Enter.
Gateway IP address on SIP interface :172.16.0.1The following displays.
SETUP TIMEZONE Setup system timezone (yes/no) [yes] :11. Type your response (yes/no) (or keep the default in [ ]), and press Enter.
SETUP TIMEZONE Setup system timezone (yes/no) [yes] : yes
Getting the System Operational
Oracle® Enterprise Communications Broker 27

The following displays.
Enter 1-20 to modify,'d' to display summary,'s' to save,'q' to exit.[s]:
12. Type your response (or keep the default in [ ]), and press Enter.
The following displays.
Saving changes and quitting wizard. Are you sure? [y/n]?: 13. Type your response (yes/no) (or keep the default in [ ]), and press Enter.
SETUP TIMEZONE Setup system timezone (yes/no) [yes] : yesThe following displays.
=========================================================Deleting configurationErase-Cache received, processing.waiting 1200 for request to finishRequest to 'ERASE-CACHE' has Finished,Erase-Cache: CompletedRunning timezone setup application----------------------------------Calling tzselect. Use ^D to cancel without savePlease identify a location so that time zone rules can be set correctly.Please select a continent or ocean.1) Africa2) Americas3) Antarctica4) Arctic Ocean5) Asia6) Atlantic Ocean7) Australia8) Europe9) Indian Ocean10) Pacific Ocean11) none - I want to specify the time zone using the Posix TZ format.#?=========================================================
14. Type your response, 2 for example and press Enter.
=========================================================
The system lists applicable countries, countries in the Americas for example.
=========================================================15. Type your response, 49 for example and press Enter.
The following displays.
=========================================================
Enter 1 - 20 to modify, 'd' to display summary, 's' to save, 'q' to exit. [s]:
=========================================================
The system lists applicable timezones.16. Type your response, Eastern Time for example, and press Enter.
The following displays.
The following information has been given:United StatesEastern TimeTherefore TZ='America/New_York' will be used.
Getting the System Operational
28 Oracle® Enterprise Communications Broker
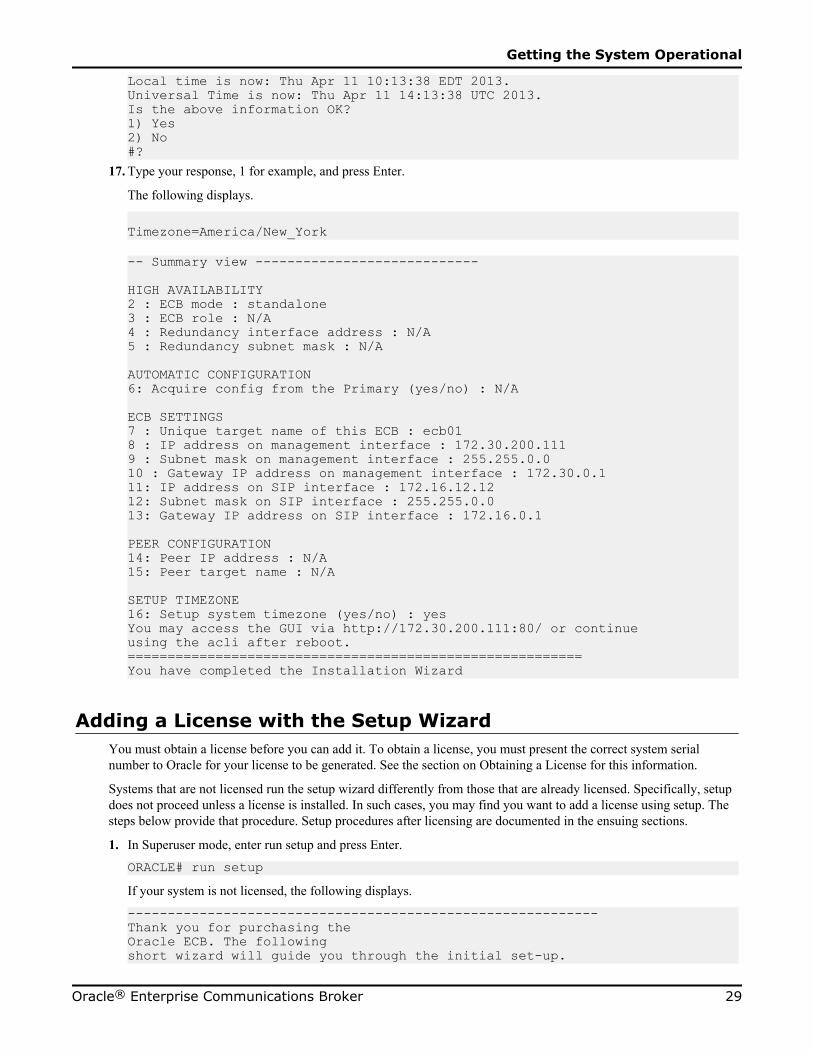
Local time is now: Thu Apr 11 10:13:38 EDT 2013.Universal Time is now: Thu Apr 11 14:13:38 UTC 2013.Is the above information OK?1) Yes2) No#?
17. Type your response, 1 for example, and press Enter.
The following displays.
Timezone=America/New_York
-- Summary view ----------------------------
HIGH AVAILABILITY2 : ECB mode : standalone3 : ECB role : N/A4 : Redundancy interface address : N/A5 : Redundancy subnet mask : N/A
AUTOMATIC CONFIGURATION6: Acquire config from the Primary (yes/no) : N/A
ECB SETTINGS7 : Unique target name of this ECB : ecb018 : IP address on management interface : 172.30.200.1119 : Subnet mask on management interface : 255.255.0.010 : Gateway IP address on management interface : 172.30.0.111: IP address on SIP interface : 172.16.12.1212: Subnet mask on SIP interface : 255.255.0.013: Gateway IP address on SIP interface : 172.16.0.1
PEER CONFIGURATION14: Peer IP address : N/A15: Peer target name : N/A
SETUP TIMEZONE16: Setup system timezone (yes/no) : yesYou may access the GUI via http://172.30.200.111:80/ or continue using the acli after reboot.=========================================================You have completed the Installation Wizard
Adding a License with the Setup WizardYou must obtain a license before you can add it. To obtain a license, you must present the correct system serialnumber to Oracle for your license to be generated. See the section on Obtaining a License for this information.
Systems that are not licensed run the setup wizard differently from those that are already licensed. Specifically, setupdoes not proceed unless a license is installed. In such cases, you may find you want to add a license using setup. Thesteps below provide that procedure. Setup procedures after licensing are documented in the ensuing sections.
1. In Superuser mode, enter run setup and press Enter.
ORACLE# run setupIf your system is not licensed, the following displays.
-----------------------------------------------------------Thank you for purchasing the Oracle ECB. The followingshort wizard will guide you through the initial set-up.
Getting the System Operational
Oracle® Enterprise Communications Broker 29

-----------------------------------------------------------
'?' = Help; '.' = Clear; 'q' = Exit
LICENSE
This wizard needs a license to run. Enter license (XXX serial number is xxxxx42274873xxx):
2. Enter your license and press Enter.The system checks the license and, if correct, installs it.
Attempting to install license ... 100%License installed successfully.
3. If the license is incorrect, the system tells you. Note the serial number displayed and obtain a working license.
Attempting to install license ... Failed to install license - 405 (Method Not Allowed) Bad serial numberTry again, or 'q' to quit the wizard.
Enter license (XXX serial number is xxxxx42274873xxx):Setup skips the license check if it finds a valid license is already installed.
Setting Up System BasicsBefore configuring and deploying your Oracle ECB, you might want to establish some basic attributes such as newUser and Superuser passwords and system prompt.
New User and Superuser PasswordsACLI passwords provide access for Telnet, SSH, SFTP and GUI sessions. Common security practices includechanging these passwords from their defaults and at intervals defined by your organization. Refer to the ACLI's secretcommand, documented in the Oracle Communications Session Border Controller ACLI Reference Guide forinformation about changing user and superuser passwords.
New System PromptYou can set the ACLI system prompt using Configure system or the Set boot parameters Wizard. Change the targetname value to make it meaningful within your network. The target name may be up to 38 characters. A value thatidentifies the system in some way is often helpful.
Getting the System Operational
30 Oracle® Enterprise Communications Broker

3Initial Configuration
OverviewThis chapter provides information about the System Administration configuration procedures, performed with theGUI on the Oracle ECB. These procedures are rarely performed during day-to-day operations. Instead, the systemadministrator performs many of these procedures as a means of establishing static system operations for which few, ifany, changes would be made once the system is deployed and providing service.
Icons grouped under System Administration, but not covered herein include:
• SIP Registrar• ECB Sync• LDAP• HMR
Although the above are not day-to-day procedures, they are integral to SIP service configuration and operation andrequire thorough understanding by the user. Refer to the Oracle Enterprise Communications Broker User's Guide forboth conceptual and instructional information on how to work with these resources. Note that System FileManagement comprises another set of tasks that overlap between Administrator and User. These tasks aredocumented in the Oracle Enterprise Communications Broker User's Guide.
System AdministrationThe Oracle ECB GUI collects controls for administering your system under System Administration, which arecovered herein. In contrast, The Oracle ECB GUI collects tools used by network architects and service provisioningtechnicians under Service Provisioning. Service provisioning is the focus of the Oracle Enterprise CommunicationsBroker User's Guide.
Regardless, all icons are explained below for context.
Oracle® Enterprise Communications Broker 31

Configuration IconsThe table below provides high-level descriptions of the Oracle ECB’s Service Provisioning and SystemAdministration controls. Service provisioning controls are shown to provide an overview of these items for systemadministrators.
Icon Description
Service Provisioning This set of icons provides access to the configuration required to deployservice.
Dial Plan Add multiple dialing-contexts and dial-patterns.
Dialing-contexts define the system behavior for calls placed to and fromeither a corporate of geographic focus.
Dialing-contexts include multiple dial-patterns, which define thenormalization required to most effectively manage diverse signalingstructures.
Agents Agents - Add agents.
An agent is usually a SIP-aware device that serves as a transit target and/orsource for signaling managed by the Oracle ECB. Agents are often specifiedas next-hops for the purposes of routing.
Indirect agents, Oracle ECB route termination points that require furtherrouting to reach an end station are also configured here.
In addition, configuration used to access ENUM servers is performed here.
Users Add user and other key phone numbers associated with the enterprise. Theuser database serves as a directory for phone numbers that needcommunications services.
Initial Configuration
32 Oracle® Enterprise Communications Broker

Icon Description
This database can specify each entry’s source context, which can provide astarting point for processing the logic behind a user’s call treatment. It alsocan specify each user’s home agent, providing a physical location forrouting user’s calls.
Routing Add service routes.
Route-entries specify strict paths for signaling traffic, allowing you tospecify policy and cost for traffic based on source and/or destination.
System Administration This set of icons provide access to configuration for which the SystemAdministrator is responsible. This configuration is associated with systemoperation rather than service provisioning and management.
General Specify standard system management information parameters.
Information includes system identification information, system managementinformation interfaces (SNMP and Syslog) and global serviceconfigurations, including Denial of Service and High Availability (systemredundancy) configuration.
Network Specify your service interface.
Your signaling interface is separate from your management interface andcarries all service traffic. There is only one network interface on the system.
SIP Interface Add multiple service (SIP) ports.
Service interfaces process SIP signaling. The system supports multiple SIPports, allowing you to segregate traffic based on your own session network’sarchitectural criteria.
Accounting Configure connections to RADIUS servers to collect call detail records(CDRs) generated by the system.
RADIUS provides a protocol for transferring CDRs for billing andtroubleshooting purposes.
Security Configure certificate records and TLS profiles, generate certificate requests,import certificates.
SNMP Specify SNMP community for allowing access to READ functions and trapreceivers.
Web Server Specify desired web server functionality, including HTTP and/or HTTPSoperation.
In addition, controls for specifying the applicable TLS profile and inactivitytimeout are available.
Note that you cannot disable both HTTP and HTTPS operation.
ECB Sync Provides control over multiple ECB synchronization processes, includingdefining applicable ECBs and initiating the synchronization.
LDAP Define servers and server access rules for using an external LDAP databaseas a source for user authentication and routing procedures.
SIP Registrar Creates and manages a SIP registrar object on the ECB to offload AORregistration processes from other network elements.
Initial Configuration
Oracle® Enterprise Communications Broker 33
Icon Description
HMR Create header manipulation rules, to be assigned to specific agents, thatchange session service messages for interoperability, policy and otherdeployment purposes.
Save and ActivateThe Web GUI retains configuration changes until you send them to your device or discard them from the GUI.Configuration dialogs include an "OK" button that sends your changes to the device.
Bear in mind that you must also Save, then Activate your changes before your device actually uses your changes. TheSave link, appearing as a disc icon towards the top left corner of each Web GUI page, initiates configuration Save andActivate procedures to your system.
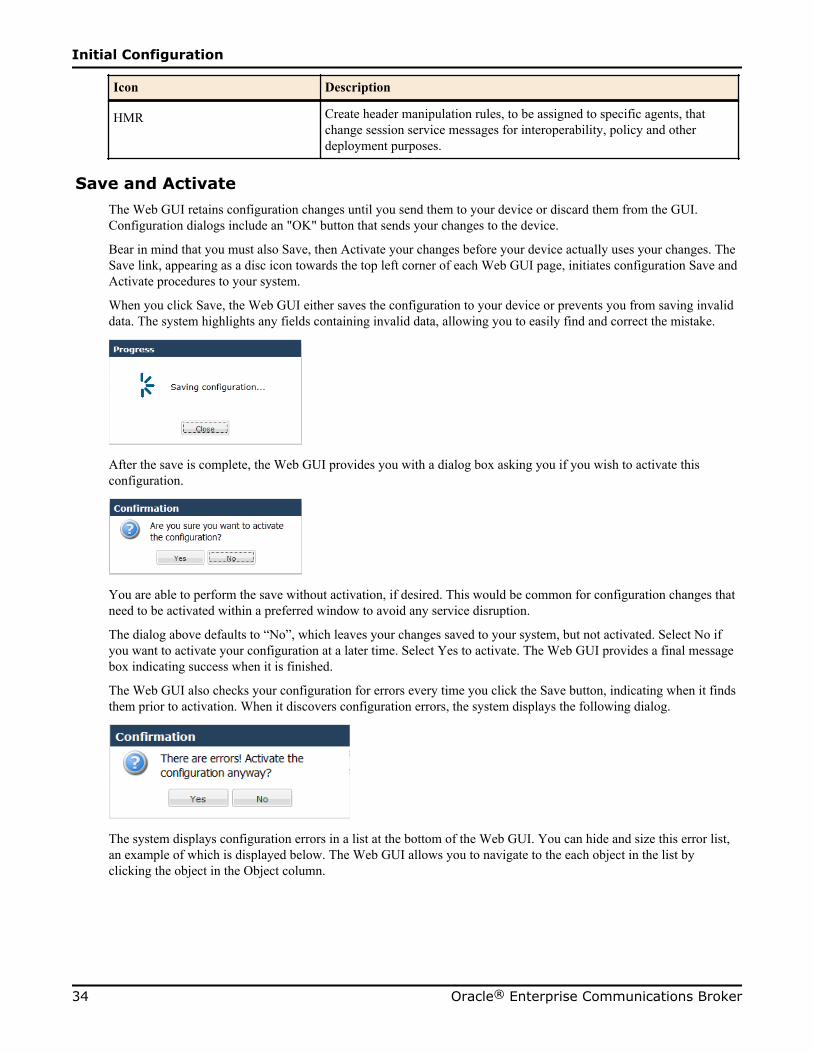
When you click Save, the Web GUI either saves the configuration to your device or prevents you from saving invaliddata. The system highlights any fields containing invalid data, allowing you to easily find and correct the mistake.
After the save is complete, the Web GUI provides you with a dialog box asking you if you wish to activate thisconfiguration.
You are able to perform the save without activation, if desired. This would be common for configuration changes thatneed to be activated within a preferred window to avoid any service disruption.
The dialog above defaults to “No”, which leaves your changes saved to your system, but not activated. Select No ifyou want to activate your configuration at a later time. Select Yes to activate. The Web GUI provides a final messagebox indicating success when it is finished.
The Web GUI also checks your configuration for errors every time you click the Save button, indicating when it findsthem prior to activation. When it discovers configuration errors, the system displays the following dialog.
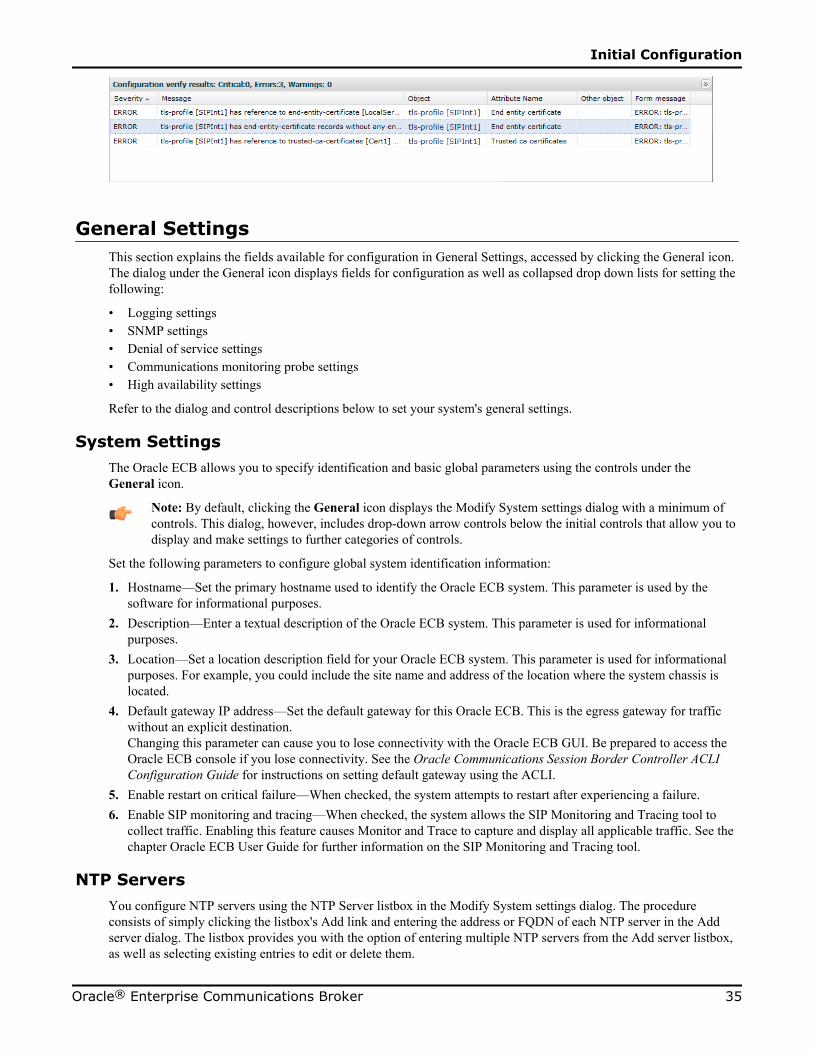
The system displays configuration errors in a list at the bottom of the Web GUI. You can hide and size this error list,an example of which is displayed below. The Web GUI allows you to navigate to the each object in the list byclicking the object in the Object column.
Initial Configuration
34 Oracle® Enterprise Communications Broker
General SettingsThis section explains the fields available for configuration in General Settings, accessed by clicking the General icon.The dialog under the General icon displays fields for configuration as well as collapsed drop down lists for setting thefollowing:
• Logging settings• SNMP settings• Denial of service settings• Communications monitoring probe settings• High availability settings
Refer to the dialog and control descriptions below to set your system's general settings.
System SettingsThe Oracle ECB allows you to specify identification and basic global parameters using the controls under theGeneral icon.
Note: By default, clicking the General icon displays the Modify System settings dialog with a minimum ofcontrols. This dialog, however, includes drop-down arrow controls below the initial controls that allow you todisplay and make settings to further categories of controls.
Set the following parameters to configure global system identification information:
1. Hostname—Set the primary hostname used to identify the Oracle ECB system. This parameter is used by thesoftware for informational purposes.
2. Description—Enter a textual description of the Oracle ECB system. This parameter is used for informationalpurposes.
3. Location—Set a location description field for your Oracle ECB system. This parameter is used for informationalpurposes. For example, you could include the site name and address of the location where the system chassis islocated.
4. Default gateway IP address—Set the default gateway for this Oracle ECB. This is the egress gateway for trafficwithout an explicit destination.Changing this parameter can cause you to lose connectivity with the Oracle ECB GUI. Be prepared to access theOracle ECB console if you lose connectivity. See the Oracle Communications Session Border Controller ACLIConfiguration Guide for instructions on setting default gateway using the ACLI.
5. Enable restart on critical failure—When checked, the system attempts to restart after experiencing a failure.6. Enable SIP monitoring and tracing—When checked, the system allows the SIP Monitoring and Tracing tool to
collect traffic. Enabling this feature causes Monitor and Trace to capture and display all applicable traffic. See thechapter Oracle ECB User Guide for further information on the SIP Monitoring and Tracing tool.
NTP ServersYou configure NTP servers using the NTP Server listbox in the Modify System settings dialog. The procedureconsists of simply clicking the listbox's Add link and entering the address or FQDN of each NTP server in the Addserver dialog. The listbox provides you with the option of entering multiple NTP servers from the Add server listbox,as well as selecting existing entries to edit or delete them.
Initial Configuration
Oracle® Enterprise Communications Broker 35

Logging (Syslog)Logging events is a critical part of diagnosing mis-configurations and optimizing operations. Oracle ECBs can sendboth syslog and process log data to appropriate hosts for storage and analysis.
Overview
The Oracle ECB generates two types of logs, syslogs and process logs. Syslogs conform to the standard used forlogging servers and processes as defined in RFC 3164.
Process logs are Oracle proprietary logs. Process logs are generated on a per-task basis and are used mainly fordebugging purposes. Because process logs are more data inclusive than syslogs, their contents encompass syslog logdata when they are sent off box. A special application must be run on a remote server to receive process logs. Pleasecontact your Oracle sales representative directly or calling Oracle Customer support for more information about theprocess log application.
Syslog and process log servers are both identified by an IPv4 address and port pair.
Process Log Messages
Process log messages are sent as UDP packets in the following format:
<file-name>:<log-message>In this format, <file-name> indicates the log filename and <log-message> indicates the full text of the log message asit would appear if it were written to the normal log file.
Syslog Settings
Set the following parameters to configure system-wide Syslog functionality.
1. Syslog server IP address—Set the IP address of the server to which you are sending syslog messages from theOracle ECB. Note that Syslog message log level is always Warning.
2. Process log level—Set the severity level of the process log messages. Debug is most verbose. Both Debug andTrace can adversely impact system performance; configure these levels temporarily and only when required.
• Critical (2)• Minor (4)• Warning (5)• Notice (6)• Info (7)• Trace (8)• Debug (9)
SNMPThis section explains how to configure Simple Network Management Protocol (SNMP) basic parameters. SNMP isused to support monitoring of network-attached devices for conditions that warrant administrative attention. SNMP iscomprised of three groups of settings on a Oracle ECB. These settings are system-wide configurations including MIBcontact information, SNMP community settings, and trap receivers.
SNMP community and trap receiver configuration is performed via a separate icon on the GUI. Explanations of thosefields is covered later in this document.
Initial Configuration
36 Oracle® Enterprise Communications Broker

Basic SNMP Parameters
The Oracle ECB includes several parameters that control basic SNMP functionality. The MIB-related elements arefor informational purposes, and are helpful if set. The remainder of the parameters determines if certain Oracle ECBevents are reported to the SNMP system.
SNMP Settings
This section describes the system-wide SNMP parameters found in the System Configuration element. Theseparameters set global SNMP information.
Set the following parameters to configure system-wide SNMP functionality:
1. MIB system contact—Set the contact information used within the Oracle ECB’s MIB transactions. The SNMPagent sends this information to an NMS in response to an SNMP Get for the MIB-II sysContact MIB variable.This parameter’s value can be a textual identification of your company’s contact person for the Oracle ECB and/orinformation about how to contact that person.
2. MIB system name—Set the identification of this Oracle ECB presented within MIB transactions. This value,along with the target name of the system (identified in the boot parameters) are the values reported for MIB-IIwhen an SNMP GET is issued by the NMS for the MIB-II sysName variable. This parameter has no direct relationto the hostname parameter in the system configuration element.
By convention, this is the node’s FQDN. For SNMP MIB-II sysName GETs, the Oracle ECB returns SNMPcommunications in the following format:
<targetName>[.<mib-system-name>]
targetName is the value configured in the target name (tn) boot parameter and mib-system-name is the valueconfigured in this field.
3. MIB system location—Set the physical location of this Oracle ECB that is reported within MIB transactions. Thisparameter is reported when an SNMP GET is issued by the NMS for the MIB-II sysLocation variable. Thisparameter has no direct relation to the location field in the system configuration element.
4. Enable event SNMP traps—When this parameter is enabled, the Oracle ECB generates traps with unique trap-IDsfor each syslog event. If this parameter is disabled , a single trap-ID is used for all events, with different values inthe description string. The default is disabled. The valid values are:
• enabled | disabled
Communications Monitoring Probe settingsConfiguring Communications Monitoring Probe settings allows you to make your Oracle ECB act as a probe, sendingnetwork traffic information to an Oracle Communications Session Monitor Mediation Engine.
The Communications Session Monitor is Oracle's Communication Experience Manager. The manager is powered bythe Oracle Communications Session Monitor Mediation Engine, a platform that collects SIP, DNS, ENUM, andprotocol message traffic received from Oracle Communications Session Monitor Probes. The mediation engine storesthe traffic in an internal database, and analyzes aggregated data to provide comprehensive multi-level monitoring,troubleshooting, and interoperability information.
Acting as a Probe, or as an exporter, the Oracle ECB can:
• Establish an authenticated, persistent, reliable TCP connection between itself and one or more OracleCommunications Session Monitor Mediation Engines.
Initial Configuration
Oracle® Enterprise Communications Broker 37

• Send UTC-timestamped, unencrypted copy of a protocol messages to the Palladion Engine(s).• Accompany the copied message with related data to include: the port/vlan on which the message was sent/
received, local and remote IP:port information, and the transport layer protocol.
Configure the probe setting fields as described below.
1. Enable the probe on your Oracle ECB by checking the Enable monitoring checkbox.2. Set the SBC group id parameter to assign an integer value to the Oracle ECB, in its role as an information
exporter.The Oracle Communications Session Monitor mediation engine uses the SBC group id parameter to segregateprobe traffic from multiple probes. Consult the administrators responsible for the Oracle Communications SessionMonitor mediation engine to determine the desired setting. The default setting is zero.
3. Set the Network interface parameter to identify the network interface whose traffic will be exported to the OracleCommunications Session Monitor Mediation Engine.In most cases, the setting should be to M00:0.
4. Set the Collector IP address parameter to specify the IP address of the target Oracle Communications SessionMonitor Mediation Engine.
5. Set the Collector port parameter to specify the port number of the target Oracle Communications Session MonitorMediation Engine.The range is 1025 to 65535 with the default of 4739.
Denial of Service SettingsDoS protection on the Oracle ECB employs a means of measuring and limiting traffic based on whether the traffic isSIP signaling or ARP. This categorization aligns with queues that logically separate these traffic types, allowing asimple method of specifying limits. The means by which traffic is defined as trusted or untrusted is, in contrast, acomplex set of rule that are not configurable via the GUI.
Denial of Service Configuration
Set the following parameters to configure system wide DoS functionality:
1. Click on Denial of service settings to expand the dialog box. The system expands the Modify System settingsdialog to display the Denial of service settings.
2. Maximum SIP packet rate—Enter the maximum SIP packet rate, in packets per seconds. Valid values are 20 to10,000. The default is 1000.
3. Maximum ARP packet rate—Enter the maximum ARP packet rate, in packets per seconds. Valid values are 20 to10,000. The default is 1000.
High Availability SettingsHigh availability is best configured using the ACLI's SETUP wizard. If you use setup, you find the HA fieldsavailable from the GUI already configured by SETUP.
Oracle ECBs can be deployed in pairs to deliver high availability (HA). Two Oracle ECBs operating in this way arecalled an HA node. Over the HA node, call state is shared, keeping sessions/calls from being dropped in the event of afailure.
Two Oracle ECBs work together in an HA node, one in active mode and one in standby mode.
• The active Oracle ECB checks itself for internal process and IP connectivity issues. If it detects that it isexperiencing certain faults, it hands over its role as the active system to the standby Oracle ECB in the node.
Initial Configuration
38 Oracle® Enterprise Communications Broker

• The standby Oracle ECB is the backup system, fully synchronized with active Oracle ECB’s session status. Thestandby Oracle ECB monitors the status of the active system so that, if needed, it can assume the active rolewithout the active system having to instruct it to do so. If the standby system takes over the active role, it notifiesnetwork management using an SNMP trap.
Refer to the Oracle Enterprise Session Border Controller Configuration Guide for more detail about HighAvailability operations, including:
• Synchronization• Checkpointing
Overview
To produce seamless switchovers from one Oracle ECB to the other, the HA node uses shared virtual MAC andvirtual IP addresses for the media interfaces in a way that is similar to VRRP (virtual router redundancy protocol).Sharing addresses eliminates the possibility that the MAC and IPv4 address set on one Oracle ECB in an HA nodewill be a single point of failure. The standby Oracle ECB sends ARP requests using a utility IPv4 address and itshard-coded MAC addresses to obtain Layer 2 bindings.
When there is a switchover, the standby Oracle ECB issues gratuitous ARP messages using the virtual MAC address,establishing that MAC on another physical port within the Ethernet switch. To the upstream router, the MAC and IPare still alive, meaning that existing sessions continue uninterrupted.
Within the HA node, the Oracle ECBs advertise their current state and health to one another in checkpointingmessages; each system is apprised of the other’s status. Using Oracle’s HA protocol, the Oracle ECBs communicatewith UDP messages sent out and received on the interfaces carrying "heartbeat" traffic between the active andstandby devices.
The standby Oracle ECB assumes the active role when:
• It has not received a checkpoint message from the active Oracle ECB for a certain period of time.• It determines that the active Oracle ECB’s health score has decreased to an unacceptable level.• The active Oracle ECB relinquishes the active role.
Establishing Active and Standby Roles
Oracle ECBs establish active and standby roles in the following ways.
• If a Oracle ECB boots up and is alone in the network, it is automatically the active system. If you then pair asecond Oracle ECB with the first to form an HA node, then the second system to boot up will establish itself asthe standby automatically.
• If both Oracle ECBs in the HA node boot up at the same time, they negotiate with each other for the active role. Ifboth systems have perfect health, then the Oracle ECB with the lowest HA interface IPv4 address will become theactive Oracle ECB. The Oracle ECB with the higher HA interface IPv4 address will become the standby OracleECB.
If the physical link between the two Oracle ECBs fails during boot up or operation, both will attempt to become theactive Oracle ECB. In this case, processing will not work properly.
High Availability Configuration
Set the following parameters to configure system wide HA functionality:
1. Click on High availability settings to expand the dialog box. In the Enable high availability field, place a checkmark in the box to enable HA on the Oracle ECB.
Initial Configuration
Oracle® Enterprise Communications Broker 39

2. In the Name of primary peer field, enter the name of the primary Oracle ECB peer. Valid values are alpha-numeric characters. Default is <primary peer name>.
3. In the Name of secondary peer field, enter the name of the secondary system you are using for HA purposes topeer with the primary system. Valid values are alpha-numeric characters. Default is blank.
Note: Both of these fields are automatically populated with the peer names that you entered when you ranthe Installation Wizard.
Network InterfaceThe network interface element specifies a logical network interface. The Oracle ECB supports only one networkinterface. You configure a SIP interface and one or more application (SIP) ports over this network interface.
This section explains how to configure a network interface with the GUI. Note that the system initialization procedurecreates a network interface. If desired, you can set or change this configuration using the GUI.
Network Interface ConfigurationSet the following parameters to configure a network interface.
1. Click the Network icon. The system displays the Modify Network settings dialog.2. vlan—Enter the identification of a specific virtual interface in a physical interface (e.g., a VLAN tab). If this
network interface is not channelized, leave this field blank, and the value will correctly default to 0. The sub-port-id is only required if the operation type is Media. The valid range is:
• Minimum—0• Maximum—4095
3. Network IP address—Enter the IPv4 address of this network interface.4. Network IP subnet mask—Enter the netmask of this network interface in dotted decimal notation.5. Network IP gateway address —Enter the gateway that this network interface uses to communicate with the next
hop. You can set an additional, secondary gateway via the sec-gateway parameter.6. DNS server ip address—Enter the IP address of the targeted DNS server.7. DNS domain—Enter the default domain name.8. Enable ICMP—See the ensuing section on Enabling ICMP.9. Enable gateway heartbeat—Within the context of high availability, check this checkbox to allow the network
interface to continually confirm that its gateway is reachable.
Enable ICMPTo configure ICMP functionality on a media interface, you define the IPv4 address on your Oracle ECB networkinterface and enable ICMP. Enabling ICMP entries automatically opens the well-known port associated with aservice.
Set the following parameters to enable ICMP functionality on a network interface:
Enable icmp—Check the checkbox to enable ICMP on this network interface.
For security and by default, if ICMP is not enabled, the Oracle ECB discards ICMP requests or responses for theaddress. It is recommended that you only enable ICMP temporarily on a network interface.
Network Interface High Availability ConfigurationHaving configured the first parameters on the Modify Network Settings dialog, the high availability setting fieldsallow you to manually specify addressing to be used by this interface for high availability operation. It isrecommended, however, that you use run setup to configure high availability.
1. Click the arrow next to High Availability settings. The system adds the following fields to the Modify NetworkSettings dialog.
Initial Configuration
40 Oracle® Enterprise Communications Broker
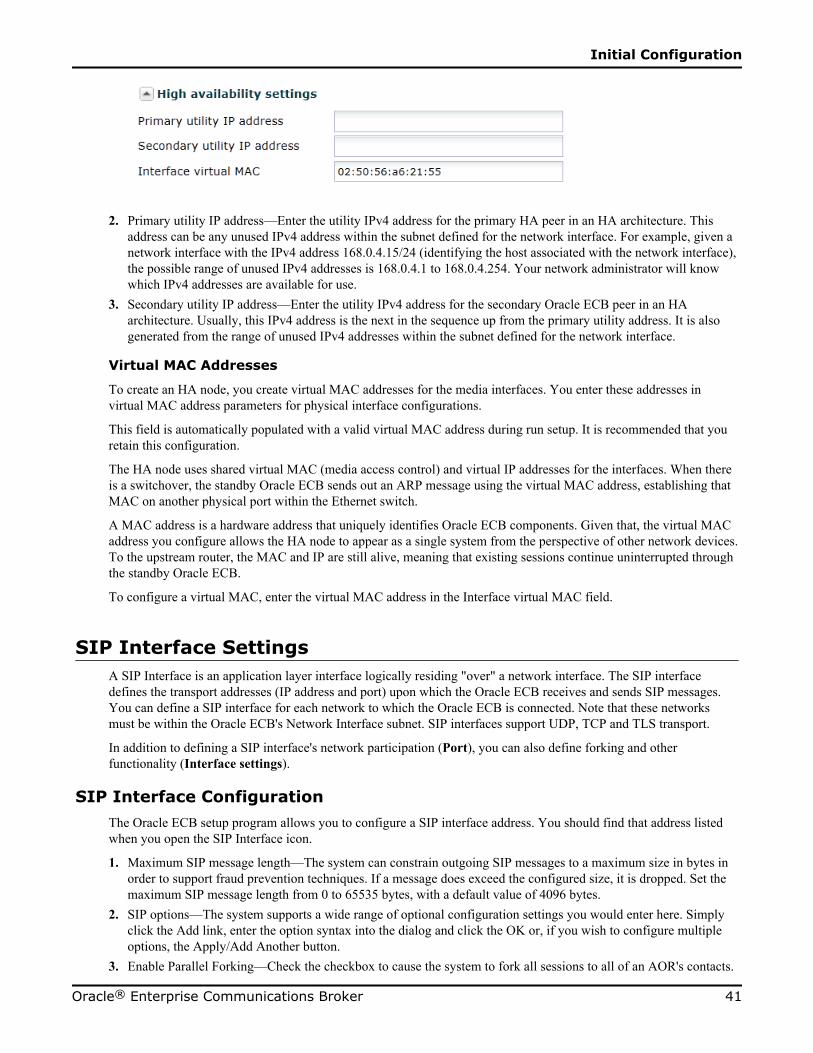
2. Primary utility IP address—Enter the utility IPv4 address for the primary HA peer in an HA architecture. Thisaddress can be any unused IPv4 address within the subnet defined for the network interface. For example, given anetwork interface with the IPv4 address 168.0.4.15/24 (identifying the host associated with the network interface),the possible range of unused IPv4 addresses is 168.0.4.1 to 168.0.4.254. Your network administrator will knowwhich IPv4 addresses are available for use.
3. Secondary utility IP address—Enter the utility IPv4 address for the secondary Oracle ECB peer in an HAarchitecture. Usually, this IPv4 address is the next in the sequence up from the primary utility address. It is alsogenerated from the range of unused IPv4 addresses within the subnet defined for the network interface.
Virtual MAC Addresses
To create an HA node, you create virtual MAC addresses for the media interfaces. You enter these addresses invirtual MAC address parameters for physical interface configurations.
This field is automatically populated with a valid virtual MAC address during run setup. It is recommended that youretain this configuration.
The HA node uses shared virtual MAC (media access control) and virtual IP addresses for the interfaces. When thereis a switchover, the standby Oracle ECB sends out an ARP message using the virtual MAC address, establishing thatMAC on another physical port within the Ethernet switch.
A MAC address is a hardware address that uniquely identifies Oracle ECB components. Given that, the virtual MACaddress you configure allows the HA node to appear as a single system from the perspective of other network devices.To the upstream router, the MAC and IP are still alive, meaning that existing sessions continue uninterrupted throughthe standby Oracle ECB.
To configure a virtual MAC, enter the virtual MAC address in the Interface virtual MAC field.
SIP Interface SettingsA SIP Interface is an application layer interface logically residing "over" a network interface. The SIP interfacedefines the transport addresses (IP address and port) upon which the Oracle ECB receives and sends SIP messages.You can define a SIP interface for each network to which the Oracle ECB is connected. Note that these networksmust be within the Oracle ECB's Network Interface subnet. SIP interfaces support UDP, TCP and TLS transport.
In addition to defining a SIP interface's network participation (Port), you can also define forking and otherfunctionality (Interface settings).
SIP Interface ConfigurationThe Oracle ECB setup program allows you to configure a SIP interface address. You should find that address listedwhen you open the SIP Interface icon.
1. Maximum SIP message length—The system can constrain outgoing SIP messages to a maximum size in bytes inorder to support fraud prevention techniques. If a message does exceed the configured size, it is dropped. Set themaximum SIP message length from 0 to 65535 bytes, with a default value of 4096 bytes.
2. SIP options—The system supports a wide range of optional configuration settings you would enter here. Simplyclick the Add link, enter the option syntax into the dialog and click the OK or, if you wish to configure multipleoptions, the Apply/Add Another button.
3. Enable Parallel Forking—Check the checkbox to cause the system to fork all sessions to all of an AOR's contacts.
Initial Configuration
Oracle® Enterprise Communications Broker 41

4. Default source context—Set the default source context for this Oracle ECB. This is the context the system uses assource context for a given call if it cannot identify source context via any other method.
5. Click the Port link on the left control bar to display the SIP Ports list.6. From the SIP Port list, click the Add link. The system displays the Add SIP Port Settings dialog.7. IP address—Enter the IP address of the host associated with the sip-port entry on which to listen.8. port—Enter the port number you want to use for this sip-port. The default is 5060. The valid range is:
• Minimum: 0• Maximum: 65535
9. Transport Protocol—Indicate the transport protocol you want to associate with the SIP interface. The default isUDP. The valid values are:
• TCP— Provides a reliable stream delivery and virtual connection service to applications through the use ofsequenced acknowledgment with the retransmission of packets when necessary.
• UDP—Provides a simple message service for transaction-oriented services. Each UDP header carries both asource port identifier and destination port identifier, allowing high-level protocols to target specificapplications and services among hosts.
• TLS—Provides a reliable and encrypted stream delivery.10. TLS Profile—Select a pre-configured TLS profile from the drop-down list.11. Save and activate you configuration.
Accounting SettingsThe Oracle ECB offers support for RADIUS, an accounting, authentication, and authorization (AAA) system. Ingeneral, RADIUS servers are responsible for receiving user connection requests, authenticating users, and returningall configuration information necessary for the client to deliver service to the user.
You can configure your Oracle ECB to send call accounting information to one or more RADIUS servers. Thisinformation can help you to see usage and QoS metrics, monitor traffic, and even troubleshoot your system.
Configuring AccountingSet the Accounting Configuration parameters in this dialog to indicate where and when you want the system toproduce accounting messages.
1. Click the accounting icon. The system displays the Modify Accounting Settings dialog.2. Enabled—Enable the generation of accounting records by clicking the checkbox or retain the default of disabled.
• enabled | disabled3. Generate Start—Retain the default value ok if you want the CDR Start record to be generated once the system
receives an OK message in response to an INVITE. (A CDR Start record informs the accounting server that a SIPsession has started.) Other values include:
• None—Start message should not be generated.• Invite—Start message should be generated once the Oracle ECB receives a SIP session INVITE.
4. Generate Interim—Retain the default value, Re-invite Response, to cause the Oracle ECB to transmit an Interimmessage. (An Interim message indicates to the accounting server that the SIP session parameters have changed.)Other values include:
• OK—Start message is generated when the Oracle ECB receives an OK message in response to an INVITE.• Re-invite—Interim message is generated when the Oracle ECB receives a SIP session reINVITE message.• Re-invite Cancel—Interim message is generated when the Oracle ECB receives a SIP session reINVITE, and
the Reinvite is cancelled before the Oracle ECB responds to it.• Unsuccessful-Attempt—Interim message is generated when a SIP session set-up attempt from a preference-
ordered list of next-hop destinations is unsuccessful. The interim message contains: the destination IP address,the disconnect reason, a timestamp for the failure, and the number that was called.
Initial Configuration
42 Oracle® Enterprise Communications Broker

5. Enable file output—Enable the system to generate local files containing accounting records by clicking thecheckbox or retain the default of disabled.
• enabled | disabled6. File Path—Specify where, on the system, you want the system to store accounting record files by typing in a valid
path.7. File rotate time—Set how often in minutes you want to rotate the stored files; the Oracle ECB overwrites the
oldest file first. The minimum rotation time is 2 minutes; the default is 60 minutes. This parameter defaults to 0,and leaving it set to the default means that the Oracle ECB does not rotate (or push) the files.
8. Max files—Set the maximum number of files to be stored on the Oracle ECB at one time. You can configure theOracle ECB to store as few as one file or as many as 4096. The default is 5.
Configure a RADIUS server to send accounting records (optional).
FTP PushIn addition to local and RADIUS server storage, the Oracle ECB provides you with the ability to send accountingfiles to an FTP server. The information sent to the FTP server is the same as is stored locally.
The FTP push feature is used to copy local CDR files to a remote FTP server on a periodic basis. This feature isconfigured by defining push receivers which contain standard login and FTP server credentials of the remotemachine. At the time interval (file rotate time), the Oracle ECB closes the current file and pushes the files that arecomplete and have not yet been pushed, including the just-closed fille to the FTP server.
Push receiver configurations must include:
• The server’s IP address and port• Remote path of where to upload the accounting files• Account login credentials
The FTP push configuration creates and pushes accounting files using the following criteria:
• The maximum accounting file size, after which the system creates a new file, is 1000000 bytes.• The number of files the system creates before it begins to overwrite files (oldest file first) is 5.• The amount of time between system file push to the FTP server is 60 minutes.
FTP Push ConfigurationThis configuration assumes a reachable, operating FTP server.
A push receiver configuration includes all the credentials that the Oracle ECB needs to log into an FTP server andupload any recent local CDR files. To configure an FTP push server, click the FTP arrow on the Accountingconfiguration dialog to display the FTP push fields.
1. Enable FTP push —Check the checkbox to enable FTP push.2. FTP-address—Set the IP address of this STP server.3. FTP-port—Set the port of this service:
• Minimum: 0• Maximum: 65535• Default: 21
Initial Configuration
Oracle® Enterprise Communications Broker 43
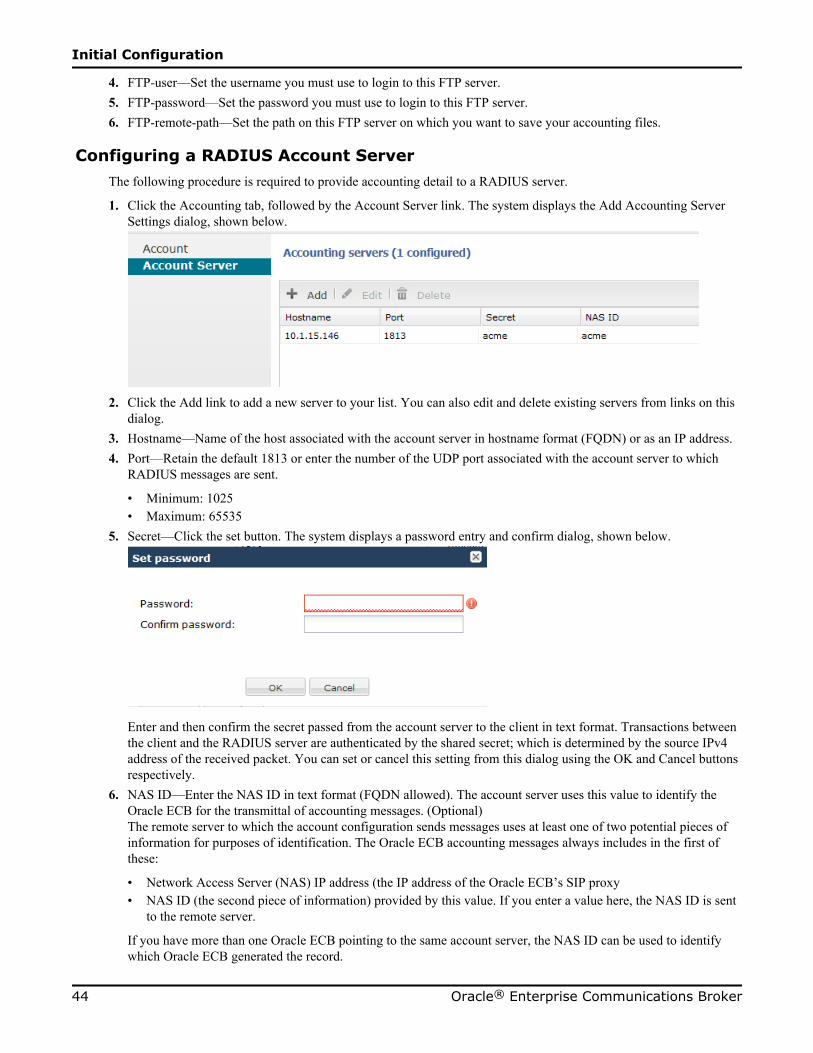
4. FTP-user—Set the username you must use to login to this FTP server.5. FTP-password—Set the password you must use to login to this FTP server.6. FTP-remote-path—Set the path on this FTP server on which you want to save your accounting files.
Configuring a RADIUS Account ServerThe following procedure is required to provide accounting detail to a RADIUS server.
1. Click the Accounting tab, followed by the Account Server link. The system displays the Add Accounting ServerSettings dialog, shown below.
2. Click the Add link to add a new server to your list. You can also edit and delete existing servers from links on thisdialog.
3. Hostname—Name of the host associated with the account server in hostname format (FQDN) or as an IP address.4. Port—Retain the default 1813 or enter the number of the UDP port associated with the account server to which
RADIUS messages are sent.
• Minimum: 1025• Maximum: 65535
5. Secret—Click the set button. The system displays a password entry and confirm dialog, shown below.
Enter and then confirm the secret passed from the account server to the client in text format. Transactions betweenthe client and the RADIUS server are authenticated by the shared secret; which is determined by the source IPv4address of the received packet. You can set or cancel this setting from this dialog using the OK and Cancel buttonsrespectively.
6. NAS ID—Enter the NAS ID in text format (FQDN allowed). The account server uses this value to identify theOracle ECB for the transmittal of accounting messages. (Optional)The remote server to which the account configuration sends messages uses at least one of two potential pieces ofinformation for purposes of identification. The Oracle ECB accounting messages always includes in the first ofthese:
• Network Access Server (NAS) IP address (the IP address of the Oracle ECB’s SIP proxy• NAS ID (the second piece of information) provided by this value. If you enter a value here, the NAS ID is sent
to the remote server.
If you have more than one Oracle ECB pointing to the same account server, the NAS ID can be used to identifywhich Oracle ECB generated the record.
Initial Configuration
44 Oracle® Enterprise Communications Broker

Security SettingsSecurity configuration from the GUI consists of creating the building blocks you can use to establish TLS-securedpaths for your signaling traffic. The overall process includes generating certificate requests and certificate import.
The TLS configuration procedures that you can perform from the GUI includes:
• Configure Certificate Records.• Generate Certificate Request for your CA.• Import Certificates.• Upload certificate files.• Download certificate files.• Configure TLS Profiles, which utilize your certificate records.• Apply TLS Profiles to SIP Interfaces, agents and the web-server-config.
The dialogs available from the Security icon allow you to perform all procedures with the exception of applying aTLS profile to a configuration element. You apply TLS profiles to configuration elements using controls within theirrespective dialogs.
Certificate Record ConfigurationA certificate record configuration represents either the end-entity or the Certificate Authority (CA) certificate on theOracle ECB. If it is used to present an end-entity certificate, a private key should be associated with this certificaterecord configuration using a certificate request. No private key should be associated with the certificate recordconfiguration if it was issued to hold a CA certificate.
A certificate can be imported to a certificate record configuration using the GUI as described below.
Note: There is no need to create a certificate record when importing a CA certificate or certificate in pkcs12format.
Follow the steps below to create a certificate record.
1. Access certificate configuration controls via the Security link.2. Click the link indicating Certificate configuration. The system displays the list of certificate records already
configured on this system.3. Click the Add link. The system displays the Add Certificates dialog. Note that this dialog is truncated for
presentation purposes here.4. name—Enter the name of the certificate record. This parameter is required; you cannot leave it empty.
In the case of establishing a certificate for the Oracle ECB, this name must be the same as the name you use togenerate a certificate request.If configuring for an end stations CA certificate (mutual authentication), this name must be the same name usedduring the import procedure. When performing an import procedure that creates the record automatically, thisname will be derived from the certificate itself.
5. country—Enter the name of the country. The default is US.6. state—Enter the name of the state. The default is MA.7. locality—Enter the name of the locality for the state. The default is Burlington.8. organization—Enter the name of the organization holding the certificate. The default is engineering.9. unit—Enter the name of the unit within the organization holding the certificate.10. common-name—Enter the common name for the certificate record.11. key-size—Enter the size of the key for the certificate. Use the default of 1024, or change it to one of the other
supported values: 512, 2048, or 4096.12. alternate-name—Enter the alternate name of the certificate holder.13. key-usage-list—Enter the usage extensions you want to use with this certificate record. This parameter can be
configured with multiple values, and it defaults to the combination of digitalSignature and keyEncipherment. For
Initial Configuration
Oracle® Enterprise Communications Broker 45

a list of possible values and their descriptions, see the section “Key Usage Control” in the Oracle CommunicationsSession Border Controller Configuration Guide.
14. extended-key-usage-list—Enter the extended key usage extensions you want to use with this certificate record.The default is serverAuth. For a list of possible values and their descriptions, see the section “Key Usage Control”in the Oracle Communications Session Border Controller Configuration Guide.
Create TLS profiles, using your certificate records to further define the encryption behavior and provide an entity thatyou can apply to a SIP interface.
TLS Profile ConfigurationCertificate records must exist prior to this configuration.
Configure a TLS profile to further define the encryption behavior you want between these systems and to establish anentity that you can apply to SIP Interfaces. Steps required follow.
1. Click the TLS Profile link. The system displays the TLS profile list.2. Click the Add link. The system displays the dialog below, which is truncated for the purpose of presentation here.3. Name—Enter the name of the TLS profile. This parameter is required.4. end-entity-certificate—Enter the name of the Certificate Record for the applicable entity.5. trusted-ca-certificates—Enter the names of the trusted CA certificate records.6. cipher-list—The following cipher-lists are supported for the GUI only:
• AES256-SHA (TLS_RSA_WITH_AES_256_CBC_SHA) - Firefox (version 12) and Chrome (version19.0.1084.46m)
• AES128-SHA (TLS_RSA_WITH_AES_128_CBC_SHA) - Firefox (version 12) and Chrome (version19.0.1084.46m)
• DES-CBC-SHA (SSL_RSA_WITH_DES_CBC_SHA or TLS_RSA_WITH_DES_CBC_SHA) - InternetExplorer (Version 9)
7. verify-depth—Specify the maximum depth of the certificate chain that will be verified. The default value is 10.The valid range is:
• Minimum-0• Maximum-10
8. mutual-authenticate—Define whether or not you want the Oracle ECB to mutually authenticate the client. Thedefault value is disabled. The valid values are:
• enabled-disabled (default)9. tls-version—Enter the TLS version you want to use with this TLS profile. Default is compatibility. Valid values
are:
• TLSv1• SSLv3• compatibility (default)
10. cert-status-check—Enables OCSP in conjunction with an existing TLS profile.11. cert-status-profile-list—Assigns one or more cert-status-profiles to the current TLS profile. Each assigned cert-
status-profile provides the information needed to access a single OCSP responder.12. ignore-dead-responder—Enables your device to establish a client connection even if the OCSP responder is
unavailable, assuming the associated certificate was signed by a trusted certificate authority.
• enabled-disabled (default)13. allow-self-signed-cert—Enables your device to establish client connections to clients that present self-signed
certificates.
• enabled-disabled (default)
Apply your TLS profile to a SIP Interface by selecting if from the SIP Interface's TLS Profile drop-down.
Initial Configuration
46 Oracle® Enterprise Communications Broker
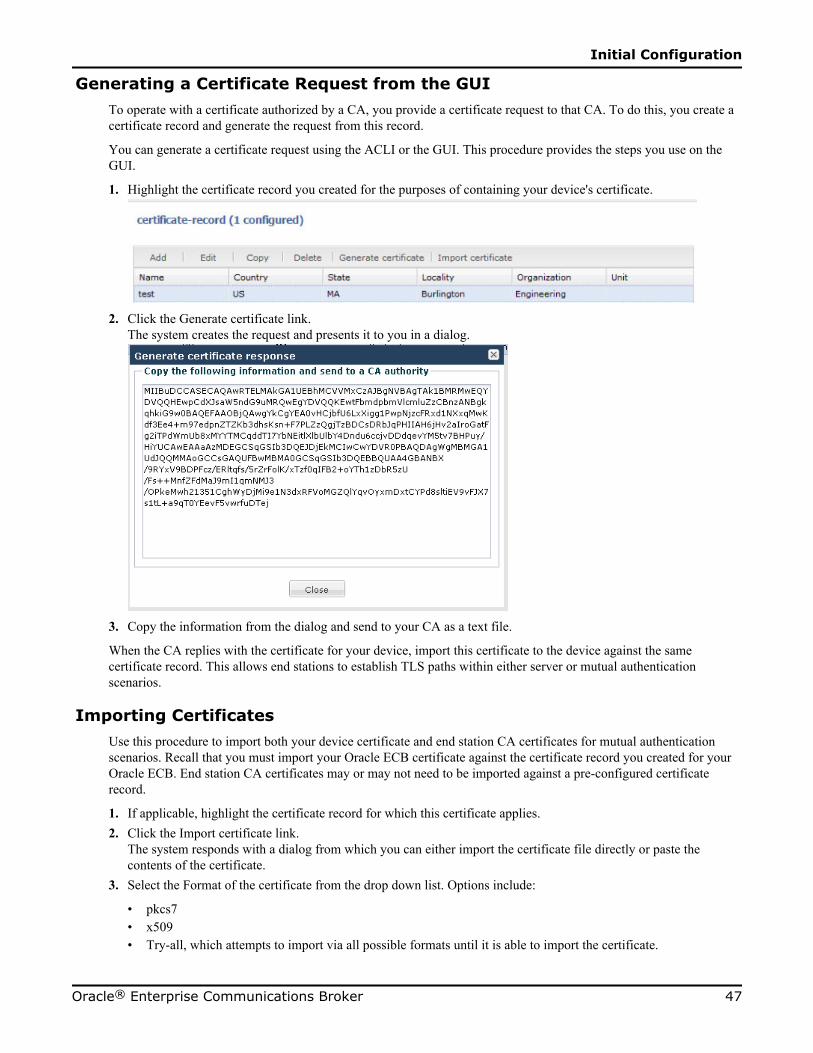
Generating a Certificate Request from the GUITo operate with a certificate authorized by a CA, you provide a certificate request to that CA. To do this, you create acertificate record and generate the request from this record.
You can generate a certificate request using the ACLI or the GUI. This procedure provides the steps you use on theGUI.
1. Highlight the certificate record you created for the purposes of containing your device's certificate.
2. Click the Generate certificate link.The system creates the request and presents it to you in a dialog.
3. Copy the information from the dialog and send to your CA as a text file.
When the CA replies with the certificate for your device, import this certificate to the device against the samecertificate record. This allows end stations to establish TLS paths within either server or mutual authenticationscenarios.
Importing CertificatesUse this procedure to import both your device certificate and end station CA certificates for mutual authenticationscenarios. Recall that you must import your Oracle ECB certificate against the certificate record you created for yourOracle ECB. End station CA certificates may or may not need to be imported against a pre-configured certificaterecord.
1. If applicable, highlight the certificate record for which this certificate applies.2. Click the Import certificate link.
The system responds with a dialog from which you can either import the certificate file directly or paste thecontents of the certificate.
3. Select the Format of the certificate from the drop down list. Options include:
• pkcs7• x509• Try-all, which attempts to import via all possible formats until it is able to import the certificate.
Initial Configuration
Oracle® Enterprise Communications Broker 47

4. Either browse to and select the certificate file, or click the paste button to change the dialog to its "paste format".This "paste format" provides a text field into which you paste your certificate information
5. Click the Import button.The system completes the procedure by importing the certificate.
Apply the operational certificate record to the intended SIP interface.
SNMPThis section explains how to configure Simple Network Management Protocol (SNMP) communities and trapreceivers. These features are not essential for baseline Oracle ECB service, but they are necessary to use an elementmanagement system to manage Oracle ECBs. They provide important monitoring and system health information thatcontribute to a robust deployment of the Oracle ECB.
OverviewSNMP is used to support monitoring of network-attached devices for conditions that warrant administrative attention.SNMP is comprised of three groups of settings on a Oracle ECB. These settings are system-wide configurationsincluding MIB contact information, SNMP community settings, and trap receivers.
Basic SNMP ParametersThe Oracle ECB includes several parameters that control basic SNMP functionality. The MIB-related elements arefor informational purposes, and are helpful if set. The remainder of the parameters determines if certain Oracle ECBevents are reported to the SNMP system.
SNMP CommunityAn SNMP community is a grouping of network devices and management stations used to define where information issent and accepted. An SNMP device or agent might belong to more than one SNMP community. SNMP communitiesprovide a type of password protection for viewing and setting management information within a community.
SNMP communities also include access level settings. They are used to define the access rights associated with aspecific SNMP community. The Oracle ECB lets you define two types of access levels: read-only and read-write.You can define multiple SNMP communities on a Oracle ECB to segregate access modes per community and NMShost.
Initial Configuration
48 Oracle® Enterprise Communications Broker

Trap ReceiversA trap receiver is an application used to receive, log, and view SNMP traps for monitoring the Oracle ECB. AnSNMP trap is the notification sent from a network device, the Oracle ECB in this case, that declares a change inservice. Multiple trap receivers can be defined on a Oracle ECB either for redundancy or to segregate alarms withdifferent severity levels to individual trap receivers.
Each server that an element management system is installed on should be configured as a trap receiver on all OracleECB’s managed by that element management system.
SNMP Community SettingsFollow the steps below to configure an SNMP community on your device.
1. Community name—Enter an SNMP community name of an active community where this Oracle ECB can send orreceive SNMP information. A community name value can also be used as a password to provide authentication,thereby limiting the NMSs that have access to this Oracle ECB. With this field, the SNMP agent provides trivialauthentication based on the community name that is exchanged in plain text SNMP messages. For example,public. Valid values are alpha-numeric characters. Default is blank.
2. From the SNMP community list, click the Add link. The system displays the Add dialog.3. IP addresses—Enter an IPv4 address that is valid within this SNMP community. This IPv4 address corresponds
with the IPv4 address of the NMS application that monitors or configures this Oracle ECB. You can enter multipleaddresses, if desired.
4. Click OK to close the Add dialog.
Trap Receiver SettingsFollow the steps below to configure trap receivers on your device.
1. From the Trap receiver list, click the Add link. The system displays the Add SNMP Trap Settings dialog.
2. Community name—Enter the SNMP community name to which this trap receiver belongs. For example, Public.Valid values are alpha-numeric characters. Default is blank.
3. IP address—Enter the IPv4 address of an authorized NMS. This value is the IPv4 address of an NMS where trapsare sent. Enter the IP address in dotted decimal format.
4. IP Port—Enter the port number of an authorized NMS. If you do not specify a port number, the default SNMPtrap port of 162 is used.
Web Server SettingsConfigure your preferences for the Oracle ECB's web server using the Modify web-server-config dialog, availablefrom the Web Server icon. Configuration field descriptions are provided below.
1. Inactivity timeout—Enter the amount of time, in minutes, that the Web GUI must have remained inactive before itends the Web session. For example, if this timeout value is set as 5, after 5 minutes of no activity, the Web sessiondisconnects. Default is 10. Valid values are 0 to 20. Zero (0) disables this parameter.
Note: The following HTTP state and HTTPS state parameters may have already been set via the GUIinstallation wizard on your Oracle ECB. You can edit these parameters if required.
Initial Configuration
Oracle® Enterprise Communications Broker 49

2. HTTP state—Specify whether or not to enable HTTP for accessing the Web server. Default is enabled. A checkmark indicates enabled, and a blank box indicates disabled.
3. HTTPS state—Specify whether or not to enable HTTPS (secure connection) for accessing the Web server. Defaultis disabled. A check mark indicates enabled, and a blank box indicates disabled.
4. TLS profile—Enter the Transport Layer Security (TLS) Protocol profile name to use with HTTPS. Valid valuesare alpha-numeric characters. Default is blank.
Note: If you specify a TLS profile, and HTTP is enabled, the Oracle ECB checks against the TLS profiletable for a match. If there is no match, the applicable errors display during the verification of theconfiguration.
5. Click OK.
Initial Configuration
50 Oracle® Enterprise Communications Broker
4Oracle ECB Maintenance and Debugging
Oracle ECB software closely aligns with Oracle SBC software. As such, the vast majority of reference and debuggingprocesses, procedures and information is common across Oracle SBC product.
This chapter documents maintenance and debugging information that is specific to the Oracle ECB as well as pointsto other members of the documentation set that provide applicable reference and debugging information.
Generic Maintenance and Debugging Documentation
The following table directs you to other Oracle documentation that provides generic monitoring and debugginginformation.
Information Type Documentation
Log File Definition and Descriptions
Fault Information Management
Manual Configuration Management Process and Procedures
Oracle SBC Maintenance and Troubleshooting Guide
MIB Descriptions
MIB Definition and Identification (OID Reference)
SNMP GETs
SNMP Trap Definition and Descriptions
Oracle SBC MIB Reference Guide
Manual HDR Management
HDR Group Definition and Descriptions
Oracle SBC Historical Data Recording (HDR)Resource Guide
Your Oracle ECB ImageYour Oracle ECB arrives with the most recent, manufacturing-approved run-time image installed on the flashmemory. If you want to use this image, you can install your Oracle ECB, establish a connection to the Oracle ECB,and then begin to configure it. On boot up, your system displays information about certain configurations not beingpresent. You can dismiss these displays and begin configuring your Oracle ECB.
Oracle® Enterprise Communications Broker 51

If you want to use an image other than the one installed on your Oracle ECB when it arrives, you can use theinformation in this section to obtain and install it.
Obtaining a New ImageYou can download software images onto the platform of your Oracle ECB from various sources. You can take anyone of the following actions:
• Obtain an image from where the Oracle Software Delivery Cloud.• Obtain an image from your Oracle customer support representative, who will transfer it to your system.
Regardless of how you obtain the image, you need to use Secure File Transfer Protocol (SFTP) to copy it from itssource to your Oracle ECB.
Upgrade Software with the GUIPreviously, software upgrade was a manual process consisting of file transfer tools and ACLI procedures. Release E-C[xz]6.4.0 M2 now allows you to upgrade software directly from the GUI.
You can upgrade (or downgrade) the software on your system from the GUI's System tab. The function is found viathe Upgrade Software link. It performs the following tasks for you:
For standalone system upgrade:
• System Health Score Display• System Disk Space Check• Display Current CFG Version• Display Current Running Version• File Transfer from Local System• Change Boot Parameters• System Reboot
For High Availability configuration upgrade, the system displays the synchronization health.
This procedure assumes SFTP access between your device the source of your new software. Follow the steps below toperform a software upgrade:
1. Click the System tab.The system opens the System dialog.
2. Click the Upgrade Software link.The system displays the upgrade software dialog.
3. Open the Verification menu.
Oracle ECB Maintenance and Debugging
52 Oracle® Enterprise Communications Broker

The system displays the current system health and links from which you can assess synchronization health, currentconfiguration version and disk usage.
4. Verify that system health, synchronization health, current configuration version and disk usage are appropriate andadequate for you to proceed with your upgrade.
5. Select the Upload method from the drop-down box. Options include.
• Local - Allows you to select a file from your system for transfer.• Flash - Allows you to select a file already on the device.• Network - Allows you to specify parameters for network boot via file transfer. These parameters initially
display the current boot parameters.
The system updates the Upgrade Software dialog with the fields you need for your selection.6. Complete the fields, specific to your current upgrade.
• Software file to upload - (Local) Use the Browse button to locate the file on your local system.• Software file - (Flash) the location and name of the file on the device.• Boot file - (Network) The complete name of the boot file.• Host IP - (Network) The IP address of the FTP server.• FTP username - (Network) The username to log into the FTP server.• FTP password - (Network) The password to log into the FTP server.
7. Click the Reboot after upload checkbox, if desired.8. Click the Complete button.
If you did not check the Reboot after upload checkbox, the system displays an information dialog indicating thatthe it needs to reboot for changes to take effect. If you did check the Reboot after upload checkbox, the systemdisplays an information dialog indicating that it is about to reboot.
9. Click OK.The system performs the file transfer or boot parameter change and, if selected, reboots.
Oracle ECB Maintenance and Debugging
Oracle® Enterprise Communications Broker 53