
Oracle Data Guard from A to Z - Real DBA Magic Data Guard from A to Z Zohar Elkayam, Service...
205
Oracle Data Guard from A to Z 1 Zohar Elkayam, Service Director: Database Solutions
Transcript of Oracle Data Guard from A to Z - Real DBA Magic Data Guard from A to Z Zohar Elkayam, Service...

Oracle Data Guard from A to Z
1
Zohar Elkayam, Service Director: Database Solutions

Agenda
• HA, DR and BCP: basic concepts • Overview of the Oracle Data Guard solution • Data Guard Physical Standby and a demo • Data Guard Broker and a short demo • Data Guard Logical Standby • Data Protection modes • Monitoring Data Guard and optimizing Data Guard • Active Data Guard • Snapshot Standby
2

?מי אני
ראש תחום בסיסי נתונים ויועץ , זהר אלקיים•
GlassHouse Technologies-אורקל בכיר ב
•DBA (תשתיתי ואפליקטיבי)1998אורקל מאז
יכולות Oracle SQL"הספר העורך הטכני של •
"המדריך לשולף המהיר, מתקדמות
zoharelkayam.wordpress.com :בלוגר•
3

4
About GlassHouse Technologies
• We provides IT Infrastructure services & solutions in most fields: storage, OS, virtualization, backup and databases
• Worldwide operations: US, UK, Swiss, Israel, Turkey and Australia
• Over 200 employees in Israel alone and ~1000 worldwide.
• Formally known as Integrity systems, in the databases business since 1995

5
Definitions: HA and DR
• High Availability (HA): The degree to which an application,
service, or functionality is available upon user demand.
Availability is measured by the perception of an application's
end user.
• Disaster Recovery (DR): The ability of IT to recover (after a
disaster) certain stated applications to defined Recovery
Service Objectives and make these applications and their
data available to the business units.

6
Recovery Service Objectives (RSO)
• RTO/MTTR: Recovery Time Objective defines the length of time it will
take to recover all the applications in case of a disaster. Typically
expressed in seconds, minutes, hours, days.
• RPO: Recovery Point Objective defines the point in time to which data
can be recovered for all the applications in case of a disaster.
Effectively defines tolerance for data loss. Typically expressed in
minutes, hours or days of data loss.
• SLA: Agreement between two parties which specifies level of
availability, performance or operation.

7
Business Continuance Procedure (BCP)
• The ability to continue (after a disaster) certain defined
components of the business for a defined time at a
defined level of competence.
• Sometimes known as COOP Continuance of Operations.
• Consists of two components:
– People and manual processes – Typically BC.
– The IT Environment – Typically DR.

Business Continuity Resumption of full operations combining People, Processes and Platforms
Disaster Recovery Site-level crisis, data and IT operations resumption
Backup and Restore Presumes infrastructure is whole 97% is file/small unit related
High Availability Presumes that the rest of the environment is active
Keeping the Business Running

Causes of Data/Service Loss
Source: Disaster Recovery Journal
Natural disasters 3%
Software corruption 4%
Computer viruses 7%
Human errors 36%
Hardware & system errors 49%
9

Real Application Clusters Continuous Availability for all Applications
Data Guard Guaranteed Zero Data Loss
Flashback Guaranteed Zero Data Loss
System Maintenance
Planned Downtime Database
Maintenance
Dynamic Reconfiguration Capacity on Demand without Interruption
Online Redefinition Adapt to Change Online
ASM Mirroring Storage Failure Protection
Human Error
Site Failures
Storage/Net Failures
Unplanned Downtime
System Failures
10

Overview of the Oracle Data Guard solution
11

What Is Oracle Data Guard? Primary
database Standby
database
Database Database copy
Redo transport
Ora
cle
Net
12

Benefits of Implementing Oracle Data Guard
Oracle Data Guard provides the following benefits: • Continuous service during disasters or crippling
data failures • Complete data protection against corruption and
data loss • Elimination of idle standby systems • Flexible configuration of your system to meet
requirements for business protection and recovery • Centralized management
13

Types of Standby Databases
• Physical standby database – Identical to the primary database on a block-for-block basis – Synchronized with the primary database through application of
redo data received from the primary database – Can be used concurrently for data protection and reporting
• Logical standby database – Shares the same schema definition – Synchronized with the primary database by transforming the data
in the redo received from the primary database into SQL statements and then executing the SQL statements
– Can be used concurrently for data protection, reporting, and database upgrades
14

Types of Standby Databases
• Snapshot standby database
– Fully updatable standby database
– Created by converting a physical standby database
– Local updates are discarded when a snapshot standby database is converted back into a physical standby database.
– Can be used for testing
15

Types of Data Guard Services
• Data Guard provides three types of services:
– Redo transport services
– Apply services
• Redo Apply
• SQL Apply
– Role management services
16

Oracle Data Guard: Architecture (Overview)
Primary database transactions
MRP or LSP
Standby database
Archived redo logs
Backup Online
redo logs
ARC0
RFS
Archived redo logs
ARC0 Reports
Standby redo logs
Ora
cle
net
LNSn
(Real-time apply)
LGWR
Redo buffer
Gap resolution
17

Primary Database Processes Primary database
transactions MRP or
LSP Standby
database
Archived redo logs
Backup Online
redo logs
ARC0
RFS
Archived redo logs
ARC0 Reports
Standby redo logs
Ora
cle
net
LNSn
(Real-time apply)
LGWR
Redo buffer
Gap resolution
18

Standby Database Processes Primary database
transactions MRP or
LSP Standby
database
Archived redo logs
Backup Online
redo logs
ARC0
RFS
Archived redo logs
ARC0 Reports
Standby redo logs
Ora
cle
net
LNSn
(Real-time apply)
LGWR
Redo buffer
Gap resolution
19

Physical Standby Database: Redo Apply Architecture
Production database
Physical standby database
Redo apply
Redo stream
Redo transport
Backup
Physical standby database
Primary database
20

Logical Standby Database: SQL Apply Architecture
Primary database
Redo transport
Transform redo information into
SQL
SQL Apply
Reports
Production database
Logical standby database
Logical standby database
21

Automatic Gap Detection and Resolution Primary database transactions
Online redo logs
ARC0
RFS
MRP or LSP
Archived redo logs
ARC0
Standby database
Reports
Standby redo logs
Archived redo logs
Backup Ora
cle
net
LNSn
(Real-time apply) LGWR
Redo buffer
ARCH ping
Redo to resolve gap
22

Data Protection Modes
Select the mode to balance cost, availability, performance, and data protection:
– Maximum protection
– Maximum availability
– Maximum performance (default)
23

Data Guard Operational Requirements: Oracle Database Software
• The same release of Oracle Database Enterprise Edition must be installed for all databases except when you perform a rolling database upgrade by using a logical standby database.
• If any database uses ASM or OMF, all databases should use the same combination.
24

Data Guard Operational Requirements: Hardware and Operating System
• Primary database systems and standby database systems may have different: – CPU architectures – Operating systems – Operating system binaries (32-bit or 64-bit) – Oracle Database binaries (32-bit or 64-bit)
• See MOS Note 413484.1 for latest capabilities and restrictions
25

Data Guard Operational Requirements: Network
• Depends on Redo generation
• Find peak redo in AWR report
• Bandwidth in MBPS =
(redo bytes per sec / 8)/1,000,000
Load Profile Per Second Per Transaction
------------ ---------- ----------------
Redo size: 51,944.64 5,177.09
26

Role Transitions: Switchover and Failover
• Oracle Data Guard supports two role-transition operations: – Switchover
• Planned role reversal • Used for OS or hardware maintenance
– Failover • Unplanned role reversal • Emergency use • Zero or minimal data loss (depending on choice of data
protection mode) • Can be initiated automatically when fast-start failover is enabled
27

Switchover
• Transitions the roles of the primary and standby databases
• Requires no resetting of the online redo logs of the new primary database
• Incurs no data loss
• Causes users to disconnect from primary
28

Switchover: Before
Standby
database
Read/write transactions
Primary
database
San Francisco
Boston
Oracle Net
Application
Application
Read-only reports
29

Switchover: After Standby
database
Read/write transactions
Primary
database
Application
Application
Read-only reports
San Francisco
Boston
Oracle Net
30

Performing a Switchover by Using DGMGRL
• After verifying the conditions required for a switchover, execute the SWITCHOVER command:
DGMGRL> SWITCHOVER TO 'pc00sby1';
Performing switchover NOW, please wait...
New primary database "pc00sby1" is opening...
Operation requires shutdown of instance "pc00prmy" on
database "pc00prmy"
Shutting down instance "pc00prmy"...
ORA-01109: database not open
Database dismounted.
ORACLE instance shut down.
Operation requires startup of instance "pc00prmy" on
database "pc00prmy"
Starting instance "pc00prmy"...
ORACLE instance started.
Database mounted.
Switchover succeeded, new primary is "pc00sby1"
31

Situations That Prevent a Switchover
• You cannot perform a switchover if:
– Archived redo log files are unavailable.
– Point-in-time recovery is required.
– The production database is not open and cannot be opened.
33

Failover
Standby
database becomes
primary database.
Read/write transactions
Online redo
logs
Local
archiving
San Francisco Boston
Archived redo
logs
Application
Online Redo
Logs
Local
Archiving
Archived redo
logs Primary database
34

Types of Failovers
• Manual failover: Invoked by the DBA
– Complete: Attempts to minimize data loss by applying all available redo on the standby database
– Immediate: No additional data is applied on the standby database
• Fast-start failover: Invoked automatically by the Data Guard broker
35

Failover Considerations
• Failover should be used only in an emergency. • Old primary database is no longer part of the
configuration. • Data loss is possible. • When choosing a standby database to fail over to,
you should: – Choose a physical standby database when possible (in
case there are logical standby in the configuration). – Choose the standby database that is most current.
36

Performing a Failover (Using DGMGRL)
1. Execute the FAILOVER command to initiate the failover operation:
2. Reset the protection mode (if necessary).
3. Reinstate the primary database to serve as a standby database in the configuration.
4. Reinstate or re-create other disabled standby databases in the configuration.
DGMGRL> FAILOVER TO 'pc00sby1' [IMMEDIATE];
37

Reenabling Disabled Databases by Using DGMGRL
• Disabled databases must be reinstated or re-created to re-enable broker management.
• Reinstate a database using REINSTATE DATABASE:
• If you cannot reinstate a database, re-create it from a copy of the primary database and then re-enable the database by using ENABLE DATABASE:
DGMGRL> REINSTATE DATABASE pc00prmy;
DGMGRL> ENABLE DATABASE pc00prmy;
38

Choosing an Interface for Administering a Data Guard Configuration
• Data Guard broker configuration:
– DGMGRL command-line interface
– Enterprise Manager Grid Control
– SQL commands to query data dictionary views
• Non–Data Guard broker configuration:
– SQL commands
39

Oracle Data Guard Broker Framework
CLI management client
Oracle Management
Server
Enterprise Manager
Repository
Primary database
Data Guard broker
Data Guard broker
Agent Agent
Standby database
40

Creating a Physical Standby Database Using SQL and RMAN Commands
41

Steps to Create a Physical Standby Database
1. Prepare the primary database.
2. Set parameters on the physical standby database.
3. Configure Oracle Net Services.
4. Start the standby database instance.
5. Execute the DUPLICATE TARGET DATABASE FOR STANDBY FROM ACTIVE DATABASE RMAN command or from backup.
6. Start the transport and application of redo.
42

Preparing the Primary Database
• Enable FORCE LOGGING at the database level.
• Create a password file if required.
• Create standby redo logs.
• Set initialization parameters.
• Enable archiving. SQL> SHUTDOWN IMMEDIATE;
SQL> STARTUP MOUNT;
SQL> ALTER DATABASE ARCHIVELOG;
SQL> ALTER DATABASE OPEN;
43

FORCE LOGGING Mode
• FORCE LOGGING mode is recommended to ensure data consistency.
• FORCE LOGGING forces redo to be generated even when NOLOGGING operations are executed.
• Temporary tablespaces and temporary segments are not logged.
• FORCE LOGGING is recommended for both physical and logical standby databases.
• Issue the following command on the primary database:
SQL> ALTER DATABASE FORCE LOGGING;
44

Configuring Standby Redo Logs
Redo shipment
RFS
Standby redo
logs
Online redo
logs
Primary database
Standby database
45

Creating Standby Redo Logs
Redo from primary database
RFS ARC0
Standby redo logs
Archived redo logs
MRP/LSP
Standby database
46

Using SQL to Create Standby Redo Logs
SQL> ALTER DATABASE ADD STANDBY LOGFILE
2 '/u01/app/oracle/oradata/orcl/srl01.log'
3 SIZE 50M;
Database altered.
SQL> ALTER DATABASE ADD STANDBY LOGFILE
2 '/u01/app/oracle/oradata/orcl/srl02.log'
3 SIZE 50M;
Database altered.
47

SQL> SELECT group#, type, member FROM v$logfile
2 WHERE type = 'STANDBY';
GROUP# TYPE MEMBER
------ ------- -----------------------------------
4 STANDBY /u01/app/oracle/oradata/pc00prmy/srl01.log
5 STANDBY /u01/app/oracle/oradata/pc00prmy/srl02.log
6 STANDBY /u01/app/oracle/oradata/pc00prmy/srl03.log
SQL> SELECT group#, dbid, thread#, sequence#, status
2 FROM v$standby_log;
GROUP# DBID THREAD# SEQUENCE# STATUS
---------- ---------- ---------- ---------- ----------
4 UNASSIGNED 0 0 UNASSIGNED
5 UNASSIGNED 0 0 UNASSIGNED
6 UNASSIGNED 0 0 UNASSIGNED
Viewing Standby Redo Log Information • View information about the standby redo logs:
48

Setting Initialization Parameters on the Primary Database to Control Redo Transport
Parameter Name Description
LOG_ARCHIVE_CONFIG Specifies the unique database name for each
database in the configuration
LOG_ARCHIVE_DEST_n Controls redo transport services
LOG_ARCHIVE_DEST_STATE_n Specifies the destination state
ARCHIVE_LAG_TARGET Forces a log switch after the specified
number of seconds
LOG_ARCHIVE_TRACE Controls output generated by the archiver
process
49

Setting LOG_ARCHIVE_CONFIG
• Specify the DG_CONFIG attribute to list the DB_UNIQUE_NAME for the primary database and each standby database in the Data Guard configuration.
LOG_ARCHIVE_CONFIG='DG_CONFIG=(pc00prmy,pc00sby1)'
50

Setting LOG_ARCHIVE_DEST_n • Specify LOG_ARCHIVE_DEST_n parameters for:
– Local archiving (if not using the flash recovery area) – Standby database location
• Include (at a minimum) one of the following: – LOCATION: Specifies a valid path name – SERVICE: Specifies a valid Oracle Net Services name referencing a
standby database
• Include a LOG_ARCHIVE_DEST_STATE_n parameter for each defined destination.
LOG_ARCHIVE_DEST_1=
'SERVICE=pc00sby1
VALID_FOR=(ONLINE_LOGFILES,PRIMARY_ROLE)
DB_UNIQUE_NAME=pc00sby1'
LOG_ARCHIVE_DEST_STATE_1=ENABLE
51

Specifying Role-Based Destinations
log_archive_dest_1 =
'service=pc00sby1 async
valid_for=
(online_logfile,
primary_role)
db_unique_name=pc00sby1'
Primary database
Standby database
Not used
log_archive_dest_1 =
'service=pc00prmy async
valid_for=
(online_logfile,
primary_role)
db_unique_name=pc00prmy'
52

Combinations for VALID_FOR Combination Primary Physical Logical
ONLINE_LOGFILE, PRIMARY_ROLE Valid Ignored Ignored
ONLINE_LOGFILE, STANDBY_ROLE Ignored Ignored Valid
ONLINE_LOGFILE, ALL_ROLES Valid Ignored Valid
STANDBY_LOGFILE,STANDBY_ROLE Ignored Valid Valid
STANDBY_LOGFILE, ALL_ROLES Ignored Valid Valid
ALL_LOGFILES, PRIMARY_ROLE Valid Ignored Ignored
ALL_LOGFILES, STANDBY_ROLE Ignored Valid Valid
ALL_LOGFILES, ALL_ROLES Valid Valid Valid
53

Defining the Redo Transport Mode
• Use the attributes of LOG_ARCHIVE_DEST_n: – SYNC and ASYNC
• Specify that network I/O operations are to be performed synchronously or asynchronously when using LGWR.
• ASYNC is the default.
– AFFIRM and NOAFFIRM • Ensure that redo was successfully written to disk
on the standby destination.
• NOAFFIRM is the default when ASYNC is specified; AFFIRM is the default when SYNC is specified.
54

Setting Initialization Parameters on the Primary Database
• Specify parameters when standby databases have disk or directory structures that differ from the primary database.
• Use parameters when the primary database is transitioned to a standby database.
Parameter Name Description
DB_FILE_NAME_CONVERT Converts primary database file names
LOG_FILE_NAME_CONVERT Converts primary database log file names
STANDBY_FILE_MANAGEMENT Controls automatic standby file management
55

Specifying Values for DB_FILE_NAME_CONVERT
– DB_FILE_NAME_CONVERT must be defined on standby databases that have different disk or directory structures from the primary.
– Multiple pairs of file names can be listed in the DB_FILE_NAME_CONVERT parameter.
– DB_FILE_NAME_CONVERT applies only to a physical standby database.
– DB_FILE_NAME_CONVERT can be set in the DUPLICATE RMAN script.
DB_FILE_NAME_CONVERT =('/oracle1/dba/',
'/ora1/stby_dba/',
'/oracle2/dba/',
'/ora2/stby_dba/')
56

Specifying Values for LOG_FILE_NAME_CONVERT
– LOG_FILE_NAME_CONVERT is similar to DB_FILE_NAME_CONVERT.
– LOG_FILE_NAME_CONVERT must be defined on standby databases that have different disk or directory structures from the primary.
– LOG_FILE_NAME_CONVERT applies only to a physical standby database.
– LOG_FILE_NAME_CONVERT can be set in the DUPLICATE RMAN script.
LOG_FILE_NAME_CONVERT = ('/oracle1/logs/',
'/ora1/stby_logs/')
57

Specifying a Value for STANDBY_FILE_MANAGEMENT
• STANDBY_FILE_MANAGEMENT is used to maintain consistency when you add or delete a data file on the primary database. – MANUAL (default)
– Data files must be manually added to the standby database.
– AUTO – Adds the data file automatically to the standby database. – Certain ALTER statements are no longer allowed on the standby
database.
• STANDBY_FILE_MANAGEMENT applies to the primary database and physical standby database.
STANDBY_FILE_MANAGEMENT = auto
58

Example: Setting Initialization Parameters on the Primary Database
DB_NAME=pc00prmy
DB_UNIQUE_NAME=pc00prmy
LOG_ARCHIVE_CONFIG='DG_CONFIG=(pc00prmy,pc00sby1)'
CONTROL_FILES='/u01/app/oracle/oradata/pc00prmy/control1.ctl',
'/u01/app/oracle/oradata/pc00prmy/control2.ctl'
LOG_ARCHIVE_DEST_1=
'SERVICE=pc00sby1
VALID_FOR=(ONLINE_LOGFILES,PRIMARY_ROLE)
DB_UNIQUE_NAME=pc00sby1'
LOG_ARCHIVE_DEST_STATE_1=ENABLE
REMOTE_LOGIN_PASSWORDFILE=EXCLUSIVE
LOG_ARCHIVE_FORMAT=%t_%s_%r.arc
59

Creating an Oracle Net Service Name for Your Physical Standby Database
• Update the tnsnames.ora file on the Primary server:
PC00SBY1 =
(DESCRIPTION =
(ADDRESS_LIST =
(ADDRESS = (PROTOCOL = TCP)
(HOST = edt3r17p1.us.oracle.com)
(PORT = 1521))
)
(CONNECT_DATA =
(SERVICE_NAME = pc00sby1.us.oracle.com)
)
)
60

Secure the transfer using SSH tunnels • You may not wish your redo data being sent unencrypted across the
internet to your standby. You can use ssh tunnels to avoid this
• Now the tnsnames entry points to the localhost
SH> ssh -N -L 3333:standby:1521 oracle@standby
PC00SBY1 =
(DESCRIPTION =
(SDU = 32767)
(ADDRESS_LIST =
(ADDRESS = (PROTOCOL = TCP)
(HOST = edt3r17p1.us.oracle.com)
(PORT = 3333))
)
(CONNECT_DATA =
(SERVICE_NAME = pc00sby1.us.oracle.com)
)
)
61

Creating an Entry for Your Standby Database for the Listener
• Configure an entry for your standby database in the listener.ora file on the standby server:
SID_LIST_LISTENER =
(SID_LIST =
(SID_DESC =
(GLOBAL_DBNAME = pc00sby1.us.oracle.com)
(ORACLE_HOME = /u01/app/oracle/product/11.1.0/db_1)
(SID_NAME = pc00sby1)
)
)
62

Copying Your Primary Database Password File to the Physical Standby Database Host
1. Copy the primary database password file to the $ORACLE_HOME/dbs directory on the standby database host.
2. Rename the file for your standby database: orapw<SID>.
63

Creating an Initialization Parameter File for the Physical Standby Database
• Create an initialization parameter file containing a single parameter:
DB_NAME=pc00sby1
64

Creating Directories for the Physical Standby Database
1. Create the audit trail directory in $ORACLE_BASE/admin:
2. Create a directory for the data files in the $ORACLE_BASE/oradata directory:
[oracle@edt3r17p1-orcl ~]$ cd /u01/app/oracle/admin
[oracle@edt3r17p1-orcl admin]$ ls
orcl
[oracle@edt3r17p1-orcl admin]$ mkdir pc00sby1
[oracle@edt3r17p1-orcl admin]$ cd pc00sby1
[oracle@edt3r17p1-orcl orclsby1]$ mkdir adump
[oracle@edt3r17p1-orcl oradata]$ mkdir pc00sby1
[oracle@edt3r17p1-orcl oradata]$ ls
orcl pc00sby1
65

Starting the Physical Standby Database
• Start the physical standby database in NOMOUNT mode:
SQL> startup nomount pfile=$HOME/dbs/pc00sby1.ora
ORACLE instance started.
Total System Global Area 150667264 bytes
Fixed Size 1298472 bytes
Variable Size 92278744 bytes
Database Buffers 50331648 bytes
Redo Buffers 6758400 bytes
66

Setting FAL_CLIENT and FAL_SERVER Initialization Parameters
• Fetch archive log (FAL): – Provides a client/server mechanism for resolving gaps detected in
the range of archived redo logs that are generated at the primary database and received at the standby database.
– Applicable for physical standby databases only. – Process is started only when needed, and shuts down as soon as it
is finished.
• FAL_CLIENT: Specifies the FAL client name that is used by the FAL service
• FAL_SERVER: Specifies the FAL server for a standby database
FAL_CLIENT = 'pc00sby1'
FAL_SERVER = 'pc00prmy'
67

Creating an RMAN Script to Create the Physical Standby Database
• Create an RMAN script to create the physical standby database:
run {
allocate channel prmy1 type disk;
allocate channel prmy2 type disk;
allocate channel prmy3 type disk;
allocate channel prmy4 type disk;
allocate auxiliary channel stby type disk;
duplicate target database for standby
from active database
68

spfile
parameter_value_convert 'pc00prmy','pc00sby1'
set db_unique_name='pc00sby1'
set db_file_name_convert='/pc00prmy/','/pc00sby1/'
set log_file_name_convert='/pc00prmy/','/pc00sby1/'
set control_files=
'/u01/app/oracle/oradata/pc00sby1.ctl'
set log_archive_max_processes='5'
set fal_client='pc00sby1'
set fal_server='pc00prmy'
set standby_file_management='AUTO'
set log_archive_config='dg_config=(pc00prmy,pc00sby1)'
set log_archive_dest_1='service=pc00prmy ASYNC
valid_for=(ONLINE_LOGFILE,PRIMARY_ROLE)
db_unique_name=pc00prmy';
}
69

Creating the Physical Standby Database
1. Invoke RMAN and connect to the primary database and the physical standby database.
2. Execute the RMAN script to create the physical standby database.
RMAN> connect target sys/oracle
RMAN> connect auxiliary sys/oracle@pc00sby1
RMAN> @cr_phys_standby
70

Starting Redo Apply
• Execute the following command on the standby database to start Redo Apply:
SQL> ALTER DATABASE
2 RECOVER MANAGED STANDBY DATABASE
3 USING CURRENT LOGFILE
4 DISCONNECT FROM SESSION;
71

Enabling Real-Time Apply RFS
Standby redo log
files
MRP
ARC0
Primary database
Standby database
Archived redo log
files
72

Real Time Apply Benefits
• Standby databases now more closely synchronized with the primary
– More up-to-date, real-time reporting
– Faster switchover and failover times
• Reduces planned and unplanned downtime
• Better Recovery Time Objective (RTO) for DR
73

DEMO
74

Special Note: Standby Database on the Same System
• Standby database data files must be at a different location. • Each database instance must archive to different locations. • Service names must be unique. • This standby database does not protect against disaster.
Primary Standby /oracle/dba /oracle/standby/dba
75

Preventing Primary Database Data Corruption from Affecting the Standby Database
• Oracle Database processes can validate redo data before it is applied to the standby database.
• Corruption detection checks occur on the primary database during redo transport and on the standby database during redo apply.
• Implement lost write detection by setting DB_LOST_WRITE_PROTECT to TYPICAL on the primary and standby databases.
76

Oracle Data Guard Broker: Overview
77

Oracle Data Guard Broker: Features
• The Oracle Data Guard broker is a distributed management framework.
• The broker automates and centralizes the creation, maintenance, and monitoring of Data Guard configurations.
• With the broker, you can perform all management operations locally or remotely with easy-to-use interfaces: – Oracle Enterprise Manager Grid Control – DGMGRL (a command-line interface)
78

Benefits of Using the Data Guard Broker
• Enhances the high-availability, data protection, and disaster protection capabilities inherent in Oracle Data Guard by automating both configuration and monitoring tasks
• Streamlines the process for any one of the standby databases to replace the primary database and take over production processing
• Enables easy configuration of additional standby databases • Provides simplified, centralized, and extended management • Automatically communicates between the databases in a Data Guard
configuration by using Oracle Net Services • Provides built-in validation that monitors the health of all databases
in the configuration
79

Comparing Configuration Management With and Without the Data Guard Broker
With the Broker Without the Broker
General Manage databases as one Manage databases separately
Creation of the standby
database
Use Grid Control wizards Manually create files
Configuration and
management
Configure and manage
from single interface
Set up services manually for each database
Monitoring • Monitor continuously
• Unified status and reports
• Integrate with EM events
Monitor each database individually through
views and scripts
Control Invoke role transitions with
a single command
Coordinate sequences of multiple commands
across database sites for role transitions
80

Data Guard Broker: Components
• Client-side: – Oracle Enterprise Manager Grid Control – DGMGRL (command-line interface)
• Server-side: Data Guard monitor – DMON process – Configuration files
81

Data Guard Broker: Configurations
• The most common configuration is a primary database at one location and a standby database at another location.
pc00prmy
Primary site
pc00sby1
Standby site
Oracle Net
82

Data Guard Broker: Management Model
Data Guard Broker Configuration
Primary database
Broker-controlled
databases
Standby database Standby database
Standby database Standby database
Standby database Standby database
Standby database Standby database
Standby database
Instances Instances
83

Primary site
Standby site 9 Standby site 2
Graphical user interface or
command-line interface
DMON
Archived redo logs
Online redo logs
Standby site 1
Oracle Net Standby
redo logs
Archived redo logs
Log apply
services
Data Guard Configuration
Log transport services
Primary database
DMON
Configuration files
Configuration files Standby
database Standby redo logs
Online redo logs
Data Guard Broker: Architecture
84

Data Guard Monitor: DMON Process
• Server-side background process • Part of each database instance in the configuration • Created when you start the broker • Performs requested functions and monitors the resource • Communicates with other DMON processes in the configuration • Updates the configuration file • Creates the drc<SID> trace file in the location set by the
DIAGNOSTIC_DEST initialization parameter • Modifies initialization parameters during role transitions as
necessary
85

Data Guard Broker Interfaces
• Command-line interface (CLI): – Is started by entering DGMGRL at the command
prompt where the Oracle server or an Oracle client is installed
– Enables you to control and monitor a Data Guard configuration from the prompt or in scripts
• Oracle Enterprise Manager Grid Control: – Provides wizards to simplify creating and managing
standby databases
86

Using the Command-Line Interface of the Data Guard Broker
DGMGRL> connect sys/oracle
Connected.
DGMGRL> show configuration verbose
Configuration
Name: DGConfig1
Enabled: YES
Protection Mode: MaxAvailability
Databases:
pc00prmy - Primary database
pc00sby1 - Physical standby database
Fast-Start Failover: DISABLED
Current status for "DGConfig1":
SUCCESS
87

Using Oracle Enterprise Manager 10g Grid Control
Click “Setup and Manage” to access the Data Guard pages.
88

Data Guard Overview Page
89

Creating a Data Guard Broker Configuration
90

Data Guard Broker: Requirements
• Oracle Database Enterprise Edition • Single-instance or multi-instance environment • COMPATIBLE parameter: Set to 10.2.0.1.0 or later for
primary and standby databases • Oracle Net Services network files: Must be configured
for the primary database and any existing standby databases. Enterprise Manager Grid Control configures files for new standby databases.
• GLOBAL_DBNAME attribute: Set to a concatenation of db_unique_name_DGMGRL.db_domain
91

Data Guard Broker: Requirements
• DG_BROKER_START initialization parameter: Set to TRUE
• Primary database: ARCHIVELOG mode
• All databases: MOUNT or OPEN mode
• DG_BROKER_CONFIG_FILEn: Configured for any RAC databases
92

Data Guard Broker and the SPFILE
• You must use a server parameter file (SPFILE) for initialization parameters.
• Using the SPFILE enables the Data Guard broker to keep its configuration file and the database SPFILE consistent.
• If you use the broker, use Enterprise Manager Grid Control or DGMGRL to update database parameter values.
93

Data Guard Monitor: Configuration File • The broker configuration file is:
– Automatically created and named using a default path name and file name when the broker is started
– Managed automatically by the DMON process • The configuration file and a copy are created at each managed site
with default names: – dr1<db_unique_name>.dat – dr2<db_unique_name>.dat
• Configuration file default locations are operating-system specific: – Default location for UNIX and Linux: ORACLE_HOME/dbs – Default location for Windows: ORACLE_HOME\database
• Use DG_BROKER_CONFIG_FILEn to override the default path name and file name.
94

Data Guard Broker: Log Files
• The broker log files contain information recorded by the DMON process.
• There is one file for each database in the broker configuration.
• Broker log files are created in the same directory as the alert log and are named drc<$ORACLE_SID>.log.
95

Creating a Broker Configuration
1. Invoke DGMGRL and connect to the primary database.
2. Define the configuration, including a profile for the primary database.
3. Add standby databases to the configuration.
4. Enable the configuration, including the databases.
96

Defining the Broker Configuration and the Primary Database Profile
DGMGRL> CREATE CONFIGURATION 'DGConfig1' AS
> PRIMARY DATABASE IS pc00prmy
> CONNECT IDENTIFIER IS pc00prmy;
Configuration "DGConfig1" created with primary database
"pc00prmy"
DGMGRL>
97

Adding a Standby Database to the Configuration
DGMGRL> ADD DATABASE pc00sby1 AS
> CONNECT IDENTIFIER IS pc00sby1;
Database "pc00sby1" added
DGMGRL>
98

Enabling the Configuration
DGMGRL> ENABLE CONFIGURATION;
Enabled.
DGMGRL> SHOW CONFIGURATION
Configuration
Name: DGConfig1
Enabled: YES
Protection Mode: MaxPerformance
Databases:
pc00prmy - Primary database
pc00sby1 - Physical standby database
Fast-Start Failover: DISABLED
Current status for "DGConfig1":
SUCCESS
99

Demo (cont.)
100

• To alter a database property:
• To alter the state of the standby database:
• To alter the state of the primary database:
Changing Database Properties and States
DGMGRL> EDIT DATABASE pc00sby1
> SET PROPERTY LogXptMode='SYNC';
DGMGRL> EDIT DATABASE pc00sby1 SET STATE='APPLY-OFF';
DGMGRL> EDIT DATABASE pc00prmy
> SET STATE='TRANSPORT-OFF';
101

Managing Redo Transport Services by Using DGMGRL
• Specify database properties to manage redo transport services: – DGConnectIdentifier
– LogXptMode
– LogShipping
102

Managing the Redo Transport Service by Using the LogXptMode Property
• The redo transport service must be set up for the chosen data protection mode.
• Use the LogXptMode property to set the redo transport services: – ASYNC
• Sets the ASYNC and NOAFFIRM attributes of LOG_ARCHIVE_DEST_n • Required for maximum performance mode
– SYNC • Sets the SYNC and AFFIRM attributes of LOG_ARCHIVE_DEST_n • Required for maximum protection and maximum availability modes
104

Setting LogXptMode to ASYNC Primary database
transactions
RFS
MRP or LSP
Archived redo logs
ARC0
Standby database
Standby redo logs
Ora
cle
Net
LNSn
(Real-time apply)
Sets the ASYNC and NOAFFIRM attributes of
LOG_ARCHIVE_DEST_n
Standby ack
Online redo logs
Redo buffer
105
LGWR

Setting LogXptMode to SYNC
Primary database transactions
Online redo logs
RFS
MRP or LSP
Archived redo logs
ARC0
Standby database
Standby redo logs
Ora
cle
Net
(Real-time apply)
Sets the SYNC and AFFIRM attributes of LOG_ARCHIVE_DEST_n
Standby ack
LNSn
Redo buffer
106
LGWR

Controlling the Shipping of Redo Data by Using the LogShipping Property
• LogShipping controls whether archived redo log files are sent to a specified standby database.
• LogShipping is applicable only when the primary database state is set to TRANSPORT-ON.
107

• Disable broker management of the configuration:
• Disable broker management of a standby database:
Disabling Broker Management of the Configuration or Standby Database
DGMGRL> DISABLE CONFIGURATION;
DGMGRL> DISABLE DATABASE 'pc00sby1';
108

• Remove a standby database from the configuration:
• Remove the configuration:
Removing the Configuration or Standby Database
DGMGRL> REMOVE DATABASE 'pc00sby1';
DGMGRL> REMOVE CONFIGURATION;
109

Creating a Logical Standby Database
110

Benefits of Implementing a Logical Standby Database
• Provides an efficient use of system resources: – Open, independent and active production database – Additional indexes and materialized views can be created for
improved query performance
• Reduces workload on the primary database by offloading the following workloads to a logical standby database: – Reporting – Summations – Queries
111

Benefits of Implementing a Logical Standby Database
• Provides data protection: – Primary database corruptions not propagated
• Provides disaster recovery capabilities: – Switchover and failover – Minimizes down time for planned and unplanned
outages
• Can be used to upgrade Oracle Database software and apply patch sets
112

Logical Standby Database: SQL Apply Architecture
Primary database
Redo transport
Transform redo information into
SQL
SQL Apply
Reports
Production database
Logical standby database
Logical standby database
113

Redo records
Shared pool
Transaction groups
Transactions sorted in
dependency order
Log Mining
Apply processing
Logical change records not grouped into transactions
Transactions to be applied
Reader Preparer Builder
Analyzer Coordinator Applier
Data files
Redo data from primary database
LCR LCR
:
SQL Apply Process: Architecture
114

Preparing to Create a Logical Standby Database
• Perform the following steps on the primary database before creating a logical standby database: – Check for unsupported data types.
– Be aware of unsupported DDL commands.
– Ensure row uniqueness.
– Verify that the primary database is configured for ARCHIVELOG mode.
115

Unsupported Objects
• Log apply services automatically exclude unsupported objects when applying redo data to the logical standby database.
• Unsupported objects: – Tables and sequences in the SYS schema – Tables using table compression – Tables used to support materialized views – Global temporary tables – Tables with unsupported data types (see list on next page)
116

Unsupported Data Types
• Log apply services automatically exclude tables with unsupported data types when applying redo data to the logical standby database.
• Unsupported data types: – BFILE, ROWID, and UROWID
– User-defined types – Multimedia data types (Spatial, Image, and Oracle Text) – Collections (VARRAYS and nested tables) – LOBs stored as SecureFiles – XMLType stored as OBJECT RELATIONAL – BINARY XML
117

Checking for Unsupported Tables • Query DBA_LOGSTDBY_UNSUPPORTED_TABLE on the
primary database for unsupported tables:
SQL> SELECT * FROM dba_logstdby_unsupported_table
2 ORDER BY owner;
OWNER TABLE_NAME
------------------------------ ------------------------------
IX AQ$_STREAMS_QUEUE_TABLE_T
IX AQ$_STREAMS_QUEUE_TABLE_H
…
OE CUSTOMERS
OE WAREHOUSES
PM PRINT_MEDIA
PM ONLINE_MEDIA
SH DIMENSION_EXCEPTIONS
20 rows selected.
118

Checking for Tables with Unsupported Data Types
• Query DBA_LOGSTDBY_UNSUPPORTED on the primary database for tables with unsupported data types:
SQL> SELECT table_name, column_name, attributes, data_type
2 FROM dba_logstdby_unsupported WHERE owner = 'OE';
TABLE_NAME COLUMN_NAME ATTRIBUTES DATA_TYPE
-------------- -------------------- ------------ ----------
CUSTOMERS CUST_ADDRESS OBJECT
CUSTOMERS PHONE_NUMBERS VARRAY
CUSTOMERS CUST_GEO_LOCATION OBJECT
WAREHOUSES WH_GEO_LOCATION OBJECT
PURCHASEORDER SYS_NC_ROWINFO$ Object Table OPAQUE
CATEGORIES_TAB CATEGORY_NAME Object Table VARCHAR2
CATEGORIES_TAB CATEGORY_DESCRIPTION Object Table VARCHAR2
CATEGORIES_TAB CATEGORY_ID Object Table NUMBER
CATEGORIES_TAB PARENT_CATEGORY_ID Object Table NUMBER
9 rows selected.
119
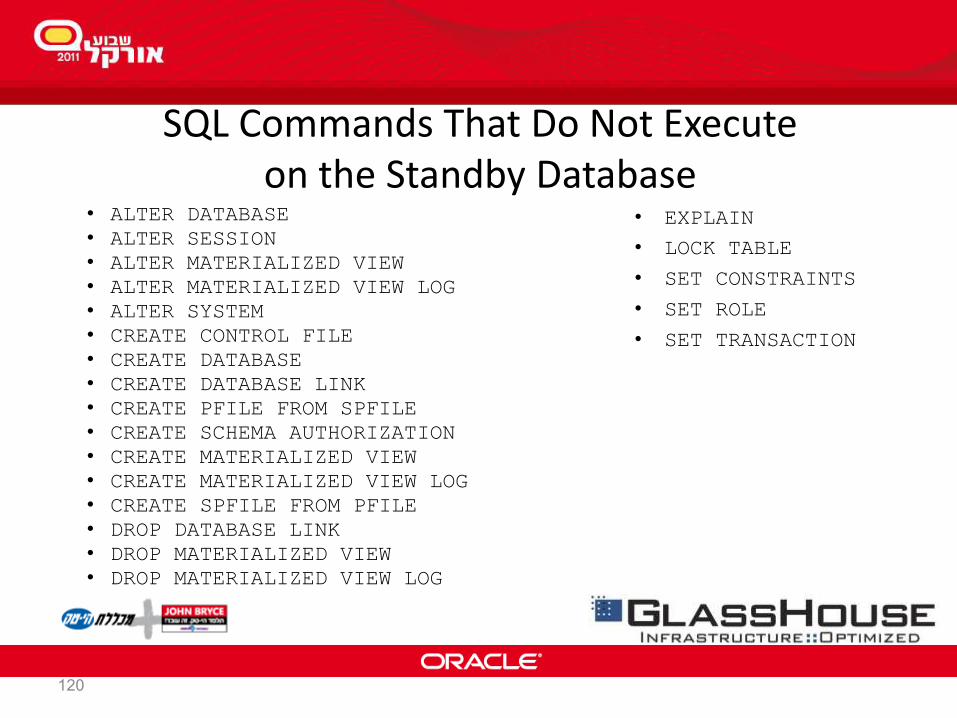
SQL Commands That Do Not Execute on the Standby Database
• EXPLAIN
• LOCK TABLE
• SET CONSTRAINTS
• SET ROLE
• SET TRANSACTION
• ALTER DATABASE
• ALTER SESSION
• ALTER MATERIALIZED VIEW
• ALTER MATERIALIZED VIEW LOG
• ALTER SYSTEM
• CREATE CONTROL FILE
• CREATE DATABASE
• CREATE DATABASE LINK
• CREATE PFILE FROM SPFILE
• CREATE SCHEMA AUTHORIZATION
• CREATE MATERIALIZED VIEW
• CREATE MATERIALIZED VIEW LOG
• CREATE SPFILE FROM PFILE
• DROP DATABASE LINK
• DROP MATERIALIZED VIEW
• DROP MATERIALIZED VIEW LOG
120

Ensuring Unique Row Identifiers • Query DBA_LOGSTDBY_NOT_UNIQUE on the primary
database to find tables without a unique identifier:
• Add a primary key or unique index to ensure that SQL Apply can efficiently apply data updates.
SQL> SELECT * FROM dba_logstdby_not_unique;
OWNER TABLE_NAME BAD_COLUMN
------ -------------------------- ----------
HR EMP_HIST N
SCOTT BONUS N
SCOTT SALGRADE N
SH SUPPLEMENTARY_DEMOGRAPHICS N
SH COSTS N
SH SALES N
121

Adding a Disabled Primary Key RELY Constraint
• You can add a disabled RELY constraint to uniquely identify rows:
SQL> ALTER TABLE hr.employees
2 ADD PRIMARY KEY (employee_id, last_name)
3 RELY DISABLE;
122

Creating a Logical Standby Database by Using SQL Commands
To create a logical standby database by using SQL commands: 1. Create a physical standby database. 2. Stop Redo Apply on the physical standby database. 3. Prepare the primary database to support a logical standby database. 4. Build a LogMiner dictionary in the redo data. 5. Transition to a logical standby database. 6. Open the logical standby database. 7. Verify that the logical standby database is performing properly.
123

Step 1: Create a Physical Standby Database
a. Create a physical standby database.
b. Ensure that the physical standby database is current with the primary database.
124

Step 2: Stop Redo Apply on the Physical Standby Database
• Before converting the physical standby database to a logical standby database, stop Redo Apply.
• Stopping Redo Apply is required to avoid applying changes past the redo that contains the LogMiner dictionary.
or
SQL> ALTER DATABASE RECOVER MANAGED STANDBY
2 DATABASE CANCEL;
DGMGRL> EDIT DATABASE 'pc00sby1' set state='apply-off';
Succeeded.
125

Step 3: Prepare the Primary Database to Support a Logical Standby Database
a. Set the LOG_ARCHIVE_DEST_n initialization parameter for transitioning to a logical standby role.
b. Set the value of UNDO_RETENTION to 3600.
LOG_ARCHIVE_DEST_2=
'LOCATION=<directory>
VALID_FOR=(STANDBY_LOGFILES, STANDBY_ROLE)
DB_UNIQUE_NAME=pc00prmy'
LOG_ARCHIVE_DEST_STATE_2=enable
126

Step 4: Build a LogMiner Dictionary in the Redo Data
• Build a LogMiner dictionary in the redo data so that SQL Apply can properly interpret changes in the redo.
• Supplemental logging is automatically enabled.
• Execute the procedure on the primary database:
SQL> EXECUTE DBMS_LOGSTDBY.BUILD;
127

Step 5: Transition to a Logical Standby Database
a. Execute the following command on the standby database to convert it to a logical standby database:
b. Shut down the logical standby database instance and restart it in MOUNT mode.
c. Adjust initialization parameters: LOG_ARCHIVE_DEST_n
SQL> ALTER DATABASE RECOVER TO
2 LOGICAL STANDBY db_name;
128

Step 6: Open the Logical Standby Database
a. Open the new logical standby database with the RESETLOGS option:
b. Start the application of redo data to the logical standby database:
SQL> ALTER DATABASE OPEN RESETLOGS;
SQL> ALTER DATABASE START LOGICAL STANDBY
2 APPLY IMMEDIATE;
129

Adding a Logical Standby Database to a Data Guard Broker Configuration
• Use DGMGRL to add a logical standby database to an existing Data Guard configuration:
DGMGRL> ADD DATABASE 'pc00sby2' AS
> CONNECT IDENTIFIER IS pc00sby2;
Database "pc00sby2" added
DGMGRL>
130

Step 7: Verify That the Logical Standby Database Is Performing Properly
a. Verify that the archived redo log files were registered:
b. Begin sending redo data to the standby database:
c. Query the DBA_LOGSTDBY_LOG view to verify that the archived redo log files were registered.
SQL> SELECT sequence#, first_time, next_time,
2 dict_begin, dict_end
3 FROM dba_logstdby_log ORDER BY sequence#;
SQL> ALTER SYSTEM ARCHIVE LOG CURRENT;
131

Step 7: Verify That the Logical Standby Database Is Performing Properly
d. Verify that redo data is being applied correctly:
e. Query the V$LOGSTDBY_PROCESS view to see current SQL Apply activity:
f. Check the overall progress of SQL Apply:
SQL> SELECT name, value FROM v$logstdby_stats
2 WHERE name = 'coordinator state';
SQL> SELECT sid, serial#, spid, type, high_scn
2 FROM v$logstdby_process;
SQL> SELECT applied_scn, latest_scn
2 FROM v$logstdby_progress;
132

Creating a Logical Standby Database by Using Enterprise Manager
Select “Create a new logical standby database.”
133

Using the Add Standby Database Wizard
134

Using the Add Standby Database Wizard
135

Using the Add Standby Database Wizard
136

Securing Your Logical Standby Database
• Configure the database guard to control user access to tables. • ALTER DATABASE GUARD command keywords:
– ALL: Prevents users from making changes to any data in the database
– STANDBY: Prevents users from making changes to any data maintained by Data Guard SQL Apply
– NONE: Normal security
• Query the GUARD_STATUS column in V$DATABASE. • The database guard level is automatically set to ALL by the
broker on the logical standby database. • The database guard level applies to all users except SYS.
137

Automatic Deletion of Redo Log Files by SQL Apply
Logical standby database
Redo logs from primary
database
Transform redo information into
SQL
Delete redo log files
SQL Apply
138

Managing Remote Archived Log File Retention
• The LOG_AUTO_DEL_RETENTION_TARGET parameter: – Is used to specify the number of minutes that SQL
Apply keeps a remote archived log after completely applying its contents
– Is applicable only if LOG_AUTO_DELETE is set to TRUE and the flash recovery area is not being used to store remote archived logs
– Has a default value of 1,440 minutes
139

Managing SQL Apply Filtering
• Use the following configurable database properties to define a SQL Apply filter: – LsbyASkipCfgPr: SQL Apply should ignore
(skip) SQL statements as specified.
– LsbyASkipErrorCfgPr: SQL Apply should ignore (skip) errors as specified.
– LsbyASkipTxnCfgPr: SQL Apply should ignore (skip) transactions as specified.
140

Managing SQL Apply Filtering
• Use the following configurable database properties to delete a previously defined SQL Apply filter: – LsbyDSkipCfgPr: Deletes an existing SQL
Apply skip specification – LsbyDSkipErrorCfgPr: Deletes an existing
SQL Apply skip error specification – LsbyDSkipTxnCfgPr: Reverses or removes the
actions of the LsbyASkipTxnCfgPr property
141

Viewing SQL Apply Filtering Settings
• Query DBA_LOGSTDBY_SKIP to view SQL Apply filtering settings:
SQL> SELECT error, statement_opt, name
2 FROM dba_logstdby_skip
3 WHERE owner='HR';
ERROR STATEMENT_OPT NAME
---------- -------------------- ----------
N DML JOBS
142

Managing SQL Apply Filtering by Using Enterprise Manager
143

Using DBMS_SCHEDULER to Create Jobs on a Logical Standby Database
• Scheduler jobs can be created on a standby database. • When a Scheduler job is created, it defaults to the local
role. • Activate existing jobs by using the DATABASE_ROLE
attribute of DBMS_SCHEDULER.SET_ATTRIBUTE, which has the following settings: – PRIMARY: The job runs only when the database is in the
role of the primary database. – LOGICAL STANDBY: The job runs only when the database
is in the role of a logical standby.
144

Configuring Data Protection Modes
145

Data Protection Modes and Redo Transport Modes
• A data protection mode requires a specific redo transport mode.
• A redo transport mode alone does not define a data protection mode.
146

Data Protection Modes
• Three data protection modes:
– Maximum protection
– Maximum availability
– Maximum performance
• Help to balance data availability and system performance
147

Maximum Protection Mode
• Maximum protection mode ensures zero data loss in the event of a failure of the primary database, the network, or all standby databases.
• The primary database shuts down if a fault prevents it from writing its redo stream to at least one synchronized standby database.
• Redo data must be written to both the local online redo log and the standby redo log on at least one synchronized standby database.
• Configuration requirements: At least one standby database must have a standby redo log, and that standby database destination must be configured with the SYNC and AFFIRM redo transport attributes.
148

Maximum Availability Mode
• Maximum availability mode ensures zero data loss without compromising the availability of the primary database.
• Redo data must be written to both the local online redo log and the standby redo log on at least one synchronized standby database.
• The primary database does not shut down if it cannot write to at least one synchronized standby database.
• If no synchronized standby databases are available, the primary database operates in an unsynchronized mode until at least one standby database is synchronized.
• Configuration requirements: At least one standby database must have a standby redo log, and that standby database destination must be configured with the SYNC and AFFIRM redo transport attributes.
149

Maximum Performance Mode
• Maximum performance mode is the default level of data protection. • This mode provides the highest possible level of data protection
without affecting the performance of the primary database. • Transactions can commit as soon as the redo data is written to the
local online redo log. • Redo data is shipped to the standby database asynchronously with
respect to the commitment of the transactions that create the redo data.
• Configuration requirements: – Standby redo log on at least one standby database – At least one standby database that is configured with the ASYNC and
NOAFFIRM redo transport attributes
150

Comparing Data Protection Modes
Mode Risk of Data Loss Transport If no acknowledgment is
received:
Maximum
Protection
Zero data loss
Double failure protection
SYNC Stall primary until an
acknowledgement is
received
Maximum
Availability
Zero data loss SYNC Stall primary until threshold
period expires, then
resume processing
Maximum
Performance
Potential for minimal
data loss
ASYNC Primary never waits for
standby acknowledgement
151

Setting the Data Protection Mode by Using DGMGRL
1. Configure standby redo logs. 2. Set the LogXptMode property (if necessary).
• Maximum protection: SYNC • Maximum availability: SYNC • Maximum performance: ASYNC
3. Set the data protection mode. DGMGRL> EDIT DATABASE 'pc00sby1' SET PROPERTY
'LogXptMode'='SYNC';
Property "LogXptMode" updated
DGMGRL> EDIT CONFIGURATION SET PROTECTION MODE AS
MAXAVAILABILITY;
Succeeded.
152
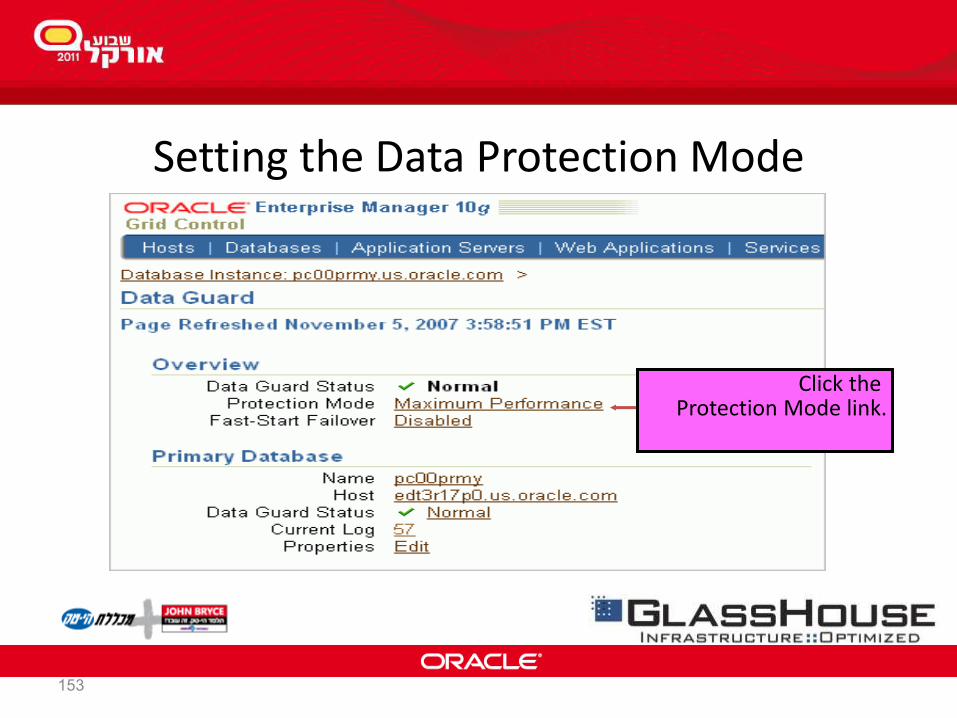
Setting the Data Protection Mode
Click the Protection Mode link.
153

Setting the Data Protection Mode
154

Monitoring Data Guard
155

Monitoring the Data Guard Configuration by Using Enterprise Manager Grid Control
• On the Data Guard Overview page, you can: – View the Standby Progress Summary graph that shows
the transport lag and the apply lag – Access additional performance and configuration
information • Performance Overview page: Information about data archived
and applied, standby database progress, and log services • Log File Details page: Information about the primary database
online redo log file
– Perform a Verify operation
156

Viewing the Data Guard Configuration Status
157

Monitoring Data Guard Performance
158

Viewing Log File Details
159

Viewing Data Guard Diagnostic Information
• The Data Guard broker records information in: – Oracle database alert log files – Data Guard broker log files
• Database status information is available by issuing the SHOW DATABASE command.
• Use the following database properties to obtain additional information: – StatusReport
– LogXptStatus
– InconsistentProperties
– InconsistentLogXptProps
DGMGRL> SHOW DATABASE 'pc00prmy' 'StatusReport';
160

Using Monitorable Database Properties to Identify a Failure
1. Check the configuration status:
2. Check the database status:
3. Check the StatusReport monitorable database property:
4. Check additional monitorable database properties as appropriate.
DGMGRL> SHOW CONFIGURATION;
DGMGRL> SHOW DATABASE 'pc00prmy';
DGMGRL> SHOW DATABASE 'pc00prmy' 'StatusReport';
161

Setting the LOG_ARCHIVE_TRACE Initialization Parameter
• LOG_ARCHIVE_TRACE is optional and is used for diagnostic purposes.
• Set this parameter to an integer value to see the progression of redo log archiving to the standby system. – On the primary database, processes write an audit trail of the
archived logs sent to the standby system into a trace file. – On the standby database, processes write an audit trail of the
archived logs received from the primary database into a trace file.
• Trace files are written to the Automatic Diagnostic Repository, the location of which is specified by the DIAGNOSTIC_DEST initialization parameter.
162

Monitoring Redo Apply by Querying V$MANAGED_STANDBY
SQL> SELECT process, status, group#, thread#, sequence#
2 FROM v$managed_standby
3 order by process, group#, thread#, sequence#;
PROCESS STATUS GROUP# THREAD# SEQUENCE#
--------- ------------ ---------- ---------- ----------
ARCH CLOSING 4 1 142
ARCH CLOSING 4 1 146
ARCH CLOSING 4 1 148
ARCH CLOSING 5 1 141
ARCH CLOSING 5 1 147
MRP0 APPLYING_LOG N/A 1 149
RFS IDLE 2 1 149
RFS IDLE N/A 0 0
RFS IDLE N/A 0 0
163

Evaluating Redo Data by Querying V$DATAGUARD_STATS
SQL> SELECT name, value, time_computed
2 FROM v$dataguard_stats;
NAME VALUE TIME_COMPUTED
------------------------- --------------- --------------
apply finish time +00 00:00:00.0 13-FEB-2008 02:44:21
apply lag +00 00:00:00 13-FEB-2008 02:44:21
estimated startup time 12 13-FEB-2008 02:44:21
standby has been open N 13-FEB-2008 02:44:21
transport lag +00 00:00:00 13-FEB-2008 02:44:21
164

Viewing Data Guard Status Information by Querying V$DATAGUARD_STATUS
SQL> SELECT timestamp, facility, dest_id, message_num,
2 error_code, message
3 FROM v$dataguard_status
4 ORDER by timestamp;
TIMESTAMP FACILITY DEST_ID MESSAGE_NUM ERROR_CODE
--------- --------------- ------- ----------- ----------
MESSAGE
--------------------------------------------------------
13-FEB-08 Log Apply Servi 0 562 0
Media Recovery Waiting for thread 1 sequence 151
13-FEB-08 Remote File Ser 0 563 0
Primary database is in MAXIMUM AVAILABILITY mode
13-FEB-08 Remote File Ser 0 564 0
Standby controlfile consistent with primary
13-FEB-08 Remote File Ser 0 565 0
RFS[25]: Successfully opened standby log 5:
'/u01/app/oracle/oradata/pc00sby1/srl02.log'
165

Optimizing a Data Guard Configuration
166

Monitoring Configuration Performance by Using Enterprise Manager Grid Control
• Review detailed performance statistics on the Performance Overview page.
167

Optimizing Redo Transport Services
• Optimize redo transport with the following techniques:
– Optimizing asynchronous redo transmission by using multiple archiver processes
– Compressing redo data
168

Setting the ReopenSecs Database Property
• This property specifies the minimum number of seconds before the archiver process tries to access a previously failed destination.
• Broker default: 300 • Set for the standby database. • Setting is propagated to the REOPEN attribute of the LOG_ARCHIVE_DEST_n initialization parameter of the primary database.
DGMGRL> EDIT DATABASE 'pc00sby1'
> SET PROPERTY 'ReopenSecs'=600;
169

Setting the NetTimeout Database Property
• This property specifies the number of seconds that the log writer process (LGWR) waits for Oracle Net Services to respond to a request.
• Broker default: 30 • Setting is propagated to the NET_TIMEOUT
attribute of the LOG_ARCHIVE_DEST_n initialization parameter of the primary database.
DGMGRL> EDIT DATABASE 'pc00sby1'
> SET PROPERTY 'NetTimeout'=20;
170

Optimizing Redo Transmission by Setting MaxConnections
LGWR
Primary database
transactions
Online redo logs
ARC0
RFS
MRP or LSP
Archived redo logs
Archived redo logs
ARC1 ARC2
LNSn
Ora
cle
Net
Reports
Backup
Standby database
171

Setting the MaxConnections Database Property
• This property specifies the number of archiver processes that are used to transmit redo data from a single archived redo log on the primary database to the archived redo log at the remote site for gap resolution.
• Broker default: 1 • Setting is propagated to the MAX_CONNECTIONS attribute of
the LOG_ARCHIVE_DEST_n initialization parameter of the primary database.
DGMGRL> EDIT DATABASE 'pc00sby1'
> SET PROPERTY 'MaxConnections'=5;
172

Compressing Redo Data by Setting the RedoCompression
Property • This property enables compression of archived redo log files
during gap transmission to the standby database. • Setting is propagated to the COMPRESSION attribute of the
LOG_ARCHIVE_DEST_n initialization parameter. • Determine if redo compression is enabled by querying the
COMPRESSION column of the V$ARCHIVE_DEST view.
DGMGRL> EDIT DATABASE 'pc00sby1'
> SET PROPERTY 'RedoCompression'='ENABLE';
173

Compressing Redo Data by Setting the RedoCompression
Property • This property enables compression of archived redo log files
during gap transmission to the standby database. • Setting is propagated to the COMPRESSION attribute of the
LOG_ARCHIVE_DEST_n initialization parameter. • Determine if redo compression is enabled by querying the
COMPRESSION column of the V$ARCHIVE_DEST view.
DGMGRL> EDIT DATABASE 'pc00sby1'
> SET PROPERTY 'RedoCompression'='ENABLE';
174

Delaying the Application of Redo • Delaying the application of redo helps safeguard
against: • Data corruption • User errors
Production database
Standby database
Ora
cle
Net
Delayed application
175

Setting the DelayMins Database Property to Delay the Application of Redo
• This property specifies the number of minutes that log apply services must wait before applying redo data to the standby database.
• Broker default: 0 (meaning that apply services applies redo data as soon as possible)
• Setting is propagated to the DELAY attribute of the LOG_ARCHIVE_DEST_n initialization parameter of the primary database.
DGMGRL> EDIT DATABASE 'pc00sby1'
> SET PROPERTY 'DelayMins'=5;
176

Using Enterprise Manager to Delay the Application of Redo
Specify the delay in minutes.
177

Optimizing SQL Apply
• Adjust the number of processes allocated to SQL Apply. – APPLIER processes – PREPARER processes
• Modify SQL Apply parameters to control the number of processes allocated to SQL Apply. – APPLY_SERVERS: Number of APPLIER processes that are used to apply
changes – MAX_SERVERS: Number of processes that SQL Apply uses to read and
apply redo – PREPARE_SERVERS: Number of PREPARER processes that are used to
prepare changes
• Set SQL Apply parameters by using the DBMS_LOGSTDBY package.
178

Adjusting the Number of APPLIER Processes
• Determine whether adjusting the number of APPLIER processes achieves greater throughput. – Determine if APPLIER processes are busy:
– Determine if there is enough work available for additional APPLIER processes:
• Adjust the MAX_SERVERS parameter (if necessary). • Adjust the APPLY_SERVERS parameter to increase the number of
APPLIER processes.
SQL> SELECT COUNT(*) AS IDLE_APPLIER
2 FROM V$LOGSTDBY_PROCESS
3 WHERE TYPE = 'APPLIER' and status_code = 16166;
SQL> SELECT NAME, VALUE FROM V$LOGSTDBY_STATS
2 WHERE NAME LIKE 'transactions%';
179

Adjusting the Number of PREPARER Processes
• Determine whether adjusting the number of PREPARER processes is required.
– Determine if all PREPARER processes are busy:
– Determine if the number of transactions ready to be applied is less than the number of available APPLIER processes:
SQL> SELECT COUNT(*) AS IDLE_PREPARER
2 FROM V$LOGSTDBY_PROCESS
3 WHERE TYPE = 'PREPARER' and status_code = 16166;
SQL> SELECT NAME, VALUE FROM V$LOGSTDBY_STATS
2 WHERE NAME LIKE 'transactions%';
SQL> SELECT COUNT(*) AS APPLIER_COUNT
2 FROM V$LOGSTDBY_PROCESS WHERE TYPE = 'APPLIER';
180

Adjusting the Number of PREPARER Processes
– Determine if there are idle APPLIER processes:
• Adjust the MAX_SERVERS parameter if necessary.
• Adjust the PREPARE_SERVERS parameter to increase the number of PREPARER processes.
SQL> SELECT COUNT(*) AS IDLE_APPLIER
2 FROM V$LOGSTDBY_PROCESS
3 WHERE TYPE = 'APPLIER' and status_code = 16166;
181

Oracle Active Data Guard
182

183
Oracle Active Data Guard
• Data Guard 11g – Recovery (redo apply) must be stopped to open a standby read-only
– Redo Apply has exclusive access to data files –reads not allowed
– Not possible to guarantee read consistency while redo apply is active
• Data Guard 11g with the Active Data Guard Option
– Physical Standby is open read-only while redo apply is active
– Read consistency is guaranteed
– Redo apply is not adversely affected by read-only workload

Oracle Active Data Guard
• Is an option for Oracle Database 11g Enterprise Edition and has extra licensing costs!
• Enhances quality of service by offloading resource-intensive activities from a production database to a standby database
• Includes the following features: – Real-time query – RMAN block change tracking on a physical standby
database

Using Real-Time Query
Physical standby database
Primary database
Redo apply
Redo stream
Redo transport
Queries
185

186
Guarantee of Consistent Reads
• Maintained through Query SCN – Identifies most recent read point – Used by queries to insure consistent reads – Current value given by current_scnfrom v$database
on standby
• Redo Apply advances the Query SCN – After all dependent changes have been fully applied – Propagated to all other instances in standby RAC

187
Enabling Active Data Guard
• Begin with a Data Guard 11g physical standby database – If redo apply is running, stop redo apply – Open the standby database read-only
– Start redo apply
• If open read-only fails because standby instance was aborted or datafiles were restored then… – Bring to mount state and start redo apply
– Stop redo apply and open read-only – Restart redo apply

Enabling Real-Time Query
1. Stop Redo Apply:
2. Open the database for read-only access:
3. Restart Redo Apply:
DGMGRL> EDIT DATABASE 'pc00sby1' SET STATE='apply-on';
Succeeded.
DGMGRL> EDIT DATABASE 'pc00sby1' set state='apply-off';
Succeeded.
SQL> ALTER DATABASE OPEN;
Database altered.
188

Disabling Real-Time Query
1. Shut down the standby database instance.
2. Restart the standby database instance in MOUNT mode.
189

Enabling Block Change Tracking on a Physical Standby Database
• Enable block change tracking on a physical standby database for fast incremental backups.
• Data file blocks that are affected by each database update are tracked in a block change tracking file.
• The block change tracking file is a binary file used by RMAN to record changed blocks to improve incremental backup performance.
190

Creating Fast Incremental Backups • Block change tracking optimizes incremental backups:
• Tracks the blocks that have changed since the last backup • Oracle Database has integrated change tracking:
• A change tracking file is used. • Changed blocks are tracked as redo is generated. • Database backup automatically uses the changed-block list.
List of changed blocks
Redo generation
Redo log
1011001010110 0001110100101 1010101110011
Change-tracking file
SGA
CTWR
191

Enabling Block Change Tracking
ALTER DATABASE
{ENABLE|DISABLE} BLOCK CHANGE TRACKING
[USING FILE '...']
192

Monitoring Block Change Tracking
SQL> SELECT filename, status, bytes
2 FROM v$block_change_tracking;
SQL> SELECT file#, avg(datafile_blocks),
2 avg(blocks_read),
3 avg(blocks_read/datafile_blocks)
4 * 100 AS PCT_READ_FOR_BACKUP,
5 avg(blocks)
5 FROM v$backup_datafile
6 WHERE used_change_tracking = 'YES'
7 AND incremental_level > 0
8 GROUP BY file#;
193

Snapshot Standby Database
194

Snapshot Standby Databases: Overview
• A snapshot standby database is a fully updatable standby database created by converting a physical standby database.
• Snapshot standby databases receive and archive—but do not apply—redo data from a primary database.
• When the physical standby database is converted, an implicit guaranteed restore point is created and Flashback Database is enabled.
195

Snapshot Standby Database: Architecture
LGWR
Primary database transactions
Online redo logs
ARC0
RFS
MRP
Archived redo logs
ARC0
Standby redo logs
Archived redo logs
Ora
cle
net
LNSn
Transactions
Snapshot standby
database
196

Converting a Physical Standby Database to a Snapshot Standby Database
• To convert a physical standby database to a snapshot standby database:
DGMGRL> CONVERT DATABASE pc00sby1
>TO SNAPSHOT STANDBY;
Converting database "pc00sby1" to a Snapshot Standby
database, please wait...
Database "pc00sby1" converted successfully
197

Activating a Snapshot Standby Database: Issues and Cautions
• When activating a snapshot standby database, be aware of:
• Potential data loss with a corrupted log file
• Lengthy conversion of the snapshot standby database to a primary database in the event of a failure of the primary database
198

Snapshot Standby Database: Target Restrictions
• A snapshot standby database cannot be:
• The only standby database in a maximum protection configuration
• The target of a switchover
• A fast-start failover target
199

Viewing Snapshot Standby Database Information
• View the database role by querying V$DATABASE:
SQL> SELECT database_role FROM v$database;
DATABASE_ROLE
----------------
SNAPSHOT STANDBY
200

Using DGMGRL to View Snapshot Standby Database Information • View snapshot standby information by using the SHOW
CONFIGURATION and SHOW CONFIGURATION VERBOSE commands:
DGMGRL> show configuration
Configuration
Name: DGConfig
Enabled: YES
Protection Mode: MaxPerformance
Databases:
pc00prmy - Primary database
pc00sby1 - Snapshot standby database
Fast-Start Failover: DISABLED
Current status for "DGConfig":
SUCCESS
201

Using DGMGRL to View Snapshot Standby Database Information • View snapshot standby information by using the SHOW DATABASE and SHOW DATABASE VERBOSE commands:
DGMGRL> show database pc00sby1
Database
Name: pc00sby1
Role: SNAPSHOT STANDBY
Enabled: YES
Intended State: APPLY-OFF
Instance(s):
pdb1
Current status for "pc00sby1":
SUCCESS
202

Converting a Snapshot Standby Database to a Physical Standby Database
• Convert the snapshot standby database back to a physical standby database:
DGMGRL> CONVERT DATABASE pc00sby1
>TO PHYSICAL STANDBY;
203

204
Summary
• We talked about Oracle Data Guard
• We discussed the reasons to use each type of DG
• We saw how to setup physical data guard, logical data guard and a broker
• We talked about maintaining, monitoring and optimizing Data Guard solution
• More info will be available on my blog:
ZoharElkayam.wordpress.com

Questions and Answers
205

207


![Biomass Auto Guard Ado] Auto Guard Ado]](https://static.fdocuments.us/doc/165x107/577d2a201a28ab4e1ea8b9ec/biomass-auto-guard-ado-auto-guard-ado.jpg)