PM/CS - Plant Maintenance & Customer Service: Workflow Scenario

Oracle AR Customer Maintenance
For questions, please contact
Update 04/02/10 ksp
1
Table of ContentsTable of ContentsTable of ContentsTable of Contents
AR Customer Maintenance 2
Looking Up Customer Information 3
Adding/Updating Customers 5
Adding/Updating Customer Addresses and Department Locations 6
Adding/Updating Customer Contacts 7
Adding Customer Contact Points 8
Kelly Flege at 3-3420

Oracle AR Customer Maintenance
For questions, please contact
Update 04/02/10 ksp
2
AR Customer Maintenance
Departments are responsible for checking, updating and adding new customer information directly into the system via AR
Customer Maintenance. All changes and new accounts must be approved by OBO before they can be used in the invoice
process. Departments should use caution when adding and updating customer information to make sure they are not
duplicating the information or updating the wrong customer account.
Each customer profile includes four levels of information:
• Customer Name and Details
• Address and Department Location
• Contact
• Contact Point
Customer maintenance can occur at one or more levels.
The following guidelines have been established to determine the appropriate action to be taken with customer
maintenance:
Update: If the customer profile was entered incorrectly in the system, use the update functionality to
correct the profile information. Also use update if the customer has made a permanent change
to their profile information (ex: Customer moved their offices or changed their business name).
PLEASE NOTE: Updating customer profile information changes all historical records to reflect
the new profile information. If you wish to maintain historical data as it was in the system prior
to the change, it is recommended that you consider inactivating the current customer profile
and setting them up as a new customer, location, etc as appropriate.
Inactive: If the customer has closed their business or a contact person has left the company. This will
prevent you from being able to use this customer profile information for future invoices. To
inactivate a customer, email the Bursar. Customers information that is inactive will have
“Inactive” appear in the field.
New: For adding new customers, addresses, locations, contacts, and contact points.
Request Status
Submitted: The customer profile has been created and is awaiting final approval of the Bursar.
Approved: The profile has been submitted, reviewed, but has not been applied to the data base.
Completed: The profile has been submitted, reviewed and the profile data has now been applied to the data
base and can be used in an invoice.
Rejected: The profile has incorrect/duplicate data and has been sent back to the creator. The creator will
be notified via email of the status of the customer profile.
Error: A problem occurred when the customer profile was applied to the data base.
Active Code
Active: The customer profile has been applied to the data base and can be used for invoice creation.
Inactive: The customer profile still exists in the database but is no longer used except for historical
purposes.
NOTE: for a customer profile to be used for an invoice it’s status MUST be both COMPLETED and ACTIVE
Kelly Flege at 3-3420

Oracle AR Customer Maintenance
For questions, please contact
Update 04/02/10 ksp
3
Looking Up Customer Information
1. Login to Oracle E-Business Suite
2. Select your FIN responsibility
a. From the expanded list on the right Select AR Customer Maintenance
b. NOTE: just because you see the listing above does not mean you can create a new Customer
3. Customer Search will open
a. Confirm that the customer does not already exist in the database
b. Search under both Customer Types: Person and Organization
i. Selecting a Customer Type first will allow the use of a wild card (%) in the subsequent fields of
Customer Name, Person Last Name.
ii. Request Status uses a drop down listing thus a wild card option is not available
4. Last Name is the only the required field in the Person Type.
5. Once the customer has been found, verify customer address and location to determine if customer has been set
up for your departmental use, by clicking the Open Button next to the customer.
6. If the Customer does not exist in the data base click on the “New Customer” button. Follow directions to Add a
New Customer beginning on page 5.
Kelly Flege at 3-3420

Oracle AR Customer Maintenance
For questions, please contact
Update 04/02/10 ksp
4
Looking Up Customer Information – continued
7. Verify the customer has been set up for your Department Location. All customers will have an EMS # for billing
through the Event Management System.
8. Click “Next 10” to see additional customer locations.
9. If the customer does not have a location set up for your department, click on New Address and follow the
directions on page 6.
Kelly Flege at 3-3420

Oracle AR Customer Maintenance
For questions, please contact
Update 04/02/10 ksp
5
Adding/Updating Customers
1. If the Customer does not exist in the data base click on the “New Customer” button
a. The FEIN/SSN is a optional field
b. Customer Type is required, select either Person or Organization
i. Once the Customer Type is selected the required fields on the display will change to reflected
current and optional fields needed for the specific Customer Type
2. Last Name is the only the required field in the Person Type
Customer Name is the only required field for organization type
3. Click on the “Apply and Create Address”
TO UPDATE THE CUSTOMER DETAILS (NAME):
• Click on the Update button
• Make the necessary changes to the Customer Name
• Click the Update button
Kelly Flege at 3-3420

Oracle AR Customer Maintenance
For questions, please contact
Update 04/02/10 ksp
6
Adding/Updating Customer Addresses and Department Locations
4. Customer Name will automatically fill-in from the prior screen
a. Address Line 1 is required
b. City is required
i. Once the city is entered click on the search light and select the correct city from the listing, this
will auto fill the State, Zip code and County
c. Department Location is the Department that is going to use this customer, use the search light to find
the correct Department listing.
5. Click on the “Apply and Create Contact” button
TO UPDATE THE CUSTOMER ADDRESS DETAILS:
• Click on the Update button
• Make the necessary changes to the Customer Address
• Click the Update button again.
• Note: You cannot update/change the department location. To change/update a department location, you must
add a new customer location with the correct department location.
Kelly Flege at 3-3420
Oracle AR Customer Maintenance
For questions, please contact
Update 04/02/10 ksp
7
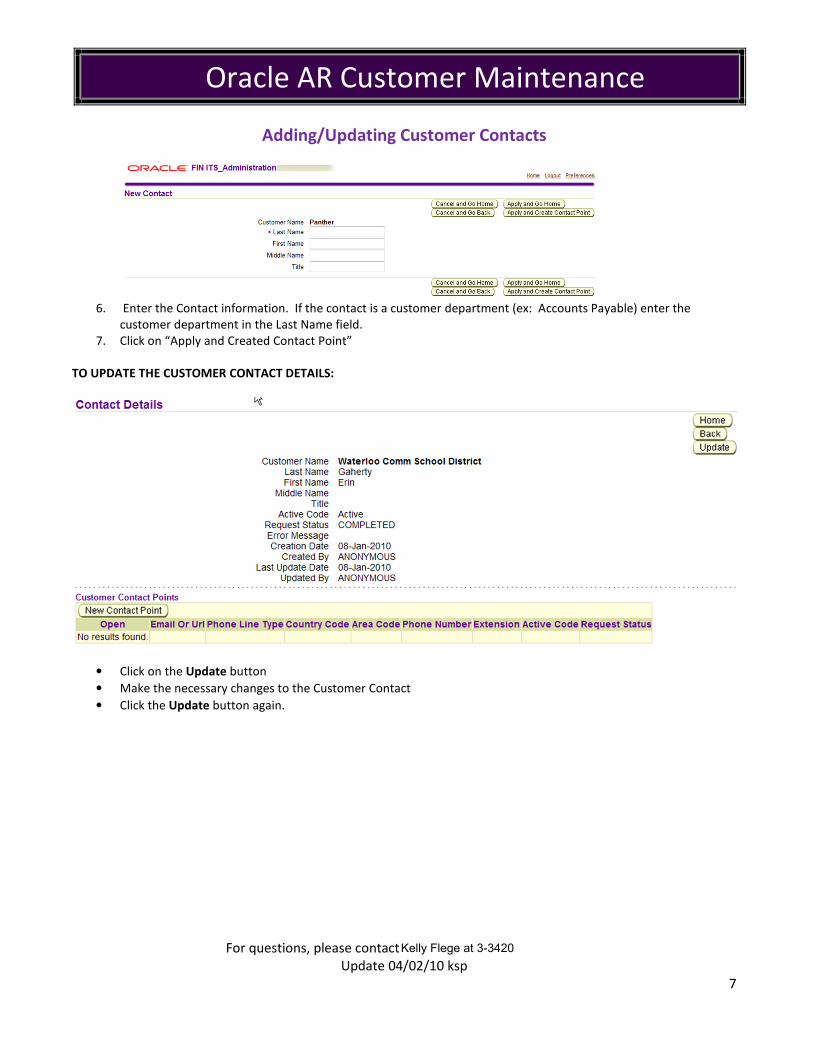
Adding/Updating Customer Contacts
6. Enter the Contact information. If the contact is a customer department (ex: Accounts Payable) enter the
customer department in the Last Name field.
7. Click on “Apply and Created Contact Point”
TO UPDATE THE CUSTOMER CONTACT DETAILS:
• Click on the Update button
• Make the necessary changes to the Customer Contact
• Click the Update button again.
Kelly Flege at 3-3420

Oracle AR Customer Maintenance
For questions, please contact
Update 04/02/10 ksp
8
Adding Customer Contact Points
8. Select the “Contact Point Type” either Email/URL or Phone Number
a. Once the type is selected the appropriate required fields will be displayed
9. E-Mail/URL option
10. Phone Number option
11. Click on “Apply and Go Home”
12. From the Main page re-query the new setup
13. The Request status will show that it has been submitted
a. Once the Bursar has checked the request and it is in the proper format it will applied to the data base
b. You will not be able to use the new customer information until the Request Status has been changed to
Completed
Kelly Flege at 3-3420