OPTIONAL RECIRCULATING ACCESSORY MODEL RECIRC30FS...
6
OPTIONAL RECIRCULATING ACCESSORY MODEL RECIRC30FS AND RECIRC36FS INSTALLATION MANUAL HOOD WIDTH DIM. "A" 30" 12 - 3/16" 36" 13 - 3/8" Figure 1 The recirculation kit consists of: • Charcoal Filters to be mounted on each side of the blower. They absorb unpleasant odors caused by cooking. • Air deflector to be mounted on top of the hood. This serves to redirect filtered air towards the kitchen. • Fittings material Before installing the recirculation kit The Installation of the Recirculation kit affects the installation of the hood, so take into consideration the following steps. Cabinet or soffit preparation when installing the recirculation kit. For cabinet or soffit preparation take into consideration that there’s no need to provide cutouts on walls for vertical or rear air discharge, since there is no need to install any Duct. See Figure 1 for Conduit passage cut-out. Figure 2 for Air passage cut-out on hood. Note The height of the hood with the recirculation kit installed increases from 11" to 15“. Check that there is enough clearance and that minimum height from the countertop to the bottom of the hood is 24” to 30”. Hood Preparation • The transition must not be installed, since no ducting is necessary. LI3QSA Wall Mount Installation First install deflector on top of the hood then install to the wall: 1. Fit four screws C on bottom of the deflector, do not tighten completely. See Figure 2. 2. Install the deflector on top of the hood so that screws C go respectively into Side Slots on top of the hood and Side Slots on bottom of Deflector (See Figure 2), slide Deflector frontward until stops. 3. Tighten the four screws C from inside of the hood. 4. Fit screws (dim:3.5x9.5), from inside the hood through point B to final assembly Deflector to the hood (see Figure 2, number depends on hood size). 5. Proceed to install hood as described on Wall Mount Installation described at the Hood Installation Manual. Note: The version of 30" only requires of 7 type “D” screws. 4 7/8” c c c B Side Slot (on bottom of Deflector) Vertical Air cut - out Side Slot (on top of Hood) c Pp.1 SCREWS C B 3 4 4 4 Figure 2 C B SCREWS F
Transcript of OPTIONAL RECIRCULATING ACCESSORY MODEL RECIRC30FS...

OPTIONAL RECIRCULATING ACCESSORY MODEL RECIRC30FS AND RECIRC36FS INSTALLATION MANUAL
HOOD WIDTH DIM. "A"
30" 12 - 3/16"
36" 13 - 3/8"
Figure 1
The recirculation kit consists of:
• Charcoal Filters to be mounted on each side of the
blower.
They absorb unpleasant odors caused by cooking.
• Air deflector to be mounted on top of the hood.
This serves to redirect filtered air towards the kitchen.
• Fittings material
Before installing the recirculation kit
The Installation of the Recirculation kit affects the installation
of the hood, so take into consideration the following steps.
Cabinet or soffit preparation when installing therecirculation kit.
For cabinet or soffit preparation take into consideration that
there’s no need to provide cutouts on walls for vertical or
rear air discharge, since there is no need to install any Duct.
See Figure 1 for Conduit passage cut-out.
Figure 2 for Air passage cut-out on hood.
Note
The height of the hood with the recirculation kit installed
increases from 11" to 15“.
Check that there is enough clearance and that minimumheight from the countertop to the bottom of the hood is24” to 30”.
Hood Preparation
• The transition must not be installed, since no ducting is
necessary.
LI3QSA
Wall Mount Installation
First install deflector on top of the hood then install to the wall:
1. Fit four screws C on bottom of the deflector, do not tighten
completely. See Figure 2.
2. Install the deflector on top of the hood so that screws C go
respectively into Side Slots on top of the hood and Side
Slots on bottom of Deflector (See Figure 2), slide Deflector
frontward until stops.
3. Tighten the four screws C from inside of the hood.
4. Fit screws (dim:3.5x9.5), from inside the hood through point Bto final assembly Deflector to the hood (see Figure 2, number
depends on hood size).
5. Proceed to install hood as described on Wall Mount
Installation described at the Hood Installation Manual.
Note: The version of 30" onlyrequires of 7 type “D”screws.
4 7/8”
c
c
c
B
Side Slot
(on bottom
of Deflector)
Vertical Air
cut - out
Side Slot
(on top of
Hood)
c
Pp.1
SCREWS
CB
3
4
4
4
Figure 2
CB
SCREWS
F

ACCESSOIRE OPTIONNEL DE RECIRCULATION
LAGEUR DE LA HOTTE DIM. "A"
30” 12 - 3/16”
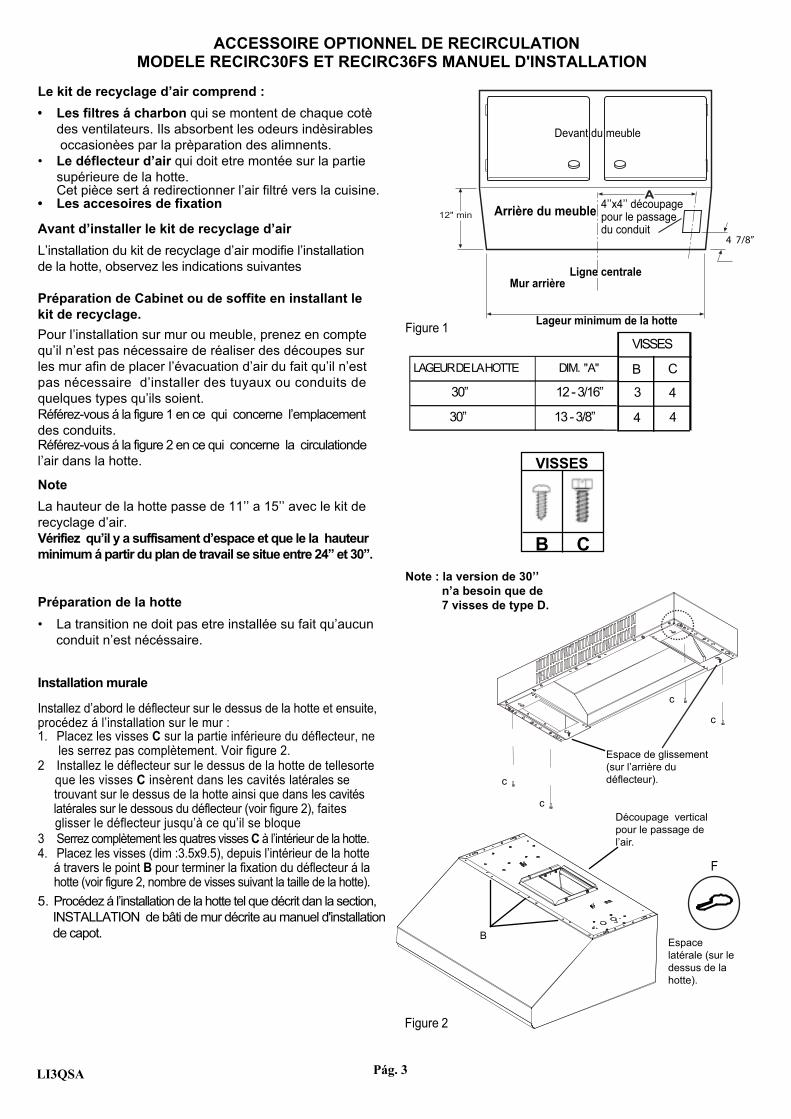
Figure 1
Le kit de recyclage d’air comprend :
• Les filtres á charbon qui se montent de chaque cotè
des ventilateurs. Ils absorbent les odeurs indèsirables
occasionèes par la prèparation des alimnents.
• Le déflecteur d’air qui doit etre montée sur la partie
supérieure de la hotte.Cet pièce sert á redirectionner l’air filtré vers la cuisine.
• Les accesoires de fixation
Avant d’installer le kit de recyclage d’air
L’installation du kit de recyclage d’air modifie l’installation
de la hotte, observez les indications suivantes
Préparation de Cabinet ou de soffite en installant le kit de recyclage.
Pour l’installation sur mur ou meuble, prenez en compte
qu’il n’est pas nécessaire de réaliser des découpes sur
les mur afin de placer l’évacuation d’air du fait qu’il n’est
pas nécessaire d’installer des tuyaux ou conduits de
quelques types qu’ils soient.
Référez-vous á la figure 1 en ce qui concerne l’emplacement
des conduits.Référez-vous á la figure 2 en ce qui concerne la circulationde
l’air dans la hotte.
Note
La hauteur de la hotte passe de 11’’ a 15’’ avec le kit de
recyclage d’air.
Vérifiez qu’il y a suffisament d’espace et que le la hauteurminimum á partir du plan de travail se situe entre 24’’ et 30’’.
Préparation de la hotte
• La transition ne doit pas etre installée su fait qu’aucun
conduit n’est nécéssaire.
LI3QSA
Installation murale
Installez d’abord le déflecteur sur le dessus de la hotte et ensuite,procédez á l’installation sur le mur :1. Placez les visses C sur la partie inférieure du déflecteur, ne les serrez pas complètement. Voir figure 2.2 Installez le déflecteur sur le dessus de la hotte de tellesorte que les visses C insèrent dans les cavités latérales se trouvant sur le dessus de la hotte ainsi que dans les cavités latérales sur le dessous du déflecteur (voir figure 2), faites glisser le déflecteur jusqu’à ce qu’il se bloque
3 Serrez complètement les quatres visses C à l’intérieur de la hotte. 4. Placez les visses (dim :3.5x9.5), depuis l’intérieur de la hotte á travers le point B pour terminer la fixation du déflecteur á la hotte (voir figure 2, nombre de visses suivant la taille de la hotte).
5. Procédez á l’installation de la hotte tel que décrit dan la section,
INSTALLATION de bâti de mur décrite au manuel d'installation
de capot.
Note : la version de 30’’ n’a besoin que de 7 visses de type D.
4 7/8”
c
c
c
B
Espace de glissement
(sur l’arrière du
déflecteur).
Découpage vertical
pour le passage de
l’air.
Espace
latérale (sur le
dessus de la
hotte).
c
Devant du meuble
Arrière du meuble4’’x4’’ découpagepour le passage du conduit
Ligne centraleMur arrière
Lageur minimum de la hotte
30” 13 - 3/8”
Pág. 3
VISSES
B C
3
4
4
4
Figure 2
MODELE RECIRC30FS ET RECIRC36FS MANUEL D'INSTALLATION
CB
VISSES
F


INSTALACION DEL KIT DE RECIRCULACIÓN OPCIONAL SÓLO PARA CAMPANAS DE PARED MODELOS RECIRC30FS - RECIRC36FS
ANCHO DE CAMPANA DIM. "A"
30" 12 - 3/16"
36" 13 - 3/8"
Figura 1
El kit de recirculación consiste en:• Filtros de carbón para ser colocados en cada lado
del extractor.
Absorben olores desagradables causados por cocinar.
• Deflector de aire para ser colocado en lo alto de la
campana. Este sirve para redirigir el aire filtrado hacia
la cocina.• Material de ajuste
Antes de instalar el kit de recirculación
La instalación del kit de recirculación afecta la instalación de
la campana, así que tome en consideración los siguientes
pasos.
Preparación del gabinete o sofito cuando se instale elkit de recirculación.
Para la preparación del gabinete o sofito tome en consideración
que no hay necesidad de proveer cortes en la pared para
descarga vertical o trasera, porque no hay necesidad de
instalar ningún ducto.
Ver Figura 1 para corte de paso de conducto.
Figura 2 para corte de paso de aire sobre la campana.
Nota
La altura de la campana con el kit de recirculación instalado
se incrementa de 11" a 15“.
Verifique que haya suficiente espacio. La mínima alturadesde el mostrador a la parte baja de la campana es de24” a 30”.
Preparación de la campana
• La transición no debe ser instalada, debido a que no es
necesario ningún ducto.
LI3QSA
Instalación montada a la pared
Primero instale el deflector sobre la campana luego instale a la pared:
1. Ajuste cuatro tornillos C en la parte baja del deflector, no los apriete completamente. Ver Figura 2
2. Instale el deflector sobre la campana de tal forma que los tornillos C vayan respectivamente en las ranuras laterales de la parte alta de la campana y las ranuras laterales de la parte baja del deflector (Ver Figura 2), deslice el deflector hacia enfrente hasta que se detenga.
3. Apriete los cuatro tornillos C por dentro de la campana. 4. Ajuste los tornillos (dim:3.5x9.5), por dentro de la campana hasta 3913.63 el punto B para finalmente ensamblar el deflector a la campana (ver Figura 2, el número depende de el tamaño de la campana). 5. Proceda a instalar la campana como se describe en
instalación del montaje de Pared descrita en el Manual
de Instalación de la Campana.
Nota: La versión de 30” solamenterequiere de 7 tornillos tipo “D”
4 7/8”
c
c
c
B
Ranura latera (en la
parte baja del
deflector)
Corte de Aire
Vertical
Ranura lateral
(Sobre la
campana)
c
Linea Central
Ancho min. de Campana
Pared trasera
Corte parasalida deconducto
Fondo del gabinete
Pág. 5
TORNILLOS
B C
3
4
4
4
Figura 2
CB
TORNILLOS
F