Operator's Manual DUST COLLECTION SYSTEM · Nota: Si está instalando este sistema colector de...
8
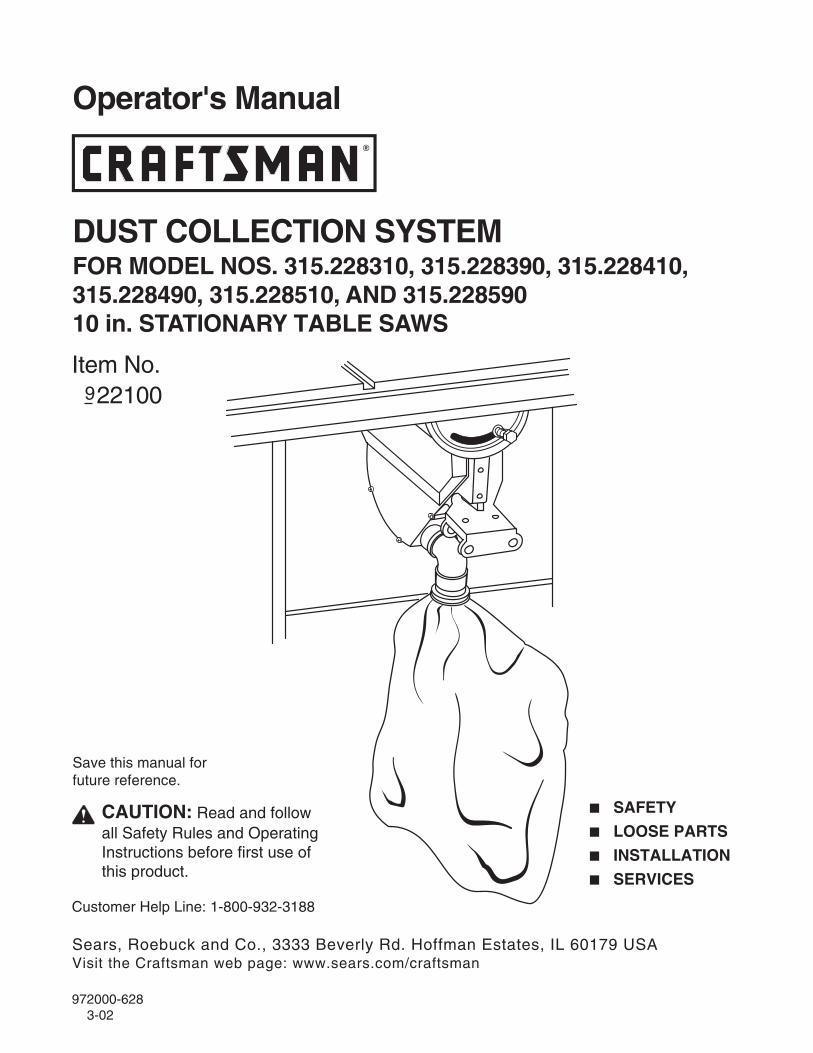
CAUTION: Read and follow all Safety Rules and Operating Instructions before first use of this product. Sears, Roebuck and Co., 3333 Beverly Rd. Hoffman Estates, IL 60179 USA Visit the Craftsman web page: www.sears.com/craftsman 972000-628 3-02 DUST COLLECTION SYSTEM FOR MODEL NOS. 315.228310, 315.228390, 315.228410, 315.228490, 315.228510, AND 315.228590 10 in. STATIONARY TABLE SAWS Operator's Manual Save this manual for future reference. ■ SAFETY ■ LOOSE PARTS ■ INSTALLATION ■ SERVICES Customer Help Line: 1-800-932-3188 Item No. 9 22100
Transcript of Operator's Manual DUST COLLECTION SYSTEM · Nota: Si está instalando este sistema colector de...
CAUTION: Read and followall Safety Rules and OperatingInstructions before first use ofthis product.
Sears, Roebuck and Co., 3333 Beverly Rd. Hoffman Estates, IL 60179 USAVisit the Craftsman web page: www.sears.com/craftsman
972000-628 3-02
DUST COLLECTION SYSTEMFOR MODEL NOS. 315.228310, 315.228390, 315.228410,315.228490, 315.228510, AND 315.22859010 in. STATIONARY TABLE SAWS
Operator's Manual
Save this manual forfuture reference.
■ SAFETY
■ LOOSE PARTS
■ INSTALLATION
■ SERVICES
Customer Help Line: 1-800-932-3188
Item No. 922100
2
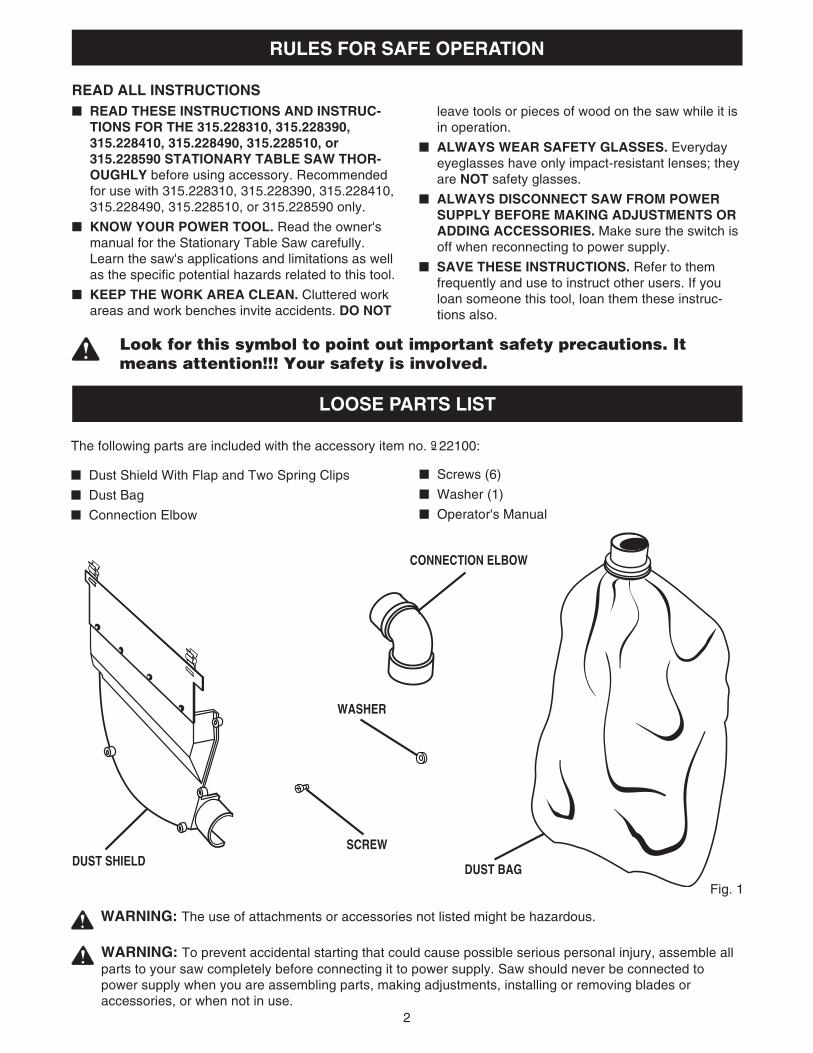
The following parts are included with the accessory item no. 9 22100:
■ Dust Shield With Flap and Two Spring Clips
■ Dust Bag
■ Connection Elbow
RULES FOR SAFE OPERATION
READ ALL INSTRUCTIONS■ READ THESE INSTRUCTIONS AND INSTRUC-
TIONS FOR THE 315.228310, 315.228390,315.228410, 315.228490, 315.228510, or315.228590 STATIONARY TABLE SAW THOR-OUGHLY before using accessory. Recommendedfor use with 315.228310, 315.228390, 315.228410,315.228490, 315.228510, or 315.228590 only.
■ KNOW YOUR POWER TOOL. Read the owner'smanual for the Stationary Table Saw carefully.Learn the saw's applications and limitations as wellas the specific potential hazards related to this tool.
■ KEEP THE WORK AREA CLEAN. Cluttered workareas and work benches invite accidents. DO NOT
leave tools or pieces of wood on the saw while it isin operation.
■ ALWAYS WEAR SAFETY GLASSES. Everydayeyeglasses have only impact-resistant lenses; theyare NOT safety glasses.
■ ALWAYS DISCONNECT SAW FROM POWERSUPPLY BEFORE MAKING ADJUSTMENTS ORADDING ACCESSORIES. Make sure the switch isoff when reconnecting to power supply.
■ SAVE THESE INSTRUCTIONS. Refer to themfrequently and use to instruct other users. If youloan someone this tool, loan them these instruc-tions also.
LOOSE PARTS LIST
WARNING: The use of attachments or accessories not listed might be hazardous.
Look for this symbol to point out important safety precautions. Itmeans attention!!! Your safety is involved.
WARNING: To prevent accidental starting that could cause possible serious personal injury, assemble allparts to your saw completely before connecting it to power supply. Saw should never be connected topower supply when you are assembling parts, making adjustments, installing or removing blades oraccessories, or when not in use.
■ Screws (6)
■ Washer (1)
■ Operator's Manual
CONNECTION ELBOW
DUST BAGDUST SHIELD
Fig. 1
WASHER
SCREW

3Fig. 2
Fig. 3
INSTALLATION
Dust collection system helps keep your work area clean.
DUST SHIELD AND CONNECTIONELBOWSee Figures 2 and 3.
Note: If installing this dust collection system to a newsaw, it is recommended that this installation be doneprior to assembling the leg stand to the saw. At thispoint the saw is upside down on the floor. If installingthis system to a saw that has already been as-sembled, removal of the motor will allow easieraccess to the area for installing dust shield.
The dust shield encloses the blade beneath the table.The rubber flap helps direct the flow of sawdust in theblade area. Install the dust shield to the blade coverusing five screws. The use of a stubby Phillips screw-driver is required due to the limited space availableinside the cabinet.
After fastening dust shield to the blade cover, snapthe two spring clips that are on the rubber flap to thecast rib on the underside of the saw table. Be surethey are completely seated on this rib, and that rubberflap is smooth and not buckled against the table.
After installing the dust shield, place the connectionelbow on the exhaust port that is formed by the dustshield and blade cover. Align the hole in the connec-tion elbow with the hole in the blade cover by using apointed object such as a small nail. Then use awasher and screw to attach the connection elbow tothe blade cover. The connection elbow will still rotatewhen the screw is tightened.
CONNECTIONELBOW
DUSTSHIELD
DUST BAG
CONNECTION ELBOW
DUST SHIELDSCREWS WASHER
SAW BLADE
EXHAUST PORT
BLADE COVER
DUST BAGSee Figure 4.
The dust bag fits inside the connection elbow. Toinstall, slide the opening of the dust bag into theconnection elbow. For more efficient operation, emptydust bag when no more than half full. This will permitbetter air flow through the bag.
CLIP FIRMLYSNAPPEDOVER RIB
CLIP FIRMLY SNAPPED OVER RIB
Fig. 4

Get it fixed, at your home or ours!For repair of major brand appliances in your own home…
no matter who made it, no matter who sold it!
1-800-4-MY-HOMESM Anytime, day or night(1-800-469-4663)
www.sears.com
To bring in products such as vacuums, lawn equipment and electronicsfor repair, call for the location of your nearest Sears Parts & Repair Center.
1-800-488-1222 Anytime, day or night
www.sears.com
For the replacement parts, accessories and owner’s manualsthat you need to do-it-yourself, call Sears PartsDirectSM !
1-800-366-PART 6 a.m. – 11 p.m. CST,(1-800-366-7278) 7 days a week
www.sears.com/partsdirect
To purchase or inquire about a Sears Service Agreement:
1-800-827-66557 a.m. – 5 p.m. CST, Mon. – Sat.
Para pedir servicio de reparación a domicilio,y para ordenar piezas con entrega a domicilio:
1-888-SU-HOGAR SM
(1-888-784-6427)
Au Canada pour service en français:1-877-LE-FOYER SM
(1-877-533-6937)
© Sears, Roebuck and Co.
® Registered Trademark / ™ Trademark of Sears, Roebuck and Co.
® Marca Registrada / ™ Marca de Fábrica de Sears, Roebuck and Co.
HomeCentralSM

5
■ SEGURIDAD
■ PIEZAS SUELTAS
■ INSTALACION
■ SERVICIOS
972000-628 3-02
Sears, Roebuck and Co., 3333 Beverly Rd. Hoffman Estates, IL 60179 USAVisite la página Web de Craftsman: www.sears.com/craftsman
Manual del Usuario
No. de teléfono de ayuda a los clientes: 1-800-932-3188
Conserve este manualpara referencia futura.
ATENCION: Lea cuidadosamente todaslas Reglas de Seguridad y las Instruccionesantes de usar este producto.
9Art. No. 22100
SISTEMA COLECTOR DE POLVOPARA LAS SIERRAS DE MESA ESTACIONARIAS DE 10 pulg.MODELOS Nos. 315.228310, 315.228390, 315.228410,315.228490, 315.228510, Y 315.228590

6
ADVERTENCIA: El uso de accesorios o dispositivos no indicados en la lista puede ser peligroso.
REGLAS PARA FUNCIONAMIENTO SEGURO
LISTA DE PIEZAS SUELTAS
Este símbolo le indica importantes reglas de seguridad.¡Significa atención! Existe riesgo para su seguridad.
2
Se incluyen las siguientes piezas con el accesorio Art. No. 9 22100:
■ Protector contra el Polvo con Aleta ydos Sujetadores de Resorte
■ Bolsa Guardapolvo
■ Codo de Conexión
CODO DE CONEXION
BOLSAGUARDAPOLVO
PROTECTORCONTRA EL POLVO
■ Tornillos (6)
■ Arandela (1)
■ Manual del Usuario
ARANDELA
TORNILLO
LEA TODAS LAS INSTRUCCIONES■ Antes de usar este accesorio LEA ATENTAMENTE
ESTAS INSTRUCCIONES Y LAS INSTRUCCIONESPARA LAS SIERRAS DE MESA ESTACIONARIASNUMEROS 315.228310, 315.228390, 315.228410,315.228490, 315.228510 o 315.228590. Serecomienda para usar con los modelos 315.228310,315.228390, 315.228410, 315.228490, 315.228510 y315.228590 solamente.
■ CONOZCA SU HERRAMIENTA MECANICA. Leaatentamente el manual del usuario de la Sierra deMesa Estacionaria. Aprenda las aplicaciones ylimitaciones de la sierra así como también los riesgospotenciales específicos relacionados con esteaccesorio.
■ MANTENGA EL AREA DE TRABAJO LIMPIA. Loslugares y bancos de trabajo desordenados invitan a
los accidentes. NO deje herramientas o pedazos demadera en la sierra cuando está siendo utilizada.
■ USE SIEMPRE LENTES PROTECTORES. Losanteojos regulares tienen solamente lentesresistentes al impacto; ellos NO son lentes deseguridad.
■ SIEMPRE DESENCHUFE LA SIERRA DE LAFUENTE DE ALIMENTACION ANTES DE HACERAJUSTES O AGREGAR ACCESORIOS. Asegúresede que el interruptor esté en la posición "off"(apagado) cuando vuelva a enchufar la sierra en lafuente de alimentación.
■ CONSERVE ESTAS INSTRUCCIONES. Consúltelascon frecuencia y úselas para ayudar a otros quepuedan usar esta herramienta. Si usted presta estaherramienta a otra persona, entregue también lasinstrucciones.
ADVERTENCIA: A fin de evitar la puesta en marcha accidental que podría causar una posible lesiónpersonal grave, instale todas las piezas de su sierra antes de enchufarla en la fuente de alimentación. Lasierra no debe estar nunca enchufada en la fuente de alimentación cuando esté instalando piezas, haciendoajustes, instalando o sacando hojas o cuando no está en uso.
Fig. 1

7
INSTALACION
CODO DE CONEXION
PROTECTORCONTRA EL POLVO
BOLSAGUARDAPOLVO
El sistema colector de polvo mantiene limpia su área detrabajo.
PROTECTOR CONTRA EL POLVO YCODO DE CONEXIONVer Figuras 2 y 3.
Nota: Si está instalando este sistema colector de polvoen una sierra nueva, se recomienda que la instalación larealice antes de instalar el pedestal con patas en lasierra. En ese momento la sierra está en posicióninvertida en el piso. Si está instalando este sistema enuna sierra que ya ha sido armada, se recomienda retirarel motor para facilitar el acceso al área en que seinstalará el protector contra el polvo.
El protector contra el polvo cubre la hoja por debajo de lamesa. La aleta de goma ayuda a dirigir el flujo de aserrínen el área de la hoja. Instale el protector contra el polvoen la cubierta de la hoja usando cinco tornillos. Serecomienda usar un destornillador Phillips de hoja anchay corta y mango grueso debido al espacio limitadodisponible dentro del gabinete.
Después de asegurar el protector contra el polvo en lacubierta de la hoja, coloque a presión en el refuerzofundido que se encuentra en el lado inferior de la mesade la sierra, los dos sujetadores de resorte que están enla aleta de goma. Asegúrese de que los sujetadores deresorte queden bien asentados en el refuerzo y que laaleta de goma quede lisa y no torcida contra la mesa.
Después de instalar el protector contra el polvo, coloqueel codo de conexión en el orificio de escape formado porel protector contra el polvo y la cubierta de la hoja. Alineeel agujero del codo de conexión con el agujero de lacubierta de la hoja usando un objeto puntiagudo, tal
INSTALACION
como un clavo pequeño. Luego use una arandela y untornillo para instalar el codo de conexión en la cubierta dela hoja. El codo de conexión girará aún cuando el tornilloesté apretado.
BOLSA GUARDAPOLVOVer Figura 4.La bolsa guardapolvo se instala en el codo de conexión.Para instalarla, inserte la abertura de la bolsaguardapolvo en el codo de conexión. Para un mejorrendimiento, vacíe la bolsa guardapolvo cuando estéllena hasta más de la mitad. Esto permitirá una mejorcirculación del aire en la bolsa.
Fig. 2
TORNILLOSARANDELA
HOJA DE LA SIERRA
ESCAPE DEL POLVO
CUBIERTADE LA HOJA
CODO DE CONEXION
PROTECTORCONTRA EL
POLVO
Fig. 3
SUJETADOR FIRMEMENTE INSTALADOA PRESION EN EL REFUERZO FUNDIDO
SUJETADOR FIRMEMENTE INSTALADOA PRESION EN EL REFUERZO FUNDIDO
Fig. 4
3

Get it fixed, at your home or ours!For repair of major brand appliances in your own home…
no matter who made it, no matter who sold it!
1-800-4-MY-HOMESM Anytime, day or night(1-800-469-4663)
www.sears.com
To bring in products such as vacuums, lawn equipment and electronicsfor repair, call for the location of your nearest Sears Parts & Repair Center.
1-800-488-1222 Anytime, day or night
www.sears.com
For the replacement parts, accessories and owner’s manualsthat you need to do-it-yourself, call Sears PartsDirectSM !
1-800-366-PART 6 a.m. – 11 p.m. CST,(1-800-366-7278) 7 days a week
www.sears.com/partsdirect
To purchase or inquire about a Sears Service Agreement:
1-800-827-66557 a.m. – 5 p.m. CST, Mon. – Sat.
Para pedir servicio de reparación a domicilio,y para ordenar piezas con entrega a domicilio:
1-888-SU-HOGAR SM
(1-888-784-6427)
Au Canada pour service en français:1-877-LE-FOYER SM
(1-877-533-6937)
© Sears, Roebuck and Co.
® Registered Trademark / ™ Trademark of Sears, Roebuck and Co.
® Marca Registrada / ™ Marca de Fábrica de Sears, Roebuck and Co.
HomeCentralSM