MySQL Developing Database Applications Using MySQL Connector-C++

Database Connector
Operator’s Manual

2 2
Art. Nr Type5580210 Fast Ethernet Port Database Connector5580212 License Database Connector DL40100 cab Database Connector A-Serie
Edition: 01/2016
CopyrightThis documentation as well as translation hereof are property of cab Produkttechnik GmbH & Co. KG.The replication, conversion, duplication or divulgement of the whole manual or parts of it for other intentions than its original intended purpose demand the previous written authorization by cab.
TrademarkMicrosoft® is a registered trademark of the Microsoft Corporation.Windows® is a registered trademark of the Microsoft Corporation.TrueTypeTM is a registered trademark of the Apple Computer, Inc.
EditorRegarding questions or comments please contact cab Produkttechnik GmbH & Co. KG.
TopicalityDue to the constant further development of our products discrepancies between documentation and product can occur.Please check www.cab.de for the latest update.
Terms and conditionsDeliveries and performances are effected under the General conditions of sale of cab.
Operator’s manualfor the following products
Europe America Asia Africa
Germanycab Produkttechnik GmbH & Co KGWilhelm-Schickard-Str. 1476131 KarlsruheTel. +49 721 6626 0Fax +49 721 6626 [email protected]
USAcab Technology, Inc.87 Progress Avenue Unit 1Tyngsboro, MA 01879Tel. +1 978 649 0293Fax +1 978 649 [email protected]/us
Taiwancab Technology Co., Ltd.
16F-1, No. 700, Jhong Jheng RdJunghe, Taipeh 23552Tel. +886 (02) 8227 3966Fax +886 (02) 8227 [email protected]/tw
South Africacab Technology (Pty) Ltd.14 Republic StreetBordeaux2125 RandburgTel. +27 11 886 3580Fax +27 11 789 [email protected]/za
cab Produkttechnik Sömmerda GmbHAm Unterwege 18-2099610 SömmerdaTel. +49 3634 6860 0Fax +49 3634 6860 [email protected]
Latin AmericaAlejandro BalmacedaHacienda Jurica Pte 1615Colonial de Valle32553 Ciudad JuárezTel. +52 656 682 3745Fax +52 656 682 [email protected]/es
Chinacab (Shanghai) Trading Co., Ltd.
A507, No. 268, Tong Xie RdShanghai 200335Tel. +86 (021) 6236 3161Fax +86 (021) 6236 [email protected]/cn
Francecab Technologies s.à.r.l.2a rue de la ModerZ.A. Nord du Val de Moder67350 NiedermodernTel. +33 388 722501Fax +33 388 722502 [email protected]
cab (Shanghai) Trading Co., Ltd.
Room 39, 10F, 8 Lin He Zhong Rd Tian He District, Guangzhou 510610Tel. +86 (020) 2831 [email protected]/cn
This document and any translations hereof are the property of cab Produkttechnik GmbH & Co KG. © cab The replication, processing, reproduction or distribution in whole or in parts requires our prior written consent.

33 Table of contents
1 Introduction ............................................................................................................................................ 41.1 Instructions ............................................................................................................................................... 41.2 System requirements ............................................................................................................................... 41.3 Overview .................................................................................................................................................. 5
2 Installation .............................................................................................................................................. 62.1 Installing the client part on the printer ...................................................................................................... 62.1.1 Installing on A-Series and Hermes A printers ..................................................................................... 62.1.2 Installing on A+-Series, EOS, Hermes+, Hermes C, Mach4, PX, XC or XD4 .................................... 62.2 Installing the server part on the computer ................................................................................................ 62.3 Starting the program ................................................................................................................................ 9
3 Confi guration ........................................................................................................................................ 103.1 Database Connector Standard ............................................................................................................... 103.2 Database Connector Extended ...............................................................................................................113.2.1 Synchronizing devices .....................................................................................................................113.2.2 Remote Trigger ................................................................................................................................. 153.2.3 File Mode .......................................................................................................................................... 163.4 Event log ................................................................................................................................................ 17
4 Creating a label with a labeling software ........................................................................................... 194.1 Creating a label with cablabel R2 Pro or Codesoft ................................................................................ 194.1.1 Activating the Database Connector option ....................................................................................... 194.1.2 Creating a query ............................................................................................................................... 204.1.3 Creating a variable with the result of a query ................................................................................... 214.2 Creating a label with cablabel S3 Pro .................................................................................................... 22
5 Creating a label directly in JScript programming language ............................................................ 235.1 List of commands ................................................................................................................................... 235.2 Full sample ............................................................................................................................................. 24
6 Appendix ............................................................................................................................................... 256.1 Operating diagram of Database Connector Extended in Printer Association mode ............................... 256.2 Operating diagram of Database Connector Extended in Remote Trigger mode .................................... 266.3 Confi guration fi le for Remote Trigger and File Mode ............................................................................. 27
4 4
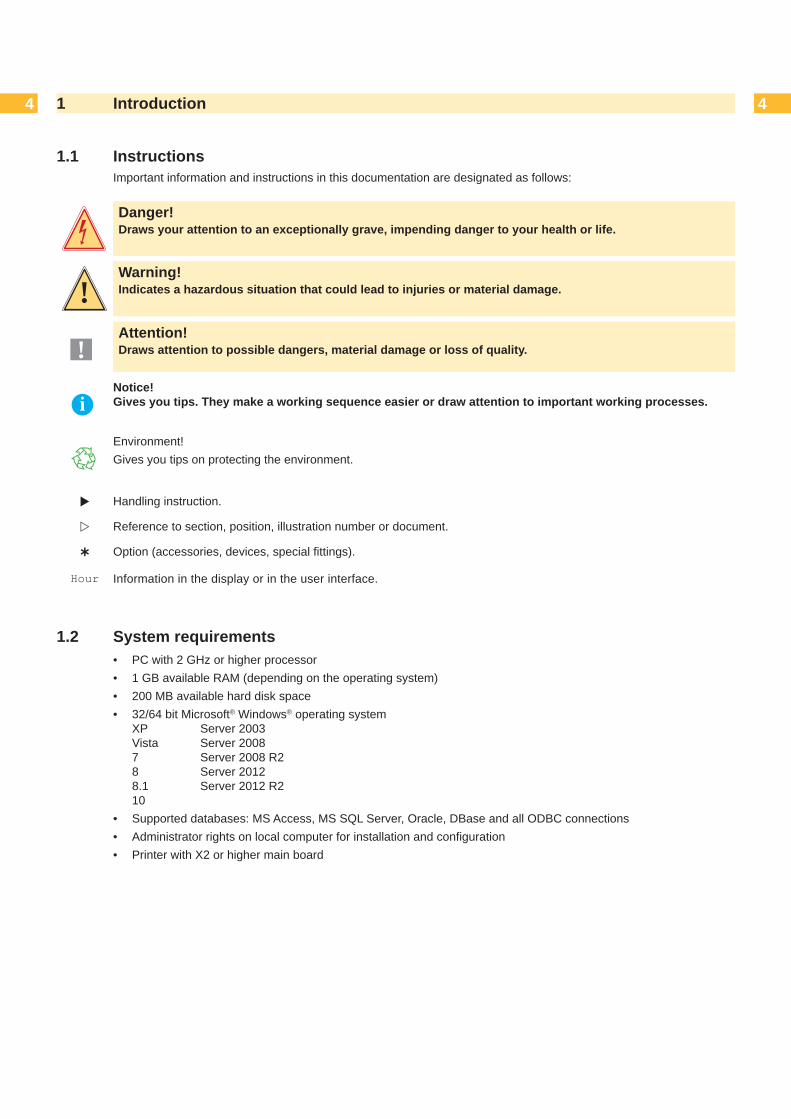
1.1 Instructions Important information and instructions in this documentation are designated as follows:
Danger!Draws your attention to an exceptionally grave, impending danger to your health or life.
!Warning!Indicates a hazardous situation that could lead to injuries or material damage.
!Attention!Draws attention to possible dangers, material damage or loss of quality.
iNotice!Gives you tips. They make a working sequence easier or draw attention to important working processes.
Environment!Gives you tips on protecting the environment.
Handling instruction.
Reference to section, position, illustration number or document.
Option (accessories, devices, special fi ttings).
Hour Information in the display or in the user interface.
1.2 System requirements• PC with 2 GHz or higher processor• 1 GB available RAM (depending on the operating system)• 200 MB available hard disk space• 32/64 bit Microsoft® Windows® operating system
XP Server 2003 Vista Server 2008 7 Server 2008 R28 Server 20128.1 Server 2012 R210
• Supported databases: MS Access, MS SQL Server, Oracle, DBase and all ODBC connections• Administrator rights on local computer for installation and confi guration• Printer with X2 or higher main board
1 Introduction

55
1.3 OverviewDatabase Connector is a module that gives cab printers directly access to external databases through TCP/IP. It is possible, for the same label, to access simultaneously multiple tables in the database. Similarly, several printers are accessing the same database and this simultaneously, thus ensuring data consistency.
It provides access to any type of database through an ODBC (Open Database Connectivity) or ADO (ActiveX Data Object) driver.
The most common databases are: - Access - SQL Server - Oracle - DBase - Informix - Paradox - Foxpro
Database Connector is composed of two separate modules: - SQLClient integrated in the printer. - The server part installed on a computer.
iNotice!To use Database Connector, SQLClient must have been previously enabled on the printer. - For A-Series / Hermes A printers, SQLClient is enabled through a specifi c Ethernet card. - For A+-Series / Mach4 / Hermes+ / Hermes C / PX / XC / XD4 printers, SQL client is activated by default since fi rmware version 3.37.- For EOS printers, SQL client is activated by default since fi rmware version 4.16.
1 Introduction
6 6
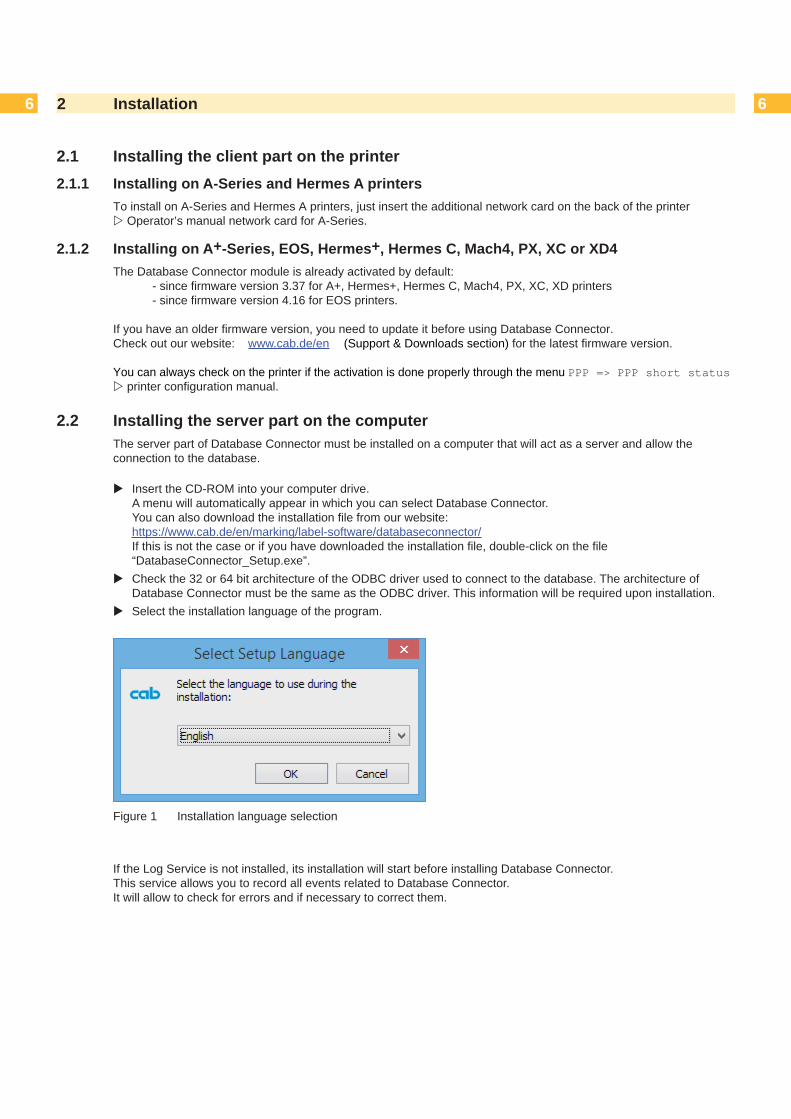
2.1 Installing the client part on the printer2.1.1 Installing on A-Series and Hermes A printers
To install on A-Series and Hermes A printers, just insert the additional network card on the back of the printer Operator’s manual network card for A-Series.
2.1.2 Installing on A+-Series, EOS, Hermes+, Hermes C, Mach4, PX, XC or XD4The Database Connector module is already activated by default: - since fi rmware version 3.37 for A+, Hermes+, Hermes C, Mach4, PX, XC, XD printers - since fi rmware version 4.16 for EOS printers. If you have an older fi rmware version, you need to update it before using Database Connector.Check out our website: www.cab.de/en (Support & Downloads section) for the latest fi rmware version.
You can always check on the printer if the activation is done properly through the menu PPP => PPP short status printer confi guration manual.
2.2 Installing the server part on the computerThe server part of Database Connector must be installed on a computer that will act as a server and allow the connection to the database.
Insert the CD-ROM into your computer drive. A menu will automatically appear in which you can select Database Connector.You can also download the installation fi le from our website: https://www.cab.de/en/marking/label-software/databaseconnector/ If this is not the case or if you have downloaded the installation fi le, double-click on the fi le “DatabaseConnector_Setup.exe”.
Check the 32 or 64 bit architecture of the ODBC driver used to connect to the database. The architecture of Database Connector must be the same as the ODBC driver. This information will be required upon installation.
Select the installation language of the program.
Figure 1 Installation language selection
If the Log Service is not installed, its installation will start before installing Database Connector. This service allows you to record all events related to Database Connector.It will allow to check for errors and if necessary to correct them.
2 Installation

77 2 Installation
Start installation by clicking the Next button.
Figure 2 Start of installation program
Enter user information and then select 32 or 64 bit architecture depending on your operating system and on the ODBC driver you want to use to connect to the database. Click on the Next button.
Figure 3 User information Figure 4 Architecture selection
!Attention!The architecture of Database Connector must be the same type as the ODBC driver.If you have a 64 bit architecture, it is possible to download the 32 bit ODBC drivers on Microsoft’s website.

8 8
Select the target folder and the start menu folder.
Figure 5 Choose of target folder Figure 6 Choose of start menu folder
Select the additional tasks to be done by the installation program and check the selected options summary. Click on the Install button.
Figure 7 Additional tasks Figure 8 Installation summary
2 Installation

99
Wait until the end of the installation, then choose if you want to start the program and click on the Finish button.
Figure 9 Installation progress Figure 10 End of installation
2.3 Starting the programAfter installing Database Connector, an icon of the program is placed on the user desktop and/or in the start menu (depending on the selected installation options).
Start the program by double clicking on one of these icons.
!Attention!You must run Database Connector as an administrator in order to be able to modify settings or to modify the service state.If you are using Windows Vista or higher, this can be done by right clicking on the program icon and selecting “Run as administrator”.
2 Installation

10 10
3.1 Database Connector Standard
!Warning!If you have a fi rewall on your computer, you must open the port used by Database Connector (by default 1001). If the port is closed the program will not work.
1. Start / stop the service2. Connection string3. Connection string wizard 4. Port5. Log events
Figure 11 Database Connector Standard
Start or stop the service using the button next to the status (1).
The Main tab allows you to select the connection string to the database (2), the port used by Database Connector (4) and the parameters for recording events (5).
Choose the database provider, depending on the type of database, by pressing the button next to the connection string (3).
Figure 12 Data Link Properties
3 Confi guration
1
4
32
5

1111 3 Confi guration
3.2 Database Connector Extended1. Start / stop the service2. Connection string3. Connection string wizard4. Port5. Log events6. Filter control characters
Figure 13 Database Connector Extended
!Attention!Click on the Restart button, if Database Connector was already running, or click on the Apply button in the main interface to apply the changes.
3.2.1 Synchronizing devices Apart from the classical use of Database Connector, it is possible to synchronize one or more peripherals with a master device. 6.1 Operating diagram of Database Connector Extended in Printer Association mode
The master device must be a cab printer with the Database Connector option. Associated devices are not necessarily cab printers.
To use a non-cab device, you must know the programming language of this device and it must be accessible via TCP/IP. The command syntax must be stored in a database or in a fi le and thereby kept in touch with the type of use (volume traded, printing execution time...). For example, PCL or PostScript streams are not recommended for this type of use.It is also possible to create multiple associations. A slave associated cab device can still be used independently. A slave device sees its print jobs linked to the master, but the slave device can also run a Database Connector query (assuming it also has this option).
4
32
5
6
1

12 123 Confi guration
The confi guration of associations is done in the Printer association tab
Figure 14 Printers association tab
Adding a master device
First of all a master device must be declared. Click the + button (1) at the bottom of the master device table to insert a new record.
Figure 15 Adding a master device
Confi gure the master device and click on the OK button
Figure 16 Master device
1. Name of the master device2. IP address of the master device3. IP port of the master device (default 9100)4. Used to compare two fi elds and perform a specifi c action
1
1
2
3
4

1313 3 Confi guration
When the master confi guration device is validated, it is then possible to defi ne one or more associated slave devices.
Adding a slave device
i Notice!It is not possible to add a slave device if no master device has been previously defi ned.
Add a slave device by clicking on the + button at the bottom of the slave table (right pane).
Figure 17 Device tab
Figure 18 Database tab
1. Enables / disables the association for this device and allows, for example, temporary inactivation of an association
2. Name of the slave device3. IP address of the slave device4. IP port of the slave device5. Processing priority of print jobs.
Used to slightly infl uence the data rate between devices. The usual values are normal or below normal. Other values are reserved for special cases.
Device tab6. Value in milliseconds to slightly delay the printing.7. Sequence to send before the print job, is executed once per print
job. Specifi c syntax8. Sequence inserted before sending each stream 9. Used as line separator. If it is empty then CRLF will be used10. Sequence added to the end of each stream11. Sequence sent between the end of the print job and the
disconnection
Database tabThe defi nition of the print job sent to the slave device can be either stored in a database fi eld (12), or in a fi le (13).
Depending on the chosen option, you must either defi ne the query (14) to recover the sequence or set the fi le path.
It is also possible to incorporate variables, for both query or in the fi le.
To defi ne a variable just use the following syntax: <#VariableName>
!Attention!It is absolutely necessary that this variable corresponds to a fi eld name and that this fi eld name is defi ned in the layout of the master printer, even if the master device does not itself use this fi eld!
1
2
345
6
78
1011
9
1312
14
14 143 Confi guration
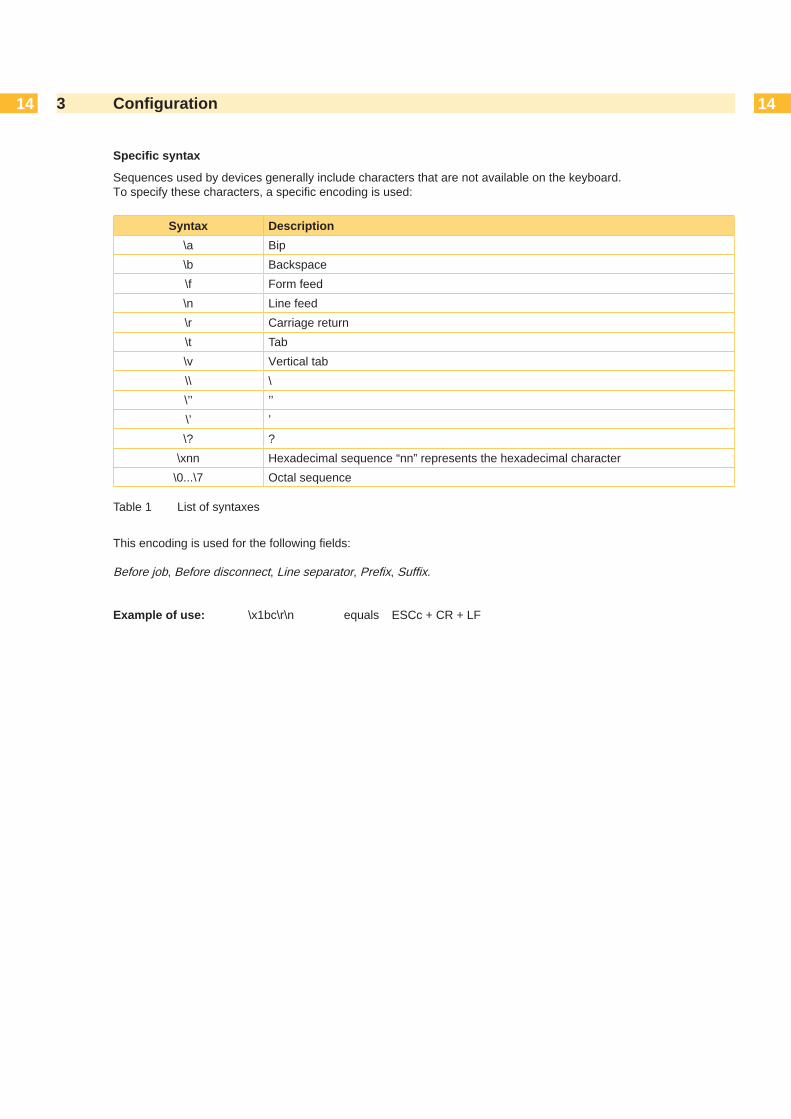
Specifi c syntax
Sequences used by devices generally include characters that are not available on the keyboard.To specify these characters, a specifi c encoding is used:
Syntax Description\a Bip\b Backspace\f Form feed\n Line feed\r Carriage return\t Tab\v Vertical tab\\ \\’’ ’’\’ ’\? ?
\xnn Hexadecimal sequence “nn” represents the hexadecimal character\0...\7 Octal sequence
Table 1 List of syntaxes
This encoding is used for the following fi elds:
Before job, Before disconnect, Line separator, Prefi x, Suffi x.
Example of use: \x1bc\r\n equals ESCc + CR + LF

1515 3 Confi guration
3.2.2 Remote TriggerThe Remote Trigger mode automatically select a label fi le based on one or more parameters.This mode necessarily requires the use of a label fi le (called ‘Remote Trigger’) specifi c to the application and created by cab and also a confi guration fi le 6.3 Confi guration fi le.
The operator selects the ‘Remote Trigger’ label on the printer via the classical label loading procedure. cab Printer Confi guration ManualThen he enters an ID number on the printer (OF, for example) which will be sent to Database Connector Server and used to fi nd the label fi lename to be printed.
iNotice!Depending on the application, it may also be possible to enter several parameters.
The label ‘Remote Trigger’ established a connection with Database Connector Server and requests the execution of a SQL query. The connection string defi ned in the General tab will be used.Database Connector Server runs the query and returns the result like a typical query.The result of the query (usually the name of the mask) is returned to the printer which then loads the corresponding label.
i Notice!The processed label is like a typical label with the ability to also use Database Connector queries.
!Attention!The label fi le must exists in the default memory (IFFS, CF ...) of the printer.
Figure 19 Remote Trigger
Enable the Remote Trigger mode (1) Defi ne a query (2) to retrieve the name of the label fi le.
To use a variable in the query, simply use the following syntax: : <#VariableName> Confi rm the changes by clicking the Apply or Restart button (3) (according to the state of the service).
1
2
3
16 16
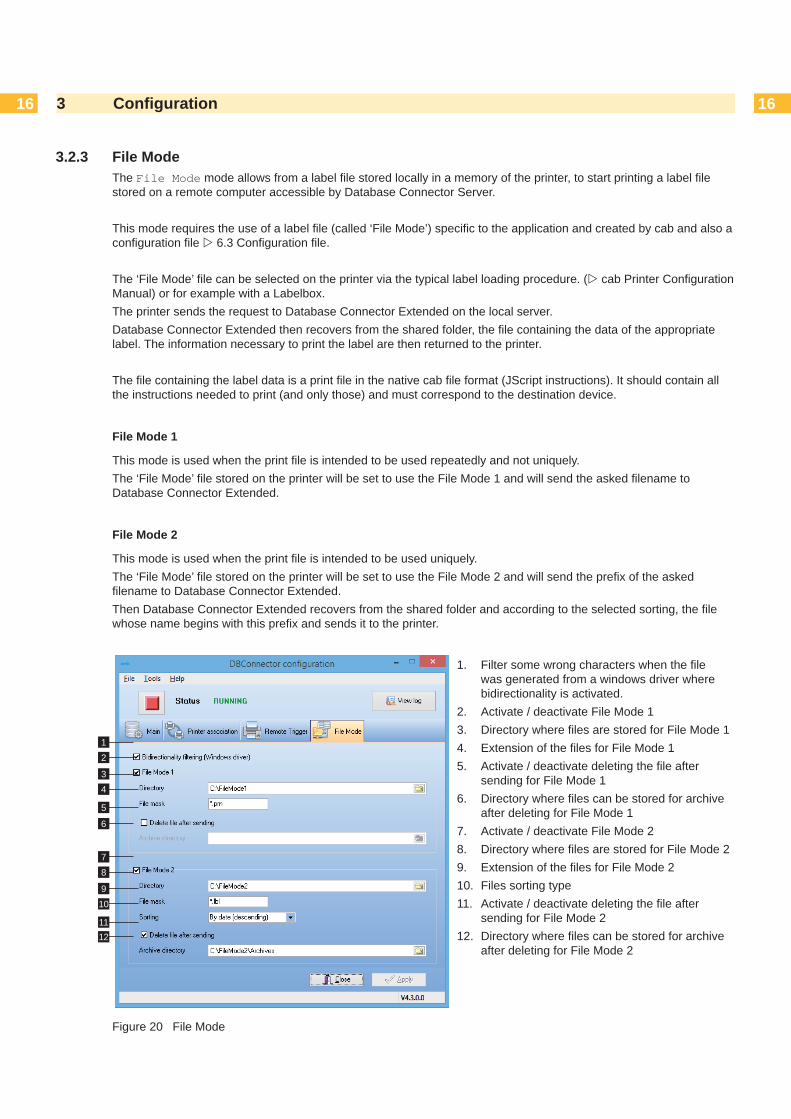
3.2.3 File ModeThe File Mode mode allows from a label fi le stored locally in a memory of the printer, to start printing a label fi le stored on a remote computer accessible by Database Connector Server.
This mode requires the use of a label fi le (called ‘File Mode’) specifi c to the application and created by cab and also a confi guration fi le 6.3 Confi guration fi le.
The ‘File Mode’ fi le can be selected on the printer via the typical label loading procedure. ( cab Printer Confi guration Manual) or for example with a Labelbox.The printer sends the request to Database Connector Extended on the local server.Database Connector Extended then recovers from the shared folder, the fi le containing the data of the appropriate label. The information necessary to print the label are then returned to the printer.
The fi le containing the label data is a print fi le in the native cab fi le format (JScript instructions). It should contain all the instructions needed to print (and only those) and must correspond to the destination device.
File Mode 1
This mode is used when the print fi le is intended to be used repeatedly and not uniquely.The ‘File Mode’ fi le stored on the printer will be set to use the File Mode 1 and will send the asked fi lename to Database Connector Extended.
File Mode 2
This mode is used when the print fi le is intended to be used uniquely.The ‘File Mode’ fi le stored on the printer will be set to use the File Mode 2 and will send the prefi x of the asked fi lename to Database Connector Extended.Then Database Connector Extended recovers from the shared folder and according to the selected sorting, the fi le whose name begins with this prefi x and sends it to the printer.
Figure 20 File Mode
1. Filter some wrong characters when the fi le was generated from a windows driver where bidirectionality is activated.
2. Activate / deactivate File Mode 13. Directory where fi les are stored for File Mode 14. Extension of the fi les for File Mode 15. Activate / deactivate deleting the fi le after
sending for File Mode 16. Directory where fi les can be stored for archive
after deleting for File Mode 17. Activate / deactivate File Mode 28. Directory where fi les are stored for File Mode 29. Extension of the fi les for File Mode 210. Files sorting type11. Activate / deactivate deleting the fi le after
sending for File Mode 212. Directory where fi les can be stored for archive
after deleting for File Mode 2
3 Confi guration
12
34
5
6
78
910
1112

1717 3 Confi guration
3.4 Event logDatabase Connector records every action performed. This allows to have an history in case of a problem or error and thus to fi nd out the cause and get a solution more easily. All these actions are registered directly in the Windows Event Viewer
You can easily access the events by clicking on the View log (1) button of the main interface.
Figure 21 Log access
The log interface will open, allowing you to view only the events related to Database Connector.
Figure 22 Event log
1

18 18
You can also view these information in the Windows Event Viewer.
Figure 23 Windows Event Viewer
iNotice!To access the Event Viewer:• on Windows XP, Server 2003 Control Panel => Administrative Tools => Event viewer• on Windows Vista, 7, 8, 10, Server 2008, Server 2008 R2, Server 2012, Server 2012 R2 Control Panel => System and security => Administrative Tools => Event viewer
3 Confi guration

1919 4 Creating a label with a labeling software
iNotice!Labels using Database Connector can be made directly with the labeling software cablabel R2 Pro, cablabel S3 Pro or Codesoft.
Only cablabel R2 Pro, cablabel S3 Pro, Codesoft Pro and Enterprise allow you to use Database Connector.
Database Connector only works with native printers and does not work with Windows drivers.
4.1 Creating a label with cablabel R2 Pro or Codesoft4.1.1 Activating the Database Connector option
Start cablabel R2 Pro or Codesoft. Install a native cab printer. Enable the Database Connector option in the printer confi guration by entering the computer IP address where the
server part is installed.
Figure 24 Printer confi guration
Create one or more queries.In the next examples we will use the table below:
Figure 25 Query result

20 204 Creating a label with a labeling software
4.1.2 Creating a query
To create queries, you must use the free variables of cablabel R2 Pro or Codesoft.
Create a free variable. Place the variable on the label as a text. Right-click on the variable to access the Specifi c options.
Figure 26 Specifi c options Figure 27 Specifi c options settings
Enable Database Connector and select the variable type Request. Enter the SQL query in the Value fi eld.
Example: SELECT * FROM Products WHERE ArtCode = {CodeArt}
If you need to use a variable from the label in the query, just use the name of this variable by enclosing it in braces {} and with single quotes if it a string.
Example : {CodeArt} for a variable representing an integer in the database ’{CodeArt}’ for a variable representing a character string in the database
iNotice!You can also make this variable invisible through the Invisible object at print job option if you do not want it to appear on the printed label, which is very often the case.

2121 4 Creating a label with a labeling software
4.1.3 Creating a variable with the result of a query
To create a variable with the result of a query you should still use the free variables of cablabel R2 Pro or Codesoft.
Create a free variable. Place the variable on the label as a text, barcode or picture. Right-click on the variable to access the Specifi c options.
Figure 28 Specifi c options
Enable Database Connector and select Variable. Use the name of the free variable containing the SQL query. Add, separated by a comma, the index of the desired fi eld. The index of the fi rst result fi eld is always 1.
If we take the table and the previous query, the index 1 represents the fi eld Artcode, index 2 the fi eld Barcode, index 3 the fi eld ProdNameUs ...
Example: Requete1,7
Requete1 is the name given to the free variable that contains the SQL query.7 is the index of the fi eld from the database (in the example the fi eld ProdNameIt).
iNotice!You can also make this variable invisible through the Invisible object at print job option if you do not want it to appear on the printed label.

22 22
4.2 Creating a label with cablabel S3 Pro
In cablabel S3 Pro, just use the Database Wizard.
Figure 29 Database Wizard
Confi gure the Database Connector connection string. Select the data source using the Query Builder.
After that, the different desired fi elds of the label may be linked to the data source.
i Notice!For more information Operator’s manual cablabel S3 Pro, chapter Database Wizard.
4 Creating a label with a labeling software

2323 5 Creating a label directly in JScript programming language
5.1 List of commands
Below is the list of specifi c JScript commands to use Database Connector.
E SQL;Server_IP:Server_Port Enables Database Connector specifying the IP address and port of the server. This command is to be added at the beginning of the fi le after the “S” command with the label size. Server_IP: IP address of the computer where the Database Connector server part is installed.Server_Port: port of the computer where the Database Connector server part is installed.
Example: E SQL;192.168.10.32:1001In the example the IP address of the server is 192.168.10.32 and port 1001.
[SQL:Query] This command is added behind a text or barcode fi eld.The command “E SQL...” must of course have been previously specifi ed.
Query: any SQL query.
Example: T:Requete;10,15,0,3,5;[SQL:SELECT * FROM Products WHERE ArtCode={CodeArt}]Selects all fi elds from the table Products where the fi eld ArtCode is equal to the part number entered by the operator.
[SQLLOG:Query] Same function as [SQL:Query], except that SQLLOG is performed only when the label is printed.This allows to make a logging in a database.
Query: any SQL query.
Example: T;57.4,5.3,0,3,3.57,q100;[SQLLOG:UPDATE Products SET LastPrinted=’{Hour0}’ WHERE ArtCode={CodeArt}][I]
[SPLIT:Result,Index] This command is added behind a text or barcode fi eld.
Result: name of the fi eld where the result of the query is stored.Index: fi eld index to retrieve from the query (1 is the fi rst fi eld).
Example: T:Product;23.1,13.8,0,3,3.57,q100;[SPLIT:Requete,3]In the example, we retrieve the third fi eld of the “Requete” request.
iNotice!More information about the direct programming of the printer cab Programming Manual.

24 245 Creating a label directly in JScript programming language
5.2 Full sample
The following example is distributed with Database Connector. You can fi nd it in the “Exemples” folder located in the installation folder of the program (by default C:\Program Files\cab technologies\Database Connector\Exemples)
It is used with the Access database located in the same folder.
mmzOJO R,S,PH100,0,TD 0.0,0.0Sl1;0.0,0.0,42.0,42.0,100.0,100.0,1E SQL;192.168.10.32:1001T:CodeArt;25.3,4.7,0,5,3.2,q100;[?:Code article ?,2,,,L200]T1.5,4.7,0,5,3.2,q100;Code article :T2.5,13.8,0,3,3.57,q100;Product:T2.5,19.0,0,3,3.57,q100;Produit :T2.5,23.9,0,3,3.57,q100;Produkt:T56.6,12.7,0,3,3.57,q100;Quantité :T56.6,18.5,0,3,3.57,q100;Poids :T:Requete;40.8,5.3,0,3,3.57,q100;[SQL:SELECT * FROM Products WHERE ArtCode={CodeArt}][I]T:Update;57.4,5.3,0,3,3.57,q100;[SQL:UPDATE Products SET LastPrinted=’{Date0}’ WHERE ArtCode={CodeArt}][I]T:Insert;72.2,5.3,0,3,3.57,q100;[SQL:INSERT INTO PRINT (ArtCode,PrintDate) VALUES ({CodeArt}, ‘{Date0}’)][I]B:Barcode;35.8,28.0,0,CODE128,12.6,0.25;[SPLIT:Requete,2]T:Product;23.1,13.8,0,3,3.57,q100;[SPLIT:Requete,3]T:Produit;23.1,19.0,0,3,3.57,q100;[SPLIT:Requete,4]T:Produkt;23.1,23.9,0,3,3.57,q100;[SPLIT:Requete,5]T:Quantite;76.1,12.7,0,3,3.57,q100;[SPLIT:Requete,11]T:Poids;84.0,5.3,0,3,3.57,q100;[SPLIT:Requete,12][I]T:Date0;3.1,39.1,0,3,3.57,q100;[DAY02]/[MONTH02]/[YYYY]T:Formule0;76.1,18.5,0,3,3.57,q100;[*:Poids,1][D:4,1][R:m]A [?]

2525
6.1 Operating diagram of Database Connector Extended in Printer Association mode
Figure 30 Database Connector Extended in Printer Association mode
6 Appendix
Queries ResponseSynchronized
stream
DatabaseDatabase Connector Extended / Log Service

26 26
1
4
2 3
5
106
9
7 8
6 Appendix
6.2 Operating diagram of Database Connector Extended in Remote Trigger mode
Figure 31 Database Connector Extended in Remote Trigger mode
Remote Trigger: function which retrieves the layout and the print quantity from a manufacturing order.
SQL Client: function which retrieves all the information needed to print from the database.
Remote TriggerSQL Client
Return response to SQL Client
Information requested by the printer1. Remote Trigger2. SQL Client
Database response
DBServer performs a query on the
database
Label printing
Loading layout
SGBD

2727 6 Appendix
6.3 Confi guration fi le for Remote Trigger and File Mode
A confi guration fi le is required for using ‘Remote Trigger’ and ‘File Mode’ labels.This fi le contains especially the IP address and port of the Database Connector server.
!Attention!The confi guration fi le must exists in the default memory (IFFS, CF ...) of the printer and must be named confi g.ini
Figure 32 Confi guration fi le
In Remote Trigger and File Mode:1. IP Address of Database Connector server2. Port used by Database Connector server
In File Mode only:3. Name assigned to the printer and prefi x in the
fi le name to send
12
3