Operator's Manual Charcoal Grill MODEL BRG08A010
14
Manual # P80151099W- Date:2010/09/03 Whether this cooker was assembled by you or someone else, you must read this entire manual before using your cooker to ensure the cooker is properly assembled and installed. Obtain assistance from another person when han- dling the large or heavy pieces. Some parts may contain sharp edges, wear pro- tective work gloves if necessary. Combustion byproducts produced when using this product contain chemicals known to the State of California to cause cancer, birth defects, or other reproductive harm. THIS COOKER IS DESIGNED FOR OUTDOOR USE ONLY CARBON MONOXIDE HAZARD - Burning char- coal inside gives off carbon monoxide without odor that can kill you. NEVER burn charcoal inside homes, vehicles or tents. This product contains chemicals known to the State of California to cause birth defects or other reproductive harm. WARNING ! ! Charcoal Grill MODEL BRG08A010 Operator's Manual FREE HELP FROM THE GRILL EXPERTS Grand Hall is the expert on this product and trained to help you with: visit www.grandhall.com or call: 1-877-934-7455 Monday - Friday 8:00am-4:30pm CST Assembly Questions Cooker Operation Replacement of Damaged or Missing parts NOTE TO ASSEMBLER / INSTALLER: Leave this manual with the consumer. NOTE TO CONSUMER: Keep this manual for future reference. RECORD YOUR SERIAL # __________________ IMPORTANT:
Transcript of Operator's Manual Charcoal Grill MODEL BRG08A010

Manual # P80151099W- Date:2010/09/03
Whether this cooker was assembled by you orsomeone else, you must read this entire manualbefore using your cooker to ensure the cooker isproperly assembled and installed.
Obtain assistance from another person when han-dling the large or heavy pieces.
Some parts may contain sharp edges, wear pro-tective work gloves if necessary.
Combustion byproducts produced when using thisproduct contain chemicals known to the State ofCalifornia to cause cancer, birth defects, or otherreproductive harm.
THIS COOKER IS DESIGNED FOR OUTDOORUSE ONLY
CARBON MONOXIDE HAZARD - Burning char-coal inside gives off carbon monoxide without odorthat can kill you. NEVER burn charcoal insidehomes, vehicles or tents.
This product contains chemicals known to theState of California to cause birth defects or otherreproductive harm.
ü
ü
ü
ü
ü
WARNING! !
ü
Charcoal GrillMODEL BRG08A010
ü
Operator's Manual
FREE HELPFROM THE GRILL EXPERTS
Grand Hall is the expert on this product andtrained to help you with:
visit www.grandhall.com or call:
1-877-934-7455Monday - Friday 8:00am-4:30pm CST
Assembly QuestionsCooker OperationReplacement of Damaged or Missing parts
üüü
ü
ü
NOTE TO ASSEMBLER / INSTALLER:Leave this manual with the consumer.
NOTE TO CONSUMER:Keep this manual for future reference.
RECORD YOUR SERIAL #__________________
IMPORTANT:
ü

2
Do not store or use gasoline or other flammableliquids or vapors in the vicinity of this or any otherappliances.
WARNING! !
Use your Globe Café at least 3 feet away from any wallor surface. Use your Globe Café at least 3 feet awayfrom combustible objects that can melt or catch fire(such as vinyl or wood siding, fences and overhangs)or sources of ignition including pilot lights on waterheaters and live electrical appliances.
WARNING! !
This instruction manual contains important infor-mation necessary for the proper assembly andsafe use of the cooker.Read and follow all warnings and instructionsbefore assembling and using the cooker.Follow all warnings and instructions when usingthe cooker.Keep this manual for future reference.
•
•
••
WARNING !!
Table of ContentsPrimary Safety Warnings ........................... 1-3Part Diagrams and Lists .......................... 4-6Assembly Instructions...............................7-11Use & Care Instructions:• Starting a Fire.......................................12• Cleaning and Maintenance.....................13Warranty Terms...........................Back Cover
If you need to move the Globe Café, get the help ofan assistant. Lift the Globe Café by supporting thebase. Never lift the Globe Café from the lid or lidattachments.
Do not push the Globe Café onto the Cart or BowlSupports. This may cause the Globe Café to fallover. Always lift or pull the Globe Café towards youwhen moving it.
Never place your hands or fingers inside the hinge,hinge parts, or the inside of the lid that isn't lockedinto the open position.
Never raise the lid fully after cooking for an extendedperiod of time. Always raise the lid a couple of inchesto release heat and air first. Fully opening the lid cancause a backdraft of heated air and flame to rush outand burn you.
WARNING! !ü
ü
ü
ü
ü Never allow children to operate your Globe Café Donot allow children or pets to play near your GlobeCafé .
In the event of rain, move Globe Café to a coveredarea.
Use your Globe Café on a level, stable surface in anarea clear of combustible materials.
Most surfaces on this Globe Café are hot whenin use. Always wear protective clothing and flameretardant BBQ mitts to prevent injury.
Do not leave Globe Café unattended when in use.
Do not move the cooker when in use.
Allow the Globe Café to cool before moving orstoring.
Do not use your Globe Café as a heater.
Do not use water to extinguish the coals.
This Globe Café is not intended to be installedin or on recreational vehicles and/or boats.
Do not use charcoal starter fluid, gasoline,kerosene, alcohol, or lighter fluid in your GlobeCafé. Refer to the lighting instructions for properfire starters.
! DANGER !
ü
ü
ü
ü
ü
ü
ü
ü
ü
ü

3
Pre-Assembly Instructions For Your Safety
You may slice the carton front corners with a utilityknife to lay open the carton front panel. This allowsyou to raise the Lid and remove the componentspacked inside, making it easier to lift. Do not cut intoinner packing material, or you may risk damaging theglazing of your cooker.
Use the Hardware and Part Diagrams to ensure allitems are included and free of damage.
Powder remnants and thin cracks may be present.There may be some variation in color on the exterior.These are normal characteristics of the ceramic ma-terial.
Do not assemble or operate the cooker if it appearsdamaged. If there are damaged or missing parts whenyou unpack the shipping box or you have questionsduring the assembly process call: 1-877-934-7455Monday-Friday 8:00am-4:30pm CST. (Note: All dam-ages to the ceramic body must be noted on your re-ceipt at the time of purchase. See warranty for de-tails.)
•••
PRE-ASSEMBLY
Read and perform the following pre-assemblyinstructions:
Tools Required for Assembly:protective work glovesprotective eyewear
You will need assistance from another person tohandle the Globe Café and other large, heavy parts.
Open Lid of shipping carton and remove top sheet ofcardboard and packing materials. Lay cardboardsheet on floor and use as a work surface to protectfloor and parts from scratches.
Phillips Head screwdriver

4
Hardware Pack Parts List for Model BRG08A010PART # PART DESCRIPTION QTY PURPOSE OF PART
P06006070A Hardware Pack 1 For use in assembly for Model BRG08A010S162G04082 Hex Head Screw 1/4"x1/2" 4 Install Cart Legs to Cart Bottom ShelfS162G04082 Hex Head Screw 1/4"x1/2" 4 Install Cross BracesS162G04082 Hex Head Screw 1/4"x1/2" 4 Install Cart Legs to Table TopP05515024L Wrench 1 Tighten CastersS411M10221 M10.5 Plain Washer 4S004200131 Fasten Loop 2
Install 8" Wheels
Hardware Pack Diagram for Model BRG08A010
Hex Head Screw1/4"x1/2"Qty. 12Part # S162G04082
M10.5 Plain WasherQty. 4Part # S411M10221
Fasten LoopQty. 2Part # S004200131
WrenchQty. 1Part # P05515024L

5
Parts Diagram for Model BRG08A010
24 17
28
13a32
29
28
23
0809
07
06
04
03
02
01
22
26
25
2525
25
31
31
30
30
29
27
27
12
11
10
05
17
16
19
20
21
18
15
3334
35
14
36
37
13b

6
Parts List for Model BRG08A010
To obtain the correct replacement parts for your cooker, please refer to the part numbers in this parts list.The following information is required to ensure you receive the correct parts:
1. Model and Serial Number (see label on cooker)2. Part Number3. Part Description4. Quantity of parts needed
Important: Use only authorized parts. The use of any part that is not factory authorized can be dangerousand will also void your product warranty. Keep this Operator's Manual for convenient referral and for partreplacement.
For the repair or replacement parts you need:Call 1-877-934-7455 Monday - Friday 8:00am-4:30pm CST
KEY PART DESCRIPTION PART # QTY1 Vent Lid Handle P00210020C 12 Vent Lid Air Shutter P069200014 13 Vent Lid Air Shutter Bracket P069210016 14 Vent Lid P069210026 15 Lid Assembly P0015002R2 16 Temperature Gauge P00601391A 17 Lid Handle Bracket P033280724 18 Heat Insulating Spacer P00209001A 19 Lid Handle P00209002A 1
10 Lid Hinge Bracket, Upper P033040604 111 Lid Hinge Bracket, Lower P033040614 112 Bowl P0075901T6 113a Bowl Air Door Assembly P069200064 113b Ash Protector P069090084 114 Grease Shield P069010294 115 Lid Hinge Spring P05504114N 216 Lid Hinge Assembly Y0550012 117 Cooking Grid Handle P055151255 218 Cooking Grid P01601027H 119 Charcoal Ring P0075902TD 120 Charcoal Grate P01701001K 121 Charcoal Box P0075903TD 122 Table Top P01002074D 123 Protective Pad P05518104I 324 Name Plate P00407030A 125 Bowl Support for Fix Place Installation P05388001D 426 Cart Bottom Shelf P01004075D 127 Cart Leg, Left P009080194 228 Cart Leg, Right P009090414 229 Cart Cross Brace P03305046D 230 Caster Seat P06801018F 231 Caster, 2.5" with Brake P05118001E 232 Wheel Axle P05103015D 133 Wheel Hub Cap P05113011C 234 Wheel, 8 in. P05103011A 235 Lid/Non Vented P0015003R2 136 Lid Hinge Protector P055540014 137 Tank Fastening Strap P05314002V 1
Cover P07007059A 1Hardware Pack P06006070A 1Operator's Manual P80151099W 1

Assembly Instructions
7
2 Install Cart Cross Brace and Wheels onto Right Cart LegsPosition the Cart Cross Brace so that the slightly rounded, arc surface is facing towards the outside asshown below. Install the Cart Cross Brace over the 2 Right Cart Legs. Align the 2 holes on the Cart CrossBrace with the 2 holes on the Right Cart Legs. Insert 2 Hex Head Screws 1/4"x1/2" and tighten securely.Thread the Wheel Axle through the top holes on the Right Cart Legs.Place the wheel parts over the left Wheel Axle in the following order: 1 Washer, 1 Wheel, and 1 Washer.Place the Fasten Loop over the groove at the end of the Wheel Axle. Snap the Wheel Hub Cap over theWheel.Repeat the previous step for installing the right Wheel.
Hex Head Screw1/4"x1/2"Qty. 2Part # S162G04082
M10.5 Plain WasherQty. 4Part # S411M10221
Fasten LoopQty. 2Part # S004200131
Hex Head Screw1/4"x1/2"Qty. 4Part # S162G04082
CAUTION: While it is possible for one person to assemble this cooker, obtain assistance from another personwhen handling some of the larger, heavier pieces.
1 Insert 4 Cart Legs into Cart Bottom ShelfInsert 4 Cart Legs into the Cart Bottom Shelf as shown. (NOTE: The Right Cart Legs go into the sideof the cart with the rounded edge. The Left Cart Legs go into the side of the cart with the indentation.)Align the 4 holes in the middle of the Cart Legs with the holes in the Cart Bottom Shelf. Insert 4 HexHead Screws 1/4"x1/2" and tighten securely.
Wheel Hub Cap
Wheel
Washer
Washer
Fasten Loop
Wheel Axle
Right Cart Cross Brace
The Fasten Loop mustbe placed over thegroove at the end of theWheel Axle.

3 Install Cart Cross Brace and Casters onto Left Cart Legs
Install Table Top4
8
Place the Table Top onto the reserved cardboard as shown. With the help of your assistant, raisethe assembled cart and place the Cart Legs into the 4 holes in the Table Top as shown.Insert 4 Hex Head Screws 1/4"x1/2" into the aligned holes of the Cart Legs and Table Top and tightensecurely.With your assistant, stand the Cart up onto its Casters.
Position the Cart Cross Brace so that the slightly rounded, arc surface is facing towards the outside asshown below. Install the Cart Cross Brace over the 2 Left Cart Legs. Align the 2 holes on the Cart CrossBrace with the 2 holes on the Right Cart Legs. Insert 2 Hex Head Screws 1/4"x1/2" and tighten securely.Insert 2 Caster Seats into the Left Cart Legs as shown. Next, install two 2.5" Casters into the CasterSeats. Secure them in place by using the provided Wrench.
Caster SeatHex Head Screw1/4"x1/2"Qty. 2Part # S162G04082
Hex Head Screw1/4"x1/2"Qty. 4Part # S162G04082
WrenchQty. 1Part # P05515024L
Left Cart Cross Brace

Place Globe Café onto the Cart.Secure the Charcoal Pail (not included in this unit) to the Cart5
Remove all components from the inside of the Globe Café.Lock the brakes on the 2.5" Casters.With the help of your assistant, lift and support the Globe Café from the base and place it into thecut out on the Cart as shown. Make sure to align the cutout (Part A in diagram below) with the fitting(Part B in diagram) on Cart Bottom Shelf.Release the fastening strap, then set the Charcoal Pail securely on the Cart and retighten the FasteningStrap.
Install Cooking Components6 Open the lid and place the cooking components inside in the following sequence: Charcoal Box, CharcoalGrate, Charcoal Ring, and Cooking Grid. Place the Charcoal Box so that one of the openings is alignedwith the Air Door. Place the Charcoal Ring so that grooves face up. (For your safety, we recommendusing the Cooking Grid Handles when removing or installing the Cooking Grids. See Fig. 1. Always waitfor the Globe Café to cool after cooking before removing the Grids.)Close the Lid and place the Vent Lid or Lid/Non Vented over the opening on the top of the lid. (TheVent Lid has a sliding top that allows you control the amount of air flowing to your cooker. This featureallows you to regulate your cooker's temperature. The Lid/Non Vented is enclosed, and restricts the flowof air to your Globe Café's lid.)
9
Fig. 1
Cooking Grid HandleCooking Grid Handle
Cooking Grid
Charcoal Ring
Charcoal Grate
Charcoal BoxGlobe Café Bowl
Lid/Non Vented
Vent Lid
A
B
10
Final Cooker Assembly StepWhen you have finished assembling yourGlobe Café, be sure that check the HingeBrackets and Lid Hinge Assembly are tight andin place. Check to make sure all hardware issecure for safe operation of your cooker.
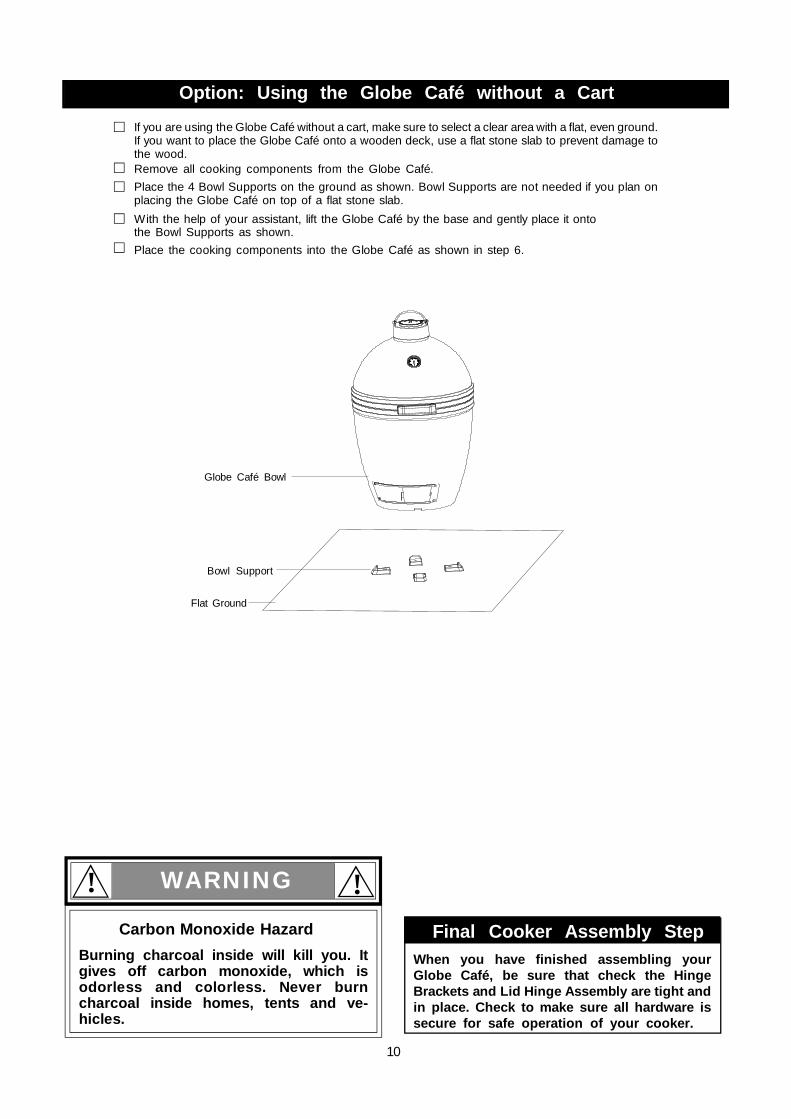
Option: Using the Globe Café without a Cart
Burning charcoal inside will kill you. Itgives off carbon monoxide, which isodorless and colorless. Never burncharcoal inside homes, tents and ve-hicles.
Carbon Monoxide Hazard
WARNING !!
If you are using the Globe Café without a cart, make sure to select a clear area with a flat, even ground.If you want to place the Globe Café onto a wooden deck, use a flat stone slab to prevent damage tothe wood.Remove all cooking components from the Globe Café.Place the 4 Bowl Supports on the ground as shown. Bowl Supports are not needed if you plan onplacing the Globe Café on top of a flat stone slab.With the help of your assistant, lift the Globe Café by the base and gently place it ontothe Bowl Supports as shown.Place the cooking components into the Globe Café as shown in step 6.
Globe Café Bowl
Bowl Support
Flat Ground

Removing and Installing the Ash Protector for Cleaning
Adjusting the Air Door:
Air Door
Halfway-Open ClosedOpen
Ash Protector
You can regulate the temperature inside your cooker by adjusting the Air Door. To increase the tempera-ture, open the Air Door all the way. To decrease the temperature, close the Air Door halfway. Consultyour temperature gauge and make adjustments as necessary to get your desired reading. When you’redone cooking, close the Air Door completely to cut off air flow into the cooker.
Ash Protector
The Ash Protector will get very hot. Always wear aflame retardant BBQ Mitt when moving or operating theAsh Protector.
WARNING! !
Note: The Ash Protector prevents ashes from flying out of the open Air Door. Refer to the directions below for using theAir Door and removing ash from the cooker.
11
Assembly and Use Instructions for Bowl Air Door
1. Open the Air Door.2. Push the tab on the right side of the Ash Protector (see “B”) towards the left (see “A”). Take the Ash Protector Out.3. Reinstall the Ash Protector by placing the two tabs on the left side of the Ash Protector into the fitting on the left side of the Air Door opening. Push the other end of the Ash Protector into the right end of the Air Door fitting.
•

12
USE AND CARE INSTRUCTIONS
Cooking on the Globe CaféWe recommend that you use lump charcoal and firestarters in your cooker for the best results. Never uselighter fluid. The chemicals in charcoal briquettes andlighter fluid may leave a lingering odor in your cooker.Follow these directions for building a controllable flameinside your cooker.
Remove the Vent/Lid or Lid/Non Vented (whicheverone you have equiped). Open the cooker Lid (makingsure it is locked in the open position). Remove theCooking Grids using the Cooking Grid Handles.
Place one or two fire starters on the Charcoal Grate inthe Charcoal Box and cover them with one or twoinches of lump charcoal.
Light the fire starters. Use the Cooking Grid Handlesto reinstall the Cooking Grids.
Slide the Bowl Air Door open all the way.
Do not place food into Globe Café until fire starters havecompletely burned away and charcoal is glowing.
You can close the Lid after several of the coals are litand open the Vent/Lid all the way.
You can regulate the temperature by adjusting theBowl Air Door and the Vent/Lid. To increase the tem-perature, adjust the Bowl Air Door and Vent/Lid so thatthe openings are wider. To decrease the temperature,adjust the Bowl Air Door and Vent/Lid so that theopenings are smaller. Consult your temperature gaugeand make adjustments as necessary to get your de-sired reading.
When you have finished cooking, close the Lid, BowlAir Door, and Vent/Lid (if equipped). NEVER use waterto extinguish charcoal.
STARTING A FIREThe Globe Café is an extremely versatile cooler. You canroast, smoke, bake, or grill in it. We recommend that youkeep the lid closed during cooking to retain heat in theunit.
For Baking: Preheat the Globe Café and adjust thedampers until the right temperature is reached.Use a cooking pan/baking sheet on top of the grids.Check on your food occasionally for doneness.
For Grilling: Place the food directly onto the cokinggrids. This is called the "direct" method of cooking.For Roasting: Your Globe Café is great at roasting.Whether you choose to roast turkeys or rib roasts,they will all turn out moist and tender. Place aroasting pan and rack into the Globe Café to roastyour food. This is called the "indirect" method ofcooking.
Do not put food in excess of 15 pounds in yourcooker.
Always use a flame retardant BBQ mitt when cook-ing.

13
USE AND CARE INSTRUCTIONS
•
•
•
WARNING! !Use your Globe Café at least 3 feet away fromany wall or surface. Use your Globe Café at least3 feet away from combustible objects that canmelt or catch fire (such as vinyl or wood siding,fences and overhangs) or sources of ignitionincluding pilot lights on water heaters and liveelectrical appliances.
Never use your Globe Café in a garage, porch, shed,breezeway or any other enclosed area.
Never obstruct the flow of ventilation air around yourcooker housing.
3ft.3ft.
Keep cooker area clear and free from combustiblematerials, gasoline and other flammable vaporsand liquids.
Do not obstruct the flow of air for combustion andventilation.
Keep the ventilation openings of the cooker free andclear of debris.
Never raise the lid fully after cooking for an extendedperiod of time. Always raise the lid a couple of inchesto release heat and air first. Fully opening the lid cancause a backdraft of heated air and flame to rush outand burn you.
CAUTIONFailure to comply with these instructions mayresult in a hazardous situation which, if notavoided, may result in injury.
!!
Proper care and maintenance will keep your cooker in topoperating condition and prolong its life. Follow thesecleaning procedures on a timely basis and your cookerwill stay clean and operate with minimum effort.
CAUTION: Make sure coals are completely extinguishedand the cooker is cool before cleaning.
If there is an excessive amount of ash on the interiorwalls of your cooker, use an ash removal tool toscrape off excess.
Inspect draft holes in the Charcoal Box to make surethat they are clear of debris. Place an ash removal toolthrough the Air Door to scoop out debris.
Keep the Charcoal Box and Charcoal Ring inside thecooker, or they may break.
Remove and clean the Cooking Grids and CharcoalGrate following the instructions provided above.
Before initial use, and periodically thereafter, washyour Cooking Grids in a mild soap and warm watersolution. You can use a wash cloth or vegetable brushto clean your cooking grids. After they've been cleaned,coat both side of the Cooking Grids with a light coat ofvegetable oil and place them back in the cooker.If charred food or ash accumulates on your CharcoalGrate, wash it using a mild soap and warm watersolution. You can use a wash cloth or vegetable brushto scrape off any caked on bits.
Cleaning Cooking Grids
CLEANING AND MAINTENANCE
Cleaning the Cooker Interior
Checking the Lid Hinges and Hardware:Periodically check the Lid Hinge Assembly to makesure that the hinges are tight. Periodically check the LidHinge Assembly to make sure that the hinges are tight.Tighten hinges if they are loose. If the hinges are loose,the lid may fall off and break.Periodically check the hardware on your Globe Cafécooker and cart to see if they are securely in place.Adjust hardware if any of it is not securely in place.
Grand Hall Limited WarrantyGrand Hall will warrant to the ORIGINAL PURCHASER of this product that it will be free of defects inmaterial and workmanship for set periods below from the date of purchase when used under normal outdooruse and correct assembly:
Limited Lifetime Warranty for Ceramic Body (See Warranty Restrictions)5 Year Limited Warranty for Metal Bands (Rust Through Only)2 Year Limited Warranty for All Other Cooker Parts
Grand Hall will require reasonable proof of your date of purchase. Therefore, you will need to send in theowner registration card or register online at www.grandhall.com. Save your receipt in case it is requiredfor warranty processing.
This Limited Warranty is limited to replacement of parts at Grand Hall's option that proved to be defectiveunder normal use and service.
Grand Hall may require the return of defective parts for examination before issuing replacement parts. Ifyou are required to return defective parts, shipping charges must be prepaid. No returns will be acceptedwithout prior authorization from Grand Hall.
Upon examination and to Grand Hall's satisfaction, if the original part is proven defective, Grand Hall mayapprove your claim and elect to replace such parts without charge. You will be charged for shipping andhandling of the replacement parts.
This Warranty does not cover any failures or operating difficulties due to accident, abuse, misuse, alteration,misapplication, vandalism, improper installation, maintenance, operation or service, as set out in the Operator'sManual.
This Warranty does not cover cosmetic wear and tear such as scratches, dents, corrosion, chips, cracks,or discoloration caused by weather, heat, chemicals, paint loss, or surface rust. Deterioration or damagedue to severe weather conditions such as hail, hurricanes, earthquakes, tsunami, tornadoes, Act of Godor terrorism is not covered by this Limited Warranty.
To Obtain Warranty:Call 1-877-934-7455 M-F 8am-4:30pm CST
Warranty Restrictions:
Manufacturer:Grand Hall Enterprise Co., Ltd.9th Fl., No. 298, Rueiguang Rd., Neihu,Taipei, Taiwan (114)
This Warranty is non-transferable and is void if product is used for commercial or rental purposes.This Warranty applies only when the product is used in the United States or Canada. Modification foruse in any other location is a safety hazard and will void the warranty.Failure to register online or send in the completed warranty card will void the warranty.Certified Grand Hall Parts must be used as replacement, or the warranty is void.Use of lighter fluid will void the warranty.This Warranty gives you specific legal rights, and you may also have other rights which vary from stateto state.This Warranty does not cover out of box chips or cracks on the unit's exterior. All exterior cracks andchips must be noted by the dealer on your receipt at the time of purchase.
••
•
•
•••