Operator’s Manual - K-Sunksun.com/wp-content/uploads/BEE3EZ-Manual-web.pdf · 3 INTRODUCTION...
36
Operator’s Manual © Copyright 2014. K-Sun® Corporation – www.ksun.com
Transcript of Operator’s Manual - K-Sunksun.com/wp-content/uploads/BEE3EZ-Manual-web.pdf · 3 INTRODUCTION...
Operator’s Manual
© Copyright 2014. K-Sun® Corporation – www.ksun.com
2
Federal Communications Commission (FCC) Declaration of Conformity
K-Sun® Corporation370 SMC Drive, PO Box 309Somerset, WI 54025Phone: 715-247-4440
Product Name: K-Sun® LABELShop® BEE3®-EZ, BEE3®-EZ+Model Number: K-Sun® LABELShop® BEE3®-EZ, BEE3®-EZ+
This device complies with part 15, subpart B Class B limits of the FCC Rules. Operation is subject to the following two conditions: (1) This device may not cause harmful interference, and (2) this device must accept any interference received, including interference that may cause undesired operation.
Note: This equipment has been tested and found to comply with the limits for a Class B digital device, pursuant to part 15 of the FCC Rules. These limits are designed to provide reasonable protection against harmful interference in a residential installation. This equipment generates, uses, and can radiate radio frequency energy and, if not installed and used in accordance with the instructions, may cause harmful interference to radio communications. However, there is no guarantee that interference will not occur in a particular installation. If this equipment does cause harmful interference to radio or television reception, which can be determined by turning the equipment off and on, the user is encouraged to try to correct the interference by one or more of the following measures:
→→ Reorient or relocate the receiving antenna.→→ Increase the separation between the equipment and receiver.→→ Connect the equipment into an outlet on a circuit different from that to which the receiver is connected.→→ Consult the dealer or an experienced radio/TV technician for help.→→ To ensure compliance with the limits for a Class B digital device the enclosed interface cable should be used. (If
Applicable)→→ Modifications or changes not expressly approved by K-Sun® Corporation could void the user’s authority to
operate the equipment.
EC DECLARATION OF CONFORMITYWe hereby declare that the following our product conform with the essential health and safety requirement of the Low Voltage Directive 2006/95/EC and EMC Directive 2004/108/EC and Eco-design Directive 2009/125/EC and EU RoHS Directive 2011/65/EU.
Product Label Printer Model LABELShop® BEE3 [BEE3®, BEE3®+,BEE3®-EZ, BEE3®-EZ+] Manufacturer K-Sun® Corporation 370 SMC Drive PO Box 309 Somerset WI 54025, USA
The above product has been evaluated by the following European standard. The technical construction file (TCF) for this product is retained at the above manufacturer’s location.
Low Voltage Directive Directive 2006/95/EC EN 60950-1 (2006) + A11(2009)+ A1(2010), A12(2011) EN 62311 (2008)EMC Directive Directive 2004/108/EC EN 55022 (2010), Class B EN 55024 (2010) EN 61000-3-2 (2006) +A1(2009) +A2(2009) EN 61000-3-3 (2008) Eco-design Directive Directive 2009/125/EC COMMISSION REGULATION (EC) No 1275/2008 COMMISSION REGULATION (EC) No 278/2009EU RoHS Directive Directive 2011/65/EU EN 50581 (2012)
Year of affixation of the CE Marking : 2009
3
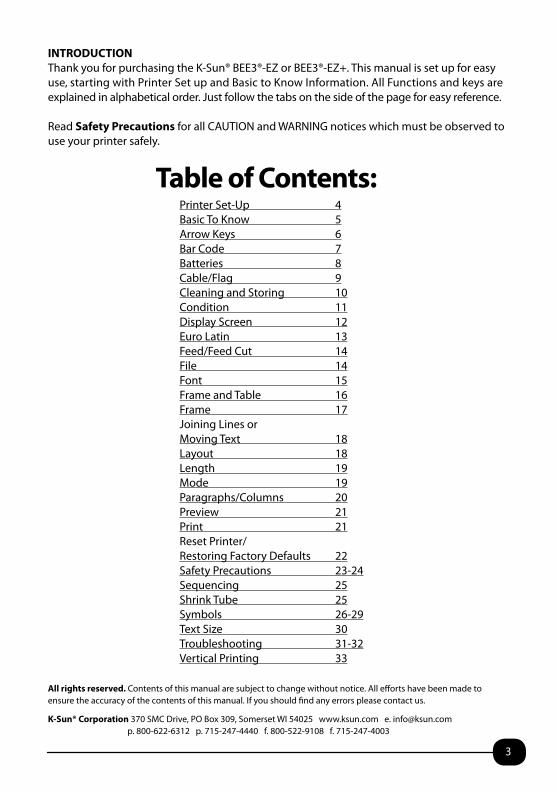
INTRODUCTIONThank you for purchasing the K-Sun® BEE3®-EZ or BEE3®-EZ+. This manual is set up for easy use, starting with Printer Set up and Basic to Know Information. All Functions and keys are explained in alphabetical order. Just follow the tabs on the side of the page for easy reference.
Read Safety Precautions for all CAUTION and WARNING notices which must be observed to use your printer safely.
Table of Contents:Printer Set-Up 4Basic To Know 5Arrow Keys 6Bar Code 7Batteries 8Cable/Flag 9Cleaning and Storing 10Condition 11Display Screen 12Euro Latin 13Feed/Feed Cut 14File 14Font 15Frame and Table 16Frame 17Joining Lines or Moving Text 18Layout 18Length 19Mode 19Paragraphs/Columns 20Preview 21Print 21Reset Printer/Restoring Factory Defaults 22Safety Precautions 23-24Sequencing 25Shrink Tube 25Symbols 26-29Text Size 30Troubleshooting 31-32Vertical Printing 33
All rights reserved. Contents of this manual are subject to change without notice. All efforts have been made to ensure the accuracy of the contents of this manual. If you should find any errors please contact us.
K-Sun® Corporation 370 SMC Drive, PO Box 309, Somerset WI 54025 www.ksun.com e. [email protected] p. 800-622-6312 p. 715-247-4440 f. 800-522-9108 f. 715-247-4003

4
1. Tighten the ribbon.
2. Open the cover
3. Insert the cartridge.a. Insert the cartridge with its label side up. b. Straighten the tape end. c. Push the tape end through the tape guide
4. Close the cover.
Note: How to remove the tape cartridgeTo remove, place your fingers on the tabs provided on both sides of the cartridge as shown in the figure, lift the tabs straight up to pull out the cartridge.
Printer Set-Up
1 2
3 a
bc
4
5. Connect the adapter to the printer. Connect the cord to the adapter then plug into the wall outlet. USE ONLY ADAPTER MARKED K-Sun® APT0615Y1-1
6. Turn on printer.
7. Feed and cut the tape to clear slack in ribbon and tape. Press Shift and the Print/FeedCut key. Display will say “Feed & Cut.” Press Return and tape will feed and cut.
Note: For supplies that require manual cutting (using scissors), Use the down Arrow key at Feed & Cut. Your screen will say “Feed.” Press Return and tape will feed.
6
7
Printer Set-Up
Feed/Cut
5
5
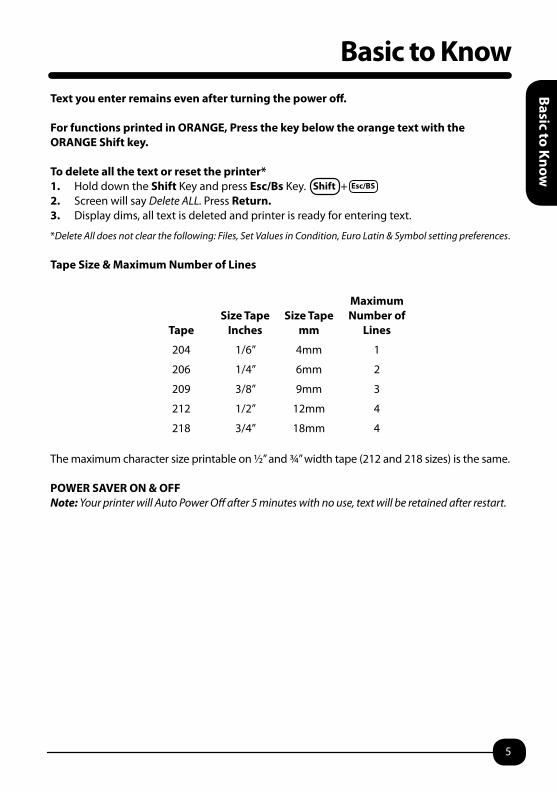
Basic to KnowText you enter remains even after turning the power off.
For functions printed in ORANGE, Press the key below the orange text with the ORANGE Shift key.
To delete all the text or reset the printer*1. Hold down the Shift Key and press Esc/Bs Key. + 2. Screen will say Delete ALL. Press Return.3. Display dims, all text is deleted and printer is ready for entering text.
*Delete All does not clear the following: Files, Set Values in Condition, Euro Latin & Symbol setting preferences.
Tape Size & Maximum Number of Lines
Tape Size Tape
InchesSize Tape
mm
Maximum Number of
Lines
204 1/6” 4mm 1
206 1/4” 6mm 2
209 3/8” 9mm 3
212 1/2” 12mm 4
218 3/4” 18mm 4
The maximum character size printable on ½” and ¾” width tape (212 and 218 sizes) is the same.
POWER SAVER ON & OFF Note: Your printer will Auto Power Off after 5 minutes with no use, text will be retained after restart.
Basic to Know
Shift Esc/BS

6
Arrow Keys
Moves cursor right. Continue to hold key down to move cursor quickly through text. May be used to navigate through menu choices with other keys.
Moves cursor left. Continue to hold key down to move cursor quickly through text.
Moves cursor up. Continue to hold key down to move cursor quickly up.
Moves cursor down. Continue to hold key down to move cursor quickly down.
Shift + Moves cursor to beginning of line. Each time keys are pressed cursor will jump to next line up.
Shift + Moves cursor to end of line. Each time keys are pressed cursor will jump to next line – end of line.
Shift +Moves the cursor to beginning of paragraph (column). Each time keys are pressed the cursor jumps to beginning of previous paragraph.
Shift + Moves the cursor to end of paragraph(column). Each time keys are pressed the cursor jumps to end of next paragraph.
Arrow
s

7
The BEE3®-EZ and BEE3®-EZ+ create 8 different bar codes:CODE 128, CODE 39, ITF, CODABAR, UPC-A, UPC-E, EAN-8, EAN-13
Choose Shift + Symbol B (Sym.B)/Barcode
The default Bar Code is Code 39. To choose a different barcode Arrow down. Return.
All Bar Codes have a width (full width) choice. (Medium is the default.) Arrow Down to scroll through the choices of Small, Medium, Large.
For Bar Codes Code 39, ITF, and Codabar choose a ratio setting (between narrow to bold bars) and turn on or off the Check Digit. These options are not available with the other bar code formats.
When you choose to have Check Digit on, the bar code has automatic Check Digit. You will see in the display screen C/D.
At the | begin entering the bar code. The number or letters will be displayed. The total of digits or letters depends on the type of bar code. The check digit is automatically displayed in the shaded field in the right upper corner of the display.
Press Return.
The display will show a bar code image indicating that a bar code has been created.
Press Preview. Press Print.
Remember to test all bar codes for scanner readability before applying to object. It is recommended that you use a tape with a white background and black characters as they are easily read by bar code readers. If trouble persists reading bar code, then adjust width or ratio and try again.
Bar Codes can be added to Frames p. 17 or Tables p. 16.
ITF and Codabar allow 1-19 digits. ITF bar codes only support even digit numbers. When entering even digit numbers with Check Digit set to “ON” or when inputting odd digit numbers with Check Digit “OFF,” the space code “0” is automatically input in the first row. The Check Digit of UPC-E is not displayed on the bar code number input screen or in the bar code number. Codabar cannot be read by the bar code reader unless one of the A,B,C,D are input at the beginning and end of the code.
Bar Code
CODE 39 C/D▒ [*|*]
Bar Code

8
Batteries
The BEE3®-EZ and BEE3®-EZ+ uses 6 AA alkaline batteries. Do not use other types of AA batteries with the printer. Follow Warnings and Cautions found on p. 23 regarding the use of batteries with the printer.
NOTE: Printing long labels, wider tape may cause the device to display “CHANGE BATTERIES” even if new batteries are installed. This is normal. New AA alkaline batteries will supply enough power for the device to print one tape cartridge at room temperature. However, operating the printer in colder temperatures will shorten the life span of the batteries.
Dispose of used batteries according to your local regulation.
Do not store your printer for long periods of time with batteries. Remove the batteries from the device to avoid possible leakage.
If you have stored files, change batteries within four minutes or you may lose text data or settings.
Remove the battery cover using the release tab.
Insert 6 AA alkaline batteries with the correct polarity as shown.
Close the battery cover. Adjust the two tabs to the holes of the main unit and close the battery cover firmly until it clicks.
Batteries

9
Cable/Flag
Press Shift + Cable/Flag Key Screen shows Cable.Arrow Down for Flag Vertical. (Flag:Vert)Arrow Down for Flag Horizontal. (Flag: Hori)
Cable Example: 1. Set Length 2.0” through 5.0” or OFF.2. Length is the full length of the label. Base the length on the circumference of object you
are placing the label on. Up to four lines of text are available. 3. Enter up to 4 lines with 4 numbers or letters. See Double Figure p. 28 for entering up to
8 digits.4. Enter up to 4 lines. Print.
Flag Vertical Example:1. Set Length 1.0” to 5.0” or OFF.2. Length is the full length of the label. A line will print in half to help guide in placing label
for flagging. Base the length on the circumference of wire plus length of flag needed to extend past wire.
3. Enter up to 4 numbers or letters per line. See Double Figure p. 28 for entering up to 8 digits.
4. Enter up to 2 lines. Text will automatically repeat on second section of label.
Flag Horizontal Example:1. Set Length 2.0” to 5.0” or OFF.2. Length is the full length of the label. A line will print in half to help guide in placing label
for flagging. Base the length on the circumference of wire plus length of flag needed to extend past wire.
3. Enter up to 4 numbers or letters per line. See Double Figure p. 28 for entering up to 8 digits.
4. Enter up to 4 lines. Text will automatically repeat on second section of label.5. Approximately 40 characters/numbers can be entered and will then be repeated on
second section of label.
Note: To delete “all” when using Cable and Flag features continue to press the backspace key through the menu and back to line 1.
Note: You cannot save Cable/Flag labels using the File function.
1234
1234
1234
1234
Cable/Flag
ShiftCable/Flag
10
Cleaning and Storing Printer
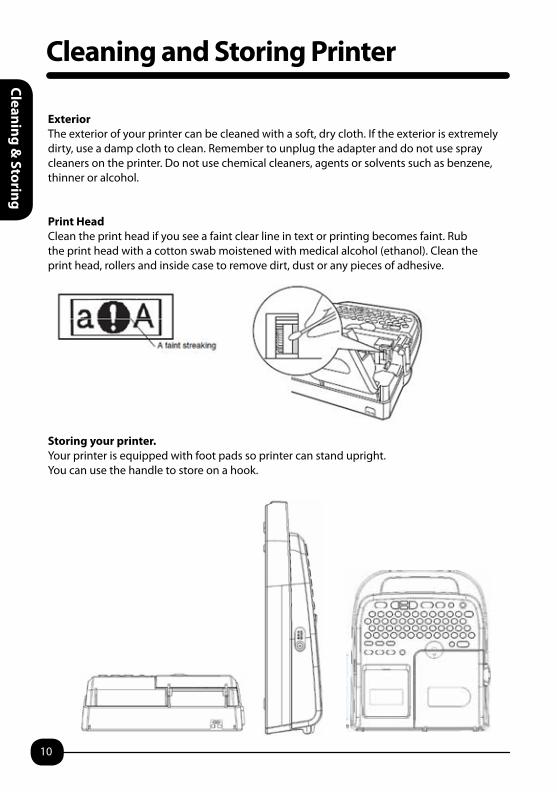
ExteriorThe exterior of your printer can be cleaned with a soft, dry cloth. If the exterior is extremely dirty, use a damp cloth to clean. Remember to unplug the adapter and do not use spray cleaners on the printer. Do not use chemical cleaners, agents or solvents such as benzene, thinner or alcohol.
Print HeadClean the print head if you see a faint clear line in text or printing becomes faint. Rub the print head with a cotton swab moistened with medical alcohol (ethanol). Clean the print head, rollers and inside case to remove dirt, dust or any pieces of adhesive.
Storing your printer.Your printer is equipped with foot pads so printer can stand upright. You can use the handle to store on a hook.
Cleaning & Storing
11
Condition
Allows the user to specify display units, display language, display and print density as well as turning auto cut on or off. Also can set printer for universal settings for consistent use.
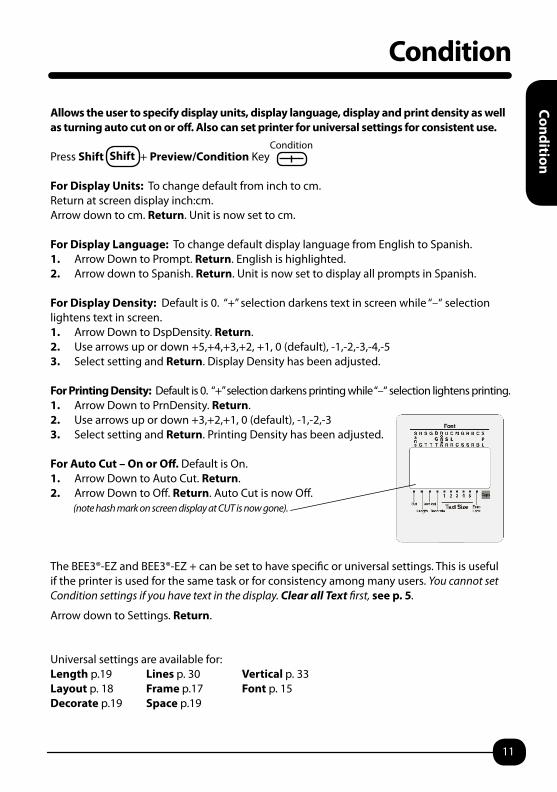
Press Shift + Preview/Condition Key
For Display Units: To change default from inch to cm.Return at screen display inch:cm.Arrow down to cm. Return. Unit is now set to cm.
For Display Language: To change default display language from English to Spanish.1. Arrow Down to Prompt. Return. English is highlighted. 2. Arrow down to Spanish. Return. Unit is now set to display all prompts in Spanish.
For Display Density: Default is 0. “+” selection darkens text in screen while “–“ selection lightens text in screen.1. Arrow Down to DspDensity. Return.2. Use arrows up or down +5,+4,+3,+2, +1, 0 (default), -1,-2,-3,-4,-53. Select setting and Return. Display Density has been adjusted.
For Printing Density: Default is 0. “+” selection darkens printing while “–“ selection lightens printing.1. Arrow Down to PrnDensity. Return.2. Use arrows up or down +3,+2,+1, 0 (default), -1,-2,-33. Select setting and Return. Printing Density has been adjusted.
For Auto Cut – On or Off. Default is On.1. Arrow Down to Auto Cut. Return.2. Arrow Down to Off. Return. Auto Cut is now Off. (note hash mark on screen display at CUT is now gone).
The BEE3®-EZ and BEE3®-EZ + can be set to have specific or universal settings. This is useful if the printer is used for the same task or for consistency among many users. You cannot set Condition settings if you have text in the display. Clear all Text first, see p. 5.
Arrow down to Settings. Return. Universal settings are available for: Length p.19 Lines p. 30 Vertical p. 33Layout p. 18 Frame p.17 Font p. 15Decorate p.19 Space p.19
Condition
ConditionShift

12
Display Screen
1 Indicates line Indicates another text mode change such as decorate. See p. 19.Cursor: A vertical line “|” indicates where to enter text.Font: The hash mark under the font indicates the default font. See p. 15.Cut: The hash mark is on when Auto Cut is set to On. See p. 11.Length: The hash mark is on when Length has been specified. See p. 19.Vertical: The hash mark is on when Vertical has been specified. See p. 33.Decorate: The hash mark is on when Decorate choices have been specified. See p. 19.Text Size Indicator. See p. 30.Euro Latin Indicator: The hash mark is on when a character replaceable with an European or Latin character is entered. See p. 13.Caps Lock Indicator: The hash mark is on when the Shift + Caps Lock is pressed and caps lock is on.
Maximum number of characters displayed 12 (6 per line). If you enter characters beyond 6 use the cursor or preview button to check the entire text.
Total number of characters that can be entered is approximately 90. When over the limit, the memory full icon appears. []
1 2
3
4
Cut
LengthVertical
Decorate
5 6 7 8 9
123
11
10987654
1110
EuroLatin
Display Screen

13
Euro Latin
Entering a European or Latin character is easy. Choose letter (either capital or lower case) that is similar and then press the Euro Latin key. Arrow right to see all the choices.Select by pressing the Return key. Euro-Latin character displays on screen.
Example: Televisión
1. Type Televisi2. Type o and press Euro Latin Key.3. Right arrow to ó and Press Return.4. Type n
When selecting a character again, character memory will occur. For example above if you type o again and press Euro Latin key you will automatically be at ó on the line. You will not have to arrow right to see all the choices.
Euro Latin characters are available in upper and lower case. For Choosing Ó you would need to press Shift + O and then Euro Latin Key. Right arrow to the Ó and return to select.
Euro Latin
EuroLatin

14
FileThe File function allows you to store up to 4 files that can be called up, changed or printed as needed. The File function allows you to save the text format, style and mode settings of the label. Because files are saved in the memory of your printer, your printer should have batteries.
Note: If you use more than four minutes to replace batteries you may lose saved files.
The File menu consists of three parts: Store, Recall, Delete
To Save/Store a File1. Create Label2. Press Shift + File.3. Screen display says Store. Return.4. Screen display says Store File 1. Return.5. Screen display shows Store 1 and first line of file to be stored. Return.6. Screen says “Execute 1” and returns to label. (At this point you can clear and create another label.)To Recall a File1. Press Shift + File. Screen display says Store. Arrow down to Recall. Return.2. Screen display will say Recall? and show label 1 and first line of label. If this is the label
you want to recall, Return. (If you have more than 1 label stored use the right or left arrow keys to scroll through the stored labels. Return at the label you need.)
3. Screen display now says Recall? 1 and the first line of the label is highlighted. Return.4. Screen says “Execute 1” and recalls label to screen.5. Print label or change label as needed. To Delete a File 1. Press Shift + File. Screen display says Store. Arrow down to Delete. Return.2. Screen display will say Delete? and show label 1 and first line of label. If this is the label
you want to delete, Return. (If you have more than 1 label stored use the right or left arrow keys to scroll thru the stored labels. Return at the label you want to delete.)
3. Screen display now says “Delete? 1” and the first line of the label is highlighted. Return.4. Screen verifies again “Delete? 1.” If this is what you want to do, Return. If this is not
what you want to do, press the Esc/Bs key until you reach the selection screen again.If there is no available space to save the file an error message reading “Memory Full” will be displayed.
Feed Cut
File
Feed Cut /Feed OnlyFeed Cut
Feed CutPress Shift with Print/Feed Cut key. Return. Tape Feeds .07" and then cuts.
Feed OnlyPress Shift with Print Key and arrow down to Feed. Return.Use Feed Cut or Feed Only when putting in a new cartridge to take up the slack in the ribbon and/or the tape and prevent cartridge function issues.Use Feed Only when using tape supplies or shrink tube supplies that need to be manually fed or cut with scissors.
File

15
Font
Your printer has 14 fonts available using the font key. As you toggle through the fonts, a small preview of the font is available on the right hand side of the screen.
Use the preview key to review before printing.
When using the Script PL font, upper and lower case letters are recommended. See p. 19 Mode/Space on how to set the letters closer together.
Font
16
Frame and Table
Use Frames or Tables for emphasis
1. Press Shift and Size/Style key.2. Arrow down to Frame. Return.3. Default is OFF.4. For Table -Arrow Down to Table. Return. For Frame-Arrow Down to Frame. Return.
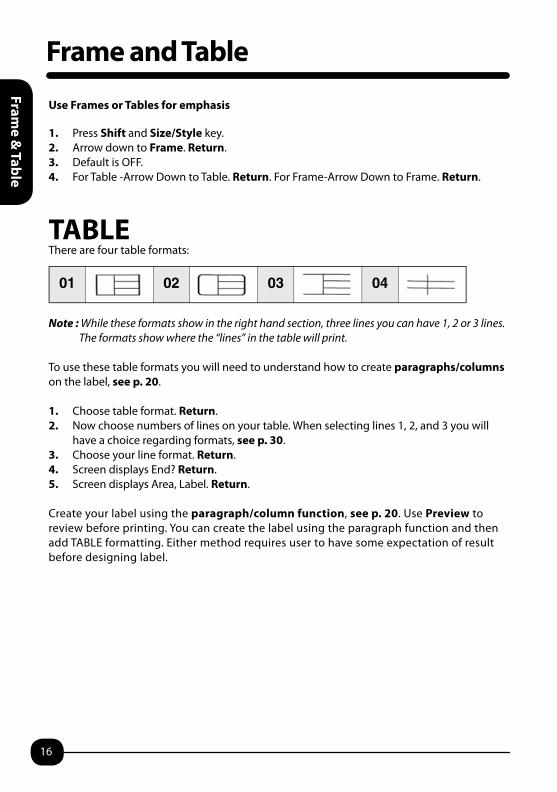
TABLEThere are four table formats:
Note : While these formats show in the right hand section, three lines you can have 1, 2 or 3 lines. The formats show where the “lines” in the table will print.
To use these table formats you will need to understand how to create paragraphs/columns on the label, see p. 20.
1. Choose table format. Return.2. Now choose numbers of lines on your table. When selecting lines 1, 2, and 3 you will
have a choice regarding formats, see p. 30.3. Choose your line format. Return.4. Screen displays End? Return.5. Screen displays Area, Label. Return.
Create your label using the paragraph/column function, see p. 20. Use Preview to review before printing. You can create the label using the paragraph function and then add TABLE formatting. Either method requires user to have some expectation of result before designing label.
119
Frame and Table List
Table
Frame
01 02 03 04
01 16 31 46 61
02 17 32 47 62
03 18 33 48 63
04 19 34 49 64
05 20 35 50 65
06 21 36 51 66
07 22 37 52 67
08 23 38 53 68
09 24 39 54 69
10 25 40 55 70
11 26 41 56 71
12 27 42 57 72
13 28 43 58 73
14 29 44 59 74
15 30 45 60 75
� Frame images in the "Frame and Symbol List" may slightly differ from actual printout.
Frame &
Table

17
Frame
Inserts Frame around the text. See here for frame reference or scroll through Frame choices for desired Frame.
1. Press Shift and Size/Style key. Arrow down to Frame. Return.2. Default is OFF.3. For Frame-Arrow Down to Frame. 4. Frame will be flashing. Return.5. Frame 01 will appear. For other Frame choices Arrow Down.
Note if you arrow up you will be at the last Frame choice.6. Choose Frame. Return.7. Now choose numbers of lines on your table. When selecting
lines 1, 2, and 3 you will have choice regarding formats. See p. 30.8. Choose your line format. Return.9. Screen will say End? Return.10. Screen will say Area, Label. Return.11. Use Preview to review before printing.
119
Frame and Table List
Table
Frame
01 02 03 04
01 16 31 46 61
02 17 32 47 62
03 18 33 48 63
04 19 34 49 64
05 20 35 50 65
06 21 36 51 66
07 22 37 52 67
08 23 38 53 68
09 24 39 54 69
10 25 40 55 70
11 26 41 56 71
12 27 42 57 72
13 28 43 58 73
14 29 44 59 74
15 30 45 60 75
� Frame images in the "Frame and Symbol List" may slightly differ from actual printout.
FRAME O
PTION
S
Frame

18
Joining Lines or Moving TextWhen entering lines of text you can adjust the text and line placement by placing the cursor in the correct spot and using the Esc/Bs key or Return key.
The cursor is a flashing straight line |. The Esc/Bs key is on upper right side of keyboard.
The Return key is on lower right side of keyboard.
Try this:1. Type in “Room 1 Class A” 2. To put Class A on the second line move cursor after “1”, Return.
Label will now read: Room 1 Class A
Type Line 1 Room 1Type Line 2 Class AType Line 3 Reading
To put Reading on line with Class A, position cursor after “A”Press Esc/Bs key.
Label will now read: Room 1 Class A Reading
Layout1. Press Shift + Size/Style key.2. Arrow down to Layout. Return.3. Arrow down to see choices: Left, Center, Right4. Highlight and Return.5. Arrow Down to End? Return.6. Screen will say Area Label. Return.7. Text will be Left Justified, Centered or Right Justified on label.
Joining Lines or Moving Text
Joining Lines or Moving Text
Return
Esc/BS
Layout
19
Specify the length of the label. Default is OFF.1. Press the Length Key. Arrow down to choose a set length of 1”– 15 “.2. Arrow up to choose formats with set length: Binder, CD Case, 3.5FD, VHS, 8mm Video,
Mini DV, Cassette (Recommended Tape Width Table below)3. Choose Text formatting: Left, Center, Right
If text does not fit on set length, a message will display “Text Long!”. Reduce text size or increase length.
Length
Use Mode to adjust font style for additional effects.1. Press Shift + Font/Mode Key.2. Choose Decorate. Return. 3. Arrow Down to Select. Return (you can only choose one
Decorate Function)
4. Choose Space. Return 5. Arrow Down to Select Normal or None
Choose None when working with Script and CB fonts. None is also effective when working with Decorate-Italic.
Length
Mode
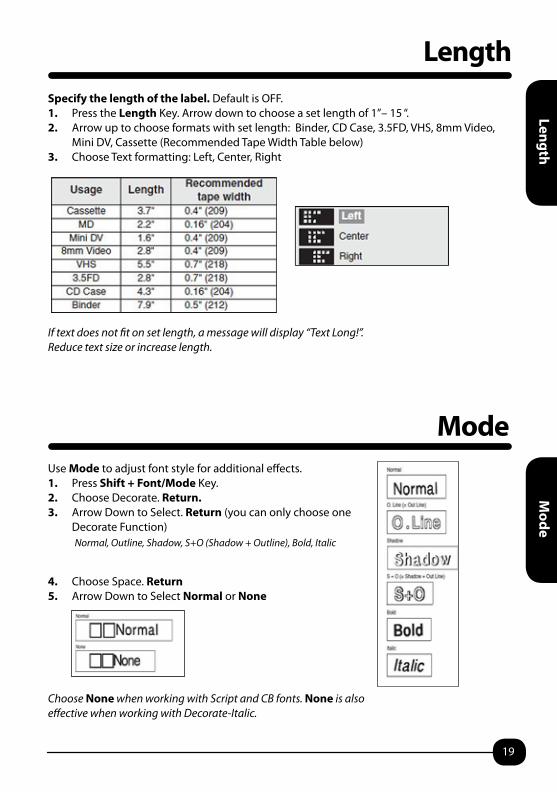
Normal, Outline, Shadow, S+O (Shadow + Outline), Bold, Italic
Mode

20
Paragraphs/ColumnsParagraph/Column feature allows you to change the number of lines within blocks of text or add a symbol the full size of the label and multiple lines. Each label can have a maximum of two paragraphs/columns.
Example One: Symbol with text1. Press Symbol B (Sym B) key. Arrow down to Work. Return. Arrow right to phone icon.
Return.2. Press Shift and Return (Column) Screen should show [1].3. Type Main Office x 210. Return.4. Type Maintenance x 208. Return.5. Type Library x 214. Press Preview. Print.
Example Two: Two paragraphs of text1. Type line one: Office. Return.2. Type line two: Extensions.3. Press Shift and Return (Column) Screen will show [1].4. Type Room 1 x 101. Return.5. Type Room 2 x 10². Return.6. Type Room 3 x 10³. Do Not Return. Press Preview. Print.
Note: When a text is divided into paragraphs the text size is “equal” regardless of setting.Formatting of text may be limited.
To Delete a Paragraph:1. Hold down the Shift Key and press the Esc/Bs Key.2. Delete appears.3. Arrow Down to Paragraph. Return. Paragraph is Deleted
Paragraphs/Columns
Main Office x 210 Maintenance x 208 Library x 214
Office Extensions
Room 1 x 101Room 2 x 10²Room 3 x 10³
21
Preview
Pressing preview will scroll the entire label for review of contents. Review font style, spelling and more before printing. This feature prevents possible misprints and tape waste. Preview will also confirm the length of the label.
PrintPress Print to print your label or shrink tube. REMEMBER to preview first!
Your printer will cut the tape automatically. For some tapes turning off Auto Cut is recommended. See p. 11.
Print will tell you the length of the label and how many times the label has been printed.
If you continue to press Print the display will show you the number of copies printed in the Copy area.
Display on Screen before printing.
Preview
Auto or Set [Length] Length [Actual] Copies [Count]
Preview

22
Reset Printer - Restoring Factory Defaults
Note: any saved files or condition settings will be deleted when you choose Reset.
Key for Chart:
: Restores the factory settings. __ : Set conditions remain.
RESET
Press Power Button and turn the power off. Caution: If the machine does not turn off when press the power off button, unplug the AC adapter and remove the batteries. Plug the AC adapter in again or install the batteries and press power button again. Power is restored.
Press the Power Button ON while holding down the Return Key and the Esc BS Key.Display will blink Reset?Caution: To abort the reset process, press any key except for Return.
Press Return. “Reset” will be displayed briefly and printer will be reset.
RESTORE the DEFAULT SETTINGS TO FACTORY SETTINGS1. Press Shift + Esc/Bs key. Delete All is displayed. Return.2. Press Shift + Condition key. Arrow Down to Setting. Return.3. Arrow Up Screen will say All Defaults. [To cancel press the Esc/Bs key.] Return.4. Screen will say All Defaults/Execute. Screen returns to line 1.
Reset Printer
Reset Restore default setting
Entry
Text entered on the display
__*1
Text entered in fixed forms
__
Input status and CapsLock status
__ __
Data File __ __
SettingPrint density __ __
Display level __ __
Various set values __
ContentFunction Delete All
Resetting restores the factory settings.Before resetting your device, refer to the table below for the items to be deleted.

23
Safety PrecautionsBe sure to read and understand the instructions before using your K-Sun® BEE3®-EZ or BEE3®-EZ+ printer and keep this manual handy for future reference. Safety precautions are marked as: DANGER – Safety precaution, which if ignored, will result in serious or fatal personal injury. Use extra caution in performing any procedure preceded by a DANGER heading.WARNING – Safety precaution which, if ignored, could result in serious or fatal personal injury.CAUTION – Safety precaution, which if ignored, could result in damage to equipment.
DANGERLeaking batteries – If liquid from leaking batteries gets into your eyes, DO NOT RUB YOUR EYES! Wash your hands well with clean water and contact a doctor immediately.
WARNING- AdapterUse only the adapter recommended and designed for use with this product. Only use the K-Sun® APT0615Y1-1 adapter. Using the wrong adapter may cause damage to your printer, overheating, fire or electric shock. Be sure to use the AC adapter with the proper voltage. Using it with other voltage levels may cause fire, smoke, overheating or electric shock. Do not pull the AC adapter cord excessively or put a heavy object on it. This may cause fire or electric shock.Unplug the AC Adapter from both the device and the outlet after use. This may prevent possible accidents caused by tripping over the cord.
WARNING- BatteryDo not use batteries with the + and – terminals reversed. This may cause leakage, overheating or explosion. If liquid from battery enters your mouth, rinse immediately with plenty of water and consult a doctor. If liquid from battery comes in contact with your skin or cloth, wash away with water. This may cause damage to your skin. Do not mix new batteries and old batteries or different types of batteries together. Doing so may cause leakage, overheating or explosion. When batteries run down, take them out of device immediately. If a battery is left inside the device for long periods, gas emitted from the battery may cause leakage, overheating, explosion or damage to the printer. If you do not use the K-Sun® BEE3®-EZ or BEE3®-EZ+ printer for an extended period, take the batteries out of the device. Misuse of the batteries may cause leakage, overheating, explosion, injury or damage to the printer. Dispose of used batteries according to local regulations.
WARNING - OtherDo not step on, drop, hit or have strong impact on the printer. This may cause fire or electric shock. If your K-Sun® BEE3®-EZ or EZ+ is damaged, turn the power off, remove the AC adapter from the electrical outlet and contact your local distributor regarding repair. Using the damaged device may cause fire and electric shock. Do not touch the device, the AC adapter, or the plug with wet hands. This may cause malfunction, fire or electric shock.
Safety Precautions

24
Keep plastic bags out of the reach of children. Children may suffocate if they put their heads into plastic bags. Do not spill liquid or spray insecticide in or on your K-Sun® BEE3®-EZ or BEE3®-EZ+. This may cause malfunction, fire or electric shock. If you spilled liquid, turn the power off, remove the AC adapter from the electrical outlet and contact your local distributor regarding repair. Using the damaged device may cause fire and electric shock.Never modify or disassemble the device. This may cause fire or electric shock. Do not carry out any operations not described in this manual, or the K-Sun® BEE3®-EZ or BEE3®-EZ+ may break or cause injury.
CAUTIONWhen using the battery follow the instructions given on the label or a package of the battery. Misuse of the batteries may cause leakage, overheating, explosion, injury or damage to the device. When using the auto-cutter, keep your fingers away from the exit slot where the label comes out during printing or when the cutter is operating. This may cut your fingers.Do not put anything heavy on the K-Sun® BEE3®-EZ or BEE3®-EZ+ or leave it in an unstable position. This may cause injury or damage to the device.Do not store the device in direct sunlight, in places with excessive humidity, or in extreme temperatures. Always turn the power off before removing the AC adapter from the electrical outlet. Do not block or insert objects into the AC adapter socket or the tape eject slot.Do not touch the print head. See p. 10 regarding cleaning the printhead. Avoid using a tape cartridge with no remaining tape or shrink tube or pressing Print without installing a tape cartridge. This may cause overheating and malfunction of the print head. Before attaching labels be sure to check the purpose and use of the material and the adhered surface. Depending on the material and environmental conditions, the following problems may occur:
Color of labels may change Labels may come off Text on the label may wear offCannot peel off label from surface Glue remains on surface Adhered surface absorbs the color of the labelAdhered surface is damaged
We shall not be liable for any damages, losses, costs or expenses arising from these problems. Do not place labels on people, living things, public buildings or property of others.Be sure to use tape cartridges that have the K-Sun® label. Always press Shift + Print to feed the tape. Never pull the tape out forcibly, otherwise the tape cartridge will be broken and unusable. Handle the tape cartridge with care. Use the keyboard carefully. Do not use a pencil or sharp material to press the keys. This may damage the keyboard. Turn printer off after use. Store printer away from direct sunlight, excessive temperature and humidity, magnetism, vibration and dust.
Safety Precautions- continued
Safety Precautions

25
One digit only in one space only.
X, 1X, 1X1
If sequencing, numbers 0-9 are available. The printer does not cycle through the next position of number, i.e. 10. If sequencing the Alphabet, chose between lower case a-z or upper case A-Z.
For this example we are going to create and auto sequence 6 labels.1. On Line 1 type “File” and press Space key.2. Now press the Shift + Sequence key.3. At Start enter 1 (the number or letter you wish to start with), Return.4. Press Print.5. Your display screen will say “File 2”. Press Print. Continue pressing Print until all 6 labels
have been printed.
1. If you needed to sequence A-Z (or a-z) you would enter text such as “File” then press Space key.
2. Then press the Shift + Sequence key. 3. At Start enter A or a. Return. Press Print.4. Your display screen will say File B. Press Print. Continue pressing Print until the
alphabet is completed.
Sequencing
File 1 File 2 File 3 File 4 File 5 File 6
SequencingSeq
Shrink TubeThe BEE3®-EZ prints on two sizes of shrink tube, 203 (1/8”) and 205 (3/16”).The BEE3®-EZ+ prints on five sizes of shrink tube, 203 (1/8”), 205 (3/16”), 208 (1/4”), 210 (3/8”) and 211 (1/2”).
If printing on shrink tube is light, turn up the print density, see p. 11.
1. Print the tube and slide onto the wire.
2. Direct hot air from an industrial-use heat gun onto the entire surface of the tube, shrinking it to the wire. Refer to your heat gun instruction manual for proper use of your heat gun with shrink tube.
Shrink Tube

26
Symbols can be entered by pressing either Symbol A or Symbol B. Press the Sym. A key.
Symbol A Menu appears. Use Up or Down Arrows to select category. Press Return. Use Right or Left Arrows to select symbol. Press Return. Symbol appears on label. Symbols found under Symbol A (continued on next page)
Symbol Menu - A Sym.A
Symbol M
enu

27
Symbol Menu - ASym
bol Menu

28
Symbol Menu - B
Symbol M
enu
Sym.B
Symbols can be entered by pressing either Symbol A or Symbol B. Press the Sym.B key.Symbol B Menu appears. Use Up or Down Arrows to select category. Press Return. Use Right or Left Arrows to select symbol. Press Return. Symbol appears on label.
How Edit Symbols work[|] Inserts a ruled line. Use with Frame. [V] Inserts a two byte space.
How Double Figure Works.Double Figure puts 2 digits in one space.
Basic categories are 00 10 20 30 40 50 60 70 80 99
Under each of the basic categories you will find ten digits such asBasic Category 00 - 00 01 02 03 04 05 06 07 08 09 or Basic Category 10 – 10 11 12 13 14 15 16 17 18 19 and so on…
After selecting Double Figure, use the right arrow key to select the basic category.Then use the right arrow key to move to the double figure and Return to select.
Symbols found under Symbol B (continued on next page)

29
Symbol Menu - BSym.B
Symbol M
enu

30
Text SizeUse the Size button and watch the changes in your screen display under text size.
Enter your text first.Press the size button and toggle through the display.Note: Text size 5 is the largest possible printing on size of tape, using one line regardless of tape or shrink tube size.
If your text is two lines the choices are:
If your text is three lines the choices are:
If your text is four lines the size is fixed.Note that choices such as 2d can provide consistency in your labels. For instance if making name badges you might choose 2d with a person’s name being larger and title being smaller.Point Text Size Chart Selecting will print characters of the following size depending on the tape width:
Text Size
size
1a/ 1b/ 1d1c/
Print Sample A A A A AP
[6]S
[10]M
[13]L
[19]G
[24]
0.7" (218) __ 1d 1d 1d 1d
0.5" (212) __ 1d 1d 1d __
0.4" (209) 1d 1d 1d __ __
0.2" (206) 1d __ __ __ __
0.16" (204) 1a,1b,1c,1d __ __ __ __
Text Size [pt]Tape
Width

31
Troubleshooting
Trouble Shooting- Error MessagesOnly one bar code per label is available. See p. 7.
The batteries have run out. Turn the power off and replace ALL the batteries with new AA Alkaline batteries. Make sure batteries are inserted with correct polarity. Use the AC adapter that comes with printer to save on batteries. See p. 8.
The tape cartridge installed will not work in the BEE3®-EZ or BEE3®-EZ+. Check that the cartridge is installed correctly. See p. 4.
User has entered too many lines for size of tape. See p. 5 fornumber of lines that can be entered per size of tape. Install a wider tape or delete some lines.
There is no available space to save a file. Delete a file. See p.14.
Printer has error printing tape. Turn printer off. Disconnect adapter. Reconnect adapter and turn printer on. Press Print. If error continues contact your point of purchase for further action.
You have attempted to call up or delete a file when there are no files saved on the device. Press any key to return to the text enter screen. See p.14.
The tape cartridge is not installed or not installed correctly. Turn the power off and reinstall the tape cartridge correctly. See p. 4.
The print head is overheated due to continuous printing. Turn the power off, remove the tape cartridge and let the device cool down.
The text does not fit in the set length. Reduce text size or increase length.
Change Batteries
Check Tape Cartridge!
Line Over! X
Memory Full
Motor Error
No File
No Tape!
Over Heat!
Text Long!
Bar Codeonly one?

32
Troubleshooting- Issues and FixesDoes not operate normally. Try resetting printer. See p. 22.
Nothing appears on display after pressing On/Off Button to On. Is AC Adapter connected firmly? Make sure connection at printer, adapter, and wall are secure. See p. 4. Are you using authorized adapter? Unauthorized adapters may overheat or damage printer circuit. See p. 4. Are batteries installed with correct polarity? See p. 8. Have the batteries run out? See p. 8. Is display level appropriate? See p. 11 to adjust display level.
Display turns off unexpectedly. Printer has auto power off. If there is no activity after 4-5 minutes the power will power off.
Nothing prints. Is text entered? Is there a message in display? See p.12. Is the tape installed correctly? See p. 4. Have the batteries run out? See p. 8. Is the top cover closed? See p. 4.
Text does not print properly? Is the tape cartridge installed correctly? See p. 4. Is the print head clean? See p. 10. Have the batteries run out? See p. 8.
Printed label does not cut automatically. Is the auto cutter feature disabled? See p. 11.
Printing stops in the middle of the text. Has tape ran out of cartridge? Replace. See p. 4. Have the batteries run out? See p. 8.
Content of files are gone. Has the device been reset? See p. 22. Did you disconnect the AC Adapter or remove the batteries.
Cannot attach labels. Is the liner removed? Are you attaching labels to a clean and flat surface?
Troubleshooting

33
Vertical
1. Press Shift + Size/Style Key.2. Vertical is highlighted. Return.3. Default is OFF. Arrow down to ON. ON will flash. Return.4. Screen will now say Layout. Arrow down to End? Return.5. Screen will now say Area/Label. Return. (A Hash mark will now appear at Vertical on
Display Screen)6. Enter Text.
You can add Symbols to vertical labels. For Symbols, see p. 26-29.
Vertical
34
Tapes
Tapes
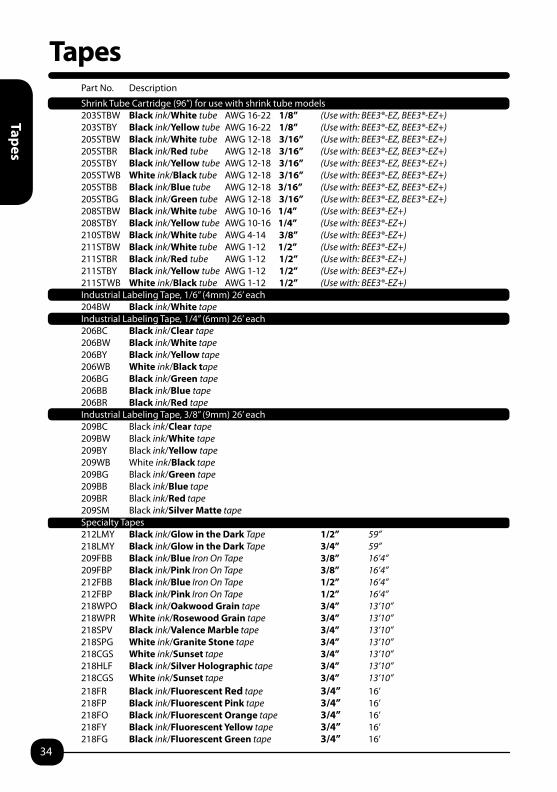
Shrink Tube Cartridge (96”) for use with shrink tube models 203STBW Black ink/White tube AWG 16-22 1/8” (Use with: BEE3®-EZ, BEE3®-EZ+) 203STBY Black ink/Yellow tube AWG 16-22 1/8” (Use with: BEE3®-EZ, BEE3®-EZ+) 205STBW Black ink/White tube AWG 12-18 3/16” (Use with: BEE3®-EZ, BEE3®-EZ+) 205STBR Black ink/Red tube AWG 12-18 3/16” (Use with: BEE3®-EZ, BEE3®-EZ+) 205STBY Black ink/Yellow tube AWG 12-18 3/16” (Use with: BEE3®-EZ, BEE3®-EZ+)205STWB White ink/Black tube AWG 12-18 3/16” (Use with: BEE3®-EZ, BEE3®-EZ+)205STBB Black ink/Blue tube AWG 12-18 3/16” (Use with: BEE3®-EZ, BEE3®-EZ+)205STBG Black ink/Green tube AWG 12-18 3/16” (Use with: BEE3®-EZ, BEE3®-EZ+)208STBW Black ink/White tube AWG 10-16 1/4” (Use with: BEE3®-EZ+) 208STBY Black ink/Yellow tube AWG 10-16 1/4” (Use with: BEE3®-EZ+)210STBW Black ink/White tube AWG 4-14 3/8” (Use with: BEE3®-EZ+)211STBW Black ink/White tube AWG 1-12 1/2” (Use with: BEE3®-EZ+) 211STBR Black ink/Red tube AWG 1-12 1/2” (Use with: BEE3®-EZ+)211STBY Black ink/Yellow tube AWG 1-12 1/2” (Use with: BEE3®-EZ+)211STWB White ink/Black tube AWG 1-12 1/2” (Use with: BEE3®-EZ+)Industrial Labeling Tape, 1/6” (4mm) 26’ each204BW Black ink/White tape Industrial Labeling Tape, 1/4” (6mm) 26’ each 206BC Black ink/Clear tape 206BW Black ink/White tape 206BY Black ink/Yellow tape 206WB White ink/Black tape 206BG Black ink/Green tape 206BB Black ink/Blue tape 206BR Black ink/Red tape Industrial Labeling Tape, 3/8” (9mm) 26’ each 209BC Black ink/Clear tape 209BW Black ink/White tape 209BY Black ink/Yellow tape 209WB White ink/Black tape 209BG Black ink/Green tape 209BB Black ink/Blue tape 209BR Black ink/Red tape209SM Black ink/Silver Matte tapeSpecialty Tapes 212LMY Black ink/Glow in the Dark Tape 1/2” 59”218LMY Black ink/Glow in the Dark Tape 3/4” 59”209FBB Black ink/Blue Iron On Tape 3/8” 16’4”209FBP Black ink/Pink Iron On Tape 3/8” 16’4”212FBB Black ink/Blue Iron On Tape 1/2” 16’4”212FBP Black ink/Pink Iron On Tape 1/2” 16’4”218WPO Black ink/Oakwood Grain tape 3/4” 13’10”218WPR White ink/Rosewood Grain tape 3/4” 13’10”218SPV Black ink/Valence Marble tape 3/4” 13’10”218SPG White ink/Granite Stone tape 3/4” 13’10”218CGS White ink/Sunset tape 3/4” 13’10”218HLF Black ink/Silver Holographic tape 3/4” 13’10”218CGS White ink/Sunset tape 3/4” 13’10”218FR Black ink/Fluorescent Red tape 3/4” 16’218FP Black ink/Fluorescent Pink tape 3/4” 16’218FO Black ink/Fluorescent Orange tape 3/4” 16’ 218FY Black ink/Fluorescent Yellow tape 3/4” 16’218FG Black ink/Fluorescent Green tape 3/4” 16’
Part No. Description
35
TapesN
otes
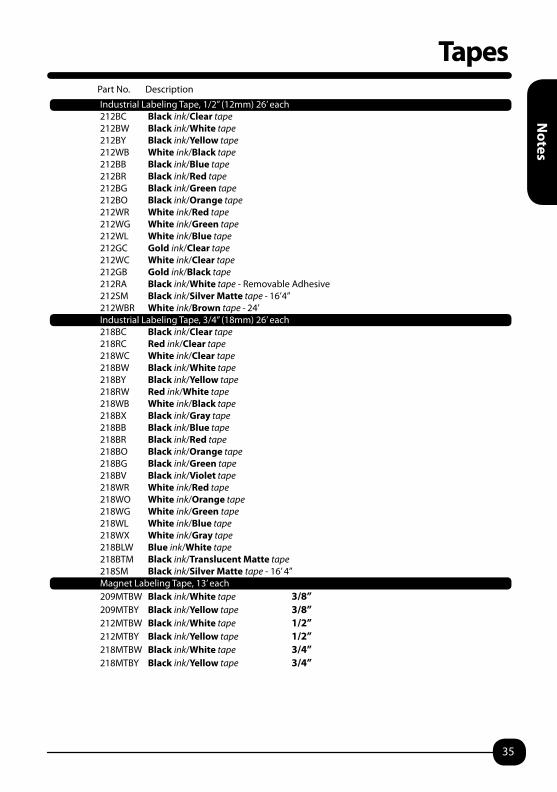
Industrial Labeling Tape, 1/2” (12mm) 26’ each 212BC Black ink/Clear tape 212BW Black ink/White tape 212BY Black ink/Yellow tape 212WB White ink/Black tape 212BB Black ink/Blue tape 212BR Black ink/Red tape 212BG Black ink/Green tape 212BO Black ink/Orange tape 212WR White ink/Red tape 212WG White ink/Green tape 212WL White ink/Blue tape 212GC Gold ink/Clear tape 212WC White ink/Clear tape212GB Gold ink/Black tape 212RA Black ink/White tape - Removable Adhesive212SM Black ink/Silver Matte tape - 16’4”212WBR White ink/Brown tape - 24’Industrial Labeling Tape, 3/4” (18mm) 26’ each218BC Black ink/Clear tape218RC Red ink/Clear tape 218WC White ink/Clear tape 218BW Black ink/White tape 218BY Black ink/Yellow tape 218RW Red ink/White tape 218WB White ink/Black tape 218BX Black ink/Gray tape 218BB Black ink/Blue tape 218BR Black ink/Red tape 218BO Black ink/Orange tape218BG Black ink/Green tape 218BV Black ink/Violet tape 218WR White ink/Red tape 218WO White ink/Orange tape 218WG White ink/Green tape 218WL White ink/Blue tape218WX White ink/Gray tape218BLW Blue ink/White tape218BTM Black ink/Translucent Matte tape 218SM Black ink/Silver Matte tape - 16’ 4”Magnet Labeling Tape, 13’ each209MTBW Black ink/White tape 3/8”209MTBY Black ink/Yellow tape 3/8”212MTBW Black ink/White tape 1/2”212MTBY Black ink/Yellow tape 1/2”218MTBW Black ink/White tape 3/4”218MTBY Black ink/Yellow tape 3/4”
Part No. Description

Serial Number: __________________________
In Service Date: _________________________
For Technical Support: 1-800-622-6312 Ext. 214 or [email protected]® Corporation | 370 SMC Drive, Somerset WI 54025 | www.ksun.com
MBEE3EZ 4.2014