Operations Guide: AM-100
42
Crestron AM-100 AirMedia ® Presentation Gateway Operations Guide
Transcript of Operations Guide: AM-100

Crestron AM-100 AirMedia® Presentation Gateway Operations Guide

Crestron software, including without limitation, product development software and product operating system software is licensed to Crestron dealers and Crestron Service Providers (CSPs) under a limited non-exclusive, non-transferable license pursuant to a separate end-user license agreement. The terms of this end-user license agreement can be found at www.crestron.com/legal/software_license_agreement. Product warranty can be found at www.crestron.com/warranty. The specific patents that cover Crestron products are listed at patents.crestron.com. Certain Crestron products contain open source software. For specific information, please visit www.crestron.com/opensource. Crestron, the Crestron logo, AirMedia, Crestron Connected, and Crestron Fusion are either trademarks or registered trademarks of Crestron Electronics, Inc. in the United States and/or other countries. App Store, iTunes, and Mac are either trademarks or registered trademarks of Apple Inc. in the United States and/or other countries. IOS is either a trademark or registered trademark of Cisco Technology, Inc. in the United States and/or other countries. Android and Google Play are either trademarks or registered trademarks of Google Inc. in the United States and/or other countries. Windows is either a trademark or registered trademark of Microsoft Corporation in the United States and/or other countries. Other trademarks, registered trademarks, and trade names may be used in this document to refer to either the entities claiming the marks and names or their products. Crestron disclaims any proprietary interest in the marks and names of others. Crestron is not responsible for errors in typography or photography. This document was written by the Technical Publications department at Crestron. © 2017 Crestron Electronics, Inc.
Regulatory Compliance As of the date of manufacture, the AM-100 has been tested and found to comply with specifications for CE marking.
Federal Communications Commission (FCC) Compliance Statement This device complies with part 15 of the FCC Rules. Operation is subject to the following conditions: (1) This device may not cause harmful interference and (2) this device must accept any interference received, including interference that may cause undesired operation. CAUTION: Changes or modifications not expressly approved by the manufacturer responsible for compliance could void the user’s authority to operate the equipment.
NOTE: This equipment has been tested and found to comply with the limits for a Class B digital device, pursuant to part 15 of the FCC Rules. These limits are designed to provide reasonable protection against harmful interference in a residential installation. This equipment generates, uses and can radiate radio frequency energy and, if not installed and used in accordance with the instructions, may cause harmful interference to radio communications. However, there is no guarantee that interference will not occur in a particular installation. If this equipment does cause harmful interference to radio or television reception, which can be determined by turning the equipment off and on, the user is encouraged to try to correct the interference by one or more of the following measures:
• Reorient or relocate the receiving antenna.
• Increase the separation between the equipment and receiver.
• Connect the equipment into an outlet on a circuit different from that to which the receiver is connected.
• Consult the dealer or an experienced radio/TV technician for help.
Industry Canada (IC) Compliance Statement
CAN ICES-3(B)/NMB-3(B)

Crestron AM-100 AirMedia Presentation Gateway
Operations Guide – DOC. 7463F Contents • i
Contents AirMedia® Presentation Gateway: AM-100 1
Setup .......................................................................................................................................... 1 Supplied Hardware ............................................................................................................. 1 Installation .......................................................................................................................... 1
Configuration ............................................................................................................................. 3 System Status ...................................................................................................................... 6 Device Setup ....................................................................................................................... 7 Network Setup .................................................................................................................... 9 Crestron Services Setup .................................................................................................... 10 OSD Setup ........................................................................................................................ 13 SNMP Setup ..................................................................................................................... 15 Device Services ................................................................................................................ 17 Change Password .............................................................................................................. 17 Firmware Upgrade ............................................................................................................ 18 Remote View Setup .......................................................................................................... 20 Reset to Default ................................................................................................................ 21 Reboot System .................................................................................................................. 22
Operation ................................................................................................................................. 23 Run the AM-100 Client .................................................................................................... 24 Control the Presentation ................................................................................................... 26 Configure Basic Presentation Settings .............................................................................. 27 Quad View ........................................................................................................................ 29 View a Presentation Remotely .......................................................................................... 29
Moderator Controls .................................................................................................................. 31 Login ................................................................................................................................ 31 Control the Display Layout .............................................................................................. 33
Hardware Reset ........................................................................................................................ 35


Crestron AM-100 AirMedia Presentation Gateway
Operations Guide – DOC. 7463F AirMedia Presentation Gateway: AM-100 • 1
AirMedia® Presentation Gateway: AM-100
Setup
Supplied Hardware A wall-mount bracket is included to mount the AM-100 to a surface. The hardware supplied with the AM-100 is listed in the following table.
Supplied Hardware for the AM-100
DESCRIPTION QUANTITY Bracket 1 Screw 2 Washer 2
Installation Ventilation The AM-100 should be used in a well-ventilated area.
To prevent overheating, do not operate this product in an area that exceeds the environmental temperature range for this product. Consider using forced air ventilation to reduce overheating. Consideration must be given if the device is installed in a closed or multiunit rack assembly, since the operating ambient temperature of the environment may be greater than the room ambient temperature. Contact with thermal insulating materials should be avoided on all sides of the unit.

AirMedia Presentation Gateway Crestron AM-100
2 • AirMedia Presentation Gateway: AM-100 Operations Guide – DOC. 7463F
Wall Mounting
The AM-100 can be mounted using the included wall-mount bracket. Refer to the following illustration for installation instructions.
Attach the Wall-Mount Bracket
Wall-mount bracket
Install the screw and washer into the unit.

Crestron AM-100 AirMedia Presentation Gateway
Operations Guide – DOC. 7463F AirMedia Presentation Gateway: AM-100 • 3
Configuration Make all connections as described in AM-100 Quickstart Guide (Doc. 7464) at www.crestron.com/manuals. The connected display device shows the AM-100 welcome screen.
AM-100 Welcome Screen
1. Open a web browser on the computer, and navigate to the web address or the IP address that is displayed on the top left of the AM-100 welcome screen. The download screen is displayed.
NOTE: By default, the AM-100 displays the IP address in parentheses to assist in the configuration of the device. The IP address can be hidden so that the end user sees only a friendly URL (i.e., http://AirMedia-019647). For details, refer to “OSD Setup” on page 13.

AirMedia Presentation Gateway Crestron AM-100
4 • AirMedia Presentation Gateway: AM-100 Operations Guide – DOC. 7463F
Download Screen
2. Click Device Administration. The admin login screen is displayed.
NOTE: Prior to displaying the admin login screen, the web browser displays a security warning message about the security certificate. It is safe to ignore this warning as long as the user verifies that the browser’s address bar indicates the correct IP address or hostname.

Crestron AM-100 AirMedia Presentation Gateway
Operations Guide – DOC. 7463F AirMedia Presentation Gateway: AM-100 • 5
Admin Login Screen
3. Enter the admin password (the default password is “admin”) and click Login. The Device Administration menu showing the System Status screen is displayed.
Device Administration Menu Showing the System Status Screen

AirMedia Presentation Gateway Crestron AM-100
6 • AirMedia Presentation Gateway: AM-100 Operations Guide – DOC. 7463F
NOTE: Changes made in any section of the Device Administration menu require that the AM-100 be rebooted for the settings to take effect. For details, refer to “Reboot System” on page 22 for details.
The Device Administration menu is divided into 12 sections: • System Status displays the operational status of the AM-100. • Device Setup sets the AM-100’s output resolution, under-scan
setting, and access code. • Network Setup sets the AM-100’s parameters for operating in a
network environment. • Crestron Services Setup sets the AM-100’s parameters for
operating in a Crestron® network environment. • OSD Setup configures the AM-100’s on-screen display. • SNMP Setup configures the AM-100 to use the Simple Network
Management Protocol (SNMP). • Device Services enables and disables remote viewing, SNMP, and
other features. • Change Password changes the admin password. • Firmware Upgrade imports or exports the system configuration to
match other AM-100 devices and upgrades the AM-100’s firmware.
• Remote View Setup specifies the auto-refresh interval. • Reset to Default resets the AM-100 to the default settings. • Reboot System reboots the AM-100.
System Status Click System Status to display the operational status of the AM-100.
Crestron AM-100 AirMedia Presentation Gateway
Operations Guide – DOC. 7463F AirMedia Presentation Gateway: AM-100 • 7
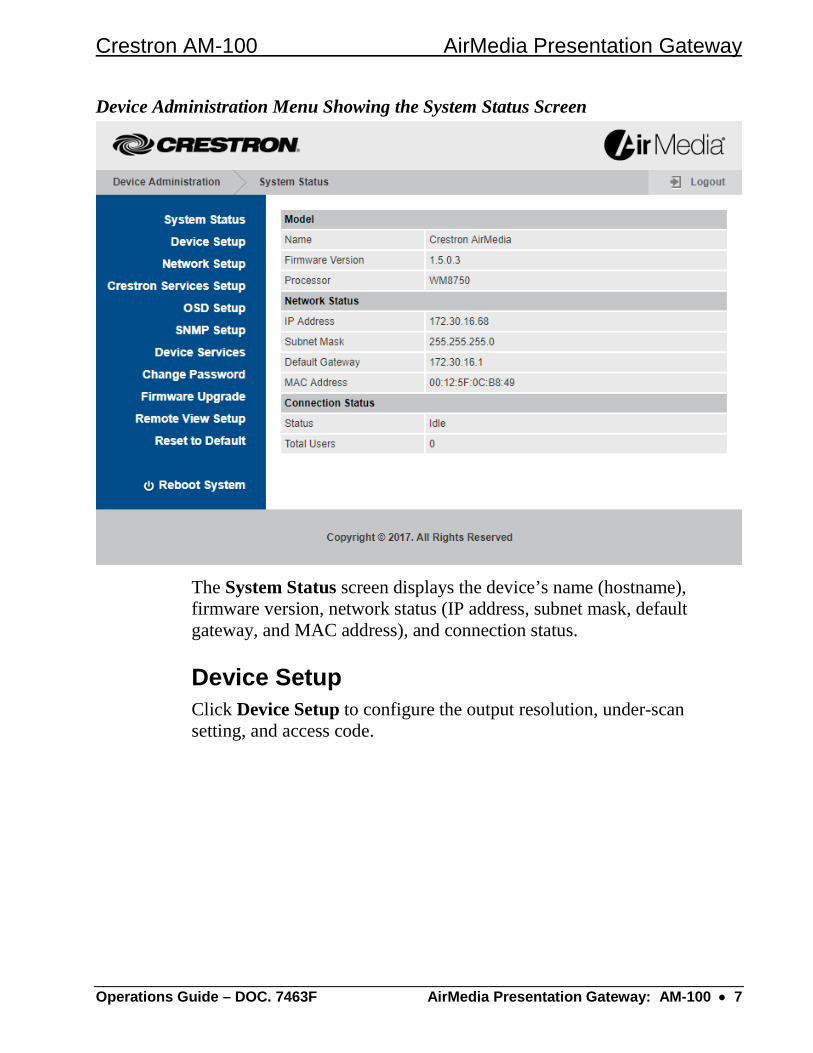
Device Administration Menu Showing the System Status Screen
The System Status screen displays the device’s name (hostname), firmware version, network status (IP address, subnet mask, default gateway, and MAC address), and connection status.
Device Setup Click Device Setup to configure the output resolution, under-scan setting, and access code.
AirMedia Presentation Gateway Crestron AM-100
8 • AirMedia Presentation Gateway: AM-100 Operations Guide – DOC. 7463F
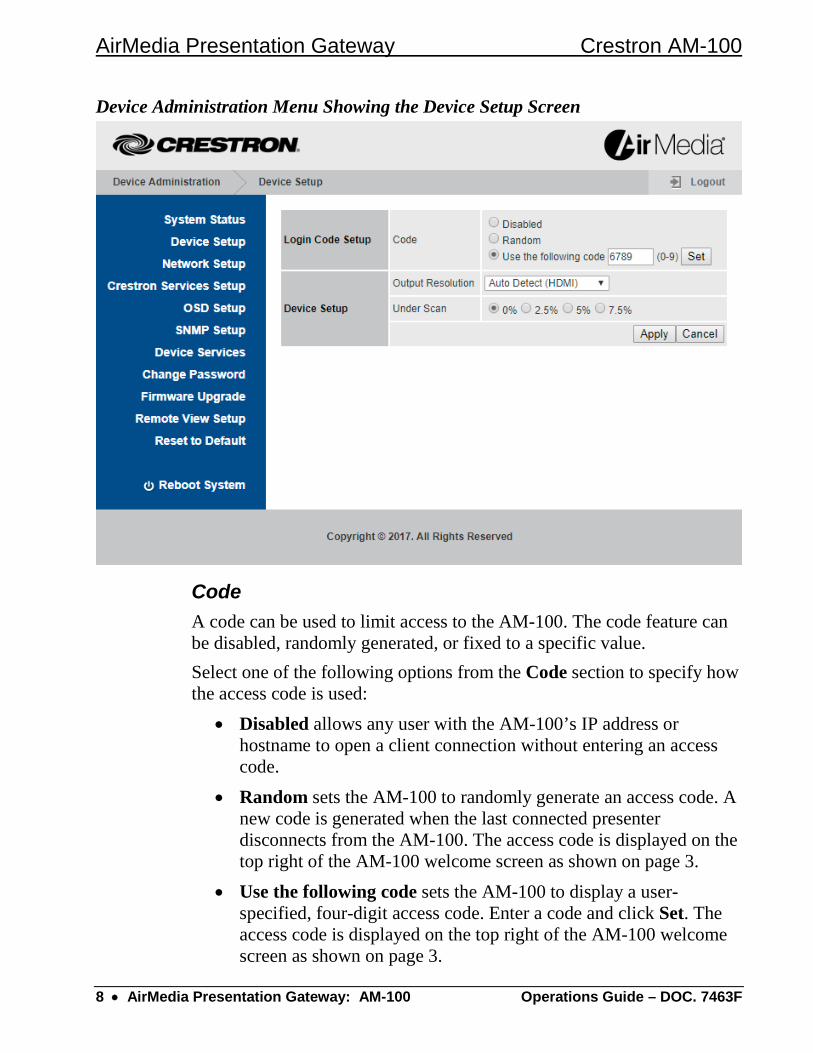
Device Administration Menu Showing the Device Setup Screen
Code A code can be used to limit access to the AM-100. The code feature can be disabled, randomly generated, or fixed to a specific value. Select one of the following options from the Code section to specify how the access code is used:
• Disabled allows any user with the AM-100’s IP address or hostname to open a client connection without entering an access code.
• Random sets the AM-100 to randomly generate an access code. A new code is generated when the last connected presenter disconnects from the AM-100. The access code is displayed on the top right of the AM-100 welcome screen as shown on page 3.
• Use the following code sets the AM-100 to display a user-specified, four-digit access code. Enter a code and click Set. The access code is displayed on the top right of the AM-100 welcome screen as shown on page 3.

Crestron AM-100 AirMedia Presentation Gateway
Operations Guide – DOC. 7463F AirMedia Presentation Gateway: AM-100 • 9
Click Apply to apply any changes. Click Cancel to cancel.
Output Resolution Select a resolution setting from the Output Resolution drop-down menu. Click Apply to apply any changes. Click Cancel to cancel.
Under Scan Select an amount of under scan to be applied to the displayed image. Click Apply to apply any changes. Click Cancel to cancel.
Network Setup Click Network Setup to configure the AM-100’s parameters for operating in a network environment.
Device Administration Menu Showing the Network Setup Screen

AirMedia Presentation Gateway Crestron AM-100
10 • AirMedia Presentation Gateway: AM-100 Operations Guide – DOC. 7463F
Hostname and Domain Name Use a hostname and domain name as an alternative to IP addressing when connecting client computers to the AM-100.
NOTE: When specifying a hostname, Crestron recommends using a hostname that is less than 15 characters.
NOTE: To use a hostname, set the AM-100’s IP Setup to Obtain an IP address automatically or, if using a static IP address, specify the domain name in the Domain Name field.
Enter a hostname (less than 15 characters) in the Hostname field and a domain name (optional) in the Domain Name field. Click Apply to apply any changes. Click Cancel to cancel.
IP Setup In the IP Setup section, the IP address, subnet mask, default gateway, and DNS server of the AM-100 can be set. The settings can be set manually or obtained from a DHCP server. Select Obtain an IP address automatically to use a DHCP server to provide the IP address, subnet mask, default gateway, and DNS server. Otherwise, select Use the following IP address and enter the Ethernet parameters. Click Apply to apply any changes. Click Cancel to cancel.
Crestron Services Setup Click Crestron Services Setup to configure the AM-100 for operation in a Crestron network environment.

Crestron AM-100 AirMedia Presentation Gateway
Operations Guide – DOC. 7463F AirMedia Presentation Gateway: AM-100 • 11
Device Administration Menu Showing the Crestron Services Setup Screen
Crestron Control System The Crestron Control System section specifies the control system controlling the AM-100.
• IP Address or Host name is the IP address or hostname of the Crestron control system. Enter the IP address or hostname of the Crestron control system and click Apply.
AirMedia Presentation Gateway Crestron AM-100
12 • AirMedia Presentation Gateway: AM-100 Operations Guide – DOC. 7463F
• IP ID identifies the AM-100 in the control system’s program. Select the AM-100’s IP ID from the drop-down menu and click Apply.
• Port is the port number used to communicate with the control system.
• Communication Status indicates the status of the communication link between the control system and the AM-100.
To apply any changes, click Apply. To cancel, click Cancel.
Fusion Server The Fusion Server section specifies the Crestron Fusion® server communicating with the AM-100.
• IP Address or Host name is the IP address or hostname of the Crestron Fusion server. Enter the IP address or hostname of the Crestron Fusion server and click Apply.
• IP ID identifies the AM-100 in the Crestron Fusion server’s program. Select the AM-100’s IP ID from the drop-down menu and click Apply.
• Port is the port number used to communicate with the Crestron Fusion server.
• Communication Status indicates the status of the communication link between the Crestron Fusion server and the AM-100.
• Click Apply to apply any changes. Click Cancel to cancel.
Crestron Connected Device The Crestron Connected Device section specifies the Crestron Connected® display device that is connected to the AM-100. Once the device is specified, basic status information and controls are displayed. Enter the IP address or hostname of the Crestron Connected device to specify the Crestron Connected device. Click Set to apply changes to the Source and Power Off Time Out settings. Click Apply to apply any changes. Click Cancel to cancel.
NOTE: The Apply button does not affect changes made to the Source and Power Off Time Out settings.

Crestron AM-100 AirMedia Presentation Gateway
Operations Guide – DOC. 7463F AirMedia Presentation Gateway: AM-100 • 13
OSD Setup Click OSD Setup to specify a logo image to display and to display or hide the AM-100's connection information.
Device Administration Menu Showing the OSD Setup Screen

AirMedia Presentation Gateway Crestron AM-100
14 • AirMedia Presentation Gateway: AM-100 Operations Guide – DOC. 7463F
Change Logo Image The Change Logo Image section is used to select the logo image on the AM-100 welcome screen.
• Logo Image displays the file name of the logo image. If the default logo image is used, “Default” is displayed.
• Restore to default reverts to the default logo image. • Customized OSD Image source allows the user to select a static
image file from the connected PC, a website, or an FTP server. Select the desired option and specify the location of the image file. When choosing a file, follow these guidelines: ⇒ Use logo images in JPEG format. ⇒ Do not exceed a file size of 510 kB. ⇒ For a given native display resolution, use the following table to
create a properly sized logo.
Native Display Resolution and Logo Image Size
Native Display Resolution Logo Image Size
800 x 600 800 x 500 1280 x 720 1280 x 600 1024 x 768 1024 x 640 1360 x 768 1360 x 640 1280 x 800 1280 x 667 1400 x 900 1400 x 750 1920 x 1080 1920 x 900 1600 x 1200 1600 x 1000
OSD Timeout The OSD Timeout section specifies how long the connection information is displayed after a presenter connects to the AM-100.
Video Out Timeout The Video Out Timeout section specifies how long the video output stays on after inactivity.
Crestron AM-100 AirMedia Presentation Gateway
Operations Guide – DOC. 7463F AirMedia Presentation Gateway: AM-100 • 15
Display Option The Display Option section controls how the connection information is displayed.
⇒ Display IP address sets the AM-100 to display the IP address after the hostname. Select On and click Apply to display the IP address, or select Off and click Apply to hide the IP address.
⇒ Display Code sets the AM-100 to display the access code on the AM-100 welcome screen. Select On and click Apply to display the access code, or select Off and click Apply to hide the access code.
⇒ Display Host Name sets the AM-100 to display the hostname. Select On and click Apply to display the hostname after the presenter connects to the AM-100, or select Off and click Apply to hide connection information after the presenter connects to the AM-100.
⇒ Display Domain Name sets the AM-100 to display the domain name to which the AM-100 is attached when using a hostname to connect with the AM-100 instead of an IP address. To display the domain name when using the AM-100’s hostname for connection, select On and click Apply. To hide the domain name, select Off and click Apply.
Click Apply to apply any changes. Click Cancel to cancel.
SNMP Setup Click SNMP Setup to configure the AM-100 to use SNMP.

AirMedia Presentation Gateway Crestron AM-100
16 • AirMedia Presentation Gateway: AM-100 Operations Guide – DOC. 7463F
Device Administration Menu Showing the SNMP Setup Screen
• The AM-100 supports SNMP versions 1, 2c, and 3. Select the version from the Version drop-down menu.
• The AM-100 uses an IP filter for SNMP connections. When an IP address is specified in the Manager IP field, the device accepts an SNMP request only from that IP address. If the field is blank, the SNMP request is honored from any IP address.
• If using SNMP version 3, a user name, authentication protocol, authentication password, privacy protocol, and privacy password must also be specified.
The default settings are as follows: Version is set to 2c, Public Community is set to public, and Private Community is set to private. Click Apply to apply any changes. Click Cancel to cancel.

Crestron AM-100 AirMedia Presentation Gateway
Operations Guide – DOC. 7463F AirMedia Presentation Gateway: AM-100 • 17
Device Services Click Device Services to enable and disable remote viewing, SNMP, and other features.
Device Administration Menu Showing the Device Services Screen
Select Enable or Disabled for each service listed in Server Setup.
NOTE: Disabling the administration pages prevents access to the AM-100’s configuration screens. These pages can still be enabled by SNMP or the control system connection. However, if SNMP and Crestron Services are disabled as well, the AM-100 must be restored to the original factory settings to gain access to the configuration screens. For details, refer to “Hardware Reset” on page 35.
Change Password Click Change Password to set a new admin password or layout control password.

AirMedia Presentation Gateway Crestron AM-100
18 • AirMedia Presentation Gateway: AM-100 Operations Guide – DOC. 7463F
Device Administration Menu Showing the Change Password Screen
Device Administration Perform the following to change the admin password:
1. Enter a new password in the Enter New Password field. 2. Enter the new password in the Confirm New Password field and
click Apply.
Layout Control Perform the following to change the layout control password:
1. Enter a new password in the Enter New Password field. 2. Enter the new password in the Confirm New Password field and
click Apply.
Firmware Upgrade Click Firmware Upgrade to import or export device configuration settings or upload new firmware.

Crestron AM-100 AirMedia Presentation Gateway
Operations Guide – DOC. 7463F AirMedia Presentation Gateway: AM-100 • 19
Device Administration Menu Showing the Firmware Upgrade Screen
Device settings can be imported from another device or exported to a file for use on another device.
Export and Import System Configuration Settings Click Export to export the system configuration file. Perform the following to import a system configuration file:
1. Click Choose File to select a file to import. The file has the .conf extension.
2. Click Import to import the configuration file and change the AM-100’s settings.
Upgrade Firmware Perform the following to update the AM-100’s firmware:
1. Click Choose File to select the desired firmware file. The file has the .img extension.
2. Click Upgrade to update the AM-100’s firmware.

AirMedia Presentation Gateway Crestron AM-100
20 • AirMedia Presentation Gateway: AM-100 Operations Guide – DOC. 7463F
NOTE: Firmware upgrades may take up to 30 minutes.
NOTE: Ensure that all users are disconnected from the AM-100 before upgrading the firmware.
NOTE: Use the AirMedia Firmware Update Utility (which is available for download from www.crestron.com/airmedia to update multiple AM-100s across an enterprise.
Remote View Setup Click Remote View Setup to configure remote view operations.
Device Administration Menu Showing the Remote View Setup Screen
Remote View Control The Remote View Control section specifies whether remote viewing is available to connected viewers when a presenter connects to the AM-100. Select Remote view always active to automatically allow remote viewing when the presenter connects to the AM-100. Select User

Crestron AM-100 AirMedia Presentation Gateway
Operations Guide – DOC. 7463F AirMedia Presentation Gateway: AM-100 • 21
controls remote view setting to require the presenter to allow remote viewing.
Access Password Control The Access Password Control section allows the code that is displayed on the screen to control access to the device when using remote view. Select Disabled or Use the same password as “Code.”
Auto Refresh Interval The Auto Refresh Interval section specifies how often the presented content should be refreshed. Using the recommended maximum amount of concurrent users shown, select a refresh interval (in seconds) from the list and click Apply. To cancel, click Cancel.
Reset to Default Click Reset to Default and then click Apply to reset the AM-100 to the factory settings.
Device Administration Menu Showing the Reset to Default Screen
AirMedia Presentation Gateway Crestron AM-100
22 • AirMedia Presentation Gateway: AM-100 Operations Guide – DOC. 7463F
Reboot System Click Reboot System and click Apply to reboot the AM-100.

Crestron AM-100 AirMedia Presentation Gateway
Operations Guide – DOC. 7463F AirMedia Presentation Gateway: AM-100 • 23
Operation The AM-100 uses a client application to share a PC or Mac® (hereafter referred to as “computer”) desktop. The computer should be able to access the AM-100 over the network.
NOTE: Crestron offers a stand-alone application for enterprise deployments. This application features additional connection methods and device management. For details, visit present.crestron.com.
NOTE: Mobile devices can share content using the AirMedia for AM-100 app, which is available for iOS® and Android™ devices. Download the latest version from the App Store® app in iTunes® software or Google Play™ store.
1. Open a web browser on the computer, and navigate to the web address or the IP address that is displayed on the top left of the AM-100 welcome screen as shown on page 3. The download screen is displayed.
Download Screen
2. Click on the Download icon for the computer’s operating system and follow the instructions for installing the client software.

AirMedia Presentation Gateway Crestron AM-100
24 • AirMedia Presentation Gateway: AM-100 Operations Guide – DOC. 7463F
NOTE: When used on a Mac, the AirMedia application must be run from within the disk image file. Do not drag the application out of the disk image file.
Run the AM-100 Client 1. Run the client software. The Enter Code (Enter Passcode on
Mac) screen is displayed.
Enter Code Screen (Windows)
Enter Passcode Screen (Mac)
2. Enter the code displayed on the AM-100 welcome screen in the Code field and click OK (CONFIRM on Mac). The client establishes a connection between the computer and the AM-100 while displaying the Crestron AirMedia controls on the computer.

Crestron AM-100 AirMedia Presentation Gateway
Operations Guide – DOC. 7463F AirMedia Presentation Gateway: AM-100 • 25
Crestron AirMedia Controls (Windows)
Crestron AirMedia Controls (Mac)
The contents of the computer screen are shown on the display connected to the AM-100.
NOTE: The application mutes the PC’s local audio, since the audio is transmitted to the device and played through the display’s speakers.
AirMedia Presentation Gateway Crestron AM-100
26 • AirMedia Presentation Gateway: AM-100 Operations Guide – DOC. 7463F
Control the Presentation Direct the presentation with the following controls:
• Click A to stop showing the computer’s screen. • Click H to start showing the computer’s screen. • Click b to freeze the computer’s screen.
• Hover over to show a volume slider control and drag the slider to raise or lower the volume.
• Click to mute the audio output.
• Click to unmute the audio output.
• Click X to close the client application and the connection between the computer and the AM-100. On a Mac, click to close the client application and the connection between the computer and the AM-100.
• Click ― to minimize the presentation control screen. On a Mac, click to minimize the presentation control screen.

Crestron AM-100 AirMedia Presentation Gateway
Operations Guide – DOC. 7463F AirMedia Presentation Gateway: AM-100 • 27
Configure Basic Presentation Settings Once a link between the computer and the AM-100 has been established, the AM-100 can be configured for custom operation. Perform the following to configure the AM-100:
1. On the presentation control screen, click Details. The screen expands to show additional controls and information.
Presentation Control Screen Details (L - Windows, R - Mac)
2. Configure the following options: • Video Source (Windows® operating system only) allows the
user to share a secondary desktop. This is similar to the Extend mode in Windows for multiple displays. On a Mac, a secondary connected display can be shared.

AirMedia Presentation Gateway Crestron AM-100
28 • AirMedia Presentation Gateway: AM-100 Operations Guide – DOC. 7463F
• Screen Position sets the position of displayed content on a remote viewer’s display. For details, refer to “Quad View” on page 29.
• Remote View allows the device to serve images of the desktop to remote viewers via the built-in web server.
3. Configure the operation and the image quality settings: a. Click Options | Settings (on a Mac, click Crestron AirMedia |
Preferences). The Settings screen is displayed.
Settings Screen (L - Windows, R - Mac)
b. Customize the settings. • Auto Discovery should be set to On. • When User Locks the Screen sets the behavior of the client
software when the connected computer is locked. Choose from Stop (the client stops sharing), Pause (the client pauses sharing), or Nothing (nothing happens).
• Show Connection Dialog on Startup selects whether connection information is displayed when the client starts.
• Latency selects the amount of latency in transmitting the signal from the computer to the AM-101. Select Application Mode (shortest) for the least amount of latency or Video Mode (PreBuffer) for a longer amount of latency that is best suited for buffering shared video.
• Set the Quality of the projected signal (0 to 100 percent). • Set the Max FPS (frames per second) refresh rate (1 to 30).
c. Click OK to confirm the settings or click Cancel to cancel.

Crestron AM-100 AirMedia Presentation Gateway
Operations Guide – DOC. 7463F AirMedia Presentation Gateway: AM-100 • 29
Quad View Up to four computers can simultaneously share their desktops with the AM-100. Shared desktops are arranged with each computer using one quarter of the projected image.
NOTE: If moderator controls are enabled, the screen position can be set by the moderator only. For details, refer to “Moderator Controls” on page 31.
NOTE: Although the AM-100 can support up to 32 connected computers for sharing, only four desktops can be displayed simultaneously.
Perform the following to share multiple desktops simultaneously: 1. Connect the computer to the AM-100 as described in “Run the
AM-100 Client” on page 24. 2. Connect up to three other computers as described in “Run the
AM-100 Client” on page 24. 3. Click Details. The screen expands to show additional controls and
information 4. Select the position from the Screen Position drop-down list.
NOTE: If another computer is already sharing the selected position, the position is replaced by the newly shared desktop. Desktop playback ceases on the “booted” computer.
NOTE: If Fullscreen is chosen, any other shared desktops are replaced by the newly shared desktop. Desktop playback ceases on the “booted” computers.
View a Presentation Remotely If Remote View is enabled, users can view desktop images via the AM-100’s built-in web server. Perform the following to remotely view images:
1. Open a web browser on a remote computer, and navigate to the web address or IP address supplied by the user or users that are sharing their desktops. The download screen as shown on page 23 is displayed.

AirMedia Presentation Gateway Crestron AM-100
30 • AirMedia Presentation Gateway: AM-100 Operations Guide – DOC. 7463F
2. Click Remote View. The shared desktop is displayed in the web browser as a web page.
Remote View Web Page
3. Use the following buttons when viewing the AM-100’s output in a web browser.
Exit remote viewing and return to the download screen.
Pause the currently displayed image.
Save the currently displayed image.
View the currently displayed image at actual size.
View the currently displayed image at full-screen size.
Refresh the image.

Crestron AM-100 AirMedia Presentation Gateway
Operations Guide – DOC. 7463F AirMedia Presentation Gateway: AM-100 • 31
Moderator Controls Moderator controls are used to determine which users can present to the display device and where their presented content is located on the display.
Login 1. Open a web browser on a remote computer, and navigate to the
web address or the IP address that is displayed on the top left of the AM-100 welcome screen. The download screen is displayed.
NOTE: By default, the AM-100 displays the IP address in parentheses to assist in the configuration of the device. The IP address can be hidden so that the end user sees only a friendly URL (i.e., http://AirMedia-019647). For details, refer to “OSD Setup” on page 13.
Download Screen
AirMedia Presentation Gateway Crestron AM-100
32 • AirMedia Presentation Gateway: AM-100 Operations Guide – DOC. 7463F
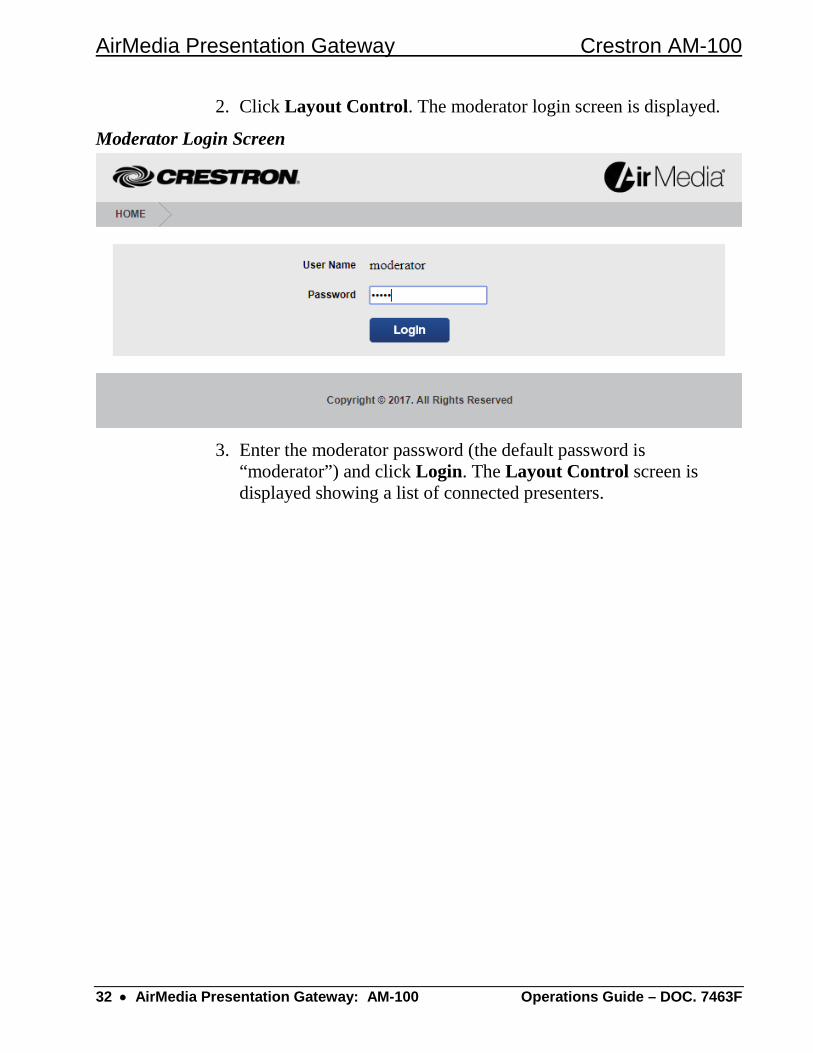
2. Click Layout Control. The moderator login screen is displayed.
Moderator Login Screen
3. Enter the moderator password (the default password is “moderator”) and click Login. The Layout Control screen is displayed showing a list of connected presenters.

Crestron AM-100 AirMedia Presentation Gateway
Operations Guide – DOC. 7463F AirMedia Presentation Gateway: AM-100 • 33
Layout Control Screen
Control the Display Layout 1. Click the Moderator check box to enable layout control.
NOTE: If Moderator is enabled, the play control can be changed only by the user who is logged in as the moderator.
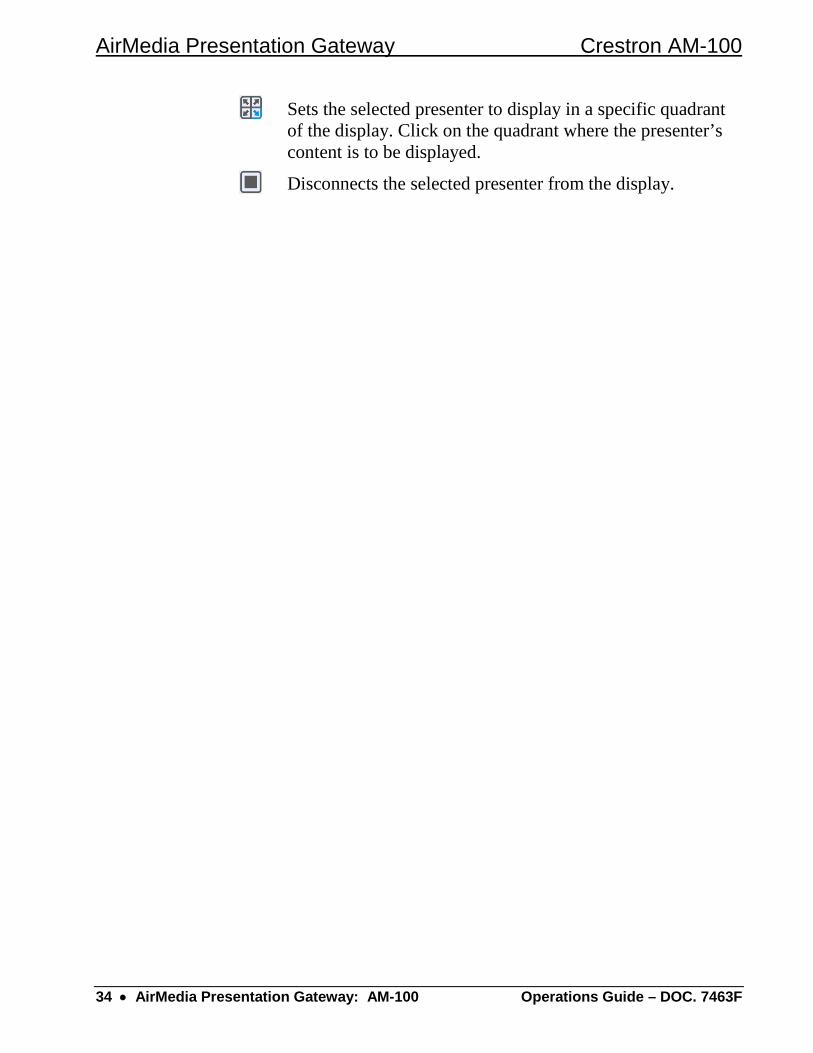
2. Up to four connected users can share content on the display at a time. Select the display capability of each connected user. Use the following controls for each connected presenter.
Sets the selected presenter to display in full screen.
AirMedia Presentation Gateway Crestron AM-100
34 • AirMedia Presentation Gateway: AM-100 Operations Guide – DOC. 7463F
Sets the selected presenter to display in a specific quadrant of the display. Click on the quadrant where the presenter’s content is to be displayed.
Disconnects the selected presenter from the display.

Crestron AM-100 AirMedia Presentation Gateway
Operations Guide – DOC. 7463F AirMedia Presentation Gateway: AM-100 • 35
Hardware Reset In the event that the administration pages are disabled or the device is configured with a static IP address that is on a different subnet and the AM-100’s configuration screens cannot be accessed, the AM-100 must be reset to the factory settings. Perform the following to restore the factory settings:
1. Turn the AM-100 upside down as shown in the following diagram.
Underside of the AM-100
2. Unplug the AM-100. 3. Press and hold the reset button. 4. Plug in the AM-100 with the button still pressed. 5. Wait approximately 30 seconds or until the front LED turns green. 6. Release the reset button. 7. Unplug the AM-100. 8. Plug in the AM-100.
Reset Button

AirMedia Presentation Gateway Crestron AM-100
36 • AirMedia Presentation Gateway: AM-100 Operations Guide – DOC. 7463F
This page is intentionally left blank.

Crestron AM-100 AirMedia Presentation Gateway
Operations Guide – DOC. 7463F AirMedia Presentation Gateway: AM-100 • 37
This page is intentionally left blank.

Crestron Electronics, Inc. Operations Guide – DOC. 7463F 15 Volvo Drive, Rockleigh, NJ 07647 (2036012) Tel: 888.CRESTRON 12.17 Fax: 201.767.7576 Specifications subject to www.crestron.com change without notice.