Operation Nest Egg incubation and chick rearing best · PDF file · 2012-10-118.1...
102
Operation Nest Egg Incubation and Chick Rearing Best Practice Protocols Final (Edited) Suzanne Bassett Oralis Limited 27 St Albans Ave Karori Wellington [email protected]
Transcript of Operation Nest Egg incubation and chick rearing best · PDF file · 2012-10-118.1...

Operation Nest Egg Incubation and Chick Rearing Best Practice Protocols
Final (Edited)
Suzanne Bassett Oralis Limited 27 St Albans Ave Karori Wellington [email protected]

ONE Best Practice Manual FINAL:– June 2012
ii
Contents
1 Introduction .......................................................................................................... 1
2 The Origins of BNZ Operation Nest Egg .............................................................. 2
3 Kiwi Egg and Chick Transportation from the Field ................................................ 3
4 General Quarantine ............................................................................................. 4
4.1 General Procedures .................................................................................... 4
4.2 Quarantine on Site ...................................................................................... 5
5 Hygiene in Incubation and Brooder Rooms Facilities ........................................... 8
5.1 Day to Day Hygiene .................................................................................... 8
5.2 Annual Clean of the Incubation and Brooder Facilities ................................ 8
6 Handling Kiwi Eggs and Chicks ......................................................................... 10
6.1 Handling Kiwi Eggs ................................................................................... 10
6.2 Handling Newly Hatched Kiwi Chicks ....................................................... 10
6.3 Handling Older Kiwi Chicks and Sub-adults .............................................. 10
7 Arrival of Kiwi Eggs at the Captive Rearing Centre ............................................ 11
7.1 Initial Egg Arrival ....................................................................................... 11
8 Kiwi Egg Incubation (Incubation Room) ............................................................. 14
8.1 Processing a New Egg for Incubation ....................................................... 14
8.2 Dealing with Cracked Eggs ....................................................................... 16
9 Protocols in the Incubation Room ...................................................................... 20
9.1 Artificial Incubation Parameters ................................................................ 20
9.2 The Daily Incubation Regime .................................................................... 22
9.3 Egg Weigh and Candling Day Regime ...................................................... 24
9.4 Egg Monitoring Points ............................................................................... 25
9.5 Egg Weight Loss ...................................................................................... 26
10 Kiwi Egg Development ....................................................................................... 31
10.1 Characteristics of Live ‘Young’ Eggs (0 - 30 days) .................................... 31
10.2 Characteristics of Live ‘Older’ Eggs (~55+ days) ...................................... 31
11 Kiwi Husbandry .................................................................................................. 33
11.1 Hatching ................................................................................................... 33
11.2 Immediate Post Hatch Care of all Chicks .................................................. 38
11.3 Post Hatch Care of Assisted Hatch Chicks (including malpositioned chicks) ............................................................... 40
11.4 Extended Time in the Hatcher/Brooder ..................................................... 41
12 Post Hatch Chick Care....................................................................................... 42
12.1 Initial Chick Care ...................................................................................... 42
12.2 Chick Care in the Brooder Room .............................................................. 43
12.3 Feeding Chicks ......................................................................................... 48
12.4 Care of Assisted Hatch and Malpositioned Chicks .................................... 54
12.5 Detecting Retained Yolk Sacs .................................................................. 54
12.6 Operation Nest Egg Chicks Hatched in the Wild ....................................... 57
12.7 Summary of Daily Brooder Care ............................................................... 59

ONE Best Practice Manual FINAL:– June 2012
iii
13 Care of Chicks in Outdoor Enclosures ............................................................... 60
13.1 Transfer of Chicks to an Outside Enclosure .............................................. 60
13.2 Release of Chicks from the Brooder Room to a Crèche Site ..................... 60
13.3 Transponders ........................................................................................... 61
13.4 DNA Sexing Methods ............................................................................... 61
13.5 Transferring Chicks to the Outside Enclosures ......................................... 61
14 General Health Observations ............................................................................. 64
14.1 Physical Check ......................................................................................... 64
14.2 Endoparasites and Routine Stool Testing ................................................. 65
15 Chick Quarantine ............................................................................................... 71
15.1 Chick Release from a Brooder to the Wild ................................................ 71
15.2 Quarantine in an Outside Enclosure ......................................................... 71
15.3 Quarantine procedures for Operation Nest Egg chicks in outdoor enclosures ................................................................................................ 72
16 Record Keeping ................................................................................................. 76
16.1 Egg Arrival and History ............................................................................. 76
16.2 Data Log for Artificial Incubation ............................................................... 77
16.3 Hatching Notes ......................................................................................... 78
16.4 Chick Rearing Notes for the Brooder and Outside Enclosures .................. 78
16.5 ICU Data Sheet ........................................................................................ 79
16.6 Stool Sample and Quarantine Records ..................................................... 79
16.7 End of Breeding Season Reports .............................................................. 80
17 Acknowledgements ............................................................................................ 81
18 References ........................................................................................................ 82
19 Contacts ............................................................................................................ 83

ONE Best Practice Manual FINAL:– June 2012
iv
Appendix
1 Assessing and assisting problem hatches ......................................................... 85
1.1 Creating a view hole in to the air cell at point of hatch .............................. 85
1.2 Chick Malposition during Hatching ............................................................ 88
1.3 Assisted Hatches ...................................................................................... 91
1.4 External Yolk or Umbilicus ........................................................................ 93
2 Correction of Malpositioned Legs ....................................................................... 95
ONE Best Practice Manual FINAL:– June 2012
v
Figures
Figure 1. Kiwi egg showing the marked air cell and centre line orientation (photo: Kiwi Encounter) ............................................................................... 14
Figure 2. A severely damaged egg that was successfully patched and subsequently hatched (photo: Kiwi Encounter) ........................................... 18
Figure 3. A severely damaged egg that was subsequently euthanased (Photo: Suzanne Bassett) ........................................................................... 19
Figure 4. Manual egg turning regime for kiwi eggs ..................................................... 21
Figure 5. External pip (Photo: Kiwi Encounter) ........................................................... 34
Figure 6. A kiwi chick in the process of hatching. The photo on the left shows the egg with the hock protruding from the non air cell end, while the photo on the right shows the egg after it has been taped at the non air cell end to prevent the hocks from breaking out before the hatch is complete. (Photos: Kiwi Encounter) ......................................................... 37
Figure 7. Weighing a young kiwi chick. (Photo: Kiwi Encounter) ................................ 38
Figure 8. Use of a paper towel donut to stabilise a kiwi chick. (Photo: Kiwi Encounter). ............................................................................. 39
Figure 9. A wooden brooder filled with peat moss and a good sized water dish. The small entrance hole leads to the sleeping area. A mesh lid closes over the top. (Photo: S. Bassett). ................................................................ 44
Figure 10. A plastic brooder on a movable trolley, with a removable wood and mesh lid, as used at the Westshore Wildlife Reserve. The base throughout is covered with non-slip matting and each area can be easily disassembled for easy cleaning. (Photo: S. Bassett) .................... 44
Figure 11. Assisted feeding of artificial diet to a young kiwi chick. (Photo: Kiwi Encounter) .................................................................................................. 51
Figure 12. Normal cloaca of a young GSK chick. (Photo: Melanie Nelson) .................. 73
Figure 13. Opening the cloaca (left) and taking a swab (right). (Photo: Kiwi Encounter) .............................................................................. 74
Figure 14. Correct location and size of a view hole placed in a kiwi egg. (Photo: S. Bassett) ...................................................................................... 86
Figure 15. Construction and use of hobbles to correct splayed legs in a young kiwi chick. (Photo: Kiwi Encounter & S. Bassett) ......................................... 96
Figure 16. Using a splint to correct curled toes in a kiwi chick. (Photo: Auckland Zoo). ............................................................................... 97
Tables
Table 1. Incubator parameters for kiwi eggs used at Kiwi Encounter and Willowbank ................................................................................................. 20
Table 2. Incubation parameters used at Auckland Zoo ............................................. 22
Table 3: Disease Screening and Treatment Recommendations for ONE kiwi, (Kate McInnes and Kerri Morgan) ............................................................... 67
Table 4: Endoparasite treatment protocol, (refer to attached Disease Screening and Treatment Recommendations). ............................................................ 70
Table 5: Example of an egg preparation checklist ..................................................... 76

ONE Best Practice Manual FINAL – June 2012
1
1 Introduction
The purpose of this document is to outline the current best-practice knowledge,
protocols and techniques for the Brown Kiwi BNZ Operation Nest EggTM (ONE)
programme. It draws together the most up-to-date information and current best
practices from the ONE programme in one place, and makes this resource available
to all current, and prospective, ONE captive rearing centres.
As in the Brown Kiwi (Apteryx mantelli) Husbandry Manual (Fraser and Johnson,
2009), this manual sets out clear minimum standards for key aspects of the Brown
Kiwi BNZ ONE programme that must be met by all captive rearing centres involved in
the programme. It is acknowledged that there will always be some variation in the
practices at different captive rearing centres, and it is not the purpose of this
document to eliminate all this variation. However, as with the Brown Kiwi
Husbandry Manual, the minimum standards included here provide a degree of quality
assurance that all ONE captive rearing centres are providing a suitable and
appropriate level of husbandry.
This ONE Best Practice Manual also contains two key performance standards that
captive rearing centres are encouraged to aim for. These relate to viable egg
hatching success and chick survival rates, and should be readily obtainable if the
minimum standards are applied.
This document contains information specific to the husbandry of Brown kiwi eggs and
chicks as part of the BNZ ONE programme. Consequently, it does not duplicate the
material contained in other kiwi husbandry and care documents, and should be used
in conjunction with them. These documents are available free of charge from the
Department of Conservation (www.doc.govt.nz), and should be consulted as
necessary. They include:
Kiwi Recovery Plan: 2008-2018 (Holzapfel et al., 2008)
Kiwi Best Practice Manual (Robertson and Colbourne, 2003 [updated 2007])
Brown Kiwi (Apteryx mantelli) Husbandry Manual (Fraser and Johnson, 2009)
Kiwi First Aid and Veterinary Care (Morgan, 2008)
Kiwi Captive Management Plan (Barlow, 2011)
Due to issues associated with intellectual property rights the BNZ Operation Nest
EggTM Kiwi Egg Candling Workshop Study Guide (Bassett, 2009) is only available to
those persons who have attended and completed the Kiwi Egg Candling Workshop.
This document is not currently able to be downloaded electronically.
This ONE Best Practice Manual will be reviewed every two years and any new or
improved techniques will be added as necessary.

ONE Best Practice Manual FINAL – June 2012
2
2 The Origins of BNZ Operation Nest Egg
BNZ Operation Nest Egg™ is a powerful tool to quickly build up kiwi numbers,
particularly for vulnerable kiwi populations in small sites. Kiwi eggs and chicks are
removed from the wild and hatched and/or raised in captivity until big enough to
fend for themselves – usually when they weigh around 1000 grams. They are then
returned to the wild.
A BNZ Operation Nest Egg™ bird has a 65% chance of surviving to adulthood –
compared to just 5% for wild-hatched and raised chicks.
It is used on all kiwi species except the little spotted kiwi.
The idea for BNZ Operation Nest Egg was hatched in 1994 when researchers noticed
that almost all kiwi chicks were killed by stoats, but adult kiwi were not.
With funding from BNZ, a pilot was run that adapted the ‘operation nest egg’
technique specifically to kiwi.
The skills for collecting, transporting and incubating kiwi eggs, then keeping young
chicks alive in captivity, were honed on brown kiwi. With only 5% of wild-hatched
chicks surviving to adulthood, there was nothing much to lose.
It worked – BNZ Operation Nest Egg has been incredibly good for quickly growing kiwi
populations near the brink of extinction, such as the critically endangered rowi and
Haast tokoeka. It has also been very effective in helping establish new populations.
Since 1995, BNZ Operation Nest Egg tool has been used every breeding season,
largely in the most vulnerable kiwi populations, buying researchers the time to find
solutions to the problems facing kiwi. The aim is to develop long-term cost-effective
and sustainable ways to keep large areas of forest free of predators. There may
come a time when it will no longer be needed as a management tool, although its
power as an advocacy tool - giving people an opportunity to get close to kiwi - will
remain immensely valuable.
BNZ has continued to sponsor kiwi recovery work since funding the initial pilot in
1991, and since then has contributed millions of dollars to the national effort to save
kiwi. BNZ Save the Kiwi Trust was formed in 2003, building on that foundation, and
in the first nine years has granted more than six million dollars to kiwi protection
project s on the ground. The Trust stands alongside the facilities, people and
projects that have developed BNZ Operation Nest Egg to be the robust management
tool it is today, and is proud to support the work by funding workshops, incubation
facilities and projects on the ground.
More information about BNZ Operation Nest Egg can be found at
www.savethekiwi.org.nz.

ONE Best Practice Manual FINAL – June 2012
3
3 Kiwi Egg and Chick Transportation from the Field
The first step in the artificial incubation and rearing of ONE eggs and chicks is the
collection of eggs and their transportation to the captive rearing centre. It is
assumed here that all field staff that are involved in monitoring and transporting kiwi
will be familiar with the Kiwi Best Practice Manual (Robertson and Colbourne, 2003),
and ideally at least some staff in each project have attended the Bank of New
Zealand Operation Nest EggTM Kiwi Egg Candling Course, and are able to determine
the age of kiwi eggs. The main information regarding egg removal and transportation
is outlined in detail in the Kiwi Best Practice Manual.

ONE Best Practice Manual FINAL – June 2012
4
4 General Quarantine
With any Operation Nest Egg (ONE) kiwi captive rearing facility, there is a risk of
accidently introducing pathogens into the wild populations and potentially causing a
disease outbreak. There are also risks of disease outbreaks within the facility when
holding many eggs and chicks on site for extended periods of time. Serious efforts
must be made at all times to minimise these risks. All staff and visitors must follow
and respect all quarantine procedures.
The following specific procedures are recommended.
4.1 General Procedures
• Operators and visitors should be aware of the procedures in place to minimise
the introduction of disease/pathogens to the captive rearing facility, and the
risks they may pose to captive and wild kiwi.
• Clean clothes are to be worn on site, and people who have been in contact with
wild kiwi (i.e. individuals bringing kiwi eggs or chicks to the captive facility)
should not have access to any on site areas containing eggs or chicks.
• All ONE chicks that have been held outside the brooder room, that are to be
transferred from any facility back to the wild population (or another captive
facility) must be screened for disease prior to the transfer. The kiwi
quarantine procedures outlined in these protocols should be followed, and all
test results must be within normal limits
• Equipment will be sanitised at the commencement of the kiwi breeding season,
especially all equipment in the incubation and brooder facilities. Equipment
must also be cleaned regularly throughout the breeding season. Only essential
items should be kept in the incubator and brooder rooms. Equipment used in
kiwi enclosures should be cleaned immediately prior to, and again after use.
Tools used in outside kiwi enclosures (such as garden spades and forks) should
remain outside and not be brought inside the facility.
• All fruit and vegetables purchased for kiwi food preparation should be of human
quality and well washed before use. Optimal storage temperatures should be
followed and use by dates should be checked regularly (i.e. cat biscuits,
vitamin pre-mix).
• All food items should be held in clean, rodent and insect proof containers. A
pest management strategy should also be implemented to ensure that any
unwanted and undesirable pest species are controlled in an appropriate
manner.
• Waste should be removed from the facility on a daily basis, and should be
removed from the incubation room immediately.
• Sick birds should be isolated to minimise the contamination of other ONE eggs
or birds. It is recommended that facilities have a separate room dedicated to
the medical treatment of sick birds.
• If a bird is found to be sick, injured or dead, follow the procedures laid out in
the Kiwi first aid and veterinary care (Morgan 2008) manual.

ONE Best Practice Manual FINAL – June 2012
5
4.2 Quarantine on Site
There should be no unauthorised entry to any incubation, brooder or chick rearing
area. All staff and visitors should change footwear before entering an ONE kiwi area.
Changing footwear will reduce the risk of transfer of diseases. There should be a
clearly marked area for footwear changes before entering the outdoor pen area, and
before entering an incubation or brooder room. There should be dedicated footwear
or overshoes provided.
If staff or visitors have been in contact with other species of birds, precautions
should be taken to minimise possible transfer of disease before handling kiwi.
Particular care must also be taken to minimise possible disease transfer if staff
working with ONE kiwi have contact with poultry and other birds while at home.
In general, earlier life stages (e.g. eggs and hatching chicks) require higher levels of
hygiene and quarantine than later ones (e.g. chicks in outside runs). Therefore,
where possible it is preferable to ensure that staff work in a one-way direction
through the incubation room, hatch room, brooder room, and then into the outdoor
pens.
All captive rearing staff are to comply with and respect quarantine procedures.
4.2.1 Incubation Room
• This area must have the strictest hygiene regime with regular cleaning. All
floor and work surfaces should be of a non-permeable material to maintain a
high state of cleanliness and reduce the establishment of any potential
pathogens.
• The incubation room must be completely scrubbed with Trigene (concentration
1:100) at the beginning of the breeding season.
• Dedicated incubation room lab coats and slip-on shoes should be worn, and
clothing worn in this room should not be worn in any other room. Ideally, long
hair should be tied back.
• Suitable hand washing facilities must be available and hands must always be
washed and sanitised before working in this room.
• It is not necessary for gloves to be used when handling kiwi eggs in the
incubation room.
• Equipment is to remain in this room at all times, and any equipment entering
the room must be cleaned in Trigene beforehand.
4.2.2 Hatch Room
Currently, in most kiwi ONE facilities, hatching occurs within the incubation room. A
separate hatch room is desirable (but not always available) to reduce potential
pathogens and contamination during and following the hatch process. A separate
hatch room has the same strict hygiene conditions as the incubation room.

ONE Best Practice Manual FINAL – June 2012
6
4.2.3 Brooder Room
• The brooder room is to be thoroughly cleaned with Trigene at the start of the
kiwi breeding season. Trigene must be rinsed off and if possible rested for 24
hours before birds are reintroduced into the area (if rinsed twice there should
be little change of a respiratory issue). The room should then be cleaned
weekly with Trigene 1% solution (1:100 dilution rate) or Microshield
(Chlorhexidine) 4% solution throughout the season, and thoroughly cleaned at
the end of the season.
• Dedicated ONE shoes and lab coats should be provided and used in the brooder
room.
• Hands are to be thoroughly washed and dried before handling kiwi chicks, kiwi
food or equipment.
4.2.4 Kiwi Outside Rearing Pens
• When entering a quarantine pen, only quarantine boots/footwear (with organic
matter removed first and thoroughly scrubbed in Trigene or another suitable
disinfectant, on a regular basis) should be used in the specific individual ONE
kiwi pen area. Once the bird has been released the boots must be sanitised
using Trigene before re-use.
• Hands should be washed before handling kiwi or equipment.
• Kiwi food boxes, tunnels and artificial burrows should be cleaned regularly
using disinfectant to minimise disease risks. It is imperative that these boxes
are rinsed thoroughly and aired for as long as possible before being put back
into the kiwi pens (to prevent respiratory tract irritation). The location of
these boxes and burrows should be moved periodically to reduce the build up of
faeces in the feeding areas. Refer to Brown kiwi (Apteryx mantelli) husbandry
manual (Fraser and Johnson, 2009).
• Food waste and any build up of faeces around feeding or roosting areas should
be removed on a daily basis.
• All quarantine protocols should be obeyed for birds in quarantine prior to
release back to the wild
4.2.5 Personal Hygiene
• Hands are to be washed regularly whenever in the brooder facility or chick
runs. Hands should always be washed and sanitised after handling birds,
cleaning brooders or food boxes, faecal collection for disease screening in order
to minimise the risk of staff contracting zoonotic diseases (such as
Campylobacter or Salmonella), as well as reducing any spread of disease to
other kiwi.
• Staff handling other species of wildlife, or kiwi in the wild, are required to
mitigate possible disease transfer prior to handling ONE kiwi at the captive
rearing facility.
• It is important that all footwear changes are observed when entering and
moving between incubation and brooder rooms, and outside kiwi pens.
Quarantine footwear (gumboots, slip-on shoes or shoe covers) must be worn

ONE Best Practice Manual FINAL – June 2012
7
when necessary. All footwear should be cleaned regularly with a Trigene
solution. A change of footwear is preferred to quarantine foot baths due to the
limited effectiveness of a footbath on soiled footwear.
• Lab coats, vet gowns or overalls used within the captive rearing facility should
be washed regularly in Trigene. All clothing should remain in the area that
they are dedicated to, (i.e. coats should remain in the incubation room, etc).

ONE Best Practice Manual FINAL – June 2012
8
5 Hygiene in Incubation and Brooder Room Facilities
5.1 Day to Day Hygiene
One of the prerequisites to ensuring good hygiene at captive rearing centres is to
make sure all staff are familiar with the hygiene procedures, (including the reasons
for them) and that they become an integral part of the daily routine.
• Trigene 1% solution is recommended is the primary cleaning agent to be used
within the captive rearing facilities. (Alternatives if Trigene is not available
include bleach, Geosil and Virkon, but these are less effective than Trigene).
Chlorhexidine (Microsheld) 4% solution can be used for general cleaning but all
residues must be washed off with a freshwater rinse. Handy Andy is not
recommended (kiwi deaths have been attributed to the toxicity of Handy Andy
build-up in brooders).
• Hands should be washed with sanitiser whenever entering the incubation or
brooder facility.
• During the season all brooders are to be thoroughly washed with Trigene (or
another suitable sterilising product) and rinsed before a new individual chick is
placed into the brooder.
• The kitchen, cupboards, food preparation surfaces and other egg preparation
room and brooder room facilities are to be keep scrupulously clean at all times.
• All food and water dishes are to be washed in detergent, well rinsed and then
drip dried (or washed in a dishwasher if available). It is recommended they are
cleaned with Trigene or another sanitiser once a week.
• All equipment entering the incubation or hatch room must be disinfected with
Trigene before entering the room.
• The outsides of all incubators and hatchers are to be cleaned/wiped weekly
throughout the incubation season. Incubators are to be thoroughly cleaned at
the start and end of the season and wiped out during the season when empty.
Incubators used for hatching eggs should be cleaned with Trigene (or another
suitable sterilising product) as soon as the chick has hatched and before a new
egg is placed into the incubator.
• Brooders that have held a sick bird must be thoroughly disinfected with
Trigene. All equipment used in relation to the sick bird must be disinfected,
and any substrate or equipment unable to be cleaned must be disposed of.
5.2 Annual Clean of the Incubation and Brooder Facilities
All incubators, hatchers, brooders, bench top surfaces, floors, walls, ceilings, and all
equipment used, are to be thoroughly cleaned prior to the start of the kiwi breeding
season. Sufficient time must be allowed to set up all incubators and hatchers in
order to check temperature consistency and fine tune temperature settings prior to
the commencement of egg incubation.
• Wash all the walls, ceilings, and all other large equipment in the incubator and
brooder rooms with Trigene and rinse thoroughly.

ONE Best Practice Manual FINAL – June 2012
9
• Clean all floors and walls using a Trigene wash (1:100 concentration). Leave
the Trigene on to air dry.
• Wash all incubators, hatchers and brooders with Trigene (1:100 dilution rate)
and rinse thoroughly.
• Check and clean any air-conditioning units and check and replace the filters (if
necessary).
• Wash all matting and clothes used in the incubator and brooder rooms in
Trigene and rinse well.
• Wash absolutely all equipment in the incubator and hatch room(s). Care must
be taken when washing fragile thermometers, wetbulb thermometers and
wicks, candlers, weigh scales and items that have been specially calibrated.
• Wash absolutely all equipment in the brooder room including all food and water
dishes, spoons, scales, weigh boxes, towels, matting, heat lamps, medical
equipment (such as crop tubes etc), leg bands, trowels and forks, mops and
brooms, brooder room footwear, etc.
• At the completion of the kiwi egg incubation and chick rearing season, all
incubators, hatchers and brooders, and all surfaces should be thoroughly
cleaned using the same procedure as carried out before the season and
appropriately stored to maintain hygiene.
Minimum Standard 1.
Hygiene in incubation and brooder room facilities
a) All incubation and brooder room facilities (walls, floors and ceilings) and equipment
must be thoroughly cleaned immediately prior to the commencement of the breeding
season.
b) Incubators, hatchers and brooders are to be frequently wiped and thoroughly cleaned
between eggs and chicks during the incubation season.
c) All egg preparation, incubator, hatching and brooder rooms are to be kept clean.
d) All food and water dishes must be cleaned daily.
e) Before any equipment enters the incubation room it must be cleaned with Trigene (or
other suitable sterilising product).
f) The incubation room must have restricted visitor entry.
g) Personal hygiene protocols such as clothing and footwear changes, and hand
sanitation must be adhered to.

ONE Best Practice Manual FINAL – June 2012
10
6 Handling Kiwi Eggs and Chicks
Kiwi require special handling techniques and they should only be handled by people
trained by an appropriate kiwi handler. Chicks can easily suffer serious leg injuries if
not handled correctly. Refer to the Kiwi Best Practice Manual (Robertson &
Colbourne 2003).
6.1 Handling Kiwi Eggs
All kiwi eggs should be handled carefully. They should never be held with the
pointed non air cell end (NACE) upwards, shaken, or rotated excessively. Hands
should always be sanitised before handling eggs (or latex gloves worn).
6.2 Handling Newly Hatched Kiwi Chicks
Kiwi chicks require very careful and gentle handling when they have just hatched.
They have a large internalised yolk sac and soft distended abdomen. Young chicks
should be cradled in the palm of two hands with your fingers lightly cupped
underneath the chick, and your thumbs gently resting on either side of the chicks’
spine. In this basket-like hold the chick can lightly be restrained with the thumbs if
necessary. Chicks up to a month old can be handled in this manner.
6.3 Handling Older Kiwi Chicks and Sub-adults
Always hold the chick firmly by the bare part of their legs, with the body cradled on
the forearm, or if you are sitting down, on your lap. You need a firm but gentle grip
around both legs to prevent them from lashing out with one leg which may cause
injury to the bird, or to the handler. If a bird does get one leg free, allow it to
rotate in your hand to prevent the upper leg being damaged and quickly grasp the
freed leg again. Kiwi chicks are very prone to trying to jump off laps so care must be
taken to hold them gently but firmly. If you are removing a chick from a natural
burrow, always make sure that you have both legs firmly grasped before you begin to
bring the chick out and support the body as soon as you can.
Refer to the Kiwi Best Practice Manual (Robertson & Colbourne 2003) for additional
details.
Minimum Standard 2.
Handling kiwi eggs or chicks
a) Kiwi eggs and chicks must only be handled by people trained in the appropriate
manner to do so.

ONE Best Practice Manual FINAL – June 2012
11
7 Arrival of Kiwi Eggs at the Captive Rearing Centre
7.1 Initial Egg Arrival
When eggs first arrive at the captive rearing centre, initial processing should occur in
the egg preparation room or incubation room. It is preferable that egg viability is
assessed in a separate room to the incubation room, but not all captive rearing
centres have this option available to them. Make sure the room used can be blacked
out to ensure optimal candling.
• Ensure all bench surfaces, scales, and the candler, have been cleaned with
Trigene. Place a clean mat (rubber matting works well) on the bench, and
have all necessary equipment and paper work ready for completion on the
bench.
• Staff and visitors should adhere to hygiene outlined in sections 3 and 4. Visitor
numbers should be limited (especially in the incubation room).
• Do not to place the egg transport box on the bench. Place it gently on the
floor, away from the door and egg preparation area to minimise risks of the box
being knocked or damaged, and to limit contamination and possible disease
risks.
• Wash, dry, and sanitise hands to handle the kiwi eggs. Gloves can be worn if
desired.
• Determine if the transport box contains a temperature probe, and if so, record
the egg surface temperature before the box is opened. Note where the
thermal sensor was located (i.e. on the top or bottom of the egg surface,
between layers of egg packaging etc).
• Handle all kiwi eggs gently and slowly, and keep all movements smooth.
• Always hold a kiwi egg level (i.e. with the long axis parallel to the floor).
• Carefully remove the egg from the transport box. Make note of any unusual
odours as the egg is removed or unwrapped.
• Place the egg on the bench and allow it to naturally centre and mark the
uppermost position of the egg. Young eggs will not always centre themselves
(because the air cell is small) so carefully check the orientation of the air cell
when the egg is initially candled. Immediately observe the orientation of the
egg and record degree and direction that the egg is off centre (i.e. 45° to
right). Record all observations on a dedicated ‘egg arrival data sheet’.
• After centering the egg place it on a clean non-slip mat.
• Record any information regarding the egg and the incubation behaviour of the
bird(s) from the field staff delivering the egg/s. This should include parentage,
nest characteristics, egg retrieval methods (night versus during the day), the
time the egg was removed from the nest, transportation type and duration.
Briefly record how the egg was packaged (if unusual) and transported. Record
any egg timer transmitter details, and details regarding a second egg (or chick)
in the clutch (for example viable, dead on arrival (DOA), left in the wild, etc).
Record details of personnel delivering the egg/s in case there is a need to refer
back for further information.

ONE Best Practice Manual FINAL – June 2012
12
• Weigh the egg (to the nearest 0.1 gram).
• Briefly candle the egg to determine viability, fertility and approximate stage of
development. This initial candling should take no more than 3-5 seconds and is
primarily to determine viability (the egg will be candled more thoroughly later
to accurately determine embryo age).
• Examine the egg extremely carefully for cracks, both in the light by eye, and in
the dark by candling, before washing the egg.
• If cracks are present, classify the severity of cracks (refer to section 8.2 on
dealing with cracked eggs). If an egg has moderate to severe cracking it will be
gently splashed with Incusan (or Chickguard), rather than being submerged.
• Note the position and general impression of the cracks (new, old, clean, or
dirty) and record these.
• Determine the unique individual egg ID code and mark this on the egg.
7.1.1 Washing the Kiwi Egg
Egg washing is a standard ONE practise. It is recommended that kiwi eggs are
washed to remove any soiling from the nest before being placed in an incubator for
artificial incubation. Some kiwi eggs can arrive at a facility in an extremely dirty
condition. Washing eggs does not affect hatchability and it helps to minimise
potential contamination. This is especially important when multiple eggs are
incubated together in a large still air or force draft incubator.
• Prepare the Incusan solution after assessing egg viability.
• The water temperature should be 35˚C (range 30-35°C) with an Incusan
concentration of 20 ml/L (e.g. 180 ml of Incusan: 9 L of warm water). Mix the
water and Incusan well to ensure a uniform temperature and concentration and
record the water temperature before washing the egg. Alternatively,
Chickguard solution can be used at a 1% dilution rate.
• Put on gloves then wash the egg by fully submerging it in the Incusan solution
for 30 seconds only. Gently remove all dirt/stains/field marks from the egg by
hand but avoid vigorously rubbing the egg shell directly. If the egg still has
caked-on mud after the first wash, a second wash maybe required (note: it may
be necessary to gently scrub the egg using a soft toothbrush or a clean wet
paper towel and the total wash time should not exceed one minute).
• Do not submerge cracked eggs. Follow the guidelines for dealing with cracked
eggs (refer to section 8.2).
• After washing, gently pat the egg dry using clean paper towels, and place the
egg on a new clean mat. Once the egg is washed, gloves may be removed but
re-sanitise hands before handling the egg again.
• If washing multiple eggs, make sure the water temperature is checked before
each egg is washed, and wash a maximum of four eggs in the same Incusan
solution. If the water temperature cools below 30°C, make a fresh warm
solution of wash water.
• Record all egg washing details and ensure that all other information has been
recorded.

ONE Best Practice Manual FINAL – June 2012
13
All relevant information must be recorded in the eggs’ individual notes as these will
follow the egg through incubation, hatching and chick rearing, until release, and
form an important data set. All viable eggs can now be prepared for artificial
incubation.
Minimum Standard 3.
Initial processing of ONE eggs
a) All kiwi eggs must be candled to determine viability. If there is doubt regarding the
viability of an egg it must be incubated for a brief period – up to 14 days for a fresh
egg and at least 2 days for an older egg (>10 days old).
b) All eggs must be weighed on arrival to the nearest 0.1 gram.
c) All eggs must be given a unique identification code upon arrival.
d) Eggs should be washed in appropriate temperature solution before being placed in an
artificial incubator.
e) Accurate individual records for all eggs must be kept.
f) All “dead on arrival” (DOA) eggs must be placed in a fridge until they are sent off for
independent post mortem.
ONE Best Practice Manual FINAL – June 2012
14
8 Kiwi Egg Incubation (Incubation Room)
Performance Standard 1.
Hatching success of viable ONE eggs
a) At least 80% of viable eggs should be successfully hatched.
b) All viable eggs that do not hatch will be sent away for independent post mortem to
determine cause of death.
8.1 Processing a New Egg for Incubation
• Weigh the egg again in incubation room. This ‘egg set weight’ is extremely
important as all weight loss calculations will be determined from this weight.
The egg must be weighed and recorded accurately.
• Measure the length and width of the egg at widest point with callipers (this is
required to determine egg size and volume).
• Using the candler to illuminate the air cell, lightly draw in air cell with pencil,
and date the air cell line with small numbers inside the circle. Unusually
shaped eggs (with bulges) may cause the air cell line to appear off centre, and
this should be recorded. Kiwi eggs are often odd shapes, for example the air
cell end may appear quite pointed, and the blunter non-air cell end (NACE)
may contain creases (wrinkles) in the egg shell.
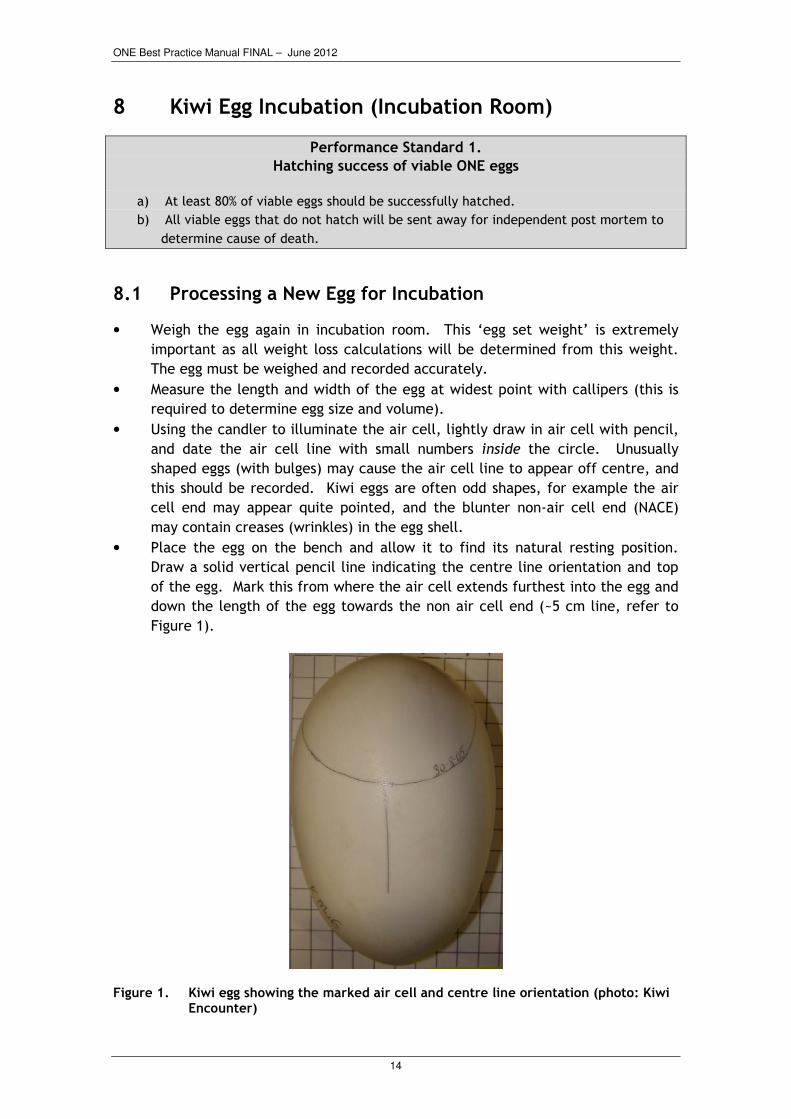
• Place the egg on the bench and allow it to find its natural resting position.
Draw a solid vertical pencil line indicating the centre line orientation and top
of the egg. Mark this from where the air cell extends furthest into the egg and
down the length of the egg towards the non air cell end (~5 cm line, refer to
Figure 1).
Figure 1. Kiwi egg showing the marked air cell and centre line orientation (photo: Kiwi Encounter)

ONE Best Practice Manual FINAL – June 2012
15
• If there are two eggs in a clutch, determine which egg is the ‘older’ of the two,
and sequentially code the eggs accordingly. Check this carefully as some eggs
may be quite close together in age (± 2 days). Write the identification code
and number on the egg in pencil, preferably in a location that can be seen
while the egg is in the incubator.
• Make sure the identification code is clear and legible.
• Take your time to candle the egg thoroughly to determine the approximate age
of the embryo. If available, use diagrams in the Kiwi egg candling workshop
study guide (Bassett 2009) to aid you. It is important to make an initial
estimation of the age of the embryo prior to the egg been set in the incubator.
• Double check the entire egg for cracks and treat if necessary (refer to Section
8.2). If cracks are present, gently ‘map’ the outline of the cracks on the shell
with a pencil. Do this carefully as the shell will be more fragile once it has
been damaged. Also sketch the size and location of the cracks on an egg
diagram as a permanent record in the notes.
• A photo of the egg is only specifically required if the egg has a very unusual
shape or appearance, is severely cracked, or has been repaired with a patch.
• It is useful to draw detailed diagrams of development of the egg on the egg
arrival sheet, preferably at the time the eggs are initially processed (or at least
within the first 24 hours). If an egg is very cold, allow it to warm up to
incubator temperature before you draw the egg (2-3 hours to warm). This is a
very useful tool to refer back to if there are problems (or mortality) in the later
stages of incubation or hatching.
• Determine which incubator the egg is going to be placed into (this is especially
important if still air and forced-draft incubators are being used).
• Record the incubator temperature and relative humidity before you place the
egg in to its designated incubator.
• Place egg into the appropriate incubator.
• Severely cracked eggs are only to be placed in a still air incubator. Where
moderately cracked eggs are to be incubated will be determined on a case-by-
case basis. No eggs are to be placed in a forced draft incubator if they have
any cracks on the lateral sides, but a hairline crack along the top of the egg is
acceptable.
8.1.1 Placing an Egg in a Still Air Incubator
• Check that the incubator base trays are filled with distilled or cooled boiled
water.
• Place the egg in the centre of the incubator, with the air cell facing away from
you. This puts the egg in the correct orientation for candling and minimises
unnecessary rotation of the egg when handled.
• Check the thermometer does not hit the egg when the lid is put down, and
place rods to either side, but clear of the egg.
• Ideally there should be no more than two eggs placed in each standard Brinsea
Hatchmaker still air incubator (unless in extreme circumstances and for a short
period of time only). The larger still air incubators can take up to eight kiwi

ONE Best Practice Manual FINAL – June 2012
16
eggs but care needs to be taken that they do not come into contact with each
other.
• Record the time the egg is placed in incubator, and how many eggs are present.
8.1.2 Placing Eggs in a Forced Draft Incubator
• Make sure that the egg is fitting snugly between the rollers and that it is as
level as possible. If the egg does not lie horizontally, place a small support
(preferably foam) at the non air cell end of the egg so the egg sits level. Eggs
should fit firmly between the rollers. Always adjust the roller spacing with the
egg removed.
• Record the time the egg is placed in incubator, and how many eggs are present.
Minimum Standard 4.
Processing an egg for artificial incubation
a) All kiwi eggs must be candled to determine an approximate embryo age prior to the
egg being set in the artificial incubator.
b) All eggs must be clearly labelled with the correct identification code specific to that
egg only.
c) All eggs must be placed in a suitable, clean incubator set to the correct temperature
and relative humidity conditions.
d) All incubators must have an accurate thermometer.
e) Egg viability must be determined as outlined in Minimum Standard 3.
f) Accurate individual egg records must be kept for all eggs.
g) All ‘dead on arrival’ eggs must be placed in a fridge until they are sent off for
independent post mortem.
8.2 Dealing with Cracked Eggs
Cracked eggs are a potential source of bacterial contamination. The risk is not only
directly to the egg itself (bacteria getting in) but also to other eggs becoming
infected when sharing an incubator with a damaged egg, (this only occurs if the
bacterial contamination goes undetected). Even when repaired, cracked eggs can be
a continual problem (high weight loss during incubation, increased risk of infection,
hatching difficulties and yolk infections post-hatch) so they must be monitored
closely.
• Make sure you differentiate between an external pip (shell pushed out) and an
impact hole (shell caved in). This is especially important if the hole is situated
within the air cell.
• Quantify the degree of shell damage and map the type of cracks.
• Severely cracked eggs should only be incubated by themselves in a still air
incubator. This avoids contamination of other eggs and allows the incubator
conditions to be managed to meet the requirements of the egg.

ONE Best Practice Manual FINAL – June 2012
17
• Eggs that have small cracks (star cracks and small hairlines) can still go into a
forced draft incubator if repaired, but they must not have any cracks on the
lateral surfaces of the egg, where pressure of the rollers will potentially result
in further cracking during automated egg turning.
8.2.1 Washing Cracked Eggs
• If an egg is found to be cracked on initial candling, do not wash the egg by fully
immersing it in the water. The egg should only be lightly splashed with warm
Incusan solution (20ml/L) away from cracked areas, or the surface of the shell
gently wiped over with gauze or tissue moistened with Incusan solution. If
cracking is restricted to the upper surface of the egg, partially submerge the
lower surface of the egg during washing.
• If there is an actual hole in the shell, be extremely careful not to get water in
the hole. Carefully wash around the damaged area with a cotton bud dipped in
the Incusan solution, before washing the remainder of the egg surface (with
partial submersion or splashing).
• After the egg has been washed, dry the cracked egg extremely carefully.
• Once the egg is clean and dry, seal all types of small cracks with nail varnish or
tape in the incubation room. Holes should be patched.
• Occasionally you may be washing a particularly dirty egg (caked on dirt in a
specific spot) and as the dirt is removed the damaged area suddenly becomes
exposed. Stop submerging the egg and proceed carefully with the remainder of
the egg preparation.
8.2.2 Definition and Degree of Egg Damage
• Star cracks: tiny cracks (<2 mm) that look just like a 5 point star.
• Hairline cracks: 1 to 2 cm line of tiny fine cracking, almost indiscernible.
These cracks are often difficult to see but it is helpful to shine the candling
light across the surface of the shell (not hard up against it) to help identify
them.
• Moderate cracks: moderate 2 – 4 cm line of cracking, includes multiple cracks
or one long hairline crack, and multiple branching. Moderate damage also
includes a substantial single long crack (with no branched cracking and can be
up to 6 cm in length).
• Severe: multiple branching (5+ joining cracks). These cracks always require
taping. Severe damage also includes holes which require patching.
• Holes: holes include a small impression in the shell (for example from an adult
toenail), through to exposed and damaged membranes. There may be bleeding
and these holes require careful patching, with another piece of shell or tape.
8.2.3 Preparation and Treatment of Cracked Eggs
• Make sure the egg is dry before sealing cracks with nail varnish or tape.
• Care should be taken when repairing cracks so that the varnish or tape does not
inhibit the chick’s ability to hatch successfully.

ONE Best Practice Manual FINAL – June 2012
18
• Carefully follow all crack lines with a pencil so you are always reminded that
the egg is cracked before you handle it. Very faintly circle any star cracks.
• Use clear nail varnish only. When sealing the crack with nail varnish, use a
sufficient amount to properly seal the crack but not excessive amounts that will
run over the shell.
• Moderate cracks can be sealed with nail varnish (but may not always require
taping). This depends on the type and location of the cracks.
• Severe cracks can be sealed with nail varnish, carefully covered with masking
tape (i.e. Office max masking tape or Scotch masking tape) and then the edges
of the tape also sealed with nail varnish. The width of the tape required will
change depending on the severity of the cracks, (smaller cracks require
narrower tape). Remember to smooth out any air bubbles in the tape.
• Multiple branching fractures should be covered with a piece of tape to help
strengthen the cracked area, and then the tape edges sealed with nail varnish.
In certain situations, if the crack is extremely dirty, it will be necessary to coat
the entire piece of tape in nail varnish to completely seal the area.
• Badly smashed eggs can have the shell of another egg taped over the damaged
area. Store pieces of pre-washed kiwi egg shell available for patching in the
incubation room (store dry and in a sealed plastic container). Select a piece of
shell from a corresponding area of the shell you will be patching and re-wash it
well in Trigene (20 ml/L concentration). The patch must be larger than the
non-fractured area of shell around the hole or extensively cracked area. Make
sure that you dry the patch before placing it on the shell. If you are able to
remove any badly cracked pieces of shell without damaging the shell membrane
or the vascular chorio-allantoic membrane underneath do so, but be extremely
careful. Place the patch over the damaged area and using small narrow pieces
of tape, tape the entire perimeter of the patch to the shell, (refer to Figure 2).
Seal the edges of the taped area with nail varnish. Do not seal the whole patch
as this will affect the rate of weight loss.
Figure 2. A severely damaged egg that was successfully patched and subsequently hatched (photo: Kiwi Encounter)

ONE Best Practice Manual FINAL –
Figure 3. A severely damaged egg that was subsequently Bassett)
• If the chorio-allantoic
smashed area upright irrespective of correct egg orientation and carefully
assess the damage. If it is haemorrhaging badly, contact a qualified
veterinarian1 for additional advice as a decision will nee
whether the egg is repairable. It is possible to repair fairly severe cracks and
holes and still successfully hatch a chick, but in rare instances where extremely
severe damage has occurred euthanasia of the embryo may
• If it is a small localised bleed, wait until it has stopped bleeding and then
patch.
• Do not apply direct pressure to the area as it may result in further damage to
membranes. Instead, place a Telfa non stick pad gently over the area until the
bleeding stops.
• Bacterial contamination is a serious risk with any cracked egg, so it is important
to carefully wash around the damaged area to minimise this.
a) All cracked damaged kiwi eggs must be repaired
b) Any egg that is so severely damaged and bleeding where survival is highly unlikely
and any repair very difficult
1 Or contact either the New Zealand Wildlife Health Centre at Massey University, Centre for Conservation Medicine at Auckland Zoo for advice.
June 2012
19
A severely damaged egg that was subsequently euthanased (Photo: Suzanne
allantoic membrane has been damaged and is bleeding, keep the
smashed area upright irrespective of correct egg orientation and carefully
assess the damage. If it is haemorrhaging badly, contact a qualified
for additional advice as a decision will need to be made as to
whether the egg is repairable. It is possible to repair fairly severe cracks and
holes and still successfully hatch a chick, but in rare instances where extremely
severe damage has occurred euthanasia of the embryo may be the only optio
If it is a small localised bleed, wait until it has stopped bleeding and then
apply direct pressure to the area as it may result in further damage to
membranes. Instead, place a Telfa non stick pad gently over the area until the
Bacterial contamination is a serious risk with any cracked egg, so it is important
to carefully wash around the damaged area to minimise this.
Minimum Standard 5.
Treatment for cracked eggs
All cracked damaged kiwi eggs must be repaired appropriately prior to incubation.
Any egg that is so severely damaged and bleeding where survival is highly unlikely
r very difficult, must be euthanased as soon as possible.
the New Zealand Wildlife Health Centre at Massey University, Palmerston North, or the at Auckland Zoo for advice.
(Photo: Suzanne
membrane has been damaged and is bleeding, keep the
smashed area upright irrespective of correct egg orientation and carefully
assess the damage. If it is haemorrhaging badly, contact a qualified
d to be made as to
whether the egg is repairable. It is possible to repair fairly severe cracks and
holes and still successfully hatch a chick, but in rare instances where extremely
be the only option.
If it is a small localised bleed, wait until it has stopped bleeding and then
apply direct pressure to the area as it may result in further damage to
membranes. Instead, place a Telfa non stick pad gently over the area until the
Bacterial contamination is a serious risk with any cracked egg, so it is important
appropriately prior to incubation.
Any egg that is so severely damaged and bleeding where survival is highly unlikely,
as soon as possible.
Palmerston North, or the New Zealand

ONE Best Practice Manual FINAL – June 2012
20
9 Protocols in the Incubation Room
9.1 Artificial Incubation Parameters
All kiwi eggs are to be kept in semi-darkness except when working in the incubation
room (when the lights can be fully on), as the eggs are light sensitive. It is not
recommended to use red light bulbs, or head lamps when working with kiwi eggs in a
captive facility. Keep incubation room lights dim throughout the day and all internal
incubator lights (if applicable) turned off. All incubation room lights should be
turned off at night.
9.1.1 Incubator Protocols used at Kiwi Encounter and Willowbank
Table 1. Incubator parameters for kiwi eggs used at Kiwi Encounter and Willowbank
Incubator
type Age (days)
Temperature at
top of egg (°°°°C)
Frequency &
degree of egg turn
Forced draft Day 20 – External pip 33.5°C Automatic: 8 turns
per day, 90° turn
angle
Still air Day 1 – External pip 35.5°C Manual: 4 x 45°
turns per day until
internal pip
Still air &
forced draft
Hatching 33.5°C or 34°C No turning
Westshore operates slightly different incubation parameters. They use still air
incubators only and incubate at 34 degrees (top of egg) from day 1 to end of hatch.
Eggs are turned through 180 degrees per day (and back the next day), and are not
turned from about day 55. From day one through to external pip incubators are
automatically turned off for 2 hours per day (off at 8pm and on again at 10pm).
9.1.2 Turning Regime for Eggs in the Still Air Incubators
Day 1 to external pip
Eggs are turned four times each day. Each turn is 45 degrees and is spaced evenly
throughout the day.
On day 1: egg turned 45° anti-clockwise (to the left) for turns 1 and 2, and then
clockwise (to the right) for turns 3 and 4. This always returns the egg to the correct
upright orientation at the end of the day. The maximum distance the egg is turned
each day is 90°.

ONE Best Practice Manual FINAL – June 2012
21
On day 2: the egg is turned 45° clockwise (to the right) for the first two turns, then
anti-clockwise (to the left) for turns 3 and 4, so the egg returns to the same position
it was in at the start of the day.
Alternating the direction of the first egg turn of the day prevents the egg from
continually being rotated the same way each day. Continue to turn the egg even
after the chick has internally pipped, but turning can cease once external pip has
occurred.
Figure 4. Manual egg turning regime for kiwi eggs
The only time it is advised that kiwi eggs are not turned is when chicks are
malpositioned, and when eggs have been artificially internally pipped and found to
be very wet or ‘sticky’. It is important in these situations to lift the lid regularly on
the still air incubator to ensure adequate air exchange (3-4 times per day).
9.1.3 Parameters for Forced Draft Incubation at Kiwi Encounter
It is important the forced draft incubator temperature is recorded four times per
day. Temperature and humidity parameters need to be set very carefully and is
dependent on the type of incubator, the air exchange levels in the incubator, and
the number of eggs being incubated. The forced draft incubator has a fully
automated system of turning the eggs which is activated via a 24 hour timer on the
top of the incubator itself. This is set to turn the eggs at regular intervals
throughout the day and night. At Kiwi Encounter this turns 8 times in a 24 hour
period. The egg trays sit inside a “dolly” that will turn a full 90º when the timer has
been activated (45º right to 45º left through the central orientation of the egg). The
eggs may automatically roll or tilt depending on the type of forced draft incubator,
and the frequency and degree of egg turn should be set accordingly.
1
3
4
2
1
2
34
Day 2 Day 1

ONE Best Practice Manual FINAL – June 2012
22
9.1.4 Incubator Temperature and Egg Turning Regimes used at Auckland Zoo
Auckland Zoo splits their incubation protocols into four age-related stages, and
includes periods of egg cooling and no egg turning. The egg turning regime in stage 2
of incubation is the same as used at Kiwi Encounter and Willowbank mentioned
above. Both protocols result in hatching successes of 90+% of viable eggs.
Table 2. Incubation parameters used at Auckland Zoo
Stage and age (days) Temperature @ top of
egg; (relative humidity)
Frequency & degree of egg
turn; cooling
Stage 1: 0 – 16 days 36.0 – 36.5°C (60-65%) No turning; 1 hr cooling
Stage 2: 16 – 55 days 36.0 – 36.5°C (60-65%) 4 x 45° turns/day, 1 hr
cooling
Stage 3: 56 – Internal
pip 35.5 – 36.0°C (55-60%) No turning, no cooling
Stage 4: Internal pip –
hatch 35.5°C (>60%) No turning, no cooling
9.2 The Daily Incubation Regime
9.2.1 General Daily Regime
• Follow all quarantine protocols when working in the incubation room to
maintain a clean and sterile environment.
• Monitor the incubation room conditions (temperature/relative humidity). This
is especially important when using still air incubators. All incubation rooms
should be at a constant temperature and relative humidity to minimise the
effect of outside influences on the still air incubators.
• Record all incubator parameters, top up water reservoirs and ensure that all
incubator lids are properly closed.
• Allow only trained and designated people to carry out incubation room tasks
and handle eggs.
9.2.2 Still Air Incubation Daily Regime
• Record the temperature and humidity the incubator is running at least twice
daily (but preferably four times per day). Record this prior to lifting the lid (or
opening the door) of the incubator. You must be able to read the thermometer
without lifting the lid.
• The temperature in the still air incubator should be set as per the facilities
parameters, and this should remain constant. Staff should be familiar with the

ONE Best Practice Manual FINAL – June 2012
23
operation of the incubators used at their facility and able to adjust both
temperature and humidity if required.
• Weather conditions can have a small effect on the still air incubator
temperature and relative humidity of the incubation room. Monitor the
temperature at least twice before adjusting the temperature control. If the
temperature is adjusted, it should be noted on the data sheet indicating the
temperature has been increased or decreased.
• If wet bulbs are used to monitor relative humidity, they must be placed so that
staff are able to read the scale without lifting the incubator lid. The wick
should just be over the bulb of the thermometer (not pushed up any further).
Make sure that the wick of the wet bulb is not touching the side of the
incubator, as this will alter the correct reading.
• Check and top up all incubator humidity and wet bulb reservoirs with distilled
water or cooled boiled water, if necessary.
• Turn eggs as required (refer to Section 9.2) at designated times. For example
manual egg turning times at Kiwi Encounter are approximately 8.15 am, 11.15
am, 2.15 pm and 4.15 pm, while Auckland Zoo turn eggs at 8.00 am, 10.30 am,
1.30 pm and 4.00 pm. Eggs must be handled gently and sudden jarring
movements avoided.
An example of a daily manual egg turning regime in a still air incubator
Day 1.
8 am:
• Record incubator temperature and humidity
• Turn eggs to the left 45° (turn 1) accordingly
11.15 am:
• Record incubator temperature and humidity – adjust if necessary
• Turn eggs to the left 45° (turn 2) accordingly
2.15 pm:
• Record incubator temperature and humidity
• Turn eggs to the right 45° (turn 3) accordingly
4.15 pm:
• Record incubator temperature and humidity – adjust if necessary
• Turn eggs to the right 45° (turn 4) accordingly

ONE Best Practice Manual FINAL – June 2012
24
9.2.3 Forced Draft Incubation Daily Regime
• Record the forced draft incubator temperature and humidity (actual, set points
and functioning %), and the orientation of the eggs (i.e. left or right) four times
per day.
• Check all wet bulb reservoirs each time the incubator is opened. Fill with
distilled water if necessary.
• Eggs that are very close to hatch need to be briefly checked early in the
morning and late in the afternoon (i.e. 8am and 4pm). Unless there is concern
regarding the degree of embryonic movement, the eggs can be quickly candled
in the incubator. Avoid bringing the eggs out of the incubator unnecessarily.
9.3 Egg Weigh and Candling Day Regime
Ideally kiwi eggs only need to be weighed twice per week to accurately determine
egg weight loss using the weight loss calculation. It is not necessary to weigh ONE
eggs every day.
• Weigh days should be equally spaced and the best days for this are Tuesday and
Friday. This allows for Monday as a catch up day, and means that eggs are not
being weighed in the weekend when staff numbers are often reduced. All eggs
should be weighed at the same time on each weigh day, and it is preferable
this is carried out in the morning.
• Remove egg from the incubator (or incubator trays) and weigh (to the nearest
0.1 gram). Record weight carefully.
• Place the egg directly on the bench and visually check for embryonic movement
(clearly detectable from day 45 onwards). At the later stages of development
(70+ days) these egg movement should be very obvious, but it still may be
necessary to whistle at or talk to the egg to stimulate embryonic movements.
Record if movement occurred and place the egg onto a non-slip mat on the
bench.
• Calculate egg weight loss and assess whether it is within the correct
parameters (refer to Section 9.5). It is essential that you refer to the previous
weight loss, and the overall weight loss trend, to gain proper insight into how
weight loss is progressing for each egg. This should be completed on the actual
weigh day, and should be denoted with an arrow (↑, ↓ or NC - no change)
depending on how the weight loss percentage has changed. Do not continue to
calculate egg weight loss once an egg has internally pipped.
• Prior to candling the egg, quickly familiarise yourself with the egg notes from
the previous candling session in order to compare the developmental
progression. This saves repetitive notes and helps to keep the candling
duration short.
• Candle all sides of the egg carefully. Record notes on developmental progress
and draw if necessary. It is useful to record early stages of development, up to
30 days, or any unusual development. If you add additional notes on the back
of the data sheet, remember to include the date of the observations. It is
essential to document all egg developmental changes as hatching approaches.

ONE Best Practice Manual FINAL – June 2012
25
Important observations include the general appearance of the vascular system,
good embryonic movement, evidence of drawdown, and internal and external
pip.
• Draw in air cell (and date) weekly.
• Check egg orientation (and centre line) and only re-draw the centre line if
there has been a marked change (namely 1+ cm out to the right hand side of
the initial centre line). Use a dashed line as opposed to a solid line when you
redraw this.
• For still air incubators, check there is sufficient water in the trays at the
bottom of the incubator and in the wet bulbs to maintain humidity levels
before replacing the egg.
• Return the egg to the incubator, and turn the egg accordingly.
Minimum Standard 6.
Monitoring kiwi eggs during incubation
a) All kiwi eggs must be continually incubated under correct and constant incubation
conditions and in a clean environment.
b) All incubation parameters for each institution must be followed and egg orientation
must be recorded daily for each egg.
c) Each kiwi egg should be candled twice per week to assess progressive development.
d) From day 45 onwards eggs should be visually checked to confirm embryonic
movement at least twice weekly. This should occur during egg candling.
e) Accurate incubation records must be kept for each individual kiwi egg and records
must be maintained daily.
9.4 Egg Monitoring Points
It is useful to candle eggs in some sort of order. It is usually easier to candle all the
eggs close to point of hatch first (post internal pip), then work from the youngest
eggs to the oldest (pre internal pip). It is helpful to maintain this order of age when
placing eggs in the trays in a forced draft incubator, or a large still air incubator, as
it is useful when candling to be able to compare eggs at similar stages of
development, especially when accurately assessing embryo age.
9.4.1 Late Embryo Development (~ 70+ days)
Once full drawdown is detected the egg should be briefly candled early in the
morning in order to determine when internal pip occurs. This brief candle is just
necessary to detect a bill movement in the air cell and possible clearing out
(lightening) on the top central surface of the egg.
If there is a potential problem with an egg in the morning, it is important not to wait
until late in the afternoon to address it. The egg should be observed mid afternoon

ONE Best Practice Manual FINAL – June 2012
26
(i.e. 2pm) so there is adequate time to get an x-ray taken or assist in some way if
necessary.
9.4.2 General Embryo Development (0 to ~ 70 days)
Follow the same weigh and candling procedure as outlined above for older eggs that
are close to hatching, candling the youngest eggs up through to the oldest eggs.
In eggs less than 45 days, embryonic movement will not be detectable by eye but it
can be detected by ‘strawing’; where a fine metal rod (or piece of dry spaghetti
pasta) is placed lengthwise across the egg. Using this method, small tremors can be
detected at the ends of the rod. Movement should be checked for all eggs 45 days
and older.
Do not have large numbers of eggs out on the bench during weighing. Keep to a
maximum of 8 eggs out at one time. Never place eggs so they can potentially roll off
the bench. All eggs must rest on non-slip matting when out on the bench.
9.5 Egg Weight Loss
A kiwi egg should lose on average between 14-18% of its fresh weight before it
internally pips, (minimum 12%, maximum 22% as a general guide). With eggs arriving
from the wild at differing stages of development it is difficult to accurately
determine the fresh weight of the egg, or how much weight it has already lost during
natural incubation, so it is necessary to calculate actual weight loss during artificial
incubation. Historically eggs were weighed on a daily basis and the egg loss
extrapolated as a form of density. It is now recommended that the weight loss
calculation outline below is used.
Westshore monitors and weighs the eggs on a daily basis to provide an indication of a
potential problem. A daily weight loss of 0.8 grams is considered normal; while
anything outside of this means that the egg is monitored more closely.
9.5.1 Humidity Control
Humidity must be controlled in the incubators to maintain the correct loss of water
vapour from the egg. To work out the actual weight loss percentage for an egg
during incubation, the kiwi egg is weighed twice a week and weight loss calculated
using the formula below. If the weight loss does not fall within the correct range for
kiwi eggs then action is required. For still air incubators the humidity levels should
be adjusted, while for forced draft incubators, the moisture loss of the egg should be
adjusted by taping the egg.
9.5.2 The Weight Loss Calculation
This formula calculates what the total percentage weight loss of the kiwi egg,
throughout the entire 78 day incubation period, will be based on the current daily
rate of weight loss and the length of time the egg has been incubated. This

ONE Best Practice Manual FINAL – June 2012
27
calculation can be performed irrespective of an eggs age and the fresh weight of the
egg when it is laid.
What is most important is the actual set weight when the egg first enters the
incubator and the actual number of days the egg has been artificially incubated.
Estimated total percentage weight loss = [(Set weight – egg weight on weigh day) ÷
(set weight x 100)] ÷ (the number of days artificially incubated x 78 days)
A simple example:
Set weight of the egg = 396.0 grams
Set date (day artificial incubation started) = 1 November 2008 (day 0)
Weight of egg on 6 November 2008 = 391.5 grams
Number of days the egg has been incubated artificially = 5 days
396.0 grams (set weight) – 391.5 grams (weight on day 5) = 4.5 grams (total grams lost over 5 days)
4.5 g ÷ 396.0 grams (set weight) = 0.0114 grams (total weight lost as a proportion of the set weight)
0.0114 x 100 (to convert to %) = 1.1364 (total weight loss as a %)
1.1364 ÷ 5 (number of days egg incubated) = 0.2272 (average % daily weight loss)
0.2272 x 78 (incubation period) = 17.7 %
Therefore, on 6 November the egg is on track to lose a total of 17.7% of its weight over the artificial incubation period.
396.0 grams – 391.5 grams = 4.5 grams
4.5 grams ÷ 396.0 grams = 0.0114
0.0114 g x 100 = 1.1364
1.1364 ÷ 5 = 0.2272
0.2272 x 78 = 17.7 %
It is not necessary to weigh eggs every day but it is important to accurately
determine the weight loss percentage, and to closely monitor all weight loss during
artificial incubation. In general, weight loss should be fairly consistent throughout
incubation, after the initial few days of settling into the artificial incubation
conditions.
It is also not necessary to use density predictions of weight loss, as this is an
outdated method. The actual weight loss formula above is more accurate and
simpler to use, resulting in fewer errors and a greater regulation of egg weight loss
during artificial incubation.
Try to avoid leaving eggs in a high humidity environment for long periods of time,
particularly late in the incubation, as it can cause splayed legs and toes. Humidity

ONE Best Practice Manual FINAL – June 2012
28
should remain stable and constant without fluctuations. Incorrect humidity and
weight loss during incubation can lead to major problems during hatching.
Insufficient weight loss leads to oedematous chicks. Indicators of this are a very
sticky wet hatch, and weak chicks with fluid filled tissue around the neck, shoulders
and thighs.
9.5.3 Maintaining the Correct Weight Loss of an Egg
When egg/s are set in the Brinsea still air incubator, ensure the base trays are filled
with water to maintain the correct relative humidity, and record the relative
humidity inside the incubator at least twice a day. It is important not to restrict the
air flow into an incubator by covering the ventilation holes in the lid or base.
Egg weight loss calculations are initiated once artificial incubation is started. It is
important to assess weight loss over two weigh days (a maximum of three weigh days
over a three to seven day period) to determine how weight loss is progressing, as an
egg will usually take a few days to adjust to the artificial incubation conditions.
The weight loss of any given egg should fall within the parameter of 12 - 20%.
There is no need to continue to weigh the egg or to calculate weight loss once the
egg has internally pipped, as this becomes irrelevant once the chick commences
pulmonary respiration.
The weight loss of an egg is controlled by adding or removing water from the trays in
the still air incubator. To increase humidity, increase the surface area of water in
the trays (add more water trays if required). This will result in the egg losing less
weight. To decrease humidity, reduce the surface area of water in the trays (remove
or empty trays). This will result in the egg losing more weight.
It is useful to record when, and how many water trays are added to or removed from
a still air incubator (plastic slide trays are ideal for this). It is best to add 3-4 small
water trays initially (as any fewer has a negligible effect on the relative humidity).
It may take up to a week to see any changes. Egg weight loss should be monitored
closely and altered gradually. Additional trays (2 slide trays at a time) can be added
as necessary.
If adding water trays does not lower the weight loss enough, then it will be necessary
to tape the egg (using products such as Office Max or Scotch Brand masking tape) to
reduce the amount of water being lost during incubation (procedure listed below).
This technique is also applicable to eggs losing excessive amounts of weight (above
20%) while incubated in a forced draft incubator.
9.5.4 Reducing Excessive Weight Loss in Eggs with Tape
The stage of embryo development is an important consideration when deciding to
tape eggs. Eggs at a late stage of development (70+ days) should not be taped.
Careful assessment must be made before beginning to tape any egg.

ONE Best Practice Manual FINAL – June 2012
29
• Use clean masking tape only (do not use insulation tape or regular sellotape as
they are too impervious to water vapour).
• Make sure you weigh the egg immediately before you start applying tape to the
shell, and re-weigh when the taping is completed. It is essential to record and
highlight the new egg weight on the egg data sheet. Remember to deduct the
weight of the tape first before calculating egg weight loss.
• The taping should start along the lateral line (side) of the egg from the air cell
line straight around to the non air cell end on the left hand side of the egg. If
weight loss is still too high and more taping is required, then tape from the non
air cell end around the lateral line of the egg (on the right hand side) up to the
air cell. The second piece of tape is now directly opposite the first piece of
tape.
• As you are applying the tape to the shell gently press out all air bubbles and
wrinkles. Handle the egg extremely carefully and smooth the tape out gently.
• When taping an egg, start by adding 1-2 pieces of tape, and closely monitor
weight loss. If it is still too high, then add another 1-2 pieces of tape and again
monitor. If necessary, more tape can be applied, but this needs to be done
gradually allowing the egg time to adjust its weight loss. Up to 50% of the non
air cell area of the shell can be taped but it is important to make sure that
gaps are left between each line of tape.
• When taping the underside of the egg, it is important to tape on either side of
the bottom of the egg. This will allow the egg to continue to move freely and
orient itself correctly when placed on the bench. Leave taping the top surface
of the egg until last, as it makes candling much easier.
• It is important not to tape into the air cell region.
• From external pip onwards, the tape can gently be removed so it does not
hinder the normal hatch process.
9.5.5 Insufficient Egg Weight Lost
If eggs are losing insufficient weight in a still air incubator, they should be set up in
an individual incubator and the relative humidity level reduced to correct the weight
loss. This is a rare occurrence and eggs have successfully completed incubation but
careful monitoring is required.
If an egg is losing insufficient amounts of weight in a forced draft incubator, and
there is no opportunity to move it into another unit with a lower relative humidity, it
will be necessary to move it into a still air incubator, and monitor weight loss
accordingly.
Minimum Standard 7.
Monitoring weight loss during incubation
a) Each kiwi egg must have weight loss monitored at least twice weekly during
incubation, and incubation parameters adjusted as necessary to ensure an
appropriate level of weight loss.

ONE Best Practice Manual FINAL – June 2012
30
b) Where egg weight loss is very high, the relative humidity parameters must be
increased or tape should be applied to the egg to reduce the weight loss. Where
weight loss is too low, the relative humidity should be decreased.

ONE Best Practice Manual FINAL – June 2012
31
10 Kiwi Egg Development
In general, the incubation length for Brown kiwi eggs is 75-78 days under artificial
incubation conditions. Westshore have identified that eggs in their region have an
incubation of around 84 days under natural incubation.
There is a real need to continue to collect quality incubation and chick rearing data
for the South island species of kiwi where available data is currently very limited.
Kiwi egg development will not be covered in detail in this document. Rather, it is
assumed captive rearing centre staff responsible for incubation will have attended
the Bank of New Zealand Operation Nest EggTM kiwi egg candling workshop, and are
able to determine the age of kiwi eggs, as well as whether there are any problems
with the development of the chick.
10.1 Characteristics of Live ‘Young’ Eggs (0 - 30 days)
• Young kiwi eggs have a small to medium-sized crisply defined air cell, and an
obvious chorio-allantoic membrane this development can be seen progressing
across the top and down the sides of the egg in a large ring, radiating from the
central embryo.
• The egg has a red-yellow glow at the top but beneath this vein network (going
down the sides of the egg) it is still very translucent, and development is very
easy to see.
10.2 Characteristics of Live ‘Older’ Eggs (~55+ days)
Eggs that are over about 55 days of age look very different when candled, compared
to younger eggs, and some of the main characteristics are described here.
• As the egg gets older the main body of the egg appears very dark. It looks
almost black when candled and you can only just determine different
structures within the egg.
• The band of veins immediately below the air cell start reducing from a width of
about two centimeters down to less than half a centimeter. These veins will
still be evident if the top of the egg is candled. The important thing is that the
egg appears dark with a deep red/orange glow at the non air cell end.
• Once the egg is 70+ days, the air cell is huge (i.e. at least a third of the way
down from the top of the egg) and the band of veins directly beneath the air
cell are very fine (‘W’ shaped and about 0.5 centimeters wide), if visible at all.
• There is still a glow at the NACE, with these veins still obvious. Waste deposits
(looking like patches under the shell, usually at the NACE) are also evident. At
this stage, it is important to continue to monitor embryonic movement.
• The air cell can be candled to look for indications that internal pip has
occurred. The egg should be held with the air cell facing away. In this position
the bill should be on the left hand side of the egg (if the air cell is facing away

ONE Best Practice Manual FINAL – June 2012
32
from you), and often close to the shell surface. The embryo moves a lot at this
stage, so the bill shadow may not always be obvious.
• In the very late stages of incubation it is possible to listen for peeping from
inside the shell and the embryo can be whistled at to stimulate movement or
vocalisation.
Minimum Standard 8.
Staff training required to monitor kiwi egg development
a) At least one staff member at a facility involved in the artificial incubation of kiwi
eggs has attended the Bank of New Zealand Operation Nest EggTM Kiwi Egg Candling
Workshop and is familiar with the stages of kiwi egg development.

ONE Best Practice Manual FINAL – June 2012
33
11 Kiwi Husbandry
11.1 Hatching
The routines outlined in this section have proved to be successful with constant
refinements and adaptive management techniques since Operation Nest Egg
commenced as a kiwi conservation tool. Over 1200 kiwi chicks have been hatched as
part of Operation Nest Egg procedures and a hatching success of 90+% can be
consistently achieved from all viable eggs incubated artificially.
11.1.1 Hatching Procedures
Kiwi eggs are currently hatched in a variety of still air and forced air incubators
around the country. Hatching methods are variable but should eventually be
standardised. If eggs are to be moved into a hatch room, or hatch incubator, it is
recommended that they can be moved as soon as they have internally pipped.
• The still air hatcher (or incubator) should be clean, with a constant
temperature and humidity as per the facility protocol.
• Ensure that the hatching egg is by itself in a still air incubator.
• There must be only one egg per compartment in a forced draft hatcher tray
(and no more than four individual eggs per tray or shelf).
• The optimal hatcher temperature is 34°C (maximum temperature of 35.5°C
used at Auckland Zoo, minimum temperature 33.5°C at Kiwi Encounter) and
must be constant before the egg is placed in the hatcher. Wet bulbs are
required in the still air hatchers and humidity should be maintained at 60-70%
(maximum 75%) once the egg has internally pipped to prevent the membranes
from drying out.
• Grey non-slip matting must always be placed on top of the metal tray in the
hatcher, and must cover the entire base. The matting should also be secured
at each end so that no movement of the matting can occur once the chick has
emerged from the egg. This provides important traction to both the egg and
chick once it has hatched and prevents the chick injuring its bill or toes on the
metal base tray.
• Metal rods should not to be used during hatching. In general, egg stabilisation
should not be necessary, but if required, the egg can be supported using wads
of VetwrapTM (or something similar) on either side of the egg to provide some
resistance when the chick is hatching. Do not use cotton wool.
• All hatching eggs should be observed four times per day (with a minimum
requirement of two observations), and all hatch information recorded in detail.
Eggs can be briefly candled twice per day (morning and evening), and chick
movements visually checked. Problem eggs may need to be checked more
regularly. If the hatch is progressing well, no assistance should be necessary.
• All holes in the still air hatcher lid and base must be left open for appropriate
air circulation.
• Record detailed notes throughout the hatching process.

ONE Best Practice Manual FINAL – June 2012
34
• If the external pip is unusual, sketch the cracking pattern in the hatch notes.
Information transfer is important to make sure other staff members can
correctly monitor changes in the hatch as it progresses.
Figure 5. External pip (Photo: Kiwi Encounter)
11.1.2 Initiation of Hatching
The initiation of hatching can vary with each individual egg.
Drawdown
Care should be taken to ensure drawdown is detected. At this stage the chick should
have almost rotated into the correct hatching position, or malposition problems
should have already been detected.
• An indication of drawdown is a rapid large increase in air cell size and the
development of a ‘shelf’ around the back of the air cell (right hand side when
the egg is held correctly and the air cell is away from you).
• The region under the air cell (at the back of the egg) becomes extremely dark
(black). The narrow light band or glow around the air cell has disappeared as a
result of the chick rotating into the hatch position.
• There are very thick, dark veins evident on the top of the egg just below the
air cell line.
• The body of the egg looks extremely dark when candled, especially on the top
and lateral sides. There is a dark red glow of yolk at the non air cell end of the
egg, and waste deposits are difficult to identify.

ONE Best Practice Manual FINAL – June 2012
35
• Embryonic movement may slow a little prior to internal pip, and this needs to
be carefully monitored. Hatching is an extremely physiologically demanding
event and embryos do go through ‘resting’ periods during the hatching process.
• These characteristics are all pre-internal pip and make up the definition of
drawdown. It is important to note that drawdown may occur between weigh
days and observations at this stage should be detailed.
Internal pip
Once drawdown has been recorded, internal pip (IP) generally occurs within the next
few days (usually 4-5 days before hatching). The sequence is briefly outlined below
but the time intervals will vary between individual chicks.
Internal pip is essentially evident by an obvious lightening in the central top area of
the shell as the top of the egg is candled. It is usual to see the bill, but not always.
The egg cannot lighten on top without pulmonary respiration commencing (and in
some instances this may take up to 12 hours after internal pip). At this stage the egg
can be moved into the hatching incubator, (if one is used).
• As soon as internal pip has been detected, clearly record this on the egg notes
and write IP on the air cell of the egg in pencil.
• At this stage the egg needs careful monitoring with a brief candle at least once
per day.
• Occasionally it is possible to feel vibrations in the egg as it is held (due to the
chick vocalising and moving within the egg), but the vocalisations are not
necessarily audible at this stage.
• It may not always be possible to see the bill directly up against the shell, but
when the bill is there it is usually obvious. If you don’t see the tip of the bill
directly, angle the candler around the air cell to detect the shadow made by
the bill.
• Throughout the internal pip process it is important to remember that the
position and the angle of the bill can change as the chick continues to rotate
into the correct hatch position. The bill may even recede under the chorio-
allantoic membrane giving a small ‘tenting’ impression.
• If the candler is held steady at the air cell it is possible to visibly detect good
bill movements under the shell or embryonic movements of the egg when it is
placed on the bench. These can be amplified by whistling or lightly tapping the
shell.
• Prior to external pip the egg can lighten considerably in colour. Initially the
egg should appear very dark on the left hand lateral side, and quite red-orange
through the main body of the egg, with a good vein network still evident. The
non air cell end of the egg should still appear as a dark, intense red-orange
colour.
• At this stage the hock can be detected on the left hand side (if it is on the right
hand side, the chick is potentially malpositioned), and you may see leg
movements visible under the shell during candling.

ONE Best Practice Manual FINAL – June 2012
36
• Not all eggs have externally pipped 3-4 days out from the initiation of hatching,
and some eggs look considerably more ‘yolky’ (golden) in general appearance.
This is quite normal.
External pip
The definition of external pip (XP) is where the shell is cracked by the pressure of
the bill pushing outwards on the inside of the eggshell. At this stage, eggs must be
transferred into a dedicated hatching incubator, if this has not already happened.
Solitary eggs in still air incubators can be left to hatch there. Once the first sign of
external pip is confirmed, clearly record this on the incubation notes.
• By this stage the bill is often up against the inside of the shell.
• There is a strong vascular network still visible on the top surface of the egg,
often with a few prominent veins.
• There is a definite lightening in the red-orange colour (glow) through the main
body of the egg, and the non air cell end is still a fairly yellow glow.
• The red-orange colour may start to change to a more orange colour. This
progresses to an orange-yellow colour without any change in the appearance of
the shell, and is quite normal.
• If weight loss had been too high during incubation and it had been necessary to
tape the egg, remove some of this tape so it does not interfere with the
hatching process.
• Frequent observations are important at this time. Candle the egg in the
morning and visually check the egg twice during the day. In some eggs the
veins appear less defined and it is important to consider the overall appearance
of the egg when candling, including movement and vocalisations.
• It is essential to write clear detailed notes of the appearance of the egg and
activity of the chick during hatching. It can be useful to make a quick sketch of
the initial external pip, and any other major changes. This helps in the transfer
of information when different people are monitoring the egg.
• Once the shell membranes are pierced it is important to smell the egg. This
‘sniff’ test enables detection of wet and sweaty chicks, which is an indication
of a difficult hatch and chicks possibly becoming stressed, especially in a long
hatch.
11.1.3 Low or Unusual Internal and External Pips
Low or unusual internal and external pips occur when the chick both internally and
externally pips at the same time down low on the edge of the air cell (usually on the
left hand side). This is a result of the chick not rotating around far enough into the
normal hatch position. Provided the chick has access to air (i.e. it has successfully
internally pipped into the air cell), and the egg is beginning to clear out, the egg only
needs monitoring. Very occasionally it may be necessary to artificially internally pip
the egg at the external pip site to ensure adequate oxygen is available to the chick.
(Refer to Appendix 1.1 for further information).

ONE Best Practice Manual FINAL – June 2012
37
11.1.4 Providing Lateral Cracks during Hatching
If the egg has completely cleared out and the hatch appears to have stopped for 24
hours, make two lateral cracks radiating out from either side of the external pip site
(~2 cm). These small cracks should encourage more movement from the chick and
consequently make the final part of the hatch easier. If there has been no change or
advancement in the hatch, it may be necessary to extend these cracks further down
the sides (~5 cm). This can often be done just be flexing the shell a little to extend
the cracks.
Sometimes during hatching the chick will force a hock out of the blunt end of the
shell. Once extensive cracking is evident at the non air cell end of the egg, tape a
small pad of gauze over this area to prevent the hock going right through the shell
(Figure 6). It is important that the pad is large enough to cover both hock areas. If
the leg is forced out it will make the rest of the hatch difficult as the chick cannot
brace its legs correctly against the shell, to push out the top of the air cell end.
Figure 6. A kiwi chick in the process of hatching. The photo on the left shows the egg with the hock protruding from the non air cell end, while the photo on the right shows the egg after it has been taped at the non air cell end to prevent the hocks from breaking out before the hatch is complete. (Photos: Kiwi Encounter)
Note
A small number of hatches will have problems, including malpositions and external
yolks or umbilici. These eggs will require assistance if they are to hatch successfully.
Procedures that may be required include artificial external and internal pip and x-
rays. Details of these procedures are given in Appendix 1, and veterinary assistance
may be required.
It is imperative not to assist in the hatch unnecessarily as the chick needs time to
internalise all yolk before hatching, but it is important to assist if the chick becomes
very weak or stressed (refer to Appendix 1.3).

ONE Best Practice Manual FINAL – June 2012
38
Minimum Standard 9.
Monitoring kiwi eggs during the hatching process
a) Each egg should be placed in an appropriate incubator, hatcher or hatch tray
compartment on its’ own, and allowed to hatch as naturally as possible.
b) All incubation parameters must be followed and recorded at least twice per day for
each egg.
c) Each kiwi egg in the process of hatching should be monitored at least twice per day to
assess hatch progress.
d) Accurate daily hatch records must be kept for each individual kiwi egg.
e) Careful consideration should be given before any hatching assistance is undertaken,
but if deemed necessary hatching assistance should be provided.
11.2 Immediate Post Hatch Care of all Chicks
• As soon as the chick has hatched, observe the appearance of the navel. A
slightly open navel or a ‘donut’ appearance does not require any further
attention. It is important to leave the chick for 10-15 minutes to rest after
hatching, and to allow the navel to seal.
• Once the chick has hatched and rested, the egg shell, membranes and hatch
remains can be removed. It is vital to ensure that the umbilical veins and
artery (usually still attached to the shell/residual chorio-allantoic membrane)
are completely separated from the chick, before any shell is removed. This is a
critical time to avoid any sort of infection so hands must be sterilised or
surgical gloves worn.
• Weigh the chick, ensuring that every care is taken to fully support the chick,
especially the abdomen (Figure 7).
Figure 7. Weighing a young kiwi chick. (Photo: Kiwi Encounter)

ONE Best Practice Manual FINAL – June 2012
39
• Carefully check the navel and if normal, spray navel with Betadine solution.
Check there is no sign of an external yolk, hernia, or an unformed umbilicus. If
the navel is slightly open, use Betadine cream rather than spray.
• Check that the legs, toes and bill tip (in case of bruising) all appear normal.
• If the hatcher is to be used for brooding the chick, empty the water trays and
remove all eggs shell and waste before returning the chick.
• All chicks are considered to be day zero on the actual day of hatch. If the
chick hatched over night and is completely dry and fluffy in the morning,
consider it to have hatched on the previous day and record the date and age
accordingly.
• Once the chick is dry start to gradually lower the hatcher temperature a few
hours after the hatch is complete. Regularly monitor the chicks behaviour to
make sure it is not consistently shivering (this does not include intermittent
shaking). If the chick is observed consistently shivering raise the temperature
again slightly until the behaviour improves and the chick is thermo-regulating
correctly. Gradually continue to lower the hatcher temperature until the chick
is moved into the brooder.
• If the chick is moving into a Brinsea TLC unit, make sure that the unit is at a
stable temperature of 34°C. The chick may remain in the hatching incubator
for the first 8 hours if necessary before being transferred to the TLC unit.
• Check the chick regularly during the day and monitor its body position. Record
if chick is lying on its side, crouching, etc. Occasionally it may be necessary to
place the chick into a ‘donut’ support if it is cast on one side and does not
appear to be able to crouch properly (Figure 8). Donuts can be easily
constructed using paper towels wrapped around to form a firm donut shape
large enough to contain the chick.
• Once the chick has hatched, it is important for the bird’s leg development that
the substrate of the hatcher/brooder allows sufficient traction. Brooder
matting should always be used for the first 6 days after hatch (and longer if the
bird has leg problems). Failure to provide the appropriate substrate is a leading
cause of splayed legs in kiwi chicks.
Figure 8. Use of a paper towel donut to stabilise a kiwi chick. (Photo: Kiwi Encounter).

ONE Best Practice Manual FINAL – June 2012
40
Minimum Standard 10.
Initial post hatch care of kiwi chicks
a) Weigh the chick once it has hatched. Observe the appearance of the navel and apply
Betadine spray or cream. Carry out a brief health check to see the bill, legs and toes
are normal.
b) If the hatcher is to be used to brood the chick post hatch, remove all egg shell and
membranes and remove all water from the trays before the chick is returned.
c) Maintain appropriate post hatch temperature conditions including a gradual reduction
in hatcher temperature until the chick is moved into a brooder.
d) Always use brooder matting in the hatcher/brooder for the first 6 days to prevent
splayed leg problems.
e) Observe the chick at least twice daily.
f) Ensure the chick is clearly identified and keep all egg and hatch records with the
correct chick.
11.3 Post Hatch Care of Assisted Hatch Chicks (including malpositioned chicks)
The degree of malposition at hatch will determine how a chick is cared for in the
hatcher. A chick that required minimal assistance is then treated as a normally
hatched chick.
A chick that requires full assistance out of the shell, with a normal presentation,
needs to be closely monitored for correct thermo-regulation post hatch. Often these
chicks internally and externally pip but for some reason fail to continue with the
hatch process (especially if it has been prolonged and the chick is tired). Care and
careful observations will be required as the hatcher temperature is being reduced.
Severely malpositioned chicks require extremely detailed observation especially in
regard to leg position and angle, and navel issues. Often as a result of the position in
the shell they have been unable to internalise all of the yolk, which coincides with a
reduced ability to crouch at an early stage. It is critical that this is identified as
early as possible. Chicks need to be placed in a donut (see definition above) if they
are continually rolling on their side and becoming cast. If left too long in this
position fluid can build up in both the lungs and the air sacs. This is most obvious in
chicks with a hugely distended yolk-filled abdomen.
On very rare occasions kiwi chicks are affected with splayed or rotated legs. This
may be a result of an unusual position in the egg, a fall resulting in injury to the leg,
or slipping on a smooth surface in the hatcher/brooder. Splayed legs are preventable
by the use of non-slip brooder matting and can be corrected with hobbles, if
identified early enough. Details of hobbling are given in Appendix 2.
Seek veterinary assistance if a chick has hatched with splayed or rotated limbs, or
any other physical deformities.

ONE Best Practice Manual FINAL – June 2012
41
11.4 Extended Time in the Hatcher/Brooder
In some situations (i.e. malpositioned chicks and prolonged hatches) a chick may
remain in the incubator/hatcher for an additional day as the temperature is reduced
at a slower rate based on its behaviour. It is desirable to get chicks into an ambient
(approx 20°C) brooder within three days (four days in extreme circumstances only).
It is important that the temperature in the hatcher/brooder is not increased above
34°C and it must be closely monitored. Any chick that remains in a hatcher at too
high a temperature will get dehydrated extremely quickly, which can lead to serious
health problems later on.
Minimum Standard 11.
Monitoring problem hatch chicks
a) Seek immediate veterinary assistance in regard to chicks which have hatched with
major deformities or severely splayed or rotated limbs.
b) Provide appropriate treatment to any chick with minor leg problems.
c) Provide all necessary post-hatch care required, and monitor the chick at least twice
daily.
d) Accurately record all post-hatch treatment undertaken, and document with
photographs if appropriate.
e) Maintain appropriate post hatch temperature conditions for the chick.
f) Review egg and chick management practices to determine the cause of the problem
encountered, and identify future prevention methods to be taken.

ONE Best Practice Manual FINAL – June 2012
42
12 Post Hatch Chick Care
This section relates to chick care and husbandry once hatching is completed.
Performance Standard 2.
Post-hatch chick survival
a) 85% of all successfully hatched ONE chicks should survive to release.
b) All chicks that die are sent for post-mortem examination to determine cause of
death.
12.1 Initial Chick Care
• Weigh the chick each morning, record the weight (to the nearest 0.1gram) and
plot this on the weight graph.
• Note the chicks’ general behaviour and position (crouching, lying etc),
especially the orientation of the legs. Spray the navel with Betadine.
• Place clean brooder matting on the base of the incubator if it is soiled. Ensure
that any rubber matting is secured into position at each end to prevent any
movement.
• If the chick is in a TLC brooder, a rolled up towel or matting around the edge
can be used for the chick to nestle into.
• Observe the appearance of the faeces. Normal faeces should be green in
colour, with a yellow urate component, for the first three to five days and then
change to a usual kiwi faecal appearance.
• Within the first 24 hours after hatching the temperature should be reduced to
30-32°C, and the chick may be moved into a TLC brooder (if used). If the chick
is transferred to a TLC unit (once the chick is dry), further reduce the
temperature over the next 48 hours at a rate determined by the chicks’
behaviour, until the chick is comfortable at 20-24°C.
• On the fourth day the chick should be ready to transfer to a large soil lined
brooder, or alternatively a non-slip rubber mat brooder, (if used) at room
temperature (20-22 °C). This temperature should be constant for the duration
of the chicks stay indoors in the brooder room. Chicks that are kept too warm
(above 20°C) are generally lethargic and very slow to start eating naturally.
• Chicks are only to stay in hatcher for longer than 48 hours if the hatch has been
difficult, and they must be monitored closely. Depending on the chicks’
behaviour leave the chick in the hatcher for 48 hours, but continue to reduce
the temperature down to 28.5 - 29°C.
• Day two is the same as the above, but the chick should be moved into the
brooder room by the end of the second day.

ONE Best Practice Manual FINAL – June 2012
43
12.2 Chick Care in the Brooder Room
Brooder rooms should be maintained at a constant ambient temperature of 18-20°C,
with good ventilation. The brooders should be safe, with smooth, washable surfaces,
and no ledges, screws or nails protruding.
In general brooders should be 70 cm wide x 165 cm long, including a smaller sleeping
area of 70 cm x 30 cm. There should be a small door (15 cm x 20 cm) into the
sleeping area and the height of the brooder should be at least 50 cm. Brooders are
much easier to clean if they are raised off the ground by approximately 50 cm, and
the total height to the top of the brooder should be about 95 cm).
Ideally, only one chick should be placed into a single brooder, and it is advisable that
no more than two chicks are placed in a brooder of this size.
12.2.1 Setting up the Brooder
• There are a variety of brooder designs currently in use for rearing Operation
Nest Egg kiwi. Large wooden soil filled brooders are the option favoured and
used at Kiwi Encounter, Willowbank and Auckland Zoo (Figure 9). An
alternative brooder has been successfully used at Westshore Wildlife Reserve
and consists of a modified large 140 litre plastic container with a mesh lid, and
a smaller adjoining container used as a sleeping area. Rubber non-slip matting
is used as a base throughout, rather than soil. These have the advantage of
being very easy to clean and only contain one chick to each brooder (Figure
10).
• The brooder should be prepared and the heat lamp temperature set (if a heat
source is used) well before the chick is due to be moved from the hatcher.
• A soil brooder should be filled with dampened peat moss (i.e. Yates). Peat
moss promotes chick foraging and can be easily discarded and replaced when
the brooder is cleaned for the next chick. The peat moss must not be too dry.
Monitor the peat moss depth carefully to ensure that it is about six centimetres
deep. When at the correct moisture level the dampened peat moss should be
crumbly when touched, not sodden. Leaf litter can also used, although this
should be obtained from areas without resident kiwi to minimise disease risk.
• If an external heat source is used, set the temperature in the small section of
the brooder to provide approximately 28.5°C at chick height. Make sure a
temperature sensor is attached to each brooder, and set at chick height.
• It is advisable that when digging over brooders that only individual garden
forks, specific to each brooder, must be used.
• Supply fresh water in a shallow dish and place in the large area of the brooder.

ONE Best Practice Manual FINAL – June 2012
44
Figure 9. A wooden brooder filled with peat moss and a good sized water dish. The small entrance hole leads to the sleeping area. A mesh lid closes over the top. (Photo: S. Bassett).
Figure 10. A plastic brooder on a movable trolley, with a removable wood and mesh lid, as used at the Westshore Wildlife Reserve. The base throughout is covered with non-slip matting and each area can be easily disassembled for easy cleaning. (Photo: S. Bassett)
12.2.2 Chick Transfer to Brooder (approximately 48 hours post-hatch)
Ideally chicks should be moved from the hatcher at 42-72 hours post-hatch, and into
a brooder unit. This interval can be extended to four days if chicks are transferred
to a TLC brooder unit after hatching.
• Chicks in the brooder room should be weighed daily by placing them in a box or
container (i.e. a modified cat carry box or large plastic container with non-slip
matting base) and using electronic scales weighed to the nearest 1 gram. It is
important to ensure the chick cannot jump out of the weigh box, and that non-
slip matting is used to prevent the bird from slipping. Alternatively, chicks can
also be placed in a canvas bag (i.e. a BNZ money bag is ideal for this purpose)
and weighed using a spring balance. This is the method used at Westshore and
each chick has its own dedicated bag.

ONE Best Practice Manual FINAL – June 2012
45
• It is ideal if there is just one chick per brooder, however this is not always
feasible with space and the number of brooders available.
• When putting two chicks into one brooder, it is essential the both chicks are
wearing a colour leg band. It is important not to have chick identity mix-ups.
Record the colour of the band on the chick’s notes. The leg band must be
checked regularly and replaced when required as the chick grows. Small
temporary plastic leg bands can easily be purchased from the DOC banding
office.
• The chicks should be of similar size and age. It is advisable to put chicks
together into a brooder as soon as they are transferred from the hatchers as
this will minimise any potential dominance behaviour (‘bullying’).
• Record any individual distinguishing marks found on the chicks to help identify
them (e.g. white feathers on head, toe nail colours, very dark/light feathers).
Record the brooder number in the chick notes so there can be no mix ups
regarding where the chick is located.
• Attach the chick notes to the brooder. If possible record the Chick ID and the
hatch date on the brooder. Clearly record if the chick had a difficult hatch or
if it is due for early release so all staff are aware of this.
• Place the chick on clean grey matting in the sleeping area for the first six days.
Towels can be used but it is important to check that there are no loose threads
that could injure chicks, (these have caused foot/leg injuries in the past). Do
not use hay or straw as bedding material due to the risks associated with
Aspergillus spp.
• Begin an individual chick weight graph for each chick as soon as they hatch.
Clearly mark the weight corresponding to a 25% and 30% weight loss as a
proportion of hatch weight. There is debate about how much weight is safe for
a chick to lose post hatch but it is recommended as best practise that they do
not lose more than 25% of their hatch weight.
• It is essential that the chick is checked twice per day (morning and evening)
and if an external heat source (generally a heat lamp) is used, that the
temperature is closely monitored until the heat source is turned off. It is
important to monitor the chicks’ behaviour (correct thermo-regulation) in
relation to the reduction in brooder temperature, and to keep a close eye on
activity (record probes, footprints, dirty water etc).
• Every day from hatch onward the chick should be weighed in the morning.
• The navel should be sprayed with Betadine once a day until the chick is three
days old. Discretion is required as a chick that has had an external yolk will
need more care for a longer period of time until the navel seals to prevent
possible infection.
• Replace grey matting/bedding each day or when soiled. The matting needs to
have faeces scrubbed off in hot water, then soaked in Trigene and/or Napisan
and washed in the washing machine. Check faeces to see if they are a normal
greenish, yolky colour*; check the chick’s eyes; and make a note of the chick’s
behaviour (i.e. standing, sleeping, walking, shivering, alert, etc).
*Note: if a young chick is on Clavulox the faeces may appear quite pink/orange.
ONE Best Practice Manual FINAL – June 2012
46
• If the chick is held a Brinsea TLC brooder, gradually reduce the temperature at
a rate governed by the chick’s behaviour, until the chick is comfortable at 20-
24°C by the end of day four.
12.2.3 Day 3 and Day 4
• Weigh chick and accurately record all information on the relevant record.
Normal weight loss at this age is 8-10 grams per night in young chicks. This
degree of weight loss should lessen over the next few days and by day eight
chicks should only be losing about 2-3 grams per night.
• Continue to check the navel daily.
• There should now be signs of the chick moving about. Check for probe holes
around the edge of the matting and replace with clean matting when
necessary. Observe if the chick has emerged out into the entrance of the large
section of the brooder.
• If used, gradually reduce the temperature of the heat lamp so that by day six
the sleeping area is at room temperature.
• Check the abdomen, eyes, plumage, general condition and behaviour each day
when a chick is weighed.
• If a chick has been held in a TLC brooder it should be transferred to the
allocated brooder at ambient room temperature on day four, (note this is
dependent on chick behaviour, but the transfer should be undertaken within
five days).
12.2.4 Day 5 - Full Health Check
• Weigh the chick.
• By now the chick should be out each night in the large part of the brooder.
Signs of activity include probe holes and dirtied water (this is harder to
determine with birds maintained on matting, but usually there is evidence that
a chick has been utilising the water dish). Note the presence and condition of
faeces in the large area. Continue to reduce the temperature of the heat lamp
down to ambient room temperature.
• Undertake a full health check. This involves checking the eyes, ears, nostrils
(redness, presence of any mucus or discharge). The colour of the gape (a pink
colour is normal, very pale or very red in colour is not), hips, legs and feet (any
sign of heat, swelling, splaying), the spine (prominent vertebrae and ribs), and
the abdomen. Closely check the navel for swelling or tightness, and the navel
stalk for redness or discolouration or discharge, and the cloaca for ‘dag-like’
faeces or any unusual discharge. A full description of a comprehensive health
check for kiwi can be found in Kiwi first aid and veterinary care (Morgan 2008).
• Changes in the appearance of the abdomen in young chicks over the first five
days:
– Very ‘yolky’ when first hatched, (abdomen full, distended and very soft).
Care must be taken when handling these young chicks.
– Two to four days later the abdomen can still be fairly soft but should be
less distended (smaller).
ONE Best Practice Manual FINAL – June 2012
47
– Generally the soft ‘yolky’ feel changes to a firmer and flatter abdomen by
day five. It is important to feel above and below the umbilicus, and to
gently check the entire navel area.
– The abdomen should begin to feel flat and empty. Note that some chicks
can have a very soft yolky abdomen but still move straight onto eating the
artificial diet themselves.
– From flat and empty, the abdomen moves to feeling concave. This
corresponds with a skinny chick with a prominent spine and bony hips.
Chicks in this condition need to be carefully managed.
– If fluid or pus is apparent on the umbilicus, it is essential to contact your
veterinarian and start the chick on a course of antibiotics.
– If the chick is just getting onto food, the abdomen will feel firmer (and
occasionally even lumpy) above the umbilicus and often softer below the
umbilicus (caudal).
• Place the chick down on a non-slip surface (a towel or matting on the floor) and
watch the chick walk. Note behaviour such as shuffling as opposed to walking,
limping, early signs of splayed legs etc. Record general chick behaviour,
characteristics, and alertness.
12.2.5 Day 6
• Signs of activity should continue to be seen in the large section of the brooder.
• If an external heat source is being used it should be turned off on day six. The
sleeping area should contain a substrate that can be easy changed, allowing
easy cleaning (e.g. green fern fronds, leaf litter or non-slip rubber matting). If
soil is used in the brooder, check that the soil is still damp and dig over, (heat
lamps do dry out the peat moss).
• The chick’s weight should be recorded in the morning and the abdomen very
gently palpated to make sure the yolk is being absorbed.
• 10 grams of food can be put out into the large part of the brooder (near the
entrance) on the night of day six, depending on the chick’s yolk absorption.
Deciding factors are: high levels of overnight activity, flat tummies, desperate
probing, and skinny chicks (prominent spine, ribs and hip bones). If a chick is
highly active in the brooder, probing the soil intensely, or out in the large
section during the day, food may be put out on the evening of day five. If the
chick still has a soft belly during gentle palpation, food could be held off until
night seven.
• Comment from West Coast Wildlife Centre: It was common to see diurnal activity
in young Rowi and Haast Tokoeka chicks. We currently offer 10g food on night 5 and
night 6, which has resulted in chicks eating food earlier and reduced diurnal activity. We
do not assist feed until morning 7.

ONE Best Practice Manual FINAL – June 2012
48
Minimum Standard 12.
Post hatch care of chicks in the first week of life
a) Weigh the chick daily and monitor weight patterns on a growth chart
b) Transfer the chick from an incubator to a brooder within 2-3 days or from a TLC unit
within 4 days, of hatching.
c) Place the chick in a clean, safe secure brooder containing a darkened sleeping area,
suitable substrate and clean water.
d) Ensure the brooder number is recorded in the chick’s notes.
e) If two chicks are to be placed in the same brooder, apply a temporary leg band to
each chick and clearly note this on the chick records.
f) If using peat moss, ensure that the brooder is dug over and maintained at the correct
moisture level. Ensure that fresh water is provided daily.
g) Carry out a full health examination of the chick at 5 days of age.
h) Keep the brooders and brooder room clean at all times.
12.3 Feeding Chicks
Currently there is no standardised kiwi chick diet for Operation Nest Egg chicks
around New Zealand and each captive rearing centre has a slightly different artificial
diet recipe. Guidelines are given in the Brown Kiwi Husbandry Manual (Fraser &
Johnston 2009). The main components consist of meat (beef heart), fruit and
vegetables, and various other ingredients (refer to Kiwi First Aid and Veterinary Care
(Morgan 2008)).
Research has been conducted at Massey University to investigate alternative diets
that more closely resemble the natural diet of wild kiwi (C. Minson, Massey
University, pers comm.).
12.3.1 Introduction to Feeding
Chicks should be fed the same artificial diet as captive adult kiwi held at the captive
institute, but it should be cut into smaller pieces (minced or finely shredded) when it
is first introduced, especially the beef heart. It is not necessary to separate out the
individual components, as it is important that the chick learns to consume the
complete artificial diet. The chick’s abdomen and faecal output should be
monitored for absorption of the yolk. By the time the chick is due to be introduced
onto food (at 6-8 days) the belly should not be distended, and the faecal colour
should be normal (not ‘yolky’).
• In general food should be introduced to the chick at day six or seven,
(especially if the chick is slow to become active). This is highly dependent on
the behaviour of the individual chick and some highly active chicks may need
food earlier (for example day five).

ONE Best Practice Manual FINAL – June 2012
49
• All chicks will lose weight after hatching over the first 7-12 days as their yolk is
being utilised. Chicks can lose up to 25% of hatch weight in the first 10-15
days.
12.3.2 General Feeding Information
• Always provide fresh water in a large shallow dish.
• Supply fresh food overnight, every night. Ensure that that the small round flat
plastic lids/bowls are well anchored in to the soil or to the surface of the
brooder so they cannot be tipped over.
• During the first week of feeding the dish can be placed in the large area near
the entrance to the sleeping area so the chick can easily locate the food.
• Record daily the amount of food eaten overnight.
• All old food must be collected from the brooder daily (and it may be well
buried and flicked around). Old food needs to have any brooder substrate
removed before weighing. Record if the food is untouched, or played with but
not eaten, etc.
• Wipe the sides of the brooder to remove any moisture, dirt and old food.
• Initially, all food is to be placed in small bowls or clear plastic lids (round
takeaway type). When the food amount starts increasing (30 grams) place food
in an appropriate sized dish or bowl.
• Record general behaviour (i.e. messy eater or calm when handled), monitor
and investigate any unusual chick behaviour.
• Gradually increase the amount of food offered overnight, especially when
chicks are establishing a regular feeding regime. As a general rule, based on
what amount has been eaten the night before, increase the amount of food
given by 10 grams per night, up until a consumption rate of 50 grams/night is
achieved. From this point, increase the amount given by 20 grams per night,
up to a maximum of 120 grams (for chicks in a brooder).
• Be careful not to offer too much food too quickly. Occasionally chicks will
gorge and then stop eating and become a problem chick.
Observation of the weigh growth chart is critical. The 25%, 30% and 35% weight loss
line must be accurately drawn on the graph. When the chick’s weight falls below the
33% weight loss threshold, then intervention is required. If the chicks weight falls
below this line it is essential to use assisted feeding to increase the bird’s weight
about this amount. This may require up to three feeds per day.
12.3.3 Assisted Feeding of Kiwi Chicks
• There is much discussion surrounding assisted feeding in kiwi chicks and
currently each captive rearing facility has a different regime for dealing with
this. If the weight loss starts tracking below the 25% weight loss line that the
artificial diet must be hand fed to the chick – initially just a couple of grams
(which equates to about 4 to 5 small pieces). This will start the turnaround of
the weight loss and establishes the chick on the artificial diet.

ONE Best Practice Manual FINAL – June 2012
50
It is necessary for the chick to maintain weight over a 24 hour period, until it begins
feeding by itself. A weight loss of more than 30% is not acceptable as the chick will
start utilising its own muscle mass and a weight loss of more than 33% is critical and
then veterinary assistance must be sought as there might be underlying issues.
An important but simple way to monitor this weight loss (and subsequent rate of
growth) is by using a weight graph. This allows for quick easy identification of a
chicks progress and accurate monitoring of the rate of growth.
Whether feeding assistance is necessary is highly dependent on each individual kiwi
chick, its rate of growth and its levels of activity. The vast majority of kiwi chicks
will begin to eat unassisted in seven to ten days of hatching and will require no help.
It is important that chicks do not lose excessive amounts of weight (i.e. 30% or more
of its body weight post hatch), so in some instances feeding assistance is necessary to
ensure a chick maintains an adequate body weight and rate of growth.
Outlined below is the current feeding regime undertaken at Kiwi Encounter, which
has been trialled intensively on over 800 Operation Nest Egg chicks. Assisting a chick
to feed should only be undertaken after careful consideration of the chicks’ rate of
growth, the degree of weight loss and the age of the chick.
From day seven (day ten at the latest): 2 to 3 small pieces of ox-heart (3 grams) can
be offered to the chick as an introductory taste only. This needs to be done quietly
and with as little stress as possible. Usually the chick will start playing with the food
and probing your fingers (refer to Figure 11).
• It is important to be calm, quiet and patient when feeding kiwi chicks.
• Two people should be present to introduce food, or if a chick is particularly
active.
• Sit the chick on a towel on your lap, with a small flat dish of food and see if the
chick shows any interest in the food. Gently rub the meat near the tip of the
bill. Gently place the meat in the tip and see if the chick swallows, slowly
move the meat up to mid bill, base of bill and then over the tongue. Make sure
the chick remains as calm as possible and that the introductory feed is gentle,
quiet and short.
• Day food should be added from this point on (10 grams only) and placed in the
small sleeping section of the brooder. The day food must be removed in the
afternoon, weighed and recorded. At this stage chicks should only be losing 3-4
grams/night in weight.
• Add a small sprinkle of crop stones to the brooder (see note on preparation
below).
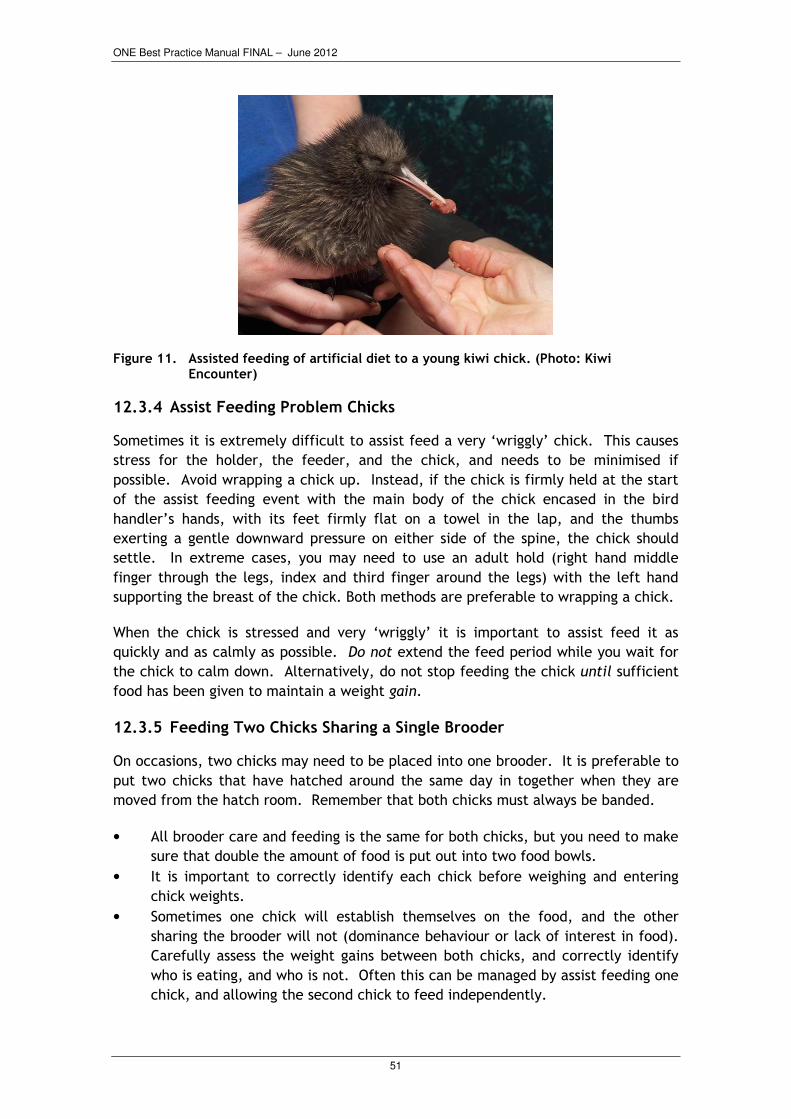
ONE Best Practice Manual FINAL – June 2012
51
Figure 11. Assisted feeding of artificial diet to a young kiwi chick. (Photo: Kiwi Encounter)
12.3.4 Assist Feeding Problem Chicks
Sometimes it is extremely difficult to assist feed a very ‘wriggly’ chick. This causes
stress for the holder, the feeder, and the chick, and needs to be minimised if
possible. Avoid wrapping a chick up. Instead, if the chick is firmly held at the start
of the assist feeding event with the main body of the chick encased in the bird
handler’s hands, with its feet firmly flat on a towel in the lap, and the thumbs
exerting a gentle downward pressure on either side of the spine, the chick should
settle. In extreme cases, you may need to use an adult hold (right hand middle
finger through the legs, index and third finger around the legs) with the left hand
supporting the breast of the chick. Both methods are preferable to wrapping a chick.
When the chick is stressed and very ‘wriggly’ it is important to assist feed it as
quickly and as calmly as possible. Do not extend the feed period while you wait for
the chick to calm down. Alternatively, do not stop feeding the chick until sufficient
food has been given to maintain a weight gain.
12.3.5 Feeding Two Chicks Sharing a Single Brooder
On occasions, two chicks may need to be placed into one brooder. It is preferable to
put two chicks that have hatched around the same day in together when they are
moved from the hatch room. Remember that both chicks must always be banded.
• All brooder care and feeding is the same for both chicks, but you need to make
sure that double the amount of food is put out into two food bowls.
• It is important to correctly identify each chick before weighing and entering
chick weights.
• Sometimes one chick will establish themselves on the food, and the other
sharing the brooder will not (dominance behaviour or lack of interest in food).
Carefully assess the weight gains between both chicks, and correctly identify
who is eating, and who is not. Often this can be managed by assist feeding one
chick, and allowing the second chick to feed independently.

ONE Best Practice Manual FINAL – June 2012
52
• If dominance behaviour is evident (one chick out during the day, or evidence of
growling and fighting) it will be necessary to separate the two chicks. Ideally,
the chick doing well should be moved into another brooder, although brooder
space can at times be limited. If there is no spare brooder, it may be possible
to place a divider down the length of the brooder to separate the two chicks.
Alternatively, it is possible to split another pair and put the two chicks that are
eating unassisted together and the two problem chicks together. Make sure
you clearly record who is moved on all chick sheets, and record the new chick
ID details on or above the relevant brooder.
• Double check the leg bands on all chicks. It is essential not to have identity
mix-ups, and it may be necessary to re-band a chick.
• Carefully monitor the chicks after the move. They may take a few days to
settle with their new brooder mate and close attention to food consumption
and weight changes are required.
12.3.6 Chicks Feeding Independently
Once a chick is established on the captive kiwi diet and is eating independently it is
still important to monitor food consumption on a daily basis. All daily weight gains
and amounts of food eaten should be recorded, and the amount of new food provided
each evening reassessed daily.
Minimum Standard 13.
Establishing kiwi chicks onto the artificial diet and monitoring growth
a) All chicks must be weighed daily and all weights recorded on a growth chart.
b) Ensure that the brooder is kept clean (remove old food and faeces) and fresh food
and water are provided daily.
c) If the chick loses 25% of its hatch weight, assisted feeding must commence.
d) If the chick loses 33% of its hatch weight, veterinary assistance must be sought.
e) All food presented to the chick must be weighed and the amount consumed overnight
recorded.
12.3.7 Care of Kiwi Chicks in the Brooder
Chicks should be weighed every day at a similar time each morning, until they are
established on the artificial diet. If necessary chicks may be then put onto scheduled
weigh times when the routine daily weighing is moved from early in the morning, to a
regular later time (which coincides with another activity, such as a guided tour at
11:30 am each day as applicable to Kiwi Encounter and Willowbank). Chicks must be
weighed daily until they are released to the wild from the brooder room, or
transferred to outside enclosures.

ONE Best Practice Manual FINAL – June 2012
53
• It is important to monitor chick growth based on actual weight, chick condition
(spine and hips), and to monitor yolk absorption by observing the size of the
abdomen.
• Monitor and note the chicks’ posture, sleeping patterns, general behaviour and
activity each day.
• Check the amount and consistency of the faeces. As a chick gets older and
starts ingesting more food, the faeces should continue to appear normal (white
with darker areas, mostly firm). It is useful to note the appearance of any
unusual faeces and if any faecal matter has a strong odour. If this occurs take
a stool sample immediately for analysis. The incidence of coccidia within
brooder rooms is very rare but it has occurred in some captive rearing facilities.
• Crop stones should be added to the brooder around day seven to ten days as
the chick is becoming established on the artificial diet. These are small river
stones (of variable sizes, but usually around 2-3 millimetres) for the chick to
ingest for use in the gizzard. These stones must be boiled for 10 minutes,
drained immediately, stored in an airtight container in the brooder room before
being sprinkled around the brooder. Only a small teaspoon is required per
brooder. It is important not to add too many stones (to avoid the risk of
impaction). More can be added later if necessary.
• Check temporary leg bands regularly and re-band if necessary. Record all band
change details in the bird records.
• Check for any activity in the large part of the brooder during the day, and
record general behaviour. If any unusual behaviour is seen for a particular
chick, investigate as necessary. This is especially important if chicks are being
out and active during the day (in the large part of the brooder).
• In the late afternoon give each chick its evening food, placed in a single dish
per chick in the large section of the brooder.
• Make sure the lights are turned off at night after the chicks have been fed for
the evening.
12.3.8 Monitoring Yolk Absorption
• Chick abdomens should be monitored for the first two to three weeks of age, as
this is a critical time to detect internalised yolk sac infection or yolk retention
problems.
• Careful attention should be paid to a chick that has hatched with an external
yolk sac, large umbilical donuts, hernias or slightly open navel.
• If a chick has ingested too many gizzard stones, they can be felt in the lower
abdomen. Refer to Kiwi First Aid and Veterinary Care, Morgan 2008 (p.57) for
further information on diagnosis and treatment.
• On very rare occasions chicks may ingest soil. If this is occurring, the faeces
will be black in colour. If a chick is eating a lot of soil they will not be gaining
weight and food consumption will be poor. The peat moss (or leaf litter)
should be removed from the brooder, and a layer of newspaper and then non-
slip matting placed over the whole brooder floor. The chick is to remain on
this matting until it is properly established on the artificial diet, then return
the soil to the brooder.

ONE Best Practice Manual FINAL – June 2012
54
12.4 Care of Assisted Hatch and Malpositioned Chicks
Malpositioned chicks that have had any form of hatching assistance require a higher
level of care and monitoring post hatch than chicks that hatch unassisted. Depending
on chick position in the shell, leg and yolk problems are of the greatest concern.
• Pay careful attention to the position and relative angles of both legs when the
chick is resting and being handled, as intervention is required at an early stage
(especially for splayed legs). In general if the leg position is incorrect as a
result of malposition while in the shell, the legs will need to be taped with a
spacer in the hatch room (refer to Appendix 2).
• Occasionally malpositioned chicks will need to be placed in a donut for a few
days in order for them to remain in the correct crouch position, with an even
distribution of weight on both tarsometatarsus (refer to Figure 8). After the
donut, they can progress, if necessary, to a concave hollow made in the
peatmoss (or cover a towel with matting and make a hollow) in the sleeping
area of the brooder, with a mat pressed into it. This prevents the chick
becoming cast on its side, especially if one leg is slightly weaker than the
other. In this situation, position a small shallow water dish near the sleeping
area.
• It is vital that leg position is closely monitored in the brooder when the chick is
crouching more and becoming far more mobile (refer to hatch notes). The
taped legs need to be carefully checked for an improvement in the correct
tarsometatarsus angle, to make sure that the spacer isn’t too tight and that the
tape is not rubbing on the leg.
• Once the chick appears to be holding the legs in the correct position, the tape
and/or spacer can be removed (usually after a couple of days) but the chick
will require continued monitoring of the leg position for the next week. This
often coincides with the full health check at day five.
• Full assisted hatch chicks in a normal position require the same level of
monitoring, but may not have the same degree of leg problems.
12.5 Detecting Retained Yolk Sacs
A retained yolk is not just specific to problem hatch chicks (as it can occur in any
chick) but the occurrence is very low (< 5 % of all hatched ONE chicks).
It is critical that chicks with retained yolk sacs are detected accurately and as early
as possible. Any chick which has had either an assisted hatch, a prolonged or
difficult hatch or has hatched with external yolk or an external umbilicus has the
potential to have a retained yolk sac at a later stage. Similarly, a chick which shows
no interest in feeding may also be a sign of a retained yolk sac.
All suspected yolk sac problems should be carefully assessed so that a chick does not
undergo an unnecessary surgery. It is also important to note that an infected
umbilicus does not always lead to a retained yolk sac.

ONE Best Practice Manual FINAL – June 2012
55
12.5.1 Symptoms of a Retained Yolk Sac
Chicks that had difficulties hatching or hatched with an external yolk sac or
umbilicus have a greater risk of yolk sac retention or infection and should be
monitored closely.
Symptoms of a retained yolk sac include:
• A distended swollen abdomen which will feel tight (this is not to be confused
with a flatter firm abdomen).
• A normal post hatch weight gain which suddenly stops or even dips, especially
if the chick has been eating unassisted. Any drop in weight of 12 grams or
more (over one night) requires immediate assessment.
• A sudden inactivity in the brooder. This may be difficult to detect with two
chicks in a brooder. It is then important to observe both chicks behaviour
during the day (i.e. is one chick lethargic or depressed, coming out during the
day?).
• A change in chick character (reduction in activity, alertness) and a depressed,
hunched appearance, often with frantic running or probing behaviour.
• ‘Daggy’ faeces stuck to the feathers around the cloaca.
It is essential that the chick has at least two or more of the above clinical symptoms,
to ensure that surgery is the most necessary course of treatment.
12.5.2 Retained or Infected Yolk Sac Treatment
Generally yolk infections are rare, and surgery is required to remove a retained yolk
sac. Refer to Kiwi First Aid and Veterinary Care, Morgan 2008 (Pg 70-72).
In general the chicks requiring surgery ranged in age from 10 to 25 days. The most
risky age is 12 to 16 days. It is extremely important to assess all combined symptoms
as a chick can die within 48 hours. On average, chicks are around two weeks old
when they undergo surgery. If you suspect a chick has a retained yolk sac notify the
veterinarian immediately. Due to the treatment of a number of cases, Kiwi
Encounter has developed experience with yolk sac surgery and it will be helpful to
contact Kiwi Encounter staff, or veterinarians at the New Zealand Wildlife Health
Centre, to discuss the case in detail prior to surgery (especially if the vet has not
carried out this type of surgery on a kiwi chick before). Closely monitor the chick for
the next 24 to 48 hours, and then reassess the symptoms.
• If there is uncertainty surrounding a possible yolk problem, seek veterinary
advice immediately, as the chick may require antibiotics as a precaution and
reassess the situation the following day until surgery can be carried out.
• If a small (2 to 5 grams) weight loss, within a normal growth rate pattern, has
occurred monitor the situation carefully for 24 hours. Not all chicks have a
sudden rapid weight loss. Sometimes the first indication of a problem is a small
change in a very stable increasing rate of growth. Observe the chick more
frequently during the day, and clearly record on the chick notes that there may

ONE Best Practice Manual FINAL – June 2012
56
be a potential yolk sac problem. The chick may be closely monitored for two
to three days before a final decision on surgery is made.
• Once there is strong evidence that the chick may have a retained yolk sac
contact your facility veterinarian to arrange a suitable time for consultation
and possible surgery. Some captive rearing centres send the chick to the NZ
Wildlife Centre, Massey University, for surgery but it is useful if a local
veterinarian can carry out the surgery.
• If the chick has usually been assist fed in the mornings, do not feed it in case it
will need to have emergency surgery that day. Weigh the chick prior to
surgery.
• Place the chick in a small carry box with towels or padding to keep it
comfortable and confined. Transport the chick to the vet clinic. In addition,
have a heat pad for post-surgery transportation, and the individual chick
rearing notes for the veterinarian to consider.
• Make sure the brooder is prepared for the chicks’ post-surgery recovery before
the chick returns from surgery. If the chick is housed on soil, remove all of the
soil from the brooder, placing newspaper and clean non-slip matting down over
the entire brooder. Place a clean folded towel in the small sleeping section
and cover this with matting. Turn a heat lamp on and check the temperature
reaches 25°C at the height of the bird (the temperature should not exceed
28°C) and make sure the lamp is not too close to bird, especially if the chick is
unable to move readily away from the heat source, as they can get thermal
burns. The external heat source should be incrementally turned down over the
next 48 hours, (dependant on chick behaviour). Chicks should be fully active 24
hours post-surgery, but if the yolk sac removed has been large, or the surgery
long, the heat lamp may remain on for a further 24 hours.
• When the chick arrives back at the captive rearing facility after surgery it
should be placed in the small ‘sleeping’ section of the brooder. The entrance
to the large section should be blocked so the chick is contained in the small
area for 12 to 24 hours, to minimise any vigorous activity. The chick should
have access to the full brooder the following night post surgery.
• The chick should be weighed post-surgery to get an accurate idea of the
amount (of weight) the chick has lost.
• It is essential to continue to offer the chick food and water.
• Details of the surgery (such as time and duration of surgery, weight of yolk
removed, complications, post surgery recovery time, antibiotic regime, etc)
should all be recorded in the chick notes.
12.5.3 Post Operation Support Care
• Hill’s artificial diet mix should be given via a crop tube approximately 2 to 3
hours after surgery. This can be given neat (don’t add water and blend
thoroughly with a spoon or fork to a consistency that can be tubed), or as a
combination as described here: Mix 52 millilitres of warm/hot water to one
scoop of ‘Ensure’, 1 centimetre toothpaste squirt of ‘Nutrigel’, 1 tablespoon of
Hill’s artificial diet mix; mix thoroughly to a consistency that will easily flow
through the crop tube. If the bird is dehydrated carry out rehydration therapy

ONE Best Practice Manual FINAL – June 2012
57
with electrolyte solution. Refer to Kiwi First Aid and Veterinary Care, Morgan
2008, (p 16).
• A second artificial diet mix feed can be administered early afternoon
(depending on the time of surgery). A third dose may be necessary in the
evening depending on the chicks’ progressive recovery. If the chick is very
young (~10 days), continue to administer the artificial diet the following day,
especially if the chick has not yet established on an artificial diet. Most chicks
will begin eating again within the next two days (some on the evening
immediately after surgery).
• Weight may continue to decline on the day following surgery, but it should
begin to increase again the following day. It is essential to provide the chick
with enough fluid and food for recuperation.
• Normal food must be put out overnight.
• Check the sutures and spray the wound with ‘Betadine’ daily.
• Antibiotics must be given daily. The type and dosage of antibiotics should be
discussed after surgery. Record the dose rate of all antibiotics given.
• Sutures should be removed ten days later, and then the soil can be returned to
the brooder. Recovery is usually rapid and post-surgery survival is generally
very high.
12.6 Operation Nest Egg Chicks Hatched in the Wild
Initially any wild hatched chicks are to be kept completely separate from those
chicks which have hatched on-site at the captive rearing facility.
On arrival a wild chick is to be maintained under quarantine status until it has passed
the initial quarantine, preferably in a separate brooder area or intensive care area
(ICU).
• A brooder should be prepared with soil, or non-slip matting, and water before
the wild chick arrives.
• Protective clothing is to be worn when handling these wild chicks until the
quarantine period is over.
• Hands should be thoroughly washed and sanitised between handling different
chicks in quarantine.
• Young chicks (< 10 days) should be placed in a brooder with a heat lamp if they
are cold on arrival. If heat lamps are unavailable, chicks are to be placed on a
heat pad, and this is to be warmed regularly. This is especially important if a
chick is cold on arrival.
• When handling wild chicks during quarantine, each chick requires a separate
feeding towel and a lab coat or gown is to be used for that chick only until the
chick has cleared quarantine.

ONE Best Practice Manual FINAL – June 2012
58
12.6.1 Wild Chick Arrival
• On arrival, it is important to obtain all necessary wild chick information and
nest details from the kiwi field staff, especially the parentage of the chick and
an approximate age of the chick if available.
• If the chick has hatched very recently (i.e. still wet from hatching), it will need
to be placed in a warm brooder or TLC unit. Warm the chick gradually, monitor
it carefully and when ready, move the chick into a brooder in an appropriate
quarantine area.
• If the chick is over 48 hours old, place it directly into the quarantine area.
• Weigh the chick.
• Carry out a full physical examination:
– Collect a stool sample as soon as possible to check for coccidian and
nematodes etc, (hint: check the carry box the chick was transported in).
– Take a cloacal sample and test for Coccidia, Salmonella, Yersina and
Campylobacter. If the chick appears unhealthy also take a blood smear.
– Check the navel area carefully.
– Check for ticks and mites and treat if necessary.
– Check for any injuries, swellings, bite marks, eye infections, etc. If
injuries are detected contact your veterinarian immediately for advice.
• Estimate chick age based on the presence of yolk in the abdomen, weight, body
condition, feather condition, etc.
• Older chicks (7 days onwards) will require overnight food.
• Record all details on the individual chick notes and draw up a weight graph.
• It is preferable if wild chicks are placed in separate brooders on arrival, but
this is not always possible. If more than one wild chick of the same species is
brought in within 24 hours of one another, they can be housed in the same
standard brooder together (if of a similar age). The chicks must be identified
with a temporary band, immediately. If wild chicks are put together it is
important to watch out for early signs of dominance, especially if one chick is
bigger.
12.6.2 Wild Chick Care while in Quarantine
• Brooder care is maintained as normal (refer to Section 12.2).
• Establish the chick onto the artificial diet.
• Once quarantine has been passed (i.e. clear stool and cloacal sample), the
chick can be transferred into the main brooder room (approximately 7-10 days).
If space is unavailable, treat the chick as if it were in the brooder room. If the
samples are positive, treat the chick as appropriate or seek veterinary advice.
• If the chick is due for an early release follow all release quarantine procedures
(refer to section 15.3).

ONE Best Practice Manual FINAL – June 2012
59
Minimum Standard 14.
Initial wild chick care and quarantine
a) All wild chicks arriving on site must be separated from all other chicks and undergo an
initial quarantine period. Once all necessary stool, cloacal (and in some instances
blood) samples are returned as clear the chick can be placed into a brooder room or
outdoor enclosure.
b) Place the chick in a clean brooder containing a darkened sleeping area, an external
heat source (if necessary), suitable damp substrate or non-slip matting and clean
water. Fresh water is to be provided daily and food, once the chick is the appropriate
age.
c) Clearly label the brooder with the chick’s identification details and ensure the
brooder number is recorded in the chicks’ notes.
d) If two wild chicks are to be placed in the same brooder, apply a temporary leg tag to
both of the chicks and clearly note this on the chick records.
12.7 Summary of Daily Brooder Care
Early morning duties
• Every chick should be weighed, and the weight plotted on the growth chart.
• Check the appearance of the faeces, and remove all faeces from the brooder.
• Supply fresh bedding (fern fronds, leaf litter, clean towel or non-slip matting)
in the sleeping area.
• Scrub and refill the water dish with fresh water.
• Remove any old food, including food that has been flicked out of the food dish
overnight. Weigh the leftover food and record the amount of food consumed.
• If using peat moss or leaf litter, dig over and water if necessary. Change the
matting if soiled.
• When handling a chick during the daily weighing, check eyes, nostrils, general
condition and chick behaviour.
• Any chicks requiring feeding assistance should be fed as soon as possible in the
morning.
• Weigh out and supply fresh food during the day (in the sleeping area) if the
chick is not yet established on the artificial diet.
Late afternoon duties
• Supply fresh evening food.
• Quietly check on the chick and note if the chick has been active during the day.
• Make sure that all lighting is turned off at night, and the doors are securely
locked.
ONE Best Practice Manual FINAL – June 2012
60
13 Care of Chicks in Outdoor Enclosures
There are a number of different scenarios for Operation Nest Egg chicks to reach a
safe release weight. The majority of birds will stay on site at the captive rearing
facility until they reach a safe weight of between 800 to 1,200 grams. The actual
release weight is determined by the aims of the individual kiwi recovery projects and
varies for different areas.
The second most common outcome is that chicks are released at 3 to 4 weeks of age,
(once they have surpassed their hatch weight), directly from the brooder room into a
temporary crèche site, (such as predator free island or fenced area), until they reach
a safe weight to enable reintroduction back into the wild.
13.1 Transfer of Chicks to an Outside Enclosure
It is important to assess each chick individually before deciding when they will move
into an outside run. Important considerations are; total weight and overall weight
gains, how long the chick has been eating independently, the age of the chick, hatch
and health history, who the chick is to be paired with in a run (if applicable), the
final destination of the chick, (crèche site, island sanctuary, outdoor enclosures etc),
and the availability of outside enclosure space.
For all Operation Nest Egg kiwi recovery projects the release weight, and location
chicks are to be released into, should be determined at the start of the breeding
season, (although the exact details may change over the season), so that appropriate
management plans are in place before the chicks start hatching.
In general a chick should go into an outside enclosure when it;
• has surpassed hatch weight,
• has a consistent regular weight gain, and
• is eating the artificial kiwi diet independently.
It is important to move a chick to an outside enclosure as soon as practical to ensure
that chicks are not held in the brooder for unnecessary extended periods of time.
It is recommended, for identification purposes, that all chicks are microchipped
before leaving the brooder room and transferred to an outdoor enclosure. This is
dependent on the requirements of the kiwi project, (some field staff prefer to
microchip the birds in the field when they are released) however, it is preferable this
is carried out in captivity to ensure there are no identification mix ups when large
numbers of kiwi are held on site at a captive rearing facility.
13.2 Release of Chicks from the Brooder Room to a Crèche Site
The minimum age that chicks should be released into a crèche site is three weeks.
The chick must have regained hatch weight before release, which takes on average
three weeks. This will ensure that the yolk is fully absorbed and the chick has
regular weight gains and is eating unassisted.

ONE Best Practice Manual FINAL – June 2012
61
• Communication with the individual project is essential at this time so that
release dates can be co-ordinated with quarantine times, to ensure chicks are
released as soon as possible and practical.
• If required by the kiwi project, a microchip is to be implanted subcutaneously
under the wing (preferably the right) four days prior to release. This allows the
implant site to be re-checked on release day.
• It is important that any required disease screening has been successfully
completed and each chick has been given a pre-transfer health check by a
veterinarian or senior experienced staff member before release.
• It is also important to check if the chick requires DNA sexing.
13.3 Transponders
A few days prior to being put into outside enclosures, (or release into a crèche site),
Operation Nest Egg chicks should be micro-chipped. It is recommended that is
carried out once the chick has regained its hatch weight.
Transponders must be inserted by a suitably trained person. Refer to the Kiwi Best
Practise Manual (Robertson & Colbourne 2003) for instructions on inserting a
transponder, and to the Brown Kiwi Husbandry Manual (Fraser & Johnston 2009), for
supplier details.
There are two brands of transponder currently being used for Operation Nest Egg kiwi
in New Zealand, (Allflex and Trovan). It is important to make sure that the same
brand of transponder is used within each kiwi project. There is currently no standard
protocol for this procedure, but it is important to be consistent within each kiwi
project. It is good practise to scan both sides when checking the identity of a chick.
13.4 DNA Sexing Methods
Chicks that hatch in captivity as part of the BNZ Operation Nest Egg programme are
not required to be DNA sexed. However, individual project partners may still request
captive rearing facilities to carry out feather collection for DNA sexing as part of
their programme objectives. Feather collection techniques are outlined in the Brown
Kiwi Husbandry Manual (Fraser & Johnson, 2009).
13.5 Transferring Chicks to the Outside Enclosures
Chicks can be moved into outside enclosures at any time of the day, but it is not
recommended if the weather forecast is for heavy rain or unsettled cold weather.
Chick enclosures should have a minimum useable area of at least 15 m2. Two chicks
may be placed together in an enclosure of at least 30 m2, and if necessary three
chicks can be placed into large enclosure (at least 50 m2).
To minimise disease transmission risks it is important to only place chicks of the same
kiwi species together, and not to place them in runs that have held other kiwi
species. Try and pair chicks with similar release areas, similar brooder room
weights, or similar final release weights.

ONE Best Practice Manual FINAL – June 2012
62
• The runs should be fully prepared before the chicks are transferred to the
enclosure. This includes new burrows, (two good burrows per chick, either
artificial or natural), dug over soil, clean food boxes/tunnels and water dishes.
If present, any long grass should be trimmed and vegetation in the runs should
be pruned periodically when the run is empty. It may be useful to use a metal
detector to check for metal objects (e.g. nails, fence staples, etc) that chicks
may eat.
• If the chick has been microchipped, scan and check the microchip number and
check the microchip site before the chick leaves the brooder room. Remove
any temporary tape leg bands.
• Record the chick weight, pen ID number and date the chick is transferred
outside in the chick records. Make sure the outdoor enclosure is clearly
labelled with the identity of the resident chick. The simplest way is to record
it on a small whiteboard, or plastic weatherproof tag, which is attached to the
gate of the outdoor enclosure.
• In order to obtain accurate food consumption records chicks are required to be
in fully enclosed outdoor enclosures. If a captive rearing facility is using rubber
flaps on food tunnels, then chicks should be trained to go through the flaps
while still in the brooder room (refer to Section 12.2).
• Chicks should be placed into separate burrows. Their evening food should be
put in with them or in the food tunnel, (if used), depending on the type of
burrow, (natural or artificial), for the first few nights. If food is placed into the
burrow with the chick it is important to remove all uneaten food daily when
cleaning.
• After two nights the food dish can be gradually shifted to the food tunnel/box.
If flaps are used on the box, keep one flap open. Within the first week the
chick should be confidently going into the box to eat, and gaining weight. It is
important to move the food box with the bird for the first few days until it is
able to easily locate the food.
• Food, (for both adults and chicks), can be put out either at early dusk or after
dark to prevent the artificial diet from drying out, especially during the hot,
dry summer months.
• Once the chick is confidently going in and out of the food box, start to move
the food box away from the burrow entrance. It is important to closely monitor
food consumption, especially when there is more than one chick in an
enclosure. This is an important stage, as a chick can go downhill very quickly if
it is not monitored adequately when it is initially placed outside.
• Pay attention to where a chick is roosting. Dominance behaviour is fairly rare,
but in some cases chicks will need to be separated. If one chick is not gaining
(or even losing) weight, fighting is evident, the small chick looks scruffy, or
there is concern about the chick, separate the two birds.
• Once the chicks go outside they need to be placed onto the regular weigh and
faecal (stool) sampling schedule. They should be weighed on day three after
transfer to the outside enclosure and undergo a quick health check. (Refer to
Table 3).
• Each chick must be sighted daily, (usually when the food dishes are collected
each morning). If enclosures are large and chicks are using natural burrows, it

ONE Best Practice Manual FINAL – June 2012
63
is important to move carefully within the enclosure to prevent accidentally
collapsing a burrow on top of a chick.
• Leftover food from the previous night should be weighed and food consumption
recorded daily. If food is untouched, and a chick is losing weight, place food in
with the chick during the day. Any dishes left out during the day must be
removed from the food box before the night food is placed out. Make sure food
consumption is carefully recorded the following day.
• When handling a chick to weigh it, always carry out a quick health check. This
consists of checking the eyes, ears, nostrils and gape (throat), plumage and
general condition, spine and hips, legs, feet, abdomen, and general chick
behaviour (snappy, subdued). Also check around the ears and head for mites.
• If DNA sexing is required, feather samples should be taken as soon as possible
after the bird moults and once the new feathers are coming through. This is
roughly at 650 grams, (but can be earlier).
• All Operation Nest Egg chicks should be regularly weighed while they are held
in outdoor enclosures until their release back into the wild.
13.5.1 Monitoring Chicks in Outdoor Enclosures
It is important that weight and stool schedules are followed to ensure the optimum
health of all Operation Nest Egg kiwi chicks. If low food consumption is noted, (less
than 100 grams overnight), this should be monitored closely for three nights. If there
is no increase in the amount of food consumed over night after three nights, the
chick should be weighed and undergo a full health check.
All chicks should have fresh faecal samples collected for internal parasite screening
(Refer to Section 14.2).
Minimum Standard 15.
Care of ONE chicks in outdoor enclosures
a) Birds must be visually sighted each day.
b) Left over food is to be collected daily and all remaining food is to be weighed and
recorded to determine food consumption.
c) Fresh water is to be provided at all times.
d) Fresh food is to be provided as late as practical each afternoon or evening.
e) Food boxes and water dishes are to be cleaned regularly (at least weekly).
f) Faecal sampling and screening for internal parasites must be undertaken for all ONE
kiwi chicks.

ONE Best Practice Manual FINAL – June 2012
64
14 General Health Observations
The following points should be considered for all chicks each day;
• Food consumption. This is an important indicator of overall chick health. Has
there been a decline in the food consumed?
• Where is the bird sleeping? Is it the usual burrow or a different burrow, or not
in a burrow at all? Does the bird regularly change burrows?
• Is the chick active during the day? This can be a strong indication that the bird
may be unwell. Note that for a chick recently transferred to a new enclosure,
activity during the day can be due to a period of adaptation to the enclosure
and feed boxes.
• Are there any flies around the entrance to the burrow or sitting on the chick?
Any flies’ eggs on the chick?
• Sleeping position? Is the bird lying on its side or crouching normally?
• Attitude of chick if disturbed, (i.e. is it snappy, growly or subdued?)
• Observe the bird's faeces. Does it have a strong sour-smelling odour? Is it
runny or unformed, or is it black and greasy indicating coccidia? Is it lacking
the white uric acid component?
• Is the food being presented fresh and in good condition?
• Are there any potential disturbance factors, such as dominance behaviour from
other chicks, or any foreign noises, such as construction?
Any changes from normal behaviour should be noted in that chicks’ file. These
observations must also be verbally passed on to other members of staff and followed
up to maintain continuity of the health and wellbeing of the bird.
14.1 Physical Check
Once a bird has been transferred outside, a comprehensive check should be done
regularly when a bird is handled, usually when the chick is weighed. It requires two
people to carry out a full health check, one to hold the bird and the other to carry
out the health check. All relevant information should be noted. This check does not
take a long, especially if you are familiar with the birds, and it is important to cover
all the points mentioned below;
• Feather condition. Is there any indication of moulting or dirty feathers around
the cloaca?
• The presence of mites, particularly around the wing, ears and eyes.
• Eyes. Are they clear and bright? If the eyes are “glued up” they can be bathed
in saline solution. If the condition does not clear up in three days, a
veterinarian should be contacted.
• Ears. Are they clean and clear with no scabs, mites, swelling or discolouration?
• Nostrils. Are they clear, a pale ivory pink colour and free of any soil?
• Throat/Gape. Is the tongue, glottis and throat pink in colour? The mucous
should be clear and not ‘sticky-looking’. White spots on the inside of the

ONE Best Practice Manual FINAL – June 2012
65
mouth are indicative of a possible yeast infection ‘candidiasis’ caused by
Candida albicans.
• Spine. Start at the shoulders/base of the neck and quietly feel down the length
of the spine and across the pelvis. A bird in poor condition will have a
prominent bony spine and pelvis (often seen in young chicks from the wild)
while an overweight bird has a spine that is difficult to feel and is usually quite
rounded.
• Stomach. The abdomen should feel firm, full and rounded, (not too tight or
hollow and empty or puffy and bloated).
• Legs and feet. Feel the joints down the leg to make sure they are not swollen
or ‘hot’ to touch and that the scales are not sloughing off. Check the feet and
toes are not swollen or have any foreign objects puncturing the skin (e.g.
thorns).
14.2 Endoparasites and Routine Stool Testing
Routine stool sampling is an easy, non-invasive way of determining if a chick has
internal parasites. A small amount of fresh kiwi faeces, (approximately 2 grams),
can be collected in a clean collection pottle and sent to a laboratory for analysis.
Coccidia are protozoal parasites which may infect the intestinal tract and/or kidneys
of mainly juvenile kiwi. These are a natural parasite of kiwi, being found in both
wild and captive birds. Coccidia are highly species specific, and it is likely that the
coccidial species found in kiwi are not found in any other species. Consequences of
infection with coccidia are related to the infective dose, with higher densities of
birds resulting in higher levels of environmental contamination, which subsequently
results in a higher exposure of birds to coccidia. Low burdens of coccidia in kiwi do
not cause clinical disease, however, heavy burdens may cause morbidity, including
weight loss, inappetance, diarrhoea and general lethargy, and untreated disease may
result in mortality.
Coccidial oocysts are extremely resistant in the environment, and are not destroyed
by conventional disinfectants. Management revolves around recognition of infection
in individuals, with treatment when necessary, and reducing environmental
contamination by the removal of contaminated substrate and faeces. It is important
to recognise that young kiwi must be exposed to coccidia in order for them to
acquire immunity to the parasites. It is not possible to completely eliminate coccidia
from their environment. Rather the aim is to limit the dosage of coccidia that young
birds are exposed to, while still allowing them to acquire a natural immunity.
It should also be noted that overzealous treatment of coccidia may result in an
interruption in development of natural immunity to the parasite, as well as running
the risk of development of resistance of the parasite to the limited number of drugs
available to treat coccidia. Therefore, management of coccidiosis in kiwi houses
must also concentrate on hygiene practices, in particular removal of faecal
contamination from their environment.

ONE Best Practice Manual FINAL – June 2012
66
• For chicks in outside enclosures it is important that the stools are correctly
identified as kiwi faeces and not those of other birds that may enter the
enclosure.
• Make sure the faeces are not contaminated with quantities of dirt or leaf litter.
They should be fresh, soft and of a sufficient amount.
• The freshest stools can usually be found just behind the chick in the sleeping
burrow. Faeces should also be collected from other sites within the enclosure.
This is because parasites shed their eggs intermittently and taking only one
sample is not a good representation of the health of the chick.
• A correct faecal sample should contain a minimum of two, preferably three,
stool samples from around the enclosure.
• The stool results should come back from the laboratory within 24 hours.
• Routine stool samples should be taken from all ONE kiwi chicks regularly to
ensure that parasite levels are controlled.
Table 3 on the following pages outlines disease screening and treatment
recommendations for ONE chicks.

ONE Best Practice Manual FINAL – June 2012
67
Table 3: Disease Screening and Treatment Recommendations for ONE kiwi, (Kate McInnes and Kerri Morgan)
Diagnostic
faecal for parasitology
Treatment for coccidia:
Husbandry recommendations for coccidia
Treatment for helminths:
Cloacal swab for microbiology (Salmonella and Yersinia only)
Procedure if positive Salmonella or Yersinia
Blood smear for white blood cell
count and haemoparasitology
Wild chick arriving to brooder
� + no treatment
++ Baycox, retest 7 days
+++ to ++++ Baycox, retest 5 days Monitor faecal consistency,
hydration status, food intake and
weight. May require supportive care
Hygiene – remove faecal material at
least daily, immediately
remove food/water bowls if
contaminated with faeces
Capillaria – if >200 epg
Stronglyids, Heterakis,
Ascarids – any +ve
Tapeworms (cestodes) no treatment*
� Isolate individual. Observe strict quarantine principles. Seek experienced veterinary advice
X
Brooder to outside pen
�- repeat fortnightly until 10 weeks old
then monthly until release
+ no treatment
++ Baycox, retest 5 days
+++ to ++++ Baycox, retest 7 days Monitor faecal consistency,
hydration status, food intake and
weight. May require supportive care
Daily faecal removal from
brooder boxes and feeding areas to minimise infective dose of coccidia
oocysts
Capillaria – if >200 epg
Stronglyids, Heterakis,
Ascarids – any +ve
Tapeworms (cestodes) no treatment*
X Do not move bird or birds in contact. Isolate individual. Observe strict quarantine principles. Seek experienced veterinary advice
X

ONE Best Practice Manual FINAL – June 2012
68
Diagnostic faecal for parasitology
Treatment for coccidia:
Husbandry recommendations for coccidia
Treatment for helminths:
Cloacal swab for microbiology (Salmonella and Yersinia only)
Procedure if positive Salmonella or Yersinia
Blood smear for white blood cell
count and haemoparasitology
Brooder to wild
� >++ Baycox to avoid stress related
disease issues upon release
n/a Tapeworms (cestodes) no treatment*
Treat all other
positives, recheck those with +++ and ++++ in 5 days before release
� Do not move bird or birds in
contact. Isolate individual.
Observe strict quarantine
principles. Seek experienced
veterinary advice
�
Outside pens to wild
� >++ Baycox to avoid stress related disease issues upon release
n/a Tapeworms (cestodes) no treatment*
Treat all other
positives, recheck those with +++ and ++++ in 5 days before release
� Do not move bird or birds in
contact. Isolate individual.
Observe strict quarantine
principles. Seek experienced
veterinary advice
�
Coccidia treatment justification
• No treatment of birds with low burdens (+) of coccidia ensures natural vaccination without interfering in acquisition of immunity to
coccidia.
• Moderate burdens (++) should be treated to reduce environmental contamination
• High burdens (+++ and ++++) should be treated to reduce morbidity/mortality of individual birds, as well as reducing environmental
contamination
• Faecal sampling – pool samples from individuals, ensure at least three stools are collected from each individual.

ONE Best Practice Manual FINAL – June 2012
69
NZVP scoring chart for coccidia (oocysts per gram): + 0-2,000; ++ 2,000-50,000; +++ 50,000-250,000; ++++ >250,000.
Therapeutics – check calculated dose rates with veterinarian if unsure. These are the recommended formulations for kiwi – there are others
also which may be used (See Morgan 2008 p. 100).
*Cestodes may be treated if high numbers and birds are clinically ill. But unlikely to cause clinical disease.

ONE Best Practice Manual FINAL – June 2012
70
Kiwi stool samples should be tested for the following internal parasites;
Ascarids, Strongylate, Heterakis, Capilleria (Nematodes), Coccidia (Protozoa) and
Tapeworms (Cestodes).
Be aware that host specific endo and ectoparasites of rare fauna can be even more
threatened than their host. You should leave the parasites alone unless they are
causing health problems to the host.
Indicative treatments for different parasites and diseases are outlined in Table 4
below. Note that a veterinary surgeon should always be contacted if there are any
concerns about the health or treatment of any chick.
Table 4: Endoparasite treatment protocol, (refer to attached Disease Screening and Treatment Recommendations).
Condition Treat with Dose rate
Ascarids, Strongylate, Heterakis and Capilleria
Roundworms (Nematodes)
Oral Sheep Ivomec
One treatment administered to the bird via a crop tube at 0.25 ml/kg body weight, Re-test after 14 days
Tapeworms Cestodes Droncit Crush one 50 mg tablet in 5 ml water. Dose once at 1.0ml per kg body weight. Re-test after 14 days
Coccidia Protozoa Baycox One treatment administered to the bird via a crop tube at 1.0ml/kg body weight
Mites, lice and ticks Frontline spray One treatment at 6 pumps/kg body weight sprayed onto the feathers
Bacterial infections - enteritis, pneumonia
Antibiotics Consult veterinary surgeon
Candidiasis (Thrush) Yeast infection
Nilstat 1ml per 300g body weight by mouth via crop tube 2 x day for 5 days
Aspergilosis Fungal infection
Nizoral tablet form, 20 to 30 mg/kg 2x day
Eye infections Saline wash or Conoptal
If saline does not improve condition after 3 days, apply conoptal cream 2 x day
Over-ingestion of crop stones
Metamucil Half teaspoon per 150 g food
Campylobacter jejuni Vibravet Consult veterinary surgeon before treatment commences
For a complete reference to treatment of parasites in kiwi refer to Kiwi First Aid and
Veterinary Care, (Morgan 2008).
ONE Best Practice Manual FINAL – June 2012
71
15 Chick Quarantine
Release weights for ONE kiwi chicks vary between DOC conservancies and kiwi
recovery projects.
For Operation Nest Egg chicks staying on site at a captive rearing facility until they
reach an approximate “stoat safe” size, release weights should be determined at the
start of the kiwi breeding season for each project. The release weight for the
majority of chicks is 1000 grams, but for some projects it may be 800 grams.
Note that this quarantine procedure is quite different from those applied to young
chicks scheduled for release into a crèche area directly from the brooder room.
15.1 Chick Release from a Brooder to the Wild
Chicks that are to be directly released back to the wild from the brooder room still
have to undergo a short quarantine period prior to release. The chick must have
reached, or exceeded, its hatch weight and be in good general condition. Three days
prior to the intended release date it must have a full health examination by a
veterinarian, and preferably a stool sample taken. A transponder can be inserted at
this time. If the stool sample returns a positive coccidia result the bird must be
treated accordingly with Baycox. The stool result should be clear before the chick is
released.
15.2 Quarantine in an Outside Enclosure
Prior to placing a chick in quarantine, it must be in good general condition, have a
healthy appetite, and corresponding good weight gain rate.
• Once a chick is placed into an outside enclosure it should remain in this
enclosure until quarantine is completed and it is released. Sometimes chicks
lose condition if moved unnecessarily.
• It is recommended that the quarantine duration for birds in outside enclosures
is 21 days, and during that time the chick should continue to gain weight. In
most cases the chick can be put in to quarantine at 930 grams, (if the desired
release weight is 1,000 grams), but this is dependent on the time of the year
and the individual growth rate of the bird, (see example below). It is
important that the daily live weight gain (DLWG) is calculated for the previous
month to determine if a chick will reach release weight within the quarantine
period. Note, there are usually seasonal differences in rates of weight gain for
chicks placed in quarantine.
• Birds should be released as soon as the quarantine period is successfully
completed, and the proposed release dates should be coordinated with the
relevant kiwi project personnel.
• During quarantine the chick will undergo various health checks. These all must
be clear before commencing the next stage of quarantine. Quarantine intervals
should only be extended if a bird fails the quarantine test procedures, and
requires additional testing. It is important to inform the relevant kiwi project

ONE Best Practice Manual FINAL – June 2012
72
staff or conservancy that the quarantine period has been extended. This
should be done promptly as the delay will immediately affect the proposed
release date and plans, especially if it is to be a public release.
• If there are multiple birds in an enclosure, it is less disruptive to place these
birds in quarantine together. The quarantine status applies to the enclosure
and all bird procedures are carried out under quarantine conditions.
15.3 Quarantine procedures for Operation Nest Egg chicks in outdoor enclosures
Chicks should complete the following quarantine tests within a defined quarantine
period.
Weight and estimated condition score × 2
Stool Samples x 2
Blood Smear x 1
Cloacal swab x 1
Transmitter fitted if necessary
Transponder implanted (if not already done when the bird was transferred outside)
Feathers for DNA if required
• Once a chick has been put into quarantine individual overalls or lab coat must
be used when handling that bird. Overalls must be washed in Trigene and dried
between quarantine events.
• Separate footwear should be used in the quarantine enclosure. These are not
to be used in the rest of the enclosures and must to be washed in disinfectant
prior to use in the quarantine enclosure.
• A quarantine sheet is to be filled out for each individual bird when the bird
goes into quarantine to ensure the quarantine process is correctly adhered to.
• It is important that a Q is written on the board on the door to the chick
enclosure, and any kiwi enclosure location map, so all captive rearing staff are
fully aware of which birds are in quarantine.
15.3.1 Cloacal Culture Sampling Method
Cloacal cultures are used to screen for Salmonella, Yersinia and Campylobacter
(although Campylobacter may shortly be removed from the screening programme).
The following procedure is used at Kiwi Encounter;
• Two people are required when taking a cloacal swab from a kiwi chick. One to
restrain the bird and the other to take the sample
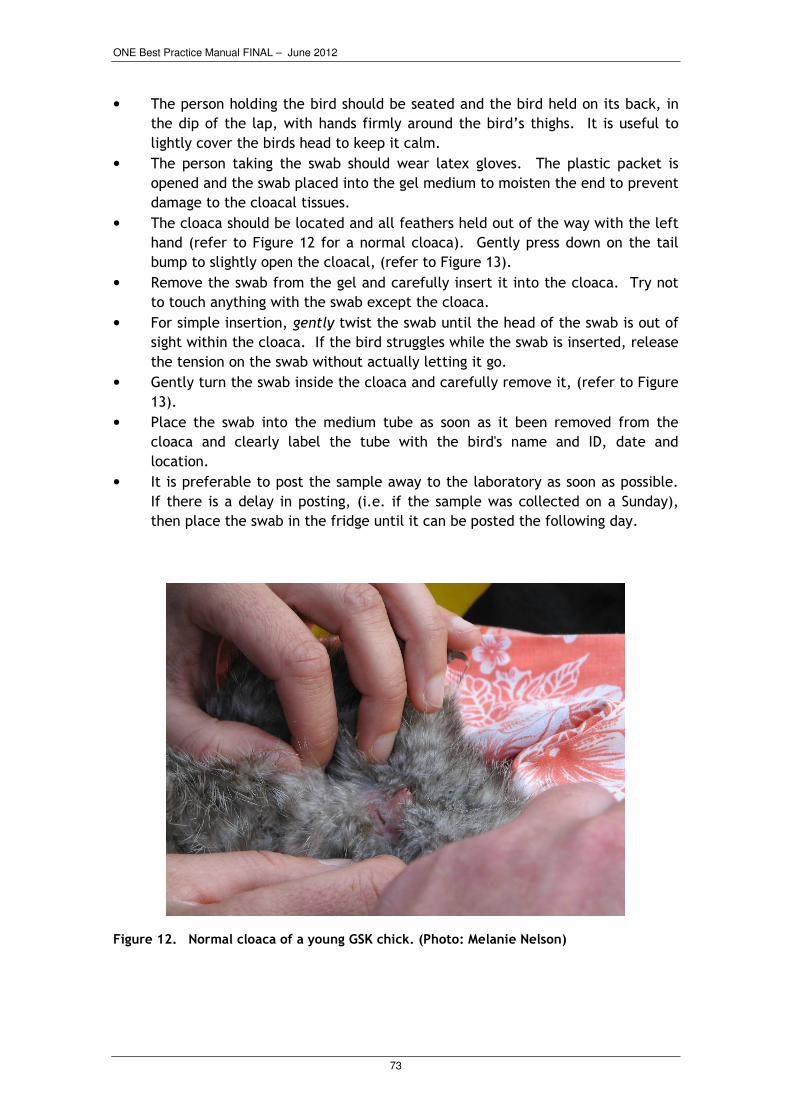
ONE Best Practice Manual FINAL – June 2012
73
• The person holding the bird should be seated and the bird held on its back, in
the dip of the lap, with hands firmly around the bird’s thighs. It is useful to
lightly cover the birds head to keep it calm.
• The person taking the swab should wear latex gloves. The plastic packet is
opened and the swab placed into the gel medium to moisten the end to prevent
damage to the cloacal tissues.
• The cloaca should be located and all feathers held out of the way with the left
hand (refer to Figure 12 for a normal cloaca). Gently press down on the tail
bump to slightly open the cloacal, (refer to Figure 13).
• Remove the swab from the gel and carefully insert it into the cloaca. Try not
to touch anything with the swab except the cloaca.
• For simple insertion, gently twist the swab until the head of the swab is out of
sight within the cloaca. If the bird struggles while the swab is inserted, release
the tension on the swab without actually letting it go.
• Gently turn the swab inside the cloaca and carefully remove it, (refer to Figure
13).
• Place the swab into the medium tube as soon as it been removed from the
cloaca and clearly label the tube with the bird's name and ID, date and
location.
• It is preferable to post the sample away to the laboratory as soon as possible.
If there is a delay in posting, (i.e. if the sample was collected on a Sunday),
then place the swab in the fridge until it can be posted the following day.
Figure 12. Normal cloaca of a young GSK chick. (Photo: Melanie Nelson)

ONE Best Practice Manual FINAL – June 2012
74
Figure 13. Opening the cloaca (left) and taking a swab (right). (Photo: Kiwi Encounter)
15.3.2 Blood Smear Sampling Method
Blood sampling should only be undertaken by an experienced operator, (refer to DOC
Blood and Feather Sampling SOP). The method used to hold the chick in order to
obtain blood for a blood smear is very similar to that used when taking a cloacal
swab sample, and both tests are generally done together.
• The sample is taken from medial metatarsal vein running along the inside of
the lower half of the right leg (tarsometatarsus bone) (refer to Kiwi First Aid
and Veterinary Care, Morgan 2008, page19, for location of vein).
• The person restraining the bird must clamp the leg firmly around the hock joint
(at the tibiotarsus and tarsometatarsus joint) which inhibits blood flow from
the lower leg, thereby making the vein more turgid.
• The person taking the blood sample should gently twist the foot outwards. This
helps to make the vein more visible, running slightly diagonally up from the
dew claw.
• The vein area is then wiped well with methylated spirits and a very small (no
more than to the first increment of a 1 ml syringe) sample of blood is taken
using a 23-25 gauge needle.
• Once the sample has been collected and the needle withdrawn, apply a gentle
pressure to the venipuncture site.
• If blood is not obtained from the right leg, repeat the procedure on the left
leg. If still unsuccessful re-schedule the blood smear for another day.
Refer to Kiwi First Aid and Veterinary Care, (Morgan 2008) for instructions of how to
prepare a blood smear.
For general quarantine standards for captive kiwi, refer to the Brown Kiwi Husbandry
Manual, (Fraser & Johnston 2009).

ONE Best Practice Manual FINAL – June 2012
75
Minimum Standard 16.
Quarantine of ONE chicks prior to release into the wild
a) All birds must be isolated in quarantine for a minimum of 21 days.
b) All birds must be weighed at the start and end of the quarantine period.
c) A faecal sample must be collected at the start of quarantine for chicks held outside
and analysed for eggs of endoparasites, (Ascarid, Heterakis, Capillaria, Strongylate
and Coccidia).
d) A cloacal sample must be taken at the start of quarantine for chicks held outside and
analysed for Salmonella, Campylobacter and Yersinia.
e) A blood smear must be collected at the start of quarantine for chicks held outside for
a white blood cell count (WBC) and analysed for haemoparasites.
f) Before release all birds have a physical examination by a veterinarian or senior
experienced staff member and are deemed healthy.
g) Only healthy birds can be released into the wild kiwi population. If medical checks or
samples reveal health problems these should be resolved or adequately controlled
before the birds are released from quarantine.

ONE Best Practice Manual FINAL – June 2012
76
16 Record Keeping
There is key information that should be collected as part of any ONE procedure.
These relate to all parts of artificial incubation and rearing, from the time the egg
arrives on site at the captive rearing centre, until the chick is released back to the
wild.
Note also that when using multiple data sheets to record information for the same
chick ensure that the chick ID is marked on every page.
16.1 Egg Arrival and History
Information that should be recorded includes;
• Kiwi species
• Area of origin
• Bird’s individual ID (or ARKS number, if used)
• Sire and dam, (if known)
• Time and date removed from burrow
• Time of arrival, (at captive rearing facility)
• Mode of transport
• Name of person who retrieved the egg from the nest
• Egg timer transmitter attached and incubation details, (if used)
• First or second clutch
• First or second egg
• Brief nest history and any other field details
• Diagrams of stage of egg development
It is also useful to use a check-list to ensure the correct egg processing and
preparation procedures are carried out before the egg is incubated. For an example
refer to Table 5. Once the process is completed it should be initialled by the staff
member responsible to ensure correct procedures have been followed.
Table 5: Example of an egg preparation checklist
Egg preparation room Confirm Incubation room Confirm
Weight Weight
Candled Candled
Cracks identified Initial estimation of
age
Small/Moderate/Severe? Air cell drawn in
Position of cracks (Draw
over pg)
ID mark, mark top of
egg

ONE Best Practice Manual FINAL – June 2012
77
Egg preparation room Confirm Incubation room Confirm
Egg washed Treatment of Cracks
Disinfectant &
Concentration
Draw development of
egg/cracks
Water temperature Length of egg
Submerged/Splashed Width of egg
Time in water Incubator type &
number
Master Conservancy
sheet filled in
Time into incubator
Master Full Summary
sheet filled in
Incubator
temperature & RH%
16.2 Data Log for Artificial Incubation
An individual data log for each egg that is incubated should be maintained.
Information recorded for every egg includes;
• Species
• Egg ID
• Estimated age of egg on arrival
• Incubator type (still air or forced draft) and number
• Start of artificial incubation (date into incubator)
• Egg weight when set
A data table should be used to record incubation parameters.
For still air incubators, these include;
• Date
• Time
• Incubator temperature (at top of egg)
• Incubator % relative humidity
• Egg orientation
• Staff member ID
• Egg weight
• Actual % weight loss
• Egg age (and days incubated)
• Number of eggs in incubator
• Humidity tray levels and numbers
• General comments (egg development and candling notes)
• Movement detected
• Egg cooling time (if used)

ONE Best Practice Manual FINAL – June 2012
78
For forced draft incubators, the parameters to record include:
• Date
• Time
• Egg weight
• Actual % weight loss
• Egg age (and days incubated)
• Incubator temperature
• Incubator % relative humidity
• Staff member ID
• Egg orientation
• Number of eggs in incubator
• General comments (egg development and candling notes)
• Movement detected
• Egg cooling time (if used)
An incubation summary for each egg is useful for assessing incubation and hatching
parameters. This is particularly important for South Island species, where less is
known about incubation and hatching.
16.3 Hatching Notes
Detailed notes of each chicks hatch should be recorded. For each observation, note
the date, time, hatcher temperature and candling details. Records can include notes
and diagrams. ARKS ID may be allocated to a chick at hatch (if used).
16.4 Chick Rearing Notes for the Brooder and Outside Enclosures
An individual data sheet for each chick that is reared should be maintained.
Information recorded for each chick should include:
• Species
• Egg ID and chick name
• Bird’s individual ID (or ARKS number, if used)
• Hatch date
• Brooder/enclosure number
• ID of other chick in brooder or enclosure (if applicable)
• Temporary band colour
• Transponder number (if applicable)
A data table should be used to record chick rearing details. Information to record in
the table includes;
• Date
• Age of chick (in days)
• Chick weight (including if the chick is gaining or losing weight)

ONE Best Practice Manual FINAL – June 2012
79
• Amount of overnight food provided
• Amount of overnight food eaten
• Details of any food provided during the day
• General comments and notes
16.5 Quarantine Data Sheet
An individual data sheet for each chick that is treated in quarantine (wild chick
arrivals, injured or sick birds) should be maintained. Chick information recorded
includes;
• Species
• Egg or chick ID
• Estimated age of chick
• Admission date
• Brooder number
• ID of other chick in brooder (if applicable)
• Temporary band colour
• Transponder number
• Discharge date
• Reasons for treatment in quarantine
A data table should be used to record chick treatment and health details.
Information to record in the table includes;
• Date
• Chick weight – including if the chick is gaining or losing weight
• Treatment (medication, physiotherapy)
• Time of treatment
• Amount of overnight food provided
• Amount of overnight food eaten
• Details of any food provided during the day
• General comments and notes
16.6 Stool Sample and Quarantine Records
All stool samples taken must be recorded with the individual bird’s ID and the test
results. All quarantine tests and dates must be recorded. Sample categories
include;
• Stool
• Cloacal
• Blood
• Vet reference ID
• Laboratory testing case number
Quarantine records must include;

ONE Best Practice Manual FINAL – June 2012
80
• Individual chick ID (code and transponder number)
• Date quarantine started
• Enclosure number
• Identity of other birds in the same enclosure
• Day one samples: Stool, cloacal and blood test (and test results); weight,
condition and full health assessment
• Second stool sample (and result)
• Any required treatment (i.e. Baycox to treat coccidia, etc)
• Release date
• Release weight
Minimum Standard 17.
Record keeping
a) Accurate records and individual identification are required for each ONE egg and
chick, including detail on origin, dam and sire, species, incubation methods and daily
parameters, hatch date, daily chick weights and rearing methods, medical treatments
and transponder implant number.
16.7 End of Breeding Season Reports
A summary of all ONE information collected by each captive rearing facility during
the season is to be submitted to the head of the Kiwi Recovery Group in the form of
an end of breeding season report. The kiwi captive co-ordinator will request a data
table from each facility to provide to the Kiwi Recovery Group at the end of each
breeding season. This will be collated for all facilities participating in ONE.
Minimum Standard 18.
End of breeding season report
a) An end of breeding season report must be submitted by 14 July for the year 1 July to
30 June.
b) A template will be supplied, and information required includes:
Numbers of all ONE eggs received on site
Numbers of all viable ONE eggs incubated
Numbers of all ONE chicks hatched
Numbers of all ONE chicks released back to the wild
List of all egg and chick ID’s including transponder number for the season
A summary of all egg and chick post-mortem results

ONE Best Practice Manual FINAL – June 2012
81
17 Acknowledgements
Funding to write this manual was provided by the BNZ Save the Kiwi Trust, with
assistance from the Department of Conservation.
Special thanks go to Andrew Nelson (Auckland Zoo), Claire Travers (Kiwi Encounter)
and Tony Billing (Westshore Wildlife Reserve) for their extensive input and comments
throughout the production of this document.
Special thanks also to Suzy Barlow (Kiwi Captive Co-ordinator) for collating all
comments and compiling all drafts.
Finally, thanks to Tony Billing (Westshore Wildlife Reserve) for undertaking the
arduous task of editing the final draft document.

ONE Best Practice Manual FINAL – June 2012
82
18 References
Barlow, S. 2011. Kiwi Captive Management Plan. Zoo and Aquarium Association and
Department of Conservation.
Bassett, S. 2009. BNZ Operation Nest Egg Kiwi Egg Candling Workshop Study Guide.
BNZ Save the Kiwi Trust, New Zealand.
Colbourne, R.M.; Bassett, S.; Billing, T.; McCormick, H.; McLennan, J.A.; Nelson, A.;
Robertson, H.A. 2005: The development of Operation Nest Egg as a tool in the
conservation management of kiwi. Science for Conservation 259. Department of
Conservation, Wellington.
Department of Conservation (2010). Blood and Feather Sampling Standard Operating
Procedure. Department of Conservation, Wellington.
Fraser, I & Johnson, T. 2009. Brown Kiwi (Apteryx mantelli) Husbandry Manual.
Department of Conservation and CMAG, Wellington, New Zealand.
Holzapfel, S., Robertson, H., McLennan, J., Sporle, W., Hackwell, K., Impey, M.
2008. Kiwi (Apteryx spp) Recovery Plan: 2008 – 2018. Threatened Species Recovery
Plan No. 60. Department of Conservation, Wellington, New Zealand.
Morgan, K. 2008. Kiwi First Aid and Veterinary Care. Department of Conservation,
Wellington, New Zealand.
Robertson, H.A. & Colbourne, R.M. 2003 (revised 2007). Kiwi (Apteryx spp) Best
Practise Manual. Internal report (QD code 1428). Department of Conservation,
Wellington, New Zealand.

ONE Best Practice Manual FINAL – June 2012
83
19 Contacts
Auckland Zoo Andrew Nelson Auckland Zoo 10 Motions Road, Western Springs 1022 Tel: +64 9 360 3800; Fax: +64 9 360 3818 [email protected] www.aucklandzoo.co.nz
Kiwi Encounter Claire Travers Fairy Springs Road, PO Box 25, Rotorua 3040 Tel: +64 7 350 0440; Fax: +64 7 350 0441 [email protected] www.kiwiencounter.co.nz
Westshore Wildlife Reserve Tony Billing 1 Watchman Road, Westshore, Napier 4110 Tel: +64 6 835 9451 [email protected] http://www.napier.govt.nz/index.php?pid=411
Pukaha Mount Bruce National Wildlife Centre Darren Page State Highway 2, R D 1, Masterton Tel: +64 6 375 8004 [email protected] www.mtbruce.org.nz
Willowbank Wildlife Reserve Shaun Horan 60 Hussey Road, Northwood, Christchurch 8051 Tel: +64 3 359 6226; Fax: +64 3 359 6212 [email protected] www.willowbank.co.nz
West Coast Wildlife Centre Bridget Wrenn West Coast Wildlife Centre P O Box 20, 31 Cron Street, Franz Josef Glacier 7856 Tel: +64 3 752 0610 Fax: +64 3 752 0606 [email protected] www.wildkiwi.co.nz

ONE Best Practice Manual FINAL – June 2012
84
Appendices

ONE Best Practice Manual FINAL – June 2012
85
1 Assessing and assisting problem hatches
1.1 Creating a view hole in to the air cell at point of hatch
Before considering opening a view hole in to the air cell of an egg, re-assess all egg
notes and egg characteristics, especially chick movement. Remember this is variable
as the chick will have rest periods during the hatch process. It is important to
carefully assess whether a view hole is necessary. Reasons why a view hole might be
needed include; the air cell membranes looking ‘tight’ over the chick; a drop off in
chick movement; veining becoming indistinct and losing its strong dark look; and a
pre internal pip ‘glow’ but no hatching progression.
• Clean all equipment required with Trigene, (small Phillips screwdriver, two sets
of fine tweezers) and the candler. Also have on hand small phials of saline
solution, cotton buds, gauze pads, and masking tape.
• Wash the bench and place the egg on a clean mat.
• Re-sanitise hands before commencing any work on the view hole.
• Candle the egg and identify any shadows that could possibly be the bill, (more
than likely the bill will not be seen). Estimate where the bill should be in a
normal hatch position and with the air cell pointing away, put a small (1
centimetre) pencil circle on the shell, slightly to the right (towards the centre
line) of where the tip of the bill should be. This hole can always be made
larger if necessary, (refer to Figure 14).
• Place the egg sideways on the mat with the air cell towards the right, (if right
handed). Hold the egg firmly with the left hand and gently using the
screwdriver tap the shell until you break through the shell only. Try to avoid
going through the outer shell membrane at this point. Using the tweezers,
carefully remove small pieces of shell up to the pencil edges. Make sure that
no shell fragments fall into the egg. The outer shell membrane should still be
intact, but it maybe pierced when putting the internal pip in.
• Using the tweezers, gently tear the outer shell membrane and remove the
circle of exposed membrane. Immediately candle the egg and look for the bill.
Note the colour and form of the inner shell membrane, (i.e. crisp, white,
damp, discoloured). If the bill is not immediately obvious, use a cotton bud
soaked in sterile saline to dampen down the inner shell membrane to locate the
bill and determine vascular activity in the chorio-allantoic membrane.

ONE Best Practice Manual FINAL – June 2012
86
Figure 14. Correct location and size of a view hole placed in a kiwi egg. (Photo: S. Bassett)
1.1.1 Observation, Actions and Treatment
Normal membranes: If the membranes appear normal, identify where the bill is by
dampening the membranes down with saline solution to determine the chick is in the
correct position. Detect the bill, assess the vascular system, (how active it is), then
tape up the hole and put the egg back in the incubator. It may be helpful to reassess
the notes and this point and consider why it was thought necessary to put in a view
hole.
When the membrane is dampened and the bill has been located, assess the vascular
system. An ‘artificial internal pip’ is not always necessary at this stage, provided the
bill is in the correct position. Reassess all information and decide if the chick can be
left for a further 12 hours. Tape the hole and place the egg back in the incubator.
Wait 12 hours and then immediately reassess the level of vacuum packing. If the
chick has internally pipped itself, it should be starting to clear out, and no further
assistance should be necessary. If the vacuum packing has become more
pronounced, and the chick has become less active, an artificial internal pip will be
required immediately, (refer to section below).
Vacuumed Membranes: This happens when the membranes are pulled tightly over
the chick and the outer shell membrane may have been torn away from the shell, (in
some cases). The folds of the membrane are extremely tight and folded over on
themselves and compressed tightly over the chick, (similar to a vacuum packed bag
of food with all the air sucked out of it). When dampened, the membranes feel very
tight and there is very little membrane movement. In conjunction with poor embryo
movement and poorly defined veins, an artificial internal pip may be required.
Identify the bill is in the correct position. If it is, the membrane is usually wrapped
completely around the tip of the bill. At this level of vacuum packing the veins in
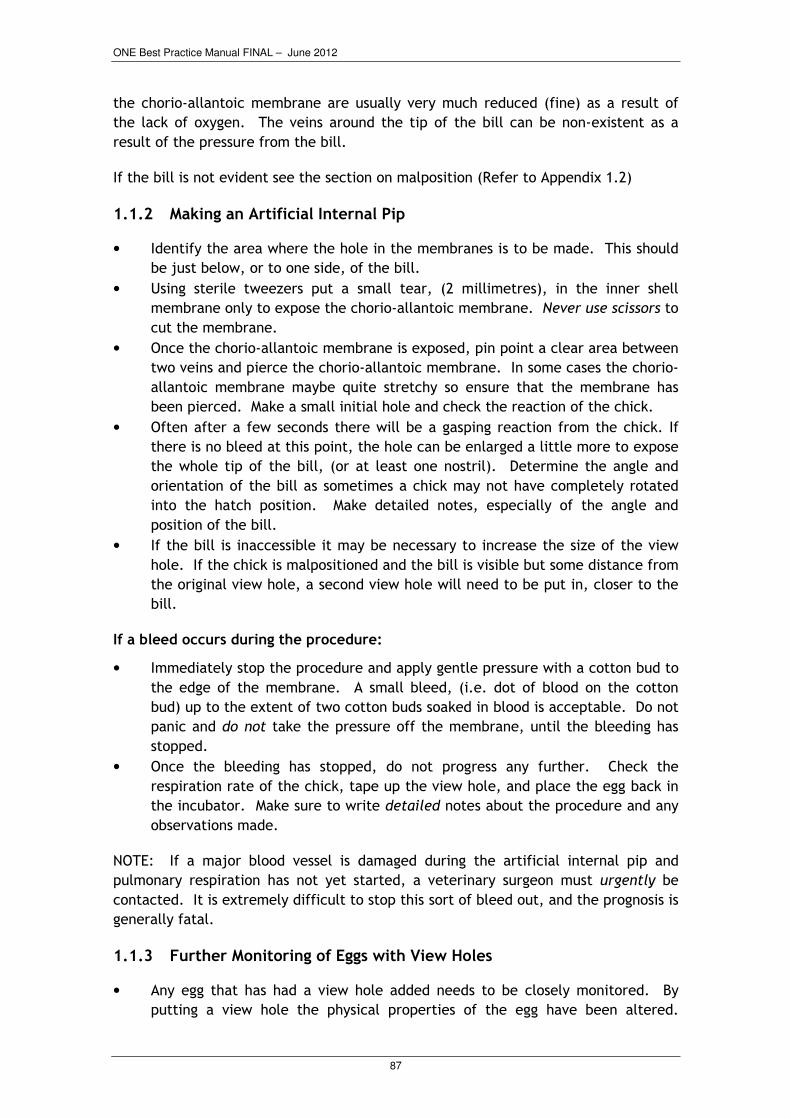
ONE Best Practice Manual FINAL – June 2012
87
the chorio-allantoic membrane are usually very much reduced (fine) as a result of
the lack of oxygen. The veins around the tip of the bill can be non-existent as a
result of the pressure from the bill.
If the bill is not evident see the section on malposition (Refer to Appendix 1.2)
1.1.2 Making an Artificial Internal Pip
• Identify the area where the hole in the membranes is to be made. This should
be just below, or to one side, of the bill.
• Using sterile tweezers put a small tear, (2 millimetres), in the inner shell
membrane only to expose the chorio-allantoic membrane. Never use scissors to
cut the membrane.
• Once the chorio-allantoic membrane is exposed, pin point a clear area between
two veins and pierce the chorio-allantoic membrane. In some cases the chorio-
allantoic membrane maybe quite stretchy so ensure that the membrane has
been pierced. Make a small initial hole and check the reaction of the chick.
• Often after a few seconds there will be a gasping reaction from the chick. If
there is no bleed at this point, the hole can be enlarged a little more to expose
the whole tip of the bill, (or at least one nostril). Determine the angle and
orientation of the bill as sometimes a chick may not have completely rotated
into the hatch position. Make detailed notes, especially of the angle and
position of the bill.
• If the bill is inaccessible it may be necessary to increase the size of the view
hole. If the chick is malpositioned and the bill is visible but some distance from
the original view hole, a second view hole will need to be put in, closer to the
bill.
If a bleed occurs during the procedure:
• Immediately stop the procedure and apply gentle pressure with a cotton bud to
the edge of the membrane. A small bleed, (i.e. dot of blood on the cotton
bud) up to the extent of two cotton buds soaked in blood is acceptable. Do not
panic and do not take the pressure off the membrane, until the bleeding has
stopped.
• Once the bleeding has stopped, do not progress any further. Check the
respiration rate of the chick, tape up the view hole, and place the egg back in
the incubator. Make sure to write detailed notes about the procedure and any
observations made.
NOTE: If a major blood vessel is damaged during the artificial internal pip and
pulmonary respiration has not yet started, a veterinary surgeon must urgently be
contacted. It is extremely difficult to stop this sort of bleed out, and the prognosis is
generally fatal.
1.1.3 Further Monitoring of Eggs with View Holes
• Any egg that has had a view hole added needs to be closely monitored. By
putting a view hole the physical properties of the egg have been altered.

ONE Best Practice Manual FINAL – June 2012
88
Provided the chick is normal and not vacuum packed, the tape will remain over
the hole and the membranes will not need checking, (or dampening down). It
is important the membranes do not dry out, and that the chick is left to both
internally and/or externally pip unassisted.
• For artificially internally pipped eggs it is essential that the egg is closely
monitored to ensure the chick is receiving adequate oxygen, and the egg is
‘clearing out’. The vascular system should now be looking a lot stronger and
chick movement should increase.
• If the egg is not starting to clear out the artificial internal pip site will need to
be reassessed to make sure that the bill has not moved under the membrane
and away from the hole. Alternatively the hole in the membrane may have
been too small, and has resealed. If this is the case, a new hole will need to be
made in the chorio-allantoic membrane.
• Carefully observe the position of the bill. Has it changed in angle? What is the
amount of bill coming up through the membrane? Has the bill disappeared
from view? Using a cotton bud soaked in saline solution, dampen down the
membranes to assess the activity of the chorio-allantoic membrane veins. If
the hatch is progressing no further action is required. Write detailed hatch
notes, as these are important for the follow through of hatch information and
are essential if and when additional assistance is required.
• 24 to 48 hours after the artificial internal pip, the egg can be transferred to a
hatch room (or hatcher). The hatcher temperature should be set at 34°C.
• When the bill is physically pushed up into the view hole, or the chick has
externally pipped elsewhere, this is considered to now be external pip. The
tape can be removed from over the view hole (unless it is a large 2 centimetre
view hole, in which case it should remain partially tape to prevent excessive
drying out of the membranes).
1.2 Chick Malposition during Hatching
In artificially incubated kiwi eggs the incident of malpositioned chicks is very low.
There are five commonly recognised types of embryo malposition, which are based
on chicken malposition terminology.
Two common embryonic malpositions in kiwi are when the embryo is rotated in the
egg, with the head located at the opposite end from the air cell, or the bill is down
between the thighs. Embryos in this position are unable to pip into the air cell
before hatching and mortality rates are extremely high.
There are a number of other additional embryonic malpositions found in kiwi,
generally as a result of their long bill. Once the embryo reaches 45 to 55 days of age
it becomes difficult to move the head and the bill into the correct position. The kiwi
becomes stuck in that orientation and continues to grow normally, (i.e. bill between
the legs), until problems arise as the hatch progresses. In some cases, hatching
assistance will be required.

ONE Best Practice Manual FINAL – June 2012
89
1.2.1 X-ray of Kiwi Eggs
• If a malpositioned chick is suspected, (based on candling), and a view hole has
been put in and the bill cannot be located, the egg will need to be x-rayed
immediately.
• Try to detect any new discolouration of the membranes under the shell as that
is often a possible hint to where the bill may be located. This is often obvious
without any candling and appears as dark smudgy patches directly under the
shell.
• Certain malpositions can be detected early in candling based on the location of
waste deposits, shadowing of the embryo in an unusual position, and
correspondingly light areas that should normally be dark, (i.e. the non air cell
end of the egg being very dark in appearance instead of being light).
• Contact the veterinarian immediately and schedule a time for the x-ray,
allowing time to package the egg properly for transport. In most cases the egg
will be x-rayed immediately. Package the egg carefully in the small carry box.
Place it on a warm heat pad and wedge small towels around the egg so there is
no movement during transportation.
• On arrival at the veterinarian’s make sure that the x-ray plate has the Egg ID
label and date on it, and most importantly a right (R) or left (L) label so the
correct orientation of the egg during the x-ray can be determined.
• Place the egg on one half of the x-ray plate and allow it to centre correctly, (so
the top of the egg is uppermost), and wedge it firmly in place with sponge
wedges (provided by the veterinarian). The egg is now ready for the first x-ray.
The second half of the plate should be covered by a lead cover.
• Move the egg to the second half of the plate and make sure that the lead cover
is correctly lined up over the first x-ray. Rotate the egg a full 90° to the right,
then wedge the egg in place. This is the second standard x-ray.
• Place the egg back in the carry box on the heat source and place in a safe area,
while the x-ray is being developed. Further x-rays should not be needed unless
it is an extremely unusual malposition. If this is the case another set of x-rays
are required with rotation 180° or a 90° rotation to the left, but this is unusual.
• Discuss any key points about the egg x-ray with the veterinarian and make sure
you are familiar with where the bill is located. Mark this in pencil on the shell
if necessary.
• Once the x-ray is ready, make sure the egg is well packaged in the transport
box and return it immediately to the incubation room, along with the x-ray. It
is useful to draw a sketch of the actual position of the chick on paper in the
chick notes as an additional reference.
• If the chick is not yet ready to hatch, (i.e. large external yolk present and
chorio-allantoic membrane still active), and depending on the type of
malposition, it may necessary to re-orientate the egg in the hatcher, (refer to
section below).

ONE Best Practice Manual FINAL – June 2012
90
1.2.2 Viewing Holes to Assess Status in Malpositioned Chicks
• Before rushing in with a view hole, re-assess all egg notes and egg
characteristics. The view hole in the case of a malpositioned chick is actually
the external and internal pip in all cases. They are also a lot more difficult
than the standard view hole, as they are made into a fully active membrane
area and not into the safety of the air cell. The membranes directly under the
shell should not be punctured accidentally as this is likely to cause a major
bleed.
• Have the x-ray at the correct orientation to the egg, and be very clear with
where the access hole is to be made, using the x-ray as a guide.
• Make sure the required tools, (small Phillips screwdriver, two sets of fine
tweezers and the candler), are sanitised with Trigene solution. Also have on
hand small phials of saline solution, cotton buds, gauze pads, and masking
tape.
• Wash the bench and make sure the egg is placed on a clean mat. If it is a
complicated malposition and the view hole may take a while, place the egg on
a warmed heat pad. It is important that the egg does not cool too much.
• Hands should be re-sanitised before commencing with the view hole.
• Mark the area where the shell is to be opened, and make sure you are
comfortable with the orientation of the egg as you hold it, (i.e. ensure that it is
not upside down).
• Very carefully tap the shell with the screwdriver until you feel the shell
starting to crumble. Take your time at this point, and very carefully remove
the shell fragments from over the shell membrane. It is essential that the
membrane is not punctured at this stage.
• Once the area is clear of shell, dampen down the membrane and often the bill
will be evident as a bump under the membrane at this point, (if you have the
hole in the correct place).
• Carefully peel the outer and inner shell membrane away to expose the chorio-
allantoic membrane.
• You should now clearly see the bill and the active blood vessels in the chorio-
allantoic membrane. Sometimes the veins around the tip of the bill can be
non-existent as a result of the pressure from the bill, or may be discoloured
due to pressure from the bill causing small bleeds. Nevertheless, you still need
to be aware of causing a bleed at this stage.
• If the bill is obvious, put in an artificial internal pip in the usual way, (refer to
section above). Make sure that you tear the membrane once you have pierced
it. Tearing automatically helps to cauterise, (seal), the blood vessels.
• If the bill is not obvious but you are sure that it is within that region, remove
more shell to enlarge the hole in the shell. Leave the chorio-allantoic
membrane intact at this stage to see if you can locate the tip of the bill by
carefully wetting down the membrane, (using sterile water and a cotton bud).
Often it is possible to feel the tip of the bill as a raised bump under the
membrane with the cotton bud. Do not continue to enlarge the view hole if
there is no sign of the bill.

ONE Best Practice Manual FINAL – June 2012
91
• Re-assess the x-ray and the predicted location of the bill. A second hole may
be required. If you are close to the bill and you put a hole in the chorio-
allantoic membrane the egg should start to clear out once there is adequate
oxygen available for pulmonary respiration. You also may see the bill through
the internal pip hole when the egg is candled.
• If the bill is not detected after a second hole is made, a second series of x-rays
may be necessary. Note: be absolutely clear the x-rays are being interpreted
correctly.
• It is essential to tape a gauze pad over the new external pip site to prevent the
membranes from drying out and sticking to the chick. If the effects of drying
are obvious, the membrane will need to be continually dampened down.
• Depending on the malposition, it may be necessary to reorient the egg position
while it is in the hatcher. It is important that there is minimal pressure lying
over the head, so the egg may need to be rotated, (so the head is upwards), or
propped up using wedges of tissue or foam. Remember to keep the original
view hole in the air cell end taped close at all times and continue to monitor
the egg closely.
• If the malposition was detected early and x-rayed at this stage, it is important
to repeat the x-ray prior to inserting a view hole in the shell. It is important to
detect where the bill is to accurately place the view hole, as the chick may
have moved or rotated during its subsequent development after the initial x-
ray.
1.3 Assisted Hatches
Embryos may fail to hatch because of sub-optimal incubation parameters or hatching
conditions, inadequate or excessive evaporative water loss, infection or microbial
contamination, developmental abnormalities, nutritional deficiencies or other
weaknesses. It is important to have appropriate protocols to accommodate
variations in hatch times for kiwi, and very clear guidelines for when to assist with
hatches.
• In the majority of cases with the chick in a difficult malposition, the chick will
not hatch without assistance. All hatching parameters, (movement, egg colour
and glow, respiration rate, vocalisations, sweaty wet chick smell, etc) should
be monitored to determine the best time to hatch the chick. It is essential that
the chick is given as much time as possible to fully absorb the yolk, for the
vascular system to shut down, and for the chick to complete the normal
physiological processes of hatching. Do not rush the hatch.
• Occasionally, malpositioned chicks will hatch unassisted but the hatch does
need to be monitored extremely closely to ensure that the chick is not
becoming stressed, or becoming ‘stuck’ part way through the hatch.
• Once the chick is deemed ready to hatch, or alternatively, if the chick becomes
very distressed, you will need to proceed with a full assisted hatch.
• Do not do this alone, and preparation is vital. A minimum of two people are
required to carry out an assisted hatch, although three people is preferable,

ONE Best Practice Manual FINAL – June 2012
92
(one to hold the egg/chick, one to carry out the assisted hatch, and one
support person to fetch equipment, take photographs, etc).
• Clean the bench where you will carry out the assisted hatch, and put down a
clean mat. Clean with Trigene solution all the implements that you require;
tweezers, clamps and scissors (to cut the tape only). Set out the saline
solution, cotton buds, gauze pads, tape, a pre-warmed heat pad, Betadine
cream and spray, the digital camera, the mobile phone, the x-rays and chick
notes. Also have available any additional notes of a previous chick in a similar
position as a useful reference, as often a sibling chick may be in a similar
position.
• Wash and sterilise hands. Before starting the assisted hatch, decide on the role
of each person, and make sure that everyone is very clear about the procedure
that is about to start. Taking detailed notes and photographs is just as
important as actually hatching the chick.
• Make sure you are fully prepared for any eventuality, (such as a bleed, large
external yolk, etc) and remain calm.
• Re-candle the egg before you start to familiarise yourself with the position.
• The first thing to determine is the presence of the external yolk sac. This can
be difficult, depending on the position of the chick. The person hatching the
egg rests the egg on the heat pad, and then begins by enlarging the external
pip area within the air cell to expose the head. Chip off only the shell above
the air cell and keep the membranes intact to start with.
• As the shell is removed, the membranes are more malleable and using a cotton
bud you can physically lift the membrane in an attempt to expose the navel
area. If you see lots of external yolk, and you feel the chick can still continue
to absorb it, it is not too late to stop. Re-assess the hatch. You can tape the
chick back into the shell for another few hours, but it will require close
monitoring to make sure the chick does not become too stressed.
• If no yolk is obvious, continue assisting the hatch. Gently remove the shell over
a larger area, exposing the back of the neck and down towards the abdomen.
• Once there is a quarter to a third of the shell membrane exposed, peel this
back and expose the chorio-allantoic membrane. Continue to try and see if
there is external yolk. Once this stage is reached the hatch must continue.
Remove the chorio-allantoic membrane and monitor for bleeding.
• If excessive bleeding begins you will need to progress quite quickly so you can
clamp the main umbilical vein and artery as soon as possible to prevent
excessive blood loss. If bleeding is minimal, (or non-existent), continue
removing the shell at a steady pace.
• When possible lift the head and bill up as this usually helps expose the navel. If
the yolk is internalised, and there is no bleeding, clamp and then carefully rip
(with your fingers) the umbilical vein and artery, at the furthest point away
from the navel as possible, (refer to notes below). Sometimes these will break
independently during the hatch anyway. Make sure the chick is not getting
chilled.
• Spray the navel with Betadine as soon after hatch as possible. Weigh the chick
and place it back into the hatcher immediately to avoid it chilling.
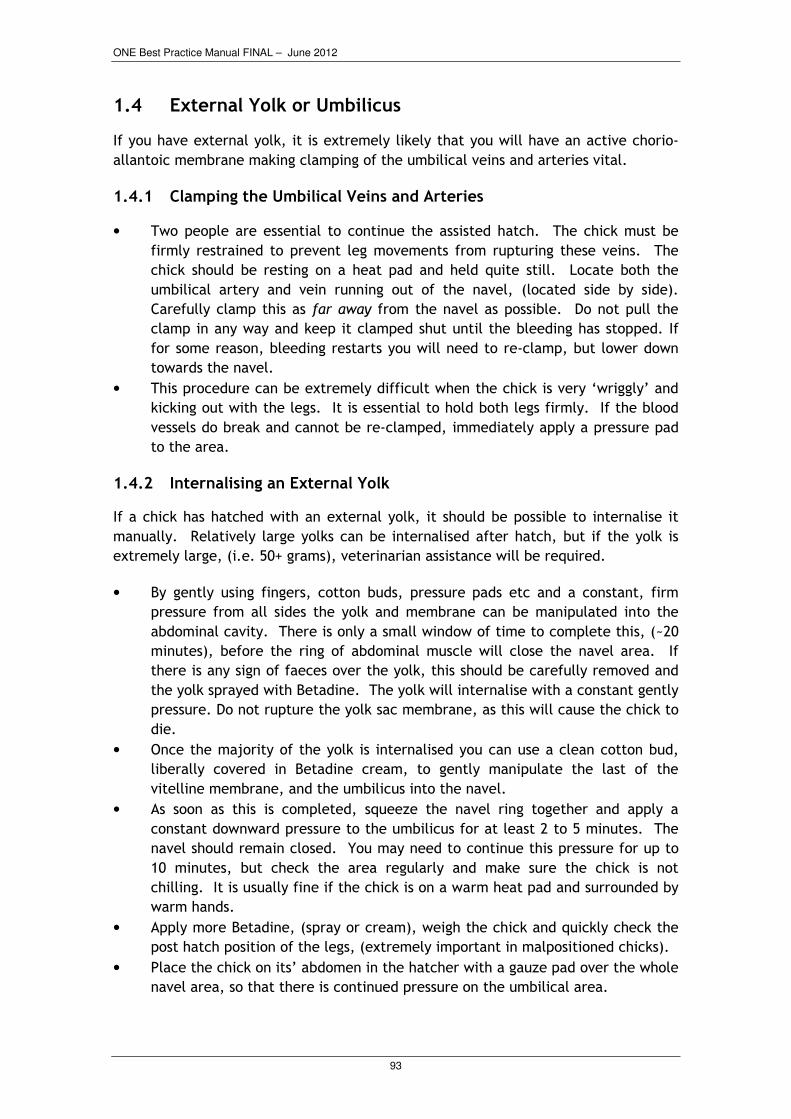
ONE Best Practice Manual FINAL – June 2012
93
1.4 External Yolk or Umbilicus
If you have external yolk, it is extremely likely that you will have an active chorio-
allantoic membrane making clamping of the umbilical veins and arteries vital.
1.4.1 Clamping the Umbilical Veins and Arteries
• Two people are essential to continue the assisted hatch. The chick must be
firmly restrained to prevent leg movements from rupturing these veins. The
chick should be resting on a heat pad and held quite still. Locate both the
umbilical artery and vein running out of the navel, (located side by side).
Carefully clamp this as far away from the navel as possible. Do not pull the
clamp in any way and keep it clamped shut until the bleeding has stopped. If
for some reason, bleeding restarts you will need to re-clamp, but lower down
towards the navel.
• This procedure can be extremely difficult when the chick is very ‘wriggly’ and
kicking out with the legs. It is essential to hold both legs firmly. If the blood
vessels do break and cannot be re-clamped, immediately apply a pressure pad
to the area.
1.4.2 Internalising an External Yolk
If a chick has hatched with an external yolk, it should be possible to internalise it
manually. Relatively large yolks can be internalised after hatch, but if the yolk is
extremely large, (i.e. 50+ grams), veterinarian assistance will be required.
• By gently using fingers, cotton buds, pressure pads etc and a constant, firm
pressure from all sides the yolk and membrane can be manipulated into the
abdominal cavity. There is only a small window of time to complete this, (~20
minutes), before the ring of abdominal muscle will close the navel area. If
there is any sign of faeces over the yolk, this should be carefully removed and
the yolk sprayed with Betadine. The yolk will internalise with a constant gently
pressure. Do not rupture the yolk sac membrane, as this will cause the chick to
die.
• Once the majority of the yolk is internalised you can use a clean cotton bud,
liberally covered in Betadine cream, to gently manipulate the last of the
vitelline membrane, and the umbilicus into the navel.
• As soon as this is completed, squeeze the navel ring together and apply a
constant downward pressure to the umbilicus for at least 2 to 5 minutes. The
navel should remain closed. You may need to continue this pressure for up to
10 minutes, but check the area regularly and make sure the chick is not
chilling. It is usually fine if the chick is on a warm heat pad and surrounded by
warm hands.
• Apply more Betadine, (spray or cream), weigh the chick and quickly check the
post hatch position of the legs, (extremely important in malpositioned chicks).
• Place the chick on its’ abdomen in the hatcher with a gauze pad over the whole
navel area, so that there is continued pressure on the umbilical area.

ONE Best Practice Manual FINAL – June 2012
94
• All assisted hatches vary greatly in the position of the chick; the degree of
external yolk, the amount of bleeding, the size of the umbilicus, etc.
• It may be necessary to maintain the hatcher temperature at 34.0°C for a longer
period of time, and if the chick is having difficulties thermo-regulating or is
extremely tired, the temperature may need to be increased slightly. This needs
to be carefully monitored and should not exceed 34.5°C.
1.4.3 External Umbilicus
• Occasionally a chick hatches with an external umbilicus. This umbilicus can
vary in length from 1 to 3 centimetres, and appears very ‘meaty’. Usually the
umbilicus will become black in colour, shrivel up and drop off. Generously
cover the umbilicus with Betadine cream, to protect the area from infection,
and leave it. Close monitoring will be required. Any sign of redness or infection
will require the chick to been seen by a veterinarian, and likely a course of
antibiotics will be prescribed.
• If staff are present at the time of hatch it may be possible to internalise the
umbilicus before the ring of abdominal muscle will close the navel area. There
is only a small window of time to complete this post hatch, (~20 minutes).
• As outlined above, use gentle pressures with a cotton bud soaked in Betadine
cream, and gently poke the umbilicus back into place. Make sure the umbilicus
is clean before commencing the procedure.
• Chicks that have had an assisted hatch or external yolk will need careful
monitoring for the next three weeks in case of additional yolk sac problems, or
umbilical/naval stalk infections.
1.4.4 Uric Acid and Pre-hatch Faeces
• Often during an assisted hatch, especially if the hatch is prolonged and the
chick is stressed, there may be evidence of very green pre-hatch stress faeces.
There also may be large deposits of white/grey ‘grainy’ uric acid. It is
important to remove this from the chick as quickly as possible. Even though it
is still sterile at this point it may cause bacterial infection at a later stage.

ONE Best Practice Manual FINAL – June 2012
95
2 Correction of Malpositioned Legs
Sometimes kiwi chicks are affected with splayed or rotated legs. This may be a result
of an unusual position in the egg, a fall resulting in injury to the leg or slipping on a
smooth surface in the hatcher or brooder.
Splayed legs are often preventable by the use of appropriate substrate during the
first week after hatch, usually brooder matting to provide a non-slip surface.
Seek veterinary assistance if a chick has hatched with splayed or rotated limbs or any
physical deformities.
A veterinarian should be consulted before any hobbling procedure is carried out to
confirm diagnosis and appropriate treatment.
If, when handling the chick post hatch it is apparent the legs, (specifically the lower
tarsometatarsus), are not evenly spaced and at the correct angle from the hip and
femur, applying hobbles may be necessary. Do not hobble the legs immediately after
the chick has hatched no matter how serious the problem is. Instead, re-examine the
orientation of the legs after 2 to 3 hours. It is important that the chick is allowed
time to rest, recover and become active after hatching.
If the hatch occurred in the late afternoon, leave correction of the limb alignment
until the morning. If the chick hatched during the night, hobble the legs the
following morning (refer to Figure 15).
If problems with splayed legs are not addressed quickly, (i.e. within 24 hours), they
can lead to long term leg problems such as permanently splayed legs, tibiotarsal
rotation and perosis, (tendon slipping off the back of the hock). This may result in
possible euthanasia when the chick gets older.
Severe leg deformities should be referred to the New Zealand Wildlife Centre for
Conservation Medicine assessment and treatment options. A veterinarian should be
consulted before the hobbling procedure is carried out to confirm diagnosis and
appropriate treatment method.
Two people are required to carry out the hobbling, (taping), procedure correctly.
This is outlined below:
• The legs are hobbled just above the foot joint, (lower tarsometatarsus), (refer
to Figure 15).
• A rigid spacer is essential when one of the legs is positioned inward towards the
navel, (midline). They are not always necessary if the leg is angled outwards
(Vet wrap, plastic electrical tape, or masking tape is sufficient for this
purpose). A spacer is a stiff piece of card or several layers of tape that form a
firm divider to keep the legs at the correct angle and space apart. Once made,
the spacer is attached to loops of tape which goes around the chicks legs. The
tape must be folded over on itself so it does not stick to the leg.

ONE Best Practice Manual FINAL – June 2012
96
• It is important to make sure the spacer is the correct size and length for the
individual chick. A spacer that is too small will pull the legs inwards too
tightly, and a spacer that is too long will push the legs apart too far. This will
subsequently have a direct effect on tendon development.
• Hold the chick on its back and line the legs up in the correct position, (to
determine the correct spacer size). The person holding the chick can then
maintain the legs in the correct orientation while the spacer is being attached.
It is important to attach the spacer to one leg and double check the size.
Several attempts may be necessary to determine the correct size of the spacer.
• Do not attach the loops around the legs too tightly. They should slide up and
down the leg and not cause rubbing.
• It may be necessary to place a second spacer above the hock joint to keep the
hocks in line, but this is rare and only necessary in very severe cases.
• If the legs are taped early enough, the hobbles/spacer should only need to stay
on the chick for 24 to 48 hours, (the time frame is determined on an individual
chick basis). By this stage the tendons are stronger, there is even weight on
both legs as the chick is crouching, and legs should now be in line. Check the
tape regularly for rubbing and loosen the loops if rubbing is obvious. Apply
Betadine cream to any rubbed areas.
• It is vital that leg position is closely monitored in the brooder when the chick is
crouching more and becoming far more mobile. The hobbled legs need careful
monitoring for an improvement in the correct leg angle, making sure that the
spacer or hobble is not too tight, and the tape is not rubbing.
• Once the chick appears to be holding the legs in the correct position, the tape
and/or spacer can be removed, but the chick will require continued monitoring
of the leg position for the next week. This often coincides with the full health
check at five days of age.
Figure 15. Construction and use of hobbles to correct splayed legs in a young kiwi chick. (Photo: Kiwi Encounter & S. Bassett)
• Malpositioned chicks can sometimes hatch with curled toes as a result of their
position in the shell. The toes can be carefully splinted to help correct this and
along with regular intensive physiotherapy the toes can return to a normal
position, (refer to Figure 16).

ONE Best Practice Manual FINAL – June 2012
97
Figure 16. Using a splint to correct curled toes in a kiwi chick. (Photo: Auckland Zoo).