NATIONAL SENIOR CERTIFICATE GRADE 12€¦ · Number of 5 bottles = 5 160 = 32 . 1 : 2,5 = x: 400

OPERATION MANUAL
Model:8903/8904/8906
LASER INFRAREDHYGRO-THERMOMETER
Model:
8857

Thank you very much for purchasing this Laser Infrared Hygro-Thermometer!
This unique meter design with 3 H.V.A.C&R must parameters in 1. The meter designed as battery operated for Humidity,Air temp., Dew Point, Wet Bulb, SurfaceTemp. & Temp. Differential measurement.
The sensor is also specially protected bygear damper device. While the sensor isretracted, the meter will not work. The sensor designed to auto detect the air temp. and humidity if it is not retracted. The psychrometer is a micro processor-based design. A must device for HVAC engineers use. No need to whirl the meter or refer to the chart. Easy to get wet bulb, dew point and surface temp.Quickly!
Features :
1
INTRODUCTION
Triple LCD digital display.T1-dew point function.(T1=surface temp.)
Emissivity adjustable.Handheld size, easy to carry.Low battery indication.Fast response .Accurate reading .Dew Point calculated in seconds.Wet Bulb calculated in seconds.Microprocessor circuitry for reliability.Auto power off time frame adjustable.Red laser indicator included.Back light for dark places.
Gear damper to protect sensor.
Infrared to measure surface temp.

2
The meter x 1Battery x 4 (AAA size )Operation manualCalibration salt bottles (33% and 75%)are optionalHard carry caseAC to DC adaptor is optionalRS232 cable is optional
This package contains:
MATERIAL SUPPLIED
WARNING
Press the gear damper device before operation. While the sensor is retracted,the air temp. and humidity will not be displayed on the LCD.
Press the gear damper device again to retract the sensor while turn off the meter. To retract the sensor will help to maintainthe sensor away from dirt.
Important:

CONTROLS AND INDICATORS
LCD DISPLAY
1) Key - Press to measure surface temp. by activating IR function. - Released to hold the surface temp. Value. - Press and at the same time to inactivate laser targeting function or activate targeting function.
3
Air temp.
Surface temp.
Air humidityBattery indicator
Emissivity
IR indicator

4
2) Key - Press to turn on the meter without IR value displayed. - Press at least 2 seconds to turn off the meter - While the meter is on, press again to enter auto-off time setting and emissivity setting. 3) Key - Press to turn on the back light. - Press again to turn off the back light. 4) Key - Press to select the operation mode from air temp., dew point to web bulb. - Press for 2 seconds to show T1-dew point. (T1=surface temp.) 5) Key - Press to change temp. unit - Press for up when setting the auto- off time and emissivity. - Press and at the same time to disable auto power off function. 6) Key
- Press and at the same time to inactivate laser targeting functionor activate targeting function. - Press for down while setting the auto-off time and emissivity.
5
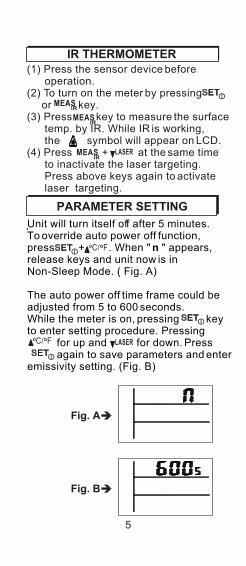
Unit will turn itself off after 5 minutes.To override auto power off function, press + . When " n " appears, release keys and unit now is in Non-Sleep Mode. ( Fig. A)
The auto power off time frame could be adjusted from 5 to 600 seconds.While the meter is on, pressing keyto enter setting procedure. Pressing for up and for down. Press again to save parameters and enteremissivity setting. (Fig. B)
PARAMETER SETTING
IR THERMOMETER(1) Press the sensor device before operation.(2) To turn on the meter by pressing or key.(3) Press key to measure the surface temp. by IR. While IR is working, the symbol will appear on LCD.(4) Press + at the same time to inactivate the laser targeting. Press above keys again to activate laser targeting.
Fig. A
Fig. B

6
The emssivity could be adjustable from 0.3 to 0.99. Pressing key twice to enter setting procedure while the meteris on. will flash on the left side.Pressing for up and for down. Press again to save parameter andback to normal.
Fig. C
&
Press key to show the DP on the LCD.Press again to show the Wb on the LCD. Press again to show the air temp. on the LCD. (See Fig. D, E, F)
Press key for 2 seconds to show on the LCD. means T1-DP.(See Fig. G). Press again for 2 seconds back to IR temp. Display.
Fig. D Fig. F
Fig. E Fig. G

LOW-BATTERY
Two level low battery indication: -Level 1: Battery indicator will flash when meet level 1. In this situation, the meterwill work normal however users shouldprepare new batteries. -Level 2: Battery indicator will always display on the LCD while meet lever 2.In this situation, users need to changebatteries immediately.
1. Open the battery cover on the rear side.2. Remove the expired batteries.3. Insert new 4pcs AAA batteries and make sure the batteries are inserted with correct polarity, put on the cover.
7
AC TO DC ADAPTOR
The compatible AC to DC adaptor is 6~9V, at least 200mA. 6V is the bestchoice.
Please be suggested only to use 6V adaptor when operating the meter withred laser targeting function.
If using 9V adaptor when the meter red laser targeting function is active, the red laser module might be damaged.

8
Note:a)You can exit calibration without saving by pressing key more than 2 sec. before step 5.
b)Auto power off is disable in calibration mode.
c)In order to get high accuracy, you have better to do the calibration at 23degree C.
d)To plug the meter probe into salt bottle, slightly rotate the probe into bottle andDO NOT push too hard.
CALIBRATION
1.Turn off the meter and plug the meterprobe into the 33% salt bottle. Pressing + at the same time and then press key as well to turn the meteron. The meter will enter calibration mode.
2.32.8 will flash on LCD. After 30 minutes, the flashing stops to indicatethe 32.8% calibration procedure is finished.
3.Move the meter probe to the 75% saltbottle and pressing to enter 75.3%calibration.
4.Also 75.2 will flash on LCD. After 30 minutes the flashing stops to indicatethe whole calibration has been completed, and the calibration data has been saved in memory. Press key more than 2 second to turn off meter.

9
RS232 SOFTWARE
Interface of RS232(3.0V level)A.9600 bps, 8 data bits, no parity.B.Format: Tx. ASCII code by every sec. while meter is on.
Txxx.xC:Txx.xC:Hxx.x%:Txx.xC:Txx.xCLRCCRLF
stWhere: The 1 value is IR temp., the nd rd2 value is Air temp., the 3 value is
thHumidity, the 4 value is Wet bulb, ththe 5 value is Dew point.
The x here means one of {0|1|2| |9|-}
SoftwareUsing Window's integrated Hyper-Terminal software. Setting the COM port and the bout rateas 9600bps, 8 data bits.
C.Format for error value: E01No value; E02 Overflow; E03 Underflow. The unit for error codeis n. Ex. If IR is disable, then tx.
TE01n:T23.5C:H45.3%:T14.9C:T12.3CLRCCRLF
Error value
RS232 CablePlease contact with your vendor topurchase the compatible cable for your meter.

10
TROUBLESHOOTING
LCD DISPLAY
Middle
Top
Bottom
First of all, the LCD right side is divided into three parts for easy explanation.
1.? Power on but no display.a)Make sure the time of pressing key is more than 0.1 second.b)Check the batteries are in place andin good contact with correct polarity.c)Replace a new battery and try again.d)Move away the battery for one minuteandput back again.
2.? Power on, LCD on, but no display immediately.a)Circuit error in RH measurement channel; return the meter to the dealerfor repairing.
3.? Display disappeara)Check whether the low battery indicator displayed before Displaydisappear, if yes, replace a new battery.b)Turn on the meter by pressing + key to disable auto power off function for long time using.
4.? TOP display (Calibration failure)a)Check whether the low battery indicator displayed before calibration, if yes, use new batteries and try again.b)Make sure the good sealing when the meter probe plugged into the salt bottle.c)Make sure the free air temperature is within 23.2 degree C when calibration.
E9

11
5.? TOP display E1a)Circuit error in IR measurement channel; return to dealer for repairing.b)Circuit error in temperature measure-ment channel. Return to dealer for repairing. (If displayed)
6.? TOP display E2a)IR temperature > 500 degree C.b)IR temperature < 500 degree C whileroom temp. >50degree C. (If displayed)
7.? TOP temperature E3a)IR temperature < -40 degree C.b)IR temperature > -40 degree C whileroom temp. <-20degree C. (If displayed)
8.? MIDDLE display E1a)Circuit error in temperature measure-ment channel; return to dealer for repairing.
9.? MIDDLE display E2a)Dp is out of the range(>50 degree C).b)If always display E2 while air temp. is between -20 to 50 degree C means there is a circuit error in temp. Measure-ment channel, return the meter to dealer for repairing.
10.? MIDDLE display E3a)Room temp. is out of the range (<-20 degree C). b)If always display E3 while temp. rangeis -20 to 50 degree C, this means thereis a circuit error in temp. Measurementchannel, return to dealer for repairing.
11.? BOTTOM display E1a)Circuit error in RH measurement channel; return to dealer for repairing.

12
12.? BOTTOM display E5.Circuit error in RH measurement channel; return to dealer for repairing.
SPECIFICATIONo o
Temp. range : -20~ +50 C(-4~ 122 F)
RH% range : 0~100%RH
Wet bulb range :o o
-21.6 ~ 49.9 C(-6.88~122 F)
Dew point range :o o
-68 ~49.9 C (-90.4~122 F )
IR temp. range : o o
-40~ 500 C (-40~932 F)
Accuracy: RH%: 3% at 10~90% ,
others 5%oo
Air temp. : 1 F ( 0.6 C) o o
IR temp. : 2% or 2 C (-20~450 C)
whichever is greater. Otherso
3% or 3 C.
Response time : 0.5 sec (IR sensing).
Size :175(H) x 50(D) x70(W)mm^3
Power:3 x 1.5V AAA battery or 6V~9V,
>200mA adaptor.

13
Proof of purchase is required for warranty repairs. Warranty is void if the meter has been opened .
The meter is warranted to be free from defects in material and workmanship for a period of one year from the date of purchase. This warranty covers normal operation and does not cover battery, misuse, abuse, alteration, tampering, neglect, improper maintenanceor damage resulting from leaking batteries.
WARRANTY
Authorization must be obtained from the supplier before returning items for any reason. When requiring a RA (Return Authorization) , please include data regarding the defective reason, the meters are returned along with good packing to prevent any damage in shipment and insured against possible damage or loss.
RETURN AUTHORIZATION

Accuracy, the Zenith of
Measuring / Testing Instruments !
More products available !
Hygrometer/Psychrometer
Thermometer
Anemometer
Sound Level Meter
Air Flow meter
Infrared Thermometer
K type Thermometer
K.J.T. type Thermometer
K.J.T.R.S.E. type Thermometer
pH Meter
Conductivity Meter
T.D.S. Meter
D.O. Meter
Saccharimeter
Manometer
Tacho Meter
Lux / Light Meter
Moisture Meter
Data logger
Temp./RH transmitter
Wireless Transmitter ..........
2004.03.1000