OPERATION AND MAINTENANCE MANUAL - Chief …€¦ · · 2015-06-19OPERATION AND MAINTENANCE...
25
CHD3001 Page 1 of 25 OPERATION AND MAINTENANCE MANUAL Vacuum assisted sanding kit system with wet mix immersion separator CHD3001 for the automotive / aerospace industries EC-15 (IT-85L) SK HEPA File number: LR 060825 CSA Certified for ordinary areas/locations 996 Industrial Drive, Madison, Indiana, United States, 47250 Phone: 800-445-9262 Fax: 866-275-0173 www.chiefautomotive.com READ ALL INSTRUCTIONS BEFORE OPERATING, CLEANING OR SERVICING IMPORTANT - SAVE THESE INSTRUCTIONS
Transcript of OPERATION AND MAINTENANCE MANUAL - Chief …€¦ · · 2015-06-19OPERATION AND MAINTENANCE...

CHD3001 Page 1 of 25
OPERATION AND MAINTENANCE MANUAL
Vacuum assisted sanding kit system
with wet mix immersion separator
CHD3001
for the automotive / aerospace industries
EC-15 (IT-85L) SK HEPA
File number: LR 060825
CSA Certified for ordinary areas/locations
996 Industrial Drive,
Madison, Indiana,
United States, 47250
Phone: 800-445-9262
Fax: 866-275-0173 www.chiefautomotive.com
READ ALL INSTRUCTIONS BEFORE OPERATING, CLEANING OR SERVICING
IMPORTANT - SAVE THESE INSTRUCTIONS

CHD3001 Page 2 of 25
ROUTINE MAINTENANCE
The wet mix immersion separator must be filled at all times with either mineral oil, water or any other liquid required to neutralize the product being recovered.
This unit must be filled up to the liquid level indicator line shown on the recovery drum.
Max. dust recovery capacity Volume of liquid required
22 lbs / 10 kg 7.9 gallons / 30 liters
Do not exceed the above mentioned recommended maximum dust recovery capacity. We recommend proceeding with the following maintenance after each use and after a maximum of 8 hours of consecutive use:
Drain the liquid by opening up the manifold drain valve.
Once drained the unit must be disconnected from its power source – either from the electrical outlet or from the air compressor.
Discard all recovered material from inside of the wet mix immersion separator.
Thoroughly clean all parts of the unit, including the suction hoses.
Once unit is clean reinstall the parts inside the wet mix immersion separator and fill it of clean liquid.
HEPA FILTER
The life of the HEPA filter depends greatly on the use of the vacuum cleaner. It is recommended that the HEPA filter be replaced once a year if the vacuum assisted sanding kit system is used intensively (daily). The filter can be replaced every two years if the vacuum assisted sanding kit system is used less frequently (two or three times per week)
COALESCING FILTER ELEMENT (CFE) (OPTIONAL)
The optional Coalescing Filter Element (CFE) is located downstream of the recovery drum at the air exhaust. Verify if the CFE needs to be drained or replaced as part of routine maintenance.
PLEASE CONSULT THE INSTRUCTION MANUAL AT ALL TIMES
CHD3001 Page 3 of 25
Table of Contents
1.0 INSPECTION ........................................................................................................................................... 4
2.0 APPLICATIONS ...................................................................................................................................... 4
3.0 SPECIAL CONDITION FOR SAFE USE IN REGARD TO THE DEGASSING VENT ............................ 5
4.0 PRE-USAGE INSTRUCTIONS AND IMPORTANT SAFETY PRECAUTIONS ...................................... 6
5.0 PRECAUTIONS FOR THE RECOVERY OF TOXIC / NUISANCE DUST .............................................. 9
6.0 GROUNDING INSTRUCTIONS .............................................................................................................. 9
7.0 OPERATING INSTRUCTIONS ............................................................................................................. 10
8.0 AUTOMATIC OPERATION WITH PNEUMATIC TOOL ....................................................................... 17
9.0 STANDARD VACUUM CLEANER OPERATION ................................................................................. 17
10.0 MAINTENANCE AND CLEAN-UP PROCEDURE ................................................................................ 18
11.0 STORAGE ............................................................................................................................................. 21
12.0 REPLACING THE COALESCING FILTER ELEMENT (CFE) (OPTIONAL) ........................................ 21
13.0 HEPA FILTER REPLACEMENT ........................................................................................................... 23
May 7, 2015
Page 4 of 25
1.0 INSPECTION Carefully unpack and inspect your vacuum assisted sanding kit system for shipping damage. Each unit is tested and thoroughly inspected before being shipped; therefore, any damage is the responsibility of the delivering carrier, who should be notified.
2.0 APPLICATIONS
WARNING: A risk assessment has to be conducted by the user for the recovery of dusts and liquids. The following recommendations cannot, in any case, supplant the conclusions of a risk assessment.
EC-15 (IT-85L) SK HEPA vacuum assisted sanding kit system is designed for use in ordinary non-hazardous areas/locations to neutralize the recovered dust into a liquid bath into the wet mix immersion separator.
WARNING: Do not use this vacuum assisted sanding kit system in
hazardous areas/locations Refer to the National Electrical Code (NEC) NFPA 70 paragraph 500 and to the Canadian Electrical Code (CEC) for more details.
WARNING: It is the user’s responsibility to determine the appropriate
liquid (water, oil, etc) to be used to neutralize the recovered dust into the wet mix immersion separator.
WARNING: This vacuum assisted sanding kit system is designed for the
recovery of dry materials only. Do not recover liquids.
WARNING: DO NOT RECOVER ANY HOT EMBERS OR IGNITED DUSTS.
Page 5 of 25
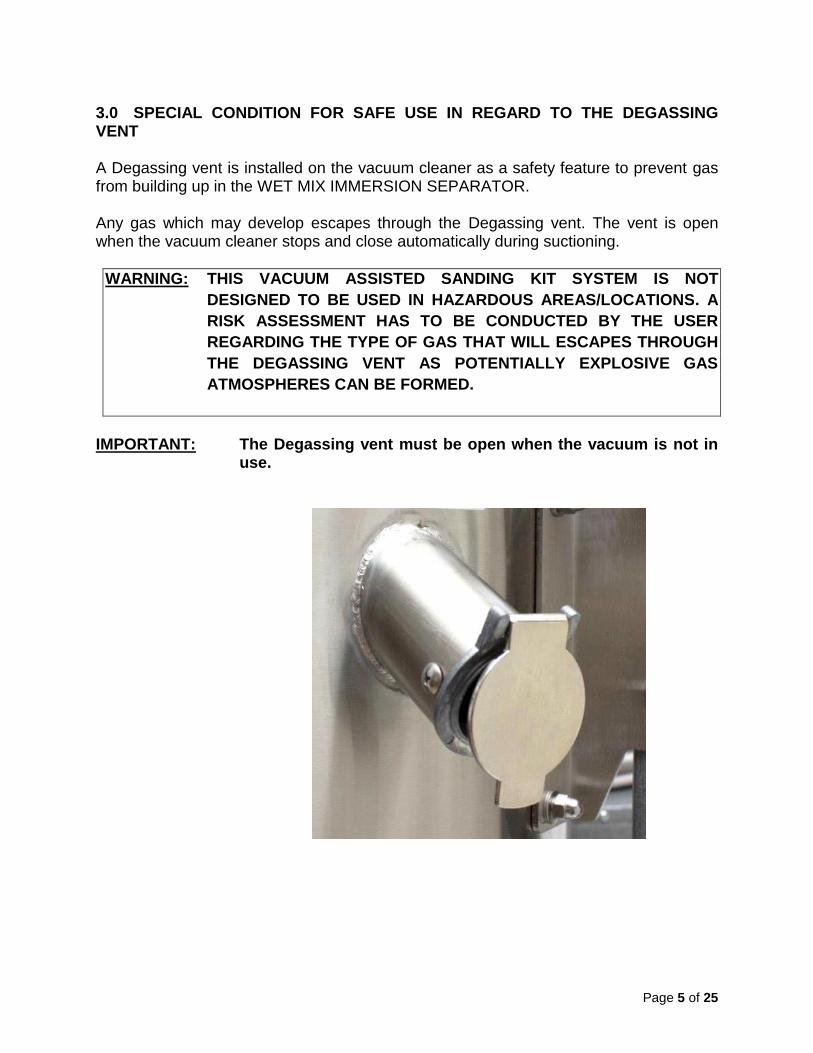
3.0 SPECIAL CONDITION FOR SAFE USE IN REGARD TO THE DEGASSING VENT A Degassing vent is installed on the vacuum cleaner as a safety feature to prevent gas from building up in the WET MIX IMMERSION SEPARATOR. Any gas which may develop escapes through the Degassing vent. The vent is open when the vacuum cleaner stops and close automatically during suctioning.
WARNING: THIS VACUUM ASSISTED SANDING KIT SYSTEM IS NOT
DESIGNED TO BE USED IN HAZARDOUS AREAS/LOCATIONS. A
RISK ASSESSMENT HAS TO BE CONDUCTED BY THE USER
REGARDING THE TYPE OF GAS THAT WILL ESCAPES THROUGH
THE DEGASSING VENT AS POTENTIALLY EXPLOSIVE GAS
ATMOSPHERES CAN BE FORMED.
IMPORTANT: The Degassing vent must be open when the vacuum is not in
use.

Page 6 of 25
4.0 PRE-USAGE INSTRUCTIONS AND IMPORTANT SAFETY PRECAUTIONS
WARNING: The vacuum assisted sanding kit system must be grounded
during use. (See Section “GROUNDING INSTRUCTIONS) WARNING: DO NOT OPERATE UNIT WITHOUT A PROPER GROUND
SOURCE. This unit is designed to operate on a grounded electrical outlet. It is the responsibility of the user to ensure that the electrical outlet is grounded.
WARNING: It is the user’s responsibility to determine the appropriate
liquid (water, oil, etc) to be used to neutralize the recovered dust into the wet mix immersion separator.
WARNING: Improper use of this vacuum assisted sanding kit system will
result in the voiding of the warranty. WARNING: Operation and service of this vacuum assisted sanding kit
system must only be carried out by trained personnel.
WARNING: Use only original replacement parts from the manufacturer or
from one of its authorized distributors. This equipment is designed to be used only with supplied or recommended hose and tools. Any alteration to this equipment by a third party nullifies its certification.
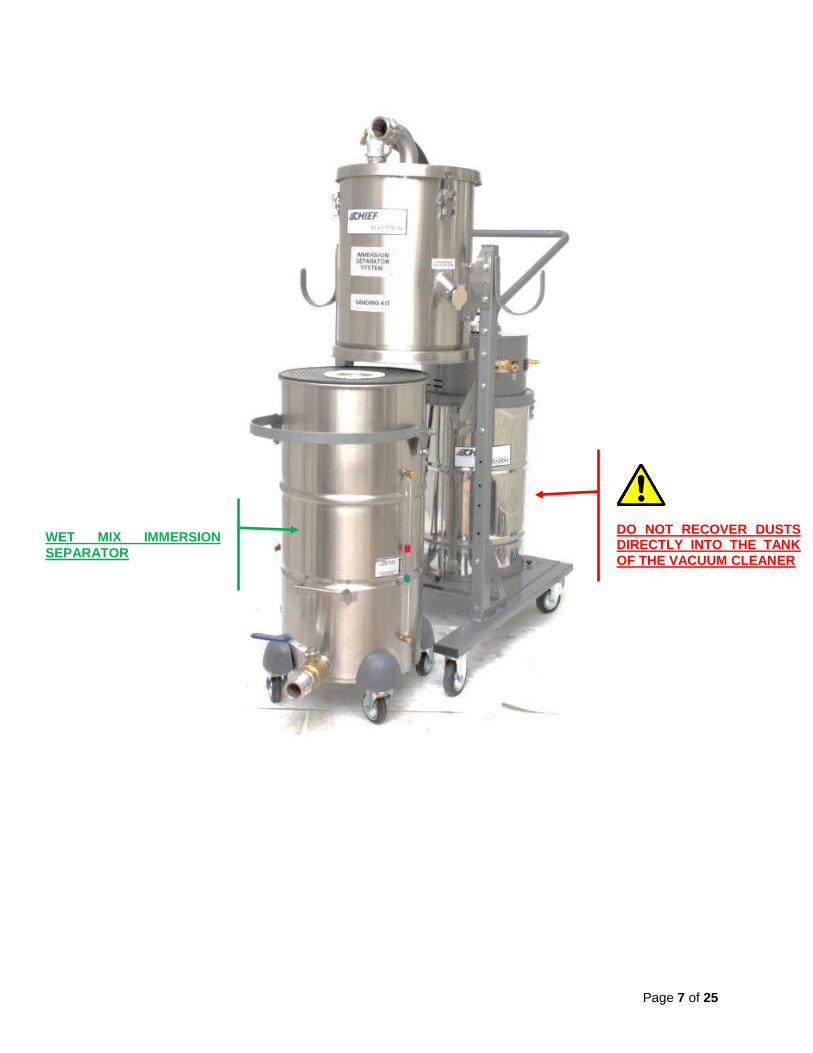
WARNING: THIS EQUIPMENT IS DESIGNED TO RECOVER DUSTS INTO
THE WET MIX IMMERSION SEPARATOR. DO NOT RECOVER DUSTS DIRECTLY INTO THE TANK OF THE VACUUM CLEANER. PERIODICALLY CHECK INSIDE OF THE TANK OF THE VACUUM CLEANER TO MAKE SURE IT IS CLEAN AND DRY.
Page 7 of 25
WET MIX IMMERSION
SEPARATOR
DO NOT RECOVER DUSTS DIRECTLY INTO THE TANK
OF THE VACUUM CLEANER

Page 8 of 25
a. Consult local electric code and authority having jurisdiction before using. Make sure that the electrical installation is compatible with the voltage stated on the nameplate.
b. Examine the vacuum assisted sanding kit system’s power cable for damage (cracking or ageing) before every use. Return to manufacturer for servicing if damaged. Use only the power cable supplied with the unit or one purchased from the manufacturer.
c. Do not pull the vacuum assisted sanding kit system by the power cable. d. Turn off the vacuum assisted sanding kit system and unplugged the power cable
before servicing or storing the unit. e. This vacuum assisted sanding kit system is designed for indoor use only. f. The wet mix immersion separator should be clean and dry before using the
vacuum assisted sanding kit system. g. WARNING: Do not pick-up anything that is burning or smoking, such as hot
ashes, cigarettes, matches or live embers. h. The appliance shall only be operated when all filters are in position and
undamaged. i. Brass fittings are required to ensure spark free operation and to ensure ground
continuity between vacuum assisted sanding kit system and the compressed air supply
j. Connect to a properly grounded outlet only. See Grounding Instructions. k. Do not use extension cords

Page 9 of 25
5.0 PRECAUTIONS FOR THE RECOVERY OF TOXIC / NUISANCE DUST
DANGER: If the vacuum assisted sanding kit system is used to recover
toxic or nuisance dust, the following safety precautions must be taken:
a. The vacuum assisted sanding kit system must be equipped with an absolute filter
HEPA or ULPA type. b. Service and operation should only be carried out by trained personnel. c. Appropriate clothing and personal protective equipment should be worn when
operating or servicing the vacuum assisted sanding kit system. d. Dispose of collected materials responsibly. Follow applicable government
regulations for the disposal of hazardous materials. NOTE: Any health hazard associated with the use of this vacuum assisted
sanding kit system in conjunction with the recovery of toxic / nuisance dust has not been investigated by CSA.
6.0 GROUNDING INSTRUCTIONS
This vacuum assisted sanding kit system must be properly grounded. If it should malfunction or breakdown, grounding provides a path of least resistance for electric current to prevent the build-up static electrical charge and to ensure that static electricity is discharged to ground. The build-up of static electricity could create a sparking hazard and an ignition hazard. This vacuum assisted sanding kit system is equipped with a static dissipating electrical cable. It is the responsibility of the user to ensure that the electric outlet is grounded.
WARNING: This vacuum assisted sanding kit system is equipped with
conductive wheels which allow for the vacuum cleaner to be grounded with the floor. Do not substitute the conductive wheels and use only replacement conductive wheels supplied by the manufacturer.
WARNING: To effectively dissipate static electricity this vacuum assisted
sanding kit system must be grounded during use. Do not operate vacuum assisted sanding kit system if the electrical outlet is not properly grounded or if the grounding is questionable.

Page 10 of 25
7.0 OPERATING INSTRUCTIONS
WARNING: Use caution when connecting and disconnecting compressed
air lines. When static air pressure is suddenly released, it can cause the airline to whip.
a. Make sure the ON/OFF button on the vacuum cleaner is in the "OFF" position
(0) b. Detach the recovery tank by lifting the lever
CAUTION: HEAVY
TANK WHEN LIQUID INSIDE
LEVER

Page 11 of 25
c. Remove the baffle system
d. Remove the sieve basket

Page 12 of 25
WARNING: Before use the inside of the wet mix immersion separator,
the baffle system, hoses and accessories should be clean and dry
e. Fill the wet mix immersion separator with liquid up to the appropriate level

Page 13 of 25
WARNING: It is the user’s responsibility to determine the appropriate
liquid (water, oil, etc) to be used to neutralize the recovered dust into the wet mix immersion separator.
f. Put back the sieve basket
g. Put back the baffle system

Page 14 of 25
h. Put back the recovery tank in place by lowering the lever
CAUTION: HEAVY
TANK WHEN LIQUID INSIDE
LEVER
Page 15 of 25
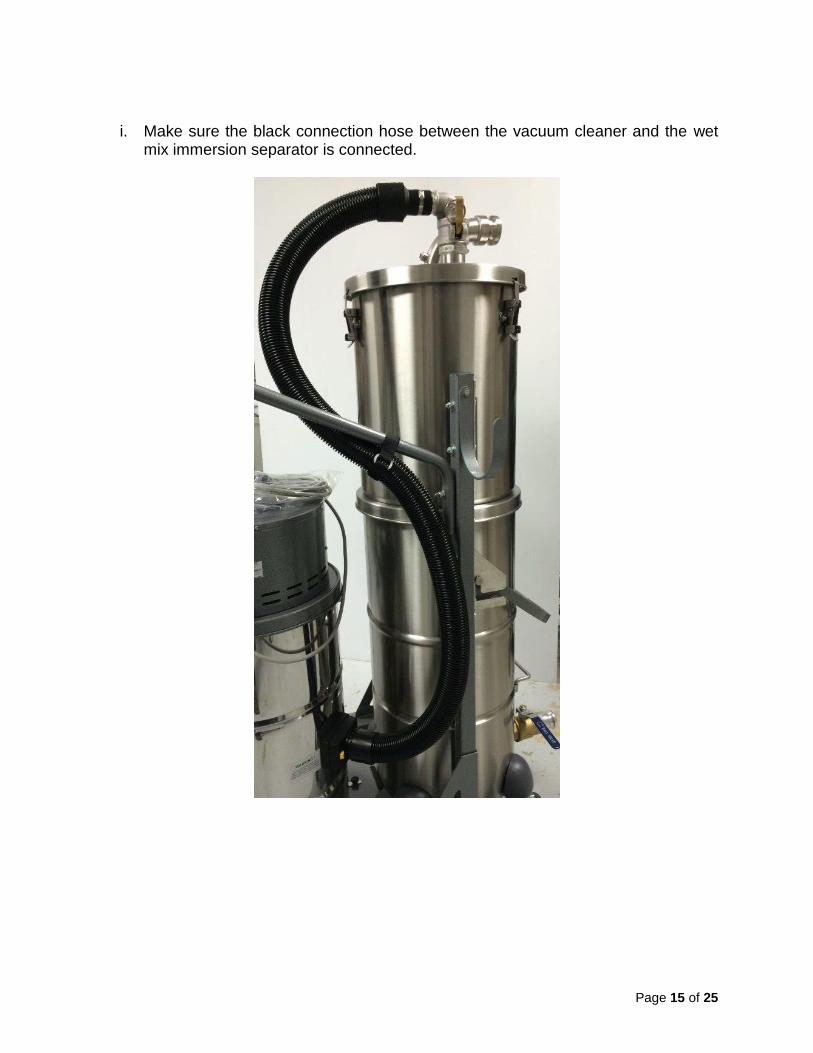
i. Make sure the black connection hose between the vacuum cleaner and the wet
mix immersion separator is connected.
Page 16 of 25
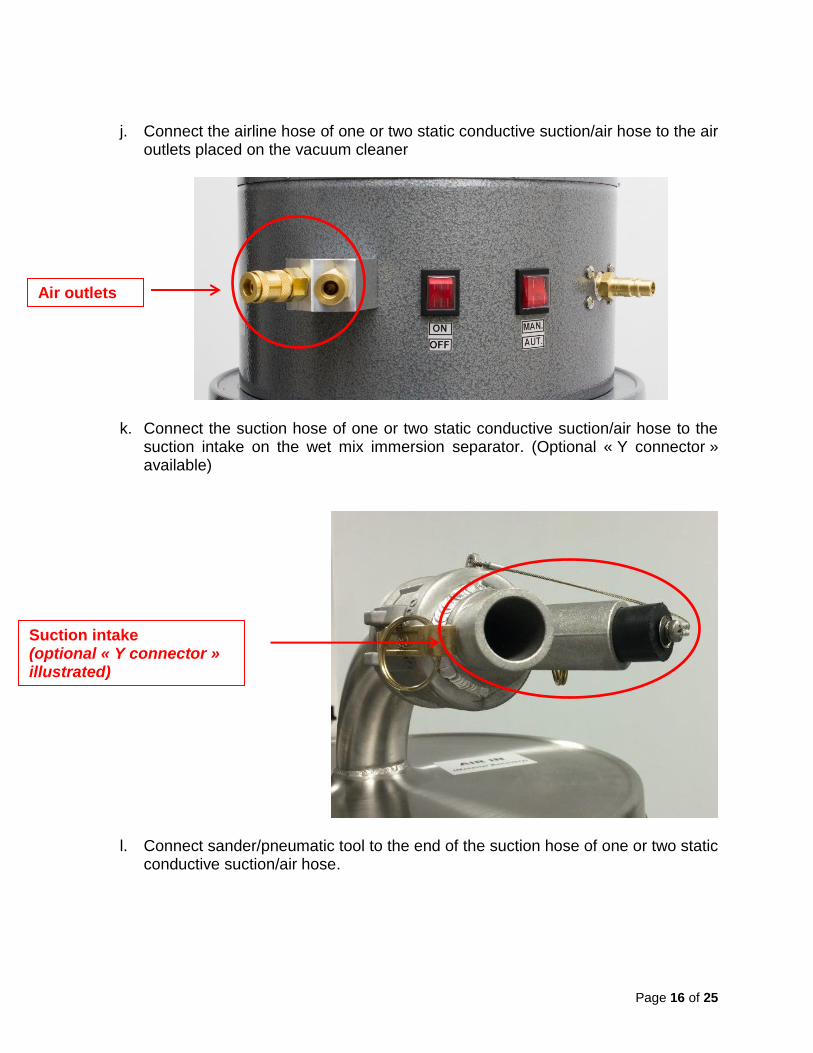
j. Connect the airline hose of one or two static conductive suction/air hose to the air
outlets placed on the vacuum cleaner
k. Connect the suction hose of one or two static conductive suction/air hose to the suction intake on the wet mix immersion separator. (Optional « Y connector » available)
l. Connect sander/pneumatic tool to the end of the suction hose of one or two static
conductive suction/air hose.
Air outlets
Suction intake (optional « Y connector » illustrated)

Page 17 of 25
8.0 AUTOMATIC OPERATION WITH PNEUMATIC TOOL a. Make sure the ON/OFF button is in the "OFF" position (0) b. Make sure that the AUT/MAN button is in "AUT" position (0)
c. Connect the air line hose to the air inlet on the vacuum cleaner and to the pneumatic air
source.
d. Plug the vacuum cleaner to a grounded electrical outlet
e. Put the ON/OFF button to the "ON" position. The red light turns on and the machine is
now on standby mode.
f. Switch the pneumatic tool ON. The vacuum motor turns on.
g. After use, switch the pneumatic tool OFF.
h. Wait 5 or 6 seconds before turning off the vacuum cleaner.
i. Switch the ON/OFF button to the "OFF" position.
9.0 STANDARD VACUUM CLEANER OPERATION
a. Make sure the ON/OFF button is in the "OFF" position (0)
b. Make sure that the AUT/MAN button is in position "MAN" (1)
c. Connect hoses and tools
d. Plug the vacuum cleaner to a grounded electrical outlet
e. To turn on the vacuum cleaner place the ON/OFF button to the "ON" position.
f. To switch off the cleaner place the ON/OFF button to the "OFF" position.
Air inlet

Page 18 of 25
10.0 MAINTENANCE AND CLEAN-UP PROCEDURE
IMPORTANT: We recommend proceeding with the following maintenance
after each use and after a maximum of 8 hours of consecutive
use
a. After operation shut the vacuum assisted sanding kit system off. b. Use the drain valve to empty collected material.
WARNING: Empty collected material as soon as the liquid reach the
maximum indicated level.
IMPORTANT: In order to check the level of liquid the vacuum assisted
sanding kit system needs to be shut down.
c. To operate drain valve lift the safety ring and turn the handle. Optional drain
hoses are available for use with the drain valve.
WARNING: Empty collected materials into suitable container.

Page 19 of 25
a. Clean the upper and lower baffle systems and remove all remaining material with brush

Page 20 of 25

Page 21 of 25
WARNING: After use, be sure to remove any remaining materials by
rinsing and cleaning the wet mix immersion separator, the baffle system, hoses and accessories.
WARNING: Flush the suction hose with water to remove build up dirt
WARNING: Empty the wet mix immersion separator regularly. Do not allow
recovered materials to sit for extended periods of time. An excessive accumulation of recovered materials can create a dust ignition hazard.
11.0 STORAGE
It is recommended that the inside of the wet mix immersion separator be clean and dry when storing the vacuum assisted sanding kit system.
12.0 REPLACING THE COALESCING FILTER ELEMENT (CFE) (OPTIONAL) For users who wish to implement a conservative protocol for replacing the optional coalescing filter element (CFE), it is recommended that it be replaced once a year.
WARNING: Proper clothing and respiratory equipment are required when
replacing the coalescing filter element.
IMPORTANT: Use only original brand replacement coalescing filter elements
(CFE). a. Shut the vacuum assisted sanding kit system off. b. Unscrew the screw and remove the lid of the coalescing filter element (CFE).
Page 22 of 25
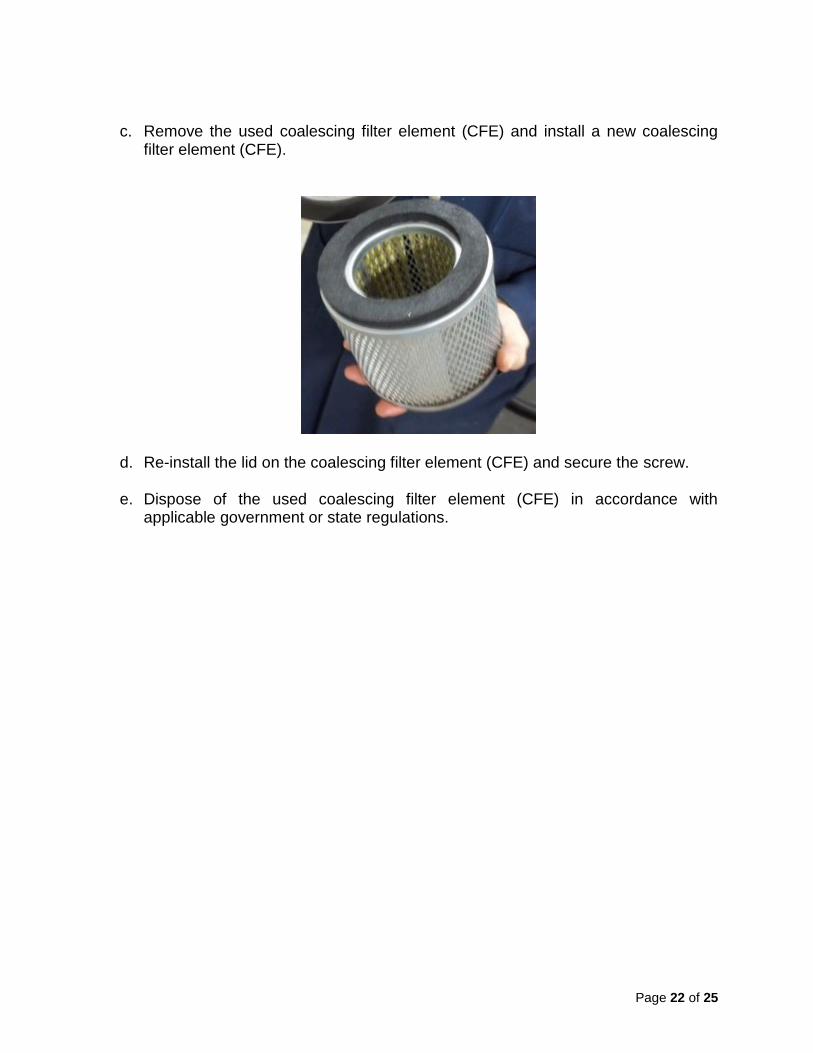
c. Remove the used coalescing filter element (CFE) and install a new coalescing
filter element (CFE).
d. Re-install the lid on the coalescing filter element (CFE) and secure the screw. e. Dispose of the used coalescing filter element (CFE) in accordance with
applicable government or state regulations.

Page 23 of 25
13.0 HEPA FILTER REPLACEMENT
A HEPA filter is designed for filtration of ultra fine particles. A clogged HEPA filter will reduce the air flow thereby reducing the vacuum’s performance thus requiring replacement. The life of the HEPA filters depends greatly on the use of the vacuum cleaner. It is recommended that the HEPA filters be replaced once a year if the vacuum is used intensively (daily). The filters can be replaced every two years if the vacuum cleaner is used less frequently (two or three times per week) WARNING: Service and operation should only be carried out by trained personnel
wearing appropriate clothing and breathing apparatus. WARNING: Dispose of collected materials responsibly. Follow government regulations
for the disposal of hazardous materials.
a. Disengage the latches and remove the powerhead from the recovery tank.
b. Remove the grey safety filter placed around the HEPA filter
ACORN NUT

Page 24 of 25
c. Unscrew and remove the acorn nut and the rubber washer securing the HEPA filter.
IMPORTANT: Conserve these items for re-use.
d. Remove the used HEPA filter and install a new HEPA filter. N.B.: It is recommended to use a silicone sealant on the lip of the HEPA filter and around the acorn nut hole of the HEPA filter. The silicone sealant is not included. The recommend product is the DOW CORNING 111 sealant.
e. Re-install the rubber washer and the acorn nut as shown.
WARNING: For the recovery of Toxic / Nuisance materials, it is recommended that an aerosol leak test be performed on the vacuum cleaner to make sure that the HEPA filter has been properly installed.
Page 25 of 25
Warranty, Liability, and Contact Information
Chief Automotive Technologies warrants for 1 year for dust extractor motors and 2 years for dust extractor tanks from date of installation and/or purchase any components of its Vacuum-Assisted Sanding System which do not perform satisfactorily due to defect caused by faulty material or workmanship. Chief’s obligation under this warranty is
limited to the repair or replacement of products which are defective and which have not been misused, carelessly
handled, or defaced by repair or repairs made or attempted by others. Chief will not warrant what is considered normal
wear on filters and hoses. CHIEF AUTOMOTIVE TECHNOLOGIES DOES NOT ASSUME RESPONSIBILITY FOR ANY DEATH, INJURY OR PROPERTY
DAMAGE RESULTING FROM THE OPERATOR’S NEGLIGENCE OR MISUSE OF THIS PRODUCT OR ITS
ATTACHMENTS. CHIEF MAKES NO WRITTEN, EXPRESS OR IMPLIED WARRANTY WHATSOEVER OF MERCHANTABILITY
OR FITNESS FOR A PARTICULAR PURPOSE OR OTHERWISE REGARDING THE EQUIPMENT OR ANY PART OF THE PRODUCT OTHER THAN THE LIMITED WARRANTY
STATED ABOVE.
Chief Automotive Technologies 996 Industrial Drive Madison, IN 47250
Phone: 800-445-9262 http://www.chiefautomotive.com