Operating manual - BakedecoOperating manual Rondostar 3000 SFS6115, SFS6115C, SFS6117, SFS6117C,...
69
Bakery machines and equipment Operating manual Rondostar 3000 SFS6115, SFS6115C, SFS6117, SFS6117C, SFS6117H, SFS6117DD SFI6117, SFI6117H Edition BC523201 Rondo S.r.l. Via Lago di Albano, 86 36015 Schio (VI) Italy Phone +39 0445 576 635 Fax +39 0445 576 641 [email protected] HEADQUARTERS Seewer GmbH & Co. Hoorwaldstrasse 44 57299 Burbach Germany Phone +49 (0)2736 203-0 Fax +49 (0)2736 203130 [email protected] Seewer Rondo S.à.r.l. PAE "Les Pins" 67319 Wasselonne Cedex France Phone +33 (0)3 88 59 11 88 Fax +33 (0)3 88 59 11 77 [email protected] Rondo Ltd. Unit 7, Chessington Park Lion Park Avenue Chessington, Surrey KT9 1ST Great Britain Phone +44 (0)208 391 1377 Fax +44 (0)208 391 5878 [email protected] Rondo Inc. 51, Joseph Street Moonachie, N.J. 07074 USA Phone +1 201 229 97 00 Fax +1 201 229 00 18 [email protected] Rondo Bakery Equipment Inc. 267 Canarctic Drive Downsview, Ont. M3J 2N7 Canada Phone +1 416 650 0220 Fax +1 416 650 9540 [email protected] OOO Rondo Doge Varschavskoje Chaussée, D. 17, Str. 1 117105 Moskau Russia Phone 007 (495) 786 39 06 Fax 007 (495) 788 98 20 [email protected] Seewer Rondo Asean Regional Office No. 14-1 Mezzanine Floor Jalan 11/116B Kuchai Entrepreneurs Park Off Jalan Kuchai Lama 58200 Kuala Lumpur Malaysia Phone +60 3 7984 55 20 Fax +60 3 7984 55 95 [email protected] COMPETENCE CENTRE SCHIO Seewer AG Heimiswilstrasse 42 3400 Burgdorf Switzerland Phone +41 (0)34 420 81 11 Fax +41 (0)34 420 81 99 [email protected] Doge Food Processing Machinery s.r.l. Via Lago di Albano, 86 36015 Schio (VI) Italy Phone +39 0445 575 429 Fax +39 0445 575 317 [email protected] SUBSIDIARIES www.rondodoge.com Technical specifications subject to change without notice
Transcript of Operating manual - BakedecoOperating manual Rondostar 3000 SFS6115, SFS6115C, SFS6117, SFS6117C,...

Bakery machines and equipment
Operating manual
Rondostar 3000
SFS6115, SFS6115C, SFS6117,SFS6117C, SFS6117H, SFS6117DD
SFI6117, SFI6117H
Edition BC523201
Rondo S.r.l.Via Lago di Albano, 8636015 Schio (VI)ItalyPhone +39 0445 576 635Fax +39 0445 576 [email protected]
HEADQUARTERSSeewer GmbH & Co.Hoorwaldstrasse 4457299 BurbachGermanyPhone +49 (0)2736 203-0Fax +49 (0)2736 [email protected]
Seewer Rondo S.à.r.l.PAE "Les Pins"67319 Wasselonne CedexFrancePhone +33 (0)3 88 59 11 88Fax +33 (0)3 88 59 11 [email protected]
Rondo Ltd.Unit 7, Chessington ParkLion Park AvenueChessington, Surrey KT9 1STGreat BritainPhone +44 (0)208 391 1377Fax +44 (0)208 391 [email protected]
Rondo Inc.51, Joseph StreetMoonachie, N.J. 07074USAPhone +1 201 229 97 00Fax +1 201 229 00 [email protected]
Rondo Bakery Equipment Inc.267 Canarctic DriveDownsview, Ont. M3J 2N7CanadaPhone +1 416 650 0220Fax +1 416 650 [email protected]
OOO Rondo DogeVarschavskoje Chaussée, D. 17, Str. 1117105 MoskauRussiaPhone 007 (495) 786 39 06Fax 007 (495) 788 98 [email protected]
Seewer RondoAsean Regional OfficeNo. 14-1 Mezzanine FloorJalan 11/116BKuchai Entrepreneurs ParkOff Jalan Kuchai Lama58200 Kuala LumpurMalaysiaPhone +60 3 7984 55 20Fax +60 3 7984 55 [email protected]
COMPETENCE CENTRE SCHIO
Seewer AGHeimiswilstrasse 423400 BurgdorfSwitzerlandPhone +41 (0)34 420 81 11Fax +41 (0)34 420 81 [email protected]
Doge Food Processing Machinery s.r.l.Via Lago di Albano, 8636015 Schio (VI)ItalyPhone +39 0445 575 429Fax +39 0445 575 [email protected]
SUBSIDIARIES
www.rondodoge.com
Technical specifications subject to change without notice


Index
Index
Code: BC523201
Index1 Safety Information .................................................................................................... B0100134
1.1 Explanation of Symbols ........................................................................................... 010 - 11.2 Explanation of Warning Signs .................................................................................. 010 - 11.3 Safety Elements ....................................................................................................... 010 - 1
1.3.1 Safety guard .................................................................................................... 010 - 11.4 Safety Instructions and Information which Must be Followed .................................. 010 - 2
2 Transporting, Setting up, Connecting, Dismounting and Storing the Machine .. B02003072.1 Machine Delivery........................................................................................................020 - 12.2 Transportation ............................................................................................................020 - 12.3 Unpacking the Machine ..............................................................................................020 - 12.4 Setting Up the Machine ..............................................................................................020 - 2
2.4.1 Mounting the table supports to the support (model SFI) .......................................020 - 22.4.2 Mounting the lowe tables (model SFI) ..................................................................020 - 22.4.3 Installing the machine tables ................................................................................020 - 32.4.4 Mounting the forked supports ..............................................................................020 - 42.4.5 Mounting the pneumatic springs (model SFI) .......................................................020 - 62.4.6 Tightening the conveyor belts ..............................................................................020 - 72.4.7 Mounting the dough catch pan .............................................................................020 - 72.4.8 Mounting the automatic flour duster .....................................................................020 - 82.4.9 Electrical Connection of the automatic dough reeler (by models SFS6117H/SFI6117H) ......................................................................020 - 92.4.10 Compound operation with a transfer table PTT150/PTT250 ..............................020 - 92.4.11 Compound operation with a make-up line / donut line ........................................020 - 9
2.5 Requirements for Putting the Machine into Operation ...............................................020 - 102.5.1 Ground fault interrupter is actuated when inverter is started ...............................020 - 10
2.6 Moving Direction Test ............................................................................................... 020 - 112.7 Moving the Machine ................................................................................................. 020 - 11
3 General Data about the Machine ............................................................................. B03003183.1 General Information ....................................................................................................030 - 1
3.1.1 The Machine's Applications .................................................................................030 - 13.1.2 Purpose of the Flour Duster ................................................................................030 - 13.1.3 Noise Values ......................................................................................................030 - 13.1.4 Temperatures ......................................................................................................030 - 13.1.5 Ambient Humidity ................................................................................................030 - 13.1.6 Machine Weight ..................................................................................................030 - 23.1.7 Operating Personnel Work Area..........................................................................030 - 2
3.2 Prerequisites .............................................................................................................030 - 23.3 Full View of the Machine.............................................................................................030 - 33.4 Operating Elements ...................................................................................................030 - 5
3.4.1 Main Switch ........................................................................................................030 - 53.4.2 Safety guards......................................................................................................030 - 53.4.3 Push Buttons .......................................................................................................030 - 53.4.4 Control Panel ......................................................................................................030 - 53.4.5 Turning knob for data input ..................................................................................030 - 53.4.6 Flour Duster - Dosing Slides ...............................................................................030 - 6

Index
Index
Code: BC523201
5 Operation .................................................................................................................. B05001605.1 General operation description for RONDOSTAR ........................................................050 - 1
5.1.1 Operating Elements ............................................................................................050 - 15.1.2 Control Panel ......................................................................................................050 - 2
5.2 Operating Instructions.................................................................................................050 - 35.2.1 Starting the machine ...........................................................................................050 - 35.2.2 General indications .............................................................................................050 - 45.2.3 Sheeting in working mode "Auto" with normal program .......................................050 - 55.2.4 Sheeting in working mode "Auto" with a multi program ........................................050 - 65.2.5 Sheeting in the working mode "Auto" with subsequent cutting of the dough sheet (Cutomat) ..................................................................................... 050 - 75.2.6 Sheeting in working mode "Manual/Auto" ......................................................... 050 - 75.2.7 Sheeting in working mode "Manual" ................................................................. 050 - 85.2.8 Simultaneous sheeting of several small dough pieces, with photo cell ............... 050 - 95.2.9 Simultaneous sheeting of several small dough pieces, without photo cell ........ 050 - 105.2.10 Working mode "compound operation with a transfer table" ........................... 050 - 105.2.11 Working mode "compound operation with a make-up line / donut line" .......... 050 - 11
5.3 Programming, modification of programs ................................................................. 050 - 125.3.1 General indications .......................................................................................... 050 - 125.3.2 Working mode "Auto" Programming of a normal program ............................... 050 - 135.3.3 Working mode "Auto" Programming a multi program ...................................... 050 - 145.3.4 Working mode "Auto" Programming the roller gap for "width" ......................... 050 - 155.3.5 Working mode "Auto" change normal programs .............................................. 050 - 155.3.6 Working mode "Auto" change a multi program ................................................ 050 - 165.3.7 Programming in the working mode "Manual/Auto" ........................................... 050 - 16
5.4 Special functionings ................................................................................................ 050 - 175.4.1 Side folding / manual reeling............................................................................ 050 - 175.4.2 Working mode "Manual" with / without photo cell ............................................ 050 - 185.4.3 Diagnosis program .......................................................................................... 050 - 195.4.4 Compound operation ....................................................................................... 050 - 19
5.5 Flour duster ............................................................................................................ 050 - 205.6 Automatic Reeler unit ............................................................................................. 050 - 215.7 Cutting device ......................................................................................................... 050 - 23
6 Cleaning .................................................................................................................... B06002786.1 Cleaning ....................................................................................................................060 - 1
6.1.1 General Information .............................................................................................060 - 16.1.2 Care ...................................................................................................................060 - 5
7 Maintenance..............................................................................................................B07003267.1 General Information for Maintenance of the Machine ...................................................070 - 17.2 Maintenance List ........................................................................................................070 - 17.3 Replacement Parts List ..............................................................................................070 - 2
4 Starting the Machine ................................................................................................ B04001334.1 Preparing for Operational Readiness .........................................................................040 - 14.2 Starting/Stopping the Machine ...................................................................................040 - 1

Index
Index
Code: BC523201
9 Technical data ...........................................................................................................B09003089.1 Technical data Rondostar 3000 ..................................................................................090 - 19.2 Additional information ................................................................................................090 - 5
chapterwise.Hint for operating manual: The numbers of the illustrations (Ex. ) are numbered1
8 Trouble Shooting ......................................................................................................B0800159
Code: B0100134Edition: 11. 1997
Operating manual
1. Safety Information
010 - 1
1 Safety Information
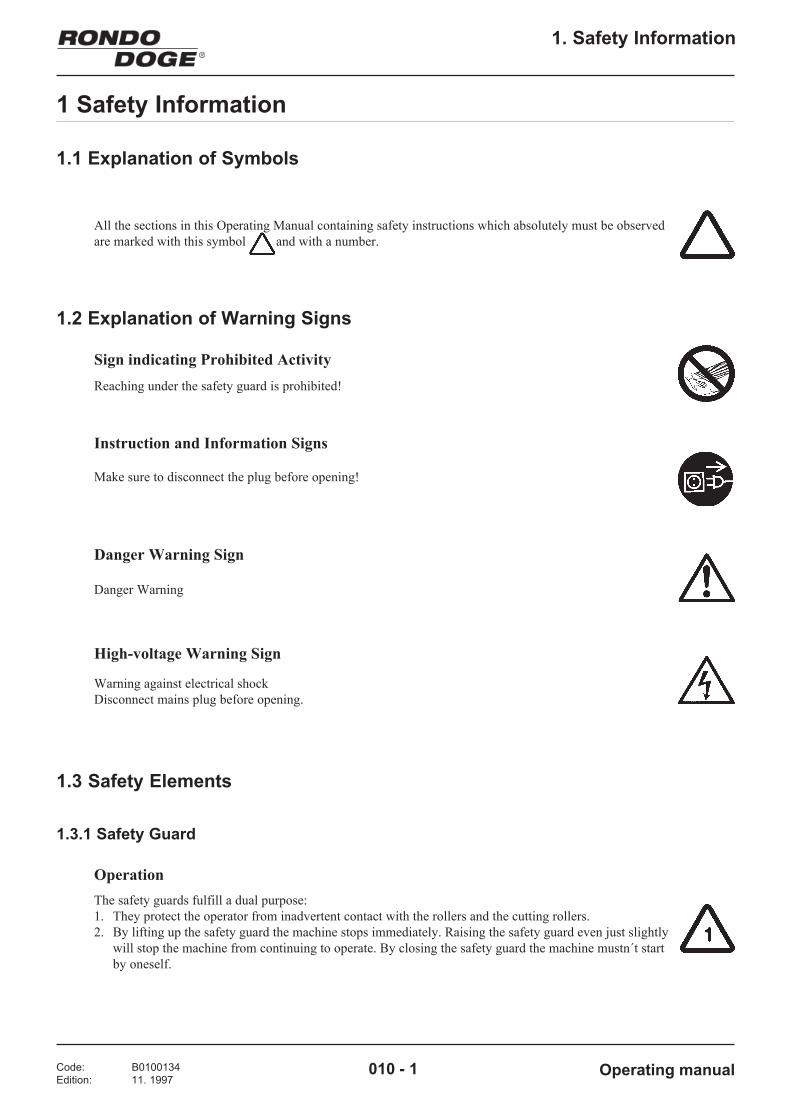
1.1 Explanation of Symbols
1.2 Explanation of Warning Signs
Sign indicating Prohibited ActivityReaching under the safety guard is prohibited!
All the sections in this Operating Manual containing safety instructions which absolutely must be observedare marked with this symbol and with a number.
Make sure to disconnect the plug before opening!
Instruction and Information Signs
Danger Warning Sign
Danger Warning
Warning against electrical shockDisconnect mains plug before opening.
High-voltage Warning Sign
1.3.1 Safety Guard
OperationThe safety guards fulfill a dual purpose:1. They protect the operator from inadvertent contact with the rollers and the cutting rollers.2. By lifting up the safety guard the machine stops immediately. Raising the safety guard even just slightly
will stop the machine from continuing to operate. By closing the safety guard the machine mustn´t startby oneself.
1.3 Safety Elements

Code: B0100134Edition: 11. 1997
Operating manual
1. Safety Information
010 - 2
- Before beginning any repair, service or cleaning work on the machine, the electricity supply to themachine must be disconnected (pull out mains plug).
- Safety devices on the machine may not be adjusted, by-passed or expanded.
- Operation of the machine when any of the safety devices is out of order is prohibited.
- The machine may only be connected to the mains using the mains plug! No permanent electricalinstallation may be made using, for example, terminal screws.
- The machine may only be connected to the mains once it has been fully assembled.In particular, operation with removed machine tables is prohibited.
- Protective covers over the electrical controls and the mechanical moving parts may only be removed byprofessionally qualified personnel and must be remounted before the machine is put back intooperation.
- Any work on the electrical components of the machine, in particular the correct professional mounting ofthe mains plug, may only be carried out by qualified personnel who are familiar with the relevant safetyinstructions.Defective cables and main plugs must be immediately replaced by qualified personnel.
- Authorized use also means that the user must follow all instructions prescribed by the manufacturer inrespect of operation, maintenance and service.
- Any unauthorized changes made to the machine, and in particular, to the safety devices on the machinewill automatically exclude any liability on the part of the manufacturer for accidents or damagesustained as a result of such changes.
1.4 Safety Instructions and Information which Must be Followed
- Rondo-Doge's dough sheeters are built for the food industry exclusively for sheeting, booking, finalsheeting and cutting (Cutomat) of dough.
- Rondo-Doge's flour duster is made exclusively for continuous dusting of dough sheets with flour.
- Any other use of these units is not in accordance with the purpose for which they are built. Therefore, themanufacturer will not be liable for any accidents or damage resulting from unauthorized use; the risk inany such instance will be borne solely by the user.

Code: B0100134Edition: 11. 1997
Operating manual
1. Safety Information
010 - 3
- Defective safety devices must be immediately replaced with new original parts from Rondo-Doge.
- Machine parts located in the areas in which the dough is being processed, and whose surface coatingbecomes worn (e.g. chromium-plate worn off), must be replaced.
- Never reach in the delivery roller of a moving flour duster with either hands or any other object!
- Reaching under the closed safety guard is prohibited!
- When transporting the machine, it may not be lifted on the machine base. The machine should befastened on a pallet without table for transport. Fasten the safety guard in the upper position.
- Do not deposit any loose objects such as knives, tools or articles of clothing, etc. in the area where thedough is processed.
- In order to guard against respiratory tract difficulties and flour dust allergies, we recommend to equipthe machine with an automatic flour duster. Limit the use of flour to a minimum.
- Check periodically to ensure that there are no loose screws in the area where the dough is processed.
- The machine may not be operated without its scrapers fitted in place.
- The automatic reeler is a device starting automatically by the electrical control.Attention when handling it!Do not reach into the stationary or running device!
- Cutting rollers must only be lowered with safety guards closed.
- The use of compressed air for cleaning the machine is not permissible.
- The use of a dust extraction system in the bakehouse is recommended.

Code: B0100134Edition: 11. 1997
Operating manual
1. Safety Information
010 - 4
- Cutting rollers must be changed cautionsly and correctly. Cutting rollers that are not in the cutting stationmust be stored in a safe place.
24- Any disposal of the installation must be carried out in accordance with environmentally-accepted
practices. The operators are fully responsible for ensuring that such practices are followed.
25- This machine is not designed to be used in explosive ambient.

Code: B0200307
Edition: 05. 2005Operating manual020 - 1
2. Transporting, Setting up, Connecting,Dismounting and Storing the Machine
2 Transporting, Setting up, Connecting, Dismounting and
Storing the Machine
When being transported, the machine must be fastened
onto a pallet. The tables must be dismounted and the
safety guards fixed in the upper position.
2.1 Machine Delivery
The machine is delivered in its original packaging.
- Report any claims for damage caused as a result of
transportation directly to the freight handlers (see
the packaging: the delivery documentations are
contained on the outside of the packaging)
2.2 Transportation
The machine must be set up on a level, even floor
surface.
For further information regarding the ambient
conditions required for the machine, see General
Information, Page 030 - 1
2.3 Unpacking the Machine
3
5
The machine must not be tipped over.
(For machine weight, see Technical Data,
Pages 090-1/2/3/4)
- Unpack table and attachments
- Check all items received against the delivery slip
for completeness
Dismount the supports from the machine base (model SFI)
If machine doesn't pass through small passages
(doors), the support (3) has to be dismounted from the
machine base (5) as follows:
- Dismount two screws (A) on each side (front and
rear) and one screw (B) (left and right) on the
machine base
- Lift off the machine base from the support
(2 persons required)
Caution when lifting by crane (danger of tipping)
Remount it in reverse order.

Code: B0200307
Edition: 05. 2005Operating manual020 - 2
2. Transporting, Setting up, Connecting,Dismounting and Storing the Machine
1
2A
2B 4
3
2C
5
2.4 Setting up the machine
Two people are required to set up the machine.
2.4.1 Mounting the table supports to the
support (model SFI)
- Mount the table supports (1) using a hexagon
screw (2A) (each support) to the support (3)
Do not yet tighten the hexagon screws (2A), after
mounting the table supports.
2.4.2 Mounting the lower tables (model SFI)
- Lay the lower tables (4) on the machine base (5)
and the table supports
- Mount the lower tables to the machine base using
three hexagon screws (2B) (each lower table)
- Mount the lower tables to the table supports using
two screws (2C) (each lower table)
- Do not yet tighten screws (2A/B/C)!
- Adjust the lower table
- Tighten all the screws of the mentioned
connections:
- Machine base - Lower tables
- Lower tables - Table supports
- Table supports - Support

Code: B0200307
Edition: 05. 2005Operating manual020 - 3
2. Transporting, Setting up, Connecting,Dismounting and Storing the Machine
2.4.3 Installing the Machine Tables
- Remove all protective foil on the stainless steel
sections of the machine
- Lift the machine table with the aid of a second
person
- Guide the center of the machine table's driving roller
to the spring bolt (6) at the rear of the housing (7)
- Push the table towards the rear, use pressure
- Center the catch of the machine table's driving
roller in the receiver (8) in the front section of the
housing
In order to snap the machine table into place, proceed
as follows:
- Tug lightly on the conveyor belt until the catch
snaps into place
- Raise the table bolt (9) (it is used to prevent the
unintentional unhinge of the table)
6
7
9
8

Code: B0200307
Edition: 05. 2005Operating manual020 - 4
2. Transporting, Setting up, Connecting,Dismounting and Storing the Machine
- Lift the table up
11
- When lifting up the table, either push in or remove
the dough catch pan
- Attach table hook (10)
The machine table is now secured.
2.4.4 Mounting the forked supports
- Push forked support (11) into the support guide (12)
10
12
13 13a
- Insert catch plug (13) of the forked support, with
fitted washer (13a), into one side of the table

Code: B0200307
Edition: 05. 2005Operating manual020 - 5
2. Transporting, Setting up, Connecting,Dismounting and Storing the Machine
- Bend up the forked support (11) and secure it to
the opposite side of the table (washer fitted on the
catch plug)
Position of the forked support when the machine table
is hinged down.
11
11
13b
14
- Fit the second washer on both sides on the inside,
afterwards screw down the cap nut (13b)
Attention: The conveyor belt has to be placed below
the cap nut.
What to watch out for when mounting the
forked supports on machines equipped with the
"Cutomat" cutting device:
The foot (14) of the forked support must be set in such
a manner that the table stands level. This is the only
way to ensure optimal functioning of the safety guard.

Code: B0200307
Edition: 05. 2005Operating manual020 - 6
2. Transporting, Setting up, Connecting,Dismounting and Storing the Machine
16
1818
15
15
16
17
2.4.5 Mounting the pneumatic springs
(model SFI)
Table with automatic reeler:
- Mount pneumatic springs 0200N
Table without automatic reeler:
- Mount pneumatic springs 0100N
- Mount pneumatic springs (15) onto the holding
device (17) and support plates (18) using ribbed
lock washers and hexagon nuts (16)

Code: B0200307
Edition: 05. 2005Operating manual020 - 7
2. Transporting, Setting up, Connecting,Dismounting and Storing the Machine
2.4.6 Tightening the Conveyor Belts
Proceed as follows:
Tighten the conveyor belt so that the heaviest dough
piece, with maximum 15 kg, is driven without slipping.
Overtightening is to be avoided.
- Observe running movement of the conveyor belt in
both directions
If the belt runs off towards one side, proceed as
follows:
- Loosen the tension nut on the opposite side
- Retighten tension nut on the side where it runs off
- Monitor the belt and, if necessary, correct it until it
runs exactly in the middle of the table
or
If necessary, repeat this procedure several times.
Routinely monitor the belt during the initial hours that
the machine is operational and, if necessary, correct it
again.
Tighten and adjust the conveyor belts with
patience!
Prior to carrying out each further correction, allow the
machine to run for at least 30 seconds.
Before putting the machine into operation, the
conveyor belts must be lightly rubbed with flour in
order to prevent the dough from sticking to the belt.
2.4.7 Mounting the dough catch pan
- Retighten the left and right tension nut (19) evenly
and parallel
- Remeasure Distance "X" on both sides using a
millimeter measuring instrument
The distance "X" must be exactly equal on both
sides
- Switch on the machine (See Starting the Machine,
Page 050 - 3)
Attention:
A gap can develop between the synthetic
conveyor belt and the idle roller if the belt is worn
on the edge or is damaged. If this is the case, the
belt must be replaced.
Reason: Risk of injuries to fingers in the area of
the idle roller.
"X"
19
- Remove the protective foil on the dough catch pan (20)
- Push in the dough catch pan on both sides20
21 22
Option:
- Attach the flour catch pan (21) to the holder (22)

Code: B0200307
Edition: 05. 2005Operating manual020 - 8
2. Transporting, Setting up, Connecting,Dismounting and Storing the Machine
2.4.8 Mounting the Automatic Flour Duster
- Guide the flour duster into both openings (25) in
the cover plate
- Remove the protective foil on cover plate (23)
- Position flour duster (24) on the cover plate to
which it belongs
- Push the flour duster backwards
- Turn the delivery roller (27) till the catch (26) can be
guided into the receiver and the flour duster locks
into place on the swelling bracket of the cover
plate.
- Insert the flour dust protection (28) and guard
plate (29) into the proper position
26
2829
23
25
24
27

Code: B0200307
Edition: 05. 2005Operating manual020 - 9
2. Transporting, Setting up, Connecting,Dismounting and Storing the Machine
2.4.9 Electrical Connection of the Automatic
Dough Reeler (by models SFS 6117H/
SFI 6117H)
- Connect the reeler cable to the Linak-Motor plug
Rondostar
RondostarTransfer table
Make-up line /
Donut line
31 3232 30
323332 31
- Fix connector cable to the table sheet using cable
clamps (model SFI)
2.4.10 Compound operation with a transfer
table PTT150/PTT250
The Rondostar and the transfer table have to be
connected together with the butt plates (30).
The space between the protection bar (31) and the
conveyor belts (32) must not be more than 3 mm.
It is prohibited to use the compound operation without
a correct mounted protection bar.
2.4.11 Compound operation with a
make-up line / donut line
The Rondostar and the make-up line have to be
connected together with the bow (33).
The space between the protection bar and the
conveyor belts must not be more than 3 mm.
- Fix connector cable with plastic pipe and screws at
the machine table
It is prohibited to use the compound operation without
a correct mounted protection bar.

Code: B0200307
Edition: 05. 2005Operating manual020 - 10
2. Transporting, Setting up, Connecting,Dismounting and Storing the Machine
2.5 Requirements for Putting the Machine into Operation
Power supply and frequency at the mains circuit to
which the machine is connected must be in accordance
with specifications contained on the sign "Electrical
connected loads" (This sign is found on the cable
lead-through on the machine base).
Direct connection to the mains without a plug is
prohibited!
Any work on the electrical components of the machine,
in particular the correct professional mounting of the
mains plug, may only be carried out by qualified
personnel who are familiar with the relevant safety
instructions.
(An electrical schematic is delivered with every machine.
It is to be found next to the electrical control in the
machine base).
- Connect the machine plug to the mains
- For starting the machine, the tables must be
correctly mounted (see Installing the Machine
Tables, Page 020 - 3)
2.5.1 Ground fault interrupter is actuated
when inverter is started
Leakage current flows through the inverter.
The inverter performs internal switching. Therefore, a
leakage current flows through the inverter. This
leakage current may actuate the ground fault
interrupter, shutting the power off.
Use a ground fault interrupter with a high leakage-
current detection value (sensitivity amperage of
200mA or more, operating time of 0,1 s or more) or one
with high-frequency countermeasures for inverter use.
Reducing the carrier frequency value in n46 is also
effective. In addition, remember that a leakage current
increases in proportion to the cable length. Normally,
approximately 5 mA of leakage current is generated for
each meter of cable.

Code: B0200307
Edition: 05. 2005Operating manual020 - 11
2. Transporting, Setting up, Connecting,Dismounting and Storing the Machine
2.6 Moving Direction Test
After the power has been turned on (See Preparing for
Operational Readiness, Page 040 - 1), the machine
automatically checks the running direction when first
starting up (moving direction of roller adjustment
drive).
2.7 Moving the Machine
- On the operator's side of the machine, lift the safety
rail (34)
Front transport castor will snap down.
The machine can now be moved on the castors
without problems.
Once the machine's permanent location is reached:
- Hold the safety rail tightly using both hands,
gently lift up the machine
- Using one foot, push the pedal (35) at the front
transport castor
- Gently ease the machine back down to the ground,
when so doing, do not let it "fall" back down
34
35

Code: B0300318Edition: 05. 2005
Operating manual
3. General Data about the Machine
030 - 1
3 General Data about the Machine3.1 General Information
3.1.1 The Machine's Applications
The machine is suitable for sheeting, booking, finalsheeting and cutting of dough for the food industry.
BookingThrough folding in fat, butter, margarine, throughsheeting to a thickness of approx. 6-11 mm andsubsequent folding of the dough, there is a resultingformation of layers of fat and dough. A repetition ofthis process yields many thin layers.
Final SheetingThis entails sheeting the dough to the final thicknessrequired for further processing.
3.1.2 Purpose of the Flour Duster
This is used to ensure that the dough sheets areautomatically dusted with flour when necessary.
Recommended Flour type: No. 550 (Use onlyflour which isclean)
3.1.4 Temperatures
The ambient temperatures permissible for the machine: +5° to +40°CPermissible temperatures for storage of the machine:-25° to +55°C, for brief periods up to +70°C
3.1.3 Noise Values
The emission value at place of operation is smallerthan "70 dB(A)", according to EN1674.
CuttingCutting of the sheeted dough band by means ofcutting rollers.
3.1.5 Ambient Humidity
The admissible ambient humidity for the machine liesin the area of 30% - 95%, relative humidity,uncondensed, resp. max. 60% for the dusting flour inthe automatic flour duster.
This product is a technical working tool which isdesignated to be used exclusively for work.

Code: B0300318Edition: 05. 2005
Operating manual
3. General Data about the Machine
030 - 2
The hatched area shows the work area designated forthe operating personnel.
3.1.7 Operating Personnel Work Area
3.1.6 Machine Weight
3.2 Prerequisites
In order that dough can be sheeted by the machine, thefollowing prerequisites must be met:
- Dough piece must not exceed 15 kg
- Flour the dough piecesThis will prevent the dough from sticking to therollers and scrapers.
In order to avoid flour dust build-up, it isrecommended to equip the machine with an automaticflour duster.
Total weight = approx. 220 - 360 kg, depending on model(Compare with Technical Data, Page 090 - 1/2/3/4)

Code: B0300318Edition: 05. 2005
Operating manual
3. General Data about the Machine
030 - 3
3.3 Full View of the Machine
1 Dough Catch Pan 2 Flour Duster (Option) 3 Roller Head 4 Safety Guard 5 Machine Table 6 Machine Base 7 Main Switch 8 Black Push Button for Starting 9 Control Panel10 Red Push Button for Stopping11 Forked Support12 Turning knob for data input13 Automatical Dough Reeler (Option)14 Cutting Station (Option)
SFS6117
SFS6115C / SFS6117C SFS6117H
1 13 44 55
11
1314
SFS6115
6 711
9
10
88
12
2
2

Code: B0300318Edition: 05. 2005
Operating manual
3. General Data about the Machine
030 - 4
SFI6117
1516 17 17
SFI6117H 13
13 Automatical Dough Reeler (Option)15 Support16 Lower table17 Forked supports

Code: B0300318Edition: 05. 2005
Operating manual
3. General Data about the Machine
030 - 5
3.4 Operating Elements
7
3.4.3 Push Buttons
The black push buttons (8) (located on the side of thehousing) serve to start the machine.
The red push button (10) serves to stop the machine.
The control panel (9) is used to operate and programthe machine (See control panel, Page 050 - 2)
3.4.5 Turning knob for data input
3.4.4 Control Panel
The turning knob (12) serves to input data (See controlpanel, Page 050 - 2)
The main switch (7) interrupts the supply of electricalcurrent.
3.4.1 Main Switch
10
9
88
12
4 3.4.2 Safety guards
The safety guards (4) protect the operator frominadvertently coming into contact with the rollers andthe cutting rollers.If the safety guard is lifted during the sheetingprocess, the machine will stop.
Code: B0300318Edition: 05. 2005
Operating manual
3. General Data about the Machine
030 - 6
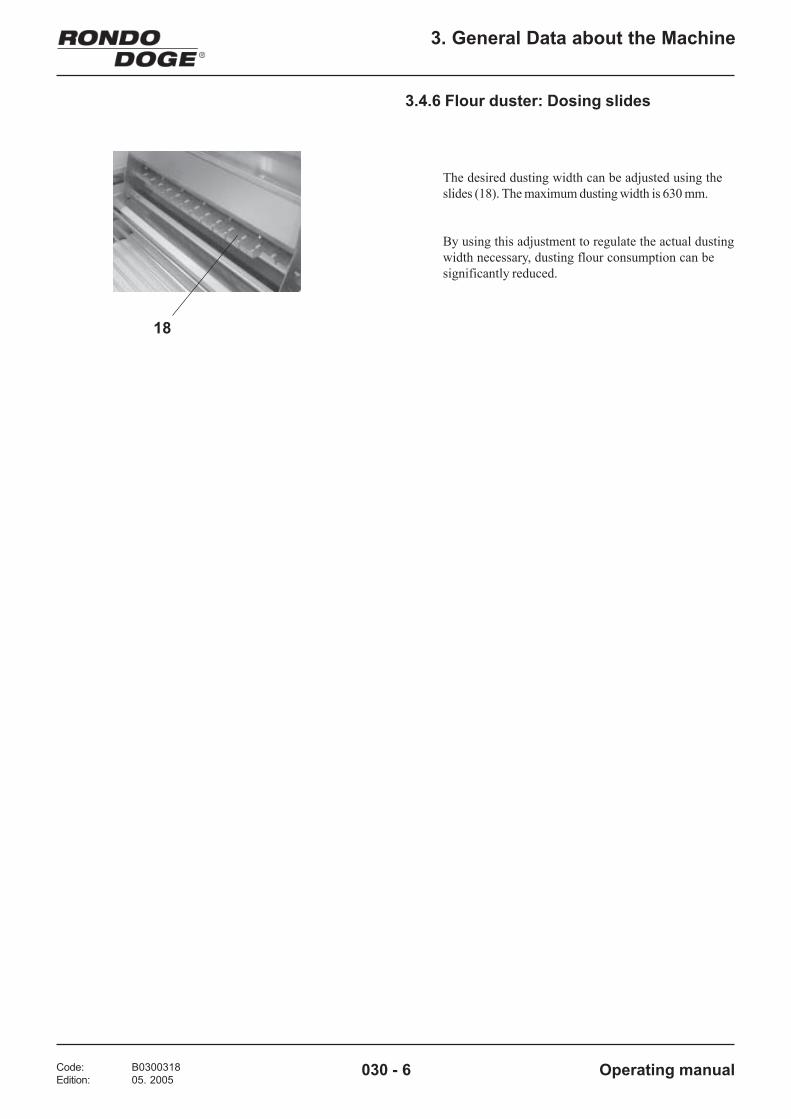
3.4.6 Flour duster: Dosing slides
The desired dusting width can be adjusted using theslides (18). The maximum dusting width is 630 mm.
18
By using this adjustment to regulate the actual dustingwidth necessary, dusting flour consumption can besignificantly reduced.

Code: B0400133Edition: 11. 1997
Operating Manual
4. Starting the Machine
040 - 1
4 Starting the Machine4.1 Preparing for Operational Readiness
4.2 Starting/Stopping the Machine
- Bring down both safety guards (3)
Starting
- Press the black push button (4) on the side on whichthe dough has been placed (see also generalindications, Page 050 - 4)
- Press the red push button (5)
- Lift the safety guard (3)
or
Stopping
- Turn the main switch (2) on the machine to "ON"
- Pull out the dough catch pans (1) on both sides
2
3
4 4
5
3
1

Code: B0500160Edition: 10. 1998
Operating Manual
5. Operation
050 - 1
5 Operation5.1 General operation description for RONDOSTAR
The dough sheeter RONDOSTAR is computercontrolled and suitable for sheeting and bookingdoughs in the following working modes:
Automatic working mode "Auto"
Automatic sheeting of the dough.By easy programming, 50 automatic programs can beset and memorized. Multi programs with 2 or 3 loopsare possible.
Manual automatic working mode "Manual/Auto"
- Turning knob (4) for data input
The "Manual/Auto" working mode signifies that a doughpiece is first sheeted in manual working mode.After the sheeting, the values used are memorized bypressing the OK-key.A "Manual/Auto" program is therewith established,which can be run to any extent desired (see programmingin working mode "Manual/Auto", page 050 - 16).These programs are especially suitable for delicatedough-qualities. Nine Manual/Auto programs can bememorized.
The sheeting is similar to the working with aconventional dough sheeter, i.e. operated by means ofthe push buttons, and manual selection of thereduction steps.
Manual working mode
5.1.1 Operating elements
- Control panel with data-display-panel (2) and keys for selecting the working mode
- Black push button (3) to start the machine up (left and right)
- Red push button (1) for stopping
3
1
2
3
4

Code: B0500160Edition: 10. 1998
Operating Manual
5. Operation
050 - 2
5.1.2 Control Panel
Data display panel (grey area)
5 Indication of the program number6 Indication of the initial roller gap7 Indication of the final roller gap8 Pre-sheeting to a width9 Indication of the chosen reduction steps big to fine
(9 possibilities)10 Indication of the end of program with the
possibilities:- stop for folding- stop for manual reeling- automatic reeling if available (option)- stop for cutting (option Cutomat)
11 Confirmation key for data input12 Key for automatic operation13 Key for manual-automatic operation14 Key for manual operation15 Start-. Stop-key for flour duster16 Breaking off a program
Function keys
5 6 7
15
16
108
13
12
11 14
9

Code: B0500160Edition: 10. 1998
Operating Manual
5. Operation
050 - 3
5.2 Operating instructions
- it is made ready for operation as described in chapter 4.1.- no loose objects, such as knives, dough scrapers, reelers or others are on the machine tables.
When leaving the factory, all 50 program spaces arefed with the same data. They can be changed in a veryeasy way, as described in the chapter "programming".
The machine is ready to start in program 01.
When switching on the main switch located on the base,the machine switches into the automatic-programNumber 01. In the indication window of the programmnumber (5) appears the indication 01 and the otherindication windows show the initial roller gap, the finalroller gap, pre-sheeting to a width, the reduction stepsand the chosen program-end.
5.2.1 Starting the machine
Before setting the machine into action, make sure that:
5

Code: B0500160Edition: 10. 1998
Operating Manual
5. Operation
050 - 4
5.2.2 General indications
Selecting working mode
The desired working mode can be selected by pressingthe relevant key.The red light-emitting diode indicates which workingmode has been selected. As long as the automaticsheeting of a dough block has not been completed, thered light-emitting diode keeps flashing.
A unfinished program can be broken off by pressing thekey ESC. The key ESC is only effective, when the beltsare not in motion.
Breaking off a program
- Press key "Auto" resp. "Manual/Auto"
As long as the program number flashes, the desirednumber can be selected by turning the turning knob (4).
Selecting a program number
For starting the machine, the black push button (3)has to be pressed, and this on the same side as thedough block has been placed on the conveyor table.
Push button
When the belts are in motion, the flour duster can beswitched on resp. off by pressing the key "flourduster".
If the preselection of the flour duster is switched on,the LED in the key "flour duster" lights up.
In this way, the flour duster can be programmed in theworking mode "Auto" and "Manual/Auto".
Flour duster
The flour duster only runs when there is doughbetween the rollers.
33
4

Code: B0500160Edition: 10. 1998
Operating Manual
5. Operation
050 - 5
5.2.3 Sheeting in working mode "Auto" withnormal program
- Interrupting the sheeting process- Press the red push button (1) or lift one of the
safety guards- To continue the sheeting process, press one of
the black push buttons (3)
For automatic sheeting of a dough block, procede asfollows:
- Selecting working mode- Press key "Auto"
Program-number-indication starts to flash for 5s.
- Selecting a program- As long as the indication is flashing, select
desired program number with turning knob (4)(program numbers 01 - 50)
- Placing dough blockThe dough block should be approx. 5 mm thickerthan the initial roller gap
- Starting the sheeting process- Press one of the black push buttons (3) (on the
same side as the dough block). The rollers open tothe initial roller gap, then the belts start running
- Switching on, resp. off the flour duster- Press key "flour duster" when belts are
running.If the preselection of the flour duster isswitched on, the LED in the key "flour duster"lights up.The flour duster is switched on for one passage.
- Press key "flour duster" to switch off the flourduster
- Pre-sheeting to a width- When the piece of dough is sheeted to the
width, the machine stops automatically. (rollergap "width")
- Turn the piece of dough- To start push either one of the black push
buttons (3)
3
1
3
4

Code: B0500160Edition: 10. 1998
Operating Manual
5. Operation
050 - 6
- At the end of the program, the dough sheet:
will be automatically reeledor
will be stopped so that a hand reeler can bepositioned. (After the hand reeler has beenpositioned, start up the machine for reeling bypressing the black push button)
orwill be placed in an ideal position for folding
orwill be stopped on the machine table withoutcutting station, allowing to release manually thedough sheet from tension, prior to cutting (seesheeting with subsequent cutting of the doughsheet, page 050 - 7)
After the conveyor belts stop automatically, therollers open up again to the initial roller gap.The sheeting program is not finished until therollers have returned to the initial roller gap.
The machine is ready to begin the sheetingprocess again.
5.2.4 Sheeting in working mode "Auto" witha multi program
In a multi program, up to 3 sheeting subprograms canbe linked together. They are executed one afteranother (program loops).The sheeting process takes place in the same way as ina normal program.
The 3 LED's in the key "Auto" indicate, if the shownprogram is a normal program or a multi program:
One LED lights up: normal programTwo LED light up: multi program with 2 loopsThree LED light up: multi program with 3 loops
At the end of a sheeting subprogram, the machineswitches automatically to the next program loop.
Indication of the program loop:left LED lights up: 1. program loopmiddle LED lights up: 2. program loopright LED lights up: 3. program loop
The program loops can be switched over manually bypressing twice the key "Auto" ("double click")(example: to change a program).

Code: B0500160Edition: 10. 1998
Operating Manual
5. Operation
050 - 7
5.2.5 Sheeting in the working mode "Auto"with subsequent cutting of the doughsheet (Cutomat)
Cutting- Press one of the two black push buttons- The rollers open automatically 5 mm, allowing the
dough sheet to pass through the rollers withoutpressure
SheetingThe sheeting function is identical as described undersheeting in a normal programm, page 050 - 5. At theend of a sheeting program the dough sheet stopsautomatically as soon as it has left the rollers. Thedough sheet is then laying on the machine tableopposite to the cutting station. The operator can - ifrequired - prior to cutting, manually release possiblyremaining tension from the dough.
Stopping / restarting
Ending the cutting operation- To stop press the red push button or lift one of the
two safety guards- Press key "ESC"
- To stop press the red push button or lift one of thetwo safety guards
- To start press one of the two black push buttons
The machine is ready for sheeting
The function Cutomat is always activated when theprogram has been ended with "Stop for Cutting". (Seeend of program, page 050 - 12)
5.2.6 Sheeting in working mode "Manual/Auto"For automatic sheeting in "Manual/Auto" procede asfollows:- Selecting working mode
- Press key "Manual/Auto"Program-number-indication starts to flash for5s.
- Selecting a program- As long as the indication is flashing, select
desired program number with turning knob (4)(program numbers H1-H9)
The further procedure is identical as for workingmode "Auto".
- Both conveyor belts start running at cutting speed.The belt speed can be adjusted by potentiometer (17)between 2,5 and 8 m/min
- For operating the cutting station (see cutting device,page 050 - 23)
17

Code: B0500160Edition: 10. 1998
Operating Manual
5. Operation
050 - 8
5.2.7 Sheeting in working mode "Manual"
The sheeting is done step by step, similar to thesheeting on an conventionalmachine.
The individual reduction steps are set by the turningknob (4).
The actual roller gap is indicated as "initial roller gap"(6) on the display.
The roller gap for the next step is indicated as "finalroller gap" (7) on the display.The conveyor stops automatically after each passage,as soon as the dough band is no more between therollers.
For sheeting a dough block, procede as follows:
- Selecting working mode- Press key "Manual"
"initial roller gap"-indication (6) starts to flash.
- Placing dough block
- Set the initial roller gap- The initial roller gap should be approx. 5 mm
smaller than the thickness of the dough block.
- The initial roller gap is set to the desired valueby the turning knob (4)
- Starting the sheeting process- Press black push button (3) (on the side where
the dough block has been placed).The rollers open to the initial roller gap andthen the table drive starts.
- Selecting the next roller gap- By turning knob (4)
The set value appears in the indication window"Final roller gap" (7).The next roller gap can already be set while thedough is still being sheeted.After each passage, the machine stopsautomatically.
- Starting for proceding- Press one of the black push buttons (3)
This procedure is repeated until the desired endthickness has been reached.
6 7
33
4

Code: B0500160Edition: 10. 1998
Operating Manual
5. Operation
050 - 9
- Switching on, resp. off the flour duster- Press key "flour duster" when belts are
running.If the preselection of the flour duster isswitched on, the LED in the key "flour duster"lights up.The flour duster is switched on for onepassage.
- Press key "flour duster" to switch off the flourduster
- Manual reeling- If the dough band has reached the middle of
the outfeed table in the last sheeting passage,stop the machine by pressing the red pushbutton
- Place the reeler and fold in the tip of the doughband
- Press one of the black push buttons until thedough band is reeled up on the reeler
Sheeting process finished- Setting the desired initial roller gap by turning
knob (4) for the next dough blockor- Press key "ESC"
5.2.8 Simultaneous sheeting of several small dough pieces, with photo cell
If several small dough pieces (Pizza bases) have to besheeted simultaneously the black push button has tobe kept pressed until the last piece has passed throughthe rollers.
The machine stops when the black push button isreleased.

Code: B0500160Edition: 10. 1998
Operating Manual
5. Operation
050 - 10
5.2.9 Simultaneous sheeting of severalsmall dough pieces, without photo cell
In the working mode "Manual", the photo cell can bedisactivated.
(See also working mode "Manual" with / withoutphoto cell, page 050 - 18)
Working without photo cell can be required if:
- The dough pieces must be sheeted in one direction only.
- The photo cell is defective and a normal functioning is not possible any more.
When working without photo cell, the operating is asfollows:
- To start, press the black push button on the sidewhere the dough block is laying(no automatic reversing)
- Stopping by red push button or the safety guard
The working modes "Auto" and "Manual/Auto" are notinfluenced by the working mode "Manual"without photo cell.If the photo cells are defective these working modesare not possible any more.
5.2.10 Working mode "compound operation with a transfer table"
Using the Rondostar and a transfer table PTT, the fullysheeted dough band can be automatically transferredto a make-up line.
Function:If there is no dough band on the transfer table, thefully sheeted dough band is automatically transferredonto the transfer table. With the Rondostar, the nextdough band can be sheeted in preparation.
If the transfer table is still occupied by a dough band,the Rondostar stops in the position "place manualreeler" (see general indications, page 050 - 12). Whenthe transfer table is free, the dough band isautomatically transferred.
Programming:Enter a program in the working modes "Auto" or"Manual/Auto" with the function manual reeling.
Important:"Side manual reeling" on the side with thetransfer table! (See side folding / manual reeling,page 050 - 17)

Code: B0500160Edition: 10. 1998
Operating Manual
5. Operation
050 - 11
5.2.11 Working mode "compound operation with a make-up line / donut line"
Using the Rondostar type SFS6117DD, the doughband can be transferred directly from the sheetingmachine to a make-up line.
Function:
The fully sheeted dough band stops automatically atthe end of the table.
If the release is given by the make-up line, the doughband is transferred to the line at the "transfer speed".When the preset transfer time has expired, theRondostar stops automatically and is ready for doughsheeting.
Programming:Enter a program in the working modes "Auto" or"Manual/Auto" with the function Cutomat.
In addition to the programming, the following settingsmust be made:
- Transfer speed
The transfer speed of the Rondostar can be matched tothe speed of the make-up line with the potentiometer 17(see sheeting in the working mode "Auto" withsubsequent cutting of the dough sheet (Cutomat),page 050 - 7).
- Stop position of the dough band at the end of the table(Waiting position for transfer)The position can be set by parameter PA 2.(Indication in 0,1 s)
- Time for transferring the dough band
The transfer time is dependent upon the transferspeed.When the transfer time has expired, the Rondostarstops automatically and is again ready for doughsheeting. The time can be set by parameter PA 3.(Indication in 0,1 s)
Setting the parameters is carried out in exactly thesame way as described under chapter 5.4 specialfunctionings.

Code: B0500160Edition: 10. 1998
Operating Manual
5. Operation
050 - 12
5.3 Programming, modification of programs
large fine
Dough band
Automatic reeler
5.3.1 General indications
Reduction steps, working mode "Auto"
Depending on the dough type, a block has to besheeted either with a few large reduction steps
or
with a number of small reduction steps.
With RONDOSTAR, 9 graduations of reduction steps(from large to fine) can be selected by means of theturning knob (4)
Program end
With RONDOSTAR, in the working modes "Auto" and"Manual/Auto", there are 4 different ways to finish.
They are as follows:
Stop for folding
On the last passage, the dough band is stopped oncethe end has left the safety guards.
The dough band is thus in an ideal position forfolding.
Stop for manual reeling
On the last passage the machine stops when the tip ofthe dough band is in an ideal position for placing themanual reeler.
The reeler can be applied and the tip of the doughband wrapped round.
By pressing one of the black push buttons, the doughband is reeled up and the sheeting process is finished.
Automatic reeling (option)
This function can only be selected if the machine isequipped with an automatic reeler (See also"Automatic reeler unit", page 050 - 21).
In the last passage, the dough band is automaticallyreeled up onto the reeler which was previously placedin the reeling device.

Code: B0500160Edition: 10. 1998
Operating Manual
5. Operation
050 - 13
Dough bandStop for cutting the dough band(Option Cutomat)
This function can only be selected, if the Rondostar isequipped with a cutting station.During the cutting process the rollers will open andthe belts are running with reduced speed.
5.3.2 Working mode "Auto"Programming of a normal program
By RONDOSTAR flashing light-emitting diodesguide you through the programming. The flashinglight-emitting diode indicates which values orfunctions can be modified by the turning knob.
For programming, procede as follows:
- Selecting working mode- Press key "Auto"
Program-number-indication starts to flash for5s.
- Selecting program- As long as the indication is flashing, select
desired program number with turning knob(program numbers 01 - 50)
- Selecting programming function- Press key "Auto" for at least 3 seconds until the
indication "initial roller gap" (6) starts to flash.
- Set the initial roller gap- Set the desired initial roller gap with turning
knob
- Press key "OK"The indication in "final roller gap" (7) starts toflash.
- Set the final roller gap- Set the desired final roller gap with turning
knob
- Press key "OK"Now the LED in the indication field "width" isflashing, indication "initial roller gap" indicates"off".
- Pre-sheeting to a width, set yes / noThe indication can be changed into "on" by theturning knob.on: width control is switched onoff: widht control is switched offThe roller gap "width" is defined by the firstsheeting process. (See programming of a multiprogram, chapter 5.3.3)
6 7

Code: B0500160Edition: 10. 1998
Operating Manual
5. Operation
050 - 14
- Press key "OK"One of the light-emitting diodes in the window"reduction steps" (9) starts to flash
- Selecting the graduation of the reductionsteps- By means of turning knob the desired reduction
steps graduation can be selected- Press key "OK"
One of the light-emitting diodes in the window"Program end" (10) starts to flash
- Selecting function stop for folding, manualreeling, automatic reeling or Cutomat- Select the desired function by means of the
turning knob
The functions "automatic reeling" and"Cutomat" are available as an option.
- Press key "OK"Now the LED in the key "Auto" is flashingIf no multi program should be created, press thekey "OK" again (multi program, see chapter5.3.3).
- Break off the programming with key "ESC"The programming can, at any time, be broken offby pressing the key "ESC"When the programming is broken off, the old dataare kept in the program with the key "ESC".
5.3.3 Working mode "Auto" Programming a multi programWhen creating a multiprogram, the 1. program loop isprogrammed in the same way as a normal program(see programming in the working mode "Auto",chapter 5.3.2)
To program a multi program, proceed as follows:
- after the selection stop for folding, manualreeling, automatic reeling or Cutomat (in 1.program loop) press the key "OK" onceThe left LED in the key "Auto" is flashing
- choose 2. program loop by turning knob(middle LED in the key "Auto" is flashing)
- Press key "OK"(Indication "Initial roller gap" is flashing)
- programming the 2. program loop
- at the end of the 2. program loop choose 3.program loop by turning knob or stopprogramming by pressing key "OK".(multi program with 2 loops)
- programming the 3. program loop
- after the 3. program loop press key "OK" again
9
10

Code: B0500160Edition: 10. 1998
Operating Manual
5. Operation
050 - 15
5.3.4 Working mode "Auto" Programmingthe roller gap for "width"If during the programmation the function "pre-sheeting to a width" is selected, the dough has to besheeted to the desired length (width) by the firstsheeeting process. The roller gap is reduced step bystep (entered by turning knob) until the dough hasreached the desired length.
Proceed as follows:- Place the dough and start sheeting process as by
the automatic sheeting. The piece of dough passesnow two times the rollers then the machine stops.
- Measure the dough length and set the new rollergap by turning knob. Start the machine with one ofthe two black push buttons. The piece of doughpasses again two times the rollers.
- Repeat these steps until the desired length(width) is reached. Turn the piece of dough. Don'tchange the roller gap again. This roller gap willbe stored as "roller gap for a width".
- Start the machineThe piece of dough will now be sheeted accordingto the sheeting program.
Pre-sheeting to a width is now programmed.The automatic sheeting program runs now as follows:
- According to the desired graduation of thereduction steps it will be sheeted automatically tothe roller gap "width". Machine stops. Turn thepiece of dough and start the machine with oneof the two black push buttons. The piece ofdough will be sheeted according to the program.
5.3.5 Working mode "Auto" change normalprogramsWhen changing a program, the data of the programcan be changed individually.To change a program proceed as follows:
- Select "change program"Press key "OK" twice shortly (double click)Indication "Initial roller gap" is flashing
- Change dataData can be changed by turning knob.Data, which should not be changed, confirm withthe key "OK".
If pressing "ESC" while changing a program, you willjump back to the start and the "old values" remainstored.
Attention: Never change a program with thefunction "programming".Change by "double click" on key"OK".

Code: B0500160Edition: 10. 1998
Operating Manual
5. Operation
050 - 16
5.3.6 Working mode "Auto" change a multiprogramMulti programs can be changed in exactly the sameway as normal programs.
Before selecting the function "changing program" thatloop of the multi program has to be selected in whichthe change should take place. ("double click" on key"Auto").
- Changing in the selected loop (1, 2 or 3) by"double click" on key "OK".
5.3.7 Programming in the working mode"Manual/Auto"For programming, a dough block is sheeted as in themode "Manual". At the end of the sheeting process,the manually set reduction steps are memorized in a"Manual/Auto" program.9 "Manual/Auto" programs (H1 - H9) can bememorized.For programming, procede as follows:- Selecting working mode
- Press key "Manual/Auto"Program-number-indication starts to flash for5s.
- Selecting program- Select desired program number with turning
knob(program numbers H1 - H9)
- Selecting programming function- Press key "Manual/Auto" for at least 3 seconds
until the indication "initial roller gap" (6) startsto flash.
- Sheeting a dough block- Sheet a dough block in the same way as
described under working mode "Manual".
- Memorizing a program- Press key "OK" after the last sheeting pass.
With this, the manually set reduction steps arememorized.
- Selecting function stop for folding, manualreeling, automatic reeling or Cutomat- Select desired function with turning knob
The selected function will be carried outautomatically by the next sheeting process.
The functions "automatic reeling" and"Cutomat" are available as an option.
- Press key "OK"The programming is completedThe machine is ready for sheeting
Individual values of a "Manual/Auto" programcannot be modified. If a modification becomesnecessary, the whole program - as describedabove has to be re-established from thebeginning.
6

Code: B0500160Edition: 10. 1998
Operating Manual
5. Operation
050 - 17
5.4 Special functionings
For changing parametre "1", procede as follows:
5.4.1 Side folding / manual reeling
By changing the parameters PA 0 or PA 1respectively, it can be selected between:
PA 0 = 0 Side folding not definedPA 0 = 1 Folding on right tablePA 0 = 2 Folding on left table
PA 1 = 0 Side manual reeling not definedPA 1 = 1 Manual reeling on right tablePA 1 = 2 Manual reeling on left tableExample:The dough should new be reeled with the manualreeler on the left instead of the right table.
- Select working mode "Auto"
- Press key "OK" for 10 s tillindication FU 0
- Select Function 1 by turning knobindication FU 1
- Press key "OK" for 3 s tillindication PA 0 1indication "0" in the middle is flashing
- Select parameter "1" by turning knobindication PA 1 1indication "1" in the middle is flashing
- Confirm parameter "1" by key "OK"indication PA 1 1indication "1" on the right is flashing
- Set PA 1 to 2 by turning knob(manual reeling on left-hand table)indication "2" on the right side is flashing
- Confirm the input by pressing key "OK"indication PA 2 0
- Press twice key "ESC"indication Auto-program 1

Code: B0500160Edition: 10. 1998
Operating Manual
5. Operation
050 - 18
5.4.2 Working mode "Manual" with / without photo cellNormal working mode: Working with photo cell (see
Simultaneous sheeting of several small dough pieces, with photo cell, page 050 - 9)
Special working mode: Working without photo cell (see Simultaneous sheeting of several small dough pieces, without photo cell, page 050 - 10)
When delivering the machine, the working mode"Manual" with photo cell is programmed.
For switch off the function of the photo cells,procede as follows:
- Select working mode "Manual"
- Press key "Manual" for 3 s till the three LED's inthe middle of the window "reduction steps" lightup. These LED's indicate, that the function of thephoto cells is switched off.
To switch on the function of the photo cells, proceedas follows:
- Change to the working mode "Auto" or "Manual/Auto"
or- Press key "Manual" during 3 s till the three light-
emitting diodes are reset

Code: B0500160Edition: 10. 1998
Operating Manual
5. Operation
050 - 19
21 3 4 5 6 7 8 9
5.4.3 Diagnosis program
With the diagnosis program, the functioning of thekeys, the turning knob, the photo cell etc. can bechecked.
For select the diagnosis, procede as follows:
- Select working mode "Auto"
- Press key "OK" during 10 s tillindication FU 0
- Select Function 2 by turning knobindication FU 2
- Press key "OK" tillindication d.
With the 9 light-emitting diodes (LED) of the rollerreduction steps, the following functions are shown:
LED 1: has to light if the control power of theprocessor is o.k.
LED 2: has to light if the general controlvoltage is o.k.
LED 3: has to light if the right push button ispressed
LED 4: has to light if the left push button ispressed
LED 5: has to light if the safety guards areclosed and one of the black pushbuttons is activated.(supervision main contactor)
LED 6: has to light if the safety guards areclosed and one of the black pushbuttons is activated.(supervision frequency converter)
LED 7: has to light on/off if the turning knob isslowly turned.
LED 8: has to light if the photo cell is covered,i.e. if dough is between the rollers.Must not light if photo cell is free; i.e.if no dough is between the rollers.
LED 9: Turning direction supply, not of interest
5.4.4 Compound operation
The Rondostar can be used in compound operationtogether with one or two make-up lines. Precisedescription to the compound operation is included inthe service manual.(See service manual, chapter 4.4 Parameter andchapter 6. Compound operation with a make-up line)
Quit the diagnosis program:- Press twice key "ESC"
indication Auto-program 1

Code: B0500160Edition: 10. 1998
Operating Manual
5. Operation
050 - 20
5.5 Flour duster
General informations
The programmable automatic flour duster provides aregular dusting of flour onto the dough band, withoutdistributing the dusting flour into the atmosphere.
Please observe the regulations for the use of the unitand of the flour dust protection appliances suppliedwith it.
Description of functioning
From the flour container, the flour runs onto arotating distributing roller, from which it is strippedoff by a brush and distributed onto the dough band.
Various loosening aids are installed inside the hopper,to avoid an unwanted compression of the flour.
One flour dust protection (18) and one protectionplate (19) are hinged-up underneath the container.
The flour duster must not be used without theflour dust protection appliances!
For the best delivery use wheat flour, type Nr. 550.
Adjusting the dusting width
The dusting width is adjusted by opening, respectivelyclosing the slides to the required width.
(Switch flour duster on and off, see chapter 5.2.2General indications)
18
19

Code: B0500160Edition: 10. 1998
Operating Manual
5. Operation
050 - 21
Reeler support sheet
5.6 Automatic Reeler unitFunction of the automatic reeler unit
The automatic reeler is a device startingautomatically by the electrical control.Attention when handling it!Do not reach into the stationary or runningdevice!
Initial position of the automatic reeler unit (open)
Dough retention bar (20)
If, when sheeting large dough blocks, the dough banddoes not slide through the opening between themachine table and the reeling device, but pushesagainst the dough retention bar (20), this bar can beremoved
- Loosen and take off the plastic screw (21)
Reeler support (23)
- Insert reeler (22) correct in reeler support (23)
Working position of the automatic reeler unit (closed)
Before the last dough passage in a program withactivated reeler, the reeler unit (26) will be closedautomatically. Whole device fold downwards, reeler issupported by lower rollers (24) and upper rollers (25).
25
26
22
23
24
20
21

Code: B0500160Edition: 10. 1998
Operating Manual
5. Operation
050 - 22
On the end of the reeling operation the device willswing back into initial position.
The finished reeled doughband (27) remains on themachine table.
Doughband will be reeled, therefore the upper rollers(25) swing upwards.
27 25
Code: B0500160Edition: 10. 1998
Operating Manual
5. Operation
050 - 23
28 29
30
31 30 31
29
32
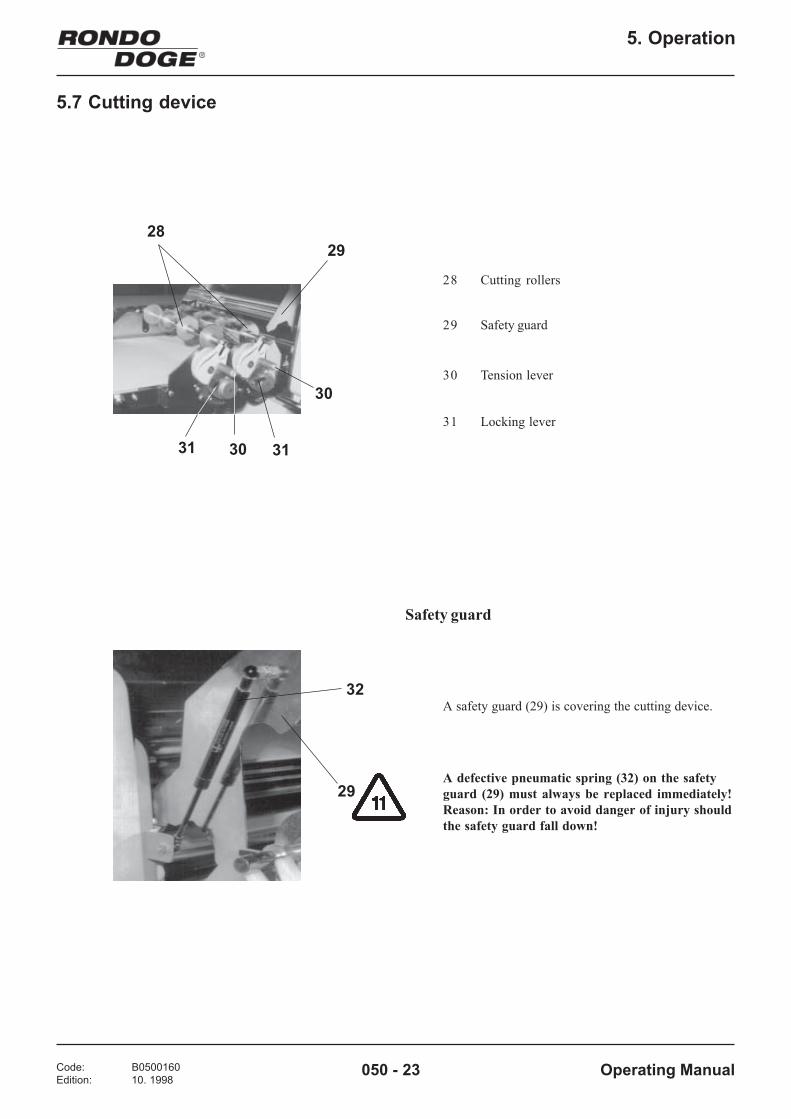
5.7 Cutting device
28 Cutting rollers
29 Safety guard
30 Tension lever
31 Locking lever
Safety guard
A safety guard (29) is covering the cutting device.
A defective pneumatic spring (32) on the safetyguard (29) must always be replaced immediately!Reason: In order to avoid danger of injury shouldthe safety guard fall down!

Code: B0500160Edition: 10. 1998
Operating Manual
5. Operation
050 - 24
H
W
W H Number of rows
120140180*180
105180140100
5345
Types of cutting rollers
Docking Roller
Length Cutter
Cross Cutter
Zig-zag Cutter
Form Cutting Roller
Tandem Cutter
Standard dimensions for zig-zag cutters in stainlesssteel version for triangles.
* Also available in plastic

Code: B0500160Edition: 10. 1998
Operating Manual
5. Operation
050 - 25
Lifting the table with cutting device
- Lift the table by hand up till the stopping lever (33)blocks up
Table in set-up-position
Letting down the table with cutting station
- Hold the table
- Push up the stopping lever (33) and let down thetable at the same time
33
33
A defective stopping lever (33) must always bereplaced immediately!Reason: In order to avoid danger of injury shouldthe table fall down!

Code: B0500160Edition: 10. 1998
Operating Manual
5. Operation
050 - 26
3435
Inserting the Cutting Rollers
Danger of injury on the sharp cutting edges ofthe cutting rollers!
The cutting rollers must be inserted in the followingsequence:
a) For Squares/Rectangles
First Length cutter, than Cross cutter
In order to ensure uninterrupted operation of thecross cutter, the cutter must be positioned in thecutting direction in such a way that the dough sheet isfirst cut by the cutting knife (34) and then afterwardsejected by the ejector (35).
b) For Triangles:
First Zig-zag Cutter, than Length Cutter
Cutting rollers not in use must be stored in thelocation provided for this purpose.Reason: In order to avoid damage to the cuttingknives.In order to avoid injury to operators.

Code: B0500160Edition: 10. 1998
Operating Manual
5. Operation
050 - 27
28 29
30
31 30 31
28
30
31 30 31
Letting down the Cutting Rollers
- Close the safety guard (29)
- Lift up the tension lever (30) lightly and turn thelocking lever (31) anti-clockwise up to the limitstop
- Let down the tension lever (30) at stages up tillthe Cutting Roller (28) is on the conveyor belt
The deeper the tension lever (30) is let down, themore the cutting pressure is applied.
When using Length Cutters remark thefollowing:
As soon as the Length Cutter touches theconveyor belt, let down the gripping lever max.two stages, otherwise the conveyor belt can becut.
Lifting up the Cutting Rollers
- Push the tension lever (30) lightly down
- Turn the looking lever (31) clockwise up to thelimit stop
- Discharge tension lever (30) and lift it up to thelimit stop

Code: B0600278
Edition: 05. 2005Operating Manual
6. Cleaning
060 - 1
6 Cleaning
The machine must never be cleaned using spray
water, high-pressure cleaner, steam-cleaning
machine or any similar cleaning methods.
6.1 Cleaning
6.1.1 General Information
Before cleaning the machine, pull out the mains
plug.
1
2
Cleaning the photoelectric barrier
(See also Trouble shooting, Page 080 - 3)
The photoelectric barrier (1) built into the machine is
automatically cleaned by a mecanical cleaning device (2).
If the conveyor belts are moving in only one direction
(i.e. not reversing), whilst the flour duster is also in
operation, an undesireable flour build-up will be
produced (scraper/conveyor belt), which in turn can
cause problems for the functioning of the
photoelectric barrier.
- From time to time, remove any flour build-up by
hand
Never clean the photoelectric barrier while the
machine is in operation!
Changing the rubber ductor
- Pull off the old ductor, mount the new ductor, the
wiper blade rubber must be positioned against the
photoelectric barrier

Code: B0600278
Edition: 05. 2005Operating Manual
6. Cleaning
060 - 2
7
6
3
4
Dismounting the scraper unit
- Close the rollers in the working mode "Manual" to
approx. 20 mm
- Lift safety guard into the upper position
Dismount the upper scraper as follows:
- Take the upper scraper (3) with both hands and
push it downwards to the limit stop (4),
then pull out the scraper simultaneously on both
sides
Dismount the lower scraper as follows:
- Push downwards simultaneously the levers (5).
Remove the lower scraper (6) from the fixing (7)
- Clean the scraper (see Care, Page 060 - 5)
5

Code: B0600278
Edition: 05. 2005Operating Manual
6. Cleaning
060 - 3
Mounting the Scraper Unit
- To remount the scraper unit, carry out the
dismounting instructions in reverse order
Removing of the Machine Table and Conveyor
Belts
- Dismount the machine table (See Installing the
Machine Tables, Page 020 - 3)
- Loosen both tension nuts on the idling side of the
table (See Tightening the Conveyor Belts, Page
020 - 7)
- Loosen conveyor belt
- Place table sideways
- Remove conveyor belt
- Clean conveyor belt (See Care, Page 060 - 5)
Assembly of the Machine Tables and Conveyor
Belts
- To reassemble the machine tables and conveyor
belts, follow the removing instructions in reverse
order
(See Installing the Machine Tables, Page 020 - 3/
Tightening the Conveyor Belts, Page 020 - 7)
8
9
Exchanging of scraper blades
- Pull out the blade (8) of the fixing (9) with the
hand and push new one over the fixing
Attention
For protection of the fingers, use a cloth. The
edges of the blades are sharp and there is danger
of cutting oneself.

Code: B0600278
Edition: 05. 2005Operating Manual
6. Cleaning
060 - 4
Cleaning the flour duster
Dismount the flour duster as follows:
- Gently lift the flour duster (10) on the right side at
the front
- Pull the flour duster over the cam (11) until the
catch (12) has been guided out of the receiver
- Guide the flour duster out of the openings (13) and
remove
Then clean flour duster as follows:
- Empty the flour duster by completely dumping out
its contents
- Beat out any remaining flour in the flour duster
- Brush clean the delivery roller using a dry brush
There should be no flour between the flour
container and the movable side plates.
Do not use any solvents!
- Remount the flour duster
(see Mounting the flour duster, page 020 - 8)
12
11
10
13

Code: B0600278
Edition: 05. 2005Operating Manual
6. Cleaning
060 - 5
traP eeSyliad
dnegeleesylkeew
dnegelees
enihcaMdnadaehrelloResab
3-030egaP A
reparcS 2-060egaP A
tlebroyevnoccitehtnyS 3-060egaP B C
snaphctachguoD 3-030,7-020egaP B
naphctacruolF 7-020egaP B
rellorgnivirD 3-020egaP D
relloreldI 7-020egaP D
retsudruolF 4-060egaP B
releerhguodcitamotuA 22-050,12-050segaP A
6.1.2 Care
Alcohol, solvents and cleaning agents which exceed a ph-value of 8 must not be used for
cleaning purposes! Only those cleaning agents approved for use in the food industry may be
used.
A Damp clean using cloth and soapy water.
B Dry clean using a brush.
C Wet clean using a brush.
D Remove excess dough using a brush and plastic
scraper.
Legend

Code: B0700326Edition: 05. 2005
Operating Manual
7. Maintenance
070 - 1
7 Maintenance7.1 General Information for Maintenance of the Machine
For a competent maintenance of the machine, a servicecontract is recommended. Your dealer will be happy toinform you about the various possibilities.
Any defects or damage on the machine must berepaired by an authorized customer servicerepresentative.
W weeklyM monthly1/2 J semi-annuallyJ annually2 J every 2 years
Legend
7.2 Maintenance List
traP ytivitcA emitgnikrowyliadh8-4
emitgnikrowyliadh8nahterom
stlebroyevnoC ecalper:yrassecenfi,kcehcnurtlebehtkcehc
W W
)retsudruolF(hsurB kcehcecalperrotsujda:yrassecenfi
M M
)reteehshguoD(edalbreparcS kcehcecalper:yrassecenfi
J2 J
releeRcitamotuA sgnir-Okcehcecalper:yrassecenfi
J J2/1
fognisuohtnorfehtnieldnipStnemtsujdarelloreht
selas-retfaehtybesaergecivres
J J2/1

Code: B0700326Edition: 05. 2005
Operating Manual
7. Maintenance
070 - 2
7.3 Replacement Parts List
The use of replacement parts not delievered byRondo-Doge can lead to premature wear or todestruction of machine parts.
.on-metI noitpircseD snoisnemiD noitacilppA
459521 etelpmocreparcS sepytlla
328431 )eulb(etelpmocreparcS H7116IFS,7116IFS
30T577221 edalbreparcS sepytlla
30T775331 )eulb(edalbreparcS H7116IFS,7116IFS
764501 )76(tlebroyevnoccitehtnyS mm046x0823,C7116SFS,7116SFS
,DD7116SFS,H7116SFSH7116IFS,7116IFS
443121 tlebroyevnoccitehtnyS mm046x0753 C7116SFS,C5116SFS
20T443121 )56(tlebroyevnoccitehtnyS mm046x0862 C5116SFS,5116SFS
143531tlebroyevnoccitehtnyS
)eulb(mm046x0823 H7116IFS,7116IFS
5398 TA0,2esuFwolsTA0,2mm02x5ø
sepytlla
59405 TA36,0esuFwolsTA36,0mm02x5ø
sepytlla
66405 sgnir-O mm26,2x3,74 releerhguodcitamotuA
84005 gnirpscitamuenP N001 H7116IFS,7116IFS
58405 gnirpscitamuenP N002 H7116IFS,7116IFS
480621 rotcudrebbuR sepytlla
880621 repiW sepytlla

Code: B0800159Edition: 10. 1998
Operating Manual
8 Trouble Shooting
080 - 1
8 Trouble ShootingmotpmyS tcefeD/esuaC riapeR/ydemeR
yalpsidnonoitacidnioN.1 .nideggulptongulpsniaM.nodehctiwstonhctiwssniaM
?gnitsixeylppuSrewoP?evitcefedgulpsniaM?gnorwylppuSrewoP
toneludomcisabni3F,2F,1FesuF?.k.o
gulpsniamnigulP.hctiwssniamnohctiwS
:naicirtcelenaybkcehcoT)sesahp3lla(ylppuSrewoPkcehC-
gulpnisnoitcennockcehC-ehtgnidroccaebtsumylppuS-
lacirtcelE"ngisehtnonoitamrofnienihcamehtfo"sdaoldetcennoc
kcehcdnagulpsniamehttuogulP-sesufeht
ebtonnacenihcam,.k.onoitacidnI.2detrats
?desolcdraugytefaS?edomemmargorpnienihcaM
?detsujdasimdraugytefasfotroppuS
.draugytefasesolC.enihcamehttratsdna"CSE"yeksserP
.retnecxeehttsujdA.detsujdaebtontsumhctiwstimiL
:segassemrorrE.3
:1rorrE
:2rorrE
:3rorrE
:4rorrE
:5rorrE
:6rorrE
:7rorrE*
:8rorrE*
:9rorrE*
rossecorporcimehtfoegatlovlortnoCllamsoot
:gnissimsiegatlovlortnoCesabni)A0,2(2FesuFevitcefeD-
.eludomeludomesabehtnitcefeD-
.gnolootgnirudsitnemtsujdarelloR
rettimsnarteulavehtfonoitcaeroN:pagrellor
gnissimesahp1:ylppusrewoP-
.k.otonsirettimsnarteulaV-
rellorehtfonoitarepotcaxenI.tnemtsujda
.dednobsahrotcatnocniaM
roretrevniycneuqerfrorrEM2Krotcatnoc
ehtgnirudretrevniycneuqerfrorrEnoitarepo
enihcamehtffognihctiwsybrorrE
gnihctiwsybsegassemrorreehtteseR)hctiwssniam(sniamehtffo
.ecivresselas-retfaehtmrofnI
naybdekcehcebotsiesufehT.naicirtcele
.ecivresselas-retfaehtmrofnI
.ecivresselas-retfaehtmrofnI
ybdekcehcebotsiylppusrewopehT)sesahp3lla(.naicirtclena
.ecivresselas-retfaehtmrofnI
.ecivresselas-retfaehtmrofnI
rotcatnocniamecalpeR
.ecivresselas-retfaehtmrofnI
.ecivresselas-retfaehtmrofnI
.ecivresselas-retfaehtmrofnI
* Only by the models SFS6115C, SFS6117C, SFS6117DD

Code: B0800159Edition: 10. 1998
Operating Manual
8 Trouble Shooting
080 - 2
motpmyS tcefeD/esuaC riapeR/ydemeR
.spots,yltnettimretnisnurenihcaM.4 )draugytefasrof(retnecxE-troppuS-.decalpsimsi
.)tcatnoctnettimretnI(seriwesooL-
.retnecxeehttsujdA
:naicirtceleyB.yltcerrocseriwtsujdA
dnasrellor,snurrotomevirdniaM.5.llitsdnatsstlebroyevnoc
.evitcefedtlebdebbiR- dnaesabenihcamforevocraerevomeRdebbirecalperyrassecenfi,daehrellor
.tleb
dnarotom,edilsstlebroyevnoC.6.nursrellor
.kaewootnoisnettleB-
.ytridrellorgnivirD-
ees(stlebroyevnocehtnethgiTegap,stlebroyevnocehtgninethgiT
.)7-020egap,eraCees(rellorgnivirdnaelC
)5-060
rollitssdnatstlebroyevnocdeefnI.7.k.onursrellor,ton/naelnisllup
/5116SFSsepytenihcamyB()H7116SFS/7116SFS
.kaewootnoisnettlebroyevnoC-
.evitareponisihctulccitengamortcelE-evirdelbatfoleehwdehtooT-
.evitcefed
ehtgninethgiTees(tlebroyevnocthgiT.)7-020egap,stlebroyevnoc
.hctulcecalpeR.trapevitcefedecalpeR
llitssdnatstlebroyevnocegrahcsiD.8.skrejro
.kaewootnoisnettlebroyevnoC- gninethgiTees(tlebroyevnocnethgiT.)7-020egap,stlebroyevnoc
,edisenootrevosnurtlebroyevnoC.9.segdeehttasraet
.noisnettlebroyevnocralugerrI-
.ytridrellorgnivirD-
ehtgninethgiTees(tlebroyevnocnethgiT.)7-020egap,stlebroyevnoc
egap,eraCees(rellorgnivirdnaelC)5-060
srellorehtfotnorfnipuseliphguoD.01neewtebrellorehtrednusessapro
.royevnocdeefnidnareparcs
.yltcerrocnidetnuomreparcS-
.tuonrowerasedalbreparcS-
egapees(yltcerrocreparcstnuoM.)3/2-060
rosedalbreparcsecalperyrassecenfI.reparcsetelpmoceht

Code: B0800159Edition: 10. 1998
Operating Manual
8 Trouble Shooting
080 - 3
motpmyS tcefeD/esuaC riapeR/ydemeR
.etarepotonseodretsudruolF.11 sierehtnehwsnurylnoretsudruolF.srellorehtneewtebhguod
.yltcerrocnidekcoltonretsudruolF-
hctac-tfahsrotomnoitcennoC-.tneicifed
.llitssdnatsrotomretsudruolF-
retsudruolffostalf(yltcerrocnikcoL.)hctacroftolsotnitiftsumtfahs
.noitcennockcehC
.ecivresselas-retfallaC
.etarepotonseodreirrabthgiL.21 reirrabthgileht,ytrideyereirrabthgiLesuacebregnolynadenaelctoneraseye
:fo
.tsolrotcefedrotcuD-.evitcefedreirrabthgiL-
tuo-nrowrepiW-
,ecivedgninaelckcehC.strapytluafecalper
.ecivresselas-retfallaCrofsdraugytefasehtgnineponehW(mmargorpehtreirrabthgilehtgninaelc
.)debrutsidtonsiwolf
.rotcudehtecalpeRsisongaiDees(reirrabthgilehtkcehC
.)91-050egap,emmargorp.repiwehtecalpeR
.seruliaf/srorrerehtollA.31 "egoD-odnoR"tseraenmrofnIhcumsagnivigecivresselas-retfa
.elbissopsanoitamrofni
Attention:Always open the safety guard in order to clean the light barrier.Never reach under the closed safety guards with hands or any other object.
Opening the safety guard and cleaning the light barrier doesnot interfere with the operation of a dough-sheeting program.

Code: B0900308
Edition: 05. 2005Operating Manual
9. Technical Data
090 - 1
9 Technical data
ataDlacinhceT 5116SFS C5116SFS
esabenihcaM stroppuskrof stroppuskrof
releeRhguoDlacitamotuA tuohtiw tuohtiw
retsudruolFlacitamotuA noitpo noitpo
noitatsgnittuC tuohtiw htiw
tlebroyevnocfohtdiW mm046 mm046
htdiwelbasU mm006 mm006
llarevohtgnelelbaT mm0272 mm0713
htgnelrelloR mm066 mm066
draugytefasfoecnaraelC mm09 mm09
pagrelloR mm54-2,0 mm54-2,0
,detareporotom,tnemtsujdarelloRmargorpotgnidrocca seY seY
royevnocegrahcsidfodeepS s/mc58 s/mc58
htiwnoitarepodnuopmoCelbatrefsnarta noitpo tuohtiw
ahtiwnoitarepodnuopmoCeniltunodaroenilpu-ekam tuohtiw tuohtiw
rewopdetaR Wk2,1/AVk0,2 Wk2,1/AVk0,2
egatlovylppuS zH06/05,V064-002x3 zH06/05,V064-002x3
gnikrowniecaps-roolf.qeRdednetxesnaphctac,noitisop mm0023x0311 mm0563x0311
noitisopgnitserniecaps-roolf.qeR mm0441x0311 mm0561x0311
ruolftuohtiwthgiewenihcaMlatoTretsud gk022 gk542
retsudruolfehtfothgieW gk02 gk02
9.1 Technical data Rondostar 3000
Technical specifications subject to change without notice.

Code: B0900308
Edition: 05. 2005Operating Manual
9. Technical Data
090 - 2
ataDlacinhceT 7116SFS C7116SFS
esabenihcaM stroppuskrof stroppuskrof
releeRhguoDlacitamotuA tuohtiw tuohtiw
retsudruolFlacitamotuA noitpo noitpo
noitatsgnittuC tuohtiw htiw
tlebroyevnocfohtdiW mm046 mm046
htdiwelbasU mm006 mm006
llarevohtgnelelbaT mm0233 mm0743
htgnelrelloR mm066 mm066
draugytefasfoecnaraelC mm09 mm09
pagrelloR mm54-2,0 mm54-2,0
,detareporotom,tnemtsujdarelloRmargorpotgnidrocca seY seY
royevnocegrahcsidfodeepS s/mc58 s/mc58
htiwnoitarepodnuopmoCelbatrefsnarta
noitpo tuohtiw
ahtiwnoitarepodnuopmoCeniltunodaroenilpu-ekam tuohtiw tuohtiw
rewopdetaR Wk2,1/AVk0,2 Wk2,1/AVk0,2
egatlovylppuS zH06/05,V064-002x3 zH06/05,V064-002x3
gnikrowniecaps-roolf.qeRdednetxesnaphctac,noitisop mm0083x0311 mm0593x0311
noitisopgnitserniecaps-roolf.qeR mm0071x0311 mm0871x0311
ruolftuohtiwthgiewenihcaMlatoTretsud gk032 gk552
retsudruolfehtfothgieW gk02 gk02
Technical specifications subject to change without notice.

Code: B0900308
Edition: 05. 2005Operating Manual
9. Technical Data
090 - 3
ataDlacinhceT H7116SFS DD7116SFS
esabenihcaM stroppuskrof stroppuskrof
releeRhguoDlacitamotuA htiw tuohtiw
retsudruolFlacitamotuA noitpo noitpo
noitatsgnittuC tuohtiw tuohtiw
tlebroyevnocfohtdiW mm046 mm046
htdiwelbasU mm006 mm006
llarevohtgnelelbaT mm5053 mm0233
htgnelrelloR mm066 mm066
draugytefasfoecnaraelC mm09 mm09
pagrelloR mm54-2,0 mm54-2,0
,detareporotom,tnemtsujdarelloRmargorpotgnidrocca seY seY
royevnocegrahcsidfodeepS s/mc58 s/mc58
htiwnoitarepodnuopmoCelbatrefsnarta tuohtiw tuohtiw
ahtiwnoitarepodnuopmoCeniltunodaroenilpu-ekam tuohtiw htiw
rewopdetaR Wk2,1/AVk0,2 Wk2,1/AVk0,2
egatlovylppuS zH06/05,V064-002x3 zH06/05,V064-002x3
gnikrowniecaps-roolf.qeRdednetxesnaphctac,noitisop mm0283x0311 mm0083x0311
noitisopgnitserniecaps-roolf.qeR mm5072x0311 mm0071x0311
ruolftuohtiwthgiewenihcaMlatoTretsud gk542 gk032
retsudruolfehtfothgieW gk02 gk02
Technical specifications subject to change without notice.

Code: B0900308
Edition: 05. 2005Operating Manual
9. Technical Data
090 - 4
ataDlacinhceT 7116IFS H7116IFS
esabenihcaM stroppuskrof stroppuskrof
releeRhguoDlacitamotuA tuohtiw htiw
retsudruolFlacitamotuA noitpo noitpo
noitatsgnittuC tuohtiw tuohtiw
tlebroyevnocfohtdiW mm046 mm046
htdiwelbasU mm006 mm006
llarevohtgnelelbaT mm0233 mm5053
htgnelrelloR mm066 mm066
draugytefasfoecnaraelC mm09 mm09
pagrelloR mm54-2,0 mm54-2,0
,detareporotom,tnemtsujdarelloRmargorpotgnidrocca seY seY
royevnocegrahcsidfodeepS s/mc58 s/mc58
htiwnoitarepodnuopmoCelbatrefsnarta tuohtiw tuohtiw
ahtiwnoitarepodnuopmoCeniltunodaroenilpu-ekam tuohtiw tuohtiw
rewopdetaR Wk2,1/AVk0,2 Wk2,1/AVk0,2
egatlovylppuS zH06/05,V064-002x3 zH06/05,V064-002x3
gnikrowniecaps-roolf.qeRdednetxesnaphctac,noitisop mm0283x0311 mm0283x0311
noitisopgnitserniecaps-roolf.qeR mm0033x0311 mm5053x0311
ruolftuohtiwthgiewenihcaMlatoTretsud gk543 gk063
retsudruolfehtfothgieW gk02 gk02
Technical specifications subject to change without notice.

Code: B0900308
Edition: 05. 2005Operating Manual
9. Technical Data
090 - 5
9.2 Additional information
All sheeters from Rondo-Doge have the following quality features:
- The conveyor belts made of plastic material:
All plastic coated conveyor belts used on our
machines are approved for coming into contact
with food stuff and correspond with the
requirements of the FDA (Food and Drug
Administration, USA).
- The conveyor belts made of cotton:
The fabric consists of 100 % cotton and has a
non-toxic finish.
- The rollers are hard-chrome plated. This coating is
approved for coming into contact with food stuff.
- The scraper blades are made of POM-C plastic
material. This material is approved for coming into
contact with food stuff and corresponds with the
requirements of the "Bundesgesundheitsamt BGA",
Germany.
- The dough catch pans are made of stainless steel
(chromium nickel steel, DIN Mat. no. 1.4301).
This material is approved for coming into contact
with food stuff.
- The rollers of the manual and the automatic dough
reeler that are touching the dough are made of
aluminium, anodised colourless and are approved
for coming into contact with food stuff.
- The knives of the cutting rollers that are touching
the dough (Cutomat-types) are made of stainless
steel (chromium nickel steel, DIN Mat. no. 1.4301).
This material is approved for coming into contact
with food stuff.
- Flour duster with Inox container:
The container is made of stainless steel (chromium
nickel steel, DIN Mat. no. 1.4301, 1.4016), the
delivery roller is made of aluminium, anodised
colourless, the bristles of the brush are made of
plastic material (PA). These materials are approved
for coming into contact with food stuff.
- Flour duster with plastic container:
The container is made of plastic material (PS-TSG),
the delivery roller is made of aluminium, anodised
colourless, the bristles of the brush are made of
plastic material (PA). These materials are approved
for coming into contact with food stuff.
- Flour container:
The flour container is made of plastic material
(ABS). This material is approved for coming into
contact with food stuff.