Operating instructions Washing machine W 1612 -...
60
Operating instructions Washing machine W 1612 To avoid the risk of personal injury or damage to the appliance, it is essential that you read these operating instructions before installation and use. This maschine is not approved for use in the United States. M.-Nr. 07 264 960 en - CA
Transcript of Operating instructions Washing machine W 1612 -...
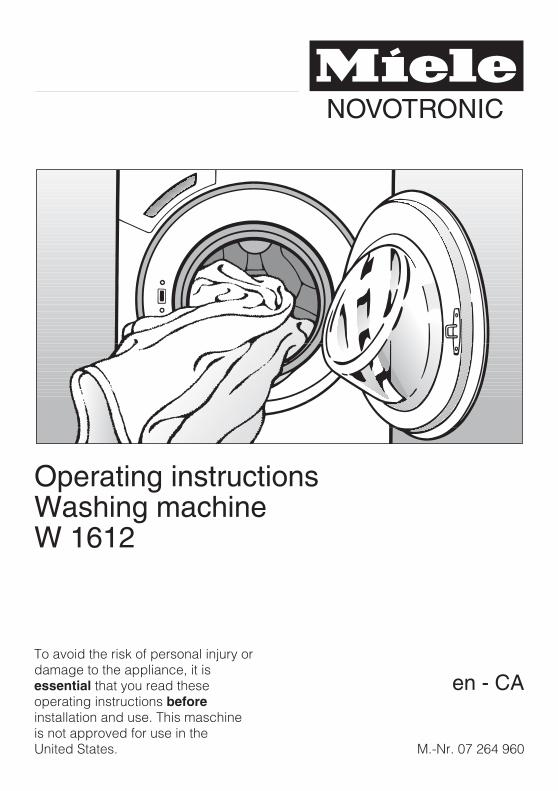
Operating instructions
Washing machine
W 1612
To avoid the risk of personal injury or
damage to the appliance, it is
essential that you read these
operating instructions before
installation and use. This maschine
is not approved for use in the
United States. M.-Nr. 07 264 960
en - CA

Disposal of packing materials
The packing materials protect the
washer from damage during shipping.
They have been selected with an eye to
environmental compatibility and
efficient disposal, and should be
recycled.
Returning packaging to the materials
cycle helps conserve raw materials and
reduces waste. The packing materials
can be returned to your dealer.
Disposing of your old
appliance
Old electric and electronic equipment
often contains valuable materials.
However, they may also contain harmful
substances that were necessary for
safe use. Improperly disposing of these
items in your household waste can be
detrimental to health and the
environment. This is why it is important
NEVER to dispose of your old
appliance with the regular household
garbage.
Instead, please contact your local
community waste collection point to
return and recycle electric and
electronic appliances. Your dealer
should be able to provide you with
details.
If the appliance is being stored for
disposal, please make sure it has been
child-proofed.
Caring for the environment
2
Caring for the environment . . . . . . . . . . . . . . . . . . . . . . . . . . . . . . . . . . . . . . . . . . 2
Important safety instructions . . . . . . . . . . . . . . . . . . . . . . . . . . . . . . . . . . . . . . . . 6
Operating the washing machine. . . . . . . . . . . . . . . . . . . . . . . . . . . . . . . . . . . . . 10
Control panel . . . . . . . . . . . . . . . . . . . . . . . . . . . . . . . . . . . . . . . . . . . . . . . . . . . . . 10
Before using for the first time. . . . . . . . . . . . . . . . . . . . . . . . . . . . . . . . . . . . . . . 12
Environmentally friendly use . . . . . . . . . . . . . . . . . . . . . . . . . . . . . . . . . . . . . . . 13
Energy and water consumption . . . . . . . . . . . . . . . . . . . . . . . . . . . . . . . . . . . . 13
Detergent consumption . . . . . . . . . . . . . . . . . . . . . . . . . . . . . . . . . . . . . . . . . . 13
How to wash correctly . . . . . . . . . . . . . . . . . . . . . . . . . . . . . . . . . . . . . . . . . . . . . 14
Brief instructions . . . . . . . . . . . . . . . . . . . . . . . . . . . . . . . . . . . . . . . . . . . . . . . . . . 14
Spin cycles . . . . . . . . . . . . . . . . . . . . . . . . . . . . . . . . . . . . . . . . . . . . . . . . . . . . . . 19
Final spin cycle speed. . . . . . . . . . . . . . . . . . . . . . . . . . . . . . . . . . . . . . . . . . . . . . 19
Rinse cycle spins . . . . . . . . . . . . . . . . . . . . . . . . . . . . . . . . . . . . . . . . . . . . . . . 19
De-select final spin (Rinse hold). . . . . . . . . . . . . . . . . . . . . . . . . . . . . . . . . . . . 19
De-select the rinse spin(s) and final spin (none�) . . . . . . . . . . . . . . . . . . . . . 19
Program overview . . . . . . . . . . . . . . . . . . . . . . . . . . . . . . . . . . . . . . . . . . . . . . . . 20
Extra options . . . . . . . . . . . . . . . . . . . . . . . . . . . . . . . . . . . . . . . . . . . . . . . . . . . . 22
Garment care label symbols . . . . . . . . . . . . . . . . . . . . . . . . . . . . . . . . . . . . . . . . 23
Program sequence. . . . . . . . . . . . . . . . . . . . . . . . . . . . . . . . . . . . . . . . . . . . . . . . 24
Changing a program sequence . . . . . . . . . . . . . . . . . . . . . . . . . . . . . . . . . . . . . 26
Canceling a program. . . . . . . . . . . . . . . . . . . . . . . . . . . . . . . . . . . . . . . . . . . . . . . 26
Interrupting a program. . . . . . . . . . . . . . . . . . . . . . . . . . . . . . . . . . . . . . . . . . . . . . 26
Changing a program . . . . . . . . . . . . . . . . . . . . . . . . . . . . . . . . . . . . . . . . . . . . . . . 26
Loading or removing laundry. . . . . . . . . . . . . . . . . . . . . . . . . . . . . . . . . . . . . . . . . 27
Childproof lock. . . . . . . . . . . . . . . . . . . . . . . . . . . . . . . . . . . . . . . . . . . . . . . . . . . . 27
Contents
3
Detergent . . . . . . . . . . . . . . . . . . . . . . . . . . . . . . . . . . . . . . . . . . . . . . . . . . . . . . . 28
Selecting the right detergent . . . . . . . . . . . . . . . . . . . . . . . . . . . . . . . . . . . . . . . . . 28
Water softener . . . . . . . . . . . . . . . . . . . . . . . . . . . . . . . . . . . . . . . . . . . . . . . . . . . . 29
Washing with several components . . . . . . . . . . . . . . . . . . . . . . . . . . . . . . . . . . . . 29
Fabric softener, fabric shaper, and liquid starch . . . . . . . . . . . . . . . . . . . . . . . . . 30
Automatic dispensing of fabric softener, fabric shaper, or liquid starch . . . . . 30
Dyes and dye removers. . . . . . . . . . . . . . . . . . . . . . . . . . . . . . . . . . . . . . . . . . . . . 30
Cleaning and care . . . . . . . . . . . . . . . . . . . . . . . . . . . . . . . . . . . . . . . . . . . . . . . . 31
Cleaning the drum . . . . . . . . . . . . . . . . . . . . . . . . . . . . . . . . . . . . . . . . . . . . . . . . . 31
Cleaning the housing and control panel . . . . . . . . . . . . . . . . . . . . . . . . . . . . . . . . 31
Cleaning the dispenser drawer . . . . . . . . . . . . . . . . . . . . . . . . . . . . . . . . . . . . . . . 31
Cleaning the water inlet filters . . . . . . . . . . . . . . . . . . . . . . . . . . . . . . . . . . . . . . . . 33
Troubleshooting. . . . . . . . . . . . . . . . . . . . . . . . . . . . . . . . . . . . . . . . . . . . . . . . . . 34
What to do if . . . . . . . . . . . . . . . . . . . . . . . . . . . . . . . . . . . . . . . . . . . . . . . . . . . . . . 34
No wash program will start . . . . . . . . . . . . . . . . . . . . . . . . . . . . . . . . . . . . . . . . . . 34
Fault messages in the display . . . . . . . . . . . . . . . . . . . . . . . . . . . . . . . . . . . . . . . . 35
General problems . . . . . . . . . . . . . . . . . . . . . . . . . . . . . . . . . . . . . . . . . . . . . . . . . 36
Unsatisfactory wash results . . . . . . . . . . . . . . . . . . . . . . . . . . . . . . . . . . . . . . . . . . 37
The loading door cannot be opened with the Door button . . . . . . . . . . . . . . . . . . 38
Opening the loading door (blocked drain outlet and/or power outage) . . . . . . . . 39
Customer service . . . . . . . . . . . . . . . . . . . . . . . . . . . . . . . . . . . . . . . . . . . . . . . . . 41
Repairs . . . . . . . . . . . . . . . . . . . . . . . . . . . . . . . . . . . . . . . . . . . . . . . . . . . . . . . 41
Program updates (PC) . . . . . . . . . . . . . . . . . . . . . . . . . . . . . . . . . . . . . . . . . . . 41
Warranty conditions and warranty period. . . . . . . . . . . . . . . . . . . . . . . . . . . . . 41
Additional accessories . . . . . . . . . . . . . . . . . . . . . . . . . . . . . . . . . . . . . . . . . . . 41
Installation and connection . . . . . . . . . . . . . . . . . . . . . . . . . . . . . . . . . . . . . . . . 42
Front view. . . . . . . . . . . . . . . . . . . . . . . . . . . . . . . . . . . . . . . . . . . . . . . . . . . . . . . . 42
Rear view . . . . . . . . . . . . . . . . . . . . . . . . . . . . . . . . . . . . . . . . . . . . . . . . . . . . . . . . 43
Installation surface. . . . . . . . . . . . . . . . . . . . . . . . . . . . . . . . . . . . . . . . . . . . . . . . . 44
Transporting the washer to the installation site . . . . . . . . . . . . . . . . . . . . . . . . 44
Removing the transport fittings . . . . . . . . . . . . . . . . . . . . . . . . . . . . . . . . . . . . . . . 44
Re-fitting the shipping rods . . . . . . . . . . . . . . . . . . . . . . . . . . . . . . . . . . . . . . . . . . 46
Contents
4

Levelling the machine . . . . . . . . . . . . . . . . . . . . . . . . . . . . . . . . . . . . . . . . . . . . . . 47
Screw out and adjust the feet . . . . . . . . . . . . . . . . . . . . . . . . . . . . . . . . . . . . . . 47
Installing under a countertop . . . . . . . . . . . . . . . . . . . . . . . . . . . . . . . . . . . . . . 48
Washer-dryer stack. . . . . . . . . . . . . . . . . . . . . . . . . . . . . . . . . . . . . . . . . . . . . . 48
The Miele water protection system . . . . . . . . . . . . . . . . . . . . . . . . . . . . . . . . . . . . 49
Connecting to the water supply. . . . . . . . . . . . . . . . . . . . . . . . . . . . . . . . . . . . . . . 49
Tap water line (cold water) . . . . . . . . . . . . . . . . . . . . . . . . . . . . . . . . . . . . . . . . 50
Hot water connection . . . . . . . . . . . . . . . . . . . . . . . . . . . . . . . . . . . . . . . . . . . . 50
Drainage system . . . . . . . . . . . . . . . . . . . . . . . . . . . . . . . . . . . . . . . . . . . . . . . . . . 51
Electrical connection . . . . . . . . . . . . . . . . . . . . . . . . . . . . . . . . . . . . . . . . . . . . . . . 52
ELECTRICAL INSTRUCTIONS. . . . . . . . . . . . . . . . . . . . . . . . . . . . . . . . . . . . . . . . 52
Electrical connection . . . . . . . . . . . . . . . . . . . . . . . . . . . . . . . . . . . . . . . . . . . . . . . 52
Technical data . . . . . . . . . . . . . . . . . . . . . . . . . . . . . . . . . . . . . . . . . . . . . . . . . . . 53
Programmable functions. . . . . . . . . . . . . . . . . . . . . . . . . . . . . . . . . . . . . . . . . . . 55
To access programmable functions . . . . . . . . . . . . . . . . . . . . . . . . . . . . . . . . . 55
To select a programmable function . . . . . . . . . . . . . . . . . . . . . . . . . . . . . . . . . 55
To change a programmable function . . . . . . . . . . . . . . . . . . . . . . . . . . . . . . . . 55
To exit a programmable function . . . . . . . . . . . . . . . . . . . . . . . . . . . . . . . . . . . 55
Language � . . . . . . . . . . . . . . . . . . . . . . . . . . . . . . . . . . . . . . . . . . . . . . . . . . . . . . 55
Water plus . . . . . . . . . . . . . . . . . . . . . . . . . . . . . . . . . . . . . . . . . . . . . . . . . . . . . . . 56
Gentle wash . . . . . . . . . . . . . . . . . . . . . . . . . . . . . . . . . . . . . . . . . . . . . . . . . . . . . . 56
Suds cooldown . . . . . . . . . . . . . . . . . . . . . . . . . . . . . . . . . . . . . . . . . . . . . . . . . . . 56
Pin code. . . . . . . . . . . . . . . . . . . . . . . . . . . . . . . . . . . . . . . . . . . . . . . . . . . . . . . . . 57
Temperature unit . . . . . . . . . . . . . . . . . . . . . . . . . . . . . . . . . . . . . . . . . . . . . . . . . . 58
Buzzer . . . . . . . . . . . . . . . . . . . . . . . . . . . . . . . . . . . . . . . . . . . . . . . . . . . . . . . . . . 58
Keypad tone . . . . . . . . . . . . . . . . . . . . . . . . . . . . . . . . . . . . . . . . . . . . . . . . . . . . . 58
Brightness . . . . . . . . . . . . . . . . . . . . . . . . . . . . . . . . . . . . . . . . . . . . . . . . . . . . . . . 58
Contrast . . . . . . . . . . . . . . . . . . . . . . . . . . . . . . . . . . . . . . . . . . . . . . . . . . . . . . . . . 58
Standby display . . . . . . . . . . . . . . . . . . . . . . . . . . . . . . . . . . . . . . . . . . . . . . . . . . . 59
Memory . . . . . . . . . . . . . . . . . . . . . . . . . . . . . . . . . . . . . . . . . . . . . . . . . . . . . . . . . 59
Anti-crease. . . . . . . . . . . . . . . . . . . . . . . . . . . . . . . . . . . . . . . . . . . . . . . . . . . . . . . 59
Contents
5
This washer complies with all
applicable safety laws and
regulations. Inappropriate use can,
however, lead to personal injury and
property damage.
Please thoroughly read these
instructions before first using the
appliance. They contain important
information on the safe installation,
operation, and care of your
appliance. They are intended to
help prevent personal injury and
damage to the appliance.
Keep these operating instructions in
a safe place and pass them on to
any future owner.
The W 1612 meets all CSA
requirements. This machine is not
approved for use in the United
States.
Proper use
� The washing machine is designed
for household use only and only for
washing textiles whose fabric care label
states that they can be washed. Other
uses may be dangerous. Miele will not
be held liable for damage caused by
improper use or incorrect operation.
� Individuals who are incapable of
using the appliance safely because of
reduced physical, sensory or mental
capabilities, or because of a lack of
experience or knowledge, must not use
this appliance without supervision or
instruction by a responsible person.
Children around the appliance
� Supervise any children in the vicinity
of the appliance. Never allow children
to play with the appliance.
� Children must not use the washer
unsupervised unless they have
received sufficient instruction to
operate it safely. They must be able to
recognize the potential hazards of
improper operation.
� Remember that high wash
temperatures will make the porthole
glass hot.
Teach children not to touch the glass
while the washer is in operation.
Important safety instructions
6

Technical safety
� Check the washer for externally
visible damage before installation.
Do not install or operate a damaged
washer.
� Before plugging in the appliance,
you must make sure that the electrical
rating (fuse amperage, voltage and
connected load in watts, indicated on
the data plate) matches the household
electrical supply. If in any doubt,
consult a qualified electrician.
� The washer can only be considered
safe if it has been connected to a
properly installed grounding system, as
per code.
It is crucial to have this essential safety
requirement tested, and to have the
household wiring checked by a
professional if there is any doubt.
Miele will not be held liable for any
damage or harm caused by a missing
or incomplete grounding system.
� For safety reasons, do not use
extension cords (danger of fire from
overheating).
� Use only genuine Miele replacement
parts to replace defective components.
Only these parts are guaranteed to
meet applicable safety requirements.
� Unauthorized repairs may create
unforeseeable risks for the user, for
which Miele assumes no liability.
Repairs should be carried out only by
authorized Miele technicians -
otherwise, associated damage will not
be covered by the warranty.
� If the power cord is damaged it
must be replaced by an authorized
Miele technician to prevent danger to
the user.
� In the event of a fault, or for care
and cleaning, the washer is only
considered disconnected from the
power supply, when
– the plug is completed removed from
the socket, or
– the circuit breaker for the house
wiring system is completely shut off,
or
– the screw-out fuse in the house
wiring system is unscrewed and
removed.
� Use only a new hose kit to attach the
washer to the household water supply.
Old hosing should not be re-used.
Important safety instructions
7

� The appliance is not designed for
use in non-stationary locations (for
example, on ships). However, this use
may be possible if a qualified specialist
determines that the appliance can be
used safely in the location in question.
� Make no modifications to the washer
that are not expressly authorized by
Miele.
Proper use
� Do not place the washer in a room
where there is a risk of frost occurring.
Frozen hoses can split or burst, and the
reliability of the electronics can be
reduced below the freezing point.
� Before using the washer for the first
time, remove the shipping rods on the
back of the appliance (see "Installation
and connection" under "Removing the
transport fittings"). Failure to remove the
shipping rods can damage the washer
and any surrounding furniture or
devices during spinning.
� For extended absences (e.g., a
vacation), close the taps, especially if
there is no gully near the washer.
� Danger of flooding!
Before hanging the drain hose in the
washbasin, make sure the water will
drain away quickly enough.
Secure the hose from slipping. The
force of the water exiting the hose can
cause an unsecured hose to pop out of
the basin.
� Ensure that no foreign bodies (e.g.,
nails, needles, coins, paper clips) are in
the wash. Foreign bodies can damage
the appliance components (e.g., suds
container, washer drum). Damaged
components, in turn, can damage
laundry items.
� Proper dosing of the detergent will
eliminate the need to remove lime
deposits. However, if heavy limescale
nonetheless forms on your washer, be
sure to select a special descaling agent
with corrosion protection. This special
product can be obtained from your
Miele dealer or from Miele Customer
Service. Closely follow the instructions
on the product package.
Important safety instructions
8
� Textiles that have been pre-treated
with solvent-based cleaners must be
rinsed thoroughly in water before you
wash them.
� NEVER use solvent-based cleaners
(e.g., benzine) in the washing machine.
The use of such products can damage
the appliance and generate noxious
fumes. Fire hazard and danger of
explosion!
� NEVER use solvent-based cleaners
(e.g., benzine) on or around the
washing machine. Splatters can
damage the plastic surfaces of the
appliance.
� Do not use dyes unless they are
recommended for use in washing
machines. Dyes are to be used in
reasonable (household) quantities only.
Closely follow the manufacturer's
instructions.
� Colour removers contain sulphur
compounds, which can lead to
corrosion. Therefore, do not use colour
removers in the washer.
� If liquid detergent comes into
contact with the eyes, immediately flush
with copious amounts of lukewarm
water. If accidentally swallowed, imme-
diately seek medical attention. Persons
with sensitive or damaged skin should
avoid contact with liquid detergents.
Accessories
� Only use accessories that are
expressly authorized by Miele.
If other parts are used, the appliance
warranty and any associated
performance and/or product liability
claims become null and void.
The manufacturer will not be held
liable for damage caused by failure
to comply with the safety instructions
and warnings.
Important safety instructions
9

Control panel
�Display
See the following page for more
information.
�Temperature button
For selecting a temperature.
�Spin speed button
For selecting the final spin speed or
Rinse hold orNo� (de-select spin).
�PC / Optical interface
Used by Customer Service for
diagnostic checks and programming
updates.
�Start/Stop button
Starts the selected wash program or
stops a started program.
�Extra option buttons
Various extras can be added to the
wash programs.
�Program selector
For selecting a program. The
indicator light next to the selected
program comes on. The program dial
can be turned right or left.
Door button
Opens the drum door.
I-On/0-Off button
For switching the machine on or off.
Operating the washing machine
10

The following functions are selected
from the display:
– wash temperature
– spin speed
– programmable functions
– program cancel
– childproof (safety) lock
The display also shows:
– program duration
– program sequence
program duration
Once a program starts, the estimated
program duration (in hours and
minutes) is displayed.
During the first 8 minutes of the
program, the washer calculates the
quantity and absorbency of the laundry.
This can cause an increase or
decrease in program times.
Programmable functions
The programmable functions can be
used to adapt the washer to your
personal requirements. In programming
mode, the display will show the function
selected.
Operating the washing machine
11
Before the washer is used for the
first time, it needs to be properly
installed and connected. See
"Installation and connection".
Because the washer was put through
a complete operational test in the
factory, there will be some water left
in the drum.
For safety reasons, the washer will not
spin until it has been prepared for use.
To activate the spinning function, you
will need to run a wash programwithout
laundry and without detergent.
If you use detergent, it will cause
excessive sudsing.
This preparation step also activates the
ball valve in the drain. Once activated,
the ball valve helps prevent detergent
escaping from the suds container into
the drain during a wash program, thus
ensuring maximum use of the
detergent.
� Press the I-On/0-Off button in.
If the washer is being switched on for
the first time, the welcome screen will
appear.
The welcome screen will appear in
the display every time the washer is
switched on, until a program lasting
longer than 1 hour has been
completed.
Setting the language
You will be prompted to select the
desired display language. You can
change the language at any time
through the programmable functions.
� deutsch
� Turn the program selector to select
the desired display language. Use
the Start/Stop button to confirm your
selection.
Reminder to remove the shipping
rods
The shipping rods must be removed
before the washer is used for the
first time, to help prevent damage to
the appliance.
� After removing the shipping rods,
press the Start/Stopbutton.
Running the washer for the first time
Run aCotton 60°C with no laundry and
no detergent. (This program is
automatically selected.)
� Open the faucets.
� Press the Start/Stopbutton.
� Once the program is finished, switch
the washer off.
The washer is now ready for regular
use.
Before using for the first time
12
Energy and water consumption
– To make the most out of each wash
load, load the maximum dry weight
for the program you have selected.
– Use the Colours and Express
programs for small loads.
– When smaller amounts of laundry are
washed using the Normal program,
the automatic load recognition
system will automatically reduce the
water, energy, and time for that load.
This may cause a correction in the
remaining time displayed for the
wash.
– Using the Normal 60°C program
instead of the Normal 95°C program
will result in energy savings of 35%
to 45%. This setting is quite sufficient
for most levels of soiling.
– To save energy, all wash programs
with a temperature setting of 40°C or
above will draw from the hot water
supply. The only exception is the
Wool program, which protects
garments by avoiding the use of hot
water.
Detergent consumption
– Do not exceed the maximum
detergent dose listed on the
package.
– Adjust the detergent dose to suit how
soiled the laundry is.
– For smaller loads, reduce the amount
(approx.1/3 less detergent for a half
load).
Choosing the right extra options
(Short and Pre-wash)
Select:
– a wash program together with the
Short option for lightly soiled items
with no obvious staining
– a wash program with NO extra
options for moderate to heavy soiling
with visible staining.
– The Heavy Soil extra option for
laundry with large amounts of dirt
(e.g., dust, sand).
When drying with a tumble dryer
To help save energy when using a
dryer, select the highest possible spin
speed for the wash program in
question.
Environmentally friendly use
13
Brief instructions
The bold headings numbered(�, �,
, ...) show the overall sequence of
steps, and may be used as short-cut
instructions.
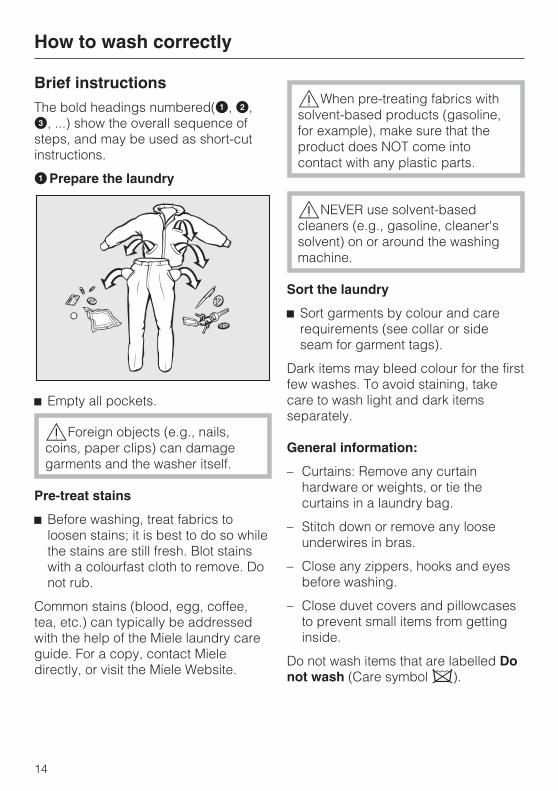
�Prepare the laundry
� Empty all pockets.
�Foreign objects (e.g., nails,
coins, paper clips) can damage
garments and the washer itself.
Pre-treat stains
� Before washing, treat fabrics to
loosen stains; it is best to do so while
the stains are still fresh. Blot stains
with a colourfast cloth to remove. Do
not rub.
Common stains (blood, egg, coffee,
tea, etc.) can typically be addressed
with the help of the Miele laundry care
guide. For a copy, contact Miele
directly, or visit the Miele Website.
�When pre-treating fabrics with
solvent-based products (gasoline,
for example), make sure that the
product does NOT come into
contact with any plastic parts.
�NEVER use solvent-based
cleaners (e.g., gasoline, cleaner's
solvent) on or around the washing
machine.
Sort the laundry
� Sort garments by colour and care
requirements (see collar or side
seam for garment tags).
Dark items may bleed colour for the first
few washes. To avoid staining, take
care to wash light and dark items
separately.
General information:
– Curtains: Remove any curtain
hardware or weights, or tie the
curtains in a laundry bag.
– Stitch down or remove any loose
underwires in bras.
– Close any zippers, hooks and eyes
before washing.
– Close duvet covers and pillowcases
to prevent small items from getting
inside.
Do not wash items that are labelled Do
not wash (Care symbol�).
How to wash correctly
14
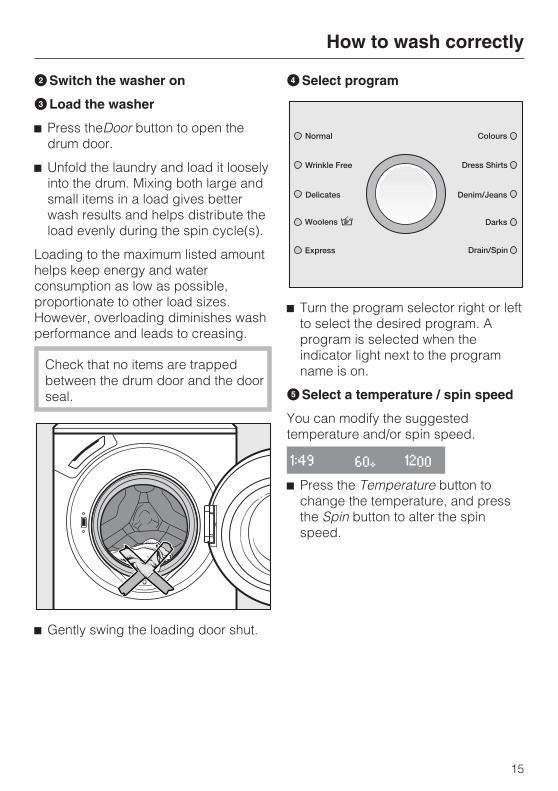
�Switch the washer on
Load the washer
� Press theDoor button to open the
drum door.
� Unfold the laundry and load it loosely
into the drum. Mixing both large and
small items in a load gives better
wash results and helps distribute the
load evenly during the spin cycle(s).
Loading to the maximum listed amount
helps keep energy and water
consumption as low as possible,
proportionate to other load sizes.
However, overloading diminishes wash
performance and leads to creasing.
Check that no items are trapped
between the drum door and the door
seal.
� Gently swing the loading door shut.
�Select program
� Turn the program selector right or left
to select the desired program. A
program is selected when the
indicator light next to the program
name is on.
�Select a temperature / spin speed
You can modify the suggested
temperature and/or spin speed.
1:49 60° 1200
� Press the Temperature button to
change the temperature, and press
the Spin button to alter the spin
speed.
How to wash correctly
15
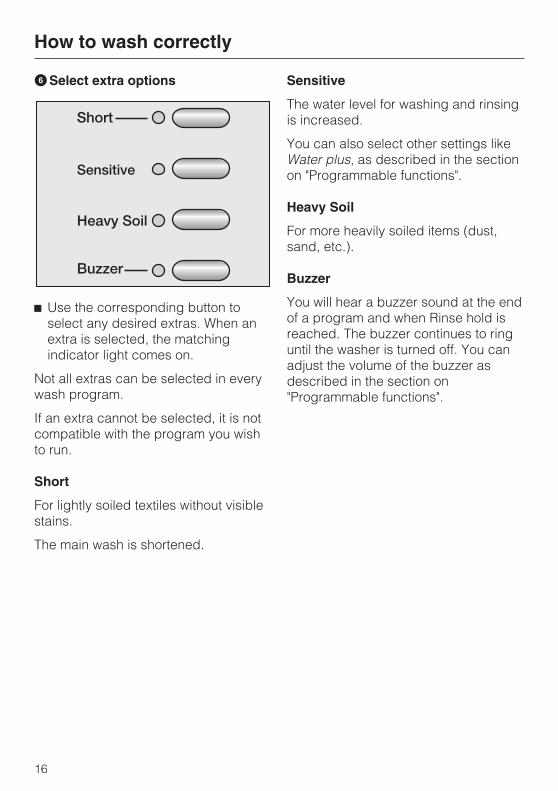
�Select extra options
� Use the corresponding button to
select any desired extras. When an
extra is selected, the matching
indicator light comes on.
Not all extras can be selected in every
wash program.
If an extra cannot be selected, it is not
compatible with the program you wish
to run.
Short
For lightly soiled textiles without visible
stains.
The main wash is shortened.
Sensitive
The water level for washing and rinsing
is increased.
You can also select other settings like
Water plus, as described in the section
on "Programmable functions".
Heavy Soil
For more heavily soiled items (dust,
sand, etc.).
Buzzer
You will hear a buzzer sound at the end
of a program and when Rinse hold is
reached. The buzzer continues to ring
until the washer is turned off. You can
adjust the volume of the buzzer as
described in the section on
"Programmable functions".
How to wash correctly
16

�Add detergent
It is important to use the right amount,
because . . .
. . . too little detergent results in:
– the laundry not getting clean, and
turning grey and stiff over time
– greasy deposits on the laundry
– limescale deposits on the heating
element
. . . too much detergent results in:
– excessive sudsing, which interferes
with proper agitation and leads to
poor wash, rinse, and spin results
– increased water consumption
because of an automatic additional
rinse cycle
– a burden to the environment
� Pull out the detergent drawer and fill
with product, as follows:
�
Detergent for the pre-wash (we
recommend dividing the total
detergent amount as follows:1/3 in
compartment� and2/3 in
compartment�)
�
Detergent for the main wash
�
Fabric softener or liquid starch
� Close the detergent drawer.
Additional information regarding
laundry products and doses can be
found in the "Detergent" section.
How to wash correctly
17

�How to start a program
� Press the flashing Start/Stopbutton.
The estimated program duration will
appear in the display as soon as the
program has started. During the first 8
minutes of the program, the washer
calculates how much water is needed,
based on the absorbency of the
laundry. This can result is shorter or
longer program times.
The program sequence will also appear
in the display. The washer will show
which program step is currently
running.
�Remove the laundry when the
program is finished
In crease-free mode, the display
alternates between:
0:00 Anti-crease
and
0:00 Finish
� Press theDoor button to open the
drum door.
� Remove the laundry.
Check that all items have been
removed from the drum. Items left
behind could shrink or bleed colour
during the next load.
� Check the folds in the door seal for
foreign objects.
� Use the I-On/0-Off button to switch
the washer off.
� Close the door. If it is left open,
objects may inadvertently be placed
in the drum. They could be washed in
the next load and damage the
laundry.
How to wash correctly
18
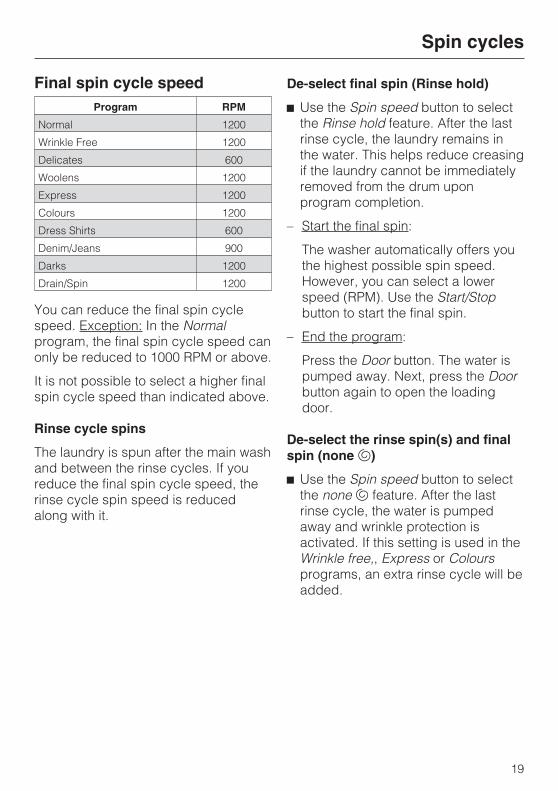
Final spin cycle speed
Program RPM
Normal 1200
Wrinkle Free 1200
Delicates 600
Woolens 1200
Express 1200
Colours 1200
Dress Shirts 600
Denim/Jeans 900
Darks 1200
Drain/Spin 1200
You can reduce the final spin cycle
speed. Exception: In the Normal
program, the final spin cycle speed can
only be reduced to 1000 RPM or above.
It is not possible to select a higher final
spin cycle speed than indicated above.
Rinse cycle spins
The laundry is spun after the main wash
and between the rinse cycles. If you
reduce the final spin cycle speed, the
rinse cycle spin speed is reduced
along with it.
De-select final spin (Rinse hold)
� Use the Spin speed button to select
the Rinse hold feature. After the last
rinse cycle, the laundry remains in
the water. This helps reduce creasing
if the laundry cannot be immediately
removed from the drum upon
program completion.
– Start the final spin:
The washer automatically offers you
the highest possible spin speed.
However, you can select a lower
speed (RPM). Use the Start/Stop
button to start the final spin.
– End the program:
Press the Door button. The water is
pumped away. Next, press the Door
button again to open the loading
door.
De-select the rinse spin(s) and final
spin (none�)
� Use the Spin speed button to select
the none� feature. After the last
rinse cycle, the water is pumped
away and wrinkle protection is
activated. If this setting is used in the
Wrinkle free,, Express or Colours
programs, an extra rinse cycle will be
added.
Spin cycles
19

Normal 95°C to 30°C
Fabric T-shirts, underwear, table linens and other such textiles made of
cotton, linen, or mixed fibres
Note for test institutes:
Short program: 3.0 kg load and Short extra option
Wrinkle Free 60°C to 30°C
Fabric Synthetic fabrics, mixed fibres and easy-care cottons
Note: For fabrics that crease easily, reduce the final spin cycle speed.
Delicates 60°C to cold
Fabric For delicate garments made of synthetic fibres, mixed fibres, and
rayon
Curtains labelled by the manufacturer as machine-washable.
Note: – The fine dust typically found in curtains makes it advisable to use
a program with pre-wash.
– For curtains that crease easily, reduce the final spin cycle speed
or deselect the final spin altogether.
Woolens� 40°C to cold
Fabric Textiles made of wool or wool blends, and hand-washable garments
Note: For fabrics that crease easily, reduce the final spin cycle speed.
Express 40°C to cold
Fabric Small load of items to be refreshed. (Items suited to the Normal
program.)
Note: If you want to rinse individual items, select this program with the
temperature setting cold, and do not add any detergent.
Program overview
20

Colours cold to 40°C
Fabric Mixed loads of garments suitable for the Normal and Wrinkle Free
programs.
Note: The wash parameters (e.g., water level, wash rhythm and spin
speed) are automatically adjusted for each load, to offer the best
combination of cleaning and care.
Dress Shirts 60°C to cold
Note: Pre-treat soiled cuffs and collars as needed.
For silk shirts and blouses, use the Delicates program.
Denim/Jeans 60°C to cold
Note: – Wash denim inside-out.
– Denim items may run during the first few washes. Take care to
wash light and dark items separately.
Darks 40°C to cold
Fabric Black and dark items made of cotton or mixed fibres.
Note: Wash inside-out.
Drain/Spin
Note: – Drain only: Select No�.
– Be sure to set the appropriate spin speed.
Program overview
21
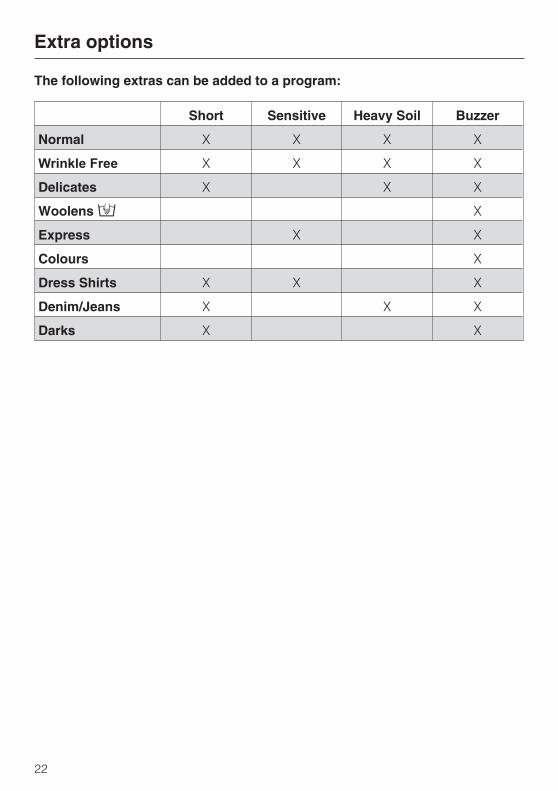
The following extras can be added to a program:
Short Sensitive Heavy Soil Buzzer
Normal X X X X
Wrinkle Free X X X X
Delicates X X X
Woolens� X
Express X X
Colours X
Dress Shirts X X X
Denim/Jeans X X X
Darks X X
Extra options
22
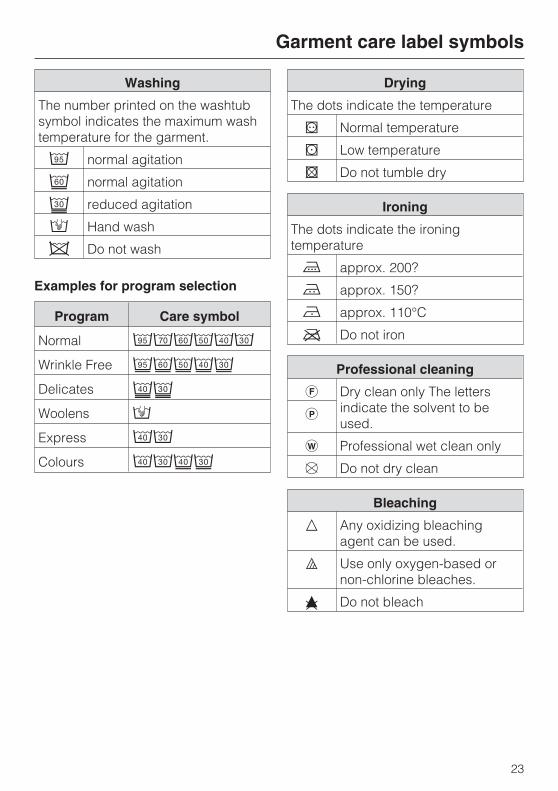
Washing
The number printed on the washtub
symbol indicates the maximum wash
temperature for the garment.
� normal agitation
normal agitation
reduced agitation
� Hand wash
� Do not wash
Examples for program selection
Program Care symbol
Normal ��� ��
Wrinkle Free ����
Delicates �
Woolens �
Express ��
Colours ����
Drying
The dots indicate the temperature
� Normal temperature
� Low temperature
� Do not tumble dry
Ironing
The dots indicate the ironing
temperature
� approx. 200?
� approx. 150?
� approx. 110°C
� Do not iron
Professional cleaning
� Dry clean only The letters
indicate the solvent to be
used.�
� Professional wet clean only
� Do not dry clean
Bleaching
� Any oxidizing bleaching
agent can be used.
� Use only oxygen-based or
non-chlorine bleaches.
� Do not bleach
Garment care label symbols
23

Main wash Rinse Spin
Water
level
Wash
rhythm
Water
level
Rinses Interim
spin
Final
spin
Normal � ! 2-41) � �
Wrinkle Free ! � " 2-32) � �
Delicates " � " 3 – �
Woolens " � " 2 � �
Express 2-32) � �
Colours ! �� " 2-32) � �
Dress Shirts " � " 2 – �
Denim/Jeans ! � " 3 – �
Darks ! 3 � �
Drain/Spin – – – – – �
= low water level
! = medium water level
" = high water level
�= Intensive rhythm
= Normal rhythm
�= Gentle rhythm
�= Sensitive rhythm
�= Handwash speed
See the next page for program sequence details.
Program sequence
24

The washer is equipped with fully
electronic controls and load
recognition. It automatically determines
how much water is needed, based on
the size and absorbency of the load.
This means that program sequences
and times can vary.
The program sequences listed here are
based on the basic program, with a
maximum load. Extra options have not
been taken into account.
At any time during a program, you can
check the display to see which step
has been reached.
Special features in the program
sequences:
Anti-crease:
To help prevent wrinkles, the washer
drum will continue to turn at intervals for
up to 30 minutes after program
completion. Exceptions: In the Woolens
program, there is no anti-crease
feature.
The washer can be opened at any time.
1)For temperature selections from
60°C to 95°C a second rinse will take
place. For temperature selections
below 60°C there are 3 rinse cycles.
A third or fourth rinse cycle will occur
if:
– there is heavy sudsing in the drum
– the final spin speed is less than
700 RPM
– No� has been selected.
2)A third rinse cycle will occur if:
No� has been selected.
Program sequence
25
Canceling a program
You can cancel a program at any time
after it has started.
� Press the Start/Stop button.
Cancel program
� Press the flashing Start/Stop button
again.
The washer will pump away all the
water in the drum.
If you wish to remove the laundry:
� Press the Door button.
If you wish to select a different
program:
� Use the I-On/0-Off button to switch
the washer off.
� Switch the washer back on.
� Check that there is still detergent in
the dispensing drawer. Add more as
needed.
� Select and start a new program.
Interrupting a program
� Use the I-On/0-Off button to switch
the washer off.
To continue with the same program:
� Use the I-On/0-Off button to switch
the washer back on.
Changing a program
Program
Once a program has started, a different
program cannot be selected.
Temperature
This setting can be changed within the
first five minutes.
� Press the Temperature button.
Spin speed
This setting can be changed up until
the start of the final spin cycle.
� Press the Spin speed button.
Extra options
Within the first five minutes of a
program you can select or de-select
the extras Short and Sensitive.
However, if the safety lock is
activated, a program can neither be
changed nor cancelled.
Changing a program sequence
26

Loading or removing laundry
� Press the Door button until the front
door opens.
� Load or unload the laundry.
� Close the door.
The program automatically proceeds.
Please note:
Once a program has started, the
washer cannot detect changes to the
size of the load.
Therefore, if laundry is added or
removed, the washer will assume the
maximum load.
The indicated program time may be
extended.
The door will not open if:
– the suds are hotter than 55°C.
– the water level exceeds a certain
limit.
– the program step Spin has been
reached.
If you press the Door button during one
of the above situations, the following
message will appear in the display:
� Door locked
Childproof lock
The childproof lock prevents the front
door from being opened and
programs from being interrupted.
Childproof feature ON
� Once a program has started, press
and hold the Start/Stop button
Stop or in 3 sec. �
� Hold down the Start/Stop button until
the time has elapsed and the
following appears in the display:
Locked �
The childproof feature is now activated
and will switch off automatically once
the program has finished.
Childproof feature OFF
� Once a program has started, press
and hold the Start/Stop button
Unlock in 3 sec.�
� Hold down the Start/Stop button until
the time has elapsed and the
following appears in the display:
Unlocked �
Changing a program sequence
27

Selecting the right detergent
You can use any detergent designed for automatic washing machines. Consult
the package for dosages and instructions.
Universal Colour Delicates
Normal X X
Wrinkle Free X X
Delicates X
Woolens Liquid detergent especially for woollens
Express X X
Colours X X
Dress Shirts X X
Denim/Jeans X1)
Darks X1)
1) liquid detergent only
Detergent
28
The right amount to dispense will
depend on the following:
– How soiled the laundry is
lightly soiled
No visible dirt or stains. Possibly
slight body odour.
moderately soiled
Visibly dirty and/or just a few light
stains.
heavily soiled
Visibly dirty and stained, with dried-
on soiling.
– The size of the load
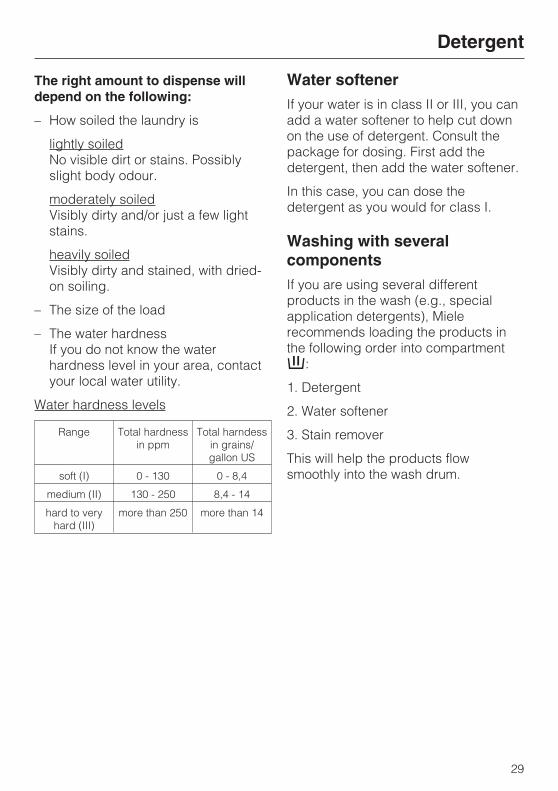
– The water hardness
If you do not know the water
hardness level in your area, contact
your local water utility.
Water hardness levels
Range Total hardness
in ppm
Total harndess
in grains/
gallon US
soft (I) 0 - 130 0 - 8,4
medium (II) 130 - 250 8,4 - 14
hard to very
hard (III)
more than 250 more than 14
Water softener
If your water is in class II or III, you can
add a water softener to help cut down
on the use of detergent. Consult the
package for dosing. First add the
detergent, then add the water softener.
In this case, you can dose the
detergent as you would for class I.
Washing with several
components
If you are using several different
products in the wash (e.g., special
application detergents), Miele
recommends loading the products in
the following order into compartment
�:
1. Detergent
2. Water softener
3. Stain remover
This will help the products flow
smoothly into the wash drum.
Detergent
29
Fabric softener, fabric shaper,
and liquid starch
Starch
can be used to give body and
crispness to laundered items.
Fabric shapers
are synthetic starches and give an even
stiffer hold.
Fabric softeners
make garments soft to handle and help
reduce static cling from the tumble
dryer.
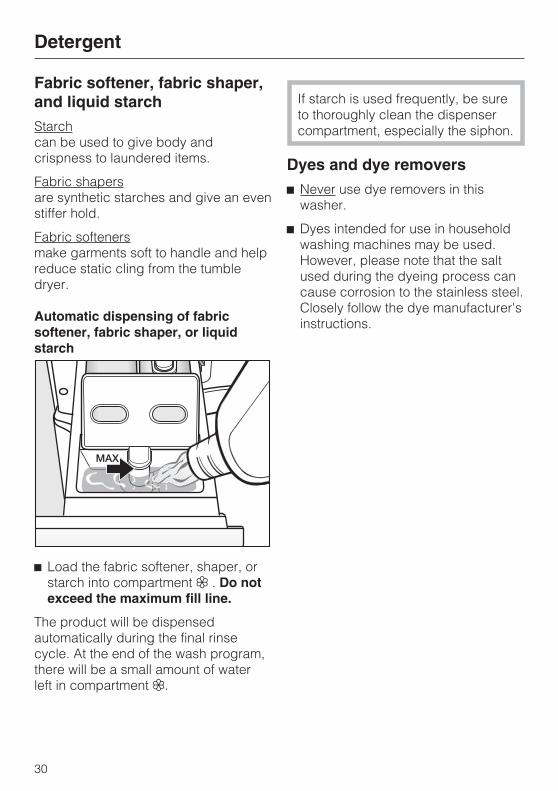
Automatic dispensing of fabric
softener, fabric shaper, or liquid
starch
� Load the fabric softener, shaper, or
starch into compartment � . Do not
exceed the maximum fill line.
The product will be dispensed
automatically during the final rinse
cycle. At the end of the wash program,
there will be a small amount of water
left in compartment �.
If starch is used frequently, be sure
to thoroughly clean the dispenser
compartment, especially the siphon.
Dyes and dye removers
� Never use dye removers in this
washer.
� Dyes intended for use in household
washing machines may be used.
However, please note that the salt
used during the dyeing process can
cause corrosion to the stainless steel.
Closely follow the dye manufacturer's
instructions.
Detergent
30
Cleaning the drum
Washing at low temperatures and/or
with liquid detergents can allow germs
and odours to form inside the
appliance. At least once a month, to
clean the drum and prevent the
formation of odours, run a wash
program at 60°C or above, using
powdered detergent.
Cleaning the housing and
control panel
�Always unplug the appliance
before cleaning.
�NEVER hose down the washer.
� Use a mild cleanser or soapy water
to clean the housing and panel, then
dry with a soft cloth.
� Use a special stainless steel cleaning
product to clean the drum.
�Do NOT use solvent-based
products, abrasive cleaners, or
glass or all-purpose cleaning
agents.
They can damage the plastic
surfaces and other components.
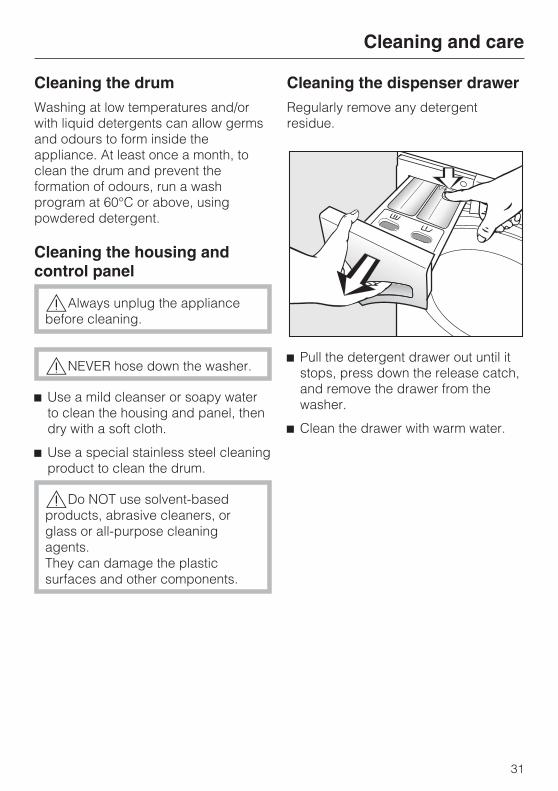
Cleaning the dispenser drawer
Regularly remove any detergent
residue.
� Pull the detergent drawer out until it
stops, press down the release catch,
and remove the drawer from the
washer.
� Clean the drawer with warm water.
Cleaning and care
31

Cleaning the siphon and softener
channel
1. Pull the siphon out of the
compartment � and rinse under
warm running water. Clean the
siphon tube the same way.
2. Replace the siphon.
� Clean the fabric softener channel
with warm water and a brush.
If liquid starch is used often, the
siphon and fabric softener channel
will need to be thoroughly cleaned.
Liquid starch can cause a build-up
and clogging.
Cleaning the detergent drawer
housing
� Use a bottle brush to remove any
detergent residue and lime deposits
from the jets inside the detergent
drawer.
Cleaning and care
32

Cleaning the water inlet filters
The water inlet valves are protected by
two filter screens. They need to be
checked approx. every 6 months. If
there are frequent interruptions to the
water network, they may need to be
checked more frequently.
Cleaning the filter in union of the
inlet hose
� Close the tap and unscrew the
threaded union that connects the free
end of the inlet hose to the stopcock.
� Remove the rubber seal 1 from the
recess.
� Use flat pliers to grasp the plastic
filter piece 2, then remove the filter.
� Clean the filter. Reverse the
instructions to re-insert the filter and
seal.
To clean the filter in the water inlet
valve
� Use adjustable pliers to carefully
loosen the ribbed plastic nut on the
inlet valve and unscrew.
� Use flat pliers to pull the filter out by
the fin, and clean it. Reverse the
instructions to re-insert and secure
the parts.
Both filters MUST be re-inserted
after cleaning.
Cleaning and care
33
What to do if . . .
Many of the faults you may encounter during everyday use can be easily rectified
yourself. This helps save time and money, because you won't need to call
Customer Service.
The following troubleshooting guide can be used to help address minor problems
without a service call. However, please note the following:
�Repairs to electrical appliances should only be carried out by qualified
professionals. Work performed by unqualified persons can place the user at
considerable risk of harm.
No wash program will start
Problem Possible cause Remedy
The display is dark and
the indicator light for
the Start/Stop button
does not come on.
There is no power to
the washer.
Check whether:
– the cord is plugged in.
– the fuse is in working order.
The display prompts
you to enter a pin
code.
The pin code feature is
active.
Enter and confirm the pin
code. De-activate the pin
code if you do not wish the
prompt to appear the next
time the washer is switched
on.
The display is dark. The display
automatically dims to
save energy (standby).
Press any button. This will
bring the display back on.
Troubleshooting
34

Fault messages in the display
Problem Possible cause Remedy�
The display lights up �and
Drain fault
flashes.
– The water outlet is
restricted or
blocked.
– The drain hose is
sitting too high.
– Clean the drain filter and
pump.
– The max. drain pump
height (delivery head) is
1m.
The display lights up �and
Water inlet fault
flashes.
The water inlet is
blocked or restricted.
Check whether:
– the stopcock is open
enough.
– the inlet hose is pinched or
bent.
– the water pressure is too
low.
The display lights up �and
Waterproof fault
flashes.
The water protection
system was triggered.
Call the service department.
The display lights up �and
Technical fault
flashes.
There is a fault. Re-start the program.
If the fault message appears
again, call Customer Service.
The display flashes
Anti-crease
Chk detergent
Excessive foam has
built up during
washing.
Use less detergent next time,
and check the recommended
doses on the package.
�To switch off the fault message: Use the I-On/0-Off button to switch the washer
off.
Troubleshooting
35

General problems
Problem Possible cause Remedy
The washer shakes
during spin cycles.
The feet are not
leveled.
Even out the feet so the
washer is stable, and
tighten the nuts.
The washer didn't spin
the laundry properly, and
it is still wet.
There was an
imbalance during the
final spin cycle and
the spin speed was
automatically
reduced.
It is best to include a mix of
large and small items in the
washer, so the laundry will
distribute evenly. Re-
arrange the laundry and
start Spin program.
There pump is making
unusual noises.
This is not a fault. Slurping noises are normal when
the pump starts and finishes.
A lot of detergent is left
behind in the detergent
compartment.
The water pressure is
too low.
– Clean the water inlet filter.
– Consider using the
Sensitive option.
Powdered detergents
used along with water
softeners tend to
clump.
Clean the detergent
compartment and, in the
future, first load the
detergent into the
compartment, followed by
the water softener.
Some fabric softener
remains behind in the
compartment, or there is
too much water in the
�compartment.
The siphon tube is
clogged or not
positioned correctly.
Clean the siphon (see
"Cleaning and care -
Cleaning the dispenser
drawer").
A foreign language
appears in the display.
A different language
has been selected in
the "Programmable
functions - Language
�" menu.
Select the language you
prefer. Use the flag symbol
as a guide.
Troubleshooting
36
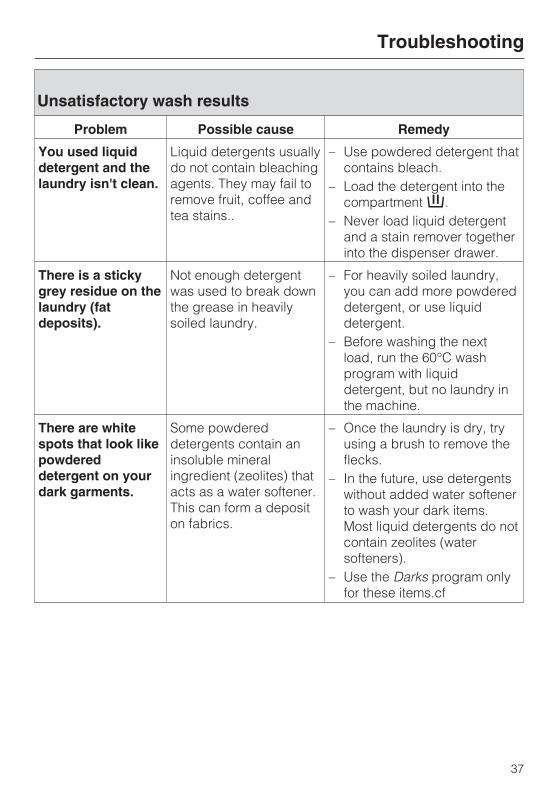
Unsatisfactory wash results
Problem Possible cause Remedy
You used liquid
detergent and the
laundry isn't clean.
Liquid detergents usually
do not contain bleaching
agents. They may fail to
remove fruit, coffee and
tea stains..
– Use powdered detergent that
contains bleach.
– Load the detergent into the
compartment�.
– Never load liquid detergent
and a stain remover together
into the dispenser drawer.
There is a sticky
grey residue on the
laundry (fat
deposits).
Not enough detergent
was used to break down
the grease in heavily
soiled laundry.
– For heavily soiled laundry,
you can add more powdered
detergent, or use liquid
detergent.
– Before washing the next
load, run the 60°C wash
program with liquid
detergent, but no laundry in
the machine.
There are white
spots that look like
powdered
detergent on your
dark garments.
Some powdered
detergents contain an
insoluble mineral
ingredient (zeolites) that
acts as a water softener.
This can form a deposit
on fabrics.
– Once the laundry is dry, try
using a brush to remove the
flecks.
– In the future, use detergents
without added water softener
to wash your dark items.
Most liquid detergents do not
contain zeolites (water
softeners).
– Use the Darks program only
for these items.cf
Troubleshooting
37

The loading door cannot be opened with the Door button
Possible cause Remedy
The washer is not
connected and/or switched
on.
Insert the three-pin plug into the socket and/or
switch the washer on using the I-On/0-Off button.
The safety lock has been
activated.
Switch off the childproofing as described in the
section on "Changing a program sequence" under
"Safety lock".
The pin code feature is
active.
Switch off the pin code as described in the section
on "Programmable functions" under "Pin code".
Power failure Open the loading door as described in the next
section.
The door was not properly
closed.
Firmly press the latch side of the loading door,
then press the Door button.
There is still water in the
drum and the washer
cannot drain.
Clean the drain filter and pump, as described in
the next section.
To prevent scalding, the door will not open if the suds temperature is higher than
55°C.
Troubleshooting
38
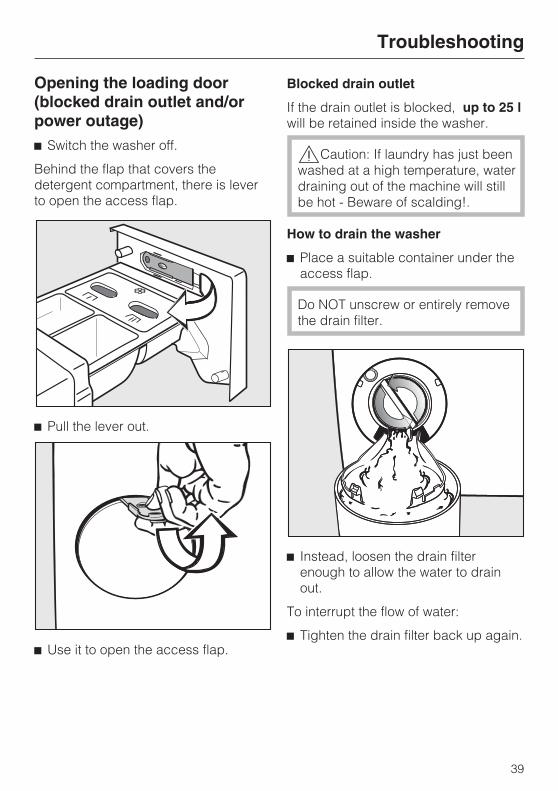
Opening the loading door
(blocked drain outlet and/or
power outage)
� Switch the washer off.
Behind the flap that covers the
detergent compartment, there is lever
to open the access flap.
� Pull the lever out.
� Use it to open the access flap.
Blocked drain outlet
If the drain outlet is blocked, up to 25 l
will be retained inside the washer.
�Caution: If laundry has just been
washed at a high temperature, water
draining out of the machine will still
be hot - Beware of scalding!.
How to drain the washer
� Place a suitable container under the
access flap.
Do NOT unscrew or entirely remove
the drain filter.
� Instead, loosen the drain filter
enough to allow the water to drain
out.
To interrupt the flow of water:
� Tighten the drain filter back up again.
Troubleshooting
39

Once the flow of water ceases:
� Pull the drain filter entirely out.
� Thoroughly clean the filter.
� Turn the pump blade by hand to
check that it moves freely, and
remove any foreign objects (buttons,
coins, etc.) that are causing an
obstruction.
� Put the drain filter back in place and
tighten it down.
�If the drain filter is not securely
tightened, there is a risk of water
leakage during operation.
Opening the loading door
�NEVER reach into the drum until
is has completely stopped moving.
Reaching into a moving drum
carries the risk of serious injury.
� Pull the emergency release (see
illustration). The loading door will
open.
Troubleshooting
40
Repairs
For faults you cannot remedy yourself,
please contact:
– your Miele dealership or
– the Miele Factory Repair Service.
The telephone number for the
Factory Repair Service is listed at
the back of these operating
instructions.
When contacting Customer Service,
you will need to quote the model and
serial number of your appliance. This
information can be found on the data
plate, above the porthole glass when
the door is open.
Program updates (PC)
The PC optical interface is used by
Customer Service to transfer program
updates (PC = Program Correction).
This information is used to integrate
future developments in detergents,
fabrics and wash procedures into your
appliance.
Miele will give timely notification of
Program updates.
Warranty conditions and warranty
period
The washer comes with a two-year
warranty.
Further warranty information can be
found in your warranty booklet.
Additional accessories
Optional accessories for this washer
are available from your Miele dealer or
from Miele Customer Service.
Customer service
41
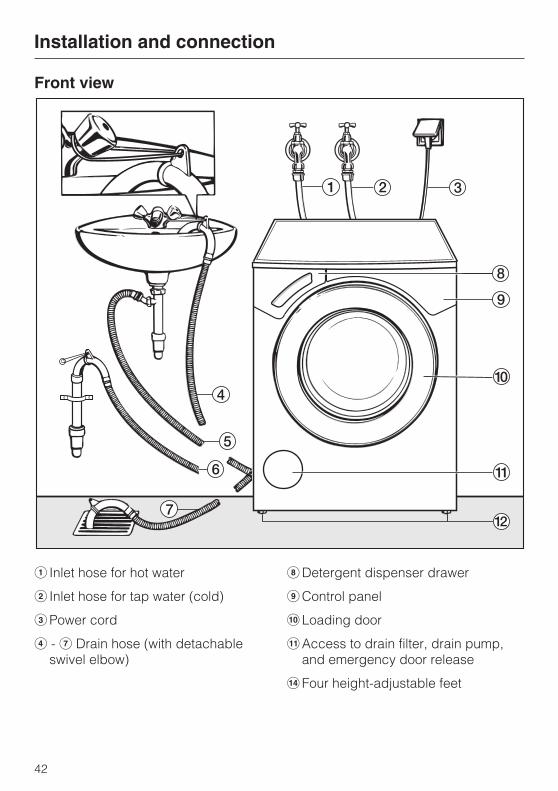
Front view
� Inlet hose for hot water
� Inlet hose for tap water (cold)
�Power cord
� - � Drain hose (with detachable
swivel elbow)
Detergent dispenser drawer
Control panel
�Loading door
�Access to drain filter, drain pump,
and emergency door release
�Four height-adjustable feet
Installation and connection
42
Rear view
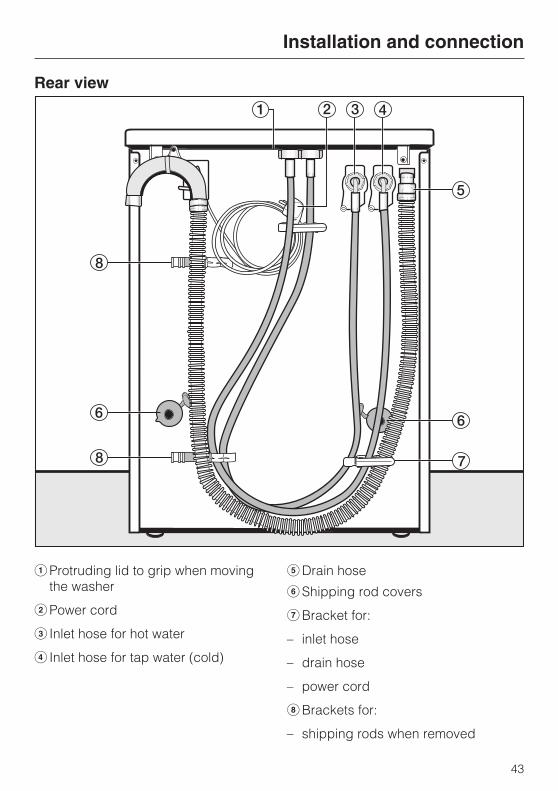
�Protruding lid to grip when moving
the washer
�Power cord
� Inlet hose for hot water
� Inlet hose for tap water (cold)
�Drain hose
�Shipping rod covers
�Bracket for:
– inlet hose
– drain hose
– power cord
Brackets for:
– shipping rods when removed
Installation and connection
43
Installation surface
The best installation surface is a
cement floor. In contrast to wooden
floorboards or other "soft" types of
flooring, cement is less prone to
vibration during the spin cycle(s).
Please note:
� Make sure the washer is standing
square on stable footing.
� To avoid vibration during spin cycles,
do not install the washer on soft floor
coverings.
If installing on wooden floorboards:
� Stand the washer on a plywood base
(at least 59x52x3 cm). The base
should span several joists and will
need to be bolted to the joists, NOT
just into the floorboards.
It is best to install the washer in the
corner of a room. This is typically the
most stable part of the floor.
�If the washer is being installed
on a raised plinth, it MUST be
secured against slippage using
retaining clips (contact your Miele
dealer or Miele Customer Service).
Otherwise, the washer may fall off
the platform during spinning.
Transporting the washer to the
installation site
To remove the washer from the packing
case to the installation site, hold it by
the front feet of the appliance and the
edge of the lid that protrudes from the
rear of the machine.
�Make sure the feet and the
installation surface are dry, to
prevent slipping during spinning.
Removing the transport
fittings
� Remove the left and right covers.
1. Use a screwdriver to pry the covers
loose as shown.
2. Pull forward to remove.
Installation and connection
44

� Use the combination wrench
supplied to turn the left-hand
shipping rod 90°, and then
� pull the rod out.
� Turn the right-hand shipping rod 90°,
and
� pull it out.
Installation and connection
45

�To avoid the risk of injury, the
holes for the shipping rods need to
be covered once the rods have
been removed.
� Fit the covers, then caps into the two
holes.
� Secure the shipping rods to the back
of the washing machine. Make sure
that the holes are fitted over the
retainers �.
�The washer must NOT be moved
without the shipping rods in place.
Store them as shown or keep in a
safe place for future use. They will
need to be attached every time you
transport the washer (for example,
during a move).
Re-fitting the shipping rods
Reverse the instructions to attach the
shipping rods when needed.
Installation and connection
46

Levelling the machine
To ensure safe and proper operation,
the washer must stand perfectly level
on all four feet.
Improper footing may increase water
and power consumption, and may
cause the washer to wander across the
floor.
Screw out and adjust the feet
Use the four adjustable feet to level the
washer. The washer is delivered with all
four feet in the shortest (screwed in)
position.
� Use the combination wrench
provided to turn the counternut 2
counterclockwise. Then turn the
counter nut 2 together with the foot 1
to unscrew.
� Use a level to check that the washer
is standing square.
� Hold the foot 1 securely with a pipe
wrench. Now use the combination
wrench to screw the counternut 2
firmly back up against the housing.
�All four counternuts must be
tightened firmly up against the
housing. Be sure to also check this
on the feet that did not require
levelling. Otherwise, the washer may
wander about.
Installation and connection
47

Installing under a countertop
�The washer lid must NOT be
removed.
Provided the workspace is high
enough, the washer can be pushed
under a countertop with the lid in place.
Washer-dryer stack
The washer can be stacked with a
Miele tumble dryer. A stacking kit will
"WTV 412", part# 6 478 870, be
required and can be obtained through
your Miele dealer or Miele Customer
Service.
Please note:
a Safety clearance to wall:
at least 2 cm
b Height:
Stacking kit without pull-out shelf:
approx. 170 cm
c Depth of the washer-dryer stack:
approx. 65 cm
Installation and connection
48

The Miele water protection
system
The Miele water protection system
protects the washer from water
damage.
The system consists of three main
components:
1) the inlet hose
2) the washer electronics and housing
3) the drain hose
1) The inlet hose
– Hose burst protection
The inlet hose can withstand
pressure of more than 7000 kPa.
2) The electronics and housing
– Sump
Any leaking water is collected in a
sump in the base of the washer. A
float then switches off the inlet
valves, preventing any additional
water inflow, and any water in the
suds container is pumped away.
– Overflow protection
This feature helps prevent the
washer from taking in too much
water. If the water exceeds a certain
level, the drain pump starts and
pumps away the water.
3) The drain hose
The drain hose is equipped with a
ventilation system that prevents the
washer from being emptied
accidentally.
Connecting to the water
supply
The washer is designed to comply with
applicable CSA standards, for
connection to a tap water line. It does
not require a non-return valve.
The flow pressure must be between
100 kPa and 1000 kPa. If the pressure
is above 1000 kPa, a pressure-
reducing valve MUST be installed.
Two stopcocks with3/4" thread are
required for connecting to the water
supply. If these are not available, you
will need to have a qualified plumber fit
the washer to the water supply.
�The screw fittings are under
pressure from the water line. To
check that the connections are
watertight, slowly open the taps.
Correct the placement of the washer
and union as needed.
Maintenance and care
If the hose ever needs to be replaced,
use only a genuine Miele hose - it is
tested to withstand pressure of at least
7000 kPa.
In order to protect the water inlet
valve, the two dirt filter screens (one
in the open end of the inlet hose, the
other in the inlet point in the washer)
should not be removed.
Optional extension hose
Longer hoses 2.5 or 4.0 m in length are
available from your Miele dealer or
Miele Customer Service.
Installation and connection
49

This washer uses hot and cold
household water.
The washer must always be
connected to a tap water line (cold
water, inlet hose with blue tag).
Tap water line (cold water)
The tap water connection is established
using the inlet hose with the blue
marking.
If the washer is connected to this line
only, the appliance will need to be re-
programmed to cold water fill only.
Please contact your Miele dealer or
Miele Customer Service for
reprogramming instructions.
The second unused inlet hose, with the
red tag, will be attached to the rear of
the washer after re-programming.
Hot water connection
The hot water connection is established
using the inlet hose with the red
marking.
Tips for the hot water connection
– The hot water temperature at the
stopcock must not exceed 60°C, and
the ideal temperature is 55°C.
– If the hot water inlet is closed, the
washer will automatically switch over
to tap water mode after a period of
time. This safety feature is not
intended for long-term use. The
washer will continue to wash in hot
water mode, which can lead to a
poor wash result.
Installation and connection
50

Drainage system
The appliance drains through a pump
with a 1m delivery head. For the water
to drain freely, the hose must be free of
kinks. The swivel elbow at the end of
the hose can be turned in either
direction, or removed as needed with a
sharp twist and pull.
If required, the hose can be extended
to a length of 5m. The necessary parts
can be ordered through your Miele
dealer or Miele Customer Service.
For delivery heads over 1m (up to a
max. of 1.8 m), contact your Miele
Customer Service for a replacement
pump and with a part # 1053992.
Drain hose connection:
1. Hang directly into a washbasin or
sink:
Please note:
– Secure the hose over the edge so
that it will not slip.
– Make sure that the water can drain
away freely without hindrance.
Otherwise, the water could overflow
or be sucked back up into the
washing machine.
2. Connect securely to a plastic drain
pipe with a rubber sleeve (not-return
valve not required).
3. Connect securely to a floor gully.
4. Attach to a washbasin with a plastic
fitting.
Installation and connection
51

Electrical connection
GROUNDING INSTRUCTIONS
This appliance must be grounded.
In the event of a malfunction or
breakdown, grounding will reduce
the risk of electric shock by
providing a path of least resistance
for electric current. This appliance is
equipped with a cord having an
equipment-grounding conductor
and a grounding plug. The plug
must be plugged into an appropriate
outlet that is properly installed and
grounded in accordance with all
local codes an ordinances.
WARNING - Improper connection of
the equipment-grounding conductor
can result in a risk of electric shock.
Check with a qualified electrician or
service representative if you are in
doubt as to whether the appliance is
properly grounded.
Do not modify the plug provided
with the appliance; if it wil not fit the
outlet, have a proper outlet installed
by a qualified electrician.
ELECTRICAL INSTRUCTIONS
This installation should be performed
by an experienced an qualified
technician, in accordance with local
codes and regulations.
The washing machine is supplied with a
1.6 m lang, 3 wire cord, ending in an
NEMA 5-15P plug, ready for connection
to a 120 V, 15 A, 60 Hz AC power
supply.
The proper outlet can be pruchased
from a electrical supply dealer.
Electrical connection
The washer is equipped with a power
cord and plug, ready for connection to
the power supply.
The plug and socket must always be
accessible, to facilitate disconnecting
the washer from the electrical supply at
any time.
To eliminate a potential fire source, the
washer should NEVER be connected
by means of extension cords, multi-
outlet power strips or similar items.
The appliance data plate indicates the
nominal power consumption and the
appropriate fuse capacity. Check that
the household electrical supply
matches the information on the data
plate.
Installation and connection
52

Height 850 mm
Width 595 mm
Depth 634 mm
Depth with door open 1074 mm
Height for building under 850 mm
Width for building under 600 mm
Weight 99 kg
Maximum floor load 1600 Newton (approx. 160 kg)
Voltage see data plate
Connected load (watts) see data plate
Fuse rating see data plate
Consumption data see section on "Consumption data"
Min. water flow pressure 100 kPa (1 bar)
Max. water flow pressure 1000 kPa (10 bar)
Inlet hose length 1.60 m
Drain hose length 1.50 m
Length of power cord 1.60 m
Max. drain pump height 1.00 m
Max. drain pump length 5.00 m
LED (light emitting diodes) Class 1
Test certifications granted see data plate
Technical data
53

Programmable functions
for changing
default settings
You can use the programmable functions to adjust the electronics to suit
changing requirements. Programmable functions can be changed at any time.
To access programmable functions
Use the Start/Stop button and the
program selector to access the
programmable functions. This
second function for the button and
selector is not indicated on the panel.
Before you begin, check that:
– The washer is switched off.
– The door is properly closed.
�Press and hold the Start/Stop button
during steps � to .
�Press the I-On/0-Off button in.
As soon as the display shows . . .
Language� ...
. . . you can release the Start/
Stopbutton.
You now have access to the
programmable functions.
To select a programmable function
Turn the program selector until the
desired programmable function
appears in the display.
�To change a displayed
programmable function, press the
Start/Stop button.
To change a programmable function
Turn the program selector to see the
various options available for a
programmable function.
The currently set option is marked with
a check �.
�Turn the program selector until the
desired option appears.
�To activate the option, press the
Start/Stop button.
To exit a programmable function
�Turn the program selector until Back
� appears in the display.
�Press the Start/Stopbutton.
Language �
The display can be set to appear in
one of several different languages.
The flag � after the word Language is a
cue for the user, in case the menu item
appears in an unfamiliar language.
The selected language will be stored in
the memory.
Programmable functions
55
Water plus
Use the Water plus programmable
function to set the options for the
Sensitive button.
You can choose one of three options:
Water +
(Factory setting)
The water level is increased in the
washing and rinsing segments.
Extra rinse
An additional rinse cycle is inserted.
Water + and Extra rinse
The water level is increased for
washing and and additional rinse cycle
is added.
Gentle wash
Activating the Gentle wash feature
reduces the drum action. It is suitable
for gently washing mildly soiled
items.
This option can be activated within the
programs for Normal and Wrinkle Free.
The factory setting for Gentle wash is
Off.
Suds cooldown
With this feature, additional water
flows into the washer at the end of
the main wash, to cool down the
suds.
The cooldown feature kicks in with the
95°C and 75°C programs.
Cooldown should be activated if:
– the drain hose is hooked over a
basin or sink - this will help prevent
scalding.
– the drain pipes in the building do not
comply with DIN 1986.
The factory setting for the Cooldown
option is Off.
Programmable functions
56

Pin code
You can use a pin code to lock the
electronics. This feature protects your
washer against unauthorized use.
Once the pin code is activated, you will
need to enter it whenever you wish to
operate the washer.
Pin code ...
� Press the Start/Stopbutton.
To activate the pin code
Activate
� Press the Start/Stopbutton.
You will now be prompted to enter the
pin code.
Enter the code
The code is 125 and cannot be
changed.
O __ __
� Turn the program knob until the first
digit appears.
� Press the Start/Stopbutton to confirm
the first digit.
� Repeat this process until all three
digits have been entered.
1 2 5
� Press the Start/Stopbutton.
The following appears in the display for
confirmation:
Code activated
Once the washer has switched off, it
cannot be used again unless the code
is entered.
To operate the washer with the pin
code
When the appliance is switched on, you
will be prompted to enter the pin code.
� Enter the code as explained above,
and confirm.
The washer is now unlocked for use.
To de-activate the pin code
Switch on the programming functions
as described.
As soon as the display shows . . .
O __ __
. . . you can release the Start/
Stopbutton.
� Now enter the pin code and press
the Start/Stopbutton.
� Select the pin code and confirm de-
activate.
Programmable functions
57

Temperature unit
You can choose whether
temperatures will be displayed in °C/
Celsius or in
°F/Fahrenheit.
The factory setting is °C/Celsius.
Buzzer
When the buzzer feature is activated,
a signal will be heard when the
program ends or when Rinse hold is
reached.
You can select one of two buzzer
volumes:
Normal
(Factory setting)
The buzzer sounds at normal volume
whenever a program ends or when
Rinse hold is reached.
Loud
The buzzer sounds at maximum volume
whenever a program ends or when
Rinse hold is reached.
Keypad tone
There will be a beep whenever a
button is pressed.
The factory setting for the keypad tone
is Off.
Brightness
There are 10 different settings for the
display brightness.
The bar diagram indicates which level
is selected.
The factory setting for brightness is 5.
The brightness changes as soon as you
choose a different setting.
Contrast
There are 10 different settings for the
display contrast.
The bar diagram indicates which level
is selected.
The factory setting for contrast is 5.
The contrast changes as soon as you
select the preferred level.
Programmable functions
58
Standby display
To save energy, the display goes out
and the Start/Stop button will start
flashing slowly.
The display will always go out:
– if no program is selected within 10
minutes of switching on the machine.
– 10 minutes after the end of a
program.
Press any button to bring the display
back on.
You can also set the display to fade out
or remain visible while a program is
running.
On
The standby function is activated. The
display will fade out 10 minutes after
the program has started.
Not in current Progr.
(Factory setting)
The standby function is not activated.
The display remains visible while a
program is running.
Memory
Whenever a program starts, the
washing machine stores the most
recently selected settings (program,
temperature, spin speed/RPM and
any extra options).
The next time the machine is switched
on, the washer displays this stored
information.
The factory setting for the memory
function is Off.
Anti-crease
The crease-free setting is designed
to help prevent wrinkles from forming
if the laundry is not immediately
removed at the end of a program.
The washer drum will continue to rotate
at intervals for up to 30 minutes after
program completion.
You can open the washer at any time to
remove the laundry.
On
(Factory setting)
The anti-crease feature is activated.
Off
The anti-crease feature is off.
Programmable functions
59

Subject to change without notice / 2009 M.-Nr. 07 264 960 / 01