OPERATING GUIDE for your - Aronson Alarmaronsonalarm.com/keypad/Napco RP1CAE2/GEM-RP1CAe2.pdf ·...
29
OPERATING GUIDE for your GEM-RP1CAe2 KEYPAD ARM E D COMPUTERIZED SECURITY SYSTEM S TA TUS GEMINI A 1 2 3 B 4 5 6 C 7 8 9 0 E F G J SYSTEM READY 09/01/05 12:09 AM NEXT / YES PRIOR / NO AREA
Transcript of OPERATING GUIDE for your - Aronson Alarmaronsonalarm.com/keypad/Napco RP1CAE2/GEM-RP1CAe2.pdf ·...

OPERATING GUIDE for your
GEM-RP1CAe2 KEYPAD
ARMED
COMPUTERIZED SECURITY SYSTEM
STATUS
GEMINI
A 1 2 3 B 4 5 6 C 7 8 9 0
E F G
J
SYSTEM READY 09/01/05 12:09 AM
NEXT / YES
PRIOR / NO
AREA
PC4Support
Typewriter
Page 1 - Simplified Instructions
PC4Support
Typewriter
PC4Support
Typewriter
Table of Contents
PC4Support
Typewriter
Click on link to view page
PC4Support
Typewriter
PC4Support
Typewriter
Pages 2-3 - Keypad Controls and Indicators
PC4Support
Typewriter
PC4Support
Typewriter
PC4Support
Typewriter
PC4Support
Typewriter
PC4Support
Typewriter
PC4Support
Typewriter
PC4Support
Typewriter
PC4Support
Typewriter
Pages 4-5 - Setting the Alarm When Leaving
PC4Support
Typewriter
PC4Support
Typewriter
PC4Support
Typewriter
PC4Support
Typewriter
Page 6 - Bypassing Zones and Instant Protection
PC4Support
Typewriter
PC4Support
Typewriter
PC4Support
Typewriter
Page 7 - Emergency Buttons
PC4Support
Typewriter
PC4Support
Typewriter
PC4Support
Typewriter
PC4Support
Typewriter
Page 8 - Disarming System
PC4Support
Typewriter
PC4Support
Typewriter
Page 9 - Fire Protection
PC4Support
Typewriter
PC4Support
Typewriter
Pages 10-13 - Keypad Functions
PC4Support
Typewriter
PC4Support
Typewriter
PC4Support
Typewriter
Pages 14-15 - Programming User Codes
PC4Support
Typewriter
PC4Support
Typewriter
Page 16 - Programming Date & Time
PC4Support
Typewriter
PC4Support
Typewriter
Pages 17-19 - Keypad Messages
PC4Support
Typewriter
PC4Support
Typewriter
Pages 20-22 - Glossary
PC4Support
Typewriter
PC4Support
Typewriter
Pages 23-27 - Error Codes
PC4Support
Typewriter
Page 28 - Troubleshooting
PC4Support
Typewriter
PC4Support
Typewriter
PC4Support
Typewriter
PC4Support
Typewriter
PC4Support
Typewriter
PC4Support
Typewriter
PC4Support
Typewriter
PC4Support
Typewriter
PC4Support
Typewriter
PC4Support
Typewriter
PC4Support
Typewriter
PC4Support
Typewriter
PC4Support
Typewriter
PC4Support
Typewriter
PC4Support
Typewriter
PC4Support
Typewriter
PC4Support
Typewriter
PC4Support
Typewriter
PC4Support
Typewriter
PC4Support
Typewriter

Simplified instructions for use of Central Station alarm systems
When Leaving Premise: A. Be sure all protected door(s) and/or window(s) are closed. B. Stand at keypad and wait for “SYSTEM READY” to appear (green status light). If "SYSTEM READY" does not appear the
keypad will alpha display all trouble zone(s). C. Enter arm/disarm code and press ON/OFF key "armed light" will come on and display will read “SYSTEM ARMED”. D. To arm all AREAS (if applicable): Press [9] then [*] then your arm/disarm code then the ON/OFF key. E. Leave immediately by designated delay door(s) only.
When Entering Premise: A. Enter by designated delay door(s) only. B. Buzzer will sound to remind you to disarm system. C. Enter arm/disarm CODE and press ON/OFF key to disarm system in your AREA only. D. To disarm the other area (if applicable) 1 or 2: Press the (1 or 2, 0 for all), [*] your CODE, [ON/OFF]. E. Red armed light will go out. (code must be valid in the area to work)
Using System While Inside Premise Without Motion Detector(s): A. Be sure all protected door(s) and/or window(s) are closed. B. Stand at keypad and wait for “SYSTEM READY” to appear (green status light). C. Press INTERIOR (interior and bypass lights will come on), enter arm/disarm CODE then press ON/OFF key. The red armed
light will come on and “SYSTEM ARMED” will display. You may now move around the house, but do not open any perimeter protection or the alarm will sound.
D. Remember you must "disarm" the system before leaving the premises.
Police Panic Feature: Press keys [P] and [*] (asterisk) simultaneously to activate panic feature (24 hour capability).
Fire Panic Feature: Press keys [F] and [*] (asterisk) simultaneously to activate panic feature (24 hour capability).
Assistance Panic Feature: Press keys [A] and [*] (asterisk) simultaneously to activate silent panic feature (24 hour capability).
Systems with smoke/fire alarm: If smoke/fire alarm sounds (pulsing tone from siren) note the particular detector that initiated the alarm (red light of smoke detector on steady). This may be helpful for troubleshooting in the future. To reset enter your arm/disarm code, press the on/off button (silences siren) then press the RESET key. System should go back to normal within about 10 seconds.
If alarm sounds for any reason always enter Arm/Disarm code then press On/Off key to silence. Wait for the Central Station to call. Be certain to have your Passcode ready. Your passcode is:
PC4Support
Typewriter
1
PC4Support
Typewriter
Return to Top
PC4Support
Typewriter
PC4Support
Typewriter

PC4Support
Typewriter
2
PC4Support
Typewriter
Return to Top
PC4Support
Typewriter
PC4Support
Typewriter

PC4Support
Typewriter
3
PC4Support
Typewriter
3
PC4Support
Typewriter
Return to Top
PC4Support
Typewriter

SETTING THE ALARM ( ARMING) WHEN LEAVING
Z O N E S F A U L T E D
0 2 B A C K D O O R
BYPASSED B Y P A S S E D
BYPASSED 0 2 B A C K D O O R
Arming the System 1 Check the keypad. The green STATUS light must be on in order to arm. If the
green light is off, “ZONES FAULTED” will display in the window followed by the number and description of each faulted zone. Note each problem zone and secure it by closing a window, door, etc. When all zones are secure, the green STATUS light will come on and the window will display “SYSTEM READY”.
2 Arm the system. Enter your code and press J. The green STATUS light will go
off, the red ARMED light will come on and the window will display “EXIT TIME XXX”, “PLEASE LEAVE NOW” (where “XXX” represents the exit time remaining, in 10-second steps). Note: If you enter a wrong code, the keypad will display “INVALID ENTRY, TRY AGAIN”.
3 Leave the premises. Leave through the exit door before exit time expires.
Priority Arming If you attempt to arm with a faulted Zone, a 3-second tone will sound at the keypad. “CAN'T ARM SYSTEM”, and “ZONES FAULTED” will display in the window, indicating that the faulted zone(s) must be secured before the panel can be armed.
Selectively Bypassing Zones If you cannot locate or repair the problem yourself, call for assistance. If you cannot get immediate help, bypass the problem zone(s) from the system by pressing B, then the zone number (or vice versa). Note: Bypassed zones are unprotected. If armed with zones bypassed, be sure to have the system checked as soon as possible
E X I T T I M E 0 60 P L E AS E L E AV E NO W
CAN’T ARM SYSTEM ZONES FAULTED
Z O NE F AU L TE D
SYSTEM READY
0 2 B AC K DO OR
BYPASSED
B YP AS S E D
BYPASSED
0 2 B AC K DO OR
PC4Support
Typewriter
4
PC4Support
Typewriter
PC4Support
Typewriter
Return to Top
PC4Support
Typewriter

SETTING THE ALARM ( ARMING) WHEN LEAVING System Trouble
If you attempt to arm with a “SYSTEM TROUBLE” display alternating with an indicated trouble code (e.g. “E02-00” (low battery); see SYSTEM TROUBLE ERROR CODES), a 3-second tone will sound at the keypad. The window will display "CAN'T ARM SYSTEM, PRESS RESET KEY". If you cannot correct the problem immediately, pressing C will enable you to arm in this condition. Be sure to call for service as soon as possible.
Area Arming (Optional) Some systems may be divided, or partitioned, into smaller independent subsystems, which are referred to as Areas. In a system that has been partitioned into multiple areas, one or more area may be armed while others remain disarmed.
Manager's Mode (Optional) The Manager's Mode allows the user to arm / disarm other areas in a partitioned system. To arm/disarm a different area:
1. Press the numerical key representing the other area number. 2. Press Gfollowed by J. The keypad will now provide status and control of that area.
3. Enter your User Code followed by J to arm or disarm the area.
4. Press G followed by J to return to the home area.
Global Arming (Optional) (Not available with GEM-P1632/816 panels) To arm all areas simultaneously, press 9, G and enter your code followed by J.
To disarm all areas simultaneously, press 0, G and enter your code followed by J.
• The User Code must be valid in all area(s). • If any zone is not secured, the keypad will display “CAN’T ARM SYSTEM, AREA X IN
TROUBLE”, where X indicates the number of the Area in trouble. All faulted zones in the respective area(s) must be secured or bypassed. Note: If a system trouble is indicated, the system cannot be armed using this method.
SYS/TRBL
L O W B AT TE R Y E02-00 SERVICE
SYS/TRBL
SYSTEM TROUBLE
SYS/TRBL
C AN ’ T AR M S YS TE M P R E SS R E SE T K EY
EXIT TIME 060 PLEASE LEAVE NOW
CAN’T ARM SYSTEM AREA X IN TROUBLE
PC4Support
Typewriter
5
PC4Support
Typewriter
PC4Support
Typewriter
PC4Support
Typewriter
Return to Top

Bypassing Interior Zones Interior Zones, when bypassed, allow free movement within the home while the protection of armed perimeter zones is maintained. To bypass Interior Zones, press E and enter your User Code followed by D.
Your system may have provisions for two groups of Interior Zones. (Optional) (Interior Groups programmed? YES NO) Press E, followed by D to Bypass Interior Group 1: [ ____________________________________ ]
• Press E twice followed by D to Bypass Interior Group 2: [ ______________________________ ] (GEM-P9600 Only)
• Press E three times followed by D to Bypass both Interior Groups 1 & 2.
Automatic Interior Bypass (Optional - Automatic Interior Bypass programmed? YES NO) Your system may have been programmed for Automatic Interior Bypass, which allows it to recognize that you have armed the system and remained in the house, prompting it to automatically adjust the interior protection accordingly. • If you arm the system and remain in the house, all Interior Zones are automatically bypassed. The keypad will display
“BYPASSED” indicating that it is safe to move about. • If the system is armed and you leave, the Interior Zones will unbypass, providing complete interior protection.
Instant Protection When retiring for the evening, after all family members are home, you can cancel the entry delay on the Entry Zone(s). To arm with instant protection, press F just prior
to arming, or at any time after the system is armed. When armed with Instant Protection opening the entry door will cause an immediate alarm. • When arming with Instant Protection, the exit delay will remain in effect, allowing exit of the house just after arming. While
armed, the window will display “SYSTEM ARMED” (“SYSTEM ARMED I” will display with the GEM-P9600/3200) and the red ARMED light will flicker rapidly to indicate instant protection.
PROTECTING YOURSELF WHILE ON THE PREMISES
BYPASSED
S YS TE M R E AD Y
S YS TE M AR M E D I
PC4Support
Typewriter
6
PC4Support
Typewriter
Return to Top
PC4Support
Typewriter

PROTECTING YOURSELF WHILE ON THE PREMISES
Easy Exit (Optional - Easy Exit programmed? YES NO) Your system may have been programmed for Easy Exit, which allows a user to exit the premises while the system is armed. By activating Easy Exit while the system is armed, the Exit Delay countdown will take place, during which time you are permitted to leave through the exit door. The Easy Exit Delay time will be identical to the Exit Delay time the system gives you each time it is armed. This will allow, for example, an early morning commuter to exit the house, without having to disarm and rearm the system, awaking the family.
Press E to activate Easy Exit on your system. (GEM-P3200/GEM-P9600 V11D or less, GEM-P1632 V8G or less)
Press D to activate Easy Exit on your system. (GEM-P3200/GEM-P9600 V20 or greater, GEM-P816/P1632 V9A or greater)
Emergency Buttons (Only available if programmed)
The Blue Emergency Buttons (7,8& 9), if programmed, are always active, whether the system is armed or disarmed. The emergency signal will only be transmitted when an Emergency Button and G are pressed at the same time.
• Fire Emergency Simultaneously press 7 and G to alert the central station of a fire emergency. *(Fire Emergency programmed? YES NO)
• Auxiliary Emergency Simultaneously press 8 and G to alert the central station of an Auxiliary emergency. *(Auxiliary Emergency programmed? YES NO)
• Police Emergency Simultaneously press 9 and G to alert the central station of a police emergency. *(Police Emergency programmed? YES NO)
PC4Support
Typewriter
7
PC4Support
Typewriter
Return to Top
PC4Support
Typewriter

Disarming the System 1 Enter your premises through the Entry/Exit door. The keypad will sound a steady or pulsing
tone to remind you to disarm the system before your Entry Delay time expires. 2 Enter your User Code and press D. The red ARMED light will go out, indicating that the
system has been disarmed. If you enter an invalid code, the keypad will beep 4 times, signifying an error. Re-enter your code immediately. 10 seconds before Entry Delay expires, the keypad will emit a pulsing warning tone.
Alarm Indication / Silencing an Alarm If the red ARMED light is flashing and “ALARM” is displayed, an alarm occurred while you were out. Proceed with caution! If you suspect that an intruder may still be on the premises, leave immediately and call authorities from a neighbor's phone.
To silence an audible alarm: 1 Enter your code and press J. After the system is disarmed, the window will continue
to display “ALARM” followed by the zone(s) violated. 2 To reset the display, note the zones violated, then press C.
Ambush (Optional) Your Ambush Code Type is: TYPE 1 (Prefix) TYPE 2 (Unique)
My Ambush Code is ___________________ If an intruder forces you to disarm your system, enter your Ambush Code and press J. There are two types of Ambush Codes:
(1) A 2-digit code (prefix) entered just prior to your normal User Code and (2) A separate and unique User Code. Example Type 1 (Prefix): If your User Code is 1234 and your Ambush Code is 99, press 991234J. Example Type 2 (Unique): If your User Code is 1234 and your Ambush Code is 8899, press 8899J Using your Ambush Code will send a silent alarm to the central station. The red ARMED light will go out and the window will display “SYSTEM READY” as if the system were normally disarmed. There will be no indication that a silent alarm has been sent.
TURNING OFF THE AL ARM (DISARMING) WHEN RETURNING
D I S AR M S YS TE M E N TR Y T I M E X X X
I N V AL I D EN TR Y TR Y AG AI N
* * * * AL AR M * ** *
0 2 - B AC K DO O R
0 3 - L I V IN G R OO M
PC4Support
Typewriter
8
PC4Support
Typewriter
Return to Top
PC4Support
Typewriter
PC4Support
Typewriter
PC4Support
Typewriter

FIRE PROTECTION
(Applicable only where local ordinance permits use of this alarm control panel for fire protection.)
Fire-Zone Alarm If a fire is detected, “FIRE ALARM” will be displayed and the keypad sounder will pulse.
1. If a fire is in progress, evacuate the premises immediately! If necessary, call the Fire Department from an outside phone.
2. Press the C button to silence the keypad sounder.
3. If there is no evidence of a fire, enter your User Code and press J to turn off the
alarm. 4 Check smoke detector(s). If a smoke detector tripped, its red alarm indicator light will
be on.
After the alarm condition is corrected (thermostat cooled down; smoke cleared from detector; etc.), pressing C again will reset the keypad within about 10 seconds.
NOTE: When the Fire Zone is reset, the FIRE icon on the left side of the display will go out. If the FIRE icon is still displayed, the fire zone has not been properly reset. If you cannot clear this condition by pressing C, call for service.
Fire-Zone Trouble
1. If a problem in the fire-circuit is detected, “FIRE TROUBLE” will display and the sounder will pulse to signal a malfunction.
2. Press C to silence the sounder. Call for service immediately!
FIRE
F I RE AL AR M
FIRE TBL
SYS/TBL
F I RE TR O UB LE
PC4Support
Typewriter
9
PC4Support
Typewriter
Return to Top
PC4Support
Typewriter
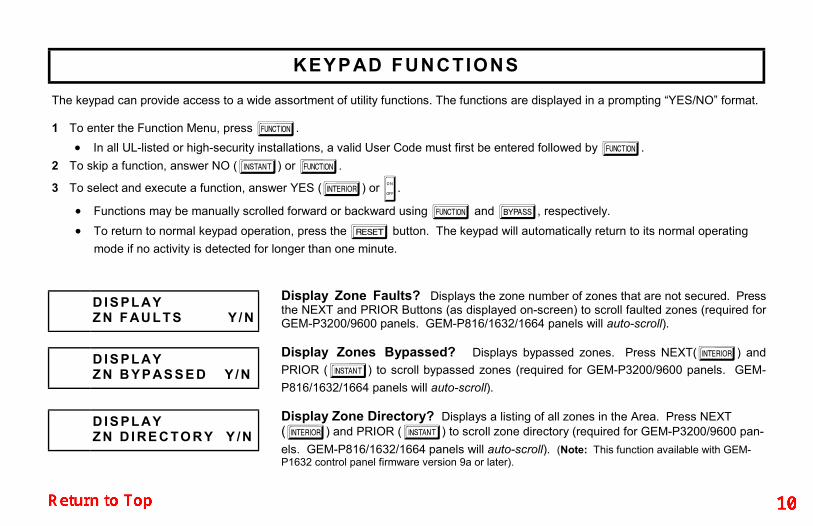
KEYPAD FUNCTIONS
The keypad can provide access to a wide assortment of utility functions. The functions are displayed in a prompting “YES/NO” format.
1 To enter the Function Menu, press A. • In all UL-listed or high-security installations, a valid User Code must first be entered followed by A.
2 To skip a function, answer NO (F) or A.
3 To select and execute a function, answer YES (E) or J.
• Functions may be manually scrolled forward or backward using A and B, respectively.
• To return to normal keypad operation, press the C button. The keypad will automatically return to its normal operating mode if no activity is detected for longer than one minute.
Display Zone Faults? Displays the zone number of zones that are not secured. Press the NEXT and PRIOR Buttons (as displayed on-screen) to scroll faulted zones (required for GEM-P3200/9600 panels. GEM-P816/1632/1664 panels will auto-scroll). Display Zones Bypassed? Displays bypassed zones. Press NEXT(E) and PRIOR (F) to scroll bypassed zones (required for GEM-P3200/9600 panels. GEM-P816/1632/1664 panels will auto-scroll). Display Zone Directory? Displays a listing of all zones in the Area. Press NEXT(E) and PRIOR (F) to scroll zone directory (required for GEM-P3200/9600 pan-els. GEM-P816/1632/1664 panels will auto-scroll). (Note: This function available with GEM-P1632 control panel firmware version 9a or later).
D I S PL AY Z N F AU L TS Y / N
D I S PL AY Z N B YP AS S E D Y /N
D I S PL AY Z N D I RE C TO R Y Y /N
PC4Support
Typewriter
10
PC4Support
Typewriter
Return to Top

Activate Bell Test? Activates the alarm (while disarmed) for about 2 seconds and performs a battery test. If the alarm does not sound, call for service. • If the battery is low, a “LOW BATTERY E02-00 SERVICE” will appear in the display
indicating a low battery condition. Allow 24 hours for the battery to recharge. If the trouble continues, call for service.
Display System Troubles? Displays 1- or 2-digit error code along with a description of a problem detected in the system. (See SYSTEM TROUBLE ERROR CODES for a full description of these codes.) Use NEXT(E) and PRIOR (F) to scroll system troubles. (Note: This function available with GEM-P9600 and GEM-P3200 control panels only).
Display Fire Alarms? Displays alarms that have occurred on the Fire Zone(s). Press the NEXT and PRIOR Buttons to scroll zones (required for GEM-P3200/9600 panels. GEM-P816/1632/1664 panels will auto-scroll).
Display Fire Troubles? Displays trouble conditions that have been detected on the Fire Zone(s). Use NEXT(E) and PRIOR (F) to scroll zones (required for GEM-P3200/9600 panels. GEM-P816/1632/1664 panels will auto-scroll).
Activate Chime? The Chime Mode will sound a tone at the keypad when the programmed zone is faulted while disarmed. To deactivate the Chime Mode, re-enter the Function Mode and when “DEACTIVATE CHIME“ is displayed, press YES (E). Note: The Chime Mode is disabled while armed. Chime is disabled for Protected zones while armed, Never Armed zones (such as a driveway sensor) will continue to chime when system is armed.
Activate Watch Mode? (Optional - Watch Mode programmed? YES NO) This optional feature simultaneously turns on all zones designated as Day Zones, which will cause an indication at the keypad if a zone is opened while the system is disarmed. To deactivate the Watch Mode, arm, then disarm. All Day Zones will revert to regular Burglary Zones. Note: The Watch Mode is disabled while armed. (Note: This function available with GEM-P9600 and GEM-P3200 control panels only).
KEYPAD FUNCTIONS
AC TI V ATE B E LL TE S T Y /N
D I S PL AY S YS TR B L Y / N
D I S PL AY F I RE AL AR M Y /N
D I S PL AY F I RE TR B L Y / N
AC TI V ATE C H IM E Y / N
AC TI V ATE W ATC H Y / N
PC4Support
Typewriter
11
PC4Support
Typewriter
Return to Top

KEYPAD FUNCTIONS Reset System Trouble? System troubles display and sound at the keypad. Correcting the trouble will clear most indications, however the following error codes will require manual reset: E13; E19; E20 and E22. (See SYSTEM TROUBLE ERROR CODES for a description of error codes.)
Reset Sensor Watch Failure? (Sensor Watch programmed? YES NO). Your system may have been programmed for Sensor Watch, a feature which supervises the motion sensors in the system. If a Sensor Watch failure occurs, a System Trouble E22-NN will result, where NN represents the zone number of the sensor in question. To reset, press C to clear the display, enter the Function Menu, scroll to ”RESET SENSOR MSG“ and press D. If you cannot correct the problem, call for service. (Note: This function available with GEM-P9600 and GEM-P3200 control panels only).
Start Exit Time? (Optional) (Start Exit Time programmed? YES NO) In Commercial Burglary systems, exit delay may have been programmed to start after a central-station “ringback” (verification) signal has been received. If the ringback tone has not been received within about 30 seconds after arming, a communication problem may exist. Use this function to start exit delay manually, then exit the premises immediately. Be sure to have your alarm specialist check communications with the central station as soon as possible. (Note: This function available with GEM-P9600 and GEM-P3200 control panels only).
R E S E T S YS TR B L Y /N
R E S E T S E N SO R M SG Y / N
S T AR T E X I T T I M E Y /N
PC4Support
Typewriter
12
PC4Support
Typewriter
Return to Top

KEYPAD FUNCTIONS
Activate Telephone Test? (Telephone Test programmed? YES NO). Sends a communicator test to the central station. A communication failure will be indicated at the keypad by a system trouble “E03-FAIL TO COMM” display. Repeat the test to attempt to correct a communication failure, as any successful communication will clear this display. Delay Arming 1-4 hours. (Not for UL-listed systems). Your system may be set to arm automatically after a delay period of 1 to 4 hours.
To Delay Arm the system: • With the function “TO ARM IN 1-4 HRS“ displayed in the window, enter the
desired Delay Arming time in hours (1, 2, 3,or 4), followed
by J.
At the end of this 1 - 4 hour Delay Arming period, the siren will sound a 2-second warning and the keypad will begin a 15-minute arming countdown with the sounder pulsing. The sounder may be silenced at this time by pressing C, but it will turn back on with a steady warning tone 1 minute prior to arming, at which time the building must be exited.
The same steps can be used to delay a scheduled Auto Arming, if your system has been programmed as such.
AC TI V ATE D I AL E R TE S T Y / N
TO AR M I N 1 - 4 H RS P R E SS 1 - 4 / N
PC4Support
Typewriter
13
PC4Support
Typewriter
Return to Top
PC4Support
Typewriter

PROGRAMMING (OPTIONAL)
Enter the User Program Mode 1. Enter your User Code, then press A to enter the Function Mode. 2. Answer NO until “ACTIVATE PROGRAM Y/N” is displayed, then press YES. “ENTER USER
CODE” will display indicating that the system is ready for User Code programming.
Programming / Reprogramming a User Code 1. Enter the digits of the user number to be programmed, followed by AA. (Example:
for User 4, enter 04 AA). 2. Enter the new User Code (up to 6 digits) 3. Press D to save the new User Code. Duplicate Codes are not allowed; therefore a duplicate
Code entered in the LCD Window will erase when D is pressed.
Repeat Steps 1 through 3 for each User Code to be programmed.
Erasing a User Code 1. Enter the digits of the user number to be erased followed by AA.
2. Press G0 to erase each digit of the User Code and then press D.
• Example: Erase User 3’s 4-digit User Code: • Press 0 3AAG0G0G0 G0 J.
User Program Mode Your Installer has programmed into your system a special User Program Code which can be used to not only Arm and Disarm the system, but also to enter the User Program Mode, where you can program other User Codes, Zone Descriptions and also set the system Time and Date. The following explains how you will use this code to program or erase additional User Codes:
AC TI V ATE P R O GR AM Y /N
E N TE R U S ER C O DE 1 23 - -
E N TE R U S ER C O DE - -
E N TE R U S ER C O DE 4 567 - -
Note: The GEM-X255 panel will display users in 3 digits, for example:
0 0 1 456 7 - -
PC4Support
Typewriter
14
PC4Support
Typewriter
Return to Top

PROGRAMMING (OPTIONAL)
Reviewing a Programmed User Code To review an existing User Code, enter the user number and the corresponding User Code will display.
Exiting the User Program Mode When you have completed programming or erasing User Codes, press C to exit the User Program Mode. Programming Example: Program the User 3 Code to “3784”:
1. Enter your User Code, followed by A. 2. Answer NO (press F ) repeatedly until “ACTIVATE PROGRAM Y/N” is displayed, then press YES
(E). The display will read: “ENTER USER CODE” 3. Press 03 for User No. 3, then press A A, followed by 3784. 4. Press J to save the code. Note: Duplicate Codes are not allowed; therefore a duplicate Code entered in the
LCD Window will erase when D is pressed. Press C to exit the Program Mode.
Notes: • If the system contains more than one keypad, only the keypad designated “No. 1” may be used for programming (if in
doubt which is No. 1, ask your installer). • While in Program Mode, the ARMED and STATUS lights remain off and burglar and fire alarm functions are disabled. • In selecting your codes, do not program repetitive numbers (1111), consecutive numbers (1234), your birth date, address, or other
obvious combinations. Choose a code of up to six digits (a minimum of four is recommended, and required in UL installations). If the keypad detects no Program Mode activity for more than 4 minutes, a tone will sound. Press C to silence.
PC42011
Highlight
PC4Support
Typewriter
15
PC4Support
Typewriter
Return to Top

PROGRAMMING (OPTIONAL)
Enter the User Program Mode 1. Enter your User Code, then press A to enter the Function Mode.
2. Answer NO (press F) until “ACTIVATE PROGRAM Y/N” is displayed, then press YES (E).
3. “ENTER USER CODE” will display, press NEXT (E) until the keypad displays the “Enter Date” screen.
Programming the Date 1. At the Enter Date screen, simply punch in the correct date using the numeric
keypad buttons. For example, for July 29, 2000, enter: 07 29 00
2. Press D to save the Date.
Programming the Time After entering in the Date, press NEXT (E) for the Time Entry screen.
1. At the Enter Time screen, simply punch in the correct time using the numeric keypad buttons and if necessary, press any numeric button to change the AM display to PM (or vice versa).
For example, for 6:30 PM, enter: 06 30 (0if necessary)
2. Press D to save the Time.
Programming the system Date and Time. The User Program Mode may also be used to set the system Date and Time which display on the keypad.
AC TI V ATE P R O GR AM Y /N
E N TE R D ATE 0 0 / 00 / 00
E N TE R D ATE 0 7 / 29 / 00
E N TE R T I ME
( 12 : 00 A)
E N TE R T I ME
( 06 : 30 P)
PC4Support
Typewriter
16
PC4Support
Typewriter
Return to Top

KEYPAD MESSAGES
The keypad can display the following functional messages. Other diagnostic messages are available for the installer or servicer. Should any unfamiliar messages appear, call your dealer for service.
All zones operating; system can be armed. If displayed (GEM-P9600/3200 panels only), “C” denotes Chime Mode on. (Note: This message may have been customized by your installer).
Panel reporting to central station on arming. If necessary, wait for ringback signal before exiting (with GEM-P9600/3200 panels only).
Exit delay in progress. XXX denotes exit time remaining, in seconds. If displayed, “S” indicates Service Code active; "I" indicates arming with Instant protection.
Entry delay in progress. XXX denotes entry time remaining, in seconds.
System armed. With the GEM-P3200-9600 panels, the “I” indicates arming with Instant protection.
Zones not secured (doors or windows may be open). Faulted zone(s) will scroll.
Arming attempted with faulted zone. The display will scroll the zone faults. Secure the zone(s) and arm system.
(With pulsing sounder). Trouble condition on a Day Zone (followed by one or more zone descriptions). Press the C button to silence sounder.
S YS TE M R E AD Y C ( D ATE ) ( T I M E )
P L E AS E E XI T I N X X X S EC O ND S
D I S AR M N OW X X X S EC O ND S
S YS TE M AR M E D I ( D ATE ) ( T I M E )
Z O NE F AU L TE D
C AN ' T AR M S Y S T E M Z O N E S F AU L T E D
D AY Z O N E TRB L
P L E AS E W AI T F O R R IN G B AC K
PC4Support
Typewriter
17
PC4Support
Typewriter
Return to Top

KEYPAD MESSAGES
Alarm condition, followed by zone description(s). “ALARM” and zones will display after system is disarmed. Note zones, then press C to clear keypad.
(With pulsing sounder.) Trouble condition on a Fire Zone. Press C to silence sounder. Correct trouble or call for service.
(With pulsing sounder.) Alarm condition on a Fire Zone. Press C to silence sounder. Evacuate premises or correct cause of alarm.
(For partitioned systems only.) Code not valid for area.
Wrong code entered or “Easy Bypass” function not enabled.
(In Global Arming Mode). Arming prevented due to unsecured zone. “#” represents number of area with unsecured zone. Press area number, then G, then J to view
zones in that area. Correct problem, then arm as normal. (For GEM-P1664/3200/9600 panels only).
* * * * AL AR M* * * *
* * * F I RE TR BL * * *
* * * F I RE AL AR M * * *
C O DE DE N IE D I N CO R RE C T AR E A
I N V AL I D EN TR Y TR Y AG AI N
C AN ’ T AR M S YS TE M / AR E A # I N TR O UBL E
PC4Support
Typewriter
18
PC4Support
Typewriter
Return to Top
PC4Support
Typewriter

KEYPAD MESSAGES
The system is in the process of reporting a cancel signal to central station which will cancel the alarm which it has just reported.
The alarm signal has been cancelled during the Abort Delay (before an alarm signal report was sent to the central station). If cancelled after the alarm signal report was sent, this message appears when the system receives an acknowledgment from the central station of the cancellation of the alarm signal.
Indicates problem(s) detected on system. (See examples below and SYSTEM TROUBLE ERROR CODES for a complete list of system troubles and corrective actions.)
Check power transformer. Check for blown fuse or circuit breaker; general power outage.
Battery weak. If not recharged within 24 hours, replace battery.
Communication failure to central station.
AT TE M P TI N G TO C AN C E L
AL AR M C AN C E L ED
* * S YS TE M TRB L **
L O W B AT TE R Y E 0 2 -0 0 S ER V IC E
C O MM F AI L E 0 3 -0 0 S ER V IC E
AC P O W E R F AI L E 0 1 -0 0 S ER V IC E
PC4Support
Typewriter
19
PC4Support
Typewriter
Return to Top

GLOSSARY
Following are brief descriptions of terms and features used herein that may be unfamiliar to you. Some of the features are programmable options that may or may not apply to your particular system.
Abort Delay - A delay period that allows the control panel to be reset, thus aborting a report to a central station.
Access Code - A code (up to 6 digits) used to remotely unlock a door.
Ambush Code - A code entered when forced to disarm. Sends a silent alarm to the central station with no indication at the keypad. There are two types: (1) A 2-digit code (prefix) entered just prior to your nor-mal User Code and (2) A separate and unique User Code used in place of your normal User Code.
Area - Some systems may be divided, or
partitioned, into smaller independent subsystems, which are referred to as
Areas. Each Area may be controlled by its own keypad or by a keypad of a different Area through Managers Mode..
Arming/Disarming - Turning the system on/off by entering your code at the keypad, then pressing J.
Battery - Backup power source in the control-panel enclosure to provide protection in the event of a power failure.
BYPASS Button - Enables you to manually remove one or more protective zones from the system.
Central Station - Monitors incoming reports and emergency messages from a digital communicator and notifies the proper authorities.
Chime - A keypad beep while disarmed alerting that the programmed zone has been opened.
Closing Window - (Optional.) A time interval within which closing (arming) is permitted without reporting to the central station.
Communicator - Reports intrusions, emergencies, openings, closings, etc. directly to the central station over telephone lines.
Control Panel - The brain of the system, it controls all system functions.
Directory - A listing of the programmed zone descriptions stored in memory.
Easy Arming - Quick arming by pressing J(optional).
PC4Support
Typewriter
20
PC4Support
Typewriter
Return to Top
PC4Support
Typewriter
PC4Support
Typewriter

GLOSSARY
Exit/Entry Delays - Separate delays that let you exit and enter your premises without setting off an alarm when the system is armed.
INTERIOR Button - Bypasses Interior Zones on arming (see Zones - Interior Zones).
Instant Protection - Arming without entry delay using the F button while remaining on the premises.
Keypad - Puts control-panel functions at your fingertips. It can be mounted anywhere in your premises.
Manager's Mode - In a partitioned system, a low-security operating mode that allows arming by area.
Panic Buttons - Blue buttons on the keypad (G and 7, 8 or 9). If enabled, pressing G together with 7, 8 or 9 will alert the central
station of a fire, auxiliary, or police emergency.
Partitioned System - A system that has been subdivided into two or more (up to eight) independent subsystems (areas).
Pre-Alarm Warning. - A keypad sounder alert of an impending alarm. This option is programmable by zone for the same duration as that programmed for Abort Delay (see Abort Delay).
Report - A transmission to a central station notifying of a change in the status of the system (alarm, trouble, low battery, etc.).
RF Low Battery - (Wireless sys- tems only) Weak transmitter battery.
RF Check In - (Wireless systems only) Periodic test report from transmitter (if a report is not received on time, a supervisory-failure system
trouble will result).
Ringback - A beep after arming verifying the central-station's receipt of a closing report.
Service Code - A code intended for temporary use.
Sounder - A local warning device at each keypad to alert that (a) entry delay has started; (b) an attempt was made to arm with a zone in trouble; (c) a Day-Zone condition exists (see Zones: Day Zone); (d) 10 seconds exit time remaining; (e) invalid code entered; or (f) central station acknowledged arming (see Ringback).
System Trouble - A problem (low battery, power failure, etc.) detected in the system.
Trouble - A zone fault; an open door, window, or other problem that may prevent arming.
PC4Support
Typewriter
21
PC4Support
Typewriter
Return to Top

GLOSSARY
User Code - Your personalized code for arming and disarming the system. It may contain up to six digits.
Zones - Independent circuits that protect specific areas of the premises:
Auto-Bypass Zone: A zone that will be automatically bypassed from the protection system if it is in trouble (faulty) when the system is armed. Burglary Zone: Detects intrusion. Day Zone: A zone that will cause a visual and audible indication at the keypad if it is in trouble while disarmed.
Exit/Entry Follower Zone: Provides exit and entry delay for interior devices. Entry delay only occurs if re-entry takes place through the normal exit/entry door first. Fire Zone: Detects fire alarms or trouble conditions. Interior Zones: Circuits within the premises, usually including space-protect ion devices, interior doors, etc.; but not exterior doors or windows. These can all be bypassed simultaneously using the E button. (Two groups of In te r io r Zones may be programmed for each area.)
Priority Zone: A zone that prevents arming if in trouble. Priority Zone with Bypass: A Priority Zone that can be bypassed using the C button. Selective-Bypassed Zone: A zone that can be individually bypassed using the B button. 24-Hour Zone: A zone that is armed and ready at all times to respond to an emergency situation.
PC4Support
Typewriter
22
PC4Support
Typewriter
Return to Top
PC4Support
Typewriter

SYSTEM TROUBLE ERROR CODES Your control panel is capable of detecting a variety of troubles that may affect system performance. In the unlikely event that a problem should occur, the SYS TBL (system trouble) icon will display on the left side of keypad window along with one or more of the following error codes. If the problem is related to a specific zone or device, the corresponding number will also be indicated. Below is a list of the most common troubles along with the necessary corrective action, if any. If a message appears that is not listed below, call your security professional for service. When a system trouble occurs, the keypad can be silenced and the display can be cleared by pressing C. The system can then be armed and disarmed as usual. Note: If you cannot clear a system trouble yourself, call installing company for service as soon as possible.
Trouble Indication
System Trouble Condition
Action
E01-00 AC Power Failure This trouble will occur if AC power is not present. Make sure system transformer is plugged into AC receptacle and check the circuit breaker, otherwise call installing company for service.
E02-00
Low Battery If there has been a recent power failure, the battery may be partially depleted and must be recharged by the control panel. The control panel performs an automatic daily test of the battery, at which time the trouble will clear if the battery has been recharged.
If the trouble does not clear in 24 hours, call installing company for service.
E03-00
Communication Failure
The system was not able to report to central station. If this is due to a temporary interruption in the telephone service, the trouble can be cleared when the service is restored by performing a Communication Test:
1 While disarmed, enter your User Code followed by A. 2 Answer NO (F) until “ACTIVATE DIALER TEST” appears in the window. 3 Press YES (E) to send a test signal to the central station. If the trouble continues, call installing company for service.
PC4Support
Typewriter
23
PC4Support
Typewriter
Return to Top
PC4Support
Typewriter

SYSTEM TROUBLE ERROR CODES
Trouble Indication
System Trouble Condition
Action
E04-NN Wireless Transmitter Supervisory Failure
A problem has been detected with a wireless transmitter. Call installing company for service.
E05-NN Wireless Transmitter Low Battery
The battery in a wireless transmitter is low and should be replaced. This transmitter is on the zone corresponding to the number NN. The replacement battery for the GEM-TRANS2 door/window transmitter, GEM-PIR motion detector and GEM-GB glass break detector is the Duracell DL123A 3 volt lithium. (2 required for the GEM-PIR and GEM-GB). The replacement battery for the GEM-SMK is the Duracell MN1604 9 Volt Alkaline (2 required). The GEM-DT Dual Technology Sensor requires 4 C cell alkaline batteries. Warning: Replace batteries only with the same type as specified above. Use of another battery may present a risk of fire or explosion. Do not recharge or disassemble battery, or dispose of in fire.
E06-NN Receiver Response Failure
Call installing company for service.
E07-00 Download Failure Call installing company for service.
E08-00 Telephone Line Cut The telephone line has failed. If telephone service has been temporarily interrupted, the trouble will clear automatically when it is restored. Otherwise, call installing company for service.
E09-00 System Cold Start
PC4Support
Typewriter
24
PC4Support
Typewriter
Return to Top

SYSTEM TROUBLE ERROR CODES
Trouble Indication
System Trouble Condition
Action
E10-NN Keypad Response Failure Call installing company for service.
E11-NN Keypad Tamper A keypad has been removed from the wall. Call installing company for service if problem cannot be repaired.
E12-NN Expansion Zone Module Response Failure
Call installing company for service.
E13-NN Expansion Module Tamper The cover has been removed from a zone expansion module. A problem has been detected with an Expansion Module. Call installing company for service.
E14-NN Relay Board Response Fail-ure
NN= Relay Board Number. Call installing company for service.
E15-NN RF Transmitter Tamper Wireless Transmitter Tamper Cover removed. NN=Transmitter Number. Call installing company for service.
E16-NN Wireless Receiver Jam A problem has been detected with the wireless receiver. Call installing company for service.
E17-NN Receiver Tamper Condition Call installing company for service.
E18-NN KeyFob Transmitter Low Battery
The batteries (2) in the wireless KeyFob transmitter indicated are low and should be replaced. The replacement battery is the #386 watch battery. Warning: Replace batteries only with the same type as specified above. Use of another battery may present a risk of fire or explosion. Do not recharge or disassemble battery, or dispose of in fire.
PC4Support
Typewriter
25
PC4Support
Typewriter
Return to Top

SYSTEM TROUBLE ERROR CODES
Trouble Indication
System Trouble Condition
Action
E19-00 User Program Memory Error
Call installing company for service.
E20-00 Dealer Program Memory Error
Call installing company for service.
E21-00 System Shutdown Call installing company for service.
E22-NN Sensor Watch Activity Failure
A Motion Sensor on the zone indicated has failed the programmed Sensor Watch activity test. Insure that the sensor is able to detect activity in the area; clear any obstacles which may be blocking the sensor from detecting activity. Press C to clear the display, and then use the Function Menu to Reset Sensor Watch Failure (see page 17). If you cannot correct the problem yourself, call installing company for service.
E23-00 Burglary Bus Failure Call installing company for service.
E24-00 Service Message The system is in need of a preventive maintenance service call. Call installing company for service. (With GEM-P9600/3200 panels only).
E27-00 Printer Failure Call installing company for service.
E39-00 Receiver Capacity Error
Call installing company for service.
PC4Support
Typewriter
26
PC4Support
Typewriter
Return to Top
PC4Support
Typewriter

SYSTEM TROUBLE ERROR CODES
Trouble Indication
System Trouble Condition
Action
E40-00 RF Self Test Failure A wireless motion sensor on the zone indicated has failed its automatic self test routine. Call installing company for service.
E41-NN Fire Trouble A problem has been detected on the Fire zone indicated. Call installing company for service. (GEM-P1632, GEM-P816 and GEM-P1664 panels only).
E51-00 Bell/Siren Trouble There is a problem with the Bell or Siren. Call installing company for service.
E58-00 Telemetry Trouble Call installing company for service.
E59-00 Telemetry Failure Call installing company for service.
E66-00 Dirty Smoke Detector Clean Smoke Detector or call installing company for service.
E99-00 Keypad Panic Shorted too Long
Call installing company for service.
PC4Support
Typewriter
27
PC4Support
Typewriter
Return to Top
PC4Support
Typewriter
PC4Support
Typewriter

TROUBLESHOOTING
What do I do if... For more info...
I try to arm my system but the keypad just displays “ZONES NOT NORMAL” and “CAN’T ARM SYSTEM” and beeps at me.
If the green STATUS light is off, a zone is open. Find and secure the open window or door. See Page 6
I try to arm my system but the keypad displays “SYSTEM TROUBLE” and beeps at me. The Error Codes numbers are displayed.
A System Trouble has been detected. Note the scrolling error codes, which represent the trouble. Press C and you will now be able arm to the system, but the trouble must be fixed as soon as possible.
See Page 7 & 33
The Fire Alarm is sounding and I don’t know how to turn it off.
If a fire is in progress, evacuate the premises immediately! If necessary, call the Fire Department from an outside phone. If there is no evidence of a fire, enter your code and press J to silence the alarm.
Note the Zone Number displayed. Check the smoke detector(s). If a smoke detector tripped, its red alarm indicator light will be on. Press C to silence the keypad sounder.
See Page 11
PC4Support
Typewriter
28
PC4Support
Typewriter
Return to Top
PC4Support
Typewriter