OpenSwitch CLI User Guide · 2018-03-19 · OpenSwitch CLI User Guide
382
OpenSwitch CLI User Guide
Transcript of OpenSwitch CLI User Guide · 2018-03-19 · OpenSwitch CLI User Guide

OpenSwitch CLI User Guide

OpenSwitch CLI User Guide
iii
Table of Contents1. Overview ........................................................................................................................... 12. Console and Telnet Administration Interface ........................................................................ 2
2.1. Local Console Management .................................................................................... 32.2. Set Up your Switch Using Console Access ............................................................... 42.3. Set Up your Switch Using Telnet Access .................................................................. 52.4. Accessing the CLI ................................................................................................... 62.5. Command Conventions ........................................................................................... 72.6. Command Modes .................................................................................................... 82.7. Command Completion and Abbreviation ................................................................. 102.8. CLI Error Messages .............................................................................................. 112.9. CLI Line-Editing Conventions ................................................................................. 122.10. Using CLI Help .................................................................................................... 13
3. Management And Utility Commands ................................................................................. 153.1. General CLI commands ......................................................................................... 17
3.1.1. Setting the session timeout ......................................................................... 173.1.2. Setting a command alias ............................................................................. 173.1.3. Displaying the session-timeout value ........................................................... 183.1.4. Displaying the aliases ................................................................................. 18
3.2. Audit framework .................................................................................................... 193.3. Management Interface Commands ......................................................................... 20
3.3.1. interface mgmt ........................................................................................... 203.3.2. ip static ...................................................................................................... 203.3.3. ip dhcp ....................................................................................................... 203.3.4. default-gateway .......................................................................................... 213.3.5. nameserver ................................................................................................ 213.3.6. show interface mgmt ................................................................................... 223.3.7. show running-config .................................................................................... 233.3.8. show running-config interface mgmt ............................................................. 23
3.4. Hostname commands ............................................................................................ 253.4.1. hostname ................................................................................................... 253.4.2. show hostname .......................................................................................... 25
3.5. Domain name commands ...................................................................................... 263.5.1. domain-name ............................................................................................. 263.5.2. show domain-name .................................................................................... 26
3.6. Configuration support for AAA ................................................................................ 283.6.1. aaa authentication login .............................................................................. 283.6.2. aaa authentication login fallback error local .................................................. 283.6.3. radius-server host ....................................................................................... 283.6.4. radius-server retries .................................................................................... 293.6.5. radius-server timeout .................................................................................. 293.6.6. ssh ............................................................................................................. 30
3.7. TACACS ............................................................................................................... 313.7.1. Adding global timeout ................................................................................. 313.7.2. Deleting global timeout ............................................................................... 313.7.3. Adding global passkey ................................................................................ 323.7.4. Deleting global passkey .............................................................................. 323.7.5. Adding global authentication mechanism ...................................................... 323.7.6. Deleting global authentication mechanism .................................................... 323.7.7. Adding a server .......................................................................................... 33

OpenSwitch CLI User Guide
iv
3.7.8. Deleting a server ........................................................................................ 333.7.9. Adding a server-group ................................................................................ 343.7.10. Deleting a server-group ............................................................................. 343.7.11. Configuring authentication sequence .......................................................... 343.7.12. Deleting authentication sequence .............................................................. 353.7.13. Enabling authentication fail-through ........................................................... 353.7.14. Disabling authentication fail-through ........................................................... 363.7.15. Configuring AAA Authorization with fallback ............................................... 363.7.16. Deleting AAA Authorization with fallback .................................................... 363.7.17. Viewing global config and TACACS+ servers ............................................. 363.7.18. Viewing TACACS+ server groups .............................................................. 373.7.19. Viewing AAA Authentication sequence ....................................................... 383.7.20. Viewing AAA Authorization sequence ......................................................... 383.7.21. Viewing Privilege level information for current user ..................................... 39
3.8. User Account and Password Commands ................................................................ 403.8.1. user add .................................................................................................... 403.8.2. password .................................................................................................... 403.8.3. user remove ............................................................................................... 403.8.4. show aaa authentication ............................................................................. 413.8.5. show radius-server ..................................................................................... 413.8.6. show SSH authentication-method ................................................................ 413.8.7. show running-config .................................................................................... 42
3.9. Configuration Support for SNMP Support ................................................................ 433.9.1. SNMP master agent configuration ............................................................... 43
3.9.1.1. JSON .............................................................................................. 433.9.2. SNMPv1, SNMPv2c community strings ........................................................ 43
3.9.2.1. JSON .............................................................................................. 433.9.3. Configuring SNMPv3 users ......................................................................... 43
3.9.3.1. JSON .............................................................................................. 443.9.4. Configuring SNMP trap ............................................................................... 44
3.9.4.1. JSON .............................................................................................. 453.9.5. Configuring SNMPv3 trap ............................................................................ 45
3.9.5.1. JSON .............................................................................................. 463.9.6. Configuring SNMP system MIB objects ........................................................ 46
3.9.6.1. JSON .............................................................................................. 473.9.7. show snmp community ............................................................................... 473.9.8. show snmp system ..................................................................................... 473.9.9. show snmp trap .......................................................................................... 483.9.10. show snmpv3 users .................................................................................. 48
3.10. DHCP Relay CLI Commands ............................................................................... 503.10.1. Configure dhcp-relay ................................................................................. 503.10.2. Configure a helper-address ....................................................................... 503.10.3. Configure dhcp-relay option 82 .................................................................. 503.10.4. Unconfigure dhcp-relay option 82 .............................................................. 513.10.5. Unconfigure response validation for the drop or replace policy of option82 ........................................................................................................................ 513.10.6. Configure DHCP relay bootp-gateway ........................................................ 513.10.7. Configure dhcp-relay hop-count-increment ................................................. 523.10.8. Show dhcp-relay configuration ................................................................... 523.10.9. Show helper-address configuration ............................................................ 533.10.10. Show bootp-gateway configuration ........................................................... 53

OpenSwitch CLI User Guide
v
3.10.11. Show running configuration ..................................................................... 543.11. DHCP server ....................................................................................................... 55
3.11.1. Changing to dhcp server context ............................................................... 553.11.2. Setting DHCP dynamic configuration ......................................................... 553.11.3. Removing DHCP dynamic configuration ..................................................... 563.11.4. Setting DHCP static configuration .............................................................. 563.11.5. Removing DHCP static configuration ......................................................... 573.11.6. Setting DHCP options configuration using an option name .......................... 583.11.7. Removing DHCP options configuration using an option name ...................... 583.11.8. Setting DHCP options configuration using an option number ........................ 583.11.9. Removing DHCP options configuration using an option number ................... 593.11.10. Setting DHCP match configuration using an option name .......................... 593.11.11. Removing DHCP match configuration using an option name ...................... 603.11.12. Setting DHCP match configuration using an option number ....................... 603.11.13. Removing DHCP match configuration using an option number ................... 613.11.14. Setting DHCP BOOTP configuration ........................................................ 613.11.15. Removing DHCP BOOTP configuration .................................................... 613.11.16. Show DHCP server configuration ............................................................. 623.11.17. Showing DHCP server leases configurations ............................................ 63
3.12. TFTP server ........................................................................................................ 643.12.1. Changing to tftp server context .................................................................. 643.12.2. Enabling TFTP server ............................................................................... 643.12.3. Disabling TFTP Server .............................................................................. 643.12.4. Enabling TFTP server secure mode ........................................................... 643.12.5. Disabling TFTP server secure mode .......................................................... 653.12.6. Setting an TFTP root ................................................................................ 653.12.7. Showing TFTP Server Configuration .......................................................... 65
3.13. SFTP Utility ......................................................................................................... 673.13.1. SFTP Server Enable/Disable ..................................................................... 673.13.2. Show command ........................................................................................ 673.13.3. SFTP client Interactive mode ..................................................................... 673.13.4. SFTP client Non-Interactive mode ............................................................. 68
3.14. sFlow Commands ................................................................................................ 703.14.1. Enable sFlow globally ............................................................................... 703.14.2. Disable sFlow globally ............................................................................... 703.14.3. Set sFlow sampling rate ............................................................................ 703.14.4. Remove sFlow sampling rate .................................................................... 703.14.5. Set sFlow polling interval .......................................................................... 713.14.6. Remove sFlow polling interval ................................................................... 713.14.7. Set sFlow collector IP address .................................................................. 713.14.8. Remove sFlow collector ip address ............................................................ 723.14.9. Set sFlow agent interface name and family ................................................ 723.14.10. Remove sFlow agent interface name and family ....................................... 723.14.11. Set sFlow header size ............................................................................. 733.14.12. Remove sFlow header size ..................................................................... 733.14.13. Set sFlow max datagram size .................................................................. 733.14.14. Remove sFlow max datagram size .......................................................... 733.14.15. Enable sFlow on the interface ................................................................. 743.14.16. Disable sFlow on the interface ................................................................. 743.14.17. Show sFlow configuration ........................................................................ 743.14.18. Show sFlow configuration interface .......................................................... 75

OpenSwitch CLI User Guide
vi
3.15. Remote Syslog Logging Configuration Commands ................................................ 763.15.1. Logging configuration commands ............................................................... 76
3.16. Access Control List (ACL) Commands .................................................................. 773.16.1. Creation, modification, and deletion ........................................................... 773.16.2. Reset ....................................................................................................... 793.16.3. Log timer .................................................................................................. 793.16.4. Interface Application, replacement, and removal ......................................... 803.16.5. VLAN Application, replacement, and removal ............................................. 813.16.6. Global context Display .............................................................................. 823.16.7. Statistics (hit counts) ................................................................................. 833.16.8. Log timer .................................................................................................. 84
3.17. Show Events Command ...................................................................................... 853.17.1. Display commands .................................................................................... 85
3.18. Audit Log ............................................................................................................ 873.18.1. Additional references ................................................................................ 88
3.19. Ping Utility ........................................................................................................... 893.19.1. IPv4 address ............................................................................................ 893.19.2. Hostname ................................................................................................. 893.19.3. Set data-fill pattern ................................................................................... 893.19.4. Set datagram-size ..................................................................................... 903.19.5. Set interval ............................................................................................... 903.19.6. Set repetitions .......................................................................................... 913.19.7. Set timeout ............................................................................................... 913.19.8. Set TOS ................................................................................................... 923.19.9. Set ip-option ............................................................................................. 923.19.10. IPv6 address .......................................................................................... 943.19.11. IPv6 Hostname ....................................................................................... 953.19.12. IPv6 Set data-fill pattern .......................................................................... 953.19.13. IPv6 Set datagram-size ........................................................................... 963.19.14. IPv6 Set interval ..................................................................................... 963.19.15. IPv6 Set repetitions ................................................................................. 96
3.20. Traceroute Utility ................................................................................................. 983.20.1. IPv4 address ............................................................................................ 983.20.2. Hostname ................................................................................................. 983.20.3. Set maximum TTL .................................................................................... 983.20.4. Set minimum TTL ..................................................................................... 993.20.5. Set destination port ................................................................................... 993.20.6. Set probes .............................................................................................. 1003.20.7. Set timeout ............................................................................................. 1003.20.8. Set ip-option loose source route .............................................................. 1003.20.9. IPv6 address .......................................................................................... 1013.20.10. IPv6 Hostname ..................................................................................... 1013.20.11. IPv6 Set maximum TTL ......................................................................... 1023.20.12. IPv6 Set destination port ....................................................................... 1023.20.13. IPv6 Set probes .................................................................................... 1023.20.14. IPv6 Set timeout ................................................................................... 103
3.21. Diagnostic Dump Commands ............................................................................. 1043.21.1. Show supported feature list ..................................................................... 1043.21.2. Show basic diagnostic ............................................................................. 1043.21.3. Capture basic diagnostic to file ................................................................ 105
3.22. Core Dump CLI Guide ....................................................................................... 106
OpenSwitch CLI User Guide
vii
3.22.1. Copy an instance of daemon coredump to tftp .......................................... 1063.22.2. Copy all instances of a corefile for a daemon ........................................... 1063.22.3. Copy kernel corefile to tftp server ............................................................ 1073.22.4. Copy one instance of daemon corefile to sftp server ................................. 1083.22.5. Copy all corefile instances for a daemon to a sftp server ........................... 1093.22.6. Copy kernel corefile to sftp srver ............................................................. 1103.22.7. Copy coredump help string ...................................................................... 1113.22.8. show core dump ..................................................................................... 113
3.23. NTP Commands Reference ................................................................................ 1143.23.1. ntp server ............................................................................................... 1143.23.2. ntp authentication .................................................................................... 1143.23.3. ntp authentication-key ............................................................................. 1143.23.4. ntp trusted-key ........................................................................................ 1153.23.5. show ntp associations ............................................................................. 1153.23.6. show ntp status ...................................................................................... 1163.23.7. show ntp authentication-keys ................................................................... 1173.23.8. show ntp trusted-keys ............................................................................. 1173.23.9. show ntp statistics ................................................................................... 117
3.24. Mirror Commands .............................................................................................. 1193.24.1. mirror session ......................................................................................... 1203.24.2. destination .............................................................................................. 1203.24.3. shutdown ................................................................................................ 1213.24.4. source .................................................................................................... 1213.24.5. show mirror ............................................................................................ 122
3.25. CLI support for Autoprovision ............................................................................. 1243.25.1. autoprovisioning ...................................................................................... 1243.25.2. show autoprovisioning ............................................................................. 124
3.26. System commands ............................................................................................ 1253.26.1. Setting the fan speed .............................................................................. 1253.26.2. Setting an LED state ............................................................................... 1253.26.3. Showing version information .................................................................... 1253.26.4. Showing package information .................................................................. 1263.26.5. Setting timezone on the switch ................................................................ 1273.26.6. Showing system information .................................................................... 1273.26.7. System fan information ............................................................................ 1293.26.8. Showing system temperature information ................................................. 1293.26.9. Showing system LED information ............................................................. 1303.26.10. Showing system power-supply information .............................................. 1303.26.11. Showing system date information ........................................................... 1313.26.12. Showing system CPU information using top ............................................ 1313.26.13. Showing system memory information using top ....................................... 1323.26.14. Showing time zone information .............................................................. 132
3.27. Secure Shell Commands .................................................................................... 1343.27.1. password-authentication .......................................................................... 1343.27.2. public-key-authentication ......................................................................... 134
3.28. Control Plane Policing ........................................................................................ 1353.28.1. show copp statistics ................................................................................ 135
3.29. CLI support for Config Persistence ..................................................................... 1373.29.1. Copy startup configuration to running configuration ................................... 1373.29.2. Copy running configuration to startup configuration ................................... 1373.29.3. Show startup configuration ...................................................................... 137

OpenSwitch CLI User Guide
viii
3.30. Logrotate Commands ......................................................................................... 1383.30.1. logrotate period ....................................................................................... 1383.30.2. logrotate maxsize .................................................................................... 1383.30.3. logrotate target ....................................................................................... 1383.30.4. show logrotate ........................................................................................ 139
3.31. Show Tech Commands ...................................................................................... 1403.31.1. show tech ............................................................................................... 1403.31.2. show tech list ......................................................................................... 1413.31.3. show tech feature ................................................................................... 1423.31.4. Show tech to file ..................................................................................... 142
3.32. Show Vlog Commands ...................................................................................... 1443.32.1. Show vlog .............................................................................................. 1443.32.2. Show vlog daemon ................................................................................. 1443.32.3. Show vlog severity .................................................................................. 1443.32.4. Show vlog config list ............................................................................... 1453.32.5. Show vlog config feature ......................................................................... 1453.32.6. Show vlog config daemon ....................................................................... 1453.32.7. Show vlog config .................................................................................... 1453.32.8. Show vlog daemon (daemon_name) severity (severity_level) ..................... 145
3.33. BroadView Commands ....................................................................................... 1493.33.1. broadview client ip port ........................................................................... 1493.33.2. broadview agent-port ............................................................................... 1493.33.3. show broadview ...................................................................................... 149
3.34. Rebooting the switch. ........................................................................................ 1503.34.1. reboot ..................................................................................................... 1503.34.2. reboot fast .............................................................................................. 1503.34.3. reboot os ................................................................................................ 1503.34.4. reboot primary ........................................................................................ 1503.34.5. reboot secondary .................................................................................... 1503.34.6. reboot warm ........................................................................................... 150
4. Layer 2 features ............................................................................................................. 1514.1. Interface Commands ............................................................................................ 152
4.1.1. Change to interface context ....................................................................... 1524.1.2. Configure a range of interfaces ................................................................. 1524.1.3. Enable an interface ................................................................................... 1524.1.4. Disable an interface .................................................................................. 1534.1.5. Enable routing on an interface ................................................................... 1534.1.6. Disable routing on an interface .................................................................. 1534.1.7. Set interface speed ................................................................................... 1534.1.8. Set interface speed to default .................................................................... 1544.1.9. Set interface MTU ..................................................................................... 1544.1.10. Set interface MTU to default .................................................................... 1544.1.11. Set interface duplexity ............................................................................. 1554.1.12. Set interface duplexity to default .............................................................. 1554.1.13. Enable flow control ................................................................................. 1554.1.14. Set flowcontrol to default ......................................................................... 1564.1.15. Set autonegotiation state ......................................................................... 1564.1.16. Set autonegotiation to default .................................................................. 1564.1.17. Set an IPv4 address for an interface ........................................................ 1574.1.18. Remove the IPv4 address for an interface ................................................ 1574.1.19. Set an IPv6 address for an interface ........................................................ 157
OpenSwitch CLI User Guide
ix
4.1.20. Remove the IPv6 address for an interface ................................................ 1584.1.21. Split a QSPF interface ............................................................................ 1584.1.22. Show all interfaces .................................................................................. 1584.1.23. Show the interface configuration .............................................................. 1604.1.24. Show transceiver information for all interfaces .......................................... 1604.1.25. Show transceiver information for an interface ........................................... 1614.1.26. Show the running configuration for all interfaces ....................................... 1624.1.27. Show the running configuration for an interface ........................................ 1624.1.28. Show transceiver DOM information for all interfaces .................................. 1634.1.29. Show transceiver DOM information for an interface ................................... 166
4.2. MAC Address Table ............................................................................................ 1694.2.1. mac-address-table .................................................................................... 1694.2.2. show mac-address-table ........................................................................... 1694.2.3. show mac-address-table [ dynamic ] .......................................................... 1704.2.4. show mac-address-table address < mac-address > ..................................... 171
4.3. LACP commands ................................................................................................. 1724.3.1. Creation of LAG interface .......................................................................... 1724.3.2. Deletion of LAG interface .......................................................................... 1724.3.3. Configuring LACP system priority .............................................................. 1724.3.4. Configuring default LACP system priority ................................................... 1724.3.5. Assigning interface to LAG ........................................................................ 1734.3.6. Removing interface from LAG ................................................................... 1734.3.7. Configuring LACP port-id .......................................................................... 1734.3.8. Configuring LACP port-priority ................................................................... 1734.3.9. Entering into LAG context ......................................................................... 1744.3.10. Configuring LACP mode .......................................................................... 1744.3.11. Configuring hash type ............................................................................. 1744.3.12. Configuring LACP fallback ....................................................................... 1754.3.13. Configuring LACP fallback mode ............................................................. 1754.3.14. Configuring LACP fallback timeout ........................................................... 1754.3.15. Configuring LACP rate ............................................................................ 1754.3.16. Configuring no shutdown ......................................................................... 1764.3.17. Configuring shutdown .............................................................................. 1764.3.18. Display global LACP configuration ........................................................... 1764.3.19. Display LACP aggregates ........................................................................ 1764.3.20. Display LACP interface configuration ....................................................... 1774.3.21. LAG show running-config ........................................................................ 1784.3.22. LAG diag-dump basic .............................................................................. 179
4.4. VLAN commands ................................................................................................. 1824.4.1. Assigning an interface to access mode VLAN ............................................. 1824.4.2. Removing an interface from access mode VLAN ........................................ 1824.4.3. Assigning a trunk native VLAN to an interface ............................................ 1824.4.4. Removing a trunk native VLAN from an interface ........................................ 1834.4.5. Assigning tagging on a native VLAN to an interface .................................... 1834.4.6. Removing tagging on a native VLAN from an interface ................................ 1834.4.7. Assigning a VLAN to a trunk on the interface ............................................. 1844.4.8. Removing a VLAN from a trunk on the interface ......................................... 1854.4.9. Turning on a VLAN ................................................................................... 1854.4.10. Turning off a VLAN ................................................................................. 1854.4.11. Creating a VLAN ..................................................................................... 1854.4.12. Deleting a VLAN ..................................................................................... 186

OpenSwitch CLI User Guide
x
4.4.13. Displaying a VLAN summary ................................................................... 1864.4.14. Displaying a VLAN detail ......................................................................... 186
4.5. MSTP commands ................................................................................................ 1884.5.1. Enable MSTP protocol .............................................................................. 1884.5.2. Disable MSTP protocol ............................................................................. 1884.5.3. Set MSTP config name ............................................................................. 1884.5.4. Set default MSTP config name .................................................................. 1884.5.5. Set MSTP config revision number .............................................................. 1894.5.6. Set default MSTP config revision number ................................................... 1894.5.7. VLAN to an instance ................................................................................. 1894.5.8. Remove VLAN from instance .................................................................... 1904.5.9. Set forward delay ..................................................................................... 1904.5.10. Set default forward delay ......................................................................... 1904.5.11. Set hello time ......................................................................................... 1904.5.12. Set default hello time .............................................................................. 1914.5.13. Set MSTP priority ................................................................................... 1914.5.14. Set default MSTP priority ........................................................................ 1914.5.15. Set transmit hold count ........................................................................... 1924.5.16. Set default transmit hold count ................................................................ 1924.5.17. Set max age ........................................................................................... 1924.5.18. Set default max age ................................................................................ 1924.5.19. Set max hops ......................................................................................... 1934.5.20. Set default max hops .............................................................................. 1934.5.21. Set instance priority ................................................................................ 1934.5.22. Set default instance priority ..................................................................... 1944.5.23. Set port type ........................................................................................... 1944.5.24. Set default port type ................................................................................ 1944.5.25. Enable bpdu guard ................................................................................. 1954.5.26. Set default bpdu guard ............................................................................ 1954.5.27. Enable root guard ................................................................................... 1954.5.28. Set default root guard ............................................................................. 1964.5.29. Enable loop guard ................................................................................... 1964.5.30. Set default loop guard ............................................................................. 1964.5.31. Enable bpdu filter .................................................................................... 1974.5.32. Set default bpdu filter .............................................................................. 1974.5.33. Set instance cost .................................................................................... 1974.5.34. Set instance default cost ......................................................................... 1984.5.35. Set instance port priority ......................................................................... 1984.5.36. Set instance default port priority ............................................................... 1984.5.37. Show spanning tree global configuration .................................................. 1994.5.38. Show spanning tree detail configuration ................................................... 1994.5.39. Show MSTP global configuration ............................................................. 2004.5.40. Show MSTP configuration ....................................................................... 2004.5.41. Show MSTP detail configuration .............................................................. 2014.5.42. Show MSTP instance configuration .......................................................... 2024.5.43. Show MSTP instance configuration .......................................................... 2024.5.44. Show MSTP running configuration ........................................................... 203
4.6. LLDP Commands ................................................................................................ 2054.6.1. Enable LLDP ............................................................................................ 2054.6.2. Disable LLDP ........................................................................................... 2054.6.3. Clear LLDP counters ................................................................................. 205
OpenSwitch CLI User Guide
xi
4.6.4. Clear LLDP neighbor details ...................................................................... 2054.6.5. Set LLDP holdtime .................................................................................... 2064.6.6. Set LLDP holdtime to default ..................................................................... 2064.6.7. Set LLDP reinit delay ................................................................................ 2064.6.8. Set LLDP reinit delay to default ................................................................. 2064.6.9. Set management IP address ..................................................................... 2074.6.10. Remove management IP address ............................................................ 2074.6.11. Select TLVs ............................................................................................ 2074.6.12. Remove TLVs ......................................................................................... 2084.6.13. Set LLDP timer ....................................................................................... 2094.6.14. Set LLDP timer to default ........................................................................ 2094.6.15. Enable LLDP transmission ...................................................................... 2104.6.16. Disable LLDP transmission ...................................................................... 2104.6.17. Enable LLDP reception ........................................................................... 2104.6.18. Disable LLDP reception ........................................................................... 2104.6.19. Show LLDP configuration ........................................................................ 2114.6.20. Show LLDP TLV ..................................................................................... 2114.6.21. Show LLDP neighbor information ............................................................. 2124.6.22. Show LLDP neighbor information for the interface ..................................... 2124.6.23. Show LLDP statistics .............................................................................. 2134.6.24. Show LLDP statistics for the interface ...................................................... 2134.6.25. Show LLDP local device information ........................................................ 213
4.7. Error Disable / Recovery ...................................................................................... 2164.7.1. errdisable detect ....................................................................................... 2164.7.2. errdisable flap-setting ................................................................................ 2164.7.3. errdisable recovery cause ......................................................................... 2164.7.4. errdisable recovery interval ........................................................................ 2174.7.5. show errdisable detect .............................................................................. 2174.7.6. show errdisable flap-values ....................................................................... 2174.7.7. show errdisable recovery .......................................................................... 218
4.8. Unidirectional Link Detection Commands .............................................................. 2194.8.1. udld enable (Global Config) ....................................................................... 2194.8.2. no udld enable (Global Config) .................................................................. 2194.8.3. udld message time ................................................................................... 2194.8.4. udld timeout interval .................................................................................. 2194.8.5. udld debug ............................................................................................... 2194.8.6. udld enable (Interface Config) ................................................................... 2204.8.7. no udld enable (Interface Config) ............................................................... 2204.8.8. udld port ................................................................................................... 2204.8.9. show udld ................................................................................................. 2204.8.10. show udld interface ................................................................................. 221
4.9. Storm-Control Commands .................................................................................... 2224.9.1. storm-control action .................................................................................. 2224.9.2. storm-control broadcast ............................................................................. 222
4.9.2.1. no storm-control broadcast ............................................................. 2234.9.3. storm-control multicast .............................................................................. 223
4.9.3.1. no storm-control multicast ............................................................... 2234.9.4. storm-control unicast ................................................................................. 223
4.9.4.1. no storm-control unicast ................................................................. 2234.9.5. show storm-control interface ...................................................................... 224
4.10. FEC .................................................................................................................. 225
OpenSwitch CLI User Guide
xii
4.10.1. fec .......................................................................................................... 2255. Layer 3 features ............................................................................................................. 226
5.1. L3 Interfaces ....................................................................................................... 2275.1.1. routing ...................................................................................................... 2275.1.2. vrf attach .................................................................................................. 2275.1.3. ip address ................................................................................................ 2275.1.4. ipv6 address ............................................................................................. 2285.1.5. ip proxy-arp .............................................................................................. 2285.1.6. ip local-proxy-arp ...................................................................................... 2285.1.7. interface vlan ............................................................................................ 2295.1.8. interface ................................................................................................... 2295.1.9. show interface .......................................................................................... 2295.1.10. show interface vlan-name ........................................................................ 2315.1.11. show ip interface ..................................................................................... 2315.1.12. show ipv6 interface ................................................................................. 232
5.2. Loopback Interface Commands ............................................................................ 2335.2.1. Create loopback interface .......................................................................... 2335.2.2. Delete loopback interface .......................................................................... 2335.2.3. Set/Unset IPv4 address ............................................................................. 2335.2.4. Set or unset IPv6 addresses ..................................................................... 2335.2.5. Show running configuration ....................................................................... 2345.2.6. Show loopback interfaces .......................................................................... 2345.2.7. Show loopback interface ........................................................................... 2355.2.8. Supportability Commands .......................................................................... 235
5.2.8.1. Display event logs .......................................................................... 2355.2.8.2. Daignostic Dump ............................................................................ 2365.2.8.3. show tech command ...................................................................... 236
5.3. ARP commands .................................................................................................. 2375.3.1. show ipv6 neighbors ................................................................................. 2375.3.2. arp aging .................................................................................................. 2375.3.3. arp response ............................................................................................ 2375.3.4. arp retry count .......................................................................................... 238
5.4. L3 Subinterfaces Commands ............................................................................... 2395.4.1. Create subinterface ................................................................................... 2395.4.2. Delete subinterface ................................................................................... 2395.4.3. Set or unset IPv4 addresses ..................................................................... 2395.4.4. Set or unset IPv6 addresses ..................................................................... 2405.4.5. Set or unset an IEEE 802.1Q VLAN encapsulation ..................................... 2405.4.6. Enable interface ........................................................................................ 2405.4.7. Disable interface ....................................................................................... 2415.4.8. Show running configuration ....................................................................... 2415.4.9. Show subinterfaces ................................................................................... 2415.4.10. Show subinterface .................................................................................. 2425.4.11. Supportability Commands ........................................................................ 243
5.4.11.1. Display event logs ........................................................................ 2435.4.11.2. Daignostic Dump .......................................................................... 244
5.5. UDP Broadcast Forwarder ................................................................................... 2455.5.1. Global enable/disable UDP broadcast forwarding ........................................ 2455.5.2. Configure UDP forward-protocol on an interface ......................................... 2455.5.3. Show UDP forward-protocol ...................................................................... 245
5.6. Static routes ........................................................................................................ 247

OpenSwitch CLI User Guide
xiii
5.6.1. ip route .................................................................................................... 2475.6.2. ipv6 route ................................................................................................. 2475.6.3. show ip route ............................................................................................ 2485.6.4. show ipv6 route ........................................................................................ 249
5.7. ECMP commands ................................................................................................ 2505.7.1. ip ecmp load-balance dst-ip disable ........................................................... 2505.7.2. ip ecmp load-balance src-ip disable ........................................................... 2505.7.3. ip ecmp load-balance dst-port disable ........................................................ 2505.7.4. ip ecmp load-balance src-port disable ........................................................ 2505.7.5. ip ecmp load-balance resilient ................................................................... 2515.7.6. show ip ecmp ........................................................................................... 251
5.8. eBGP Command Reference ................................................................................. 2525.8.1. router bgp ................................................................................................ 2525.8.2. bgp router-id ............................................................................................. 252
5.9. IPv4 network ....................................................................................................... 2535.9.1. maximum-paths ........................................................................................ 2535.9.2. timers bgp ................................................................................................ 2535.9.3. IPv6 network ............................................................................................ 2545.9.4. bgp fast-external-failover ........................................................................... 2545.9.5. bgp log-neighbor-changes ......................................................................... 2545.9.6. redistribute routes ..................................................................................... 2545.9.7. neighbor remote-as ................................................................................... 2555.9.8. neighbor description .................................................................................. 2555.9.9. neighbor password .................................................................................... 2565.9.10. neighbor timers ....................................................................................... 2565.9.11. neighbor allowas-in ................................................................................. 2565.9.12. neighbor remove-private-AS .................................................................... 2575.9.13. neighbor soft-reconfiguration inbound ....................................................... 2575.9.14. neighbor shutdown .................................................................................. 2575.9.15. neighbor peer-group ................................................................................ 2585.9.16. neighbor route-map ................................................................................. 2585.9.17. neighbor advertisement-interval ............................................................... 2585.9.18. neighbor ebgp-multihop ........................................................................... 2595.9.19. neighbor filter-list .................................................................................... 2595.9.20. neighbor prefix-list ................................................................................... 2605.9.21. neighbor soft-reconfiguration .................................................................... 2605.9.22. neighbor ttl-security ................................................................................. 2605.9.23. as-path access-list .................................................................................. 2615.9.24. route-map ............................................................................................... 2615.9.25. match as-path ......................................................................................... 2625.9.26. match community .................................................................................... 2625.9.27. match community exact-match ................................................................. 2625.9.28. match extcommunity ............................................................................... 2635.9.29. match ip address prefix-list ...................................................................... 2635.9.30. match ipv6 address prefix-list .................................................................. 2635.9.31. match ipv6 next-hop ................................................................................ 2645.9.32. match metric ........................................................................................... 2645.9.33. match origin ............................................................................................ 2645.9.34. match probability ..................................................................................... 2655.9.35. Route-map set ........................................................................................ 2655.9.36. set aggregator ........................................................................................ 265
OpenSwitch CLI User Guide
xiv
5.9.37. set as-path exclude ................................................................................. 2665.9.38. set as-path prepend ................................................................................ 2665.9.39. set atomic-aggregate ............................................................................... 2665.9.40. set comm-list delete ................................................................................ 2675.9.41. set community ........................................................................................ 2675.9.42. set community rt ..................................................................................... 2675.9.43. set extcommunity soo ............................................................................. 2685.9.44. set ipv6 next-hop global .......................................................................... 2685.9.45. set local-preference ................................................................................. 2685.9.46. set metric ............................................................................................... 2695.9.47. set origin ................................................................................................ 2695.9.48. set weight ............................................................................................... 270
5.9.48.1. Route-map description .................................................................. 2705.9.49. Route-map call ....................................................................................... 2705.9.50. Route-map continue ................................................................................ 2715.9.51. IPv4 prefix-list ......................................................................................... 2715.9.52. IPv6 prefix-list ......................................................................................... 2715.9.53. Community lists configuration commands ................................................. 2725.9.54. Extended community lists configuration commands ................................... 2735.9.55. show ip bgp ............................................................................................ 2735.9.56. show ip bgp summary ............................................................................. 2745.9.57. show bgp neighbors ................................................................................ 2745.9.58. show ip bgp route-map WORD ................................................................ 2755.9.59. show ip prefix list .................................................................................... 2755.9.60. show ip prefix-list WORD seq num .......................................................... 2765.9.61. show ip prefix list detail WORD ............................................................... 2765.9.62. show ip prefix list summary WORD .......................................................... 2765.9.63. show ipv6 prefix list ................................................................................ 2775.9.64. show ipv6 prefix list WORD ..................................................................... 2775.9.65. show ipv6 prefix-list WORD seq num ....................................................... 2775.9.66. show ipv6 prefix list detail ....................................................................... 278
5.10. show ipv6 prefix list detail WORD ....................................................................... 2795.10.1. show ipv6 prefix list summary .................................................................. 2795.10.2. show ipv6 prefix list summary WORD ...................................................... 2795.10.3. show ipv6 prefix list WORD X:X::X:X/M .................................................... 2805.10.4. show ipv6 prefix list WORD X:X::X:X/M first-match .................................... 2805.10.5. show ipv6 prefix list WORD X:X::X:X/M longer .......................................... 2805.10.6. show ip community list ............................................................................ 2815.10.7. show ip extcommunity list ........................................................................ 2815.10.8. show as-path access list ......................................................................... 2815.10.9. show as-path access list WORD .............................................................. 281
5.11. OSPFv2 commands ........................................................................................... 2835.11.1. Create OSPF instance ............................................................................ 2835.11.2. Remove OSPF instance .......................................................................... 2835.11.3. Set router ID ........................................................................................... 2835.11.4. Set router ID to default ............................................................................ 2845.11.5. Set OSPF network for the area ................................................................ 2845.11.6. Unset OSPF network for the area ............................................................ 2845.11.7. Enable OSPF area authentication ............................................................ 2855.11.8. Disable OSPF area authentication ........................................................... 2855.11.9. Set cost for default LSA summary ............................................................ 285
OpenSwitch CLI User Guide
xv
5.11.10. Set cost for default LSA summary to default ........................................... 2865.11.11. Set the area as NSSA ........................................................................... 2865.11.12. Unset the area as NSSA ....................................................................... 2875.11.13. Configure the area as stub .................................................................... 2875.11.14. Unset the area as stub .......................................................................... 2885.11.15. Summarize intra-area paths ................................................................... 2885.11.16. Unset summarization ............................................................................. 2895.11.17. Filter networks between OSPF areas ..................................................... 2895.11.18. Disable filtering of networks between OSPF areas .................................. 2905.11.19. Configure OSPF virtual links .................................................................. 2905.11.20. Delete OSPF virtual links ....................................................................... 2915.11.21. Set OSPF virtual links authentication keys .............................................. 2915.11.22. Delete OSPF virtual links authentication keys ......................................... 2925.11.23. Set OSPF virtual link delays and intervals .............................................. 2935.11.24. Set OSPF virtual links delay or interval to default .................................... 2935.11.25. Control distribution of default route information ....................................... 2945.11.26. Disable distribution of default route information ....................................... 2945.11.27. Set default metric for redistributed routes ............................................... 2955.11.28. Set default metric of redistributed routes to default .................................. 2955.11.29. Define OSPF administrative distance ..................................................... 2955.11.30. Set OSPF administrative distance to default ........................................... 2965.11.31. Set OSPF administrative distance for a particular route type .................... 2965.11.32. Set OSPF administrative distance for a particular route type to default ...... 2965.11.33. Stub router advertisement ...................................................................... 2975.11.34. Advertise normal cost metric .................................................................. 2975.11.35. Log changes in the adjacency state ....................................................... 2985.11.36. Disable logging changes in the adjacency state ...................................... 2985.11.37. Enable OSPF RFC1583 compatibility ..................................................... 2985.11.38. Disable OSPF RFC1583 compatibility .................................................... 2995.11.39. Redistribute routes into OSPF ............................................................... 2995.11.40. Disable redistributing routes into OSPF .................................................. 2995.11.41. OSPF BFD configuration ....................................................................... 3005.11.42. Set OSPF timers ................................................................................... 3005.11.43. Set OSPF timers to default .................................................................... 3005.11.44. Set OSPF throttling parameters ............................................................. 3015.11.45. Set OSPF throttling parameters to default ............................................... 3015.11.46. Configure NBMA neighbor ..................................................................... 3015.11.47. Remove NBMA neighbor ....................................................................... 3025.11.48. Set the interface as OSPF passive interface ........................................... 3025.11.49. Set the interface as OSPF active interface ............................................. 3035.11.50. Enable authentication on the interface .................................................... 3035.11.51. Disable authentication on the interface ................................................... 3045.11.52. Set time interval between hello packets for the interface .......................... 3045.11.53. Set time interval between hello packets for the interface to default ............ 3045.11.54. Set neighbor dead interval for the interface ............................................. 3055.11.55. Set neighbor dead interval for the interface to default .............................. 3055.11.56. Disable MTU mismatch detection ........................................................... 3055.11.57. Enable MTU mismatch detection ............................................................ 3065.11.58. Set the interface cost ............................................................................ 3065.11.59. Set the interface cost to default ............................................................. 3065.11.60. Set OSPF network type for the interface ................................................. 306

OpenSwitch CLI User Guide
xvi
5.11.61. Set OSPF network type for the interface to default .................................. 3075.11.62. Set the OSPF priority for the interface .................................................... 3075.11.63. Set the OSPF priority for the interface to default ..................................... 3075.11.64. Set the retransmit interval for the interface ............................................. 3085.11.65. Set the retransmit interval for the interface to default ............................... 3085.11.66. Set the transmit delay for the interface ................................................... 3085.11.67. Set the transmit delay for the interface to default ..................................... 3095.11.68. Show general OSPF configurations ........................................................ 3095.11.69. Show OSPF database information ......................................................... 3105.11.70. Show OSPF interface information .......................................................... 3155.11.71. Show OSPF neighbor information .......................................................... 3165.11.72. Show OSPF routing table ...................................................................... 3175.11.73. Show OSPF active non default configurations ......................................... 317
5.12. Source Interface Commands .............................................................................. 3195.12.1. Setting a source-interface IP address to the TFTP protocol ........................ 3195.12.2. Setting a source-interface IP address for all the specified protocols ............ 3195.12.3. Setting a source-interface to TFTP protocol .............................................. 3195.12.4. Setting a source-interface for all the specified protocols ............................. 3205.12.5. Unsetting a source-interface to TFTP protocol .......................................... 3205.12.6. Unsetting a source-interface for all the specified protocols ......................... 3215.12.7. Showing source-interface selection configuration assigned to the TFTPprotocol. ............................................................................................................. 3215.12.8. Showing source-interface selection configuration for all the specified proto-cols. ................................................................................................................... 321
5.13. Virtual Router Redundancy Protocol Commands ................................................. 3235.13.1. ip vrrp .................................................................................................... 3235.13.2. ip vrrp authentication ............................................................................... 3235.13.3. ip vrrp ip ................................................................................................. 3235.13.4. ip vrrp mode ........................................................................................... 3245.13.5. ip vrrp preempt ....................................................................................... 3245.13.6. ip vrrp priority ......................................................................................... 3255.13.7. ip vrrp timers advertise ............................................................................ 325
6. Data Center Command ................................................................................................... 3276.1. Priority-Based Flow Control Commands ................................................................ 328
6.1.1. priority-flow-control mode .......................................................................... 3286.1.1.1. no priority-flow-control mode ........................................................... 329
6.1.2. priority-flow-control priority ......................................................................... 3296.1.2.1. no priority-flow-control priority ......................................................... 329
6.2. OpenFlow CLI Commands ................................................................................... 3306.2.1. openflow ................................................................................................... 3306.2.2. controller .................................................................................................. 3306.2.3. hybridmode ............................................................................................... 3316.2.4. openflow-port ............................................................................................ 3316.2.5. show openflow .......................................................................................... 3326.2.6. show openflow flows ................................................................................. 3326.2.7. show openflow groups .............................................................................. 3336.2.8. show openflow meters .............................................................................. 333
6.3. VXLAN Commands .............................................................................................. 3356.3.1. vxlan source-interface ............................................................................... 335
6.3.1.1. no vxlan source ............................................................................. 3356.3.2. vxlan tenant-system .................................................................................. 335

OpenSwitch CLI User Guide
xvii
6.3.2.1. no vxlan tenant-system ................................................................... 3366.3.3. vni Tunnel Configuration ........................................................................... 3366.3.4. vxlan-vni ................................................................................................... 336
6.3.4.1. no vxlan vlan ................................................................................. 3376.3.5. show vxlan ............................................................................................... 3376.3.6. show vxlan tenant-system ......................................................................... 3376.3.7. show vxlan tenant-system configuration ..................................................... 3386.3.8. show vxlan tunnel ..................................................................................... 338
7. Quality of Service Commands ......................................................................................... 3397.1. Definition of terms ............................................................................................... 3407.2. QoS global configuration commands .................................................................... 341
7.2.1. apply qos queue-profile ............................................................................. 3417.2.2. apply qos wred-profile ............................................................................... 3437.2.3. qos cos-map ............................................................................................. 3437.2.4. qos dscp-map ........................................................................................... 3437.2.5. qos queue-profile ...................................................................................... 3447.2.6. qos schedule-profile .................................................................................. 3457.2.7. qos trust ................................................................................................... 3467.2.8. qos wred-profile ........................................................................................ 346
7.2.8.1. qos wred-profile queue ................................................................... 3477.3. QoS interface configuration commands ................................................................. 348
7.3.1. interface apply qos ................................................................................... 3487.3.2. interface qos dscp .................................................................................... 3507.3.3. interface qos trust ..................................................................................... 350
7.4. QOS queue profile configuration commands ......................................................... 3527.4.1. name ........................................................................................................ 3527.4.2. map ......................................................................................................... 353
7.5. QoS schedule profile configuration commands ...................................................... 3547.5.1. strict ......................................................................................................... 3547.5.2. dwrr ......................................................................................................... 355
7.6. Display commands .............................................................................................. 3567.6.1. show interface .......................................................................................... 3567.6.2. show interface queues .............................................................................. 3567.6.3. show qos cos-map .................................................................................... 3577.6.4. show qos dscp-map .................................................................................. 3577.6.5. show qos queue-profile ............................................................................. 3597.6.6. show qos schedule-profile ......................................................................... 3607.6.7. show qos trust .......................................................................................... 3607.6.8. show running config .................................................................................. 3607.6.9. show running config interface .................................................................... 361
7.7. Common troubleshooting ..................................................................................... 3627.8. Traffic shape ....................................................................................................... 363

xviii
List of Figures2.1. Console Setting Environment ........................................................................................... 4

xix
List of Tables2.1. CLI Command Modes ..................................................................................................... 82.2. CLI Mode Access and Exit .............................................................................................. 82.3. CLI Error Messages ...................................................................................................... 112.4. CLI Editing Conventions ................................................................................................ 12
1
Chapter 1. OverviewThe next natural step in the evolution of DC network disaggregation is to move to an open sourceoperating system, which gives users and developers control over their networks and freedom fromthe costs and limitations of packaged software.
OpenSwitch is a Linux-based, fully featured L2/L3 operating system that is built on modularity andhigh availability using modern development tools and environments. The architecture and modu-larity of OpenSwitch allows users and developers to build solutions using modern tools that reducethe time to service while resulting in more reliable solutions.
Built under the open source model, OpenSwitch offers the freedom of innovation while maintainingstability and limiting vulnerability.
OpenSwitch is a network operating system for disaggregated switches that are built around OCPcompliant hardware and that utilizes the ONIE boot loader to install and uninstall network operat-ing systems. It is aimed at accelerating the transition to open networking as well as the adoption ofdisaggregated data center networks. OpenSwitch provides a fully-featured control plane stack withsupport for layer 2 and layer 3 networking protocols. The NOS is built around a reliable architec-ture focusing on modularity and a central state repository.
OpenSwitch is an extensible NOS that utilizes modern development tools and offers extensiveAPIs and management interfaces.
Developers can build on the reliable and modern architecture to create unique networking featuresand applications using an agile development approach for faster development and more stable ap-plications with fewer post-release defects.
2
Chapter 2. Console and TelnetAdministration Interface
This chapter discusses many of the features used to manage the Switch and explains many con-cepts and important points regarding these features. Configuring the Switch to implement theseconcepts is discussed in detail later in this guide.
Console and Telnet Ad-ministration Interface
3
2.1. Local Console ManagementLocal console management involves the administration of the Switch via a direct connection to theRS-232 DCE console port. This is an Out-of-band connection, meaning that it is on a different cir-cuit than normal network communications, and thus works even when the network is down.
The local console management connection involves a terminal or PC running terminal emulationsoftware to operate the Switch’s built-in console program. Using the console program, a networkadministrator can manage, control, and monitor many functions of the Switch. Hardware compo-nents in the Switch allow it to be an active part of a manageable network. These components in-clude a CPU, memory for data storage, other related hardware, and SNMP agent firmware. Activ-ities on the Switch can be monitored with these components while the Switch can be manipulatedto carry out specific tasks.

Console and Telnet Ad-ministration Interface
4
2.2. Set Up your Switch Using Console Ac-cess
Out-of-band management requires connecting a terminal, such as a VT-100 or a PC running a ter-minal emulation program (such as HyperTerminal, which is automatically installed with MicrosoftWindows) to the RS-232 DCE console port of the Switch. Switch management using the RS-232DCE console port is called Local Console Management to differentiate it from management donevia management platforms, such as DView or HP OpenView.
Make sure the terminal or PC you are using to make this connection is configured to match thesesettings. If you are having problems making this connection on a PC, make sure the emulation isset to VT-100 or ANSI. If you still don’t see anything, try pressing <Ctrl> + r to refresh the screen.
The first-time configuration must be carried out through a console, that is, either (a) a VT100-typeserial data terminal, or (b) a computer running communications software set to emulate a VT100.The console must be connected to the Diagnostics port - an RS-232 port with a 9-socket D-shellconnector and DCE-type wiring. Make the connection as follows:
1. Obtain suitable cabling for the connection.You can use a null-modem RS-232 cable or an ordi-nary RS-232 cable and a null-modem adapter. One end of the cable (or cable/adapter combina-tion) must have a 9-pin D-shell connector suitable for the Diagnostics port, the other end musthave a connector suitable for the console’s serial communications port.
2. Power down the devices, attach the cable (or cable/adapter combination) to the correct portsand restore power.
3. Set the console to use the following communication parameters for your terminal:
• The console port is set for the following configuration:
• Baud rate: 115,200
• Data width: 8 bits
• Parity: none
• Stop bits: 1
• Flow Control: none
A typical console connection is illustrated below:
Figure 2.1. Console Setting Environment

Console and Telnet Ad-ministration Interface
5
2.3. Set Up your Switch Using Telnet AccessThe switch has no IP address by default. The DHCP client on the service port is enabled, and theDHCP client on the network interface is disabled.
Once you have set an IP address for your Switch, you can use a Telnet program (in a VT-100compatible terminal mode) to access and control the Switch. Most of the screens are identical,whether accessed through the console port or a Telnet interface.

Console and Telnet Ad-ministration Interface
6
2.4. Accessing the CLIOnce console or Telnet access is established, and the system completes the boot cycle, the User:prompt appears.
Default user credentials are "admin/admin."
After a successful login, the screen shows the Linux system prompt, switch:~$
1. Elevate your privilege level using sudo -i command.
2. To view the service port network information use the ip a command. Eth0 interface serves as aservice port.
3. To access the CLI use the "vtysh" command.
Example:
switch:~$ sudo -iroot@switch:~# vtyshswitch#
By default, the DHCP client on the service port is enabled. If your network has a DHCP server,then you need only to connect the switch service port to your management network to allow theswitch to acquire basic network information.
Console and Telnet Ad-ministration Interface
7
2.5. Command ConventionsThe parameters for a command might include mandatory values, optional values, or keywordchoices.
Parameters are order dependent.
The text in bold italics should be replaced with a name or number. To use spaces as part of aname parameter, enclose it in double quotes like this: "System Name with Spaces".
Parameters may be mandatory values, optional values, choices, or a combination.
• <parameter>. The <> angle brackets indicate that a mandatory parameter must be entered inplace of the brackets and text inside them.
• [parameter]. The [] square brackets indicate that an optional parameter may be entered in placeof the brackets and text inside them.
• choice1 | choice2. The | indicates that only one of the parameters should be entered.
The {} curly braces indicate that a parameter must be chosen from the list of choices.

Console and Telnet Ad-ministration Interface
8
2.6. Command ModesThe CLI groups commands into modes according to the command function. Each of the commandmodes supports specific OpenSwitch software commands. The commands in one mode are notavailable until you switch to that particular mode.
The command prompt changes in each command mode to help you identify the current mode. Thetable below describes the command modes and the prompts visible in that mode.
The command modes available on your switch depend on the software modules thatare installed. For example, a switch that does not support BGPv4 does not have theBGPv4 RouterCommand Mode.
Table 2.1. CLI Command Modes
Command Mode Prompt Mode Description
Global Config Switch (Config)# Groups general setup commands andpermits you to make modifications tothe running configuration.
VLAN Config Switch (Vlan)# Groups all the VLAN commands.
Interface Config Switch (Interface number)#
Switch (Interface vlan vlan-id)#
Switch (Interface lag vlan-id)#
Switch (Interface Loopback id)#
Switch (Interface tunnel id)#
Switch (Interface (startrange)-(en-drange)#
Manages the operation of an interfaceand provides access to the router in-terface configuration commands. Usethis mode to set up a physical port fora specific logical connection opera-tion. You can also use this mode tomanage the operation of a range ofinterfaces.
For example for the range of inter-faces from ports 2 to 4, the promptdisplays as follows:
switch(config)# interface range intf2-4
Line SSH Switch (config-ssh)# Contains commands to configureSSH login/ enable authentication.
Router Config Switch (Config-router)# Contains the OSPF and BGP4 config-uration commands.
Route Map Config Switch (config-route-map)# Contains the route map configuration
The next table explains how to enter each mode. To exit a mode and return to the previous mode,enter exit. To exit to Privileged EXEC mode, press Ctrl+z.
Table 2.2. CLI Mode Access and Exit
Command Mode Access Method
Global Config From the Privileged EXEC mode, enter the configure command.
VLAN Config From the Privileged EXEC mode, enter vlan number command.

Console and Telnet Ad-ministration Interface
9
Command Mode Access Method
Interface Config From the Global Config mode, enter one of the following:
interface number
interface vlan vlan-id
interface lag lag-number
interface loopback id
interface tunnel id
interface range intf/lag/vlan
Router OSPF Config From the Global Config mode, enter router ospf
BGP Router Config From the Global Config mode, enter router bgp <asnumber>
Route Map Config From the Global Config mode, enter route-map map-tag

Console and Telnet Ad-ministration Interface
10
2.7. Command Completion and AbbreviationCommand completion finishes spelling the command when you type enough letters of a commandto identify uniquely the command keyword. Once you have entered enough letters, press the TABkey to complete the word.
Command abbreviation allows you to execute a command when you have entered there areenough letters to identify uniquely the command. You must enter all of the required keywords andparameters before you enter the command.
Console and Telnet Ad-ministration Interface
11
2.8. CLI Error MessagesIf you enter a command, and the system is unable to execute it, an error message appears. Thetable below describes the most common CLI error messages.
Table 2.3. CLI Error Messages
Message Text Description
% Invalid input detected at'^'marker.
Indicates that you entered an incorrect or unavailable command. Thecarat (^) shows where the invalid text is detected. This message alsoappears if any of the parameters or values is not recognized.
Command not found /Incomplete command.Use ? to list commands.
Indicates that you did not enter the required keywords or values.
Ambiguous command Indicates that you did not enter enough letters to identify uniquely thecommand.

Console and Telnet Ad-ministration Interface
12
2.9. CLI Line-Editing ConventionsThe table below describes the key combinations you can use to edit commands or increase thespeed of command entry. You can access this list from the CLI by entering help from the User orPrivileged EXEC modes.
Table 2.4. CLI Editing Conventions
Key Sequence Description
DEL or Backspace Delete previous character.
Ctrl-A Go to the beginning of the line.
Ctrl-E Go to end of the line.
Ctrl-F Go forward one character.
Ctrl-B Go backward one character.
Ctrl-D Delete current character.
Ctrl-U, X Delete to beginning of the line.
Ctrl-K Delete to end of the line.
Ctrl-W Delete previous word.
Ctrl-T Transpose previous character.
Ctrl-P Go to the previous line in the history buffer.
Ctrl-R Rewrites or pastes the line.
Ctrl-N Go to next line in the history buffer.
Ctrl-Y Prints last deleted character.
Ctrl-Z Return to root command prompt.
Tab Command-line completion.
Exit Go to next lower command prompt.
? List available commands, keywords, or parameters.

Console and Telnet Ad-ministration Interface
13
2.10. Using CLI HelpEnter a question mark (?) at the command prompt to display the commands available in the cur-rent mode.
switch# ? clear Reset functions configure Configuration from vty interface copy Copy from one config to another debug Debug Configuration diag-dump Display diagnostic dump disable Turn off privileged mode command end End current mode and change to enable mode erase Erase configuration exit Exit current mode and down to previous mode list Print command list no Negate a command or set its defaults page Enable page break password Change user password ping Send ping requests to a device on the network ping6 Send IPv6 ping requests to a device on the network reboot Reload the switch show Show running system information start-shell Start Bash shell top Top command traceroute Trace the IPv4 route to a device on the network traceroute6 Trace the IPv6 route to a device on the network
Enter a question mark (?) after each word you enter to display available command keywords orparameters.
(Routing) #network ?mgmt_vlan Configure the Management VLAN ID of the switch.parms Configure Network Parameters of the router.protocol Select DHCP, BootP, or None as the network configprotocol.
If the help output shows a parameter in angle brackets, you must replace the parameter with a val-ue.
switch# configure ? <cr> terminal Configuration terminal (default)
If there are no additional command keywords or parameters, or if additional parameters are option-al, the following message appears in the output:
<cr> Press Enter to execute the command
You can also enter a question mark (?) after typing one or more characters of a word to list theavailable command or parameters that begin with the letters, as shown in the following example:
switch# show v ?

Console and Telnet Ad-ministration Interface
14
version Displays switch version vlan Show VLAN configuration vlog Display all vlogs vrf VRF Configuration vrrp Shows all VRRP groups information vxlan VxLAN information.
15
Chapter 3. Management And UtilityCommands
This section describes the following management commands available in the OpenSwitch CLI:
Section 3.1, “General CLI commands”
Section 3.2, “Audit framework”
Section 3.3, “Management Interface Commands”
Section 3.4, “Hostname commands”
Section 3.5, “Domain name commands”
Section 3.6, “Configuration support for AAA”
Section 3.7, “TACACS”
Section 3.8, “User Account and Password Commands”
Section 3.9, “Configuration Support for SNMP Support”
Section 3.10, “DHCP Relay CLI Commands”
Section 3.11, “DHCP server”
Section 3.12, “TFTP server”
Section 3.13, “SFTP Utility”
Section 3.14, “sFlow Commands”
Section 3.15, “Remote Syslog Logging Configuration Commands”
Section 3.16, “Access Control List (ACL) Commands”
Section 3.17, “Show Events Command”
Section 3.18, “Audit Log”
Section 3.19, “Ping Utility”
Section 3.20, “Traceroute Utility”
Section 3.21, “Diagnostic Dump Commands”
Section 3.22, “Core Dump CLI Guide”
Section 3.23, “NTP Commands Reference”
Section 3.24, “Mirror Commands”
Section 3.25, “CLI support for Autoprovision”

Management And Utility Commands
16
Section 3.26, “System commands”
Section 3.27, “Secure Shell Commands”
Section 3.28, “Control Plane Policing”
Section 3.29, “CLI support for Config Persistence”
Section 3.30, “Logrotate Commands”
Section 3.31, “Show Tech Commands”
Section 3.32, “Show Vlog Commands”
Section 3.34, “Rebooting the switch.”
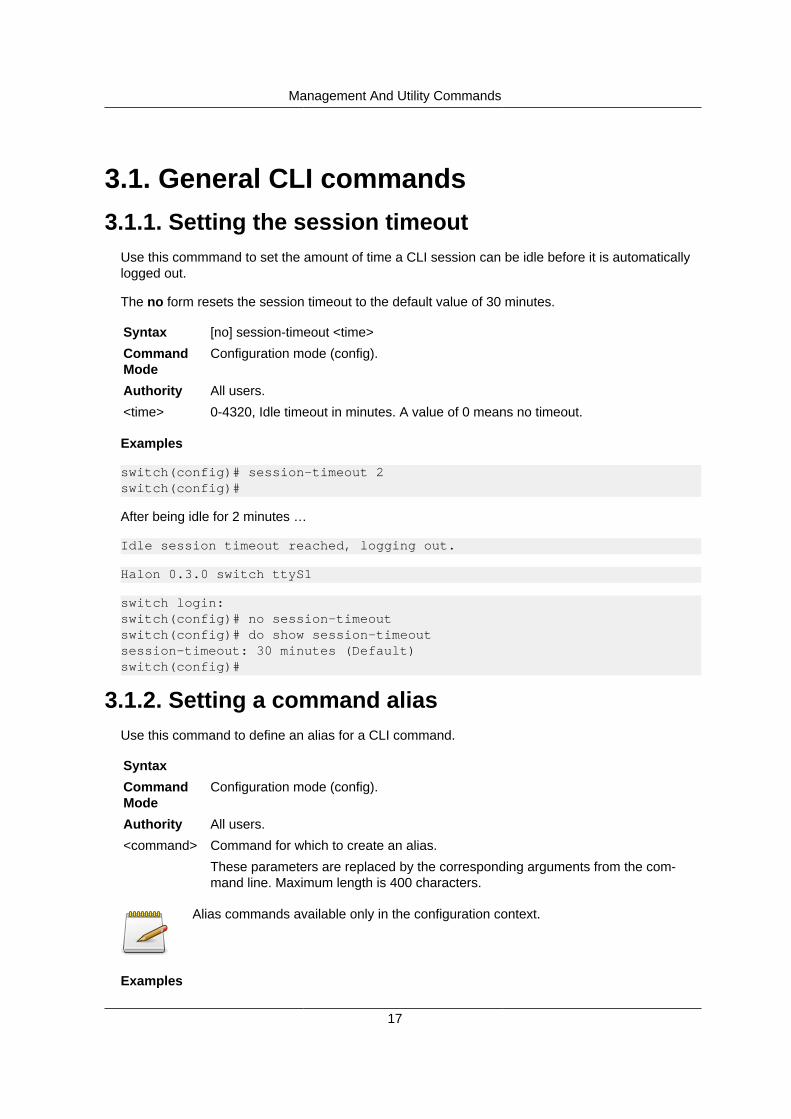
Management And Utility Commands
17
3.1. General CLI commands3.1.1. Setting the session timeout
Use this commmand to set the amount of time a CLI session can be idle before it is automaticallylogged out.
The no form resets the session timeout to the default value of 30 minutes.
Syntax [no] session-timeout <time>
CommandMode
Configuration mode (config).
Authority All users.
<time> 0-4320, Idle timeout in minutes. A value of 0 means no timeout.
Examples
switch(config)# session-timeout 2switch(config)#
After being idle for 2 minutes …
Idle session timeout reached, logging out.
Halon 0.3.0 switch ttyS1
switch login:switch(config)# no session-timeoutswitch(config)# do show session-timeoutsession-timeout: 30 minutes (Default)switch(config)#
3.1.2. Setting a command aliasUse this command to define an alias for a CLI command.
SyntaxCommandMode
Configuration mode (config).
Authority All users.
<command> Command for which to create an alias.
These parameters are replaced by the corresponding arguments from the com-mand line. Maximum length is 400 characters.
Alias commands available only in the configuration context.
Examples

Management And Utility Commands
18
switch(config)# alias hst hostname $1switch(config)# hst myhostmyhost(config)#myhost(config)# do show aliasAlias Name Alias Definition-------------------------------------------------------------------------------hst hostname $1myhost(config)#
myhost(config)# no alias hstmyhost(config)# do show hstAlias Name Alias Definition-------------------------------------------------------------------------------myhost(config)#
3.1.3. Displaying the session-timeout valueThis command shows the idle timeout in minutes.
Syntax show session-timeout
Authority All users.
Examples
switch# show session-timeoutsession-timeout: 2 minutesswitch#
3.1.4. Displaying the aliasesThis command shows all aliases that are defined.
Syntax show alias
Authority All users.
Examples
switch# show aliasAlias Name Alias Definition-------------------------------------------------------------------------------abc hostname $1
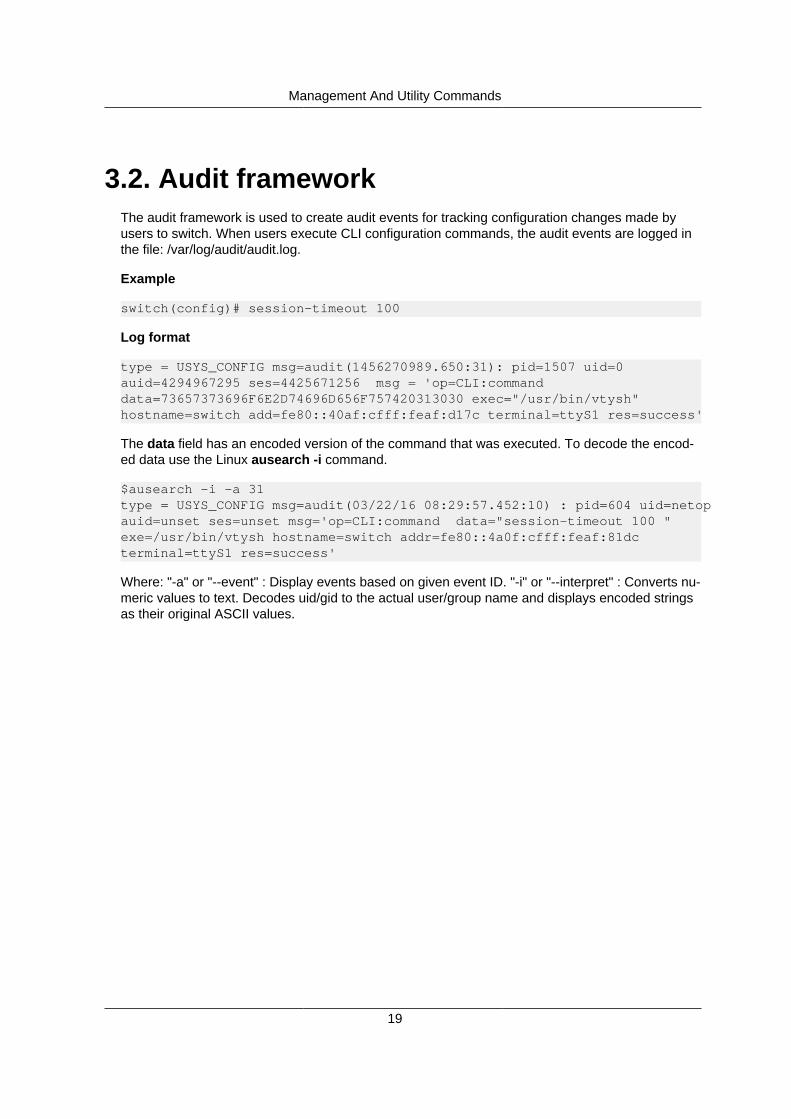
Management And Utility Commands
19
3.2. Audit frameworkThe audit framework is used to create audit events for tracking configuration changes made byusers to switch. When users execute CLI configuration commands, the audit events are logged inthe file: /var/log/audit/audit.log.
Example
switch(config)# session-timeout 100
Log format
type = USYS_CONFIG msg=audit(1456270989.650:31): pid=1507 uid=0auid=4294967295 ses=4425671256 msg = 'op=CLI:commanddata=73657373696F6E2D74696D656F757420313030 exec="/usr/bin/vtysh"hostname=switch add=fe80::40af:cfff:feaf:d17c terminal=ttyS1 res=success'
The data field has an encoded version of the command that was executed. To decode the encod-ed data use the Linux ausearch -i command.
$ausearch -i -a 31type = USYS_CONFIG msg=audit(03/22/16 08:29:57.452:10) : pid=604 uid=netopauid=unset ses=unset msg='op=CLI:command data="session-timeout 100 "exe=/usr/bin/vtysh hostname=switch addr=fe80::4a0f:cfff:feaf:81dcterminal=ttyS1 res=success'
Where: "-a" or "--event" : Display events based on given event ID. "-i" or "--interpret" : Converts nu-meric values to text. Decodes uid/gid to the actual user/group name and displays encoded stringsas their original ASCII values.

Management And Utility Commands
20
3.3. Management Interface CommandsThis section describes the commands you use to configure a logical interface for management ac-cess.
3.3.1. interface mgmtSwitches to management interface configuration mode from configuration mode. All the manage-ment interface commands are available in this mode only.
Syntax interface mgmt
CommandMode
Configuration mode (config).
Authority Admin.
Example: Switching to management interface mode
switch(config)# interface mgmtswitch(config-if-mgmt)#
3.3.2. ip staticAssigns a static IP address to the management interface. You can assign both an IPv4 and IPv6address at the same time.
Syntax ip static <address>/<mask>
CommandMode
Management interface mode (config-if-mgmt).
Authority Admin.
<address> Required. Static IP address in either IPv4 format (A.B.C.D), or IPv6 format(X:X::X:X). Reserved, multicast, broadcast, and loopback addresses are not al-lowed.
<mask> Required. Subnet mask associated with the static address in CIDR format.
Examples:
Setting an IPv4 address on the management interface
switch(config-if-mgmt)# ip static 192.168.1.10/16
Setting an IPv6 address on the management interface
switch(config-if-mgmt)# ip static 2001:db8:0:1::129/64
3.3.3. ip dhcpEnables the DHCP client on the management interface. When enabled, the management inter-face attempts to retrieve its configuration settings from a DHCP server. If successful, these set-tings overwrite any statically configured values.
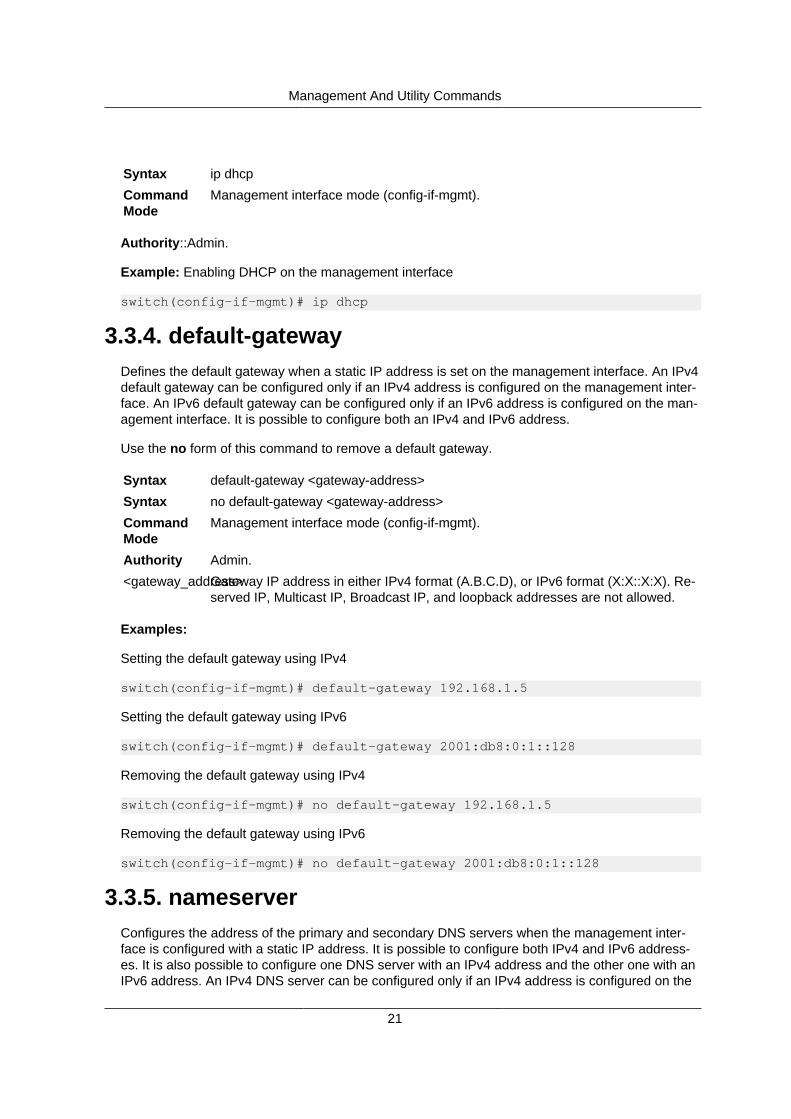
Management And Utility Commands
21
Syntax ip dhcp
CommandMode
Management interface mode (config-if-mgmt).
Authority::Admin.
Example: Enabling DHCP on the management interface
switch(config-if-mgmt)# ip dhcp
3.3.4. default-gatewayDefines the default gateway when a static IP address is set on the management interface. An IPv4default gateway can be configured only if an IPv4 address is configured on the management inter-face. An IPv6 default gateway can be configured only if an IPv6 address is configured on the man-agement interface. It is possible to configure both an IPv4 and IPv6 address.
Use the no form of this command to remove a default gateway.
Syntax default-gateway <gateway-address>
Syntax no default-gateway <gateway-address>
CommandMode
Management interface mode (config-if-mgmt).
Authority Admin.
<gateway_address>Gateway IP address in either IPv4 format (A.B.C.D), or IPv6 format (X:X::X:X). Re-served IP, Multicast IP, Broadcast IP, and loopback addresses are not allowed.
Examples:
Setting the default gateway using IPv4
switch(config-if-mgmt)# default-gateway 192.168.1.5
Setting the default gateway using IPv6
switch(config-if-mgmt)# default-gateway 2001:db8:0:1::128
Removing the default gateway using IPv4
switch(config-if-mgmt)# no default-gateway 192.168.1.5
Removing the default gateway using IPv6
switch(config-if-mgmt)# no default-gateway 2001:db8:0:1::128
3.3.5. nameserverConfigures the address of the primary and secondary DNS servers when the management inter-face is configured with a static IP address. It is possible to configure both IPv4 and IPv6 address-es. It is also possible to configure one DNS server with an IPv4 address and the other one with anIPv6 address. An IPv4 DNS server can be configured only if an IPv4 address is configured on the

Management And Utility Commands
22
management interface. An IPv6 DNS server can be configured only if an IPv6 address is config-ured on the management interface.
Use the no form of this command to remove a DNS server. You cannot remove the secondaryDNS server without first removing the primary DNS server.
Syntax nameserver <address-1> [<address-2>]
Syntax no nameserver <address-1> [<address-2>]
CommandMode
Management interface mode (config-if-mgmt).
Authority Admin.
<address-1> IP address of the primary DNS server in either IPv4 format (A.B.C.D), or IPv6 for-mat (X:X::X:X). Reserved, multicast, broadcast, and loopback addresses are notallowed.
<address-2> IP address of the primary DNS server in either IPv4 format (A.B.C.D), or IPv6 for-mat (X:X::X:X). Reserved, multicast, broadcast, and loopback addresses are notallowed.
Examples
Setting the primary DNS server using IPv4
switch(config-if-mgmt)# nameserver 192.168.1.1
Setting the primary and secondary DNS server using IPv4
switch(config-if-mgmt)# nameserver 192.168.1.2 192.168.1.3
Setting the primary DNS server using IPv6
switch(config-if-mgmt)# nameserver 2001:db8:0:1::100
Setting the primary and secondary DNS server using IPv6
switch(config-if-mgmt)# nameserver 2001:db8:0:2::100 2001:db8:0:3::150
Removing the primary and secondary DNS server using IPv4
switch(config-if-mgmt)# no nameserver 192.168.1.2 192.168.1.3
Removing the primary and secondary DNS server using IPv6
switch(config-if-mgmt)# no nameserver 2001:db8:0:2::100 2001:db8:0:3::150
3.3.6. show interface mgmtDisplays the current configuration of the management interface.
Syntax show interface mgmt
CommandMode
Enable mode.

Management And Utility Commands
23
Authority All users.
Example
switch#show interface mgmt Address Mode : static IPv4 address/subnet-mask : 192.168.1.100/16 Default gateway IPv4 : 192.168.1.5 IPv6 address/prefix : 2001:db8:0:1::129/64 IPv6 link local address/prefix : fe80::7272:cfff:fefd:e485/64 Default gateway IPv6 : 2001:db8:0:1::128 Primary Nameserver : 2001:db8:0:2::100 Secondary Nameserver : 2001:db8:0:3::150
3.3.7. show running-configUse this command to display the current configuration of the switch.
Syntax show running-config
CommandMode
Enable mode.
Authority Admin.
Example
switch# show running-config Current configuration: ! hostname "new-name" ! interface mgmt ip static 192.168.1.100/16 ip static 2001:db8:0:1::129/64 default-gateway 192.168.1.5 default-gateway 2001:db8:0:1::128 nameserver 2001:db8:0:2::100 2001:db8:0:3::150
3.3.8. show running-config interface mgmtDisplays the current configuration of the switch from interface mode.
Syntax show running-config interface mgmt
CommandMode
Enable mode.
Authority Admin.
Example
switch# show running-config interface mgmtCurrent configuration:
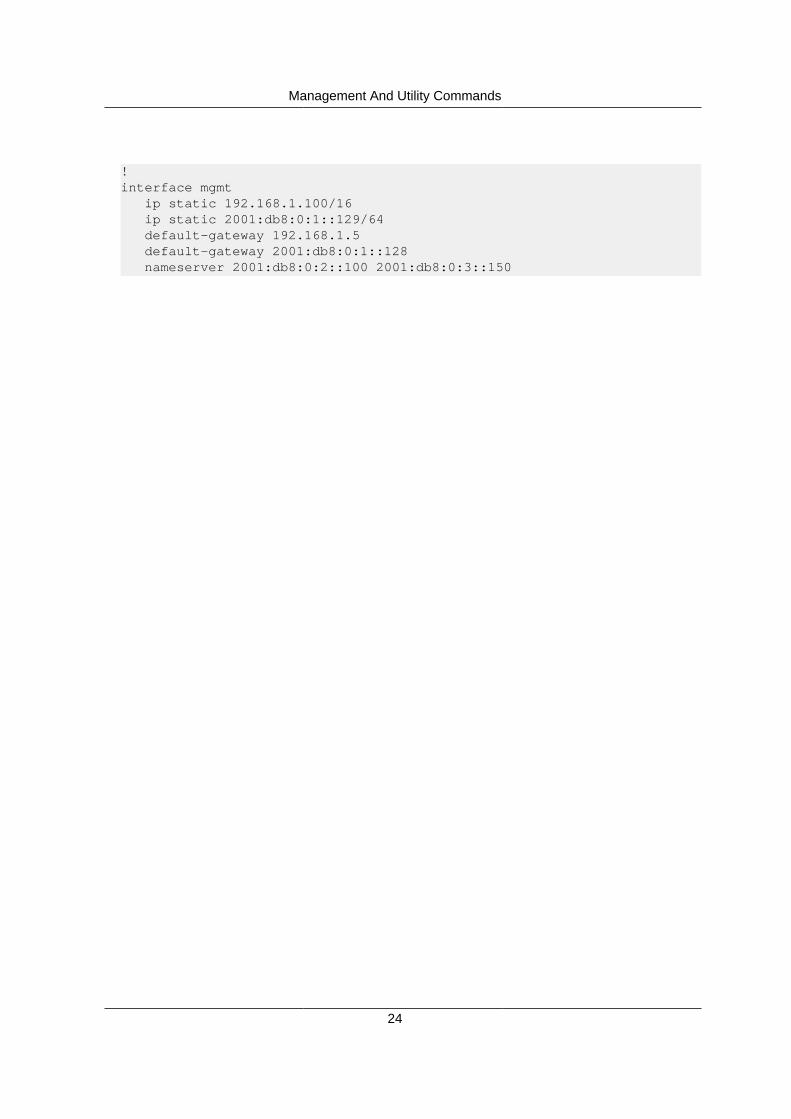
Management And Utility Commands
24
!interface mgmt ip static 192.168.1.100/16 ip static 2001:db8:0:1::129/64 default-gateway 192.168.1.5 default-gateway 2001:db8:0:1::128 nameserver 2001:db8:0:2::100 2001:db8:0:3::150

Management And Utility Commands
25
3.4. Hostname commands3.4.1. hostname
Configures the hostname assigned to the switch. The hostname is shown as part of each CLIprompt. The default hostname is switch.
Use the no form of this command to set the hostname to the default value.
Syntax hostname <name>
Syntax no hostname
CommandMode
Enable mode.
Authority Admin.
<name> Hostname starting with a letter and having a maximum length of 32 characters.
Example
Setting and then removing the host name "new-name"
switch(config)# hostname new-namenew-name(config)# no hostname
3.4.2. show hostnameDisplays the currently configured hostname.
Syntax show hostname
CommandMode
Enable mode.
Authority All users.
Example
switch# show hostnameswitch

Management And Utility Commands
26
3.5. Domain name commands3.5.1. domain-name
Sets the domain name of the switch.
Use the no form of this command to remove the domain name.
Syntax domain-name <name>
Syntax no domain-name
CommandMode
Configuration mode (config).
Authority Admin.
<name> Domain name starting with a letter and having a maximum length of 32 characters.
Examples
Setting the domain name to "example.com"
switch(config)# domain-name example.comswitch(config)# do show domain-nameexample.com
Removing the domain
switch(config)# no domain-nameswitch(config)# do show domain-name
switch(config)#
The do options runs a command in the enable mode.
3.5.2. show domain-nameDisplays the domain name currently assigned to the switch.
Syntax show domain-name
CommandMode
Enable mode.
Authority All users.
Example
Setting the domain to "example.com" and then displaying it
switch(config)# domain-name example.comswitch(config)# exit

Management And Utility Commands
27
switch# show domain-nameexample.com
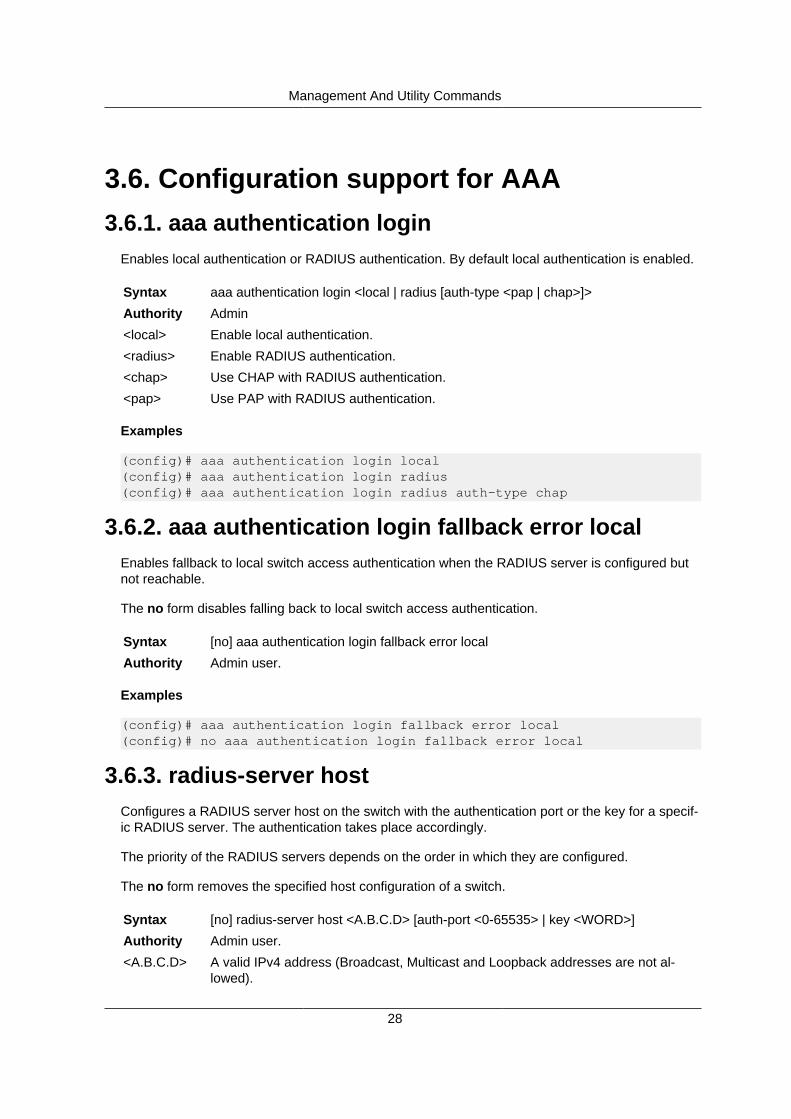
Management And Utility Commands
28
3.6. Configuration support for AAA3.6.1. aaa authentication login
Enables local authentication or RADIUS authentication. By default local authentication is enabled.
Syntax aaa authentication login <local | radius [auth-type <pap | chap>]>
Authority Admin
<local> Enable local authentication.
<radius> Enable RADIUS authentication.
<chap> Use CHAP with RADIUS authentication.
<pap> Use PAP with RADIUS authentication.
Examples
(config)# aaa authentication login local(config)# aaa authentication login radius(config)# aaa authentication login radius auth-type chap
3.6.2. aaa authentication login fallback error localEnables fallback to local switch access authentication when the RADIUS server is configured butnot reachable.
The no form disables falling back to local switch access authentication.
Syntax [no] aaa authentication login fallback error local
Authority Admin user.
Examples
(config)# aaa authentication login fallback error local(config)# no aaa authentication login fallback error local
3.6.3. radius-server hostConfigures a RADIUS server host on the switch with the authentication port or the key for a specif-ic RADIUS server. The authentication takes place accordingly.
The priority of the RADIUS servers depends on the order in which they are configured.
The no form removes the specified host configuration of a switch.
Syntax [no] radius-server host <A.B.C.D> [auth-port <0-65535> | key <WORD>]
Authority Admin user.
<A.B.C.D> A valid IPv4 address (Broadcast, Multicast and Loopback addresses are not al-lowed).

Management And Utility Commands
29
<0-65535> The authentication port, with a default of port 1812.
<WORD> The key for a specific RADIUS server. The default is testing123-1
Examples
(config)# radius-server host 10.10.10.10(config)# no radius-server host 10.10.10.10(config)# radius-server host 20.20.20.20 key testRadius(config)# no radius-server host 20.20.20.20 key testRadius(config)# radius-server host 30.30.30.30 auth-port 2015(config)# no radius-server host 30.30.30.30 auth-port 2015
3.6.4. radius-server retriesConfigures the number of retries when connecting to the RADIUS server host from the switch. Theauthentication takes place accordingly.
The priority of the RADIUS servers depends on the order in which they are configured.
The no form removes the configuration for the number of retries.
Syntax [no] radius-server retries <0-5>
Authority Admin user.
<0-5> The number of retries.
Examples
(config)# radius-server retries 5(config)# no radius-server retries 5
3.6.5. radius-server timeoutConfigures the timeout in seconds when connecting to the RADIUS server host from the switch.The authentication takes place accordingly.
The priority of the RADIUS servers depends on the order in which they are configured.
The no form removes the configuration for the timeout.
Syntax [no] radius-server timeout <1-60>
Authority Admin user.
<1-60> The maximum amount of seconds the RADIUS client waits for a response from theRADIUS authentication server before it times out.
Examples:
(config)# radius-server timeout 10(config)# no radius-server timeout 10

Management And Utility Commands
30
3.6.6. sshEnables the selected SSH authentication method. Public key authentication uses authorized keyssaved in the user’s .ssh folder, either by autoprovisioning script or manually. By default public keyauthentication and password authentication are enabled.
The no form disables the selected SSH authentication method.
Syntax [no] ssh <password-authentication | public-key-authentication>
Authority Admin user.
<pass-word-authen-tication>
Sets the SSH authentication method for password authentication.
<public-key-authentica-tion>
Sets the SSH authentication method for public key authentication.
Examples:
(config)# ssh password-authentication(config)# no ssh password-authentication(config)# ssh public-key-authentication(config)# no ssh public-key-authentication
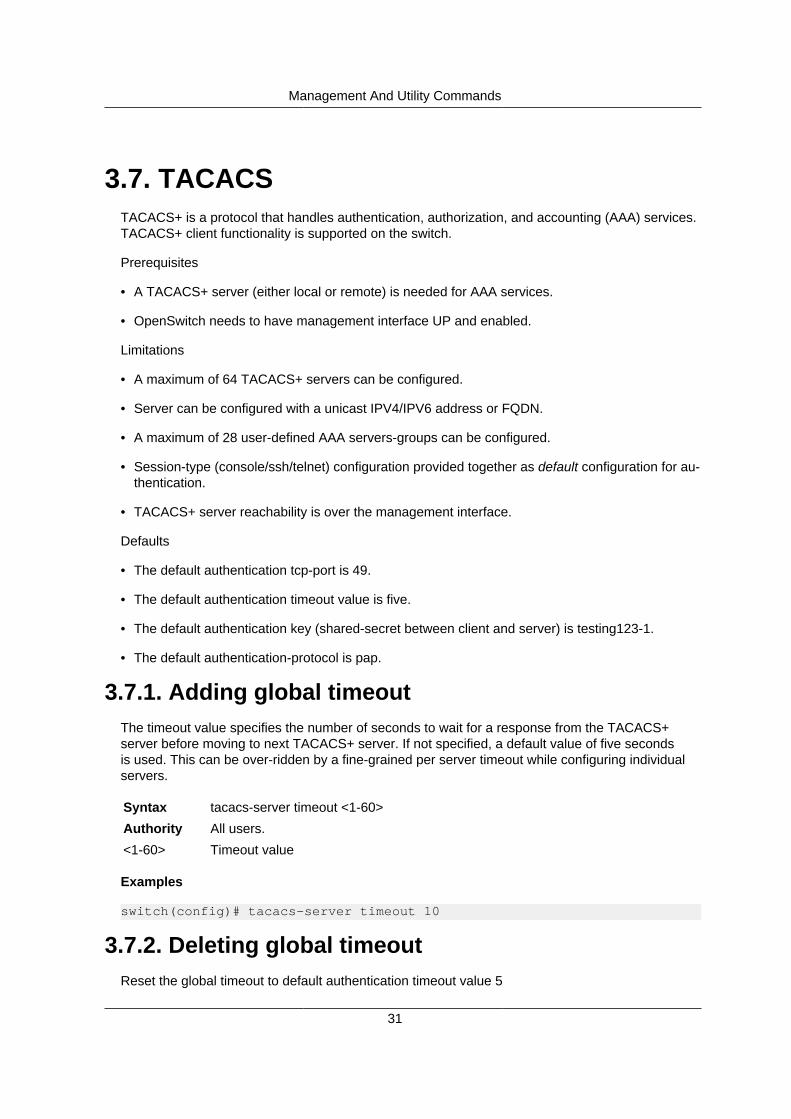
Management And Utility Commands
31
3.7. TACACSTACACS+ is a protocol that handles authentication, authorization, and accounting (AAA) services.TACACS+ client functionality is supported on the switch.
Prerequisites
• A TACACS+ server (either local or remote) is needed for AAA services.
• OpenSwitch needs to have management interface UP and enabled.
Limitations
• A maximum of 64 TACACS+ servers can be configured.
• Server can be configured with a unicast IPV4/IPV6 address or FQDN.
• A maximum of 28 user-defined AAA servers-groups can be configured.
• Session-type (console/ssh/telnet) configuration provided together as default configuration for au-thentication.
• TACACS+ server reachability is over the management interface.
Defaults
• The default authentication tcp-port is 49.
• The default authentication timeout value is five.
• The default authentication key (shared-secret between client and server) is testing123-1.
• The default authentication-protocol is pap.
3.7.1. Adding global timeoutThe timeout value specifies the number of seconds to wait for a response from the TACACS+server before moving to next TACACS+ server. If not specified, a default value of five secondsis used. This can be over-ridden by a fine-grained per server timeout while configuring individualservers.
Syntax tacacs-server timeout <1-60>
Authority All users.
<1-60> Timeout value
Examples
switch(config)# tacacs-server timeout 10
3.7.2. Deleting global timeoutReset the global timeout to default authentication timeout value 5
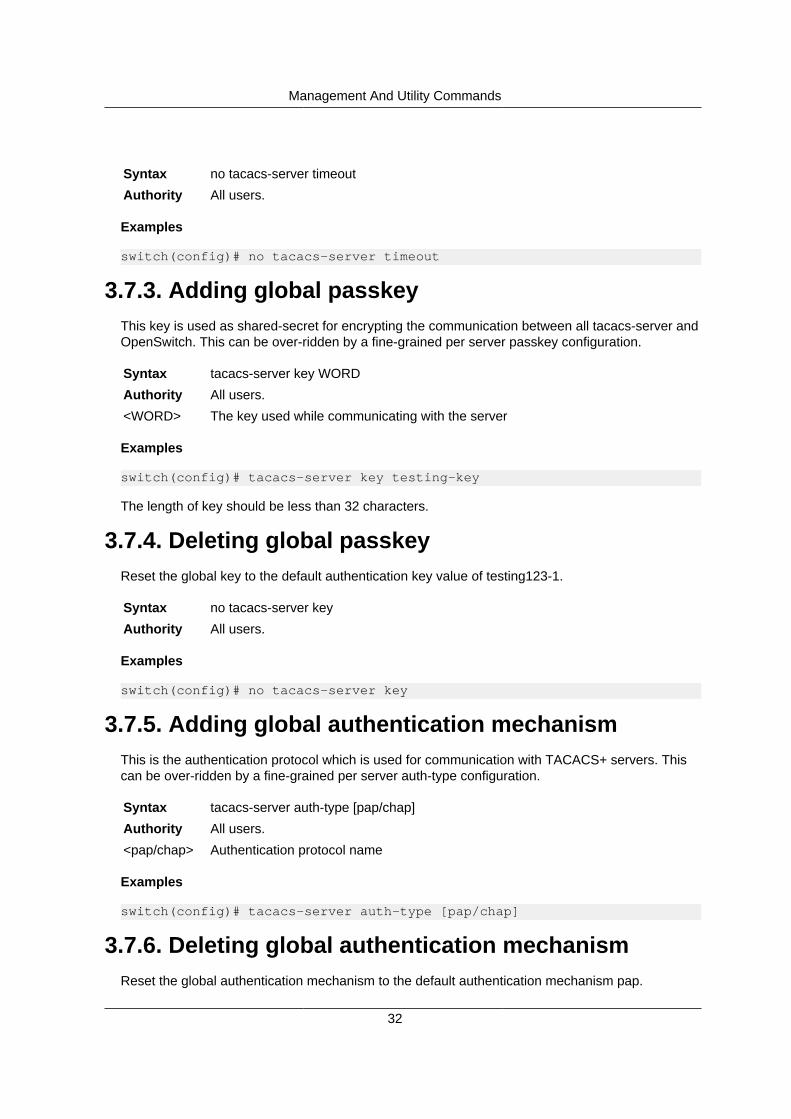
Management And Utility Commands
32
Syntax no tacacs-server timeout
Authority All users.
Examples
switch(config)# no tacacs-server timeout
3.7.3. Adding global passkeyThis key is used as shared-secret for encrypting the communication between all tacacs-server andOpenSwitch. This can be over-ridden by a fine-grained per server passkey configuration.
Syntax tacacs-server key WORD
Authority All users.
<WORD> The key used while communicating with the server
Examples
switch(config)# tacacs-server key testing-key
The length of key should be less than 32 characters.
3.7.4. Deleting global passkeyReset the global key to the default authentication key value of testing123-1.
Syntax no tacacs-server key
Authority All users.
Examples
switch(config)# no tacacs-server key
3.7.5. Adding global authentication mechanismThis is the authentication protocol which is used for communication with TACACS+ servers. Thiscan be over-ridden by a fine-grained per server auth-type configuration.
Syntax tacacs-server auth-type [pap/chap]
Authority All users.
<pap/chap> Authentication protocol name
Examples
switch(config)# tacacs-server auth-type [pap/chap]
3.7.6. Deleting global authentication mechanismReset the global authentication mechanism to the default authentication mechanism pap.

Management And Utility Commands
33
Syntax no tacacs-server auth-type
Authority All users.
Examples
switch(config)# no tacacs-server auth-type
3.7.7. Adding a serverAdd a TACACS+ SERVER and the configured TACACS+ server is added to the default TACACS+family group (named "tacacs_plus").
Syntax tacacs-server host <FQDN/IPv4/IPv6 address> [key passkey] [timeout <1-60>][port <1-65535>] [auth-type pap/chap]
Authority All users.
<FQDN/IPv4/IPv6>
The name or IPv4/IPv6 address of the server.
<passkey> The key used while communicating with the server, max 32 characters.
<1-60> Timeout value
<1-65535> TCP port number
<pap/chap> Authentication protocol name
Examples
switch(config)# tacacs-server host 1.1.1.1switch(config)# tacacs-server host 1.1.1.2 port 12switch(config)# tacacs-server host abc.com timeout 15 port 22switch(config)# tacacs-server host 2001:0db8:85a3:0000:0000:8a2e:0370:7334switch(config)# tacacs-server host 1.1.1.3 key test-123 timeout 15 port 22auth-type chap
3.7.8. Deleting a serverDelete a previously added TACACS+ server.
Syntax tacacs-server host <FQDN/IPv4/IPv6> [port <1-65535>]
Authority All users.
<FQDN/IPv4/IPv6>
The name or IPv4/IPv6 address of the server.
<1-65535> TCP port number
If a port number is not provided, the system will search the TACACS+ server by host name anddefault authentication port 49.
Examples
switch(config)# no tacacs-server host 1.1.1.1switch(config)# no tacacs-server host abc.com port 22
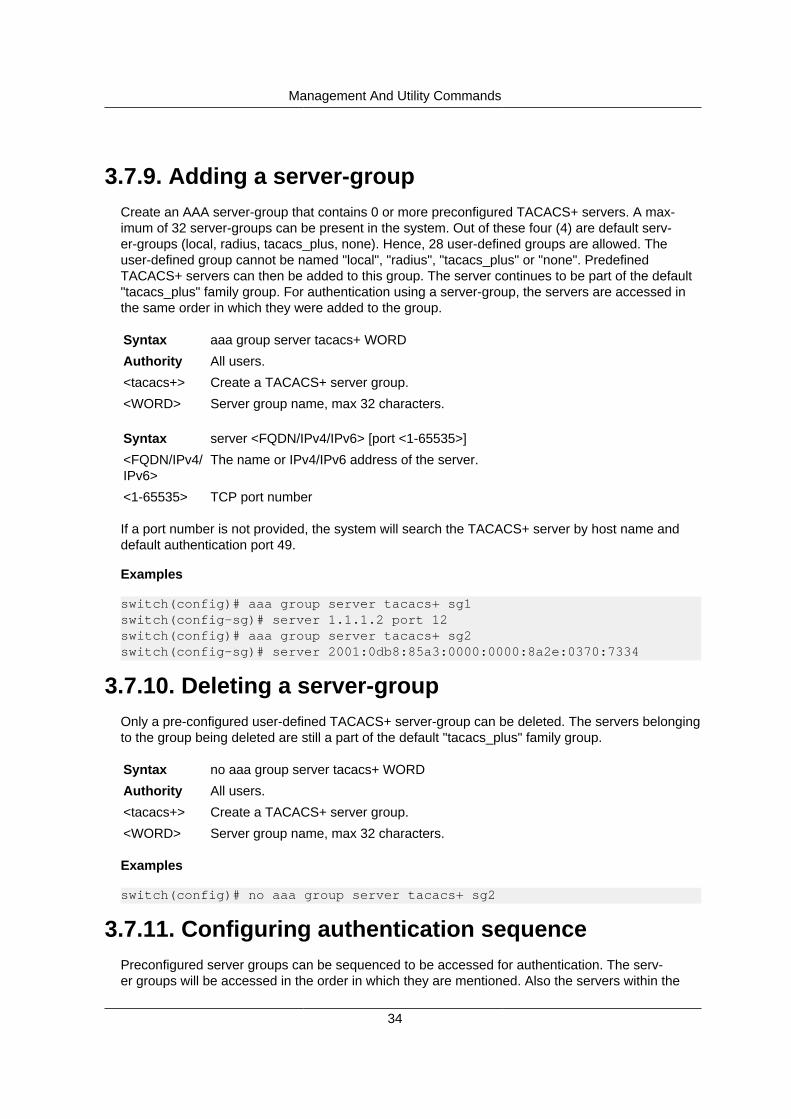
Management And Utility Commands
34
3.7.9. Adding a server-groupCreate an AAA server-group that contains 0 or more preconfigured TACACS+ servers. A max-imum of 32 server-groups can be present in the system. Out of these four (4) are default serv-er-groups (local, radius, tacacs_plus, none). Hence, 28 user-defined groups are allowed. Theuser-defined group cannot be named "local", "radius", "tacacs_plus" or "none". PredefinedTACACS+ servers can then be added to this group. The server continues to be part of the default"tacacs_plus" family group. For authentication using a server-group, the servers are accessed inthe same order in which they were added to the group.
Syntax aaa group server tacacs+ WORD
Authority All users.
<tacacs+> Create a TACACS+ server group.
<WORD> Server group name, max 32 characters.
Syntax server <FQDN/IPv4/IPv6> [port <1-65535>]
<FQDN/IPv4/IPv6>
The name or IPv4/IPv6 address of the server.
<1-65535> TCP port number
If a port number is not provided, the system will search the TACACS+ server by host name anddefault authentication port 49.
Examples
switch(config)# aaa group server tacacs+ sg1switch(config-sg)# server 1.1.1.2 port 12switch(config)# aaa group server tacacs+ sg2switch(config-sg)# server 2001:0db8:85a3:0000:0000:8a2e:0370:7334
3.7.10. Deleting a server-groupOnly a pre-configured user-defined TACACS+ server-group can be deleted. The servers belongingto the group being deleted are still a part of the default "tacacs_plus" family group.
Syntax no aaa group server tacacs+ WORD
Authority All users.
<tacacs+> Create a TACACS+ server group.
<WORD> Server group name, max 32 characters.
Examples
switch(config)# no aaa group server tacacs+ sg2
3.7.11. Configuring authentication sequencePreconfigured server groups can be sequenced to be accessed for authentication. The serv-er groups will be accessed in the order in which they are mentioned. Also the servers within the

Management And Utility Commands
35
groups will be accessed in the order in which they were added to the group. By default "local" au-thentication is triggered if no group is mentioned or if the mentioned list is exhausted. All serverswill be accessed in a fail-through manner if aaa authentication allow-fail-through is configured. fail-through Upon failure in connection or failure in authentication, the next server will be reached outto.
Syntax aaa authentication login default <local | group group-list>
Authority All users.
<local> Enable local authentication.
<group-list> Space separated group or family names
Notes:
1. Valid family names are: local, tacacs+ and radius .
2. Each group should be given only once in a group-list.
3. The local literal can be given at most once, either before group literal or as part of group-list.
4. Either the local literal or user defined group-list must be given in command.
Examples
switch(config)# aaa authentication login default group sg1 tacacs_plus localswitch(config)# aaa authentication login default local
3.7.12. Deleting authentication sequenceRemove a configured sequence of server-groups for authentication.
Syntax no aaa authentication login default
Authority All users.
Examples
switch(config)# no aaa authentication login default
3.7.13. Enabling authentication fail-throughEnables Authentication fail-through. If failed to authenticate on a TACACS+ or RADIUS server, thesystem attempts to authenticate on the next TACACS+/RADIUS server according to the authenti-cation priority sequence.
Syntax aaa authentication allow-fail-through
Authority All users.
Examples
switch(config)# aaa authentication allow-fail-through

Management And Utility Commands
36
3.7.14. Disabling authentication fail-throughDisables Authentication fail-through. If failed to authenticate on a TACACS+ or RADIUS server,the system will not attempt to authenticate on the next TACACS+/RADIUS server.
Syntax no aaa authentication allow-fail-through
Authority All users.
Examples
switch(config)# no aaa authentication allow-fail-through
3.7.15. Configuring AAA Authorization with fallbackBy issuing the aaa authorization commands default command, the user can configure Autho-rization on the switch. Fallback preference is dictated by the sequence of groups and none are en-tered by the user. This command would mean that it would reach out to TACACS+ for each com-mand entered for all users.
Syntax aaa authorization commands default {group <group-list> | none}
Authority All users.
Examples
switch(config)# aaa authorization commands default group tacacs+ noneswitch(config)# aaa authorization commands default group TacGroup1tacacs+ none
3.7.16. Deleting AAA Authorization with fallbackBy issuing a no aaa authorization commands default command, the user can unconfigure AAAAuthorization on the switch. If AAA Authorization is not configured, it uses RBAC authorization.
switch(config)# no aaa authorization commands default
3.7.17. Viewing global config and TACACS+ serversThe show tacacs-server and show tacacs-server detail commands display the configuredTACACS+ servers. Both the commands show the global parameters as well as per server config-urations. For TACACS+ server assigned to user defined groups, group priority (the sequence ofTACACS+ server assignment to user defined group) is displayed, otherwise default priority (thesequence of TACACS+ server creation) is displayed instead.
Syntax show tacacs-server [detail]
Authority All users.
<detail> Display detailed TACACS+ servers information.
Examples
switch# show tacacs-server

Management And Utility Commands
37
******* Global TACACS+ Configuration *******Shared-Secret: testing123-1Timeout: 5Auth-Type: papNumber of Servers: 3
--------------------------------------------------------------------SERVER NAME | PORT--------------------------------------------------------------------1.1.1.2 | 122001:0db8:85a3:0000:0000:8a2e:0370:7334 | 491.1.1.3 | 22
switch# show tacacs-server detail
******* Global TACACS+ Configuration *******Shared-Secret: testing123-1Timeout: 5Auth-Type: papNumber of Servers: 3
****** TACACS+ Server Information ******Server-Name : 1.1.1.2Auth-Port : 12Shared-Secret (default) : testing123-1Timeout (default) : 5Auth-Type (default) : papServer-Group : sg1Group-Priority : 1
Server-Name : 2001:0db8:85a3:0000:0000:8a2e:0370:7334Auth-Port : 49Shared-Secret (default) : testing123-1Timeout (default) : 5Auth-Type (default) : papServer-Group (default) : tacacs_plusDefault-Priority : 4
Server-Name : 1.1.1.3 Auth-Port : 22 Shared-Secret : test-123 Timeout : 15 Auth-Type : chap Server-Group (default) : tacacs_plusDefault-Priority : 5
3.7.18. Viewing TACACS+ server groupsDisplay a table of TACACS+ servers grouped by different TACACS+ server group assignment.For TACACS+ server assigned to user defined groups, group priority (the sequence of TACACS+server assignment to user defined group) is displayed, otherwise default priority (the sequence ofTACACS+ server creation) is displayed instead.

Management And Utility Commands
38
Syntax show aaa server-group
Authority All users.
Examples
switch# show aaa server-groups
******* AAA Mechanism TACACS+ *******-------------------------------------------------------------------------GROUP NAME | SERVER NAME | PORT | PRIORITY-------------------------------------------------------------------------sg1 | 1.1.1.2 | 12 | 1-------------------------------------------------------------------------tacacs_plus (default) | 2001:0db8:85a3:0000:0000:8a2e:0370:7334 | 49 | 4tacacs_plus (default) | 1.1.1.3 | 22 | 5------------------------------------------------------------------------
3.7.19. Viewing AAA Authentication sequenceDisplay a table of server groups based on the sequence of authentication access.
Group priority here represent the sequence of group, which is different from TACACS+server group priority (which is sequence of server assigned to group)
Syntax show aaa authentication
Authority All users.
Example
switch(config)# aaa authentication login default group sg1 tacacs_plus localswitch(config)# exitswitch# show aaa authenticationAAA Authentication: Fail-through : Disabled Fallback to local authentication : Enabled
Default Authentication for All Channels:---------------------------------------------------------------------------GROUP NAME | GROUP PRIORITY---------------------------------------------------------------------------sg1 | 1tacacs_plus | 2local | 3
3.7.20. Viewing AAA Authorization sequenceThe show aaa authorization command displays detailed information on Authorization configurationon the switch.
Syntax show aaa authorization
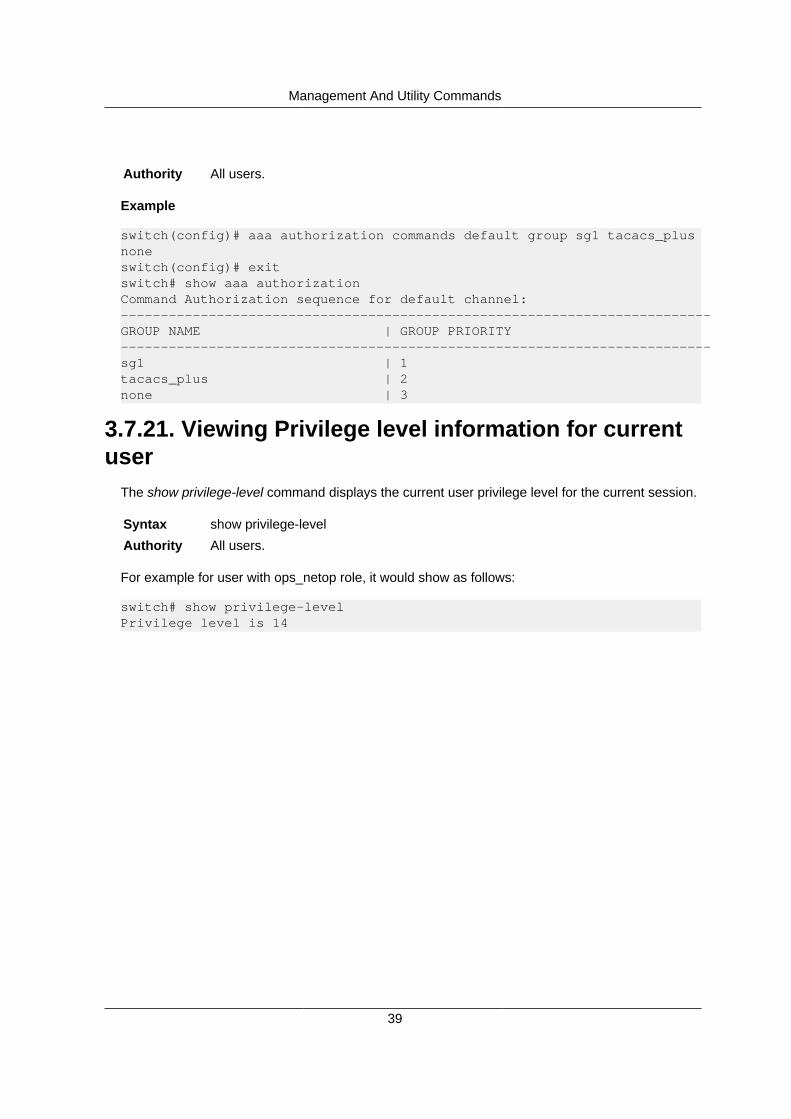
Management And Utility Commands
39
Authority All users.
Example
switch(config)# aaa authorization commands default group sg1 tacacs_plusnoneswitch(config)# exitswitch# show aaa authorizationCommand Authorization sequence for default channel:--------------------------------------------------------------------------GROUP NAME | GROUP PRIORITY--------------------------------------------------------------------------sg1 | 1tacacs_plus | 2none | 3
3.7.21. Viewing Privilege level information for currentuser
The show privilege-level command displays the current user privilege level for the current session.
Syntax show privilege-level
Authority All users.
For example for user with ops_netop role, it would show as follows:
switch# show privilege-levelPrivilege level is 14

Management And Utility Commands
40
3.8. User Account and Password Commands3.8.1. user add
Adds users to the switch and configures their passwords.
Syntax user add <user_name>
Authority All users.
<user_name> The user name to be added to the switch.
Examples
siwtch# user add openswitch-userAdding user openswitch-userEnter new password:Confirm new password:user added successfully.
3.8.2. passwordConfigures an existing user password, except for the root user.
Syntax password <user_name>
Authority All users.
<user_name> The user name corresponding to the password to be changed.
Examples
switch2# password openswitch-userChanging password for user openswitch-userEnter new password:Confirm new password:password updated successfully
3.8.3. user removeDeletes a user entry from the switch. The command cannot delete the root user or a user that iscurrently logged into the switch. Also, this command cannot delete the last existing user on theswitch.
Syntax user remove <user_name>
Authority All users.
<user_name> The user name corresponding to the user entry to be removed from the switch.
Examples
switch# user remove openswitch-user

Management And Utility Commands
41
3.8.4. show aaa authenticationDisplays the authentication used for the switch login.
Syntax show aaa authentication
Authority All users.
Examples
switch# show aaa authenticationAAA Authentication Local authentication : Enabled Radius authentication : Disabled Fallback to local authentication : Enabled
switch# show aaa authenticationAAA Authentication Local authentication : Disabled Radius authentication : Enabled Radius authentication type : CHAP Fallback to local authentication : Enabled
3.8.5. show radius-serverDisplays all configured RADIUS servers, with the following information for each server:
• IP addresss
• Shared secrets
• Ports used for authentication
• Retries and timeouts
Syntax show radius-server
Authority All users.
Examples
switch# show radius-server***** Radius Server information ******Radius-server:1 Host IP address : 1.2.3.4 Shared secret : testRadius Auth port : 2015 Retries : 5 Timeout : 10
3.8.6. show SSH authentication-methodDisplays the configured SSH authentication method.
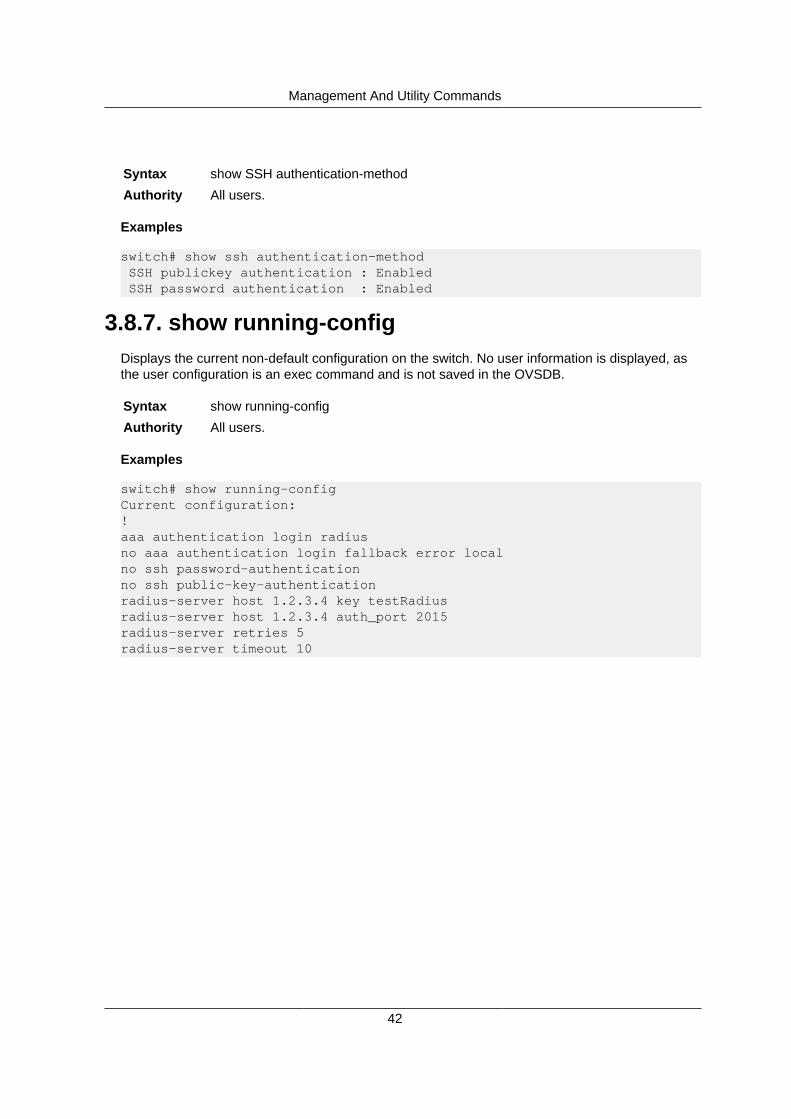
Management And Utility Commands
42
Syntax show SSH authentication-method
Authority All users.
Examples
switch# show ssh authentication-method SSH publickey authentication : Enabled SSH password authentication : Enabled
3.8.7. show running-configDisplays the current non-default configuration on the switch. No user information is displayed, asthe user configuration is an exec command and is not saved in the OVSDB.
Syntax show running-config
Authority All users.
Examples
switch# show running-configCurrent configuration:!aaa authentication login radiusno aaa authentication login fallback error localno ssh password-authenticationno ssh public-key-authenticationradius-server host 1.2.3.4 key testRadiusradius-server host 1.2.3.4 auth_port 2015radius-server retries 5radius-server timeout 10

Management And Utility Commands
43
3.9. Configuration Support for SNMP Support3.9.1. SNMP master agent configuration
The following command configures the port to which the SNMP master agent is bound.
The no version resets the SNMP master agent port to the default value of UDP port 161.
Default agent-port is 161.
Syntax [no] snmp-server agent-port <1-65535>
Authority Admin user.
<1-65535> The port on which the SNMP master agent listens for SNMP requests.
Examples
(config)# snmp-server agent-port 2000(config)# no snmp-server agent-port 2000
3.9.1.1. JSONCLI Command: snmp-server agent-port 5 REST Output: "other_config": { "snmp_agent_port": "5" },
3.9.2. SNMPv1, SNMPv2c community stringsThis command is used to configure community strings for the SNMP agent. Maximum of 10 SNMPcommunities can be configured. Default community is restored only when count of configured SN-MP communities is zero.
This command adds/removes community strings.
Defaults Default snmp community is public.
Syntax [no] snmp-server community <WORD>
Authority Admin user.
<no> Removes the specified community string.
<WORD> The name of the community string. Default is public.
Examples
(config)# snmp-server community private(config)# no snmp-server community private
3.9.2.1. JSONCLI Command: snmp-server community public REST Output: "snmp_communities": [ "public" ],
3.9.3. Configuring SNMPv3 usersThis command is used to configure the credentials of SNMPv3 user. The SNMPv3 provides se-cure access to devices by a combination of authenticating and encrypting SNMP protocol packetsover the network.

Management And Utility Commands
44
This command adds/removes SNMPv3 users.
Syntax [no] snmpv3 user <WORD> [auth <md5 | sha>] auth-pass <WORD> [priv <aes |des>] priv-pass <WORD>
Authority Admin user.
Parameters
<no>Removes the specified SNMPv3 user.
<WORD>The name of the SNMPv3 user.
<md5 or sha>The SNMPv3 authentication protocol can be either MD5 or SHA.
<WORD>The auth passphrase of the SNMPv3 user. It must be at least 8 characters in length.
<aes or des>The SNMPv3 privacy protocol can be either aes or des.
<WORD>The privacy passphrase of the SNMPv3 user. It must be at least 8 characters in length.
Examples
(config)# snmpv3 user Admin auth sha auth-pass mypassword priv des priv-passmyprivpass
(config)# no snmpv3 user Admin auth sha auth-pass mypassword priv despriv-pass myprivpass
3.9.3.1. JSONCLI Command: snmpv3 user Admin auth sha auth-pass mypassword priv des priv- pass mypriv-pass REST Output: [ "/rest/v1/system/snmpv3_users/Admin" ]
3.9.4. Configuring SNMP trapThis command is used to configure the trap receivers to which the SNMP agent can send trap noti-fications.
This command is used to configure the SNMP Trap receivers with IP and port, notification type,version, community string.
Default community_name - public receiver_udp_port - 162
Syntax [no] snmp-server host <A.B.C.D | X:X::X:X > [trap] [version < v1 | v2c >] [communi-ty WORD] [port <UDP port>]
Syntax [no] snmp-server host <A.B.C.D | X:X::X:X > [trap | inform] [version < v2c >] [com-munity WORD] [port <UDP port>]
Authority Admin user.
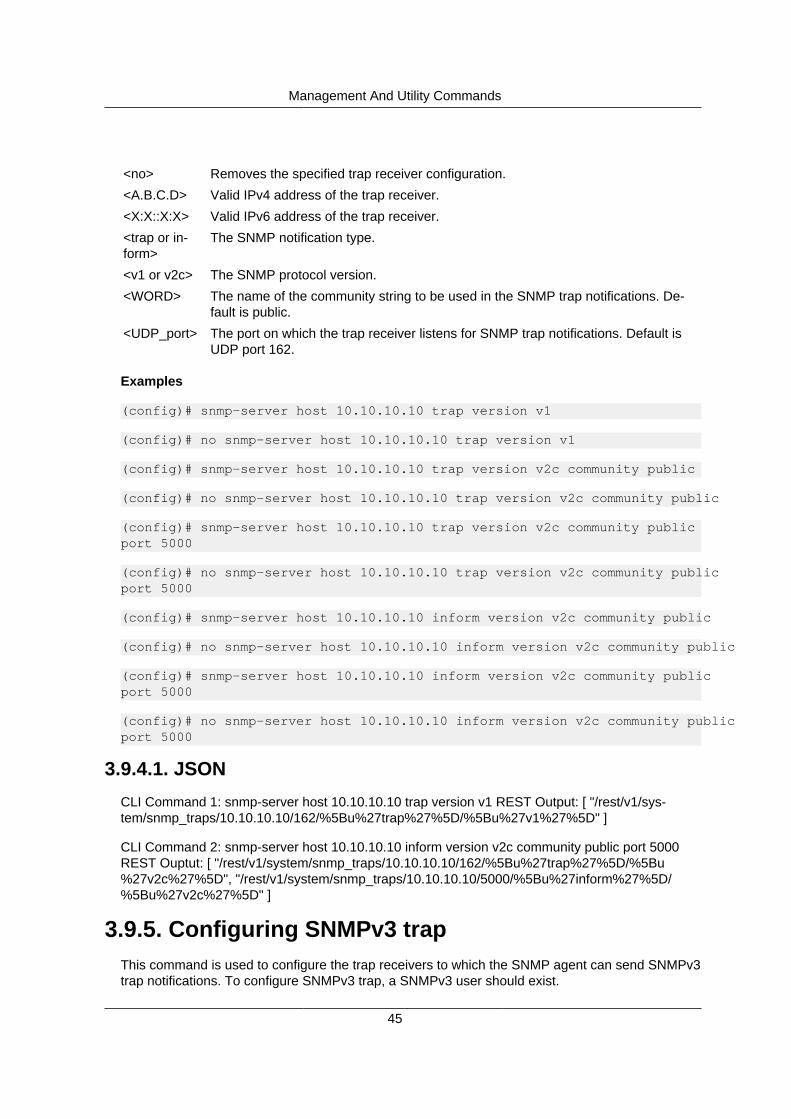
Management And Utility Commands
45
<no> Removes the specified trap receiver configuration.
<A.B.C.D> Valid IPv4 address of the trap receiver.
<X:X::X:X> Valid IPv6 address of the trap receiver.
<trap or in-form>
The SNMP notification type.
<v1 or v2c> The SNMP protocol version.
<WORD> The name of the community string to be used in the SNMP trap notifications. De-fault is public.
<UDP_port> The port on which the trap receiver listens for SNMP trap notifications. Default isUDP port 162.
Examples
(config)# snmp-server host 10.10.10.10 trap version v1
(config)# no snmp-server host 10.10.10.10 trap version v1
(config)# snmp-server host 10.10.10.10 trap version v2c community public
(config)# no snmp-server host 10.10.10.10 trap version v2c community public
(config)# snmp-server host 10.10.10.10 trap version v2c community publicport 5000
(config)# no snmp-server host 10.10.10.10 trap version v2c community publicport 5000
(config)# snmp-server host 10.10.10.10 inform version v2c community public
(config)# no snmp-server host 10.10.10.10 inform version v2c community public
(config)# snmp-server host 10.10.10.10 inform version v2c community publicport 5000
(config)# no snmp-server host 10.10.10.10 inform version v2c community publicport 5000
3.9.4.1. JSONCLI Command 1: snmp-server host 10.10.10.10 trap version v1 REST Output: [ "/rest/v1/sys-tem/snmp_traps/10.10.10.10/162/%5Bu%27trap%27%5D/%5Bu%27v1%27%5D" ]
CLI Command 2: snmp-server host 10.10.10.10 inform version v2c community public port 5000REST Ouptut: [ "/rest/v1/system/snmp_traps/10.10.10.10/162/%5Bu%27trap%27%5D/%5Bu%27v2c%27%5D", "/rest/v1/system/snmp_traps/10.10.10.10/5000/%5Bu%27inform%27%5D/%5Bu%27v2c%27%5D" ]
3.9.5. Configuring SNMPv3 trapThis command is used to configure the trap receivers to which the SNMP agent can send SNMPv3trap notifications. To configure SNMPv3 trap, a SNMPv3 user should exist.
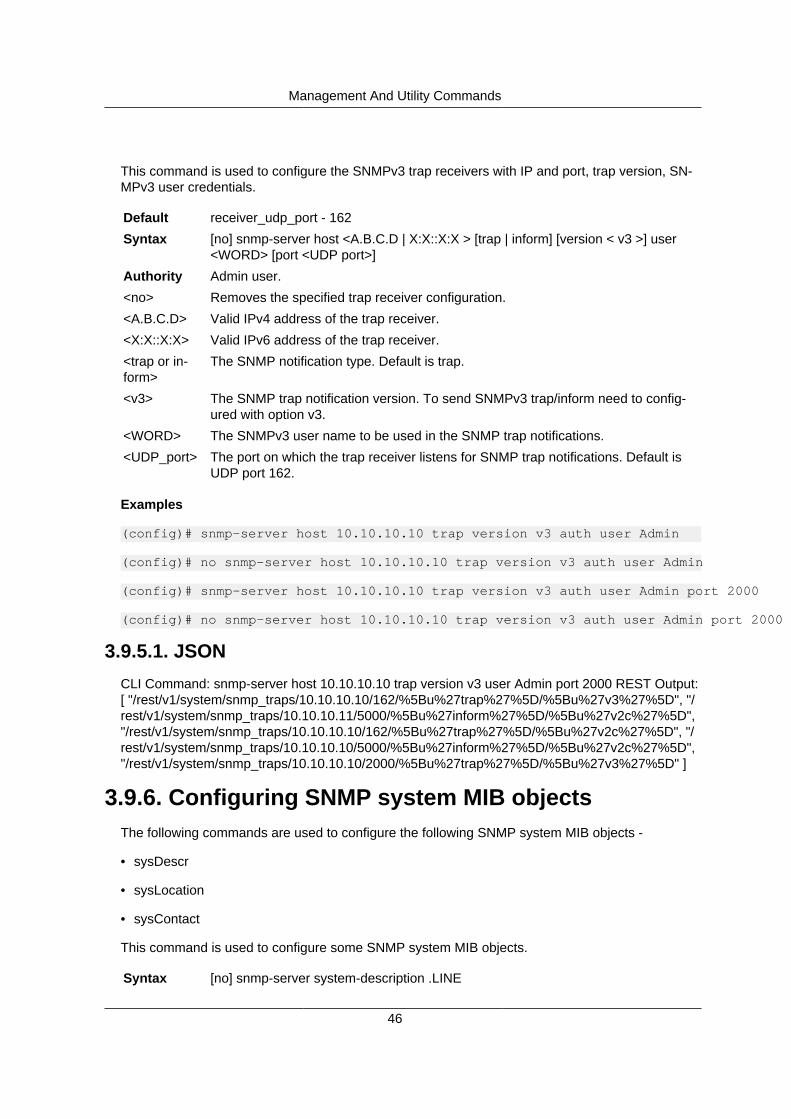
Management And Utility Commands
46
This command is used to configure the SNMPv3 trap receivers with IP and port, trap version, SN-MPv3 user credentials.
Default receiver_udp_port - 162
Syntax [no] snmp-server host <A.B.C.D | X:X::X:X > [trap | inform] [version < v3 >] user<WORD> [port <UDP port>]
Authority Admin user.
<no> Removes the specified trap receiver configuration.
<A.B.C.D> Valid IPv4 address of the trap receiver.
<X:X::X:X> Valid IPv6 address of the trap receiver.
<trap or in-form>
The SNMP notification type. Default is trap.
<v3> The SNMP trap notification version. To send SNMPv3 trap/inform need to config-ured with option v3.
<WORD> The SNMPv3 user name to be used in the SNMP trap notifications.
<UDP_port> The port on which the trap receiver listens for SNMP trap notifications. Default isUDP port 162.
Examples
(config)# snmp-server host 10.10.10.10 trap version v3 auth user Admin
(config)# no snmp-server host 10.10.10.10 trap version v3 auth user Admin
(config)# snmp-server host 10.10.10.10 trap version v3 auth user Admin port 2000
(config)# no snmp-server host 10.10.10.10 trap version v3 auth user Admin port 2000
3.9.5.1. JSONCLI Command: snmp-server host 10.10.10.10 trap version v3 user Admin port 2000 REST Output:[ "/rest/v1/system/snmp_traps/10.10.10.10/162/%5Bu%27trap%27%5D/%5Bu%27v3%27%5D", "/rest/v1/system/snmp_traps/10.10.10.11/5000/%5Bu%27inform%27%5D/%5Bu%27v2c%27%5D","/rest/v1/system/snmp_traps/10.10.10.10/162/%5Bu%27trap%27%5D/%5Bu%27v2c%27%5D", "/rest/v1/system/snmp_traps/10.10.10.10/5000/%5Bu%27inform%27%5D/%5Bu%27v2c%27%5D","/rest/v1/system/snmp_traps/10.10.10.10/2000/%5Bu%27trap%27%5D/%5Bu%27v3%27%5D" ]
3.9.6. Configuring SNMP system MIB objectsThe following commands are used to configure the following SNMP system MIB objects -
• sysDescr
• sysLocation
• sysContact
This command is used to configure some SNMP system MIB objects.
Syntax [no] snmp-server system-description .LINE

Management And Utility Commands
47
Syntax [no] snmp-server system-contact .LINE
Syntax [no] snmp-server system-location LINE
Authority Admin user.
<no> Removes the specified trap receiver configuration.
<sys-tem-description .LINE>
Configures sysDescr
<sys-tem-contact .LINE>
Configures sysContact
<sys-tem-location .LINE>
Configures sysLocation
Examples
switch(config)# snmp-server system-description this is openswitch system
switch(config)# snmp-server system-location Dock of the bay
switch(config)# snmp-server system-contact [email protected]
3.9.6.1. JSONCLI Command 1: snmp-server system-description This is OpenSwitch System
CLI Command 2: snmp-server system-location Dock of the bay
CLI Command 3: snmp-server system-contact [email protected] [mailto:[email protected]]
REST Ouput: "other_config": { "system_contact": "[email protected]", "system_location": "Dock of thebay", "system_description": "This is OpenSwitch System", },
3.9.7. show snmp communityThis command displays details of all the configured community strings.
Syntax show snmp community
Authority Admin user.
Examples
switch# show snmp communityCommunity Names :privateadmin
3.9.8. show snmp systemThis command displays details of all the configured system MIB objects.
Syntax show snmp system
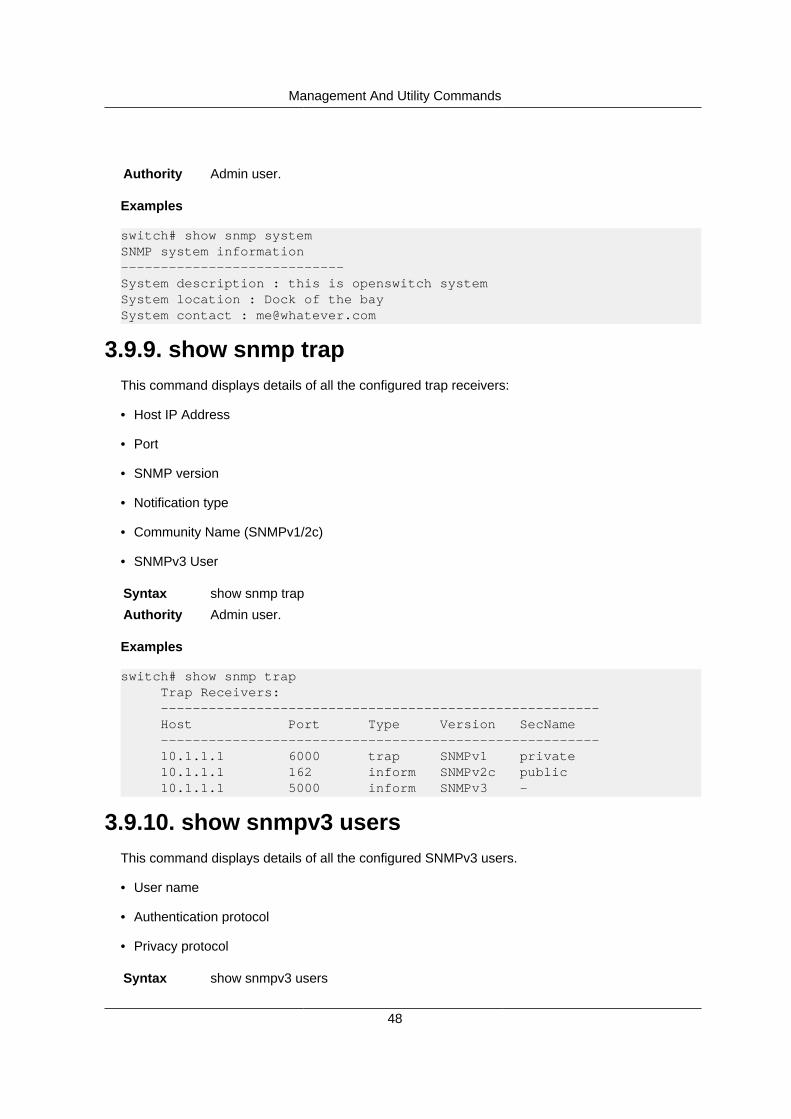
Management And Utility Commands
48
Authority Admin user.
Examples
switch# show snmp systemSNMP system information----------------------------System description : this is openswitch systemSystem location : Dock of the baySystem contact : [email protected]
3.9.9. show snmp trapThis command displays details of all the configured trap receivers:
• Host IP Address
• Port
• SNMP version
• Notification type
• Community Name (SNMPv1/2c)
• SNMPv3 User
Syntax show snmp trap
Authority Admin user.
Examples
switch# show snmp trap Trap Receivers: ------------------------------------------------------- Host Port Type Version SecName ------------------------------------------------------- 10.1.1.1 6000 trap SNMPv1 private 10.1.1.1 162 inform SNMPv2c public 10.1.1.1 5000 inform SNMPv3 -
3.9.10. show snmpv3 usersThis command displays details of all the configured SNMPv3 users.
• User name
• Authentication protocol
• Privacy protocol
Syntax show snmpv3 users

Management And Utility Commands
49
Authority Admin user.
Examples
switch# show snmpv3 usersSNMPv3 Users :--------------------------------- User AuthMode PrivMode--------------------------------- Admin MD5 AES Guest MD5 AES
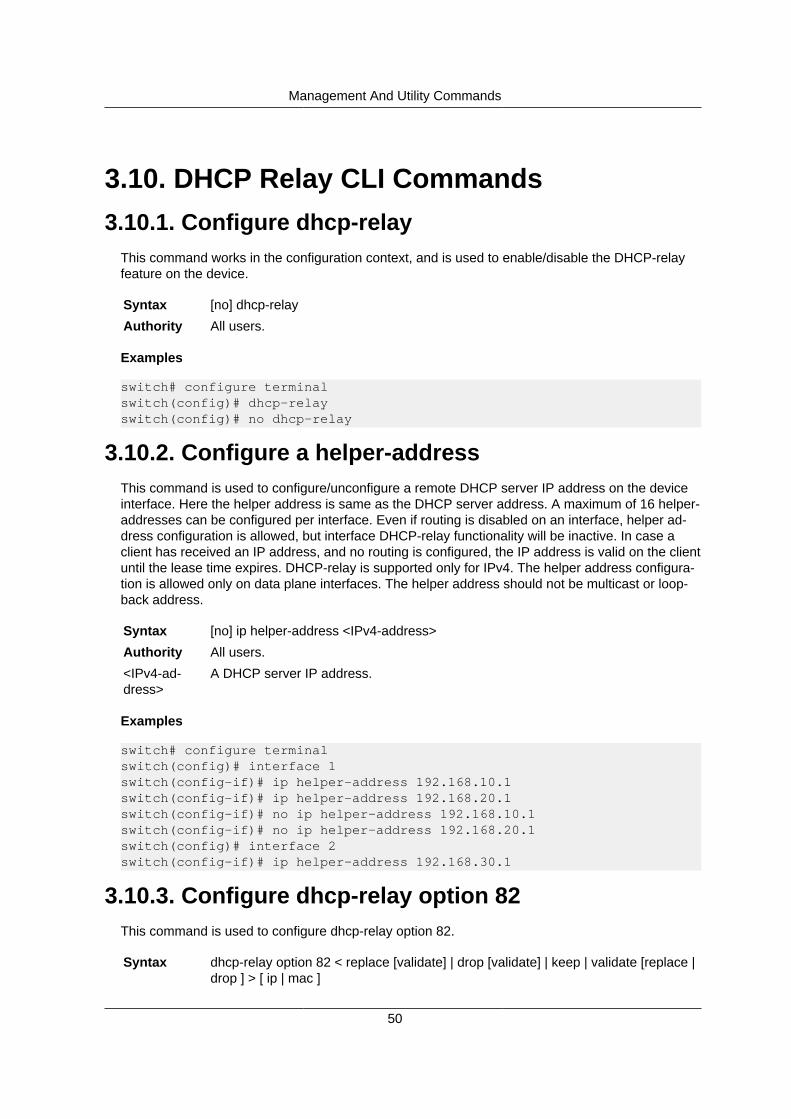
Management And Utility Commands
50
3.10. DHCP Relay CLI Commands3.10.1. Configure dhcp-relay
This command works in the configuration context, and is used to enable/disable the DHCP-relayfeature on the device.
Syntax [no] dhcp-relay
Authority All users.
Examples
switch# configure terminalswitch(config)# dhcp-relayswitch(config)# no dhcp-relay
3.10.2. Configure a helper-addressThis command is used to configure/unconfigure a remote DHCP server IP address on the deviceinterface. Here the helper address is same as the DHCP server address. A maximum of 16 helper-addresses can be configured per interface. Even if routing is disabled on an interface, helper ad-dress configuration is allowed, but interface DHCP-relay functionality will be inactive. In case aclient has received an IP address, and no routing is configured, the IP address is valid on the clientuntil the lease time expires. DHCP-relay is supported only for IPv4. The helper address configura-tion is allowed only on data plane interfaces. The helper address should not be multicast or loop-back address.
Syntax [no] ip helper-address <IPv4-address>
Authority All users.
<IPv4-ad-dress>
A DHCP server IP address.
Examples
switch# configure terminalswitch(config)# interface 1switch(config-if)# ip helper-address 192.168.10.1switch(config-if)# ip helper-address 192.168.20.1switch(config-if)# no ip helper-address 192.168.10.1switch(config-if)# no ip helper-address 192.168.20.1switch(config)# interface 2switch(config-if)# ip helper-address 192.168.30.1
3.10.3. Configure dhcp-relay option 82This command is used to configure dhcp-relay option 82.
Syntax dhcp-relay option 82 < replace [validate] | drop [validate] | keep | validate [replace |drop ] > [ ip | mac ]

Management And Utility Commands
51
Authority All users.
<replace> Replaces the existing option 82 field.
<keep> Keeps the existing option 82 field.
<drop> Drops the option 82 packets.
<mac> Specifies the MAC address of the router.
<ip> Specifies the IP address of the interface on which the client DHCP packet entersthe switch.
<validate> Validates the DHCP server responses.
Examples
switch# configure terminalswitch(config)# dhcp-relay option 82 replace validate mac
3.10.4. Unconfigure dhcp-relay option 82This command is used to unconfigure dhcp-relay option 82.
Syntax no dhcp-relay option 82
Authority All users.
Examples
switch# configure terminalswitch(config)# no dhcp-relay option 82
3.10.5. Unconfigure response validation for the dropor replace policy of option 82
This command is used to unconfigure response validation only for the drop/replace policy.
Syntax no dhcp-relay option 82 validate
Authority All users.
Examples
switch# configure terminalswitch(config)# no dhcp-relay option 82
3.10.6. Configure DHCP relay bootp-gatewayThis command is used to configure/unconfigure a gateway address for the DHCP relay agentto use for DHCP requests, rather than the DHCP relay agent automatically assigning the low-est-numbered IP address. This is supported only for IPv4. The BOOTP gateway configuration is al-lowed only on data plane interfaces.
Syntax [no] ip bootp-gateway <IPv4-address>
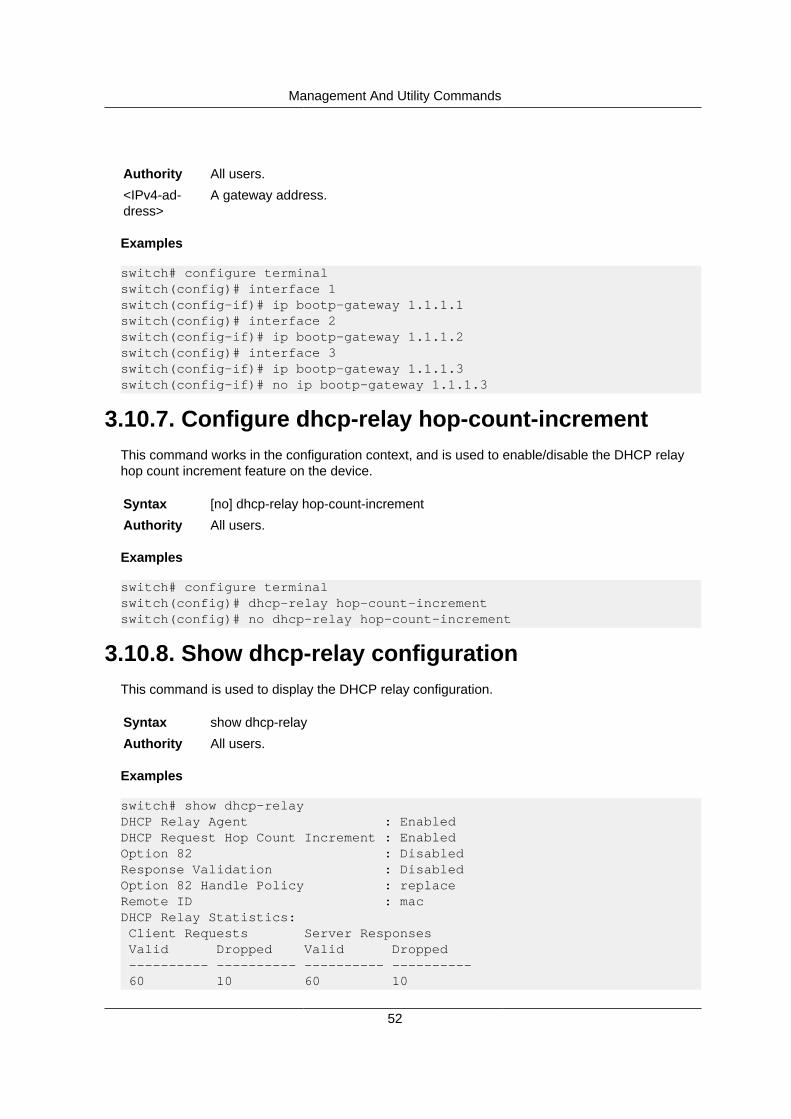
Management And Utility Commands
52
Authority All users.
<IPv4-ad-dress>
A gateway address.
Examples
switch# configure terminalswitch(config)# interface 1switch(config-if)# ip bootp-gateway 1.1.1.1switch(config)# interface 2switch(config-if)# ip bootp-gateway 1.1.1.2switch(config)# interface 3switch(config-if)# ip bootp-gateway 1.1.1.3switch(config-if)# no ip bootp-gateway 1.1.1.3
3.10.7. Configure dhcp-relay hop-count-incrementThis command works in the configuration context, and is used to enable/disable the DHCP relayhop count increment feature on the device.
Syntax [no] dhcp-relay hop-count-increment
Authority All users.
Examples
switch# configure terminalswitch(config)# dhcp-relay hop-count-incrementswitch(config)# no dhcp-relay hop-count-increment
3.10.8. Show dhcp-relay configurationThis command is used to display the DHCP relay configuration.
Syntax show dhcp-relay
Authority All users.
Examples
switch# show dhcp-relayDHCP Relay Agent : EnabledDHCP Request Hop Count Increment : EnabledOption 82 : DisabledResponse Validation : DisabledOption 82 Handle Policy : replaceRemote ID : macDHCP Relay Statistics: Client Requests Server Responses Valid Dropped Valid Dropped ---------- ---------- ---------- ---------- 60 10 60 10
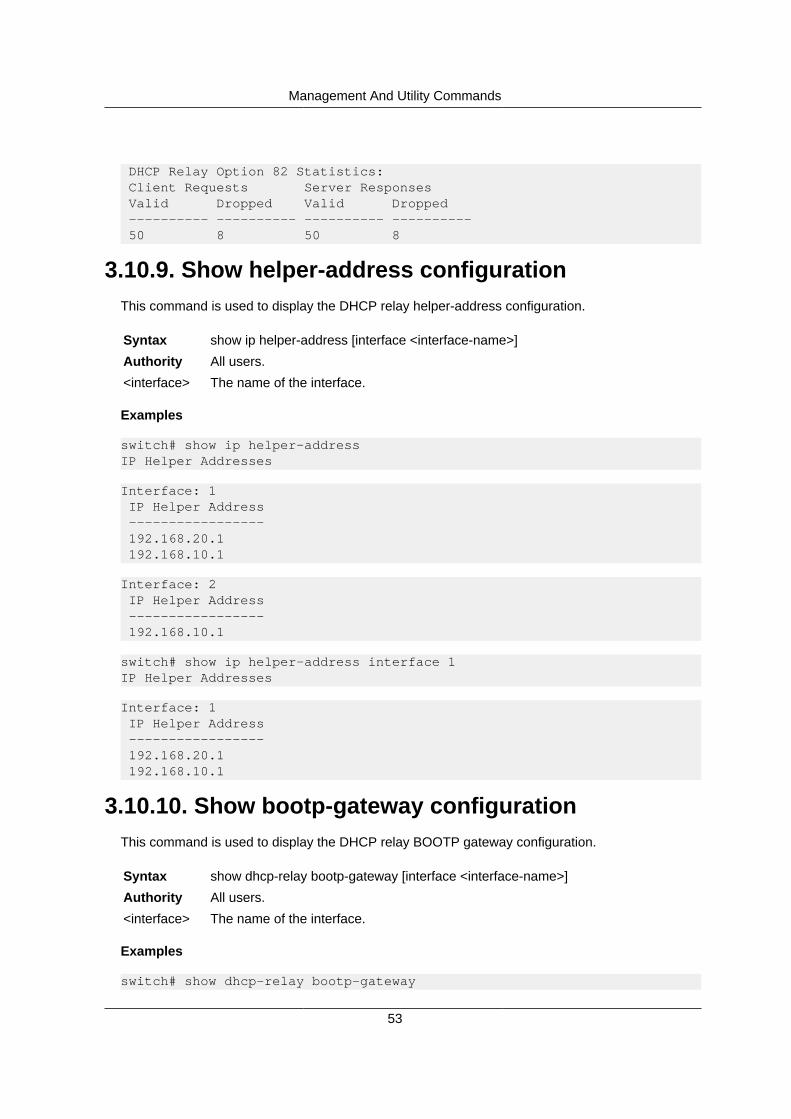
Management And Utility Commands
53
DHCP Relay Option 82 Statistics: Client Requests Server Responses Valid Dropped Valid Dropped ---------- ---------- ---------- ---------- 50 8 50 8
3.10.9. Show helper-address configurationThis command is used to display the DHCP relay helper-address configuration.
Syntax show ip helper-address [interface <interface-name>]
Authority All users.
<interface> The name of the interface.
Examples
switch# show ip helper-addressIP Helper Addresses
Interface: 1 IP Helper Address ----------------- 192.168.20.1 192.168.10.1
Interface: 2 IP Helper Address ----------------- 192.168.10.1
switch# show ip helper-address interface 1IP Helper Addresses
Interface: 1 IP Helper Address ----------------- 192.168.20.1 192.168.10.1
3.10.10. Show bootp-gateway configurationThis command is used to display the DHCP relay BOOTP gateway configuration.
Syntax show dhcp-relay bootp-gateway [interface <interface-name>]
Authority All users.
<interface> The name of the interface.
Examples
switch# show dhcp-relay bootp-gateway

Management And Utility Commands
54
BOOTP Gateway Entries
Interface BOOTP Gateway-------------------- ---------------1 1.1.1.12 1.1.1.2
switch# show ip helper-address interface 1BOOTP Gateway Entries
Interface BOOTP Gateway-------------------- ---------------1 1.1.1.1
3.10.11. Show running configurationThis command displays the current non-default configuration on the switch.
Syntax show running-config
Authority All users.
Examples
switch# show running-configCurrent configuration:!!!no dhcp-relayno dhcp-relay hop-count-incrementinterface 1 helper-address 192.168.10.1 helper-address 192.168.20.1 ip bootp-gateway 1.1.1.1interface 2 helper-address 192.168.10.1 ip bootp-gateway 1.1.1.2

Management And Utility Commands
55
3.11. DHCP serverIn vtysh, every command belongs to a particular context. All dhcp server configuration commands,except "dhcp-server", work in dhcp server context.
3.11.1. Changing to dhcp server contextThis command changes vtysh context to dhcp server. This command works in config context.
Syntax dhcp-server
Authority All users.
Examples
switch# configure terminalswitch(config)# dhcp-serverswitch(config-dhcp-server)#
3.11.2. Setting DHCP dynamic configurationThis command works in the dhcp-server context and sets DHCP dynamic configuration valuesfor the DHCP server. The parameters netmask and broadcast should not be set for IPv6 andprefix-len should not be set for IPv4. The parameter end-ip-address must be set before settingnetmask. The parameter netmask must be set before broadcast. The parameter static shouldbe specified only for static IP address allocation within the range set. The parameters netmask,broadcast, match tags, set tags, perfix-len, lease-duration and static are optional. The default val-ue of prefix-len is 64 and the default value of lease-duration is 60 minutes. The parameter matchtags can have multiple tags and the parameter set tag should be single tag.
Syntax range <range-name> start-ip-address ( <ipv4_address> | <ipv6_address> ) end-ip-address ( <ipv4_address> | <ipv6_address> ) netmask <subnet_mask> broadcast<broadcast_address> match tags <match_tag_names> set tag <set_tag_name>prefix-len <prefix_length_value> lease-duration <lease_duration_value> static
Authority All users.
<range-name>
Set DHCP dynamic configuration name.Length must be less than 15.
<ipv4_address>Set IPV4 address.
<ipv6_address>Set IPV6 address.
<subnet_mask>Set the network mask.
<broadcast_address>Set the broadcast address.
<match_tag_names>Set the match tags list. Each tag length must be less than 15.
<set_tag_name>Set the set tag name. Length must be less than 15.
<prefix-len> Set the IPV6 prefix length value.
<lease-dura-tion>
Set the lease duration value.
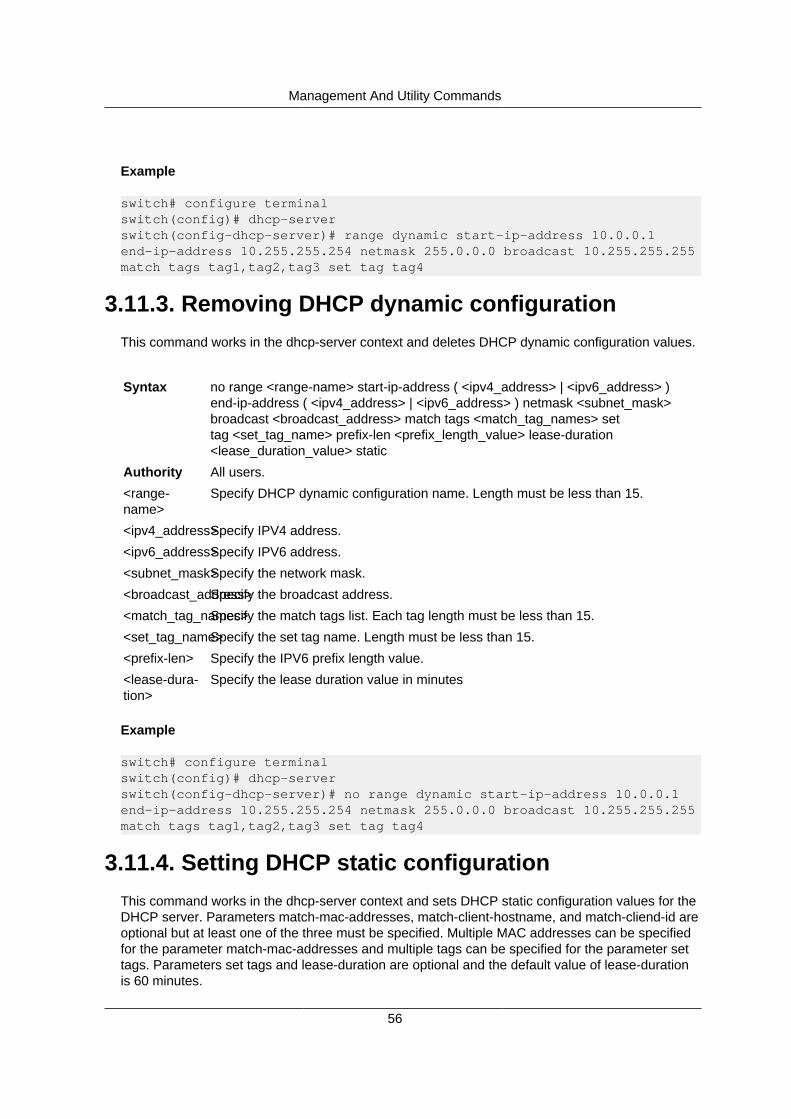
Management And Utility Commands
56
Example
switch# configure terminalswitch(config)# dhcp-serverswitch(config-dhcp-server)# range dynamic start-ip-address 10.0.0.1end-ip-address 10.255.255.254 netmask 255.0.0.0 broadcast 10.255.255.255match tags tag1,tag2,tag3 set tag tag4
3.11.3. Removing DHCP dynamic configurationThis command works in the dhcp-server context and deletes DHCP dynamic configuration values.
Syntax no range <range-name> start-ip-address ( <ipv4_address> | <ipv6_address> )end-ip-address ( <ipv4_address> | <ipv6_address> ) netmask <subnet_mask>broadcast <broadcast_address> match tags <match_tag_names> settag <set_tag_name> prefix-len <prefix_length_value> lease-duration<lease_duration_value> static
Authority All users.
<range-name>
Specify DHCP dynamic configuration name. Length must be less than 15.
<ipv4_address>Specify IPV4 address.
<ipv6_address>Specify IPV6 address.
<subnet_mask>Specify the network mask.
<broadcast_address>Specify the broadcast address.
<match_tag_names>Specify the match tags list. Each tag length must be less than 15.
<set_tag_name>Specify the set tag name. Length must be less than 15.
<prefix-len> Specify the IPV6 prefix length value.
<lease-dura-tion>
Specify the lease duration value in minutes
Example
switch# configure terminalswitch(config)# dhcp-serverswitch(config-dhcp-server)# no range dynamic start-ip-address 10.0.0.1end-ip-address 10.255.255.254 netmask 255.0.0.0 broadcast 10.255.255.255match tags tag1,tag2,tag3 set tag tag4
3.11.4. Setting DHCP static configurationThis command works in the dhcp-server context and sets DHCP static configuration values for theDHCP server. Parameters match-mac-addresses, match-client-hostname, and match-cliend-id areoptional but at least one of the three must be specified. Multiple MAC addresses can be specifiedfor the parameter match-mac-addresses and multiple tags can be specified for the parameter settags. Parameters set tags and lease-duration are optional and the default value of lease-durationis 60 minutes.

Management And Utility Commands
57
Syntax static ( <ipv4_address> | <ipv6_address> ) match-mac-addresses<mac_addresses> match-client-hostname <hostname> match-client-id <client-id>set tags <set_tag_names> lease-duration <lease_duration_value>
Authority All users.
<ipv4_address>Set IPV4 address.
<ipv6_address>Set IPV6 address.
<mac_addresses>Set the MAC address.
<hostname> Set the client hostname. Length must be less than 15.
<client-id> Set the client id. Length must be less than 15.
<set_tag_names>Set the set tags list. Each tag length must be less than 15.
<lease-dura-tion>
Set the lease duration value.
Example
switch# configure terminalswitch(config)# dhcp-serverswitch(config-dhcp-server)#static 10.0.0.25 match-mac-addresses36:d4:1b:12:ea:52 match-client-hostname 95_h2 set tags tag1,tag2,tag3lease-duration 120
3.11.5. Removing DHCP static configurationThis command works in the dhcp-server context and removes DHCP static configuration values forthe DHCP server.
Syntax no static ( <ipv4_address> | <ipv6_address> ) match-mac-addresses<mac_addresses> match-client-hostname <hostname> match-client-id <client-id>set tags <set_tag_names> lease-duration <lease_duration_value>
Authority All users.
<ipv4_address>Specify IPV4 address.
<ipv6_address>Specify IPV6 address.
<mac_addresses>Specify the MAC address.
<hostname> Specify the client hostname. Length must be less than 15.
<client-id> Specify the client id. Length must be less than 15.
<set_tag_names>Specify the set tags list. Each tag Length must be less than 15.
<lease-dura-tion>
Specify the lease duration value.
Example
switch# configure terminalswitch(config)# dhcp-serverswitch(config-dhcp-server)#no static 10.0.0.25 match-mac-addresses36:d4:1b:12:ea:52 match-client-hostname 95_h2 set tags tag1,tag2,tag3lease-duration 120

Management And Utility Commands
58
3.11.6. Setting DHCP options configuration using anoption name
This command works in the dhcp-server context and sets DHCP option configuration values forthe DHCP server by specifying an option name. The parameter match-tags is optional and mul-tiple tags can be specified for the parameter match-tags. The optional parameter IPv6 specifieswhether the options are IPv6 options or not.
Syntax option set option-name <option_name> option-value <option_value> match tags<match_tag_names> ipv6
Authority All users.
<option_name>Set DHCP option name. Length must be less than 15.
<option_value>Set DHCP option value.
<match_tag_names>Specify the match tags list. Each tag length must be less than 15.
Example
switch# configure terminalswitch(config)# dhcp-serverswitch(config-dhcp-server)#option set option-name Router option-value10.0.0.1 match tags tag1,tag2,tag3
3.11.7. Removing DHCP options configuration usingan option name
This command works in the dhcp-server context and removes DHCP option configuration valuesby specifying an option name.
Syntax no option set option-name <option_name> option-value <option_value> matchtags <match_tag_names> ipv6
Authority All users.
<option_name>Set DHCP option name. Length must be less than 15.
<option_value>Set DHCP option value.
<match_tag_names>Specify the match tags list. Each tag length must be less than 15.
Example
switch# configure terminalswitch(config)# dhcp-serverswitch(config-dhcp-server)# no option set option-name Router option-value10.0.0.1 match tags tag1,tag2,tag3
3.11.8. Setting DHCP options configuration using anoption number
This command works in the dhcp-server context and sets DHCP option configuration values forthe DHCP server by specifying an option number. The parameter match-tags is optional and mul-
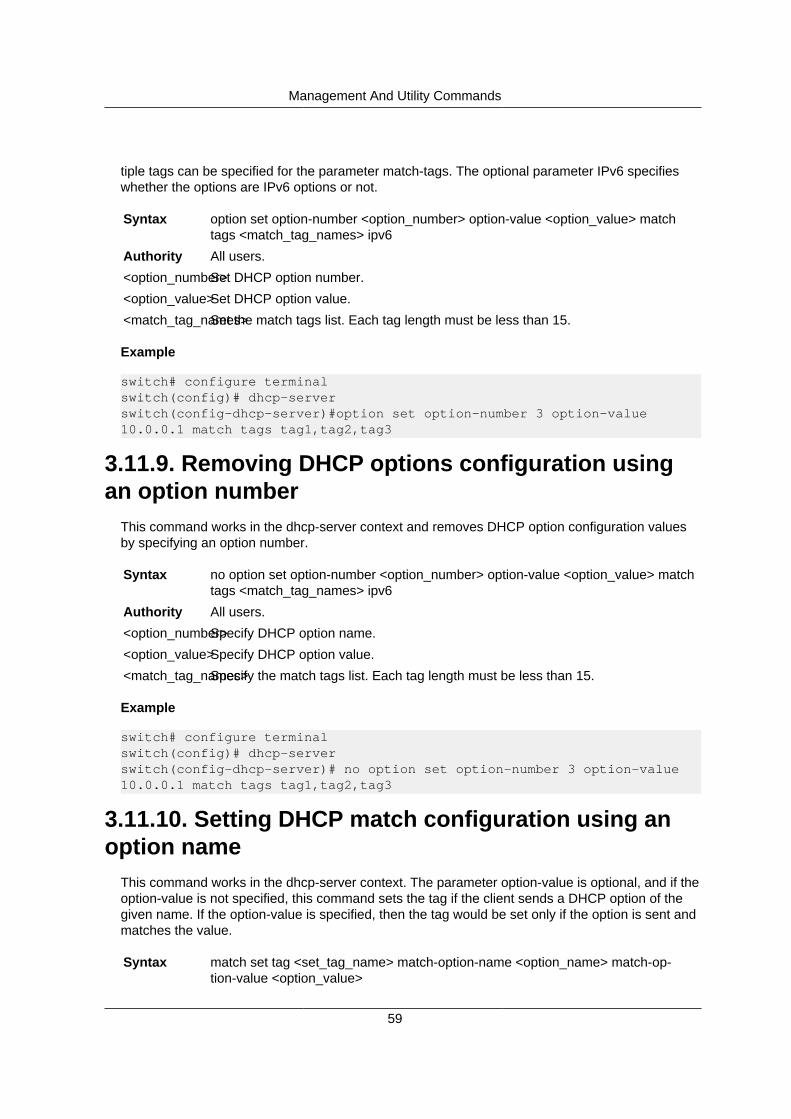
Management And Utility Commands
59
tiple tags can be specified for the parameter match-tags. The optional parameter IPv6 specifieswhether the options are IPv6 options or not.
Syntax option set option-number <option_number> option-value <option_value> matchtags <match_tag_names> ipv6
Authority All users.
<option_number>Set DHCP option number.
<option_value>Set DHCP option value.
<match_tag_names>Set the match tags list. Each tag length must be less than 15.
Example
switch# configure terminalswitch(config)# dhcp-serverswitch(config-dhcp-server)#option set option-number 3 option-value10.0.0.1 match tags tag1,tag2,tag3
3.11.9. Removing DHCP options configuration usingan option number
This command works in the dhcp-server context and removes DHCP option configuration valuesby specifying an option number.
Syntax no option set option-number <option_number> option-value <option_value> matchtags <match_tag_names> ipv6
Authority All users.
<option_number>Specify DHCP option name.
<option_value>Specify DHCP option value.
<match_tag_names>Specify the match tags list. Each tag length must be less than 15.
Example
switch# configure terminalswitch(config)# dhcp-serverswitch(config-dhcp-server)# no option set option-number 3 option-value10.0.0.1 match tags tag1,tag2,tag3
3.11.10. Setting DHCP match configuration using anoption name
This command works in the dhcp-server context. The parameter option-value is optional, and if theoption-value is not specified, this command sets the tag if the client sends a DHCP option of thegiven name. If the option-value is specified, then the tag would be set only if the option is sent andmatches the value.
Syntax match set tag <set_tag_name> match-option-name <option_name> match-op-tion-value <option_value>

Management And Utility Commands
60
Authority All users.
<set_tag_name>Set the set tag name. Length must be less than 15.
<option_name>Set DHCP option name. Length must be less than 15.
<option_value>Set DHCP option value.
Example
switch# configure terminalswitch(config)# dhcp-serverswitch(config-dhcp-server)# match set tag tag1 match-option-name Routermatch-option-value 10.0.0.1
3.11.11. Removing DHCP match configuration usingan option name
This command works in the dhcp-server context and removes the dhcp match configuration.
Syntax no match set tag <set_tag_name> match-option-name <option_name> match-op-tion-value <option_value>
Authority All users.
<set_tag_name>Set the set tag name. Length must be less than 15.
<option_name>Set DHCP option name. Length must be less than 15.
<option_value>Set DHCP option value.
Example
switch# configure terminalswitch(config)# dhcp-serverswitch(config-dhcp-server)# no match set tag tag1 match-option-name Routermatch-option-value 10.0.0.1
3.11.12. Setting DHCP match configuration using anoption number
This command works in the dhcp-server context. The parameter option-value is optional and if anoption-value is not specified, this command sets the tag if the client sends a DHCP option of thegiven number. If the option-value is specified, then the tag would be set only if the option is sentand matches the value.
Syntax match set tag <set_tag_name> match-option-number <option_number> match-op-tion-value <option_value>
Authority All users.
<set_tag_name>Set the set tag name. Length must be less than 15.
<option_number>Set DHCP option number.
<option_value>Set DHCP option value.

Management And Utility Commands
61
Example
switch# configure terminalswitch(config)# dhcp-serverswitch(config-dhcp-server)# match set tag tag1 match-option-number 3match-option-value 10.0.0.1
3.11.13. Removing DHCP match configuration usingan option number
This command works in the dhcp-server context and removes the dhcp match configuration.
Syntax no match set tag <set_tag_name> match-option-number <option_number> match-option-value <option_value>
Authority All users.
<set_tag_name>Set the set tag name.
<option_number>Set DHCP option number.
<option_value>Set DHCP option value.
Example
switch# configure terminalswitch(config)# dhcp-serverswitch(config-dhcp-server)#no match set tag tag1 match-option-number 3match-option-value 10.0.0.1
3.11.14. Setting DHCP BOOTP configurationThis command works in the dhcp-server context and sets the BOOTP options to be returned bythe DHCP server.
Syntax boot set file <file_name> match tag <match_tag_name>
Authority All users.
<file_name> Set the file name.
<match_tag_name>Set match tag name. Length must be less than 15.
Example
switch# configure terminalswitch(config)# dhcp-serverswitch(config-dhcp-server)# boot set file /tmp/tftp_file match tag tag1
3.11.15. Removing DHCP BOOTP configurationThis command works in the dhcp-server context and removes the BOOTP options.
Syntax no boot set file <file_name> match tag <match_tag_name>
Authority All users.
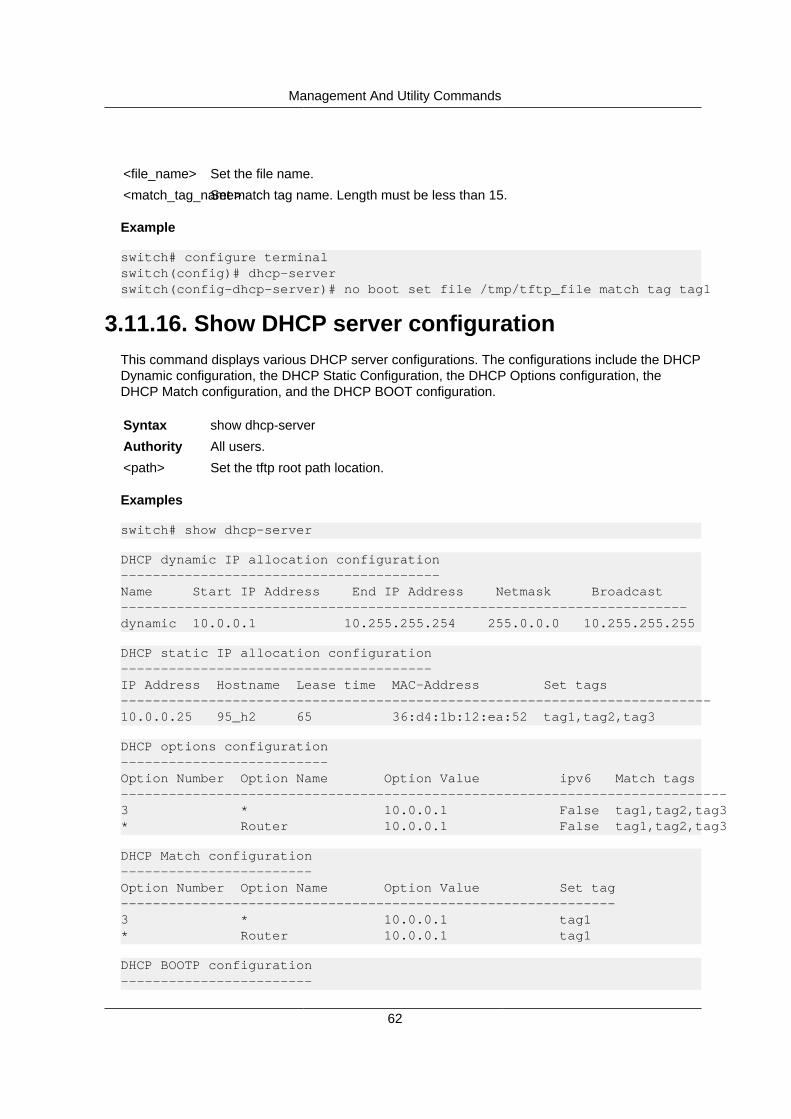
Management And Utility Commands
62
<file_name> Set the file name.
<match_tag_name>Set match tag name. Length must be less than 15.
Example
switch# configure terminalswitch(config)# dhcp-serverswitch(config-dhcp-server)# no boot set file /tmp/tftp_file match tag tag1
3.11.16. Show DHCP server configurationThis command displays various DHCP server configurations. The configurations include the DHCPDynamic configuration, the DHCP Static Configuration, the DHCP Options configuration, theDHCP Match configuration, and the DHCP BOOT configuration.
Syntax show dhcp-server
Authority All users.
<path> Set the tftp root path location.
Examples
switch# show dhcp-server
DHCP dynamic IP allocation configuration----------------------------------------Name Start IP Address End IP Address Netmask Broadcast-----------------------------------------------------------------------dynamic 10.0.0.1 10.255.255.254 255.0.0.0 10.255.255.255
DHCP static IP allocation configuration---------------------------------------IP Address Hostname Lease time MAC-Address Set tags--------------------------------------------------------------------------10.0.0.25 95_h2 65 36:d4:1b:12:ea:52 tag1,tag2,tag3
DHCP options configuration--------------------------Option Number Option Name Option Value ipv6 Match tags----------------------------------------------------------------------------3 * 10.0.0.1 False tag1,tag2,tag3* Router 10.0.0.1 False tag1,tag2,tag3
DHCP Match configuration------------------------Option Number Option Name Option Value Set tag--------------------------------------------------------------3 * 10.0.0.1 tag1* Router 10.0.0.1 tag1
DHCP BOOTP configuration------------------------
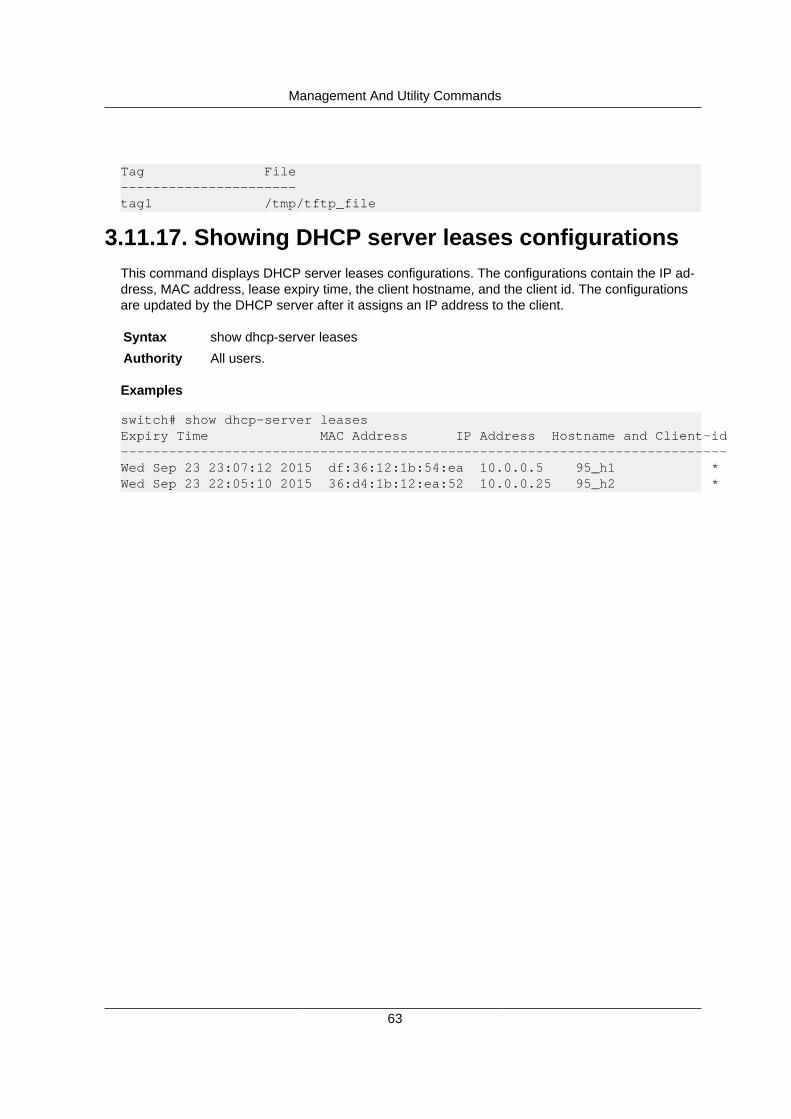
Management And Utility Commands
63
Tag File----------------------tag1 /tmp/tftp_file
3.11.17. Showing DHCP server leases configurationsThis command displays DHCP server leases configurations. The configurations contain the IP ad-dress, MAC address, lease expiry time, the client hostname, and the client id. The configurationsare updated by the DHCP server after it assigns an IP address to the client.
Syntax show dhcp-server leases
Authority All users.
Examples
switch# show dhcp-server leasesExpiry Time MAC Address IP Address Hostname and Client-id----------------------------------------------------------------------------Wed Sep 23 23:07:12 2015 df:36:12:1b:54:ea 10.0.0.5 95_h1 *Wed Sep 23 22:05:10 2015 36:d4:1b:12:ea:52 10.0.0.25 95_h2 *

Management And Utility Commands
64
3.12. TFTP serverAll TFTP configurations work in the tftp-server context.
3.12.1. Changing to tftp server contextThis command changes vtysh context to the tftp server and works in a config context.
Syntax tftp-server
Authority All users.
Examples
switch# configure terminalswitch(config)# tftp-serverswitch(config-tftp-server)#
3.12.2. Enabling TFTP serverThis command works in the tftp-server context and enables the TFTP Server.
Syntax enable
Authority All users.
Examples
switch# configure terminalswitch(config)# tftp-serverswitch(config-tftp-server)# enable
3.12.3. Disabling TFTP ServerThis command works in the tftp-server context and disables the TFTP Server.
Syntax disable
Authority All users.
Examples
switch# configure terminalswitch(config)# tftp-serverswitch(config-tftp-server)# no enable
3.12.4. Enabling TFTP server secure modeThis command works in the tftp-server context and enables the TFTP server secure mode.
Syntax secure-mode
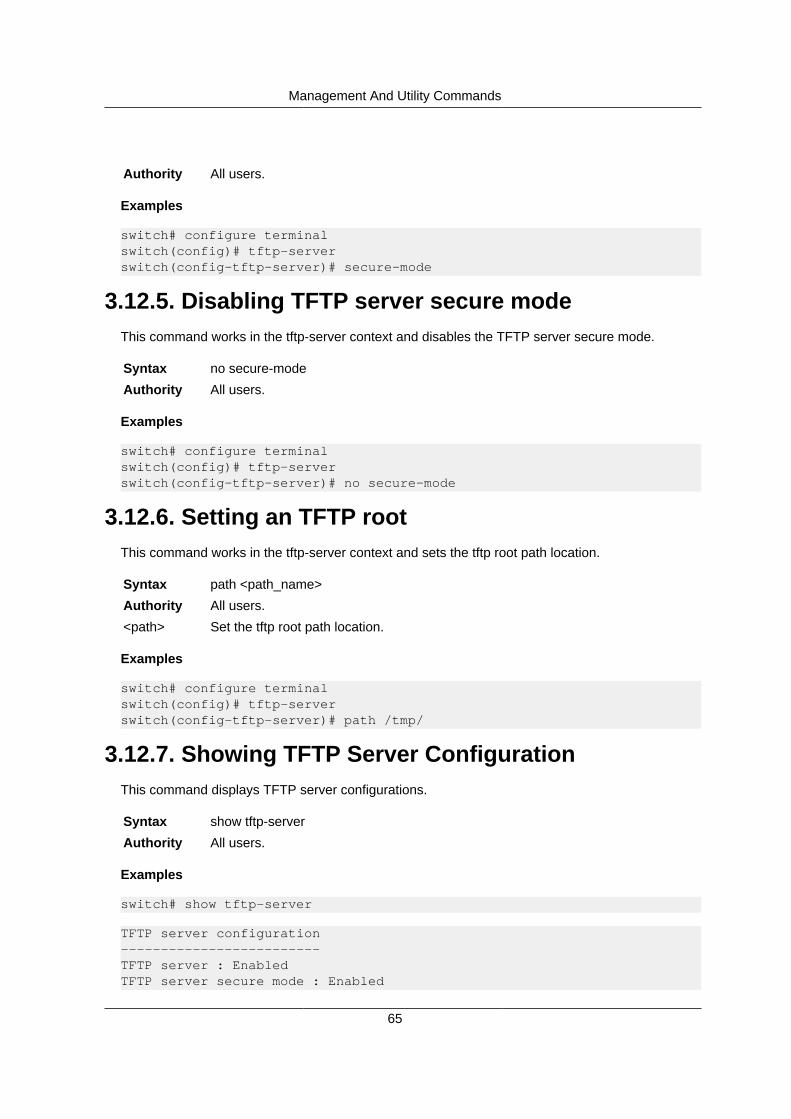
Management And Utility Commands
65
Authority All users.
Examples
switch# configure terminalswitch(config)# tftp-serverswitch(config-tftp-server)# secure-mode
3.12.5. Disabling TFTP server secure modeThis command works in the tftp-server context and disables the TFTP server secure mode.
Syntax no secure-mode
Authority All users.
Examples
switch# configure terminalswitch(config)# tftp-serverswitch(config-tftp-server)# no secure-mode
3.12.6. Setting an TFTP rootThis command works in the tftp-server context and sets the tftp root path location.
Syntax path <path_name>
Authority All users.
<path> Set the tftp root path location.
Examples
switch# configure terminalswitch(config)# tftp-serverswitch(config-tftp-server)# path /tmp/
3.12.7. Showing TFTP Server ConfigurationThis command displays TFTP server configurations.
Syntax show tftp-server
Authority All users.
Examples
switch# show tftp-server
TFTP server configuration-------------------------TFTP server : EnabledTFTP server secure mode : Enabled

Management And Utility Commands
66
TFTP server file path : /tmp/
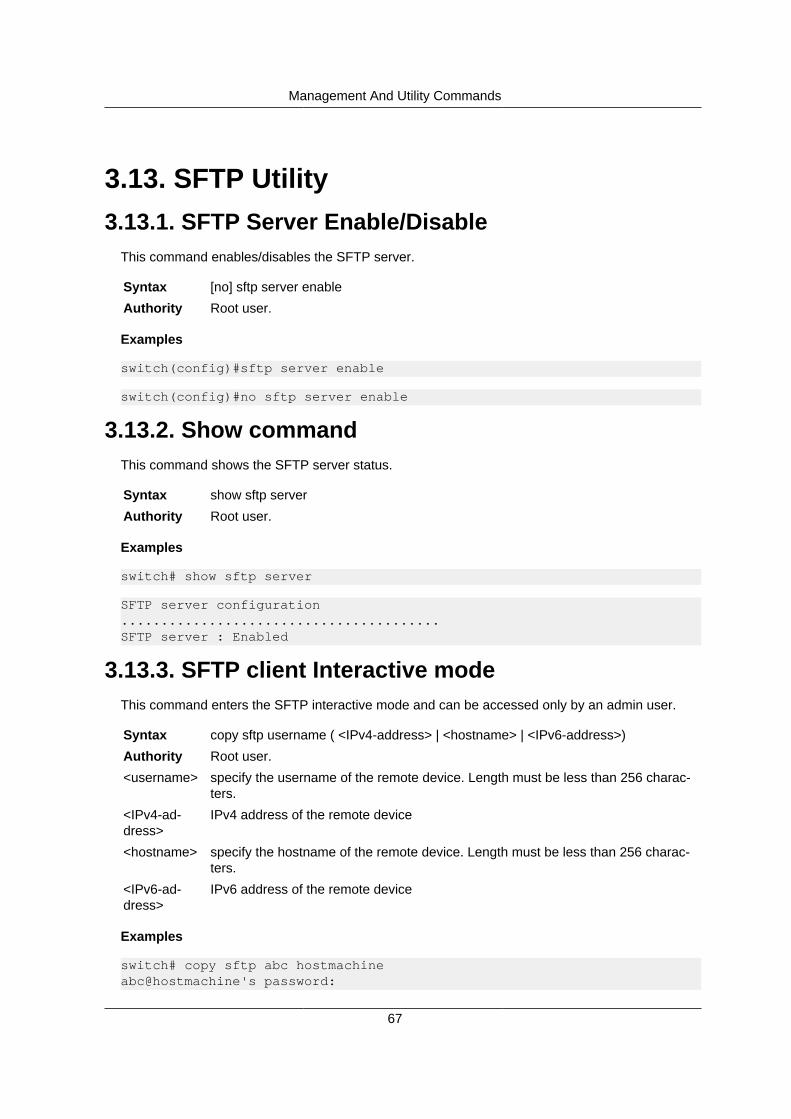
Management And Utility Commands
67
3.13. SFTP Utility3.13.1. SFTP Server Enable/Disable
This command enables/disables the SFTP server.
Syntax [no] sftp server enable
Authority Root user.
Examples
switch(config)#sftp server enable
switch(config)#no sftp server enable
3.13.2. Show commandThis command shows the SFTP server status.
Syntax show sftp server
Authority Root user.
Examples
switch# show sftp server
SFTP server configuration........................................SFTP server : Enabled
3.13.3. SFTP client Interactive modeThis command enters the SFTP interactive mode and can be accessed only by an admin user.
Syntax copy sftp username ( <IPv4-address> | <hostname> | <IPv6-address>)
Authority Root user.
<username> specify the username of the remote device. Length must be less than 256 charac-ters.
<IPv4-ad-dress>
IPv4 address of the remote device
<hostname> specify the hostname of the remote device. Length must be less than 256 charac-ters.
<IPv6-ad-dress>
IPv6 address of the remote device
Examples
switch# copy sftp abc hostmachineabc@hostmachine's password:

Management And Utility Commands
68
Connected to hostmachine.sftp>
switch# copy sftp abc 10.1.1.1The authenticity of host '10.1.1.1 (10.1.1.1)' can't be established.ECDSA key fingerprint is SHA256:uWeyXm2j6VkDfCitlyz/P+xGgZW9YYw5GnDOsEgVHeU.Are you sure you want to continue connecting (yes/no)? yesWarning: Permanently added '10.1.1.1' (ECDSA) to the list of known [email protected]'s password:Connected to 10.1.1.1.sftp>sftp> get /users/abc/test_fileFetching /users/abc/test_file to test_file/users/abc/test_file 100% 212 0.2KB/s 00:00sftp> put test_file /users/abc/Uploading test_file to /users/abc/test_filetest_file 100% 212 0.2KB/s 00:00
switch# copy sftp abc a::1The authenticity of host 'a::1 (a::1)' can't be established.ECDSA key fingerprint is SHA256:uWeyXm2j6VkDfCitlyz/P+xGgZW9YYw5GnDOsEgVHeU.Are you sure you want to continue connecting (yes/no)? yesWarning: Permanently added 'a::1' (ECDSA) to the list of known hosts.abc@a::1's password:Connected to a::1.sftp>sftp> get /users/abc/test_fileFetching /users/abc/test_file to test_file/users/abc/test_file 100% 212 0.2KB/s 00:00sftp> put test_file /users/abc/Uploading test_file to /users/abc/test_filetest_file 100% 212 0.2KB/s 00:00
3.13.4. SFTP client Non-Interactive modeThis command performs a non-interactive SFTP get and can be accessed only by an admin user.
Syntax copy sftp username ( <IPv4-address> | <hostname> | <IPv6-address> ) Source[Destination]
Authority Root user.
<username> specify the username of the remote device. Length must be less than 256 charac-ters.
<IPv4-ad-dress>
IPv4 address of the remote device
<hostname> string specify the hostname of the remote device. Length must be less than 256characters.
<IPv6-ad-dress>
IPv6 address of the remote device
<Source> specify the source path of the file

Management And Utility Commands
69
<Destina-tion>
specify the detination path to store the file (Default path : /var/local/)
Examples
switch# copy sftp abc hostmachine source-fileabc@hostmachine's password:Connected to 10.1.1.1.Fetching source-file to source-filesource-file 100% 25 0.0KB/s 00:00switch#
switch# copy sftp abc 10.1.1.1 [email protected]'s password:Connected to 10.1.1.1.Fetching source-file to source-filesource-file 100% 25 0.0KB/s 00:00switch#
switch# copy sftp abc a::1 source-fileabc@a::1's password:Connected to a::1.Fetching source-file to source-filesource-file 100% 25 0.0KB/s 00:00switch#
switch# copy sftp abc hostmachine source-file destination-fileabc@hostmachine's password:Connected to hostmachine.Fetching source-file to destination-filesource-file 100% 25 0.0KB/s 00:00switch#
switch# copy sftp abc 10.1.1.1 source-file [email protected]'s password:Connected to 10.1.1.1.Fetching source-file to destination-filesource-file 100% 25 0.0KB/s 00:00switch#
switch# copy sftp abc a::1 source-file destination-fileabc@a::1's password:Connected to a::1.Fetching source-file to destination-filesource-file 100% 25 0.0KB/s 00:00switch#

Management And Utility Commands
70
3.14. sFlow Commands3.14.1. Enable sFlow globally
This command enables sFlow globally. By default sFlow is disabled.
Syntax sflow enable
Authority All users.
Example
switch# configure terminalswitch(config)# sflow enable
3.14.2. Disable sFlow globallyThis command disables sFlow globally. By default sFlow is disabled.
Syntax no sflow enable
Authority All users.
Example
switch# configure terminalswitch(config)# no sflow enable
3.14.3. Set sFlow sampling rateThis command sets the global sampling rate for sFlow. The default sampling rate is 4096, whichmeans that one in every 4096 packets is sampled.
Syntax sflow sampling <rate>
Authority All users.
<rate> Sets the global sampling rate, 1-1000000000.
Example
switch# configure terminalswitch(config)# sflow sampling 1000
3.14.4. Remove sFlow sampling rateThis command sets the global sampling rate back to the default of 4096, which means that one inevery 4096 packets is sampled.
Syntax no sflow sampling
Authority All users.

Management And Utility Commands
71
Example
switch# configure terminalswitch(config)# no sflow sampling
3.14.5. Set sFlow polling intervalThis command sets the global polling interval, which by default is 30 seconds. Set the polling inter-val to 0 to disable polling.
Syntax sflow polling <interval>
Authority All users.
<interval> Sets the global polling interval, 0-3600.
Example
switch# configure terminalswitch(config)# sflow polling 10
3.14.6. Remove sFlow polling intervalThis command resets the global polling interval to 30 seconds.
Syntax no sflow polling
Authority All users.
Example
switch# configure terminalswitch(config)# no sflow polling
3.14.7. Set sFlow collector IP addressThis command sets a collector IP address (IPv4 or IPv6), with optional port and VRF (virtual rout-ing and forwarding). The default port is 6343. VRF is the vrf on which the collector can be reached.By default, this is the data vrf. A maximum of three collectors can be configured.
Syntax sflow collector <IP> [port <port-number>] [vrf <vrf-name>]
Authority All users.
<IP> Collector IPv4 or IPv6 address.
<port-num-ber>
Port on which to reach a collector.
<vrf-name> Name of VRF on which to reach a collector.
Example
switch# configure terminalswitch(config)# sflow collector 10.0.0.1 port 6343 vrf vrf1
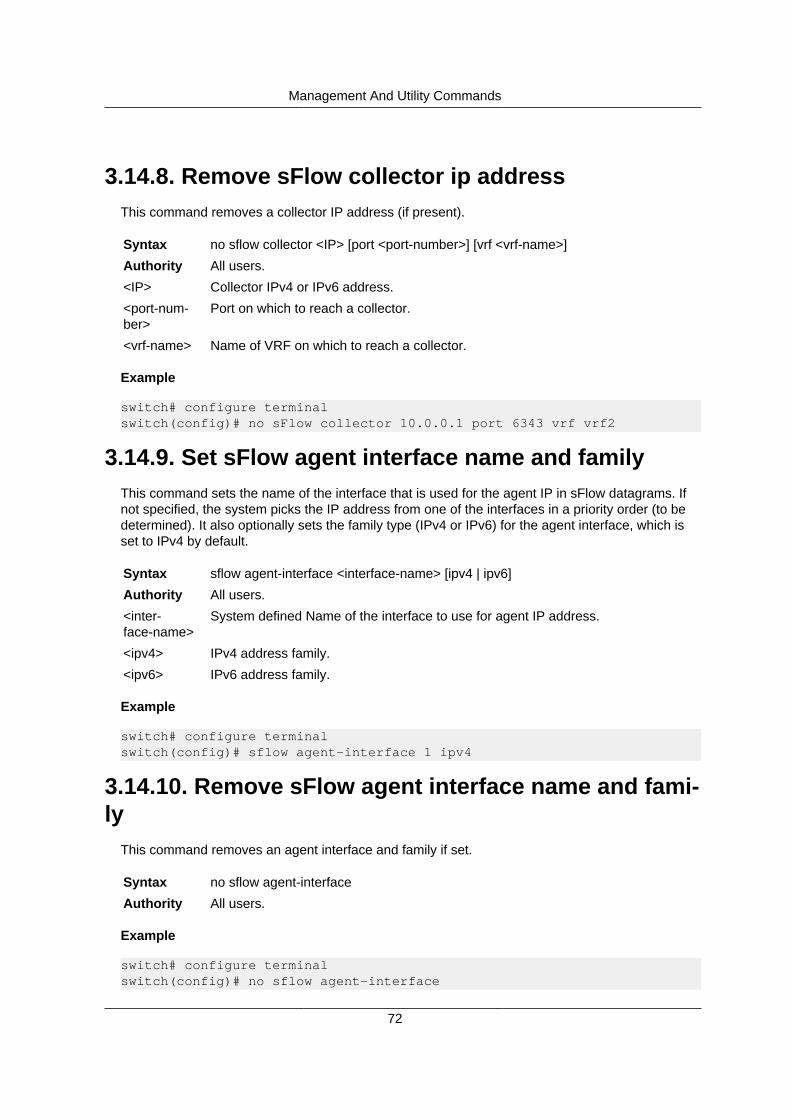
Management And Utility Commands
72
3.14.8. Remove sFlow collector ip addressThis command removes a collector IP address (if present).
Syntax no sflow collector <IP> [port <port-number>] [vrf <vrf-name>]
Authority All users.
<IP> Collector IPv4 or IPv6 address.
<port-num-ber>
Port on which to reach a collector.
<vrf-name> Name of VRF on which to reach a collector.
Example
switch# configure terminalswitch(config)# no sFlow collector 10.0.0.1 port 6343 vrf vrf2
3.14.9. Set sFlow agent interface name and familyThis command sets the name of the interface that is used for the agent IP in sFlow datagrams. Ifnot specified, the system picks the IP address from one of the interfaces in a priority order (to bedetermined). It also optionally sets the family type (IPv4 or IPv6) for the agent interface, which isset to IPv4 by default.
Syntax sflow agent-interface <interface-name> [ipv4 | ipv6]
Authority All users.
<inter-face-name>
System defined Name of the interface to use for agent IP address.
<ipv4> IPv4 address family.
<ipv6> IPv6 address family.
Example
switch# configure terminalswitch(config)# sflow agent-interface 1 ipv4
3.14.10. Remove sFlow agent interface name and fami-ly
This command removes an agent interface and family if set.
Syntax no sflow agent-interface
Authority All users.
Example
switch# configure terminalswitch(config)# no sflow agent-interface

Management And Utility Commands
73
3.14.11. Set sFlow header sizeThis command sets the sFlow header size in bytes. The default value is 128.
Syntax sflow header-size <size>
Authority All users.
<size> Sets size of the header in bytes, 64-256.
Example
switch# configure terminalswitch(config)# sflow header-size 64
3.14.12. Remove sFlow header sizeThis command resets the sFlow header size to the default value of 128 bytes.
Syntax no sflow header-size
Authority All users.
Example
switch# configure terminalswitch(config)# no sflow header-size
3.14.13. Set sFlow max datagram sizeThis command sets the maximum number of bytes that are sent in one sFlow datagram. The de-fault value is 1400 bytes.
Syntax sflow max-datagram-size <size>
Authority All users.
<size> Sets the maximum size of an sFlow datagram, 200-9000.
Example
switch# configure terminalswitch(config)# sflow max-datagram-size 1000
3.14.14. Remove sFlow max datagram sizeThis command resets the number of bytes that are sent in one sFlow datagram to the default of1400.
Syntax no sflow max-datagram-size
Authority All users.
Example
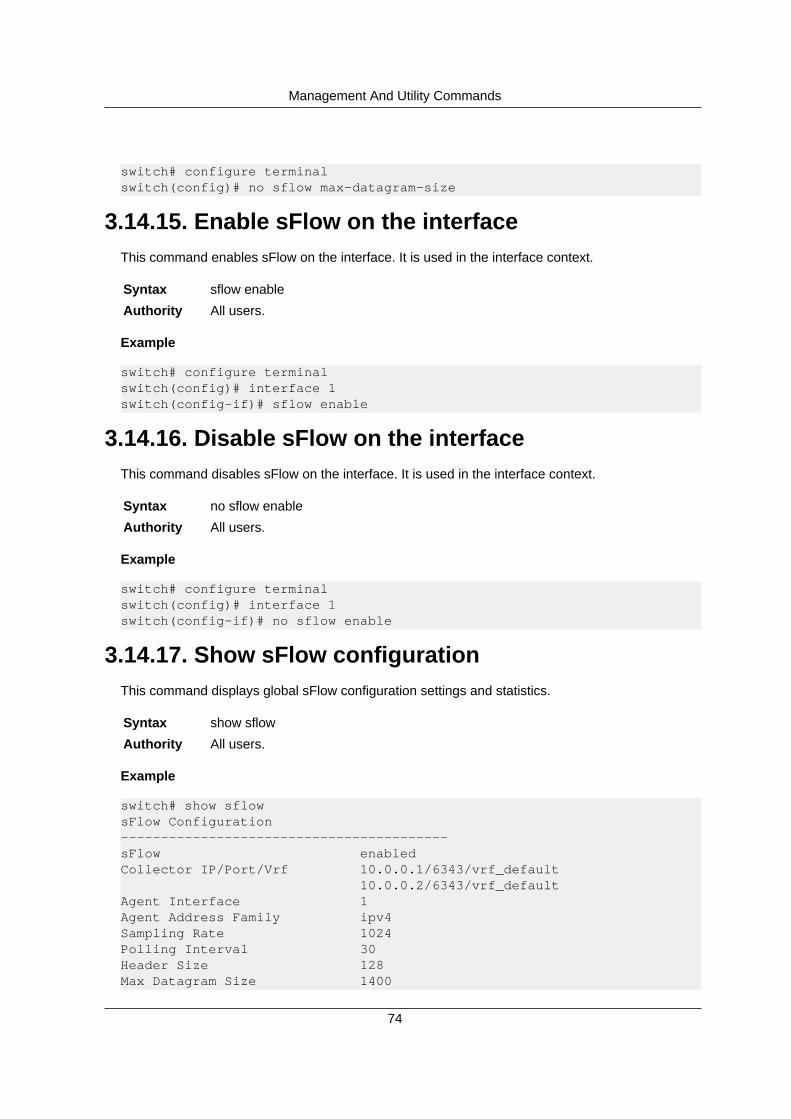
Management And Utility Commands
74
switch# configure terminalswitch(config)# no sflow max-datagram-size
3.14.15. Enable sFlow on the interfaceThis command enables sFlow on the interface. It is used in the interface context.
Syntax sflow enable
Authority All users.
Example
switch# configure terminalswitch(config)# interface 1switch(config-if)# sflow enable
3.14.16. Disable sFlow on the interfaceThis command disables sFlow on the interface. It is used in the interface context.
Syntax no sflow enable
Authority All users.
Example
switch# configure terminalswitch(config)# interface 1switch(config-if)# no sflow enable
3.14.17. Show sFlow configurationThis command displays global sFlow configuration settings and statistics.
Syntax show sflow
Authority All users.
Example
switch# show sflowsFlow Configuration-----------------------------------------sFlow enabledCollector IP/Port/Vrf 10.0.0.1/6343/vrf_default 10.0.0.2/6343/vrf_defaultAgent Interface 1Agent Address Family ipv4Sampling Rate 1024Polling Interval 30Header Size 128Max Datagram Size 1400
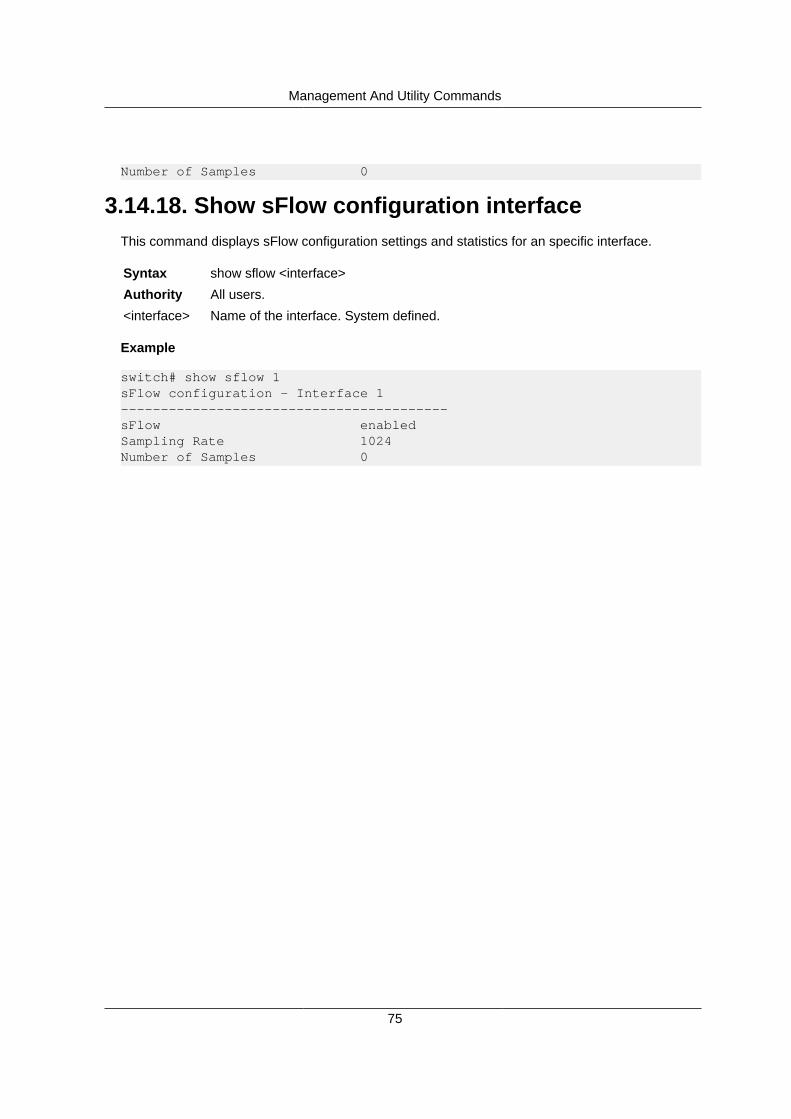
Management And Utility Commands
75
Number of Samples 0
3.14.18. Show sFlow configuration interfaceThis command displays sFlow configuration settings and statistics for an specific interface.
Syntax show sflow <interface>
Authority All users.
<interface> Name of the interface. System defined.
Example
switch# show sflow 1sFlow configuration - Interface 1-----------------------------------------sFlow enabledSampling Rate 1024Number of Samples 0

Management And Utility Commands
76
3.15. Remote Syslog Logging ConfigurationCommands3.15.1. Logging configuration commands
This command is used to add or remove remote syslog server configurations.
Syntax [no] logging <IPv4-address> | <IPv6-address> | <hostname> [udp [<port>] | tcp[<port>]] [severity <level>]
Authority All users.
<IPv4-ad-dress>
IPv4 address of the remote syslog server
<IPv6-ad-dress>
IPv6 address of the remote syslog server
<hostname> FQDN or hostname of the remote syslog server
<udp> UDP transport protocol used to send syslog messages
<tcp> TCP transport protocol used to send syslog messages
<port> Port Number on which the remote syslog server runs. Default for UDP is 514 andfor TCP is 1470
<severity> Filter syslog messages using severity
<level> Filter messages with severity higher than or equal to the specified value
Examples
switch(config)#logging 10.0.10.2
switch(config)#no logging
switch(config)#logging 10.0.10.6 severity info
switch(config)#no logging 10.0.10.6
switch(config)#logging 10.0.10.9 tcp 4242 severity err
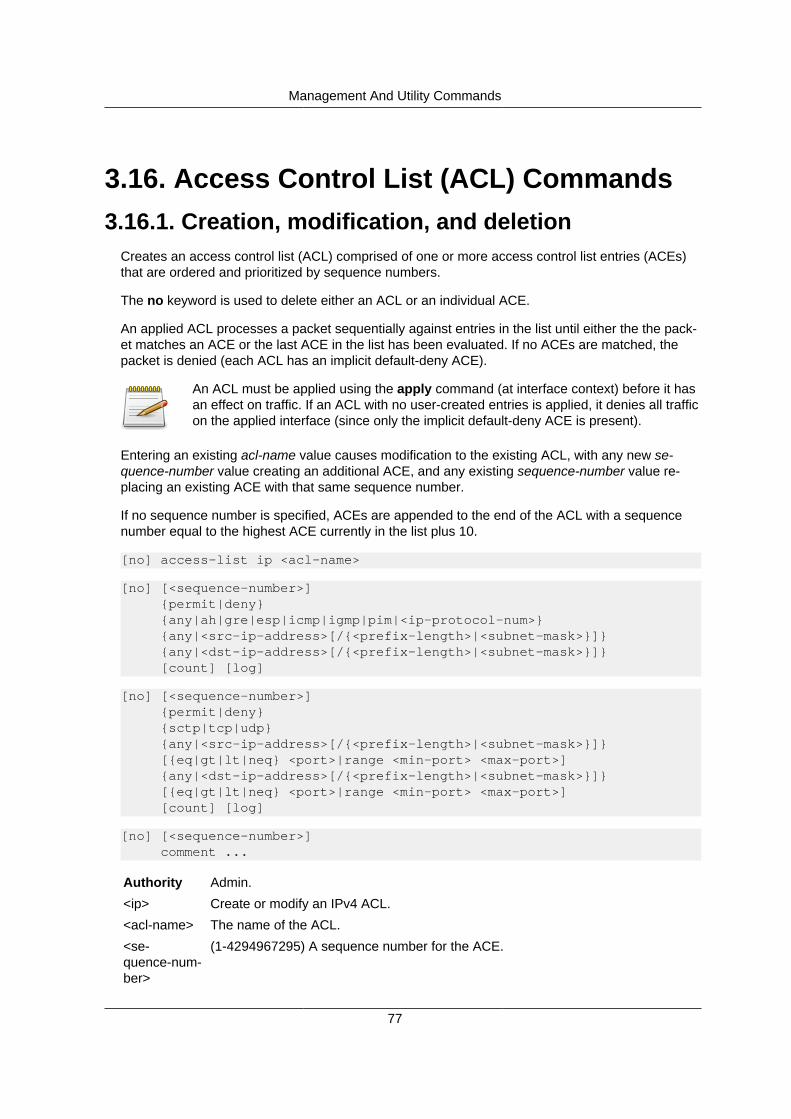
Management And Utility Commands
77
3.16. Access Control List (ACL) Commands3.16.1. Creation, modification, and deletion
Creates an access control list (ACL) comprised of one or more access control list entries (ACEs)that are ordered and prioritized by sequence numbers.
The no keyword is used to delete either an ACL or an individual ACE.
An applied ACL processes a packet sequentially against entries in the list until either the the pack-et matches an ACE or the last ACE in the list has been evaluated. If no ACEs are matched, thepacket is denied (each ACL has an implicit default-deny ACE).
An ACL must be applied using the apply command (at interface context) before it hasan effect on traffic. If an ACL with no user-created entries is applied, it denies all trafficon the applied interface (since only the implicit default-deny ACE is present).
Entering an existing acl-name value causes modification to the existing ACL, with any new se-quence-number value creating an additional ACE, and any existing sequence-number value re-placing an existing ACE with that same sequence number.
If no sequence number is specified, ACEs are appended to the end of the ACL with a sequencenumber equal to the highest ACE currently in the list plus 10.
[no] access-list ip <acl-name>
[no] [<sequence-number>] {permit|deny} {any|ah|gre|esp|icmp|igmp|pim|<ip-protocol-num>} {any|<src-ip-address>[/{<prefix-length>|<subnet-mask>}]} {any|<dst-ip-address>[/{<prefix-length>|<subnet-mask>}]} [count] [log]
[no] [<sequence-number>] {permit|deny} {sctp|tcp|udp} {any|<src-ip-address>[/{<prefix-length>|<subnet-mask>}]} [{eq|gt|lt|neq} <port>|range <min-port> <max-port>] {any|<dst-ip-address>[/{<prefix-length>|<subnet-mask>}]} [{eq|gt|lt|neq} <port>|range <min-port> <max-port>] [count] [log]
[no] [<sequence-number>] comment ...
Authority Admin.
<ip> Create or modify an IPv4 ACL.
<acl-name> The name of the ACL.
<se-quence-num-ber>
(1-4294967295) A sequence number for the ACE.

Management And Utility Commands
78
<action> Permit or deny traffic matching the ACE.
<comment> Store the remaining entered text as an ACE comment.
<ip-protocol> An IP protocol number or name.
<src-ip-ad-dress>
The source IP host, network address, or any.
<dst-ip-ad-dress>
The destination IP host, network address, or any.
<pre-fix-length>
The address bits to mask (CIDR subnet mask notation, 1-32).
<sub-net-mask>
The address bits to mask (dotted decimal notation).
<eq> Layer 4 port is equal to port.
<gt> Layer 4 port is greater than port.
<lt> Layer 4 port is less than port.
<neq> Layer 4 port is not equal to port.
<port> A single Layer 4 port.
<range> Layer 4 port between min-port-max-port (inclusive).
<min-port> The start of a Layer 4 port range.
<max-port> The end of a Layer 4 port range.
<count> Keep hit counts of the number of packets matching the ACE.
<log> Keep a log of the number of packets matching the ACE.
Examples
Create an ACL with three entries:
switch(config)# access-list ip My_ACLswitch(config-acl)# 10 permit udp any 172.16.1.0/24switch(config-acl)# 20 permit tcp 172.16.2.0/16 gt 1023 anyswitch(config-acl)# 30 deny any any any countswitch(config-acl)# exit
Add a comment to an existing ACE:
switch(config)# access-list ip My_ACLswitch(config-acl)# 20 comment Permit all TCP ephemeral portsswitch(config-acl)# do show access-listswitch(config-acl)# exit
Add an ACE to an existing ACL:
switch(config)# access-list ip My_ACLswitch(config-acl)# 25 permit icmp 172.16.2.0/16 anyswitch(config-acl)# exit
Replace an ACE in an existing ACL:
switch(config)# access-list ip My_ACL
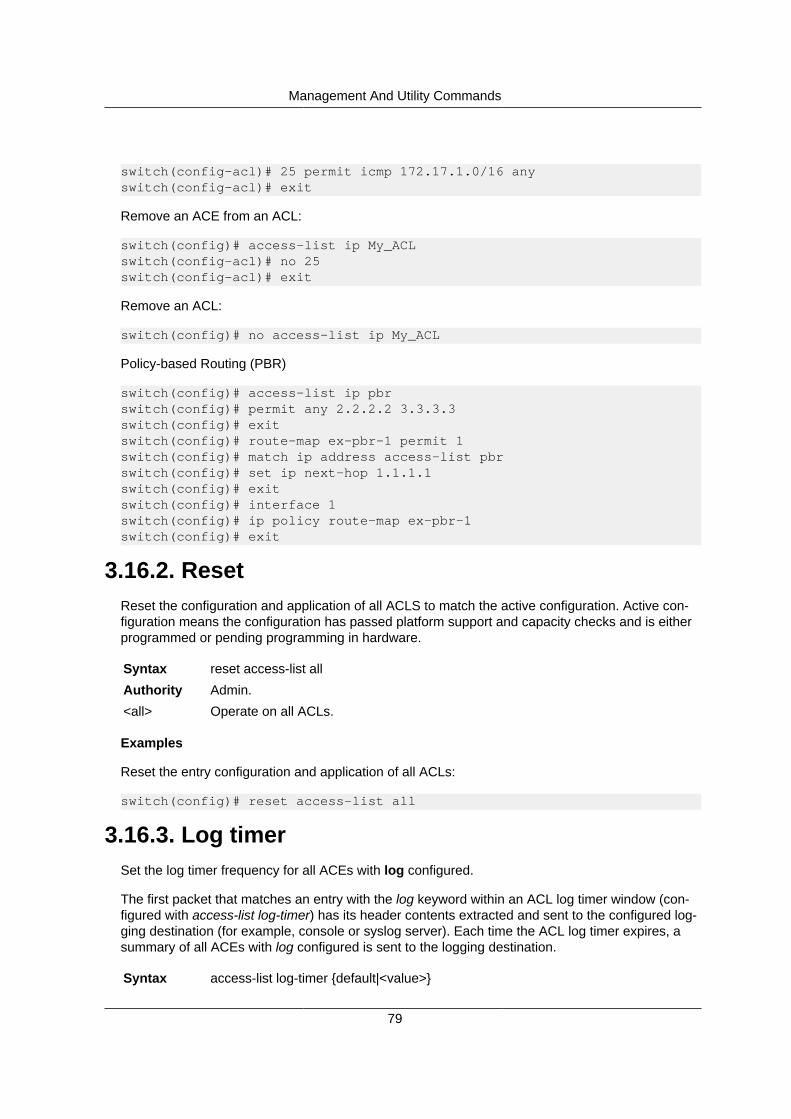
Management And Utility Commands
79
switch(config-acl)# 25 permit icmp 172.17.1.0/16 anyswitch(config-acl)# exit
Remove an ACE from an ACL:
switch(config)# access-list ip My_ACLswitch(config-acl)# no 25switch(config-acl)# exit
Remove an ACL:
switch(config)# no access-list ip My_ACL
Policy-based Routing (PBR)
switch(config)# access-list ip pbrswitch(config)# permit any 2.2.2.2 3.3.3.3switch(config)# exitswitch(config)# route-map ex-pbr-1 permit 1switch(config)# match ip address access-list pbrswitch(config)# set ip next-hop 1.1.1.1switch(config)# exitswitch(config)# interface 1switch(config)# ip policy route-map ex-pbr-1switch(config)# exit
3.16.2. ResetReset the configuration and application of all ACLS to match the active configuration. Active con-figuration means the configuration has passed platform support and capacity checks and is eitherprogrammed or pending programming in hardware.
Syntax reset access-list all
Authority Admin.
<all> Operate on all ACLs.
Examples
Reset the entry configuration and application of all ACLs:
switch(config)# reset access-list all
3.16.3. Log timerSet the log timer frequency for all ACEs with log configured.
The first packet that matches an entry with the log keyword within an ACL log timer window (con-figured with access-list log-timer) has its header contents extracted and sent to the configured log-ging destination (for example, console or syslog server). Each time the ACL log timer expires, asummary of all ACEs with log configured is sent to the logging destination.
Syntax access-list log-timer {default|<value>}
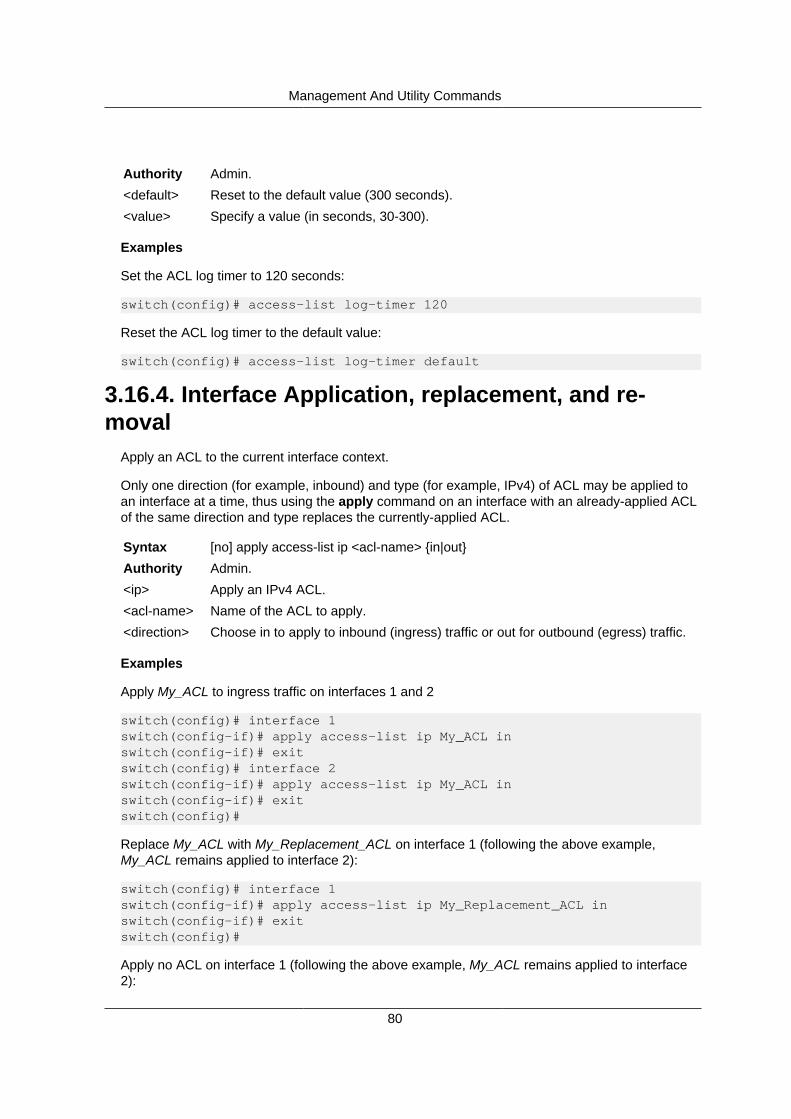
Management And Utility Commands
80
Authority Admin.
<default> Reset to the default value (300 seconds).
<value> Specify a value (in seconds, 30-300).
Examples
Set the ACL log timer to 120 seconds:
switch(config)# access-list log-timer 120
Reset the ACL log timer to the default value:
switch(config)# access-list log-timer default
3.16.4. Interface Application, replacement, and re-moval
Apply an ACL to the current interface context.
Only one direction (for example, inbound) and type (for example, IPv4) of ACL may be applied toan interface at a time, thus using the apply command on an interface with an already-applied ACLof the same direction and type replaces the currently-applied ACL.
Syntax [no] apply access-list ip <acl-name> {in|out}
Authority Admin.
<ip> Apply an IPv4 ACL.
<acl-name> Name of the ACL to apply.
<direction> Choose in to apply to inbound (ingress) traffic or out for outbound (egress) traffic.
Examples
Apply My_ACL to ingress traffic on interfaces 1 and 2
switch(config)# interface 1switch(config-if)# apply access-list ip My_ACL inswitch(config-if)# exitswitch(config)# interface 2switch(config-if)# apply access-list ip My_ACL inswitch(config-if)# exitswitch(config)#
Replace My_ACL with My_Replacement_ACL on interface 1 (following the above example,My_ACL remains applied to interface 2):
switch(config)# interface 1switch(config-if)# apply access-list ip My_Replacement_ACL inswitch(config-if)# exitswitch(config)#
Apply no ACL on interface 1 (following the above example, My_ACL remains applied to interface2):
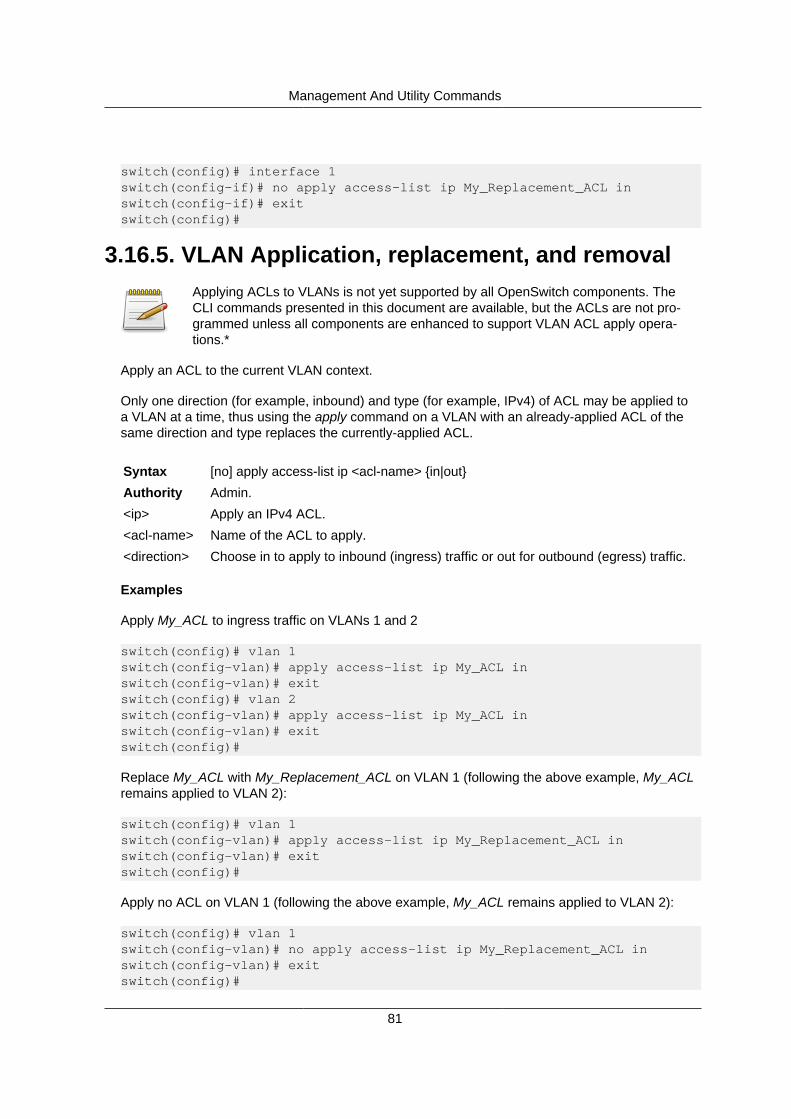
Management And Utility Commands
81
switch(config)# interface 1switch(config-if)# no apply access-list ip My_Replacement_ACL inswitch(config-if)# exitswitch(config)#
3.16.5. VLAN Application, replacement, and removalApplying ACLs to VLANs is not yet supported by all OpenSwitch components. TheCLI commands presented in this document are available, but the ACLs are not pro-grammed unless all components are enhanced to support VLAN ACL apply opera-tions.*
Apply an ACL to the current VLAN context.
Only one direction (for example, inbound) and type (for example, IPv4) of ACL may be applied toa VLAN at a time, thus using the apply command on a VLAN with an already-applied ACL of thesame direction and type replaces the currently-applied ACL.
Syntax [no] apply access-list ip <acl-name> {in|out}
Authority Admin.
<ip> Apply an IPv4 ACL.
<acl-name> Name of the ACL to apply.
<direction> Choose in to apply to inbound (ingress) traffic or out for outbound (egress) traffic.
Examples
Apply My_ACL to ingress traffic on VLANs 1 and 2
switch(config)# vlan 1switch(config-vlan)# apply access-list ip My_ACL inswitch(config-vlan)# exitswitch(config)# vlan 2switch(config-vlan)# apply access-list ip My_ACL inswitch(config-vlan)# exitswitch(config)#
Replace My_ACL with My_Replacement_ACL on VLAN 1 (following the above example, My_ACLremains applied to VLAN 2):
switch(config)# vlan 1switch(config-vlan)# apply access-list ip My_Replacement_ACL inswitch(config-vlan)# exitswitch(config)#
Apply no ACL on VLAN 1 (following the above example, My_ACL remains applied to VLAN 2):
switch(config)# vlan 1switch(config-vlan)# no apply access-list ip My_Replacement_ACL inswitch(config-vlan)# exitswitch(config)#

Management And Utility Commands
82
3.16.6. Global context DisplayDisplays configured, active ACLs and their entries.
By default, show access-list displays the ACL configuration active in the system. Active config-uration means the configuration has passed platform support and capacity checks, and is eitherprogrammed or pending programming in hardware.
By specifying the configuration token, the user-specified configuration is displayed, whether ornot it is active. This command displays a warning if the active and user-specified configuration donot match. In such a case, the user may wish to use the reset access-list command (see Sec-tion 3.16.2, “Reset”).
Specifying commands displays active ACL entries as well as the state of any apply commands oninterfaces.
Syntax show access-list [{interface|vlan} <id> [{in|out}]] [ip] [<acl-name>] [config]
Authority Admin.
<interface> Display ACLs applied to a specified interface name.
<vlan> Display ACLs applied to a specified VLAN ID.
<id> The name or ID of the interface or VLAN.
<direction> Choose in to limit display to ingress ACLs or out for egress ACLs.
<ip> Limit display to IPv4 ACLs.
<acl-name> Display the ACL matching the name.
<commands> Display output as CLI commands.
<configura-tion>
Display the user-specified configuration.
Examples
Display ACLs configured in examples from previous sections:
switch# show access-listType Name Sequence Comment Action L3 Protocol Source IP Address Source L4 Port(s) Destination IP Address Destination L4 Port(s) Additional Parameters-------------------------------------------------------------------------IPv4 My_ACL 10 permit udp any 172.16.1.0/24 20 Permit all TCP ephemeral ports permit tcp 172.16.2.0/16 > 1023 any 30 deny any

Management And Utility Commands
83
any any Hit-counts: enabled-------------------------------------------------------------------------
Display ACLs configured and applied in above examples as CLI commands:
switch# show access-list commandsaccess-list ip My_ACL 10 permit udp any 172.16.1.0/24 20 permit tcp 172.16.2.0/16 gt 1023 any 30 deny any any any countinterface 2 apply access-list ip My_ACL in
3.16.7. Statistics (hit counts)Display or clear hit counts for ACEs with the count keyword in the specified ACL.
If an entry does not have the count keyword enabled, it displays the - character instead of a hitcount.
Syntax show access-list hitcounts ip <acl-name> [{interface|vlan} <id> [{in|out}]]
Syntax clear access-list hitcounts {all|ip <acl-name> {interface|vlan} <id> [{in|out}]}
Authority Admin.
<all> Operate on all ACLs.
<ip> Operate on an IPv4 ACL.
<acl-name> Operate on a named ACL.
<interface> Specify the interface to which the ACL is applied.
<vlan> Specify the VLAN to which the ACL is applied.
<id> The name or ID of the interface or VLAN.
<direction> Choose in to operate on ACLs applied to ingress traffic or out for egress traffic.
Examples
Display hit counts for ACL configured in above examples:
switch# show access-list hitcounts ip My_ACL interface 1Statistics for ACL My_ACL (ipv4):Interface 1 (in): Hit Count Configuration - 10 permit udp any 172.16.1.0/24 - 20 permit tcp 172.16.2.0/16 gt 1023 any 0 30 deny any any any count
Clear hit counts for ACL configured in above examples:
switch# clear access-list hitcounts ip My_ACL interface 1
Clear hit counts for all configured ACLs:

Management And Utility Commands
84
switch# clear access-list hitcounts all
3.16.8. Log timerDisplay ACL log timer configuration. See log timer configuration for information on changing thissetting.
Syntax show access-list log-timer
Authority Admin.
Examples
switch# show access-list log-timer
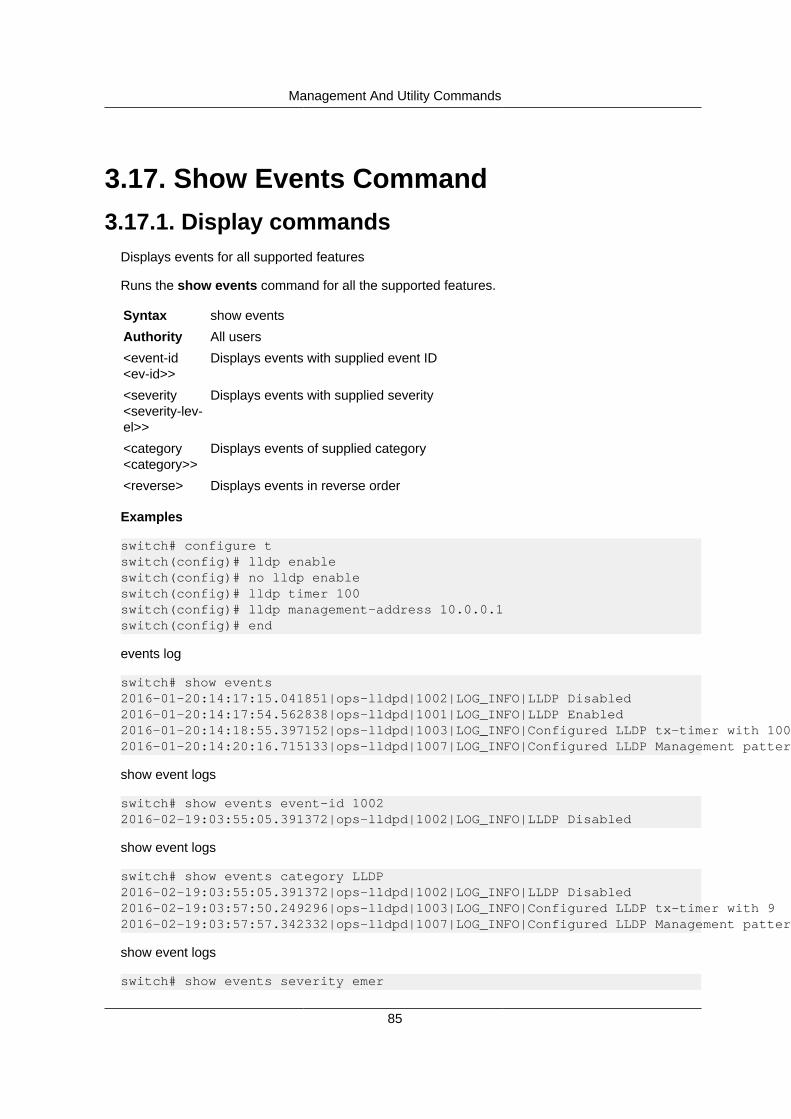
Management And Utility Commands
85
3.17. Show Events Command3.17.1. Display commands
Displays events for all supported features
Runs the show events command for all the supported features.
Syntax show events
Authority All users
<event-id<ev-id>>
Displays events with supplied event ID
<severity<severity-lev-el>>
Displays events with supplied severity
<category<category>>
Displays events of supplied category
<reverse> Displays events in reverse order
Examples
switch# configure tswitch(config)# lldp enableswitch(config)# no lldp enableswitch(config)# lldp timer 100switch(config)# lldp management-address 10.0.0.1switch(config)# end
events log
switch# show events2016-01-20:14:17:15.041851|ops-lldpd|1002|LOG_INFO|LLDP Disabled2016-01-20:14:17:54.562838|ops-lldpd|1001|LOG_INFO|LLDP Enabled2016-01-20:14:18:55.397152|ops-lldpd|1003|LOG_INFO|Configured LLDP tx-timer with 1002016-01-20:14:20:16.715133|ops-lldpd|1007|LOG_INFO|Configured LLDP Management pattern 10.0.0.1
show event logs
switch# show events event-id 10022016-02-19:03:55:05.391372|ops-lldpd|1002|LOG_INFO|LLDP Disabled
show event logs
switch# show events category LLDP2016-02-19:03:55:05.391372|ops-lldpd|1002|LOG_INFO|LLDP Disabled2016-02-19:03:57:50.249296|ops-lldpd|1003|LOG_INFO|Configured LLDP tx-timer with 92016-02-19:03:57:57.342332|ops-lldpd|1007|LOG_INFO|Configured LLDP Management pattern 10.1.1.1
show event logs
switch# show events severity emer
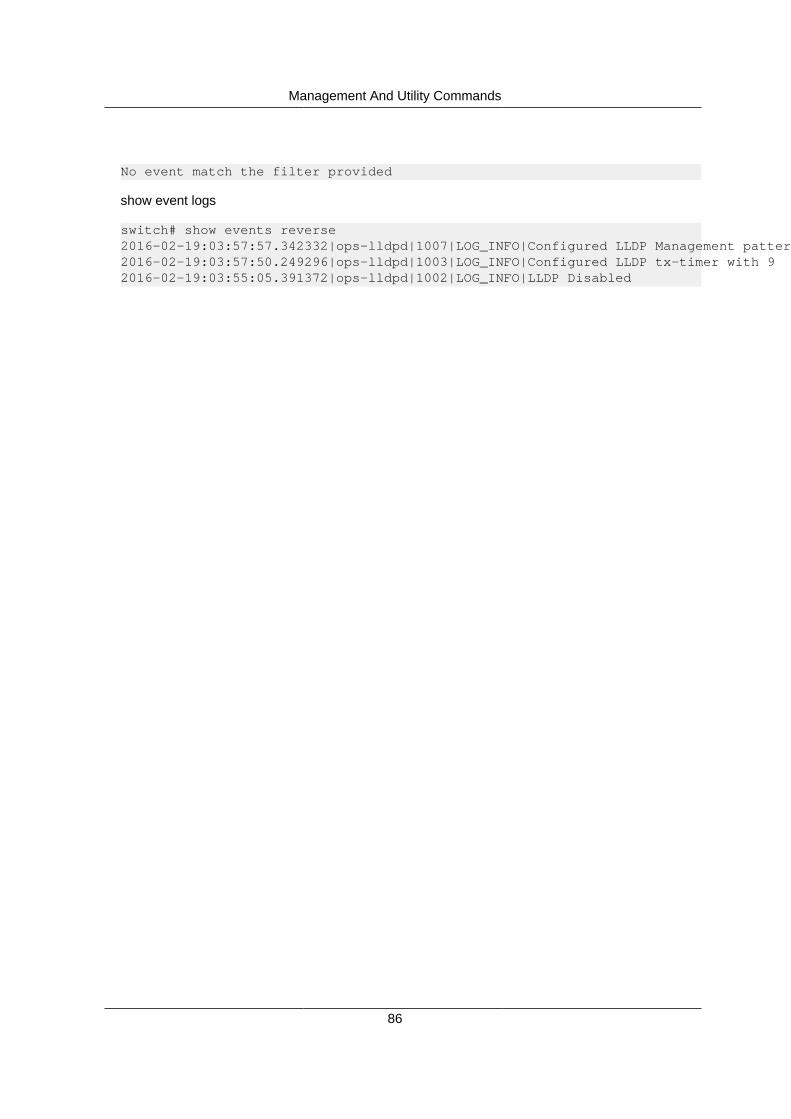
Management And Utility Commands
86
No event match the filter provided
show event logs
switch# show events reverse2016-02-19:03:57:57.342332|ops-lldpd|1007|LOG_INFO|Configured LLDP Management pattern 10.1.1.12016-02-19:03:57:50.249296|ops-lldpd|1003|LOG_INFO|Configured LLDP tx-timer with 92016-02-19:03:55:05.391372|ops-lldpd|1002|LOG_INFO|LLDP Disabled

Management And Utility Commands
87
3.18. Audit LogThe default audit log file is located at /var/log/audit/audit.log. A typical raw log record appears asfollows:
type=USYS_CONFIG msg=audit(1446776250.787:91): pid=540 uid=1002auid=4294967295 ses=4294967295 msg='op=CLI:Set-Hostname data="newHostName"exe="/usr/bin/vtysh" hostname=? addr=? terminal=pts/1 res=success
This particular record was generated by prototype code calling the audit_log_user_message()function in vtysh. Most fields are self-explanatory. Several fields match the parameters supplied inthe audit_log_user_message() function. Explanations for some fields are as follows:
• msg=audit(1446776250.787:91) is the time stamp and event number. The time stamp value is1446776250.787 and the event number is 91.
• pid=540 is the process ID of the program that made the audit log call.
• uid=1002 is the user ID of the program that made the audit log call.
• auid=4294967295 is the login user ID. This specific value represents -1 for a "C" int and indi-cates the value is not set.
• ses=4294967295 is the session ID, if any. In this case, it is not set.
• op=CLI:Set-Hostname data="newHostName" is the content of the message parameter passedto audit_log_user_message().
The ausearch utility is used to display audit log events. Note that all audit utilities are restricted tothe root user. To get easier to read output, use the "-i" or "--interpret" option. Consult the man pagefor more information about the many options available for this utility. If "ausearch -i -a 91" was is-sued to display event number 91, it would output the following:
type=USYS_CONFIG msg=audit(11/06/15 02:17:30.787:91) : pid=540 uid=fredfauid=unset ses=unset msg='op=CLI:Set-Hostnamedata="newHostName"exe=/usr/bin/vtysh hostname=? addr=? terminal=pts/1res=success'
The other main audit utility is aureport, which is used to get a variety of summary reports. Read theman page for additional details. Running aureport without any options displays the following sum-mary:
Summary Report======================Range of time in logs: 01/08/01 07:11:42.847 - 11/06/15 03:01:02.171Selected time for report: 01/08/01 07:11:42 - 11/06/15 03:01:02.171Number of changes in configuration: 2Number of changes to accounts, groups, or roles: 5Number of logins: 0Number of failed logins: 0Number of authentications: 3Number of failed authentications: 5Number of users: 1
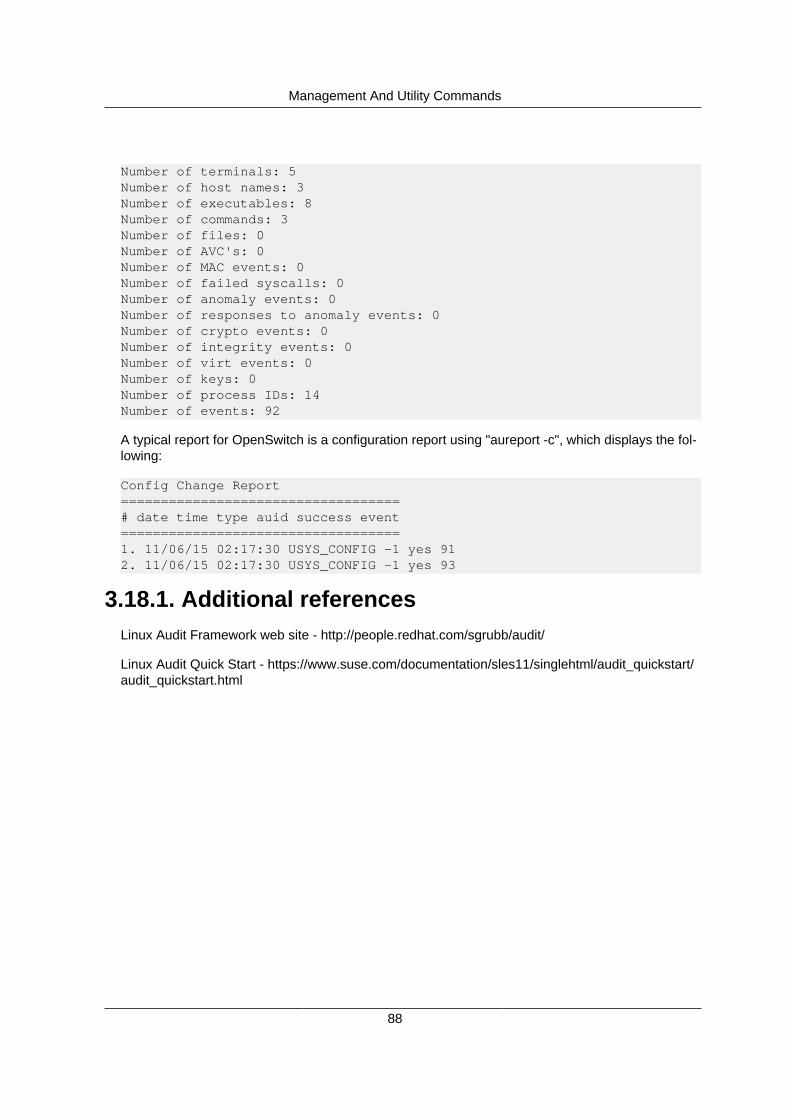
Management And Utility Commands
88
Number of terminals: 5Number of host names: 3Number of executables: 8Number of commands: 3Number of files: 0Number of AVC's: 0Number of MAC events: 0Number of failed syscalls: 0Number of anomaly events: 0Number of responses to anomaly events: 0Number of crypto events: 0Number of integrity events: 0Number of virt events: 0Number of keys: 0Number of process IDs: 14Number of events: 92
A typical report for OpenSwitch is a configuration report using "aureport -c", which displays the fol-lowing:
Config Change Report===================================# date time type auid success event===================================1. 11/06/15 02:17:30 USYS_CONFIG -1 yes 912. 11/06/15 02:17:30 USYS_CONFIG -1 yes 93
3.18.1. Additional referencesLinux Audit Framework web site - http://people.redhat.com/sgrubb/audit/
Linux Audit Quick Start - https://www.suse.com/documentation/sles11/singlehtml/audit_quickstart/audit_quickstart.html

Management And Utility Commands
89
3.19. Ping Utility3.19.1. IPv4 address
This command is used to ping a specific IPv4 address.
Syntax ping <IPv4-address>
Authority Root user.
<IPv4-ad-dress>
IPv4 address to ping.
Examples
switch# ping 9.0.0.1PING 9.0.0.1 (9.0.0.1) 100(128) bytes of data.108 bytes from 9.0.0.1: icmp_seq=1 ttl=64 time=0.035 ms108 bytes from 9.0.0.1: icmp_seq=2 ttl=64 time=0.034 ms108 bytes from 9.0.0.1: icmp_seq=3 ttl=64 time=0.034 ms108 bytes from 9.0.0.1: icmp_seq=4 ttl=64 time=0.034 ms108 bytes from 9.0.0.1: icmp_seq=5 ttl=64 time=0.033 ms
--- 9.0.0.1 ping statistics ---5 packets transmitted, 5 received, 0% packet loss, time 3999msrtt min/avg/max/mdev = 0.033/0.034/0.035/0.000 ms
3.19.2. HostnameThis command is used to ping a specific Hostname.
Syntax ping <hostname>
Authority Root user.
<hostname> Hostname to ping. Length must be less than 256 characters.
Examples
switch# ping localhostPING localhost (127.0.0.1) 100(128) bytes of data.108 bytes from localhost (127.0.0.1): icmp_seq=1 ttl=64 time=0.060 ms108 bytes from localhost (127.0.0.1): icmp_seq=2 ttl=64 time=0.035 ms108 bytes from localhost (127.0.0.1): icmp_seq=3 ttl=64 time=0.043 ms108 bytes from localhost (127.0.0.1): icmp_seq=4 ttl=64 time=0.041 ms108 bytes from localhost (127.0.0.1): icmp_seq=5 ttl=64 time=0.034 ms
--- localhost ping statistics ---5 packets transmitted, 5 received, 0% packet loss, time 3998msrtt min/avg/max/mdev = 0.034/0.042/0.060/0.011 ms
3.19.3. Set data-fill patternThis command sets the hexadecimal pattern to be filled in the packet.
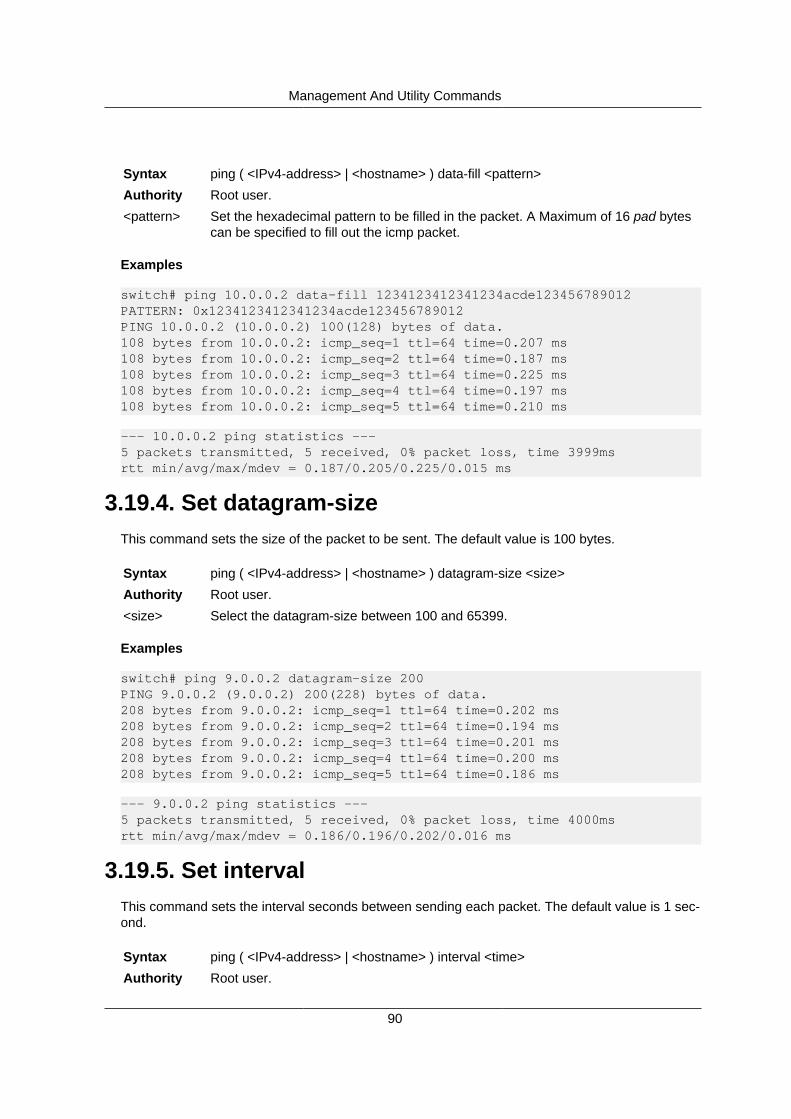
Management And Utility Commands
90
Syntax ping ( <IPv4-address> | <hostname> ) data-fill <pattern>
Authority Root user.
<pattern> Set the hexadecimal pattern to be filled in the packet. A Maximum of 16 pad bytescan be specified to fill out the icmp packet.
Examples
switch# ping 10.0.0.2 data-fill 1234123412341234acde123456789012PATTERN: 0x1234123412341234acde123456789012PING 10.0.0.2 (10.0.0.2) 100(128) bytes of data.108 bytes from 10.0.0.2: icmp_seq=1 ttl=64 time=0.207 ms108 bytes from 10.0.0.2: icmp_seq=2 ttl=64 time=0.187 ms108 bytes from 10.0.0.2: icmp_seq=3 ttl=64 time=0.225 ms108 bytes from 10.0.0.2: icmp_seq=4 ttl=64 time=0.197 ms108 bytes from 10.0.0.2: icmp_seq=5 ttl=64 time=0.210 ms
--- 10.0.0.2 ping statistics ---5 packets transmitted, 5 received, 0% packet loss, time 3999msrtt min/avg/max/mdev = 0.187/0.205/0.225/0.015 ms
3.19.4. Set datagram-sizeThis command sets the size of the packet to be sent. The default value is 100 bytes.
Syntax ping ( <IPv4-address> | <hostname> ) datagram-size <size>
Authority Root user.
<size> Select the datagram-size between 100 and 65399.
Examples
switch# ping 9.0.0.2 datagram-size 200PING 9.0.0.2 (9.0.0.2) 200(228) bytes of data.208 bytes from 9.0.0.2: icmp_seq=1 ttl=64 time=0.202 ms208 bytes from 9.0.0.2: icmp_seq=2 ttl=64 time=0.194 ms208 bytes from 9.0.0.2: icmp_seq=3 ttl=64 time=0.201 ms208 bytes from 9.0.0.2: icmp_seq=4 ttl=64 time=0.200 ms208 bytes from 9.0.0.2: icmp_seq=5 ttl=64 time=0.186 ms
--- 9.0.0.2 ping statistics ---5 packets transmitted, 5 received, 0% packet loss, time 4000msrtt min/avg/max/mdev = 0.186/0.196/0.202/0.016 ms
3.19.5. Set intervalThis command sets the interval seconds between sending each packet. The default value is 1 sec-ond.
Syntax ping ( <IPv4-address> | <hostname> ) interval <time>
Authority Root user.

Management And Utility Commands
91
<time> Select an interval in seconds between 1 and 60.
Examples
switch# ping 9.0.0.2 interval 2PING 9.0.0.2 (9.0.0.2) 100(128) bytes of data.108 bytes from 9.0.0.2: icmp_seq=1 ttl=64 time=0.199 ms108 bytes from 9.0.0.2: icmp_seq=2 ttl=64 time=0.192 ms108 bytes from 9.0.0.2: icmp_seq=3 ttl=64 time=0.208 ms108 bytes from 9.0.0.2: icmp_seq=4 ttl=64 time=0.182 ms108 bytes from 9.0.0.2: icmp_seq=5 ttl=64 time=0.194 ms
--- 9.0.0.2 ping statistics ---5 packets transmitted, 5 received, 0% packet loss, time 7999msrtt min/avg/max/mdev = 0.182/0.195/0.208/0.008 ms
3.19.6. Set repetitionsThis command sets the number of packets to be sent to the destination address. The default valueis 5.
Syntax ping ( <IPv4-address> | <hostname> ) repetitions <number>
Authority Root user.
<number> Select the number of packets to send between 1 and 10000.
Examples
switch# ping 9.0.0.2 repetitions 10PING 9.0.0.2 (9.0.0.2) 100(128) bytes of data.108 bytes from 9.0.0.2: icmp_seq=1 ttl=64 time=0.213 ms108 bytes from 9.0.0.2: icmp_seq=2 ttl=64 time=0.204 ms108 bytes from 9.0.0.2: icmp_seq=3 ttl=64 time=0.201 ms108 bytes from 9.0.0.2: icmp_seq=4 ttl=64 time=0.184 ms108 bytes from 9.0.0.2: icmp_seq=5 ttl=64 time=0.202 ms108 bytes from 9.0.0.2: icmp_seq=6 ttl=64 time=0.184 ms108 bytes from 9.0.0.2: icmp_seq=7 ttl=64 time=0.193 ms108 bytes from 9.0.0.2: icmp_seq=8 ttl=64 time=0.196 ms108 bytes from 9.0.0.2: icmp_seq=9 ttl=64 time=0.193 ms108 bytes from 9.0.0.2: icmp_seq=10 ttl=64 time=0.200 ms
--- 9.0.0.2 ping statistics ---10 packets transmitted, 10 received, 0% packet loss, time 8999msrtt min/avg/max/mdev = 0.184/0.197/0.213/0.008 ms
3.19.7. Set timeoutThis command sets the time to wait for a response in seconds from the receiver. The default valueis 2 seconds.
Syntax ping ( <IPv4-address> | <hostname> ) timeout <time>

Management And Utility Commands
92
Authority Root user.
<time> Select timeout in seconds between 1 and 60.
Examples
switch# ping 9.0.0.2 timeout 3PING 9.0.0.2 (9.0.0.2) 100(128) bytes of data.108 bytes from 9.0.0.2: icmp_seq=1 ttl=64 time=0.175 ms108 bytes from 9.0.0.2: icmp_seq=2 ttl=64 time=0.192 ms108 bytes from 9.0.0.2: icmp_seq=3 ttl=64 time=0.190 ms108 bytes from 9.0.0.2: icmp_seq=4 ttl=64 time=0.181 ms108 bytes from 9.0.0.2: icmp_seq=5 ttl=64 time=0.197 ms
--- 9.0.0.2 ping statistics ---5 packets transmitted, 5 received, 0% packet loss, time 4000msrtt min/avg/max/mdev = 0.175/0.187/0.197/0.007 ms
3.19.8. Set TOSThis command sets Type of Service (TOS) related bits in ICMP datagrams.
Syntax ping ( <IPv4-address> | <hostname> ) tos <number>
Authority Root user.
<number> Select the TOS value between 0 and 255.
Examples
switch# ping 9.0.0.2 tos 2PING 9.0.0.2 (9.0.0.2) 100(128) bytes of data.108 bytes from 9.0.0.2: icmp_seq=1 ttl=64 time=0.033 ms108 bytes from 9.0.0.2: icmp_seq=2 ttl=64 time=0.034 ms108 bytes from 9.0.0.2: icmp_seq=3 ttl=64 time=0.031 ms108 bytes from 9.0.0.2: icmp_seq=4 ttl=64 time=0.034 ms108 bytes from 9.0.0.2: icmp_seq=5 ttl=64 time=0.031 ms
--- 9.0.0.2 ping statistics ---5 packets transmitted, 5 received, 0% packet loss, time 3999msrtt min/avg/max/mdev = 0.031/0.032/0.034/0.006 ms
3.19.9. Set ip-optionThis command is used to record either the intermediate router timestamp, the intermediate routertimestamp and IP address, or the intermediate router addresses.
Syntax ping ( <IPv4-address> | <hostname> ) ip-option (include-timestamp |include-time-stamp-and-address |record-route )
Authority Root user.
Examples
switch# ping 9.0.0.2 ip-option include-timestamp

Management And Utility Commands
93
PING 9.0.0.2 (9.0.0.2) 100(168) bytes of data.108 bytes from 9.0.0.2: icmp_seq=1 ttl=64 time=0.031 msTS: 59909005 absolute 0 0 0
108 bytes from 9.0.0.2: icmp_seq=2 ttl=64 time=0.034 msTS: 59910005 absolute 0 0 0
108 bytes from 9.0.0.2: icmp_seq=3 ttl=64 time=0.038 msTS: 59911005 absolute 0 0 0
108 bytes from 9.0.0.2: icmp_seq=4 ttl=64 time=0.035 msTS: 59912005 absolute 0 0 0
108 bytes from 9.0.0.2: icmp_seq=5 ttl=64 time=0.037 msTS: 59913005 absolute 0 0 0
--- 9.0.0.2 ping statistics ---5 packets transmitted, 5 received, 0% packet loss, time 3999msrtt min/avg/max/mdev = 0.031/0.035/0.038/0.002 ms
switch# ping 9.0.0.2 ip-option include-timestamp-and-addressPING 9.0.0.2 (9.0.0.2) 100(168) bytes of data.108 bytes from 9.0.0.2: icmp_seq=1 ttl=64 time=0.030 msTS: 9.0.0.2 60007355 absolute 9.0.0.2 0 9.0.0.2 0 9.0.0.2 0
108 bytes from 9.0.0.2: icmp_seq=2 ttl=64 time=0.037 msTS: 9.0.0.2 60008355 absolute 9.0.0.2 0 9.0.0.2 0 9.0.0.2 0
108 bytes from 9.0.0.2: icmp_seq=3 ttl=64 time=0.037 msTS: 9.0.0.2 60009355 absolute 9.0.0.2 0 9.0.0.2 0

Management And Utility Commands
94
9.0.0.2 0
108 bytes from 9.0.0.2: icmp_seq=4 ttl=64 time=0.038 msTS: 9.0.0.2 60010355 absolute 9.0.0.2 0 9.0.0.2 0 9.0.0.2 0
108 bytes from 9.0.0.2: icmp_seq=5 ttl=64 time=0.039 msTS: 9.0.0.2 60011355 absolute 9.0.0.2 0 9.0.0.2 0 9.0.0.2 0
--- 9.0.0.2 ping statistics ---5 packets transmitted, 5 received, 0% packet loss, time 3999msrtt min/avg/max/mdev = 0.030/0.036/0.039/0.005 ms
switch# ping 9.0.0.2 ip-option record-routePING 9.0.0.2 (9.0.0.2) 100(168) bytes of data.108 bytes from 9.0.0.2: icmp_seq=1 ttl=64 time=0.034 msRR: 9.0.0.2 9.0.0.2 9.0.0.2 9.0.0.2
108 bytes from 9.0.0.2: icmp_seq=2 ttl=64 time=0.038 ms (same route)108 bytes from 9.0.0.2: icmp_seq=3 ttl=64 time=0.036 ms (same route)108 bytes from 9.0.0.2: icmp_seq=4 ttl=64 time=0.037 ms (same route)108 bytes from 9.0.0.2: icmp_seq=5 ttl=64 time=0.035 ms (same route)
--- 9.0.0.2 ping statistics ---5 packets transmitted, 5 received, 0% packet loss, time 3999msrtt min/avg/max/mdev = 0.034/0.036/0.038/0.001 ms
3.19.10. IPv6 addressThis command is used to ping the specified IPv6 address.
Syntax ping6 <IPv6-address>
Authority Root user.
<IPv6-ad-dress>
IPv6 address to ping.
Examples
switch# ping6 2020::2PING 2020::2(2020::2) 100 data bytes108 bytes from 2020::2: icmp_seq=1 ttl=64 time=0.386 ms108 bytes from 2020::2: icmp_seq=2 ttl=64 time=0.235 ms108 bytes from 2020::2: icmp_seq=3 ttl=64 time=0.249 ms108 bytes from 2020::2: icmp_seq=4 ttl=64 time=0.240 ms
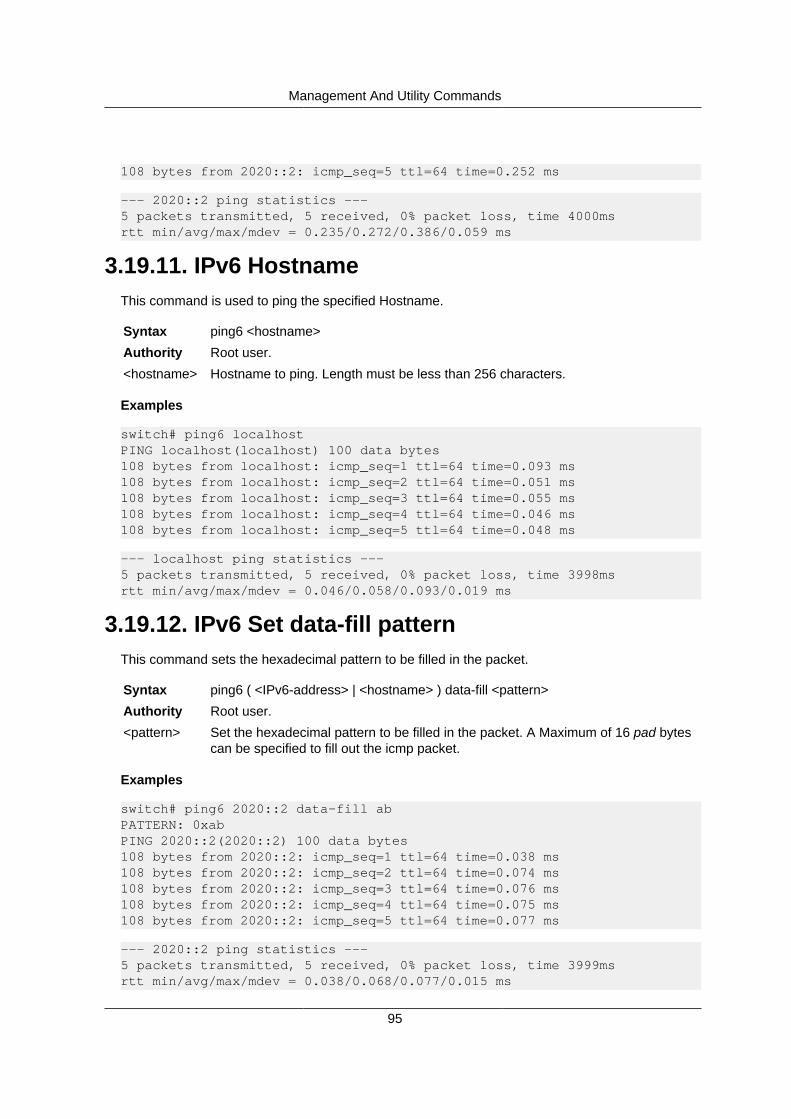
Management And Utility Commands
95
108 bytes from 2020::2: icmp_seq=5 ttl=64 time=0.252 ms
--- 2020::2 ping statistics ---5 packets transmitted, 5 received, 0% packet loss, time 4000msrtt min/avg/max/mdev = 0.235/0.272/0.386/0.059 ms
3.19.11. IPv6 HostnameThis command is used to ping the specified Hostname.
Syntax ping6 <hostname>
Authority Root user.
<hostname> Hostname to ping. Length must be less than 256 characters.
Examples
switch# ping6 localhostPING localhost(localhost) 100 data bytes108 bytes from localhost: icmp_seq=1 ttl=64 time=0.093 ms108 bytes from localhost: icmp_seq=2 ttl=64 time=0.051 ms108 bytes from localhost: icmp_seq=3 ttl=64 time=0.055 ms108 bytes from localhost: icmp_seq=4 ttl=64 time=0.046 ms108 bytes from localhost: icmp_seq=5 ttl=64 time=0.048 ms
--- localhost ping statistics ---5 packets transmitted, 5 received, 0% packet loss, time 3998msrtt min/avg/max/mdev = 0.046/0.058/0.093/0.019 ms
3.19.12. IPv6 Set data-fill patternThis command sets the hexadecimal pattern to be filled in the packet.
Syntax ping6 ( <IPv6-address> | <hostname> ) data-fill <pattern>
Authority Root user.
<pattern> Set the hexadecimal pattern to be filled in the packet. A Maximum of 16 pad bytescan be specified to fill out the icmp packet.
Examples
switch# ping6 2020::2 data-fill abPATTERN: 0xabPING 2020::2(2020::2) 100 data bytes108 bytes from 2020::2: icmp_seq=1 ttl=64 time=0.038 ms108 bytes from 2020::2: icmp_seq=2 ttl=64 time=0.074 ms108 bytes from 2020::2: icmp_seq=3 ttl=64 time=0.076 ms108 bytes from 2020::2: icmp_seq=4 ttl=64 time=0.075 ms108 bytes from 2020::2: icmp_seq=5 ttl=64 time=0.077 ms
--- 2020::2 ping statistics ---5 packets transmitted, 5 received, 0% packet loss, time 3999msrtt min/avg/max/mdev = 0.038/0.068/0.077/0.015 ms
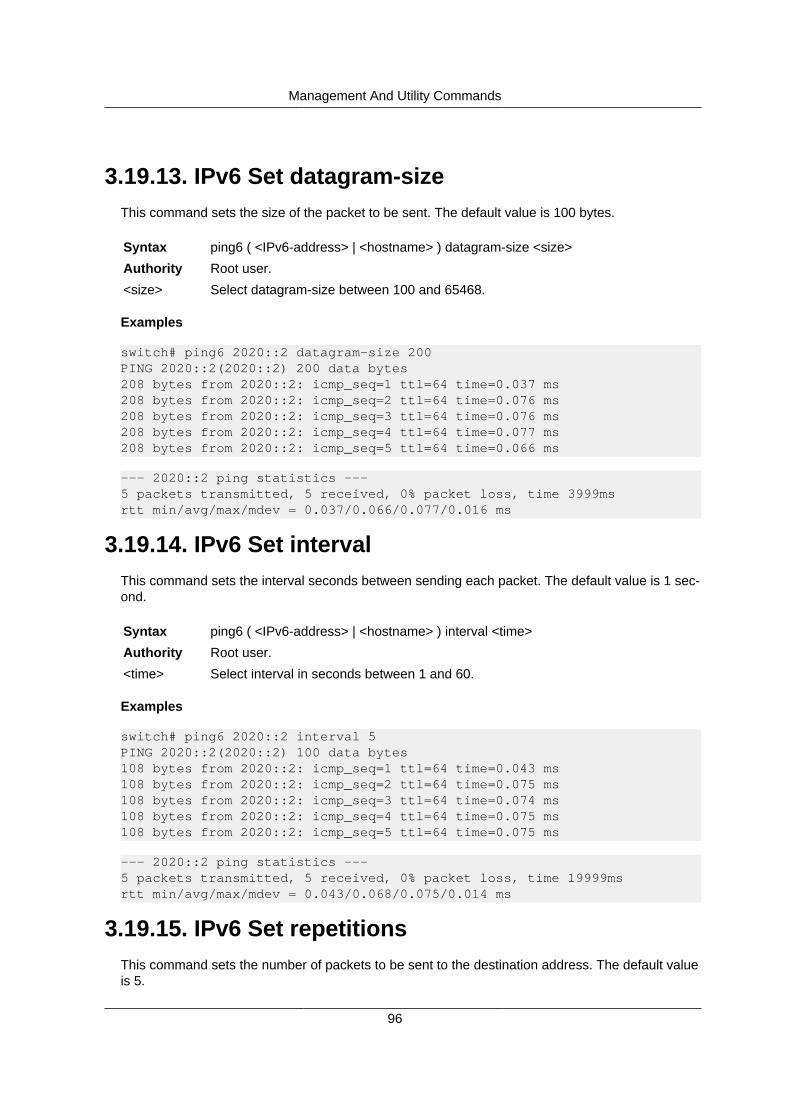
Management And Utility Commands
96
3.19.13. IPv6 Set datagram-sizeThis command sets the size of the packet to be sent. The default value is 100 bytes.
Syntax ping6 ( <IPv6-address> | <hostname> ) datagram-size <size>
Authority Root user.
<size> Select datagram-size between 100 and 65468.
Examples
switch# ping6 2020::2 datagram-size 200PING 2020::2(2020::2) 200 data bytes208 bytes from 2020::2: icmp_seq=1 ttl=64 time=0.037 ms208 bytes from 2020::2: icmp_seq=2 ttl=64 time=0.076 ms208 bytes from 2020::2: icmp_seq=3 ttl=64 time=0.076 ms208 bytes from 2020::2: icmp_seq=4 ttl=64 time=0.077 ms208 bytes from 2020::2: icmp_seq=5 ttl=64 time=0.066 ms
--- 2020::2 ping statistics ---5 packets transmitted, 5 received, 0% packet loss, time 3999msrtt min/avg/max/mdev = 0.037/0.066/0.077/0.016 ms
3.19.14. IPv6 Set intervalThis command sets the interval seconds between sending each packet. The default value is 1 sec-ond.
Syntax ping6 ( <IPv6-address> | <hostname> ) interval <time>
Authority Root user.
<time> Select interval in seconds between 1 and 60.
Examples
switch# ping6 2020::2 interval 5PING 2020::2(2020::2) 100 data bytes108 bytes from 2020::2: icmp_seq=1 ttl=64 time=0.043 ms108 bytes from 2020::2: icmp_seq=2 ttl=64 time=0.075 ms108 bytes from 2020::2: icmp_seq=3 ttl=64 time=0.074 ms108 bytes from 2020::2: icmp_seq=4 ttl=64 time=0.075 ms108 bytes from 2020::2: icmp_seq=5 ttl=64 time=0.075 ms
--- 2020::2 ping statistics ---5 packets transmitted, 5 received, 0% packet loss, time 19999msrtt min/avg/max/mdev = 0.043/0.068/0.075/0.014 ms
3.19.15. IPv6 Set repetitionsThis command sets the number of packets to be sent to the destination address. The default valueis 5.
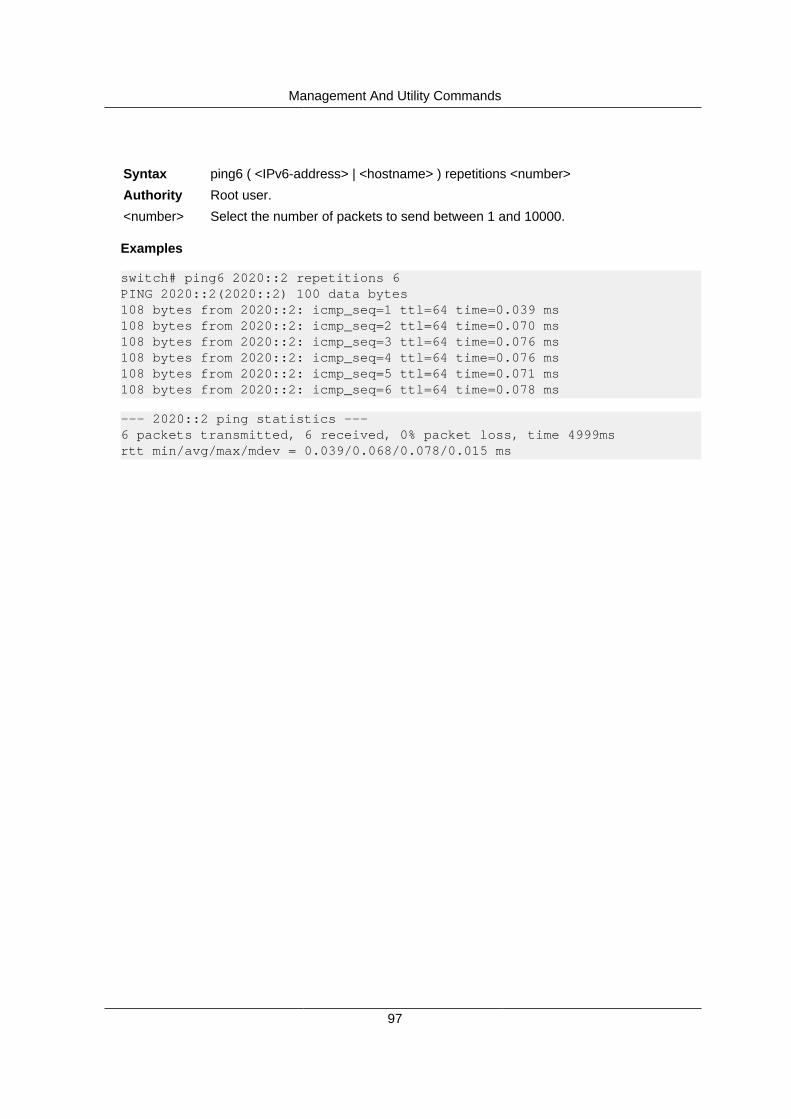
Management And Utility Commands
97
Syntax ping6 ( <IPv6-address> | <hostname> ) repetitions <number>
Authority Root user.
<number> Select the number of packets to send between 1 and 10000.
Examples
switch# ping6 2020::2 repetitions 6PING 2020::2(2020::2) 100 data bytes108 bytes from 2020::2: icmp_seq=1 ttl=64 time=0.039 ms108 bytes from 2020::2: icmp_seq=2 ttl=64 time=0.070 ms108 bytes from 2020::2: icmp_seq=3 ttl=64 time=0.076 ms108 bytes from 2020::2: icmp_seq=4 ttl=64 time=0.076 ms108 bytes from 2020::2: icmp_seq=5 ttl=64 time=0.071 ms108 bytes from 2020::2: icmp_seq=6 ttl=64 time=0.078 ms
--- 2020::2 ping statistics ---6 packets transmitted, 6 received, 0% packet loss, time 4999msrtt min/avg/max/mdev = 0.039/0.068/0.078/0.015 ms

Management And Utility Commands
98
3.20. Traceroute Utility3.20.1. IPv4 address
This command is used to traceroute the specified IPv4 address.
Syntax traceroute <IPv4-address>
Authority Root user.
<IPv4-ad-dress>
IPv4 address to traceroute.
Examples
switch# traceroute 10.0.10.1traceroute to 10.0.10.1 (10.0.10.1) , 1 hops min, 30 hops max, 3 sec.timeout, 3 probes 1 10.0.40.2 0.002ms 0.002ms 0.001ms 2 10.0.30.1 0.002ms 0.001ms 0.001ms 3 10.0.10.1 0.001ms 0.002ms 0.002ms
3.20.2. HostnameThis command is used to traceroute the specified Hostname.
Syntax traceroute <hostname>
Authority Root user.
<hostname> Hostname to traceroute. Length must be less than 256 characters.
Examples
switch# traceroute localhosttraceroute to localhost (127.0.0.1), 1 hops min, 30 hops max, 3 sec.timeout, 3 probes 1 127.0.0.1 0.018ms 0.006ms 0.003ms
3.20.3. Set maximum TTLThis command sets the maximum number of hops used in outgoing probe packets. The defaultvalue is 30.
Syntax traceroute ( <IPv4-address> | <hostname> ) maxttl <number>
Authority Root user.
<IPv4-ad-dress>
IPv4 address to traceroute.
<hostname> Hostname to traceroute. Length must be less than 256 characters.
<number> Select maximum number of hops used in outgoing probe packets between 1 to255.

Management And Utility Commands
99
Examples
switch# traceroute 10.0.10.1 maxttl 20traceroute to 10.0.10.1 (10.0.10.1) , 1 hops min, 20 hops max, 3 sec.timeout, 3 probes 1 10.0.40.2 0.002ms 0.002ms 0.001ms 2 10.0.30.1 0.002ms 0.001ms 0.001ms 3 10.0.10.1 0.001ms 0.002ms 0.002ms
3.20.4. Set minimum TTLThis command sets the minimum number of hops used in outgoing probe packets. The default val-ue is 1.
Syntax traceroute ( <IPv4-address> | <hostname> ) minttl <number>
Authority Root user.
<IPv4-ad-dress>
IPv4 address to traceroute.
<hostname> Hostname to traceroute. Length must be less than 256 characters.
<number> Select maximum number of hops used in outgoing probe packets between 1 to255.
Examples
switch# traceroute 10.0.10.1 minttl 1traceroute to 10.0.10.1 (10.0.10.1) , 1 hops min, 30 hops max, 3 sec.timeout, 3 probes 1 10.0.40.2 0.002ms 0.002ms 0.001ms 2 10.0.30.1 0.002ms 0.001ms 0.001ms 3 10.0.10.1 0.001ms 0.002ms 0.002ms
3.20.5. Set destination portThis command sets the destination port. The default value is dstport 33434.
Syntax traceroute ( <IPv4-address> | <hostname> ) dstport <number>
Authority Root user.
<IPv4-ad-dress>
IPv4 address to traceroute.
<hostname> Hostname to traceroute. Length must be less than 256 characters.
<number> Select the destination port number, 1-34000.
Examples
switch# traceroute 10.0.10.1 dstport 33434traceroute to 10.0.10.1 (10.0.10.1) , 1 hops min, 30 hops max, 3 sec.timeout, 3 probes 1 10.0.40.2 0.002ms 0.002ms 0.001ms
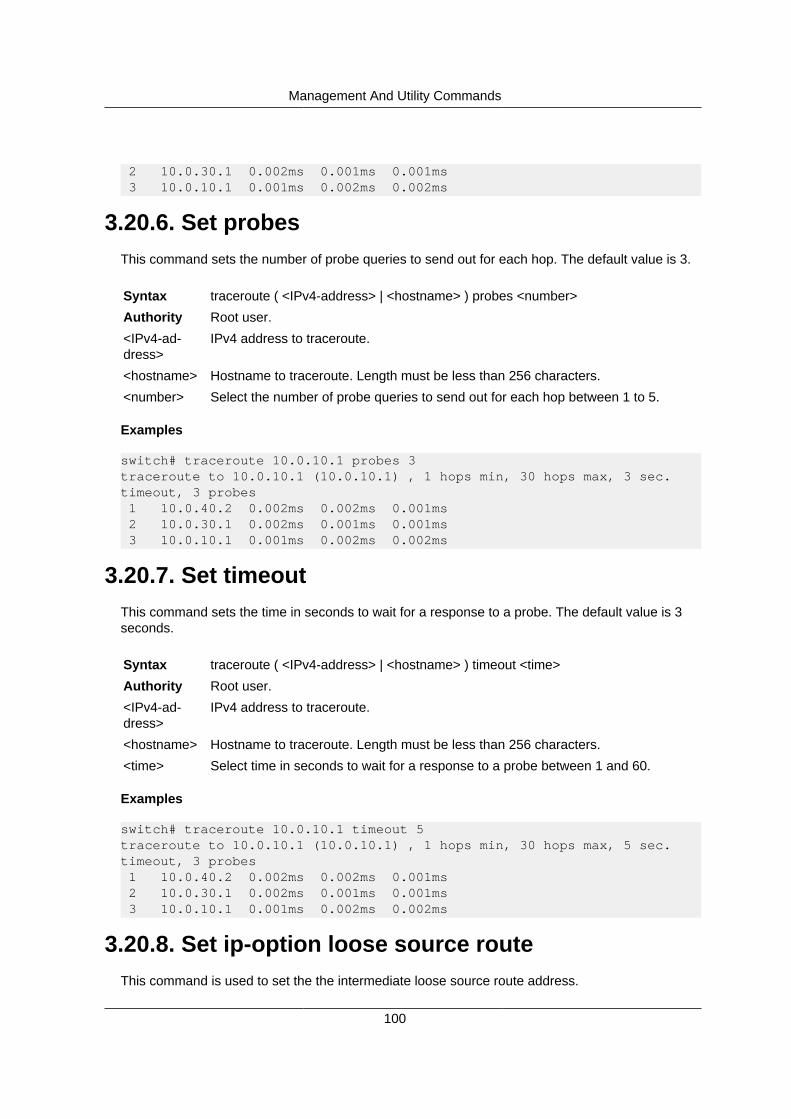
Management And Utility Commands
100
2 10.0.30.1 0.002ms 0.001ms 0.001ms 3 10.0.10.1 0.001ms 0.002ms 0.002ms
3.20.6. Set probesThis command sets the number of probe queries to send out for each hop. The default value is 3.
Syntax traceroute ( <IPv4-address> | <hostname> ) probes <number>
Authority Root user.
<IPv4-ad-dress>
IPv4 address to traceroute.
<hostname> Hostname to traceroute. Length must be less than 256 characters.
<number> Select the number of probe queries to send out for each hop between 1 to 5.
Examples
switch# traceroute 10.0.10.1 probes 3traceroute to 10.0.10.1 (10.0.10.1) , 1 hops min, 30 hops max, 3 sec.timeout, 3 probes 1 10.0.40.2 0.002ms 0.002ms 0.001ms 2 10.0.30.1 0.002ms 0.001ms 0.001ms 3 10.0.10.1 0.001ms 0.002ms 0.002ms
3.20.7. Set timeoutThis command sets the time in seconds to wait for a response to a probe. The default value is 3seconds.
Syntax traceroute ( <IPv4-address> | <hostname> ) timeout <time>
Authority Root user.
<IPv4-ad-dress>
IPv4 address to traceroute.
<hostname> Hostname to traceroute. Length must be less than 256 characters.
<time> Select time in seconds to wait for a response to a probe between 1 and 60.
Examples
switch# traceroute 10.0.10.1 timeout 5traceroute to 10.0.10.1 (10.0.10.1) , 1 hops min, 30 hops max, 5 sec.timeout, 3 probes 1 10.0.40.2 0.002ms 0.002ms 0.001ms 2 10.0.30.1 0.002ms 0.001ms 0.001ms 3 10.0.10.1 0.001ms 0.002ms 0.002ms
3.20.8. Set ip-option loose source routeThis command is used to set the the intermediate loose source route address.

Management And Utility Commands
101
Syntax traceroute ( <IPv4-address> | <hostname> ) ip-option loosesourceroute <IPv4-Ad-dress>
Authority Root user.
<IPv4-ad-dress>
IPv4 address to traceroute.
<hostname> Hostname to traceroute. Length must be less than 256 characters.
<IPv4-ad-dress>
Loose source route address to traceroute.
Examples
switch# traceroute 10.0.10.1 ip-option loosesourceroute 10.0.40.2traceroute to 10.0.10.1 (10.0.10.1) , 1 hops min, 30 hops max, 3 sec.timeout, 3 probes 1 10.0.40.2 0.002ms 0.002ms 0.001ms 2 10.0.30.1 0.002ms 0.001ms 0.001ms 3 10.0.10.1 0.001ms 0.002ms 0.002ms
3.20.9. IPv6 addressThis command is used to traceroute the specified IPv6 address.
Syntax traceroute6 <IPv6-address>
Authority Root user.
<IPv6-ad-dress>
IPv6 address to traceroute.
Examples
switch# traceroute6 0:0::0:1traceroute to 0:0::0:1 (::1) from ::1, 30 hops max, 3 sec. timeout, 3 probes,24 byte packets1 localhost (::1) 0.117 ms 0.032 ms 0.021 ms
3.20.10. IPv6 HostnameThis command is used to traceroute the specified Hostname.
Syntax traceroute6 <hostname>
Authority Root user.
<hostname> Hostname to traceroute. Length must be less than 256 characters.
Examples
switch# traceroute6 localhosttraceroute to localhost (::1) from ::1, 30 hops max, 3 sec. timeout, 3probes, 24 byte packets1 localhost (::1) 0.189 ms 0.089 ms 0.025 ms
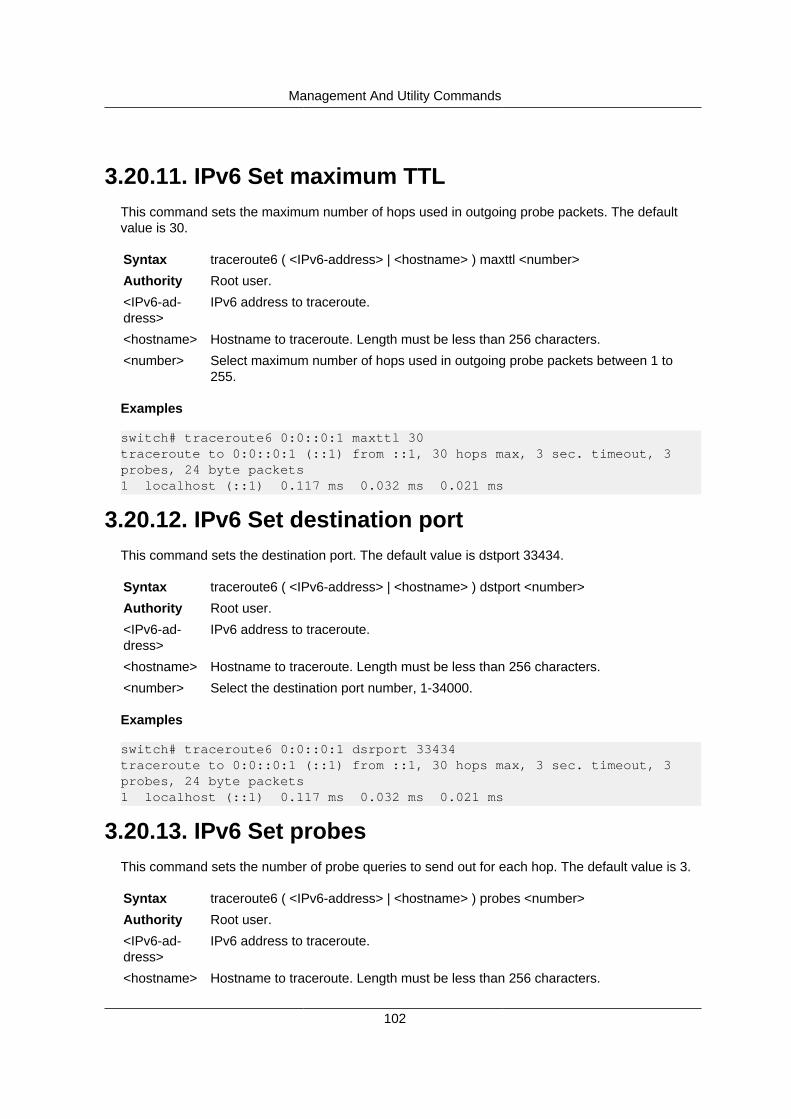
Management And Utility Commands
102
3.20.11. IPv6 Set maximum TTLThis command sets the maximum number of hops used in outgoing probe packets. The defaultvalue is 30.
Syntax traceroute6 ( <IPv6-address> | <hostname> ) maxttl <number>
Authority Root user.
<IPv6-ad-dress>
IPv6 address to traceroute.
<hostname> Hostname to traceroute. Length must be less than 256 characters.
<number> Select maximum number of hops used in outgoing probe packets between 1 to255.
Examples
switch# traceroute6 0:0::0:1 maxttl 30traceroute to 0:0::0:1 (::1) from ::1, 30 hops max, 3 sec. timeout, 3probes, 24 byte packets1 localhost (::1) 0.117 ms 0.032 ms 0.021 ms
3.20.12. IPv6 Set destination portThis command sets the destination port. The default value is dstport 33434.
Syntax traceroute6 ( <IPv6-address> | <hostname> ) dstport <number>
Authority Root user.
<IPv6-ad-dress>
IPv6 address to traceroute.
<hostname> Hostname to traceroute. Length must be less than 256 characters.
<number> Select the destination port number, 1-34000.
Examples
switch# traceroute6 0:0::0:1 dsrport 33434traceroute to 0:0::0:1 (::1) from ::1, 30 hops max, 3 sec. timeout, 3probes, 24 byte packets1 localhost (::1) 0.117 ms 0.032 ms 0.021 ms
3.20.13. IPv6 Set probesThis command sets the number of probe queries to send out for each hop. The default value is 3.
Syntax traceroute6 ( <IPv6-address> | <hostname> ) probes <number>
Authority Root user.
<IPv6-ad-dress>
IPv6 address to traceroute.
<hostname> Hostname to traceroute. Length must be less than 256 characters.
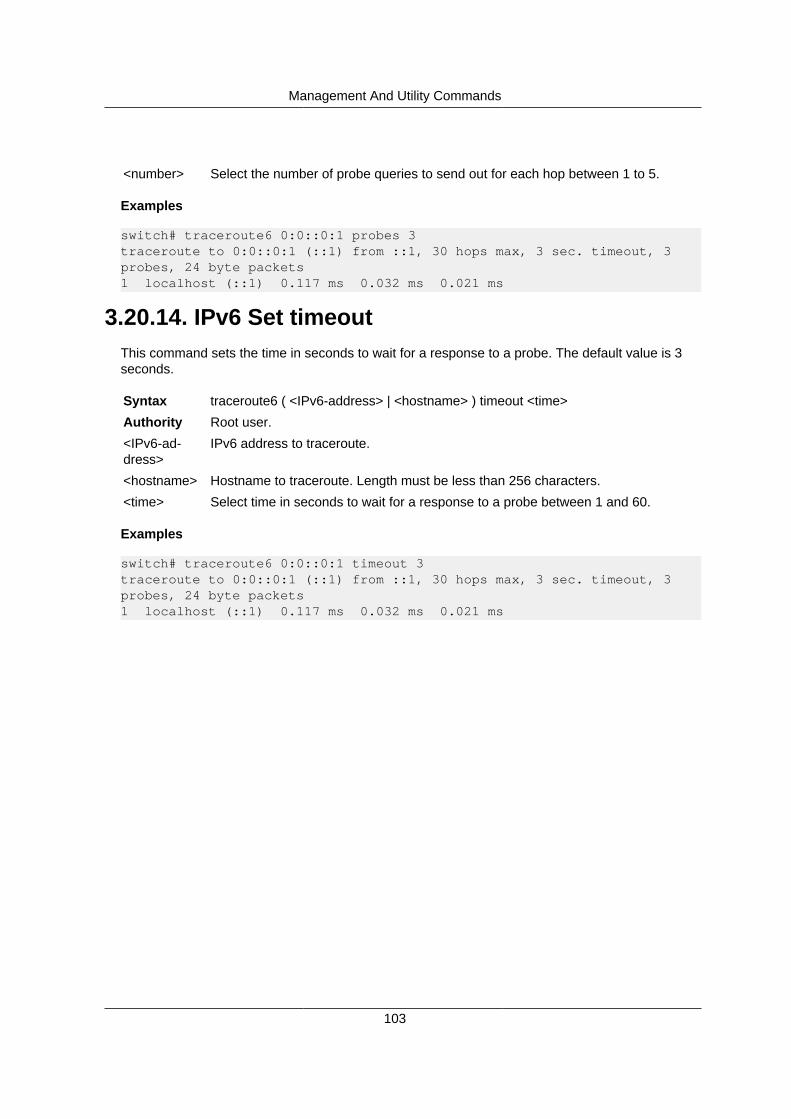
Management And Utility Commands
103
<number> Select the number of probe queries to send out for each hop between 1 to 5.
Examples
switch# traceroute6 0:0::0:1 probes 3traceroute to 0:0::0:1 (::1) from ::1, 30 hops max, 3 sec. timeout, 3probes, 24 byte packets1 localhost (::1) 0.117 ms 0.032 ms 0.021 ms
3.20.14. IPv6 Set timeoutThis command sets the time in seconds to wait for a response to a probe. The default value is 3seconds.
Syntax traceroute6 ( <IPv6-address> | <hostname> ) timeout <time>
Authority Root user.
<IPv6-ad-dress>
IPv6 address to traceroute.
<hostname> Hostname to traceroute. Length must be less than 256 characters.
<time> Select time in seconds to wait for a response to a probe between 1 and 60.
Examples
switch# traceroute6 0:0::0:1 timeout 3traceroute to 0:0::0:1 (::1) from ::1, 30 hops max, 3 sec. timeout, 3probes, 24 byte packets1 localhost (::1) 0.117 ms 0.032 ms 0.021 ms
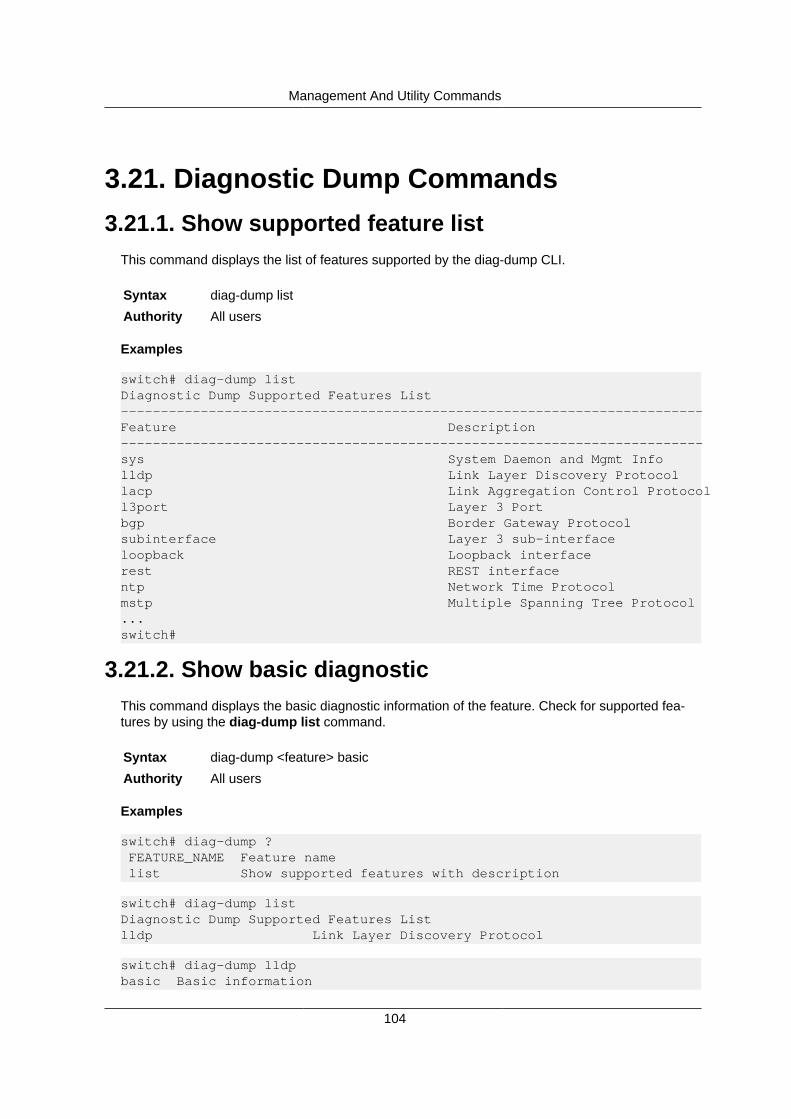
Management And Utility Commands
104
3.21. Diagnostic Dump Commands3.21.1. Show supported feature list
This command displays the list of features supported by the diag-dump CLI.
Syntax diag-dump list
Authority All users
Examples
switch# diag-dump listDiagnostic Dump Supported Features List-------------------------------------------------------------------------Feature Description-------------------------------------------------------------------------sys System Daemon and Mgmt Infolldp Link Layer Discovery Protocollacp Link Aggregation Control Protocoll3port Layer 3 Portbgp Border Gateway Protocolsubinterface Layer 3 sub-interfaceloopback Loopback interfacerest REST interfacentp Network Time Protocolmstp Multiple Spanning Tree Protocol...switch#
3.21.2. Show basic diagnosticThis command displays the basic diagnostic information of the feature. Check for supported fea-tures by using the diag-dump list command.
Syntax diag-dump <feature> basic
Authority All users
Examples
switch# diag-dump ? FEATURE_NAME Feature name list Show supported features with description
switch# diag-dump listDiagnostic Dump Supported Features Listlldp Link Layer Discovery Protocol
switch# diag-dump lldpbasic Basic information
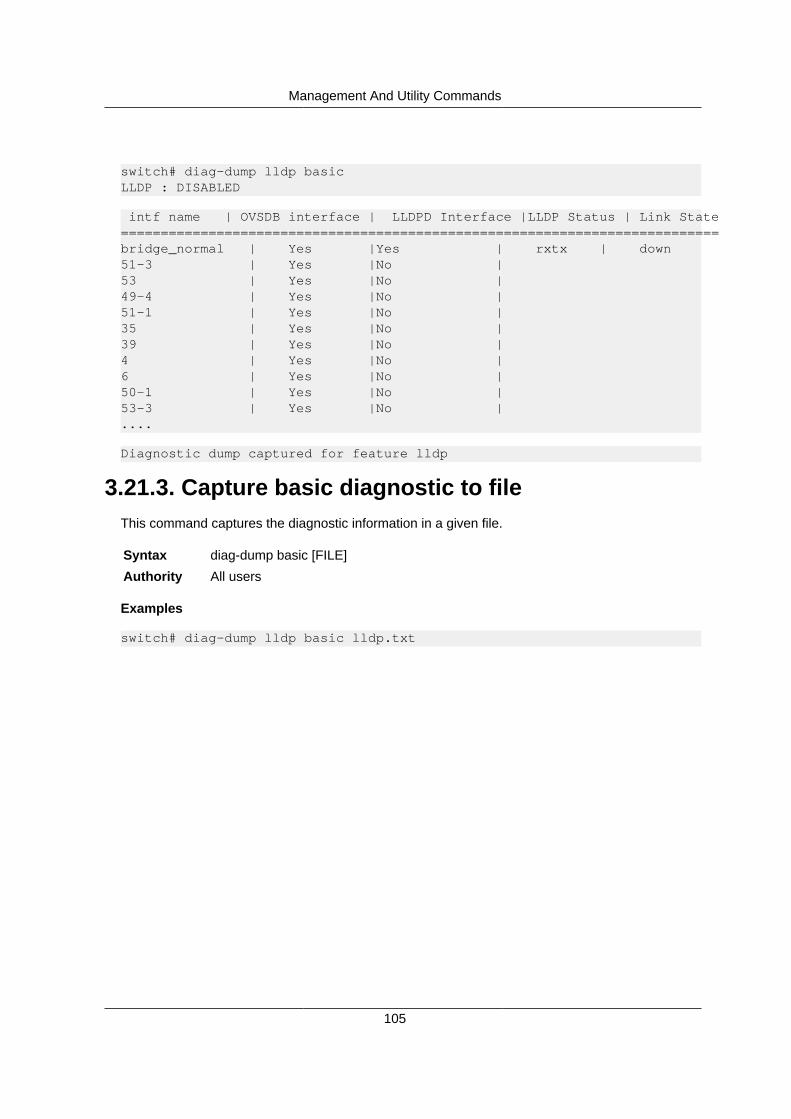
Management And Utility Commands
105
switch# diag-dump lldp basicLLDP : DISABLED
intf name | OVSDB interface | LLDPD Interface |LLDP Status | Link State===========================================================================bridge_normal | Yes |Yes | rxtx | down51-3 | Yes |No |53 | Yes |No |49-4 | Yes |No |51-1 | Yes |No |35 | Yes |No |39 | Yes |No |4 | Yes |No |6 | Yes |No |50-1 | Yes |No |53-3 | Yes |No |....
Diagnostic dump captured for feature lldp
3.21.3. Capture basic diagnostic to fileThis command captures the diagnostic information in a given file.
Syntax diag-dump basic [FILE]
Authority All users
Examples
switch# diag-dump lldp basic lldp.txt
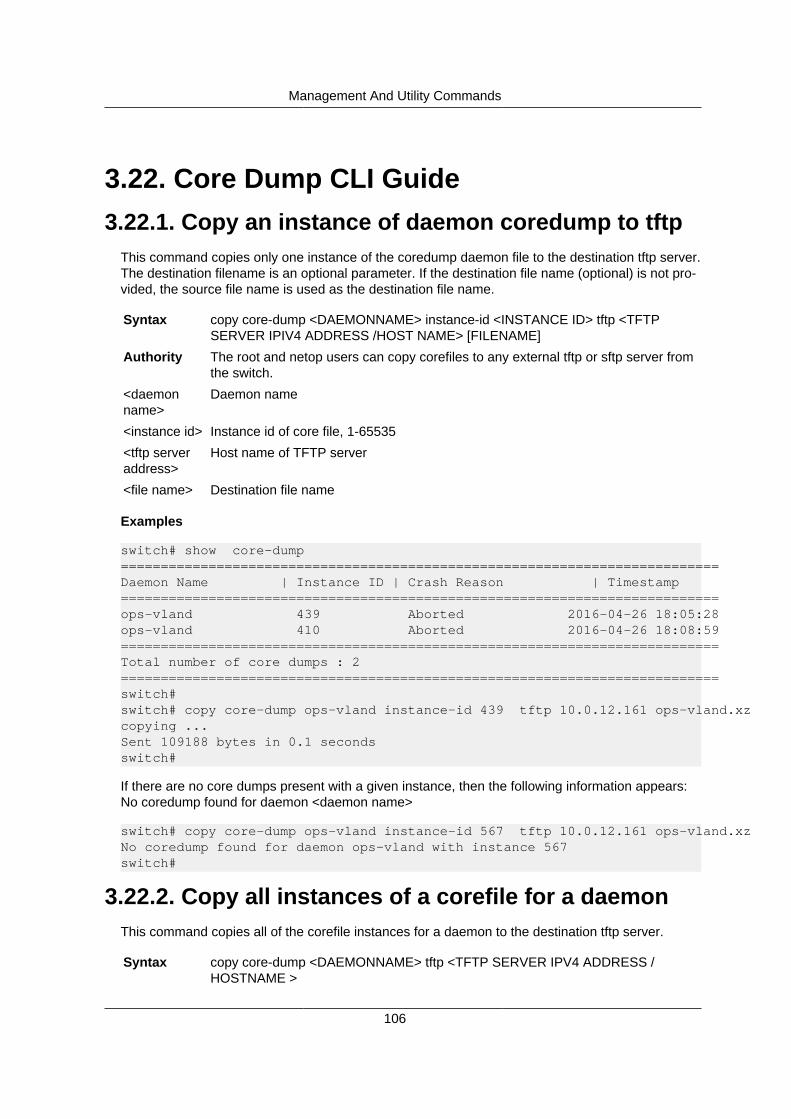
Management And Utility Commands
106
3.22. Core Dump CLI Guide3.22.1. Copy an instance of daemon coredump to tftp
This command copies only one instance of the coredump daemon file to the destination tftp server.The destination filename is an optional parameter. If the destination file name (optional) is not pro-vided, the source file name is used as the destination file name.
Syntax copy core-dump <DAEMONNAME> instance-id <INSTANCE ID> tftp <TFTPSERVER IPIV4 ADDRESS /HOST NAME> [FILENAME]
Authority The root and netop users can copy corefiles to any external tftp or sftp server fromthe switch.
<daemonname>
Daemon name
<instance id> Instance id of core file, 1-65535
<tftp serveraddress>
Host name of TFTP server
<file name> Destination file name
Examples
switch# show core-dump===========================================================================Daemon Name | Instance ID | Crash Reason | Timestamp===========================================================================ops-vland 439 Aborted 2016-04-26 18:05:28ops-vland 410 Aborted 2016-04-26 18:08:59===========================================================================Total number of core dumps : 2===========================================================================switch#switch# copy core-dump ops-vland instance-id 439 tftp 10.0.12.161 ops-vland.xzcopying ...Sent 109188 bytes in 0.1 secondsswitch#
If there are no core dumps present with a given instance, then the following information appears:No coredump found for daemon <daemon name>
switch# copy core-dump ops-vland instance-id 567 tftp 10.0.12.161 ops-vland.xzNo coredump found for daemon ops-vland with instance 567switch#
3.22.2. Copy all instances of a corefile for a daemonThis command copies all of the corefile instances for a daemon to the destination tftp server.
Syntax copy core-dump <DAEMONNAME> tftp <TFTP SERVER IPV4 ADDRESS /HOSTNAME >

Management And Utility Commands
107
Authority The root and netop users can copy corefiles to any external tftp or sftp server fromthe switch.
<daemonname>
Daemon name
<tftp serveraddress>
Host name of TFTP server
Examples
switch# show core-dump===========================================================================Daemon Name | Instance ID | Crash Reason | Timestamp===========================================================================ops-vland 439 Aborted 2016-04-26 18:05:28ops-vland 410 Aborted 2016-04-26 18:08:59===========================================================================Total number of core dumps : 2===========================================================================switch#switch# copy core-dump ops-vland tftp 10.0.12.161copying ...Sent 109188 bytes in 0.1 secondscopying ...Sent 109044 bytes in 0.0 secondsswitch#
If there are no core dumps files present, then the following information appears:
switch# copy core-dump ops-lldpd tftp 10.0.12.161No coredump found for daemon ops-lldpdswitch#
3.22.3. Copy kernel corefile to tftp serverThis command copies the daemon coredump to the destination sftp server. You can specify thedestination filename by specifying in the command.
Syntax copy core-dump kernel tftp <TFTP SERVER IPV4 ADDRESS / HOST NAME >[FILENAME]
Authority The root and netop users can copy corefiles to any external tftp or sftp server fromthe switch.
<tftp serveraddress>
Host name of TFTP server
<file name> Destination file name
Examples
switch# show core-dump===========================================================================Daemon Name | Instance ID | Crash Reason | Timestamp

Management And Utility Commands
108
===========================================================================ops-vland 439 Aborted 2016-04-26 18:05:28ops-vland 410 Aborted 2016-04-26 18:08:59kernel 2016-04-26 18:04:20===========================================================================Total number of core dumps : 3===========================================================================switch#switch#switch# copy core-dump kernelsftp tftpswitch# copy core-dump kernel sftp Copy coredump to sftp server tftp Copy coredump to tftp serverswitch# copy core-dump kernel tftp A.B.C.D Specify server IP WORD Specify server nameswitch# copy core-dump kernel tftp 10.0.12.161 <cr> [FILENAME] Specify destination file name
switch# copy core-dump kernel tftp 10.0.12.161copying ...Sent 30955484 bytes in 19.6 secondsswitch#
If there are no kernel corefiles, then the following information appears: No coredump found for ker-nel
switch# copy core-dump kernel tftp 10.0.12.161No coredump found for kernelswitch#
3.22.4. Copy one instance of daemon corefile to sftpserver
This command copies the daemon coredump to the destination sftp server. You can specify thedestination filename. The destination filename is optional parameter. If you have not specified thefile name, then it saves as a source file name.
Syntax copy core-dump <DAEMONNAME> instance-id <INSTANCE ID> sftp <USER-NAME> <SFTP SERVER IPV4/HOST NAME> [FILENAME]
Authority The root and netop users can copy corefiles to any external tftp or sftp server fromthe switch.
<daemonname>
Daemon name
<instance id> Instance id of core file, 1-65535
<sftp serveraddress>
Host name of SFTP server

Management And Utility Commands
109
<user name> User name
<file name> Destination file name
Examples
switch#copy core-dump ops-vland instance-id 410 sftp naiksat 10.0.12.161ops-vland.xzcopying [email protected]'s password:Connected to 10.0.12.161.sftp> put /var/diagnostics/coredump/core.ops-vland.0.a6f6c4b58aa5467ba57d7f9492afa10f.410.1461694139000000.xz ops-vland.xzUploading /var/diagnostics/coredump/core.ops-vland.0.a6f6c4b58aa5467ba57d7f9492afa10f.410.1461694139000000.xz to /users/naiksat/ops-vland.xz/var/diagnostics/coredump/core.ops-vland.0.a6 100% 106KB 106.5KB/s 00:00switch#
If there are no core dumps to present, the following information appears:
copy core-dump ops-vland instance-id 410 sftp naiksat 10.0.12.161 ops-vland.xzNo coredump found for daemon ops-vland with instance 410
3.22.5. Copy all corefile instances for a daemon to asftp server
This command copies all instance of a daemon coredump to the destination sftp server. You canspecify the destination file name. If you have not specified the file name then it saves as a sourcefile name.
Syntax copy core-dump < DAEMON NAME> sftp <USERNAME> <SFTP SERVER AD-DRESS> [DESTINATION FILE NAME]
Authority The root and netop users can copy corefiles to any external tftp or sftp server fromthe switch.
<daemonname>
Daemon name
<instance id> Instance id of core file, 1-65535
<sftp serveraddress>
Host name of SFTP server
<file name> Destination file name
Examples
switch# copy core-dump ops-switchd sftp naiksat 10.0.12.161copying ...The authenticity of host '10.0.12.161 (10.0.12.161)' can't be established.ECDSA key fingerprint is SHA256:uWeyXm2j6VkDfCitlyz/P+xGgZW9YYw5GnDOsEgVHeU.Are you sure you want to continue connecting (yes/no)? yesWarning: Permanently added '10.0.12.161' (ECDSA) to the list of known hosts.
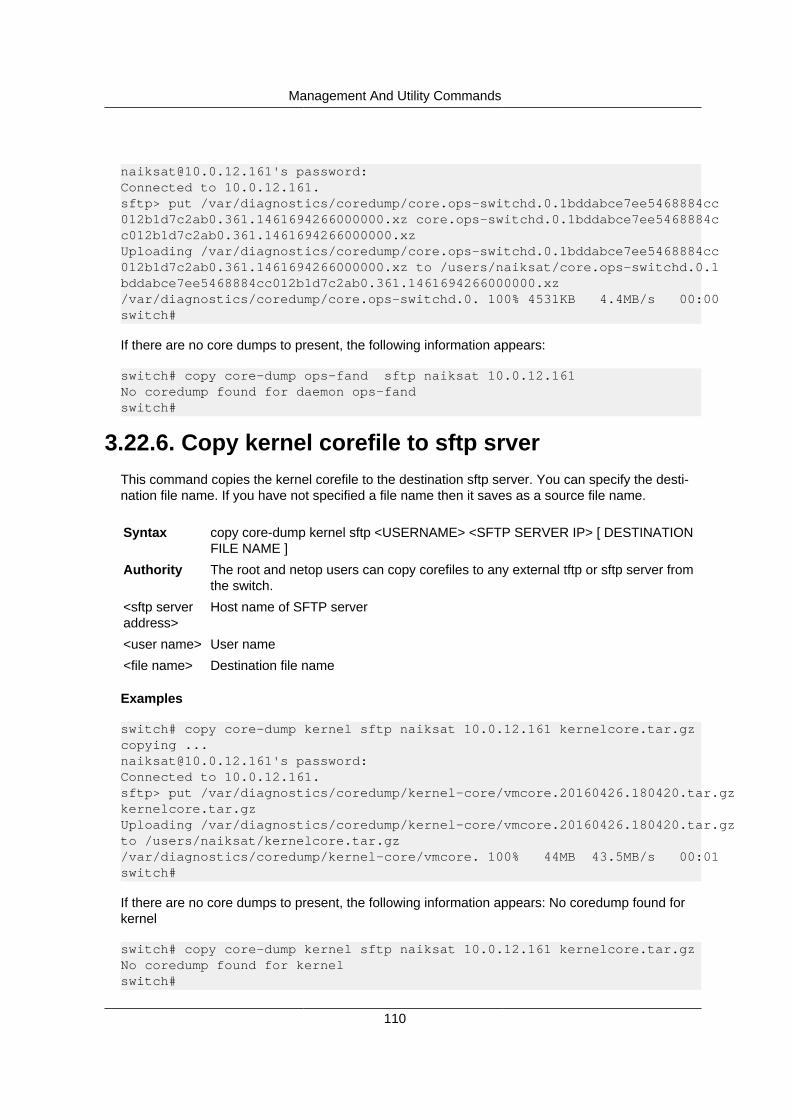
Management And Utility Commands
110
[email protected]'s password:Connected to 10.0.12.161.sftp> put /var/diagnostics/coredump/core.ops-switchd.0.1bddabce7ee5468884cc012b1d7c2ab0.361.1461694266000000.xz core.ops-switchd.0.1bddabce7ee5468884cc012b1d7c2ab0.361.1461694266000000.xzUploading /var/diagnostics/coredump/core.ops-switchd.0.1bddabce7ee5468884cc012b1d7c2ab0.361.1461694266000000.xz to /users/naiksat/core.ops-switchd.0.1bddabce7ee5468884cc012b1d7c2ab0.361.1461694266000000.xz/var/diagnostics/coredump/core.ops-switchd.0. 100% 4531KB 4.4MB/s 00:00switch#
If there are no core dumps to present, the following information appears:
switch# copy core-dump ops-fand sftp naiksat 10.0.12.161No coredump found for daemon ops-fandswitch#
3.22.6. Copy kernel corefile to sftp srverThis command copies the kernel corefile to the destination sftp server. You can specify the desti-nation file name. If you have not specified a file name then it saves as a source file name.
Syntax copy core-dump kernel sftp <USERNAME> <SFTP SERVER IP> [ DESTINATIONFILE NAME ]
Authority The root and netop users can copy corefiles to any external tftp or sftp server fromthe switch.
<sftp serveraddress>
Host name of SFTP server
<user name> User name
<file name> Destination file name
Examples
switch# copy core-dump kernel sftp naiksat 10.0.12.161 kernelcore.tar.gzcopying [email protected]'s password:Connected to 10.0.12.161.sftp> put /var/diagnostics/coredump/kernel-core/vmcore.20160426.180420.tar.gzkernelcore.tar.gzUploading /var/diagnostics/coredump/kernel-core/vmcore.20160426.180420.tar.gzto /users/naiksat/kernelcore.tar.gz/var/diagnostics/coredump/kernel-core/vmcore. 100% 44MB 43.5MB/s 00:01switch#
If there are no core dumps to present, the following information appears: No coredump found forkernel
switch# copy core-dump kernel sftp naiksat 10.0.12.161 kernelcore.tar.gzNo coredump found for kernelswitch#
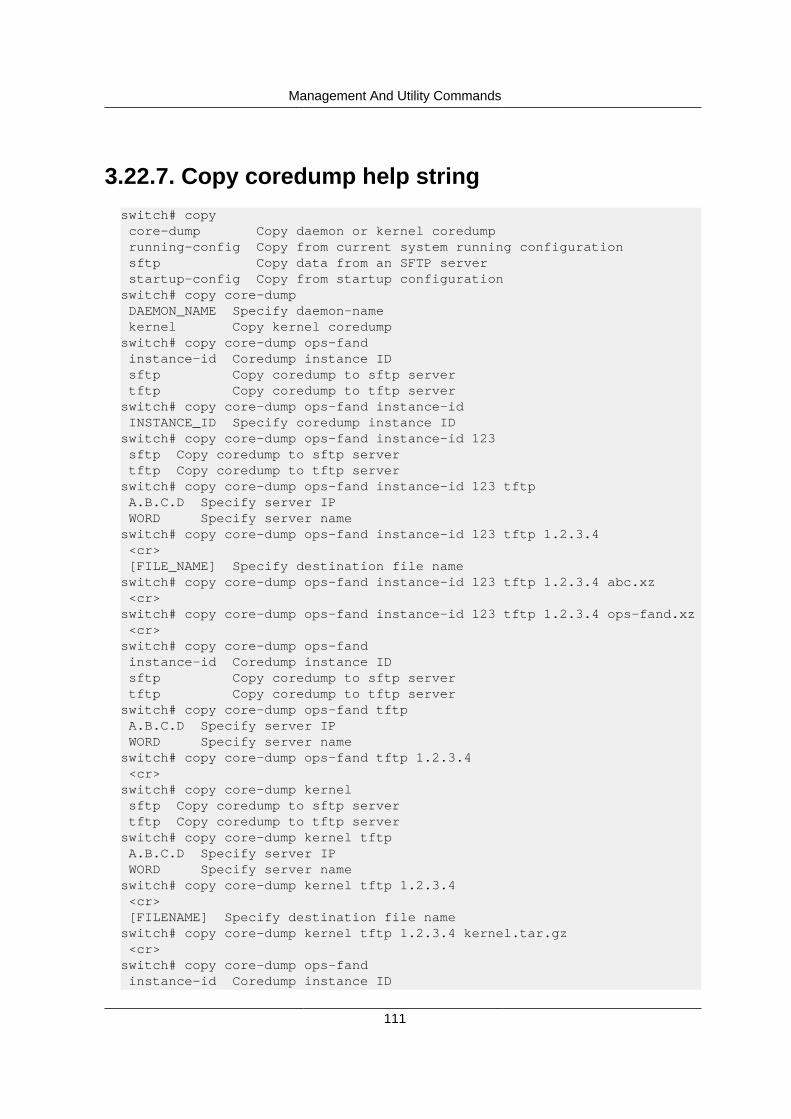
Management And Utility Commands
111
3.22.7. Copy coredump help stringswitch# copy core-dump Copy daemon or kernel coredump running-config Copy from current system running configuration sftp Copy data from an SFTP server startup-config Copy from startup configurationswitch# copy core-dump DAEMON_NAME Specify daemon-name kernel Copy kernel coredumpswitch# copy core-dump ops-fand instance-id Coredump instance ID sftp Copy coredump to sftp server tftp Copy coredump to tftp serverswitch# copy core-dump ops-fand instance-id INSTANCE_ID Specify coredump instance IDswitch# copy core-dump ops-fand instance-id 123 sftp Copy coredump to sftp server tftp Copy coredump to tftp serverswitch# copy core-dump ops-fand instance-id 123 tftp A.B.C.D Specify server IP WORD Specify server nameswitch# copy core-dump ops-fand instance-id 123 tftp 1.2.3.4 <cr> [FILE_NAME] Specify destination file nameswitch# copy core-dump ops-fand instance-id 123 tftp 1.2.3.4 abc.xz <cr>switch# copy core-dump ops-fand instance-id 123 tftp 1.2.3.4 ops-fand.xz <cr>switch# copy core-dump ops-fand instance-id Coredump instance ID sftp Copy coredump to sftp server tftp Copy coredump to tftp serverswitch# copy core-dump ops-fand tftp A.B.C.D Specify server IP WORD Specify server nameswitch# copy core-dump ops-fand tftp 1.2.3.4 <cr>switch# copy core-dump kernel sftp Copy coredump to sftp server tftp Copy coredump to tftp serverswitch# copy core-dump kernel tftp A.B.C.D Specify server IP WORD Specify server nameswitch# copy core-dump kernel tftp 1.2.3.4 <cr> [FILENAME] Specify destination file nameswitch# copy core-dump kernel tftp 1.2.3.4 kernel.tar.gz <cr>switch# copy core-dump ops-fand instance-id Coredump instance ID
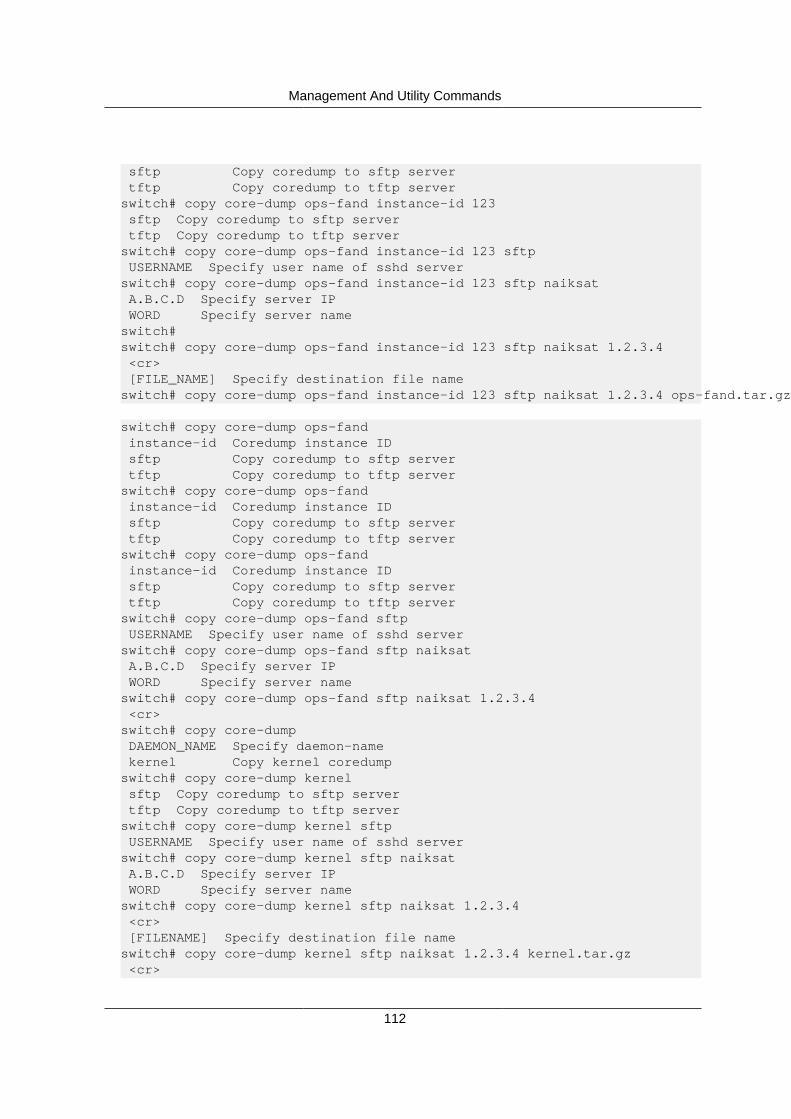
Management And Utility Commands
112
sftp Copy coredump to sftp server tftp Copy coredump to tftp serverswitch# copy core-dump ops-fand instance-id 123 sftp Copy coredump to sftp server tftp Copy coredump to tftp serverswitch# copy core-dump ops-fand instance-id 123 sftp USERNAME Specify user name of sshd serverswitch# copy core-dump ops-fand instance-id 123 sftp naiksat A.B.C.D Specify server IP WORD Specify server nameswitch#switch# copy core-dump ops-fand instance-id 123 sftp naiksat 1.2.3.4 <cr> [FILE_NAME] Specify destination file nameswitch# copy core-dump ops-fand instance-id 123 sftp naiksat 1.2.3.4 ops-fand.tar.gz
switch# copy core-dump ops-fand instance-id Coredump instance ID sftp Copy coredump to sftp server tftp Copy coredump to tftp serverswitch# copy core-dump ops-fand instance-id Coredump instance ID sftp Copy coredump to sftp server tftp Copy coredump to tftp serverswitch# copy core-dump ops-fand instance-id Coredump instance ID sftp Copy coredump to sftp server tftp Copy coredump to tftp serverswitch# copy core-dump ops-fand sftp USERNAME Specify user name of sshd serverswitch# copy core-dump ops-fand sftp naiksat A.B.C.D Specify server IP WORD Specify server nameswitch# copy core-dump ops-fand sftp naiksat 1.2.3.4 <cr>switch# copy core-dump DAEMON_NAME Specify daemon-name kernel Copy kernel coredumpswitch# copy core-dump kernel sftp Copy coredump to sftp server tftp Copy coredump to tftp serverswitch# copy core-dump kernel sftp USERNAME Specify user name of sshd serverswitch# copy core-dump kernel sftp naiksat A.B.C.D Specify server IP WORD Specify server nameswitch# copy core-dump kernel sftp naiksat 1.2.3.4 <cr> [FILENAME] Specify destination file nameswitch# copy core-dump kernel sftp naiksat 1.2.3.4 kernel.tar.gz <cr>

Management And Utility Commands
113
3.22.8. show core dumpThis command lists all the core dumps in the switch. Each entry in the listing displays the daemonname that crashed and the timestamp of the crash event.
Syntax show core-dump
Authority All users
Examples
switch# show core-dump===========================================================TimeStamp | Daemon Name===========================================================2016-10-09 09:08:22 ops-lldpd2015-09-12 10:34:56 kernel===========================================================Total number of core dumps : 1===========================================================
If there are no core dumps to present, the following information appears:
switch# show core-dumpNo core dumps are present

Management And Utility Commands
114
3.23. NTP Commands Reference3.23.1. ntp server
Forms an association with an NTP server.
Syntax ntp server <name|ipv4-address> [key key-id] [prefer] [version version-number]
Syntax [no] ntp server <name|ipv4-address>
Authority Admin user.
<name> The name or IPV4 address of the server.
<key-id> The key used while communicating with the server, 1-65534.
<prefer> Request to make this the preferred NTP server.
<version-no> NTP version 3 or 4.
<no> Destroys a previously configured server. |
Examples
s1(config)#ntp server time.apple.com key 10 version 4s1(config)#no ntp server 192.0.1.1
3.23.2. ntp authenticationEnables/disables the NTP authentication feature.
Syntax [no] ntp authentication enable
Authority Admin user.
<no> Disables the NTP authentication feature.
Examples
s1(config)#ntp authentication enables1(config)#no ntp authentication enable
3.23.3. ntp authentication-keyDefines the authentication key.
Syntax ntp authentication-key <key-id> md5 <password>
Syntax [no] ntp authentication-key <key-id>
Authority Admin user.
<key-id> The key used while communicating with the server, 1-65534.
<password> The MD5 password, 8-16 chars.
<no> Destroys the previously created NTP authentication key.
Examples

Management And Utility Commands
115
s1(config)#ntp authentication-key 10 md5 myPasswords1(config)#no ntp authentication-key 10
3.23.4. ntp trusted-keyMarks a previously defined authentication key as trusted. If NTP authentication is enabled, the de-vice synchronizes with a time source only if the server carries one of the authentication keys speci-fied as a trusted key.
Syntax [no] ntp trusted-key <key-id>
Authority Admin user.
<key-id> The key used while communicating with the server, 1-65534.
<no> Destroys the previously created NTP authentication key.
Examples
s1(config)#ntp trusted-key 10s1(config)#no ntp trusted-key 10
3.23.5. show ntp associationsDisplays the status of connections to NTP servers.
Syntax show ntp associations
Authority Admin user.
Examples
s1(config)#show ntp associations------------------------------------------------------------ ID NAME REMOTE VER KEYID------------------------------------------------------------ 1 192.0.1.1 192.0.1.1 3 -* 2 time.apple.com 17.253.2.253 4 10------------------------------------------------------------
--------------------------------------------------------REF-ID ST T LAST POLL REACH DELAY OFFSET JITTER--------------------------------------------------------.INIT. - - - - - - - -.GPSs. 2 U 10 64 0 0.121 0.994 0.001--------------------------------------------------------
Key
code : Tally code (Explained later)ID : Server numberNAME : NTP server FQDN/IPV4 address (only the first 15 charactersof the name are displayed)REMOTE : Remote server IP address
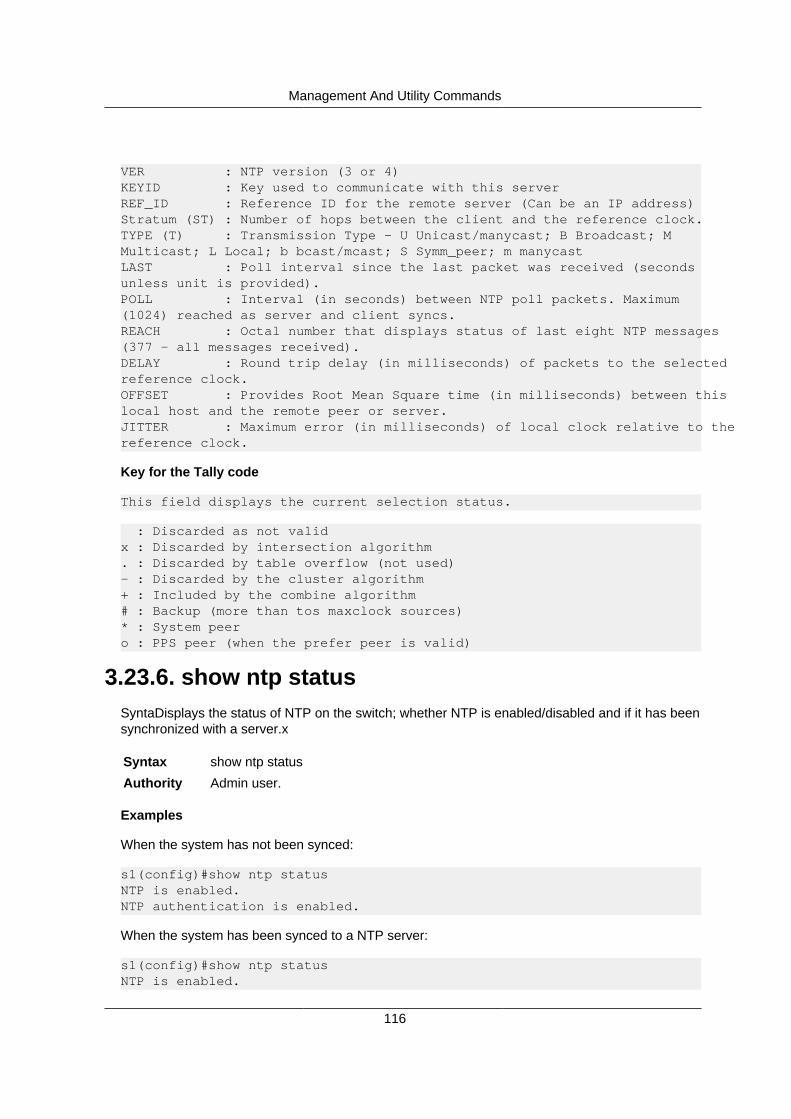
Management And Utility Commands
116
VER : NTP version (3 or 4)KEYID : Key used to communicate with this serverREF_ID : Reference ID for the remote server (Can be an IP address)Stratum (ST) : Number of hops between the client and the reference clock.TYPE (T) : Transmission Type - U Unicast/manycast; B Broadcast; MMulticast; L Local; b bcast/mcast; S Symm_peer; m manycastLAST : Poll interval since the last packet was received (secondsunless unit is provided).POLL : Interval (in seconds) between NTP poll packets. Maximum(1024) reached as server and client syncs.REACH : Octal number that displays status of last eight NTP messages(377 - all messages received).DELAY : Round trip delay (in milliseconds) of packets to the selectedreference clock.OFFSET : Provides Root Mean Square time (in milliseconds) between thislocal host and the remote peer or server.JITTER : Maximum error (in milliseconds) of local clock relative to thereference clock.
Key for the Tally code
This field displays the current selection status.
: Discarded as not validx : Discarded by intersection algorithm. : Discarded by table overflow (not used)- : Discarded by the cluster algorithm+ : Included by the combine algorithm# : Backup (more than tos maxclock sources)* : System peero : PPS peer (when the prefer peer is valid)
3.23.6. show ntp statusSyntaDisplays the status of NTP on the switch; whether NTP is enabled/disabled and if it has beensynchronized with a server.x
Syntax show ntp status
Authority Admin user.
Examples
When the system has not been synced:
s1(config)#show ntp statusNTP is enabled.NTP authentication is enabled.
When the system has been synced to a NTP server:
s1(config)#show ntp statusNTP is enabled.
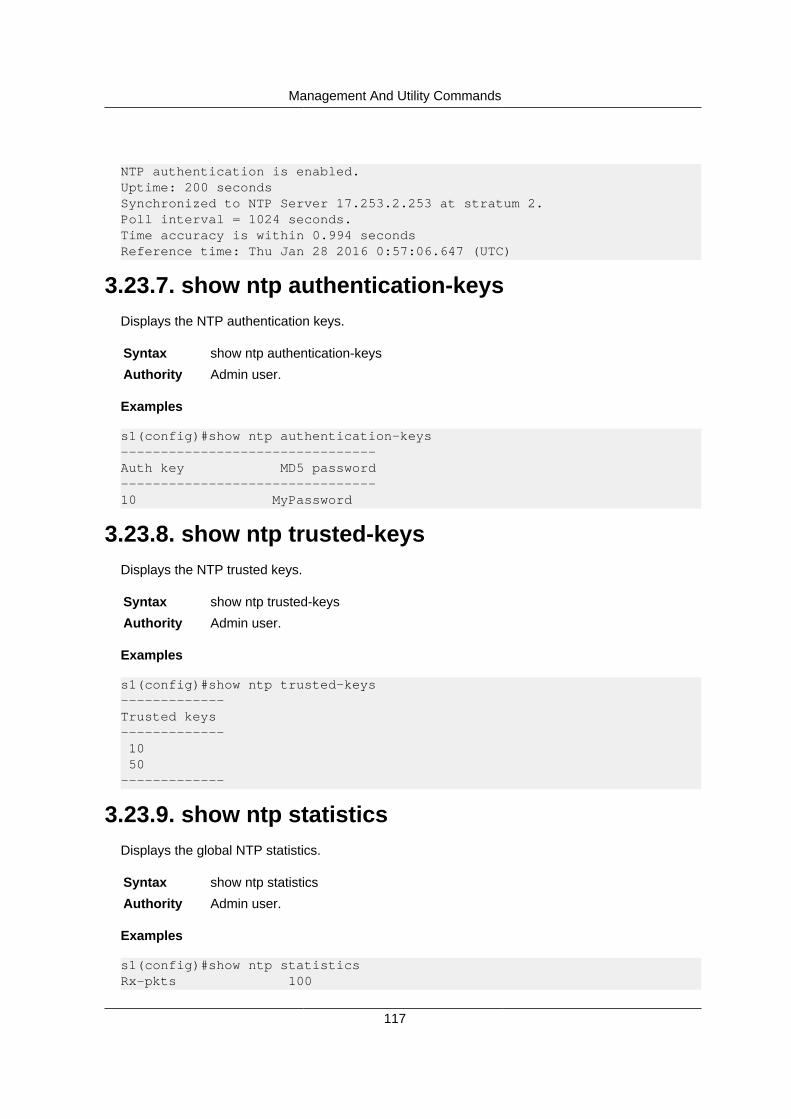
Management And Utility Commands
117
NTP authentication is enabled.Uptime: 200 secondsSynchronized to NTP Server 17.253.2.253 at stratum 2.Poll interval = 1024 seconds.Time accuracy is within 0.994 secondsReference time: Thu Jan 28 2016 0:57:06.647 (UTC)
3.23.7. show ntp authentication-keysDisplays the NTP authentication keys.
Syntax show ntp authentication-keys
Authority Admin user.
Examples
s1(config)#show ntp authentication-keys--------------------------------Auth key MD5 password--------------------------------10 MyPassword
3.23.8. show ntp trusted-keysDisplays the NTP trusted keys.
Syntax show ntp trusted-keys
Authority Admin user.
Examples
s1(config)#show ntp trusted-keys-------------Trusted keys------------- 10 50-------------
3.23.9. show ntp statisticsDisplays the global NTP statistics.
Syntax show ntp statistics
Authority Admin user.
Examples
s1(config)#show ntp statisticsRx-pkts 100

Management And Utility Commands
118
Rx cur ver 80Rx old ver 20Err-pkts 2Auth-failed-pkts 1Declined-pkts 0Restricted-pkts 0Rate-limited-pkts 0KoD-pkts 0
Legend:
Rx-pkts: Total NTP packets received.Cur Ver Rx-pkts: Number of NTP packets that match the current NTP version.Old Ver Rx-pkts: Number of NTP packets that match the previous NTP version.Error pkts: Packets dropped due to all other error reasons.Auth-failed pkts: Packets dropped due to authentication failure.Declined pkts: Packets denied access for any reason.Restricted pkts: Packets dropped due to NTP access control.Rate-limited pkts: Number of packets discarded due to rate limitation.KOD pkts: Number of Kiss of Death packets sent.
For general NTP debugging information, see http://doc.ntp.org/4.2.6p5/debug.html. http://doc.ntp.org/4.2.8p8/monopt.html.
Because ntpq sends query messages to ntpd for fetching status information. Rx-pktsfield may show a non-zero packet count, even when ntp association is not configuredon the switch.
Management And Utility Commands
119
3.24. Mirror CommandsOverview
The port mirroring feature enables traffic on one or more switch interfaces to be replicated on an-other interface.
Mirror session
A mirror session defines the settings for the replication of data between one or more source inter-faces and a destination interface.
A maximum of four mirror sessions can be active at the same time on the switch. There is no limiton the number of inactive sessions that can be defined in the configuration.
Each mirror session has a single output, or destination interface, and zero or more input, or sourceinterfaces. The destination interface is the recipient of all mirrored traffic, and must able to supportthe combined data rate of all source interfaces. Source interfaces can be configured to mirror re-ceived traffic, transmitted traffic, or all traffic.
Source and destination interfaces do not need to reside in the same subnet, VLAN or VRF.
A LAG can be specified as either a source or destination interface. The switch internally handlesthe mirroring of the traffic appropriately across all the LAG member interfaces.
Mirroring is VRF agnostic. That is, a network administrator may choose to specify source inter-faces from different VRFs in the same mirror session and have a single destination for the mir-rored traffic.
Mirror rules
The following rules apply when creating a mirror session:
1. An interface cannot be both a source and destination in the same mirror session.
2. The destination interface in an active mirror session cannot be the source or destination in an-other active mirror session.
3. The source interface in an active mirror session cannot be the destination in another activemirror session.
4. The destination interface cannot be a member of a VLAN nor have an IP address configured.
5. The destination interface cannot have the spanning tree protocol enabled on it.
If you try to activate a mirror session that violates rules 2 or 3 it will remain shutdown.
The same interface can be the source in more than one mirror session as long as itdoes not violate rule 1 or 3.

Management And Utility Commands
120
3.24.1. mirror sessionChanges to mirror session mode for the specified session name. If the session name does not ex-ist, it is created.
Use the no form of this command to remove a mirror session.
Syntax [no] mirror session <name>
Commandmode
Configuration mode (config).
Authority All users.
<name> Name of a session. Up to 64 letters, numbers, underscores, dashes, or periods.
Example
Creating a new mirror session named Mirror_3
switch(config)# mirror session Mirror_3switch(config-mirror)#
3.24.2. destinationThe destination interface command assigns the specified Ethernet interface or LAG where allmirror traffic for this session will be transmitted. Only one destination interface is allowed per ses-sion.
The interface must already be an interface defined in the switch configuration. Interface activationis not necessary for addition to a mirror session.
Entering another destination interface will cause all mirror traffic to use the interface. This maycause a temporary suspension of mirror traffic from the source(s) during the reconfiguration.
The no destination interface command will cease the use of the interface and deactivate (shut-down) the session.
Special requirements for destination interfaces
To be qualified as a mirror session destination, the interface:
• Must not already be a source or destination in any other active mirror session
• Must not be participating in any form of Spanning Tree protocol
• Must not be a member of a VLAN nor have an IP address configured.
An interface will be automatically removed from a mirror session in these two circum-stances:
• the interface becomes a member of a LAG
• the interface route mode is changed (i.e. ‘routing’ or ‘no routing’)
Management And Utility Commands
121
If the interface removed is a mirror destination, then the mirror session is automatically de-activat-ed (i.e. ‘no shutdown’).
The interface/LAG must then be re-added to the mirror session and the session reactivated.
Syntax [no] destination interface <interface>
Commandmode
Mirror session mode (config-mirror).
Authority All users.
<interface> Name of a an interface.
Example
Setting interface 10 as the destination for the session Mirror_3
switch(config)# mirror session Mirror_3switch(config-mirror)# destination interface 10
Removing interface 10 as the destination for the session Mirror_3
switch(config)# mirror session Mirror_3switch(config-mirror)# no destination interface
3.24.3. shutdownDeactivates a mirror session. By default, mirror sessions are inactive.
Use the no form of this command to activate a mirror session.
Syntax [no] shutdown
Commandmode
Mirror session mode (config-mirror).
Authority All users.
Examples
Activating mirror session Mirror_3
switch(config)# mirror session Mirror_3switch(config-mirror)# no shutdown
3.24.4. sourceThe source interface command adds, modifies, or removes the specified Ethernet interface orLAG as a mirror source. When adding or modifying a source port, the mirror traffic direction mustbe specified:
• both - traffic received and transmitted
• rx only received traffic
• tx only transmitted traffic

Management And Utility Commands
122
A source interface must already be an interface defined in the switch configuration. Interface acti-vation is not necessary for addition to a mirror session.
More than one source interface can be configured in a mirror session, each with their own direc-tion.
To change the direction of a source interface, re-enter the source interface command again withthe new direction.
There may be a temporary suspension of mirrored traffic when adding sources or changing sourcedirections.
The no source command will cease mirroring traffic from the source interface.
Special requirements for mirror source interfaces
To be qualified as a mirror session source, the interface must:
• Not already be a destination in any mirror session
An interface will be automatically removed from a mirror session in these two circum-stances:
• the interface becomes a member of a LAG
• the interface route mode is changed (i.e. ‘routing’ or ‘no routing’)
The interface/LAG must then be re-added to the mirror session.
Syntax source interface <INTERFACE> {both|rx|tx}
Syntax no source interface <INTERFACE>
Commandmode
Mirror session mode (config-mirror).
Authority All users.
<INTER-FACE>
Ethernet interface or LAG
Examples
switch# configure terminalswitch(config)# mirror session Mirror_3switch(config-mirror)# source interface 5 both
3.24.5. show mirrorThe show mirror command will display the list of all configured mirror sessions and their status.
With a NAME parameter, this command will display the details of the single named mirror session.
Syntax show mirror [<NAME>]
Management And Utility Commands
123
Authority All users.
<NAME> Display the details of that mirror session
Examples
switch# show mirrorname status--------------------------------------------------------------- --------My_Session_1 activeOther-Session-2 shutdown
switch# show mirror My_Session_1Mirror Session: My_Session_1Status: activeSource: interface 2 bothSource: interface 3 rxDestination: interface 1Output Packets: 123456789Output Bytes: 8912345678

Management And Utility Commands
124
3.25. CLI support for AutoprovisionThe feature is enabled by default and cannot be turned off through CLI. To disable the autoprovi-sioning feature, configure the DHCP server to NOT send option 239 in the DHCP reply/ack mes-sages.
3.25.1. autoprovisioningThis command forces manual autoprovisioning.
Syntax autoprovisioning manual
Authority Admin
3.25.2. show autoprovisioningThis command displays the autoprovision status. If autoprovision has been performed, the scriptURL is displayed. See the following examples for expected output.
Syntax show autoprovisioning
Authority Admin
Examples
If autoprovision is performed
switch # show autoprovisioningPerformed : YesURL : http://192.168.1.1/autoprovision.sh
If autoprovision is not performed
switch # show autoprovisioningPerformed : No

Management And Utility Commands
125
3.26. System commands3.26.1. Setting the fan speed
This command globally sets the fan speed to the value indicated by the command parameter. Thiscommand overrides the fan speed set internally by the platform. The fan speed value set by theuser takes affect depending on platform cooling requirements.
By default fans operate at normal speed.
Syntax [no] fan-speed < normal | medium | fast | maximum >
Authority All users.
<no> Removes the configured fan speed, and sets it to the default speed.
<normal> Normal is 40% of maximum speed.
<medium> Medium is 65% of maximum speed.
<fast> Fast is 80% of maximum speed.
<max> Fan speed is at maximum speed.
Examples
switch(config)#fan-speed slow
3.26.2. Setting an LED stateThis command sets the LED state to on, off, or flashing. By default, the LED state is off.
Syntax [no] led < led-name > < on | flashing | off >
Authority All users.
<no> Turns off the LED.
<led-name> LED name of whose state is to be set
<off> Select this to switch off LED
<on> Select this to switch on LED
<flashing> Select this to blink/flash the LED
Examples
switch(config)#led base-loc on
3.26.3. Showing version informationThis command shows the current switch version information. The format of the show version out-put:
<name> <version> (Build: <platform>-ops-<X.Y.Z-string>-<branch-name>[-<build-time>][-<meta-string>]
Syntax show version
Management And Utility Commands
126
Authority All users.
Field Name Explanation
name Name of the project.
version Version of the software.
platform Platform for which the image is built.
ops Abbreviation for OpenSwitch.
X.Y.Z-string The release version tag.
branch-name Branch where the image is built.
build-time For periodic builds, the build time-stamp in YYYYMMDDNN format.For developer builds, the build time-stamp in YYYYMMDDHHmmssformat.
meta-string “dev” is appended to image names when a developer builds an im-age using “make”.
Examples
switch# show versionFOXOSS 2.0.0 (Build: foxoss-ops-2.0.0-Poblano-20180308014408-dev
3.26.4. Showing package informationThis command lists every package present in the switch image under the PACKAGE column. TheVERSION column displays the git hash value if the SOURCE URL is a git repository. If not, theVERSION column displays the version string of the package. SOURCE TYPE displays the type ofsource pointed to by SOURCE URL. SOURCE URL displays the download location for the source-code of the corresponding package in the SOURCE URI column. If version information and/orSource URL is not available during build-time, show version detail displays NA (Not Available).
Syntax show version detail [ops]
Authority All users.
<ops> Displays git-hashes for OpenSwitch repos (ops-*) alone.
Examples
switch# show version detailPACKAGE : libz1VERSION : NASOURCE TYPE : otherSOURCE URL : NA
PACKAGE : libjemalloc-dbgVERSION : NASOURCE TYPE : otherSOURCE URL : NA
PACKAGE : lttng-toolsVERSION : d522c1f14285e2e8b10b7c0cd011847696ffe779
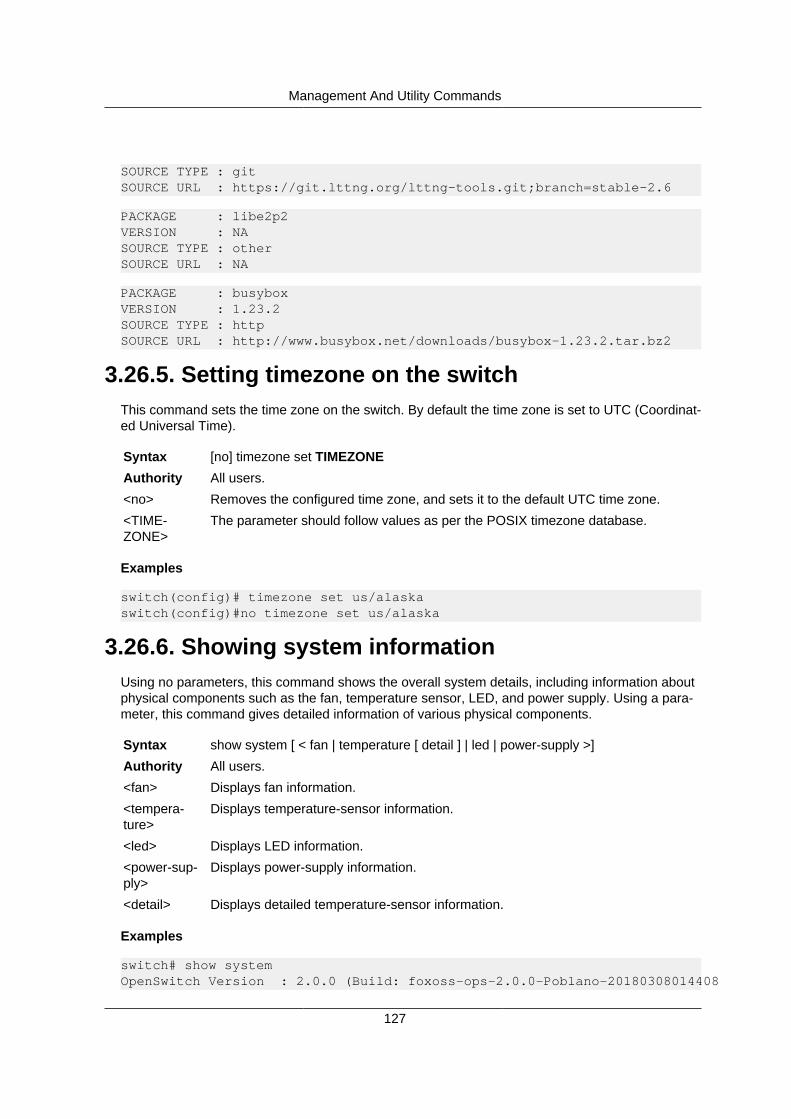
Management And Utility Commands
127
SOURCE TYPE : gitSOURCE URL : https://git.lttng.org/lttng-tools.git;branch=stable-2.6
PACKAGE : libe2p2VERSION : NASOURCE TYPE : otherSOURCE URL : NA
PACKAGE : busyboxVERSION : 1.23.2SOURCE TYPE : httpSOURCE URL : http://www.busybox.net/downloads/busybox-1.23.2.tar.bz2
3.26.5. Setting timezone on the switchThis command sets the time zone on the switch. By default the time zone is set to UTC (Coordinat-ed Universal Time).
Syntax [no] timezone set TIMEZONEAuthority All users.
<no> Removes the configured time zone, and sets it to the default UTC time zone.
<TIME-ZONE>
The parameter should follow values as per the POSIX timezone database.
Examples
switch(config)# timezone set us/alaskaswitch(config)#no timezone set us/alaska
3.26.6. Showing system informationUsing no parameters, this command shows the overall system details, including information aboutphysical components such as the fan, temperature sensor, LED, and power supply. Using a para-meter, this command gives detailed information of various physical components.
Syntax show system [ < fan | temperature [ detail ] | led | power-supply >]
Authority All users.
<fan> Displays fan information.
<tempera-ture>
Displays temperature-sensor information.
<led> Displays LED information.
<power-sup-ply>
Displays power-supply information.
<detail> Displays detailed temperature-sensor information.
Examples
switch# show systemOpenSwitch Version : 2.0.0 (Build: foxoss-ops-2.0.0-Poblano-20180308014408

Management And Utility Commands
128
-dev)Product Name : Aurora 720
Vendor : NetbergPlatform : x86_64-huracan_rangeley-r0Manufacturer : NetbergManufacturer Date : 04/11/2016 14:35:24
Serial Number : 2M3AR000129 Label Revision :
ONIE Version : 2015.11 DIAG Version : DIAG_HURACAN_1.3.7Base MAC Address : 70:b3:d5:cc:f0:47 Number of MACs : 1067Interface Count : 160 Max Interface Speed : 100000Mbps
Fan details:
Name Speed Status--------------------------------base-1B normal okbase-1F normal okbase-2B normal okbase-2F normal okbase-3B normal okbase-3F normal okbase-4B normal okbase-4F normal ok
LED details:
Name State Status-------------------------base-psu1 on okbase-psu2 flashing okbase-stat on okbase-fan on ok
Power supply details:
Name Status-----------------------base-psu1 OKbase-psu2 Input Fault
Temperature Sensors:
Location Name Reading(celsius)------------------------------------------------------------------------CPU core 0 base-4 30.00CPU core 3 base-7 31.00Embedded Switch Chip Sensors base-3 50.00Close to the front of MAC base-1 34.04CPU core 2 base-6 31.00Close to the rear of MAC base-2 37.00

Management And Utility Commands
129
CPU core 1 base-5 30.00
3.26.7. System fan informationThis command displays detailed fan information.
Syntax show system fan
Authority All users
Example
switch#show system fanFan information------------------------------------------------------Name Speed Direction Status RPM------------------------------------------------------base-3F normal front-to-back ok 5400base-1F normal front-to-back ok 5273base-4F normal front-to-back ok 5335base-2F normal front-to-back ok 5357base-2B normal front-to-back ok 4368base-3B normal front-to-back ok 4500base-4B normal front-to-back ok 4383base-1B normal front-to-back ok 4470------------------------------------------------------Fan speed override is set to : normal------------------------------------------------------
3.26.8. Showing system temperature informationThis command displays detailed temperature sensor information. If a parameter is not used, thecommand displays minimal temperature information.
Syntax show system temperature [detail]
Authority All users
<detail> Displays detailed temperature-sensor information.
Example
switch# show system temperatureTemperature information--------------------------------------------------- CurrentName temperature Status Fan state (in C)---------------------------------------------------base-4 32.00 normal normalbase-7 31.00 normal normalbase-3 50.00 normal normalbase-1 34.04 normal normal
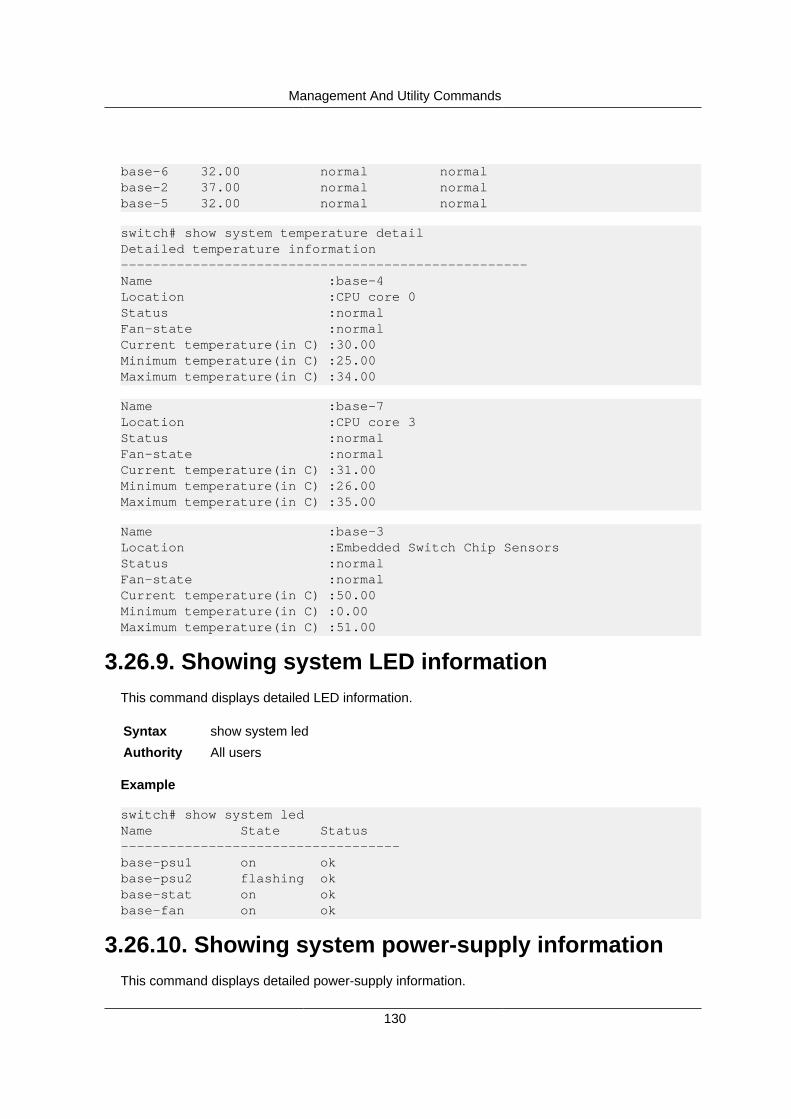
Management And Utility Commands
130
base-6 32.00 normal normalbase-2 37.00 normal normalbase-5 32.00 normal normal
switch# show system temperature detailDetailed temperature information---------------------------------------------------Name :base-4Location :CPU core 0Status :normalFan-state :normalCurrent temperature(in C) :30.00Minimum temperature(in C) :25.00Maximum temperature(in C) :34.00
Name :base-7Location :CPU core 3Status :normalFan-state :normalCurrent temperature(in C) :31.00Minimum temperature(in C) :26.00Maximum temperature(in C) :35.00
Name :base-3Location :Embedded Switch Chip SensorsStatus :normalFan-state :normalCurrent temperature(in C) :50.00Minimum temperature(in C) :0.00Maximum temperature(in C) :51.00
3.26.9. Showing system LED informationThis command displays detailed LED information.
Syntax show system led
Authority All users
Example
switch# show system ledName State Status-----------------------------------base-psu1 on okbase-psu2 flashing okbase-stat on okbase-fan on ok
3.26.10. Showing system power-supply informationThis command displays detailed power-supply information.
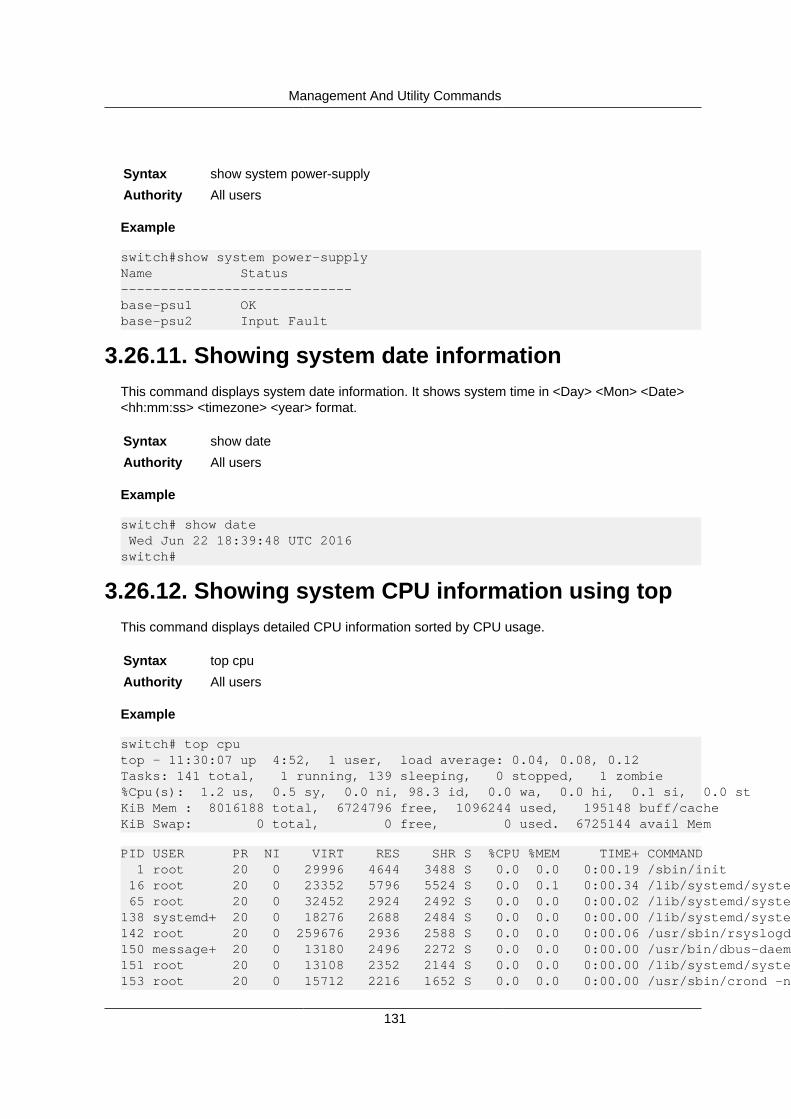
Management And Utility Commands
131
Syntax show system power-supply
Authority All users
Example
switch#show system power-supplyName Status-----------------------------base-psu1 OKbase-psu2 Input Fault
3.26.11. Showing system date informationThis command displays system date information. It shows system time in <Day> <Mon> <Date><hh:mm:ss> <timezone> <year> format.
Syntax show date
Authority All users
Example
switch# show date Wed Jun 22 18:39:48 UTC 2016switch#
3.26.12. Showing system CPU information using topThis command displays detailed CPU information sorted by CPU usage.
Syntax top cpu
Authority All users
Example
switch# top cputop - 11:30:07 up 4:52, 1 user, load average: 0.04, 0.08, 0.12Tasks: 141 total, 1 running, 139 sleeping, 0 stopped, 1 zombie%Cpu(s): 1.2 us, 0.5 sy, 0.0 ni, 98.3 id, 0.0 wa, 0.0 hi, 0.1 si, 0.0 stKiB Mem : 8016188 total, 6724796 free, 1096244 used, 195148 buff/cacheKiB Swap: 0 total, 0 free, 0 used. 6725144 avail Mem
PID USER PR NI VIRT RES SHR S %CPU %MEM TIME+ COMMAND 1 root 20 0 29996 4644 3488 S 0.0 0.0 0:00.19 /sbin/init 16 root 20 0 23352 5796 5524 S 0.0 0.1 0:00.34 /lib/systemd/systemd-journald 65 root 20 0 32452 2924 2492 S 0.0 0.0 0:00.02 /lib/systemd/systemd-udevd138 systemd+ 20 0 18276 2688 2484 S 0.0 0.0 0:00.00 /lib/systemd/systemd-resolved142 root 20 0 259676 2936 2588 S 0.0 0.0 0:00.06 /usr/sbin/rsyslogd -n150 message+ 20 0 13180 2496 2272 S 0.0 0.0 0:00.00 /usr/bin/dbus-daemon --system +151 root 20 0 13108 2352 2144 S 0.0 0.0 0:00.00 /lib/systemd/systemd-logind153 root 20 0 15712 2216 1652 S 0.0 0.0 0:00.00 /usr/sbin/crond -n

Management And Utility Commands
132
3.26.13. Showing system memory information usingtop
This command displays detailed memory information sorted by memory usage.
Syntax top memory
Authority All users
Example
switch# top memorytop - 11:31:28 up 4:53, 1 user, load average: 0.28, 0.15, 0.14Tasks: 141 total, 1 running, 139 sleeping, 0 stopped, 1 zombie%Cpu(s): 1.2 us, 0.5 sy, 0.0 ni, 98.3 id, 0.0 wa, 0.0 hi, 0.1 si, 0.0 stKiB Mem : 8016188 total, 6724432 free, 1096560 used, 195196 buff/cacheKiB Swap: 0 total, 0 free, 0 used. 6724784 avail Mem
PID USER PR NI VIRT RES SHR S %CPU %MEM TIME+ COMMAND321 root 20 0 161984 38516 8848 S 0.0 0.4 0:02.75 python /usr/bin/restd236 root 20 0 182212 18520 7176 S 0.0 0.2 0:00.81 python /usr/bin/ops_ntpd253 root 20 0 101828 18052 7108 S 0.0 0.2 0:00.29 python /usr/bin/ops_dhcp_tftp312 root 20 0 112496 17312 3992 S 0.0 0.2 0:00.07 python /usr/bin/ops_mgmtintfcf+405 root 20 0 109908 16208 3344 S 0.0 0.2 0:00.66 python /usr/bin/ops_ntpd313 root 20 0 101564 14008 3244 S 0.0 0.1 0:00.00 python /usr/bin/ops_aaautilspa+188 root 20 0 40288 13300 4636 S 0.0 0.1 0:00.35 /usr/sbin/ovsdb-server --remot+
3.26.14. Showing time zone informationThis command displays detailed information for the time zone configured on the system.
Syntax show system timezone
Authority All users
Example
By default the time zone configured is UTC:
switch# show system timezoneSystem is configured for timezone : UTC DST active: n/a
If the time zone is configured for "US/Alaska", then it may be verified using the show system time-zone command:
switch# show system timezoneSystem is configured for timezone : US/Alaska DST active: yesLast DST change: DST began at Sun 2016-03-13 01:59:59 AKST Sun 2016-03-13 03:00:00 AKDT

Management And Utility Commands
133
Next DST change: DST ends (the clock jumps one hour backwards) at Sun 2016-11-06 01:59:59 AKDT Sun 2016-11-06 01:00:00 AKST
Management And Utility Commands
134
3.27. Secure Shell CommandsThis section describes the commands you use to configure Secure Shell (SSH) access to theswitch. Use SSH to access the switch from a remote management host.
3.27.1. password-authenticationEnable password authentication method.
The no form disables password authentication method.
Syntax [no] ssh password-authentication
Authority Admin
3.27.2. public-key-authenticationEnable publickey authentication method
The no form disables publickey authentication method.
Syntax [no] ssh public-key-authentication
Authority Admin

Management And Utility Commands
135
3.28. Control Plane PolicingControl plane policing (CoPP) in OpenSwitch is used to prioritize traffic handling by the CPU, andto protect the switch from DoS attacks.
NOTE:
• If a packet class is not supported on the switch, then all status and statistics values for that classwill be empty.
• Statistics that are not supported for a packet class will be empty.
3.28.1. show copp statisticsDisplays control plane policing (CoPP) statistics for all protocols, or a specific protocol.
Syntax show copp statistics [<protocol-name>]
Authority Operator.
<proto-col-name>
Name of a protocol for wich to retrieve CoPP statistics. To see a list of all support-ed protocol names, use the command: show copp statistics ?
Example
switch# sh copp statistics acl-logging Control Plane Packet: ACL LOGGING packets
rate (pps): 5burst size (pkts): 5local_priority: 0
packets_passed: 5 bytes_passed: 320packets_dropped: 5 bytes_dropped: 320
switch# sh copp statistics Control Plane Packets Total Statistics
total_packets_passed: 5500 total_bytes_passed: 352000total_packets_dropped: 5500 total_bytes_dropped: 352000
Control Plane Packet: BGP packets
rate (pps): 5000burst size (pkts): 5000local_priority: 9
packets_passed: 5000 bytes_passed: 320000packets_dropped: 5000 bytes_dropped: 320000
Control Plane Packet: LLDP packets
rate (pps): 500burst size (pkts): 500

Management And Utility Commands
136
local_priority: 8
packets_passed: 500 bytes_passed: 32000packets_dropped: 500 bytes_dropped: 32000
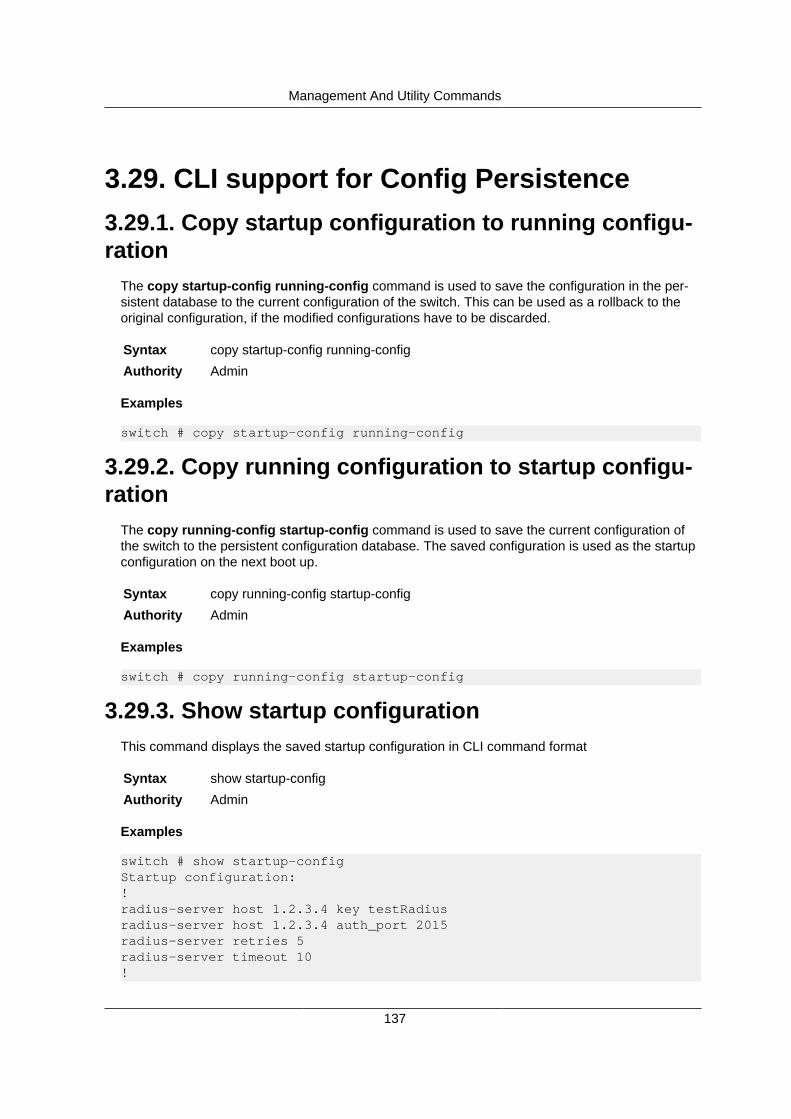
Management And Utility Commands
137
3.29. CLI support for Config Persistence3.29.1. Copy startup configuration to running configu-ration
The copy startup-config running-config command is used to save the configuration in the per-sistent database to the current configuration of the switch. This can be used as a rollback to theoriginal configuration, if the modified configurations have to be discarded.
Syntax copy startup-config running-config
Authority Admin
Examples
switch # copy startup-config running-config
3.29.2. Copy running configuration to startup configu-ration
The copy running-config startup-config command is used to save the current configuration ofthe switch to the persistent configuration database. The saved configuration is used as the startupconfiguration on the next boot up.
Syntax copy running-config startup-config
Authority Admin
Examples
switch # copy running-config startup-config
3.29.3. Show startup configurationThis command displays the saved startup configuration in CLI command format
Syntax show startup-config
Authority Admin
Examples
switch # show startup-configStartup configuration:!radius-server host 1.2.3.4 key testRadiusradius-server host 1.2.3.4 auth_port 2015radius-server retries 5radius-server timeout 10!

Management And Utility Commands
138
3.30. Logrotate Commands3.30.1. logrotate period
This command configures the rotation of log files based on time. The possible values are hourly,weekly or monthly. When the time difference between the last rotation of a log file and current timeexceeds the configured value, the log rotation is triggered for that particular file. To reset the logrotation to the default value of daily, use the no form of the command (no logrotate period ( hourly |weekly | monthly)).
If no parameter is specified, the default value of daily is used.
Syntax logrotate period ( hourly | weekly | monthly )
Authority All users
<hourly> Rotates log files every hour.
<monthly> Rotates log files every month.
<weekly> Rotates log files every week.
Examples
switch(config)# logrotate period weekly
3.30.2. logrotate maxsizeThis command configures the log rotation based on log file size. The log file size is checkedhourly. When the size of the log file exceeds the configured value, the rotation is triggered for thatparticular log file. To reset the default value of 10 MB, use the no form of the command (no logro-tate maxsize filesize).
Syntax logrotate maxsize <filesize>
Authority All users
<filesize> File size in Mega Bytes (MB), 1-200. Default value is 10MB
Examples
switch(config)# logrotate maxsize 20
3.30.3. logrotate targetThis command sends the rotated log files to a specified remote host Universal Resource Identifi-er (URI) by using the tftp protocol. If no URI is specified, the rotated and compressed log files arestored locally in the /var/log/ path. To prevent rotated logs from being sent to a remote host, usethe no form of the command (no logrotate target URI).
This parameter specifies the URI of the remote host. The possible values are tftp://A.B.C.D' or'tftp://X:X::X:X. Both IPv4 and IPv6 addresses are supported.
Syntax logrotate target <URI>
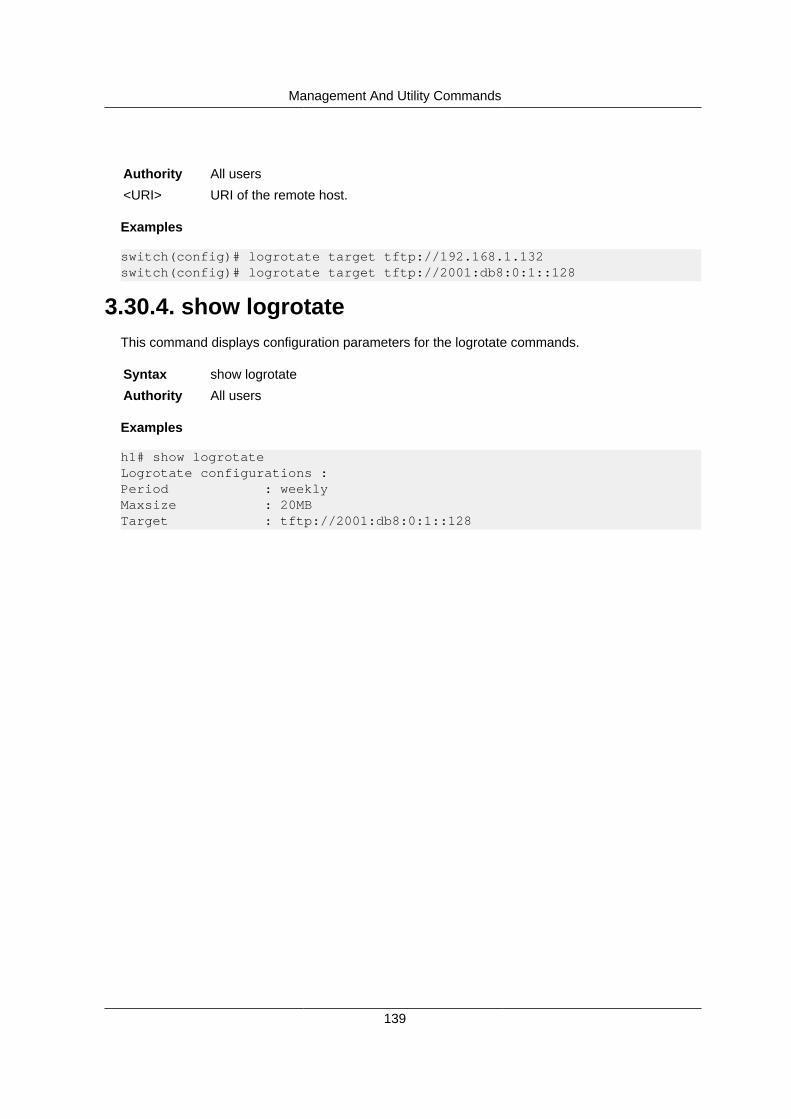
Management And Utility Commands
139
Authority All users
<URI> URI of the remote host.
Examples
switch(config)# logrotate target tftp://192.168.1.132switch(config)# logrotate target tftp://2001:db8:0:1::128
3.30.4. show logrotateThis command displays configuration parameters for the logrotate commands.
Syntax show logrotate
Authority All users
Examples
h1# show logrotateLogrotate configurations :Period : weeklyMaxsize : 20MBTarget : tftp://2001:db8:0:1::128

Management And Utility Commands
140
3.31. Show Tech Commands3.31.1. show tech
Displays detailed information about the switch by automatically running the collection of showcommands associated with switch features. The show commands associated with a feature aredefined in the show tech configuration file (ops-supportability/conf/ops_showtech.yaml).
Syntax show tech
Authority All users
Examples
This example shows a truncated version of the information returned by the show tech command.The system feature results in the running of three show commands: show version, show system,and show vlan.
switch# show tech====================================================Show Tech executed on Wed Mar 14 06:56:56 2018========================================================================================================[Begin] Feature basic====================================================*********************************Command : show version*********************************FOXOSS 2.0.0 (Build: foxoss-ops-2.0.0-Poblano-20180308014408-dev)
*********************************Command : show system*********************************OpenSwitch Version : 2.0.0 (Build: foxoss-ops-2.0.0-Poblano-20180308014408-dev)Product Name : Aurora 720
Vendor : NetbergPlatform : x86_64-huracan_rangeley-r0Manufacturer : NetbergManufacturer Date : 04/11/2016 14:35:24
Serial Number : 2M3AR000129 Label Revision :
ONIE Version : 2015.11 DIAG Version : DIAG_HURACAN_1.3.7Base MAC Address : 70:b3:d5:cc:f0:47 Number of MACs : 4Interface Count : 160 Max Interface Speed : 100000Mbps
Fan details:
Name Speed Status--------------------------------base-1B normal ok

Management And Utility Commands
141
base-1F normal okbase-2B normal okbase-2F normal okbase-3B normal okbase-3F normal okbase-4B normal okbase-4F normal ok
LED details:
Name State Status-------------------------base-psu1 on okbase-fan on okbase-psu2 flashing okbase-stat on ok
Power supply details:Name Status-----------------------base-psu1 OKbase-psu2 Input Fault
3.31.2. show tech listLists all features that are supported by the show tech command.
Syntax show tech list
Authority All users
Examples
switch# show tech listShow Tech Supported Features List------------------------------------------------------------Feature Desc------------------------------------------------------------basic Show Tech Basicntp Network Time Protocollldp Link Layer Discovery Protocollag Link Aggregation Protocolqos Quality of Serviceacl Access Control Listsecmp IP ECMP Load Balancingmstp Multiple Spanning Tree Protocolsflow sFlowversion Image versioning schemeospfv2 Open Shortest Path First version 2 Protocolucast-routing Unicast Routing Informationcopp Control Plane Policingdhcp-server Dynamic Host Configuration Protocol Servertftp-server Trivial File Transfer Protocol Server

Management And Utility Commands
142
snmp SNMPsftp-server SSH File Transfer Protocol Serversource-interface-selection Source Interface Selectionloopback Loopback Interfaceaaa Authentication Authorization and Accountingvlan Virtual Local Area Networkztp Zero Touch Provisioning
3.31.3. show tech featureRuns all show commands that are defined for the specified feature.
Syntax show tech <feature>
Authority All users
<feature> Feature name as displayed by the show tech list command.
Examples
switch# show tech sflow====================================================Show Tech executed on Wed Mar 14 07:02:16 2018========================================================================================================[Begin] Feature sflow====================================================*********************************Command : show sflow*********************************sFlow not yet configured.====================================================[End] Feature sflow====================================================
====================================================Show Tech commands executed successfully====================================================
3.31.4. Show tech to fileSaves the output of the show tech command to a file.
Syntax show tech [<feature>] localfile <filename> [force]
Authority All users
<feature> Feature name as displayed by the show tech list command.
<filename> Name of the file where output of the command is saved. If the specified file alreadyexisits, it is not overwritten.
<force> If the specified output file exists, it is overwritten.
Examples

Management And Utility Commands
143
switch# show tech basic localfile stbasic.staShow Tech output stored in file /tmp/stbasic.sta
switch# show tech basic localfile stbasic.sta/tmp/stbasic.sta already exists, please give different name or use forceoption to overwrite existing file
switch# show tech basic localfile stbasic.sta forceShow Tech output stored in file /tmp/stbasic.sta

Management And Utility Commands
144
3.32. Show Vlog CommandsCommand Usage
show vlog Displays vlog messages of ops daemons.
show vlog daemon(daemon_name)
Displays the vlog messages of the corresponding ops-daemononly.
show vlog severity(severity_level)
Displays the vlog messages of the corresponding severity leveland above.
show vlog config list Displays a list of supported features and descriptions.
show vlog config feature(feature_Name)
Displays the feature configuration log level of syslog and filedestinations.
show vlog config daemon(daemon_Name)
Displays the daemon configuration log level of syslog and filedestinations.
show vlog config Displays a list of supported features' corresponding daemonslogging levels of file and console destinations.
show vlog daemon(daemon_name) severity(severity_level)
Displays vlogs for the specified ops-daemon with the specifiedseverity level and above.
show vlog severity(severity_level) daemon(daemon_name)
Displays vlogs for the specified severity level and above withops-daemon only.
3.32.1. Show vlogDisplays vlog messages of ops daemons.
Syntax show vlog
Authority All users
3.32.2. Show vlog daemonDisplays only the corresponding ops daemon vlog messages.
Syntax show vlog daemon <daemon_name>
Authority All users
<daemon_name>Name of the ops daemon.
3.32.3. Show vlog severityDisplays corresponding severity level and above vlog messages.
Syntax show vlog severity <emer/err/warn/info/debug>
Authority All users

Management And Utility Commands
145
<emer> Emergency logs only.
<err> Error and above severity logs.
<warn> Warning and above severity logs.
<info> Information and above severity logs.
<debug> All logs.
3.32.4. Show vlog config listLists all vlog supported features and descriptions.
Syntax show vlog config list
Authority All users
3.32.5. Show vlog config featureDisplays the feature configuration log levels of file and syslog destinations.
Syntax show vlog config feature <feature_name>
Authority All users
<feature_name>Name of the feature.
3.32.6. Show vlog config daemonDisplays the ops-daemon configuration log levels of file and syslog destinations.
Syntax show vlog config daemon <daemon_name>
Authority All users
<daemon_name>Name of the ops daemon.
3.32.7. Show vlog configLists all supported features and coresponding daemons logging levels of file and syslog destina-tions.
Syntax show vlog config
Authority All users
3.32.8. Show vlog daemon (daemon_name) severity(severity_level)
Displays vlogs for the specified ops-daemon only with specified severity level and above.
Syntax show vlog daemon <daemon_name> severity <severity_level>
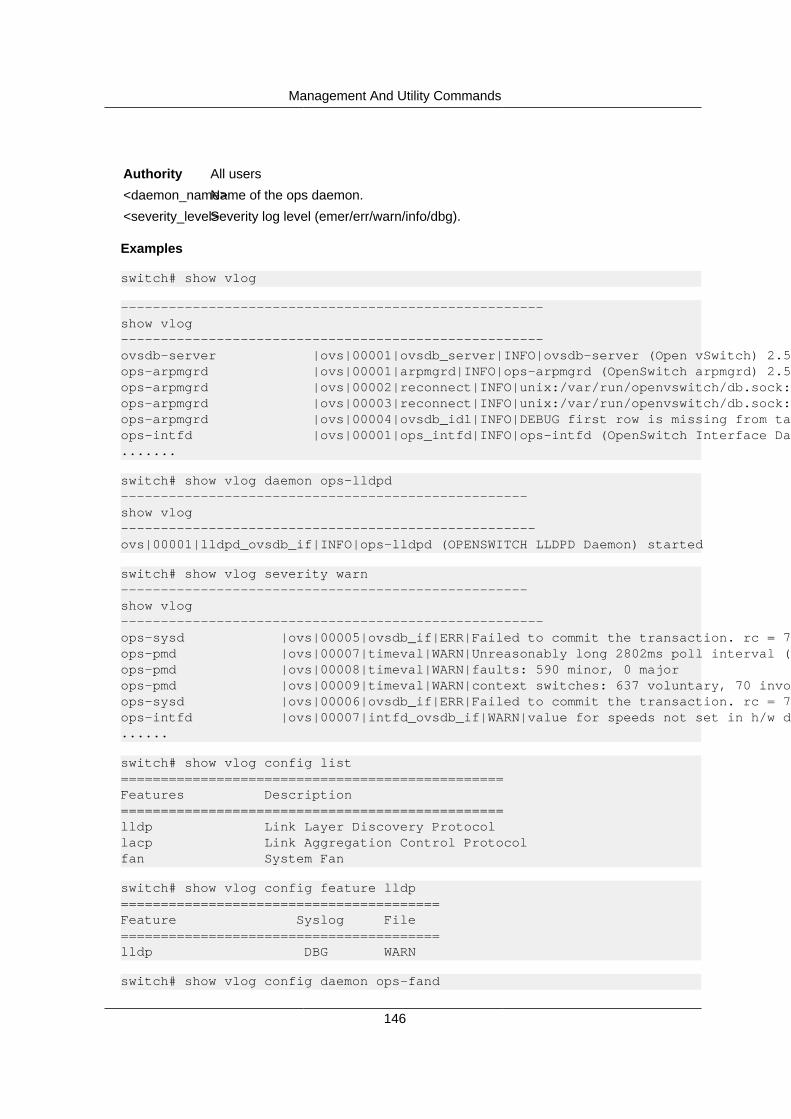
Management And Utility Commands
146
Authority All users
<daemon_name>Name of the ops daemon.
<severity_level>Severity log level (emer/err/warn/info/dbg).
Examples
switch# show vlog
-----------------------------------------------------show vlog-----------------------------------------------------ovsdb-server |ovs|00001|ovsdb_server|INFO|ovsdb-server (Open vSwitch) 2.5.0ops-arpmgrd |ovs|00001|arpmgrd|INFO|ops-arpmgrd (OpenSwitch arpmgrd) 2.5.0ops-arpmgrd |ovs|00002|reconnect|INFO|unix:/var/run/openvswitch/db.sock: connecting...ops-arpmgrd |ovs|00003|reconnect|INFO|unix:/var/run/openvswitch/db.sock: connectedops-arpmgrd |ovs|00004|ovsdb_idl|INFO|DEBUG first row is missing from table class Systemops-intfd |ovs|00001|ops_intfd|INFO|ops-intfd (OpenSwitch Interface Daemon) started.......
switch# show vlog daemon ops-lldpd---------------------------------------------------show vlog----------------------------------------------------ovs|00001|lldpd_ovsdb_if|INFO|ops-lldpd (OPENSWITCH LLDPD Daemon) started
switch# show vlog severity warn---------------------------------------------------show vlog-----------------------------------------------------ops-sysd |ovs|00005|ovsdb_if|ERR|Failed to commit the transaction. rc = 7ops-pmd |ovs|00007|timeval|WARN|Unreasonably long 2802ms poll interval (168ms user, 29ms system)ops-pmd |ovs|00008|timeval|WARN|faults: 590 minor, 0 majorops-pmd |ovs|00009|timeval|WARN|context switches: 637 voluntary, 70 involuntaryops-sysd |ovs|00006|ovsdb_if|ERR|Failed to commit the transaction. rc = 7ops-intfd |ovs|00007|intfd_ovsdb_if|WARN|value for speeds not set in h/w description file......
switch# show vlog config list================================================Features Description================================================lldp Link Layer Discovery Protocollacp Link Aggregation Control Protocolfan System Fan
switch# show vlog config feature lldp========================================Feature Syslog File========================================lldp DBG WARN
switch# show vlog config daemon ops-fand

Management And Utility Commands
147
======================================Daemon Syslog File======================================ops-fand DBG WARN
switch# show vlog config=================================================Feature Daemon Syslog File=================================================lldp ops-lldpd DBG DBG ops-portd INFO INFOlacp ops-lacpd OFF OFF ops-ledd DBG EMERfan ops-fand INFO INFO
switch# configureswitch(config)# vlog feature lacp syslog dbgswitch(config)# vlog daemon ops-lldpd file warnswitch(config)# endswitch# show vlog feature lacp========================================Feature Syslog File========================================lacp DBG INFO
switch# show vlog daemon ops-lldpd======================================Daemon Syslog File======================================ops-lldpd DBG WARN
switch# configure tswitch(config)# vlog feature lacp file dbgswitch(config)# vlog daemon ops-lldpd syslog infoswitch(config)# vlog feature fand all dbgswitch(config)# end
switch# show vlog config feature lacp========================================Feature Syslog File========================================lacp OFF DBG
switch# show vlog config daemon ops-lldpd ======================================Daemon Syslog File======================================ops-lldpd INFO DBG
switch# show vlog config feature fan========================================Feature Syslog File========================================

Management And Utility Commands
148
fan DBG DBG
switch# show vlog severity debug daemon ops-pmd---------------------------------------------------show vlog-----------------------------------------------------ovs|00006|ops_pmd|INFO|ops-pmd (OpenSwitch pmd) 0.02

Management And Utility Commands
149
3.33. BroadView CommandsBroadview support depends on the OpenNSL library.
3.33.1. broadview client ip portSets the IP address of the remote device on which the application that retrieves BroadView statis-tics is located.
Syntax broadview client ip <ipv4-address> port <port-num>
Authority Admin
<ipv4-ad-dress>
IPv4 adddress of the remote device.
<port-num> Port number the application is using on the remote device.
Example
Setting up communications with a application on device 10.10.47.50 on port 8080
switch(config)# broadview client ip 10.10.47.50 port 8080
3.33.2. broadview agent-portSets the port number the BroadView agent on the switch will use to communicate with the applica-tion on the remote device.
Syntax broadview agent-port <port-num>
Authority Admin.
<port-num> Port number the BroadView agent will use to communicate.
Examples
Setting the agent port to 8080
switch(config)# broadview agent-port 8080
3.33.3. show broadviewDisplay configuration settings.
Syntax show broadview
Authority Admin.
Example
switch# show broadviewBroadView client IP is 10.130.168.30BroadView client port is 9054BroadView agent port is 8080
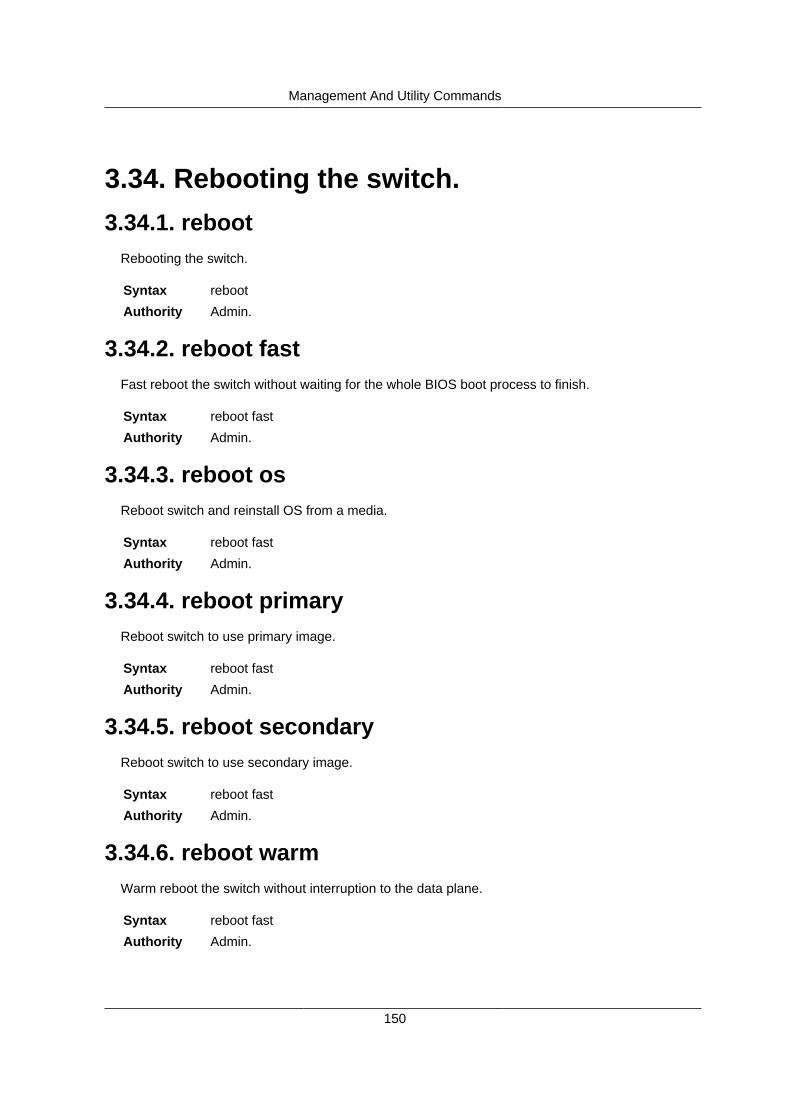
Management And Utility Commands
150
3.34. Rebooting the switch.3.34.1. reboot
Rebooting the switch.
Syntax reboot
Authority Admin.
3.34.2. reboot fastFast reboot the switch without waiting for the whole BIOS boot process to finish.
Syntax reboot fast
Authority Admin.
3.34.3. reboot osReboot switch and reinstall OS from a media.
Syntax reboot fast
Authority Admin.
3.34.4. reboot primaryReboot switch to use primary image.
Syntax reboot fast
Authority Admin.
3.34.5. reboot secondaryReboot switch to use secondary image.
Syntax reboot fast
Authority Admin.
3.34.6. reboot warmWarm reboot the switch without interruption to the data plane.
Syntax reboot fast
Authority Admin.

151
Chapter 4. Layer 2 featuresSection 4.1, “Interface Commands”
Section 4.2, “MAC Address Table”
Section 4.3, “LACP commands”
Section 4.4, “VLAN commands”
Section 4.5, “MSTP commands”
Section 4.6, “LLDP Commands”
Section 4.7, “Error Disable / Recovery”
Section 4.8, “Unidirectional Link Detection Commands”
Section 4.9, “Storm-Control Commands”
Section 4.10, “FEC”

Layer 2 features
152
4.1. Interface CommandsIn vtysh every command belongs to a particular context. All interface configuration commands, ex-cept interface, work in the interface context.
4.1.1. Change to interface contextThis command changes the vtysh context to interface. This command works in the config context.
Syntax interface
Authority All users
<A.B> Subinterface name as physical_interface.subinterface name <1-4294967293>
<IFNAME> Interface’s name
<lag> Configure link-aggregation parameters
<loopback> Configure loopback interface
<mgmt> Configure management interface
<range> Configure interface range
<tunnel> Tunnel Configuration
<vlan> VLAN configuration
Examples
switch# configure terminalswitch(config)# interface 1switch(config-if)#
4.1.2. Configure a range of interfacesSyntax interface range
Authority All users
<intf> Physical interface
<lag> Link-aggregation interface
<vlan> VLAN interface
4.1.3. Enable an interfaceThis command enables an interface.
Syntax no shutdown
Authority All users
Examples
switch# configure terminalswitch(config)# interface 1
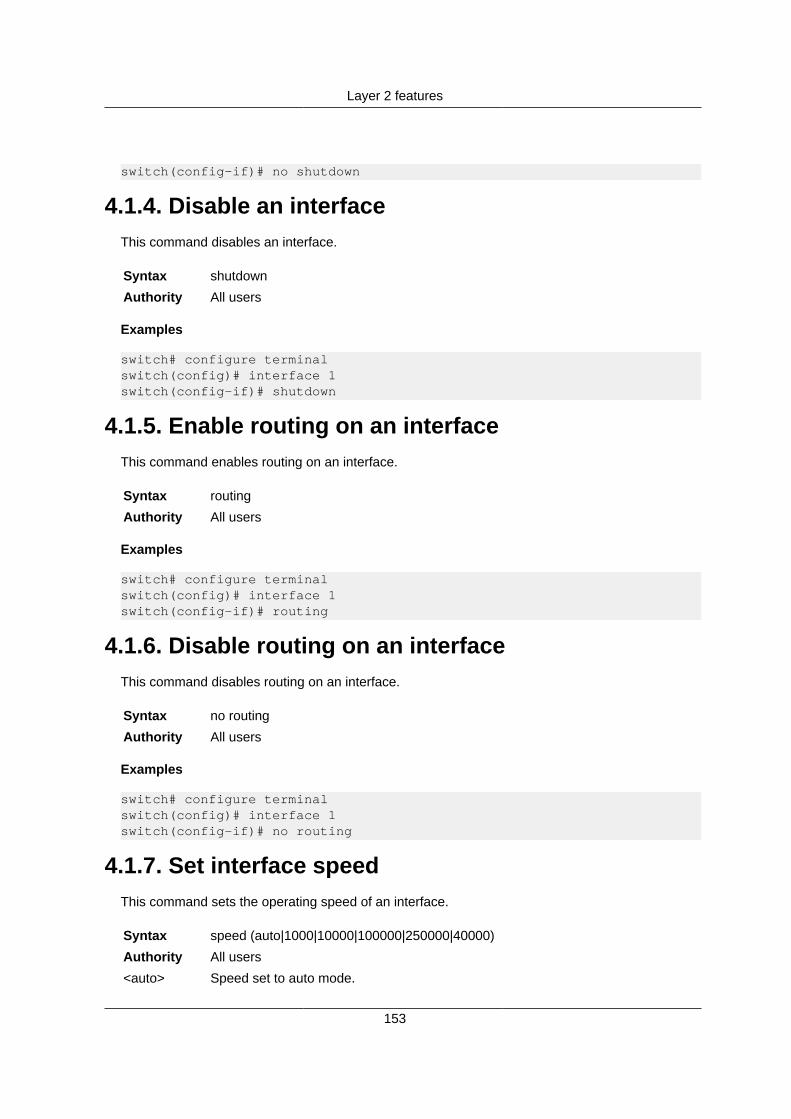
Layer 2 features
153
switch(config-if)# no shutdown
4.1.4. Disable an interfaceThis command disables an interface.
Syntax shutdown
Authority All users
Examples
switch# configure terminalswitch(config)# interface 1switch(config-if)# shutdown
4.1.5. Enable routing on an interfaceThis command enables routing on an interface.
Syntax routing
Authority All users
Examples
switch# configure terminalswitch(config)# interface 1switch(config-if)# routing
4.1.6. Disable routing on an interfaceThis command disables routing on an interface.
Syntax no routing
Authority All users
Examples
switch# configure terminalswitch(config)# interface 1switch(config-if)# no routing
4.1.7. Set interface speedThis command sets the operating speed of an interface.
Syntax speed (auto|1000|10000|100000|250000|40000)
Authority All users
<auto> Speed set to auto mode.

Layer 2 features
154
<1000> Speed set to 1 Gbps.
<10000> Speed set to 10 Gbps.
<100000> Speed set to 100 Gbps.
<25000> Speed set to 25 Gbps.
<40000> Speed set to 40 Gbps.
Examples
switch# configure terminalswitch(config)# interface 1switch(config-if)# speed 10000
4.1.8. Set interface speed to defaultThis command sets the operating speed of an interface to default. The default setting is auto.
Syntax no speed
Authority All users
Examples
switch# configure terminalswitch(config)# interface 1switch(config-if)# no speed
4.1.9. Set interface MTUThis command sets the MTU (maximum transmission unit) of an interface.
Syntax mtu (auto|<value>)
Authority All users
<auto> MTU set to auto mode.
<value> MTU value between 576 and 9192 bytes.
Examples
switch# configure terminalswitch(config)# interface 1switch(config-if)# mtu autoswitch(config-if)# mtu 580
4.1.10. Set interface MTU to defaultThis command sets the MTU (maximum transmission unit) of an interface to default. The defaultsetting is auto.
Syntax no mtu

Layer 2 features
155
Authority All users
Examples
switch# configure terminalswitch(config)# interface 1switch(config-if)# no mtu
4.1.11. Set interface duplexityThis command sets the duplexity of an interface to either half duplex or full duplex.
Syntax duplex (half|full)
Authority All users
<half> Set mode as half duplex.
<full> Set mode as full duplex.
Examples
switch# configure terminalswitch(config)# interface 1switch(config-if)# duplex half
4.1.12. Set interface duplexity to defaultThis command sets the duplexity of an interface to default. The default mode is full.
Syntax no duplex
Authority All users
Examples
switch# configure terminalswitch(config)# interface 1switch(config-if)# no duplex
4.1.13. Enable flow controlThis command enables flow control for sending and receiving pause frames.
Syntax flowcontrol (receive|send) (off|on)
Authority All users
<receive> Select the status for receiving pause frames.
<send> Select the status for sending pause frames.
<off> Switches flow control off for the above parameter.
<on> Switches flow control on for the above parameter.
Examples

Layer 2 features
156
switch# configure terminalswitch(config)# interface 1switch(config-if)# flowcontrol receive onswitch(config-if)# flowcontrol send on
4.1.14. Set flowcontrol to defaultThis command sets the flow control to default. The default is off.
Syntax no flowcontrol (receive|send)
Authority All users
<receive> Select the status for receiving pause frames.
<send> Select the status for sending pause frames.
Examples
switch# configure terminalswitch(config)# interface 1switch(config-if)# no flowcontrol receiveswitch(config-if)# no flowcontrol send
4.1.15. Set autonegotiation stateThis command sets the autonegotiation state of the interface.
Syntax autonegotiation (on|off)
Authority All users
<off> Switch off auto negotiation.
<on> Switch on auto negotiation.
Examples
switch# configure terminalswitch(config)# interface 1switch(config-if)# autonegotiation on
4.1.16. Set autonegotiation to defaultThis command sets the autonegotiation state to default. The default is off.
Syntax no autonegotiation
Authority All users
Examples
switch# configure terminalswitch(config)# interface 1switch(config-if)# no autonegotiation

Layer 2 features
157
4.1.17. Set an IPv4 address for an interfaceThis command sets an IPv4 address for an interface. This command only works when the inter-face is configured as L3.
Syntax ip address <ipv4_address/mask> [secondary]
Authority All users
<ipv4_address/mask>
IPv4 address with mask for the interface.
<secondary> Select this if the IPv4 address is a secondary address.
Examples
switch# configure terminalswitch(config)# interface 1switch(config-if)# ip address 10.0.0.2/24switch(config-if)# ip address 10.0.0.3/24 secondary
4.1.18. Remove the IPv4 address for an interfaceThis command removes the IPv4 address associated with an interface. This command works onlywhen the interface is configured as L3.
Syntax no ip address <ipv4_address/mask> [secondary]
Authority All users
<ipv4_address/mask>
IPv4 address with mask for the interface.
<secondary> Select this if the IPv4 address is a secondary address.
Examples
switch# configure terminalswitch(config)# interface 1switch(config-if)# no ip address 10.0.0.2/24switch(config-if)# no ip address 10.0.0.3/24 secondary
4.1.19. Set an IPv6 address for an interfaceThis command sets an IPv6 address for an interface. This command only works when the inter-face is configured as L3.
Syntax ipv6 address <ipv6_address/mask> [secondary]
Authority All users
<ipv6_address/mask>
IPv6 address with mask for the interface.
<secondary> Select this if the IPv6 address is a secondary address.
Examples

Layer 2 features
158
switch# configure terminalswitch(config)# interface 1switch(config-if)# ipv6 address 2001:0db8:85a3:0000:0000:8a2e:0370:7334/24switch(config-if)# ipv6 address 2001:0db8:85a3:0000:0000:8a2e:0370:733/24secondary
4.1.20. Remove the IPv6 address for an interfaceThis command removes the IPv6 address associated with an interface. This command only workswhen the interface is configured as L3.
Syntax no ipv6 address <ipv6_address/mask> [secondary]
Authority All users
<ipv6_address/mask>
IPv6 address with mask for the interface.
<secondary> Select this if the IPv6 address is a secondary address.
Examples
switch# configure terminalswitch(config)# interface 1switch(config-if)# no ipv6 address 2001:0db8:85a3:0000:0000:8a2e:0370:7334/24switch(config-if)# no ipv6 address 2001:0db8:85a3:0000:0000:8a2e:0370:733/24secondary
4.1.21. Split a QSPF interfaceThe split command, splits a QSPF interface to work as four 10Gb/25Gb interfaces. The QSPF in-terface must support splitter cables in order to split the interface.
The no split command combines the split QSPF interface to work as one 40Gb/100Gb interface.
The split interface names are appended with -1,-2,-3 and -4. For example, if the QSPF interfacename is 54 then the split interface names are 54-1, 54-2, 54-3 and 54-4.
Syntax [no] split
Authority All users
Examples
switch# configure terminalswitch(config)# interface 54switch(config)# split
switch# configure terminalswitch(config)# interface 54switch(config)# no split
4.1.22. Show all interfacesThis command displays various switch interfaces with their configurations and statuses.
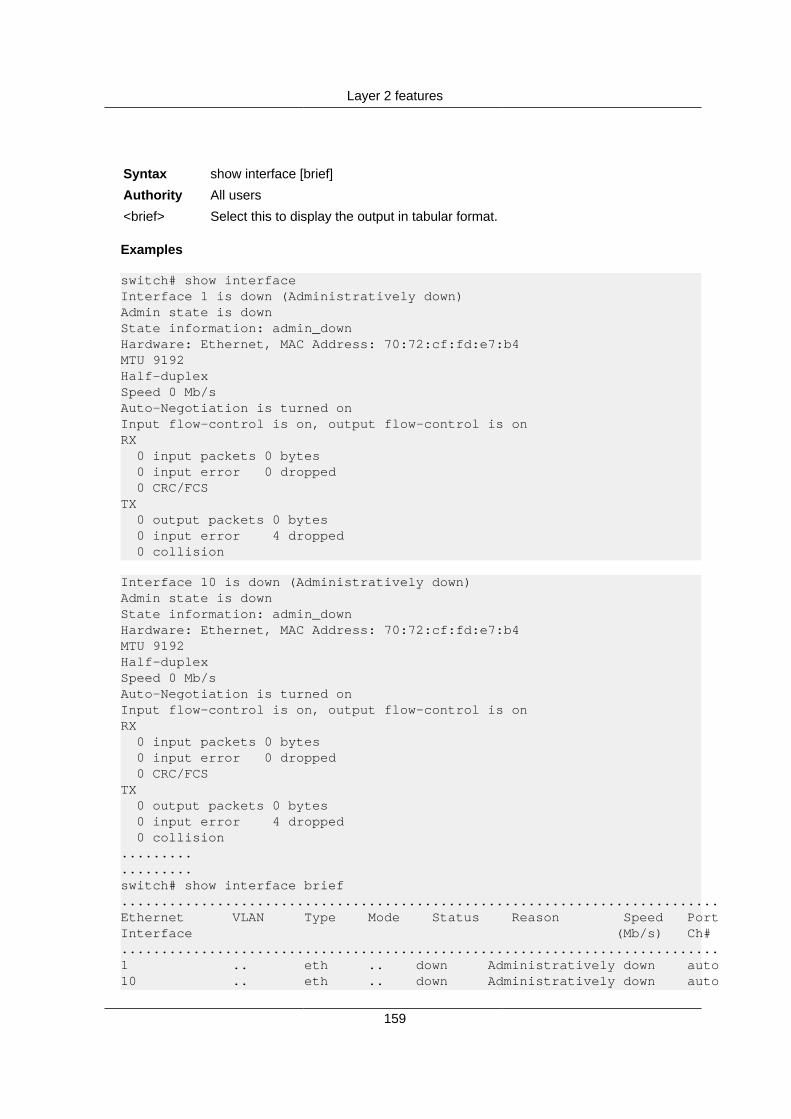
Layer 2 features
159
Syntax show interface [brief]
Authority All users
<brief> Select this to display the output in tabular format.
Examples
switch# show interfaceInterface 1 is down (Administratively down)Admin state is downState information: admin_downHardware: Ethernet, MAC Address: 70:72:cf:fd:e7:b4MTU 9192Half-duplexSpeed 0 Mb/sAuto-Negotiation is turned onInput flow-control is on, output flow-control is onRX 0 input packets 0 bytes 0 input error 0 dropped 0 CRC/FCSTX 0 output packets 0 bytes 0 input error 4 dropped 0 collision
Interface 10 is down (Administratively down)Admin state is downState information: admin_downHardware: Ethernet, MAC Address: 70:72:cf:fd:e7:b4MTU 9192Half-duplexSpeed 0 Mb/sAuto-Negotiation is turned onInput flow-control is on, output flow-control is onRX 0 input packets 0 bytes 0 input error 0 dropped 0 CRC/FCSTX 0 output packets 0 bytes 0 input error 4 dropped 0 collision..................switch# show interface brief...........................................................................Ethernet VLAN Type Mode Status Reason Speed PortInterface (Mb/s) Ch#...........................................................................1 .. eth .. down Administratively down auto10 .. eth .. down Administratively down auto

Layer 2 features
160
11 .. eth .. down Administratively down auto
4.1.23. Show the interface configurationThis command displays the configuration and status of an interface.
Syntax show interface <interface> [brief]
Authority All users
<brief> Select this to display the output in tabular format.
Examples
switch# show interface 1Interface 1 is upAdmin state is upHardware: Ethernet, MAC Address: 70:72:cf:fd:e7:b4MTU 1500Full-duplexSpeed 1000 Mb/sAuto-Negotiation is turned onInput flow-control is off, output flow-control is offRX 0 input packets 0 bytes 0 input error 0 dropped 0 CRC/FCSTX 0 output packets 0 bytes 0 input error 0 dropped 0 collisionswitch# show interface 1 briefEthernet VLAN Type Mode Status Reason Speed PortInterface (Mb/s) Ch#...........................................................................1 .. eth .. down Administratively down auto
4.1.24. Show transceiver information for all interfacesThis command displays information about pluggable modules or fixed interfaces present in theswitch.
Syntax show interface transceiver [brief]
Authority All users
<brief> Select this to display the output in tabular format.
Examples
switch# show interface transceiverInterface 1:Connector: SFP+Transceiver module: SFP_RJ45

Layer 2 features
161
Connector status: supportedVendor name: AVAGOPart number: ABCU-5710RZ-HP8Part revision:Serial number: MY36G2C52DSupported speeds: 1000
Interface 10:Connector: SFP+Transceiver module: not present
Interface 11:Connector: SFP+Transceiver module: not present--------------switch# show interface transceiver brief
-----------------------------------------------Ethernet Connector Module ModuleInterface Type Status-----------------------------------------------1 SFP+ SFP_RJ45 supported10 SFP+ -- --11 SFP+ -- --12 SFP+ -- --13 SFP+ -- --
4.1.25. Show transceiver information for an interfaceThis command displays transceiver information about a particular switch interface.
Syntax show interface <interface> transceiver [brief]
Authority All users
<interface> Name of the interface.
<brief> Select this to display the output in tabular format.
Examples
switch# show interface 1 transceiverInterface 1:Connector: SFP+Transceiver module: SFP_RJ45Connector status: supportedVendor name: AVAGOPart number: ABCU-5710RZ-HP8Part revision:Serial number: MY36G2C52DSupported speeds: 1000
switch# show interface 1 transceiver brief

Layer 2 features
162
-----------------------------------------------Ethernet Connector Module ModuleInterface Type Status-----------------------------------------------1 SFP+ SFP_RJ45 supported
4.1.26. Show the running configuration for all inter-faces
This command displays active configurations of various switch interfaces.
Syntax show running-config interface
Authority All users
Examples
switch# show running-config interfaceInterface 2 no shutdown speed 40000 autonegotiation on exitInterface 1 no shutdown exit..........................
switch# show running-config interfaceinterface bridge_normal no shutdown no routing exitinterface 2 no shutdown lag 100 exitinterface lag 100 no routing lacp mode active
4.1.27. Show the running configuration for an interfaceThis command displays active configurations of a particular switch interface.
Syntax show running-config interface <interface>
Authority All users
<interface> Name of the interface.
Examples

Layer 2 features
163
switch# show running-config interface 2Interface 2 no shutdown speed 40000 autonegotiation on exit
switch# do show running-config interface lag100interface lag 100 no routing lacp mode active
4.1.28. Show transceiver DOM information for all inter-faces
This command displays diagnostics information, and alarm and warning flags of optical trans-ceivers (SFP, SFP+, QSFP+), on all interfaces. This information is known as DOM (Digital OpticalMonitoring).
DOM information also consists of vendor determined thresholds which trigger high/low alarm andwarning flags.
Syntax show interface dom
Authority All users
Examples
switch# sh int 1 domInterface 1:Connector: SFP+Transceiver module: SFP_SR Temperature: 18.00C Temperature high alarm: Off Temperature low alarm: Off Temperature high warning: Off Temperature low warning: Off Temperature high alarm threshold: 73.00C Temperature low alarm threshold: -3.00C Temperature high warning threshold: 70.00C Temperature low warning threshold: 0.00C Voltage: 3.41V Voltage high alarm: Off Voltage high alarm: Off Voltage high alarm: Off Voltage low warning: Off Voltage high alarm threshold: 3.80V Voltage low alarm threshold: 2.81V Voltage high warning threshold: 3.46V Voltage low warning threshold: 3.13V Bias current: 0.16mA Bias current high alarm: Off
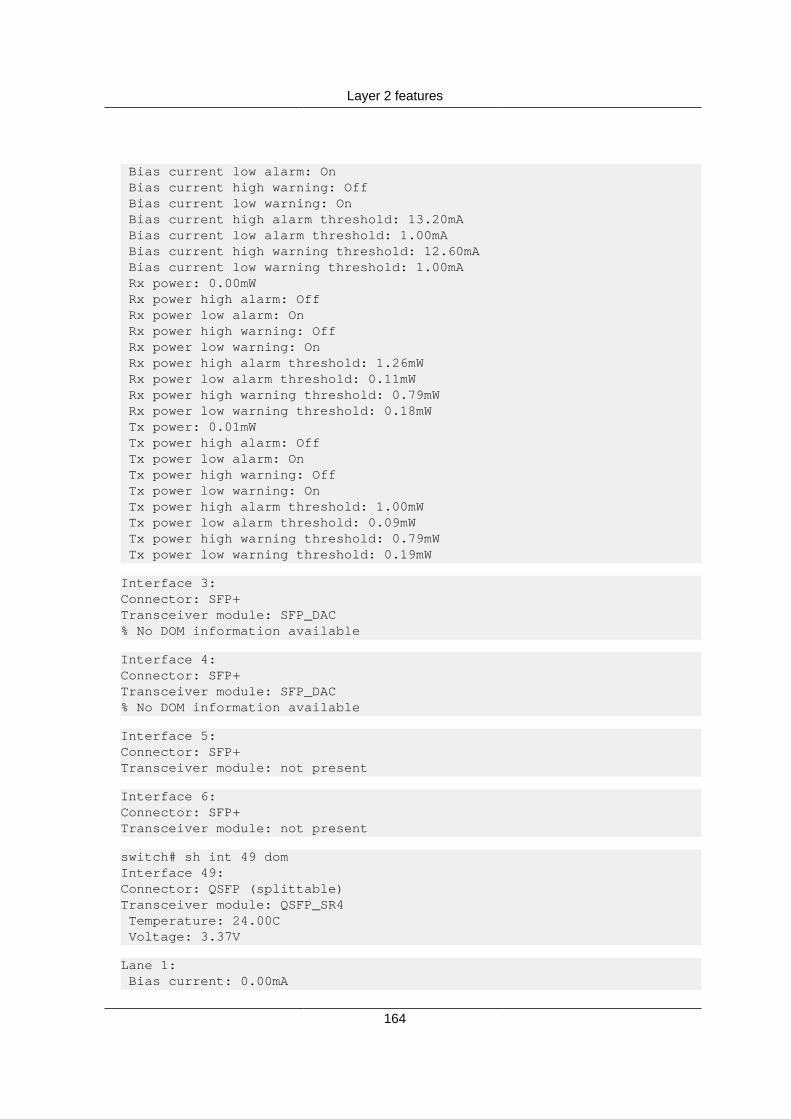
Layer 2 features
164
Bias current low alarm: On Bias current high warning: Off Bias current low warning: On Bias current high alarm threshold: 13.20mA Bias current low alarm threshold: 1.00mA Bias current high warning threshold: 12.60mA Bias current low warning threshold: 1.00mA Rx power: 0.00mW Rx power high alarm: Off Rx power low alarm: On Rx power high warning: Off Rx power low warning: On Rx power high alarm threshold: 1.26mW Rx power low alarm threshold: 0.11mW Rx power high warning threshold: 0.79mW Rx power low warning threshold: 0.18mW Tx power: 0.01mW Tx power high alarm: Off Tx power low alarm: On Tx power high warning: Off Tx power low warning: On Tx power high alarm threshold: 1.00mW Tx power low alarm threshold: 0.09mW Tx power high warning threshold: 0.79mW Tx power low warning threshold: 0.19mW
Interface 3:Connector: SFP+Transceiver module: SFP_DAC% No DOM information available
Interface 4:Connector: SFP+Transceiver module: SFP_DAC% No DOM information available
Interface 5:Connector: SFP+Transceiver module: not present
Interface 6:Connector: SFP+Transceiver module: not present
switch# sh int 49 domInterface 49:Connector: QSFP (splittable)Transceiver module: QSFP_SR4 Temperature: 24.00C Voltage: 3.37V
Lane 1: Bias current: 0.00mA
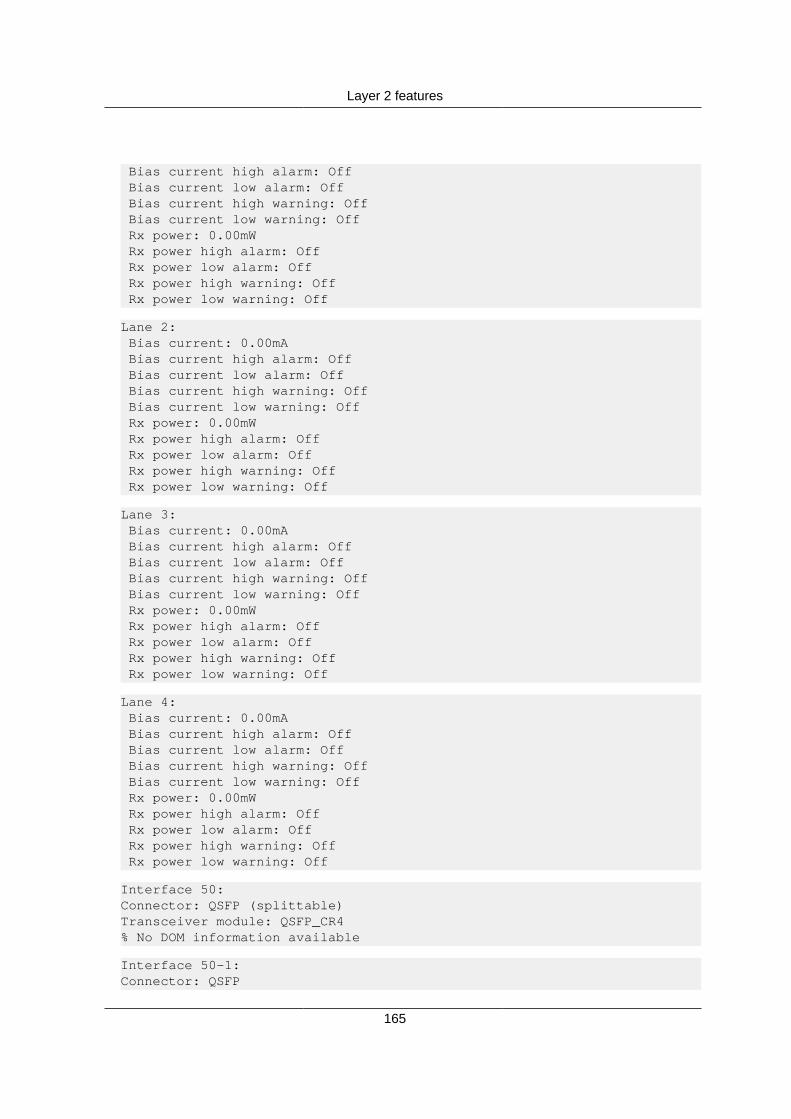
Layer 2 features
165
Bias current high alarm: Off Bias current low alarm: Off Bias current high warning: Off Bias current low warning: Off Rx power: 0.00mW Rx power high alarm: Off Rx power low alarm: Off Rx power high warning: Off Rx power low warning: Off
Lane 2: Bias current: 0.00mA Bias current high alarm: Off Bias current low alarm: Off Bias current high warning: Off Bias current low warning: Off Rx power: 0.00mW Rx power high alarm: Off Rx power low alarm: Off Rx power high warning: Off Rx power low warning: Off
Lane 3: Bias current: 0.00mA Bias current high alarm: Off Bias current low alarm: Off Bias current high warning: Off Bias current low warning: Off Rx power: 0.00mW Rx power high alarm: Off Rx power low alarm: Off Rx power high warning: Off Rx power low warning: Off
Lane 4: Bias current: 0.00mA Bias current high alarm: Off Bias current low alarm: Off Bias current high warning: Off Bias current low warning: Off Rx power: 0.00mW Rx power high alarm: Off Rx power low alarm: Off Rx power high warning: Off Rx power low warning: Off
Interface 50:Connector: QSFP (splittable)Transceiver module: QSFP_CR4% No DOM information available
Interface 50-1:Connector: QSFP

Layer 2 features
166
Interface 50-2:Connector: QSFP
Interface 50-3:Connector: QSFP
Interface 50-4:Connector: QSFP
Interface 51:Connector: QSFP (splittable)Transceiver module: not present
4.1.29. Show transceiver DOM information for an inter-face
This command displays diagnostics information, and alarm and warning flags of optical trans-ceivers (SFP, SFP+, QSFP+), on a particular interface.
Syntax show interface <interface> dom
Authority All users
<interface> Name of the interface.
Examples
switch# sh int 1 domInterface 1:Connector: SFP+Transceiver module: SFP_SR Temperature: 18.00C Temperature high alarm: Off Temperature low alarm: Off Temperature high warning: Off Temperature low warning: Off Temperature high alarm threshold: 73.00C Temperature low alarm threshold: -3.00C Temperature high warning threshold: 70.00C Temperature low warning threshold: 0.00C Voltage: 3.41V Voltage high alarm: Off Voltage high alarm: Off Voltage high alarm: Off Voltage low warning: Off Voltage high alarm threshold: 3.80V Voltage low alarm threshold: 2.81V Voltage high warning threshold: 3.46V Voltage low warning threshold: 3.13V Bias current: 0.16mA Bias current high alarm: Off Bias current low alarm: On Bias current high warning: Off
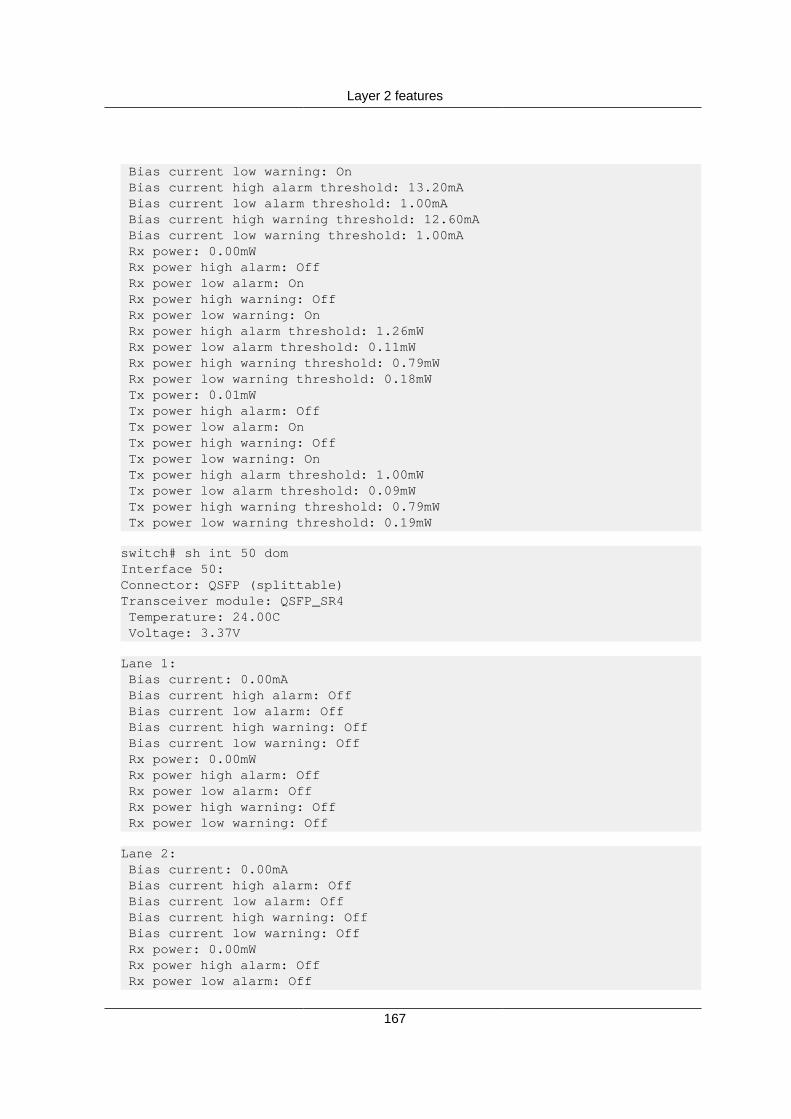
Layer 2 features
167
Bias current low warning: On Bias current high alarm threshold: 13.20mA Bias current low alarm threshold: 1.00mA Bias current high warning threshold: 12.60mA Bias current low warning threshold: 1.00mA Rx power: 0.00mW Rx power high alarm: Off Rx power low alarm: On Rx power high warning: Off Rx power low warning: On Rx power high alarm threshold: 1.26mW Rx power low alarm threshold: 0.11mW Rx power high warning threshold: 0.79mW Rx power low warning threshold: 0.18mW Tx power: 0.01mW Tx power high alarm: Off Tx power low alarm: On Tx power high warning: Off Tx power low warning: On Tx power high alarm threshold: 1.00mW Tx power low alarm threshold: 0.09mW Tx power high warning threshold: 0.79mW Tx power low warning threshold: 0.19mW
switch# sh int 50 domInterface 50:Connector: QSFP (splittable)Transceiver module: QSFP_SR4 Temperature: 24.00C Voltage: 3.37V
Lane 1: Bias current: 0.00mA Bias current high alarm: Off Bias current low alarm: Off Bias current high warning: Off Bias current low warning: Off Rx power: 0.00mW Rx power high alarm: Off Rx power low alarm: Off Rx power high warning: Off Rx power low warning: Off
Lane 2: Bias current: 0.00mA Bias current high alarm: Off Bias current low alarm: Off Bias current high warning: Off Bias current low warning: Off Rx power: 0.00mW Rx power high alarm: Off Rx power low alarm: Off
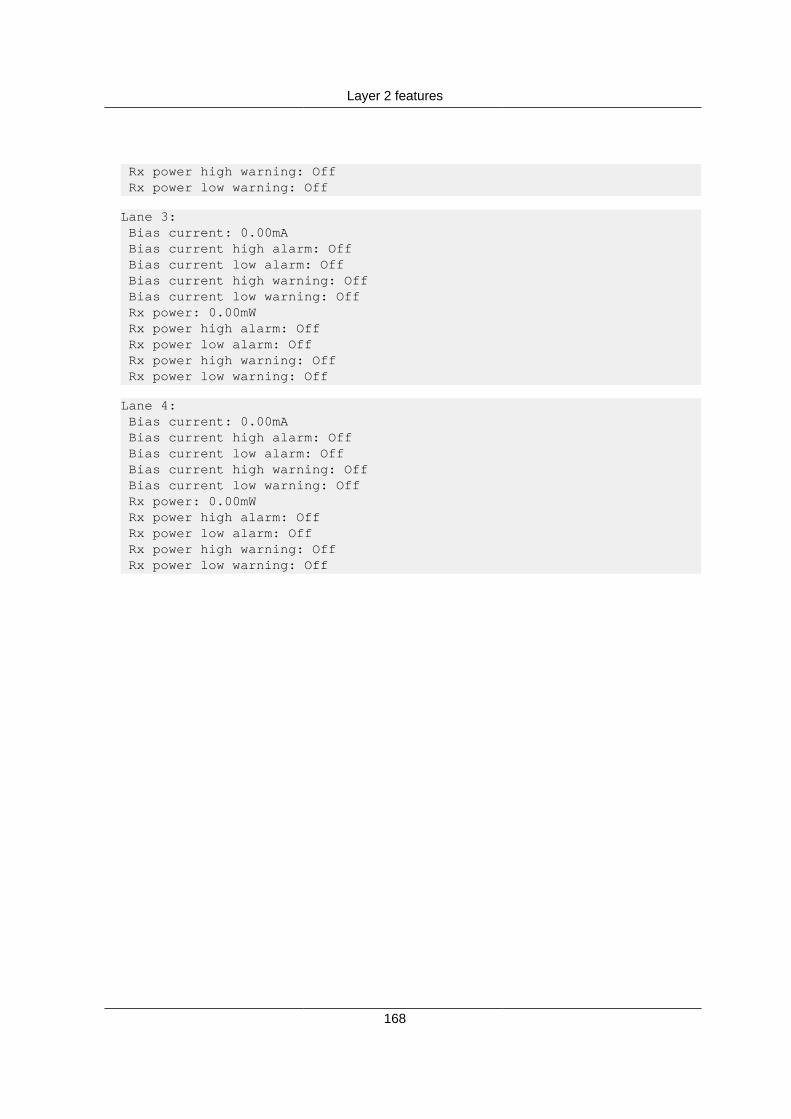
Layer 2 features
168
Rx power high warning: Off Rx power low warning: Off
Lane 3: Bias current: 0.00mA Bias current high alarm: Off Bias current low alarm: Off Bias current high warning: Off Bias current low warning: Off Rx power: 0.00mW Rx power high alarm: Off Rx power low alarm: Off Rx power high warning: Off Rx power low warning: Off
Lane 4: Bias current: 0.00mA Bias current high alarm: Off Bias current low alarm: Off Bias current high warning: Off Bias current low warning: Off Rx power: 0.00mW Rx power high alarm: Off Rx power low alarm: Off Rx power high warning: Off Rx power low warning: Off
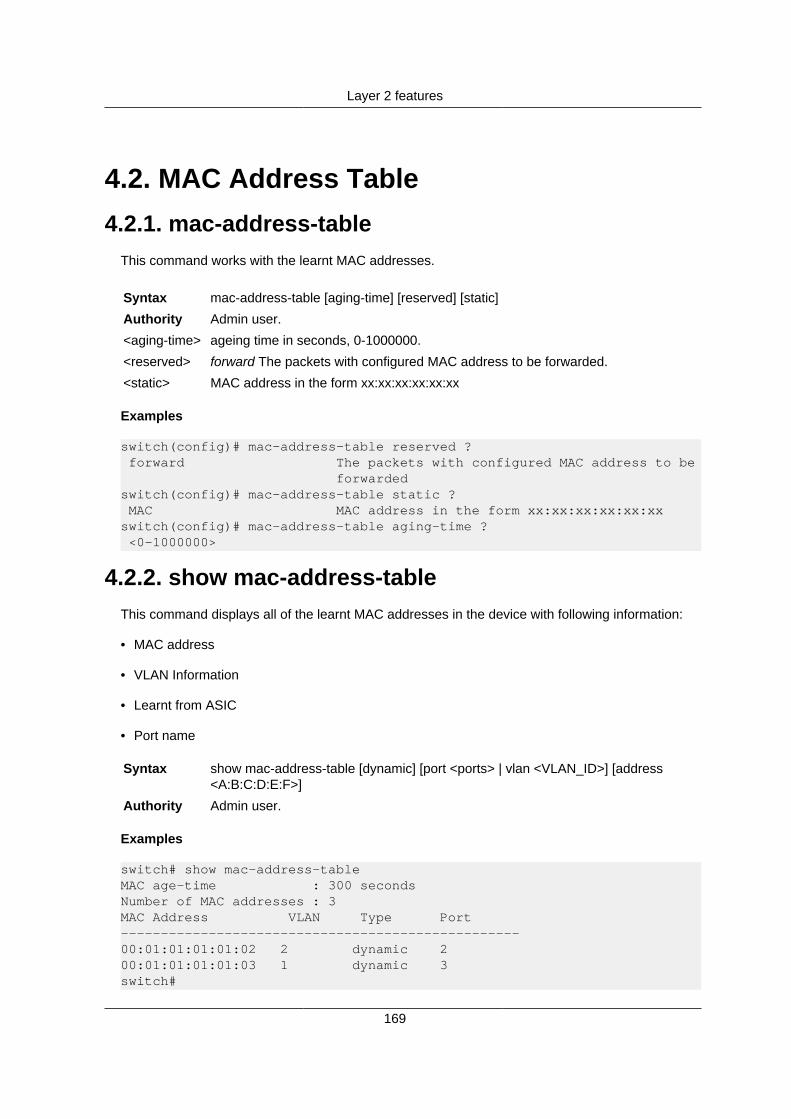
Layer 2 features
169
4.2. MAC Address Table4.2.1. mac-address-table
This command works with the learnt MAC addresses.
Syntax mac-address-table [aging-time] [reserved] [static]
Authority Admin user.
<aging-time> ageing time in seconds, 0-1000000.
<reserved> forward The packets with configured MAC address to be forwarded.
<static> MAC address in the form xx:xx:xx:xx:xx:xx
Examples
switch(config)# mac-address-table reserved ? forward The packets with configured MAC address to be forwardedswitch(config)# mac-address-table static ? MAC MAC address in the form xx:xx:xx:xx:xx:xxswitch(config)# mac-address-table aging-time ? <0-1000000>
4.2.2. show mac-address-tableThis command displays all of the learnt MAC addresses in the device with following information:
• MAC address
• VLAN Information
• Learnt from ASIC
• Port name
Syntax show mac-address-table [dynamic] [port <ports> | vlan <VLAN_ID>] [address<A:B:C:D:E:F>]
Authority Admin user.
Examples
switch# show mac-address-tableMAC age-time : 300 secondsNumber of MAC addresses : 3MAC Address VLAN Type Port--------------------------------------------------00:01:01:01:01:02 2 dynamic 200:01:01:01:01:03 1 dynamic 3switch#

Layer 2 features
170
4.2.3. show mac-address-table [ dynamic ]This command displays details of all MAC addresses learnt on specified ports.
Syntax show mac-address-table [ dynamic ] [ port < 2 | 1-2 > ]
Authority Admin user.
< 1 or 1-2 or1,lag1 >
Show all learnt MAC addresses on specified ports.
Examples
switch# show mac-address-table dynamic port 1MAC age-time : 300 secondsNumber of MAC addresses : 1MAC Address VLAN Type Port--------------------------------------------------00:01:01:01:01:03 1 dynamic 1
switch# show mac-address-table dynamic port 1-2MAC age-time : 300 secondsNumber of MAC addresses : 2MAC Address VLAN Type Port--------------------------------------------------00:01:01:01:01:02 2 dynamic 200:01:01:01:01:03 1 dynamic 1
This command displays details of all MAC addresses learnt on specified VLANS.
Syntax show mac-address-table [ dynamic ] [ vlan < 2 | 1-2 > ]
Authority Admin user.
< 1 or 1-2 or1,lag1 >
Show all MAC addresses learnt on specified VLANs.
Examples
switch# show mac-address-table dynamic vlan 1MAC age-time : 300 secondsNumber of MAC addresses : 1MAC Address VLAN Type Port--------------------------------------------------00:01:01:01:01:03 1 dynamic 1
switch# show mac-address-table dynamic vlan 2-3MAC age-time : 300 secondsNumber of MAC addresses : 2MAC Address VLAN Type Port--------------------------------------------------00:01:01:01:01:02 2 dynamic 200:01:01:01:0c:02 3 dynamic 2
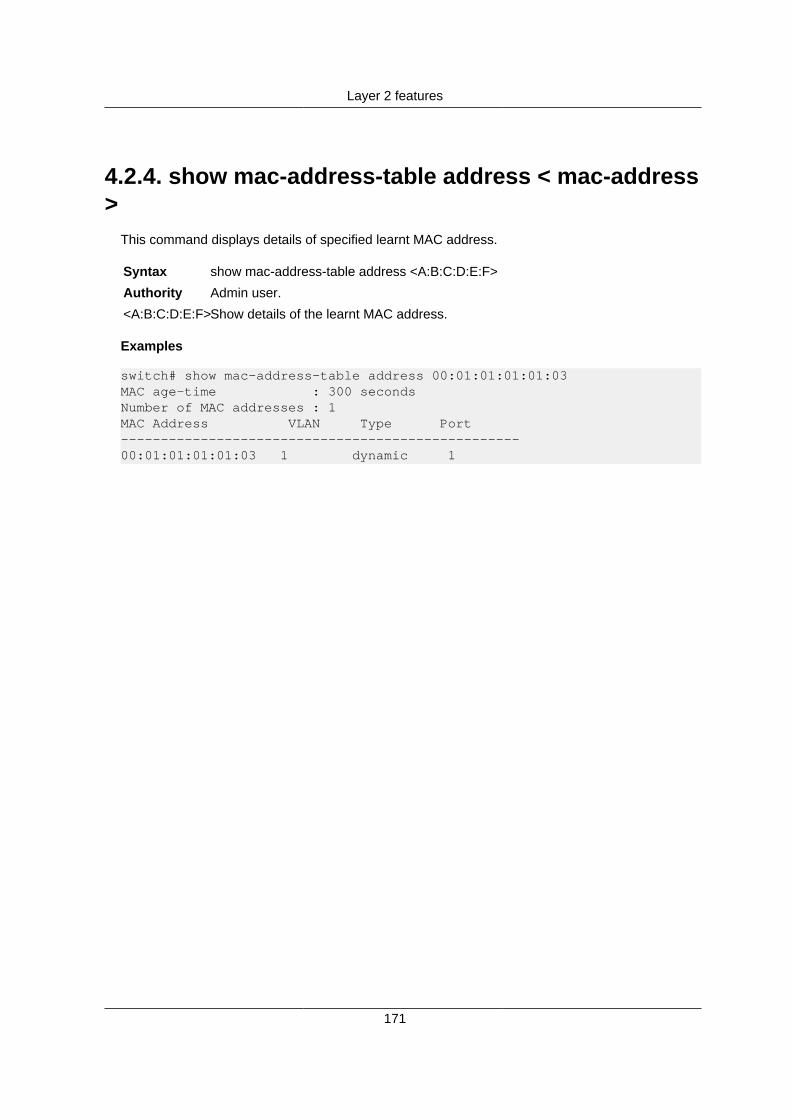
Layer 2 features
171
4.2.4. show mac-address-table address < mac-address>
This command displays details of specified learnt MAC address.
Syntax show mac-address-table address <A:B:C:D:E:F>
Authority Admin user.
<A:B:C:D:E:F>Show details of the learnt MAC address.
Examples
switch# show mac-address-table address 00:01:01:01:01:03MAC age-time : 300 secondsNumber of MAC addresses : 1MAC Address VLAN Type Port--------------------------------------------------00:01:01:01:01:03 1 dynamic 1

Layer 2 features
172
4.3. LACP commands4.3.1. Creation of LAG interface
This command creates a Link Aggregation Group (LAG) interface represented by an ID.
Syntax interface lag ID
Authority All users
<ID> This command takes an ID as a parameter which represents a LAG interface. TheLAG interface ID can be in the range of 1 to 2000.
Examples
switch(config)# interface lag 100switch(config-lag-if)#
4.3.2. Deletion of LAG interfaceThis command deletes a LAG interface represented by an ID.
Syntax no interface lag ID
Authority All users
<ID> This command takes an ID as a parameter which represents a LAG interface. TheLAG interface ID can be in the range of 1 to 2000.
Examples
switch(config)# no interface lag 100
4.3.3. Configuring LACP system priorityThis command sets a Link Aggregation Control Protocol (LACP) system priority.
Syntax lacp system-priority <0-65535>
Authority All users
<0-65535> This command takes a system priority value in the of range 0 to 65535.
Examples
switch(config)# lacp system-priority 100
4.3.4. Configuring default LACP system priorityThis command sets an LACP system priority to a default(65534).
Syntax no lacp system-priority
Authority All users
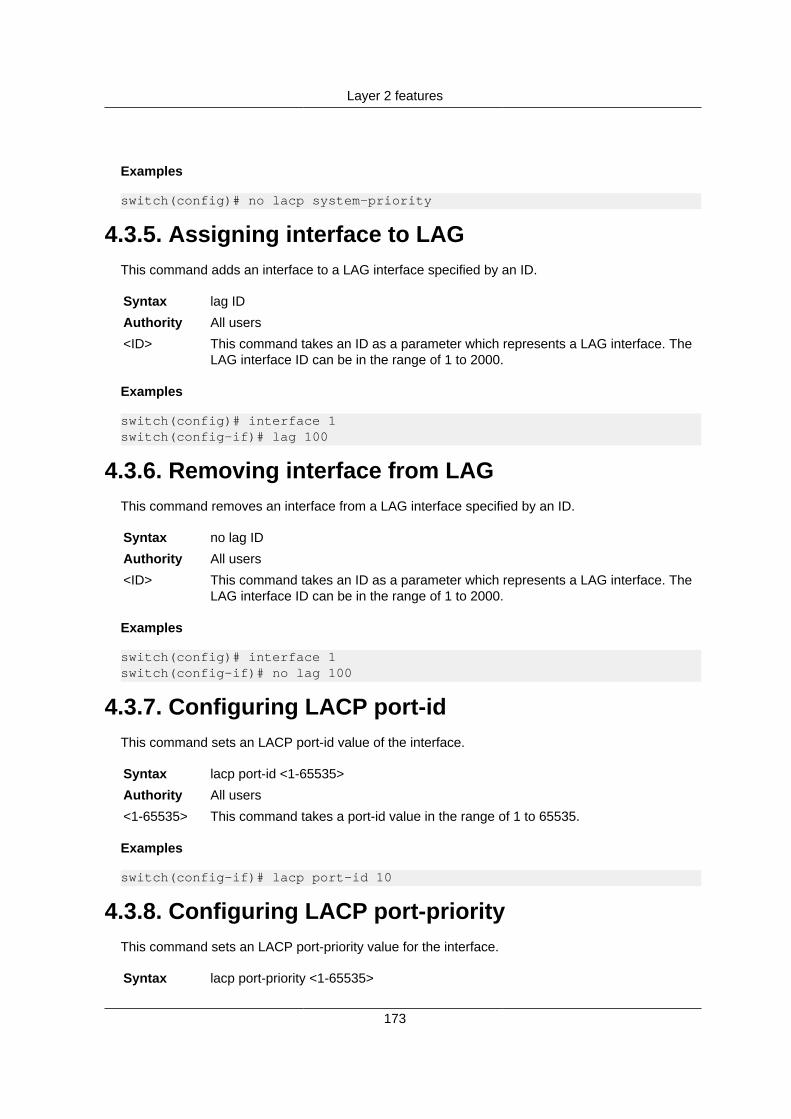
Layer 2 features
173
Examples
switch(config)# no lacp system-priority
4.3.5. Assigning interface to LAGThis command adds an interface to a LAG interface specified by an ID.
Syntax lag ID
Authority All users
<ID> This command takes an ID as a parameter which represents a LAG interface. TheLAG interface ID can be in the range of 1 to 2000.
Examples
switch(config)# interface 1switch(config-if)# lag 100
4.3.6. Removing interface from LAGThis command removes an interface from a LAG interface specified by an ID.
Syntax no lag ID
Authority All users
<ID> This command takes an ID as a parameter which represents a LAG interface. TheLAG interface ID can be in the range of 1 to 2000.
Examples
switch(config)# interface 1switch(config-if)# no lag 100
4.3.7. Configuring LACP port-idThis command sets an LACP port-id value of the interface.
Syntax lacp port-id <1-65535>
Authority All users
<1-65535> This command takes a port-id value in the range of 1 to 65535.
Examples
switch(config-if)# lacp port-id 10
4.3.8. Configuring LACP port-priorityThis command sets an LACP port-priority value for the interface.
Syntax lacp port-priority <1-65535>

Layer 2 features
174
Authority All users
<1-65535> This command takes a port-priority value in the range of 1 to 65535.
Examples
switch(config-if)# lacp port-priority 10
4.3.9. Entering into LAG contextThis command enters into the LAG context of the specified LAG ID. If the specified LAG interfaceis not present, this command creates a LAG interface and enters it into the LAG context.
Syntax interface lag ID
Authority All users
<ID> This command takes an ID as a parameter which represents a LAG interface. TheLAG interface ID can be in the range of 1 to 2000.
Examples
switch(config)# interface 1switch(config-if)# lag 100
4.3.10. Configuring LACP modeThis command sets an LACP mode to active or passive. The no form of the command sets theLACP mode to off.
Syntax [no] lacp mode {active/passive}
Authority All users
<active/pas-sive>
This command takes an active or passive keyword as an argument to set an LACPmode.
Examples
switch(config)# interface lag 1switch(config-lag-if)# lacp mode activeswitch(config-lag-if)# no lacp mode active
4.3.11. Configuring hash typeThis command sets an LACP hash type to l2-src-dst, l3-src-dst or l4-src-dst. The default is l3-src-dst.
Syntax hash {l2-src-dst/l3-src-dst/l4-src-dst}
Authority All users
Examples
switch(config)# interface lag 1switch(config-lag-if)# hash l2-src-dst
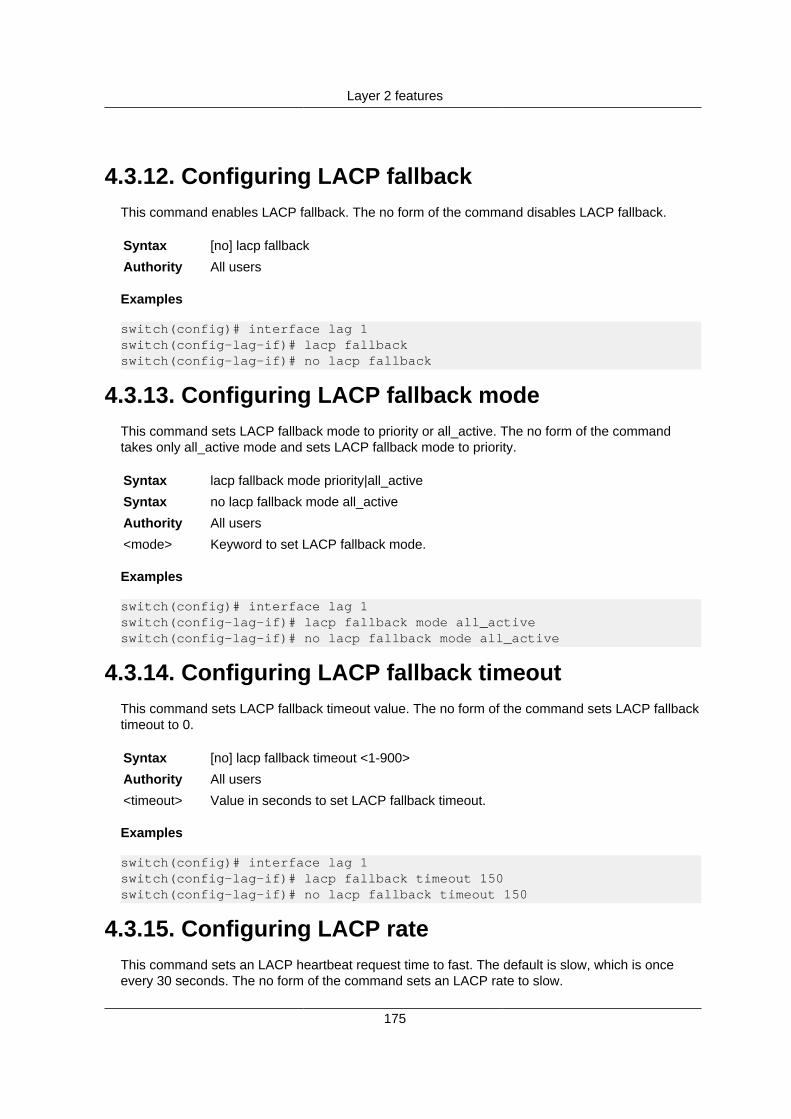
Layer 2 features
175
4.3.12. Configuring LACP fallbackThis command enables LACP fallback. The no form of the command disables LACP fallback.
Syntax [no] lacp fallback
Authority All users
Examples
switch(config)# interface lag 1switch(config-lag-if)# lacp fallbackswitch(config-lag-if)# no lacp fallback
4.3.13. Configuring LACP fallback modeThis command sets LACP fallback mode to priority or all_active. The no form of the commandtakes only all_active mode and sets LACP fallback mode to priority.
Syntax lacp fallback mode priority|all_active
Syntax no lacp fallback mode all_active
Authority All users
<mode> Keyword to set LACP fallback mode.
Examples
switch(config)# interface lag 1switch(config-lag-if)# lacp fallback mode all_activeswitch(config-lag-if)# no lacp fallback mode all_active
4.3.14. Configuring LACP fallback timeoutThis command sets LACP fallback timeout value. The no form of the command sets LACP fallbacktimeout to 0.
Syntax [no] lacp fallback timeout <1-900>
Authority All users
<timeout> Value in seconds to set LACP fallback timeout.
Examples
switch(config)# interface lag 1switch(config-lag-if)# lacp fallback timeout 150switch(config-lag-if)# no lacp fallback timeout 150
4.3.15. Configuring LACP rateThis command sets an LACP heartbeat request time to fast. The default is slow, which is onceevery 30 seconds. The no form of the command sets an LACP rate to slow.
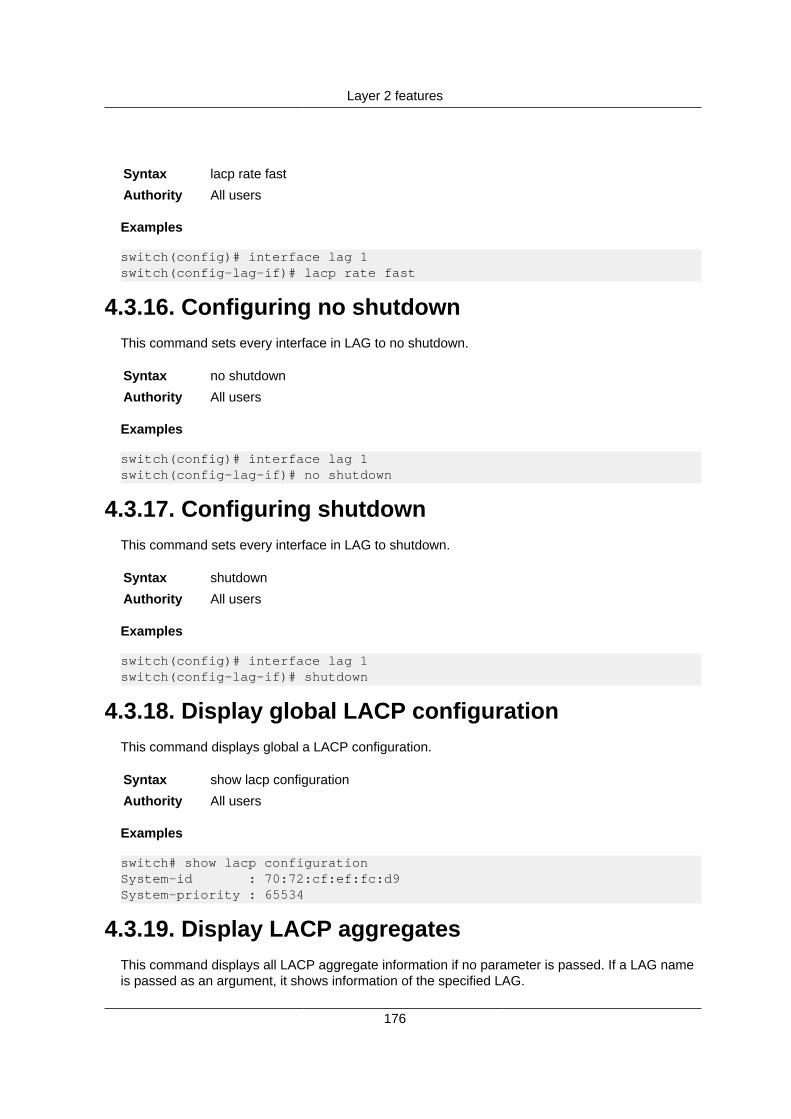
Layer 2 features
176
Syntax lacp rate fast
Authority All users
Examples
switch(config)# interface lag 1switch(config-lag-if)# lacp rate fast
4.3.16. Configuring no shutdownThis command sets every interface in LAG to no shutdown.
Syntax no shutdown
Authority All users
Examples
switch(config)# interface lag 1switch(config-lag-if)# no shutdown
4.3.17. Configuring shutdownThis command sets every interface in LAG to shutdown.
Syntax shutdown
Authority All users
Examples
switch(config)# interface lag 1switch(config-lag-if)# shutdown
4.3.18. Display global LACP configurationThis command displays global a LACP configuration.
Syntax show lacp configuration
Authority All users
Examples
switch# show lacp configurationSystem-id : 70:72:cf:ef:fc:d9System-priority : 65534
4.3.19. Display LACP aggregatesThis command displays all LACP aggregate information if no parameter is passed. If a LAG nameis passed as an argument, it shows information of the specified LAG.

Layer 2 features
177
Syntax show lacp aggregates [lag-name]
Authority All users
<lag-name> This command takes a LAG name as an optional parameter.
Examples
switch# show lacp aggregates lag100Aggregate-name : lag100Aggregated-interfaces : 1Heartbeat rate : slowFallback : falseFallback mode : priorityFallback timeout : 0Hash : l3-src-dstAggregate mode : active
switch# show lacp aggregatesAggregate-name : lag100Aggregated-interfaces : 1Heartbeat rate : slowFallback : falseFallback mode : priorityFallback timeout : 0Hash : l3-src-dstAggregate mode : active
Aggregate-name : lag200Aggregated-interfaces : 3 2Heartbeat rate : slowFallback : falseFallback mode : all_activeFallback timeout : 100Hash : l3-src-dstAggregate mode : activeswitch#
4.3.20. Display LACP interface configurationThis command displays an LACP configuration of the physical interfaces. If an interface name ispassed as argument, it only displays an LACP configuration of a specified interface.
Syntax show lacp interfaces [IFNAME]
Authority All users
<IFNAME> This command takes an interface name as an optional parameter.
Examples
switch# show lacp interfacesState abbreviationsA - Active P - Passive F - Aggregable I - Individual
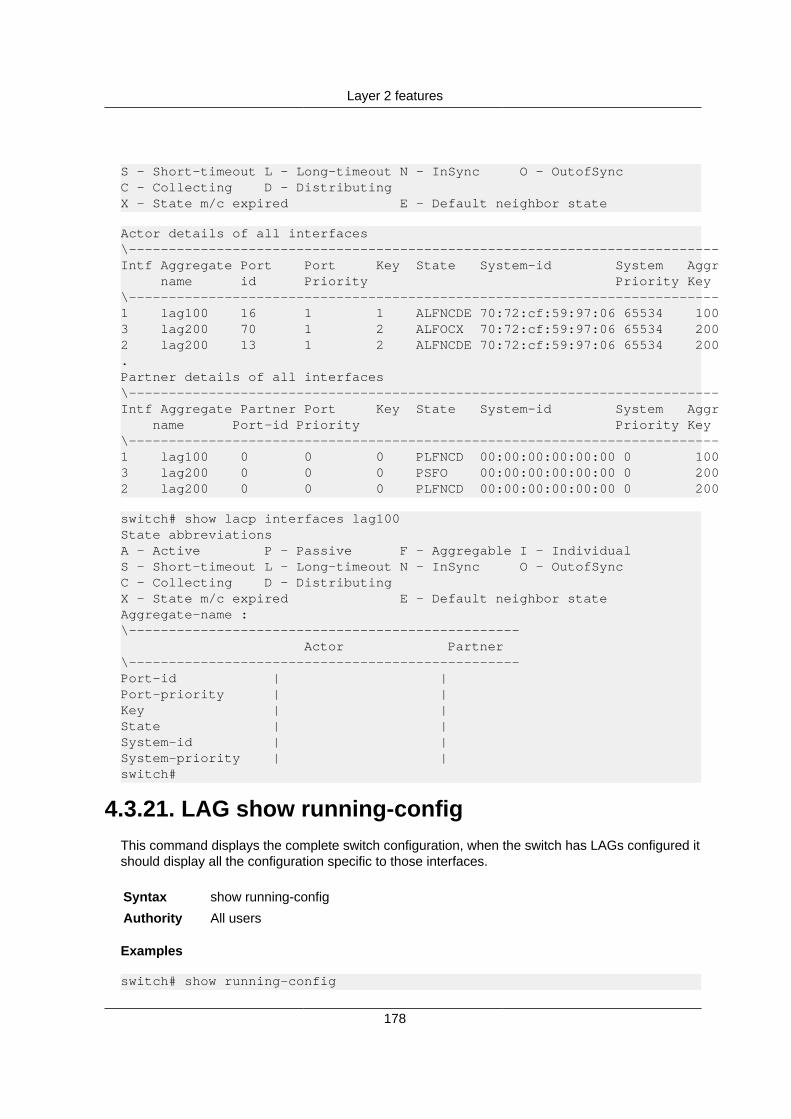
Layer 2 features
178
S - Short-timeout L - Long-timeout N - InSync O - OutofSyncC - Collecting D - DistributingX - State m/c expired E - Default neighbor state
Actor details of all interfaces\--------------------------------------------------------------------------Intf Aggregate Port Port Key State System-id System Aggr name id Priority Priority Key\--------------------------------------------------------------------------1 lag100 16 1 1 ALFNCDE 70:72:cf:59:97:06 65534 1003 lag200 70 1 2 ALFOCX 70:72:cf:59:97:06 65534 2002 lag200 13 1 2 ALFNCDE 70:72:cf:59:97:06 65534 200.Partner details of all interfaces\--------------------------------------------------------------------------Intf Aggregate Partner Port Key State System-id System Aggr name Port-id Priority Priority Key\--------------------------------------------------------------------------1 lag100 0 0 0 PLFNCD 00:00:00:00:00:00 0 1003 lag200 0 0 0 PSFO 00:00:00:00:00:00 0 2002 lag200 0 0 0 PLFNCD 00:00:00:00:00:00 0 200
switch# show lacp interfaces lag100State abbreviationsA - Active P - Passive F - Aggregable I - IndividualS - Short-timeout L - Long-timeout N - InSync O - OutofSyncC - Collecting D - DistributingX - State m/c expired E - Default neighbor stateAggregate-name :\------------------------------------------------- Actor Partner\-------------------------------------------------Port-id | |Port-priority | |Key | |State | |System-id | |System-priority | |switch#
4.3.21. LAG show running-configThis command displays the complete switch configuration, when the switch has LAGs configured itshould display all the configuration specific to those interfaces.
Syntax show running-config
Authority All users
Examples
switch# show running-config
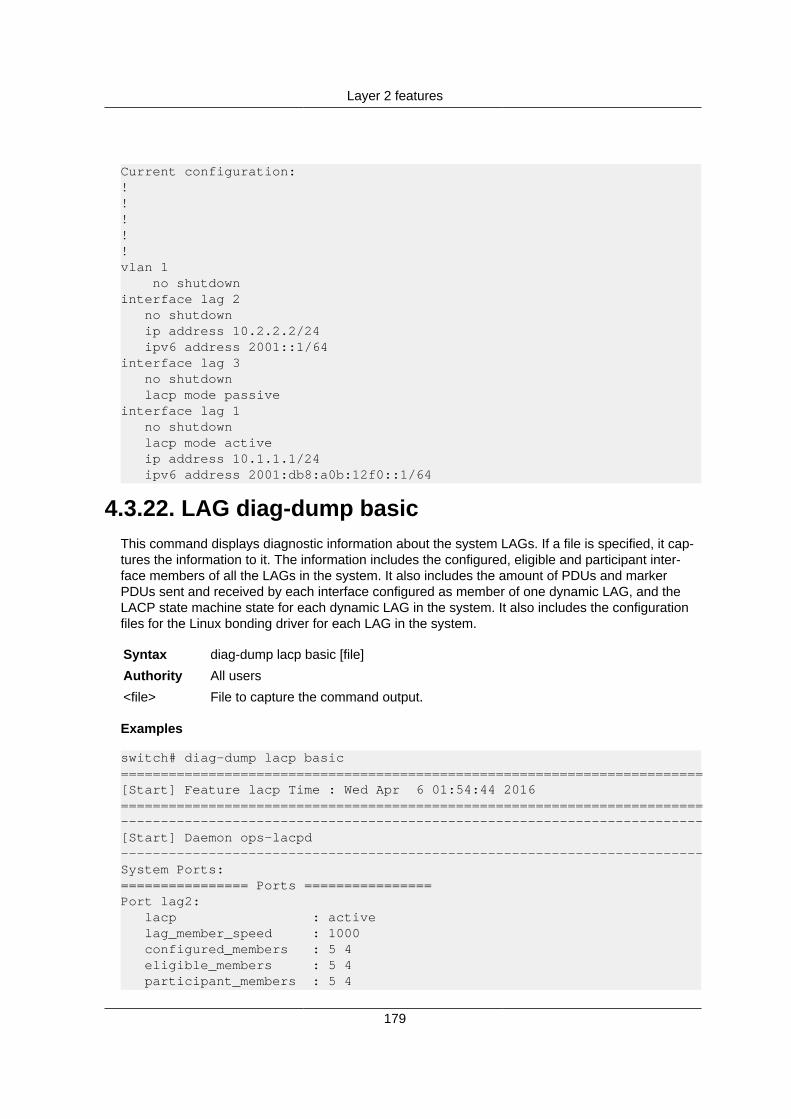
Layer 2 features
179
Current configuration:!!!!!vlan 1 no shutdowninterface lag 2 no shutdown ip address 10.2.2.2/24 ipv6 address 2001::1/64interface lag 3 no shutdown lacp mode passiveinterface lag 1 no shutdown lacp mode active ip address 10.1.1.1/24 ipv6 address 2001:db8:a0b:12f0::1/64
4.3.22. LAG diag-dump basicThis command displays diagnostic information about the system LAGs. If a file is specified, it cap-tures the information to it. The information includes the configured, eligible and participant inter-face members of all the LAGs in the system. It also includes the amount of PDUs and markerPDUs sent and received by each interface configured as member of one dynamic LAG, and theLACP state machine state for each dynamic LAG in the system. It also includes the configurationfiles for the Linux bonding driver for each LAG in the system.
Syntax diag-dump lacp basic [file]
Authority All users
<file> File to capture the command output.
Examples
switch# diag-dump lacp basic=========================================================================[Start] Feature lacp Time : Wed Apr 6 01:54:44 2016=========================================================================-------------------------------------------------------------------------[Start] Daemon ops-lacpd-------------------------------------------------------------------------System Ports:================ Ports ================Port lag2: lacp : active lag_member_speed : 1000 configured_members : 5 4 eligible_members : 5 4 participant_members : 5 4

Layer 2 features
180
interface_count : 2Port 1: lacp : off lag_member_speed : 1000 configured_members : 1 eligible_members : 1 participant_members : interface_count : 0Port bridge_normal: lacp : off lag_member_speed : 0 configured_members : bridge_normal eligible_members : participant_members : interface_count : 0
LAG interfaces:Port lag2: configured_members : 5 4 eligible_members : 5 4 participant_members : 5 4
LACP PDUs counters:LAG lag2:Configured interfaces: Interface: 5 lacp_pdus_sent: 10 marker_response_pdus_sent: 0 lacp_pdus_received: 7 marker_pdus_received: 0 Interface: 4 lacp_pdus_sent: 10 marker_response_pdus_sent: 0 lacp_pdus_received: 8 marker_pdus_received: 0
LACP state:LAG lag2:Configured interfaces: Interface: 5 actor_oper_port_state lacp_activity:1 time_out:0 aggregation:1 sync:1 collecting:1 distributing:1 defaulted:0 expired:0 partner_oper_port_state lacp_activity:1 time_out:0 aggregation:1 sync:1 collecting:1 distributing:1 defaulted:0 expired:0 lacp_control begin:0 actor_churn:0 partner_churn:0 ready_n:1 selected:1 port_moved:0 ntt:0 port_enabled:1 Interface: 4 actor_oper_port_state lacp_activity:1 time_out:0 aggregation:1 sync:1 collecting:1

Layer 2 features
181
distributing:1 defaulted:0 expired:0 partner_oper_port_state lacp_activity:1 time_out:0 aggregation:1 sync:1 collecting:1 distributing:1 defaulted:0 expired:0 lacp_control begin:0 actor_churn:0 partner_churn:0 ready_n:1 selected:1 port_moved:0 ntt:0 port_enabled:1
-------------------------------------------------------------------------[End] Daemon ops-lacpd--------------------------------------------------------------------------------------------------------------------------------------------------[Start] Daemon ops-portd-------------------------------------------------------------------------Configuration file for lag2:Ethernet Channel Bonding Driver: v3.7.1 (April 27, 2011)
Bonding Mode: load balancing (xor)Transmit Hash Policy: layer2 (0)MII Status: upMII Polling Interval (ms): 0Up Delay (ms): 0Down Delay (ms): 0
Slave Interface: 5MII Status: upSpeed: 10000 MbpsDuplex: fullLink Failure Count: 0Permanent HW addr: 70:72:cf:3a:b6:b6Slave queue ID: 0
Slave Interface: 4MII Status: upSpeed: 10000 MbpsDuplex: fullLink Failure Count: 0Permanent HW addr: 70:72:cf:3a:b6:b6Slave queue ID: 0
-------------------------------------------------------------------------[End] Daemon ops-portd-------------------------------------------------------------------------=========================================================================[End] Feature lacp=========================================================================Diagnostic dump captured for feature lacp

Layer 2 features
182
4.4. VLAN commands4.4.1. Assigning an interface to access mode VLAN
This command assigns the interface to an existing access VLAN represented by the ID in the com-mand. If the VLAN does not exist already, this command displays an error.
Syntax vlan access <vlanid>
Authority All users
<vlanid> Represents VLAN and takes values from 1 to 4094
Examples
The following commands assign interface 2 to access mode VLAN 20.
switch(config)# interface 2switch(config-if)#no routingswitch(config-if)#vlan access 20
4.4.2. Removing an interface from access mode VLANThis command removes the interface from an access VLAN represented by an ID.
Syntax no vlan access [<vlanid>]
Authority All users
<vlanid> Represents VLAN and takes values from 1 to 4094
Examples
switch(config)#interface 2switch(config-if)# no VLAN access
OR
switch(config-if)# no VLAN access 20
4.4.3. Assigning a trunk native VLAN to an interfaceThis command assigns a trunk native VLAN represented by an ID to an interface or a LAG inter-face. The interface or LAG interface should have routing disabled for this command to work cor-rectly.
Syntax vlan trunk native <vlanid>
Authority All users
<vlanid> Represents VLAN and takes values from 1 to 4094
Examples
switch(config)# interface 2

Layer 2 features
183
switch(config-if)#no routingswitch(config-if)#vlan trunk native 20
switch(config)# interface lag 2switch(config-lag-if)#no routingswitch(config-lag-if)#vlan trunk native 20
4.4.4. Removing a trunk native VLAN from an interfaceThis command removes the trunk native VLAN from an interface/LAG interface.
Syntax no vlan trunk native [<vlanid>]
Authority All users
<vlanid> Represents VLAN and takes values from 1 to 4094
Examples
switch(config)# interface 2switch(config-if)#no vlan trunk native
switch(config)# interface lag 2switch(config-lag-if)#no vlan trunk native
4.4.5. Assigning tagging on a native VLAN to an inter-face
This command enables tagging on a native VLAN to an interface or a LAG interface.
Syntax vlan trunk native tag
Authority All users
Examples
switch(config)# interface 2switch(config-if)#no routingswitch(config-if)#vlan trunk native tag
switch(config)# interface lag 2switch(config-if)#no routingswitch(config-lag-if)#vlan trunk native tag
4.4.6. Removing tagging on a native VLAN from an in-terface
This command disables tagging on a native VLAN on an interface/LAG interface.
Syntax no vlan trunk native tag
Authority All users
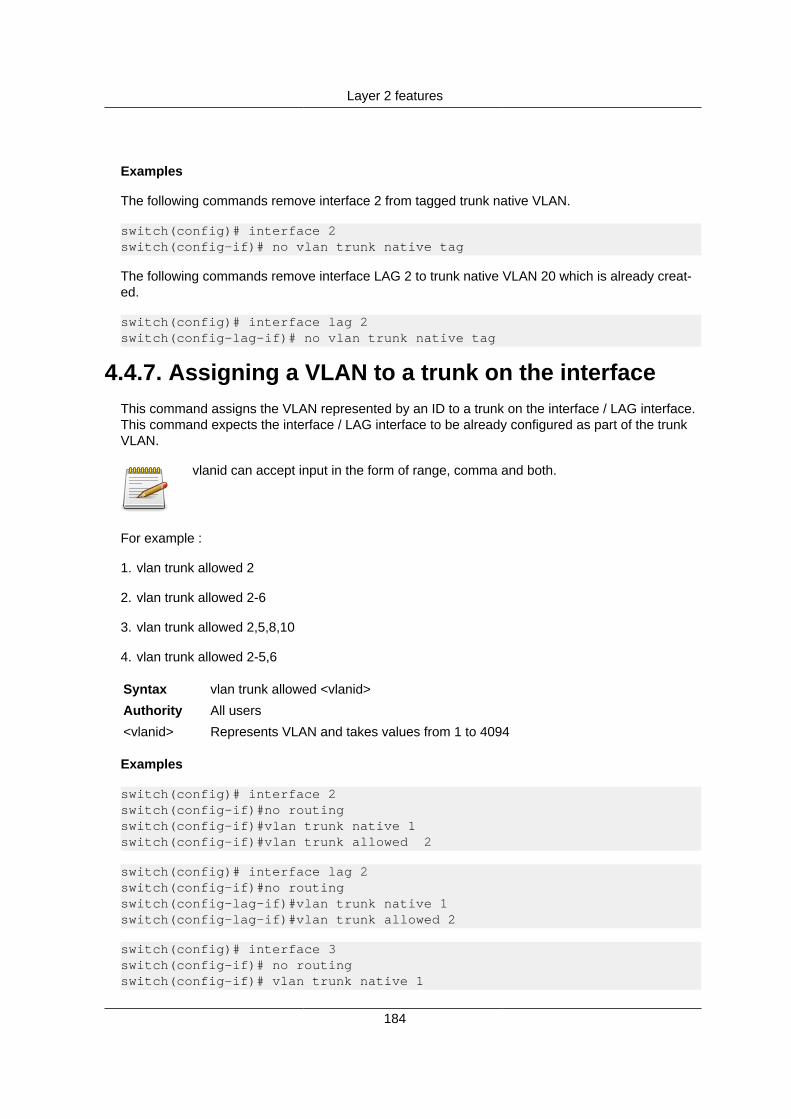
Layer 2 features
184
Examples
The following commands remove interface 2 from tagged trunk native VLAN.
switch(config)# interface 2switch(config-if)# no vlan trunk native tag
The following commands remove interface LAG 2 to trunk native VLAN 20 which is already creat-ed.
switch(config)# interface lag 2switch(config-lag-if)# no vlan trunk native tag
4.4.7. Assigning a VLAN to a trunk on the interfaceThis command assigns the VLAN represented by an ID to a trunk on the interface / LAG interface.This command expects the interface / LAG interface to be already configured as part of the trunkVLAN.
vlanid can accept input in the form of range, comma and both.
For example :
1. vlan trunk allowed 2
2. vlan trunk allowed 2-6
3. vlan trunk allowed 2,5,8,10
4. vlan trunk allowed 2-5,6
Syntax vlan trunk allowed <vlanid>
Authority All users
<vlanid> Represents VLAN and takes values from 1 to 4094
Examples
switch(config)# interface 2switch(config-if)#no routingswitch(config-if)#vlan trunk native 1switch(config-if)#vlan trunk allowed 2
switch(config)# interface lag 2switch(config-if)#no routingswitch(config-lag-if)#vlan trunk native 1switch(config-lag-if)#vlan trunk allowed 2
switch(config)# interface 3switch(config-if)# no routingswitch(config-if)# vlan trunk native 1

Layer 2 features
185
switch(config-if)# vlan trunk allowed 2-5,10,17
4.4.8. Removing a VLAN from a trunk on the interfaceThis command removes the VLAN represented by an ID from a trunk on the interface/LAG inter-face.
Syntax no vlan trunk allowed [<vlanid>]
Authority All users
<vlanid> Represents VLAN and takes values from 1 to 4094
Examples
switch(config)# interface 2switch(config-if)#no vlan trunk allowed 2
switch(config)# interface lag 2switch(config-lag-if)#no vlan trunk allowed 2
4.4.9. Turning on a VLANThis command powers the VLAN up.
Syntax no shutdown
Authority All users
Examples
switch(config)# vlan 3switch(config-vlan)# no shutdown
4.4.10. Turning off a VLANThis command shuts the VLAN down.
Syntax shutdown
Authority All users
Examples
switch(config)# vlan 3switch(config-vlan)# shutdown
4.4.11. Creating a VLANThis command creates a VLAN with a given ID and sets the admin state of the VLAN to the defaultof down.
Syntax vlan <vlanid>

Layer 2 features
186
Authority All users
<vlanid> Represents VLAN and takes values from 1 to 4094
Examples
switch(config)# vlan 3switch(config-vlan)#
4.4.12. Deleting a VLANThis command deletes the VLAN with a given ID. The value ranges from 1 to 4094.
Syntax no vlan < vlanid >
Authority All users
<vlanid> Represents VLAN and takes values from 1 to 4094
Examples
switch(config-vlan)# no vlan 3switch(config)#
4.4.13. Displaying a VLAN summaryThis command displays a summary of a VLAN configuration.
Syntax show vlan summary
Authority All users
Examples
switch#show vlan summary
Number of existing VLANs : 2
4.4.14. Displaying a VLAN detailThis command displays VLAN configuration information of all existing VLANs in the switch.
Syntax show vlan [< vlanid >]
Authority All users
<vlanid> Represents VLAN and takes values from 1 to 4094
Examples
switch#show vlan --------------------------------------------------------------------------VLAN Name Status Reason Reserved Interfaces---------------------------------------------------------------------------1 DEFAULT_VLAN_1 down no_member_port

Layer 2 features
187
33 VLAN33 up ok l3port 1
switch#show vlan 33---------------------------------------------------------------------------VLAN Name Status Reason Reserved Interfaces---------------------------------------------------------------------------33 VLAN33 up ok l3port

Layer 2 features
188
4.5. MSTP commands4.5.1. Enable MSTP protocol
This command enables MSTP feature for all the instances.
Syntax spanning-tree
Authority All users
Examples
switch# configure terminalswitch# spanning-tree
4.5.2. Disable MSTP protocolThis command disables MSTP feature for all the instances.
Syntax no spanning-tree
Authority All users
Examples
switch# configure terminalswitch# no spanning-tree
4.5.3. Set MSTP config nameThis command sets config name for MSTP.
Syntax spanning-tree config-name <configuration-name>
Authority All users
<configura-tion-name>
Specifies the MSTP configuration name(maximum 32 characters)
Examples
switch# configure terminalswitch# spanning-tree config-name MST0
4.5.4. Set default MSTP config nameThis command sets the default config name for all the instances, default is system MAC-Address.
Syntax no spanning-tree config-name [<configuration-name>]
Authority All users

Layer 2 features
189
<con-fig-name>
Specifies the MSTP configuration name
Examples
switch# configure terminalswitch# no spanning-tree config-name
4.5.5. Set MSTP config revision numberThis command sets config revision number for the all the instances.
Syntax spanning-tree config-revision <revision-number>
Authority All users
<revi-sion-number>
Specifies the MSTP configuration revision number value, 1-65535.
Examples
switch# configure terminalswitch# spanning-tree config-revision 40
4.5.6. Set default MSTP config revision numberThis command sets default config revision number for the all the instances, default value is 0.
Syntax no spanning-tree config-revision [<revision-number>]
Authority All users
<revi-sion-number>
Specifies the MSTP configuration revision number value, 1-65535.
Examples
switch# configure terminalswitch# no spanning-tree config-revision
4.5.7. VLAN to an instanceThis command maps the VLAN-ID to corresponding instance.
Syntax spanning-tree instance <instance-id> vlan <VLAN-ID>
Authority All users
<instance-id> Specifies the MSTP instance number, 1-64.
<VLAN-ID> Specifies the VLAN-ID number, 1-4094
Examples
switch# configure terminalswitch# spanning-tree instance 1 vlan 1switch# spanning-tree instance 1 vlan 2

Layer 2 features
190
4.5.8. Remove VLAN from instanceThis command removes the VLAN-ID from the MSTP instance.
Syntax no spanning-tree instance <instance-id> vlan <VLAN-ID>
Authority All users
<instance-id> Specifies the MSTP instance number, 1-64.
<VLAN-ID> Specifies the VLAN-ID number, 1-4094
Examples
switch# configure terminalswitch# no spanning-tree instance 1 vlan 1switch# no spanning-tree instance 1 vlan 2
4.5.9. Set forward delayThis command sets the forward-delay for the bridge.
Syntax spanning-tree forward-delay <delay-in-secs>
Authority All users
<delay-in-secs>
Specifies the forward delay in seconds, 4-30
Examples
switch# configure terminalswitch# spanning-tree forward-delay 6
4.5.10. Set default forward delayThis command sets the default forward-delay for the bridge, default value is 15 seconds.
Syntax no spanning-tree forward-delay [<delay-in-secs>]
Authority All users
<delay-in-secs>
Specifies the forward delay in seconds, 4-30
Examples
switch# configure terminalswitch# no spanning-tree forward-delay
4.5.11. Set hello timeThis command sets the hello interval for all the MSTP instances.
Syntax spanning-tree hello-time <hello-in-secs>
Authority All users
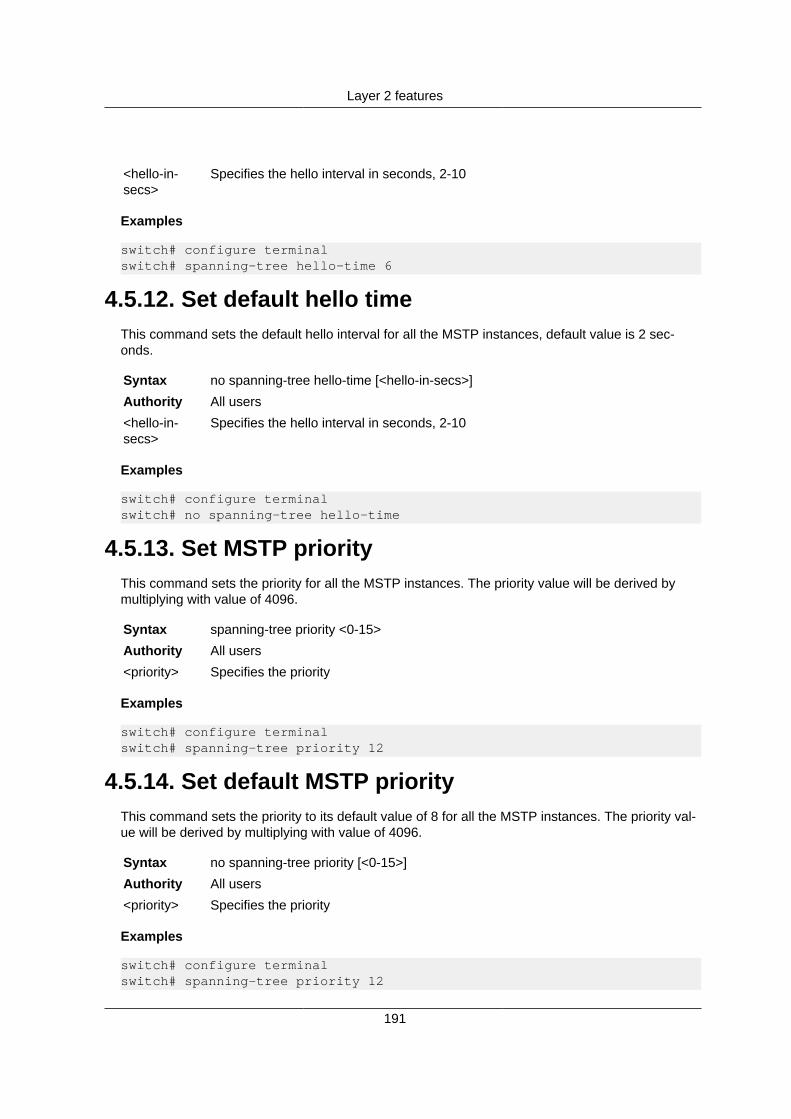
Layer 2 features
191
<hello-in-secs>
Specifies the hello interval in seconds, 2-10
Examples
switch# configure terminalswitch# spanning-tree hello-time 6
4.5.12. Set default hello timeThis command sets the default hello interval for all the MSTP instances, default value is 2 sec-onds.
Syntax no spanning-tree hello-time [<hello-in-secs>]
Authority All users
<hello-in-secs>
Specifies the hello interval in seconds, 2-10
Examples
switch# configure terminalswitch# no spanning-tree hello-time
4.5.13. Set MSTP priorityThis command sets the priority for all the MSTP instances. The priority value will be derived bymultiplying with value of 4096.
Syntax spanning-tree priority <0-15>
Authority All users
<priority> Specifies the priority
Examples
switch# configure terminalswitch# spanning-tree priority 12
4.5.14. Set default MSTP priorityThis command sets the priority to its default value of 8 for all the MSTP instances. The priority val-ue will be derived by multiplying with value of 4096.
Syntax no spanning-tree priority [<0-15>]
Authority All users
<priority> Specifies the priority
Examples
switch# configure terminalswitch# spanning-tree priority 12

Layer 2 features
192
4.5.15. Set transmit hold countThis command sets the txHoldCount for all the MSTP instances. Used by protocol to limit the maxi-mum transmission rate of MST BPDUs within the hello interval.
Syntax spanning-tree transmit-hold-count <0-10>
Authority All users
<trans-mit-hold-count>
Specifies the txHoldCount in pps
Examples
switch# configure terminalswitch# spanning-tree transmit-hold-count 5
4.5.16. Set default transmit hold countThis command sets the txHoldCount to its default value of 6 pps for all MST instances.
Syntax no spanning-tree transmit-hold-count [<0-10>]
Authority All users
<trans-mit-hold-count>
Specifies the txHoldCount in pps
Examples
switch# configure terminalswitch# spanning-tree transmit-hold-count 5
4.5.17. Set max ageThis command sets the maximum age for all the MSTP instances.
Syntax spanning-tree max-age <age-in-secs>
Authority All users
<age-in-secs>
Specifies the maximum age in seconds, 6-30
Examples
switch# configure terminalswitch# spanning-tree max-age 10
4.5.18. Set default max ageThis command sets the default max age for all the MSTP instances, default value is 20 seconds.

Layer 2 features
193
Syntax no spanning-tree max-age [<age-in-secs>]
Authority All users
<age-in-secs>
Specifies the maximum age in seconds, 6-30
Examples
switch# configure terminalswitch# no spanning-tree max-age
4.5.19. Set max hopsThis command sets the hop count for all the MSTP instances.
Syntax spanning-tree max-hops <hop-count>
Authority All users
<hop-count> Specifies the maximum number of hops, 1-40.
Examples
switch# configure terminalswitch# spanning-tree max-hops 10
4.5.20. Set default max hopsThis command sets the default hop count for all the MSTP instances, default value is 20.
Syntax no spanning-tree max-hops [<hop-count>]
Authority All users
<hop-count> Specifies the maximum number of hops, 1-40.
Examples
switch# configure terminalswitch# no spanning-tree max-hops
4.5.21. Set instance priorityThis command sets the priority value for that particular instance.
Syntax spanning-tree instance <1-64> priority <0-15>
Authority All users
<instance-id> Specifies the instance-id
<priority-val-ue>
Specifies the priority value
Examples

Layer 2 features
194
switch# configure terminalswitch# spanning-tree instance 1 priority 5
4.5.22. Set default instance priorityThis command sets the default priority value for that particular instance.
Syntax no spanning-tree instance <1-64> priority [<0-15>]
Authority All users
<instance-id> Specifies the instance-id
<priority-val-ue>
Specifies the priority value
Examples
switch# configure terminalswitch# no spanning-tree instance 1 priority
4.5.23. Set port typeThis command sets the port-type for all the MSTP instances.
Syntax spanning-tree port-type (admin-edge | admin-network)
Authority All users
<ad-min-edge>
Specifies the port as admin-edge
<admin-net-work>
Specifies the port as admin-network
Examples
switch# configure terminalswitch# interface 1switch# spanning-tree port-type admin-edgeswitch# spanning-tree port-type admin-network
4.5.24. Set default port typeThis command sets the port-type to its default value of admin-network for all the MSTP instances.
Syntax no spanning-tree port-type [admin-edge | admin-network]
Authority All users
<ad-min-edge>
Specifies the port as admin-edge
<admin-net-work>
Specifies the port as admin-network
Examples
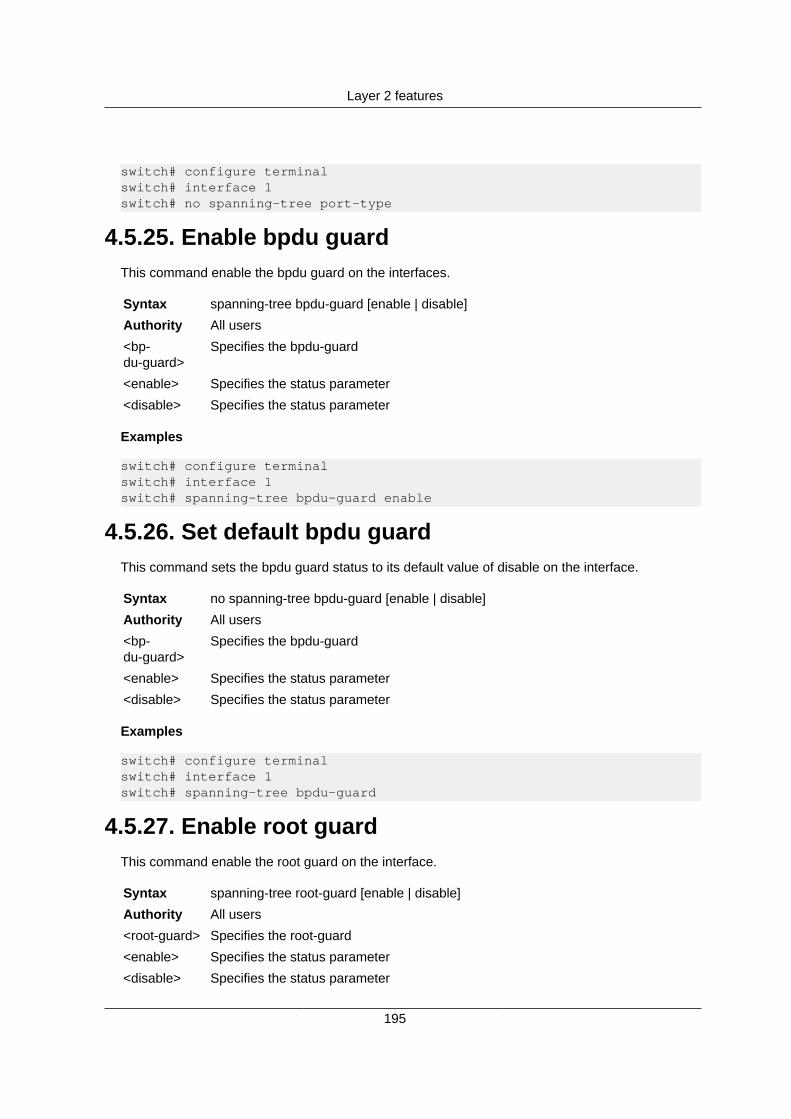
Layer 2 features
195
switch# configure terminalswitch# interface 1switch# no spanning-tree port-type
4.5.25. Enable bpdu guardThis command enable the bpdu guard on the interfaces.
Syntax spanning-tree bpdu-guard [enable | disable]
Authority All users
<bp-du-guard>
Specifies the bpdu-guard
<enable> Specifies the status parameter
<disable> Specifies the status parameter
Examples
switch# configure terminalswitch# interface 1switch# spanning-tree bpdu-guard enable
4.5.26. Set default bpdu guardThis command sets the bpdu guard status to its default value of disable on the interface.
Syntax no spanning-tree bpdu-guard [enable | disable]
Authority All users
<bp-du-guard>
Specifies the bpdu-guard
<enable> Specifies the status parameter
<disable> Specifies the status parameter
Examples
switch# configure terminalswitch# interface 1switch# spanning-tree bpdu-guard
4.5.27. Enable root guardThis command enable the root guard on the interface.
Syntax spanning-tree root-guard [enable | disable]
Authority All users
<root-guard> Specifies the root-guard
<enable> Specifies the status parameter
<disable> Specifies the status parameter
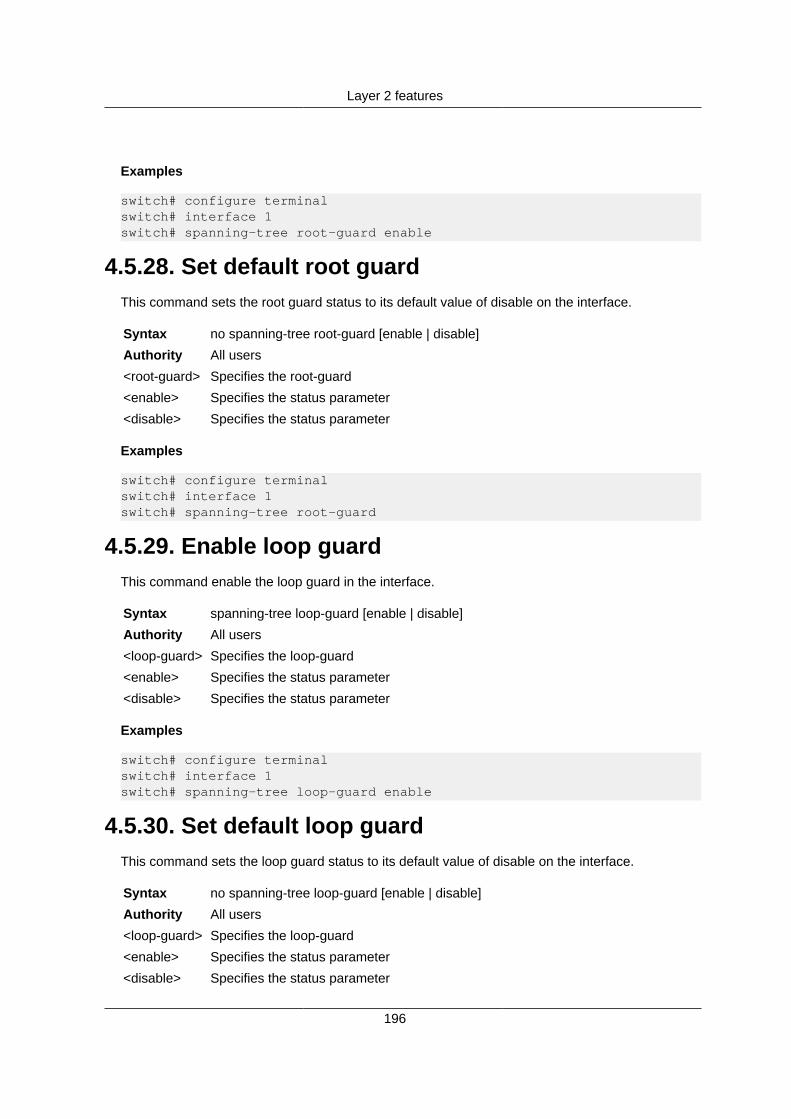
Layer 2 features
196
Examples
switch# configure terminalswitch# interface 1switch# spanning-tree root-guard enable
4.5.28. Set default root guardThis command sets the root guard status to its default value of disable on the interface.
Syntax no spanning-tree root-guard [enable | disable]
Authority All users
<root-guard> Specifies the root-guard
<enable> Specifies the status parameter
<disable> Specifies the status parameter
Examples
switch# configure terminalswitch# interface 1switch# spanning-tree root-guard
4.5.29. Enable loop guardThis command enable the loop guard in the interface.
Syntax spanning-tree loop-guard [enable | disable]
Authority All users
<loop-guard> Specifies the loop-guard
<enable> Specifies the status parameter
<disable> Specifies the status parameter
Examples
switch# configure terminalswitch# interface 1switch# spanning-tree loop-guard enable
4.5.30. Set default loop guardThis command sets the loop guard status to its default value of disable on the interface.
Syntax no spanning-tree loop-guard [enable | disable]
Authority All users
<loop-guard> Specifies the loop-guard
<enable> Specifies the status parameter
<disable> Specifies the status parameter

Layer 2 features
197
Examples
switch# configure terminalswitch# interface 1switch# spanning-tree loop-guard
4.5.31. Enable bpdu filterThis command enable the bpdu filter in the interface.
Syntax spanning-tree bpdu-filter [enable | disable]
Authority All users
<bpdu-filter> Specifies the bpdu-filter
<enable> Specifies the status parameter
<disable> Specifies the status parameter
Examples
switch# configure terminalswitch# interface 1switch# spanning-tree bpdu-guard enableswitch# spanning-tree root-guard disable
4.5.32. Set default bpdu filterThis command sets the bpdu filter status to its default value of disable on the interface.
Syntax no spanning-tree bpdu-filter [enable | disable]
Authority All users
<bpdu-filter> Specifies the bpdu-filter
<enable> Specifies the status parameter
<disable> Specifies the status parameter
Examples
switch# configure terminalswitch# interface 1switch# spanning-tree bpdu-guard enableswitch# spanning-tree root-guard disable
4.5.33. Set instance costThis command sets MSTP cost value for that particular instance.
Syntax spanning-tree instance <1-64> cost <1-200000000>
Authority All users
<instance-id> Specifies the instance-id

Layer 2 features
198
<cost-value> Specifies the cost value
Examples
switch# configure terminalswitch# interface 1switch# spanning-tree instance 1 cost 2000
4.5.34. Set instance default costThis command sets the default MSTP cost value for the instance to 20000.
Syntax no spanning-tree instance <1-64> cost [<1-200000000>]
Authority All users
<instance-id> Specifies the instance-id
<cost-value> Specifies the cost value
Examples
switch# configure terminalswitch# interface 1switch# no spanning-tree instance 1 cost
4.5.35. Set instance port priorityThis command sets MSTP port-priority value for that particular instance. The priority value will bederived by multiplying with value of 16.
Syntax spanning-tree instance <1-64> port-priority <1-15>
Authority All users
<instance-id> Specifies the instance-id
<port-priori-ty-value>
Specifies the port-priority value
Examples
switch# configure terminalswitch# interface 1switch# spanning-tree instance 1 port-priority 8
4.5.36. Set instance default port priorityThis command sets the port-priority to its default value of 8 for that MSTP instance. The priorityvalue will be derived by multiplying with value of 16.
Syntax no spanning-tree instance <1-64> port-priority [<1-15>]
Authority All users
<instance-id> Specifies the instance-id
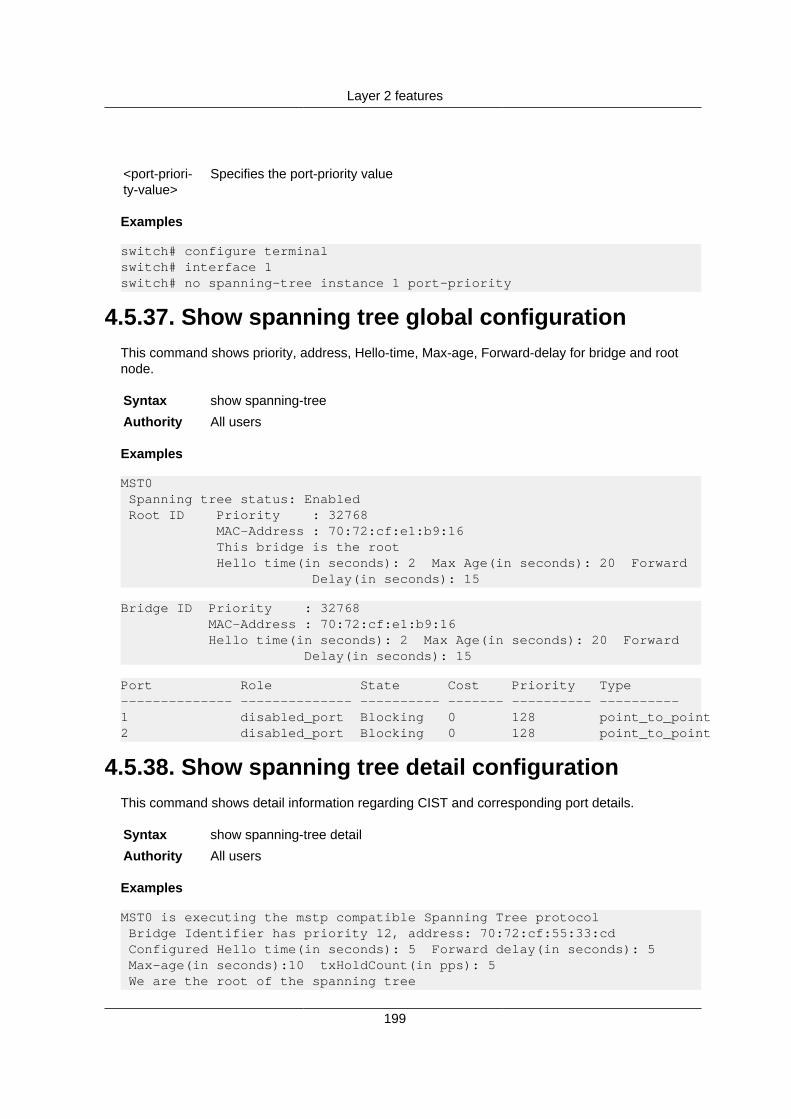
Layer 2 features
199
<port-priori-ty-value>
Specifies the port-priority value
Examples
switch# configure terminalswitch# interface 1switch# no spanning-tree instance 1 port-priority
4.5.37. Show spanning tree global configurationThis command shows priority, address, Hello-time, Max-age, Forward-delay for bridge and rootnode.
Syntax show spanning-tree
Authority All users
Examples
MST0 Spanning tree status: Enabled Root ID Priority : 32768 MAC-Address : 70:72:cf:e1:b9:16 This bridge is the root Hello time(in seconds): 2 Max Age(in seconds): 20 Forward Delay(in seconds): 15
Bridge ID Priority : 32768 MAC-Address : 70:72:cf:e1:b9:16 Hello time(in seconds): 2 Max Age(in seconds): 20 Forward Delay(in seconds): 15
Port Role State Cost Priority Type-------------- -------------- ---------- ------- ---------- ----------1 disabled_port Blocking 0 128 point_to_point2 disabled_port Blocking 0 128 point_to_point
4.5.38. Show spanning tree detail configurationThis command shows detail information regarding CIST and corresponding port details.
Syntax show spanning-tree detail
Authority All users
Examples
MST0 is executing the mstp compatible Spanning Tree protocol Bridge Identifier has priority 12, address: 70:72:cf:55:33:cd Configured Hello time(in seconds): 5 Forward delay(in seconds): 5 Max-age(in seconds):10 txHoldCount(in pps): 5 We are the root of the spanning tree
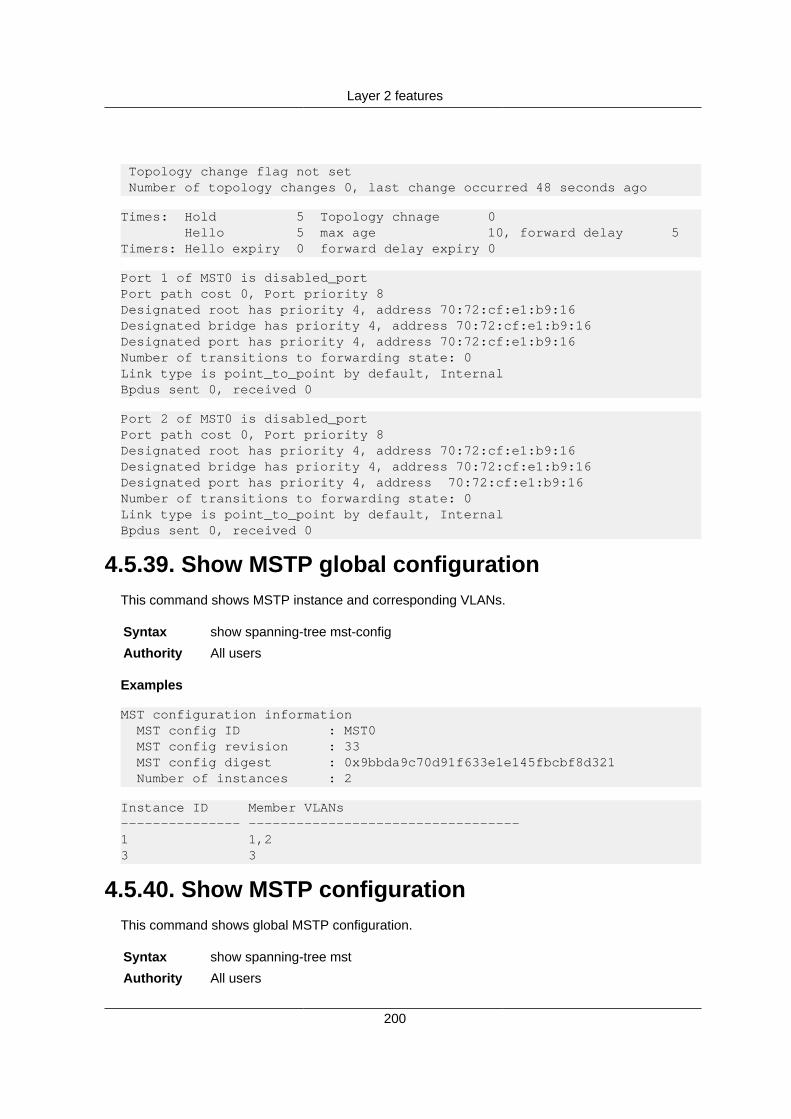
Layer 2 features
200
Topology change flag not set Number of topology changes 0, last change occurred 48 seconds ago
Times: Hold 5 Topology chnage 0 Hello 5 max age 10, forward delay 5Timers: Hello expiry 0 forward delay expiry 0
Port 1 of MST0 is disabled_portPort path cost 0, Port priority 8Designated root has priority 4, address 70:72:cf:e1:b9:16Designated bridge has priority 4, address 70:72:cf:e1:b9:16Designated port has priority 4, address 70:72:cf:e1:b9:16Number of transitions to forwarding state: 0Link type is point_to_point by default, InternalBpdus sent 0, received 0
Port 2 of MST0 is disabled_portPort path cost 0, Port priority 8Designated root has priority 4, address 70:72:cf:e1:b9:16Designated bridge has priority 4, address 70:72:cf:e1:b9:16Designated port has priority 4, address 70:72:cf:e1:b9:16Number of transitions to forwarding state: 0Link type is point_to_point by default, InternalBpdus sent 0, received 0
4.5.39. Show MSTP global configurationThis command shows MSTP instance and corresponding VLANs.
Syntax show spanning-tree mst-config
Authority All users
Examples
MST configuration information MST config ID : MST0 MST config revision : 33 MST config digest : 0x9bbda9c70d91f633e1e145fbcbf8d321 Number of instances : 2
Instance ID Member VLANs--------------- ----------------------------------1 1,23 3
4.5.40. Show MSTP configurationThis command shows global MSTP configuration.
Syntax show spanning-tree mst
Authority All users

Layer 2 features
201
Examples
switch# show spanning-tree mstMST0Vlans mapped:Bridge Address:70:72:cf:84:d1:56 priority:8RootRegional RootOperational Hello time(in seconds): 2 Forward delay(in seconds):15Max-age(in seconds):20 txHoldCount(in pps): 6Configured Hello time(in seconds): 2 Forward delay(in seconds):15Max-age(in seconds):20 txHoldCount(in pps): 6
Port Role State Cost Priority Type-------------- -------------- ---------- ---------- ---------- ----------1 Disabled Blocking 0 8 point_to_point2 Disabled Blocking 0 8 point_to_point
MST1Vlans mapped: 1Bridge Address:70:72:cf:84:d1:56 Priority:8Root Address: Priority:8 Port:0, Cost:20000, Rem Hops:0
Port Role State Cost Priority Type-------------- -------------- ---------- ------- ---------- ----------1 Disabled Blocking 0 8 Point_to_point2 Disabled Blocking 0 8 Point_to_point
4.5.41. Show MSTP detail configurationThis command shows detail MSTP CIST and all instance related information with port detail.
Syntax show spanning-tree mst detail
Authority All users
Examples
switch# show spanning-tree mst detailMST0Vlans mapped:Bridge Address:70:72:cf:84:d1:56 priority:8RootRegional RootOperational Hello time(in seconds): 2 Forward delay(in seconds):15Max-age(in seconds):20 txHoldCount(in pps): 6Configured Hello time(in seconds): 2 Forward delay(in seconds):15Max-age(in seconds):20 txHoldCount(in pps): 6
Port Role State Cost Priority Type-------------- -------------- ---------- ---------- ---------- ----------1 Disabled Blocking 0 8 point_to_point

Layer 2 features
202
2 Disabled Blocking 0 8 point_to_point
MST1Vlans mapped: 1Bridge Address:70:72:cf:84:d1:56 Priority:8Root Address:70:72:cf:05:02:b3 Priority:8 Port:0, Cost:20000, Rem Hops:0
Port Role State Cost Priority Type-------------- -------------- ---------- ------- ---------- ----------1 Disabled Blocking 0 8 Point_to_point2 Disabled Blocking 0 8 Point_to_point
Port 1Designated root address : 70:72:cf:05:02:b3Designated regional root address : 70:72:cf:05:02:b3Designated bridge address : 70:72:cf:05:02:b3Timers: Message expires in 0 sec, Forward delay expiry:0, Forward transitions:0Bpdus sent 0, received 0
Port 2Designated root address : 70:72:cf:05:02:b3Designated regional root address : 70:72:cf:05:02:b3Designated bridge address : 70:72:cf:05:02:b3Timers: Message expires in 0 sec, Forward delay expiry:0, Forward transitions:0Bpdus sent 0, received 0
4.5.42. Show MSTP instance configurationThis command shows MSTP configurations for the given instance ID.
Syntax show spanning-tree mst <1-64>
Authority All users
Examples
switch# sh spanning-tree mst 1MST1Vlans mapped: 1Bridge Address:70:72:cf:84:d1:56 Priority:8Root Address: Priority:8 Port:0, Cost:20000, Rem Hops:0
Port Role State Cost Priority Type-------------- -------------- ---------- ------- ---------- ----------1 Disabled Blocking 0 8 Point_to_point2 Disabled Blocking 0 8 Point_to_point
4.5.43. Show MSTP instance configurationThis command shows MSTP configurations for the given instance ID with corresponding port de-tails.
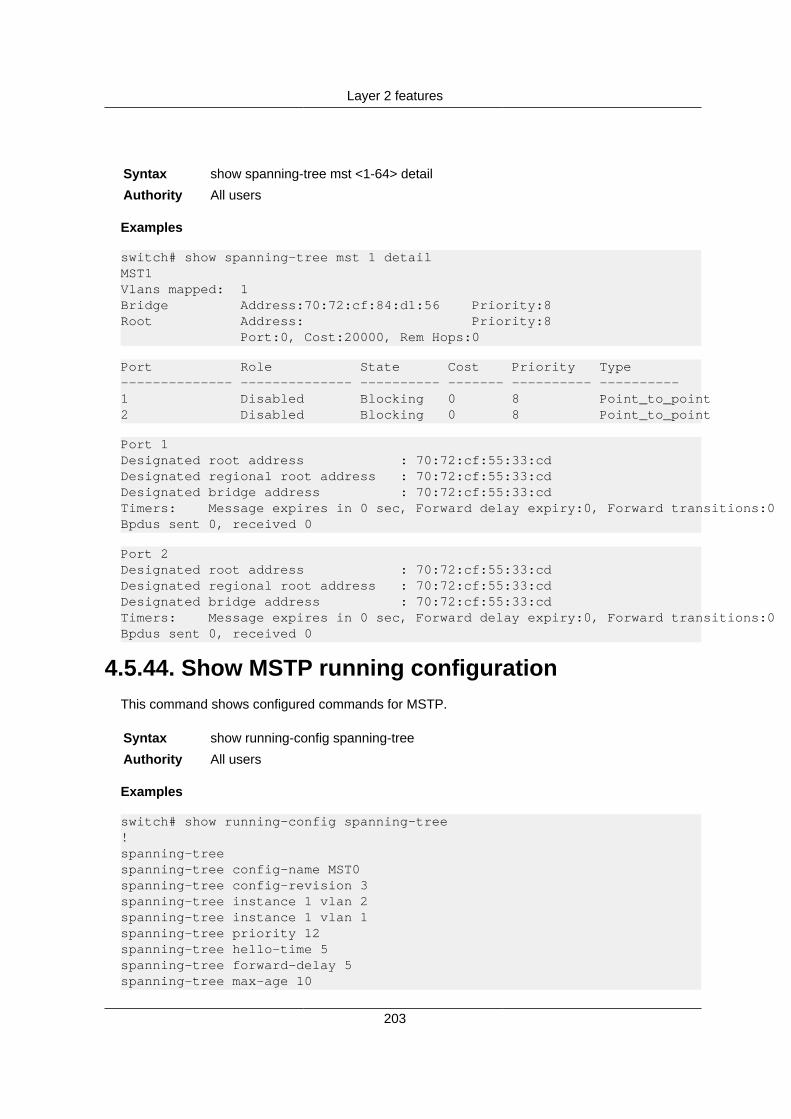
Layer 2 features
203
Syntax show spanning-tree mst <1-64> detail
Authority All users
Examples
switch# show spanning-tree mst 1 detailMST1Vlans mapped: 1Bridge Address:70:72:cf:84:d1:56 Priority:8Root Address: Priority:8 Port:0, Cost:20000, Rem Hops:0
Port Role State Cost Priority Type-------------- -------------- ---------- ------- ---------- ----------1 Disabled Blocking 0 8 Point_to_point2 Disabled Blocking 0 8 Point_to_point
Port 1Designated root address : 70:72:cf:55:33:cdDesignated regional root address : 70:72:cf:55:33:cdDesignated bridge address : 70:72:cf:55:33:cdTimers: Message expires in 0 sec, Forward delay expiry:0, Forward transitions:0Bpdus sent 0, received 0
Port 2Designated root address : 70:72:cf:55:33:cdDesignated regional root address : 70:72:cf:55:33:cdDesignated bridge address : 70:72:cf:55:33:cdTimers: Message expires in 0 sec, Forward delay expiry:0, Forward transitions:0Bpdus sent 0, received 0
4.5.44. Show MSTP running configurationThis command shows configured commands for MSTP.
Syntax show running-config spanning-tree
Authority All users
Examples
switch# show running-config spanning-tree!spanning-treespanning-tree config-name MST0spanning-tree config-revision 3spanning-tree instance 1 vlan 2spanning-tree instance 1 vlan 1spanning-tree priority 12spanning-tree hello-time 5spanning-tree forward-delay 5spanning-tree max-age 10

Layer 2 features
204
spanning-tree max-hops 10spanning-tree transmit-hold-count 5spanning-tree instance 1 priority 12interface 2 spanning-tree instance 1 cost 2000000interface 1 spanning-tree instance 1 port-priority 12 spanning-tree instance 1 cost 200000

Layer 2 features
205
4.6. LLDP CommandsAll LLDP configuration commands except lldp transmission and lldp reception work in config con-text.
4.6.1. Enable LLDPThis command enables the LLDP (Link Layer Discovery Protocol) feature in the device. By default,LLDP is enabled on the device.
Syntax lldp enable
Authority All users
Examples
switch# configure terminalswitch(config)# lldp enable
4.6.2. Disable LLDPThis command disables the LLDP (Link Layer Discovery Protocol) feature in the device.
Syntax no lldp enable
Authority All users
Examples
switch# configure terminalswitch(config)# no lldp enable
4.6.3. Clear LLDP countersThis command clears LLDP neighbor counters.
Syntax lldp clear counters
Authority All users
Examples
switch# configure terminalswitch(config)# lldp clear counters
4.6.4. Clear LLDP neighbor detailsThis command clears LLDP neighbor details.
Syntax lldp clear neighbors
Authority All users

Layer 2 features
206
Examples
switch# configure terminalswitch(config)# lldp clear neighbors
4.6.5. Set LLDP holdtimeThis command sets the amount of time (in seconds), a receiving device holds the information sentbefore discarding it.
Syntax lldp holdtime <time>
Authority All users
<time> Select hold time between 2 and 10 seconds.
Examples
switch# configure terminalswitch(config)# lldp holdtime 5
4.6.6. Set LLDP holdtime to defaultThis command sets default values for the amount of time a receiving device should hold the infor-mation sent before discarding it. The default value is 4 seconds.
Syntax no lldp holdtime
Authority All users
Examples
switch# configure terminalswitch(config)# no lldp holdtime
4.6.7. Set LLDP reinit delayThis command sets the amount of time (in seconds) to wait before performing LLDP initializationon any interface.
Syntax lldp reinit <time>
Authority All users
<time> Select reinit delay between 1 and 10 seconds.
Examples
switch# configure terminalswitch(config)# lldp reinit 5
4.6.8. Set LLDP reinit delay to defaultThis command resets to default value the amount of time to wait before performing LLDP initializa-tion on any interface. The default value is 2 seconds.

Layer 2 features
207
Syntax no lldp reinit
Authority All users
Examples
switch# configure terminalswitch(config)# no lldp reinit
4.6.9. Set management IP addressThis command sets the Management IP Address to be sent using LLDP TLV.
Syntax lldp management-address ( <ipv4_address> | <ipv6_address>)
Authority All users
<ipv4_address>Set IPV4 address as LLDP management address.
<ipv6_address>Set IPV6 address as LLDP management address.
Examples
switch# configure terminalswitch(config)# lldp management-address 16.93.49.9switch(config)# lldp management-address 2001:db8:85a3::8a2e:370:7334
4.6.10. Remove management IP addressThis command removes the Management IP Address to be sent using LLDP TLV.
Syntax no lldp management-address
Authority All users
Examples
switch# configure terminalswitch(config)# no lldp management-address
4.6.11. Select TLVsThis command selects the TLVs to be sent and received in LLDP packets.
Syntax lldp select-tlv (management-address | port-description | port-vlan-id | port-vlan-name | port-protocol-vlan-id | port-protocol-id | system-capabilities | system-de-scription | system-name)
Authority All users
<manage-ment-ad-dress>
Select management-address TLV.
<port-de-scription>
Select port-description TLV.
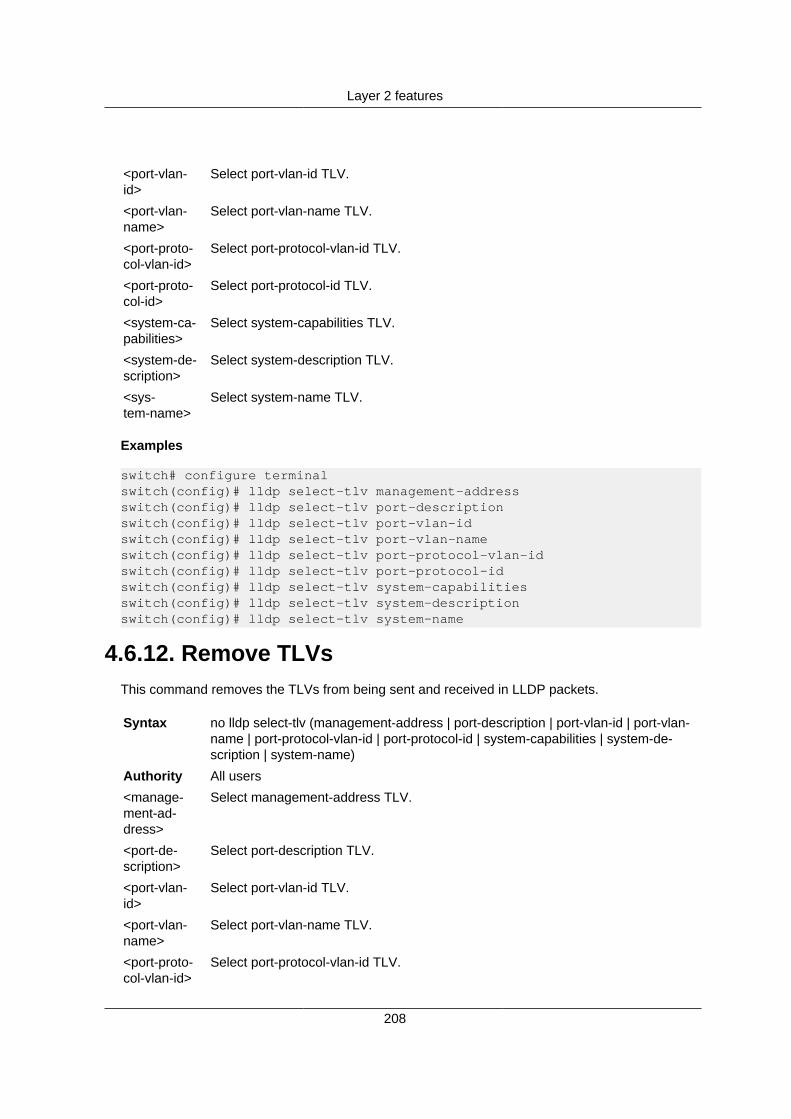
Layer 2 features
208
<port-vlan-id>
Select port-vlan-id TLV.
<port-vlan-name>
Select port-vlan-name TLV.
<port-proto-col-vlan-id>
Select port-protocol-vlan-id TLV.
<port-proto-col-id>
Select port-protocol-id TLV.
<system-ca-pabilities>
Select system-capabilities TLV.
<system-de-scription>
Select system-description TLV.
<sys-tem-name>
Select system-name TLV.
Examples
switch# configure terminalswitch(config)# lldp select-tlv management-addressswitch(config)# lldp select-tlv port-descriptionswitch(config)# lldp select-tlv port-vlan-idswitch(config)# lldp select-tlv port-vlan-nameswitch(config)# lldp select-tlv port-protocol-vlan-idswitch(config)# lldp select-tlv port-protocol-idswitch(config)# lldp select-tlv system-capabilitiesswitch(config)# lldp select-tlv system-descriptionswitch(config)# lldp select-tlv system-name
4.6.12. Remove TLVsThis command removes the TLVs from being sent and received in LLDP packets.
Syntax no lldp select-tlv (management-address | port-description | port-vlan-id | port-vlan-name | port-protocol-vlan-id | port-protocol-id | system-capabilities | system-de-scription | system-name)
Authority All users
<manage-ment-ad-dress>
Select management-address TLV.
<port-de-scription>
Select port-description TLV.
<port-vlan-id>
Select port-vlan-id TLV.
<port-vlan-name>
Select port-vlan-name TLV.
<port-proto-col-vlan-id>
Select port-protocol-vlan-id TLV.

Layer 2 features
209
<port-proto-col-id>
Select port-protocol-id TLV.
<system-ca-pabilities>
Select system-capabilities TLV.
<system-de-scription>
Select system-description TLV.
<sys-tem-name>
Select system-name TLV.
Examples
switch# configure terminalswitch(config)# no lldp select-tlv management-addressswitch(config)# no lldp select-tlv port-descriptionswitch(config)# no lldp select-tlv port-vlan-idswitch(config)# no lldp select-tlv port-vlan-nameswitch(config)# no lldp select-tlv port-protocol-vlan-idswitch(config)# no lldp select-tlv port-protocol-idswitch(config)# no lldp select-tlv system-capabilitiesswitch(config)# no lldp select-tlv system-descriptionswitch(config)# no lldp select-tlv system-name
4.6.13. Set LLDP timerThis command sets the LLDP status update interval in seconds which are transmitted to neigh-bors.
Syntax lldp timer <time>
Authority All users
<time> Select timer between 5 and 32768 seconds
Examples
switch# configure terminalswitch(config)# lldp timer 7
4.6.14. Set LLDP timer to defaultThis command sets the default time interval for transmitting LLDP status updates to neighbors.The default value is 30 seconds.
Syntax no lldp timer
Authority All users
Examples
switch# configure terminalswitch(config)# no lldp timer
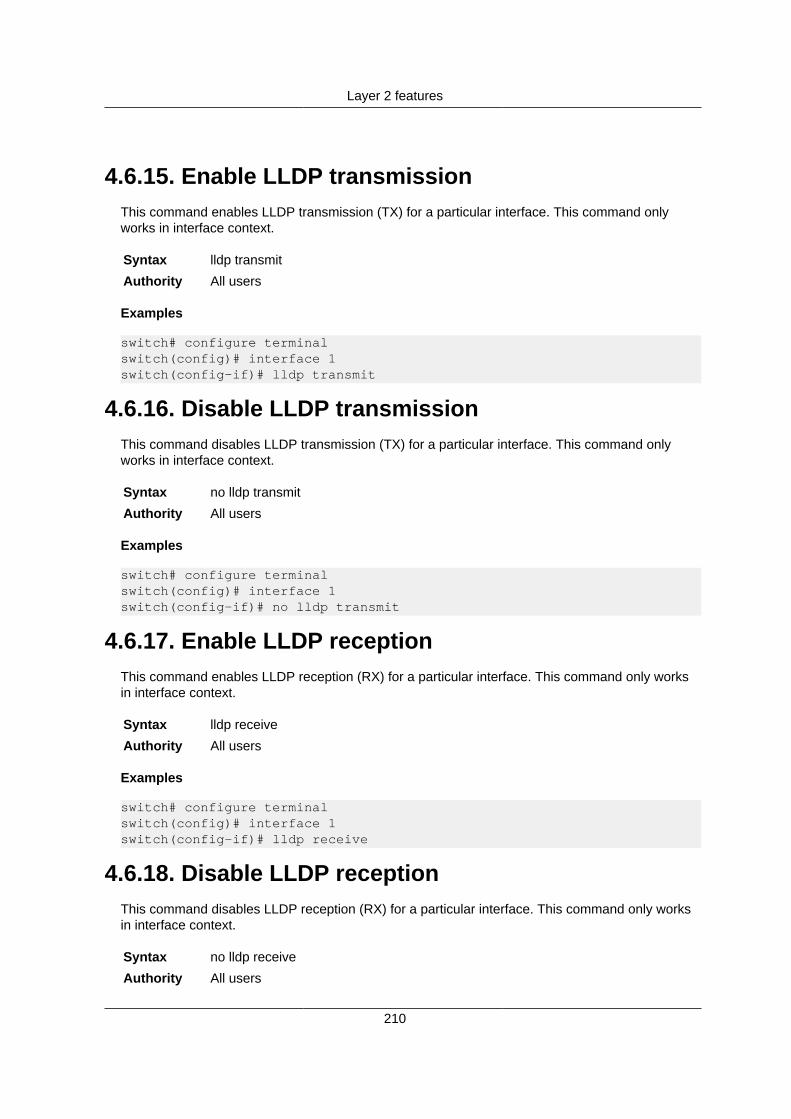
Layer 2 features
210
4.6.15. Enable LLDP transmissionThis command enables LLDP transmission (TX) for a particular interface. This command onlyworks in interface context.
Syntax lldp transmit
Authority All users
Examples
switch# configure terminalswitch(config)# interface 1switch(config-if)# lldp transmit
4.6.16. Disable LLDP transmissionThis command disables LLDP transmission (TX) for a particular interface. This command onlyworks in interface context.
Syntax no lldp transmit
Authority All users
Examples
switch# configure terminalswitch(config)# interface 1switch(config-if)# no lldp transmit
4.6.17. Enable LLDP receptionThis command enables LLDP reception (RX) for a particular interface. This command only worksin interface context.
Syntax lldp receive
Authority All users
Examples
switch# configure terminalswitch(config)# interface 1switch(config-if)# lldp receive
4.6.18. Disable LLDP receptionThis command disables LLDP reception (RX) for a particular interface. This command only worksin interface context.
Syntax no lldp receive
Authority All users

Layer 2 features
211
Examples
switch# configure terminalswitch(config)# interface 1switch(config-if)# no lldp receive
4.6.19. Show LLDP configurationThis command displays various switch LLDP configurations. The configuration includes the LLDPtimer, transmission status, reception status, selected TLVs and so on.
Syntax show lldp configuration
Authority All users
Examples
switch# show lldp configurationLLDP Global Configuration:LLDP Enabled :NoLLDP Transmit Interval :30LLDP Hold time Multiplier :4
TLVs advertised:Management AddressPort descriptionPort VLAN-IDPort Protocol VLAN-IDPort VLAN NamePort Protocol-IDSystem capabilitiesSystem descriptionSystem name
LLDP Port Configuration:Port Transmission-enabled Receive-enabled1 Yes Yes10 Yes Yes11 Yes Yes12 Yes Yes13 Yes Yes
4.6.20. Show LLDP TLVThis command displays TLVs that will be sent and received in LLDP packets.
Syntax show lldp tlv
Authority All users
Examples
switch# show lldp tlvTLVs advertised:

Layer 2 features
212
Management AdressPort descriptionPort VLAN-IDPort Protocol VLAN-IDPort VLAN NamePort Protocol-IDSystem capabilitiesSystem descriptionSystem name
4.6.21. Show LLDP neighbor informationThis command displays information about the switch’s neighbors.
Syntax show lldp neighbor-info
Authority All users
Examples
switch# show lldp neighbor-infoTotal neighbor entries : 1Total neighbor entries deleted : 0Total neighbor entries dropped : 0Total neighbor entries aged-out : 0
Local Port Neighbor Chassis-ID Neighbor Port-ID TTL1 10:60:4b:39:3e:80 1 1202
4.6.22. Show LLDP neighbor information for the inter-face
This command displays detailed information about a particular neighbor connected to a particularinterface.
Syntax show lldp neighbor-info <interface>
Authority All users
<interface> Name of the interface. System defined.
Examples
switch# show lldp neighbor-info 1Port : 1Neighbor entries : 1Neighbor entries deleted : 0Neighbor entries dropped : 0Neighbor entries age-out : 0Neighbor Chassis-Name : HP-3800-24G-PoEP-2XGNeighbor Chassis-Description : HP J9587A 3800-24G-PoE+-2XG SwitchNeighbor Chassis-ID : 10:60:4b:39:3e:80
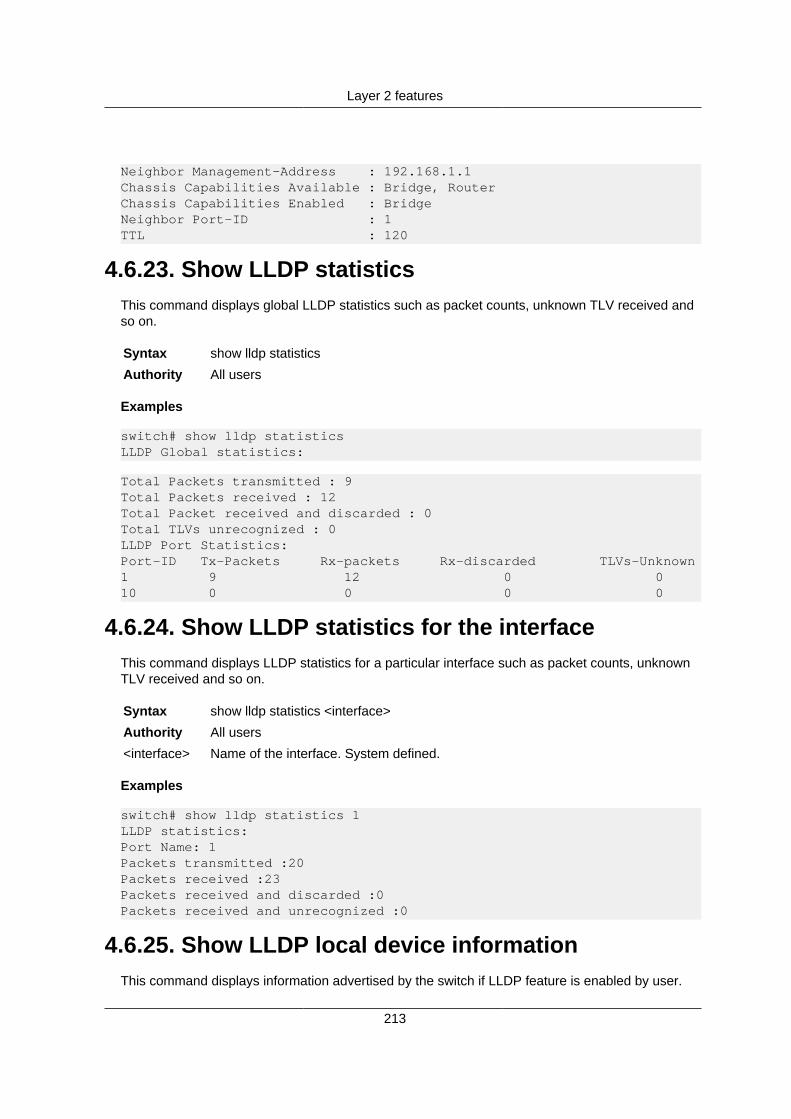
Layer 2 features
213
Neighbor Management-Address : 192.168.1.1Chassis Capabilities Available : Bridge, RouterChassis Capabilities Enabled : BridgeNeighbor Port-ID : 1TTL : 120
4.6.23. Show LLDP statisticsThis command displays global LLDP statistics such as packet counts, unknown TLV received andso on.
Syntax show lldp statistics
Authority All users
Examples
switch# show lldp statisticsLLDP Global statistics:
Total Packets transmitted : 9Total Packets received : 12Total Packet received and discarded : 0Total TLVs unrecognized : 0LLDP Port Statistics:Port-ID Tx-Packets Rx-packets Rx-discarded TLVs-Unknown1 9 12 0 010 0 0 0 0
4.6.24. Show LLDP statistics for the interfaceThis command displays LLDP statistics for a particular interface such as packet counts, unknownTLV received and so on.
Syntax show lldp statistics <interface>
Authority All users
<interface> Name of the interface. System defined.
Examples
switch# show lldp statistics 1LLDP statistics:Port Name: 1Packets transmitted :20Packets received :23Packets received and discarded :0Packets received and unrecognized :0
4.6.25. Show LLDP local device informationThis command displays information advertised by the switch if LLDP feature is enabled by user.
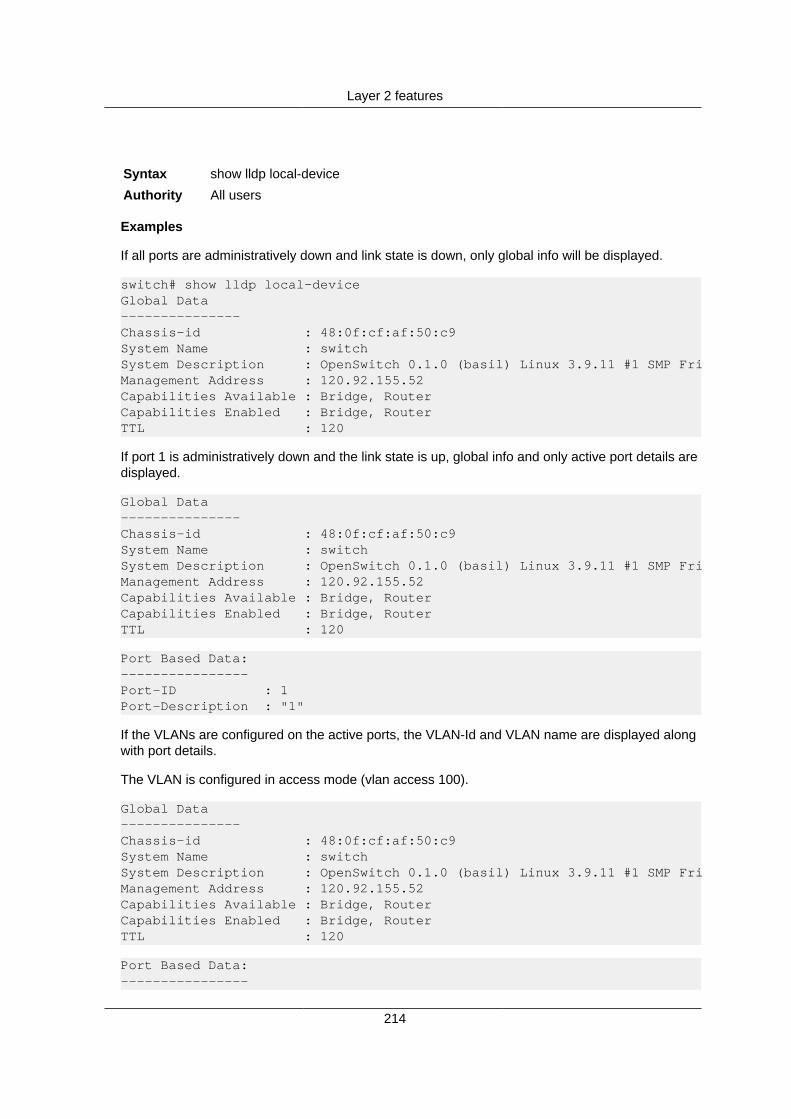
Layer 2 features
214
Syntax show lldp local-device
Authority All users
Examples
If all ports are administratively down and link state is down, only global info will be displayed.
switch# show lldp local-deviceGlobal Data---------------Chassis-id : 48:0f:cf:af:50:c9System Name : switchSystem Description : OpenSwitch 0.1.0 (basil) Linux 3.9.11 #1 SMP FriManagement Address : 120.92.155.52Capabilities Available : Bridge, RouterCapabilities Enabled : Bridge, RouterTTL : 120
If port 1 is administratively down and the link state is up, global info and only active port details aredisplayed.
Global Data---------------Chassis-id : 48:0f:cf:af:50:c9System Name : switchSystem Description : OpenSwitch 0.1.0 (basil) Linux 3.9.11 #1 SMP FriManagement Address : 120.92.155.52Capabilities Available : Bridge, RouterCapabilities Enabled : Bridge, RouterTTL : 120
Port Based Data:----------------Port-ID : 1Port-Description : "1"
If the VLANs are configured on the active ports, the VLAN-Id and VLAN name are displayed alongwith port details.
The VLAN is configured in access mode (vlan access 100).
Global Data---------------Chassis-id : 48:0f:cf:af:50:c9System Name : switchSystem Description : OpenSwitch 0.1.0 (basil) Linux 3.9.11 #1 SMP FriManagement Address : 120.92.155.52Capabilities Available : Bridge, RouterCapabilities Enabled : Bridge, RouterTTL : 120
Port Based Data:----------------

Layer 2 features
215
Port-ID : 1Port-Description : "1"Port VLAN Id : 100VLAN-Ids : 100VLAN Name : VLAN100
The VLAN is configured in trunk mode (vlan trunk 200 300).
Global Data---------------Chassis-id : 48:0f:cf:af:50:c9System Name : switchSystem Description : OpenSwitch 0.1.0 (basil) Linux 3.9.11 #1 SMP FriManagement Address : 120.92.155.52Capabilities Available : Bridge, RouterCapabilities Enabled : Bridge, RouterTTL : 120
Port Based Data:----------------Port-ID : 1Port-Description : "1"Port VLAN Id :VLAN-Ids : 200, 300VLAN Name : VLAN200, VLAN300
The VLAN is configured in native tagged or untagged mode (vlan native 100, vlan trunk 200 300).
Global Data---------------Chassis-id : 48:0f:cf:af:50:c9System Name : switchSystem Description : OpenSwitch 0.1.0 (basil) Linux 3.9.11 #1 SMP FriManagement Address : 120.92.155.52Capabilities Available : Bridge, RouterCapabilities Enabled : Bridge, RouterTTL : 120
Port Based Data:----------------Port-ID : 1Port-Description : "1"Port VLAN Id : 100VLAN-Ids : 100, 200, 300VLAN Name : VLAN100, VLAN200, VLAN300

Layer 2 features
216
4.7. Error Disable / RecoveryInterface error disable automatically disables an interface when an error is detected; no traffic is al-lowed until the interface is either manually re-enabled or, if auto recovery is configured, the config-ured auto recovery time interval has passed.
For interface error disable and auto recovery, an error condition is detected for an interface, the in-terface is placed in a diagnostic disabled state by shutting down the interface. The error disabledinterface does not allow any traffic until the interface is re-enabled. The error disabled interfacecan be manually enabled . Alternatively administrator can enable auto recovery feature.
This feature works in the global config mode.
4.7.1. errdisable detectThis command detects a specified cause or all causes.
The no form of this command disables the detection. When disabled, auto recovery will not occurfor interfaces in a diag-disable state due to that cause.
Syntax [no] errdisable detect cause <all> <link-flap> <mac-flap> <storm-control> <udld>
Authority Admin
<all> Enable error detection on all causes
<link-flap> Enable error detection on link flap
<mac-flap> Enable error detection on mac flapping
<storm-con-trol>
Enable error detection on storm control
<udld> Enable error detection on udld
4.7.2. errdisable flap-settingSet error disable flap parameters for application.
The no form of this command removes flap paramenters.
Syntax [no] errdisable flap-setting cause link-flap max-flaps <1-100>
Authority Admin
<1-100> Flap count
4.7.3. errdisable recovery causeUse this command to enable auto recovery for a specified cause or all causes. When auto recov-ery is enabled, ports in the diag-disable state are recovered (link up) when the recovery intervalexpires. If the interface continues to experience errors, the interface may be placed back in the di-ag- disable state and disabled (link down). Interfaces in the diag-disable state can be manually re-covered by entering the no shutdown command for the interface.
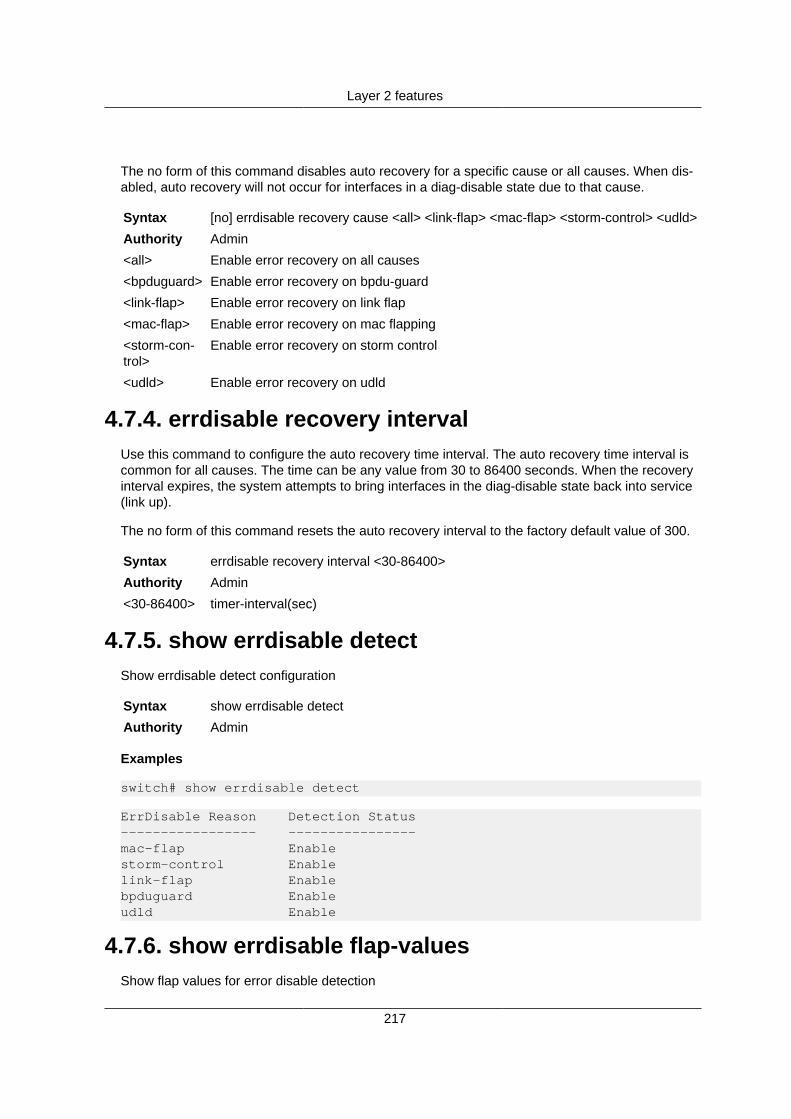
Layer 2 features
217
The no form of this command disables auto recovery for a specific cause or all causes. When dis-abled, auto recovery will not occur for interfaces in a diag-disable state due to that cause.
Syntax [no] errdisable recovery cause <all> <link-flap> <mac-flap> <storm-control> <udld>
Authority Admin
<all> Enable error recovery on all causes
<bpduguard> Enable error recovery on bpdu-guard
<link-flap> Enable error recovery on link flap
<mac-flap> Enable error recovery on mac flapping
<storm-con-trol>
Enable error recovery on storm control
<udld> Enable error recovery on udld
4.7.4. errdisable recovery intervalUse this command to configure the auto recovery time interval. The auto recovery time interval iscommon for all causes. The time can be any value from 30 to 86400 seconds. When the recoveryinterval expires, the system attempts to bring interfaces in the diag-disable state back into service(link up).
The no form of this command resets the auto recovery interval to the factory default value of 300.
Syntax errdisable recovery interval <30-86400>
Authority Admin
<30-86400> timer-interval(sec)
4.7.5. show errdisable detectShow errdisable detect configuration
Syntax show errdisable detect
Authority Admin
Examples
switch# show errdisable detect
ErrDisable Reason Detection Status----------------- ----------------mac-flap Enablestorm-control Enablelink-flap Enablebpduguard Enableudld Enable
4.7.6. show errdisable flap-valuesShow flap values for error disable detection

Layer 2 features
218
Syntax show errdisable flap-values
Authority Admin
Examples
switch# show errdisable flap-values
ErrDisable Reason Flaps Time(sec)----------------- ----- ---------mac-flap 5 10link-flap 5 10
4.7.7. show errdisable recoveryShow errdisable recovery configuration
Syntax show errdisable recovery
Authority Admin
Examples
switch# show errdisable recovery
ErrDisable Reason Recovery Status----------------- ---------------mac-flap Disablestorm-control Disablelink-flap Disablebpduguard Disableudld Disable
Timer Interval: 300 seconds
Interface Errdisable Reason Time left(sec)--------- ----------------- --------------
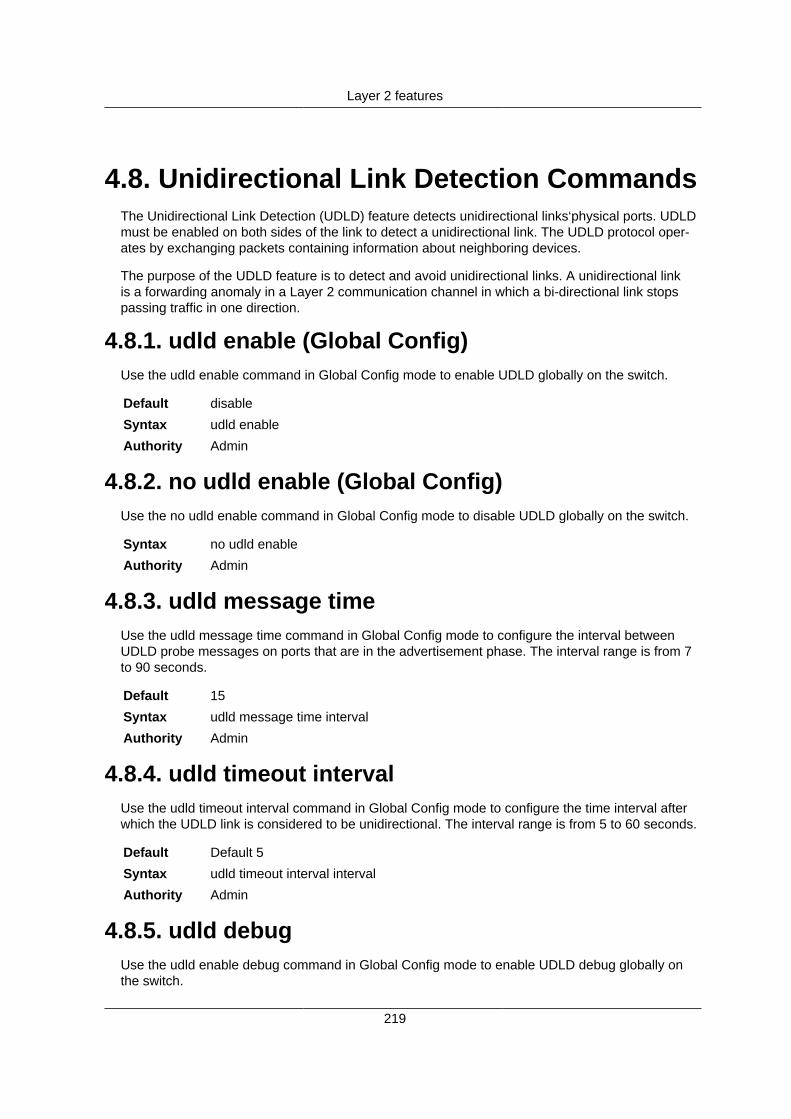
Layer 2 features
219
4.8. Unidirectional Link Detection CommandsThe Unidirectional Link Detection (UDLD) feature detects unidirectional links‘physical ports. UDLDmust be enabled on both sides of the link to detect a unidirectional link. The UDLD protocol oper-ates by exchanging packets containing information about neighboring devices.
The purpose of the UDLD feature is to detect and avoid unidirectional links. A unidirectional linkis a forwarding anomaly in a Layer 2 communication channel in which a bi-directional link stopspassing traffic in one direction.
4.8.1. udld enable (Global Config)Use the udld enable command in Global Config mode to enable UDLD globally on the switch.
Default disable
Syntax udld enable
Authority Admin
4.8.2. no udld enable (Global Config)Use the no udld enable command in Global Config mode to disable UDLD globally on the switch.
Syntax no udld enable
Authority Admin
4.8.3. udld message timeUse the udld message time command in Global Config mode to configure the interval betweenUDLD probe messages on ports that are in the advertisement phase. The interval range is from 7to 90 seconds.
Default 15
Syntax udld message time interval
Authority Admin
4.8.4. udld timeout intervalUse the udld timeout interval command in Global Config mode to configure the time interval afterwhich the UDLD link is considered to be unidirectional. The interval range is from 5 to 60 seconds.
Default Default 5
Syntax udld timeout interval interval
Authority Admin
4.8.5. udld debugUse the udld enable debug command in Global Config mode to enable UDLD debug globally onthe switch.
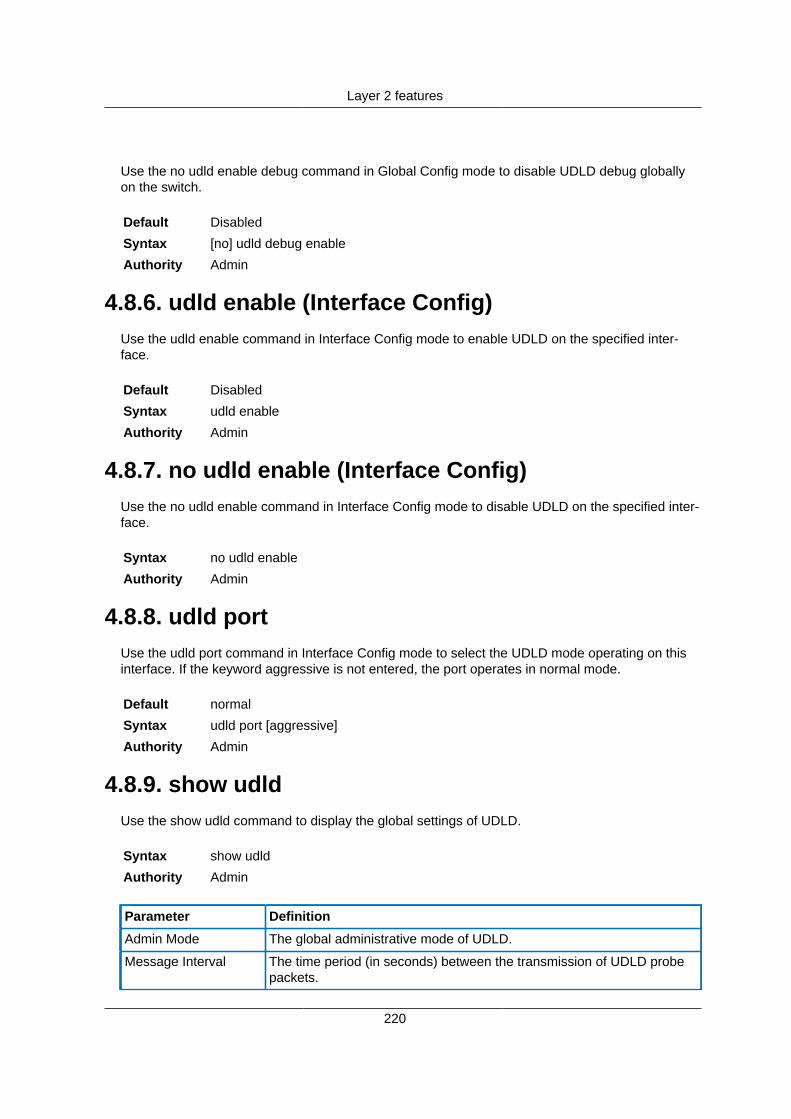
Layer 2 features
220
Use the no udld enable debug command in Global Config mode to disable UDLD debug globallyon the switch.
Default Disabled
Syntax [no] udld debug enable
Authority Admin
4.8.6. udld enable (Interface Config)Use the udld enable command in Interface Config mode to enable UDLD on the specified inter-face.
Default Disabled
Syntax udld enable
Authority Admin
4.8.7. no udld enable (Interface Config)Use the no udld enable command in Interface Config mode to disable UDLD on the specified inter-face.
Syntax no udld enable
Authority Admin
4.8.8. udld portUse the udld port command in Interface Config mode to select the UDLD mode operating on thisinterface. If the keyword aggressive is not entered, the port operates in normal mode.
Default normal
Syntax udld port [aggressive]
Authority Admin
4.8.9. show udldUse the show udld command to display the global settings of UDLD.
Syntax show udld
Authority Admin
Parameter Definition
Admin Mode The global administrative mode of UDLD.
Message Interval The time period (in seconds) between the transmission of UDLD probepackets.
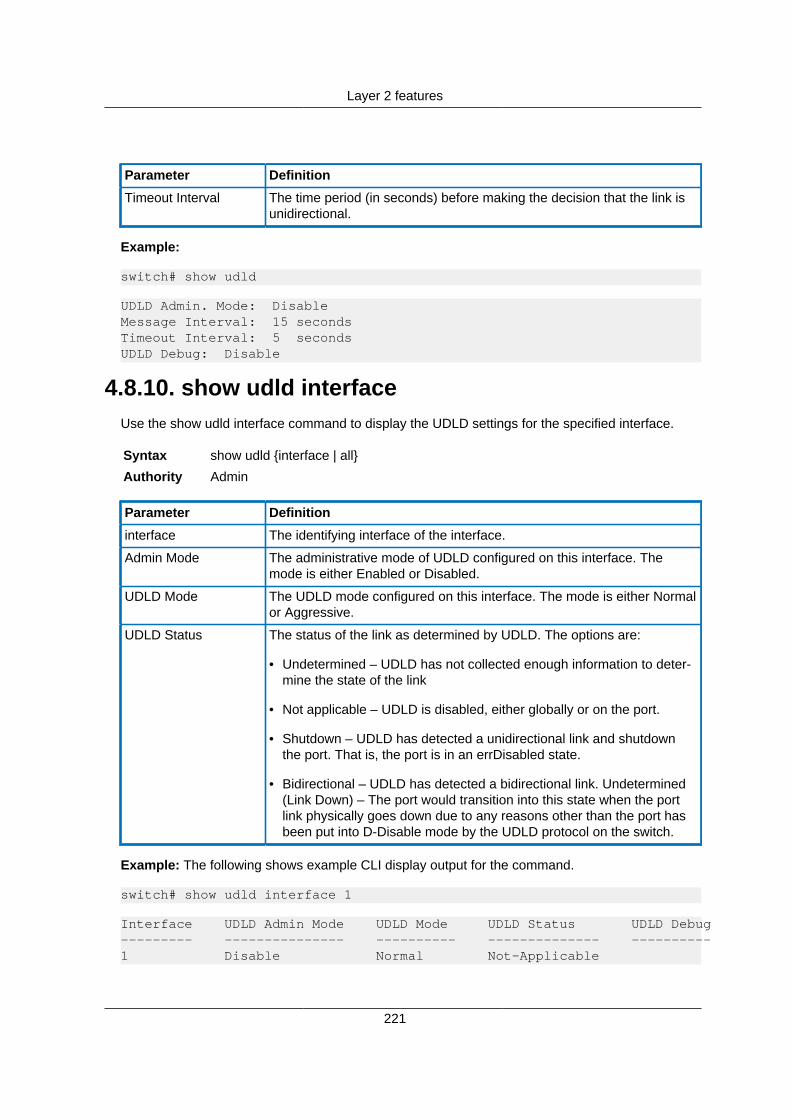
Layer 2 features
221
Parameter Definition
Timeout Interval The time period (in seconds) before making the decision that the link isunidirectional.
Example:
switch# show udld
UDLD Admin. Mode: DisableMessage Interval: 15 secondsTimeout Interval: 5 secondsUDLD Debug: Disable
4.8.10. show udld interfaceUse the show udld interface command to display the UDLD settings for the specified interface.
Syntax show udld {interface | all}
Authority Admin
Parameter Definition
interface The identifying interface of the interface.
Admin Mode The administrative mode of UDLD configured on this interface. Themode is either Enabled or Disabled.
UDLD Mode The UDLD mode configured on this interface. The mode is either Normalor Aggressive.
UDLD Status The status of the link as determined by UDLD. The options are:
• Undetermined – UDLD has not collected enough information to deter-mine the state of the link
• Not applicable – UDLD is disabled, either globally or on the port.
• Shutdown – UDLD has detected a unidirectional link and shutdownthe port. That is, the port is in an errDisabled state.
• Bidirectional – UDLD has detected a bidirectional link. Undetermined(Link Down) – The port would transition into this state when the portlink physically goes down due to any reasons other than the port hasbeen put into D-Disable mode by the UDLD protocol on the switch.
Example: The following shows example CLI display output for the command.
switch# show udld interface 1
Interface UDLD Admin Mode UDLD Mode UDLD Status UDLD Debug--------- --------------- ---------- -------------- ----------1 Disable Normal Not-Applicable
Layer 2 features
222
4.9. Storm-Control CommandsThis section describes commands you use to configure storm-control and view storm-control con-figuration information. A traffic storm is a condition that occurs when incoming packets flood theLAN, which creates performance degradation in the network. The Storm-Control feature protectsagainst this condition.
OpenSwitch provides broadcast and unicast story recovery for individual interfaces. UnicastStorm-Control protects against traffic whose MAC addresses are not known by the system. Forbroadcast and unicast storm-control, if the rate of traffic ingressing on an interface increases be-yond the configured threshold for that type, the traffic is dropped.
To configure storm-control, you will enable the feature for all interfaces or for individual interfaces,and you will set the threshold (storm-control level) beyond which the broadcast or unicast trafficwill be dropped. The Storm-Control feature allows you to limit the rate of specific types of packetsthrough the switch on a per-port, per-type, basis.
Configuring a storm-control level also enables that form of storm-control. Disabling a storm-controllevel using the no form of storm-control maintains the configured level (to be active the next timethat form of storm-control is enabled).
The actual rate of ingress traffic required to activate storm-control is based on the sizeof incoming packets and the hard-coded average packet size of 512 bytes - used tocalculate a packet- per-second (pps) rate - as the forwarding-plane requires pps ver-sus an absolute rate kbps. For example, if the configured limit is 10%, this is convert-ed to ~25000 pps, and this pps limit is set in forwarding plane (hardware). You get theapproximate desired output when 512bytes packets are used.
4.9.1. storm-control actionThis command disable an interface if a storm occurs.
Default enabled
Syntax storm-control action shutdown
Authority Admin
4.9.2. storm-control broadcastUse this command to enable broadcast storm recovery mode for one or more interfaces (Inter-face Config mode). If the mode is enabled, broadcast storm recovery is active and, if the rate of L2broadcast traffic ingressing on an interface increases beyond the configured threshold, the trafficwill be dropped. Therefore, the rate of broadcast traffic will be limited to the configured threshold.
Default enabled
Syntax storm-control broadcast {level | rate}
Authority Admin
<level> Set storm suppression level on this interface
<rate> Set storm rate limitation on this interface
Layer 2 features
223
4.9.2.1. no storm-control broadcastUse this command to disable broadcast storm recovery mode for a specific interface or range ofinterfaces.
Syntax no storm-control broadcast
Authority Admin
4.9.3. storm-control multicastThis command enables multicast storm recovery mode for an interface or range of interfaces. Ifthe mode is enabled, multicast storm recovery is active, and if the rate of L2 multicast traffic in-gressing on an interface increases beyond the configured threshold, the traffic will be dropped.Therefore, the rate of multicast traffic will be limited to the configured threshold.
Default disabled
Syntax storm-control multicast {level | rate}
Authority Admin
<level> Set storm suppression level on this interface
<rate> Set storm rate limitation on this interface
4.9.3.1. no storm-control multicastThis command disables multicast storm recovery mode for an interface.
Syntax no storm-control multicast
Authority Admin
4.9.4. storm-control unicastThis command enables unicast storm recovery mode for an interface or range of interfaces. If themode is enabled, unicast storm recovery is active, and if the rate of unknown L2 unicast (destina-tion lookup failure) traffic ingressing on an interface increases beyond the configured threshold,the traffic will be dropped. Therefore, the rate of unknown unicast traffic will be limited to the con-figured threshold.
Default disabled
Syntax storm-control unicast {level | rate}
Authority Admin
<level> Set storm suppression level on this interface
<rate> Set storm rate limitation on this interface
4.9.4.1. no storm-control unicastThis command disables unicast storm recovery mode for an interface.
Syntax no storm-control unicast
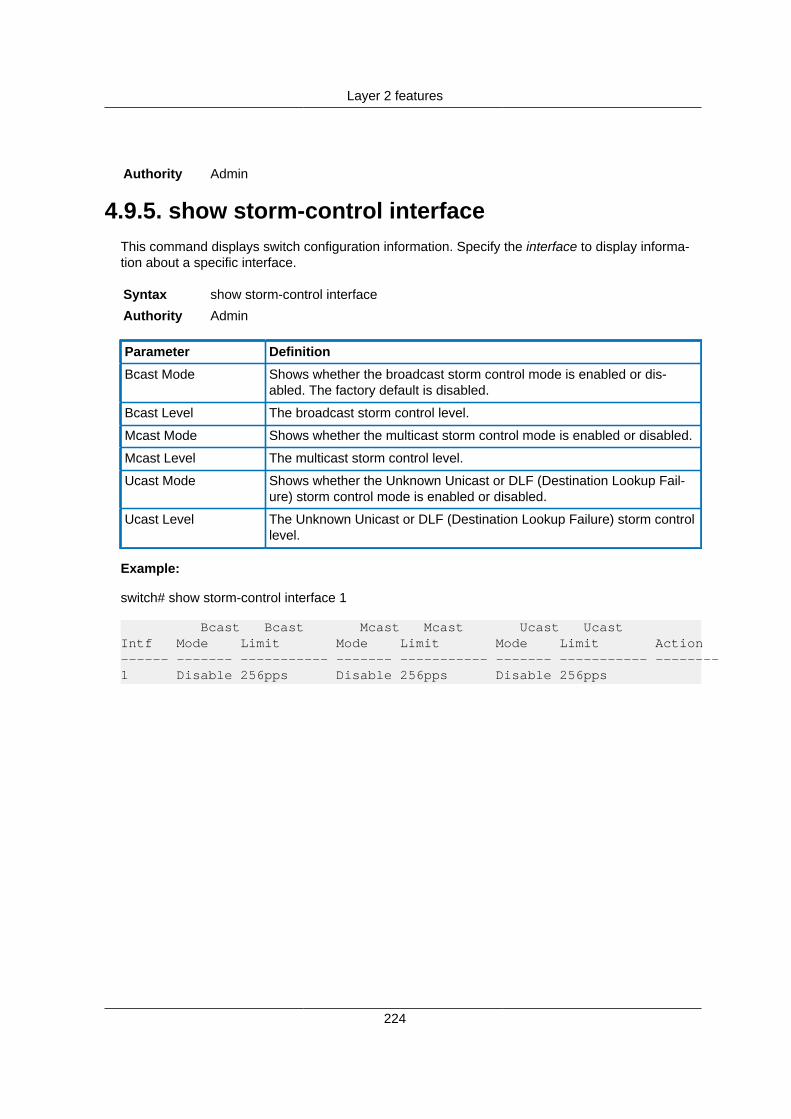
Layer 2 features
224
Authority Admin
4.9.5. show storm-control interfaceThis command displays switch configuration information. Specify the interface to display informa-tion about a specific interface.
Syntax show storm-control interface
Authority Admin
Parameter Definition
Bcast Mode Shows whether the broadcast storm control mode is enabled or dis-abled. The factory default is disabled.
Bcast Level The broadcast storm control level.
Mcast Mode Shows whether the multicast storm control mode is enabled or disabled.
Mcast Level The multicast storm control level.
Ucast Mode Shows whether the Unknown Unicast or DLF (Destination Lookup Fail-ure) storm control mode is enabled or disabled.
Ucast Level The Unknown Unicast or DLF (Destination Lookup Failure) storm controllevel.
Example:
switch# show storm-control interface 1
Bcast Bcast Mcast Mcast Ucast UcastIntf Mode Limit Mode Limit Mode Limit Action------ ------- ----------- ------- ----------- ------- ----------- --------1 Disable 256pps Disable 256pps Disable 256pps

Layer 2 features
225
4.10. FEC4.10.1. fec
Enable/disable the RS-FEC mode for the interface.
Syntax [no] fec
Authority Admin

226
Chapter 5. Layer 3 featuresSection 5.1, “L3 Interfaces”
Section 5.2, “Loopback Interface Commands”
Section 5.3, “ARP commands”
Section 5.4, “L3 Subinterfaces Commands”
Section 5.5, “UDP Broadcast Forwarder”
Section 5.6, “Static routes”
Section 5.7, “ECMP commands”
Section 5.8, “eBGP Command Reference”
Section 5.11, “OSPFv2 commands”
Section 5.12, “Source Interface Commands”
Section 5.13, “Virtual Router Redundancy Protocol Commands”
Layer 3 features
227
5.1. L3 Interfaces5.1.1. routing
The command enables or disables the routing for the interface.
Enter the following syntax under the interface context.
Syntax [no] routing
Authority Admin
Example
hostname(config-if)# routinghostname(config-if)#
5.1.2. vrf attachThe command attaches or detaches an interface to or from a VRF.
Enter the following syntax under the interface context.
Only default VRF is supported. Multiple VRF is not supported.
Syntax [no] vrf attach <vrf-name>
Authority Admin
<vrf-name> The name of the VRF.
Example
Attach an interface to a VRF (interface: 1, VRF: myVRF)
hostname(config)# interface 1hostname(config-if)# vrf attach myVRFhostname(config-if)#
5.1.3. ip addressThis command configures an IPv4 address to the specified interface.
Enter the following syntax under the interface context.
Syntax [no] ip address <address/mask> [secondary]
Authority Admin
<ad-dress/mask>
The address and mask.

Layer 3 features
228
<secondary> Configures a secondary address.
Example
Configure an IPv4 address on the interface.
hostname(config-if)# interface 1hostname(config-if)# ip address 172.16.100.10/24hostname(config-if)#
5.1.4. ipv6 addressThis command configures an IPv6 address to the specified interface.
Enter the following syntax under the interface context.
Syntax [no] ipv6 address <address/prefix> [secondary]
Authority Admin
<ad-dress/prafix>
The address and prefix length.
<secondary> Configures a secondary address.
Example
Configure an IPv6 address on the interface.
hostname(config)# interface 1hostname(config-if)# ipv6 address fd00:5708::f02d:4df6/64hostname(config-if)#
5.1.5. ip proxy-arpThe command enables/disables proxy ARP on the specified interface. By default, it is disabled.
Enter the following syntax under the interface context.
Syntax [no] ip proxy-arp
Authority Admin
Example
Configure the proxy ARP on an interface
hostname(config)# interface 1hostname(config-if)# ip proxy-arp
5.1.6. ip local-proxy-arpThe command enables or disables local proxy ARP on the specified interface. By default, the localproxy ARP is disabled.
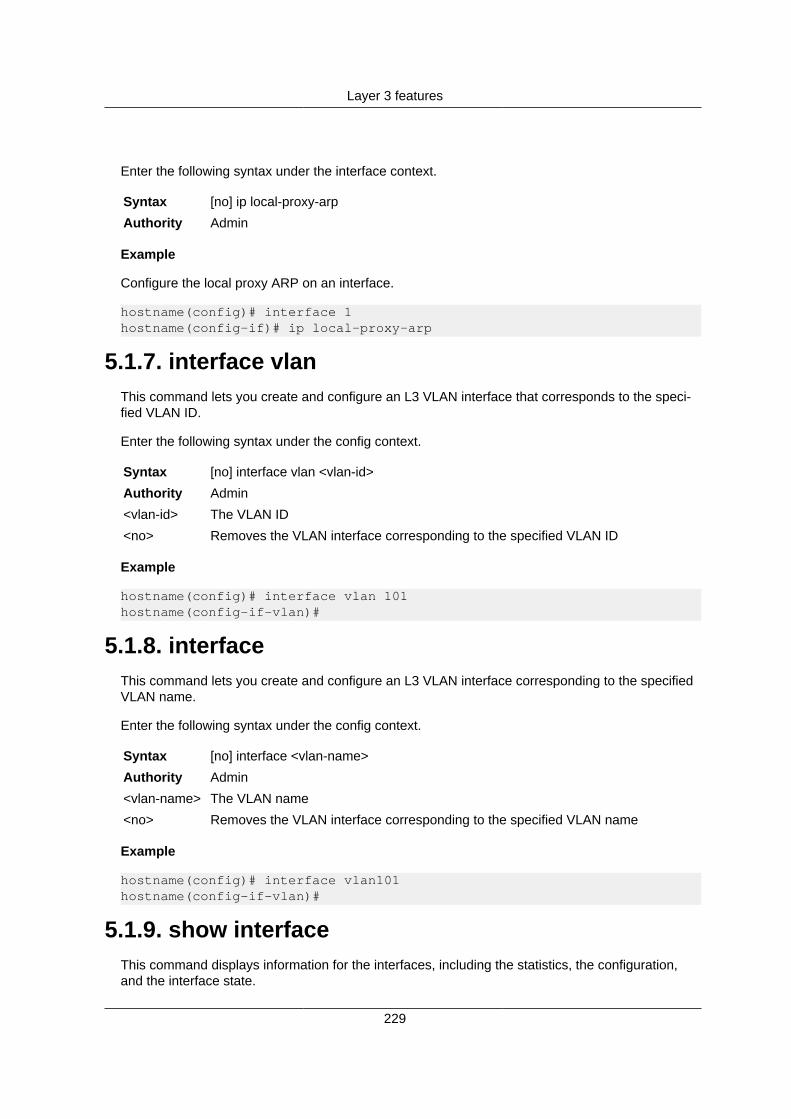
Layer 3 features
229
Enter the following syntax under the interface context.
Syntax [no] ip local-proxy-arp
Authority Admin
Example
Configure the local proxy ARP on an interface.
hostname(config)# interface 1hostname(config-if)# ip local-proxy-arp
5.1.7. interface vlanThis command lets you create and configure an L3 VLAN interface that corresponds to the speci-fied VLAN ID.
Enter the following syntax under the config context.
Syntax [no] interface vlan <vlan-id>
Authority Admin
<vlan-id> The VLAN ID
<no> Removes the VLAN interface corresponding to the specified VLAN ID
Example
hostname(config)# interface vlan 101hostname(config-if-vlan)#
5.1.8. interfaceThis command lets you create and configure an L3 VLAN interface corresponding to the specifiedVLAN name.
Enter the following syntax under the config context.
Syntax [no] interface <vlan-name>
Authority Admin
<vlan-name> The VLAN name
<no> Removes the VLAN interface corresponding to the specified VLAN name
Example
hostname(config)# interface vlan101hostname(config-if-vlan)#
5.1.9. show interfaceThis command displays information for the interfaces, including the statistics, the configuration,and the interface state.
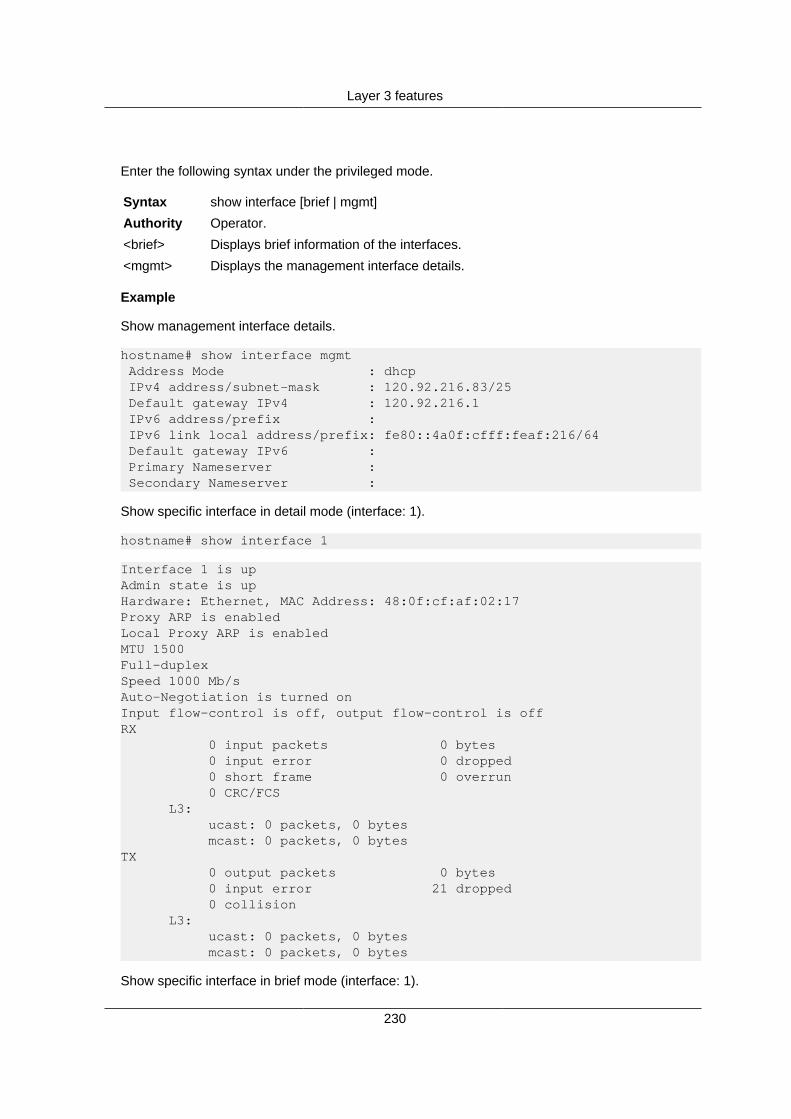
Layer 3 features
230
Enter the following syntax under the privileged mode.
Syntax show interface [brief | mgmt]
Authority Operator.
<brief> Displays brief information of the interfaces.
<mgmt> Displays the management interface details.
Example
Show management interface details.
hostname# show interface mgmt Address Mode : dhcp IPv4 address/subnet-mask : 120.92.216.83/25 Default gateway IPv4 : 120.92.216.1 IPv6 address/prefix : IPv6 link local address/prefix: fe80::4a0f:cfff:feaf:216/64 Default gateway IPv6 : Primary Nameserver : Secondary Nameserver :
Show specific interface in detail mode (interface: 1).
hostname# show interface 1
Interface 1 is upAdmin state is upHardware: Ethernet, MAC Address: 48:0f:cf:af:02:17Proxy ARP is enabledLocal Proxy ARP is enabledMTU 1500Full-duplexSpeed 1000 Mb/sAuto-Negotiation is turned onInput flow-control is off, output flow-control is offRX 0 input packets 0 bytes 0 input error 0 dropped 0 short frame 0 overrun 0 CRC/FCS L3: ucast: 0 packets, 0 bytes mcast: 0 packets, 0 bytesTX 0 output packets 0 bytes 0 input error 21 dropped 0 collision L3: ucast: 0 packets, 0 bytes mcast: 0 packets, 0 bytes
Show specific interface in brief mode (interface: 1).

Layer 3 features
231
hostname# show interface 1 brief
---------------------------------------------------------------------------Ethernet VLAN Type Mode Status Reason Speed PortInterface (Mb/s) Ch#--------------------------------------------------------------------------- 1 -- eth -- up 1000 --
5.1.10. show interface vlan-nameThis command displays the interface VLAN configuration.
Enter the following syntax under the privileged mode.
Syntax show interface <vlan-name>
Authority Operator.
<vlan-name> The VLAN name.
Example
Display the VLAN interface configuration for VLAN: vlan10.
hostname# show interface vlan10
Interface vlan10 is upAdmin state is upHardware: Ethernet, MAC Address: 70:72:cf:fd:e9:26IPv4 address 3.3.3.1/24RX L3: ucast: 0 packets, 0 bytes mcast: 0 packets, 0 bytesTX L3: ucast: 0 packets, 0 bytes mcast: 0 packets, 0 bytes
5.1.11. show ip interfaceThis command displays L3 and IPv4 specific information for the interfaces including the statistics,the configuration and the interface state. Currently this command is only supported for L3 physicalinterfaces and does not support other L3 VLAN interfaces.
Enter the following syntax under the privileged mode.
Syntax show ip interface [ifname] <brief>
Authority Operator.
<ifname> Name of the interface
<brief> Show brief info of routing interfaces
Example
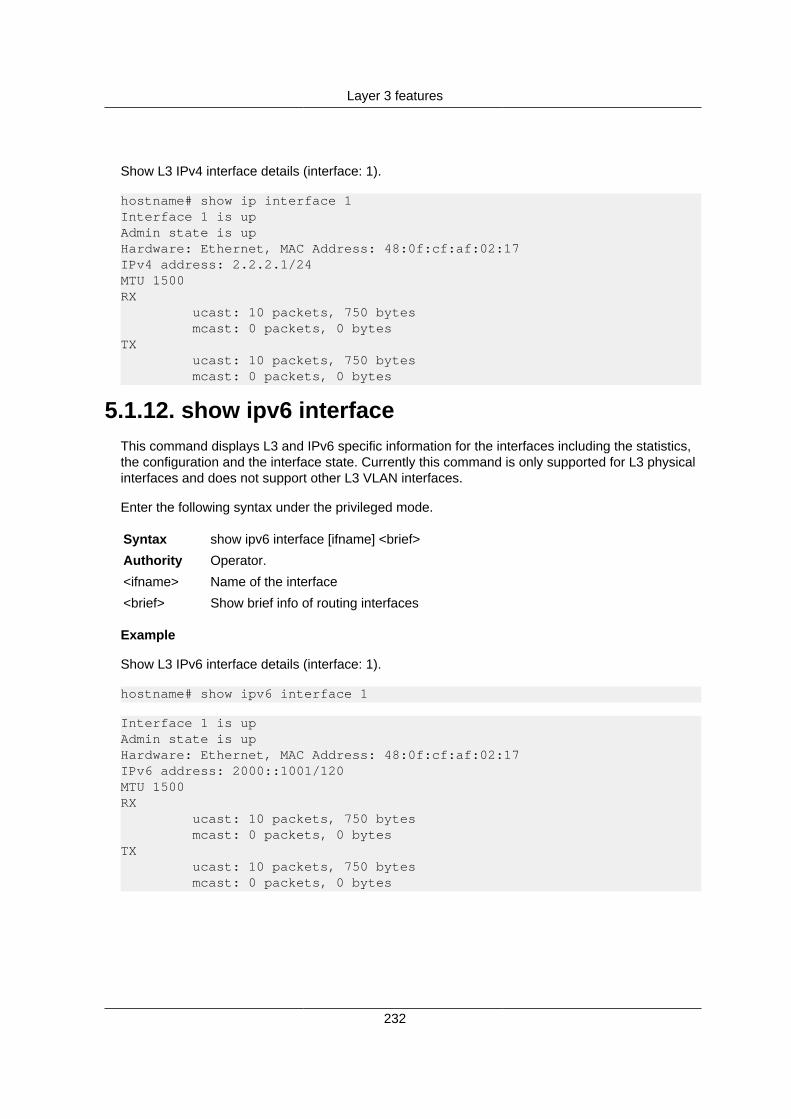
Layer 3 features
232
Show L3 IPv4 interface details (interface: 1).
hostname# show ip interface 1Interface 1 is upAdmin state is upHardware: Ethernet, MAC Address: 48:0f:cf:af:02:17IPv4 address: 2.2.2.1/24MTU 1500RX ucast: 10 packets, 750 bytes mcast: 0 packets, 0 bytesTX ucast: 10 packets, 750 bytes mcast: 0 packets, 0 bytes
5.1.12. show ipv6 interfaceThis command displays L3 and IPv6 specific information for the interfaces including the statistics,the configuration and the interface state. Currently this command is only supported for L3 physicalinterfaces and does not support other L3 VLAN interfaces.
Enter the following syntax under the privileged mode.
Syntax show ipv6 interface [ifname] <brief>
Authority Operator.
<ifname> Name of the interface
<brief> Show brief info of routing interfaces
Example
Show L3 IPv6 interface details (interface: 1).
hostname# show ipv6 interface 1
Interface 1 is upAdmin state is upHardware: Ethernet, MAC Address: 48:0f:cf:af:02:17IPv6 address: 2000::1001/120MTU 1500RX ucast: 10 packets, 750 bytes mcast: 0 packets, 0 bytesTX ucast: 10 packets, 750 bytes mcast: 0 packets, 0 bytes

Layer 3 features
233
5.2. Loopback Interface Commands5.2.1. Create loopback interface
This command creates a loopback interface and enters loopback configuration mode.
Syntax interface loopback instance
Authority All Users
<instance> loopback interface ID 1 to 2147483647
Examples
switch# configure terminalswitch(config)# interface loopback 1switch(config-loopback-if)#
5.2.2. Delete loopback interfaceThis command deletes a loopback interface.
Syntax no interface loopback instance
Authority All Users
<instance> loopback interface ID 1 to 2147483647
Examples
switch# configure terminalswitch(config)# no interface loopback 1
5.2.3. Set/Unset IPv4 addressThis command sets the IPv4 address for a loopback interface.
Syntax [no] ip address <ipv4_address/prefix-length>
Authority All Users
<ipv4_address/prefix-length>
IPv4 address with prefix-length for the loopback interface
Examples
switch# configure terminalswitch(config)# interface loopback 1switch(config-loopback-if)# ip address 16.93.50.2/24
5.2.4. Set or unset IPv6 addressesThis command sets the IPv6 address for a loopback interface.

Layer 3 features
234
Syntax [no] ip address <ipv6_address/prefix-length>
Authority All Users
<ipv6_address/prefix-length>
IPv6 address with prefix-length for the loopback interface
Examples
switch# configure terminalswitch(config)# interface loopback 1switch(config-loopback-if)# ipv6 address fd00:5708::f02d:4df6/64
5.2.5. Show running configurationThis command displays all loopback interfaces.
Syntax show running-config
Authority All Users
Examples
switch# show running-config..........................................................interface loopback 1 no shutdown ip address 192.168.1.1/24interface loopback 2 no shutdown ip address 182.168.1.1/24..........................................................
5.2.6. Show loopback interfacesThis command displays all configured loopback interfaces.
Syntax show interface loopback [brief]
Authority All Users
Examples
switch# show interface loopbackInterface loopback 1 is upAdmin state is upHardware is LoopbackIPv4 address 192.168.1.1/24Interface loopback 2 is upAdmin state is upHardware is LoopbackIPv4 address 182.168.1.1/24
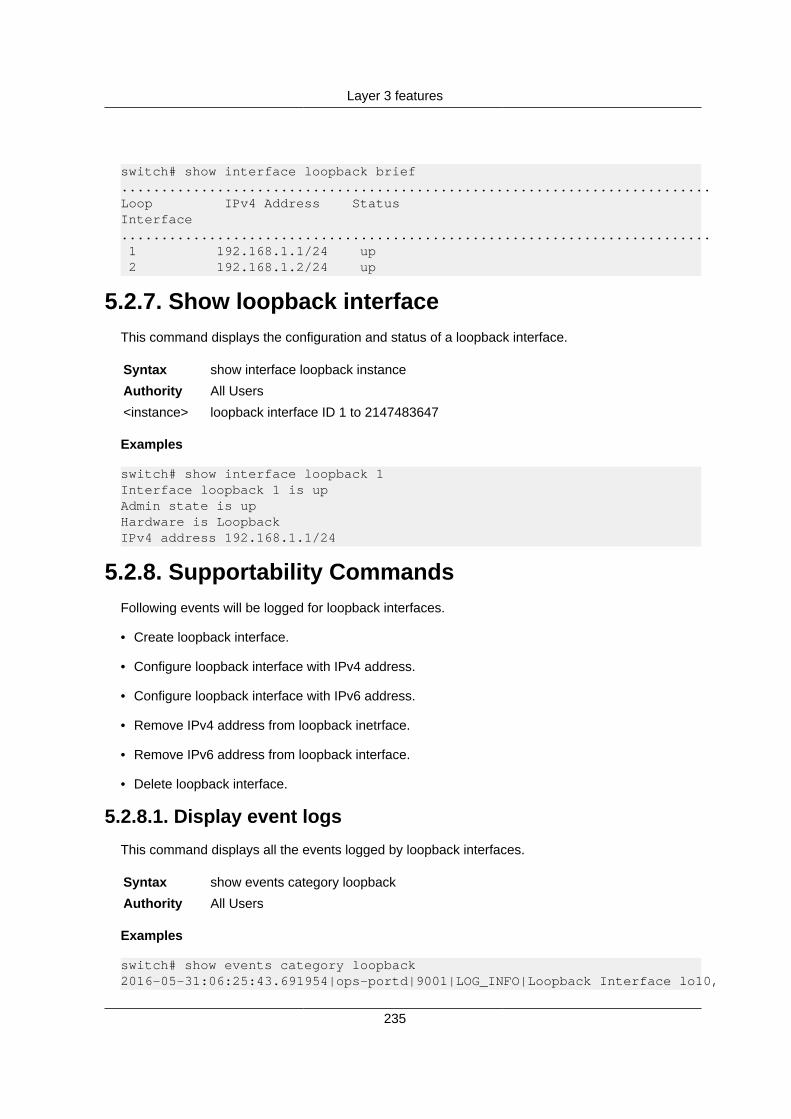
Layer 3 features
235
switch# show interface loopback brief..........................................................................Loop IPv4 Address StatusInterface.......................................................................... 1 192.168.1.1/24 up 2 192.168.1.2/24 up
5.2.7. Show loopback interfaceThis command displays the configuration and status of a loopback interface.
Syntax show interface loopback instance
Authority All Users
<instance> loopback interface ID 1 to 2147483647
Examples
switch# show interface loopback 1Interface loopback 1 is upAdmin state is upHardware is LoopbackIPv4 address 192.168.1.1/24
5.2.8. Supportability CommandsFollowing events will be logged for loopback interfaces.
• Create loopback interface.
• Configure loopback interface with IPv4 address.
• Configure loopback interface with IPv6 address.
• Remove IPv4 address from loopback inetrface.
• Remove IPv6 address from loopback interface.
• Delete loopback interface.
5.2.8.1. Display event logsThis command displays all the events logged by loopback interfaces.
Syntax show events category loopback
Authority All Users
Examples
switch# show events category loopback2016-05-31:06:25:43.691954|ops-portd|9001|LOG_INFO|Loopback Interface lo10,
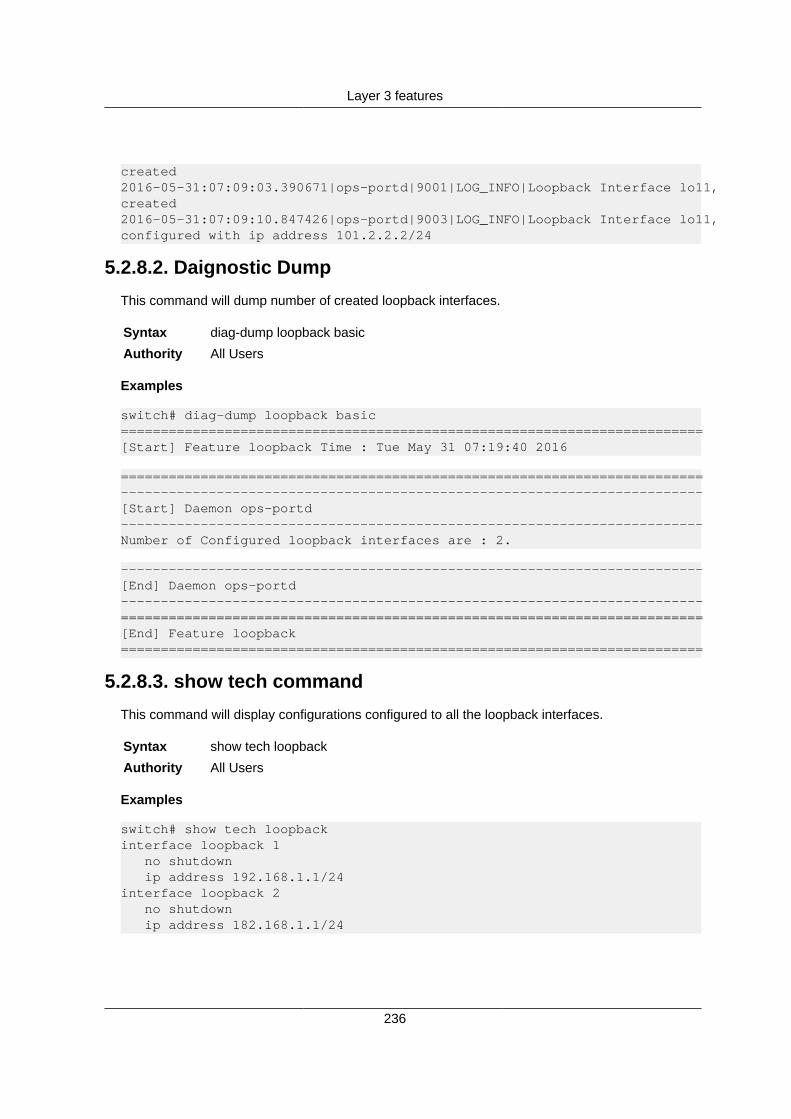
Layer 3 features
236
created2016-05-31:07:09:03.390671|ops-portd|9001|LOG_INFO|Loopback Interface lo11,created2016-05-31:07:09:10.847426|ops-portd|9003|LOG_INFO|Loopback Interface lo11,configured with ip address 101.2.2.2/24
5.2.8.2. Daignostic DumpThis command will dump number of created loopback interfaces.
Syntax diag-dump loopback basic
Authority All Users
Examples
switch# diag-dump loopback basic=========================================================================[Start] Feature loopback Time : Tue May 31 07:19:40 2016
=========================================================================-------------------------------------------------------------------------[Start] Daemon ops-portd-------------------------------------------------------------------------Number of Configured loopback interfaces are : 2.
-------------------------------------------------------------------------[End] Daemon ops-portd-------------------------------------------------------------------------=========================================================================[End] Feature loopback=========================================================================
5.2.8.3. show tech commandThis command will display configurations configured to all the loopback interfaces.
Syntax show tech loopback
Authority All Users
Examples
switch# show tech loopbackinterface loopback 1 no shutdown ip address 192.168.1.1/24interface loopback 2 no shutdown ip address 182.168.1.1/24

Layer 3 features
237
5.3. ARP commandsDisplays the IPv4 addresses from the Address Resolution Protocol (ARP) table.
Syntax show arp
Authority Operator.
Example
hostname# show arpARP IPv4 Entries:------------------IPv4 Address MAC Port Status172.16.1.1 48:0F:CF:AF:D1:C7 1 --172.16.1.2 48:0F:CF:AF:D1:C8 2 --
5.3.1. show ipv6 neighborsDisplays IPv6 addresses from the neighbor table.
Syntax show ipv6 neighbors
Authority Operator.
Example
hostname# show ipv6 neighborsIPv6 Entries:------------------IPv6 Address MAC Port StatusFE80:0000:0000:0000:0202:B3FF:FE1E:8329 00:01:02:03:04:08 4 --FE80:0000:0000:0000:0202:B3FF:FE1E:8328 00:01:02:03:04:07 3 --
5.3.2. arp agingThis command sets the ARP entry ageout time.
Syntax [no] arp aging-time <15-21600>
Authority Operator.
<15-21600> ARP entry ageout time (in seconds)
Example
switch# configureswitch(config)# arp aging-time 30
5.3.3. arp responseThis command sets the ARP entry request response timeout.
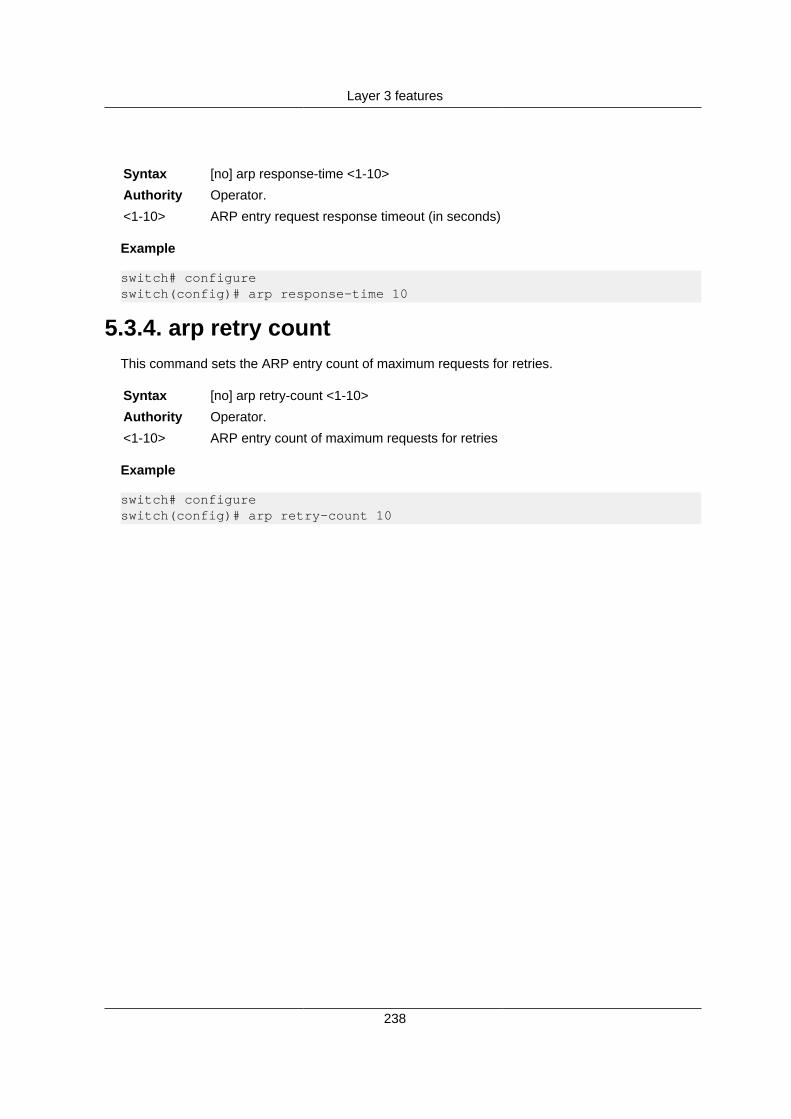
Layer 3 features
238
Syntax [no] arp response-time <1-10>
Authority Operator.
<1-10> ARP entry request response timeout (in seconds)
Example
switch# configureswitch(config)# arp response-time 10
5.3.4. arp retry countThis command sets the ARP entry count of maximum requests for retries.
Syntax [no] arp retry-count <1-10>
Authority Operator.
<1-10> ARP entry count of maximum requests for retries
Example
switch# configureswitch(config)# arp retry-count 10
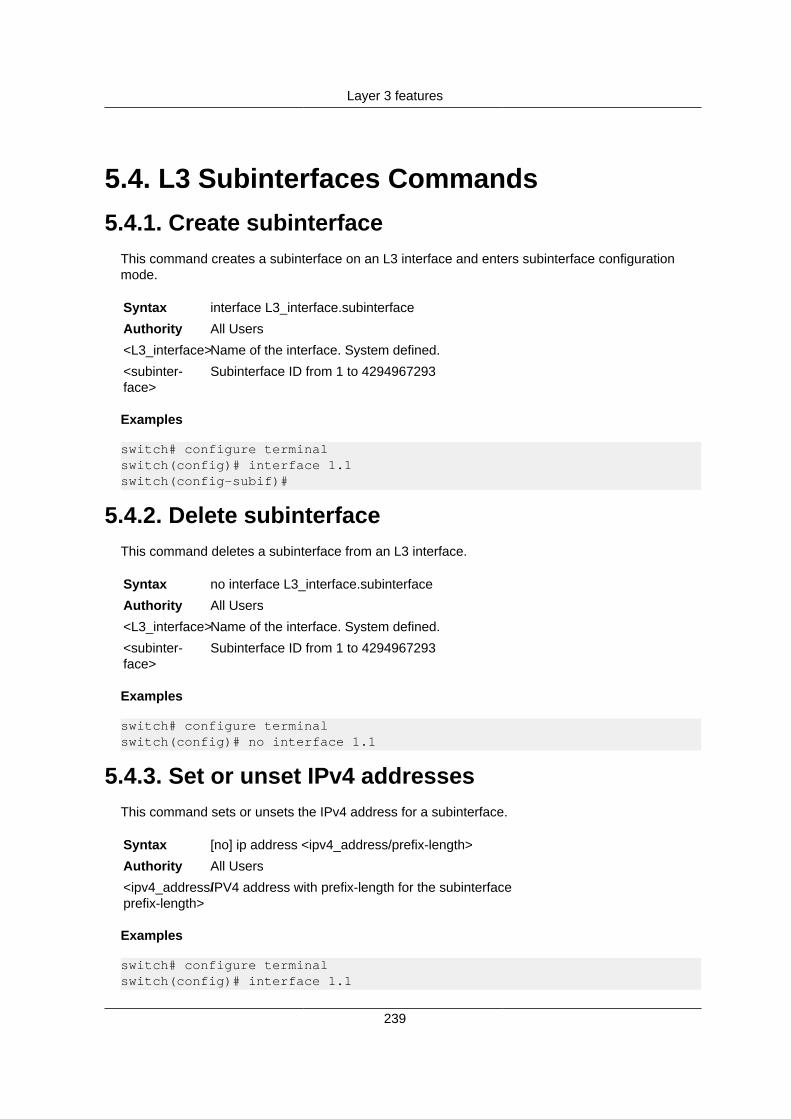
Layer 3 features
239
5.4. L3 Subinterfaces Commands5.4.1. Create subinterface
This command creates a subinterface on an L3 interface and enters subinterface configurationmode.
Syntax interface L3_interface.subinterface
Authority All Users
<L3_interface>Name of the interface. System defined.
<subinter-face>
Subinterface ID from 1 to 4294967293
Examples
switch# configure terminalswitch(config)# interface 1.1switch(config-subif)#
5.4.2. Delete subinterfaceThis command deletes a subinterface from an L3 interface.
Syntax no interface L3_interface.subinterface
Authority All Users
<L3_interface>Name of the interface. System defined.
<subinter-face>
Subinterface ID from 1 to 4294967293
Examples
switch# configure terminalswitch(config)# no interface 1.1
5.4.3. Set or unset IPv4 addressesThis command sets or unsets the IPv4 address for a subinterface.
Syntax [no] ip address <ipv4_address/prefix-length>
Authority All Users
<ipv4_address/prefix-length>
IPV4 address with prefix-length for the subinterface
Examples
switch# configure terminalswitch(config)# interface 1.1

Layer 3 features
240
switch(config-subif)# ip address 10.0.10.1/24
5.4.4. Set or unset IPv6 addressesThis command sets or unsets the IPv6 address for a subinterface.
Syntax [no] ipv6 address <ipv6_address/prefix-length>
Authority All Users
<ipv6_address/prefix-length>
IPV6 address with prefix-length for the subinterface
Examples
switch# configure terminalswitch(config)# interface 1.1switch(config-subif)# ipv6 address fd00:5708::f02d:4df6/64
5.4.5. Set or unset an IEEE 802.1Q VLAN encapsula-tion
There is no need to remove the old VLAN ID with the "no" option. Instead, enter the VLAN com-mand with a different VLAN ID.
Syntax [no] encapsulation dot1Q vlan-id
Authority All Users
<vlan-id> Represents VLAN and takes values from 1 to 4094
Examples
switch# configure terminalswitch(config)# interface 1.1switch(config-subif)#encapsulation dot1Q 33
switch# configure terminalswitch(config)# interface 1.1switch(config-subif)#no encapsulation dot1Q 33
5.4.6. Enable interfaceThis command enables a subinterface.
Syntax no shutdown
Authority All Users
Examples
switch# configure terminalswitch(config)# interface 1.1switch(config-subif)# no shutdown

Layer 3 features
241
5.4.7. Disable interfaceThis command disables a subinterface.
Syntax shutdown
Authority All Users
Examples
switch# configure terminalswitch(config)# interface 1.1switch(config-if)# shutdown
5.4.8. Show running configurationThis command displays all configured subinterfaces.
Syntax show running-config
Authority All Users
Examples
switch# show running-config..........................................................interface 1.1 no shutdown ip address 10.0.10.1/24interface 1.2 no shutdown ip address 10.0.20.1/24 encapsulation dot1Q 44..........................................................
5.4.9. Show subinterfacesThis command displays all configured subinterfaces. This command also optionally displays a par-ticular L3 interface.
Syntax show interface <L3_interface> sub-interface [brief]
Authority All Users
<L3_interface>Name of the interface. System defined.
<brief> Formats the output in tabular form.
Examples
switch# show interface 1 sub-interfaceInterface 1.1 is down(Parent Interface Admin down)
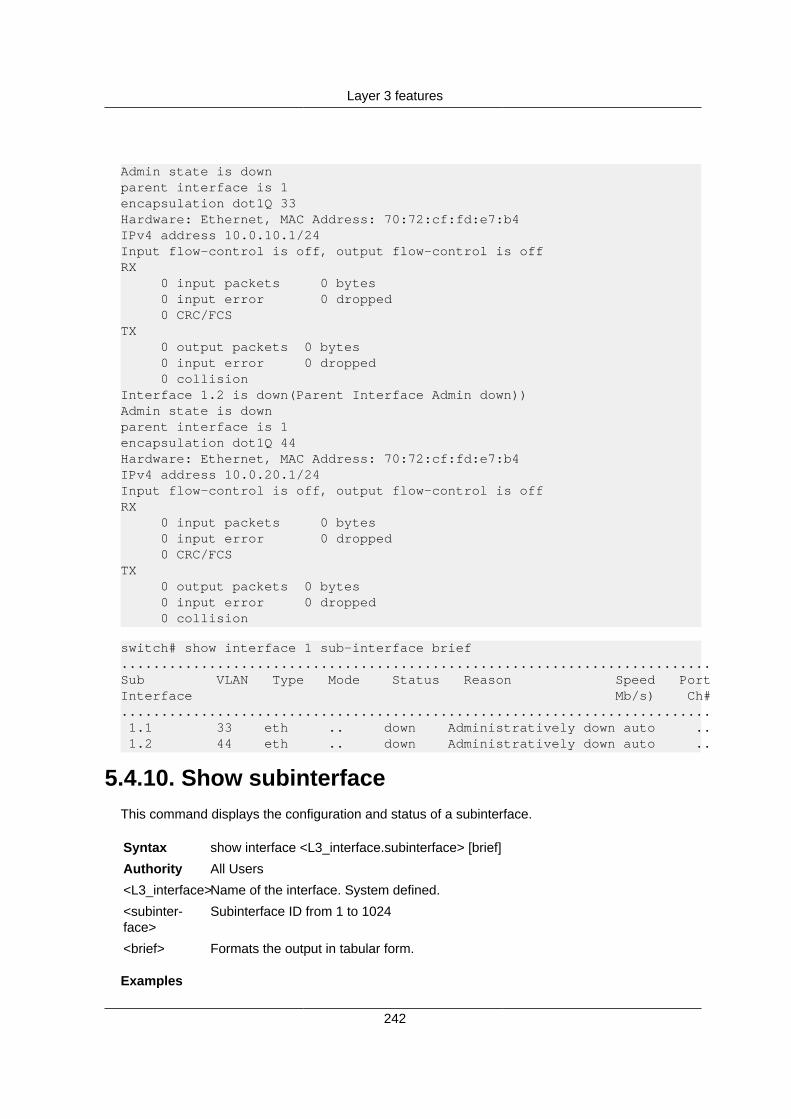
Layer 3 features
242
Admin state is downparent interface is 1encapsulation dot1Q 33Hardware: Ethernet, MAC Address: 70:72:cf:fd:e7:b4IPv4 address 10.0.10.1/24Input flow-control is off, output flow-control is offRX 0 input packets 0 bytes 0 input error 0 dropped 0 CRC/FCSTX 0 output packets 0 bytes 0 input error 0 dropped 0 collisionInterface 1.2 is down(Parent Interface Admin down))Admin state is downparent interface is 1encapsulation dot1Q 44Hardware: Ethernet, MAC Address: 70:72:cf:fd:e7:b4IPv4 address 10.0.20.1/24Input flow-control is off, output flow-control is offRX 0 input packets 0 bytes 0 input error 0 dropped 0 CRC/FCSTX 0 output packets 0 bytes 0 input error 0 dropped 0 collision
switch# show interface 1 sub-interface brief..........................................................................Sub VLAN Type Mode Status Reason Speed PortInterface Mb/s) Ch#.......................................................................... 1.1 33 eth .. down Administratively down auto .. 1.2 44 eth .. down Administratively down auto ..
5.4.10. Show subinterfaceThis command displays the configuration and status of a subinterface.
Syntax show interface <L3_interface.subinterface> [brief]
Authority All Users
<L3_interface>Name of the interface. System defined.
<subinter-face>
Subinterface ID from 1 to 1024
<brief> Formats the output in tabular form.
Examples

Layer 3 features
243
switch# show interface 1.1Interface 1.1 is down(Parent Interface Admin down)Admin state is downparent interface is 1encapsulation dot1Q 33Hardware: Ethernet, MAC Address: 70:72:cf:fd:e7:b4IPv4 address 10.0.10.1/2Input flow-control is off, output flow-control is offRX 0 input packets 0 bytes 0 input error 0 dropped 0 CRC/FCSTX 0 output packets 0 bytes 0 input error 0 dropped 0 collisionswitch# show interface 1.1 brief..........................................................................Sub VLAN Type Mode Status Reason Speed PortInterface Mb/s) Ch#.......................................................................... 1.1 33 eth .. down Administratively down auto ..
5.4.11. Supportability Commands5.4.11.1. Display event logs
Description This command displays all the events logged by sub-interfaces.
Following events will be logged for sub-interfaces.
• Create subinterface.
• Configure subinterface with IPv4 address.
• Configure subinterface with IPv6 address.
• Configure subinterface with encapsulation dot 1Q vlan ID.
• Configure subinterface with admin up.
• Configure subinterface with admin down.
• Remove IPv4 address.
• Remove IPv6 address.
• Remove encapsulation dot 1Q vlan ID.
• Delete subinterface.
Syntax show events category subinterface
Authority All users

Layer 3 features
244
Examples
switch# show events category subinterafce2016-05-31:06:26:27.363923|ops-portd|10001|LOG_INFO|Sub-Interface 4.5,created2016-05-31:07:08:51.351755|ops-portd|10001|LOG_INFO|Sub-Interface 4.4,created2016-05-31:07:08:57.418705|ops-portd|10003|LOG_INFO|Sub-Interface 4.4,configured with ip address 10.1.1.1/24
5.4.11.2. Daignostic DumpThis command will dump number of created subinterfaces.
Syntax diag-dump subinterface basic
Authority All users
Examples
switch# diag-dump subinterface basic=========================================================================[Start] Feature subinterface Time : Tue May 31 07:19:57 2016
=========================================================================-------------------------------------------------------------------------[Start] Daemon ops-portd-------------------------------------------------------------------------Number of Configured sub-interfaces are : 2.
-------------------------------------------------------------------------[End] Daemon ops-portd-------------------------------------------------------------------------=========================================================================[End] Feature subinterface=========================================================================
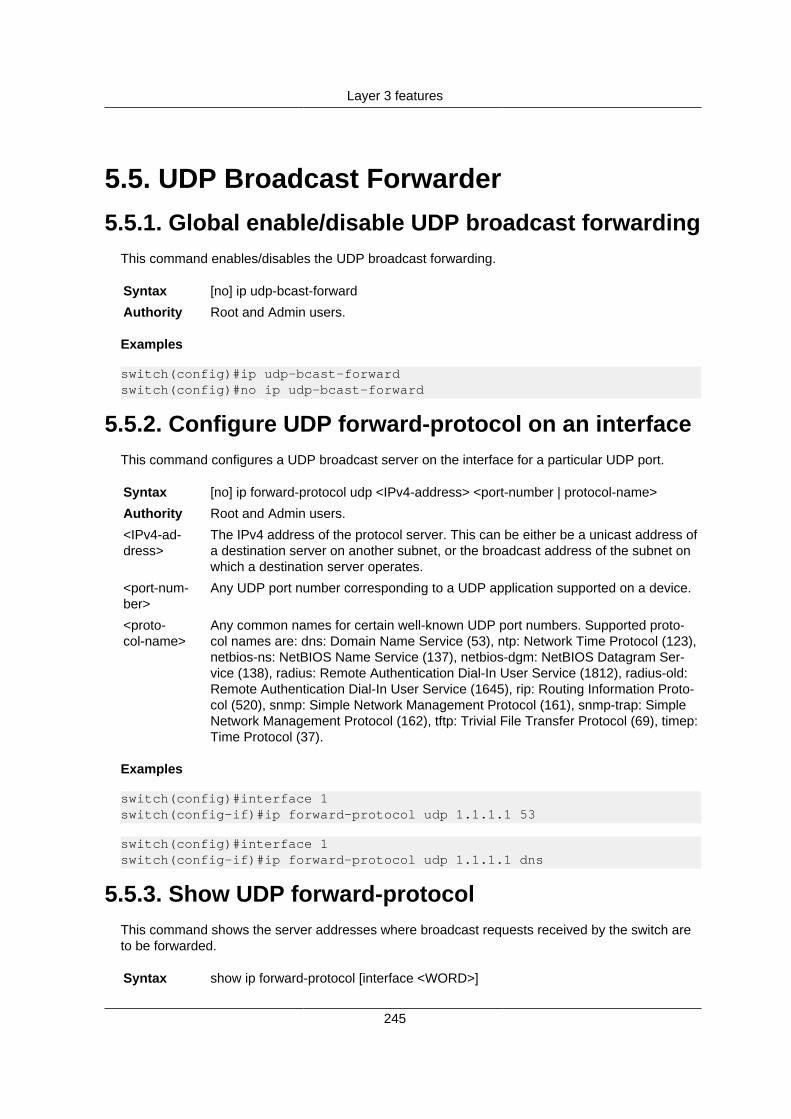
Layer 3 features
245
5.5. UDP Broadcast Forwarder5.5.1. Global enable/disable UDP broadcast forwarding
This command enables/disables the UDP broadcast forwarding.
Syntax [no] ip udp-bcast-forward
Authority Root and Admin users.
Examples
switch(config)#ip udp-bcast-forwardswitch(config)#no ip udp-bcast-forward
5.5.2. Configure UDP forward-protocol on an interfaceThis command configures a UDP broadcast server on the interface for a particular UDP port.
Syntax [no] ip forward-protocol udp <IPv4-address> <port-number | protocol-name>
Authority Root and Admin users.
<IPv4-ad-dress>
The IPv4 address of the protocol server. This can be either be a unicast address ofa destination server on another subnet, or the broadcast address of the subnet onwhich a destination server operates.
<port-num-ber>
Any UDP port number corresponding to a UDP application supported on a device.
<proto-col-name>
Any common names for certain well-known UDP port numbers. Supported proto-col names are: dns: Domain Name Service (53), ntp: Network Time Protocol (123),netbios-ns: NetBIOS Name Service (137), netbios-dgm: NetBIOS Datagram Ser-vice (138), radius: Remote Authentication Dial-In User Service (1812), radius-old:Remote Authentication Dial-In User Service (1645), rip: Routing Information Proto-col (520), snmp: Simple Network Management Protocol (161), snmp-trap: SimpleNetwork Management Protocol (162), tftp: Trivial File Transfer Protocol (69), timep:Time Protocol (37).
Examples
switch(config)#interface 1switch(config-if)#ip forward-protocol udp 1.1.1.1 53
switch(config)#interface 1switch(config-if)#ip forward-protocol udp 1.1.1.1 dns
5.5.3. Show UDP forward-protocolThis command shows the server addresses where broadcast requests received by the switch areto be forwarded.
Syntax show ip forward-protocol [interface <WORD>]

Layer 3 features
246
Authority Root and Admin users.
<interface> Select the interface on which UDP broadcast forwarding information needs to bedisplayed.
Examples
switch(config)#ip udp-bcast-forwardswitch(config)#interface 1switch(config-if)#ip forward-protocol udp 1.1.1.1 53switch(config-if)#ip forward-protocol udp 8.1.1.1 161switch(config-if)#ip forward-protocol udp 4.4.4.4 137switch(config)#interface 2switch(config-if)#ip forward-protocol udp 2.2.2.2 161
switch#show ip forward-protocolUDP Broadcast Forwarder : enabledInterface: 1 IP Forward Address UDP Port ----------------------------- 4.4.4.4 137 1.1.1.1 53 8.1.1.1 161Interface: 2 IP Forward Address UDP Port ----------------------------- 2.2.2.2 161
switch#show ip forward-protocol interface 1
UDP Broadcast Forwarder : enabledInterface: 1 IP Forward Address UDP Port ------------------------------- 4.4.4.4 137 1.1.1.1 53 8.1.1.1 161

Layer 3 features
247
5.6. Static routes5.6.1. ip route
This command configures IPv4 static routes.
Under the config context
Syntax [no] ip route <destination> <nexthop | interface> [<distance>]
Authority Admin
<destination> The address and mask
<nexthop> The address of the nexthop
<interface> The name of the interface
<distance> Distance for this route. Default is 1 for static routes. 1-255
<no> Removes the specified configuration for an IPv4 address
Examples
Configuring IPv4 route with nexthop as an IP address (nexthop: 10.10.10.1):
hostname(config)# ip route 172.16.32.0/24 10.10.10.1
Configuring IPv4 route with nexthop as an interface (interface: 32):
hostname(config)# ip route 172.16.32.0/24 32
Configuring IPv4 route with nexthop as a VLAN interface (interface: vlan10):
hostname(config)# interface vlan10hostname(config-if-vlan)# ip address 10.10.10.2/24hostname(config-if-vlan)# exithostname(config)# ip route 172.16.32.0/24 vlan10
Configuring IPv4 route with nexthop as a subinterface (interface: 1.1):
hostname(config)# interface 1.1hostname(config-subif)# ip address 10.10.10.3/24hostname(config-subif)# exithostname(config)# ip route 172.16.32.0/24 1.1
Configuring IPv4 route with nexthop as a L3 LAG interface (interface: lag10):
hostname(config)# interface lag10hostname(config-lag-if)# ip address 10.10.10.3/24hostname(config-lag-if)# exithostname(config)# ip route 172.16.32.0/24 lag10
5.6.2. ipv6 routeThis command configures IPv6 static routes.

Layer 3 features
248
Under the config context
Syntax [no] ipv6 route <destination> <nexthop | interface> [<distance>]
Authority Admin
<destination> The address and prefix length, X:X::X:X/P.
<nexthop> The address of the nexthop, X:X::X:X.
<interface> The name of the interface.
<distance> Distance for this route. Default is 1 for static routes, 1-255.
<no> Removes the specified configuration for an IPv6 address
Examples
Configuring IPv6 route with nexthop as an IP address (nexthop: 2010:bda::/ ):
hostname(config)# ipv6 route fde1:87a5:2185:a5fc::/64 2010:bda::/
Configuring IPv6 route with nexthop as an interface (interface: 32):
hostname(config)# ipv6 route fde1:87a5:2185:a5fc::/64 32
Configuring IPv6 route with nexthop as a VLAN interface (interface: vlan10):
hostname(config)# interface vlan10hostname(config-if-vlan)# ipv6 address 2001::1/120hostname(config-if-vlan)# exithostname(config)# ipv6 route fde1:87a5:2185:a5fc::/64 vlan10
Configuring IPv6 route with nexthop as a subinterface (interface: 1.1):
hostname(config)# interface 1.1hostname(config-subif)# ipv6 address 2001::2/120hostname(config-subif)# exithostname(config)# ipv6 route fde1:87a5:2185:a5fc::/64 1.1
Configuring IPv6 route with nexthop as a L3 LAG interface (interface: lag10):
hostname(config)# interface lag10hostname(config-lag-if)# ipv6 address 2001::3/120hostname(config-lag-if)# exithostname(config)# ipv6 route fde1:87a5:2185:a5fc::/64 lag10
5.6.3. show ip routeThis command displays the routing table.
Under privileged mode
Syntax show ip route
Authority Operator
Example
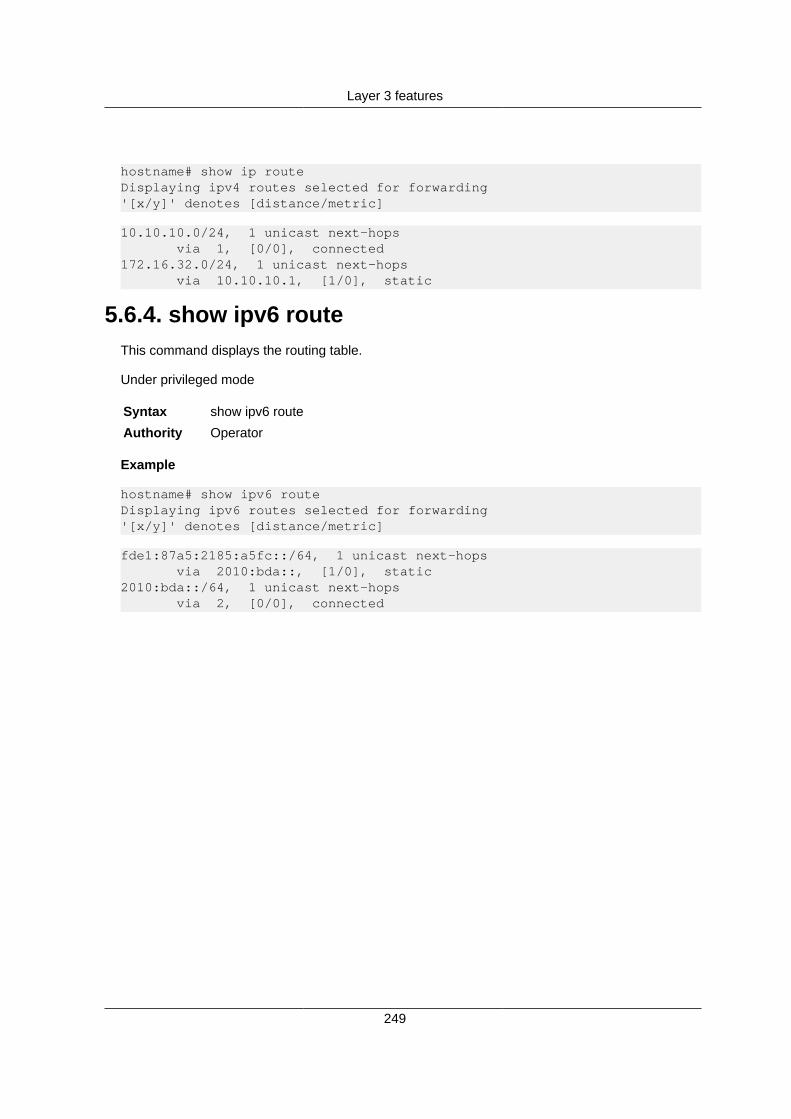
Layer 3 features
249
hostname# show ip routeDisplaying ipv4 routes selected for forwarding'[x/y]' denotes [distance/metric]
10.10.10.0/24, 1 unicast next-hops via 1, [0/0], connected172.16.32.0/24, 1 unicast next-hops via 10.10.10.1, [1/0], static
5.6.4. show ipv6 routeThis command displays the routing table.
Under privileged mode
Syntax show ipv6 route
Authority Operator
Example
hostname# show ipv6 routeDisplaying ipv6 routes selected for forwarding'[x/y]' denotes [distance/metric]
fde1:87a5:2185:a5fc::/64, 1 unicast next-hops via 2010:bda::, [1/0], static2010:bda::/64, 1 unicast next-hops via 2, [0/0], connected

Layer 3 features
250
5.7. ECMP commands5.7.1. ip ecmp load-balance dst-ip disable
Disable destination IP based load balancing. Use the no variant to enable.
Under the config context.
Syntax [no] ip ecmp load-balance dst-ip disable
Authority Admin.
Example
hostname(config)# ip ecmp load-balance dst-ip disablehostname(config)#
5.7.2. ip ecmp load-balance src-ip disableDisable source IP based load balancing. Use the no variant to enable.
Under the config context.
Syntax [no] ip ecmp load-balance src-ip disable
Authority Admin.
Example
hostname(config)# ip ecmp load-balance src-ip disablehostname(config)#
5.7.3. ip ecmp load-balance dst-port disableDisable destination port based load balancing. Use the no variant to enable.
Under the config context.
Syntax [no] ip ecmp load-balance dst-port disable
Authority Admin.
Example
hostname(config)# ip ecmp load-balance dst-port disablehostname(config)#
5.7.4. ip ecmp load-balance src-port disableDisable source port based load balancing. Use the no variant to enable.
Under the config context.
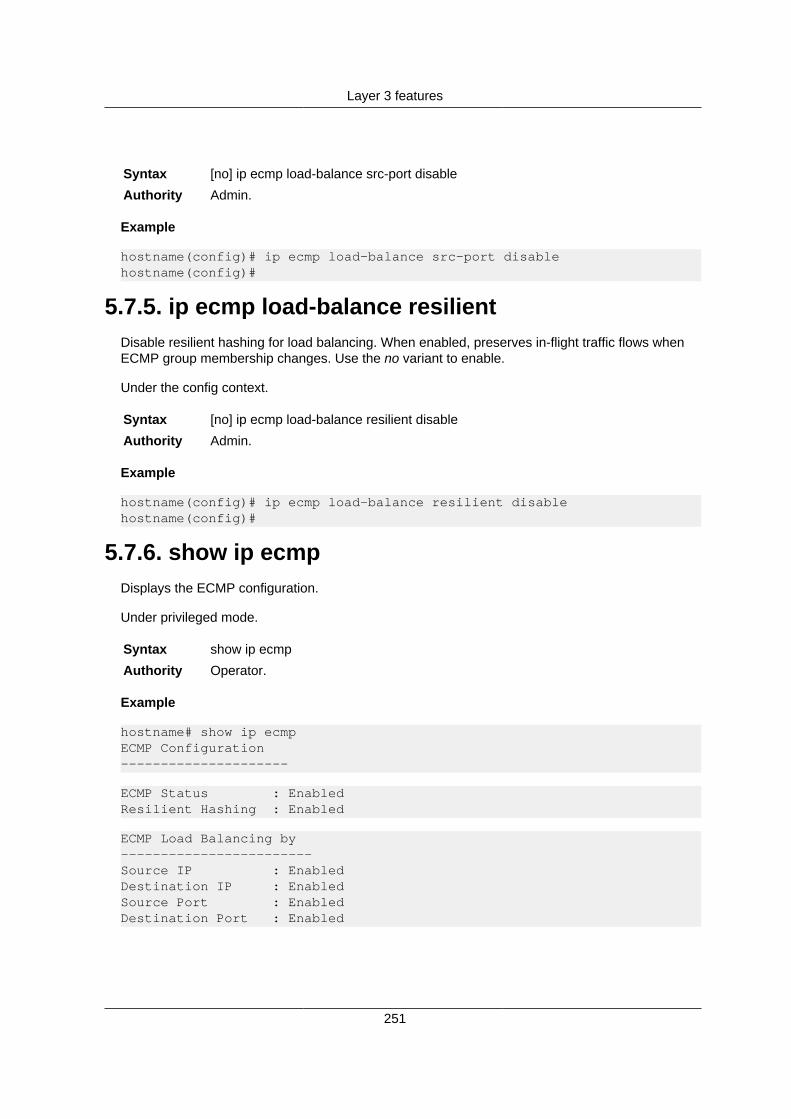
Layer 3 features
251
Syntax [no] ip ecmp load-balance src-port disable
Authority Admin.
Example
hostname(config)# ip ecmp load-balance src-port disablehostname(config)#
5.7.5. ip ecmp load-balance resilientDisable resilient hashing for load balancing. When enabled, preserves in-flight traffic flows whenECMP group membership changes. Use the no variant to enable.
Under the config context.
Syntax [no] ip ecmp load-balance resilient disable
Authority Admin.
Example
hostname(config)# ip ecmp load-balance resilient disablehostname(config)#
5.7.6. show ip ecmpDisplays the ECMP configuration.
Under privileged mode.
Syntax show ip ecmp
Authority Operator.
Example
hostname# show ip ecmpECMP Configuration---------------------
ECMP Status : EnabledResilient Hashing : Enabled
ECMP Load Balancing by------------------------Source IP : EnabledDestination IP : EnabledSource Port : EnabledDestination Port : Enabled
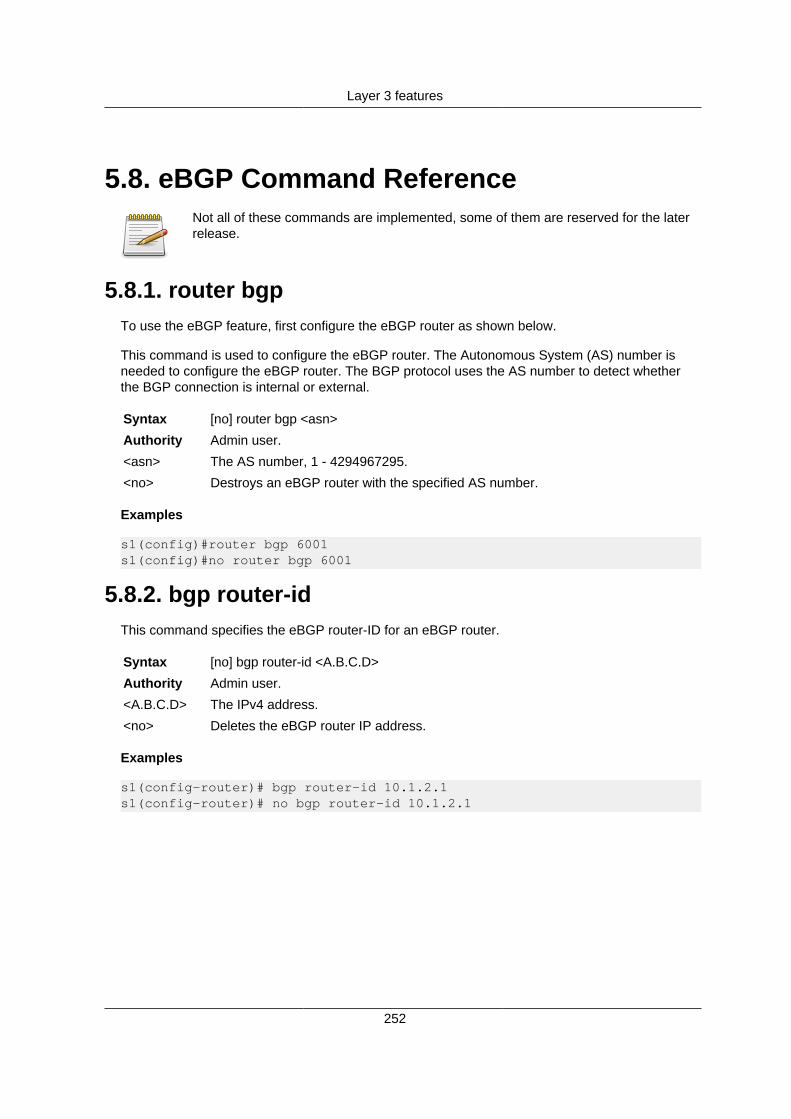
Layer 3 features
252
5.8. eBGP Command ReferenceNot all of these commands are implemented, some of them are reserved for the laterrelease.
5.8.1. router bgpTo use the eBGP feature, first configure the eBGP router as shown below.
This command is used to configure the eBGP router. The Autonomous System (AS) number isneeded to configure the eBGP router. The BGP protocol uses the AS number to detect whetherthe BGP connection is internal or external.
Syntax [no] router bgp <asn>
Authority Admin user.
<asn> The AS number, 1 - 4294967295.
<no> Destroys an eBGP router with the specified AS number.
Examples
s1(config)#router bgp 6001s1(config)#no router bgp 6001
5.8.2. bgp router-idThis command specifies the eBGP router-ID for an eBGP router.
Syntax [no] bgp router-id <A.B.C.D>
Authority Admin user.
<A.B.C.D> The IPv4 address.
<no> Deletes the eBGP router IP address.
Examples
s1(config-router)# bgp router-id 10.1.2.1s1(config-router)# no bgp router-id 10.1.2.1

Layer 3 features
253
5.9. IPv4 networkThis command adds the announcement network.
Syntax [no] network <A.B.C.D/M>
Authority Admin user.
<A.B.C.D/M> IPv4 address with the prefix length.
<no> Removes the announced network for the eBGP router.
Examples
The following configuration example shows that network 10.1.2.0/24 is announced to all neighbors:
s1(config-router)# network 10.1.2.0/24s1(config)# do sh runCurrent configuration:!router bgp 6001 bgp router-id 10.1.2.1 network 10.1.2.0/24
5.9.1. maximum-pathsThis command sets the maximum number of paths for an eBGP router.
Syntax [no] maximum-paths <num>
Authority Admin user.
<num> Maximum number of paths, 1-255.
<no> Sets the maximum number of paths to the default value of 1.
Examples
s1(config)# router bgp 6001s1(config-router)# maximum-paths 5
5.9.2. timers bgpThis command sets the keepalive interval and hold time for an eBGP router.
Syntax [no] timers bgp <keepalive> <holdtime>
Authority Admin user.
<Keepalive> The keepalive interval in seconds, 0-65535.
<holdtime> Hold time in seconds, 0-65535.
<no> Resets the keepalive and hold time values to their default values (60 seconds forthe keepalive interval and 180 seconds for the hold time value).
Examples
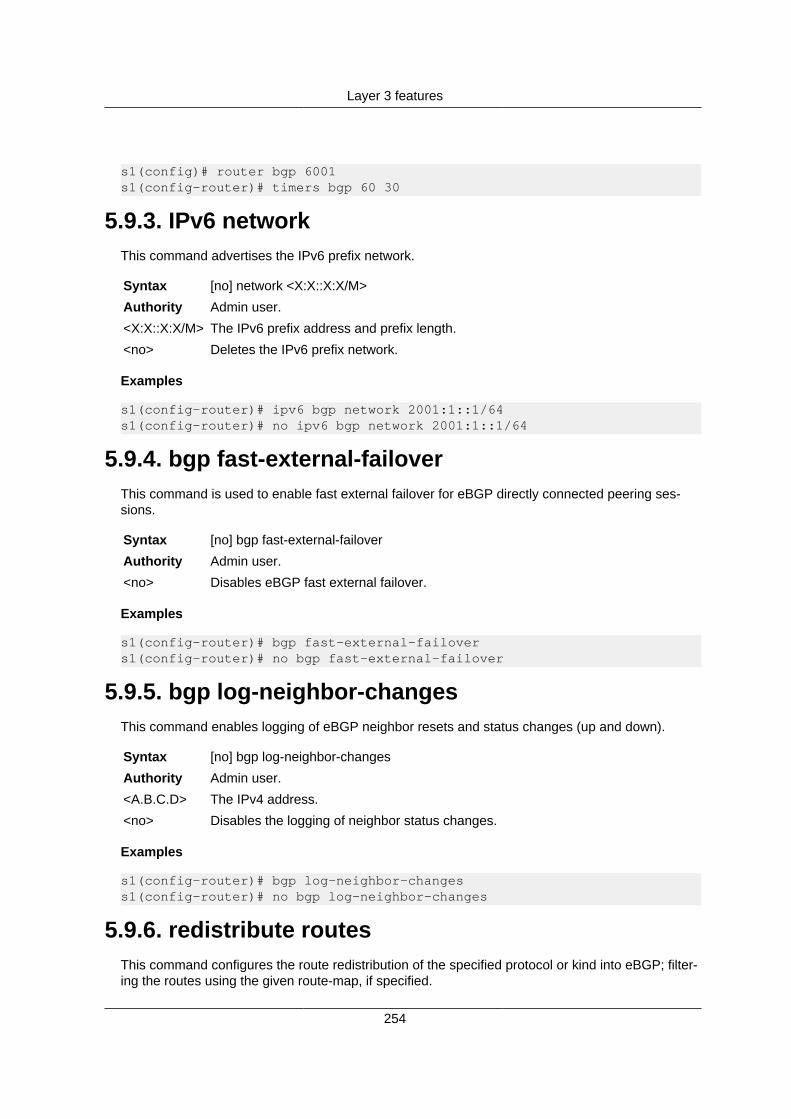
Layer 3 features
254
s1(config)# router bgp 6001s1(config-router)# timers bgp 60 30
5.9.3. IPv6 networkThis command advertises the IPv6 prefix network.
Syntax [no] network <X:X::X:X/M>
Authority Admin user.
<X:X::X:X/M> The IPv6 prefix address and prefix length.
<no> Deletes the IPv6 prefix network.
Examples
s1(config-router)# ipv6 bgp network 2001:1::1/64s1(config-router)# no ipv6 bgp network 2001:1::1/64
5.9.4. bgp fast-external-failoverThis command is used to enable fast external failover for eBGP directly connected peering ses-sions.
Syntax [no] bgp fast-external-failover
Authority Admin user.
<no> Disables eBGP fast external failover.
Examples
s1(config-router)# bgp fast-external-failovers1(config-router)# no bgp fast-external-failover
5.9.5. bgp log-neighbor-changesThis command enables logging of eBGP neighbor resets and status changes (up and down).
Syntax [no] bgp log-neighbor-changes
Authority Admin user.
<A.B.C.D> The IPv4 address.
<no> Disables the logging of neighbor status changes.
Examples
s1(config-router)# bgp log-neighbor-changess1(config-router)# no bgp log-neighbor-changes
5.9.6. redistribute routesThis command configures the route redistribution of the specified protocol or kind into eBGP; filter-ing the routes using the given route-map, if specified.

Layer 3 features
255
Syntax [no] redistribute <connected | static | ospf> route-map <name>
Authority Admin user.
<name> The route-map name, up to 80 chars.
<no> Removes the redistribution of routes from eBGP.
Examples
s1(config)# router bgp 6001s1(config-router)# redistribute kernels1(config-router)# redistribute connecteds1(config-router)# redistribute statics1(config-router)# redistribute ospfs1(config-router)# redistribute kernel route-map rm1s1(config-router)# redistribute connected route-map rm1s1(config-router)# redistribute static route-map rm1s1(config-router)# redistribute ospf route-map rm1
5.9.7. neighbor remote-asThis command creates a neighbor whose remote-as is asn, an autonomous system number. Cur-rently only IPv4 addresses are supported.
Syntax [no] neighbor <A.B.C.D> remote-as <asn>
Authority Admin user.
<A.B.C.D> The peer IPv4 address.
<asn> The autonomous system number of the peer, 1 - 4294967295.
<no> Deletes a configured eBGP peer.
Examples
s1(config)# router bgp 6001s1(config-router)# neighbor 10.1.2.1 remote-as 6002s1(config-router)# no neighbor 10.1.2.1 remote-as 6002
5.9.8. neighbor descriptionThis command sets the description for the peer.
Syntax [no] neighbor <A.B.C.D> description <text>
Authority Admin user.
<A.B.C.D> The peer IPv4 address.
<text> Description of the peer, up to 80 chars.
<no> Deletes the peer description.
Examples
s1(config)# router bgp 6001s1(config-router)# neighbor 10.1.2.1 remote-as 6002

Layer 3 features
256
s1(config-router)# neighbor 10.1.2.1 description peer1
5.9.9. neighbor passwordThis command enables MD5 authentication on a TCP connection between eBGP peers.
Syntax [no] neighbor <A.B.C.D> password <text>
<A.B.C.D> The peer IPv4 address.
<text> Password for the peer connection, up to 80 chars.
<no> Disables authentication for the peer connection.
Examples
s1(config)# router bgp 6001s1(config-router)# neighbor 10.1.2.1 remote-as 6002s1(config-router)# neighbor 10.1.2.1 password secret
5.9.10. neighbor timersThis command sets the keepalive interval and hold time for a specific eBGP peer.
Syntax [no] neighbor <A.B.C.D> timers <keepalive> <holdtimer>
Authority Admin user.
<Keepalive> The keepalive interval in seconds, 0-65535.
<holdtime> The hold time in seconds, 0-65535.
<no> Resets the keepalive and hold time values to their default values which are 0.
Examples
s1(config)# router bgp 6001s1(config-router)# neighbor 10.1.2.1 remote-as 6002s1(config-router)# neighbor 10.1.2.1 timers 20 10
5.9.11. neighbor allowas-inThis command specifies an allow-as-in occurrence number for an AS to be in the AS path. Issuethe no command to clear the state.
Syntax [no] neighbor <A.B.C.D> allowas-in <val>
Authority Admin user.
<A.B.C.D> The peer IPv4 address.
<val> Number of times eBGP allows an instance of AS to be in the AS_PATH, 1-10.
<no> Clears the state.
Examples
s1(config)# router bgp 6001
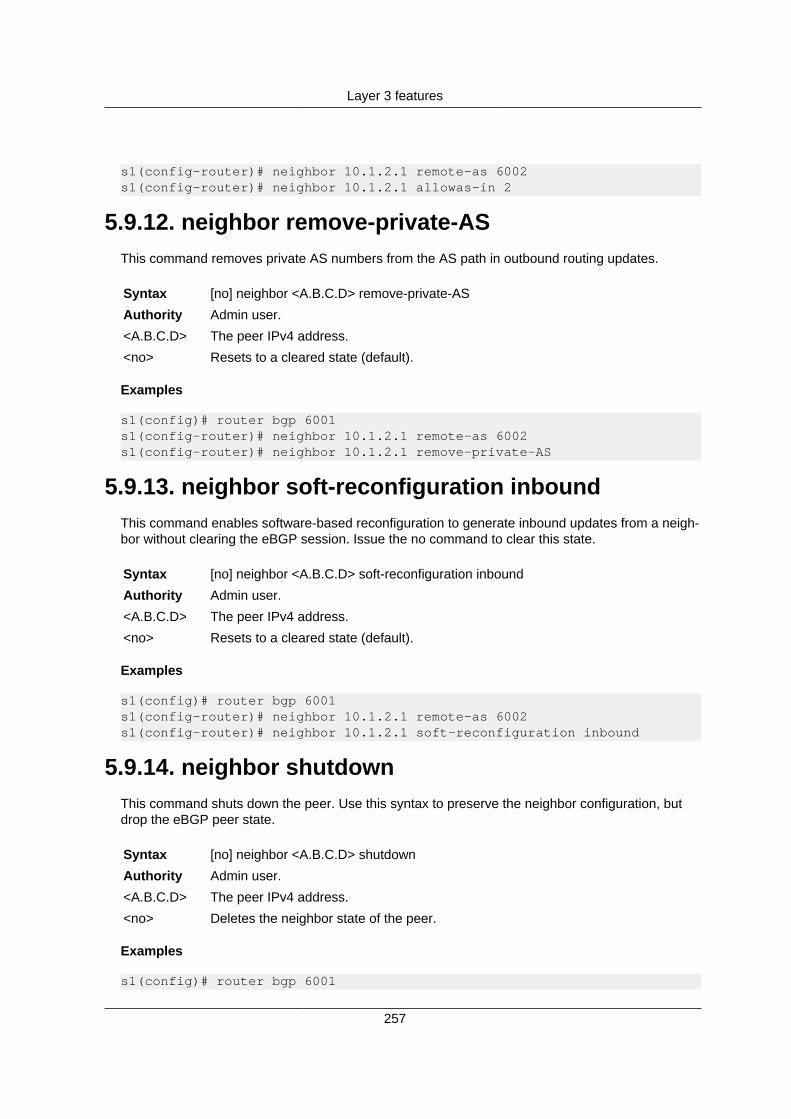
Layer 3 features
257
s1(config-router)# neighbor 10.1.2.1 remote-as 6002s1(config-router)# neighbor 10.1.2.1 allowas-in 2
5.9.12. neighbor remove-private-ASThis command removes private AS numbers from the AS path in outbound routing updates.
Syntax [no] neighbor <A.B.C.D> remove-private-AS
Authority Admin user.
<A.B.C.D> The peer IPv4 address.
<no> Resets to a cleared state (default).
Examples
s1(config)# router bgp 6001s1(config-router)# neighbor 10.1.2.1 remote-as 6002s1(config-router)# neighbor 10.1.2.1 remove-private-AS
5.9.13. neighbor soft-reconfiguration inboundThis command enables software-based reconfiguration to generate inbound updates from a neigh-bor without clearing the eBGP session. Issue the no command to clear this state.
Syntax [no] neighbor <A.B.C.D> soft-reconfiguration inbound
Authority Admin user.
<A.B.C.D> The peer IPv4 address.
<no> Resets to a cleared state (default).
Examples
s1(config)# router bgp 6001s1(config-router)# neighbor 10.1.2.1 remote-as 6002s1(config-router)# neighbor 10.1.2.1 soft-reconfiguration inbound
5.9.14. neighbor shutdownThis command shuts down the peer. Use this syntax to preserve the neighbor configuration, butdrop the eBGP peer state.
Syntax [no] neighbor <A.B.C.D> shutdown
Authority Admin user.
<A.B.C.D> The peer IPv4 address.
<no> Deletes the neighbor state of the peer.
Examples
s1(config)# router bgp 6001
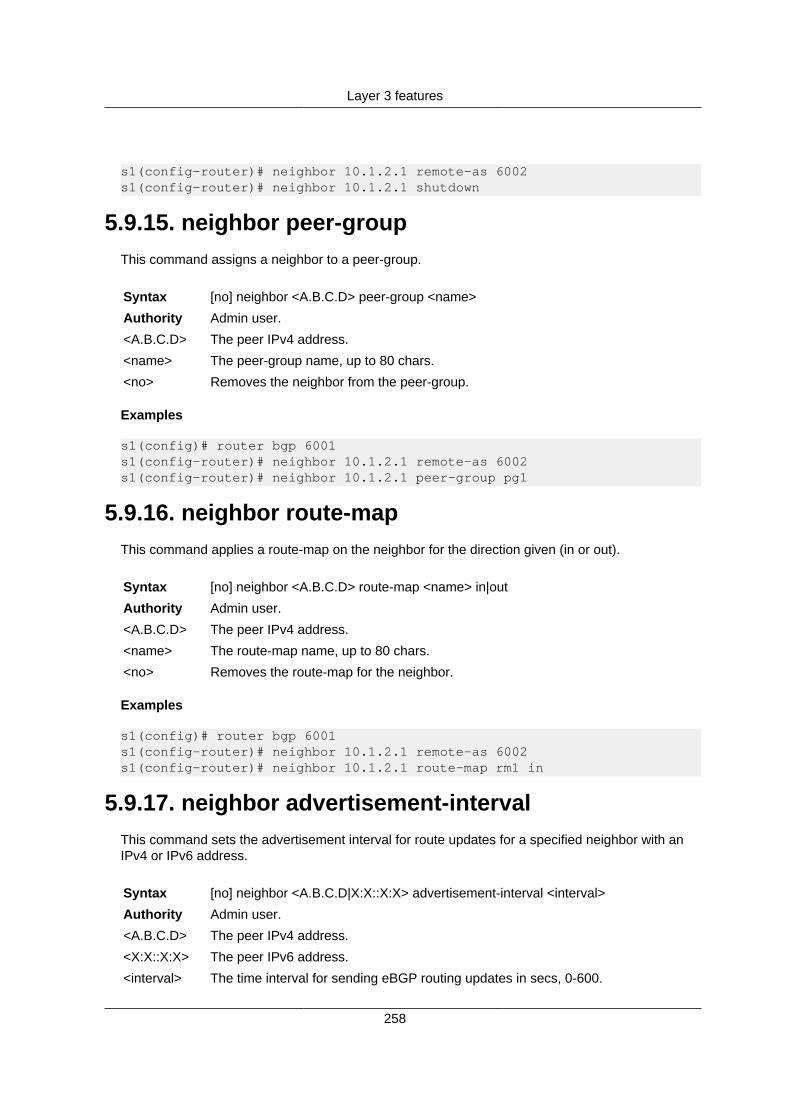
Layer 3 features
258
s1(config-router)# neighbor 10.1.2.1 remote-as 6002s1(config-router)# neighbor 10.1.2.1 shutdown
5.9.15. neighbor peer-groupThis command assigns a neighbor to a peer-group.
Syntax [no] neighbor <A.B.C.D> peer-group <name>
Authority Admin user.
<A.B.C.D> The peer IPv4 address.
<name> The peer-group name, up to 80 chars.
<no> Removes the neighbor from the peer-group.
Examples
s1(config)# router bgp 6001s1(config-router)# neighbor 10.1.2.1 remote-as 6002s1(config-router)# neighbor 10.1.2.1 peer-group pg1
5.9.16. neighbor route-mapThis command applies a route-map on the neighbor for the direction given (in or out).
Syntax [no] neighbor <A.B.C.D> route-map <name> in|out
Authority Admin user.
<A.B.C.D> The peer IPv4 address.
<name> The route-map name, up to 80 chars.
<no> Removes the route-map for the neighbor.
Examples
s1(config)# router bgp 6001s1(config-router)# neighbor 10.1.2.1 remote-as 6002s1(config-router)# neighbor 10.1.2.1 route-map rm1 in
5.9.17. neighbor advertisement-intervalThis command sets the advertisement interval for route updates for a specified neighbor with anIPv4 or IPv6 address.
Syntax [no] neighbor <A.B.C.D|X:X::X:X> advertisement-interval <interval>
Authority Admin user.
<A.B.C.D> The peer IPv4 address.
<X:X::X:X> The peer IPv6 address.
<interval> The time interval for sending eBGP routing updates in secs, 0-600.
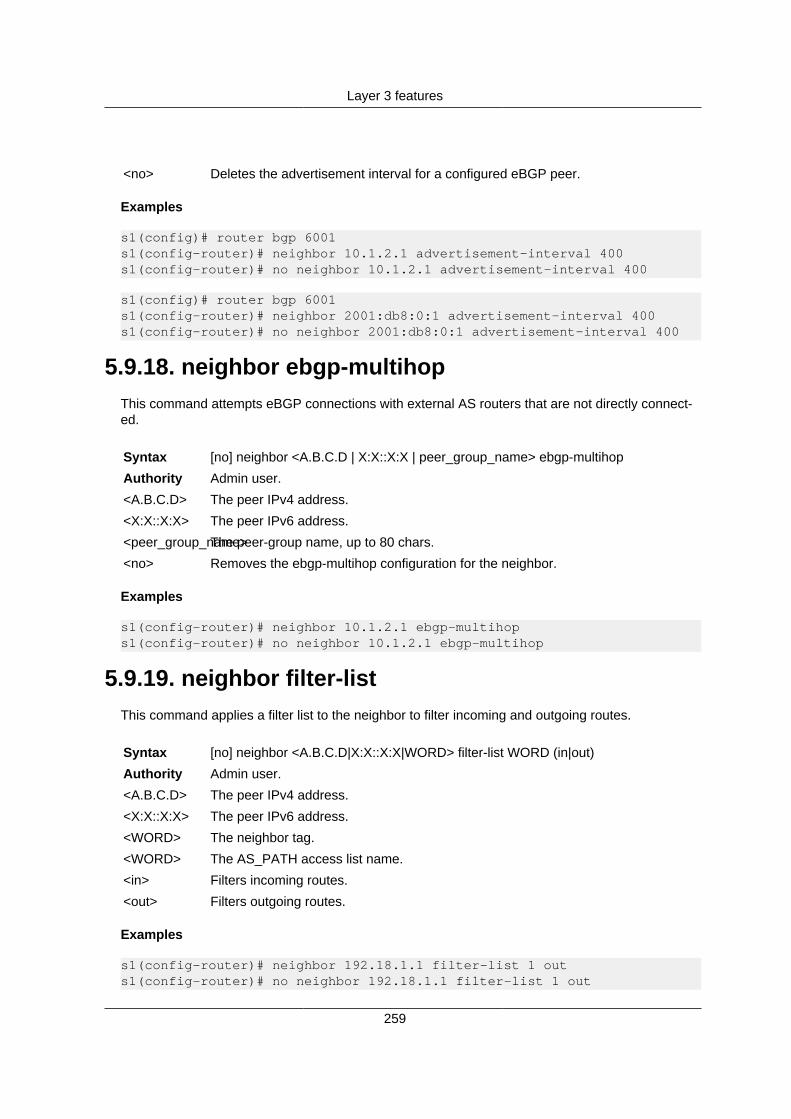
Layer 3 features
259
<no> Deletes the advertisement interval for a configured eBGP peer.
Examples
s1(config)# router bgp 6001s1(config-router)# neighbor 10.1.2.1 advertisement-interval 400s1(config-router)# no neighbor 10.1.2.1 advertisement-interval 400
s1(config)# router bgp 6001s1(config-router)# neighbor 2001:db8:0:1 advertisement-interval 400s1(config-router)# no neighbor 2001:db8:0:1 advertisement-interval 400
5.9.18. neighbor ebgp-multihopThis command attempts eBGP connections with external AS routers that are not directly connect-ed.
Syntax [no] neighbor <A.B.C.D | X:X::X:X | peer_group_name> ebgp-multihop
Authority Admin user.
<A.B.C.D> The peer IPv4 address.
<X:X::X:X> The peer IPv6 address.
<peer_group_name>The peer-group name, up to 80 chars.
<no> Removes the ebgp-multihop configuration for the neighbor.
Examples
s1(config-router)# neighbor 10.1.2.1 ebgp-multihops1(config-router)# no neighbor 10.1.2.1 ebgp-multihop
5.9.19. neighbor filter-listThis command applies a filter list to the neighbor to filter incoming and outgoing routes.
Syntax [no] neighbor <A.B.C.D|X:X::X:X|WORD> filter-list WORD (in|out)
Authority Admin user.
<A.B.C.D> The peer IPv4 address.
<X:X::X:X> The peer IPv6 address.
<WORD> The neighbor tag.
<WORD> The AS_PATH access list name.
<in> Filters incoming routes.
<out> Filters outgoing routes.
Examples
s1(config-router)# neighbor 192.18.1.1 filter-list 1 outs1(config-router)# no neighbor 192.18.1.1 filter-list 1 out
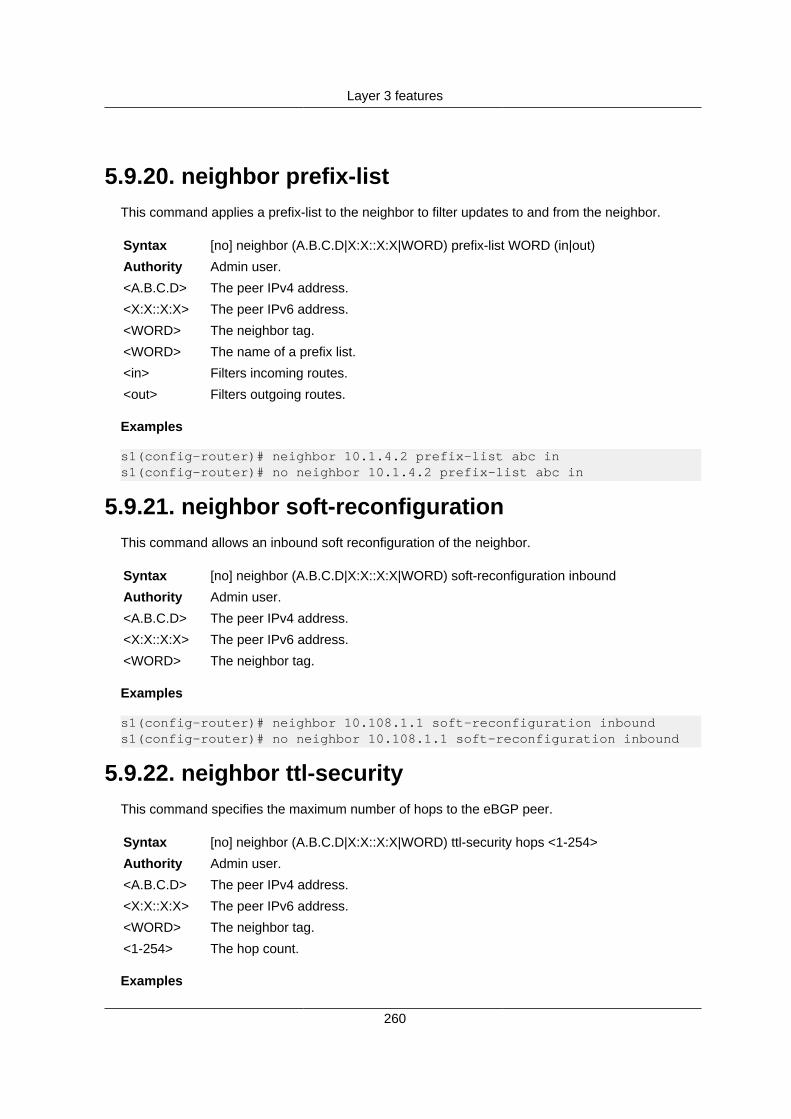
Layer 3 features
260
5.9.20. neighbor prefix-listThis command applies a prefix-list to the neighbor to filter updates to and from the neighbor.
Syntax [no] neighbor (A.B.C.D|X:X::X:X|WORD) prefix-list WORD (in|out)
Authority Admin user.
<A.B.C.D> The peer IPv4 address.
<X:X::X:X> The peer IPv6 address.
<WORD> The neighbor tag.
<WORD> The name of a prefix list.
<in> Filters incoming routes.
<out> Filters outgoing routes.
Examples
s1(config-router)# neighbor 10.1.4.2 prefix-list abc ins1(config-router)# no neighbor 10.1.4.2 prefix-list abc in
5.9.21. neighbor soft-reconfigurationThis command allows an inbound soft reconfiguration of the neighbor.
Syntax [no] neighbor (A.B.C.D|X:X::X:X|WORD) soft-reconfiguration inbound
Authority Admin user.
<A.B.C.D> The peer IPv4 address.
<X:X::X:X> The peer IPv6 address.
<WORD> The neighbor tag.
Examples
s1(config-router)# neighbor 10.108.1.1 soft-reconfiguration inbounds1(config-router)# no neighbor 10.108.1.1 soft-reconfiguration inbound
5.9.22. neighbor ttl-securityThis command specifies the maximum number of hops to the eBGP peer.
Syntax [no] neighbor (A.B.C.D|X:X::X:X|WORD) ttl-security hops <1-254>
Authority Admin user.
<A.B.C.D> The peer IPv4 address.
<X:X::X:X> The peer IPv6 address.
<WORD> The neighbor tag.
<1-254> The hop count.
Examples
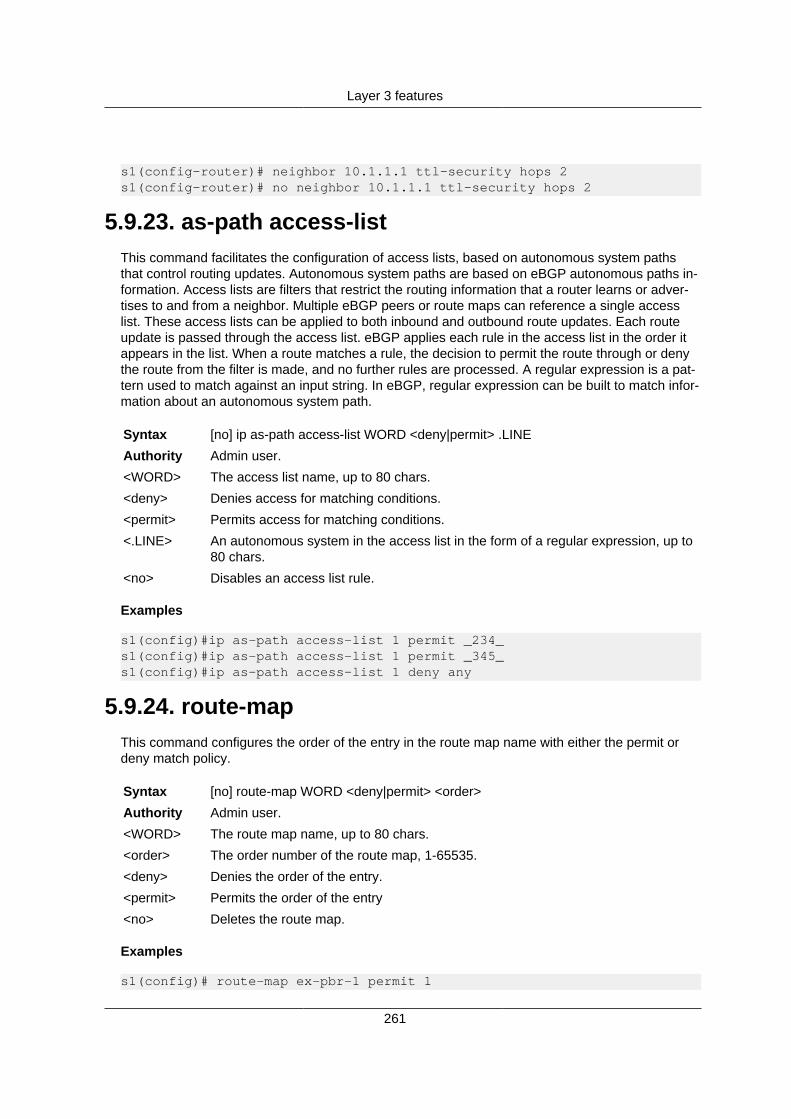
Layer 3 features
261
s1(config-router)# neighbor 10.1.1.1 ttl-security hops 2s1(config-router)# no neighbor 10.1.1.1 ttl-security hops 2
5.9.23. as-path access-listThis command facilitates the configuration of access lists, based on autonomous system pathsthat control routing updates. Autonomous system paths are based on eBGP autonomous paths in-formation. Access lists are filters that restrict the routing information that a router learns or adver-tises to and from a neighbor. Multiple eBGP peers or route maps can reference a single accesslist. These access lists can be applied to both inbound and outbound route updates. Each routeupdate is passed through the access list. eBGP applies each rule in the access list in the order itappears in the list. When a route matches a rule, the decision to permit the route through or denythe route from the filter is made, and no further rules are processed. A regular expression is a pat-tern used to match against an input string. In eBGP, regular expression can be built to match infor-mation about an autonomous system path.
Syntax [no] ip as-path access-list WORD <deny|permit> .LINE
Authority Admin user.
<WORD> The access list name, up to 80 chars.
<deny> Denies access for matching conditions.
<permit> Permits access for matching conditions.
<.LINE> An autonomous system in the access list in the form of a regular expression, up to80 chars.
<no> Disables an access list rule.
Examples
s1(config)#ip as-path access-list 1 permit _234_s1(config)#ip as-path access-list 1 permit _345_s1(config)#ip as-path access-list 1 deny any
5.9.24. route-mapThis command configures the order of the entry in the route map name with either the permit ordeny match policy.
Syntax [no] route-map WORD <deny|permit> <order>
Authority Admin user.
<WORD> The route map name, up to 80 chars.
<order> The order number of the route map, 1-65535.
<deny> Denies the order of the entry.
<permit> Permits the order of the entry
<no> Deletes the route map.
Examples
s1(config)# route-map ex-pbr-1 permit 1
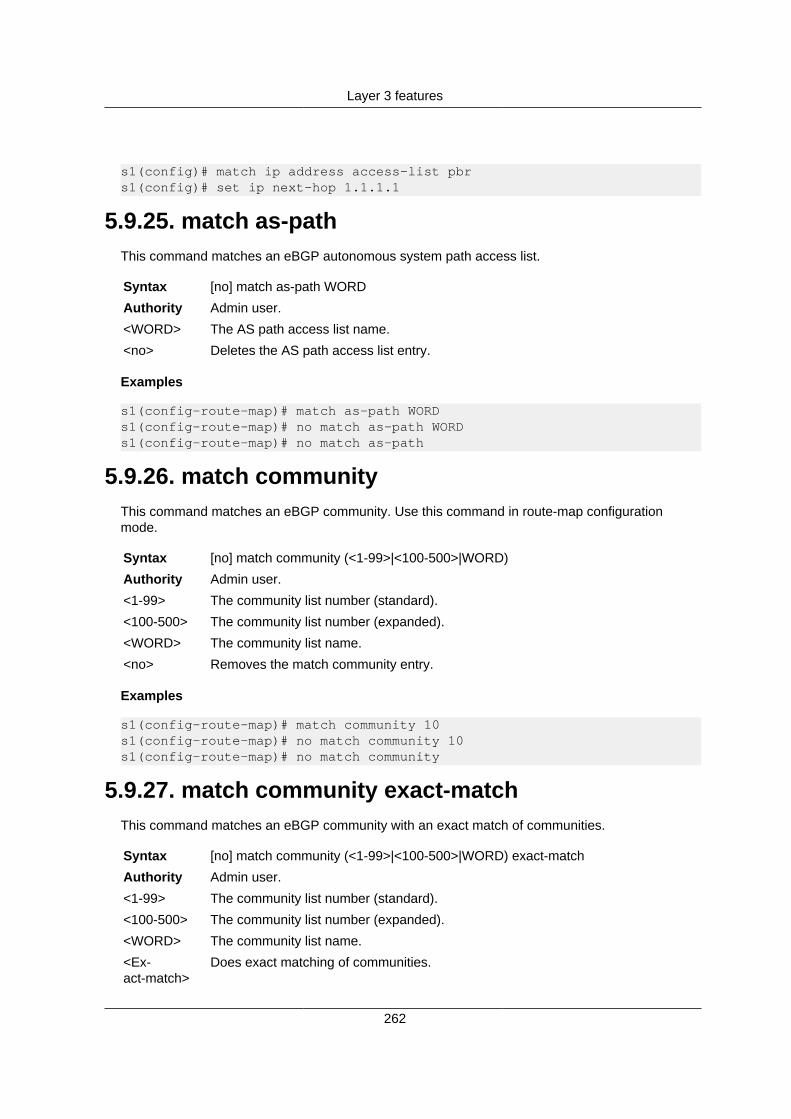
Layer 3 features
262
s1(config)# match ip address access-list pbrs1(config)# set ip next-hop 1.1.1.1
5.9.25. match as-pathThis command matches an eBGP autonomous system path access list.
Syntax [no] match as-path WORD
Authority Admin user.
<WORD> The AS path access list name.
<no> Deletes the AS path access list entry.
Examples
s1(config-route-map)# match as-path WORDs1(config-route-map)# no match as-path WORDs1(config-route-map)# no match as-path
5.9.26. match communityThis command matches an eBGP community. Use this command in route-map configurationmode.
Syntax [no] match community (<1-99>|<100-500>|WORD)
Authority Admin user.
<1-99> The community list number (standard).
<100-500> The community list number (expanded).
<WORD> The community list name.
<no> Removes the match community entry.
Examples
s1(config-route-map)# match community 10s1(config-route-map)# no match community 10s1(config-route-map)# no match community
5.9.27. match community exact-matchThis command matches an eBGP community with an exact match of communities.
Syntax [no] match community (<1-99>|<100-500>|WORD) exact-match
Authority Admin user.
<1-99> The community list number (standard).
<100-500> The community list number (expanded).
<WORD> The community list name.
<Ex-act-match>
Does exact matching of communities.

Layer 3 features
263
<no> Removes the match community exact-match entry.
Examples
s1(config-route-map)# match community c1 exact-matchs1(config-route-map)# no match community c1 exact-match
5.9.28. match extcommunityThis command matches the eBGP extended community list attributes. Use this command in route-map mode.
Syntax [no] match extcommunity (<1-99>|<100-500>|WORD)
Authority Admin user.
<1-99> The extended community list number (standard).
<100-500> The extended community list number (expanded).
<WORD> The extended community list name.
<no> Removes the match extcommunity entry.
Examples
s1(config-route-map)# match extcommunity 10s1(config-route-map)# no match extcommunity 10s1(config-route-map)# no match extcommunity
5.9.29. match ip address prefix-listTo distribute any routes that have a destination network number address that is permitted by aprefix list.
Syntax [no] match ip address prefix-list WORD
Authority Admin user.
<WORD> The IP prefix list name.
<no> Removes the match ip address prefix-list entry.
Examples
s1(config-route-map)# match ip address prefix-list pl1s1(config-route-map)# no match ip address prefix-list pl1s1(config-route-map)# no match ip address prefix-list
5.9.30. match ipv6 address prefix-listThis command distributes IPv6 routes that have a prefix specified in an IPv6 prefix list.
Syntax [no] match ipv6 address prefix-list WORD
Authority Admin user.
<WORD> The IPv6 prefix list.

Layer 3 features
264
<no> Removes the match ipv6 address prefix-list entry.
Examples
s1(config-route-map)# match ipv6 address prefix-list p1s1(config-route-map)# no match ipv6 address prefix-list p1
5.9.31. match ipv6 next-hopThis command distributes IPv6 routes that have a specified next hop.
Syntax [no] match ipv6 next-hop X:X::X:X
Authority Admin user.
<X:X::X:X> The IPv6 address of the next hop.
<no> Removes the match ipv6 next-hop entry.
Examples
s1(config-route-map)# match ipv6 next-hop 2001::1s1(config-route-map)# no match ipv6 next-hop 2001::1
5.9.32. match metricThis command redistributes routes with the specified metric.
Syntax [no] match metric <0-4294967295>
Authority Admin user.
<0-4294967295>The metric value.
<no> Removes the match metric entry.
Examples
s1(config-route-map)# match metric 400s1(config-route-map)# no match metric 400s1(config-route-map)# no match metric
5.9.33. match originThis command matches eBGP routes based on the origin of the specified route.
Syntax [no] match origin (egp|igp|incomplete)
Authority Admin user.
<EGP> Remote egp.
<IGP> Local igp.
<Incomplete> Unknown heritage.
<no> Removes the match origin entry.
Examples
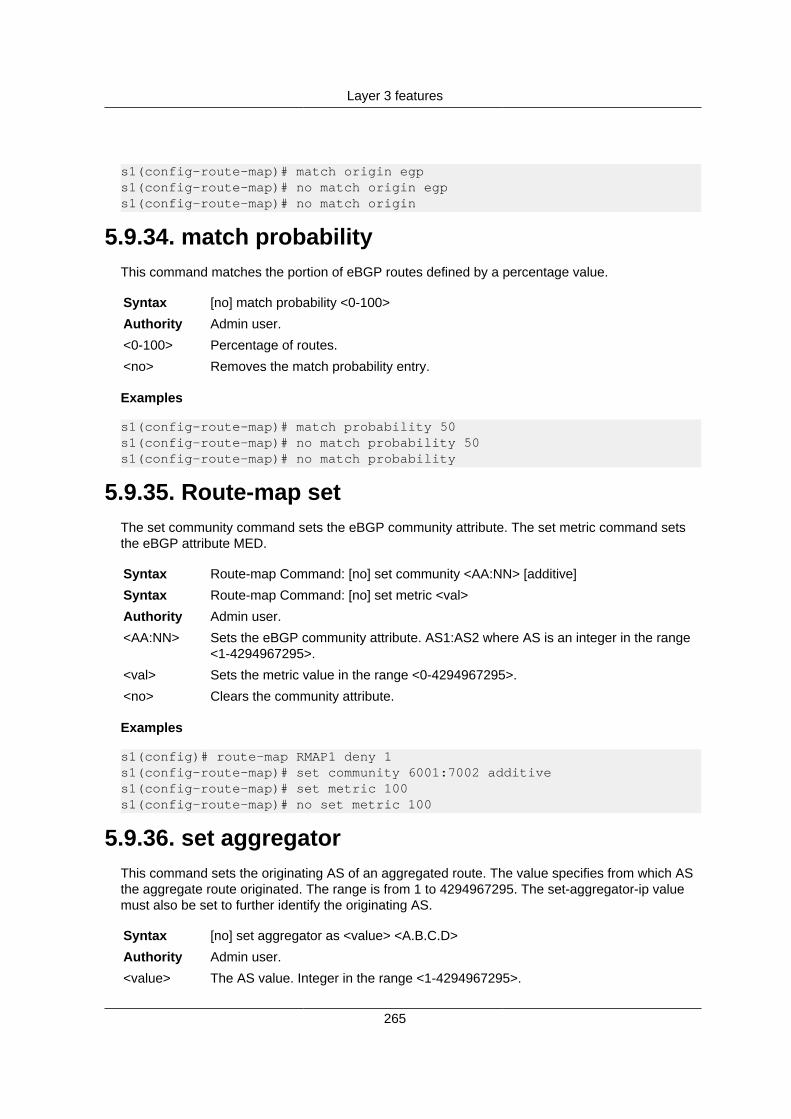
Layer 3 features
265
s1(config-route-map)# match origin egps1(config-route-map)# no match origin egps1(config-route-map)# no match origin
5.9.34. match probabilityThis command matches the portion of eBGP routes defined by a percentage value.
Syntax [no] match probability <0-100>
Authority Admin user.
<0-100> Percentage of routes.
<no> Removes the match probability entry.
Examples
s1(config-route-map)# match probability 50s1(config-route-map)# no match probability 50s1(config-route-map)# no match probability
5.9.35. Route-map setThe set community command sets the eBGP community attribute. The set metric command setsthe eBGP attribute MED.
Syntax Route-map Command: [no] set community <AA:NN> [additive]
Syntax Route-map Command: [no] set metric <val>
Authority Admin user.
<AA:NN> Sets the eBGP community attribute. AS1:AS2 where AS is an integer in the range<1-4294967295>.
<val> Sets the metric value in the range <0-4294967295>.
<no> Clears the community attribute.
Examples
s1(config)# route-map RMAP1 deny 1s1(config-route-map)# set community 6001:7002 additives1(config-route-map)# set metric 100s1(config-route-map)# no set metric 100
5.9.36. set aggregatorThis command sets the originating AS of an aggregated route. The value specifies from which ASthe aggregate route originated. The range is from 1 to 4294967295. The set-aggregator-ip valuemust also be set to further identify the originating AS.
Syntax [no] set aggregator as <value> <A.B.C.D>
Authority Admin user.
<value> The AS value. Integer in the range <1-4294967295>.

Layer 3 features
266
<A.B.C.D> The IPv4 address of AS.
<no> Clears the aggregator configuration for the route map.
Examples
s1(config)# route-map RMAP1 deny 1s1(config-route-map)#set aggregator as 1 10.1.2.1
5.9.37. set as-path excludeThis command excludes the given AS number from the AS_PATH.
Syntax [no] set as-path exclude .<value>
Authority Admin user.
<value> The AS value to be excluded from the AS_PATH. Integer in the range<1-4294967295>.
<no> Clears the AS value exclusion from the AS_PATH.
Examples
s1(config)# route-map RMAP1 deny 1s1(config-route-map)#set as-path exclude 2
5.9.38. set as-path prependThis command prepends the given AS number to the AS_PATH.
Syntax [no] set as-path prepend .<value>
Authority Admin user.
<value> The AS value to be added to the AS_PATH. Integer in the range <1-4294967295>.
<no> Clears the AS value from the AS_PATH.
Examples
s1(config)# route-map RMAP1 deny 1s1(config-route-map)#set as-path prepend 2
5.9.39. set atomic-aggregateThis command enables a warning to upstream routers, through the ATOMIC_AGGREGATE at-tribute, that address aggregation has occurred on an aggregate route.
Syntax [no] set atomic-aggregate
Authority Admin user.
<no> Disables the route-aggregation notification to upstream routers.
Examples
s1(config)# route-map RMAP1 deny 1
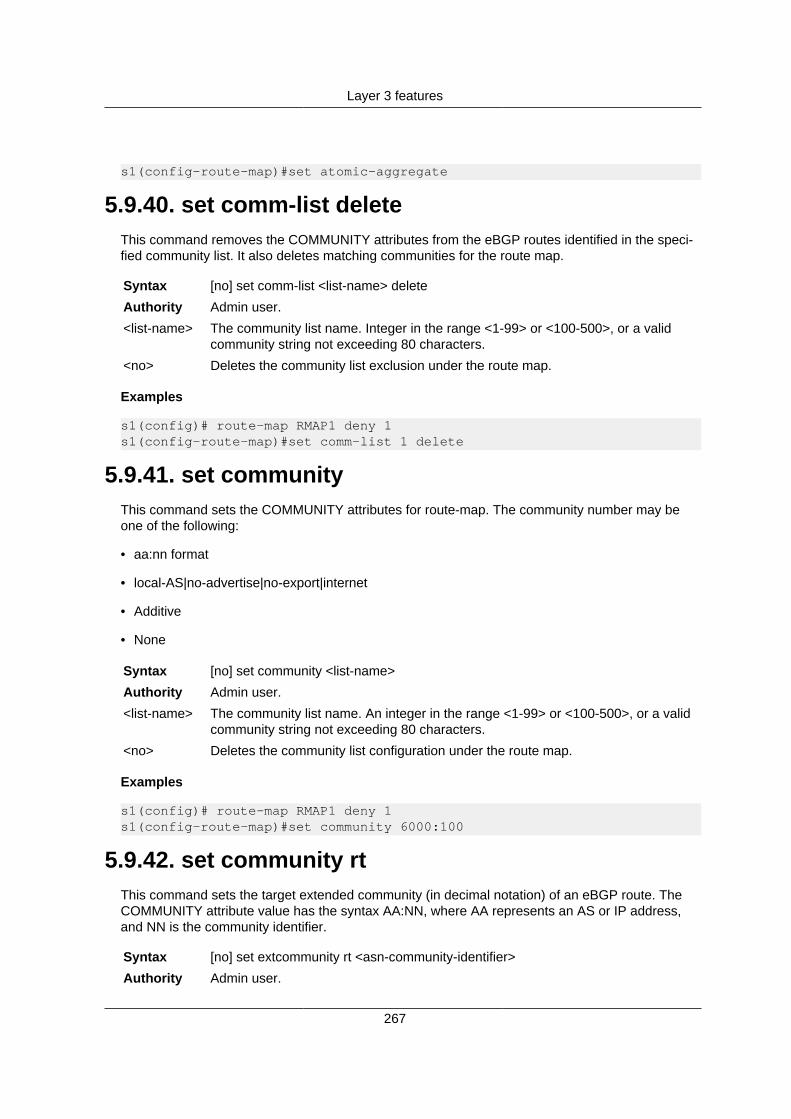
Layer 3 features
267
s1(config-route-map)#set atomic-aggregate
5.9.40. set comm-list deleteThis command removes the COMMUNITY attributes from the eBGP routes identified in the speci-fied community list. It also deletes matching communities for the route map.
Syntax [no] set comm-list <list-name> delete
Authority Admin user.
<list-name> The community list name. Integer in the range <1-99> or <100-500>, or a validcommunity string not exceeding 80 characters.
<no> Deletes the community list exclusion under the route map.
Examples
s1(config)# route-map RMAP1 deny 1s1(config-route-map)#set comm-list 1 delete
5.9.41. set communityThis command sets the COMMUNITY attributes for route-map. The community number may beone of the following:
• aa:nn format
• local-AS|no-advertise|no-export|internet
• Additive
• None
Syntax [no] set community <list-name>
Authority Admin user.
<list-name> The community list name. An integer in the range <1-99> or <100-500>, or a validcommunity string not exceeding 80 characters.
<no> Deletes the community list configuration under the route map.
Examples
s1(config)# route-map RMAP1 deny 1s1(config-route-map)#set community 6000:100
5.9.42. set community rtThis command sets the target extended community (in decimal notation) of an eBGP route. TheCOMMUNITY attribute value has the syntax AA:NN, where AA represents an AS or IP address,and NN is the community identifier.
Syntax [no] set extcommunity rt <asn-community-identifier>
Authority Admin user.
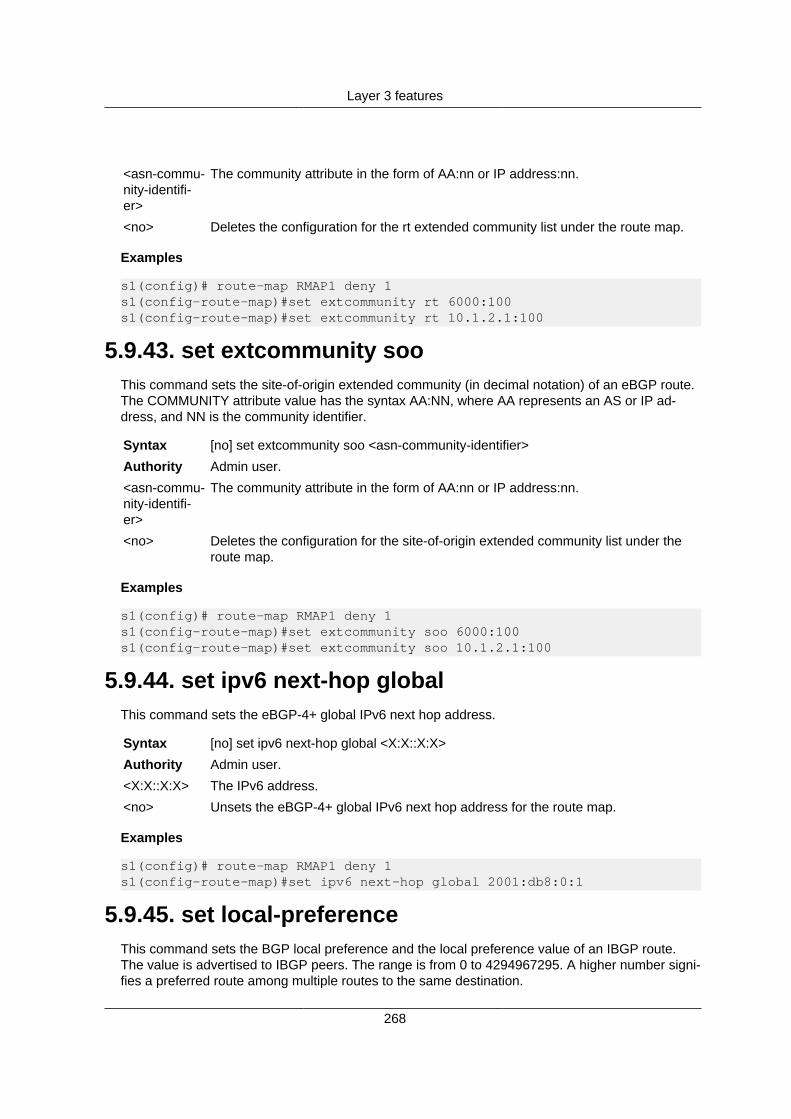
Layer 3 features
268
<asn-commu-nity-identifi-er>
The community attribute in the form of AA:nn or IP address:nn.
<no> Deletes the configuration for the rt extended community list under the route map.
Examples
s1(config)# route-map RMAP1 deny 1s1(config-route-map)#set extcommunity rt 6000:100s1(config-route-map)#set extcommunity rt 10.1.2.1:100
5.9.43. set extcommunity sooThis command sets the site-of-origin extended community (in decimal notation) of an eBGP route.The COMMUNITY attribute value has the syntax AA:NN, where AA represents an AS or IP ad-dress, and NN is the community identifier.
Syntax [no] set extcommunity soo <asn-community-identifier>
Authority Admin user.
<asn-commu-nity-identifi-er>
The community attribute in the form of AA:nn or IP address:nn.
<no> Deletes the configuration for the site-of-origin extended community list under theroute map.
Examples
s1(config)# route-map RMAP1 deny 1s1(config-route-map)#set extcommunity soo 6000:100s1(config-route-map)#set extcommunity soo 10.1.2.1:100
5.9.44. set ipv6 next-hop globalThis command sets the eBGP-4+ global IPv6 next hop address.
Syntax [no] set ipv6 next-hop global <X:X::X:X>
Authority Admin user.
<X:X::X:X> The IPv6 address.
<no> Unsets the eBGP-4+ global IPv6 next hop address for the route map.
Examples
s1(config)# route-map RMAP1 deny 1s1(config-route-map)#set ipv6 next-hop global 2001:db8:0:1
5.9.45. set local-preferenceThis command sets the BGP local preference and the local preference value of an IBGP route.The value is advertised to IBGP peers. The range is from 0 to 4294967295. A higher number signi-fies a preferred route among multiple routes to the same destination.

Layer 3 features
269
Syntax [no] set local-preference <value>
Authority Admin user.
<value> The value of an IBGP route.
<no> Unsets the BGP local preference for the route map.
Examples
s1(config)# route-map RMAP1 deny 1s1(config-route-map)#set local-preference 1
5.9.46. set metricThis command specifies the relative change of metric which is used with eBGP route advertise-ment. This command takes the route’s current metric and increases or decreases it by a specifiedvalue before it is propagated. If the value is specified as negative and ends up being negative afterthe metric decrease, the value is interpreted as an increase in metric.
Syntax [no] set metric <expr>
Authority Admin user.
<expr> The metric expression.
<no> Unsets the eBGP local preference for the route map.
Examples
s1(config)# route-map RMAP1 deny 1s1(config-route-map)#set metric +2
s1(config)# route-map RMAP1 deny 1s1(config-route-map)#set metric -367In this case -367 is treated as +367.
5.9.47. set originThis command sets the ORIGIN attribute of a local eBGP route to one of the following:
• egp: Sets the value to the Network Layer Reachablility Information (NLRI) learned from the Ex-terior Gateway Protocol (EGP).
• igp: Sets the value to the NLRI learned from a protocol internal to the originating AS.
• incomplete: If the value is not egp or igp.
Syntax [no] set origin <egp | igp | incomplete>
Authority Admin user.
<egp> Specifies the type-1 metric.
<igp> Specifies the type-2 metric.
<incomplete> Specifies the type-2 metric.
<no> Unsets the eBGP origin attribute for the route map.
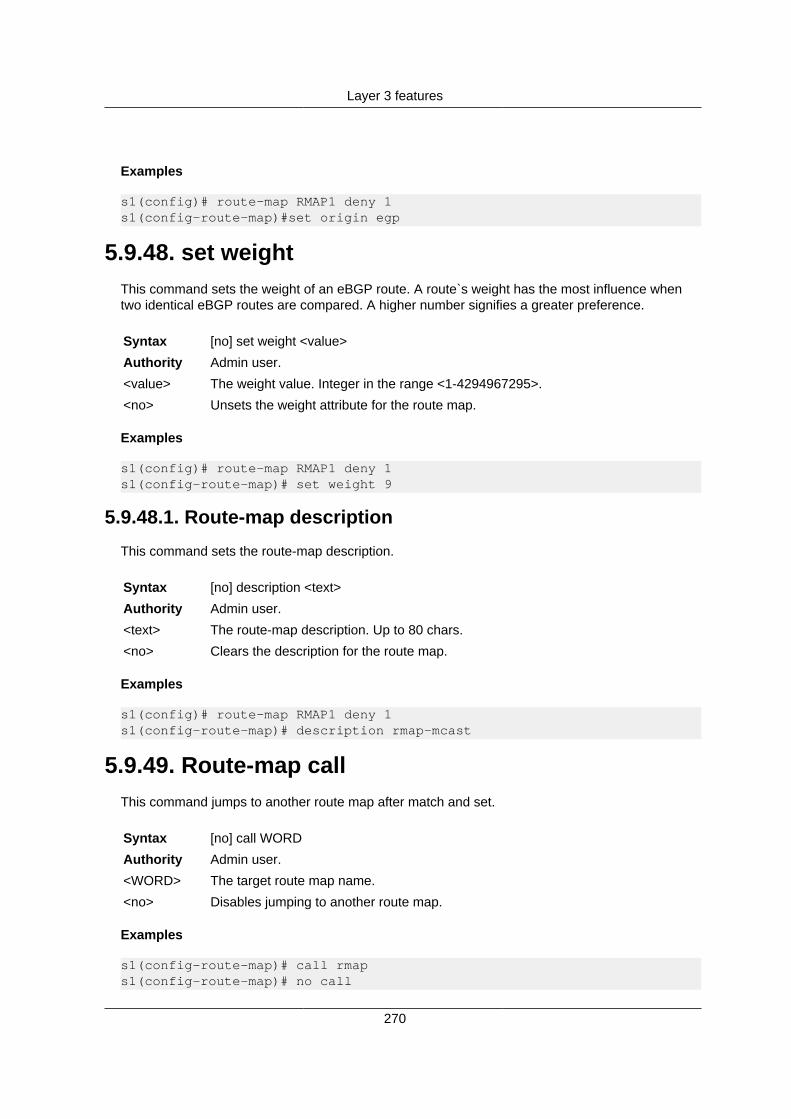
Layer 3 features
270
Examples
s1(config)# route-map RMAP1 deny 1s1(config-route-map)#set origin egp
5.9.48. set weightThis command sets the weight of an eBGP route. A route`s weight has the most influence whentwo identical eBGP routes are compared. A higher number signifies a greater preference.
Syntax [no] set weight <value>
Authority Admin user.
<value> The weight value. Integer in the range <1-4294967295>.
<no> Unsets the weight attribute for the route map.
Examples
s1(config)# route-map RMAP1 deny 1s1(config-route-map)# set weight 9
5.9.48.1. Route-map description
This command sets the route-map description.
Syntax [no] description <text>
Authority Admin user.
<text> The route-map description. Up to 80 chars.
<no> Clears the description for the route map.
Examples
s1(config)# route-map RMAP1 deny 1s1(config-route-map)# description rmap-mcast
5.9.49. Route-map callThis command jumps to another route map after match and set.
Syntax [no] call WORD
Authority Admin user.
<WORD> The target route map name.
<no> Disables jumping to another route map.
Examples
s1(config-route-map)# call rmaps1(config-route-map)# no call

Layer 3 features
271
5.9.50. Route-map continueThis command continues onto a different entry within the route map.
Syntax [no] continue <1-65535>
Authority Admin user.
<1-65535> The route map entry sequence number.
<no> Disables continuing onto a different entry.
Examples
s1(config-route-map)# continue 300s1(config-route-map)# no continue 300s1(config-route-map)# no continue
5.9.51. IPv4 prefix-listThe ip prefix-list command provides a powerful prefix-based filtering mechanism. It has prefixlength range and sequential number specifications. You can add or delete prefix-based filters toarbitrary points of a prefix-list by using a sequential number specification. If no ip prefix-list is spec-ified, it acts as a permit. If the ip prefix-list is defined, and no match is found, the default deny is ap-plied.
Syntax [no] ip prefix-list WORD seq <num> (deny|permit) <A.B.C.D/M|any>
Syntax [no] ip prefix-list WORD seq <num> (deny|permit) A.B.C.D/M le <0-32> ge <0-32>
Syntax [no] ip prefix-list WORD seq <num> (deny|permit) A.B.C.D/M ge <0-32>
Syntax [no] ip prefix-list WORD seq <num> (deny|permit) A.B.C.D/M le <0-32>
Authority Admin user.
<WORD> The IP prefix-list name. String of maximum length 80 characters.
<num> The sequence number. 1-4294967295
<A.B.C.D/M> The IPv4 prefix.
<0-32> Minimum prefix length to be matched.
<0-32> Maximum prefix length to be matched.
<no> Deletes the IP prefix-list.
Examples
s1(config)# ip prefix-list PLIST1 seq 5 deny 10.1.1.0/24s1(config)# ip prefix-list PLIST2 seq 10 permit 10.2.2.0/24s1(config)# no ip prefix-list PLIST1 seq 5 deny 10.3.2.0/24s1(config)# no ip prefix-list PLIST2
5.9.52. IPv6 prefix-listThe ipv6 prefix-list command provides IPv6 prefix-based filtering mechanism. Descriptions maybe added to prefix lists. The description command adds a description to the prefix list. The ge

Layer 3 features
272
command specifies prefix length, and the prefix list is applied if the prefix length is greater than orequal to the ge prefix length. The le command specifies prefix length, and the prefix list is be ap-plied if the prefix length is less than or equal to the le prefix length. If no ipv6 prefix-list is specified,it acts as permit. If ipv6 prefix-list is defined, and no match is found, the default deny is applied.
Syntax [no] ipv6 prefix-list WORD description .LINE
Syntax [no] ipv6 prefix-list WORD seq <num> <deny|permit> <X:X::X:X/M|any>
Syntax [no] ipv6 prefix-list WORD seq <num> <deny|permit> <X:X::X:X/M> ge <length>
Syntax [no] ipv6 prefix-list WORD seq <num> <deny|permit> <X:X::X:X/M> ge <length> le<length>
Syntax [no] ipv6 prefix-list WORD seq <num> <deny|permit> <X:X::X:X/M> le <length>
<WORD> The IP prefix-list name. String of maximum length of 80 characters.
<num> The sequence number. 1-4294967295
<.LINE> The prefix list description. String of maximum length 80 characters.
<X:X::X:X/M> The IPv6 prefix.
<length> The prefix length. 0-128
<no> Deletes the IPv6 prefix-list.
Examples
s1(config)# ipv6 prefix-list COMMON-PREFIXES description prefixess1(config)# no ipv6 prefix-list COMMON-PREFIXESs1(config)# ipv6 prefix-list COMMON-PREFIXES seq 5 permit 2001:0DB8:0000::/48s1(config)# ipv6 prefix-list COMMON-PREFIXES seq 10 deny anys1(config)# ipv6 prefix-list COMMON-PREFIXES seq 15 permit 2001:0DB8:0000::/48 ge 64s1(config)# no ipv6 prefix-list COMMON-PREFIXESs1(config)# ipv6 prefix-list PEER-A-PREFIXES seq 5 permit 2001:0DB8:AAAA::/48 ge 64 le 64s1(config)# no ipv6 prefix-list PEER-A-PREFIXES
5.9.53. Community lists configuration commandsThis command defines a new community list. LINE is a string expression of the communities at-tribute. LINE can include a regular expression to match the communities attribute in eBGP up-dates. The community is compiled into a community structure. Multiple community lists can bedefined under the same name. In that case, the match happens in user-defined order. Once thecommunity list matches to the communities attribute in eBGP updates, it returns a permit or denybased on the community list definition. When there is no matched entry, deny is returned. Whenthe community is empty, the system matches to any routes.
Syntax [no] ip community-list WORD <deny|permit> .LINE
Authority Admin user.
<WORD> The community list name.
<deny> Denies access for matching conditions.
<permit> Permits access for matching conditions.
<.LINE> Community numbers specified as regular expressions.
<no> Deletes the rule for the specified community.
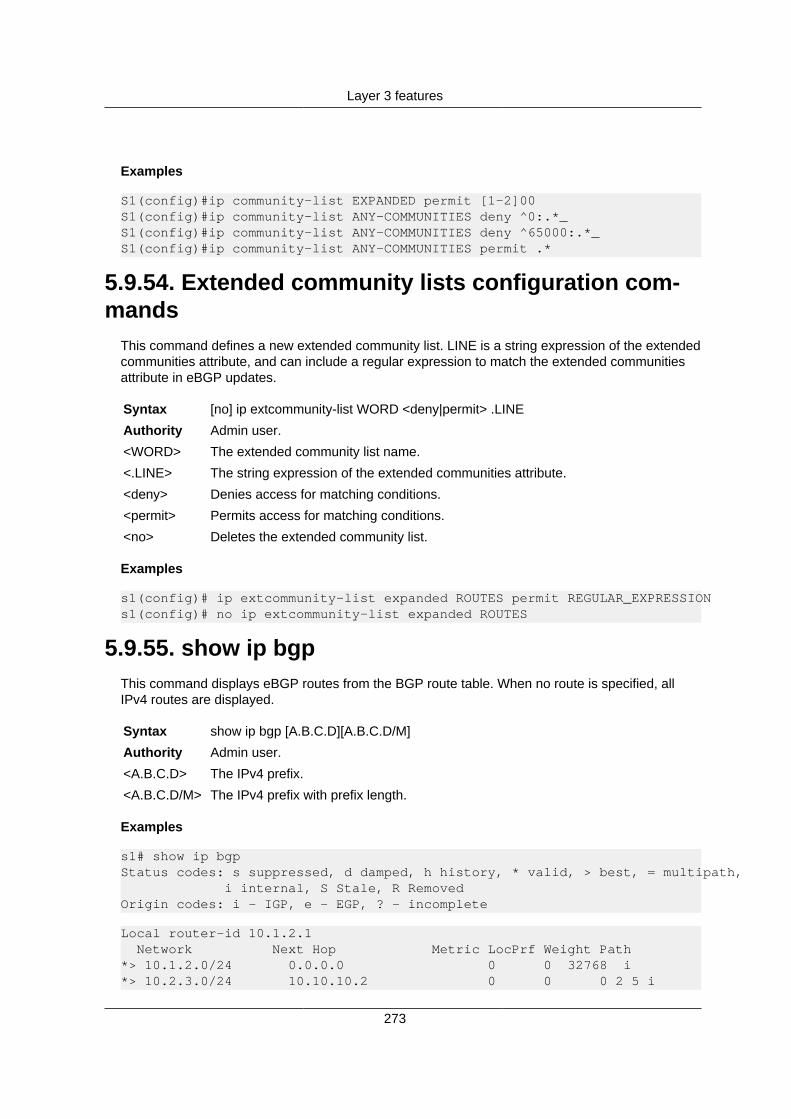
Layer 3 features
273
Examples
S1(config)#ip community-list EXPANDED permit [1-2]00S1(config)#ip community-list ANY-COMMUNITIES deny ^0:.*_S1(config)#ip community-list ANY-COMMUNITIES deny ^65000:.*_S1(config)#ip community-list ANY-COMMUNITIES permit .*
5.9.54. Extended community lists configuration com-mands
This command defines a new extended community list. LINE is a string expression of the extendedcommunities attribute, and can include a regular expression to match the extended communitiesattribute in eBGP updates.
Syntax [no] ip extcommunity-list WORD <deny|permit> .LINE
Authority Admin user.
<WORD> The extended community list name.
<.LINE> The string expression of the extended communities attribute.
<deny> Denies access for matching conditions.
<permit> Permits access for matching conditions.
<no> Deletes the extended community list.
Examples
s1(config)# ip extcommunity-list expanded ROUTES permit REGULAR_EXPRESSIONs1(config)# no ip extcommunity-list expanded ROUTES
5.9.55. show ip bgpThis command displays eBGP routes from the BGP route table. When no route is specified, allIPv4 routes are displayed.
Syntax show ip bgp [A.B.C.D][A.B.C.D/M]
Authority Admin user.
<A.B.C.D> The IPv4 prefix.
<A.B.C.D/M> The IPv4 prefix with prefix length.
Examples
s1# show ip bgpStatus codes: s suppressed, d damped, h history, * valid, > best, = multipath, i internal, S Stale, R RemovedOrigin codes: i - IGP, e - EGP, ? - incomplete
Local router-id 10.1.2.1 Network Next Hop Metric LocPrf Weight Path*> 10.1.2.0/24 0.0.0.0 0 0 32768 i*> 10.2.3.0/24 10.10.10.2 0 0 0 2 5 i
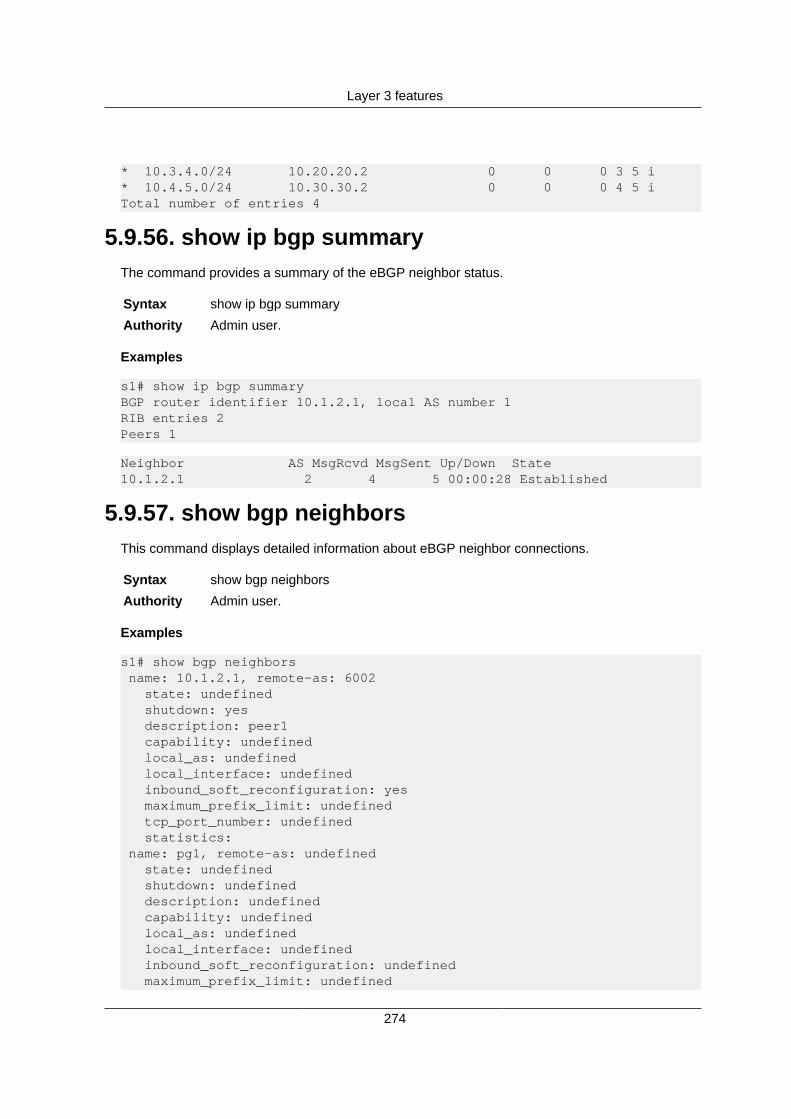
Layer 3 features
274
* 10.3.4.0/24 10.20.20.2 0 0 0 3 5 i* 10.4.5.0/24 10.30.30.2 0 0 0 4 5 iTotal number of entries 4
5.9.56. show ip bgp summaryThe command provides a summary of the eBGP neighbor status.
Syntax show ip bgp summary
Authority Admin user.
Examples
s1# show ip bgp summaryBGP router identifier 10.1.2.1, local AS number 1RIB entries 2Peers 1
Neighbor AS MsgRcvd MsgSent Up/Down State10.1.2.1 2 4 5 00:00:28 Established
5.9.57. show bgp neighborsThis command displays detailed information about eBGP neighbor connections.
Syntax show bgp neighbors
Authority Admin user.
Examples
s1# show bgp neighbors name: 10.1.2.1, remote-as: 6002 state: undefined shutdown: yes description: peer1 capability: undefined local_as: undefined local_interface: undefined inbound_soft_reconfiguration: yes maximum_prefix_limit: undefined tcp_port_number: undefined statistics: name: pg1, remote-as: undefined state: undefined shutdown: undefined description: undefined capability: undefined local_as: undefined local_interface: undefined inbound_soft_reconfiguration: undefined maximum_prefix_limit: undefined

Layer 3 features
275
tcp_port_number: undefined statistics:
5.9.58. show ip bgp route-map WORDThis command displays route-map set and match attributes.
Syntax show ip bgp route-map WORD
Authority Admin user.
<WORD> Route-map name.
Examples
s1# show ip bgp route-map BGP_INBGP route map table entry for BGP_INEntry 1: action : permit Set parameters : metric : 4 aggregator_as : 1 10.1.2.1 as_path_prepend : 1 1 atomic_aggregate : true comm_list : test delete ipv6_next_hop_global : 2001::4 local_preference : 33 origin : egp weight : 44 Match parameters :
s2# show ip bgp route-map BGP_OUTBGP route map table entry for BGP_OUTEntry 1: action : permit Set parameters : Match parameters : as_path : test origin : egp metric : 4 probability : 20
5.9.59. show ip prefix listThis command displays all ip prefix list configurations.
Syntax show ip prefix list
Authority Admin user.
Examples
s1# show ip prefix-list

Layer 3 features
276
ip prefix-list BGP_IN_: 5 entries seq 5 deny 10.1.1.0/24 seq 10 permit 10.2.2.0/24 seq 15 permit 172.16.15.0/20 ge 21 le 28 seq 20 permit 192.168.15.0/16 ge 19 seq 25 deny 192.168.15.0/16 le 25
5.9.60. show ip prefix-list WORD seq numThis command displays ip prefix list configuration with a specific name and sequence number.
Syntax show ip prefix list WORD seq <num>
Authority Admin user.
<WORD> The IP prefix-list name.
<num> The sequence number. 1-4294967295.
Examples
s1# show ip prefix-list BGP_IN_ seq 10 seq 10 permit 10.1.0.0/24
5.9.61. show ip prefix list detail WORDThis command displays the detailed IP prefix list configuration with a specific name.
Syntax show ip prefix-list detail WORD
Authority Admin user.
<WORD> The IP prefix-list name.
Examples
s1# show ip prefix-list detail BGP_IN_ip prefix-list BGP_IN_: count: 5, sequences: 5 - 25 seq 5 deny 10.1.0.0/24 seq 10 permit 10.2.0.0/24 seq 15 permit 172.16.15.0/20 ge 25 le 28 seq 20 permit 192.168.15.0/16 ge 27 seq 25 deny 192.168.15.0/16 le 25
5.9.62. show ip prefix list summary WORDThis command displays the summarized ip prefix list configuration with a specific name.
Syntax show ip prefix-list summary WORD
Authority Admin user.
<WORD> The IP prefix-list name.
Examples

Layer 3 features
277
s1# show ip prefix-list summary BGP_IN_ip prefix-list BGP_IN_: count: 5, sequences: 5 - 25
5.9.63. show ipv6 prefix listThis command displays all ipv6 prefix list configurations.
Syntax show ipv6 prefix list
Authority Admin user.
Examples
s1# show ipv6 prefix-listipv6 prefix-list BGP_IN: 5 entries Description: IPV6 Prefix Test seq 10 deny 9966:1:2::/64 ge 80 le 100 seq 20 permit 7d5d:1:1::/64 le 70 seq 30 permit 5d5d:1:1::/64 le 70 seq 40 permit 2ccd:1:1::/64 ge 65 seq 50 permit 4ddc:1:1::/64
5.9.64. show ipv6 prefix list WORDThis command displays ipv6 prefix list configuration with a specific name.
Syntax show ipv6 prefix list WORD
Authority Admin user.
<WORD> The IPv6 prefix-list name.
Examples
s1# show ipv6 prefix-list BGP_INipv6 prefix-list BGP_IN: 5 entries Description: IPV6 Prefix Test seq 10 deny 9966:1:2::/64 ge 80 le 100 seq 20 permit 7d5d:1:1::/64 le 70 seq 30 permit 5d5d:1:1::/64 le 70 seq 40 permit 2ccd:1:1::/64 ge 65 seq 50 permit 4ddc:1:1::/64
5.9.65. show ipv6 prefix-list WORD seq numThis command displays the ipv6 prefix list configuration with the specific name and sequencenumber.
Syntax show ipv6 prefix list <WORD> seq <num>
Authority Admin user.
<WORD> The IPv6 prefix-list name.
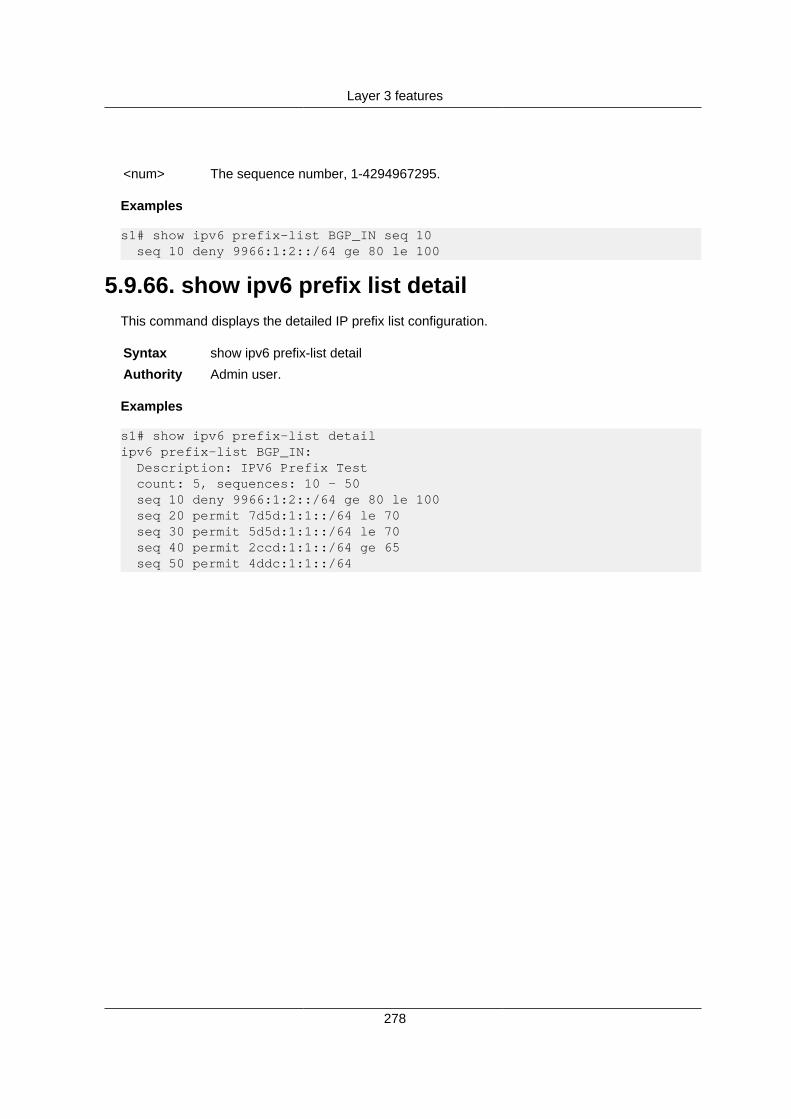
Layer 3 features
278
<num> The sequence number, 1-4294967295.
Examples
s1# show ipv6 prefix-list BGP_IN seq 10 seq 10 deny 9966:1:2::/64 ge 80 le 100
5.9.66. show ipv6 prefix list detailThis command displays the detailed IP prefix list configuration.
Syntax show ipv6 prefix-list detail
Authority Admin user.
Examples
s1# show ipv6 prefix-list detailipv6 prefix-list BGP_IN: Description: IPV6 Prefix Test count: 5, sequences: 10 - 50 seq 10 deny 9966:1:2::/64 ge 80 le 100 seq 20 permit 7d5d:1:1::/64 le 70 seq 30 permit 5d5d:1:1::/64 le 70 seq 40 permit 2ccd:1:1::/64 ge 65 seq 50 permit 4ddc:1:1::/64
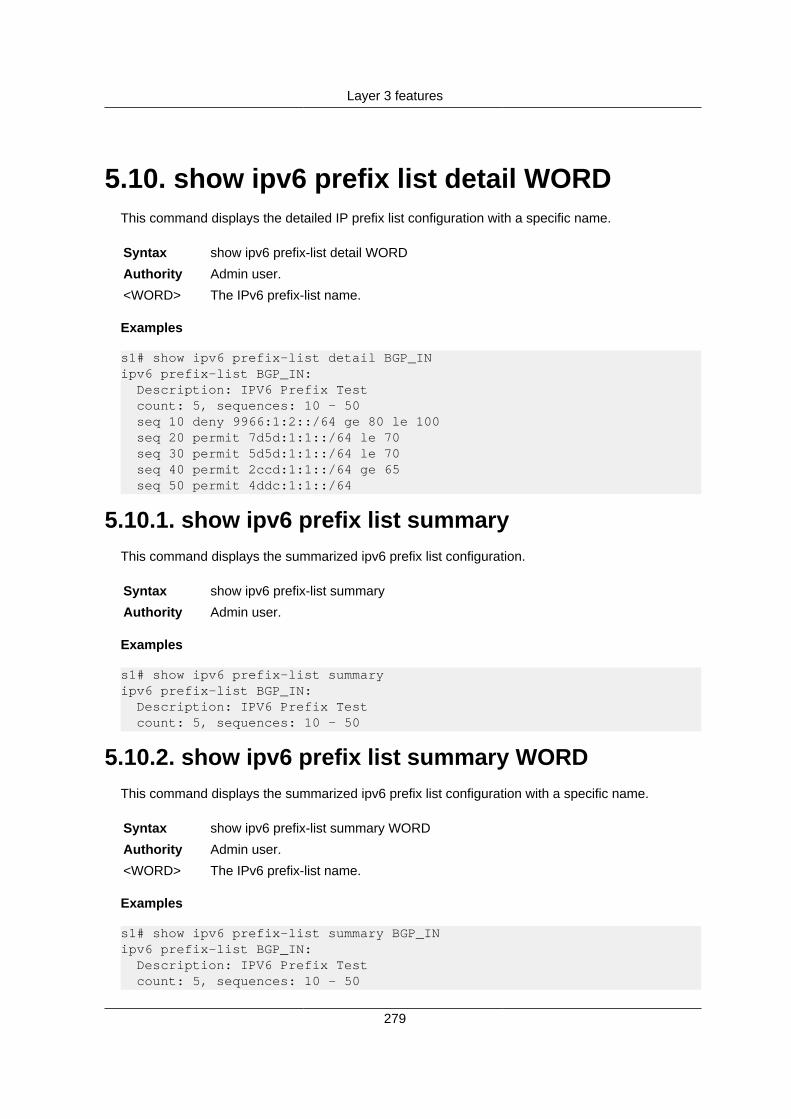
Layer 3 features
279
5.10. show ipv6 prefix list detail WORDThis command displays the detailed IP prefix list configuration with a specific name.
Syntax show ipv6 prefix-list detail WORD
Authority Admin user.
<WORD> The IPv6 prefix-list name.
Examples
s1# show ipv6 prefix-list detail BGP_INipv6 prefix-list BGP_IN: Description: IPV6 Prefix Test count: 5, sequences: 10 - 50 seq 10 deny 9966:1:2::/64 ge 80 le 100 seq 20 permit 7d5d:1:1::/64 le 70 seq 30 permit 5d5d:1:1::/64 le 70 seq 40 permit 2ccd:1:1::/64 ge 65 seq 50 permit 4ddc:1:1::/64
5.10.1. show ipv6 prefix list summaryThis command displays the summarized ipv6 prefix list configuration.
Syntax show ipv6 prefix-list summary
Authority Admin user.
Examples
s1# show ipv6 prefix-list summaryipv6 prefix-list BGP_IN: Description: IPV6 Prefix Test count: 5, sequences: 10 - 50
5.10.2. show ipv6 prefix list summary WORDThis command displays the summarized ipv6 prefix list configuration with a specific name.
Syntax show ipv6 prefix-list summary WORD
Authority Admin user.
<WORD> The IPv6 prefix-list name.
Examples
s1# show ipv6 prefix-list summary BGP_INipv6 prefix-list BGP_IN: Description: IPV6 Prefix Test count: 5, sequences: 10 - 50

Layer 3 features
280
5.10.3. show ipv6 prefix list WORD X:X::X:X/MThis command displays the ipv6 prefix list configuration with a specific name and ipv6 address.
Syntax show ipv6 prefix list WORD X:X::X:X/M
Authority Admin user.
<WORD> The IP prefix-list name.
<X:X::X:X/M> The IPv6 address with prefix length M.
Examples
s1# show ipv6 prefix-list BGP_IN 9966:1:2::/64seq 10 deny 9966:1:2::/64 ge 80 le 100seq 80 permit 9966:1:2::/64 ge 110
5.10.4. show ipv6 prefix list WORD X:X::X:X/M first-match
This command displays the first ipv6 prefix list configuration with a specific name and ipv6 ad-dress.
Syntax show ipv6 prefix list WORD first-match
Authority Admin user.
<WORD> The IP prefix-list name.
<X:X::X:X/M> The IPv6 address with prefix length M.
Examples
s1# show ipv6 prefix-list BGP_IN 9966:1:2::/64 first-matchseq 10 deny 9966:1:2::/64 ge 80 le 100
5.10.5. show ipv6 prefix list WORD X:X::X:X/M longerThis command displays the ipv6 prefix list configuration with a specific name, ipv6 address, andprefix-length greater than or equal to M.
Syntax show ipv6 prefix list WORD longer.
Authority Admin user.
<WORD> The IP prefix-list name.
<X:X::X:X/M> The IPv6 address with prefix length M.
Examples
s1# show ipv6 prefix-list BGP_IN 9966:1:2::/64 longer seq 10 deny 9966:1:2::/64 ge 80 le 100 seq 60 permit 9966:1:2::/70 seq 80 permit 9966:1:2::/64 ge 110
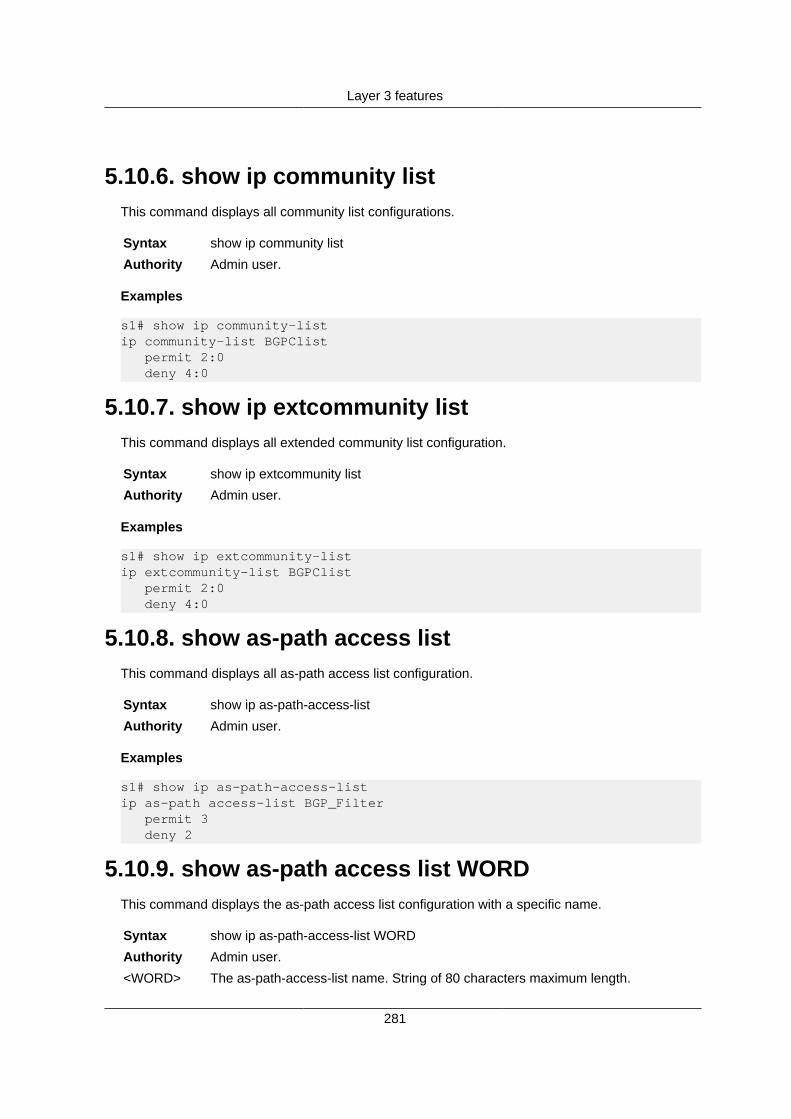
Layer 3 features
281
5.10.6. show ip community listThis command displays all community list configurations.
Syntax show ip community list
Authority Admin user.
Examples
s1# show ip community-listip community-list BGPClist permit 2:0 deny 4:0
5.10.7. show ip extcommunity listThis command displays all extended community list configuration.
Syntax show ip extcommunity list
Authority Admin user.
Examples
s1# show ip extcommunity-listip extcommunity-list BGPClist permit 2:0 deny 4:0
5.10.8. show as-path access listThis command displays all as-path access list configuration.
Syntax show ip as-path-access-list
Authority Admin user.
Examples
s1# show ip as-path-access-listip as-path access-list BGP_Filter permit 3 deny 2
5.10.9. show as-path access list WORDThis command displays the as-path access list configuration with a specific name.
Syntax show ip as-path-access-list WORD
Authority Admin user.
<WORD> The as-path-access-list name. String of 80 characters maximum length.

Layer 3 features
282
Examples
s1# show ip as-path-access-list BGP_Filterip as-path access-list BGP_Filter permit 3 deny 2
Layer 3 features
283
5.11. OSPFv2 commandsIn vtysh every command belongs to a particular context.
Not all of these commands are implemented, some of them are reserved for the laterrelease.
5.11.1. Create OSPF instanceThis command creates the OSPF instance (if not created already) and enters the router ospf con-text.
Syntax router ospf
Authority All users.
Examples
switch# configure terminalswitch# router ospf
5.11.2. Remove OSPF instanceThis command removes the OSPF instance.
Syntax no router ospf
Authority All users.
Examples
switch# configure terminalswitch# no router ospf
5.11.3. Set router IDThis command sets an id for the router in an IPv4 address format.
Syntax router-id <router_address>
Authority All users.
<router_address>Router id in IPv4 address format.
Examples
switch# configure terminalswitch# router ospfswitch(config-router)# router-id 1.1.1.1

Layer 3 features
284
5.11.4. Set router ID to defaultThis command unconfigures the router-id for the instance. The Router-id is changed to the globalrouter-id, if configured. Otherwise, it is changed to the dynamically selected router-id.
Syntax no router-id
Authority All users.
Examples
switch# configure terminalswitch# router ospfswitch(config-router)# no router-id
5.11.5. Set OSPF network for the areaThis command will run the OSPF protocol on the configured network address. The interfaceswhich have an IP address configured in this network or in a subset of this network, will participatein the OSPF protocol.
Syntax network <network_prefix> area (<area_ip>|<area_id>)
Authority All users.
<network_prefix>Specify the network prefix for the area.
<area_ip> OSPF area identifier in IPv4 address format.
<area_id> Pass the OSPF area identifier as a decimal value, 0-4294967295.
Examples
switch# configure terminalswitch# router ospfswitch(config-router)# network 10.10.10.0/24 area 1switch(config-router)# network 100.10.10.0/24 area 0.0.0.2
5.11.6. Unset OSPF network for the areaThis command disables OSPF on the network. The interfaces which have an IP address config-ured in this network or in a subset of this network, will stop participating in the OSPF protocol.
Syntax no network <network_prefix> area (<area_ip>|<area_id>)
Authority All users.
<network_prefix>Specify the network prefix for the area.
<area_ip> OSPF area identifier in IPv4 address format.
<area_id> Pass the OSPF area identifier as a decimal value, 0-4294967295.
Examples
switch# configure terminal
Layer 3 features
285
switch# router ospfswitch(config-router)# no network 10.10.10.0/24 area 1switch(config-router)# no network 100.10.10.0/24 area 0.0.0.2
5.11.7. Enable OSPF area authenticationThis command enables authentication for an area.
Syntax area (<area_ip>|<area_id>) authentication [message-digest]
Authority All users.
<area_ip> OSPF area identifier in IPv4 address format.
<area_id> Pass the OSPF area identifier as a decimal value, 0-4294967295.
<authentica-tion>
Enable authentication for the area with a simple password.
<message-di-gest>
Enable message-digest authentication.
Examples
switch# configure terminalswitch# router ospfswitch(config-router)# area 1 authenticationswitch(config-router)# area 0.0.0.2 authenticationswitch(config-router)#switch(config-router)# area 0.0.0.2 authentication message-digestswitch(config-router)#
5.11.8. Disable OSPF area authenticationThis command disables authentication for an area.
Syntax no area (<area_ip>|<area_id>) authentication
Authority All users.
<area_ip> OSPF area identifier in IPv4 address format.
<area_id> Pass the OSPF area identifier as a decimal value, 0-4294967295.
<authentica-tion>
Disable authentication for the area.
Examples
switch# configure terminalswitch# router ospfswitch#(config-router) no area 1 authenticationswitch#(config-router)
5.11.9. Set cost for default LSA summaryThis command sets the cost of default-summary LSAs announced to NSSA or the stub areas.

Layer 3 features
286
Syntax area (<area_ip>|<area_id>) default-cost <cost>
Authority All users.
<area_ip> OSPF area identifier in IPv4 address format.
<area_id> Pass the OSPF area identifier as a decimal value, 0-4294967295.
<de-fault-cost>
Sets the cost of default-summary LSAs announced to NSSA or the stub areas.
<cost> Cost of default-summary LSAs announced to the stubby areas, 0-16777215.
Examples
switch# configure terminalswitch# router ospfswitch(config-router)# area 1 default-cost 2switch(config-router)# area 0.0.0.2 default-cost 2switch(config-router)#
5.11.10. Set cost for default LSA summary to defaultThis command resets the cost of the default-summary LSAs announced to NSSA or stub areas, tothe default. The default value is one.
Syntax no area (<area_ip>|<area_id>) default-cost [<cost>]
Authority All users.
<area_ip> OSPF area identifier in IPv4 address format.
<area_id> Pass the OSPF area identifier as a decimal value, 0-4294967295.
<de-fault-cost>
Sets the cost of the default-summary LSAs announced to NSSA or stub areas, todefault.
<cost> Configured cost of default-summary LSAs announced to the stubby areas,0-16777215.
Examples
switch# configure terminalswitch# router ospfswitch(config-router)# no area 1 default-cost 2switch(config-router)# no area 0.0.0.2 default-cost 2switch(config-router)#
5.11.11. Set the area as NSSAThis command changes the area type to NSSA (Not So Stubby Area).
Syntax area (<area_ip>|<area_id>) nssa {translate-candidate|translate-never|translate-al-ways} [no-summary]
Authority All users.
<area_ip> OSPF area identifier in IPv4 address format.
<area_id> Pass the OSPF area identifier as a decimal value, 0-4294967295.

Layer 3 features
287
<trans-late-candi-date>
Configure NSSA-ABR for translate election. This is the default behaviour.
<trans-late-never>
Configure NSSA-ABR to never translate.
<translate-al-ways>
Configure NSSA-ABR to always translate.
<nssa> Configure OSPF area as NSSA.
<no-summa-ry>
Do not inject inter-area routes into NSSA.
Examples
switch# configure terminalswitch# router ospfswitch(config-router)# area 1 nssaswitch(config-router)# area 1 nssa no-summaryswitch(config-router)# area 1 nssa translate-always no-summaryswitch(config-router)# area 1 nssa translate-alwaysswitch(config-router)#
5.11.12. Unset the area as NSSAThis command unsets the area type as NSSA (Not So Stubby Area). That is,the configured areawill not be NSSA. The no area (<area_ip>|<area_id>) nssa no_summary command enables send-ing inter-area routes into NSSA, but will not unset the area as NSSA.
Syntax no area (<area_ip>|<area_id>) nssa [no_summary]
Authority All users.
<area_ip> OSPF area identifier in IPv4 address format.
<area_id> Pass the OSPF area identifier as a decimal value, 0-4294967295.
<nssa> Unset area as NSSA.
<no-summa-ry>
Inject inter-area routes into NSSA.
Examples
switch# configure terminalswitch# router ospfswitch(config-router)# no area 1 nssaswitch(config-router)# no area 1 nssa no-summaryswitch(config-router)#
5.11.13. Configure the area as stubThis command sets the area type as stub.
Syntax area (<area_ip>|<area_id>) stub [no_summary]

Layer 3 features
288
Authority All users.
<area_ip> OSPF area identifier in IPv4 address format.
<area_id> Pass the OSPF area identifier as a decimal value, 0-4294967295.
<stub> Configure OSPF area as stub.
<no-summa-ry>
Do not inject inter-area routes into stub areas.
Examples
switch# configure terminalswitch# router ospfswitch(config-router)# area 1 stubswitch(config-router)# area 1 stub no-summaryswitch(config-router)#
5.11.14. Unset the area as stubThis command unsets the area type as stub. This means that the configured area becomes anarea type default. The no area (<area_ip>|<area_id>) stub no_summary command will stop send-ing inter-area routes into the stub area, but will not unset the area as stub.
Syntax no area (<area_ip>|<area_id>) stub [no_summary]
Authority All users.
<area_ip> OSPF area identifier in IPv4 address format.
<area_id> Pass the OSPF area identifier as a decimal value, 0-4294967295.
<stub> Unset area as stub.
<no-summa-ry>
Inject inter-area routes into stub areas.
5.11.15. Summarize intra-area pathsThis command summarizes the routes with the matching address or masks. This command onlyworks for border routers.
Syntax area (<area_ip>|<area_id>) range <ipv4_address> {cost <range_cost> | not-adver-tise}
Authority All users.
<area_ip> OSPF area identifier in IPv4 address format.
<area_id> Pass the OSPF area identifier as a decimal value, 0-4294967295.
<ipv4_address>Area range prefix.
<cost> User specified metric for this range.
<range_cost> Metric for this range, 0-16777215.
<not-adver-tise>
Do not advertise this range to other areas.
Examples

Layer 3 features
289
switch# configure terminalswitch# router ospfswitch(config-router)# area 1 range 16.77.114.0/24switch(config-router)# area 1 range 16.77.114.0/24 cost 40switch(config-router)# area 1 range 16.77.114.0/24 not-advertise
5.11.16. Unset summarizationThis command unsets the route summarization for the configured IPv4 prefix address on the ABR.
Syntax no area (<area_ip>|<area_id>) range <ipv4_address> {cost <range_cost> | not-ad-vertise}
Authority All users.
<area_ip> OSPF area identifier in IPv4 address format.
<area_id> Pass the OSPF area identifier as a decimal value, 0-4294967295.
<ipv4_address>Area range prefix.
<cost> User specified metric for this range.
<range_cost> Metric for this range, 0-16777215.
<not-adver-tise>
Do not advertise this range to other areas.
Examples
switch# configure terminalswitch# router ospfswitch(config-router)# no area 1 range 16.77.114.0/24switch(config-router)# no area 1 range 16.77.114.0/24 cost 40switch(config-router)# no area 1 range 16.77.114.0/24 not-advertise
5.11.17. Filter networks between OSPF areasThis command filters networks between OSPF areas. The filtering is done as per the prefix lists.This command is only used on area border routers.
Syntax area (<area_ip>|<area_id>) filter-list <list-name> (in|out)
Authority All users.
<area_ip> OSPF area identifier in IPv4 address format.
<area_id> Pass the OSPF area identifier as a decimal value, 0-4294967295.
<filter-list> Filter networks/routes between OSPF areas.
<list-name> Prefix list name.
<in> Filter networks sent to this area.
<out> Filter networks sent from this area.
Examples
switch# configure terminal

Layer 3 features
290
switch# router ospfswitch(config-router)# area 1 filter-list list1 inswitch(config-router)# area 1 filter-list list2 outswitch(config-router)#
5.11.18. Disable filtering of networks between OSPFareas
This command disables network filtering for a particular area. This command is only used on areaborder routers.
Syntax no area (<area_ip>|<area_id>) filter-list <list-name> (in|out)
Authority All users.
<area_ip> OSPF area identifier in IPv4 address format.
<area_id> Pass the OSPF area identifier as a decimal value, 0-4294967295.
<filter-list> Stop filtering networks/routes between OSPF areas.
<list-name> Prefix list name.
<in> Disable filtering of networks sent to this area.
<out> Disable filtering of networks sent from this area.
Examples
switch# configure terminalswitch# router ospfswitch(config-router)# no area 1 filter-list list1 inswitch(config-router)# no area 1 filter-list list2 outswitch(config-router)#
5.11.19. Configure OSPF virtual linksThis command creates a virtual link with the remote ABR and optionally sets authentication typethat will be used. The area (<area_ip>|<area_id>) virtual-link <remote_address> command createsan OSPF virtual link with remote ABR.
Syntax area (<area_ip>|<area_id>) virtual-link <remote_address> {authentication (mes-sage-digest|null)}
Authority All users.
<area_ip> OSPF area identifier in IPv4 address format.
<area_id> Pass the OSPF area identifier as a decimal value, 0-4294967295.
<virtual-link> Configure a virtual link.
<remote_address>Router ID of the remote ABR.
<authentica-tion>
Select authentication type for the virtual link.
<message-di-gest>
Set authentication as message-digest.

Layer 3 features
291
<null> Use null authentication.
Examples
switch# configure terminalswitch# router ospfswitch(config-router)# area 100 virtual-link 100.0.1.1switch(config-router)# area 100 virtual-link 100.0.1.1 authenticationmessage-digestswitch(config-router)# area 100 virtual-link 100.0.1.1 authentication null
5.11.20. Delete OSPF virtual linksThis command deletes a virtual link with the remote ABR and optionally sets authentication type tothe default. The no area (<area_ip>|<area_id>) virtual-link <remote_address> command deletesan OSPF virtual link with remote ABR.
Syntax no area (<area_ip>|<area_id>) virtual-link <remote_address> [authentication]
Authority All users.
<area_ip> OSPF area identifier in IPv4 address format.
<area_id> Pass the OSPF area identifier as a decimal value, 0-4294967295.
<virtual-link> Configure a virtual link to the default settings/Delete the virtual link.
<remote_address>Router ID of the remote ABR.
<authentica-tion>
Set the authentication type for virtual link to the default. By default the virtual linkwill have no authentication.
Examples
switch# configure terminalswitch# router ospfswitch(config-router)# no area 100 virtual-link 100.0.1.1switch(config-router)# no area 100 virtual-link 100.0.1.1 authentication
5.11.21. Set OSPF virtual links authentication keysThis command sets the authentication key that is used for a particular authentication. Thearea (<area_ip>|<area_id>) virtual-link <remote_address> authentication-key <auth_key>command sets a plain text authentication key and the area (<area_ip>|<area_id>) virtual-link<remote_address> message-digest-key <key_id> md5 <key> command sets the message digestauthentication key.
Syntax area (<area_ip>|<area_id>) virtual-link <remote_address> [authentication-key<auth_key> | message-digest-key <key_id> md5 <key> ]
Authority All users.
<area_ip> OSPF area identifier in IPv4 address format.
<area_id> Pass the OSPF area identifier as a decimal value, 0-4294967295.
<virtual-link> Configure a virtual link.

Layer 3 features
292
<remote_address>Router ID of the remote ABR.
<authentica-tion-key>
Set authentication key for plain text authentication.
<auth_key> Key value for authentication.
<message-di-gest-key>
Set authentication key for message digest authentication.
<key_id> Key identification number, 1-255.
<md5> Use message-digest algorithm as md5.
<key> message-digest key string.
Examples
switch# configure terminalswitch# router ospfswitch(config-router)# area 100 virtual-link 100.0.1.1 authentication-keyopenswitchswitch(config-router)# area 100 virtual-link 100.0.1.1 message-digest-key1 md5 openswitch
5.11.22. Delete OSPF virtual links authentication keysThis command deletes the authentication key that is used for a particular authentication. Theno area (<area_ip>|<area_id>) virtual-link <remote_address> authentication-key commanddeletes the plain text authentication key and the no area (<area_ip>|<area_id>) virtual-link<remote_address> message-digest-key <key_id> command deletes the message digest authenti-cation key.
Syntax no area (<area_ip>|<area_id>) virtual-link <remote_address> (authentication-key |message-digest-key) [<key_id>]
Authority All users.
<area_ip> OSPF area identifier in IPv4 address format.
<area_id> Pass the OSPF area identifier as a decimal value, 0-4294967295.
<virtual-link> Configure a virtual link.
<remote_address>Router ID of the remote ABR.
<authentica-tion-key>
Delete authentication key for plain text authentication.
<message-di-gest-key>
Delete authentication key for message digest authentication.
<key_id> Key identification number, 1-255. This is optional, if not given deletes all the mes-sage digest keys.
Examples
switch# configure terminalswitch# router ospfswitch(config-router)# no area 100 virtual-link 100.0.1.1 authentication-keyswitch(config-router)# no area 100 virtual-link 100.0.1.1 message-digest-key
Layer 3 features
293
switch(config-router)# no area 100 virtual-link 100.0.1.1 message-digest-key 1
5.11.23. Set OSPF virtual link delays and intervalsThis command sets the time intervals and time delays for virtual links.
Syntax area (<area_ip>|<area_id>) virtual-link <remote_address> (hello-interval | retrans-mit-interval | transmit-delay | dead-interval) <time_value>
Authority All users.
<area_ip> OSPF area identifier in IPv4 address format.
<area_id> Pass the OSPF area identifier as a decimal value, 0-4294967295.
<virtual-link> Configure a virtual link.
<remote_address>Router ID of the remote ABR.
<hello-inter-val>
Set time interval between OSPF hello packets.
<retrans-mit-interval>
Set time between retransmitting lost link state advertisements.
<transmit-de-lay>
Set time delay in Link state transmission.
<dead-inter-val>
Set interval after which a neighbor is declared dead if no response comes.
<time_value> Time delay/interval for the above parameters, 1-65535.
Examples
switch# configure terminalswitch# router ospfswitch(config-router)# area 100 virtual-link 100.0.1.1 hello-interval 30switch(config-router)# area 100 virtual-link 100.0.1.1 retransmit-interval 30switch(config-router)# area 100 virtual-link 100.0.1.1 transmit-delay 30switch(config-router)# area 100 virtual-link 100.0.1.1 dead-interval 30
5.11.24. Set OSPF virtual links delay or interval to de-fault
This command sets the time interval and delay defaults for virtual links.
Syntax no area (<area_ip>|<area_id>) virtual-link <remote_address> (hello-interval | re-transmit-interval | transmit-delay | dead-interval)
Authority All users.
<area_ip> OSPF area identifier in IPv4 address format.
<area_id> Pass the OSPF area identifier as a decimal value, 0-4294967295.
<virtual-link> Configure a virtual link.
<remote_address>Router ID of the remote ABR.
Layer 3 features
294
<hello-inter-val>
Set time interval OSPF hello packets to the default. Default value is 10 seconds.
<retrans-mit-interval>
Set time between retransmitting lost link state advertisements to the default. De-fault value is 5 seconds.
<transmit-de-lay>
Set delay in Link state transmission to the default. The default value is 1 second.
<dead-inter-val>
Set interval after which a neighbor is declared dead, to default. The default value is40 seconds (Generally 4 times the hello packet interval).
Examples
switch# configure terminalswitch# router ospfswitch(config-router)# no area 100 virtual-link 100.0.1.1 hello-intervalswitch(config-router)# no area 100 virtual-link 100.0.1.1 retransmit-intervalswitch(config-router)# no area 100 virtual-link 100.0.1.1 transmit-delayswitch(config-router)# no area 100 virtual-link 100.0.1.1 dead-interval
5.11.25. Control distribution of default route informa-tion
This command controls the distribution of default route information.
SyntaxAuthority All users.
<always> Always advertise the default route even if no default route in present.
Examples
switch# configure terminalswitch# router ospfswitch(config-router)# default-information originateswitch(config-router)# default-information originate alwaysswitch(config-router)#
5.11.26. Disable distribution of default route informa-tion
This command disables the distribution of default route information.
Syntax no default-information originate
Authority All users.
Examples
switch# configure terminalswitch# router ospf

Layer 3 features
295
switch(config-router)# no default-information originateswitch(config-router)#
5.11.27. Set default metric for redistributed routesThis command sets the default metric to use for redistributed routes in the OSPF. The metric val-ues are dependent on bandwidth, MTU, and so on.
Syntax default-metric <metric_value>
Authority All users.
<metric_value>Sets the default metric value to use for redistributed routes, 0-16777214.
Examples
switch# configure terminalswitch# router ospfswitch(config-router)# default-metric 37
5.11.28. Set default metric of redistributed routes todefault
This command sets the default metric to be used for redistributed routes into OSPF to the default.The default value is 20.
Syntax no default-metric [metric_value]
Authority All users.
<metric_value>Sets the default metric value to use for redistributed routes, 0-16777214.
Examples
switch# configure terminalswitch# router ospfswitch(config-router)# no default-metricswitch(config-router)# no default-metric 37
5.11.29. Define OSPF administrative distanceThis command defines an administrative distance for OSPF. Administrative distance is used as acriteria to select the best route when multiple routes are present.
Syntax distance <admin_distance>
Authority All users.
<admin_distance>OSPF administrative distance, 1-255.
Examples
switch# configure terminalswitch# router ospf

Layer 3 features
296
switch(config-router)# distance 100
5.11.30. Set OSPF administrative distance to defaultThis command sets the OSPF administrative distance to the default. The default value is 110.
Syntax no distance <admin_distance>
Authority All users.
<admin_distance>OSPF administrative distance, 1-255.
Examples
switch# configure terminalswitch# router ospfswitch(config-router)# no distance 100
5.11.31. Set OSPF administrative distance for a partic-ular route type
This command sets the OSPF administrative distance for different OSPF route types.
Syntax distance ospf {intra-area <intra_area>|inter-area <inter_area>|external <ext_area>}
Authority All users.
<intra-area> OSPF administrative distance for intra area routes.
<intra_area> OSPF administrative distance, 1-255.
<inter-area> OSPF administrative distance for inter area routes.
<inter_area> OSPF administrative distance, 1-255.
<external> OSPF administrative distance for external routes.
<ext_area> OSPF administrative distance, 1-255.
Examples
switch# configure terminalswitch# router ospfswitch(config-router)# distance ospf inter-area 110switch(config-router)# distance ospf intra-area 110switch(config-router)# distance ospf external 110switch(config-router)# distance ospf external 110 inter-area 110
5.11.32. Set OSPF administrative distance for a partic-ular route type to default
This command sets the OSPF administrative distance for different OSPF route types to the default.The default value is 110.
Syntax no distance (intra-area |inter-area |external)
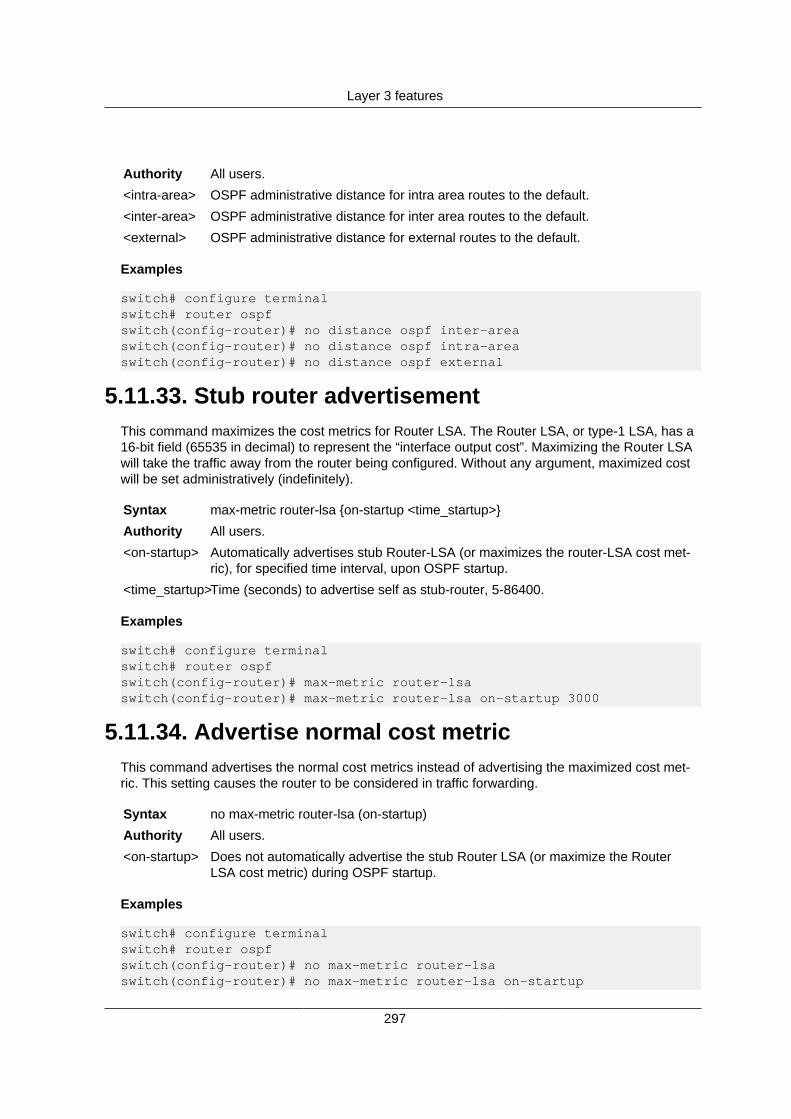
Layer 3 features
297
Authority All users.
<intra-area> OSPF administrative distance for intra area routes to the default.
<inter-area> OSPF administrative distance for inter area routes to the default.
<external> OSPF administrative distance for external routes to the default.
Examples
switch# configure terminalswitch# router ospfswitch(config-router)# no distance ospf inter-areaswitch(config-router)# no distance ospf intra-areaswitch(config-router)# no distance ospf external
5.11.33. Stub router advertisementThis command maximizes the cost metrics for Router LSA. The Router LSA, or type-1 LSA, has a16-bit field (65535 in decimal) to represent the “interface output cost”. Maximizing the Router LSAwill take the traffic away from the router being configured. Without any argument, maximized costwill be set administratively (indefinitely).
Syntax max-metric router-lsa {on-startup <time_startup>}
Authority All users.
<on-startup> Automatically advertises stub Router-LSA (or maximizes the router-LSA cost met-ric), for specified time interval, upon OSPF startup.
<time_startup>Time (seconds) to advertise self as stub-router, 5-86400.
Examples
switch# configure terminalswitch# router ospfswitch(config-router)# max-metric router-lsaswitch(config-router)# max-metric router-lsa on-startup 3000
5.11.34. Advertise normal cost metricThis command advertises the normal cost metrics instead of advertising the maximized cost met-ric. This setting causes the router to be considered in traffic forwarding.
Syntax no max-metric router-lsa (on-startup)
Authority All users.
<on-startup> Does not automatically advertise the stub Router LSA (or maximize the RouterLSA cost metric) during OSPF startup.
Examples
switch# configure terminalswitch# router ospfswitch(config-router)# no max-metric router-lsaswitch(config-router)# no max-metric router-lsa on-startup

Layer 3 features
298
5.11.35. Log changes in the adjacency stateThis command configures the router to log the adjacency status changes. With the optional detailargument, all the changes in the adjacency status are displayed. Without the optional detail argu-ment, only status changes to full or regressions are displayed.
Syntax log-adjacency-changes [detail]
Authority All users.
<detail> Send a syslog message for all the link state changes.
Examples
switch# configure terminalswitch# router ospfswitch(config-router)# log-adjacency-changesswitch(config-router)# log-adjacency-changes detail
5.11.36. Disable logging changes in the adjacencystate
This command disables logging a syslog message when there is an OSPF link state change orwhen a neighbor goes up or down. The no log-adjacency-changes command disables loggingcompletely.
Syntax no log-adjacency-changes [detail]
Authority All users.
<detail> Disable logging link state changes. Neighbor up or down events are still be report-ed.
Examples
switch# configure terminalswitch# router ospfswitch(config-router)# no log-adjacency-changesswitch(config-router)# no log-adjacency-changes detail
5.11.37. Enable OSPF RFC1583 compatibilityThis command enables OSPF compatibility with RFC1583 (backward compatibility). If RFC1583compatibility is enabled then the route cost calculation follows a different method.
Syntax compatible rfc1583
Authority All users.
Examples
switch# configure terminalswitch# router ospfswitch(config-router)# compatible rfc1583

Layer 3 features
299
5.11.38. Disable OSPF RFC1583 compatibilityThis command disables OSPF compatibility with RFC1583 (backward compatibility). By default theRFC1583 compatibility is disabled.
Syntax no compatible rfc1583
Authority All users.
Examples
switch# configure terminalswitch# router ospfswitch(config-router)# no compatible rfc1583
5.11.39. Redistribute routes into OSPFThis command redistributes routes originating from other protocols to OSPF.
Syntax redistribute {bgp | connected | static}
Authority All users.
<bgp> Redistribute BGP routes into OSPF.
<connected> Redistribute connected routes (directly attached subnet or host).
<static> Redistribute static routes into OSPF.
Examples
switch# configure terminalswitch# router ospfswitch(config-router)# redistribute connectedswitch(config-router)# redistribute bgpswitch(config-router)# redistribute static
5.11.40. Disable redistributing routes into OSPFThis command disables redistributing routes originating from other protocols to OSPF.
Syntax no redistribute {bgp | connected | static}
Authority All users.
<bgp> Redistribute BGP routes into OSPF.
<connected> Redistribute connected routes (directly attached subnet or host).
<static> Redistribute static routes into OSPF.
Examples
switch# configure terminalswitch# router ospfswitch(config-router)# no redistribute connectedswitch(config-router)# no redistribute bgp
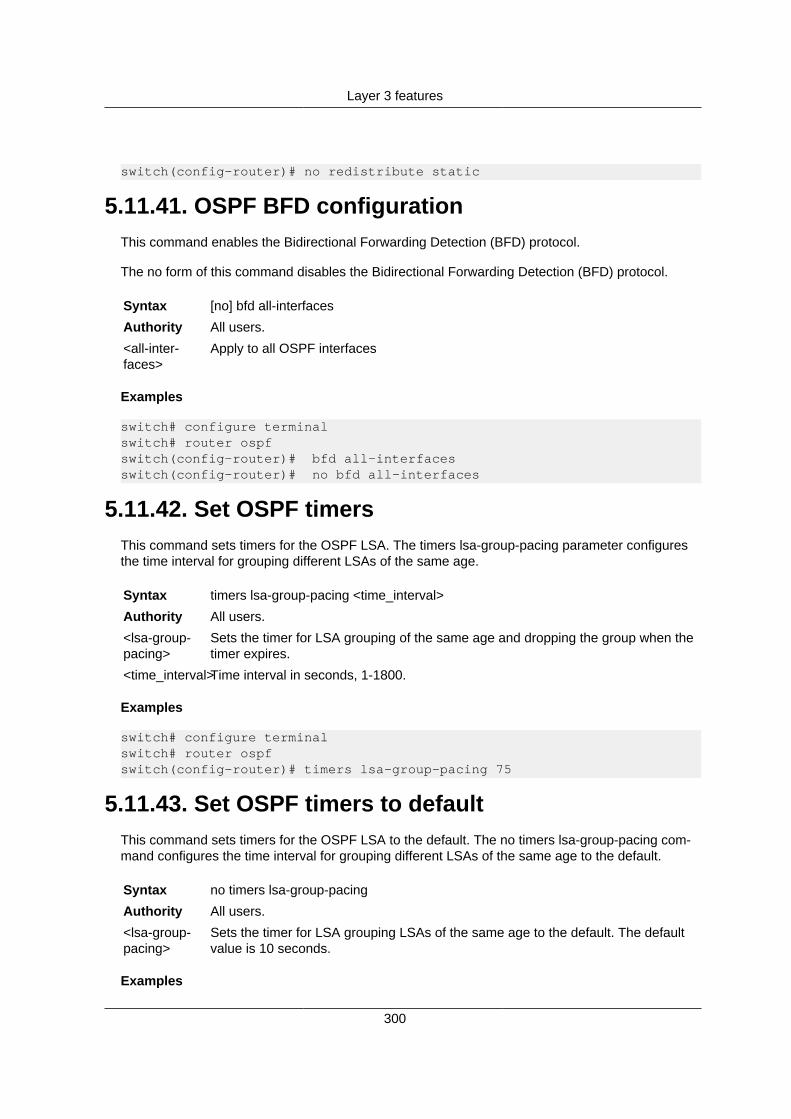
Layer 3 features
300
switch(config-router)# no redistribute static
5.11.41. OSPF BFD configurationThis command enables the Bidirectional Forwarding Detection (BFD) protocol.
The no form of this command disables the Bidirectional Forwarding Detection (BFD) protocol.
Syntax [no] bfd all-interfaces
Authority All users.
<all-inter-faces>
Apply to all OSPF interfaces
Examples
switch# configure terminalswitch# router ospfswitch(config-router)# bfd all-interfacesswitch(config-router)# no bfd all-interfaces
5.11.42. Set OSPF timersThis command sets timers for the OSPF LSA. The timers lsa-group-pacing parameter configuresthe time interval for grouping different LSAs of the same age.
Syntax timers lsa-group-pacing <time_interval>
Authority All users.
<lsa-group-pacing>
Sets the timer for LSA grouping of the same age and dropping the group when thetimer expires.
<time_interval>Time interval in seconds, 1-1800.
Examples
switch# configure terminalswitch# router ospfswitch(config-router)# timers lsa-group-pacing 75
5.11.43. Set OSPF timers to defaultThis command sets timers for the OSPF LSA to the default. The no timers lsa-group-pacing com-mand configures the time interval for grouping different LSAs of the same age to the default.
Syntax no timers lsa-group-pacing
Authority All users.
<lsa-group-pacing>
Sets the timer for LSA grouping LSAs of the same age to the default. The defaultvalue is 10 seconds.
Examples
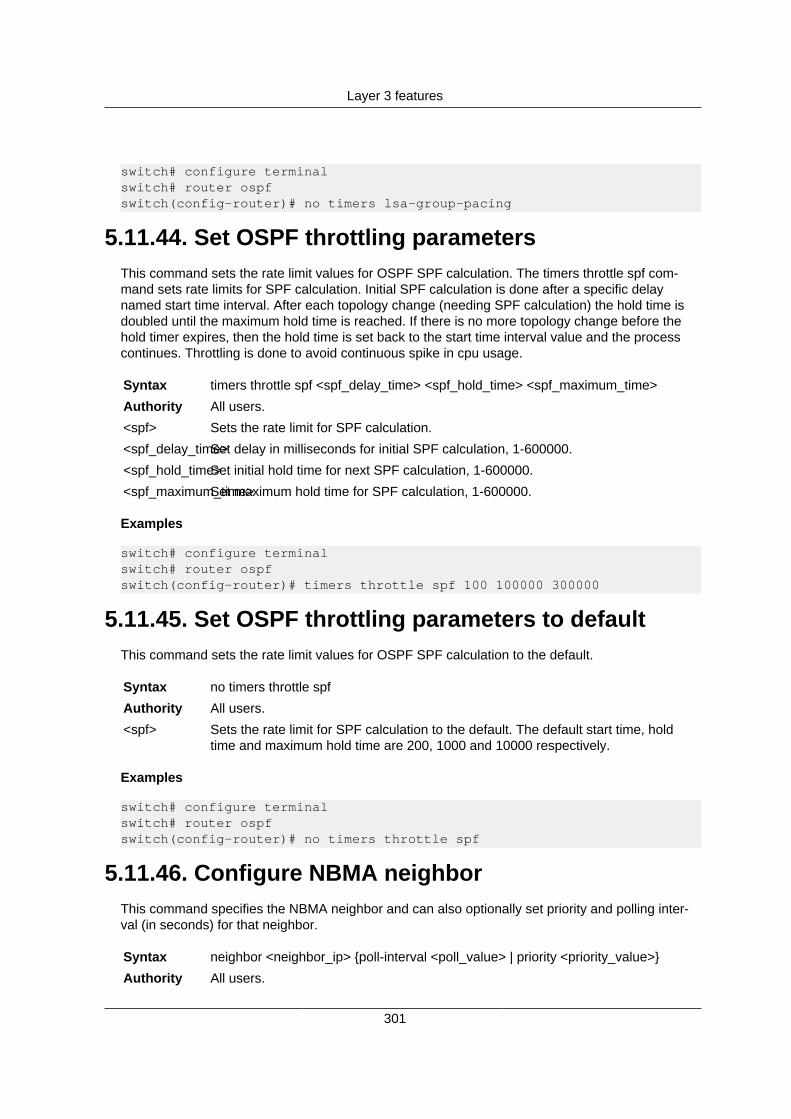
Layer 3 features
301
switch# configure terminalswitch# router ospfswitch(config-router)# no timers lsa-group-pacing
5.11.44. Set OSPF throttling parametersThis command sets the rate limit values for OSPF SPF calculation. The timers throttle spf com-mand sets rate limits for SPF calculation. Initial SPF calculation is done after a specific delaynamed start time interval. After each topology change (needing SPF calculation) the hold time isdoubled until the maximum hold time is reached. If there is no more topology change before thehold timer expires, then the hold time is set back to the start time interval value and the processcontinues. Throttling is done to avoid continuous spike in cpu usage.
Syntax timers throttle spf <spf_delay_time> <spf_hold_time> <spf_maximum_time>
Authority All users.
<spf> Sets the rate limit for SPF calculation.
<spf_delay_time>Set delay in milliseconds for initial SPF calculation, 1-600000.
<spf_hold_time>Set initial hold time for next SPF calculation, 1-600000.
<spf_maximum_time>Set maximum hold time for SPF calculation, 1-600000.
Examples
switch# configure terminalswitch# router ospfswitch(config-router)# timers throttle spf 100 100000 300000
5.11.45. Set OSPF throttling parameters to defaultThis command sets the rate limit values for OSPF SPF calculation to the default.
Syntax no timers throttle spf
Authority All users.
<spf> Sets the rate limit for SPF calculation to the default. The default start time, holdtime and maximum hold time are 200, 1000 and 10000 respectively.
Examples
switch# configure terminalswitch# router ospfswitch(config-router)# no timers throttle spf
5.11.46. Configure NBMA neighborThis command specifies the NBMA neighbor and can also optionally set priority and polling inter-val (in seconds) for that neighbor.
Syntax neighbor <neighbor_ip> {poll-interval <poll_value> | priority <priority_value>}
Authority All users.
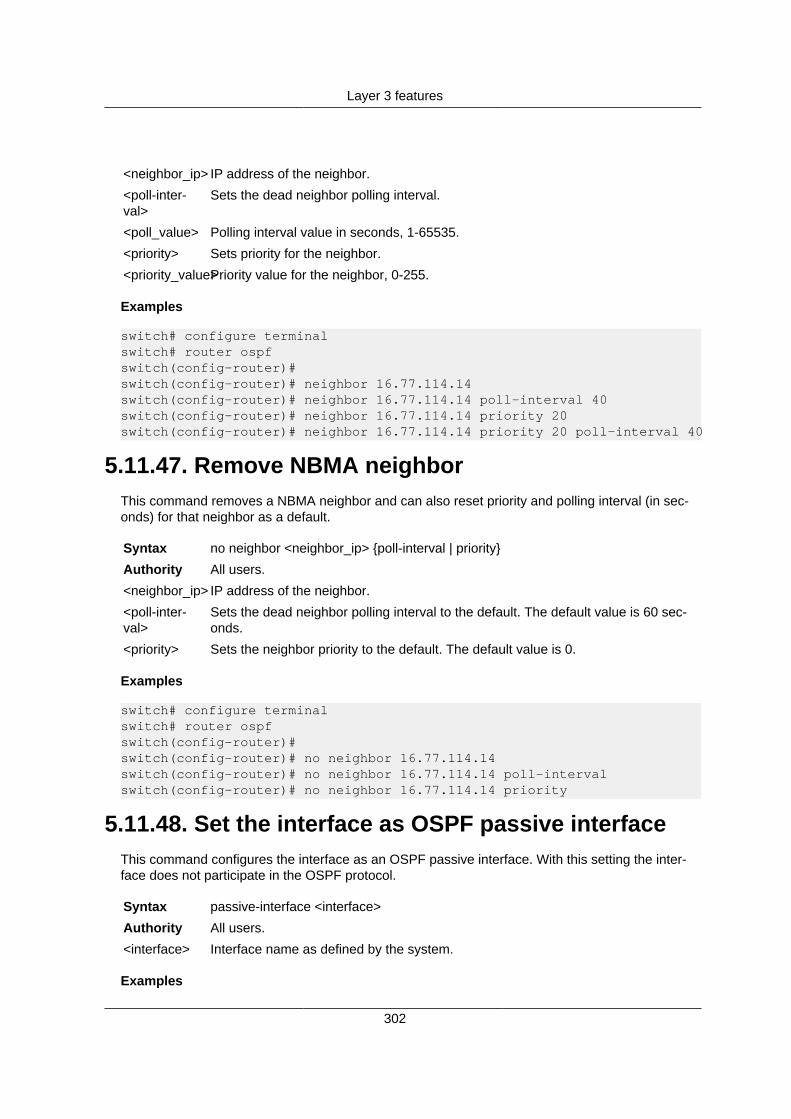
Layer 3 features
302
<neighbor_ip> IP address of the neighbor.
<poll-inter-val>
Sets the dead neighbor polling interval.
<poll_value> Polling interval value in seconds, 1-65535.
<priority> Sets priority for the neighbor.
<priority_value>Priority value for the neighbor, 0-255.
Examples
switch# configure terminalswitch# router ospfswitch(config-router)#switch(config-router)# neighbor 16.77.114.14switch(config-router)# neighbor 16.77.114.14 poll-interval 40switch(config-router)# neighbor 16.77.114.14 priority 20switch(config-router)# neighbor 16.77.114.14 priority 20 poll-interval 40
5.11.47. Remove NBMA neighborThis command removes a NBMA neighbor and can also reset priority and polling interval (in sec-onds) for that neighbor as a default.
Syntax no neighbor <neighbor_ip> {poll-interval | priority}
Authority All users.
<neighbor_ip> IP address of the neighbor.
<poll-inter-val>
Sets the dead neighbor polling interval to the default. The default value is 60 sec-onds.
<priority> Sets the neighbor priority to the default. The default value is 0.
Examples
switch# configure terminalswitch# router ospfswitch(config-router)#switch(config-router)# no neighbor 16.77.114.14switch(config-router)# no neighbor 16.77.114.14 poll-intervalswitch(config-router)# no neighbor 16.77.114.14 priority
5.11.48. Set the interface as OSPF passive interfaceThis command configures the interface as an OSPF passive interface. With this setting the inter-face does not participate in the OSPF protocol.
Syntax passive-interface <interface>
Authority All users.
<interface> Interface name as defined by the system.
Examples
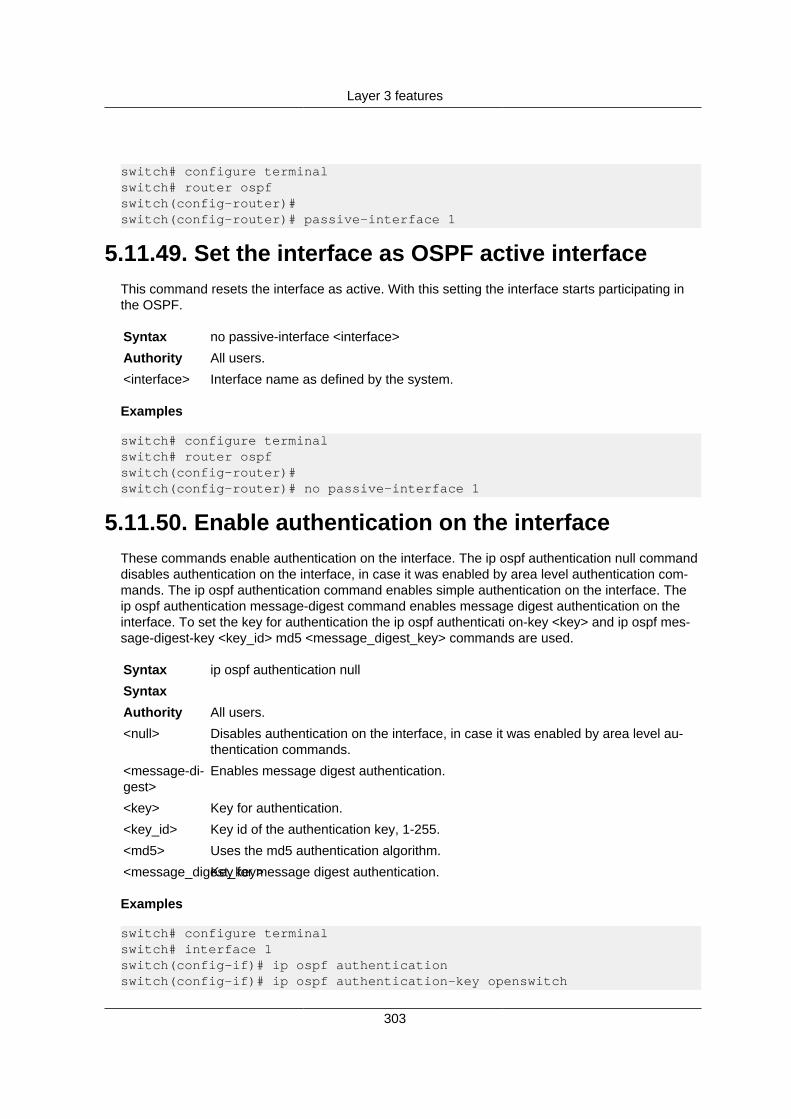
Layer 3 features
303
switch# configure terminalswitch# router ospfswitch(config-router)#switch(config-router)# passive-interface 1
5.11.49. Set the interface as OSPF active interfaceThis command resets the interface as active. With this setting the interface starts participating inthe OSPF.
Syntax no passive-interface <interface>
Authority All users.
<interface> Interface name as defined by the system.
Examples
switch# configure terminalswitch# router ospfswitch(config-router)#switch(config-router)# no passive-interface 1
5.11.50. Enable authentication on the interfaceThese commands enable authentication on the interface. The ip ospf authentication null commanddisables authentication on the interface, in case it was enabled by area level authentication com-mands. The ip ospf authentication command enables simple authentication on the interface. Theip ospf authentication message-digest command enables message digest authentication on theinterface. To set the key for authentication the ip ospf authenticati on-key <key> and ip ospf mes-sage-digest-key <key_id> md5 <message_digest_key> commands are used.
Syntax ip ospf authentication null
SyntaxAuthority All users.
<null> Disables authentication on the interface, in case it was enabled by area level au-thentication commands.
<message-di-gest>
Enables message digest authentication.
<key> Key for authentication.
<key_id> Key id of the authentication key, 1-255.
<md5> Uses the md5 authentication algorithm.
<message_digest_key>Key for message digest authentication.
Examples
switch# configure terminalswitch# interface 1switch(config-if)# ip ospf authenticationswitch(config-if)# ip ospf authentication-key openswitch
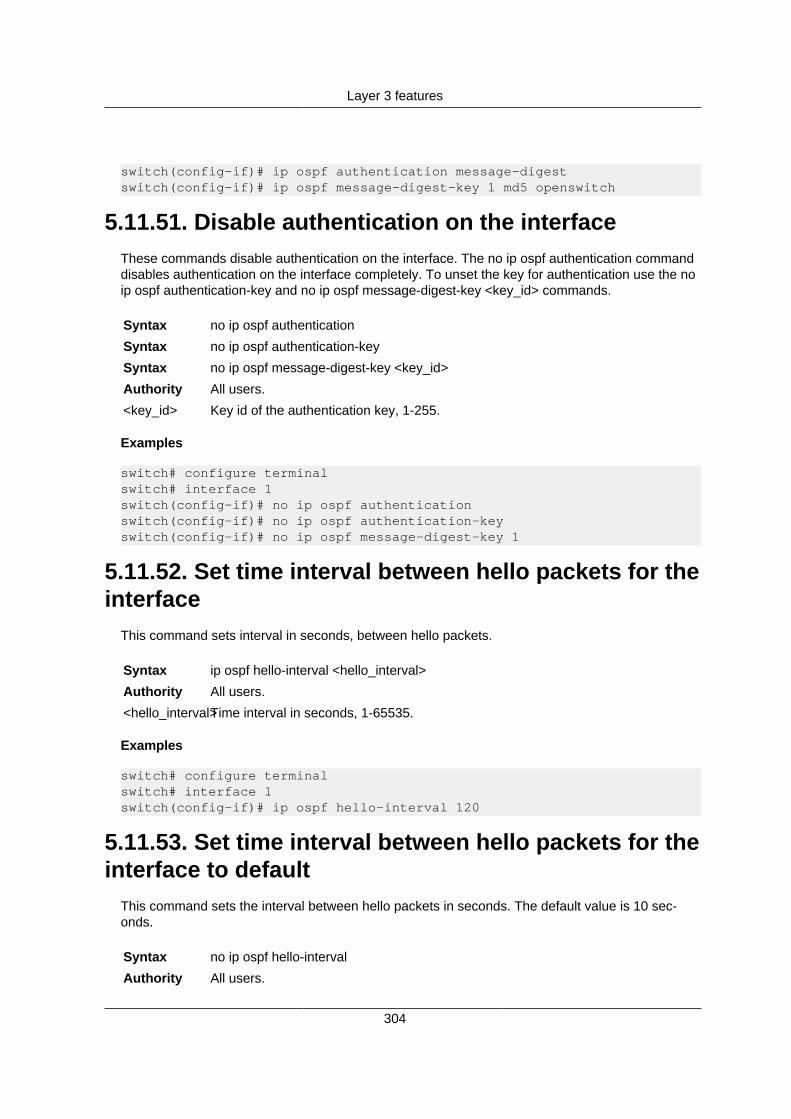
Layer 3 features
304
switch(config-if)# ip ospf authentication message-digestswitch(config-if)# ip ospf message-digest-key 1 md5 openswitch
5.11.51. Disable authentication on the interfaceThese commands disable authentication on the interface. The no ip ospf authentication commanddisables authentication on the interface completely. To unset the key for authentication use the noip ospf authentication-key and no ip ospf message-digest-key <key_id> commands.
Syntax no ip ospf authentication
Syntax no ip ospf authentication-key
Syntax no ip ospf message-digest-key <key_id>
Authority All users.
<key_id> Key id of the authentication key, 1-255.
Examples
switch# configure terminalswitch# interface 1switch(config-if)# no ip ospf authenticationswitch(config-if)# no ip ospf authentication-keyswitch(config-if)# no ip ospf message-digest-key 1
5.11.52. Set time interval between hello packets for theinterface
This command sets interval in seconds, between hello packets.
Syntax ip ospf hello-interval <hello_interval>
Authority All users.
<hello_interval>Time interval in seconds, 1-65535.
Examples
switch# configure terminalswitch# interface 1switch(config-if)# ip ospf hello-interval 120
5.11.53. Set time interval between hello packets for theinterface to default
This command sets the interval between hello packets in seconds. The default value is 10 sec-onds.
Syntax no ip ospf hello-interval
Authority All users.

Layer 3 features
305
Examples
switch# configure terminalswitch# interface 1switch(config-if)# no ip ospf hello-interval
5.11.54. Set neighbor dead interval for the interfaceThis command sets the interval in seconds, in which a neighbor connected to the interface is de-clared dead.
Syntax ip ospf dead-interval <dead_interval>
Authority All users.
<dead_interval>Time interval in seconds, 1-65535.
Examples
switch# configure terminalswitch# interface 1switch(config-if)# ip ospf dead-interval 120
5.11.55. Set neighbor dead interval for the interface todefault
This command sets the interval in seconds, after which a neighbor connected to the interface isdeclared dead to the default. The default value is 40 seconds (four times the hello-interval).
Syntax no ip ospf dead-interval
Authority All users.
Examples
switch# configure terminalswitch# interface 1switch(config-if)# no ip ospf dead-interval
5.11.56. Disable MTU mismatch detectionThis command disables the MTU mismatch detection on the interface. When the MTU value in thedatabase description packet that is coming from a neighbor is larger than the router can handlethen the packet may be dropped without this setting.
Syntax ip ospf mtu-ignore
Authority All users.
Examples
switch# configure terminalswitch# interface 1

Layer 3 features
306
switch(config-if)# ip ospf mtu-ignore
5.11.57. Enable MTU mismatch detectionThis command enables the MTU mismatch detection on the interface. When the MTU value in thedatabase description packet that is coming from a neighbor is larger than the router can handle,the packet may be dropped with this setting.
Syntax no ip ospf mtu-ignore
Authority All users.
Examples
switch# configure terminalswitch# interface 1switch(config-if)# no ip ospf mtu-ignore
5.11.58. Set the interface costThis command sets the cost (metric) associated with a particular interface. The interface cost isused as a parameter to calculate the best routes.
Syntax no ip ospf cost <interface_cost>
Authority All users.
<interface_cost>Interface cost value, 1-65535.
Examples
switch# configure terminalswitch# interface 1switch(config-if)# ip ospf cost 100
5.11.59. Set the interface cost to defaultThis command sets the cost (metric) associated with a particular interface to the default. The de-fault cost is calculated automatically depending on the bandwidth of the interface.
Syntax no ip ospf cost
Authority All users.
Examples
switch# configure terminalswitch# interface 1switch(config-if)# no ip ospf cost
5.11.60. Set OSPF network type for the interfaceThis command explicitly sets the network type for the interface.
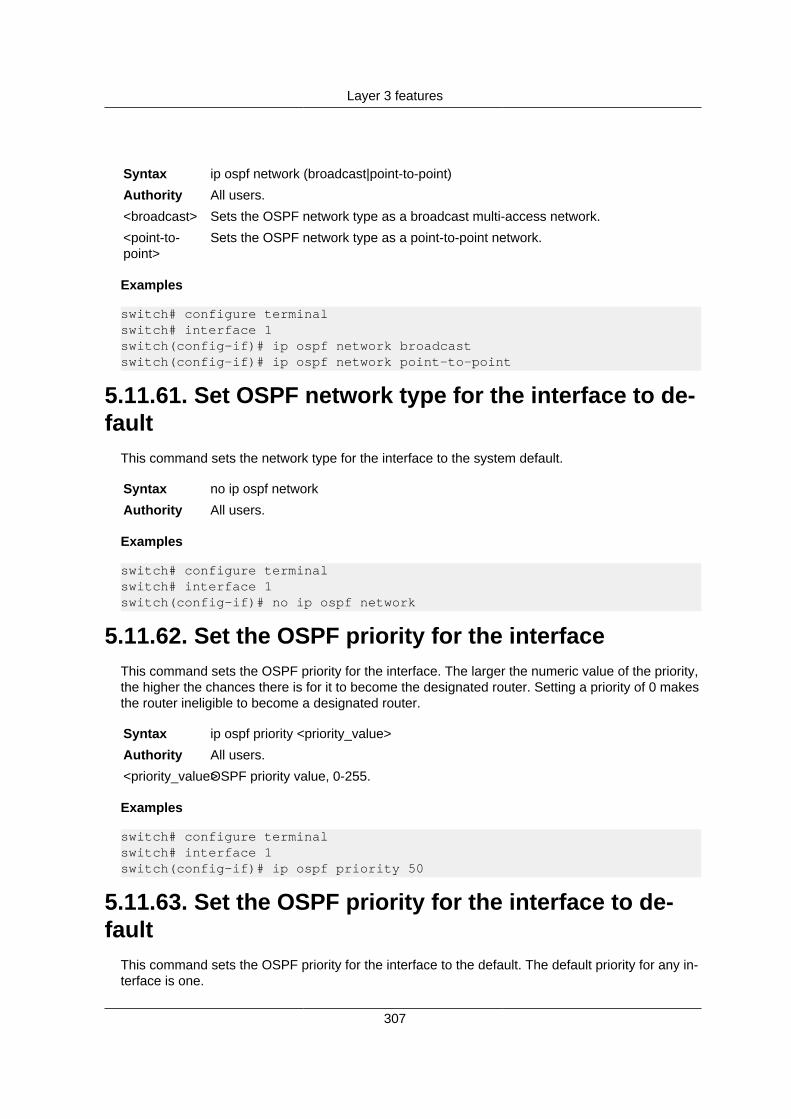
Layer 3 features
307
Syntax ip ospf network (broadcast|point-to-point)
Authority All users.
<broadcast> Sets the OSPF network type as a broadcast multi-access network.
<point-to-point>
Sets the OSPF network type as a point-to-point network.
Examples
switch# configure terminalswitch# interface 1switch(config-if)# ip ospf network broadcastswitch(config-if)# ip ospf network point-to-point
5.11.61. Set OSPF network type for the interface to de-fault
This command sets the network type for the interface to the system default.
Syntax no ip ospf network
Authority All users.
Examples
switch# configure terminalswitch# interface 1switch(config-if)# no ip ospf network
5.11.62. Set the OSPF priority for the interfaceThis command sets the OSPF priority for the interface. The larger the numeric value of the priority,the higher the chances there is for it to become the designated router. Setting a priority of 0 makesthe router ineligible to become a designated router.
Syntax ip ospf priority <priority_value>
Authority All users.
<priority_value>OSPF priority value, 0-255.
Examples
switch# configure terminalswitch# interface 1switch(config-if)# ip ospf priority 50
5.11.63. Set the OSPF priority for the interface to de-fault
This command sets the OSPF priority for the interface to the default. The default priority for any in-terface is one.

Layer 3 features
308
Syntax no ip ospf priority
Authority All users.
Examples
switch# configure terminalswitch# interface 1switch(config-if)# no ip ospf priority
5.11.64. Set the retransmit interval for the interfaceThis command sets time interval between transmitting and then retransmitting the lost link stateadvertisements for the interface.
Syntax ip ospf retransmit-interval <retransmit_interval>
Authority All users.
<retransmit_interval>Time interval in seconds, 3-65535.
Examples
switch# configure terminalswitch# interface 1switch(config-if)# ip ospf retransmit-interval 10
5.11.65. Set the retransmit interval for the interface todefault
This command sets the time interval between transmitting and then retransmitting the lost linkstate advertisements for the interface to the default. The default value is five seconds.
Syntax no ip ospf retransmit-interval
Authority All users.
Examples
switch# configure terminalswitch# interface 1switch(config-if)# no ip ospf retransmit-interval
5.11.66. Set the transmit delay for the interfaceThis command sets the time delay for the OSPF packet transmission. The LSA age is incrementedby this value when transmitting.
Syntax ip ospf transmit-delay <transmit_delay_time>
Authority All users.
<transmit_delay_time>Time interval in seconds, 1-65535.

Layer 3 features
309
Examples
switch# configure terminalswitch# interface 1switch(config-if)# ip ospf transmit-delay 10
5.11.67. Set the transmit delay for the interface to de-fault
This command sets the time delay for the OSPF packet transmission to the default. The defaultvalue is one second.
Syntax no ip ospf transmit-delay
Authority All users.
Examples
switch# configure terminalswitch# interface 1switch(config-if)# no ip ospf transmit-delay
5.11.68. Show general OSPF configurationsThis command shows information on a variety of general OSPF, area, state, and configuration in-formation.
Syntax show ip ospf [border-routers]
Authority All users.
<bor-der-routers>
Show information only of border-routers.
Examples
switch# show ip ospfOSPF Routing Process, Router ID: 16.77.114.14Supports only single TOS (TOS0) routesThis implementation conforms to RFC2328RFC1583Compatibility flag is enabledOpaqueCapability flag is enabledStub router advertisement is configured Enabled for 2000s after start-upInitial SPF scheduling delay 3000 millisec(s)Minimum hold time between consecutive SPFs 3000 millisec(s)Maximum hold time between consecutive SPFs 5000 millisec(s)Hold time multiplier is currently 1Refresh timer 10 secsThis router is an ABR, This router is ASBRNumber of external LSA 0. Checksum Sum 0x00000000Number of opaque AS LSA 0. Checksum Sum 0x00000000
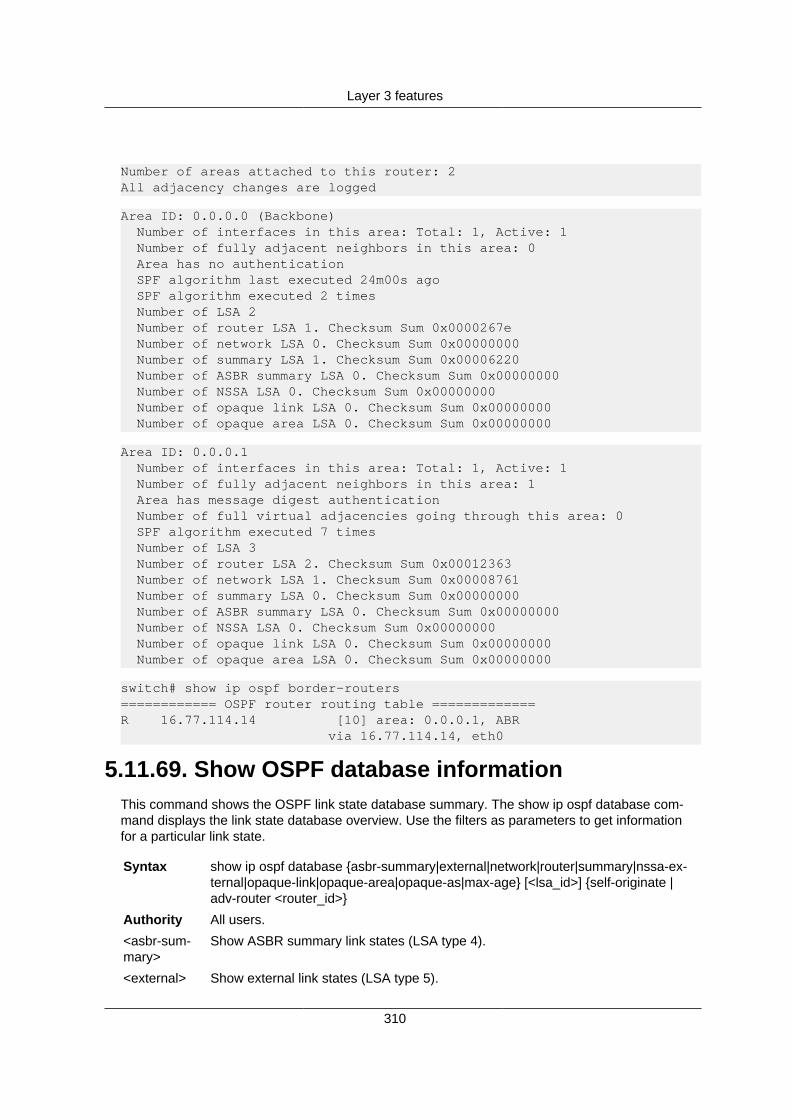
Layer 3 features
310
Number of areas attached to this router: 2All adjacency changes are logged
Area ID: 0.0.0.0 (Backbone) Number of interfaces in this area: Total: 1, Active: 1 Number of fully adjacent neighbors in this area: 0 Area has no authentication SPF algorithm last executed 24m00s ago SPF algorithm executed 2 times Number of LSA 2 Number of router LSA 1. Checksum Sum 0x0000267e Number of network LSA 0. Checksum Sum 0x00000000 Number of summary LSA 1. Checksum Sum 0x00006220 Number of ASBR summary LSA 0. Checksum Sum 0x00000000 Number of NSSA LSA 0. Checksum Sum 0x00000000 Number of opaque link LSA 0. Checksum Sum 0x00000000 Number of opaque area LSA 0. Checksum Sum 0x00000000
Area ID: 0.0.0.1 Number of interfaces in this area: Total: 1, Active: 1 Number of fully adjacent neighbors in this area: 1 Area has message digest authentication Number of full virtual adjacencies going through this area: 0 SPF algorithm executed 7 times Number of LSA 3 Number of router LSA 2. Checksum Sum 0x00012363 Number of network LSA 1. Checksum Sum 0x00008761 Number of summary LSA 0. Checksum Sum 0x00000000 Number of ASBR summary LSA 0. Checksum Sum 0x00000000 Number of NSSA LSA 0. Checksum Sum 0x00000000 Number of opaque link LSA 0. Checksum Sum 0x00000000 Number of opaque area LSA 0. Checksum Sum 0x00000000
switch# show ip ospf border-routers============ OSPF router routing table =============R 16.77.114.14 [10] area: 0.0.0.1, ABR via 16.77.114.14, eth0
5.11.69. Show OSPF database informationThis command shows the OSPF link state database summary. The show ip ospf database com-mand displays the link state database overview. Use the filters as parameters to get informationfor a particular link state.
Syntax show ip ospf database {asbr-summary|external|network|router|summary|nssa-ex-ternal|opaque-link|opaque-area|opaque-as|max-age} [<lsa_id>] {self-originate |adv-router <router_id>}
Authority All users.
<asbr-sum-mary>
Show ASBR summary link states (LSA type 4).
<external> Show external link states (LSA type 5).

Layer 3 features
311
<network> Show network LSAs.
<router> Show router LSAs.
<summary> Show network-summary link states (LSA type 3).
<nssa-exter-nal>
Show NSSA external link states (LSA type 7).
<opaque-link>
Show opaque Link-Local LSAs.
<opaque-area>
Show opaque Area LSAs.
<opaque-as> Show opaque AS LSAs.
<max-age> Show LSAs in max age list.
<lsa_id> Show information filtered by link state identifier.
<self-origi-nate>
Shows self-originated link states.
<adv-router> Shows link states for a particular advertising router.
<router_id> Router id of the advertising router.
Examples
Switch# ip ospf database OSPF Router with ID (16.77.114.14) Router Link States (Area 0.0.0.0)
Link ID ADV Router Age Seq# ChkSum Link count16.77.114.14 16.77.114.14 723 0x80000004 0x247f 0
Summary Link States (Area 0.0.0.0)
Link ID ADV Router Age Seq# ChkSum Route16.77.114.0 16.77.114.14 482 0x80000003 0x0f79 16.77.114.0/24
Router Link States (Area 0.0.0.1)
Link ID ADV Router Age Seq# ChkSum Link count16.77.114.12 16.77.114.12 830 0x80000004 0x5483 116.77.114.14 16.77.114.14 633 0x80000004 0xcae2 1
Net Link States (Area 0.0.0.1)
Link ID ADV Router Age Seq# ChkSum16.77.114.12 16.77.114.12 790 0x80000002 0x8562
switch# show ip ospf database asbr-summary
OSPF Router with id(192.168.239.66) (Process ID 300) Displaying Summary ASB Link States(Area 0.0.0.0)LS age: 1463Options: (No TOS-capability)LS Type: Summary Links(AS Boundary Router)
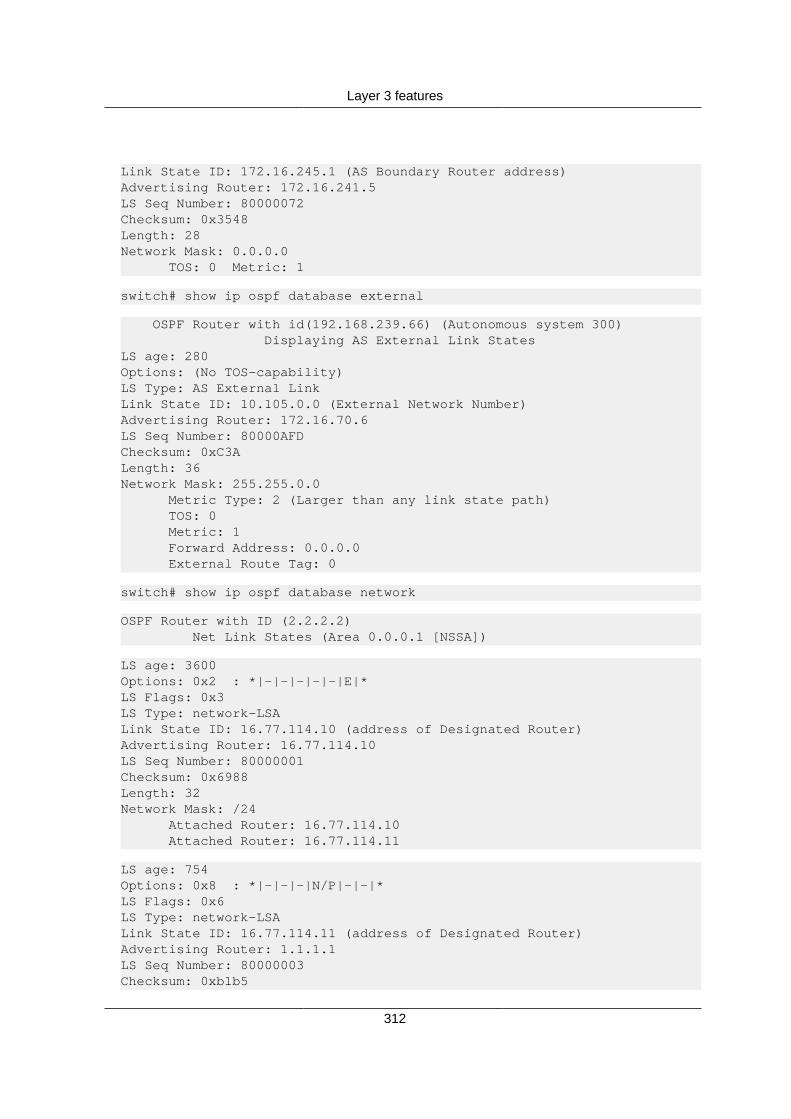
Layer 3 features
312
Link State ID: 172.16.245.1 (AS Boundary Router address)Advertising Router: 172.16.241.5LS Seq Number: 80000072Checksum: 0x3548Length: 28Network Mask: 0.0.0.0 TOS: 0 Metric: 1
switch# show ip ospf database external
OSPF Router with id(192.168.239.66) (Autonomous system 300) Displaying AS External Link StatesLS age: 280Options: (No TOS-capability)LS Type: AS External LinkLink State ID: 10.105.0.0 (External Network Number)Advertising Router: 172.16.70.6LS Seq Number: 80000AFDChecksum: 0xC3ALength: 36Network Mask: 255.255.0.0 Metric Type: 2 (Larger than any link state path) TOS: 0 Metric: 1 Forward Address: 0.0.0.0 External Route Tag: 0
switch# show ip ospf database network
OSPF Router with ID (2.2.2.2) Net Link States (Area 0.0.0.1 [NSSA])
LS age: 3600Options: 0x2 : *|-|-|-|-|-|E|*LS Flags: 0x3LS Type: network-LSALink State ID: 16.77.114.10 (address of Designated Router)Advertising Router: 16.77.114.10LS Seq Number: 80000001Checksum: 0x6988Length: 32Network Mask: /24 Attached Router: 16.77.114.10 Attached Router: 16.77.114.11
LS age: 754Options: 0x8 : *|-|-|-|N/P|-|-|*LS Flags: 0x6LS Type: network-LSALink State ID: 16.77.114.11 (address of Designated Router)Advertising Router: 1.1.1.1LS Seq Number: 80000003Checksum: 0xb1b5

Layer 3 features
313
Length: 32Network Mask: /24 Attached Router: 2.2.2.2 Attached Router: 1.1.1.1
LS age: 104Options: 0x8 : *|-|-|-|N/P|-|-|*LS Flags: 0x3LS Type: network-LSALink State ID: 16.77.114.11 (address of Designated Router)Advertising Router: 2.2.2.2LS Seq Number: 80000002Checksum: 0x95ceLength: 32Network Mask: /24 Attached Router: 2.2.2.2 Attached Router: 1.1.1.1
switch# show ip ospf database router OSPF Router with ID (2.2.2.2) Router Link States (Area 0.0.0.1 [NSSA]) LS age: 676 Options: 0x8 : *|-|-|-|N/P|-|-|* LS Flags: 0x6 Flags: 0x0 LS Type: router-LSA Link State ID: 1.1.1.1 Advertising Router: 1.1.1.1 LS Seq Number: 80000007 Checksum: 0xc7b8 Length: 36 Number of Links: 1 Link connected to: a Transit Network (Link ID) Designated Router address: 16.77.114.11 (Link Data) Router Interface address: 16.77.114.11 Number of TOS metrics: 0 TOS 0 Metric: 10 LS age: 680 Options: 0x8 : *|-|-|-|N/P|-|-|* LS Flags: 0x3 Flags: 0x2 : ASBR LS Type: router-LSA Link State ID: 2.2.2.2 Advertising Router: 2.2.2.2 LS Seq Number: 80000008 Checksum: 0xbcc3 Length: 36 Number of Links: 1 Link connected to: a Transit Network (Link ID) Designated Router address: 16.77.114.11 (Link Data) Router Interface address: 16.77.114.10 Number of TOS metrics: 0
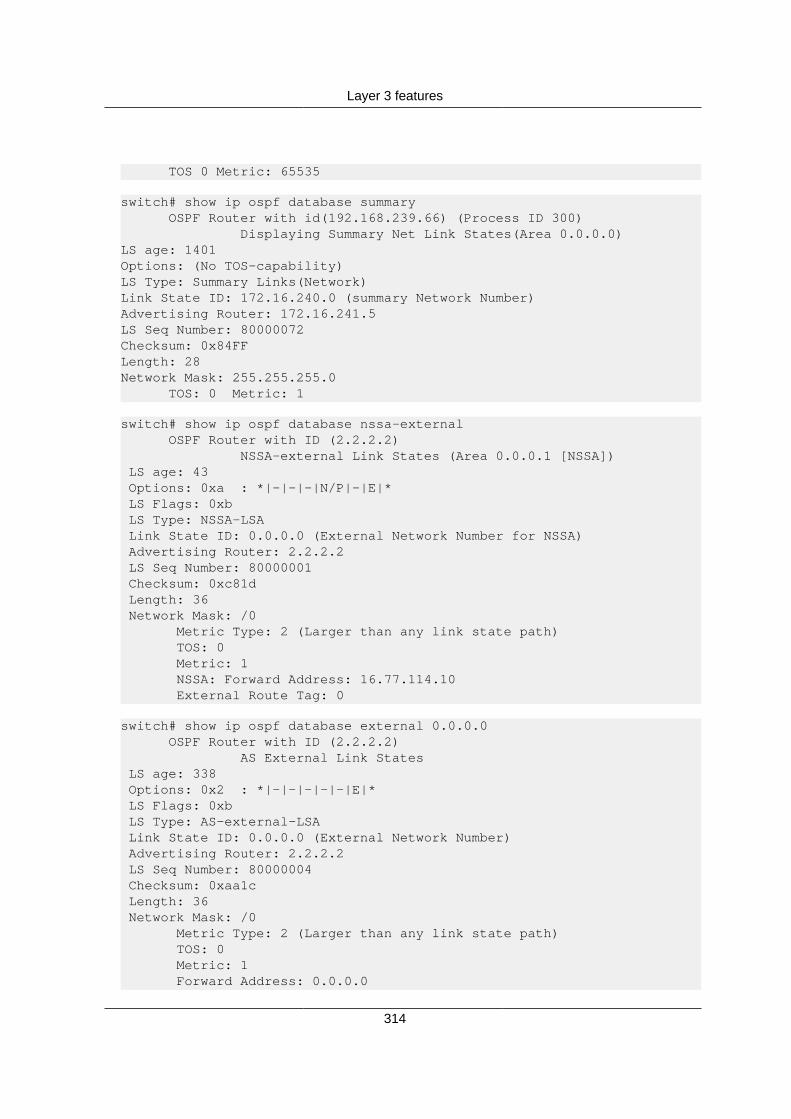
Layer 3 features
314
TOS 0 Metric: 65535
switch# show ip ospf database summary OSPF Router with id(192.168.239.66) (Process ID 300) Displaying Summary Net Link States(Area 0.0.0.0)LS age: 1401Options: (No TOS-capability)LS Type: Summary Links(Network)Link State ID: 172.16.240.0 (summary Network Number)Advertising Router: 172.16.241.5LS Seq Number: 80000072Checksum: 0x84FFLength: 28Network Mask: 255.255.255.0 TOS: 0 Metric: 1
switch# show ip ospf database nssa-external OSPF Router with ID (2.2.2.2) NSSA-external Link States (Area 0.0.0.1 [NSSA]) LS age: 43 Options: 0xa : *|-|-|-|N/P|-|E|* LS Flags: 0xb LS Type: NSSA-LSA Link State ID: 0.0.0.0 (External Network Number for NSSA) Advertising Router: 2.2.2.2 LS Seq Number: 80000001 Checksum: 0xc81d Length: 36 Network Mask: /0 Metric Type: 2 (Larger than any link state path) TOS: 0 Metric: 1 NSSA: Forward Address: 16.77.114.10 External Route Tag: 0
switch# show ip ospf database external 0.0.0.0 OSPF Router with ID (2.2.2.2) AS External Link States LS age: 338 Options: 0x2 : *|-|-|-|-|-|E|* LS Flags: 0xb LS Type: AS-external-LSA Link State ID: 0.0.0.0 (External Network Number) Advertising Router: 2.2.2.2 LS Seq Number: 80000004 Checksum: 0xaa1c Length: 36 Network Mask: /0 Metric Type: 2 (Larger than any link state path) TOS: 0 Metric: 1 Forward Address: 0.0.0.0
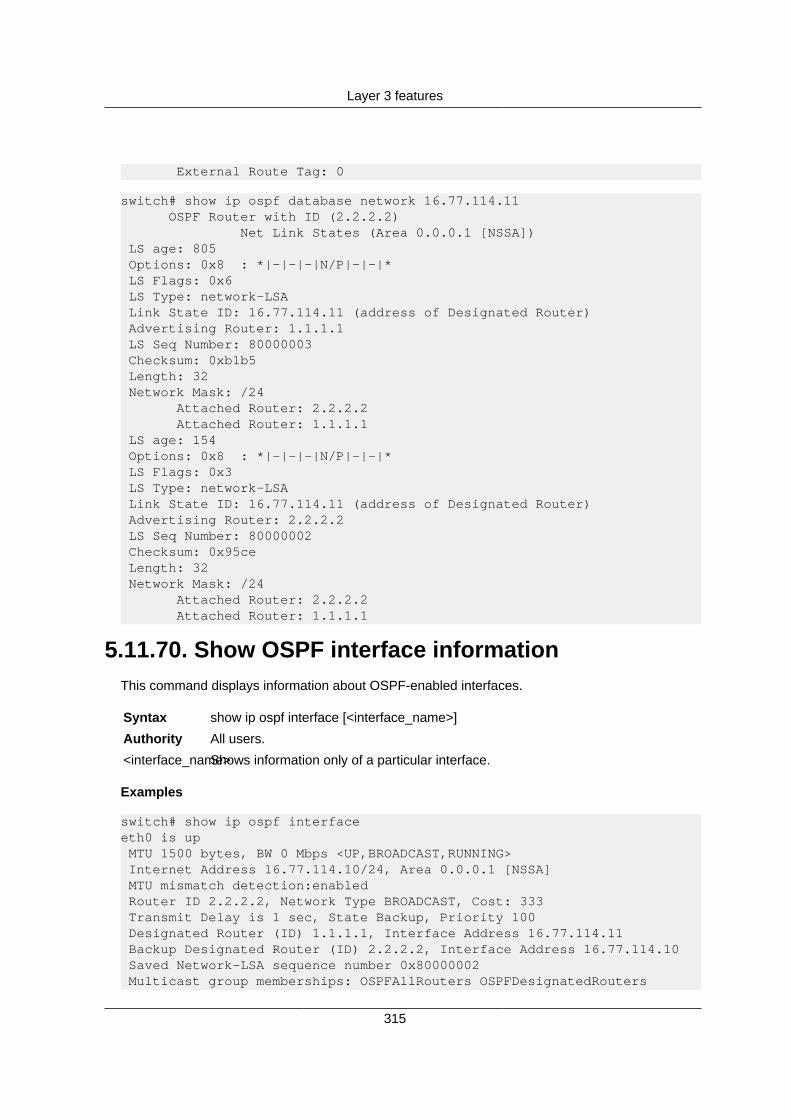
Layer 3 features
315
External Route Tag: 0
switch# show ip ospf database network 16.77.114.11 OSPF Router with ID (2.2.2.2) Net Link States (Area 0.0.0.1 [NSSA]) LS age: 805 Options: 0x8 : *|-|-|-|N/P|-|-|* LS Flags: 0x6 LS Type: network-LSA Link State ID: 16.77.114.11 (address of Designated Router) Advertising Router: 1.1.1.1 LS Seq Number: 80000003 Checksum: 0xb1b5 Length: 32 Network Mask: /24 Attached Router: 2.2.2.2 Attached Router: 1.1.1.1 LS age: 154 Options: 0x8 : *|-|-|-|N/P|-|-|* LS Flags: 0x3 LS Type: network-LSA Link State ID: 16.77.114.11 (address of Designated Router) Advertising Router: 2.2.2.2 LS Seq Number: 80000002 Checksum: 0x95ce Length: 32 Network Mask: /24 Attached Router: 2.2.2.2 Attached Router: 1.1.1.1
5.11.70. Show OSPF interface informationThis command displays information about OSPF-enabled interfaces.
Syntax show ip ospf interface [<interface_name>]
Authority All users.
<interface_name>Shows information only of a particular interface.
Examples
switch# show ip ospf interfaceeth0 is up MTU 1500 bytes, BW 0 Mbps <UP,BROADCAST,RUNNING> Internet Address 16.77.114.10/24, Area 0.0.0.1 [NSSA] MTU mismatch detection:enabled Router ID 2.2.2.2, Network Type BROADCAST, Cost: 333 Transmit Delay is 1 sec, State Backup, Priority 100 Designated Router (ID) 1.1.1.1, Interface Address 16.77.114.11 Backup Designated Router (ID) 2.2.2.2, Interface Address 16.77.114.10 Saved Network-LSA sequence number 0x80000002 Multicast group memberships: OSPFAllRouters OSPFDesignatedRouters
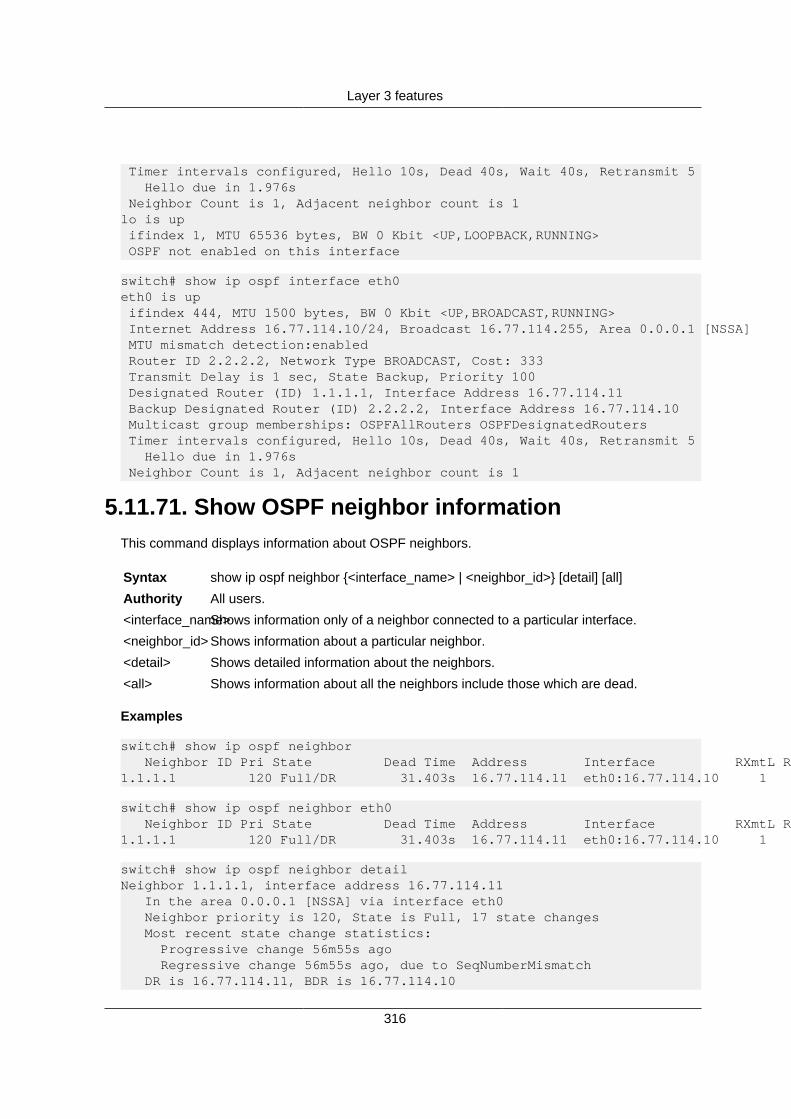
Layer 3 features
316
Timer intervals configured, Hello 10s, Dead 40s, Wait 40s, Retransmit 5 Hello due in 1.976s Neighbor Count is 1, Adjacent neighbor count is 1lo is up ifindex 1, MTU 65536 bytes, BW 0 Kbit <UP,LOOPBACK,RUNNING> OSPF not enabled on this interface
switch# show ip ospf interface eth0eth0 is up ifindex 444, MTU 1500 bytes, BW 0 Kbit <UP,BROADCAST,RUNNING> Internet Address 16.77.114.10/24, Broadcast 16.77.114.255, Area 0.0.0.1 [NSSA] MTU mismatch detection:enabled Router ID 2.2.2.2, Network Type BROADCAST, Cost: 333 Transmit Delay is 1 sec, State Backup, Priority 100 Designated Router (ID) 1.1.1.1, Interface Address 16.77.114.11 Backup Designated Router (ID) 2.2.2.2, Interface Address 16.77.114.10 Multicast group memberships: OSPFAllRouters OSPFDesignatedRouters Timer intervals configured, Hello 10s, Dead 40s, Wait 40s, Retransmit 5 Hello due in 1.976s Neighbor Count is 1, Adjacent neighbor count is 1
5.11.71. Show OSPF neighbor informationThis command displays information about OSPF neighbors.
Syntax show ip ospf neighbor {<interface_name> | <neighbor_id>} [detail] [all]
Authority All users.
<interface_name>Shows information only of a neighbor connected to a particular interface.
<neighbor_id> Shows information about a particular neighbor.
<detail> Shows detailed information about the neighbors.
<all> Shows information about all the neighbors include those which are dead.
Examples
switch# show ip ospf neighbor Neighbor ID Pri State Dead Time Address Interface RXmtL RqstL DBsmL1.1.1.1 120 Full/DR 31.403s 16.77.114.11 eth0:16.77.114.10 1 0 0
switch# show ip ospf neighbor eth0 Neighbor ID Pri State Dead Time Address Interface RXmtL RqstL DBsmL1.1.1.1 120 Full/DR 31.403s 16.77.114.11 eth0:16.77.114.10 1 0 0
switch# show ip ospf neighbor detailNeighbor 1.1.1.1, interface address 16.77.114.11 In the area 0.0.0.1 [NSSA] via interface eth0 Neighbor priority is 120, State is Full, 17 state changes Most recent state change statistics: Progressive change 56m55s ago Regressive change 56m55s ago, due to SeqNumberMismatch DR is 16.77.114.11, BDR is 16.77.114.10
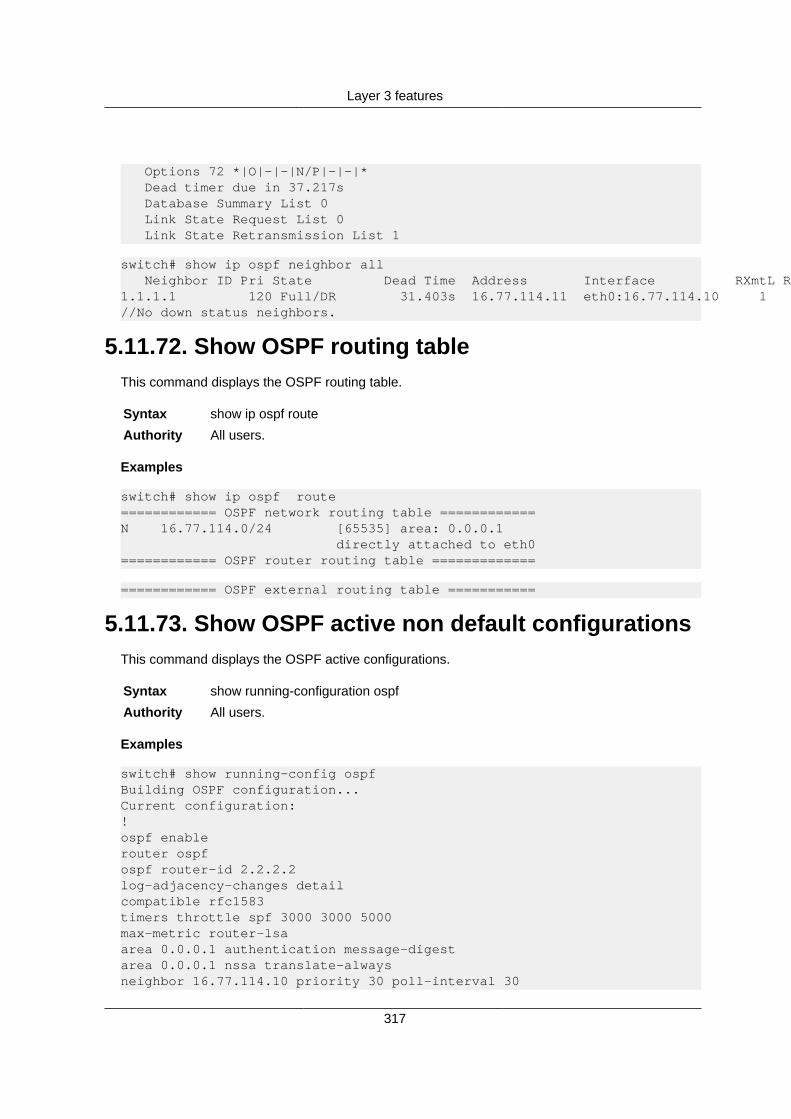
Layer 3 features
317
Options 72 *|O|-|-|N/P|-|-|* Dead timer due in 37.217s Database Summary List 0 Link State Request List 0 Link State Retransmission List 1
switch# show ip ospf neighbor all Neighbor ID Pri State Dead Time Address Interface RXmtL RqstL DBsmL1.1.1.1 120 Full/DR 31.403s 16.77.114.11 eth0:16.77.114.10 1 0 0//No down status neighbors.
5.11.72. Show OSPF routing tableThis command displays the OSPF routing table.
Syntax show ip ospf route
Authority All users.
Examples
switch# show ip ospf route============ OSPF network routing table ============N 16.77.114.0/24 [65535] area: 0.0.0.1 directly attached to eth0============ OSPF router routing table =============
============ OSPF external routing table ===========
5.11.73. Show OSPF active non default configurationsThis command displays the OSPF active configurations.
Syntax show running-configuration ospf
Authority All users.
Examples
switch# show running-config ospfBuilding OSPF configuration...Current configuration:!ospf enablerouter ospfospf router-id 2.2.2.2log-adjacency-changes detailcompatible rfc1583timers throttle spf 3000 3000 5000max-metric router-lsaarea 0.0.0.1 authentication message-digestarea 0.0.0.1 nssa translate-alwaysneighbor 16.77.114.10 priority 30 poll-interval 30

Layer 3 features
318
default-metric 30default-information originate alwaysdistance 110distance ospf inter-area 40 external 30capability opaque!end

Layer 3 features
319
5.12. Source Interface Commands5.12.1. Setting a source-interface IP address to theTFTP protocol
This command works in the configuration context and sets a source-interface IP address to theTFTP protocol.
As of now the CLI infra is ready, end to end functionality of source interface selectionto the TFTP protocol is not implemented.
Syntax ip source-interface tftp address <A.B.C.D>
Authority All users.
<address> Sets the IP address defined on any interface to the TFTP protocol.
Examples
switch# configure terminalswitch(config)# ip source-interface tftp address 1.1.1.1
5.12.2. Setting a source-interface IP address for all thespecified protocols
This command works in the configuration context and sets a source-interface IP address for all thespecified protocols.
As of now the CLI infra is ready, end to end functionality of source interface selectionfor all the specified protocols is not implemented.
Syntax ip source-interface all address <A.B.C.D>
Authority All users.
<address> Sets the IP address defined on any interface for all the specified protocols.
Examples
switch# configure terminalswitch(config)# ip source-interface all address 1.1.1.1
5.12.3. Setting a source-interface to TFTP protocolThis command works in the configuration context and sets a source-interface to the TFTP proto-col.
As of now the CLI infra is ready, end to end functionality of source interface selectionto the TFTP protocol is not implemented.
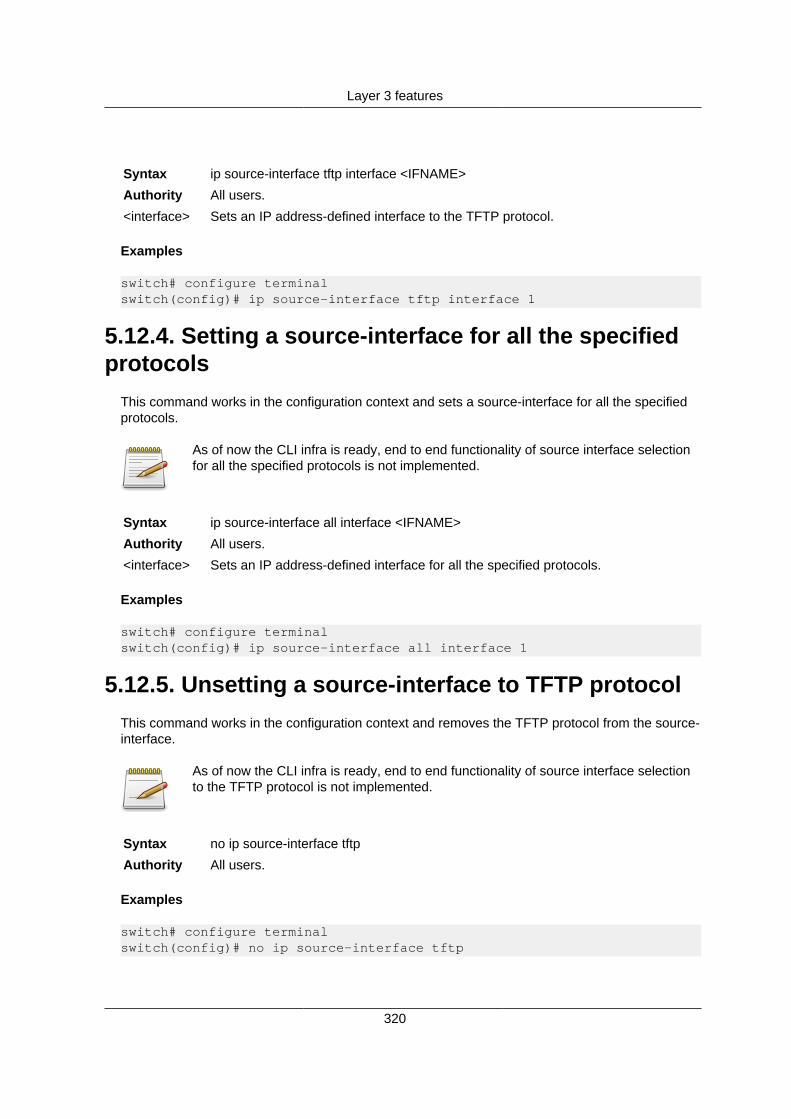
Layer 3 features
320
Syntax ip source-interface tftp interface <IFNAME>
Authority All users.
<interface> Sets an IP address-defined interface to the TFTP protocol.
Examples
switch# configure terminalswitch(config)# ip source-interface tftp interface 1
5.12.4. Setting a source-interface for all the specifiedprotocols
This command works in the configuration context and sets a source-interface for all the specifiedprotocols.
As of now the CLI infra is ready, end to end functionality of source interface selectionfor all the specified protocols is not implemented.
Syntax ip source-interface all interface <IFNAME>
Authority All users.
<interface> Sets an IP address-defined interface for all the specified protocols.
Examples
switch# configure terminalswitch(config)# ip source-interface all interface 1
5.12.5. Unsetting a source-interface to TFTP protocolThis command works in the configuration context and removes the TFTP protocol from the source-interface.
As of now the CLI infra is ready, end to end functionality of source interface selectionto the TFTP protocol is not implemented.
Syntax no ip source-interface tftp
Authority All users.
Examples
switch# configure terminalswitch(config)# no ip source-interface tftp
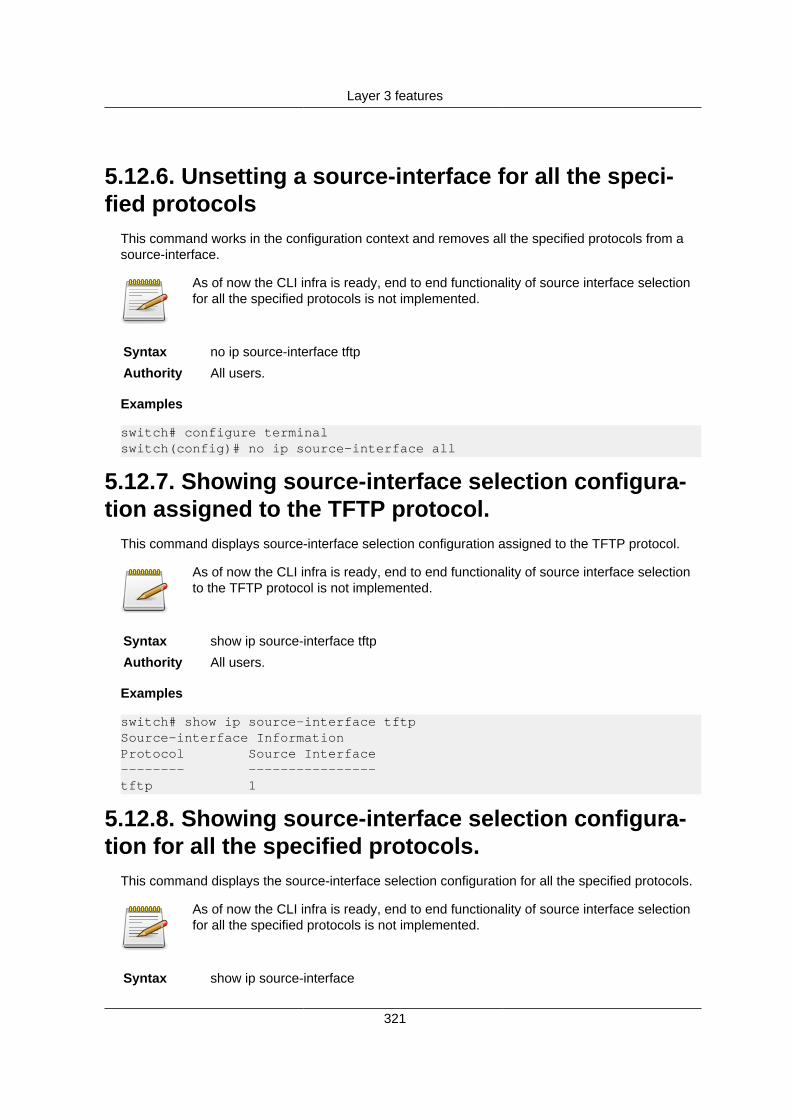
Layer 3 features
321
5.12.6. Unsetting a source-interface for all the speci-fied protocols
This command works in the configuration context and removes all the specified protocols from asource-interface.
As of now the CLI infra is ready, end to end functionality of source interface selectionfor all the specified protocols is not implemented.
Syntax no ip source-interface tftp
Authority All users.
Examples
switch# configure terminalswitch(config)# no ip source-interface all
5.12.7. Showing source-interface selection configura-tion assigned to the TFTP protocol.
This command displays source-interface selection configuration assigned to the TFTP protocol.
As of now the CLI infra is ready, end to end functionality of source interface selectionto the TFTP protocol is not implemented.
Syntax show ip source-interface tftp
Authority All users.
Examples
switch# show ip source-interface tftpSource-interface InformationProtocol Source Interface-------- ----------------tftp 1
5.12.8. Showing source-interface selection configura-tion for all the specified protocols.
This command displays the source-interface selection configuration for all the specified protocols.
As of now the CLI infra is ready, end to end functionality of source interface selectionfor all the specified protocols is not implemented.
Syntax show ip source-interface

Layer 3 features
322
Authority All users.
Examples
switch# show ip source-interfaceSource-interface InformationProtocol Source Interface-------- ----------------tftp 1
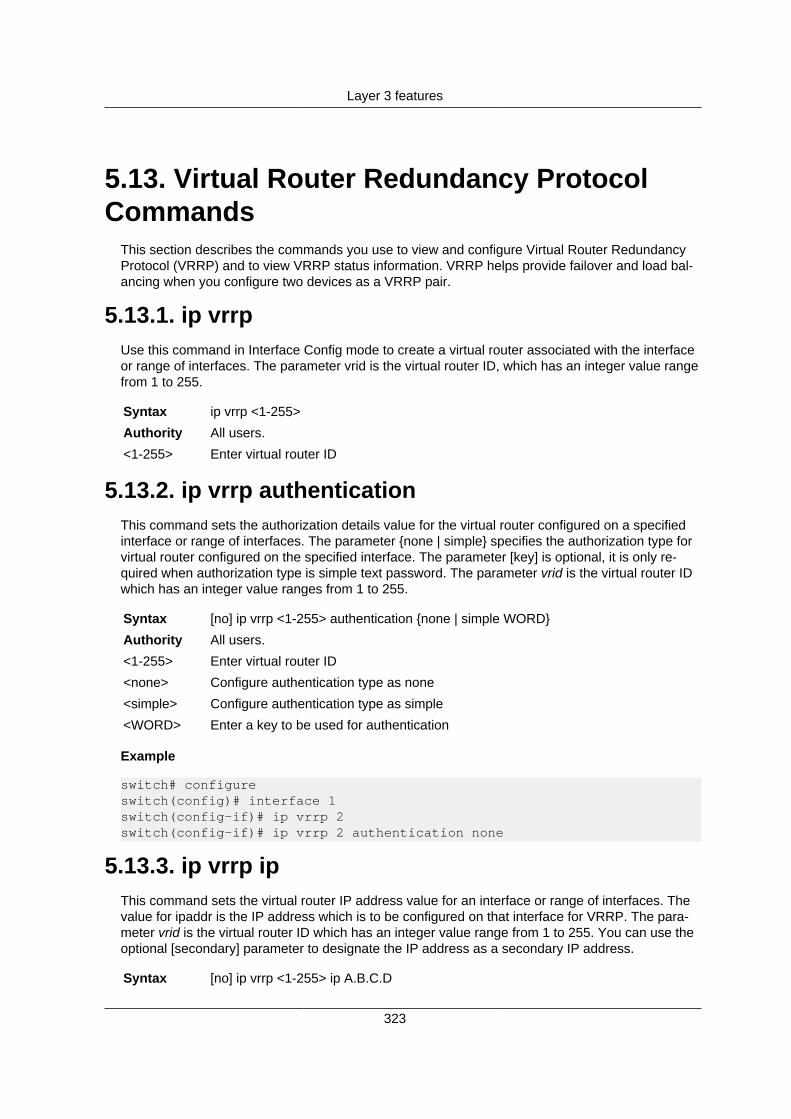
Layer 3 features
323
5.13. Virtual Router Redundancy ProtocolCommands
This section describes the commands you use to view and configure Virtual Router RedundancyProtocol (VRRP) and to view VRRP status information. VRRP helps provide failover and load bal-ancing when you configure two devices as a VRRP pair.
5.13.1. ip vrrpUse this command in Interface Config mode to create a virtual router associated with the interfaceor range of interfaces. The parameter vrid is the virtual router ID, which has an integer value rangefrom 1 to 255.
Syntax ip vrrp <1-255>
Authority All users.
<1-255> Enter virtual router ID
5.13.2. ip vrrp authenticationThis command sets the authorization details value for the virtual router configured on a specifiedinterface or range of interfaces. The parameter {none | simple} specifies the authorization type forvirtual router configured on the specified interface. The parameter [key] is optional, it is only re-quired when authorization type is simple text password. The parameter vrid is the virtual router IDwhich has an integer value ranges from 1 to 255.
Syntax [no] ip vrrp <1-255> authentication {none | simple WORD}
Authority All users.
<1-255> Enter virtual router ID
<none> Configure authentication type as none
<simple> Configure authentication type as simple
<WORD> Enter a key to be used for authentication
Example
switch# configureswitch(config)# interface 1switch(config-if)# ip vrrp 2switch(config-if)# ip vrrp 2 authentication none
5.13.3. ip vrrp ipThis command sets the virtual router IP address value for an interface or range of interfaces. Thevalue for ipaddr is the IP address which is to be configured on that interface for VRRP. The para-meter vrid is the virtual router ID which has an integer value range from 1 to 255. You can use theoptional [secondary] parameter to designate the IP address as a secondary IP address.
Syntax [no] ip vrrp <1-255> ip A.B.C.D

Layer 3 features
324
Authority All users.
<1-255> Enter virtual router ID
<A.B.C.D> Set IP address
Example
switch# configureswitch(config)# interface 1switch(config-if)# ip vrrp 2switch(config-if)# ip vrrp 2 ip 192.136.0.1
5.13.4. ip vrrp modeThis command enables the virtual router configured on the specified interface. Enabling the sta-tus field starts a virtual router. The parameter vrid is the virtual router ID which has an integer val-ue ranging from 1 to 255.
Default disabled
Syntax [no] ip vrrp <1-255> mode
Authority All users.
<1-255> Enter virtual router ID
<mode> Enable/disable the VRID on the interface
Examples
switch# configureswitch(config)# interface 1switch(config-if)# ip vrrp 2switch(config-if)# ip vrrp 2 modeswitch(config-if)# no ip vrrp 2 mode
5.13.5. ip vrrp preemptThis command sets the preemption mode value for the virtual router configured on a specified in-terface or range of interfaces. The parameter vrid is the virtual router ID, which is an integer from 1to 255.
Default enabled
Syntax [no] ip vrrp <1-255> preempt delay minimum <0-3600>
<delay> Configure delay timer
<minimum> Configure minimum value
<0-3600> Enter time value in seconds
Examples
switch# configureswitch(config)# interface 1switch(config-if)# ip vrrp 2
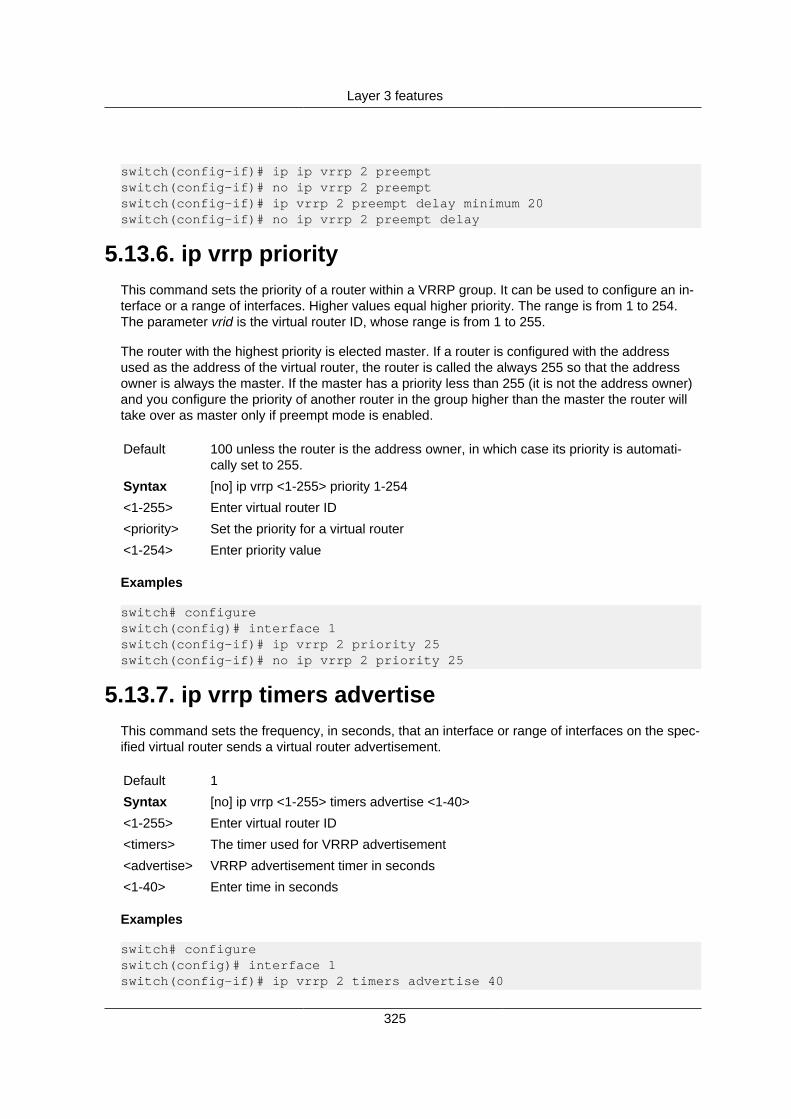
Layer 3 features
325
switch(config-if)# ip ip vrrp 2 preemptswitch(config-if)# no ip vrrp 2 preemptswitch(config-if)# ip vrrp 2 preempt delay minimum 20switch(config-if)# no ip vrrp 2 preempt delay
5.13.6. ip vrrp priorityThis command sets the priority of a router within a VRRP group. It can be used to configure an in-terface or a range of interfaces. Higher values equal higher priority. The range is from 1 to 254.The parameter vrid is the virtual router ID, whose range is from 1 to 255.
The router with the highest priority is elected master. If a router is configured with the addressused as the address of the virtual router, the router is called the always 255 so that the addressowner is always the master. If the master has a priority less than 255 (it is not the address owner)and you configure the priority of another router in the group higher than the master the router willtake over as master only if preempt mode is enabled.
Default 100 unless the router is the address owner, in which case its priority is automati-cally set to 255.
Syntax [no] ip vrrp <1-255> priority 1-254
<1-255> Enter virtual router ID
<priority> Set the priority for a virtual router
<1-254> Enter priority value
Examples
switch# configureswitch(config)# interface 1switch(config-if)# ip vrrp 2 priority 25switch(config-if)# no ip vrrp 2 priority 25
5.13.7. ip vrrp timers advertiseThis command sets the frequency, in seconds, that an interface or range of interfaces on the spec-ified virtual router sends a virtual router advertisement.
Default 1
Syntax [no] ip vrrp <1-255> timers advertise <1-40>
<1-255> Enter virtual router ID
<timers> The timer used for VRRP advertisement
<advertise> VRRP advertisement timer in seconds
<1-40> Enter time in seconds
Examples
switch# configureswitch(config)# interface 1switch(config-if)# ip vrrp 2 timers advertise 40

Layer 3 features
326
switch(config-if)# no ip vrrp 2 timers advertise 40
327
Chapter 6. Data Center CommandThis chapter describes the commands to configure the data center features available in theOpenSwitch CLI:
Section 6.1, “Priority-Based Flow Control Commands”
Section 6.2, “OpenFlow CLI Commands”
Section 6.3, “VXLAN Commands”

Data Center Command
328
6.1. Priority-Based Flow Control CommandsOrdinarily, when flow control is enabled on a physical link, it applies to all traffic on the link. Whencongestion occurs, the hardware sends pause frames that temporarily suspend traffic flow.
Pausing traffic helps prevent buffer overflow and dropped frames.
Priority-based flow control (PFC) provides a way to distinguish which traffic on physical link ispaused when congestion occurs, based on the priority of the traffic. An interface can be config-ured to pause only high priority (i.e., loss-sensitive) traffic when necessary prevent dropped frameswhile allowing traffic that has greater loss tolerance to continue to flow on the interface.
Priorities are differentiated by the priority field of the IEEE 802.1Q VLAN header, which identifiesan IEEE 802.1p priority value. In ICOS, these priority values must be mapped to internal class-of-service (CoS) values. To enable priority-based flow control for a particular CoS value on an inter-face:
1. Ensure that VLAN tagging is enabled on the interface so that the 802.1p priority values are car-ried through the network.
2. Ensure that 802.1p priority values are mapped to ICOS CoS values.
When priority-flow-control is disabled, the interface defaults to the IEEE 802.3x flow control settingfor the interface. When priority-based flow control is enabled, the interface will not pause any CoSunless there is, at least, one no-drop priority.
6.1.1. priority-flow-control modeUse the priority-flow-control mode command in the Interface Config mode to enable Priori-ty-Flow-Control (PFC) on the given interface.
Use the no form of the command to return the mode to the default (off). VLAN tagging (trunk orgeneral mode) must be enabled on the interface in order to carry the dot1p value through the net-work. Additionally, the dot1mapping to class-of-service must be set to one-to-one.
When PFC is enabled on an interface, the normal PAUSE control mechanism is operationally dis-abled.
Default Priority-flow-control mode is off (disabled) by default.
Syntax priority-flow-control mode { on | off }
Authority Admin.
<on> Enable PFC on the interface.
<off> Disable PFC on the interface.
Example: The following example enables PFC on an interface.
switch# configureswitch(config)# interface 1switch(config-if)# priority-flow-control mode on

Data Center Command
329
6.1.1.1. no priority-flow-control modeUse the no priority-flow-control mode command to return the PFC mode to the default (off).
Syntax no priority-flow-control mode
Authority Admin.
6.1.2. priority-flow-control priorityUse the priority-flow-control priority command in the Interface Config mode to enable the prioritygroup for lossless (no-drop) or lossy (drop) behavior on the selected interface. Up to two losslesspriorities can be enabled on an interface. The administrator must configure the same no-drop pri-orities across the network in order to ensure end-to-end lossless behavior.
The command has no effect on interfaces not enabled for PFC. VLAN tagging needs to be turnedon in order to carry the dot1p value through the network. Additionally, the dot1pmapping to class ofservice must be set to one to one.
Default The default behavior for all priorities is drop.
Syntax priority-flow-control priority priority-list {drop | no-drop}
Authority Admin.
<drop> Disable lossless behavior on the selected priorities.
<no-drop> Enable lossless behavior on the selected priorities.
Example: The following example sets priority 3 to no drop behavior.
switch# configureswitch(config)# interface 1switch(config-if)#priority-flow-control mode onswitch(config-if)# priority-flow-control priority 1 no-drop
6.1.2.1. no priority-flow-control priorityUse the no priority-flow-control priority command in Datacenter-Bridging Config mode to enablelossy behavior on all priorities on the interface. This has no effect on interfaces not enabled forPFC or with no lossless priorities configured.
Syntax no priority-flow-control priority
Authority Admin.
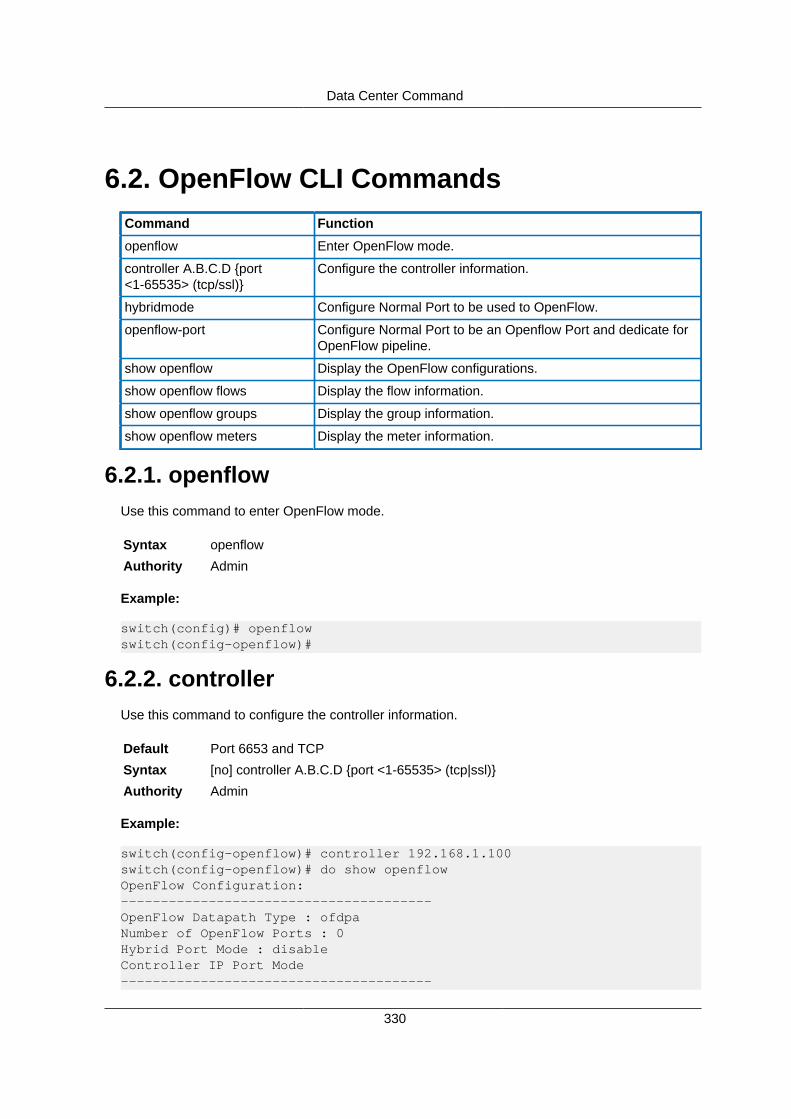
Data Center Command
330
6.2. OpenFlow CLI CommandsCommand Function
openflow Enter OpenFlow mode.
controller A.B.C.D {port<1-65535> (tcp/ssl)}
Configure the controller information.
hybridmode Configure Normal Port to be used to OpenFlow.
openflow-port Configure Normal Port to be an Openflow Port and dedicate forOpenFlow pipeline.
show openflow Display the OpenFlow configurations.
show openflow flows Display the flow information.
show openflow groups Display the group information.
show openflow meters Display the meter information.
6.2.1. openflowUse this command to enter OpenFlow mode.
Syntax openflow
Authority Admin
Example:
switch(config)# openflowswitch(config-openflow)#
6.2.2. controllerUse this command to configure the controller information.
Default Port 6653 and TCP
Syntax [no] controller A.B.C.D {port <1-65535> (tcp|ssl)}
Authority Admin
Example:
switch(config-openflow)# controller 192.168.1.100switch(config-openflow)# do show openflowOpenFlow Configuration:---------------------------------------OpenFlow Datapath Type : ofdpaNumber of OpenFlow Ports : 0Hybrid Port Mode : disableController IP Port Mode---------------------------------------
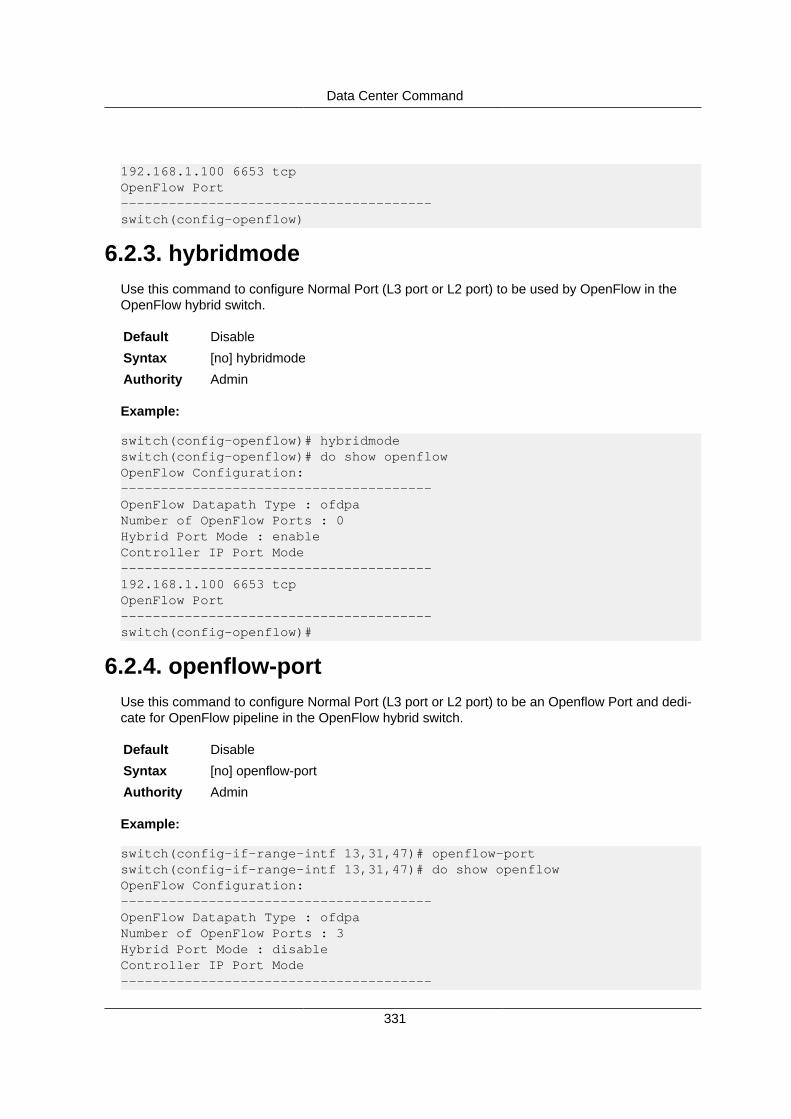
Data Center Command
331
192.168.1.100 6653 tcpOpenFlow Port---------------------------------------switch(config-openflow)
6.2.3. hybridmodeUse this command to configure Normal Port (L3 port or L2 port) to be used by OpenFlow in theOpenFlow hybrid switch.
Default Disable
Syntax [no] hybridmode
Authority Admin
Example:
switch(config-openflow)# hybridmodeswitch(config-openflow)# do show openflowOpenFlow Configuration:---------------------------------------OpenFlow Datapath Type : ofdpaNumber of OpenFlow Ports : 0Hybrid Port Mode : enableController IP Port Mode---------------------------------------192.168.1.100 6653 tcpOpenFlow Port---------------------------------------switch(config-openflow)#
6.2.4. openflow-portUse this command to configure Normal Port (L3 port or L2 port) to be an Openflow Port and dedi-cate for OpenFlow pipeline in the OpenFlow hybrid switch.
Default Disable
Syntax [no] openflow-port
Authority Admin
Example:
switch(config-if-range-intf 13,31,47)# openflow-portswitch(config-if-range-intf 13,31,47)# do show openflowOpenFlow Configuration:---------------------------------------OpenFlow Datapath Type : ofdpaNumber of OpenFlow Ports : 3Hybrid Port Mode : disableController IP Port Mode---------------------------------------

Data Center Command
332
192.168.1.100 6653 tcpOpenFlow Port---------------------------------------133147switch(config-if-range-intf 13,31,47)#
6.2.5. show openflowUse this command to display the OpenFlow configurations.
Syntax show openflow
Authority Admin
Example:
switch# show openflowOpenFlow Configuration:---------------------------------------OpenFlow Datapath Type : ofdpaNumber of OpenFlow Ports : 3Hybrid Port Mode : disableController IP Port Mode---------------------------------------192.168.1.100 6653 tcpOpenFlow Port---------------------------------------133147switch#
6.2.6. show openflow flowsUse this command to display the flow information.
Syntax show openflow flows
Authority Admin
Example:
switch# show openflow flowsFlows:---------------------------------------cookie=0x0, duration=418.659s, table=20, n_packets=83, n_bytes=139851186626542,ip,dl_dst=00:00:00:11:22:33 actions=goto_table:30cookie=0x0, duration=418.621s, table=30, n_packets=83, n_bytes=139851186626542,ip,nw_dst=1.1.1.0/24 actions=write_actions(group:536870913),goto_table:60cookie=0x0, duration=418.588s, table=30, n_packets=83, n_bytes=139851186626542,ip,nw_dst=2.2.2.0/24 actions=write_actions(group:536870914),goto_table:60
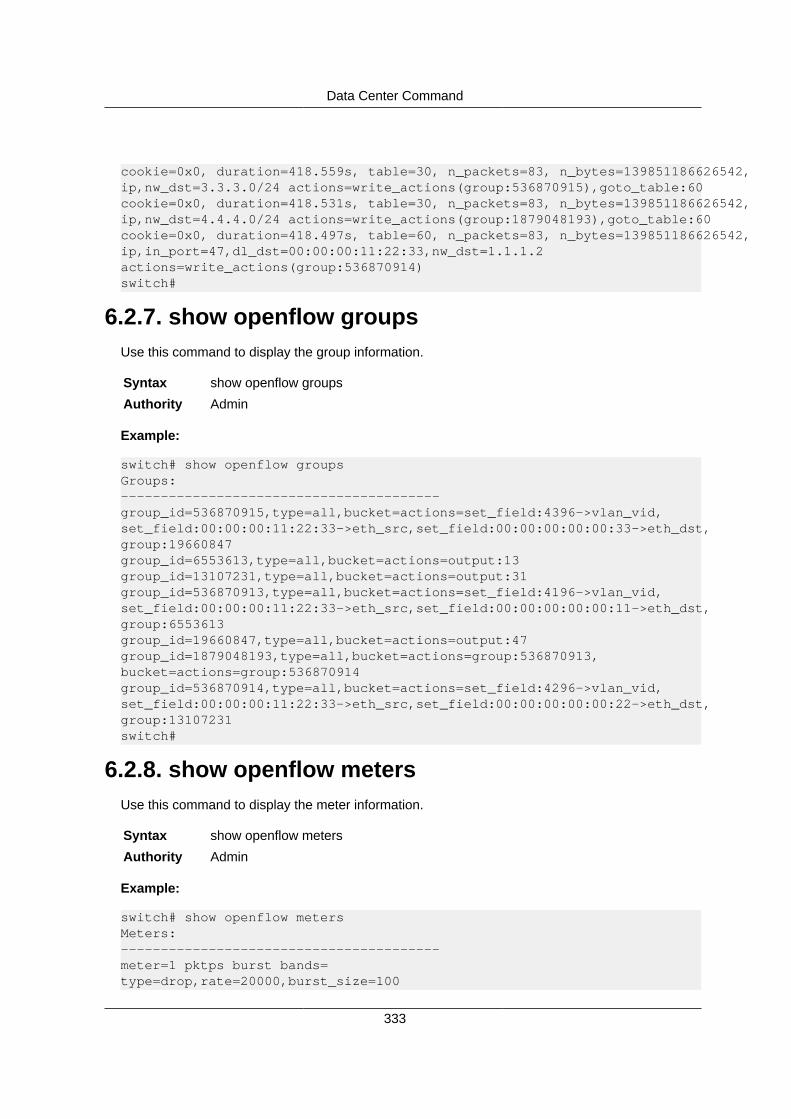
Data Center Command
333
cookie=0x0, duration=418.559s, table=30, n_packets=83, n_bytes=139851186626542,ip,nw_dst=3.3.3.0/24 actions=write_actions(group:536870915),goto_table:60cookie=0x0, duration=418.531s, table=30, n_packets=83, n_bytes=139851186626542,ip,nw_dst=4.4.4.0/24 actions=write_actions(group:1879048193),goto_table:60cookie=0x0, duration=418.497s, table=60, n_packets=83, n_bytes=139851186626542,ip,in_port=47,dl_dst=00:00:00:11:22:33,nw_dst=1.1.1.2actions=write_actions(group:536870914)switch#
6.2.7. show openflow groupsUse this command to display the group information.
Syntax show openflow groups
Authority Admin
Example:
switch# show openflow groupsGroups:----------------------------------------group_id=536870915,type=all,bucket=actions=set_field:4396->vlan_vid,set_field:00:00:00:11:22:33->eth_src,set_field:00:00:00:00:00:33->eth_dst,group:19660847group_id=6553613,type=all,bucket=actions=output:13group_id=13107231,type=all,bucket=actions=output:31group_id=536870913,type=all,bucket=actions=set_field:4196->vlan_vid,set_field:00:00:00:11:22:33->eth_src,set_field:00:00:00:00:00:11->eth_dst,group:6553613group_id=19660847,type=all,bucket=actions=output:47group_id=1879048193,type=all,bucket=actions=group:536870913,bucket=actions=group:536870914group_id=536870914,type=all,bucket=actions=set_field:4296->vlan_vid,set_field:00:00:00:11:22:33->eth_src,set_field:00:00:00:00:00:22->eth_dst,group:13107231switch#
6.2.8. show openflow metersUse this command to display the meter information.
Syntax show openflow meters
Authority Admin
Example:
switch# show openflow metersMeters:----------------------------------------meter=1 pktps burst bands=type=drop,rate=20000,burst_size=100

Data Center Command
334
meter=2 pktps burst bands=type=drop,rate=40000,burst_size=100switch#

Data Center Command
335
6.3. VXLAN CommandsThis section lists the commands that enable the network virtualization technologies (VXLAN) tocommunicate with another network.
6.3.1. vxlan source-interfaceUse this command to specify the loopback source IP address for encapsulated packets sent on aVXLAN.
It is recommended to configure a loopback interface with the intended local VXLANGateway IP address and use it as the source-ip for all tenants.
It is also possible to configure tenants with a different source-ip when multiple loopback interfacesare configured and used as local VXLAN Gateways if required. Loopback interfaces intended to beused as local VXLAN Gateways should be dedicated interfaces and must not be used for any oth-er purpose.
Default There is no source IP address.
Syntax vxlan source-interface loopback <1-2147483647>
Authority Admin
<1-2147483647>Loopback interface number
6.3.1.1. no vxlan sourceUse this command to remove the source interface.
Syntax no vxlan source-interface
Authority Admin
6.3.2. vxlan tenant-systemUse this command to configure a forwarding entry for the tenant systems MAC address mac-ad-dr‘ in the given VN that is reachable through the access interface. The user can configure tenantsystems incrementally one by one. Normally, the system automatically learns tenant systems MACaddress from received traffic on the access interface. The user can configure the tenant systemsMAC address mac-addr on the access interface to avoid initial flooding. If the user configures atenant system on the interface, the configuration overrides learning for the given MAC address inthat VN.
This command is valid only on physical and port-channel interfaces. The configuredinterface should also be a member of VLAN that is associated with the specified vnid.
These tenant system MAC addresses are maintained in a separate table. These are not listed aspart of FDB mac-address table. They internally consume shared system hardware L2 address ta-ble resources. So, the maximum number of tenant systems configured or learned depend on thenumber of resources left in the hardware L2 table, which is dynamic in nature.

Data Center Command
336
The configurable range for the VNID 1 to 16777214. 16777215 is reserved for internal purposes.
User is allowed to configure maximum 24 tenant systems per physical or port-channel interface.
Default No tenant MAC addresses are associated with the VN.
Syntax vxlan vnid <1-16777216> tenant-system <mac-addr>
Authority Admin
<1-16777216>VxLAN identifier
<mac-addr> MAC address in the form xx:xx:xx:xx:xx:xx
6.3.2.1. no vxlan tenant-systemUse this command to delete the configured tenant system forwarding entry on an interface whenthe tenant system mac-address and vnid are specified. This command cannot be used to delete adynamically-learned tenant system association on the interface in a specified vnid VN.
When an access port configuration of the VN specified by vnid is removed, by remov-ing the port participation of associated VLAN, all forwarding entries, if any, configuredby the user and learned by the switch on that access port are also removed.
Syntax no vxlan vnid tenant-system mac-addr
Authority Admin
6.3.3. vni Tunnel ConfigurationUse this command to set the tunnel ID for configuration.
Syntax vni <1-16777216>
Authority Admin
<1-16777216>Set the tunnel key
6.3.4. vxlan-vniUse this command to associate an access VLAN to the specified tunnel.
The packets that arrive with the specified VLAN vlan-id tag are associated to the VXLAN vnid. Thiscommand only associates the traffic from the specified VLAN to a given VN identified by vsid. TheVLAN vlan-id must be created already for this command to work. The user must configure the ac-cess ports for the VN specified by vnid by configuring the VLAN vlan-id membership on the eligibleinterfaces before or after this command is issued.
It is recommended to configure ingress filtering on all member ports of the VLAN vlan-id.
The configurable range for the VNID 1 to 16777214. 16777215 is reserved for internal purposes.
Default No VLAN is associated with the VXLAN.
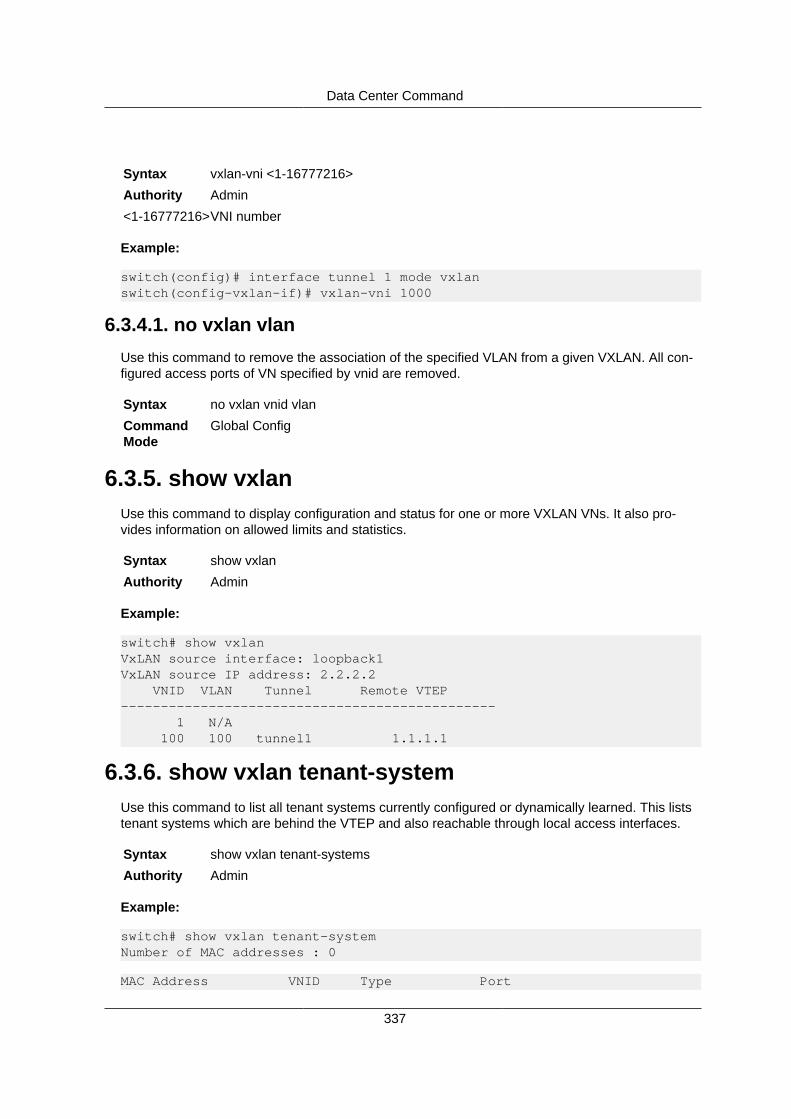
Data Center Command
337
Syntax vxlan-vni <1-16777216>
Authority Admin
<1-16777216>VNI number
Example:
switch(config)# interface tunnel 1 mode vxlanswitch(config-vxlan-if)# vxlan-vni 1000
6.3.4.1. no vxlan vlanUse this command to remove the association of the specified VLAN from a given VXLAN. All con-figured access ports of VN specified by vnid are removed.
Syntax no vxlan vnid vlan
CommandMode
Global Config
6.3.5. show vxlanUse this command to display configuration and status for one or more VXLAN VNs. It also pro-vides information on allowed limits and statistics.
Syntax show vxlan
Authority Admin
Example:
switch# show vxlanVxLAN source interface: loopback1VxLAN source IP address: 2.2.2.2 VNID VLAN Tunnel Remote VTEP----------------------------------------------- 1 N/A 100 100 tunnel1 1.1.1.1
6.3.6. show vxlan tenant-systemUse this command to list all tenant systems currently configured or dynamically learned. This liststenant systems which are behind the VTEP and also reachable through local access interfaces.
Syntax show vxlan tenant-systems
Authority Admin
Example:
switch# show vxlan tenant-systemNumber of MAC addresses : 0
MAC Address VNID Type Port
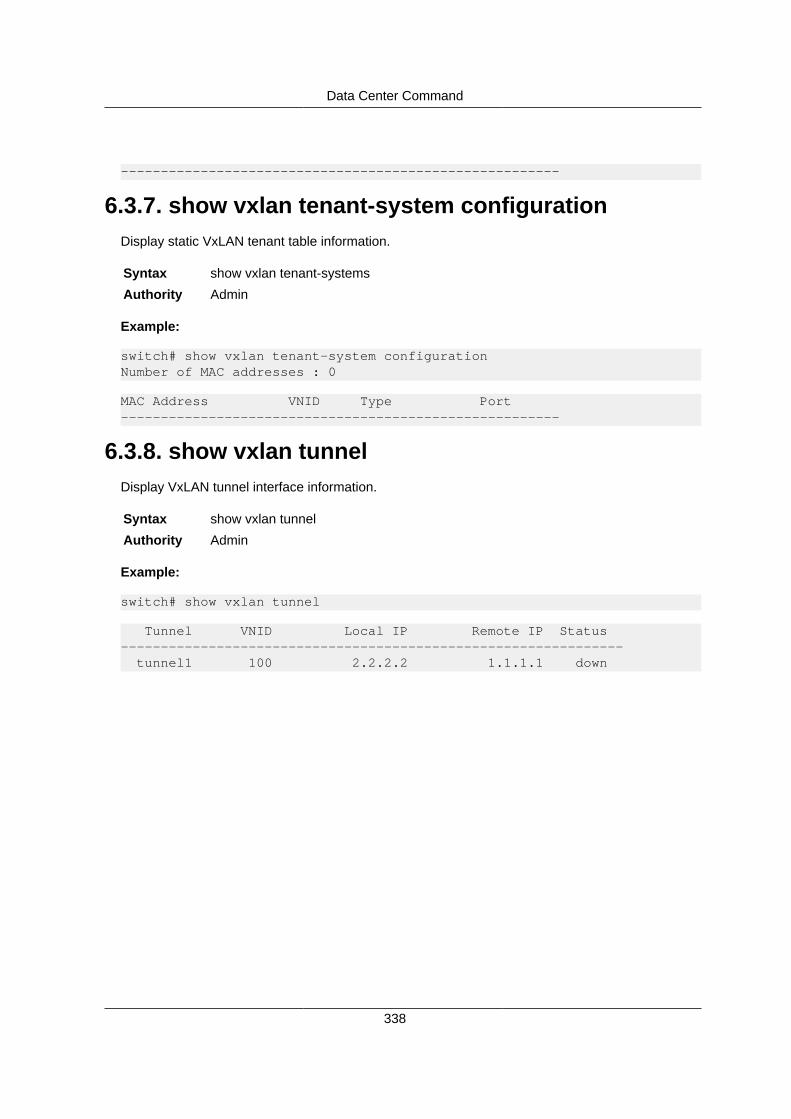
Data Center Command
338
-------------------------------------------------------
6.3.7. show vxlan tenant-system configurationDisplay static VxLAN tenant table information.
Syntax show vxlan tenant-systems
Authority Admin
Example:
switch# show vxlan tenant-system configurationNumber of MAC addresses : 0
MAC Address VNID Type Port-------------------------------------------------------
6.3.8. show vxlan tunnelDisplay VxLAN tunnel interface information.
Syntax show vxlan tunnel
Authority Admin
Example:
switch# show vxlan tunnel
Tunnel VNID Local IP Remote IP Status--------------------------------------------------------------- tunnel1 100 2.2.2.2 1.1.1.1 down

339
Chapter 7. Quality of ServiceCommands
Section 7.1, “Definition of terms”
Section 7.2, “QoS global configuration commands”
Section 7.3, “QoS interface configuration commands”
Section 7.4, “QOS queue profile configuration commands”
Section 7.5, “QoS schedule profile configuration commands”
Section 7.6, “Display commands”
Section 7.7, “Common troubleshooting”
Section 7.8, “Traffic shape”
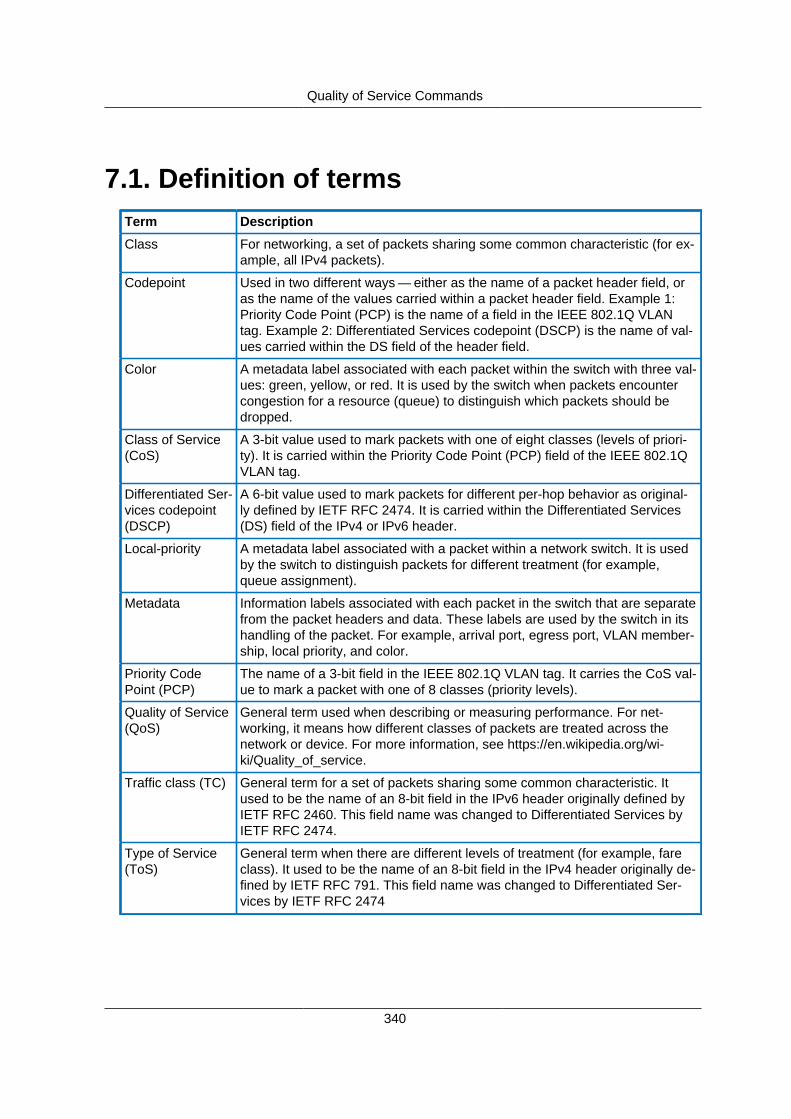
Quality of Service Commands
340
7.1. Definition of termsTerm Description
Class For networking, a set of packets sharing some common characteristic (for ex-ample, all IPv4 packets).
Codepoint Used in two different ways — either as the name of a packet header field, oras the name of the values carried within a packet header field. Example 1:Priority Code Point (PCP) is the name of a field in the IEEE 802.1Q VLANtag. Example 2: Differentiated Services codepoint (DSCP) is the name of val-ues carried within the DS field of the header field.
Color A metadata label associated with each packet within the switch with three val-ues: green, yellow, or red. It is used by the switch when packets encountercongestion for a resource (queue) to distinguish which packets should bedropped.
Class of Service(CoS)
A 3-bit value used to mark packets with one of eight classes (levels of priori-ty). It is carried within the Priority Code Point (PCP) field of the IEEE 802.1QVLAN tag.
Differentiated Ser-vices codepoint(DSCP)
A 6-bit value used to mark packets for different per-hop behavior as original-ly defined by IETF RFC 2474. It is carried within the Differentiated Services(DS) field of the IPv4 or IPv6 header.
Local-priority A metadata label associated with a packet within a network switch. It is usedby the switch to distinguish packets for different treatment (for example,queue assignment).
Metadata Information labels associated with each packet in the switch that are separatefrom the packet headers and data. These labels are used by the switch in itshandling of the packet. For example, arrival port, egress port, VLAN member-ship, local priority, and color.
Priority CodePoint (PCP)
The name of a 3-bit field in the IEEE 802.1Q VLAN tag. It carries the CoS val-ue to mark a packet with one of 8 classes (priority levels).
Quality of Service(QoS)
General term used when describing or measuring performance. For net-working, it means how different classes of packets are treated across thenetwork or device. For more information, see https://en.wikipedia.org/wi-ki/Quality_of_service.
Traffic class (TC) General term for a set of packets sharing some common characteristic. Itused to be the name of an 8-bit field in the IPv6 header originally defined byIETF RFC 2460. This field name was changed to Differentiated Services byIETF RFC 2474.
Type of Service(ToS)
General term when there are different levels of treatment (for example, fareclass). It used to be the name of an 8-bit field in the IPv4 header originally de-fined by IETF RFC 791. This field name was changed to Differentiated Ser-vices by IETF RFC 2474

Quality of Service Commands
341
7.2. QoS global configuration commandsThese commands are entered in the global configuration context.
7.2.1. apply qos queue-profileThe apply qos command in the global configuration context configures the given queue profile andschedule profile at the global level. Global profiles are configured on all Ethernet interfaces andLAGs that have not applied their own profiles.
This may cause the interface(s) or LAG(s) to shut down briefly during the reconfiguration.
For a queue profile to be complete and ready to be applied, all local priorities must be mapped to aqueue.
For the schedule profile to be complete and ready to be applied, it must have a configuration foreach queue defined by the queue profile. All queues must use the same algorithm except for thehighest numbered queue, which may be "strict".
There is a special, pre-defined schedule-profile named "strict". It is always present and unalter-able. The strict profile services all queues of an associated queue profile using the strict priority al-gorithm.
Both the queue profile and the schedule profile must specify the same number of queues.
An applied profile cannot be updated or deleted until such time that it is no longer applied.
The no apply qos command is disallowed in the global configuration context. It is required to al-ways have a global and schedule profile applied. To cease the use of a profile, apply a differentprofile.
Syntax apply qos queue-profile <NAME> schedule-profile {<NAME> | strict}
Authority All configuration users.
<NAME> The name of the profile to apply
<strict> Use the strict schedule profile
Examples
switch# configure terminalswitch(config)# apply qos queue-profile default schedule-profile strict
Troubleshooting
See the Section 7.7, “Common troubleshooting” for error messages that may appear as the outputof various commands.
If a profile fails to be applied to the hardware, then the desired configuration may differ from theactual configuration (known as "status"). In this case, the desired configuration and the actual con-figuration (status) would both be displayed by the show interface command. In the following ex-ample, the desired schedule profile is strict, but the actual schedule profile in hardware is default:
switch# configure terminal
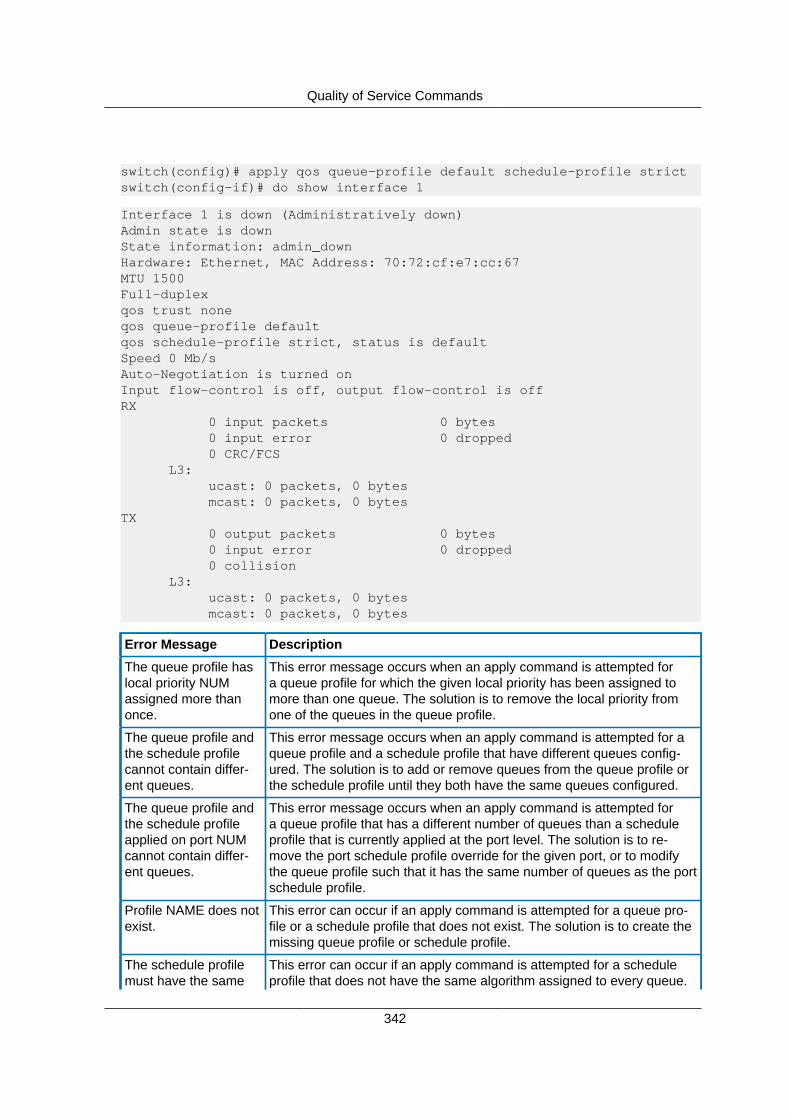
Quality of Service Commands
342
switch(config)# apply qos queue-profile default schedule-profile strictswitch(config-if)# do show interface 1
Interface 1 is down (Administratively down)Admin state is downState information: admin_downHardware: Ethernet, MAC Address: 70:72:cf:e7:cc:67MTU 1500Full-duplexqos trust noneqos queue-profile defaultqos schedule-profile strict, status is defaultSpeed 0 Mb/sAuto-Negotiation is turned onInput flow-control is off, output flow-control is offRX 0 input packets 0 bytes 0 input error 0 dropped 0 CRC/FCS L3: ucast: 0 packets, 0 bytes mcast: 0 packets, 0 bytesTX 0 output packets 0 bytes 0 input error 0 dropped 0 collision L3: ucast: 0 packets, 0 bytes mcast: 0 packets, 0 bytes
Error Message Description
The queue profile haslocal priority NUMassigned more thanonce.
This error message occurs when an apply command is attempted fora queue profile for which the given local priority has been assigned tomore than one queue. The solution is to remove the local priority fromone of the queues in the queue profile.
The queue profile andthe schedule profilecannot contain differ-ent queues.
This error message occurs when an apply command is attempted for aqueue profile and a schedule profile that have different queues config-ured. The solution is to add or remove queues from the queue profile orthe schedule profile until they both have the same queues configured.
The queue profile andthe schedule profileapplied on port NUMcannot contain differ-ent queues.
This error message occurs when an apply command is attempted fora queue profile that has a different number of queues than a scheduleprofile that is currently applied at the port level. The solution is to re-move the port schedule profile override for the given port, or to modifythe queue profile such that it has the same number of queues as the portschedule profile.
Profile NAME does notexist.
This error can occur if an apply command is attempted for a queue pro-file or a schedule profile that does not exist. The solution is to create themissing queue profile or schedule profile.
The schedule profilemust have the same
This error can occur if an apply command is attempted for a scheduleprofile that does not have the same algorithm assigned to every queue.
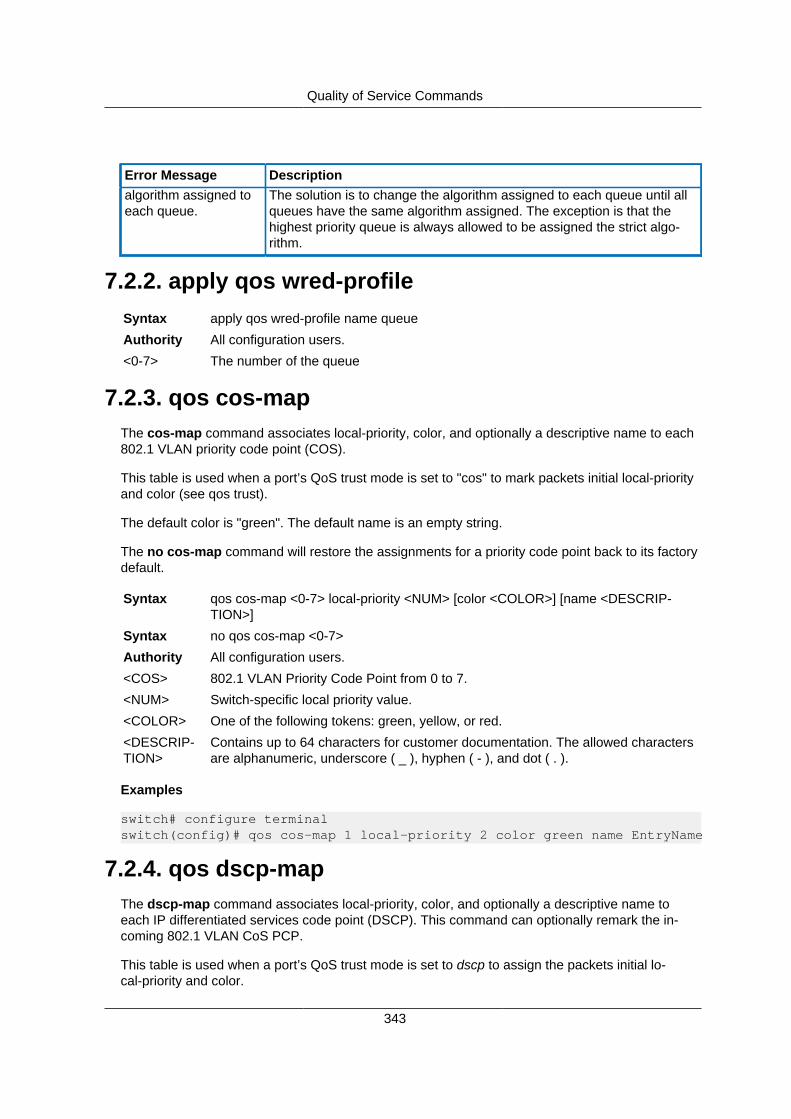
Quality of Service Commands
343
Error Message Descriptionalgorithm assigned toeach queue.
The solution is to change the algorithm assigned to each queue until allqueues have the same algorithm assigned. The exception is that thehighest priority queue is always allowed to be assigned the strict algo-rithm.
7.2.2. apply qos wred-profileSyntax apply qos wred-profile name queue
Authority All configuration users.
<0-7> The number of the queue
7.2.3. qos cos-mapThe cos-map command associates local-priority, color, and optionally a descriptive name to each802.1 VLAN priority code point (COS).
This table is used when a port’s QoS trust mode is set to "cos" to mark packets initial local-priorityand color (see qos trust).
The default color is "green". The default name is an empty string.
The no cos-map command will restore the assignments for a priority code point back to its factorydefault.
Syntax qos cos-map <0-7> local-priority <NUM> [color <COLOR>] [name <DESCRIP-TION>]
Syntax no qos cos-map <0-7>
Authority All configuration users.
<COS> 802.1 VLAN Priority Code Point from 0 to 7.
<NUM> Switch-specific local priority value.
<COLOR> One of the following tokens: green, yellow, or red.
<DESCRIP-TION>
Contains up to 64 characters for customer documentation. The allowed charactersare alphanumeric, underscore ( _ ), hyphen ( - ), and dot ( . ).
Examples
switch# configure terminalswitch(config)# qos cos-map 1 local-priority 2 color green name EntryName
7.2.4. qos dscp-mapThe dscp-map command associates local-priority, color, and optionally a descriptive name toeach IP differentiated services code point (DSCP). This command can optionally remark the in-coming 802.1 VLAN CoS PCP.
This table is used when a port’s QoS trust mode is set to dscp to assign the packets initial lo-cal-priority and color.
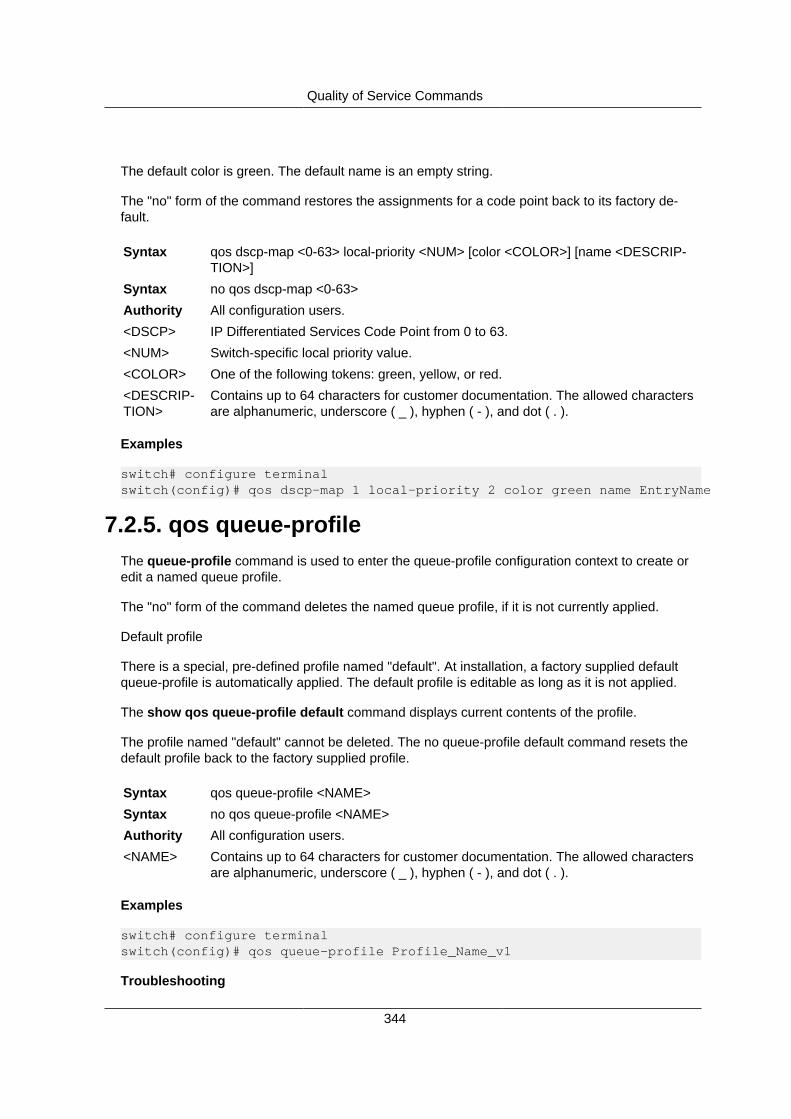
Quality of Service Commands
344
The default color is green. The default name is an empty string.
The "no" form of the command restores the assignments for a code point back to its factory de-fault.
Syntax qos dscp-map <0-63> local-priority <NUM> [color <COLOR>] [name <DESCRIP-TION>]
Syntax no qos dscp-map <0-63>
Authority All configuration users.
<DSCP> IP Differentiated Services Code Point from 0 to 63.
<NUM> Switch-specific local priority value.
<COLOR> One of the following tokens: green, yellow, or red.
<DESCRIP-TION>
Contains up to 64 characters for customer documentation. The allowed charactersare alphanumeric, underscore ( _ ), hyphen ( - ), and dot ( . ).
Examples
switch# configure terminalswitch(config)# qos dscp-map 1 local-priority 2 color green name EntryName
7.2.5. qos queue-profileThe queue-profile command is used to enter the queue-profile configuration context to create oredit a named queue profile.
The "no" form of the command deletes the named queue profile, if it is not currently applied.
Default profile
There is a special, pre-defined profile named "default". At installation, a factory supplied defaultqueue-profile is automatically applied. The default profile is editable as long as it is not applied.
The show qos queue-profile default command displays current contents of the profile.
The profile named "default" cannot be deleted. The no queue-profile default command resets thedefault profile back to the factory supplied profile.
Syntax qos queue-profile <NAME>
Syntax no qos queue-profile <NAME>
Authority All configuration users.
<NAME> Contains up to 64 characters for customer documentation. The allowed charactersare alphanumeric, underscore ( _ ), hyphen ( - ), and dot ( . ).
Examples
switch# configure terminalswitch(config)# qos queue-profile Profile_Name_v1
Troubleshooting
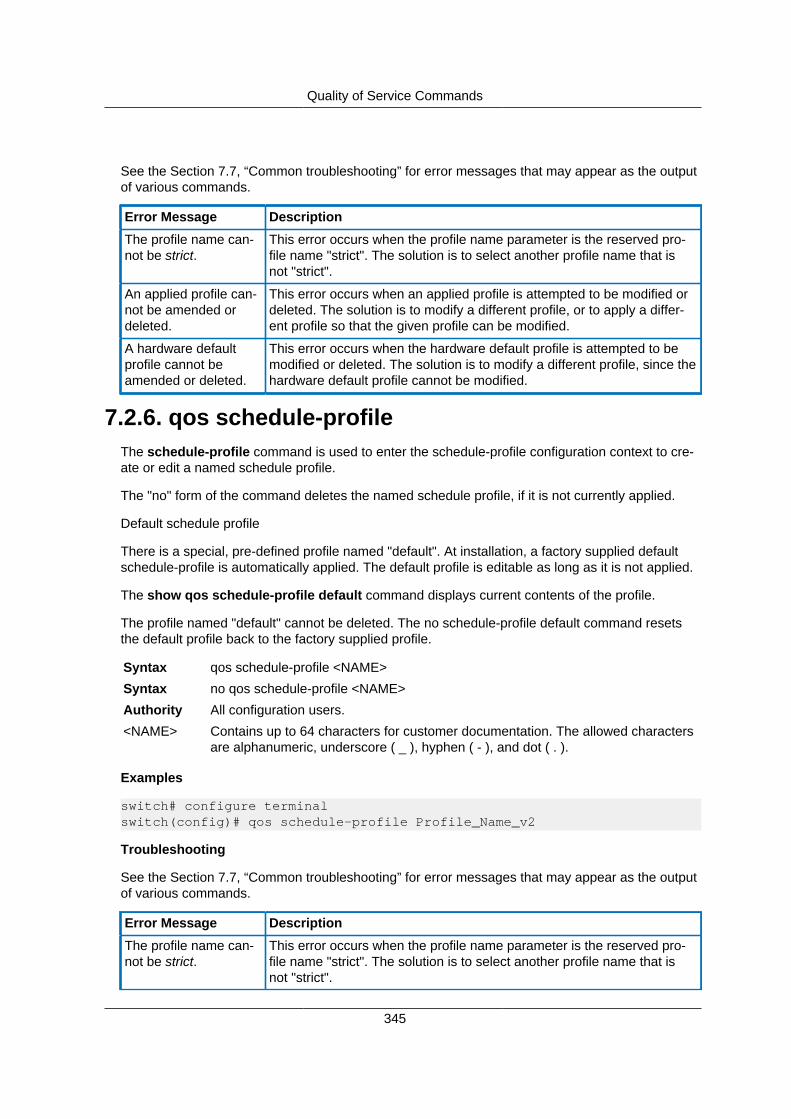
Quality of Service Commands
345
See the Section 7.7, “Common troubleshooting” for error messages that may appear as the outputof various commands.
Error Message Description
The profile name can-not be strict.
This error occurs when the profile name parameter is the reserved pro-file name "strict". The solution is to select another profile name that isnot "strict".
An applied profile can-not be amended ordeleted.
This error occurs when an applied profile is attempted to be modified ordeleted. The solution is to modify a different profile, or to apply a differ-ent profile so that the given profile can be modified.
A hardware defaultprofile cannot beamended or deleted.
This error occurs when the hardware default profile is attempted to bemodified or deleted. The solution is to modify a different profile, since thehardware default profile cannot be modified.
7.2.6. qos schedule-profileThe schedule-profile command is used to enter the schedule-profile configuration context to cre-ate or edit a named schedule profile.
The "no" form of the command deletes the named schedule profile, if it is not currently applied.
Default schedule profile
There is a special, pre-defined profile named "default". At installation, a factory supplied defaultschedule-profile is automatically applied. The default profile is editable as long as it is not applied.
The show qos schedule-profile default command displays current contents of the profile.
The profile named "default" cannot be deleted. The no schedule-profile default command resetsthe default profile back to the factory supplied profile.
Syntax qos schedule-profile <NAME>
Syntax no qos schedule-profile <NAME>
Authority All configuration users.
<NAME> Contains up to 64 characters for customer documentation. The allowed charactersare alphanumeric, underscore ( _ ), hyphen ( - ), and dot ( . ).
Examples
switch# configure terminalswitch(config)# qos schedule-profile Profile_Name_v2
Troubleshooting
See the Section 7.7, “Common troubleshooting” for error messages that may appear as the outputof various commands.
Error Message Description
The profile name can-not be strict.
This error occurs when the profile name parameter is the reserved pro-file name "strict". The solution is to select another profile name that isnot "strict".

Quality of Service Commands
346
Error Message Description
An applied profile can-not be amended ordeleted.
This error occurs when an applied profile is attempted to be modified ordeleted. The solution is to modify a different profile, or to apply a differ-ent profile so that the given profile can be modified.
A hardware defaultprofile cannot beamended or deleted.
This error occurs when the hardware default profile is attempted to bemodified or deleted. The solution is to modify a different profile, since thehardware default profile cannot be modified.
7.2.7. qos trustThe trust command configures one of three modes that be applied globally on all Ethernet inter-faces and LAGs. The modes determine which of any packet field values are used to assign the ini-tial Local-priority and Color metadata values to the packet from the CoS or DSCP Map tables.
The no qos trust command restores the trust mode back to the factory default.
Syntax qos trust {none|cos|dscp}
Syntax no qos trust
Authority All configuration users.
<none> Ignores all packet headers. The packet is initially assigned local_priority of zeroand color of green.
<cos> For 802.1 VLAN tagged packets, use the priority code point field value of the outer-most VLAN header as the index into the COS Map. If the packet is untagged, usethe metadata values at index zero of the COS Map.
<dscp> For IP packets, use the DSCP value as the index into the DSCP Map. For non-IPpackets with 802.1 VLAN tag(s), use the priority code point field value of the out-ermost tag header as the index into the CoS Map. For untagged, non-IP packets,use the metadata values at index zero of the CoS Map.
Examples
switch# configure terminalswitch(config)# qos trust dscp
7.2.8. qos wred-profileThe wred-profile command switches the vtysh context to the WRED configuration.
The no wred-profile command restores the factory default.
Syntax qos wred-profile <NAME>
Syntax no qos wred-profile
Authority All configuration users.
<NAME> The name of the WRED Profile
Examples
switch# configure terminal

Quality of Service Commands
347
switch(config)# qos wred-profile name1switch(config-wred)#
7.2.8.1. qos wred-profile queueConfigure the threshold or ECN marking for a queue of WRED Profile
Syntax queue <0-7> (green|yellow|red|non-tcp) min-threshold <0-100> max-threshold<0-100> max-drop <0-100>
Syntax no queue <0-7>
<0-7> The number of the queue
<green> color green TCP
<non-tcp> non-TCP
<red> color red TCP
<remark> ECN marking during congestion
<yellow> color yellow TCP
<min-thresh-old>
minimum threshold
<max-thresh-old>
maximum threshold
<max-drop> max drop probability
Examples
switch(config-wred)# queue 1 green min-threshold 30 max-threshold 60max-drop 10
Quality of Service Commands
348
7.3. QoS interface configuration commandsThese commands are entered in the interface configuration context.
7.3.1. interface apply qosThe apply qos command in the Ethernet or LAG interface configuration context configures thegiven schedule profile just for that interface. It overrides any schedule-profile applied in the globalcontext.
This may cause the interface (or LAG) to shutdown briefly during the reconfiguration.
The same name as the currently applied schedule-profile can be applied in the glob-al context. This guarantees that the interface always uses this schedule-profile, evenwhen the global context schedule-profile subsequently changes.
For the schedule profile to be complete and ready to be applied, it must have a configuration foreach queue defined by the queue profile. All queues must use the same algorithm (for examplemDWRR), except for the highest numbered queue, which may be "strict".
An applied profile cannot be updated or deleted until it is no longer applied.
Strict schedule profile
There is a special, pre-defined profile named "strict". It is always present and unalterable. Thestrict profile services all queues of an associated queue profile using strict priority scheduling.
The no apply qos schedule-profile command clears a schedule profile override for a given in-terface and the interface uses the global schedule profile. This is the only way to remove a sched-ule-profile override from the interface.
Syntax apply qos schedule-profile {<NAME> | strict}
Syntax no apply qos schedule-profile
Authority All configuration users.
<NAME> The name of the profile to apply.
<strict> Use the strict schedule profile.
Examples
switch# configure terminalswitch(config)# interface 1switch(config-if)# apply qos schedule-profile strict
Troubleshooting
See the Section 7.7, “Common troubleshooting” for error messages that may appear as the outputof various commands.
If a profile fails to be applied to the hardware, then the desired configuration may differ from theactual configuration (known as "status"). In this case, the desired configuration and the actual con-

Quality of Service Commands
349
figuration (status) would both be displayed by the show interface command. In the following ex-ample, the desired schedule profile is "strict", but the actual schedule profile in hardware is "de-fault":
switch# configure terminalswitch(config)# interface 1switch(config-if)# apply qos schedule-profile strictswitch(config-if)# do show interface 1
Interface 1 is down (Administratively down)Admin state is downState information: admin_downHardware: Ethernet, MAC Address: 70:72:cf:e7:cc:67MTU 1500Full-duplexqos trust noneqos queue-profile defaultqos schedule-profile strict, status is defaultSpeed 0 Mb/sAuto-Negotiation is turned onInput flow-control is off, output flow-control is offRX 0 input packets 0 bytes 0 input error 0 dropped 0 CRC/FCS L3: ucast: 0 packets, 0 bytes mcast: 0 packets, 0 bytesTX 0 output packets 0 bytes 0 input error 0 dropped 0 collision L3: ucast: 0 packets, 0 bytes mcast: 0 packets, 0 bytes
Error Message Description
The queue profile andthe schedule profilecannot contain differ-ent queues.
This error message occurs when an apply command is attempted for aqueue profile and a schedule profile that have different queues config-ured. The solution is to add or remove queues from the queue profile orthe schedule profile until they both have the same queues configured.
Profile NAME does notexist.
This error can occur if an apply command is attempted for a queue pro-file or a schedule profile that does not exist. The solution is to create themissing queue profile or schedule profile.
The schedule profilemust have the samealgorithm assigned toeach queue.
This error can occur if an apply command is attempted for a scheduleprofile that does not have the same algorithm assigned to every queue.The solution is to change the algorithm assigned to each queue until allqueues have the same algorithm assigned. The exception is that thehighest priority queue is always allowed to be assigned the strict algo-rithm.

Quality of Service Commands
350
7.3.2. interface qos dscpThe qos dscp command in the Ethernet or LAG interface configuration context configures a DSCPoverride just for that interface. It is only allowed if the interface trust mode is "none".
If a DSCP override has been configured, and the trust mode is subsequently set to"cos" or "dscp", then the DSCP override is ignored.
The no qos dscp command clears the DSCP override for the interface.
For all arriving IPv4 or IPv6 packets:
• Initial local-priority and color metadata are assigned from the DSCP map entry indexed by theDSCP override value.
• Remark the packet’s DSCP in IPv4 or IPv6 DS header field with the DSCP override value.
For all arriving non-IP packets:
• Initial local-priority and color metadata are assigned from the CoS Map entry index 0.
• The CoS of all arriving tagged non-IP packets are unchanged. — If the packet is subsequentlytransmitted with a 802.1Q VLAN tag, the PCP field contains the unchanged CoS.
Syntax [no] qos dscp <0-63>
Authority All configuration users.
<0-63> Index into the DSCP Map.
Examples
switch# configure terminalswitch(config)# qos trust cosswitch(config)# interface 1switch(config-if)# qos trust noneswitch(config-if)# qos dscp 0
Troubleshooting
See the Section 7.7, “Common troubleshooting” for error messages that may appear as the outputof various commands.
Error Message Description
QoS DSCP override isonly allowed if the porttrust mode is none.
This error occurs when a DSCP override command is attempted whenthe port trust mode is "none". The solution is to configure the port trustmode to "none".
7.3.3. interface qos trustThe qos trust command in the Ethernet or LAG interface configuration context configures a trustmode override just for that interface. It overrides the trust mode applied in the global context. The

Quality of Service Commands
351
modes determine which of any packet field values are used to assign the initial Local-priority andColor metadata values to the packet from the CoS or DSCP Map tables.
The no qos trust command clears the trust mode override for a given interface and the interfacewill use the global schedule profile. This is the only way to remove a trust mode override from theinterface.
Syntax qos trust {none|cos|dscp}
Syntax no qos trust
Authority All configuration users.
<none> Ignores all packet headers. The packet is initially assigned local_priority of zeroand color of green.
<cos> For 802.1 VLAN tagged packets, use the priority code point field value of the outer-most VLAN header as the index into the COS Map. If the packet is untagged, usethe metadata values at index zero of the COS Map.
<dscp> For IP packets, use the DSCP value as the index into the DSCP Map. For non-IPpackets with 802.1 VLAN tag(s), use the priority code point field value of the out-ermost tag header as the index into the CoS Map. For untagged, non-IP packets,use the metadata values at index zero of the CoS Map.
Examples
switch# configure terminalswitch(config)# interface 1switch(config-if)# qos trust dscp

Quality of Service Commands
352
7.4. QOS queue profile configuration com-mands
To enter the queue profile context, enter the qos queue-profile command. The following com-mands are available in queue profile context:
• name
• map
Queue numbering
Queues are numbered consecutively starting from zero. Queue zero is the lowest priority queue.The larger the queue number, the higher priority the queue has in scheduling algorithms (see Sec-tion 7.5, “QoS schedule profile configuration commands”). The maximum allowed queue numbermay vary by product. For products supporting eight queues, the largest queue number is seven.Please refer to the product specifications for the maximum.
Default profile
There is a special, pre-defined profile named "default". At installation, a factory supplied defaultqueue-profile is automatically applied. The default profile is editable as long as it is not applied.
7.4.1. nameThe name command assigns a descriptive string to a queue number in a queue profile. It has noeffect on the product configuration.
The descriptive string contains up to 64 characters for customer documentation. The allowed char-acters are alphanumeric, underscore ( _ ), hyphen ( - ), and dot ( . ).
The no name command deletes the name of a queue number in a queue profile.
Syntax name queue <0-7> <DESCRIPTION> no name queue <0-7>
Authority All configuration users.
<QUEUE> The queue number from 0 to 7
<DESCRIP-TION>
The string to assign to the queue number
Examples
switch# configure terminalswitch(config)# qos queue-profile Profile_Nameswitch(config-queue)# name queue 0 Scavenger_and_backup_data
Troubleshooting
See the Section 7.7, “Common troubleshooting” for error messages that may appear as the outputof various commands.
Quality of Service Commands
353
Error Message Description
Profile NAME does nothave queue NUM con-figured.
This error occurs when a "no" command is attempted for a queue thathas not yet been configured. The solution is to first configure the queue.
7.4.2. mapThe map command assigns a local priority to a queue number in a queue profile. Packets markedwith that local-priority use the queue.
More than one local-priority can be assigned to use the same queue. A queue without any lo-cal-priorities assigned is not used to store packets.
For a queue profile to be suitable to be applied (see apply qos), all local-priorities must be as-signed to some queue in the profile.
The no map command removes the assignment of the local priority from the queue number. If nolocal priority is provided, then the assignment of all local priorities are removed from the queue.
Syntax map queue <0-7> local-priority <0-7> no map queue <0-7> [local-priority <0-7>]
Authority All configuration users.
<QUEUE> The queue number from 0 to 7
<LOCAL_PRIORITY>The local priority to add or remove from the queue number
Examples
switch# configure terminalswitch(config)# qos queue-profile ProfileNameswitch(config-queue)# map queue 0 local-priority 1
Troubleshooting
See the Section 7.7, “Common troubleshooting” for error messages that may appear as the outputof various commands.
Error Message Description
Profile NAME does nothave queue NUM con-figured.
This error occurs when a "no" command is attempted for a queue thathas not yet been configured. The solution is to first configure the queue.

Quality of Service Commands
354
7.5. QoS schedule profile configuration com-mands
To enter the schedule profile context, enter the qos schedule-profile command. The following com-mands are available in queue profile context:
• strict
• dwrr (deficit weighted round robin)
Queue numbering
Queues in a schedule profile are numbered consecutively starting from zero. Queue zero is thelowest priority queue. The larger the queue number the higher priority the queue has in schedulingalgorithms. The maximum allowed queue number may vary by product. For products supportingeight queues, the largest queue number is seven. Please refer to the product specifications for themaximum.
Allowed forms
There are two allowed forms for schedule profiles:
1. All queues use the same scheduling algorithm (for example, dwrr).
2. The highest queue number uses Strict Priority, and all remaining (lower) queues use the samealgorithm (for example, dwrr).
The second form supports priority scheduling behavior necessary for the IEFT RFC 3246 Expedit-ed Forwarding specification.
Default schedule profile
There is a special, pre-defined profile named "default". At installation, a factory supplied defaultschedule-profile is automatically applied. The default profile is editable as long as it is not applied.
Strict schedule profile
There is a special, pre-defined profile named "strict". It is always present and unalterable. Thestrict profile services all queues of an associated queue profile using the strict priority algorithm.
7.5.1. strictThe strict command assigns the strict priority algorithm to a queue. Strict priority services all pack-ets waiting in a queue before any packets in lower priority queues are serviced.
The no strict command only clears the algorithm for a queue when the algorithm already assignedis Strict Priority.
Syntax strict queue <0-7> no strict queue <0-7>
Authority All configuration users.
<QUEUE> The queue number from 0 to 7
Quality of Service Commands
355
Examples
switch# configure terminalswitch(config)# qos schedule-profile Profile_1p7qswitch(config-schedule)# strict queue 7
Troubleshooting
See the Section 7.7, “Common troubleshooting” for error messages that may appear as the outputof various commands.
Error Message Description
Profile NAME does nothave queue NUM con-figured.
This error occurs when a "no" command is attempted for a queue thathas not yet been configured. The solution is to first configure the queue.
7.5.2. dwrrThe dwrr command assigns the deficit weighted round robin algorithm and its byte weight to aqueue.
Deficit weight round robin apportions available bandwidth among all non-empty queues in relationto their queue weights. A product will either support deficit weighted round robin or weighted roundrobin, but not both. See the specifications for the product.
The no dwrr command only clears the algorithm for a queue when the algorithm already assignedis deficit weighted round robin.
Syntax dwrr queue <0-7> weight <1-127> no dwrr queue <0-7>
Authority All configuration users.
<QUEUE> The queue number from 0 to 7
<WEIGHT> The weight to use for the dwrr scheduling.
Examples
switch# configure terminalswitch(config)# qos schedule-profile ProfileNameswitch(config-schedule)# dwrr queue 0 weight 11switch(config-schedule)# dwrr queue 1 weight 17
Troubleshooting
See the Section 7.7, “Common troubleshooting” for error messages that may appear as the outputof various commands.
Error Message Description
Profile NAME does nothave queue NUM con-figured.
This error occurs when a "no" command is attempted for a queue thathas not yet been configured. The solution is to first configure the queue.

Quality of Service Commands
356
7.6. Display commandsThe following commands show configuration and status information.
7.6.1. show interfaceThis command’s display includes the QoS settings that have been configured for an interface.
Syntax show interface <INTERFACE>
Authority All users.
<INTER-FACE>
Name of the interface.
Examples
switch# configure terminalswitch(config)# interface 1switch(config-if)# qos trust dscpswitch(config-if)# endswitch# show interface 1
Interface 1 is down (Administratively down)Admin state is downState information: admin_downHardware: Ethernet, MAC Address: 70:72:cf:fc:51:deMTU 0Half-duplexqos trust dscpSpeed 0 Mb/sAuto-Negotiation is turned onInput flow-control is off, output flow-control is offRX 0 input packets 0 bytes 0 input error 0 dropped 0 CRC/FCSTX 0 output packets 0 bytes 0 input error 0 dropped 0 collision
7.6.2. show interface queuesThis command displays statistics from each queue for an interface:
• Number of packets transmitted
• Number of bytes transmitted
• Number of packets that were not transmitted due to an error (for example: queue full)
Queues are numbered consecutively starting from zero. Queue zero is the lowest priority queue.The larger the queue number the higher priority the queue has in scheduling algorithms. The max-
Quality of Service Commands
357
imum allowed queue number may vary by product. For products supporting eight queues, thelargest queue number is seven. Please refer to the product specifications for the maximum.
Syntax show interface <INTERFACE> queues
Authority All users.
<INTER-FACE>
Name of the interface.
Examples
switch# show interface 1 queues
Interface 1 is (Administratively down)Admin state is downState information: admin_down Tx Packets Tx Bytes Tx Packet ErrorsQ0 100 8000 0Q1 1234567 12345678908 5Q2 0 0 0Q3 0 0 0Q4 0 0 0Q5 0 0 0Q6 0 0 0Q7 0 0 0
7.6.3. show qos cos-mapThis command displays the QoS cos-map.
Syntax show qos cos-map [default]
Authority All configuration users.
<default> The optional "default" parameter displays the factory default values.
Examples
switch# show qos cos-map defaultcode_point local_priority color name---------- -------------- ------- ----0 1 green Best_Effort1 0 green Background2 2 green Excellent_Effort3 3 green Critical_Applications4 4 green Video5 5 green Voice6 6 green Internetwork_Control7 7 green Network_Control
7.6.4. show qos dscp-mapThis command displays the QoS dscp-map.
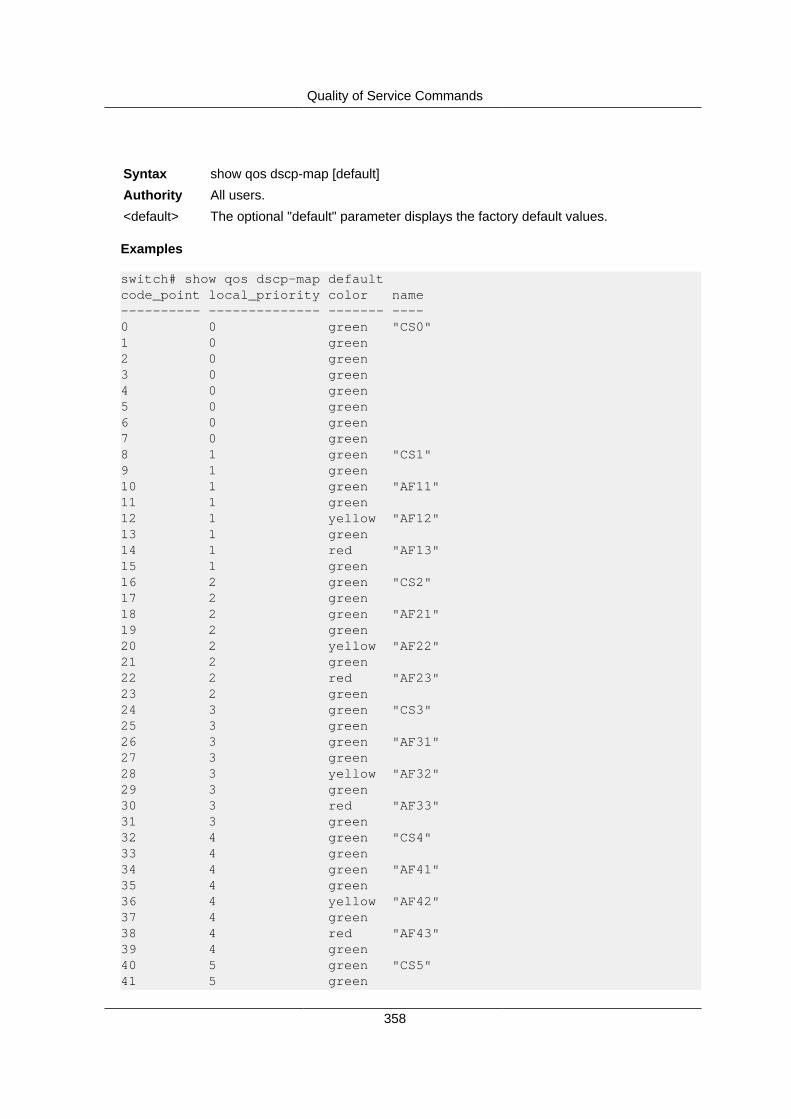
Quality of Service Commands
358
Syntax show qos dscp-map [default]
Authority All users.
<default> The optional "default" parameter displays the factory default values.
Examples
switch# show qos dscp-map defaultcode_point local_priority color name---------- -------------- ------- ----0 0 green "CS0"1 0 green2 0 green3 0 green4 0 green5 0 green6 0 green7 0 green8 1 green "CS1"9 1 green10 1 green "AF11"11 1 green12 1 yellow "AF12"13 1 green14 1 red "AF13"15 1 green16 2 green "CS2"17 2 green18 2 green "AF21"19 2 green20 2 yellow "AF22"21 2 green22 2 red "AF23"23 2 green24 3 green "CS3"25 3 green26 3 green "AF31"27 3 green28 3 yellow "AF32"29 3 green30 3 red "AF33"31 3 green32 4 green "CS4"33 4 green34 4 green "AF41"35 4 green36 4 yellow "AF42"37 4 green38 4 red "AF43"39 4 green40 5 green "CS5"41 5 green
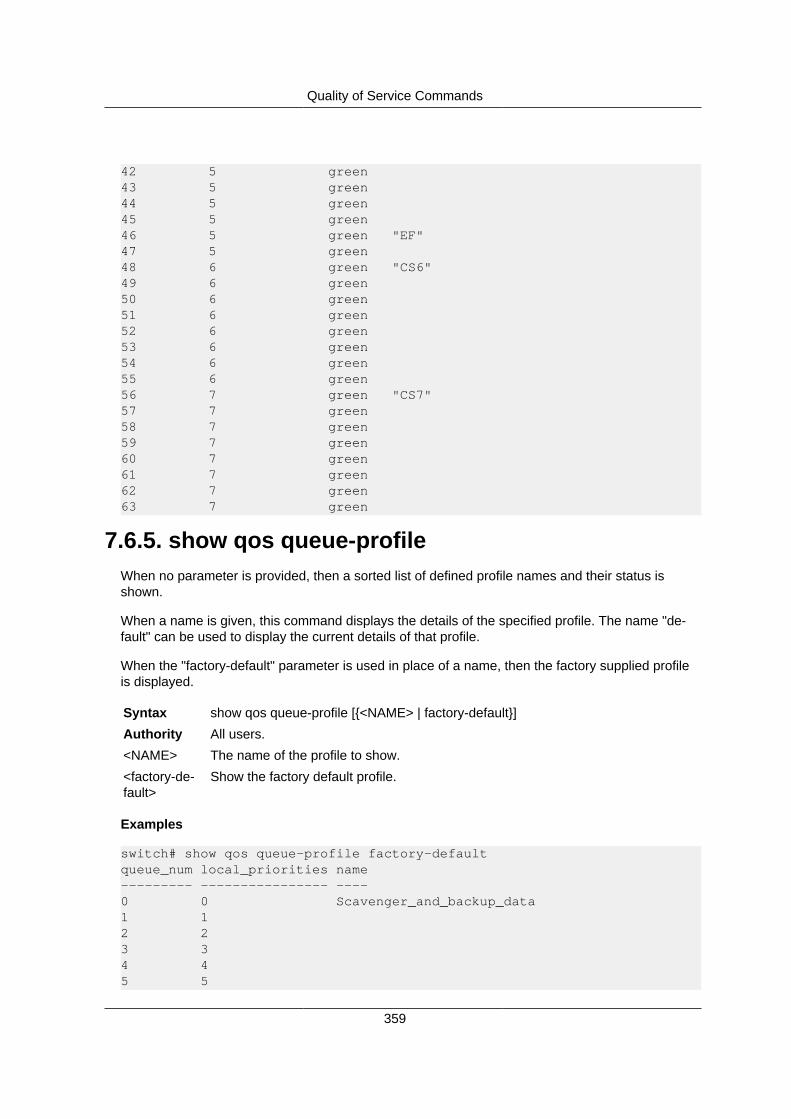
Quality of Service Commands
359
42 5 green43 5 green44 5 green45 5 green46 5 green "EF"47 5 green48 6 green "CS6"49 6 green50 6 green51 6 green52 6 green53 6 green54 6 green55 6 green56 7 green "CS7"57 7 green58 7 green59 7 green60 7 green61 7 green62 7 green63 7 green
7.6.5. show qos queue-profileWhen no parameter is provided, then a sorted list of defined profile names and their status isshown.
When a name is given, this command displays the details of the specified profile. The name "de-fault" can be used to display the current details of that profile.
When the "factory-default" parameter is used in place of a name, then the factory supplied profileis displayed.
Syntax show qos queue-profile [{<NAME> | factory-default}]
Authority All users.
<NAME> The name of the profile to show.
<factory-de-fault>
Show the factory default profile.
Examples
switch# show qos queue-profile factory-defaultqueue_num local_priorities name--------- ---------------- ----0 0 Scavenger_and_backup_data1 12 23 34 45 5
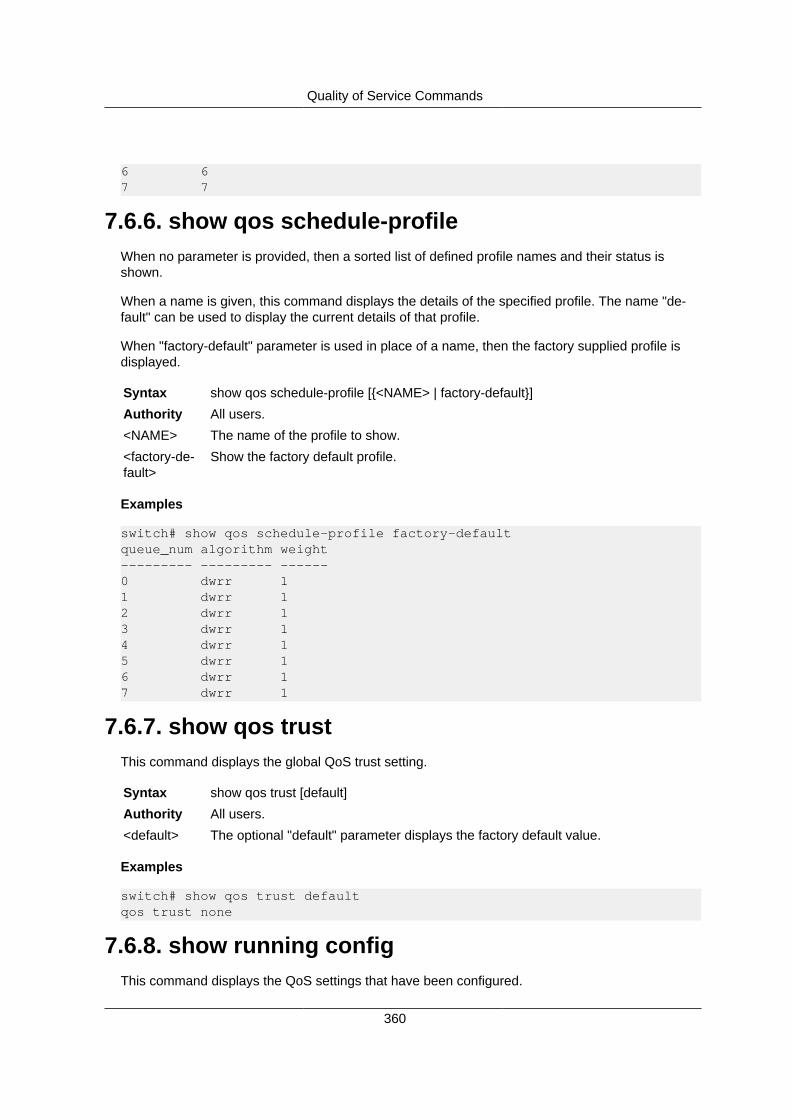
Quality of Service Commands
360
6 67 7
7.6.6. show qos schedule-profileWhen no parameter is provided, then a sorted list of defined profile names and their status isshown.
When a name is given, this command displays the details of the specified profile. The name "de-fault" can be used to display the current details of that profile.
When "factory-default" parameter is used in place of a name, then the factory supplied profile isdisplayed.
Syntax show qos schedule-profile [{<NAME> | factory-default}]
Authority All users.
<NAME> The name of the profile to show.
<factory-de-fault>
Show the factory default profile.
Examples
switch# show qos schedule-profile factory-defaultqueue_num algorithm weight--------- --------- ------0 dwrr 11 dwrr 12 dwrr 13 dwrr 14 dwrr 15 dwrr 16 dwrr 17 dwrr 1
7.6.7. show qos trustThis command displays the global QoS trust setting.
Syntax show qos trust [default]
Authority All users.
<default> The optional "default" parameter displays the factory default value.
Examples
switch# show qos trust defaultqos trust none
7.6.8. show running configThis command displays the QoS settings that have been configured.

Quality of Service Commands
361
Syntax show running-config
Authority All users.
Examples
switch# configure terminalswitch(config)# qos trust dscpswitch(config)# interface 1switch(config-if)# qos trust cosswitch(config-if)# interface lag 10switch(config-lag-if)# qos trust noneswitch(config-lag-if)# endswitch# show running-configCurrent configuration:!!!!!interface 1 qos trust cosinterface lag 10 qos trust noneqos trust dscp
7.6.9. show running config interfaceThis command displays the QoS settings that have been configured for an interface.
Syntax show running-config interface <interface>
Authority All users.
<interface> Name of the interface.
Examples
switch# configure terminalswitch(config)# interface 1switch(config-if)# qos trust dscpswitch(config-if)# endswitch# show running-config interface 1interface 1 qos trust dscp exit

Quality of Service Commands
362
7.7. Common troubleshootingThe following error messages may appear as the output of various commands.
Error Message Description
This field can have alength up to 64 charac-ters.
This error message occurs when a parameter is provided whose lengthis greater than 64 characters. The solution is to select a name that has64 or fewer characters.
The allowed charactersare alphanumeric, un-derscore ( _ ), hyphen( - ), and dot ( . ).
This error message occurs when a parameter is provided that containsillegal characters. The allowed characters are alphanumeric, underscore( _ ), hyphen ( - ), and dot ( . ).
Unknown command This error message can occur if a required parameter is missing fromthe command, or if a given parameter is out of range. The solution is toensure that all required parameters are specified for the command, andare within bounds.
Command incomplete This error message can occur if a required parameter is missing fromthe command. The solution is to ensure that all required parameters arespecified for the command.
PROPERTY cannot beconfigured on a mem-ber of a LAG.
This error message occurs if a command is attempted on an interfacethat is a member of a LAG. The solution is to execute the command onthe LAG, or to remove the interface from the LAG.

Quality of Service Commands
363
7.8. Traffic shapeThis command specifies the maximum transmission bandwidth limit for the interface as a whole.You can also specify this value for a range of interfaces or all interfaces. Also known as rate shap-ing, traffic shaping has the effect of smoothing temporary traffic bursts over time so that the trans-mitted traffic rate is bounded.
Syntax traffic-shape rate <0-100>
Authority Admin.
<rate> Configure the maximum transmission bandwidth limit
<0-100> Specify the bandwidth limit in percentage. 0 - disable
Examples
switch(config)# interface 1switch(config-if)# traffic-shape rate 50