OpenScape Personal Edition V7 - Midland Telecom How to Change the Default Ring Tone (HiPath...
246
OpenScape Personal Edition V7 User Guide A31003-G2570-U100-13-7619
Transcript of OpenScape Personal Edition V7 - Midland Telecom How to Change the Default Ring Tone (HiPath...

OpenScape Personal Edition V7
User Guide
A31003-G2570-U100-13-7619

Our Quality and Environmental Management Systems are implemented according to the requirements of the ISO9001 and ISO14001 standards and are certified by an external certification company.
Copyright © Unify GmbH & Co. KG 06/2015 Hofmannstr. 63, 81379 Munich/Germany
All rights reserved.
Reference No.: A31003-G2570-U100-13-7619
The information provided in this document contains merely general descriptions or characteristics of performance which in case of actual use do not always apply as described or which may change as a result of further development of the products. An obligation to provide the respective characteristics shall only exist if expressly agreed in the terms of contract.
Availability and technical specifications are subject to change without notice.
Unify, OpenScape, OpenStage and HiPath are registered trademarks of Unify GmbH & Co. KG. All other company, brand, product and service names are trademarks or registered trademarks of their respective holders.
unify.com

Contents
Contents
History of Changes . . . . . . . . . . . . . . . . . . . . . . . . . . . . . . . . . . . . . . . . . . . . . . . . . . . . . . . . . . . . . . . . . . . . . . . 9
1 About this Manual . . . . . . . . . . . . . . . . . . . . . . . . . . . . . . . . . . . . . . . . . . . . . . . . . . . . . . . . . . . . . . . . . . . . . 111.1 Target Group of this Manual . . . . . . . . . . . . . . . . . . . . . . . . . . . . . . . . . . . . . . . . . . . . . . . . . . . . . . . . . . . . 111.2 Contents of this Manual . . . . . . . . . . . . . . . . . . . . . . . . . . . . . . . . . . . . . . . . . . . . . . . . . . . . . . . . . . . . . . . . 111.3 Representation Conventions . . . . . . . . . . . . . . . . . . . . . . . . . . . . . . . . . . . . . . . . . . . . . . . . . . . . . . . . . . . . 12
1.3.1 Formats and Display Forms . . . . . . . . . . . . . . . . . . . . . . . . . . . . . . . . . . . . . . . . . . . . . . . . . . . . . . . . . 121.3.2 Notes . . . . . . . . . . . . . . . . . . . . . . . . . . . . . . . . . . . . . . . . . . . . . . . . . . . . . . . . . . . . . . . . . . . . . . . . . . 121.3.3 Figures . . . . . . . . . . . . . . . . . . . . . . . . . . . . . . . . . . . . . . . . . . . . . . . . . . . . . . . . . . . . . . . . . . . . . . . . . 13
1.4 Continuative Documentation . . . . . . . . . . . . . . . . . . . . . . . . . . . . . . . . . . . . . . . . . . . . . . . . . . . . . . . . . . . . 131.5 Acronyms . . . . . . . . . . . . . . . . . . . . . . . . . . . . . . . . . . . . . . . . . . . . . . . . . . . . . . . . . . . . . . . . . . . . . . . . . . . 13
2 Configuration and Settings . . . . . . . . . . . . . . . . . . . . . . . . . . . . . . . . . . . . . . . . . . . . . . . . . . . . . . . . . . . . . 152.1 “Audio Schemes” Tab . . . . . . . . . . . . . . . . . . . . . . . . . . . . . . . . . . . . . . . . . . . . . . . . . . . . . . . . . . . . . . . 152.2 “Modules” Tab . . . . . . . . . . . . . . . . . . . . . . . . . . . . . . . . . . . . . . . . . . . . . . . . . . . . . . . . . . . . . . . . . . . . . . . 182.3 “Advanced” Tab . . . . . . . . . . . . . . . . . . . . . . . . . . . . . . . . . . . . . . . . . . . . . . . . . . . . . . . . . . . . . . . . . . . . . . 21
2.3.1 General Settings . . . . . . . . . . . . . . . . . . . . . . . . . . . . . . . . . . . . . . . . . . . . . . . . . . . . . . . . . . . . . . . . . 222.3.1.1 General . . . . . . . . . . . . . . . . . . . . . . . . . . . . . . . . . . . . . . . . . . . . . . . . . . . . . . . . . . . . . . . . . . . . . 222.3.1.2 User Data . . . . . . . . . . . . . . . . . . . . . . . . . . . . . . . . . . . . . . . . . . . . . . . . . . . . . . . . . . . . . . . . . . . 232.3.1.3 Starting the Program . . . . . . . . . . . . . . . . . . . . . . . . . . . . . . . . . . . . . . . . . . . . . . . . . . . . . . . . . . . 242.3.1.4 Connection Status Change . . . . . . . . . . . . . . . . . . . . . . . . . . . . . . . . . . . . . . . . . . . . . . . . . . . . . . 262.3.1.5 Task Bar and Notification Area . . . . . . . . . . . . . . . . . . . . . . . . . . . . . . . . . . . . . . . . . . . . . . . . . . . 282.3.1.6 Program Update . . . . . . . . . . . . . . . . . . . . . . . . . . . . . . . . . . . . . . . . . . . . . . . . . . . . . . . . . . . . . . 282.3.1.7 Central Configuration . . . . . . . . . . . . . . . . . . . . . . . . . . . . . . . . . . . . . . . . . . . . . . . . . . . . . . . . . . 29
2.3.2 Telephone Settings . . . . . . . . . . . . . . . . . . . . . . . . . . . . . . . . . . . . . . . . . . . . . . . . . . . . . . . . . . . . . . . 312.3.3 Device State Settings . . . . . . . . . . . . . . . . . . . . . . . . . . . . . . . . . . . . . . . . . . . . . . . . . . . . . . . . . . . . . . 32
2.3.3.1 Line Settings . . . . . . . . . . . . . . . . . . . . . . . . . . . . . . . . . . . . . . . . . . . . . . . . . . . . . . . . . . . . . . . . . 322.3.4 Web Browser Settings . . . . . . . . . . . . . . . . . . . . . . . . . . . . . . . . . . . . . . . . . . . . . . . . . . . . . . . . . . . . . 33
2.3.4.1 Internet Page Settings . . . . . . . . . . . . . . . . . . . . . . . . . . . . . . . . . . . . . . . . . . . . . . . . . . . . . . . . . 332.3.5 SIP Service Provider Settings . . . . . . . . . . . . . . . . . . . . . . . . . . . . . . . . . . . . . . . . . . . . . . . . . . . . . . . 34
2.3.5.1 System Services . . . . . . . . . . . . . . . . . . . . . . . . . . . . . . . . . . . . . . . . . . . . . . . . . . . . . . . . . . . . . . 352.3.5.2 Connection . . . . . . . . . . . . . . . . . . . . . . . . . . . . . . . . . . . . . . . . . . . . . . . . . . . . . . . . . . . . . . . . . . 372.3.5.3 Main Line. . . . . . . . . . . . . . . . . . . . . . . . . . . . . . . . . . . . . . . . . . . . . . . . . . . . . . . . . . . . . . . . . . . . 392.3.5.4 Additional Lines . . . . . . . . . . . . . . . . . . . . . . . . . . . . . . . . . . . . . . . . . . . . . . . . . . . . . . . . . . . . . . 412.3.5.5 Line Parameters . . . . . . . . . . . . . . . . . . . . . . . . . . . . . . . . . . . . . . . . . . . . . . . . . . . . . . . . . . . . . . 432.3.5.6 Registrar . . . . . . . . . . . . . . . . . . . . . . . . . . . . . . . . . . . . . . . . . . . . . . . . . . . . . . . . . . . . . . . . . . . . 452.3.5.7 Proxy . . . . . . . . . . . . . . . . . . . . . . . . . . . . . . . . . . . . . . . . . . . . . . . . . . . . . . . . . . . . . . . . . . . . . . . 462.3.5.8 Outbound Domain . . . . . . . . . . . . . . . . . . . . . . . . . . . . . . . . . . . . . . . . . . . . . . . . . . . . . . . . . . . . . 472.3.5.9 Network Access. . . . . . . . . . . . . . . . . . . . . . . . . . . . . . . . . . . . . . . . . . . . . . . . . . . . . . . . . . . . . . . 502.3.5.10 Address Conversion . . . . . . . . . . . . . . . . . . . . . . . . . . . . . . . . . . . . . . . . . . . . . . . . . . . . . . . . . . 522.3.5.11 Additional Functions . . . . . . . . . . . . . . . . . . . . . . . . . . . . . . . . . . . . . . . . . . . . . . . . . . . . . . . . . . 532.3.5.12 System Functions . . . . . . . . . . . . . . . . . . . . . . . . . . . . . . . . . . . . . . . . . . . . . . . . . . . . . . . . . . . . 552.3.5.13 Codes . . . . . . . . . . . . . . . . . . . . . . . . . . . . . . . . . . . . . . . . . . . . . . . . . . . . . . . . . . . . . . . . . . . . . 562.3.5.14 Sounds . . . . . . . . . . . . . . . . . . . . . . . . . . . . . . . . . . . . . . . . . . . . . . . . . . . . . . . . . . . . . . . . . . . . 592.3.5.15 Ring Tones . . . . . . . . . . . . . . . . . . . . . . . . . . . . . . . . . . . . . . . . . . . . . . . . . . . . . . . . . . . . . . . . . 592.3.5.16 Video Schemes . . . . . . . . . . . . . . . . . . . . . . . . . . . . . . . . . . . . . . . . . . . . . . . . . . . . . . . . . . . 602.3.5.17 Bandwidth . . . . . . . . . . . . . . . . . . . . . . . . . . . . . . . . . . . . . . . . . . . . . . . . . . . . . . . . . . . . . . . . . . 632.3.5.18 Port Restrictions . . . . . . . . . . . . . . . . . . . . . . . . . . . . . . . . . . . . . . . . . . . . . . . . . . . . . . . . . . . . . 65
A31003-G2570-U100-13-7619, 06/2015OpenScape Personal Edition V7, User Guide 3

Contents
2.3.5.19 Mobile User . . . . . . . . . . . . . . . . . . . . . . . . . . . . . . . . . . . . . . . . . . . . . . . . . . . . . . . . . . . . . . . . . 662.3.5.20 Quality of Service (QoS). . . . . . . . . . . . . . . . . . . . . . . . . . . . . . . . . . . . . . . . . . . . . . . . . . . . . . . . 68
2.3.6 HiPath Provider Settings . . . . . . . . . . . . . . . . . . . . . . . . . . . . . . . . . . . . . . . . . . . . . . . . . . . . . . . . . . . . 692.3.6.1 Device. . . . . . . . . . . . . . . . . . . . . . . . . . . . . . . . . . . . . . . . . . . . . . . . . . . . . . . . . . . . . . . . . . . . . . . 692.3.6.2 Main Connection. . . . . . . . . . . . . . . . . . . . . . . . . . . . . . . . . . . . . . . . . . . . . . . . . . . . . . . . . . . . . . . 702.3.6.3 Main Network Access . . . . . . . . . . . . . . . . . . . . . . . . . . . . . . . . . . . . . . . . . . . . . . . . . . . . . . . . . . 722.3.6.4 Fallback Connection . . . . . . . . . . . . . . . . . . . . . . . . . . . . . . . . . . . . . . . . . . . . . . . . . . . . . . . . . . . . 742.3.6.5 Fallback Network Access . . . . . . . . . . . . . . . . . . . . . . . . . . . . . . . . . . . . . . . . . . . . . . . . . . . . . . . 762.3.6.6 Failover. . . . . . . . . . . . . . . . . . . . . . . . . . . . . . . . . . . . . . . . . . . . . . . . . . . . . . . . . . . . . . . . . . . . . . 782.3.6.7 Ring Tones . . . . . . . . . . . . . . . . . . . . . . . . . . . . . . . . . . . . . . . . . . . . . . . . . . . . . . . . . . . . . . . . . . 792.3.6.8 Bandwith Reduction . . . . . . . . . . . . . . . . . . . . . . . . . . . . . . . . . . . . . . . . . . . . . . . . . . . . . . . . . . . . 802.3.6.9 Port Restrictions . . . . . . . . . . . . . . . . . . . . . . . . . . . . . . . . . . . . . . . . . . . . . . . . . . . . . . . . . . . . . . . 812.3.6.10 VPN . . . . . . . . . . . . . . . . . . . . . . . . . . . . . . . . . . . . . . . . . . . . . . . . . . . . . . . . . . . . . . . . . . . . . . . 822.3.6.11 Quality of Service (QoS). . . . . . . . . . . . . . . . . . . . . . . . . . . . . . . . . . . . . . . . . . . . . . . . . . . . . . . . 832.3.6.12 Operation Settings . . . . . . . . . . . . . . . . . . . . . . . . . . . . . . . . . . . . . . . . . . . . . . . . . . . . . . . . . . . . 842.3.6.13 Security. . . . . . . . . . . . . . . . . . . . . . . . . . . . . . . . . . . . . . . . . . . . . . . . . . . . . . . . . . . . . . . . . . . . . 85
2.3.7 Stimulus Provider Settings . . . . . . . . . . . . . . . . . . . . . . . . . . . . . . . . . . . . . . . . . . . . . . . . . . . . . . . . . . 862.3.7.1 General Stimulus Provider Settings . . . . . . . . . . . . . . . . . . . . . . . . . . . . . . . . . . . . . . . . . . . . . . . . 872.3.7.2 View . . . . . . . . . . . . . . . . . . . . . . . . . . . . . . . . . . . . . . . . . . . . . . . . . . . . . . . . . . . . . . . . . . . . . . . . 87
2.3.8 SQLite Provider Settings . . . . . . . . . . . . . . . . . . . . . . . . . . . . . . . . . . . . . . . . . . . . . . . . . . . . . . . . . . . . 872.3.8.1 SQLite Directories . . . . . . . . . . . . . . . . . . . . . . . . . . . . . . . . . . . . . . . . . . . . . . . . . . . . . . . . . . . . . 88
2.3.9 Settings for the LDAP Directory Provider. . . . . . . . . . . . . . . . . . . . . . . . . . . . . . . . . . . . . . . . . . . . . . . . 892.3.9.1 LDAP Directories . . . . . . . . . . . . . . . . . . . . . . . . . . . . . . . . . . . . . . . . . . . . . . . . . . . . . . . . . . . . . . 902.3.9.2 Base DN for an LDAP Directory . . . . . . . . . . . . . . . . . . . . . . . . . . . . . . . . . . . . . . . . . . . . . . . . . . . 93
2.3.10 Local-Journal-Provider Settings. . . . . . . . . . . . . . . . . . . . . . . . . . . . . . . . . . . . . . . . . . . . . . . . . . . . . . 932.3.11 HLM License Provider Settings . . . . . . . . . . . . . . . . . . . . . . . . . . . . . . . . . . . . . . . . . . . . . . . . . . . . . . 942.3.12 Lotus Notes Provider Settings . . . . . . . . . . . . . . . . . . . . . . . . . . . . . . . . . . . . . . . . . . . . . . . . . . . . . . . 95
2.3.12.1 Lotus Notes Databases . . . . . . . . . . . . . . . . . . . . . . . . . . . . . . . . . . . . . . . . . . . . . . . . . . . . . . . . 952.3.12.2 Dialog for Configuring a Lotus Notes Database . . . . . . . . . . . . . . . . . . . . . . . . . . . . . . . . . . . . . . 962.3.12.3 Authentication. . . . . . . . . . . . . . . . . . . . . . . . . . . . . . . . . . . . . . . . . . . . . . . . . . . . . . . . . . . . . . . 102
2.3.13 Notifier Toast (Desktop Alerts) Settings. . . . . . . . . . . . . . . . . . . . . . . . . . . . . . . . . . . . . . . . . . . . . . . 1022.3.14 The Sendmail Provider Module . . . . . . . . . . . . . . . . . . . . . . . . . . . . . . . . . . . . . . . . . . . . . . . . . . . . 1032.3.15 Keyboard Manager Settings . . . . . . . . . . . . . . . . . . . . . . . . . . . . . . . . . . . . . . . . . . . . . . . . . . . . . . . 103
2.3.15.1 Key Assignments . . . . . . . . . . . . . . . . . . . . . . . . . . . . . . . . . . . . . . . . . . . . . . . . . . . . . . . . . . . . 1032.3.16 Screensaver Manager Settings . . . . . . . . . . . . . . . . . . . . . . . . . . . . . . . . . . . . . . . . . . . . . . . . . . . . . 105
2.3.16.1 Settings. . . . . . . . . . . . . . . . . . . . . . . . . . . . . . . . . . . . . . . . . . . . . . . . . . . . . . . . . . . . . . . . . . . . 1052.3.17 Directory Manager Settings . . . . . . . . . . . . . . . . . . . . . . . . . . . . . . . . . . . . . . . . . . . . . . . . . . . . . . . . 106
3 Operation Reference . . . . . . . . . . . . . . . . . . . . . . . . . . . . . . . . . . . . . . . . . . . . . . . . . . . . . . . . . . . . . . . . . . 1093.1 How to Start the Program of OpenScape Desktop Client . . . . . . . . . . . . . . . . . . . . . . . . . . . . . . . . . . . . . . 109
3.1.1 Error Signaling at the Program Start . . . . . . . . . . . . . . . . . . . . . . . . . . . . . . . . . . . . . . . . . . . . . . . . . . 1123.2 Logging on to the Program . . . . . . . . . . . . . . . . . . . . . . . . . . . . . . . . . . . . . . . . . . . . . . . . . . . . . . . . . . . . . 113
3.2.1 Initial Program-Login . . . . . . . . . . . . . . . . . . . . . . . . . . . . . . . . . . . . . . . . . . . . . . . . . . . . . . . . . . . . . . 1143.2.2 Default Login . . . . . . . . . . . . . . . . . . . . . . . . . . . . . . . . . . . . . . . . . . . . . . . . . . . . . . . . . . . . . . . . . . 115
3.3 Administering the Configuration Settings . . . . . . . . . . . . . . . . . . . . . . . . . . . . . . . . . . . . . . . . . . . . . . 1163.4 Ending the Program . . . . . . . . . . . . . . . . . . . . . . . . . . . . . . . . . . . . . . . . . . . . . . . . . . . . . . . . . . . . . . . . . . 1173.5 Main Bar . . . . . . . . . . . . . . . . . . . . . . . . . . . . . . . . . . . . . . . . . . . . . . . . . . . . . . . . . . . . . . . . . . . . . . . . . . . 118
3.5.1 The Main Bar Menu . . . . . . . . . . . . . . . . . . . . . . . . . . . . . . . . . . . . . . . . . . . . . . . . . . . . . . . . . . . . . . . 1203.6 Pearl Menu . . . . . . . . . . . . . . . . . . . . . . . . . . . . . . . . . . . . . . . . . . . . . . . . . . . . . . . . . . . . . . . . . . . . 1213.7 Quick-Access Toolbar . . . . . . . . . . . . . . . . . . . . . . . . . . . . . . . . . . . . . . . . . . . . . . . . . . . . . . . . . . . . . . . . . 1233.8 Ribbon. . . . . . . . . . . . . . . . . . . . . . . . . . . . . . . . . . . . . . . . . . . . . . . . . . . . . . . . . . . . . . . . . . . . . . . . . . . . . 124
3.8.1 “Home” Tab . . . . . . . . . . . . . . . . . . . . . . . . . . . . . . . . . . . . . . . . . . . . . . . . . . . . . . . . . . . . . . . . . . . . . 125
A31003-G2570-U100-13-7619, 06/20154 OpenScape Personal Edition V7, User Guide
Contents
3.8.1.1 Controls of the "Call Control" Group . . . . . . . . . . . . . . . . . . . . . . . . . . . . . . . . . . . . . . . . . . . . . . 1253.8.1.2 Controls of the “Contacts” Group . . . . . . . . . . . . . . . . . . . . . . . . . . . . . . . . . . . . . . . . . . . . . . . . 126
3.8.2 “SoftPhone” Tab . . . . . . . . . . . . . . . . . . . . . . . . . . . . . . . . . . . . . . . . . . . . . . . . . . . . . . . . . . . . . . . . . 1263.8.2.1 Controls of the “Calls” Group. . . . . . . . . . . . . . . . . . . . . . . . . . . . . . . . . . . . . . . . . . . . . . . . . . . . 1263.8.2.2 Controls of the “Device Feature” Group . . . . . . . . . . . . . . . . . . . . . . . . . . . . . . . . . . . . . . . . . . . 1273.8.2.3 Controls of the “Video” (SIP) Group . . . . . . . . . . . . . . . . . . . . . . . . . . . . . . . . . . . . . . . . . . . . . . 1313.8.2.4 Video Features . . . . . . . . . . . . . . . . . . . . . . . . . . . . . . . . . . . . . . . . . . . . . . . . . . . . . . . . . . . . . . 1313.8.2.5 Video Streaming Behavior. . . . . . . . . . . . . . . . . . . . . . . . . . . . . . . . . . . . . . . . . . . . . . . . . . . . . . 1373.8.2.6 Views of the Video Window. . . . . . . . . . . . . . . . . . . . . . . . . . . . . . . . . . . . . . . . . . . . . . . . . . . . . 138
3.9 General Information about Frames . . . . . . . . . . . . . . . . . . . . . . . . . . . . . . . . . . . . . . . . . . . . . . . . . . . . . . 1433.10 Frame "Call Control" . . . . . . . . . . . . . . . . . . . . . . . . . . . . . . . . . . . . . . . . . . . . . . . . . . . . . . . . . . . . . . . . 144
3.10.1 Context Menus of the "Call Control" Frame . . . . . . . . . . . . . . . . . . . . . . . . . . . . . . . . . . . . . . . . . . . 1463.10.1.1 Context Menu of an outbound Connection . . . . . . . . . . . . . . . . . . . . . . . . . . . . . . . . . . . . . . . . 1463.10.1.2 Context Menu of an inbound Connection . . . . . . . . . . . . . . . . . . . . . . . . . . . . . . . . . . . . . . . . . 1473.10.1.3 Context Menu of an active Call . . . . . . . . . . . . . . . . . . . . . . . . . . . . . . . . . . . . . . . . . . . . . . . . . 1473.10.1.4 Context Menu of a Consultation Call . . . . . . . . . . . . . . . . . . . . . . . . . . . . . . . . . . . . . . . . . . . . . 148
3.11 "Contacts" Frame. . . . . . . . . . . . . . . . . . . . . . . . . . . . . . . . . . . . . . . . . . . . . . . . . . . . . . . . . . . . . . . . . . . 1503.11.1 Adding a new Contact. . . . . . . . . . . . . . . . . . . . . . . . . . . . . . . . . . . . . . . . . . . . . . . . . . . . . . . . . . . . 1513.11.2 Contact Details . . . . . . . . . . . . . . . . . . . . . . . . . . . . . . . . . . . . . . . . . . . . . . . . . . . . . . . . . . . . . . . . . 1523.11.3 Context Menus of the "Contacts" Frame . . . . . . . . . . . . . . . . . . . . . . . . . . . . . . . . . . . . . . . . . . . . . 155
3.11.3.1 Context Menu of a Contact . . . . . . . . . . . . . . . . . . . . . . . . . . . . . . . . . . . . . . . . . . . . . . . . . . . . 1553.11.3.2 Context Menu of a Group . . . . . . . . . . . . . . . . . . . . . . . . . . . . . . . . . . . . . . . . . . . . . . . . . . . . . 156
3.12 Directory Search . . . . . . . . . . . . . . . . . . . . . . . . . . . . . . . . . . . . . . . . . . . . . . . . . . . . . . . . . . . . . . . . . . . 1583.13 "Journal" Frame . . . . . . . . . . . . . . . . . . . . . . . . . . . . . . . . . . . . . . . . . . . . . . . . . . . . . . . . . . . . . . . . . . . . 159
3.13.1 Journal Controls . . . . . . . . . . . . . . . . . . . . . . . . . . . . . . . . . . . . . . . . . . . . . . . . . . . . . . . . . . . . . . . . 1603.13.2 Context Menu of the "Journal" Frame. . . . . . . . . . . . . . . . . . . . . . . . . . . . . . . . . . . . . . . . . . . . . . . . 163
3.14 Lines . . . . . . . . . . . . . . . . . . . . . . . . . . . . . . . . . . . . . . . . . . . . . . . . . . . . . . . . . . . . . . . . . . . . . . . . . . . . 1643.14.1 Icon Displays in the Line Window. . . . . . . . . . . . . . . . . . . . . . . . . . . . . . . . . . . . . . . . . . . . . . . . . . . 1653.14.2 Working with Lines . . . . . . . . . . . . . . . . . . . . . . . . . . . . . . . . . . . . . . . . . . . . . . . . . . . . . . . . . . . . . . 1663.14.3 Context Menu of a Line. . . . . . . . . . . . . . . . . . . . . . . . . . . . . . . . . . . . . . . . . . . . . . . . . . . . . . . . . . . 166
3.15 Status Bar . . . . . . . . . . . . . . . . . . . . . . . . . . . . . . . . . . . . . . . . . . . . . . . . . . . . . . . . . . . . . . . . . . . . . . . . 1673.16 Free Phone . . . . . . . . . . . . . . . . . . . . . . . . . . . . . . . . . . . . . . . . . . . . . . . . . . . . . . . . . . . . . . . . . . . . . . . 1683.17 Integrated Phone . . . . . . . . . . . . . . . . . . . . . . . . . . . . . . . . . . . . . . . . . . . . . . . . . . . . . . . . . . . . . . . . . . . 1693.18 SoftPhone . . . . . . . . . . . . . . . . . . . . . . . . . . . . . . . . . . . . . . . . . . . . . . . . . . . . . . . . . . . . . . . . . . . . . . . . 1693.19 Extended Keypad. . . . . . . . . . . . . . . . . . . . . . . . . . . . . . . . . . . . . . . . . . . . . . . . . . . . . . . . . . . . . . . . . . . 170
3.19.1 Context Menu of the Extended Keypad . . . . . . . . . . . . . . . . . . . . . . . . . . . . . . . . . . . . . . . . . . . . . . 1723.20 Webbrowser. . . . . . . . . . . . . . . . . . . . . . . . . . . . . . . . . . . . . . . . . . . . . . . . . . . . . . . . . . . . . . . . . . . . . . . 1723.21 Notifier Toast . . . . . . . . . . . . . . . . . . . . . . . . . . . . . . . . . . . . . . . . . . . . . . . . . . . . . . . . . . . . . . . . . . . . . . 1733.22 Screensaver. . . . . . . . . . . . . . . . . . . . . . . . . . . . . . . . . . . . . . . . . . . . . . . . . . . . . . . . . . . . . . . . . . . . . . . 1743.23 Operating OpenScape Desktop Client with the Computer Keyboard . . . . . . . . . . . . . . . . . . . . . . . . . . . 175
3.23.1 Operating with Hotkeys. . . . . . . . . . . . . . . . . . . . . . . . . . . . . . . . . . . . . . . . . . . . . . . . . . . . . . . . . . . 1753.24 Audio Control Operating Elements . . . . . . . . . . . . . . . . . . . . . . . . . . . . . . . . . . . . . . . . . . . . . . . . . . . . 1763.25 OpenScape Icon and Context Menu in the Notification Area of the Windows Task Bar . . . . . . . . . . . . . 1773.26 IBM Notes Integration . . . . . . . . . . . . . . . . . . . . . . . . . . . . . . . . . . . . . . . . . . . . . . . . . . . . . . . . . . . . . . . 1783.27 Microsoft Outlook Integration . . . . . . . . . . . . . . . . . . . . . . . . . . . . . . . . . . . . . . . . . . . . . . . . . . . . . . . . . . 1793.28 Operation in Restricted Mode . . . . . . . . . . . . . . . . . . . . . . . . . . . . . . . . . . . . . . . . . . . . . . . . . . . . . . . . . 1813.29 Session Expiring Timeout for ODC PE VDI . . . . . . . . . . . . . . . . . . . . . . . . . . . . . . . . . . . . . . . . . . . . . . . 182
4 Step-by-Step . . . . . . . . . . . . . . . . . . . . . . . . . . . . . . . . . . . . . . . . . . . . . . . . . . . . . . . . . . . . . . . . . . . . . . . . 1834.1 General Information . . . . . . . . . . . . . . . . . . . . . . . . . . . . . . . . . . . . . . . . . . . . . . . . . . . . . . . . . . . . . . . . . . 183
4.1.1 How to Start the Program . . . . . . . . . . . . . . . . . . . . . . . . . . . . . . . . . . . . . . . . . . . . . . . . . . . . . . . . . . 1834.1.2 How to Log on to the Program . . . . . . . . . . . . . . . . . . . . . . . . . . . . . . . . . . . . . . . . . . . . . . . . . . . . . . 183
A31003-G2570-U100-13-7619, 06/2015OpenScape Personal Edition V7, User Guide 5
Contents
4.1.2.1 How to Create a new Profile. . . . . . . . . . . . . . . . . . . . . . . . . . . . . . . . . . . . . . . . . . . . . . . . . . . . . 1844.1.3 Configuring the Main Window . . . . . . . . . . . . . . . . . . . . . . . . . . . . . . . . . . . . . . . . . . . . . . . . . . . . . . . 185
4.1.3.1 How to Integrate a Frame in the Main Window . . . . . . . . . . . . . . . . . . . . . . . . . . . . . . . . . . . . . . 1854.1.3.2 How to Remove Frames from the Main Window . . . . . . . . . . . . . . . . . . . . . . . . . . . . . . . . . . . . . 1854.1.3.3 How to Change the Quick-Access Toolbar Position. . . . . . . . . . . . . . . . . . . . . . . . . . . . . . . . . . . 1854.1.3.4 How to Add an Icon to the Quick-Access Toolbar . . . . . . . . . . . . . . . . . . . . . . . . . . . . . . . . . . . . 1864.1.3.5 How to Remove an Icon from the Quick-Access Toolbar. . . . . . . . . . . . . . . . . . . . . . . . . . . . . . . 186
4.1.4 How to Shut the Program Down . . . . . . . . . . . . . . . . . . . . . . . . . . . . . . . . . . . . . . . . . . . . . . . . . . . . . 1864.2 Getting Started with the Program . . . . . . . . . . . . . . . . . . . . . . . . . . . . . . . . . . . . . . . . . . . . . . . . . . . . . . . . 186
4.2.1 How to Log on for the first Time. . . . . . . . . . . . . . . . . . . . . . . . . . . . . . . . . . . . . . . . . . . . . . . . . . . . . . 1874.2.2 Initial Configuration . . . . . . . . . . . . . . . . . . . . . . . . . . . . . . . . . . . . . . . . . . . . . . . . . . . . . . . . . . . . . . . 188
4.2.2.1 How to Configure an Audio Device. . . . . . . . . . . . . . . . . . . . . . . . . . . . . . . . . . . . . . . . . . . . . . . . 1884.2.2.2 How to Configure a HiPath Connection . . . . . . . . . . . . . . . . . . . . . . . . . . . . . . . . . . . . . . . . . . . . 1894.2.2.3 How to Configure an SIP Connection. . . . . . . . . . . . . . . . . . . . . . . . . . . . . . . . . . . . . . . . . . . . . . 1914.2.2.4 How to Configure the Microsoft Outlook Integration. . . . . . . . . . . . . . . . . . . . . . . . . . . . . . . . . . . 192
4.3 Overview of the User Interface . . . . . . . . . . . . . . . . . . . . . . . . . . . . . . . . . . . . . . . . . . . . . . . . . . . . . . . . . . 1934.4 Settings-related Actions . . . . . . . . . . . . . . . . . . . . . . . . . . . . . . . . . . . . . . . . . . . . . . . . . . . . . . . . . . . . . . . 196
4.4.1 How to Change the Language . . . . . . . . . . . . . . . . . . . . . . . . . . . . . . . . . . . . . . . . . . . . . . . . . . . . . . . 1964.4.2 How to Add an Audio Scheme. . . . . . . . . . . . . . . . . . . . . . . . . . . . . . . . . . . . . . . . . . . . . . . . . . . . . . . 1974.4.3 How to Edit an Audio Scheme . . . . . . . . . . . . . . . . . . . . . . . . . . . . . . . . . . . . . . . . . . . . . . . . . . . . . . . 1984.4.4 How to React to Automatic Audio Device Detection . . . . . . . . . . . . . . . . . . . . . . . . . . . . . . . . . . . . . . 1994.4.5 How to Add a Video Scheme. . . . . . . . . . . . . . . . . . . . . . . . . . . . . . . . . . . . . . . . . . . . . . . . . . . . . . . . 2004.4.6 How to Edit a Video Scheme . . . . . . . . . . . . . . . . . . . . . . . . . . . . . . . . . . . . . . . . . . . . . . . . . . . . . . . . 2014.4.7 How to React to Automatic Video Device Detection . . . . . . . . . . . . . . . . . . . . . . . . . . . . . . . . . . . . . . 2024.4.8 How to Add a Call Forwarding . . . . . . . . . . . . . . . . . . . . . . . . . . . . . . . . . . . . . . . . . . . . . . . . . . . . . . . 2034.4.9 How to Activate a Call Forwarding. . . . . . . . . . . . . . . . . . . . . . . . . . . . . . . . . . . . . . . . . . . . . . . . . . . . 2044.4.10 How to Disable a Call Forwarding . . . . . . . . . . . . . . . . . . . . . . . . . . . . . . . . . . . . . . . . . . . . . . . . . . . 2044.4.11 How to Configure an individual Ring Tone . . . . . . . . . . . . . . . . . . . . . . . . . . . . . . . . . . . . . . . . . . . . 2054.4.12 How to Change the Default Ring Tone (HiPath Provider) . . . . . . . . . . . . . . . . . . . . . . . . . . . . . . . . . 2064.4.13 How to Add a new Internet Page . . . . . . . . . . . . . . . . . . . . . . . . . . . . . . . . . . . . . . . . . . . . . . . . . . . . 2064.4.14 How to Change an Internet Page. . . . . . . . . . . . . . . . . . . . . . . . . . . . . . . . . . . . . . . . . . . . . . . . . . . . 2074.4.15 How to Delete an Internet Page. . . . . . . . . . . . . . . . . . . . . . . . . . . . . . . . . . . . . . . . . . . . . . . . . . . . . 2074.4.16 How to Configure a new SIP Additional Line . . . . . . . . . . . . . . . . . . . . . . . . . . . . . . . . . . . . . . . . . . . 2084.4.17 How to Change an SIP Additional Line . . . . . . . . . . . . . . . . . . . . . . . . . . . . . . . . . . . . . . . . . . . . . . . 2094.4.18 How to Delete an SIP Additional Line . . . . . . . . . . . . . . . . . . . . . . . . . . . . . . . . . . . . . . . . . . . . . . . . 210
4.5 Contact Management . . . . . . . . . . . . . . . . . . . . . . . . . . . . . . . . . . . . . . . . . . . . . . . . . . . . . . . . . . . . . . . . . 2104.5.1 How to Create a new Contact . . . . . . . . . . . . . . . . . . . . . . . . . . . . . . . . . . . . . . . . . . . . . . . . . . . . . . . 2104.5.2 How to Add a Contact from a Directory . . . . . . . . . . . . . . . . . . . . . . . . . . . . . . . . . . . . . . . . . . . . . . . . 2114.5.3 How to Edit Contact Data. . . . . . . . . . . . . . . . . . . . . . . . . . . . . . . . . . . . . . . . . . . . . . . . . . . . . . . . . . . 2114.5.4 How to Create a new Group . . . . . . . . . . . . . . . . . . . . . . . . . . . . . . . . . . . . . . . . . . . . . . . . . . . . . . . . 2124.5.5 How to Add a Contact to a Group . . . . . . . . . . . . . . . . . . . . . . . . . . . . . . . . . . . . . . . . . . . . . . . . . . . . 2134.5.6 How to Add Contacts to a Group . . . . . . . . . . . . . . . . . . . . . . . . . . . . . . . . . . . . . . . . . . . . . . . . . . . . . 2144.5.7 How to Move Contacts to a Group. . . . . . . . . . . . . . . . . . . . . . . . . . . . . . . . . . . . . . . . . . . . . . . . . . . . 2144.5.8 How to Import Contacts from a File . . . . . . . . . . . . . . . . . . . . . . . . . . . . . . . . . . . . . . . . . . . . . . . . . . . 2154.5.9 How to Export Contacts to a File . . . . . . . . . . . . . . . . . . . . . . . . . . . . . . . . . . . . . . . . . . . . . . . . . . . . . 216
4.6 Communicating with your Contacts. . . . . . . . . . . . . . . . . . . . . . . . . . . . . . . . . . . . . . . . . . . . . . . . . . . . . . . 2174.6.1 How to Call a Contact . . . . . . . . . . . . . . . . . . . . . . . . . . . . . . . . . . . . . . . . . . . . . . . . . . . . . . . . . . . . . 2174.6.2 How to Dial a Phone Number . . . . . . . . . . . . . . . . . . . . . . . . . . . . . . . . . . . . . . . . . . . . . . . . . . . . . . . 217
4.6.2.1 How to Dial a Phone Number Using Copy & Paste . . . . . . . . . . . . . . . . . . . . . . . . . . . . . . . . . . . 2184.6.2.2 How to Dial a Number Using "Drag&Drop". . . . . . . . . . . . . . . . . . . . . . . . . . . . . . . . . . . . . . . . . . 218
4.6.3 How to Accept a Call . . . . . . . . . . . . . . . . . . . . . . . . . . . . . . . . . . . . . . . . . . . . . . . . . . . . . . . . . . . . . . 2194.6.4 How to Transfer a Call to a Device/Subscriber . . . . . . . . . . . . . . . . . . . . . . . . . . . . . . . . . . . . . . . . . . 219
A31003-G2570-U100-13-7619, 06/20156 OpenScape Personal Edition V7, User Guide
Contents
4.6.5 How to Change the Device during an active Call . . . . . . . . . . . . . . . . . . . . . . . . . . . . . . . . . . . . . . . . 2204.6.6 How to Hold a Call . . . . . . . . . . . . . . . . . . . . . . . . . . . . . . . . . . . . . . . . . . . . . . . . . . . . . . . . . . . . . . . 2204.6.7 How to Retrieve a Held Call . . . . . . . . . . . . . . . . . . . . . . . . . . . . . . . . . . . . . . . . . . . . . . . . . . . . . . . . 2214.6.8 How to Make a Consultation Call . . . . . . . . . . . . . . . . . . . . . . . . . . . . . . . . . . . . . . . . . . . . . . . . . . . . 2214.6.9 How to Toggle. . . . . . . . . . . . . . . . . . . . . . . . . . . . . . . . . . . . . . . . . . . . . . . . . . . . . . . . . . . . . . . . . . . 2224.6.10 How to Transfer a Call to a new Subscriber . . . . . . . . . . . . . . . . . . . . . . . . . . . . . . . . . . . . . . . . . . . 2224.6.11 How to Activate the "Completion of Calls to Busy Subscriber" (CCBS) Feature . . . . . . . . . . . . . . . 2224.6.12 How to Activate the "Completion of Calls on no Reply" (CCNR) Feature. . . . . . . . . . . . . . . . . . . . . 2234.6.13 How to Terminate a Call . . . . . . . . . . . . . . . . . . . . . . . . . . . . . . . . . . . . . . . . . . . . . . . . . . . . . . . . . . 2244.6.14 How to Send an E-Mail to a Contact. . . . . . . . . . . . . . . . . . . . . . . . . . . . . . . . . . . . . . . . . . . . . . . . . 2244.6.15 How to Call a IBM Notes Contact . . . . . . . . . . . . . . . . . . . . . . . . . . . . . . . . . . . . . . . . . . . . . . . . . . . 2244.6.16 How to Call a Microsoft Outlook Contact . . . . . . . . . . . . . . . . . . . . . . . . . . . . . . . . . . . . . . . . . . . . . 2254.6.17 How to Call an E-Mail Originator with IBM Notes . . . . . . . . . . . . . . . . . . . . . . . . . . . . . . . . . . . . . . . 2254.6.18 How to Call an E-Mail Originator with Microsoft Outlook . . . . . . . . . . . . . . . . . . . . . . . . . . . . . . . . . 2264.6.19 How to Sort your Journal Entries by Call Type . . . . . . . . . . . . . . . . . . . . . . . . . . . . . . . . . . . . . . . . . 2264.6.20 How to Display your missed Calls . . . . . . . . . . . . . . . . . . . . . . . . . . . . . . . . . . . . . . . . . . . . . . . . . . 2264.6.21 How to Dial from the Journal . . . . . . . . . . . . . . . . . . . . . . . . . . . . . . . . . . . . . . . . . . . . . . . . . . . . . . 2264.6.22 How to Initiate a Video Call (SIP only) . . . . . . . . . . . . . . . . . . . . . . . . . . . . . . . . . . . . . . . . . . . . . . . 2274.6.23 How to Start Video Streaming . . . . . . . . . . . . . . . . . . . . . . . . . . . . . . . . . . . . . . . . . . . . . . . . . . . . . 2284.6.24 How to Stop Video Streaming. . . . . . . . . . . . . . . . . . . . . . . . . . . . . . . . . . . . . . . . . . . . . . . . . . . . . . 229
4.7 How to Collaborate with Contacts in a Conference . . . . . . . . . . . . . . . . . . . . . . . . . . . . . . . . . . . . . . . . . . 2294.7.1 How to Start a Local Conference . . . . . . . . . . . . . . . . . . . . . . . . . . . . . . . . . . . . . . . . . . . . . . . . . . . . 2294.7.2 How to End a Local Conference . . . . . . . . . . . . . . . . . . . . . . . . . . . . . . . . . . . . . . . . . . . . . . . . . . . . . 2304.7.3 How to Start a Local Video Conference . . . . . . . . . . . . . . . . . . . . . . . . . . . . . . . . . . . . . . . . . . . . . . . 2304.7.4 How to End a Local Video Conference. . . . . . . . . . . . . . . . . . . . . . . . . . . . . . . . . . . . . . . . . . . . . . . . 2314.7.5 How to Start a Server-based Audio Conference. . . . . . . . . . . . . . . . . . . . . . . . . . . . . . . . . . . . . . . . . 2324.7.6 How to Add further Participants to a Server-Based Conference . . . . . . . . . . . . . . . . . . . . . . . . . . . . 2324.7.7 How to Initiate a Phone Handover via DTMF Keys . . . . . . . . . . . . . . . . . . . . . . . . . . . . . . . . . . . . . . 233
5 Communicating with Contacts . . . . . . . . . . . . . . . . . . . . . . . . . . . . . . . . . . . . . . . . . . . . . . . . . . . . . . . . . 2345.1 Reaching a Contact from the Contact List by Telephone or E-mail . . . . . . . . . . . . . . . . . . . . . . . . . . . . . . 2345.2 Calling any Contact . . . . . . . . . . . . . . . . . . . . . . . . . . . . . . . . . . . . . . . . . . . . . . . . . . . . . . . . . . . . . . . . . . 2345.3 The Bubble (Business Card) . . . . . . . . . . . . . . . . . . . . . . . . . . . . . . . . . . . . . . . . . . . . . . . . . . . . . . . . . . . 2355.4 Collaboration in Conferences. . . . . . . . . . . . . . . . . . . . . . . . . . . . . . . . . . . . . . . . . . . . . . . . . . . . . . . . . . . 235
5.4.1 Local Conference (Three-Party Conference) . . . . . . . . . . . . . . . . . . . . . . . . . . . . . . . . . . . . . . . . . . . 2365.4.2 Server-based Voice Conference. . . . . . . . . . . . . . . . . . . . . . . . . . . . . . . . . . . . . . . . . . . . . . . . . . . . . 2365.4.3 Controlling a Conference via Telephone . . . . . . . . . . . . . . . . . . . . . . . . . . . . . . . . . . . . . . . . . . . . . . 236
Index. . . . . . . . . . . . . . . . . . . . . . . . . . . . . . . . . . . . . . . . . . . . . . . . . . . . . . . . . . . . . . . . . . . . . . . . . . . . . . . . . 238
A31003-G2570-U100-13-7619, 06/2015OpenScape Personal Edition V7, User Guide 7

Contents
A31003-G2570-U100-13-7619, 06/20158 OpenScape Personal Edition V7, User Guide

History.fm
History of Changes
History of Changes
Date Changes Reason
2012-03-02 ADDED:When logging on in the Profile creation dialog for the first time the user need not perform any manual configurations.
FRN4403
2012-03-02 ADDED:Depending on the configuration, the context menu of a consultation call offers the option to start a local or server-based conference.
FRN5079
2012-03-02 ADDED:In the Port restrictions dialog of the SIP Service Provider you can define the port ranges for audio and video streaming.
FRN4685
2012-04-26 CHANGED:The dialog for configuring the QoS settings of the SIP Service Provider are available under Microsoft Windows XP only.
CQ00207211
2012-09-10 ADDED:Description of the new options in the configuration dialog of an audio scheme: Echo cancelling Enable/disable and Echo cancelling delay (ms).
FRN4942
2012-09-10 ADDED:Description of the new options for the default video configuration in the configuration dialog of a video scheme.New video layouts are supported during a video call: In call, Full window and Full screen.
FRN4954
2012-09-10 ADDED:Description of the features in the Softphone toolbar in the Video window.
FRN4956
2012-09-19 CHANGED:Information about the display of new voicemails in the Pearl menu > Status Information.
CQ00226077
2012-09-20 ADDED:The video screen quality or screen resolution may change during an active call. Such changes result from the bandwith for transmitting video data streams automatically adjusting to the available bandwidth resources of the communications system.
FRN4943
2013-03-18 ADDED:The user can activate/disable the video call feature via a new icon in the main toolbar, in the Video group of the ribbon and in the Softphone toolbar of the Video window.In addition, when creating a new contact in the contact input form, a video-compatible device Video Phone 1 under which the contact can be reached can be configured. The configured video device is displayed in the Contacts frame and can be dialed from there.
FRN4977
2013-03-18 CHANGED:The volume control in the main toolbar and in the status bar of the main window is no longer available.
V7R1
2013-03-18 REMOVED:The Microsoft Outlook Provider module from the list of installed modules.
V7R1
2013-04-18 ADDED:The Video Call feature is displayed in the main toolbar.
CQ00250966
2013-04-18 CHANGED:Description of the Speaker and Additional Speaker features in the main toolbar.
CQ00249784
2013-06-11 ADDED:Automatic detection of audio and video devices.
CQ00216848
2013-07-17 ADDED:Selection of the contact folders in the Microsoft Outlook-Integration.
FRN5652
2013-09-04 ADDED:Procedure applied for specifying system-wide hotkeys
CQ00269710
A31003-G2570-U100-13-7619, 06/2015OpenScape Personal Edition V7, User Guide 9

History of Changes
2014-01-09 REMOVED:Option for setting a color scheme has become obsolete.
CQ00283374
2014-02-14 CHANGED:Restrictions on specifying System-wide keyboard tokens (hotkeys).
CQ00285013
2014-02-24 ADDED:Only phone numbers (FQTN) fully specified according to E. 164 are supported for dialing via hotkeys.
CQ00282797
2014-03-28 ADDED:The current audio device can only be changed via the audio schemes, not via the Windows control panel.
CQ00292486
2014-05-28 CHANGED:Note on the configurability of the TLS protocol's port 5061.
CQ00265343
2014-08-07 ADDED:Ring tones may not be played if speakers integrated in the monitor are disabled in the scope of power management or with activation of a screensaver.
CQ00308534
2014-09-26 REMOVED:Restriction on Additional Lines.
CQ00314864
2015-01-27 Add information about File access for Citrix (FRN9048) CQ00323945
2015-02-02 Add information about Citrix client FRN9048
2015-03-11 11 - Add stand-by behaviour for VDI (Citrix) - FRN9048 CQ00327953
2015-03-24 11 - Section 2.3.5.20 correction of typo
2015-05-26 12 - minor changes
2015-06-16 13 - Adding DHCP option 120 for outbound domain under domain name CQ00332320
Date Changes Reason
A31003-G2570-U100-13-7619, 06/201510 OpenScape Personal Edition V7, User Guide

About this Manual
1 About this Manual
The OpenScape Personal Edition (also called OpenScape Desktop Client in this manual) is an IP-based communications software that can be used as an SIP or HFA softphone when connected to an SIP or HFA communications system. It is installed on a computer and enables mobile users to take their phone number with them. Calls can thus be made and accepted independently from the location. In addition, it enables managing a local contact list, integrating corporate directories and private contact lists (for example Microsoft Outlook contacts) via LDAP as well as calling Microsoft Outlook contacts directly from Microsoft Outlook. During operation, all calls are logged in a local journal. In combination with an OpenScape Voice there is the option of conducting video phone calls and taking part in video conferences with up to three participants.
1.1 Target Group of this Manual
This manual addresses:
• all users who deploy OpenScape Personal Edition; in particular also newcomers who require information about the program's interface and operation.
• advanced users who want to customize OpenScape Personal Edition.
The instructions contain important information about using OpenScape Personal Edition safely and correctly. Please follow them precisely to avoid incorrect operation and to make best use of this application.
1.2 Contents of this Manual
This manual describes how to configure and operate OpenScape Personal Edition after the setup.
The information is structured as follows:
Chapter 1: About this Manual
In this chapter you find information about the structure and use of these operating instructions as well as a list of all acronyms used.
Chapter 2: Configuration and Settings
This chapter tells you how to set parameters required for operation.
Chapter 3: Operation Reference
This chapter represents the different controls and explains how to use them.
Chapter 4: Step-by-Step
The information contained in this chapter helps the user to familiarize himself/herself with the client's features.
A31003-G2570-U100-13-7619, 06/2015OpenScape Personal Edition V7, User Guide 11
About this Manual
Chapter 5: Communicating with Contacts
In this chapter you find information about the features that enable communicating with your contacts.
1.3 Representation Conventions
We use the following markups and representations to highlight information in this manual.
1.3.1 Formats and Display Forms
In the manual on hand the following conventions apply:
1.3.2 Notes
Types of notes
Critical notes and additional information are indicated in this manual in the following manner:
NOTICE: Denotes information worth knowing or useful tips.
Purpose Appearance Example
Special emphasis Bold Name must not be deleted.
User interface ele-ments
Bold Click on OK.
Menu sequence > File > Exit
Textual cross refer-ence
Italic You find further information in the Configura-tion and Administration manual.
Path and file names Font with fix character spac-ing, for example Courier
c:\Program Files\... or Example.txt
Specifications that may have individual content, for example variables.
Italic in angle brackets
Enter your <user name> and the <password> to log on to the system.
System entry and out-put
Font with fix character spac-ing, for example Courier
Command not found.
Key combination Bold [Ctrl]+[Alt]+[Esc]
A31003-G2570-U100-13-7619, 06/201512 OpenScape Personal Edition V7, User Guide
About this Manual
IMPORTANT: Denotes information of high priority. Please definitely read and heed such notes to avoid malfunctions, loss of data or damage to devices.
1.3.3 Figures
This manual displays all input windows important for operation and configuration. Depending on the operating system, the browser used, the screen resolution, the configurations on your computer and your selection of the user interface style these dialogs may appear slightly different. Normally, this does not influence the described functionality .
1.4 Continuative Documentation
You find further information about OpenScape Desktop Client in the following documentation:
• OpenScape Personal Edition V7 Installation and Administration, setup guideContains information about setting up and uninstalling OpenScape Personal Edition and as well as detailed information about program configuration and the tools supplied for administrators.
• OpenScape Personal Edition V7, quick guideDescribes the basic OpenScape Personal Edition features.
1.5 Acronyms
Table: Acronyms used
Abbreviation Meaning
ACD Automatic Call Distribution
BLF Busy-Lamp Field
CAC Call Admission Control
CCBS Completion of Calls to Busy Subscriber
CCNR Completion of Calls on No Reply
CLA Customer License Agent
CMP Common Management Platform
CSV Comma Separated Value
DLC DLS Client
DLS DepLoyment Service
DMC Direct Media Connect
DNS Domain Name System
A31003-G2570-U100-13-7619, 06/2015OpenScape Personal Edition V7, User Guide 13

About this Manual
DTMF Dual -Tone Multi-Frequency
GAL Global Address List
HFA HiPath Feature Access
HLM HiPath License Management
IPC InterProcess Communication
LAN Local Area Network
LDAP Lightweight Directory Access Protocol
LED Light-emitting Diode
LIN Local Identification Number
MLHG Multi-Line Hunt Group
MWI Message Waiting Indicator
NANP North American Numbering Plan
OCS Office Communications Server
QoS Quality-of-Service
qWAVE Quality Windows Audio/Video Experience
RNA Ring-No-Answer
SDES Session Description Protocol (SDP) Security Descriptions for Media Streams
SIP Session Initiation Protocol
SRTP Secure Real-time Transport Protocol
TCSPI Telephony Conferencing Service Provider Interface
TLS Transport Layer Security
UC Unified Communications
URI Uniform Resource Identifier
VDI Virtual Desktop Infrastructure
VPN Virtual Private Network
Abbreviation Meaning
A31003-G2570-U100-13-7619, 06/201514 OpenScape Personal Edition V7, User Guide

Configuration and Settings
2 Configuration and Settings
Operating the OpenScape Desktop Client smoothly requires various individual user settings. Type and volume of these settings depend among other things on the installed and activated modules, basic network parameters and installed audio hardware. Some settings must be performed before the initial login, since proper operation is otherwise not possible. Other settings can be performed during operation.
You edit user settings in the Settings dialog.
You can open this dialog in two ways: Either click on the Manage button in the Logon dialog and then select Settings. Or, during operation after the login, select the OpenScape Options item in the OpenScape context menu that you open in the notification area of the Windows task bar.
NOTICE: During live operation, not all settings can be modified.
2.1 “Audio Schemes” Tab
So that you can conduct phone calls, your computer must be equipped with speaker and microphone, for example in the form of a headset.
A31003-G2570-U100-13-7619, 06/2015OpenScape Personal Edition V7, User Guide 15

Configuration and Settings
NOTICE: OpenScape Desktop Client supports operating a range of audio devices. You find a list of these devices in the setup manual of OpenScape Desktop Client.
The hardware settings are grouped in audio schemes. To set the audio schemes, select in the Settings dialog the Audio Schemes tab during the user login.
You can add audio schemes and modify or delete single audio schemes. In this way you can easily program various audio options (for example on different hardware) and then select them as the scheme you want to use.
Adding an audio scheme
A click on the Add... button defines a new audio scheme in the OpenScape Desktop Client. The following dialog opens:
A31003-G2570-U100-13-7619, 06/201516 OpenScape Personal Edition V7, User Guide

Configuration and Settings
• Enter an expressive text for the audio scheme under Description. This text appears in green (the audio scheme is available) or red writing (the audio scheme is unavailable) in the list of configured audio schemes.
• Select the audio hardware for the voice recording under Voice recording.
• You determine the audio hardware for voice playback under Audio Response.
• You select optionally the audio hardware for the additional speaker under Additional speaker. If you have defined an additional speaker here and this audio scheme is being used by OpenScape Desktop Client, the SoftPhone > Calls tab of the ribbon, the main toolbar and the Softphone toolbar of the
Video window display the icon. .
NOTICE: The hardware for the additional speaker and audio response must be different.
• You determine the audio hardware for the ring tone under Signal response.
• Under Controller you select the audio hardware for controlling special hardware functions.
• Echo cancelling Enable/DisableSelecting the Enable option activates the echo cancelling.This will remove unwanted echo signals during voice transmission. Echo cancelling is disabled by default but we recommend to activate it.
• Echo cancelling delay (ms)During an active call (for example in an audio conference), feedbacks may occur between speaker and microphone. The signal that the speaker sends is picked up by the microphone and transmitted in addition to the actual voice signal as so-called echo signal with a slight delay. The Echo cancelling delay (ms) specifies the possible delay time between sending the loudspeaker signal and its being picked up by the microphone. The delay influences the echo cancelling efficiency. A delay of 70 ms is assumed by default but depending on the system used this value may deviate and needs to be adjusted accordingly. The values you can select for this setting are 0 ms, 70 ms or 140 ms.
NOTICE: Before you change the Echo cancelling delay (ms) please consult your system administrator.
NOTICE: Components of an audio scheme currently locally unavailable are represented in brackets. The entire audio scheme is then considered unavailable. The OpenScape Desktop Client may then use the next available audio scheme.
Selecting/activating audio schemes
To select an audio scheme, click the one you want in the list of audio schemes.
A31003-G2570-U100-13-7619, 06/2015OpenScape Personal Edition V7, User Guide 17

Configuration and Settings
Changing an audio scheme
You can edit the settings of the selected audio scheme by clicking on the Change... button. The following dialog opens:
The possible settings are identical with the settings for a new audio scheme.
Deleting an audio scheme
You can remove a selected audio scheme from the list of configured audio schemes with a click on the Delete button.
Sequence of audio schemes
You can use the audio scheme sequence to influence the required audio hardware selected. After the user has logged in, the OpenScape Desktop Client checks the audio hardware specified in the audio schemes and processes the schemes one after the other from top to bottom. If all components set for a scheme are available and ready for operation, this scheme is used for operating the OpenScape Desktop Client.
You can change the sequence of an audio scheme with the buttons up and down.
Click the Refresh button to check the availability of added audio schemes and to display the scheme currently used.
NOTICE: Always change the current audio device via the audio schemes, not via the Windows control panel. Because you cannot synchronize the respective settings, the audio device set in the Windows control panel would be used but the client would display the audio device set last via the audio schemes.
2.2 “Modules” Tab
The Modules tab lists all modules that, based on their functionality and features, have been specified for operation with the standard provider selected during the installation.
A31003-G2570-U100-13-7619, 06/201518 OpenScape Personal Edition V7, User Guide

Configuration and Settings
Click the Show all modules button to see all installed modules.
NOTICE: You can activate or deactivate modules only before you log in. This is not possible during operation.
The following table lists the available modules and summarizes their functions. The modules automatically loaded with any setup method are indicated with ( ).
IMPORTANT: Do not activate modules not contained in the below table! If you add modules not described here, considerable problems may occur during the operation of OpenScape Desktop Client!
Module Description Setup type
Screensaver manager Provides the OpenScape Desktop Client screensaver feature. All ( )
Communication Provider1 Enables SIP Service Provider operation. SIP Provider
Directory Manager This module activates name resolution via configured directory ser-vices (for example LDAP, private contact list) and controls the priority with which the information in these directories is handled.
All ( )
Device State This module is in charge of the telephone and redirection menus in the main bar and ribbon of the OpenScape Desktop Client.
All ( )
HiPath Provider Provides the connection to a OpenScape 4000 or OpenScape Office MX PBX.
HiPath Provider
A31003-G2570-U100-13-7619, 06/2015OpenScape Personal Edition V7, User Guide 19

Configuration and Settings
HLM License Provider Provides the connection to the HiPath license server. SIP Provider and HiPath Provider
IPC Manager1 This module is required for initiating calls from Microsoft Outlook or IBM Notes via the OpenScape Desktop Client. It provides a dialog for selecting phone numbers.
All ( )
Journal Provides the Journal user interface. All ( )
Keyboard manager This module provides keyboard support features. All ( )
Contact List1 This module provides a contact list for local use. All ( )
LDAP Directory Provider The LDAP Directory Provider enables connecting OpenScape Desktop Client to external LDAP directories used for resolving phone numbers.
All ( )
Local journal Provider Stores connection data for the journal in the local database. These data records are automatically deleted after a specific period or when a certain maximum number of data records has been reached.
All ( )
Lotus Notes Provider This module provides the connection to a IBM Notes client and enables the IBM Notes integration.
All
Ribbon1 This module is in charge of representing the ribbon in the main win-dow.
All ( )
Notifier Toast (Desktop Alerts) This module controls the display of a dynamically appearing notifica-tion window at the bottom right screen margin.
All ( )
Pearl Main Window1 This module is in charge of the individual window view. All ( )
Sendmail Provider1 This module enables sending e-mails to a contact directly from one of the directories or from the contact list.
All ( )
SIP Service Provider This module enables the OpenScape Desktop Client to perform SIP telephony services.
SIP Provider
Softphone1 This module provides user interface of a telephone. All
Sound control1 This module is in charge of the audio command (audio buttons, menu volume, volume control, button additional speakers).
All ( )
SQLite Provider The SQLite Provider enables accessing Microsoft Outlook contact directories via an SQLite database.
All ( )
Stimulus Provider This module is in charge of showing information on the telephone dis-play.
SIP Provider and HiPath Provider
Lookup Service1 Enables looking for contacts in all available directories. All ( )
Toolbar1 The activated module is in charge of representing the main bar in the individual window view.
All ( )
Telephone The telephone module controls the integrated and free telephone in the OpenScape Desktop Client.
All ( )
Call Control Provides the call control feature. All ( )
Directory Search1 Enables searching contact directories from several data sources, for example LDAP directories, Microsoft Outlook contacts, etc.
All ( )
Video Viewer This module is in charge of representing the video window in the video viewer.
SIP Provider
Module Description Setup type
A31003-G2570-U100-13-7619, 06/201520 OpenScape Personal Edition V7, User Guide

Configuration and Settings
NOTICE: How to add or remove modules is outlined in the setup manual of OpenScape Desktop Client of the OpenScape Personal Edition.
2.3 “Advanced” Tab
On the Advanced tab you can perform the main settings for the application. The single main settings are subdivided in subsettings.
You can perform the following main settings, listed in the left-hand area, by default.
Dialing Helper1 Using this module the OpenScape Desktop Client initiates calls started in Microsoft Outlook or in IBM Notes. The dialing helper is exclusively used in combination with the IPC manager.
All ( )
Webbrowser This module enables opening frequently accessed internet pages directly in the web browser of the OpenScape Desktop Client.
All ( )
Web Access Manager1 This module enables configuring and opening web addresses for your contacts.
All ( )
Status and Event Display1 This module serves as indicator plugin and enables the display of vari-ous events and stati, for example secure or non-secure connection, in the main bar.
All
1 For this module there are no settings in the registercard extended possible or necessary.
Module Description Setup type
A31003-G2570-U100-13-7619, 06/2015OpenScape Personal Edition V7, User Guide 21

Configuration and Settings
In case of VDI-Environment (Citrix) the SIP Service Provider is shown as Virtual SIP Service Provider
2.3.1 General Settings
The General settings include the following sub-settings.
2.3.1.1 General
You can select a preset and coordinated color scheme to adjust the color layout of your OpenScape Desktop Client. For this purpose, select on the tab Advanced > General > General.
In the right-hand section of the Advanced tab you can perform the following settings:
• Activating the Automatically run program when I log on to Windows check box starts the OpenScape Desktop Client automatically when you perform your Windows logon to the system.
• Open main windowIn this input field you can specify a key or hotkeys considered System-wide keyboard tokens (hotkeys) for reopening the main window or moving it to
A31003-G2570-U100-13-7619, 06/201522 OpenScape Personal Edition V7, User Guide

Configuration and Settings
the foreground when it is hidden or minimized. The cursor is automatically positioned in the <Name or Number> input field of the main menu.
NOTICE: Only phone numbers (FQTN) fully specified according to E.164 are supported for dialing via System-wide keyboard tokens (hotkeys).
NOTICE: The system-wide keyboard token (hotkey) is also available during operation in restricted mode.
IMPORTANT: System-wide means in this case that no other application executed on your computer in parallel to the OpenScape Desktop Client will react to these keys. Be sure not to enter keys or hotkeys allocated in other programs or in the Windows environment with functions you want to use.
Admissible keys or hotkeys are:
– [F2] to [F11], also in combination with Shift or [Ctrl],
– Letter keys A to Z in combination with [Ctrl],
– Digit keys 0 to 9 in combination with [Ctrl],
– Shift key + [Esc],
– Blank key
NOTICE: You must not define the function keys [F1] and [F12] as hotkeys.
To specify hotkeys, click in the input field and push the desired key or hotkey. The desired key or hotkey is displayed in the input field.
2.3.1.2 User Data
NOTICE: You can set or modify user data only while logging on and not while operating the system.
You can enter your First Name and Last Name here as well as paste your Own image. This image is only used during a chat (instant messaging). It will not be stored on the server and not transferred, i.e. it is not visible for the chat partner.
A31003-G2570-U100-13-7619, 06/2015OpenScape Personal Edition V7, User Guide 23

Configuration and Settings
You can add your image via the Loading... button. Select the relevant image file in the open file selection dialog. Then click the Open button. The selected image appears in the Own image section.
Clicking the Delete button removes the image.
NOTICE: In Citrix environment, the ’Browse Folders/Files’ is executed in Citrix Server machine and not in the user machine. However the administrator can give you a permission so that you can access your local files. Please ask your administrator for more information.
Refer also to the Installation and Admin Guide.
2.3.1.3 Starting the Program
NOTICE: Options for editing program start settings are only available when you activate them while operating the OpenScape Desktop Client. Open the OpenScape context menu in the Windows task bar and select the OpenScape Options menu item.
To edit the OpenScape Desktop Client start-up options, select on the tab Advanced > General > Program Start.
A31003-G2570-U100-13-7619, 06/201524 OpenScape Personal Edition V7, User Guide

Configuration and Settings
You can define the following settings for the program start:
• Profile to be selectedWhen you select this option, the login dialog displays the field for selecting a profile. If this option is not selected, there are no profile-specific administration functions available in the Logon dialog.Activate this setting, for example, if you want to use the same Windows user account in different locations. Profile-specific parameters are then considered during logon.
NOTICE: Profile-specific information is always necessary for user logon. Consequently, the Profile field may only be masked out in the Logon dialog if only one profile is used. This profile must be created at the first program start after the installation.
• Language to be selectedWhen you select this option, the login dialog displays the field for selecting a Language. Select this setting, for example, if staff members with different native languages operate the OpenScape Desktop Client on the same computer.
• Configuration AlternativesYou can use this setting to specify whether – and if so which – configuration options shall be available to a user when logging on. The following options are available:
– Admit Settings and Profile administrationThe complete list of management features as well as the Settings option is displayed in the menu of the Manage button when you click on the Manage button. The Add Profile ... button appears in the Logon dialog in addition.
– Hide Settings and Profile administrationYou cannot access the menu of the Manage button. The Add Profile ... button is hidden.
– Only accept settingsThe Settings entry is displayed in the menu of the Manage button after you have clicked on the button. The other management functions are not available. The Add Profile ... button is hidden from the Logon dialog.
A31003-G2570-U100-13-7619, 06/2015OpenScape Personal Edition V7, User Guide 25

Configuration and Settings
• Settings for the LIN modeThis option controls how an LIN (Local Identification Number) is entered in the Logon dialog. The LIN can be used to pinpoint emergency calls by assigning location numbers to buildings, building section numbers, etc.
NOTICE: Please obtain detailed information about configuring an LIN number in an OpenScape 4000 from the documentation of the respective OpenScape 4000 PBX.
The following options are available:
– Suppressed (no entries)The LIN field is not displayed in the Logon dialog.
NOTICE: If the Suppressed (no entries) option was selected and no password was assigned to the user, the program starts automatically without displaying the Logon dialog.
– Optional (empty entry field)The LIN field appears blank in the Logon dialog and need not be filled in for logging on.
– Optional (display last entry)The LIN field is displayed in the Logon dialog. The LIN from the last logon is set by default. The field need not be filled in for logging on.
– Mandatory (empty entry field) The LIN field appears blank in the Logon dialog and need to be filled in for logging on.
– Mandatory (display last entry)The LIN field is displayed in the Logon dialog. The LIN from the last logon is set by default. The field must be filled in for logging on.
NOTICE: If you want to see the Logon dialog every time, but do not wish to assign a password, select the Optional (empty entry field) option.
2.3.1.4 Connection Status Change
NOTICE: Options for editing settings that change the connection status are only available when activated during login, not when activated during live operation.
Depending on the display mode set for the OpenScape Desktop Client in normal mode you may want the display mode to reflect a connection status change. For example, if the main bar is minimized in connection-free status, you can perform a setting that places the OpenScape Desktop Client back on top in the case of incoming or outgoing calls.
A31003-G2570-U100-13-7619, 06/201526 OpenScape Personal Edition V7, User Guide

Configuration and Settings
To edit these options, select on the tab Advanced > General > Change of connection status. You can define the display mode of the program for any connection status.
The following connection stati exist:
• Without connectionThere is no connection (no connection request, no connection setup, no active connection).
• Connection setupYou set up a connection to another station, for example, a call connection, by dialing a phone number.
• Active ConnectionThere is an active connection. This may be an active call.
• Connection requestYou receive a connection request, for example, an incoming call.
You can determine how OpenScape Desktop Client displays the single connection stati in case of a connection status change. The display mode can change to:
• (no changes)The current display is not modified.
• normal/positionedThe main bar is reset to the active status (normal or positioned) in which it was before it was minimized. The OpenScape Desktop Client reappears on the desktop.
• minimized/hiddenThe main bar is minimized or hidden. The main bar is hidden if you did not select the icon display in the notification area settings.
The time entered in the after field for all connection stati and all display modes indicates for how many seconds the specified display mode is to be active after a connection status change. This setting ensures that the OpenScape Desktop Client is automatically minimized/hidden again within a certain period after a connection has ended.
A31003-G2570-U100-13-7619, 06/2015OpenScape Personal Edition V7, User Guide 27

Configuration and Settings
2.3.1.5 Task Bar and Notification Area
NOTICE: Options for editing settings for the Windows task bar and notification area of the Windows task bar are only available after you have activated them when logging on, not when you activate them during operation.
To edit the options for displaying the OpenScape Desktop Client in the Windows taskbar and in the notification area of the Windows taskbar, select on the tab Advanced > General > Task Bar and Notification Area.
• Symbol in notification areaDepending on the status of the main window you can display an icon (we call it OpenScape icon as we proceed) in the notification area of the Windows task bar.
– Normal main windowThe OpenScape icon is displayed when the main window is not minimized.
– Minimized main windowThe OpenScape icon is displayed when the main window is minimized.
• Entry in task bar and task managerBy activating the Minimized main window option you can determine that an entry for the OpenScape Desktop Client is displayed in the task bar and in the task manager of Windows when the main window is minimized.
2.3.1.6 Program Update
NOTICE: You find detailed information about the automatic program update of OpenScape Desktop Client in the manual OpenScape UC Application V7 OpenScape Desktop Client Installation and Administration.
NOTICE: Options for editing program update settings are only available after you have activated them when logging on, not when you activate them during live operation.
On the Advanced > General > Program Update tab you can perform various settings to automate the search for updates.
A31003-G2570-U100-13-7619, 06/201528 OpenScape Personal Edition V7, User Guide
Configuration and Settings
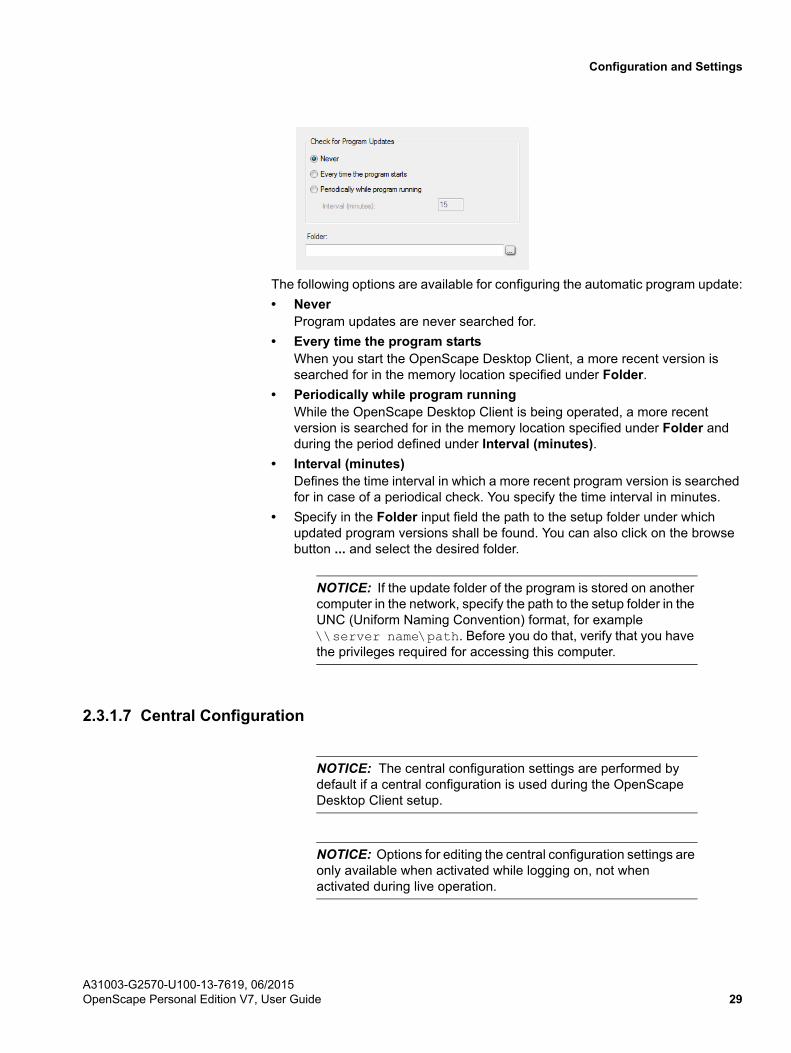
The following options are available for configuring the automatic program update:
• NeverProgram updates are never searched for.
• Every time the program startsWhen you start the OpenScape Desktop Client, a more recent version is searched for in the memory location specified under Folder.
• Periodically while program runningWhile the OpenScape Desktop Client is being operated, a more recent version is searched for in the memory location specified under Folder and during the period defined under Interval (minutes).
• Interval (minutes)Defines the time interval in which a more recent program version is searched for in case of a periodical check. You specify the time interval in minutes.
• Specify in the Folder input field the path to the setup folder under which updated program versions shall be found. You can also click on the browse button ... and select the desired folder.
NOTICE: If the update folder of the program is stored on another computer in the network, specify the path to the setup folder in the UNC (Uniform Naming Convention) format, for example \\server name\path. Before you do that, verify that you have the privileges required for accessing this computer.
2.3.1.7 Central Configuration
NOTICE: The central configuration settings are performed by default if a central configuration is used during the OpenScape Desktop Client setup.
NOTICE: Options for editing the central configuration settings are only available when activated while logging on, not when activated during live operation.
A31003-G2570-U100-13-7619, 06/2015OpenScape Personal Edition V7, User Guide 29

Configuration and Settings
NOTICE: Useful information about necessary DLS settings and functional restrictions on using a central configuration for automatic configuration is contained in the OpenScape Personal Edition V7 Installation and Administration setup guide.
In cases where a Deployment Service (DLS or central configuration) is available on the network for an installation, the settings for the OpenScape Desktop Client can also be stored centrally. In such cases, the parameters for accessing the central configuration must be entered in the OpenScape Desktop Client, so that the centrally stored parameters can be retrieved.
To edit the settings for the central configuration, select on the tab Advanced > General > Central Configuration.
The following settings are required for using the central configuration:
• ConnectionIf you have configured using a central configuration during the installation, select the required setting under Connection. The following options are available:
– No useNo central configuration.
– Complete useComplete use of the central configuration.
– Only for encryptionThe central configuration is exclusively used for encoding the voice signaling.
• Server (DLS)Enter the IP address in the Server field and the port number of the DLS server in the Port field. The DLS port is the port number used for accessing the central server.
• Client (DLC)
– Select the client Address. You can either use Detect automatically for the entry or select the IP address(es) specified in the client PC configu-ration. Furthermore, you can enter an IP address manually.
A31003-G2570-U100-13-7619, 06/201530 OpenScape Personal Edition V7, User Guide

Configuration and Settings
NOTICE: If you use central configuration here and have multiple network cards and/or multiple IP addresses on a network card, you must deactivate the Detect automatically option and manually configure the IP address/MAC address to be used. The IP address/MAC address set here is then transferred to the connected DLS.
– In the Port field, enter the number of the local port under which the OpenScape Desktop Client responds to queries from the central server.
– In the Network card combo box select the network card ID used for DLS-server exchange. The options available here are Detect automatically or the network card IDs configured on the PC.
NOTICE: IDs of network cards no longer available in the computer are listed in brackets ( ).
NOTICE: These settings are performed by default if the central configuration is used during the OpenScape Desktop Client setup.
2.3.2 Telephone Settings
The telephone module controls the integrated and free telephone in the OpenScape Desktop Client.
While the display of the integrated phone is a permanent main bar feature, the corresponding function, dial and dialog keys (depending on the individual setting) are usually not displayed. Under Advanced > Telephone > Integrated phone you can specify the action to be performed following a click on the display in the main bar.
By selecting the desired option you can control the display behavior that follows a click on the display of the integrated phone. The following options are available:
• Display integrated phone as popup windowWhen you click on the display, the dial and dialog keys appear as popup window on the display (subject to individual setting). You can then use the keys in the window as usual. When you click on another window, the popup window with the keys is hidden again.
A31003-G2570-U100-13-7619, 06/2015OpenScape Personal Edition V7, User Guide 31

Configuration and Settings
• Display free phoneWhen you click on the integrated-phone display, the free phone opens (subject to individual setting). If the free phone is already open, this window will be switched to.
• Show and hide free phoneWhen you click on the integrated-phone display, the free phone opens (subject to individual setting). If the free phone is already open, it will be closed now.
2.3.3 Device State Settings
The Device State Settings module provides the phone menu as an element of the Softphone menu. Since no additional settings are required for this module, no editing parameters can be selected.
2.3.3.1 Line Settings
NOTICE: Options for editing line display settings are only available when activated during live operation, not when activated during login.
You define the line display options on the tab Advanced > Device State > Lines. You can select the lines you wish to display in the Lines window from the list of configured lines:
In the Display line status section you can define the icon size (Large icons or Small icons) for the line options displayed in the Lines window.
• Normal ViewSelect the icon size for the Lines window, if it is docked to the main bar or freely positionable.
• Anchored ViewDefine the icon size in the Lines window.
A31003-G2570-U100-13-7619, 06/201532 OpenScape Personal Edition V7, User Guide

Configuration and Settings
• SymbolsYou can also specify whether the symbols in the Lines window are to appear in Gold or in Silver-Gray.
All lines configured in the OpenScape Desktop Client are listed in the Lines to be displayed section. Select here the lines to be displayed in the Lines window. Only the lines activated here can later be operated in the Lines window.
2.3.4 Web Browser Settings
NOTICE: You can edit the web browser settings via the Settings dialog during the program start or during live operation. Click on the Manage button in the Logon dialog or the OpenScape Options button in the Pearl menu.
In daily operation you can directly open frequently visited internet pages in the web browser of the OpenScape Desktop Client without having to leave the program. The selectable internet pages are configured in the Internet pages section and subsequently offered as selection options in the Pearl menu > View > Webbrowser.
2.3.4.1 Internet Page Settings
If you want to perform web browser settings, click on the Internet pages option in the Webbrowser area.
Here you can add a new internet page, edit already configured web pages or delete them. The following operating elements are available in this dialog:
Add...
A click on this button opens the following dialog:
A31003-G2570-U100-13-7619, 06/2015OpenScape Personal Edition V7, User Guide 33

Configuration and Settings
In this dialog you can configure a new internet page address for the web browser.
• NameEnter an expressive name for the desired internet page in this field. While you operate the OpenScape Desktop Client, this name appears in the Pearl menu > View > Web Browser and enables invoking the respective internet page.
• AddressEnter the URL of the desired internet page in this field.
Change...
NOTICE: The corresponding button remains inactive until you select an entry in the list of configured internet pages.
A click on this button opens the following dialog:
In this dialog you can change the already configured Name and the Address of a selected internet page.
Delete
NOTICE: The corresponding button remains inactive until you select an entry in the list of configured internet pages.
A click on this button removes a selected entry from the list of configured internet pages.
2.3.5 SIP Service Provider Settings
NOTICE: To edit the SIP Service Provider settings you need to open the Settings dialog during the program start. Click on the Manage button in the logon dialog for this purpose.
By setting the SIP Service Provider you configure the OpenScape Desktop Client for being used as softphone at an SIP communications system.
A31003-G2570-U100-13-7619, 06/201534 OpenScape Personal Edition V7, User Guide

Configuration and Settings
To edit the SIP Service Provider settings, select on the tab Advanced > SIP Service Provider. Then click on one of the following settings.
NOTICE: In case of VDI-Environment (Citrix) the menu is Advanced -> Virtual SIP Service Provider.
2.3.5.1 System Services
Select under Advanced > SIP Service Provider > System Services the server type with which the OpenScape Desktop Client is connected.
NOTICE: In case of VDI-Environment the menu is Advanced > Virtual SIP Service Provider > System Services
Server Type
• OpenScape Voice/hiQ4200Select this server type if the OpenScape Desktop Client is connected to an OpenScape Voice or a hiQ4200.
• OpenScape Voice/hiQ4200 without videoSelect this server type if the OpenScape Desktop Client is connected to an OpenScape Voice or a hiQ4200 without video support.
• HiPath 3000/OpenOffice EESelect this server type if the OpenScape Desktop Client is connected to this server.
• HiPath 3000 >=V8Select this server type if the OpenScape Desktop Client is connected to an HiPath or later.
• OpenScape 4000 >=V6Select this server type if the OpenScape Desktop Client is connected to an OpenScape 4000 or later.
A31003-G2570-U100-13-7619, 06/2015OpenScape Personal Edition V7, User Guide 35
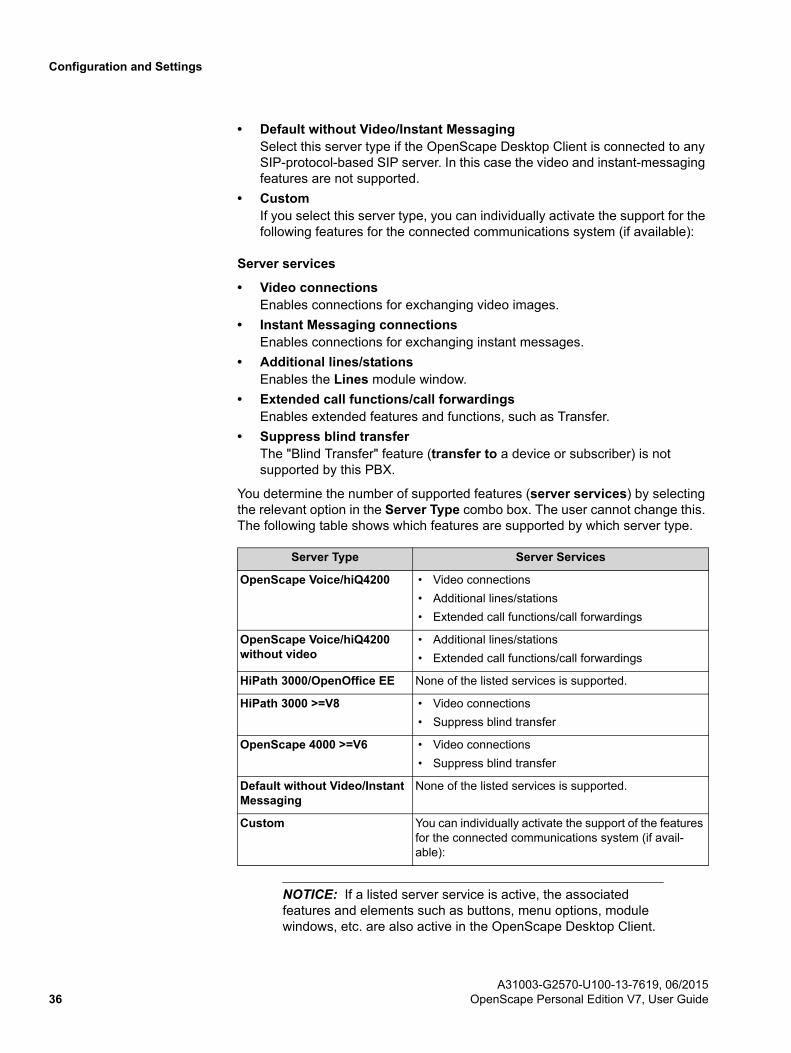
Configuration and Settings
• Default without Video/Instant MessagingSelect this server type if the OpenScape Desktop Client is connected to any SIP-protocol-based SIP server. In this case the video and instant-messaging features are not supported.
• CustomIf you select this server type, you can individually activate the support for the following features for the connected communications system (if available):
Server services
• Video connectionsEnables connections for exchanging video images.
• Instant Messaging connectionsEnables connections for exchanging instant messages.
• Additional lines/stationsEnables the Lines module window.
• Extended call functions/call forwardingsEnables extended features and functions, such as Transfer.
• Suppress blind transferThe "Blind Transfer" feature (transfer to a device or subscriber) is not supported by this PBX.
You determine the number of supported features (server services) by selecting the relevant option in the Server Type combo box. The user cannot change this. The following table shows which features are supported by which server type.
NOTICE: If a listed server service is active, the associated features and elements such as buttons, menu options, module windows, etc. are also active in the OpenScape Desktop Client.
Server Type Server Services
OpenScape Voice/hiQ4200 • Video connections
• Additional lines/stations
• Extended call functions/call forwardings
OpenScape Voice/hiQ4200 without video
• Additional lines/stations
• Extended call functions/call forwardings
HiPath 3000/OpenOffice EE None of the listed services is supported.
HiPath 3000 >=V8 • Video connections
• Suppress blind transfer
OpenScape 4000 >=V6 • Video connections
• Suppress blind transfer
Default without Video/Instant Messaging
None of the listed services is supported.
Custom You can individually activate the support of the features for the connected communications system (if avail-able):
A31003-G2570-U100-13-7619, 06/201536 OpenScape Personal Edition V7, User Guide
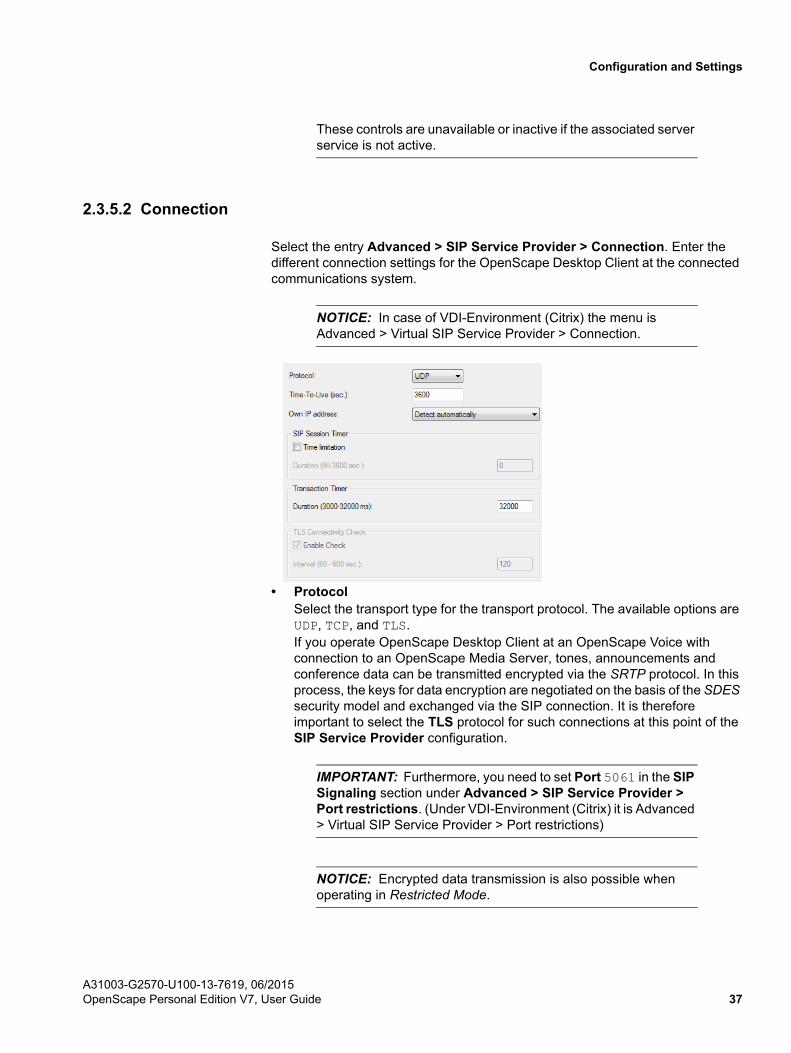
Configuration and Settings
These controls are unavailable or inactive if the associated server service is not active.
2.3.5.2 Connection
Select the entry Advanced > SIP Service Provider > Connection. Enter the different connection settings for the OpenScape Desktop Client at the connected communications system.
NOTICE: In case of VDI-Environment (Citrix) the menu is Advanced > Virtual SIP Service Provider > Connection.
• ProtocolSelect the transport type for the transport protocol. The available options are UDP, TCP, and TLS.If you operate OpenScape Desktop Client at an OpenScape Voice with connection to an OpenScape Media Server, tones, announcements and conference data can be transmitted encrypted via the SRTP protocol. In this process, the keys for data encryption are negotiated on the basis of the SDES security model and exchanged via the SIP connection. It is therefore important to select the TLS protocol for such connections at this point of the SIP Service Provider configuration.
IMPORTANT: Furthermore, you need to set Port 5061 in the SIP Signaling section under Advanced > SIP Service Provider > Port restrictions. (Under VDI-Environment (Citrix) it is Advanced > Virtual SIP Service Provider > Port restrictions)
NOTICE: Encrypted data transmission is also possible when operating in Restricted Mode.
A31003-G2570-U100-13-7619, 06/2015OpenScape Personal Edition V7, User Guide 37
Configuration and Settings
NOTICE: You find more information about data encryption in the manual OpenScape Personal Edition V7 Installation and Admin-istration.
• Time-To-Live (sec.)This is an SIP-specific timer for some kind of heartbeat procedure: So that the SIP server does not put an inactive subscriber out of action, the OpenScape Desktop Client needs to register with the SIP server in intervals specified in the Time-To-Live (sec.) field.
IMPORTANT: This value should only be modified by your system administrator.
• Own IP addressThe Own IP address must be known for the IP connection of the OpenScape Desktop Client. If the OpenScape Desktop Client is connected to a network adapter to which a unique IP address has been assigned, select the Detect automatically setting. If the network card is assigned multiple IP addresses or if the network card cannot be reached directly, for example, via the ACME/Session Border Controller, all addresses are listed in the list box and you can select the required one.
SIP Session Timer
• Time limitationActivate this option to specify whether the validity of active sessions shall be monitored with help of heartbeat procedures.
• Duration (90-3600 sec.)Specify here the duration of the timer in seconds (admissible range 90 - 3600 sec.). Value 0 means the timer is off.
Transaction Timer
• Duration (3000-32000 ms)The OpenScape Desktop Client expects a response from the SIP server to its SIP request (for example when setting up an SIP connection) within this period. The default value set for this parameter is 32000 ms. When this period has expired and the OpenScape Desktop Client has not yet received an answer from the SIP server, an error message is generated. An example is the error message “Request Timeout”, in the case that the network can be reached but the SIP server temporarily or permanently cannot.
NOTICE: The required details are provided by your administrator or PBX administrator.
TLS Connectivity Check
If OpenScape Desktop Client is connected to an OpenScape Voice via the TLS protocol, the connection to the PBX can be checked regularly. As soon as a
A31003-G2570-U100-13-7619, 06/201538 OpenScape Personal Edition V7, User Guide

Configuration and Settings
connection breakdown has been detected, the program attempts automatically to re-establish the connection to the PBX.
NOTICE: You can change the settings for monitoring the TLS connection to the OpenScape Voice after you have selected the TLS option under Protocol.
• Enable CheckIf a tick is placed in the Enable Check check box (default settings), monitoring the TLS connection is active.
• Interval (60 - 600 sec.)With this parameter you can specify an interval of 60 sec. to 600 sec. in which the TLS connection to the OpenScape Voice is checked for being established. The default value is 120 sec.
2.3.5.3 Main Line
Select Advanced > SIP Service Provider > Main line for defining the param-eters for the main line of the OpenScape Desktop Client.
NOTICE: In case of VDI-Environment (Citrix) it is Advanced > Virtual SIP Service Provider > Main line.
• UserFor logging on to the SIP communications system you need to enter a unique OpenScape Desktop Client phone number/user address.If you leave this field emtpy, logging on to the SIP communications system (for example OpenScape Voice) will fail. In this case it is not possible using the OpenScape Desktop Client as SIP softphone.
• ViewEnter the complete name. The text is displayed by the free or integrated phone when idle and is also transferred as name information to your connection partners. This text is also used as a description of the primary line in the Lines window or menu.
A31003-G2570-U100-13-7619, 06/2015OpenScape Personal Edition V7, User Guide 39

Configuration and Settings
• Tooltip textThe tooltip text appears when the mouse pointer is moved close to the main connection line in the Lines window.
• LoginEnter here your SIP ID that has been configured for authentication at the SIP communications system.
• PasswordEnter here the SIP password that has been configured for the SIP ID specified under Login.
NOTICE: The administrator of your SIP communications system provides you with the required details.
You can define a connection target in the Immediate connection section. This target is automatically called after you have picked up the receiver or pushed the corresponding headset button (pick up/put down receiver), and after a configu-rable period has elapsed, in which you have not dialed a phone number.
• AddressEnter here the phone number or SIP address to be automatically called after activating the line (for example after picking up the receiver or pushing the corresponding key (picking up/putting down the receiver) of your headset).
IMPORTANT: You can use the Immediate connection feature only with headsets that have a function key picking up/putting down the receiver, such as the headset USB adapter GN 8120 USB and other products by the manufacturers GN Netcom and Plantronics.
• Delay (sec.)This entry specifies the delay after which the above address is to be dialed. If the delay is set to 0, the immediate connection is set up without delay.
• KeysetActivate this check box to configure your OpenScape Desktop Client as Keyset. A Keyset is a telephone that can support several lines and on which each line is represented by a key with LED. As soon as you have defined at least one assignment, this check box becomes automatically active. In this case the setting can only be deactivated by deleting the additional line. If your OpenScape Desktop Client is connected to an OpenScape Voice PBX, the user of a single line (i. e. only one main line and no additional lines are configured) must activate the check box for logging on to the system.
• Private usageActivating this check box defines this line as private line. That is, if you use this line, other stations with a secondary line do not receive any status change messages on your call number/user address.
NOTICE: The administrator of your PBX provides the required details.
A31003-G2570-U100-13-7619, 06/201540 OpenScape Personal Edition V7, User Guide

Configuration and Settings
2.3.5.4 Additional Lines
Your connections are conducted via lines in the OpenScape Desktop Client. Every user has at least one separate line that is individually assigned and used only by that specific user (main line). If supported by the communications system connection, SIP users can use additional configured lines or share them with other SIP users. The choice of available lines is defined in the connected commu-nications system. You can define further lines for the user on the Advanced tab under SIP Service Provider > Additional lines.
NOTICE: In case of VDI-Environment (Citrix) it is under Advanced > Virtual SIP Service Provider > Additional lines.
Previously configured additional lines are displayed in the list. You can add additional lines, change settings or delete lines.
Adding additional lines
After clicking the Add... button you can define an additional line for the user. The following dialog opens:
A31003-G2570-U100-13-7619, 06/2015OpenScape Personal Edition V7, User Guide 41

Configuration and Settings
• Under User enter the phone number of the SIP user.
• Enter an expressive text in the Display field. This text will be shown in the display of the free respectively integrated phone in idle state and also trans-mitted as name information to your connection partners. Furthermore, this text will be used as description of the respective line in the line window respectively line menu.
• The Tooltip text appears when the mousepointer rests on the connection line in the line window.
• LoginEnter your login here.
• PasswordIf the authentication was configured on the server, you need to enter your password in this field.
In the Immediate connection section you can configure an immediate connection for the main line.
• AddressUse this input field to specify which address is to be dialed after the line has become active (for example after lifting the handset).
• Delay (sec.)This entry specifies the delay after which the above address is to be dialed. If the delay is set to 0, the immediate connection is set up without delay.
• Private usageActivating this check box defines this line as private line. That is, if you use this line, other stations with a secondary line do not receive any status change messages on your call number/user address.
NOTICE: The required details are provided by your OpenScape UC Application or PBX administrator.
The main line and all additional lines configured here can be selected in the Lines menu on the main bar. The Lines window, on the other hand, only contains lines that were specially activated and suitable for editing.
Changing additional lines
After clicking the Change... button you can edit the already configured settings of a line. The following dialog opens:
A31003-G2570-U100-13-7619, 06/201542 OpenScape Personal Edition V7, User Guide

Configuration and Settings
NOTICE: You cannot change the entry in the User input field.
Deleting additional lines
You can remove a selected line from the list of configured lines with a click on the Delete button.
2.3.5.5 Line Parameters
NOTICE: The line parameters settings are only required in combination with configured additional lines.
Select under Advanced > SIP Service Provider the Line parameters option. In the displayed dialog you can perform the following settings:
NOTICE: In case of VDI-Environment (Citrix) it is Advanced > Virtual SIP Service Provider.
A31003-G2570-U100-13-7619, 06/2015OpenScape Personal Edition V7, User Guide 43

Configuration and Settings
Accept calls automatically
Select an option in this combo box to define the criteria to be used for accepting
calls on a specific line by lifting the handset or pushing the headset key or .
The following settings are available:
• From the preferred line or the line that has been ringing the longest (default)
• From the line that has been ringing the longest
• From the preferred line or the line that was called the longest
• From the line that was called the longest
• Only from the preferred line for incoming calls
Line selection for outbound calls
Select an option in this combo box to define the criteria to be used for accepting
calls on a specific line by lifting the handset or pushing the headset key or .
The following settings are available:
• On the preferred line (default)
• On the next free line (lines always considered from first to last)
• On the last line used
• No automatic line seizure
Signaling type for second call waiting on another line
Select an option in this combo box to define if and how the OpenScape Desktop Client should signal inbound connection requests if an active call is in progress when you receive a second connection request on another line.
You can choose from:
• Special alert tone (default)
• Normal alert tone
• No Alert tone
A31003-G2570-U100-13-7619, 06/201544 OpenScape Personal Edition V7, User Guide
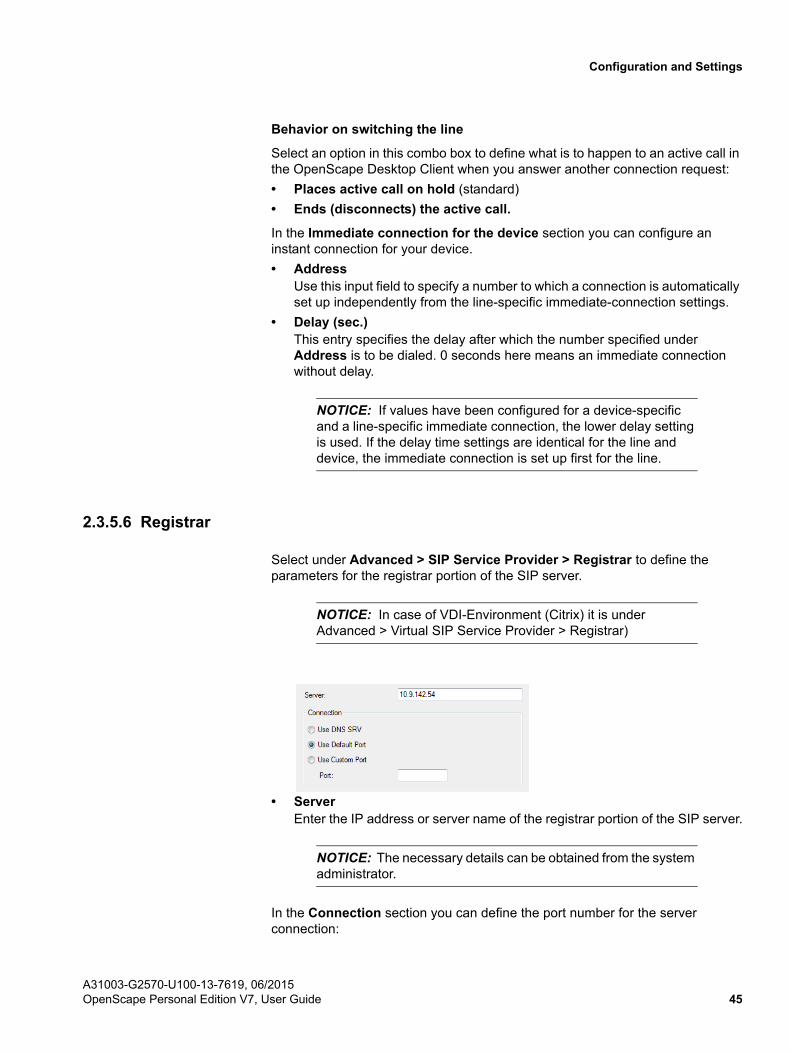
Configuration and Settings
Behavior on switching the line
Select an option in this combo box to define what is to happen to an active call in the OpenScape Desktop Client when you answer another connection request:
• Places active call on hold (standard)
• Ends (disconnects) the active call.
In the Immediate connection for the device section you can configure an instant connection for your device.
• AddressUse this input field to specify a number to which a connection is automatically set up independently from the line-specific immediate-connection settings.
• Delay (sec.)This entry specifies the delay after which the number specified under Address is to be dialed. 0 seconds here means an immediate connection without delay.
NOTICE: If values have been configured for a device-specific and a line-specific immediate connection, the lower delay setting is used. If the delay time settings are identical for the line and device, the immediate connection is set up first for the line.
2.3.5.6 Registrar
Select under Advanced > SIP Service Provider > Registrar to define the parameters for the registrar portion of the SIP server.
NOTICE: In case of VDI-Environment (Citrix) it is under Advanced > Virtual SIP Service Provider > Registrar)
• ServerEnter the IP address or server name of the registrar portion of the SIP server.
NOTICE: The necessary details can be obtained from the system administrator.
In the Connection section you can define the port number for the server connection:
A31003-G2570-U100-13-7619, 06/2015OpenScape Personal Edition V7, User Guide 45

Configuration and Settings
• Use DNS SRVIf this option is active, the settings for the registrar portion of the SIP server are determined by a DNS service. In this case, enter the domain name of the registrar portion of the server under Server.
• Use Default Port Depending on the selected transport type, this option for the connection to the registrar portion of the server is active by default.
• Use Custom PortIf you select this option, you must enter the port number under Port.
NOTICE: The necessary details can be obtained from the system administrator.
2.3.5.7 Proxy
Select under Advanced > SIP Service Provider > Proxy to define the param-eters for the proxy portion of the SIP server.
NOTICE: In case of VDI-Environment (Citrix) it is under Advanced > Virtual SIP Service Provider > Proxy.
• ServerEnter the IP address or server name of the proxy portion of the SIP server.
NOTICE: The necessary details can be obtained from the system administrator.
In the Connection section you can define the port number for the server connection:
• Use DNS SRVIf this option is active, the settings for the proxy portion of the SIP server are determined by a DNS service. In this case, enter the domain name of the proxy portion of the server under Server.
• Use Default PortDepending on the selected transport type, this option for the connection to the proxy portion of the server is active by default.
• Use Custom PortIf you select this option, you must enter the port number under Port.
A31003-G2570-U100-13-7619, 06/201546 OpenScape Personal Edition V7, User Guide

Configuration and Settings
NOTICE: The necessary details can be obtained from the system administrator.
2.3.5.8 Outbound Domain
An outbound domain (outbound proxy server) is used, for example, for a (Survivable Branch Office Solution) with an OpenScape Voice. In this case the survivability is provided by an extra proxy component of the SIP server (survivable SIP proxy, for example Comdasys Convergence). A survivable SIP proxy (gateway) offers restricted SIP server functions (restricted operation mode), as soon as it realizes that the OpenScape Voice cannot be reached. The OpenScape Personal Edition status bar signals operation in restricted mode by a corresponding information display . Operation is not interrupted.
NOTICE: Survivability describes here the ability of the communi-cations network to maintain the service for network subscribers even in case of existing errors in the network. You find detailed information about Survivability in the administrator manual of the OpenScape Voice V4R1 or V5.
Using an outbound domain enables you to make calls without having to specify the complete SIP addresses (SIP URIs/SIP phone numbers) when dialing. For example, the SIP phone number to be dialed reads: sip:0123456789@Domain Name. You can enter only 0123456789 in the <Name or Number> input field in the main menu. The SIP communications system completes the SIP phone number to the dialed.
Select the entry Advanced > SIP Service Provider > Outbound Domain to define the parameters for the outbound domain and the SIP gateway server.
NOTICE: In case of VDI-Environment (Citrix) it is under Advanced > Virtual SIP Service Provider > Outbound Domain.
A31003-G2570-U100-13-7619, 06/2015OpenScape Personal Edition V7, User Guide 47
Configuration and Settings
• Use Outbound DomainActivate this option so that you can fill in the fields in this dialog.
NOTICE: This check box must be ticked for connecting the OpenScape Desktop Client to an OpenScape Voice in the central as well as in a branch office.
• Domain nameEnter the name of your outbound domain in this input field. The SIP commu-nications system automatically completes it in the phone number to be dialed before the connection is set up.
NOTICE: Leave this input field empty for connecting the OpenScape Desktop Client to an OpenScape Voice with an OpenScape Branch solution in the central as well as in a branch office.
domain names can be provided also via DHCP option 120.With this domain names are provided at startup via DHCP option 120. This is possible only for users behind an SBC or Proxy.
A31003-G2570-U100-13-7619, 06/201548 OpenScape Personal Edition V7, User Guide
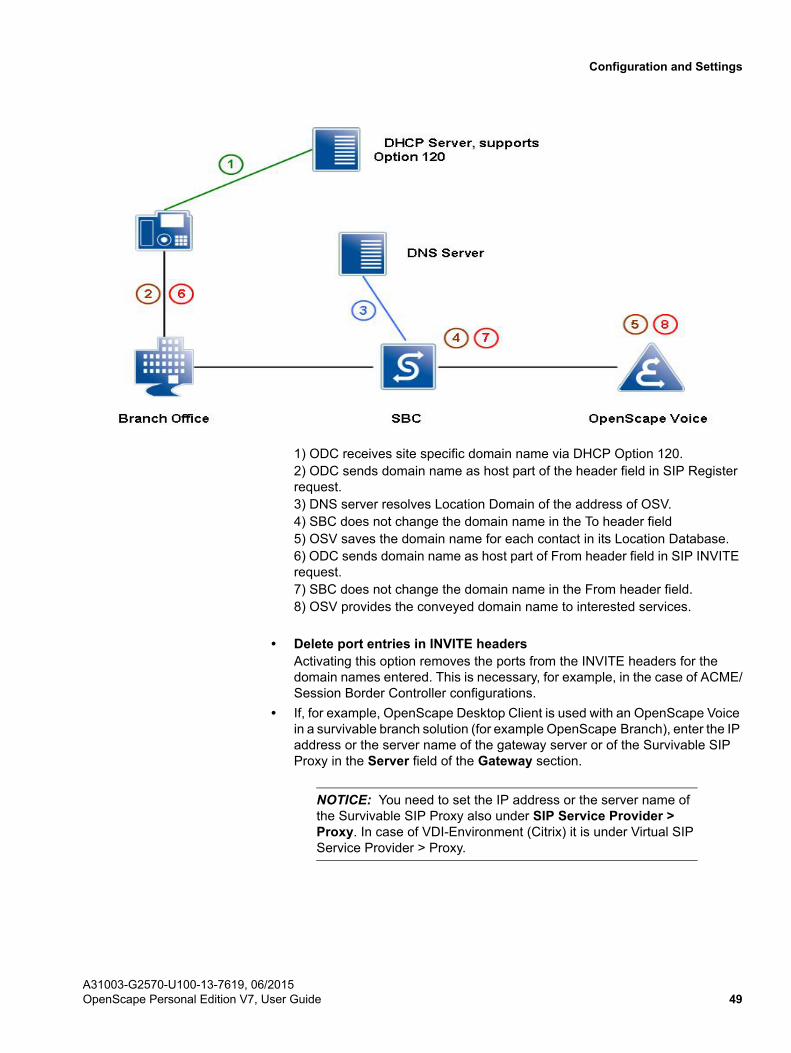
Configuration and Settings
1) ODC receives site specific domain name via DHCP Option 120.2) ODC sends domain name as host part of the header field in SIP Register request.3) DNS server resolves Location Domain of the address of OSV.4) SBC does not change the domain name in the To header field5) OSV saves the domain name for each contact in its Location Database.6) ODC sends domain name as host part of From header field in SIP INVITE request.7) SBC does not change the domain name in the From header field.8) OSV provides the conveyed domain name to interested services.
• Delete port entries in INVITE headersActivating this option removes the ports from the INVITE headers for the domain names entered. This is necessary, for example, in the case of ACME/Session Border Controller configurations.
• If, for example, OpenScape Desktop Client is used with an OpenScape Voice in a survivable branch solution (for example OpenScape Branch), enter the IP address or the server name of the gateway server or of the Survivable SIP Proxy in the Server field of the Gateway section.
NOTICE: You need to set the IP address or the server name of the Survivable SIP Proxy also under SIP Service Provider > Proxy. In case of VDI-Environment (Citrix) it is under Virtual SIP Service Provider > Proxy.
A31003-G2570-U100-13-7619, 06/2015OpenScape Personal Edition V7, User Guide 49
Configuration and Settings
IMPORTANT: Leave this input field empty for connecting the OpenScape Desktop Client to an OpenScape Voice with an OpenScape Branch solution in the central office.
NOTICE: The necessary details can be obtained from the system administrator.
Set the port number for the server connection in the Connection section:
• Delete DNS SRV / port specification in ROUTE headersIf this option is active, a DNS server can be used to search the gateway settings. In this case, enter the domain name of the gateway server under Server. Alternatively, the ports can be removed from the ROUTE header. This is necessary, for example, in the case of ACME/Session Border Controller configuration. To do this, enter the IP address of the gateway under Server.
IMPORTANT: You must set this option for connecting an OpenScape Voice in survivable branch solutions (for example OpenScape Branch).
• Use Default PortDepending on the selected transport type, this option for the connection to the proxy server is active by default.
• Use Custom PortIf you select this option, you must enter the port number under Port.
2.3.5.9 Network Access
NOTICE: The network access settings are used for normalizing phone numbers. They need to be configured only if the Normalize call numbers option has been activated in the Settings dialog on the tab Advanced > SIP Service Provider > Address conversion. In case of VDI-Environment (Citrix) it is under Advanced > Virtual SIP Server Provider > Address conversion.
Network access settings (location information) are needed for setting up a direct connection to telephone numbers from OpenScape Desktop Client directories or call lists. These settings are also used for converting call numbers into the inter-nationally dialable format. If these settings are not configured properly, you may encounter problems when setting up connections.
Select on the tab Advanced > SIP Service Provider > Network access to configure the network access settings.
A31003-G2570-U100-13-7619, 06/201550 OpenScape Personal Edition V7, User Guide

Configuration and Settings
NOTICE: In case of VDI-Environment (Citrix) it is under Advanced > Virtual SIP Service Provider > Network access.
• Country codeEnter here the international prefix for your location, for example 49 for Germany.
• Area codeEnter here the telephone prefix for your location in the national phone number scope. Omit the leading zero for this entry.
• System identification numberEnter the system identification number. This system ID number identifies internal call numbers in the directories that only set up internal connections when selected.
• Extension rangeSpecify the extension range of your network in the form of a regular expression.Example:You have been assigned the system identification number with the numbers 0049 35 12345-2000 to 0049 35 12345-4999. In this case the extension range reads 2000 to 4999. Enter the following in the Extension range field for these phone numbers: \b[2-4][0-9]{3}\b.
– \b - the number must begin with a blank
– [2-4] - the first digit may be a character between 2 and 4 inclusive, thus 2, 3, 4
– [0-9]{3} - for the next three digits, numbers 0 to 9 are allowed
– \b - the number must end with a blank
• Trunk codeEnter here the code that has been configured on your system or on your PBX to allocate trunks for outgoing connections.
• Prefix for local calls/long distance calls/international callsEnter the network operator ID for the respective call type in the corresponding fields. For example, in Germany no Prefix for local calls is used, while for other countries in Europe and members of the NANP (North American Numbering Plan) the zero is used to mark local calls. In Germany, for
A31003-G2570-U100-13-7619, 06/2015OpenScape Personal Edition V7, User Guide 51

Configuration and Settings
example, the prefix for long distance calls is 0 and the prefix for interna-tional calls is 00. This data is independent from the configuration of the connected communications system and determined by the network operator.
• Additional code for local calls/long distance calls/international calls Enter here any additional digits to be used as call-by-call prefixes. This data is independent from the configuration of the connected communications system.The sequence of the various codes is as follows:<office code><additional code><prefix><phone number>
Test
Click on the Test... button to open the following dialog and test your entries.
• Extension to be dialedEnter the number to be dialed in this entry field. Based on the currently set parameters the OpenScape Desktop Client determines the phone number in international format.
• Converted internationallyThe phone number entered in the above field is automatically displayed in this field.
• Effectively dialedThis field displays automatically the actually dialed number. Depending on the set network access parameters the number may be shorter, for example, if an internal phone number has been recognized.
2.3.5.10 Address Conversion
In the Settings dialog, select on the tab Advanced > SIP Service Provider > Address conversion.
NOTICE: In case of VDI-Environment (Citrix) it is under Advanced > Virtual SIP Service Provider > Address conversion.
A31003-G2570-U100-13-7619, 06/201552 OpenScape Personal Edition V7, User Guide

Configuration and Settings
• Normalize call numbers Normalizing a phone number means its conversion in a permanent default representation from any representation format. A phone number is always normalized when it is to be searched for or passed on to another system that expects a defined phone number format.Activate this option if phone numbers are to be normalized based on the infor-mation from the network access settings on the tab Advanced > SIP Service Provider > Network access.
NOTICE: In case of VDI-Environment (Citrix) it is under Advanced > Virtual SIP Service Provider > Network Access
NOTICE: Make sure that all required network access data on the tab Advanced > SIP Service Provider > Network access is set correctly. In case of VDI-Environment (Citrix) check Advanced -> Virtual SIP Service Provider > Network access.
• Remove domain specification in display textsActivate this option to suppress the domain port for a SIP-URI to be displayed (for example display the calling station) on the display.
• Remove same domain in addressActivate this option to suppress the domain port in the case of SIP-URIs from the same/own registrar in addresses, for example call lists.
• Add international prefix (“+“) to SIP-addressActivate this option if the OpenScape Desktop Client is to indicate the SIP address as international.Example:The SIP Service Provider delivers the address sip:[email protected] and the OpenScape Desktop Client converts it in sip:[email protected].
• Handle SIP-addresses as call numbersIf this option is active, the domain portion is ignored and the text that precedes the domain considered a phone number.Example:sip:[email protected] is considered +4924049087666.
• Input and selection option of SIP-addressesActivate this check box to allow the input and selection option of SIP-addresses.
2.3.5.11 Additional Functions
On the Advanced tab, under SIP Service Provider > Additional functions , you can define additional features depending on the connected communications system.
A31003-G2570-U100-13-7619, 06/2015OpenScape Personal Edition V7, User Guide 53

Configuration and Settings
NOTICE: In case of VDI-Environment it Virtual SIP Service Provider > Additional functions.
Call forwarding
• Ringing time (sec.) until the call forwarding type ’unavailable’ takes effectUsing this option you can set a ringing time after the expiry of which a call forwarding you have configured becomes active. Specify the desired value in the associated field.
DTMF tone dialing
The DTMF tone dialing feature is only available during an active call. It enables using the phone keypad of your preferred device or the computer keyboard for transmitting control commands to the communications system by sending DTMF tones.
• DTMF modeThe available options in this combo box read Auto and Inband. You can obtain further details from your PBX administrator.
Attendant function
• Join call after hang upThis option determines the telephone's reaction when you hang up
via during a consultation call: you are connected to the consultation call subscriber while the connection to the original caller is being held. If this option is active, the original caller and consultation call subscriber are then connected. If this option is inactive, the connection to the consultation call subscriber is closed and you are automatically reconnected to the original caller.
NOTICE: If, however, you put down the receiver, the held connection persists. Your PBX automatically triggers a call signal. After picking up the receiver, you are reconnected to the held subscriber.
A31003-G2570-U100-13-7619, 06/201554 OpenScape Personal Edition V7, User Guide

Configuration and Settings
Reconnect function
• Reconnect call after hang upIf a connection (partner A with partner B) is set to call-hold owing to a consul-tation call (A consults with C) and the consultation call is finished, activating this option will effect the following:
– Partner A is automatically reconnected to the held partner B, after partner C has closed the consultation call connection.
– The held partner B calls partner A again after partner A has closed the consultation call connection.
2.3.5.12 System Functions
Select on the tab Advanced > SIP Service Provider > System functions to define the system function settings.
NOTICE: In case of VDI-Environment (Citrix) it is under Advanced > Virtual SIP Service Provider > System functions
NOTICE: The functions provided in this dialog are possibly not supported by every SIP communications system.
Message Waiting Indicator (MWI)
You can use this feature to be alerted to available voicemails and retrieve them.
• Voice-Mail IDEnter the phone number for the callback access of the voicemail system
under Voice-Mail ID. This setting effects the display of the Request
messages option in the telephone menu .
NOTICE: The necessary details for this can be obtained from the administrator of the connected communications system.
A31003-G2570-U100-13-7619, 06/2015OpenScape Personal Edition V7, User Guide 55

Configuration and Settings
Server-based voice conference
A server-based voice conference is a conference connection based on a consul-tation call connection that can connect more than three participants to each other.
NOTICE: In the OpenScape Voice documentation this type of conference is referred to as device-controlled conference.
• Conference Factory URIEnter here the number or URI of the conference server supported by your communications system. For example, the OpenScape Desktop Client sends during a consultation call the conference server URI to the OpenScape Voice, which then establishes a conference connection to the connected Media Server of the OpenScape UC Application. If this function is configured, the context menu of a consultation call contains the "Initiate server-based conference" option. Otherwise, the context menu of a consultation call contains the "Initiate local conference" option.
NOTICE: We recommend to only enter the user portion of the conference server URI, for example "4989" instead of "4989@<address of the SIP server>".
Automatic acceptance of calls for server-controlled connections
• Alert toneIf you operate the OpenScape Personal Edition via a CTI application and have dialed a phone number via the CTI application, a connection is first set up to the OpenScape Personal Edition. The program accepts this connection request automatically. Subsequently, the connection to the desired call target is set up. In case of the check box ticked, the OpenScape Desktop Client indicates that the hands-free function is active with a signal tone after the automatic call pickup.
Voice recording
• Disable Voice Recording
NOTICE: This option is not activated by default.
Activating this option hides the voice recording icon in the main bar and in the ribbon > SoftPhone tab > Calls group. Recording an active call with OpenScape Desktop Client is then not possible anymore.
2.3.5.13 Codes
Select on the tab Advanced > SIP Service Provider > Codes to define codes for various telephony features.
A31003-G2570-U100-13-7619, 06/201556 OpenScape Personal Edition V7, User Guide

Configuration and Settings
NOTICE: In case of VDI-Environment (Citrix) it is under Advanced > Virtual Service Provider > Codes.
Callback
The callback function enables you to activate an automatic callback for a busy or free internal subscriber. When the busy subscriber finishes his/her call, the callback is initiated. In this process, the subscriber who activated the callback is called first, and after he/she has accepted this call, the target subscriber is called.
You can set the following codes for the Callback function:
• Code for activation "on free"The setting defines the key (0 to 9, *, #) used for automatic activation in case of a free line.
• Code for activation "on busy"The setting defines the key (0 to 9, *, #) required for automatic activation in case of a busy line.
• Code to delete all requestsThis setting defines the key (0 to 9, *, #) required for deleting all automatic callback requestsThe option Delete callback is additionally available in the telephony menu of
the main bar ( ) and in the ribbon > SoftPhone tab > Functions by config-uring this code during operation.
Call pickup
Call pickup is a telephony function that allows the members of a subscriber group (or business group in OpenScape Voice terminology) to pick up calls for other members of the group. Two features are available for this function:
• Call pickup groupThis feature combines subscribers in pickup groups. Each group member can accept a call for another group member. Calls signalled acoustically to a subscriber of a call pickup group are at the same time signalled visually to the other group members by an LED (next to the programmed key) on the display. You can pick up the call by pushing a key or dialing a code number as well as via the displayed desktop notification.
A31003-G2570-U100-13-7619, 06/2015OpenScape Personal Edition V7, User Guide 57

Configuration and Settings
NOTICE: To use the Call Pickup Group feature you need to perform appropriate settings in the OpenScape Voice.
• Directed call pickupThis feature allows subscribers to accept signalled or waiting calls and to resume manually held calls for every phone number within a business group.
You can set the following parameters for the call pickup function:
• Server TypeYou can select one of the following server types from this combo box:
– OpenScape Voice
– Broadsoft
– Sylantro
– Auto
– HiQ4200
NOTICE: The PBX OpenScape Voice used to be called HiPath .
• CodeHere you can define the key (0 to 9, *, #) used for call pickup and configured in the OpenScape Voice.
By configuring this code during operation, the options Directed call
pickup and Pickup call are additionally available in the telephony menu
of the main bar ( ) and in the ribbon > SoftPhone tab > Functions.
Hunting group
The hunting group telephony feature enables call distribution within a subscriber group. These subscribers are linked, so that a call to the group is automatically routed to the next free member in case of a busy or unanswered phone.
You can set the following codes for the hunting group function:
• Code to stop call forwarding This setting defines the key (0 to 9, *, #) required for ending the automatic call forwarding. You can use the keypad of the integrated/free phone as well as of the OpenScape Personal Edition SoftPhone.The option Logoff from hunting group is additionally available in the
telephony menu of the main bar ( ) and in the ribbon > SoftPhone tab > Functions by configuring this code during operation.
• Code for busy signalingThis setting defines the key (0 to 9, *, #) required for signaling a busy line. You can use the keypad of the integrated/free phone as well as of the OpenScape Personal Edition SoftPhone.The option Unavailable for hunting group is additionally available in the
telephony menu of the main bar ( ) and in the ribbon > SoftPhone tab > Functions by configuring this code during operation.
A31003-G2570-U100-13-7619, 06/201558 OpenScape Personal Edition V7, User Guide
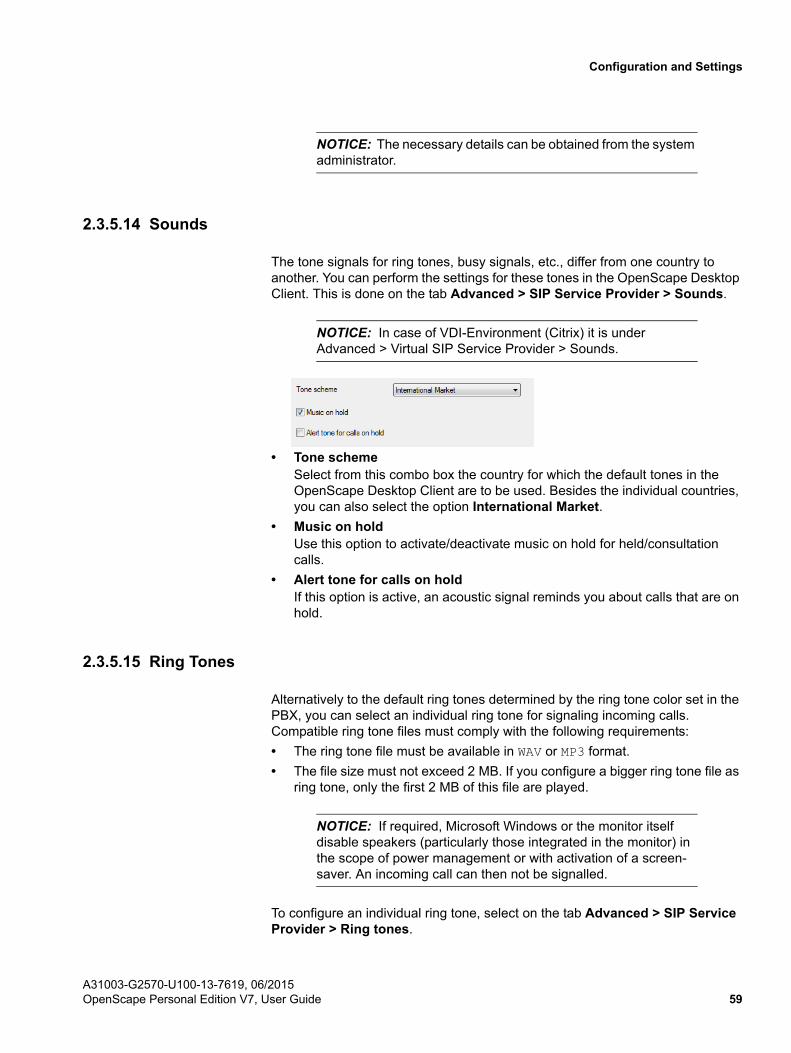
Configuration and Settings
NOTICE: The necessary details can be obtained from the system administrator.
2.3.5.14 Sounds
The tone signals for ring tones, busy signals, etc., differ from one country to another. You can perform the settings for these tones in the OpenScape Desktop Client. This is done on the tab Advanced > SIP Service Provider > Sounds.
NOTICE: In case of VDI-Environment (Citrix) it is under Advanced > Virtual SIP Service Provider > Sounds.
• Tone schemeSelect from this combo box the country for which the default tones in the OpenScape Desktop Client are to be used. Besides the individual countries, you can also select the option International Market.
• Music on holdUse this option to activate/deactivate music on hold for held/consultation calls.
• Alert tone for calls on holdIf this option is active, an acoustic signal reminds you about calls that are on hold.
2.3.5.15 Ring Tones
Alternatively to the default ring tones determined by the ring tone color set in the PBX, you can select an individual ring tone for signaling incoming calls. Compatible ring tone files must comply with the following requirements:
• The ring tone file must be available in WAV or MP3 format.
• The file size must not exceed 2 MB. If you configure a bigger ring tone file as ring tone, only the first 2 MB of this file are played.
NOTICE: If required, Microsoft Windows or the monitor itself disable speakers (particularly those integrated in the monitor) in the scope of power management or with activation of a screen-saver. An incoming call can then not be signalled.
To configure an individual ring tone, select on the tab Advanced > SIP Service Provider > Ring tones.
A31003-G2570-U100-13-7619, 06/2015OpenScape Personal Edition V7, User Guide 59
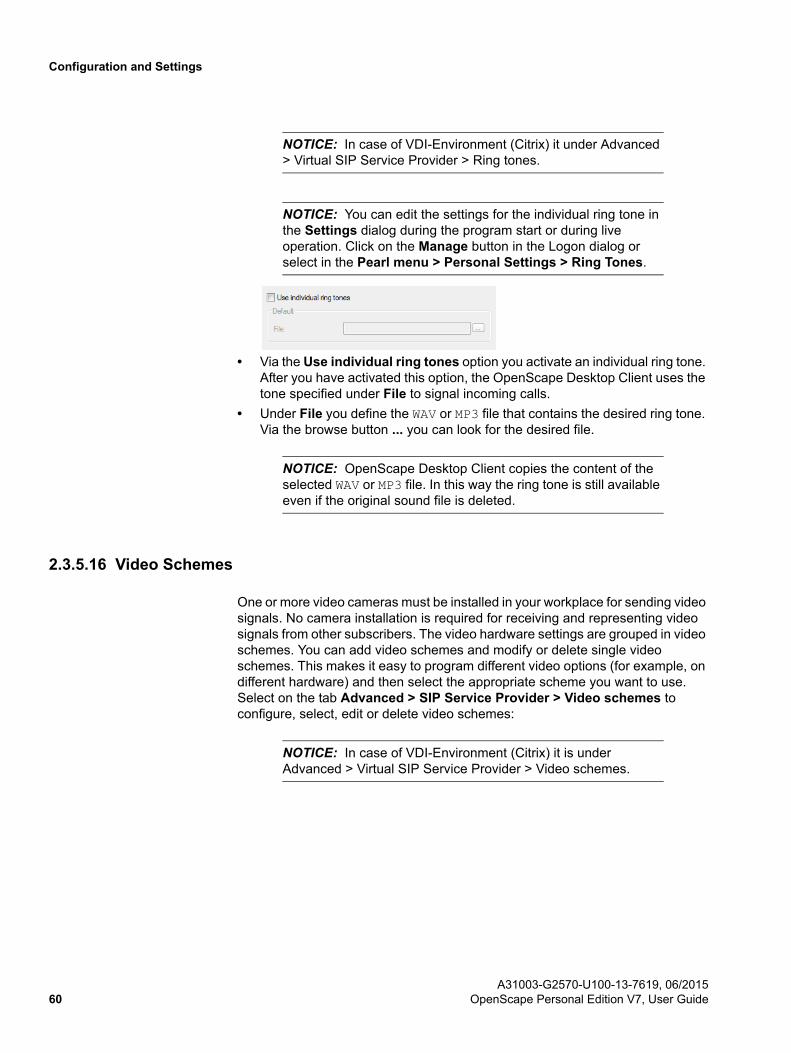
Configuration and Settings
NOTICE: In case of VDI-Environment (Citrix) it under Advanced > Virtual SIP Service Provider > Ring tones.
NOTICE: You can edit the settings for the individual ring tone in the Settings dialog during the program start or during live operation. Click on the Manage button in the Logon dialog or select in the Pearl menu > Personal Settings > Ring Tones.
• Via the Use individual ring tones option you activate an individual ring tone. After you have activated this option, the OpenScape Desktop Client uses the tone specified under File to signal incoming calls.
• Under File you define the WAV or MP3 file that contains the desired ring tone. Via the browse button ... you can look for the desired file.
NOTICE: OpenScape Desktop Client copies the content of the selected WAV or MP3 file. In this way the ring tone is still available even if the original sound file is deleted.
2.3.5.16 Video Schemes
One or more video cameras must be installed in your workplace for sending video signals. No camera installation is required for receiving and representing video signals from other subscribers. The video hardware settings are grouped in video schemes. You can add video schemes and modify or delete single video schemes. This makes it easy to program different video options (for example, on different hardware) and then select the appropriate scheme you want to use. Select on the tab Advanced > SIP Service Provider > Video schemes to configure, select, edit or delete video schemes:
NOTICE: In case of VDI-Environment (Citrix) it is under Advanced > Virtual SIP Service Provider > Video schemes.
A31003-G2570-U100-13-7619, 06/201560 OpenScape Personal Edition V7, User Guide

Configuration and Settings
Adding a video scheme
After clicking the Add... button you can configure a new video scheme. The following dialog opens:
• Enter an expressive name for the video scheme under Description.
• In the Camera combo box you select the camera to record the image for the video connections in the OpenScape Desktop Client.
Selecting/activating a video scheme
To select/activate a video scheme, click the one you want in the list of configured video schemes. If a video scheme is available and active and the user logged in, the SoftPhone tab in the ribbon displays in the Video group the following icon for
switching the camera on and off: camera preview.
NOTICE: If a video scheme is temporarily locally unavailable, the OpenScape Desktop Client uses the next available video scheme.
Changing a video scheme
After clicking the Change... button you can edit the Description and Camera settings of a selected video scheme. The following dialog opens:
A31003-G2570-U100-13-7619, 06/2015OpenScape Personal Edition V7, User Guide 61

Configuration and Settings
Deleting a video scheme
You can remove a video scheme from the list of configured video schemes with a click on the Delete button.
Video scheme sequence
You can define the sequence of the configured video schemes, thus influencing the respective video hardware selection. After the user log-in, OpenScape Desktop Client checks the video hardware specified in the video schemes. The list entries are processed from top to bottom. You can set the video scheme sequence using the up and down buttons.
Default video configuration
This section provides settings that specify the representation of images in the Video window.
• LayoutThis option lets you specify the default view for your video window. You can select one of the following views:
– In call (default)This view displays images of the connection partners in a frame and slightly turned. Your own image (camera image) appears bottom left. When it is being transmitted, it is shown in a red frame.
– Full windowIn this view the image of the connection partner occupies the entire video window. Your own image (if configured) appears bottom left. When it is being transmitted, it is shown in a red frame.
– Full screenIn this view the image of the connection partner occupies the entire screen. Your own image (if configured) appears bottom left. When it is being transmitted, it is shown in a red frame.
– Keep previousWith this setting you determine that the view used last is saved when you shut the OpenScape Desktop Client down and used again when you restart the program.
• Preview
– OffYour own image is not displayed or the video camera is switched off.
– On (default)Your own image is displayed or the video camera is switched on.
– Keep previousWith this setting you determine that the view used last for your own image is saved when you shut the OpenScape Desktop Client down and used again when you restart the program.
• Mirrored
– When this option is active, your own image is displayed mirrored in the Video window but transmitted unmirrored to the connection partner.
A31003-G2570-U100-13-7619, 06/201562 OpenScape Personal Edition V7, User Guide
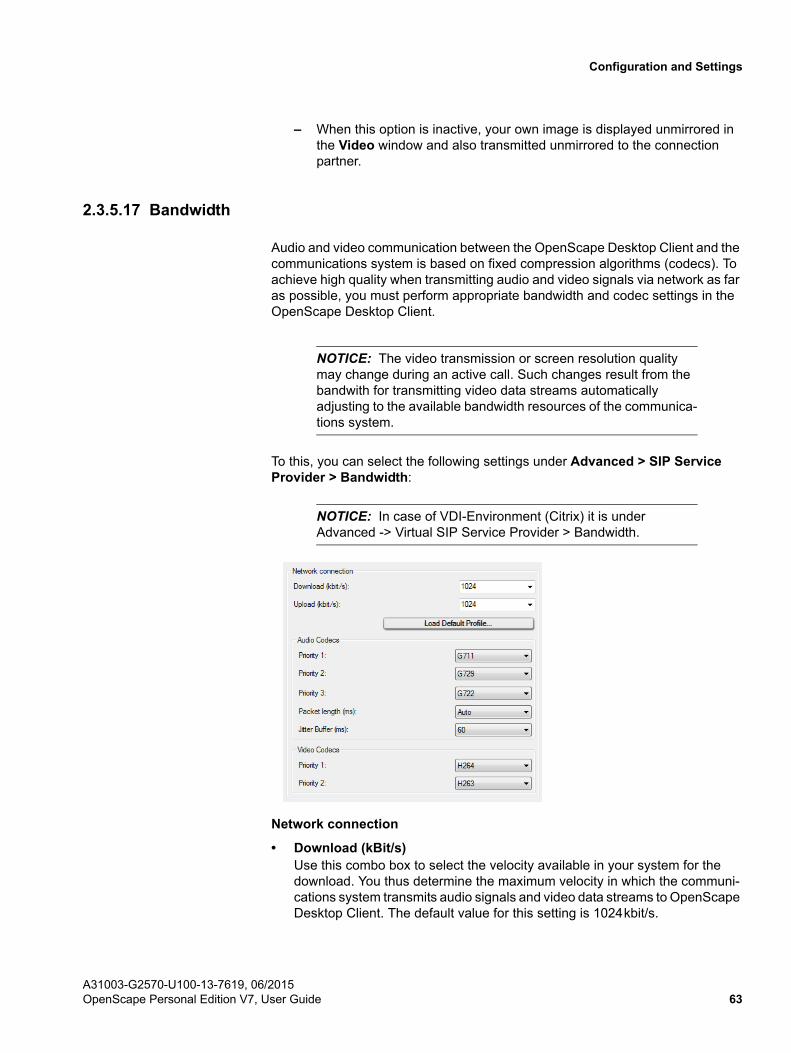
Configuration and Settings
– When this option is inactive, your own image is displayed unmirrored in the Video window and also transmitted unmirrored to the connection partner.
2.3.5.17 Bandwidth
Audio and video communication between the OpenScape Desktop Client and the communications system is based on fixed compression algorithms (codecs). To achieve high quality when transmitting audio and video signals via network as far as possible, you must perform appropriate bandwidth and codec settings in the OpenScape Desktop Client.
NOTICE: The video transmission or screen resolution quality may change during an active call. Such changes result from the bandwith for transmitting video data streams automatically adjusting to the available bandwidth resources of the communica-tions system.
To this, you can select the following settings under Advanced > SIP Service Provider > Bandwidth:
NOTICE: In case of VDI-Environment (Citrix) it is under Advanced -> Virtual SIP Service Provider > Bandwidth.
Network connection
• Download (kBit/s) Use this combo box to select the velocity available in your system for the download. You thus determine the maximum velocity in which the communi-cations system transmits audio signals and video data streams to OpenScape Desktop Client. The default value for this setting is 1024 kbit/s.
A31003-G2570-U100-13-7619, 06/2015OpenScape Personal Edition V7, User Guide 63
Configuration and Settings
NOTICE: To achieve the maximum video image quality during a video conference, we recommend the maximum value of 36000 kbit/s for setting the download speed.
• Upload (kbit/s)Use this combo box to select the velocity available in your system for the upload. You thus determine the maximum velocity in which the OpenScape Desktop Client transmits audio signals and video data streams to the commu-nications system. The minimum value we recommend for this setting is 256kbit/s. The default setting for this value is 1024 kbit/s.
NOTICE: To achieve the maximum video image quality during a video conference, we recommend the maximum value of 36000 kbit/s for setting the upload speed.
• Load default profileUse this button to open a window in which the different profiles (tariffs) are listed. You can select your tariff/profile there. Although the associated speeds for Download or Upload are preset by default, they can be modified.
Audio Codecs
Determine in this section the codec sequence required for voice communication. The three audio codecs that OpenScape Desktop Client supports are G.711, G.729 and G.722.
• Priority 1Use this combo box to select the audio codec to be used for your voice connections with the highest priority.
• Priority 2Use this combo box to select the audio codec to be used for your voice connections if the audio codec with the highest priority is not available.
• Priority 3Use this combo box to select the audio codec to be used for your voice connections if the audio codecs with Priority 1 and Priority 2 are not available.
• Packet length (ms)Select Auto here or enter the desired value (in milliseconds).
• Jitter Buffer (ms)To avoid voice packet loss, which can result in poor voice quality and dropouts, set the buffer size in this field. We recommend to set the jitter buffer to value 60. The jitter buffer caches all incoming voice packets for the period set and then forwards them to the audio device’s sound output. The jitter buffer continues to forward voice packets until none are left, even if the network does not deliver new voice packets quickly enough. This avoids dropouts.When selecting the optimum setting for the jitter buffer the following applies:
– The better the network quality, the smaller the jitter buffer may be.
– The bigger the jitter buffer, the more the voice output will be delayed.
A31003-G2570-U100-13-7619, 06/201564 OpenScape Personal Edition V7, User Guide

Configuration and Settings
Video Codecs
Determine in this section the codec sequence required for video connection. The two video codecs that the OpenScape Desktop Client supports are H.263 and H.264.
• Priority 1Use this combo box to select the video codec to be used for your voice connections with the highest priority.
• Priority 2Use this combo box to select the video codec to be used for your voice connections if the video codec with the highest priority is not available.
2.3.5.18 Port Restrictions
To determine the port restrictions in firewall environments, select on the tab Advanced > SIP Service Provider > Port restrictions.
NOTICE: In case of VDI-Environment (Citrix) it is under Advanced > Virtual SIP Service Provider > Port restrictions.
Port restrictions
• RTP video port range from/toEnter the RTP ports used for the video connections in these fields.
NOTICE: If no video transmission is possible during operation despite a correct login, make sure that the RTP port range is configured between 29120 and 29131.
• RTP audio port range from/toEnter the RTP ports used for the voice connections in these fields.
NOTICE: If no voice transmission is possible during operation despite a correct login, make sure that the RTP port range is configured between 29100 and 29119.
A31003-G2570-U100-13-7619, 06/2015OpenScape Personal Edition V7, User Guide 65

Configuration and Settings
SIP signaling
• PortIn this entry field you specify the SIP port used for the signaling connections.
NOTICE: If you have set the TLS entry under SIP Service Provider > Connection in the Protocol field, specify the recom-mended value 5061 here. Your administrator may have set a different port. This port is used for secure connections. In case of VDI-Environment check under Virtual SIP Service Provider > Connection.
2.3.5.19 Mobile User
NOTICE: You can use the SIP Mobile User functionality only if a DLS server is available in your SIP communications system. Furthermore, the Use central configuration option must have been activated when setting up OpenScape Desktop Client. In addition, you must enter the DLS configuration parameters for the central configuration on the tab Advanced > General > Central Configuration.
The DLS mobility concept enables assigning phone numbers of specific persons or person profiles instead of specific devices. In this way, OpenScape Desktop Client users can communicate with their contacts independently from the device used. When the device is changed, the user keeps his/her phone number and personal settings (for example individual ringtone). The DLS server administers for each mobile user a mobile-user profile, which consists of a mobility number and a mobile-user password.
SIP Mobile User logon
An SIP Mobile User can log on to the OpenScape Desktop Client or at a device (for example office phone, mobile phone, laptop) with his/her mobile-user profile.
NOTICE: Be sure to have a mobile-user profile in the DLS. Please consult your system administrator for further information.
If you are logged in at the OpenScape Desktop Client with your mobile-user profile, a corresponding message is displayed when you try to log on to another device. You are logged off from the communications system immediately after-wards. The user interface, however, is visible until you click on OK. The message is closed and the OpenScape Desktop Client terminated.
If you are still conducting a call with OpenScape Desktop Client, there are two options, which depend on the DLS configuration:
• The active connection is immediately closed. You are logged off from the communications system afterwards. The user interface, however, is visible
A31003-G2570-U100-13-7619, 06/201566 OpenScape Personal Edition V7, User Guide

Configuration and Settings
until you click on OK. The message is closed and the OpenScape Desktop Client terminated.
• After a pre-set time has expired, the active connection is automatically closed and you are logged off from the communications system. The user interface, however, is visible until you click on OK. The message is closed and the OpenScape Desktop Client terminated.
In the When the client is started and there is another user logged on with the same mobile number combo box you can define how the DLS server is to behave if you are logged in at another device or at OpenScape Desktop Client with your mobile-user profile at the time of the login at OpenScape Desktop Client or at a device.
• ask for confirmationIf you are logged in at a device with your mobile-user profile and this option is selected, a message is displayed at the OpenScape Desktop Client start. This message informs you, that you are already logged in at another device, which is indicated with its MAC address or assigned phone number, with the same mobile-user profile. Select Yes to log off from the other device and to start the OpenScape Desktop Client as mobile-user. Select No to abort logging on to the OpenScape Desktop Client.If you are still conducting a call on the device, there are two options, which depend on the DLS configuration:
– The active connection is closed after a pre-set time and the OpenScape Desktop Client logs on to the communications system.
– Logging off from the device is denied by the DLS. You can try again after finishing the call.
• log them off without confirmationYou are automatically logged off from the other device, at which you are logged in at the time of the program start with the same mobile-user profile.
• do not start the clientThe OpenScape Desktop Client is not started.
During the first start of the program you are prompted to enter the Mobile User Password. Your entry is copied to the input field of the same name.
NOTICE: If the specified Mobile User Password is incorrect, a corresponding error message appears. Thereafter, you can enter the password again.
NOTICE: The program start is also abandoned if you do not have a valid mobile-user license or if the device has not been
A31003-G2570-U100-13-7619, 06/2015OpenScape Personal Edition V7, User Guide 67

Configuration and Settings
configured as mobility-enabled device in the DLS. A corre-sponding error message is displayed.
NOTICE: You can obtain further information about DLS and the DLS mobility concept from the administrator documentation of Deployment Service V3.0.
2.3.5.20 Quality of Service (QoS)
IMPORTANT: Deploying the QoS service requires a QoS Packet Scheduler being active for the connection used.
NOTICE: Please obtain further information about configuring the QoS settings and creating the QoS policies for the operating systems Microsoft Windows Vista SP1/Microsoft Windows 7/Microsoft Windows 7 SP1 from the setup guide OpenScape Personal EditionV7 Installation and Administration.
If you wish to modify the QoS settings, select on the tab Advanced > SIP Service Provider > Quality of Service.
NOTICE: In case of VDI-Environment (Citrix) it is under Advanced > Virtual SIP Service Provider > Quality of Service.
The displayed dialog shows the default settings for the following parameters:
• Layer 2: User priority acc. to IEEE802.1pUnder Microsoft Windows XP Professional SP2 and later you cannot perform any settings for Layer 2.
A31003-G2570-U100-13-7619, 06/201568 OpenScape Personal Edition V7, User Guide
Configuration and Settings
• Layer 3: Priority classes (Codepoint acc. to DiffServ)Under Microsoft Windows XP Professional SP2 and later you can set the QoS values for the traffic types Call Signaling and Voice payload individually. You can use the Mark Packets option to individually define whether the data of the traffic types Call Signaling and Voice payload is furnished with the respectively set QoS values.
• Restore Standard SettingsClick on this button if you want to reset the QoS settings to the default values.
NOTICE: On a computer with Intel Centrino Duo processor, OpenScape Desktop Client will detect this automatically at runtime. In this case the OpenScape Desktop Client uses the QoS support provided by the Intel Centrino Duo processor.
NOTICE: The computer needs to be rebooted for the QoS settings changes to become active.
2.3.6 HiPath Provider Settings
NOTICE: You cannot activate the HiPath Provider module in combination with the Communication and Stimulus Provider modules.
You perform settings for the HiPath Provider to use the OpenScape Desktop Client as softphone at a HiPath 3000 or OpenScape 4000. To edit the HiPath Provider settings, select in the left-hand area of the tab Advanced > HiPath Provider.
You can configure the following settings for the HiPath Provider:
2.3.6.1 Device
NOTICE: To edit the device settings you need to open the Settings dialog during the program start. Click on the Manage button in the Logon dialog for this purpose.
To display the freephone of OpenScape Desktop Client and the extended keypad, you can choose from various device types for phone and key module.
To set the desired device type, select on the tab Advanced > HiPath Provider the Device option.
A31003-G2570-U100-13-7619, 06/2015OpenScape Personal Edition V7, User Guide 69

Configuration and Settings
• Phone typeSelect your phone type in this combo box. Phone type determines also the following properties for the free and integrated phone of OpenScape Desktop Client:
– Number of display lines shown in the OpenScape Desktop Client freephone (in the integrated phone of the main bar always two display lines are shown).
– Availability of Electronic Key Labeling (EKL) to the OpenScape Desktop Client.
– Number of feature keys available in the free and integrated telephone of OpenScape Desktop Client.
– Number of feature keys available in the extended keypad of OpenScape Desktop Client.
• Key module typeThis combo box lets you define the type of your key module and determine the following key module properties:
– Availability of Electronic Key Labeling (EKL) to the key module columns in the extended keypad.
– Number of programmable feature keys available in the key module columns of the extended keypad in OpenScape Desktop Client.
• Maximum number of key modulesThis combo box specifies how many key module columns are displayed in the extended keypad at the most. Possible values range from 0 to 4. Value 0 means that the extended keypad remains empty, and 4 means that a maximum of four key module columns is displayed in the extended keypad.
2.3.6.2 Main Connection
NOTICE: To edit the main connection settings you need to open the Settings dialog during the program start. Click on the Manage button in the logon dialog for this purpose.
The main connection configuration defines the connection properties between OpenScape Desktop Client and the main communications system.
To configure the failover parameters, select on the tab Advanced > HiPath Provider the Main connection option.
A31003-G2570-U100-13-7619, 06/201570 OpenScape Personal Edition V7, User Guide
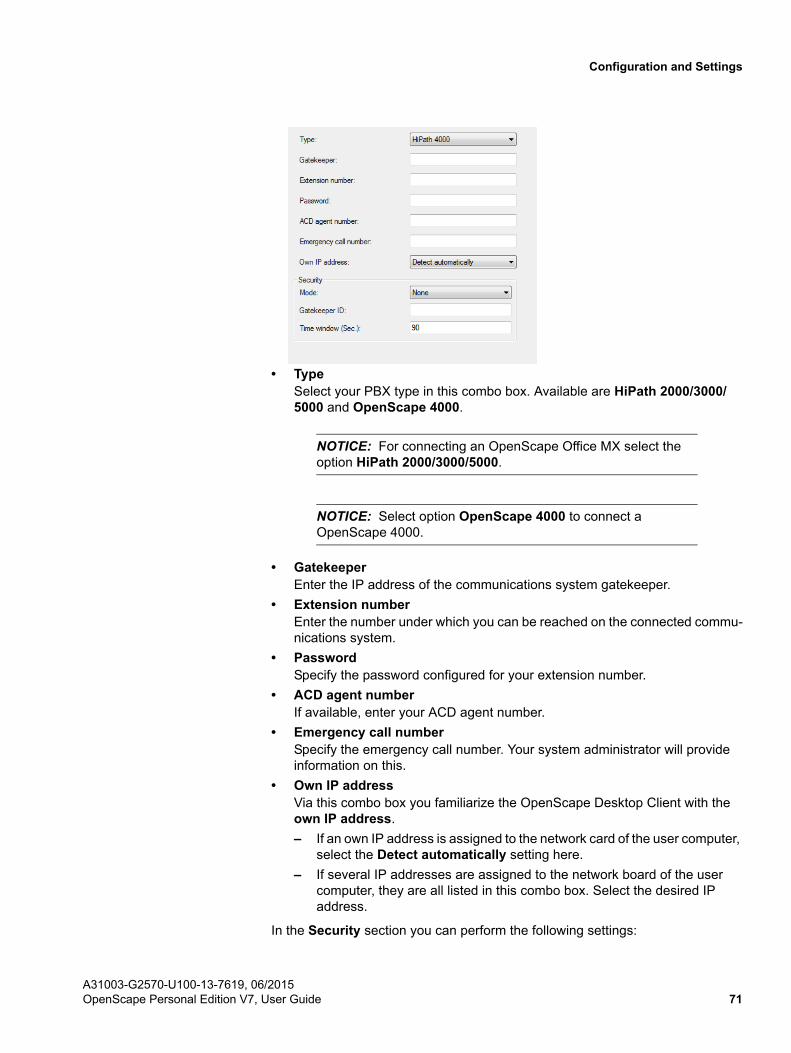
Configuration and Settings
• TypeSelect your PBX type in this combo box. Available are HiPath 2000/3000/5000 and OpenScape 4000.
NOTICE: For connecting an OpenScape Office MX select the option HiPath 2000/3000/5000.
NOTICE: Select option OpenScape 4000 to connect a OpenScape 4000.
• GatekeeperEnter the IP address of the communications system gatekeeper.
• Extension numberEnter the number under which you can be reached on the connected commu-nications system.
• PasswordSpecify the password configured for your extension number.
• ACD agent numberIf available, enter your ACD agent number.
• Emergency call numberSpecify the emergency call number. Your system administrator will provide information on this.
• Own IP addressVia this combo box you familiarize the OpenScape Desktop Client with the own IP address.
– If an own IP address is assigned to the network card of the user computer, select the Detect automatically setting here.
– If several IP addresses are assigned to the network board of the user computer, they are all listed in this combo box. Select the desired IP address.
In the Security section you can perform the following settings:
A31003-G2570-U100-13-7619, 06/2015OpenScape Personal Edition V7, User Guide 71

Configuration and Settings
• ModeFrom this combo box you can select the security mode that is also selected as security mode on the connected communications system.
• Gatekeeper IDSpecify the Gatekeeper ID already configured on your PBX.
• Time window (Sec.)Under this option you can enter the time in seconds. Your system adminis-trator will provide information on this.
NOTICE: You can obtain more detailed information about these parameters from your system administrator.
2.3.6.3 Main Network Access
NOTICE: To edit the main network access settings you need to open the Settings dialog during the program start. Click on the Manage button in the logon dialog for this purpose.
Network access settings must be entered when call number normalization is active. Network access settings (location information) are needed for setting up a direct connection to telephone numbers from OpenScape Desktop Client direc-tories or call lists. These settings are also used for converting call numbers into the internationally dialable format. If these settings are not configured properly, you may encounter problems when setting up connections. Network access settings are not needed when call number normalization is inactive.
Select the HiPath Provider option on the Advanced tab and open the Main network access dialog to configure the network access settings. The parameters you see in the figure are only examples.
• Country codeEnter here the international prefix for your location, for example 49 for Germany.
A31003-G2570-U100-13-7619, 06/201572 OpenScape Personal Edition V7, User Guide

Configuration and Settings
• Area codeEnter here the telephone prefix for your location in the national phone number scope. Omit the leading zero for this entry.
• System identification numberEnter the system identification number. This system ID number identifies internal call numbers in the directories that only set up internal connections when selected.
• Extension rangeSpecify the extension range of your network in the form of a regular expression.Example:You have been assigned the system identification number with the numbers 0049 35 12345-2000 to 0049 35 12345-4999. In this case the extension range reads 2000 to 4999. Enter the following in the Extension range field for these phone numbers: \b[2-4][0-9]{3}\b.
– \b - the number must begin with a blank
– [2-4] - the first digit may be a character between 2 and 4 inclusive, thus 2, 3, 4
– [0-9]{3} - for the next three digits, numbers 0 to 9 are allowed
– \b - the number must end with a blank
• Trunk codeEnter here the code that has been configured on your system or on your PBX to allocate trunks for outgoing connections.
• Prefix for local calls, Prefix for long distance calls, Prefix for interna-tional callsEnter the network operator ID for the respective call type in the corresponding fields. For example, in Germany no Prefix for local calls is used, while for other countries in Europe and members of the NANP (North American Numbering Plan) the zero is used to mark local calls. In Germany, for example, the prefix for long distance calls is 0 and the prefix for interna-tional calls is 00. This data is independent from the configuration of the connected communications system and determined by the network operator.
• Additional code for local calls, Additional code for long distance calls, Additional code for international callsEnter additional digits to be used as call-by-call prefixes in the respective fields. This data is independent from the configuration of the connected communications system.The sequence of the various codes is as follows:<office code><additional code><prefix><phone number>
Test
Click on the Test... button to open the following dialog and test your entries.
A31003-G2570-U100-13-7619, 06/2015OpenScape Personal Edition V7, User Guide 73

Configuration and Settings
• Extension to be dialedEnter the number to be dialed in this entry field. Based on the currently set parameters the OpenScape Desktop Client determines the phone number in international format.
• Converted internationallyThe phone number entered in the above field is automatically displayed in this field.
• Effectively dialedThis field displays automatically the actually dialed number. Depending on the set network access parameters the number may be shorter, for example, if an internal phone number has been recognized.
2.3.6.4 Fallback Connection
NOTICE: To edit the fallback connection settings you need to open the Settings dialog during the program start. Click on the Manage button in the logon dialog for this purpose.
NOTICE: You only need to perform the fallback system settings if you operate the OpenScape Desktop Client with a fallback system. The configuration of the fallback connection defines the connection properties between the OpenScape Desktop Client and the fallback communications system.
To configure the failover parameters, select on the tab Advanced > HiPath Provider the Fallback connection option.
A31003-G2570-U100-13-7619, 06/201574 OpenScape Personal Edition V7, User Guide

Configuration and Settings
• TypeSelect the fallback system type in this combo box. The following options are available: No fallback system and OpenScape 4000.
NOTICE: The significance of the further parameters for the fallback connection corresponds to the significance of the param-eters for the main connection. They do not, however, refer to the main but to the fallback communications system.
• GatekeeperEnter the IP address of the fallback system gatekeeper in this field.
• Extension numberEnter the number under which you can be reached on the fallback system in this field.
• PasswordSpecify the password configured for your extension number on the fallback system in this field.
• ACD agent numberIf available, enter your ACD agent number.
• Emergency call numberSpecify the emergency call number. Your system administrator will provide information on this.
• Own IP addressSelect your own IP address or Detect automatically in this combo box.
In the Security section you can perform the following settings:
• ModeFrom this combo box you can select the security mode that is also selected as security mode on the connected communications system.
• Gatekeeper IDSpecify the Gatekeeper ID already configured on your PBX.
• Time window (Sec.)Under this option you can enter the time in seconds. Your system adminis-trator will provide information on this.
A31003-G2570-U100-13-7619, 06/2015OpenScape Personal Edition V7, User Guide 75

Configuration and Settings
NOTICE: You can obtain more detailed information about these parameters from your system administrator.
2.3.6.5 Fallback Network Access
NOTICE: To edit the fallback network access settings you need to open the Settings dialog during the program start. Click on the Manage button in the logon dialog for this purpose.
NOTICE: You only need to perform the fallback network access settings if you operate the OpenScape Desktop Client with a fallback system.
Select on the tab Advanced > HiPath Provider the Fallback network access option to configure the fallback network access settings. The parameters you see in the figure are only examples.
NOTICE: The settings of the fallback network access parameters correspond to those for the main network access but do not refer to the main but to the fallback communications system.
• Country codeEnter here the international prefix for your location, for example 49 for Germany.
• Area codeEnter here the telephone prefix for your location in the national phone number scope. Omit the leading zero for this entry.
A31003-G2570-U100-13-7619, 06/201576 OpenScape Personal Edition V7, User Guide
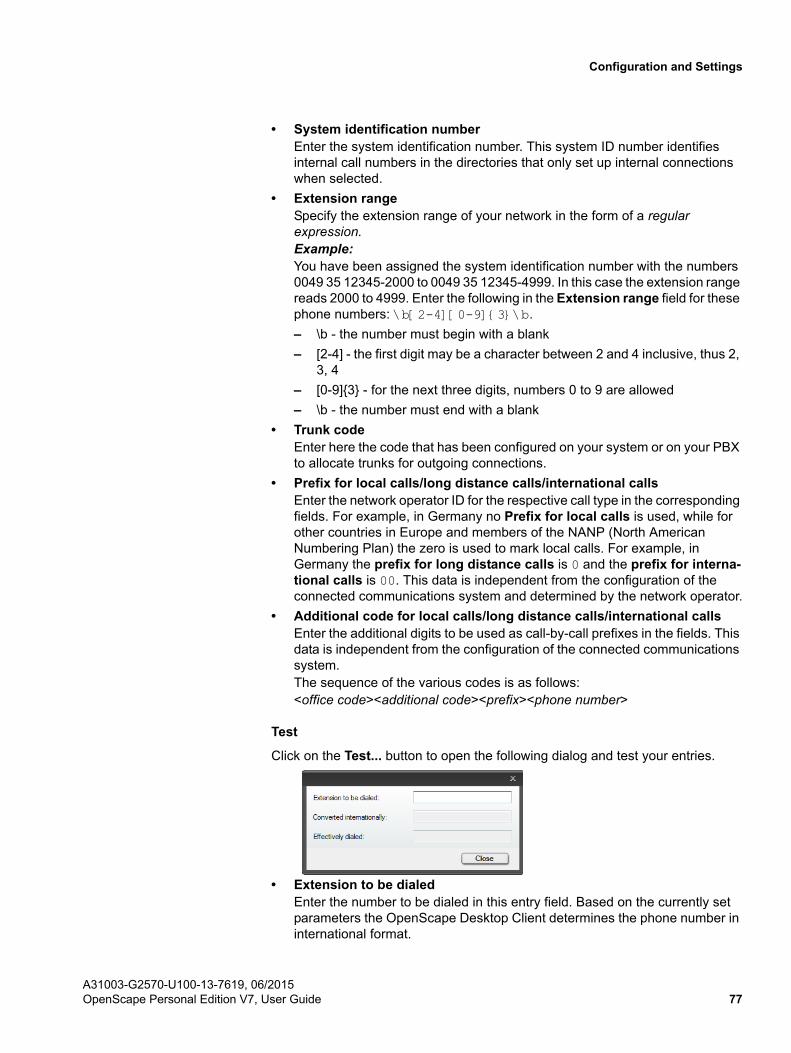
Configuration and Settings
• System identification numberEnter the system identification number. This system ID number identifies internal call numbers in the directories that only set up internal connections when selected.
• Extension rangeSpecify the extension range of your network in the form of a regular expression.Example:You have been assigned the system identification number with the numbers 0049 35 12345-2000 to 0049 35 12345-4999. In this case the extension range reads 2000 to 4999. Enter the following in the Extension range field for these phone numbers: \b[2-4][0-9]{3}\b.
– \b - the number must begin with a blank
– [2-4] - the first digit may be a character between 2 and 4 inclusive, thus 2, 3, 4
– [0-9]{3} - for the next three digits, numbers 0 to 9 are allowed
– \b - the number must end with a blank
• Trunk codeEnter here the code that has been configured on your system or on your PBX to allocate trunks for outgoing connections.
• Prefix for local calls/long distance calls/international callsEnter the network operator ID for the respective call type in the corresponding fields. For example, in Germany no Prefix for local calls is used, while for other countries in Europe and members of the NANP (North American Numbering Plan) the zero is used to mark local calls. For example, in Germany the prefix for long distance calls is 0 and the prefix for interna-tional calls is 00. This data is independent from the configuration of the connected communications system and determined by the network operator.
• Additional code for local calls/long distance calls/international callsEnter the additional digits to be used as call-by-call prefixes in the fields. This data is independent from the configuration of the connected communications system.The sequence of the various codes is as follows: <office code><additional code><prefix><phone number>
Test
Click on the Test... button to open the following dialog and test your entries.
• Extension to be dialedEnter the number to be dialed in this entry field. Based on the currently set parameters the OpenScape Desktop Client determines the phone number in international format.
A31003-G2570-U100-13-7619, 06/2015OpenScape Personal Edition V7, User Guide 77

Configuration and Settings
• Converted internationallyThe phone number entered in the above field is automatically displayed in this field.
• Effectively dialedThis field displays automatically the actually dialed number. Depending on the set network access parameters the number may be shorter, for example, if an internal phone number has been recognized.
2.3.6.6 Failover
NOTICE: To edit the failover settings you need to open the Settings dialog during the program start. Click on the Manage button in the logon dialog for this purpose.
If you use the OpenScape Desktop Client with a failover communications system, then OpenScape Desktop Client will be automatically switched to the specified fallback communications system if the main communications system fails. After this switch, OpenScape Desktop Client attempts in regular intervals to reach and reconnect to the main communications system.
To configure the failover parameters, select on the tab Advanced > HiPath Provider the Failover option.
Determine the values for the following parameters:
• Under Number of failed connection attempts to the primary system before you are switched to the fallback system in case of failure you specify after how many failed connection attempts OpenScape Desktop Client will switch from the main to the fallback communications system.
• Under Waiting time between connection attempts (sec) you specify the intervals in which the OpenScape Desktop Client attempts to reach the main communications system again.
• Under Minimum number of successful connection attempts to primary system to switch back you specify after how many successful connection attempts the main communications system is to be considered operable again. The OpenScape Desktop Client will not switch back to the main communications system until it is considered operable.
A31003-G2570-U100-13-7619, 06/201578 OpenScape Personal Edition V7, User Guide

Configuration and Settings
• Under Waiting time between connection attempts you specify in which intervals the OpenScape Desktop Client attempts to reach the main commu-nications system again.
• With the No automatic switch back to primary system option you determine whether OpenScape Desktop Client automatically switches back to the main communication system as soon as it is operable again. If you activate the check box of this option, the OpenScape Desktop Client does not automatically switch back to the main communications system.
2.3.6.7 Ring Tones
Alternatively to the default ring tones determined by the ring tone color set in the PBX, you can select an individual ring tone for signaling incoming calls. Compatible ring tone files must comply with the following requirements:
• The ring tone file must be available in WAV or MP3 format.
• The file size must not exceed 2 MB. If you configure a bigger ring tone file as ring tone, only the first 2 MB of this file are played.
NOTICE: If required, Microsoft Windows or the monitor itself disable speakers (particularly those integrated in the monitor) in the scope of power management or with activation of a screen-saver. An incoming call can then not be signalled.
To configure an individual ring tone, select on the tab Advanced > HiPath Provider > Ring tones.
NOTICE: You can edit the settings for the individual ring tone in the Settings dialog during the program start or during live operation. Click on the Manage button in the Logon dialog or select in the Pearl menu > Personal Settings > Ring Tones.
• Via the Use individual ring tones option you activate an individual ring tone. After you have activated this option, the OpenScape Desktop Client uses the tone specified under File to signal incoming calls.
• Under File you define the WAV or MP3 file that contains the desired ring tone. Via the browse button ... you can look for the desired file.
NOTICE: OpenScape Desktop Client copies the content of the selected WAV or MP3 file. In this way the ring tone is still available even if the original sound file is deleted.
A31003-G2570-U100-13-7619, 06/2015OpenScape Personal Edition V7, User Guide 79

Configuration and Settings
2.3.6.8 Bandwith Reduction
NOTICE: To edit the bandwith reduction settings you need to open the Settings dialog during the program start. Click on the Manage button in the logon dialog for this purpose.
You can optimize the voice transmission quality by adjusting various settings to the current environment of your network setup.
To configure the voice transmission parameters, select on the tab Advanced > HiPath Provider > Bandwidth reduction.
The OpenScape Desktop Client displays the default settings. Do not change them without instructions from your system administrator.
• Disable DMCIf you operate the OpenScape Desktop Client with a OpenScape 4000 PBX, voice packets are directly exchanged between the communication partners via the network (Direct Media Connect - DMC). If required, you can deactivate this behavior by disabling this check box. This will stop the direct exchange of voice packets between the communication partners. You can activate this option if you operate the OpenScape Desktop Client for example from a home office.
• TeleworkingIf you work at home, activate the Teleworking check box. This sets the Suppress cyclical control message check box automatically. In this way you reduce the data volume on the trunk line and thus the bandwidth demand in teleworking mode.
NOTICE: You need to disable this option to operate the OpenScape Desktop Client at an OpenScape Voice/Cisco proxy, since the communications system cannot send any busy-lamp field (BLF) messages.
A31003-G2570-U100-13-7619, 06/201580 OpenScape Personal Edition V7, User Guide

Configuration and Settings
• Codec sequenceCommunication between the OpenScape Desktop Client and the communi-cations system is based on defined compression algorithms (codecs) for the network transmission of audio signals via the network. Using this combo box you can determine the sequence of the codecs for the voice connection.Select the setting suitable for your location in the Codec sequence combo box.
NOTICE: When you activate the Teleworking option, a different selection is available.
• Codec packet lengthsThe respective voice packet lengths for the codecs G.711, G.723 and G.729 are individually defined in milliseconds in this section.Select a value in each of the three codecs' combo boxes. The values are indicated in milliseconds (ms).
• Jitter Buffer (ms)To avoid voice packet loss, which can result in poor voice quality and dropouts, set the buffer size in this field. The jitter buffer caches all incoming voice packets for the period set and then forwards them to the audio device’s sound output. The jitter buffer continues to forward voice packets until none are left, even if the network does not deliver new voice packets quickly enough. This avoids dropouts.Select a value in the Jitter Buffer (ms) combo box. The values are indicated in milliseconds (ms).
Specialties upon selecting the jitter buffer
When selecting the optimum setting for the jitter buffer please note the following:
• The better the network quality, the smaller the jitter buffer may be.
• The bigger the jitter buffer, the more the voice transmission will be delayed.
• We recommend to set the jitter buffer to value 60.
With a click on the Restore Standard Settings button you can reset the values to the default settings.
2.3.6.9 Port Restrictions
NOTICE: To edit the port restrictions settings you need to open the Settings dialog during the program start. Click on the Manage button in the logon dialog for this purpose.
To determine the port restrictions in firewall environments, select on the tab Advanced > HiPath Provider > Port restrictions.
A31003-G2570-U100-13-7619, 06/2015OpenScape Personal Edition V7, User Guide 81

Configuration and Settings
The OpenScape Desktop Client displays the default settings. Do not change them without instructions from your system administrator.
• Gatekeeper CornetIP PortThe communications port, which supports signaling and voice connections for CorNet-IP via a gatekeeper, is defined by activating this field.
• PC-CorNetIP Port range from/toThe communications ports, which support signaling and voice connections between a PC and CorNet-IP, are defined by activating the fields from and to of the PC-CorNetIP Port range option.
• RTP port range from/toIn these input fields you specify the values that define the range of the RTP ports used for signaling and voice connections.
• H.245 port range from/toIn these input fields you specify the values that define the range of the H.245 ports used for signaling and voice connections.
• H.225-SignalingIn this input field you specify the value used for the signaling connections.
NOTICE: If no voice transmission is possible during operation despite a correct logon, make sure that the RTP port range is configured between 1024 and 65353.
• With a click on the Restore Standard Settings button you can reset the values to the default settings.
2.3.6.10 VPN
NOTICE: To edit the VPN (Virtual Private Network) settings you need to open the Settings dialog during the program start. Click on the Manage button in the logon dialog for this purpose.
A31003-G2570-U100-13-7619, 06/201582 OpenScape Personal Edition V7, User Guide

Configuration and Settings
The OpenScape Desktop Client informs its active connection partners at specific times about the individual IP address – for example to address the audio packets correctly. For this purpose, OpenScape Desktop Client needs to know the current IP address, respectively, how it can be determined.
Under Advanced > HiPath Provider > VPN you can define the behavior of the OpenScape Desktop Client in a VPN (Virtual Private Network).
Virtual Private Network (VPN)
In this combo box you define whether or not you have a VPN. The following settings can be made:
• none – No VPN is used or you use a VPN where the VPN client provides a virtual network adapter for the VPN tunnel.
• automatic – VPN is used, the IP address is determined by the OpenScape Desktop Client.
NOTICE: If the VPN client does not provide a virtual network adapter on the PC on which the OpenScape Desktop Client is installed, you need to select the automatic option.
• manual – You need to enter the IP address of the OpenScape Desktop Client assigned by the VPN in the corresponding field.
2.3.6.11 Quality of Service (QoS)
IMPORTANT: Deploying the QoS service requires a QoS Packet Scheduler being active for the connection used.
If you wish to modify the QoS settings, select on the tab Advanced > HiPath Provider > Quality of Service (QoS).
A31003-G2570-U100-13-7619, 06/2015OpenScape Personal Edition V7, User Guide 83

Configuration and Settings
For the transmission level Layer 2: User Priority acc. to IEEE802.1p and Layer 3: Priority classes (Codepoint acc. to DiffServ) you can use the Mark Packets option to individually define whether the data of the traffic types Call Signaling and Voice payload is furnished with the respectively set QoS values.
The QoS settings depend on the operating system used.
• Layer 2: User priority acc. to IEEE802.1p
– Under Microsoft Windows XP Professional SP2 and later you cannot perform any settings for Layer 2.
– Under Microsoft Windows Vista/7 you cannot perform any settings for Layer 2. The configuration of the Mark Packets option is automatically adjusted to the setting for Layer 3.
• Layer 3: Priority classes (Codepoint acc. to DiffServ)
– Under Microsoft Windows XP Professional SP2 and later you can set the QoS values for the traffic types Call Signaling and Voice payload individually. The default value for the traffic type Call Signaling is AF31 and for Voice payload EF.
– Under Microsoft Windows Vista/7 you can only activate/deactivate the Mark Packets option. The operating system defines the combo boxes Call Signaling and Voice payload automatically via the new network platform qWAVE (Quality Windows Audio/Video Experience) for audio and video streaming applications in private IP networks. TrafficTypes are used instead of Codepoint acc. to DiffServ . The TrafficType for call signalling is QOSTrafficTypeControl, which corresponds to the CodePoint acc. to DiffServ 0x38 (CS7). The TrafficType for voice and video data is QOSTrafficTypeVoice, which corresponds to the CodePoint acc. to DiffServ 0x38 (CS7). The combo boxes Call Signaling and Voice payload are therefore default set with value CS7 and cannot be changed.
• Restore Standard SettingsClick on this button if you want to reset the QoS settings to the default values.
NOTICE: On a computer with Intel Centrino Duo processor, OpenScape Desktop Client will detect this automatically at runtime. In this case the OpenScape Desktop Client uses the QoS support provided by the Intel Centrino Duo processor.
NOTICE: The computer needs to be rebooted for the QoS settings changes to become active.
2.3.6.12 Operation Settings
NOTICE: The Operation settings entry is only available when you invoke the Settings dialog with a started OpenScape
A31003-G2570-U100-13-7619, 06/201584 OpenScape Personal Edition V7, User Guide

Configuration and Settings
Desktop Client. Select the OpenScape Options item in the context menu of the Windows taskbar for this purpose.
If you use default ring tones, you can change the pitch of the ring tone in the operation settings. Select on the tab Advanced > HiPath Provider > Operation settings.
NOTICE: This feature is not available when you have selected an individual ring tone.
You can use the Change Ring Tone button to modify the ringer pitch of the default ring tones.
You hear the ring tone currently set. Via the Next ring tone and Previous ring tone buttons you can set the ringer pitch individually. A click on Close closes the configuration dialog for these settings. The setting you have selected last is immediately active.
2.3.6.13 Security
NOTICE: These settings are centrally configured and cannot be modified in the OpenScape Desktop Client. More details about how to display these settings is provided in the manual OpenScape UC Application V7 OpenScape Desktop Client Installation and Administration.
If the system times of the OpenScape Desktop Client and the PBX are not identical or differ from each other too much, signaling and voice encryption may cause problems during login or connection setup. You can use the security settings to compare the system times and detect time zone errors. Furthermore, you can determine if the code was changed and when this happened last.
After the HiPath Provider module has been activated and the OpenScape Desktop Client started, click the OpenScape Options button to see the Security entry on the tab Advanced > HiPath Provider.
A31003-G2570-U100-13-7619, 06/2015OpenScape Personal Edition V7, User Guide 85
Configuration and Settings
• Current time (UTC)These settings correspond to the current system time (tt.mm.jjjj hh:mm:ss) of the OpenScape Desktop Client PC in UTC (= GMT).
• Current time (local)These settings correspond to the current system time (tt.mm.jjjj hh:mm:ss) of the OpenScape Desktop Client PC in local time.
• Current modeThe entry in this field specifies whether the encryption is active (Encryption ON) or inactive (Encryption OFF).
• Current activation (UTC)This input field specifies the time when the current mode was activated in UTC (= GMT).
• Current activation (local)This input field specifies the time when the current mode was activated in local time.
• Next modeThe next applicable encryption mode is displayed in this field.
• Next activation (UTC)This input field specifies the time when the next mode was activated in UTC (= GMT).
• Next activation (local)This input field specifies the time when the next mode was activated in local time.
NOTICE: If you operate the OpenScape Desktop Client without central configuration, signaling and voice data is usually unencrypted.
2.3.7 Stimulus Provider Settings
NOTICE: You can perform the Stimulus Provider settings only via the dialog Logon > Manage button > Settings.
The Stimulus Provider ensures displaying information about the conversational partner (phone number or name, connection duration) and about the available telephony features (for example call transfer, consultation, etc.) on the display of the integrated phone, free phone or softphone. Furthermore, it enables automat-ically setting up the connection to a number specified by the user after a configu-rable waiting period has expired.
NOTICE: The Stimulus Provider module cannot be activated in combination with the HiPath Provider.
The following settings are possible:
A31003-G2570-U100-13-7619, 06/201586 OpenScape Personal Edition V7, User Guide

Configuration and Settings
2.3.7.1 General Stimulus Provider Settings
You reach these settings on the tab Advanced > Stimulus Provider > General.
If you enter a phone number but do not click on , the OpenScape Desktop Client can automatically establish the connection to the entered phone number after a specified period.
• Time limit (ms)Specify here a period after which the OpenScape Desktop Client establishes automatically a connection to the entered number. Value 0 means that the connection is not automatically set up.
2.3.7.2 View
You reach these settings on the tab Advanced > Stimulus Provider > Display.
• Call stateThe settings in this section refer to displays during an active call. If you want the Caller-Id and/or the Call Duration to appear, activate the respective option.
• Ringing stateThe settings in this section refer to displays during a connection request. If you want the Caller-Id to appear then, activate this option.
2.3.8 SQLite Provider Settings
The SQLite Provider enables connecting OpenScape Desktop Client to external directories via an SQLite database. Thus you can search external directories for contacts and resolve phone numbers on the basis of external directories.
NOTICE: You can edit the SQLite Provider settings only if the Settings dialog is opened during the program start. To open this dialog, click on the Manage button in the user Logon dialog during the program start.
A31003-G2570-U100-13-7619, 06/2015OpenScape Personal Edition V7, User Guide 87

Configuration and Settings
NOTICE: For the time being, the SQLite Provider allows connecting Microsoft Outlook directories and Lotus Sametime contact lists to OpenScape Desktop Client.
NOTICE: So that the SQLite Provider can access the Microsoft Outlook directories or the IBM Notes contact list, the respective client and subsequently OpenScape Desktop Client must be started after the installation of OpenScape Desktop Client.
You can perform and edit the settings for SQLite directories on the tab Advanced > SQLite Provider > SQLite Directories.
2.3.8.1 SQLite Directories
The SQLite directories OpenScape Desktop Client uses to search for contacts and resolve phone numbers are configured and edited in the following dialog.
The left-hand section of this dialog displays a list of all configured SQLite direc-tories.
On the right, controls for configuring SQLite directories are available:
• Add...A click on this button opens the dialog for configuring a new SQLite directory. The small triangle on the button lets you select pre-configurations for the supported connections.
• Edit...This button opens the configuration dialog for the SQLite directory selected in the directory list so that you can change the settings.
• RemoveUsing this button you can remove the SQLite directory selected in the SQLite directory list from the list or configuration of the SQLite Provider.
A31003-G2570-U100-13-7619, 06/201588 OpenScape Personal Edition V7, User Guide

Configuration and Settings
• EnableThis button activates the SQLite directory selected in the directory list.
• DisableThis button deactivates the SQLite directory selected in the directory list.
The configuration dialog, which you reach via the Add... or Edit... button, provides the following options:
• NameSpecify here the name under which the SQLite directory is managed in the OpenScape Desktop Client configuration.
• FileHere you specify the file name of the SQLite database to be used for the SQLite directory.
• Browse...If you do not know the name of the desired file you can click on the Browse… button to open a search dialog and find available SQLite databases.
• TestThis button starts a test for checking the connection to the SQLite database.
2.3.9 Settings for the LDAP Directory Provider
The LDAP Directory Provider enables connecting OpenScape Desktop Client to external LDAP directories. Such a connection is used for resolving phone numbers.
NOTICE: You can edit the LDAP directory settings only if the Settings dialog is opened during the program start. To open this dialog, click on the Manage button in the user Logon dialog during the program start.
The directories OpenScape Desktop Client is to use for resolving phone numbers must have been previously configured in the LDAP Directory Provider. Select on the tab Advanced > LDAP Directory Provider > LDAP Directories for this purpose.
A31003-G2570-U100-13-7619, 06/2015OpenScape Personal Edition V7, User Guide 89
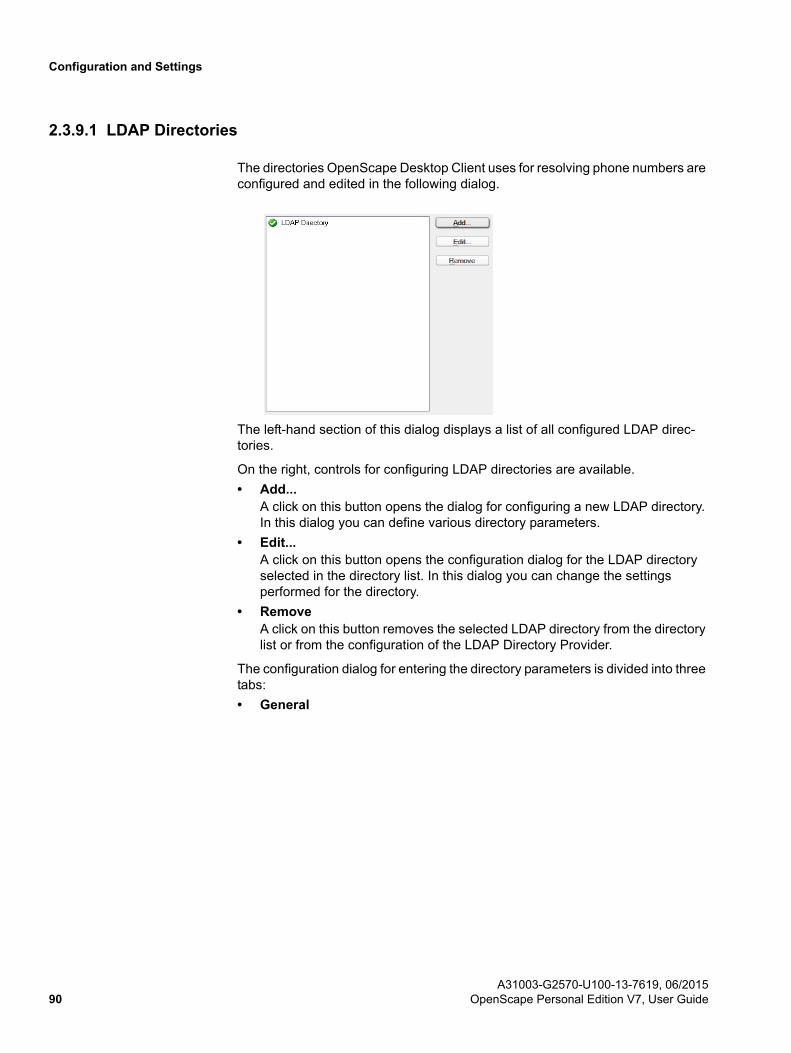
Configuration and Settings
2.3.9.1 LDAP Directories
The directories OpenScape Desktop Client uses for resolving phone numbers are configured and edited in the following dialog.
The left-hand section of this dialog displays a list of all configured LDAP direc-tories.
On the right, controls for configuring LDAP directories are available.
• Add...A click on this button opens the dialog for configuring a new LDAP directory. In this dialog you can define various directory parameters.
• Edit...A click on this button opens the configuration dialog for the LDAP directory selected in the directory list. In this dialog you can change the settings performed for the directory.
• RemoveA click on this button removes the selected LDAP directory from the directory list or from the configuration of the LDAP Directory Provider.
The configuration dialog for entering the directory parameters is divided into three tabs:
• General
A31003-G2570-U100-13-7619, 06/201590 OpenScape Personal Edition V7, User Guide
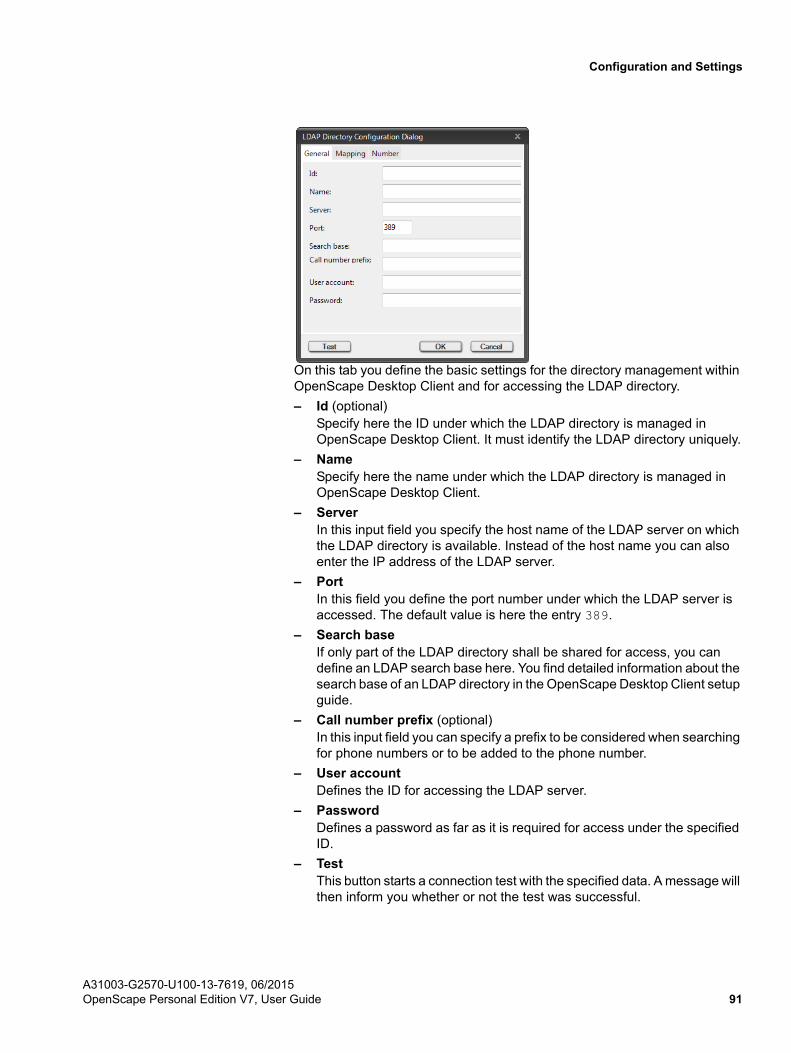
Configuration and Settings
On this tab you define the basic settings for the directory management within OpenScape Desktop Client and for accessing the LDAP directory.
– Id (optional)Specify here the ID under which the LDAP directory is managed in OpenScape Desktop Client. It must identify the LDAP directory uniquely.
– NameSpecify here the name under which the LDAP directory is managed in OpenScape Desktop Client.
– ServerIn this input field you specify the host name of the LDAP server on which the LDAP directory is available. Instead of the host name you can also enter the IP address of the LDAP server.
– PortIn this field you define the port number under which the LDAP server is accessed. The default value is here the entry 389.
– Search baseIf only part of the LDAP directory shall be shared for access, you can define an LDAP search base here. You find detailed information about the search base of an LDAP directory in the OpenScape Desktop Client setup guide.
– Call number prefix (optional)In this input field you can specify a prefix to be considered when searching for phone numbers or to be added to the phone number.
– User accountDefines the ID for accessing the LDAP server.
– PasswordDefines a password as far as it is required for access under the specified ID.
– TestThis button starts a connection test with the specified data. A message will then inform you whether or not the test was successful.
A31003-G2570-U100-13-7619, 06/2015OpenScape Personal Edition V7, User Guide 91

Configuration and Settings
• MappingOn this tab you define how OpenScape Desktop Client maps the structure of the LDAP directory on the proprietary, internal data structure.
To do this, assign appropriate LDAP attributes to the OpenScape Desktop Client criteria in the right-hand column.
• NumberOn this tab you define the LDAP attribute that OpenScape Desktop Client uses for resolving a phone number in a name.
The specified attribute must contain the phone number of the respective contact.
NOTICE: To ensure that phone number resolution via an LDAP directory works correctly, the phone numbers must be entered in the defined attribute in normalized format, for example 490489901100.
A31003-G2570-U100-13-7619, 06/201592 OpenScape Personal Edition V7, User Guide

Configuration and Settings
2.3.9.2 Base DN for an LDAP Directory
With integrating an LDAP directory in OpenScape Desktop Client, you can define a Base DN in the scope of the directory configuration. On the basis of this Base DN, LDAP directory entries are searched for and displayed in the OpenScape Desktop Client.
NOTICE: If you do not define a Base DN, the entire LDAP directory is used as search base.
You can define the Base DN in the corresponding input field of the Add Directory dialog in two possible formats:
• <Level name 3>=<Name>, <Level name 2>=<Name>, <Level name 1>=<Name>
• <Level name1>=<Name>/<Level name 2>=<Name>/<Level name 3>=<Name>
An LDAP directory shall be filtered for all users of the corporate unit ICN. The directory to be integrated shall have the following structure:
• Name of level 1: C (for example country code)
• Name of level 2: O (for example company name)
• Name of level 3: OU (for example corporate unit).
OpenScape Desktop Client is only to access directory entries for which the following applies:
• Level 1: C=DE
• Level 2: O=ENTERPRISE
• Level 3: C=ICN.
According to these defaults the following is to be entered for the Base DN:
• OU=ICN,O=ENTERPRISE,C=DE
or alternatively
• C=DE/O=ENTERPRISE/OU=ICN.
2.3.10 Local-Journal-Provider Settings
NOTICE: To edit the Local-Journal-Provider settings you need to open the Settings dialog during the program start. Click on the Manage button in the logon dialog for this purpose.
Using this module you store connection data for the journal in the local database. These data records are automatically deleted after a specific period or when a certain maximum number of data records has been reached. You can perform the Local-Journal-Provider settings on the tab Advanced > Local Journal Provider > General .
A31003-G2570-U100-13-7619, 06/2015OpenScape Personal Edition V7, User Guide 93

Configuration and Settings
Activate the check box of the desired option to apply the default value or to change it if necessary. By default, the maximum number of the data records is set to 300 and the maximum age of these data records is set to 90 days.
2.3.11 HLM License Provider Settings
If you want to use the OpenScape Desktop Client as softphone at an SIP or HFA communications system, you need to have the matching SIP or HFA licenses. These licenses are generated by a central license server and managed by a License Agent server (Customer License Agent).
The HLM License Provider is the licensing component of the OpenScape Desktop Client. Every time the program starts the provider checks whether a valid license exists for the program. For this purpose it connects to the License Agent server (CLA), which must have been set up either on the local user computer or on a central computer in the network.
NOTICE: You find more information about licensing of OpenScape Desktop Client in the OpenScape Personal Edition V7 Installation und Administration setup guide.
Select on the tab Advanced > HLM License Provider > Licensing to perform the settings for the connection to the License Agent (CLA) server.
• ServerSpecify in this input field the IP address of the PC on which the License Agent (CLA) server for the OpenScape Desktop Client is installed. If the License Agent (CLA) server is installed locally, enter the local IP address or the address of the local host. If the License Agent (CLA) server is installed on the network, enter the IP address in the network.
• PortEnter here the default port number for accessing the License Agent (CLA) server. It is 61740.
A31003-G2570-U100-13-7619, 06/201594 OpenScape Personal Edition V7, User Guide

Configuration and Settings
• Timeout (ms)Specify in this field the maximum time (in milliseconds) an attempt to set up a connection to the License Agent (CLA) server may take.
• AttemptsUse this field to determine the number of connection setup attempts.
• PasswordIf an access password has been defined on the License Agent (CLA) server, enter that password here as well.
NOTICE: If no License Agent (CLA) server has been configured or the OpenScape Desktop Client cannot connect the License Agent (CLA) server because, for example, of invalid parameters, the program start is aborted and a corresponding message displayed.
2.3.12 Lotus Notes Provider Settings
The Lotus Notes Provider provides the connection to a IBM Notes client.
It enables you to access the following features:
• Searching IBM Notes address books for contacts
• Making calls in the IBM Notes client
• Resolving phone numbers and names on the basis of IBM Notes address books.
You can perform and edit the Lotus Notes Provider settings only during the program start. To do this, click on the Manage button in the Logon dialog and select the tab Advanced > Lotus Notes Provider in the Settings dialog.
NOTICE: Details specific to IBM Notes are required for config-uring the Lotus Notes Provider. You receive such details from the administrator of your IBM Notes system.
You can perform settings for the following areas:
• IBM Notes Databases
• Authentication
2.3.12.1 Lotus Notes Databases
To use the Lotus Notes Provider you need to specify the IBM Notes databases to be deployed.
To specify the IBM Notes databases, select in the Settings dialog on the tab Advanced > Lotus Notes Provider > Lotus Notes Databases.
A31003-G2570-U100-13-7619, 06/2015OpenScape Personal Edition V7, User Guide 95

Configuration and Settings
The following options are available for specifying the IBM Notes databases:
• <Database list>This list contains all databases configured in the Lotus Notes Provider.
• Add...A click on this button opens the dialog for configuring a new IBM Notes database to be used in the Lotus Notes Provider.
• Edit...This button lets you edit the settings of an already defined IBM Notes database selected in the database list. The configuration dialog that opens for editing a database features the same settings as the dialog for configuring a new IBM Notes database.
• RemoveWith a click on this button you can remove a selected IBM Notes database from the database list.
• EnableYou can use this button to activate a database selected in the database list.
• DisableYou can use this button to deactivate a database selected in the database list.
2.3.12.2 Dialog for Configuring a Lotus Notes Database
In this configuration dialog you can specify the settings for a IBM Notes database to be used in the Lotus Notes Provider. You reach the dialog on the tab Advanced > Lotus Notes Provider > Lotus Notes Databases with a click on the Add... button.
The settings are divided into the following tabs:
"General" tab
On this tab you define the general settings of the IBM Notes database.
A31003-G2570-U100-13-7619, 06/201596 OpenScape Personal Edition V7, User Guide

Configuration and Settings
Such settings comprise:
• Configuration nameSpecifies the name under which the relevant database entry is managed in the database list. It is independent from the database name under IBM Notes.
• Use local databaseSelect this option to configure a local database for the IBM Notes integration.
• Use server databaseSelect this option to configure a server database for the IBM Notes integration.
• Server nameSpecifies the name of the IBM Domino server on which the desired server database is available. The field provides a selection list with available servers. If you wish to configure a server name not contained in the list, you can enter it in the text field directly.
NOTICE: This field is evaluated only if the Use server database option is active..
• Additional ServerIf the desired database is provided by other IBM Domino servers also, you can specify such servers in this field. This setting can be useful e. g. for a IBM Notes cluster.
• Database nameSpecifies the name under which the desired database is available on the server or on the user computer. If you do not know the database name, you can open a search dialog via the associated Browse… button. In the dialog you can then look for available databases.
• TestA click on this button starts a check as to whether a connection to the specified database can be set up.
A31003-G2570-U100-13-7619, 06/2015OpenScape Personal Edition V7, User Guide 97

Configuration and Settings
"Mapping" tab
To enable OpenScape Desktop Client processing the information of a IBM Notes database correctly, the attributes of the IBM Notes database must be assigned to the corresponding directory fields (criteria) of OpenScape Desktop Client. You perform this assignment on the Mapping tab.
If a new database is created, the pre-set assignment corresponds to the default assignment.
• CriterionThis column shows the criteria available in OpenScape Desktop Client.
• IBM Notes FieldIn this column you can assign the attributes of the IBM Notes database to the various criteria of OpenScape Desktop Client.
• TestA click on this button starts a check as to whether the attributes specified in the mapping exist in the documents of the specified database. OpenScape Desktop Client searches the specified database and checks the first found IBM Notes document that is based on the view displayed in the test dialog and on the form possibly defined. If the specified attributes are contained in this document, the test terminates successfully. If the mapping includes attributes that do not exist in the checked document, the test will point to this discrepancy. However, such a message does not necessarily point out an error, because OpenScape Desktop Client always searches only the document found first.
"Number" tab
The Number tab contains settings for resolving phone numbers in names via the relevant database.
A31003-G2570-U100-13-7619, 06/201598 OpenScape Personal Edition V7, User Guide

Configuration and Settings
• Server nameDisplays the server name you defined on the General tab. No server name is displayed when a local database is configured.
• Database nameDisplays the name of the database you defined on the General tab.
• Name of viewDefines the view OpenScape Desktop Client uses for accessing the relevant database when a phone number is to be resolved in a name. If you do not know the name of the desired view, you can open a search dialog via the associated Browse… button. In the dialog you can then look for available views.
NOTICE: If you wish to enter the name of the view in the input field via keyboard, you need to use the view's alias.
• TestA click on this button starts a check as to whether the specified view exists in the defined database.
"Name" tab
The Name tab contains settings for searching the relevant database for contacts and resolving names in phone numbers.
A31003-G2570-U100-13-7619, 06/2015OpenScape Personal Edition V7, User Guide 99

Configuration and Settings
• Server nameDisplays the server name you defined on the General tab. No server name is displayed when a local database is configured.
• Database nameDisplays the name of the database you defined on the General tab.
• Name of viewDefines the view OpenScape Desktop Client uses for accessing the relevant database when you look for a contact or a phone number is to be resolved in a name. If you do not know the name of the desired view, you can open a search dialog via the associated Browse… button. In the dialog you can then look for available views.
NOTICE: If you wish to enter the name of the view in the input field via keyboard, you need to use the view's alias.
• TestA click on this button starts a check as to whether the specified view exists in the defined database.
"Dial" tab
The Dial tab contains settings for dialing from a database.
A31003-G2570-U100-13-7619, 06/2015100 OpenScape Personal Edition V7, User Guide

Configuration and Settings
• Server nameDisplays the server name you defined on the General tab. No server name is displayed when a local database is configured.
• Database nameDisplays the name of the database you defined on the General tab.
• Name of formThis name serves for finding the correct assignment of the database fields in OpenScape Desktop Client for a database under IBM Notes.
NOTICE: If you initiate a call from a IBM Notes database, the configuration of the IBM Notes integration is searched for a database that has the same form name as the database from which you are dialing. If such a database exists in the configu-ration, the associated assignment of the database fields is used for finding the dial information in the database. The dial process fails if no database with the form searched for is configured in the IBM Notes integration.
If you do not know the name of the desired form, you can open a search dialog via the associated Browse… button. In the dialog you can then look for available views.
NOTICE: If you wish to enter the form's name in the text field via keyboard, you must use the form's alias.
– Forms for address booksSelect the Contact form for a database based on the pernames.ntf template. As a rule, this applies for local address books.Select the Person form for a database based on the pubnames.ntf template. As a rule, this applies for server address books.
– Forms for mail databaseEvery mail displayed in your IBM Notes client is based on a defined form. If you wish to dial from an e-mail of your IBM Notes client with OpenScape Desktop Client you need to specify this form when configuring the
A31003-G2570-U100-13-7619, 06/2015OpenScape Personal Edition V7, User Guide 101

Configuration and Settings
relevant IBM Notes mail database in the IBM Notes provider. Because various e-mails in a mail database may be based on different forms, you may have to specify several forms for a mail database for dialing from all e-mails. To do this you need to create several database entries and configure one of the required forms for each of these entries.
• TestA click on this button starts a check as to whether the specified form exists in the defined database.
2.3.12.3 Authentication
Communication between OpenScape Desktop Client and IBM Notes client requires the storage location of the notes.ini configuration file and the password for accessing the IBM Domino Lotus Domino server.
To perform these settings, select in the Settings dialog on the tab Advanced > Lotus Notes Provider > Authentication.
The following options are available for specifying the storage location:
• Use default pathIf this option is active, OpenScape Desktop Client expects the notes.ini configuration file to be in its default directory. If the notes.ini file is not stored in the default directory, you need to specify the individual directory path under the Use user-specific path option.
• Use user-specific pathIf the notes.ini file is not stored in the default directory, you need to specify the individual path under which the configuration file is stored.
• Please enter your Lotus Notes passwordEnter here your IBM Notes passoword for accessing the IBM Domino server.
2.3.13 Notifier Toast (Desktop Alerts) Settings
The Notifier Toast (Desktop Alerts) module enables displaying status changes as desktop notifications. It is included in the setup by default and independently from the selected default provider.
NOTICE: You can edit the settings for the Notifier Toast (Desktop Alerts) via the Settings dialog during the program start
A31003-G2570-U100-13-7619, 06/2015102 OpenScape Personal Edition V7, User Guide

Configuration and Settings
and while operating the program. Click on the Manage button in the Logon dialog or on the OpenScape Options button in the Pearl menu of the main window.
You reach the configuration dialog for the settings of the Notifier Toast (Desktop Alerts) module on the tab Advanced > Notifier Toast (Desktop Alerts) > General.
You can use the Enable the Group pickup call toaster option to activate (default setting) or deactivate the display of desktop alerts for incoming calls to subscribers of a call pickup group. When this option is active, incoming group pickup calls are indicated in a desktop notification and can be accepted from there.
2.3.14 The Sendmail Provider Module
You need the Sendmail Provider to send e-mails to a contact directly from one of the directories or from the contact list. This provider starts the e-mail client (for example Microsoft Outlook) installed/configured on the computer and uses the contact's e-mail address as recipient address for a new e-mail.
The Sendmail Provider module is added and provided after launching the OpenScape Desktop Client by default. The Sendmail Provider does not require any further settings.
For sending e-mails to contacts directly from OpenScape Desktop Client the following requirements must have been met:
• A standard mail client is installed and configured on the OpenScape Desktop Client computer.
• The Sendmail Provider module is active.
• The directory or contact list entries of the relevant contacts include an e-mail address that has been selected for direct message transmission.
2.3.15 Keyboard Manager Settings
The Keyboard Manager provides keyboard support features. You can edit the following parameters for the keyboard support.
2.3.15.1 Key Assignments
You can program hotkeys for accepting connection requests or closing connec-tions by performing the appropriate key assignments in the Keyboard Manager. Hotkeys are useful when you mostly use the keyboard for triggering functions.
Select on the tab Advanced > Keyboard Manager > Key assignments.
A31003-G2570-U100-13-7619, 06/2015OpenScape Personal Edition V7, User Guide 103

Configuration and Settings
NOTICE: To edit the key assignments settings you need to open the Settings dialog during the program start. Click on the Manage button in the logon dialog for this purpose.
System-wide keyboard tokens (hotkeys)
In this area you can determine the keys or hotkeys for the following actions:
• Accept ringing voice connectionPicking up the receiver
• Disconnect voice connectionHanging up
• Dial selected textWhen you push the assigned key or hotkey, the OpenScape Desktop Client interprets the current cursor marking as target number and initiates a connection setup.
NOTICE: Only phone numbers (FQTN) fully specified according to E.164 are supported for dialing via System-wide keyboard tokens (hotkeys).
IMPORTANT: System-wide means in this case that no other application executed on your computer in parallel to the OpenScape Desktop Client will react to these keys. Be sure not to enter keys or hotkeys allocated in other programs or in the Windows environment with functions you want to use.
Admissible keys or hotkeys are:
• [F2] to [F11], also in combination with Shift or [Ctrl],
• Letter keys A to Z and the digit key 0 to 9, also in combination with [Ctrl],
• The hotkey Shift + [Esc],
• Blank key,
• [Alt] + Shift + [Ctrl].
NOTICE: You must not define the function keys [F1] and [F12] as hotkeys.
A31003-G2570-U100-13-7619, 06/2015104 OpenScape Personal Edition V7, User Guide

Configuration and Settings
2.3.16 Screensaver Manager Settings
OpenScape Desktop Client comes with its own screensaver, which can be activated as the default screensaver for Windows. While the screensaver is active, incoming calls can be accepted and individually defined speed-dial numbers dialed. You can perform the following settings for the screensaver.
2.3.16.1 Settings
Select on the tab Advanced > Screensaver Manager > Settings.
• Activate as default ScreensaverThe screensaver is used as default screensaver for the PC.
NOTICE: The special features of the screensaver (call accep-tance, speed-dial number) are only available if the screensaver was activated with this option. If you select the OpenScape Desktop Client screensaver merely in the Windows display options, the special features do not become active.
• Activate if computer is lockedIf you lock your computer upon activating a screensaver, the screensaver will not be activated until a specific period has elapsed. With this option, the OpenScape Desktop Client is automatically activated ten seconds after locking the computer. This setting ensures that you can at least dial the speed-dial number when the screensaver is active.
• Disable during an active connectionWhen you select this option, the Windows screensaver is inactive during an established connection. As soon as the connection is closed, the screensaver becomes active again.
Speed-dial number
Use this section to store the phone numbers that you also want to dial with an active screensaver. The speed-dial numbers are displayed in the screen saver as
A31003-G2570-U100-13-7619, 06/2015OpenScape Personal Edition V7, User Guide 105
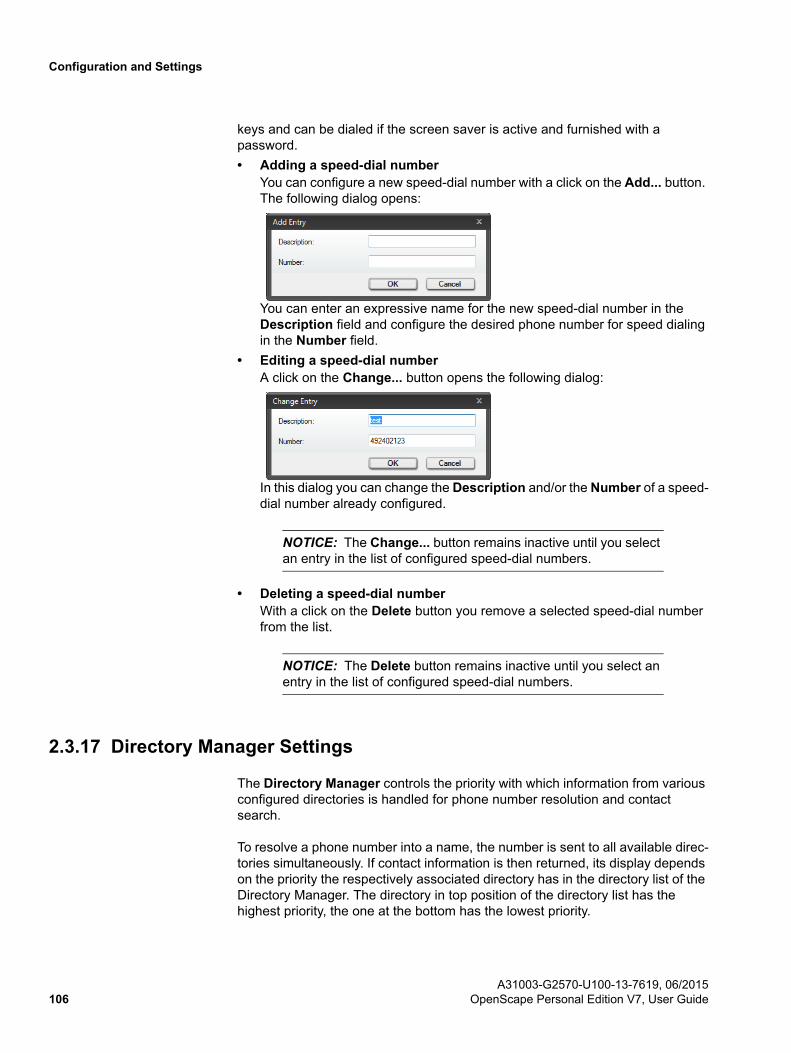
Configuration and Settings
keys and can be dialed if the screen saver is active and furnished with a password.
• Adding a speed-dial numberYou can configure a new speed-dial number with a click on the Add... button. The following dialog opens:
You can enter an expressive name for the new speed-dial number in the Description field and configure the desired phone number for speed dialing in the Number field.
• Editing a speed-dial numberA click on the Change... button opens the following dialog:
In this dialog you can change the Description and/or the Number of a speed-dial number already configured.
NOTICE: The Change... button remains inactive until you select an entry in the list of configured speed-dial numbers.
• Deleting a speed-dial numberWith a click on the Delete button you remove a selected speed-dial number from the list.
NOTICE: The Delete button remains inactive until you select an entry in the list of configured speed-dial numbers.
2.3.17 Directory Manager Settings
The Directory Manager controls the priority with which information from various configured directories is handled for phone number resolution and contact search.
To resolve a phone number into a name, the number is sent to all available direc-tories simultaneously. If contact information is then returned, its display depends on the priority the respectively associated directory has in the directory list of the Directory Manager. The directory in top position of the directory list has the highest priority, the one at the bottom has the lowest priority.
A31003-G2570-U100-13-7619, 06/2015106 OpenScape Personal Edition V7, User Guide
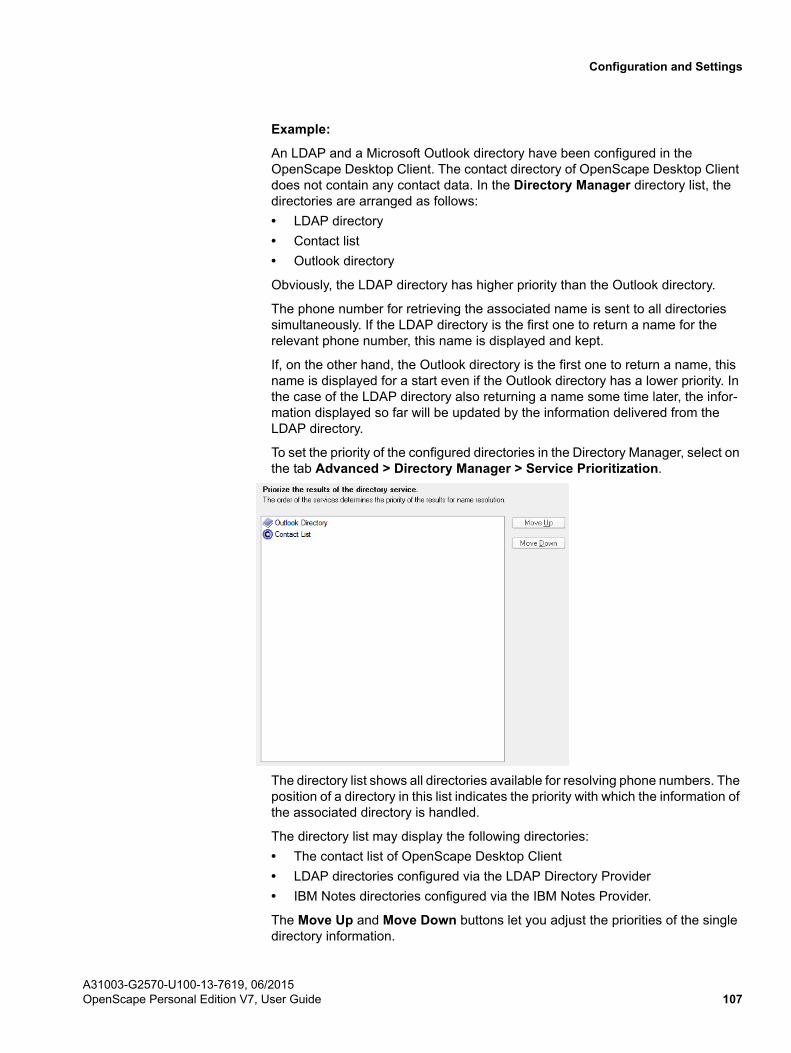
Configuration and Settings
Example:
An LDAP and a Microsoft Outlook directory have been configured in the OpenScape Desktop Client. The contact directory of OpenScape Desktop Client does not contain any contact data. In the Directory Manager directory list, the directories are arranged as follows:
• LDAP directory
• Contact list
• Outlook directory
Obviously, the LDAP directory has higher priority than the Outlook directory.
The phone number for retrieving the associated name is sent to all directories simultaneously. If the LDAP directory is the first one to return a name for the relevant phone number, this name is displayed and kept.
If, on the other hand, the Outlook directory is the first one to return a name, this name is displayed for a start even if the Outlook directory has a lower priority. In the case of the LDAP directory also returning a name some time later, the infor-mation displayed so far will be updated by the information delivered from the LDAP directory.
To set the priority of the configured directories in the Directory Manager, select on the tab Advanced > Directory Manager > Service Prioritization.
The directory list shows all directories available for resolving phone numbers. The position of a directory in this list indicates the priority with which the information of the associated directory is handled.
The directory list may display the following directories:
• The contact list of OpenScape Desktop Client
• LDAP directories configured via the LDAP Directory Provider
• IBM Notes directories configured via the IBM Notes Provider.
The Move Up and Move Down buttons let you adjust the priorities of the single directory information.
A31003-G2570-U100-13-7619, 06/2015OpenScape Personal Edition V7, User Guide 107

Configuration and Settings
• Move UpIs used to move the selected directory entry up by one position. This increases the priority of the relevant directory.
• Move DownIs used to move the selected directory entry down by one position. This decreases the priority of the relevant directory.
A31003-G2570-U100-13-7619, 06/2015108 OpenScape Personal Edition V7, User Guide
Operation Reference
3 Operation Reference
This chapter contains detailed information about the various controls you find in the user interface.
3.1 How to Start the Program of OpenScape Desktop Client
You can start the OpenScape Desktop Client as follows:
- Classic way without OpenScape Personal Edition VDI (Citrix) :
• Click on Start in the Windows task bar and select OpenScape Desktop Client.
• Doubleclick the OpenScape Desktop Client link on the desktop of your user computer.
- With OpenScape Personal Edition VDI (Citrix) :
A31003-G2570-U100-13-7619, 06/2015OpenScape Personal Edition V7, User Guide 109
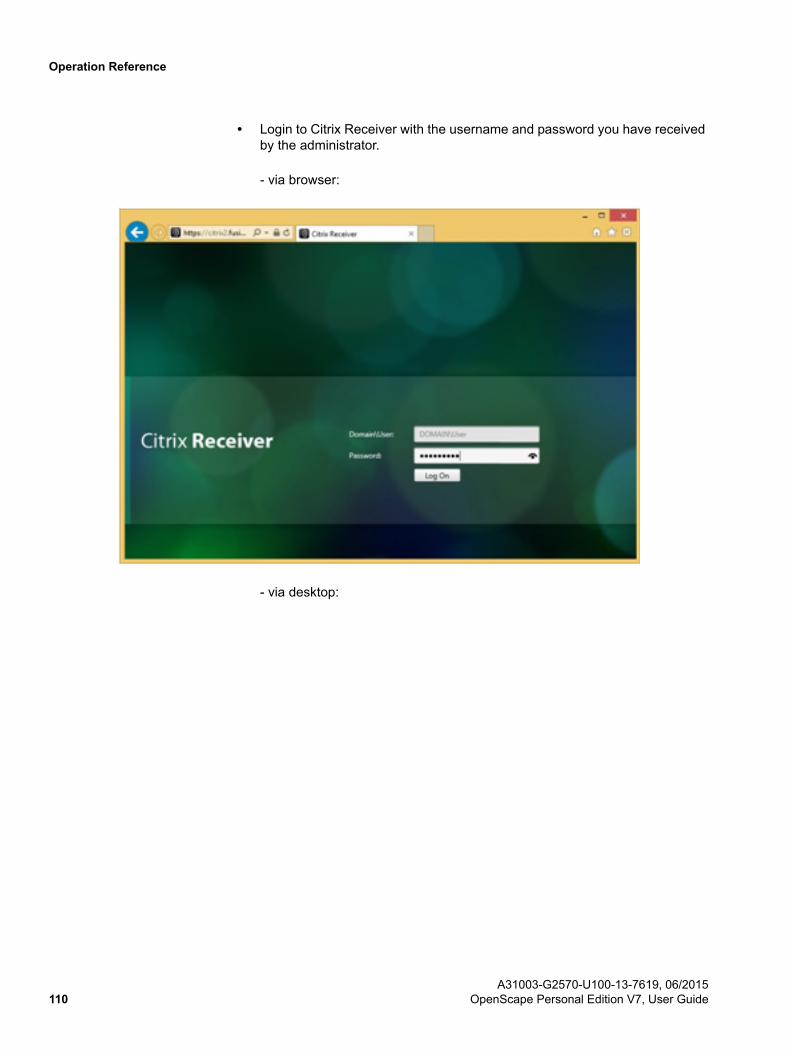
Operation Reference
• Login to Citrix Receiver with the username and password you have received by the administrator.
- via browser:
- via desktop:
A31003-G2570-U100-13-7619, 06/2015110 OpenScape Personal Edition V7, User Guide

Operation Reference
• After you have logged in successfully you can see the desktop.
A31003-G2570-U100-13-7619, 06/2015OpenScape Personal Edition V7, User Guide 111
Operation Reference
• Double click on the ODC PE symbol
NOTICE: In case you cannot access your files, please contact the administrator, so that you can get the permission to access your files. Refer also to the Installation and Admin Guide.
After you have double clicked on the ODC PE symbol
OpenScape Desktop Client starts under the user profile used last by default.
If the field for specifying the LIN number is hidden, the OpenScape Desktop Client starts without any further login actions.
3.1.1 Error Signaling at the Program Start
If errors occur in the first 120 seconds after the program start of OpenScape Desktop Client, for example connection, sound device or license problems, the Current error report window opens. This window contains details about the occurred error.
If an error occurs during operation, it is indicated in the Pearl menu and in the OpenScape context menu in the notification area of the Windows task bar by
In case of OpenScape Personal Edition VDI the Citrix receiver is not installed, normally the Citrix Server provides it.
You will see the following :
A31003-G2570-U100-13-7619, 06/2015112 OpenScape Personal Edition V7, User Guide

Operation Reference
Please contact your administrator for further details.
3.2 Logging on to the Program
The user can deploy three login types for logging on to the OpenScape Desktop Client:
• Initial loginThe Profile creation dialog opens during the initial program start after the setup or, if no user profile has yet been created for the current Windows account, when the program starts.
• Default loginWhen you start the program, the Logon dialog is displayed by default. You can edit login information there.
NOTICE: If profile data from the last session is available when you start the program, it is entered by default for the current session.
• Automatic loginIf no LIN number has been configured for your user account or the LIN entry field is hidden, you are automatically logged on and need not fill in the Logon dialog. In this case, changes to the profile preferences (language selection, for instance) are impossible before the program starts.
A31003-G2570-U100-13-7619, 06/2015OpenScape Personal Edition V7, User Guide 113
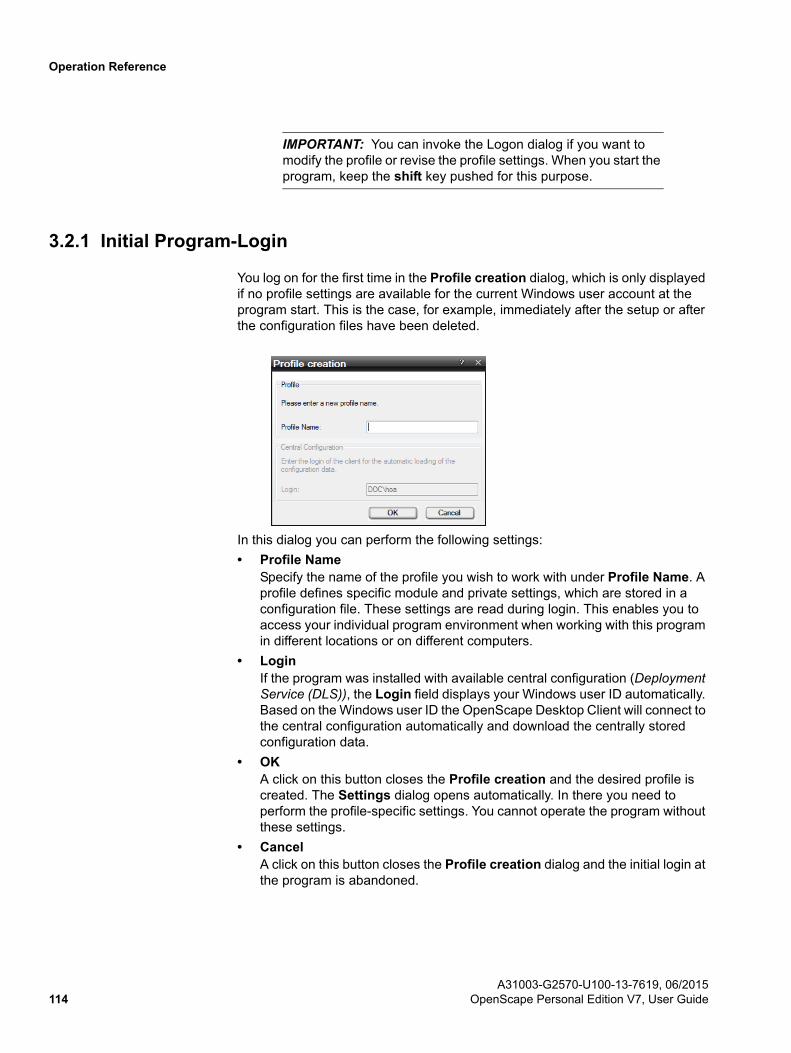
Operation Reference
IMPORTANT: You can invoke the Logon dialog if you want to modify the profile or revise the profile settings. When you start the program, keep the shift key pushed for this purpose.
3.2.1 Initial Program-Login
You log on for the first time in the Profile creation dialog, which is only displayed if no profile settings are available for the current Windows user account at the program start. This is the case, for example, immediately after the setup or after the configuration files have been deleted.
In this dialog you can perform the following settings:
• Profile NameSpecify the name of the profile you wish to work with under Profile Name. A profile defines specific module and private settings, which are stored in a configuration file. These settings are read during login. This enables you to access your individual program environment when working with this program in different locations or on different computers.
• LoginIf the program was installed with available central configuration (Deployment Service (DLS)), the Login field displays your Windows user ID automatically. Based on the Windows user ID the OpenScape Desktop Client will connect to the central configuration automatically and download the centrally stored configuration data.
• OKA click on this button closes the Profile creation and the desired profile is created. The Settings dialog opens automatically. In there you need to perform the profile-specific settings. You cannot operate the program without these settings.
• CancelA click on this button closes the Profile creation dialog and the initial login at the program is abandoned.
A31003-G2570-U100-13-7619, 06/2015114 OpenScape Personal Edition V7, User Guide

Operation Reference
3.2.2 Default Login
The Logon dialog is used for the default login at the program.
Depending on the program-start settings, this dialog may appear differently. Some input fields and buttons may be disabled.
In the following we describe the functions of all input fields and buttons of the Logon dialog:
• ProfileSelect the profile that allows you to operate as a user in the Profile field. If the profile you are using is not yet listed, click on the Add Profile... button (if configured).
• LanguageSelect from the languages list the language to be used for the OpenScape Desktop Client controls and online help.
• LINThe LIN (Local Identification Number) field is used for local assignments of building and room numbers or coordinates, for example. This number serves for quickly locating an OpenScape Desktop Client computer. Depending on your configuration, this field can be hidden, furnished with a default value or configured as required field.
NOTICE: You can use the LIN number only if you operate the OpenScape Desktop Client connected to a OpenScape 4000 (HiPath Provider).
• Add Profile...A click on this button lets you create a new profile. The Add Profile dialog for specifying the Profile Name opens.
NOTICE: You can obtain detailed information about the user and location concept of OpenScape Desktop Client from the OpenScape Personal Edition V7 Installation and Administration manual.
• ManageA click on this button invokes the menu for managing the configuration settings.
A31003-G2570-U100-13-7619, 06/2015OpenScape Personal Edition V7, User Guide 115
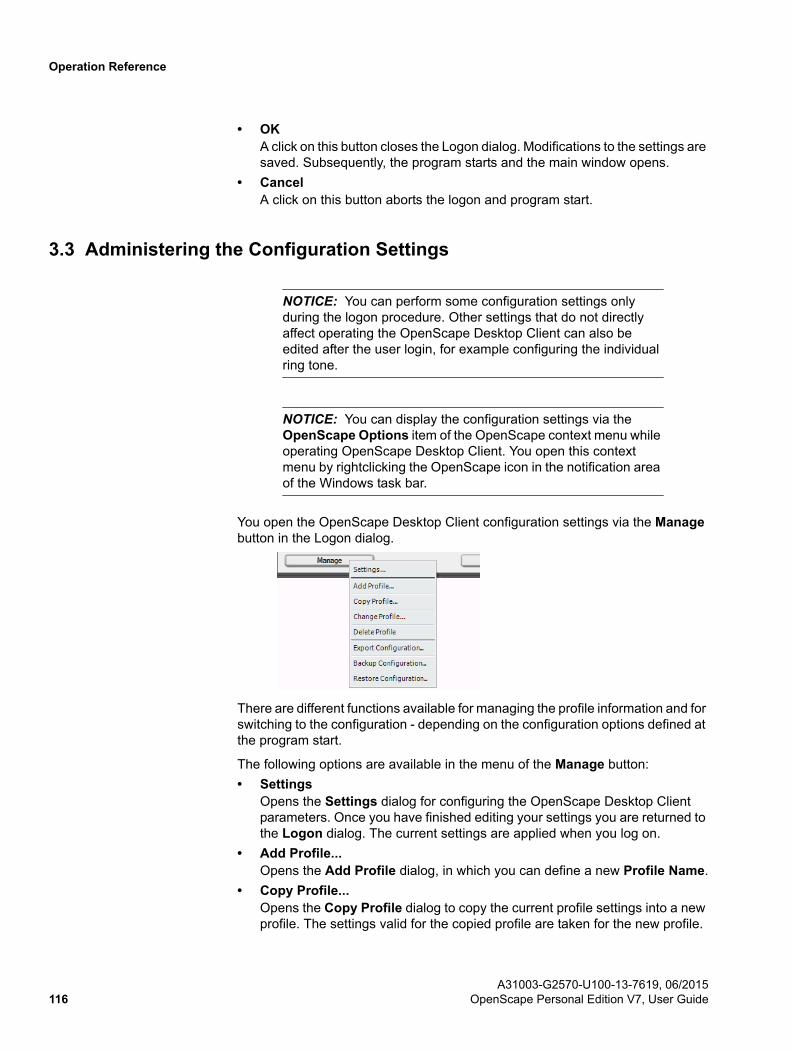
Operation Reference
• OKA click on this button closes the Logon dialog. Modifications to the settings are saved. Subsequently, the program starts and the main window opens.
• CancelA click on this button aborts the logon and program start.
3.3 Administering the Configuration Settings
NOTICE: You can perform some configuration settings only during the logon procedure. Other settings that do not directly affect operating the OpenScape Desktop Client can also be edited after the user login, for example configuring the individual ring tone.
NOTICE: You can display the configuration settings via the OpenScape Options item of the OpenScape context menu while operating OpenScape Desktop Client. You open this context menu by rightclicking the OpenScape icon in the notification area of the Windows task bar.
You open the OpenScape Desktop Client configuration settings via the Manage button in the Logon dialog.
There are different functions available for managing the profile information and for switching to the configuration - depending on the configuration options defined at the program start.
The following options are available in the menu of the Manage button:
• SettingsOpens the Settings dialog for configuring the OpenScape Desktop Client parameters. Once you have finished editing your settings you are returned to the Logon dialog. The current settings are applied when you log on.
• Add Profile...Opens the Add Profile dialog, in which you can define a new Profile Name.
• Copy Profile...Opens the Copy Profile dialog to copy the current profile settings into a new profile. The settings valid for the copied profile are taken for the new profile.
A31003-G2570-U100-13-7619, 06/2015116 OpenScape Personal Edition V7, User Guide

Operation Reference
• Change Profile...Opens the Change Profile dialog in which you can define a different Profile Name for the current profile.
• Delete profileDeletes the current profile.
• Export Configuration...Lets you export the parameter settings for the current Windows user account, the current login computer or the current login profile either fully or partially to the configuration or script files. You find further information about exporting the configuration in the OpenScape Personal Edition V7 Installation and Administration manual.
• Backup Configuration...Outsources all parameter settings for the current Windows user account, the current login computers and login profiles. You can create a destination folder to which this full configuration is then exported in a defined structure. You find further information about backing up the configuration in the OpenScape Personal Edition V7 Installation and Administration manual.
• Restore Configuration...Loads all parameter settings for a user/PC/profile combination. You can enter a source folder from which the defined structure for a full configuration is loaded. You find further information about backing up the configuration in the OpenScape Personal Edition V7 Installation and Administration manual.
With Introduction of VDI (Virtual Desktop Infrastructure) there is an additional option for file access (refer also to OpenScape Personal Edition V7 Installation and Administration Guide) .
• in OpenScape Personal Edition VDI (Citrix Environment)The ’Browse Folders/Files’ is executed in Citrix Server machine and not in the user machine. The administrator can give the permission to access also local files.
NOTICE: Ask your administrator for more information
3.4 Ending the Program
You can shut the OpenScape Desktop Client down as follows:
• By doubleclicking the Pearl menu.
• By clicking on at the top right margin of the main window.
• Via the [Alt] + [F4] hotkey.
• Via the Exit OpenScape option in the OpenScape Desktop Client context menu in the notification area of the Windows task bar.
If you wish to shut the OpenScape Desktop Client down during an active call, a confirmation dialog opens. A click on OK then confirms that you agree to the program's shutdown despite the active call. A click on Cancel closes the confir-mation dialog and the active call can still be conducted.
A31003-G2570-U100-13-7619, 06/2015OpenScape Personal Edition V7, User Guide 117
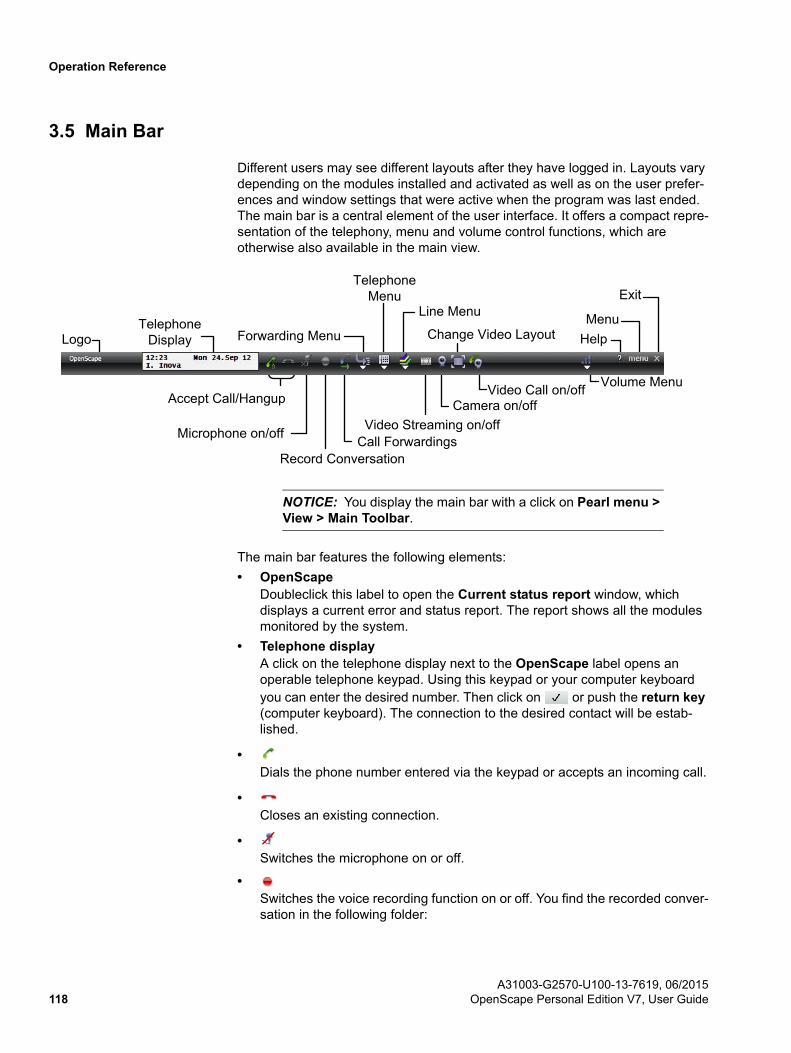
Operation Reference
3.5 Main Bar
Different users may see different layouts after they have logged in. Layouts vary depending on the modules installed and activated as well as on the user prefer-ences and window settings that were active when the program was last ended. The main bar is a central element of the user interface. It offers a compact repre-sentation of the telephony, menu and volume control functions, which are otherwise also available in the main view.
NOTICE: You display the main bar with a click on Pearl menu > View > Main Toolbar.
The main bar features the following elements:
• OpenScapeDoubleclick this label to open the Current status report window, which displays a current error and status report. The report shows all the modules monitored by the system.
• Telephone displayA click on the telephone display next to the OpenScape label opens an operable telephone keypad. Using this keypad or your computer keyboard you can enter the desired number. Then click on or push the return key (computer keyboard). The connection to the desired contact will be estab-lished.
•Dials the phone number entered via the keypad or accepts an incoming call.
•Closes an existing connection.
•Switches the microphone on or off.
•Switches the voice recording function on or off. You find the recorded conver-sation in the following folder:
Camera on/off
LogoTelephoneDisplay
Record Conversation
Forwarding Menu
TelephoneMenu
HelpMenu
Exit
Accept Call/Hangup
Microphone on/off Call Forwardings
Line Menu
Volume Menu
Video Streaming on/off
Change Video Layout
Video Call on/off
A31003-G2570-U100-13-7619, 06/2015118 OpenScape Personal Edition V7, User Guide
Operation Reference
•Activates or deactivates the speaker during an active call or in idle state. This feature is available for example if plathosys CT-180/220/Headset is used as audio device and plathosys CT-180/220/Headset is selected under Control in the corresponding audio scheme.
•Switches the additional speaker on/off during an active call
•Displays the currently active call forwardings.
•Displays the configured call forwardings.
•Opens the phone menu.
•Opens the line menu.
•Switches video streaming on or off during an active call.
•Switches the video camera of the preview of your own video image on or off.
•Enables toggling three default layouts of the Video window: In call, Full window and Full screen.
•Activates/disables the Video Call feature
• New Audio DeviceThis button appears only if a new audio device is connected during operation. It allows you to integrate the new device in a new audio scheme and to connect and use the audio scheme or the new device. The program need not be rebooted for this purpose.
• New Video DeviceThis button appears only if a new video device is connected during operation. It allows you to integrate the new device in a new video scheme and to connect and use the video scheme or the new device. The program need not be rebooted for this purpose.
•Enables setting the volume of ring tone, microphone, speaker and additional speaker (if configured)
•Opens the program's online help.
My Documents\My Music\VoiceRecordings
A31003-G2570-U100-13-7619, 06/2015OpenScape Personal Edition V7, User Guide 119
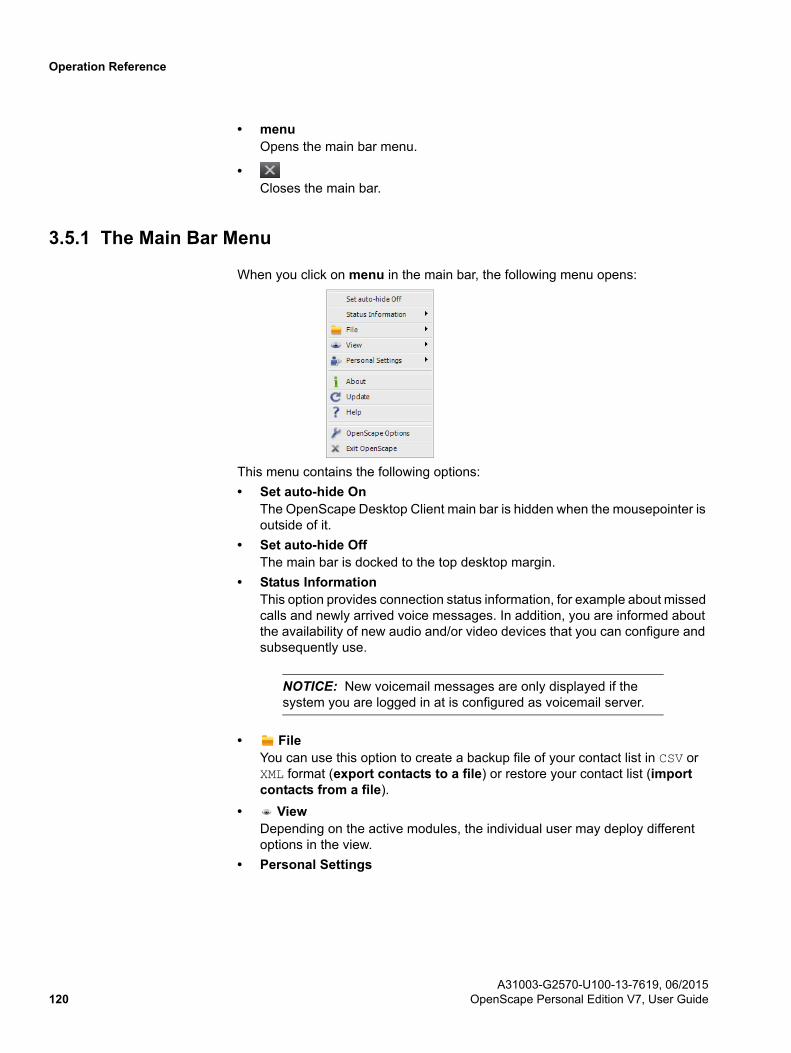
Operation Reference
• menuOpens the main bar menu.
•Closes the main bar.
3.5.1 The Main Bar Menu
When you click on menu in the main bar, the following menu opens:
This menu contains the following options:
• Set auto-hide OnThe OpenScape Desktop Client main bar is hidden when the mousepointer is outside of it.
• Set auto-hide OffThe main bar is docked to the top desktop margin.
• Status InformationThis option provides connection status information, for example about missed calls and newly arrived voice messages. In addition, you are informed about the availability of new audio and/or video devices that you can configure and subsequently use.
NOTICE: New voicemail messages are only displayed if the system you are logged in at is configured as voicemail server.
• FileYou can use this option to create a backup file of your contact list in CSV or XML format (export contacts to a file) or restore your contact list (import contacts from a file).
• ViewDepending on the active modules, the individual user may deploy different options in the view.
• Personal Settings
A31003-G2570-U100-13-7619, 06/2015120 OpenScape Personal Edition V7, User Guide
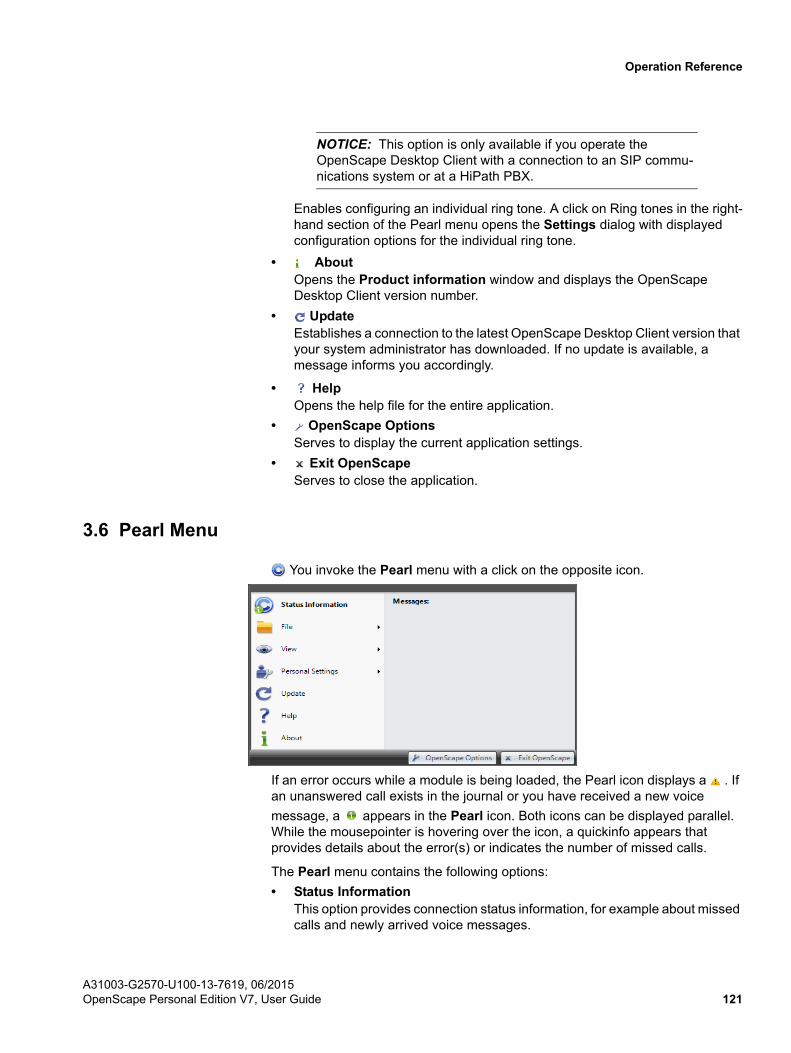
Operation Reference
NOTICE: This option is only available if you operate the OpenScape Desktop Client with a connection to an SIP commu-nications system or at a HiPath PBX.
Enables configuring an individual ring tone. A click on Ring tones in the right-hand section of the Pearl menu opens the Settings dialog with displayed configuration options for the individual ring tone.
• AboutOpens the Product information window and displays the OpenScape Desktop Client version number.
• UpdateEstablishes a connection to the latest OpenScape Desktop Client version that your system administrator has downloaded. If no update is available, a message informs you accordingly.
• HelpOpens the help file for the entire application.
• OpenScape OptionsServes to display the current application settings.
• Exit OpenScapeServes to close the application.
3.6 Pearl Menu
You invoke the Pearl menu with a click on the opposite icon.
If an error occurs while a module is being loaded, the Pearl icon displays a . If an unanswered call exists in the journal or you have received a new voice
message, a appears in the Pearl icon. Both icons can be displayed parallel. While the mousepointer is hovering over the icon, a quickinfo appears that provides details about the error(s) or indicates the number of missed calls.
The Pearl menu contains the following options:
• Status InformationThis option provides connection status information, for example about missed calls and newly arrived voice messages.
A31003-G2570-U100-13-7619, 06/2015OpenScape Personal Edition V7, User Guide 121
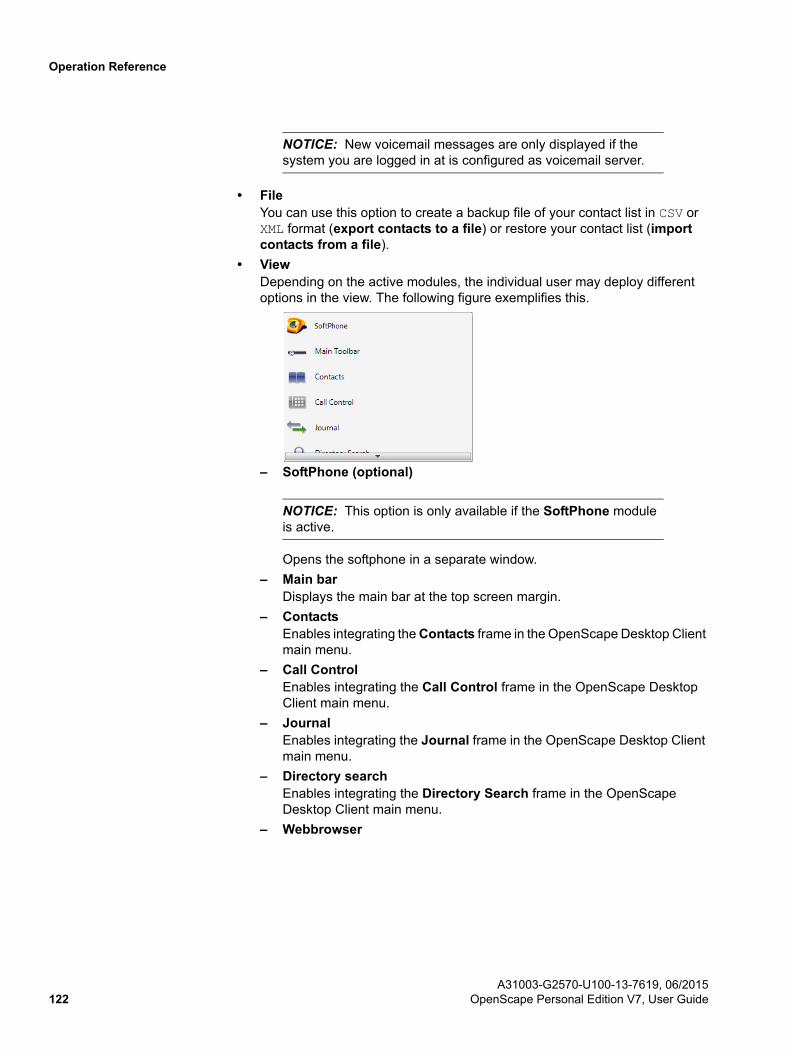
Operation Reference
NOTICE: New voicemail messages are only displayed if the system you are logged in at is configured as voicemail server.
• FileYou can use this option to create a backup file of your contact list in CSV or XML format (export contacts to a file) or restore your contact list (import contacts from a file).
• ViewDepending on the active modules, the individual user may deploy different options in the view. The following figure exemplifies this.
– SoftPhone (optional)
NOTICE: This option is only available if the SoftPhone module is active.
Opens the softphone in a separate window.
– Main barDisplays the main bar at the top screen margin.
– ContactsEnables integrating the Contacts frame in the OpenScape Desktop Client main menu.
– Call ControlEnables integrating the Call Control frame in the OpenScape Desktop Client main menu.
– JournalEnables integrating the Journal frame in the OpenScape Desktop Client main menu.
– Directory searchEnables integrating the Directory Search frame in the OpenScape Desktop Client main menu.
– Webbrowser
A31003-G2570-U100-13-7619, 06/2015122 OpenScape Personal Edition V7, User Guide

Operation Reference
NOTICE: This option is available as soon as you have configured at least one Internet page in the dialog Settings > Advanced > Webbrowser > Internet pages.
Displays a list of your pre-configured internet pages. Select an internet page with a click on the corresponding name. OpenScape Desktop Client opens this internet page in a separate window in which you can navigate. Each internet page is displayed in a separate window.
– Free phoneA click on this option opens or closes a freely positionable phone (display and keypad) on the desktop in a separate window. This option is only available if the Telephone module is active.
– Lines (SIP, optional)A click on this option integrates the Lines frame in the OpenScape Desktop Client main window. Another click removes it from the OpenScape Desktop Client main window. This feature is only available in connection with an SIP Provider.
• Personal settings
NOTICE: This option is only available if you operate the OpenScape Desktop Client with a connection to an SIP commu-nications system or at a HiPath PBX.
Enables configuring an individual ring tone. A click on Ring tones in the right-hand section of the Pearl menu opens the Settings dialog with displayed configuration options for the individual ring tone.
• UpdateEstablishes a connection to the latest OpenScape Desktop Client version that your system administrator has downloaded. If no update is available, a message informs you accordingly.
• HelpOpens the program's online help.
• AboutOpens the Product information window and displays the OpenScape Desktop Client version number.
• OpenScape OptionsThis button opens the Settings dialog, which displays the current settings of the application.
• Exit OpenScapeThis icon serves for closing the application.
3.7 Quick-Access Toolbar
The Quick Access Toolbar enables fast access to your OpenScape Desktop Client features. It is positioned in the caption bar of the main window above the ribbon.
A31003-G2570-U100-13-7619, 06/2015OpenScape Personal Edition V7, User Guide 123

Operation Reference
The <name or number> combo box as well as the Call and
Hangup features are included in the Quick Access Toolbar by default.
NOTICE: The remains inactive (shaded gray) as long as the
<Name or Number> field does not contain any entry. The icon is only active during an active call.
The context menu options let you remove features from the bar, adjust the bar's position as well as minimize the ribbon. You reach the context menu with a click of the right mouse button on the Quick Access Toolbar.
• Remove from Quick Access ToolbarRemoves the relevant icon from the Quick Access Toolbar
• Show Quick Access Toolbar Below the RibbonMoves the Quick Access Toolbar below the ribbon. The option changes to Show Quick Access Toolbar Above the Ribbon for repositioning the Quick Access Toolbar above the ribbon.
• Minimize the RibbonMinimizes the ribbon. Only the tabs' captions are displayed. A click on one of these captions displays the associated tab. Another click minimizes the displayed tab again.
3.8 Ribbon
Below the Pearl menu and Quick Access Toolbar, the ribbon displays the OpenScape Desktop Client controls in tabs and groups by default.
Tabs
Tabs organize controls in the ribbon around core scenarios and tasks the users perform with the OpenScape Desktop Client.
The ribbon includes the following tabs, regardless whether you use OpenScape Desktop Client at an HFA or SIP communications system:
• Home
• SoftPhone.
Groups
Groups within each tab show related controls together.
The following groups are always available on the Home tab of the ribbon:
• Call Control
• Contacts.
The following groups are available on the SoftPhone tab of the ribbon:
• Calls
A31003-G2570-U100-13-7619, 06/2015124 OpenScape Personal Edition V7, User Guide

Operation Reference
• Device Feature
• Video this group is available only with an SIP connection with operable video camera and configured video scheme.
You can integrate all features available in the ribbon in the Quick Access Toolbar via the ribbon's context menu. You reach the context menu with a click of the right mouse button on the ribbon.
• Add to Quick Access ToolbarIntegrates the icon that was clicked with the right mouse button in the Quick Access Toolbar also.
• Show Quick Access Toolbar Below the RibbonMoves the Quick Access Toolbar below the ribbon. The option changes to Show Quick Access Toolbar Above the Ribbon for repositioning the Quick Access Toolbar above the ribbon.
• Minimize the RibbonMinimizes the ribbon. Only the tabs' captions are displayed. A click on one of these captions displays the associated tab. Another click minimizes the displayed tab again.
3.8.1 “Home” Tab
On the Home tab you find the groups Call Control and Contacts with their controls.
3.8.1.1 Controls of the "Call Control" Group
The Call Control group contains the following controls:
• <name or number>You can enter the phone number or the contact name of the desired conver-sational partner in this field.
• Call For initiating a new call.
• Hang upTo clear an existing connection.
A31003-G2570-U100-13-7619, 06/2015OpenScape Personal Edition V7, User Guide 125

Operation Reference
3.8.1.2 Controls of the “Contacts” Group
The Contacts group provides controls to view and add contacts in your contact list.
• ViewClick on View to add the Contacts frame to the OpenScape Desktop Client main window.
• Add ContactClick on Add Contact... to open the Add New Contact dialog and add a contact to your list.
3.8.2 “SoftPhone” Tab
Independent from the installed provider module (HiPath or [Virtual] SIP Service Provider), the SoftPhone tab contains the groups Calls and Device Feature with their controls.
If you use OpenScape Desktop Client as SIP softphone and have an operable video camera used by an active video scheme, the SoftPhone tab contains the Video group in addition. The controls of this group enable switching the video camera on and off as well as transmitting your own video image during an active connection.
3.8.2.1 Controls of the “Calls” Group
The Calls group is always displayed on the SoftPhone tab, regardless of the communications system (HiPath or [Virtual] SIP Service Provider) at which you operate OpenScape Desktop Client. Depending on the audio device used it contains the following controls:
• Accept/Hook offAccepts an incoming call or starts a new conversation
• Hang upCloses a connection
• MuteActivates and deactivates the muting of an existing connection.
• Voice recordingActivates and deactivates the voice recording function.
A31003-G2570-U100-13-7619, 06/2015126 OpenScape Personal Edition V7, User Guide

Operation Reference
• HeadsetSwitches the headset on/off in case of an active call or in idle state
• Additional speakerSwitches the additional speaker on/off for an active call. The additional speaker must be configured in the settings for the currently used audio scheme.
3.8.2.2 Controls of the “Device Feature” Group
The Device Feature group is always displayed on the SoftPhone tab, regardless of the communications system (HiPath or [Virtual] SIP Service Provider) at which you operate OpenScape Desktop Client. It enables access to the following telephone and dial tone features.
Functions
Click on the Functions button to display the following menu, for example:
NOTICE: Depending on your PBX further features are available, which are described in the following.
• Do Not DisturbClick on the Do Not Disturb option if you do not want to receive any calls. The caller receives a busy tone.
• Call waitingWhen the Call waiting option is active, another call that comes in during an active call is signaled by a so-called call-waiting tone. The caller hears a normal ringing tone and no busy tone. You can then accept, ignore or reject the second call. To accept the second call, click on the green handset icon. The active call will then automatically be held.
• Second call without toneThis option corresponds to Call waiting, but no call-waiting tone is played.
A31003-G2570-U100-13-7619, 06/2015OpenScape Personal Edition V7, User Guide 127

Operation Reference
• Ringer cutoffWhen you activate the Ringer cutoff option, your OpenScape Desktop Client will signal incoming calls without ring tone.
• Repertory dialingWhen the Repertory dialing option is active, the OpenScape Desktop Client creates from an entered character string a digit string that is the actual phone number, for example, the entered character string 0800OpenScape is converted in the phone number 0800673672273.
• Voice recordingActivate/deactivate the Voice recording option to activate or deactivate the recording feature. You find the recorded calls in the folder My Documents\My Music\VoiceRecordings.
• Directed call pickupThis feature allows you to accept calls that are designated for someone else. If, for example, your colleague is called but he/she cannot accept the call himself/herself (he/she is in a meeting, on the phone on another line, etc.), select the Directed call pickup option. In the open dialog of the same name enter the phone number of the device with the alerting call. Click on OK. You are connected to the caller.
• Pickup callThis feature allows every member of a call pickup group to accept a call for another group member. Calls signalled acoustically to a subscriber of a call pickup group are at the same time signalled visually to the other group members by an LED (next to the programmed key) on the display. You can pick up the call by pushing a key or dialing a code number as well as via the displayed desktop notification.
• Request messagesYou can use this option to play newly received voicemails.
• Delete callbackSelecting this menu option deactivates the callback feature.
NOTICE: If you want to use the Callback feature, access the Advanced tab in the Settings dialog, select the [Virtual] SIP Service Provider > Codes option and specify the required codes in the Callback area. In case of VDI-Environment (Citrix) it is Virtual SIP Service Provider.
• ACD Logon (HFA)Logging on as call center agent.
• ACD Post-processing (HFA)Switching to status Post-processing after a call as call center agent.
• ACD not available (HFA)Call center agent loggs off temporarily.
Lines
Click on the Lines button to display a selection list with all configured lines.
A31003-G2570-U100-13-7619, 06/2015128 OpenScape Personal Edition V7, User Guide

Operation Reference
All lines configured in the OpenScape Desktop Client are displayed in the Lines menu. You can change the line options and the line/connection status for individual lines. Doubleclick a line to allocate it and to receive a dial tone in the Lines menu of the main bar, in the "Lines" window or in the line control in the Device Feature Group on the Softphone tab.
All lines configured in the OpenScape Desktop Client can be configured in the Lines frame. Only those lines that are shown can be edited.
Call forwardings
Click on the Call forwardings button to display the following menu:
If connection requests are to be diverted in your absence, you can define settings for different forwarding types in the OpenScape Desktop Client. This feature can be activated or deactivated as required. The connected provider defines which types of forwarding are available.
NOTICE: In the call forwardings menu you see the currently active call forwardings highlighted. Forwardings set but not available any more are faded gray.
NOTICE: The active call forwarding items are effective when OpenScape Desktop Client is up. When you shut down OpenScape Desktop Client and reboot it, the forwardings that were active at the time the program was shut down are automati-cally reactivated and the deactivated ones stay inactive.
NOTICE: In case of an OpenScape Voice connection, active forwardings stay effective even if the OpenScape Desktop Client has been shut down. All incoming calls are then forwarded to a specific, pre-set destination.
• Add call forwarding...A click on this option lets you configure a new call forwarding. The following dialog opens:
In this dialog you perform the following settings for the new call forwarding:
– TypeDefines the type of the new forwarding
A31003-G2570-U100-13-7619, 06/2015OpenScape Personal Edition V7, User Guide 129
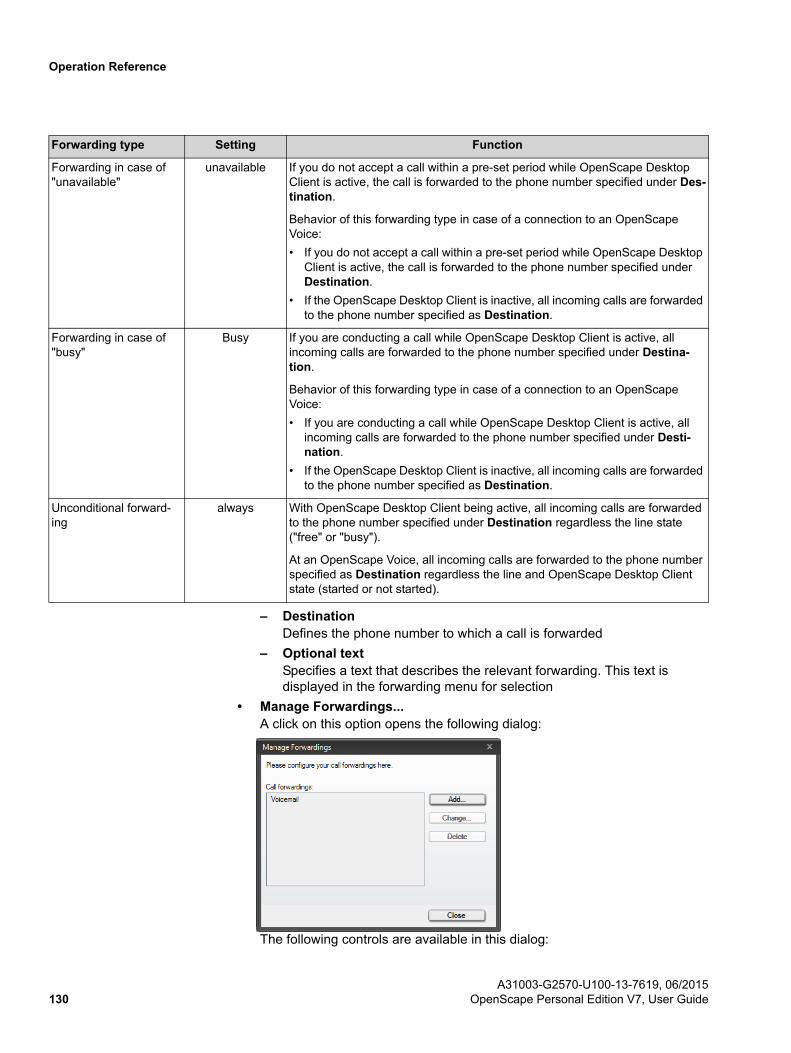
Operation Reference
– DestinationDefines the phone number to which a call is forwarded
– Optional textSpecifies a text that describes the relevant forwarding. This text is displayed in the forwarding menu for selection
• Manage Forwardings...A click on this option opens the following dialog:
The following controls are available in this dialog:
Forwarding type Setting Function
Forwarding in case of "unavailable"
unavailable If you do not accept a call within a pre-set period while OpenScape Desktop Client is active, the call is forwarded to the phone number specified under Des-tination.
Behavior of this forwarding type in case of a connection to an OpenScape Voice:
• If you do not accept a call within a pre-set period while OpenScape Desktop Client is active, the call is forwarded to the phone number specified under Destination.
• If the OpenScape Desktop Client is inactive, all incoming calls are forwarded to the phone number specified as Destination.
Forwarding in case of "busy"
Busy If you are conducting a call while OpenScape Desktop Client is active, all incoming calls are forwarded to the phone number specified under Destina-tion.
Behavior of this forwarding type in case of a connection to an OpenScape Voice:
• If you are conducting a call while OpenScape Desktop Client is active, all incoming calls are forwarded to the phone number specified under Desti-nation.
• If the OpenScape Desktop Client is inactive, all incoming calls are forwarded to the phone number specified as Destination.
Unconditional forward-ing
always With OpenScape Desktop Client being active, all incoming calls are forwarded to the phone number specified under Destination regardless the line state ("free" or "busy").
At an OpenScape Voice, all incoming calls are forwarded to the phone number specified as Destination regardless the line and OpenScape Desktop Client state (started or not started).
A31003-G2570-U100-13-7619, 06/2015130 OpenScape Personal Edition V7, User Guide

Operation Reference
– Add...This button enables configuring a new call forwarding in the Add Forwarding dialog.
– Change...This button enables editing the settings of an already defined call forwarding in the Change Forwarding dialog.
– DeleteUsing this button you can remove a selected call forwarding from the call forwardings list.
– CloseA click on this button closes the Manage Forwardings dialog.
• Deactivate all call forwardingsA click on this option disables all configured forwardings.
• <List of possible call forwardings>Selecting a call forwarding displayed here toggles the forwarding state:
– a previously inactive call forwarding is activated (displayed highlighted)
– a previously active call forwarding becomes inactive.
3.8.2.3 Controls of the “Video” (SIP) Group
The Video group enables access to the video functions and features the following controls:
• Camera imageUsing this option you switch your own camera image on or off.
• Video streamingActivates or deactivates the video data transmission during an active call.
• Activate video callThis option activates/disables the Video Call feature.
NOTICE: The buttons Camera image and Video Streaming must be activated to enable video telephony. If these two buttons are inactive, the OpenScape Desktop Client can solely receive video data from other participants. Your video image is not sent to the conversational partners.
3.8.2.4 Video Features
Parallel to an audio connection, you can also exchange images of the connection partners. This requires an operable video camera on your and your communi-
A31003-G2570-U100-13-7619, 06/2015OpenScape Personal Edition V7, User Guide 131

Operation Reference
cation partners' side, a sufficient number of free video licenses and adequate bandwidth as well as configuring a video scheme in the [Virtual] SIP Service Provider settings.
When the above requirements are complied with, you can use the video telephony features as follows:
• You can switch the video image to an existing audio connection.When your connection partner complies with the video transmission require-ments, you receive the video image of your connection partner automatically, no matter whether a video camera is installed or switched on at your station. This requires the Video Viewer module to be active. Your own video image or the one sent to your connection partner as well as the video image received from your connection partner appear in the Video window.
• You can activate the Video Call feature via the Activate video call icon in the Video group on the SoftPhone tab to automatically set up a video and audio connection to the desired conversational partner. A video call is automatically initiated only if both conversational partners have enabled the
Activate video call icon at the time the call shall be made. If they have done so, the Video window opens automatically on both sides. The partners' own video image is being transmitted and they receive the image of the respective other partner. The default view of the video window currently displayed depends on the settings in the Default video configuration of the [Virtual] SIP Service Provider.
NOTICE: The video transmission or screen resolution quality may change during an active call. Such changes result from the bandwith for transmitting video data streams automatically adjusting to the available bandwidth resources of the communica-tions system.
NOTICE: If the SIP communications system does not provide a sufficient amount of free bandwidth, no video call can be set up and no active call an be expanded to a video connection. A corre-sponding message informs the user about this fact.
The video telephony feature enables using the following functions:
Camera image
The camera image function opens your own video image in the Video window. You can perform camera image settings in the Settings dialog on the Advanced > [Virtual] SIP Service Provider > Video schemes tab. For example, you can configure whether the camera image or your own video image is automatically switched on at every program start or switched on/off with a click on the Camera image button of the Video group. Your connection partner does not see this image. In addition, there are two options for you to represent your own image: mirrored and unmirrored. By default, you see your own video image mirrored, but it is transmitted unmirrored to the connection partner. The following figure shows
A31003-G2570-U100-13-7619, 06/2015132 OpenScape Personal Edition V7, User Guide

Operation Reference
an example of the Video window in which the camera image was automatically switched on at the program start. As long as there is no connection that transmits the video image of the connection partner, you can switch the camera image off
with a click on the Close (x) button in the screen's top right corner or on in the Softphone toolbar. This also closes the Video window.
Receiving a video image
Received video images are always accepted and represented independently from an installed or active video camera. This, however, requires the Video Viewer module to be active. The representation of received video images cannot be suppressed or switched off. As long as your conversational partner sends his/her video image, the Video window stays open. There is no way you can close the Video window.
The next figure is an example of the Video window during an active call conducted between two connection partners. They receive the image of the respective other participant, but do not yet send any video data themselves.
A31003-G2570-U100-13-7619, 06/2015OpenScape Personal Edition V7, User Guide 133

Operation Reference
Sending a video image (point-to-point video)
To send video images you need an installed and configured video camera as well as a video scheme defined in the [Virtual] SIP Service Provider settings. The video streaming can be switched to an audio connection only retrospectively. This applies for the caller as well as for the callee. During a call, a unilateral or a bidirectional video transmission may take place.
You start sending your own image with a click on the Video Streaming button
in the ribbon > SoftPhone tab > Video group or on in the Softphone toolbar of the Video window. Your own video image appears in a red frame.
You stop sending your own image with another click on the Video Streaming
button in the ribbon > SoftPhone tab > Video group or on . You can then still see the image of your connection partner. After the active call has been termi-nated, the video streaming comes automatically to an end too and you see only your own image (if activated) in the Video window.
NOTICE: While a video connection with mutual video streaming is up, you cannot close the Video window. You can merely disable the preview of your own video image via the Softphone toolbar
with a click on .
A31003-G2570-U100-13-7619, 06/2015134 OpenScape Personal Edition V7, User Guide

Operation Reference
Controls in the Softphone toolbar
You find the Softphone toolbar of the Video window at the bottom margin of the Video window where it provides the following features:
• Terminate active call
NOTICE: This icon stays inactive (grayed out) as long as there is no connection.
A click on the icon closes the active connection. Video streaming then terminates automatically and the Video window closes.
• Switch microphone on/off
NOTICE: This icon stays inactive (grayed out) as long as there is no connection.
A click on the icon mutes the microphone. The icon then changes to . A
click on the icon undoes the muting.
•Activates or deactivates the speaker during an active call or in idle state. This feature is available for example if plathosys CT-180/220/Headset is used as audio device and plathosys CT-180/220/Headset is selected under Control in the corresponding audio scheme.
•Switches the additional speaker on/off during an active call
• Switch voice recording on/off
NOTICE: This icon stays inactive (grayed out) as long as there is no connection.
A click on activates the conversation recording. The icon then changes its color from gray to orange.
• Display volume settings
A click on opens the following menu:
In there you can set the volume for Microphone, Ring tone and Speaker independently from your respective conversational state.
A31003-G2570-U100-13-7619, 06/2015OpenScape Personal Edition V7, User Guide 135
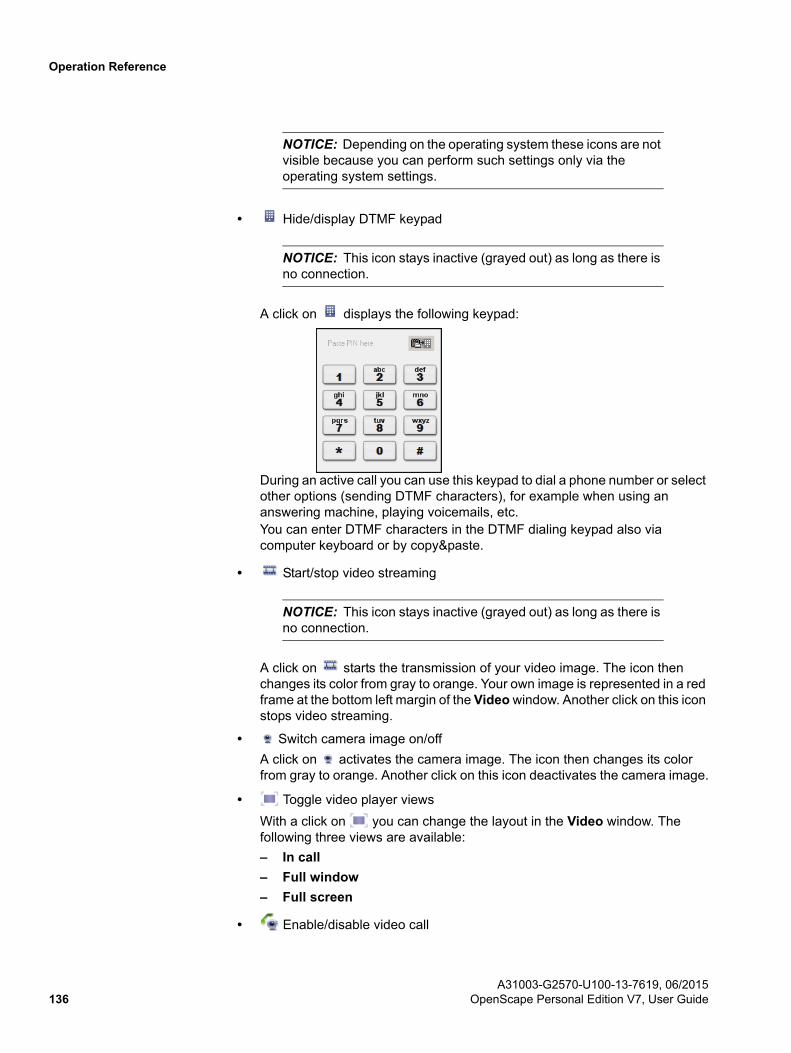
Operation Reference
NOTICE: Depending on the operating system these icons are not visible because you can perform such settings only via the operating system settings.
• Hide/display DTMF keypad
NOTICE: This icon stays inactive (grayed out) as long as there is no connection.
A click on displays the following keypad:
During an active call you can use this keypad to dial a phone number or select other options (sending DTMF characters), for example when using an answering machine, playing voicemails, etc.You can enter DTMF characters in the DTMF dialing keypad also via computer keyboard or by copy&paste.
• Start/stop video streaming
NOTICE: This icon stays inactive (grayed out) as long as there is no connection.
A click on starts the transmission of your video image. The icon then changes its color from gray to orange. Your own image is represented in a red frame at the bottom left margin of the Video window. Another click on this icon stops video streaming.
• Switch camera image on/off
A click on activates the camera image. The icon then changes its color from gray to orange. Another click on this icon deactivates the camera image.
• Toggle video player views
With a click on you can change the layout in the Video window. The following three views are available:
– In call
– Full window
– Full screen
• Enable/disable video call
A31003-G2570-U100-13-7619, 06/2015136 OpenScape Personal Edition V7, User Guide

Operation Reference
NOTICE: This icon is only displayed if you operate the program at an SIP communications system (OpenScape Voice) and have an operable video camera currently used by a video scheme of the [Virtual] SIP Service Provider.
The state of this icon – active or disabled – specifies whether or not video resources are reserved during the connection setup. It thus determines whether the call shall be initiated as video or pure audio call. The icon for activating/disabling the video call feature is inactive by default, i .e. the feature is in idle state. Consequently, all calls are set up as pure audio connections. However, you can extend such connections to video connec-
tions via the icon in the Softphone toolbar at a later date.If the icon for activating/disabling the video call feature is enabled, each call is automatically initiated as video or audio connection depending on the state of this icon on the conversational partner's side. If both partners have activated this icon, a video connection is automatically switched to the audio connection. The Video window opens automatically. The video images of the conversational partners are being transmitted. The displayed video view corresponds to the Default video configuration in the Settings dialog on the tab Advanced > [Virtual] SIP Service Provider > Video schemes.If only one of the two conversational partners has activated the video call feature, a message in the automatically opened Video window informs him/her that the other one does not wish to set up a video connection. The
subscriber who has activated the icon sees only his/her own image in the pre-set view of the Video window. It is not automatically transmitted. In this
case, supplementing the audio transmission with video via the icon in the Softphone toolbar at a later date is not possible.
Operating with computer keyboard
[F11] key - Enabling the [F11] key you can maximize or restore the Video window. This feature is only supported for the camera image and the views In call and Full window.
NOTICE: During a video conference or an active call with video streaming you can use the keys of your computer keyboard (or of your configured preferred device) to give control commands to the communications system by sending DTMF tones.
3.8.2.5 Video Streaming Behavior
The video streaming behavior follows the changes analog to the audio trans-mission:
• Call is on-holdWhen a call is held, the video streaming stops as well. The held subscriber does not see a video screen. If the video streaming status changes during a held call, restoring the connection follows this change. If, for example, the
A31003-G2570-U100-13-7619, 06/2015OpenScape Personal Edition V7, User Guide 137
Operation Reference
camera is switched off, the video streaming is inactive when the call is resumed.
• During a consultation callFor modifications to the video streaming status during a consultation call the same applies as for a held call.
• TogglingWhen you toggle the active and held subscriber, the video streaming to the active subscriber is held and resumed to the held subscriber also. The Video window shows only your own video image and the one of the respective subscriber. The video stati of the two connections are independent from each other in this case. In other words, if the video streaming status of one connection is changed, it does not affect the other connection.
• Transferring a callWhen a call is transferred, the video installation and configuration of the subscriber to be transferred and of the new subscriber decides whether no, a unilateral or a bidirectional video connection exists.
• Local video conferenceIn case of a local conference in which all participants have activated the video streaming, the initiator of the conference receives the video images of the other two participants. Three video images can be seen in his/her Video window: his/her own one in a red frame and two of the other participants. The other two conference participants see in the Video window the following: their own video image in a red frame and one received video image. The initiator mixes the latter in a way that a participant receives the video image of the initiator and of the third participant in one video image.If the initiator has not installed, configured or activated a video camera, the initiator receives both video images within a conference, but since his/her own video transmission channel is missing, the other two participants do not receive a video image.If at least one participant has not installed, configured or activated a video camera in a conference, the initiator does not adopt a video mixing function, so that both participants receive the video image of the initiator.
3.8.2.6 Views of the Video Window
The OpenScape Desktop Client video window provides three default views: In call, Full window and Full screen. In addition, the video feature of OpenScape Desktop Client enables you to customize video window views. You can specify in the Settings > Advanced > [Virtual] SIP Service Provider > Video schemes dialog whether to switch the camera image automatically on at the program start and which view of the video window to display during an active video connection by default.
NOTICE: The figures shown in the following are examples. They help the user to imagine possible default views of the Video window.
A31003-G2570-U100-13-7619, 06/2015138 OpenScape Personal Edition V7, User Guide
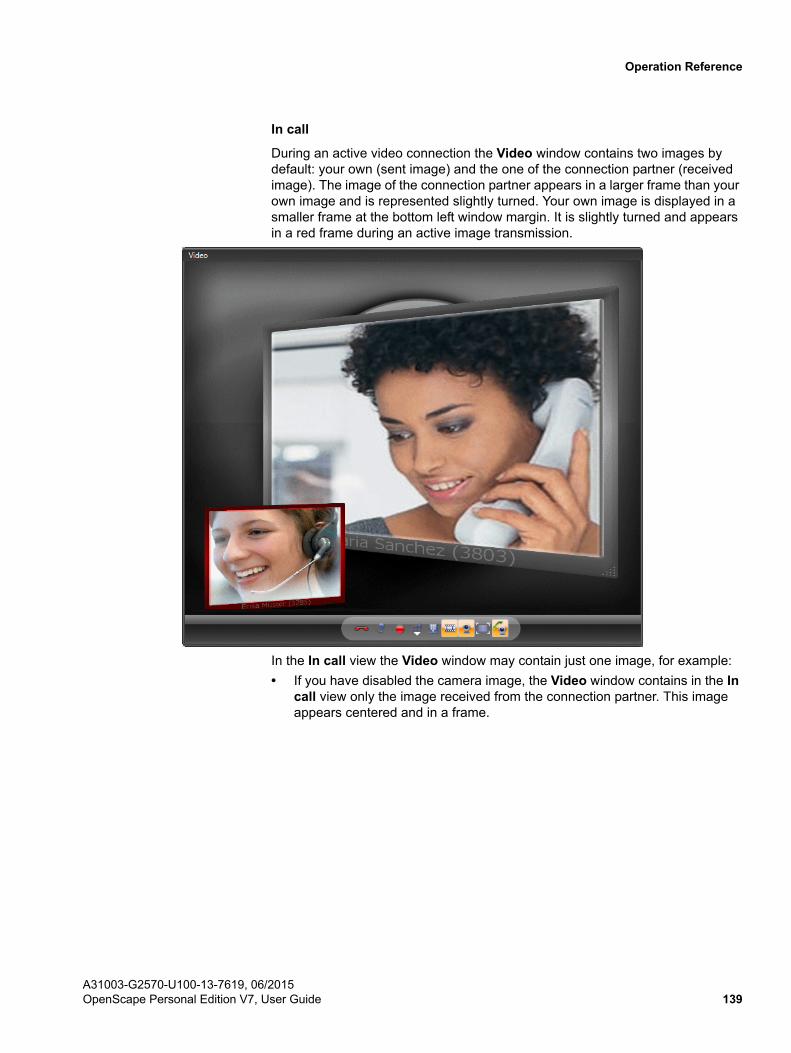
Operation Reference
In call
During an active video connection the Video window contains two images by default: your own (sent image) and the one of the connection partner (received image). The image of the connection partner appears in a larger frame than your own image and is represented slightly turned. Your own image is displayed in a smaller frame at the bottom left window margin. It is slightly turned and appears in a red frame during an active image transmission.
In the In call view the Video window may contain just one image, for example:
• If you have disabled the camera image, the Video window contains in the In call view only the image received from the connection partner. This image appears centered and in a frame.
A31003-G2570-U100-13-7619, 06/2015OpenScape Personal Edition V7, User Guide 139

Operation Reference
• If the connection partner has not yet activated his/her video transmission, the Video window contains in the In call view your own image only. This image appears centered and in a frame.
Full window
In this view the Video window may contain one or two images. The image received from the connection partner always appears centered and without a frame. Your own image is displayed in a smaller frame at the bottom left window margin. It is slightly turned and appears in a red frame during an active image transmission. The following figure shows for example the Video window in the Full window view when the image of the conversational partner is received. Your own image is transmitted but the camera image is disabled.
A31003-G2570-U100-13-7619, 06/2015140 OpenScape Personal Edition V7, User Guide

Operation Reference
If you activate the camera image in addition, the Video window in the Full window view may look as follows:
Full screen
In this view the Video window may contain one or two images. The received image occupies the entire screen. If the camera image is active, your own image appears bottom left. The Softphone toolbar is hidden and only displayed again at the bottom screen margin when you position the mousepointer on it.
A31003-G2570-U100-13-7619, 06/2015OpenScape Personal Edition V7, User Guide 141
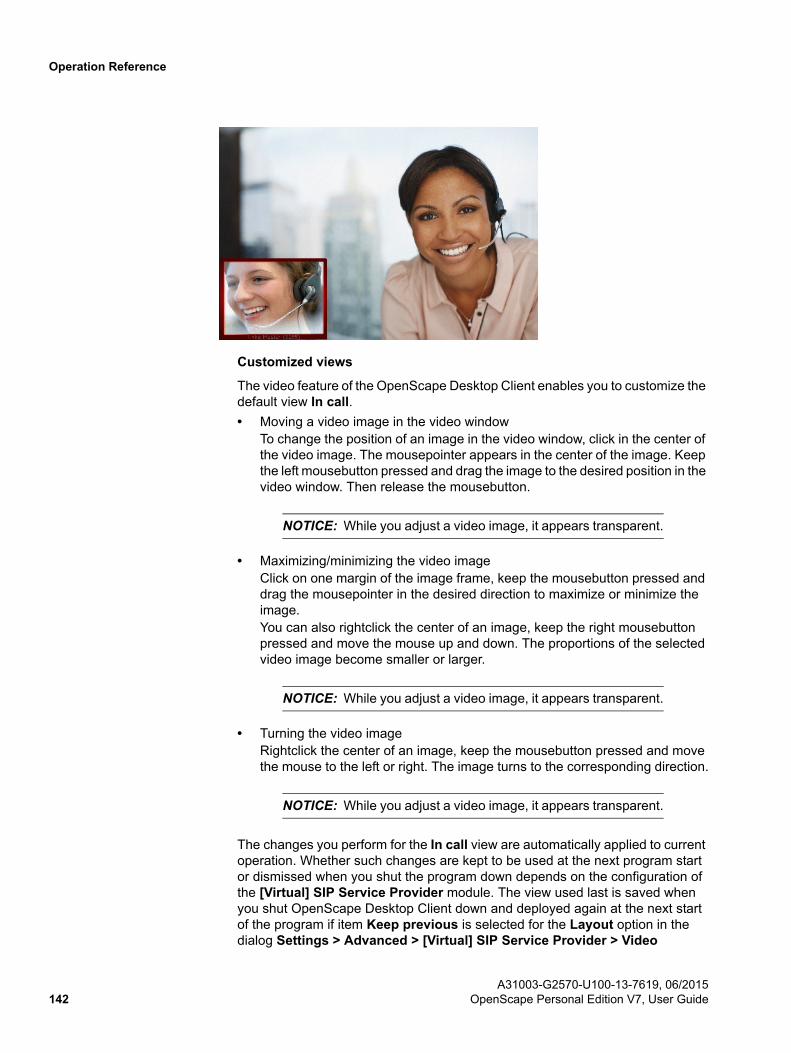
Operation Reference
Customized views
The video feature of the OpenScape Desktop Client enables you to customize the default view In call.
• Moving a video image in the video windowTo change the position of an image in the video window, click in the center of the video image. The mousepointer appears in the center of the image. Keep the left mousebutton pressed and drag the image to the desired position in the video window. Then release the mousebutton.
NOTICE: While you adjust a video image, it appears transparent.
• Maximizing/minimizing the video imageClick on one margin of the image frame, keep the mousebutton pressed and drag the mousepointer in the desired direction to maximize or minimize the image.You can also rightclick the center of an image, keep the right mousebutton pressed and move the mouse up and down. The proportions of the selected video image become smaller or larger.
NOTICE: While you adjust a video image, it appears transparent.
• Turning the video imageRightclick the center of an image, keep the mousebutton pressed and move the mouse to the left or right. The image turns to the corresponding direction.
NOTICE: While you adjust a video image, it appears transparent.
The changes you perform for the In call view are automatically applied to current operation. Whether such changes are kept to be used at the next program start or dismissed when you shut the program down depends on the configuration of the [Virtual] SIP Service Provider module. The view used last is saved when you shut OpenScape Desktop Client down and deployed again at the next start of the program if item Keep previous is selected for the Layout option in the dialog Settings > Advanced > [Virtual] SIP Service Provider > Video
A31003-G2570-U100-13-7619, 06/2015142 OpenScape Personal Edition V7, User Guide
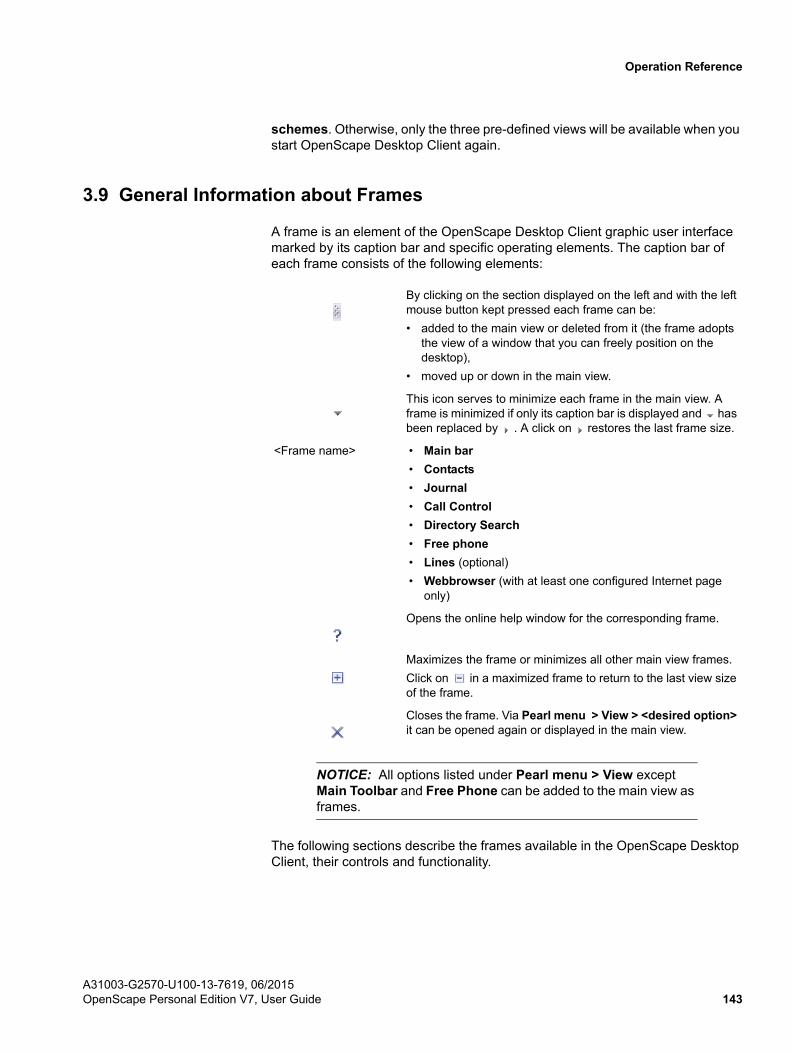
Operation Reference
schemes. Otherwise, only the three pre-defined views will be available when you start OpenScape Desktop Client again.
3.9 General Information about Frames
A frame is an element of the OpenScape Desktop Client graphic user interface marked by its caption bar and specific operating elements. The caption bar of each frame consists of the following elements:
NOTICE: All options listed under Pearl menu > View except Main Toolbar and Free Phone can be added to the main view as frames.
The following sections describe the frames available in the OpenScape Desktop Client, their controls and functionality.
By clicking on the section displayed on the left and with the left mouse button kept pressed each frame can be:
• added to the main view or deleted from it (the frame adopts the view of a window that you can freely position on the desktop),
• moved up or down in the main view.
This icon serves to minimize each frame in the main view. A frame is minimized if only its caption bar is displayed and has been replaced by . A click on restores the last frame size.
<Frame name> • Main bar
• Contacts
• Journal
• Call Control
• Directory Search
• Free phone
• Lines (optional)
• Webbrowser (with at least one configured Internet page only)
Opens the online help window for the corresponding frame.
Maximizes the frame or minimizes all other main view frames.
Click on in a maximized frame to return to the last view size of the frame.
Closes the frame. Via Pearl menu > View > <desired option> it can be opened again or displayed in the main view.
A31003-G2570-U100-13-7619, 06/2015OpenScape Personal Edition V7, User Guide 143
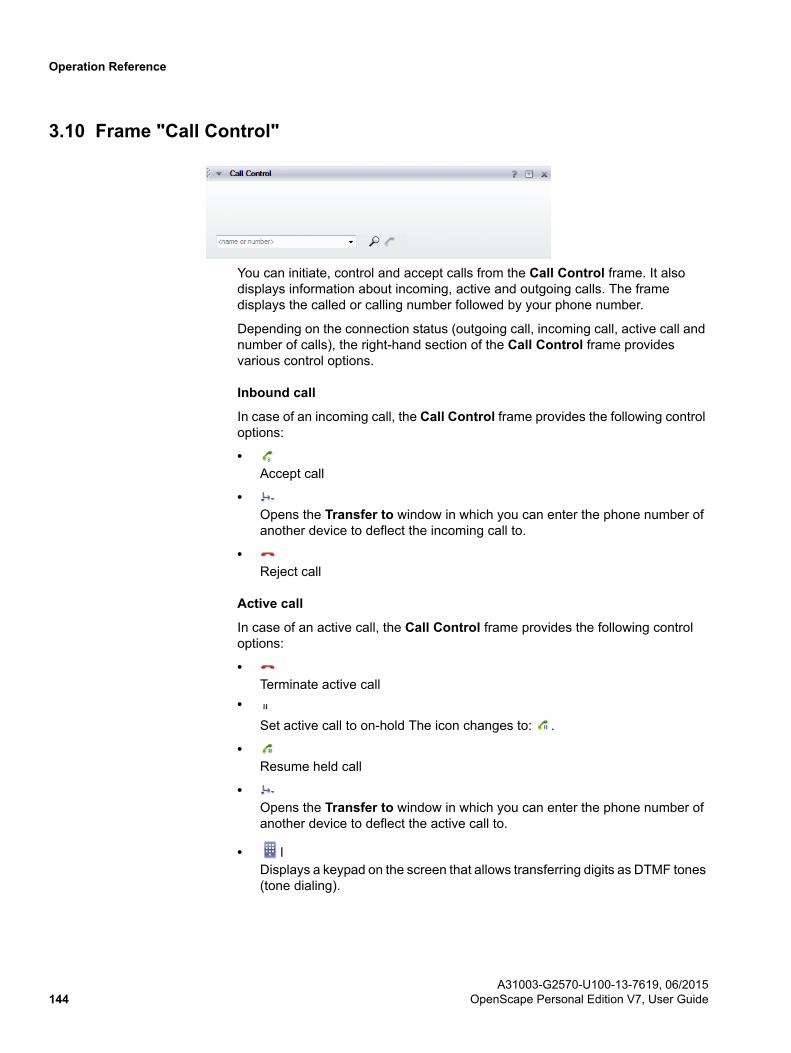
Operation Reference
3.10 Frame "Call Control"
You can initiate, control and accept calls from the Call Control frame. It also displays information about incoming, active and outgoing calls. The frame displays the called or calling number followed by your phone number.
Depending on the connection status (outgoing call, incoming call, active call and number of calls), the right-hand section of the Call Control frame provides various control options.
Inbound call
In case of an incoming call, the Call Control frame provides the following control options:
•Accept call
•Opens the Transfer to window in which you can enter the phone number of another device to deflect the incoming call to.
•Reject call
Active call
In case of an active call, the Call Control frame provides the following control options:
•Terminate active call
•
Set active call to on-hold The icon changes to: .
•Resume held call
•Opens the Transfer to window in which you can enter the phone number of another device to deflect the active call to.
• lDisplays a keypad on the screen that allows transferring digits as DTMF tones (tone dialing).
A31003-G2570-U100-13-7619, 06/2015144 OpenScape Personal Edition V7, User Guide

Operation Reference
Consultation call
In case of a consultation call, the Call Control frame lists two calls: the held and the consultation call. The following control options are available in the area of the held call:
•Disconnect active call
•Transfers the held call to the consultation-call subscriber. Your connection is then automatically cleared.
• lDisplays a keypad on the screen that allows transferring digits as DTMF tones (tone dialing).
The following control options are available in the consultation call area:
•Disconnect active call
•
Set active call to on-hold The icon changes to: .
•Resume held call
•Opens the Transfer to window in which you can enter the phone number of another device to deflect the active call to.
•Select this option if two connections exist (one is on hold and the other one is active) to connect the other two subscribers. Your telephone calls are now finished.
•
Click on to display the below keypad.
You can use this keypad to dial a phone number or select other options (sending DTMF characters) when deploying an answering machine or while playing your voicemails.You can enter DTMF characters also via the computer keyboard or by copy&paste. Copy the desired content (for example PIN, phone number, etc.) by simultaneously pushing [Ctrl] + [C] to the clipboard. Then click on .
A31003-G2570-U100-13-7619, 06/2015OpenScape Personal Edition V7, User Guide 145

Operation Reference
Paste the copied content via [Ctrl] + [V] in the DTMF dialing keyboard.
Enable at the top right margin on the DTMF dialing keyboard for sending this content. The selected DTMF characters are displayed at the top left margin of the DTMF dialing keypad.
•The existing connections are extended to a conference (participant-controlled conference). You can add up to 48 participants to this conference.
•Phone calls (one or both set to on-hold) are merged to a local conference (three-party conference), so that all three participants can talk to each other. No further participants can be added.
•Using this feature you can toggle two connections. Only the subscribers to the active connection can talk to each other. The conversational partner who has been put on-hold listens to music-on-hold until the conversation is taken up again.
•This option allows you to record the conversation. You find the recording in the folder My Documents\My Music\VoiceRecordings.
Outbound call
In case of an outgoing call, the Call Control frame provides the following control options:
•Terminate initiated call
3.10.1 Context Menus of the "Call Control" Frame
When the Call Control frame displays a connection, you can invoke a context menu by clicking the right mousebutton. Depending on the connection status (outbound, inbound or existing connection and number of connections), the context menu offers various options for controlling the respective connection.
3.10.1.1 Context Menu of an outbound Connection
An outbound connection is a connection that you have initiated. OpenScape Desktop Client displays this connection in the Call Control frame. The desired connection partner has not yet accepted your call.
During an outbound call the context menu of the Call Control frame provides the following options:
• Disconnect
Click Disconnect to clear the connection.
A31003-G2570-U100-13-7619, 06/2015146 OpenScape Personal Edition V7, User Guide

Operation Reference
• CallbackSelect this option to activate the callback function.This feature is only available for specific PBXs.
• Start voice recordingClick on Start voice recording to record the conversation. You find the recording in the folder My Documents\My Music\VoiceRecordings.
3.10.1.2 Context Menu of an inbound Connection
An inbound connection has been set up by another subscriber. OpenScape Desktop Client displays this connection in the Call Control frame. You have not yet accepted this call.
The context menu provides the following options:
• AcceptClick on Accept to set up an active connection.
• Transfer to...Click on Transfer to... to open the Transfer to dialog and to enter the phone number of the device to which you want to transfer the incoming call.
• RejectClick on Reject to reject the call.
• Start voice recordingClick on Start voice recording to record the conversation. You find the recording in the folder My Documents\My Music\VoiceRecordings.
3.10.1.3 Context Menu of an active Call
During an active call the context menu of the Call Control frame provides the following options:
• DisconnectClick on Disconnect to clear the existing connection.
• On holdClick on On hold to hold the active call. The On hold menu option is replaced
with Back to Waiting. Click on Back to Waiting to retrieve the held call.
A31003-G2570-U100-13-7619, 06/2015OpenScape Personal Edition V7, User Guide 147

Operation Reference
• Transfer toClick on Transfer to... to open the Transfer to dialog and to enter the phone number of another device to which you want to transfer the active call.
• Consultation toClick on Consultation to to place a call on hold and to set up a new connection to another extension.
• Public HoldClick on Public Hold to keep a call in the PBX. You can then ring off and accept the call at another telephone.
• DTMF-dialingClick on DTMF-dialing to display the below keypad.
You can use this keypad to dial a phone number or select other options (sending DTMF characters) when deploying an answering machine or while playing your voicemails.You can enter DTMF characters also via the computer keyboard or by copy&paste. Copy the desired content (for example PIN, phone number, etc.) by simultaneously pushing [Ctrl] + [C] to the clipboard. Then click on . Paste the copied content via [Ctrl] + [V] in the DTMF dialing keyboard.
Enable at the top right margin on the DTMF dialing keyboard for sending this content. The selected DTMF characters are displayed at the top left margin of the DTMF dialing keypad.
• Start voice recordingClick on Start voice recording to record the conversation. You find the recording in the folder My Documents\My Music\VoiceRecordings.
3.10.1.4 Context Menu of a Consultation Call
NOTICE: The number of provided options depends on the type of the communications system used.
During an active consultation call the context menu of the Call Control frame provides the following options, for example:
A31003-G2570-U100-13-7619, 06/2015148 OpenScape Personal Edition V7, User Guide

Operation Reference
• DisconnectClick on Disconnect to clear the existing connection.
• On holdClick on On hold to hold the active call. Click on Back to Waiting to retrieve the held call.
• Transfer to...Click on Transfer to... to open the Transfer to dialog and to enter the phone number of another device to which you want to transfer the active call.
• TransferSelect this option if two connections exist (one is on hold and the other one is active) to connect the other two subscribers. Your telephone calls are now finished.
• DTMF-dialingClick on DTMF-dialing to display the below keypad.
You can use this keypad to dial a phone number or select other options (sending DTMF characters) when deploying an answering machine or while playing your voicemails.You can enter DTMF characters also via the computer keyboard or by copy&paste. Copy the desired content (for example PIN, phone number, etc.) by simultaneously pushing [Ctrl] + [C] to the clipboard. Then click on . Paste the copied content via [Ctrl] + [V] in the DTMF dialing keyboard.
Enable at the top right margin on the DTMF dialing keyboard for sending this content. The selected DTMF characters are displayed at the top left margin of the DTMF dialing keypad.
• Initiate server-based conferenceThe existing connections are extended to a conference (participant-controlled conference). You can add up to 48 participants to this conference.
A31003-G2570-U100-13-7619, 06/2015OpenScape Personal Edition V7, User Guide 149
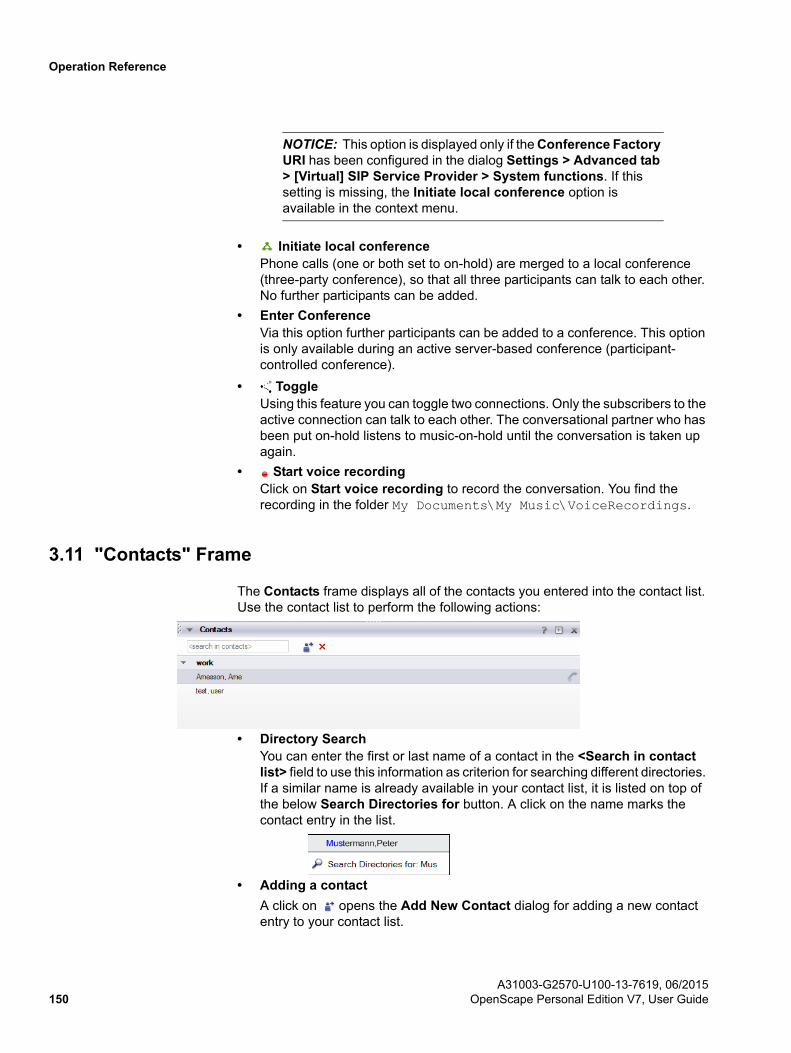
Operation Reference
NOTICE: This option is displayed only if the Conference Factory URI has been configured in the dialog Settings > Advanced tab > [Virtual] SIP Service Provider > System functions. If this setting is missing, the Initiate local conference option is available in the context menu.
• Initiate local conferencePhone calls (one or both set to on-hold) are merged to a local conference (three-party conference), so that all three participants can talk to each other. No further participants can be added.
• Enter ConferenceVia this option further participants can be added to a conference. This option is only available during an active server-based conference (participant-controlled conference).
• ToggleUsing this feature you can toggle two connections. Only the subscribers to the active connection can talk to each other. The conversational partner who has been put on-hold listens to music-on-hold until the conversation is taken up again.
• Start voice recordingClick on Start voice recording to record the conversation. You find the recording in the folder My Documents\My Music\VoiceRecordings.
3.11 "Contacts" Frame
The Contacts frame displays all of the contacts you entered into the contact list. Use the contact list to perform the following actions:
• Directory SearchYou can enter the first or last name of a contact in the <Search in contact list> field to use this information as criterion for searching different directories. If a similar name is already available in your contact list, it is listed on top of the below Search Directories for button. A click on the name marks the contact entry in the list.
• Adding a contact
A click on opens the Add New Contact dialog for adding a new contact entry to your contact list.
A31003-G2570-U100-13-7619, 06/2015150 OpenScape Personal Edition V7, User Guide

Operation Reference
• Removing contact/group
With a click on you can remove the name of a contact or group from your contact list.
• Call
Clicking on or (if several phone numbers are specified for a contact) you can initiate a call to the contact of your contact list. This outbound call is then displayed in the Call Control frame.
NOTICE: If several phone numbers are available for the contact
you wish to call, click on to select one of them.
3.11.1 Adding a new Contact
The contact list can contain names from several sources. You can add names from Microsoft Outlook. You can also copy contacts from an internal company directory. And you can create new contacts manually via the Add New Contact dialog.
NOTICE: You reach the Add New Contact dialog via the context
menu of the Contacts frame or with a click on in the Contacts frame.
The Add New Contact dialog lets you enter the following information for a new contact:
• Last NameLast Name of the new contact.
• First NameFirst Name of the new contact.
• <Contact information> combo boxSelect the contact information that you want to configure from the list. In the field to the right of the combo box you can make you entries for the following contact data:
– Phone Business
– Phone Business 2
– Phone Mobile
– Phone Private
A31003-G2570-U100-13-7619, 06/2015OpenScape Personal Edition V7, User Guide 151

Operation Reference
– Fax
– Video Phone 1In case of active [Virtual] SIP Service Provider module only
– E-mail Business
– E-mail Business 2
– Web Address
– SIP addressIn case of active SIP Service Provider module only
• Contact DetailsWith a click on the Contact Details button you open the Add Contact dialog. In this dialog you can enter further information for the new contact.
• AddA click on this button closes the Add New Contact dialog and integrates the new contact in the contact list.
• CancelA click on this button closes the Add New Contact dialog. The settings you have made will then not be saved.
3.11.2 Contact Details
In addition to standard contact data such as name, first name, phone number etc. you can specify more detailed information on a contact in the OpenScape Desktop Client. This information includes the address, job-related facts or a photo that you can add to the contact profile.
You complete the information about a new contact in the Add Contact dialog. Furthermore, you can edit the detailed contact data of an already existing contact in the Change Contact dialog. You reach both dialogs in the Contacts frame via the Add New Contact or Change Contact Information dialog as well as with a click on the Contact Details button.
NOTICE: You invoke the Add New Contact dialog in the context menu of the Contacts frame by selecting the Add Contact... option.
NOTICE: You invoke the Change Contact Information dialog in the context menu of the Contacts frame by selecting the Edit Contact... option.
A31003-G2570-U100-13-7619, 06/2015152 OpenScape Personal Edition V7, User Guide

Operation Reference
The following options are available for entering contact information:
• Last NameYou can enter here a maximum of 64 characters to specify a surname.
• First NameYou can enter here a maximum of 64 characters to specify a forename.
• AddressYou can enter here a maximum of 64 characters to specify an address.
• Zip code/CityIn the first field you can enter a maximum of 7 characters to specify the Zip code. In the second field you can enter a maximum of 40 characters to specify a town or city.
• CompanyYou can enter here a maximum of 64 characters to specify a company name.
• DepartmentYou can enter here a maximum of 64 characters to specify a department.
• Room numberYou can enter here a maximum of 32 characters to a room number.
• StateYou can enter here a maximum of 40 characters to specify a state or county.
• CountryYou can enter here a maximum of 40 characters to specify a country.
• Internet pageYou can enter here a maximum of 64 characters to specify a URL.
• Select ImageA click on this button opens a dialog in which you can select an image for the relevant contact. A click on Open closes the dialog and the selected image is integrated.
A31003-G2570-U100-13-7619, 06/2015OpenScape Personal Edition V7, User Guide 153

Operation Reference
• Delete ImageA click on this button deletes the image assigned to the selected or new contact.
The Add Contact or Change Contact includes four tabs in the bottom section.
• Web AddressDisplays the contact’s web address.
NOTICE: The Web Address tab is available in case of the active Web Access Manager module only.
• E-mailDisplays all e-mail addresses defined for this contact.
• Call numberDisplays all phone numbers entered for this contact.
• SIP addressDisplays the contact’s SIP address.
NOTICE: This tab is only displayed if you have selected the [Virtual] SIP Service Provider as default provider.
Each of the four tabs provides the following functions:
A31003-G2570-U100-13-7619, 06/2015154 OpenScape Personal Edition V7, User Guide

Operation Reference
• Add...A click on this button opens an input dialog. In this dialog's Description field you enter a short description of the associated information (web address, e-mail, phone number or SIP address). If you specify several information items of the same type, a description helps to distinguish them. The type of information that you can add depends on the respectively active tab.
• Change...A click on this button opens a dialog in which you can edit the web address, e-mail, call number or SIP address already available for the contact.
• DeleteWith a click on this button you remove a selected web address, e-mail, call number or SIP address for the relevant contact. Before you can actually delete the selected item, a message appears that you need to confirm with OK, upon which the relevant information is deleted then.
• OKA click on this button closes the Add Contact or Change Contact dialog. Your entries or modifications are saved.
• CancelA click on this button closes the Add Contact or Change Contact dialog. Your entries or modifications are not saved.
3.11.3 Context Menus of the "Contacts" Frame
The Contacts frame provides the following context menus.
3.11.3.1 Context Menu of a Contact
Rightclick a contact's name to display the following context menu.
• Add Contact...Click on Add Contact... to open the Add New Contact window.
• Create Group...Click on Create Group... to open the Create Group window for assigning a group name to a contact.
• Edit Contact...Click on Edit Contact... to open the Change Contact Information window to modify the information of an existing contact.
A31003-G2570-U100-13-7619, 06/2015OpenScape Personal Edition V7, User Guide 155

Operation Reference
NOTICE: The menu options Add Contact... and Edit Contact... open two dialogs that provide the same setting options.
• Synchronize Contact...This feature requires an OpenScape UC Application server and has therefore no functionality.
• Add Contacts to Group...Select one or several contacts and click on Add Contacts to Group... to open the Add Contacts window and to add the contact(s) to one of the listed groups.
• Move Contacts to group...Select one or several contacts and click on Move Contacts to group... to open the All Groups window and to assign the contact(s) to another group.
• Default Name OrderYou can use the Default Name Order option to define in which sequence the first and last name of your contacts are displayed: <last name, first name> or <first name, last name>.
• Sort ContactsYou can use the Sort Contacts option to determine whether the list of your contacts should be sorted alphabetically Ascending (A - Z) or alphabetically Descending (Z - A).
• DeleteClick Delete to remove the name of the selected contact from your list of contacts.
3.11.3.2 Context Menu of a Group
Right-click the name of a group to display a menu from which you can select the following settings:
• Add Contact...Click on Add Contact... to open the Add New Contact dialog and to add a new contact to the selected group.
A31003-G2570-U100-13-7619, 06/2015156 OpenScape Personal Edition V7, User Guide
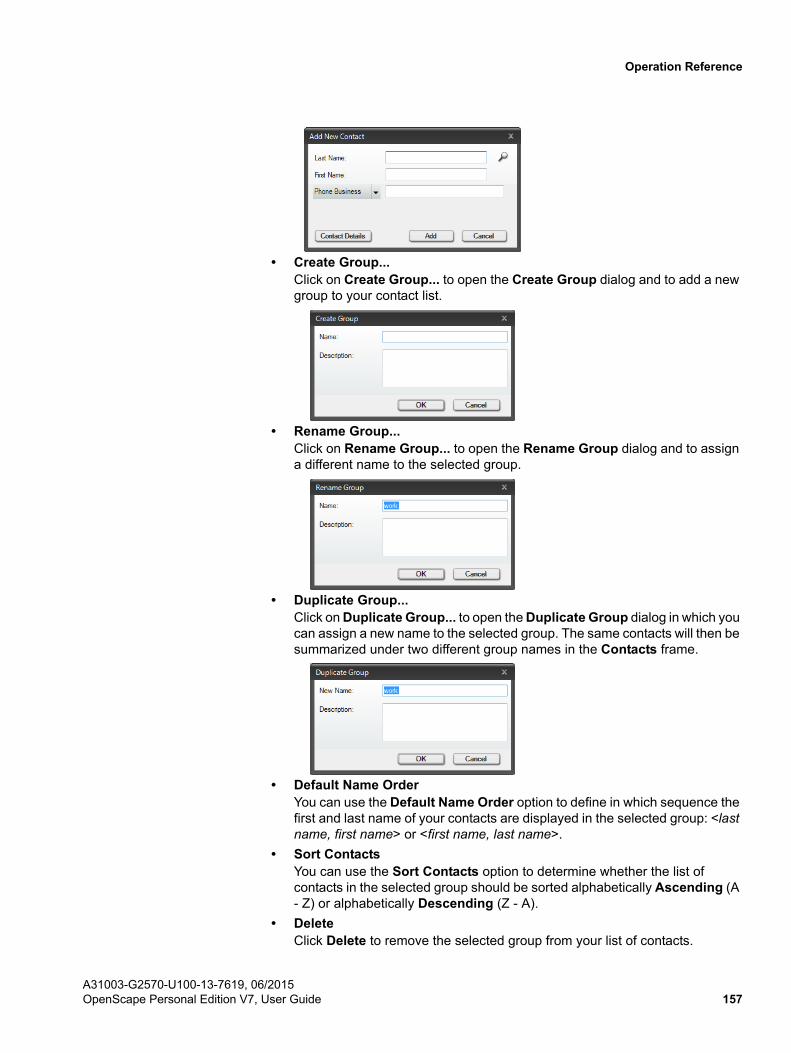
Operation Reference
• Create Group...Click on Create Group... to open the Create Group dialog and to add a new group to your contact list.
• Rename Group...Click on Rename Group... to open the Rename Group dialog and to assign a different name to the selected group.
• Duplicate Group...Click on Duplicate Group... to open the Duplicate Group dialog in which you can assign a new name to the selected group. The same contacts will then be summarized under two different group names in the Contacts frame.
• Default Name OrderYou can use the Default Name Order option to define in which sequence the first and last name of your contacts are displayed in the selected group: <last name, first name> or <first name, last name>.
• Sort ContactsYou can use the Sort Contacts option to determine whether the list of contacts in the selected group should be sorted alphabetically Ascending (A - Z) or alphabetically Descending (Z - A).
• DeleteClick Delete to remove the selected group from your list of contacts.
A31003-G2570-U100-13-7619, 06/2015OpenScape Personal Edition V7, User Guide 157

Operation Reference
3.12 Directory Search
In the Directory Search frame you can access your company directory and your private contacts.
It is not displayed in the OpenScape Desktop Client main view by default. Go to Pearl menu > View and select the Directory Search option. The separate Directory Search window is displayed.
To integrate this window as frame in the main view, click on the area and drag the frame to the desired position in the main view.
The following features are available in this window or frame:
<search address books>
In this field you enter the name to be searched for in the configured directories.
Please heed the following when making your entry:
• The “blank” character is the default field separator.
• The order of given name and surname is not important.
• Names that include an affix are handled like given name and surname. This may lead to No Search Results.
<number of directories>
Select in this combo box the directories to be searched for the desired contact.
• All DirectoriesIf this check box is set, OpenScape Desktop Client will search all configured directories for the desired contact.
• Microsoft Outlook directoryIf this checkbox is set, OpenScape Desktop Client will search your Microsoft Outlook contact list for the desired contact.
• <corporate directory>If this check box is set, OpenScape Desktop Client will search the configured directory of your company for the desired contact.
Execute the search
A click on this icon starts the search for the desired contact in the configured direc-tories. The search results are listed in the Directory Search window or frame.
Add to contact list
A click on this icon integrates a selected contact in the OpenScape contact list.
A31003-G2570-U100-13-7619, 06/2015158 OpenScape Personal Edition V7, User Guide

Operation Reference
If a contact with the same first and second name exists already in your contact list, the Similar contact detected dialog is displayed.
In this dialog you can perform the following settings:
• Add the contact anywayAdds the new contact under the same name to the contact list.
• Update new information from this contact to the existing one:Select this option if you want to update the contact information of one of the contacts in your OpenScape contact list.
• Remember decision for other contactsIf this check box is active, the Similar contact detected dialog is no more displayed in case of repeated similarity of contact data. Depending on the active option, the new contact is directly integrated in the OpenScape contact list or the data of a contact already available in your OpenScape contact list is automatically updated.
3.13 "Journal" Frame
In the Journal frame OpenScape Desktop Client logs all in- and outgoing calls locally on the computer as long as the OpenScape Desktop Client is started. Furthermore, you can initiate connections to logged communication partners from the Journal.
The Journal frame remains empty until you make at least one call or receive a call.
NOTICE: Please note that no calls are logged in the Journal if OpenScape Desktop Client is not started. Incoming calls that
A31003-G2570-U100-13-7619, 06/2015OpenScape Personal Edition V7, User Guide 159

Operation Reference
were missed while OpenScape Desktop Client was down are not displayed in the Journal after the application's start.
3.13.1 Journal Controls
The following controls are available in the Journal frame for operating the journal:
• <search in journal list>Enter a contact name, a contact number or a conference description in the <search in journal list> input field to search for a corresponding journal entry. The journal entries that correspond to the entered search mask are automatically listed in Journal frame by the OpenScape Desktop Client. If the name or phone number searched for have not been found, the Journal frame does not show any entries.
• Call a contact
Select a call entry in the journal and click on to set up the connection.
• Delete journal entry
Select a call entry in the journal and click on to remove the entry from the journal.
• Play voicerecordingIf you have selected a journal entry for which a voice recording is available, you can click on to play the recording. The icon in the row of the relevant journal entry indicates whether a voice recording is available.
• Delete voicerecordingIf you have selected a journal entry for which a voice recording is available, you can click on to delete the voice recording.
In the Journal frame you can select the scheme for representing the journal infor-mation.
• Change to period view
Click on to activate the period view. In this view, the entries in the Journal frame are grouped in periods.The number of entries for the following periods are displayed in the Direction column:
– Today (number of entries)
– This week (number of entries)
– Last week (number of entries)
– Two weeks ago (number of entries)
– Three weeks ago (number of entries)
– More than three weeks ago (number of entries)The rest of the connection data in this representation are the same as in the normal view.
• Switch to normal view
Click on to deactivate the period view and return to the normal view.
A31003-G2570-U100-13-7619, 06/2015160 OpenScape Personal Edition V7, User Guide

Operation Reference
When the period view is deactivated, a contact name is associated with each call in the combined view for both the activated and deactivated states. In this representation the following call data is displayed:
– Direction The call direction is displayed as icon.Click the icon preceding the Direction label to sort the list of journal entries Ascending or Descending .
– TimeThe time at which the call was made or received.Click the icon preceding the Time label to sort the list of journal entries Ascending or Descending according to the respective times.
– NameName or number of the contact or conference.Click the icon preceding the Name label to sort the list of journal entries Ascending or Descending in alphabetic order.
– NumberDisplays the called or calling phone number.Click the icon preceding the Number label to sort the list of journal entries Ascending or Descending in numerical order.
– Connection TimeDisplays the call duration.Click the icon preceding the Connection Time label to sort the list of journal entries Ascending or Descending according to the connection time.
– NoteA note added to a call via the Edit note context menu option.Click the icon preceding the Note label to sort the list of journal entries Ascending or Descending according to notes.
• Combined view
Click on to activate the combined view.
A31003-G2570-U100-13-7619, 06/2015OpenScape Personal Edition V7, User Guide 161

Operation Reference
NOTICE: This view can be combined with one of the two other views - normal or period view.
In this representation the following call data is displayed:
– DirectionDepending on the other view that is active at the same time, this column is the same as the column of the period or normal view.The call direction is displayed as icon.Click the icon preceding the Direction label to sort the list of journal entries Ascending or Descending .
– TimeThe time at which the call was made or received.Click the icon preceding the Time label to sort the list of journal entries Ascending or Descending according to the respective times.
– NameName or number of the contact or conference.Click the icon preceding the Name label to sort the list of journal entries Ascending or Descending in alphabetic order.
– Connection TimeDisplays the call duration.Click the icon preceding the Connection Time label to sort the list of journal entries Ascending or Descending according to the connection time.
– NoteA note added to a call via the Edit note context menu option.Click the icon preceding the Note label to sort the list of journal entries Ascending or Descending according to notes.
• Click to return to the normal or period view.
• Options for filtering journal entries
Select in the drop-down menu next to the combined view icon an option that determines how information is filtered in your journal. The selection list contains the following options:
Icon Definition Description
All All entries are displayed in alphabetic order according to the contact names.
Incoming / outgoing – connected
All active calls are displayed.
Incoming – connected All active incoming calls are displayed.
A31003-G2570-U100-13-7619, 06/2015162 OpenScape Personal Edition V7, User Guide

Operation Reference
3.13.2 Context Menu of the "Journal" Frame
When you rightclick an entry in the Journal frame, a context menu appears that may look as follows:
In the following we describe all options provided in this context menu:
• CallClick on Call to call the contact.
• DeleteClick on Delete to remove the journal entry.
• Edit NoteClick on Edit Note to open the Edit a Note dialog.
In this dialog you can add a note to the selected connection in the journal.
• Delete NoteClick on Delete Note to remove a call note from the journal. If no note is available for the entry, this option is inactive.
• Copy NumberWhen you click on Copy Number, the phone number of the entry is pasted to the clipboard and can be inserted in other applications.
Incoming – not reached All unaccepted incoming calls are displayed.
Outgoing – connected All active outgoing calls are displayed.
Outgoing – not reached All unaccepted outgoing calls are displayed.
Icon Definition Description
A31003-G2570-U100-13-7619, 06/2015OpenScape Personal Edition V7, User Guide 163
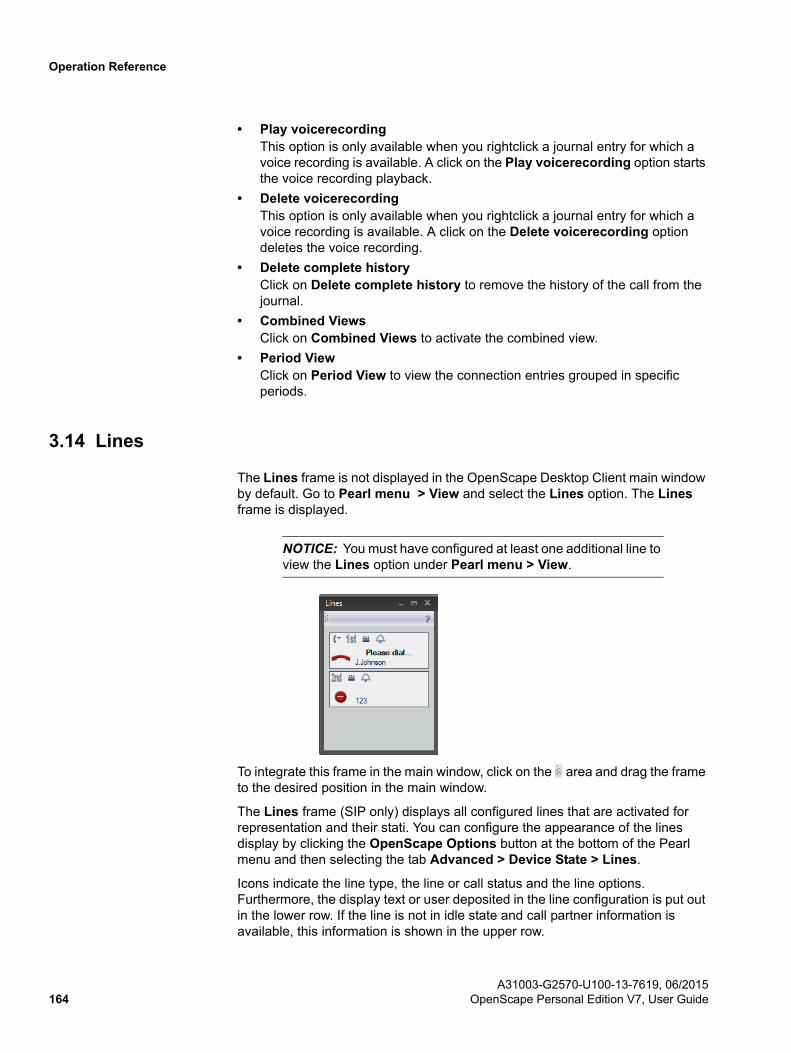
Operation Reference
• Play voicerecordingThis option is only available when you rightclick a journal entry for which a voice recording is available. A click on the Play voicerecording option starts the voice recording playback.
• Delete voicerecordingThis option is only available when you rightclick a journal entry for which a voice recording is available. A click on the Delete voicerecording option deletes the voice recording.
• Delete complete historyClick on Delete complete history to remove the history of the call from the journal.
• Combined ViewsClick on Combined Views to activate the combined view.
• Period ViewClick on Period View to view the connection entries grouped in specific periods.
3.14 Lines
The Lines frame is not displayed in the OpenScape Desktop Client main window by default. Go to Pearl menu > View and select the Lines option. The Lines frame is displayed.
NOTICE: You must have configured at least one additional line to view the Lines option under Pearl menu > View.
To integrate this frame in the main window, click on the area and drag the frame to the desired position in the main window.
The Lines frame (SIP only) displays all configured lines that are activated for representation and their stati. You can configure the appearance of the lines display by clicking the OpenScape Options button at the bottom of the Pearl menu and then selecting the tab Advanced > Device State > Lines.
Icons indicate the line type, the line or call status and the line options. Furthermore, the display text or user deposited in the line configuration is put out in the lower row. If the line is not in idle state and call partner information is available, this information is shown in the upper row.
A31003-G2570-U100-13-7619, 06/2015164 OpenScape Personal Edition V7, User Guide

Operation Reference
3.14.1 Icon Displays in the Line Window
The following status displays are shown per line:
Icon Meaning
Line type
Corresponds to the primary line (own line).
Corresponds to the secondary line (foreign line).
Line options
Line is the default line for incoming calls.
Line is the default line for outgoing calls.
Line is a private line.
Line is a commonly used line.
Line rings in case of incoming connection requests.
Line does not ring in case of incoming connection requests.
Line rings delayed in case of incoming connection requests.
Line/call status
Ringer cutoff (no call)
Ringer cutoff (diverted)
Line is used for an outgoing connection request, corresponds to status start / accomplish dialing.
Line is used for an outgoing connection request, destination rings.
Line is used, destination is busy.
Line is used, status connected.
Incoming connection request on preferred line.
A31003-G2570-U100-13-7619, 06/2015OpenScape Personal Edition V7, User Guide 165

Operation Reference
3.14.2 Working with Lines
Initiating a call
The following options are available for calling a contact via a specific line:
• You doubleclick the desired line and dial the call partner in the integrated or free phone. The connection is set up, using this line.
• Using the drag & drop method you drag a contact from the contact directory to the desired line. The connection is set up, using this line.
• Click on in the main bar. The preferred line will automatically be used for the following connection request.
Accepting a call
The following options are available to accept a call on a specific line:
• You can accept incoming connections requests with a doubleclick on the line on which they arrive. You conduct the call via this line then.
• If you click on in the main bar, the preferred line is automatically used to answer inbound connection requests (for incoming calls).
Parking a call
The following options are available for parking a call:
• You park an active call on a line by doubleclicking the line status icon.
• Another doubleclick on the line status icon will reactivate parked or privately held calls.
3.14.3 Context Menu of a Line
Right-click the line you want to edit in the Lines frame. A context menu opens.
Incoming connection request on non-preferred lines.
Line is used by third party (currently not operable).
Call is publicly held on the line and can be accepted (similar to park-ing).
Connection is held (in case of a consultation on one / the same line).
Icon Meaning
A31003-G2570-U100-13-7619, 06/2015166 OpenScape Personal Edition V7, User Guide
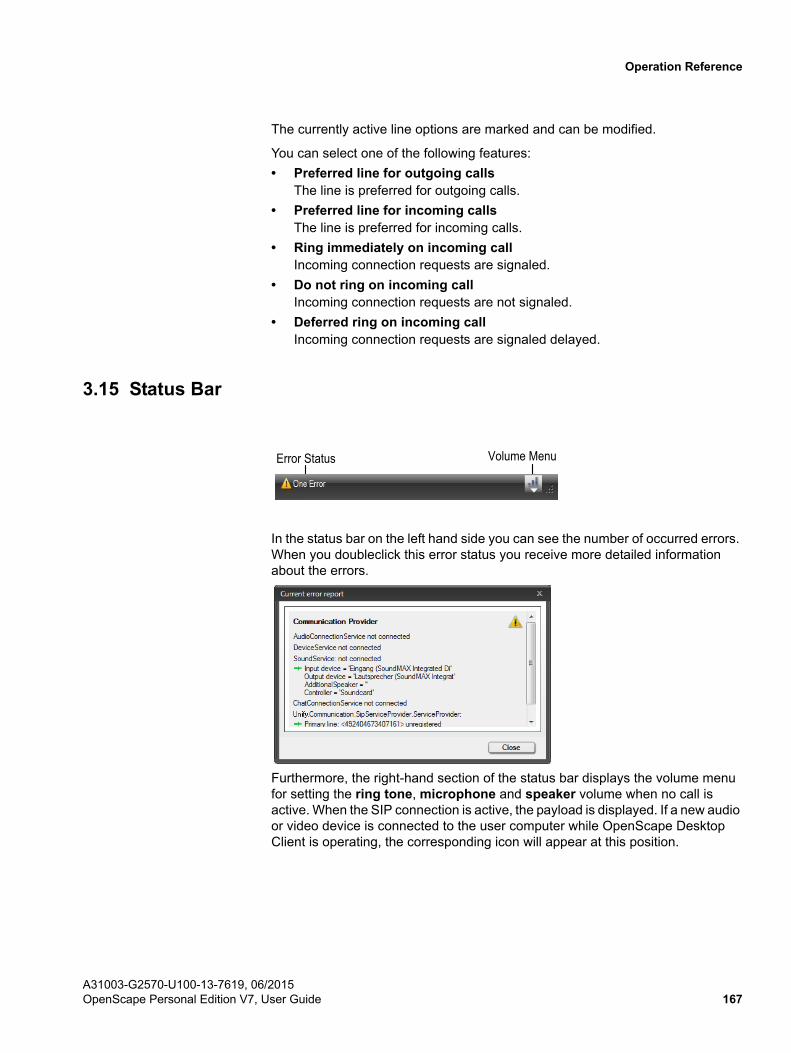
Operation Reference
The currently active line options are marked and can be modified.
You can select one of the following features:
• Preferred line for outgoing callsThe line is preferred for outgoing calls.
• Preferred line for incoming callsThe line is preferred for incoming calls.
• Ring immediately on incoming callIncoming connection requests are signaled.
• Do not ring on incoming callIncoming connection requests are not signaled.
• Deferred ring on incoming callIncoming connection requests are signaled delayed.
3.15 Status Bar
In the status bar on the left hand side you can see the number of occurred errors. When you doubleclick this error status you receive more detailed information about the errors.
Furthermore, the right-hand section of the status bar displays the volume menu for setting the ring tone, microphone and speaker volume when no call is active. When the SIP connection is active, the payload is displayed. If a new audio or video device is connected to the user computer while OpenScape Desktop Client is operating, the corresponding icon will appear at this position.
Error Status Volume Menu
A31003-G2570-U100-13-7619, 06/2015OpenScape Personal Edition V7, User Guide 167

Operation Reference
3.16 Free Phone
The OpenScape Desktop Client has a telephone that can be freely positioned on the desktop and used as dial aid. With this telephone you can make calls, accept incoming calls etc.
To display the Phone window on the desktop, select Pearl menu > View > Free phone.
NOTICE: The free phone is only available (selectable in the Pearl menu > View) when the Telephone module is active.
The OpenScape Desktop Client free phone offers the following controls:
• DisplayThe two-line display shows time, date and your own phone number. During an active call you can use dialog keys to browse different functions or select them.
• Telephone keypadOn the telephone keypad you find digit keys from [0] to [9] (with the corre-sponding assignment to letters) as well as the keys [*] and [#]. Depending on the input mode you can enter normal and special characters by pushing keys. Push the appropriate key as often as it takes to show the desired character in the display.
• Dialog keysYou use the three dialog keys for browsing (back and forth) and to confirm functions.
Display
TelephoneKeypad
Dialog Keys
A31003-G2570-U100-13-7619, 06/2015168 OpenScape Personal Edition V7, User Guide

Operation Reference
3.17 Integrated Phone
The OpenScape Desktop Client has an integrated phone that can be used as a dialing aid. The integrated phone is docked to the main bar. After a mouse click on the telephone icon in the main toolbar, a keypad appears under the telephone icon. Via this telephone you can make calls, accept incoming ones etc.
The integrated phone of OpenScape Desktop Client offers the same controls as in the free phone.
3.18 SoftPhone
To display the SoftPhone window on the desktop, select in the Pearl menu > View > SoftPhone.
NOTICE: Opening the softphone via Pearl menu > View is only possible with the active SoftPhone module.
The SoftPhone serves as dial aid that you can freely position on the desktop. To integrate the softphone in the main window or to remove it from there, click on the
depicted area at the left margin under the window caption bar with the mouse-button kept pressed.
A31003-G2570-U100-13-7619, 06/2015OpenScape Personal Edition V7, User Guide 169
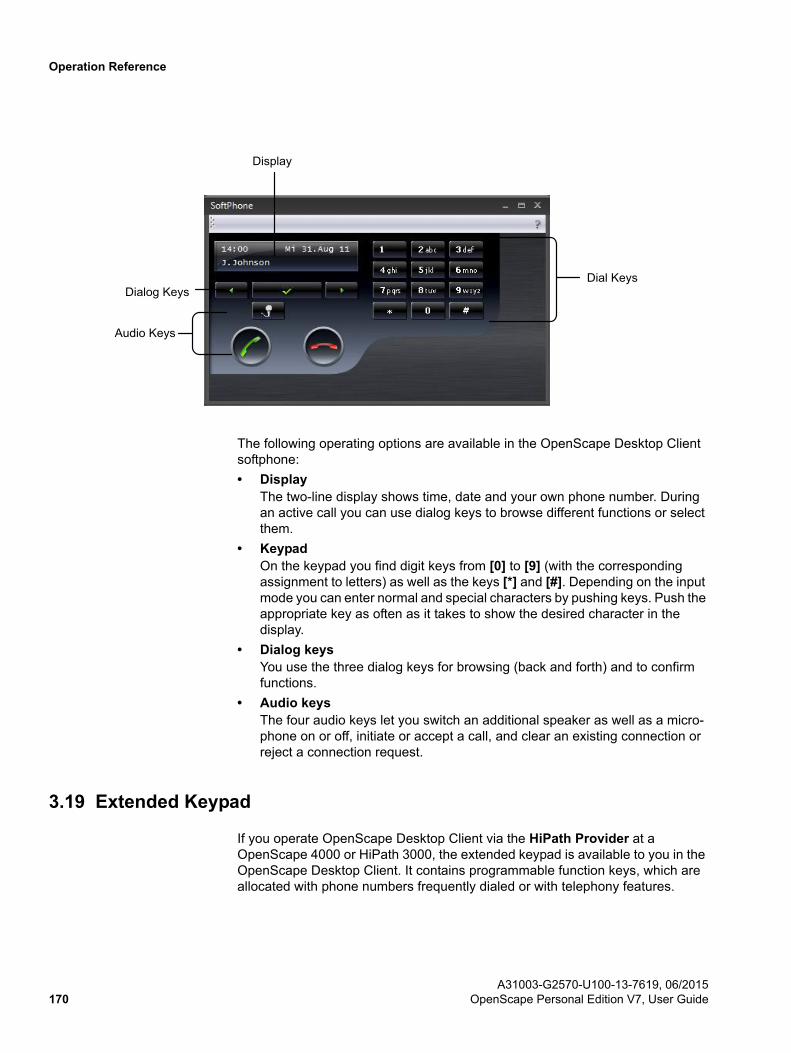
Operation Reference
The following operating options are available in the OpenScape Desktop Client softphone:
• DisplayThe two-line display shows time, date and your own phone number. During an active call you can use dialog keys to browse different functions or select them.
• KeypadOn the keypad you find digit keys from [0] to [9] (with the corresponding assignment to letters) as well as the keys [*] and [#]. Depending on the input mode you can enter normal and special characters by pushing keys. Push the appropriate key as often as it takes to show the desired character in the display.
• Dialog keysYou use the three dialog keys for browsing (back and forth) and to confirm functions.
• Audio keysThe four audio keys let you switch an additional speaker as well as a micro-phone on or off, initiate or accept a call, and clear an existing connection or reject a connection request.
3.19 Extended Keypad
If you operate OpenScape Desktop Client via the HiPath Provider at a OpenScape 4000 or HiPath 3000, the extended keypad is available to you in the OpenScape Desktop Client. It contains programmable function keys, which are allocated with phone numbers frequently dialed or with telephony features.
Display
Dial KeysDialog Keys
Audio Keys
A31003-G2570-U100-13-7619, 06/2015170 OpenScape Personal Edition V7, User Guide

Operation Reference
You open the extended keypad via the Pearl menu > View > Extended Keypad.
The keypad can contain up to four key columns. The number of key columns, the number of function keys per column as well as the allocation of the function keys depends on the selected device or key module type in the HiPath Provider configuration.
If the extended keypad comprises several columns, you can unfold or hide them at will. For this purpose, use the triangle icons at the top margin of the respective column as exemplified in the next figure.
After the OpenScape Desktop Client setup, some keys may already be allocated with default functions of the HiPath 3000/4000 used.
The telephone or key module type configured in the HiPath Provider determines whether Electronc Key Labeling (EKL) is available. If EKL is available, all keys that are or will be programmed with a function are automatically labelled with the function text specified in the HiPath system for this purpose. In this case you cannot individually label the function keys configured in OpenScape Desktop Client anymore.
If you have a telephone or key module type without EKL selected for OpenScape Desktop Client, you can use the context menu of the extended keypad to allocate keys with functions individually and label them manually.
A31003-G2570-U100-13-7619, 06/2015OpenScape Personal Edition V7, User Guide 171

Operation Reference
3.19.1 Context Menu of the Extended Keypad
You can use the context menu of the extended keypad to allocate keys with functions individually and to label such keys.
NOTICE: If a telephone or key module type with EKL has been configured for the OpenScape Desktop Client telephone, you cannot allocate the keys of the extended keypad with functions individually and label them.
The following options are available for allocating and labelling the keys:
• Change Caption...Opens a dialog in which you can define a caption of the selected key.
• Accept caption from displayAllows copying a key caption from the current display of the OpenScape Desktop Client telephone. Two options are available:
– Accept caption from displayCopies the phone number currently shown in the telephone display as key caption.
– Shift key + Accept caption from displayCopies the name currently shown in the telephone display as key caption.
3.20 Webbrowser
NOTICE: Using the web browser features requires the Webbrowser module to be active.
You can use the OpenScape Desktop Client webbrowser like any other standard browser to open configured internet pages and deploy navigation features. The web browser thus enables fast access to internet pages frequently visited.
Opening the webbrowser
To open the window that displays the webbrowser, select Pearl menu > View > Webbrowser. In the submenu then available select a previously configured internet page.
The caption bar of the opened window features the internet page's name that was defined during the configuration of the internet addresses.
A31003-G2570-U100-13-7619, 06/2015172 OpenScape Personal Edition V7, User Guide

Operation Reference
Four icons in the top left corner of the window assist you in working with the webbrowser:
• Page backMakes the browser return to the previous page.
• Page forwardMakes the browser move forward to the next page.
• CancelStops the current internet page loading.
• UpdateReloads the currently displayed internet page.
3.21 Notifier Toast
An incoming call displays a notifier toast in the bottom right area of the desktop on the first ring and for as long as the call continues to ring. You can accept the
call ( ), reject it ( ) or forward it to another phone number ( ).
If the caller's phone number was found in the configured directories (private contact list, LDAP directory, Microsoft Outlook directory or Lotus Sametime
A31003-G2570-U100-13-7619, 06/2015OpenScape Personal Edition V7, User Guide 173

Operation Reference
contact list), the notifier toast displays the contact's name and phone number. Otherwise, it contains the information "Unknown".
The notifier toast will stick and stay when you hover the cursor over it.
Notifier Toast for Call Pickup Group
NOTICE: To use the Enable the Group pickup call toaster feature you need to perform specific settings in the modules Notifier Toast (Desktop Alerts) and [Virtual] SIP Service Provider > Codes.
A desktop notification for a call pickup group is displayed whenever a group member receives a call. The notification persists until the call is accepted or the caller hangs up. The names of the caller and of the callee are displayed if they were found in the configured directories. Otherwise, the names are represented as "Unknown".
You can accept the pickup group call with a click on .
3.22 Screensaver
The OpenScape Desktop Client offers a screensaver feature that you can configure as default screensaver for the user computer. In this state you can dial a configured speed-dial number as well as accept and terminate an incoming call for yourself or a member of your call pickup group without having to close the active screensaver.
NOTICE: You can start the screensaver on the user computer only if the OpenScape Desktop Client has been started also.
Depending on the connection status of OpenScape Desktop Client, the screen-saver displays the following controls:
• <Speed-dial number> DialIf speed-dial numbers have been configured for the screensaver, you can click on Dial to open a menu for selecting the phone number to be dialed.
NOTICE: OpenScape Desktop Client must have been started so that a connection to the speed-dial number can be established.
• Accept callWhen a call arrives and the screensaver is active, the Accept call button appears. With this button you can directly accept the call without deactivating the screensaver.
• Disconnect callTerminates a call conducted while the screensaver is active.
A31003-G2570-U100-13-7619, 06/2015174 OpenScape Personal Edition V7, User Guide

Operation Reference
• Close ScreensaverDeactivates the screensaver.
• OpenScape Desktop Client is up or OpenScape Desktop Client is not upThis display indicates the OpenScape Desktop Client status. If the OpenScape Desktop Client is inactive, you cannot accept incoming calls or establish a connection with the speed-dial number.
3.23 Operating OpenScape Desktop Client with the Computer Keyboard
The following information refers to operating the OpenScape Desktop Client with the computer keyboard:
In the OpenScape Desktop Client you can frequently directly dial with digit keys by selecting the relevant input field with a mouseclick and entering the number.
NOTICE: In the Web browser window you cannot directly dial with the keypad.
3.23.1 Operating with Hotkeys
You can use the OpenScape Desktop Client without the mouse via hotkeys.
• Push the Alt key to display the hotkeys options. The options appear as letters and numbers over each function.
Action Key/hotkey
System-wide keys (independent from the cursor/mousepointer position)
Accept incoming call Key configurable
End active call (hangup) Key configurable
Divert call (the current marking is used as forwarding destina-tion).
Key configurable
Mousepointer in the OpenScape Desktop Client telephone or on the main bar
Search features [left arrow key] or [right arrow key]
Confirm feature Return key
Return to idle state in the system menu [Esc] (this key corre-
sponds to the icon in the main bar.)
Dial directly from the clipboard; the conversion of the charac-ters to be dialed is determined by the network access. The office code is not added.
Shift key + [Ins]
Dial directly from the clipboard; the conversion of the charac-ters to be dialed is determined by the network access. In this case the office code is added.
[Ctrl] + [V]
A31003-G2570-U100-13-7619, 06/2015OpenScape Personal Edition V7, User Guide 175

Operation Reference
• Push the letter or number that corresponds with the function you want to use. Some of the functions are triggered immediately. Other functions display additional hotkey options (letters and numbers) that can be pushed.
• Push the Esc key at any time to return to the respective previous hotkey level. You can continue pushing the [Esc] key until the display of hot-key options does no longer appear.
• Push the Alt key a second time to hide the hotkey options.
3.24 Audio Control Operating Elements
When you integrate an audio scheme in OpenScape Desktop Client, various audio icons are displayed in the main bar depending on the hardware and user settings. Using these audio icons you can quickly and effectively activate the corresponding features:
Icon Function / Meaning
Lift receiver
(handset or another provided audio device)
• In case of an active connection request, for example an incoming call:accept call and set up connection.
• In idle state:activate handset or another provided audio device.
Hanging up
(handset or another provided audio device)
• In case of an established connection:close connection.
• In the system menu:finish scrolling, return to idle state.
Microphone on/off
• In case of an established connection:activate or deactivate audio device muting.
Loudspeaker on / off
• In case of an established connection or in idle state:activate or deactivate speaker.
A31003-G2570-U100-13-7619, 06/2015176 OpenScape Personal Edition V7, User Guide

Operation Reference
NOTICE: The headset icon and the headset volume control are only available if you use a terminal device with appropriate signaling and this audio device was configured in the active audio scheme.
3.25 OpenScape Icon and Context Menu in the Notification Area of the Windows Task Bar
When the OpenScape Desktop Client is started, the OpenScape icon is displayed in the notification area of the Windows task bar by default. In the Settings dialog > Advanced tab > General > Task Bar and Notification Area you can activate/deactivate displaying this icon. The OpenScape icon displays
status messages about missed calls and signals error messages and
warnings .
NOTICE: You can open the current error report via the <number of errors/warnings> button in the status bar of the main window.
Double-clicking the OpenScape icon displays the main window again after it has been minimized or not the currently active window.
Headset on / off
• In case of an established connection or in idle state:activate or deactivate headset operation.
"Volume" menu
Open the "Volume" menu with a click on the "Volume" button to set the volume of microphone, ring tone, speaker and additional speaker (if configured) independently from your respective call state in OpenScape Desktop Client. Here you can adjust the volume of the relevant audio device.
Depending on the operating system these icons are not visi-ble because you can perform such settings only via the oper-ating system settings.
Additional speaker on / off
If your computer has an operable additional speaker and this speaker is configured in the settings for the current audio scheme, you can activate or deactivate it with a click on the "additional speaker" icon.
Icon Function / Meaning
A31003-G2570-U100-13-7619, 06/2015OpenScape Personal Edition V7, User Guide 177
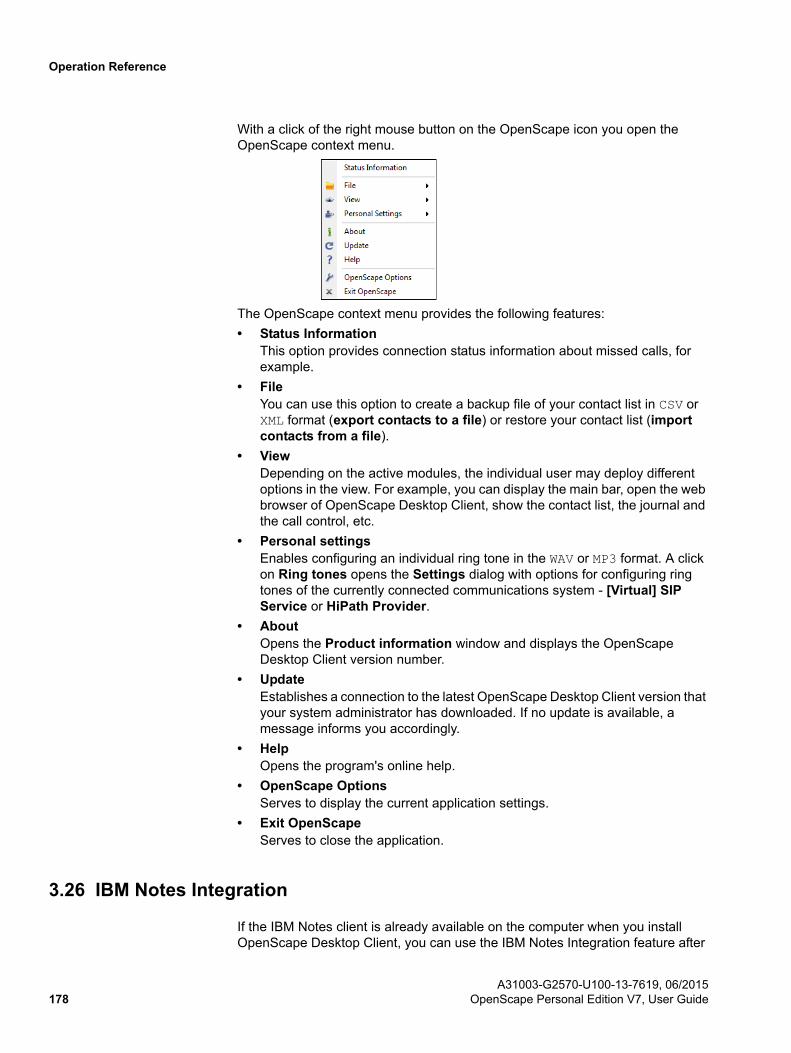
Operation Reference
With a click of the right mouse button on the OpenScape icon you open the OpenScape context menu.
The OpenScape context menu provides the following features:
• Status InformationThis option provides connection status information about missed calls, for example.
• FileYou can use this option to create a backup file of your contact list in CSV or XML format (export contacts to a file) or restore your contact list (import contacts from a file).
• ViewDepending on the active modules, the individual user may deploy different options in the view. For example, you can display the main bar, open the web browser of OpenScape Desktop Client, show the contact list, the journal and the call control, etc.
• Personal settingsEnables configuring an individual ring tone in the WAV or MP3 format. A click on Ring tones opens the Settings dialog with options for configuring ring tones of the currently connected communications system - [Virtual] SIP Service or HiPath Provider.
• AboutOpens the Product information window and displays the OpenScape Desktop Client version number.
• UpdateEstablishes a connection to the latest OpenScape Desktop Client version that your system administrator has downloaded. If no update is available, a message informs you accordingly.
• HelpOpens the program's online help.
• OpenScape OptionsServes to display the current application settings.
• Exit OpenScapeServes to close the application.
3.26 IBM Notes Integration
If the IBM Notes client is already available on the computer when you install OpenScape Desktop Client, you can use the IBM Notes Integration feature after
A31003-G2570-U100-13-7619, 06/2015178 OpenScape Personal Edition V7, User Guide

Operation Reference
the setup. It extends the IBM Notes client by the features of the OpenScape Personal Edition. This enables IBM Notes users to deploy features of the OpenScape Personal Edition in their familiar IBM Notes environment.
NOTICE: To use the IBM Notes Integration you must add the Lotus Notes Provider module to the OpenScape Desktop Client configuration. A guide to adding or removing modules is given in the setup manual of OpenScape Personal Edition.
NOTICE: To use the IBM Notes Integration, a IBM Notes client must have been installed and started on the user computer.
The IBM Notes Integration provides the following features:
• Searching IBM Notes address books for contactsIf you have IBM Notes address books configured in the Lotus Notes Provider you can search them for contacts. This search option is available in the Directory Search scope.
• Initiating calls in the IBM Notes clientYou can initiate a call from your private or global IBM Notes address book.In this process, all phone number information contained in the IBM Notes address book for the selected contact is transferred to OpenScape Desktop Client. If several phone numbers are available, you need to select one of them for setting up a connection.To initiate a call in the IBM Notes client, select the desired IBM Notes contact in the IBM Notes address book. Then click on Dial in the toolbar of the IBM Notes client.
NOTICE: The Dial button in the toolbar of the IBM Notes client is always displayed. However, it only works in IBM Notes databases configured in the IBM Notes Provider.
As soon as you have initiated the call, the main window of OpenScape Desktop Client appears in the foreground. In there you can control the connection in the Call Control frame as usual.
• Resolving phone numbers and names The IBM Notes Integration enables resolving phone numbers and names on the basis of IBM Notes address books. Phone numbers and names are resolved in the background. Private as well as global IBM Notes address books are supported.
3.27 Microsoft Outlook Integration
If the Microsoft Outlook client is already available on the computer when you install OpenScape Desktop Client, you can use the Microsoft Outlook Integration feature after the setup. It extends the Microsoft Outlook client by the features of the OpenScape Personal Edition. This enables Microsoft Outlook users to deploy
A31003-G2570-U100-13-7619, 06/2015OpenScape Personal Edition V7, User Guide 179

Operation Reference
features of the OpenScape Personal Edition in their familiar Microsoft Outlook environment.
NOTICE: To use the Microsoft Outlook Integration you need to add the SQLite Provider module to the OpenScape Desktop Client configuration. How to add or remove modules is outlined in the setup manual of the OpenScape Personal Edition.
NOTICE: To use the Microsoft Outlook Integration, a Microsoft Outlook client must have been installed and started on the user computer.
The Microsoft Outlook Integration enables the following features:
• Finding contact information in Microsoft Outlook contact directoriesThe SQLite Provider is used for accessing the information of Microsoft Outlook contact directories. The corresponding module is installed with the Microsoft Outlook Integration. In this process, it is automatically pre-configured for accessing the information of Microsoft Outlook contact direc-tories. This search option is available in the Directory Search scope.
• Initiating calls in the Microsoft Outlook clientFor this feature, the toolbar provides different Microsoft Outlook windows and the Dial button. You can initiate a call from the following Microsoft Outlook windows:
– Your Microsoft Outlook contact list or the window of an opened Microsoft Outlook contactIf you have selected a contact entry in your Microsoft Outlook contact list and click the Dial button, Microsoft Outlook evaluates the current object (name, phone number, e-mail address etc.) and determines the associated phone number based on the Microsoft Outlook contacts. The phone number is transferred to the OpenScape Desktop Client that uses it as destination number and sets up a connection.If several phone numbers are available for the current Microsoft Outlook contact, for example business phone, private and mobile phone, the following dialog in which you must select one of them opens.
A31003-G2570-U100-13-7619, 06/2015180 OpenScape Personal Edition V7, User Guide

Operation Reference
NOTICE: OpenScape Desktop Client refreshes your Microsoft Outlook contacts only with every program start. If you have added a new contact in Microsoft Outlook or changed contact data, you must restart the OpenScape Desktop Client. Only then your new contact entries or your changes in Microsoft Outlook are applied by the OpenScape Desktop Client.
If no phone number information is available, the connection setup fails.
– Your Microsoft Outlook inbox or the window of an opened e-mailIf you select an e-mail and click the Dial button then, the Microsoft Outlook client searches the Microsoft Outlook address books (your private Microsoft Outlook contact list and, for example, the corporate directory) for the originator's name. The phone numbers that can be associated to the originator are transferred to the OpenScape Desktop Client.If several phone numbers have been stored for the selected contact, proceedings are the same as outlined above.If no phone number information is available for the selected e-mail origi-nator, the connection setup fails.
NOTICE: This dialog appears even if you have selected a sent e-mail with several addressees. Select the desired contact from this dialog.
– Your Microsoft Outlook task list or the window of an opened taskYou can compare initiating a call from a task with the procedure described for initiating a call from your Microsoft Outlook inbox.
– The window of an opened appointment in your Microsoft Outlook calendarYou can compare initiating a call from an appointment with the procedure described for initiating a call from your Microsoft Outlook inbox.
As soon as you have initiated the call, the main window of OpenScape Desktop Client appears in the foreground. In there you can control the connection in the Call Control frame as usual.
• Resolving phone numbers and names The Microsoft Outlook Integration enables resolving phone numbers and names on the basis of Microsoft Outlook address books. Phone numbers and names are resolved in the background. Private as well as global Microsoft Outlook address books are supported.
3.28 Operation in Restricted Mode
You can operate the OpenScape Personal Edition as SIP Softphone at an OpenScape Voice with a so-called survivability solution (for example OpenScape Branch). If the OpenScape Voice fails, the survivability solution ensures that the program switches automatically to restricted mode, thus being able to permanently provide basic SIP telephony services.
A31003-G2570-U100-13-7619, 06/2015OpenScape Personal Edition V7, User Guide 181

Operation Reference
The status bar of OpenScape Personal Edition signals operation in restricted mode by a corresponding information display . In this case the following functions are available in the Call Control:
• Make call
• Accept an incoming call
• End call
• Set active call to on-hold
• Retrieve held call
• Make a consultation call
• Connect consultation call subscriber with waiting subscriber
When the OpenScape Voice is available again, the OpenScape Desktop Client returns automatically to the normal operation mode.
3.29 Session Expiring Timeout for ODC PE VDI
The terminal with VDI (Citrix) enters in stand-by mode after 15 minutes. in case of lacking communication with the softphone installed in the user’s terminal.
This can happen for several reasons :
• result of hibernating the terminal computer
• result of sleeping the terminal computer
• missing network
The following warning message will be presented in this situation: The session has expired because your terminal is out for more than 15 minutes. This warning message reports that ODC!PE went to stand-by/safety mode in order to optimize resources in the Citrix Terminal server.
A31003-G2570-U100-13-7619, 06/2015182 OpenScape Personal Edition V7, User Guide
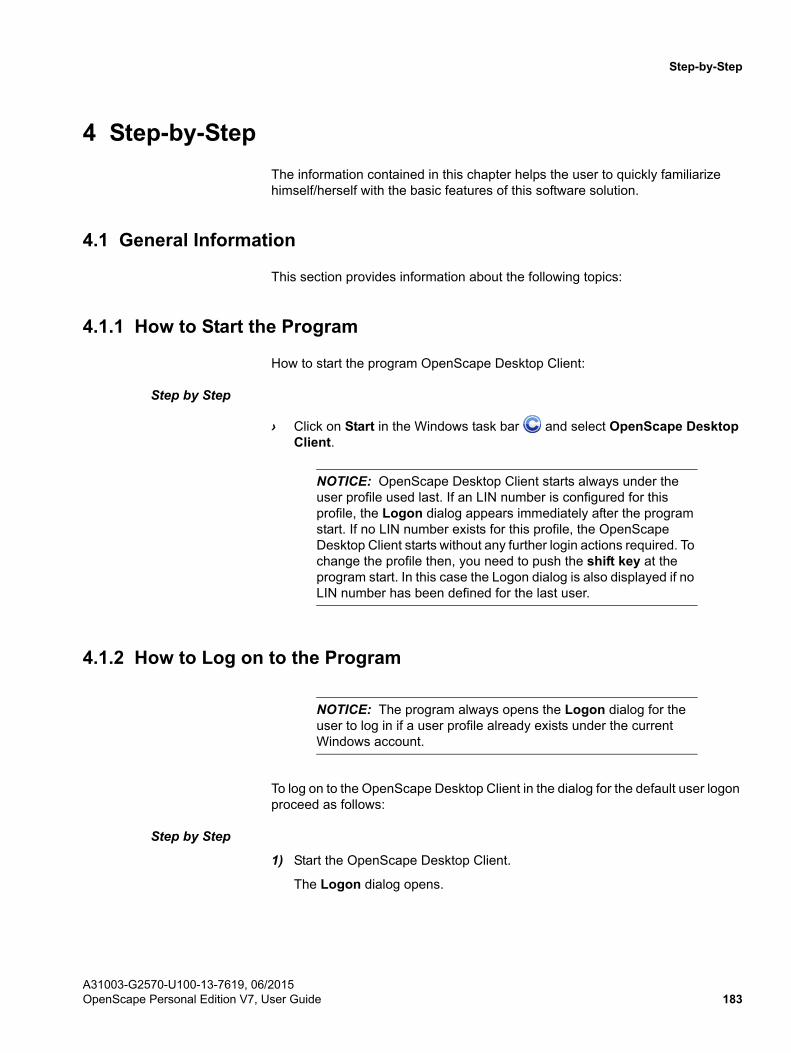
Step-by-Step
4 Step-by-Step
The information contained in this chapter helps the user to quickly familiarize himself/herself with the basic features of this software solution.
4.1 General Information
This section provides information about the following topics:
4.1.1 How to Start the Program
How to start the program OpenScape Desktop Client:
Step by Step
› Click on Start in the Windows task bar and select OpenScape Desktop Client.
NOTICE: OpenScape Desktop Client starts always under the user profile used last. If an LIN number is configured for this profile, the Logon dialog appears immediately after the program start. If no LIN number exists for this profile, the OpenScape Desktop Client starts without any further login actions required. To change the profile then, you need to push the shift key at the program start. In this case the Logon dialog is also displayed if no LIN number has been defined for the last user.
4.1.2 How to Log on to the Program
NOTICE: The program always opens the Logon dialog for the user to log in if a user profile already exists under the current Windows account.
To log on to the OpenScape Desktop Client in the dialog for the default user logon proceed as follows:
Step by Step
1) Start the OpenScape Desktop Client.
The Logon dialog opens.
A31003-G2570-U100-13-7619, 06/2015OpenScape Personal Edition V7, User Guide 183

Step-by-Step
2) Use the Profile combo box to select the desired profile or create a new profile via the Add Profile ... button.
3) Apply the default language used for displaying the OpenScape Desktop Client controls and online help or select another language from the list of available languages.
4) Then click on OK.
The Logon dialog closes.
The program is started.
4.1.2.1 How to Create a new Profile
You can change the user profile only during the default logon to the communica-tions system by proceeding as follows:
Step by Step
1) Start the OpenScape Desktop Client.
The Logon dialog opens.
2) Click on the Add Profile... button.
The Add Profile dialog opens.
3) Enter a Profile Name.
4) Confirm your entries with OK.
The Add Profile dialog closes.
You have successfully created the new user profile.
A31003-G2570-U100-13-7619, 06/2015184 OpenScape Personal Edition V7, User Guide

Step-by-Step
4.1.3 Configuring the Main Window
The main window opens after the OpenScape Desktop Client start. It contains the frames Call Control, Contacts and Journal by default.
4.1.3.1 How to Integrate a Frame in the Main Window
How to integrate further frames, such as Directory Search, in the main window:
Step by Step
1) Select under Pearl Menu > View the Directory Search option.
The Directory Search dialog opens as separate window.
2) Click in the Directory Search dialog on the area in the caption bar and drag the mouse pointer to the desired position in the main view with the left mouse button kept pressed.
The Directory Search window is now integrated in the main view.
4.1.3.2 How to Remove Frames from the Main Window
To remove a frame (for example Directory Search) from the main window, click
on in the caption bar of the frame. The frame is closed. It is not automatically displayed in the main window again after a reboot of the program, but must be added manually via the Pearl menu > View.
4.1.3.3 How to Change the Quick-Access Toolbar Position
Prerequisites
• OpenScape Desktop Client is correctly configured and you are logged in at the communications system.
How to position the quick-access toolbar under the ribbon in the main window:
Step by Step
1) Click on the icon to the left of the OpenScape label in the caption bar of the main window.
The context menu of the quick-access toolbar is displayed.
2) Select the Show Below the Ribbon option.
The quick-access toolbar is displayed under the ribbon.
NOTICE: To move the quick-access toolbar back to its original position above the ribbon, select the Show Above the Ribbon
A31003-G2570-U100-13-7619, 06/2015OpenScape Personal Edition V7, User Guide 185

Step-by-Step
option, which is displayed instead of the Show Below the Ribbon option in the context menu.
4.1.3.4 How to Add an Icon to the Quick-Access Toolbar
How to integrate an icon, for example a frequently used one, in the toolbar for quick access:
Step by Step
1) Rightclick the desired icon in the ribbon to display a context menu.
A context menu opens.
2) Select the Add to Quick Access Toolbar option in this context menu.
The selected icon is displayed in the toolbar for quick access.
4.1.3.5 How to Remove an Icon from the Quick-Access Toolbar
Proceed as follows:
Step by Step
1) Rightclick the desired icon in the quick-access toolbar.
A context menu opens.
2) Select the Remove from Quick Access Toolbar option.
The selected icon is no longer displayed in the quick-access toolbar.
4.1.4 How to Shut the Program Down
The program can be shut down as follows:
Step by Step
1) Rightclick the OpenScape icon in the notification area of the Windows taskbar.
The OpenScape context menu is displayed.
2) Select Exit OpenScape.
The main window closes and the OpenScape Desktop Client is shut down.
4.2 Getting Started with the Program
This section contains information about configuration adjustments to be performed at the initial program start after the OpenScape Desktop Client setup.
A31003-G2570-U100-13-7619, 06/2015186 OpenScape Personal Edition V7, User Guide

Step-by-Step
NOTICE: You find detailed information about the installation and uninstallation of OpenScape Personal Edition in the manual OpenScape Personal Edition V7 Installation Installation and Administration.
4.2.1 How to Log on for the first Time
You log on for the first time in the Profile creation dialog, which is only displayed if no user settings are available at the program start. This is the case, for example, immediately after the setup or after the configuration files have been deleted.
NOTICE: When you log on as user for the first time, you need to configure the user-specific settings to for example identify the OpenScape Desktop Client user. You cannot operate OpenScape Desktop Client without these settings.
How to log on to the OpenScape Desktop Client for the first time:
Step by Step
1) Start the OpenScape Desktop Client.
The Profile creation dialog opens.
2) Specify the name of the profile or location you wish to work with under Profile Name.
3) Click on OK.
The Profile creation dialog closes.
The program creates the specified profile and switches automatically to the Logon dialog in which you perform the language and LIN settings as well as manage the configuration settings.
A31003-G2570-U100-13-7619, 06/2015OpenScape Personal Edition V7, User Guide 187
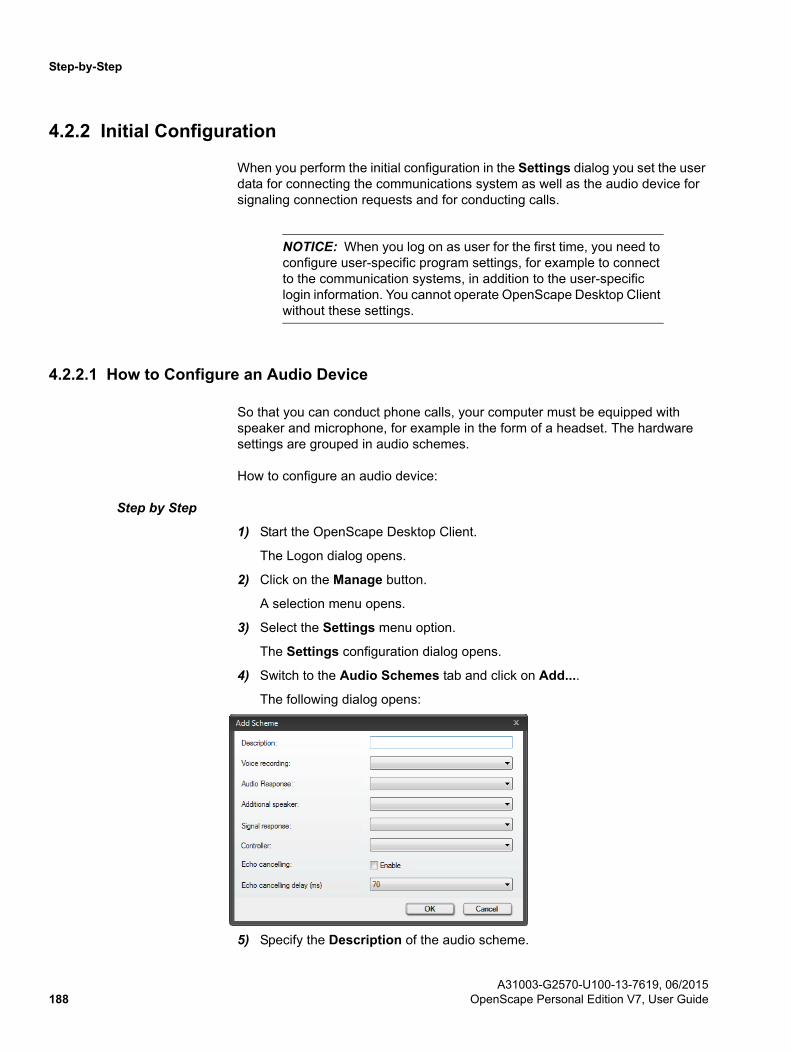
Step-by-Step
4.2.2 Initial Configuration
When you perform the initial configuration in the Settings dialog you set the user data for connecting the communications system as well as the audio device for signaling connection requests and for conducting calls.
NOTICE: When you log on as user for the first time, you need to configure user-specific program settings, for example to connect to the communication systems, in addition to the user-specific login information. You cannot operate OpenScape Desktop Client without these settings.
4.2.2.1 How to Configure an Audio Device
So that you can conduct phone calls, your computer must be equipped with speaker and microphone, for example in the form of a headset. The hardware settings are grouped in audio schemes.
How to configure an audio device:
Step by Step
1) Start the OpenScape Desktop Client.
The Logon dialog opens.
2) Click on the Manage button.
A selection menu opens.
3) Select the Settings menu option.
The Settings configuration dialog opens.
4) Switch to the Audio Schemes tab and click on Add....
The following dialog opens:
5) Specify the Description of the audio scheme.
A31003-G2570-U100-13-7619, 06/2015188 OpenScape Personal Edition V7, User Guide
Step-by-Step
6) Define the audio hardware for the following features:
• Voice recording
Microphone for voice recording
• Audio Response
Primary playback speaker
• Additional speaker
Additional speaker for voice output.
NOTICE: The hardware for the additional speaker must be different from the audio response hardware.
• Signal response
Speaker for the signal output (ringing).
• Controller
Select the hardware you use. If this hardware is not contained in the selection list, then use Soundcard.
7) Activate the Echo cancelling option.
8) Select the value suitable for your system under Echo cancelling delay (ms).
9) Click on OK.
The Add Scheme dialog closes.
The new audio scheme is the top entry in the list of configured audio schemes on the Audio Schemes tab. This sets it automatically as the currently used hardware for audio connections.
NOTICE: Always change the current audio device via the audio schemes, not via the Windows control panel. Because you cannot synchronize the respective settings, the audio device set in the Windows control panel would be used but the client would display the audio device set last via the audio schemes.
4.2.2.2 How to Configure a HiPath Connection
Prerequisites
• When installing the program you selected the HiPath Provider as default provider.
How to configure the HiPath Provider module, thus the Softphone functionality of OpenScape Desktop Client:
A31003-G2570-U100-13-7619, 06/2015OpenScape Personal Edition V7, User Guide 189

Step-by-Step
Step by Step
1) Start the OpenScape Desktop Client.
The Logon dialog opens.
2) Click on the Manage button.
A selection menu opens.
3) Select the Settings menu option.
The Settings dialog opens.
4) Switch to the Advanced tab.
5) Under HiPath Provider > Device you select your Phone type and your Key module type if required.
6) Under HiPath Provider > Main connection set the following parameters:
• Type: <Select your PBX here.>
• Gatekeeper: <Enter here the IP address of the communications system gatekeeper.>
• Extension number: <Enter here the number under which you can be reached on the connected communications system.>
• Password: <Specify here the password configured for your extension number.>
• Own IP address: <Select the Detect automatically option.>
7) Under HiPath Provider > Main network access determine the following parameters:
• Country code: <Enter here the international prefix for your site, for example 49 for Germany.>
• Area code: <Enter here the area code of your location without leading zero.>
• System identification number: <Enter here the system identification number.>
• Trunk code: <Enter the code configured on your system for allocating outbound trunks, for example 0.>
• Prefix for long distance calls: <Enter here the network operator code for long distance calls, for example 0.>
• Prefix for international calls: <Enter the network operator code for inter-national calls, for example 00.>
8) Click the Test button to check your entries.
The following dialog opens.
A31003-G2570-U100-13-7619, 06/2015190 OpenScape Personal Edition V7, User Guide

Step-by-Step
9) Enter the Extension to be dialed. Based on the parameters set for the Main network access, the OpenScape Desktop Client automatically determines the phone number in the international number format in the Converted inter-nationally field.
10) When the test has confirmed your entries for the main network access parameter as correct, click on the Close button.
The test dialog closes.
You have configured the OpenScape Desktop Client as your softphone with connection to a HiPath communications system.
4.2.2.3 How to Configure an SIP Connection
Prerequisites
• When installing the program you selected the SIP Provider as default provider.
How to configure the [Virtual] SIP Service Provider module, thus the softphone functionality of OpenScape Desktop Client:
Step by Step
1) Start the OpenScape Desktop Client.
The Logon dialog opens.
2) Click on the Manage button.
A selection menu opens.
3) Select the Settings menu option.
The Settings dialog opens.
4) Switch to the Advanced tab.
5) Under [Virtual] SIP Service Provider > Main line enter the following param-eters:
• User: <Enter your phone number here>
• Display: <Enter your name here>
• Tooltip text: <Enter something like SIP Phone optionally>
• ID: <Enter your phone number or e-mail address.>
A31003-G2570-U100-13-7619, 06/2015OpenScape Personal Edition V7, User Guide 191

Step-by-Step
• Password: <Enter here the password provided by your system adminis-trator.>
6) Under [Virtual] SIP Service Provider > Registrar set the following param-eters:
• Server: <Enter here the IP address provided by your system adminis-trator>
• You determine the port for the server connection in the Connection area. Your system administrator will provide further information.
7) Under [Virtual] SIP Service Provider > Proxy set the following parameters:
• Server: <Enter here the IP address provided by your system adminis-trator>
• You determine the port for the server connection in the Connection area. Your system administrator will provide further information.
8) Under [Virtual] SIP Service Provider > Network access enter the network access data provided by your system administrator (optional).
NOTICE: Make sure that the Normalize call numbers option has been set under [Virtual] SIP Service Provider > Address conversion. The network access data is otherwise not required.
9) Under HLM Provider > Licensing, enter in the Server field the IP address of the computer on which the license server for the OpenScape Desktop Client is installed.
You have configured the OpenScape Desktop Client as your SIP softphone.
4.2.2.4 How to Configure the Microsoft Outlook Integration
The Microsoft Outlook Integration feature extends the Microsoft Outlook client by features of the OpenScape Personal Edition.
NOTICE: To use the Microsoft Outlook Integration you need to add the SQLite Provider module to the OpenScape Desktop Client configuration. A guide to adding or removing modules is given in the setup manual of OpenScape Personal Edition.
NOTICE: To use the Microsoft Outlook Integration, a Microsoft Outlook client must have been installed and started on the user computer.
To configure the Microsoft Outlook Integration, proceed as follows:
A31003-G2570-U100-13-7619, 06/2015192 OpenScape Personal Edition V7, User Guide

Step-by-Step
Step by Step
1) In the main menu of the Microsoft Outlook client, select in case of
• Microsoft Outlook 2003/2007 Tools > Options > OpenScape Desktop Client or
• in case of Microsoft Outlook 2010 File > Outlook Options > Add-Ins > OpenScape Desktop Client > Add-in Options.
The Add-in Options dialog opens.
2) Specify under Contact folder options the private contact folders to be used by the Microsoft Outlook Integration:
• If you wish to use all private contact folders, activate the Read all private folders option.
• If you wish to use only selected private contact folders, activate the Read all private folders, except option.
3) If you opt for the Read all private folders, except option, click on the Add and Remove buttons to specify all private contact folders not to be used.
4) Determine the public contact folders to be used by the Microsoft Outlook Integration by activating the Read public folders option.
5) Then, using Add and Remove, pick all public contact folders to be used.
6) Confirm with a click on OK.
The Microsoft Outlook Integration has been configured and is ready for use.
4.3 Overview of the User Interface
The OpenScape Desktop Client user interface comprises the following controls:
Main bar
The main bar allows operating the program quickly with minimum screen usage. You can dock the main bar to the top margin of the desktop or only display it in its area when you move the mouse pointer.
Main window
After you have successfully logged in at the system, the program's main window opens.
A31003-G2570-U100-13-7619, 06/2015OpenScape Personal Edition V7, User Guide 193
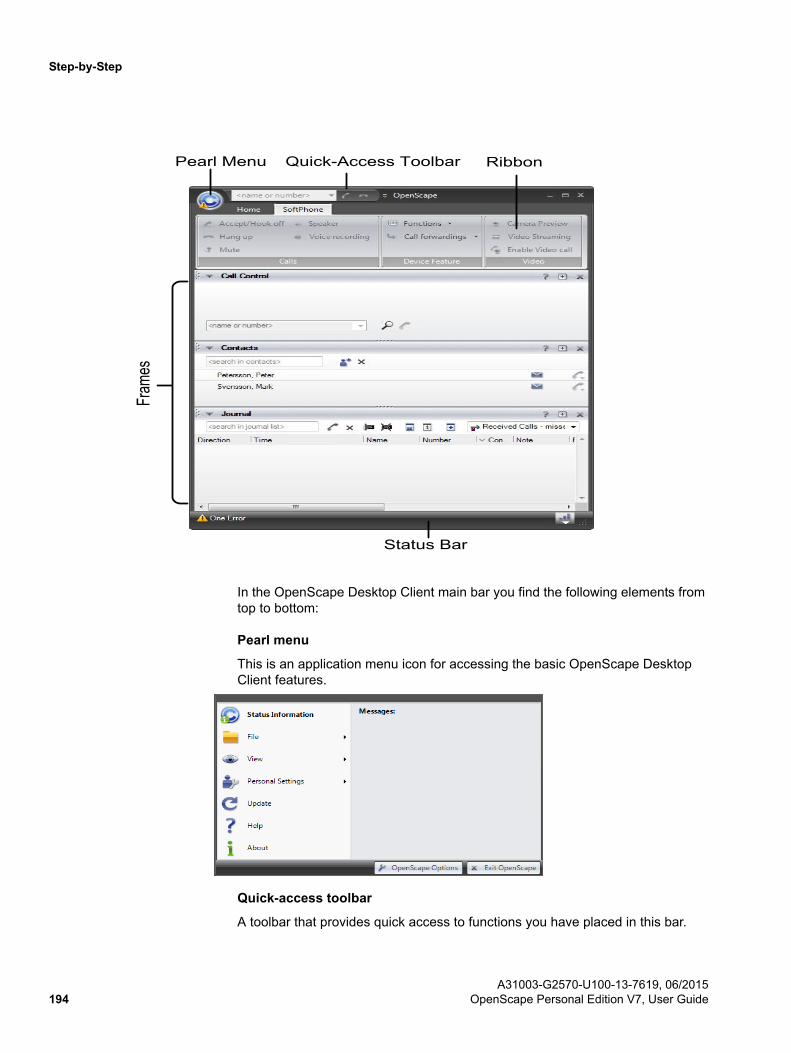
Step-by-Step
In the OpenScape Desktop Client main bar you find the following elements from top to bottom:
Pearl menu
This is an application menu icon for accessing the basic OpenScape Desktop Client features.
Quick-access toolbar
A toolbar that provides quick access to functions you have placed in this bar.
Pearl Menu Quick-Access ToolbarFrames
Status Bar
Ribbon
A31003-G2570-U100-13-7619, 06/2015194 OpenScape Personal Edition V7, User Guide

Step-by-Step
Ribbon
This is a bar that contains the following elements:
• Tabs organize controls in the ribbon around core scenarios and tasks the users perform with the OpenScape Desktop Client.
• Groups within each tab show related controls together.
• Controls within each group provide OpenScape Desktop Client click-to-action functions.
Frame
You can customize the main view of the OpenScape Desktop Client by adding or removing frames. The following frames are available via Pearl menu > View:
• Call ControlThe call control lets you look for and call a contact, shows information about in- and outbound calls and provides telephony features during an active call.
• ContactsThe Contacts frame represents your private contact list. You can add single contacts to this contact list manually or import such contacts from various directories and then group them in the list to suit your own requirements. You can also directly call single contacts, edit and remove existing contact data as well as send e-mails from the contact list.
• JournalIn the Journal frame OpenScape Desktop Client logs all in- and outgoing calls locally on the computer as long as the OpenScape Desktop Client is started. Furthermore, you can initiate connections to logged communication partners from the Journal.
A31003-G2570-U100-13-7619, 06/2015OpenScape Personal Edition V7, User Guide 195

Step-by-Step
• Directory searchOpenScape Desktop Client supports the integration of several directories. You can search these directories for specific contacts and get in touch with them directly by e-mail or phone as well as integrate these contacts in your private contact list.
• LinesThe Lines frame lists all lines configured in the OpenScape Desktop Client and activated for display. This includes the stati of the various lines.
• Status BarThe status bar enables volume setting and displays errors.
4.4 Settings-related Actions
You can perform the following individual settings for each user:
4.4.1 How to Change the Language
The language in which the controls and the online help of the OpenScape Desktop Client are represented is defined during the default login. How to change the language:
Step by Step
1) Shut the OpenScape Desktop Client down.
2) Reboot the OpenScape Desktop Client.
3) Select the Language you want to set from the language list in the Logon dialog.
A31003-G2570-U100-13-7619, 06/2015196 OpenScape Personal Edition V7, User Guide

Step-by-Step
4) Then click on OK.
The Logon dialog closes. The language change has been saved and the program starts.
The currently configured language is used for representing the user interface and the online help.
4.4.2 How to Add an Audio Scheme
NOTICE: You can configure a new audio scheme in the Settings dialog while logging on to the program as well as during operation.
How to proceed when you operate the OpenScape Desktop Client at an SIP or HiPath communications system and wish to add an audio scheme to the program configuration:
Step by Step
1) Click on the Manage button in the Logon dialog and select Settings.
The Settings dialog opens. The Audio Schemes tab is displayed by default.
2) Click on the Add button.
The Add Scheme dialog opens.
3) Assign a name to the new audio scheme in the Description field.
4) In the Voice recording combo box select the audio hardware of the user computer to be used by OpenScape Desktop Client for voice recording.
5) In the Audio Response combo box select the audio hardware of the user computer to be used by OpenScape Desktop Client for voice playback.
6) In the Additional speaker combo box select an additional speaker for voice output if required. If an additional speaker has been selected here and this audio scheme is active, the SoftPhone > Calls tab, the main toolbar and the
Softphone toolbar of the Video window display the icon for the open listening feature.
A31003-G2570-U100-13-7619, 06/2015OpenScape Personal Edition V7, User Guide 197

Step-by-Step
NOTICE: The hardware for the additional speaker must be different from the audio response hardware.
7) In the Signal response combo box select the audio hardware of the user computer to be used by OpenScape Desktop Client for ringtone output.
8) Select the audio hardware of the user computer to be used for controlling special hardware in the Controller field.
9) Activate the Echo cancelling option.
10) Select the value suitable for your system under Echo cancelling delay (ms).
11) Confirm the settings of the new audio scheme with OK.
The Add Scheme dialog closes.
The newly defined audio scheme appears as first entry in the list of the configured audio schemes on the Audio Schemes tab.
4.4.3 How to Edit an Audio Scheme
NOTICE: You can configure a new audio scheme in the Settings dialog while logging on to the program as well as during operation.
How to proceed when you operate the OpenScape Desktop Client at an SIP or HiPath communications system and wish to change the configuration of an audio scheme:
Step by Step
1) Click on the Manage button in the Logon dialog and select Settings.
The Settings dialog opens. The Audio Schemes tab is displayed by default.
2) Click on the Change... button.
The Change Scheme dialog opens.
A31003-G2570-U100-13-7619, 06/2015198 OpenScape Personal Edition V7, User Guide
Step-by-Step
3) Perform the desired modifications.
4) Confirm the changes with OK.
The Change Scheme dialog closes. Your settings are saved.
4.4.4 How to React to Automatic Audio Device Detection
Under certain circumstances, OpenScape Desktop Client can detect new audio devices as soon as you connect them to the computer.
When OpenScape Desktop Client is operating and you connect your computer with an audio device for which Windows has the required drivers, the main and
status bar of OpenScape Desktop Client display the New Audio Device icon.
How to configure a new audio scheme for the automatically detected device and add it subsequently:
Step by Step
1) Click on the freshly displayed icon.
A message appears, informing you that a new audio device has been detected.
2) Click on Yes in this message.
The Add Scheme dialog opens.
3) Assign a name to the new audio scheme in the Description field.
4) In the Voice recording combo box select the audio hardware of the user computer to be used by OpenScape Desktop Client for voice recording.
5) In the Audio Response combo box select the audio hardware of the user computer to be used by OpenScape Desktop Client for voice playback.
6) In the Additional speaker combo box select an additional speaker for voice output if required. If an additional speaker has been selected here and this audio scheme is active, the SoftPhone > Calls tab, the main toolbar and the
A31003-G2570-U100-13-7619, 06/2015OpenScape Personal Edition V7, User Guide 199

Step-by-Step
Softphone toolbar of the Video window display the icon for the open listening feature.
NOTICE: The hardware for the additional speaker must be different from the audio response hardware.
7) In the Signal response combo box select the audio hardware of the user computer to be used by OpenScape Desktop Client for ringtone output.
8) Select the audio hardware of the user computer to be used for controlling special hardware in the Controller field.
9) Activate the Echo cancelling option.
10) Select the value suitable for your system under Echo cancelling delay (ms).
11) Confirm the settings of the new audio scheme with OK.
You have now added and configured a new audio scheme for the automatically detected audio device. The Add Scheme dialog closes. The newly defined audio scheme appears as first entry in the list of the configured audio schemes on the Audio Schemes tab.
4.4.5 How to Add a Video Scheme
Prerequisites
• You operate the OpenScape Desktop Client at an SIP communications system.
• The SIP Service Provider module is active.
NOTICE: You can configure a new video scheme only in the Settings dialog while logging on to the program.
How to add a new video scheme to the OpenScape Desktop Client configuration:
Step by Step
1) Click on the Manage button in the Logon dialog and select Settings.
The Settings dialog opens. The Audio Schemes tab is displayed by default.
2) Switch to the tab Advanced > [Virtual] SIP Service Provider > Video schemes.
3) Click on the Add button.
The Add Video scheme dialog opens.
A31003-G2570-U100-13-7619, 06/2015200 OpenScape Personal Edition V7, User Guide

Step-by-Step
4) Assign a name to the new video scheme in the Description field.
5) In the Camera combo box select the video hardware of the user computer to be used by OpenScape Desktop Client for sending video signals.
6) Confirm your settings with OK.
The Add Video scheme dialog closes. The new video scheme appears on the Advanced tab in the list of configured video schemes.
7) Perform the settings for your default video configuration:
a) Select the default view for your video screen under Layout.
b) Select the setting for the camera preview (own video image) under Preview.
c) Activate or disable the Mirrored option to determine whether or not your own image shall be displayed mirrored in the Video screen.
Configuring the video scheme and the default video configuration is now complete.
4.4.6 How to Edit a Video Scheme
Prerequisites
• You operate the OpenScape Desktop Client at an SIP communications system.
• The [Virtual] SIP Service Provider module is active.
NOTICE: You can change the configuration of an audio scheme only in the Settings dialog while logging on to the program.
How to change the configuration of a video scheme:
Step by Step
1) Click on the Manage button in the Logon dialog and select Settings.
The Settings dialog opens. The Audio Schemes tab is displayed by default.
2) Switch to the tab Advanced > [Virtual] SIP Service Provider > Video schemes.
3) Click on the Change... button.
The Change Video scheme dialog opens
A31003-G2570-U100-13-7619, 06/2015OpenScape Personal Edition V7, User Guide 201

Step-by-Step
4) Perform the desired modifications.
5) Confirm your settings with OK.
The Change Video scheme dialog closes. Your modifications are saved.
6) Perform changes to the default video configuration if required.
4.4.7 How to React to Automatic Video Device Detection
Under certain circumstances, OpenScape Desktop Client can detect new video devices as soon as you connect them to the computer.
When OpenScape Desktop Client is operating and you connect your computer with a video device for which Windows has the required drivers, the main and
status bar of OpenScape Desktop Client display the New Video Device icon.
How to configure a new video scheme for the automatically detected device and add it subsequently:
Step by Step
1) Click on the freshly displayed icon.
A message appears, informing you that a new video device has been detected.
2) Click on Yes in this message.
The Add Video scheme dialog opens.
3) Assign a name to the new video scheme in the Description field.
4) In the Camera combo box select the video hardware of the user computer to be used by OpenScape Desktop Client for sending video signals.
5) Confirm your settings with OK.
The Add Video scheme dialog closes. The new video scheme appears on the Advanced tab under SIP Service Provider > Video schemes in the list of configured video schemes.
A31003-G2570-U100-13-7619, 06/2015202 OpenScape Personal Edition V7, User Guide

Step-by-Step
6) Perform the settings for your default video configuration there:
a) Select the default view for your video screen under Layout.
b) Select the setting for the camera preview (own video image) under Preview.
c) Activate or disable the Mirrored option to determine whether or not your own image shall be displayed mirrored in the Video screen.
You have now added and configured a new video scheme for the automatically detected video device and completed the default video configuration.
4.4.8 How to Add a Call Forwarding
After you have configured call forwardings on the SoftPhone tab in the ribbon of OpenScape Desktop Client you can quickly rerout incoming calls at a later date.
How to configure a new call forwarding:
Step by Step
1) In the ribbon > SoftPhone tab > Device Feature group click on Call forwardings.
A combo box opens.
2) Select Add call forwarding.
The Add Forwarding dialog opens.
3) Select the type of the new forwarding in the Type combo box.
4) Enter the phone number to serve as rerouting target in the Destination field.
5) If you wish to assign a short description to the new forwarding, make a corre-sponding entry in the Optional text field. This description will later be displayed in the forwarding menu for selection.
6) Click on OK.
The Add Forwarding dialog closes.
The new call forwarding has been created.
A31003-G2570-U100-13-7619, 06/2015OpenScape Personal Edition V7, User Guide 203
Step-by-Step
4.4.9 How to Activate a Call Forwarding
Prerequisites
• OpenScape Desktop Client is correctly configured and you are logged in at the communications system.
• You must have previously configured at least one call forwarding.
The forwarding menu in the main bar of OpenScape Desktop Client lets you rerout your telephone fast and easily.
How to activate a previously defined call forwarding:
Step by Step
1) Click on in the main bar.
The list of configured call forwardings is displayed.
NOTICE: Call forwardings already active are displayed highlighted in the forwarding menu. Forwardings set but not available any more are faded gray.
2) Select the desired list entry.
The selected call forwarding has become active.
4.4.10 How to Disable a Call Forwarding
How to disable an active call forwarding:
Step by Step
1) Click on in the main bar.
The list of configured call forwardings is displayed.
NOTICE: Call forwardings already active are displayed highlighted in the forwarding menu. Forwardings set but not available any more are faded gray.
2) Select the list entry of the active call forwarding.
The call forwarding is disabled.
A31003-G2570-U100-13-7619, 06/2015204 OpenScape Personal Edition V7, User Guide

Step-by-Step
4.4.11 How to Configure an individual Ring Tone
NOTICE: You can edit the settings for the individual ring tone in the Settings dialog during the program start as well as during live operation. Click on the Manage button in the Logon dialog or select in the Pearl menu > Personal Settings > Ring Tones. You can perform these settings at an SIP as well as at a HiPath communications system.
NOTICE: The settings you perform for the individual ring tone at an SIP communications system are identical to the settings for the individual ring tone at a HiPath communications system. You reach them in the Settings dialog on the Advanced tab under the [Virtual] SIP Service Provider > Ring tones or HiPath Provider > Ring tones option.
How to select an individual ring tone for signaling incoming connection requests at an SIP or HitPath communications system while operating OpenScape Desktop Client:
Step by Step
1) Open the Pearl menu.
2) Select the Personal Settings > Ring tones option.
The Settings dialog opens. The Advanced tab with option [Virtual] SIP Service Provider > Ring tones or HiPath Provider > Ring tones is displayed.
3) Activate the Use individual ring tones check box.
4) Click the ... button.
The Open window is displayed.
5) In the Open window switch to the folder that contains the desired WAV or MP3 file.
6) Select the desired file.
7) Click the Open button.
The Open dialog is closed.
The selected audio file has been adopted as the ring tone of your OpenScape Desktop Client.
A31003-G2570-U100-13-7619, 06/2015OpenScape Personal Edition V7, User Guide 205
Step-by-Step
4.4.12 How to Change the Default Ring Tone (HiPath Provider)
NOTICE: These settings are only available while the OpenScape Desktop Client is active, you are logged in and no individual ring tone has been configured.
If you operate your OpenScape Desktop Client at a HiPath communications system and use the default ring tones of the system, you can change the pitch in the following way:
Step by Step
1) Open the Pearl menu.
2) Click on the OpenScape Options button.
The Settings dialog opens.
3) Switch to the tab Advanced > HiPath Provider > Operation settings.
4) Click the Change Ring Tone button.
A dialog is displayed and the current ring tone sounds.
5) Click on Next Ring Tone or Previous Ring Tone to select the desired ring tone.
6) Click the Close button to complete the setting.
The selected setting is immediately active.
4.4.13 How to Add a new Internet Page
If you want to open an internet page you visit frequently directly in the web browser of the OpenScape Desktop Client, you must previously define this page in the following way:
Step by Step
1) Open the Pearl menu and click on the OpenScape Options button.
The Settings dialog opens.
2) Switch to the tab Advanced > Webbrowser > Internet pages.
3) Click on the Add... button.
The following dialog opens.
4) Then enter the desired Name and Address (URL).
A31003-G2570-U100-13-7619, 06/2015206 OpenScape Personal Edition V7, User Guide

Step-by-Step
5) Confirm your entries with OK.
The new internet page appears with Name and Address in the last position of the configured internet pages list.
4.4.14 How to Change an Internet Page
How to change the settings of an already configured internet page:
Step by Step
1) Open the Pearl menu and click on the OpenScape Options button.
The Settings dialog opens.
2) Switch to the tab Advanced > Webbrowser > Internet pages.
3) Mark the desired entry in the list of configured internet pages.
4) Then click on the Change button.
The following dialog opens.
5) Change the Name and/or the Address (URL).
6) Click on OK.
The Change Entry dialog closes and your modifications are saved.
4.4.15 How to Delete an Internet Page
How to delete an already configured internet page from the list:
Step by Step
1) Open the Pearl menu and click on the OpenScape Options button.
The Settings dialog opens.
2) Switch to the tab Advanced > Webbrowser > Internet pages.
3) Mark the desired entry in the list of configured internet pages.
4) Then click on the Delete button.
The selected list entry has been removed from the list of configured internet pages.
A31003-G2570-U100-13-7619, 06/2015OpenScape Personal Edition V7, User Guide 207

Step-by-Step
4.4.16 How to Configure a new SIP Additional Line
How to configure a new additional line:
Step by Step
1) Start the OpenScape Desktop Client.
2) Click on the Manage button in the Logon dialog.
A selection menu opens.
3) Select the Settings menu option.
The Settings dialog opens.
4) Select on the tab Advanced > [Virtual] SIP Service Provider > Additional lines.
5) Click the Add... button.
The following dialog opens.
6) Enter the unique OpenScape Desktop Client phone number/user address in the User field.
7) Enter an expressive text in the Display field.
8) Enter the text to be displayed as tooltip in the Tooltip text field.
9) Enter your login.
10) If the authentication was configured on the server, enter your Password in addition.
NOTICE: Further details can be obtained from the system admin-istrator.
A31003-G2570-U100-13-7619, 06/2015208 OpenScape Personal Edition V7, User Guide
Step-by-Step
11) Confirm your entries with OK.
The dialog for configuring a new SIP additional line closes. The new line entry appears in the list of configured additional lines.
4.4.17 How to Change an SIP Additional Line
How to change the settings of an already configured SIP additional line:
Step by Step
1) Start the OpenScape Desktop Client.
2) Click on the Manage button in the Logon dialog.
A selection menu opens.
3) Select the Settings menu option.
The Settings dialog opens.
4) Select on the tab Advanced > [Virtual] SIP Service Provider > Additional lines.
5) Click on the Change... button.
The following dialog opens.
6) Perform the desired modifications.
NOTICE: You cannot edit the User entry field.
7) Confirm your changes with OK.
The dialog for editing an existing SIP additional line closes.
A31003-G2570-U100-13-7619, 06/2015OpenScape Personal Edition V7, User Guide 209

Step-by-Step
4.4.18 How to Delete an SIP Additional Line
How to delete an SIP additional line already configured:
Step by Step
1) Start the OpenScape Desktop Client.
2) Click on the Manage button in the Logon dialog.
A selection menu opens.
3) Select the Settings menu option.
The Settings dialog opens.
4) Select on the tab Advanced > [Virtual] SIP Service Provider > Additional lines.
5) Select the line entry you want to delete in the list of configured additional lines.
6) Click on the Delete button.
The line entry has been removed from the list of configured SIP additional lines.
4.5 Contact Management
The following features are available for managing the contacts in your OpenScape contact list.
4.5.1 How to Create a new Contact
Prerequisites
• OpenScape Desktop Client is correctly configured and you are logged in at the communications system.
How to add a new contact to your OpenScape contact list:
Step by Step
1) Click on in the Contacts frame.
The following dialog opens.
2) Enter the First Name and Last Name of the new contact in the respective input fields.
A31003-G2570-U100-13-7619, 06/2015210 OpenScape Personal Edition V7, User Guide
Step-by-Step
3) Click on the small triangle of the combo box and select the contact information that you want to add, for example the business phone number of the contact or his/her business e-mail address.
4) Click on Add to confirm you entries.
The Add New Contact dialog closes.
Your entries are saved and the new contact entry appears in the contact list.
4.5.2 How to Add a Contact from a Directory
Prerequisites
• OpenScape Desktop Client is correctly configured and you are logged in at the communications system.
How to search a directory for a contact and add him/her to your contact list:
Step by Step
1) Open the Directory Search frame by selecting Pearl menu > View > Directory Search.
The Directory Search window opens.
2) Enter the first or second name of the person you look for in the <search address books> input field.
3) Click on .
The dialog with the search results from different directories opens.
4) Click on the desired contact entry to select it.
5) Click on . The Add Contact dialog with available contact data opens. If desired, you can complete the contact data here.
6) Click on Add to confirm your entries.
The Add Contacts dialog closes.
Your entries are saved and the new contact entry appears in the contact list.
4.5.3 How to Edit Contact Data
Prerequisites
• OpenScape Desktop Client is correctly configured and you are logged in at the communications system.
How to edit the contact information of an already configured contact:
A31003-G2570-U100-13-7619, 06/2015OpenScape Personal Edition V7, User Guide 211

Step-by-Step
Step by Step
1) Rightclick the name of a contact in the Contacts frame.
The context menu of the contact opens.
2) Select the Edit contact option.
The following dialog with the available contact data opens.
3) Perform the desired modifications.
NOTICE: Click on the Contact Details button to edit further infor-mation for the selected contact entry in the Change Contact dialog. With a click on OK you can save the modifications and close the Change Contact dialog.
4) Click the Change button.
Your modifications have become valid and the Change Contact Information dialog closes.
4.5.4 How to Create a new Group
Prerequisites
• OpenScape Desktop Client is correctly configured and you are logged in at the communications system.
How to add a new group to your contact list:
Step by Step
1) Rightclick in the Contacts frame.
The context menu of the Contacts frame opens.
2) Select the Create group... context menu option.
The following dialog opens.
A31003-G2570-U100-13-7619, 06/2015212 OpenScape Personal Edition V7, User Guide

Step-by-Step
3) Enter a unique name for the group in the Name field. This is a required field.
4) Enter a description that is meaningful to you in the Description field. This entry is optional.
5) Click on OK.
The Create Group dialog is closed.
The newly created group is displayed in the contacts frame.
4.5.5 How to Add a Contact to a Group
Prerequisites
• OpenScape Desktop Client is correctly configured and you are logged in at the communications system.
• You have already created a group in your contact list.
How to add a contact from your contact list to a group:
Step by Step
1) Rightclick the name of a group in the Contacts frame.
The context menu of a contact opens.
2) Select the Add Contact... context menu option.
The Add New Contact dialog opens.
3) Enter the First and Last Name of the new contact in the respective entry fields.
4) Click on the small triangle of the combo box and select the contact information that you want to add, for example the business phone number of the contact or his/her business e-mail address.
5) Click on Add to confirm you entries.
The Add New Contact dialog closes.
The new contact appears in the contact list as group entry.
A31003-G2570-U100-13-7619, 06/2015OpenScape Personal Edition V7, User Guide 213

Step-by-Step
4.5.6 How to Add Contacts to a Group
Prerequisites
• OpenScape Desktop Client is correctly configured and you are logged in at the communications system.
• You have already created a group in your contact list.
How to add specific contacts from your contact list to a group:
Step by Step
1) Select the contacts you want to integrate in a group from the contact list.
NOTICE: To select several contact entries at the same time, keep the [Ctrl] key pushed while you click on the names of the desired contacts.
2) Rightclick the name of a group in the Contacts frame.
The context menu of a group opens.
3) Select the Add Contacts to Group... option.
The following dialog opens:
4) Select one of the groups in the Add Contacts dialog.
5) Click on OK.
The Add Contacts dialog closes.
The selected contacts are displayed in the desired group. They are thus itemized in the contact list twice.
4.5.7 How to Move Contacts to a Group
Prerequisites
• OpenScape Desktop Client is correctly configured and you are logged in at the communications system.
• You have created at least two groups.
How to move specific contacts to a group:
A31003-G2570-U100-13-7619, 06/2015214 OpenScape Personal Edition V7, User Guide

Step-by-Step
Step by Step
1) Select the contacts you want to integrate in a group from the contact list.
NOTICE: You can move contacts from your contact list to a group, or from one group to another.
NOTICE: To select several contact entries at the same time, keep the [Ctrl] key pushed while you click on the names of the desired contacts.
2) Rightclick the name of a group in the Contacts frame.
The context menu of a group opens.
3) Select the Move Contacts to Group... option.
The following dialog opens:
4) Select the desired group in the All Groups dialog.
5) Click on OK.
The All Groups dialog closes.
The contact(s) is/are integrated in the selected group.
4.5.8 How to Import Contacts from a File
Prerequisites
• OpenScape Desktop Client is correctly configured and you are logged in at the communications system.
• You have created a backup copy of your OpenScape or Microsoft Outlook contact list in the XML or CSV format.
How to integrate your Microsoft Outlook contact list in the OpenScape contact list or restore your OpenScape contact list after e.g. a reinstallation of the program:
Step by Step
1) Open the Pearl menu and select the File option.
2) Click on Import Contacts from file in the right-hand section of the Pearl menu.
A31003-G2570-U100-13-7619, 06/2015OpenScape Personal Edition V7, User Guide 215

Step-by-Step
The following dialog opens:
3) Click on the ... button and select the memory location of the contact list file you want to import.
4) Click on OK.
The Restore Contact List dialog closes.
The Contacts frame displays your imported contact information.
4.5.9 How to Export Contacts to a File
Prerequisites
• OpenScape Desktop Client is correctly configured and you are logged in at the communications system.
How to create a backup copy of your contact list:
Step by Step
1) Open the Pearl menu and select the File option.
2) Click on Export Contacts to file in the right-hand section of the Pearl menu.
The following dialog opens:
3) Select the memory location where you wish to store the contact list data and click on the ... button.
4) Select in the Contact data format combo box the file type (.xml or .csv).
5) Click on OK.
A31003-G2570-U100-13-7619, 06/2015216 OpenScape Personal Edition V7, User Guide

Step-by-Step
The Backup Contact List dialog closes.
The backup file of your contact list has been created. A confirmation dialog opens, which also states the storage location. A click on OK closes the confirmation dialog.
4.6 Communicating with your Contacts
The following features are available for communicating with other subscribers:
4.6.1 How to Call a Contact
Prerequisites
• OpenScape Desktop Client is correctly configured and you are logged in at the communications system.
How to call a contact from your contact list with OpenScape Desktop Client:
Step by Step
› Click in the Contacts frame in the row of the desired contact entry.
NOTICE: If more than one number is specified for the contact,
click on to select the desired one.
The connection is established and displayed in the Call Control frame.
4.6.2 How to Dial a Phone Number
Prerequisites
• OpenScape Desktop Client is correctly configured and you are logged in at the communications system.
How to set up a connection to any phone number:
Step by Step
1) Click on the telephone display in the main bar.
The OpenScape Desktop Client keypad is displayed.
2) Enter the desired phone number via the telephone keypad.
3) Then push the return key.
The call is initiated and listed in the Call Control frame.
A31003-G2570-U100-13-7619, 06/2015OpenScape Personal Edition V7, User Guide 217

Step-by-Step
4.6.2.1 How to Dial a Phone Number Using Copy & Paste
You can use the copy & paste method in the OpenScape Desktop Client to set up a connection to a phone number you have entered in another application (for example a word processing program).
Step by Step
1) Select the phone number in the application (for example in a word processing program).
2) Copy the selected number to the clipboard by pushing the keys [Ctrl] + [C] simultaneously or using the functions provided by the application.
3) Paste the phone number with one of the following hotkeys from the clipboard in the display field of the integrated telephone in the main bar:
• Shift key + [Ins] without office code
• [Ctrl] + [V] with office code.
NOTICE: Dialing by copy and paste is only supported for phone numbers fully specified (FQTN) according to E.164.
NOTICE: Alternatively, you can paste the phone number to be dialed in the display field of the free phone.
The phone number is shown in the display. The connection is immediately set up and listed in the Call Control frame.
4.6.2.2 How to Dial a Number Using "Drag&Drop"
You can use the drag&drop method in OpenScape Desktop Client the to set up a connection to a phone number you have entered in another application (for example in a word processing program, web browser etc.):
Step by Step
1) Select the phone number in the application (for example in a word processing program).
2) Drag the selected phone number into the display field of the integrated telephone in the main bar with the left mousebutton kept pressed.
3) Release the mouse button.
The phone number appears in the display field of the integrated telephone in the main bar.
A31003-G2570-U100-13-7619, 06/2015218 OpenScape Personal Edition V7, User Guide

Step-by-Step
NOTICE: Alternatively, you can paste the phone number to be dialed in the display field of the free phone.
The connection is immediately set up and listed in the Call Control frame.
4.6.3 How to Accept a Call
Prerequisites
• OpenScape Desktop Client is correctly configured and you are logged in at the communications system.
How to accept an icoming call displayed in the Call Control frame:
Step by Step
› Click on in the Call Control frame.
You are connected to your connection partner. The Call Control frame shows call control features.
4.6.4 How to Transfer a Call to a Device/Subscriber
Prerequisites
• OpenScape Desktop Client is correctly configured and you are logged in at the communications system.
How to transfer the control of an incoming call to another device:
Step by Step
1) Rightclick in the area of the call displayed in the Call Control frame.
A context menu opens.
2) Select Transfer to in the context menu.
The following dialog opens.
3) Enter the phone number of the device you want to transfer the incoming call to.
4) Click on the Transfer Call To icon in the Transfer call dialog.
A31003-G2570-U100-13-7619, 06/2015OpenScape Personal Edition V7, User Guide 219

Step-by-Step
The Transfer call dialog closes.
You can accept the call on another device.
NOTICE: If you operate the OpenScape Desktop Client at a OpenScape 4000, the on-hold option is unavailable.
4.6.5 How to Change the Device during an active Call
Prerequisites
• OpenScape Desktop Client is correctly configured and you are logged in at the communications system.
How to change the device during an active call while keeping the call control:
Step by Step
1) Rightclick the area of the displayed active call in the Call Control frame.
A context menu opens.
2) Select Transfer to in the context menu.
The following dialog opens.
3) Enter the phone number of the device you want to transfer the incoming call to.
4) Click on the Transfer Call To icon in the Transfer call dialog.
The dialog closes.
You can accept the call on another device.
4.6.6 How to Hold a Call
Prerequisites
• OpenScape Desktop Client is correctly configured and you are logged in at the communications system.
• You are conducting a call, which is displayed in the Call Control frame.
How to set an active call to on-hold:
A31003-G2570-U100-13-7619, 06/2015220 OpenScape Personal Edition V7, User Guide
Step-by-Step
Step by Step
› In the Call Control frame click on .
Your connection is being held. The conversational partner hears music-on-hold.
NOTICE: If you operate the OpenScape Desktop Client at a OpenScape 4000, the on-hold option is unavailable.
4.6.7 How to Retrieve a Held Call
Prerequisites
• OpenScape Desktop Client is correctly configured and you are logged in at the communications system.
• Your active call is being held and displayed in the Call Control frame.
Step by Step
› Click in the Call Control frame on in the area of the held call.
Your held call is released.
NOTICE: If you operate the OpenScape Desktop Client at a
OpenScape 4000, the back to waiting option is unavailable.
4.6.8 How to Make a Consultation Call
Prerequisites
• OpenScape Desktop Client is correctly configured and you are logged in at the communications system.
• You are conducting a call.
How to consult another subscriber during an active call:
Step by Step
1) Enter the phone number of the subscriber who you want to consult in the <Name or Number> combo box of the Call Control frame.
2) Click on to the right of the <Name or Number> field to initiate the call.
The connection to the first conversational partner is automatically being held and he/she hears music(-on-hold). You can now talk to the consultation-call subscriber.
A31003-G2570-U100-13-7619, 06/2015OpenScape Personal Edition V7, User Guide 221

Step-by-Step
4.6.9 How to Toggle
Prerequisites
• OpenScape Desktop Client is correctly configured and you are logged in at the communications system.
• You are being connected to two conversational partners. One of these calls has been set to on-hold because you are conducting a consultation call.
How to toggle calls during a consultation:
Step by Step
1) Rightclick in the Call Control frame in the area of the held call.
A context menu opens.
2) Select the Toggle option.
The held call becomes active again and you can talk to the original subscriber. The connection to the consultation-call subscriber is held.
4.6.10 How to Transfer a Call to a new Subscriber
Prerequisites
• OpenScape Desktop Client is correctly configured and you are logged in at the communications system.
• You are conducting an active consultation call.
How to connect the original caller to the consultation call subscriber during a consultation call:
Step by Step
1) Rightclick in the Call Control frame in the area of the held call.
A context menu opens.
2) Select the Transfer option.
Your connection is automatically closed. The other two subscribers can talk to each other.
4.6.11 How to Activate the "Completion of Calls to Busy Subscriber" (CCBS) Feature
This feature enables you to automate a connection setup to a previously busy subscriber in the PBX. When you initiate a call and receive a busy signal from the target subscriber, you can activate or use the callback feature as follows:
A31003-G2570-U100-13-7619, 06/2015222 OpenScape Personal Edition V7, User Guide

Step-by-Step
Step by Step
1) Rightclick the area of the displayed connection in the Call Control window.
The context menu of an active call opens.
2) Select the Callback option.
A greeting informs you that the callback function is active. Thereafter, the connection is cleared. You are then available to other callers again and you can make calls.
If the previously busy target subscriber becomes available again, the OpenScape Desktop Client is informed by the PBX accordingly. The program then lets you know by a call in the Call Control frame that the target subscriber is no longer busy.
3) Accept the call with a click on in the Call Control frame.
The PBX calls the target subscriber again.
NOTICE: CCBS cannot be used if the callee rejects the call or the PBX of the callee does not support the feature.
4.6.12 How to Activate the "Completion of Calls on no Reply" (CCNR) Feature
This feature enables you to automate a connection setup to a subscriber who does not answer the phone in the PBX. If the target subscriber is available but does not answer the phone, you can activate the callback feature as follows:
Step by Step
1) Rightclick the area of the displayed connection in the Call Control window.
The context menu of an active call opens.
2) Select the Callback option.
A greeting informs you that the callback function is active.
When the target subscriber hangs up the next time, the PBX informs the OpenScape Desktop Client accordingly. The program then lets you know by a call in the Call Control frame that the target subscriber is available.
3) Accept the call with a click on in the Call Control frame.
The PBX reconnects you to the target subscriber.
NOTICE: When you use the softphone, the free phone or the integrated phone of the Personal Edition, the callback request is shown in the telephone display. With a click
on (softphone) or (free or integrated phone), the callback function becomes active. To be automatically recon-nected to the subscriber who has become available or is present
A31003-G2570-U100-13-7619, 06/2015OpenScape Personal Edition V7, User Guide 223

Step-by-Step
again, click in the softphone on or , or on in the integrated or free phone.
NOTICE: CCNR cannot be used if the callee rejects the call or the PBX of the callee does not support the feature.
4.6.13 How to Terminate a Call
How to clear a connection listed in the Call Control frame:
Step by Step
› Click in the Call Control frame on in the area of the active call.
The connection is cleared and does no longer appear in the Call Control frame.
4.6.14 How to Send an E-Mail to a Contact
Prerequisites
• OpenScape Desktop Client is correctly configured and you are logged in at the communications system.
• An e-mail address has been configured for the contact under the contact infor-mation.
How to send an e-mail to a contact from the contact list:
Step by Step
1) Click on in the Contacts frame in the row of the desired contact.
Your preconfigured default e-mail application starts.
2) Write and send the e-mail message as usual.
The window of the e-mail application closes. The e-mail was sent.
4.6.15 How to Call a IBM Notes Contact
How to initiate a call from your IBM Notes address book using the IBM Notes integration:
Step by Step
1) Switch to the address book of your IBM Notes client.
2) Select the desired contact.
3) Click on the Dial button in the IBM Notes toolbar.
A31003-G2570-U100-13-7619, 06/2015224 OpenScape Personal Edition V7, User Guide

Step-by-Step
4) If the selected contact includes several phone numbers, a selection dialog of OpenScape Desktop Client opens. Mark the phone number you wish to use for the call in this dialog.
5) Then click on the Connect button in the selection dialog.
The call is initiated and the selection dialog closed. The main window of OpenScape Desktop Client appears in the foreground. The connection is displayed in the Call Control frame.
4.6.16 How to Call a Microsoft Outlook Contact
How to initiate a call from your Microsoft Outlook address book using the Microsoft Outlook integration:
Step by Step
1) Switch to the address book of your Microsoft Outlook client.
2) Select the desired contact and click in the Microsoft Outlook toolbar on the Dial icon.
3) If the selected contact includes several phone numbers, a selection dialog of OpenScape Desktop Client opens. Mark the phone number you wish to use for the call in this dialog.
4) Then click on the Connect button in the selection dialog.
The call is initiated and the selection dialog closed. The main window of OpenScape Desktop Client appears in the foreground. The connection is displayed in the Call Control frame.
4.6.17 How to Call an E-Mail Originator with IBM Notes
To call the originator of an e-mail in the IBM Notes client proceed as follows:
Step by Step
1) Switch to the inbox of your IBM Notes client.
2) Select the relevant e-mail.
3) Click on the Dial button in the IBM Notes toolbar.
4) If the selected contact includes several phone numbers, a selection dialog of OpenScape Desktop Client opens. Mark the phone number you wish to use for the call in this dialog.
5) Then click on the Connect button in the selection dialog.
The call is initiated and the selection dialog closed. The main window of OpenScape Desktop Client appears in the foreground. The connection is displayed in the Call Control frame.
A31003-G2570-U100-13-7619, 06/2015OpenScape Personal Edition V7, User Guide 225

Step-by-Step
4.6.18 How to Call an E-Mail Originator with Microsoft Outlook
To call the originator of an e-mail in the Microsoft Outlook proceed as follows:
Step by Step
1) Switch to the inbox of your Microsoft Outlook client.
2) Select the relevant e-mail and click in the Microsoft Outlook toolbar on the Dial icon.
3) If the selected contact includes several phone numbers, a selection dialog of OpenScape Desktop Client opens. Mark the phone number you wish to use for the call in this dialog.
4) Then click on the Connect button in the selection dialog.
The call is initiated and the selection dialog closed. The main window of OpenScape Desktop Client appears in the foreground. The connection is displayed in the Call Control frame.
4.6.19 How to Sort your Journal Entries by Call Type
How to display only specific call types in the journal:
Step by Step
› Select the call type you wish to have displayed in the Journal in the combo box at the top right margin of the Journal frame.
The Journal function window lists only the calls of the selected call type.
4.6.20 How to Display your missed Calls
How to display a list of all missed calls in the Journal frame:
Step by Step
› Select in the combo box at the top right margin of the Journal frame.
The Journal displays the missed calls only.
4.6.21 How to Dial from the Journal
How to set up a phone connection from the Journal frame:
Step by Step
1) In the journal list select the entry of the subscriber you want to call.
2) Click on in the toolbar of the Journal frame.
The call is initiated and listed in the Call Control frame.
A31003-G2570-U100-13-7619, 06/2015226 OpenScape Personal Edition V7, User Guide

Step-by-Step
4.6.22 How to Initiate a Video Call (SIP only)
In the following you learn how to initiate a video call to a contact from your private contact list.
Prerequisites
• The OpenScape Desktop Client is connected to an OpenScape Voice V5 or later.
• You and your conversational partner have an installed and operable video camera (webcam).
• In the SIP Service Provider settings you have configured and selected a video scheme that uses your operable video camera.
• The settings of the Default video configuration apply for the video scheme selected in the dialog Settings > Advanced > [Virtual] SIP Service Provider > Video schemes: the Preview is enabled (On) and Mirrored, the Layout is In call.
• A video-compatible device has been configured for the desired conversa-tional partner, i. e. a phone number has been specified in the Video Phone 1 input field of the contact entry form.
Proceed as follows to initiate a video call:
Step by Step
1) Switch to the SoftPhone tab in the ribbon.
2) In the Video group, click on the Enable Video Call option.
The Video Call feature becomes active.
3) Click in the Contacts frame in the row of the desired contact entry.
A list with the phone numbers configured for the contact is displayed.
4) Click on the list entry Video Phone 1.
When your conversational partner too has activated the icon, the video call is initiated and listed in the Call Control. The Video window opens automatically and shows your own image in a red frame and the image of your conversational partner.
NOTICE: If the SIP communications system does not provide a sufficient amount of free bandwidth, no video call can be set up. A message will inform you about this fact.
A31003-G2570-U100-13-7619, 06/2015OpenScape Personal Edition V7, User Guide 227

Step-by-Step
4.6.23 How to Start Video Streaming
Prerequisites
• The OpenScape Desktop Client is connected to an OpenScape Voice V5 or later.
• You have an installed and operable video camera.
• The Video Viewer module is active.
• In the SIP Service Provider settings you have configured and selected a video scheme that uses your operable video camera.
• For the video scheme you have selected in the Settings > Advanced > [Virtual] SIP Service Provider > Video schemes dialog the Preview is disabled (off).
How to switch a video connection to an active call:
Step by Step
1) Click in the ribbon > Softphone tab > Video group on the Camera image button.
The Video window opens, showing your own image.
2) Click in the Softphone toolbar of the Video window on .
A31003-G2570-U100-13-7619, 06/2015228 OpenScape Personal Edition V7, User Guide

Step-by-Step
Your own image appears in a red frame. It is transmitted to the connection partner.
NOTICE: If your connection partner also has a video camera and switched his/her image to the conference in the same way, it appears automatically in your Video window. You cannot control or activate/deactivate receiving video images.
4.6.24 How to Stop Video Streaming
How to terminate transmitting your own video image:
Step by Step
› Click in the Softphone toolbar of the Video window on .
Your own image does no longer appear in a red frame.
NOTICE: The video image of your connection partner remains visible until he/she terminates the transmission or the connection is cleared.
Your video image is no longer being transmitted. It is, however, still visible in the Video window until you switch off the video camera via the Camera image button
in the ribbon > SoftPhone tab > Video group or via in the Softphone toolbar of the Video window.
4.7 How to Collaborate with Contacts in a Conference
The OpenScape Desktop Client offers the following conference features for collaborating with other participants.
4.7.1 How to Start a Local Conference
How to combine two calls to a local conference:
Step by Step
1) Call one of the desired participants.
2) Rightclick the call displayed in the Call Control frame.
A context menu opens.
3) Select Consultation to in the open context menu.
The active call is being held. Your conversational partner listens to music-on-hold.
A31003-G2570-U100-13-7619, 06/2015OpenScape Personal Edition V7, User Guide 229

Step-by-Step
4) Enter the phone number of the subscriber who you want to consult in the <Name or Number> combo box of the Call Control frame.
The Consultation to dialog opens.
5) Rightclick in the area of the newly set up connection in the Call Control frame.
A context menu opens.
6) Select the Initiate local conference option.
All subscribers are connected to each other. No more participants can be added to the conference.
4.7.2 How to End a Local Conference
How to clear the connection to an active local conference:
Step by Step
› Click on in the area of the displayed conference connection in the Call Control frame.
You are no longer connected to the conference. As soon as every participant has hung up, the conference has ended.
4.7.3 How to Start a Local Video Conference
Prerequisites
• You operate the OpenScape Desktop Client at an OpenScape Voice V5 or later.
• You are taking part in an active local voice conference.
• All participants have an installed and operable video camera.
• For the video scheme you use in the Settings > Advanced > [Virtual] SIP Service Provider > Video schemes dialog the Preview is disabled (off).
How to switch a video connection to an active local conference connection:
Step by Step
1) Click in the ribbon > Softphone tab > Video group on the Camera image button.
The Video window opens, showing your own image.
2) Click in the Softphone toolbar of the Video window on .
Your own image appears in a red frame. It is transmitted to the connection partners.
A31003-G2570-U100-13-7619, 06/2015230 OpenScape Personal Edition V7, User Guide

Step-by-Step
NOTICE: If your connection partners also have a video camera and switched their image transmission to the conference in the same way, you can automatically see these images in your Video window. You cannot control or activate/deactivate receiving video images.
NOTICE: If you are the conference initiator, you see three images in your Video window: your own one in a red frame and the images of the other two connection partners.
NOTICE: If you are not the initiator of the local conference, you see two images in your Video window: your own one in a red frame and one that you receive. The latter one is mixed by the initiator in such a way that it shows the video image of the initiator and of the third participant in one video image.
4.7.4 How to End a Local Video Conference
How to terminate transmitting your own video image during a local video conference:
Step by Step
› Click in the Softphone toolbar of the Video window on .
Your own image does no longer appear in a red frame.
Your video image is no longer being transmitted. It is, however, still visible in the Video window until you switch off the video camera via the Camera image button
in the ribbon > SoftPhone tab > Video group or via in the Softphone toolbar of the Video window.
If your are the initiator and switch off your video camera via the Camera image button, the other two participants do not receive a video image any more. The local video conference then turns into a normal local audio conference.
If you are a participant without initiator privileges and switch off your video camera via the Camera image button, the initiator only sees the image of the other partic-ipant and vice versa.
A31003-G2570-U100-13-7619, 06/2015OpenScape Personal Edition V7, User Guide 231

Step-by-Step
4.7.5 How to Start a Server-based Audio Conference
Prerequisites
• A connection to an OpenScape Voice has been set up.
• You have configured the correct conference server URI in the dialog Settings > Advanced tab > [Virtual] SIP Service Provider > System functions.
How to extend a consultation call to a server-based conference (participant-controlled conference):
Step by Step
1) Rightclick in the Call Control frame in the area of the held call.
A context menu opens.
2) Click on Initiate server-based conference.
A conference between the subscribers is being initiated. The caller, the callee and the consultation-call subscriber are then connected to each other. You can switch further participants to the conference.
NOTICE: As soon as every participant has hung up, the conference has ended.
4.7.6 How to Add further Participants to a Server-Based Conference
If you wish to add further participants to an active server-based audio conference (participant-controlled conference), proceed as follows:
Step by Step
1) Rightclick the conference entry in the Call Control frame.
A context menu opens.
2) Select the Consultation to option.
The Consultation to dialog opens.
3) Enter the phone number of the desired subscriber.
4) Confirm your entries with the OK button.
The new connection is established and listed in the Call Control frame.
5) Rightclick the new connection.
A context menu opens.
6) Select the Enter Conference option.
The desired participant has been added to the conference. Only the conference is now displayed in the Call Control frame.
A31003-G2570-U100-13-7619, 06/2015232 OpenScape Personal Edition V7, User Guide

Step-by-Step
4.7.7 How to Initiate a Phone Handover via DTMF Keys
How to change a device you use in a conference:
Step by Step
1) Push the key.
2) Enter the phone number of the device you want to switch to.
3) Complete entering the phone number with the key.
The entered phone number is announced for you to check.
4) You are then prompted to continue with one of the following options:
• Push the key to perform the handover,
• push the key to abandon the process.
A31003-G2570-U100-13-7619, 06/2015OpenScape Personal Edition V7, User Guide 233

Communicating with Contacts
5 Communicating with Contacts
The contact list of the OpenScape Personal Edition is your private address book. It allows fast communication with your regular conversational partners.
5.1 Reaching a Contact from the Contact List by Telephone or E-mail
The icons to the right of a contact’s name in the Contacts frame show you whether that person can be reached by phone or e-mail.
• - The contact can be reached via telephone.
• - The contact can be reached via telephone. There are at least two phone numbers configured for him/her.
• - This icon is always available when an e-mail address has been configured for the contact.
This information is also available in the form of a tool tip when you hover the cursor on the icon.
To call a contact from your contact list or to send him/her an e-mail, click the appropriate icon next to the contact’s name in the Contacts frame.
Callback
If you cannot reach a contact by phone - he/she does not answer the phone or the line is busy - you can use the Callback feature. Rightclick the area of the displayed connection in the Call Control window. Select the Callback option in the displayed context menu.
NOTICE: So that you can use this feature you need to open the Settings dialog and select on the tab Advanced > [Virtual] SIP Service Provider > Codes. Then specify the required codes in the Callback area.
NOTICE: Only specific PBXs support the callback feature.
5.2 Calling any Contact
You can use the following options to call a subscriber who is not entered in your contact list of the OpenScape Personal Edition:
• Via the main barClick on the telephone display in the main bar. Using the open keypad or your
computer keyboard you can enter the desired number. Then click on or push the return key. The connection to the desired contact is established.
A31003-G2570-U100-13-7619, 06/2015234 OpenScape Personal Edition V7, User Guide

Communicating with Contacts
• Via the quick-access toolbarEnter the desired phone number in the <name or number> field and click
on .
• Via the ribbonEnter the desired phone number in the <name or number> field of the tab
Home > Group Call Control and click on the Make Call button.
• Via the Call Control frameEnter the desired phone number in the <name or number> field and click
on .
5.3 The Bubble (Business Card)
The business card is shown when you hover the cursor over the name of a contact in the Contacts frame or in the Journal. It sticks on top of all windows when clicked, and it can be moved and deleted.
• The business card displays a picture you assigned to the contact when you added him/her to your contact list.
• In the business card you can see the contact's name.
• The business card shows the name and address of the contact's company as far as such information is available.
• The icon lets you invoke a default e-mail application (for example Microsoft Outlook) to send an e-mail to the contact.
• The or icon lets you set up a phone connection to the contact.
5.4 Collaboration in Conferences
With the OpenScape Personal Edition you can use two types of conference services:
• Local conference (three-party conference)
• Server-based voice conference
NOTICE: In the OpenScape Voice documentation the server-based audio conference is referred to as participant-controlled conference.
A31003-G2570-U100-13-7619, 06/2015OpenScape Personal Edition V7, User Guide 235

Communicating with Contacts
5.4.1 Local Conference (Three-Party Conference)
A local conference (three-party conference) is a spontaneous simplified telephone conference started by an initiator (participant who initiates the conference). Three participants can talk to each other on the phone at the same time, that is, each participant with each participant. This type of conference is realized by the device and no conference bridge is required. The participants must already be connected before the conference may be initiated. The difference for the initiator of a local conference is that the two other conversational partners must already be connected to him/her. The other two must either be put on hold or one must be on hold and the other one in an active call.
NOTICE: In a local conference the initiator cannot add more than two other participants to the conference.
5.4.2 Server-based Voice Conference
A server-based audio conference is a spontaneous conference initiated by a participant who asks other participants to join in on the basis of consultation calls.
NOTICE: In the OpenScape Voice documentation this type of conference is referred to as participant-controlled conference.
In contrast to a local conference (three-party conference) this type of conference is provided by a conference server. This enables it to connect up to 48 participants to each other.
NOTICE: Using this feature requires the system to support the consultation call feature, at least one active connection as well as a connection to an OpenScape Voice.
5.4.3 Controlling a Conference via Telephone
With OpenScape Desktop Client you can control a current local or server-based audio conference (participant-controlled conference) via the keys of the SoftPhone, integrated phone or free phone. The keys of one of these phones are used for transmitting control commands to the system by sending DTMF tones.
NOTICE: The administrator can deactivate the operating menu by configuration. Furthermore, he/she can change the assignment of commands to the single keys. In case of doubt,
have the menu options announced via .
A31003-G2570-U100-13-7619, 06/2015236 OpenScape Personal Edition V7, User Guide
Communicating with Contacts
Activating the control menu
To control a conference via the keys of the SoftPhone, integrated phone or free
phone you first need to activate the operating menu by pushing the key. This prevents disruptions caused by a telephone key pushed inadvertently.
NOTICE: The administrator can deactivate this behavior by configuration, so that you need not activate the operating menu separately.
Control commands
In the OpenScape Desktop Client you can use the following key commands for controlling a conference:
• Prompt menuThe available menu options are announced to you.
• Lock/unlock conferenceOnce the conference has been locked, no further participants may dial in. Pushing this key once more undoes the restriction.
NOTICE: In a local conference only the initiator can trigger this feature.
• Mute selfVia this key you can temporarily deactivate the microphone of your telephone. The conference connection is maintained. Pushing this key once more reacti-vates the microphone.
• Mute conferenceThis feature mutes all microphones of the conference participants. Only the voice signal of the conference participant who triggers this function is still transmitted to all conference participants.
NOTICE: In a local conference only the initiator can trigger this feature. In case of a server-based audio conference (device-controlled conference), all conference participants can trigger this function and also cancel a muting by themselves.
• Initiate device handoverThis function allows you to change the device you use in the conference. After you have pushed this key, enter the phone number of the device you want to
switch to. You need to complete the phone number entry with the key. For further proceedings, please follow the voice prompts.
• Toggle music-on-holdIf you currently are the only conference participant and hear music-on-hold, you can push this key to switch the music off. Pushing this key once more reactivates the music-on-hold.
A31003-G2570-U100-13-7619, 06/2015OpenScape Personal Edition V7, User Guide 237

Communicating with Contacts
A31003-G2570-U100-13-7619, 06/2015238 OpenScape Personal Edition V7, User Guide
Index
Index
"Home" tab 125"SoftPhone" tab 126
Aaccepting 176, 219Acronym directory 13activating 61, 204adding 16, 33, 61, 115, 116, 150, 151, 155, 184, 197, 200, 203, 206, 210adding a contact 156, 213adding a directory 90adding contacts 214Adding/removing modules 21Additional code 52, 73, 77Additional line 208Additional speaker 17, 177, 197, 199adjusting 124Alert tone 44Area code 51, 73, 76Attendant function 54Audio codec 64Audio controls 176Audio devices 16, 188, 192, 199Audio response 17, 197, 199Audio scheme 16, 17, 18, 197, 198, 200Audio scheme sequence 18authentication 102automatic detection 199, 202
Bbehavior 137Blind transfer 36Bubble (business card) 235
CCall 176, 219, 220Call forwarding 54Call pickup 57, 58Call pickup group 57Call pickup group (pickup call) 128Call types in the journal 162Callback 57, 222, 223calling a contact 160calling an e-mail originator 225, 226Calling with Lotus Notes 224Calling with Microsoft Outlook 225Camera image 132central configuration 30
Index
A31003-G2570-U100-13-7619, 06/2015OpenScape Personal Edition V7, User Guide 238

Index
changing 18, 34, 61, 117, 196, 206, 207, 209Changing a device 220code 58Color layout 22color scheme 22combined view 161Configuration administration 116configuration alternatives 25Configuration settings 116configuring 188, 192, 208Configuring a Lotus Notes database 95Configuring a ring tone 79, 205configuring an IBM Lotus Notes database 95Configuring an LDAP directory 91, 92Configuring Notes databases 96, 98, 99, 100Configuring SQLite directories 88Configuring the main window 185Connection status change 26, 27Consultation call 221Contact 150, 151, 152, 155, 210Contact list 150, 215, 216Contacts 156context menu 124, 125, 156, 163Controlling conferences 237Conventions 12Copy & paste 218copying 116Country code 51, 72, 76creating 157, 212
Ddeactivating 204Default ring tone 85, 206defining a base DN 93deleting 18, 34, 62, 117, 160, 164, 207, 210details 152dial 100Dialing aid 218dialing by copy&paste 218Directed call pickup 58, 128directories 89Directory Manager 106Directory search 158disabling 56display mode 27Displaying missed calls 120, 121, 178Displaying the language list 25DLS 30DMC 80Download 63Drag&drop 218DTMF keys 237
A31003-G2570-U100-13-7619, 06/2015239 OpenScape Personal Edition V7, User Guide

Index
DTMF mode 54duplicating 157
EEcho cancelling 17Echo cancelling delay 17editing 155, 198, 201Editing contact data 211EKL 70Electronic key labeling 70E-mail 224, 234Enabling/disabling video call 136ending 229, 230, 231Ending the program 117, 186exporting 216Exporting the configuration 117Extended keypad 170Extension range 51, 73, 77
FFailover 78Fallback connection 74filtering entries 162, 226Formats in the manual 12Forward call 203, 204Forwarding 203, 204Free phone 168
GGeneral settings 22general settings 91, 96Group 156, 157, 212, 213, 214
HHandover via DTMF keys 233Hanging up 176, 224Headset 177HFA connection 70HFA license 94HiPath connection 77HiPath license server 94HiPath Provider 69HiPath provider 70, 72, 73, 76, 77, 83HLM License Provider 94holding 220Hotkeys 22, 175
Iimporting 215incoming call 173individual ringtone 59, 79Initial configuration 188Initial login 187
A31003-G2570-U100-13-7619, 06/2015OpenScape Personal Edition V7, User Guide 240

Index
Initiating a video call 227instant messages 36Integrated phone 169Integration 179, 180, 192Internet page 33, 34, 206, 207
JJitter buffer 81Journal 159, 160, 161, 162, 163, 226
KKey assignments 103key configuration 57Key module 70Keyboard manager 103Keyboard operation 175Keyboard support 103
LLanguage 115, 196LDAP 89, 90, 93LDAP Directory Provider 89License server 94Licensing 94LIN 26, 115Line settings 32Lines 164Loading the default profile 64local conference 236Local conferences 229, 230Local journal provider 93Local video conference 138Location 25Location information 50, 72Logging on 113, 115logging on 66Lotus Notes 179, 225Lotus Notes address book 179, 180Lotus Notes integration 179Lotus Notes Provider 95, 102
MMain bar 118, 120Main connection 39, 70main connection 70main line 39Managing the configuration settings 116mapping 92, 98menu 120, 177Microsoft Outlook 180, 192, 226Microsoft Outlook integration 180, 192minimizing 125Mobile user 66
A31003-G2570-U100-13-7619, 06/2015241 OpenScape Personal Edition V7, User Guide

Index
Mode 26moving contacts 214MP3 file 59, 79
NName 99Name resolution 179, 181network access settings 50normal view 160Normalize call numbers 53Notification area 28Notifier 173Notifier toast 102, 173, 174number 92, 98
Oon / off 176, 177on no reply (CCNR) 223OpenScape symbol in the task bar 28Operating with computer keyboard 175options 26, 160Outbound domain 48Outlook integration 180, 192Own video image 132
PParticipant-controlled conference 232Pearl menu 121, 123, 178period view 160Personal settings 121Phone number resolution 179, 181pickup group call 174playback 17, 197, 199playing 160, 164Point-to-point video 134Ports 65, 81Prefix 51, 73, 77Profile 115, 116, 117, 184Program start settings 24Program Update 28Proxy server 46
QQoS settings 68, 83Quick-access toolbar 124
Rreceiving 133Registrar server 45renaming 157Restricted mode 182restrictions 65, 81Ribbon 124, 125, 126
A31003-G2570-U100-13-7619, 06/2015OpenScape Personal Edition V7, User Guide 242

Index
Ring tones 59, 79Ringer pitch 85
SScreensaver 105, 174Screensaver manager 105Second call waiting signalling 44Secure connection 37Security settings 85selecting 115Selecting the user language 115selecting/activating 17sending 134Sendmail Provider 103sequence 62Sequence of audio schemes 18Server-based voice conference 232, 236settings 24, 69, 87, 95, 102, 106settings (HiPath provider) 81settings (SIP Service Provider) 65signal response 17, 198, 200SIP additional line 208, 209, 210SIP server 35, 36SIP Service Provider 34, 39, 50, 51, 52, 68SoftPhone 169sorting 156sorting entries 226Speaker 176Speed-dial number 105SQLite Provider 87starting 131, 228, 229, 230Starting the program 24, 25, 109, 183Status Bar 167status information 121Stimulus Provider 86Switching microphone on /off 176synchronizing 156System identification number 51, 73
TTask bar 28Task manager 28Telephone module 31Teleworking 80Three-party conference 236TLS protocol 37to busy subscriber (CCBS) 222Toggling 222Tone signals 59Trunk code 51, 73, 77
A31003-G2570-U100-13-7619, 06/2015243 OpenScape Personal Edition V7, User Guide

Index
UUpdate 28Updating the program 28Upload 64User administration 25User interface 193User login 183
Vvideo 36Video codec 65Video conference 230, 231Video devices 202Video features 132Video image 133, 134Video scheme 61, 62, 200, 201Video scheme sequence 62Video schemes 62Video streaming 131, 137, 228, 229Video streaming behavior 137Video telephony 137Video Viewer 20Video window 138views 138Voice recording 17, 56, 160, 164, 197, 199Volume 177VPN 83
WWebbrowser 172
A31003-G2570-U100-13-7619, 06/2015OpenScape Personal Edition V7, User Guide 244

Index
A31003-G2570-U100-13-7619, 06/2015245 OpenScape Personal Edition V7, User Guide