Op Man; M-Series Rev F - Hip Health
29
M-Series Analytical Balances Denver Instrument Company
Transcript of Op Man; M-Series Rev F - Hip Health

M-SeriesAnalyticalBalances
Operation Manual700714.1 Rev. F
Denver Instrument Company

Table Of ContentsDisclaimer Notice . . . . . . . . . . . . . . . . . . . . . . . . . . . . . . . . . . . . 4Introduction . . . . . . . . . . . . . . . . . . . . . . . . . . . . . . . . . . . . . . . 5Specifications
Common Specifications and Features . . . . . . . . . . . . . . . 5Installation . . . . . . . . . . . . . . . . . . . . . . . . . . . . . . . . . . . . . . 6Environment . . . . . . . . . . . . . . . . . . . . . . . . . . . . . . . . . . . . . . 6Power Source . . . . . . . . . . . . . . . . . . . . . . . . . . . . . . . . . . . . . 7Leveling the Balance . . . . . . . . . . . . . . . . . . . . . . . . . . . . . . . 7Connecting external power transformer . . . . . . . . . . . . . . . 7
General InformationDual Display . . . . . . . . . . . . . . . . . . . . . . . . . . . . . . . . . . . . . . 8Numeric Display . . . . . . . . . . . . . . . . . . . . . . . . . . . . . . . . . . . 8Message Display. . . . . . . . . . . . . . . . . . . . . . . . . . . . . . . . . . . 8Keyboard . . . . . . . . . . . . . . . . . . . . . . . . . . . . . . . . . . . . . . . . 8
Calibration. . . . . . . . . . . . . . . . . . . . . . . . . . . . . . . . . . . . . . . . . . 9Balance Operation
Basic Weighing . . . . . . . . . . . . . . . . . . . . . . . . . . . . . . . . . . . 11Zeroing (Taring). . . . . . . . . . . . . . . . . . . . . . . . . . . . . . . . . . . 11Setup Menus . . . . . . . . . . . . . . . . . . . . . . . . . . . . . . . . . . . . 12Print Menu . . . . . . . . . . . . . . . . . . . . . . . . . . . . . . . . . . . . . 14Modifying Calibration Variance . . . . . . . . . . . . . . . . . . . . . 12
Interface ApplicationsSignal Definition . . . . . . . . . . . . . . . . . . . . . . . . . . . . . . . . . . 17I/O Specifications . . . . . . . . . . . . . . . . . . . . . . . . . . . . . . . . . 17I/O Connection . . . . . . . . . . . . . . . . . . . . . . . . . . . . . . . . . . 18I/O Commands . . . . . . . . . . . . . . . . . . . . . . . . . . . . . . . . . . 18
Troubleshooting Guide . . . . . . . . . . . . . . . . . . . . . . . . . . . . . . . 22Cleaning Instructions . . . . . . . . . . . . . . . . . . . . . . . . . . . . . . 22
Initialization and Linearity Correction . . . . . . . . . . . . . . . . . . 23Glossary Of Terms . . . . . . . . . . . . . . . . . . . . . . . . . . . . . . . . . 25Accessories . . . . . . . . . . . . . . . . . . . . . . . . . . . . . . . . . . . . . . . . 26Calibration Variance. . . . . . . . . . . . . . . . . . . . . . . . . . . . . . . . . 27Menu Trees . . . . . . . . . . . . . . . . . . . . . . . . . . . . . . . . . . . . . . . . 28Warranty . . . . . . . . . . . . . . . . . . . . . . . . . . . . Inside Back Cover
You have purchased a quality precision weighing instru-ment that requires handling with care.
Read entire contents of this Operation Manual prior tooperating your new Denver Instrument balance.
Disclaimer Notice“Calibrate your balance using reference weights of theappropriate tolerance (class). An instrument can be nomore accurate than the standard to which it has beencompared. For assistance in the selection of referenceweights, please contact the factory”.
Class A Digital Devices:
Notice: This equipment has been tested and found to complywith the limits for a Class A digital device, pursuant to Part 15 ofthe FCC rules. These limits are designed to provide reasonableprotection against harmful interference when the equipment isoperated in a commercial environment. The equipment gener-ates, uses, and can radiate radio frequency energy and, if notinstalled and used in accordance with the instruction manual,may cause harmful interference to radio communications.Operation of this device in a residential area is likely to causeharmful interference in which the user will be required to correctthe interference at his own expense.
Caution: Changes or modifications not expressly approved bythe manufacturer could void the user’s authority to operate thisequipment.
Manufactured in the U.S.A. by:
Denver Instrument Company6542 Fig Street • Arvada, Colorado 80004
(303) 431-7255 • (800) 321-1135 • Fax(303) 423-4831

IntroductionThank you for choosing one of our precision instruments. Yourbalance is designed and manufactured to the most rigorousstandards in order to give you years of service. Check thecontents of the shipping carton. You should find the following:
• Operation Manual • Warranty Card• Weighing Pan • External Power Transformer• Pan Ring • Power Cord
Immediately verify that all items have been included and thatthere has been no damage in shipping. To take advantage ofyour new balance’s many features, carefully read your oper-ating manual. It contains step-by-step procedures, examples,and other vital information.Warranty CardRemember to return your completed warranty card within tendays and to record all purchase information in the space pro-vided on the back cover of your manual.
Warning: Use of this product in a manner not specified by themanufacturer may impair any safety protection provided bythe equipment!
SpecificationsModel # M-120 M-220 M-310 M-220DCapacity 120g 220g 310g 220g/31gReadability 0.1mg 0.1mg 0.1mg 0.1mg/0.01mg
Common Specifications and FeaturesElectrical Requirements 115/230~50/60 Hz.Response Time VariableControls Membrane Keyboard, 5 Keys
plus Zero (Tare) keyDisplay, Message 0.25" high Vacuum Fluorescent,
14 segment, 10 characters.Display, Numeric 0.5" high Vacuum Fluorescent,
seven segment character.Pan Diameter 3 1/4" (8.25 cm).
RS-232 Bidirectional Interface, 5 different formats.Automatic Calibration with built-in NIST (National Institute ofStandards and Technology) Traceable Weights.
!
5
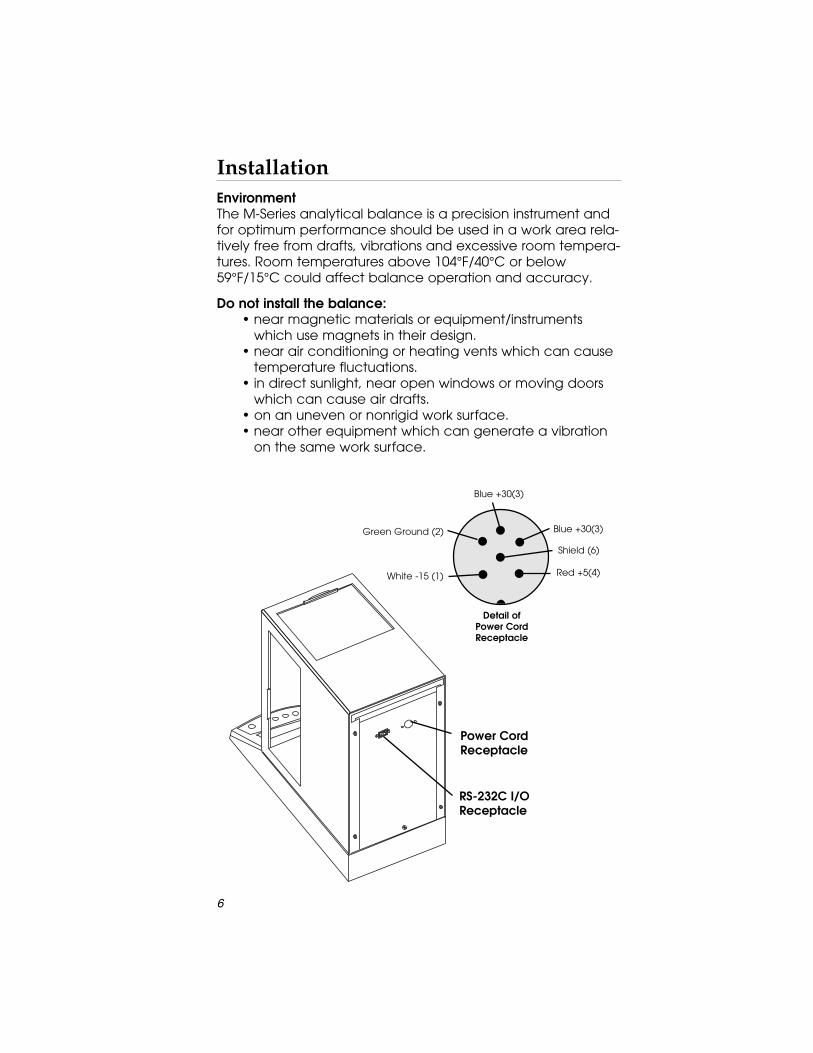
InstallationEnvironmentThe M-Series analytical balance is a precision instrument andfor optimum performance should be used in a work area rela-tively free from drafts, vibrations and excessive room tempera-tures. Room temperatures above 104°F/40°C or below59°F/15°C could affect balance operation and accuracy.
Do not install the balance:• near magnetic materials or equipment/instruments
which use magnets in their design.• near air conditioning or heating vents which can cause
temperature fluctuations.• in direct sunlight, near open windows or moving doors
which can cause air drafts.• on an uneven or nonrigid work surface.• near other equipment which can generate a vibration
on the same work surface.
6
Power CordReceptacle
RS-232C I/O Receptacle
Detail ofPower CordReceptacle
Blue +30(3)
Blue +30(3)
Red +5(4)
Green Ground (2)
White -15 (1)
Shield (6)

Power SourceThe line voltage, which is used to power the analytical bal-ance, should be reasonably constant and free from fluctua-tions. It is also not advisable to use an outlet that is sharedwith fluorescent fixtures or other electrical equipment thatdraws current in an inconsistent manner.
Leveling the BalancePlace the balance in a work area as described above. Thebalance must then be leveled to weigh accurately. A levelindicator vial on the floor of the weighing chamber is provid-ed for your convenience. Adjust the leveling foot at the backof the balance, then the side leveling feet until the bubble isin the center of the level indicator vial. Turn clockwise to raiseor counterclockwise to lower the balance.
Installing the Weighing Pan and Pan RingGently place the weighing pan into the load receiver whichshows through the hole in the center of the weighing cham-ber floor. Then place and center the pan ring on the outsideof the weighing pan. A metal ring on the floor of weighingchamber will keep the pan ring in place and from touchingthe weighing pan.
Connecting the External Transformer1. Prior to connecting the power to the balance, it is impor-
tant to verify that the external power supply matches thevoltage of the power source. If the proper transformer is notused, damage to the balance may occur.
2. Connect the power cord to the external transformer. Thennoting the orientation of the connector, connect the exter-nal transformer cord to the receptacle on the back of the balance. See figure on following page.
3. Finally, plug the power cord in to a proper AC outlet. Thebalance will go through a self test procedure, display checkand then indicate the model designation.
Your balance is designed to be continuously plugged in. If thebalance is unplugged from the power source, it will be neces-sary to go through a warm up period for the balance to stabi-lize.
Warm UpTo stabilize the balance for accurate weighing, it is importantthat the balance be warmed up for a minimum of 24 hoursfor the model 220D and 2 hours for all other models.
7

General InformationDisplay FeaturesYour balance features two displays (a large Numeric Displayand a smaller Message Display) to give you complete weigh-ing information.Numeric DisplayThe Numeric Display continuously shows your weighing results.The number of decimal places displayed depends on the bal-ance model.Message DisplayThe Message Display conveniently uses text to clearly provideweighing information. During a weighing, the Message Displaycontinues to show the weighing unit, (for example, GRAM)and also the unstable indicator. Whenever the balance isunstable, an indicator (U) appears on the far right side of theMessage Display. During the Set Up procedures, the MessageDisplay will scroll through the available set up options.
KeypadThe balance features a sealed membrane keypad for easyand reliable operation. To operate a key quickly press it firmlyand then release. When scrolling through a list of selections,the key may also be held and released when the desiredselection is shown in the Message Display.
The following outlines the function of each key.
On/Off Enters desired setting in Set Up Display and SetUp Print Menus.Turns display ON and OFF.
8
On/Off Setup Select Calibrate Print Zero
Denver Instrument M-220D
Numeric Display Message Display Unstable Indicator
Setup Accesses Set Up Display Menu and Set Up PrintMenus.Cycles through the Display Set Up Menuoptions.
Select Cycles through Set Up selections.Changes Range on Model-220D only.
Calibrate Initiates automatic internal calibration.Print Initiates data transmit via serial I/O.
Cycles through the Set Up Print Menu options.Zero Re-zeroes (tares) the Numeric Display.
Exits Set Up Display and Set Up Print Menus toweighing display.
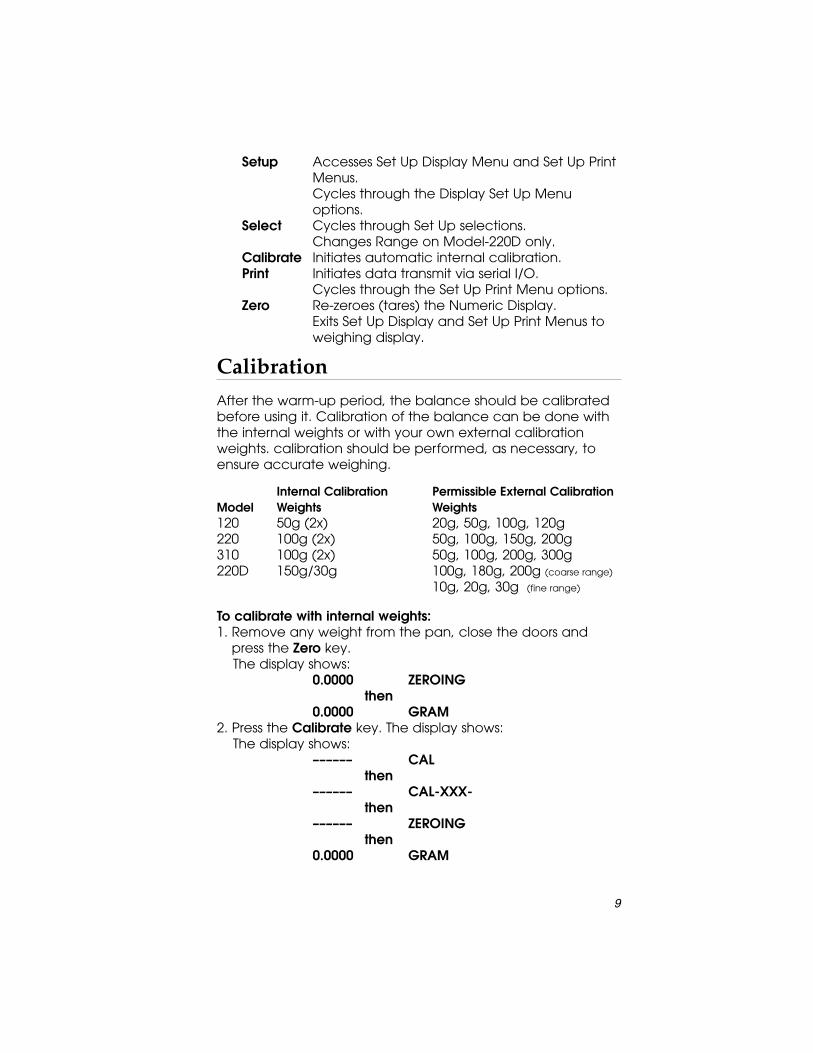
CalibrationAfter the warm-up period, the balance should be calibratedbefore using it. Calibration of the balance can be done withthe internal weights or with your own external calibrationweights. calibration should be performed, as necessary, toensure accurate weighing.
Internal Calibration Permissible External CalibrationModel Weights Weights120 50g (2x) 20g, 50g, 100g, 120g220 100g (2x) 50g, 100g, 150g, 200g310 100g (2x) 50g, 100g, 200g, 300g220D 150g/30g 100g, 180g, 200g (coarse range)
10g, 20g, 30g (fine range)
To calibrate with internal weights:1. Remove any weight from the pan, close the doors and
press the Zero key. The display shows:
0.0000 ZEROINGthen
0.0000 GRAM2. Press the Calibrate key. The display shows:
The display shows:–––––– CAL
then–––––– CAL-XXX-
then–––––– ZEROING
then0.0000 GRAM
9

To calibrate with External weights:
1. Remove any weight from the pan, close the doors andpress the Zero key. The display shows:
0.0000 ZEROINGthen
0.0000 GRAM2. Place a permissible calibration weight on the pan and close
the doors. (100 gram weight used for illustration).The display shows:
100.0001 GRAM3. Press the Calibrate key.
The display shows:100.0000 CAL-100-
4. Remove the weight. The display shows:
0.0000 GRAM
Balance OperationThe balance operation is designed for ease of use. Alwaysmake sure the balance is stable before each step of weigh-ing. When the balance is stable, the unbalance indicator (U)will disappear from the right hand side of the Message Display.The balance is set to weigh in Grams. Other weighing unitscan only be set through the I/O port. (See page 18)
I. Default (Factory) Settings
The balance is preset at the factory to correspond to themost common user requirements. Listed below are the fac-tory settings that are activated when the balance is initial-ly turned on. (See the Set Up Menus Section IV)
Filter – FAST Auto Zero – ON Beeper – On, longRange* – Manual Print – Single Baud – 300Format – Type 1 Zero Print – ON Parity – OFFInterval – No Interval Echo – ON
* For Model 220D only.
10

II. Basic WeighingTo weigh without a container:1. Close the doors of the weighing chamber.2. Press the Zero key.
The display shows:0.0000 ZEROING
then0.0000 GRAM
3. Place the object or material to be weighed on theweighing pan.The display shows:123.0120 GRAM (For example)
4. Wait for the unstable indicator (U) to disappear andthen take the weight reading.
Dual Range Weighing (Model 220D)Pressing the Select key toggles between the fine andcoarse ranges.
III. Zeroing (Taring)All models have zeroing capability up to the capacity ofthe balance. By zeroing the container prior to adding asample, the container’s weight is stored in memory untilthe Zero key is pressed again.
To weigh with a container:1. Close the doors of the weighing chamber.2. Press the Zero key.
The display shows:0.0000 ZEROING
then0.0000 GRAM
3. Place the container to be zeroed on the weighing panand close the doors.The display shows:
23.3485 GRAM (For example)4. Wait for the unstable indicator (U) to disappear and
then press the Zero Key. The display shows:
0.0000 ZEROINGthen
0.0000 GRAM5. Place the sample to be weighed into the container.
The display shows:
124.2234 GRAM U (For example)6. Wait for the unstable indicator (U) to disappear, then
take the weight reading.
11

IV. Set Up MenusThe balance menu structure consists of two Set Up Menuswhich allow the operator to configure the balance to yourspecific operating environment or weighing applications.
A. DISPLAY MENUThese parameters are related to how the weighing infor-mation is displayed. Parameters in the following:Current Shows the current balance menu settings.Default Sets the parameter to factory default settings.Filter Optimizes response to vibrations by changing
the update speed.Auto Zero Automatic re-zero of the display when near
zero.Beeper Audible BEEP when keys are pressed.Range (On the models 220D only), selects method for
range change.•To check the Current configuration:
1. Press the Setup key. The display shows Setup.2. Press the Setup key again. The display shows Current.3. Press the On/Off key to select the Current option.4. Press the Select key repeatedly to scroll through the cur-
rent parameter selections. 5. Press the Zero key to return to the weighing mode.
•To set the Default (factory) settings:1. Press the Setup key three (3) times. The display shows
Default.2. Press the On/Off key to select the Default settings. The
display will return to the weighing mode.
•To set the Filter selection:1. Press the Setup key four (4) times. The display shows
Filter.2. Press the Select key repeatedly to scroll through the
three (3) selections:• FT FAST — (Filter Fast): Used under ideal conditions.• F NORMAL — (Filter Normal): Used under standard
laboratory conditions.• FT SLOW — (Filter Slow): Used in areas with drafts and
vibrations.3. Press the On/Off key to select the desired Filter setting
when it appears in the Message Display.4. Press the Setup key to go to Auto Zero, or the Zero key
to return to the weighing mode.
12

•To set Auto Zero:1. Press the Setup key five (5) times. The display shows A-
Zero.2. Press the Select key repeatedly to scroll through the two
(2) selections: • A-Z ON — (Auto Zero On): Automatically compen-
sates for zero drift.• A-Z OFF — (Auto Zero Off): Turns off this correction
feature.3. Press the On/Off key to select the desired Auto Zero set-
ting when it appears in the Message Display.4. Press the Setup key to go to Beeper or the Zero key to
return to the weighing mode.
•To Change Beeper duration or to turn Off:1. Press the Setup key six (6) times. The display shows
Beeper.2. Press the Select key repeatedly to scroll through the
three (3) selections:• BP SHORT — (Beeper Short): Sets audible tone to a
short duration• BP LONG — (Beeper Long): Sets audible tone to a
long duration• BP OFF — (Beeper Off): Sets audible tone to OFF.
3. Press the On/Off key to select the desired Beeper set-ting when it appears in the Message Display.
4. Press the Setup key to go to Default (or Range on model220D) or the Zero key to return to the weighing mode.
•To set method for Range change (model 220D only):1. Press the Setup key seven (7) times. The display shows
Range.2. Press the Select key repeatedly to scroll through the two
(2) selections:• AUTO R — (Auto Range): After placing a sample
weight on the pan that exceeds its' 31 gram capaci-ty, the balance will automatically switch from fine tocoarse range and tare out the sample. The displayshows: 0.000. To return to fine range, remove weightand press the Select key
• MANUAL R — (Manual Range): Keeps the balancefrom switching ranges when 31 grams is exceeded.The display shows: - - - - , when this occurs.
3. Press the On/Off key to select the desired Range settingwhen it appears in the Message Display.
4. Press the Setup key to go to Default, or the Zero key toreturn to the weighing mode.
13

B. PRINT MENUThese parameters are related to the set up of the serialinterface for printer or computer interface applications:Print Allows the balance to send data to a comput-
er or printer when interfaced.Baud Sets the transfer rate unit for serial data trans-
mission in bits/second.Format Sets the format for the type of I/O string.Zero Print Permits balance to print at zero weight.Parity Permits recognition of simple bit errors in data
transmissions.Interval Adapts data transfer to match receivers of dif-
ferent speeds.Echo Permits verification of commands sent from a
computer
•To set Print when the data string is sent:1. Press the Setup Key. The display shows Setup.2. Press the Print key. The display shows Print.3. Press the Select key repeatedly to scroll through the
three (3) selections:• SINGLE — Manually sends a single data string from
the balance to printer or computer after stability.• AFTR STB — (After stability): Automatically sends a sin-
gle data string after the display stabilizes.• EACH DSP — (Each Display): Continually sends signal
through the serial port.4. Press the On/Off key to select the desired Print setting
when it appears in the Message Display.5. The display will return to the weighing mode.
• To set the Baud rate:1. Press the Setup key. The display shows Setup.2. Press the Print key twice (2). The display shows Baud.3. Press the Select key repeatedly to scroll through the six
(6) selections:
110BD 1200BD300BD 2400BD600BD 4800BD
4. Press the On/Off key to select the desired Baud Ratewhen it appears in the Message Display.
5. The display will return to the weighing mode.
14

•To set Format:1. Press the Setup key. The display shows Setup.2. Press the Print key three (3) times. The display shows
Format.3. Press the Select key repeatedly to scroll through the five
(5) selections: (See page 15 for Output Specifications)
TYPE 1 TYPE 3 TYPE 5TYPE 2 TYPE 4
4. Press the On/Off key to select the desired Format settingwhen it appears in the Message Display.
5. The display will return to the weighing mode.
•To set Zero Print:1. Press the Setup key. The display shows Setup.2. Press the Print key four (4) times. The display shows ZPrint.3. Press the Select key repeatedly to scroll through the two
(2) selections:
• Z PR ON — (Zero Print On): Prints when displays readszero.
• Z PR OFF — (Zero Print Off): Does not prints when dis-play reads zero.
4. Press the On/Off key to select the desired Zero Print set-ting when it appears in the Message Display.
5. The display will return to the weighing mode.
•To set Parity:1. Press the Setup key. The display shows Setup.2. Press the Print key five (5) times. The display shows Parity.3. Press the Select key repeatedly to scroll through the
three (3) selections:
• PRTY OFF — (Parity Off) - Turns parity off.• EVN PRTY — (Even Parity) - Requires that the number
of set bits must be even.• ODD PRTY — (Odd Parity) -Requires that the number
of set bits must be odd.
4. Press the On/Off key to select the desired Parity settingwhen it appears in the Message Display.
5. The display will return to the weighing mode.
15

•To set Interval:1. Press the Setup key. The display shows Setup.2. Press the Print key six (6) times. The display shows
Interval.3. Press the Select key repeatedly to scroll through the four
(4) selections:
• NO INTVL — (No Interval): Transfers data automati-cally when any change or update occurs.
• 1/1 SEC** — (Print 1/1 second): Transfers data onceevery second or up date.
• 1/10 SEC** — (Print 1/10 seconds): Transfers dataonce every ten seconds.
• 1/60 SEC** — (Print 1/60 seconds): Transfers dataonce every 60 seconds.
**to use this setting, the Each Display (EACH DSP) mustfirst be selected. See page 14.
4. Press the On/Off key to select the desired Interval set-ting when it appears in the Message Display.
5. The display will return to the weighing mode.
•To set Echo:1. Press the Setup key. The display shows Setup.2. Press the Print key seven (7) times. The display shows
Echo.3. Press the Select key repeatedly to scroll through the two
(2) selections:
• ECHO ON: Balance echoes command back to com-puter.
• ECHO OFF: No echo from the balance.
4. Press the On/Off key to select the desired Echo settingwhen it appears in the Message Display.
5. The display will return to the weighing mode.
16

Interface ApplicationsTECHNICAL SPECIFICATIONSI. Signal Definition
Your balance uses a RS-232C interface, with the defaultsetting at 8 data bits, Parity Off and two (2) stop bits. Thebalance must receive one (1) or two (2) stop bits.
Data output: Voltage output compatible with RS-232C levels, 300 ohm source resistanceunits and ± 10 volt swing minimum.
Data input: Voltage input compatible with RS-232Clevels, nominal 3000 ohms input impedance, ± 5 volt minimum swing, ±20 volts maximum voltage.
Case ground: Tied to earth ground through the powercord.
Signal ground: Tied internally to the case ground.
II. I/O SpecificationsThe information transfer to and from the balance isaccomplished with RS-232C serial compatible signals,using a choice of 8 data bits with Parity Off or 7 data bitswith Parity On. The interface connector is a 9 pin malesubminiature D plug.
It is important to determine interface requirements ofequipment connected to the balance. The maximumrecommended cable length is 25 feet. The information istransmitted at variable baud rates ( from 110 to 4800) instandard ASCII format. See page 15 to change the baudrate.
Output SpecificationsOutput can be in one of the following forms:
Stable UnstableType 1 1 + 0000.0002 U + 0000.0002Type 2 S + 0000.0003g SD + 0000.0003gType 3 ST + 0000.0003 US + 000.0003Type 4 + 0000.0003 + 000.0003Type 5 + 0000.0003 grams + 0000.0003 unstableThe output string is terminated with a <cr> <If>.
17
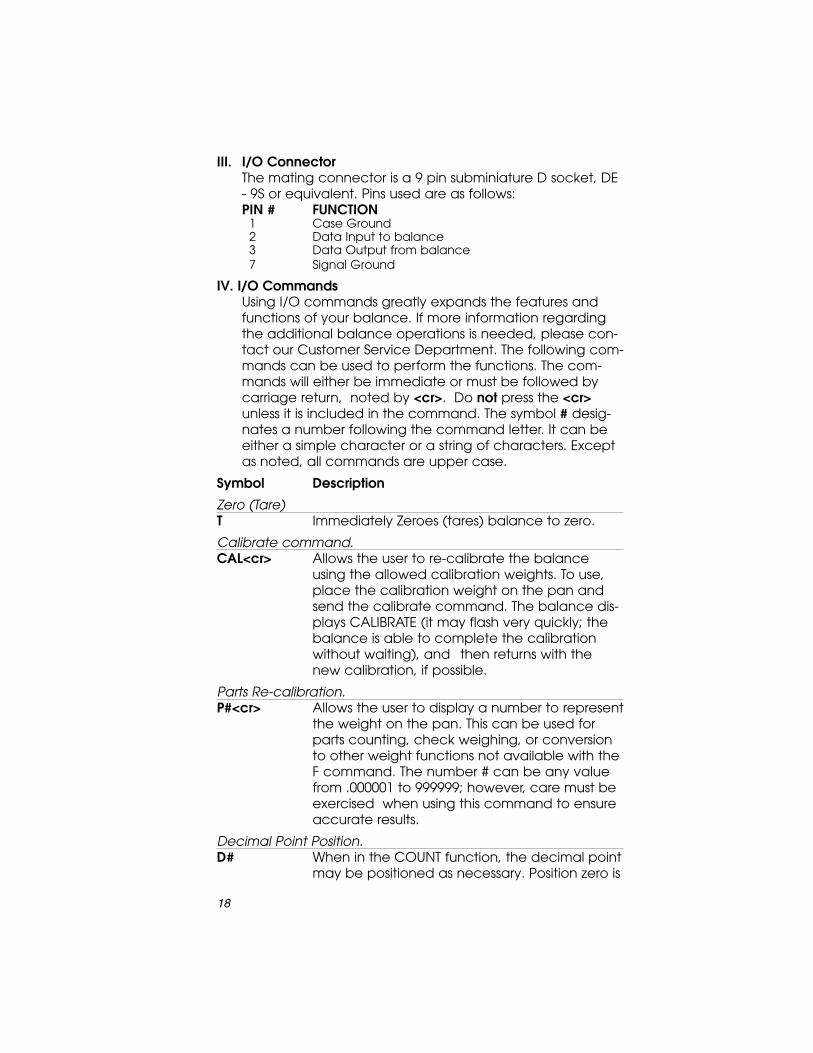
III. I/O ConnectorThe mating connector is a 9 pin subminiature D socket, DE- 9S or equivalent. Pins used are as follows:PIN # FUNCTION
1 Case Ground2 Data Input to balance3 Data Output from balance7 Signal Ground
IV. I/O CommandsUsing I/O commands greatly expands the features andfunctions of your balance. If more information regardingthe additional balance operations is needed, please con-tact our Customer Service Department. The following com-mands can be used to perform the functions. The com-mands will either be immediate or must be followed bycarriage return, noted by <cr>. Do not press the <cr>unless it is included in the command. The symbol # desig-nates a number following the command letter. It can beeither a simple character or a string of characters. Exceptas noted, all commands are upper case.
Symbol DescriptionZero (Tare)T Immediately Zeroes (tares) balance to zero.
Calibrate command.CAL<cr> Allows the user to re-calibrate the balance
using the allowed calibration weights. To use,place the calibration weight on the pan andsend the calibrate command. The balance dis-plays CALIBRATE (it may flash very quickly; thebalance is able to complete the calibrationwithout waiting), and then returns with thenew calibration, if possible.
Parts Re-calibration.P#<cr> Allows the user to display a number to represent
the weight on the pan. This can be used forparts counting, check weighing, or conversionto other weight functions not available with theF command. The number # can be any valuefrom .000001 to 999999; however, care must beexercised when using this command to ensureaccurate results.
Decimal Point Position.D# When in the COUNT function, the decimal point
may be positioned as necessary. Position zero is
18

to the right of the least significant digit andposition seven is to the left of the seventh digit.Seven digits plus the decimal place are avail-able, but there may be some variationsdepending upon the unit's capacity.
Range Change. Selects Range on dual range models.RL Changes Range to Lower capacity.RH Changes Range to Higher capacity.
Function select. F# The balance changes to the function selected
by the function number (#). The # represents ahex number (0-9, B-D). It is not necessary toremove the weight or Zero (tare) when chang-ing functions. The following table lists theFunction number and function name.
0 - COUNT 5 - GRAIN 9 - DRAM2 - DWT (Pennyweight) 6 - CARAT B - MATH A3 - OUNCE 7 - POUND D - MILLI (Milligrams)4 - OZT (Troy Ounce) 8 - SCRUP (Scruple)
SU<cr> Set Up Accesses Set Up Menu and lists alloptions.
M# <cr> Enters balance Identification Name.D Sets Default Values and Exits.F# Function. Disables Functions 0-9, A-C.
Example: F10 = GRAMS OFFF#1 Enables Functions 0-9. A-C.
Example: F11 - GRAMS ONFI Function Initialization resets factory parameters.I# Sets Filter integration speeds using a hex num-
ber (1-9, A-F) with 1 being fastest, 5 being thestandard, and F being the slowest.
Auto-Zero. Sets Zero Reading Adjustment.ZØ Disables Auto-Zero.Z1 Enables Auto-Zero.
Beeper. Adjusts Beeper tone.BØ Disables Beeper tone.B1 Sets Beeper for short, soft tone.B2 Sets Beeper for longer, louder tone.
Range. A Range Change on dual range models.RA Sets Automatic Range change when lower
capacity is exceeded.RM Keeps balance in lower capacity range, oper-
ated Manually.
19

Exit.X Exits and Saves settings that remain stored
even if power is lost.Set up print.SUP Accesses Print Menu and lists all options.
Print. Sends data string to printer.PØ Prints continuously.P1 Single when Print Key is pressed after balance
has stabilized.P2 Prints after balance has stabilized.
Baud. B# Sets Baud.
1 - 110 3 - 600 5 - 24002 - 300 4 - 1200 6 - 4800
Format.F# Sets Format Type for I/O string with F1 being the
standard setting.1 - Type 1 3 - Type 3 5 - Type 52 - Type 2 4 - Type 4
Zero Print. Sets Printer for Zero Printing.ZØ Does not print at zero weight.Z1 Prints at zero weight.
Parity. Sets Parity Parameters.PTØ Turns OFF Parity.PT1 Turns ON Parity.PT2 Sets Parity at even.PT3 Sets Parity at odd.
Interval. Sets time Intervals for printing.IØ No Interval.I # Prints at Intervals set by seconds up to once
every 120 seconds.Echo.EØ Sets Echo OFF, half display.E1 Sets Echo ON, full display
Print.?# Prints the data # of times when the balance
has stabilized. The # can be 1 to 9. If # is zero,then the balance does a continuous output ofthe data. Example: If # = 4, then the balance (when sta-ble) outputs its data string four times consecu-tively following the receipt of the command.
20

Balance Identification NumberID=#<CR> Enters Balance Identification Number. Up to an
eight digit number can be entered, but onlythe last six digits are shown on the MessageDisplay.
ID<CR> Displays balance name and Identification num-ber.
Statistical AnalysisRC Clears memory of any statistical data.RN# Sample #. Assigns the first sample Number
with additional samples being numbered con-secutively. # can be from 1 to 1,000
E Enters sample from weighing pan and assignssample number beginning with the numberpreviously set.
Recall.R<cr> Recalls all statistical data.
Multiple Tare Values.Z#S Enters Multiple ZERO (Tare) Weight directly from
the weighing pan.Z#=#<cr> Enters a Multiple ZERO (Tare) Value. The first # is
the number of the ZERO (tare) value which canbe any digit between 0 and 9. The second # is the weight of the (tare) value which canbe any 6 digit number plus a decimal point.
Z#R Recalls a multiple tare value that has beenstored (0-9).
Math Function.A#<cr> Enters the value for A.
OFF.OF Turns Display OFF.ON Turns Display ON.
Keyboard.KL Set Up Menu lock.KU Set Up Menu unlock.Linearity Correction.WØ Internal Weight OffW1 Small Internal Weight On.W2 Large Internal Weight On.
21

Appendix A - Troubleshooting Guide
Display Shows Cause Remedy
On/Off key pressed Press the On/Off keyto turn Off Displays.Power cord not Connect cord.connected.No power to outlet or Check power supimproper voltage. ply and voltage
switch.Temporary fault Disconnect and
reconnect power cord. (Wait at least five seconds beforereconnecting it.)
Weight exceedsbalance capacity. Reduce weight.Pan not properly Install properly.installed.Pan obstructed. Move balance.Air movement Move balance or around balance. alter filter.Unstable location. Make sample sta-
tionary.Balance operating Re-calibrate error balance.
Check level.Pan obstructed Check pan place-
ment.Calibration error See Calibration
Section.
NOTEThis unit contains no user serviceable parts. Please refer to the inside back cover of this manual for the phone number of your sales and service representative.
Cleaning Instructions
The exterior surfaces of the product may be cleaned with amild water-based detergent and a lint-free nonabrasive cloth.Alternately, isopropyl alcohol may be used. Do not immersethe product in any liquid.
– – – – – OO VV EE RR
– – – – – UU NN DD EE RR
99 55 .. 22 44 77 GG RR AA MM UU
22 55 .. 22 33 11 GG RR AA MM
NN OO CC AA LL
22
(Blank Screens)

Appendix B - Initialization* and/orLinearity CorrectionWarning: The following procedure should only be preformed
by a qualified technician. Improper adjustment willeffect the accuracy of readings.
Equipment: Use two test weights of similar value to set lineari-ty. Recommended weight is either 1/3 or 1/2 of the balancecapacity. However, the exact value of either weight need notbe known to do this procedure.
NOTE: Pressing Zero during this procedure will exit linearity.
1. Press the Setup key.The display shows:
SET UP2. Press the Calibrate key.
The display shows:INITALZ
3. Press the Select key.The display shows:
INITTo initialize the balance, proceed to the next step. To performthe linearity correction, skip to Step #6.4. Press the On/Off key.
The display shows:INIT -XX-
5. Press the Zero key and return to normal operation.The display shows:
ZEROING6. Press the Select key again.
The display shows:LIN
7. Press the On/Off key. The display shows:
LIN 18. When the Numeric Display is stable, again press On/Off key.
The display shows:LIN 2
9. Place the first test weight on the weighing pan.10. When the Numeric Display is stable, again press On/Off
key. The display shows:LIN 3
11. Remove the first test weight and place the second testweight on the weighing pan.
23
12. When the Numeric Display is stable, again press On/Off key. The display shows:
LIN 413. Place both test weights on the weighing pan.14. When the Numeric Display is stable, again press the On/Off
key and the Message. Display shows the LinearityCorrection.The display shows:
L number. 15. Remove weights and press the Zero key to return to normal
operations.
* Initialization resets to the default parameters and erases alluser data.
24

Appendix C - Glossary of Terms Automatic Calibration Automatic self-calibration of the balance.Auto-Zero Automatically correcting the zero display
due to slow drift.Baud Rate The transfer rate unit for serial data transmis-
sion in bits/seconds between the computerand the printer.
Bit Unit used for the information content of acommunication.
Calibrate Adapts the balance to a reference weight.Capacity The maximum mass that a balance is capa-
ble of weighing (the top end of the rangescale). See Balance Specifications forcapacity.
Coarse Range Normal weighing range with ten time lessreadability than the fine range. (See DualRange.)
Counting Pieces A weighing application for determining thepiece count of identical weighing samples.
Default Preset parameters automatically in usewhen the balance is turned on.
Dual Range Balance Balance with an auxiliary fine range that hasa ten times greater readability than thecoarse range.
Electronic Balance Using one of several methods, an electronicbalance senses a physical force whenweight is placed on it and translates thisforce into digital form.
Factory Setting Settings pre-selected in the menu by themanufacturer for normal applications andconditions. These can be changed by theuser, but they also can be reset using thedefault Set Up Procedure.
Fine Range Weighing range with ten times greater read-ability than the coarse range.
Interface Connector with standardized data transferbetween the balance and another compo-nent of the system (printer, computer).
Leveling Horizontal aligning of the balance duringinstallation.
Linearity The amount a weight reading may deviatefrom a straight line between 0 grams andthe maximum capacity of the balance.Within the capacity of the balance, weightreadings will deviate a very small amount.
Menu A series of settings from which the user canchoose in order to the balance to a particu-lar weighing situation
Parity Checking information in the data transmis-sion.
25

Readability The smallest increment that a balance is ableto display.
Resolution The minimum discernible measurement. Inother words, the minimum weight that mustbe added to the balance to enable the dis-play.
Re-zero Returns balance to zero setting using the Zero(Tare) key.
Set Up The process of configuring the balance tooperate in a certain way.
Tare Weight Weight of a container or package thatshould not be taken into account in theweighing.
Taring Compensating for a Tare Weight by settingthe display of the balance at zero with thecontainer or other packaging material onthe weighing pan. Also called re-zeroing orzeroing.
Unstable Indicator Symbol that is automatically displayed whenthe balance is not stable. It disappears whenthe balance becomes stable.
Weighing Mode Used for the weighing operation. The weigh-ing unit being used is displayed on theMessage Display.
Appendix D - AccessoriesITEM DENVER INSTRUMENT PART NO.Lock-down Device 36800110.1Printer 115V 901038.1Printer 230V 901039.1Printer Paper 901044.1Printer Ribbon 901045.1External Calibration Weights - available through your distributor.
Part# Input Output all power supplies700754.1 115V~, 50/60 hz, 25 watts +30 V, 100mA700754.3 230V~, 50/60 hz, 25 watts +15 V, 100mA700754.4 100V~, 50/60 hz, 25 watts -15 V, 100mA 700754.7 220V~, 50/60 hz, 25 watts +5 V, 1mA
The tolerance for AC input to the external transformer is ± 10%.A separate cord set is provided to connect the external trans-former to the mains supply.
Note: Other main connector plug configurations may beavailable. Contact your sales representative.
26
Appendix E - Calibration VarianceCorrections can be made to the calibration values to com-pensate for the difference between the actual weight beingused and the permissible value. This feature allows the calibra-tion value to match certified weights with correction value. Apermissible weight value can be altered as much as ± 19.9milligrams, and on the Model 220D low range, ± 1.99miligrams.
NOTE: Altering the calibration value for an external calibra-tion weight which matches to that models internalweight, will change the internal calibration varianceas set at the factory. The variance, which is estab-lished in the following procedure, will remain in memo-ry until this procedure is performed again.
To modify the calibration variance:
1. Press the Calibrate key.The display shows:
CAL2. Press repeatedly the Setup key until the calibration value to
be modified is displayed.The display shows: (100 grams used in this example.)
CAL-100-3. Press the On/Off key to select the value.
The display shows:V + 00.0
4. Press the Setup key repeatedly to display either the plus (+)or minus (-) sign.
5. Press the On/Off key when the desired sign is displayed. Thedisplay shows:
V - 00.06. Press the Select key repeatedly to change the first digit
(digits cycles 0-1). The display shows:
V-10.07. Press the On/Off key when the desired digit is displayed.8. Press the Select key repeatedly when the desired digit is dis-
played.9. Repeat steps 8 and 9 for each additional digit. The balance
returns to the weighing display when the last digit has beenselected with the On/Off key.
27

Appendix F – Menu Trees
28
DISPLAY MENU TREE
CURRENTDEFAULTFILTER FT FAST*
F NORMALFT SLOW
BP SHORTBP LONG*BP OFF
AZ ON*AZ OFF
BEEPER
AUTO ZERO
AUTO RMANUAL R*
RANGE(220D Only)
PRINT MENU TREE
PRINT SINGLE*AFTR STBEACH DSP
110BD 1200BD300BD* 2400BD600BD 4800BD
TYPE1* TYPE4TYPE2 TYPE5TYPE3
BAUD
FOR MAT
Z PR ON*Z PR OFF
ZERO PRINT
PRTY OFF*EVN PRTYODD PRTY
PARITY
NO INTVL*1/1 SEC1/10 SEC1/60 SEC
INTERVAL
ECHO ON*ECHO OFF
ECHO
* FactoryDefaultSettings

Warranty Instructions
1. Please return the prepaid, pre-addressed PurchaseRegistration Card to Denver Instrument Companypromptly upon your purchase of the Denver Instrumentproduct. the return of the card is not a condition prece-dent to warranty coverage.
2. If you have any questions about a Denver Instrumentproduct, please call toll-free, 1-800-321-1135 (or FAXdescription of problem to (303) 423-4831) for technicalassistance.
3. If it becomes necessary to return your Denver Instrumentproduct for service, you must obtain a “ReturnAuthorization Number”. Please pack the productsecurely in its original approved packing carton or othersuitable container and include your ReturnAuthorization Number on the shipping label and as aprecaution also a note inside the box. Shipping chargesmust be fully prepaid.
Ship to:Denver Instrument Company6542 Fig StreetArvada, Colorado 80004

Denver Instrument Company6542 Fig Street • Arvada, Colorado 80004 U.S.A.
1-800-321-1135 • (303) 431-7255 • Fax (303) 423-4831www.denverinstrument.com