Oop 2014 embedded systems with open source hardware v2
72
Developing Developing Software Software for for Open Open Source Hardware Source Hardware © Prof. Dr. Michael Stal, 2014
-
Upload
michael-stal -
Category
Documents
-
view
125 -
download
3
description
Transcript of Oop 2014 embedded systems with open source hardware v2

DevelopingDeveloping Software Software forfor Open Open Source HardwareSource Hardware
© Prof. Dr. Michael Stal, 2014

Engineers never failEngineers never fail
I have not failed. I've just found 10,000 ways that won't work.
[Thomas A. Edison]

The The RiseRise ofof PhysicalPhysical ComputingComputingDefinition: Building interactive physical systems by the use of software and hardware that can sense and respond to the analog world […] In practical use, the term most often describes handmade art, design or DIY hobby projects that use sensors and microcontrollers to translate analog input to a software system, and/or control electro-mechanical devices such as motors, servos, lighting or other hardware.
Arduino-based Laser Harp: visithttp://makezine.com/projects/laser-harp/ for detailed instructions

Maker MovementMaker MovementModern version of DIY (Do-It-Yourself)extends the idea of open source softwarebuild things with free hardware and donate the design to the communityFabLabs* for tinkerers who share tools as opposed to owning themIncreasing number of
s* FabLab = Fabrication Laboratory

Portals with Public Domain ProjectsPortals with Public Domain Projects
ExamplesThingiverse http://www.thingiverse.comInstructables http://www.instructables.com

Instructions and Design DocumentsInstructions and Design Documents
IncludesDesign CAD files
Part list
Instructions how to assemble the parts

UsefulUsefulThings Things –– well, not well, not alwaysalways thatthat usefuluseful
Design provided as STL (Standard Triangulation Format) documents in verbose ASCII or in compact binary format
Example:solid namefacet normal n1 n2 n3outer loopvertex p1x p1y p1zvertex p2x p2y p2zvertex p3x p3y p3z
endloopendfacetendsolid name

Production of 3D ObjectsProduction of 3D ObjectsHow?
Either yourself using a 3D printer (from under 1000 € to 10.000s of €)Or by cheap commercial fabrication companies (on-demand production)Main benefit: feasible even for small amounts of itemsLiability: may make piracy easier

So, What?So, What?
Increasing number of open source microcontroller boards
Excellent and cheap tools for prototyping
Useful to learn basics of software development for embedded systems
Scope are systems w/o stringent real-time/dependability requirements
Intel goes ArduinoIntel goes ArduinoEven large companies support Arduino:
headline on October, 3rd, 2013: Intel launches Galileo, an Arduino-compatible development
board with x86 CPU

Open Source Hardware BoardsOpen Source Hardware Boards
The most important ones:Arduino(microcontroller board)Raspberry Pi (controller plus a Linux PC)NetDuino (layoutcompatible with Arduino but .NET based)BeagleBone(microcontroller board, Embedded Linux)
Typical price range from 20€ to around 50€
Main focusof this talk

PrerequisitesPrerequisitesWhich prerequisites are necessary for building such systems?
Small Systems, Medium Systems with Low Complexity:
For implementing existing designs, only basic knowledge of electronics/mechatronics
Some rather inexpensive tools
Sets like the Arduino Starter Kit
Hint: many open source projects available in the Internet and in books
Larger and/or complex systems:Knowledge about electrical engineering/mechatronics
Soldering skills and Soldering station (except if only prototyping on breadboards)
Electronic test instruments (oscilloscope, frequence analyzer, power generator, voltmeters...)
A collection of components and ICs
Tools, Cables, Breadboard, Hansaplast, ...
David L. Jones publishes excellent videos on electronics in his blog: EEVBlog (Electronics Engineering Video Blog)

Arduino & FriendsArduino & Friends
HA
L (powered by A
rduino)

Back Back toto thethe FutureFuture2005: Started as project at the Interaction Design Institute Ivrea, Italy 2006: Won a price at Prix Ars Electronica in 2006 Name taken from Arduino d'Ivrea (King of Italy around 1002 AC) *Goal: up-to-date board for students as an alternative to BASIC Stamp & Wiring framework„Processing for Hardware“Creative Common LicenseWatch documentary on http://vimeo.com/18539129
Creators of Arduino with Massimo Banzi(to the right):
First prototype board, made in 2005
well, that‘s the romantic version. Actually, it was named after a local pub
Arduino Web Sitehttp://arduino.cc
*

The Arduino FamilyThe Arduino FamilyArduino comes in a lot of flavors, e.g.,
LilyPad Arduino (Arduino for your clothes)
Arduino Uno Rev. 3 (the „reference model“)
Arduino Yun and Arduino Tre (microcontroller + separate Linux system on one board)
Commercial companies sell their own implementations: e.g., SainSmart, Seed, AdaFruitBYO: You can even build your own Arduino board

ArduinoArduino Board DesignBoard DesignAnalog Reference
Digital I/O Pins 2-13 (9, 10, 11with PWM = Pulse Width Modulation)
Digital Ground
Pins 1 & 2: Digital I/O. When used forcommunicationthen Serial In/Out, TX/RX
Reset Button: on reset the bootloader restarts
In-Circuit Serial Programmer: if you need to upload another bootloader
Analog In: 0-5
Jumpers: Toggling between USB power and external power (jumpers)
Power Connectorsconnected with your board. Not all boards use 5V!
External Power Supply
USB Used to load programs (=sketches) to the board, to power the board, and for serial communication
Boards (i.e., their pins) have a maximum current they can handle. Most Arduino boards define a maximum of 40 mA. Higher values will cause damage.
CPU with16MHz

II22C* C* –– The LowThe Low--Speed BusSpeed BusMulti-master serial single-ended computer bus invented by Philips SemiconductorsUsed in most open source hardware boards for attaching low-speed peripherals (speed 10 Kb/s-100Kb/s; newer versions even up to 3.6 Mb/s)Two bidirectional open-drain lines: Serial Data Line (SDA) und Serial Clock (SCL)Pull-up resistors to prevent data floatingWire library available (for accessing I2C)
Master generates the clock andinitiates communicationSlave receives clock and respondswhen addressed by masterMaster sends only if it detects no start or stop bit sent by another master Single Message or Multi MessageLicense free; only slave addressesmust be bought
* I2C = Inter-Integrated Circuit, invented by Philips Semiconductor Division, now NXP

ProcessorsProcessorsNewer boards (Due): ARM with Cortex-M3 (32 Bit Architecture)
Previous Boards (Uno, Mega. Leonardo, Duemillenova, ...): based on Atmel‘s chip family ATMega xxx, 8 Bit Architecture
ArduinoYun and Tre: additional but separate on-board unit(Atheros resp. ARM Cortex A8) running Linux (OpenWRT)
ArduinoYun Architecture
A bridgeconnects
both worlds

Solderless BreadboardsSolderless BreadboardsConnecting the Arduino to a breadboard is very useful for designing circuits without solderingWhen finished you may use a PCB (Printed Circuit Board) instead
Breadboards consist of pinholes to place components(terminal strip) as well as busstrips:
Terminal strip: all pin holesBus strips for power supply (red = voltage, blue = ground) Notch in the middle (where mostlyICs such as DIPs are placed)

Standard ComponentsStandard ComponentsYou‘ll need a basic set of components:
Resistors, Potis, Capacitors
Transistors, Diodes, LEDs
Buttons, Switches
Relays, Transformators
Motors
Standard ICs such as OpAmps, L298 bridges
App for looking up resistor color codes
Wires, wires, wires
A 9V block battery with a connector
WRONG
BETTER

Sensor & Actuator ComponentsSensor & Actuator Components
Pressure Sensor
Ultrasonic
Gyro
Hall Sensor
Temperature Sensor
Developers needs to add specific code for reading or writing actuator/sensor values
Usually attached through an analog port
Specification of chip/component explains how to map between sensor values and physical units
PWM (Pulse Width Modulation) often used in digital outputs to vary intensity of speed, volume, brightness, ...

Shields, Shields, ShieldsShields, Shields, ShieldsArduino shields (incl. program libraries) add advanced logicBuilt to fit on top of an Arduino board Typically, provide the same pins like the Arduino (stacking of boards)Examples:
Motor Shield (Arduino)LCD Shield (Sparkfun)Proto Shield (Seeed Studio)GPS Shield (Adafruit)WiFi Shield (AsyncLabs)
See http://shieldlist.org/

Circuit Design with FritzingCircuit Design with Fritzing
Fritzing, an open source editor for circuit designdeveloped by University of Applied Sciences, PotsdamFritzing.org: non-profit organizationSupports, Mac OS X, Windows, LinuxYou can directly order a PCB board from within the editor

Programming an Programming an ArduinoArduinoWhen coding a sketch (= program) for microcontroller boards like Arduino, two steps are necessary:
InitializationControlling & Monitoring
1. Initialization phase executed once at start-up time: definitions and initialization of ports, connections, ...
2. Controlling & Monitoring happens in an „endless“ loop. Sketch can monitor and control the board
Application may terminate itself on specific events
Initialization
Controlling&
Monitoring
start
exit

The Arduino IDE*The Arduino IDE*Available for MacOS X, Windows, Linux at no costBased on Processing, built with Java Subset of C/C++, (implementation of Wiring) Uses gcc & avr-gcc libraries in the build processC/C++ Libraries import You may use gcc directly or within Eclipse for C++Other languages such as Java can remotely connect to Arduino using a wrapper on top of a RxTx native library
* Free guide available at http://www.me.umn.edu/courses/me2011/arduino/arduinoGuide.pdf

„Hello World“„Hello World“I respect the old tradition and present the embedded cousine of „Hello, World“...
... which results in a blinking LED
// Pin 13 has an LED connected on most boardsint led = 13;
// the setup routine - runs after each reset:void setup() {
// initialize digital pin as an output pinpinMode(led, OUTPUT);Serial.begin(9600); // start serial port
}
// infinite loop; HIGH & LOW are voltage levels!void loop() {
Serial.println(“Hello, World”); // send stringdigitalWrite(led, HIGH); // shine a lightdelay(1000); // wait for a seconddigitalWrite(led, LOW); // switch off LED delay(1000); // wait for a second
}
Language based on C/C++
Serial stream received by host and displayed on the IDE‘s Serial Monitor if available

Programming ModelsProgramming ModelsIn general, there are threeprogramming models forembedded devices:
Command-Driven (proactive, polling)
Event-Driven* (reactive, Pub/Sub)
Model-Driven (e.g., Matlab + Simulink, Labview)
All of these models havestrengths and limitations
Select the right one for your environment
Model-Driven generates code for one of the other models
Command Driven
* It is also called Behaviour-driven or Reactive Model
gene
rate
+ü´ßwsaeqq
Arduino IDE based on command-driven mode.

Reactor PatternReactor PatternIf the event-driven model is not supported, you may use the Reactor pattern to avoid the command-driven model.
Reactor Event_Handler
*
Handler 1 Handler 2
select Handle
dispatches
maintains
**
notifies
owns
Reactor (central component) waits for incoming events and demultiplexes & dispatches each event (i.e., calls your Handler which is supposed to deal with this event)
Handlers are interested in certain types of events and register for this type with the Reactor or are hard-wired
Handlers must implement a predefined interface
• Events can be prioritized• Handlers may run
concurrently• Dispatching tasks to a
thread in a multicore system is possible, but very complex (to do it right)
Consider whether you have timing constraints before use!
Handle is a unique value of a particular type (e.g., interrupts, Unix handles)that determines to which handler an event will be dispatched

Recommended Design ApproachRecommended Design ApproachIn most projects, finite state machines (FSM) (together with timing diagrams) are the best choice for design activities
1. Define the problem (space) and check the requirements
2. Elaborate all program flows that are necessary (but also consider error scenarios!)
3. Determine the states the system must support as well as the transitions incl. the actions to be called for a particular transition
4. Check and optimize the FSM5. Implement it with the table
approach or generate it

Host/Target DevelopmentHost/Target Development
Host Target
IDE
Cross-Compiler
Command Line
Development Environment
Test Environment
Developing Cross-Compiling Testing on Simulator or Physical Target
Bootloader starts on reset
USB
ICSB port for programming other firmware

Developer EcosystemsDeveloper EcosystemsArduino native IDEMariaMole: alternative IDECodeBlocks for AVR & ArduinoArduino for Microsoft Visual Studio and Atmel Studio (free). Plug-In with features of the Arduino IDE, optional USB/WiFi debuggerArduino Eclipse Plug-InArduino-Devel: ant-scripts for Eclipse instead of plug-inEclipse & AVR PlugInembedXcode: Apple’s XcodeMiniBloq: Graphical UI
More details on the Arduino Playground: http://playground.arduino.cc/

Java VM on ArduinoJava VM on ArduinoHaikoVM runs on Arduino and implements Java 6 bytecodeRuns on AVR ATmega8, AVR ATmega328p (and Windows, UNIX)A lot of nice features:
Preemptive threads & SynchronizationExceptions...
Workflow1. Java to Class2. Class to C3. C to Binary4. Upload and Run
Work still ongoing

Learning by ExampleLearning by ExampleExamples are helpful to introduce Arduino concepts
Thanks to Mike McRoberts for providing a free manual with various experiments (see below)
http://math.hws.edu/vaughn/cpsc/226/docs/askmanual.pdf http://math.hws.edu/vaughn/cpsc/226/docs/askmanual.pdf
In theory, theory and practice are the same. In practice, they are not.

Arduino ProjectsArduino ProjectsI will demo one of my own experiments
The other projects are actually taken from the Arduino Playground: http://playground.arduino.cc//main/projects
... so that you can find detailed instructions, part lists, etc. on the Web.
Uncountable Arduino projects availabe that may give you inspiration for your own experiments
But don‘t go too far!

Project Traffic LightProject Traffic LightBuilding a Traffic Light with LEDs and a Piezo speaker that signals red or green.

Example 1: DebouncingExample 1: DebouncingProblem: when pressing a switch or button the signal can bounce for a while
Solution: Debouncing pattern

Example 1 Example 1 –– Code (Setup)Code (Setup)// constants won't change. They're used here to set pin numbers:const int buttonPin = 2; // the number of the pushbutton pinconst int ledPin = 13; // the number of the LED pin
// Variables will change:int ledState = HIGH; // the current state of the output pinint buttonState; // the current reading from the input pinint lastButtonState = LOW; // the previous reading from the input pin
long lastDebounceTime = 0; // the last time the output pin was toggledlong debounceDelay = 50; // the debounce time; increase if output flickers
void setup() {pinMode(buttonPin, INPUT);pinMode(ledPin, OUTPUT);
// set initial LED statedigitalWrite(ledPin, ledState);
}

Example 1 Example 1 –– Code (Loop)Code (Loop)void loop() {// read the state of the switch into a local variable:int reading = digitalRead(buttonPin);
// If the switch changed, due to noise or pressing:if (reading != lastButtonState) {// reset the debouncing timerlastDebounceTime = millis();
}
if ((millis() - lastDebounceTime) > debounceDelay) {// whatever the reading is at, it's been there for longer// than the debounce delay, so take it as the actual current state:
// if the button state has changed:if (reading != buttonState) {buttonState = reading;// only toggle the LED if the new button state is HIGHif (buttonState == HIGH) {ledState = !ledState;
}}
}digitalWrite(ledPin, ledState); // set the LEDlastButtonState = reading; // this will be the lastButtonState in the next loop
}

Alternative SolutionAlternative SolutionUsing the Debounce Library (DRY)Available in the Arduino IDEImplements the same functionality in an elegant way
// This code turns a led on/off through a debounced switch#include <Debounce.h>#define SWITCH 5#define LED 13
// Instantiate a Debounce object with a 20 millisecond debounce timeDebounce debouncer = Debounce( 20 , SWITCH );
void setup() {pinMode(SWITCH,INPUT);pinMode(LED,OUTPUT);
}
void loop() {// Update the debouncerdebouncer.update ( );
// Get the update valuedigitalWrite(LED, debouncer.read() );
}

Example 2: PullExample 2: Pull--Up ResistorsUp ResistorsProblem: circuits are subject to electrical fluctuations which may lead to an undefined state.
Solution: use a pull-up resistor so that when unpressed, 5V will be on pin 2, and when pressed will be low to connection with ground
Arduino internally provides Pull-Up resistors for digital pins

Example 2 Example 2 –– CodeCode
void setup(){Serial.begin(9600); // start serial connectionpinMode(2, INPUT_PULLUP); // pin 2 is input and uses the pull-up resistorpinMode(13, OUTPUT);
}
void loop(){//read the pushbutton value into a variableint sensorVal = digitalRead(2);//print out the value of the pushbuttonSerial.println(sensorVal); // send current value via serial communication to host
// Keep in mind the pull-up means the push-button's// logic is inverted. It goes HIGH when it's open,// and LOW when it's pressed. Turn on pin 13 when the// button's pressed, and off when it's not:if (sensorVal == HIGH) {digitalWrite(13, LOW);
}else {digitalWrite(13, HIGH);
}}

Example 3: Using PWMExample 3: Using PWMProblem: for dimming a led, ..., we need to change the actual current continuously, but how?
Solution: Use PWM (Pulse-Width-Modulation) to simulate an analog output with variable current
Done by swítching the signal on and off for specific time intervals (duty cycles)
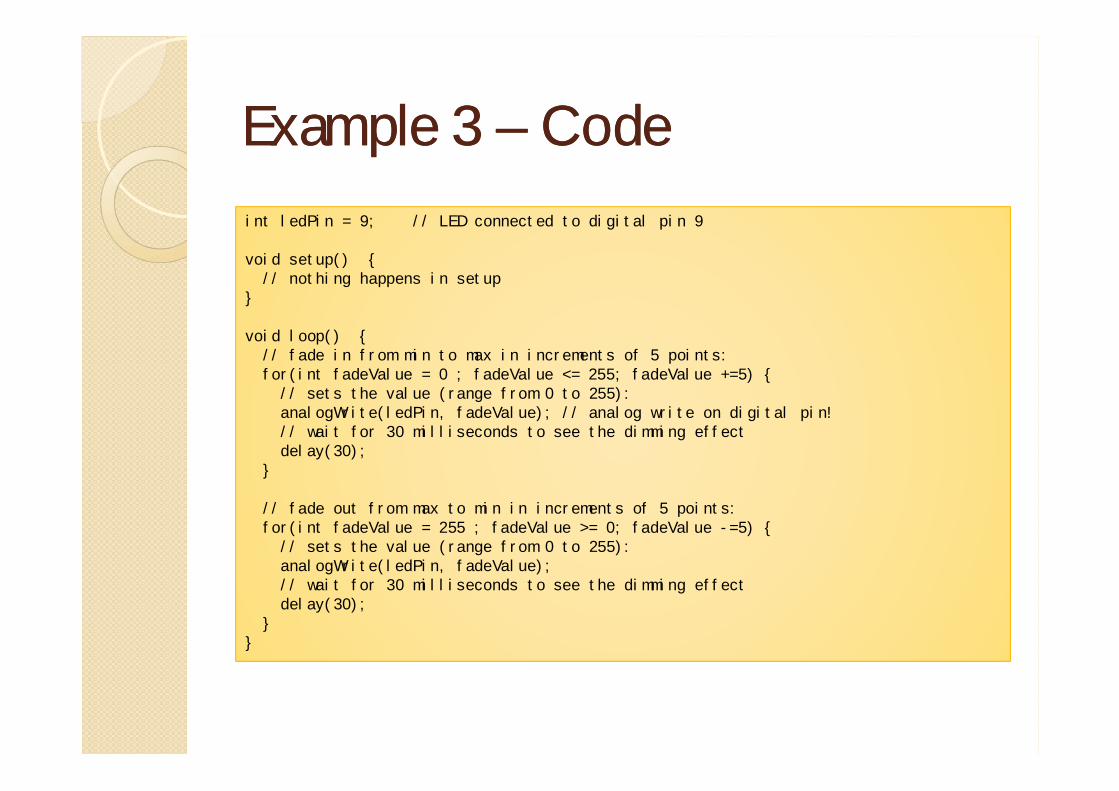
Example 3 Example 3 –– CodeCodeint ledPin = 9; // LED connected to digital pin 9
void setup() {// nothing happens in setup
}
void loop() {// fade in from min to max in increments of 5 points:for(int fadeValue = 0 ; fadeValue <= 255; fadeValue +=5) {// sets the value (range from 0 to 255):analogWrite(ledPin, fadeValue); // analog write on digital pin! // wait for 30 milliseconds to see the dimming effect delay(30);
}
// fade out from max to min in increments of 5 points:for(int fadeValue = 255 ; fadeValue >= 0; fadeValue -=5) {// sets the value (range from 0 to 255):analogWrite(ledPin, fadeValue); // wait for 30 milliseconds to see the dimming effect delay(30);
}}

Example 4: Using LibrariesExample 4: Using LibrariesProblem: How can we access the LiquidChrystal display
Solution: we need to import the LiquidChrystal Library

Example 4 Example 4 –– CodeCode#include <LiquidCrystal.h> // the library for using LCDs
// initialize the library with the numbers of the interface pinsLiquidCrystal lcd(12, 11, 5, 4, 3, 2);
void setup() {// set up the LCD's to 16 numbers and 2 rowslcd.begin(16, 2); // Print a message to the LCD.lcd.print("hello, world!");
}
void loop() {// set the cursor to column 0, line 1// (note: line 1 is the second row, since counting begins with 0):lcd.setCursor(0, 1);// print the number of seconds since reset:lcd.print(millis()/1000);
}
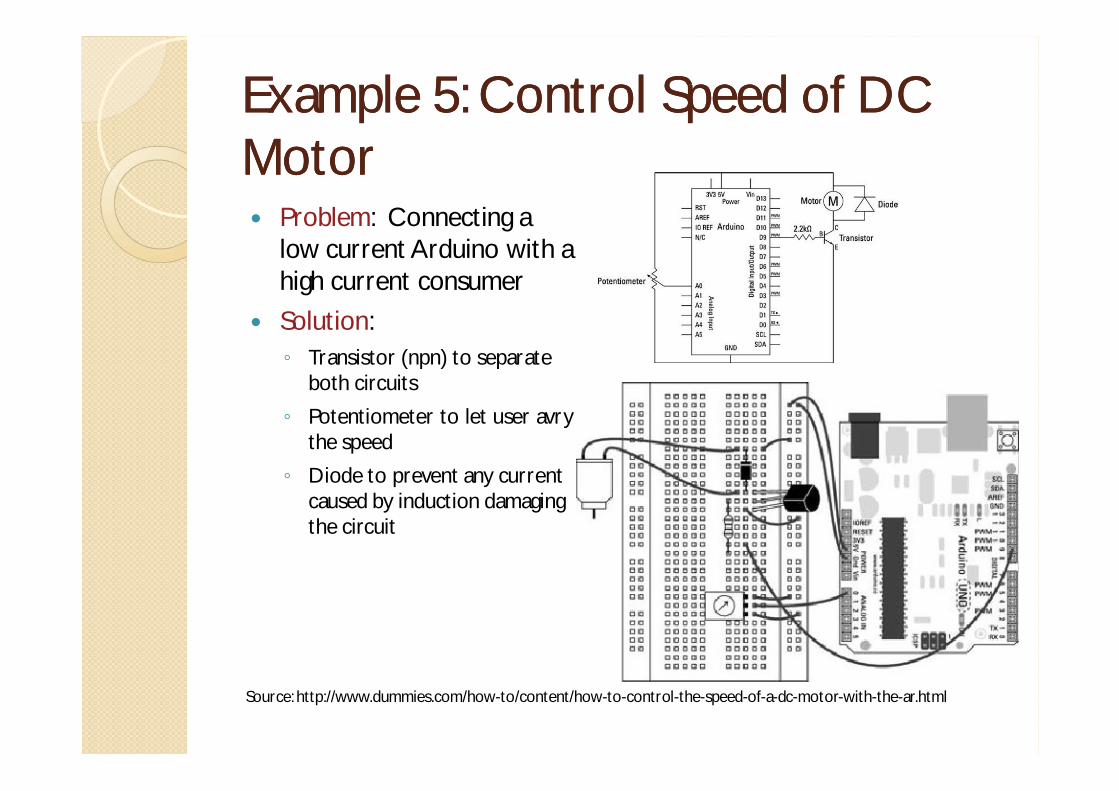
Example 5: Control Speed of DC Example 5: Control Speed of DC MotorMotor
Problem: Connecting a low current Arduino with a high current consumer
Solution: Transistor (npn) to separate both circuits
Potentiometer to let user avry the speed
Diode to prevent any current caused by induction damaging the circuit
Source: http://www.dummies.com/how-to/content/how-to-control-the-speed-of-a-dc-motor-with-the-ar.html
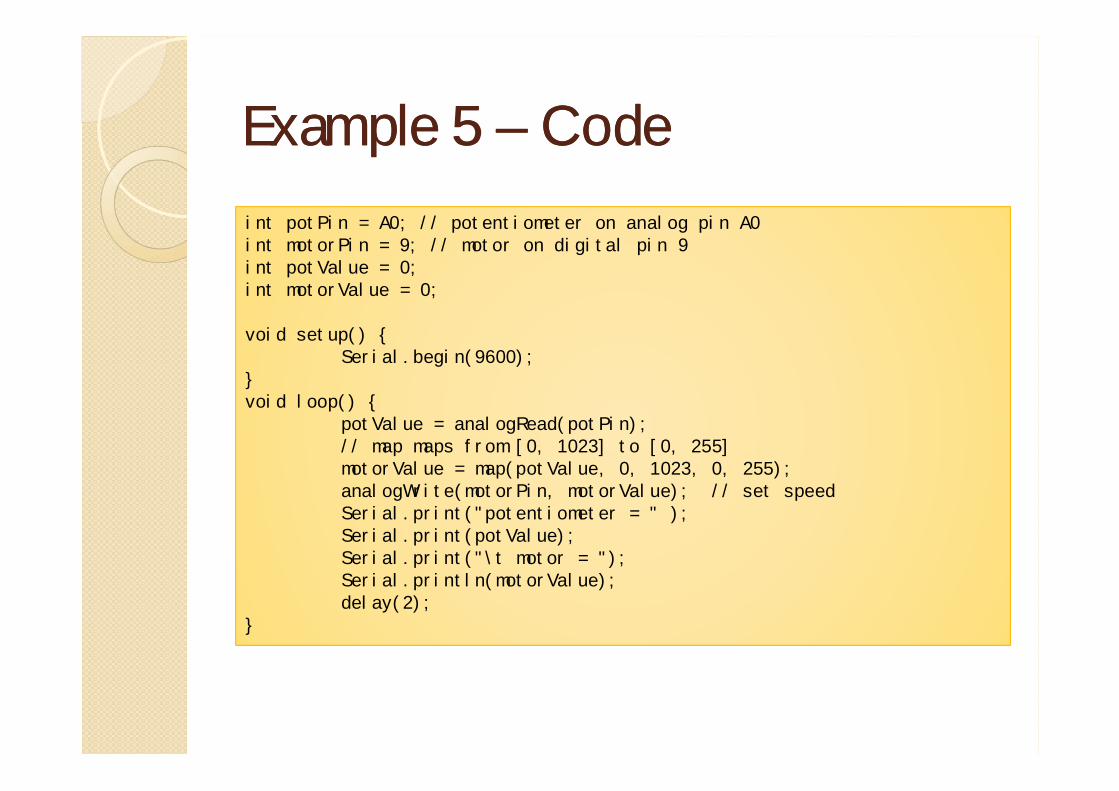
Example 5 Example 5 –– CodeCodeint potPin = A0; // potentiometer on analog pin A0int motorPin = 9; // motor on digital pin 9int potValue = 0;int motorValue = 0;
void setup() {Serial.begin(9600);
}void loop() {
potValue = analogRead(potPin); // map maps from [0, 1023] to [0, 255]motorValue = map(potValue, 0, 1023, 0, 255); analogWrite(motorPin, motorValue); // set speed Serial.print("potentiometer = " ); Serial.print(potValue);Serial.print("\t motor = ");Serial.println(motorValue);delay(2);
}

Alternative SolutionAlternative SolutionUse a motor shield (several available)
Can support multiple motors (brushed dc motor, stepper, servo)
Motor shields leverage the H-bridge L298P
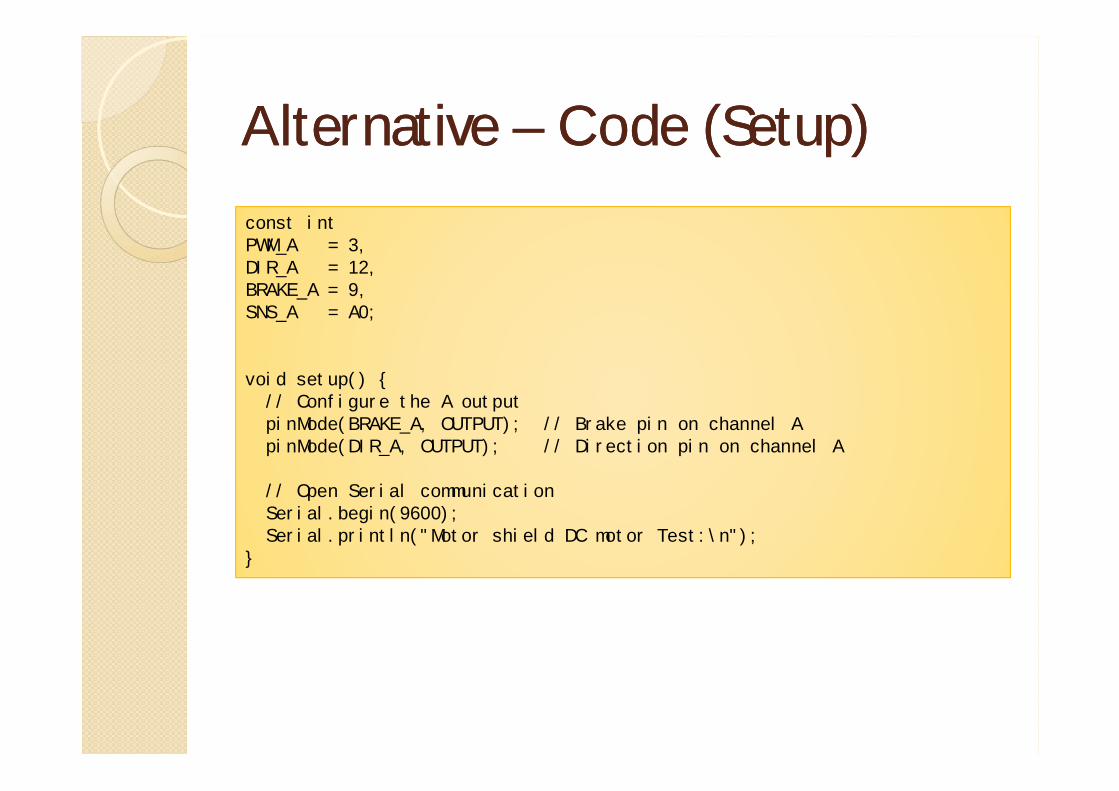
Alternative Alternative –– Code (Setup)Code (Setup)const intPWM_A = 3,DIR_A = 12,BRAKE_A = 9,SNS_A = A0;
void setup() {// Configure the A outputpinMode(BRAKE_A, OUTPUT); // Brake pin on channel ApinMode(DIR_A, OUTPUT); // Direction pin on channel A
// Open Serial communicationSerial.begin(9600);Serial.println("Motor shield DC motor Test:\n");
}

Alternative Alternative –– Code (Loop 1)Code (Loop 1)void loop() {
// Set the outputs to run the motor forward
digitalWrite(BRAKE_A, LOW); // setting brake LOW disable motor brakedigitalWrite(DIR_A, HIGH); // setting direction to HIGH: motor will spin forward
analogWrite(PWM_A, 255); // Set the speed of the motor, 255 is the max value
delay(5000); // hold the motor at full speed for 5 secondsSerial.print("current consumption at full speed: ");Serial.println(analogRead(SNS_A));
// Brake the motor
Serial.println("Start braking\n");// raising the brake pin the motor will stop faster than the stop by inertiadigitalWrite(BRAKE_A, HIGH); // raise the brakedelay(5000);
// to be continued

Alternative Alternative –– Code (Loop 2)Code (Loop 2)// … continued
// Set the outputs to run the motor backward
Serial.println("Backward");digitalWrite(BRAKE_A, LOW); // setting againg the brake LOW to disable motor brakedigitalWrite(DIR_A, LOW); // now change the direction to backw: LOW DIR_A pin
analogWrite(PWM_A, 255); // Set the speed of the motor
delay(5000);Serial.print("current consumption backward: ");Serial.println(analogRead(SNS_A));
// now stop the motor by inertia, motor will stop slower than with brake functionanalogWrite(PWM_A, 0); // turn off power to the motor
Serial.print("current brake: ");Serial.println(analogRead(A0));Serial.println("End of the motor shield test with DC motors. Thank you!");
while(1);}

Example 6: Interface to ProcessingExample 6: Interface to Processing
Problem: How can we access Arduino from Processing?
Solution: use the Processing library
Based on Firmata: generic protocol for communicating with microcontrollers like the Arduino from software on a host computer.
Guess, where the Arduino IDE came from. Processing was developed as a subset of Java to support visual artists, designers, young programmers, .... It provides stunning
Animation, Simulation, Graphics.

Example 6 Example 6 –– CodeCodeimport processing.serial.*;import cc.arduino.*;
Arduino arduino;int ledPin = 13;
void setup(){
//println(Arduino.list()); // we assume it is the first devicearduino = new Arduino(this, Arduino.list()[0], 57600);arduino.pinMode(ledPin, Arduino.OUTPUT);
}
void draw() // draw is the Processing cousin of loop{
arduino.digitalWrite(ledPin, Arduino.HIGH);delay(1000);arduino.digitalWrite(ledPin, Arduino.LOW);delay(1000);
}
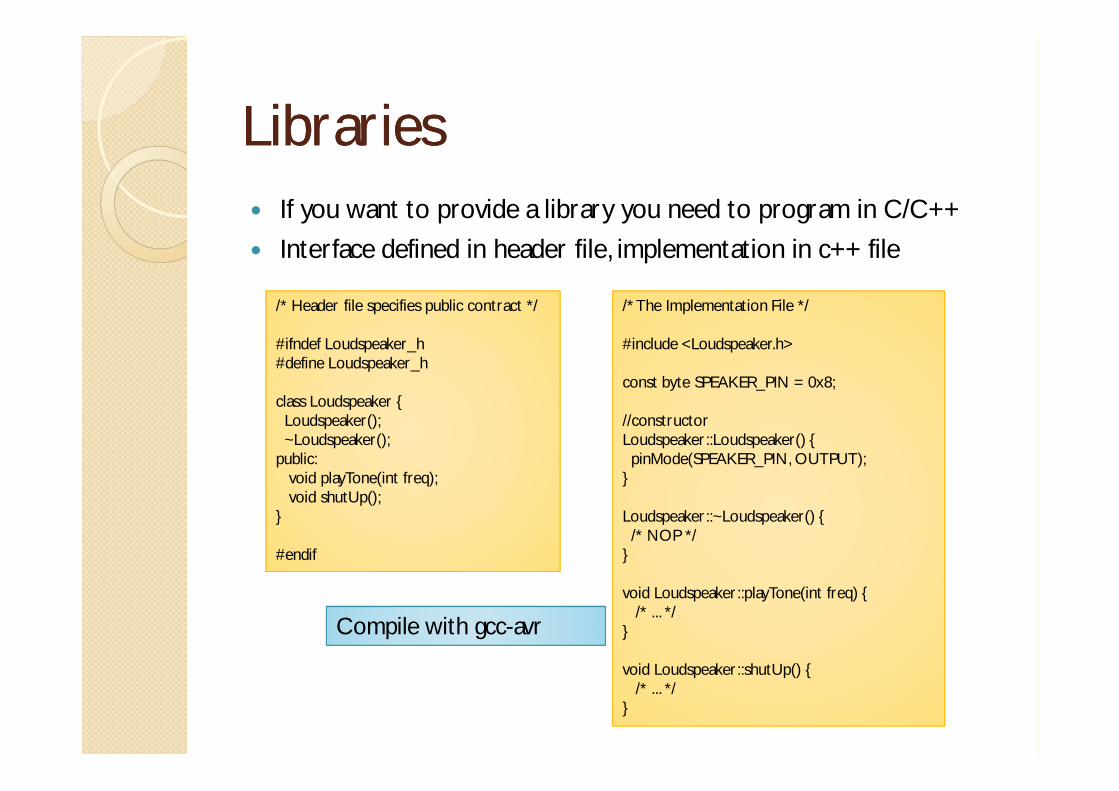
LibrariesLibrariesIf you want to provide a library you need to program in C/C++
Interface defined in header file, implementation in c++ file
/* Header file specifies public contract */
#ifndef Loudspeaker_h#define Loudspeaker_h
class Loudspeaker {Loudspeaker();~Loudspeaker();
public:void playTone(int freq);void shutUp();
}
#endif
/* The Implementation File */
#include <Loudspeaker.h>
const byte SPEAKER_PIN = 0x8;
//constructorLoudspeaker::Loudspeaker() {pinMode(SPEAKER_PIN, OUTPUT);
}
Loudspeaker::~Loudspeaker() {/* NOP */
}
void Loudspeaker::playTone(int freq) {/* ... */
}
void Loudspeaker::shutUp() {/* ... */
}
Compile with gcc-avr

Arduino SimulatorsArduino SimulatorsSimulator for those with limited tinkering capabilities or without interest
Virtronics not perfect, but so far the best solution I found (14,95 AUD)
Running my Traffic Lighht example

NetduinoNetduino
Shield-compatible with Arduino Uno Rev. 3Based on .NET Micro FrameworkSupports C#, VB, ...STMicro 32-bit microcontrollerSpeed: 168MHz, Cortex-M4Code Storage: 384 KBRAM: 100+ KB10 mbps EthernetMicro SD card support up to 2 GBInput Voltage: 7.5 - 9.0 VDC or USB powered25 mA max. current per pinDigital I/O 3.3 V but 5 V tolerant12 bit ADC (Analog Digital Converter)
„Arduino.NET“
USB
For both images: (c) Microsoft

Blinking LED in NetduinoBlinking LED in NetduinoIn Visual Studio:
Change deployment target from emulator to the real board (in the „project menu“ visit „Hello_LED properties“. There you‘ll find the „.NET Micro Framework“ where you eventually change the transport type to „USB“)
using System;using System.Threading;using Microsoft.SPOT;using Microsoft.SPOT.Hardware;using SecretLabs.NETMF.Hardware;using SecretLabs.NETMF.Hardware.Netduino;
namespace Hello_LED {public class Program {
public static void Main() {OutputPort LED = new OutputPort(Pins.ONBOARD_LED, false);while (true) {
LED.Write(true);Thread.Sleep(250);LED.Write(false);Thread.Sleep(250);
} /* while */} /* Main() */
} //* Program */} //* Hello_LED */

EventEvent--Driven NetduinoDriven NetduinoEvent-driven system-level example using .NET eventhandlers
/* imports as in the Blinking LED example */
namespace EventDrivenLED{
public class Program {static OutputPort LED = new OutputPort(Pins.ONBOARD_LED, false);
public static void Main() {InterruptPort button = new InterruptPort(Pins.ONBOARD_SW1, false, Port.ResistorMode.
Disabled, Port.InterruptMode.InterruptEdgeBoth);button.OnInterrupt += new NativeEventHandler(button_OnInterrupt);
Thread.Sleep(Timeout.Infinite);} //* Main() */
static void button_OnInterrupt(uint inf1, uint inf2, DateTime time) { // inf1: id of the button, inf2: button stateLED.Write(inf2 == 0); // true => button was pushed
} /* button_OnInterrupt */} /* Program */
} /* EventDrivenLED

Raspberry PiRaspberry Pimore a cheap ARM6-based PC to go with size of a credit cardWith 1 GHz, 512 MB RAM, separate Broadcom Graphics processor, HDMI. Often used as media center (XBMC)Created by the Raspberry Pi Foundation.„PI“ originally came from „Python Interpreter“. Not fully open source!GNU/Linux (Raspbian), or other OS loaded from a SD cardVoltage 5V (Micro-USB or batteries)Ports: 17 Digital GPIO-Pins, SPI, I²C, UART, EGL Caution: Ports can only handle 3.3V
GPIO = General Purpose I/O
SPI = Serial Peripheral Interface
EGL = Programming Interface: shields APIs
(OpenGL, ...) from the underlying windowing system

Using the GPIO PinsUsing the GPIO PinsDifferent choices:
Python, favourite language of the RPi creators
Unix Shell: writing 1 to the port 17 with the program gpio:gpio -g write 17 1
C/C++
Javascript
Java
HTML5
Perl
Erlang
...
import RPi.GPIO as GPIOimport time
/* use board pin numbers */GPIO.setmode(GPIO.BOARD)/* use it as an output port */GPIO.setup(11, GPIO.OUT)
def helloRPi(pin):GPIO.output(pin,GPIO.HIGH)
time.sleep(1)GPIO.output(pin,GPIO.LOW)
time.sleep(1)return
for i in range(0,1000):helloRPi(11)
GPIO.cleanup()

Expanding the Raspberry PiExpanding the Raspberry PiLimited capabilities compared with ArduinoVarious shields available, e.g.:
Shield to connect Raspberry Pi & Arduino
Shield to expand the capabilities of RPi
The Gert Board is a well known expansion board
Sold assembled and not assembled
12 x Buffered I/O
3 x Push Buttons
6 x Open collector drivers (50V, 0.5A)
18V, 2A motor controller
28-pin dual in line ATmegamicrocontroller
2 -channel 8, 10, or12 bit Digital to Analog converter
2- channel 10 bit Analog to Digital converter

beaglebeagleboard.orgboard.org -- BeagleBoneBeagleBoneBeagleBone Black, the sprinter:
Powered by Embedded Linux
CPU AM335x 1GHz ARM® Cortex-A8
512MB DDR3 RAM
2GB 8-bit eMMC on-board flash
3D graphics accelerator
NEON floating-point accelerator
2x PRU 32-bit microcontrollers
ConnectivityUSB client for power & communications
USB host
Ethernet
HDMI
2x 46 pin headers
• PRU = Programmable Realtime Unit• PMIC = Power Management IC

BeagleBone External Interface PinsBeagleBone External Interface Pins
Satisfaction guaranteed

BeagleBone Programming BeagleBone Programming Supports Python, Perl, C/C++, JVM Languages, JavaScript + BoneScript Library, Shell commands, ...
Can interact with Arduino serially using Java RxTx
Eclipse, Visual Studio, Cloud9 support
var b = require('bonescript');
var state = b.LOW;
b.pinMode("USR0", b.OUTPUT);b.pinMode("USR1", b.OUTPUT);b.pinMode("USR2", b.OUTPUT);b.pinMode("USR3", b.OUTPUT);setInterval(toggle, 1000);
function toggle() {if(state == b.LOW) state = b.HIGH;else state = b.LOW;b.digitalWrite("USR3", state);
}
JavaScript + BoneScript

And the rest?And the rest?pcDuino: Arduino + Android or Linux
Nanode: Actually, an extended Arduino
Libelium Waspnode: Designed for Wireless Sensor Networks, uses the Arduino IDE, for Arduino sketches - only some adjustments necessary
... CubieBoard, PandaBoard, ...Mona Lisa built with hardware(c) http://karachi.olx.com.pk/

What we didn‘t hearWhat we didn‘t hearThis was the tip of the icebergIn practice, we face additional challenges:
Multitasking and SynchronizationBoard-to-Board CommunicationNative tools „ilities“ such as SafetyReal-time requirementsDeveloping DriversEvolution and UpdateProduct FamiliesTesting & Debugging...
Nonetheless, the capabilities of open source hardware as well as its wide acceptance are more than promising. Wiring is fun!

RoboticsRoboticsFor robotics applications you may use Arduino, Raspberry Pi, BeagleBone et al. but that is tedious
Often, special robotics kits may be the better choice, e.g., Lego Mindstorms EV3
Not open source but often used for prototyping or demos
Contains NI LabVIEW, a graphical programming environment. You may also use:
LeJOS implements Java and provides its own firmware
RobotC
... many further options ...

StateState--ofof--thethe--ArtArtOpen Source Hardware helps
to learn the fundamentals of embedded systems (development)to build prototypesto create commercial systems to implement physical computing devices that interact with users and the Webto have fun
Most systems can be programmed using comfortable IDEs
But don‘t let the IDEs fool you. Embedded systems differ significantly from desktop systems, e.g.,
Hard resource constraints (small memory, short battery lifetime, less speed, ...)Time as a first order conceptIntegration with electronics, mechatronics, mechanics, ...Dependability and SafetyTesting & SimulatorsUpdates of (mobile) devices
Software is essential for embedded devices
Only a few systems today aren‘t based on software Today‘s microcontrollers are several orders of magnitudes more powerful than an Intel 8051

Future TrendsFuture TrendsThe Future is Embedded
Modern cars contain a network with several dozens interconnected embedded systemsIn „hardware“-companies like Siemens two thirds of revenues depend on software. And this number is increasing.There are far more embedded systems than other systems, but they are usually hidden in a boxConnected embedded systems become commodity products (example: cars, home automation)New types of HMI (Human Machine Interaction)Robotics on the rise
Resistance is futile -Human-Machine Interaction
Arduino-based or not?

ConclusionsConclusionsOpen source hardware boards offer a cheap and easy way to dive into embedded systems
Arduino & Raspberry Pi & Beaglebone are the VIPsArduino is superior for pure electronics projects, butArduino Yun and Arduino Tre provide a Linux system, a microcontroller, and a bridge Raspberry Pi comprises a small Linux systemBeagleBone: Arduino-like GPIO and Linux-based like Raspberry PI
Netduino:interesting for .NET developers compatible with the Arduino board layout (shield compatible)
BeagleBone and other boards are powerful but have less distribution
Board selection based on need and available support
Lego Mindstorms EV3 is excellent for learning robotics albeit commercial
Solutions for connecting Arduino/Raspberry Pi, Arduino/ Mindstorms, ... already available
Boards help to learn the pitfalls of developing embedded software without needing a safety net
• Dear NSA, the community strikes back with an Arduino-based Drone!
• Already available and much cheaper than the Euro-Hawk!
http://hacknmod.com/hack/make-a-uav-spyplane-using-the-arduino/

Some folks won‘t ever give away their Arduino board
Others would shamelessly steal it
It is like a precious ring
So, keep an eye on your ringmicro controller board

Last Words: The Last Words: The Pain of EngineeringPain of Engineering
The major difference between a thing that might go wrong and a thing that cannot possibly go wrong is that when a thing that cannot possibly go wrong goes wrong, it usually turns out to be impossible to get at and repair.
[Douglas Adams]


![[OOP - Lec 04,05] Basic Building Blocks of OOP](https://static.fdocuments.us/doc/165x107/58e63bf21a28abe3108b50b3/oop-lec-0405-basic-building-blocks-of-oop.jpg)