Online Campusecampus.nmit.ac.nz/.../NMIT_Online_Student_Guide_201… · Web viewSee details below...
41
Help pages - Student guide to using NMIT Online NMIT Online is a website providing course resources and learning activities for NMIT students. Not all courses at NMIT have materials in NMIT Online – your tutor will direct you to the site as appropriate. The site utilizes the internationally recognized MOODLE Open Source software platform. To get to NMIT Online, go to http://ecampus.nmit.ac.nz/ Help pages - Student guide to using NMIT Online (Version 2) NMIT FLEXIBLE LEARNING 12 March 2010 Getting started with NMIT Online 3 Logging in to NMIT Online 4 Having trouble Logging in? 5 Am I an online distance student? 6 Applications and software you may require 7 Your personal NMT Online home page 8 How to update your user profile & email address 9 Using your course page 11 Private messaging 13 Using the NMIT Online text editor 14 Adding images to NMIT Online 15 NMIT Online activities 17 How to view and upload an Assignment 18 Turnitin - Submitting your assignment 20 How to participate in a Forum 24 Managing Forum emails 27
Transcript of Online Campusecampus.nmit.ac.nz/.../NMIT_Online_Student_Guide_201… · Web viewSee details below...

Help pages - Student guide to using NMIT Online
NMIT Online is a website providing course resources and learning activities for NMIT students. Not all courses at NMIT have materials in NMIT Online – your tutor will direct you to the site as appropriate. The site utilizes the internationally recognized MOODLE Open Source software platform.
To get to NMIT Online, go to http://ecampus.nmit.ac.nz/
Help pages - Student guide to using NMIT Online (Version 2)NMIT FLEXIBLE LEARNING12 March 2010
Getting started with NMIT Online 3
Logging in to NMIT Online 4
Having trouble Logging in? 5
Am I an online distance student? 6
Applications and software you may require 7
Your personal NMT Online home page 8
How to update your user profile & email address 9
Using your course page 11
Private messaging 13
Using the NMIT Online text editor 14
Adding images to NMIT Online 15
NMIT Online activities 17
How to view and upload an Assignment 18
Turnitin - Submitting your assignment 20
How to participate in a Forum 24
Managing Forum emails 27
How to use the Calendar 29
Using a Glossary 30
How to participate in a Chat session 31
Using a Wiki 32

NMIT Online Student Help
In this guide you will be introduced to the basics of accessing course resources and activities available in NMIT Online. Most NMIT courses are classroom-based but we do provide a page where you can see some sample online courses. If you're looking for hints on how to manage your online study, see the separate pages: Online study - so what's involved?
Assistance
Please contact the ITS Helpdesk if you have any problems logging in on this site - 0800 422 733 ext 792 -- [email protected] (8.00 am to 5.00 pm – Monday to Friday)
Please contact your tutor if you cannot access a course area once you have logged in on NMIT Online or if you cannot find materials they have told you will be available.
Please contact the Flexible Learning Team if you have any other problems using this web site - 0800 422 733 ext 778 -- [email protected] (8.00 am to 5.00 pm – Monday to Friday).
These pages have been adapted from material kindly provided by the Wintec Moodle team and Humboldt State University
2 Student Guide to NMIT Online

Getting started with NMIT Online
This section covers the basics of logging in, updating your personal information and registering on the relevant course sites.
Computer requirements
Students planning to study our online courses or access NMIT Online from home will require access to:
A computer capable of running the following software, accessing the internet and playing audio and video files (i.e. has a sound card with speakers or headphones).
An Internet connection – while the courses can be accessed via a 56 kbps modem we strongly recommend a broadband connection to take full advantage of video and audio resources provided.
An email programme (e.g. Outlook or Thunderbird) or online email account (e.g. Gmail or Hotmail)
An Internet Browser equivalent to Microsoft Internet Explorer 7.0 or above (e.g. Firefox 3+ or Safari). Media player software for playing common audio and video files either as a standalone software (e.g.
Windows media player, iTunes, QuickTime, VLC media player) or plug-ins to your internet browser (e,g, Flash).
Adobe Acrobat Reader (version 7 or above) for displaying PDF files. A word processing programme - either Microsoft Word 2000 (or above), Open Office (free), Google Docs
(free) or some other equivalent.
Students should also be comfortable with using the computer including, basic file management, email and word processing skills. Access to and familiarity with using a digital camera and uploading pictures would also be an advantage.
The following resources may be useful to guide you through general computing and online study issues.NMIT Computer support materials iNeedHelp (http://www.nmit.ac.nz/support/iNeedHelp/)
provides information on other NMIT computing services as well as resources on a range of general software and internet skills
Library, research and study supportNMIT Learning Support service (http://www.nmit.ac.nz/support/learning/)
Study tip sheetsNMIT Library (http://library.nmit.ac.nz/)
Online research resources SearchPath - a tutorial on Library services and research skills Services for distance students
Online study – so what’s involved? (http://www.nmit.ac.nz/support/online/) Hints for studying online

Logging in to NMIT Online
NMIT Online password for campus students & staff
For Campus-based students and staff, your NMIT Online password is the same as your NMIT computer network password. You can change this password on any campus computer or by visiting the Password Service Manager page (https://webmail.nmit.ac.nz/iisadmpwd/).Note: these passwords MUST be changed every 90 days - we recommed you choose to chamnge them yourselves via the Password Service Manager page every second month to prevent accidental password expiry locking you out of the system. Any problems with logging in should be referred to the ITS HelpDesk.
NMIT Online password for distance students & special users
Online Distance students & special users, your passwords are unique to NMIT Online and can be changed from your profile page once you have logged in to NMIT Online.
The term "Distance students" includes any students on the following online courses Aviation, Career Guidance, First Line Management, Horticulture, NZ DipBus, Tourism Management or Viticulture and Wine Science. See this page for more details.
Special users are people who aren't students or staff members but have been provided login access to NMIT Online for community or project work. See this page for more details.
If you have any problems contact the ITS Helpdesk0800 422 733 ext 792 -- [email protected] am to 5.00 pm – Monday to Friday
Format of your initial / default NMIT login account
Initial NMIT student account format Student login exampleName: Jo Bloggs Student ID: 20049999 Username : jo-bloggs Password : 20049999Jb (that is: ID number followed by upper case first initial, lower case last initial) Remember the hyphen between names is important and the password is case sensitive! NOTE – long names: Usernames are restricted to a maximum of 20 characters , and any punctuation in names has been removed. (e.g. Simon Foxton-Hummingbird will have a username of Simon-FoxtonHummingb).
Password format
When you change your password it must be in the following format 1. Be at least eight (8) characters in length 2. Have at least one (1) capital letter – ABC … 3. Have at least (one) 1 number 123 … 4. Have at least one (1) lower case letter – abc … 5. Cannot contain 3 consecutive letters from your user name” e.g. jimmy cannot use jim, mmy, etc. 6. Not be the same password that you have used in the last 24 passwords Back to Password Service Manager
4 Student Guide to NMIT Online

Having trouble Logging in?
Students on campus-based courses
Your password is the same as your computer network password. If you are visiting this website before you have logged into an NMIT computer, go to the Password Service Manager page to activate your account. Contact the ITS HelpDesk if you have any problems.
Make sure You include the hyphen in your username. Check your “Caps Lock” key is not active on your keyboard and that you have entered your initials in the
correct case. If you supplied a preferred name in your enrolment forms this has been used for your username (e.g.
Elizabeth Smith prefers to be known as Liz Smith. Her username is Liz-Smith). Usernames are restricted to a maximum of 20 characters, and any punctuation in names has been removed.
(e.g. Simon Foxton-Hummingbird will have a username of Simon-FoxtonHummingb). Occasionally other people at NMIT may share you firstname and lastname. In this situation numbers have
been added to the usernames to ensure they are unique. You could try adding 2 or 3 on the end of your username (e.g. Jo-Bloggs2)
Contact the ITS HelpDesk for further assistance.
Distance students
First time visitNot sure if you are a distance student? Check out this page.Your login details should be provided to your in your online orientation pack. They will normally follow the format described on this page.
Been here before but can’t remember your login? If you have logged into NMIT Online previously and are sure your email address in your NMIT Online profile is correct, you can have the system generate you a new password.
Click on the “Yes, help me log in” button underneath the login boxes. Fill in your username OR your email address (this must match the address in your NMIT Online profile) and the system will send you an email asking you to confirm you have requested a new password. Go to your email account, and click on the link within the email message. The system will then send you a new password. For you own security, you should always change a system generated password as soon as you have successfully logged in again.
Still having problems?Make sure
You include the hyphen in your username. Check your “Caps Lock” key is not active on your keyboard and that you have entered your initials in the
correct case. Make sure you are using your NMIT Online password. As a distance student, if you have changed your
password on the computer network or the NMIT email service, it has NOT changed on NMIT Online.

If you supplied a preferred name in your enrolment forms this has been used for your username (e.g. Elizabeth Smith prefers to be known as Liz Smith. Her username is Liz-Smith).
Usernames are restricted to a maximum of 20 characters, and any punctuation in names has been removed. (e.g. Simon Foxton-Hummingbird will have a username of Simon-FoxtonHummingb).
Occasionally other people at NMIT may share you firstname and lastname. In this situation numbers have been added to the usernames to ensure they are unique. You could try adding 2 or 3 on the end of your username (e.g. Jo-Bloggs2)
Contact the ITS HelpDesk for further assistance, telling them which course you are on so they know you are a distance student.
Am I an online distance student?A NMIT Online distance student is an NMIT student enrolled in one of the following courses.
1. Aviation: All courses in Aviation are considered online distance. If you are enrolled in any course in the in Diploma in Aeronautical Maintenance Engineering then you are an online distance student.
2. Career guidance: All courses in the Diploma in Career Guidance are considered online distance. If you are enrolled in a course that has CRS in the course code (eg CRS601) then you are an online distance student. If you require help with your NMIT Online password please contact SUTI directly -- [email protected]
3. National Certificate in Business (First Line Management): All courses in First Line Management are considered online distance. If you are enrolled in a course that has FLM in the course code (eg FLM401) then you are an online distance student.
4. Horticulture: All courses in Horticulture are considered online distance. If you are enrolled in a course that has HRT in the course code (eg HRT201) then you are an online distance student. If you require help with your NMIT Online password please contact SUTI directly -- [email protected]
5. New Zealand Diploma of Business (NZ DipBus): All courses in New Zealand Diploma of Business (NZ DipBus) are considered online distance. If you are enrolled in a course that has NZDB in the course code (eg NZDB550) then you are an online distance student.
6. Tourism Management (Distance): If you are a student who is enrolled in one of the following courses, then you are a distance student.
a. HRM501 Human Resource Management for the Tourism Industry (Distance Learning) b. HRM501 Human Resource Management for the Tourism Industry (Distance) c. ITC502 Information Technology Two d. POT501 Principles of Tourism (Distance) e. TBS502 Tourism Business Skills Two (Distance) f. TIM501 Tourism Industry Management (Distance) g. TMK501 Tourism Marketing (Distance) h. TMK501 Tourism Marketing (Distance)
7. Viticulture and wine science: If you are a student who is enrolled in one of the following courses, then you are a distance student.
a. PSC401 Plant Science (Dip VWP - Distance)b. VWP402 Viticultural Engineering (Distance)c. VWP403 Vineyard Experience (Distance)d. VWP501 Viticultural Practices (Distance) e. VWP505 Wine Science (Distance) f. COM540 Professional Communications (DipVWP, Distance) g. MGT533 Human Resource Management (Dip VWP -Distance) h. MKT571 Principles of Marketing (Dip VWP -Distance) i. VWP502 Soil Science (Distance) j. VWP503 Vineyard Bioprotection (Distance) k. VWP504 Wine Production (Distance) l. HMT601 Horticultural systems (Dip VWP - Distance) m. VWP601 Viticultural Science (Distance) n. VWP603 Winery Experience (Distance)
6 Student Guide to NMIT Online

o. VWP604 Wine Technology and Evaluation (Distance)
Applications and software you may requireThe icons below are common file formats used on the internet and in NMIT Online. They will require you to have the software application installed on your computer or viewers to display the NMIT Online files. All NMIT computers will have this software but you may need to install some software on your home computer (see separate page for minimum computer requirements). See details below on where you can download the appropriate application viewers and software.Links to application resources
PowerPoint Presentation Excel Spreadsheet Word Document
Graphic, picture or image Flash file Adobe Acrobat file
Sound file Zipped file Movie or video file
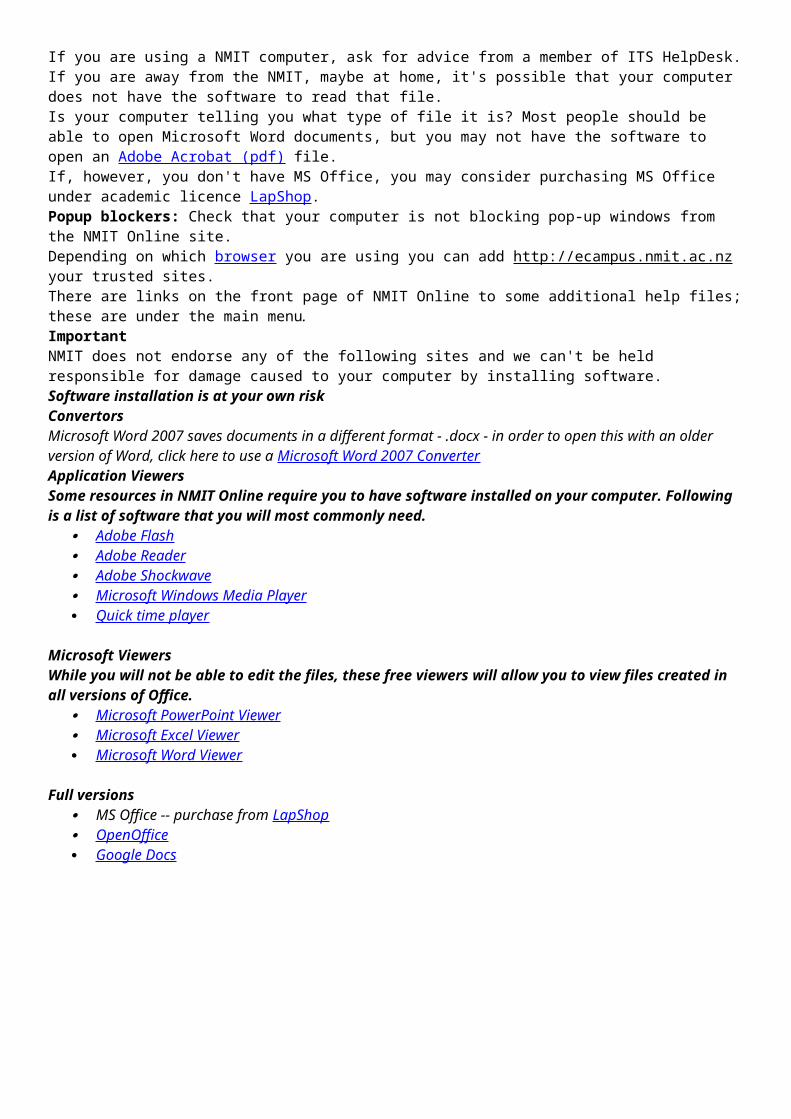
What do I do if I can't open or download a file? If you are using a NMIT computer, ask for advice from a member of ITS HelpDesk. If you are away from the NMIT, maybe at home, it's possible that your computer does not have the software to read that file. Is your computer telling you what type of file it is? Most people should be able to open Microsoft Word documents, but you may not have the software to open an Adobe Acrobat (pdf) file.If, however, you don't have MS Office, you may consider purchasing MS Office under academic licence LapShop.Popup blockers: Check that your computer is not blocking pop-up windows from the NMIT Online site. Depending on which browser you are using you can add http://ecampus.nmit.ac.nz your trusted sites. There are links on the front page of NMIT Online to some additional help files; these are under the main menu . Important NMIT does not endorse any of the following sites and we can't be held responsible for damage caused to your computer by installing software. Software installation is at your own riskConvertorsMicrosoft Word 2007 saves documents in a different format - .docx - in order to open this with an older version of Word, click here to use a Microsoft Word 2007 ConverterApplication ViewersSome resources in NMIT Online require you to have software installed on your computer. Following is a list of software that you will most commonly need.
Adobe Flash Adobe Reader Adobe Shockwave Microsoft Windows Media Player Quick time player
Microsoft ViewersWhile you will not be able to edit the files, these free viewers will allow you to view files created in all versions of Office.
Microsoft PowerPoint Viewer Microsoft Excel Viewer Microsoft Word Viewer
Full versions MS Office -- purchase from LapShop OpenOffice Google Docs

8 Student Guide to NMIT Online
Your personal NMT Online home pageAs soon as you login you will be presented with a list of courses you have access to. This is your "My Courses" page and has a number of useful components identified below. You can return to this page from anywhere within the site by clicking on the “My Courses” link at the top right of the screen. Explore this page for yourself once you have logged in and then Click on the name of a course to see the course home page.

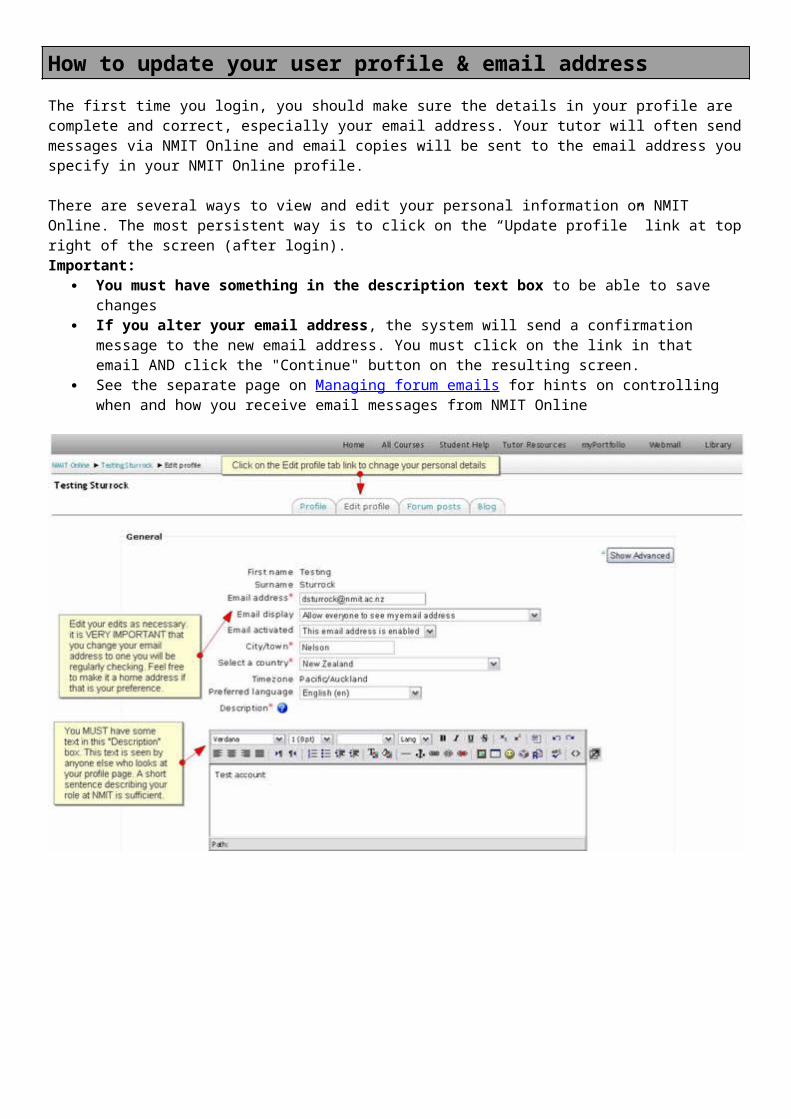
How to update your user profile & email addressThe first time you login, you should make sure the details in your profile are complete and correct, especially your email address. Your tutor will often send messages via NMIT Online and email copies will be sent to the email address you specify in your NMIT Online profile.
There are several ways to view and edit your personal information on NMIT Online. The most persistent way is to click on the “Update profile” link at top right of the screen (after login). Important:
You must have something in the description text box to be able to save changes If you alter your email address, the system will send a confirmation message to the new email address. You
must click on the link in that email AND click the "Continue" button on the resulting screen. See the separate page on Managing forum emails for hints on controlling when and how you receive email
messages from NMIT Online
10 Student Guide to NMIT Online
Update changes to return to the version of the profile page that everyone else sees.

Using your course pageClick on a course name in the my Courses list or block to enter the course. Your course may look different to the sample below but the general format will be the same.
Each NMIT Online course is divided into parts or topic boxes - the topic names or weeks are usually listed in the course menu at the top left of the course page. Each topic or weekly box will contain instructions, links to documents or web sites and perhaps links to activities such as discussion forums, assignment drop-boxes, quizzes etc. All your courses will look fairly similar, but with different resources, activities, number of topic areas available and perhaps different blocks showing on the left and right sides.
Scroll down the page to view all the available topic boxes and their content. Your tutor may have all the topic boxes visible from the start of your course OR they may only make certain topic boxes visible as they become relevant. NMIT Online gives you some clues to the type of resources and activities in each topic( ) indicates a discussion forum, and the Word document symbol ( ) indicates a Word document for you to download. You'll come across other ones too for PDF documents ( ), web links ( ) and quizzes ( ) etc. Click on the linked text beside the icons to view the documents or follow the links. Some links may open in a new window.
It is possible to focus on one topic box only, and to access the other parts by selecting from a drop down list. To achieve this, click on the squares at the right edge of the topic box you want displayed, as shown below.
This will "collapse" the parts leaving just one in view. The process can be reversed by clicking one of the two squares now displayed at the right of the topic box.12 Student Guide to NMIT Online

Looking higher up on this screen, there is a string of links just below the grey navigation menu bar, showing your present location in the course (like the one below)?
This is the breadcrumb menu, which is one of the easiest ways of navigating NMIT Online. It shows where you've been so you can go back by simply clicking any of its links.If you use the Internet, you'll be familiar with a "back" button in your web browser. You can use this in NMIT Online too, however we recommend using the navigation options within the website and course pages as the safest options, as different browsers behave inconsistently.By all means try it and see if it works for you.

Private messagingNMIT Online supports private messaging between users. Messages are sent via a popup Message window and if both users are online at the same time can operate as a private chat room. If you send a message to someone who isn't online, an email copy is sent to their preferred address.
Sending a messageYou can send someone a message in three ways:
From their profile page, click on the "Send message" button. You can view someones profile page by clicking on their name where it is linked from a forum post or in the course participants list (click on the Participants link in the course menu or people block).
Click the "Messages" link in the Messages block on the "My Courses" page. Then click on the Search tab to search for the person, if appropriate checking the box "Only in my courses", then click on their name.
Alternatively, if the person is listed in an Online Users block on your course, simply click on the "Add/send message" envelope opposite their name.
In all cases, once the message box appears simply type your message and click "Send message". If you expect a quick reply, leave the message box showing and their reply will appear below your original message.
Reading and replying to messagesWhen you are sent a message, the Messages window will pop-up. Also, the Messages block will display the name of the person sending the message with a link to read the message. If you have set the email option (see Message Settings below), then you will get a copy of the message in your email after the time you have specified if you are not logged in. After reading a message, you may type a reply then click on the "Send message" button.
Managing contactsPeople may be added to your list of contacts (or blocked from contacting you) by clicking the "Add contact" (or "Block contact")
icon opposite their name in the Messages window. By default the contact list is empty. In order to send a message or to create a shortcut to the person you are sending, go to the Search tab.
Message historyA record of messages sent to/from a person may obtained by clicking the "History" icon opposite their name in the Messages window.
Searching messagesIn addition to searching for people, the Search tab in the Messages window provides the option to search for keywords, only messages to or from you, and to include in the search people you have previously blocked from contacting you.
Message settingsMessage settings may be changed via the Settings tab in the Messages window. Here you can decide on having a popup Message window whenever you get a new message, blocking messages from people who are not on your Contacts list, having an audio signal for a new message, using a HTML editor, or getting email messages when you are offline.
14 Student Guide to NMIT Online

Note: It's possible to set a different email address for receiving copies of messages to the email address in your profile.
Using the NMIT Online text editor
The text editor in NMIT Online shows up whenever you are asked to submit substantive text within NMIT Online. Examples include the Description box in your personal profile, when you are adding a forum message or a glossary entry, using a wiki etc. The editor allows you to format your text using standard word processor tools. The editor enables you to do things like add pictures, link to web site, add color and formatting to your messages, spell check your messages, undo and redo, change your fonts, etc. The editor runs on Windows on Internet Explorer 7+, Firefox 2+. For Macintosh it runs on Firefox but NOT the Safari browser.
Below is a screen shot of the editor showing some of the common commands. Simply type your text, select the section you want to format and click the appropriate icon on the editor tool bar.Inserting images is a little more complex than if you are using Microsoft Word, see the separate Adding images to NMIT Online page for more detail.
If you know HTML you can click on the edit source button (<>) and paste code right into the editor. Be careful however as you cannot include the head tag or style sheets. All CSS must be inline.
If you do not see the editor, it may be that your browser does not support it or that your Profile settings have the editor option disabled.Using emoticonsEmoticons can be used to convey the non-verbal tone, expression or intent of a comment. The text editor has a image on the toolbar that allows you to insert an emoticon into your forum posts or other places where the text editor appears. In chat sessions you can use the keyboard characters to convey the same emoticons - see table below.Note: when using keyboard characters there should not be any spaces between characters.
smile : -)
big grin : -D
wink ; -)
mixed : -/
thoughtful V -.
tongueout : -P
cool B -)
approve ^ -)
wide eyes 8 -)
surprise 8 -o
sad : -(
shy 8 -.
blush : -I
kiss : -X
clown : o)
black eye P -|
angry 8 -[
dead xx -P
sleepy | -.
evil } -]
For more general tips for studying online see the separate pages: Online study - so what's involved?

Adding images to NMIT OnlineSome of courses may ask you to share images of your own work or other pictures to share with your peers. NMIT Online supports sharing pictures (and other files) in a number of ways:
1. Uploading or attaching a picture file from your computer - you can attach files to messages posted in forums, glossaries and wiki's or add pictures to a gallery within your course
2. Inserting a picture from the internet - you can embed a picture located elsewhere on the internet within your own message or wiki page. In fact this method works anywhere you have access to the "Insert Image" tool in the standard text editor ( ).
Note: Whichever way you choose to post images within NMIT Online, for copyright purposes you should include appropriate references for the website you are taking the picture from.
Uploading or attaching a picture file from your computer
In a forum or glossary, you will see an Attachment option below the box where you type your message. In a photo gallery there will be an option to add your own entry by clicking on the "Add entry" tab.
In both cases, click on the Browse button. Find where the file is located on your computer and select it.
16 Student Guide to NMIT Online

Once you have filled in all the boxes click on the "Post to forum" or equivalent save button to save your entry. Your information will be saved on NMIT Online, including a copy of your picture. Check it is all correct and you can use the edit option to change it if required.
If you uploaded a picture within a picture gallery, NMIT Online will automatically create a small version of it (thumbnail) to display in the list view.
Editing picture files
Picture files can be large in terms of their dimensions (800 x 600) and their file size (1.5 MB) depending on the camera settings and how you have saved them on your computer. We recommend images are kept to the following standards to ensure they display correctly on Moodle:
Maximum dimensions of 640 x 480 pixels
File formats: jpg, gif or png File size: less than 150 kb if possible.
You may have your own software you can use to resize images (e.g. Picasa, Paint.Net, IrfanView) or others. NMIT provides the Microsoft Picture Manager software on all our computers.
Using Picture Manager to resize an image
Use Windows Explorer to find your picture file Right Click on it and select "Open with... Microsoft Office Picture Manager"
from your context menu. Picture manager will open and show the selected
picture Click on the Edit Pictures option on the Toolbar -
an editting option pane will show on the right of screen
Click on the "Resize" option Select the picture size you want from the "predefined width x height"
option or make a custom selection (web large or web small are good starting points).
Click OK - the picture will change size Choose File --> Save As... to save the new version of the picture, giving it new file name to distinguish it from
your original You are now ready to upload the smaller picture into NMIT Online.
Inserting an image from the internet - copy/paste URL (web address)
These images must already reside on the internet (e.g. be elsewhere within NMIT Online or be on a different website e.g. Flickr, Wikipedia etc).

You must have two tabs (or windows) open in Internet Explorer (or your alternative browser). One showing the NMIT Online page you are editing, the other showing the web site that contains the picture you want to embed.
1. Right click on the image you want to embed2. Left click on the Properties option (usually at the
bottom)3. Highlight the Address (URL) text - usually looks
something like http://www.websitename.xxx/image/sample.jpg
4. Copy the text (right click -> copy or keyboard shortcut Ctrl + C)5. Go to your NMIT Online page and click the cursor where you want your picture to be inserted6. Click on the "Insert image" icon in the editor toolbar (a dialog box will pop up)7. Paste the image address into the Image URL box (right click paste or keyboard shortcut Ctrl + V)8. Type short descriptive text in the "Alternative text" box9. Select alignment, border and spacing options to suit and then click "OK"10. You image should appear in the text editor within a few seconds.11. You can do some resizing using the handles in the corners of the picture, then click the Save changes or Post
to Forum button.Your picture should now show within your saved page.
18 Student Guide to NMIT Online

NMIT Online activitiesCourse sites include content and activities defined by the course tutor. In addition to web links and documents, courses may contain activities based on the following features available in NMIT online.
An assignment is a task with a due date and a maximum grade. Assignments can be either Offline or Uploaded.
Chat tool used for instant online discussions with one or more participants logged in at the same time.
A choice is like a poll and allows the instructor to gather statistics.
Forums are ways for students to hold discussions online and act like a virtual message board. A forum is a good place to post questions and comments.
A glossary is a list of words defined by you or your instructor. Participants are able to view and comment on all entries. Your instructor may allow you to also add entries.
A Lesson delivers your course content in one or more pages normally ending with a question. To advance to the next lesson you are required to answer the question.
A Quiz is an online test and can have either multiple choice, true-false or short answer questions.
Your instructor will use resources to provide course information or reference material.

How to view and upload an Assignment
An assignment submission area will look like this, although your tutor may have chosen not to enable all the submission features shown here.
So what does it all mean? Follow the numbers...
20 Student Guide to NMIT Online

Optional feature 1
Optional feature 2
Note: You can click on your file to view it. When you upload or replace a file your instructor is notified of the date.
Grading: When your tutor has marked your assignment, they may send you an email notifying you that your marks and feedback are available online. Follow the link in the email, or just return to the place you submitted your assignment and your grade and tutor comments will be visible.

Turnitin - Submitting your assignmentTurnitin.com provides a service for checking academic work for possible sources of plagiarism. Your tutor will provide details on what they consider plagiarism to be and how to maintain your academic integrity. NMIT has a policy of allowing students to check your Turnitin reports prior to formally submitting your assignments - and it happens within NMIT Online.
Turnitin can only generate reports for Microsoft Word, PDF, HTML, RTF or plain text files. There are online instructions available for converting Open Office and Microsoft Works files so they can be submitted in an Turnitin enabled assignment.
22 Student Guide to NMIT Online


24 Student Guide to NMIT Online


How to participate in a Forum
Forums ( ) are ways for students to hold discussions online and act like a virtual message board.Each course contains at least one forum for course news and announcements (the exact name can vary). This forum is used by the tutor to broadcast course news to all students and every student will receive email copies of messages posted within it.
Other forums may also be available within a course at the discretion of the tutor and are good places to post questions and comments, share ideas etc.
Click on the forum’s name to view a description of the forums purpose and a list of the Discussion topics. The topics are listed from latest to oldest. Click the discussion topic's title to view and participate in the discussion. If you click on the persons name you will see their profile page, not their forum message.
The discussion and all replies are listed from oldest to newest. Click the Reply link on the appropriate discussion to post your ideas or comments (the link is at the bottom right corner of the message.
Type your message in the text entry box. Click 'Post to forum ' to finish. Your message will be indented underneath the one you replied to and will be visible to everyone else with access to the forum (class mates). You have 15 minutes to edit your entry, after which edit rights disappear and email copies are sent to anyone subscribed to the forum.
26 Student Guide to NMIT Online

Subscription means that you are automatically emailed when someone posts a message. [Click to see more details on managing your email subscription options]
You may also attach a document or picture file to your forum message if you wish by clicking 'Browse' to upload a file before posting your message to the forum. File size limits may apply for attachements (e.g. maximum file size of 1 MB for an attachment).
If you want to change your attachment after you have posted your message, follow these steps (within 15 minutes of making your original posting):
Click on Edit at the bottom of the page Scroll down to the attachment box. You will notice that this box is blank. This does not mean there is no
attachment on your message! Click browse. Choose your new attachment file. Click Post to Forum - this will replace your old attachment.
Note: Remember, only post information on what the forum is about. You only have 15 minutes to edit your entry. Starting your own discussion topic
Click 'Add a new discussion topic…' to begin a new discussion - you may not be able to do this depending on how the tutor has set up the forum. Make sure your subject line explains the topic well. Follow the instructions.

Layout options for forums
You have several options for displaying topics or discussion threads on the forums. There is a drop-down menu at the top of each topic. Experiment with these options to find the format that you find easiest to use.
Precautions
It wouldn't be fair if we didn't admit that things occasionally go wrong while using the discussion forums. When working on a message over a long period there is the risk of it "disappearing" should, for example, the NMIT Online session time out or a dial-up connection drop out.Also, there is no "auto-save" feature, so if you move away from the reply page (e.g. click on a link) you will lose all your typing.Noting the following tips for writing and saving discussion forum messages will spare you from these mishaps.
1. Just before you post your message, select all the text of your message and copy it. If your message fails to save properly you will be able to create a new message and paste you copied text back into it.
2. If you need to follow a link while you are part way through typing a message, use the "New Tab" feature of your browser to follow the link in a separate tab. Tabs allow you to work on other web pages without affecting your original one.
3. Good, "safe" practice when creating long forum messages is to put your cutting and pasting skills to work. Write and save the message in a word processor, copy it, then log in to NMIT Online and paste the text into a discussion topic message. Keep formating to a minimum when using a word processor, applying the required formatting after pasting into the NMIT Online text editor.
This method also saves quite a bit of online time if a you happen to be working via a dial-up connection.
Discussion Forum Communication Protocols
1. Avoid using all capitals – Internet conventions mean this is the equivalent of shouting or “flaming” someone. 2. When posting a reply to another student’s discussion posting or chat comment, make sure the ‘golden rule’
applies i.e. don’t post anything you would be unhappy to receive if it were posted to you. 3. Any issues or problems with the course or with another course member should be notified privately to the
tutor by email or phone, not raised in a chat room or posted publicly on a discussion forum –please use email or phone the tutor for emergencies or important course issues only.
4. Log in to the course regularly (but preferably each working day) just to keep up with what is happening. 5. Keep to one topic per discussion posting as much as possible, it is better to post several postings on one
topic each, rather than one long posting with several topics embedded in it.
28 Student Guide to NMIT Online

Managing Forum emailsAn option when using forums is to receive postings via your email address. This provides a number of advantages such as important message posted by the instructor. You have the option of receiving forum postings to your email.There are three actions you can take to control these e-mails:
1. You can choose to unsubscribe from a forum2. You can go to your NMIT Online profile and change your e-mail settings there3. Create a rule in your email account to automatically shift course messages into a special folder to view later
1. Unsubscribing from a forum
You can change this before you post your message to the forum, so check the Subscription option before clicking 'Post to forum'.
If you choose Send me email copies... you are subscribing to this forum. If you choose I don't want email copies... you are unsubscribing to this forum.
To view which forums you are subscribed to click 'Forum' on the breadcrumbs at the top of the page when viewing a forum.
You can then click either the word Yes or the word No to change if you are Subscribed or Unsubscribed to that particular forum.
Note: If your instructor has forced everyone to be subscribed to a forum it will be for a valid reason, such as passing on important information.
1. You can not Unsubscribe from a forum when the instructor has done this.2. The only way to stop receiving emails from these types of forums is to change your User Profile.
2. You can go to your NMIT Online profile and change your e-mail settings there
There are a number five options within your User Profile which relate to the email system.
1. Email display allows you to choose different options to set who can view your email address through your profile.
2. Email activated allows you to enable or disable your email address.
o If you enable your email address you will receive emails when subscribed to a forum.
o If you disable your email address you will not receive emails even if subscribed to a forum. 3. Email format provides the option of your email address being plain text or HTML - you can leave this as
'Pretty HTML format' which is the default. 4. Email digest type provides receiving options
o If No digest (single email per forum post) is set you will receive an email for every single posting to subscribed forums within 30 minutes of the posting.
o If Complete (daily email with full posts) is set you will receive ONE email with the forum posting details each day.
o If Subjects (daily email with subjects only) is set you will receive ONE email with the forum subject details each day.

5. Forum auto-subscribe sets the following default option shown when posting a forum
3. Create a rule in your email client
Create a rule in your email client to automatically shift course messages into a special folder that you can then choose to look at when convenient. Here are instructions on how to do this in Microsoft Outlook - perhaps using the option to move messages to a folder based on having the term "Course Name" in the subject line.
Right-click the message you want to base a rule on. Click Create Rule. In the Create Rule dialog box, select the conditions and actions you want to apply. To add more conditions, actions, or exceptions to the rule, click Advanced Options, and then follow the rest
of the instructions in the Rules Wizard. To run the rule as soon as you have created it, select the Run this rule now on the messages already in
"folder" check box on the last page of the Rules Wizard.
30 Student Guide to NMIT Online

How to use the CalendarThe course calendar highlights dates related to activities within the course. These dates may be the opening, closing or due dates of an activity.
When you move your mouse over the highlighted date the activity it is related to will appear.
Click on the activity to view the full description. Click again on the activity title to navigate to it.
To view the full calendar with titles shown click on the month name.
To Add your own user event click the 'New Event' button. 1. Name your event and provide a description.2. Change the Date if required as the default is the current date, the Time is optional
You are able to specify a Duration and/or Repeats for your event

Using a Glossary
A glossary ( ) is a list of words defined by you or your instructor. Participants are able to view and comment on all entries. Your instructor may allow you to also add entries.
Viewing the glossary
1. Click on the glossary name to browse entries.2. You have various browsing options. The default is
browse by alphabet letter.Note: You may be able to comment on the glossary entry if the comment icon is showing. Click this icon to add a comment about the entry.
Add a new entry to the glossary
Add a new entry to the glossary - video1. Click "Add New Entry" to add a new definition 2. First determine the word and the alternate words that mean the same thing. 3. Write the details of your posting in the "Definitions" field. You can add links within your text and embed
pictures from other websites (refer to separate page "Adding images to NMIT Online") as well as attaching a file directly to your entry (pictures or documents).
4. Concept and definition are mandatory fields and your tutor may require you to Select a category and/or add
keywords. 5. Click "Save changes" to submit your entry.
Note: You may or may not be able to add a new entry to the glossary, depending on how the instructor has set up the course. If you can you should remember that everyone can view your entry.
32 Student Guide to NMIT Online

How to participate in a Chat session
A chat ( ) is a way for students to hold live discussions online. Click on the green numbers in the image below to see the steps demonstrated.
1. Click on the chat name to view a description
2. Click the link 'Click here to enter the chat now'. Participants already in the chat room are listed
3. The chat room opens in a new window with the screen divided into three parts:
o Messages are displayed in the main part of the screen
o Participants are displayed on the right hand part of the screen
o You type your message in the text entry box at the bottom of the screen
4. When you have typed your message and press the 'Enter' key on the keyboard to submit it to the group - see standard protocols below
5. When you enter the chatroom you will only see messages posted from that point on. If transcripts have been enabled for the chat session you can view earlier comments at the end of the session (instructions below)
6. To leave the chatroom, just close the chatroom window (cross at extreme top right of window)7. For the more confident user: Because the chatroom has its own window, you can move back to the chat
description page and go to different pages or web sites while you monitor the open chatroom.Be careful not to close the chatroom window
A transcript of any chat can be recorded (option setting for the teacher). Steps to follow when viewing transcripts.1. Go to the chat description page, but don't click on the link to enter the chat2. Click on the "View past chat sessions" at top right on screen3. This page will list past sessions, along with the participants4. Scroll down to the session you wish to review5. Click on the "See this session" link6. Read the transcript7. When you have finished click on the "Continue" button to return to the session list page
Chat room protocolsHere are a few chat-specific protocols to make chats go more smoothly.
... (ellipses) - at the end of a line indicated that the speaker is still talking and so should not be interrupted GA (go ahead) - means speaker is finished. Can be followed by a name, eg GA Karen, to indicate who should
take the floor [bla bla bla] - square brackets means an interruption for notification (ie we only have 5 more minutes) but
not content Facilitator will use CAPITALISATION to change the topic ? at beginning of sentence to indicate you have a question for speaker use the @ symbol to respond to someone, eg "@Chris, I think you make a valid point there". This can be
useful when several discussion threads are happening at the same time. Emoticons like the smile :- ) and wink ; -) can also be used.

Using a WikiMany course's use wikis to support collaborative project work some use private wikis to allow students to keep journals. Wikis allow you to create new web pages and easily add text and images.
Most of the content formatting can be done through the in-line Web editor - including copying and pasting text from other documents. However, there are some tasks that require specific wiki formatting.
Creating a new page
New pages are created by linking to them from another wiki page. 1. In the [Edit] tab screen of an existing wiki page type the name of the new wiki
page inside square brackets (e.g., [My Life Story]). 2. After saving the page, a question mark will appear after the name of the new
page. 3. Click the question mark link. This will take you to the edit screen of the new page. 4. Enter content for the new page and click [Save].
Linking to an existing wiki page
1. In the [Edit] tab screen of an existing wiki page enter the name of the wiki page you want to link to within square brackets (e.g., [My Life Story]).
2. Click [Save] when finished.
Uploading and inserting images
Students are able to upload picture files to a wiki.Only .jpg, .gif, and .png files are supported.
1. In the [Edit] tab screen for the page there is an option to upload files. 2. Click the [Browse] button to locate the image file on your computer. 3. Double click on the selected picture file and click the [Upload] button.
A new browser window will open and show an internal reference for your uploaded picture using the following syntax: [internal://advertisement.jpg]
4. Copy this internal reference and close the browser window. 5. Place your cursor where you want the picture to appear in your wiki
page and paste the internal reference. 6. Click the [Save] button.
34 Student Guide to NMIT Online