Online Permit Application & Payment User Manual
56
Online Permit Application & Payment User Manual
Transcript of Online Permit Application & Payment User Manual

Online Permit Application & Payment User Manual

Back to Contents
February 2022 | 2 Austin Build + Connect User Manual
Austin Build + Connect is the City of Austin Development Services Department’s online portal at
http://www.austintexas.gov/abc to apply for permits, to schedule inspections, monitor Escrow accounts,
pay for permit / inspection fees, and much more. If you do not have a need for these activities, you can
abandon this process and continue to use the City's Public Search function at abc.austintexas.gov.
Contents
3 Registration for First Time Users
7 Forgotten Password (Reset)
9 Change Password
10 My Permits/Cases
10 My Bills
11 My Inspections
13 Applying for Permits
17 Attach/Upload Documents
19 Permit Self-Assignment and Payment
21 Paying Permits
22 Echeck Payment Process
28 Credit Card Payment Process
32 View Payment Information on a Permit
30 View Credit Card Payment History
33 My Escrow Account
35 Search for Permits Paid Through Escrow
36 Payment Errors
36 311 Ticket (Refund, Voids, Cancellations)
39 Find Final / Closed Permits
42 Print Permits
44 Permit Change Request
56 Uploading Files for ePlan Review

Back to Contents
February 2022 | 3 Austin Build + Connect User Manual
Registration for First Time Users
An online account is needed to process payments on this website.
1) LOGIN/REGISTER as First Time User to create an online account:
2) NEW REGISTRATION (STEP 1):
The first step to creating an online account is to select an email address to build your profile.
You will receive emails during the registration process and will use this email to log in to the
Austin Build + Connect website.

Back to Contents
February 2022 | 4 Austin Build + Connect User Manual
3) USER INFORMATION (STEP 2):
The second step in the registration process is filling out your personal information. This data will be
used to help create your online account and billing information.
The red asterisks (*) indicate required fields.
4) ACCESS REQUEST SENT (STEP 3):
Next you will receive an email from the City of Austin Development Services Department.

Back to Contents
February 2022 | 5 Austin Build + Connect User Manual
• EXAMPLE EMAIL - Austin Build + Connect Registration
The subject line of the email will be “Austin Build + Connect Registration.” In this email are two
important things: a link and a PIN number. Copy the PIN number and click on the longer link:
Thank you for starting the registration process. After completing the registration process you will be able to conduct
business online, such as
* Viewing status of your permits, inspections, and fees
* Pay for permits
* Pay for fees
If you do not have a need for these activities, you can abandon this registration process and continue to use the City's Public
Search function at abc.austintexas.gov
To continue your registration process, use the link and personal identification number (PIN) below to verify your
information and gain access to the Austin Build + Connect website's Registered Users area:
https://abc.austintexas.gov/web/permit/index
PIN Number XXXXXXXXXX (Copy PIN number before clicking on above link)
Note: If you are unable to click on the link above, please be sure to copy and paste the entire link into your browser's
navigation bar, as all the information is needed to continue registration.
Regards,
City of Austin
311 or (512) 974-2000
5) PIN NUMBER CONFIRMATION:
Enter the PIN number from the email and the first and last name entered during registration.

Back to Contents
February 2022 | 6 Austin Build + Connect User Manual
6) CREATE PASSWORD:
Enter a password, and select a password security reminder question.
7) REGISTRATION CONFIRMATION:
The City of Austin Development Services Department will send you an email with the subject line:
“Austin Build + Connect.” The email has instructions on getting your online account connected to your
business account. After the accounts have been connected, you will be able to conduct business with
the City of Austin thru the website.
• EXAMPLE EMAIL - Austin Build + Connect Confirmation
Congratulations on activating your Austin Build + Connect account! You are now able to access the City's website, view your
permits, schedule inspections, and make payments online. To access your records and conduct business online, you need to
have this new internet registration account linked with your business accounts. Please call (512) 978-4000 to have your
accounts linked. Please have identifying information (account ID, etc.) for each account you need to link.
The staff at the Permit Center can also help you create and link up to six authorized Agents for your account. You can
download the Contractor's Letter of Authorization form at austintexas.gov/page/building-applications and email to
For sender validation, your Log-in ID is:
Regards,
City of Austin
Back to Contents
February 2022 | 7 Austin Build + Connect User Manual
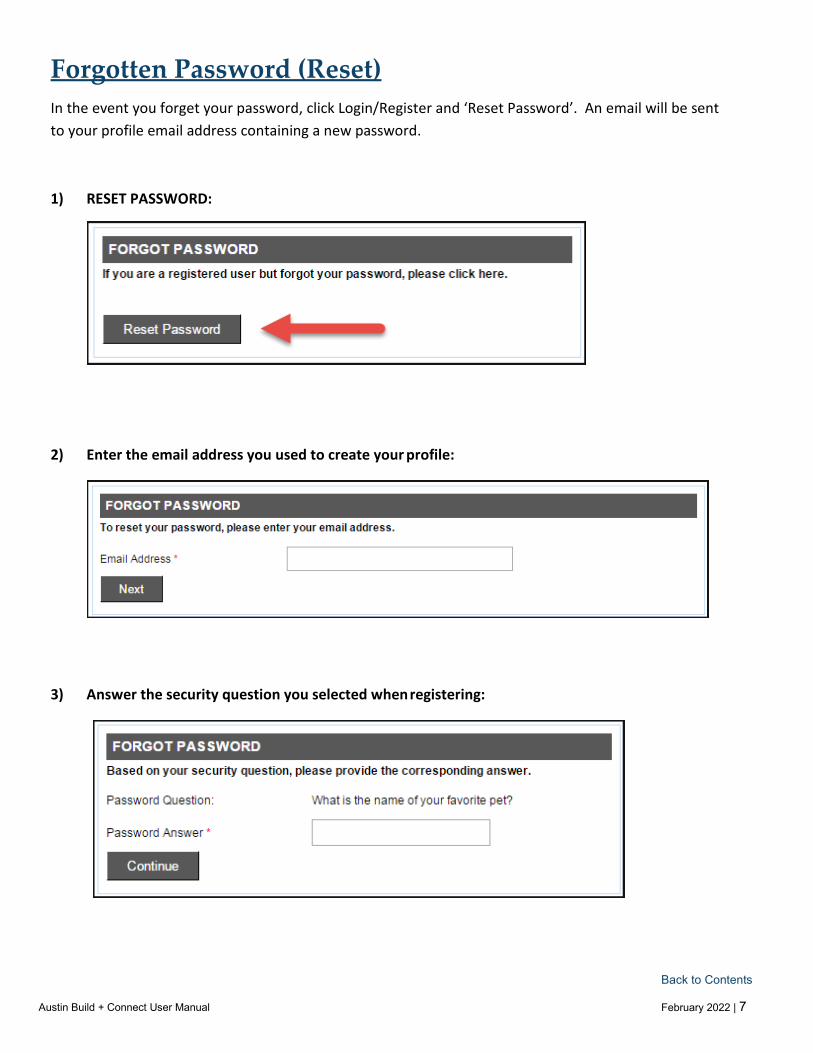
Forgotten Password (Reset)
In the event you forget your password, click Login/Register and ‘Reset Password’. An email will be sent
to your profile email address containing a new password.
1) RESET PASSWORD:
2) Enter the email address you used to create your profile:
3) Answer the security question you selected when registering:

Back to Contents
February 2022 | 8 Austin Build + Connect User Manual
4) After answering the security question, a temporary password will be sent to the email address entered:
• EXAMPLE EMAIL - Forgotten Password
Dear Internet User,
This email has been sent to you in response to your password request from Austin Build + Connect. Your password has been
reset to: *********
Once you have successfully logged in you can reset your password by clicking on the My Profile link on the left menu bar.
Regards,
City of Austin
5) Click ‘Go to Login Page’:
6) Login using your email address and the new reset password from the email you received:

Back to Contents
February 2022 | 9 Austin Build + Connect User Manual
Change Password After login you can change the temporary password you received in the email to a new personal password.
1) Click ‘My Profile’ from the left menu bar and at the bottom of the UPDATE MY PROFILE page, click
‘Change Password’:
3) Your Current Password is the temporary password that was emailed to you. Enter a personal
password in the ‘New Password’ field, and re-enter it in the ‘Confirm New Password’ field.
Click ‘Update’:
CONGRATLUATIONS! You have changed your password:

Back to Contents
February 2022 | 10 Austin Build + Connect User Manual
My Permits/Cases
1) Once logged in you will see a list of permits associated with your business account:
A permit with a checkbox indicates that particular permit is eligible for payment.
My Bills
1) Clicking ‘My Bills’ will only display permits on your account that are eligible for payment:

Back to Contents
February 2022 | 11 Austin Build + Connect User Manual
My Inspections
1) Clicking ‘My Inspections’ will display permits with available inspections to be scheduled:
Select the permit you want to schedule an inspection for by checking the box to the left of it.
2) A list of inspections needed for that permit will appear:
3) Schedule your inspection:
Check the box for the inspection you want to schedule. Use the ‘Requested Date’ column drop
down to pick a day within five days from when you are scheduling the inspection. You can also
leave comments/notes for the inspector. Once done, click ‘Request Inspections.’

Back to Contents
February 2022 | 12 Austin Build + Connect User Manual
4) You will receive a confirmation once the inspection is successfully sent:
5) Cancel Inspection:
If you need to cancel an inspection, go to ‘My Inspections,’ select the permit which has the
scheduled inspection, and click ‘Cancel Inspections.’
6) Select the scheduled inspection(s) you want to cancel and click ‘Cancel Inspections:’
7) A confirmation notice will appear saying the inspection has been cancelled:

Back to Contents
February 2022 | 13 Austin Build + Connect User Manual
Applying for Permits
1) Click ‘Apply for Permits/Cases’ in the left navigation bar and select the application you need:
2) Select the contractor you want to assign to the permit:
Only contractors that match the permit type – i.e. Mechanical Permit – and have a valid license (or
plumbing insurance) and registration on file with the City will be listed. Click ‘Continue’.

Back to Contents
February 2022 | 14 Austin Build + Connect User Manual
3) For Change out Permits: Please review the qualifications for a change out to determine if this
permit is appropriate for the work being done. If so, select the type of work from the drop down.
For Standalone Trade Permits: Enter the description and scope of work for the permit.
Click ‘Continue – Apply Online’:

Back to Contents
February 2022 | 15 Austin Build + Connect User Manual
4) Search for an address:
Enter the house number and street name of the location. Click ‘Search.’
A list of addresses that contain the street number and name entered will appear.
Select the correct address.
5) For Change Outs: A summary of the information you have entered so far will be displayed.
For Standalone Trade Permits: Use this space to enter a description of the work to be done.
Back to Contents
February 2022 | 16 Austin Build + Connect User Manual
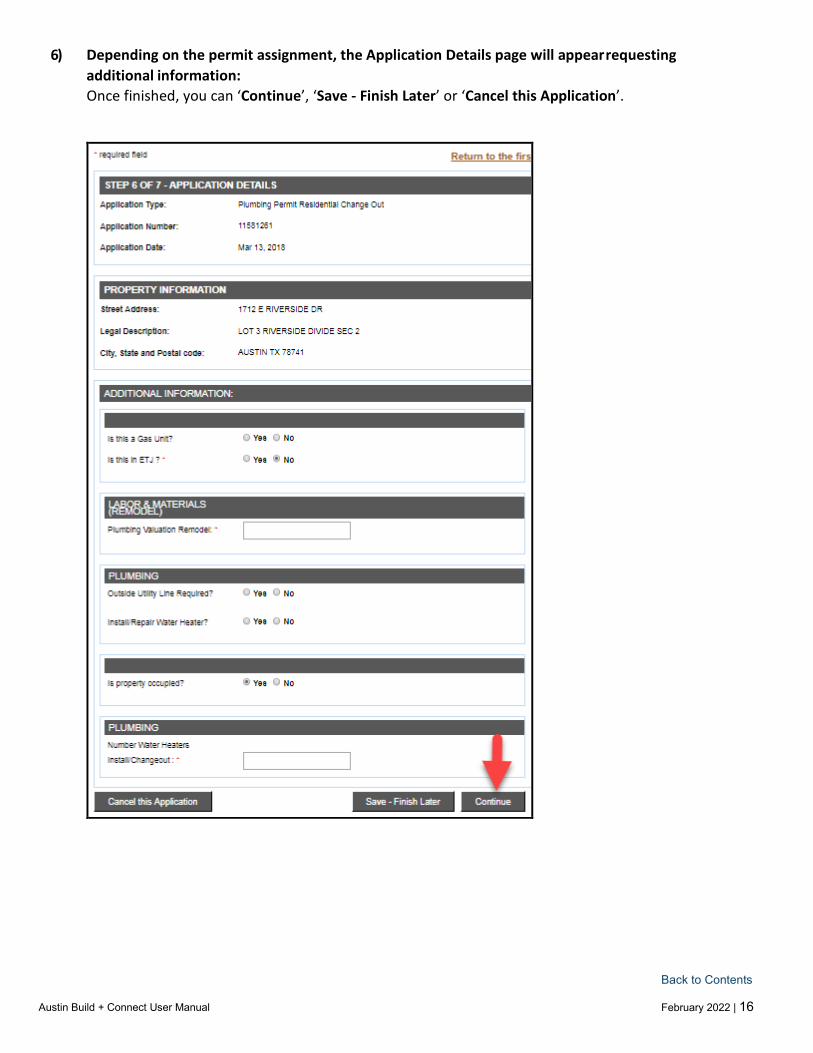
6) Depending on the permit assignment, the Application Details page will appear requesting
additional information:
Once finished, you can ‘Continue’, ‘Save - Finish Later’ or ‘Cancel this Application’.

Back to Contents
February 2022 | 17 Austin Build + Connect User Manual
Attach/Upload Documents
7) Any necessary paperwork associated with the permit can be uploaded in STEP 7:
Application Attachments:
Select My Permits/Cases. Select the permit and go into the permit.
Scroll past the details, past the inspections section, and go to the section
titled Application Attachments. Select ‘Choose File’ and then select the
document you want to upload. Once attached, click ‘Add Attachment.’ A
message will populate that states that the document was uploaded
correctly. Once uploaded, click ‘Continue’.

Back to Contents
February 2022 | 18 Austin Build + Connect User Manual
8) A summary of the application is displayed:
If you are applying for multiple permits you can ‘Create new application with same info’ or
‘Create new application with new info.’ You can also ‘Save - Finish Later.’
If you are ready to pay, click ‘Submit for Billing’.
9) For Change Out Permits, a detailed list of fees will be displayed:
Certain permit types require review by permit specialists and instead will go into a queue for review. You will
receive an email notification once they are either accepted or rejected.
10) Continue with a payment process listed in the Paying Permits Section.

Back to Contents
February 2022 | 19 Austin Build + Connect User Manual
Permit Self-Assignment and Payment This process applies to both RESIDENTIAL and COMMERCIAL Trade Permits associated with an
active Building Permit.
• There are now over 27 types of permits available online.
• All fees can be paid by a credit card, electronic check, or Escrow.
• Exceptions and changes to permits are only done in person at the Permit Center.
1) Clicking ‘Assign Permit’ in the left navigation bar will take you to the permit retrieve section so you can
look up trade permits:
• Enter the permit number using the following format: Year, Permit Sequence Number and Permit
Type (2016-123456 MP). No wildcard searches are allowed.
• When the permit is found, a window will display the following permit details so you can verify you
have the correct permit number: Project Name (address), Permit Number, Description, Address,
General Contractor, and Fee Due.
2) Click ‘Assign & Pay’ to take you to Contractor Selection:

Back to Contents
February 2022 | 20 Austin Build + Connect User Manual
3) Select the contractor you want to assign to the permit:
Only contractors that match the permit type – i.e. Mechanical Permit – and have a valid license (or
plumbing insurance) and registration on file with the City will be listed.
4) Depending on the permit assignment, the Permit Details page will appear requesting additional
information. Once you have answered the questions, click ‘Continue’:
5) To proceed to the Citybase site to pay, click ‘Pay Now:’
If you want to pay multiple permits, click ‘Return to My Permits/Cases’ and select additional
permits to pay in one transaction. Click ‘Cancel Assignment’ if you wish to remove the contractor
assigned on the Select Contractor page. Click ‘Pay Now’ if you wish to pay for just that permit.

Back to Contents
February 2022 | 21 Austin Build + Connect User Manual
Paying Permits
1) Select the check box next to the eligible permit in either the ‘My Permits/Cases’ or ‘My Bills’ page.
2) After selecting the permit(s) you want to pay, click ‘Pay Selected’:
3) You will get a summary page displaying the permit(s) you are paying:
Click ‘Pay Now’ if you wish to continue the payment process.
4) Clicking ‘Pay Now’ will direct you to the Citybase site to process the payment:
Select the payment method - either Bank Account or Credit or debit card.

Back to Contents
February 2022 | 22 Austin Build + Connect User Manual
eCheck Payment Process
Information required for eCheck payments - Bank Routing Number and Bank Account Number:
1) Select ‘Bank Account’
Enter your banking information and click ‘Next’.

Back to Contents
February 2022 | 23 Austin Build + Connect User Manual
2) Customer Information
Enter your billing and contact information and click ‘Next’.

Back to Contents
February 2022 | 24 Austin Build + Connect User Manual
3) Review and Confirm
Review and Confirm your billing information, accept the Terms and Conditions, then click ‘Pay’.

Back to Contents
February 2022 | 25 Austin Build + Connect User Manual
4) Confirmation
A confirmation of your payments will be displayed. Click ‘Continue’ to return to the Austin Build + Connect site.
You can also register and set up a Wallet with Citybase if you choose by clicking ‘Register for Wallet’. The Wallet
allows you to save credit cards or checking accounts (ACH) with Citybase. The information saved is security
encrypted and once added, the details are not visible and cannot be edited, but can be deleted and re-added.
The Wallet allows you to speed up the checkout process, but it is not part of the City of Austin feature. You may
pre-register your credit card(s) or checking account(s), or you may maintain what saved payment methods you
have with Citybase through this link. You will be required to create and maintain a separate username and logon
at the Citybase site.

Back to Contents
February 2022 | 26 Austin Build + Connect User Manual
5) Your payment has been processed:
You will receive 3 emails. One email from [email protected] with a subject line of
“Payment Success: Austin Build + Connect Payment Portal.” This is an email from Citybase informing
you the payment has been accepted. The second email will be from
[email protected] with a subject line of “Austin Build + Connect Payment
Confirmation” informing you the payment has been received from Citybase and your permit has
been issued. The third email will be from [email protected] issuing you the approved permit.
• EXAMPLE EMAIL - Payment Success: Austin Build + Connect Payment Portal

Back to Contents
February 2022 | 27 Austin Build + Connect User Manual
• EXAMPLE EMAIL - Austin Build + Connect Payment Confirmation
• EXAMPLE EMAIL – City of Austin Development Services Department Permit Approval

Back to Contents
February 2022 | 28 Austin Build + Connect User Manual
Credit Card Payment Process
1) Select ‘Credit or debit card’
Fill out the Credit Card information and click ‘Next’.

Back to Contents
February 2022 | 29 Austin Build + Connect User Manual
2) Customer Information
Enter billing and contact information, then click ‘Next’.

Back to Contents
February 2022 | 30 Austin Build + Connect User Manual
3) Review and Confirm
Review and Confirm your billing information, accept the Terms and Conditions, then click ‘Pay’.

Back to Contents
February 2022 | 31 Austin Build + Connect User Manual
4) Confirmation
A confirmation of your payments will be displayed. Click ‘Continue’ to return to the Austin Build + Connect
site. You can also register and set up a Wallet with Citybase if you choose by clicking ‘Register for Wallet’.
The Wallet allows you to save credit cards or checking accounts (ACH) with Citybase. The information saved
is security encrypted and once added, the details are not visible and cannot be edited, but can be deleted
and re-added. The Wallet allows you to speed up the checkout process, but it is not part of the City of
Austin feature. You may pre-register your credit card(s) or checking account(s), or you may maintain what
saved payment methods you have with Citybase through this link. You will be required to create and
maintain a separate username and logon at the Citybase site.
5) Your payment has been processed:
You will receive 3 emails. See above for details and examples.

Back to Contents
February 2022 | 32 Austin Build + Connect User Manual
View Payment Information on Permit
How do I view my payment information for a permit?
Select My Permits/Cases. Select the orange permit link. Go into the permit. Scroll down to FEES AND PAYMENTS
and select the orange PAYMENT NUMBER (invoice number) link to see the PAYMENT RECEIPT and PURCHASE
INFORMATION.

Back to Contents
February 2022 | 33 Austin Build + Connect User Manual
My Escrow Account
By click on ‘My Escrow Account’, you can view balances and statements for all escrow accounts
associated with the contractors linked to your online account.
There are two ways to pay for permits using escrow on Austin Build + Connect:
1. Through the permit hyperlink (individual standalone permit)
2. With Assign Permit (contractor self-assignment)
1) When paying a standalone permit fee by Escrow, click the permit number instead of selecting the
check box under ‘My Bills’. Select ‘Pay Now’.
2) The invoice will display an option to Pay From Escrow Account. Select the account, review the

Back to Contents
February 2022 | 34 Austin Build + Connect User Manual
information, and enter the Escrow PIN number:
3) Select ‘Pay Now with Escrow’ and a transaction receipt will appear, along with email verifications to
the payer and the escrow account holder.
When pulling existing permits through Assign Permit, follow the same steps as described in
self-assignment. If the contractor has an escrow account with enough money to cover the cost of the
permit, an escrow payment option will be available under the invoice.

Back to Contents
February 2022 | 35 Austin Build + Connect User Manual
Search for permits paid through Escrow
To find permits paid through Escrow, select My Escrow Account. Select the Escrow Account Number as shown
in the example scree shot below. Select Escrow Statement under the column Request Report.

Back to Contents
February 2022 | 36 Austin Build + Connect User Manual
Payment Errors If you submit a payment but receive a page error or close the page, you will not be able to immediately
select the permit to try again. The Citybase system will put the permit on hold for approximately 90
minutes in order to prevent multiple payments on the same permit. After the 90 minute period, the
permit will be available to select again if the previous payment did not get processed.
311 Ticket (Refund, Voids, Cancellations)
If there is a problem with your payment (ex: used wrong credit card, paid wrong permit, etc.), you can
request an adjustment from the City of Austin Development Services Department.
1) In the Austin Build + Connect Payment Confirmation email there is a link to request a refund,
void, or cancellation. The link will take you to the City of Austin’s 311 System where you can
submit your request:
Link here: Submit a Request online
2) The Service Information request ticket:

Back to Contents
February 2022 | 37 Austin Build + Connect User Manual
3) Select the issue that reflects your request. Select the department this is regarding:
4) The Permit Number, Invoice Number, and Confirmation Number can be found in either Payment
Confirmation emails:

Back to Contents
February 2022 | 38 Austin Build + Connect User Manual
5) Enter your information. Click ‘Next’:
6) Enter your reason for request and attach any relevant files. Click ‘Next’:
7) Review your request before submitting. Click ‘Submit’:

Back to Contents
February 2022 | 39 Austin Build + Connect User Manual
8) Tracking Number is displayed. Click ‘Finish’:
9) You will receive an email from the City of Austin 311 Ticket System confirming your request:
Find Final / Closed Permits
Once a permit has passed inspection, the permit will no longer be listed within My Permits/Cases.
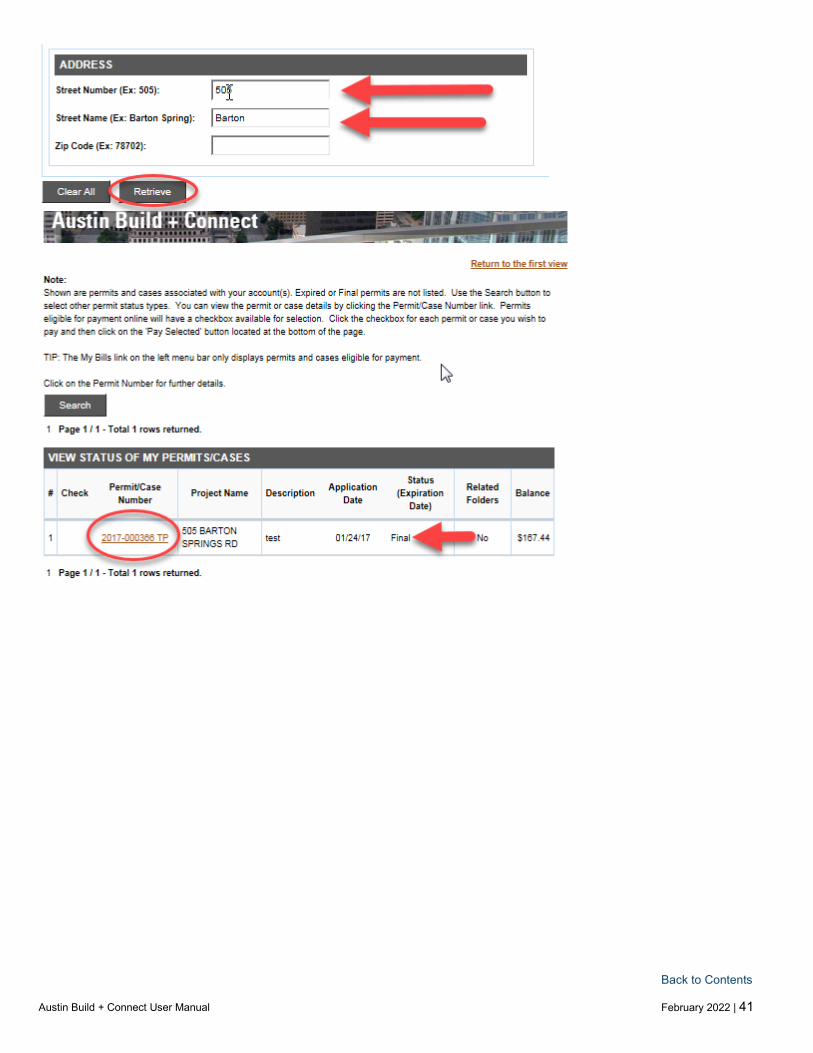
To find final permits or closed permits: If the permit is finaled, go to “my permits/cases”. Select the Search button at the top of the list.
Search by either permit number or address. Also when searching for a permit, the date range
that it auto populates is from today‘s date to 1 year ago. If the permit is older than that make
sure to change the date range, but it can only search a span of 365 days at a time (Example: 2015-
01-01 thru 2016-01-01). You will also need to select the checkbox by Final permits. Click on
Retrieve. The orange permit # will populate. The Status will show as Final.

Back to Contents
February 2022 | 40 Austin Build + Connect User Manual
Back to Contents
February 2022 | 41 Austin Build + Connect User Manual

Back to Contents
February 2022 | 42 Austin Build + Connect User Manual
Printing Permits
(Example: Using Google Chrome browser)
Printing Permits are available for Development Services permits only.
1) Find the finaled building permit.
If the permit is finaled, go to “My Permits/Cases”. Select the search button at the top of the list. Search by either permit
number or address. Also when searching for a permit, the date range that it auto populates is from today‘s date to 1 year
ago. If the permit is older than that make sure to change the date range, but it can only search a span of 365 days at a
time (Example: 2015-01-01 thru 2016-01-01). You will also need to select finaled permits.
To find all other permits that are active or not finaled or closed. Under My Permits/Cases
Click on the permit # (the orange number link) under My Permits/Cases. *See print screen example: 2017-001028 BP
2) Scroll down past Attachment Upload to the section called Reports. Click on View Permit.
*The City of Austin permit will populate on the screen.*

Back to Contents
February 2022 | 43 Austin Build + Connect User Manual
3) To print: move the mouse to the right hand side top of the screen and click on the print icon . *Note* Move the mouse in the upper right hand part of the screen for the grey bar to pop up with the
print icon . See print screen below.
A pop up of a screen on the left side of your computer looks like the print screen below: 4) Select the blue print button and the permit should print to the printer destination.
Back to Contents
February 2022 | 44 Austin Build + Connect User Manual
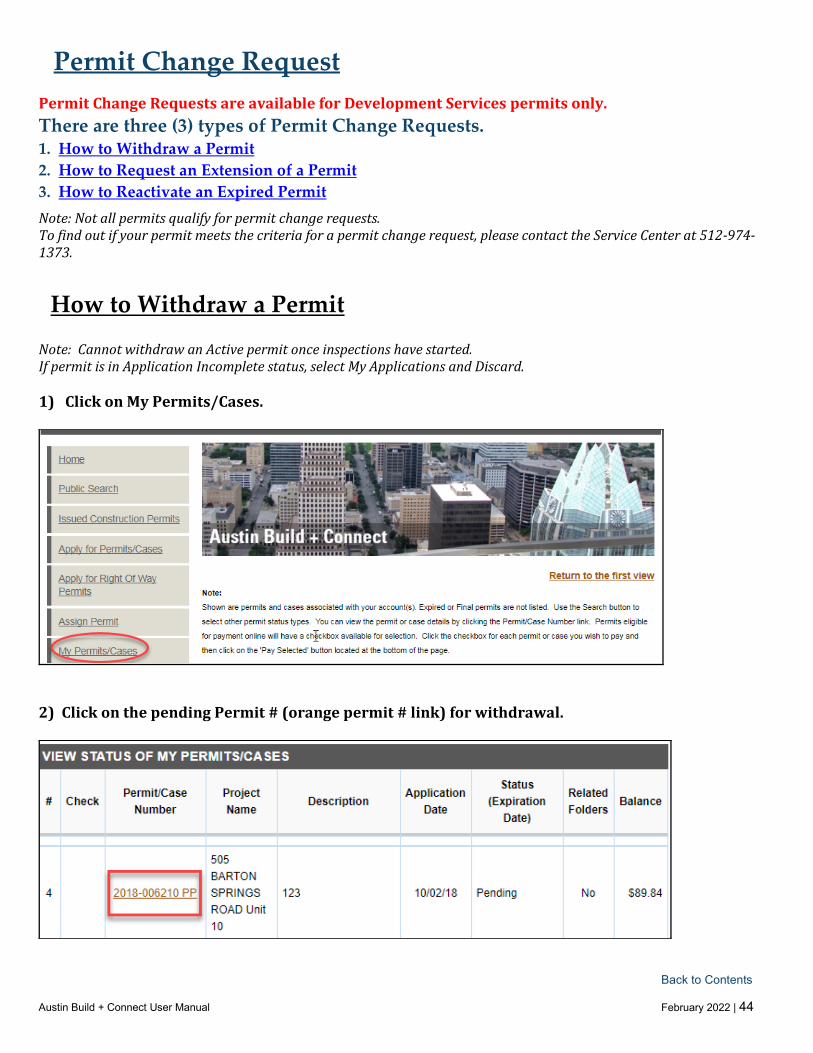
Permit Change Request
Permit Change Requests are available for Development Services permits only.
There are three (3) types of Permit Change Requests. 1. How to Withdraw a Permit
2. How to Request an Extension of a Permit
3. How to Reactivate an Expired Permit
Note: Not all permits qualify for permit change requests.
To find out if your permit meets the criteria for a permit change request, please contact the Service Center at 512-974-
1373.
How to Withdraw a Permit
Note: Cannot withdraw an Active permit once inspections have started.
If permit is in Application Incomplete status, select My Applications and Discard.
1) Click on My Permits/Cases.
2) Click on the pending Permit # (orange permit # link) for withdrawal.
Back to Contents
February 2022 | 45 Austin Build + Connect User Manual
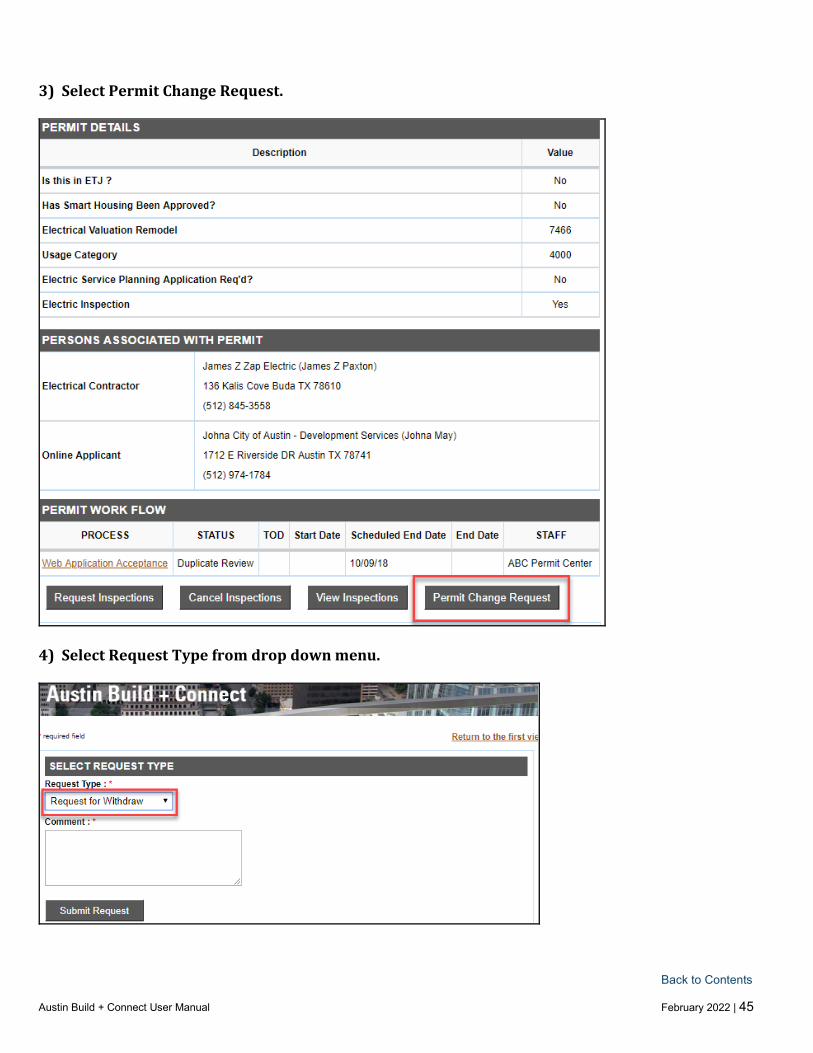
3) Select Permit Change Request.
4) Select Request Type from drop down menu.

Back to Contents
February 2022 | 46 Austin Build + Connect User Manual
5) In the Comment section add comments here. Select Submit Request.
6) Add Reason for Withdrawal. Select I Agree.

Back to Contents
February 2022 | 47 Austin Build + Connect User Manual
7) The Request Confirmation populates on screen. Select Done.
8) An auto generated email will be sent to the email listed on the contractor account.
EXAMPLE EMAIL - Austin Build + Connect Withdrawal of Permit Confirmation

Back to Contents
February 2022 | 48 Austin Build + Connect User Manual
How to Request an Extension of a Permit
1) Select the permit with the soon to expire expiration date.
2) Go into the permit. Scroll past the Permit Summary, Property Details, Permit Details,
Persons Associated With Permit and Permit Work Flow and click on Permit Change Request.

Back to Contents
February 2022 | 49 Austin Build + Connect User Manual
3) Select the drop down box for Request Type. Select Request for Extension and type in the
comments the reason for extension. Select Submit Request
4) A pop up screen will appear to check the box that "I understand that prior to the expiration
date, the building official is authorized to grant a one-time extension for a period not to
exceed 180 days." Select I agree and a pop up message will appear that the extension request
has been granted.

Back to Contents
February 2022 | 50 Austin Build + Connect User Manual
5) A Confirmation will populate stating that the extension request has been granted.
6) An auto generated email from [email protected] will be sent to the email that is listed on
the contractor record.
EXAMPLE EMAIL - Austin Build + Connect Request for Extension Confirmation

Back to Contents
February 2022 | 51 Austin Build + Connect User Manual
How to Reactivate an Expired Permit 1) Permit holder will receive an auto generated notification 30 days before the permit will expire.
2) Select the Permit # that is expired.

Back to Contents
February 2022 | 52 Austin Build + Connect User Manual
3) Scroll past Permit Work Flow and select Permit Change Request.
4) The Request Type will appear with a drop down box. Select from the drop down menu
Request For Reactivation. Type in permit comments in the Comment Box. Select Submit
Request.

Back to Contents
February 2022 | 53 Austin Build + Connect User Manual
5) Answer the 4 Permit Reactivation Consent Questions. Select I agree.
6) A screen will populate that shows the reactivation request has been received. Select Done.

Back to Contents
February 2022 | 54 Austin Build + Connect User Manual
7) An auto generated email from [email protected] will be sent to the email that is listed on the
contractor record stating that the reactivation of the permit has been granted.
EXAMPLE EMAIL - Austin Build + Connect Reactivation of Permit Confirmation
8) Select My Bills. The permit status has changed to Pending Permit. Select Pay Selected.

Back to Contents
February 2022 | 55 Austin Build + Connect User Manual
9) Select Pay Now. Proceed to pay the expired permit fee.

Back to Contents
February 2022 | 56 Austin Build + Connect User Manual
Uploading Files for ePlan Review
Once you have submitted the required paper applications for plan review, you will receive an email that
initiates the electronic plan review. From there all file uploading of plans will be done through the Project Dox
portal.
Assistance
Should you have questions or need assistance please call the following numbers:
• For Permitting questions call 512-978-4000
• For Financial questions call 311 (512-974-2000)