Online education - outdoor navigation - NSW … · never replace the skills of reading a map and...
32
OUTDOOR NAVIGATION A tutorial for hunters
Transcript of Online education - outdoor navigation - NSW … · never replace the skills of reading a map and...
OUTDOOR NAVIGATION A tutorial for hunters
Welcome to the Outdoor Navigation tutorial This tutorial will provide you with knowledge of map reading and the use of a compass and GPS.
The tutorial was developed in line with the recommendations of the review of the risk assessment for hunting on State forests and Crown lands.
This tutorial must be completed before you are able to access the online booking system to book a hunt on a State forest.
You will not be required to complete the assessment phase of this tutorial again – it is a once-only process.
Outdoor Navigation Learning Outcomes:
Section 1: Map reading
• Reading a topographical map • Reading a grid reference from a map Section 2: The compass
• Knowledge of the ‘adjustable dial compass’ • Using the map and compass together Section 3: GPS
• Knowing how a GPS works • Knowing how to use the map and the GPS together
The Tutorial and Assessment It will take you approximately 45 minutes to complete this tutorial and the assessment. Read and understand the tutorial thoroughly. You will be assessed on your knowledge of the three sections through 4 multiple choice or true/false questions for each section. You will need to answer 3 out of the 4 questions correctly in each section to pass this tutorial. You will be able to return to the tutorial at any time during the assessment by clicking the ‘Save and Exit’ box at the bottom of the assessment page. If you do not pass the tutorial on the first attempt, you will be granted two more attempts in a 24-hour period. If you do not pass within the 24-hour period, you can then resit the assessment on any day after that period.
Outdoor Navigation Glossary of terms: • Global Positioning System (GPS) – A satellite navigation system that
provides location information anywhere on earth.
• Topographical Map – A relief map showing natural and man-made features.
• Adjustable Dial Compass – A compass which has an adjustable dial to enable it to be orientated to a map.
Outdoor Navigation
Introduction The skill of outdoor navigation is knowing where you are, where you want to go and how to get there. Reading a map, using a map and compass together, and using a GPS to navigate, are important skills to have when hunting. The practice of looking at features on the map and identifying the same features on the ground is, to a large extent, being replaced by the use of GPS, BUT the GPS should never be relied upon as the only means of navigation and it should never replace the skills of reading a map and using a compass to navigate.
Map Reading
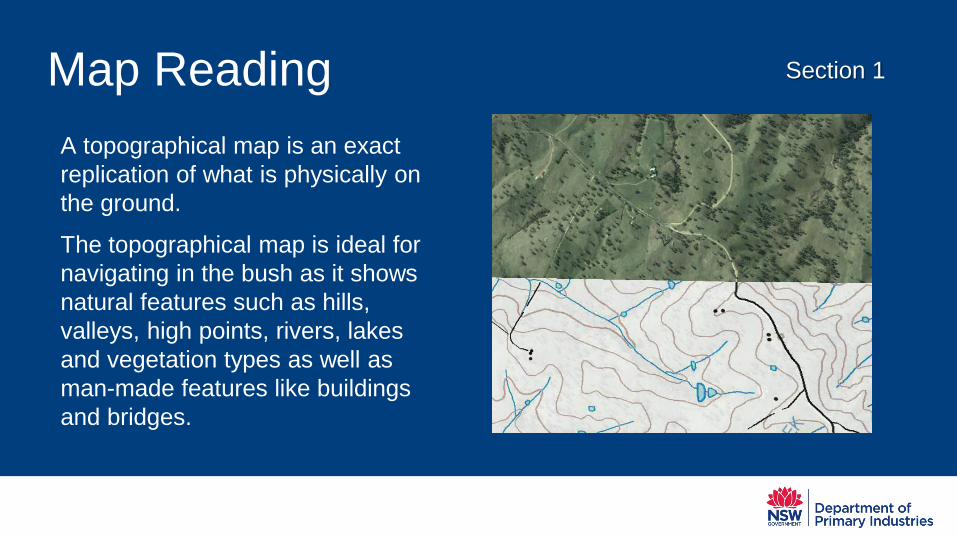
A topographical map is an exact replication of what is physically on the ground.
The topographical map is ideal for navigating in the bush as it shows natural features such as hills, valleys, high points, rivers, lakes and vegetation types as well as man-made features like buildings and bridges.
Section 1
The Map Legend
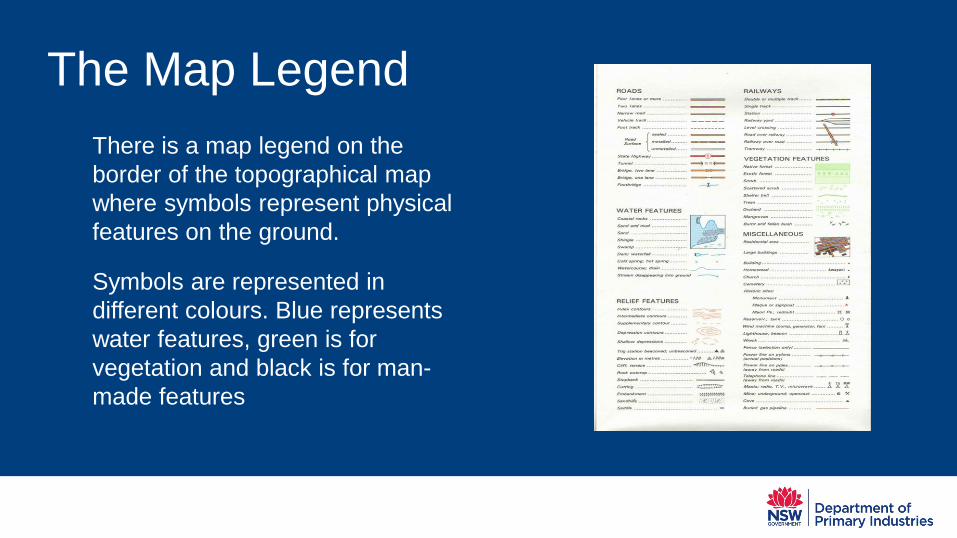
There is a map legend on the border of the topographical map where symbols represent physical features on the ground.
Symbols are represented in different colours. Blue represents water features, green is for vegetation and black is for man-made features
True, Magnetic and Grid North
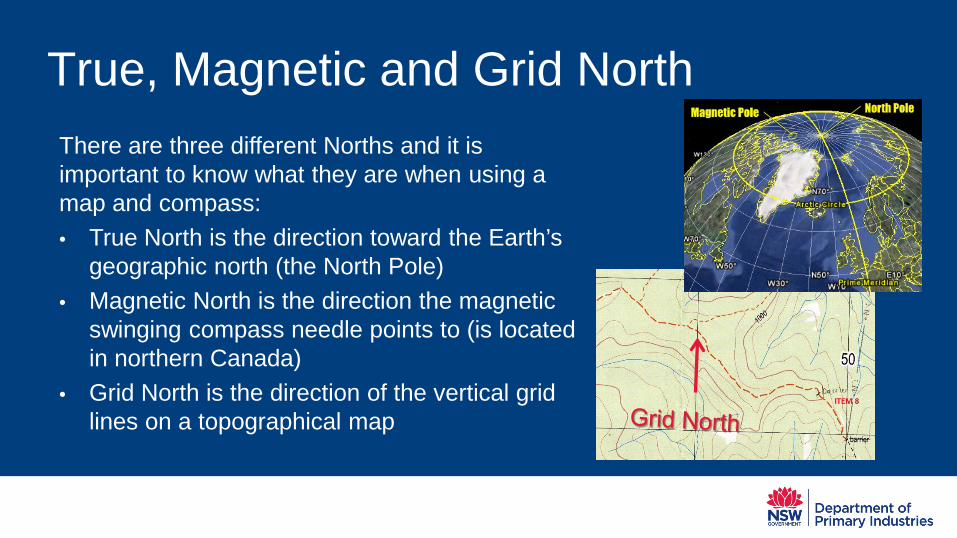
There are three different Norths and it is important to know what they are when using a map and compass: • True North is the direction toward the Earth’s
geographic north (the North Pole) • Magnetic North is the direction the magnetic
swinging compass needle points to (is located in northern Canada)
• Grid North is the direction of the vertical grid lines on a topographical map
Contour Lines
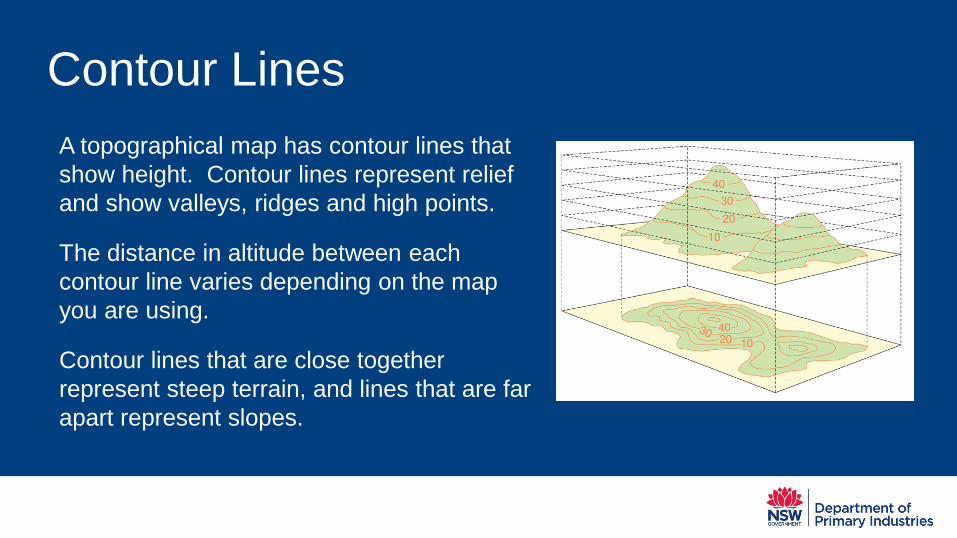
A topographical map has contour lines that show height. Contour lines represent relief and show valleys, ridges and high points.
The distance in altitude between each contour line varies depending on the map you are using.
Contour lines that are close together represent steep terrain, and lines that are far apart represent slopes.
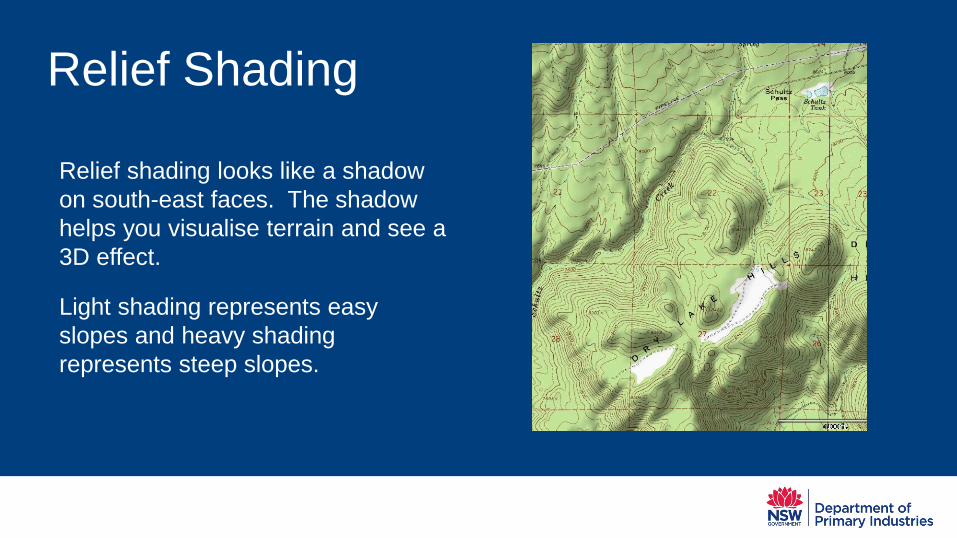
Relief Shading
Relief shading looks like a shadow on south-east faces. The shadow helps you visualise terrain and see a 3D effect.
Light shading represents easy slopes and heavy shading represents steep slopes.
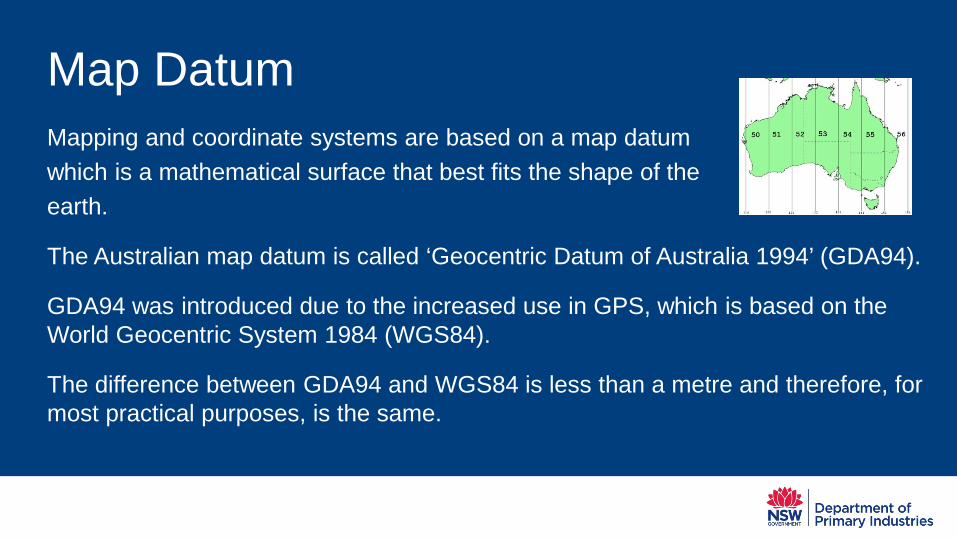
Map Datum
Mapping and coordinate systems are based on a map datum which is a mathematical surface that best fits the shape of the earth.
The Australian map datum is called ‘Geocentric Datum of Australia 1994’ (GDA94).
GDA94 was introduced due to the increased use in GPS, which is based on the World Geocentric System 1984 (WGS84).
The difference between GDA94 and WGS84 is less than a metre and therefore, for most practical purposes, is the same.
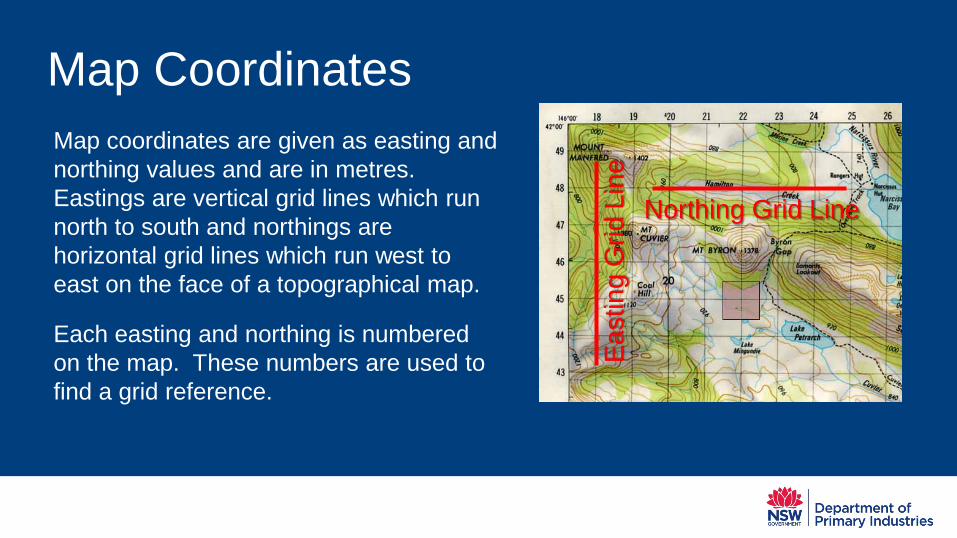
Map Coordinates
Map coordinates are given as easting and northing values and are in metres. Eastings are vertical grid lines which run north to south and northings are horizontal grid lines which run west to east on the face of a topographical map.
Each easting and northing is numbered on the map. These numbers are used to find a grid reference.
East
ing
Grid
Lin
e
Northing Grid Line
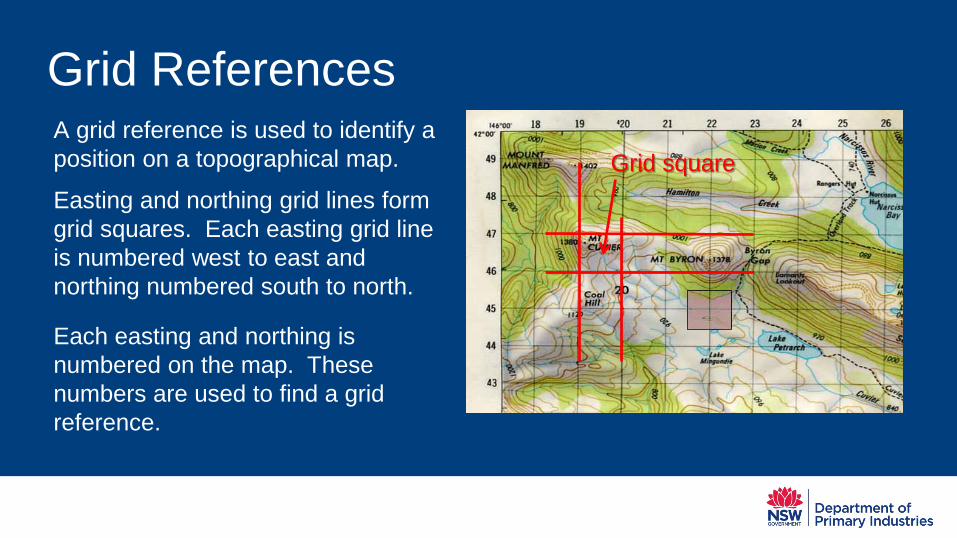
Grid References
A grid reference is used to identify a position on a topographical map.
Easting and northing grid lines form grid squares. Each easting grid line is numbered west to east and northing numbered south to north.
Each easting and northing is numbered on the map. These numbers are used to find a grid reference.
Grid square

Find a six figure grid reference
Find the grid reference for ‘Mt Cuvier’ by identifying the grid square where Mt Cuvier sits in. Read the two figure easting value then estimate the tenths from the easting grid line toward the east. The first three figures of the grid reference are 192. Then estimate the tenths from the northing grid line toward the north. The final three figures of the grid reference are 467. The six figure grid reference for Mt Cuvier is 192467. Remember: to read across the map and then up the map “walk before you climb”.
Grid Square
Northing Grid Line
Eas
ting
Grid
Lin
e
7
2
Navigating from a topographical map
Navigating using a topographical map requires route planning. The easiest route is not always the shortest distance. Walking in rough terrain is difficult and will more likely increase the time to travel the distance. Knowing how to read a topographical map enables you to see features on the map and then identify the corresponding features on the ground or vice versa. These features might include stream junctions, a rock bluff, a change in vegetation or a high point. Travelling using a topographical map is done by recognising features on the ground and then following them on the map or identifying features on the map and following them on the ground. If you see features on the map you should expect to find them on the ground as you travel.

Navigating by following handrails
Handrails are features that are easily identified on the map and on the ground such as streams, ridges, bush edges, tracks or fence lines. Plan your route to follow handrails and use these to stay on your route. In steeper terrain it is better to use ridges and spurs as hand rails rather than streams which can be steep and difficult to navigate.
The planned route on the map uses a creek, river and spur as a handrail.
Assessment for Section 1
You have now completed section 1 for: • reading a topographical map • reading a grid reference from a map You can now go on to completing the assessment for section 1 by clicking on the ‘assessment’ box below. You will be able to go back to the tutorial for further reading at any time during the assessment.
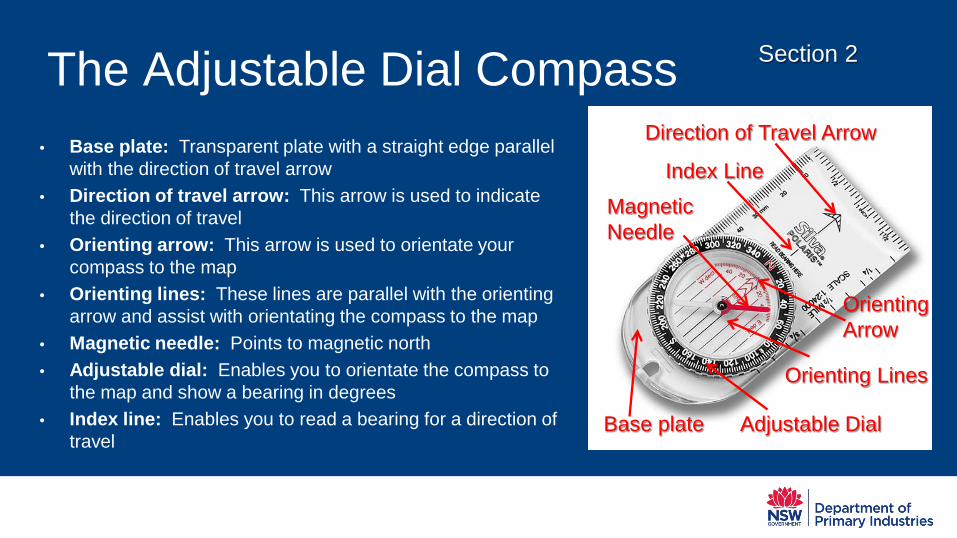
The Adjustable Dial Compass
• Base plate: Transparent plate with a straight edge parallel with the direction of travel arrow
• Direction of travel arrow: This arrow is used to indicate the direction of travel
• Orienting arrow: This arrow is used to orientate your compass to the map
• Orienting lines: These lines are parallel with the orienting arrow and assist with orientating the compass to the map
• Magnetic needle: Points to magnetic north • Adjustable dial: Enables you to orientate the compass to
the map and show a bearing in degrees • Index line: Enables you to read a bearing for a direction of
travel
Section 2
Base plate
Orienting Lines
Index Line
Adjustable Dial
Magnetic Needle
Orienting Arrow
Direction of Travel Arrow
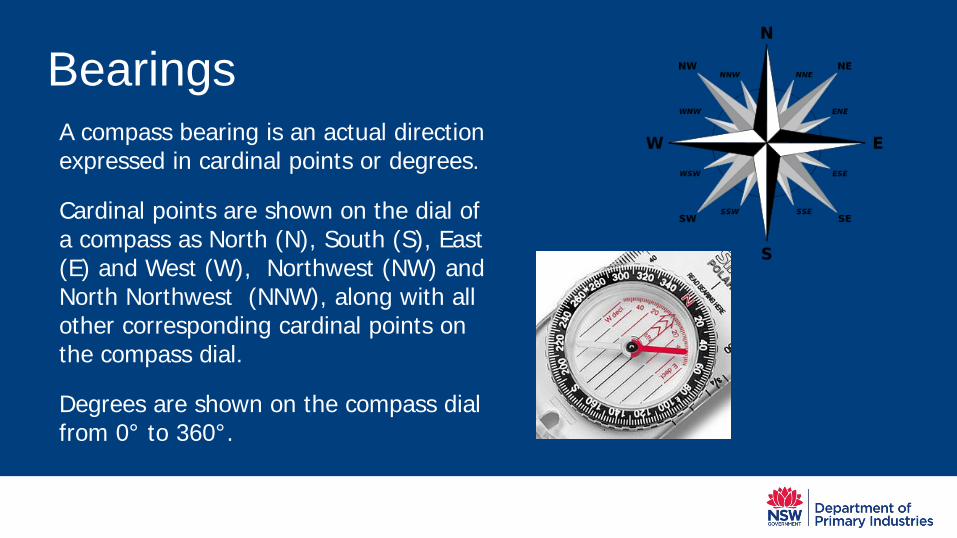
Bearings
A compass bearing is an actual direction expressed in cardinal points or degrees.
Cardinal points are shown on the dial of a compass as North (N), South (S), East (E) and West (W), Northwest (NW) and North Northwest (NNW), along with all other corresponding cardinal points on the compass dial.
Degrees are shown on the compass dial from 0° to 360°.
Magnetic Variation
Magnetic variation, sometimes also known as magnetic declination, is the difference in degrees between grid north and magnetic north.
Magnetic variation differs depending on where you are on the Earth’s surface and changes over time.
The relevant magnetic variation information can be found on the border of the topographical map you are using.
You will need to know the magnetic variation to gain a direction of travel by using a map and compass together.
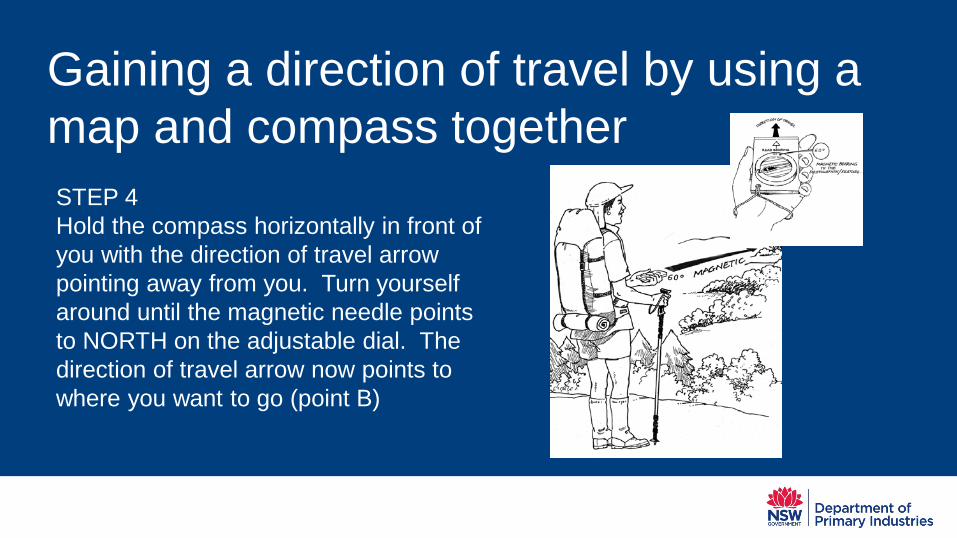
Gaining a direction of travel by using a map and compass together
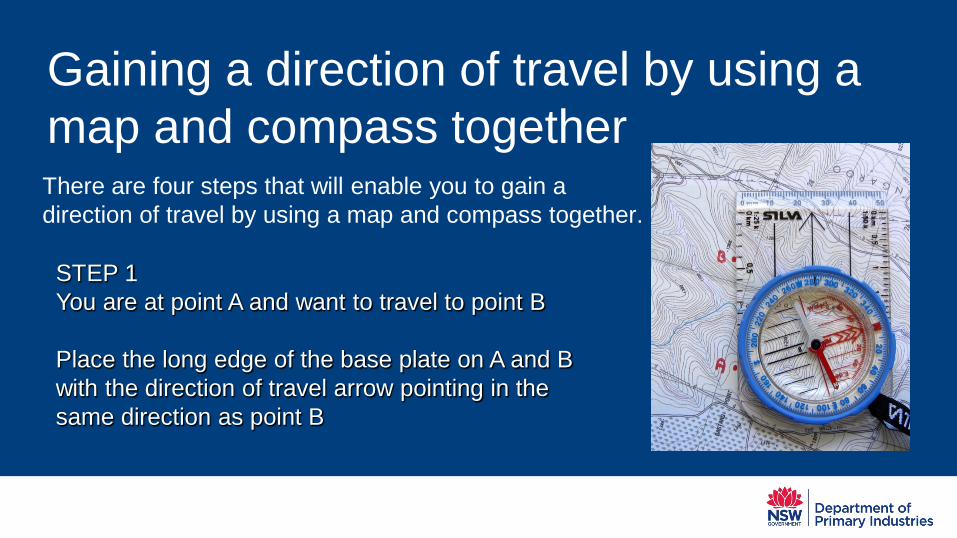
There are four steps that will enable you to gain a direction of travel by using a map and compass together.
STEP 1 You are at point A and want to travel to point B Place the long edge of the base plate on A and B with the direction of travel arrow pointing in the same direction as point B
Gaining a direction of travel by using a map and compass together
There are four steps that will enable you to gain a direction of travel by using a map and compass together.
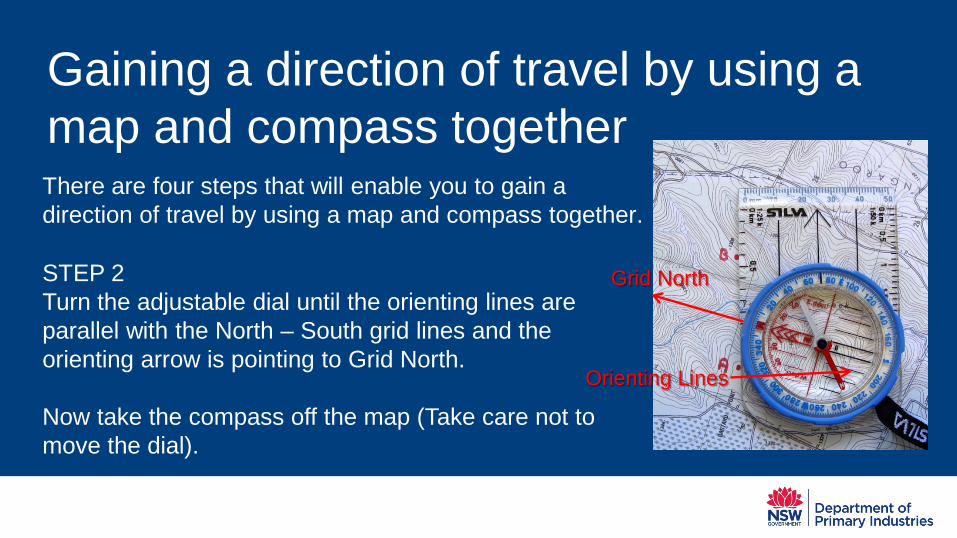
STEP 2 Turn the adjustable dial until the orienting lines are parallel with the North – South grid lines and the orienting arrow is pointing to Grid North. Now take the compass off the map (Take care not to move the dial).
Orienting Lines
Grid North
Gaining a direction of travel by using a map and compass together
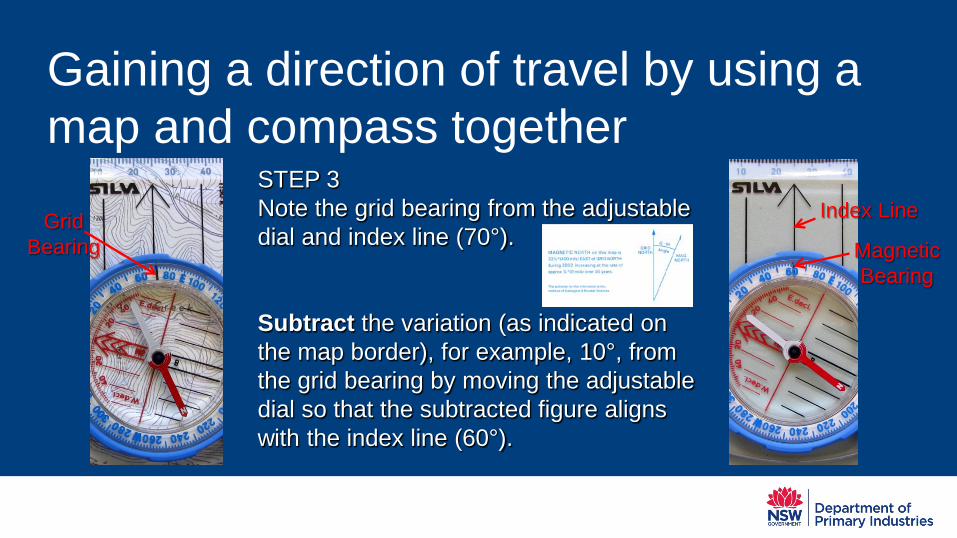
STEP 3 Note the grid bearing from the adjustable dial and index line (70°). Subtract the variation (as indicated on the map border), for example, 10°, from the grid bearing by moving the adjustable dial so that the subtracted figure aligns with the index line (60°).
Grid Bearing
Index Line
Magnetic Bearing
Gaining a direction of travel by using a map and compass together
STEP 4 Hold the compass horizontally in front of you with the direction of travel arrow pointing away from you. Turn yourself around until the magnetic needle points to NORTH on the adjustable dial. The direction of travel arrow now points to where you want to go (point B)
Assessment for Section 2
You have now completed section 2 for: • knowledge of the adjustable dial compass • using a map and compass together You can now go on to completing the assessment for section 2 by clicking on the ‘assessment’ box below. You will be able to go back to the tutorial for further reading at any time during the assessment.
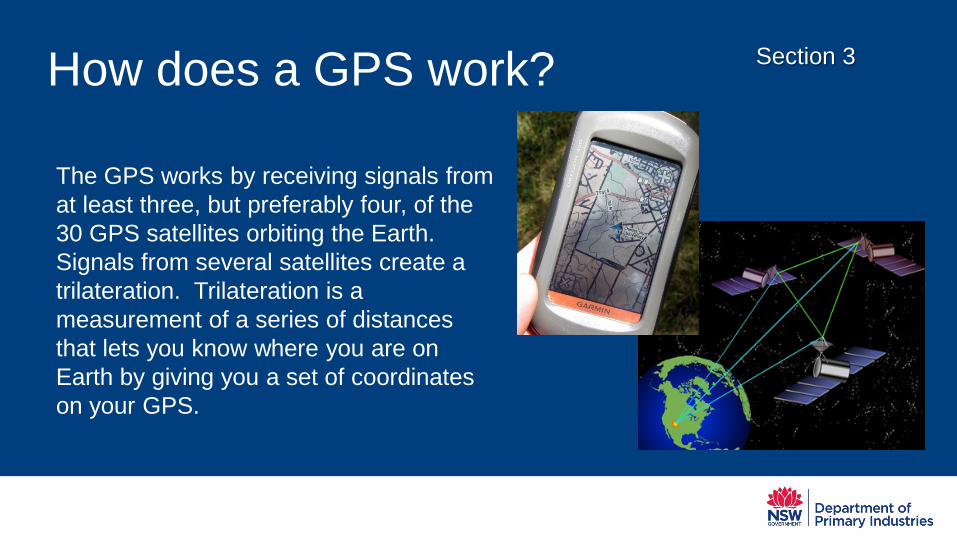
How does a GPS work?
The GPS works by receiving signals from at least three, but preferably four, of the 30 GPS satellites orbiting the Earth. Signals from several satellites create a trilateration. Trilateration is a measurement of a series of distances that lets you know where you are on Earth by giving you a set of coordinates on your GPS.
Section 3
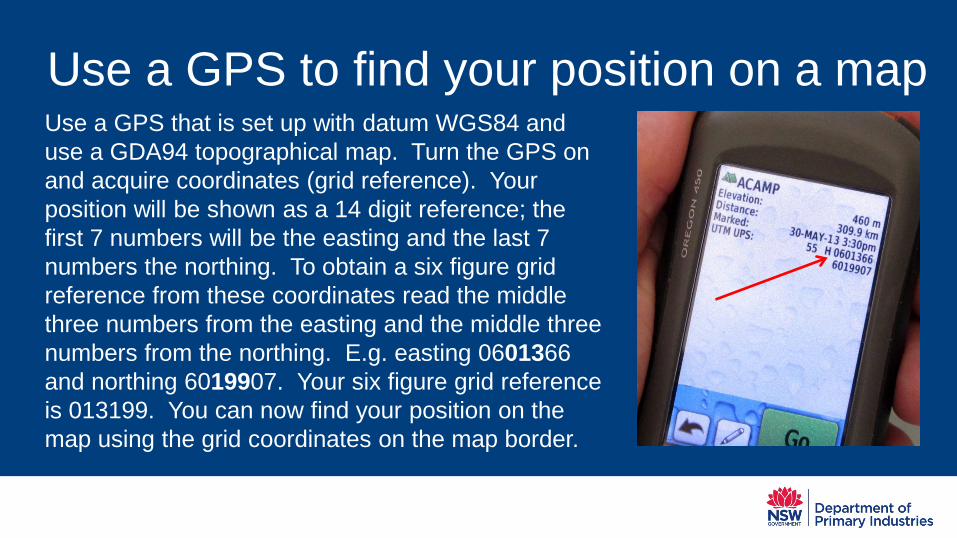
Use a GPS to find your position on a map
Use a GPS that is set up with datum WGS84 and use a GDA94 topographical map. Turn the GPS on and acquire coordinates (grid reference). Your position will be shown as a 14 digit reference; the first 7 numbers will be the easting and the last 7 numbers the northing. To obtain a six figure grid reference from these coordinates read the middle three numbers from the easting and the middle three numbers from the northing. E.g. easting 0601366 and northing 6019907. Your six figure grid reference is 013199. You can now find your position on the map using the grid coordinates on the map border.
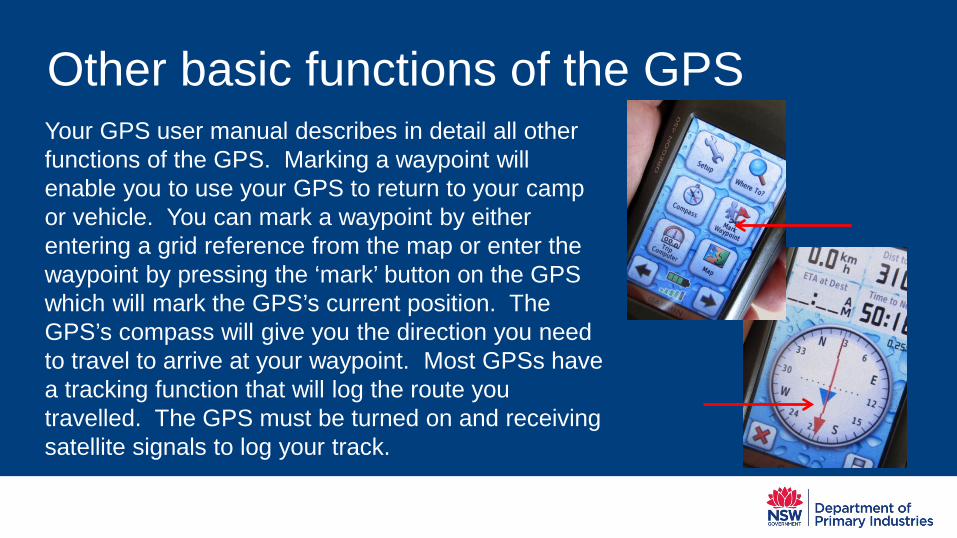
Other basic functions of the GPS
Your GPS user manual describes in detail all other functions of the GPS. Marking a waypoint will enable you to use your GPS to return to your camp or vehicle. You can mark a waypoint by either entering a grid reference from the map or enter the waypoint by pressing the ‘mark’ button on the GPS which will mark the GPS’s current position. The GPS’s compass will give you the direction you need to travel to arrive at your waypoint. Most GPSs have a tracking function that will log the route you travelled. The GPS must be turned on and receiving satellite signals to log your track.
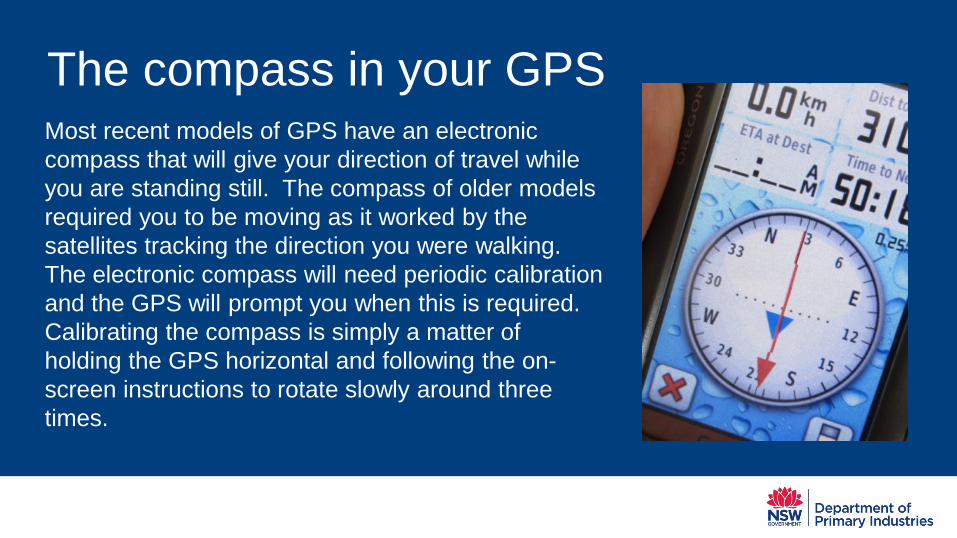
The compass in your GPS
Most recent models of GPS have an electronic compass that will give your direction of travel while you are standing still. The compass of older models required you to be moving as it worked by the satellites tracking the direction you were walking. The electronic compass will need periodic calibration and the GPS will prompt you when this is required. Calibrating the compass is simply a matter of holding the GPS horizontal and following the on-screen instructions to rotate slowly around three times.
Things to be wary of when using a GPS
Beware that the GPS will not work if the batteries go flat. Always ensure you take spare batteries with you.
Acquiring a position and coordinates under thick bush canopies, especially when the canopy is wet from rain, can be difficult. You may need to move to a more open area.
Deep valleys may restrict the availability of satellites as they will be obscured by the hills. You may need to climb part way out of the valley to acquire a position.
Satellites continually move across the sky as the Earth rotates and at times there may not be enough satellites visible to your GPS for your GPS to acquire a position. The situation will change as more satellites pass within range of your GPS.
Do not rely on your GPS as your sole navigation tool. They can break down. Always take a map and compass.

Assessment for Section 3
You have now completed section 3 for: • knowing how a GPS works • how to use a GPS and map together You can now go on to completing the assessment for section 3 by clicking on the ‘assessment’ box below. You will be able to go back to the tutorial for further reading at any time during the assessment.