Online Banking Manual - Taylor Bank Online Banking Manual Login 2 Password Change Required 3...
25
1 Online Banking Manual Login 2 Password Change Required 3 Personal Image 4 Verification Questions 5 Accounts Page 6 Transactions 6 Download 7 Statements 8 Stop Payments 8 Transfers 10 Bill Payment 11 Add Payee 12 Add Payment 13 Quick Payment 15 History 16 Options 17 PIN (password) Change 17 Online Banking ID Change 17 Email Address Change 18 Personal Question & Answer 18 Account Name Change 18 Alerts 19 Event & Balance Alerts 20 Item & Personal Alerts 21 ATM/Debit Cards 22 Display 22 eStatements 23 Enrollment 23 Statements & Notices 24 Sign-Up/Changes 24 Disclosures 25 Email Settings 25 Recon 25
Transcript of Online Banking Manual - Taylor Bank Online Banking Manual Login 2 Password Change Required 3...
1
Online Banking Manual Login 2 Password Change Required 3 Personal Image 4 Verification Questions 5 Accounts Page 6 Transactions 6 Download 7 Statements 8 Stop Payments 8 Transfers 10 Bill Payment 11 Add Payee 12 Add Payment 13 Quick Payment 15 History 16 Options 17 PIN (password) Change 17 Online Banking ID Change 17 Email Address Change 18 Personal Question & Answer 18 Account Name Change 18 Alerts 19 Event & Balance Alerts 20 Item & Personal Alerts 21 ATM/Debit Cards 22 Display 22 eStatements 23
Enrollment 23 Statements & Notices 24 Sign-Up/Changes 24 Disclosures 25 Email Settings 25 Recon 25

2
Log-In Use either of the following URL’s to login to your Online Banking account: www.taylorbank.com Enter your username (Online Banking ID) in the upper right corner.
OR www.netteller.com/taylorbank
The next screen will be the disclosure and agreement screen.

3
** You must check the box marked “I Agree” and then hit “Accept” to move forward. If you do not accept the agreement, your account will be disabled and you must contact the Computer Department to have your account re-activated. Password Change Required
After accepting the agreement, you must change your temporary password to a new 8-20 character alpha-numeric PIN.
1. Your current password is the 4 digit temporary PIN issued by the Electronic Services Department.
2. Your new password must be between eight and twenty (8-20) characters long, and must be comprised of numbers and letters.

4
You may create a new Online Banking ID under the Options tab after a successful login. If you choose to create a new ID, both the new ID and the original ID issued by the Computer Department may be used as your username.
3. Click on “Continue” to complete the process. 4. You may not reuse your previous three (3) passwords.
After logging in, you may be asked to confirm or change your email address for our records
Personal Image You will be asked to pick a personal image. Once a personal image is submitted this image will show up each time you login after entering your Online Banking ID. If your selected image does not appear, close the current webpage you are on and go to the taylorbank.com to login again.

5
Verification Questions You will be asked to establish verification questions and answers during one of the first several times you login. This is an added layer of security that is designed to verify your identity.
You must select three verification questions from the drop down boxes, and supply answers to these questions. At times, we will ask you to supply the answers to these questions to ensure your identity and prevent unauthorized access to your account.
6
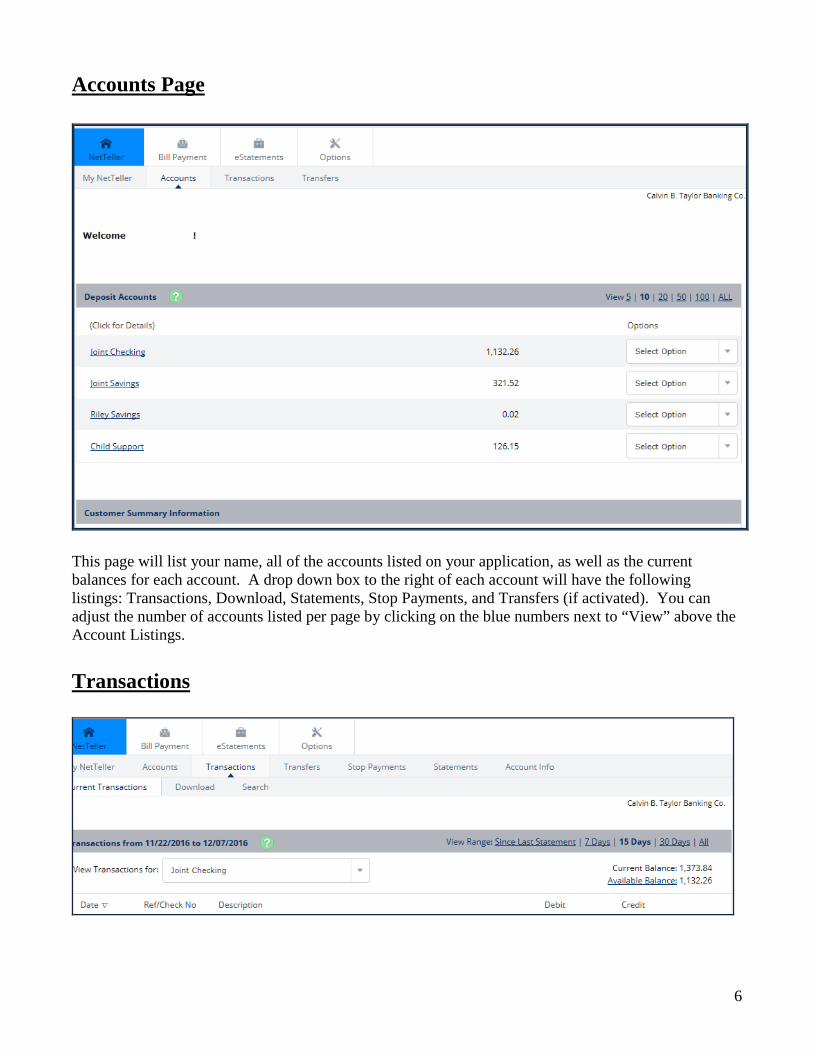
Accounts Page
This page will list your name, all of the accounts listed on your application, as well as the current balances for each account. A drop down box to the right of each account will have the following listings: Transactions, Download, Statements, Stop Payments, and Transfers (if activated). You can adjust the number of accounts listed per page by clicking on the blue numbers next to “View” above the Account Listings. Transactions

7
Transactions for the previous fifteen days are listed in descending order. You can change the period of time by selecting the appropriate range next to “View Range”. You may also switch accounts by using the drop down box next to “View Transactions For”. To view an image, click on the check number or on “View Image” under the “Check No.” column. The image will appear and can be rotated or flipped to view the endorsement on the back of the item. To view transactions between a specific date range, click on “Search” located next to the “Current Transactions” and “Download” features.
Enter the information you need to filter your transactions such as “From Date”, “To Date”, “Begin Amount”, “End Amount”, and check numbers. Use the boxes at the bottom of the screen to include or exclude checks or electronic transactions. Use the “View” drop down box to view only debits, only credits, or both. Download Choose “Download” from the menu to the right of the accounts on the main page. Select an account from the top drop down box, a range from the “Download Range” box, and the file format you wish to use. After you click submit, instructions will appear that will be based on your PC type and the type of Internet browser you are using.

8
Statements The Statements tab will allow you to view the previous thirteen statements (not including images). Starting with the fourteenth, the oldest statement will become unavailable. Next to each statement is a drop down box indicating which format you wish to use to view the statement. The choices are: PDF for Adobe Acrobat viewing, HTML document for browser viewing, or a TXT text document for downloading or viewing later.
Stop Payments The Stop Payments tab allows you to view stop payments previously entered, and to submit new stop payment requests.

9
**If you add a stop payment, you will automatically be charged a $32 stop payment fee. If you have a voucher for a free stop payment, you must bring the voucher to a branch office to receive a refund of the stop payment fee.
- Enter the following information to place a stop payment: - Check Date: The date the check was written. - Start Check Number: The beginning check number of the checks you wish
• to stop payment on. - End Check Number: The ending check number of the checks you wish to
• stop payment on. If only one check, both Start and • End check numbers are the same.
- Amount: The beginning and ending amounts of the check(s). - Payee: The person or company to whom the check was made payable. - Remark: Any notes you wish to add for your personal reference.
Once all fields have been completed, click “Submit”. A new screen will appear for you to review the information. If anything is incorrect, click on “edit” to make changes. If all of the information is correct, choose “Confirm”.

10
Transfers The Transfers option allows you to transfer funds between accounts. You must indicate which accounts you want this feature activated for on the Online Banking application. From the drop down menu to the right of the account, choose transfer. The first screen shows any pending transactions and indicates which account(s) will be credited, the total transfer amount, the frequency, and the date of the transfer. You can view, delete, or edit the transfer using the menu on the right.
To create a new transfer, choose “New” which is located on the left side above “View Transfers for”. Select which account you want the funds transferred from, the account to be credited, the amount of the transfer, the frequency, and the date. The Memo is what will be indicated on your statement for the reason for the transfer.

11
Bill Payment The first time you click on “Bill Payment” you will be asked to set up the account(s) you wish to use for bill payment. Only checking accounts that were marked as “Bill Pay” on the Internet Banking application will be available.
After selecting an account, you will be shown the Bill Pay Service Agreement, the Bill Pay fees, and the Starting check number. You must pick the first digit to be used for check payments. The check numbers start in the hundreds of thousands. (Ex. Choose the number 2 and your first check will be Check number 200,000) If more than one account was marked on the application as Bill Pay, you will be brought back to the set up screen. Also, the “Add Account” button will be added next to “History” if you wish to set up another pay account at a later date.
12
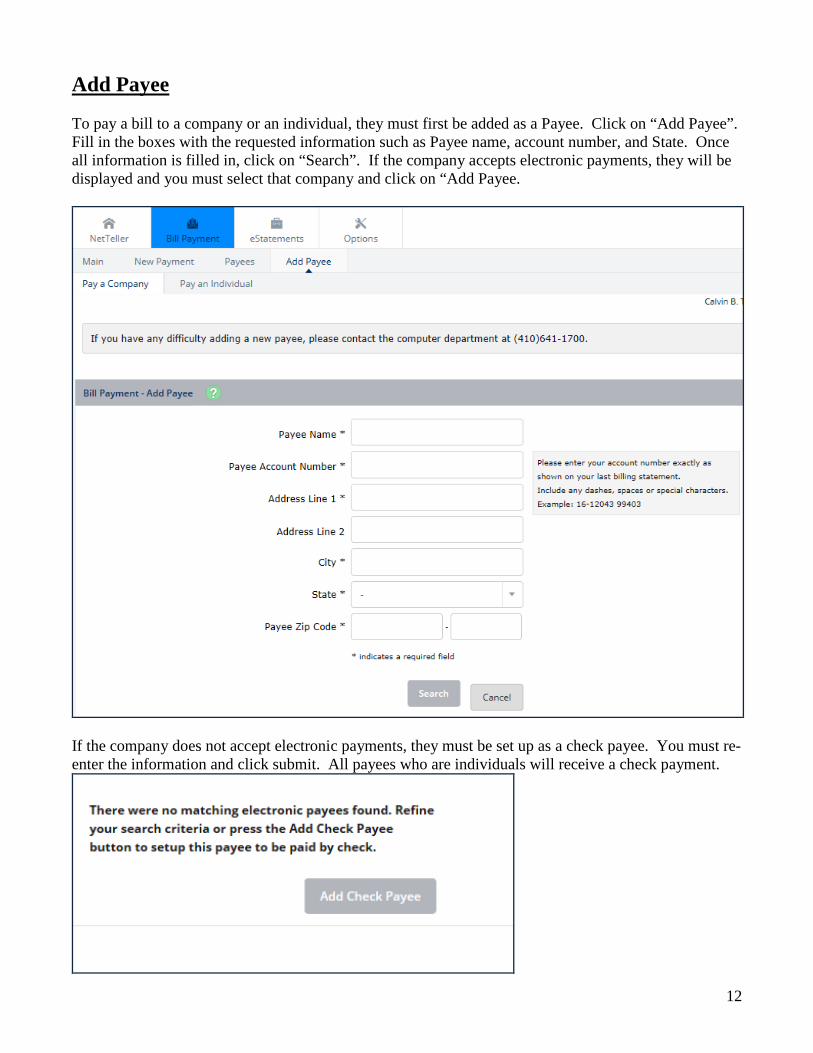
Add Payee To pay a bill to a company or an individual, they must first be added as a Payee. Click on “Add Payee”. Fill in the boxes with the requested information such as Payee name, account number, and State. Once all information is filled in, click on “Search”. If the company accepts electronic payments, they will be displayed and you must select that company and click on “Add Payee.
If the company does not accept electronic payments, they must be set up as a check payee. You must re-enter the information and click submit. All payees who are individuals will receive a check payment.
13
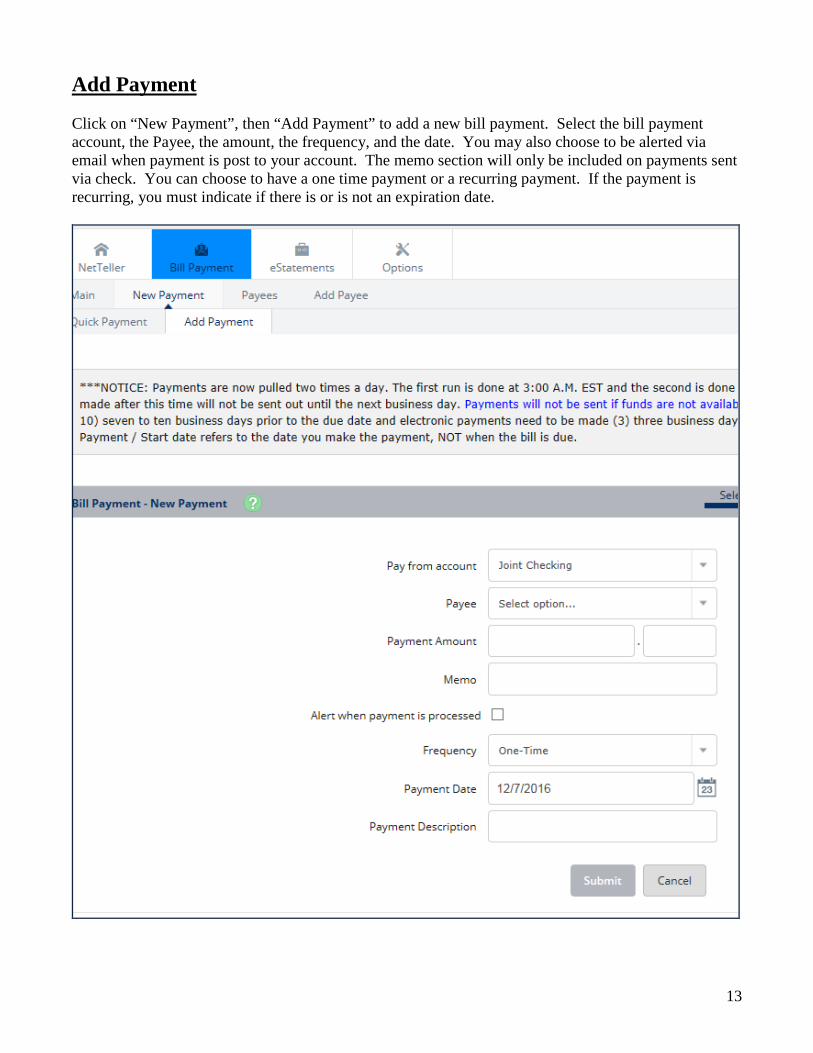
Add Payment Click on “New Payment”, then “Add Payment” to add a new bill payment. Select the bill payment account, the Payee, the amount, the frequency, and the date. You may also choose to be alerted via email when payment is post to your account. The memo section will only be included on payments sent via check. You can choose to have a one time payment or a recurring payment. If the payment is recurring, you must indicate if there is or is not an expiration date.

14
**Payments are pulled twice a day. The first run is at 3:00 AM EST and the second is at 1:00 PM EST. Any payments made after 1:00 PM EST will not be sent until the next business day. Checks payments must be made seven to ten (7-10) days prior to the due date and electronic payments must be made three (3) days prior to the due date. The Payment Date refers to when the payment is made, not the bill due date. After submitting the payment, the main screen will appear with all scheduled payments. You can check any payment listed and view, edit, or delete that payment using “Select Option” on the right.

15
Quick Payments Quick Payments allow you to quickly set up a one time payment. Up to ten (10) separate payments can be set up at once. First select the Payee(s) and click Submit.
Enter the information about the payment such as the payment date, memo, account, and amount.

16
History Click on “Main”, then “History” to view a record of payments made. The default is 15 days, but you can change it to 7 days, 30 days, since last statement, or search a range of dates using the drop down box.
17
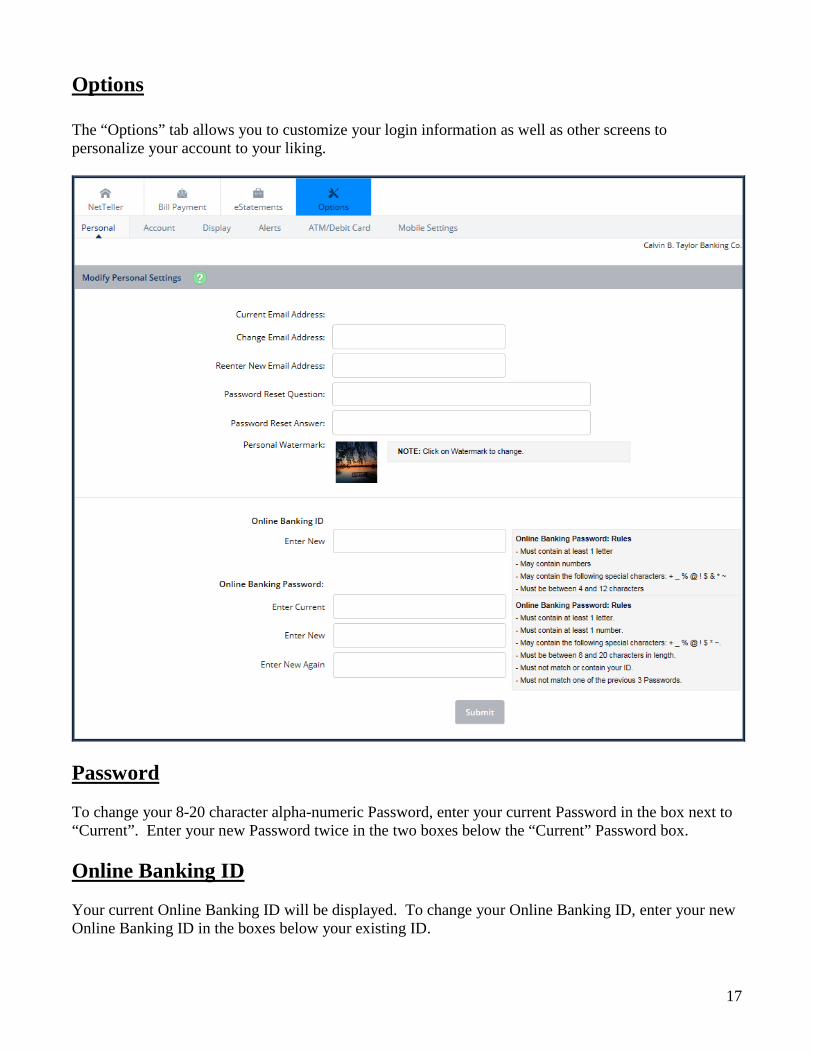
Options The “Options” tab allows you to customize your login information as well as other screens to personalize your account to your liking.
Password To change your 8-20 character alpha-numeric Password, enter your current Password in the box next to “Current”. Enter your new Password twice in the two boxes below the “Current” Password box. Online Banking ID Your current Online Banking ID will be displayed. To change your Online Banking ID, enter your new Online Banking ID in the boxes below your existing ID.

18
E-mail Address Your current e-mail address will be displayed. To change your e-mail address, enter your new e-mail address in the boxes below your current address. Personal Question & Answer In the event that you have forgotten or lost your password, you can create a “Personal Question” and answer which will allow you to retrieve your password. If you have forgotten your password, go to www.netteller.com/taylorbank and click on “Reset Password” next to the Online Banking ID box. You will receive an email at the address listed online. The email will contain a link which will prompt you to supply the answer to your question. Upon successfully supplying the answer, you will gain access to your account. Account The “Account” section allows you to change the names of the accounts accessible through your online account. To change an account name, enter the desired name in the box next to the account you wish to change.

19
Alerts The “Alerts” tab allows you to set up conditions that will cause a message to be displayed on the Main page when you first login.

20
Event Alerts Event Alerts will notify you of certain events such as Incoming Wires, Incoming ACH’s, Scheduled Payment Expiring, and several other events. Scheduled Payment Expiring and Scheduled Transfer Expiring are also available for e-mail alerts.
Balance Alerts Balance Alerts allow you to set up notifications when the balance of selected account rises above or falls below certain amounts.

21
Item Alerts Item Alerts allow you to set up notifications when specific items clear the specified accounts. Choose the account and then enter the check number in the “Number” box.
Personal Alerts Personal Alerts allow you to set up a reminder or message that will be displayed on a certain date. Choose the date of the reminder and type in your message in the “Text” box.

22
ATM/Debit Cards ATM/Debit Cards allow you to report a lost/stolen card if you listed that card on your application. Display Display allows you to change the default display settings for various features including Bill Pay History, Transaction periods, Transfer History, and Accounts displayed.
eStatements The eStatement service allows you to receive your monthly Checking and Savings statements and any legal notices electronically in lieu of paper statements. Once you receive the email notifying you that your statement is ready for viewing, you will need to login to your Online Banking account and click on the eStatement tab to view your available documents. Enrollment Click on the eStatement tab next to the Options tab. The default settings are to convert all accounts that are available online to eStatements. Click on “details” to customize which accounts you wish to convert to eStatements. Verify that your email address is correct. Make any necessary modifications. Your eStatements notifications will be delivered to this email address.

23
Choose a Security Phrase. The Security Phrase will be included in any email sent to you regarding your eStatement or the eStatement service. If you receive an email claiming to be from Taylor Bank regarding your eStatement, and it does not contain your security phrase, do not click on any links or supply any information. Contact the Computer Department at 410-641-1700. You must read and accept the Disclosure before enrolling in eStatements. Once you enroll, you will receive an email indicating that your enrollment was successful.

24
Statements & Notices This section will allow you to review the past 18 months’ worth of statements for each eStatement that was delivered.
Sign-Up/Changes The Sign-Up/Changes section allows you to view accounts that are eligible to receive eStatements. It also allows you to add or remove accounts from the eStatement service.

25
Disclosures The Disclosures tab will allow you to view the full disclosure you accepted during the enrollment process. Email Settings The Email Settings tab will allow you to modify the primary email address and the security phrase. Reconciliation Wizard The Recon tab will allow you to conduct reconciliation of your statement and transactions. You must first enter the beginning balance from your last statement. Then enter any deposits that have been made. You must then enter any outstanding checks. If you have any questions please contact us at: Taylor Bank Electronic Services Department 24N. Main Street Berlin, MD 21811 Phone: 410-641-1700 Fax: 410-641-0543 [email protected]