OnCommand Insight Connector for BMC - NetApp … · 1.1 Related Documentation • NetApp OnCommand...
77
USER GUIDE NetApp OnCommand Insight Connector for BMC by Seamless Technologies Version 1.4.06 Seamless Technologies Inc. 35 Airport Road Morristown, New Jersey 07960 USA Document Version 1.4 May 2011 Author: Seamless Seamless Technologies, Inc. (973) 326-8900
Transcript of OnCommand Insight Connector for BMC - NetApp … · 1.1 Related Documentation • NetApp OnCommand...

USER GUIDE NetApp OnCommand Insight Connector for BMC by Seamless Technologies Version 1.4.06 Seamless Technologies Inc. 35 Airport Road Morristown, New Jersey 07960 USA Document Version 1.4 May 2011 Author: Seamless Seamless Technologies, Inc. (973) 326-8900

NETAPP to BMC Atrium CMDB Integration by Seamless Technologies User Guide
Version 1.4.06
Seamless Technologies Inc. - Proprietary Information Use pursuant to company instructions
Monday, May 16, 2011
2
1 Preface .................................................................................................. 3 1.1 Related Documentation ......................................................................... 3 1.2 Conventions ........................................................................................ 3
2 Introduction .......................................................................................... 4 The Storage Service Construction between a host and its storage is shown below: ....................... 4 2.1 Overview ............................................................................................ 6 2.2 Key Functionality ................................................................................. 7
2.2.1 Integration Compliance ............................................................................................ 7 2.2.2 Predefined Customizable Data Map ............................................................................ 7 2.2.3 Reconciliation Job.................................................................................................... 7
3 Installation ............................................................................................ 8 3.1 Installation requirements ...................................................................... 8 3.2 New-Installation, Re-Installalation ......................................................... 8
3.2.1 Installing the Connector for the first time ................................................................... 8 3.2.2 Re-Installing the Connector: ..................................................................................... 9
3.3 Choosing where to install .................................................................... 10 3.3.1 Install on the Standalone Server ............................................................................. 10 3.3.2 Install on the Remedy CMDB (Target) Server ........................................................... 10 3.3.3 Install on the NetApp OnCommand Insight DWH (Source) Server................................ 10
3.4 Component Installation ....................................................................... 10 3.4.1 NetApp2CMDB Connector Installation on Windows .................................................... 10 3.4.2 Get License File .................................................................................................... 10 3.4.3 Install NETAPP 2CMDB instance (netapp2asset) as a service ....................................... 11 3.4.4 NETAPP2CMDB Connector Installation on UNIX ......................................................... 12
3.5 Logs and Troubleshooting ................................................................... 13 3.5.1 Location of the log file ........................................................................................... 13 3.5.2 How to contact Support and what to send to Support ................................................ 13 3.5.3 Reference to our ticketing system and knowledge base .............................................. 13
3.6 Remedy Workflow Installation ............................................................. 13 3.7 Start the Configuration tool ................................................................. 14 3.8 Check Connection .............................................................................. 16
3.8.1 Checking the connection from the Options menu ....................................................... 16 3.8.2 Checking the Connection from the Configuration UI Connections pane edit button ......... 18 3.8.3 Validating the SQL connection ................................................................................ 20
3.9 Verify Data Import ............................................................................. 21 3.10 Un-Installation ................................................................................ 21
3.10.1 Un-installing on Windows ....................................................................................... 21 3.10.2 Un-installing on UNIX ............................................................................................ 22
4 Configuration ....................................................................................... 22 4.1 Create Dataset .................................................................................. 22 4.2 Basic Configuration ............................................................................ 27
4.2.1 Changing Connection Settings ................................................................................ 27 4.2.2 Creating Your First Map ......................................................................................... 28 4.2.3 Verify the Mapping ................................................................................................ 29 4.2.4 Changing a Dataset ............................................................................................... 32 4.2.5 Changing Company ............................................................................................... 33
4.3 Creating Connector Instance ............................................................... 34 4.4 Customize Configurations .................................................................... 34
4.4.1 Changing the Schedule .......................................................................................... 34 4.4.2 Editing Maps ......................................................................................................... 35 4.4.3 Editing Submap Attributes ...................................................................................... 39
4.5 Reconciliation and CMDB Extension ...................................................... 43 5 Starting the Connector ........................................................................ 44
5.1 Starting the Connector using command line options ............................... 44 5.2 Starting the Service ........................................................................... 45 5.3 Verify Data Import ............................................................................. 45 5.4 Run Reconciliation Job ........................................................................ 46
6 Integration with BMC Asset Management ............................................ 47

NETAPP to BMC Atrium CMDB Integration by Seamless Technologies User Guide
Version 1.4.06
Seamless Technologies Inc. - Proprietary Information Use pursuant to company instructions
Monday, May 16, 2011
3
6.1 Create Instances ................................................................................ 47 6.2 Set Dataset ....................................................................................... 48 6.3 Product Categorization ........................................................................ 48 6.4 Adding data fields to the Remedy join forms .......................................... 49
6.4.1 Add a data field to a “AST:NetappStorageData” join form ............................................................ 49 6.4.2 Add a data field to a AST:NetAppStorageService join form ......................................... 61
7 FAQ...................................................................................................... 62 8 Appendices .......................................................................................... 63
8.1 NETWORK Storage Service Map ........................................................... 63
1 Preface This guide contains detailed information about the NetApp OnCommand Insight to the BMC Atrium Configuration Management Database (CMDB) Connector by Seamless Technologies. It provides instructions for installing, configuring, and using the integration, and is intended for use by system administrators. Use this guide along with the appropriate user guides for your NetApp OnCommand Insight products and BMC products. This document assumes that you are familiar with your host operating system and with the NetApp and BMC products installations. You should know how to perform basic actions in the Windows environment, such as choosing menu commands and dragging and dropping icons.
1.1 Related Documentation
• NetApp OnCommand Insight Installation and Administration Guide • BMC Atrium Configuration Management Database Administration Guide
If you have any questions, contact NetApp Support at http://support.netapp.com
1.2 Conventions The following conventions are used in this guide:
This book includes special elements called notes, warnings, examples, and tips:
Note: Notes provide additional information about the current subject.
Warning: Warnings alert you to situations that can cause problems, such as loss of data, if you do not follow instructions carefully.
Example: An example clarifies a concept discussed in text.
Tip: A tip provides useful information that may improve product performance or make
procedures easier to follow.
All syntax, operating system terms, and literal examples are presented in this typeface.
In instructions, boldface type highlights information that you enter. File names, directories, and Web addresses also appear in boldface type.

NETAPP to BMC Atrium CMDB Integration by Seamless Technologies User Guide
Version 1.4.06
Seamless Technologies Inc. - Proprietary Information Use pursuant to company instructions
Monday, May 16, 2011
4
The symbol => connects items in a menu sequence. For example, Actions => Create Test instructs you to choose the Create Test command from the Actions menu.
The symbol » denotes one-step instructions. In syntax, path names, or system messages, italic text represents a variable, as shown in
the following examples: The table table_name is not available. system/instance/file_name
2 Introduction The NetApp OnCommand Insight Connector for BMC by Seamless Technologies takes NetApp OnCommand Insight physical and logical stored data from the network storage systems (for example, storage unit, host storage service, VS Storage Service, VM Storage Service) and their relationship between devices (host, storage switch and tape) and imports it to the BMC Atrium CMDB. The NetApp to CMDB Connector uses the Remedy API to create the integration between NetApp OnCommand Insight and BMC products. This functionality enables discovery of physical, logical stored data and violation from the network storage system in the BMC Atrium CMDB. Network Topology Example: The relationship between host, storage system and volume is shown below.
The Storage Service Construction between a host and its storage is shown below:
NETAPP to BMC Atrium CMDB Integration by Seamless Technologies User Guide
Version 1.4.06
Seamless Technologies Inc. - Proprietary Information Use pursuant to company instructions
Monday, May 16, 2011
5
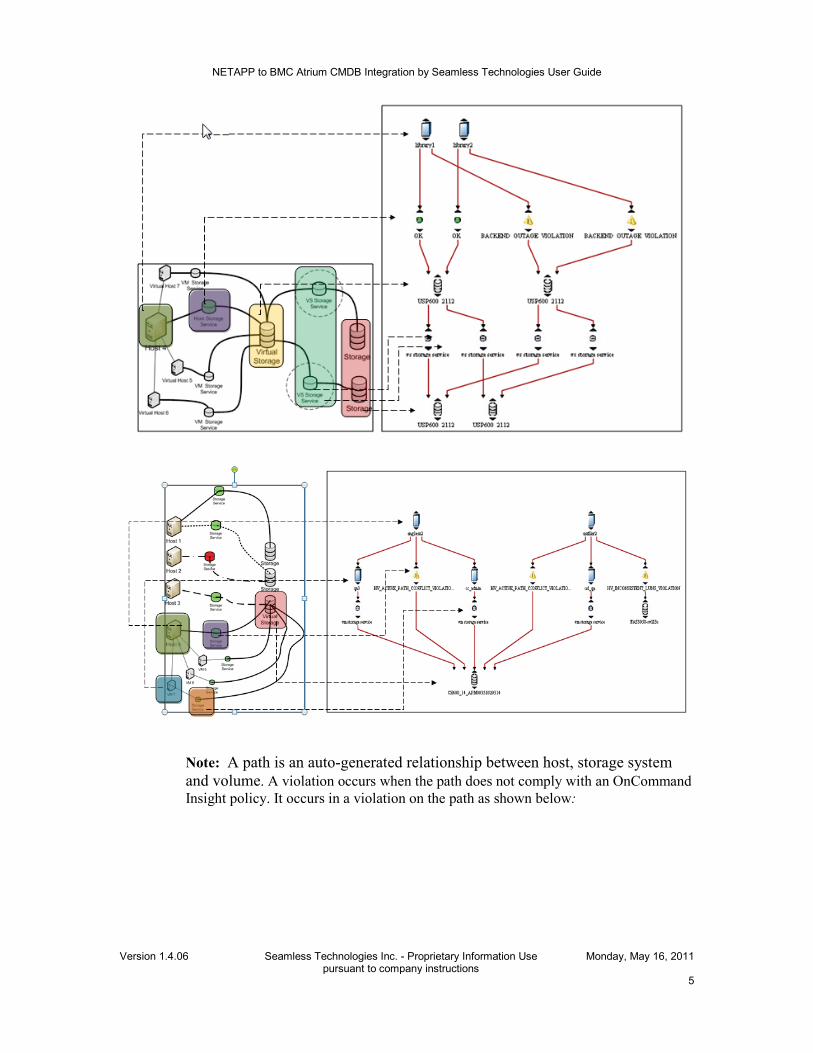
Note: A path is an auto-generated relationship between host, storage system and volume. A violation occurs when the path does not comply with an OnCommand Insight policy. It occurs in a violation on the path as shown below:
NETAPP to BMC Atrium CMDB Integration by Seamless Technologies User Guide
Version 1.4.06
Seamless Technologies Inc. - Proprietary Information Use pursuant to company instructions
Monday, May 16, 2011
6
Note: The violation is always generated on the path and not on any of the end nodes such as host, storage or volume.
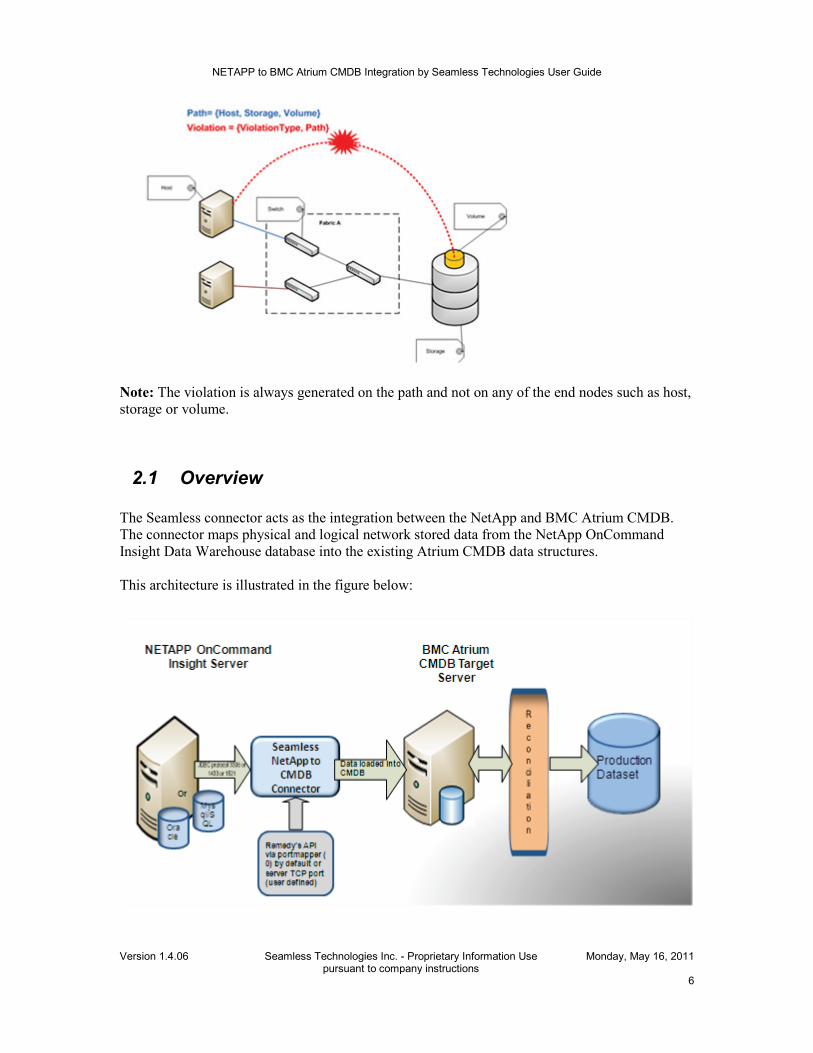
2.1 Overview The Seamless connector acts as the integration between the NetApp and BMC Atrium CMDB. The connector maps physical and logical network stored data from the NetApp OnCommand Insight Data Warehouse database into the existing Atrium CMDB data structures. This architecture is illustrated in the figure below:

NETAPP to BMC Atrium CMDB Integration by Seamless Technologies User Guide
Version 1.4.06
Seamless Technologies Inc. - Proprietary Information Use pursuant to company instructions
Monday, May 16, 2011
7
2.2 Key Functionality
The Seamless Technologies NetApp to CMDB Connector is automated, easy to use and supports ITIL. Some of the key features include the following:
• Includes configurable, predefined class maps of NetApp to Atrium CMDB • Supports both full load and delta updates • Enables configuration & mapping using existing GUI capabilities • Supports NetApp OnCommand Insight • Provides flexible and powerful configuration & mapping • Provides a default CMDB reconciliation job • Enables automated CMDB reconciliation • Supports high performance, runs as a service or daemon • Enables the update schedule to be set as per the customer’s requirements • Is technically compliant —architecture level and JDBC, NetApp catalog and BMC
Remedy Java APIs
2.2.1 Integration Compliance
Requires: BMC® Atrium™ CMDB 2.0/ 2.1/7.5/7.6 Requires: Java 1.5 and up [OnCommand Insight requires Java 6.0] Requires: Network Connectivity to NetApp OnCommand Insight data storage Requires: NetApp OnCommand Insight
2.2.2 Predefined Customizable Data Map The NetApp to Atrium CMDB Connector provides customizable configuration files for the user to map NetApp database entries to the BMC® Atrium CMDB. The default mapping consists of:
• Network storages: network storages and their relationships. • Network violation: Network violations and their relationships.
2.2.3 Reconciliation Job The reconciliation job is a container for reconciliation activities, which themselves can have different components. The primary activities are Identify and Merge. A reconciliation job can have one or more activities, each of which defines one or more datasets and rules for that activity. In addition, you can use a Qualification Set to restrict the instances participating in a reconciliation activity. You can merge class instances from one dataset (such as discovery) to another dataset (by default, the production BMC.ASSET dataset). For detailed information about the reconciliation job, see the BMC Atrium CMDB Administrator’s Guide. A default reconciliation job is available out of the box. The reconciled data can be used by Batch Mode or Service/Daemon Mode. The integration operates as a command line utility for the batch job scripts, or as a Windows service (or Unix Daemon) to poll the

NETAPP to BMC Atrium CMDB Integration by Seamless Technologies User Guide
Version 1.4.06
Seamless Technologies Inc. - Proprietary Information Use pursuant to company instructions
Monday, May 16, 2011
8
data at a defined schedule. This will ensure maximum flexibility for building a CMDB which is accurate and easy to audit, access, and change.
3 Installation This section of the guide describes the installation procedures for the various components that make up the Integration between the Connector and its components. If you are a first-time user and want to see test results quickly, it is strongly recommended you follow these instructions and run the sample map provided with the package.
3.1 Installation requirements The NetApp OnCommand Insight to BMC Atrium CMDB Connector by Seamless Technologies can run on any server as long as there is network connectivity to the NetApp OnCommand Insight DWH database and CMDB servers. Prerequisites:
• Java (JRE) v1.5 or later [OnCommand Insight uses Java 6.0] • Network Connectivity to NetApp database and Atrium CMDB
Supported Platforms:
• Windows 2003 (SP2) or 2008 • Solaris 10 (Requires Solaris Zones Patch 11883-36 or Later) • Linux
Supported Database • MYSQL
NetApp OnCommand Insight v6.1 product
BMC Products
• BMC Remedy 7.x • BMC® Atrium™ CMDB 2.01/7.5/7.6
3.2 New-Installation, Re-Installalation
3.2.1 Installing the Connector for the first time
• On Windows: 1. Download the NETAPP2CMDB Connector from NetApp website to the server
where the integration will be installed. 2. Unzip the download file (netapp2atrium_win_x86_1_4_06.) into a NetApp
install directory, for example., C:\Program Files\netapp\hpna2cmdb. This is referred as <netapp-install-dir>
NETAPP to BMC Atrium CMDB Integration by Seamless Technologies User Guide
Version 1.4.06
Seamless Technologies Inc. - Proprietary Information Use pursuant to company instructions
Monday, May 16, 2011
9
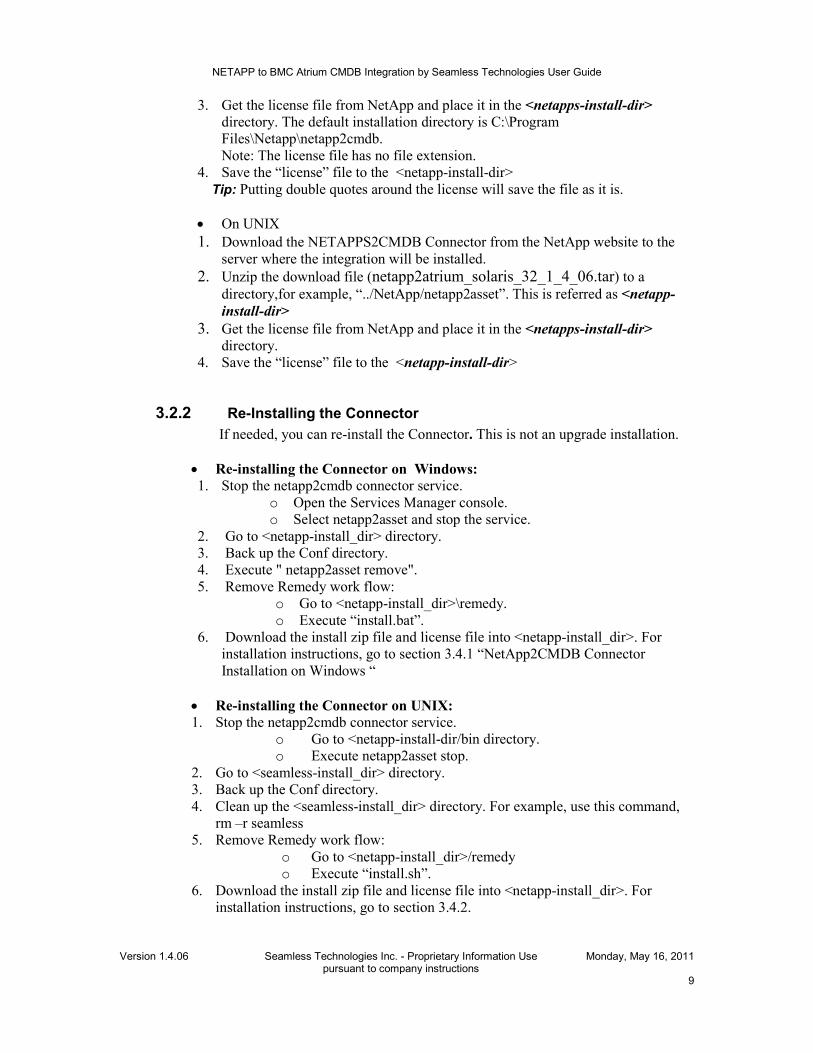
3. Get the license file from NetApp and place it in the <netapps-install-dir> directory. The default installation directory is C:\Program Files\Netapp\netapp2cmdb. Note: The license file has no file extension.
4. Save the “license” file to the <netapp-install-dir> Tip: Putting double quotes around the license will save the file as it is.
• On UNIX 1. Download the NETAPPS2CMDB Connector from the NetApp website to the
server where the integration will be installed. 2. Unzip the download file (netapp2atrium_solaris_32_1_4_06.tar) to a
directory,for example, “../NetApp/netapp2asset”. This is referred as <netapp-install-dir>
3. Get the license file from NetApp and place it in the <netapps-install-dir> directory.
4. Save the “license” file to the <netapp-install-dir>
3.2.2 Re-Installing the Connector If needed, you can re-install the Connector. This is not an upgrade installation.
• Re-installing the Connector on Windows: 1. Stop the netapp2cmdb connector service.
o Open the Services Manager console. o Select netapp2asset and stop the service.
2. Go to <netapp-install_dir> directory. 3. Back up the Conf directory. 4. Execute " netapp2asset remove". 5. Remove Remedy work flow:
o Go to <netapp-install_dir>\remedy. o Execute “install.bat”.
6. Download the install zip file and license file into <netapp-install_dir>. For installation instructions, go to section 3.4.1 “NetApp2CMDB Connector Installation on Windows “
• Re-installing the Connector on UNIX: 1. Stop the netapp2cmdb connector service.
o Go to <netapp-install-dir/bin directory. o Execute netapp2asset stop.
2. Go to <seamless-install_dir> directory. 3. Back up the Conf directory. 4. Clean up the <seamless-install_dir> directory. For example, use this command,
rm –r seamless 5. Remove Remedy work flow:
o Go to <netapp-install_dir>/remedy o Execute “install.sh”.
6. Download the install zip file and license file into <netapp-install_dir>. For installation instructions, go to section 3.4.2.

NETAPP to BMC Atrium CMDB Integration by Seamless Technologies User Guide
Version 1.4.06
Seamless Technologies Inc. - Proprietary Information Use pursuant to company instructions
Monday, May 16, 2011
10
3.3 Choosing where to install You should choose one of the following options for the Connector installation:
3.3.1 Install on the Standalone Server 1. Unzip the NetApp to CMDB connector installer on the standalone server. 2. Do one of the following:
• For the Windows installation, go to section 3.4.1. • For the UNIX installation, go to section 3.4.4.
3.3.2 Install on the Remedy CMDB (Target) Server 1. Unzip the NetApp to CMDB connector installer on the target server. 2. Do one of the following:
For the Windows installation, go to section 3.4.1. For the UNIX installation, go to section 3.4.4.
3.3.3 Install on the NetApp OnCommand Insight DWH (Source) Server
1. Unzip the NetApp to CMDB connector installer on the Source server. 2. Do one of the following:
• For the Windows installation, go to section 3.4.1. • For the UNIX installation, go to section 3.4.4.
3.4 Component Installation This section of the guide describes the installation procedures for the various components. You install a component, and then get a license file.
3.4.1 NetApp2CMDB Connector Installation on Windows
1. Download the NETAPP2CMDB Connector from the NetApp website to the server where the integration will be installed. [Do not use an apostrophe with a company name.]
2. Unzip the download file (netapp2atrium_win_x86_1_4_01.) into a Seamless install
directory, for example, C:\Program Files\Seamless\hpna2cmdb. This is referred as <netapp-install-dir>.
3.4.2 Get License File Access the NetApp Support site at http://support.netapp.com for licensing information. The Version file contains the Connector version information.
1. When the license file is received, save it to the <netapp-install-dir> directory. 2. The default installation directory is C:\Program Files\NetApp\netapp2cmdb.
Note: The license file has no file extension.

NETAPP to BMC Atrium CMDB Integration by Seamless Technologies User Guide
Version 1.4.06
Seamless Technologies Inc. - Proprietary Information Use pursuant to company instructions
Monday, May 16, 2011
11
3. Save the “license” file to the <netapp-install-dir> directory as shown below.
Tip: Putting double quotes around the license will save the file as it is.
3.4.3 Install NETAPP 2CMDB instance (netapp2asset) as a service The integration operates as a command line utility for the batch job scripts or as a Windows service (or Unix Daemon) to poll the data at a defined schedule. This ensures maximum flexibility for building a CMDB that is accurate and easy to audit, access, and change. The following example shows how to register the default instance (netapp2cmdb) as a Windows service.
1. Open a CMD command prompt. If you need more than one connector instance,
you can repeat the process. Install connector service 2. Go to bin <netapps-install-dir> directory, i.e., “C:\Program
Files\NetApp\netapp2cmdb\bin> netapp2asset install
3. Install NETAPP2ASSET instance (netapp2asset) as a service.
NETAPP to BMC Atrium CMDB Integration by Seamless Technologies User Guide
Version 1.4.06
Seamless Technologies Inc. - Proprietary Information Use pursuant to company instructions
Monday, May 16, 2011
12
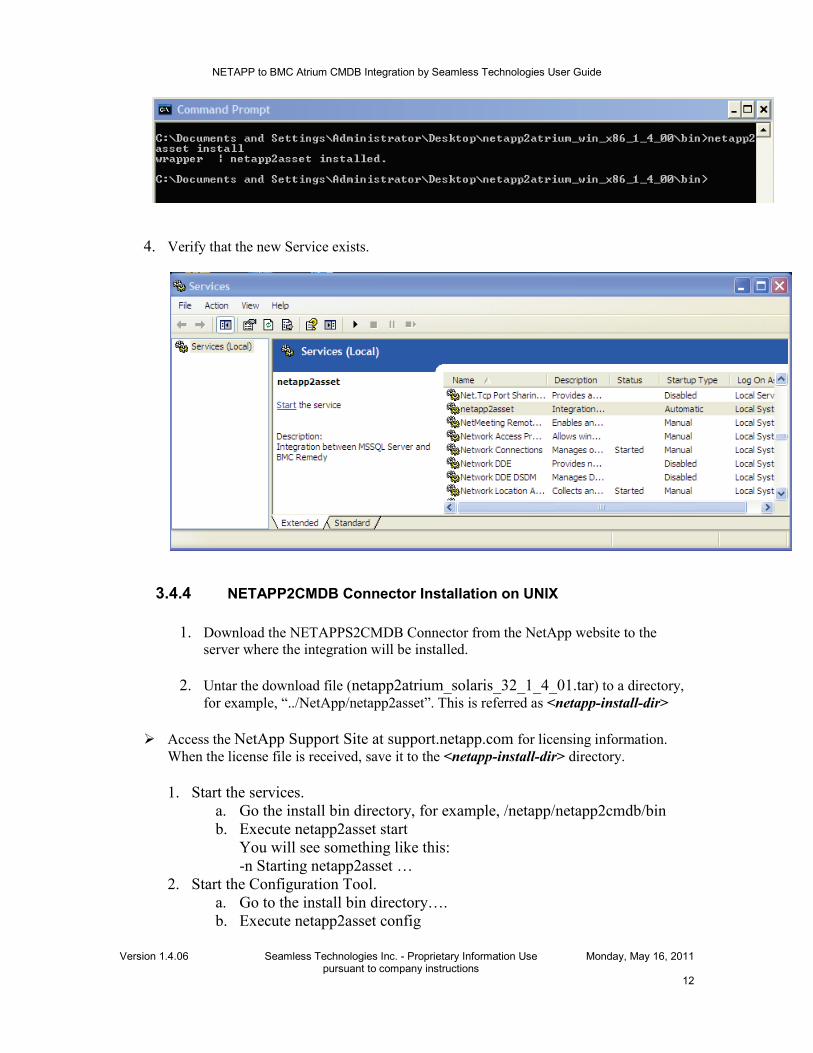
4. Verify that the new Service exists.
3.4.4 NETAPP2CMDB Connector Installation on UNIX
1. Download the NETAPPS2CMDB Connector from the NetApp website to the server where the integration will be installed.
2. Untar the download file (netapp2atrium_solaris_32_1_4_01.tar) to a directory,
for example, “../NetApp/netapp2asset”. This is referred as <netapp-install-dir>
Access the NetApp Support Site at support.netapp.com for licensing information. When the license file is received, save it to the <netapp-install-dir> directory.
1. Start the services.
a. Go the install bin directory, for example, /netapp/netapp2cmdb/bin b. Execute netapp2asset start
You will see something like this: -n Starting netapp2asset …
2. Start the Configuration Tool. a. Go to the install bin directory…. b. Execute netapp2asset config

NETAPP to BMC Atrium CMDB Integration by Seamless Technologies User Guide
Version 1.4.06
Seamless Technologies Inc. - Proprietary Information Use pursuant to company instructions
Monday, May 16, 2011
13
c. For instructions on using the Configuration Tool, see section 3.8 “Check Connection”.
3.5 Logs and Troubleshooting
3.5.1 Location of the log file The installer creates log files. The files are written to: • Windows: <install_dir>\Logs • UNIX:<install_dir>/Logs
3.5.2 How to contact Support and what to send to Support You can contact NetApp Customer Support using one of the following methods. Be sure to provide either your NetApp or BMC Connector serial number.
Send map files, logs and the conf file to NetApp Customer Support.
Support Hotline: • 1-888-4-NETAPP (North America) • 00.800.44.NETAPP (EMEA)
Get answers on the NetApp Support Site at http://support.netapp.com NetApp Global Services contact info: www.netapp.com/us/support/ngs-
contacts.html
3.5.3 Reference to our ticketing system and knowledge base Prior to contacting support, search our ticketing system and knowledge base. Click the following link for the Support login to access to ticketing and the knowledgebase: http://support.netapp.com Process to request access to the Support system if you do not have access
If you do not have a login, contact NetApp via the NetApp Support Site -at http://support.netapp.com
3.6 Remedy Workflow Installation The procedures listed below installs the integration product. You need to run this script. This installation script imports the sample reconciliation job (Seamless Sample) into your BMC Atrium CMDB. The sample job is defined to identify and merge CI and its relationship from the staging dataset (for example, NETAPP.IMPORT.SANSCREEN) into the target dataset (BMC Asset).This install script installs the dataset, a sample job, and xx.
1. Go to the <netapp-install-dir>\remedy directory. 2. Execute “install” script from the command window. 3. Follow the instructions when prompted by the script. For example you will see
something like this below:
NETAPP to BMC Atrium CMDB Integration by Seamless Technologies User Guide
Version 1.4.06
Seamless Technologies Inc. - Proprietary Information Use pursuant to company instructions
Monday, May 16, 2011
14
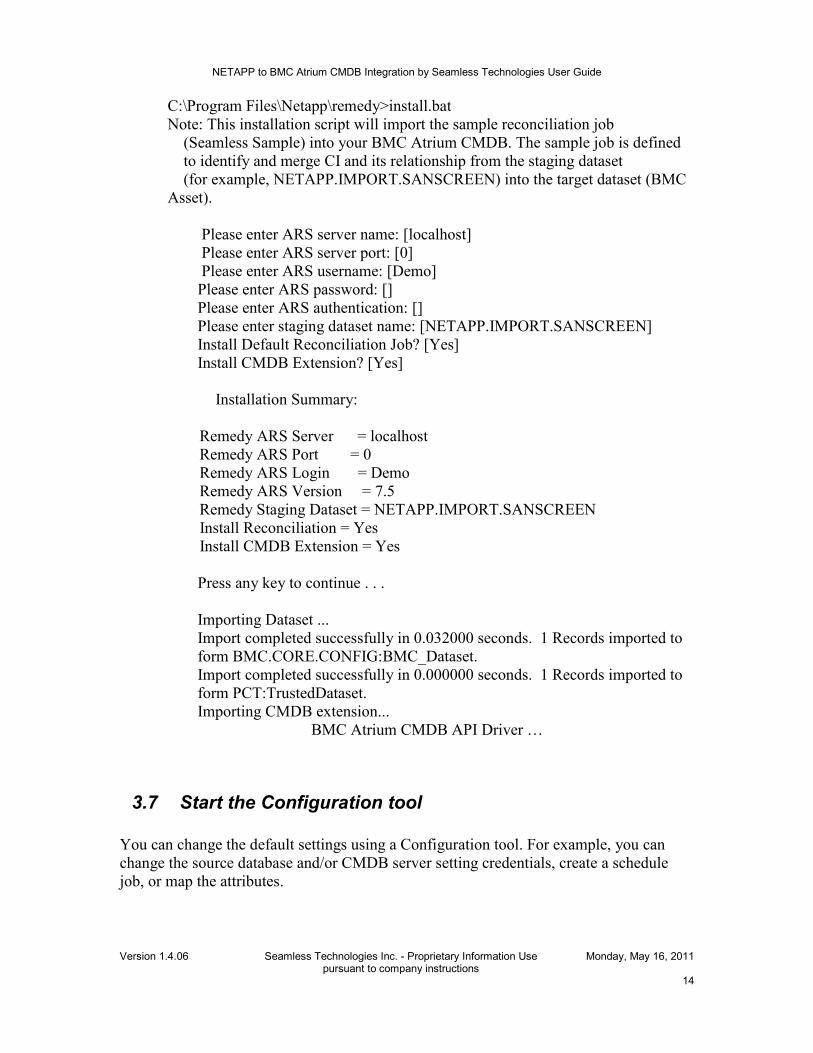
C:\Program Files\Netapp\remedy>install.bat Note: This installation script will import the sample reconciliation job (Seamless Sample) into your BMC Atrium CMDB. The sample job is defined to identify and merge CI and its relationship from the staging dataset (for example, NETAPP.IMPORT.SANSCREEN) into the target dataset (BMC Asset).
Please enter ARS server name: [localhost] Please enter ARS server port: [0] Please enter ARS username: [Demo]
Please enter ARS password: [] Please enter ARS authentication: [] Please enter staging dataset name: [NETAPP.IMPORT.SANSCREEN] Install Default Reconciliation Job? [Yes] Install CMDB Extension? [Yes]
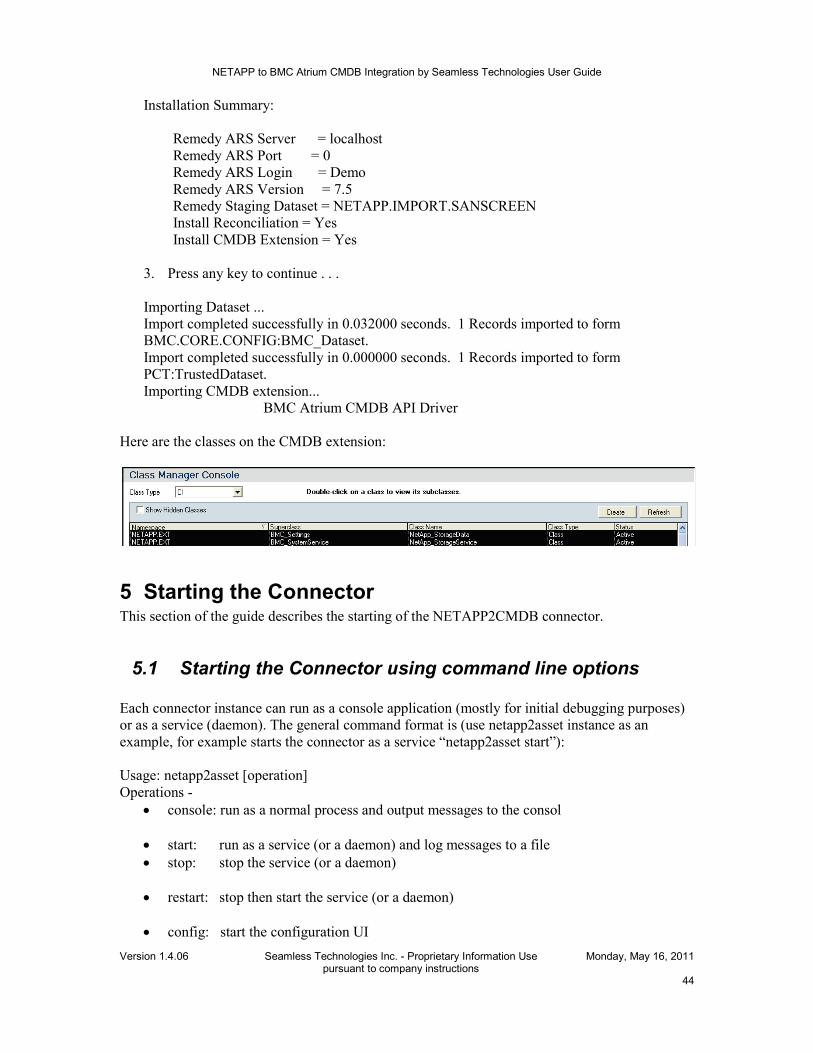
Installation Summary:
Remedy ARS Server = localhost Remedy ARS Port = 0 Remedy ARS Login = Demo Remedy ARS Version = 7.5 Remedy Staging Dataset = NETAPP.IMPORT.SANSCREEN Install Reconciliation = Yes Install CMDB Extension = Yes
Press any key to continue . . . Importing Dataset ... Import completed successfully in 0.032000 seconds. 1 Records imported to form BMC.CORE.CONFIG:BMC_Dataset. Import completed successfully in 0.000000 seconds. 1 Records imported to form PCT:TrustedDataset. Importing CMDB extension... BMC Atrium CMDB API Driver …
3.7 Start the Configuration tool You can change the default settings using a Configuration tool. For example, you can change the source database and/or CMDB server setting credentials, create a schedule job, or map the attributes.
NETAPP to BMC Atrium CMDB Integration by Seamless Technologies User Guide
Version 1.4.06
Seamless Technologies Inc. - Proprietary Information Use pursuant to company instructions
Monday, May 16, 2011
15
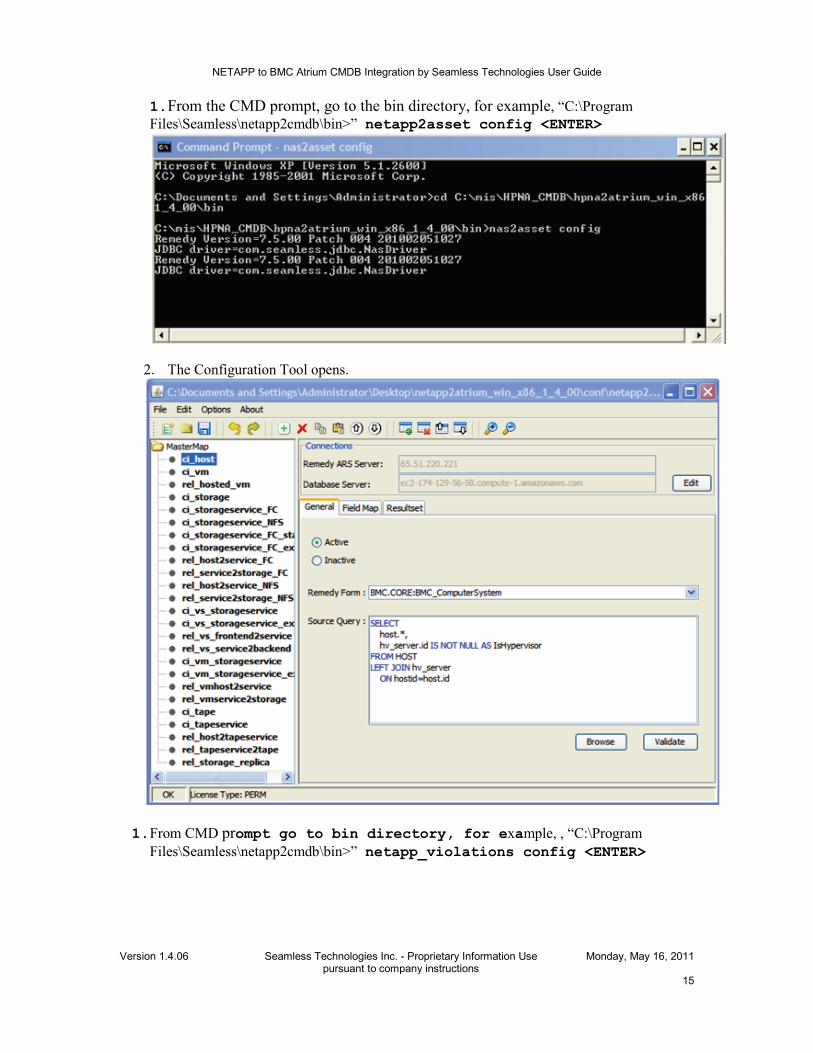
1. From the CMD prompt, go to the bin directory, for example, “C:\Program Files\Seamless\netapp2cmdb\bin>” netapp2asset config <ENTER>
2. The Configuration Tool opens.
1. From CMD prompt go to bin directory, for example, , “C:\Program
Files\Seamless\netapp2cmdb\bin>” netapp_violations config <ENTER>

NETAPP to BMC Atrium CMDB Integration by Seamless Technologies User Guide
Version 1.4.06
Seamless Technologies Inc. - Proprietary Information Use pursuant to company instructions
Monday, May 16, 2011
16
The Configuration tool opens.
Note: To start the Configuration tool on UNIX, see under UNIX installation section 3.4.4.
3.8 Check Connection There are two ways to check the connection settings or change your connection
settings: From the Options menu and the Edit button.
3.8.1 Checking the connection from the Options menu 1. From the menu, choose Options => Connections.

NETAPP to BMC Atrium CMDB Integration by Seamless Technologies User Guide
Version 1.4.06
Seamless Technologies Inc. - Proprietary Information Use pursuant to company instructions
Monday, May 16, 2011
17
The Connection Settings dialog box opens.
2. In the Database Settings pane, enter the following information below: • In the Server field, enter Netapp OnCommand Insight
DWH (source) database server name • In the Port field, enter the database port number. • In the Database field, enter the database name. • In the User Name field, enter the database user name. • In the Password field, enter the database password. • In the JDBC Driver field, take the default. Do not change
this.
NETAPP to BMC Atrium CMDB Integration by Seamless Technologies User Guide
Version 1.4.06
Seamless Technologies Inc. - Proprietary Information Use pursuant to company instructions
Monday, May 16, 2011
18
• In the Full URL field, Click Edit to edit the JDBC URL,. This is for advanced users.
3. In the Remedy Settings pane, enter the following information below.
• In the Server field, enter the Remedy cmdb server name. • In the Port field, enter the server port. • In the User Name field, enter or select your AR System user
name. • In the Password field, type your password. See your
administrator if you do not know your password. • In the Authentication field, if you are working in your
organization’s default domain, you can leave this field blank. If you have entered a valid user name and password, and an error message still appears, notify your administrator to verify if you need to enter a value in the Authentication field.
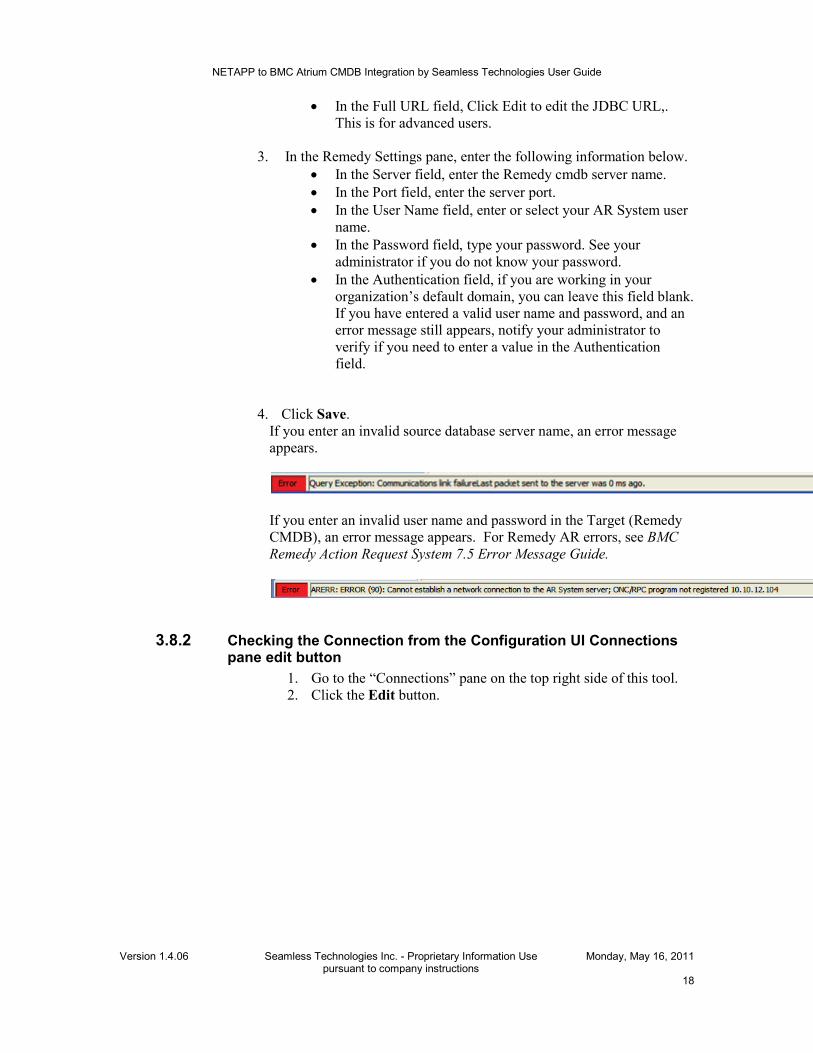
4. Click Save. If you enter an invalid source database server name, an error message appears.
If you enter an invalid user name and password in the Target (Remedy CMDB), an error message appears. For Remedy AR errors, see BMC Remedy Action Request System 7.5 Error Message Guide.
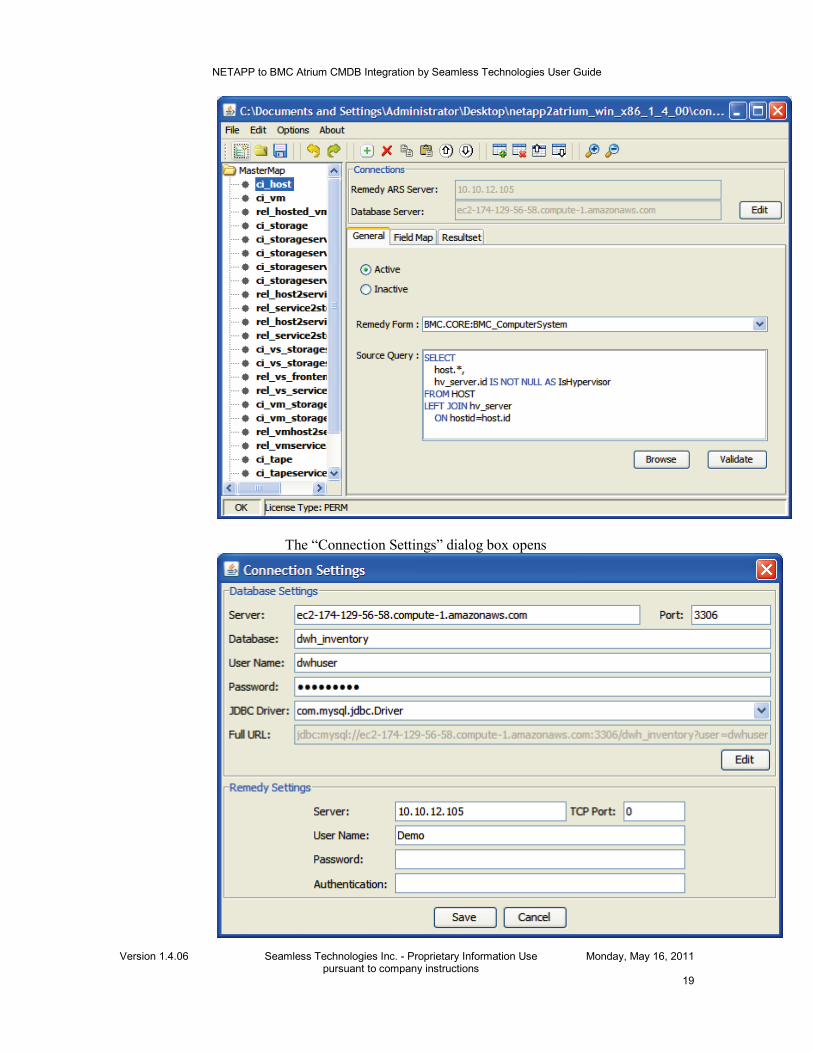
3.8.2 Checking the Connection from the Configuration UI Connections pane edit button
1. Go to the “Connections” pane on the top right side of this tool. 2. Click the Edit button.
NETAPP to BMC Atrium CMDB Integration by Seamless Technologies User Guide
Version 1.4.06
Seamless Technologies Inc. - Proprietary Information Use pursuant to company instructions
Monday, May 16, 2011
19
The “Connection Settings” dialog box opens
NETAPP to BMC Atrium CMDB Integration by Seamless Technologies User Guide
Version 1.4.06
Seamless Technologies Inc. - Proprietary Information Use pursuant to company instructions
Monday, May 16, 2011
20
3. Enter Source (Netapp OnCommand Insight DWH) database
and Target (Remedy CMDB) server information in the fields. See section 3.8.1 (steps 2&3) for detailed information. [line up the step number and text correctly. ]
4. Click Save. The Connections view is displayed.
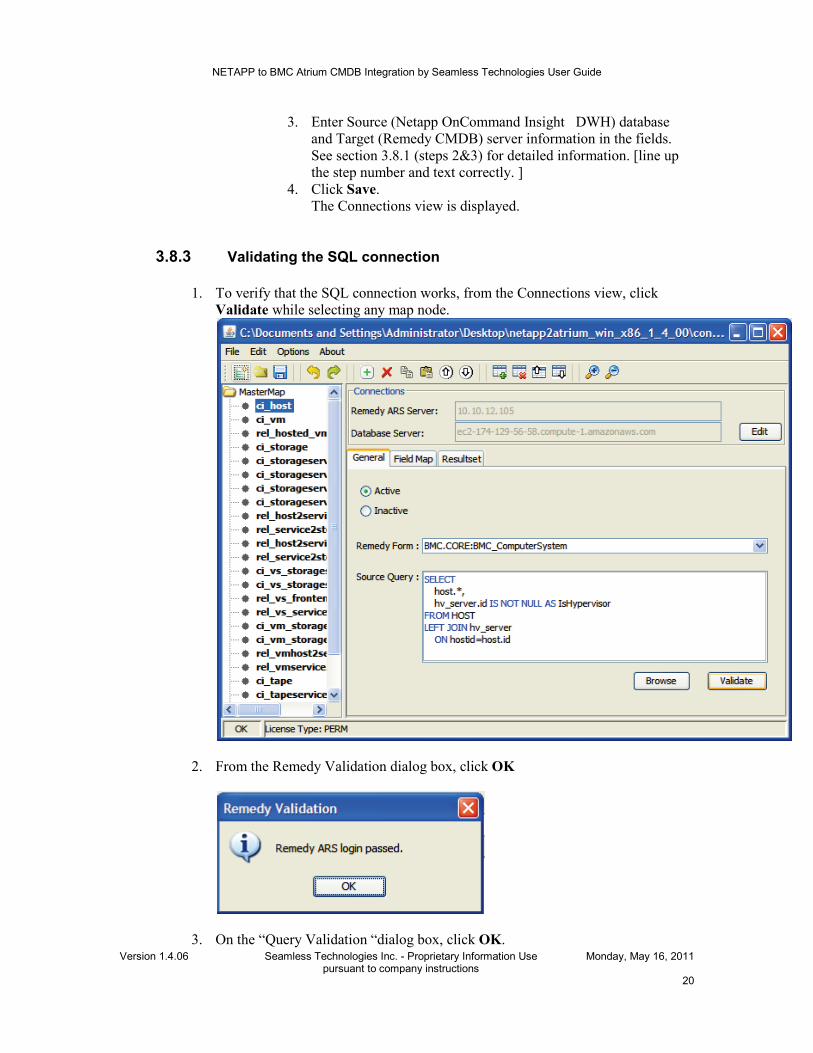
3.8.3 Validating the SQL connection
1. To verify that the SQL connection works, from the Connections view, click Validate while selecting any map node.
2. From the Remedy Validation dialog box, click OK
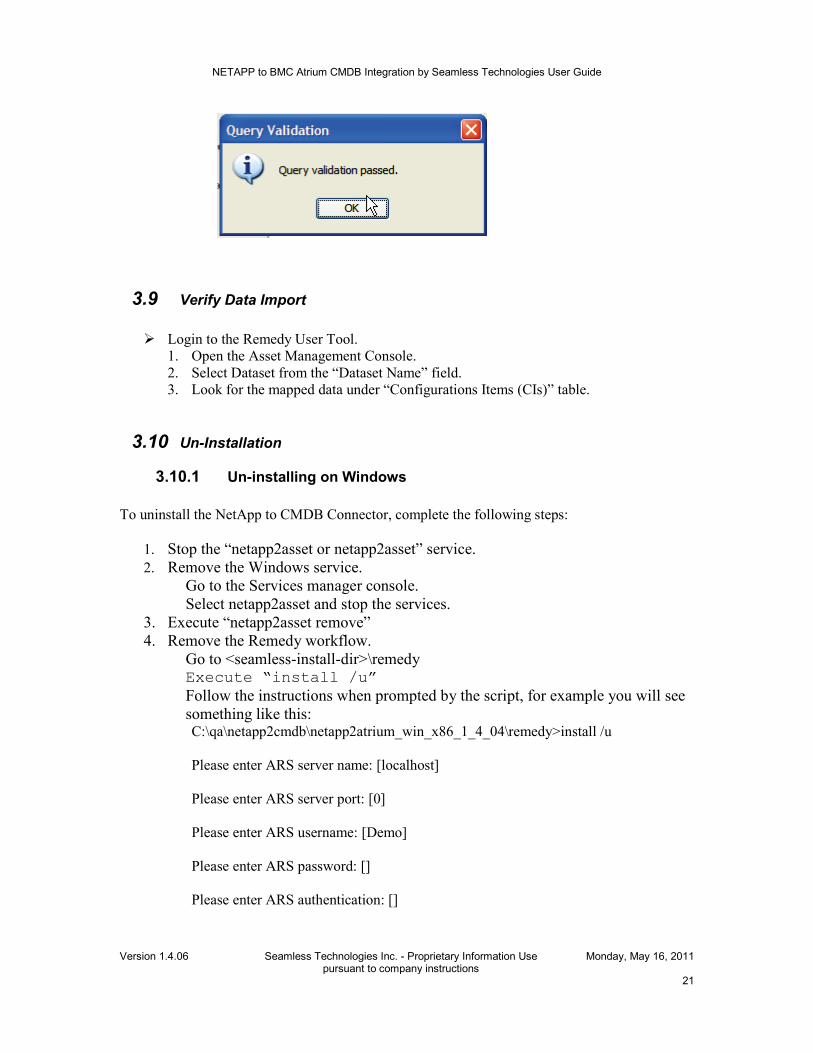
3. On the “Query Validation “dialog box, click OK.
NETAPP to BMC Atrium CMDB Integration by Seamless Technologies User Guide
Version 1.4.06
Seamless Technologies Inc. - Proprietary Information Use pursuant to company instructions
Monday, May 16, 2011
21
3.9 Verify Data Import Login to the Remedy User Tool.
1. Open the Asset Management Console. 2. Select Dataset from the “Dataset Name” field. 3. Look for the mapped data under “Configurations Items (CIs)” table.
3.10 Un-Installation
3.10.1 Un-installing on Windows To uninstall the NetApp to CMDB Connector, complete the following steps:
1. Stop the “netapp2asset or netapp2asset” service. 2. Remove the Windows service.
Go to the Services manager console. Select netapp2asset and stop the services.
3. Execute “netapp2asset remove” 4. Remove the Remedy workflow.
Go to <seamless-install-dir>\remedy Execute “install /u” Follow the instructions when prompted by the script, for example you will see something like this: C:\qa\netapp2cmdb\netapp2atrium_win_x86_1_4_04\remedy>install /u Please enter ARS server name: [localhost] Please enter ARS server port: [0] Please enter ARS username: [Demo] Please enter ARS password: [] Please enter ARS authentication: []

NETAPP to BMC Atrium CMDB Integration by Seamless Technologies User Guide
Version 1.4.06
Seamless Technologies Inc. - Proprietary Information Use pursuant to company instructions
Monday, May 16, 2011
22
Installation Summary: Remedy ARS Server = localhost Remedy ARS Port = 0 Remedy ARS Login = Demo Remedy ARS Version = 7.6 Press any key to continue . . .
3.10.2 Un-installing on UNIX To uninstall the NetApp to CMDB Connector, complete the following steps: You can back up conf folder for reinstall.
1. Stop the “netapp2asset or netapp2asset” service. 2. Go to install bin directory. 3. Execute “netapp2asset stop”. 4. Remove the install dir.
rm –r seamless
5. Remove Remedy workflow. Go to <seamless-install-dir>\remedy. Execute “install /u”
4 Configuration This section of the guide describes the configuration procedure for the various components. The configuration consists of:
• Required: Setting up connections to BMC Remedy and NetApp database • Required: Creating a staging dataset to hold NetApp data or you skip section 3.6. • Required: Importing the default reconciliation job, or create your own job
4.1 Create Dataset The NetApp to CMDB Connector from Seamless brings data into a staging dataset (default: NETAPPIMPORT.SANSCREEN) in the BMC Atrium CMDB. If you decide to import the default reconciliation job by executing the install script from the <netapp-install-dir>\remedy directory, then you can skip this section. The install script creates the dataset for you. Otherwise, you may need to manually create the dataset and reconciliation job via the Remedy User tool. Choose one of the following procedures, depending on which BMC Atrium CMDB version you are using:
• Creating a dataset BMC Atrium CMDB version7.0x • Creating a dataset BMC Atrium CMDB version7.5x

NETAPP to BMC Atrium CMDB Integration by Seamless Technologies User Guide
Version 1.4.06
Seamless Technologies Inc. - Proprietary Information Use pursuant to company instructions
Monday, May 16, 2011
23
• Creating a dataset (BMC Atrium CMDB version 7.0x) These steps show how to create a dataset in BMC Atrium CMDB version7.0x via the Remedy User tool.
1. Log in to the BMC Remedy User Tool. 2. Open the CMDB Console. 3. Click the Reconciliation Manager tab. 4. Click Create. Then select Dataset.
5. Enter the new dataset information.
6. Click Save. 7. Click Close.

NETAPP to BMC Atrium CMDB Integration by Seamless Technologies User Guide
Version 1.4.06
Seamless Technologies Inc. - Proprietary Information Use pursuant to company instructions
Monday, May 16, 2011
24
Creating a dataset (BMC Atrium CMDB version 7.5x) [Not sure why this has a bullet.] These steps show how to create a dataset in BMC Atrium CMDB version7.5x via the Remedy User tool.
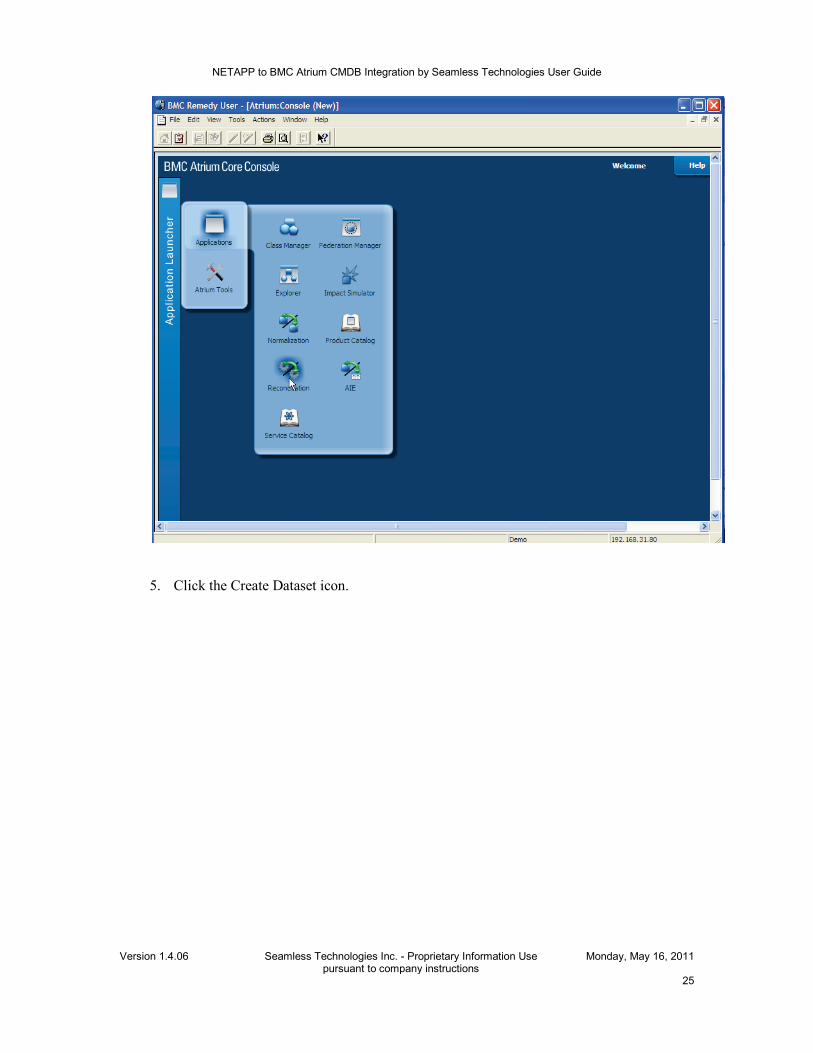
1. Log in to the BMC Remedy User Tool. 2. Open the BMC Atrium Core Console.
3. Select the Application Launcher => Application.
4. Click Reconciliation.
NETAPP to BMC Atrium CMDB Integration by Seamless Technologies User Guide
Version 1.4.06
Seamless Technologies Inc. - Proprietary Information Use pursuant to company instructions
Monday, May 16, 2011
25
5. Click the Create Dataset icon.

NETAPP to BMC Atrium CMDB Integration by Seamless Technologies User Guide
Version 1.4.06
Seamless Technologies Inc. - Proprietary Information Use pursuant to company instructions
Monday, May 16, 2011
26
6. Enter the new dataset information.
NETAPP to BMC Atrium CMDB Integration by Seamless Technologies User Guide
Version 1.4.06
Seamless Technologies Inc. - Proprietary Information Use pursuant to company instructions
Monday, May 16, 2011
27
7. Click Save. 8. Click Close.
4.2 Basic Configuration
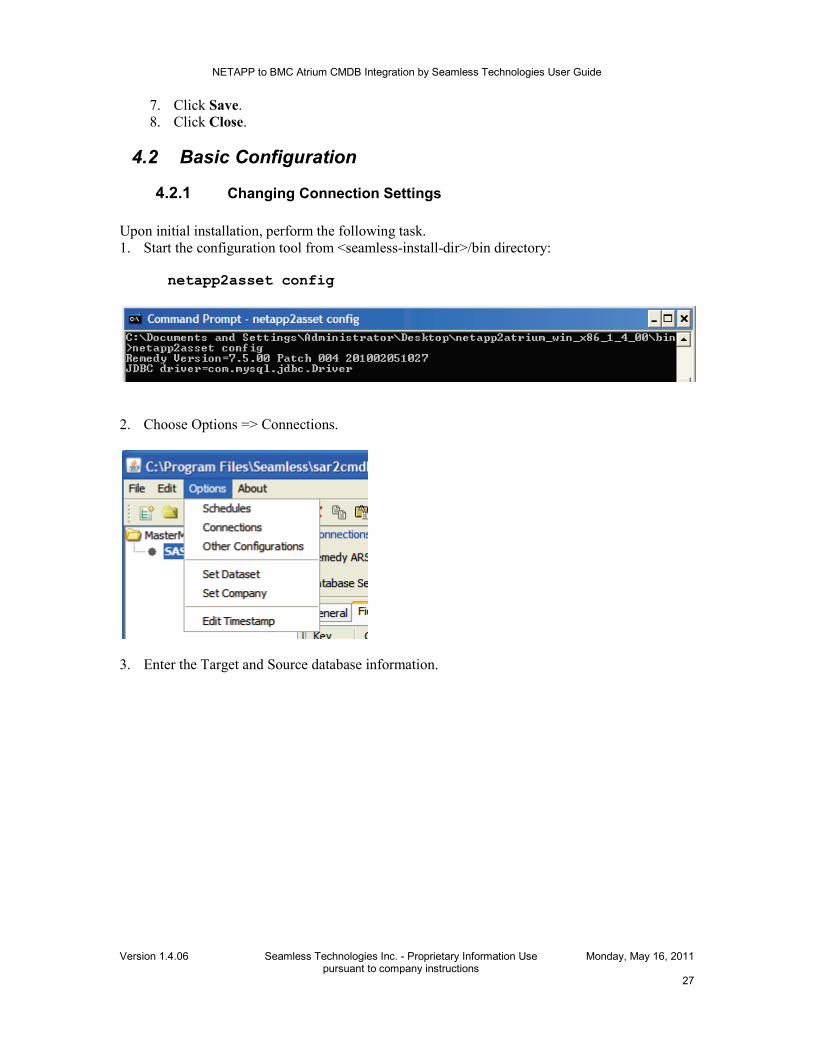
4.2.1 Changing Connection Settings Upon initial installation, perform the following task. 1. Start the configuration tool from <seamless-install-dir>/bin directory:
netapp2asset config
2. Choose Options => Connections.
3. Enter the Target and Source database information.

NETAPP to BMC Atrium CMDB Integration by Seamless Technologies User Guide
Version 1.4.06
Seamless Technologies Inc. - Proprietary Information Use pursuant to company instructions
Monday, May 16, 2011
28
4. Click OK. 5. Choose File => Save. Tip: To verify that the SQL connection works, click Validate while selecting any map node. See Section 3.8.3 (Validating the SQL connection).
4.2.2 Creating Your First Map This section uses the Microsoft SQL server as an example and assumes that you have a table named “Computers”, which contains 4 columns:
• ID • Name • Serial Number • Host Name
1. Select File>>New, a “new_map” appears on the left panel. This is called a sub-map.
You can define as many sub-maps as you need. Sub-maps are executed sequentially. Therefore, the order of the maps is important. To add (delete) another sub-map, select Edit=>>Map=>>Add (Delete)
2. Select “new_map”, change Remedy Form to “BMC.CORE:BMC_ComputerSystem”.
3. Enter the list device in the Source Query window on the right panel.

NETAPP to BMC Atrium CMDB Integration by Seamless Technologies User Guide
Version 1.4.06
Seamless Technologies Inc. - Proprietary Information Use pursuant to company instructions
Monday, May 16, 2011
29
4. Click the Field Map tab. The display area is empty.
5. Select Edit=>>Attribute=>>Insert. A new empty row appears.
6. Select “InstanceId” from the CMDB Attribute list, and make it a Key attribute.
7. Select [ID] from Formatted DB Field. Note: “InstanceId” is the most important attribute in the BMC Atrium CMDB. It is a free-formatted string. You may use prefix and a combination of fields to make it unique, such as: MY_[ID]_[Serial Number]. This is important because if you need to create any kind of relationship, the relationship will reference the “InstanceId”.
8. Repeat the previous three steps to add more rows. For a default CMDB object the following attributes are required,
a. Dataset b. Name
9. Select File=>>Save to save the map. You have the choice of using the current instance
to execute this map or creating a new instance later (see section 4.2).
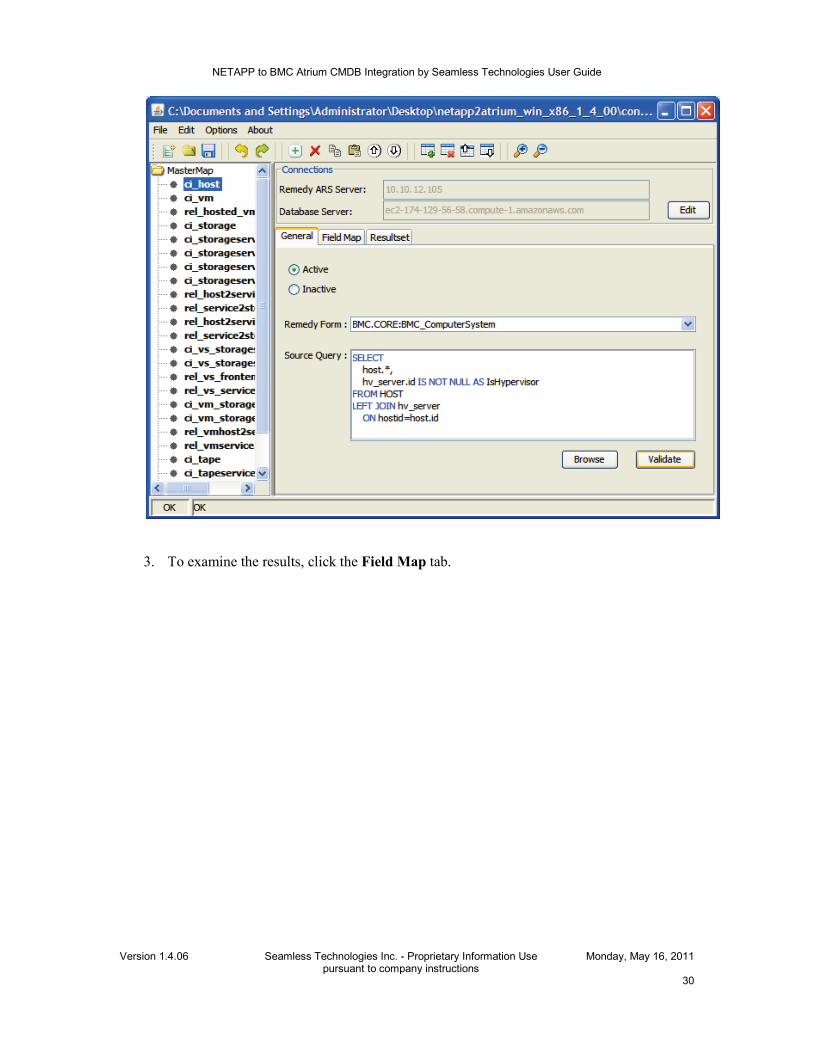
4.2.3 Verify the Mapping You can validate the connector against your environment and view a color-coded validation result. If you see any red text in either the master map (left tree) or the field map table (right tab), it implies an error.
1. To verify the Remedy and SQL connection, select a map node. 2. Click Validate.
NETAPP to BMC Atrium CMDB Integration by Seamless Technologies User Guide
Version 1.4.06
Seamless Technologies Inc. - Proprietary Information Use pursuant to company instructions
Monday, May 16, 2011
30
3. To examine the results, click the Field Map tab.

NETAPP to BMC Atrium CMDB Integration by Seamless Technologies User Guide
Version 1.4.06
Seamless Technologies Inc. - Proprietary Information Use pursuant to company instructions
Monday, May 16, 2011
31
4. Click the Result set tab. The returned data appears here. Check your data to get an understanding of the data’s format, especially the null fields.

NETAPP to BMC Atrium CMDB Integration by Seamless Technologies User Guide
Version 1.4.06
Seamless Technologies Inc. - Proprietary Information Use pursuant to company instructions
Monday, May 16, 2011
32
4.2.4 Changing a Dataset If you have created a dataset, perform the following configuration. For details about creating a dataset, see the BMC Atrium CMDB Administrator Guide.
1. Choose Options => Set Dataset.
2. Select the appropriate dataset.
NETAPP to BMC Atrium CMDB Integration by Seamless Technologies User Guide
Version 1.4.06
Seamless Technologies Inc. - Proprietary Information Use pursuant to company instructions
Monday, May 16, 2011
33
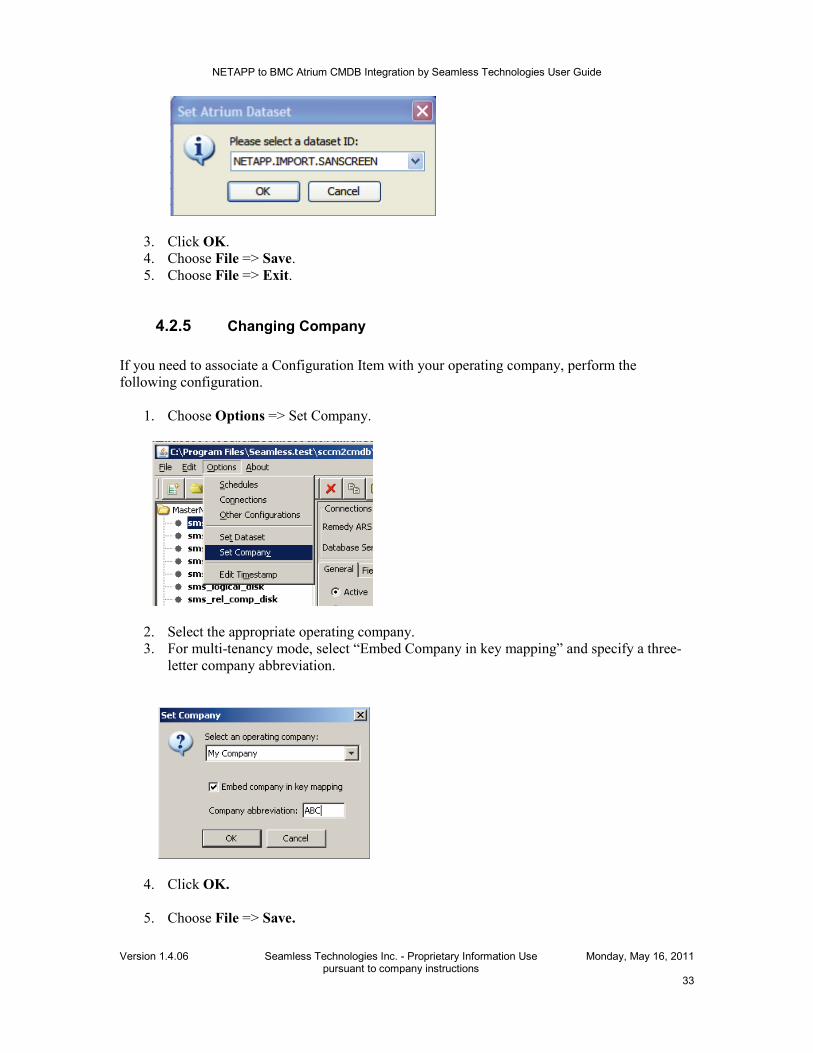
3. Click OK. 4. Choose File => Save. 5. Choose File => Exit.
4.2.5 Changing Company If you need to associate a Configuration Item with your operating company, perform the following configuration.
1. Choose Options => Set Company.
2. Select the appropriate operating company. 3. For multi-tenancy mode, select “Embed Company in key mapping” and specify a three-
letter company abbreviation.
4. Click OK.
5. Choose File => Save.

NETAPP to BMC Atrium CMDB Integration by Seamless Technologies User Guide
Version 1.4.06
Seamless Technologies Inc. - Proprietary Information Use pursuant to company instructions
Monday, May 16, 2011
34
6. Choose File => Exit.
4.3 Creating Connector Instances The NetApp to Atrium CMDB Connector instances provides customizable configuration files for the user to map NetApp OnCommand Insight DWH database entries to BMC® Atrium CMD. The following maps are shipped with this product:
• netapp2asset.map - is related to network store data • netapp2violations.map - is related to violations on the path (If the path does not comply
with an OnCommand Insight policy, a violation is generated on the path). Each connector instance contains
• name.bat -- An executable, such as netapp2asset.bat and netapp_violations.bat. The executable can configure, install and start itself as a Windows service or Unix Daemon.
• name.conf -- A configuration file, such as netapp2asset.conf and netapp_violations.conf The configuration file inherits all connection and schedule settings from the instance.
• name.map -- A map file, such as netapp2asset.map and netapp_violations.map The map file contains the data source, destination, attribute mapping. The map file has to exist first.
To create an instance, follow these steps:
1. Navigate to the <seamless-install-dir>/bin directory in CMD prompt. 2. Run the following command
netapp2asset create <instance name> A new instance (<instance-name>) is created.
4.4 Customize Configurations The configuration files are stored in <seamless-install-dir>/conf directory such as netapp2asset and netapp2violations. The instance (for example, netapp2asset) is associated with a conf-map pair (for example, netapp2asset.conf and netapp2asset.map). The conf-map pair can be edited using the configuration tool. For example, the user can make changes in the source database and /or target server. To start the configuration tool, run netapp2asset config.
4.4.1 Changing the Schedule Each connector instance can have its own schedule. You can set the schedule as -
• Interval

NETAPP to BMC Atrium CMDB Integration by Seamless Technologies User Guide
Version 1.4.06
Seamless Technologies Inc. - Proprietary Information Use pursuant to company instructions
Monday, May 16, 2011
35
• Daily • Weekly • Monthly • Event
To edit the schedule,
1. Choose Options => Schedules The Schedules Settings dialog box appears.
2. Choose desired “Run At” attribute.
3. Click Save.
4. Choose File=>Save.
4.4.2 Editing Maps You can reset, rename, add, delete, copy, paste, move up and move down. Each map contains one or more sub-maps. During the runtime, sub-maps are executed one by one. So the order of sub-maps in the map tree is important. Here are some common tasks to manipulate maps. Always click “Save” before “Exit” To change the order of the sub-map,
1. Select a sub-map.
2. Choose Edit => Map=>Move Up (or Move Down) Tip: The shortcut key is PAGE-UP (or PAGE-DOWN)
NETAPP to BMC Atrium CMDB Integration by Seamless Technologies User Guide
Version 1.4.06
Seamless Technologies Inc. - Proprietary Information Use pursuant to company instructions
Monday, May 16, 2011
36
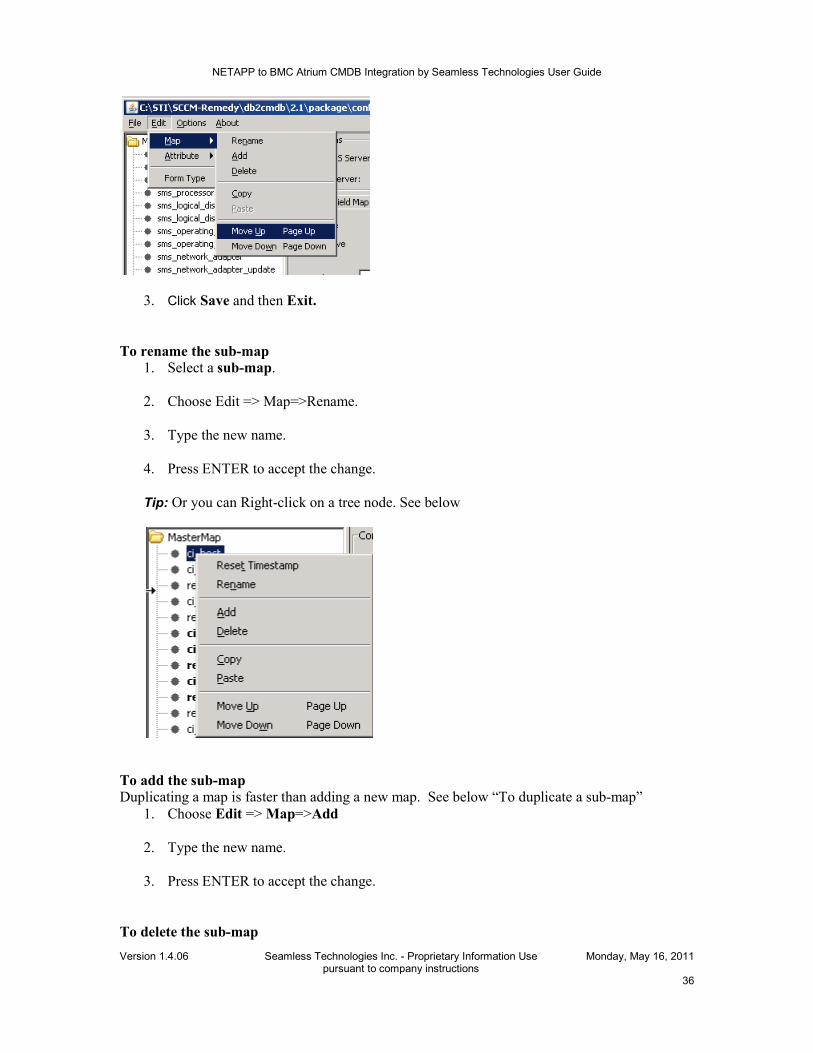
3. Click Save and then Exit. To rename the sub-map
1. Select a sub-map.
2. Choose Edit => Map=>Rename.
3. Type the new name.
4. Press ENTER to accept the change.
Tip: Or you can Right-click on a tree node. See below
To add the sub-map Duplicating a map is faster than adding a new map. See below “To duplicate a sub-map”
1. Choose Edit => Map=>Add
2. Type the new name.
3. Press ENTER to accept the change.
To delete the sub-map

NETAPP to BMC Atrium CMDB Integration by Seamless Technologies User Guide
Version 1.4.06
Seamless Technologies Inc. - Proprietary Information Use pursuant to company instructions
Monday, May 16, 2011
37
You cannot undo the “Delete” action. You may prefer to use “Inactive” to disable the sub-map. 1. Select a sub-map. 2. Choose Edit => Map=>Delete.
To duplicate a sub-map
Select a sub-map.
1. Choose Edit => Map=>Copy.
2. Choose Edit => Map=>Paste.
3. Change the map name.
4. Press ENTER to accept the change. To Move a sub-map
1. Select a sub-map.
2. Choose Edit=>Map=>Move UP.
3. Press ENTER to accept the change.
To Move a sub-map down 1. Select a sub-map.
2. Choose Edit=>Map=>Move Down.
3. Press ENTER to accept the change.
To open an existing map,
1. Choose File => Open. A dialog appears

NETAPP to BMC Atrium CMDB Integration by Seamless Technologies User Guide
Version 1.4.06
Seamless Technologies Inc. - Proprietary Information Use pursuant to company instructions
Monday, May 16, 2011
38
2. Select the map file 3. Click Open.
Tip: This map is not associated with the current instance yet. When you “Save”, the message box appears. Choose “yes” to make the association. The map file is saved regardless of your selection.
To merge two maps 1. Choose File => Append.
A dialog appears.
2. Select the map file.
3. Click Open.

NETAPP to BMC Atrium CMDB Integration by Seamless Technologies User Guide
Version 1.4.06
Seamless Technologies Inc. - Proprietary Information Use pursuant to company instructions
Monday, May 16, 2011
39
4. Change the sub-map order if needed.
5. Delete duplicated map if needed.
6. Rename one or more sub-maps if needed.
4.4.3 Editing Submap Attributes Each sub-map contains general and mapping attributes. The attributes are shown in the right panel when the sub-map node is selected. In general sub-map attributes define the following:
1. A SQL statement on a NetApp database defines the connector about the kind of data to bring into the Atrium CMDB.
2. A Remedy form defines the connector about where the data is to be imported into Remedy (CMDB).
3. A series of one-on-one mappings defines the connector on how to put the data into Remedy (CMDB). Such as, attributes are Name, Description, Category, Type and Items
If the connections are set correctly, many selections for editing are pre-populated. Here are some common tasks that you can perform on map attributes. To enable or disable a sub-map
1. Select a sub-map node. 2. Choose Active or Inactive.
To change the target Remedy form A Remedy form instructs the connector about where the data is to be imported into Remedy (CMDB) such as BMC.CORE:BMC_ComputerSystem
1. Select a sub-map node.
2. Choose an entry from the drop-down menu, or type the form name.
To change the Source SQL

NETAPP to BMC Atrium CMDB Integration by Seamless Technologies User Guide
Version 1.4.06
Seamless Technologies Inc. - Proprietary Information Use pursuant to company instructions
Monday, May 16, 2011
40
1. Select a sub-map node.
2. Change the contents of Source SQL.
3. Click Validate to report any errors.
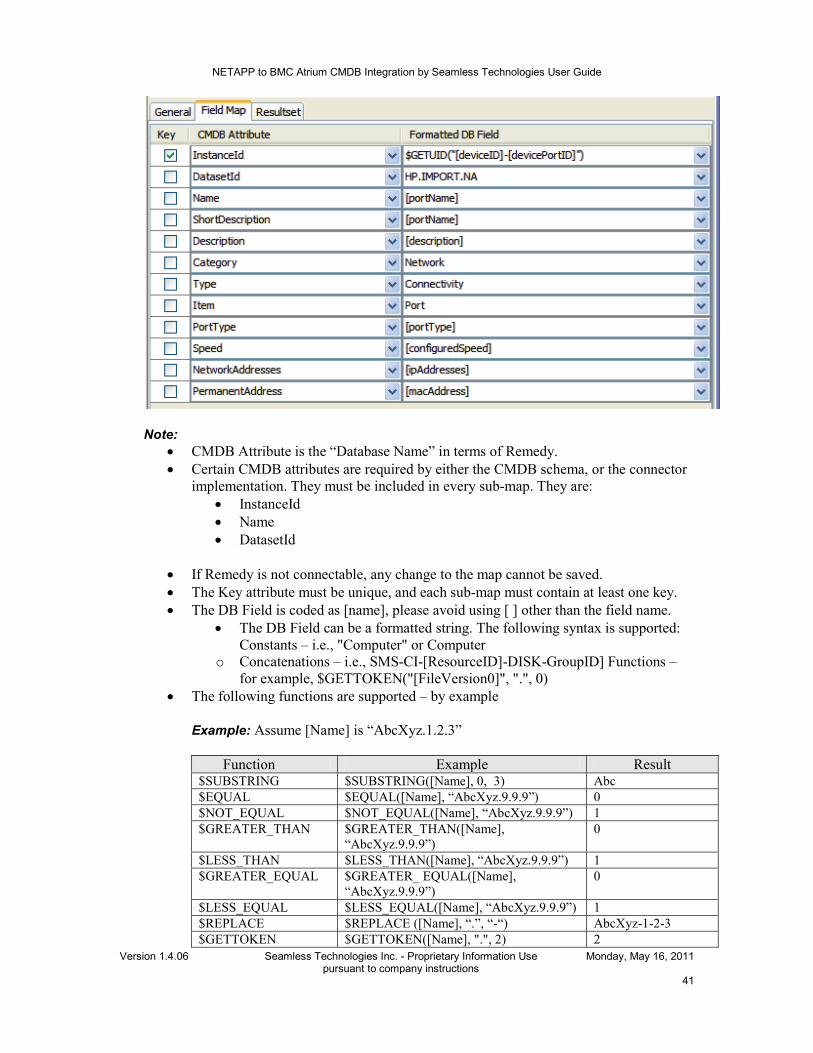
To change field mapping attributes You can map the attributes according to your requirements. For example, if you want to map the Name attribute with the IP address.
1. Select a sub-map node.
2. Click the Field Map tab.
3. Select an entry in the CMDB Attributes column.
4. Type in the Formatted DB Field, or select one from the drop-down list.
NETAPP to BMC Atrium CMDB Integration by Seamless Technologies User Guide
Version 1.4.06
Seamless Technologies Inc. - Proprietary Information Use pursuant to company instructions
Monday, May 16, 2011
41
Note:
• CMDB Attribute is the “Database Name” in terms of Remedy. • Certain CMDB attributes are required by either the CMDB schema, or the connector
implementation. They must be included in every sub-map. They are: • InstanceId • Name • DatasetId
• If Remedy is not connectable, any change to the map cannot be saved. • The Key attribute must be unique, and each sub-map must contain at least one key. • The DB Field is coded as [name], please avoid using [ ] other than the field name.
• The DB Field can be a formatted string. The following syntax is supported: Constants – i.e., "Computer" or Computer
o Concatenations – i.e., SMS-CI-[ResourceID]-DISK-GroupID] Functions – for example, $GETTOKEN("[FileVersion0]", ".", 0)
• The following functions are supported – by example
Example: Assume [Name] is “AbcXyz.1.2.3”
Function Example Result $SUBSTRING $SUBSTRING([Name], 0, 3) Abc $EQUAL $EQUAL([Name], “AbcXyz.9.9.9”) 0 $NOT_EQUAL $NOT_EQUAL([Name], “AbcXyz.9.9.9”) 1 $GREATER_THAN $GREATER_THAN([Name],
“AbcXyz.9.9.9”) 0
$LESS_THAN $LESS_THAN([Name], “AbcXyz.9.9.9”) 1 $GREATER_EQUAL $GREATER_ EQUAL([Name],
“AbcXyz.9.9.9”) 0
$LESS_EQUAL $LESS_EQUAL([Name], “AbcXyz.9.9.9”) 1 $REPLACE $REPLACE ([Name], “.”, “-“) AbcXyz-1-2-3 $GETTOKEN $GETTOKEN([Name], ".", 2) 2
NETAPP to BMC Atrium CMDB Integration by Seamless Technologies User Guide
Version 1.4.06
Seamless Technologies Inc. - Proprietary Information Use pursuant to company instructions
Monday, May 16, 2011
42
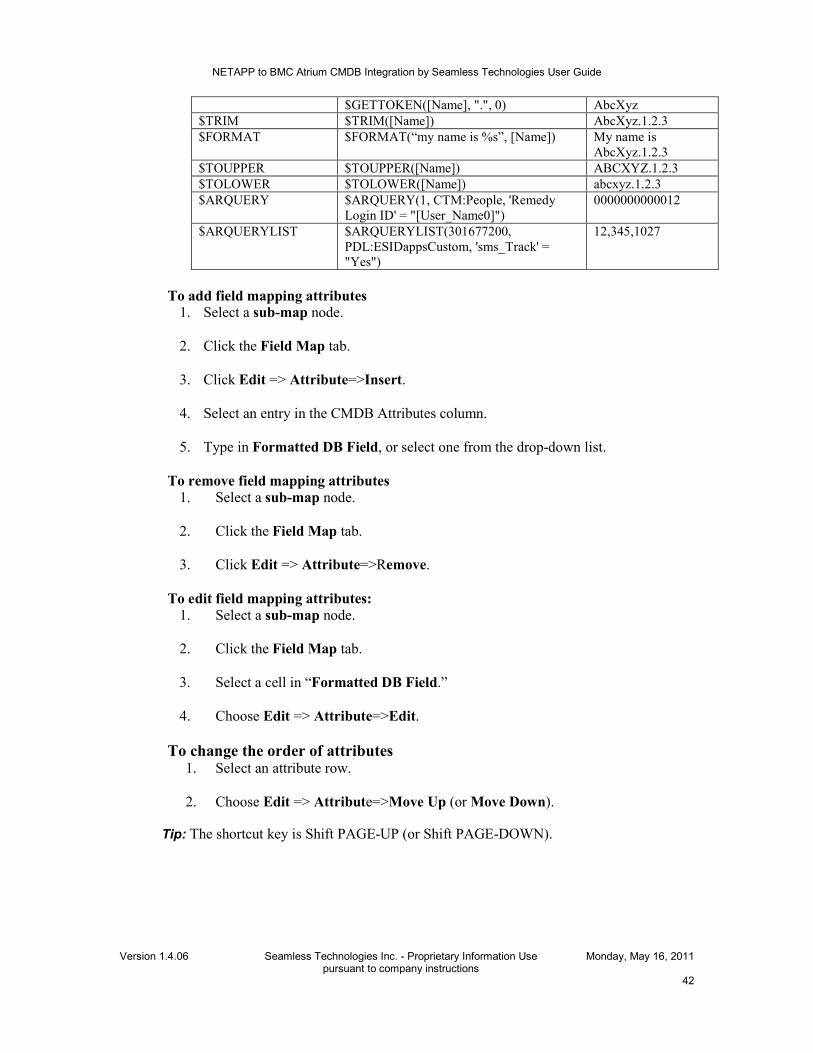
$GETTOKEN([Name], ".", 0) AbcXyz $TRIM $TRIM([Name]) AbcXyz.1.2.3 $FORMAT $FORMAT(“my name is %s”, [Name]) My name is
AbcXyz.1.2.3 $TOUPPER $TOUPPER([Name]) ABCXYZ.1.2.3 $TOLOWER $TOLOWER([Name]) abcxyz.1.2.3 $ARQUERY $ARQUERY(1, CTM:People, 'Remedy
Login ID' = "[User_Name0]") 0000000000012
$ARQUERYLIST $ARQUERYLIST(301677200, PDL:ESIDappsCustom, 'sms_Track' = "Yes")
12,345,1027
To add field mapping attributes
1. Select a sub-map node. 2. Click the Field Map tab.
3. Click Edit => Attribute=>Insert.
4. Select an entry in the CMDB Attributes column.
5. Type in Formatted DB Field, or select one from the drop-down list.
To remove field mapping attributes
1. Select a sub-map node.
2. Click the Field Map tab.
3. Click Edit => Attribute=>Remove.
To edit field mapping attributes: 1. Select a sub-map node. 2. Click the Field Map tab. 3. Select a cell in “Formatted DB Field.” 4. Choose Edit => Attribute=>Edit.
To change the order of attributes 1. Select an attribute row.
2. Choose Edit => Attribute=>Move Up (or Move Down).
Tip: The shortcut key is Shift PAGE-UP (or Shift PAGE-DOWN).

NETAPP to BMC Atrium CMDB Integration by Seamless Technologies User Guide
Version 1.4.06
Seamless Technologies Inc. - Proprietary Information Use pursuant to company instructions
Monday, May 16, 2011
43
Create a Report on Attribute Mapping The configuration utility provides a simple function to export your map file into a CSV-formatted report. To export a CSV-formatted map file
1. Choose File=>Export.
2. Enter a file name with CSV file extension, i.e.,netapp2asset.csv.
3. Click Save. To export a HTML-formatted map file
1. Choose File=>Export.
2. Enter a file name with html file extension, for example, netapp2asset.html.
3. Click Save.
4.5 Reconciliation and CMDB Extension The product ships with a default reconciliation job, CMDB extension, and an install script. You can import the default reconciliation job and CMDB extension.
1. Run the “install” script from the CMD command prompt.
2. Follow the directions from the scripts such as: Please enter ARS server name: [<Server Name>] Please enter ARS server port: [0] Please enter ARS username: [ARS User Name>] Please enter ARS password: [ARS User password] Please enter ARS authentication: [] Please enter staging dataset name: [NETAPP.IMPORT.SANSCREEN] Install Default Reconciliation Job? [Yes]
Install CMDB Extension? [Yes]
NETAPP to BMC Atrium CMDB Integration by Seamless Technologies User Guide
Version 1.4.06
Seamless Technologies Inc. - Proprietary Information Use pursuant to company instructions
Monday, May 16, 2011
44
Installation Summary: Remedy ARS Server = localhost Remedy ARS Port = 0 Remedy ARS Login = Demo Remedy ARS Version = 7.5 Remedy Staging Dataset = NETAPP.IMPORT.SANSCREEN Install Reconciliation = Yes Install CMDB Extension = Yes 3. Press any key to continue . . . Importing Dataset ... Import completed successfully in 0.032000 seconds. 1 Records imported to form BMC.CORE.CONFIG:BMC_Dataset. Import completed successfully in 0.000000 seconds. 1 Records imported to form PCT:TrustedDataset. Importing CMDB extension... BMC Atrium CMDB API Driver
Here are the classes on the CMDB extension:
5 Starting the Connector This section of the guide describes the starting of the NETAPP2CMDB connector.
5.1 Starting the Connector using command line options Each connector instance can run as a console application (mostly for initial debugging purposes) or as a service (daemon). The general command format is (use netapp2asset instance as an example, for example starts the connector as a service “netapp2asset start”): Usage: netapp2asset [operation] Operations -
• console: run as a normal process and output messages to the consol
• start: run as a service (or a daemon) and log messages to a file • stop: stop the service (or a daemon)
• restart: stop then start the service (or a daemon)
• config: start the configuration UI

NETAPP to BMC Atrium CMDB Integration by Seamless Technologies User Guide
Version 1.4.06
Seamless Technologies Inc. - Proprietary Information Use pursuant to company instructions
Monday, May 16, 2011
45
• create: create a new instance with a different map
[Windows only] • install: install the instance as a Windows service
• remove: remove the application from the Windows service control panel
[UNIX only] • status: check the status of the application
• dump: cause the JVM to do full thread dump
5.2 Starting the Service The service can be started using the following methods:
• From the Windows Service Control Panel
• From the CMD prompt netapp2asset start
5.3 Verify Data Import 1. To verify that the source (NetApp SANScreeb DWH) data has been imported, login to
the Remedy User Tool. 2. Open the CMDB Console=>CMDB Data=>Browses Instances. 3. Fill in the appropriate criteria, and click Search. The results display as shown here.

NETAPP to BMC Atrium CMDB Integration by Seamless Technologies User Guide
Version 1.4.06
Seamless Technologies Inc. - Proprietary Information Use pursuant to company instructions
Monday, May 16, 2011
46
If the data import fails, check the log file for the error message. You will see an error message similar to this example: ERROR (120040): The relationship endpoint instance does not exist.; Rel(clsId:BM C.CORE:BMC_DEPENDENCY instId: E3FD9EC81CF376AE9B7F4FF85AD7E173 can't be created. L-endpoint inst does not exist -- , instId: E12AC32A0319FDC9C0B2CCA627848F74 >>>>>Statistics: target class: BMC.CORE:BMC_Dependency target map: rel_host2service total rows: 21 created: 0 updated: 0 failed: 21 duplicated: 0 execution time: 2672 ms
5.4 Run Reconciliation Job For details about creating and running the reconciliation job, see the BMC Atrium CMDB Administrator Guide. The following procedure provides only a shortcut to start the default reconciliation job that shipped with this product.
1. Using the BMC Remedy User tool, open the BMC Atrium CMDB console.
2. Navigate to the BMC Atrium CMDB console.

NETAPP to BMC Atrium CMDB Integration by Seamless Technologies User Guide
Version 1.4.06
Seamless Technologies Inc. - Proprietary Information Use pursuant to company instructions
Monday, May 16, 2011
47
3. Click the Reconciliation Manager icon.
4. Click the Job History.
5. Select Seamless Sample (NetApp Import) – Identify and Merge.
6. Click Start Job.
6 Integration with BMC Asset Management The Asset Management integration is essentially the same as the base Atrium CMDB integration. However, asset management extends the CMDB with extra attributes and adds extra workflows to the product categorization (Tier 1, Tier2, Tier3, Product Name, Model Version, and Manufacture.).
6.1 Create Instances
By default netapp2asset.map includes the extended attribute mapping. If you need to rename the instance, the easiest way is to rename the map file and run.
NETAPP to BMC Atrium CMDB Integration by Seamless Technologies User Guide
Version 1.4.06
Seamless Technologies Inc. - Proprietary Information Use pursuant to company instructions
Monday, May 16, 2011
48
netapp2asset create name Refer to section 4.3 “Create Connector Instance” for instructions.
6.2 Set Dataset If you have created a dataset other than “NETAPP.IMPORT.SANSCREEN”, refer to section 4.2.4 “Changing the dataset” for instructions.
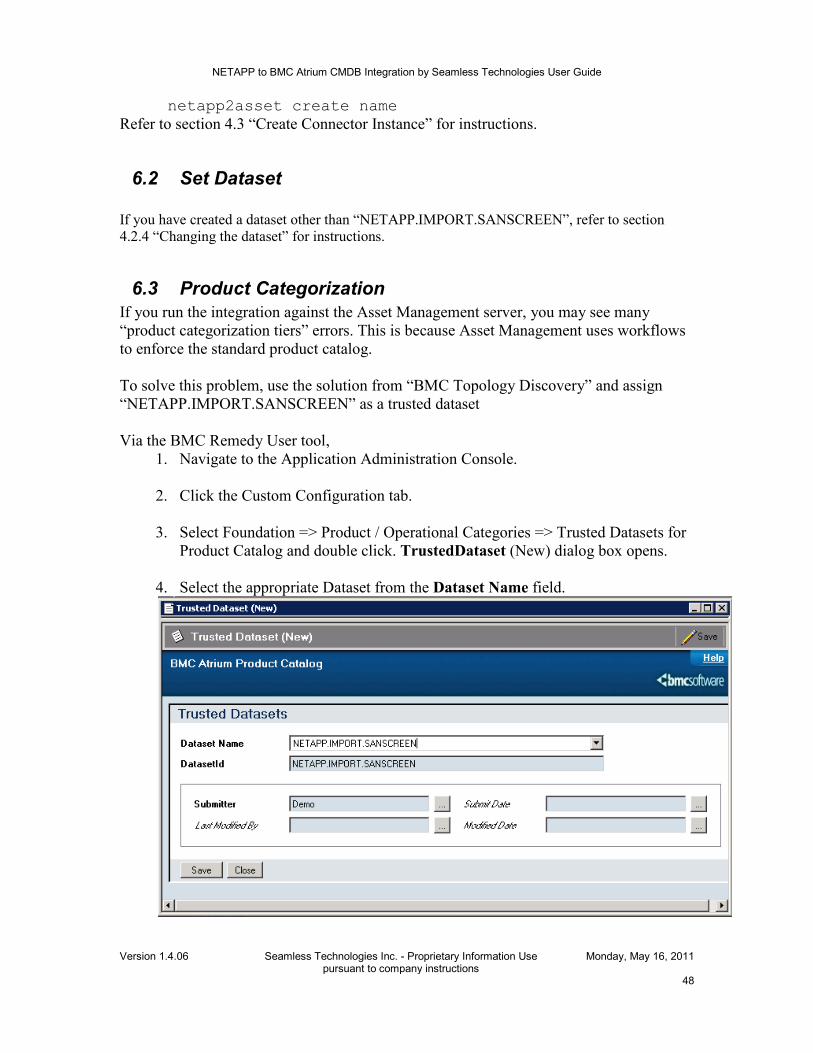
6.3 Product Categorization If you run the integration against the Asset Management server, you may see many “product categorization tiers” errors. This is because Asset Management uses workflows to enforce the standard product catalog. To solve this problem, use the solution from “BMC Topology Discovery” and assign “NETAPP.IMPORT.SANSCREEN” as a trusted dataset Via the BMC Remedy User tool,
1. Navigate to the Application Administration Console.
2. Click the Custom Configuration tab.
3. Select Foundation => Product / Operational Categories => Trusted Datasets for Product Catalog and double click. TrustedDataset (New) dialog box opens.
4. Select the appropriate Dataset from the Dataset Name field.

NETAPP to BMC Atrium CMDB Integration by Seamless Technologies User Guide
Version 1.4.06
Seamless Technologies Inc. - Proprietary Information Use pursuant to company instructions
Monday, May 16, 2011
49
5. Click Save.
6. Click Close.
6.4 Adding data fields to the Remedy join forms From a database perspective, a join form is a temporary composite table. Therefore, you cannot add data fields directly to a join form. Instead, you can add only data fields that already exist in the underlying primary or secondary form. You need to add additional data fields to the AST:NetappStorageData and AST:NetAppStorageService forms. User needs administrative permission for working on this form. The following data fields are included in the AST:NetappStorageData:
1. NETAPP.EXT:NetApp_StorageData RawCapacity 710000500
2. NETAPP.EXT:NetApp_StorageData Datacenter 710000510
3. NETAPP.EXT:NetApp_StorageData StorageFamily 710000520
4. NETAPP.EXT:NetApp_StorageData ManageURL 710000540
6.4.1 Add a data field to a “AST:NetappStorageData” join form 1. Open BMC Remedy Developer Studio from, Start->All Programs->BMC
Software->AR System. 2. Click OK on the Workspace Launcher dialog.
3. Login as an administrator. 4. From the left panel, click the <server name> => All Objects.

NETAPP to BMC Atrium CMDB Integration by Seamless Technologies User Guide
Version 1.4.06
Seamless Technologies Inc. - Proprietary Information Use pursuant to company instructions
Monday, May 16, 2011
50
5. Double-click the form.
6. From the Filtering Options table, select a “AST:NetApp_StorageData” as shown in this example.

NETAPP to BMC Atrium CMDB Integration by Seamless Technologies User Guide
Version 1.4.06
Seamless Technologies Inc. - Proprietary Information Use pursuant to company instructions
Monday, May 16, 2011
51
7. Double-click the AST:NetApp_StorageData. The” AST:NetApp_StorageData” form opens.

NETAPP to BMC Atrium CMDB Integration by Seamless Technologies User Guide
Version 1.4.06
Seamless Technologies Inc. - Proprietary Information Use pursuant to company instructions
Monday, May 16, 2011
52
8. Go to top right side of the Outline panel and select the Tab_Specifications (301134900) under Page Holder (300025300).

NETAPP to BMC Atrium CMDB Integration by Seamless Technologies User Guide
Version 1.4.06
Seamless Technologies Inc. - Proprietary Information Use pursuant to company instructions
Monday, May 16, 2011
53
9. Go to the “Properties” panel and click the Display. 10. Go to the “Visible” field and select “True” from the dropdown list items.

NETAPP to BMC Atrium CMDB Integration by Seamless Technologies User Guide
Version 1.4.06
Seamless Technologies Inc. - Proprietary Information Use pursuant to company instructions
Monday, May 16, 2011
54
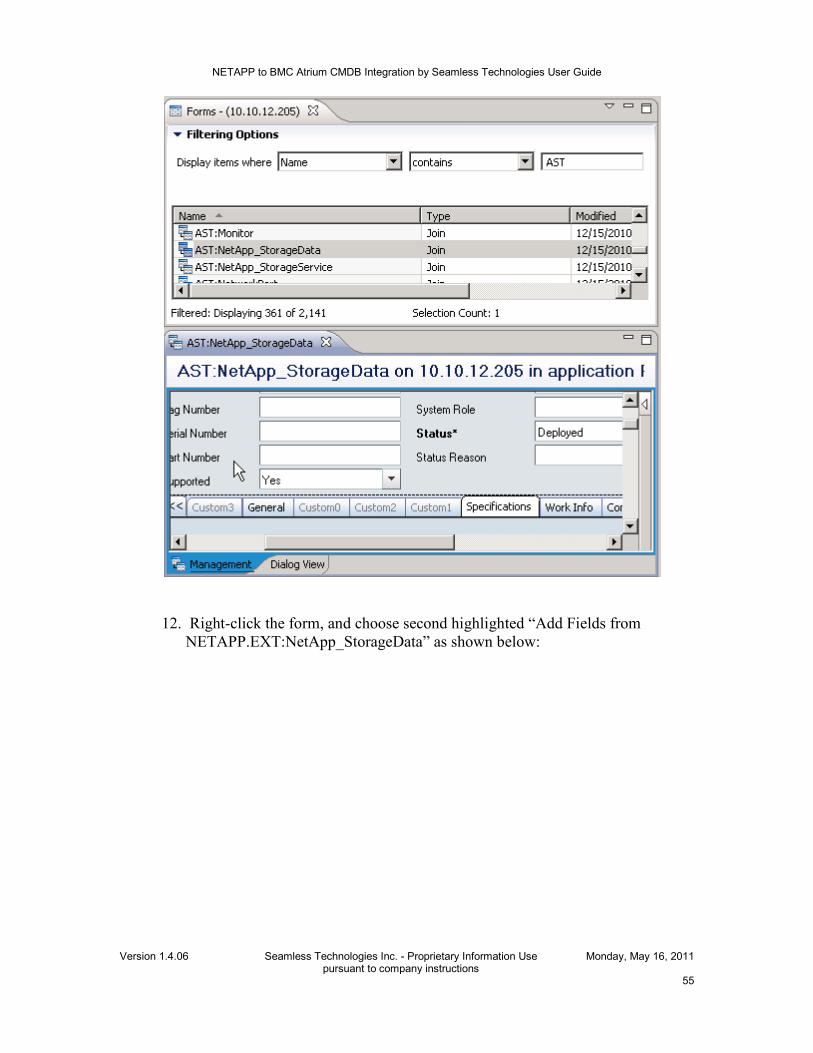
11. Click the Specifications tab on the “AST:NetApp_StorageData”form. .
NETAPP to BMC Atrium CMDB Integration by Seamless Technologies User Guide
Version 1.4.06
Seamless Technologies Inc. - Proprietary Information Use pursuant to company instructions
Monday, May 16, 2011
55
12. Right-click the form, and choose second highlighted “Add Fields from
NETAPP.EXT:NetApp_StorageData” as shown below:

NETAPP to BMC Atrium CMDB Integration by Seamless Technologies User Guide
Version 1.4.06
Seamless Technologies Inc. - Proprietary Information Use pursuant to company instructions
Monday, May 16, 2011
56
13. The Add Fields dialog box appears. It contains a list of fields in the underlying form that are not on the join form.

NETAPP to BMC Atrium CMDB Integration by Seamless Technologies User Guide
Version 1.4.06
Seamless Technologies Inc. - Proprietary Information Use pursuant to company instructions
Monday, May 16, 2011
57
14. In the Select Field from NETAPP.EXT:NetApp_StorageData list, select the Field ID 7100000500for the RawCapacity.
15. Click OK.
The selected fields appear in the upper-left corner of the join form.

NETAPP to BMC Atrium CMDB Integration by Seamless Technologies User Guide
Version 1.4.06
Seamless Technologies Inc. - Proprietary Information Use pursuant to company instructions
Monday, May 16, 2011
58
16. Drag the fields to the appropriate position in the join form (in the Specification tab).

NETAPP to BMC Atrium CMDB Integration by Seamless Technologies User Guide
Version 1.4.06
Seamless Technologies Inc. - Proprietary Information Use pursuant to company instructions
Monday, May 16, 2011
59
17. Repeat the previous steps for the following fields: NETAPP.EXT:NetApp_StorageData Datacenter 710000510 NETAPP.EXT:NetApp_StorageData StorageFamily 710000520 NETAPP.EXT:NetApp_StorageData ManageURL 710000540
18. Right-click the form, and choose Save. It takes few minutes to save this form.

NETAPP to BMC Atrium CMDB Integration by Seamless Technologies User Guide
Version 1.4.06
Seamless Technologies Inc. - Proprietary Information Use pursuant to company instructions
Monday, May 16, 2011
60
19. Click OK on the BMC Remedy Developer Studio. Ignore the warnings.
20. Login to Remedy User Tool and open the AST:NetApp_StorageData”form.

NETAPP to BMC Atrium CMDB Integration by Seamless Technologies User Guide
Version 1.4.06
Seamless Technologies Inc. - Proprietary Information Use pursuant to company instructions
Monday, May 16, 2011
61
21. Go to Specification tab and verify the fields which you have added above in the Specification tab.
6.4.2 Add a data field to a AST:NetAppStorageService join form
Follow the same steps as mentioned above in the section 6.4.1 for the AST:NetApp_StorageSystem form. Add the following fields to the Specification tab of the AST:NetApp_StorageService form: NETAPP.EXT:NetApp_StorageService InitiatorName 710000100 NETAPP.EXT:NetApp_StorageService TargetName 710000110 NETAPP.EXT:NetApp_StorageService TargetType 710000120 NETAPP.EXT:NetApp_StorageService AccessedVolumes 710000130 NETAPP.EXT:NetApp_StorageService AccessedCapacity 710000140 NETAPP.EXT:NetApp_StorageService ServiceStatus 710000150 NETAPP.EXT:NetApp_StorageService ServiceStatusSince 710000160 NETAPP.EXT:NetApp_StorageService HasVMData 710000165 NETAPP.EXT:NetApp_StorageService VMVolumes 710000166 NETAPP.EXT:NetApp_StorageService VMCapacity 710000167 NETAPP.EXT:NetApp_StorageService HasRecoveryService 710000170 NETAPP.EXT:NetApp_StorageService RecoverableVolumes 710000180 NETAPP.EXT:NetApp_StorageService RecoverableCapacity 710000190
NETAPP to BMC Atrium CMDB Integration by Seamless Technologies User Guide
Version 1.4.06
Seamless Technologies Inc. - Proprietary Information Use pursuant to company instructions
Monday, May 16, 2011
62
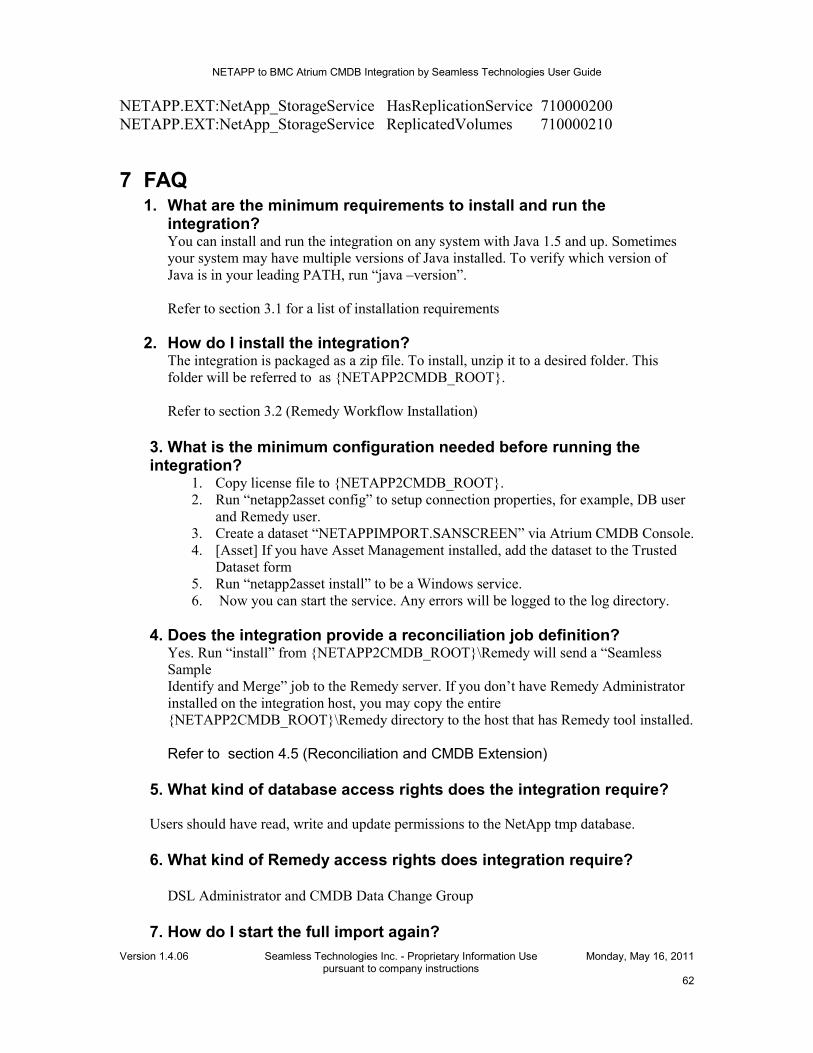
NETAPP.EXT:NetApp_StorageService HasReplicationService 710000200 NETAPP.EXT:NetApp_StorageService ReplicatedVolumes 710000210
7 FAQ 1. What are the minimum requirements to install and run the
integration? You can install and run the integration on any system with Java 1.5 and up. Sometimes your system may have multiple versions of Java installed. To verify which version of Java is in your leading PATH, run “java –version”.
Refer to section 3.1 for a list of installation requirements
2. How do I install the integration?
The integration is packaged as a zip file. To install, unzip it to a desired folder. This folder will be referred to as {NETAPP2CMDB_ROOT}. Refer to section 3.2 (Remedy Workflow Installation)
3. What is the minimum configuration needed before running the integration?
1. Copy license file to {NETAPP2CMDB_ROOT}. 2. Run “netapp2asset config” to setup connection properties, for example, DB user
and Remedy user. 3. Create a dataset “NETAPPIMPORT.SANSCREEN” via Atrium CMDB Console. 4. [Asset] If you have Asset Management installed, add the dataset to the Trusted
Dataset form 5. Run “netapp2asset install” to be a Windows service. 6. Now you can start the service. Any errors will be logged to the log directory.
4. Does the integration provide a reconciliation job definition?
Yes. Run “install” from {NETAPP2CMDB_ROOT}\Remedy will send a “Seamless Sample Identify and Merge” job to the Remedy server. If you don’t have Remedy Administrator installed on the integration host, you may copy the entire {NETAPP2CMDB_ROOT}\Remedy directory to the host that has Remedy tool installed. Refer to section 4.5 (Reconciliation and CMDB Extension)
5. What kind of database access rights does the integration require?
Users should have read, write and update permissions to the NetApp tmp database.
6. What kind of Remedy access rights does integration require?
DSL Administrator and CMDB Data Change Group
7. How do I start the full import again?

NETAPP to BMC Atrium CMDB Integration by Seamless Technologies User Guide
Version 1.4.06
Seamless Technologies Inc. - Proprietary Information Use pursuant to company instructions
Monday, May 16, 2011
63
After the initial import, there will be a timestamp file saved under {NETAPP2CMDB_ROOT}\Remedy directory. Any subsequent run will do delta queries to the database. To start the full import again, you may delete the timestamp file, i.e., netapp2asset.ts.
8. How do I specify a shorter interval for a test environment?
Run “netapp2asset config”, then go to menu Options>>Schedules to change the pulling interval. The default value is 24 hours.
Reference: section 4.4.1 of this user guide
9. Why do I have to create several separate instances?
The command of “netapp2asset create something” is used to duplicate the connection settings for another map, to save user of entering the same user name and password multiple times. The reason why having multiple maps is that each data exchange may requires different schedules, for example, netapp2asset may run on demand, server map may require to run once a day.
10. What is the Virtual Storage (VS)?
A device that resides on the network between storage and a host 11. What is the storage service? Storage Service indicate that receiving is initiator host, VM, or a virtual storage is consuming storage resources from a storage or tape There are three types of storage service Host Storage Service, VM Storage Service and VS Storage Service
8 Appendices
8.1 NETWORK Storage Service Map These map files shows the information for the CMDB attribute and Source DB Field attribute. This table is for your reference to see the mapped attributes. Map name: netapp2asset.map Map Name: ci_host Atrium Class: BMC.CORE:BMC_ComputerSystem
CMDB Attribute Source DB Field
InstanceId $GETUID("[identifier]")

NETAPP to BMC Atrium CMDB Integration by Seamless Technologies User Guide
Version 1.4.06
Seamless Technologies Inc. - Proprietary Information Use pursuant to company instructions
Monday, May 16, 2011
64
DatasetId NETAPP.IMPORT.SANSCREEN
Name [Name]
ShortDescription [name]
Description [ip]
Category Harware
Type Processing Unit
Item $LOOKUP([IsHypervisor]) { 0->Server; 1->Hypervisor; }
ManufacturerName [Manufacturer]
Model [Model]
TotalPhysicalMemory [InstalledMemoryMB]
isVirtual No
EnvironmentSpecification [Os]
ConfigurationOptions [ip]
HostName [name]
AssetLifecycleStatus Deployed
Submitter ci_host
8.1.1.1 Map Name: ci_host_ip Atrium Class: BMC.CORE:BMC_IPEndpoint CMDB Attribute Source DB Field
InstanceId $GETUID("NETAPP_IPADDR-[IP0]")
DatasetId NETAPP.IMPORT.SANSCREEN
Name [IP0]
ShortDescription [IP0]
AssetLifecycleStatus Deployed
Submitter ci_host_ip

NETAPP to BMC Atrium CMDB Integration by Seamless Technologies User Guide
Version 1.4.06
Seamless Technologies Inc. - Proprietary Information Use pursuant to company instructions
Monday, May 16, 2011
65
Map Name: rel_hosted_ip Atrium Class: BMC.CORE:BMC_HostedAccessPoint
CMDB Attribute Source DB Field
InstanceId $GETUID("REL-[Identifier]-[IP0]")
DatasetId NETAPP.IMPORT.SANSCREEN
Name Hosted Access Point
ShortDescription Hosted Access Point
Source.InstanceId $GETUID("[Identifier]")
Destination.InstanceId $GETUID("NETAPP_IPADDR-[IP0]")
Submitter rel_hosted_ip
Map Name: ci_host_OS Atrium Class: BMC.CORE:BMC_OperatingSystem
CMDB Attribute Source DB Field
InstanceId $GETUID("[identifier]-[os]")
DatasetId NETAPP.IMPORT.SANSCREEN
Name [Os]
ShortDescription [Os]
Category Software
Type Operating System Software
Item Standard OS
AssetLifecycleStatus Deployed
Submitter ci_host_OS
Map Name: rel_hosted_OS Atrium Class: BMC.CORE:BMC_HostedSystemComponents
CMDB Attribute Source DB Field
InstanceId $GETUID("REL-[Identifier]-[os]")
DatasetId NETAPP.IMPORT.SANSCREEN
Name Hosted Operating System

NETAPP to BMC Atrium CMDB Integration by Seamless Technologies User Guide
Version 1.4.06
Seamless Technologies Inc. - Proprietary Information Use pursuant to company instructions
Monday, May 16, 2011
66
ShortDescription Hosted Operating System
Source.InstanceId $GETUID("[Identifier]")
Destination.InstanceId $GETUID("[identifier]-[os]")
Submitter rel_hosted_OS
Map Name: ci_vm Atrium Class: BMC.CORE:BMC_ComputerSystem
CMDB Attribute Source DB Field
InstanceId $GETUID("[naturalKey]")
DatasetId NETAPP.IMPORT.SANSCREEN
Name [name]
ShortDescription [name]
Description [ips]
Category Hardware
Type Processing Unit
Item Virtual Server
EnvironmentSpecification [os]
ConfigurationOptions $SUBSTRING("[ips]", 0, 60)
TotalPhysicalMemory [memory]
isVirtual Yes
HostName [dnsName]
Submitter ci_vm
Map Name: ci_vm_ip Atrium Class: BMC.CORE:BMC_IPEndpoint
CMDB Attribute Source DB Field
InstanceId $GETUID("NETAPP_IPADDR-[IP0]")
DatasetId NETAPP.IMPORT.SANSCREEN
Name [IP0]

NETAPP to BMC Atrium CMDB Integration by Seamless Technologies User Guide
Version 1.4.06
Seamless Technologies Inc. - Proprietary Information Use pursuant to company instructions
Monday, May 16, 2011
67
ShortDescription [IP0]
AssetLifecycleStatus Deployed
Submitter ci_vm_ip
Map Name: rel_vm_ip Atrium Class: BMC.CORE:BMC_HostedAccessPoint
CMDB Attribute Source DB Field
InstanceId $GETUID("REL-[naturalKey]-[IP0]")
DatasetId NETAPP.IMPORT.SANSCREEN
Name Hosted Access Point
ShortDescription Hosted Access Point
Source.InstanceId $GETUID("[naturalKey]")
Destination.InstanceId $GETUID("NETAPP_IPADDR-[IP0]")
Submitter rel_vm_ip
Map Name: ci_vm_os Atrium Class: BMC.CORE:BMC_OperatingSystem
CMDB Attribute Source DB Field
InstanceId $GETUID("[naturalKey]-[os]")
DatasetId NETAPP.IMPORT.SANSCREEN
Name [Os]
ShortDescription [Os]
Category Software
Type Operating System Software
Item Virtualization OS
AssetLifecycleStatus Deployed
Submitter ci_vm_os

NETAPP to BMC Atrium CMDB Integration by Seamless Technologies User Guide
Version 1.4.06
Seamless Technologies Inc. - Proprietary Information Use pursuant to company instructions
Monday, May 16, 2011
68
Map Name: rel_vm_os Atrium Class: BMC.CORE:BMC_HostedSystemComponents
CMDB Attribute Source DB Field
InstanceId $GETUID("REL-[naturalKey]-[os]")
DatasetId NETAPP.IMPORT.SANSCREEN
Name Hosted Operating System
ShortDescription Hosted Operating System
Source.InstanceId $GETUID("[naturalKey]")
Destination.InstanceId $GETUID("[naturalKey]-[os]")
Submitter rel_vm_os
Map Name: rel_hosted_vm Atrium Class: BMC.CORE:BMC_Dependency
CMDB Attribute Source DB Field
InstanceId $GETUID("[key1]-[key2]")
DatasetId NETAPP.IMPORT.SANSCREEN
Name Hosted VM
ShortDescription Hosted VM
Source.InstanceId $GETUID("[key1]")
Destination.InstanceId $GETUID("[key2]")
Submitter rel_hosted_vm
Map Name: ci_storage Atrium Class: BMC.CORE:BMC_ComputerSystem
CMDB Attribute Source DB Field
InstanceId $GETUID("[identifier]")
DatasetId NETAPP.IMPORT.SANSCREEN
Name [name]
ShortDescription [name]
Description [ip]
NETAPP to BMC Atrium CMDB Integration by Seamless Technologies User Guide
Version 1.4.06
Seamless Technologies Inc. - Proprietary Information Use pursuant to company instructions
Monday, May 16, 2011
69
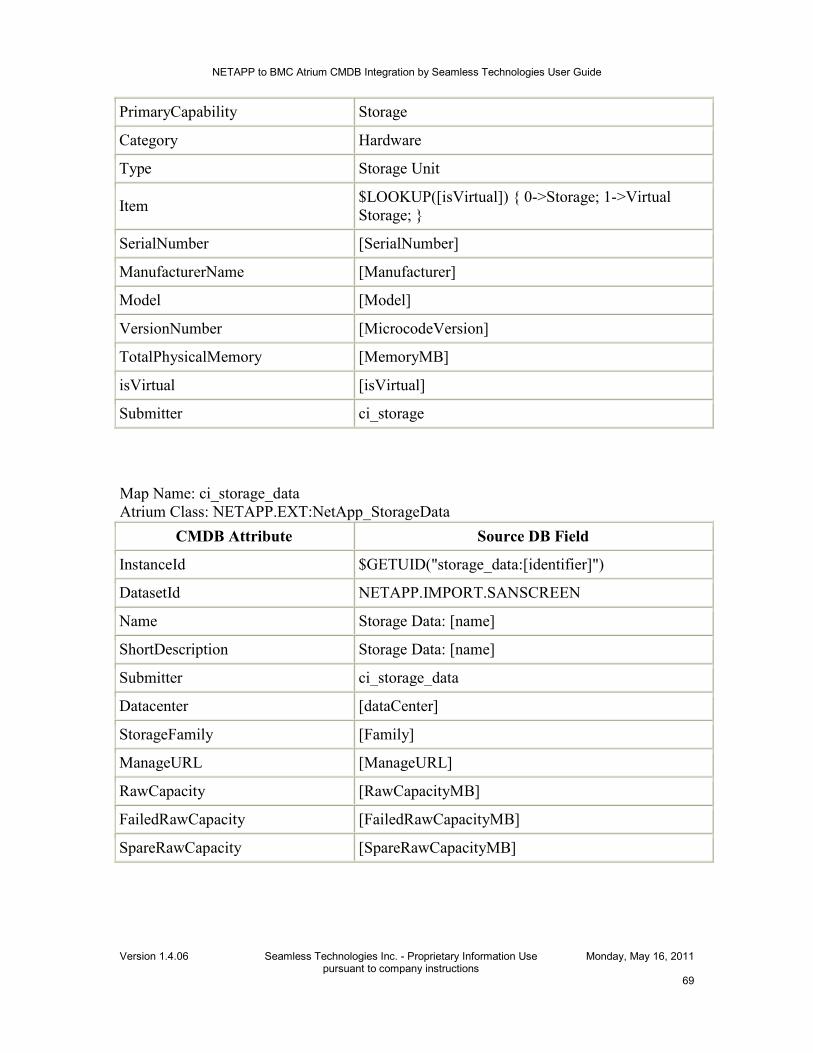
PrimaryCapability Storage
Category Hardware
Type Storage Unit
Item $LOOKUP([isVirtual]) { 0->Storage; 1->Virtual Storage; }
SerialNumber [SerialNumber]
ManufacturerName [Manufacturer]
Model [Model]
VersionNumber [MicrocodeVersion]
TotalPhysicalMemory [MemoryMB]
isVirtual [isVirtual]
Submitter ci_storage
Map Name: ci_storage_data Atrium Class: NETAPP.EXT:NetApp_StorageData
CMDB Attribute Source DB Field
InstanceId $GETUID("storage_data:[identifier]")
DatasetId NETAPP.IMPORT.SANSCREEN
Name Storage Data: [name]
ShortDescription Storage Data: [name]
Submitter ci_storage_data
Datacenter [dataCenter]
StorageFamily [Family]
ManageURL [ManageURL]
RawCapacity [RawCapacityMB]
FailedRawCapacity [FailedRawCapacityMB]
SpareRawCapacity [SpareRawCapacityMB]

NETAPP to BMC Atrium CMDB Integration by Seamless Technologies User Guide
Version 1.4.06
Seamless Technologies Inc. - Proprietary Information Use pursuant to company instructions
Monday, May 16, 2011
70
Map Name: rel_storage_data Atrium Class: BMC.CORE:BMC_SettingsOf
CMDB Attribute Source DB Field
InstanceId $GETUID("rel_storage_data:[identifier]")
DatasetId NETAPP.IMPORT.SANSCREEN
Name Setting Of
ShortDescription Setting Of
Source.InstanceId $GETUID("[identifier]")
Destination.InstanceId $GETUID("storage_data:[identifier]")
Submitter rel_storage_data
Map Name: ci_storageservice Atrium Class: NETAPP.EXT:NetApp_StorageService
CMDB Attribute Source DB Field
InstanceId $GETUID("CI-[protocol]-[key1]-[key2]")
DatasetId NETAPP.IMPORT.SANSCREEN
Name $LOOKUP([type0]) { APPROVE_NOT_EXIST->Error; OK->OK; *_*->Warning; }
ShortDescription [hostname]/[storagename]
Description A logical CI between [hostname] and [storageName]
Category Miscellaneous
Type Host Storage Service
Item [protocol]
InitiatorName [hostName]
TargetName [storageName]
TargetType STORAGE
AccessedVolumes [volCount]
AccessedCapacity [volSum]
ServiceStatus $LOOKUP([type0]) { APPROVE_NOT_EXIST->Error; OK->OK; *_*->Warning; }
ServiceStatusSince [since0]

NETAPP to BMC Atrium CMDB Integration by Seamless Technologies User Guide
Version 1.4.06
Seamless Technologies Inc. - Proprietary Information Use pursuant to company instructions
Monday, May 16, 2011
71
HasRecoveryService $NOT_EQUAL([recoveryVolumes], 0)
RecoverableVolumes [recoveryVolumes]
RecoverableCapacity [recoveryCapacity]
HasReplicationService $NOT_EQUAL([replicaVolumes], 0)
ReplicatedVolumes [replicaVolumes]
ReplicatedCapacity [replicaCapacity]
Submitter ci_storageservice
Map Name: rel_host2service Atrium Class: BMC.CORE:BMC_Dependency
CMDB Attribute Source DB Field
InstanceId $GETUID("REL1-[key1]-[key2]-[protocol]")
DatasetId NETAPP.IMPORT.SANSCREEN
Name Dependency
ShortDescription Dependency
Source.InstanceId $GETUID("[key1]")
Destination.InstanceId $GETUID("CI-[protocol]-[key1]-[key2]")
Submitter rel_host2service
Map Name: rel_service2storage Atrium Class: BMC.CORE:BMC_Dependency
CMDB Attribute Source DB Field
InstanceId $GETUID("REL2-[key1]-[key2]-[protocol]")
DatasetId NETAPP.IMPORT.SANSCREEN
Name Dependency
ShortDescription Dependency
Source.InstanceId $GETUID("CI-[protocol]-[key1]-[key2]")
Destination.InstanceId $GETUID("[key2]")
Submitter rel_service2storage
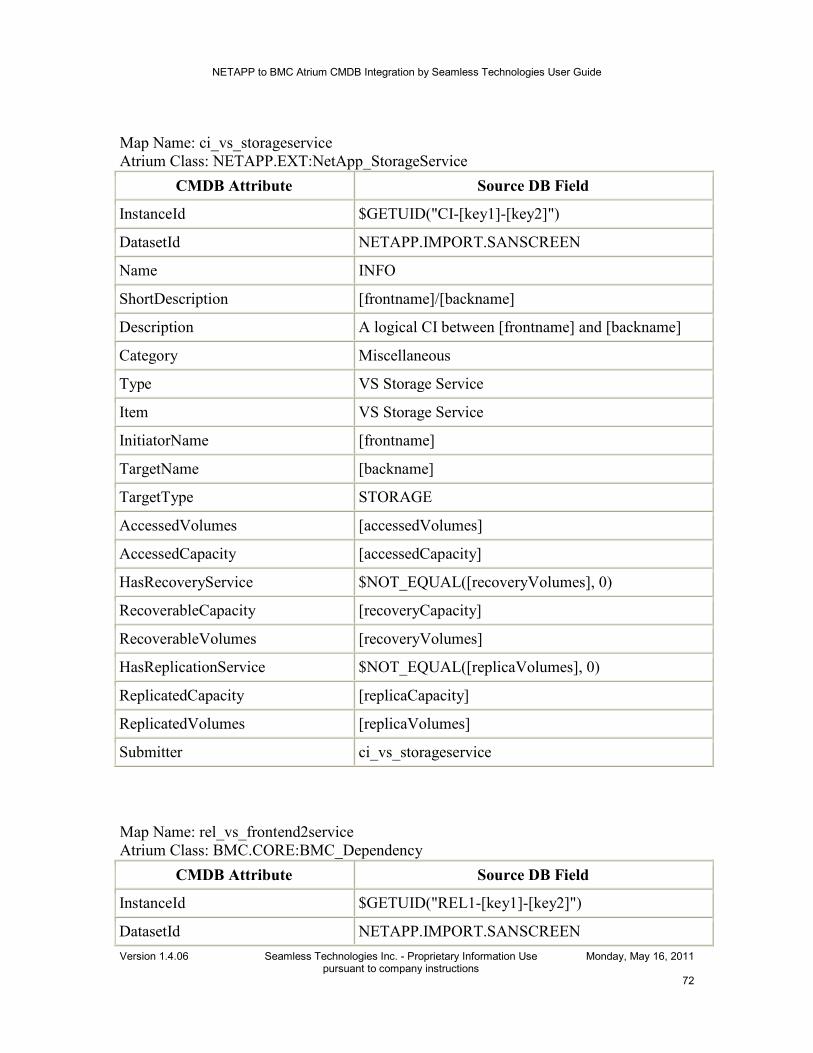
NETAPP to BMC Atrium CMDB Integration by Seamless Technologies User Guide
Version 1.4.06
Seamless Technologies Inc. - Proprietary Information Use pursuant to company instructions
Monday, May 16, 2011
72
Map Name: ci_vs_storageservice Atrium Class: NETAPP.EXT:NetApp_StorageService
CMDB Attribute Source DB Field
InstanceId $GETUID("CI-[key1]-[key2]")
DatasetId NETAPP.IMPORT.SANSCREEN
Name INFO
ShortDescription [frontname]/[backname]
Description A logical CI between [frontname] and [backname]
Category Miscellaneous
Type VS Storage Service
Item VS Storage Service
InitiatorName [frontname]
TargetName [backname]
TargetType STORAGE
AccessedVolumes [accessedVolumes]
AccessedCapacity [accessedCapacity]
HasRecoveryService $NOT_EQUAL([recoveryVolumes], 0)
RecoverableCapacity [recoveryCapacity]
RecoverableVolumes [recoveryVolumes]
HasReplicationService $NOT_EQUAL([replicaVolumes], 0)
ReplicatedCapacity [replicaCapacity]
ReplicatedVolumes [replicaVolumes]
Submitter ci_vs_storageservice
Map Name: rel_vs_frontend2service Atrium Class: BMC.CORE:BMC_Dependency
CMDB Attribute Source DB Field
InstanceId $GETUID("REL1-[key1]-[key2]")
DatasetId NETAPP.IMPORT.SANSCREEN

NETAPP to BMC Atrium CMDB Integration by Seamless Technologies User Guide
Version 1.4.06
Seamless Technologies Inc. - Proprietary Information Use pursuant to company instructions
Monday, May 16, 2011
73
Name Dependency
ShortDescription Dependency
Source.InstanceId $GETUID("[key1]")
Destination.InstanceId $GETUID("CI-[key1]-[key2]")
Submitter rel_vs_frontend2service
Map Name: rel_vs_service2backend Atrium Class: BMC.CORE:BMC_Dependency
CMDB Attribute Source DB Field
InstanceId $GETUID("REL2-[key1]-[key2]")
DatasetId NETAPP.IMPORT.SANSCREEN
Name Dependency
ShortDescription Dependency
Source.InstanceId $GETUID("CI-[key1]-[key2]")
Destination.InstanceId $GETUID("[key2]")
Submitter rel_vs_service2backend
Map Name: ci_vm_storageservice Atrium Class: NETAPP.EXT:NetApp_StorageService
CMDB Attribute Source DB Field
InstanceId $GETUID("CI-[key1]-[key2]")
DatasetId NETAPP.IMPORT.SANSCREEN
Name INFO
ShortDescription [hostname]/[storagename]
Description A logical CI between [hostname] and [storagename]
Category Miscellaneous
Type VM Storage Service
Item VM Storage Service
InitiatorName [hostname]
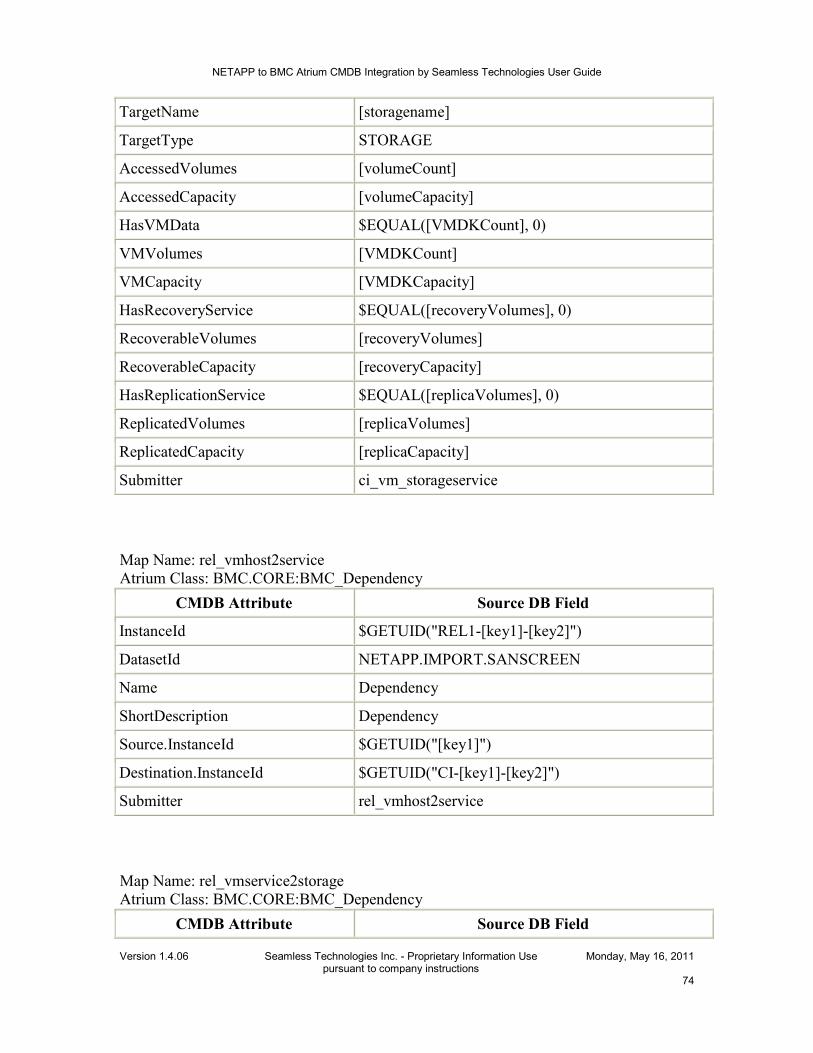
NETAPP to BMC Atrium CMDB Integration by Seamless Technologies User Guide
Version 1.4.06
Seamless Technologies Inc. - Proprietary Information Use pursuant to company instructions
Monday, May 16, 2011
74
TargetName [storagename]
TargetType STORAGE
AccessedVolumes [volumeCount]
AccessedCapacity [volumeCapacity]
HasVMData $EQUAL([VMDKCount], 0)
VMVolumes [VMDKCount]
VMCapacity [VMDKCapacity]
HasRecoveryService $EQUAL([recoveryVolumes], 0)
RecoverableVolumes [recoveryVolumes]
RecoverableCapacity [recoveryCapacity]
HasReplicationService $EQUAL([replicaVolumes], 0)
ReplicatedVolumes [replicaVolumes]
ReplicatedCapacity [replicaCapacity]
Submitter ci_vm_storageservice
Map Name: rel_vmhost2service Atrium Class: BMC.CORE:BMC_Dependency
CMDB Attribute Source DB Field
InstanceId $GETUID("REL1-[key1]-[key2]")
DatasetId NETAPP.IMPORT.SANSCREEN
Name Dependency
ShortDescription Dependency
Source.InstanceId $GETUID("[key1]")
Destination.InstanceId $GETUID("CI-[key1]-[key2]")
Submitter rel_vmhost2service
Map Name: rel_vmservice2storage Atrium Class: BMC.CORE:BMC_Dependency
CMDB Attribute Source DB Field

NETAPP to BMC Atrium CMDB Integration by Seamless Technologies User Guide
Version 1.4.06
Seamless Technologies Inc. - Proprietary Information Use pursuant to company instructions
Monday, May 16, 2011
75
InstanceId $GETUID("REL2-[key1]-[key2]")
DatasetId NETAPP.IMPORT.SANSCREEN
Name Dependency
ShortDescription Dependency
Source.InstanceId $GETUID("CI-[key1]-[key2]")
Destination.InstanceId $GETUID("[key2]")
Submitter rel_vmservice2storage
Map Name: ci_tape Atrium Class: BMC.CORE:BMC_TapeDrive
CMDB Attribute Source DB Field
InstanceId $GETUID("[identifier]")
DatasetId NETAPP.IMPORT.SANSCREEN
Name [name]
ShortDescription [name]
Description [ip]
Category Hardware
Type Tape Device
Item Tape Array
ManufacturerName [Manufacturer]
Model Unknown
SerialNumber [SerialNumber]
Submitter ci_tape
Map Name: ci_tapeservice Atrium Class: NETAPP.EXT:NetApp_StorageService
CMDB Attribute Source DB Field
InstanceId $GETUID("[key1]-[key2]")
DatasetId NETAPP.IMPORT.SANSCREEN

NETAPP to BMC Atrium CMDB Integration by Seamless Technologies User Guide
Version 1.4.06
Seamless Technologies Inc. - Proprietary Information Use pursuant to company instructions
Monday, May 16, 2011
76
Name $LOOKUP([type0]) { APPROVE_NOT_EXIST->Error; OK->OK; *_*->Warning; }
ShortDescription [hostname]/[tapename]
Description A logical CI between [hostname] and [tapeName]
Category Miscellaneous
Type Host Storage Service
Item Tape
InitiatorName [hostName]
TargetName [tapeName]
TargetType TAPE
ServiceStatus $LOOKUP([type0]) { APPROVE_NOT_EXIST->Error; OK->OK; *_*->Warning; }
ServiceStatusSince [since0]
Submitter ci_tapeservice
Map Name: rel_host2tapeservice Atrium Class: BMC.CORE:BMC_Dependency
CMDB Attribute Source DB Field
InstanceId $GETUID("REL1-[key1]-[key2]")
DatasetId NETAPP.IMPORT.SANSCREEN
Name tape service
ShortDescription OK
Source.InstanceId $GETUID("[key1]")
Destination.InstanceId $GETUID("[key1]-[key2]")
Submitter rel_host2tapeservice
Map Name: rel_tapeservice2tape Atrium Class: BMC.CORE:BMC_Dependency
CMDB Attribute Source DB Field
InstanceId $GETUID("REL2-[key1]-[key2]")

NETAPP to BMC Atrium CMDB Integration by Seamless Technologies User Guide
Version 1.4.06
Seamless Technologies Inc. - Proprietary Information Use pursuant to company instructions
Monday, May 16, 2011
77
DatasetId NETAPP.IMPORT.SANSCREEN
Name tape service
ShortDescription OK
Source.InstanceId $GETUID("[key1]-[key2]")
Destination.InstanceId $GETUID("[key2]")
Submitter rel_tapeservice2tape
Map Name: storage_violation Atrium Class: NETAPP.EXT:NetApp_StorageService
CMDB Attribute Source DB Field
InstanceId $GETUID(CI-[protocol]-[key1]-[key2])
DatasetId NETAPP.IMPORT.SANSCREEN
ServiceStatus $LOOKUP([type0]) { APPROVE_NOT_EXIST->Error; OK->OK; *_*->Warning; }
ServiceStatusSince [since0]
Submitter ci_storageservice
Map Name: tape_violation Atrium Class: NETAPP.EXT:NetApp_StorageService
CMDB Attribute Source DB Field
InstanceId $GETUID(CI-[key1]-[key2])
DatasetId NETAPP.IMPORT.SANSCREEN
ServiceStatus $LOOKUP([type0]) { APPROVE_NOT_EXIST->Error; OK->OK; *_*->Warning; }
ServiceStatusSince [since0]
Submitter ci_tapeservice