OnBase Quick Reference Guide
34
OnBase Quick Reference Guide Unity Client Retrieval For OnBase 11.0 Support: Team M | [email protected] | 440.788.6605 Prepared by: Hyland Software, Inc. 28500 Clemens Road Westlake, Ohio 44145 Ph: (440) 788-5000 Fax: (440) 788-5100 www.OnBase.com
Transcript of OnBase Quick Reference Guide

OnBase Quick Reference Guide Unity Client Retrieval
For OnBase 11.0 Support: Team M | [email protected] | 440.788.6605
Prepared by:
Hyland Software, Inc.
28500 Clemens Road
Westlake, Ohio 44145
Ph: (440) 788-5000
Fax: (440) 788-5100
www.OnBase.com
OnBase Quick Reference Guide
Unity Client Retrieval
2011 Hyland Software, Inc. All Rights Reserved. ii
DISCLAIMER
© Copyright 1992-2011 Hyland Software, Inc. All rights reserved.
Information in this document is subject to change without notice and does not represent a commitment on the part of Hyland Software, Inc. The software described in this document is furnished under a license agreement or nondisclosure agreement and may be used or copied only according to the terms of this agreement. It is against the law to copy the software except as specifically allowed in the license or nondisclosure agreement, or without the expressed written consent of Hyland Software, Inc. Any unauthorized duplication or use of the OnBase Information Management System, or its corresponding documentation is forbidden. All data, names, and formats used in this document’s examples are fictitious unless noted otherwise. Should you have any questions pertaining to discrepancies in this document, please contact Hyland Software, Inc. Depending on the modules licensed, the OnBase Information Management System may contain portions of: Imaging technology, Copyright © Snowbound Software Corporation; CD-R technology, Copyright © Sonic Solutions; CD-R technology, Copyright © Rimage Corporation; OCR technology © ScanSoft, Inc; Mail interface technology © Intuitive Data Solutions; Electronic signature technology, Copyright © Silanis Technology, Inc.; Full text search technology, Copyright © Microsoft Corporation; Full text search technology, Copyright © Verity, Inc.; SYBASE Adaptive Server Anywhere Desktop Runtime, Copyright © SYBASE, Inc., Portions, Copyright © Rational Systems, Inc.; ISIS technology, Copyright © Pixel Translations, a division of ActionPoint, Inc. Portions contained within are licensed by U.S. Patent Nos. 6,094,505; 5,768,416; 5,369,508 and 5,258,855. Hyland Software© and OnBase© are registered trademarks of Hyland Software, Inc. Application Enabler™ is an unregistered trademark of Hyland Software, Inc. EMC Centera© is a registered trademark of EMC Corporation.
All other trademarks, service marks, trade names and products of other companies are the property of their respective companies.
DOCUMENT ATTRIBUTES
Document Name OnBase Quick Reference Guide Unity Client Retrieval
Publish Date June 2011
Revision Number 1.0
Responsible Group Higher Education Services Group

OnBase Quick Reference Guide
Unity Client Retrieval
2011 Hyland Software, Inc. All Rights Reserved. iii
Table of Contents
Disclaimer .......................................................................................................................................... ii
Document Attributes ......................................................................................................................... ii
Table of Contents .................................................................................................................................... iii
1. Starting OnBase ........................................................................................................................... 4
2. Unity Home Page ......................................................................................................................... 5
3. Document Retrieval by Custom Query .......................................................................................... 6
4. Document Retrieval by Document Type ........................................................................................ 8
5. Document Retrieval by Keywords ............................................................................................... 11
6. Keyword Operators and Wildcards ............................................................................................. 13
7. Document Retrieval by Date Range ............................................................................................ 15
8. Document Retrieval by Cross Reference ..................................................................................... 16
9. Document Retrieval Using Note Search....................................................................................... 17
10. Document Retrieval Using External Text Search .......................................................................... 19
11. Working with Documents ........................................................................................................... 21
Document Tab ........................................................................................................................................ 22
Image Tab ............................................................................................................................................... 23
Text Tab .................................................................................................................................................. 24
Internal Text Search ............................................................................................................................... 25
12. Notes ......................................................................................................................................... 26
13. Annotations ............................................................................................................................... 27
Highlights ............................................................................................................................................... 27
Arrows .................................................................................................................................................... 28
Overlap Text ........................................................................................................................................... 29
Ellipses .................................................................................................................................................... 30
Deleting Annotations ............................................................................................................................. 31
14. Indexing .................................................................................................................................... 32

Confidential - 2011 Hyland Software, Inc.
2011 Hyland Software, Inc. All Rights Reserved. 4
1. Starting OnBase
To login to OnBase:
Locate and Double-Click the Unity Client shortcut
Enter your Username and Password and click Login

Confidential - 2011 Hyland Software, Inc.
2011 Hyland Software, Inc. All Rights Reserved. 5
2. Unity Home Page
Once you have successfully logged into the system, you are presented with a Home Page, which may
include your organization’s webpage, as well as an RSS Feed related to your organization or industry.
This Home Page layout is user-configurable, and can be easily changed to other screens in OnBase,
such as Custom Queries, Document Retrieval, and Workflow, among others.
To Access this Home Page from anywhere in OnBase, click the Home button at the top left of the
screen.
To set a new Home page layout, click the Down Arrow beneath the Home button, and select ‘Make
this layout my Home Page’. You can always reset to the default Home Page by selecting ‘Reset Home
Page’.

Confidential - 2011 Hyland Software, Inc.
2011 Hyland Software, Inc. All Rights Reserved. 6
3. Document Retrieval by Custom Query
A Custom Query can be developed to allow users to more easily retrieve documents that exist within
OnBase. This allows the user to find the specified documents using a pre-defined form and limits the
criteria needed to perform the search.
To perform a custom query:
Click Custom Queries in the ribbon
Select a Custom Query from the pane on the left. The query will open to the right.

Confidential - 2011 Hyland Software, Inc.
2011 Hyland Software, Inc. All Rights Reserved. 7
Enter the appropriate search criteria and Press the Enter key, or click the search button
configured on the Customer Query. Your search result(s) will be displayed on a tab.
Double-click on a document to view it.
When you conduct multiple Custom Queries, results for each Custom Query are retained on their
respective tabs for future use.
NOTE: Results are retained for the duration of your OnBase session.
A tab contains the following buttons:
Click to open the Custom Query results in a new window.
Click to close the Custom Query results. These results will no longer be available.

Confidential - 2011 Hyland Software, Inc.
2011 Hyland Software, Inc. All Rights Reserved. 8
4. Document Retrieval by Document Type
To Access Document Retrieval, click the Retrieval Icon. The Document Retrieval pane will
open to the left.
Document Types and Groups –
1. Select a Document Type Group and/or Document Type(s). 2. (Optional) Provide other search parameters (such as a date range and/or Keyword Values). See the following sections for further information:
• Retrieval by Keyword Value on page 12 • Retrieval by Document Date on page 16 • Retrieval Using Note Search on page 18 • Retrieval Using External Text Search on page 20
3. Click Find. NOTE: You need user rights to access the Document
Retrieval layout and to view documents. If you have any
problems, see your system administrator.
NOTE: Depending on your configuration, you may not
be able to perform searches without providing some
search parameters.
Date Range – Define specific date or range of dates based
on the document date of the document. A specific date can
be selected from the drop-down arrow.
Keywords – Enter specific Keywords to narrow document
searches. The Keyword edit fields will change depending
on the Document Type selected.
Note Search – Search documents for notes. You can limit your search by Document Type, Keyword Value, Note Type, note text, note creation date, and the note creator. Text Search – Find specific text in a text-based document
assigned to a Document Type or Document Type Group.

Confidential - 2011 Hyland Software, Inc.
2011 Hyland Software, Inc. All Rights Reserved. 9
To retrieve all documents in the system under a particular Document Type:
NOTE: This type of blind search is only possible under certain configurations, as it may inhibit system
performance for other users by putting a strain on the database.
Select a Document Type Group. You will now see a list of Document Types for the selected Document
Type Group.
Select the Document Type(s) to retrieve.
Click Find to execute the search. The Document Search Results will display to the right.

Confidential - 2011 Hyland Software, Inc.
2011 Hyland Software, Inc. All Rights Reserved. 10
Double-click on a document in the results hit list. The document will open in a new window.
Confidential - 2011 Hyland Software, Inc.
2011 Hyland Software, Inc. All Rights Reserved. 11
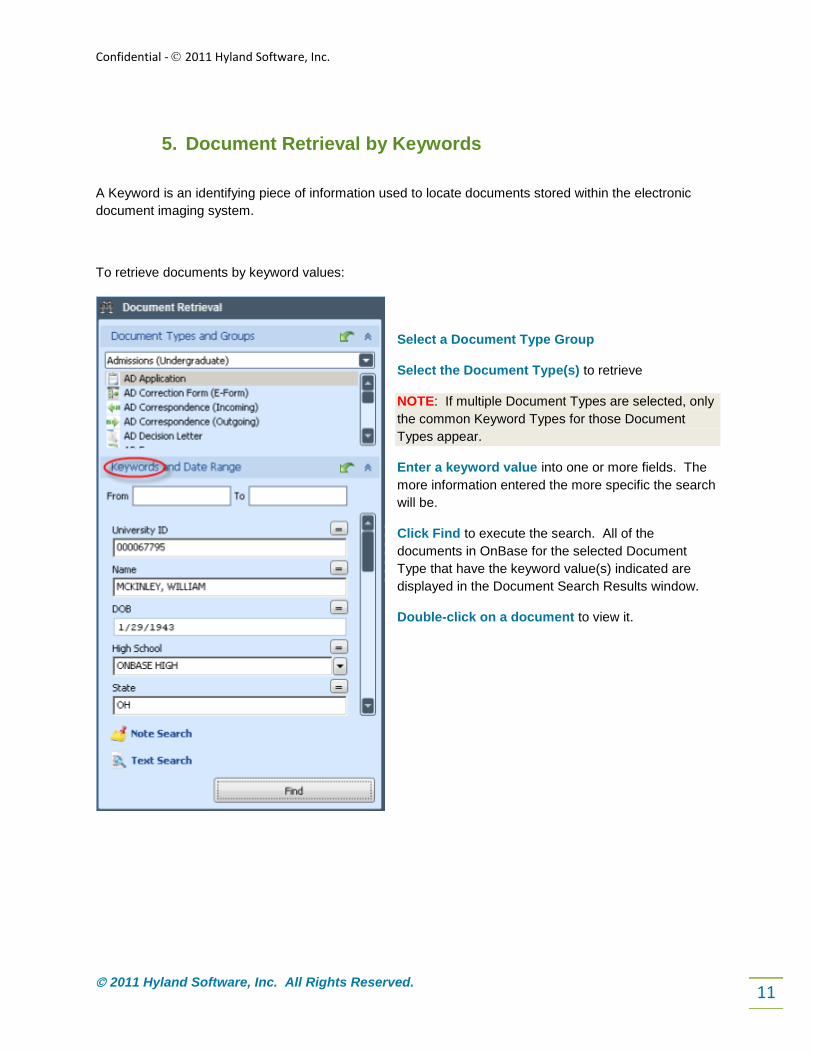
5. Document Retrieval by Keywords
A Keyword is an identifying piece of information used to locate documents stored within the electronic
document imaging system.
To retrieve documents by keyword values:
Select a Document Type Group
Select the Document Type(s) to retrieve
NOTE: If multiple Document Types are selected, only
the common Keyword Types for those Document
Types appear.
Enter a keyword value into one or more fields. The
more information entered the more specific the search
will be.
Click Find to execute the search. All of the
documents in OnBase for the selected Document
Type that have the keyword value(s) indicated are
displayed in the Document Search Results window.
Double-click on a document to view it.
Confidential - 2011 Hyland Software, Inc.
2011 Hyland Software, Inc. All Rights Reserved. 12
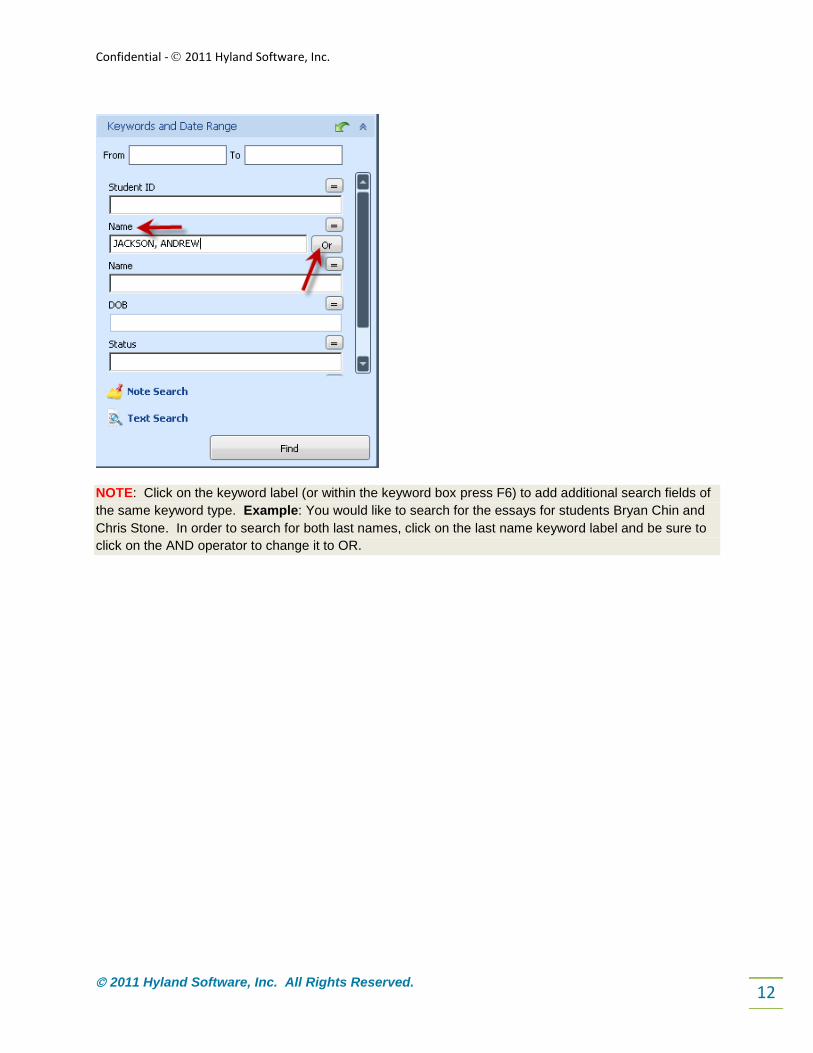
NOTE: Click on the keyword label (or within the keyword box press F6) to add additional search fields of
the same keyword type. Example: You would like to search for the essays for students Bryan Chin and
Chris Stone. In order to search for both last names, click on the last name keyword label and be sure to
click on the AND operator to change it to OR.

Confidential - 2011 Hyland Software, Inc.
2011 Hyland Software, Inc. All Rights Reserved. 13
6. Keyword Operators and Wildcards
The Keyword Type Edit Field default property = (equal to) will appear in a box on the right side of each
Keyword Type Edit Field, and the default binary operator, AND will appear in a box on the right side of
each Keyword Type Edit Field when multiple search fields have been activated for a Keyword in the
Document Retrieval dialog box.
If you left-click the = operator, it will act as a toggle switch and
allow you to toggle through the following choices (choices vary
depending on the format of the Keyword, i.e. date,
alphanumeric, currency, etc. )
Equal To allows you to search for keyword values that are an exact match to what is
entered for retrieval.
Not Equal To allows you to search for keyword values that are not equal to the keyword value
entered for retrieval.
Double Quotes returns only those documents containing the literal entry.
Greater Than allows for the retrieval of documents with keyword values greater than the
numeric or date value entered for retrieval.
Less Than allows for the retrieval of documents with keyword values less than the numeric or
date value entered for retrieval.
Greater Than/Equal To allows for the retrieval of documents with keyword values greater than
or equal to the numeric or date value entered for retrieval.
Less Than/Equal To allows for the retrieval of documents with keyword values less than or
equal to the numeric or date value entered for retrieval.
F6 F6 opens a second entry field for the active keyword. You can also click on the keyword label.
And allows for searching two or more values of the same keyword type that exists on the
selected document type.

Confidential - 2011 Hyland Software, Inc.
2011 Hyland Software, Inc. All Rights Reserved. 14
Or allows you to search either one (or more) documents containing either one or more specific
keyword types. Click And to change to Or.
To allows you to search from one keyword to another keyword of the same keyword. Used
with Numeric or Date keywords.
Wildcards
Combined with keyword values can be used to retrieve documents.
* Replaces multiple characters. (ADAMS* would retrieve ADAMS, ADAMSON,
ADAMSTON, etc.)
? Replaces a single character. (SM?TH would retrieve SMITH, SMYTH, SMOTH, etc.)
Confidential - 2011 Hyland Software, Inc.
2011 Hyland Software, Inc. All Rights Reserved. 15
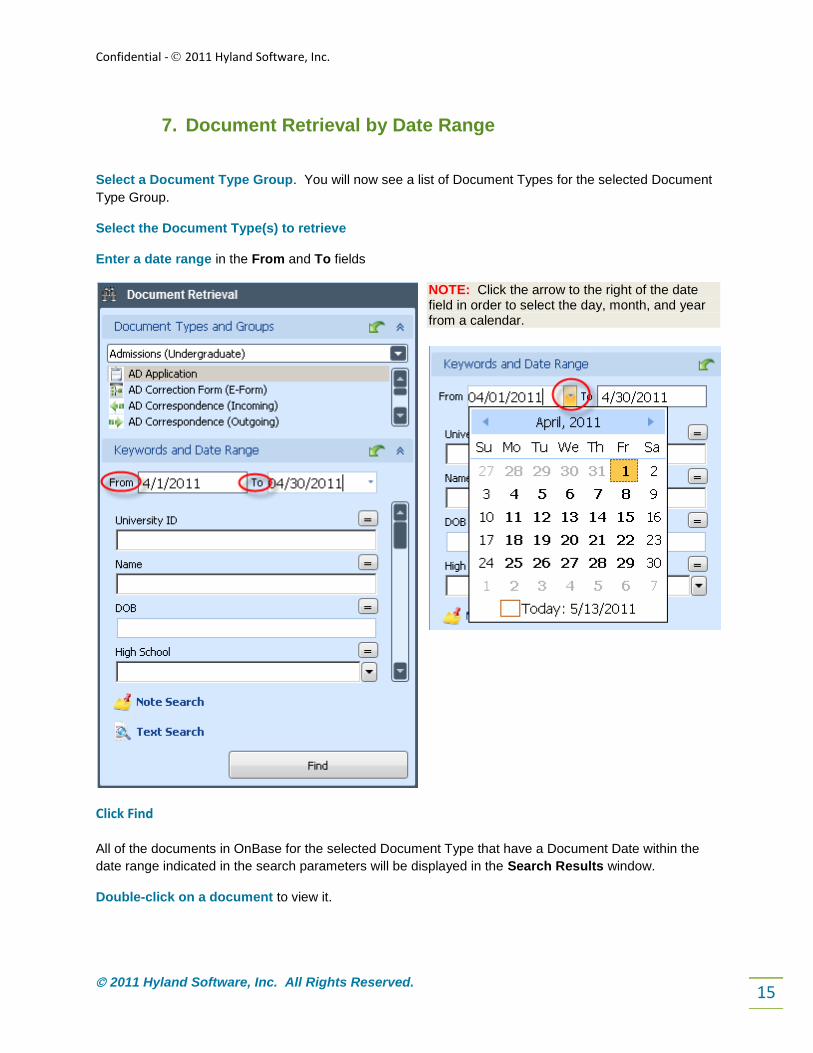
7. Document Retrieval by Date Range
Select a Document Type Group. You will now see a list of Document Types for the selected Document
Type Group.
Select the Document Type(s) to retrieve
Enter a date range in the From and To fields
NOTE: Click the arrow to the right of the date field in order to select the day, month, and year from a calendar.
Click Find
All of the documents in OnBase for the selected Document Type that have a Document Date within the
date range indicated in the search parameters will be displayed in the Search Results window.
Double-click on a document to view it.

Confidential - 2011 Hyland Software, Inc.
2011 Hyland Software, Inc. All Rights Reserved. 16
8. Document Retrieval by Cross Reference
A Cross Reference is a relationship between a Document Type and one or more other Document
Type(s). This allows you to double-click on a document and retrieve the related document(s).
To open a document by cross-reference:
Retrieve a document
Highlight that document, and click on the Document tab. Click the Cross-References button. If a cross
reference has been configured for the Document Type, this will automatically display a new Cross-
References pane with all of the documents related to the original document. NOTE: All this happens
without having to enter Keyword information.
Double-click a document in the Cross-References pane to open it. You can then position the windows
side-by-side, or move the new window to a separate monitor if your workstation is configured with dual
monitoring, to view multiple documents at the same time.

Confidential - 2011 Hyland Software, Inc.
2011 Hyland Software, Inc. All Rights Reserved. 17
9. Document Retrieval Using Note Search
Note Search allows you to search documents for notes. You can limit your search by Document Type, Keyword Value, Note Type, note text, note creation date, and the note creator.
In the Document Retrieval pane, select the Document Type Group(s) and/or Document Type(s) to search. Click the Note Search hyperlink.
Type the note text to search for in the Find What field, or use the drop-down list to select from previous
note searches. You can also expand the Options pane for additional search parameters based on Date
Range, Note Owner, or Note Type.
Click outside the Note Search window.
The Note Search window closes and the Note Search field displays in the Document Retrieval pane:

Confidential - 2011 Hyland Software, Inc.
2011 Hyland Software, Inc. All Rights Reserved. 18
If you specified note text to search for in the Note Search window’s Find What field, the Note Search
field contains this text enclosed by quotation marks; additional search criteria are represented as
+Parameters.
You can remove the note search by clicking the following button:
Click Find:
When the search is finished, OnBase displays all matching documents in a Document Search Results
list.
Open a document by double-clicking its listing. The document is displayed in the Document Viewer:

Confidential - 2011 Hyland Software, Inc.
2011 Hyland Software, Inc. All Rights Reserved. 19
10. Document Retrieval Using External Text Search
If you have sufficient privileges, you can search for specific text in a text-based document assigned to a
Document Type or Document Type Group.
In the Document Retrieval pane, select the Document Type Group(s) and/or Document Type(s) to search. Click the Text Search hyperlink.
The Text Search window is displayed:
In the Find What field, type the text string you want to search for. The string must contain at least two characters, and at least one character in the string must be a letter or a number. Use the drop-down list to select from previous text searches. To add additional search parameters, expand the Options pane:
Select a Type Radio Button:
• Text - Searches for alphanumeric text. • Number - Searches for numeric values and allows the use of the following operators to limit the search: =,
>, <, =>, and <=. You can use and, or, and to as operators to search for a range of values. For example, type 2009 and 2010 to find documents containing both 2009 and 2010.
If you are searching for an exact number that is part of an alphanumeric text string, then the number will not be found. For example, if you search for 001 and the actual text is ABC001, then the value will not be found.
• Formatted Number - Searches for numeric values that use formatting characters. For example, to search for all Social Security Numbers greater than 800-00-0000, type > 800-00-0000 in the Search String field.
Confidential - 2011 Hyland Software, Inc.
2011 Hyland Software, Inc. All Rights Reserved. 20
You can use this option with following operators to limit your search: =, >, <, =>, and <=. The and, or, and to operators can be used to search for a range of values. For example, type 800-00-000 to 900-00-0000 to find
documents containing values within this range.
Select one of the following check boxes if necessary: • Select Use Wildcards to include wild card characters in your text string search criteria. • Select Case Sensitive to return only matches that have the same capitalization as the text string search
criteria. • Select Column Search to search for a text string within specified columns. In the From field, type the
character position of the column to start the search in (the left most column to be searched). The column of characters at the far left of the document is 1, the next column to the right is 2, and so on. In the To field,
type the character position of the column to end the search in (the right most column to be searched). The number in the To field must be greater than or equal to the number in the From field.
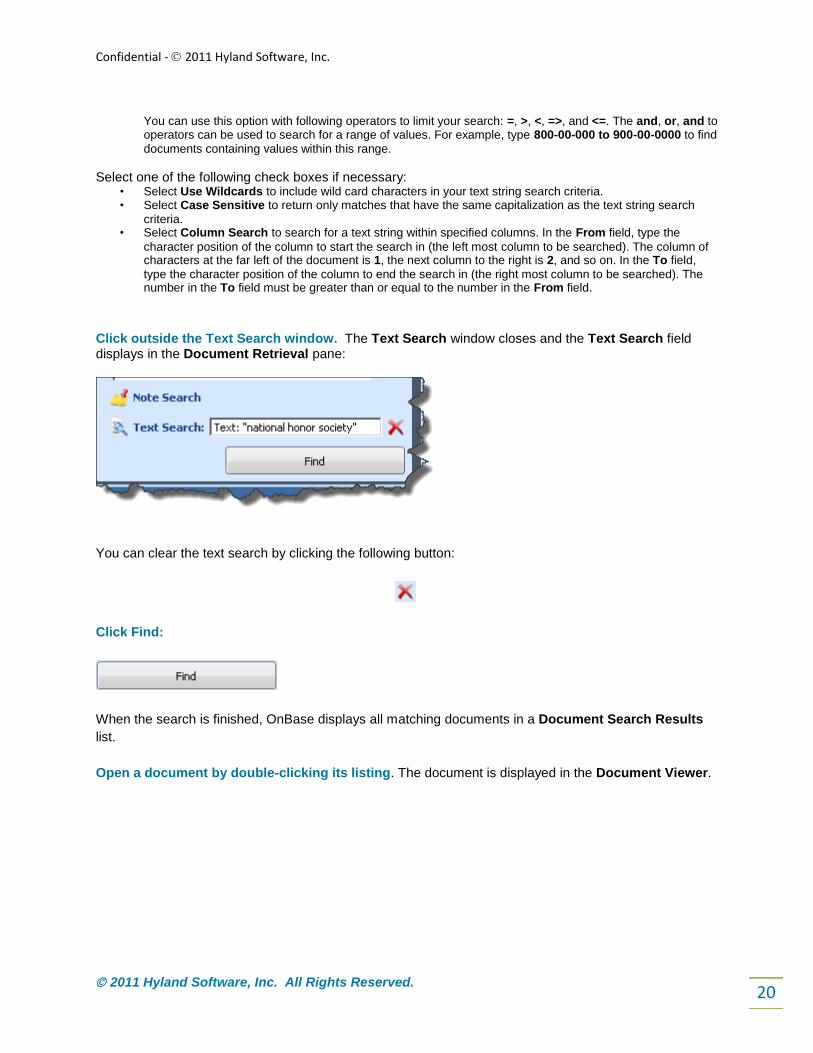
Click outside the Text Search window. The Text Search window closes and the Text Search field displays in the Document Retrieval pane:
You can clear the text search by clicking the following button:
Click Find:
When the search is finished, OnBase displays all matching documents in a Document Search Results
list.
Open a document by double-clicking its listing. The document is displayed in the Document Viewer.
Confidential - 2011 Hyland Software, Inc.
2011 Hyland Software, Inc. All Rights Reserved. 21
11. Working with Documents
This chapter provides a general overview of working with documents. When working with documents in
OnBase, it is important to understand that documents may behave slightly differently depending upon
their file format. A file format identifies the type of file. The two most common file formats are image
documents and text documents. Other file formats include XML, video formats, or OLE documents, such
as those created with Microsoft Office applications. See your system administrator for specific questions
regarding your system’s file types and their default behavior.
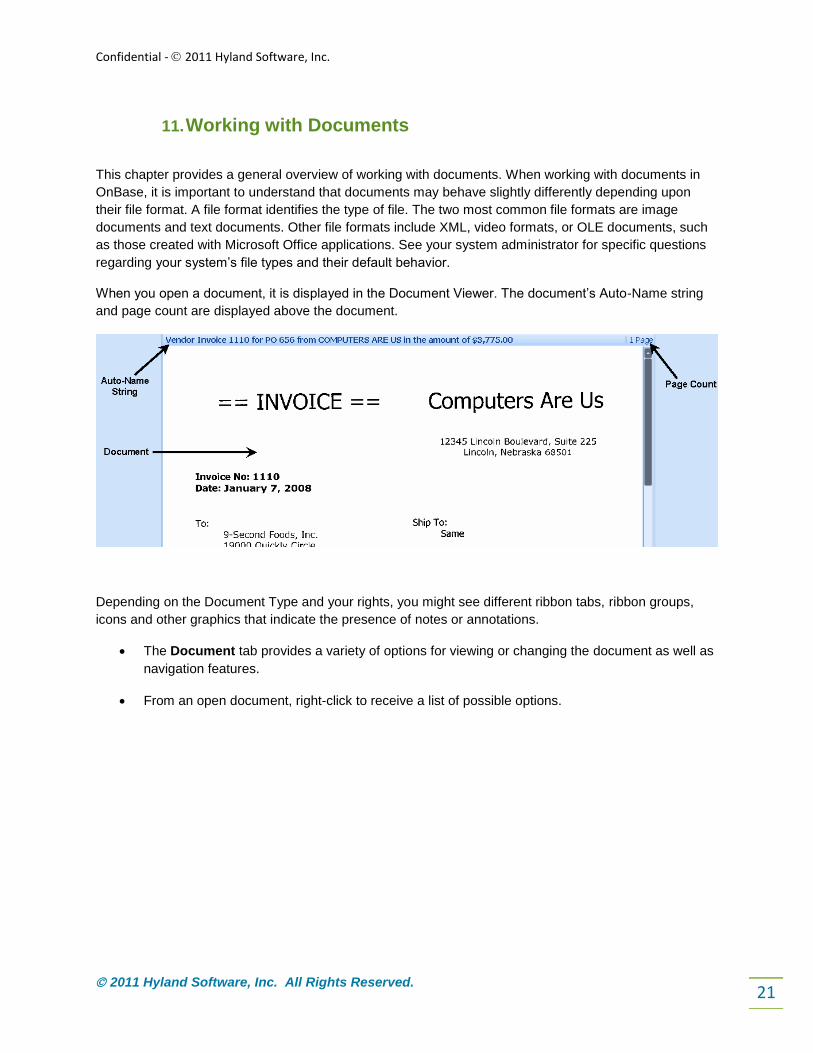
When you open a document, it is displayed in the Document Viewer. The document’s Auto-Name string
and page count are displayed above the document.
Depending on the Document Type and your rights, you might see different ribbon tabs, ribbon groups,
icons and other graphics that indicate the presence of notes or annotations.
The Document tab provides a variety of options for viewing or changing the document as well as
navigation features.
From an open document, right-click to receive a list of possible options.

Confidential - 2011 Hyland Software, Inc.
2011 Hyland Software, Inc. All Rights Reserved. 22
Document Tab
Keywords displays the Add/Modify Keywords pane in the task pane
Tip: When the Add/Modify Keywords pane is displayed, you can easily view the
document’s notes and cross-references by selecting the corresponding tab.
Cross-References displays the Cross-References pane in the task pane.
Tip: When the Cross-References pane is displayed, you can easily view the
document’s keywords and notes by selecting the corresponding tab.
Discussions displays the Discussions pane in the task pane.
Note: Collaboration licensing is required to use discussions. For information on using
discussions, see the Collaboration documentation.
Revisions displays the Revisions and Renditions dialog box.
Note: EDM Services licensing is required to use revisions. For information on using
revisions, see the EDM Services documentation.
History displays the Document History dialog box.
Properties displays the Document Properties dialog box.
Send To displays the following options:
• Briefcase sends the selected document to a Unity Briefcase folio. Unity
Briefcase licensing is required to send documents to Unity Briefcase folios. See
the Unity Briefcase documentation for more information on folios.
• Mail Recipient sends the document or a link to the document to a user via
external mail.
• Envelope displays the Envelope pane in the task pane.
• Print displays the Print dialog box.
• File displays the File pane in the task pane.
Start a Discussion displays the Discussions pane in the task pane.
Note: Collaboration licensing is required to use discussions. For information on using
discussions, see the Collaboration documentation.
Re-Index displays the Re-Index pane in the task pane.
Delete removes the document from OnBase.

Confidential - 2011 Hyland Software, Inc.
2011 Hyland Software, Inc. All Rights Reserved. 23
Check Out persistently checks out the selected document(s).
Note: EDM Services licensing is required to check out documents. For information on
using persistent check out, see the EDM Services documentation.
Image Tab
The Image tab allows you to view documents more efficiently. You can use the buttons to resize and reorient the document.
Selection Zoom allows you to zoom in on the selected region of the document. When this button is selected, click on the document and drag the mouse select a region. Release the mouse button to zoom in on the selected region.
Hand Tool allows you to pan, or scroll, the document in any direction. When this button is selected, click on the document and drag the mouse to move the document. Note: To pan quickly, hold down the Alt key while moving the mouse.
Previous Document displays the previous document in the Document Search
Results list.
Next Document displays the next document in the Document Search Results
list.
Previous Page displays the preceding page of a multi-page document.
Next Page displays the following page of a multi-page document.
First Page displays the first page of the document.
Last Page displays the last page of the document.
Go To Page allows you to go to a specific page in the document. After clicking this button, type a page number and click OK.

Confidential - 2011 Hyland Software, Inc.
2011 Hyland Software, Inc. All Rights Reserved. 24
Toggle Thumbnails displays or hides thumbnails.
Zoom In magnifies the view of a document, reducing the portion that is visible.
Every zoom increases magnification by one third.
Zoom Out reduces the magnification of a document, increasing the portion that
is visible. Every zoom reduces magnification by one third.
Sizing options allow you to select a standard sizing option. Select a specific percentage of reduction or magnification (25%, 50%, 75%, 100%, or 200%), Fit To Width, or Fit To Window. You can also type a custom scale. Also displays the current magnification percentage whenever the Zoom In or the Zoom Out options are used. Note: Fit To Width is selected by default.
Actual Size displays the document in its actual size (as it is stored in OnBase).
Fit To Width resizes the document page so that its width is the same as the
width of the document display area.
Fit To Window resizes the document page so that the entire image is displayed
in the window.
Toggle Overlay turns the overlay on and off, if an overlay is present.
Rotate Left rotates the document 90 degrees counterclockwise.
Rotate Right rotates the document 90 degrees clockwise.
Flip Horizontally flips the document along the horizontal axis.
Flip Vertically flips the document along the vertical axis.
Save Flip & Rotation saves any flips or rotations.
Text Tab
The Text tab allows you to view text documents more efficiently. You can use the buttons to resize and
reorient the document. You can also search for text. The text tab contains similar icons and functionality
as the Image tab, save for the Find in Document Search box.
Confidential - 2011 Hyland Software, Inc.
2011 Hyland Software, Inc. All Rights Reserved. 25
Internal Text Search
Use the Find in Document field on the Text tab to search for specific text strings within the document. To perform an internal text search:
1. Click in the Find in Document field and type the characters to search for. Internal text searches are case-insensitive, so searches for Account will also find account, and searches for account will also find Account.
2. Press the Enter key. 3. The number of occurrences of the specified string of text is displayed below the Find in
Document field as Result 1 of #, where # is the total number of occurrences. 4. The first occurrence of the specified string of text is displayed within a highlight bar. 5. Click Find Next to search for the next following occurrence of the specified string within the
current text document.
6. Click Find Previous to search for the previous occurrence of the specified string within the
current text document.

Confidential - 2011 Hyland Software, Inc.
2011 Hyland Software, Inc. All Rights Reserved. 26
12. Notes
If you have sufficient privileges, you can view notes and create notes and annotations on documents
using the Notes gallery.
When you click View Notes, the Notes pane displays in the task pane.
Tip: When the Notes pane is displayed, you can easily view the document’s keywords and cross-
references by selecting the corresponding tab.
Scroll through the available notes and annotations using the following buttons:
To display all available notes and annotations, click the following button:
Notes are available from the Notes gallery when a document is opened in the OnBase viewer or selected
in the Document Search Results list. Notes are limited to 250 characters.
1. On the Document tab, in Notes, select the type of note.
2. If you are adding a note to an open text or image document, click on the document to place the
note. To type text for the note, double-click the note. You can also click View Notes, and type
text in the Notes pane.
If you are adding a note to a document in the Document Search Results list, or an open OLE
document or E-Form, the Notes pane is displayed. If necessary, type text for the note. Click
Close.
3. To delete a note, perform one of the following:
• Select the note and click Delete Note in the Notes gallery.
• Right-click the note and select Delete.
Confidential - 2011 Hyland Software, Inc.
2011 Hyland Software, Inc. All Rights Reserved. 27
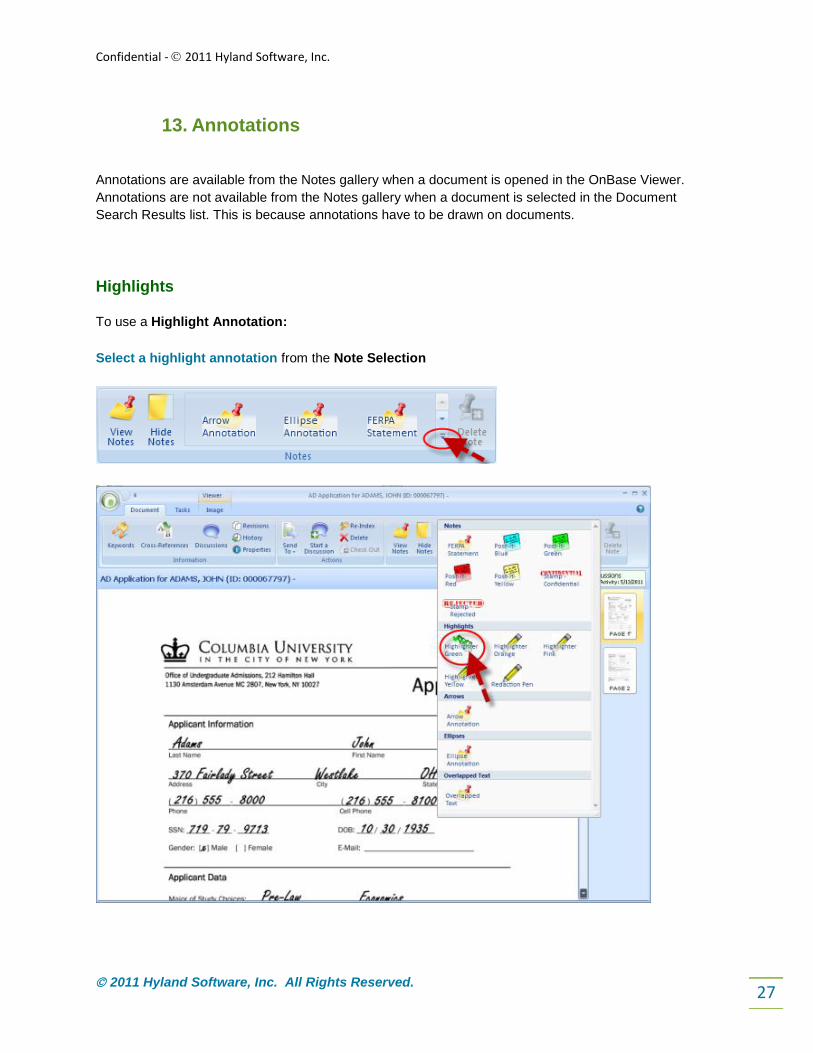
13. Annotations
Annotations are available from the Notes gallery when a document is opened in the OnBase Viewer.
Annotations are not available from the Notes gallery when a document is selected in the Document
Search Results list. This is because annotations have to be drawn on documents.
Highlights
To use a Highlight Annotation:
Select a highlight annotation from the Note Selection

Confidential - 2011 Hyland Software, Inc.
2011 Hyland Software, Inc. All Rights Reserved. 28
Left-click and drag your mouse over the portion of the document that you would like to highlight
Release your left-click and the highlight will appear on the document
Arrows
To use the Arrow Annotation:
Select Arrow as an Annotation Type
Left-click and drag your mouse where you would like the arrow to display. (Where you release the left-
click is where the head of the arrow will be displayed)

Confidential - 2011 Hyland Software, Inc.
2011 Hyland Software, Inc. All Rights Reserved. 29
Overlap Text
To use Overlapped Text:
Select Overlapped Text Annotation Type
Left-click and drag your mouse where you would like the Overlapped Text to be displayed on the
document.
Type the text you would like to display on the document.
When you click away from the text box, the Overlapped Text will be displayed on the document.

Confidential - 2011 Hyland Software, Inc.
2011 Hyland Software, Inc. All Rights Reserved. 30
Ellipses
To use the Ellipse Annotation:
Select Ellipse Annotation from the Note selection
Left-click and drag your mouse over the portion of the document that you would like the ellipse
displayed. (When you release the left-click the ellipse will display on the document)

Confidential - 2011 Hyland Software, Inc.
2011 Hyland Software, Inc. All Rights Reserved. 31
Deleting Annotations
To delete an annotation:
Left-click on the Annotation. It will be selected in gray.
Right-click on the Annotation. A Delete option will appear.
Select Delete. Click Yes when it asks Are you sure you want to delete this note?

Confidential - 2011 Hyland Software, Inc.
2011 Hyland Software, Inc. All Rights Reserved. 32
14. Indexing Batch Indexing allows you to index batches of documents available in a scan queue. To Batch Index documents:
Select Batch Indexing
The Batch Indexing interface is filtered by batch status.
Awaiting Index includes all batches available for indexing.
Index In Progress includes all batches where indexing has started but the batch is not fully indexed.
Awaiting Commit includes all batches where indexing is complete, but the documents have not been committed.
Commit includes all batches where the documents are fully indexed and committed to OnBase.
Select Awaiting Index to begin indexing documents.
Right Click on the scan queue and select Index Documents
Select the appropriate Document Type.
Enter the Date and Keywords values
Click Index.

Confidential - 2011 Hyland Software, Inc.
2011 Hyland Software, Inc. All Rights Reserved. 33
The Index button allows you to mark the current document as indexed. All indexing information entered for the document is saved and the document is no longer available for indexing (thought it can be re-indexed).
The Append button allows you to append the current document to the end of the previously indexed document. If you select to append the last document in a batch to the previous document, you are prompted to review the action.
If you click Yes, you must click Undo to undo the previous action.
If you click No, the batch is marked as indexed and routed to the next batch status queue. You are no longer able to undo the action.
NOTE: This button is only available when indexing an image document.
The Scan button allows you to scan additional pages into the current document.
The Undo button allows you to undo the indexing task (i.e., append document, delete page, delete document, or skip document) that was performed for the previous document. If you perform an undoable action on the last document in the batch, you are prompted to review the action.
If you click Yes, you must click Undo to undo the previous action.
If you click No, the batch is marked as indexed and routed to the next batch status queue. You are no longer able to undo the action.
Confidential - 2011 Hyland Software, Inc.
2011 Hyland Software, Inc. All Rights Reserved. 34
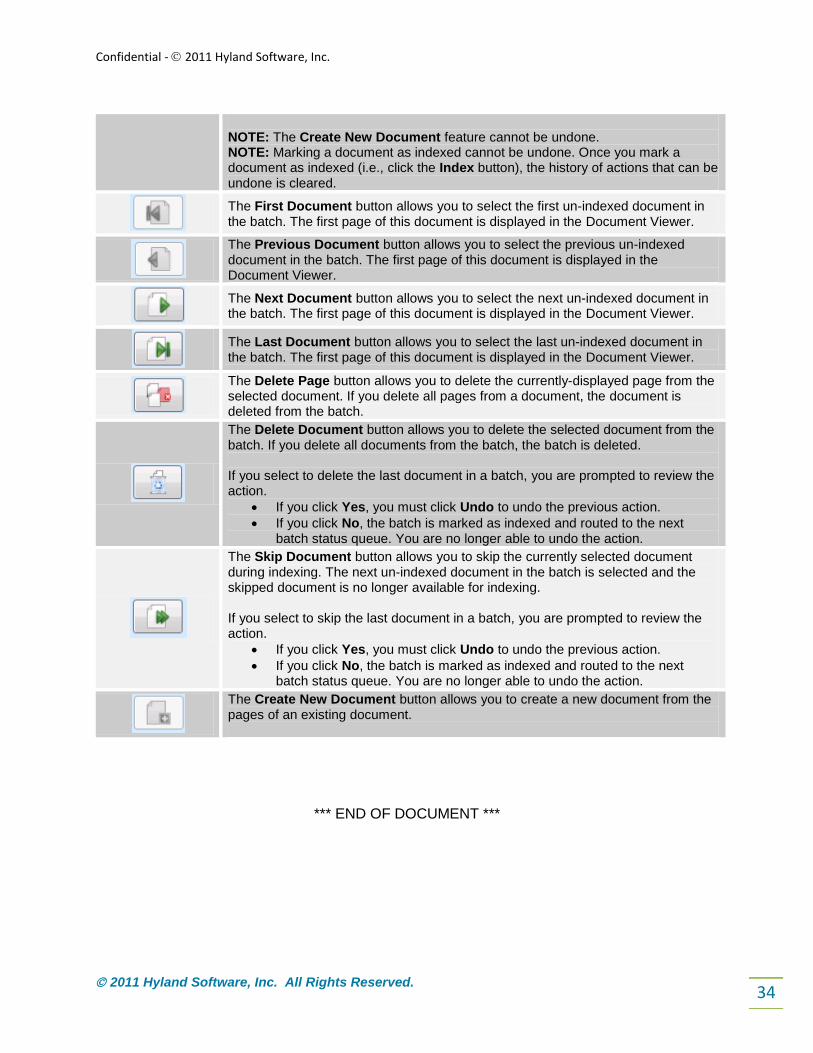
NOTE: The Create New Document feature cannot be undone. NOTE: Marking a document as indexed cannot be undone. Once you mark a document as indexed (i.e., click the Index button), the history of actions that can be undone is cleared.
The First Document button allows you to select the first un-indexed document in the batch. The first page of this document is displayed in the Document Viewer.
The Previous Document button allows you to select the previous un-indexed document in the batch. The first page of this document is displayed in the Document Viewer.
The Next Document button allows you to select the next un-indexed document in the batch. The first page of this document is displayed in the Document Viewer.
The Last Document button allows you to select the last un-indexed document in the batch. The first page of this document is displayed in the Document Viewer.
The Delete Page button allows you to delete the currently-displayed page from the selected document. If you delete all pages from a document, the document is deleted from the batch.
The Delete Document button allows you to delete the selected document from the batch. If you delete all documents from the batch, the batch is deleted. If you select to delete the last document in a batch, you are prompted to review the action.
If you click Yes, you must click Undo to undo the previous action.
If you click No, the batch is marked as indexed and routed to the next batch status queue. You are no longer able to undo the action.
The Skip Document button allows you to skip the currently selected document during indexing. The next un-indexed document in the batch is selected and the skipped document is no longer available for indexing. If you select to skip the last document in a batch, you are prompted to review the action.
If you click Yes, you must click Undo to undo the previous action.
If you click No, the batch is marked as indexed and routed to the next batch status queue. You are no longer able to undo the action.
The Create New Document button allows you to create a new document from the pages of an existing document.
*** END OF DOCUMENT ***


![CCNP BCMSN Quick Reference Sheets - Lagout Quick Reference... · CCNP BCMSN Quick Reference Sheets Exam 642-812 ... [ 4 ] CCNP BCMSN Quick Reference Sheets. ... switch would be used](https://static.fdocuments.us/doc/165x107/5a7a6ec87f8b9a05538dccf5/ccnp-bcmsn-quick-reference-sheets-lagout-quick-referenceccnp-bcmsn-quick-reference.jpg)