ON-FLOOR WIREWAY INSTALLATION GUIDE - … · ON-FLOOR WIREWAY INSTALLATION GUIDE ... provided by...
7
ON-FLOOR WIREWAY INSTALLATION (02102014) CONNECTRAC.COM 1 ON-FLOOR WIREWAY INSTALLATION GUIDE BEFORE STARTING: • Concrete floor surfaces must be flat, level and structurally sound. Floor topping / leveling may be required prior to installation of the Connectrac system. Aluminum Connectrac components which will be cut to length should be cut with a non-ferrous metal-cutting sawblade. This blade can be used with a miter saw or chop saw (recommended), radial arm saw, or table saw. • Coordinate Connectrac length, location, and power devices with furniture prior to installation. NOTE: FOR INSTALLATION OF POWER DEVICES SEE PAGE 04 BASE SYSTEM COMPONENTS - included with every wireway segment ALUMINUM WIREWAY TOP CAP Snaps into bottom track Trimmed to length WIRE MANAGEMENT CLIPS Snaps into bottom track Included with each wireway CONCRETE SCREWS Secures bottom track to concrete slab Includes 5/32” drill bit Included with each wireway ALUMINUM WIREWAY BOTTOM TRACK AND SIDE RAMPS Screws to concrete slab FOAM TAPE Pre-applied to aluminum bottom track ON-C90-AL ON-C45-AL NOTE: WIREWAY RELATED ACCESSORIES (SOLD SEPARATELY) USE THE SAME BASE COMPONENTS AND ARE INSTALLED IN THE SAME WAY
Transcript of ON-FLOOR WIREWAY INSTALLATION GUIDE - … · ON-FLOOR WIREWAY INSTALLATION GUIDE ... provided by...

ON-FLOOR WIREWAY INSTALLATION (02102014) CONNECTRAC.COM1
O N - F L O O R W I R E W A Y I N S T A L L A T I O N G U I D E
BEFORE STARTING: • Concrete floor surfaces must be flat, level and structurally sound. Floor topping / leveling may be required prior to installation of the Connectrac system. Aluminum Connectrac components which will be cut to length should be cut with a non-ferrous metal-cutting sawblade. This blade can be used with a miter saw or chop saw (recommended), radial arm saw, or table saw.
• Coordinate Connectrac length, location, and power devices with furniture prior to installation.
NOTE: FOR INSTALLATION OF POWER DEVICES SEE PAGE 04
BASE SYSTEM COMPONENTS - included with every wireway segment
ALUMINUM WIREWAY TOP CAP Snaps into bottom track Trimmed to length
WIRE MANAGEMENT CLIPS Snaps into bottom track Included with each wireway
CONCRETE SCREWS Secures bottom track to concrete slab Includes 5/32” drill bit Included with each wireway
ALUMINUM WIREWAY BOTTOM TRACK AND SIDE RAMPS Screws to concrete slab
FOAM TAPE Pre-applied to aluminum bottom track
ON-C90-AL ON-C45-AL
NOTE: WIREWAY RELATED ACCESSORIES (SOLD SEPARATELY) USE THE SAME BASE COMPONENTS AND ARE INSTALLED IN THE SAME WAY

4”
4”
1.5”
ON-FLOOR WIREWAY INSTALLATION (02102014) CONNECTRAC.COM2
OPTIONAL ROUGH-IN BOX INSTALLATION
STEP 1 STEP 2
STEP 3 STEP 4
NOTE: The rough-in box (AC-RIB-1) is not required for existing construction, and is an optional component in new construction. If not using, continue to step 1 below.
NOTE: This opening will be covered by the wall base upon finishing.
NEW WALL CONSTRUCTION: Make two cuts in floor stud track, 4” apart, and fold inward. Position rough-in box accessory in track, and secure to slab using concrete screws. Install gypsum board, cutting around rough-in box. This creates an opening to transition cabling from the building into the wireway. NOTE: Coordinate opening with furniture and device location.
Flip over wireway bottom track and end component over. Peel back foam tape from bottom track and insert end component tabs into wireway channels as indicated. Align both pieces and secure with included set screws.
Cut a 1.5”x3” hole in gypsum board, through the wall base. Cut bottom stud track at edges, and fold inward. NOTE: Coordinate lengths with furniture and device locations.
Trim bottom track to length.NOTE: Coordinate lengths with furniture and device location. TIP: Save offcuts for use elsewhere.
3”
1.5”
If using more than one bottom track section or corner accessory, peel back foam tape at joint and insert couplers into wireway channels as indicated. Align both pieces and secure with included set screws.

ON-FLOOR WIREWAY INSTALLATION (02102014) CONNECTRAC.COM3
STEP 6
Pre-drill 1/4” holes in grooves of aluminum bottom track at a minimum of 18” apart on-center and a maximum 6” from the end, staggering side to side along the length. Drill floor slab with concrete bit using hammer drill (recommended) or standard drill, and install concrete screws to secure bottom track to slab. Do not place screws where a receptacle device will be located. TIP: Finish installing screws by hand to avoid over-torquing.
GROOVESstagger screws fromside to side
STEP 5
Place track assembly on floor and align centerline of bottom track with centerline of wall opening. Mark the edges of the wireway with tape and trim angled portion of wall base as indicated to allow wireway to sit flush against wall.
When done laying cabling (see following pages), snap AC-WT-SV wall transition cover accessory into wireway bottom track at wall base.NOTE: Do not fully snap top cap in bottom track until all cabling is laid.
TRIM
CL
TRIM
AC-WT-SV(sold separately)

INSTALLING SINGLE POWER DEVICES
ON-FLOOR WIREWAY INSTALLATION (02102014) CONNECTRAC.COM4
CONNECTING POWER SYSTEMS TELECOM
INSTALLING MODULAR POWER DEVICES
Modular receptacle power systems rely on fixed-length jumper cables that don’t stretch and don’t shrink - ensure correct device placement by mocking up full electrical system prior to anchoring device or cutting top cap.
NOTE: To check fit and positioning in wireway, loosely place the entire power device and any cover components in bottom track prior to anchoring device. Ensure the device location is coordinated with furniture.
Once positioned, anchor power devices to slab through bottom track using included concrete screws.
Pull flexible conduit through wall opening up cavity of stud wall and wire to junction box. See wiring diagrams on page 06.
Pull telecom cabling through wall opening and lay in wireway. Use supplied wireway clips to secure all cabling. See page 06 for telecom installation information.
All power devices are anchored through the bottom track and into the building slab. Single device options (above) are typically located at the end of the wireway segment. Locate power device in wireway and anchor it through bottom track using included concrete screws.
NOTE: To check fit and positioning in wireway, loosely place the entire power device and any cover components in bottom track prior to anchoring device. Ensure the device location is coordinated with furniture.
PM-RECM-QD-XXXXPM-JUMP-XXX
PM-RECM-DP-XPM-MODC-XXX
NOTE: NEVER INSTALL A POWER DEVICE IN A WALKING PATH
NOTE: NEVER INSTALL A POWER DEVICE IN A WALKING PATH
ON-CENTER SPACING SET BY PM-JUMP-XXX COMPONENTS
PS-I-XXX• Single receptacle device• Pre-wired, attached conduit• Modular voice/data/AV
PS-A-IN-XXX• Single receptacle device for AV• Pre-wired, attached conduit• Fits any double-gang telecom faceplate
PS-M-XXX• Single 8-wire/4-circuit connection monument• Pre-wired, attached conduit• Voice/data passes through
FURNITURECONNECTION
ELECTRICALSIDE
DATA PASS-THRU
WIRE MANAGEMENT CLIPS
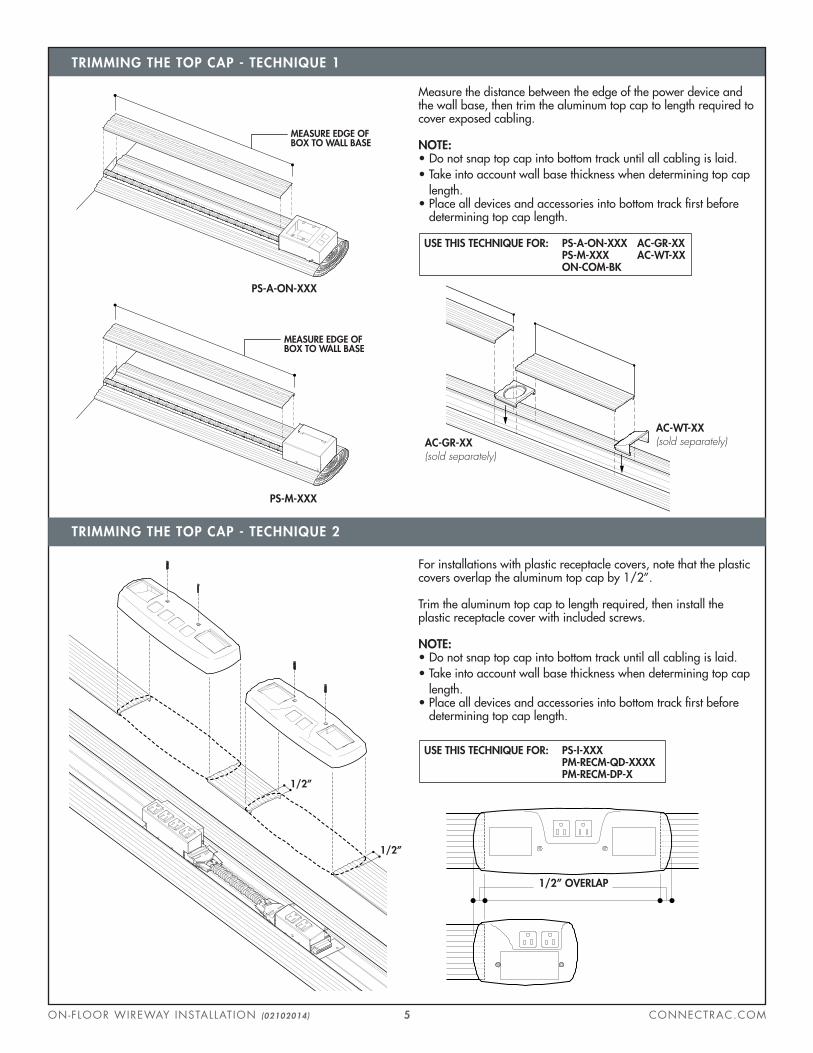
TRIMMING THE TOP CAP - TECHNIQUE 1
ON-FLOOR WIREWAY INSTALLATION (02102014) CONNECTRAC.COM5
TRIMMING THE TOP CAP - TECHNIQUE 2
PS-A-ON-XXX
PS-M-XXX
MEASURE EDGE OFBOX TO WALL BASE
MEASURE EDGE OFBOX TO WALL BASE
Measure the distance between the edge of the power device and the wall base, then trim the aluminum top cap to length required to cover exposed cabling.
NOTE: • Do not snap top cap into bottom track until all cabling is laid. • Take into account wall base thickness when determining top cap length.• Place all devices and accessories into bottom track first before determining top cap length.
For installations with plastic receptacle covers, note that the plastic covers overlap the aluminum top cap by 1/2”.
Trim the aluminum top cap to length required, then install the plastic receptacle cover with included screws.
NOTE: • Do not snap top cap into bottom track until all cabling is laid.• Take into account wall base thickness when determining top cap length. • Place all devices and accessories into bottom track first before determining top cap length.
1/2” OVERLAP
PS-A-ON-XXXPS-M-XXXON-COM-BK
AC-GR-XXAC-WT-XX
USE THIS TECHNIQUE FOR:
PS-I-XXXPM-RECM-QD-XXXXPM-RECM-DP-X
USE THIS TECHNIQUE FOR:
AC-GR-XX(sold separately)
AC-WT-XX(sold separately)
1/2”
1/2”

TELECOM INFORMATION
WIRING DIAGRAMS
CABLE FILL INFORMATION
For devices with plastic covers, pull cabling through data openings and terminate connectors being used in telecom modules. Snap telecom modules in data openings.
PS-I-XXX PM-RECM-QD-XXXXPM-RECM-DP-X
4-CIRCUIT FURNITURE CONNECTION MONUMENT:PS-M-XXX
SINGLE DUPLEX RECEPTACLES SYSTEMS:PS-I-XXX, PS-A-IN-XXX
MODULAR RECEPTACLE SYSTEMS:PM-RECM-DP-X, PM-RECM-QD-XXXX
NEUTRAL (12 gauge)
GROUND (12 gauge)
HOT (12 gauge)
WHITE
GREEN
BLACK
GRAYWHITEGRN-YELGREENPINKBLUEREDBLACK
12 GAUGE10 GAUGE12 GAUGE12 GAUGE12 GAUGE12 GAUGE12 GAUGE12 GAUGE
NEUTRAL 2NEUTRAL 1
ISO GROUNDGROUND
HOT 4HOT 3HOT 2HOT 1
CIRCUITONE
CIRCUITTWO
CIRCUITTHREE
CIRCUITFOUR
(ISOLATED)
I II III IV
2+2 OPTION:
GRAYWHITEGRN-YELGREENPINKBLUEREDBLACK
12 GAUGE10 GAUGE12 GAUGE12 GAUGE12 GAUGE12 GAUGE12 GAUGE12 GAUGE
NEUTRAL 2NEUTRAL 1
ISO GROUNDGROUND
HOT 4HOT 3HOT 2HOT 1
CIRCUITONE
CIRCUITTWO
CIRCUITTHREE
CIRCUITFOUR
I II III IV3+1 OPTION:
GRAYWHITEGRN-YELGREENPINKBLUEREDBLACK
12 GAUGE10 GAUGE12 GAUGE12 GAUGE12 GAUGE12 GAUGE12 GAUGE12 GAUGE
NEUTRAL 2NEUTRAL 1
ISO GROUNDGROUND
HOT 4HOT 3HOT 2HOT 1
CIRCUITONE
CIRCUITTWO
CIRCUITTHREE
CIRCUITFOUR
(ISOLATED)
I II III IV
INSIDE DIMENSIONS:3.15” x .65”
Voice / Data / AV cabling can be placed alongside power in the wireway channel. Shielding for the low voltage cabling is provided by Connectrac’s special steel flex conduit.
STANDARD FILL CAPACITIES:
Cable OD (varies by manufacturer)
Cable cross sectional area
Max cables in wireway with power conduit
.21”
.035”
25
.25”
.035”
18
.354”
.035”
*
Cat 5e Cat 6 Cat 6a
* The number of Cat 6A cables must be determined by the communications system designer due to the special installation requirements of Cat 6A cables.
ON-FLOOR WIREWAY INSTALLATION (02102014) CONNECTRAC.COM6

CONNECTRAC LIMITED WARRANTY (“Statement”)
Strong Products Group, Ltd. d/b/a Connectrac (“Connectrac”) hereby warrants, to the original purchaser or owner (collectively, “Buyer”), that any product manufactured and sold by Connectrac will be substantially free from unreasonable and significant de-fects in material, construction, and workmanship under normal use, service, and only for their original purpose, for a period of five (5) years from the date of original installation or six (6) years from the date of purchase, whichever is sooner. Standard commercial tolerances apply. This Statement applies only to products, which have been installed properly in accordance with Installation Instructions supplied by Connectrac and any applicable codes and standards.
This Statement is void if any Connectrac products have been modified, repaired, altered, tampered, mixed with, or intermixed (used within a system) with products or materials in a manner not approved by Connectrac. This Statement does not cover Connectrac products subjected to accidents, improper use, improper maintenance, improper cleaning, negligence, misuse, or abuse. This Statement is void if damage results from the use of detergents, cleaners, abrasives, or other harsh chemical agents not authorized or sanctioned by Connectrac. Connectrac is in no way liable or responsible for any damage to Connectrac products that would void this Statement.
When you contact Connectrac, please provide reasonable proof of the date of your purchase of the Connectrac product at issue. It may be necessary for Connectrac to arrange an inspection of your product to determine whether or not a defect exists. Connec-trac’s sole obligation (and the sole exclusive remedy of the Buyer) with respect to any products that are proven to be defective, will, at the sole discretion of Connectrac, be the repair or replacement of the defective products or refund of the purchase price of the defective products. Returned products will not be accepted unless Connectrac is notified and authorizes the return, in writing, prior to shipment.
Certain products of Connectrac may have a specific limited warranty or limitation of liability included that differs from this State-ment. The terms of any such specific limited warranty or limitation of liability supersede those set forth in this Statement.
Connectrac’s products are listed by Underwriters Laboratories, Inc. and the Canadian Standards Association. Buyer agrees to exercise reasonable care in the installation and use of Connectrac products. Buyer acknowledges that Connectrac products may be dangerous and agrees to release Connectrac from any liability for injury or damage in connection therewith. Buyer further agrees to defend, indemnify, and hold harmless Connectrac from and against any and all third-party claims and liabilities (includ-ing, without limitation, reasonable attorneys’ fees and costs), regardless of the form of action, arising out of or in connection with the installation and use of Connectrac products, provided that Buyer is notified promptly in writing of the action, Connectrac has not reached any compromise or settlement of such action or made any admissions in respect of the same, and Buyer is given the option, at its expense, to control the action and all requested reasonable assistance, including indemnification from any third party, to defend the same.
L I M I TAT I O N O F WA R R A N T I E SALL PRODUCTS ARE SOLD “AS IS.” EXCEPT AS EXPRESSLY STATED HEREIN, CONNECTRAC DISCLAIMS ALL WARRANTIES OF ANY KIND, EITHER EXPRESS OR IMPLIED, EITHER IN FACT OR BY OPERATION OF LAW, STATUTORY OR OTHERWISE, INCLUD-ING, WITHOUT LIMITATION, IMPLIED WARRANTIES OF MERCHANTABILITY, FITNESS OF A PARTICULAR PURPOSE, AND WAR-RANTY OF NON-INFRINGEMENT.
L I M I TAT I O N O F L I A B I L I T Y A N D R E M E D I E SCONNECTRAC NEITHER ASSUMES NOR AUTHORIZES ANY OTHER PERSON TO ASSUME FOR IT ANY LIABILITY IN CON-NECTION WITH THE USE OF ANY OF ITS PRODUCTS. IN NO EVENT WILL CONNECTRAC BE LIABLE TO BUYER OR ANY THIRD PARTY FOR ANY LOST PROFITS OR REVENUE, INCIDENTAL OR CONSEQUENTIAL DAMAGES (INCLUDING, WITHOUT LIMITATION, INDIRECT, SPECIAL, PUNITIVE, OR EXEMPLARY DAMAGES) ARISING OUT OF THE USE OR INABILITY TO USE ITS PRODUCTS, OR FOR ANY CLAIM BY ANY OTHER PARTY, EVEN IF CONNECTRAC HAS BEEN ADVISED OF, HAD (OR SHOULD HAVE HAD) ANY KNOWLEDGE (ACTUAL OR CONSTRUCTIVE) OF THE POSSIBILITY OF SUCH DAMAGES.
CONNECTRAC’S AGGREGATE LIABILITY WITH RESPECT TO ITS OBLIGATIONS UNDER THIS LIMITED WARRANTY, OR WITH RE-SPECT TO ANY PRODUCT OR OTHERWISE, WILL NOT EXCEED THE AMOUNT OF THE PAYMENT PAID BY BUYER. SOME JURIS-DICTIONS DO NOT ALLOW THE EXCLUSION OR WAIVER OF LIMITATION OF LIABILITY FOR CONSEQUENTIAL OR INCIDENTAL DAMAGES SO THEY MAY NOT APPLY.
ON-FLOOR WIREWAY INSTALLATION (02102014) CONNECTRAC.COM7