OMT Without An OMT Table - American Academy of Osteopathy
25
OMT Without An OMT Table Workshop Dennis Dowling, DO FAAO Ann Habenicht, DO FAAO FACOFP
Transcript of OMT Without An OMT Table - American Academy of Osteopathy

OMT Without An OMT TableWorkshop
Dennis Dowling, DO FAAO
Ann Habenicht, DO FAAO FACOFP
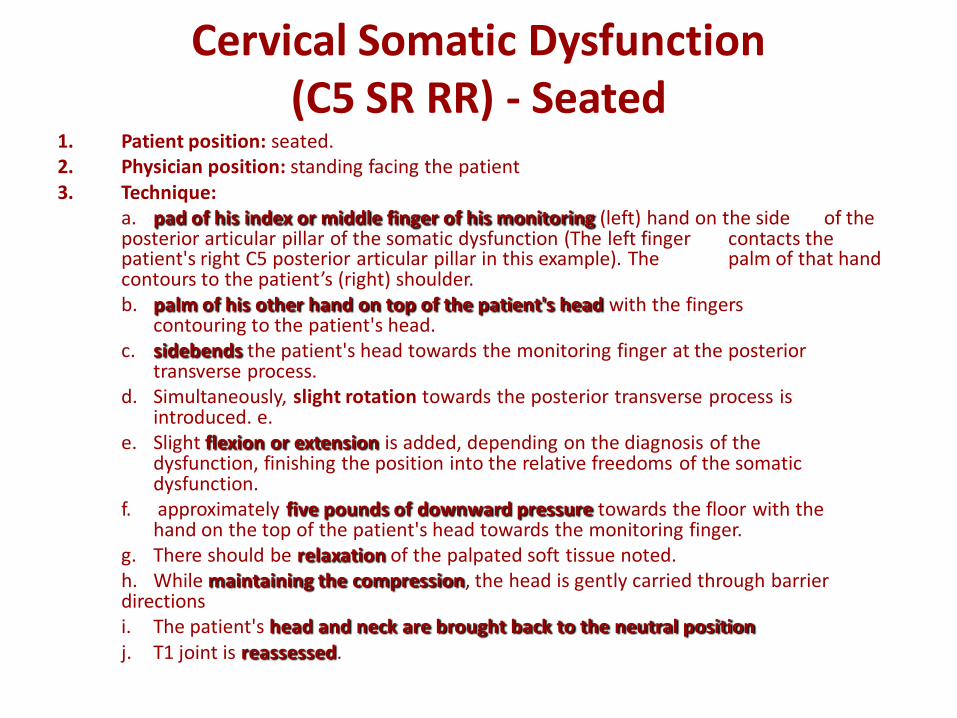
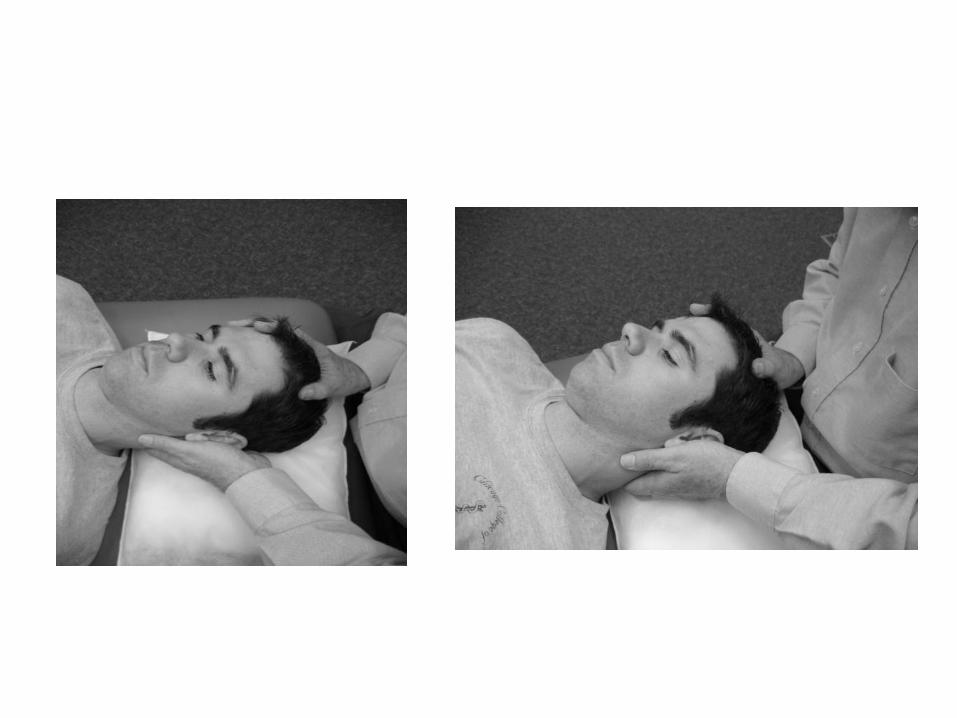
Cervical Somatic Dysfunction (C5 SR RR) - Seated
1. Patient position: seated.2. Physician position: standing facing the patient3. Technique:
a. pad of his index or middle finger of his monitoring (left) hand on the side of the posterior articular pillar of the somatic dysfunction (The left finger contacts the patient's right C5 posterior articular pillar in this example). The palm of that hand contours to the patient’s (right) shoulder.b. palm of his other hand on top of the patient's head with the fingers
contouring to the patient's head.c. sidebends the patient's head towards the monitoring finger at the posterior
transverse process. d. Simultaneously, slight rotation towards the posterior transverse process is
introduced. e.e. Slight flexion or extension is added, depending on the diagnosis of the
dysfunction, finishing the position into the relative freedoms of the somatic dysfunction.
f. approximately five pounds of downward pressure towards the floor with the hand on the top of the patient's head towards the monitoring finger.
g. There should be relaxation of the palpated soft tissue noted.h. While maintaining the compression, the head is gently carried through barrier directionsi. The patient's head and neck are brought back to the neutral positionj. T1 joint is reassessed.
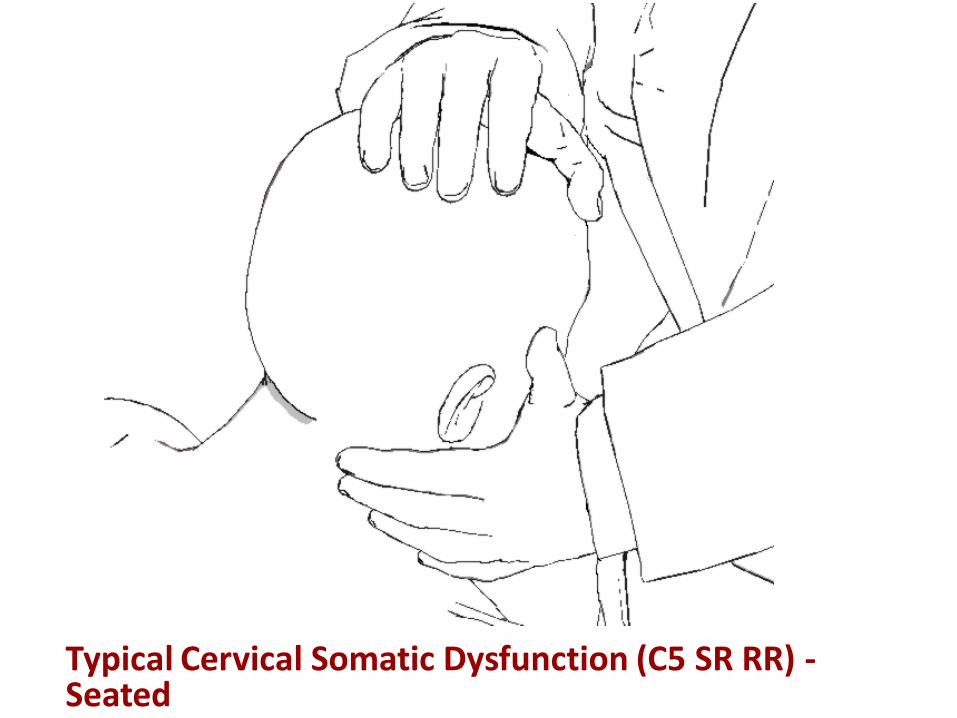
Typical Cervical Somatic Dysfunction (C5 SR RR) -Seated
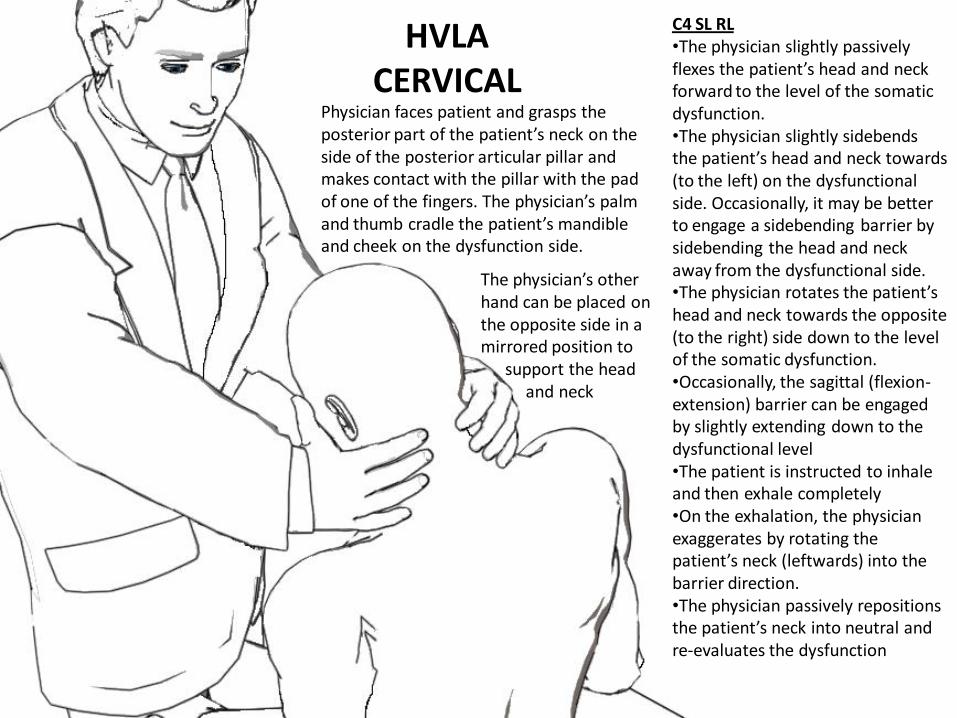
HVLA CERVICAL
Physician faces patient and grasps the posterior part of the patient’s neck on the side of the posterior articular pillar and makes contact with the pillar with the pad of one of the fingers. The physician’s palm and thumb cradle the patient’s mandible and cheek on the dysfunction side.
C4 SL RL•The physician slightly passively flexes the patient’s head and neck forward to the level of the somatic dysfunction.•The physician slightly sidebends the patient’s head and neck towards (to the left) on the dysfunctional side. Occasionally, it may be better to engage a sidebending barrier by sidebending the head and neck away from the dysfunctional side. •The physician rotates the patient’s head and neck towards the opposite (to the right) side down to the level of the somatic dysfunction.•Occasionally, the sagittal (flexion-extension) barrier can be engaged by slightly extending down to the dysfunctional level •The patient is instructed to inhale and then exhale completely•On the exhalation, the physician exaggerates by rotating the patient’s neck (leftwards) into the barrier direction.•The physician passively repositions the patient’s neck into neutral and re-evaluates the dysfunction
The physician’s other hand can be placed on the opposite side in a mirrored position to
support the head and neck
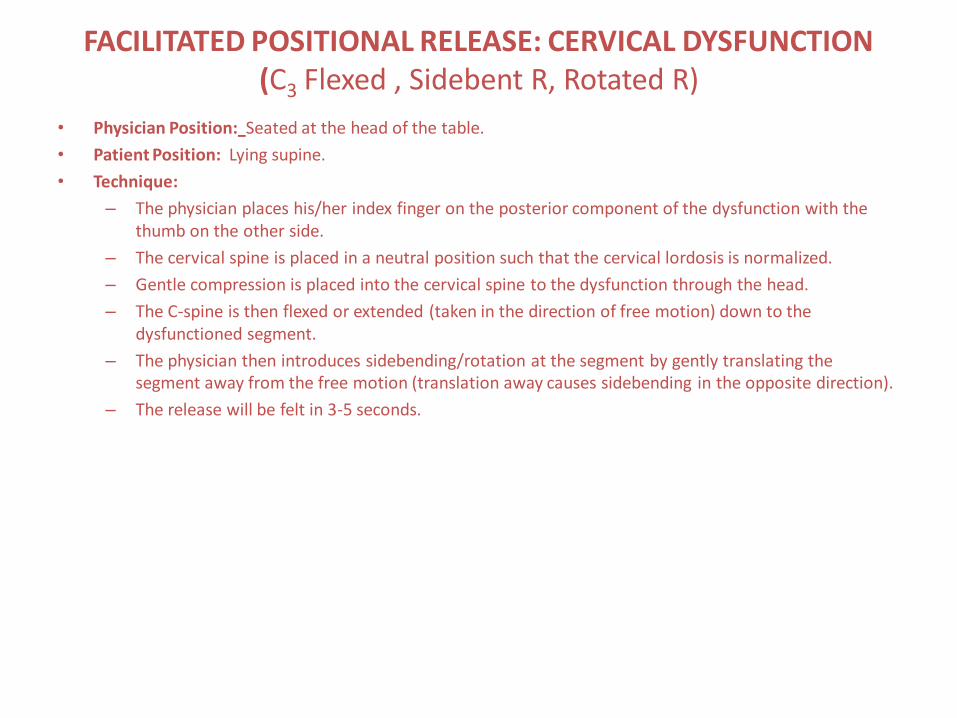
FACILITATED POSITIONAL RELEASE: CERVICAL DYSFUNCTION(C3 Flexed , Sidebent R, Rotated R)
• Physician Position: Seated at the head of the table.
• Patient Position: Lying supine.
• Technique:
– The physician places his/her index finger on the posterior component of the dysfunction with the thumb on the other side.
– The cervical spine is placed in a neutral position such that the cervical lordosis is normalized.
– Gentle compression is placed into the cervical spine to the dysfunction through the head.
– The C-spine is then flexed or extended (taken in the direction of free motion) down to the dysfunctioned segment.
– The physician then introduces sidebending/rotation at the segment by gently translating the segment away from the free motion (translation away causes sidebending in the opposite direction).
– The release will be felt in 3-5 seconds.
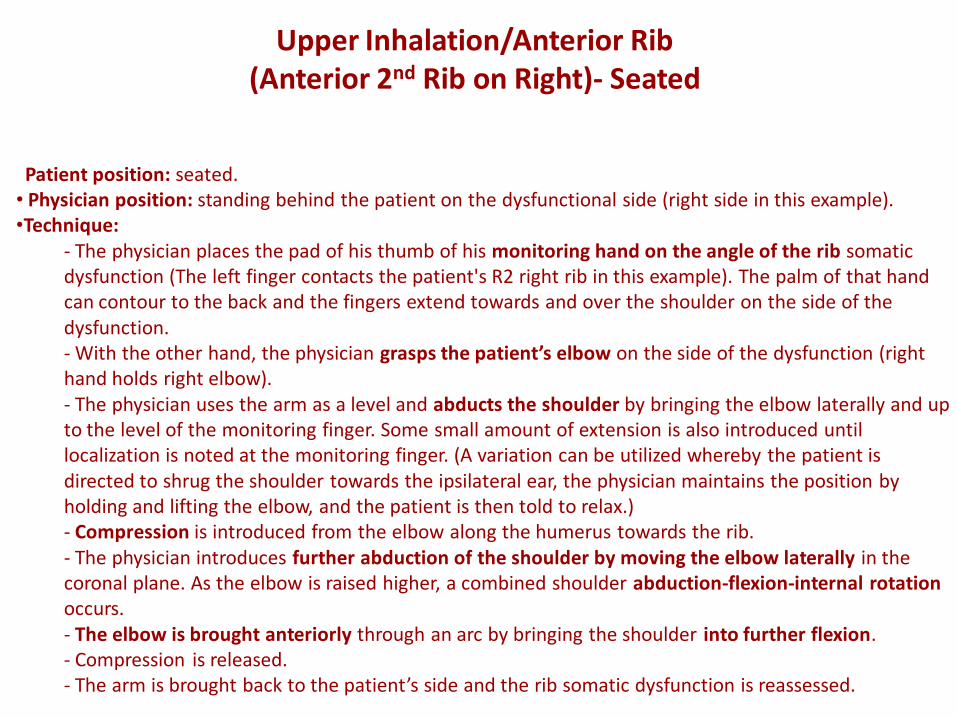
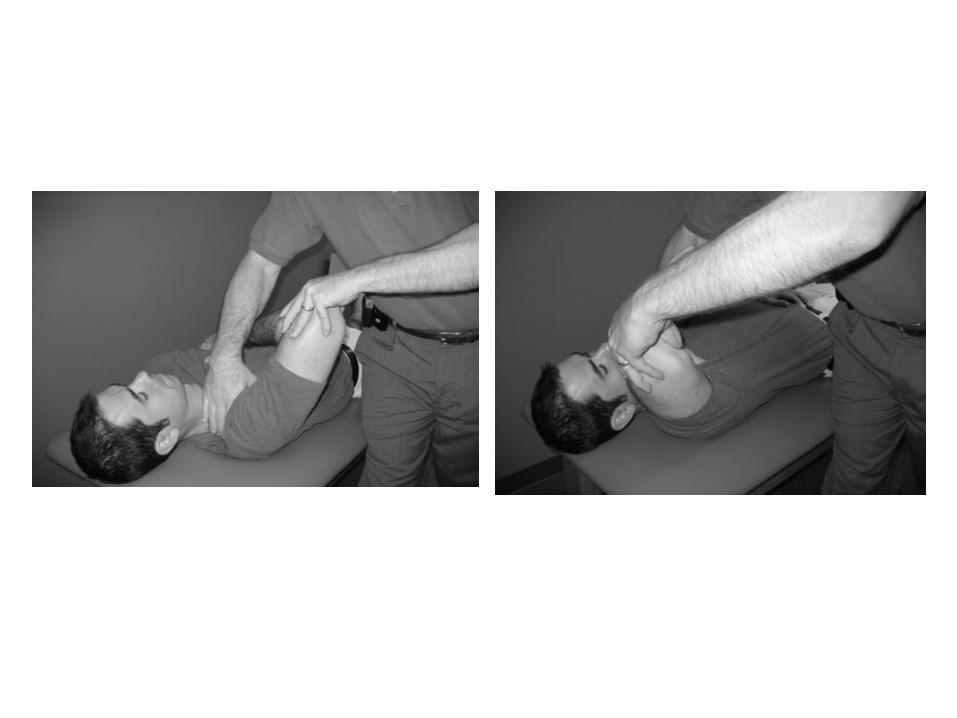
Patient position: seated.• Physician position: standing behind the patient on the dysfunctional side (right side in this example).•Technique:
- The physician places the pad of his thumb of his monitoring hand on the angle of the rib somatic dysfunction (The left finger contacts the patient's R2 right rib in this example). The palm of that hand can contour to the back and the fingers extend towards and over the shoulder on the side of the dysfunction.- With the other hand, the physician grasps the patient’s elbow on the side of the dysfunction (right hand holds right elbow).- The physician uses the arm as a level and abducts the shoulder by bringing the elbow laterally and up to the level of the monitoring finger. Some small amount of extension is also introduced until localization is noted at the monitoring finger. (A variation can be utilized whereby the patient is directed to shrug the shoulder towards the ipsilateral ear, the physician maintains the position by holding and lifting the elbow, and the patient is then told to relax.)- Compression is introduced from the elbow along the humerus towards the rib.- The physician introduces further abduction of the shoulder by moving the elbow laterally in the coronal plane. As the elbow is raised higher, a combined shoulder abduction-flexion-internal rotation occurs.- The elbow is brought anteriorly through an arc by bringing the shoulder into further flexion. - Compression is released.- The arm is brought back to the patient’s side and the rib somatic dysfunction is reassessed.
Upper Inhalation/Anterior Rib (Anterior 2nd Rib on Right)- Seated
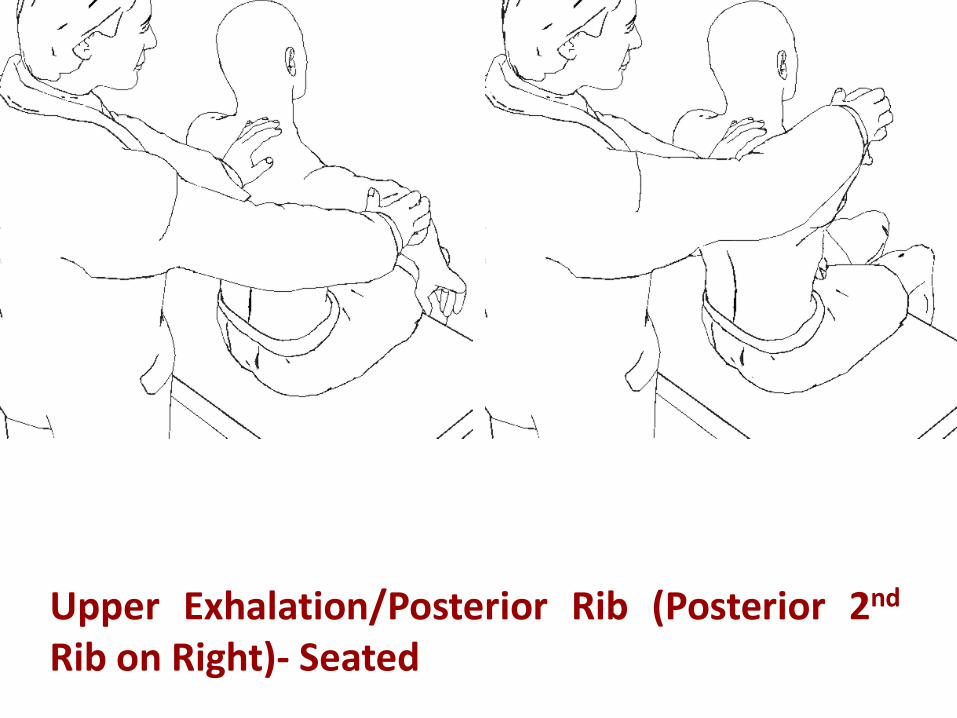
Upper Exhalation/Posterior Rib (Posterior 2nd
Rib on Right)- Seated
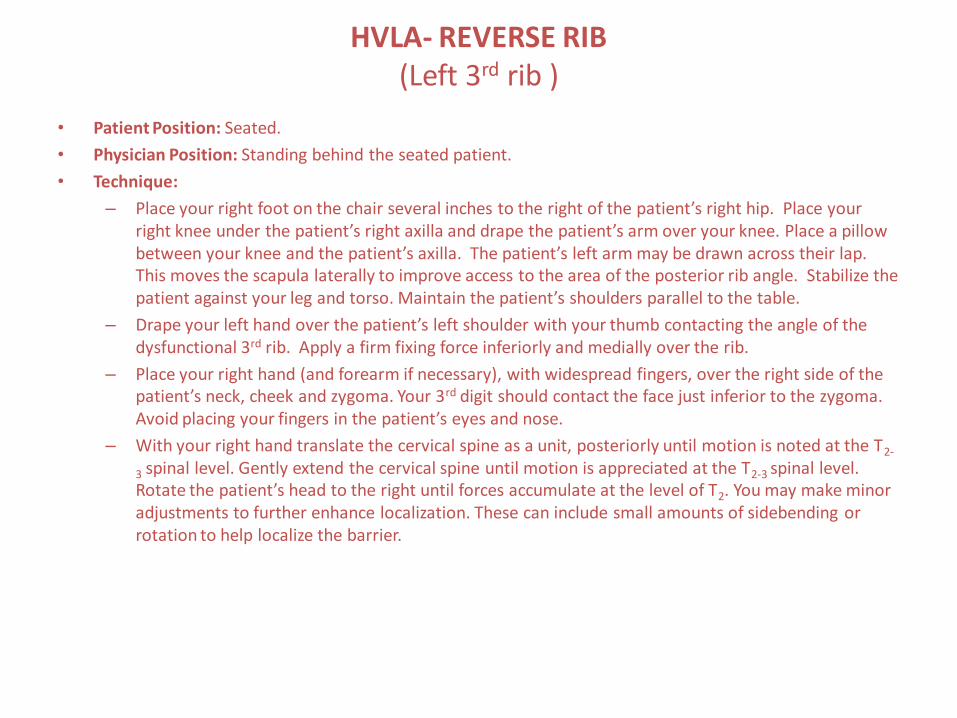
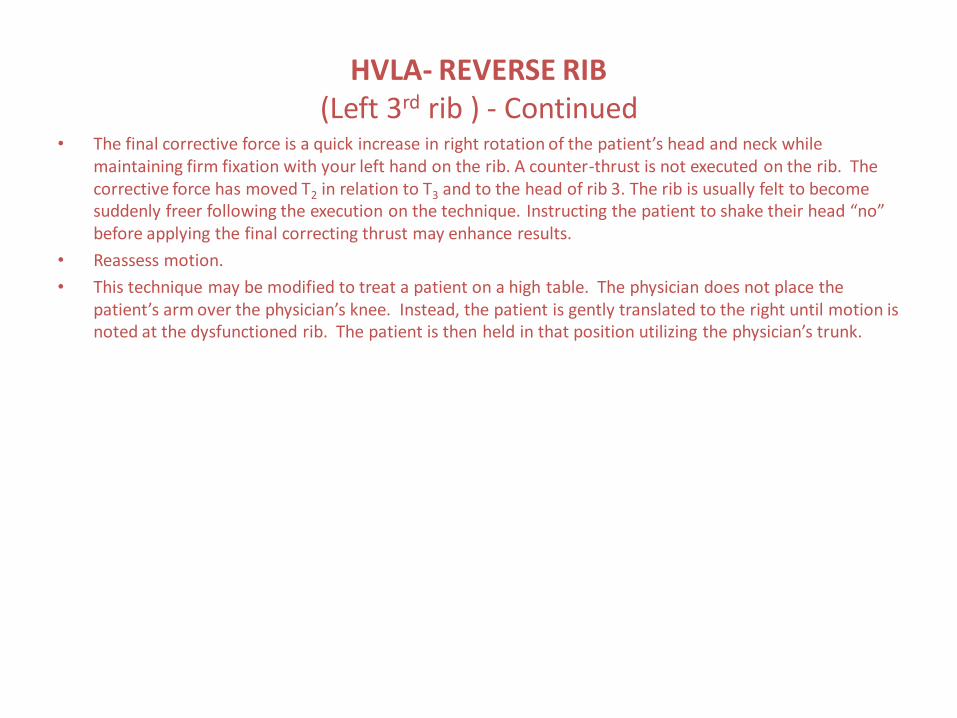
HVLA- REVERSE RIB (Left 3rd rib )
• Patient Position: Seated.
• Physician Position: Standing behind the seated patient.
• Technique:
– Place your right foot on the chair several inches to the right of the patient’s right hip. Place your right knee under the patient’s right axilla and drape the patient’s arm over your knee. Place a pillow between your knee and the patient’s axilla. The patient’s left arm may be drawn across their lap. This moves the scapula laterally to improve access to the area of the posterior rib angle. Stabilize the patient against your leg and torso. Maintain the patient’s shoulders parallel to the table.
– Drape your left hand over the patient’s left shoulder with your thumb contacting the angle of the dysfunctional 3rd rib. Apply a firm fixing force inferiorly and medially over the rib.
– Place your right hand (and forearm if necessary), with widespread fingers, over the right side of the patient’s neck, cheek and zygoma. Your 3rd digit should contact the face just inferior to the zygoma. Avoid placing your fingers in the patient’s eyes and nose.
– With your right hand translate the cervical spine as a unit, posteriorly until motion is noted at the T2-
3 spinal level. Gently extend the cervical spine until motion is appreciated at the T2-3 spinal level. Rotate the patient’s head to the right until forces accumulate at the level of T2. You may make minor adjustments to further enhance localization. These can include small amounts of sidebending or rotation to help localize the barrier.
HVLA- REVERSE RIB (Left 3rd rib ) - Continued
• The final corrective force is a quick increase in right rotation of the patient’s head and neck while maintaining firm fixation with your left hand on the rib. A counter-thrust is not executed on the rib. The corrective force has moved T2 in relation to T3 and to the head of rib 3. The rib is usually felt to become suddenly freer following the execution on the technique. Instructing the patient to shake their head “no” before applying the final correcting thrust may enhance results.
• Reassess motion.
• This technique may be modified to treat a patient on a high table. The physician does not place the patient’s arm over the physician’s knee. Instead, the patient is gently translated to the right until motion is noted at the dysfunctioned rib. The patient is then held in that position utilizing the physician’s trunk.
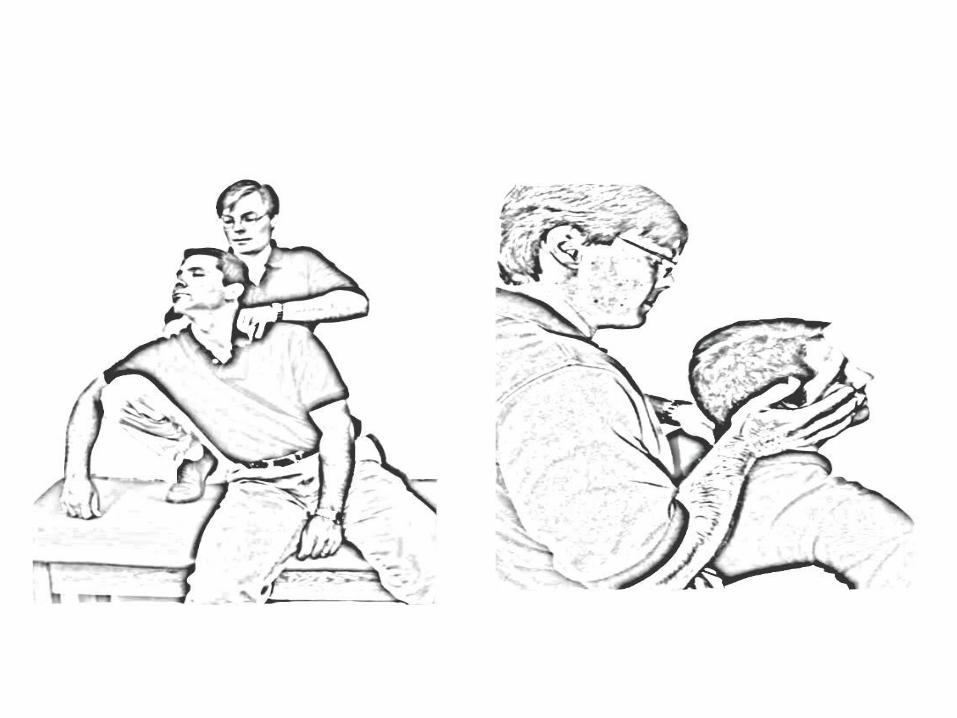
STILL TECHNIQUE FOR RIBS- PATIENT SEATED Posterior rib 3 left (PR3L)
• Patient Position: seated
• Physician Position: standing behind the patient on the side of the affected rib.
• Technique:
– The physician places the fingers or thumb of his right hand on the posterior rib angle. This will be the sensing hand.
– The physician gently cradles the patient’s left arm by holding the elbow in the palm of his left hand.
– The patient’s left arm is then abducted and extended until motion is localized at the R3L rib angle.
– A compressive force is then applied through the elbow laterally toward the trunk to the rib angle.
– While maintaining the compression (the steering rod), the physician takes the left shoulder through a smooth arc of motion through abduction, partial flexion and ending in adduction.
– The vector force is released.
– Reassess
• This technique can be modified for the anterior rib. The start position is the same EXCEPT the arm is started in adduction and the shoulder is articulated through partial flexion/abduction and into extension.
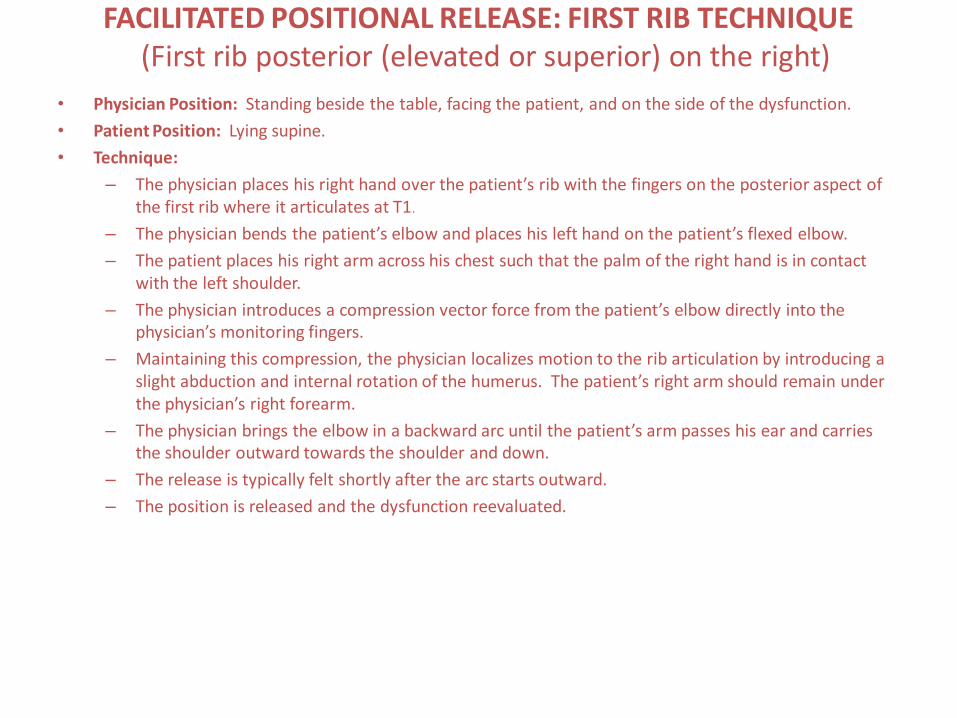
FACILITATED POSITIONAL RELEASE: FIRST RIB TECHNIQUE(First rib posterior (elevated or superior) on the right)
• Physician Position: Standing beside the table, facing the patient, and on the side of the dysfunction.
• Patient Position: Lying supine.
• Technique:
– The physician places his right hand over the patient’s rib with the fingers on the posterior aspect of the first rib where it articulates at T1.
– The physician bends the patient’s elbow and places his left hand on the patient’s flexed elbow.
– The patient places his right arm across his chest such that the palm of the right hand is in contact with the left shoulder.
– The physician introduces a compression vector force from the patient’s elbow directly into the physician’s monitoring fingers.
– Maintaining this compression, the physician localizes motion to the rib articulation by introducing a slight abduction and internal rotation of the humerus. The patient’s right arm should remain under the physician’s right forearm.
– The physician brings the elbow in a backward arc until the patient’s arm passes his ear and carries the shoulder outward towards the shoulder and down.
– The release is typically felt shortly after the arc starts outward.
– The position is released and the dysfunction reevaluated.
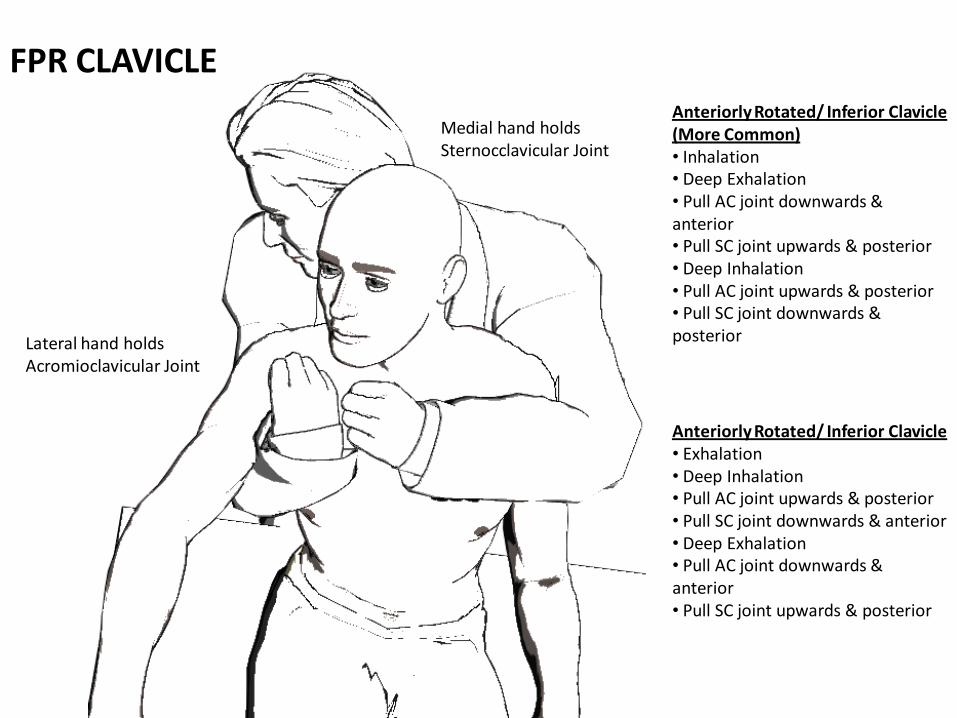
FPR CLAVICLE
Lateral hand holds Acromioclavicular Joint
Medial hand holds Sternocclavicular Joint
Anteriorly Rotated/ Inferior Clavicle (More Common)• Inhalation• Deep Exhalation• Pull AC joint downwards & anterior• Pull SC joint upwards & posterior• Deep Inhalation• Pull AC joint upwards & posterior• Pull SC joint downwards & posterior
Anteriorly Rotated/ Inferior Clavicle• Exhalation• Deep Inhalation• Pull AC joint upwards & posterior• Pull SC joint downwards & anterior• Deep Exhalation• Pull AC joint downwards & anterior• Pull SC joint upwards & posterior
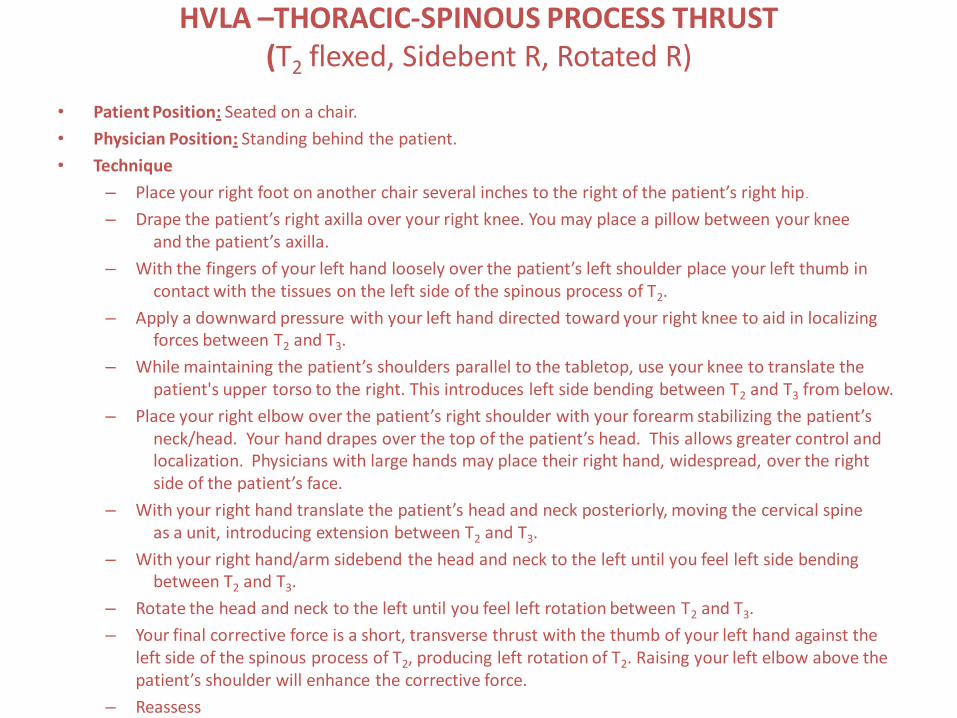
HVLA –THORACIC-SPINOUS PROCESS THRUST (T2 flexed, Sidebent R, Rotated R)
• Patient Position: Seated on a chair.
• Physician Position: Standing behind the patient.
• Technique
– Place your right foot on another chair several inches to the right of the patient’s right hip.
– Drape the patient’s right axilla over your right knee. You may place a pillow between your knee and the patient’s axilla.
– With the fingers of your left hand loosely over the patient’s left shoulder place your left thumb in contact with the tissues on the left side of the spinous process of T2.
– Apply a downward pressure with your left hand directed toward your right knee to aid in localizing forces between T2 and T3.
– While maintaining the patient’s shoulders parallel to the tabletop, use your knee to translate the patient's upper torso to the right. This introduces left side bending between T2 and T3 from below.
– Place your right elbow over the patient’s right shoulder with your forearm stabilizing the patient’s neck/head. Your hand drapes over the top of the patient’s head. This allows greater control and localization. Physicians with large hands may place their right hand, widespread, over the right side of the patient’s face.
– With your right hand translate the patient’s head and neck posteriorly, moving the cervical spine as a unit, introducing extension between T2 and T3.
– With your right hand/arm sidebend the head and neck to the left until you feel left side bending between T2 and T3.
– Rotate the head and neck to the left until you feel left rotation between T2 and T3.
– Your final corrective force is a short, transverse thrust with the thumb of your left hand against the left side of the spinous process of T2, producing left rotation of T2. Raising your left elbow above the patient’s shoulder will enhance the corrective force.
– Reassess
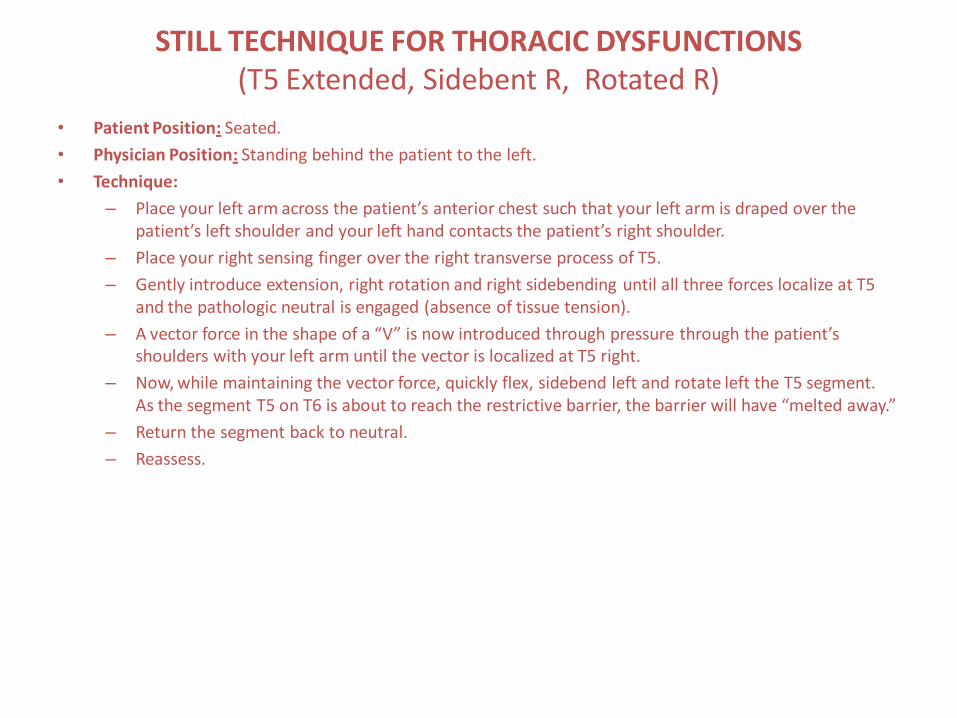
STILL TECHNIQUE FOR THORACIC DYSFUNCTIONS(T5 Extended, Sidebent R, Rotated R)
• Patient Position: Seated.
• Physician Position: Standing behind the patient to the left.
• Technique:
– Place your left arm across the patient’s anterior chest such that your left arm is draped over the patient’s left shoulder and your left hand contacts the patient’s right shoulder.
– Place your right sensing finger over the right transverse process of T5.
– Gently introduce extension, right rotation and right sidebending until all three forces localize at T5 and the pathologic neutral is engaged (absence of tissue tension).
– A vector force in the shape of a “V” is now introduced through pressure through the patient’s shoulders with your left arm until the vector is localized at T5 right.
– Now, while maintaining the vector force, quickly flex, sidebend left and rotate left the T5 segment. As the segment T5 on T6 is about to reach the restrictive barrier, the barrier will have “melted away.”
– Return the segment back to neutral.
– Reassess.
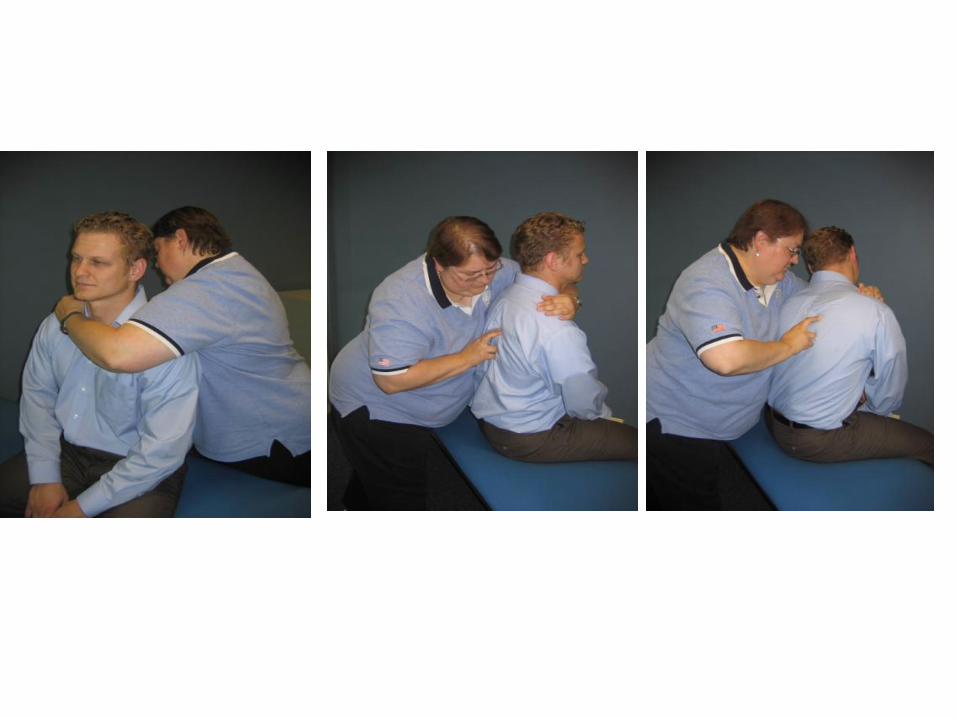
HVLA - Thoracic "Walk Around" Technique-seated(T5 Flexed, Sidebent R, Rotated R)
• Physician Position: Standing behind the seated patient.• Patient Position: Patient sitting on the side of the table, at the right end, with their back towards the
physician. An assistant will stand to the side of the patient’s opposite leg to act as a counterforce for the patient. Keep their pelvis close to the edge.
• Technique:– Instruct the patient to clasp their hands behind their neck.– With your left arm, reach beneath the patient's left axillae just below the shoulder, crossing the
chest anteriorly. Place your left hand over the patient's right arm, grasping the area of the right humeral head.
– Instruct the patient to slump forward until gaping (flexion) is palpated between the spinous processes of T5 and T6.
– Place the heel of your right hand over the right transverse process of T5. Translate the thoracic area across the midline to the right, by applying pressure with your body against the patient's left axillae. This right translation engages the barrier and localizes the left sidebending force to T5 on T6.
– Keep the patient's shoulders level and ischial tuberosities on the table.– Now, rotate the patient to the left, this is accomplished by walking around the end of the table
to the right while combining a pull with your left arm. Maintain localization by pressure through your right hand until the barrier is engaged. After the barrier is engaged by lateral translation, rotate T5 left by pushing with your right hand, maintaining the lateral translation right.
– Your left arm keeps the patient’s torso flexed. Do not allow the T5 somatic dysfunction to extend (lose the flexed position) during the corrective force, as this will probably render the technique ineffective. The dominant corrective force in this technique is with the right hand on the posterior transverse process, with a secondary force from above.
– The final corrective force is a quick increase in left rotation of T5 with an anterolaterally-directed force through the heel of your right hand by shifting your body around to the restrictive barrier.
– Once you go through the restrictive barrier with your hand, immediately return the thoracic area to the neutral position.
– Reassess motion.
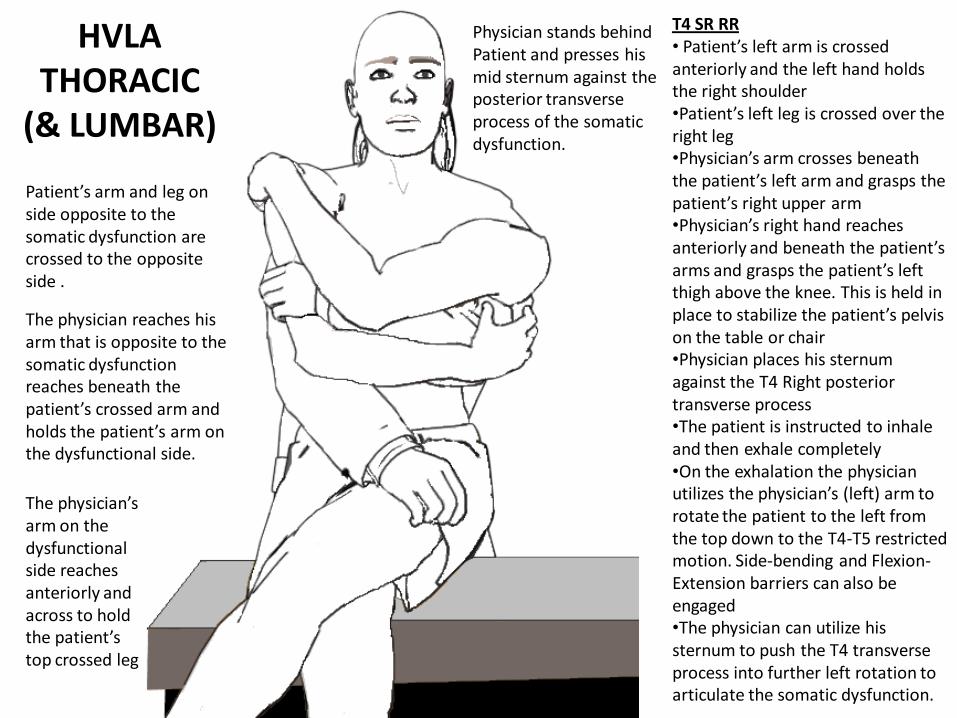
HVLA THORACIC
(& LUMBAR)
Patient’s arm and leg on side opposite to the somatic dysfunction are crossed to the opposite side .
Physician stands behind Patient and presses his mid sternum against the posterior transverse process of the somatic dysfunction.
T4 SR RR• Patient’s left arm is crossed anteriorly and the left hand holds the right shoulder•Patient’s left leg is crossed over the right leg•Physician’s arm crosses beneath the patient’s left arm and grasps the patient’s right upper arm•Physician’s right hand reaches anteriorly and beneath the patient’s arms and grasps the patient’s left thigh above the knee. This is held in place to stabilize the patient’s pelvis on the table or chair•Physician places his sternum against the T4 Right posterior transverse process•The patient is instructed to inhale and then exhale completely•On the exhalation the physician utilizes the physician’s (left) arm to rotate the patient to the left from the top down to the T4-T5 restricted motion. Side-bending and Flexion-Extension barriers can also be engaged•The physician can utilize his sternum to push the T4 transverse process into further left rotation to articulate the somatic dysfunction.
The physician reaches his arm that is opposite to the somatic dysfunction reaches beneath the patient’s crossed arm and holds the patient’s arm on the dysfunctional side.
The physician’s arm on the dysfunctional side reaches anteriorly and across to hold the patient’s top crossed leg
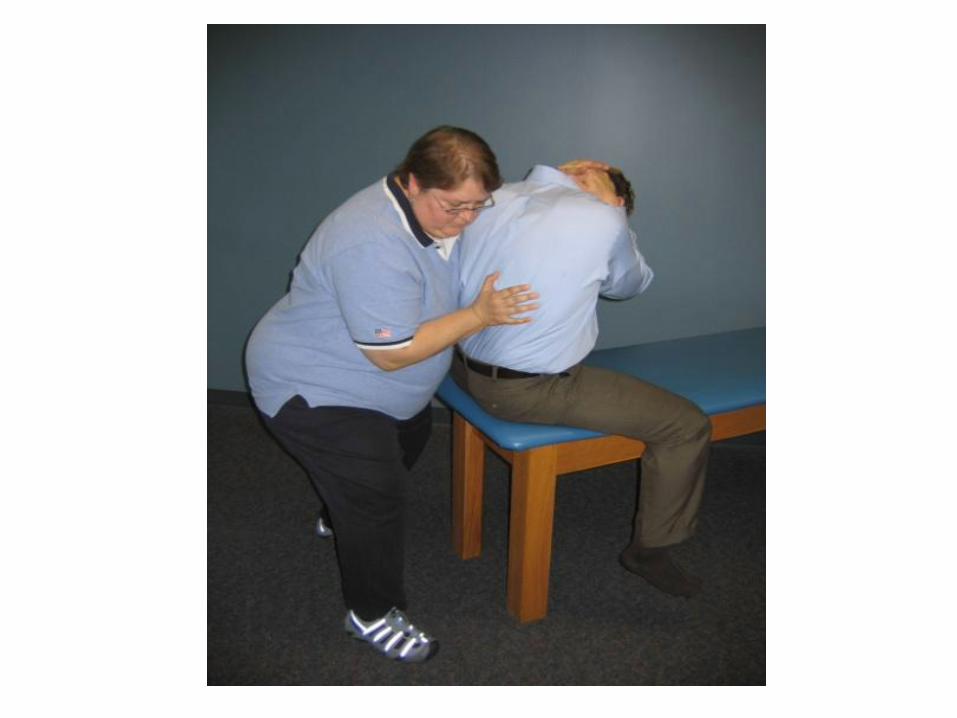
HVLA - LUMBAR "WALK AROUND" TECHNIQUE (L1 Extended, Sidebent R, Rotated R)
• Physician Position: Standing behind the seated patient.
• Patient Position: Patient sitting on the side of the table at the right end of the table with their back towards the physician. An assistant will stand to the side of the patient’s opposite leg to act as a counterforce for the patient. Keep their pelvis close to the edge.
• Technique:– Instruct the patient to clasp their hands behind their neck.
– With your left arm, reach beneath the patient's left axillae just below the shoulder, crossing the chest anteriorly. Place your left hand over the patient's right arm, grasping the area of the right humeral head.
– Instruct the patient to slump forward until gaping (flexion) is palpated between the spinous processes of L1 and L2.
– Place the heel of your right hand over the right transverse process of L1. Translate the entire lumbar and low thoracic area across the midline to the right, by applying pressure with your body against the patient's left axillae. This right translation engages the barrier and localizes the left sidebending force to L1 on L2.
– Keep the patient's shoulders level and ischial tuberosities on the table.
– Now, rotate the patient to the left, this is accomplished by walking around the end of the table to the right while combining a pull with your left arm. Maintain localization by pressure through your right hand until the barrier is engaged. Firmly fix your right elbow against your right side. After the barrier is engaged by lateral translation, rotate L1 left by pushing with your right hand, maintaining the lateral translation right. Your right arm should be functionally fixed to your torso, or you may fix your right elbow to your right side.
– Your left arm keeps the patient’s torso flexed. Do not allow the L1 somatic dysfunction to extend (lose the flexed position) during the corrective force, as this will probably render the technique ineffective. The dominant corrective force in this technique is with the right hand on the posterior transverse process, with a secondary force from above.
HVLA - LUMBAR "WALK AROUND" TECHNIQUE (L1 Extended, Sidebent R, Rotated R)
• The final corrective force is a quick increase in left rotation of L1 with an anterolaterally-directed force through the heel of your right hand by shifting your body around to the restrictive barrier. At this point your feet don’t move.
• Use your entire body as a unit and maintain good body mechanics. Be sure to engage the barrier prior to your thrust. Do not "wind up and thrust."
• Reassess motion.
• TREATMENT FOR FLEXED DYSFUNCTIONS: Using the same set up, introduce extension at L1 on L2 by having the patient actively sit upright while you simultaneously place your hand against the right transverse process of L1. Hold the extension with your right hand and have the patient relax. Now you are ready to introduce translation/sidebending and rotation.
•
• FOR MUSCLE ENERGY MODIFICATION: Once again, follow the steps above and engage the restrictive barrier. Instead of thrusting through the barrier, have the patient rotate back to the right, or simply elevate their left shoulder. Again, hold for 3-5 seconds, rest, and reengage the restrictive barrier.
•
INDIRECT RELEASE-LUMBAR- FPR MODIFICATION( L1 Flexed, Sidebent R, Rotated R )
• Patient position: prone
• Physician position: standing on the opposite side of the dysfunction.
• Technique:
– The physician contacts the transverse processes of L1 with his thumbs.
– Rotation is introduced by rotating the transverse processes to the right with the thumbs until the pathological neutral or balanced point is met.
– The segment is then gently translated to the left until the balance point is met.
– Since the segment is flexed, flexion is introduced by rolling the thumbs cephalad and anteriorly on the transverse processes of L1 until the balance point is met.
– An anterior directed force is applied to both transverse processes and is held until the release is felt, usually 3-5 seconds. The segment is then returned to the midline.
– Reassess.