
OMT For Common Sports Injuries - FSACOFP · andrew m. teffeau, d.o. sports medicine fellow...
38
ANDREW M. TEFFEAU, D.O. SPORTS MEDICINE FELLOW INSTITUTE FOR NON-SURGICAL ORTHOPEDICS OMT For Common Sports Injuries
Transcript of OMT For Common Sports Injuries - FSACOFP · andrew m. teffeau, d.o. sports medicine fellow...

A N D R E W M . T E F F E A U , D . O .
S P O R T S M E D I C I N E F E L L O W
I N S T I T U T E F O R N O N - S U R G I C A L O R T H O P E D I C S
OMT For Common Sports Injuries
Main Reference

Objectives
A Brief review of anatomy and structure and function
A review of easy to use OMT treatments for commonly seen MSK injuries/complaints

Common Injuries/ Complaints
Shoulder Pain
Ankle Sprains
Elbow Pain

Shoulder

Shoulder Capsule
Shoulder Capsular Pattern: ROM Limited ER>ABD>FLX and IR

Shoulder
Shoulder Range of Motion
Flexion – 180
Extension – 60
Adduction – 75
Abduction – 180(1st 90° no scapula)
Internal rotation – 90
External rotation - 90
Shoulder Pain
OMT Indications:
Somatic Dysfunction
Adhesive capsulitis
Bursitis
Tenosynovitis
Arthritis
ROM Restriction – Dysfunction
AC/SC, Glenohumeral, scapulothoracic
IR/ER, F/E, Abd/Add, Horizontal Abd/ADD
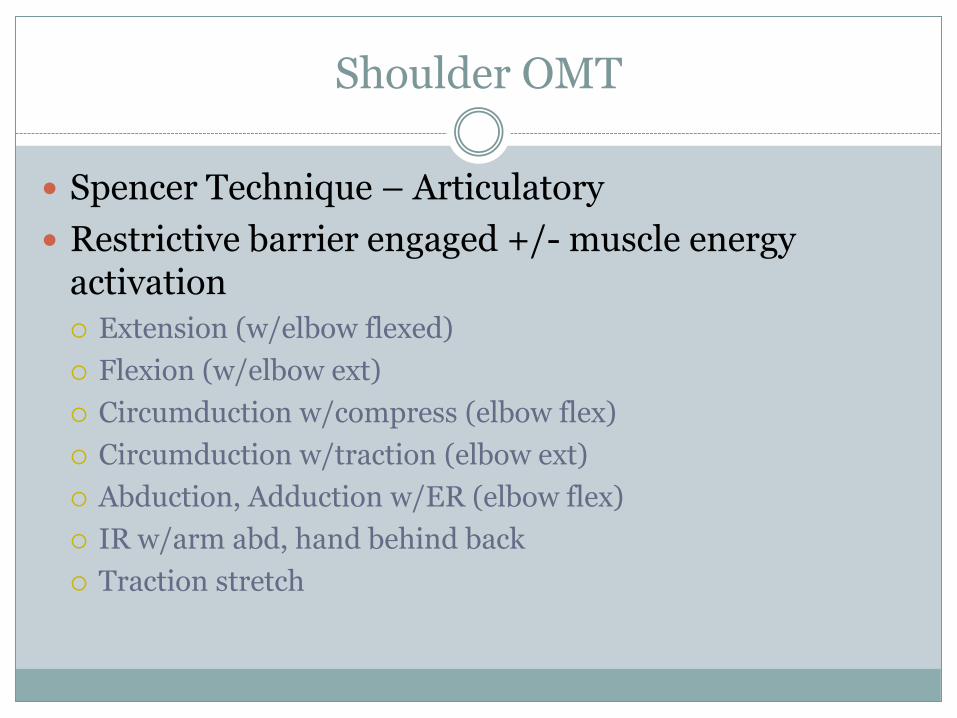
Shoulder OMT
Spencer Technique – Articulatory
Restrictive barrier engaged +/- muscle energy activation
Extension (w/elbow flexed)
Flexion (w/elbow ext)
Circumduction w/compress (elbow flex)
Circumduction w/traction (elbow ext)
Abduction, Adduction w/ER (elbow flex)
IR w/arm abd, hand behind back
Traction stretch

Shoulder Girdle: Spencer Technique Stage 1—Shoulder Extension with Elbow Flexed
1. The physician stands facing the patient.
2. The physician’s cephalad hand bridges the shoulder to lock out any acromioclavicular and scapulothoracic motion. The fingers are on the spine of the scapula, and the thumb is on the anterior surface of the clavicle.
3. The physician’s caudad hand grasps the patient’s elbow.
4. The patient’s shoulder is moved into extension in the horizontal plane to the edge of the restrictive barrier.
5. A slow, gentle springing (articulatory, make and break) motion (arrows, Fig. 17.1) is applied at the end range of motion.
6. Muscle energy activation: The patient is instructed to attempt to flex the shoulder (black arrow, Fig. 17.2) against the physician’s resistance (white arrow). This contraction is held for 3 to 5 seconds.
7. After a second of relaxation, the shoulder is extended to the new restrictive barrier (Fig. 17.3).
8. Steps 6 and 7 are repeated three to five times and extension is reassessed.

Shoulder Girdle: Spencer Technique Stage 2—Shoulder Flexion with Elbow Extended
1. The physician’s hands reverse shoulder and arm contact positions. The caudad hand reaches over and behind the patient and bridges the shoulder to lock out acromioclavicular and scapulothoracic motion. The fingers are on the anterior surface of the clavicle, and the heel of the hand is on the spine of the scapula.
2. Using the other hand, the physician takes the patient’s shoulder into its flexion motion in the horizontal plane to the edge of its restrictive barrier.
3. A slow, springing (articulatory, make and break) motion (arrows, Fig. 17.5) is applied at the end range of motion.
4. Muscle energy activation: The patient is instructed to extend the shoulder (black arrow, Fig. 17.6) against the physician’s resistance (white arrow). This contraction is maintained for 3 to 5 seconds.
5. After a second of relaxation, the shoulder is flexed further until a new restrictive barrier is engaged (Fig. 17.7).
6. Steps 4 and 5 are repeated three to five times and flexion is reassessed.

Shoulder Girdle: Spencer Technique Stage 3 Circumduction with Slight Compression and Elbow Flexed
1. The original starting position is resumed with the cephalad hand. 2. The patient’s shoulder is abducted to the edge of the restrictive barrier (Fig. 17.9). 3. The patient’s arm is moved through full clockwise circumduction (small diameter) with slight compression. Larger and larger concentric circles are made, increasing the range of motion (Fig. 17.10). 4. Circumduction may be tuned to a particular barrier. The same maneuver is repeated counterclockwise (Fig. 17.11). 5. There is no specific muscle energy activation for this step; however, during fine-tuning of the circumduction, it may be feasible to implement it in a portion of the restricted arc. 6. This is repeated for approximately 15 to 30 seconds in each direction, and circumduction is reassessed.

Shoulder Girdle: Spencer Technique Stage 4—Circumduction and Traction with Elbow Extended
1. The patient’s shoulder is abducted to the edge of the restrictive barrier with the elbow extended.
2. The physician’s caudad hand grasps the patient’s wrist and exerts vertical traction. The physician’s cephalad hand braces the shoulder as in Stage 1 (Fig. 17.12).
3. The patient’s arm is moved through full clockwise circumduction with synchronous traction. Larger and larger concentric circles are made, increasing the range of motion (Fig. 17.13).
4. The same maneuver is repeated counterclockwise (Fig. 17.14).
5. There is no specific muscle energy activation for this step; however, during fine-tuning of the circumduction, it may be feasible to implement it in a portion of the restricted arc.
6. This is repeated for approximately 15 to 30 seconds in each direction, and circumduction is reassessed.

Shoulder Girdle: Spencer Technique Stage 5A—Abduction with Elbow Flexed
1. The patient’s shoulder is abducted to the edge of the restrictive barrier.
2. The physician’s cephalad arm is positioned parallel to the surface of the table.
3. The patient is instructed to grasp the physician’s forearm with the hand of the arm being treated (Fig. 17.15).
4. The patient’s elbow is moved toward the head, abducting the shoulder, until a motion barrier is engaged. Slight internal rotation may be added.
5. A slow, gentle (articulatory, make and break) motion (arrows, Fig. 17.16) is applied at the end range of motion.
6. Muscle energy activation: The patient is instructed to adduct the shoulder (black arrow, Fig. 17.17) against the physician’s resistance (white arrow). This contraction is held for 3 to 5 seconds.
7. After a second of relaxation, the shoulder is further abducted to a new restrictive barrier (Fig. 17.18).
8. Steps 6 and 7 are repeated three to five times, and abduction is reassessed.
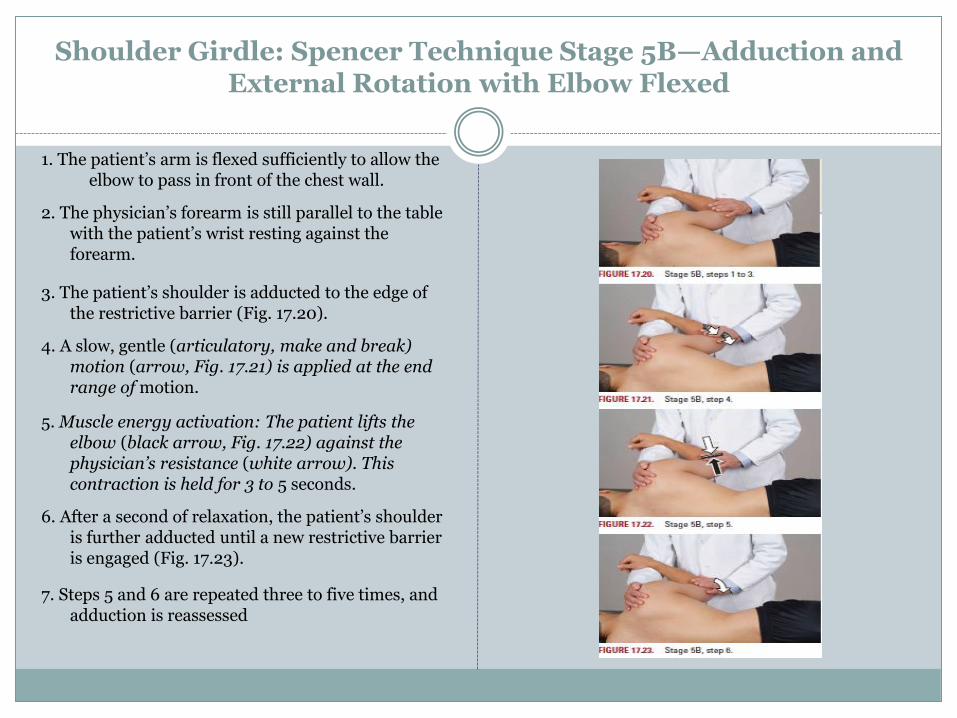
Shoulder Girdle: Spencer Technique Stage 5B—Adduction and External Rotation with Elbow Flexed
1. The patient’s arm is flexed sufficiently to allow the elbow to pass in front of the chest wall.
2. The physician’s forearm is still parallel to the table with the patient’s wrist resting against the forearm.
3. The patient’s shoulder is adducted to the edge of the restrictive barrier (Fig. 17.20).
4. A slow, gentle (articulatory, make and break) motion (arrow, Fig. 17.21) is applied at the end range of motion.
5. Muscle energy activation: The patient lifts the elbow (black arrow, Fig. 17.22) against the physician’s resistance (white arrow). This contraction is held for 3 to 5 seconds.
6. After a second of relaxation, the patient’s shoulder is further adducted until a new restrictive barrier is engaged (Fig. 17.23).
7. Steps 5 and 6 are repeated three to five times, and adduction is reassessed
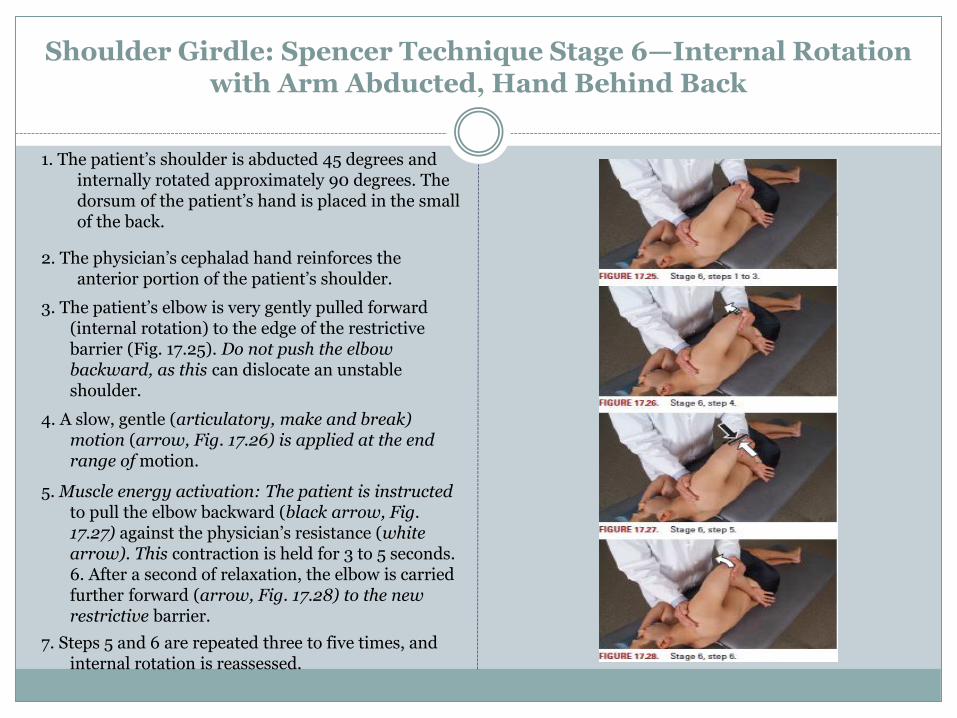
Shoulder Girdle: Spencer Technique Stage 6—Internal Rotation with Arm Abducted, Hand Behind Back
1. The patient’s shoulder is abducted 45 degrees and internally rotated approximately 90 degrees. The dorsum of the patient’s hand is placed in the small of the back.
2. The physician’s cephalad hand reinforces the anterior portion of the patient’s shoulder.
3. The patient’s elbow is very gently pulled forward (internal rotation) to the edge of the restrictive barrier (Fig. 17.25). Do not push the elbow backward, as this can dislocate an unstable shoulder.
4. A slow, gentle (articulatory, make and break) motion (arrow, Fig. 17.26) is applied at the end range of motion.
5. Muscle energy activation: The patient is instructed to pull the elbow backward (black arrow, Fig. 17.27) against the physician’s resistance (white arrow). This contraction is held for 3 to 5 seconds. 6. After a second of relaxation, the elbow is carried further forward (arrow, Fig. 17.28) to the new restrictive barrier.
7. Steps 5 and 6 are repeated three to five times, and internal rotation is reassessed.

Shoulder Girdle: Spencer Technique Stage 7—Distraction, Stretching Tissues, and Enhancing Fluid Drainage with Arm Extended
1. The physician turns and faces the head of the table.
2. The patient’s shoulder is abducted, and the patient’s hand and forearm are placed on the physician’s shoulder closest to the patient.
3. With fingers interlaced, the physician’s hands are positioned just distal to the acromion process (Fig. 17.30).
4. The patient’s shoulder is scooped inferiorly (arrow, Fig. 17.31) creating a translatory motion across the inferior edge of the glenoid fossa. This is done repeatedly in an articulatory fashion.
5. Alternatively, the arm may be pushed straight down into the glenoid fossa and pulled straight out again (arrows, Fig 17.32) with a pumping motion.
6. Muscle energy activation: Scooping traction is placed on the shoulder and maintained. While the traction is maintained (curved arrow), the patient is instructed to push the hand straight down on the physician’s resisting shoulder (straight arrows). This contraction is held for 3 to 5 seconds. After a second of relaxation, further caudad traction is placed on the shoulder until a new restrictive barrier is engaged (Fig. 17.33).
7. Step 6 is repeated three to five times.
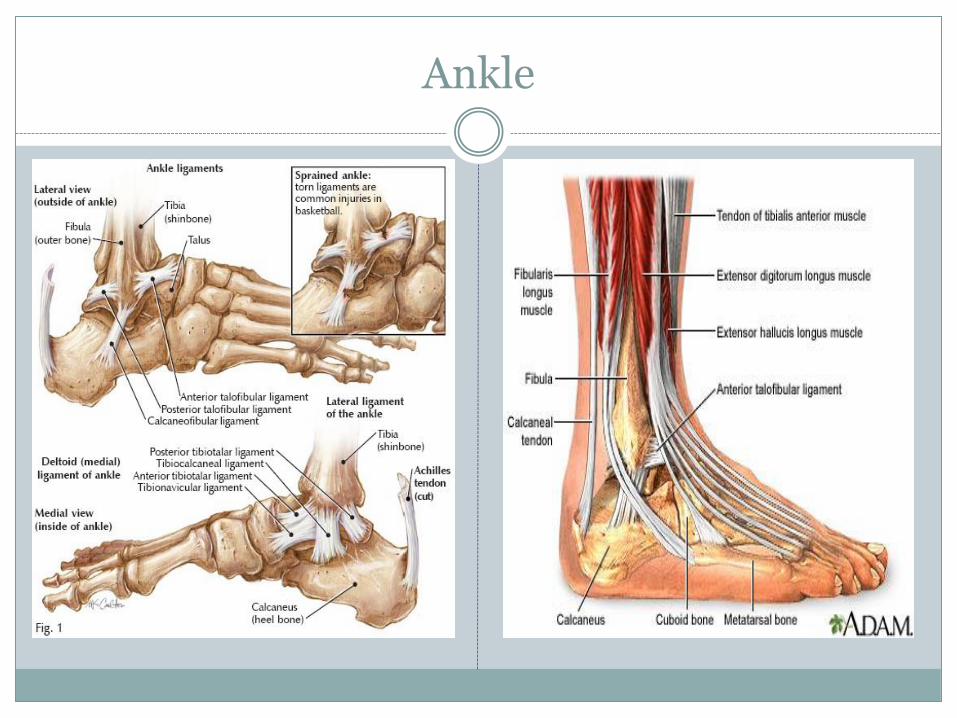
Ankle

Ankle Sprains
80% of all ankle Sprains are Inversion
Graded I-III
Type I – slight ligament stretching
Type II – mild ligament tearing
Type III – complete ligament tearing, instability
X-rays should be attained according to the Ottawa ankle rules to rule out fractures.
Most ankle injuries result from an inversion mechanism where the foot is plantar flexed and the sole of
the foot is inverted medially.
The foot is supported laterally by 3 ligaments and the peroneus muscle. The ligaments are relatively
weak, and when the exerted force exceeds the strength of the supporting structures, tearing of the
ligament fibers and muscle fibers occur.
Somatic Dysfunctions Associated with Inversion Ankle Sprains
Inversion of the Navicular
Eversion of the Cuboid
Posterior Fibular Head

Ankle Sprain

Eversion of Cuboid
• During a inversion ankle sprain the peroneus longus is stretched which pulls the cuboid into eversion, this in turn collapses the lateral arch, which then causes the navicular-cunieform ligament to pull the navicular in to inversion
Spring Ligament
Peroneus Longus Insertion
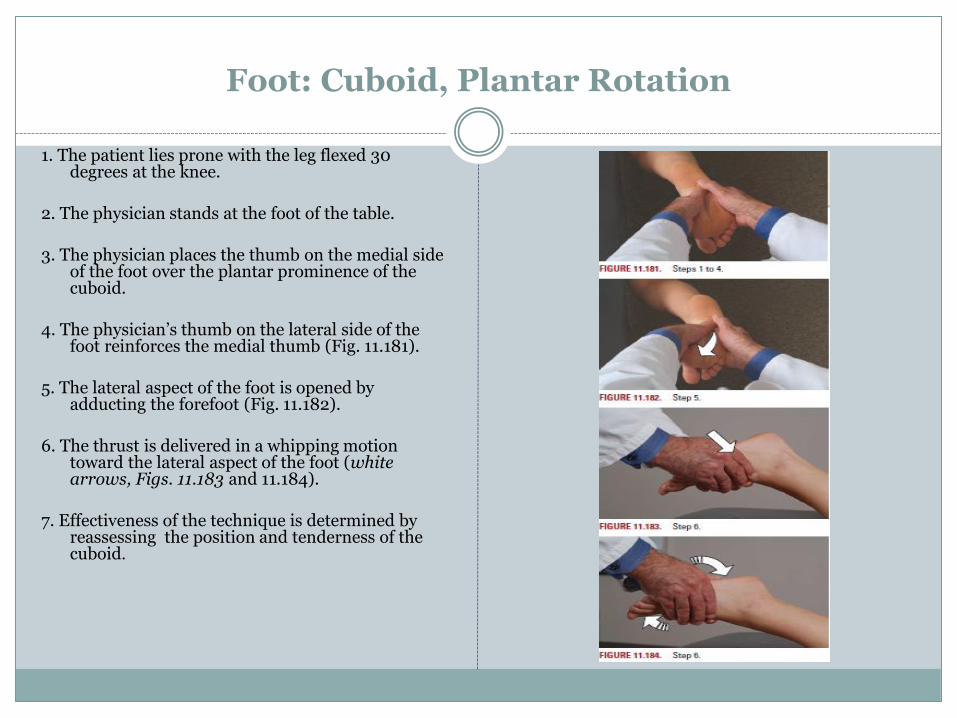
Foot: Cuboid, Plantar Rotation
1. The patient lies prone with the leg flexed 30 degrees at the knee.
2. The physician stands at the foot of the table. 3. The physician places the thumb on the medial side
of the foot over the plantar prominence of the cuboid.
4. The physician’s thumb on the lateral side of the
foot reinforces the medial thumb (Fig. 11.181). 5. The lateral aspect of the foot is opened by
adducting the forefoot (Fig. 11.182). 6. The thrust is delivered in a whipping motion
toward the lateral aspect of the foot (white arrows, Figs. 11.183 and 11.184).
7. Effectiveness of the technique is determined by
reassessing the position and tenderness of the cuboid.

Fibular Head: Motion mechanics
If the knee is flexed, then with ankle dorsiflexion the fibular head moves anterior and with plantar flexion the fibular head moves posterior.
BUT
If the knee is extended, then with ankle plantar flexion, the fibular head moves anterior and with ankle dorsiflexion the fibular head moves posterior.

Knee: Posterior Fibular Head Dysfunction
1. The patient lies supine, and the physician sits at the side of the dysfunctional leg.
2. The patient’s hip and knee are both flexed to approximately 90 degrees.
3. The thumb of the physician’s cephalad hand is placed at the superolateral aspect of the fibular head.
4. The physician’s other hand controls the foot just inferior to the distal fibula (Fig. 14.68).
5. The physician’s thumb adds pressure on the proximal fibula in a vector straight toward the foot (arrow at right, Fig. 14.69) while the other hand (arrows at left) inverts the foot and ankle.
6. The physician attempts to determine a point of balanced tension at the proximal fibula and maintains this position.
7. When this total balanced position is achieved, a slow rhythmic ebb and flow of pressure may present itself at the dysfunctional segment. The physician holds the position against it until a release in the direction of ease occurs.
8. The physician reassesses the components of the dysfunction (TART).
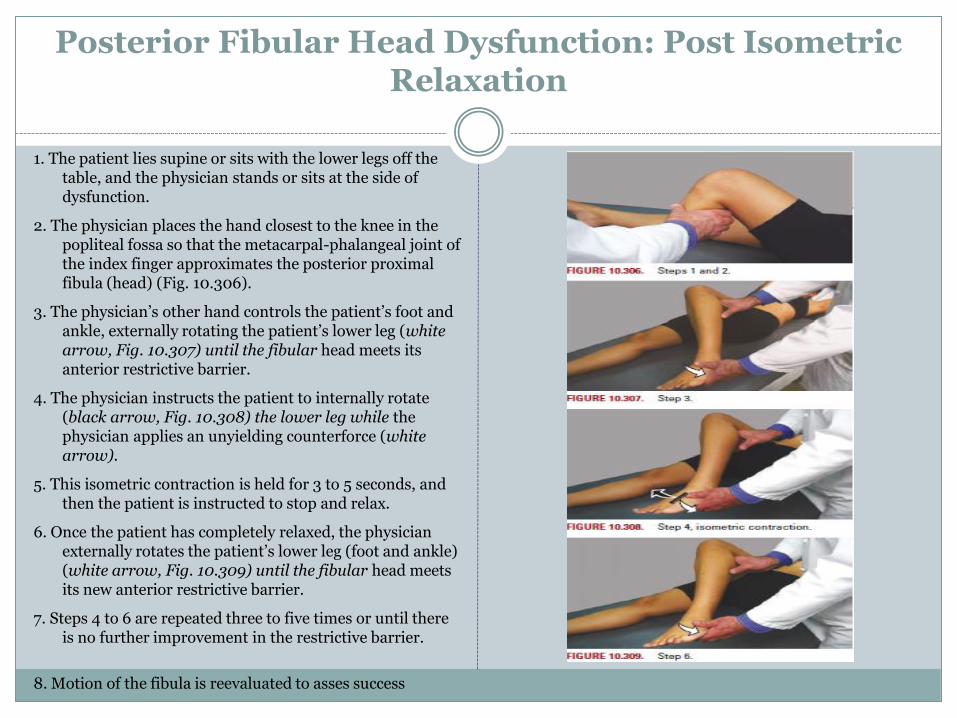
Posterior Fibular Head Dysfunction: Post Isometric Relaxation
1. The patient lies supine or sits with the lower legs off the table, and the physician stands or sits at the side of dysfunction.
2. The physician places the hand closest to the knee in the popliteal fossa so that the metacarpal-phalangeal joint of the index finger approximates the posterior proximal fibula (head) (Fig. 10.306).
3. The physician’s other hand controls the patient’s foot and ankle, externally rotating the patient’s lower leg (white arrow, Fig. 10.307) until the fibular head meets its anterior restrictive barrier.
4. The physician instructs the patient to internally rotate (black arrow, Fig. 10.308) the lower leg while the physician applies an unyielding counterforce (white arrow).
5. This isometric contraction is held for 3 to 5 seconds, and then the patient is instructed to stop and relax.
6. Once the patient has completely relaxed, the physician externally rotates the patient’s lower leg (foot and ankle) (white arrow, Fig. 10.309) until the fibular head meets its new anterior restrictive barrier.
7. Steps 4 to 6 are repeated three to five times or until there is no further improvement in the restrictive barrier.
8. Motion of the fibula is reevaluated to asses success
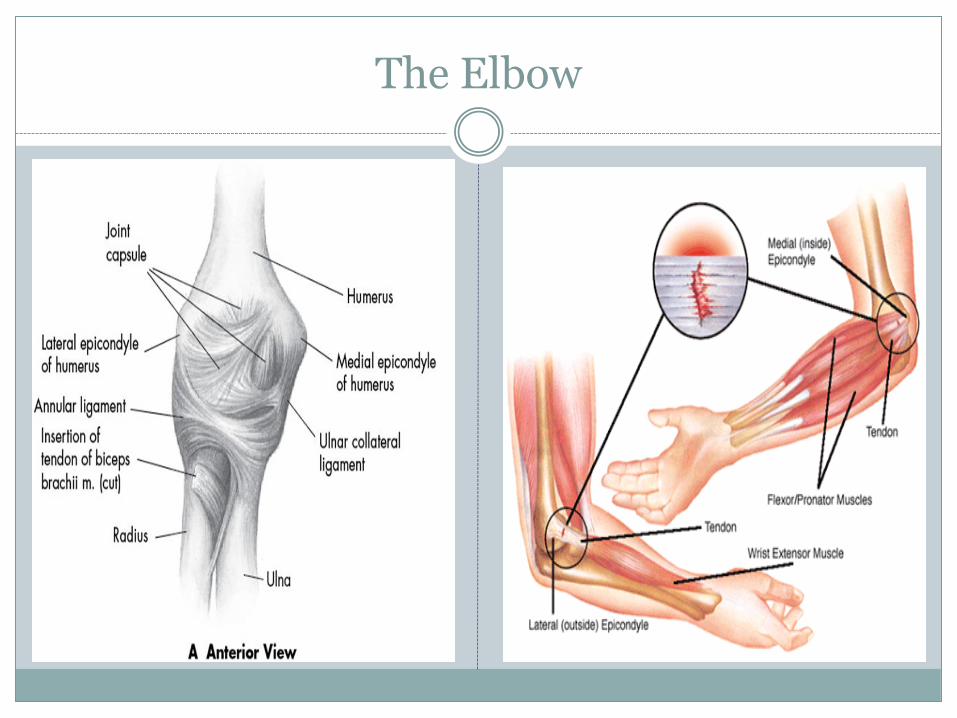
The Elbow
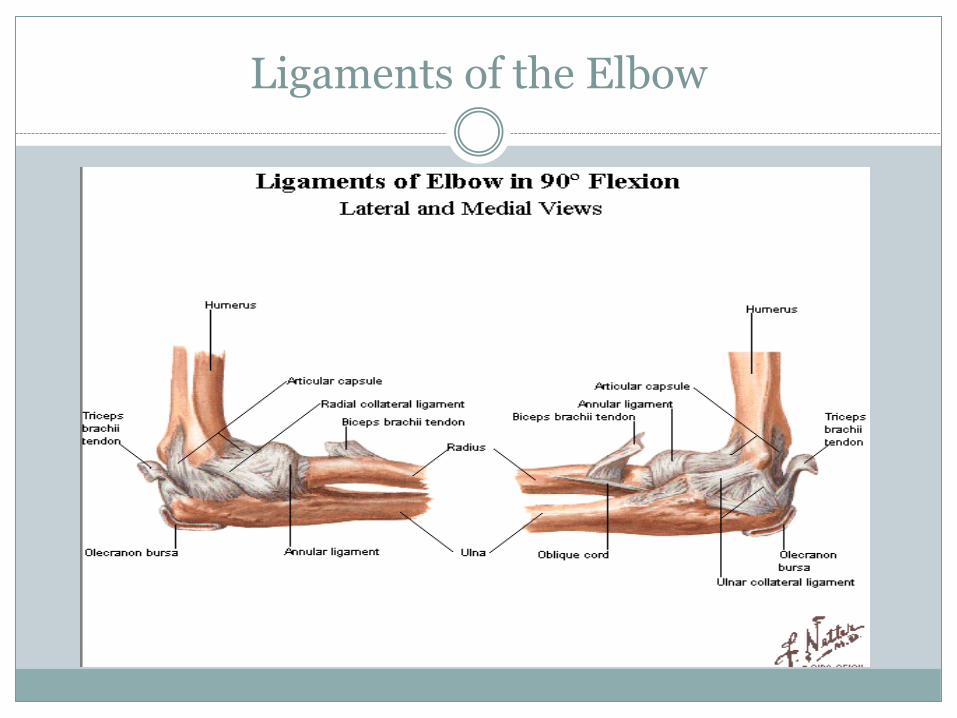
Ligaments of the Elbow

Elbow Pain
Commonly seen Elbow Pathology
Anterior/Supination Radial Head Dysfunction
Posterior/Pronation Radial Head Dysfunction
Lateral Epicondylitis
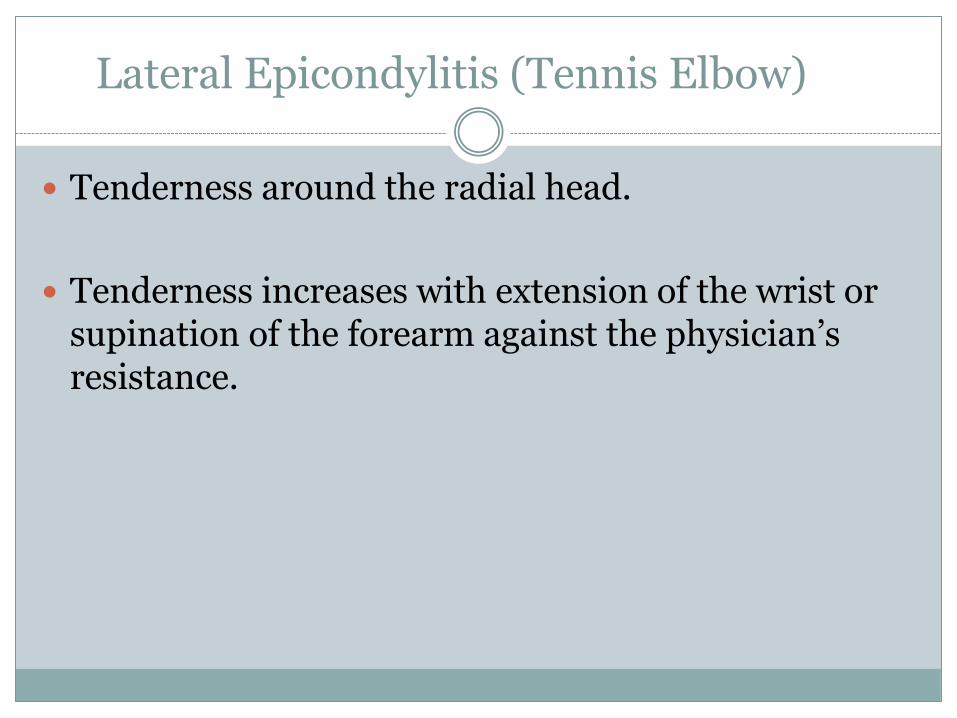
Lateral Epicondylitis (Tennis Elbow)
Tenderness around the radial head.
Tenderness increases with extension of the wrist or supination of the forearm against the physician’s resistance.

Common Extensor Tendon

OMT for Lateral Epicondylitis
The affected elbow is fully extended held in supination, is supported by the physician’s sensing hand, finger on the lateral epicondyle.
The patient’s hand fingers are extended, physician feeling relaxation of the tissues at the lateral epicondyle.
Axial compression is introduced from the hand to the lateral epicondyle.
The elbow is then flexed, the arm adducted, the wrist and fingers are fully flexed and the upper arm comes to rest anterior to the chest
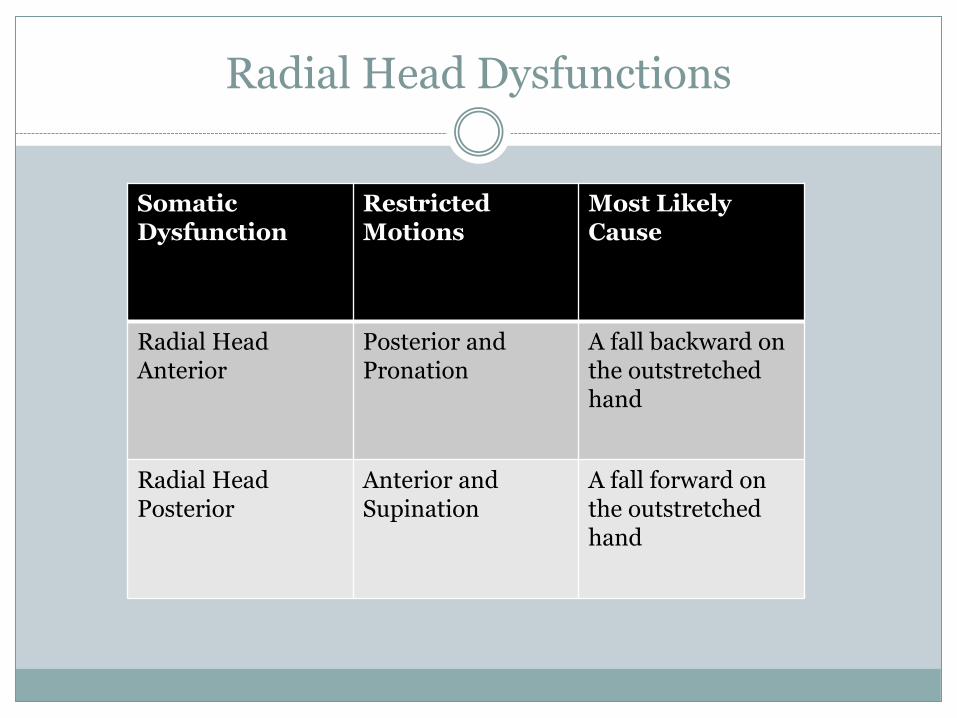
Radial Head Dysfunctions
Somatic Dysfunction
Restricted Motions
Most Likely Cause
Radial Head Anterior
Posterior and Pronation
A fall backward on the outstretched hand
Radial Head Posterior
Anterior and Supination
A fall forward on the outstretched hand

Radial Head Dysfunction
Anterior Radial Head
Diagnose with decreased posterior motion and loss of pronation
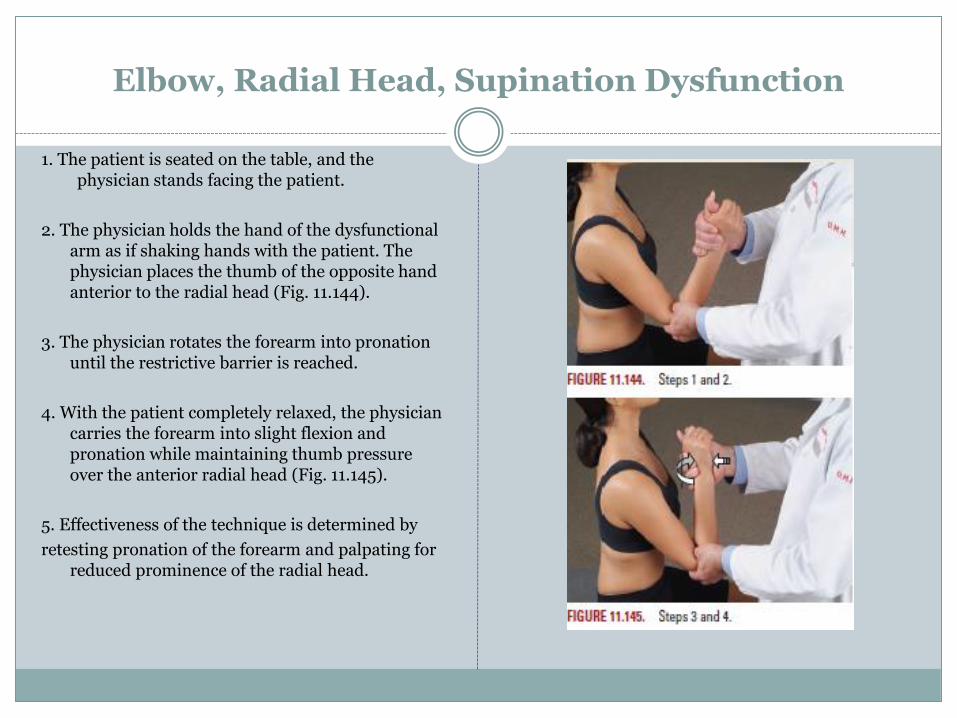
Elbow, Radial Head, Supination Dysfunction
1. The patient is seated on the table, and the physician stands facing the patient.
2. The physician holds the hand of the dysfunctional arm as if shaking hands with the patient. The physician places the thumb of the opposite hand anterior to the radial head (Fig. 11.144).
3. The physician rotates the forearm into pronation until the restrictive barrier is reached.
4. With the patient completely relaxed, the physician carries the forearm into slight flexion and pronation while maintaining thumb pressure over the anterior radial head (Fig. 11.145).
5. Effectiveness of the technique is determined by
retesting pronation of the forearm and palpating for reduced prominence of the radial head.
Radial Head Dysfunction
Posterior Radial Head
Diagnose with decreased anterior radial head motion and decreased supination
Treatment – Contact radial head with fingers, encouraging anterior motion while hyper extending the elbow joint.
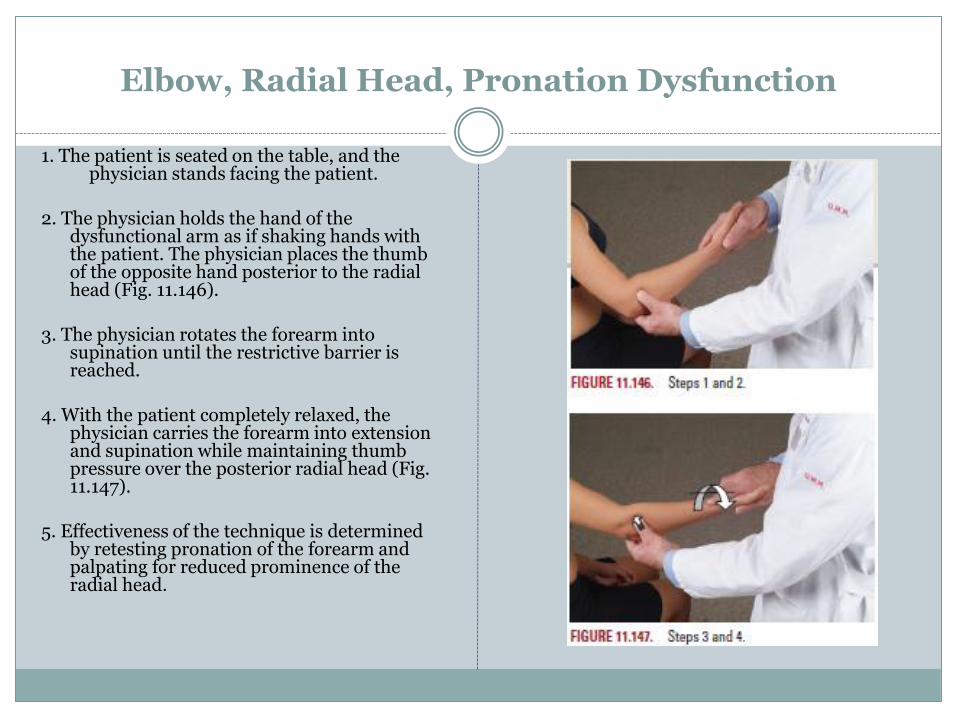
Elbow, Radial Head, Pronation Dysfunction
1. The patient is seated on the table, and the physician stands facing the patient.
2. The physician holds the hand of the dysfunctional arm as if shaking hands with the patient. The physician places the thumb of the opposite hand posterior to the radial head (Fig. 11.146).
3. The physician rotates the forearm into
supination until the restrictive barrier is reached.
4. With the patient completely relaxed, the
physician carries the forearm into extension and supination while maintaining thumb pressure over the posterior radial head (Fig. 11.147).
5. Effectiveness of the technique is determined
by retesting pronation of the forearm and palpating for reduced prominence of the radial head.

Questions??
References
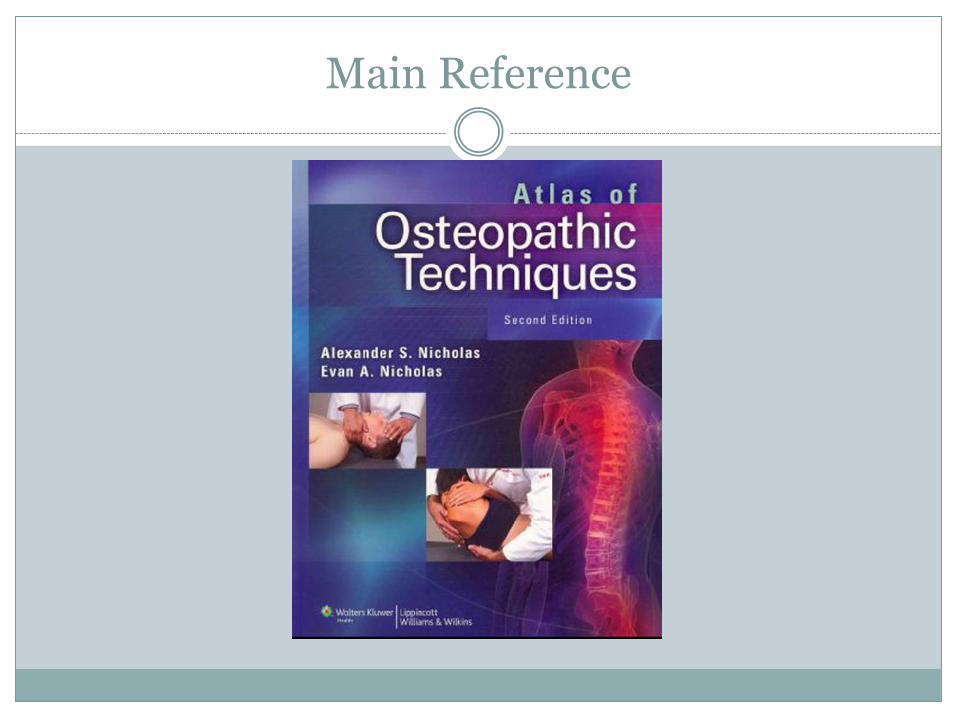
Atlas of Osteopathic Techniques, 2nd ed, Nicholas and Nicholas, Lippincott 2012
Clinical sports medicine, P. Brukner, K. Khan, McGraw-Hill, 2007
Netter's Sports Medicine, 1e, C. Madden, M. Putukian, C. Young, E. McCarty, Saunders, 2010