

Olm Snatch Manual
38
www.OlympicLifting.net PAGE | 1
-
Upload
kiwimeister279 -
Category
Documents
-
view
77 -
download
2
description
Olm Snatch Manual
Transcript of Olm Snatch Manual
www.OlympicLifting.net PAGE | 2
COPYRIGHT NOTICE Copyright © 2011 by Eric Wong Training Systems – All Rights Reserved. No part of this work may be reproduced or transmitted in any form or by any means without express written permission of Eric Wong or Eric Wong Training Systems. Published by: Eric Wong Training Systems 388 Richmond St. W Toronto, Ontario, Canada M5V 3P1 E-mail: [email protected] Web: www.EricWongMMA.com DISCLAIMER AND/OR LEGAL NOTICES The information presented in this work is by no way intended as medical advice or as a substitute for medical counseling. The information should be used in conjunction with the guidance and care of your physician. Consult your physician before beginning this program as you would with any exercise and nutrition program. If you choose not to obtain the consent of your physician and/or work with your physician throughout the duration of your time using the recommendations in the program, you are agreeing to accept full responsibility for your actions. By continuing with the program you recognize that despite all precautions on the part of Eric Wong Training Systems, there are risks of injury or illness which can occur because of your use of the aforementioned information and you expressly assume such risks and waive, relinquish and release any claim which you may have against Eric Wong Training Systems, or its affiliates as a result of any future physical injury or illness incurred in connection with, or as a result of, the use or misuse of the program. Bottom line – if you die, it’s not my fault, and you can’t sue me. :) However, use of this program as intended is highly unlikely to cause death and will only result in improved strength, power, flexibility and overall fitness.
www.OlympicLifting.net PAGE | 3
table of contents
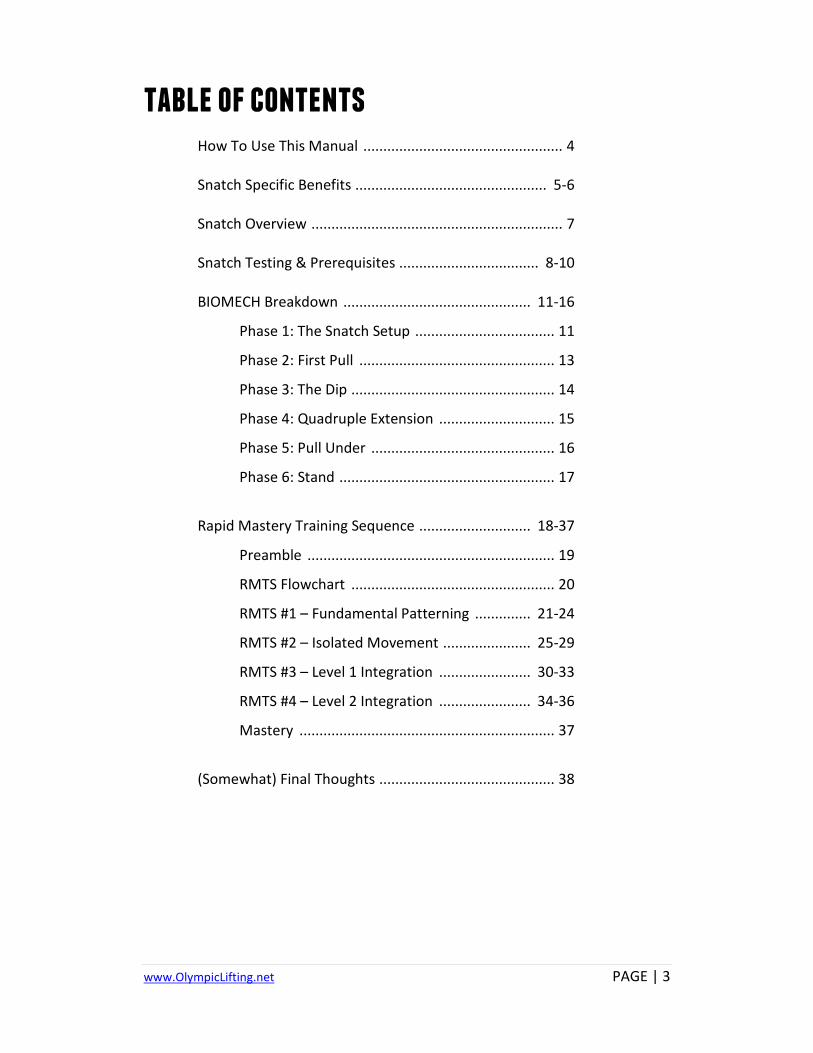
How To Use This Manual .................................................. 4 Snatch Specific Benefits ................................................ 5-6 Snatch Overview ............................................................... 7 Snatch Testing & Prerequisites ................................... 8-10 BIOMECH Breakdown ............................................... 11-16
Phase 1: The Snatch Setup ................................... 11
Phase 2: First Pull ................................................. 13
Phase 3: The Dip ................................................... 14
Phase 4: Quadruple Extension ............................. 15
Phase 5: Pull Under .............................................. 16
Phase 6: Stand ...................................................... 17
Rapid Mastery Training Sequence ............................ 18-37
Preamble .............................................................. 19
RMTS Flowchart ................................................... 20
RMTS #1 – Fundamental Patterning .............. 21-24
RMTS #2 – Isolated Movement ...................... 25-29
RMTS #3 – Level 1 Integration ....................... 30-33
RMTS #4 – Level 2 Integration ....................... 34-36
Mastery ................................................................ 37
(Somewhat) Final Thoughts ............................................ 38
www.OlympicLifting.net PAGE | 4
how to use this manual This manual is all about one thing – ACTION. The first time you go through it, feel free to skim through the whole thing. Once you’ve done that, here’s what you need to do to make put this goldmine of lifting knowledge to work for you: Step 1 – Perform the tests in the Prerequisites section. Follow the instructions based on your results. Step 2 – When ready, read through the Snatch Overview and BIOMECH Breakdown [BB] sections again to get a big picture overview of the entire movement, but don’t try the exercises outlined here. The overview is a brief outline of the 6 phases of the Snatch, while the Biomech Breakdown includes in-depth instruction for each phase. These are placed first so you can see how the exercises in the Rapid Mastery Training Sequence [RMTS] relate to the full lift. Step 3 – Begin RMTS #1. Do not skip ahead or try to do multiple sequences at the same time, even if you feel like you’ve got it 100%, which I’ve given the scientific research for in the Master Manual. Complete one sequence in full, then proceed to the next. Step 4 – Once you’ve completed RMTS #1-4, practice the Snatch alone for your Mastery sessions (after a warmup, of course) 3 sessions either by itself or with the Clean and Jerk (if you’ve mastered it as well) before integrating it into a full workout. Details are given in the Mastery section of the RMTS. Tip: Don’t think of these sessions as a workout, they’re designed to practice the movements in a fresh state so your body and brain can memorize them. Step 5 – Add the Snatch to your own workouts or follow one of the programs I’ve got available that integrate the exercise, such as “The Olympian”. While progression through this process will require patience and restraint, good things come to those who wait! You could run out and do Snatches right away, but I guarantee you’d be doing something wrong and it takes a lot more time to ‘unlearn’ a bad motor skill than to learn a new one, so be sure to follow the program as outlined and take your time.
www.OlympicLifting.net PAGE | 5
snatch specific benefits
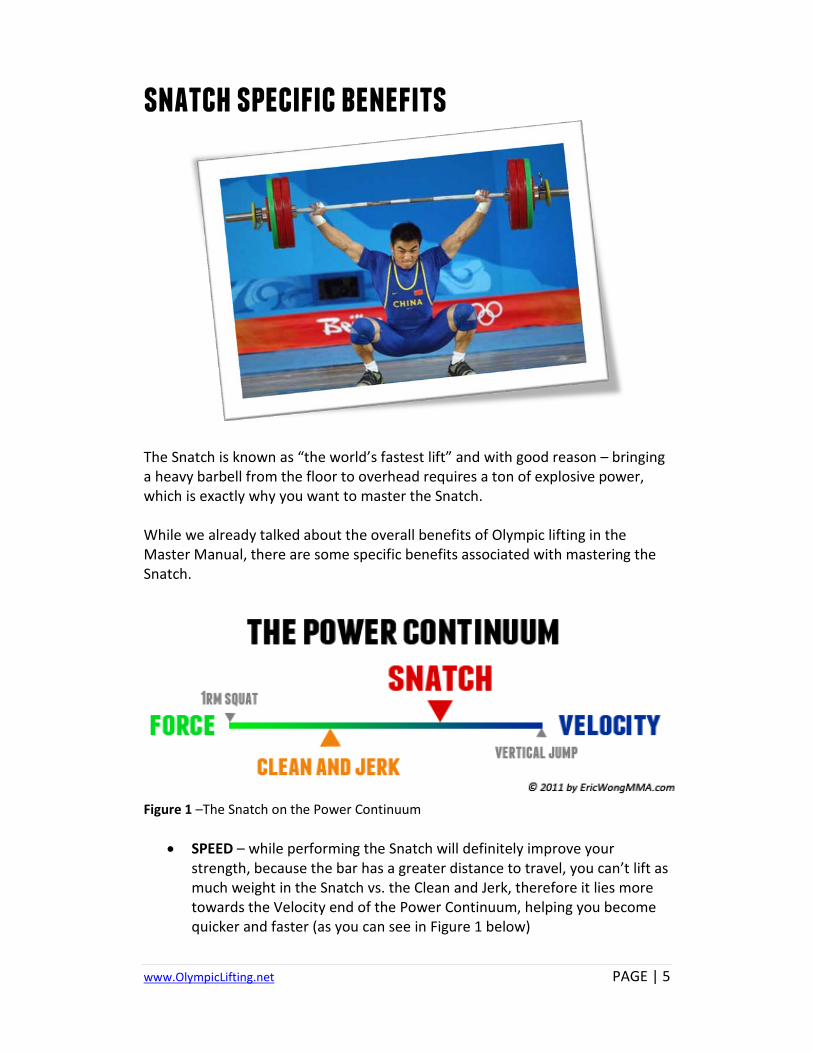
The Snatch is known as “the world’s fastest lift” and with good reason – bringing a heavy barbell from the floor to overhead requires a ton of explosive power, which is exactly why you want to master the Snatch. While we already talked about the overall benefits of Olympic lifting in the Master Manual, there are some specific benefits associated with mastering the Snatch.
Figure 1 –The Snatch on the Power Continuum
• SPEED – while performing the Snatch will definitely improve your strength, because the bar has a greater distance to travel, you can’t lift as much weight in the Snatch vs. the Clean and Jerk, therefore it lies more towards the Velocity end of the Power Continuum, helping you become quicker and faster (as you can see in Figure 1 below)
www.OlympicLifting.net PAGE | 6
• Integrated Mobility in Your Hips, Shoulders and Thoracic Spine – when you catch the barbell overhead in the deep squat, you develop a high level of integrated mobility in your hips, shoulders and thoracic spine; integrated mobility is more difficult to achieve and more advanced than single joint mobility
• Integrated Stability from Your Hips to Your Hands – again, catching the barbell overhead in the Deep Squat requires a high level of coordinated stability in every muscle from your low back to your hands
It’s not all milk and honey though, as the Snatch is a very technical lift and one that is performed wrong more often than right. That’s why I’ve put this program together – so YOU can master the Snatch and reap all of the benefits of “the world’s fastest lift”.
www.OlympicLifting.net PAGE | 7
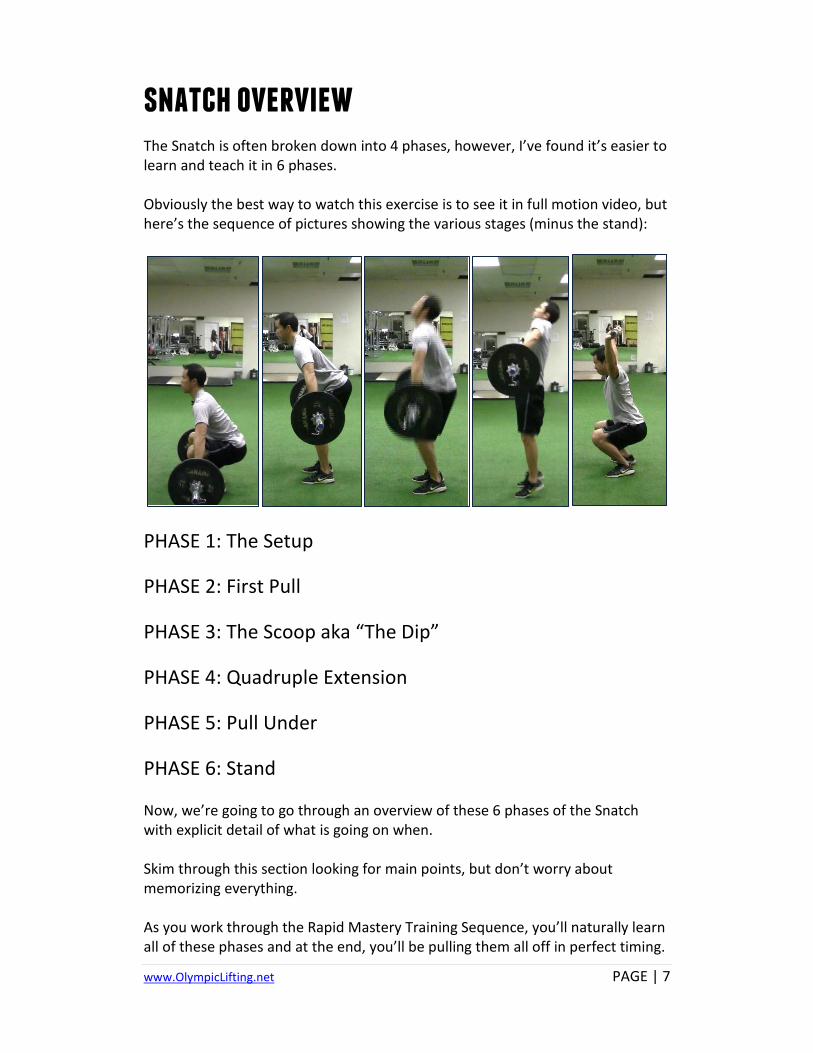
snatch overview The Snatch is often broken down into 4 phases, however, I’ve found it’s easier to learn and teach it in 6 phases. Obviously the best way to watch this exercise is to see it in full motion video, but here’s the sequence of pictures showing the various stages (minus the stand):
PHASE 1: The Setup PHASE 2: First Pull PHASE 3: The Scoop aka “The Dip” PHASE 4: Quadruple Extension PHASE 5: Pull Under PHASE 6: Stand Now, we’re going to go through an overview of these 6 phases of the Snatch with explicit detail of what is going on when. Skim through this section looking for main points, but don’t worry about memorizing everything. As you work through the Rapid Mastery Training Sequence, you’ll naturally learn all of these phases and at the end, you’ll be pulling them all off in perfect timing.
www.OlympicLifting.net PAGE | 8
snatch testing & prerequisites The Snatch is a complex exercise that requires a high level of mobility and strength. If you’re lacking in any of these areas, you will not be able to execute the Snatch in good form. So before proceeding through the Rapid Mastery Training Sequence or attempting the full Squat Snatch, perform these tests and take the actions suggested based on your results.
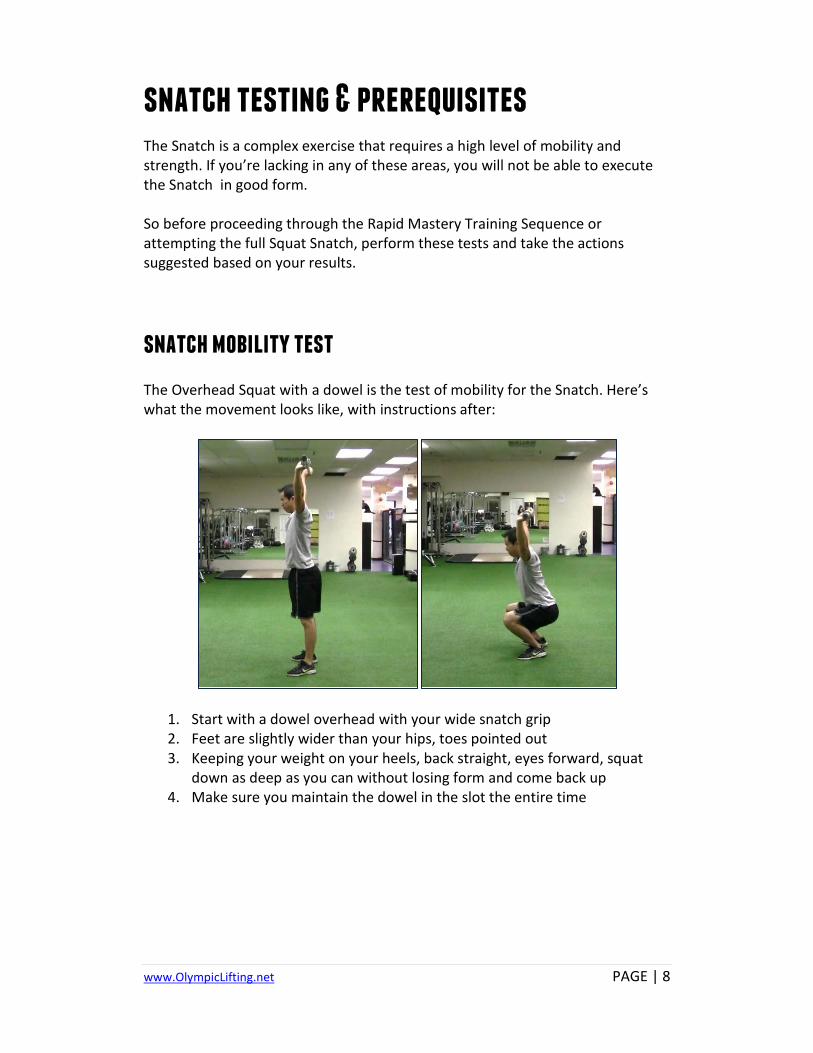
snatch mobility test The Overhead Squat with a dowel is the test of mobility for the Snatch. Here’s what the movement looks like, with instructions after:
1. Start with a dowel overhead with your wide snatch grip 2. Feet are slightly wider than your hips, toes pointed out 3. Keeping your weight on your heels, back straight, eyes forward, squat
down as deep as you can without losing form and come back up 4. Make sure you maintain the dowel in the slot the entire time
www.OlympicLifting.net PAGE | 9
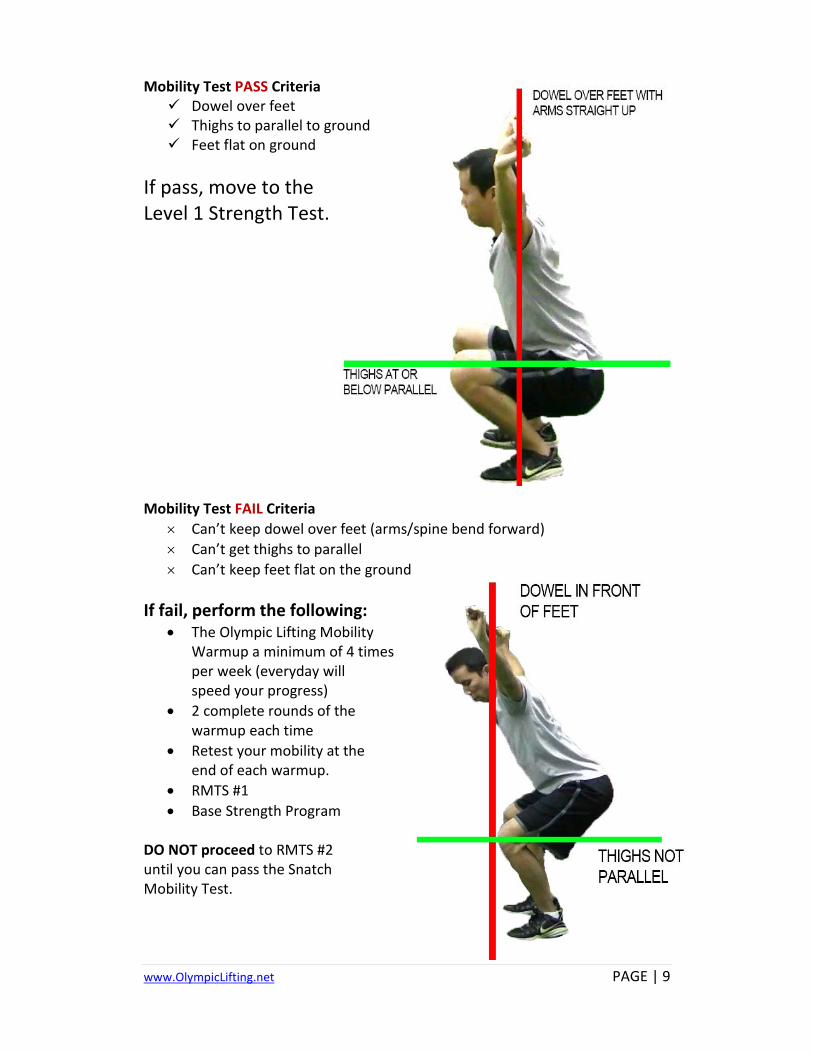
Mobility Test PASS Criteria Dowel over feet Thighs to parallel to ground Feet flat on ground
If pass, move to the Level 1 Strength Test. Mobility Test FAIL Criteria
× Can’t keep dowel over feet (arms/spine bend forward) × Can’t get thighs to parallel × Can’t keep feet flat on the ground
If fail, perform the following:
• The Olympic Lifting Mobility Warmup a minimum of 4 times per week (everyday will speed your progress)
• 2 complete rounds of the warmup each time
• Retest your mobility at the end of each warmup.
• RMTS #1 • Base Strength Program
DO NOT proceed to RMTS #2 until you can pass the Snatch Mobility Test.
www.OlympicLifting.net PAGE | 10
snatch strength test If you didn’t pass the Snatch Mobility Test, you can’t perform the Snatch Strength Test, since it’s the Overhead Squat again, this time with weight. There’s no point strengthening bad form! Follow the guidelines given previously and come back here when you can pass the mobility test. If you did pass the mobility test, perform the Overhead Squat as outlined below: Level 1 – Overhead Squat with 45 lbs for 3 reps
FAIL Level 1: Proceed to RMTS #2, but do not go further.
PASS Level 1: Proceed through the entire RMTS as outlined. Level 2 – Overhead Squat w/0.6 x Bodyweight for 3 reps
Example: 0.6 x 165 lbs = 100 lbs (rounded up) If you can perform 3 reps in good form with this weight, you’ve got the minimum level of strength necessary to learn the Snatch and begin working with the Snatch in your own workout or in one of the training programs I’ve got available, after going through the RMTS, of course. Until you meet this level of strength, you must continue working through the Olympic Lifting Base Strength program and retest bi-weekly. Don’t worry, your #’s will go up quickly! On the next page I’m going to summarize all of the testing guidelines for you in an easy-to-follow chart. I primarily train MMA fighters, so I’m used to making things as easy as possible to understand, since getting punched and kicked for a living can take its toll on the old noggin. :)
www.OlympicLifting.net PAGE | 12
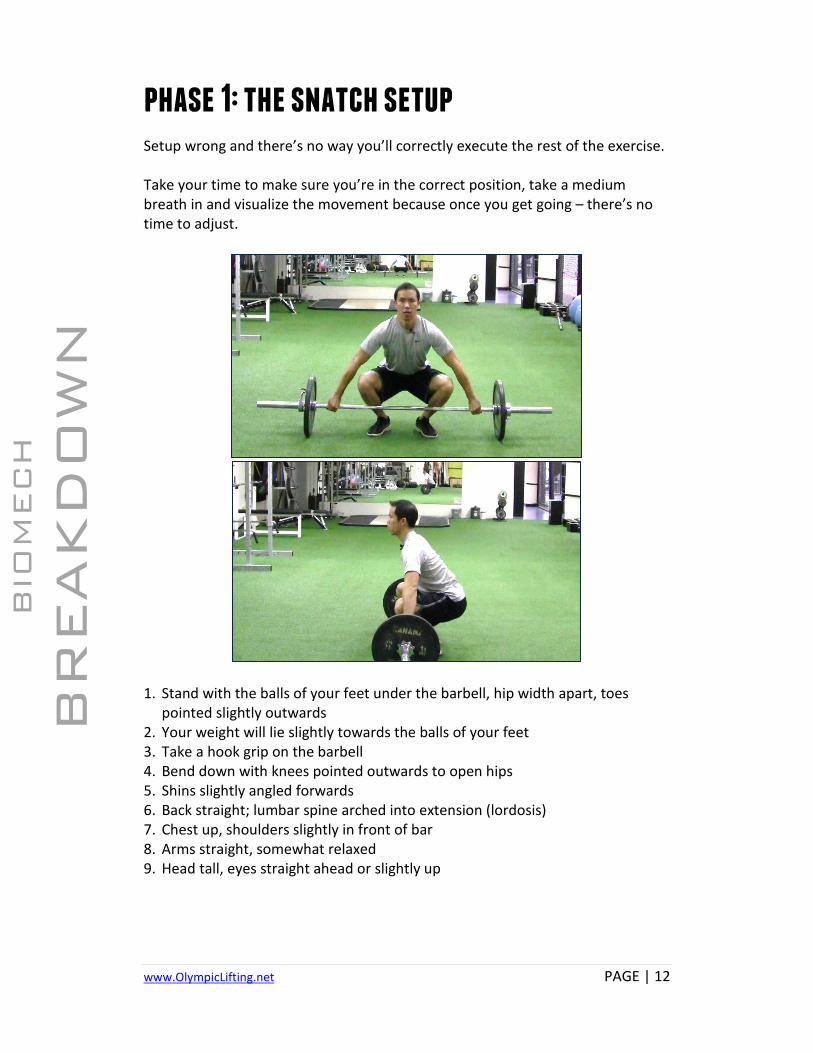
phase 1: the snatch setup Setup wrong and there’s no way you’ll correctly execute the rest of the exercise. Take your time to make sure you’re in the correct position, take a medium breath in and visualize the movement because once you get going – there’s no time to adjust.
1. Stand with the balls of your feet under the barbell, hip width apart, toes
pointed slightly outwards 2. Your weight will lie slightly towards the balls of your feet 3. Take a hook grip on the barbell 4. Bend down with knees pointed outwards to open hips 5. Shins slightly angled forwards 6. Back straight; lumbar spine arched into extension (lordosis) 7. Chest up, shoulders slightly in front of bar 8. Arms straight, somewhat relaxed 9. Head tall, eyes straight ahead or slightly up
BIO
MECH
BR
EAKD
OW
N
www.OlympicLifting.net PAGE | 13
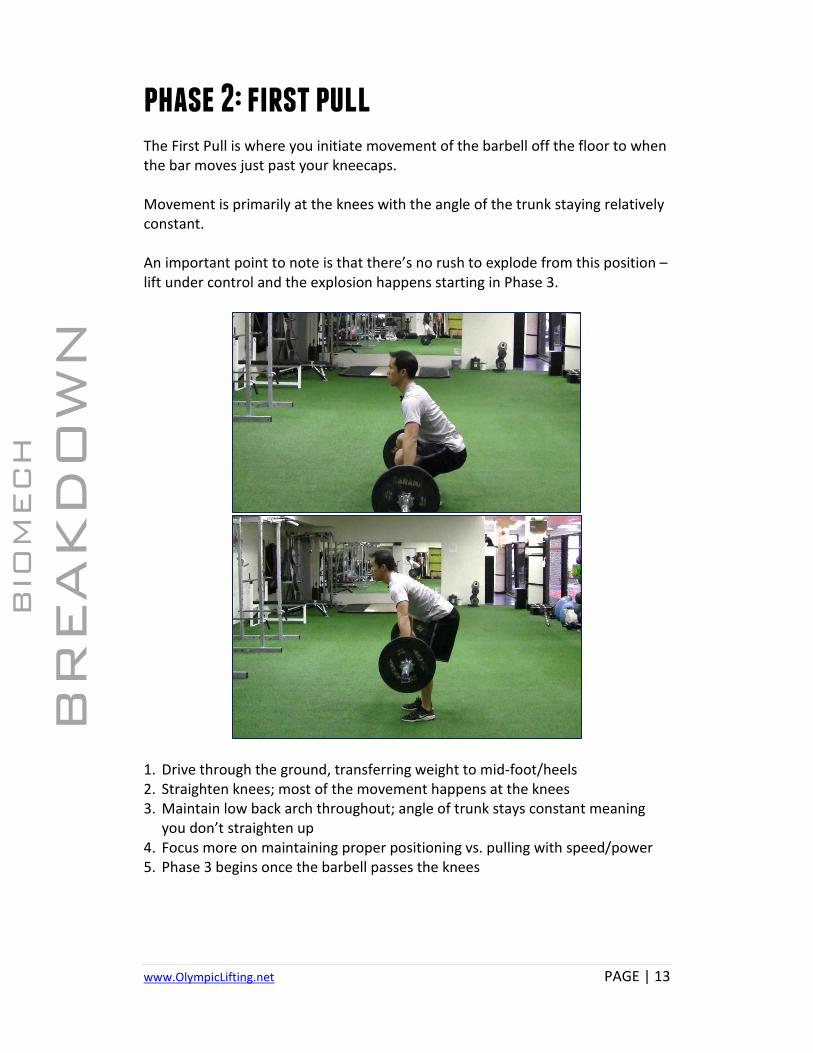
phase 2: first pull The First Pull is where you initiate movement of the barbell off the floor to when the bar moves just past your kneecaps. Movement is primarily at the knees with the angle of the trunk staying relatively constant. An important point to note is that there’s no rush to explode from this position – lift under control and the explosion happens starting in Phase 3.
1. Drive through the ground, transferring weight to mid-foot/heels 2. Straighten knees; most of the movement happens at the knees 3. Maintain low back arch throughout; angle of trunk stays constant meaning
you don’t straighten up 4. Focus more on maintaining proper positioning vs. pulling with speed/power 5. Phase 3 begins once the barbell passes the knees
BIO
MECH
BR
EAKD
OW
N
www.OlympicLifting.net PAGE | 14
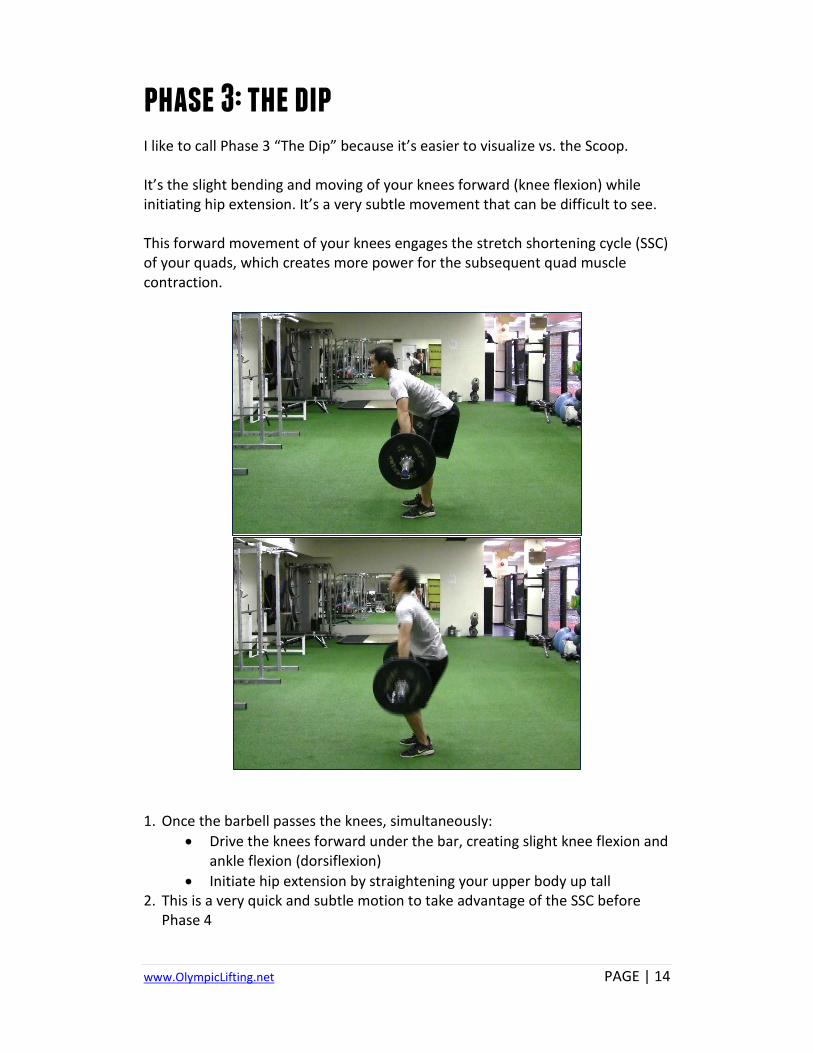
phase 3: the dip I like to call Phase 3 “The Dip” because it’s easier to visualize vs. the Scoop. It’s the slight bending and moving of your knees forward (knee flexion) while initiating hip extension. It’s a very subtle movement that can be difficult to see. This forward movement of your knees engages the stretch shortening cycle (SSC) of your quads, which creates more power for the subsequent quad muscle contraction.
1. Once the barbell passes the knees, simultaneously:
• Drive the knees forward under the bar, creating slight knee flexion and ankle flexion (dorsiflexion)
• Initiate hip extension by straightening your upper body up tall 2. This is a very quick and subtle motion to take advantage of the SSC before
Phase 4
www.OlympicLifting.net PAGE | 15
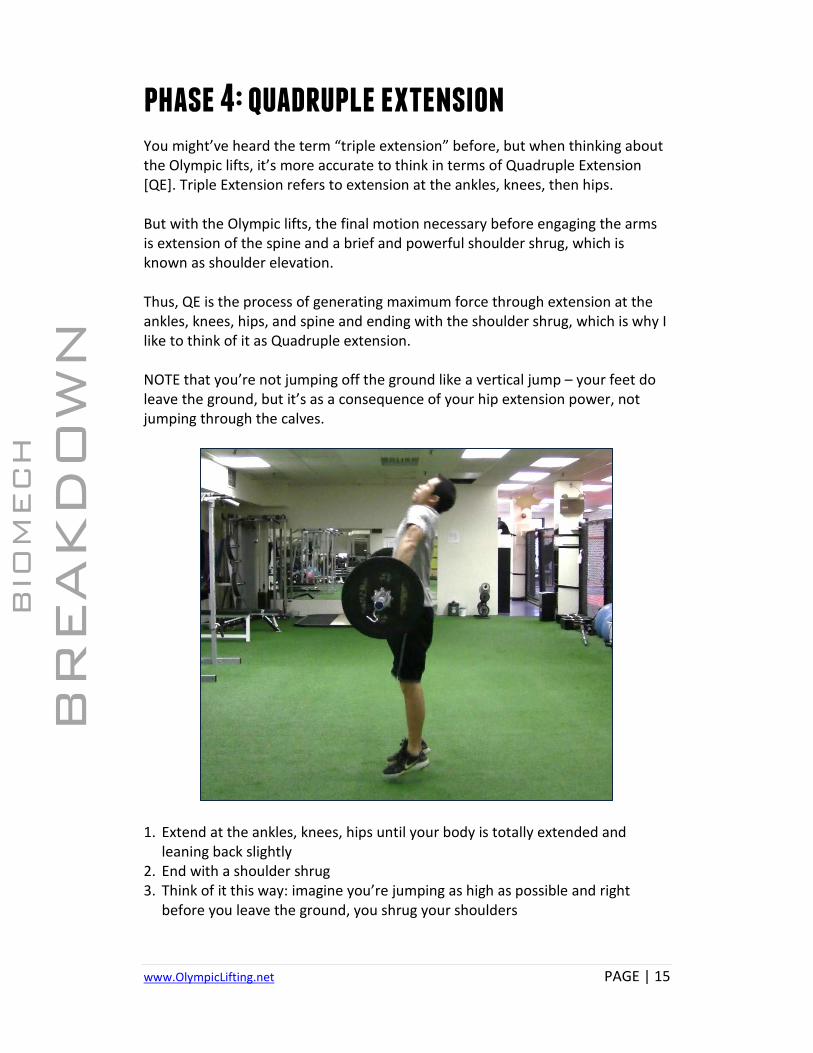
phase 4: quadruple extension You might’ve heard the term “triple extension” before, but when thinking about the Olympic lifts, it’s more accurate to think in terms of Quadruple Extension [QE]. Triple Extension refers to extension at the ankles, knees, then hips. But with the Olympic lifts, the final motion necessary before engaging the arms is extension of the spine and a brief and powerful shoulder shrug, which is known as shoulder elevation. Thus, QE is the process of generating maximum force through extension at the ankles, knees, hips, and spine and ending with the shoulder shrug, which is why I like to think of it as Quadruple extension. NOTE that you’re not jumping off the ground like a vertical jump – your feet do leave the ground, but it’s as a consequence of your hip extension power, not jumping through the calves.
1. Extend at the ankles, knees, hips until your body is totally extended and
leaning back slightly 2. End with a shoulder shrug 3. Think of it this way: imagine you’re jumping as high as possible and right
before you leave the ground, you shrug your shoulders
BIO
MECH
BR
EAKD
OW
N
www.OlympicLifting.net PAGE | 16
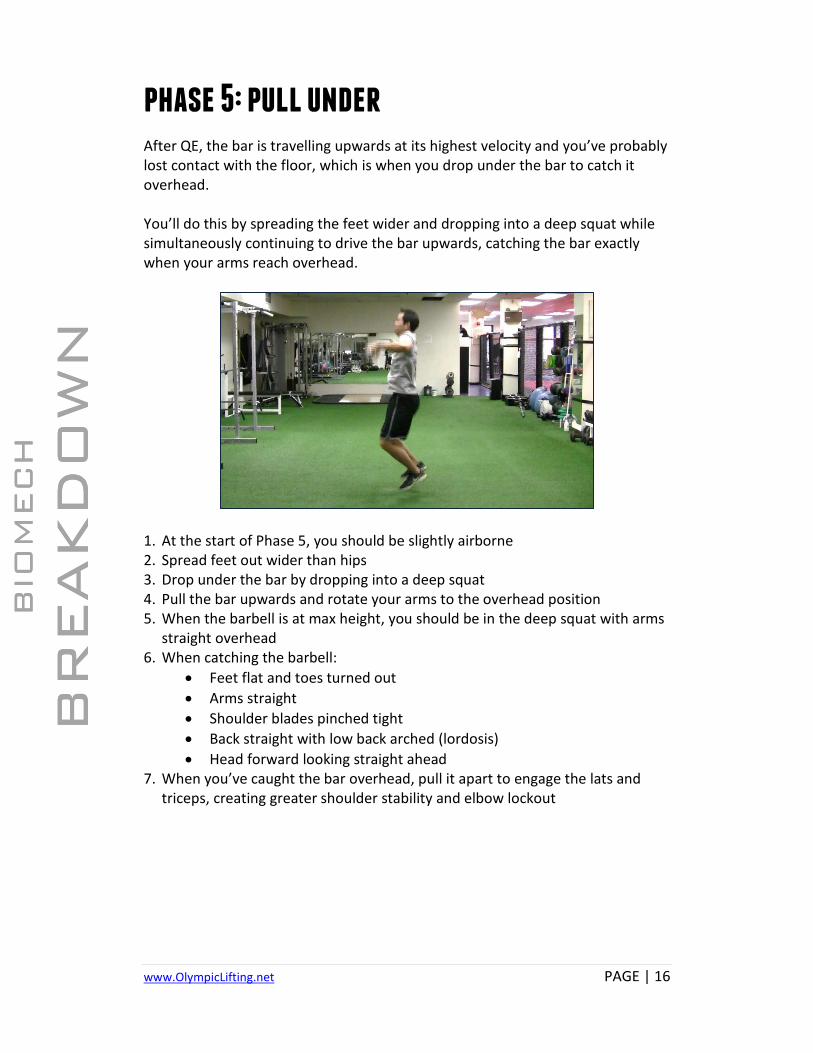
phase 5: pull under After QE, the bar is travelling upwards at its highest velocity and you’ve probably lost contact with the floor, which is when you drop under the bar to catch it overhead. You’ll do this by spreading the feet wider and dropping into a deep squat while simultaneously continuing to drive the bar upwards, catching the bar exactly when your arms reach overhead.
1. At the start of Phase 5, you should be slightly airborne 2. Spread feet out wider than hips 3. Drop under the bar by dropping into a deep squat 4. Pull the bar upwards and rotate your arms to the overhead position 5. When the barbell is at max height, you should be in the deep squat with arms
straight overhead 6. When catching the barbell:
• Feet flat and toes turned out • Arms straight • Shoulder blades pinched tight • Back straight with low back arched (lordosis) • Head forward looking straight ahead
7. When you’ve caught the bar overhead, pull it apart to engage the lats and triceps, creating greater shoulder stability and elbow lockout
BIO
MECH
BR
EAKD
OW
N
BIO
MECH
BR
EAKD
OW
N
www.OlympicLifting.net PAGE | 17
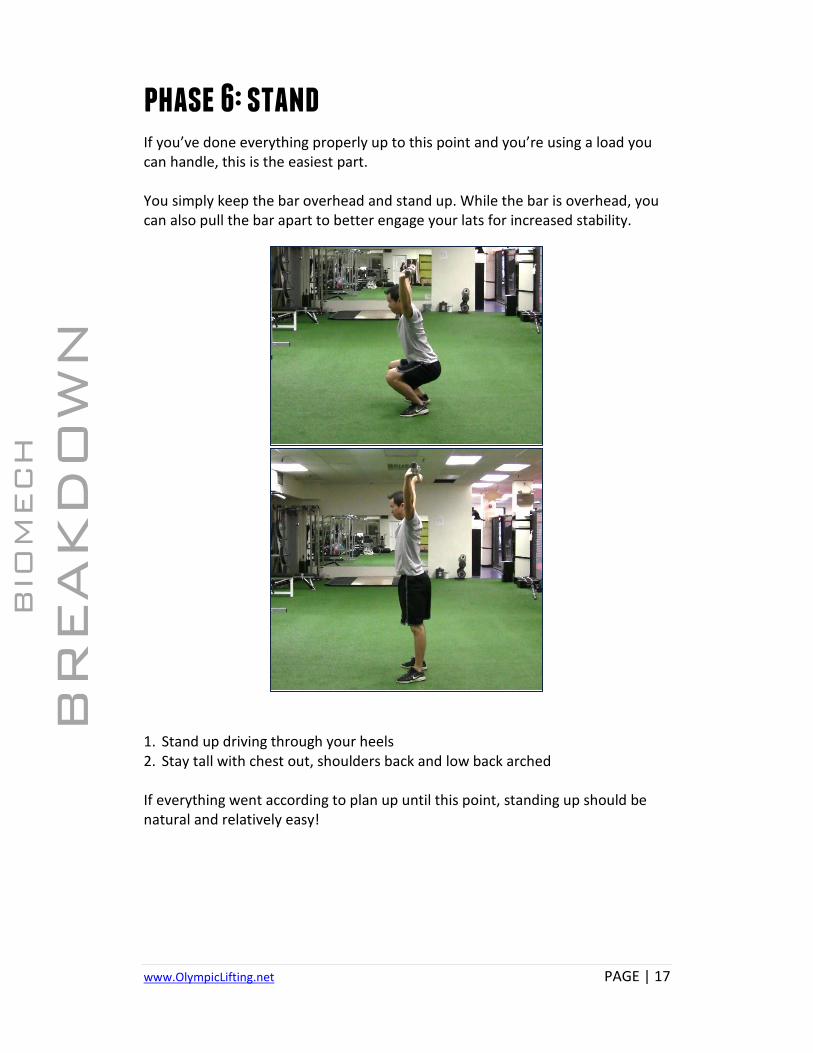
phase 6: stand If you’ve done everything properly up to this point and you’re using a load you can handle, this is the easiest part. You simply keep the bar overhead and stand up. While the bar is overhead, you can also pull the bar apart to better engage your lats for increased stability.
1. Stand up driving through your heels 2. Stay tall with chest out, shoulders back and low back arched
If everything went according to plan up until this point, standing up should be natural and relatively easy!
BIO
MECH
BR
EAKD
OW
N
www.OlympicLifting.net PAGE | 18
rapid mastery training sequence
the snatch
www.OlympicLifting.net PAGE | 19
preamble The Rapid Mastery Training Sequence for the Snatch will take you from a complete newbie to mastery faster than any other method you could do on your own, and a heck of a lot cheaper than finding a trainer or coach. However, before you get started, you must meet the Snatch prerequisites – proceeding through the RMTS without meeting these prerequisites is like going to war without practicing how to use your weapon – you’re going to get killed! Well, maybe it’s not that dramatic, but you’re going to be programming your body with poor technique since failure of the tests says that your body is physically incapable of good technique. Remember – practice doesn’t make perfect; perfect practice makes perfect, so be patient and before you know it, you’ll be a master of the world’s fastest lift.

www.OlympicLifting.net PAGE | 20
rmts flowchart the snatch Master the Snatch Setup Drop Power Snatch (Arms Up) Prisoner Squat w/Pause Overhead Squat Drop Power Snatch (Arms Down)
Hang Snatch Pull Snatch Deadlift to Above Knees Drop Squat Snatch (Arms Down) Snatch Pull Hang Power Snatch Hang Squat Snatch Power Snatch FULL SQUAT SNATCH!
RMTS #1 Fundamental
Patterning
RMTS #2 Isolated
Movement
RMTS #3 Level 1
Integration
RMTS #4 Level 2
Integration
MASTERY Full Execution
www.OlympicLifting.net PAGE | 21
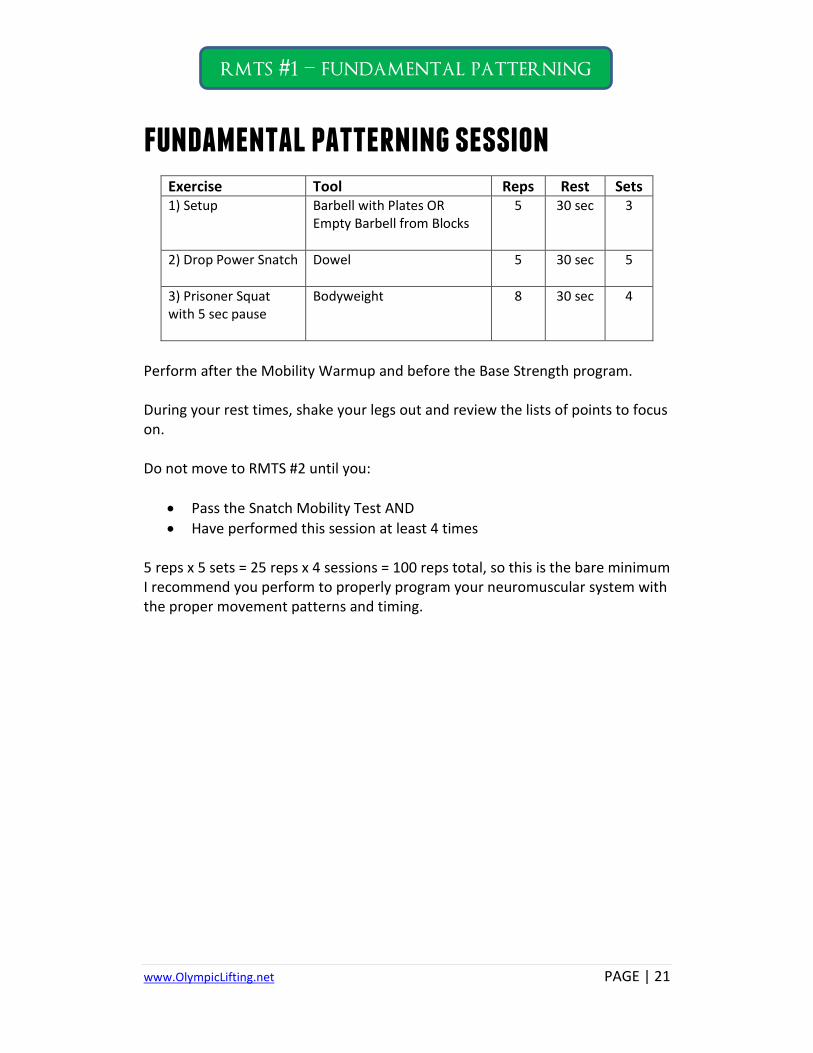
fundamental patterning session
Exercise Tool Reps Rest Sets 1) Setup Barbell with Plates OR
Empty Barbell from Blocks
5 30 sec 3
2) Drop Power Snatch Dowel
5 30 sec 5
3) Prisoner Squat with 5 sec pause
Bodyweight 8 30 sec 4
Perform after the Mobility Warmup and before the Base Strength program. During your rest times, shake your legs out and review the lists of points to focus on. Do not move to RMTS #2 until you:
• Pass the Snatch Mobility Test AND • Have performed this session at least 4 times
5 reps x 5 sets = 25 reps x 4 sessions = 100 reps total, so this is the bare minimum I recommend you perform to properly program your neuromuscular system with the proper movement patterns and timing.
rmts #1 – fundamental patterning
www.OlympicLifting.net PAGE | 22
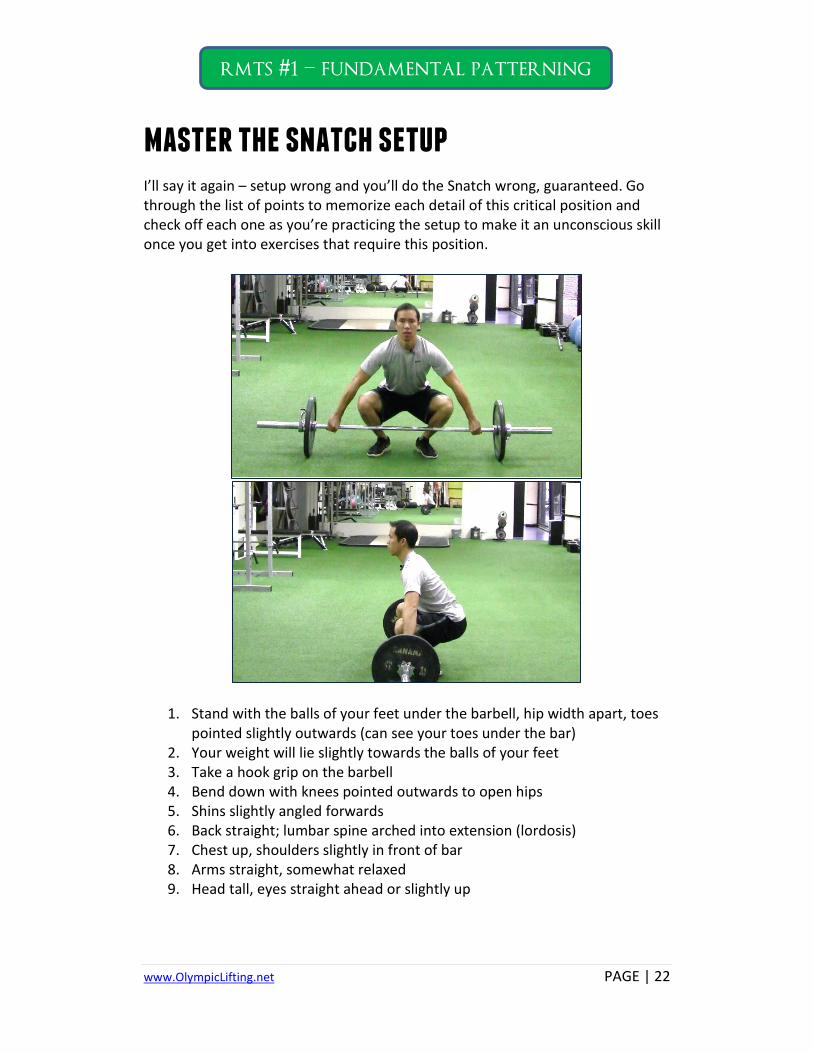
master the snatch setup I’ll say it again – setup wrong and you’ll do the Snatch wrong, guaranteed. Go through the list of points to memorize each detail of this critical position and check off each one as you’re practicing the setup to make it an unconscious skill once you get into exercises that require this position.
1. Stand with the balls of your feet under the barbell, hip width apart, toes pointed slightly outwards (can see your toes under the bar)
2. Your weight will lie slightly towards the balls of your feet 3. Take a hook grip on the barbell 4. Bend down with knees pointed outwards to open hips 5. Shins slightly angled forwards 6. Back straight; lumbar spine arched into extension (lordosis) 7. Chest up, shoulders slightly in front of bar 8. Arms straight, somewhat relaxed 9. Head tall, eyes straight ahead or slightly up
rmts #1 – fundamental patterning
www.OlympicLifting.net PAGE | 23
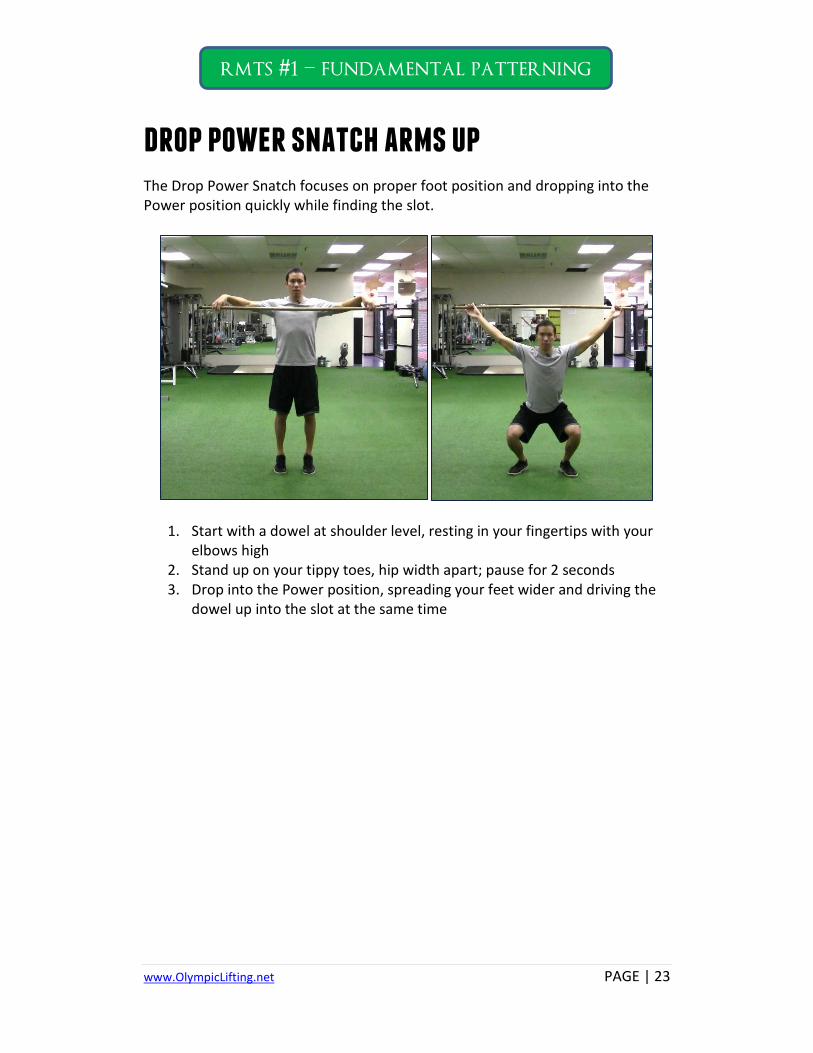
drop power snatch arms up The Drop Power Snatch focuses on proper foot position and dropping into the Power position quickly while finding the slot.
1. Start with a dowel at shoulder level, resting in your fingertips with your elbows high
2. Stand up on your tippy toes, hip width apart; pause for 2 seconds 3. Drop into the Power position, spreading your feet wider and driving the
dowel up into the slot at the same time
rmts #1 – fundamental patterning
www.OlympicLifting.net PAGE | 24
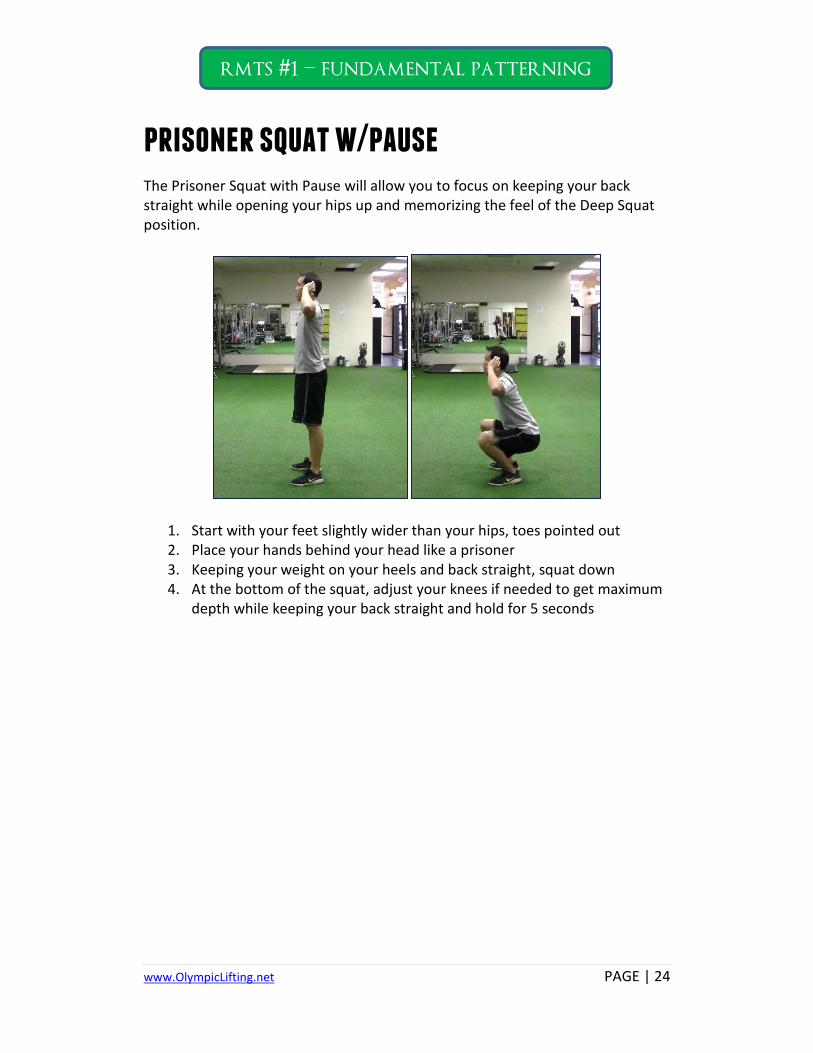
prisoner squat w/pause The Prisoner Squat with Pause will allow you to focus on keeping your back straight while opening your hips up and memorizing the feel of the Deep Squat position.
1. Start with your feet slightly wider than your hips, toes pointed out 2. Place your hands behind your head like a prisoner 3. Keeping your weight on your heels and back straight, squat down 4. At the bottom of the squat, adjust your knees if needed to get maximum
depth while keeping your back straight and hold for 5 seconds
rmts #1 – fundamental patterning
www.OlympicLifting.net PAGE | 25
isolated movement session
Exercise Tool / Weight Reps Rest Sets 1) Overhead Squat Light Training Barbell 45
lbs/20 kg MAX
5 30 sec 5
2) Drop Power Snatch Arms Down
Dowel 5 30 sec 5
3) Hang Snatch Pull Empty Barbell 65 lbs/30 kg MAX weight
5 30-60 sec
5
4) Snatch Deadlift to Above Knees: 404 tempo
Empty Barbell from Blocks 95 lbs/45 kg MAX weight
3 60 sec 6
Perform after the Mobility Warmup and before the Base Strength program. During your rest times, shake your legs out and review the lists of points to focus on. Do not move to RMTS #3 until you:
• Pass the Level 1 Snatch Strength Test AND • Have performed this session at least 4 times
5 reps x 5 sets = 25 reps x 4 sessions = 100 reps total, so this is the bare minimum I recommend you perform to properly program your neuromuscular system with the proper movement patterns and timing.
rmts #2 – isolated movement
www.OlympicLifting.net PAGE | 26
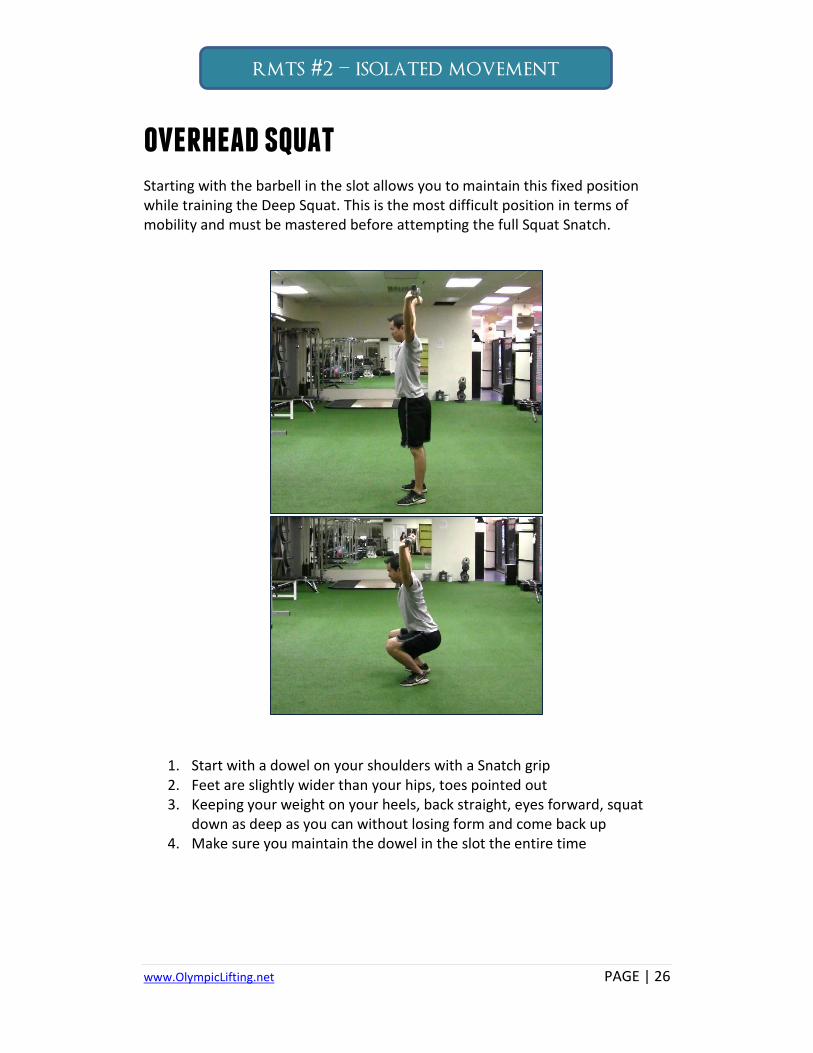
overhead squat Starting with the barbell in the slot allows you to maintain this fixed position while training the Deep Squat. This is the most difficult position in terms of mobility and must be mastered before attempting the full Squat Snatch.
1. Start with a dowel on your shoulders with a Snatch grip 2. Feet are slightly wider than your hips, toes pointed out 3. Keeping your weight on your heels, back straight, eyes forward, squat
down as deep as you can without losing form and come back up 4. Make sure you maintain the dowel in the slot the entire time
rmts #2 – isolated movement
www.OlympicLifting.net PAGE | 27
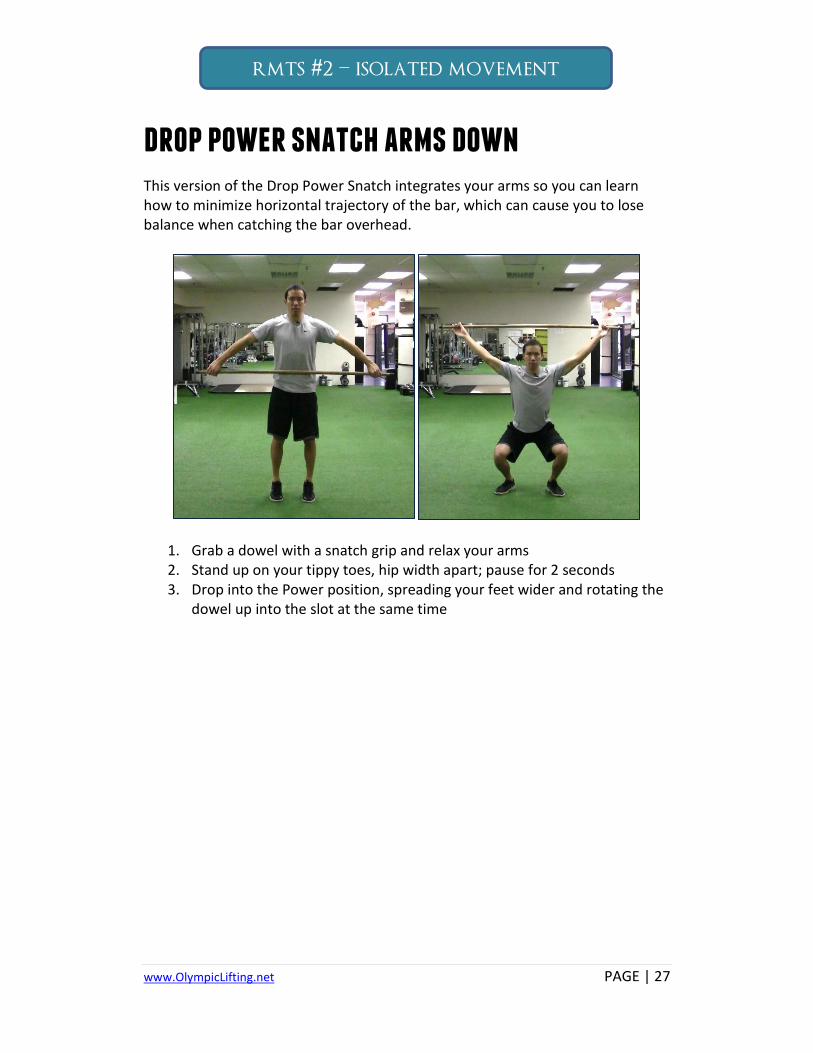
drop power snatch arms down This version of the Drop Power Snatch integrates your arms so you can learn how to minimize horizontal trajectory of the bar, which can cause you to lose balance when catching the bar overhead.
1. Grab a dowel with a snatch grip and relax your arms 2. Stand up on your tippy toes, hip width apart; pause for 2 seconds 3. Drop into the Power position, spreading your feet wider and rotating the
dowel up into the slot at the same time
rmts #2 – isolated movement
www.OlympicLifting.net PAGE | 28
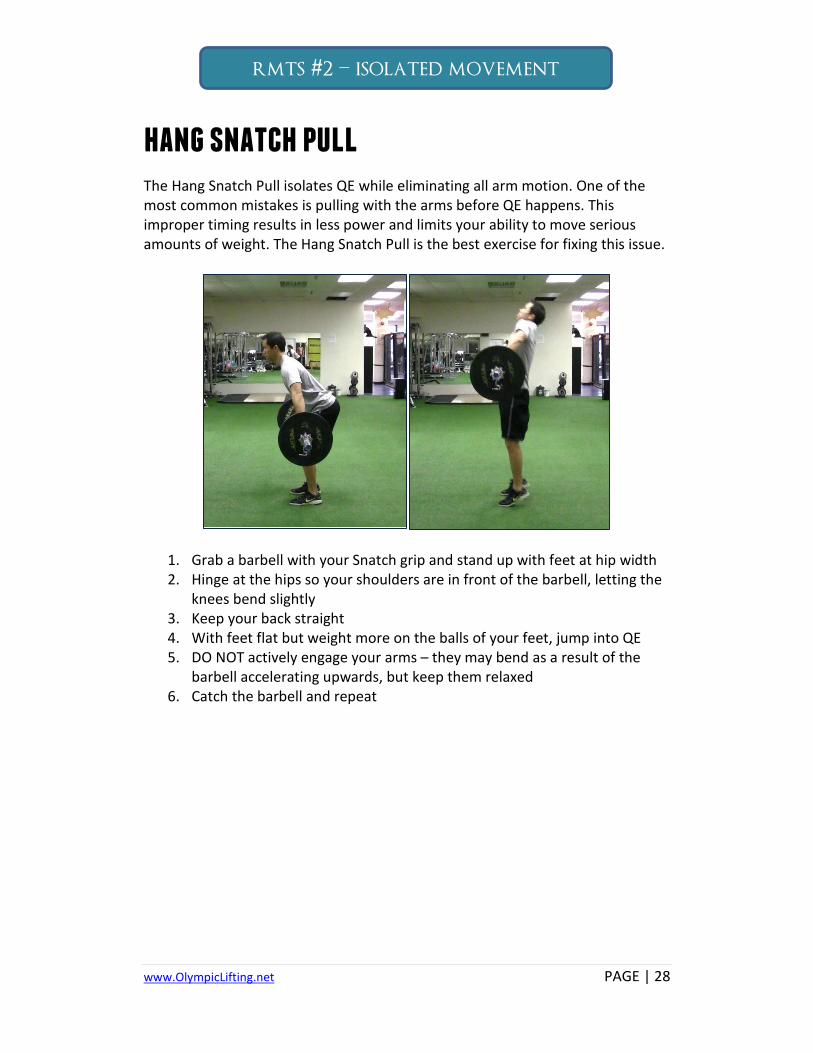
hang snatch pull The Hang Snatch Pull isolates QE while eliminating all arm motion. One of the most common mistakes is pulling with the arms before QE happens. This improper timing results in less power and limits your ability to move serious amounts of weight. The Hang Snatch Pull is the best exercise for fixing this issue.
1. Grab a barbell with your Snatch grip and stand up with feet at hip width 2. Hinge at the hips so your shoulders are in front of the barbell, letting the
knees bend slightly 3. Keep your back straight 4. With feet flat but weight more on the balls of your feet, jump into QE 5. DO NOT actively engage your arms – they may bend as a result of the
barbell accelerating upwards, but keep them relaxed 6. Catch the barbell and repeat
rmts #2 – isolated movement
www.OlympicLifting.net PAGE | 29
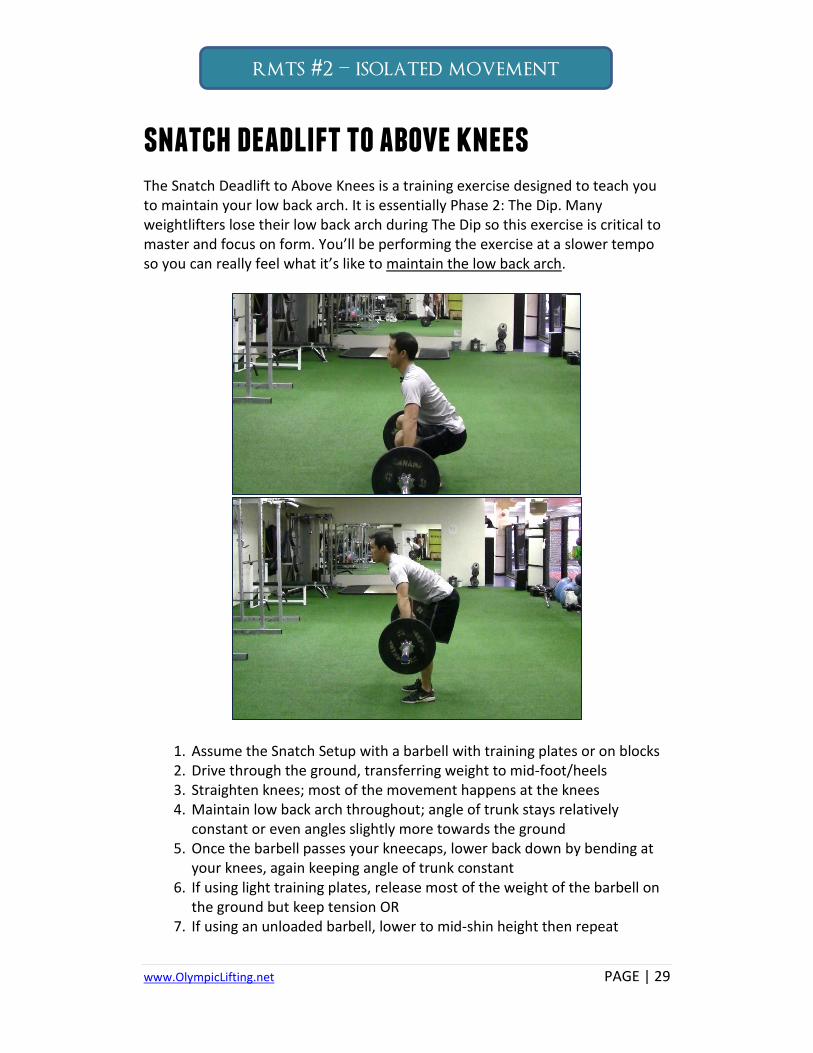
snatch deadlift to above knees The Snatch Deadlift to Above Knees is a training exercise designed to teach you to maintain your low back arch. It is essentially Phase 2: The Dip. Many weightlifters lose their low back arch during The Dip so this exercise is critical to master and focus on form. You’ll be performing the exercise at a slower tempo so you can really feel what it’s like to maintain the low back arch.
1. Assume the Snatch Setup with a barbell with training plates or on blocks 2. Drive through the ground, transferring weight to mid-foot/heels 3. Straighten knees; most of the movement happens at the knees 4. Maintain low back arch throughout; angle of trunk stays relatively
constant or even angles slightly more towards the ground 5. Once the barbell passes your kneecaps, lower back down by bending at
your knees, again keeping angle of trunk constant 6. If using light training plates, release most of the weight of the barbell on
the ground but keep tension OR 7. If using an unloaded barbell, lower to mid-shin height then repeat
rmts #2 – isolated movement
www.OlympicLifting.net PAGE | 30
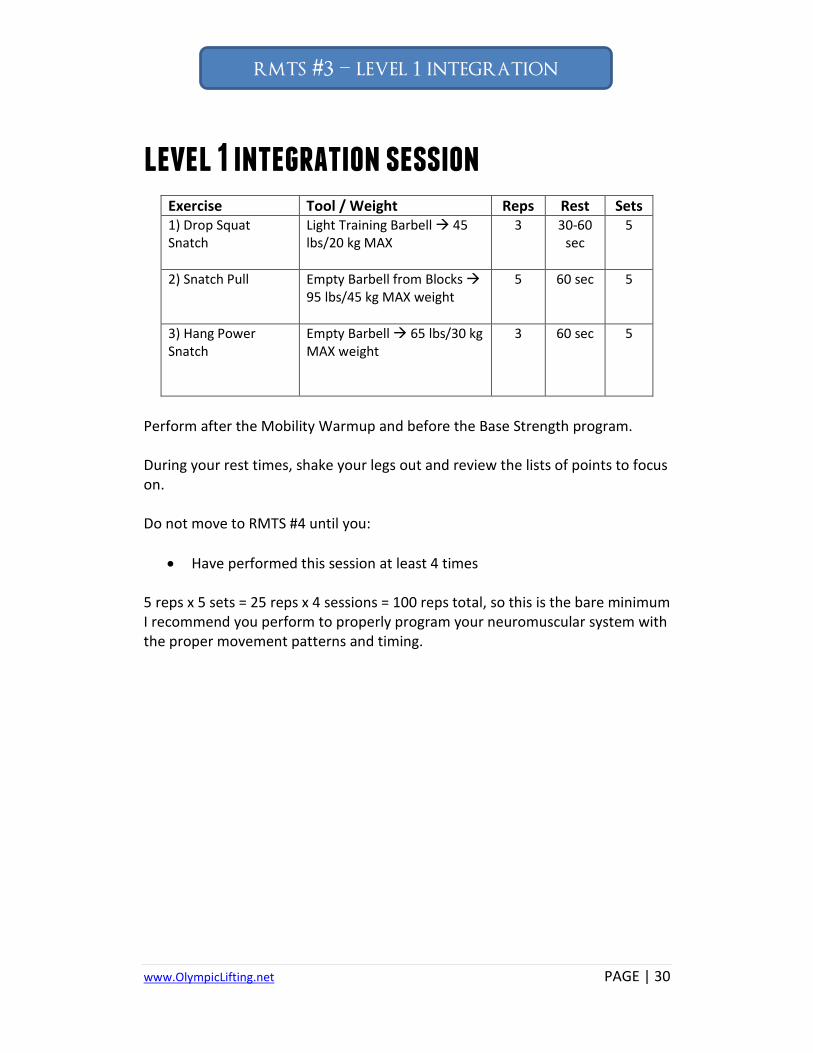
level 1 integration session
Exercise Tool / Weight Reps Rest Sets 1) Drop Squat Snatch
Light Training Barbell 45 lbs/20 kg MAX
3 30-60 sec
5
2) Snatch Pull Empty Barbell from Blocks 95 lbs/45 kg MAX weight
5 60 sec 5
3) Hang Power Snatch
Empty Barbell 65 lbs/30 kg MAX weight
3 60 sec 5
Perform after the Mobility Warmup and before the Base Strength program. During your rest times, shake your legs out and review the lists of points to focus on. Do not move to RMTS #4 until you:
• Have performed this session at least 4 times 5 reps x 5 sets = 25 reps x 4 sessions = 100 reps total, so this is the bare minimum I recommend you perform to properly program your neuromuscular system with the proper movement patterns and timing.
rmts #3 – level 1 integration
www.OlympicLifting.net PAGE | 31
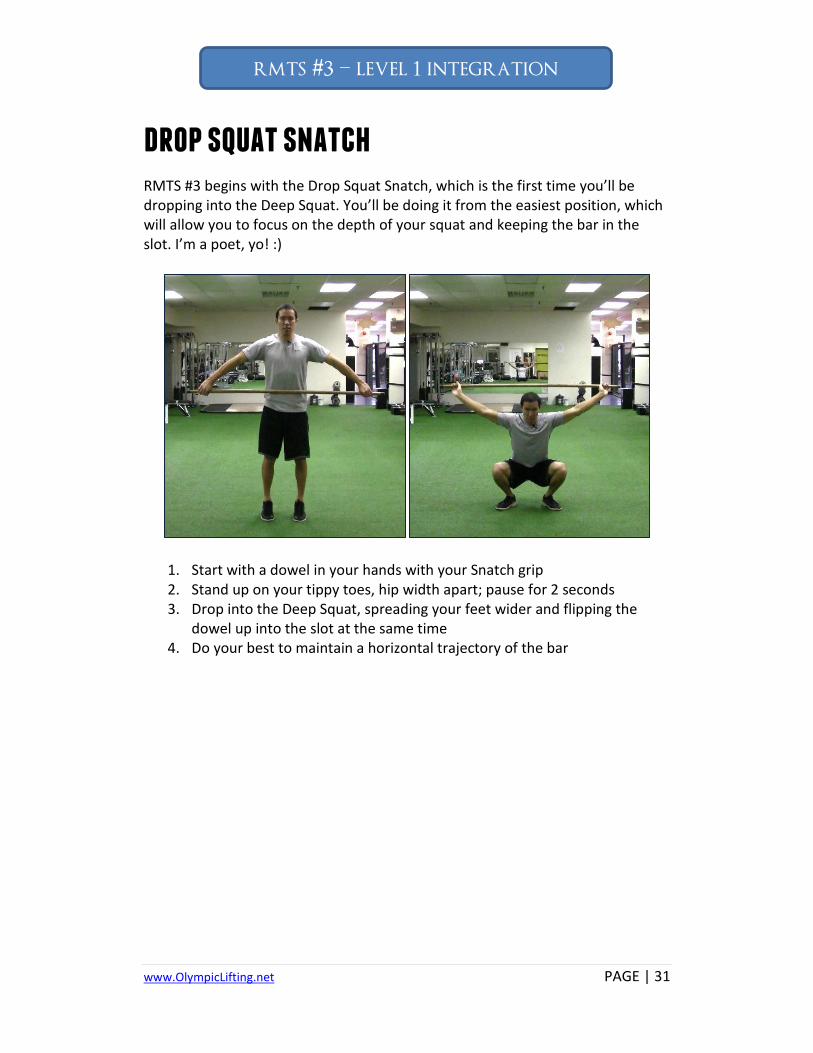
drop squat snatch RMTS #3 begins with the Drop Squat Snatch, which is the first time you’ll be dropping into the Deep Squat. You’ll be doing it from the easiest position, which will allow you to focus on the depth of your squat and keeping the bar in the slot. I’m a poet, yo! :)
1. Start with a dowel in your hands with your Snatch grip 2. Stand up on your tippy toes, hip width apart; pause for 2 seconds 3. Drop into the Deep Squat, spreading your feet wider and flipping the
dowel up into the slot at the same time 4. Do your best to maintain a horizontal trajectory of the bar
rmts #3 – level 1 integration
www.OlympicLifting.net PAGE | 32
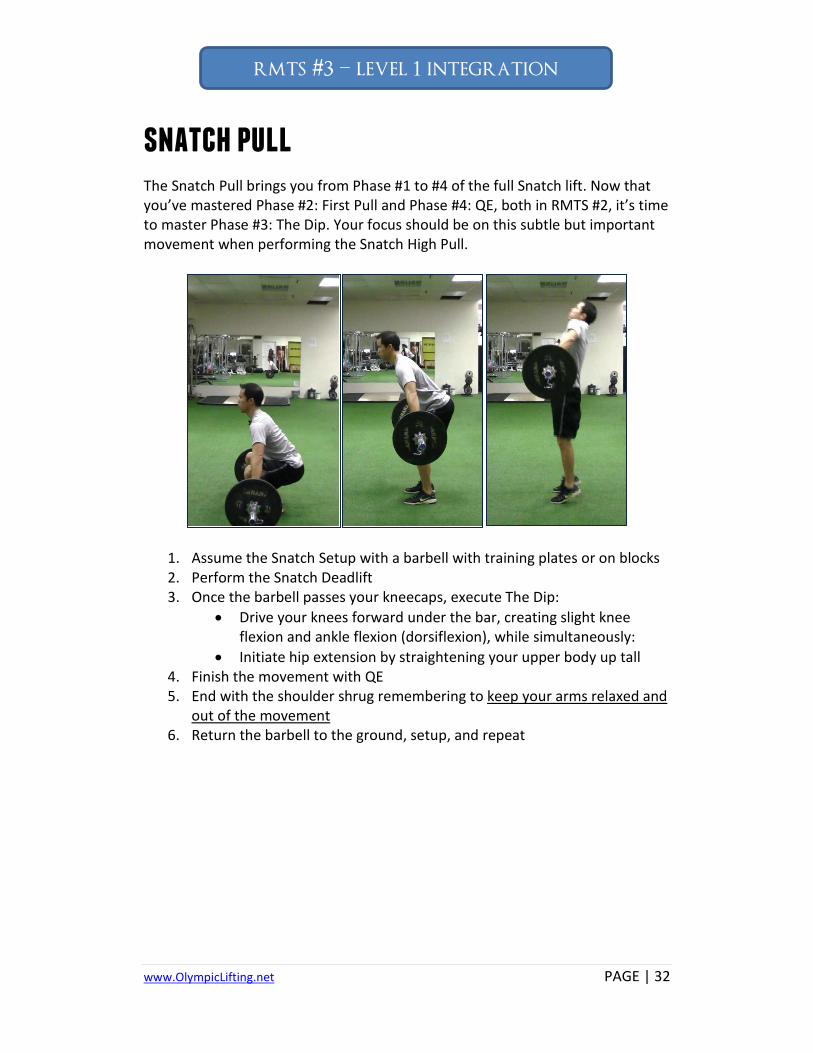
snatch pull The Snatch Pull brings you from Phase #1 to #4 of the full Snatch lift. Now that you’ve mastered Phase #2: First Pull and Phase #4: QE, both in RMTS #2, it’s time to master Phase #3: The Dip. Your focus should be on this subtle but important movement when performing the Snatch High Pull.
1. Assume the Snatch Setup with a barbell with training plates or on blocks 2. Perform the Snatch Deadlift 3. Once the barbell passes your kneecaps, execute The Dip:
• Drive your knees forward under the bar, creating slight knee flexion and ankle flexion (dorsiflexion), while simultaneously:
• Initiate hip extension by straightening your upper body up tall 4. Finish the movement with QE 5. End with the shoulder shrug remembering to keep your arms relaxed and
out of the movement 6. Return the barbell to the ground, setup, and repeat
rmts #3 – level 1 integration
www.OlympicLifting.net PAGE | 33
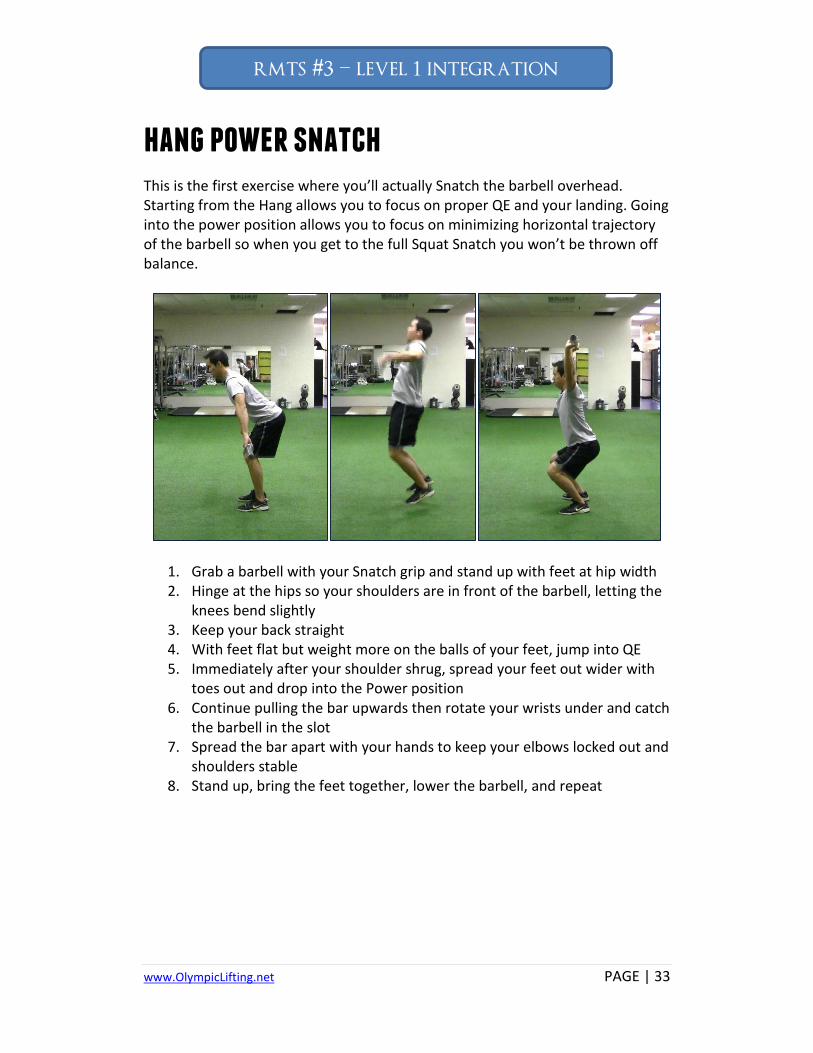
hang power snatch This is the first exercise where you’ll actually Snatch the barbell overhead. Starting from the Hang allows you to focus on proper QE and your landing. Going into the power position allows you to focus on minimizing horizontal trajectory of the barbell so when you get to the full Squat Snatch you won’t be thrown off balance.
1. Grab a barbell with your Snatch grip and stand up with feet at hip width 2. Hinge at the hips so your shoulders are in front of the barbell, letting the
knees bend slightly 3. Keep your back straight 4. With feet flat but weight more on the balls of your feet, jump into QE 5. Immediately after your shoulder shrug, spread your feet out wider with
toes out and drop into the Power position 6. Continue pulling the bar upwards then rotate your wrists under and catch
the barbell in the slot 7. Spread the bar apart with your hands to keep your elbows locked out and
shoulders stable 8. Stand up, bring the feet together, lower the barbell, and repeat
rmts #3 – level 1 integration
www.OlympicLifting.net PAGE | 34
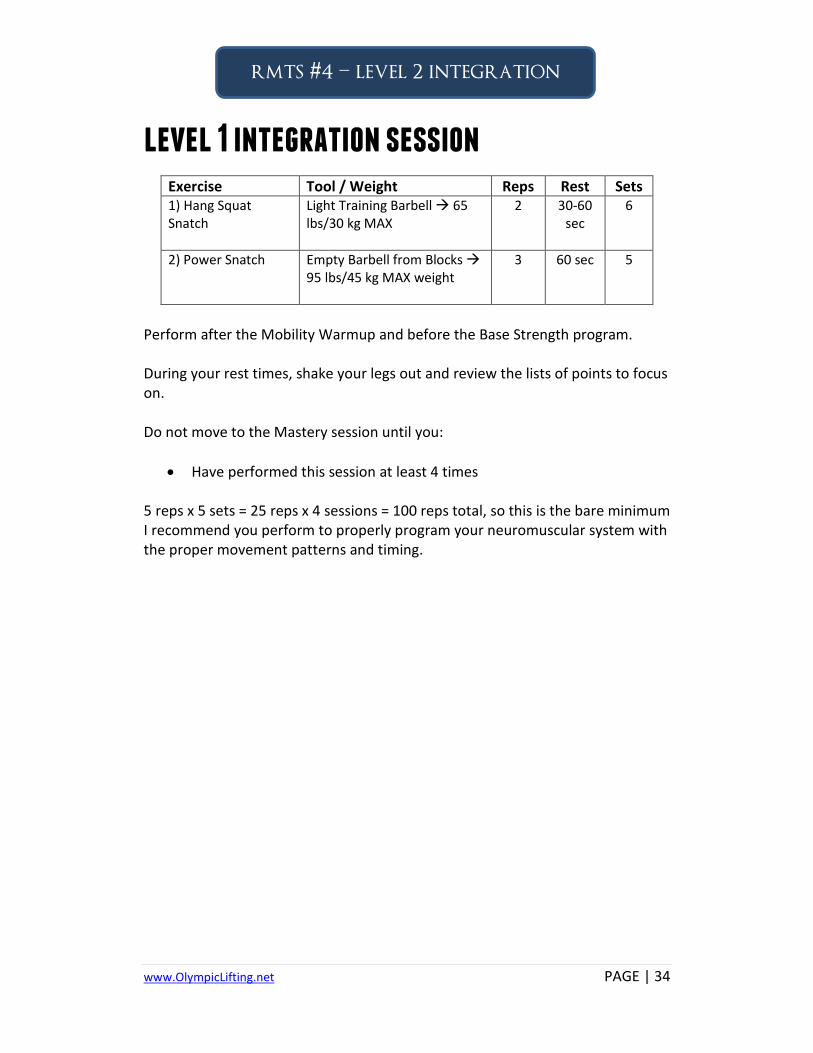
level 1 integration session
Exercise Tool / Weight Reps Rest Sets 1) Hang Squat Snatch
Light Training Barbell 65 lbs/30 kg MAX
2 30-60 sec
6
2) Power Snatch Empty Barbell from Blocks 95 lbs/45 kg MAX weight
3 60 sec 5
Perform after the Mobility Warmup and before the Base Strength program. During your rest times, shake your legs out and review the lists of points to focus on. Do not move to the Mastery session until you:
• Have performed this session at least 4 times 5 reps x 5 sets = 25 reps x 4 sessions = 100 reps total, so this is the bare minimum I recommend you perform to properly program your neuromuscular system with the proper movement patterns and timing.
rmts #4 – level 2 integration
www.OlympicLifting.net PAGE | 35
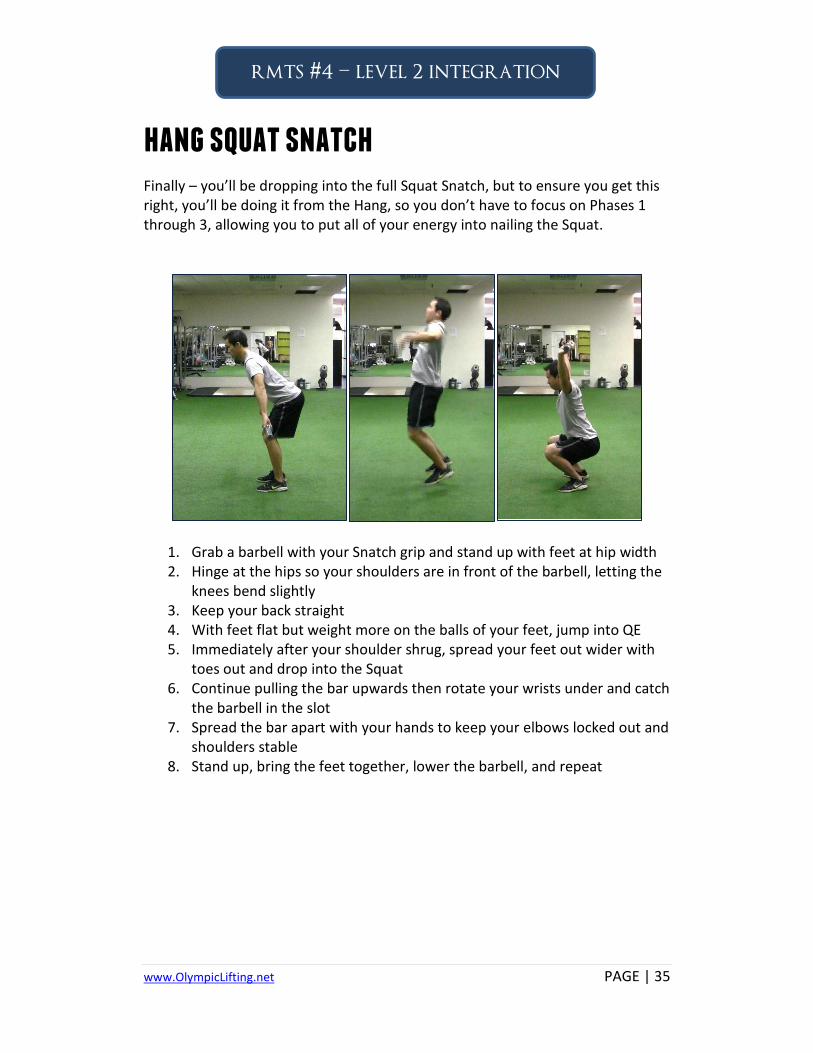
hang squat snatch Finally – you’ll be dropping into the full Squat Snatch, but to ensure you get this right, you’ll be doing it from the Hang, so you don’t have to focus on Phases 1 through 3, allowing you to put all of your energy into nailing the Squat.
1. Grab a barbell with your Snatch grip and stand up with feet at hip width 2. Hinge at the hips so your shoulders are in front of the barbell, letting the
knees bend slightly 3. Keep your back straight 4. With feet flat but weight more on the balls of your feet, jump into QE 5. Immediately after your shoulder shrug, spread your feet out wider with
toes out and drop into the Squat 6. Continue pulling the bar upwards then rotate your wrists under and catch
the barbell in the slot 7. Spread the bar apart with your hands to keep your elbows locked out and
shoulders stable 8. Stand up, bring the feet together, lower the barbell, and repeat
rmts #4 – level 2 integration
www.OlympicLifting.net PAGE | 36
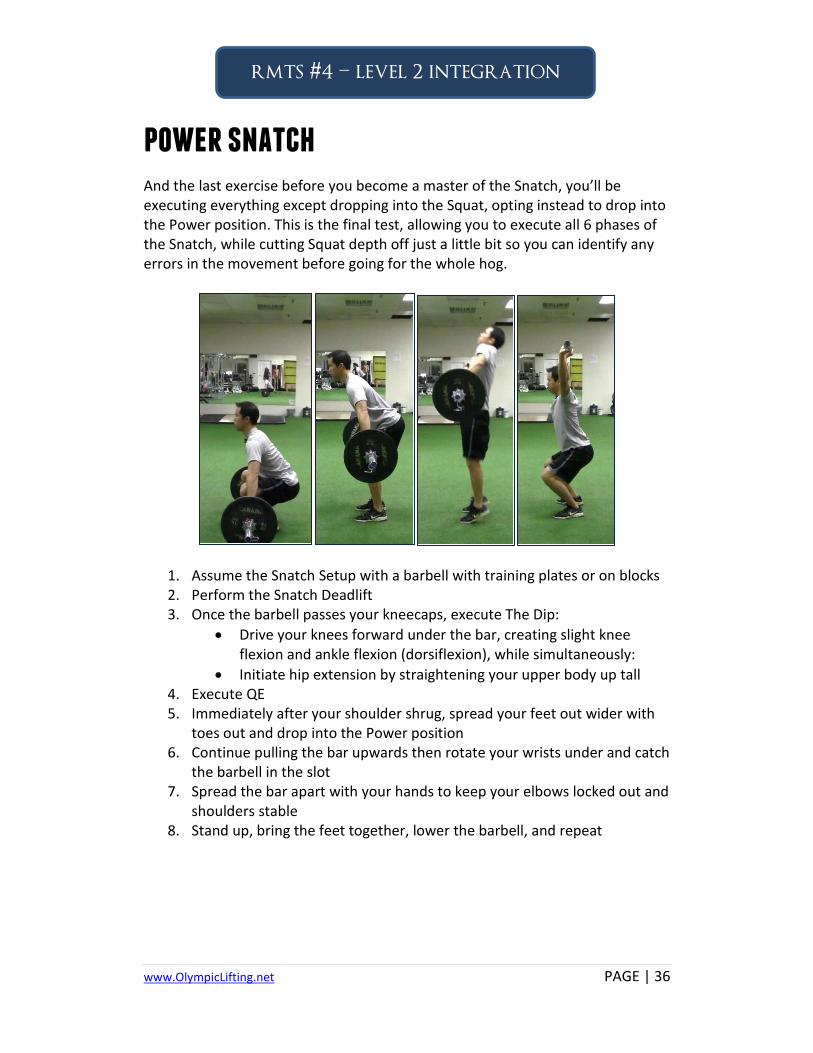
power snatch And the last exercise before you become a master of the Snatch, you’ll be executing everything except dropping into the Squat, opting instead to drop into the Power position. This is the final test, allowing you to execute all 6 phases of the Snatch, while cutting Squat depth off just a little bit so you can identify any errors in the movement before going for the whole hog.
1. Assume the Snatch Setup with a barbell with training plates or on blocks 2. Perform the Snatch Deadlift 3. Once the barbell passes your kneecaps, execute The Dip:
• Drive your knees forward under the bar, creating slight knee flexion and ankle flexion (dorsiflexion), while simultaneously:
• Initiate hip extension by straightening your upper body up tall 4. Execute QE 5. Immediately after your shoulder shrug, spread your feet out wider with
toes out and drop into the Power position 6. Continue pulling the bar upwards then rotate your wrists under and catch
the barbell in the slot 7. Spread the bar apart with your hands to keep your elbows locked out and
shoulders stable 8. Stand up, bring the feet together, lower the barbell, and repeat
rmts #4 – level 2 integration
www.OlympicLifting.net PAGE | 37
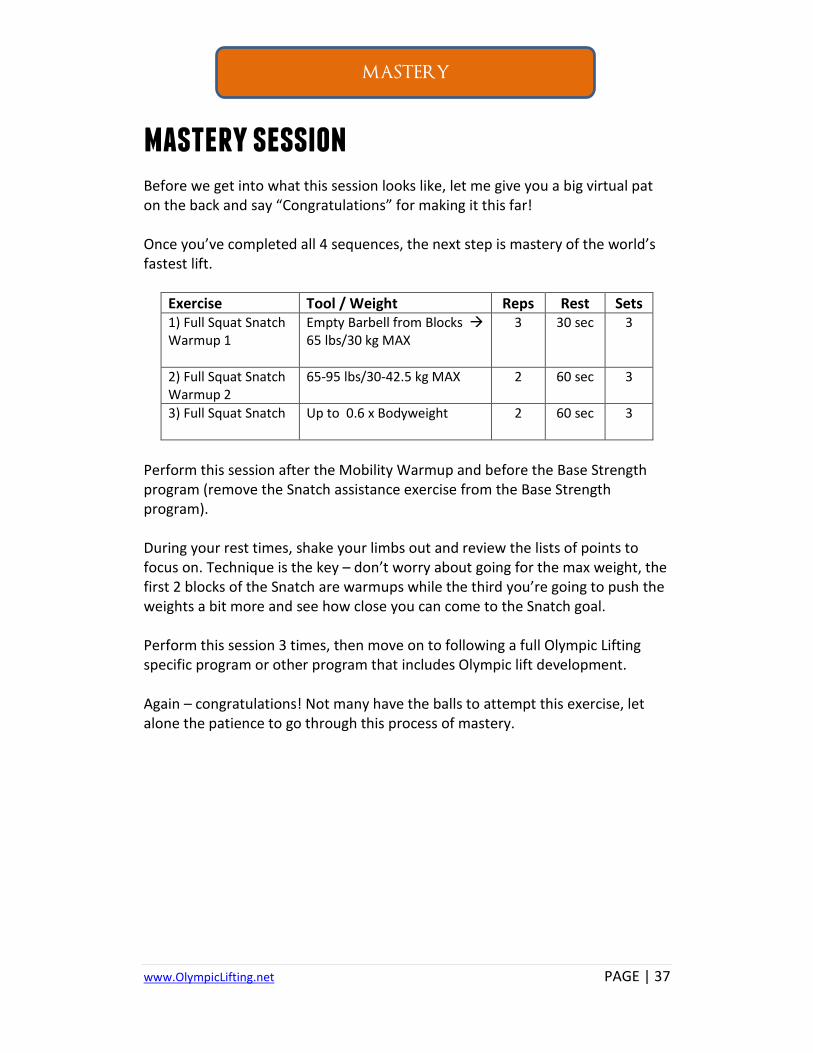
mastery session Before we get into what this session looks like, let me give you a big virtual pat on the back and say “Congratulations” for making it this far! Once you’ve completed all 4 sequences, the next step is mastery of the world’s fastest lift.
Exercise Tool / Weight Reps Rest Sets 1) Full Squat Snatch Warmup 1
Empty Barbell from Blocks 65 lbs/30 kg MAX
3 30 sec 3
2) Full Squat Snatch Warmup 2
65-95 lbs/30-42.5 kg MAX
2 60 sec 3
3) Full Squat Snatch Up to 0.6 x Bodyweight
2 60 sec 3
Perform this session after the Mobility Warmup and before the Base Strength program (remove the Snatch assistance exercise from the Base Strength program). During your rest times, shake your limbs out and review the lists of points to focus on. Technique is the key – don’t worry about going for the max weight, the first 2 blocks of the Snatch are warmups while the third you’re going to push the weights a bit more and see how close you can come to the Snatch goal. Perform this session 3 times, then move on to following a full Olympic Lifting specific program or other program that includes Olympic lift development. Again – congratulations! Not many have the balls to attempt this exercise, let alone the patience to go through this process of mastery.
mastery
www.OlympicLifting.net PAGE | 38
(somewhat) final thoughts By taking your time and putting the reps in with these exercises as outlined, you’ll have broken down any bad habits you might’ve had from playing with these lifts in the past, while simultaneously building the proper movements and timing needed for peak performance. If you’ve never tried the Snatch before, following this RMTS before doing a single rep of the Snatch is the shortest distance to technical mastery. Because the Snatch is complex, most people are too impatient to spend the time to learn it and either avoid it completely or do it wrong. Through patience, consistency and following the RMTS, you can be confident that you’re performing the lift to the best of your ability. However, many people still wish they had some eyes coaching them. Finding a qualified coach is an option to some, but not all. If you’d like to learn how you can get me to analyze your lifts and give you recommendations to correct any errors you might be making, click here. Otherwise, happy Snatching, and have fun showing off your skills in the gym. It’s been a pleasure putting this together for you and I hope you put it to full use. Sincerely,
Eric Wong, BSc, CSCS http://www.EricWongMMA.com