NX-595E Installation Manual - beveiligingswinkel.nl · protocol used by devices to obtain...
47
NX-595E Installation Manual P/N 230242 • REV C • ISS 02JUL14
Transcript of NX-595E Installation Manual - beveiligingswinkel.nl · protocol used by devices to obtain...

NX-595E Installation Manual
P/N 230242 • REV C • ISS 02JUL14
Copyright © 2014 UTC Fire & Security Americas Corporation, Inc. All rights reserved.
This document may not be copied in whole or in part or otherwise reproduced without prior written consent from UTC Fire & Security Americas Corporation, Inc., except where specifically permitted under US and international copyright law.
Trademarks and patents
The NX-595E name and logo are trademarks of UTC Fire & Security Americas Corporation, Inc.
NX-595E name is a trademark of UTC Fire & Security Americas Corporation, Inc.
Other trade names used in this document may be trademarks or registered trademarks of the manufacturers or vendors of the respective products.
Manufacturer Placed on the market by: UTC Fire & Security Americas Corporation, Inc. 3211 Progress Drive, Lincolnton, NC, 28092, USA
Authorized EU manufacturing representative: UTC Fire & Security B.V. Kelvinstraat 7, 6003 DH Weert, Netherlands
Compliance
EU directives UTC Fire & Security hereby declares that this device is in compliance with the applicable requirements and provisions of one or more of the Directives 1999/5/EC, 2014/30/EU and 2014/35/EU. For more information see: www.utcfireandsecurity.com or www.interlogix.com
2002/96/EC (WEEE directive): Products marked with this symbol cannot be disposed of as unsorted municipal waste in the European Union. For proper recycling, return this product to your local supplier upon the purchase of equivalent new equipment, or dispose of it at designated collection points. For more information see: www.recyclethis.info.
2006/66/EC (battery directive): This product contains a battery that cannot be disposed of as unsorted municipal waste in the European Union. See the product documentation for specific battery information. The battery is marked with this symbol, which may include lettering to indicate cadmium (Cd), lead (Pb), or mercury (Hg). For proper recycling, return the battery to your supplier or to a designated collection point. For more information see: www.recyclethis.info.
Contact information www.utcfireandsecurity.com or www.interlogix.com
Customer support www.interlogix.com/customer-support or www.utcfssecurityproducts.eu

NX-595E Installation Manual 3
Content
Important information 5 Limitation of liability 5 Advisory messages 5 Disclaimer 6 Warranty 6
Introduction 7
Features & Benefits 8 Phone Line connection 8 Phone Line connection, and network connection 9 Phone Line connection, network connection and integrated into the
door intercom system 9 Phone Line connection, network connection, integrated into the
door intercom system with NX-181xx Voice keypads 9
Installing The NX-595E into the enclosure 11
Wiring The NX-595E 12
PCB Layout 14
Terminal descriptions 14
Wiring Structure 15
FAQ - Frequently Asked Questions 16
xTun Cloud Service Error! Bookmark not defined.
Loading Factory Defaults (device 191) 17 Using a NX-181xx Voice keypad 18 Using a Standard Keypad (Icon or LCD) 18
Enrolling the NX-595E 19
Accessing the NX-595E – via a Touch Tone Phone 19
Main Menu – Structure 20
Main Menu - Additional Installer Information 21 Output Control 21 Service provider phone number 22 Panel and device configuration 23

4 NX-595E Installation Manual
Accessing the NX-595E - via the Web pages 24 Find the IP Address 24 Set the IP Address 24 Navigating to the NX-595E 24 Sign in Page 25 Main Menu (Web) – Accesssed with Installer Code 25 Users 26 Network Settings 27 Feature List 29 Outputs 31 IP Reporting 33
Enable Remote Web Access 34
Access via Android App 35
Access via iPhone App 36 Troubleshooting 36
Worksheets 38
System Status Messages 46

NX-595E Installation Manual 5
Important information
Limitation of liability To the maximum extent permitted by applicable law, in no event will UTCFS be liable for any lost profits or business opportunities, loss of use, business interruption, loss of data, or any other indirect, special, incidental, or consequential damages under any theory of liability, whether based in contract, tort, negligence, product liability, or otherwise. Because some jurisdictions do not allow the exclusion or limitation of liability for consequential or incidental damages the preceding limitation may not apply to you. In any event the total liability of UTCFS shall not exceed the purchase price of the product. The foregoing limitation will apply to the maximum extent permitted by applicable law, regardless of whether UTCFS has been advised of the possibility of such damages and regardless of whether any remedy fails of its essential purpose.
Installation in accordance with this manual, applicable codes, and the instructions of the authority having jurisdiction is mandatory.
While every precaution has been taken during the preparation of this manual to ensure the accuracy of its contents, UTCFS assumes no responsibility for errors or omissions.
Advisory messages Advisory messages alert you to conditions or practices that can cause unwanted results. The advisory messages used in this document are shown and described below.
WARNING: Warning messages advise you of hazards that could result in injury or loss of life. They tell you which actions to take or to avoid in order to prevent the injury or loss of life.
Caution: Caution messages advise you of possible equipment damage. They tell you which actions to take or to avoid in order to prevent the damage.
Note: Note messages advise you of the possible loss of time or effort. They describe how to avoid the loss. Notes are also used to point out important information that you should read.
Keep in mind, the level of security you will obtain with this system relates specifically with two major factors:
• The quantity, quality, and placement of security devices attached to this security system.
• The knowledge you have of the security system and how that knowledge is utilized in a weekly test of the complete system.
This product is to be installed by qualified SERVICE PERSONNEL only

6 NX-595E Installation Manual
The equipment should only be operated with an approved power adapter with insulated live pins.
Caution: Risk of explosion if battery is replaced by an incorrect type. Dispose of batteries according to the instructions. Contact your service provider for replacement batteries.
Disclaimer A level of TCP IP knowledge is required by the installer/s to set up some of the NX-595E functionality. UTCSF limits it support to NX-595E setup only, and is unable to offer further assistance on your client's DSL modem, router, firewall or any other 3rd party software. Please consult your customers IT department or qualified IT professional about implementing this product onto your client's network.
Warranty UTC Fire & Security Americas Corporation, Inc. guarantees this product against defective parts and workmanship for twenty-four (24) months from the date of purchase. If any defect appears during the warranty period contact your service provider. UTC Fire & Security Americas Corporation, Inc. assumes no liability for consequential or indirect damage, and accepts no responsibility for repairing damage to the product caused by misuse, careless handling, or where repairs have been made by others.
No other guarantee, written or verbal, is authorized by UTC Fire & Security Americas Corporation, Inc.

NX-595E Installation Manual 7
Introduction
The NX-595E is an optional module that may be added to your NetworX security system to provide remote access and reporting features. You can also integrate the security system to devices such as intercom, doors, lighting and air-conditioning via low-level relays.
NX-595E provides a web interface accessible via computer or smart phone, and simple configuration for remote access.
You can access the NX-595E using these methods:
• Personal Voice Guide (PVG) - When accessing the NX-595E via a touch-tone phone, the inbuilt PVG will talk to you and guide you through operating your security system. You can dial in and check the status of your security system, change a user’s PIN number, enter a new alarm phone number, or arm your system with easy to follow voice prompts.
• Built-In Web Server - provides access from PC, Mac, or smart phone with web browser. It allows users to arm / disarm individual partitions, check system status, enable / disable user codes, modify email accounts and Voice phone numbers from any standard web browser.
• iPhone app – provides access from an easy to use iPhone app without needing to set up port forwarding.
The NX-595E can interact with you with one or more of these:
• Voice Reporting - will call up to three phone numbers and announce alerts in plain English
• Email Reporting - will email up to three addresses, no mail server needs to be configured
Authorized users may customize voice recordings for user names, zone names, partition names, room names, output names and system names. These recordings offer a level of system customization usually reserved for more elaborate installations. The NX-595E can also store (and forward to NX-181xx Voice keypads) exit and entry messages. These messages can be left for other users of the security system.
NX-595E modules built in web server allows users to arm / disarm individual partitions, check system status, enable / disable user codes, modify email accounts and Voice phone numbers from any standard web browser.
Advanced intercom features are also incorporated within the NX-595E. Imagine a visitor to your home pressing the button at your front door intercom, and then being able to talk to you on your mobile phone anywhere in the world. Maybe it’s a courier delivering a parcel? You may wish to open the garage door and allow them to drop the parcel inside.

8 NX-595E Installation Manual
Features & Benefits
The more integration that is performed, the more features and benefits will become available:
Feature Connection
Phone Line Network Intercom NX-181xx
Dial Up Control Yes - - -
Dial Up Programming Yes - - -
Voice Reporting Yes - - -
4x Extra Zones Yes - - -
Real Time Clock Yes - - -
2x Extra Relays Yes - - -
Email Reporting - Yes - -
Automatic DHCP - Yes - -
Built-In Web Server - Yes - -
iPhone app - Yes - -
No mail server and port forwarding set up required
- Yes - -
Call Divert - - Yes -
Remote Listen In to Outdoor Station
- - Yes -
NX-181xx Access to Intercom and Door Release
- - - Yes
Remote Listen In to NX-181xxs - - - Yes
Phone Line connection • Voice Reporting – The NX-595E can phone the user and announce selected
event conditions in a human voice. This is in addition to alarm signals sent via the NetworX panel to the central monitoring center. Users can customize individual name recordings for zones, partitions, users, rooms and outputs. No more confusing beeps or sirens!
• Dial up control – The NX-595E can be access by any outside touch tone telephone and once connected the inbuilt Personal Voice Guide (PVG) will navigate you through all available menu options. From basic Arming / Disarming control, to more advanced menus like zone bypassing and System recordings.
• Dial up programming – An invaluable feature for the installer is the ability to remotely access the NX-595E from any outside touch tone telephone to carry out full system interrogation or advanced programming.

NX-595E Installation Manual 9
• Zones – There are two onboard zones that can be zone doubled to for use within the security system. Only available on the NX-8E control panels.
• RTC – “Real Time Clock” is an onboard component that holds the current time date setting. A built-in power-sense circuit detects power failures and automatically switches to the backup supply. This significantly reduces the chance of a "loss of date \ time" in periods of extended power outage.
Phone Line connection, and network connection
• All of the above features plus:
• Email Reporting – Up to three email addresses can be entered.
• DHCP - or Dynamic Host Configuration Protocol, is a computer network protocol used by devices to obtain configuration information for operation in an Internet Protocol network. This protocol reduces system administration workload, allowing networks to add devices with little or no manual intervention
• NX-595E Web Interface – Once connected to the network, users will enjoy the simple web user interface that is supplied with the NX-595E. Enter the IP address of your NX-595E into a web browser to access the NX-595E Configuration Server. Here the user can configure pin codes, arm and disarm partitions, view the last 185 event history, enter and change all voice, and divert phone numbers and assign email address. Installers have further access to network settings, feature lists and outputs.
• Relays – The two onboard relays are fully configurable and come defaulted for door release one and door release two.
Phone Line connection, network connection and integrated into the door intercom system • All of the above features plus:
• Call divert – This feature will call up to three different phone numbers when a visitor presses the call button on the outside door station whilst the NetworX security system is armed. Once the call is connected, a bi-directional conversation can take place and the called party has the ability to operate the onboard relay allowing access to the premises.
• Remote listen-in / two way communication – this feature allows users to connect to the outdoor station from a remote location
Phone Line connection, network connection, integrated into the door intercom system with NX-181xx Voice keypads • All of the above features plus:

10 NX-595E Installation Manual
• NX-181xx Voice keypads can be configured to answer a call initiated from either of the two door stations, they can also control the NX-595E modules onboard door release relays.
• Remote listen in / two way communication – this feature allows users to connect to any or all of the connected NX-181xx Voice keypads from a remote location an “listen-in” to any audio within that room / rooms.
NX-595E Installation Manual 11
Installing The NX-595E into the enclosure
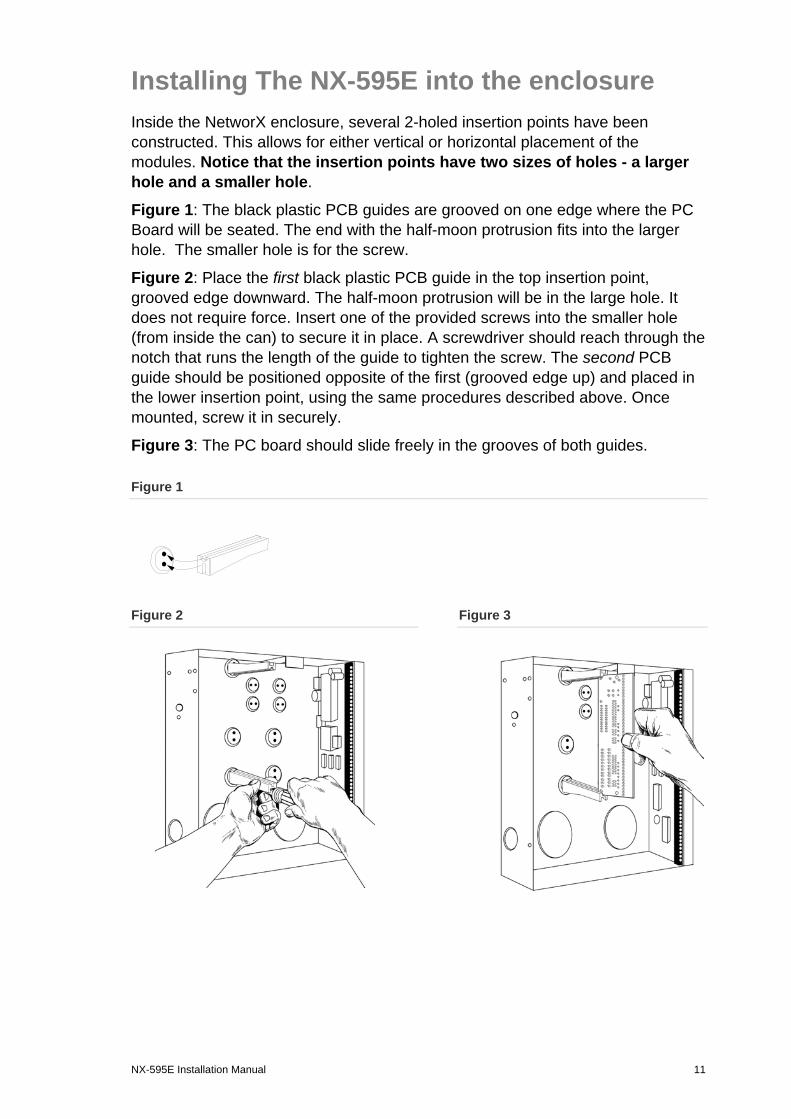
Inside the NetworX enclosure, several 2-holed insertion points have been constructed. This allows for either vertical or horizontal placement of the modules. Notice that the insertion points have two sizes of holes - a larger hole and a smaller hole.
Figure 1: The black plastic PCB guides are grooved on one edge where the PC Board will be seated. The end with the half-moon protrusion fits into the larger hole. The smaller hole is for the screw.
Figure 2: Place the first black plastic PCB guide in the top insertion point, grooved edge downward. The half-moon protrusion will be in the large hole. It does not require force. Insert one of the provided screws into the smaller hole (from inside the can) to secure it in place. A screwdriver should reach through the notch that runs the length of the guide to tighten the screw. The second PCB guide should be positioned opposite of the first (grooved edge up) and placed in the lower insertion point, using the same procedures described above. Once mounted, screw it in securely.
Figure 3: The PC board should slide freely in the grooves of both guides.
Figure 1
Figure 2
Figure 3

12 NX-595E Installation Manual
Wiring The NX-595E
Remove all power to the NetworX security system and connect NX-595E's terminals POS, COM & DATA to the NetworX bus.
A 5-wire interconnecting cable is supplied with the NX-595E. Connect one end to J1 (Audio Tap) on the NX-595E and the other end to J4 (Audio Tap) on the NetworX board.
Important: Ensure the trace is aligned with pin 1 on both taps. Refer to Figure 4, 5, 6 & 7 for correct orientation.
1. Connect J14 (RJ45) to available network port via a patch cable.
2. Connect E1C, E1A, E1+ in parallel to front door camera 1
3. Connect E2C, E2A, E2+ in parallel to front door camera 2
4. Connect V1+, V1- and V2+, V2 audio input in parallel with NX-181xx audio lines A and B
5. Connect Zones as required:
• 3.3K Single EOL’s
• 3.7K Lower zone EOL’s (when zone doubled)
• 6.9K Higher zone EOL’s (when zone doubled)
6. Select relay contact requirements via jumpers J10 and J11. Place link between GND and C for negative switch, and 12 V+ and C for positive switch, remove link for dry contact switching.
When integrating the NX-595E with an external camera and video monitor, it is important to power up the monitor before you power up the NX-595E. The NX-595E will then identify the presence of the monitor, and switch off its 5 VDC supplied to E1A and E2A and utilize the power supplied from the video monitor.
NetworX / NX Audio tap connections
Figure 4
Figure 5
NX-4, 6, 8
Terminal Strip NX-4
NX8
NX-6
NX-8E
Terminal Strip
NX-595E Installation Manual 13
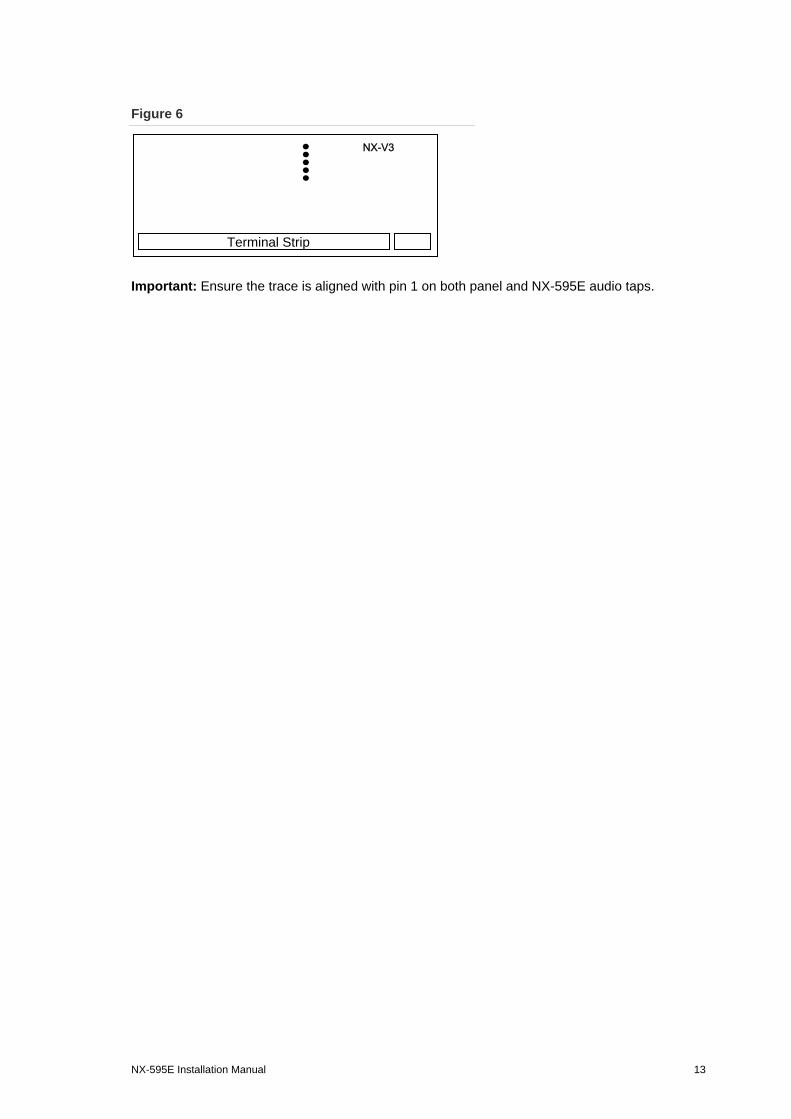
Figure 6
Important: Ensure the trace is aligned with pin 1 on both panel and NX-595E audio taps.
Terminal Strip
NX-V3
14 NX-595E Installation Manual
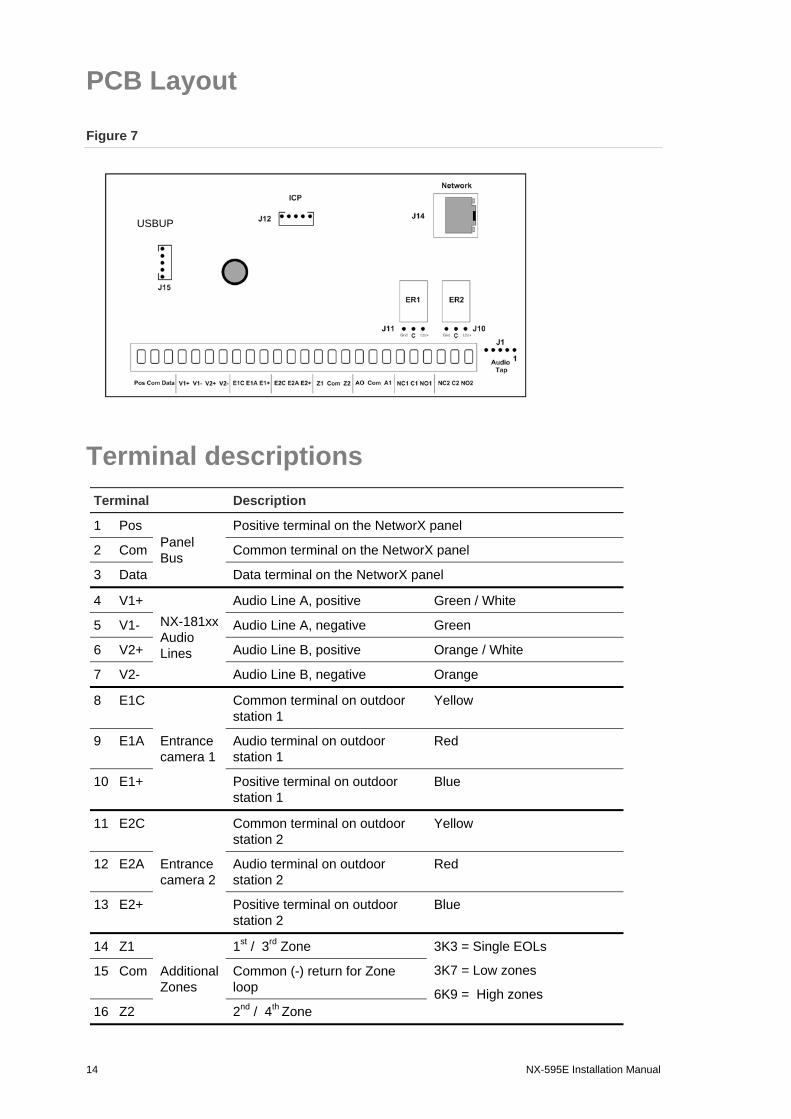
PCB Layout
Figure 7
Terminal descriptions
Terminal Description
1 Pos Panel Bus
Positive terminal on the NetworX panel
2 Com Common terminal on the NetworX panel
3 Data Data terminal on the NetworX panel
4 V1+
NX-181xx Audio Lines
Audio Line A, positive Green / White
5 V1- Audio Line A, negative Green
6 V2+ Audio Line B, positive Orange / White
7 V2- Audio Line B, negative Orange
8 E1C
Entrance camera 1
Common terminal on outdoor station 1
Yellow
9 E1A Audio terminal on outdoor station 1
Red
10 E1+ Positive terminal on outdoor station 1
Blue
11 E2C
Entrance camera 2
Common terminal on outdoor station 2
Yellow
12 E2A Audio terminal on outdoor station 2
Red
13 E2+ Positive terminal on outdoor station 2
Blue
14 Z1
Additional Zones
1st / 3rd Zone 3K3 = Single EOLs
3K7 = Low zones
6K9 = High zones
15 Com Common (-) return for Zone loop
16 Z2 2nd / 4th Zone
USBUP

NX-595E Installation Manual 15
17 AO Future Use
18 Com
19 A1
20 NC1 ER1 Entry Relay 1
Normally closed This relay is controlled from the NX-181xx communicating with outdoor station 1 21 C1 Common
22 NO1 Normally open
23 NC2 ER2 Entry Relay 2
Normally closed This relay is controlled from the NX-181xx communicating with outdoor station 2 24 C2 Common
25 NO2 Normally open
Wiring Structure Figure 8

16 NX-595E Installation Manual
Note: Video Intercom Monitor requires independent power source
FAQ - Frequently Asked Questions
1. If I am upgrading from a previous version of NX-595E what do I need to do? The new NX-595E will automatically configure itself in the cloud and provide email and remote access services without further configuration. Older versions of NX-595E required port forwarding to allow remote access. The new version does not require port forwarding so please remove any port forwarding settings from your router as these may interfere with the new cloud service.
2. Do I need port forwarding? No, the new NX-595E does not require port forwarding. Built-in cloud services automatically configure remote connections so it is easier to get online.
3. Do I need an email server? You do not need an email account to send emails as the new NX-595E will send emails using a secure cloud service. This is automatically configured and you only need to specify the destination email address(es). You can optionally provide your own email account and SMTP server settings and the NX-595E will use this instead to send you emails. Ask your email provider for these settings.
4. How do I connect/program the NX-595E?
a. Default the NX-595E following the instructions below.
b. Ensure your router supports DHCP (most do out of the box).
c. Connect the NX-595E to it using an Ethernet cable. The router should automatically assign the NX-595E module an IP address.
d. On a keypad connected to the NetworX security system, enter *8 [Master PIN] 0# 191# 21# which will tell you the IP address of the NX-595E. Press * to scroll through each segment of the IP address.
e. On a computer enter the IP address into a web browser to bring up the login page. Your NX-595E must remain in program mode to allow access.
f. Login to the NX-595E. The default username/password is installer 9713.
g. You can now program any additional settings you require via the web interface/
1. What if I cannot connect to NX-595E with my computer?
a. Check that your router has DHCP enabled, refer to your router manual for details.
b. Default the NX-595E. This will ensure DHCP is enabled.
c. Check that an IP address has been allocated in Location 21 of the NX-595E. If it is 0.0.0.0 then DHCP is not working correctly. You should assign the NX-595E a static IP address in Location 21. Make sure that it is

NX-595E Installation Manual 17
on the same subnet as our computer and that the IP address is not used by another device.
d. Put the NX-595E into program mode by using a keypad and enter device 191. By default this is an extra layer of security to prevent unauthorised remote access. Then try again from a web browser. You can also enable web access permanently on the NX-595E in Location 19, Segment 1, Option 6 = On
e. While the NX-595E is in program mode: On a windows computer, click Run, type cmd, press Enter, then ping [ip address]. If there is an error it will show “timed out” and you should check your network. If you see a time then your computer can talk to the NX-595E. You can also enable ping permanently on the NX-595E in Location 19, Segment 1, Option 4 = On.
2. I’m not receiving any emails!
a. Perform testing using a standard user PIN, the installer account by default does not send all reports.
b. Check that the emails are not being captured in your SPAM folder or blocked by a firewall.
c. Check the email address is correct.
d. Check that the event is ticked in the NX-595E settings.
e. Check that you are receiving other emails.
f. Check that the relevant reporting options are enabled in the panel programming.
g. Try using xConnect app to verify your system is connecting to the servers
Loading Factory Defaults (device 191)
The NX-595E is automatically set to device number 191, and programming is carried out like all other NetworX modules. The following examples show how to access the programming of the NX-595E via a standard keypad or a NX-181xx Voice keypad. The NX-595E will require defaulting the first time it is accessed by entering [9][1][0][#] or [9][1][0] [ENTER] depending on the keypad type. This will only be required once.

18 NX-595E Installation Manual
Using a NX-181xx Voice keypad
Step Device Programming, Using NX-181xx Voice keypads
Example Defaulting to factory settings
1. [MENU]-[0] Selects main menu - Option 0, Advanced system configuration
Enter your code, touch menu to exit.
2. [?]-[?]-[?]-[?] Enter your 4 or 6 digit Programming code
Touch 1 for keypad configuration Touch 2 for panel and device configuration Touch 3 to configure service provider phone number Touch menu to exit.
3. [ 2 ] Selects Panel and Device configuration
Select a device number followed by enter Touch menu to go back.
4. [ 1 ][ 9 ][ 1 ] [ENTER]
Connects to device 191 (NX-595E)
Selected device 191 is connected Select a Location number followed by enter Touch menu to go back.
5. [ 9 ][ 1 ][ 0 ] [ENTER]
Defaults the device, Note: only required once
You are now ready to begin NX-595E programming
6. [MENU] Moves back to step 4, select a device number
7. [MENU] Moves back to step 3, Advanced system configuration selection.
8. [MENU] Exits from Advanced system configuration.
Using a Standard Keypad (Icon or LCD)
Step Device Programming, Using standard keypad
Example Defaulting to factory settings 1. [ * ] [ 8 ] Selects Panel and Device programming
2. [?]-[?]-[?]-[?] Enter your 4 or 6 digit Programming code
3. [1][9][1] - [#] Connects to device 191 (NX-595E)
4. [9][1][0] - [#] Defaults the device, Note: only required once
You are now ready to begin NX-595E programming
5. [Exit] Moves back to step 3
6. [Exit] Exits programming

NX-595E Installation Manual 19
Enrolling the NX-595E
NetworX control panels can automatically find and store all modules that are connected to the communications bus, such as NX-595E, keypads, zone expanders, wireless receivers, output boards and other modules. This allows for polled supervision of these modules, and if the NetworX panel does not detect an enrolled module, a service condition will be generated.
The NX-595E module will be automatically enrolled if you perform the defaulting procedure described above. Enrolling takes about 12 seconds and user codes will not be accepted during this time.
Accessing the NX-595E – via a Touch Tone Phone
This section describes how to access the NX-595E via an off site touch-tone phone. The NX-595E must be on an independent line to the touch-tone phone from which you are trying to connect. The NX-595E must be pre-programmed by your security service provider to automatically answer the incoming call once the predetermined number of calls / rings have been reached. When the desired number of calls / rings has been reached the NX-595E will grab the phone line and announce the following. Enter your code for system access, press star to cancel
Enter your user / master code / Installer code (default master code is 1234 and default Installer code is 9713), the NX-595E will announce the recorded system name (if recorded) and list all accessible main menus, you can now make your selection as required. You are now connected to (system name)……
Press 1 for system status Press 2 for system control Press 3 for intercom control Press 4 for output control Press 5 for message bank Press 0 for system configuration * Press # to exit
* Denotes master code access only
The above sequence will be shown throughout this manual as [PIN].
Location 2, Dial attempts must be set to the desired number of rings before the NX-595E will answer an incoming call to begin a voice session. Location 1, segment 2, answering machine defeat can also be used to bypass onsite answering machines.
If answering machine defeat is enabled, accessing the NX-595E remotely is accomplished by calling the phone number the NX-595E is connected to and allowing it to ring once or twice, then hanging up, waiting 10 seconds, then

20 NX-595E Installation Manual
calling back the NX-595E, which will now answer the next incoming call. The second call must be made within 60 seconds of the first call.
An installer code is unrestricted and can access all partitions of the NX-595E, including menu 0.0 “Panel and device configuration”.
Main Menu – Structure
1 System Status
2 System Control 2.1 System Status 2.2 Partition Control 2.3 Zone Bypass 2.4 Event History 2.4.1 Alarm Memory 2.4.2 Event History 3 Intercom Control 3.1 Listen In 3.2 Two way communication 4 Output Control
5 Message Bank 5.1 Record an Exit Message 5.2 Record an Entry Message 0 System
Configuration
0.1 User Configuration 0.1.1 User Pin 0.1.2 User Partition 0.1.3 User Authority 0.2 Time and Date 0.2.1 Time 0.2.2 Date 0.3 Partition Entry Time 0.4 Partition Exit Time 0.5 Phone number configuration 0.5.1 Alarm Phone Number One 0.5.2 Alarm Phone Number Two 0.5.3 Alarm Phone Number Three 0.5.4 Divert Phone Number One 0.5.5 Divert Phone Number Two 0.5.6 Divert Phone Number Three
0.5.0 Service provider phone number
Installer access only
0.6 Voice Message 0.6.1 Exit message 0.6.2 Entry message 0.6.3 User name 0.6.4 Zone name 0.6.5 Partition name 0.6.6 Output name 0.6.7 Room name

NX-595E Installation Manual 21
0.6.8 System name 0.0 Panel and device configuration Installer access only
Main Menu - Additional Installer Information
4 - Output Control
The two onboard relays are defaulted as Door 1 and Door 2 control and are controlled when an intercom session is established between an outdoor station and NX-181xx Voice keypads.
Relay trigger events are selectable and can be chosen from a drop down “Activation events” list from within the web interface. Events can only be selected from within the NX-595E web interface.
Note: From the activation event drop down list “” output 1 trigger” “ and ” output 2 trigger” are fixed X10 module commands 0 and 1. When selected, they can be controlled directly from within Menu 4-output control when connected to a NX-595E. Drop down Event X10 Module Number Output 1 trigger 0 Output 2 trigger 1
Additional relay boards (NX-507) can be added, with a system total of 16. An output from a NX-181xx or NX-595E is an X10 command that can be tied to different relays. Set the relay you wish to control to follow event 56 (follow X10 command). Then tie the relay to the output by setting the corresponding X10 module number (from the chart below) at the X10 address for the relay. Please refer to your NX-507 installation instructions for further details.
Note: NX-508 output boards can also be used.
Outputs X10 Module Number
Outputs
X10 Module Number
1 0 9 8 2 1 10 9 3 2 11 10 4 3 12 11 5 4 13 12 6 5 14 13 7 6 15 14 8 7 16 15
0 - System Configuration
0.1 User Configuration

22 NX-595E Installation Manual
0.2 Time & Date
0.3 Partition Entry Time
0.4 Partition Exit Time
0.5 Phone number configuration
0.5.1 Alarm phone number One
0.5.2 Alarm phone number Two
0.5.3 Alarm phone number Three 0.5.4 Divert phone number One
0.5.5 Divert phone number Two
0.5.6 Divert phone number Three 0.5.0 Service provider phone number 0.6 Voice message recording 0.0 Panel and device configuration
Service provider phone number Menu 0.5.0. This is the phone number you wish your clients to call for servicing; this number will be announced via your NX-181xx Voice keypads, each arming and disarming cycle whilst a system fault is present.
How to: Enter Service provider phone number
Step Example Enter service provider phone numbers
1. [PIN]Call the NX-595E via an offsite touch-tone phone to begin the session.
2.
Press [0] for system configuration menu Press [5] for phone number configuration Press [0] for service provider phone number
3. Select a new alarm / divert phone number, followed by #
4.
1st star. Move back to step 3, phone number selection 2nd star, moves back to system configuration menu 3rd star, moves back to main menu # Disconnects session
0 - System Configuration
0.1 User Configuration 0.2 Time & Date 0.3 Partition Entry Time 0.4 Partition Exit Time
0.5 Phone number configuration
0.6 Voice message recording 0.0 Panel and device configuration
NX-595E Installation Manual 23
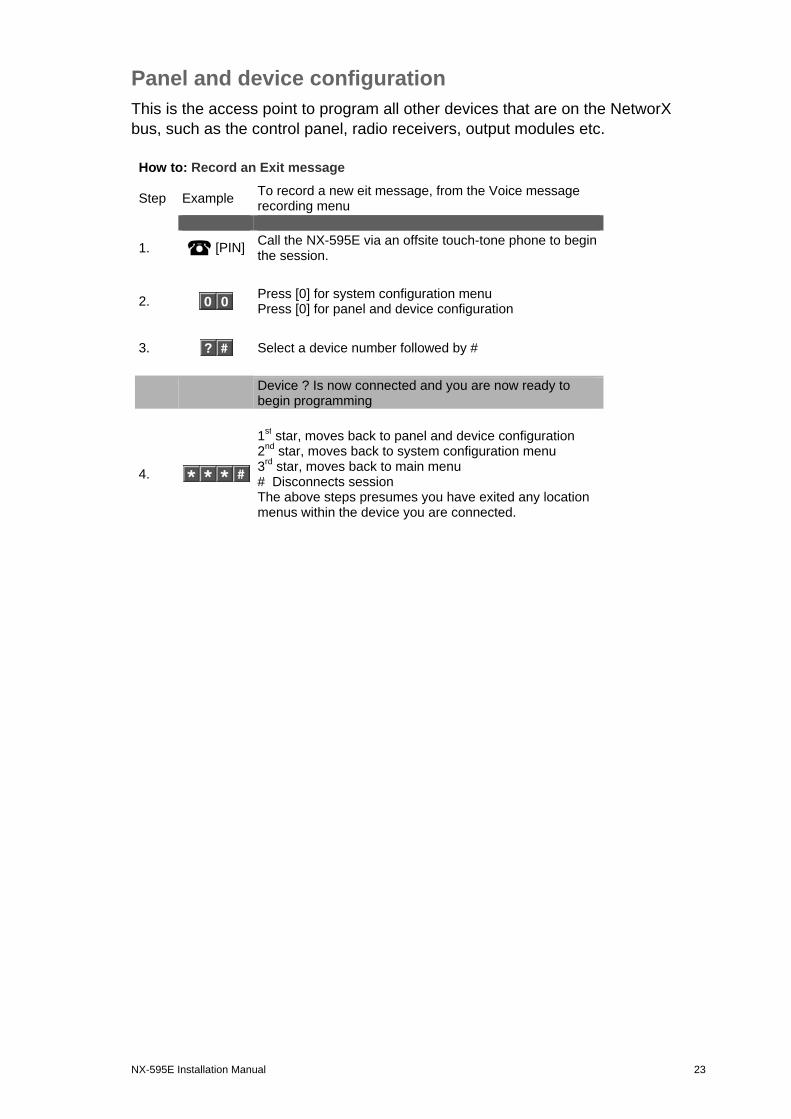
Panel and device configuration This is the access point to program all other devices that are on the NetworX bus, such as the control panel, radio receivers, output modules etc.
How to: Record an Exit message
Step Example To record a new eit message, from the Voice message recording menu
1. [PIN]Call the NX-595E via an offsite touch-tone phone to begin the session.
2. Press [0] for system configuration menu Press [0] for panel and device configuration
3. Select a device number followed by #
Device ? Is now connected and you are now ready to begin programming
4.
1st star, moves back to panel and device configuration 2nd star, moves back to system configuration menu 3rd star, moves back to main menu # Disconnects session The above steps presumes you have exited any location menus within the device you are connected.

24 NX-595E Installation Manual
Accessing the NX-595E - via the Web pages
Find the IP Address DHCP is enabled by default which means an IP address will be assigned automatically if your network supports DHCP.
To discover the IP address - use a keypad connected to the alarm system, enter program mode, and navigate to device 191, Location 21.
Set the IP Address If the IP address is empty (Location 21, Segment 1 will be 0), then program the relevant locations below.
Location 19 – IP Location Settings
• Enable option 1 to turn on DHCP which will allow your router to assign the NX-595E and IP address automatically. Disable this option to manually assign an IP address.
• Enable option 2 to force SSL connections, turn off to allow either standard or SSL connections.
• Enable option 4 to allow ping command for troubleshooting.
• Enable option 5 to allow the clock to automatically update using an internet time server.
• Enable option 6 to always allow remote access to the NX-595E programming menus. At default the NX-595E programming menus are only available when the NX-595E is in program mode (e.g. you enter the device programming menu via a keypad connected to the NetworX system).
Location 20 – IP Gateway
Location 21 – NX-595E IP Address
Location 22 – Subnet Mask
Navigating to the NX-595E Enter the IP address of your NX-595E into the web browser to access the NX-595E Configuration Server.
Note: You may also connect using SSL or Secure Sockets Layer by typing https: instead of http: for higher security communications between your browser and the NX-595E. SSL connections may be slightly slower due to the encryption process. You will also receive a warning window “There is a problem with this websites security certificate”, choose “Continue to this website” to connect to the NX-595E.

NX-595E Installation Manual 25
Figure 9
Sign in Page
When successfully connected, the NX-595E will display the “Sign in Page”. Enter the correct username/password combination to login.
• Default Installer Username: installer (username is case sensitive)
• Default Password: 9713 (enter the NetworX panel programming code)
The default installer name can be changed on the Location Setup menu after you have logged in.
Main Menu (Web) – Accesssed with Installer Code
Partition 1

26 NX-595E Installation Manual
The screen shot above shows the NX-595E’s complete menu when accessed via an installer code.
Network settings, location list, outputs and IP reporting will not be presented when accessed via a master code and only Arm/Disarm and Sensors will display if a standard user code is used to access the NX-595E. Make your programming selection by clicking on one of the left tabs.
Note: The NX-595E must either be in program mode, or alternately Location 19, Option 6 must be enabled before the NX-595E will present network settings, location list, outputs or IP reporting, even when accessed via an installer code.
Users
The user configuration menu is where user PIN codes are assigned to users.
The authorisation level determines the options available to that user, user authorisation is where you would alter and increase a users authority to become a Master Code. Master codes can only create, delete or modify user codes with equal or less authority than themselves.
The user configuration menu is where you also assign partition control and adjust authorisation levels to each user. Assigning partitions to users, determines which sections (partitions) of the security system a user may access.
Important: You must create a user name for your customer to enable them to login to the NX-595E. The installer account is for installer access only. Write the user name and PIN code on the back page of the User Manual.

NX-595E Installation Manual 27
Network Settings
MAC Address: Media Access Control address (MAC address) is a unique identifier assigned to most network interface cards by the manufacturer for identification.
Host Name: Fixed as “NX-595E”
Enable DHCP: DHCP or Dynamic Host Configuration Protocol, is a computer network protocol used by devices to obtain configuration information for operation in an Internet Protocol network. This protocol reduces system administration workload, allowing networks to add devices with little or no manual intervention
Require SSL: SSL or Secure Sockets Layer is a security protocol for communication over networks such as the Internet and reduce the chance of someone eavesdropping on your interaction with the security system. If Require SSL is selected then port 80 (standard http:) will be disabled and you must use https: which by default is port 443. If Require SSL is not enabled then you can connect using either http: on port 80 or https: at the configured SSL port.

28 NX-595E Installation Manual
Web Updates: When enabled, allows updating of the NX-595E Configuration Server's web pages via FTP. Normally disabled.
Ping: The “ping” command is always functional whilst the NX-595E is in program mode and is defaulted to NOT operate whilst the NX-595E is in the normal run mode. Enable this option to allow the NX-595E to respond to "ping" commands in normal operation. For security reasons it is recommended this option remain disabled during normal operation.
Web Time Updates: The NX-595E will check its internal and use the internet to compare it against GMT time. This is done every 15min and will update itself if the variance is greater than 3 minutes.
NetworX Protocols: This protocol is disabled by default, but is active for the first 5min after power up. Allows devices such as iPhones and UHS devices to communicate with the NX-595E via NetworX protocols.
xConnect: This enables the app and automatic email configuration. Can only be disabled from a keypad.
IP Address: An Internet Protocol (IP) address is a numerical label that is assigned to devices participating in a computer network. If DHCP is enabled and supported by your network, the NX-595E IP address will be automatically assigned, otherwise you will be required to enter your unique IP address here.
Subnet Mask: Allows a network to be divided into subnets, and allows the flow of network traffic between hosts to be segregated based on a network configuration. Applying the subnet mask to an IP address splits the address into two parts, an "extended network address" and a host address. A typical subnet mask is 255.255.255.0
Primary DNS: IP address of the primary DNS server. DNS (Domain Name System) allows dedicated servers on the internet to be assign both an IP address and a corresponding name, called a domain name.
Secondary DNS: IP address of the secondary DNS server. DNS (Domain Name System) allows dedicated servers on the internet to be assign both an IP address and a corresponding name, called a domain name.
SSL Port: Selectable port configuration, a default port is 443.
Web Access Passcode: This code allows the iPhone app to connect to this NX-595E, it does not affect the operation of other features.
xConnect Server 1: This server address should not be changed, it enables the remote web access, iPhone app and email services without having to set up port forwarding.
xConnect Server 2: This server address should not be changed.

NX-595E Installation Manual 29
Feature List
Zone-doubling: this feature will allow the two onboard zones to double to four zones.
Zone Lower Zone Higher Zone Single EOL 3K3 N/A N/A
Zone Doubled EOL’s N/A 3K7 6K9
Answering machine defeat: When answering machine defeat is enabled, accessing the NX-595E remotely is accomplished by calling the phone number the NX-595E is connected to and allowing it to ring once or twice, then hanging up. Wait 10 seconds. Then calling back the NX-595E, which will now answer the next incoming call. The second call must be made within 60 seconds of the first call.
Rings to Answer: The number of rings the NX-595E must detect before answering the telephone line when initiating a communication session. A value of 1 to 15 can be entered.
Note: Generally rings to answer would be disabled when enabling answering machine defeat.
Starting Zone: Used to enter the starting zone number of the additional zones on the NX-595E.

30 NX-595E Installation Manual
Data Zones Data Zones Data Zones Data Zones
9 = 9 - 12 41 = 41 - 44 73 = 73 - 76 105 = 105 -108
17 = 17 - 20 49 = 49 - 52 81 = 81 - 84 113 = 113 - 116
25 = 25 - 28 57 = 57 - 60 89 = 89 - 92 121 = 121 - 124
33 = 33 - 36 65 = 65 - 68 97 = 97 - 100
Note: Additional zones are only available on the NX-8E. This feature is not available for NX-4 or NX-8 panels.
Installer Name: Default installer name is installer and is case sensitive. Installer name access will present all tabs. Master user name access will not present the Network settings, location list, Outputs or IP reporting tabs.
Service Number: The system service number will be announced at NX-181xx Voice keypads when a system fault is present.
GMT Offset Hours/Minutes: Sets local GMT (Greenwich Mean Time).
DST Start / End month: Selects the months daylight savings begins and ends for the particular installation region.
DST Start / End week: – Selects which Sunday daylight savings begins and ends for the particular installation region.
Firmware, Hardware, Web version, Voice and Language: Displays the current versions loaded on the connected NX-595E.

NX-595E Installation Manual 31
Outputs
The two onboard relays are defaulted as Door 1 and Door 2 control and are controlled when an intercom session is established between an outdoor station and NX-181xx Voice keypads.
Relay trigger events are selectable and can be chosen from a drop down “Activation events” list from within the web interface. Events can only be selected from within the NX-595E web interface.
Note: From the activation event drop down list “Output 1 Trigger” and ”Output 2 Trigger” are fixed X10 module commands 0 and 1. This allows you to send an X10 module command 0 or 1 remotely by using Menu 4-Output Control on the NX-595E.
Drop down Event X10 Module Number
Output 1 trigger 0
Output 2 trigger 1

32 NX-595E Installation Manual
Activation Event: Select the required event from the drop down list that will activate the corresponding relay
Activation Time: Time the relay will be active, options 0 –255
Minutes: On if output should be timed in minutes; off if timed in seconds
Latch: On if output should latch; off if output should be timed.
Code Reset: On if output should stop timing upon code entry; off if output should follow timer.
Open Schedule: On if output should only activate between the opening and closing time
Close Schedule: On if output should only activate between the closing and opening time
Invert: On if output should be inverted
Activation Partitions: Is used to select the partition(s) the event must occur in before the output will activate.
Schedule Times: Sets the Opening / Closing hours and minutes (24 hour format) and the days of the week the event must occur in before the output will activate.

NX-595E Installation Manual 33
IP Reporting
34 NX-595E Installation Manual
Enable Remote Web Access
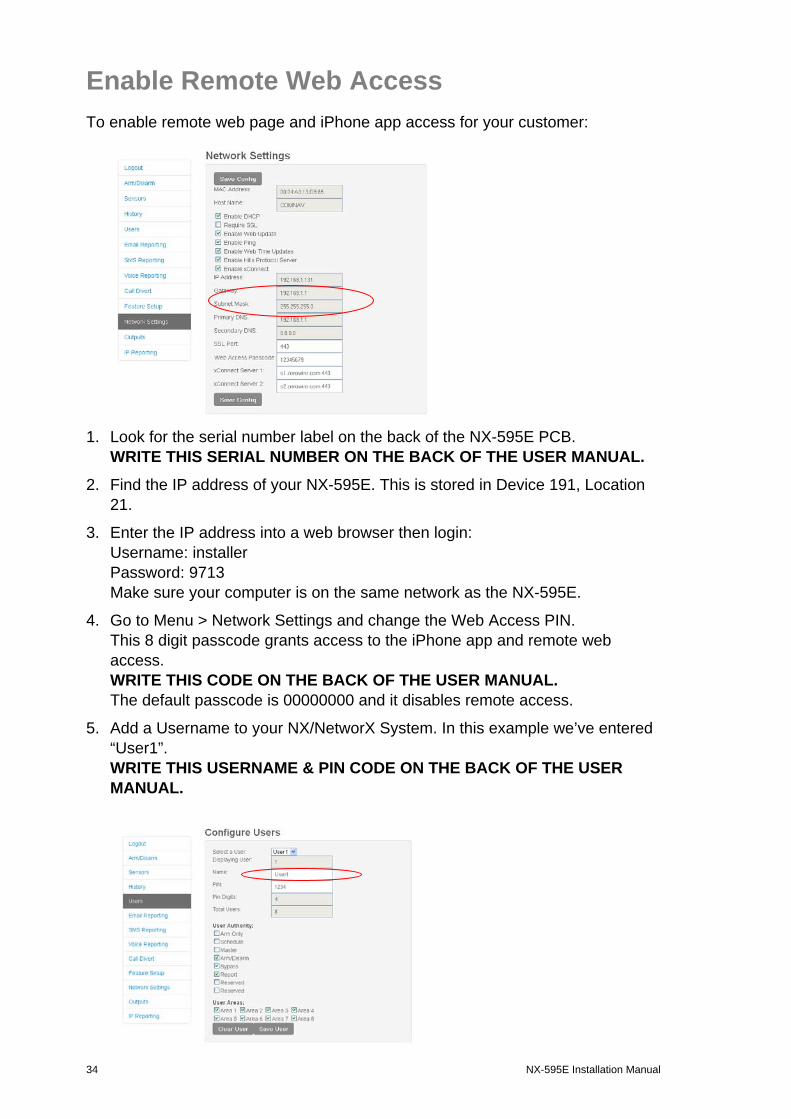
To enable remote web page and iPhone app access for your customer:
1. Look for the serial number label on the back of the NX-595E PCB. WRITE THIS SERIAL NUMBER ON THE BACK OF THE USER MANUAL.
2. Find the IP address of your NX-595E. This is stored in Device 191, Location 21.
3. Enter the IP address into a web browser then login: Username: installer Password: 9713 Make sure your computer is on the same network as the NX-595E.
4. Go to Menu > Network Settings and change the Web Access PIN. This 8 digit passcode grants access to the iPhone app and remote web access. WRITE THIS CODE ON THE BACK OF THE USER MANUAL. The default passcode is 00000000 and it disables remote access.
5. Add a Username to your NX/NetworX System. In this example we’ve entered “User1”. WRITE THIS USERNAME & PIN CODE ON THE BACK OF THE USER MANUAL.

NX-595E Installation Manual 35
Access via Android App
The built-in web server can also be accessed from an Android device via a dedicated app. This app is available to download from the Google PlayTM store. Carrier charges may apply and a Google account is required.
Most features available from the web server are displayed inside the Android app.
1. On your Android device go to the Google PlayTM store.
2. Search for xConnect.
3. Install the app.
4. Click the icon on your device to launch it.
5. Click + to add a new account.
6. Enter the details of your security system – this should be on the back of this manual, if not please contact your security installation company or builder for assistance. The serial number is also printed on the back of the NX-595E unit inside the NetworX enclosure. Opening the enclosure may cause a tamper alarm to sound.
7. Click Sites button to save the details.
8. Click the name of the Site, the app will now connect you to NX-595E.
NX-595E
NX-595E
Partition 1
36 NX-595E Installation Manual
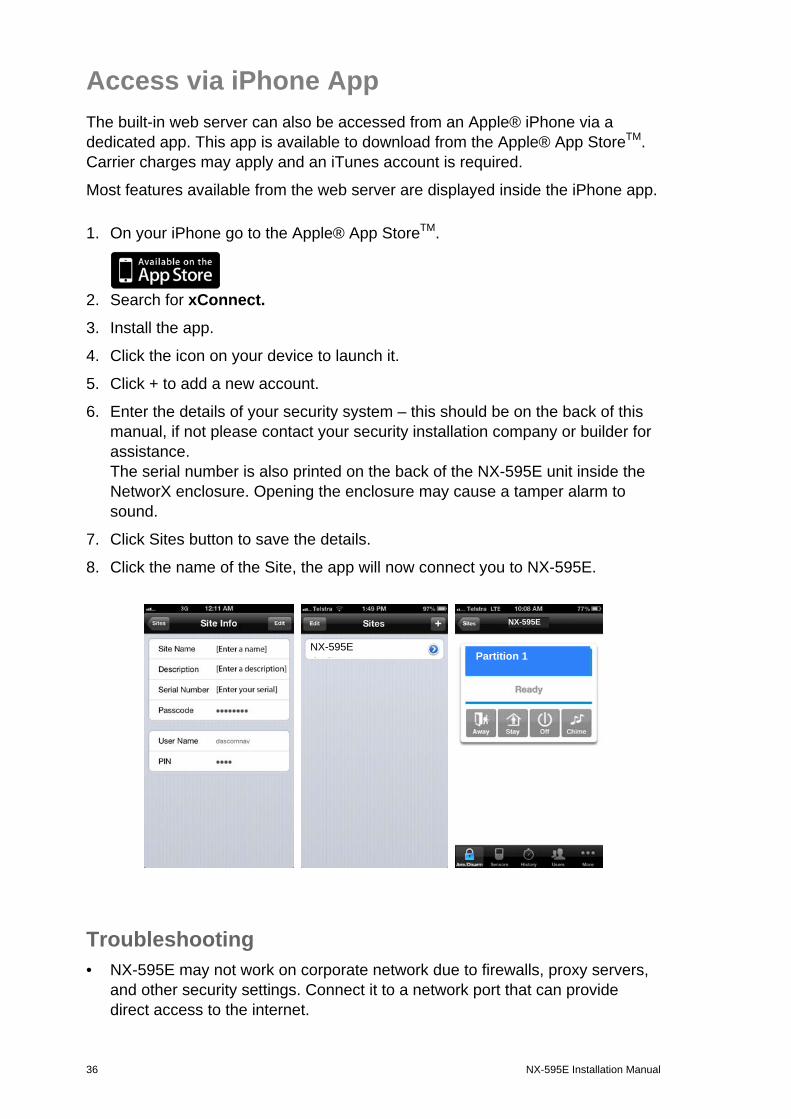
Access via iPhone App
The built-in web server can also be accessed from an Apple® iPhone via a dedicated app. This app is available to download from the Apple® App StoreTM. Carrier charges may apply and an iTunes account is required.
Most features available from the web server are displayed inside the iPhone app.
1. On your iPhone go to the Apple® App StoreTM.
2. Search for xConnect.
3. Install the app.
4. Click the icon on your device to launch it.
5. Click + to add a new account.
6. Enter the details of your security system – this should be on the back of this manual, if not please contact your security installation company or builder for assistance. The serial number is also printed on the back of the NX-595E unit inside the NetworX enclosure. Opening the enclosure may cause a tamper alarm to sound.
7. Click Sites button to save the details.
8. Click the name of the Site, the app will now connect you to NX-595E.
Troubleshooting • NX-595E may not work on corporate network due to firewalls, proxy servers,
and other security settings. Connect it to a network port that can provide direct access to the internet.
NX-595E
NX-595E
Partition 1

NX-595E Installation Manual 37
• Check that other devices on the same network can connect to the internet, if they are working then confirm all access codes are correct (serial number, Web Access Passcode, username, PIN)

38 NX-595E Installation Manual
Worksheets
Location 0 – Audio level adjustment for Outdoor Stations
The 2 segments in Location 0 are used to set the volume level to and from an outdoor station.
Segment 1, controls the intercom volume level from the audio bus to an outdoor station. Segment 2, controls the intercom volume level from an outdoor station to the audio bus.
Options are from 1 – 15.
Note: It may be necessary to adjust the NX-181xx microphone sensitivity (found in the mute menu / option 9) depending on the selected setting in segment 1.
Segments 1 - 2 12 15
Location 1 - NX-595E Features
Option 1 is used to set the zone-doubling feature. This feature will allow the two onboard zones to double to four zones. Please refer to Location 18 for starting zone number. If this feature is unselected, both onboard zones remain as single end of line zones and require 3K3 resistors.
When Zone doubling is enabled:
Lower zones = 3K7
Higher zones = 6K9
Option 2. Answering machines usually answer calls after a long ring period. This segment is used to set the answering machine defeat feature and enable a connection to the NX-595E before the answering machine answers the incoming call. When answering machine defeat is enabled, accessing the NX-595E remotely is accomplished by calling the phone number the NX-595E is connected to and allowing it to ring once or twice, then hanging up. Wait 10 seconds. Then calling back the NX-595E, which will now answer the next incoming call. The second call must be made within 60 seconds of the first call.
Segments 2 & 3 are reserved
Segment 1
(1) Zone doubling
(2) Answering machine defeat
(3) Reserved
(4) Reserved
(5) Reserved
(6) Reserved
(7) Reserved
(8) Reserved
Segment 2 Reserved
Segment 3 Reserved

NX-595E Installation Manual 39
Location 2 - Number of Rings
Location 2 contains the number of rings the NX-595E must detect before answering the telephone line when initiating a communication session. A value of 1 – 15 can be entered in this segment. Generally rings to answer would be disabled when enabling answering machine defeat.
Segment 1
Location 3 - Dial Attempts
Location 3 is used to enter the number of dial attempts the NX-595E will make before ending the communication cycle. A value from 1 – 15 may be used, and the default is 6.
Segment 1 6
Location 4 - Voice Reporting Features
Event Selection for all Voice dialing numbers
Segment 1
(1) Alarms
(2) Alarm Restores
(3) Open / Close (alarm system disarmed = Open, alarm system armed = close.
(4) Zone Bypass and restores
(5) Zone Trouble and restores
(6) Power Trouble and restores (AC Failure or Low Battery)
(7) Tamper and restores (Zones, Box, Keypad and Zone Activity Monitor)
(8) Test Reports
Segment 2
(1) System Trouble and restores (Siren, Phone, Expander, Short Circuit)
(2) Failure to Communicate
(3) Sensor Lost or Sensor Low Battery
(4) Program mode, Download and Log Full (full log must be enabled in system options)
(5) Cancel Code (cancel reporting must be enabled in partition options)
(6) Recent Closing, Exit Error
(7) Reserved
(8) Reserved

40 NX-595E Installation Manual
Location 5 - Alarm Phone Number One (1)
The first voice message phone number is programmed in Location 5
15 = Pulse dialing – in the segment where pulse dialing should begin
14 = Indicates the end of the phone number
13 = Creates a four second delay
12 = #
11 =*
Segments 1-20 14 14 14 14 14 14 14 14 14 14 14 14 14 14 14 14 14 14 14 14
Location 6 - Alarm Phone Number Two (2)
The second voice message phone number is programmed in Location 5
15 = Pulse dialing – in the segment where pulse dialing should begin
14 = Indicates the end of the phone number
13 = Creates a four second delay
12 = #
11 =*
Segments 1-20 14 14 14 14 14 14 14 14 14 14 14 14 14 14 14 14 14 14 14 14
Location 7 - Alarm Phone Number Three (3)
The third voice message phone number is programmed in Location 5
15 = Pulse dialing – in the segment where pulse dialing should begin
14 = Indicates the end of the phone number
13 = Creates a four second delay
12 = #
11 =*
Segments 1-20 14 14 14 14 14 14 14 14 14 14 14 14 14 14 14 14 14 14 14 14
Note: If multiple phone numbers are entered, the NX-595E will call each number in turn until it is answered or the designated number of dial attempts set in Location 3 has been reached. The NX-595E will first call phone number 1, wait 25 seconds for a PIN to be entered, if not entered it will hang up for 6 seconds, then call phone number 2 and repeats this process for phone number 3.
Location 8 - Reserved
Location 9 - Reserved
Location 10 - Reserved
Location 11 - Reserved
Location 12 - Reserved

NX-595E Installation Manual 41
Location 13 - Reserved
Location 14 – Reserved
Location 15 - Divert Phone Number One (1) The first Divert phone number is programmed in Location 15
Call divert phone numbers will be dialed in sequence when a call is initiated from an outdoor station. The outdoor station must be interfaced with the NetworX security system via the NX-595E. The NetworX security system must also be in the armed condition
15 = Pulse dialing – in the segment where pulse dialing should begin
14 = Indicates the end of the phone number
13 = Creates a four second delay
12 = #
11 =*
Segments 1-20 14 14 14 14 14 14 14 14 14 14 14 14 14 14 14 14 14 14 14 14
Location 16 - Divert Phone Number Two (2)
The second Divert phone number is programmed in Location 16
Call divert phone number 2 will be dialed if call divert phone number 1 is busy, when a call is initiated from an outdoor station. The outdoor station must be interfaced with the NetworX security system via the NX-595E. The NetworX security system must also be in the armed condition
15 = Pulse dialing – in the segment where pulse dialing should begin
14 = Indicates the end of the phone number
13 = Creates a four second delay
12 = #
11 =*
Segments 1-20 14 14 14 14 14 14 14 14 14 14 14 14 14 14 14 14 14 14 14 14

42 NX-595E Installation Manual
Location 17 - Divert Phone Number Three (3)
The third Divert phone number is programmed in Location 17
Call divert phone number 3 will be dialed if call divert phone number 2 is busy, when a call is initiated from an outdoor station. The outdoor station must be interfaced with the NetworX security system via the NX-595E. The NetworX security system must also be in the armed condition
15 = Pulse dialing – in the segment where pulse dialing should begin
14 = Indicates the end of the phone number
13 = Creates a four second delay
12 = #
11 =*
Segments 1-20 14 14 14 14 14 14 14 14 14 14 14 14 14 14 14 14 14 14 14 14
Location 18 - Zone Starting Number
Location 18 is used to enter the starting zone number of the additional zones on the NX-595E. The two zones can also be zone doubled, please refer to Location 1 to enable the zone doubling feature. 0 = Disabled
Data Zones Data Zones Data Zones Data Zones
9 = 9 - 12 41 = 41 - 44 73 = 73 - 76 105 = 105 -108
17 = 17 - 20 49 = 49 - 52 81 = 81 - 84 113 = 113 - 116
25 = 25 - 28 57 = 57 - 60 89 = 89 - 92 121 = 121 - 124
33 = 33 - 36 65 = 65 - 68 97 = 97 - 100
Note: Additional zones are only available on the NX-8E. This feature is not available for NX-4 or NX-8 panels.
Segment 1
Location 19 - IP Feature Options Location 19 is used to set required network settings.
Enable DHCP: DHCP or Dynamic Host Configuration Protocol, is a computer network protocol used by devices to obtain configuration information for operation in an Internet Protocol network. This protocol reduces system administration workload, allowing networks to add devices with little or no manual intervention.
Require SSL: SSL or Secure Sockets Layer is a security protocol for communication over networks such as the Internet and reduce the chance of someone eavesdropping on your interaction with the security system. If Require SSL is selected then port 80 (standard http:) will be disabled and you must use https: which by default is port 443. If Require SSL is not enabled then you can connect using either http: on port 80 or https: on port 443.
Enable Web page updates without a login: When enabled, allows updating of the NX-595E Configuration Server's web pages via FTP. Normally disabled.

NX-595E Installation Manual 43
Enable Ping in the run mode: The “ping” command is always functional whilst the NX-595E is in program mode and is defaulted to NOT operate whilst the NX-595E is in the normal run mode. Enable this option to allow the NX-595E to respond to "ping" commands in normal operation. For security reasons it is recommended this option remain disabled during normal operation.
Enable periodic update of clock via internet: The NX-595E will check its internal and use the internet to compare it against GMT time. This is done every 15min and will update itself if the variance is greater than 3 minutes.
Enable web programming: When enabled a user can access Network settings, location list, Outputs and IP reporting via the NX-595E's web pages. Otherwise the NX-595E will need to be in program mode to access these additional features. By default this is off to prevent an end-user access to these additional menus.
Enable NetworX protocol server: Disabled by default, do not change.
Enable Service: Enabled by default. Enabling this option allows you to use the app (xConnect).
Segment 1
(1) Enable DHCP
(2) Require SSL
3 Enable Web page updates without a login
4 Enable Ping in run mode
5 Enable periodic update of clock via internet
6 Enable Web programming of Network settings, location list, Outputs and IP reporting without NX-595E needing to be in program mode
7 Enable NetworX protocol server
8 Enable Service
Segment 2 Reserved
Location 20 - IP Gateway
The 4 segments in Location 20 are used to set the IP address of the networks gateway.
In homes, the gateway is usually the Internet Service Provider (ISP) device that connects the user to the internet, such as a DSL or cable modem.
In an enterprise system, the gateway is the node that routes the traffic from a workstation to another network segment. The default gateway is commonly the node connecting the internal networks and the outside network (Internet).
Segments 1 - 4

44 NX-595E Installation Manual
Location 21 - NX-595E IP Address
The 4 segments in Location 21 are used to set the IP address of the NX-595E so as it can be identified on the network.
Segments 1 - 4
Location 22 - Subnet Mask
The 4 segments in Location 22 are used to set the Subnet mask.
Segments 1 - 4
Location 23 - DNS Server 1
The 4 segments in Location 23 are used to set the networks DNS server address.
Segments 1 - 4
Location 24 - DNS Server 2
The 4 segments in Location 24 are used to set the networks DNS server address.
Segments 1 - 4
Location 25 - UHS Client Server IP address
The 4 segments in Location 21 are used to set the IP address of the NX-595E so it can be identified on the network by the UHS ultra agent. (Currently not supported)
Segments 1 - 4
Location 26 - UHS Client reporting selections Event selection for UHS client reporting
Segment 1
(1) Alarms
(2) Alarm Restores
(3) Open / Close (alarm system disarmed = Open, alarm system armed = close.
(4) Zone Bypass and restores
(5) Zone Trouble and restores
(6) Power Trouble and restores (AC Failure or Low Battery)
(7) Tamper and restores (Zones, Box, Keypad and Zone Activity Monitor)
(8) Test Reports
Segment 2
(1) System Trouble and restores (Siren, Phone, Expander, Short Circuit)
(2) Failure to Communicate

NX-595E Installation Manual 45
(3) Sensor Lost or Sensor Low Battery
(4) Program mode, Download and Log Full (full log must be enabled in system options)
(5) Cancel Code (cancel reporting must be enabled in partition options)
(6) Recent Closing, Exit Error
(7) Reserved
(8) Reserved

46 NX-595E Installation Manual
System Status Messages
Zone Number / Zone Name
In alarm – This zone has triggered a system alarm condition
Is bypassed – This zone is isolated (disabled) and will not activate an alarm
Chime is set – This zone is part of the chime group
Is not secure – This zone is not closed
Fire alarm – This zone has triggered a fire alarm
Tamper – This zone has triggered a tamper alarm
Trouble fault – This zone has an open circuit
Loss of wireless supervision – This zone is a wireless device and has lost its communication link with the control panel
Low battery – This zone is a wireless device and needs its battery changed
Partition Number / Partition Name
Is on in the away mode – This partition is armed in the away mode
Is on in the stay mode – This partition is armed in the stay mode
Is ready – This partition is secure and ready to be armed
Is not ready – This partition is NOT ready to be armed, a zone is not secure
All partitions are on in the away mode – All partitions in this multi partition system are armed in the away mode
All partitions are on in the stay mode – All partitions in this multi partition system are armed in the stay mode
All partitions are ready – All partitions in this multi partition system are secure and ready to be armed
System
AC power fail – The security system has lost its electricity power
Low battery – The security systems back up battery requires charging
Battery test fail – The security systems back up battery requires changing
Box tamper – The security systems cabinet tamper input has activated
Siren trouble – The security systems external siren has a problem
Over current – The security system is drawing too much current
Time and date loss The security system time and date need resetting
Communication fault – The security system has detected a problem with the phone line
Expander
Low battery – A remote power supply’s back up battery requires charging
AC power fail – A remote power supply has lost its electricity power
Box tamper – An expanders cabinet tamper input has activated

NX-595E Installation Manual 47
Keypad
Fire alarm – A fire alarm has been activated at the keypad
Panic – A panic alarm has been activated at the keypad
Medical – A medical alarm has been activated at the keypad