Nutrient Management Spear Program Laboratory...
50
College of Agriculture and Life Sciences Nutrient Management Spear Program Laboratory Manual Soil, Plant and Water Analysis Prepared by: Sanjay K. Gami Reviewed by: Quirine M. Ketterings 5/9/2017 Department of Animal Science Cornell University Cornell Nutrient Management Spear Program A collaboration among the Department of Animal Science, Cornell Cooperative Extension and PRODAIRY. http://nmsp.cals.cornell.edu
-
Upload
nguyenduong -
Category
Documents
-
view
214 -
download
0
Transcript of Nutrient Management Spear Program Laboratory...

College of
Agriculture and Life Sciences
Nutrient Management Spear Program
Laboratory
Manual
Soil, Plant and Water Analysis
Prepared by: Sanjay K. Gami
Reviewed by: Quirine M. Ketterings
5/9/2017
Department of Animal Science
Cornell University
Cornell Nutrient Management Spear Program A collaboration among the Department of Animal Science, Cornell Cooperative Extension and PRODAIRY. http://nmsp.cals.cornell.edu
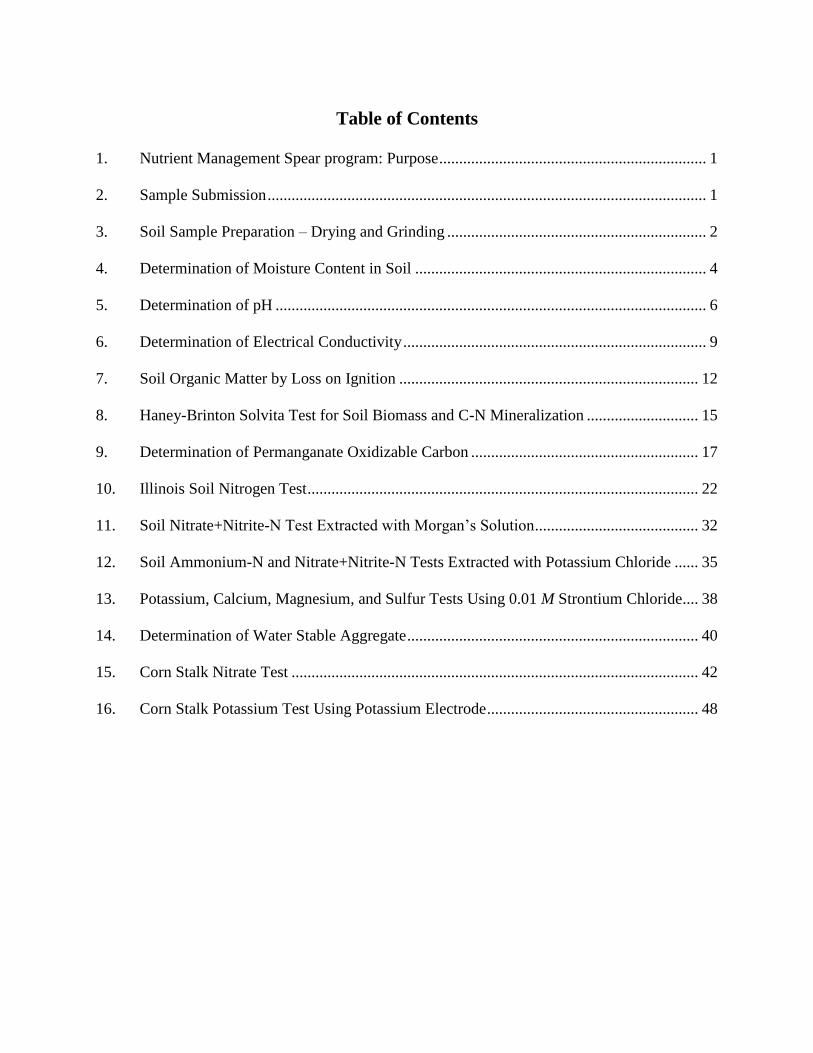
Table of Contents
1. Nutrient Management Spear program: Purpose ................................................................... 1
2. Sample Submission .............................................................................................................. 1
3. Soil Sample Preparation – Drying and Grinding ................................................................. 2
4. Determination of Moisture Content in Soil ......................................................................... 4
5. Determination of pH ............................................................................................................ 6
6. Determination of Electrical Conductivity ............................................................................ 9
7. Soil Organic Matter by Loss on Ignition ........................................................................... 12
8. Haney-Brinton Solvita Test for Soil Biomass and C-N Mineralization ............................ 15
9. Determination of Permanganate Oxidizable Carbon ......................................................... 17
10. Illinois Soil Nitrogen Test .................................................................................................. 22
11. Soil Nitrate+Nitrite-N Test Extracted with Morgan’s Solution ......................................... 32
12. Soil Ammonium-N and Nitrate+Nitrite-N Tests Extracted with Potassium Chloride ...... 35
13. Potassium, Calcium, Magnesium, and Sulfur Tests Using 0.01 M Strontium Chloride .... 38
14. Determination of Water Stable Aggregate ......................................................................... 40
15. Corn Stalk Nitrate Test ...................................................................................................... 42
16. Corn Stalk Potassium Test Using Potassium Electrode ..................................................... 48
1
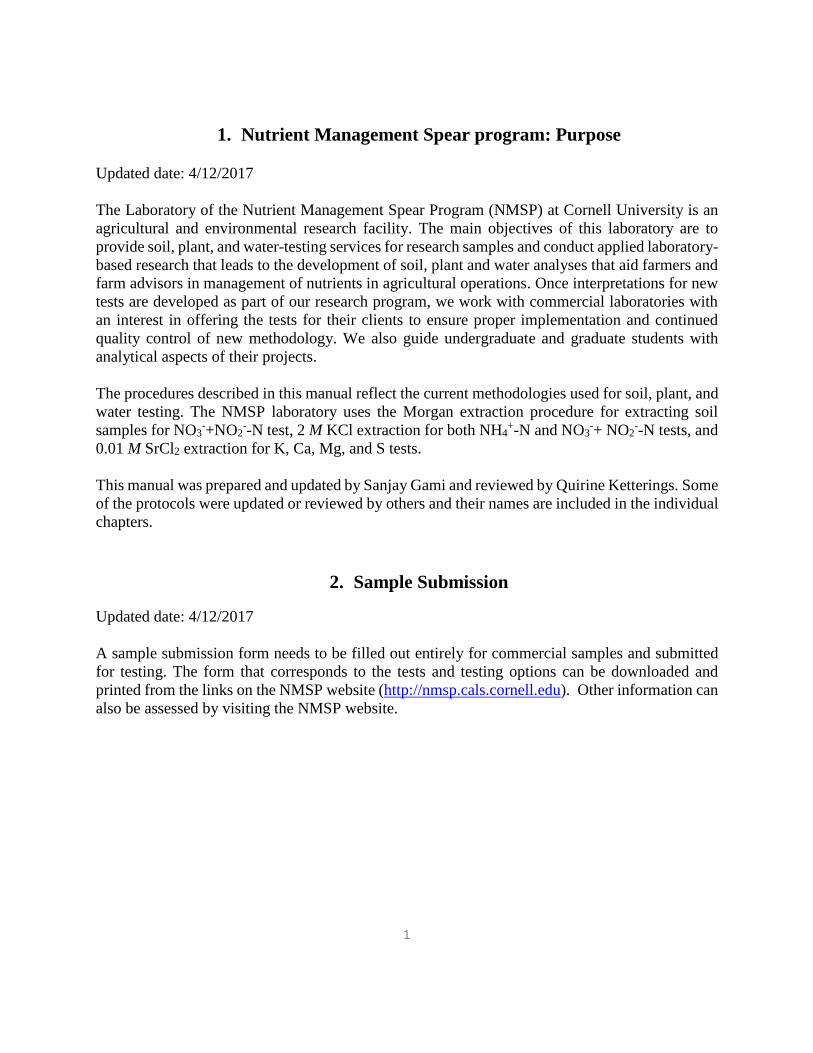
1. Nutrient Management Spear program: Purpose
Updated date: 4/12/2017
The Laboratory of the Nutrient Management Spear Program (NMSP) at Cornell University is an
agricultural and environmental research facility. The main objectives of this laboratory are to
provide soil, plant, and water-testing services for research samples and conduct applied laboratory-
based research that leads to the development of soil, plant and water analyses that aid farmers and
farm advisors in management of nutrients in agricultural operations. Once interpretations for new
tests are developed as part of our research program, we work with commercial laboratories with
an interest in offering the tests for their clients to ensure proper implementation and continued
quality control of new methodology. We also guide undergraduate and graduate students with
analytical aspects of their projects.
The procedures described in this manual reflect the current methodologies used for soil, plant, and
water testing. The NMSP laboratory uses the Morgan extraction procedure for extracting soil
samples for NO3-+NO2
--N test, 2 M KCl extraction for both NH4+-N and NO3
-+ NO2--N tests, and
0.01 M SrCl2 extraction for K, Ca, Mg, and S tests.
This manual was prepared and updated by Sanjay Gami and reviewed by Quirine Ketterings. Some
of the protocols were updated or reviewed by others and their names are included in the individual
chapters.
2. Sample Submission
Updated date: 4/12/2017
A sample submission form needs to be filled out entirely for commercial samples and submitted
for testing. The form that corresponds to the tests and testing options can be downloaded and
printed from the links on the NMSP website (http://nmsp.cals.cornell.edu). Other information can
also be assessed by visiting the NMSP website.
2
3. Soil Sample Preparation – Drying and Grinding
Updated date: 2/2009
Introduction:
For routine soil testing, it is suggested to dry the samples before analysis. Analysis of undried
samples is not recommended because of the effect of the moisture content on soil to extractant ratio
and the need for determination of moisture content.
Apparatus:
1. Drying oven
2. Crusher, mill, grinder, mortar and pestle.
3. Plate sieve, mesh sieve
Procedure:
Soils:
1. Once samples have been collected, they must be processed promptly to prevent any changes
that might affect analysis.
2. Break up large chunks of soil and spread out to air dry where the sample will not be
contaminated. Remove stones and large objects by hand picking. The sample may also be
placed in a forced air oven set at 500C.
3. Soil should be ground in a soil grinder to pass through a 2-mm sieve (or 10 to 20-mesh
screen) (Jackson, 1958) for routine soil test. However, analysis of carbon, nitrogen, and total
elements (arsenic, cadmium, copper, chromium, iron, lead, manganese, molybdenum, nickel,
phosphorus, selenium, zinc) requires that the sample be ground to a fine powder (to pass
through a 60-mesh screen).
4. Mix each soil sample to homogenize before weighing or scooping the subsample.
Plants:
1. After plant samples have been received in the lab, fresh samples should be placed into paper
bags or trays and dried in a forced air oven at 60°C. In general, adequate drying time is
approximately 12 to 48 hours or until the material breaks easily.

3
2. Most plant and feed samples should be ground to pass through a screen according to test
requirements. For corn stalk nitrate test, samples should be ground to pass through a 2-mm
screen. See agronomy factsheet 31 for sampling procedure and sample submission protocol
for corn stalk samples.
References:
1. Jackson, M.L. 1958. Soil Chemical Analysis. Prentice-Hall, Inc. Englewood Cliffs, N.J.

4
4. Determination of Moisture Content in Soil
Updated date: 2/2009
Introduction:
Soil moisture influences crop growth by affecting nutrient availability, nutrient transformations and
soil biological behavior1. The method is based on removing soil moisture by oven drying a soil
sample until the weight remains constant. The moisture content (%) is calculated from the sample
weight before and after drying.
Apparatus:
1. Oven – capable of maintaining a temperature of 105°C
2. Crucibles - 10-mL, porcelain
3. Crucible racks
4. Balance - minimum capacity of 50 g, 0.001 g
5. Scoop – 1 cm3 capacity
Procedure:
1. Dry the samples in a forced air oven set at 500C.
2. Prepare the soil sample for weighing by removing any stones, twigs, and plant matter; grind
in a soil grinder to pass through a 2-mm sieve.
3. Take the weight of empty crucibles (Wc).
4. Accurately weigh 2 g of the soil sample into the crucible, and record the weight of the
crucible and soil sample (Wcs).
5. Place the crucibles containing sample into the oven, set at 105°C and dry for one hour (after
temperature reaches 105°C).
6. Remove the crucible containing sample from the oven and allow to cool in a dry atmosphere
for 20 minutes.

5
7. Weigh the crucibles with the dried sample (Wos) and determine the moisture content.
Note: Record all weights to 0.001 g.
Calculations:
Calculate the moisture content of the soil as a percentage of the dry soil weight.
𝑀𝑜𝑖𝑠𝑡𝑢𝑟𝑒 (%) =𝑊𝑐𝑠 − 𝑊𝑜𝑠
𝑊𝑐𝑠 − 𝑊𝑐 𝑥 100
Where,
Wc = Weight of empty crucible
Wcs = Weight of crucible plus soil before drying at 105°C
Wos = Weight of crucible plus soil after drying at 105°C
References:
1. Analytical Laboratories, Department of Agronomy, Cornell University, procedure no.
S1810, issued: 03/12/2087, revised: 01/06/2004.
2. 1Soil and Plant Analysis Laboratory Manual available at
www.icarda.org/Publications/Lab_Manual/read.htm.

6
5. Determination of pH
Updated date: 8/18/2009
Introduction:
Soil pH is a representation of hydrogen ion activity in a liquid. It is the negative logarithm of the
amount of hydrogen ions (in moles) per liter of liquid. The pH found in soils ranges from 3 to 9.
It reflects whether a soil is acidic, neutral, basic or alkaline. Soil pH is one of the most indicative
measurements of the chemical properties of a soil (McLean, 1982). The availability of most plant-
essential elements depends on soil pH. It is one of the single most informative measurements that
can be made to determine soil characteristics (Thomas, 1996). A suspension, one part water to one
part soil (McLean, 1982; Thomas, 1996), is prepared and allowed to stand at room temperature for
one hour. The pH of this suspension is determined using a standard pH meter and electrode.
Apparatus:
1. pH Meter equipped with glass and reference electrode or combination electrode
2. 1.25 or 3 oz plastic cups or 50-mL beakers
3. Dispenser calibrated to deliver 20 mL deionized (DI) water
4. Weighing balance
5. Stirring rod
Reagents:
1. Standard buffers: pH 4.0, pH 7.0, and pH 10.0
2. Deionized water
Procedure:
pH in soil samples:
1. Weigh out or scoop 20 g of soil in a 3 oz disposable plastic cup or 50 mL beaker.
2. Add 20 mL of DI water to the soil in the cup/beaker.
3. Stir each sample several times until homogeneous slurry is achieved. Rinse the stirring rod
with DI water after stirring each sample.

7
4. Allow to stand for one hour.
5. Refer to the instrument manual for specific instructions supplied with the specific meter for
the operation of the instrument. Standardize the instrument using the pH buffers.
Note: Allow the pH buffers to come to room temperature before attempting to calibrate the
instrument. Two pH standards should be used to calibrate the pH meter. They must be chosen
in accordance with the pH range expected for the samples analyzed (pH 4.0 and 7.0 or pH
7.0 and 10.0).
6. Determine the pH of all samples.
7. Between pH readings, rinse the electrodes with DI water.
8. To check the meter during analysis, measure the pH of a buffer solution after every 10
samples and at the end of the analysis. The pH should be within 0.1 pH units of the buffer
value.
9. When finished, be sure the electrode is immersed in pH 4.0 buffer for storage.
pH in aqueous sample:
This method is applicable to drinking water, surface, ground, and saline waters, and other liquid
samples such as acid whey, manure samples etc.
Note: Water and other liquid samples for pH determination are to be preserved by refrigeration at
40C. Allow the samples to come to room temperature prior to measuring the pH.
1. Pour approximately 25 mL of each sample into individual cups or beakers. You can use 1.25
or 3 oz plastic cups or 50 mL beakers for the samples.
2. Follow steps 5-9 as described above for pH in soil samples.
Calibration of pH Meter:
1. Touch main screen.
2. Press 1.
3. Press pH.
4. Press Standard.
5. Press Clear.

8
6. Put electrode in pH 4.0 buffer; Press Standard and wait for it to stabilize.
7. Put electrode in pH 7.0 buffer; Press Standard 2 times.
8. If the slope shown on the instrument screen is 90% or above, continue to take readings for
samples.
Clean-Up:
1. Pour off the supernatant liquid, then dispose of the cups and soil in the waste soil
containers.
Maintenance:
1. Always keep the electrode in water or pH 4.0 buffer when not in use.
2. Always keep the filling hole of the electrode covered when not in use.
3. For further details on maintenance of the instrument and the electrode, refer to the
instrument standard operating procedure (SOP) and related hardware manuals.
References:
1. EPA Method 150.1 (4-79-020).
2. Hendershot, W.H., H. Lalande, and M. Duquette. 1993. Soil reaction and exchangeable
acidity. In: M.R. Carter Soil Sampling and Methods of Analysis. Lewis Publishers, pp 41-
145.
3. Mclean, E.O. 1982. Soil pH and lime requirement. p. 199-224. In A.L. Page et al. (ed.)
Methods of soil analysis. Part 2. 2nd ed. Agron Monogr. 9. ASA and SSSA, Madison, WI.
4. Thomas, G.W. 1996. Soil pH and soil acidity. p. 475-490. In D.L. Sparks et al. (ed.) Methods
of soil analysis. Part 3. Book series no. 5. SSSA and ASA, Madison, WI.
9
6. Determination of Electrical Conductivity
Updated date: 7/2009
Introduction:
The conductivity is manually determined using a conductivity meter. Samples are preferably
analyzed at 25°C. If the meter does not provide automatic temperature compensation, readings
should be corrected to 25°C based on measured temperature of the samples and known
compensation factors (Janzen, 1993). This method is used for determining the electrical
conductivity (EC) in milliSiemens per meter (mS/m) in the samples. It is often called “Soluble
Salts”. Soluble salts refer to the inorganic soil constituents that are soluble in water (EPA Method
120.1). Electrical conductivity estimates the amount of total dissolved salts or the total amount of
dissolved ions in the water and in the soil-water suspension. It is a function of quantity and specific
types of cations and anions in the soil-water suspension (Rhoades, 1982).
Soluble salts are readily accumulated in arid regions where leaching is limited. Salts may be
released by weathering of parent material or they may be transported to a soil by wind or water.
The accumulation of soluble salts in the soil profile limits plant growth by increasing the osmotic
potential of the soil solution and inducing specific ion toxicities or nutrient imbalance (Janjen,
1993).
Apparatus:
1. Conductivity meter
2. Conductivity cell, with constant K-1.0
3. 1.25 or 3 oz plastic cups or 50-mL beakers
4. Dispenser, capable of delivering 20 mL
5. Soil Scoop, 20 cm3
6. Stirring rod
Reagents:
1. 0.01 M KCl standard solution: Dissolve 0.7456 g potassium chloride (KCl) in deionized
(DI) water. Make up to 1 L with DI water and mix at 25°C. This solution is used as a
standard and reference solution.

10
Procedure:
Electrical conductivity in soil samples:
1. Weigh out or scoop 20 g of soil in a 3 oz plastic cup or 50 mL beaker.
2. Set the dispenser capable to deliver 20 mL, and add 20 mL of DI water to the soil in the
cup/beaker.
3. Stir each sample several times, until homogeneous slurry is achieved. Rinse the stirring rod
with DI water after stirring each sample.
4. Allow to stand for one hour.
5. Calibrate conductivity meter using the standard KCl solution following manufacturer’s
instructions.
6. Rinse the conductivity cell with DI water and insert the cell into the soil-water suspension
making sure that the tip of the cell is completely immersed. Allow the EC reading to
become stable. Read the electrical conductivity of the suspension. To check the meter
during analysis, measure EC of the standard after every 10 samples and at the end of the
analysis.
7. Between EC readings, rinse the cell with DI water.
Electrical conductivity in aqueous samples:
1. If analysis is not completed within 24 hours of sample collection, sample should be filtered
through a 0.45 micron filter and stored at 4°C.
2. Filter and apparatus must be washed with DI water and pre-rinsed with sample before use.
3. Pour approximately 25 mL sample into a 1.25 or 3 oz plastic cup or 50 mL beaker.
4. Rinse the cell with DI water and place the cell in the water samples. Allow the EC reading
to become stable. Record the EC in the Data Notebook.
5. Between EC readings, rinse the cell with DI water.
6. To check the meter during analysis, measure EC of the standard after every 10 samples and
at the end of the analysis.

11
Calculations:
The laboratory reports all electrical conductivity measurements in deciSiemens per meter (dS/m),
which is equal to the reading in mS/m divided by 100. The relationship between electrical
conductivity and salt concentration are approximate and can be calculated as given below:
Soluble salts in ppm (mg/liter) = EC in dS/m x 640
Total Cations or Anions (meq/liter) = EC in dS/m x 10
References:
1. EPA Method 120.1 (4-79-020)
2. http//www.epa.gov/region6/6pd/qa/qadevtools/mod5_sopsfield_
Measurements/29palms_field_conductivity.pdf
3. Janzen, H.H. 1993. Soluble salts. Soil reaction and exchangeable acidity. In: M.R. Carter
Soil Sampling and Methods of Analysis. Lewis Publishers, pp 161-166.
4. Rhoades, J. D. 1982. Soluble salts. p. 167-179. In: A. L. Page et al. (ed.) Methods of soil
analysis: Part 2: Chemical and microbiological properties. Monograph Number 9 (Second
Edition). ASA, Madison, WI.

12
7. Soil Organic Matter by Loss on Ignition
Updated date: 6/18/2009
Introduction:
We follow the same protocol as revised by Analytical Laboratories, Cornell University in 2004.
Loss-on-ignition (LOI) is an inexpensive and reliable technique that has been used for decades for
the determination of soil organic carbon (SOC) and soil organic matter (SOM). The LOI method is
generally used to determine the OM content of soils by weighing the sample before and after an
ashing (Storer, 1984; Bisutti et al., 2004). The method is based on the principle that at the chosen
temperature, all OC is converted to CO2. To obtain the OC value from the weight difference, it is
necessary to develop individual conversion factors or equations. These regression equations and
conversion factors vary with the nature of OM and are different for specific areas, soils and soil
horizons (Bisutti et al., 2004). Loss in weight gives an indication of the content of the organic matter
in the sample. Soil organic matter is oxidized at a moderate to high temperature, with the weight loss
being proportional to the amount of SOM in the sample (Konen et al., 2002). A known weight of
soil is placed in a tared crucible. The sample is dried at 105oC and moisture content is determined.
The sample is then ashed for two hours at 500oC. The percent weight loss of the soil ignition is
calculated.
Apparatus:
1. Oven - capable of maintaining a temperature of 105oC
2. Muffle furnace or oven - capable of maintaining a temperature of 500oC
3. Crucibles, 10-mL, porcelain
4. Balance - minimum capacity of 50 g, 0.001 g
5. Scoop - 1 cm3 capacity
Procedure:
The following procedure is written for use by the Nutrient Management Spear Program
Laboratory, where 50 soil samples, including a quality control soil and a replicate are prepared for
organic matter analysis by loss on ignition:
1. Take the weight of empty crucibles (Wc).
2. Accurately weigh 2 g of the soil sample into the crucible, and record the weight of the
crucible and soil sample (Wcs). Remove the crucible from the balance.

13
3. Dry the soil in the crucible in an oven set at 105oC for one hour.
4. Remove the crucibles and allow cooling for 15 minutes.
5. Weigh the crucibles with the dried sample (Wos).
6. When all the crucibles containing a dried soil sample have been weighed, place into a
muffle furnace, which equilibrated at 500°C, for two hours.
7. Remove the crucibles and allow cooling for one hour.
8. Place the crucible and the ashed sample on the balance and record the weight (Wca).
Remove the crucible from the balance.
Note: Record all weights to 0.001 g.
Calculations:
1. Moisture (%):
𝑀𝑜𝑖𝑠𝑡𝑢𝑟𝑒 (%) =𝑊𝑐𝑠 − 𝑊𝑜𝑠
𝑊𝑐𝑠 − 𝑊𝑐 𝑥 100
2. Loss on ignition (%):
𝐿𝑂𝐼 (%) =𝑊𝑜𝑠 − 𝑊𝑐𝑎
𝑊𝑜𝑠 − 𝑊𝑐 𝑥 100
Where,
LOI = Percent weight loss on ignition
Wc = Weight of empty crucible
Wcs = Weight of crucible plus soil before drying at 105oC
Wos = Weight of crucible plus soil after drying at 105oC
Wca = Weight of crucible plus ashed soil

14
3. Organic matter (%):
OM (%) = (0.7 x LOI) – 0.23
References:
1. Analytical Laboratories, Department of Agronomy, Cornell University, procedure no.
S1810, issued: 03/12/2087, revised: 01/06/2004
2. Bisutti, I., I. Hike, and M. Raessler. 2004. Determination of total organic carbon- an
overview of current methods. Trends in Analytical Chemistry 23: 716-726.
3. Konen, M.E., P.M. Jacobs, C. Lee Burras, B.J. Talaga, and J.A. Mason. 2002. Equations
for predicting soil organic carbon using loss-on-ignition for North Central U.S. soils. Soil
Science Society of America Journal 66: 1878-1881.
4. Storer, D.A. 1984. A simple high sample volume ashing procedure for determination of
soil organic matter. Communications in Soil Science and Plant Analysis 15 759-772.

15
8. Haney-Brinton Solvita Test for Soil Biomass and C-N Mineralization
Updated date: 4/2/2012
Introduction:
The procedure and detail information are taken from Solvita booklet. The Solvita soil test is a tool
which easily and accurately measures soil biological CO2 respiration. This is a measure of
microbial activity in the soil and is highly related to the fertility of the soil. Dried and weighed
samples of soils are moistened at the time of testing, and run for 24 hours to obtain the CO2-burst
potential, which is proportional to biomass. The results are read with the Digital Color Reader
(DCR).
Apparatus:
1. Digital color reader
2. Plastic beaker
3. Fiber filter
4. Glass jar with lid
5. Weighing balance
6. Solvita paddle (probe)
7. Dispenser calibrated to deliver 25 mL deionized (DI) water
Procedure:
1. Place fiber filter in the bottom of the small plastic beaker.
2. Weigh 40 g (0.02 g) of the pre-dried and 2-mm sieved soil into each plastic beaker.
3. Place the plastic beaker into the glass jar.
4. Add 25 mL of DI water into the glass jar (do not get soil wet).
5. Using plastic tweezers, place the Solvita paddle (probe) next to plastic beaker in glass jar.

16
6. Put the paddle with gel facing out next to the clear side of the jar.
7. Screw the lid on jar tightly.
8. Record the time.
9. Store jars at room temperature (25C) for 24 hours.
10. After 24 hours (30 minutes), remove paddle from glass jar.
11. Insert paddle (gel up) into the DCR.
12. Press the Low CO2 button.
13. Press the READ button.
14. The DCR reports the color chart number on the first line and the ppm CO2-C on the second
line. Record both.
15. Use the appropriate interpretation tables from the Solvita booklet for test results.
References:
1. Solvita 2011. Official Solvita guidelines soil respiration test. Booklet with digital color
reader. Also information found at www.solvita.com.

17
9. Determination of Permanganate Oxidizable Carbon
Updated date: 3/3/2017
Introduction:
Weil et al. (2003) originally developed this method and Culman et al. revised this protocol in 2012.
We follow exactly the same protocol as revised by Culman et al. (2012). We just copied their
protocol here. However, some of the points and steps are modified/adjusted for our equipment and
facilities. This procedure estimates the permanganate oxidizable carbon. In short, this is called
POXC (Culman, 2012). In this method, slightly diluted alkaline KMnO4 reacts with the soil readily
oxidizable (active) forms of soil C that converts Mn(VII) to Mn(II) and proportionally lowering
absorbance of 550 nm light (Weil et al., 2003). Calcium chloride (0.1 M) addition to permanganate
helps in settling of the soil after shaking.
Apparatus:
1. Spectrophotometer
2. pH meter
3. Weighing balance, resolution ± 0.01 g
4. Dispensers calibrated to 2 mL, 18 mL and 49.5 mL
5. Horizontal mechanical shaker
6. Magnetic stirrers
7. Adjustable 1 and 10 mL pipettor and tips
8. 50 mL centrifuge tubes with lids
9. Timer
10. Cuvettes

18
Reagents:
Preparation of KMnO4 stock solution 0.2 M:
1. 0.1 N NaOH solution (need for pH adjustment): Completely dissolve 4 g of NaOH in 1 L
of deionized (DI) water.
2. Dissolve 147 g of CaCl2 in about 600 mL of DI water. Dilute to 1 L DI water and mix
thoroughly.
3. Weigh 31.60 g of KMnO4 into a 1 L beaker/volumetric flask and add approximately 900
mL of the CaCl2 solution. Place on the magnetic stir plate with gentle heat and stir until
dissolved completely. Dissolution may be very slow and check the solution for undissolved
KMnO4.
4. Once dissolution is complete, bring the volume to 1 L with the CaCl2 solution and mix
well. Begin by adjusting the pH to 7.2 by adding a few drops of 0.1 N NaOH. Once the pH
unit is close to approach 7.2, add 1 drop at a time. Allow the pH reading to stabilize between
additions of NaOH. Once the pH is adjusted, transfer to a brown glass bottle and store in a
dark place. If stored as indicated, the stability of this solution will be 3-6 months.
Standards:
Four standard concentrations (0.005, 0.01, 0.015 and 0.02 M) will be prepared from the KMnO4
stock solution. The standard preparation involves first making a standard stock solution and then
diluting each standard stock solution to a final working standard.
Part 1 Standard stock solutions: Use the table below to prepare standard stock solutions. These
stock solutions can be prepared in 50 mL volumetric flask or centrifuge tubes and used for three
days (in glass and in the dark) to prepare working standards.
Concentration Volume of KMnO4 stock
solution
Volume of DI water
0.005 M 0.25 mL 9.75 mL
0.01 M 0.5 mL 9.5 mL
0.015 M 0.75 mL 9.25 mL
0.02 M 1.0 mL 9.0 mL
Part 2 Dilution step: Dilute each standard stock solution to a working standard by adding 0.5 mL
of each stock solution to 49.5 mL of DI water in 50 mL volumetric flask or centrifuge tubes. These
flask now contain the working standards (0.00005, 0.0001, 0.00015, and 0.0002 M KMnO4) and
should be prepared fresh daily.
19
Procedure:
Procedure for sample preparation involves two-parts; a sample reaction and sample dilution, as
detailed below:
Part 1 Sample reaction:
1. Label two 50 mL centrifuge tubes for each sample. Weigh 2.50 g (± 0.05 g) of air-dried
soil (sieved to 2-mm) into one of the 50 mL centrifuge tubes.
2. Use two quality control samples, one with soil (soil standard) and one without soil (solution
standard) in each batch. For soil standard, 2.50 g of known pulverized soil should be used.
Place the other set of tubes aside.
3. Add 18.0 mL of deionized water to each of the centrifuge tubes. Using the 1.0-10.0 mL
pipettor or 1.0-5.0 mL dispenser, add 2.0 mL of 0.2 M KMnO4 stock solution to each tube.
4. Working quickly, cap tubes tightly and hand-shake each tube vigorously for 2 seconds to
assure soil dispersion within the solution.
5. Place tubes on shaker and shake on high speed 240 oscillations per minute for 2 minutes.
6. After 2 minutes, remove samples from shaker and swirl or shake the tube vigorously to
ensure that there is no soil clinging to the sides or cap of the tube. At this point, remove
caps to avoid further disturbance of soil after settling. Place the samples in a dark area and
allow soil to settle for 10 minutes. Settling time is a critical step.
Note: It is important that the timing of each step be consistent, particularly the shaking and
settling times. The permanganate will continue to react with soil as long as it remains in
contact. Hence, working quickly with small batches of 10 samples or less is advised.
Part 2 Sample dilution:
1. While samples are settling, add 49.5 mL of DI water to the second set of centrifuge tubes.
2. Once the 10-minute settling period has passed, quickly transfer 0.5 mL of supernatant
(avoiding any particulate matter) to the second tube containing 49.5 mL of DI water. This
step should be performed as quickly as possible as the permanganate will continue to react
with soil as long as it remains in contact.
3. Cap second set of tubes and invert to mix. These are the final sample solutions for analysis.
They are stable for up to 24 hours if stored in the dark.

20
Reading Samples on Spectrophotometer:
1. Measure and record the absorbance of standards and samples at 550 nm using AquaMate
spectrophotometer single cuvette reader.
Calculating Mass of POXC for Unknown Soil Samples:
1. The amount of carbon oxidized is a function of the quantity of permanganate reduced.
Consequently, the higher the POXC values the lower the absorbance (intensity of the color
of the solution).
2. Use the following equation to determine POXC, Weil et al. (2003):
POXC (mg kg-1) =
[0.02 mol/ L – (a + b × Abs)] × (9000 mg C/mol) × (0.02 L solution/Wt)
Where,
0.02 mol/L = initial solution concentration
a = intercept of the standard curve
b = slope of the standard curve
Abs = absorbance of unknown
9000 = milligrams of C oxidized by 1 mole of MnO4 changing from Mn7+ to Mn2+
0.02 L = volume of stock solution reacted
Wt = weight of air-dried soil sample in kg
Example for Calculation:
Construct standard curve with the following values:
Y-axis (Molarity of stock KMnO4 standards)* 0.005 0.01 0.015 0.02
X-axis (Abs values from spectrophotometer) 0.1000 0.1984 0.3034 0.3966
* Note: The standard curve should use the molarity of the stock standards, and not the working
standards, since the stock standards represent the actual concentration (0.02 M KMnO4) used
to react with the soil.
This produces the regression line: y = 0.0502x – 0.00004; R2 = 0.999
21
Unknown sample absorbance: 0.3087; unknown sample soil weight: 2.48 g
POXC (mg kg-1 soil) = [0.02 M – (-0.00004 + (0.0502 × 0.3087)] × (9000 mg C/ mol) ×
(0.02 L solution/ 0.00248 kg) = 329.75 mg POXC kg -1 soil
Clean-up and Disposal:
Leaving the centrifuge tubes capped but on the bench top for a week or more will allow the
permanganate to completely react with the soil and lose all purple pigmentation. Liquid can then
be safely disposed of down the sink and tubes with soil thrown out or cleaned and reused. The
second dilution of samples and standards contains very little KMnO4 and may be safely flushed
down the drain with copious amounts of water. However, check environmental health and safety
rules for proper disposal.
Equipment Operation and Calibration Procedure:
Turn instrument “ON” and warm up instrument for about three minutes.
Select “GENERAL TEST”→ Select “QUANT” → Select “WAVELENGTH” (change according
to methodology) → “ENTER STANDARDS” → Enter the concentration of the standards. To enter
Standard concentration, use the “UP” and “DOWN” arrow keys to move through the list of
standards. Use the numeric keys to enter the concentration of the standard and press “ENTER”
when finished. The instrument returns to the Standards Entry Page with the highlight on the next
Standard on the list. When all the Standards have been entered press the “ACCEPT” function key
to return to the QUANT Page with the new list of Standards.
Press “ZEROBASE” to zero the instrument and press “CALIBRATE”. The Quant Calibration
graph will be displaced and the instrument will prompt for each standard (and replicate) in turn.
As the measurements of the standards proceed, the data points are marked on the graph. When all
the standards have been measured, the system calculates the equation, rescales the graph then
draws and displays the line of best fit. Now we can take sample measurement and then switch to
the Quant Results screen. Press “ZEROBASE” to zero again before taking sample measurement.
References:
1. AquaMate User Manual, AM Issue 3b (07/2001).
2. Culman, Steve, M. Freeman, and S. Snapp. 2012. Procedure for determination of permanganate
oxidizable carbon. Kellogg Biological Station, Michigan State University, Hickory Corners,
MI 49060. Found at http://lter.kbs.msu.edu/protocols/133.
3. Weil, R.R., K.R. Islam, M.A. Stine, J.B. Gruver, and S.E. Samson-Liebig.2003. Estimating
active carbon for soil quality assessment: A simplified method for laboratory and field use.
American Journal of Alternative Agriculture. 18: 3-17.

22
10. Illinois Soil Nitrogen Test
Updated date: 3/25/2008 and 6/2009
Introduction:
The protocol for the Illinois soil nitrogen test (ISNT) was originally developed by Nathalie Galens
and Jon Klapwijk and updated on 3/25/2008 by Kevin Dietzel. Sanjay Gami updated this protocol
in 6/2009. The ISNT is a simple laboratory analysis that can be used as a tool to predict if additional
nitrogen (N) application for corn (Zea mays L.) will result in a yield increase. Initial testing of the
method at Cornell University showed a high degree of day-to-day and within-griddle soil test N
variability. At the University of Illinois, similar findings led to modification of the method to
include jar rotations 1.5 and 3 hours after initiation of the 5-hour incubation period used in the test.
To determine if variability could be reduced without additional labor by enclosing the griddles
using plywood boxes, experiments were designed to compare soil test variability using both the
open-bench and enclosed-griddle methods. Enclosing the griddles decreased the coefficient of
variance (p=0.013) to 2.5% from 3.8% when analyses were done using the open-bench method
(using 10 exterior positions of the griddle for each method). Enclosing griddles did not impact
recovery of added glucosamine-N but resulted in lower N test values when set at the same
temperature as the open-bench griddles. A comparison study of 14 soils analyzed at the University
of Illinois using the standard open-bench procedure with jar rotation and at Cornell University
using the enclosed-griddle method without rotation showed sample means to be comparable when
the enclosed griddles were set at 50.6ºC (Klapwyk and Ketterings, 2005). These results imply that
the modified method could be adopted for use beyond well-controlled laboratory environments
but that griddle temperature setting is extremely important. Field work indicated the test reflects
past manure and compost N applications (Klapwyk et al., 2006) and was accurate in predicting
corn responsiveness in New York (Klapwyk and Ketterings, 2006; Lawrence et al, 2009).
Apparatus:
1. Weighing balance: An analytical balance with at least 0.1 mg accuracy is used to weigh
out soil for analysis.
2. Quality control soil: Two samples of a quality control soil are used on each griddle to
monitor the accuracy of the values determined from that griddle. This soil (a mix of various
soils, thoroughly mixed and ground to pass 250 μm) was run more than 100 times with an
average value of 230 ppm, maximum 255 ppm and minimum 205 ppm.
3. Mason jars: Pint sized glass canning jars (cat. No. 14400-66000, Alltrista, Muncie, IN).

23
4. Lid: Attached onto the jar lids is a screw with a turnable apparatus where the Petri dishes
can be mounted. See diagram. Supplies list for lid:
i. Machine screws (Part No. 91783A161, McMaster Carr, Aurora, OH).
ii. Stainless steel nuts (Part No. 91841A007, McMaster Carr).
iii. Nylon screw (Part No. 94609A150, McMaster Carr).
iv. Nylon nut (Part No. 94812A133, McMaster Carr).
v. Viton O-ring (Part No. 9464K11, McMaster Carr).
vi. Nylon strap (Part No. 8876T14, McMaster Carr).
vii. Releasable cable tie (Part No. 7134K3, McMaster Carr).
viii. Panduit Cable tie mounts (Part No. TM2S6-C, available through Horizon
Solutions Corp., Holyoke, MA).

24
5. Petri dishes: 60 mm diam. by 15 mm deep Pyrex Petri Dishes (C-3160-60B0, Labglass,
Buena, NJ).
6. HOBO temperature sensor: HOBO (Model H08-006-04, Onset Computer Corp., Bourne,
MA) four-channel external data loggers with water/soil temperature sensors (Part No.
TMC6-HD, Onset Computer Corp.) are used to record temperatures within griddles.
7. Timer: A Big-Digit timer (Cat No. S407992, Fisher Scientific) is used to time the 5 h
incubation and the 7 min loading and unloading times.
8. Lamp timers: Lamp timers (Model No.
TN111, Intermatic Inc., Spring Grove,
IL) are used to preheat griddles at least 1
hr 15 min. before start time.
9. Griddles: Electric Griddles with the
original temperature controller (Model
76220, West Bend, West Bend, WI).
10. Plywood boxes: Plywood boxes are 12.7
mm thick for the walls of the box, and 19
mm thick for the bottom and lid. Outside
dimensions of the boxes are 81.3 cm in length, 40.6 cm in width, and 62.9 cm in height
(see diagram). A 19 by 25 mm hole was cut into the side of the box for electrical plug of
the griddle. Inside corners and sides of the top of the lid were secured with 38 by 38 mm
spruce lumber. The bottom of the lid was lined with 32 by 5 mm weather stripping (Prod.
No. V447, Thermwell Products Co., Mahwah, NJ).
11. Titrator: An automatic titrator (719 S Titrino, Metrohm Ltd., available through Brinkmann
Instruments, Inc., Westbury, NY) with propeller titration stand (Metrohm 727 Ti Stand)
performs a pH titration using 0.01 M H2SO4 of H3BO3 and DI water in Petri dishes after
5 h incubation.
12. Printer: An Epson LX-300+ 9-pin dot matrix printer (Seiko Epson Corp., Nagano, Japan)
is connected to the titrator for automatic printing of outputs.
13. Acid Bath: Acid bath is made by adding 160 mL of Concentrated H2SO4 to 8 L of DI water.
14. Drying Oven: Any model drying oven with temperature set to 50°C.

25
Reagents:
1. 2.00 M NaOH (Cat. No. VW6720-7, VWR International, Bridgeport, NJ)
2. 4% H3BO3 with pH indicator (Cat. No. VW3251-7, VWR International, West Chester, PA)
3. 0.01 M H2SO4 (SA226-20, Fisher Scientific, Fair Lawn, NJ)
Procedure:
Sample preparation:
1. Dry samples in a 50˚C oven and crush to pass through a 2-mm sieve.
2. Weigh out two samples of 1 g (0.9975-1.005 g) each from each sample to be tested.
3. Place in glass jar and cover with lid marked with griddle # and position.
4. Designate the placement of each sample in a randomized fashion so that the two duplicate
samples are assigned to different positions on different griddles.
5. Positions 6 and 7 are always quality control samples (ground to 250 μm).
Data loggers:
HOBO 4-Channel External data loggers from Onset Computer Corporation are used to monitor
temperature. They are used with HOBO Water/Soil Temperature sensors (part Number TMC6-
HD). Data is saved using BoxCar Pro 4.3.
Launch HOBOs:
1. Open BoxCar Pro 4.3 from the desktop.
2. Plug in data logger.
3. Click Launch Data Logger button from the toolbar (or hit Ctrl + L).
4. In Launch window, change date in Description field to current date.
5. Click Start.
6. A reminder will pop up that launching will erase previous data. Click Yes to continue.
7. When Disconnect Logger window opens, unplug logger and then press OK.

26
8. Check for flashing light on logger.
Readout HOBOs:
1. Open BoxCar Pro 4.3 from the desktop.
2. Plug in data logger.
3. Click Readout Data Logger button from the toolbar (or hit Ctrl + R).
4. When Disconnect Logger window opens, unplug logger then press OK.
5. In Save As window, confirm that file name is ok and click Save.
6. In Select Series to Show in View window, uncheck all °F boxes and check all °C ones.
7. Click OK.
8. A graph of the temperature data will appear. Check for anything unusual.
9. Click Export Excel Spreadsheet button from the toolbar.
10. In Export Window, click Export.
11. In Save As window, confirm that file name and location to save are correct and click
Save.
12. Currently, temperature data is saved in the Shared ISNT Results Temperature
2017 folder.
13. An Export window with the message “Writing series Info…” will remain open until the
export is complete, this may take awhile.
14. If the data logger batteries run low, replacements (3 V Maxell CR203 microlithium cells)
are in Morrison Hall Room no. 306 in a drawer beneath the reagent dispensing bottles.
Loading griddles:
Preheat:
1. Fill water jars with 120 mL DI water the night before.
2. Set timers to preheat griddles at least 1 h 15 min. before start time (lids closed).
27
3. For Monday runs: fill water jars with 150 mL DI water on Friday. Set timers to run for 3 h
in the morning. On Monday, be sure to reset timers before loading griddles so they run for
the full 5 h period.
4. Launch HOBO’s.
5. Shake/swirl then prime reagent bottles; check volume setting of dispensers with
graduated cylinder.
Loading (repeat for each griddle):
1. Plug in HOBO to first temperature sensor.
2. Open box lid.
3. Start timer to count down from five hours.
For each jar:
1. Swirl dry soil in jar.
2. Add 10 mL 2 M NaOH (clear) around walls of jar to wash down any soil; gently swirl jar.
3. Add 5 mL H3BO3 (pink) to Petri dish; insert dish into jar.
4. Hold jar tilted towards screw and screw rings on tightly.
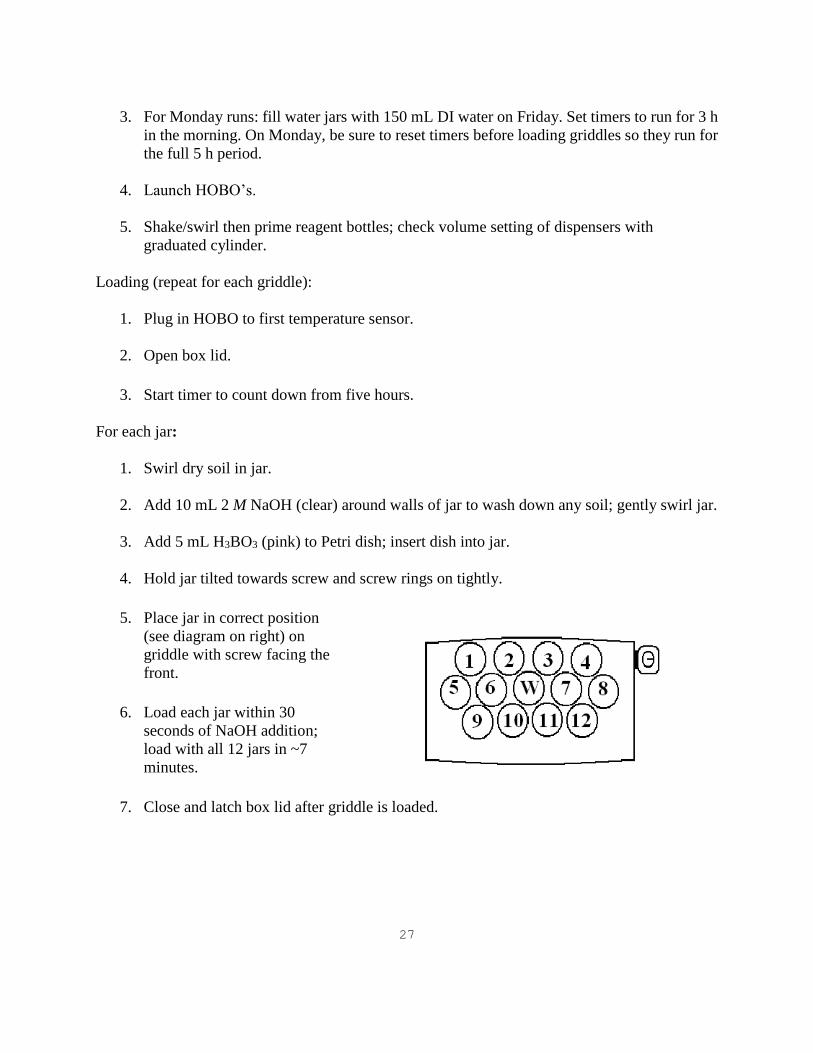
5. Place jar in correct position
(see diagram on right) on
griddle with screw facing the
front.
6. Load each jar within 30
seconds of NaOH addition;
load with all 12 jars in ~7
minutes.
7. Close and latch box lid after griddle is loaded.

28
Removing jars:
1. Open box lid at 5 h and remove jars in same order as loading (jars 1-12).
2. Tilt jar towards screw.
3. Level the Petri dish
4. Allow condensed water to run down screw and not drip into Petri dish.
5. Remove Petri dish and place on tray.
6. Make sure to not drip water from gloves/hands into Petri dish.
7. Unplug HOBO and griddle power after each box is done.
8. Add 5.0 mL DI water to each Petri dish.
9. Keep entire griddle (12 samples) at the same time and in the same order as they were
unloaded.
10. Make sure electrode is in solution and the propeller is under the acid line.
Setup for Titration:
Check standards:
1. Turn titrator ON (red switch on back left side), keep printer OFF.
2. Spin propeller/electrode/acid line (P/E/A) in DI water for 2+ minutes.
3. Wash/dry P/E/A. Spin again in DI water.
Recalibration:
1. Press mode = CAL. Enter. Start. 25°C: Enter.
2. pH 7: Place electrode in “old” pH 7 buffer; wash/dry electrode.
3. Place electrode in new pH 7 buffer and press START. Watch for final mV value
displayed and record this value (it will no longer be displayed once calibration is
complete); wash/dry electrode.
4. pH 4: Place electrode in “old” pH 4 buffer; wash/dry electrode.

29
5. Place electrode in new pH 4 buffer and press START. Watch for final mV value
displayed and record this value, as well as the pH and slope.
6. Press STOP.
7. Wash/dry electrode.
Measure pH of 3 blank samples:
1. Add 5.0 mL boric acid (pink) and 5.0 mL DI water to 3 clean/dry Petri dishes.
2. Mode = MEAS. Enter. Start.
3. Write down pH of each of the three samples. Wash/dry after each sample.
4. Press STOP.
Set titrator to average of last 2 samples:
1. Mode = SET. Press ENTER. Press ENTER.
2. Press USER METH. Recall: ENTER. Dif1: ENTER.
3. Press PARAM. Set1: ENTER. Input pH average of last 2 blank samples from above.
ENTER. Dynamics: Press STOP.
4. Press USER METH twice until get to ‘store method’: Press ENTER. Dif1: ENTER.
Overwrite: ENTER.
5. Now the titrator is set and can be used; but first: Press and hold DOS to remove air
bubbles from acid line. Wash/dry. Press STOP.
6. Make sure printer is turned off.
7. Do one practice titration by adding a bit of “old” pH 7 buffer to one of the blank samples
(see below for titration method).
8. Turn printer on (this will remove the error message).
Samples titration:
1. Titrate in same order as load/remove (griddle 1: 1-12, griddle 2: 1-12…).
2. Place Petri dish on platform, lower P/E/A, press START.

30
3. Wait for titration to print, making sure the printer did not jam. Remove Petri dish,
wash/dry electrode.
4. If washing jars at the same time, make sure to not drip from gloves into Petri dish.
Printer:
To adjust printer paper:
1. Press LF/FF to advance enough to tear off.
2. Press Load/Eject.
3. Press LF/FF.
4. Check to make sure pause light is off (if on, press pause button to take printer off pause).
Shutdown:
1. Place electrode in pH 4 buffer.
2. Turn off titrator and printer.
Cleaning:
1. Always wear safety goggles, lab coat and large gloves when using acid bath.
Jars:
1. Tap water rinse 3x (remove all soil; no soil should get into the acid bath), scrub with brush.
2. Put in 0.1 M H2SO4 acid bath for at least one minute.
3. Put jars in tub of water; scrub each jar.
4. Rinse outside of jar under DI water 1x, inside 2x; put into the drying oven.
Lids:
1. Let lids soak/rinse in tub of warm tap water for a couple of minutes (this makes inserting
Petri dishes easier). They should not stay in water overnight or they will rust.

31
Petri dishes:
1. Place in tub of water and rinse.
2. Put in 0.1 M H2SO4 bath for 30+ seconds.
3. Put into tub of tap water; scrub with brush.
4. DI water rinse outside 1x, inside 2x.
5. Fit into lids/cable ties while still wet, place upside down to air dry with 36 lids/dishes per
tray on two wooden trays (72 total).
Data Entry:
The outputs from the titration are automatically printed in the order that the samples are titrated.
From this printout, enter the number following the label “N DTD” into an Excel spreadsheet. This
number is displayed in units of μg (H2SO4 added). The values can then be matched to their sample
ID’s. From the duplicate values of each sample, calculate the average, standard deviation, and the
coefficient of variance (% CV). Re-run samples with CV>10 % (%CV = standard
deviation/average * 100).
1. Quality control samples should be between 205 and 255 ppm.
2. Average griddle temperature should be 50.6 ± 0.5˚C. Calculate the average beginning with
the values at the time the sensor was plugged into the HOBO, as temperatures begin to be
recorded as soon as loggers are launched and end when loggers are read out.
References:
1. Klapwyk, J.H., and Q.M. Ketterings (2006). Soil nitrogen tests for predicting if corn will
respond to nitrogen fertilizer in New York. Agronomy Journal 98: 675-681.
2. Klapwyk, J.H., Q.M. Ketterings, G.S. Godwin, and M. Wang (2006). Response of the
Illinois Soil Nitrogen Test to liquid and composted dairy manure application in a corn
agroecosystem. Canadian Journal of Soil Science 86: 655-663.
3. Klapwyk, J.H., and Q.M. Ketterings (2005). Reducing laboratory variability of the Illinois
soil N test with enclosed griddles. Soil Science Society of America Journal 69: 1129-1134.
4. Lawrence, J.R., Q.M. Ketterings, M.G. Goler, J.H. Cherney, W.J. Cox, and K.J. Czymmek
(2009). Accuracy of the Illinois Soil Nitrogen Test (ISNT) in predicting N responsiveness
of corn in rotation. Soil Science Society of America Journal 73: 303-311.

32
11. Soil Nitrate+Nitrite-N Test Extracted with Morgan’s Solution
Update date: 4/27/2013
Introduction:
For the determination of nitrate-N, soils are extracted with Morgan's solution (diluted sodium
acetate/acetic acid solution, buffered at pH 4.8). Activated carbon is added to the extraction to help
in the removal of organic matter and decolorize the extraction solution. After shaking, the extract is
filtered and the concentration of available nutrients is measured in the clear filtered extract.
The automated procedure for the determination of nitrate utilizes the reaction whereby nitrate is
reduced to nitrite by a proprietary Chemical R1. The reduced nitrate is then treated with
sulfanilamide and N-1-naptylethylenediamine dihydrochloride under acidic conditions to form a
soluble dye which is measured colorimetrically at 546 nm. The final product measured represents
the nitrite ion originally present plus that formed from the nitrate.
Apparatus:
1. EasyChem analyzer
2. Computer for data collection
3. Printer
4. Stainless steel scoop
5. Reciprocating or rotary shaker
6. 100 mL Erlenmeyer flasks or plastic bottles
7. Test tubes
8. Balance with sensitivity of ±0.01 g
9. Automatic pipette or dispenser capable of dispensing 50 mL
10. Funnels
11. Funnel rack
12. Whatman 2V, Size:150 mm (Cat No. 1202-150) filter paper or its equivalent

33
Reagents:
1. Morgan’s Solution: Weigh 400 g of sodium acetate trihydrate (CH3COONa3H2O) and add
deionized (DI) water in a 4 L volumetric flask. Add 116 mL glacial acetic acid, and mix
until the sodium acetate is dissolved. Dilute to the 4 L mark, and mix well. The pH of this
solution should be 4.80 ±0.05. If not, adjust a lower pH with sodium acetate or a higher pH
with acetic acid.
2. Darco G-6 activated carbon
3. R1 – Systea (1-Reagent) nitrate solution (proprietary); R1 – 1 L size, part number E/R1-
10 and R1 – 0.5 liter size, part number E/R1-05; available for purchase from Chinchilla
Scientific, 900 Jorie Blvd., Suite 35, Oak Brook, IL 60523; Phone: 630-645-0600; Fax:
630-645-0601; Email: [email protected]
4. Potassium nitrate (KNO3)
Standards:
1. Stock Standard (1000 mg/L NO3--N): Dissolve 7.218 g of potassium nitrate in
approximately 600 mL of DI water. Mix thoroughly and dilute to 1 L with DI water.
2. Working Standard (100 mg/L): Dilute 10 mL of 1000 mg/L stock standard in a 100 mL
volumetric flask with DI water.
Procedure:
1. Weigh 10 g of dried and sieved (<2mm) soil into a 100 mL Erlenmeyer flask or plastic
bottle. See chapter for details on sample preparation - drying and grinding.
2. Add approximately 0.15 g of activated carbon to each sample.
3. Add 50 mL of Morgan’s solution to each flask, place the flask horizontally in the reciprocal
shaker and shake for 15 min on low speed (180 oscillation per minute).
4. Filter the extracts through filter paper (Whatman 2V or equivalent) into the test tubes.
5. Use a quality control soil sample in each batch.
6. Remove the funnel racks, dispose of the filter papers, and place the test tubes containing the
extract in the 50-place test tube rack.
7. The extracts are now ready for analysis.
34
8. Enter cup IDs into computer and pour samples into the cup and keep in tray in order.
9. Analyze the sample for nitrate+nitrite-N test with discrete analyzer.
10. Follow directions for EasyChem Discrete Analyzer start-up and shut down procedures.
Also, refer to the instrument manual for specific instructions for the operation of the
instrument.
11. Wash the plastic bottle and funnels thoroughly with hot water, then rinse several times with
DI water and allow them to dry.
12. After all analyses have been completed, rinse the test tubes thoroughly with hot water, then
clean with DI water, and dry.
Calculations:
Report mg/kg of NO-3+NO-
2-N in sample:
mg/kg of NO-3+NO-
2-N = NO-3+NO-
2-N in extract mg/Lx50/sample weight
References:
1. Analytical Laboratories, Department of Agronomy, Cornell University. Procedure No.
S1100-1, issued on 2/27/89.
2. EasyChem Methodology. 2009. Nitrate by discrete analysis, Systea easy (1-reagent) nitrate
method (colorimetric, automated, 1 reagent). Systea Scientific, LLC, 900 Jorie Blvd., suite
35, Oak Brook, IL 60523.
3. Morgan, M.F. (1941), Chemical Soil Diagnosis by the Universal Soil Testing System., Conn.
Agr. Exp. Sta., Bulletin 450.

35
12. Soil Ammonium-N and Nitrate+Nitrite-N Tests Extracted with
Potassium Chloride
Updated date: 4/27/2013
This 2 M KCl effectively extracts both exchangeable NH4
+-N and NO3-+NO2
--N from soils. The
aqueous sample containing ammonia reacts hypochlorite to form monocholoramine. In the
presence of excess hypochlorite, monochloramine reacts with phenol to give indophenol blue in
an amount that is proportional to the ammonia concentration. The blue color is intensified with
sodium nitroferricyanide. The absorbance is measured at 670 nm.
Apparatus:
1. EasyChem analyzer
2. Computer for data collection
3. Printer
4. Stainless steel scoop
5. Reciprocating or rotary shaker
6. 100 mL Erlenmeyer flasks or plastic bottles
7. Test tubes
8. Balance with sensitivity of ±0.01 g
9. Automatic pipette or dispenser capable of dispensing 50 mL
10. Funnels
11. Funnel rack
12. Whatman 2V, Size:150 mm (Cat No. 1202-150) filter paper or its equivalent
Reagents:
1. Extractant: 2 M KCl: Dissolve 596.4 g analytical grade KCl (Potassium chloride) in
deionized water (DI) bring to 4 L.
2. Darco G-6 activated carbon

36
3. Ammonium Sulfate, (NH4)2SO4
4. Sodium Hydroxide, NaOH
5. Sodium Nitroferricyanide, Na2Fe(CN)5NO.2H2O Stock Solution: dissolve 0.2 g of sodium
nitroferricyanide in 75 mL DI water, mix thoroughly, and dilute to 100 mL with DI water.
Transfer to a light-resistant container. Stable for at least one month at room temperature.
6. Liquefied Phenol (88%), C6H5OH Stock Solution: Dissolve 3.2 g of sodium hydroxide in
75 mL DI water, mix thoroughly, and cool. Slowly add 9.4 mL of liquefied phenol and
dilute to 100 mL with DI water. Transfer to a light-resistant container. Stable for at least
one month at room temperature.
7. Ethylenediamine Tetraacetic Acid, Disodium Salt Dehydrate; EDTA,
C10H14N2Na2O8.2H2O Stock Solution: Add 0.1 g of sodium hydroxide to 75 mL DI water
and cool, dissolve 5 g of EDTA, mix thoroughly, and dilute to 100 mL with DI water.
Transfer to a light-resistant container. Stable for at least one month at room temperature.
8. Phenol/nitriferricyanide/EDTA Solution: Add 20 mL EDTA stock solution, 5 mL
nitriferrivyanide stock solution, and 20 mL phenol stock solution and mix well. Transfer
to an EasyChem reagent bottle. Stable for one single day of analysis.
9. Sodium Hypochlorite (NaOCl) Solution: Add 20 mL sodium hypochlorite to 30 mL DI
water and mix well. Transfer to an EasyChem reagent bottle. Best if prepared daily.
Standards:
1. Stock Standard (1000 mg/L): Dissolve 4.7168 g of ammonium sulfate, dried at 110°C, in
about 600 mL of DI water. Dilute to 1 L with DI water and mix thoroughly.
2. Working Standard (100 mg/L): Dilute 10 mL of 1000 mg/L stock standard in a 100 mL
volumetric flask with DI water.
Procedure:
1. Weigh 5 g of dried and sieved (<2mm) soil into a 100 mL Erlenmeyer flask or plastic
bottle. See chapter for details on sample preparation - drying and grinding.
2. Add approx. 0.15 g of activated carbon to each sample.
3. Add 50 mL of 2 M of KCl solution to each flask.

37
4. Place the flask horizontally in the reciprocal shaker and shake for 1 hour on low speed (180
oscillations per minute).
5. Filter the extracts through filter paper (Whatman 2V or equivalent) into the tubes.
6. Use a quality control soil sample in each batch.
7. Remove the funnel racks, dispose of the filter papers, and place the test tubes containing the
extract in the 50-place test tube rack.
8. The extracts are now ready for analysis.
9. Enter cup IDs into computer and pour samples into the cup and keep in tray in order.
10. Analyze the sample for exchangeable NH4+-N and NO-
3+NO-2-N analysis with discrete
analyzer at NMSP lab.
10. Follow directions for EasyChem Discrete Analyzer start-up and shut-down procedures.
Also, refer to the instrument manual for specific instructions for the operation of the
instrument.
11. Wash the plastic bottle and funnels thoroughly with hot water, then rinse several times with
DI water and allow to dry.
12. After all analyses have been completed, rinse the test tubes thoroughly with hot water, then
clean with DI water, and dry.
Calculations:
Report mg/kg of NH4+-N or of NO-
3+NO-2-N in sample:
mg/kg of NH4+-N or NO-
3+NO-2-N = NH4
+-N or NO-3+NO-
2-N in extract mg/Lx 50/sample
weight
References:
1. EasyChem Methodology. 2009. Ammonia, USEPA by discrete analysis, Systea easy
ammonia method 350.1-02 (colorimetric, automated). Systea Scientific, LLC, 900 Jorie
Blvd., suite 35, Oak Brook, IL 60523.
2. Recommended Soil Testing Procedures for the North Eastern United States. 2nd edition,
Northeast Regional Publication, December 1995, Bulletin # 493. Agricultural Experiemnt
Station, University of Delaware, Newark, DE 19717-1303.
38
13. Potassium, Calcium, Magnesium, and Sulfur Tests Using 0.01 M
Strontium Chloride
Updated date: 11/26/2014
Apparatus:
1. 50-mL centrifuge tubes with lid
2. Weighing balance, resolution ±0.001 g
3. Dispensers calibrated to 20 mL
4. Horizontal/reciprocal shaker
5. Whatman 2V, Size:150 mm (Cat No. 1202-150) filter paper or its equivalent
6. Timer
7. Test tubes
8. Funnels
9. Funnel rack
Reagents:
1. 0.01 M Strontium Chloride, SrCl26H2O: Dissolve 2.6662 g of SrCl2.6H2O and make up to
1 L with deionized water (DI) water.
Procedure:
1. Place 2 g of dried and sieved (<2 mm) soil into a 50 mL centrifuge tube.
2. Add 20 ml of 0.01 M SrCl2 in each centrifuge tube, place the tube horizontally in the
reciprocal shaker and shake for five minutes on low speed (180 oscillation per minute).
3. Filter the extracts through filter paper (Whatman 2V or equivalent) into the tubes.
4. Filter 2 blank (0.01 M SrCl2 extracting solution) samples through filter paper in each batch.
Subtract the mean value of K, Ca, Mg and S of blank samples from each sample.

39
5. Submit the sample to laboratory for K, Ca, Mg and S analysis with ICP.
Calculations for K, Ca, Mg, and S in Mg/Kg:
mg/kg of K or Ca or Mg or S = K or Ca or Mg or S in extract mg/Lx20/sample weight
Equation to Adjust Soil S:
Y= 0.9685X
Report the soil S data after adjusting with this equation.
Calculations for CEC:
Total CEC is calculated by summation of the three major nonacid cations (K, Ca, and Mg).
Total CEC (cmol/kg) = K(mg/kg)/390+Ca (mg/kg)/200+Mg (mg/kg)/120
Equation to Adjust CEC:
Y= 1.0453x - 0.2419
Report the CEC data after adjusting with this equation.
Calculations for Base Saturation:
Ca (%) = Ca (mg/kg)/200/CECx100
Mg (%) = Mg (mg/kg)/120/CECx100
K (%) = K (mg/kg)/390/CECx100
Note: Our data showed that a single 0.01 M SrCl2 extraction is a simple, rapid, and inexpensive
method of estimating effective cation exchange capacity (ECEC), cation saturation ratios and
sulfur. We also concluded that three major cations (Ca, Mg and K) are enough to calculate ECEC
(Ketterings et al., 2014).
References:
1. Ketterings, Q.M., S. Gami, R.R. Mathur, and M. Woods (2014). A simple method for
estimating effective cation exchange capacity, cation saturation ratios and sulfur across a
wide range of soils. Soil Science 179:230-236.

40
14. Determination of Water Stable Aggregate
Updated date: 8/2016
Introduction:
Sarah Hetrick and Sanjay Gami prepared the protocol for the determination of water stable
aggregate in August 2016. The wet aggregate stability is determined by the principle that unstable
aggregates will break down more easily than stable aggregates when immersed into water.
Apparatus:
1. Eijkelkamp wet sieving apparatus
2. 0.25 mm sieves
3. 150+ mL beakers
4. Cans
5. Rubber policeman
Procedure:
1. Soil should be air dried prior to fraction separation. Use 0.25-2 mm fraction aggregates to
measure small aggregate and use 2-4 mm fraction to measure large aggregate. Use eight
0.25 mm sieves.
2. Label and weigh 2 sets of 150+ mL beakers: one set for stable aggregate (label as A) and
another one for sand/large residue (label as S). Record the weights of all beakers with
labels.
3. Gently mix soil sample and weigh 4.00 ±0.02 g of soil into sieve for small aggregate and
weigh 2.00 ±0.01 g of soil into sieve for large aggregate.
4. Label and fill cans with 100 mL deionized (DI) water.
5. Lower rack holding sieves so that aggregates are just submerged. Soak for 3-5 minutes.
6. Raise rack to middle prong and run apparatus for three minutes. Lift the sieves to the top
prong, drain for about 30 seconds, then gently submerge and run once again for three
minutes. Raise rack and allow sieves to drain for 3-5 minutes.

41
7. Discard contents of can and rinse cans with tap and DI water thoroughly.
8. Replace can under proper sieve and add 100 mL of 2 g/L NaOH to each can as a solvent.
9. Lower sieves into cans and operate apparatus for three minutes. Lift sieves and stir contents
of each gently and thoroughly with rubber policeman for about 10 seconds, break up
remaining aggregates and unclogging the sieves. Be sure to not transfer residue across
sieves by rinsing with DI water above the sieves between samples so that all residue is
returned to the sieve. Lower sieves and operate another three minutes.
10. Raise sieves and let drain for 3-5 minutes. Transfer entire contents of can (aggregate
residue) into the properly labeled A beaker with a wash bottle and set aside.
11. Using a wash bottle, transfer remaining contents of sieves into the S beaker; Again, be sure
to capture all residue in the beaker.
12. Now place both beakers for each soil size/number in an oven at 110°C until completely
dry.
13. Weigh beaker + dry aggregate residue and record weight. Weigh second beaker +
sand/large residue and record weight. Subtract initial weights for corresponding beakers to
find the relative amounts of water-stable aggregate residue, and sand/large residue. Use
these to infer the amount of water unstable aggregate residue. Turn these to percentages of
the initial ~2.00 or ~4.00 g.
14. Ensure that all materials have been thoroughly cleaned of residue for next trials.
15. If replicates have a relative difference > 10%, repeat one additional replicate sample run
until any two replicates agree within 10%.
References:
1. Operating instructions, 08.13 Wet Sieving Apparatus. Found at www.eijkelkamp.com.
2. Water stable aggregate procedure (protocol from University of Maine).

42
15. Corn Stalk Nitrate Test
Updated date: 8/2007, 8/20/2013, and 2/2/2016
Introduction:
Sanjay Gami prepared the protocol and Renuka Rao reviewed this protocol for the corn stalk nitrate
test (CSNT) in August 2007. Sanjay Gami updated the protocol on 8/20/2013. A third update was
prepared by Sanjay Gami and Sheryl Swink on 2/15/2016. The end-of-season corn stalk nitrate
test analysis provides a method of assessing the N available to the corn (Zea mays L.) crop during
the latter part of the season (Wilhelm et al. 2005). The method semiquantifies the concentration of
nitrate-nitrogen (NO3-N) in plant tissue by extraction with an aluminum sulfate solution
[Al2(NH4)2SO4] without filtration and subsequent determination by nitrate electrode (Baker and
Smith, 1969; Milham et al., 1970; Carlson and Keeney, 1971; Mills, 1980; Baker and Thompson,
1992 as cited by Miller 1998). In this method, the need to filter the media is eliminated, because
the electrode is placed directly into the agitating extraction media and electrometer readings are
observed (Wilhelm et al. 2000).
Apparatus:
1. pH/ISE meter
2. Nitrate electrode
3. Weighing balance, resolution ± 0.001 g
4. Dispenser, calibrated to 50 mL ± 0.2 mL
5. 50 mL centrifuge tubes with lid
6. Horizontal mechanical shaker
7. Magnetic stirrer and 1” stir bar
Reagents:
1. Ionic Strength Adjustor (ISA): add 264.28 g of ammonium sulfate [(NH4)2SO4] to 1 L
volumetric flask and fill to volume with deionized (DI) water to make 2 M (NH4)2SO4
ionic strength adjustor (ISA).
2. Aluminum sulfate [Al2(SO4)3] extracting solution: add 320 grams of Al2(SO4)3 (16 g per L
DI water) to 20 liter carboy. This solution is also used to make standards.
43
3. Place 7.218 g of potassium nitrate (KNO3) in 1 L DI water to make a 1000 ppm N solution.
Standards:
1. 1 ppm: add 0.5 mL of KNO3 solution in 500 mL volumetric flask and filled with Al2(SO4)3
extracting solution.
2. 4 ppm: add 2 mL of KNO3 solution in 500 mL volumetric flask and filled with Al2(SO4)3
extracting solution. .
3. 10 ppm: add 5 mL of KNO3 solution in 500 mL volumetric flask and filled with Al2(SO4)3
extracting solution.
4. 40 ppm: add 20 mL of KNO3 solution in 500 mL volumetric flask and filled with Al2(SO4)3
extracting solution.
5. 100 ppm: add 50 mL of KNO3 solution in 500 mL volumetric flask and filled with
Al2(SO4)3 extracting solution.
Calibration:
Calibration and measurement of concentration:
1. It is good idea to remove standard from refrigerator and leave them out overnight to reach
room temperature.
2. Fill the combination electrode with the filling solution (Catlalog No. 13-620-807, Scientific
Fisher) shipped with the electrode to a level just below the fill hole. Connect the electrode
to the proper terminal of the meter as recommended by the meter manufacturer. The system
is now ready for use.
3. Store the electrode in distilled water; place it in 100 ppm standard for at least 1 h before
running standards and samples.
4. Do the calibration and measurement of the instrument according to AR 50 Accumet Meter
Instruction Manual.
5. Set the meter in MV mode.

44
6. Measure 50 mL of each standard (1, 4, 10, 40, and 100 ppm) into individual cups and add
1 mL of ISA to each cup.
7. Drop a stir bar into each cup of standard to be measured.
8. Place the standard on a magnetic stirrer at medium (moderate) setting and lower the
electrode into the standard solution.
9. Record the MV reading.
10. Repeat to get to obtain readings for each of the standards.
11. Calculate the difference between readings for 1 and 10 ppm standards, 4 and 40 ppm
standards, and 10 and 100 ppm standards. If the differences in readings for each pair of
standards are between 54 and 60, then continue running samples. Sometimes the difference
between the 1 and 10 ppm standards may not be in this range; if that is the only one out of
range, you can still continue the work.
Calibration of instrument:
1. Set the meter in Ion mode.
2. Use the 1, 10, and 100 ppm standards just used for MV mode.
3. Place the first standard on the magnetic stirrer (on medium speed as before).
4. Touch “Std” on the instrument screen to access standardize mode; Press “Std” again.
5. Place the electrode in each standard (1, 10, and 100 ppm) and enter the correct
concentration of std. into the key pad of instrument screen.
6. If the slope shown on the instrument screen is 70% or above, continue on to take readings
for previously prepared CSNT samples (see next).
Procedure:
1. Dry the CSNT stalk samples at about 60°C and grind with a Wiley mill to pass a 2-mm
screen (Gami and Ketterings, 2010). For sampling protocol see the Factsheet 31 at NMSP
website (http://nmsp.cals.cornell.edu).

45
2. Weigh 0.5 g of each corn stalk sample into individual centrifuge tubes and record weight
of tared sample to two decimal points (can be done prior to day of analysis).
3. Add 50 mL of aluminum sulfate extracting solution to each tube of sample, shake to
suspend and wet all of sample, and cap tubes.
4. Organize the sample tubes securely on a shaker set on low speed; shake for 15 minutes.
5. While first set of tubes are shaking, calibrate the instrument with standard solutions as
described in calibration section.
6. When samples are done shaking, hand swirl or shake each tube to fully suspend CSNT
sample, especially material settled into bottom of tube. Then pour into numbered plastic
cups and arrange in trays.
7. Add 1 mL of ISA to each cup - one tray row (10 samples) at a time in case you need to stop
or take a break. All samples with added ISA need to be analyzed before stopping for a
break.
8. Drop a stir bar into the plastic cup of sample; place on magnetic stirrer set to medium speed.
Lower the electrode into the sample and record the stabilized reading of each sample on
data sheet. Do not submerge the electrode above the sensing module (located ~1.5 inches
above tip of electrode).
9. Clean electrodes with DI water and wipe with a Chem Wipe after each sample.
10. Rinse stirring bar with DI water and dry with Chem Wipe before placing in new samples.
11. After every 10 samples, take a reading of the standard that is closest to midrange of your
CSNT sample values (usually the 10 ppm standard, but if your values are high, use a higher
standard) to make sure the electrode is working properly. If the value of the standard is
10% or more above or below its ppm value, repeat above calibration steps before running
any more samples.
12. After taking the reading of all samples, place the nitrate electrode in a 100 ppm nitrate
solution.
13. Keep all the standards and ISA solution in the refrigerator.

46
14. When through with CSNT analyses for the day, throw out the set of standards used that
day and do Cleanup.
Cleanup:
1. Drain the extracting solution from cups into sink and throw the cups and residue in garbage.
2. Soak all flask and glassware in hot water. Rinse all centrifuge tubes, flask, and glassware
thoroughly with hot water 3-4 times (use a brush inside the centrifuge tubes the first time
to release any CSNT sample residue), then give a final rinse with DI water 3-4 times.
Calculations:
Report mg/kg of NO3-N in sample:
mg/kg = NO3-N in extract mg/Lx50/sample weight
Notes:
1. Routinely check electrode calibration every 10th sample using a mid-range standard.
2. Clean electrodes with DI water and wipe with a Chem Wipe after each sample.
3. Rinse stirring bar with DI water and dry with Chem Wipe before placing in new samples.
4. Change in sampling protocol for stalk length (August 2013): It has the option for stalks
taken between 2-8 inches or 6-14 inches. This should be noted for every sample we receive
as the results need to be adjusted. For sample taken between 2-8 inches, divide the lab
results by 1.5 and report that new number in our reporting system. The conversion only
applies when samples are taken between 2 and 8 inches off the ground.
5. Sorghum stalk nitrate test (SSNT): the exact same reagents, standards, and protocol were
used for sorghum stalk nitrate test for the first time in January 2017. This test will be tested
and verified again in the coming 2017 fall season.
47
References:
1. Gami, S.K., and Q.M. Ketterings, 2010. Comparison of Nitrate Concentrations of corn
stalk samples ground with Wiley Mill using 1 and 2-mm Screen Size. Unpublished Report.
Nutrient Management Spear Program, Department of animal Science, Cornell University.
2. Miller, R.O. 1998. Extractable nitrate in plant tissue: ion selective electrode method. P 85-
88. In Y.P. Kalra (ed.) Handbook of Reference Methods for plant Analysis. CRC Press
LLC, Boca Raton, FL.
3. Stalk Analysis. Methodology prepared by Soil Nutrient Analysis Laboratory, University of
Connecticut.
4. Wilhelm, W.W., S.L. Arnold, and J.S. Schepers. 2000. Using nitrate specific ion electrode
to determine stalk nitrate-nitrogen concentration. Agronomy Journal 92:186-189.
5. Wilhelm, W.W., G.E. Varvel, and J.S. Schepers. 2005. Corn stalk nitrate concentration
profile. Agronomy Journal 97:1502-1507.

48
16. Corn Stalk Potassium Test Using Potassium Electrode
Updated date: 5/2015
Introduction:
The potassium electrode is used to quickly, simply, accurately and economically measure
potassium ions.
Apparatus:
1. Potassium electrode; other apparatus are similar to corn stalk nitrate test.
Reagents:
1. Aluminum sulfate [Al2(SO4)3] extracting solution: add 320 grams of Al2(SO4)3 (16 grams
per liter distilled water) to 20 liter carboy; this solution is also used to make standards.
2. Ionic Strength Adjustor (ISA), 5 M NaCl
3. Potassium standard, 10,000 ppm K
4. Filling solution, 0.1 M NaCl
Standards:
1. 40 ppm: add 2 mL of 10,000 ppm K solution in 500 mL volumetric flask and filled with
Al2(SO4)3.
2. 400 ppm: add 20 mL of 10,000 ppm K solution in 500 mL volumetric flask and filled with
Al2(SO4)3.
Procedure:
Use the same protocols as described for the corn stalk nitrate test, except use a 5 M NaCl solution
as the ISA, a 0.1 M NaCl solution for the filling solution, and 10,000 ppm K solution for preparing
potassium standards.